Transcripts
1. Introduction: Hi, my name is Tracy Bellamy and welcome to eco dining nature's paint, creating unique guard using leaves and flowers. I'm a mixed media artist and I live in the capital region of New York. And like so many of us during the pandemic argued creating and experimenting in my art studio, trying a lot of different techniques, like kids and I have also been walking a lot more outdoors, hiking different trails, and spending time in nature. So will we discovered eco dying? It was a perfect combination of her love for nature and our love for art. Anyone can be go die. It's such a simple process. Need any artistic ability. And you don't need a lot of fancy expensive art supplies. You're basically using what nature provides you and a few household items. There are many different variations to IPO dying. But for purposes of this class, will focus on a very basic method because it's easy, it's inexpensive, and you'll still get amazing results. Your ego dies will have gorgeous just frames. But you can also use your printed papers and fabrics for lots of different projects. In this class, we'll use our ego dyed fabrics and papers to make these adorable little a Korean journals. They're so simple to make and every single one is unique. They're perfect for gift-giving or journaling, or even to commemorate a special occasion. One of my favorite parts of the class is the big reveal. You are going to be so exciting when you unwrap your bundles and see your beautiful unique designs. I hope you'll join me on this eco dying J. I can't wait to see your friends.
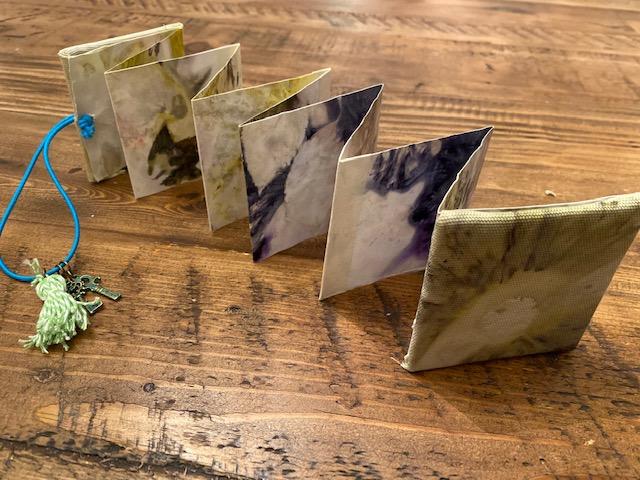
2. The Project: Hello and welcome to my studio. Once again, I'm Tracy villa May, and I'm so happy you decided to join me for ICO dying nature's paint, creating unique art using leaves and flowers. At the end of the course, you will not only have a unique stack of beautiful iodide papers and fabrics, but for the final project, I am going to show you how to make one of a kind of mini journals. These journals are perfect for gift-giving or to keep for yourself. And they're super, super simple to put together. I kept it easy because I want you to go through the entire process of putting them together and be so thrilled with the results. Because the first time you open yourself up and see what you've done, that's when you're gonna get hooked. I'll also share variations along the way, different things you can do to jazz them up. Or it may be a little more advanced ART techniques. But first we have to make our papers and fabrics. So let's get started.
3. Supplies Part I: So these are the items that you're going to need for this basic method of eco die. Then I'm going to teach you in this class today. And most of them, you probably already have at home. But I'll start with the one that you may not have and that is Alum. Now I'm told that alum is used for pickling vegetables. So you can find it in the spice section of most grocery stores. However, you're going to probably find a little one like this. Now this is certainly enough for purposes of this class and for a one, at least one Eco dying session. But because I eco die a lot, I order this big one from Amazon and this will last me a while. So if you feel like maybe you could start with this one and if you feel like you're going to die more, it's definitely more cost, cost-wise. Better idea to get the bigger one. And I will share that link with you. You'll also, you'll be mixing your alum with water so you need a little bit bowl and you're also going to need a white vinegar. I took the label off of this one. This is a distilled white vinegar. So you're going to need that. You're gonna want a paintbrush to apply the alum and water mixture to your paper. Now, I use an old paintbrush. I don't find that the alum has ruined it in any way, but just to be safe, we are working with vinegar and dirt and stuff, so I don't want to mess up my good paint brushes for actual painting. An old paintbrush or a spray bottle. A spray bottle work as well. If you have a spray bottle with a nice missed on it, I would just make sure you label it. You don't want to be spraying alum on things that you don't want to spray it on. Me, you're going to need a twine. This is just a Jew. I got it for like a dollar. I don't have much left, left, but we're gonna be making bundles and this is just to tie them up real tight. Of course, you're going to need your papers. Now for the class project, you're going to want a mixed media paper or watercolor paper will work as well. You don't want it to be too heavy, but you do want it to have some weight because we're going to be folding it and it's going to become pages in your many journals. So I will put a link to exactly what weight this is n-type of mixed media paper, but it works really well for the class project. However, you can also use copy paper. Copy paper gets nice dies on it and it's perfect if you want a collage with your ego dies. That's also why I will use something like a coffee filter. It's nice and thin. So to tear it off and use it for a layer of collage with your pretty prints on it. That works as well. Book papers, a fun thing to eco dye on it gives a nice vintage she look. And it takes the prince pretty well. And then I also have fun. I'll throw in little envelopes, maybe I'll put that in a journal someday. And I found these little, these little cutout hearts. This side is smooth and shiny. It probably will get a print on it, but the side with the tooth is probably going to get a much better print. So that's also something you can use. But for purposes of the class, I'd say a nice medium weight mixed media paper at the minimum. If you plan to do our project, you're also gonna want fabric. If you plan to do our project, this is a Muslin, so it is a little heavy. So to use it for a book cover, it's, it's a little bit more difficult to work with than a cotton, but it takes a nice prints and I don't mind using it. If you think that you're going to have trouble or you'd prefer something that's a little easier to work with. For the project, I would go with a white or a cream cotton. And you're going to need a pot. I use an old pot because as you can see, there's stains in here because you're always going to be putting dirt and rocks and Rustin here. So I would use a pot that you don't plan on cooking in. And then also get some nice big rocks or bricks to weigh down your bundles and then the rst. Now this is optional. I like to use the Ross, That's why I use the vinegar because it reacts and it gives the paper a nice vintage look. These are old rusty nails. This is Russ taken from a broken down car and the car was blue. So I might even get a hint of blue on my papers if I choose to use these. You can also get that vintage look from natural dyes like coffee, tea. You could use turmeric, which gives a yellow color. I like, I like the grungy browns and yellows. But if you wanna do pinks user raspberry tea, or even a food coloring. And I will remind you at what point you can put those colors in when, when we get to the process, the last thing you're gonna need for the process, of course, are your flowers and your leaves. So we will look at what I'm going to use next.
4. Supplies Part II: So I just went on a little scavenger hunt in my yard. And this is what I came up with. Now, it is fall in upstate New York. So you're gonna see some colorful leaves here, all different beautiful colors. Now, these colors are not going to come out on my, my papers. In fact, the green leaves. And it's why I grabbed so much green, often print better. And I think that's because they have a more of a natural pigments. But I still like to use these leaves because what's gonna happen is by using them, you're gonna get a nice mask. So you're, you're Rust is going to turn the paper or brownish, yellow. And you're gonna get a little outline of this leaf. Now with something like this, a Greenleaf, you should get the actual prints of the leaf itself. These, I think I can't remember what plant this came from, but I do have some actual weeds here. I also, I grabbed some sage. I grabbed anything really based more on the shape, then on the colour. These firms are some of my favorite, favorite things to equal die with because they're so beautiful. The shapes and the outlines, I mean, look at that just like that. That looks like it was painted. These have gone brown. So I'm going to get more of a mask, but I loved the mask that I'll get from a firm like this, really, really beautiful. This is from a flowering plant that I had in my front yard. It's still green. This, these not this one, this is from a peony. Actually. These give beautiful prints when they're really green Now this one's turning a bit, so I'm not sure how well of a print it'll give, but it'll certainly give an outline. And this is a tomato plant. I've never tried eco dying with a tomato plant, but what the heck? You know, you can try anything. And then of course, flowers I chose, actually got these flowers from the grocery store because they remind me of, Oh, look, there's a weed, there's a wheat. You can use little, little, maybe it gets a little yellow from that. But anyway, I grabbed moms and full flowers because it's just sort of the theme I'm going for. And probably we're gonna get some color. Red can either come out red, sometimes it comes out Purple. And these, I believe, are the natural colors. I know sometimes the grocery stores will die the flowers. And that's fun too, because you can get the color of the dye. So if you don't want all natural and you wanna go kind of rainbow. If you get pink died and blue tied flowers, that's going to come out on your paper. But I thought these would be fun to experiment with a lot of floors to, if you want to try eco dying in the winter, owen loved that these fell off because we'll, you'll see what we'll do with those in a little while. But in the wintertime, if you go to a florist and they're good, they don't keep their flowers forever, what they don't sell, maybe ask them if you can take advantage of those. The fresher the flower, the better the prints you're going to get. But like I said, you can use something that's on the verge of expiring and get beautiful masks. So go ahead and do your foraging and see what you come up with. And we will get to the ICO dying next.
5. The Dyeing: Let's get started. I have prepared a little solution here. In this bowl is about a quarter cup of the alum and about two cups, maybe 2.5 of warm water, which I used a whisk to dissolve the alum in and create our solution. Now, some people will soak their leaves in this, but I find it works just as well if you brush it onto your surface before applying your leaves. So that's what we are going to do. I like to start with the fabric. If I'm going to use fabric and I just randomly cut a piece of paper or a piece of fabric big enough so that I can fold it over. The top of my ego dies once I get them stacked up in here. So I'll fold that over. And we are going to saturate the fabric with the alum and water mixture. Get it nice and wet. Like this. It's probably good enough. And we're going to start laying our leaves and flowers onto the fabric. I'm going to try a maple leaf and I'm going to put this green one behind it. Hopefully I'll get a nice mask from that. And you just randomly place it. You know, if there's a set design you want to try and do, You can absolutely trying to set design. But I pine alike the randomness of just putting things down in different patterns. I think I'm going to add flour to see what that does. Now with your flowers, you want to keep a MV. Oh, look at what happen and that actually is not a bad thing. If you don't lay them flat, you definitely want to try and do this. And in fact, I'm going to try and get some under there. Under there is some under here. Now I'm not going to remove all of it from on top of these leaves because when I put the next layer, we're going to let your paper and you can use the spray bottle for this too. And lay it on top because you will get prints on both here and here. And sometimes the back ones with better. So you can just decide which one you want to use. And of course, for our accordion journals, for the project, you're going to want the paper to have prints on both sides anyway. So we'll do our next one here. Now, this time I'm going to try and lay some flowers down without them falling apart. So I think I'm going to use these, maybe just splay them out like that and push it down as hard as I can. Put this one here. And I already see that a little colour is coming. I think these are gonna print purple. I'm not sure. But I can't wait to find out. Maybe little leaf over that. And let's put something down here. Let's put some of these, these yellow these weeds. You never know what they're gonna do. That's what I love about this process. You can think you're getting one thing and I just random out, throw, throw anything that you think you're getting one thing and you get something completely different. And no two are alike. So much fun to get my next one zone here. Push it down. All right, I think I'm gonna go with for this next one, a coffee filter to cover that up. And I'm not going to use the coffee filters in our project, but I do want to show you how they actually print it. You want to use that in a different project. So we've got our last layer there, and we've got our fabric here. And I am going to fold this over height as I can. Fold that. So now I have my bundle. Now at this point, if you didn't have a pot big enough for this dataset down in, you can actually roll this, but you're going to want to roll it around a dowel, wood or metal, maybe a rusty one. You're gonna want to roll it around something. I have enough room to lay this flat like just enough room. So my last step before I put it in, the water is going to be to wrap it up nice and secure using this Twine. So once I have secured that, I'm going to head over to the stove and I will meet you there. Okay, so here I am over at my stove and I've got my pot on the stove with a brick at the bottom. Sometimes I'll use a slate. This brick was a good size. It was dirty, but I don't care. I like that grungy look. So if a little dirt gets mixed in, that's fine with me. Now, I'm going to take the leftover of my alum and water from wiping it on with the brush. And I'm just going to pour that right in. And then I'm going to take my bundle here it is all wrapped up. And I'm going to set that in. And what I wanna do is I want a way that down because I want to make sure it stays fully submerged in the water. So I'm going to place these other bricks right on top. Like that. I'm going to add my rusty elements. I got my rusty nails here. This is probably why you want to use an old pots. And I think I'm also going to add some of the rust from that car. See if any blue comes out. Get some of the bigger pieces in there. And then finally, before we bring it to a boil and got a lot to put it in the vinegar. I usually eyeball it to put like a quarter cup probably for pot this size. I just kinda pour it in. And that is going to react with the Rust. Going to clean up my nails and get some color into my paper. So I'm gonna want to bring this to a boil. And then once it's boiling it, bring it boiling, bring it down to a simmer, and let it simmer for a couple of hours. And then we're gonna even go a step further and leave it over night after it's done simmering. But we'll come back after the hours of simmering. And I will show you the next step.
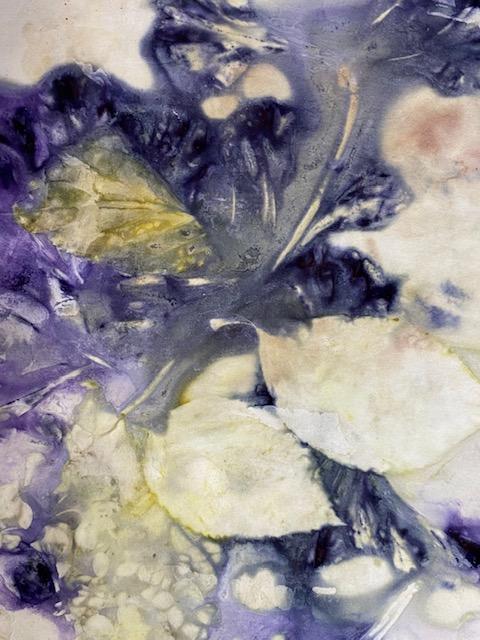
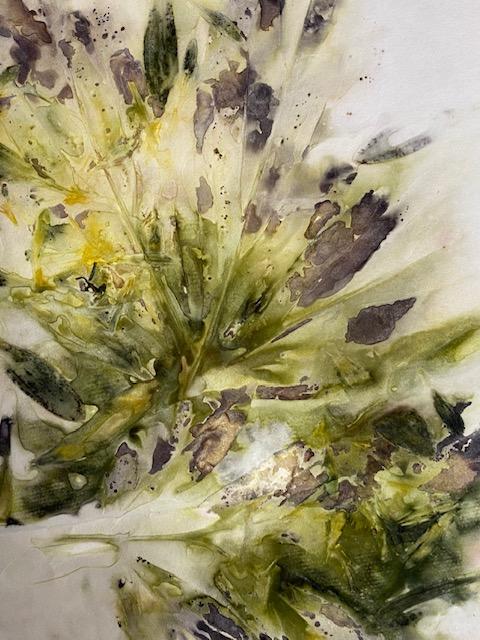
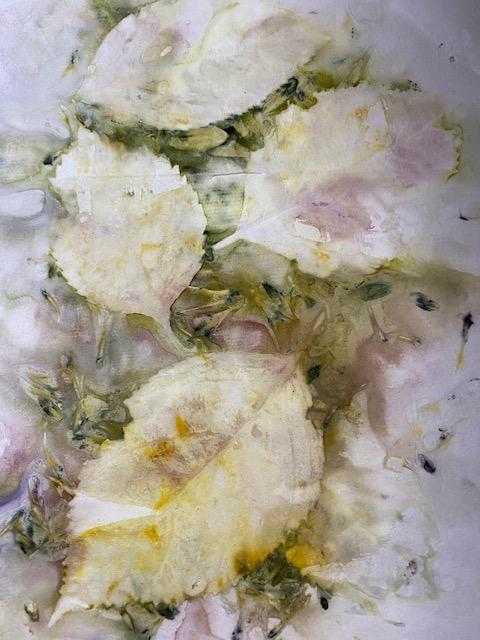
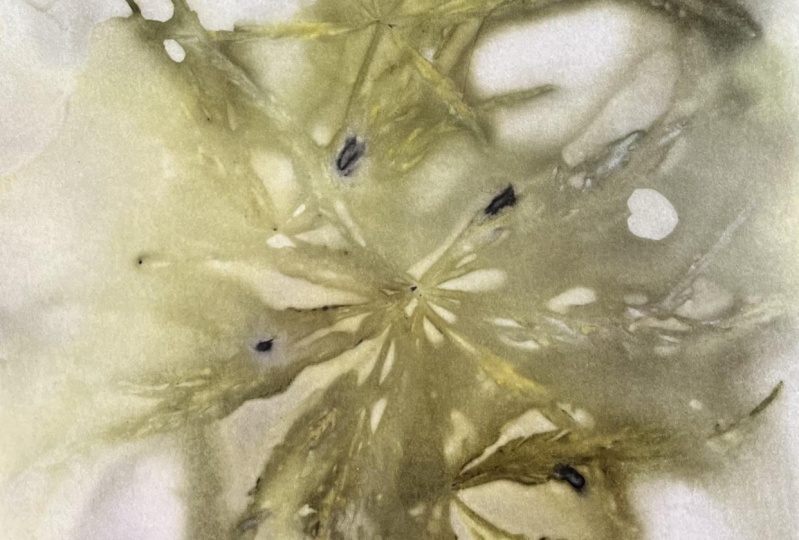
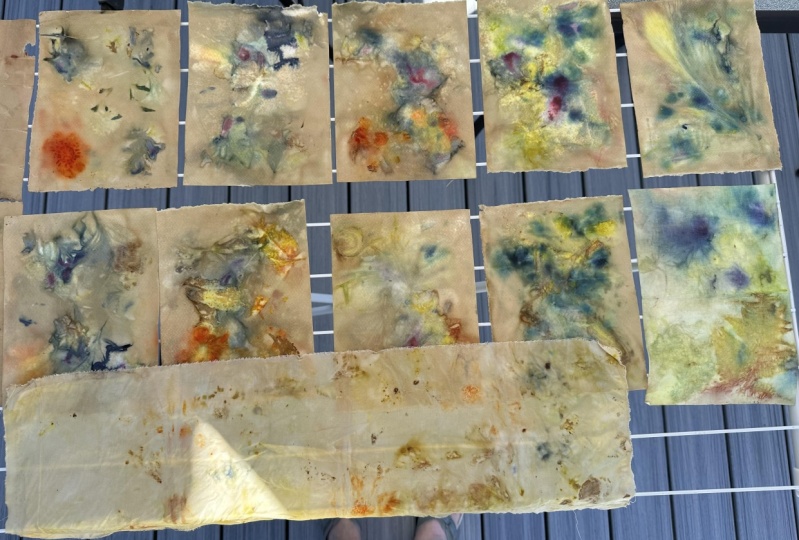
6. The Reveal: Hi, welcome back. It is time for my favorite part in this process, the big reveal. Now, here's my bundle, took it out of the water, actually let this sit overnight, which is completely an option. I would say the minimum you wanted to be in your hot water is two hours. But I wound up letting it sit overnight. And this is what it looks like. I can see oh, I could see a little mask there. So without further ado, let's take a look. Alright, so we want to cut off our twine here. I'd like to do this in the sink. I leave some paper towels to the side because I'm going to stack up my papers on those paper towels so that it can absorb some of the moisture because they have to completely dry out before we do our project. Let's get rid of them. And I do like to do it in the sink as well so that I can rinse everything really well. You want to rinse the papers because the alumn will tend to be a little powdery on the surface. Alright, so here we go. Here we go. Here's number one. I did not get a print from these leaves. But you can see a little bit of a mask there. And the flowers will printed up real nice. And now I'm going to rinse off the back. See the back has a little bit oh, I had one of the heart slaying there. That's kind of cute. Cut a little mask of a heart. But I really loved this look at the yellows and the greens. That's going to be beautiful in a journal. All right, moving along. So there is the smooth side of the heart. And as I thought it didn't get much of a print. But look what happened on the other side. Isn't act gorgeous. Little leaf, they're flower petals. And I do think some of the blue from that rust kinda mixed in. Here's the little envelope I'd put in their rinse that off. That's nice. Another thing I like to do with these sometimes is use a gel pen when they're all dried out and draw on it. A white gel pen overlooks really, really beautiful. Let's compare next one here. That's gorgeous. Gorgeous. Look at that. Oh, I get so excited. Look at those colors and patterns there. That is really gorgeous, nice little mask going on there. You can see that the maple leaves, we got black prints from them. Actually. Look at this side. Now this is, this looks like this is the Sage. And I did actually get a really nice print from that, from that maple leaf that was already turned. Oh, I love this one, I love it. The sage is gorgeous. Set that aside. This is the fern here. Gorgeous, absolutely gorgeous. Look at that and look at this. Look at that. Those flowers did really well and I definitely got some blue in there. I don't know if it's from the rust or if it's just the yellows mixing in. Look at those colors. And I'm definitely getting a little purple up here. I'm definitely getting that fall vibe that I wanted. I tend to do shoot for pinks and purples in the summer and spring. But I love these greens and yellows. Look at that mask. These are gonna be beautiful in our little journals. Another example of a great mass can see the shape of the leaf. So pretty. And then look at, I'm so in love with this. I mean, these are really inexpensive grocery store flowers. You can find moms everywhere in the fall. But flowers just make gorgeous prints. A love that maple leaf to. Almost done here few more. And then we'll look at our fabric. This is one of my favorites. I love to do a fern and you get the beautiful delicate outline or those Fern flowers. So pretty. Wow, I see some purples on this one. This 11 goes red flowers. And if you look really closely at this, you can see it just looks like a blooming flower. I love the way that printed. And if you do decide to draw on top of it and you outline that with a gel pen. Just gorgeous. This Is, this one actually maybe worth framing and not putting it in a journal. That beautiful. Some more blues on the other side, those little flower petals. And then finally, let's take a look and see what happened to the fabric. And a wins this offer oily really well. Didn't take too much color. Y, if you use a big piece, what you're going to use for the cover of your journals. You can kind of move it around and use the section you want. And right off the bat, I see an absolute We beautiful option for a cover. Look at that mask. So not the perfect little mask of a maple leaf. And then maybe this is also an option. One of my flowers printed really nice. So those are my prints. I hope that if you choose to do the project, you will share your finished project. But I would love, love to see your prince before you do anything with them. If you want to make a video of your reveal that be fun, but absolutely loved to see your prints. And if you remember what flowers and leaves you used, if you share that or if you did anything different to your water, loved to know. Okay, so now it's time to dry these out. We're going to layer them with paper towels, put some books on top of them so they're nice and flat, dry them out really good. And then we will put together our many journals in the next video. So I'll see you there.
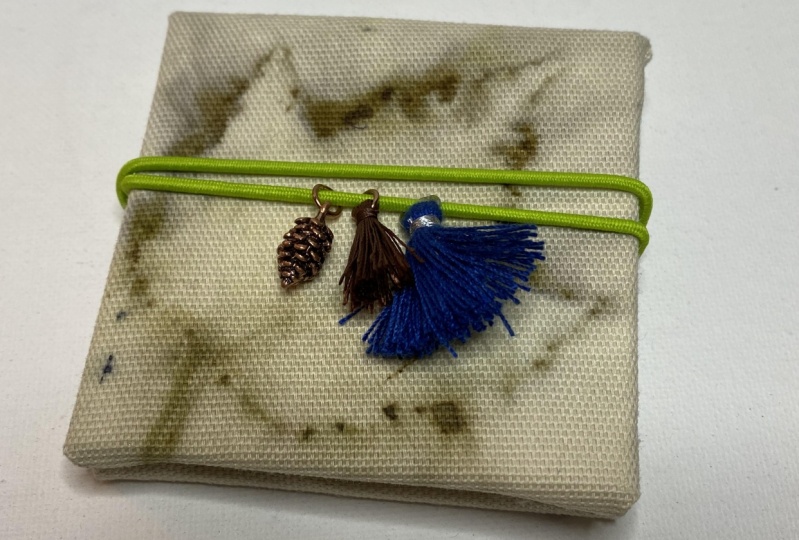
7. Supplies Part III: Here are the supplies you're going to need to make your mini accordion journals. And hopefully you have most of these at home already. We'll start with the cover. I love to use these little mini canvases, their three-by-three there available and most craft stores. And I find that they hold the book together nice and tight and your tie or your closure is not going to damage the edges and it will protect your papers. But if you can't find them or you don't want to get them, a thick, heavy cardboard is also an option. So here's a little trick to tell whether or not it's thick enough. If you can take your cardboard like this piece here between two fingers and easily bend it. It's probably not thick enough. But if your cardboard is not easily bent between two fingers, it probably is. You're also going to need a hole punch to make a hole in your cardboard or your canvas. If you're using the card stock or cardboard, probably can get through it with a standard hole punch. And if you're using the many Canvas says, then you're going to need an owl to make your hole. Hole punch is just not strong enough to get through these little guys. Of course, you're going to need your ego died. Papers and fabrics. I've picked some of my favorite ones. I picked a little spot on the fabrics that I want to highlight. You're gonna need scissors, of course, to cut your papers or a mini paper cutter. I opt for the paper cutter because I have one and I cannot cut a straight line to save my life. You're going to want double-sided tape. You could use a glue stick. I recommend the double-sided tape. You can find them at the dollar store. If you need to rearrange something, it's just so convenient and this holds really well. You're going to need a masking tape. This is going to be used on the paper's not the fabric. The reason I like a masking tape, you certainly can use a bookbinding tape. But with this tape, if you dont line it up properly and you want to pull it off and realign, then you're not going to damage your paper. It's nice and gentle, but it has a good hold. Finally, you don't want something to hold your Korean journal closed. I love to use this chord. I found this box on Amazon. I'll have a link for you every color under the sun. And it's a nice stretchy chord and that is going to wrap around and hold your journal tight. And I just loved to use that. That's also a nice thickness, perfect to get little charms onto. And that is the last thing you're going to need. I always search for nature related charms that I find on sale or I pulled them off of packaging. This was unpackaging or old pieces of jewelry. They come in sets like this on a lot of the craft stores. And they go on sale often. But keep in mind, if you buy a set like this check to see if they have O rings on them. Some will and some won't. And you're definitely going to want an O-ring if they do not come with the charms. And finally, a loved to put little tassels on. These are premade, but if you want to make your own just a little twine, anything you have at home that you can get through an O-ring, you can make your own little tassel, and that's it. So let's get started making our mini accordion journals.
8. Project Part I: The first step in making our mini accordion journals is to prepare the inside of the journal. So you're going to need your ego died papers, your paper cutter or your scissors and your masking tape. Now, I did not mention in our supplies that are rulers probably also going to come in handy. My paper cutter has a ruler on it. But you could also eyeball it. It's not necessary to measure it out, but if you want everything consistent, you're probably gonna want a ruler to okay. I like to have it least nine panels counting each one of these pages as a panel. So 1234 up to 99 or ten is my preference. You can certainly make it bigger. A lot of it's probably going to depend on the size of the paper that you died. On. My paper is six by about 7.5. So I know that I'm going to cut in strips and probably get four panels on one of my sheets. So I have selected three sheets to use for the inside of my many journal. And I like to select the more abstract pieces because I love the way it looks and you're gonna want it to look good on both sides. And this was one of the few eco dying projects where you actually get to use both sides. So that's exciting and just flip through and see what appeals to you. I loved the masks on this one. I selected this one because occasionally even though I like the abstract, if I get a really good print, like this flower here, I wanna make sure I cut it. So it's going to be featured on one of my panels in one of my pages. So select the papers and the number of papers you are going to need and then get cutting. Now again, my paper is about six inches wide, but I do want to cut my panels a little bit smaller then my cover. So my first panel, this is the three inch mark. I'm just going to move it in ever so slightly. I can also I could trim it when I'm done and cut so we can measure and see if that is going to fit in there. And yes, it will. Now of course, I have to. I can't leave it like this because this isn't enough for three panels, it's only enough for two. So I am going to do another caught trim it down here. And this edge off here. And then hold it up to my panel here. I'll use this one so you can see a little bit better. And I'm going to fold right where it's going to fold in the book. And then actually, I think I like to design on this side better. So let's do that again. Let's do a fold right there. And then I'm gonna trim off that excess, see if it fits. And it does. So there I have the first panel. So I'm gonna go ahead and cut the rest of my panels. And then I'll meet you back here. So here are my panels all folded and cut. And now I'm going to open them up and just take a look at the designs. Maybe see which designs kinda maybe look good together. So that when I lay them out in the book, they make a little bit of sense. And I think I'm gonna do all of these on one side and make sure this looks good and these on the other side. So the first thing I'd like to do is choose which panel I want to see when I first opened my book. So I'm going to choose if this is the cover. I want them to see this, if this is the cover, I want them to see this. And of course I want them to see this. So this is going to be my first set of panels. And then I will grab which one I want next. And I think that one will do just fine. And I'm going to line them up together. And I'm going to rip off a piece of masking tape that is big enough to go around this at least once. So we want to double still laying. And that looks pretty good. And then you can either lay the tape down this way. So I find it a little bit easier to line up if you do that. And you're going to set your first paper on there. So it covers half the tape. And then you're going to line up your next one. Press it down, and then you're going to fold your tape over. I liked the masking tape because it's got a natural color and it just blends in very nicely. You can also write on this tape if you want to embellish and it won't smear once dry. So there I have my first four panels. Now I'm gonna go ahead and I'm gonna tape together the rest. So I have one big long piece, ego dyed paper. All right, so now I have my long line of ego died papers. I love the way these look together. It seems abstract yet somehow makes sense. So now we fold. I like to grab my cover or what am I panels from my cover. I like to put the first one, lined it up and then folded over and then like an accordion, fold this one back. Now when you're folding on the masking tape, just make sure you find where those two papers meat. And it should fold up very nicely for you. Because as down while the inside of our many book is prepped and ready to go. So now let's get to work on our cover.
9. Project Part II: Now we're going to make the cover for our mini accordion journal. And what you're going to need for your cover is your small canvas or your cardboard. A pair of scissors, your double-sided tape, hole puncher or your OWL, and your ego dyed fabric. Now if you did not eco die any fabric, there are other options, so don't panic and I'm just going to quickly show you one. Remember what I talked about, how good the ego dies. Look if you take a gel pen to them. This is one that I took a gel pen to. This was one of those flowers that died up real nice. And I took a white gel pen. I just randomly outlined where I felt the lines were. And then I cut it out. Then then a grab one of my black panels, which obviously if you're using cardboard or the white, you can paint it black. And I would just use a glue stick to put that on the panel and look at that would not make a beautiful cover. I think so. But I'm going to show you how to make a fabric cover for this many journal. I went and I looked at my two pieces of fabric. I did not eco die a lot of fabric. And I just found little interesting dies, very random. I liked this one. And I of course liked this one. So I want that to be my two covers. And all I'm gonna do is take my panel and lay it on top of the fabric over the area that I want to show and just flip it over and take a look and make sure that that's gonna look good. And I think it looks better on this side. But I like that. I like that. So now going to turn back, straighten it out again, and just caught around it. You do not need to cut in a perfect straight line. And you only need to leave enough so that you can fold it over. It's probably about three quarters of an inch. So go ahead and cut this one off. Check make sure on still lined up. Pretty good. Yes, I like that. So now I will go ahead and trim around the rest. Remember it does not need to be perfect. Okay. So now I have my two pieces of fabric cut and I choose a, which sides I want facing L. And I think it's going to be these two sides. So the next step is to take your panel. I think I'm gonna make this the front cover. Take your panel. Can't make up my mind. Flip over your fabric and lay your panel back on it. I actually think this could be trimmed just a little bit more. And then you are going to take your double-sided tape and run it across the top and across the bottom. I usually do two rows, one of the small tape like this. And then you're going to fold it over. It's like you're wrapping a mini present. And then you're going to move on to this side. Now, like I said, like a mini president. You're gonna wanna do the folds as you would a present and make sure that those little edges are folded in and talk to over. I actually, because you're not going to see this. We'll even trim the ends. So it's not bulky. Dual trim there and a little trim there. And then it's going to be much smoother when I fold this over. And I'm going to put a little more tape under there. And there you go. That side is down. And now I'm gonna do this side. And I'm gonna do the bottom. And then I'm gonna do my second panel. Okay, so my front and back covers are all rapt and ready to go. So now I want to punch my hole before I put my papers in and the hole is going to go in the back cover. I think I decided this is going to be the front cover and this will be the back. And it's going to go, if you open the book this way, it's going to go on the right side. And it's going to be just about halfway. This this little piece of fabric was folded shorter. But if you did that three quarters of an inch is going to be like right in the middle of the fabric. So right about here. Now I'm using an owl because I had the canvases, so I'm going to protect it with a piece of styrofoam. And I'm going to go ahead and punch my hole right through. Now, this is a small L and R chord is a little bit bigger than that. So you're gonna have to work it a little bit. So I've worked that whole pretty good. And I think it's going to be big enough. I can always work it a little bit more once it comes time to put the cord through there. So now I have my back cover and I have my front cover. I have my insides. And now we're going to put it all together.
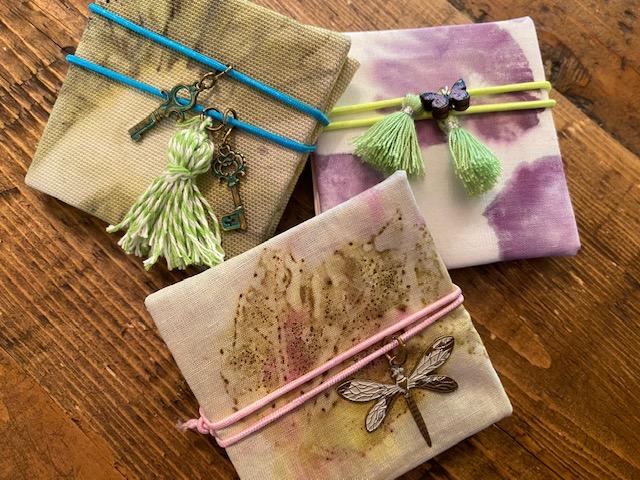
10. Project Part III: Now it's time to put it all together. We've got our covers front and back. We have our inside panels. We have our chord and our little embellishments, and we will still need our double-sided tape and keep the owl handy. The chord's gotta go through the whole twice. So we're probably going to have to work that hole a little bit more. It's the hardest part, but it is so worth it. First we're gonna get our papers inside and complete, flee, assemble the journal. So again, this is my front cover and I wanted that flower to be the first thing you saw, right? So let's see where it is. All right. So we're gonna go this way. And the flowers going to go there. Yes, I love it. So we're going to lay down our cover and use the double-sided tape. I like to do an X in the middle. And then all along the sides. Your burn out. Why light up your paper? Impress it right onto their side, is done. Now we're gonna go to the back and do the same thing. It's a shame that this one gets covered up, but I'm not bothered too much by it because I liked the smaller leaves in this better and the flowers. Keep that in mind and see my whole is here. So I want it to be right there. So I'm gonna do the same thing on the back. And impressive together and voila it together. So the final step Mulally corn ruled out there is to get that poured through the hole to make our closure. Ok. For the last step we're gonna put our closure on and then our mini accordion journals will be done. I've picked out the color that I want for my closure. I've picked out this funky Green. I think it looks really cool. And because I have some notes of blue inside, I'm going to go with a blue tassel. I also like this copper color. I think it coordinates well. And I grabbed little acorn and a little silver heart. You can put as many charms on as you want. You don't even have to use the charms. And if you're using ribbon, just tie it around as many times. And tie it off and you're done. But I love to use this chord and so I have cut it so that it will wrap around my many journal twice. And to measure, all I did was hold it, folded it and hold it up to my journal. I left about an inch and a half. So why cannot it? And then I made sure that I can go around two times 12. So a cut that and then I had to work my hole a little bit more to get a big enough. So I just took my L I had to get through the paper. The paper wasn't punched through yet because remember, we've put that on after we made our hole and I just worked it until it was big enough so that I could get both ends through from the outside in. But you're going to want to do them one at a time because you have to put your charms On. So I put the first one through the hole. So it's hanging inside. And then I'm going to slide my charms On. And I like to go biggest to smallest. And in, let's say the flip it over so that I know how they're going to lay on the front. So we'll do blue tassel, will do copper tassel. And I just loved this acorn. I'm going to use the acorn. Be it an odd number. Little heart is awfully q. Let's see let's see how it looks. Too much. Yeah, I think I'm just going to go with the odd number. Okay. So I have those on. So I'm gonna flip back over and put my other end through and it's starting to fray a little bit. So I'm just going to trim it. So it's easier to get through the hole. There we go. Now, I am going to line them up. And I'm a lefty so a turned it around and make a knot really tight and pull that through. So it's nice and tight. I'm going to make sure that it's the proper length. Remember we want the charms in the front. Let's get those charms back in the front. One. To think that worked out rather nicely. Now what I can do is I can go back and I can trim these if they're too long. Just a little bit too long. My Charms back to the front. Once, twice. And my mini accordion journal is completed. Here It is my finished little accordion at journal, and I am so in love with it. I love this little acorn. I love the blue and green and the way it coordinates with my back cover. And then of course, the surprises in psi. I can use this to journal. I can ride around my designs. I could give it as a gift to a friend, maybe use some flowers from an anniversary or a wedding or a birthday and date it with a print of the flowers. There's so many different things you can do. Then makes such thoughtful gifts and such lovely keep sakes for yourself or anyone in your family. And I just adore them. Something made from nature, something meaningful, and something super-simple. I hope you enjoyed this class. I hope that you will share your ego dies. All of your prints and your little accordion journals when they are complete. I can't wait to see what you do and I hope you've enjoyed your first eco dying experience.
11. Thank you!: Thank you again for joining me for this course. I really do hope that you enjoyed your first eco dying experience. And if you're already anxious to try some variations, stay tuned because as promised, I'm going to share some results from some of my own experiments. Also feel free to follow me on Instagram at Tracy Ville art or at my blog, cork and brushed.com. I'm always posting new ideas and new results. Have fun, enjoy, and don't forget to post your projects and your ego dies in the project section of this course.
 Tracy Villaume, Mixed Media Artist