Transcripts
1. Intro: Hey everyone, This is Megan. I'm a watercolor artist
based in Bangalore, India, and I help upcoming artists
explore the talent within. I'm truly love with watercolors, their beauty and transparency, and the joy of just
painting with watercolors. I truly believe that they are so simple and fun and
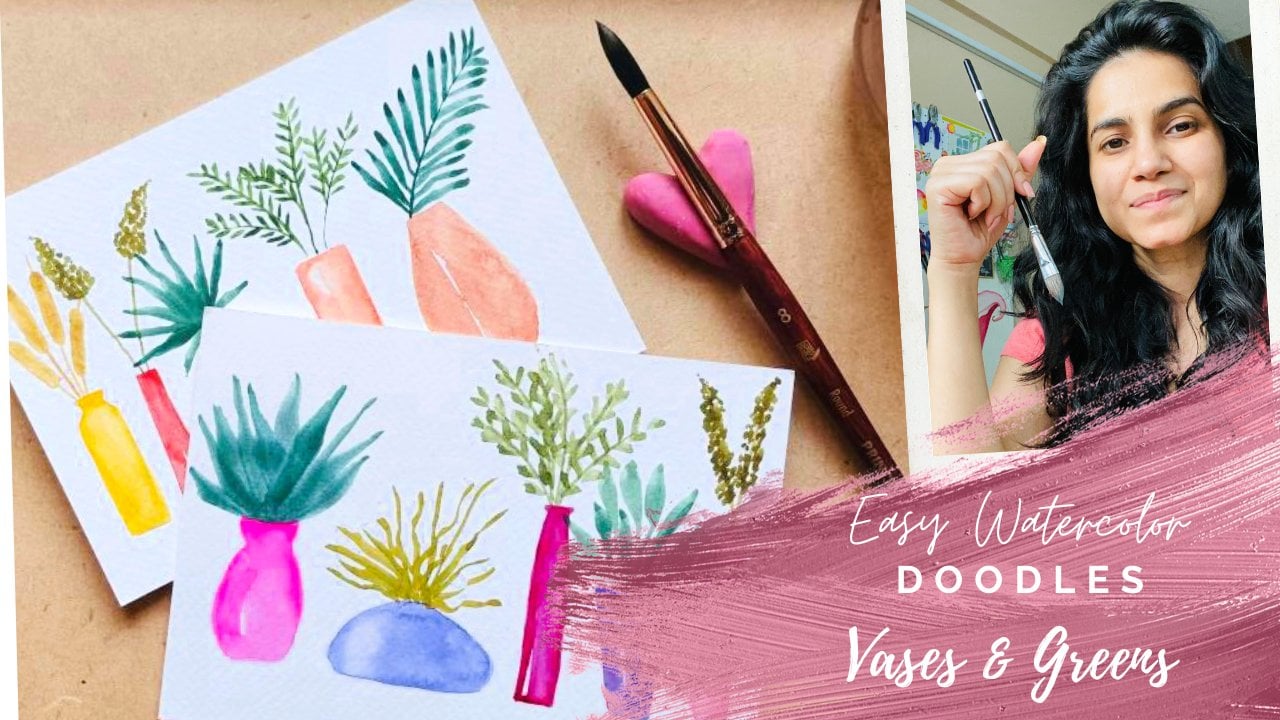
anybody can try it. So in today's class, we are going to paint this cute watercolor
house plant doodles. So there's no drawing involved. You can directly use your
brush and paint this or draw this and then they are
super fun and super light. They're not difficult
techniques involved in this. This is really, really beginner friendly and anybody can try it. In this class, I will
show you how to paint all these pods the
plants are to remember. And it's also going
to show you how to be calm and relaxed about it. And these are so easy to paint and so much fun that you
are going to love it. So I'll tell you what our
materials we will be needing, how we're going to do this, how to compose this, and how to stay calm and do all this without
any further delay. Let's go ahead and start with this watercolor
class in which I show you how to paint watercolor house plant
doodles in a simple, easy and fun way.
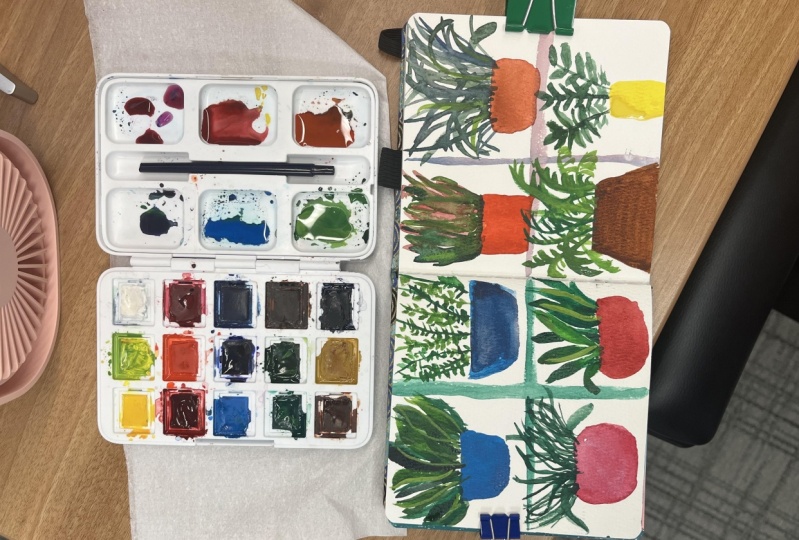
2. Materials: All right, so let's
have a look at all the materials that we will be needing for today's class. So I have my A4 size
watercolor paper here. It's 100% cotton and 300 GSM, because we are going to
paint everything on this. So I'm using a huge
sheet if you want, you can also use smaller sheets. And then here is the brush. This is a number ten
silver brush round. If you're not comfortable
with number ten, you can always go for
a smaller number, like an eight or a number six, whichever feels
comfortable to you. Then I have my watercolors here. So this is Daniel
Smith watercolors, which I have just put in
my personal box here. And all the colors are
from Daniel Smith. So we will be using
these today for painting our mini house plants. And there are three
beautiful greens in here. We will also be mixing a few
greens along the way and playing with the colors
and trying something new. And then I have my
two jars of water. As always, you should
have two jars of water. And then it's always
a good idea to keep some tissue handy to wipe off the extra water or extra paint. The T0. And since this
is an old drawing one, so we are directly going and
would link with the brush. But if you feel uncomfortable as a first time or if you want to try to sketch
your pizza level, then you can always use
a pencil and an eraser. And then you can draw lightly your plant and your Pods first and then you
can start painting. So that's about the materials that we will be using today. Let's hop on to the next
part of this class where we will be starting with
painting all the pots.
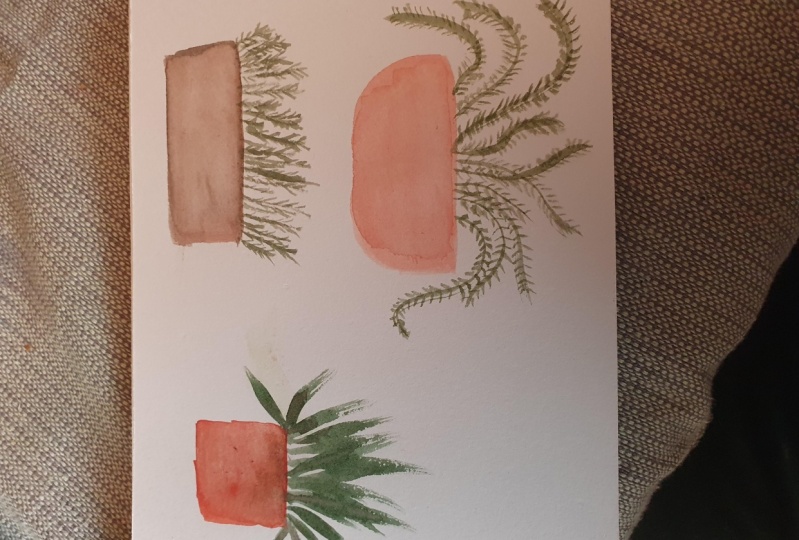
3. Painting the Pots: Okay, let's start painting
our pods and do remember one thing when you are painting this to this with
a very calm mind. Do this very ready freely. Don't worry too much about
perfection, symmetry, this that just relaxed and
that's why I want you to just directly do deal
with your brush and know Brian with pencil. No preparing nothing. So here is my nice
and bright red. So I'll just skip this heel like this and make some space here. Okay? Yeah, because I want to show you how to have fun
with these colors. So I'm just taking
some bright red. Okay, Now we want to
mute it a little. So I'm just adding
a little black. As you can see,
all these colors. I'm just taking that in because that's what happens
when you mix them all up. You get a little muddy, muddy color and that's
what we want to use. So here it is. And then maybe a little. Also have a swatch
card ready with you for your colors
so that you know how how they look when they dry or how they look on the paper. Okay, so when we are
painting the bots, we will just keep in mind a few random shapes are a few basic shapes,
if you call it. And I will just quickly
show you what they are. Just give me a second
to grab my shape. And then I will
quickly show you. Okay, so here it is
just enough sheet and then just a basic shapes. That means you are
supposed to think in terms of like this square shape. Okay? No perfection. A tangle like this oval, circle. All these basic shapes,
geometric shapes. If you want to do
hexagon or pentagon, whatever, you get like this. So that's the basic
thing that you must keep in mind for your
painting of your pods. They can be long, like this. They can be broad,
then semicircle. So all these basic things
you have to keep in mind. So we have to keep it very
light and keep it very, very non symmetrical and
just play around with it. So since you are going
to do ten of these, so don't mix my colors
a little more again. And the pots, they are
mostly keeping terracotta, so it's going to be different
shades of oranges, greens, reds, maybe a little
bit more in some, little bit less
than some like that we just tried to color. So here I have my
colors mix here nicely, and I have loaded
it on my brush. Now when you're
painting as a newbie, just rest your hand
nicely, firmly. Just take a deep
breath and relax. Then we'll just play very, very gently the tar brush, see how it goes, what you like. I think this one can be a nice little squarish bought here. And do remember that
we are not going to do anything which is realistic, hyper-realistic or
anything like that. We're just playing around
and having fun drawing very, very 2D kind of doodles. Okay, so I always like to leave this whitespace and
then you just pick up some color from this kind of spots
that come are really, really good for the
terracotta. Again. And let's get a little
bit red for the next one. Kind of reddish. And for this one, um, let's go flat. Maybe. See, just look at
the movement of the brush. Very, very soft. Then again, leave
the whitespace here. You can see I'm not too
worried about the symmetry. Any thing. Keep it light from the side. Then just let it wash your
brush and then paint in it. Again, wash your brush. And the best thing about
terracotta is when this kind of max come, it's, it happens when you
use too much water, but it really looks good
as a terracotta effect. So I really don't want
to correct it too much. So we'll just leave it there. And then the third one, maybe let's try more 0 D for
this color, for this spot. Let's do brownish,
blackish like this. Just adding a little black, then a little brown
and then other the ocher mixed which
we had from before. So just like this and then this one we can
do a simple one. Very basic shape. Suggest the tip of the brush. Just playing around. Just like the kids do. First they do outline and then they just
fill in the color. So it says simple and fun. Then just wipe off. Lift up the color. We are done with three. Let's move on to our next one. Again, we will be
repeating most of it. Doing a little bit of changes. Change the color. However, we want. Brown, more red,
more yellow, more. Just added a little
more yellow this time. Then the ochre. And another number like this. Then just start again. You have to leave a little
space for our plants as well. So maybe 1 234-567-8910. We will do here this one. So first you draw the outline
with your brush and then just enjoy filling the color and forget to leave
your white spot. Then wash your brush
and then just blending the cup a little color from
the side. And that's it. It's really, really simple. Let's go four more
brown this time. I'm adding a little umber. The black semi-circle we have done, Let's prefer something
around then the same, roundish because we
are not worrying too much about perfection
or symmetry. Fill your color. Lift your color. That's about it. A little
lighter. Like that. Again, just playing
around with the colors. Next one we'll try a little bit, a little bit bright
orange maybe. Okay, So again, just
whatever shape comes to you, just go with it. Maybe a flag on this time. Filling, filling and lifting. The color of B enough. Just like Don't forget
to change your water. If you have two. Then let's try on a little bit more orange. The adding yellow. And you can see, I'm just saying yellow because
you might have other sets. You can go for lemon yellow
than I see yellow ocher, yellow ocher, yellow and orange, whichever you feel as most orangeish because we
don't want to get into any technical things or get confused about
anything here today. Just having fun
painting some simple, simple, simple watercolor
plant doodles. Okay, now you can also repeat
the shapes if you want. If not, then now we
have to do for years. So we might go for
slightly thin one. So it's still a thinner
when you're first. Long and tall. Even if it's a
little bit uneven. Don't pay too much attention. Back. Then, fill it in and
just lift up your color. Is very, very simple. Just like this. Then let's dig a little bit
more ocher here. Yellow. Okay, so for this one van, we can do a little bit a
little bit broad one also. Or I can go for
I'm just thinking. We can just repeat the basic shape and
change it a little. This and then make
it a little longer. Filling it up. First shovel ash fell in. And then just lift the color. Just like this. Just for terracotta, you can use any mixtures
of oranges, browns, greens, yellows. Just like that. Let's do a flat one. Long one. Just to break this. Don't think too much about it. Whatever comes to your mind, just go ahead and paint that. Let's lift up and just
leave it like that. And now our last one, pick up whatever color you want. Slightly darker,
lighter, brighter, whatever fields,
whatever you feel like. Okay. I think I repeat one of the patterns because I really don't
want to think too much. I'm just going with this one. This deal NAV is look different because
using different colors, just some more color. So that's about it. So simple and so
easy and we are just done with all our terracotta
pots here and here, use different, different
colors and mix them. Next up, we just go ahead and add leaves or plants
to these just to bring them to life
and you'll see how simple and fun
and easy it is. So see you in the next
part of the class.
4. Painting the Plants : Okay, so once this
is nice and dry, we'll start with our leaves. Make sure that you
change the water now or you have access
to clean water. Clean water because I will
be hopping on to the greens. So for this one now, what I'm gonna do is we are again going to use
just the brush mostly. So again, show it on
paper before this one. This time around. We will just play with
the tip of the brush. Like this. If you are just using the tip than thin strokes, if you're bench pressing the
brush, then thick strokes. If you are doing this
for a little while, then leaves like this. If you are doing this for
long and then picking up, then leaves like this. Sometimes just touching the
brush and taking it up, touching it and taking it up. So we will just be playing
around with the brush. Very, very thin. Only the tip of the brush. Pressing, lifting,
tip, press and lift. So basically this fun
exercise we'll be doing all the way when
we are doing the leaves. Again, low pressure
and really simple and fun with that now. Then I have these greens here. We'll be using those
and maybe adding some yellow to make it
lighter or darker. However, for the first one at school with
a very, very basic. So let's start from
the tip of this. Think of our bot and go up, press and lift,
deciliter and lift. Make sure you're starting at
the same mostly Point site. Then lift like this. Then you might want to
add a little black. I know most people are not
a big fan of the black, but I like to use
it if you want. Then you can add
different kinds of green, this limit of stem, and then press, then
lift just like this. Maybe one last one here,
which is coming up. So just as simple as this, nothing more than that. No shading, nothing, no
variation, no layers, nothing. Only very, very simple. Now we have done, use the whole brush. Now let's start with the tip. So what I'll do for this one is first let's make
some stems coming up. So since it's a low bot, using the tip of the brush, make sure that they are random. You don't do any symmetry. If you like this, then leaving just
be using the tip of the brush and making some
tiny leaves on this. So I'm just touching
it like this. Not focusing on how
the strokes are coming or they
even look similar. This, that nothing only
focus on this and then just painted just touching the brush. Like this. See, we build on this also. Since the grid is darker, it's coming on nice. Just tiny, tiny strokes who only with
the tip of the brush. It's overlapping here, would
worry too much about it. Just follow where the line is taking you keep on painting. This is the last one. I think. We have one more tiny one here. That's it. So they see advance, it comes together, it
looks really nice. Maybe we can just fill
in a little stems here. Last one year. Yeah, that's about
it. For this one. Let's hop on to our third one. Let's use. Fifth or more lucky. The whole brush. This time again. They get this making a little mixing a little brown to it just to get darker green are more
like an olive type of green. And then we'll start here, but start pressing the brush. And then we lift up. We will not make any
thin stem want anything. Start pressing the
brush from here, green to it so that
different color leaf. This. Let It Bleed and mix them and do
whatever it wants to. Just don't bother about it. Make sure that your brush is
loaded with too much water. Just like this. You
can see one more, maybe we can do here whatever
pleases to your eye. Okay, so just we have
started from here. I want to minimize this gap. You can do that as the
third one is also done. Now let's do something fun. Again. Some kind
of found a leaf, maybe that would be dry here. So one little bit
thicker, lines, 2.3. And then we can just using
the side of the brush. One side of the brush, digging out leaves like this. Just using the
side of the brush, not applying too much pressure, but I'm using almost half
of the brush like this flat, slightly darker green. For this one. You
can do the same. For this if you want, you can add more, but I think it looks really, really good. Nice and simple. So I'm
not going to add anymore. Let's try a little
bit more sense. This time. There's no pressure on what green you want to use, use whatever you like. So the standard sku
for thinner ones, maybe three or four main. And then we can take
out a few from this. And for the leaves, you can do simple leaves. Small side of the brush, blessing and lifting. Just pressing a little bit. Yeah, we pass only the tip. So very, very
little, little tiny, tiny strokes here we are pressing it a little
bit more and then just dislike this
lifting lifting, blessing and this lady randomly. Yeah, that's about it. Let's move on. 61. Okay. Let's see what do you
want to do for this? Maybe something
again, like this one. So first, you can draw or
paint stems coming out like this. Just to leave. Only just using the
tip of the brush, not pressing it too much. Blessing it slightly
and then just lifting it up with
a nice thin point. This one you can do again, start with thin dress and then thin little
bit of to stand on. So all you have to do is press. And just on the hand,
however you want. Like this, press Done, go back. Press down and go back. So just like this, again, very, very simple, easy and fun. Let's hop on to the seventh one. And for this one also, I want to show you a
really cool technique. So there's one star. Go up like this, sideways and then lift it up. Go up the bristle
brush sideways, and then just lift. So you can do both directions. So just go up, press on the side
and then lift up. Lift up, press and lift. Press, lift up like this. So you can see all these
random edge which is coming, which is looking
really, really nice. Again, very, very simple. Then if you are a little
confused about this one, It's not that tricky. You just go like this. Sorry. You just go like this
breadth and then just lift up like this. Press and lift up, press and lift up
just like this. Okay. So next one, Let's do
something very, very typical. So I'll just stick out to me and then we'll do the
very typical lease. Start. Lift and lift my brush a little and lift. And make sure that
you just change the direction of the
leaves and little bit so it looks nicer that way. Press and lift. Same thing. I'm just don't worry about
overlapping bleeding. It don't look snakes.
Minutes done. Alright. Let's try. Let's try a little yellow maybe the stain so that our green girls on it later. So for this one
also it's simple. What I'm going to do is take
out quite a feat of this. Stems coming out using
just the tip of the brush. All in random directions. No symmetry or anything. Now, you can also leave it
like this snake number of Ds. But yeah, I want to show
you something else. Again using the
tip of the brush. This time I'm doing the slides. So you can see, yeah,
it's a complex thing. Only the tip of the brush. Here, the breast it a little
to get the leaf shape. Here we're not pressing. You only want straight lines. Super tiny, tiny kind of leaves. You can see on a few plants. Lines change the color. You want. No, don't have to cover
all the stems that we did. A few of them must be
hiding already behind. Simple and light
too much about it. Yeah, So that's about it. So that's a different style
again, which is very, very simple and fun
and so easy to paint. All right, so for the last one, I don't know What should we try? Look at all this and
maybe something more fun. Again. Simple and fun. Super easy. Flow out. That's the nice thing
about houseplants. You have so much
school like this. Overlap and go. Maybe a little dark
color this time. Suggest doing lines and
leaving it the fine tip here. So then it's brought here. We are mostly doing grassy
and longer and flowy. Very, very thin tip. Again tin, very slight
pressure on the brush, goes back in change of greens. And just see how nice this
overlapping and mixing. It looks really nice. Just on your hand however
you want with the leaves. Enough. You don't
want to overdo it. Just like this. Our class for watercolor
doodles where I painted ten simpler loves
plants for you, mostly doodles. They are the only
really simple and fun. And v, the terracotta
pots and then very, very simple leaves without any drawing or
anything, no pressure. Very, very commonly and very, very freely using our brushes, playing around with the brush. I hope you enjoyed it. And then the next
part of the class, I will let you know
about your classes.
5. Class Project: Okay, so I hope you
enjoyed painting this super fun
watercolor doodles with knee watercolor
house plant doodles. And you saw how easy
and simple it is. This effect. We didn't do any layering, nothing very, very simple, basic watercolors just to
get a feel of watercolor. Just to know what a color a bit better and just to
feel good about something that we
have painted in as few simple steps for
your class project. I want you to paint
any three of these. If you want, you can paint
all very, very good. I would really love
to see your versions. And I would be really happy to see your
projects submissions. But as something for you, as a guideline for you, I
just want you to paint, at least try three of these and I'm sure you will
want to paint more, but for your class project, pick any three of these and submit it as your class project. I'm so looking forward to it. If you have watched this class, if you have enjoyed
it and liked it, don't forget to leave
a review for me. I love hearing from you do submit your projects
so that I can see them. Give you feedback,
let you know how you can improve what you
have done nicely. I'll also love to share it. So please do that. And that's about it
for today's class. I will see you in my
next class till then. Thank you and bye-bye. Take care.
 Dr Megha Cassandra, Art Therapy Coach, Watercolor, Handwriting Expert