Transcripts
1. Trailer: Do you also love animals and painting, but oil colors still seem difficult for you. Then you're in the right class here. Thank you for taking this class. You will see turning a blank canvas into a cute and colorful picture of an animal is no magic. You don't need to have previous experience with oil painting Just have fun creating art. Do something good for yourself and your friends. What about a fluffy present with a cute animal? or preparing your first exhibition? or just decor in your home This course is your quick workshop to get started. By the end of this course, you will have an overview of the affordable tools you will need to start painting in oil. And a step-by-step guide of creating a painting like this. You will see it's not difficult. So see you in class.
2. Introduction: I am Julie Boehm, an artist from Germany, I have my studio in a small town near Berlin. I create art nonstop. Painting grounds me again. It has a double positive effect. On the one hand, I love creating positive, colorful things. And on the other hand, these artworks embellish my home and my studio. I am particularly connected to the animals I created the recent years. Now it's already a whole collections of paintings, bags, cards. And I get so much positive response from my customers. Giving joy and time is what I want to pass on to you with this course. Just enjoy doing what is good for your life. And I'm very thankful that you take this course. So let's get started.
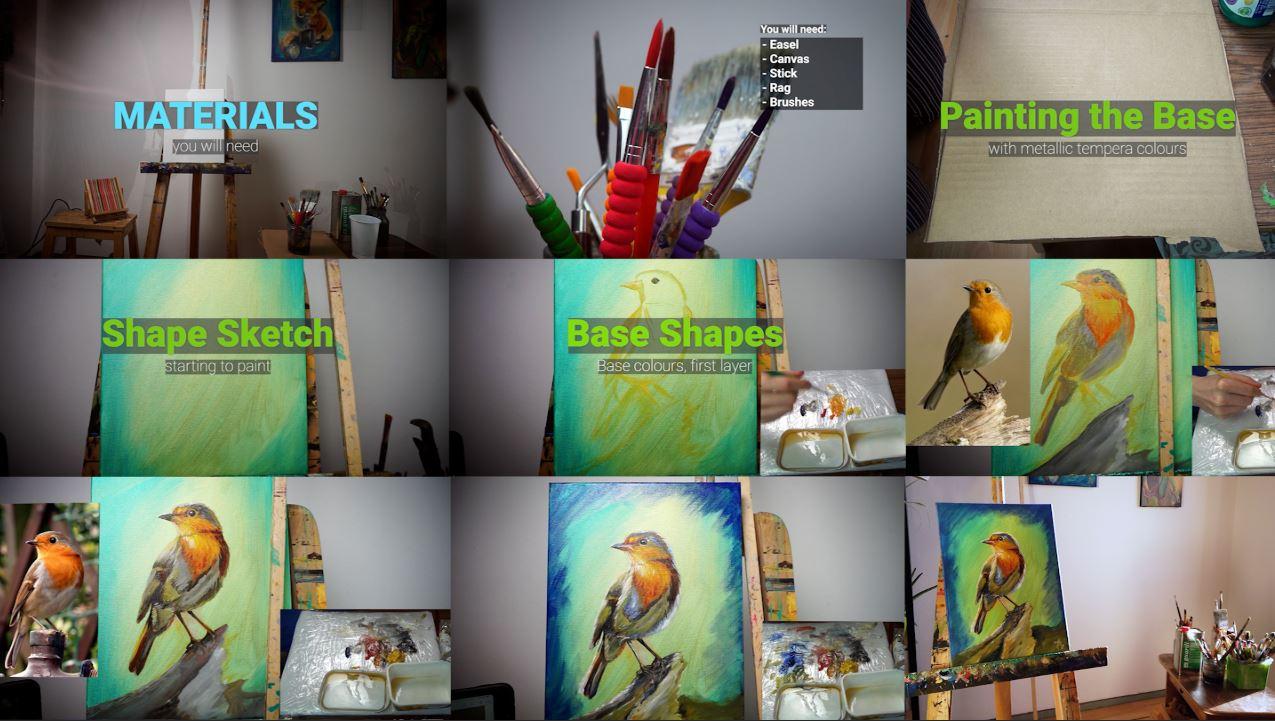
3. Materials: First of all, let's talk about the materials I used for painting. Here's my easel. It's very simple frame that the adjustable in height. It's quite colorful and old. You don't have to take the most expensive one. Just make sure it's stable, doesn't tip over and you can adjust the height. Let's move on to the canvas. Today I am using the size of 16 to 12 inches. Feel free to choose the size you feel comfortable with. I tend to paint with oil paint on a larger canvas because it is easier to scale more abstract textures with coarse brushes. To tighten the frame, there is always a small bag with wedges that you can clamp in the back and tighten if the canvas loosens. And it's important that the frame is straight. I also have a 2.5 meter long stick, which they use for oil paintings to stabilize my hand. This way. I don't put my palm on the painting and smudge it. >On my one stool I have a book stand with my iPad where I load my references. I also use old sheets to clean my brushes in between when a change to another color. Now about my brushes, mine don't have a specific brand. I bought them from the dollar store was seven pieces for €3. There are similar ones from Faber Castell. and they are all made of synthetic hair. The important thing is that they can make a nice tip, so clean them properly with brush soap. after every painting, I also have this super cool fan brush that was in my set, and I normally use it for fur and feathers. It's perfect for details. You will also need a bigger synthetic brush for making the base. It's also important that you use a painting medium for thinning when painting. Some use turpentine or pure linseed oil. I use this rapid medium which makes the paint dry faster. In addition, it's cheaper in this large bottle than the small bottles and it lasts forever. It's also handy to have a yogurt or butter cup attend where you can get the medium directly out with the brush. Now let's move on to the colors. I use these water-based metallic tempera paint for the base. They are very cheap and perfect as a primer that will be unique because you can print this mixture and the gloss ratio. I also got them from the dollar store for around 4 bucks. All I can tell you about my oil colours is that none of the paints I've ever used have not worked. Unlike acrylic paints, you can even use the very cheap gains from the dollar store. I, for example, do use all tubes that I inherited from my grandfather. There are about 30 years old and still perfect. As long as the tube doesn't break, I can use it. The most important thing is that the tones are the right ones. Do not use mixing white, but a titanium primary white. Primary colours are also important If the colors are really pure, you can mix everything without turning dirty brown. So take cadmium red, cadmium yellow, cadmium orange, ultramarine, black and white for this painting. The last two things you will also need are a cardboard box of paper. And cling film for the mixing palette. Now you are ready to set up and we can start painting.
4. Reference: The reference for my painting I took from Pinterest. And there I have a big board with different birds. You can also get inspired by. Just make sure you don't copy them but make your own version of it like I did. You see in my bird feet are different than from the reference because also I didn't like that you couldn't see it the picture. And I also took this photo for referencing the light that was very nice blue on the photo. You will find a link to this reference. in the description. Choose a photo you like, save it on your phone or tablet and see you in the next lesson.
5. Metallic Base - preparing the canvas: Let's start with a metallic primer for the painting. Take the tempera paint and put it in your card board palette. Two blobs of each color. Then take a wide synthetic brush and mix the light golden color into the green. The outside is darker than the inside like a vignette. This serves to draw the viewer's eye to the center where the bird is sitting. You can already see how beautiful metallic it glows. Finally, you can also paint the edges on the side After that you can make it break because the picture has to dry for a couple of hours. Now let's create our DIY painting palette. When you have painted all the colors on your cardboard place two white sheets of paper on the top. Then stick the cling film on the top with tape. And now we're ready for the oil painting process. See you in the next lesson.
6. Sketching the shape : The canvas is now dry and we can start painting our motif. On my color palette you can see all the primary colors we will start with. Also, pour a little medium into the pot: To begin, I take a large flat brush and sketch the shape of the bird with light orange color and the rough strokes. I hold the brush from time to time, first on the reference and then on the picture to see what all lies on this line. After I've painted the big shapes , it gets finer and I see that I adjust the organic shape of the bird bit by bit. I liked the bird's feet better on another reference because you could see more and the background seemed more natural I also encourage you not to paint the photo exactly, but to find your own artistic version. So mix different references in your painting as inspiration. Don't copy too much and you can also enhance some details you like more than in the reference. With a smaller brush, I now define where the eye of the bird is. I mix a darker color with blue for this purpose. Always compare the ratio so that they are approximately correct. We can still change them. So I become more and more precise with my sketch and the edges become more clearer. Our sketches now ready And we will color it in the next lesson.
7. Base colours: Now as use the same brush to place the orange color areas, but lay it flatter so that there is more surface to paint on. It's always important to go with the direction of the growth of the feathers of the bird On the left-wing, I use a lot of medium because it's a base that I can paint over later with the other colours of the wing. Now we mix a little bit of fret into the orange. And now we can paint where the red merges into the orange. Here I use my painting stick so that I don't smear the wet orange on the picture. With the red I paint the first details into the plumage of the bird. When I need a new color, I simply rub the brush on my cloth. Now we want to set the grey of the plumage of his body. So I take my black from the tube and mix it with white.
The black is very intense very intense. So use a little more of the medium so that the pigments are not too much. Because we now have a lot of medium on the brush. It mixes well with the red and creates a new colour tone on the canvas. I always find it interesting to mix it directly on the Canvas. So you have lots of different tones you can use for your painting.
8. Details: Contrast with shadows: Now it's time for the feet. For this use, I use a finer brush with a tip. I had chosen the other photo reference where we can see at the feet of the animal better. Here I am mixing of brownish tone with red and black. The legs are very thin. . Now I've used so much dark red brown. It seems strange if you have just one color only on one place you want to paint a harmonious whole. Likes to Impressionists I like to have all colors everywhere. Setting black contrast as a focus of interest point. It is important to draw the eye to where we want the focus to be. For me, it's not the stone where the little bird is standing on, but the feathers. So I paint more and more dark tones into the feathers. Above the eyes should be very black because that is where it is the main focus. So use pure color here with little to no medium so that it is powerfully dark. . his beak is also very dark dry with little medium for this part in the painting Go through the whole painting where you can add more contrast. Here you can also see there's still something missing on the feet. We need more dark contrasts to it. I don't quite like the shape of the feet yet. They are still too thick. With a little bit of the medium and white contrast in the background. you can correct them. Finally, we are coming to the ninth and the highlights for this, just go into the next lesson.
9. Details: Contrast with highlights: Very important for cute animals and a lifetime look is the reflection in the eye. So take care and paint very precise. The reflection that is very wide without much media onto your painting. I always look where the light comes from, what is eliminated, what the highlights are, and where the shadows are. I paint fine feeders into the plumage for the texture where it's rather dark and we don't have so much detail I blended into the grey with medium. Let's try to paint the texture, especially where the light falls with strong men tones of the painting. Here, the orange, red contrast clearly with a green background. . .
00:04:32.450 --> 00:04:34.129
For fur and feathers is this fan brush, this adds a bit of texture. . . That's it. You can see the bird's breast has a strong yellow orange. Here I bring the yellow onto the canvas was little medium so that the latish radiates from within. I also use this yellow for a few colorful highlights. I especially tried to make the area around the eyes contrasty, colorful and interesting because that's our main focus. You see we're coming to the end and they are just two steps left until we are done with this painting. Move to the next lesson to see how we paint the blue atmosphere and adding an artistic brush stroke to our painting.
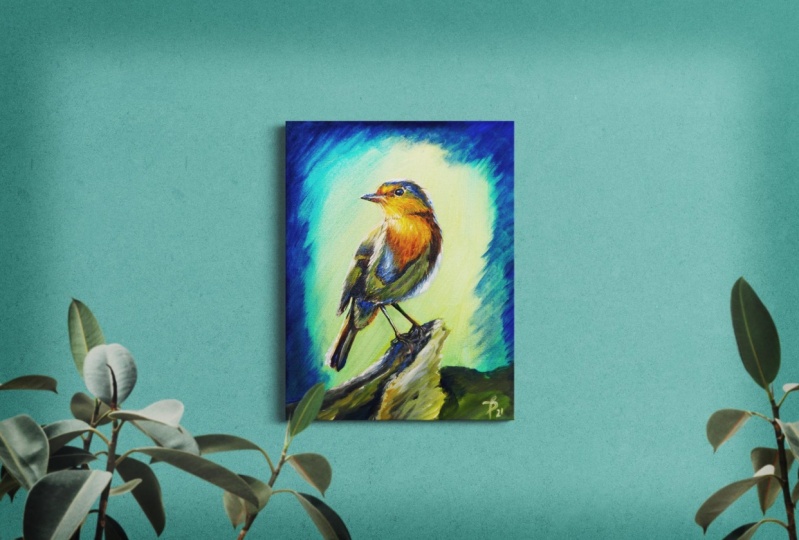
10. Blue Atmosphere: Now I take a clean brush to paint the cool highlights. I always paint this step at the very end. It's for the areas where the cool day light hits a bird at the edge. Above all, it makes us subject shine even more. The bluish tint adds also the artistic style. And especially put some blue highlights on the peak and button where the light will hit the bird the most. Out of the frame that could be a puddle and our bird could get a bit of the blue from the sky illuminated from below. So you can also put a little bit of this bright blue contrast in the middle of his body. Also put some blue reflection of the sky into the eye. On the corners of the sun. A little blue from the sky could be also reflected. Finally, I mix a bit of green from the blue with the yellow, because I like to add a bit of color to the grading. On the one hand, this is to match the color of the subject to the background. And on the other hand, to increase the color contrast to the orange of the feathers. A little bit of green on the stand where loss could grow and stone is simply reflected by the green surroundings. Here I paint the green is a transition into the background so that the picture does not tilt to the left of the weight. It only serves the harmony and should not distract, which too much contrast. About to talk about. Now I emphasize the last parts again, the light comes from the upper left, so obtained the light edge on the left side of the bird. Hello. So for the mouth is still missing a few details that I paint. A choose a pure red without thinning. It's important to finish the ice correctly because it will be the first people will look at a few final contrasts and bled. . And I added some highlights on the feet as it was on the first reference. . . . And finally, I'm just finishing this painting was some details and contrasts and colors of course, just started. That can be also some big brush strokes like I do. . . . .
11. Blue Vignette: In many of my paintings, I also paint a vignette because it helps to focus the eye on the center. And the last step, I paint with the ultramarine color and some medium, a frame that goes diagonally in the direction of movement of the picture. I also find this diagonal fitting because our reading rings from the left to the right. With this direction of the movement, a positive expression resonates. It goes uphill. Thank you so much. This last step is much fun. You can add your personal artistic style like I do with this big brush. Just ask.
12. Thank you and good bye: Congratulations on finishing this course. Thank you for staying with me. I hope you enjoyed my course of old painting, this cute bird here. You have the amazing opportunity to get feedback on your work. So please also share your work in the projects gallery. And when you have some question or wishes, Just let me know and let's support each other. I will select some of your students work on this course and tags you and share it on my Instagram channel, Instagram: @julieboehm_art And please also don't forget to upload your work onto your channel and tag me. So happy creating happy sharing, and see you next time. Bye.
 Julie Boehm, Painter and Filmmaker