Transcripts
1. Introduction: Hello, my name is
Jessica and I have been a professional photographer
for about 40 years now. They didn't use
to be many of us, the equipment was
very expensive. Film was even more expensive, and developing and making prints was more
expensive than that. These days, everyone is a photographer at
some level or other. There are great cameras, right in our phones. We're all shooting
everything all the time. But the truth is, at every
level of expertise is a rare thing to shoot a perfect photo that won't
need some kind of editing. Very few people
know how to add it. And for good reason, the software is expensive and it has a steep
learning curve and the information is both
confusing and complicated. There are also
affordable apps by the dozen that put editing
tools in your hands, but they don't tell
you what to do with them or why you would
want to do that. They just give you
buttons to tap and sliders to slide that. Aside from cropping,
most folks ignore them all except for special
effects filters, which usually make
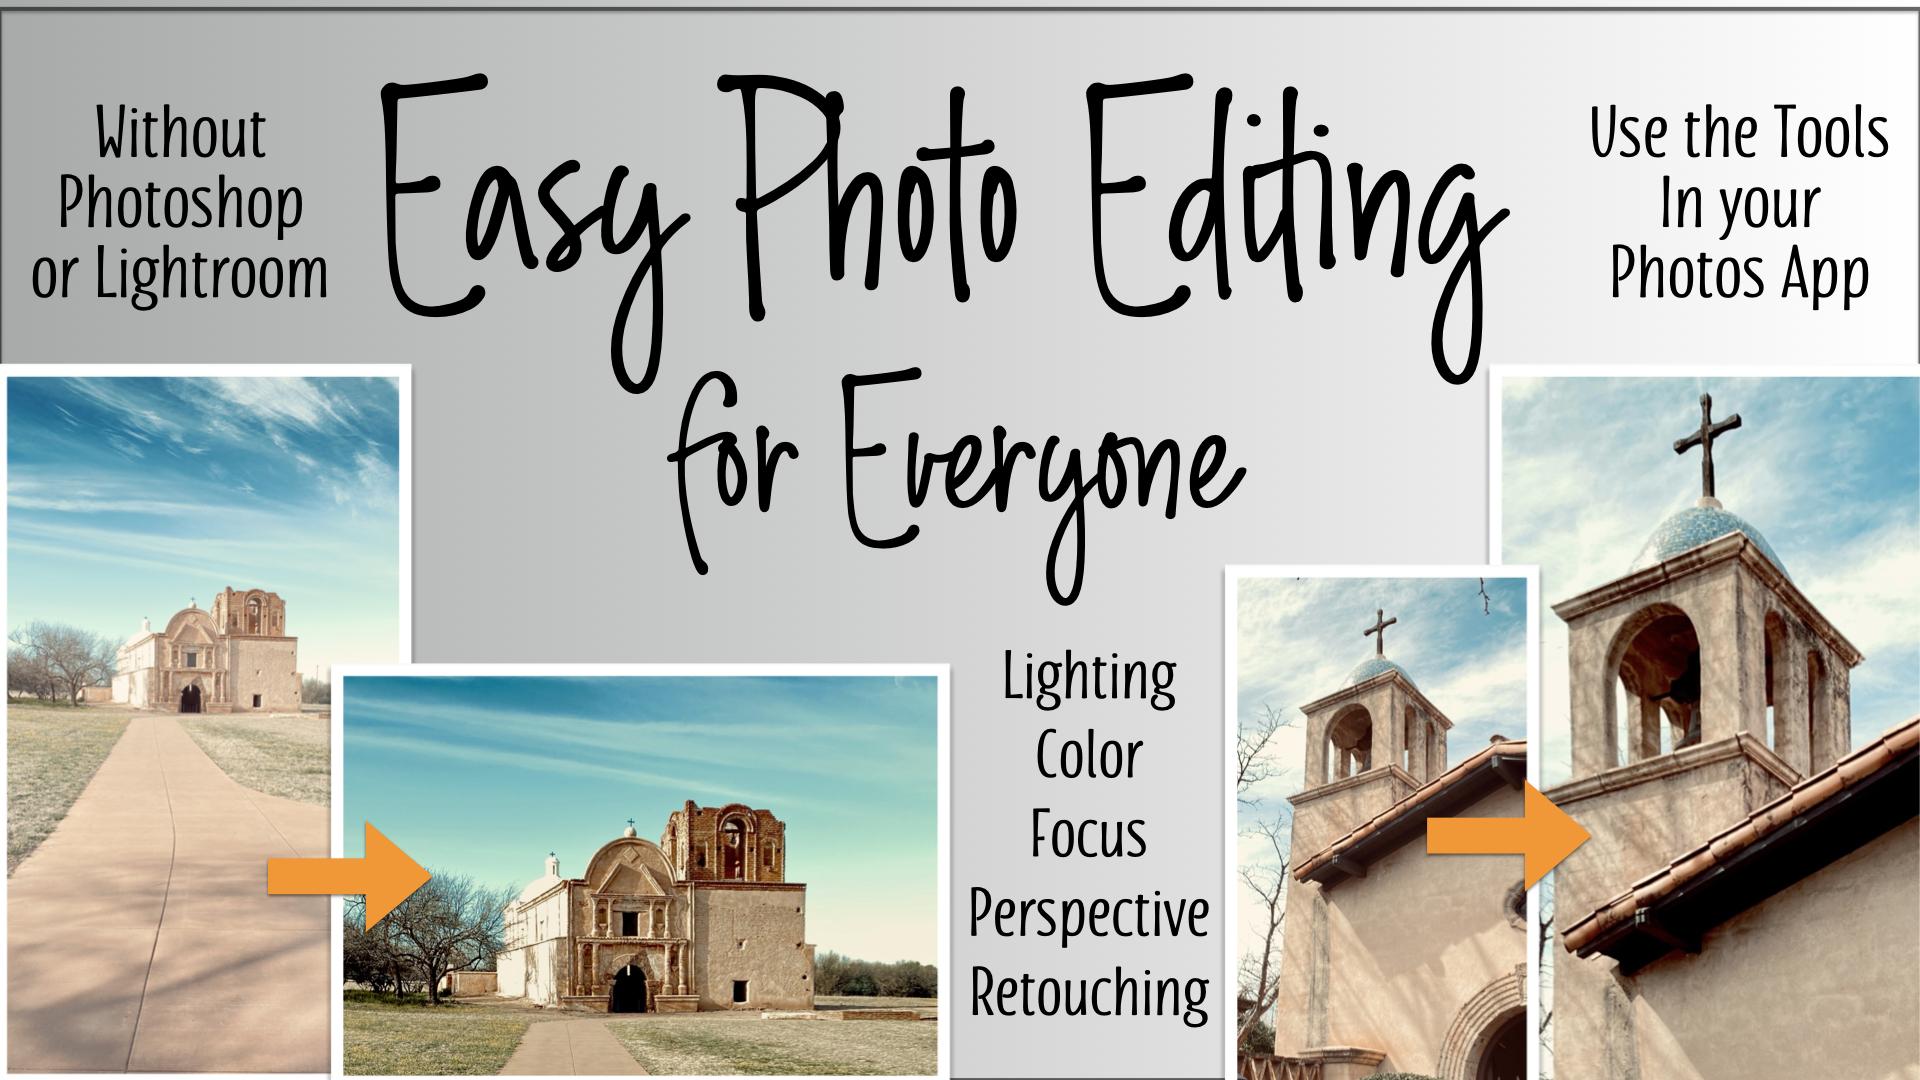
photos look unnatural. In this class, you will learn
all about photo editing using mostly the tools already in your photos
app on your phone. Plus two affordable apps that do retouching and
perspective adjustment for your project. We will edit to
provided photographs into much better
versions of themselves. And then you will edit one
or more photos of your own and share the before and after versions in
the project section so we can heat preys
on your endeavors. So download the two photos I have put in the
resources section, and let's edit them together.
2. Crop and Straighten: This particular travel
photo is going to give us a lot of opportunity
to learn editing things. It's not a very good photo on its current condition,
its original condition. And so it makes a really
good start for us to talk about the first and easiest and probably most
well-known edit that people do to photographs
and that is to crop them, crop and straighten and
actually when it's possible. And so this photograph has a whole lot of area that is not necessary
to the photograph. And I to be truthful, I sometimes do this on purpose. When I am going to take a
photograph of a landscape, I will back up and take
these big thing, big area. Because sometimes later
on when I'm working with what I have focused in on, I'll find a missing
part of something and I want to see the rest
of that looked like. So anyway, back to
the idea of cropping. And so we are going to get rid
of what isn't needed here. And the first step that I
often do before I go to the Crop tool is I will
just do a zoom crop. For example. Like what would this look like without that
interesting sky there? Do I need the interesting sky? We lost all of our darker
values are, you can see. And what I want like a
horizontal like this. Do I want the trees? And this is something, this is not bad. This is something that you can do first before
you ever get into the crop tool just to get an idea of what you
might be going for. Alright, so the next thing we're going to do is
go to the actual edit. This is probably familiar
territory to you if you have any Apple product and
the photos app gallery. This is the editing screen. And where you're most familiar with probably is with the
crop tool right there. And when you use the crop tool, you get the crop corners
which you get on anything. And by pointing to and fro, you reshape your
photographs. Okay? If you are on an iPhone, it could be that you have
a limited aspect ratio and limited to the 69 or whatever you have
set on your iPhone. And so when you
pull this around, I'm going to make this set. So you can see what I mean. Here's a 916 in on an iPhone. This will generally be locked in already so that when
you go to crop, you don't have you can't really, I can't make this less tall. All I can do is get something that same shape,
larger or smaller. So that is a big
irritation on the iPhone. It isn't happening
here on the iPad. And the iPhone,
what you would do is hit this aspect ratio button, and then you would
choose free form. And that now unlock
cis and allows you to have any shape of
a crop that you want. I just want you to
know that because otherwise it will lock you into something where you can't
make these choices. So we can, because we're on
an iPad and the first place, but we've hit free form. If we're on the phone. I'm going to play with
my corners a little more and see what it is that I want. And I don't want, and there's a little person taking
a picture right here. And that'll be a distraction
in my composition. So I don't want that. I want some interesting sky. If you can't pull your
corner down further, you can move your image
inside of the cropping frame. And I obviously I've got
to have some foreground. And I want more of what would be like
a four by six format. This is all arbitrary. It's all up to you to make
these choices are right. I think I'm going
to go with this. And I'm wondering if it needs
a little straightening. This looks like it does. The horizon line should always be straight
in your photograph. And so I'm going to use
the straighten tool, which is this slider right here. And rotate just a little bit. Now, when you, when
you hit this tool, you see the grid pops up
and that's really helpful. So that you can align
things with what is a true vertical or a
true horizontal. So this isn't the
world's best thing, but I'm going to go with it. And the other thing
that troubles me just a little bit is that my eye is brought to this extra white cloud
space over here. That's distracting
to the photograph. So I'm going to just do that. And you see the difference
if that made no horizon pulled to that bright
spot over there anymore. And so as far as cropping
and straightening, I'm done with this
3. What is Exposure: So we have done our
first simple edit. The simplest editing tool, which is the crop tool. The photos still has a lot of things that have to
happen and we're going to go after that by editing
lighting situation. This is probably going to be the silliest explanation of photography that you ever heard. But it also might
make things more clear than the other explanations
that you have heard. And so there's just
gonna be cartoony. And I'm going to start with the fact that
photography is about light, and most of our editing
is about light. We crop, we adjust perspective, but that just a balance
or a little bit of it. Most of editing and photography is tweaking and adjusting light. In fact, most photography, the picture taking part
is about the same thing. It's about adjusting light. Let's understand why it's very unusual to get
a perfect photo. When you shoot something and
you get back and look at it. Here's the sun. And the sun gives us
full spectrum light. Full spectrum light
is light that has the full spectrum
as in rainbow. It has all the colors in it. Okay, It's a very different
thing than pigment color. But pigment color is
what is on giving things their ability
to have a color. So suppose this was a red ball. It has something in it that
is able to reflect red light, the red part of the
full spectrum light. And so what we see
is read on the ball. If the whole rainbow, the whole spectrum
hits an object, and the object bounces back all those colors, we see white. Again, this is about what
material the object is made of, so to speak, okay? If the object absorbs all of
the spectrum, we see black. Okay? So everything else
is an in-between, but we are working
between that white, which is your highlight, and that black, which
is your deepest shadow. So the light comes, it strikes a thing and the thing takes in some of
the colors of the light. And the thing bounces back or reflects other
colors of the light. And now we're gonna get
our son out of here because we're going
to put something else here to catch these reflections. And the first thing
that we're going to put is our own eyeball. This is not going to be a
good eyeball, but okay, so our eye sees this
light coming back, this colored light coming back. And we perceive this
thing to be that color. So let's just pretend
maybe this is red coming back and this is some
blue coming back. And we're probably going to see this as some kind of a violet, a mix of those two. Okay, So far, so good. So in photography, what we
have here is not an eyeball. We have a surface
that is sensitive in all little spots on it to
getting this light hitting it. So I'm just going to make that be a square because
it used to be film. And the film had an emulsion and the Molson was able to record, if you will, this reflected
red, reflected blue, whatever's happening at
the spot that it got hit. And that was make a color
photograph for us. Okay. Or a black and white one. But we're not gonna get
too difficult right now. So this receptor is not
usually film anymore unless you're a very arty
photographer who has still has a dark room and it's having a good time with all
of that history. But usually this is
now an image card And it's a digital thing and
it's not emulsion anymore, but the function
is the same thing. It is going to catch and record the reflected
light from an object. I changed my diagram
a little bit just to make it a little
neater to understand. So we know that. And I'm also just
gonna get rid of this idea that there
was anything blue. And say that what's
coming back is red. This is a red ball. Okay? So a light coming from the sun, all the colors in the spectrum
are getting absorbed by whatever this ball is
made of, except for red. And red is being bounced
back to our image sensor. And it will make a
picture of our bone here. And that is rent. How darker red, how bright
of Iran, how light, how doll of a red
is a product of how long the image sensor gets to see this
reflected red light. The longer it sees it, the more it washes out. If it just sees it
for a little bit, you're going to get a dark red. If it sees it for a longer time, you're going to get
a washed-out red. And that is called overexposed. And if something
is underexposed, it can get so dark. And I can't do it here
with good old Procreate, but you can get so dark that it can lose its color
and just go to black. Now that is because the image
sensor has its limitations. It's not the human eye. And so we have to adjust how much time
this exposure happens. This red light hits
the image sensor. That is controlled in two ways. One of those ways
is that you have, I won't draw this in red
because it'll be too confusing. One way is that between the
thing and the image sensor, you have a lens. And the lens allows that red light to go in
to the image sensor. And that's a whole when
I'm Ally it in, Okay. How long you have that whole open is one of the
factors of exposure. And that's called shutter speed. That's called a shutter, a little door on that whole. Shutter speed is one
way that you control. The deepness, the
richness of your colors shorter is going to give
you a richer color. Okay? It also controls
blur and movement, but we're not going
there at this moment. Okay, The other factor
that's equally as important is the
size of this hole. This hole is a lot bigger. More light gets in it, right? And so this is
called the aperture. Maybe you've heard these terms. You've certainly seen
him on the controls of even as simple as cameras, but that is what's
going on there. Your hammer, a door to open. And how much light
gets in is a product of how long has that door open
and how big is that door? That's the big,
that's the how long. So on good cameras, there are controls for
both of these things. You can set your shutter speed, you can set your aperture, and that's all a good thing. When a camera is
taking a picture, it has to figure that out. If it's an auto like
the phone usually is in a lot of cameras or
it has to figure that out. So on the top of somewhere on the camera Is a light meter. The light meter is reading what light is going
on over here. When it is, it,
is it reflecting? Is it not reflecting
as it whatever. And this is headed
wanting a middle ground. So this meter is adjusting the aperture,
the size of the hole, and the shutter speed to allow a middle gray value
to come back in here. And now it doesn't matter,
I'm saying middle gray All colors. If you ever turned one
of your color pictures into a grayscale picture, you know that all
colors have a value. And a value is the lightness
or darkness of a thing. And so the camera, in order to get the best
exposure of all of the things, is going to want to expose for a middle value
in middle gray. Now, we are, We do not have only one
thing in a photograph. No. We always have
kind of a lot of things in the photograph
and they will be different as far as how much light they absorb
and how much they send back. This, this meters
not reading color, is just reading values. So as saying, Okay, but whatever that
object is made of, it just took an half the light and sending
the other half back. And that's what
it's headed for to have a middle value
exposure here. But that's just not
always possible. Mostly it's not possible. It's something is too bright
and something is too dark. Then that bright area gets washed out in that
dark area goes to black and you don't have any picture information
there to even pull out. And I'm getting too complicated
there and I know it. But the camera itself
is going to try to meet her the best for all the
objects in your picture. And that's what you have to
know because you have to know that you are not very
likely to take a camera, shoot it on auto like
most phones are, and get a well are
perfectly exposed. Photograph probably
not going to happen. And this is why we edit. Most of editing is
about adjusting light. All of photography is
about adjusting white. But this doesn't always
turn out so well. Even if, I mean, yes, you can adjust manually
your aperture and your shutter speed according
to what you want to happen. But the likelihood of perfect
exposure on everything in a photo that's all made out of different stuff is not likely. And therefore we edit. And so in our next
lesson where we start to play with light editing, we're playing with exposure. And we after the fact, after this information is
recorded on our image sensor, we are able with editing tools to go back in
and change some of that. And that's very magical. And for most of recent time, you have needed
Photoshop or Lightroom. Or I can't even think of all the different
really expensive and really high learning curve tools that have been used to
do this very thing. But what most people
don't understand is that these tools are right here
in your phone camera. I'm gonna be able to show you exactly where they
are and how they work in iPhone because that's the only kind of
equipment I have. But if you go into any brand phone and into the Photos app and into
where they say edit. You're going to run
into the same things that you can change, even run into him on Instagram. You run into them in all
kinds of editing apps. But you're going to have
this set of tools to use. You're not going to
know what they're for or why they're different. And so that's why we're here. We're going to explain
that to you starting now
4. Exposure, Highlioghts, Shadow & Contrast: Here we are back at our
photograph that we cropped. When you look at
this photograph, I wanted to just stop
for a second and think, what do I think about
this photograph? So let's just take
that second right now. If you said, I think
this photograph is too light, You are right. A good photograph has deep
color where it should be. Deep definition and deep shadow. Shadow here is brown
and highlights it don't blow away the sky color and so on or the color
of anything else. So I decided this building. Okay. This photograph is overexposed. This is not something I
would have done on purpose, but somebody had taken a
picture with my camera. They had increased
exposure button on and I didn't know it. So when I looked at
this, I thought, what was I thinking? But it wasn't me thinking, but it gives us a
great example to play with our light editing. So we have a problem to solve. It is that all the values in this photograph
are too light. You don't have enough contrast, so you don't have any pop. And you don't have
your intense color, which is a beautiful color
on that, on that church. And you don't have your deep tree trunks,
anything like that. So we can fix that. So let's go to edit. This time. We're not going to
choose the crop tool. It is probable that you're this little clunky
son thing up here. Icon is already got the yellow dot on
under it as a default. Okay? This is our light correction. And there are a bunch
of tools for us to use. I mean, not even
what showing here, but look at this. Don't worry. We will explain and you don't need them all every time either. You just need to know they're
there and what they do. Because when you analyze
what your problem is, you won't know what
to do about it. We're going to start out by
skipping this magic wand. The magic wand or the
enhanced image or the, they call it different things and a lot
of different apps. It is something that they
preset and algorithm. Nasty word algorithm. It's been preset
for most photos. And it's a combo of these
other light settings, but it's not specific
to this photo. So unless you know
the AI in there. Thanks, It is terrible words. Anyway. So we're going to skip
that because we're gonna do things manually and we're going to find out what these tools are and what
we can do with them. Okay, Ready, set, go. And this is going to
take us a couple of videos because they're
going to get too long. I think. I'm going
to move to this. And as we move that to the
mid point of the slide, we say that that says exposure. So what this is going to adjust is what would have happened
if we had a smaller aperture, shorter shutter speed,
or whatever it was that overexposed this photo and it was one of those
two are combo of both. The hole was too big and
it was open for too long. And so by sliding
this up and down, watch this photo
because I want to take you all the way
to wash out here. Do you see what's happening? Okay, we are increasing
exposure here and what happens is finally
blows out the color, almost all of it, and it loses information. If you went in here and you were trying to do
some kind of edit, there are no pixels in any of this area for
you to work with. Okay, so you'd never
I don't think you'd ever see it
overexposure like this. Okay. We're back to the mid ground
and this is overexposed. So by being a little
bit reasonable and bring our exposure
down a little bit You see how we have
intensified the color. We've darken that
deepest shadow. And as we keep going, we're
darkening everything. Problem is that if you
keep going, you don't, you have an underexposed photo and you've lost contrast and
you've done a lot of things. Okay? And so you want to stop
between enough and too much? Now why do I say too much? Because I just lost my light and my sky by trying to get a
little more of this definition. Okay? And you see that even with
that much underexposure, we still have very little detail on that blown out
wall over there. This photo could be hopeless, but we're not going to
look at that right now. We're going to use the exposure
control to get it just enough to be a place we can
work with from here forward. Okay? This is a global edit. It means that every thing
is getting more or less light because that's what would happen when you're taking
a picture with the camera. If you have more exposure, everything is gonna
be exposed to poor. And if you have less, that's gonna be true
for everything. So that's a global. Some edits are not global, they are specific and we're
going to be seeing that. Okay, moving on to this guy, this is called brilliance. And we're going to
skip it for right now, because right now
it would be too confusing and we're
gonna go onto runs that aren't
confusing first. Okay? And here we have our
control for our highlights. This is not a global control. So therefore, when we are going lighter and
darker with this slider, we're only talking about highlight areas and that
would be your clouds. Sidewalk here, this blown
out wall, this hotspot. Okay, So watch, watch how
the shadow does not change, but the highlights do. Now that's an increase. See how white that gut. And we're gonna go
back to center. And what we would like
to do in this photo is bring our highlights down. Okay, now we're losing
white in the clouds. But do we this is
a judgment call. Do we care about that in exchange for getting
more detail on her wall? And so you again, you are looking for the
place between too much and enough and all the way down turns things
yellow looks weird. Okay, So where does starting
from the mid point, where does it start
to work better? And I think right about there. And you'll get a number so that you can I don't know where you're going to
do with the number, but we're going to
stick with this a -57 right now and our
highlight control. Okay. Next is shadows. Again, deepen and Leighton
deepen, enlightened. Okay. This time we don't have very dark shadows and so
we're going to deepen, but not too much. Watch this door here
we are at midpoint. Arches his door. We got a kind of a
brown shadow area there and not very black. So I'm going to go just
where it starts to be black. Not too much though, and see what's happening. Not just in our shadow,
but you see in here, look at all this definition that happened now because we
have a deeper shadow and they're in our trees
are looking at a little more like like trees and we still have a
blowout of white back there, but that's just not, we're not going to be
able to do anything
5. Brightness and Color Adjustments: Our next tool here, brightness, brightness and contrast,
always work together. Brightnesses an
overall like vibrancy. Okay, so let's look at
what this slider does. It brightens everything,
it darkens everything. That's garish and that's
too much down there. And I don't know if we need it. Let's go to our start here. And let's just go up. Let's not go up. I don't work the brightness. It's taking us back to
having troubles here. But we put about a 17
on their brightness. And I think it's added a little, I think it's added some
nice definition up here. But this works with contrast. So after brightening,
you can go back to contrast and see if
you want to move. What did we have? There
are 50 something. If you can move that anywhere to make it
a little bit better. Now you're getting picky, nit picky is what
happens when you get into really editing something. But it's nice to know all the
control you actually have. This is starting to look like a good exposure taken
on a very bright day. Very bright light is a problem
always with photography, and that's why you will find all your professional
photographers at the roadside or whatever in the evening or in
the early morning, because light in the morning or in the evening is much
more mellow and it's also coming from an angle and you can work with
it a lot better. This was taken in way
too bright light, so we're doing the best we can, but we're not going to get
perfect because of that. Okay, so contrast
and brightness, you'll find those in
every edit control and every camera and every app. Okay, this is black point. This determines how
black is, you're black. And so where can we watch this? Let's watch it in or
our doorway there. Oops, done. Where am I? I don't have my
black point here. Okay, and watch what
happens here less or more. We got pretty black
there all the way at hundred per cent in I think
it's too much because again, we're getting stuck
and we're getting the best edits are what we
call transparent edits. And that means that
you look at the photo, you don't know that
it's been edited, or you don't want to do things
that make it look goofy. And a lot of these controls
will make it look goofy and people will know it wasn't a good photograph
in the first place. And still isn't because
it's looks goofy. Okay. I have this at about 60 56 now and I'm going to leave
it there are lifetime, I'm getting a lot of excellent detail in
my main subject area. So that makes me happy. Okay, the next one, saturation. Saturation is basically the
intensity of the color. So a super saturated
red would be a really, really bright red and a somewhat on saturated
red would be more grayish. If you have 100% D saturated. It's just a grayscale. So let's look here and see
if this one goes that far. There we go. That's
a good way to turn your photo into black and
white if you wanted to. Anytime you can do that just
to look at your values. Okay, so we were on saturation and we went the
whole way to D saturate. And now we have basically
a black and white photo, which is really good for
looking at your values and how, how are your lights and
darks balanced out. And that's looking very fine. I think it's looking better
than I expected it to look. Okay. But we don't want a
black and white photo. We might be a tad
saturated here. This is starting to
look like a little bit Too much. So very delicately. I'm going to try and make
that look more normal. Orangey garish, a
little bit more normal. But I don't want
to lose my detail. I just want to look like someone would
think it would look if it wasn't played with. Okay. So what we did was we made all color just a little dollar, and that made it look just
a little more natural. Here's another colorful thing. Vibrance. Vibrance like brilliance is a tool that's pretty much come
along in the digital age. And it's a control that it
does what it says it does, but you don't necessarily ever, ever have to use it. But let's look. Okay, you see what happen
with the sky there? Then if we went all the
way down and get all doll. In this case because we blew our sky out with our exposure. I want to put a little
color back in the sky. And so I'm at about
14 in vibrance. And I want to go too far
because then it starts to look like there was something
wrong with the Sun that day. That's like at a 50. And so somewhere in between
the too much and just enough. We want to stop. And so I'm gonna do that
in the teens there. You might want to do something
else with your photo, but I don't want my I
want my sky to have color and I don't
want it to look fake. Okay. This little
thermostat deal here is it controls the
color of the light. On earth. Do I mean by that? Light is warm or cool
or warm is more yellow. So you're out in the middle
of a sunny afternoon, your photo is going
to be more yellow. And this one is because it was taken in a
sunny afternoon. And if something
is more in shadow, or you have an overcast day, or you have the best life for
photography that there is, which is called open shade, which is not overcast with grain is to it kind of a cloud
covers so that the sun, It's like using a big light tint the sun and it washes over
rather than hitting harshly. Anyway, it's great light if you go outside to take
pictures and you go, oh sons, and I hope that
it's nice and bright. You've hit a jackpot. So take advantage of it and
take a bunch of pictures. So let's watch our warm
and cool happened here. Says get more blue. More shadow. Looks like shadow. Reason is it light and
shadow is more blue. It's more on the blue
side of the spectrum. Okay, so there we are. This is as cool as we
can make this picture. And this was where we were. And if you've made it more and more yellow, this would happen. More warm, I mean. Okay, Now good though, because at our half point here, I think we're too yellow
by a little bit anyway, and that is making
our sky more of an ACO or turquoise
than a nice cool blues. So, but I'm not going
very far because I liked the brilliance
of the church. And so I'm just I'm watching the sky
to see if I can get it knocked back just enough
to look more blue. And yet still hang on to the
natural log of the Church. And I'm at negative 16 there. And I think I like that. Some staying with it. Tint is like kind of a thing
that you're not going to use much either because you just did that with your yellow and
you're warm and you're cool. But let's look at what it does. It's a toy to play
with if you want to. So there goes a green tint. And you see what I mean? This is there's so much in digital editing that is about not what I
would call editing. I would call it photo
art or something. When you change a photo, like you apply these
filters to it, you do all that kinda stuff. You're not editing. You are changing the photo
into something that is not. And I'm not saying
that's a bad thing. There's a lot of
wonderful works that are, that are done that way and they make very interesting
photographs. But the kind of editing
that we're doing is your everyday editing
that you got to do to get your pictures not to look like they were shot wrong, which they mostly are because it's really
hard not to do that. So anyway, I would
ignore tent as well.
6. Edting Focus: Here we have sharpness. Now. We're no longer
talking about light. We're talking about
focus with sharpness. And shutter speed is how you control footwall
focusing the camera. Shutter speed is how you
can get sharp focus. Okay? And we have sharp focus. We don't really want to get too much sharper because we
could look very weird. But I want to show
you what this does. And it only goes like I think it only
goes in one direction. Yeah. This one only
goes in one direction. And it's going to
sharpen the edges. But it does it by fooling
around with pixels so it can turn a photo
into an odd thing. Really easily. See that, see all that white outlining
happening around there. Way too sharp. Not real looking. Maybe useful in some
kind of special effects. They look at your grass
is turned into it looks like there's snow on it. So not good, but a
little sharpening is a good thing on some photos that somehow got a little blurry. And just control
yourself there though, because it can very
quickly go to very bad. Okay? Definition is really
the same thing. But it's working. Instead of just an adjective, it's working more eternally. And let's see how this
makes things work. Okay, It's a gentler
sharpness control and you see that
hopefully it shows up. And even at its extreme, it didn't make a hideous
thing out of our picture. It's not good, but it's not as bad as sharpened at its extreme. And so you might
want to play with definition Before you would
do any sharpness control. Because it does a better job. It's working with
a lot more levels. And I'm giving you a
better definition. But not giving you white outlines and
strange things happening. I don't even think I want to
go that high. I was at 25. I'm just going to just be
delicate with this here. Because like I say, we
have a very good focus. We had a lot of light
and we got good focus. We didn't have to fool
with that too much. Noise reduction. This is about taken
out speckles. And I'm trying to think
of the instance in this, in these modern times in
which you would get those, you get them a lot
in older photographs because older photographs
are full of dust and dirt if your you'd get them if you had a
lens that was dirty. But anyway, I don't even
think we have any here, but just for the
sake of seeing it, Let's see what noise reduction does and what it did
is it knocked back, which we don't
want in our photo. It knocked back this
brick texture and so on. Watch that now that
I've pointed it out, as I increase this, you see, we're losing the
definition that we just put in. So this would be the anti high-definition tool and we don't have it took
the texture of the grass. So if this was lent on, on somebody's suit or something, this would be helpful, but it's only useful in
that kind of a situation. Alright, and finally, vignette. This is pretty useless. It's a special effect. It doesn't do anything
with your image except for either putting
light around the edges, are putting dark
around the edges. So some, some subjects
that looks good. But it's not, I don't
find it useful. I like the vignette in some artworks where you
can fuzz the whole edge. But that's not what this is. So we are done with our, our editing of light and exposure in our photo
looks an awful lot better. There's one more thing
to explore here. And that's in the middle
between the crop tool and lighting controls
and its filters. So these are fun. And what they are all of them, they're a combination
of what we did only. They have been preset, again to apply to a photo
right in the beginning. And so like this is
what we have right now. So let's for the double of it, just hit some of these
are dramatic warm, that one's called
dramatic black and white. Okay, So this is playtime. And I never used these
because I really prefer the control that I have
for fixing my photograph. If I if I stick with the
manual tools for editing. But you can play with
it if you want to. You can go back to your
original here by hitting God's. Okay, And that's where
we are right now. When we're done
with our editing, we have a choice to be done up here or to cancel
the whole thing. We want to obviously
save this photo. And so we're going to say done. Here we are back
in the photos app. And here we are with this photo. I have made a duplicate so that I can show you what
we have done to our original photograph
and how we have really enhanced it and improved it as if it was well shot
in the first place. So are we ready? Wow, right. So when you have taken a picture and you
get home and you go, Oh my gosh, that's awful. You don't lose hope
because you can crop it. First of all is what we did. We got rid of all of the
excess sidewalks and so on. And then we went to our
editing of exposure and light. And we were able to
come up with this
7. Editing Perspective in the Photos App: We are going to move on to a photo with
perspective problems. And so that we can explore
that part of the edit. Before I do that, I want to demonstrate
something that's brand new in the newest
system, iOS 16. And this iPad is running 16.5. But anyway, it's
kind of a cool trick because as I was thinking
about this next lesson, it's another shot from the same Arizona vacation
in the camera was still unbeknownst to me
on to HIV and exposure. I know I'm not the most
observant person I think I am, but I guess I'm not. Anyway, the edits that we might do that light wise
would be very similar. So I was wondering if there is a way to copy the edits
from one photo to another. And there wasn't I mean,
there hasn't been, but I just wondered
and so I googled it. And lo and behold, a new thing in systems 16
is that you can do that. Now, I tried it on a couple of photos that it didn't work. I mean, I couldn't
really see a change, but I did try it on the photo
we're going to use next. You've made quite a change
in a good direction. And so anyway, I want to
point this out to you. And there's little, they've changed the
way things look here. Like you used to
have to share and then duplicate them under
those share choices. Well now there's
this drop-down menu in the upper corner when you are looking at a photo and
you can copy the photo, duplicate the photo,
hide, slideshow, add to an album all those
choices that used to be tucked underneath
that rolling scale. So to me, this is a
really nice change. Anyway, copy edits
is a new thing here. And then I'm going to
click that beaker, tap that because this is the photo that we edited
and we liked our results. So copy edits. Here's our second picture and
it has perspective issues, which is why we're going to
use it as a second example. But before we do that, I'm going to try to apply
the light edits that we did with our other photo to this one and see
if that works out. So we want to come up with its little three dots
thing here in the corner. And this time what we
have is paced edits. And the reason there
was no copy editors because there hasn't been any editing done
to this photo yet. So let's watch a photo and
let's see what happens. I guess there's a difference. I guess we can see a difference. Alright, I'm back here and
paste those edits again. There are shadows got darker, and some subtle
things going on here. So that does work. But what we're here for
more is to work with this perspective
problem that we have. Because we shot this up. And you're always going to get a slant and a narrowing
and everything. And it just doesn't, it looks realistic, I guess, but it doesn't make for really artful
photographs because what you would love to do is take a shot up
and then have it all still stand up like
this part does here. This still looks okay. Got very little slant on
that wall right here, but the tower as it
goes up, it goes away. And so we're going
into Edit here. We're going to look at what
we did not look at before in the cropping choice. And that is these
two right here, which look like
rectangles being warped. And that is what they are. And let's look at what happens if this was
our straighten. You remember, let's look at what happens with our
vertical control here. As we. Oh, look at that. Okay. I use a separate app for this. So this is kind of
new for me as well. Now it is getting out of the
crop line by the time that I want to keep the
cross in there. So let me try this one
and see what it does. Now, it turns things. And I think that plays
with the realism. Too much. Don't like that one. But you might, you might
get things that you do like now bed. I'm going back to this one. I would love to pull, wonder if there's any footnote or you do is move
it around in there. Now I pulled this all over the place and I
didn't leave all that on the recording because really
strange things happened. I did get the straight
tower I was looking for. I did lose the building
that its width. But I do think that I liked the photograph that
I ended up with. I am not nuts about this corner down here being
light because of, you know, or that one really
because it's distracting. But I have like a whole new animal here from
the original photograph. And so I am at a negative 14 on that that
first control there. And when I did that, you can see barely hear in the background how it
distorted the photograph. So that now We have to crop it in order to get
something to look right again. And so I have my crop in place. And I, like I said, I'm just not nuts about
that light down there. Or I don't know if
coming down is better. Yeah. And I'm going to
stay right there. So there's what we have as a new photograph and I
do think it's powerful. But at this point, these little tree
pieces over here, a problem in the
original photograph. They weren't. In order for us to look at what we've done and
make a choice or rather it's a good
thing that we've done. I'm going to make a copy. I'm going to duplicate this photo because I
want to keep that edit. And this is now on this
drop-down menu as well. And now we have two of them. And on this one I'm going
to go in and I'm going to revert to the original. So now what we have is a
comparison between this photo. This photo, I'm
going to show you an alternative app for doing the corrections of
perspective and also another one for
getting rid of twigs
8. Editing Perspective in the SKWRT App: So now we have our
original photograph to compare the differences
we had to make an order to get our stand-up
subjects were significant and ended up in getting rid of a lot of the
image in order to do that. So this is a choice. You know, why did I
take this picture? I took it because of the tower. And so I now have a really
nice photograph of that tower. I think this one was a question of having a
whole different personality. We had tree and this one, and we had greenery. And we had this
building in front, which is kind of, you know, sort of charming there. The personality of this
was what we wanted to maintain and a lot more
of the subject matter. We have to move out of
the photos app into some other app in order to
do Perspective Correction. And I do have one
to tell you about. All. I am back at our original
photo and it's the one that we didn't even apply the edits to, the
lighting edits. Remember that we've pasted, and I wonder if
they're still there. I'm going to duplicate
this original. Okay, and I'm going to paste, if they're still
there paced edits. There. This one. I'm going to take out
to a different app. To do that. I'm going to share. And I'm going to share it to
an app that is on my iPad. And when this app is on
your iPad or your phone, it shows up in the sharer list. And the name is
something I wouldn't even try to pronounce. But it's s, k, r, w, t. I believe it's available
for both platforms, but I'm not sure. Anyway, I'm going to import this photo into that
app by doing that. And it's an app that has different sections that
do different things. But the only thing that
we're going to talk about in this lesson in this class actually is the one
called four points. So I'm sending this
photo to four points. And now that that's done, I'm going to go and
open four points. And here it is. It's a black square with
an orange geometric on it. And I'm going to hit it. It's going to open in its four points section for me with my photo already
there to work with. And this is one of the
things that I really love about this app is that it will do this and
it's so much easier than all the other steps that he would have
to go through. So what this app is
about is being able to pull your photograph
into shapes, so to speak. Now we were doing that
over in the photos app. But what was happening
when we were pulling was set to some
very strange parameters. And so it was, it was expanding
the size and it was like, you know, it was a little
out of control and that's why I like this
one a lot better. My correction in here
is not gonna be huge. I want to stand that up. And when you look at it, what would you need to do
to stand that up into me? I feel like I need to pull this this way in order
to get it stand up. And what is that? That's the upper left quadrant. Okay. Down here are your corners. Upper left, upper right, lower left, lower right. And you want to tab on the one
that you want to activate. When you do that, you can anywhere
in the photo here, a griddle come up to. Anywhere in the photo. You can just pull until things are as
you want them to be. I like it. I think I don't I don't see any unusual slump
there That's pretty vertical. If I did, I could go to the
other corner and I could pull to do that. Now. I think it would
be good if there wasn't this much of a
slant on that wall. Although I think that
was true in reality. But let's just look
here. To do that. I want to pull on
my bottom left, right and pull that
into line there. I'm checking what has happened
to other things here. It looks good. So I'm going to say, Okay, I like this. I'm going to send it to photos. So you get here and then
send save to gallery. It asks, it just comes up this
way when you work with it. Do you want to select more
photos and I don't right now, so I'm just going to say
keep the current selection. When you make the
save out of this app, it saves to your
main photo gallery. And it will go back not
as the newest thing, but it will go back
and be next to where the original photo
was in the first place. So you may have to look for it. If you look at the newest photo, won't be there and you'll
think, oh, that didn't work, but it did, it's just back
wherever in your queue. That photo was in
the first place. Now, when we look at this, we see that we need to
crop it because what happened is that we have, have reshaped the
bottom of this and so it no longer fills its frame. But that's real simple
because we will just go to edit into our cropping tool. And we will have to come in on our trees over here until
we hit where there's image. And we're going to
have to go up just a smidge here into this greenery. Now, when we do that, that ends no longer looking very good where the greenery is. And so I'm going to
knock that greenery out of there totally. Because otherwise it's
just a distraction.
9. Retouch Editing: So this is the app that we
don't know how to pronounce, but we're calling squirt that we used to adjust perspective
in our photos. And I don't know, I can't tell you what
it costs right now. I know that it isn't much, but I own it so you can no longer see the price from here. So that's app number one, that is totally useful and does something outside of
what photos app does. And now we're going to
search for app number to retouch is just, I can't say enough. It's wonderful. I've had
it since it was created. And I've used it thousands
of times because with it, you can just instantly and easily get rid of things
in your photograph. Even really complicated things you see right here
is a picture of a cyclone fence in front
of someone, not someone. Well, yes, I'm here were
some lines across the sky. Telephone lines. We get those all the time. He can't help it because
they're everywhere. In tiny little things like our little tree limbs and so on in our photograph that
we are working on. So I'm wondering if they look, they're showing
you a little video here of how it happens. See the puppies
behind the fence and you don't have to
trace the whole fence. That's what's cool. Or the whole line. It just start and it just
zooms and gets rid of it. So anyway, this will be one of your favorite
apps for ever. When you open the
touch retouch app, you have a very simple
screen like this. And one of your choices
is to look at tutorials, which is a good thing if
you've never used it. And one of your choices
is to go to albums. And when you go to albums, you get to choose. Once you open the photo, you have these choices
at the bottom. And one of them, my favorites is Quick Repair. Here It's a tiny
little band-aid. And I'm going to choose that. You have with
whatever you choose, you have a size control. I just usually work
with the default because I'm trying to do
delicate little things. Usually. I have quick repair as default at its default size. And I'm going to go over here. And I am just going
to draw along those little twigs and
watch them disappear. Isn't that incredible?
And it's all, it's replaced with
Content Aware Fill. And what that means is that it's filling with what
it sees behind it. No, I have in here some very delicate little
little pieces or twig. Then I want to get
rid of and right here and I'm I'm the jury's out on whether I want
to keep that tree. I probably do. It adds to things. It doesn't, it doesn't detract. And so I'm gonna take that out. And this branch. And so even spots, obviously, you can
take out right here. I wanted to get rid of that
little little tiny glitch in the in the stucco. I can do that with this photo. This is as far as I
would probably go. When you have gone as
far as you want to go, you go up here and you
have a Share button. And you get to choose whether you modify
the original photo, whether you save a copy
with your changes, or whether you open in
another app so you could, I don't know what we'd
be able to go to two R squirt out a year. We wanted to. It's just, I'm never sure how
the choices are made with apps are in
here, but there it is. Okay, so had we not already
straightened our perspective, we had cleaned up first. We could export
this cleanup right into spurt and then clean
up that perspective. So that's a really good thing. Or you can copy so that you
can paste it somewhere else. Alright, I am going to
modify my original because I want those little branches gone. And here comes your
permission thing And when we go back
to this photo, we will find that there
aren't any branches and, uh, since I've saved it, I'm going to hit done. But the photo is still here. I wanted to show you a
couple of the other tools. To get back to the main toolbar. You can hit this and you
get your choices down here. And we were using Quick Repair. Line removal is here. I don't really see a
line that it will. I'm going to try it
on the tree though, just to see this is, I'm not going to be saved. This. Let's see if it does it. It doesn't work as well on
a wiggly line like that. This is really for
straight lines. And I wonder if it'll even
to pretty much I mean, I could probably I could get rid of that top
edge of the tile altogether. Then we go back to
her for toolset. Again, we have a tool
called object removal. To show you how this works. I'm going to use it
up here on our cross. And you color in. It's bigger than a
little quick repair. It's not a straight line. You color in the thing
that you want to go away. And then you have down
here are GO button. And it goes away. That is leg so magic
than I can't believe it, but I have now destroyed
her photograph. And so I am not going
to be saving this. The fourth tool here is
called the Clone Stamp. And basically what it does is it has you determine an area, a source area, and
then you can paint with that sort of stamp
with that source area. I use this tool in Photoshop
for certain corrections, I guess you would say. And I don't know how it
works in Photoshop so well, and I don't really get
how it works in any of the pro of the iPad
apps that have the tool. I'm not the person to teach you about using
that clone stamp, but they do have tutorials. When we opened the app
and I haven't looked, but I bet there is a tutorial on how you would use
that clone stamp. Meanwhile, I'm done playing
and I'm not going to save this photograph because
I like the one that we remove the twigs
from unsaved before. This was just for demo. Here we are with our final
edit from the tower photo. We applied some lighting to it, some light edits
to it that we had copied from our
other photographs. We went into the square root app and we stood this tower up. We made choices about cropping after we
stood this tower up. And I decided for my point of view that this is what
I actually wanted. I am willing to forego having the rest of this little
building and this little stuff. Because I think this is more powerful than what I was
after in this photo. Which is always the question
you have to ask yourself. What was I after in this
photo, what attracted me? And what was I
trying to capture? And what I was trying
to capture was this beautiful tower had to lock the potty so
that I have done. Then we took the result
from our fixing of the perspective into another
app called touch retouch. And we were able to use
Quick Repair there to just get rid of this extraneous
little pieces of twig. I see that I missed
running that window. But anyway, those
mysterious little pieces of twig that were there. One of the big things about editing a photograph
is knowing when to stop because you can overdo it and you can
ruin what you've done. No, it's just the truth. But I like this the way it is. I am going to end this edit
on this photograph here. I'm going to invite
you to upload your edits on the
two photographs that I provided for you. Even if you're adults, um, show different choices,
if they're different than mine, that's
perfectly fine. It's something that you chose. And I would love to see them
in the project section. But the real project
for you from this class is to go and get
a photograph that you took. Dorm, choose a total piece of junk because it won't make you happy no matter
what you do to it. But choose a photograph
that you took and you wish it was a
really good photograph. And take that photograph
and run through all of the editing choices
that we had to choose from and edit your photo. And then if you need to take
it into the squirt app in the Four Corners thing for points and fix the perspective. And if you need to take it
into the touch, retouch, add and take out little
glitches here and there. And then upload both your
before and you're after. So work on a duplicate of your original photo
needing editing. Duplicate it first and
then do all your edits. And then you'll have
a before and after to share with yourself and with us. And should you ever wish to do something else with
that original, then you wouldn't be
able to do that as well. I ended up with two
versions of this photo. It, this one is my favorite, but I also have a
version that's not bad, but does have this
little house in it. So everything is about choices and knowing what there is to choose from and why you
want to choose that thing. And I think we
have that covered. I hope you've enjoyed this
class and I hope you feel a lot more powerful now about
your own photography.
 Jessica Wesolek, Artist/Teacher