Transcripts
1. Introduction to Black Background Photography: Have you ever seen these
super dramatic cooling part for backpacker and photos? Well, let me tell you a secret. They are super easy to do. And this class, I wanted
to show you how you can take your own black
background photos, whether you're using a
camera or just a phone. This type of photos
helped me get through where I am today with more than 1 million followers combined between
TikTok and Instagram. Because as soon as
you show the photos, you're extremely powerful
and usually people love it. So it's going to be
a very fun class where I show you everything that you need in order to
take this type of photos in different scenarios. I'm going to show you how to
set up your camera and also your phone so that you can
take your own portraits, are taking portraits
of other people. We're going to have a look
at the right settings at different setup are and how you can move the
light from left to right, and how you can add
multiple lights to create even better photos. We're going to try to
add a few effects. We're going to talk
about split lighting. We're going to talk
about backlighting. We're going to talk about
different types of effects you can create with one or
more light as well. And you know, the coolest part is that you don't even need to have a black bag going to
take these types of photos. It's all about the setup. And also throughout the class, I'm going to show
you how you can take the same exact photo with different types
of lighting, e.g. using lighting they have
just in your house. It sounds crazy, but usually
you don't have to have this type of photos
because if you do everything right
with this setup, then the background
will look already dark with some soft shadows. But I'm also going to show
you how you can enhance your photos in post-production on both desktop and mobile. So without further ado, you in the next video.
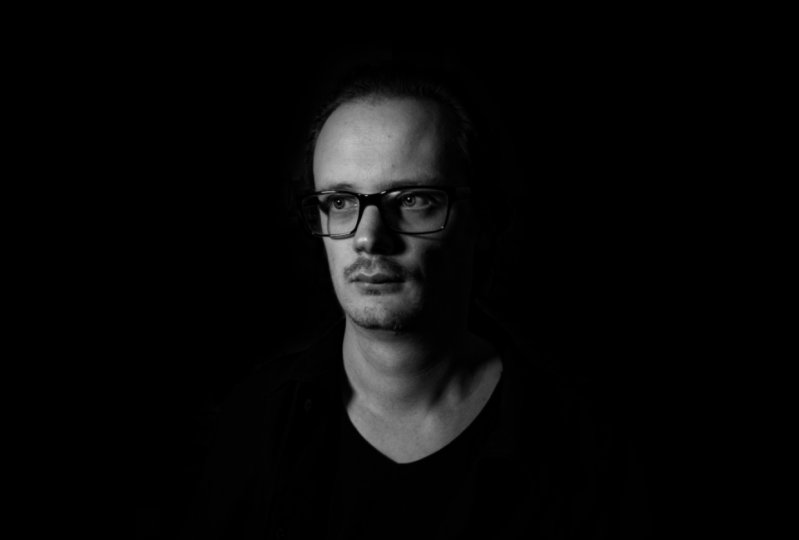
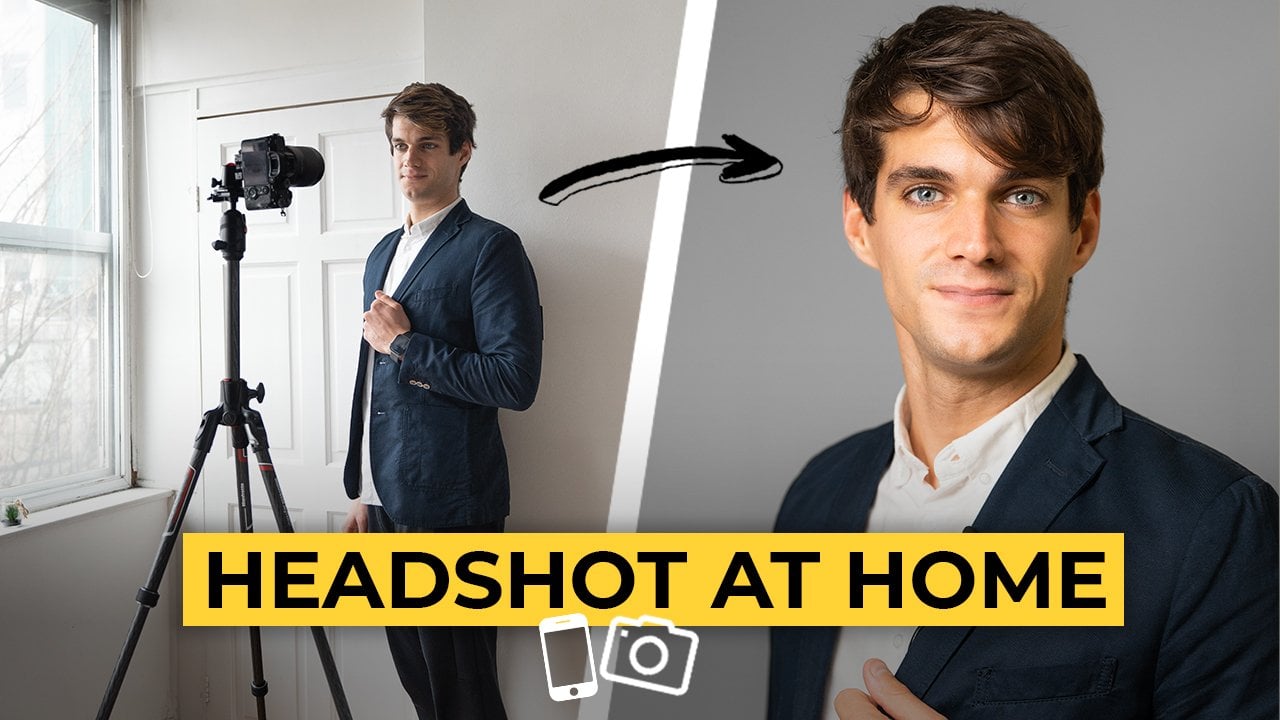
2. Equipment needed: Hi, and welcome to
the first video of this class right now. And we're going to talk
about the equipment that you need in order to take this super cool traumatic
black background photo. And we're going to start
with the first end. Quite important thing. This is a black piece of cloth like this one that
you see right here. Now, let me tell you
already that this is not absolutely necessary, but it will make your life much easier
throughout the class. I'm going to also
show you how you can take the same exact type of photos but without having
that piece of black cloth. However, in case you
don't have a black cloth, you need to have a very, very strong source of light. And Jess, you need to
have a very strong light that you can use to then have it very close to yourself so that we can
adjust the settings, the camera, or the
phone so that we expose correctly our face and
everything else will look dark. But don't worry, I explain you. Everything, just makes
sure to find some sort of lighting that you can use
to take this type of photos. I'm going to use a big 4600
by not let as a main example. And I'm also going to
show you another example using a medium that you
can find in your home. But eventually you can also go for some cheaper alternative, like some Amazon cheap
notebooks that I use quite often at the
beginning of my career. Then another very important
element in case you're alone and you want to take
your own self portraits, or also in case
you don't want to move too much is a tripod. So your camera or
phone should be on a tripod in case
you are on your own. This is very important, otherwise it won't be
possible obviously. Then one more thing
that you might need in case you're on your own, a some sort of remote shooting. This could be e.g. a. Phone. If you have, let's say, a Sony that has an
app that allows to control the camera with
a phone like I do. Or you can use remote
controllers so that you can shoot directly photos
from where you're sitting. And then another
kind of person would be to have a flipping
screen or your camera, or an Apple Watch, or some sort of watching kids, you're using your
smartphone so that you can see and shoot directly
from your first. Or you can have also
an external monitor attached to your camera so that you can see yourself while you're taking
your self-portraits. Obviously all these
things are not necessarily in case you
are at a photographer, so you are shooting
the model and you are able to control all the
settings of the camera. Then one more thing that
you might want to have, and I'm going to show
you lots of example or actually RGB colors, e.g. this one is not like
little act five. C is a very small pocket light. They can assume lots
of different colors. This is not necessary, but it's gonna be extremely
useful if we want to add more effects to our
black background photos. Or you can have big panels with RGB lights as
well like this one. Then now it's set to
blue and is illuminating the background and a little
bit of myself right here, or also like this one, which is a pump tube
goodie x by non-life, you can have smaller tubes. You can have different
types of lighting. Anything that you want could work in case we
don't want to add more effects apart from having this strong key light source. And that's it in case you want
to change clothes and put something fancy or something
that might represent you, then you feel free
to do so, right? I'll see you in the next video. We're going to talk
about the setup of this black bag portraits.
3. Set Up: Now we're going to
talk about the setup. And this is extremely important because if you manage
to get the setup right, that is gonna be
extremely easy to shoot these type of dramatic
black bag on portraits. And the first thing that you need to take care of is actually using the longest diagonal
that you have in your room. Right now. I'm shooting in a
garage and I'm pretty lucky because I have around five
to 6 m that I can use. So what I wanna do is that
I want to try to stay at least two to 3 m further
away from the background. And this is because my
background is already black. So it's much easier in
case you're not using a black background
as we're gonna see later in the course. We'll have to stay
much further away. If you really want to make this portrait with that
background without editing, then the next thing
that you want to take care of is actually
setting the camera. And this case will have to be on the opposite side of the background based
on where you are. So let's say if the
background is there, then you hear than my camera will have to
be in front of myself. And the position of
the camera actually depends on your lens and camera. So right now, I'm using
a 55 millimeter F 1.8, which is a medium length, is not too long, is not too wide. If you're using a long
lens than your camera will have to be further
away from yourself. If you're using a wide
angle camera and lens, then you have to be
very close to yourself. 55 millimeter is a focal
length and I actually love, and I love also this lens
because it's super small. But the portraits, they
look absolutely right. So in this case, let's say
I'm going to set the camera, probably is gonna be two to 3
m further away from myself. But then I'm going to check
this with the app that I'm using to connect the camera to my phone so that I can
see the exact framing. Or if you have a
person that can help you set the camera and send the framing
that is even better. Or the last alternative, if you don't have
any of these two, then you'll just have to do some Charlotte error is
going to take awhile. But if you're going
to get there, so let's say I'm going
to put the camera on Probably right there. But then in the next
video we're going to talk about the settings. So right now we
don't have to be too precise because we need to take care also of
positioning the light. Throughout this class, I'm
actually going to show you different types
of lighting on how we can move the key light and eventually also use
additional lights. So afterwards we're
going to use a second and also a third light to then create even
more dramatic photos with some super cool effects. So for the first example, we're just going to use a
very classic Rembrandt light. This means that my
light is going to be 45 degrees towards myself, a little bit higher
than my island. The goal is to
create a triangle on the opposite sheet comparing two where you have the light. So let's say I decided to sit here that I'm like 2 m
away from the background, then my light will
have to come from this way is exactly
where it is right now. Maybe I can have it closer right out of frame in case I
have a very powerful light. In case you don't have
a match powerful light. Maybe you have a knee
and maybe you have an Amazon cheap softbox or something like that,
as we'll see later. You can also have the light in-frame and then
we're going to remove it. What some postproduction, whether you're using a
desktop or a mobile, we're going to see all
of the alternatives. Alright, I'll see you in the next video where
we're going to talk about settings and also
shooting the first example.
4. Settings and Shooting: In this video, we're going to actually have a
look on how we can set the camera properly and
also take the first photos. Once you positioned yourself, the camera, the light,
and also the background, then we can actually start
turning gone delight, and then do all the adjustments
that we need to make. So let's turn on this light. There you go. Now it's
extremely powerful. Let me adjust the camera, okay, now that we've got
this lights on, then the next thing
is actually trying to adjust the framing
of the camera. Okay, so now I linked the
camera to my phone so that I can adjust directly the settings to make sure that we're
taking the photos right. Also, I have a flip screen
on my Sony A7 four, which is extremely useful. So they can see myself. And obviously I can
notice that I'm not perfect and frame, so I'm just going to
move it in manually. Caught. Now I just did the
cameras so that I'm sure that the
frame looks great. And also I can see
it from my phone. Next thing is actually
adjusting the settings. Once again, adjusting
the settings is not something that
is universal because it really depends on what
type of light you have right now because I
have a professional life, this is a force of 200 by
net-net with a 90 cm softbox. This is a very strong light. I have set it to 100%. In this way, I'll be able to shrink down the shutter speed of my camera so that everything
else will look dark. So here's the concept. Again. If you have a very strong light, you'll be able to
actually adjust the settings of your camera so that everything else will look dark by exposing
the subject's face. Let's say in this case, when I take portraits, I always like to keep the F
around 1.8 or 2.8 if I can, if I have a lens that allows it because the portrait is
just going to look great. So I'm going to keep the F18. And then what I'm gonna
do is then I'm going to try to adjust the
shutter speed so that my face is exposed correctly and see if everything
else will look dark. I'm just going to move
the shutter speed. Let's say like this. There you go. Okay, I think this is fine. Is one-four hundredth. Okay. That looks fine. And that as we can
notice, are ready. Everything else looks dark so you don't see the background. You don't see anything
that is going on route. This is because I adjusted the exposure to my face
and this is the key. And it's going to
be the key also from when we're going to use the phone afterwards in order
to have the focus right? You have different options depending on what
camera you're using. And in this case, I'm just using continuous focus where
the eye tracking, because the A7 for
allows that and it's amazing if you
don't have that option, usually I was using the small flexible spot or
you can use the white also, continuous focus so that you want to make sure that
you are in focus. Obviously, even this one, if you don't have
top quality camera, it might take a few trial and
error if you are alone and if you don't have
someone that can help you take this
type of photos. But if you are a
photographer and you are the one
controlling the camera, then obviously it
is so much easier. Alright, now we're gonna take our first photo and
we just connect. Keep the hatch tray
towards the camera. Would the light 45 degrees, make sure that the
lightened this case is out of frame, like so. In case you're using a smaller
and less powerful light, then you can also
keep it in frame. Are we going to see this later? And then whenever you're
ready to just shoot a photo. And there you go. We already have our first photo when a completely
black background. And as you can see,
it's been super easy. It's just really about having a strong light and also
adjust the camera settings. But let me tell you that this is not all because you can add a lot of different variations depending on how you
move this light, how you move multiple
lights, if you can add more, if you can add colors to, then create even more
dramatic photos. And I want to show you how much the total changes by simply moving to life a little bit more in the front are a little
bit more on the side. So let me just move this one a little bit more on the side. And I want to show
you the result. I'm just going to
take another photo. Cool, because I move this light to wash the side of my face, then we're going to have more
of a split toning effect. That means that one side
is going to be very bright and the other side
is going to be very black. So depending how dramatic
you want the photo, then you'll be able
to actually move the slide a little bit more on the site or a little
bit more in the front. Let me show you what
happens when you actually move it
towards the front. There you go, just write
out a frame and then eventually I can also
move my face to Dan, change how dramatic the
photo will be in this case, I'm just going to have a look at the light directly
and see the result. There you go. Now, I evenly lit because I'm looking directly
into the photo. So if he's on the side,
obviously one side is going to be darker
if it's just tray on top of myself
than my face will be accordingly at the same time, what can happen is that
you can move a little bit higher or a little
bit lower the light. What happens is that if you keep the light a
little bit too low, then you're going to
have a very flat face. Now the light is
higher than my island. Therefore, when we look at
the photo that we just took, we can see that there
are shadows here, e.g. if I move on the opposite side, then you can see
some shadows also on my opposite side of the nose and also in the eyes. And
this is more natural. It's more like, let's
say professional. If we move this light
exactly in front of myself, then we're not going to
have any shadow because the light is going
to come also here. And this part is going
to be lit as well. So this is not
extremely professional. You always want to
create some sort of conscious with shadows and
highlights in your portraits. Alright, now that we
took our first photo, then we can start
adding more lights. And we're gonna do this
in the next video.
5. Adding Extra Lights: Now one of the parts
that I liked the most and we're going to add
more light to our photo. So this step is
actually not necessary, but I think it makes a huge difference because
adding more light simply allow us to separate
ourselves from the background and actually having more
depth in the photo. You can use any any any sort of lighting that
you have at home or e.g. I'm going to show you
where this little light, five C, which is a basically the pocket like that, it
fits in your pocket. We know problems is RGB lights or you can put any
color that you want. Then we're going to use also a bigger panel just to
show you an also a tube. So this is a power tube 30 x, you can use a success, which is a much smaller tube. You could use a 15, which is a half of this one,
or even this one. It doesn't really matter. Anything would work because these will be just
secondary light. So we're not going to use full power this panel
because we don't need that. But just to show you now, the first thing that you want to use whenever
you are adding the second light is
actually having it on the opposite side of the killer. So if our key light is
coming from this side, then we want to try to have another light coming
from the opposite side. So let's use this panel. In this case because
our light is white, I'm going to use a
contrasting color. This slide is actually
5,700 Kelvin. So this is a white cold light. We're going to use a yellow warm at 2,700 Kelvin right now. So let me just set it up. Okay, this is already yellow. It's a little bit too strong, so I'm just gonna
decrease it a bit. There you go. And then I'm going
to position it right on the opposite side. And now we can see that there is this part are ready that
was not there before, but it actually creates
separation from the background. It's kind of like adding an
extra layer our photo and he's always pretty nice and especially because they're
contrasting color. So even afterwards
when we are going to use some different colors, then you always want to try to understand if two colors
will look good together. Now I connected
again the camera to my phone so that we can see
exactly what's happening. I'm just going to
remove on the site this poverty tube k Then mixture that the LED
panel is out of frame. I want to make sure that
also touches my head. So the direction is supposed to be also touching here, is, if it's too low, we
can make this one a little bit higher, like so. Then let's shoot a test photo. Okay, that's pretty nice, but I think he's not strong enough. So let's increase
the power of this. Day. You go. And boom, that's pretty nice. So we have that
contrasting color. If you want to make you stronger and you don't have
a powerful light, you can always try to
have it owed a frame, but closer to yourself
for a member, the more distance you
have to your life, the less powerful
they're gonna be. So let's take another trial. Now, what we could
do eventually, instead of having
a yellow color, you could also add
a different color. And now I want to try to
use maybe a bluish kind of maybe we can use also agreeing Anything would
look right because this is just a white light. So we're going to
try to maybe put TO, let's try to put teal. Alright, This looks fine. Just going to decrease
the strength. There you go. I just want a touch of blue
right there, the back. And then let's try
to take a photo. Alright, that's cool. I actually like quite a lot the blue. But then let me show
you one more thing. Let's say you like this one, but then you want to
add one more light than what you can do. We can try to use this
little like five, maybe put this one on
yellow and actually have them as
three-point lighting. So let's have a triangle
between the key light, the one that is called fill
light on the other side and also maybe a
backlight on the back. So let me turn this on. Let's say it's in maximum
power at 2,700 Kelvin. So this is a little bit yellow. And then we're going to
put it on a small tripod. Go and we're going to position
it right here, the frame. And then we're going
to snap a photo. There you go and
write out what we have is a key light
in the front, figure, light that is blue. We can change any
color that we want. And also another light on the opposite side towards the back that acts
as a backlight. And then this case is yellow
and it's pretty small. The same thing could
have been done also using a palette tube. So let's try it out. We're just going to
turn off this one. Put it on the side. Alright, let's try to
use a poverty tube. In this case, we are going
to use it as a hair light. So I'm just going
to use the color red because I like red and blue. So let's just have these. We're going to put
them at around 80%. And I'm gonna see if I can
fit in just right here. Even in the frame
is not a problem, but we can try to edit
out of frame maybe. So I'm gonna just make
it a little bit higher. There you go, change
the direction towards me and see if
we can see anything. Alright, that's not enough. So I'm just going to
increase power k. There you go. Yes, we see a bit of a spread. And then that is
coming from this side. Let me have it maybe here, and then we snap a photo. See what happens. That's cool. We have that
touch of red that is not bad. Or eventually you
can also change yet. Have it closer to yourself, and then we're
going to retain it so that it's actually
in the front. You can come into frame is not a big deal because we can
remove it very easily, or otherwise we just
leave it out of frame. And there you go. Snap a photo. That's nice. I like that quite a lot. You can do a lot of trial and ever you can move them around, see which kind of angle you
prefer you like the most, which one is the most impactful? And then decide. So let's map another photo. Cool, I like it, That's it. Alright, as you can see,
you're going to have a lot of fun with three lights. You can add even more, but I think that's
really the sweet spot. Just having one in the front, one on other side and
one in the back that acts as a hair light or as
a backlight, let's say. I'll see you in the next
video where I'm going to show you how to do the
exact same thing, but using a needle that you can find in your house, very common.
6. Shooting Using a Home Neon: Now it's time to show you how you can do the exact
same thing but using ammonium and the fun part is that the process
is exactly the same. The only difference
that we have with the different types of
lighting is that we need to adjust the camera
settings and make sure that our background
still stays black. The concept is that because
this neon is not as powerful as my force
achieve hundred, then I need to have this one as close as possible to my face. And is it also okay if this
one goes into the frame, careful you just need
to not cover your face. So if I have this one, as you can see, very close to me than the light,
obviously the stronger. As soon as I move it
further away from myself, this slide becomes weaker. That's why we need
to keep it very, very close to ourselves so that we can adjust the
camera settings accordingly and still have the black background
as we had it before. I'm just going to
hold the knee in on my knee and then with the
hand I'm just going to move it until it's like
as close as possible to my face without actually
covering my face. And then even in this case using it as a 45 degrees
type of light. So we're going to try to illuminate both
parts without having to Gianni split lighting
like so. There you go. So in this case, just to
give you a reference, I'm ISO to 51 point
8.1 out of 400. Let's take a different
type of photo. We can always look at the light as well. Okay. And there you have it. But you could use naps and
as you can see, the process is exactly
the same if you want. You can also add all the
other lines that we just saw. Different color, a
different position, three-point lighting is
exactly the same thing. So let's see with having
also a backlight. And there you go. We got it. Now. Now the problem is that if
you use this one in frame, then you have to
remove it somehow. But don't worry, because
it's super easy to do on both mobile and desktop. And I'll show you the
editing process and which app you can use one
of the future videos. So I'll see you in the next one.
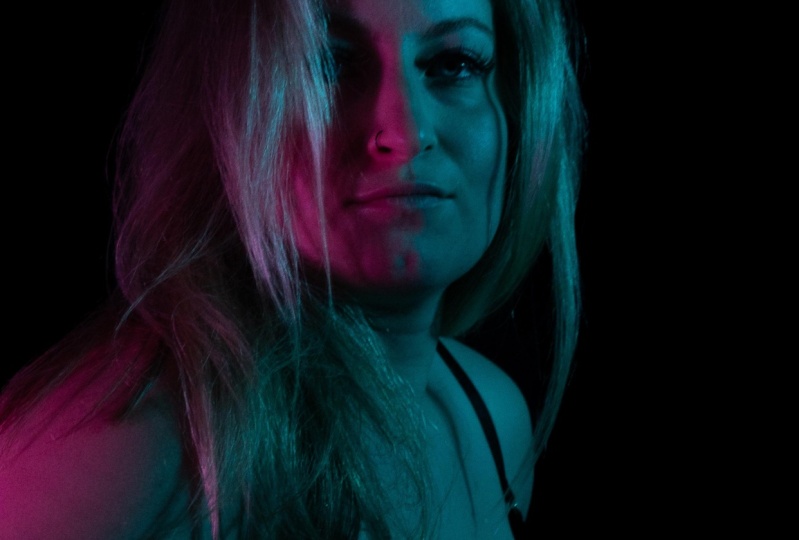
7. Split Lighting: In this video, we're going
to have a deeper look where the few examples
on split light, as we've seen before, split lighting is
simply tried to divide our face when one
color and the other. It could be white and it
could be dark on one side. It could be maybe blue
and it could be read. And to do this, obviously
you just need to RGB light can be any
type of lighting. And once again, I'm going to use just this panel on the right
and a cube on the left. But once again, you can use
anything that you want, whether it's small or big,
it doesn't really matter. Also in case you don't
have any RGB light. You can also buy
gel like this one. You can find them anywhere
into your super cheap. You can cover the light. So you have in your house or the one that you have maybe in your bedroom or anything
that you want just with different gel so that you
can have different colors. And it's super simple. In order to find the best
combination of colors, you can use loads of
different methods. One of the easiest
solution in case you don't have any
knowledge in colors, you can use tools online that allow you to actually find e.g. complimentary colors. This case, complimentary colors
mean so they are simply on the opposite side
of the color wheel. And we can use e.g. red and green, or
maybe blue and yellow, or maybe teal and orange, e.g. let's try to have it and
maybe green and magenta. So I'm going to
change the color of these LED panel
into maybe cream. So let's use this one. There you go. Like that. And then maybe let's change and use this tube as a red color. Okay, There you go. Now here again, the
concept of simply having your face
split in two parts. So one color and the
other on the other color, this could be also
eventually 45.45. That means 145
degrees in the front and the other 145
degrees in the back. And this effect would also work because as we
mentioned before, having one color and the contrasting one on
the other side. So let's just have a look
at the normal splitting. So in this case,
you want to adjust either the settings on
the camera or you can also decrease the brightness
of the light that you have. So I'm just going to
go here to crazy. Maybe it went to 6%,
that looks fine. And also remember that the closer this trunk
or if it's too strong, you can move it a little bit further away from you, like so. And then once
everything is ready, then you can try
to snap a photo. Go listen up another
one. And that's it. Now, let's try another example. We're going to
change the color and maybe use a different one. So let me see what
we can do here. Let's see, let's do
teal and orange. So I'm just going to
use orange right here. And in the tube we're
going to select a deal. Okay, that looks good. I'm going to move it a
little bit towards myself. And then maybe this one is
a little bit too greenish, little bit more blue. And whenever you're ready, you're going to
snap a photo. Cool. Now let me just show you the
same examples are having one night 45 and the other
145, but in the back. So we just move these two. And then we're going to
snap a photo right now. There you go. It changed completely
the photo simply by moving 45
degrees, both light. And this is also why super
interesting this effect, because you can play around with so many different
colors with having one key light and
then a backlight or maybe just on the side
and so on so forth. I hope you enjoyed this video and I'm gonna see
you in the next one.
8. Top Lighting: This video, I want to
show you how you can create another very cool effect that is called top lighting. And obviously as the name says, it's simply about having a light that is
right on top of you. Some people also
call it Butterfly, but depends up to you. What I'm going to use
is just these two. This is a pub or tube 30 x, but not like you can use anything that you
want as long as it's higher than your island and
it doesn't go in your camera. This is very comfortable
because they can just pop it up like this. And there you go. If it's still in frame, then I can try to
lift it up a bit. Now, let's live it in like this. And you go, I'm just
going to have it very, very close to me, even if it's in the
frame is not a problem, it's gonna be very easy
to actually remove it in Photoshop or just using
Lightroom Mobile. So we have this light, we can turn this one
off if you want it, but I like it, so I'm
just going to keep it, it doesn't really matter. And then I'm going
to snap a photo. Alright, that's cool. I love this type of
lighting, to be honest. There's one more thing
that I want you to notice, and it's super important. Based on even smooth
movement of your face, your eyes will be more
clear or even darker. So depending on what kind of
effect you want to achieve, you can move actually your
chin a little bit up, a little bit undecided. And this will change
everything because consider that the light is coming
obviously from the top. So if I look at the light, then the result
will be completely different compared to before. Let's just do one photo. There you go. You see how I am and how good the lighting is. The reason why
this one is really good is because allows to have a very tree dimensional face by increasing the
shadow in this part. So the higher is the light than the most shadows you're
going to have in this part under the chin, because obviously the
chain is coming out, so the light is coming here, then you're going to
have a big shadow here. And it looks good. One
more thing that you can do with this type of
lighting is actually having one more that is in the bottom so
that illuminates a little bit more right
here in case you don't like debt dramatic effect. We can use any sort of lighting. We're just going to
use these five stages. We're going to set it
into white as well. So 5,700 Kelvin. There you go. And then we're just
going to have it. And the bottom, there
you go, That points. Watch us and we
snap another photo. There you go. And the
difference between before and after,
It's very simple. There's much more
shadows and less shadows depending whether you have
a light under the chin. This is totally up to you. Once again, you can play
around with anything. I love this one because
it really helps you with the symmetry
of your face and especially without the light because it's extremely
dramatic getting really enhance your face and your face line in
general, your phase shift. So this is totally up to you. I'll leave you to it,
have some practice, try to take some
different photos and feel free to post down below any salt that you might want to share
with the community. I'll see you in the next video.
9. Back Lighting: Right? Another example is about
having a backlight only. You can do a lot of
effects with this one. You can maybe just on the side and then move it
a little bit backward. And the photo that you get a DNA's completely
different comparing to what we got with the
split lighting or maybe the butterfly
that we have right now, everything that we need
to do is very simple. Whatever kind of like you have, whether you have a tube,
whether you have softbox, whether you have anything else, you just need to move this
one on the site first. So just right here. And we're going to turn this
off just because I want to show you what the result might be eventually what you can do. This, you simply
stay in profile. Just have a look at the light. I tried to take a photo. You go Also. You can try to look
at the camera. There you go. But then the cool
part and another type of photo that you
have much more dramatic, even more dramatic in it before we just going to use this light, we're going to move it 45
degrees towards the back. And in this case, because
it's coming this side, we just can see a little
part of us in this way, actually in this moment, I also have another
kind of bright light also there in the back to
illuminate for the class. But I'm just going to turn
it off right now so that I can show you exactly
the result of this one. Alright, so now that we
turn off the main light, we just have literally this
one in the whole room. Everything else
is dark because I don't have any
window right here, so there's no light spilling. What I want to show you is the result of just
having one backlight. This is 45 degrees
towards the back. Okay, so we're going to have
a look at the camera first. And then you can also take a photo simply looking forward. The photos are pretty sick. I love this one as well
because it's kinda like a silhouette effect is
extremely dramatic. Obviously you don't
see your eyes, but usually in Portuguese
you want to see them. But it depends on your gratuity. This is just another type. And I really wanted to show you this one because I
think it's pretty good. Same thing you could do
also with different colors. So if we change this
to maybe a blue, we can use the profile, just the back illuminating
with that color. Let's snap a photo that you go. And then eventually
Let's try play around with the light's
coming from the back. We've got another split
lighting, but in this case, because we have two
lines that are in the back than the front of
our face is not seeing. It's not, we can't really see our eyes that I
think is super cool. I, especially this one with
two lights in the back. I think it's really,
really good. I hope you guys
enjoyed this video and I'm gonna see
you in the next one.
10. Editing with Desktop: In this video, we're
going to see how we can edit those photos and
make them come alive. So here I'm using lightroom
desktop, Lightroom Classic. I'm not going to go in depth in all the functions that
the software offers because I have a
full course here on Skillshare in case you
want to check it out. So I'm gonna go quite fast, but I just want to show you the key concept for editing
this type of photos. As you can see here, we have already a photo
looks pretty great, but if you want to enhance it, then we always have to adjust the exposure based on
how we shot the image. And then usually I
apply some contrast. I decrease the highlights. And then eventually if I want, I can increase the
shadows a tiny bit. But this is totally
up to you because depending on how I
move the shadows, I'm going to have
a black that is true black or black
that is a little bit, Let's say grayish and same
thing with the black. So if I'm pulled it out, I'm going to have an image that is a little bit more faded. And obviously, when you
bring up the shadows, you're going to see
a little bit more details in the shadows. So this is a little
bit up to you. I like to keep it
maybe like this. And then the next thing
that you wanna do is that you want to just
temperature and tint. This is something
that you need to be a bit careful about because depending on how you move
the temperature and the tint than the skin color will
actually change a lot. So let's let's move it a
little bit closer to my face. Okay. Like so and then we're
going to try to change the tint a bit towards
them, magenta. And I think that's
pretty much it. Let's try to move a little bit towards the yellow so we have a little bit warmer tones and I think I'm happy with the result. Let's see the before
and the after, before and after for now. Then one more thing that
I like to do is that I want to modify
texture and clarity because I'm shooting
a portrait when I decrease the texture and
clarity than my skin will look at tiny bit
softer so you don't want to go crazy or otherwise will look completely
bleached out. But then maybe I wanna go
around -11 looks good. And then same thing
with the clarity. Don't push too much that
clarity on this side because some beginners
like this kind of effect, but trust me, this is not
a professional effect. So maybe you want to
decrease it and you go minus four,
something like that. And then we zoom in my face
and I think this looks good. You don't, usually I don't touch the dehaze with these
type of portraits. And then maybe the vibrance, you want to bring it up Last three or
something like that. That looks fine to me. One more thing that I like
to do is try to create an S curve in all
the turn curves. So here we have the
luminance and then here we have the red and green. Don't worry about what
you see right now because it's going to
change the result. And then also again here
in this one as well. And then also in the blue. That's it. Okay, if he's a little bit
too strong to conscious, we can always try to adjust
back the previous settings. So in this case,
you want to bring down the highlights
and maybe you want to bring up exposure
and see what happens. If there is one part
that is too bright, then obviously you can
keep adjusting even with localized brushes
and so on, so forth. Now here depends
really on what you like and what you want to
achieve with this photo. This could be okay, But to be honest, I'm not a huge fan of two
contrastive photos. So either we decrease this
contrast and we'd go back to kind of the initial result that we got like
this and I like it. Or we can also eliminate these tone curves so that we
have a more natural result. But I think I'm going
to keep it like this because I like it very much. And then here are the colors. I wouldn't do
anything about this. I wouldn't adjust
any color grading and I would not add
sharpening, to be honest, unless you have, let's say, a kind of a cheap camera, you can try to sharpen
the image a tiny bit. Let's leave it like 20. And in case you have a lot of noise that you have
a lower-end camera, then you can try to use the noise reduction to get rid of that noise that you have. Now, there's one
thing that I usually do when I edit my portraits
and this is about eyes. Usually what I do
is that I create a radial gradient and
metal of my eyes. There you go. And then
here I just exposure and craze it a tiny bit. There you go. Then
increase the clarity just in the eye and also
increase the sharpness. Then if I click on the mask, I'm going to duplicate
and bring it towards the outer i and I think debts it. We got the before and
we got the after. That looks fine to me. One more thing that I
wanna do is that if I want to remove these drops
because I was sweating, then you can go into the
correction mode and then you're going to decrease the
dimension of your brush. You go, maybe you can increase the feather if you want to. And then just try to find a position that matches
the skin, you go. And then we get to do
the same thing here. Click Okay, and then if
you're happy, then that's it. Now, there are few things
that we can do more to adjust his portrait and
making it even better. But we're gonna do
this in Photoshop and I'm going to show
it to you later. I'm going to click to
because I edited this photo, so I'm good to go then I'm
going to move to the next one. And to do this, we
have a few options. If we edited the one before we can right-click on this image, we're gonna go into
Settings and then we're going to pass settings
from previous. And this will copy and
paste everything that we've done in the previous
image also into this one. Then if there is a
change in composition, then you can just
change the cropping, make it as you like, and click Okay, There you go. Now in this case, I want
to make it even smaller. Like so and then just align the top line of the
grid when my eyes and said, I'm just going to zoom in and
see if it's good, then yes, Then I'm gonna go
also into masking, look forward to, to mask
that we created for the ice. And then I'm just going
to select each of them and then
position in the ice. Respectfully, there you go. This is the before and
this is the after. That's not bad. Obviously, this is just
the color adjustment is nothing about
skin retouching, is not about fixing all the details and the
stuff that we could do. And then I'm going
to show you also some tips that you
can do in Photoshop. Then one last thing that you want to do that you
wouldn't have removed the previous correction
that you've made because if you do so
these patches that are going to be applied and then another tip that you can
use that eventually if you like this type of edit
and you're going to use this type of edit in loads of
photos even in the future, you can create a preset. So when you've done
all your adjustments, you want to go into presets. Then you want to click plus and you're going to
create a preset. You give it your name, you choose the group,
and you click on Create. I've already all my
presets that I use for all my portraits that I use for all the photos that I take. And I'm going to show you
in the next photo, e.g. here, instead of
having to pass from previous or do all from zero, what I'm gonna do is
that I'm just going to pick a preset that I like. And I know that the
preset 12 is made for black background photos
that I use quite often. And I'm just going to adjust
the crop pink that you go maybe a little bit more I just want to face in this
case, and that's it. It's basically edited, ready, he's done now with the presets. Usually you don't have
local adjustments. So in this case
I'm going to just add a radial gradient
and then I'm going to put it here in the eye and then I'm
going to duplicate it. And then here I'm going to
make my adjustments and I'm going to increase a
bit the exposure, I'm going to increase
a bit the clarity, and I'm going to
increase the sharpness. There you go. So we have some super sharp
eyes where we got the before and after,
before and after. It looks pretty great. And then I want to show
you also one more trick that you can use to
edit your portraits. So in this case I'm going to use a local adjustments and I'm
going to select Color Range. Then I'm going to drag the dropper on top
of my skin colors. There you go. Now basically,
everything that is similar to my skin
color is selected. Now what you wanna do that
first you want to double-click on the facts so that
everything gets reset. And then usually what I do, I decrease the clarity a tiny bit in my skin so that
will look even smoother. Sometimes it's a little bit difficult to notice
the difference, but right now you can
see the before and after of this edit and
looks pretty great to me. Now what we do is that
we simply gonna do the exact same thing in
all the other photos. So we're going to just
copy from previous, make sure that we have
the right cropping. We're going to adjust
the mask on our eyes. There you go. And then we go. All right. I'm going to skip for the other
photos that look similar, but then I want to show you
something with the color. So let's go into this one, e.g. even when we have color, we're just going to pass
settings from previous. We're just going to adjust
the mask on the eyes. There you go. Make sure that
this one works. That's fine. And said, We have an
amazing black bag when portrait in case I want to
change the cropping even more. Gonna do this. And there you go. Love it. Before,
after, before, after. If it's too bright, you
can always decrease a tiny bit and exposure and maybe change also the
temperature based on what type of skin
color you like. I think this one looks great. There you go. This is after. This
is before and after. Now I want to show you one photo with the
neon that we took. And as you can see, is in the middle of the
frame, is this a problem? Absolutely not.
Especially when we have this type of black
background photos. So what we do right now
is that either we apply the precepts so we can check what kind of pieces we
have that could work, or we could always go with the same one and then
we adjusted later. So we're going to
increase exposure until I see the face
and is not burned out, then I'm going to
adjust the temperature. This is a little bit
too yellow because the light color was
a bit different. And I'm just going
to move the tint and the temperature until I'm
satisfied with the skin color. I think this is
what I liked that. And here we have two options. The first one is
that we could crop the image until we don't
see any more delight. So let's say like this, okay, or a better solution is that you just crop the
photo until you want. So say like this. And then what you do,
you're just going to use the brush into clone or heel to then draw on it
with the right dimension. There you go. And then
you just gonna move this brush on something
that is black. You want to adjust the feather? When I just decided we
want to still pass it in, everything that you need to,
you're going to click done. And then if there
is one more piece that is not perfectly fixed, then you can always
go and try to fix it. So there you go. Done. And we have now a
perfect background photo. Before and after,
before and after, eventually even
here I didn't put actually the two
radial gradient. But you can do as
we've done before, which is going to create
one here for the eye. And then you just can
increase the exposure. There you go, the
clarity, sharpness, and then you're going to
duplicate this one on the other. I done. Then one more thing that
you can do is that you click Plus you have
a Color Range, select the skin, and then make sure that you
have everything reset. And then simply decrease
the clarity a tiny bit. And there you go. Got it. Before and
after, before and after. Now, just to show you another example for
the colored ones, here, the process is
exactly the same. There's no difference whether we having some split lighting, whether we have some top
lighting on anything. The concept is the same. So we're just going
to take any kind of portrait preset that we have or from previous
edit reduce going to select it and then simply adjust the exposure to contrast the radial filters and all this type of stuff
based on what you like. Even in this case, we're just going to adjust the cropping. So there's not much they don't
want to do in this photo, simply a bit of exposure. Same thing where the other
one from previous Done. There you go. One more thing that you could do eventually when you're modifying colors is actually using
the HSL Color panel. So in this case,
you'll be able to modify the colors
that we have here. Before. When we have a
natural skin color, we didn't do it
because we don't want to mess up with the
normal skin color, but in case we
have these colors. Let me show you when
we go into blue, e.g. you could see that we can
actually change the color of the light that we have
coming from our left, right. So if we want to have
it maybe more green, you stay more towards this side or otherwise
you go on the other side, you're going to have
more, a darker blue. Then this totally up to you. You can actually
change to sliders, to change the column, same
thing on the other side, probably going to orange. And we see that
we can go towards the magenta are also
towards the yellow. This is totally up to you, but this is an option that we have when we are using colors. Then if we need to edit this photo where light
is coming from the top, the concept is exactly the same. So we're just going
to crop it first, see if we can put it out just with the cropping.
There you go. I think I like this. If he's still here, no problem. We just use the adjustment. We make the brush
as big as we need, and then we are going
to solve it in 3 s. No problem. Then we're going
to adjust with the presets. And if it's too blue, maybe we can change
it to yellow to have a warmer color if we like. So this is the before, there's the after or you can change it even
warmer if you want. This is the before
versus the after. And then you want to go into
using some radial filters, venue and joy and I increase the exposure,
clarity, sharpness. And then you duplicate this one. And there you go. Now, I
don't want to make you bored. So I'm not going to show you anything else because this is exactly the concept that you want to do when you're
editing your portrait, even when the color are
a little bit darker, everything that
you've gotta do is that simply pass previews. And then you want to just
adjust the exposure. So going down, going
up, there you go. Then you're just a cropping. The photo is already
edited, EVF some mistakes. If you have some reflections, then you can use the correction. What you could do is that
you can go into Photoshop. And now I want to show you a few things that you can do in Photoshop to make it even
better. So let's say e.g. this photo, we're gonna go editing and then we
click Photoshop. Now that we are
here in Photoshop, I want to show you
a different way your account. You can remove. Actually this part of
the lightening case with black woman didn't work because sometimes
it doesn't work. You want to go in lasso and
then you want to create a selection around the object
that you want to remove, that you wanna, you wanna hold
Shift and then backspace. And you'll be able to actually fill this at a Content Aware, you're going to click Okay, and then 99% of the time, this works in 2 s.
If it doesn't work, let me click Command
Z to go back. I wanted to show
you that you could actually use the
spot healing brush. So you want to have it a little
bit bigger. There you go. You're just going to
paint it on top of it and then done, it's gone. Want to go again? And boom. One more option that you have is that you can use
the Patch Tool. So you're just going to
drag around a selection. There you go. Then you, and then jog
the patch and black area, you release it and
boom, it's gone. There are loads of different
ways that you can use Photoshop to remove any
object that you don't like. And I want to show
you also that with the spot healing brush, you'll be able to adjust also. So let me actually make
a copy of this so that you can see the before and after if you want
to adjust the skin, this is my favorite
method to do so. So you want to just talk with the spot healing brush around the imperfection of the skin. Now I'm going to make the
video a little bit faster because I'm going to go
through the whole face. There you go. Now I finished we've
got the before and after I removed all
the little pimples that I had on my skin, then one more thing
that you could do is that you could sharpen the eyes using Photoshop
to go to sharpen tool. And then you want to make
the brushes big as the eye. They are going in your tap, tap, tap, and then it's sharper. And you sharpen DIE a bit. That's it. Then one more thing
that you could do is that you could use the Dutch function to make
the eye slightly brighter. So you collect with derange, midterms are used
exposure 50 per cent, and there you go
just a tiny bit. You don't want to make it
a natural. There you go. We've got the before and
after, before and after. One more thing that you
can do is that let me make another copy to smoothen the skin
is that you could use the surface blur and blur. And then the last
one is surface blur. Even here you want to
adjust the settings, you don't want to go too crazy. Obviously, maybe you're
going to hear of radius one pixel threshold 25. I think that's could be fine. Then you want to create
a mask, invert the mask. Simply use a white brush to paint on top of this kinda
you want to smoothen up, make sure that your
opacity is at 100%. And then a little
bit UGA around, a little bit on your
skin, and that's it. So this is the before
and the after. Here's the before and
this is the after. These are sub two changes, very small because
I don't want to go too crazy with this photo. But in case you want to
know more about anything super soft skin and like
professional retouching, then you should definitely
check out my Photoshop course. Because there is a section
where I talk about portraits, eyes had to adjust August shape of the face
and so on, so forth. And you'll find it
here on Skillshare.
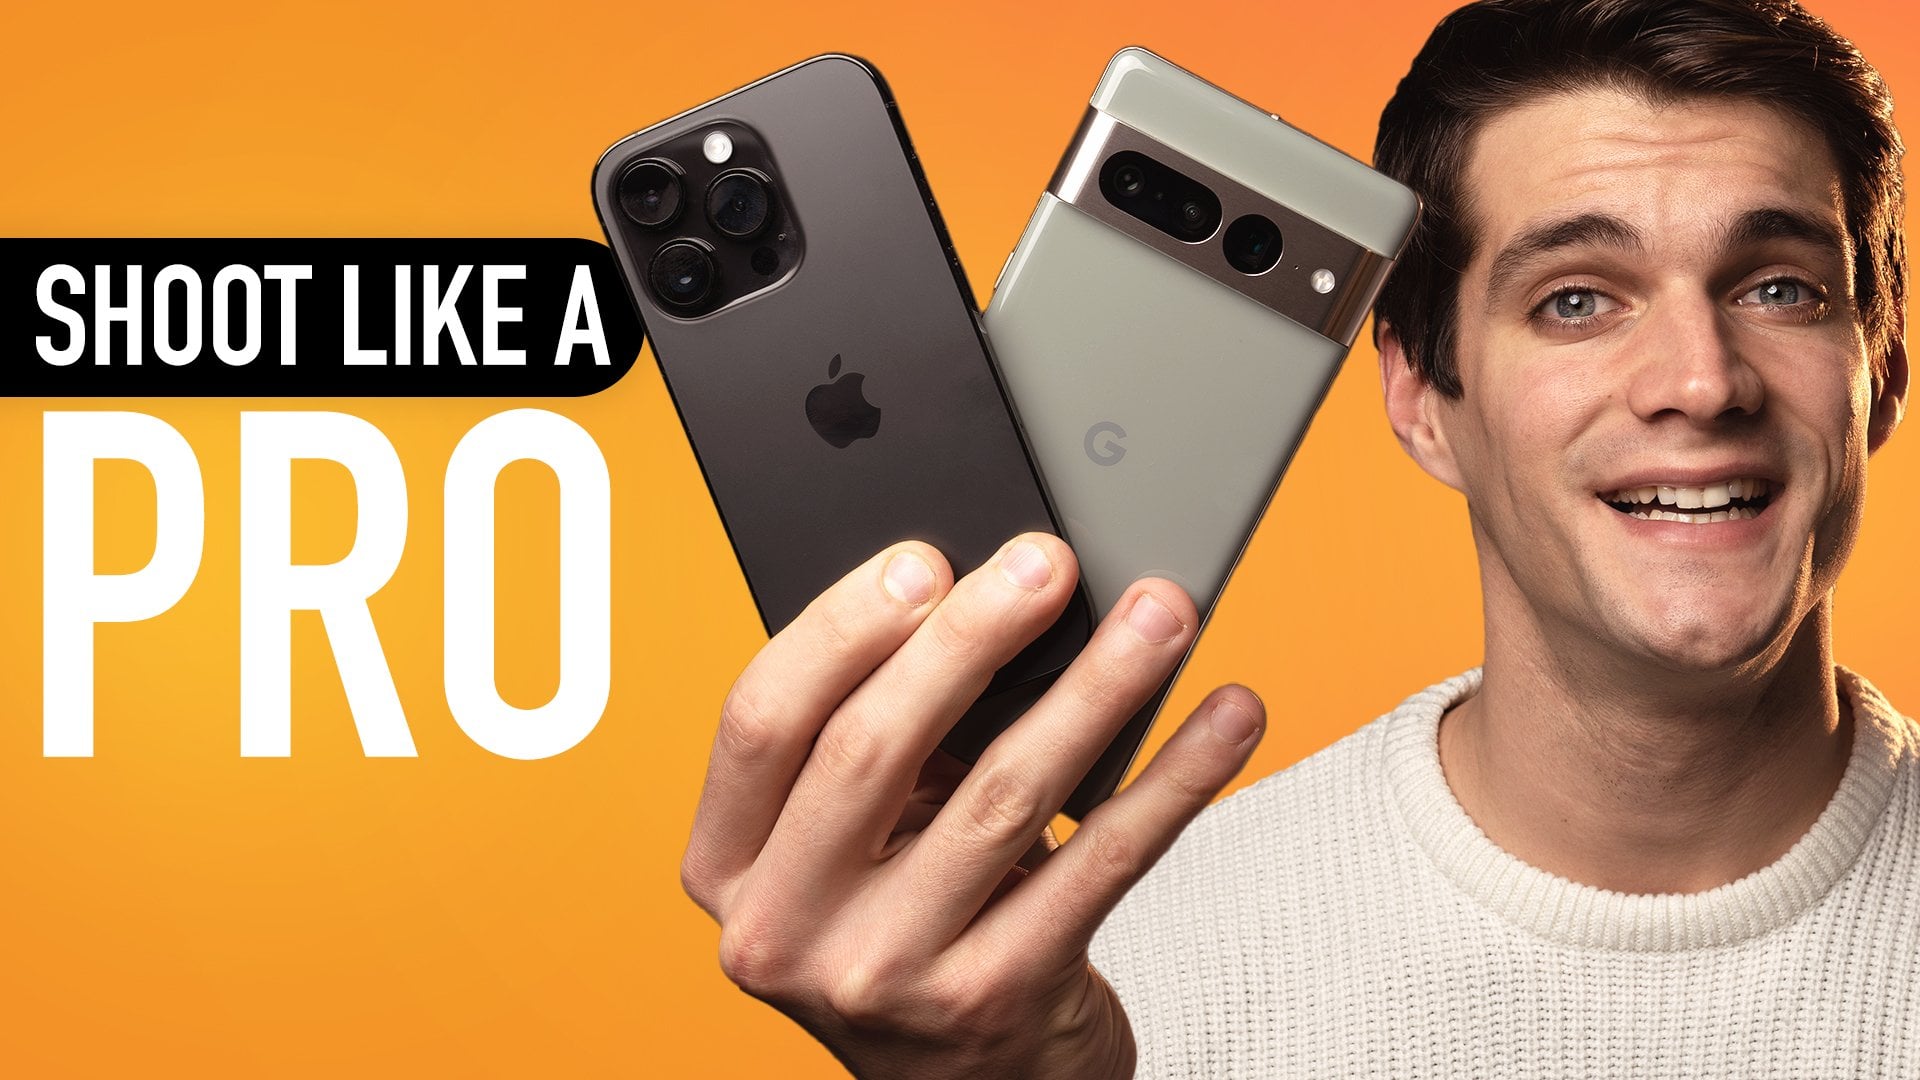
11. Shooting with a Phone: The first example I want
to show you just using the normal camera of your iPhone or your
Android, whatever you have. So we're going to open
it and we need to have this trunk light sources close as possible
to your subject. Just write out a frame. So in this case
we're moving very, very close and try to place it 45 degrees towards the subject. So in this case, we're just
going to move this one. Fry. There. There you go. I think it looks fine, maybe slightly
more in the front. So right now I'm just
using the two pairs Zoom. And then now because the
linea is overexposed, you can see also the background. But what happens is that when I click on a linear
space and then I just drag this sun
down, down, down, down. There you go. Now
the background is completely dark and
we can snap a photo. Yeah, we can direct the
subject and move up and down. Also the sun to have it
more or less bright. And also we can keep
pressing our finger on in linear space so
we're going to lock the focus and exposure
and then vary. Now we take the Sun
and we drag it down. There you go. Everything is becoming dark. How cool is that? And then we can snap all
the photos that you want. And millennia can move a
bit, maybe change angle, look at the light, and then as photographers we need
to direct the model. But as you can see
that super easy because everything
is completely black. There you go. There's no editing required. If the light goes into frame, then you can move it a bit and then keeps snapping photos. There you go. A beautiful,
beautiful data set. You can see how the background
is completely black, pitch black just because
you use a strong light and we expose
correctly our phone. Now, I want to show you one more options that
we can have by simply utilizing a not a light on the back of millennia or undecided to add a
little bit of movement, a little bit of conscious. So in this case I'm using this
little light five c by not let the normal mode
with 2,700 Kelvin, that means is a yellow light, as you can see right now. And I'm just gonna
positioning on the side of the linea a
little bit towards the back. Let's say we're going to
do the same exact thing, but right now the
difference is that we have a light that is
coming from the bag. She's afraid there
with the linear. So we can click to pair to have the Zoom function hold on in linear space and then
drag the sun ride down. There you go. And we can see that we have that little light
just on the site. If it's not enough, then obviously we can place the light in
different positions. So right now I moved it
a little bit higher. And then again, we hold on a linear space and then we drive down the
exposure. There you go. And then when you're ready, we're just going
to snap a photo. Look at the light, please. Yeah. Look again more, more and more and
more and they go, we snap a photo. Boom, that's nice is you can
see this light right here. It's helping us having a
little bit more depth, a little bit more
contrast in the photo. And now if we ever look at
them than they look very nice.
12. Editing with a Phone: In this video, I'm
gonna show you how to do the editing part
and the mobile. The up-to-date use
is called Lightroom. You can download it for free
for both Android and iOS. Than what you wanna
do is that if you've shot with your camera, you want to click this
button right here and then you want to add
photos from camera roll. I've already added the photos
that are here and here, and my camera roll and
inside that room so that now I'll be able to do all the adjustments
that I want to make. Now, if you follow
the previous lesson, everything that we need to do is exactly the same from here. So the first thing that you
wanna do is just cropping the image-based on the
framing that you like. I'm going to pick like so then you want to
adjust the lighting, maybe the conscious,
maybe the highlights, maybe the shadows, maybe the
whites, maybe the blacks, depending on how you
liked the image, following the exact
same principle that we've applied before. So I'm going to move the tint and also the temperature a bit. Then I'm going to decrease the texture and decrease
the clarity as well. Maybe minus ten for the
texture would work. And then the data, if you
want to sharpen it a bit, you can, but it's
totally up to you. Then what you wanna
do is that if you have a premium version, you can use also
the masking tool. We can do all the local
adjustments that we've done before on also on a mobile. So what I'm gonna do
is that I'm going to zoom into the image and I'm going to create the
radial gradient. And then I want to do,
and then I'm going to drag my finger and tap the eye. And then from here
I'll be able to adjust the exposure a tiny bit. And then also the
clarity you go. And if I want sharpness that
you go down, if you want, you can duplicate this one and then you're going
to zoom in again, pick it, and then move
it in the other eye. Obviously this might take slightly longer than
doing with desktop, but the principle,
It's exactly the same. Now that we've edited the eyes, eventually you can go and try to fix the image
using the healing so that you can try to delete all the
imperfection of the skin. So e.g. if you want to
removal the pimples, then you want to click on
it and then you need to select a part where
lateral wall copy. But there is also
another alternative in case you don't have the premium subscription of Lightroom and we're going
to show it to you later. Now we've finished basically
to edit the photo. So we've got the before, we got the after you've
been here venture, you can add the curves
and all the things, but this is exactly the same thing as doing it on desktop. So in this case be the before and after know much
of a difference, but that's exactly
what we want it. Now let me show you
with the other photo, same as we've done before. You can simply apply
directly a presets. So what do you wanna
do in this case that you going presets
and then you've got everything that you've
already saved on your phone are also on the cloud of Adobe. So in this case, I'm
going to go into user preset and then I'm
going to pick the preset called pitch black
because I know that this one is the one that
I use for this type of photos and then I'm
going to increase the exposure if I
want. There you go. And the photo is
basically edited. We've got the before,
we got the after. Now what happens is
that let me show you another alternative
to cancel eventually, this light and the top in case you don't want
to crop it too much. So we have it like this. There you go. We're going to click Okay, and then what we do
right now is that we export to camera roll. And then I'm going to show you a different app that you can use to do your edits
that this one is free, completely free, and
it's called snaps it. So we're going to
go into Snapseed. This is a Google app that
allows you to do lots of different things for editing
your photos and it's free. We're gonna go and
open on-device. And then we click this photo. Then we're gonna go in tool, we're gonna go in healing. And then in this case as well, we'll be able to jog our finger on top of the light
and then snaps it. We're ready, do its magic. So we're just going to tap on here and then remove
it from here. Boom, boom, boom, there you go. The image is already edited. This one works also
for the people. So if you want to
touch up your skin, you just need to zoom in into your face and then touch
on the little points that you want to
fix and snaps it will do its own
magic day you go. This is super-simple and I love to use this app
when I'm on the go, you click Okay, and then we
got the before and after, before and after the same time. One more thing that I
want to show you is that in tools you'll have
the possibility to go into selective and then select a part of the body or
of the face or e.g. your eyes that you want
to edit independently, you're gonna go in place and
then you click on your skin. Basically we chew fingers. You'll be able to select the area that you want to
effect with these adjustments. And this is basically the
color range in labrum. And if you want to go
for the whole skin, now you'll be able to drag your finger up and down to then go and select the
brightness contrast, saturation or structure. So now for destructure, which is similar to the clarity
that we've seen before. We can go and structure, then modify towards
the left side. And as you can see,
it's becoming more blurred, more soft skin. This is amazing now I don't
want to do it too much. I'm just gonna do a -40, 35. There you go. And this is affecting
only the skin, is not affecting my eyes,
which is very cool. They're gonna click the V on the bottom right
corner, and that's it. This is the final image where
the before and the after. I hope you understood the power
even editing with mobile. Now if you want to know more about editing and
shooting when a mobile, I have a full class
here on Skillshare. It's about photography from a to Z that you can check
how it at anytime. I hope you enjoyed
this video and I'm going to see you
in the next one.
13. Shooting without a Black Background (full process) : Here the trick is that we're not going to have a
black background, but we're going to try to
take this type of photos with different wall or even with that type of window and
different type of scenarios. And we'll see what we can
do this type of photos. This time we're going
to use Sony Alpha 6,400 with a tomorrow 28, 75 F2, which is a full
frame length that I have for my Sony A7 three, which is now recording
and annotate it to attach it in a crop sensor. So whatever we're going to use, we need to multiply times 1.5 to get the
right focal length. In this case, I'm using
the force at 60 with a parabolic 60 cm
softbox by non-life, which is the entry level
of professional lighting. So I'm in a garage and this is not a professional
studio or anything. So the audio here is pretty terrible and I hope
you guys don't mind, just let me know in advance. Now the very first thing to
take this type of photos is actually you need to be as
far as possible from the bag. So whatever room you're
in and try to find the longest line between
two different coordinates. And then you're going
to place the camera in one corner and then you're
going to place yourself close to the camera
and as far as possible the opposite corner. And in this case we're going to just take exactly like this. So we're going to
use that corner right there as our background. And even though
it's a yellow wall, we're going to try to make it fully black with
no editing again. So, um, this case I
want to try to place the camera as far as possible. In this case, I'm
just going to move this table right here. So then I'm going to
have the camera right here that is pretty far
from the background. So I'm going to put my lens and the crop sensors
are 50 millimeter, but considering this equals to a 75 more or less in a full frame. And then the next step
is that I need to place myself based
on the framing, but it's close as
possible to the camera. So we're going to see here, we're going to place the chair
and probably going to be this distance looking at
the frame of my Sony there. Then the next thing is
to place our lighting. And once again, this is the number one thing that you need to take care
when you're taking these types of photos
because you need to have the strongest light possible on yourself so that we can adjust the camera and have the
background completely black. Now, let me take
the force of 60. That now is just right
behind the camera. Mount. The camera probably you're
going to see me that I'm blown out here because the
light is so close to me. And that's why we create
this contrast because you see everything else that
he's exposed correctly, but my face is blown out. So what we need to
do is that we need to adjust the settings
of the camera that is shooting the photo
to expose correctly my face and therefore
everything else will be darker. So now let me place again
the light very close to me, but right out of
frame in this case. And then that's perfect. So in this case I need to adjust every setting that allows me to have myself correctly exposed. So in this case, I
just need to be in the center to get the focus. And then what I wanna do, I want to increase
the shutter speed, let's say like this
one out of 160. And as you can see, everything else became black while I was moving
the shutter speed, and now my face is
correctly exposed. Now I keep F2, 0.8, and ISO 100. So these are the settings
that I'm using right now, but these depends
also on your setup, on your room, on what type of light you have and
how strong is it? There you go. Right now, I
just wanted to remove also my sweater so it's gonna
be more black. Let's go. Okay, now, it's much better
because everything is super, super dramatic, super dark. So once again, we check that
everything is alright and the camera eventually you can
also move back and forth, just try to stay and maybe
in the middle right here. And then he went to
set up the self timer, maybe 2 s, and see
what we can get. Make sure that you have
the focus on your face. So let me just double-check this on the camera that
is in the center. There you go. It was
not in dissenters. That's why we're
struggling a bit and then assume
whatever pose you like. And then we're going to do
and try to do a test shot. Stay in the middle,
and then when you're ready to defocus, you go, Let's see
what we can get. Boom, that's a very dark photo. Now, this photo is exactly what we wanted
and it's kinda perfect. That really depends
on how you want it, because in this case
my eyes are very dark. So what I can do, We
have two options here. Either that when we shoot, we're going to move our
heads towards the light. And in this case we're
going to see much more of the part where the
eyes are or you can just lower the leg so it's more towards your face and therefore you're going to
illuminate also these partners. Now it's dark
because the light is 45 degrees towards yourself. I tried to take another photo, but in this case I'm just
going to move my head towards the light and see the difference there
in the center. And there you go. As you can see now, my eyes are there and
are not completely dark. So here is really about moving your head and try
different position, try different angles and
also moving the life. Let me show you a
different case where we lower the light, okay. And then we're just
going to stay straight. So in this case, I'm watching
the camera again and boom. Here's the difference
between the very first photo and the third photo. Just because I lowered
a bit delight. But, but, but remember, this one has to be as close
as possible to your face. Or otherwise, this effect is
not going to come because you're not gonna be able to
export correctly the photo. Now let's try another scenario. And in this case I'm
just going to move the light completely
on the side. And then we're going
to have a split toning main with lighting only. So in this case, one
part will be correctly exposed and the other one
will be completely black. Super dramatic photo, but
I'm not a very nice effect. So the light is
right on my side. And because this is so strong in order to expose
correctly this part, then everything
else will be dark. So let's take a photo together
and see what we can get. Just want to stay in the middle. Take this one very close, just write out a frame and
then we stay in the center. We have a look in the
camera, ready to go. That's it. Let's
take another one. Stick a few more. So right now, I'm just
going to move my face towards the light and
see what we can get. It was exposed correctly. You are ready because I
expose it from this side. And then it doesn't
really matter if I'm moving for lab purposes. So let's stay like this, mature. We are in the middle
and then we should. There you go. Let's take
a couple. There you go. Now, I don't see very well
the photos from my phone. So what I'm gonna do, I'm gonna try to have a look at the camera and then
zoom in there and see if everything is okay if I manage to have them
in focus or not. Obviously, if you
have another person that is helping you doing this, everything is much
easier for me. I'm alone, so I want to
show you how you can do it a lot in a
pretty simple way. So now let's have a look at MC if you've got
them right or not. I know. I want to look
at the photos and see if I'm in focus or not. Let's have a look. I think we good. Now let's zoom in, in the eyes and that's perfect. We are in-focus, so that's good. Now, having a look at
these photos right now, I can notice that the bag grown especially in
the first one where I had the light in front or
it's not extremely dark, is not like pure black. Why this? Because probably
the light that we have is actually spilling
towards the wall. So what I want to try right now, he's actually moving myself
a little bit further away and then see if
that changes anything. Cool. So I'm just going to move and try to match
the previous scene, both with my lighting and with myself and see if we
can make it very, very black in this case. You go Now with good. Just because a position the light and now seems
that everything, It's much better than before. Now the background is
not visible anymore. Let's see what we can get there. You go. Stay in the middle, make sure
that the light is extremely close to you by write
out a frame like so. And there you go. As you can see, just moving 1
m more from the background, it actually made a
huge difference and our background and was
slightly visible before. Now it's not visible anymore. Now, I want to show you
one more thing to make this photos incredibly better. And this is about
adding an extra light, any type of colored light, or even a white or
yellow light just right here on the side as
a backup as a sidelight. So let me get it. Correct. So what I'm using right now
is just this JOB teleport. And this is an unlike
legal life five C. So it's a small light that
can actually be any color, but also normally
yellow and white. So in this case I'm just
going to use a yellow light. You can use also your bad lamp or anything that
you have at home. Do you have it as a second? So I'm just going to place
it in this small tripod. There you go. Okay, like this, then we can
place it at 70% strength. We're going to have it
right in the middle. Here. There you go. Now it's better to have
it as close as possible. So I'm just going to
use a chair right here. As is I can see from my phone, this part is illuminated, but that's more life. And he makes huge
difference because you add conscious that
the photo and add also depth because this part is not fully black but have it illuminated but that
yellow light which is contrasting with this white one. So let's take it, put it together and see
what we can get. This one a little
bit more in the site to web it more dramatic effect. Go, but I prefer a
little bit taller light. So I'm just going
to place it like so more 45 degrees towards myself instead of having
directly on my face. And there you go. Take a photo. Let's
try another 11. Cool thing that you can do also is that you can change this one or any light that you have as a color like
so in this case, I'm just going to switch it to HSI and then I'm just going to change the color to
something like maybe blue. There you go. We
have this little TO, again, a pit in the same
position in the back. And then let's take
another photo.
14. Conclusion: We're reaching the
end of the class. I had a lot of fun. I love to take this
type of photos and even self-portraits because
I think you're super dramatic, you're
super impactful. And usually when other people look at them, they're like, Wow, this is amazing,
but as you know, are hurting, they're
super easy to do. So I'm super happy you
watch until the end. Now there are a few things
that I would like to add. First one for the class project, I'd like you to
create any sort of black background
photos and just post them right below here so that I can give
you feedback as well. This is a great opportunity
to showcase your work to others and also to receive
feedback from a cell. Then the second thing
that I would suggest you, he's tried to
implement this type of photography also in some
sort of short videos. If you don't know how to create the short
vertical videos, I have a full class here on
Skillshare where I teach you everything you need
to know to help yourself also grow
on social media. Depending on when you're
watching this video, there might be more
than six courses are ready on Skillshare from myself about Lightroom to master color, creating
about Photoshop, to attach your photos, about creating short and engaging vertical
videos for TikTok, Instagram Reels and
YouTube shorts, and also Instagram for beginners
and mobile photography. So there's plenty
of things to learn. One last thing I would really, really appreciate if
you could live review, let me know if you
enjoyed this course. This helps me a lot, making better courses and reaching more people in
case you have any question, feel free to post them in the discussion below
or reach out on social media ads Pharaoh 21 on IG TikTok and see
monophyletic on YouTube. I reply to everyone,
thanks again everyone. And I'll see you
in the next class. Ciao.
 Simone Ferretti, Professional Photo/Videographer