Transcripts
1. Intro to the Classes: We all know that
content is king. In today's word people are
bombard with tons of pictures, for instance, on Instagram. So we need to grab
their attention. We need something that stops the scroll and
keeps them engaged. This is where animations
and videos come in. How to learn it?
Well, my name is Aga, and I'm a designer,
and I'm going to show you that it's not that
difficult as you thought. In this classes, I'm
going to take you for the entire
process step by step, so you will finish it with at least three ready to go animations that
you can post it on your Instagram platform as Instagram story or even
Instagram post that is animated. And the good news is
that you don't need to struggle with
after effects or other so that requires
a design knowledge. With Smart animate in Figma, we can really quickly prototype interesting
ideas for our animations, and then we can
record it and have the file ready to publish
whatever you want. So are you ready to begin your journey with
animations? Let's start.
2. Class Project: What is the class project? Well, you need to submit
to the class project at least one of the
animations that we're going to do during the course. Of course, if you would
like to experiment, if you'd like to do
something differently, you're more than welcomed, please remember to submit
the project to this section. And the goodness
is that I prepared a special price for the
first three people. These people who will submit their project as
first, they will get three one and one consultations with me that will
take half an hour. So if you would like to
discuss about your career, about your creativity,
about your ideas, about my other
classes on coding, feel free to be fast and
submit your project as soon as possible in the
project section for those people who won't be
able to get the price. I just wanted to tell that
it's great to show your work. It's great to ask for feedback. Also the other members
from the community. So I totally encourage you to go through the exercises and then show to the word
what you've prepared.
3. Starting with Figma: All right. So let's jump into Figma into the very
first exercise. But before that, let me quickly tell you about
the Figma plans. The good news is that
you don't need to any upgrade or you don't
need to buy a subscription. It's totally fine to use the free Figma
plan, the starter, a so called starter, and it will be totally
sufficient for our experiments and also for exporting the file you create. So let's now switch
to Figma application. I totally recommend you to use FGMA in the standalone app, not in the browser. Because there might
be some problems with installing the
external funds. I think that the app
is more optimized, so definitely take
advantage of it. You can download
Figma Four Windows, you can download
FMF MAC as well. You can do it from figma com. So I'm switching to the app
that I've currently download. And what you can see
here is the blank state, let's say, I have the team project created,
but it doesn't matter. The most important thing
is that you have to create the design file,
not Fike JM board. But of course you can check
out FikJM afterwards. It's super cool.
It's the Whiteboard. You can use for workshops, for meetings with
other people online. It's really cool. But today, we're going to focus on
designing in FIG Map, so we need to click Design. File. And what we can
see here is that we can title our files, for instance, exercise one. And we're going to start with creating the
very first frame. For my purposes, I will switch to the file that
I've already created, and I also ask you
to duplicate it. So it will be easier for us to work on the file that already has some assets would be much
more efficient to be there. So currently I'm
in my Figma file. And what I will ask you to do is to duplicate this file
into your workspace. So it means that you can
easily edit everything you want and that changes will
be visible only for you. So only for your account. Of course, if you'd like to share this file
with other people invite some other co
authors or collaborators, they will be able
to edit as well. But I don't want to
make this file open for everyone because all
the projects will be here. So make sure to create
your individual file by duplicating particular
this file from me. So once you duplicate this, we're ready to go
and we're ready to start and create our
very first frame. Before we jump into the very first exercise
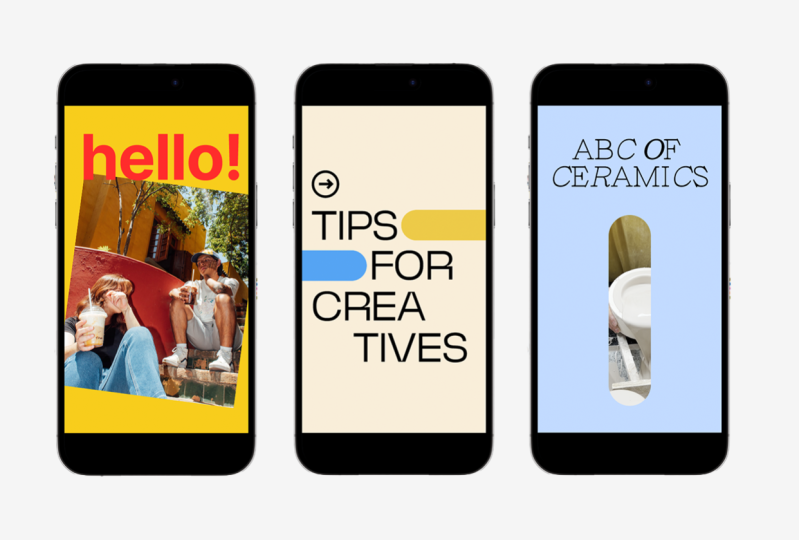
into the first step, Let's see how the animations
that we're going to work on as basic as a
starter will look like. So I'm clicking play. Don't worry about, you know, anything that I'm doing here. Yes. This is the animation. So you see that some
images are rotating. They're also changing
their positions. So we're going to
start with that. I need to close the prototype, and I'm into my design file. You can see here that I've already created all
the assets for you. You can easily use
it for your needs, and we're ready to go to
create our first frame. So frames just like a canvas. It's something that
you just use as the main element in
which you're going to create other items
and then export. So it's something like artboard, if you're familiar with
illustrator or photoshop. So I navigate to the top left, of the interface, and I
see that there is a frame. So once I click it, I will
see that on my right, I have the list of
all available formats that are predefined for me. And what I'm particularly interested in are
social media formats, and I'm looking for
Instagram story because we're going to
focus on Instagram story. And once I click it, I see that my frame is created. I can change its
position very easily. So once I'm inside, I can start to recreate the thing that
I have already here. So I change the tab to design. And the very first
thing we have to do is changing the background
color from yellow, sorry, from white to yellow. So this is the color that I've
already prepared for you.
4. Smart Animate: We are going to use massively in the classes is Smart
animate feature in Figma. It means that maybe I'll use the definitions that I
took from the website, from FigMas website, that Smart animate looks
for matching layers, recognizes differences, and animate layers between
frames and the prototype. Might sound a bit
complicated for some of you who haven't tried
it yet, but don't worry. I'll show you everything. So we take advantage of it
that smart animate is smart, and it looks for
some differences. So once we have two frames and connect them in
the prototype mode, you'll see what will happen. So let's imagine that
we have a rectangle. I'm just drawing
a rectangle here. It can be red just as this one. We can, of course,
center it using the aligning item feature. Okay. It's centered
horizontally and it's centered. Vertically. All right. So let's copy the same
element into my frame. So what I do is I click
Command C on Mac. You can click Control C on on
PC. This is the rectangle. I can see it in the left panel, which shows all the
layers that I have. So I have my rectangle copied. I mark the frame that I want
to paste this rectangle in, and I click Command V or
Control V for pasting. And you'll see that it will
have the same position. So let's imagine
that I would like to have this rectangle smaller. So I'm changing its size just
but by dragging its height. And I want to animate
these two frames. So I need to click on
the very first one. Change the tab from
design to prototype. Just drag from the
point where I see the plus icon to the frame
that I want to combine. And then the piece of interface responsible
for setting the animation will appear. So what I can see
here is that I have the Smart animation Smart
animate feature option checked. Probably instant would be
the one that's default, so you need to click in and
change to Smart animate. You will see the demo of
this animation and timing. So if we take for
instance, 1 second, so it's 1,000 milliseconds, it will be a bit longer. We have Smart animate. So I'm clicking here, I see that the new
flow is created. I click on the play icon
and I see my animation. Well, it's not going, it's not moving because
we need to click. Once I click, I see that
Smart animate kicks in. So Smart animate looks
for the differences, and the differences between
these two frames is the height of this
rectangle, right? Because we change its height. If we have a totally different totally
different rectangle, and for instance, we would like to, you know, have the animations from
this rectangle to that one, you'll see that it
won't work like that because this gray rectangle is a new element
that doesn't appear. So this is the one
called rectangle ten, and it doesn't appear
in the first frame. So Smart animate looks only for the same objects
within two frames. So this is why looks
for matching layers, and rectangle ten is not a layer that is matched
into the first frame. If we want to have it in
the first frame as well, we just need to copy it and paste in the same place, we can, for instance, change its
height and position, and you'll see what will happen. It looks nice. I mean, attractive at least for something that we can
do within a minute. And I want to show you by
this exercise that you can experiment a lot with this feature because
it's really cool. So you don't need to create
all the states of animation, only the entry one
and the final one, and everything, what is between frames will be automatically
done by Figma. So remember to have
the matching objects. This is important. And the
other thing is that I needed to click on the on
the frame here, two to start the animation. And this is how
we can change it. Once you click it, on the
settings of the animation, you will see that we
have click option. We can change it. And
there are various options. They are great for
simulating the behaviors of the tapping or changing the course on the
website, for instance, you have mouse
enter, mouse leave, but we can also have
automatic transition from frame one to another one
by choosing after delay. So after some time, the frame will be transitioned to the
next one automatically. We can change of
course to 0 seconds, so it will be done instantly. We have the smart animate setup, the timing, and let's
see what will happen. Once I play, the
animation starts. So it's really, really nice, and we can take
advantage of it and configure our video, our
animation accordingly. All right, so this is
something very, very simple. I just wanted to
explain to you what Smart animate is, how it works. But let's get back to the
animation that I have here. So this movement
of the pictures, let me just remove
the rectangles that I have, and let's begin.
5. First Steps with Animation in Figma: So I will take the items, the elements that I have, and the elements that I
actually created for you. I need to click in to the group, and then I see that
I have frames. So you already recognized
that the sign is frame, and we have free pictures. I can mark them. I'm using shift. And with a shift, I can I can mark
longer list of files. I click Common C to copy them, and then I paste
it into my frame, and I have free pictures. I think that they
should be bigger. So let me just click Shift. And with shift, I'm just, it doesn't work like that. Oh, because they're in frames. They're not picture itself. In every frame, we
have a picture. All right, so for enlarging
elements that are in frames, we need to use the
scale link option. I'm going to show
you how to use it. So you need to click K press
K letter on your keyboard. And you will see that
the arrows have changed. The double arrows. And once I click Shift and
start resizing the frame, I'll see that it keeps
the proportions. It's also marked here. If I change to
move and start and start just using the the
resizing button without shift. It will just allow me to manipulate the
height and the width, but there will not
be connected so they won't keep proportions
that I set up. So I can make it larger with the k one cyclic it
changes here, in the left. So let me just make it a bit
larger and see if it's fine, maybe Maybe this
size would be nice. And I need to change it
with the same thing. So I can start resizing, but we want to keep
the same sizes. So maybe make it
more easy to do, I'll change it to hundred 9,590, so I can just change this sizing and we
have the same sizes. Okay If I click
click it like this, you'll see that the
frame is enlarged, but the image that
it's inside, not. So we'll probably need
to change it as well. And we're ready almost because I see that it doesn't
fill the whole frame, so we can click on the
image and enlarge it a bit. Oh, yes, great. We can navigate within the frame and see
how it's positioned, but I'm satisfied with this one. Okay, so let's check if you
have everything the same. So we have one, two,
and three pictures. Each one is in a separate frame, and we have the frame story one. So what we're going to do is
we need to stack everything. I'll stack, for instance,
this image here. I'll check if it's
in the center. I'll stack this image
in the very same place. But what you have
to be aware is that usually if you place an
element on the other element, that it's a frame, the frame
will jump into it inside. And we don't want to
have such effect. So I need to take it and
bring it into another layer. So it's still a separate frame. And I have picture, number one, and it will happen the thing that will happen is
actually the same. But I don't want to have the first picture on the
front. So I change it. This is my entry point. Let me just remove this frame. What is easier to play
with Smart animate is to create the very first
frame that it's finished, and then you can quickly
just copy it and paste. Command C and Comm for Mac, and I can play with both
frames are actually the same. So we as I look for
this cheat sheet, say, I see that the pictures
are changed its position. So let me just take
picture three. And change it. Let me click on the picture one and change it
somewhere here, right? So we have position
of these elements, and let's connect them
in the prototype tab. So I'm in the prototype. I just drag it. Click Navigate two. Yes, that's true, smart animate. Let's keep it 1 second. It's fine. But we want to
have it on after a delay. So after 0 seconds, start. Actually, we have to give
something more than zero, but one milliseconds,
like nothing. So it's still fine for us. And let's see the animation. Nice. So we have the
pictures moving. So we have one picture
the main on the front, and then the other
one will will appear. Okay, so let's do
the other step, which is changing
the position of the image that are on the
top and on the bottom. I do the same, so I
just copy the frame. And to keep the same position, and I'll just, you know, change it, you can go like this. You have to be aware that
if you drag it too far, it will step out of
the original frame. So if you want to
keep it inside, you just need to put it here
and it will be clipped out. I will just show you one thing. If we have this clip
content switched on. It won't show everything
that it's outside the frame. But once we uncheck it, it will be shown like this. But for our purposes, we want to have clip
content checked. All right. So we also want to rotate this
pictures a bit like this, and of course, switching
to prototype mode. And yeah, navigate is fine. After a delay, one millisecond
fine. Smart animate. Great. And let's play Cool. What is also interesting in the animation panel
is that you can change the dynamics
of the animation, so it can be bouncy,
for instance. Let's see how it will effect. Yes. So you can see that this
picture is just bounced. Oh, let's keep it just
for adding something new. Maybe this picture would
be hidden like that. And the next movement is to take the pictures from the top and bottom to
the center position. So once again, I copy paste. And let me bring this
frame to the top. Oh, we wanted to actually
keep the different one. So if you want to keep
the different one, just you need to change
the position of the frame, and it's on the front. So, something like
that. And next, we need to prototype here. If you don't see the option, just check whether you're
switched to the prototype mode. All right. So I'm dragging
I'm dragging the arrow, Smart animate, maybe let's
change to the gentle. It's going to
happen after delay, 1 second, one millisecond,
sorry. Let's see. Shoot. Yes, goes like that. Really nice. And we
want to rotate it. So next thing, copying. I actually did the copy of the previous frame
bar by clicking on it and also clicking
Option on Mac on Windows. Option A. Dragging,
and I'm copying the dire that I'm
that I picked before. So we have the same
frame that it's before. And now we're ready
to change it a bit, so for instance,
we can rotate it. And of course, we
need to connect it after delay, one millisecond. And let's see. Cool. Of course, you can do more with it. I mean, you can, for instance, change its size,
we're on the P three. But remember about keeping
the scale if you want to change both frame and the proportions of the
picture that's inside. So we can do
something like this. And you can add text. For instance, Hello. Nothing original here, but yeah, I'm using the
Clash grow test font, and but just give me a second. I will get into it. You need to download it and install
on your system. Okay. Let's try
something bigger. Hello. As you can see, the text is within
the P three frame. So this is why it's masked. But once we drag it out of here and keep it in the general
space of the frame seven, It will appear like
that. So we have hello. We can change its color fill by using the the
color P cursory. I'm clicking the color
that I prepared for you, and we have hello sign. Okay, let's combine
switch to prototype. After delay one sec Milk second. The next one. And let's see. Oh, I needed to click it. Yeah, probably, yeah, it
should be after delay. Yeah. So it's very simple. Maybe you know, we can do
more to make it even better, but I wanted to show you that, you know, within really, like, a couple of minutes, we can do something that doesn't require skills from
us, advanced skills. Either in Figma in
animations in general.
6. Creating First Animation: All right. So let's check how the animation that
we're aiming at looks like. I'm clicking here
the play option, and this is what you see. I hope that you like it. I just wanted to
show you that you can also change the size of this window because I
didn't do it before. So once again, once I
click Play on the flow, you'll see the animation
that we're going to prepare. I hope that you are
excited as well. All right, so let's recreate
the effect that we have. First of all, let's think
what has just happened. Maybe we can slow the
animation a bit, for instance, to 20 seconds, which is a bit long and see what's happening. So the image is
shrinking and the text, both on the top and the bottom
change their positions. And we can see the
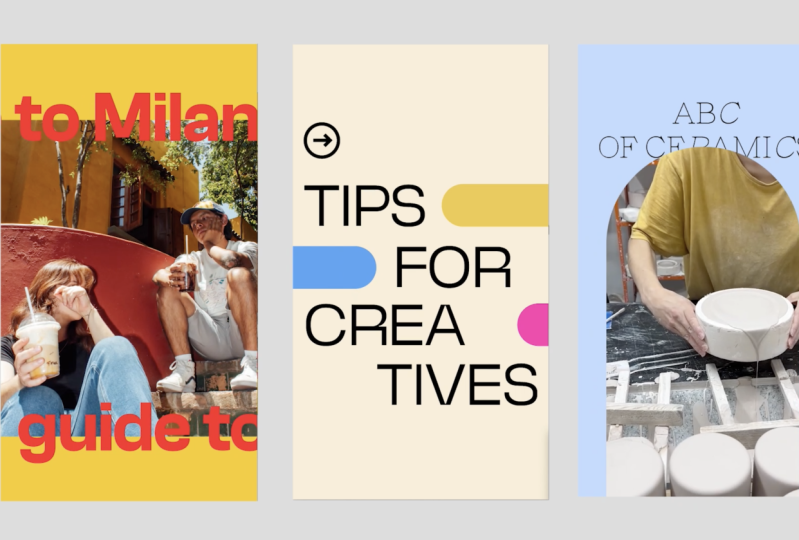
yellow break around. So what we need to do? I'm taking a new frame
and Instagram story. We have the frame ready. Let's do it on the bottom here and change the
background to yellow. Fulfill, I have already yellow yellow in
the document color, so I can select it. My Instagram story
frame is ready. Of course, you can
remain it, for instance, change it to guide to millon animation to make it more easily
recognizable for you. Of course, keeping the the order and the proper names of the
layers, super important. I'm not going to show everything here because it's not the topic. It's not the subject of figma, but I guess that
keeping good practices, even if you're experimenting,
it's worth doing. All right, so we have the frame, and we want to use the
picture that we have. So let's copy the one
that from the top frame. But we need to change it a bit. So I'm clicking K to scale it a bit to fulfill it
to the full frame. Like this. And I want to
shrink it into the next one. So with K, still, I'm changing the
size of the picture. Just looking more or less on the proportions
of the animation. Yeah, it can be
something like that, and we want to center it. Great. So let's connect
switching to prototype. Choosing Smart animate. Maybe we can keep it on click. We have 10 seconds. All right. So let's
click Play and see. I'm clicking and the
image is shrinking. I see some space here. Let's see what type of
animation is used here gentle. I don't remember which
one I used here. So let me just quickly check. You won't be having
the solutions here. So yeah, gentle as well. So I guess that we needed
to make it because there's a little shift
between this edges. So I do it like this. So the frame would
be a bit bigger. But the picture would feel
it like that. All right. Great. And let's go once again. I click and the
image is shrinking. Right. It's a bit slower than
in the original version, but don't worry, we'll change
the timing afterwards. Okay, so next step is the text. And what you have to do is please download the
clash grotesque fund. It's for free. It's open source. Once you navigate to
the text and click, the browser should
be open and you have the option to download
clash grotesque. So for instance, you can Um, test it, but we don't
want to do it right now. Let me just yeah, you need to click it
and check you can add all the tiles everything because I think that
every style it's nice. And once we march all of
them, you select all of them. I'm just checking if you have the option to
select all at once. But I don't see
it, unfortunately. So you need to select
style by style, and then you have
to download family. Once you download family, you need to install the funds. If you have Figma application
already, that's great. But if you don't, please
install FDMA application instead instead of playing with it in the web browser
because otherwise, there might be some
problems with funds. And also, what is important
is to check Figma agent. Installer. So this
is the app that you have to download
as well and install. Yeah, you see font installers. So please install the fund
installer, thanks to them. Thanks to the installer, you'll be able to use the
funds that are external, not the typical system funds, but some funds that
you downloaded from Google funds or
any other sources. So go to either Mac OS or Windows depending on
your system and install it after actually before installing our funds
would be better probably. So I'm also taking this link, and I'll add this link to Figma. I can add a link here. And Oh, why it doesn't work. By Yes, like this. Yeah. And you have fun
installer as well. Great. So please do it. Both installing and fun
installer from Figma. All right. So once
you install the fund, and we can check whether it's recognizable
by FGMA from the text, you need to types. And I'm typing guide maybe two M let's stick to the
text that's in our example. If you don't have clash
grotesque on your list, close the application, close
the Figma application. Install the font
installer from Figma. Check if the clash grow task
is in your system funds, and then launch the
Figma once again, and the fund should be here. Usually, the problems
appear if you use a web browser or maybe sometimes you think that the
font is already installed, but it's not, or you haven't installed
that font installer. All right, so I have
my text guide to millon I want to make it larger, so I click K and just,
you know, enlarge it. I also want to change
its fill to red, and I can place
it tax somewhere. Let's try with 160 maybe even 300. Yeah,
something like that. So what is happening
here is that we have, for instance, text that it's
transitioned, like that. And the same text, I copied it with
option with old key. And we can have guide to like
this. Something like that. Okay. So we have
two lines of text, and let's see what will happen. Once I change to the prototype mode and
switch the animation. The text just fades in. It's a bit different from
the thing that I showed you. So let's get back to
the original one. So the text is appearing here. As we know from
the Smart animate, we have to have
the same objects. The objects have to
match with each other, comparing the two frames. So as you can see, we have gym text, but we don't have it
in our first frames. So let's stop here for a while. If we want to have the effect of this text that it's
being transitions from left to right and
from right to left, we need to copy exactly
the same objects and have it in the
very first frame. So to make it easier to identify these objects and
frames, I will rename it. So, sorry, this is the
second one, right? And this should be the first. So I'm changing the
names of the layers, and I will do the
same with the text. So this is text on the top, and this is on bottom, And I'm copying two of the objects clicking
on that first frame. And I'm just pacing it. So I see the text.
And that's great. So let's see, for
instance, with shift hold, I hold the shift key so
that the text can be only transitioned from left
to right and the x axis. So if I hold shift, it will be easier
for me just to keep the same position in terms
of the vertical position, and I can scroll it
horizontally with shift. So let me transition it. Okay. And I see that it stepped out from the
second frame, right? This is the second frame
and the text it's outside. So I need to put it right. Great. And actually, I don't
know why we have two oh, sorry, I put it into
the wrong wrong frame. Yes. This is the first one, so I need to put this in the top guide to
the first frame. I hope that it's clear for you. So we have the text
in the first frame. It's changed its position. So let's see how
it will look like. Sorry, I will just maybe
change it to After delay, I have 7,000 seconds. We can add two
milliseconds and C. Yes. It resembles the
very first exercise the very first video that I showed you, let's
get back to it. This is the
demonstrations. All right. Nice. So we can do the same, but we need to
change the position. It should be hidden. Yeah. So we need to
take it to the right. Again, it happened that it
stepped out of the frame, so we need to put it
to the first one, and we need to do
with the bottom text. So it goes from right to left, so I need to change
its position. And again, it stepped out, so I need to put it under top just to keep the same
orders of the layers. Let's see. Yes. This is exactly what
I wanted to achieve. So we're happy that this animation looks like the original one
that I showed you, and now it's time to
record this animation so later we can export this video and publish it on
Instagram stories. Let's see how we can do it.
7. Mac Users: Exporting Animation as Video with QuickTime: Okay, so how to
record the animation, how to export the video. I'm a Mac user, so it makes the thing
a bit simple because I don't need to install any
other external application. So if you use Mac, we're going to use quick Tim. And for the Windows user, I strongly recommend to use Lom Ida class
project description, you'll have the link
and also in Figma. It's really nice
because what I like in this tool is that you can record the part
of the screen. So Later, I will show
you how to do it. But now let's jump into recording the screen
for Mac users. So recording and Quicktime. We want to record the specific size of
the Instagram stories. So let's see how we can
do it with Quick Time. So I'm lounging QuickTime. And I'm doing with
the right key. I'm taking new screen recording. And what I see is that I
already have a certain size. So I can click record. And in the meantime, I can also click the animation. Well, let me just
stop recording. Because I see that I had a different setting
in my prototype. I want to so I mean,
the prototype tab. And what I would like to do is that I would like to
change the settings. So I don't want to
have this device, but only the presentations
mode, it's fine. Great. So what I'm going
to do is I need to check if the Proportions
of the quick time will match my graphics, will match my animation. I see that it should be bigger, I'm taking the full
size of the graphics. Okay. And I can record it. But as you know, the animation already is already gone because
it played only once. So what we can do is we
can save the given space, so we can click record and stop and don't worry
about it for now. But we need to set some sort of delay once we switch
on the quick time. We need to have some sort of delay when the
animation will start. So let me add here a
longer longer time, for instance, 4 seconds. Okay. So taking new
screen recording, record, and I'm
playing the animation. I think that it
should be, like this. And the animation is
recorded. Let's see. This is the file that was recorded by
Quicktime. Let's play. Of course, this is the piece of the interface that we
were recording as well. I was changing but the position
of the window, all right. We have the video ready. Nice feature in QuickTime
is that we can trim the video so we can
c the first part. Yes, I think it
would be this one. And so I can now
export the file, so file export as 1,000
ADP it's totally fine. And we can call this
guide to Milan, and I'm saving it. This file, I can
transfer to my mobile, and then I can publish
it on Instagram.
8. Windows Users: Exporing Animation as Vdeo with Loom: Okay. All right, so I have loom installed
as an application. I strongly recommend you to
do it because it's easy. I just open loom and
I have the interface. What I can do here is that I can record either for screen
or the custom size, which is the most important
for us because we need to adjust the size of the
recording to our prototype. So let me the prototype first. And thanks to it, I'll be able to customize size area
for the recording. Yes, like this, and I can record this part
of the animation. As you can see, there
are 3 seconds before the screen is going to be
recorded, and this is the time. I can, of course, stop it. And here my loom
will be generated. I can download this file
or keep it in the cloud. But let's do it once again. Maybe I will add additional
frame to make it easier to start recording, just as a starting frame so
that I can give it on click, flow will start here, and after delay can start
after 15 milliseconds. So let me the prototype. Once I click inside, the animation will start. So again, I'm looking for loom custom size,
start recording. Okay. I'm drawing the
custom size. It's fine. Start recording. It will
be counting three to one, and then I can click
on the prototype, and animation is ready. Yes, I switch to this account so that you can see the edit option,
trim and stitch. This is something that
you would like to use, and then we can trim the video. So it will start from
the given animation. And then you can
export the clip, save the existing one
and then export it, let's say that it's finished. And I can download
the video just by clicking into more actions and here download
the video. Okay.
9. Creating Second Animation – part 1: All right. So let's switch
to the second exercise, which is going to be
exciting as well. So we need to switch to Figma. All right, so we're in Figma. And let me present you the animation that we're
going to work on now. As you can see,
there are lots of colors and lots of
different animations. I'm super happy to
show you some tricks. So as usual, you have
all the assets created, and we need to download
and install a new fund. This is the phone
that actually can be downloaded from G Road.
Yeah, from GM road. Sorry, I was thinking whether this is the right
address, but, yeah. So Kina, and you need to download this phone fund
from this marketplace. Of course, you can pay for it. You can also type zero. If you want to have it for free, it's free for personal
and commercial use, which is super nice. I really like this type phase, so feel free to download it. Then install, and please
check if it works in Figma. If not, please
switch off the app, Figma app and then
launch it once again. Sometimes I have such
problems, so I'm just, you know, giving
this tip for you. We have a set of colors, and also this icon, which we're going to use
in some of the frames. All right. So let's start. You already know how to begin. We need to go to frame design and create the Instagram story. Template. For your fill, we're going to use
the base background. And just checking out, we have tips for creatives. So I'm doing this
text tips Yakhina. I already have chosen it on
my list from the funds list. Let's make it larger
with K. Tips. We'll see if it's create is. I don't remember how
I divided this word. Let's see. Creatives. Yep. I think that this size is okay, and we want to group them and have the same
spaces between all of them, so we can use distribute
vertical spacing. Oh, I don't know. It doesn't
look This is the same. So do it once again. I'll take this frame just
to have it similarly. I see that the funds
should be bigger, so I make it a bit
larger T four creatives. Let me check which fund I used for the demonstration
purposes medium. It's medium, it's fine. All right. It be
something like this. Creatives and let's
tidy up a bit. All right. I think that we that the tips four is a
bit bigger here. So yeah, let's do
something like that. So the composition is
fine, more or less. And what we can do here is
we can create a component. So whenever we decide
that I don't know, we want to make this fun bigger, it will change in all the
instances of this component. So let's create the
component first, and you'll see what I mean. I select all the items that
needs to be in the component, and then you can quickly do it with this
concrete component. And we can name it tip
section, for instance, And once I copy, you know, the frame for the
next stages of the animation. But in the meantime, I'll decide that, well, actually this funds
should be bigger. I can, you know, have an influence
in my component, I can change something
in my component, and it will reflect in all the instances
of this component. So I think that this
is very useful, especially if you're
experimenting a lot, And in general, keeping repetitive items in components
in Figma is very useful. All right, so I have
tips for creatives. I can remove this
frames for now. I want to copy the
arrow icon and make it a little bit
bigger All right. So we have tips for creatives. And as you remember
from the animation, we have various
color fuel stripes that will appear
from various sites. So we need to
create the stripes, and I do I do it with a frame, so I click frame, and I will draw
it, but watch out. This is happening
inside the component, so we need to drag it and
take it out of the component. Let's check the height because later this stripes
will cover the text. So let's make it a bit bigger, so I'll say 180. And we want to fill this
frame with a color. The first color will be
the yellow one, this one. You can also check it here. You can use the color picker, and we want to make it rounded. So here, we can take 100, for instance, to see that it looks nice, it's
fully rounded. So we have the first stripe. But we have to replicate
it for more items. So we have another
one, the blue one. It should be within this frame. Let's rename it to Tips for creatives and change
the color to blue. I'm clicking on it and with
the old or option key, and we need to change the
color to pink one, right. Again, changing adding
it to the frame. We can call it pink. This one, we can call
it blue and yellow. All right. And I guess it
would be the last one. The green one.
Yes. Okay. Oh, no. Actually, it's not
the last one, sorry. It's orange, right. And the last one would be somewhere here.
It will be green. So this is the stage of
the animation, one stage. But actually, it's the middle. So we want to have
the starter point. It will look like
this. I will copy it. So all these frames
would be hidden. Make sure that they'll still
stay right in the frame. By the way, I didn't rename it. Sorry for that. All right. So we're doing prototype. No, this one as well. Sorry. Okay. Right? And this would be one of the further step
of the animation. And let's copy. Let's copy. All right. So yellow. Yellow. I will switch to design. Yellow will appear.
The next stage. Which one is the next one. Shod be four, so the
blue one, right? Make sure that you're, you know, editing the appriate frame. Okay. So blue, then pink, I guess, or is pink. It's here. And The next stage is green. Orange. Sorry. Sorry.
Yeah. It's orange. Of course, for having more
and better organized content, I strongly recommend you
to rename the frames.
10. Creating Second Animation – part 2: All right. So I think that
we can try to connect them in the prototype and see
how the animation will go. All right. Smart animate. I would keep it short, so maybe 600 milliseconds. After delay, let's keep it
very quick, 50 milliseconds, and let's do the same
with the other Actually, we can make it a bulk at it. So I'm just combining, and then I will select. Mm hmm. I'll select all the arrows with shift. And then I can change
sorry, not this one, but here, after delay, 50
milliseconds, right? It's correct. And let's see. Cool. I will use this one recreate the last one because I
saw that there were some inconsistencies,
give me a sac. We're taking the green
one from number seven. Switching to design so that
I can change its length. And I think it would be better
to make it more dynamic. This is what I saw. But let's say it once again. Yeah. We need to wait a bit
longer for the pink one. I don't know why. So, this is one
for the pink one. Oh, Because it didn't change to 50 milliseconds and probably
the same with this one. Sometimes this bulk edit
doesn't work that good. All right. And let's see. Nice. It can be faster overall. So maybe not 600, but 400. Let's do it for the
different ones. Yep. And let's see. Yeah. It's more dynamic. It's. The next frame was that the arrow turned We can
also the Ron turned, but also there were
some other stripes. So I would recommend doing something like this
because if we change the worry, I need to go to the zone. For the full bottom, we will cover the tips world. So I would the tips text, pasted the same way. To make that smooth transition
between the frames. We can not do smart
animate this time, but just instant connection. So not smart animate, but instant here, and
it can be pretty fast. So not on click, but after delay,
one millisecond, and we copied this one because
we want to do a new one. So like tips, right? I'm just checking if yeah, tips it will be in the Oh, as you can see, I
didn't manage to cover for the text here as well. So hopefully hopefully we can add the component, the main component so that this letters can
be a bit smaller, for instance, like this. And did it change something? And I think that
in this situation, I would put it a bit, yeah, because this
is the second row. So I put it a bit by
two, three pixels. Four. Yeah. And now it's hidden. I need to also
copy this one once again and paste it here so that their positions would be the same pasting it as well
and adding the connection. So connecting. And now I can
add sorry, smart animate. After a delay one
millisecond see. Yes. Nice. And after this I want
this arrow to show tips. Another one that I
need to connect with smart animate after
delay, one millisecond. But actually, it can be faster. And this as well,
because it was too long. Okay. And what is happening is that we're having some words appearing, let's see. It can be done in such a way
that we're covering a word, and then we're changing the size of the rectngle
that it's covering the word. Now let's create
the other words. So check this out. We have this frame. But we
need to cover these words. So I copied the dirtungle but
I need to put it up front. Also copy pink one. I need to copy this blue one
and paste it once again. If you want to make it
as the first layer, just select the frame
and then paste it. The same with the pink one select the frame,
and the text is. And orange as well. Great. In the next steps, we're going to change the
height of this rectangle. So it will diminish
to almost zero. The same with the pink one, the same with orange
one, and we got it. Great. So now we can
connect it prototype mode, Check and smart animate. Maybe make it a bit faster. Oh, I forgot to change it too. After a delay, the
same with this one. After delay millisecond.
And with this one. After a delay, one millisecond. Okay. I'm very curious about this animation.
So let's see. Cool. But I think it's
too fast, right? It should be a bit slower. Let me check this one. So maybe we will change to
600. And we'll be better. You know, Timing
and animation is super important because it's
all about the experience. We don't want to
hurt hats of our. Okay. So there is a
problem here, I see. I think it's a matter of here, we have smart animate. And in my opinion, let's see whether it's good. I will add a longer time. If you want to check something, you can add longer time. And this one is Smart Mate. And this one should be smart Mate as well. Okay. So I will check
what's happening here. Let's play it once again. This looks good. This
looks good as well. Okay, so we had a problem
I guess after this frame. T or this one. Because I'm not sure if this
frames This frame matches. We have tips here on the top. But the tips in the ten ten
frames in a different spot. You have to be very
careful about it. Of course, you know, it's all about looking for the mistakes or
places to improve. So yeah, I think that we need
to change it to instant. And also, this icon
should be the same. And let's see if it works. Okay. Yes, it's better. It's definitely
better. Great. So we have tips. Check this out. And the last stage of the animation, the last
stage that we did. Oh, actually, it's
check them out. Okay. I will correct it. We have various backgrounds, but as you can see, they'll change immediately,
and there is one transition. Maybe I'll show you in a longer time 2
seconds, let's say. There is the round that
stripe that goes from the top to the
bottom. Let's do it.
11. Creating Second Animation – part 3: We need to copy
this frame and add a new frame that
would be the sorry. Let's do this frame
outside would be the, the bash stripe that
goes on the text. It should be around it as well. Cool. It can be longer, and we put it into
the frame 14th, it looks like this, I would call the stripe So for
now, we can hide it. But in the next frame, the best stripe goes
all the way down. Okay. Connect. Just to show you why I added this best stripe in such a way that it's
hidden on the top, and then it appears because we want to use smart
animate here once again. And between these frames, because we don't
want to, you know, add this bash stripe to
all the frames before, because we want to have the matching layers in order to make the smart
animate work smoothly. I just want to have one
transition that will be instant, and it doesn't need to match the layers between two
frames. All right. After delay, can be one, right, and then the next
one, Smart animate. We can make it a bit
longer. Let's see. Oh. Yeah. Sorry. Yeah, I forgot
to between the frames, add It's after a
delay, so it's fine. After the delay, it's fine. I needed to click one
layer, so I'm wondering. After a delay. I don't know why
this flow appeared. I just removed this flow. And to me, this one
should be longer, so let's add 2 seconds. L see. Okay. Okay. So I think that
this is the spot where we have After delay. Everything should work here. I don't know why
I need to click. Maybe it's Bog or something. Hopefully not. Here
we have on click. Sorry. So we need to change
after delay one millisecond. And there's one more
thing I wanted to check, but let me launch it once again. Okay, this looks cool. We wanted to have the word them. So it's also a good practice to make components of
this word in order to have more flexibility
because as you can see, I wanted to change them, and, you know, because
it's not a component, I had to change them in three
places in three frames. All right. So now
we're just copy this This last frame and change the color just simply change the
color of the stripe. So it'd be yellow. Yeah, bash stripe, bash stripe, turns into yellow,
then into blue. Whoops. Sorry. I need to mark
down the bash stripe. Yeah. Make sure that you have
the proper frame selected. And by the way, I see that
it's because of the rounds, we need to stretch it a bit. So I will stretch it as
well. The best stripe. It should go down and
this as well, right? Then pink, I guess. And orange and green. Okay. Okay. So the last thing
that we have to do is connecting the rest of the
frames, smart animate. Actually, it doesn't matter
whether it's smart animate. It can be dissolved
because we just, you know, any object
won't move, right? It's not about changing
the place, it's position. It's only about
changing the color, so it would be just, you
know, fading in and out. We can leave 600 after delay. One millisecond. I'd do
the same for all of them. After delay after delay. And after delay. But
it should be 600. Yeah. Okay. Let's
see what we have. Okay, so this one
should be definitely faster because it took us some time after
delay, one maybe 200. Okay, I think that
there's one more place. We have to change this to them because if we hide
this pink stripe. We have this and now we have
DM and it should be fine. This is why it's better to have components because
in such situations, all the edits will be replicated
to all the other frames. All right. So let's
check the animation. Okay. I think that there's
still one place. This is the last
frame where we have. Here we have them
or maybe that one. Yes. Let for a second. On this frame 15, let's hide Bart
and we have this. So we need to check
it through them and hide and go once
again prototype. Okay. This looks good. Yeah. This is cool, but I think
that we need to wait a bit. We have 2 seconds here, so let's change to 200
and now it will be good. Oh, no, I think it's too fast. Definitely too fast. So maybe 1 second. And for this 600 600 instant 600. Okay. The final final final. Yeah, I think it should
be faster, actually. Let's change to 300 and
it would be perfect. Okay. And now, once again, we can create the recording. So what is important
here is that the first animation start
after, I don't know. Let's say 5 seconds
or seven second. Okay. So we have 400 but we need to copy and
change connection. It can be instant
dissolve seconds and I'm adding quick time player new
screen recording record, and I, it was
pretty fast, right? So Let me stop it and check. Oh, we need to change the starting
position of the flow because it started from this
frame, not from that one. And let's do it once again. Record Well wait a bit and it will start animating Okay. We can now stop it and trim it and it
trim in quick time. I hope that you have also, like a simple ways of cutting
the video on windows. All right. Okay, let's trim, and let's export the file. And we can show this
on our Instagram. Of course, you can
redo this example, do something different, change the colors, change the text. This is one of your
class projects, so I'll be happy
to see your art.
12. Creating Third Animation – part 1: Okay. All right. So let's go to the
third exercise. We're going to Figma. But before, I'll ask you
to download ZT Chins font. So the link should be in the
Figma I prepared for you. And there are also
some videos to download which we're going
to use in the exercise. You, of course, have the space to use for the experiments. And it's high time to show you what we're going to work on. So I'm starting the animation. Let's go. Okay. So as you can see, it's about masking the video, which is giving us a new
opportunities and new ideas to present our work or to present the work of our clients, everything we want to
do on Insygram stories. So let's deep dive into
what's happening here. So we need to, as always, create a new frame,
clicking frame, picking up Insygram story, and we're taking blue
baby blue color. We also have the title ABC
of Ceramics using Zenz font. ABC of ceramics
let's try tins font. I want to have it thin
and a bit bigger. So I'm going to
use K for scaling. And I think that we need to change the line height
to maybe this one. And I also used in the example, I used some variants
of the font for the italic for O and
E and I and, I guess. So let's play with it a bit. I'm going to my file, so I mark C and use
light thin Italic. Maybe F, let's see
if it looks nice. You know, just to play a bit
with typography as well. Something like that. We
can make it a bit bigger. And I guess that maybe
it's not super readable, so I will turn to the light. Maybe you would be better. Maybe R, Yeah, looks nice. Okay, so we have the title, and what's happening here is
that we're adding videos. I need to add the video. Let me go to the folder
with the videos, and I'm adding the first
one. The first one intro. All right. And for instance,
I'm adding it here. If we click prototype, Nothing will happen because
there's no another screen. So let's do another one just for the sake of
connecting to screens. And what you will see is that we're having the
sound of the video, right? And it's played
in the prototype. So it's a good practice. Of course, depending
what you want to do to mute the video, and you can do it by
switching on this icon. All right. So the
Video is muted, and we need to create the mask. So our mask is a rectangle. With the rounded corners. Let's imagine this is our mask, want to round corners. My only round the corners on the top and on the bottom
will stay sample like this. This will be our mask. How to do it, we need to
have a shape and then click and then click
on the use as mask. Currently, it's a mask, but
the video is not masked. So we need to take it, drag it and put it after
the mask inside its group. Now it looks nice. Let me check how it looked like. Okay, so it was thicker. The mask was bigger so
we can stretch it a bit. But we also need to stretch
the video with I'm clicking shift so that it can
be masks properly. Okay. So we're creating
another frame, and we're changing
the size of the mask. So we need to go
to the rectangle. Maybe it would be better
to rename it to mask. So we're trying to
keep the order. The mask will change will
be smaller and both. Maybe let's do this and see the prototype mode,
how it looks like. Of course, smart animate. Let's see. Nice. We can make it a bit
longer so you can see the difference. I click. And what I really liked
about this technique is that the video is playing
and the mask is animating, so it gives a really
interesting effect. Okay. So now let's
create the third frame. And we will change the mask. So we can make it smaller. What's more, we can also
change the dynamics, how the smart animate will work, what will be the dynamic
of the animation. And I suggest to
changes to quick. So let's connect
with the next one. It will be quick, right. And let's check. I like this effect that this
mask is bouncing a bit. So we can change it to
after after a delay. After 100 Meliscond Let's see. Cool. The next stage
is changing it to from rectangle with rounded corners to
actually to a circle. So it's really cool that having a mask doesn't mean
the same shape all the time. So we can add 500 to
both top and bottom. So it will become a circle. And then this mask can
also change its position, so it can go to the top
and be a bit smaller. Oh, actually, it became
smaller in the bottom. But let's keep it that way. We'll see what's
more interesting. What looks better. So prototype. We can live on click for now and change it afterwards.
So let's see. Okay. Definitely
here. It's quick. But maybe I would
change this position. I would change
position of this mask, for instance, to
the top, like that. And this would be
smaller, like this. And then we can play again
with the shape of this mask. We can make something
like this and then enlarge by both sides. Hopefully, it's in the center. Yeah. Okay, so now
we have to connect it and see how it looks like. Cool. I like this when
the video zooms in, and at the same time,
the mask is changing. Okay, so we can switch
it to after delay. For instance, this one can
be after 300 milliseconds. After delay 200. And the next, we're having
some text items that appear. So let's quickly create it. I'm the frame and taking, for instance, join classes. And let's change text to
the font to enter maybe, maybe 50 or 50 will be fine, but I would change
it to small case. And as you could see, it looked like a small button, like a round rounded element. So we can frame it
by right click. Frame section selection. Okay. And we can
add out a layout. So it will dynamically set the width and
height of this button. If we add fill,
you will see that, you know, the margin, the paddingth actually inside
this frame is 100 pixels, but we want to keep it not
that big, rather small. And here I would keep 15, let's say, also
round it to corners. And I would switch it
to 40. Join classes. I don't remember the color. Sorry. I forgot to
prepare them here. So it's gray and kind of man. Join classes. Every Tuesday, Now, I'm changing the text. I can use whatever you want. And for this one, we will
change the color to this one. And this could be gray. Maybe I will tidy up. Okay. And let's see. Let's actually get back to
the original one because I wanted to check what was
the idea behind the text? So how it will appear. Okay, so it doesn't matter because the text
was just appearing. Smart animate. We'll see what
will happen. Let's check. Uh huh.
13. Creating Third Animation – part 2: If you would like to do
something more fancy. We can copy the text. It's already inside the mask, so we can paste to
this mask as well, and we can change its position. Of course, we need to
drag again into the mask, so it's here, right? It's in this mask. And it also matches
the next frame. So it has an interesting in fact. Yeah. I like it. And we also in the previous
version, the original one, I added another video
to show you that, you know, we can mix the videos. We can change them. So
I'm adding another one. And for instance, I can drug it into the mask and we'll
see what will happen. Okay. I can see this video. Probably it's not connected. Okay. So one more thing, we need to connect it, right? Smart animate. Let's it on
click or maybe after a delay. Okay. Let's see. I will just quickly take it here just to see changing
those two frames. Okay. It's nothing
spectacular, say. If you would like to have
it more interesting, I would put the same video
here, change its position. But Yeah, it's something
that we can leave or, or. We can copy this frame. Added here. I mean, the whole mask. It's not bad, so
we can play a bit. We can also make this mask. Entering more area,
so getting bigger. But pay attention that your
video is cut it out here, it needs to be the position
of it needs to be changed. We'll see how it looks
like in the prototype. It's not connected.
Forget about it. Wait a second. Nice. I like it. So I think that we can do even bigger mask can grow
like this, like that. And the video can go Like here. Let's see. Cool. Like this. So by the end, we can leave like
a short short tax. Waiting for you,
something small that will add a nice touch the
visual touch as well. We can make it is super quick. And change after delay change all the previous
sections to after delay. Okay. Oh, we have many, many frames, but I think
that the fact looks noise. After delay. Okay. This
one is after delay, e. So we'll start the flow. I'm replacing it to the
very first frame. Okay. Cool. I really like it. Hope you like it too. So of course, you can use the
front videos if you want, but all the two actually videos are in the
drop box folder. So now, recording it
with with quick time, at least for my case. And for this one, let's start after
6 seconds. Okay. So your task now is
to create the video. I can quickly help
you with one thing. Please copy the first frame. So we have a margin
time margin once we start recording the screen. I would say half of the
second and prototype. I would, I will start here. Preview. I don't know why preview just
escaped my prototype. But I added a new
flow starting point. So let's try to record it. I'm clicking quick time,
new screen recording. The prototype, and it's
being animated. Awesome. Okay. I forgot to switch off the sound in the
video in the last video. So let me correct this. Maybe you can hear it because I switch I put down the volume. But once you enter prototype
and click into the video, you'll see that the sound is on. And let's check the previous
previous frames as well. Yeah. Only three
frames, hopefully. Not a lot of work. Okay. And we're ready. The animation should be ready. I hope you liked playing
with masking and video. It's a really powerful weapon. I hope you'll have
some experiments, especially with this approach
with the techniques, and I want to see them
all in the class project.
14. Bonus – Another Type of Animation: I also prepared a bonus video, a bonus type of animation. So let's see what
it's all about. Let me switch to the
prototype and play. I can actually create
the starting point. So you can see it, and
it's sometimes the load. And as you see, we have the video that it's masked
and also another video, and this is the screen recording from just the note on my mac. And I'm writing something,
typing something. And I think that it
looks really cool. And I saw some Instagram stories and this type of animations. So I think that it grab people's attention
because they want to see what you're going to convey. What is your message?
So how to do it. Well, It's not that difficult. Actually, we can look inside what's happening
in this frame. So we have various frames
like stickers, right? So desire the stickers created
within another frames. So I just, you know, added some colors to it. If we go inside, you will see that
we have the text, and each frame has
a different fill, the different background color, and it's also rounded. So we have a certain stickers. Also another one with a smile. But I think that the most interesting would be
the two elements. So the group that it's masked. So we have a rectangle with rounded corners and inside,
we have some groups. Actually, it doesn't need to
be a group, doesn't matter. It's just a pure video. So maybe sorry. I'll take this video
out of this group, so it would be more clear. And as you see, I can manipulate with this video,
I can make it smaller. I can change its position. Once you switch to
the prototype mode, once you run the animation, you'll see that the
video is being played. And the same happens with this note, this
typing animation. We have a rectangle
that is rounded, as I will show you that, you know, we can change
the shape of it easily. So it's rounded, and we have the video that I recorded
using QuickTime on my Mac. If you want to
recreate it, you know, just switch to your
favorite notes app on Mac, I'm using QuickTime. And choosing the new
screen recording. Of course, we can change
the size of it like this. I can switch the position, click record and go to notes, and I can start typing. My day was terrible. Let me share my story
with you. Whatever. Then we just simply
save the this video. Okay, I'm ready to save
the video, to export it. This resolution should be fine. Let's add it to the bonus. I will name it
typing. All right. So it's being saved. And I can quickly
add the new frame. So In story, I can
add a background, I can create rectangle. Let's try with different
colors so it would be more recognizable, maybe bigger. Okay, so I'm ready
to add my video. It's also trimmed already. So I've recorded only this
piece of writing and notes. So I'm just dragging
and dropping the video, and we want to keep
it in this mask. So I'm using this
feature use as mask. You can also use the shortcuts and my video is mask,
which is great. I can change the
size a little bit. To make it to adjust it
to the size of the mask. Or I can also do a
different operation. I can get rid of the mask. So I can just grab the video, remove the mask and change the color fill of the background to match
the fill from the video. So we have this effect of
the whole window visible. But there is one shadow
from another item, I guess, and finder. So still, I think it would be better to add some sort of mask, Thanks to it, we will
cut the shadow a bit. So this is mask and t cat. It looks better. So this
is our whole frame. And you can add another, for instance, rounded a mask. So we need to take it from
the existing masking group, and maybe I'll group it and
put it under this ellipse. And to this ellipse, I can add another video presenting
myself, for instance. I have already recorded it. So I'm treating this
ellipse as a mask. Well, that looks strange. But, maybe. Maybe maybe maybe. And I can, of course, change
the size of the video, and I can change the position
of the mask as well. I can mark two of
these layers group it and put some somewhere here, depending on what
you want to achieve. And let's see what we have. I'll go to the prototype. Yeah, this one is
actually bigger a bit. So I wanted to show
you how it looks like. Yeah, it's something that
is interesting, right? Because you see a person's
face and see a message. So to me, it's attracting
the user's attention. It's something that draws me in. And I think on
Instagram stories, this type of content, this type of animation
might be valuable. And of course, you can
add, for instance, I use the stickers here. So I just copy and pasted them to add them like
something more colorful. But the only thing
that you have to be aware is that we're currently
inside the masking group, so we want to take it over, take it a bath in
our layer hierarchy. And again, we can see maybe let's create the
low starting point. We have no interactions here. But what I wanted to show
you as a bonus that you can use also the
device prototype, the device frame, which
looks really nice. So for instance, P, okay, and this would be
something like that. And here, you can imagine how your Instagram stories
would look like, also, I strongly recommend
you to check this prototype settings because you can easily play with
various background. I mean, the various
simulations of the device, even the color of iPhone, which is super small detail. If you want to have
something nice to your portfolio or present your work in the
spilation of mobile. You can also use the
option to record it, so I can take quick
time as well, and adjusted so that I can record this whole frame
with mobile like this, and I can start recording and we'll have animations like that. I hope that you
enjoy these classes. I hope that you learn
something new and I can't wait to see
your class project.
15. Recap: So let's quickly
recap what you've learned and what you've
done during the classes. So first of all,
you already have the basic knowledge of
the FINMA interface. Maybe you don't know
in depth how to deliig and where are
all the features, but more or less
with my exercise, you'll be able to create
some Instagram stories. The second thing is that you
know that Smart animate, it's a really cool Figma
feature because it helps you to animate whatever
happens between frames. So, for instance, if we
have frame A and free B, everything that is between them will be
automatically done by Figma based on comparing
those two frames. So we all know that
Smart animate looks for the differences and the similarities in
terms of the layers. So this is why
throughout the course, I was showing you
that, you know, the order of the layers
is important and, you know, duplicating
some elements. From a given frame to
another one is important. And we also know how
to create component, which is super important, especially when you have
more complex animations, so don't be afraid of that. And of course, I totally invite you to
check other FINMA classes. And if you have some
special requests for the future classes from me, Let me know in the
comment section, I'd be really happy
to check them all. You can also reach me
out on Instagram at h5d awesome or you can
check my Twitter account, which is Agana Ploha
This is my name. And I hope to see you there. Thank you for joining, and I'm keeping fingers crossed
for your class project. Just as a reminder,
your class project is to recreate one of the animations that
I was presenting to you or create something
totally fresh, totally new based on the techniques that you
were learning with me. Please applaud the work that you prepared in the class
project section. You can either paste the link to the video or embed the video. If you have any questions,
just let me know. So first, three people
who will submit their work in the class
project sections will have exclusive one on one session with me that
will help half an hour. So if you'd like to talk about your career or
maybe techniques in Figma or maybe different stuff connected with
coding or designing, I'll be happy to
answer your questions. So remember, first, free
people, I'm waiting for you, and hopefully you'll have fun to enjoy the process
creating the animations.