Transcripts
1. Hello & Welcome!: If you're looking
to give your Etsy shop a professional look without spending hours on design, you're in
the right place. In this class, we're
going to create beautiful eye catching banners and icons for your etsy shop by using curated
Canva templates. There's no need to
start from scratch or worry about mastering
design principles. These templates are all
ready for you to customize. I'm Kelly, an artist with a top 1% etc shop with over
a decade of experience. I know that making a good
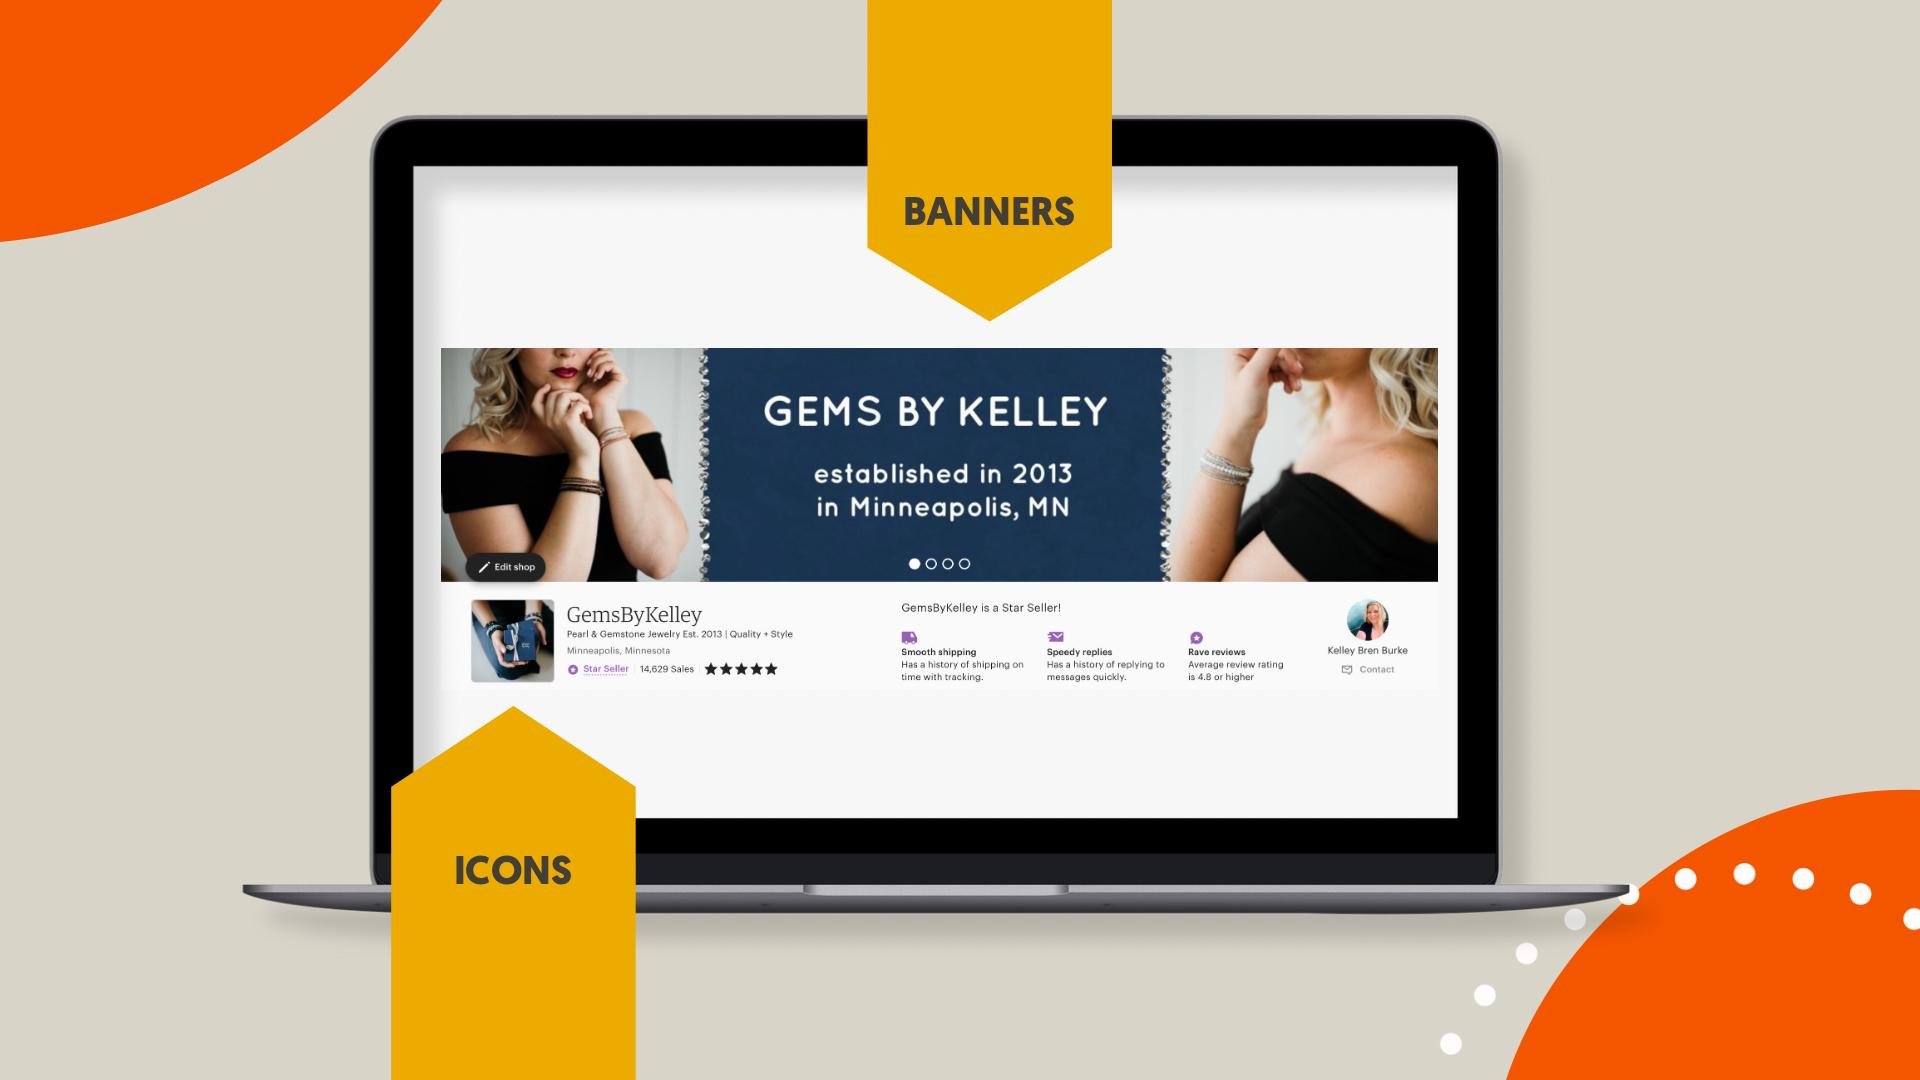
first impression is essential, especially on Etsy, where your shops visuals are one of the first things
that customers see. That's why I've created three specialized templates
just for this class, one for minimalist banners, one for photo frame banners, and one for Etsy shop icons. Each template includes 20 different options
tailored for Etsy, so you'll have plenty of ways to make your shop stand out. And you want to hear
about the best part? I'll guide you through
every step from choosing and editing your templates
to uploading them to EDS. For a broader overview of
Canva and Color Palettes, check out my previous class. Color your brand, a
beginner's introduction to Canva and palettes. By the end of this
class, you'll have a polished banner and
icon ready for Etsy, all created with Es using
Canva, templates, and tools. Plus, I've added eight
free color palettes you can use to make
your designs pop. This class is perfect for beginners and for anyone
that wants a quick, straightforward way to
elevate their Etzshop. Let's get started. Your beautiful customized
Etzi shop awaits.
2. Class Project & Resources: Let's jump into
the class project and look at the resources that will make designing
your Etsy shop both easy and fun. These are graphics
that make a big impact as soon as a visitor
lands on your page. When you're finished,
you'll upload these images to the
project gallery. One of the best things
about this class is the set of Canva templates
that I've created for you. I've put together three
curated templates. They'll make the design process simple and give you plenty of options to make each
piece feel like your own. First, there's a
minimalist banner template for clean modern designs. It's perfect if you want to polish look without
too many distractions. You'll also find a photo
frame banner template. This is ideal if you'd like to feature your own product photos. Finally, there's a shop
icon template that will create that recognizable
stamp for your brand. Each of these templates has
20 customizable options. You can mix and
match styles to find which option suits
your brand best. To make the process
even smoother, I'm providing eight free
color palettes that you can use right away to bring
your designs to life. These palettes are
perfect for Etsy shops. Whether you want
something that's vibrant, soft, or earthy, you'll have
options at your fingertips. When you're done, upload your final designs to the
class Project Gallery. Sharing your work here
is a great way to get feedback and see what other
students have created. To get started, download
the class worksheet and take a quick peek at the templates and
the color palettes. This will give you a feel
for what's ahead and make it easy for you to follow
along in the lessons. I'm so excited to see how you bring your shop's
personality to life. Let's dive in and
start creating.
3. Etsy Branding Worksheet: You'll find a self
audit worksheet in the class resources
to guide you. The self audit starts
with three pro tips. First, look at the shops on a browser and mobile and
the Etsy shopping app. You'll see that the
shops look really different based on how
you're looking at them. When you look at
it in the browser, you have the largest view of it and the most
complete view of it. But I'll also be interspersing
views of how that shop looks in the app and while
you're shopping on mobile. You want to look in
a private browser so your results aren't affected by your past browsing and shopping
activity on EtS. And next, we're going to
filter by Star seller, and I'll show you how to do
that when we are browsing. But Star sellers on Etsy consistently earn
five star reviews, ship orders on time and
reply quickly to messages. Etsy doesn't retain the
filters for each search, so you will want to click Star seller for each
new search that you do. So if you search for
candles in Star seller, and then you want to switch to looking at weddings
in Star seller, you'll need to click
Star Seller each time. In the self audit,
we'll be looking at three different areas colors, fonts, and vibe check. So are the colors cohesive? Do they work together
well? Are they consistent? Is there some contrast? As far as the fonts,
are they legible? Are they consistent? Are they limited to two or three Max? And finally, vibe check. Is there a clear vibe that
reflects the offerings? And some examples of vibes
would be artsy, cool, clean, cozy, earthy, elegant, luxurious, moody,
natural, whimsical. Getting clear on your vibe
and your audience will really help you in creating
your banner and icon. Finally, there's two links at the bottom that will take you to areas within the
Etsy seller handbook and the Etsy Help Center, so you can get information
directly from Etsy on what they say about
banners and icons. When I browse, I'm going to take some ideas from the complete
Etsy category list, looking at the top
level categories. So, let's get started.
4. Browsing Etsy for Inspiration : Welcome back. In this lesson, we're going to browse Etsy shops looking at their banners
and icons for inspiration. You want to look in
a private browser so your results aren't affected by your past browsing and shopping
activity on Etsy. And next, we're going to
filter by Star seller, and I'll show you how to do
that when we are browsing. But star sellers on EtS consistently earn
five star reviews, ship orders on time and
reply quickly to messages. When I browse, I'm going to take some ideas from the complete
at S category list, looking at the top
level categories. So let's get started. So here's the Etsy homepage. I'm going to start by
searching for candles. And I want to filter
by Star Seller, and I am in a private
browsing mode in Safari. So I'm looking for something
that catches my eye, and then we're going
to go directly to the homepage on Etsy. I just want to show you that
this row is a row of ads. So when you're clicking
on those, you're costing sellers money. So you just want to be
careful about that. I try not to unless I have to. I saw this before and I'm
going to click on it. I think this is very eye catching and it's called
off color Candles. So here we are. I'm going to click right here so we
can look at the homepage. This looks great. It
looks very professional. There are just a few colors. The fonts are very legible. They highlight four things
that they're proud of here, the ingredients, the
prices, and the shipping. This is the icon right here, and that also is
cohesive with banner. And you'll see here that
the off color candles, this looks exactly
the same as that except the off is vertical. But it has those
same little dashes. I think this is very cohesive, and this is the shop owner. Etsy recommends that you
show your smiling face here so customers can see
who they're dealing with and that they're
dealing with a real person. That looks great. It's a clear photo of her face. I think this looks fantastic. The photos are all
really consistent too, if you saw any of these
photos in search again, you would recognize this shop. All right. Let's look
at something else. Let's look at this one. This has a different vibe. It's not as trendy
and bright and cool. It's still very nice.
It's very clean, and they have a collage
of different items here, making it clear what they sell. They sell scented things. Here is the icon right here. What are the things
about this icon? I think it looks good. The words here say
Established 2018, and that would not be as
legible if we looked at it on a mobile or in
the shopping app. And here is the
shop owner's photo. And again, we have a nice
photo of a smiling face, and you can see how the vibe is completely different
from that other shop. I think this looks really great. Okay, let's look for
something else on EtS. Let's just go abroad and
look at accessories. That's a top category on EtS. And again, we have to
reflter by Star seller. Here are some accessories. It's a large variety
of accessories. I think Etsy is showing me candles because I already
searched for candles. Let's just see what we
want to look at here. Okay, so this is really cute
flour linen hair clips. So we're gonna click on that. Okay, so these are really cute. Let's click on the homepage. My first impression here is that there's a lot to look at. If we remember the
candle shop that we just looked at
had four photos. I think that's more effective than what this shop is doing, which is showing ten
different photos. And I can see that
they're trying to show their different offerings, but I think it would be
a lot more effective if they used fewer photos. I think the icon
looks very nice. We see another smiling
face with a dog. I like that. My main feedback here would be that it would be more
effective with fewer photos. Let's look at another top
category on EtS books. So let's see what
we can see here. And we are limiting
by Star seller. Okay. Lots of different
options here. Let's just see what
catches my eye. So this is interesting. A book page flower bouquet. The shop is called
Melting Prose. Let's tap on there. I think
the banner looks pretty good. They make it clear
what they are. It's bookish candles and gifts. Right here, the icon, again, we have the written
word and a candle. We have a smiling face
for the shop owner. I think it's pretty
good and cohesive. I would prefer to see their
product in the banner. That's just my opinion. Let's search for weddings,
another top category. And let's just see what's
catching my eye here. Let's look at this shop
called Keepsake hankies. So that's embroidered
and ready to ship. Let's click on their homepage. Okay, here we have a shop that is choosing not
to use a banner, and this is what it looks
like on the browser. I'll also show you what
that shop looks like on mobile and in the
Etsy Shopping App. Here is a picture
of the shop owner, which is a picture
of their product. It's pretty hard to
see here and it will be even harder to see
on a smaller screen, but it is an embroidered
napkin with some pearls, so it looks pretty
wettingy doesn't give you an idea of who the
shop owner is, of course. And this is their icon, which shows you a hanky, but again, it's going to
be too small to read. And I don't know if
you'd necessarily grasp what it is at a glance. So I think my main critique
about this is it's not really giving you an idea
of what the shop is. It's like going into a
store that doesn't have any signs or anything in the windows really
that you can see clearly. It's not setting the
tone for the shop. So I'm not exactly
sure what I'm going to be seeing when I'm
browsing these items. That being said, it is
a star seller shop. They have over 7,000 sales. So clearly, they're doing
a lot of things right. Let's wrap up the
inspiration gathering part of this lesson. And remember the goal here
is to find inspiration. So use these ideas for a springboard for creating something unique
for your own shop. Let's take a quick break. In the next lesson, we'll go over your eight free
brand palettes. I will see you in
the next lesson.
5. Using the Free Color Palettes in Canva: Welcome back. Last time we
browsed Etsy for inspiration. Now, let's take a look at your eight free palettes and
how to use them in Canva. If you need a brand
color palette or you want to experiment, feel free to use any of mine. I'll be using one from the
class resources throughout. If you're looking
for more options, you can also purchase an
additional 48 palettes. They're linked in the class
resources and worksheet. For a more detailed look into working with
color palettes, check out my previous class. Color your brand,
a beginner's guide to Canva and palettes. While I'll guide you
through my process here, that class covers
everything in depth. Okay, so let's get started by opening your eight
free palettes. There are Canva templates, and each lesson in this
class uses a template, so you'll keep learning
more about Canva as we go. All of the templates are
linked in the Canva worksheet. So here is the link in Safari. When you click it, the template will pop right into Canva. And here's Canva in
my Safari browser. I'm moving to the Canva app for this class as it offers the color picker tool
which we'll be using. Either the free or pro version of Canva will work
fine for this class. Okay, so here are the eight
branding color palettes. Each color has a six
digit hex code above it, which is a universal
way to identify colors, and hex codes combine
letters and numbers. So this one is 6b69 73 for
this dusty purple color. So I'm going to
save the template, and I'm going to hit Share, save as, and I am going to just save it right
to my camera role. If you're using one of the
class pallets for the class, I recommend that you download it too and then bring it into Canva by clicking Upload over
here and then upload files, and I'm going to go
to my photo library, and here they are. I know I'm going to be
using just this sheet, so I'm going to bring
just one in right now. And so here is
another copy of it. I am going to so this is a flat copy of the worksheet as opposed to the layered
ones that you have here. So that's why we
brought in this copy. And I'm going to
make it smaller by grabbing these little
rectangles and dragging it in, so all we can see is the colors, and that will make it easy for the color picker to do
its color picking thing. Okay, now that we
have it cropped in, I just want to make it
bigger but still cropped. So now that we have
it cropped in small, I am going to add a new page in Canva by hitting the plus sign
here and hitting add page. And I'm going to find
this color palette, and I'm going to move it
over to this empty page. And this is so we can save it easily with a transparent background, and
I'll walk you through that. We're also going to stretch
this out and bring in the color palette
with the hex codes. So we'll have both of them in our uploaded files if we
need to refer to them. So now that they are
here on the second page, I'm going to hit Share, and I want it to be a
transparent background. So I'm going to hit Save as PNG. A PNG is the only file that can have a
transparent background. So I'm going to click
Transparent Background. And I don't want
all of the pages. I just want page two. So I'm going to download that I know this seems like
kind of busy work, but it will make it
easier in the class. This is the way you can
do a workaround over using a brand color
palette in Canva. If you have a pro Canva account, you can have a
saved color palette and I'll show you what
that looks like later. If you don't, you can only save three colors
of a color palette. So that's why we are
doing this workaround. And I'm going to
upload these files again, and I'm going to go here. Now that it's up here,
I'm going to delete these by hitting the
little trash can, and I'm going to
bring these back. And if you can see here, there's a little checkerboard
background, and that means it's a PNG with
a transparent background. So this sets us up nicely
for the next lesson. Let's take a quick break. I'll see you soon.
6. Minimalist Etsy Banners: Project 1: Welcome back. In
the last lesson, we explored color
palettes in Canva. Now, we'll start editing our next Canva template,
minimalist banners. Let's open the minimalist banner template
and start editing. Again, I will walk you
through every step. So I'm tapping right here
and it opened in Canva. So we're going to hit open to bring it up in the Canva app. Okay, so here are 20 minimalist banners that
are curated for at C shops. I put them all together. This lesson, we're going to
edit some of them together. So I'm going to pretend
that my shop is a natural candle shop and I will be editing the
banners accordingly. The goal here is to show you different techniques in Canva. It's not for me to make
stunning perfect banners, and I'm saying that for myself because I can get
hung up on that. So this is just a
learning exercise. So we will start with this one. I always like to look at what makes up
the Canva template, and you can do that
by tapping position, and you can see here what all
the different elements are. Right here, this guy
is off the screen, and I'm going to bring
it back by hitting Undo. Same with this
one. There's a lot that you don't see
that's off the screen. And let's bring our
color palette back. We uploaded that in
the previous lesson. I don't really need
the numbers right now, so I'm just going to put
those off the screen. I'm just going to start changing the colors to the
new color palette. So I'm going to go
back to position, and I'm going to tap this, which is the background, and I am going to tap
this colored circle, and I'm going to make the
background, this dark color. And if you can see here, Canva brings up the
photo coolors here. So that's how we can get around using the color
picker or the brand palette. So I'm going to
change the background to this dark purple color. That looks good.
Let's keep going. I am going to change these little stars to
the light pink color, so I'm going to tap here and tap here, and let's keep going. I'm going to change
these little guys again to the light pink color. It's asking if I want to change all the colors
at the same time. I do, so I'm just
going to do that. It helps with this if you
try and save similar color. So the background
was a dark color, so I did a dark color. This was a light color, so I
did a light color and so on. This element right here
is kind of reddish, so I'll change it to the peach, and I'm going to change
all of the colors to that. Let's move on to this
gold abstract shape, and let's change that
color to the lavender. So I'm going to change them all. It looks like they
have an extra color here that maybe we don't have. Maybe we don't have the
second darkest purple. Let's see if that shows up. Instead, I'm going to do
that the lightest purple, and then I'm going to do
these the darker purple because I want more
contrast between the peach and the purple color. So I'm going to do this. Yeah. Uh, don't love it. I'm gonna go back to
the way it was before. So we have all of
our colors changed, and we have all of our
colors represented. I think this one is the
light purple still, so I'm gonna tap this circle
and do the medium purple, and that's fine for
it to be just kind of a subtle element
hanging out there. I'm going to change the font here and let's just
call my candle Company. I'll be really clever.
Candle Company. You can also change the fonts
if you have brand fonts. You can use the suggested
fonts here if you like them, or you can use any of
the free fonts in Canva. These are my brand kit fonts. I will just change this to Alta, which is similar but different. Sure. I could make it bigger
by tapping on the plus sign. Or by just saying like 200 here. That's probably,
that's not too much. It's fine. I am going to move this palette down here for the next one so we
can take a look at this, and I could change
this to natural sense. So that is how you could edit this template
and make it your own. Let's move on to the
next Canva template. And this one, it looks like it's for a photography company. Let's tap position
and look inside here. There are just three
elements to this banner. It's the background photo and the font here
and the font there. So that is easy enough. Instead, we want to make
that our candle photo. So I'm going to delete
the background picture. I'm going to go to elements, and I'm going to search candles. And I'm going to go to photos. I'm going to actually
add horizontal to this so we can get
a horizontal photo. These colors work really
nicely with our brand colors. However, I'm seeing
that it is a pro photo. So if you wanted to use that and you didn't
have a Pro account, Canva would charge
you a small fee. But since I want this class aimed for free Canva users,
I'm not going to use it. I'm going to trash
it, and I'm going to go up here and I'm
going to hit free. So we want only free
candle elements. So this is what we have here. I'm looking for one that
could look nice horizontally. This looks close to
our color palette. So let's just see
what this looks. I'm stretching it out by
grabbing the corners, and I'm going to
bring this up here. And, you know, if you wanted an abstract banner with just like that BCO effect, you
could use something like that. But here is my candle. I'm going to tap position again and bring it
down to the bottom. I think in this
case, we might want the words to be left justified. So I'm going to tap up here and left justify these two
different sets of words. I'm going to move
this over here. And I'm going to show
you a trick to make this candle color look a little bit more like
our color palette. So we're going to
go to elements, again, and we're going
to go to graphics. I'm just going to type square
or rectangle. Both will do. Here is a rectangle
with this color, and instead, I'm going
to make it our color. So I'm going to tap
on this color circle and oh, here's something to see. Now there are two
sets of photos. It's the background
photo that it's pulling from and also our palette. That can be a cool way to create color palettes by
using pictures. That's just another
way to do it. But instead, I'm going to just change it to this purple color, and let's see what happens
if we stretch this across here and make it transparent by clicking on
these little checkerboards. Checker boards mean transparent. Let me just bring down the
transparency to let's say 44. I'm going to X out this and I'm going to tap here and I'm going to look
at the position, and I'm going to move this down. So it's just right
above the photo. That makes it look, I think, a little bit more like
our color palette. What if I deleted it? Yep,
and then brought it back. Yeah, it makes it closer
to our color palette. I also see that this is not stretched all the way
now, so I'm doing that. And you could play with a
transparency again to make it. Oh, the transparency went
back to 100 when we moved it. So let's bring it back to, like, here, I have a
transparency of 70. So that changes it. It's not perfect
in this instance, but that is a good trick for changing colors to
the way you want them. Actually, I just thought of an easier way that we could change the color
that might work. So I'm going to go in position. I'm going to tap on
this candle photo. I'm going to hit Edit. And I'm going to go to filters. I'm going to look for a
filter that looks kind of like our color
palette right here. Again, this is just training. It doesn't need to be perfect. So we want peachy lavenderi. Oh, and I still have that
color thing up here. I'm going to bring it under by dragging it down
underneath the photo, and then we can see the
colors more clearly. So here we have our photo, going back to edit. Look at the filters. I don't know if I'm seeing
a perfect match here, but you get the idea. That is another way to
change colors within Canva. And once again, I'm going
to change the font here. What is my candle
company called? It's called Candle Co.
And one last step, we want to change the color
to our lightest color, which is down here,
and then we want to change this color again
to our lightest color. Again, we could change the
font to anything we wanted. It's an all cap, so that looks weird because
it's a script font, but we could tap these
three dots and hit the AA, and that makes it
mostly lowercase. So you could play around with
the fonts if you wanted. I'm going to grab this
palette and move it on to the next banner. Okay, let's take a quick break. In the next lesson, we
will continue editing our minimalist at C Banners.
I will see you soon.
7. More Minimalist Banners for Etsy : O. Let's move on
to the next one. So Lycia and C, I'm going to go to position, and these are the elements. We have these abstract
figures again. These I call them
abstract blobs. We might as well.
So I'm going to start by changing those colors. I'm going to change it to our lightest purple
color right here, and I'm going to change both
of them at the same time. I'm going to change
the background, which is usually a
good place to start. So we're going to
go to position. And I'm going to tap
on this background, and we'll change it to
our lightest color. So if we wanted to use a little icon that
was candle esque, we could look for, like, maybe a flame and then look
specifically within graphics. And here are some
flame graphics, and I still have it. So we're only seeing
free options. So we're going to
continue with that. So here are some options. What about this one? We want one that we can change the color and if you
can change the color, then you'll see
this color up here. I'm going to make it
bigger so we can see it. We can change the color. Here we go. And we're going to change all
of that to this. What we could do here is
I'm going to hit Copy, so we have that copied. I'm going to bring this up here where the little star was. I'm going to make
it a little bit smaller and move it around. And now I'm going
to actually copy it now that I have
it the right size. And then if we wanted
to customize this, we could get rid of the other
little stars and paste. And here we have our
little candle logo again. I could also duplicate this by hitting the
plus sign here, and we would then just
be replacing all of the stars with the
little flame icons, and that could be part of your
logo, too, if you wanted. The other elements to change
colors are the title. So we're going to tap on that A. I'm not going to keep changing the name of my shop to Candle Company because
I think you got it. So I'm going to tap that, change all of the colors, and then the other
thing to change are these little lines. And if you wanted
to move the lines, you can by hitting this
little double arrow, and if you wanted to angle them, you can do that by hitting
a little compassy thing, and then the circular
arrows will twist it. So I'm going to hit Undo, so that goes back
to the right place. I just wanted to show you
a little bit of that, and you can change the color
of this line right here with a circle that has the
little empty center, and let's change
that to this color, and we want to
change all of them. That's another way that you can personalize your Canva banner. Let's move on to this one. It's a shop that has
soaps and lotions. I'm going to make
this bigger for you. I'm going to hit position, and right here the
picture is set to the background instead of it just being above
sitting in the layers. So I'm going to hit these
three dots and I'm going to hit detach image
from background, and there you can see the
picture that they use there. So the background can either be the bottom layer or you
can make any picture. I'm going to do it by tapping these three pictures and
hit Replace background. So it just pops
into shape there. But I'm going to undo
that and get rid of that because I have
a candle shop. I am going to look for another
horizontal candle picture. I am going to go to
my elements and go to photos and do candles
horizontal again. I continue to have
free options here. Because it's in the background, we want to keep
aware that there's a color overlay to
this also of course, keep in mind that it's
a horizontal photo. And ideally, have
it work well with our color palette so
I'm going to move our color palette
over to Barcell, which I should
have done earlier. Let's just say that works
for our color palette. So I'm going to take this photo and I'm going to stretch it
out by the corners, and I'm going to tap position, and I'm going to bring it
down to the bottom layer. Okay, so here is our candles. Let's see if we can filter that back photo so it looks a little bit more like
our color palette. Edit filters CA. That sangria looks nice
with our peachy overlay, so I'm going to choose that one. Let's go back into position. Maybe we can change this
overlay. It's right here. If you want to get
the idea of it. I'm going to undo it and
put it back where it was. Let's change that. Let's see how it looks
with our peachy color. You know, I like it. Let's change that. The
only things left to do would be to change
our font color. To this light color, then change the second
font to our light color. I think that looks pretty good. This soaps and lotion
isn't super clear, so I would change that font because kind of it's
a busy background. Another thing we could
do is go to here, and we're tapping on this layer, and let's see how
transparent it is. The transparency is 28%, so we could make it
less transparent. So maybe the font
would be more clear. That's 36. We'll leave
it at that for now. And again, I would just change this font to
something more bold. This bold font doesn't go with a vibe exactly, but
let's try this. And let's see if we can
bold that. There we go. You know, I do like this one, and I would just be
very conscious of the fonts that I'm using so
it doesn't get lost here. Another way you could experiment
with fonts in Canva is by going to text over here, and you can see some
different examples of fonts paired together. But this is a good
place to check out different font pairings. Let's say we wanted
to use that font. I mean, we don't. But
that's how you would do it. You would just put
it back in there, and then you would
change the color to whatever you wanted. I deleted our photo
with our color palette, so that's not there anymore, so I'll just get rid
of the sticker. That's another way
to find fonts. You are welcome to use any of these templates for your own, and I would love to
see the template that you designed or edited
as a class project. I will give you feedback on it. Please remember to share one or more banners
as a class project. So that was our lesson using
our minimalist banners. In the next lesson, we are going to move on to a different Canva
template that also has 20 different
options for you to use, and we'll continue to edit them. These banners are slightly
more complex because they're going to be using something
called frames in Canva. And I will tell you
all about that in the next lesson. I
will see you soon.
8. Using Photo Frames in Canva: Welcome back. In
the last lesson, we finished our
minimalist banners. This lesson features templates that use Canva photo frames. Canva photo frame banners
are for sellers who want to showcase their
product photography directly within the banner. They're perfect if you have strong images that you'd
like to highlight. Alright, let's get started. So, here's another
Canva template. Let's open it up
in the Canva app. So here's the template
within the app. Let's open her up. So here is the template. And let's just scroll
through so you can get an idea of what kind of
options we have here. They are all using photo frames. There are 20 options here
for you to choose from. All perfect for Etsy banners. I'm going to click out of there, and I'm just going to start
a new page down here. I have this new page, and if I click on these
little squares down here, it will open up just
to this new page. And this new page is just
for practice with frames. So if we go to elements, there is a frame
option right here. And so if we tap frame, here are the kind of frames you might think about like
frames for a photo. But then there's Canva
frames which have all of these different
shapes and they have the little cloud the
green landscape. So let me just show
you one to start. I'm going to make it
bigger by dragging here and I'm just
going to find a photo. I'm just going to use
one of these from my other class about
color palettes and Canva, and you can see that it hops right into there.
Let me undo it. So if you can see here, I'm tapping on this
thing again and it gets pulled right
in to that frame. And if I wanted to undo it and try something else, I
can trash this one. Let me show you what happens if I put something in
there that's too long. So here is a long image, and if we put it
within this frame, it just crops it
off to the center. So let's just go back to our
elements and to our frames, and there are some really
interesting ones you can use. There's this one right
here that kind of looks like paint or it looks
scribbled on there. So we could find a photo, and let's put this right
in there. Here it is. So a frame is a container that highlights a photo that you already have. And when you're getting rid
of a photo and you hit trash, you can either delete the image, which leaves the
frame or I'm going to back up or you can
trash the whole thing. So delete the frame and
the whole thing's gone. So that is just a quick
intro to frames in Canva.
9. Canva Frame Banners: Project 2: Let's get into the lesson. Let's start with
this first banner, and I'm going to bring back
my colors that I was using my brand colors that I had
saved in the elements here. So I'm going to go back
to uploads. There we go. Okay. So here's our photos, and I still have my
pretend candle shop. So we are going to move this over here, so
we have the colors. I am going to start by
changing the background. So I'm going to go to position. I'm going to go to layers, and I'm going to go to
this bottom layer, and I'm going to
change the color to this light pink color. It asks us if we want
to change all, sure, it might affect another template down the line, but that's fine. And then we are going
to change this font. Let's do it the darkest
color in our palette. And here is our
palette right here. So I'm going to choose
that, and I'm going to change all of the
colors to that color. And then we are on this
brush strokes here, and we can change the color. You can't always change
the color on things, but if there's this color dot
up here, we can change it. So let's change that. Let's try our peachy color, or I like the lavender color better. What if we went dark? Now, let's do this color. And now that we are finished
with our colors here, I'm just going to
move that swatch down to the next banner, and we will find a different
picture for our frame. So, again, if we hit trash here, it gives us the option to delete the image or
delete the frame, and we're going to
delete the image, and we are going to go
back into elements, and we are going to find
a picture of a candle. You had your own candle photos, this would be a great
place to put them. And again, I'm going to
limit my search by free. So I have candle. I'm going
to tap up here and tap free. And so now we only have
free candle photos. And so, again, this lesson is not about me making
perfect banners. It's about showing you how
to make really good banners. So I'm going to tap on this
picture again that has that kind of purply hue, and I'm going to
put it in there. Oh, that's interesting. Let's back up and see
what happened. Ah, I see. This is tilted to the side. So if we went like this, it has a zero down here. So now if we do this,
I bet it will Yep, it'll go in there well. And now we have a
very purple banner, too much purple,
one might argue. It's a very purple banner. It's fine. There's not
a lot of contrast. The paint swatch
might be better in, like, a peach color.
But there you go. Not perfect, but
you get the idea. Let's move on to
this next banner, and this is for skin care. Let's start by changing
the background. What if we did darker color, Let's see what that looks like. So I'm tapping on here on this color dot, and sure, let's. Then let's change these
photos to candle photos. And we have our free
candle photos over here. And again, if you have
your own product photos, it's a great place to use them. Let's move this one into here. It's a little off centered. Let's see if we can fix that.
I'm going to undo that. And I'm just going to crop
this in a little bit, so it's a little
bit more square, so maybe it will work
in there better. Yeah, still did the same thing. Anyway, it's fine.
This is another frame, so I'm going to
delete this image. And we are going to find
another candle photo, or maybe it would be a picture
of your gift wrapping. So let's say this is
your gift wrapping. I would have to be a very small
candle, but there you go. So we can pop that
right in there. And that looks nice. I wasn't conscious. Whoops. We got rid
of some undo, undo. Okay, here we go. Ah,
I see what happened. My palette popped
into the frame. So we're going to move this around until it goes in there, and that color actually
works pretty well. It's not super centered. Let's see if we can fix that. It looks a little
bit better there. There's a little
chunk of her thumb cut off, but that's fine. And let's click on these images. Okay, so this one
we can't change the color because there's
no color thing up here. The Avery Davis, we can
change to our lightest color. This one, we could. I'm just going to
move this palette over to the next space. It's a picture of a woman, so we could find something
else, like in graphics. Let's do self care aesthetic. They don't really
match this vibe. What if we did a candle
line drawing? Here we go. The other one was flowers, and we could do flowers again. Let's use this one, and maybe we could,
like, double her up. We can change the color,
so I'm going to tap here and make this whitish pink
that's already on there. So I think that's right there, and we want to
change all of those. I could change this to candles, but you know how to do that. I'm going to go to this
A and change it to here. Actually, I think this
is our pink right here. If we wanted to, we
could duplicate this by clicking plus,
and now we have two, and we want to hit flip
to flip one horizontal, and then we can
bring it over here where these can kind of
book end each other. I think they would look
better the other way. Yeah. So let's move Avery
Davis to the center. I'm going to delete
the skin care, and we're just going to
move these over here. So if I want to look at my work here and
critique my own work, I'm going to shut this so
I can make this bigger. The Avery Davis here is
kind of lost in the center. Let's see if I can
make that bold. I could keep the same
font and make it bold. I could move these things
down a little bit. You can also stretch this out. Again, not perfect,
but you get the idea. Maybe I would put some
more texts down here. I could duplicate
this text and just write Candles unbold that. I'm going to highlight
it, unfold it there, make this smaller, and then
just bring it up here. Anyway, not perfect,
but you get the idea. Okay, let's move on
to the next one.
10. More Canva Frame Banners: Okay, this is a
little bit different. I'm going to go
back to my uploads, grab the color palette,
and here we go. So let's look at
what we have here. They have two computers
and like an iPhone. If we look in the position, we can see that
the background is also like a texture of
sorts, kind of abstract. So we could switch that one out. We're going to detach
it from the background. Let's find something else. Candles don't exactly work
with these computer things, but let's say now I have
a candle making class. That's what I'm going
to be promoting. So I'm going to find in the
elements, a background. We're just going to look for something abstract
for our background. Ideally, we want it
within our color palette, and we want it to be free.
That's still selected. Remember, we do have the
option with a filter of changing a color
a little bit, so it works more for us. I'm not sure if we
use this one before. Let's just try it. So we have it right here. We're going to go into position, and we're going to bring it down here and I'm going to tap here and hit Replace background. So that is our background now, and I'm going to delete
this original photo. This isn't exactly our color, so let's go to Edit and see
if we can make it more peach. That's the chroma filter, or Zeal is even better. Hazel, let's just go with
zeal for our filter for that. So now our background
is within our palette. We're going to look at
these little flowers down here and we can
change the color. There are two different colors. So we're going to make the
darker one our darker color. So I don't see our palette here, and that's because it's picking up these other photos
that already exist. So I'm going to delete the
images that are within the frames so now we can
see our own palette again. So back to these little flowers. We'll click on the dark color, make it that color. I'm going to change
all of those. I'm going to go to
here and change it to this light purple color. So I changed all those. We could change the font to
something that's ours. Let's just change it to here. We're going to
change all of them. And if we wanted a different
font to play with, we could look for something
that looks like calligraphy. And you'll see here
with the fonts that there's pro fonts, and there are free fonts. And in this case, there is a font that I uploaded to Canva, the Winter Calligraphy
Sands regular font. So we have changed the colors. We've changed the font, and now we just want pictures
that are ideally within our color palette but
I'm just going to move the color palette over here so we can work
with it next time. This phone has all of
these different colors of gray and black in here to give it some depth,
I would imagine. But let's go back to elements, look for candle making because now I'm doing
a candle making class. And I want free photos again. This photo I like,
and it's horizontal. So let's see if we can plug
it in here. That looks good. We could also filter it, edit it so it's better with our color palette,
which is down here. Let's just choose
this area filter, and maybe we can filter all of our photos area so
they are consistent. Let's go back to
our candle making and let's look for a
horizontal picture for our phone. Here we go. And let's filter that to area. Edit, filter, see all. Right there. So we change that. Now we have an iPad
that needs a photo, and let's do this one. So we're going to
pop that in there, and we are going to change
the filter again to area, Edit filters, see all and area. So I'm going to
delete this photo, and this is what we have. I don't know, love
the font here. I don't love this, frankly,
but we're going to move on. Here, we have a shop
that sells kids things, but we are going to make
it into a candle shop, and so we are going
to delete the images. We are going to change the
colors, so they work for us. So we are going to change this orange to our light purple. We are going to change
this yellow to our peach. There's actually
two colors here. So let me just finish doing this and I'll show you. I'm going to change them all. It looks like this graphic, if we put it on top, is actually a graphic with
two different colors, which you don't see
that terribly often, but we can change both of them. I just wanted to show you. So we're going to undo that
and put it back where it was. So we're going to change
this different color to our pink. This will be our
white pink color. I think that looks nice. I can't tap on
that text exactly, so I'm going to go to position. And here and change the color
to this color right here. I'm going to get rid
of that palette, and now we have our colors, so we would just put
our pictures up there. So I'm going to delete this one, and let's say I'm
still promoting a candle making class just
because we have them up here. So I'm going to put this here. It's a horizontal photo. That doesn't work. Undo.
And the reason it doesn't work is because this is off the page. I'm
going to undo that. So it would be centered if
it was within the page, and maybe we could
find a photo that would be better off
if it was cut off. What about this one? This one, again, there's a lot of
action at the bottom. Let's see how that
works. Sure. That works. We could change
the filters again to go with our brand or
we could just keep going. And let's put this
over here. That works. And let's put this over here. And actually, just a little detail here because this hand, it makes us look like off
the page at the direction. And if we just flip horizontal, then it's looking kind of into the page, if
you know what I mean? And then there's
something taller and lower and taller
and lower there. So I think that
looks pretty good. If we wanted to, we could
give these a border. Let me show you how to do that. So I'm clicking on that one.
I'm clicking on these lines, and I'm going to give it
a border weight of four, which is Canva's
default border weight. So I'm going to hit Return, and now it has a border, and I can also change
the border's color to work within my color palette. And now what it's doing
here is it's pulling up all of the photos in all
of the templates. But let's see if I can find it. I think this is
probably our color. So now it's changed to
our color for a border. You can't see it
very well, so maybe I want to change the
thickness of that, and let's just make it
just so we can see at ten. So there you go. That is how you would put a border on a frame. I think this looks. Good. And again, if you like these fonts, you
can keep the fonts. This one's called Glicker. This one's called Lexin Deca. So we have done four
different banners together. I'm just going to scroll here and see if there's
anything to show you. I like these gold lines, so I wanted to show you
how you would do that. You would go to position,
and they're right here. In this case, there are
three different gold lines. And if you wanted
more gold lines, I don't think you
would with this. I think it looks great as it is, but you could go to
elements and look for thin gold lines. So we're going to
go to graphics. Here's an example of
gold lines and so on. When you start choosing
a couple lines, Canva will come up with
some magic recommendations. There's also frames that
look like polaroids, which is fun, so you can
pop your images in there. I think that is a pretty good overview of
using frames in Canva. Remember, I'd love
to see your banner in the class projects, so pop that in there. And the next lesson,
we'll be working on our final template, and that is for icons, the little square images
on a shop's homepage. And we'll do that with my
existing color palette and my existing
pretend candle shop. I will see you in
the next lesson.
11. Etsy Shop Icons: Project 3: Hello, and welcome back. In the last lesson, we edited
our Canva frame banners. In this lesson, we
are going to be working on our last template, our Canva icon templates. And this is what it looks like, and I'm going to
open it up in Canva, and I'm going to move it
on over to the Canva app. Okay, so here are our icons. You'll find the icon right
here on your Etsy profile. So there are 31
different options that I gave you for icons. You'll definitely want your icon to be in the same palette, vibe and font as your banner, so keep that in mind. I am going to bring up
this color palette that I've been using throughout
the class, and here it is. I'm just going to copy it. And let's start on
this first icon. It's very simple. If we go to position and layers, we can see what it's made of. It just has the background, the heart, and the text. I think it looks very
nice and simple, and I'm going to paste
that color palette that I grabbed before, and here we go. Let's try a dark background. I think that might be pretty. Here's the colors
from the palette. That looks nice. Let's click on this heart and let's change the color of the heart
to our lighter purple. Now we're going to
have to have the text be in a light font.
So let's do that. It's very simple and minimalist, and we have our
colors represented. I am going to move
this palette to the next one, and let's
take a look at this. I think it looks nice
simple and nice. We could play with the
transparency of the heart. That's 52%. I think
that looks good. Okay. Again, you can play with the fonts
if you would like. I like these two
fonts, pinon and Leto. I think they look nice together. Okay, let's move on
to the next icon. This again is a
very simple icon. If we look at position, we can see what it's made of. So what they did here, I just want to point out
this. It's a good trick. They put a rectangle
that's the same color as the background over the DG to put the name. I
think that looks nice. What color do we
want to do this? What if we did it
our darkest color And then also did this square. It needs to be the same color. And then, of course, we need
to make the font light. So I'm going to click on here. I'm on the font or light pink
color. No, that's peach. Here we go. Go back to the
words. Make it pale pink. I don't know why I haven't been changing all of the colors. I'll do it this time. Yes,
that was much easier. So here we have going to move this color palette
over to the next one. A very nice and simple icon. We could also make
it a little bit bigger if we grouped
the elements together. And to do that, you would tap on those three dots and
hit Select multiple. And sometimes it's
kind of tricky. It's easier to do on a
computer than it is an iPad, but I think it's working. I just need to grab this, and you can see that
we're grabbing it, and then I grab the G, and it says five elements selected, so I'm going to hit done,
and I'm going to group them. So I'm going to move them. So it's just a
little bit bigger, and Canva will
help me center it. I'll put it right in
the middle there. But you can also tap on
these three dots and tap on a line to page and
make sure that it's in the center
and in the middle. Or if we wanted it to the
left, it would look like that. But for this, we
definitely want it in the center and in the middle. This one, it's not super legible as it is, but
let's work on it. Let's change the colors. Let's go back to
position and see, Okay, we have a white
circle behind there, and we're going to change
that to this light pink. So we'll change all of those, and then we have
this green circle. Let's try this color, I think that looks nice. Let's go back to the position and we have that
circle right there, and I'm going to change
that to our darkest color. And I think it would
probably look more legible if the rest of the font
was in a darker color. I don't know if I've gone
over this in this class, but I definitely
did at length in my previous class about
color palettes in Canva. But Canva has an
accessibility check to see if the fonts
contrast enough. And you can go to
file accessibility, check design accessibility. And it says that there are 32
issues with color contrast, and we want to see if
there's any for page three. And indeed it is saying that that color is not easy to read, so it's suggesting a different
color within our palette, and we'll just keep going in that fashion to change
it to the darker color. I'm going to move this palette
on over to the next one, and let's take a look
at what we have here. I'm realizing as I'm
going along that I don't really love that
peach color in the palette. I'm not necessarily
a peach person, so you can see I've kind
of been avoiding it. But that's a good thing to
notice when you're doing this. If there's a color within your palette that you just don't use, then it's probably not
a great color for you. Speaking of the
accessibility, let's go back. It says that we have
accessibility issues on page one, that this is not dark enough. I'm wondering if we made the heart more transparent that that would
eliminate the issue. If we go to color contrast, we no longer have a
color contrast issue. On page one, our first
color contrast issue is on page eight.
That's a great tool. And once again, it's
file accessibility, check design accessibility. And you want to look
at color contrast. Let's move on. Let's first look and
see what we have here. This background here, if I
detach it from the background, it looks like it's
just abstract paint. It is within our color, that works within
our color palette. Let's just put that
back where it was, we'll keep it, and then we
will swap out the photo. I'm going to trash the image, and we're going to put
in a different image. This would be you or one
of your product photos, if it was for your shop, but let's just look in the
elements for a woman smiling. And we're going to
look at photos, and we want to keep in
mind our color palette. We can also edit
the photo again. I think she might look nice. Let's put her in that frame. She doesn't want
to get in there. Okay, lady. There we go. Just had to talk sternly to her. Okay, so this works okay. We could make it work better with our color palette
by going to edit and filters and
making her purply, whimsy or black and white. I don't know if I like
these filters on her. That one's nice. But is it better than none? It probably isn't. So we'll
just leave her as is. So that's that icon
with a photo frame.
12. More Etsy Shop Icons : On to this one
because I don't think we've worked with
curved font yet. And let's pretend that I
still have my candle shop, and here is my color palette. I'm just going to
copy it and paste it. I am going to start by changing the background to
our peach color. There we go, and I am going to change the text to
our dark color. And I'm going to change
it all. That looks good. And while we are in the text, this text has an effect. And if we tap here on effect, it has a curve. So this curve is at 45 degrees, and you can change
the amount of curve, so it will do whatever you want. But we will bring it back to 45 and if we wanted
to undo that curve, we could hit none,
but we do want it, so we're going to undo again
with this little button. Okay. And so this font down here has a negative 45 degrees curve,
so it matches that one. This is positive 45,
this is negative 45. Okay, so we're going to keep
on changing the colors. Let's also change
this leaf here. And instead of the leaf, we want a candle graphic. So I want to go back to free, and here we go That was cute. It has a lot of different
colors. Let's give it a try. So we're going to
make this dark color, this color, we're going
to make this yellow. What about that
color? Sure. What if we make that yellow, this white? That's better. And what if we make the pink, the lavender? That's okay. You know, I think the real
deal is that I don't like this peach background. But
let's just keep going. And where's this pink color? I don't understand? I don't
know, but I just changed it. Okay, so there we go
here. There we go here. And now we have
these little stars that we want to change colors. We could also do different
things like flames, but I like these little stars. Let's change the colors. Let's change this one to a different color
in our palette. How does the purple look? That is too light. So we could do that color
or the darkest color. Oops, I just changed
a bunch of things. I want to undo that. So let's move this on over to another screen and take a look at
what we have here. I think that actually
looks really good, despite the fact that I
don't like that peach. What would happen? I'm
going to see if we grab a square and we are going
to make it our peach color. There we go. I am going to spread
this across the page. I am going to tap here I'm going to close this so
we can look at the layers. I'm going to move this
all the way down. So I'm going to
change the background here to just a white color. That's fine. And I'm going to go up to
this little checkerboard and change the transparency. Yeah, I think I would like that peach different if it was
just a little lighter. So that's another thing
you can do with colors. You can play with the opacity to keep it within your
color palette. But you can see it
kind of pops more. It contrasts more
with this dark color, so I will keep it
that way for now. I want to show you
this one because it's another text effect. I don't think I'm going to
change all of the colors here. But if we click on this first word Shadwi
and we go to effects, we can see that it has an
outline with a thickness of 50, so we could make the
outline thinner or thicker. And because the outline is the same color as the back dot, it looks like it's only
outlined on the sides there, which is kind of a cool effect. And I'm guessing this one
also has an outline of 50. And there's lots of fun
things you can do with text. You can give it a
background color like that. If we wanted to
change the background color to that, we could. I don't want to do that there, but it's just an effect. So play with those different
effects within the fonts. This one right here, we looked at before how there was a rectangle
covering up a letter, and here they have it too. There's a square covering that part of the bee,
so we put it back. And then there's a circle here. If I move it out, what the
circle is doing is it's covering up the stem of
that flower behind the bee. So remember that you can
use squares and circles and those kind of things to hide things that you
don't want shown. Here's a nice simple icon. We can pretend that we
have a candle shop here. This will be my last one.
I'm going to undo this. I am going to look
for, let's say, a match instead of a candle, and I'm going to go
within graphics, and I'm going to go to free and let's just look at the
ones that are not free, that are pro because I
think we can probably find a better one just
for this exercise. That's cute. The colors
are not changeable, but I think it's cute,
and it's similar to the needle and thread. This is a pro one
here. So we have this. We could change it to
any color we wanted. And again, we could
change the font. I think this is kind
of a bold icon. So we might want
a more bold font. I mean, I think these
two go together. We could just make
it smaller up here. This font is called Gente. Again, if we wanted to group these, so it was in the center, we could go to select multiple and put it right in the
center. And there we go. Oh, there's some other words in here that are a
really light color. Let's see what they are.
Oh, it's a sewing blog, but instead, we are going
to say pretend candle shop. I hope that was helpful.
Oh, this is cute. And this one, the
colors can change. I really like that one. I like that one
better. But again, that's a pro, and
we're not gonna change the colors right now. But I
think that's really cute. If we liked that
one, we could change the angle to whatever we wanted. Um, and you can see that I
could do this all day long. And sometimes I do. I hope that was a helpful
introduction to icons. I hope you can find an icon
that works great for you. And after you
change the color to your palette and the font
to your desired font, that it works perfectly
with your banner. And the next lesson,
we are going to upload your new banners to Etsy. I will see you in
the next lesson. And again, please upload your icons as a class
project as well. Alright. See you soon.
13. Uploading Your Graphics to Etsy: Welcome back. In this
super quick lesson, I'm going to show
you how to upload your new banner and
icon to your Etsy shop. So this is my digital
downloads for Creatives shop, and I'm going to tap Edit Shop, and I'm going to tap
this little pencil here and I'm going to
delete my current banner. I really do want
the same banner, so I'm just going to re upload
it from my photo library. Tara, Tara. And that looks good.
I'm going to hit Save. Next, let's edit the icon, and that's also super easy
and quick tap on the camera, choose a file, photo library. I want the same icon. It's right here in
my photo library. I'm going to tap
done. There's no need to adjust or crop it. I'm going to hit
Save. Looks good. And then I'm going
to go to View shop, and here is my refreshed
banner and icon. And that is how you change
your EtS banner and icon. The next lesson is also
super, super quick. It's a quick wrap up of
the class with next steps. I will see you in
the next lesson.
14. Congrats & Thank You!: Congratulations on
finishing this class. Each design that
you've created is a unique reflection
of your brand, and I'm thrilled to have
helped you along the way. Designing your Etsy
store front is a powerful way to set yourself apart in a
crowded marketplace. And with Canvas tools
at your fingertips, you can easily update and refresh your brand
as it evolves. Thank you for joining
me in this class. I'd love to see
your final designs, so don't forget to upload them to the class
project gallery. And if you have
questions, feel free to drop them in the
discussion section. And finally, if you
enjoyed the class, please leave me a quick review. So are you ready to bring
your shop's brand to life? Let's go make a lasting
impression on Etsy. Thank you, and I will
see you the next time.
 Kelley Bren Burke, Artist & Educator