Transcripts
1. Intro: Hello. In this course, you will
learn about stylized or a fluffy trees creation
from a treat program. And we're going to modify
it a little bit in Blender and we're going
to import it into unreal. And we're going to create
a little mask for it in Photoshop and just get everything sorted
in Unreal Engine. And we can make beautiful stylized slash
Ghibli trees in no time. So without further ado, if you want to hop on and see
see what this is all about.
2. Software Requirements: Hey guys. So before we dive deep into actual creation
of these fluffy trees, I just want to
make sure that you startup every program
that is needed. So for this one, we'll be using Unreal
Blender Photoshop entry it if you don't have Photoshop, I will provide with some of the masks that we will
create in Photoshop. So no need to worry about that. You can always download
them and use them. You can always use any other photo editing software for the same exact thing. I'm just using Photoshop
in this instance. So this is gonna be
a pretty straight forward and a fast
little course. So I hope you just
open them up real quick and we get through this and get you the
results you want.
3. 1 Tree It Tree Modelling: So let us get started
with creating the tree because we
actually need one. So I'm using tree it. You can use any
other program you can use B-tree you can use, you can even model
that yourself. I'm just using this program because it makes really good
results really quickly. You can copy and mishmash what I did here in
some other program as well. But I'm just going to show
it how I do it in tree it. And this is my actual workflow. So it's a pretty simple program. We will head write-off to trunk, and let's do our
trunk count of three. Now you can see it
because not a single one. They're all in the same place. And what I'm going to keep
the trunk length, length 200. But what I'm gonna do
is trunk crinkling. You'll see I'm just going
to bend them a little bit. So you can have some pretty fun. You can have some fun
with these and make some really cool
effects like this. But I'm not here
to do that to her. I'm here to just get decent
results with with the tree. And now bend. I want these bends to be wondered trees to
be a little bit further apart from
them, from each other. So let's look 3D.
And let's do -30. I think that gives a
decent, decent look here. Now, you can always
mess with these, with these little shapes. But I'm not gonna
do that right now. So because I think
are really simple trunk is actually just good enough for what
we're doing here. So also another
thing you can always go to tree and you
can go edit joints. And you can select
each individual tree, trunk and branch and just kinda configure it
your way if you want to. So let me just show
you an example. I can just kinda put it in
here, something like this, and create, and create
this little edit. So let's go to the
branch and branch count. Let's do 34. Begin for starters, let's do 30. And because most of the
time you will not see the branches in their full well, in their full shape,
to be honest, you will not see
them here because they're really for almost
fully covered in leaves. What I do is just lower
the branch segments. We just slower all of these. So to say, optimization features here and probably
reduction making Max. And I just like doing
that because it makes it, it makes it have
way less polygons. And you really don't need, don't need high polygons
for something you're not really going to look at
because it will be completely, almost completely
covered in leaves. So we can do branch, Let's, let's do branch slits
for beginning one-twenty. Let's actually pumped
out to max. Why not? Also distribution
on the branches? I like to put it to max because the best way
you get something. And for the branch, let's same thing,
just put it to max. And you can do split. And split is a good way
of adding more leaves. And I'm going to
do a little bit of splits on the
branches themselves. Yeah, that looks good. Basically, it splits it
splits the branch into and makes you have more
more stuff on it. And again, branch slits will
be almost invisible like you really have to try your
hardest to actually see them in a tree branch. Let's segments completely down, everything completely down. So just put every single thing so you actually have
better optimization. And I'm really satisfied
with how this looks. Just, just one thing I wanna do is branch distortion and a
little bit of green cleaners. They're just a little bit of
that natural flair to it, that it's actually bending. And let's go to
the leaf section. Leaf, I almost always
bump up to max. And what I use is
front or cross front. The other ones are not really worth your
time to be honest, because they don't they
don't produce good results. So I usually use
front or cross front. Front is a little bit
more optimized overall. So we have our little tree here. And what we wanna do
is we want to add just something on
the actual leaves. So we have materials separation. So we have a separate
material for the leaves and separate
material for the trunk here. So what we wanna do is scroll down here and you will
have some default textures. We'll just use them. It doesn't really matter. Use anything. Just
so it separates. This looks weird, but just so it separates Our how to
say our materials. We don't do this. You will be having a hard
time actually separating the tree trunk and branches
from the actual leaves. Just do this, trust me, put anything in really
doesn't matter. Basically. Now we are done. I'm pretty satisfied with
the look of this tree. So I'm just going to
click on File and Export, and I'm ready to OBJ. And I already have
the folder where I usually keep this
stuff and trees, you can put it
wherever you like. And I'm just going to
name it tree tutorial or three course. Let's see. Go in and I'm just
going to create a separate folder for tree it. And this is tree course. And click Save. And we're basically done. So the next step is Blender. Fire it up. And let's get into
creating in Blender.
4. 2 Blender Tweaks: So now that we're in Blender, we want to actually
import our tree and just click on File Import
and we will import OBJ. And just find the folder
where you put this thing in. And tree and logistic
OBJ imports. And this is the main reason I import stuff into
Blender first before importing it into unreal is because you get some
anomalies like this tree is abnormally big and also sometimes the tree
is rotated weirdly. So it's sometimes like
90 degrees like this. So that's why I
usually just put it in a software first before I actually before I
do anything really. So let's just put
it back in place. And now if you go to
the material section, you can see we have
separated materials. I'm going to name one bark
and I'm going to name the other one leafs. So there it is. We have Barack
and we have some leaves. But what we truly need is
to reduce the size of this. So blender makes
this really simple. You can just divide. You don't need to type your
dimensions in manually. So what I usually found works
the best is divided by 25. It usually gives us some
nice, nice numbers here. So we allocate 16.9 m. It's really a really
decent size for a tree. Let's put this into place. We can delete the cube, and let's just select
this and File Export. I like to export
my stuff as FBX. You can do other stuff
FBX and find your place. And I'm just gonna
do blender and just do tree course selected
objects and export FBX. And now we're going to import this into Unreal
so far up unreal. And we're going to create masks and materials for the leaves.
5. 3 Unreal Engine Material Creation: So now that we're in Unreal, we want to import our tree
into unreal, of course. So let's just, i'm, I'm going to import it
from the other screen. Just drag it into a folder. And let's, let just import. It should import fairly quickly. And we can get onto making some actual important stuff
and making it look nice. So this doesn't really matter. And we can see it's
imported the flower. And we can delete all of these because we
don't really need them. We will be creating everything
ourselves from scratch. So we can import,
we can put it into our scene and it looks, it doesn't look that good. So let's go into here
and open this up. So we already made a
little material here. The third one we will
be using, so leaves. Leaf, sorry. Yeah, okay. So see now our bark
is not textured, but are, our actual leaves are. So let's save this for now. And we'll, this is just
a placeholder for now. We will come back to this later and you can see what you
can actually do in here. But before I actually
go into creating and mixing some
options with this and making it look really
nice, like it should. Let me show you the
actual material and walk you through
it so you can copy it or you can just download the actual scene here I'm using. So I'm just going
to open it up here. And there we go. So there's not much stuff here. It's basically just some
base color or some emissive. And the most complicated thing
is the billboard shader. And what it does, it basically makes so the
leaves always look at you, always look in your direction. So they will rotate. You will not see
that quite well, but they will rotate towards you a little bit,
just a little bit, just enough to
follow you to make that bushy looking effect
that we're looking for and that sort of Ghibli
looking effect that we want. So let's just first get
into the base color. And here we just have a
simple color parameter. You can, you can get that
out by pressing three, left-click and just right-click onto it and convert
the perimeter. And we basically
plug it into this, into underside color
and a huge shift. And we just have a few of these. A few of these here. What are they
called? Parameters? So what we do to get
those parameters, press S and left-click
and you get a perimeter, you name it and plug it in. We do a simple
underside color with multiply and a huge shift, basically creating
the underside color. And what we have here is vertex normal and
we break it out, just get the b value. We add that with
our perimeter here. We multiply that by 0.5. This knee don't, don't
convert this into a parameter because this
needs to say as 0.5. And what we do now is we just do power and with the n softness. And what we do one minus x and learn those things together and plug them into base color. The next thing is emissive. Emissivity is really
not that complicated. We just do a radius, a parameter with a
Fresnel and saturate. Multiply that with
a thin Buddha tint. The same thing we
used here for color. And multiply that with power
so we can adjust the power, the actual power of
the whole thing and plug that into a
massive for roughness. I just did a little
bit, just did. You can press one and
left-click and you can get variable here
are parameters, sorry, and you can just put a value of one and plug that in. For the opacity mask. You basically just to
get the texture sample. And you convert it into a parameter here and plug
it into the opacity mask. And after that, what we
do is we can do normal, but normally it's pretty simple. It just fixing
some normal issues and you just get a color. You don't need to have parameter for this. It's pretty simple. So just the color and
it's one on blue. So just plug it in
here, one on blue. And we multiply that by
a two-sided sign here, and we plug that
into normal here. And now, the most
complicated thing. That we are actually using here. But before I head into that, I just wanted to show you a few of these parameters here because this is not
completely normal. What we're using here
on Blend Mode is masked and shading model
is two-sided foliage. And we want this two-sided
thing to be checked. Just so you can see the
opacity mask actually, because if it's not mask, if it's opaque, can see the opacity mask will
not be present here. So we needed to put two masked and two-sided
foliage and two-sided, just so everything
looks even nicer. Let's get into this
billboard shader. The billboard, billboard shader is basically texts coordinates, which are just the
x-coordinates. Just search it up. And we might 1minus exit
and multiplied by two. So this, these do not, they can't be parameters. These need to be
solid numbers because it's a pretty complicated
equation and not to bore you. Just copy this thing here and you will have
everything under control. So multiply it with two
and then subtract one. Then multiply with a to float. So just press two
and then left-click. You can get this to
float and append with zeros and then transform
vector into normalize. And now we get into some stuff. So billboard size, how big the actual billboard
is going to be. And we're going to
transform it and add here with inflates. So how, how inflated are
the billboard is gonna be? You will you will see this
when we start configuring the actual the actual
materials themselves. And you can see it on a
tree, what everything does. And then you will be
able to play around with these really freely and create some amazing
looking trees. So we put inflate and vertex
normal in to multiply. We add them all up and
multiply with billboard scale, which are basically just
built billboard scale, you will see
everything like that. And now we plug this in to simple grasping because
we want a little bit of wind and we just blanketed
two additional BPO. And what we do next is
just when intensity, wind weight, wind speed, just make all these parameters. And we plug that into
worlds position offset, and that is the
material for you. You can copy this using the tutorial or
you can download it. And in the project settings, it's not that hard. You can get it down in probably 15 min to just
copy everything up. It's not it's not
really complicated. And once you get to
flow, what does, what you'll really
start to understand it. And I don't like explaining these nodes much
because I think when you actually see
what does what you will understand the nodes
themselves are way, way better. So let's head on to actually creating
something interesting.
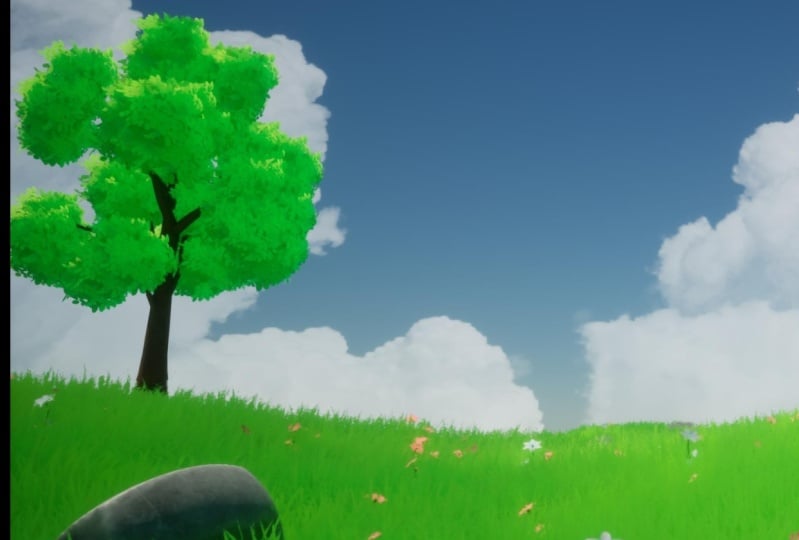
6. 4 Leaves Mask Creation: So here we are with
our little tree thing. And what we want to do is we
want these kind of leaves. You can make a bunch
of these leaves. And what we can do is open this one up and
just put it to the side. And you can see sort
of what each one does. So masks, you can bring these, you can see some of these. This will e.g. look really weird because this
is not a tree. Let's set up for that. You can have fun with these
and experiment pretty much. But we're going to
learn how to make one mask out of this. This one in particular. We'll make our custom
mask in Photoshop. And let's start our
blank project that is one K by one K and L
just say leaf mask. And let's click Create. The first thing that
I wanna do is get myself the bucket and
paint this black. We want that to be
completely black. And just yeah, just that. So now what you want to do is look for your
leaf shape online. You, you can, you can, you can make your own. You don't need to do this, but I like doing this because
it gets me a little bit of it gets me a starting point, a bit better starting point. And what they do, I just
use the snipping tool and just snip out this shape. I save it probably in the
download section and as a leaf. And I close it up and
go back to Photoshop and just get this leaf inside. So now the leaf is not really
what we're looking for. So grabbed a presenter
first and grabbed the magic wand and select
everything we need. And press up here,
select and mask. And make sure to
output to a new layer. And there we go. We have our leaf here. We can delete this. And since it's just scan
over the edges showing up, we want to go to effects
and color overlay. And just max and the
whites and press. Okay, and now we have ourselves
a nice looking shape. Sorry. I messed up there. So just to cover overlay, okay, we have ourselves a nice
looking shape here. And what we wanna do
is just copied around, based it all over the place and just move it and scale it
in different directions. As you can see. Just make it feel a little
natural scaled sum down. And then you can
always press Enter. Let me just lock this in place. I'm sorry. Sorry about that. So let's just copy these over and basically just spread
them all over the place, scale them down a little bit. And after a while you can just basically copy and
paste the whole thing, turn it around, and
mess around with it. And the one thing I
would recommend you is try to not make them
touch each other. But even if you overlap some, it's it's pretty okay. It's pretty, it's not that bad. Just on, don't make
mistakes like this. This will look weird on the map, but a simple overlay
is really okay. So we're just going
to copy some more. And let's just select this. We will just rotate it a little. Make sure it's not out of line. And we can always scale it in the opposite direction as well. Let's, let's do a
little bit like this. That seems nice. Let's This is okay as well. And now I just
want one of these. Let me just try and select. It's hard to select when
there's so many stuff here. But let's try our best. There we go. So now we can make something
like this, scale it down. And e.g. here I would
like some overlap. Like this. I would like a bigger one there. And let's just Let's just
move these out of the way. Basically, it's a
copy-paste game. And you just copy paste a
lot of these stuff and make, just make the whole
thing feel full. That's, that's our
main objective here. And let's just
move this like so, this like so maybe this here. Yeah, this is really good. I would just like to add
one here, smaller one. And I think this
looks pretty good. So we can just go
File Export as PNG. And what we wanna do is go to our place where
we saved our tree. I'll let just see leaf mask. And I'm going to do course
because I have a lot of leaf mask so I can know
which one is which. And with that, we're pretty
much done with Photoshop. You can make a bunch of
similar looking leaf masks. And you can experiment a lot with them and
see what works. What doesn't, It's up to you. I'm just showing you one that I really liked a lot
and how I made it. So let's head on to unreal and actually make
these little trees.
7. 5 Final Touches and Closing Thoughts: So now that we're
back in Unreal, we, we have the material
used for the trees. Just go ahead and
create an instance. And we already have one here. So we will be
configuring that one. I will go to the mask
masks folder and go to the folder where
we save this. And we will just
drag our mask here. And let's just make it here. There it is, so you can see it. I'm pretty satisfied
with how it looks. It isn't the same as this one, but it has that
nice field with it. And now let me
actually show you, let me actually show you what, what's happening
with these controls. So we have these
controls to create some interesting
looking materials. You can, you can, you
can even try to create some mythical trees
like this blue one. Looks pretty cool. And let's, I would like to create some
kind of orange red one maybe. Let's see. This is just
experimentation pretty much. We are just configuring everything to see how
everything works. And now the hue shift
is a big part of this because it creates
that underside color. You see, so one, and if you put zero, there
is no underside color, It's only black pretty much. The underside color is
affected by this huge shift. And as you can see, because
the hue shift is 0.5, it shifted all the way
to some bluish color. So we can do one. So it's pretty much
the same color. You can do that. It's
totally up to you. We can do 0.9 or 0.1. You can, you can't really go over because it
doesn't make sense, because it should be
really clamped to one. So you can see, you can
mess around with all of these effects and figure
out for yourself. I like to look up one, so I'm just gonna do something
close to one like 9.5. So it has some variation. And now you can
choose the power, which is the softness of it. It's all in your hands, how you configure these. So something like this
looks pretty nice. Now, emissive color
and emissive tint. You might have noticed it. If I put zero, you see that blackness
and we don't want that. We really don't want these
little underside colors here. So we want this something low. Even one. Even 0.1
is a bit too high. I use it with really
low values because I just wanted to get rid of
that little black tint there. And I want it to feel
a little magical. Because you see if you
put something whitish, it feels it gets that
magical little field to it. And of course you can do radius. You can lower it. You can make it
higher if you want. We can have fun with this. Honestly, we can, we can
really mess around with these. You can even change it
to something like this. And now it's a little
bit better looking. It's completely up to you. I like to have mine
at really low values. So let's do four and this 1.07. And let's do something white under the underside
of it looks white. And that's what I like. You can experiment
with this, of course. And now these billboard sizes and play tables and whatever, they can get confusing
if you want, you can completely copy
this and get a sort of a good overlook of
what's going on. And you can just mess around until you find something
that looks really nice. So billboard size,
we can change that. And it's sort of yeah,
don't go overboard. It's a weird one, so don't mess with it too much, but literally keep it to one. I usually I think I
could have just placed this as a non
perimeter because one is the default and it should
stay one pretty much. There's nothing else
you should really do. And then scale. You can see what that
does pretty clearly. So we can do 0.5 if you
want some skinnier trees. We can do 1.5 like
we had before. We can do in two or three if you want some bushier
trees like this one, It's totally up to you. I like the look of this. I like I like the look of three. Yeah, three looks pretty good. And then inflate inflate is basically how much you
want them to pop out. And let me getting
a closer shot. Sorry for the leg a little. So you can see how they will basically
inflate each other. But if we put them two minus, it's not that good. So zero, I like to keep
this 65 because it's a, it's a decent number to have. I like this, I like
the whole look of it. And now, of course, the wind, wind intensity, you can always put your own, you can always put
your own wind speed. I like something
lower for wind speed, but maybe higher wind intensity. And wind wait five. Yeah, if you can see that, then it can create some
pretty hectic effects. But 11 is pretty gray. Maybe even 0.7.
Something like that, should work pretty **** nicely. So let's just close this up and let me give you my
closing thoughts on this. So basically, what we did
is created a tree and tree. It just modified it a little bit in Blender inputted into Unreal. We made the material and
we made the mask for, for the actual leaves. And we just played around
with the settings. And the playing around
with the settings is pretty much the major
part of this whole thing. And I want you to do it as
much as possible because only that way can you create some really cool looking trees. And these, these really green trees that
have this Ghibli effect. I created them by experimenting just a bunch and just don't be afraid of
messing something up. You will eventually
mess something up. Don't worry, just go out and experiment
as much as you can. You will learn the
most that way. And I hope you enjoyed
this little course, and I hope you will see next
some of my other courses. And I will cover the tree bark. But the tree bark
material than I made here in this scene is a
little bit more complicated. So it will need to
wait for another to another tutorial or a course. So hope you had a great time and see you in the next course.
 Populus Course