Transcripts
1. Introduction : If you're looking to start
making materials and Substance Designer,
this course is for you. You will learn them
from the ground up about creating shapes, blending noises, etc, and build up the
foundation needed to start your own material making. Took on top of that, this will be an
ever-evolving course. We can always come back to see new material is being explained. That the decoder
complete beginner, or someone who wants to improve their skills and
Substance Designer, this has got to be adequate for you. Let's
start it together.
2. 1 Navigation: Hello everyone. That's joining this
course right now. And we will start off with the first step is to navigation. If you already know around. If you already know how to
navigate around substance, designer, feel free to just
skip ahead of this video. This is just for real
beginners here so they get a bit of a better
understanding of how the substance
designer works. Let's dive into it.
Basically, when you start up the program, you will be treated
with this screen. You will have
learned and create. And basically for now, we're just going
to create a graph. You see how it goes. We
will get another pop-up. Here. You get all these presets, but we will be meaning mainly
working from empty presets. So you know how to set up
everything by yourself. You can choose the
graph name so we can just say navigation
or whatever. We can do bad and size. Basically. How basically
that exercise, I usually leave it as two k because It's easy
to work into K. But you can leave it at even less than normal or
however you feel like. But working into K is really
the best in my opinion. You can always
change that later. Anyways, this, you just
leave basically to default. Nothing, nothing special there. And you click Okay. So you will be
treated with this. And here we have an
exploded in the Explorer. You have packages and graphs. Packages can hold
multiple graphs and you can have
multiple packages open. Here is display the current
graph you've selected. And basically if you're working with modern materials,
you can do that too. So you can have motor packages, model material
packages, monographs, and just go between
them really quickly, which is amazing
because it helps. It helps a lot if you're
using something from some other material
and just want to replicate it in, in another one. And now what we will, what other we have
is 3D and 2D view. So to review, you cannot
see because we don't have any nodes here. So
let's change that. You can hit space, and when
you hit space or hole at this popup comes out
and you can see all. You can see some blending
stuff and some nodes, but we will just search for
Perlin noise, my favorite. As you can see now
we have 2D view. Here we have the properties. These are all the
properties and we have base by Methodist
and the base parameters are basically the same for every single mask or node views. Then we have attributes. This is just whether
you can find it. It's nothing special, nothing
that we will be using. And then we have
instance parameters that's specific to almost
every single node, but there are some repetitions. So let's say if I pull
out the Gaussian noise, see they have the same
instance parameters, but you will see why. So basically we can change
the scale disorder, all that kind of stuff, but
we will get into that later. Basically, you have your 2D view of the mask that you're
currently selected. And you have your 3D view. In 3D view you can change, you can change the 3D model. You're previewing us. And you can change. There are multiple ones. I usually use a rounded
cube or a cylinder, but it depends on what your end. It really depends on
what you're making here. Now, we're not displaying anything because we don't
have any output nodes, but we will change that in
the next video, next step. So basically here, you can have a low load of stuff and you can even change
some material attributes, but that will be, that will be described
in other videos. Here we have the library. Now, personally, I don't
use the library much, but it does help. Here. You can go to
texture generators. You can pull out any of
these textures generators. You like. You have
them in a library. I sort of prefer clicking space and just typing
in what I need. But this definitely gives
a nice preview to maybe what you're searching for and see if you can just drag
them out. Basically. We also have filters that
you can also drag out. Basically almost everything
you can find here. But throughout the course
I will be using space to, to get out the older nodes. Basically that is it
for basic navigation, for moving around in the graph. You just use the middle
mouse button and basically space for
space for adding nodes. So let me actually
teach one more thing. Let's grab out the blend. We're just going to connect these repressed left-click and connect them into the spaces. If you want to. You want to disconnect them. You press Alt and then
click as you can see. And if you want to
move them to another, to another place,
you press shift. And then you can
drag press Shift and left-click and you
can drag them around. So that's just
something for starters. There will be more as we go. But this is just something you have some kind of
foundation before we start. Let's get into the next video.
3. 2 Output Nodes: Okay, Let's start on
the output nodes. Currently, we don't see
anything in our 3D view. That's because we don't
have any output nodes. To get the output nodes, you can simply press Space
and press an output node. And you can name it base color or anything
you really like, and then plug something into it, like maybe a uniform color here. There we go. But still,
this is not black. I will show you two ways. I will show you how
you can create each, each one of these manually and how I create them
to save a lot of time. Basically, you can hoping
here and say viewing 3D view, and then you select what
you want to view it as. Ours is a base color here. And as you can see, our
cubed changed color. But this is a bit, this is a bit, it's called, it's a bit tedious, especially when you need
to create multiple maps like normal Lambeth,
new occlusion, height, metallic roughness,
and whatsoever, It's really gets annoying. What they bring out
is a node called material, base material here. And these six maps
here, yeah, six. These are basically
what you will these are all the six maps you will basically need for prostatitis. I still use all of these maps. Basically, the default
for everything. You might need to
change one or two, but these are the ones
you will most likely use. What they do is press
right-click on the node, Press hovered over
to Create and then output nodes and create
notes for hidden connectors. We don't want to do
that. We only want to create for these six
that are shown here. You can see we have all, all of the stuff we want here. And it's an amazing thing because it's just created all
these output nodes for us. And all we have
to do is press on our graph here and the Explorer tab and go
view outputs in 3D view. Now, every single one of
these outputs is shown here. Every single one. Basic alert, normal roughness, metallic diethylamide
occlusion, everything is here. Let's photo that
will set this up. So I don't like this
base material node. I just use it for creating this. What they do is usually
just stick a uniform color. This is just a basic
setup so you can, we can test their own
stuff in the future. I take something
grayish connected. Normal is going to
create a blend one. And I'm going to go,
I'm just going to do a Perlin noise.
Actually not Berlin. I'm gonna create a shape just
with basically anything. But I like doing this. We can see stuff. You will see what I mean. So normal and I usually
put the intensity to ten by default and
just plug it in here. Roughness, we can plug this metallic uniform
color and place it here. Height, we can just take
this and ambient occlusion. We do A0. So ambient occlusion HBO. And like everything
in as you can see, everything is showing here. This is just some
basic setup here. And what we will do is we can, we can have a bit more
fun with our color. I think I will leave it at this. We can maybe bump
this up even more. But it depends on the
material and we will always go through the settings
and change them around. Basically, this is four, this is it for output nodes. And let's go to the next step.
4. 3 Basic Nodes: Hello, over on, Okay, now we are getting
to some basic notes. So let's bring out
some notes here. Bring out Perlin noise, bring out the Gaussian noise. Bringing out some grungy noise. Let's say maybe seven.
It looks kind of nice. You can change, you can pick
out whichever one you like. And I'm going to pick up clubs. Do. I mean, these are some of the
main noises we will use. I'm just using them
for testing now. So you get the, you get sort of the idea how
everything works. Because I've been
using blend nodes and all these nodes and you don't really
know what they do. Now I'll be explaining
some of the, some of the basic nodes
and how you use them, how they work and whatnot. So first we have a blend note. Let me just bring
everything out. So blend of water per node. Let's say a blur node. There we go. What do these do? Basically, we have a blend mode. Blend nodes, blend two masks together on top of each
other with certain, well with the certain presets. So here we have copy. And if you have a bunch
of these and don't again, don't get too overwhelmed. You will understand
when to use each one. And sometimes even I sometimes just go through
them and see what looks best. Copy is just a simple one. If it's one, it will
show up at Illinois. If it's 0, it will show
the conundrum app noise. You can put it somewhere
in-between to show each and everyone, each one. A little bit. As you can see. Let's get over to
add Linear Dodge basically adds one
on top of the other. We can do subtract when we subtract the noises
from each other. And let's see, I can
show you even if we switch out if Berlin, Berlin noise on the background and the conundrum amp
on the photograph, you can see how it's changed. Is it how, how it
goes in reverse? And once a flex
from the other one, we can have multiply, which multiplies our values. So wherever, wherever
we see black, it's gonna multiply
with that pixel there. So basically we have, we have a grayish pixel here, for example, in a
grayish pixel there, both of them are going
to multiply each other and we're
going to come out with another pixel basically. As you can see, multiply
also works pretty nicely. We have a lot of these add sub. As you can see,
it's different from ad Linear Dodge
just adds in subs. Max, light, and Mendota can, we will, we will be using
all of these and you will, you might not get
what they all do, but you will see as
we make the materials and you will see how to use
them in a practical way. So that's it for blend nodes. And now we have a verb node. What does? Let's plug the intensity,
so see nothing. It does nothing no
matter how high it is. But if I plug the gradient in
density, look what happens. It warps the whole
textured by this. And we can even, we can load it down a little. And you can see, you can see how it
changes slowly. And we can have some really
interesting effects. We can have a look and
plug around other stuff. As you can see. There is a lot of freedom. What we can create
in this program. We don't only have
this kind of water, so we have a lot of warps. This is just the most basic one. We have directional warp, which as you can maybe think of a YouTube's directionally
so you can choose the direction
that these warps in. And it will warp
in that direction. As you can see. Very, very
useful thing as well. If we type warp, you
can see a lot of warps. There is a multi-directional
verb gray scale. It's still just a bit more
complicated, but it's still, it's still more or
less only a warp and we will be using them throughout the material
generation process. And you will see how they,
how each of them work. Here you can change the
mode in Richard doing this. Basically that's it
for the worker nodes. Now blurred unknowns. So blood nodes are
pretty simple. Basically. You have just blow to them. And we also have
multiple blow dynodes. And we usually don't
use the normal blur. Which do you use? Blur HQ because blurry HQ stands for high-quality
and retired. We get the quality to Max. And it's usually better to use this one then
just a regular blur. So basically, yeah. What else we have here is a non-uniform blur
and slow blood. So all of these are
very, very interesting. What I liked doing, always, just messing around with them. So here you have samples. You can bump up the
samples and get the intensity low and just have fun mixing these up and
getting comfortable with all these modes and with
all these settings. And if you think you
mess something up, you can always just delete the
node and get it out again. Get the node out again, and have fun around
with it again. You can create some
really fun stuff, so just mess around with it. I would recommend that. Another, another types of
nodes that I wanted to show you. Well shaped nodes. And we have a shape node, which is just a shape. And we here we can
choose the pattern. You, you saw me
use that earlier. But here we chose
a pattern and we can choose any one of these. There's a lot of them. Feel free to just go, go through all of them. They're all, they're all interesting shapes and we
will be using a lot of them. Maybe not everyone,
every single one, but we will be using
a lot of them. Basically. Material generation
process usually, usually consists of getting shapes and then scattering them, warping them, and making
them into interesting, making them into materials. That's where the tile
nodes come in place. So dial nodes are
these three nodes. So let me show you all of them. Dial random tile
sampler. There we go. Let's create, let's start with
the title generator here. This has a built-in shape, but you can also
do an image input. So if you may be saved, you hoped this and
you'll learn how to warp this with, let's say clouds. You'll learn how to warp it. But see you have a really interesting
shape here going on. But you cannot, you
cannot use that. You cannot find that shape Here. You go into bet
and input and see. Now we have all of your eye. Now you have your
a custom shapes ortho imported into
Ital generator. Here. You can mess around
with the amount of shapes and a lot of
other cool stuff. You can even change the
number of pattern inputs so you can have multiple
stuff going on here. This is one of the
things that you just really want to mess
around with to see, to learn, to learn
to node basically. Here you can get Scott
a scaled random, basically self-explanatory
offset them, offset them randomly. Send them, offset
the random seeds. A position random C you
can get to a lot of, you can get really
interesting shapes in, in really a matter of seconds, maybe even minutes,
luminance random. So basically, some
shapes get a bit darker. Stay the same. Random masks. You remove some of the shapes. These tile, tile nodes are
really similar to one another. Dial random, each randomly. It's randomly distributes them. I rarely ever use this one. But there is that out of there are places where you actually
use this, this tile node. You will see that most of these, most of these, most
of these settings are really similar to each
other, if not the same. And then at last we
have the tile sampler. Sampler is basically
the most used one. Because in the title sampler, you have the most
amount of options. You have the best control
over your options. So you would notice that we Here we have just background
input and pattern input. But here we have
way more inputs. As you can see, you
have scale map inputs, displacement map inputs,
rotation vector, color, mask, pattern,
distribution, background. All of these do a certain thing. So if we were to bring
out a shape here, Let's have some fun here. Let's get a Gaussian
and get it into, let's say maybe
Displacement Map. Now we have found the
displacement map intensity. And you will see how they can
change depending on that. But it's kind of
weird to see it now. Maybe if we have a bit more
shapes, yeah, there we go. So you can see how it's sort
of forming that shape here. Maybe we can, we can
even do that Illinois. So this is one of the, one of the most interesting ways to get a really
good pattern really quickly just to get the Perlin
noise out and scale it and maybe change the disorder or
maybe even a random seed. Now let's now wrong thing. Let's now plug it into here. You see how it's sort of changes and it has these weirder than
interesting patterns. That's because we use this map. You have a lot of control
and we will be using these map inputs to
create a lot of areas, natural shapes, and a
lot of coal materials. Also, I forgot I forgot to tell you if you ever want to
test your materials. So test your maps. This setup here we created, It's not just for show
is that we plug here. We can see how it
looks right away. This is of course not
gonna be end-product. We are not just going to
plug it in here and we're still going to mess up maybe
with the ambient occlusion, roughness and more
maps like this, but this is a good This is a good place photo,
starting everything up. We can maybe lower this down. There's a lot of,
there's lots of room for just experimenting
and having fun. And let's say, let's just test. How did you, how you
want to subtract 11 object from
another like this. And we can create
maybe this doughnut looking shape. We
can plug it in. And now we have some
kind of doughnut. It's just, it's just a lot of messing around and testing to
find how everything works. While we create the materials, you will see some of the, some of the methods I use for creating maps and
natural materials. But it's still up to you to
test out a lot of things and to make them look nice and maybe invent
something new, who knows? That's basically it for
basic node gets, gets to, get to experimenting
with these nodes because you will really need it and it's a good way to
build up a foundation. Anyways. See you in
the next episode.
5. Custom Node Adding: Hello guys. Photoshop.
We need to get a custom node in that I used for the material we're
about to create. The node is called gets slope. So to get it just started to get slope
Substance Designer, I will have a link down and
try and find the legacy. If you can't find it, just typing leg,
that's not legacy. And there it is. Share legacy substance
3D designer. And there is the slope. So you download it. You need to unzip it
into a certain folder. Once you unzip it, you need
to find the actual folder. So let's just get it here. I have it in my custom
nodes and get slope. It will look
something like this. And once you go inside
your substance designer, go to Edit and then Preferences. Then go to project. Go to library. And you can see I
already have it here, but click on this plus sign
and find where you stored it. I'm gonna go to my, my custom nodes and gets
slope and that's it. Press Select Folder
and you're done here. What you want to do next is, let's just open this
up a little bit more. You have this thing here. I already have mine here, but what you want
to do is create a new folder and name
it whatever you like. Let's say tutorial
for the sake of this, but just add custom notes
or whatever you like. In this, we will add a
filter, add a new filter. What you will do here
is you will say bitmap. I believe. Let me just have a look at here. Sorry for this. Oh, yes,
sorry, graph, graph, not a bitmap I'm
bringing forth here. What we want to do
here is searched by URL and contains just leave
it as this and the URL. The URL here is our
URL from this thing, our path to the actual folder. So let's just copy it
in here and presenter. And you can see these
two nodes, ballpark. And after that, you can call
the filter here, get slope. And once you can maybe get out of it and get
again. And there we go. You get your free node, you get your customer
node in here. Well, that is it for this. And you can add any custom
mode you like this way. But we need, we
will be using this gets slope node. So
see you in the video.
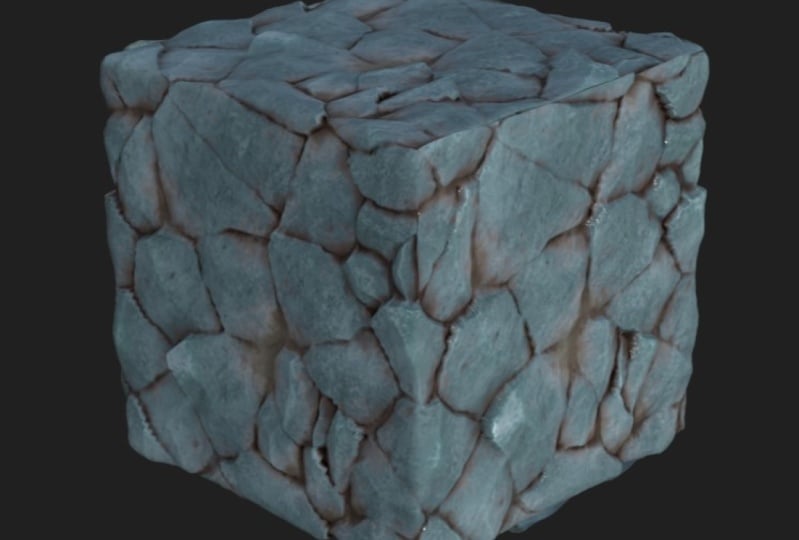
6. 4 Creating Rock Shapes: Hello, welcome to
the next episode. Now we will be creating
a basic rock shape. Up until now we've been
learning some kind of basics and however
they think works. Now let's get to
some actual font. The font stuff. We want to create some
basic rock shapes. So we can maybe build further from that and make
some amazing rock materials. Let's say. Let's start with
a title sampler. What I'm aiming here with my towel sampler is if I put
it into a distance nodes, so this is distance nodes. And I need to put it on a
really high value like 2.5 K. And let's have, let's have fun around this, these settings. What do we want? First scale random,
completely random. And now we want
to have rotation. And I like to rotate
this rotation, rotation, something like this. What I do is I want them
to be thin like this. Now we do position random. We can do offset may be, doesn't matter that much. Rotation random we don't want
it to be actually, let's, for the sake of
this, let's, let's, let's make it this way. I think I'm going to do a bit more of a scaling up actually
that's a bit too much. Maybe point to
something like this. Now let me go to here
and call it random. And I wanted to
lower the colon is on something, some stuff. And let's get the mask random. Let's remove some of those. We've still not getting
the right amount, so let's try ten by ten, maybe. Another thing you can do. So if you click double-click, it shows this distance node. If I click left-click only
once on this tower sampler, I can mess around
with these settings. But still look at the mask here. That's a really good
thing about this. But we will be just having, just mess around with
these a bit more. Maybe. Let's see. So here, you can see, here we get some stuff, but that's not really
what we are aiming for. So let's, let's try
and scale this up. A bunch. Maybe three even. Let's see What I'm
really aiming for. And you will see
that in a minute. We need to have
this color random. Let me, let me actually
remove rotation random. Let's see what else I can do. This is the stuff that
three-to-one to happen. Okay, sorry about that. We need to plug the source
symbols as well here. Yeah, Now we are getting
the thing we want. Sorry about it. So we want to go to
0.5 K and we want to, I think I'm gonna go
back to 16 by 16 by 16. And we can get these shapes. They look pretty nice, but let me, let me lower
the value Donald little. Something like that may be null. Let me go to the
rotation random, we get to complete
random rotation. This is something I
think is pretty nice. So what we can do also, you can customize this
to your liking as well. Maybe have a look around, maybe five by five, we create bigger shapes. I might, I think ten
by ten is better. So what do we do now? We do is edge detect
and that does exactly what we
want. Denote says. Here. We can have at roundness,
I don't like this. I usually just get it
to 0 and edge width. As you can see. Let's just leave it for now. See now this starts, this starting to look
like something actually, as you can see, the What do we do now? Since this is a bit, this will create a bit of
problems in the future. We will want to be beveling it. As you can see,
bevel just don't, don't do the distance that much. It's very, very, you need to input really
low values in here. As you can see, really low values and maybe some smoothing. I'm going to put one here. I'm not going to do smoothing
just now, just, just yet. What I'm gonna do is levels now levels node with levels no does is you can change
the values here. You can change all the values. So if I want all
the white values to go a bit darker, I can do that. If I won't hold the
dark values to go a bit lighter, I can do that. And there are a lot of
things you can do this. You can even go to, if you click here, you'll go
to the pyramid parameters. So you don't need to
have this thing here. You can just choose
how you like it. As you can see here. But here we can sort of see
how it affects our material. We can maybe hit here
and do smoothing. And we see how that affects it. Just a little bit of
smoothing will do. So. Now we have this. But before we do that, what I wanted to do before that, this is, let's use
a blend nodes. Simple blend node. Now,
there is nothing on it yet. You will see what we
want to do with it. What they do with it is
creates a crystal one node. And let's scale it
up quite a bit. Actually. Also, not normal blend mode,
it's directional warp. We do a directional warp here, and we put it into intensity. Now, you saw something
changed just slightly. Probably. We can scale this to five maybe. Do you see how those more
natural shapes kind of form. This is, I bump it up a
bit more as you can see. Now, instead of
having these blend, maybe some straight lines, we actually have some natural
looking lines in here. Then we plug that into pebble. One thing, LLC, if you want
to do to notice you can dock these nodes so I press D when
I select it and it's duct. Now, as you can see, it can make the whole
graph look at the idea. Here we have, we have a pretty nice base for
what we were building. We can plug this in
and look how it looks. It's looking pretty flat. What we do to remove that flatness is you're going
to do a fluid-filled nodes. Thoughtful node creates this. And now you need
to be unique to be careful with the,
with the levels. So if I go here and
adjust the levels, see how default will just
doesn't do anything anymore. It is because we need, we need to have black pixels. Basically we need
to have something. We can really blend these two together
that hardly we need to have black pixels
separating these shapes. The fluid-filled works. The
outfile now gives us this, and probably you don't even
know what to do with this. But this is an amazing tool
that we will probably use. We will be using it quite a lot. What do we do now is
fluid-filled to gradient. Now we get the gradient. And as you can see, we have some kind of black
and white texture. And if we plug that in here, now we'll see it actually has
some kind of variation now. But it's weird. Know, it looks very, very weird. So what we wanna do in this scenario, what do
we want to do here? Is we want to duplicate
Control C Control. We duplicate this
around four times. I like to do it four times, maybe three for some materials, three is even, is even better. And I do angle variation. Now as you can see,
this angle variation gets us a bunch of
different angles and they usually pop this on all of these to somewhere,
somewhere near one. So just over 1.5. It doesn't really
matter that much. You can do random
seed to get it, to get different
variations as well. Here, what we do usually
change the angle, like play around with these
and get different results. Just change the
angles and whatnot. And what we do now, we bring up the blend node and we
plug this in here, and we go Min data Canada. Yes, msn.com. You see how I created
the side here. And now if I hold Shift and click this
and plug it into here, it created a side on that truck. Now we have something that
kind of resembles a rock. Not completely,
but a little bit. So what do we do next is basically just do the
same thing with this thing. You see how we're creating
and sculpting the shape. That's exactly what
we want to have. You can use three sides
I usually like for, for the motor variations and
let's just plug it in here. Now we have something that looks like rocks.
You would agree. Now this is, this is a really, really good starting point for our rock material or whatever rock material
that we want to create. This is a really good
starting point for shapes. And the best part about
this is that we can, we can change this
almost completely. So let's say you wanted
to bigger, bigger shapes. The power of
Substance Designer is so big that you can just
type two numbers here. We have almost a completely
different material here. As you can see. You can maybe have
more if you want. So 15 by 15 and
more little ones. It's really up to you and you can play around with this
as much as you like. And this is the best part
about Substance Designer. The motor play around with it. The battery will become at
making all these stuff. And we will be wrapping up this. We will be expanding upon this disruption rock creation in the next, in the next video. But for now, see you
in the next video.
7. 5 Further Rock Texturing: Hello guys. Welcome back. Let's get on to work
with these shapes. First things first, you need
to keep things organized. So let's quickly do that. Because we will be creating
quite big materials. And in big materials, if you're not organized
the graphs really, you're really going to struggle with making anything great. Let's photos through a frame. After frame. You can go and say this is as the
main shape, for example. You can comment
this as you like, but you can copy me, so you can follow
along tutorial easily. It's just important
that you have some sort of some sort of how it's called organization
in your graphs. Let's name this second part
of sculpting the shape. Now, there is a
thing I forgot here. As you can see, the edges are
a bit off. We're looking. What do we need to do here is we need to invert gray scale. Now it might seem a bit weird that we are
inverting gray scale, but hang on with me a bit. We're going to do
a histogram scan. So what this does is
disposition thing. It brings all the right values. And as you can see, if I
pull it all the way up, it's almost completely white. So I'm gonna put this
2.15 for starters. What do we do this,
what we do now is a non uniform
blurred gray scale. And the blur map. We use this. As you can see, now we're
blurring a lot of this and I want this to be a bit,
a bit more subtle blur. Let's plug that in.
Now we can see this looks substantially better
than than what we had before. Now, what I want to tell you Just before we continue
on with the graph stuff, we need to turn on
tessellation here, distillation to make, to make stuff pop out a little
bit from the height map. Let us go to Materials
default and edit. Scroll down and find the
height and height scale. I usually put it to
eight for default. You can put it as,
as what you like. And it's really, truly looks like bulbs all
the shapes and makes, makes the work on
the materials way, way better, way easier. So what we're gonna do next is we're going to
move this a bit further. And we're going to break
out the edges a bit. We're going to make some
more natural looking edges on the stroke shapes. What we do here is
multi-directional morph grayscale. What we are going to work
with with is one of the main, one of the main masks that we're going to use almost all the time is Perlin noise. Here, which is a Perlin noise. And let's just lower the intensity to maybe
something like six. And as you can see, it's a subtle change, but there is change and it
really helps the material. Now, I'm feeling that the whole, the whole material is
a bit way too dark. So what I'm gonna do
is do an auto levels. And in auto levels, what we do here is basically just if we bring
out normal levels. Here we can adjust stuff. But as you can see,
these lines here, those are the colors that are
not on the mass, correct? Now, what auto levels
does is basically just puts these into place, these color values into place. As you can see here. It's really handy tool because when we change
something here, everything is made
for us automatically. We don't have to go to the
levels and edit it out again. What we're gonna do now is get another
multi-directional Warp. Now we want to use
them moisture noise. Moisture noise. Also emotionally just
mix these kind of small, small little edge cuts all over. I also want to lower
that down quite a bit. Here it is. And let's
see how our material looks way better
than what you think. Now looks like something is actually happening
within the material. So let's comment this and
say breaking out the edges. Just so we can have a bit
of clean, cleanliness. And what do we do now is we want a bit of texture
on this drug don't treat. This is fine what
we added right now, but it's still lacking in
that texture department. We're gonna do one of my
favorite things on this thing is basically we're going
to do a sells one. We're going to grab a clouds do. You're gonna do a
slow blur grayscale. And now this looks like nothing. But when we need to scale, scale this cells
down a bit first. So after we scale
down the cells, let's bump up the samples. Let me just select it.
Bump up the samples. Once we bumped, bumped
the samples up, we need to lower the
intensity quite a lot. One seems good, 1.5 maybe even. We can always come back to this. I like it on a lower values. So let's say 0.7 maybe. After that, we want
a directional word. What we do with this
with direction of lobe, we use our mask here as the intensity input and
we changed the angle. I like, I like this angle and let's
bump it up quite hard. Now. Now you're gonna see the magic happened when we invert the map. Look, well, so again, it's really those rocky,
like, really, really rocky, rocky detail
that we are going to add now. You will see now when
we use a blending mode and take this and go
to add Linear Dodge. Now go to the blend, and you can see,
this is very lucky. But for us this is maybe even a bit too rocky for
the whole material. What we're gonna do, we're
gonna lower this to 0.25. And now it's more subtle and you can see older rocky detail. But I will direct can be
lowered even further. You can see if we go like this, let's say point to
maybe, point to. Let's say maybe
two or maybe one. This is just one of the
details we're adding in. No need, no need to
stress about it too much. But pretty much this is
what you are doing here. We can maybe scale this
up or scale it down. What they also saw. We can reduce the
whole texture size. Reduce it by this amount. I just get some fun bug. You can just play
around with it. You don't have to
do it. But this is one of the texturing
that we're going to do. Let's say frame rock. Texturing. While this is pretty
good, we still need, we're still, we still
have to do a lot more. What do we do next is, well, let's first, let's
first bring out the edges. Submit. We want to pump the
edges out a bit more. So let's do shadows. And I like to put this to one. Then when we invert
gray scale or getting somewhat of a
similar map to hear, but not quite the same. This is a really good map and we blend it with the subtract. As you can see, we plug this in. You can see the shapes
pop out immediately. The shapes are really
popped out now. They really have that
more natural field, but we're not going
to keep it on this, this is a bit way too high. We can just keep
it something low. Even here I'm thinking
that we lowered It's two, maybe 15, something like that. I'm liking this for now. Let's say here, bringing
out the shapes. Again, it's really important that you comment everything
because that way you keep everything tidy and you end up needing
something, you can just look on. It's way easier to find then if they're literally
no comments. So keep your graphs
clean. Please. So what we're gonna do next
is adding some scratches. How are we going
to add scratches is we're going to actually get a scratches generator here. This is one of those
nodes that you really just play around with. We'll tie, do is get
a bit of a rollover. Scalar random distortion,
random distortion frequency. Maybe a bit more
randomness here. It doesn't matter that much, but we don't want that. We wanted to completely distortion Not much but
the scale it in random. Random is pretty good. Just get something
that you like. End up liking this pretty much. After that, we're going
to put them into a bevel. This bevel is very weird. Now. Going to make
it be more normal. Let's bump it all that much. Let's get a smoothing. Just get something
that feels like this. This would be almost ideal. Maybe we can even do Angular. Something like that,
could really benefit. We're going to drag out
from height and do a blend. And we're going to blend
it with Perlin noise. But Perlin noise that is really scaled down
like this, something. You're going to subtract
it from each other. You're gonna see exactly why. We don't want these
scratches everywhere. We want them to be a bit less. We don't want them every
were basically with me, subtract and see how they're
not showing up everywhere. What I'm gonna do
here is actually increase this
number quite a bit. Maybe even 210000. And now it looks more like it. There it is, There is the there is the effect I was looking for. So just be very careful here. We're going to do a
bit of list smoothing. Something like this here. Now. There we go. This is amazing. You can see all those
little scratches there. We're going to blend it again. And we're going to subtract. And as you can see,
there's scratches now, so let's plug it in. And they're pretty card
which we don't want. Let's 0.7. Maybe even less. Something like 0.4 will work. Let's come into this first
and say adding scratches. We're going to move this
outwards just a little. What we're gonna do now is
add those little spots. You probably know
when you see a rock there's a bit of spots
digging into it. How we're going to do that. We're going to grab
out the dirt node. And I'm thinking of the three. Sorry. The three. This one. What we're gonna
do is do a levels. What this does, we're going
to lower the amount of these dots we have by quite
a substantial amount. And after that, we're
going to bevel them. Beveling them does, is
basically let us do around 0. Smoothing. We kind of remove
even more of it. We don't have many. We have some small ones. And they're really subtle here. That's exactly the
effect we want. It's really subtle one, but it really helps
with the whole aesthetic of the
rock. Subtracted. Now, as you can see, there are a few here. And if we plug it
in, you will see it. You'll see how many there are. Even though on the mask, it almost doesn't
even show them. Let's put this 2.7. Maybe. That is
looking pretty nice. So let's say adding spots. There we go. That stat for it. What we're going to
do now with the rock, we're going to add
some surface noise. What do you mean
by surface noise is we're going to do a blend. And you're going to say fractal some maybe or moisture noise. Any noise that is similar
to these two can work. We plug them in and we do, we can do at SAP, at sub is good or multiply. I personally like
multiply a bit more. I don't know. You can see how it adds
that grunge genus. And we will need that. When we start making the
albedo, the base color. Moisture noise works
just fine as well. I will keep the
moisture analyze, but we will not
block this one here. The sole reason because it will look a bit way too
grungy as you can see. If you like that, you can. But I still prefer the height
map and other stuff to be the that I've
thrown this mask here. And let's just name this
adding surface noise. And basically that's what
we, what do we have here? This is where we've got. See you in the next
video when we are gonna be doing the albedo
or base color. See you.
8. #6 Albedo Mask: Hello guys. Let's continue
where we left off. Basically what you're
going to do now, just before we actually start
working on the Albedo map, I wanted to introduce you to another way you can
add the doc texturing. So let's move this just
a little bit here. This is really way. This is really a good way
to add a bit more detail. What you do here is
get the blend node. And I'm going to bring
out the clouds to note because I think it
works best with a close too. Now, you don't want to
drag out from here. We want to press Space
and normal to height HQ. So this is gonna be very weird, but basically we're
going to plug a grayscale input into
this normal to height. And we're gonna get to a really interesting
looking picture. I like to get this
almost completely here because relevant to one, we get almost all the we get
more of that drug detail. You can lower this
down a little bit. But I don't like it. I didn't like loading
it way too much. What we do is plug it in here. Adsorb is good and
Multiplies good. And maybe even Min darken could be interesting
to play around with. So we'll just plug
these and see that creates these kind of holes
into it and chipping send. It's really like you
can really transform the material and not
add sub multiply. You can see once I want to do here is probably
add sub with 0.3, I think maybe even lower. Let's do point to maybe, or let's try and multiply. Multiplies way more subtle, which I think I like. Here. I'm gonna do multiplying
this situation. Let me just sort of for this, let me just bring
back the distillation factor somewhere around it. And it looks, it
looks pretty good. And it gave our rock
some more texturing. Let's just move it up here
and frame this we can say texturing lead to
or whatever you like. This is how we add a bit more texture to Iraq and
I'm a bit more life to it. So now let's get back on track. We are making the base color. The base color,
how we create it. Basically, we want a bit
more of a grungy map here. How we achieve that is you get an AO, so ambient occlusion. And you blend it with
the original mask. Here. Maybe even bump it
out a little to get the bit norm grungy ionise
in there as you can see. Then we just lower this to
somewhere around half maybe. Yeah, this is pretty decent. So what do we do now? Is basically we do
an herb blends. Let's go blend. And I like using here a
fractal some base. So this is another, another random surface noise
that we're adding on top. I like putting this to a
higher value, something 0.7. As you can see, we went from this to this and this is
gonna be extremely useful. You will see in a second
when using gradient maps, we're going to get the gradient. We're going to pick a gradient. But Hopi gradients are usually sample them
off some picture. I have here. A really, really good
picture for this. So let's pick a gradient and
let's choose the picture. Actually. Yeah,
sorry about that. We need to we need to minimize it every single
time we pick a gradient. What we are doing here is just going to go
to Gradient Editor. And I'm going to go
pick a gradient. And you pick a gradient
to like, let's say, I like this part here
and close it up. And that's more or
less how I do it. I tweak around these
settings a little bit. Just finding what's normal
looking and whatnot, but more or less, it's usually this and it usually consists of
trial and error. I pick a gradient, it doesn't suit me,
I pick another one. Then it may be suits me. And just have fun around
testing and find. Maybe you can copy my
gradient and whatnot, but you can always, you can always test stuff out. Here, this is, this is what
I'm really happy with. What I'm doing here. If you didn't notice, I'm removing these dark
spots because that's usually the effect
of shade happening. I don't want that I wanted to flat like it's completely
lit up the material. Now we have that. What do we want to do now? The most basic technique
you can do is just get darker and the lighter variation and
mix them up together. Basically, that does wonders. We're gonna do here.
We're going to do a bit of lightness here, just a little bit, just a tad. And I'm going to do
a level's node here. We'd levels node.
I'm going to bring it closer to darker color. What I'm gonna do now is I'm
going to get our thing here, this mask here before
surface noise. And I'm going to press Tab here, left Alt, sorry to get
this connection here. And I'm going to get slope. This is a custom node we
have downloaded previously. I'm going to type
here eighty seven, eighty eight, eighty
eight, eighty seven. As you can see, this creates a lot of interesting patterns. I'm going to do a
follow up a little bit less. What this does. It creates all these very, very natural looking shapes. As you can see. All of them. You see how they go,
go with the flow. And that's exactly what
we're looking for. Before we do that though, we blend this with a Ambient Occlusion mask here with this one
we made before, we can test stuff out, we can multiply, multiplies. Probably one of the
best ways to do this, but yeah, I think this is fine. And then we go to row
a histogram scan and we went went through
with it before. So just, you know, what's
the notes up here? Now, we want a little
bit less contrast, but we want these white lines. This is exactly what we want. Here. We're going to
do a simple blend, going to see a blend only copy, but you're going to use
the opacity mask here. You see the change immediately. You see how all of these
whitespaces now to have their places and now they
actually look more natural. So let me maybe adjust
the position even more. Now it's starting to look like a decent, decent looking rock. Let's plug this in here. Actually. You see this, this is starting to form some kind of
shape of our octets. We like. Maybe we don't like it that the dark churches
we call devalues a bit. This is starting to look
like an actual rock here. We have of course
a lot more to go, but this is a good start. So what they like doing here is basically just commenting everything because
it helps a lot. Thirst, gradient map. You can name it,
whatever just so you can remember what you're
naming actually. And here I'm going to name this peaks and valleys because
it looks similar to those. There we go. We're now getting
nice, nice results. What do we want to do now? We gonna grab the Mask again. I like keeping stuff organized. And we're gonna
do a blend again. Now the blend is going to
be a bit more interesting. Let's use a grungy map. Seven, let's say
maybe some else, something else,
let us say grunge. Grunge maps. Nine, looks good. Let's see which one
of these is better. It, let's keep this one. I think it's good. So what I like doing here, so let's create a
directional warp. And you will see
why in a second. We want to warp this estimator. We want to warp the grunge
with the actual material. Now we just get
high-intensity and change it. We're getting now some, it's a bit more
natural opacity mask and we're going to
use it exactly here. What we're gonna
do here is we're going to create an HSL here. And we created even a
lighter variation of this. Now, we can maybe
even use this one. But I like creating
a lighter variation in maybe a bit more
saturated one. Maybe just, just a tad
different from this one. You see how it breaks out all the colors very nicely.
So let me plug that in. Now you can see there is
actually a pattern in our rocks. What they don't like though, is a bit too light, so let's maybe even
tune it down a little. It just needs to be different. Maybe even do an
HSL of this one. So feel free to
experiment with these. These are really stuff you
should experiment with. Maybe desaturated a bit. Wherever you go. Now, you see it's starting
to form goods shapes. Maybe a bit less of this. And maybe just tiny bit lighter, maybe 0.8 or 0.6
c. It's up to you. But it was way
better than before. Keep on adding stuff. So we break out the color. Here. We can even keep,
keeping this, this way. But here we break out. The color being way too. Way too. How to say uniform? Yeah. What I would maybe like doing a switching these
up to see how it looks. We don't want to do the weights
and what did they do now? It's here. So we can even lower the opacity of
this, which I do like. So we just have a look
around everything you like. I think I'm liking
this one so far. So maybe just, maybe for, just get those values up a bit. Here. I like this, like this. Although I think I put a photo, this one, this one here. Also. It depends on what kind of rock
you're making again, so you can make a lot of
different variations this way. Here we are adding some color
breakout, I will call it. Now. We're going to do, is actually just going
to move this a bit. What we're gonna do
now is get the dirt. This third, this a
really useful thing. We're going to grab our
ambient occlusion here. And here is where we
want to do attach this. And we're going to
attach this thing here. Because we will be
needing our normal Mask. There we go, there. We will be needing curvature. Curvature, just a
normal curvature. There we go. We have everything plugged in. Here is where you have fun. And more or less, just experiment with things. Just get these dirt stuff is
really, really nice-looking. And we will get a blend here. Let's just set it up.
This is an opacity mask and going to actually get
just a uniform color here. I'm going to sum my bed. Some color like
this for starters, let's say let's plug it in. The first thing you notice, it's sort of looks
like it's ground underneath now if that's
something you want, feel free to use it. But I didn't like that much. I'm going to remove it. But not just yet. We're doing here. Maybe we switch this for
curvature smooth. See if that changes stuff. Not really. Curvature. Okay, so we're just going
to manually delete this. It shouldn't be too hard. We can just use the thing we usually into the histogram scan. And let's just get to tilt nth. There we go. We can just blend the oh, sorry. Can use a blend. And we just subtract. As we can see here. This is, this is
exactly what I want. If I put the contrast up, maybe position and contrast. There we go, this
is looking better. Or is it doesn't really
I can never mind. Let's just keep it with
the within the dirt mask. You can play around with these there's there's a lot of
stuff you can play around. Grunge amount. And I like to keep the
grunge amount pretty high. Edge masking wherever
we can do crunch scale. Let's lower it down a bit. And basically those
are the settings here. And I like them quite a bit. Switch that alternate. So basically, let's
just get this here. I will keep, keep
this I will keep this this dirt inside
because I kinda like it. But if you want to remove it, you can use maybe even this mask here to remove those stuff. Or maybe what you can
even do is to levels and kind of cannot display. You need to create
a mask. Sorry. Sorry for this really. But I'm currently
liking how this looks. So I will just keep it this way. Maybe just reduce the
opacity actually. What, yeah, sorry,
What we're gonna do, we're gonna add Linear Dodge. Linear Dodge is important here because you can see how
everything changes. When we switch from copy
to add Linear Dodge. Here, we have these rusted
edges instead of dirt, but you can keep it
how you want it. Like both are really good. But I think I'm gonna go for
add linear dose for this, sorry for all the
changes of mine, but for now, I think
Linear Dodge is good here. Let's set it to four. And you can see the
changes before and after. So let me just show
you see this kind of intensifies everything a little
bit and gives it a bit of warmth that the
material needs really. This is, you would say it
starting to look pretty decent. Now we're going to say here, dirty edition, keep
everything organized. Let us remove this and let's
move it a little bit further than that is pretty much magical
stuff that I'm going to do. And it's really, really
good thing I saw in one. I learned. It's really, it's
really helps to shape, pop out and feel more natural, at least in the base color. What we're gonna do
is gonna go blend. And we're going to
grab our thing here. And we're going to get
the curvature smooth. And instead of Direct X, we're going to go OpenGL. And you'll see, it looks weird. But there are these
two formatting system, Direct X and OpenGL. It depends on program,
your program you're using. But most of, most of
this stuff uses direct, direct x, but it's
easily fixable. But for engines and for
most of this stuff, this is really optimal
Direct X like the default in the substance painter,
substance, I'm sorry. But we're going to use OpenGL to get these weird lines going on. Then we're going to
get the gradient map. And we're getting a gradient map only because we want
to transform this, transformed this,
transform this into color. Because if we were to plug this in, it doesn't do anything. But this actually doesn't
synthesize something. We're going to go
into a bit of this. And you can see the change here. I believe it said Linear Dodge. We can maybe at some,
I think it's at, so we'll see we'll see we will have desks
around with those. If it sets up, let's
put that up here. But I believe it sets up. We're gonna get to another one. And let's just
press Alt thunder. And you're gonna get curvature. We're going to pretty much
leave everything as it is, but just go Open GL and we're
going to do the same thing, Gradient Map and
plug it in here. Now, let me, let's see the
changes from this to this. And let's see if we
plug this in here. This looks a bit more sharp
and a little bit better. But let's have, let's
have a test with all these blending modes. You can always test this stuff
because why wouldn't you? You can create really happy
accidents pretty much. Here. We can do add sub. I'm gonna do at SAP on both. Let's see the change from this. This, this, this looks way
more sharp and it looks, it looks somehow more ready. You can apply this
to any albedo if you have any materials
laying around right now, you can apply this
to it and it will, it will really boost the
appearance of your materials, especially if they're realistic ones, if they're stylized. Well, that's a bit of
a different story. And I'm going to
frame this magic. There we go. You can also, you can have
a goof around with these. I like to keep them low. 0.3, maybe, maybe
even lower than that, like my 0.15 for experiment. This is it for basic alert. You learned the basics of
how the color works in a realistic materials
and some ways to use it. In the next episode
where we're just, we're just going to we're going to fine tune these stuff
just, just a tiny little bit. We're just going to
fine tune everything. And we're going to do a
roughness map real quick and we'll be finishing up this
material in this section. So see you in the next one.
9. 7 Roughness and Outro: Hello guys. So we are approaching the last
part of this video. And that is the roughness map and a little bit of fine tuning. First of all, let's create some space for the
actual roughness map. We won't need much. It's pretty simple thing. What we want to do is we want to get a
little better here. We want to do a
grayscale conversion. Now we want the greatest
kids grayscale conversion. We want to get it into levels. And these levels just kinda
bring it just a tiny bit up. After that, get a blend node. What we are blending with is actually we're going
to get this line here. And we're gonna do get
slope again. Here. We're gonna do Mr.
Reagan, I think. Just a second. Wait. Just a second. Just a second. Here. They're showing up a little. We want these natural
lines. Basically. We want these natural
lines showing up here. What we're gonna do is I'm
going to get the slope mask. Subtract. Now we only have the rocks here, and that's exactly what we want. We only want the
rocks here to be sort of a tiny bit shiny. What I always like doing is putting a levels and those you don't even
have to configure it. Just putting a level's
node for control here. Because now you can
control everything. So let's see. You can get it really shiny. You can get it really
rough if you want. And it's practically
looking amazing. This is our roughness
map pretty much. You can have a goof
around with it. And we're just going
to frame it and say, roughness, roughness.
There we go. Now we're done
with all the mass. Now, with all the maps, we just need to fine
tune everything in here. Metallic stays metallic, so there's no need
for this map here. Let's just bring it down a bit. Height. We will stay here. It will say here, what
we can fine tune is the albedo, my
ambient occlusion. So you can pop this
quite high actually. But I personally don't like it. I like when my when my ambient occlusion masks
are a bit more grounded, a bit, a bit less noisy, like in this case. Here. As you can see, there's a lot of noise here. I'm just going to put it to 0.4. Again. At this part, you're
finished the material. You, you change every sentence, average setting you
like, how you want it. Just have fun with it. Another thing I wanted to
encourage everyone to do. Every single time we
finish the material. Please let it be let it
look really orderly. First of all, after that, name your materials correctly. So let's name this
rock material. And we're just going to do this. And I like naming rock material
base as a base material. Then I copy it and
you can paste it. You press the unsaved package of the package if you saved
it and press paste. And then what I do is
just name them a, B, or C, or you can do 123
however you like it. And then just open that one and start messing around
with the settings so you can maybe change the
random seed and this one look completely
different material here. Just have fun with those. Especially if you want
to have fun with the, with other kinds of with
other kinds of colors. Feel free to do that. Just
create a few versions that look really nice
and have fun with it, because that's the way
you will learn the best if you just do this and
copy everything I do. You want to learn much, but if you copied everything
and you understood it, and then you copy
your material and then play around
with the settings. You will, you will understand every single setting,
why I did it, and how you can make
it better if something comes to mind or how
you can improve it, or how you can change a certain thing to look
more appealing to you. And that's, that's
the thing you really need to do to learn this,
this type of stuff. And again, if you've finished and you've got this
file by yourself on the back and
congratulate yourself for getting this far and
for getting this material. And we'll be doing more materials and more
stuff for this course. So stay tuned. Have a wonderful day.
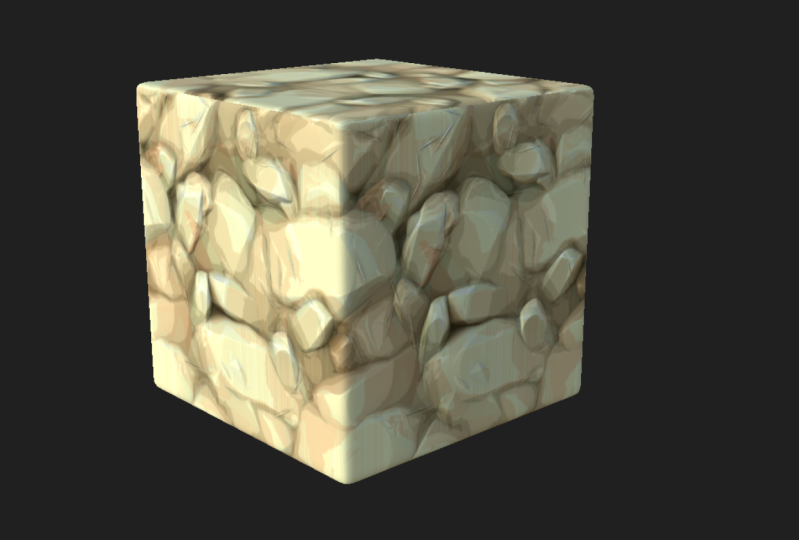
10. #1 Stylized Rock Material Base Mask: Is. So we have already made realistic
looking cliff material, rock material, however
we want to call it. Now, we will get onto a stylized be
Silver Cliff material. As always, let's first
start with the graph, and we're gonna call this
one stylized cliff material. And just keep it to K bet. Okay, Click. Okay. Let's just do the things
we always need to do. So basically let's just get
the base material load. Once we get it, you click, right-click Create
and output nodes. And we do not want to create
nodes for hidden connectors. Let's set this up real quick. So first we want to blend. And let's just do a shape quick. So we turn this into a base
scale input and normal. Let's put here 15 photo status. Let's get to fiscal. Wanted a uniform color
and I want something grayish but not completely
completely gray. Something like the default here. Roughness. I just want
a uniform color but turn that into a grayscale
value and turn it to white. Metallic. Same thing,
but then it to black because we don't want
this to be mentally here. We just plug it into here and
gets an ambient occlusion. Go to Image Occlusion. We got everything
sorted and good to go. What do we start
with? This time? And I'd like to start
with tile sampling. What we're going to do is get
a paraboloid as an input. A paraboloid here. And
let's put it 12 by 12. So what we're gonna do now is really going to bring
up the scale quite a bit. So let's say ten. We're going to do scalar
random quite a bit. After that, we are going
to get position random. I'm going after seeing these, these, but I'm from
another screen, but you can mess around with them because that'll sampler. You really just need to
mess around with it. It's nothing special.
Like offset, you can put modal as anything. I'm just gonna put it
something like 59. And after that, we
want to do is go here. And we want to do some
color randomness here. Let's do like 0.5, maybe. There it is. We
have done that one. What we want to
do now is copied. And we want to have two of
the same ones more or less. Just here. We're going to actually
do eight by eight. So we're going to have
a bit bigger shapes on both of them are going
to do alter levels. Alter levels just to
bring the values nicely. Then we're going to do Levels. Levels just so we can
control this a little bit. And we won't be
touching this much. Maybe, maybe as we make
the actual material, we can tweak this a little bit, but for now we don't
want to do that. And here we need to create
another tile sampler. So this is the one that's
actually going to have a shape. We also want to, want it to be a paraboloid. We want to put two
way to four shapes. You will see how why this
is important really soon. So we need four shapes here. What you're gonna do is going to scale them
just a tiny bit. So something like 1.2 is good. We're gonna get some
size randomness. So 0.57. Oh sorry, note,
notes, randomness. We're just going to tweak
the size a little bit. I actually didn't put in
the pedal paraboloid. So we want to have
this kind of shape. The kinda extruded not
completely around. For all the other ones. We just keep
everything as it is. We want them to be
pretty, pretty good here. So we now do levels here. And with levels we want to bring out the white
values tiny bit. Not completely, but
just a tiny bit. And then we add a
heading into a blend. Go here, lambda and we are
going to choose Subtract. See how this creates a
very interesting shapes. So let me just plug
it in real quick. We need to refresh these real quick and right-click here and view outputs
in three-degree. Here at this. Here we have some
interesting shapes. Now this is a bit too much, so I'm just gonna do 0.5.6.6.66 of eight
seems a bit better. After that, we're gonna get to directional,
directional work. And we're going to
warp it with this. Here. What we do with the
directional water is we're going to pick an angle. So just a relatively random one. You can choose
whichever one you like. And we're going to
get the intensity down just a slight bit. And let's plug it back in. Yeah, that's some
slight variation here. What we're gonna do now is
we're gonna grab a board. Here. We are going to blur
this value a little bit, is just going to
be a little bit. So I'm gonna go
here and quality. And let's say 1.8, just a little blur here. And then we put it into
the gradient input. And as you can see, this is a bit too hard. So let's see 1.6 maybe, or 1.7. Both seem fine. So let's, let's have
a go with this. You will now see a little
bit of weirdness here. But it's all right, don't worry. This will all be fixed. After that we had
on to auto levels. Let's actually see now
a little bit better. After that. What we do is we do a histogram scan and we can get this completely
white value of them. And we're gonna be doing levels. And what we do with this
levels is we again, putting these values
up just a little bit, not too much, and bring
these black values down. Then we're going to
blend this. And we're going to blend it
with the multiplier. We want to multiply these so we don't get these
black areas here. Multiply C, no, no gray
areas in between them. Let's plug this in here. The shapes are
getting pretty nice. So far. This is going to
be the main shape. Let's just comment it because
it's really important to have everything tied it up. This is, let's say main shapes. Here. Let's move this a little
bit further to even. Let's start on the next thing. The next thing is we're going
to grab a histogram scan. With a histogram scan
would just gonna get, uh, get to a position high on again
with these sort of stuff. And we're gonna do flood fill. So you already know what fault fillers gets really interesting, the colors on your masks. And what we're gonna
do now is you're gonna get a fluid-filled
to gradient. As you can see,
fluid-filled to gradient. And we're going to
get a few of these. So the amount of these,
it depends on you, but I found it for
is pretty good. You can have more,
you can have less. More basically gets you
a bit more detailed, less gets less detail. Here. Gets the random
angle variations. Make sure to go over 0.5. That's how I like to do it, because it gets sold
better results, and just choose
some random angles. There's nothing, nothing
special to be down here. What do we do now is we
actually grab levels node. And what do we do with this
level is node is we bring this black value lot to here. We only have these
sort of edges here. And we do that for
every single one. So let's, let's
do it real quick. Just make everything
aligned properly. And one more. Here they are. Different, different stuff. What do we want to do
now is just to do it. It, the levels. Levels get us a bit
of a better result. Then just just this
normal levels. Let's just get that Olin. We've got everything
now finally, what we want to do
now is we're going to grab our main thing here. Use blends, blends, and
pick every single one. So let's take this
and do subtract it. As you can see,
kind of sculpting. This is similar to what we have done in the realistic rock. Our cliff material,
very similar, but it's not
completely the same. We repeat this process as
many times as we need. Here. We just took this,
another blend. We pick this and subtract. As you can see, what
we did here is we slowly sculpted out the
shape of these rocks. As you can see, there
are looking pretty nice. We want to common this as well. So I'm just gonna come
and this actually, let's, let's lower
this a little bit. And let's commented
shaped sculpting. Now, we're getting
into a fun part. So soon we're gonna make a mask. What we want to do now, it gets a transformation to
D. We need four of these, but let's start with
just one for now. You are going to
want to double this. Then 0.25.25. As you can see, we isolated
this one rock shape. We're going to do
that four times four, all the four rock shapes. Here. Let's say we
put the minus here. There we go. And we put a minus here. This, and this one
needs two minuses. So minus and minus. Now, we have four different shapes for
different variations. We should've going
to come really handy once we start making stuff. What do we want to do? Now? I will show you
two ways to do this. But for starters, let's do, let's do only, only want. I want to grab gradients, linear gradient, linear one. We're going to
grab four of them. What we're gonna
do is rotate them. This 190 degrees, this 1180, and this one to 17. What we're gonna
do is do a blend node real quick with multiply. And we're gonna do this
with every single one. Just grab these. And this makes for a really
nice effect. Later on. It really gives a bit of a
bit of depth of anything. Basically we do that
and after that, we want to, we want
to do auto levels. This is a bit too dark, so
we just do auto levels. Levels is just self-explanatory, nothing to be configured. We go. Now before we head
into the next step, we actually need to
create some details. So let's, let's do that exactly. We're going to grab a title
Sampler again down here. And we're going to use a disk. This q. Let's set this seven
by seven for example. And let's get to
tweaking these values. Here. I want to be 0.1. So a really low LU, scaled random,
high-value, like 8.5. Position random, pretty high. Or something more. Offsets, just something random. What we wanted to
again, rotation random. And we want to have a
bit of a color random. There. It is. Going to grab this and
get a distance node. And we're actually going to
plug this into source input. For this other part, we're gonna do histogram scan. Histograms can hear. The histogram of scan is just going to be a
complete scan here. Like this. And distance. As you can see, nothing
special going on. But we will need to just
plug it really high. And we get to a lot of
these interesting shapes. As you can see it. We're going to actually do only source here because I
want more of these flat ones. Alternate going to do next is edge detection is pretty
self-explanatory node. It just detect seizures. We're going to do edge width a bit lower,
something like 1.3. What we're gonna do is a
directional verb next. Now our favorite
noise is Berlin. Berlin. We need to scale
it down a little bit. This is way too much for this. And plug it into the
directional warp. And we're going to grab 30. Just choose some random
angle, something like this. Next direction warp is also
gonna be Perlin noise. But this time it's gonna be
full-scale Perlin noise. 36, maybe even. Let's go, let's go 36. Now. What we're gonna do is this has to be a
bit of a lower value. And let's just choose
an angle here. After that, another
direction is needed. And what we're gonna do
here is a crystal one node. What do we do with
the crystal one? We're just going to
get two bit more zoomed in and we're
going to blur HQ. We're not going to
blurred it much. But it's still needs
that slight blur. There we go. Wrong inputs. Here and here we also want a little bit of light. What up? Now, this might
not make sense now, but it will soon. So what we're gonna do now
is inverted grayscale. And you can see these very
interesting sort of crack. They look like cracks in the rock is what we're
actually trying to do. And we're going to do a bevel. Bevel. Now it doesn't
seem like much. But bevel, Let's put
it to minus 0.2. As you can see, it
creates these very, very natural looking shapes. We're going to do an auto levels here just to bring them
out a little bit more. And now what you can do is
take a transformation to the, which we're gonna do. Let's actually do
it and just mess around with it and get some
random values in there. Let's get this one
and just rotate, maybe get an, a big bigger. The whole point is to
randomize this a little bit. And a transformation to D
is a great node for that. Because it isn't, it isn't really costly to
use transformation duty. But if we were to
copy this four times, that would cost us a
lot of elements here. Let's come to this
and I'm going to comment this rock cracks. Basically what we
want to do next is we want to grab
our blend nodes. And let's do blend. Now, what's your blending
with these maps? Of course. Let's, let's have them tidy. I want this to be really nicely organized
because when we are dealing with this much this menu of
samples and this many lines, it can get really messy. And it can look like
spaghetti very quickly. What I'm doing here is trying
to avoid that completely because once you need to
look back at your material, it will really be, you'll be thinking yourself
just because of this. Because having a material
that's in order is really. Um, it's really good
when you come back to it if you need
something from it. Because it will be way
easier to navigate. It's way easier to navigate if you need some changes as well. So that's why we're doing
all these boarding steps. But in the end, they really
make up a good material. What we want to do
is you probably already guessed it both
to, we want to subtract. As you can see, it
subtracts quite nicely. But these need to
be really subtle. Was I did four values, is I randomize them. So let's do 0.05. Here, maybe 0.03. Let's do a highest
value of 0.07. Maybe. Let's do a really
low value of 0.02. There it is. And we are done with this here. So we are going to
detail link to shape, just commented real quick. Now it's the most fun part. So we are now going
to do sampling. We are going to combine these. Let's do pattern input, set the pattern input
number to four. And let's plug these guys in. So now they don't look
anything special. Let's do five-by-five. You don't want many
of them started. And let's have fun with these. Let's do 1.51.5. Size random. I like to keep the y size
random a bit bigger. Scale 2.7 something, scaled
random, 0.5 or something. Now we do position random
for we can do offset, some relatively high offset. Rotation random,
mutation random. You could do that. I'm gonna leave it to 0 for the middle, but you could do rotation
random with no problem. But what I really need is a color random
and I put the 2.3. What else you can mess around
with is a blending mode. We need to match with Max. And let's have a look
at how this looks. As you can see, it
looks somewhat decent. But you would agree
this is not really what I had in mind. What they do here is we
do another tower sampler. But we can always have more
fun around with this one. So we can maybe
randomize the seed and get something
more appealing to us. But I'm not gonna do that rather than I'm going to do a
bit of attention random, because I think it gives us a
good feel for the material. I want another title sampler, very similar to this one. Very, very similar. We're
just going to copy it here. I'm going to tell you the
differences in this one. This one is going to be a
seven times seven bit more, a bit of a bigger number, and it's gonna be a bit smaller. So now why we are doing this, you will see in just a moment. But there shouldn't be anything else that needs to be changed. What we're doing now
is we're getting auto levels from this first
style sampler auto levels. We do a histogram scan where we sort of do a high-value and putting
all these white values. Then V inverted Grayscale. Why we are doing that
is what I'm trying to achieve is get
these black values here and fill those out with
smaller types of rocks. And what I'm gonna do
here are gonna plug this into mask map inputs. Now it didn't do
anything just now. But watch as I get mask,
MAP, threshold up, masks, everything but the
stuff on where the white is. I would like to have really low mass map input because it feels very
nice to have a good one. Have more rocks here. And what we're gonna do is
we're going to blend them. And let's do a blend
layer real quick. I chose max slides and that's
what fits best for me. So position I can maybe gets
a bit more interesting. And basically more or less
to something like this. Now you will have hold still, but they will be
filled out a bit more and they will feel a
bit more natural this way. I like how this is looking. So let's just have a liquid
and have a look at it. Here to this, as you can see, we have a lot of
these small ones. Maybe, maybe actually just bump the contrast up
just a little bit. So we don't have a lot of them. Because I didn't like
when we have really, really a ton of
these small ones, it kind of breaks
out of the field. But this is basically
what we did here. What we want to do now
is add a bit of detail. Let us do waveform one, samples, samples to allot 124. Let's see, size max 0.12. Number one, pattern noise. Remove the noise and we get
this sort of feel here. We get the bevel out. How we do this. Let's do minus 0.26, some low value there. Then we plug it into
a tile Sampler. Again. Let's get some
basic values here. So five-by-five, we
want better inputs. The patron input
being this actually, what they wanted to
do here is get size, size, size, size 1.5 on dx. So a bit longer. Let's scale this
down a little bit. In total scalar random or
something like 0.5 position, random position then randomly around and rotation random is really important
here as well. Here. We have this mask here. And it is really, really create those kind of shipping and scratches on
the rocks that we need. Let's let's do that real quick. We're gonna have auto levels. Let's come in this real quick. Something like scratches
that fits nicely. And we're gonna have
another blend here. The blend is gonna be subtract, but it's gonna be really low. Like it's gonna be
something like 0.03. And let's get it here. Even though it's 0.03,
the really visible. Let me fix this ambient
occlusion or real quick. We can ditch it for now. Actually. Never mind, let's
keep it as it is. Now. Maybe just do a 0. We have a better
overlook of everything. This is gonna be our
main mask. Here. We're actually going to end the video because we go
to all the main shapes. And this was quite a
lengthy video as well. Next up we're gonna do albedo
and a quick roughness map, which is nothing,
nothing really special. And we're going to finish the material up and
I'm going to show you how you create variations and
we're going to wrap it up. This has got a link to a video. See you in the next one.
11. 2# Stylized Rock Albedo: Hi guys. We're back
at the material and now we will be creating the
albedo Mac or base color. But before we do that, we first need to fix
up a few things. So you have noticed
probably less to video that we had a problem with our normal
and ambient inclusion map. As you can see, it has
this weird lines here. The simple solution
is just to plug both of these inputs into here. And it fixes it. I don't know why it
happens like that, but it just does. The second thing,
which I've noticed once I've actually fixed the ambient occlusion is you
can see these lines are not actually crevices or
scratches on the rock. That's because on the
first one it's on subtract but the other
ones we didn't put, actually I didn't
put on subtract, so change these blend nodes to subtract if you
haven't already. Sorry, that was my mistake. Now you should see some
of that detail bump up. Without further ado. Let's, let's get into
making the Albedo map. First. Let's get up and
ambient occlusion. Let's grab a normal. Once we grab the normal, let's bump it up to 15. From the normal, we're going
to do a curvature smooth. And we're going to do a curvature of normal
curvature, sorry. The normal curvature,
we're going to bump it up to something like eight maybe. What we're gonna do
now is we're going to get into a histogram scan. And this one is really, really hard to get nicely. But we will try our best. We do a thoughtful
node afterwards. This one is actually
pretty decent. So let's maybe configure
it a little bit. Let's see how it changes. There we go. So 0.6 to maybe 0.62
should be interesting. We do fluid-filled to
random grayscale here. So we get some random
grayscale values. And after that we do a distance. In distance, we do
source inputs to fault Phil and histograms. Can we do the mask inputs? And we do only source? And you are going to
bump this up real high. Maybe gets even 2k. Now it's time to really
mess around with these. And now these do
give a decent color. These do actually give
a decent color value. Just having a lot of them
is a bit of a problem. So removing some
nice, nice to do. We are going to grab that
and get the gradient map. So what you're gonna do
with a gradient map is always going to click
here and delete that one. We're going to grab a
interesting grayish, maybe even a bit green, just a tiny bit. And from here we're
going to go to blue and grab a bluish color. Actually. Let's, let's go, let's go to another one. But it's actually a
reddish color here. So we'd go to the red and it's pretty we need to keep it
just a little bit saturated. And the other one
is the blue one. This one, this one is
the red one, sorry. This one should be
somewhere around here and this one
is the blue one. And it should be really dark. Something like this probably. Let's let's keep that for now. I want to change
this a little bit. I get more variation. Maybe we can try and
blurred this tiny bit. So one on the blur. Let's see the difference. This and this. Yeah, it looks blurred. I'm going to keep this for now. I'm gonna I'm gonna
keep this Definitely. What we're going to do first, this is gonna be sort
of our base color. There is a problem with this. This shouldn't exist here. Sorry about it. We fixed it. So it should
be somewhat like this. Just somewhat soda photo these I would actually
remove even a bit more red desaturated
a little bit. There we go. This is something I
would, I would like. What you're gonna do now is get to histograms scan
from a myth occlusion. You will see why in a moment. We're going to do something like 0.3 and we're gonna
get some contrast in. Then you're going to
invert gray scale. May be maybe
something like this. Maybe a bit less
than two position, maybe something like this. But we can always have
fundamental change it. Anyways, we're going
to grab a blend node. Finally, we're going to do a gradient map just so we
convert it to this into color. We're going to dock
that, the D button and we're going to
plug this one in here. What we're gonna do is
we're going to do subtract with a really low value,
something like 0.05. Now you see the
difference this makes, it makes in the shapes
actually feel natural. Let me, let me plug this in. There it is. The shapes are
feeling natural now. If they actually, if we plug this one in C
called flat today, are compared to this. Now there are a few
problems with this. We will fix them as we go. The next thing, we want to do, another ambient
occlusion from this one. But this one is going to
be a tiny bit different since we are going to bump
these values up a little bit. So maybe this is going to
reduce to something like 0.6. It is. Now I've added a very interesting node
quantize grayscale. So this one is very radical because it sort
of creates these layers. And that's exactly
what we need for this. Now we are going to slope
this slope blur grayscale. What we're going to use
for the slope is actually through rectal some base, the fractal, some base. What we have to change here. But these 2.42 or four. And now mid-level, Let's do five and the max
level is due nine. And that should be it. We plugged this in here. Now for the values, we need to up the samples and reduce this to
something like 1.6, maybe add artist,
maybe even more. Now we're getting those
really natural feeling stuff. We're going to blur it, just
a slight blur grayscale. Let's just set it to something
like this, a low value. And after that, we're going
to quantize grayscale again. But this time we're going
to quantize it seven times. Now, it looks way more
natural as you can see. What we're gonna do here. We're going to do a blend mode. And we're going to
do a gradient map. And we're going to go
here and duct this. And we're going to blend
this with add sub. That's up. And we're going to put
it on a low value. You see how this adds a bit
more color to everything. That's exactly what
we're looking for. This. Now it's starting to pop
out and feel actually like, like a decent looking rock. Now, what we could do is the next one node and the next blend mode we're going to get from
curvature smooth. You're going to see in a minute, we're going to do
a histogram scan. Again. This one is a
really interesting ones. So contrast, let's bump
it almost to Max and 35, let's say, let's
say not completely. Let's do this to nine. What this does, it
gets us these edges. And this gives a
really nice effect. When we blend it in, let me
just show you real quick. We put a gradient map
and just delicate. And what we're gonna
do here is and Linear Dodge do 0.08 maybe. Yeah, there it is. You can see how it brings out
those edges really nicely. And that's what we are
looking forward in here. Let's get it there. Yeah. It looks really good. It you can see how we went from this looking
really blend boring. I mean, looking nice,
but it's boring to this. It really brings out
those shapes nicely. Let me just rewrote this a little bit to
make it a bit cleaner. And another blend mode. This is gonna be the last one. What we're gonna do is this curvature is still
needs something here. So we're going to
do histograms scan. This is pretty similar to
what we have done already. So let's just bump this up high. And we're gonna do a
slope blur grayscale. And the slope is of
course going to be this. And plug it into the sample sky and get this
lowered something like five. It gets these very,
very interesting stuff. What we want to do is max here. As you can see, we get all these interesting, interesting
looking shapes. And after that we put it
into another histogram scan. This histogram scan,
submit values. Something like this feels nice. Here we are getting
all these scratches and what different effects. And let's get the
gradient map docket. Here. We're going to crab
a linear dodge. And I'll just looks way
too much as you can see, and we just put it on a really, really low value,
something like 0.05. For this, you can
even use gets slope, but this one is really cool
way of using it as well. I was doing it at all.
So let's plug that in. And that brings
life to our rocks. Actually, as you can see, this is oral, all very
easily changeable. Now the thing that
is bothering me is this, this one here. This one needs to
change really badly. So let's see what
we can do about it. If you do it like this, it's way too one-color
it. As you can see. We don't get all those random, random colors, which
you would like. You could do that, like
you could just do normal, normal color here, maybe
plug this in here. As you can see. You could do that and have a pretty decent
looking material, but I liked the variation here. Let's, let's have a little
bit of fun with it. Actually keeping it. Hi,
seems to solve the problem. Mostly. I'm going to do that even though it kind of creates
a bit less variation. But this seems nice,
This seems good for me. Let's settle it here. So what we're gonna do, the last thing is of
course the common to everything and this is
going to be albedo. The color map. Let's remove this for now. And now. The roughness map, I
kinda keep it blank. I think I think it makes photo. You could have fun with it. What you could do is
grayscale conversion here. With the grayscale conversion, you can blend it
with fractal sum, which is the thing I
like and I like to randomize seed with multiplying. I like getting that real
nice grunge and then getting a levels and bringing
all the values. And then plugging it into
roughness. We can do that. And that way we can control
the amount of roughness. As a consumer. We can make them shiny a little
bit here and there. And that's what I actually like. I think I like this sort of shininess just a
tiny little bit. I'm going to keep
this basically here. We can maybe bump this
out a little bit. When it comes to stylize
materials, you can have, you can tweak the
ambient occlusion math a little bit more
because there's not much detail going on. It's usually flat, but I'm going to keep
it as it is here. I liked, I liked.
If you want to get a good shot inside the
substance designer, what I recommend go to
Materials and then edit. Get the height scale to
something like eight. So let's set it to eight. It looks pretty good. What I would do is just bump the tessellation factor a
little bit more high poly. And we can get to
really nice shot here. If you're looking to save
an image inside substance, what you want to do is go to
a camera and save render. And then it's going
to pop out where to save and you just save it. Although in the expansion
of this course, I will do little tutorial on how to present
your materials. There probably will be that too. We can wrap this up now. This looks pretty good. You can feel free to
experiment with it. Actually, yeah, I
haven't showed you that. This is always the base. I like keeping the base
pretty just as it is. I don't like doing
anything else to it. So let's go to aid. For example. I can show you how easy it
is to change this material. So what we can do here is go to this sampler
and randomize the seed. And we have created almost a completely
different material here. What I like doing with
the stylus materials, it's usually really easy to
have fun around with colors. You can have some interesting
looking colors as well. You can have, maybe, let's pick out
something like this. And from here, pick
out something, lie this and it's
kind of getting that sort of river field to it. We can also grab a bit of a
bit of more more color to it. Just grab it in, get it,
get it nice-looking. As you can see, gets really nice variation
all over the place. Now those little lines
are kind of a problem, but you just need to tweak it a little bit
everywhere you go, it more or less here and there, even a bigger problems. So maybe 0.6 fixes
them a little bit. Maybe bump this
out quite higher. Maybe even. Let's see if we put 20, we can get some quite big stuff. All they can say is that you need to play
around with these. They are very touchy. For now. I'm going to leave this to ten because it seems to
produce the best results. And even these kind of weird extrusions give
it a really good, good field to the
rock antibodies. But basically that's
more or less it. That's it for our
stylus material. Hope you enjoyed and see
you on the next video.
12. Stylized Rock Albedo Quick Fix: Hey guys, I just
wanted to tell you a quick fix about
the flood fill node. So because of those weird, weird coloring we
have been getting, basically what we
should've done is got normal and got it to OpenGL. The same thing with
the curvature here to normal format. Opengl. Bomb the intensity to ten
if you already didn't. Histogram scan contrast 1.67, some normal values with fulfill. While they changed here, it does, it does. It is a bit more vary
on the computer. But if you change
the safety speech trade-off to know failure mode, mode, you will get
better results. So that's basically what I did to get these
more cleaner rocks. That's what I advise you do too, because this is something that that is a bit of a problem. I think this is the
easiest way to solve it and it gets us
quite good results. And of course, you will still have to kind of
play around with this a little bit before getting
the result you like. But it's way better than having those weird lines
showing off everywhere. Yeah. Well, basically they
said just wanted to tell you a quick
quick tip for that. Let me see.
13. 1# StylizedGrass Material: Hello guys. Today
we will be making stylized grasp material and
how we will be doing it. Well, actually I'm
going to show it, but we already made it. Made the graph is
just an empty graph so we can get things set up. And as usual, GI just
use a base material. Right-click create
output nodes and know that we use a blend node. I usually use it just it makes it makes
life a bit easier. So we plug this in. We say normal. We plugged this into height. We do ambient occlusion. This is the fastest
way to do it. And we will be doing
uniform color. And for the uniform
color will just create something a little bit. Softness are just
going to be two, roughness and metallic go to
uniform color is going to be grayscale, gonna be white. For starters, we will
be changing this, but this is just for some base. There we go. We can start
making the actual material. We need to do is
grab a way forward. And what I'm gonna do here
is get the samples up. My phone number is only one. I'm going to do is
noise, 0, pattern, and a bunch of
buttons, but choose pattern to it are going to do is get this size max to a
really low number like 0.28. Yeah. Now transformation through D are going to rotate
it 90 degrees. We're going to offset
it by minus 0.2. We're going to also
remove the tiling here. So just go to the
tiling mode, absolute. And we do the tiling and
we select know tiling. What we are doing kid
basically is by default every single node is
relative to inputs. So like the tiling mode is going to be relative to
the tiling of the input. Here, tiling is H and V tiling. Heat is going to be
H and me tiling. We had overwriting it but saying We wanted to actually
do something about it. And we say no tiling, tiling and horizontal dialing. You can save vertical tiling
and it moves that one. But if we move it here, it's actually going to
have a horizontal tiling. We're just gonna do know tiling. And let's do minus 0.20. From that point on, we're going to go into bevel. Both of these
actually two bubbles, but we will use now
the other will be useful for some later stuff. We're gonna do to one and we're going to put a minus, minus 21. For the other one. It's gonna be just o2, but it's gonna be minus O2. So we bevel, bevel the edges. Correctly. After that, we're going to grab
all the levels here. So we bring up those
white values a little bit and we're going
to invert gray scale. You will see in a moment why
we are doing all of this. Let me just move
this out of the way. We're going to grab
a Curves in here. And let's just get these points. And we're going to
bring this point up here, all the way up there. We're going to bring
this one as well here. We're going to create
a code of that, something like this. Now we're going to actually
use our bevel here. We're going to grab
a blend to node. We're going to multiply it. And that creates a nice
little shape here. And after that we're going
to grab a Levels node. Just gonna load at these levels lower to the white
levels down a little bit. To that. We'll be using could have a lot. Let's just do a gradient linear. We will be needing
three curves nodes. Get them out like this. The first code of node a is going to be very
straightforward. Just going to get a point here. And we're just going to try
and get something like this. Notice trying to do is
get these black part. It's all the way down here to be black and all
of it to be white. So we can do blend here. Let's move this up here. I do multiply. We remove that bottom part. And that's what
we're looking for. That's the that's the thing
we're looking for here. Let us do auto levels before
we welcome these two curves. The first code of here,
very, very specific as well. So we will be needing 1 here. And the other point is
somewhere around here. So how we do this one
is very interesting. So we need to bring this
one up here as well. This one needs to be lowered, something like this here. And this one needs to be low, would have both of
them a tiny, tiny bit. This guy needs to be
something like this. Sorry about that
little interruption. So what we are doing here
is basically creating a very interesting
sort of curve. You will see why in a moment it doesn't
have to be perfect. But try and get it to
look as good as possible. We should get this
blackness a bit on the top. And let's create the other
one, the other curve. So this one, we just
go bump it up all the way down here and get it. Maybe a bit more.
Here. There we go. That's the that's what
we were looking for. What we're using for.
What we're using these for is we use two
directional warps. We're creating some
variation here. Let's plug them in. Let's say 30. Let's say for this something
like 30 as well. So it creates very natural
looking variation. Maybe bump this up a little
bit. Experiment for this. This is completely up to you. Let's just put these
a bit like here. We save some space. Then we're going to do transformation, 2D, 2D transform here as well. We're just going
to make them a bit smaller and move them
somewhere up here. The same thing for this
one. Move them up here. Now, we will be
getting both of these into sampler is actually before to center them
a little bit smaller. Just a little bit. But before we do that, we need to create
a rotation map. Well to both 3-fold
rotational map, Let's just get to
a frame here and say base good *** blade shape. What we're doing with this, we are just commenting so, you know what's
going on when you actually revisit this material. Eventually. What we're doing here is we're doing
Perlin noise. Scale it down to five. We're doing auto levels. From auto levels slope blur, and we're going to use
it as slope as well. And bump this to 3216. Now this is not something we
would want, we want to have. We want to have min here. So the blending modes
should be min here. After that, we go to
non-uniform blood. It's not the directional,
it's just nonuniform. And we grab a plasma
anode and a plasma node. We get it to something like 12. We don't want it to be too big. Grayscale input
and blur map these slope and the plasma
is grayscale. So what do we do with this? Is we set the intensity
to something like 14. Then samples 16
blades set to nine. We get to a really interesting
looking shape here. We do ultra levels. This skull are auto
levels should look like. And this is our mask here. Let's frame it and say
here, rotation mask. Now we are ready
for title samplers. Not like that. Let's make the bottom 1 first. What we have to do, photo stop Bethany input and select
Beth and input number two, because we need two
of these inputs here. Exactly. After that, we're going to get a rotation map input
and plug it into this. What we are going to do here, Let's first two hundred, eight hundred, something
like that should do fine. After that, we can
increase the scale. Scale 11. Maybe. After that, we
can do position random. Position random is really low
number 0.3 and offset 0.5. Nothing, nothing
too special here. But here is where all
the magic happens. So 0.05 in rotation random, and then we're going to do
rotation multiplied to Max. Do you see how it's changed
completely naturally and we get all this natural
flow in our material. So let's plug this in. Now. There is nothing
showing because we need to actually right-click here and your
outputs in 3D view. I messed up somewhere. Let me just see where
ambient inclusion, yeah, I didn't plug it in. You see? It's really natural. It has that natural flow. And it is really amazing how we, how a simple rotation map
can make all this happen. Let's copy this one up here. Because they, both of
them are really similar. Actually, did we do
everything? We didn't? I forgot one very
important thing here is called a random 0.85. We don't want everything
to be completely. We want some randomness
here and there. It makes a better natural
looking material. We're doing now. This other one, having almost
all the same stuff here. We just need position, random. Position at random,
that there's a kid. We set that to 0.
Offset stays the same, rotation stays the same. We only need to do a
mask random as I see. Let me just, let me just
get this stuff cleared. So I don't mess up somewhere. Not even colder
than dummies here. We don't have any
randomness in the colon. It's pretty similar to this. Mask map is something
we utilize here. Let's do 0.65 photo started. I think that would be decent. Let me actually scale needs
to be a bit bigger just so we have some some stuff
actually different. Let me just see. I think this should be let me just do a
quick double-check. Everything should
be good to go here. Let's let's do alter levels. Sorry, sorry. Levels. Levels heater as well. Here is where I will
end this video. See you in the next one.
14. 2# Stylized Grass Material: Hey guys, Let's continue
where we left off. First thing I wanted to
tell you is transformed to make these a
little bit bigger. They would really
small like this here. And let me let me lower
them down a little bit. You had these really
big holes and from from faraway there
were kind of okay. But close-up isn't that good? To make it more, to make
it better and more fluffy, you just increase
it a little bit. Just increase these two. Just a tiny bit, and you will
get much more full grass. So to say the grass fields
way more full and it gets, gets this nice soft look. What we're gonna do now. We have these two O2 levels. Let's combine these
two, combine them. This one will first
go into levels node, and we will lower the white
value is quite substantially. And we're going to blend these. Blend these together. This
is just gonna be temporary. So you can see,
sorry Max, lighter. We can have just the basic
look on it, how it will look. And we can maybe change the
values a little bit and see how it looks. But yeah, I think this is, this is looking fine so far. We just let's delete this. We don't need it actually. It's continue on to other stuff. We will do the similar kind of levels to this one as well. So just lower the white values a lot and move the
black values as well, just a tiny bit. Then we're going to put
it into a histogram scan. So let's just move this out
of the way a little bit. We're going to put this
into a histogram scan scan. And it's going to be 11. So we want full contrast. We want this to be like a mask. What you're gonna do. Now, let me see what we can do first. Let's talk about this. It's just a little
bit complicated. This one. We're going to set that one up. We're going to set another
thing up real quick. So we're gonna have
a rewrote node here. Just simply press
Alt while dragging. And we're going to
do a height blend. Here. This one's going to be on top. And on the bottom is actually
going to be this one here. Once we want to do is
set the height blend, height offset to 0.5
and contrast to one. And that should be all. What we do afterwards is
we get the blending mask, the blending mask,
and we go blend. And we're going to add
another node from here. We're going to do multiply. I think This Exactly. So let me just see. We lowered it. Let me just check
this real quick. If everything is okay. Everything should be okay. We can maybe we should lower oh, yeah, I forgot to
lower this even photo. Yeah, That's the
mistake I made here. You need to keep this
load quite a bit. Then we are still
getting the mask. That is really, really
big. Let me see. If I load it do in photo, then the mask is still there. Did something wrong here. Probably. Let me just check this. Two levels. Blend. This should be on 0.5. Then the mask here. Maybe we should thinking that
we should actually go down here and enter the title sampler and get the mask
random a bit higher. So something like seven. Maybe even 88 sounds decent. Actually, let's, let's bump it up to some really kind of value. Something like 95. Almost 95. Maybe a bit too much, 0.9. Let's see. Now, what we are getting
actually makes sense. This is now okay. This is now decent, sorry for that interruption. What we actually
could do is maybe even get the size a bit bigger. So something like 13. This is all a bit of
experimenting and feel free to experiment
on your own as well. Actually, I want to make
d is even, even bigger. These two. Let's make them bigger. Now. We might even get
a better result. Yeah, this seems,
this seems better. You will see why we
do this in a second. So what I'm trying to do here is basically this is gonna be
the main grass like this, this sort of flowy pattern. But this here is
actually going to be the tips of the
grass and that's what, that is what will make them look really nice and that's what
will make them stand out. I will, I will get
this even bigger, just a tiny bit. Now, I think now it's good. So we have this now. Let's say we're going to
do, we're going to get it inside the gradient map. Inside the gradient map. Now, I'm going to copy the
gradient I already have here. Something like this. Basically, what
this gradient does, it gets that really bright
yellowish color to the steps. And that's what you
are looking for. And we're going to
blend this together. We're just going to
use a blend nodes, but we don't have anything
to blend it to yet. What you're doing here is we need to get the color
for this part of the grass. How we are going to do it is going to grab
the auto levels. Why did this go down
the auto levels? And we're going to do a
simple gradient map. Again. This gradient maps are
really, really simple. I'm just going to
sample them again. And let me just, here is the gradient I have. I'm just going to sample them and make it a nice gradient. There we go. This is gonna be the
main color of the grass. You can again
expected experiments with the colors if you feel like you can use HSL nodes,
also. Hsl nodes. I really like using them
because they're really, they look nice most of the time. But what you can do is you
can always change the hue. And that is, that is an amazing thing I
like because this one, this grass is a bit see
yellowy and whatnot. I can change it
to be more green, more even blue like
and you can change the saturation to have a lot
of different impacts on it. But we can do, we can do all of that later on once we
finish the actual material. So now we're going to blend it. We're gonna blend it
with an opacity mask. Opacity mask is none other than this histogram scanner
we created before. And we're going to
blend it in like that. And as you can see, we have wonderful looking
tips of the grass. And that's exactly what
we were aiming for. Because now those steps. A really, really shine
through in the material. Let's make disorganized because we use the bit too much
space for all of this. When it's not that complicated. Just do something like this. This should be fine. Now if you want to, actually,
let's do it. Let's plug this into the base
color and see how it looks. In my opinion, it looks amazing. Now one thing that is
kind of messing with our a whole field is the
ambient occlusion because it's still it's still hard on the
harder than the whole grass. To make it soft, we
need really low values. Like let's do 0.020.08
on the radius. So this makes it look
a little bit softer. Yeah, that's, that's
exactly what we need. Let me just drag it out
a bit to see better. As you can see, this is really exactly what you're looking for. Nice fluffy grass with
natural looking flow. So we're not done
with this part yet. But I'm going to
end the video here. Actually, before we do that, we need to come in
this base masks. Here I'm gonna say base albedo. Just keep everything
commented all the time. So you know what is happening on the actual graph really is
needed a lot of the times. Also what we can use, what we can tweak. Now. Just a quick little thing. Instead of using this one, let's use levels on. The height is way different. Let me see. Just bring it up a little
bit, just a notch. Let's see how all of this goes. I might not like that, but we will
experiment with easy. It's all of this is really, is really made to be
experimented with. So we can always go and
change stuff. As we go. I'm gonna I'm gonna do
a quick blend node. So the one we actually deleted
are I actually deleted? We're going to do
blend and max light and let's plug that in here. Let's plug this null. Let's just pull it
out here roughly for now. I don't like that. Let's delete it
for now and let's, let's keep on using
this photo now. After, after sometime
we will think of Cl2, will think of what
to do with this. We fixed this. I'm pretty sure I missed
somewhere, messed up somewhere. Now, here, I need to return this to be way
lower than it was. Yeah, we'll end it here. Don't don't actually do
anything here to for now, we will mess with the
values of bits later. We can also mess with these. We want to actually, we can have a goof around
with these values. Let's see how they affect them. The whole look of the material. Making it brighter does
give out a nice nice June. We could, we could
leave it as it is here. We can maybe lower this value to create a bit
more uniform shape. Well, this is all up to,
up to experimenting, but I'm gonna keep it,
keep it like this for now. And we'll see you in
the next episode. Where are we? Fine tune it a little bit more
and we're going to add the clovers so we can have some kind of flowers
in the material. See you then.
15. 3# Stylized Grass Material: Hey guys. So continuing with, we left off. The first thing I will tell you did I just changed
the radius to 0.04. Maybe even lower
this down to 0.01. Just a little bit, might give it a bit
more smoother look. Now, we should get going
to making clovers. So let's get started
that somewhere over here maybe let's get
the shape. What do we need? Photoshop is a paraboloid. We need to make it
a bit different, so scale it down a little. It to make it 0.7. Need to thin it out a bit. We're going to do
transformation 2D. And we're just going to do
a really slight offset. Just to really slight
one and F two to that, we are going to do a skew, grayscale, skewed gray scale. And it's gonna be horizontal
and the line is center. And what we're gonna do with
this, you can also do this. We transformed to D, but I
found this to be a bit better. Yeah, minus 0.23 maybe. Let's do 0.25. Sounds
like a better number. Now, we're going
to do motor skill. Now it creates that kind
of heart shape we need. After that, I'm just gonna do
a blend and radiant linear. We're going to blend
these together. Multiply. Let us do multiplier. We create that fade away
effect at the bottom. Exactly what we need. Now we need a splatter
circular pattern input here. Now, we need to mess around
with this, a little bit. Pattern among five. This all these lift better
than this image input. Of course. In 18, let's do it like that. Maybe radius multiplier,
that's all gonna be left out. Global offset should be 0. Why was that value there? 1.1 scale, scale m, We need to get to
scale up to five. Yeah. I'm pretty sure that
we need to get this. This is the global shape
we would get here. Now what we do with it, We're gonna do a histogram scan. That histogram scan is just going to have
a position of one. There we go. We're gonna do a bevel. Note that bevel is gonna
be really, really subtle. But we do want to put
a minus in there. We want to battle it inwards. What we also want to do is
get all two levels here. The normal levels. What we did with these levels. But all the black value
down a little bit here. Now blend. It goes up and this
goes to bottom. We're going to blend
it on multiply data. We go, we get a really
nice-looking clover shape. We can dock this by pressing
D If we won't tell you, I don't really like looking at like the way it looks like now. Gonna do alter levels again. Just to get those values backup might not even be
that necessary, but let's just do it for
the sake of doing it. Now. We're doing a blend. We don't have the folder ground. I'm going to plug it into gonna
grab another shape nodes. There is. This shape is again going
to be a paraboloid. Sorry. They're just
going to make it small. Gonna do a tile
sampler. Sampler. There we go. We're not gonna put
it in pattern input. We're going to put
the mask mapping. And you're gonna see
exactly why that is. Here. We had also using a paraboloid. Let's first get this flipping
through any of them. Paraboloid. Let's just
mess around scale. Scale three-point scaled
random 0.45 shouldn't be 0. I didn't like this. Let's see, let's see, let's see. What else do we have
here to mask map, we need to do a mask. My 0.17. We go. That's it. I'm gonna do call a random one. Exactly. What we did here is
actually just a, just a way to get the middle
section of the flower. It's a bit weird. It is nice-looking once you, once you see it
when it's useful, now you might not
notice it that much. I'm gonna do a little
bit of position random, I think in seven offset, 45. There we go. This looks, we need to get
that kind of circular shape. We do a histogram is
kept from this scan. Position one. We go and we need
to do a Levels. Levels. We just bring
the light value. The black bit here as well. Something like this seems good. Blend and blend it on. Multiply. We get this sort of a year. Now, we do a transform
to what we use it for, is actually quite interesting. Now we're going to plug
it into the blend mode. And the blend mode is actually
Max slide them dead it is. Now how you do this
to make this easier, to double-click on
the blend mode. And if we click once
in the transform to D, you will get to the options of the transformation to denote that you will be able to see how it affects the blend nodes. So if I can leave here,
you can see very clearly, Let's do 0 by 0 then only
if you can these values. So let's just get them
small, something like this. We need zeros, 0 to center
it quickly that it is. Now we don't need
styling in this. So as it says, per usual we do Q absolute and no
Thailand. Thailand. Yeah. We get that shape field. But what's even better
is if we make it even something like
this, I'm content with. This is gonna be our main shape. But before we do that, we do need to do a blend here. What do we do with the
v, The Kite blend? We get to alter levels and
we get this into this. Now, this contrast one. Let me see if I plugged
it in correctly. Yes, I did. And we
need the height mask. Mask. You just didn't go to grayscale. That it is the grayscale. It's actually quite interesting. Let me see. Now we need style
centers. Do tiles. I'm going to put this
into an input that it is. Let's see, the pattern inputs. Debt at a few things we
want to tweak of quota, so let's make them a
little bit bigger. And scaled random. Definitely some scalar random. We wanted. Position random three. That seems nice. Five maybe. Something like that is decent. Rotation. That we
would want a mask. Mask and just controls how
many flowers you want to have. So let's put it to a high-value like this. Forest autochthonous. Just call it random, just somebody point
forward is fine. We can bump this out as well. This seems completely fine. We can do here, so we can
scale that it is good. We need another
tile sampler now. It's exactly this one. But instead of this
pattern input, we're going to use this one. You will see how we use that. In a moment. After death. We do a levels. The levels are as usual. We just want to lower
down on devalues. Histogram, scan, scan, contrast. Let me just check
something real quick. Actually, those make a
difference, doesn't it? One is kind of a rough one. Okay. I will I will keep
it 10199 for now. I just want to get a cube. I'm just going to
place it like that. Good enough for doing this. And I'm gonna, gonna say lowers. That's what I'm gonna
do fluid this video. And in the next one
will be finishing the material completely.
We'll see you then.
16. 4# Stylized Grass Material: Hello guys. In the less
absolute we made the clovers. And in this one, what
we will be creating, actually just
finishing the albedo, coloring the clovers in. And we'll be finishing
the whole material. What we want to do
now, Let's start off. Let's start off by getting ourselves a blend
node from this one. Exactly that. So what are we going to get
into this blend node? First? We're going
to get this one. And we're going to just
do gradient map from it, it to this into a color value. So you can go into the blend mode and we're
going to dock it by pressing D. We get
that value there. Now, what we want to do,
very interesting one. You will see, I believe it's this one. Yeah, this one is this one. So we get this one here. This Histograms,
can we use a blend? The blend is really important and you'll see why in a moment. And we'll just going
to use rewrote node because we need
this cell put here. The blend is going
to be subtract. We subtract the grass
blades from these clovers. Y null because we
won't some of them to be kind of hidden behind it. Hidden behind the grass. There is can you see fit? They fit perfectly. Now they're completely white, so we will be changing that. Just you wait. After that. What we're doing is grabbing another blend
mode. Of course. This one. What is gonna be
the opacity mask? Well, it's pretty similar. It is pretty, pretty similar. I'm going to grab a blend, the node Q. Blend. Better it is. We're going
to plug it in here. For the other input. What we will be needing is
the bottom, this one here. Let's go to have both cells are rewrote mode,
bringing it in a bit. And then it is. And we are going to
get it here as well. They didn't map and
bulky thing here. The same process
that's happened here. We do it exactly the same. Actually we just need to do
is subtract here real quick. There it is. We have that kind of thing. Let's plug it in to DLB to just see how
it looks like now. Looking pretty cool.
So far, so good. After that, we are plugging
this in another blend node. What is it going to be
in dead blend node is actually this rewrote and will be made and it's
going to go into A0. So ambient occlusion. And the ambient
occlusion is going to be very specific and
very low values. Something like this. 0.06, like it would've going to invert
the gray scale. Here. This will be Gradient
Map and plug it in here. And Dr going to do subtract the opacity mask, what we're gonna be using. The same thing we
used here. I believe. This should be yeah,
I photographed. So yeah, this is the thing
we need to use here. But I forgot one thing. In this gradient, we
actually need to change it. This value here should
be some yellowish value. Let us do a stronger docket. Yeah, we get that to
yellow. Pointing out there. Here. We do a bit low and I
think that looks amazing. I think that that
is really good. That looks really, really good. With that. We are actually
finishing out albedo. So kind of frame,
say adding clover. Go for the albedo. What do we need to do though? Let's get this out here first. Get a blend node. My favorite note to use floated off in this
maps, fractal some base. I think this is pretty
much old default values. Default values. I just do five. Will tell you always
do with these, just do. My experiment. I usually do multiply. Add Linear Dodge
doesn't seem goods. We're going to do
multiply with if we end up using
these levels node, the whole thing might
change our minds here. Let's try and do it. Now I could do add Linear Dodge. It's something like full
depended looks better. Plug it into the roughness. It does look good, but I think the height map
is really bad here. Let me just see options here. This is the deafness
methyl showed us. This is, this isn't
more or less it. But I don't like the height
being this necessary. The normal nerve
should be denied. This. Maybe if I plug it into the
levels levels first, maybe this Apollo we do. Seems good. Ambient
occlusion. Sounds good. Normal, normal, same setup, same maybe levels as well and kinda these values. Low. So maybe if I do
it like this now, this looks decent enough. I think we'll be going with this height and
floated the deafness. We will keep this. This looks really good. Once we could do. This is just not experimenting. Feel free to do the
exponent notation on your own. How you want it. Will time looking to do is
create a really soft little. I could really,
really soft rule. To consume a B is
actually do this. Maybe plug it into heat as well. Into here as well. Lot of options to be had here. Let's call this one
the original one. Original one kind of looks
the best in my opinion. If I place it in this kite and there's occlusion and
there's normal amount. One thing I would change though. Let me let me see how it would go if we place them like this. So this gives us a way more
like a bigger grass shapes. But what degree between these? Just a tiny bit. Maybe actually put
them at ease them. Put them solidly key. Starting to get more
natural if we get a little bit bigger shape here. I think this is pretty good. Hsl node here. Just fooled. Just
going to Control. I like to having that control
because we can we can change everything in
it. As you can see. Look how good it looks. But actually maybe putting it, that isn't bad idea
maybe we should do. Here could be a good idea. We can just change pretty much everything eldest way too late. We can expand. It meant that only
with these colors. You can do a lot of
fun stuff with this. Remember if something new, if you fail something you
just said back to normal. I hope you enjoyed
this tutorial. I'm sorry. This is the graph we have no. Hope you liked it. See you in the next video. Have
a wonderful day guys.
 Populus Course