Transcripts
1. Easy Cinematic Video (using the Canon M50): Hello there. My name is Kai and I'm a filmmaker, videographer, photographer, animator, and YouTuber. You can actually have a look at my creative work over on YouTube by searching for Kai Creative. Today, we're going to be looking at my top 10 tips on how to create a cinematic video. Now for this class, we will be using the popular Canon M50 camera to demonstrate things like menus and settings. But all the advice tips and principles in this class will also apply to any camera that you use. We will cover setting up your camera, how to shoot in manual mode, we'll talk about frame rates, shutter speed, ISO, picture styles, and depth of field. We'll talk about kit, lenses, ND filters, gimbals, sliders, and then we'll jump into Premiere Pro to discuss points for your editing. Now there is also a class project and that is for you to use what you learn to create a one-minute cinematic video and post it here on the class projects page. I'm super excited to jump into this class with you and see all the cinematic pieces that you create.
2. Go Manual: The first point is that you need to shoot video manually, not in auto mode. Change the top dial on your Canon M50 camera 2D camera icon. I know a lot of vloggers pop their camera onto auto mode and shoot video like that. That's completely fine if you want to create casual vlog videos. I've done it before for quick videos and it's easy and convenient. That's because auto mode allows the camera to decide all the settings based on your current light. But now we want to control our exposure manually for the best cinematic experience possible and not let the camera decide the settings for us. Change your M50 dial to camera mode. Select "menu". For the very first menu, make sure that it's set to movie manual exposure and press "Okay". Now we're good to go.
3. Frame Rates: With the manual mode set, the next thing you have to do is set the frame rate. There are two frame rates that we will suggest that you use: 24 and 60 frames per second. We'll talk about 60 frames per second later, but for now, for that film look, we want to use 24FPS. The reason why is because traditionally, film was shot at 24 frames per second, and our brains have been conditioned to associate that frame rate with movies. Although this is slowly starting to change, if you want that associated film look with your video, then you want to shoot at 24 frames per second. To do this on your M50, make sure that your camera is set to NTSC. To do this, go to Menu, go to the spanner icon, third menu across, select Video system, and change it to NTSC. Now go to the first menu of the camera, Menu 1, and select Movie rec quality, and change it to 1080, 24 frames per second, or here represented as 23.98P, and press "OK". You will notice that there is a 4K option at 24FPS on the M50. However, this 4K does have a heavy crop, which means it's really zoomed in. Also, the advanced autofocusing system of the M50, the dual pixel autofocus is dropped in this mode, which means you generally have to use the manual focusing system with 4K. Which is fine, if you want to do that, and want to deal with the video crop. Other cameras will have 4K and higher options that are easier to use than the M50. Really, it's up to you what aspect ratio you choose. But for our cinematic settings on the Canon M50, we are going to recommend that you stick to using that 1080 full HD option.
4. Shutter Speed: Now since we are in manual mode, we need to manually set our shutter speed, aperture, and ISO. Don't worry if you don't know what these things are, I would explain what you need to do. Firstly, the parameter that you should set and shouldn't change for your video is the shutter speed. The shutter speed needs to be twice the frame rate. Remember that the frame rate is 24 frames per second, so the shutter speed needs to be one of a second. We don't have this on our camera, so we're going to the next closest possible option, and that is 1/50 of a second. That's what we're going to set our shutter speed to and we don't want to change that. Now the reason it needs to be twice the frame rate is so that the motion blur looks natural on the screen and not jittery. That's the shutter speed set. We will cover aperture and ISO in a minute. But for now, let's move on to the next point which involves slow motion.
5. Slow Motion: Slow motion footage always seems to be used in cinematic videos. For parts of our video where we want slow motion, we actually need to change our frame rate from 24 frames per second to 60 frames per second. We can do this in our menu by going to the first camera menu and then movie rec quality, and then changing our video to full HD, 60 frames per second, or here it says 59.94P. When you make this change, remember that your shutter speed has to be double the frame rate for natural motion blur. So change the shutter speed to 1/125 and leave it at that. Now when we record video at 60 frames per second, we can actually interpret this down to 24 frames per second in post-production. Let's quickly jump into Premiere Pro to show you how to do this. We're in Premiere Pro now and we're going to show you very quickly how you can transform your 60 frames per second footage into 24 frames per seconds slow motion footage. Here, I have some footage that was shot from our cinematic M50 video. I'm going to just drop in one of these files into a slow motion folder. As you can see down here, it's set at 59.94 frames per second. If I create a new sequence from clip, so now you can see that it's running at normal speed. I've got two variations of this shot, and we want to slow this down for that cinematic slow motion. What can we do? We're going to right-click on the footage. We're going to Modify, Interpret Footage, and we're going to assume a frame rate of 24 frames per second. Then we're going to hit "OK". Now what you'll notice is we can actually stretch this footage out. It's stretching out the footage and it's assuming a frame rate of 24 frames per second. Now, as you can see, just quickly cut some of this down. We've got some cinematic slow motion and we've got a lot more footage to play with as well. We can really choose those parts that we want to use for our B-roll. Maybe Rob here looking around. We could just cut some of these bits out, cut that out, cut that out. If we watch this back now, we can see the cinematic walk seen with Rob and his little M50 on his shoulder there. That's how to interpret 60 FPS footage as 24 FPS and gets that cinematic slow motion. For shots that we want to film in real-time, set your frame rate to 24 frames per second and your shutter speed to 1/50. For shots that you want in slow motion, use 60 frames per second and a shutter speed of 1/125, and interpret this down to 24 frames per second in post-production.
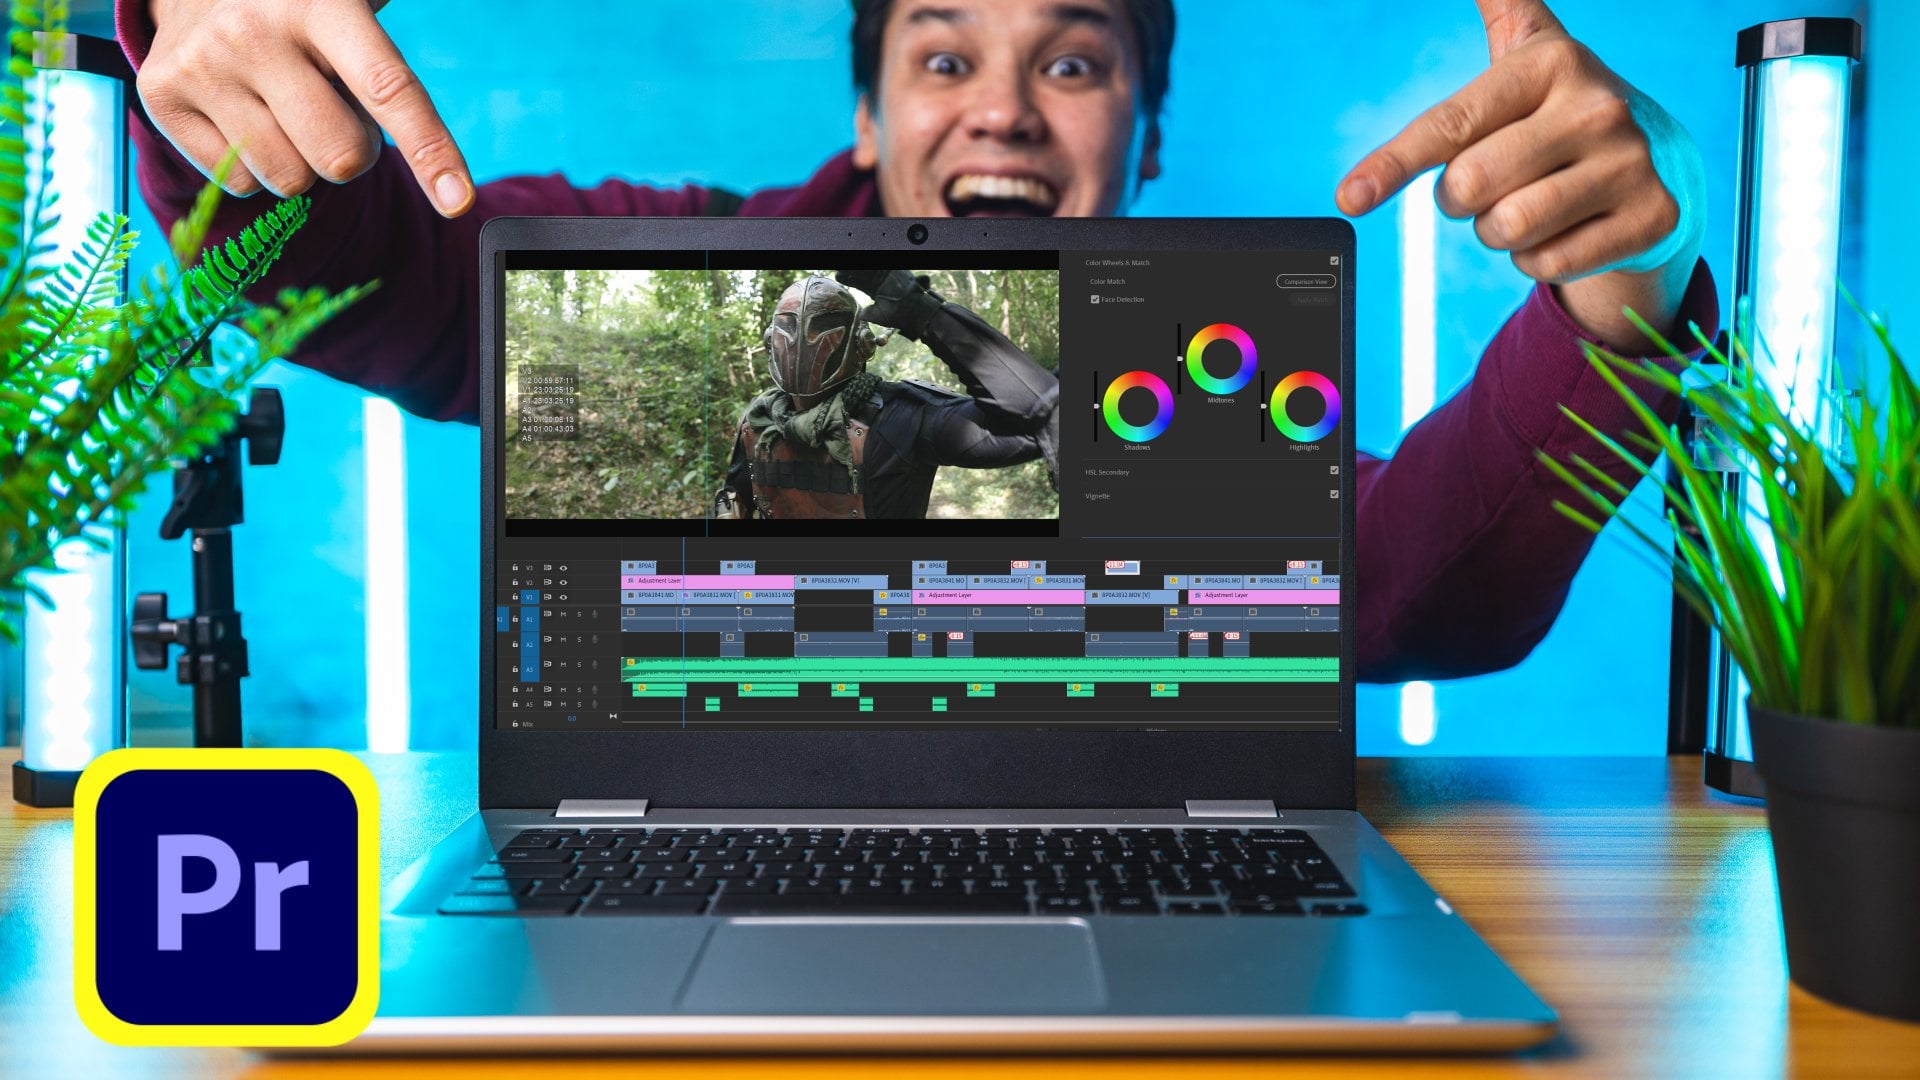
6. Camera Picture Styles: The camera picture style is next on the list. Unfortunately, there isn't a log option to film with on the Canon M50, so you can't take advantage of C log and filming with that increased dynamic range like you can on a Canon R Series. But you do have options to change up your picture style. First of all, you want to avoid using the standard picture setting, as it is heavily contrasted and you'll get a very digital look. Instead, I would encourage you to use the neutral picture setting, which actually gives you some wiggle room to color grade later on in post-production. To set this up on your Canon M50, go into the menu, select the camera option, then the third option, and then select "Picture Style." From there you want to select the "Neutral" setting. I even go a step further and customize this style, by selecting "Info Detail set," and then selecting "Contrast," and I tap the contrast down by two steps. Then set to okay. Now, you have a less contrasty, easier-to-manage picture profile. We're jumping very quickly into Premiere to show you how you might be able to color grade this neutral footage from your Canon M50. Again, we have our slow-motion walk cycle with Rob. What we want to do is start to add a little bit of color to this image, to make it a little bit more vibrant and make it pop a little more. What we need to, first of all, is to just bring up the Lumetri Scopes, and we can do that by going to a window and adding Lumetri Scopes, and then we should be able to see our scope here, so if we click on there, we've got our Lumetri Scopes, and this is the RGB scope. Now if we click on this little spanner, we want to have a look at the waveform RGB. And we're going to turn off the parade RGB there. That's our waveform. And you can see we're very close to the black and there's a little bit of wiggle room here with the whites. What we can do now is go to Lumetri color over here on the right. We can go to Color Wheels and match, and what you might want to do with the midtones is just bring them up slightly. Just lift them slightly, lift the highlights slightly, and then bring the shadows down. Just a touch. But we don't want to go to zero because that's when you start getting clipping and you'll get artifacting in your colors. You can start to see already, we're adding a little bit more vibrance, a little bit more life back into this image. Next we can go to basic correction. We can lift the highlights slightly, can pull the shadows down again. For the whites up slightly and pull the blacks down. Just a tad. We don't want to go past this zero line here. If we do, I'll quickly show you what happens. It really does destroy a lot of our image. I want to keep that power wave zero and under a 100 and some clipping that's happening up here. And that's probably from these really white clouds, maybe even this white car here. What we can do next is go to our creative, sharpen a little bit because remember, it is a neutral picture, and add a little bit of vibrance, and you can see we can actually make the whole image really pop with the vibrance. But then we start to get weird artifacts and over here we go too high. But in some cases we might be able to go up to 50 with the vibrance and not see any drastic color shifting like we're seeing in the bonnet of the car over here. Then if we go to curves, we can create that S curve. Just a tad, across at the top and down slightly without crushing those blacks too much. As you can see now, if we compare it before, we've added a little bit more vibrant scene to the greens, a little bit more into the blues. The whole image is a bit brighter without really losing too many details. When you're color grading your neutral settings, you really don't have that much room to work with compared to C log or log footage, but you do have a little bit of space to play with. At this point, we've covered enough information to help you set up your Canon M50 to film something cinematic. Now we will look at the aperture and ISO values and we'll talk about additional kits and ways to make your footage look even more cinematic.
7. Shallow Depth of Field - Aperture: The next thing to think about to create that cinematic look, is to have a shallow depth of field. That means having a blurry background. A lot of this has to do with having a fast lens. That means having a large aperture, or low F-stop numbers. You'll see them like 1.4, 1.8, 2.8. These numbers will be written on your lens. It will tell you how wide your aperture can actually open. Really, all you need to remember is, the lower the number, the larger the aperture, and the blurrier you can make your background. A piece of kit that I'm using on my M50 is the Viltrox speed booster. This actually pulls in the crop of the M50, as well as increases your lens aperture by one stop. For example, I could use the Viltrox speed booster here with the 50 millimeter 1.4 Canon EF lens, and now, with the speed booster, I can take the aperture all the way up to F-stop 1. You can see that it makes everything super blurry in the background. For me, 50 millimeters on a crop frame camera doesn't give us enough of a focal range to play with. Instead, I opted to use a 16 to 35 millimeter F-stop 2.8 EF lens, for my cinematic shots, to get more into my shots. I still managed an F-stop 2 with the speed booster, giving me more than enough background blur, to help separate my subject from the background. Now, you don't need to have this complex setup on your Canon M50, but I would encourage you to investigate lenses with fast apertures.
8. Setting ISO: We've already established that our shutter speed should be set to to for 24 frames per second, and also one for 60 frames per second. Also, that we want our aperture as wide as possible to get that shallow depth of field. This means that we can only really rely on our ISO to control our exposure. On the M50, I would recommend not going over 800 ISO, so that means allowing enough light into your sensor either by filming outside in daylight or with additional lighting, like in a studio setup.
9. ND Filters: Now, you might wonder, what if you're outside and the light is too bright? Let's say your ISO is already at the lowest it will go, so 100 on the Canon M50. You could compensate by closing up your aperture, but that would create a deep depth of field, it will bring the background more into focus and you would lose that blurry background effect. To combat this, what you could do is use an ND filter. Now, ND filters act like sunglasses but for your camera, and this helps us to keep the aperture open and therefore have a blurry background without the shot being completely blown out because it's too bright. In our little shoot, we use the new freewell magnetic VND, with the 2-5 stop filter on the 16-35 millimeter lens with the view track speed booster a f-stop 2, to help us retain a blurry background during a bright day. Another great thing about the freewell VND is that it comes with a 1/8 mist filter and this filter adds a vintage look to your footage by blending the highlights and also adding in some contrast helping to add to that cinematic look. This also works well with our insight footage, where our practical lights are emphasized and we get nice halos around them.
10. Controlled Movement: The next thing to consider to help you make your footage look more cinematic on a Canon M50 is to use smooth controlled movement. This isn't just for the M50, but should be for your camera work in general. Handheld, shaky footage doesn't scream cinematic, but rather quite the opposite. For our videos, we use the DJI Ronin-S Gimbal for our outside shoots, and a Zeapon Motorized Slider for our inside video shoot. Controlling the movement this way it shows that you can keep your subject in focus. It doesn't distract the audience and therefore, lends itself to the storytelling element. Because of its compact size, the M50 is a perfect camera to use on gimbals and sliders.
11. Film Grain: In the past, movies were shot using film, and this method added in what we refer to as film grain. With the advent of modern digital cameras, we no longer have that effect. Some people say that our modern footage can look too clean and too sharp. Many will argue that for a cinematic look, we want to have that film grain added back in. Like the 24 frames per second frame rate, it does have a little bit of historical significance and we have been conditioned through the years to see movies at the cinema with this grain, whether we consciously recognize that or not. We can add film grain back in over our footage as an overlay in Premiere Pro. I'm going to show you how we can do this really quickly. We're back here with our walking scene, and now what we want to do is add in some film grain. I've already got some film grain here that I'm going to place onto the footage. I'm going to go for the 16 millimeter full HD film grain. I'm just going to pop that into my project. Now what I want to do is to place that on top of my footage. You can see the grain is here already, but we can't actually see the footage underneath. What we want to do is to make it so that we can see the footage underneath affected by the film grain layer. To do this, we can click on the layer. Go to Effects Controls, go to opacity and then change the blend mode to overlay. Now we can start to see parts of the image effected by that film noise. I've also found that the Soft Light blend mode works pretty well with film grain and if it's still too harsh, then you can go up to the opacity, change it to 75 percent. There are still parts where it might be harsh, you might want to turn it down more. But for the most part, it's quite subtle, but it's there. It adds to the effects and it sells the whole cinematic experience. If you want this film grain files, then send me a message via Skillshare and I will send you the link.
12. Atmosphere: Very similar to the film grain. Our next tip is a practical effect, and it's about adding atmosphere to your scenes. In particular, I'm talking about this productive atmosphere aerosol. This is basically fog or haze in a can that you can spray into your scene. It can really help define your light sources as well as add atmosphere to your films. Alternatively, you can get yourself a fog machine and folk fluid, which works out a lot cheaper if you are regularly using fog for your videos.
13. Black Bars: All cinematic videos seem to have a black bars. How can we add those in? Let's quickly jump back into Premiere Pro, and I'm going to show you how you can quickly add some black bars to your movie. Here we are back in Premiere Pro, and we want to add those cinematic black bars to our footage, to give it that movie look. How can we go about doing that? To create the cinematic black bars, what we can do is create a new adjustment layer. To do that, go to File, go to New. Then you want to select "Adjustment Layer." Now it might be blanked out for you. The reason for this is that we haven't selected the project. Come out of the Menu, select the "Projects" tab, then go to 'File, New, and adjustment layer is now available to us. Select "Adjustment Layer," and go, ''Okay." Our adjustment layer just popped up here. It's actually in the film green folder. That's fine. We're going to put it on top of our footage and our film grain. We're just going to stretch it out, to the complete size of our footage in the composition. We can't see anything just yet. It's just an adjustment layer. We need to put something on there to adjust to the footage underneath. If you go to your Effects, go to Crop, and put the crop on top of the adjustment layer. Again, we don't see anything because we need to adjust some of these parameters. What we want to do is set the top to 10 percent. We want to set the bottom to 10 percent. There we have our cinematic bars. When we render this out, we will be cropping our footage down. Now, you might notice that this isn't really framed correctly. What we can do, is select our footage, and then go to the motion and position. We've got x and y values and we might want to just push our y value up, so that Rob is now central. We can do the same here. We want to push that value down. Now that you've got a bit of headspace there. I have seen some movies where they increase or decrease the size of the black bars. If you want to do that, just go to your Adjustment Layer, and either increase or decrease the size of your black bars. I've seen some have some pretty thick bars on the top and bottom, like so. Again, if you want to just to correct your y values for your footage, so that things are more central, you're starting to get a very cinematic look and feel to your Canon M50 footage.
14. Conclusion : Well done if you've made it this far. We've covered a lot of information in a very short period of time. Now if you follow and practice these steps, you will definitely up your cinematic filming game. If there's anything that you're not quite sure about, then maybe just go back and watch that section again or reach out to me and ask me any questions that you have. Also, make sure that you share your cinematic videos to the project page of this class. Thank you so much for watching. I very much look forward to seeing all your cinematic films and I'll catch you in the next class.
 Kai Song, ìmagìne · ìmplement · ìnspìre