Transcripts
1. 1. Intro and Materials: Hi there. I'm Wendy Lee. Welcome to my watercolor
class Cats in Love. This class is perfect
for kids and beginners. In this class, you will become more comfortable
with watercolors and you'll learn how to use basic shapes to
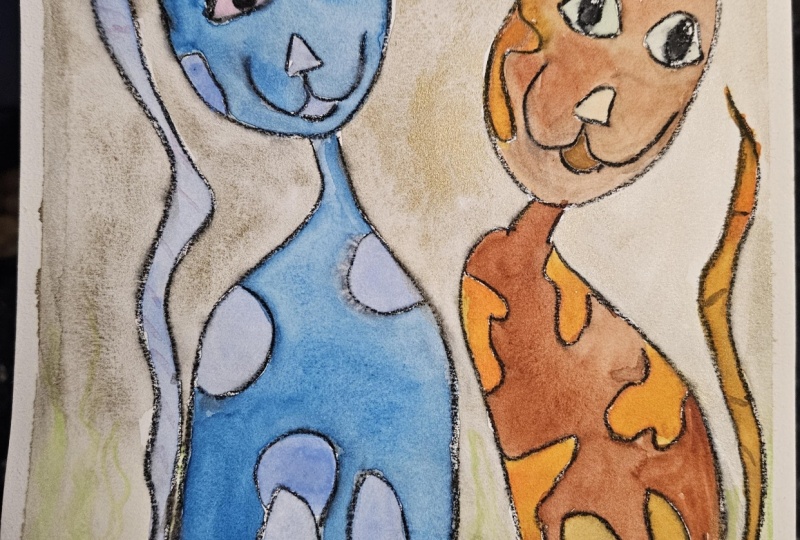
create your artwork. For our class project, we will be creating this
beautiful artwork together. You can do it exactly like me or change up the
background a bit. I can't wait to see
what you come up with. Let's look at the
materials you will need. You will need watercolor paper. It doesn't matter if it is hot or cold pressed
watercolor paper. It's best to tape the
sides of the page to a board or a table to prevent it from
buckling when it's wet. You need a medium tipped
watercolor paint brush for painting larger areas and a smaller paint brush for
painting smaller areas. You need watercolor
paint and if you like, a spray bottle to
keep your paint wet. You need a pencil and an eraser
and a jar of clean water. You will also need
wax crayons or pastels to draw the
outlines of your picture. We will be tracing
over our pencil lines so that it creates a wax
resist when we are painting. Okay, let's start drawing.
2. 2. Drawing Cats in Love: Have you got all your
materials ready? Good. Let's start drawing. I'm going to draw
two cup shapes. These will be the
faces of my cats. I'm drawing them lightly in pencil in case I make a mistake. Draw two triangles at
the top of each cup. These will be the ears. Do
the same on both cats faces. Now we are drawing upside down triangles
for the cats noses. It's really simple when you use basic shapes
to help you draw. Don't forget to draw
a little mouth. Draw two oval shapes for eyes and another straight up
oval inside the eye. This will serve as
the pupil of the eye, and it will give the
cat some character. Of course, you need to add these eyes and repeat the same
process on the second cat. Now, these are cartoon cats, so we'll give them thin
little necks and long bodies. Keep a space on the side
to include the tail later. Their bodies don't need to be in proportion or to
even look alike. This is your artwork. You can draw your cat's
body just how you like it. I'm just drawing
some basic legs. They look like a
little squiggle, and then I'll add
some little toenails to the bottom to create
the illusion of feet. Make a long squiggle
for the tail. Your tail doesn't even
have to look like this. It can come around the front of your cat's feet if
you would like. These cats are in love, so draw one or two
hearts between them. Then for my background, I would like a
crescent shaped moon. But you can put anything
in your background. If you prefer a sun or clouds or trees in
your background, you are welcome to add
them instead of this moon. Let's add some details
to our cat, shall we? So eyebrows, some
patterns, some lines. If you want spots on your cats, you can even put spots on
your cats and make them look decorative instead
of like real cats. And later when we paint them, you can even do them in
any color you want to. They don't have to be the
traditional cat colors. I'm going to draw. This one's
got patches all around it. It's looking so beautiful, and it's going to look gorgeous once they have color on them. Don't forget to put some
patterns on the legs and tail. Now I'm tracing all along my pencil lines with
a black wax crayon. Feel free to choose any
color crayon you want to. I've chosen black because
it's easier for you to see when I'm doing this artwork. Just go over all
your pencil lines. This might take a little while, so I'm going to fast forward
the video in a few places. The nice thing
about this artwork is these cats are not realistic. They're not meant to look
like realistic cats. So you can really go wild and do whatever
you want on them. And you can make them
any color you want to. After all, this is your artwork, and by doing this, you are
making it uniquely yours. It's quite relaxing tracing
over all these lines. You can add some music in
the background if you want to listen to some
relaxing sounds while you are
tracing your lines. While I'm tracing my lines, I'm thinking about my
background a bit more. I think I would like
to add something more. It looks a little bit empty. There's so many options to add. I can add the cat
sitting on a wall or a fence or even some
grass in the background. The choices are endless. I've decided to make long
green strands of grass, different lengths of
grasses behind my cats. And then I think
I'm ready to paint. So grab your watercolors.
Let's paint.
3. 3. Painting Cats in Love: Spray your watercolors with
water to activate them. This will make them
brighter when you paint. As I previously mentioned, you can use any colors you want, as this is your unique artwork. I've done this exact same lesson in my weekly face to
face art lessons, and the children have used every imaginable
color for their cats. For my cats face and body, I'm using a burnt sienna, also known as a red brown, and I'm painting it
with my smaller brush. Depending on the weather
conditions in your area, your paint might dry quickly or even take a few hours to dry. If it is a very hot day, you need to paint a bit faster if you want to blend
your edges neatly. If you go over the
edges by accident or over the edges of the picture
by accident, that's okay. You can do touch ups when
it is dry or you can use your darkest sky color
later on to paint over it. For me, the painting part
is always my favorite part, as it is way easier
than the drawing part. I'm almost finished painting the bigger areas on
this cat's body, and then I will move to the
cat's tail and the patches. I think I'll paint
the patches black. While you are painting,
you may notice that our wax lines
or outlines that we drew prevent the paint from spilling into
the other colors. This is called wax resist. So it's creating a little
bit of a border so that one color will not blend or
mix into the other colors. I I've chosen a light orange
color for my other cat. So this one will
be my ginger cat. Painting takes a little while, so you can pause the video
at anytime to fetch yourself a drink or to change your water if you notice
it is getting too dirty. Perhaps even put your
favorite music on so that you can sing along to it while you paint your cats. Don't forget to paint
your cats noses and ears. Once again, you can paint
them any color you want, a black nose, a pink nose. The insides of the ears can be pink or light brown.
The choice is yours. I'm mixing up a deep
red for the love heart. Oh, so cute. I want to make my cat's
eyes pop a little bit, so I'm adding some color on
either side of the pupils. This one's got some
green in his eyes. And the ginger cat's eyes
are going to be brown. Do you notice I've left
a little piece of white still that'll be the
edges of the eyes. Now I'm painting the
stripes of my ginger cat. I've used a darker brown. You can use any color. Yellow would also
look beautiful. Now for the grass, I'm adding
a dark green just to put underneath the cats and to paint over some of
the longer grasses. Later on, when I do my sky, some of it will overlap with this section, and that's okay. It will just help create
some depth in this painting. As you can see, I'm
using clean water and painting my whole
sky with a clean water. We are going to be
using the wet on wet painting technique
for this background. That means that when I use my watercolor paint on
the wet background, it will spread by itself, and it will bloom
in beautiful areas. It becomes a little bit less predictable than how
I did it on the cats. So just continue painting
your background with water. It doesn't look like much on the video because it's water
and you can't see anything, but you will notice on your
page that the water will slightly sit on your
watercolor paper. Then I'm adding my blue. I've made a mixture of two or
three blues in my palette. Once again, I don't have a specific color to tell you to use because I've
chosen a mixture of blues. You can use cerulean blue, cobalt blue, or even
Paints gray blue. All of them will be beautiful, depending on how dark you
want to make your sky. And depending if your picture is a cats outside in the day
or cats outside at night, that is totally up to you, and that will make my painting look slightly
different to yours. So because this is a wet on
wet watercolor technique, the paint flows by itself, and it's also easier to spread. If I make a mistake,
it's easier to wipe off while it is still wet. Do you see how I'm putting it
between the grass strands? In the next video,
I will show you a special effect I sometimes like to use in my backgrounds. So finish up your background, and then I'll see you
in the next video.
4. 4. Final touches & Class Project: Let's add a couple of
final touches, shall we? We hardly ever use
white watercolor paint, but it can be found
in every paint set. Put a lot of water on your
paint brush and make the white nice and wet and now
flick it onto your background. You can do this while
your background is still wet or even dry. Either way, it will create
a lovely whimsical design. You can paint your moon silver, color it in with
a silver marker, or leave it white. Let's add some
smaller details like whiskers or eyelashes
to your cats faces. This will give them
some more character and make them
unique and special. If you have a white marker
or some white acrylic paint, you can add little sparkles
to your cat's eyes, but this is totally optional. And our paintings done
to remove the tape, pull it away from your painting so that it doesn't damage it. If it is a hot day, it will be easy to
remove the tape. Otherwise, I would suggest
first using a hair dryer or a drying tool to heat the tape before removing it so that it
doesn't drip your painting. This painting or
your version of it, will serve as your
class project. Please share it with me by uploading it to the
class project gallery. I'd really love to see it. And if you enjoyed
painting along with me, go and try some of my
other Skillshare classes. I would also love to hear
your feedback on this class, so please fill in the
feedback section and let me know what other topics you'd like to paint
along with me in future. Don't forget to follow me so you'll be notified first when I publish a new class.
See you soon.
 Wendy-Lee Strydom, Teacher, Artist, Art teacher