Transcripts
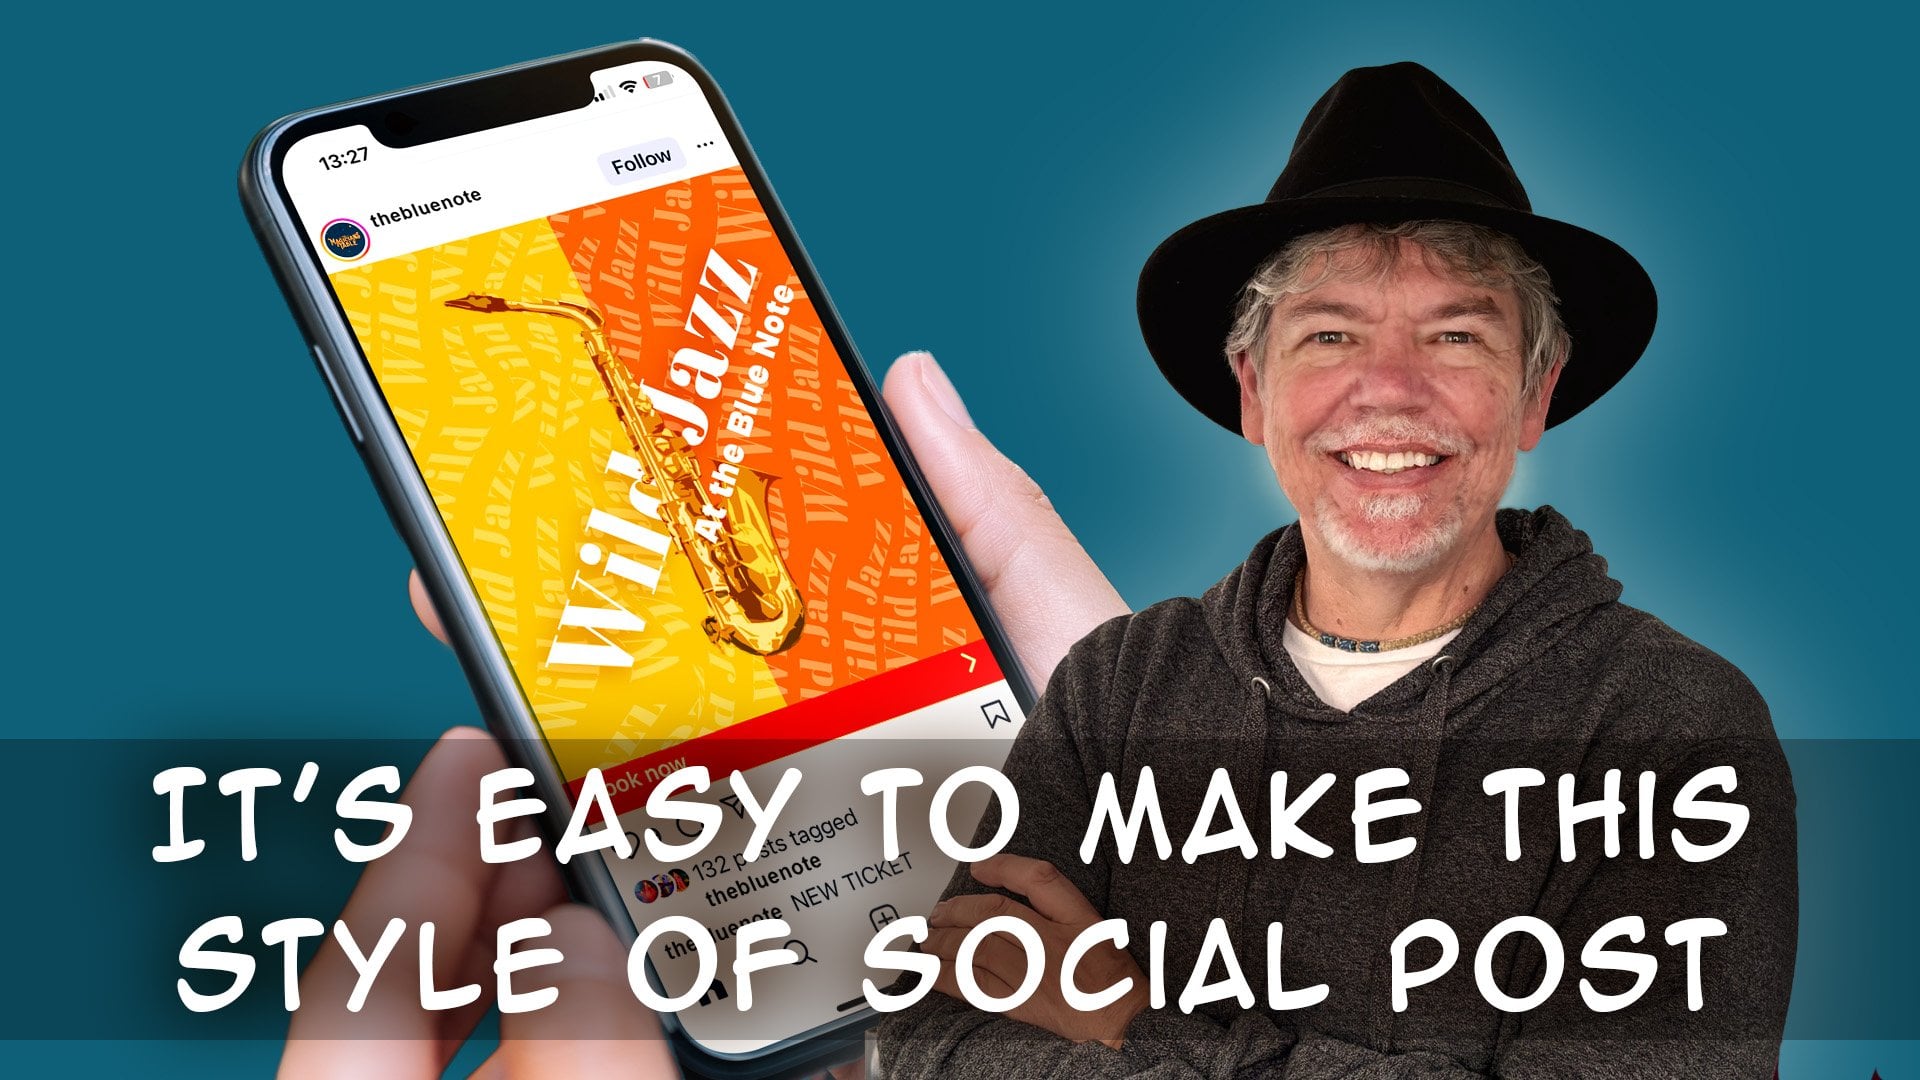
1. Sun Ray Effect Intro: We're going to take
this family picture. It's the usual sort of selfie. And we're going to
cut the people out, and we're going to put them into a really wild and
wonderful background. So we're going to
move them across and do an interesting
background like that. Now, the important part about this is not
so much the cutout, although I'll show
you the cutout, but it's how to create these
really cool backgrounds, which you can then
adjust as you go along. So you can change the
color really easily. So, you know, in
two weeks' time, you think, shame
I did it in pink. You can double click
it and you can change it to something else
just like that. They're not just useful
for people pictures, they're great if you
just want to draw attention to a bit
of text like that, same principle once again. But we will be starting with a simple image like this
one. Let's get going.
2. Cut-out People: Let's do a cutout.
I'm going to click on Select Subject down the bottom
here and see what we get. That's not a bad cutout at all, although I can see a
little bit over here where it actually hasn't
cut that bit out, so we can see some of
the couch through there. Now, because this is actually
going to be quite small, it will be, you know, for social media on a
phone or something. You probably might
not notice that. But for sake of getting
things a little bit better, I'm actually going
to then remove that bit with one of
these tools here. And I'm going to go along to
the Object Selection tool. Now the object selection
tool allows you to add or subtract from a selection as well as
make new selections. I'm going to go to
the subtract option. You'll see as I move over it, it finds all of these little
bits and pieces for me. But what I'm going to do
is on the subtract option, that one there, I'm just going to surround
the area that I want. I'll zoom in a bit. Over there, don't worry
about the pink flashing. I'm just going to
surround that little area over there and saying, you know, get rid of that, and sort of finds that edge for me. Remember, this doesn't have to be perfect because
we're never going to be seeing it at this size. So let's do that bit there, and I'm going to go up over
there and do that bit. And it's finding
the edges for me. I think there's
probably a little bit more maybe like that. Okay, it can't find that edge. But I think that's probably
where the hair is. Let's zoom out a bit like so. So that looks a
little bit better. What I'm going to do now is
I'm going to go and refine this selection so it
looks even better still because it's going
to be a little bit harsh, particularly on the hair. Let's go up to the select menu and
choose Select and Mask. And in select and mask, firstly, go over here and show your background your picture
on a white background, and then you can change
the opacity so that you can just see the
cut out properly. Now that's not bad at tool, and I'm going to just use
this little firebush. It's called the refine
Edges brush tool, but it looks like it's on fire. Change the brush size to
something that works for me and just paint just to touch
the edge of the hair. Some of those bits. In
the, I've gone too far. If you do use Control
Z or Command Z, I might have to use a
smaller brush for that, but this will help
just to mix the hair in slightly with a background. I think that looks okay there. Remember, because it's
going to be quite small, you're not going to see
all those little details. So just get it roughly
looking correct. Now, I'm going to move down here to the bottom to where it
says decontaminate colors. I'm going to switch
that on because that will help to get rid of any weird coloring that's coming through or bleeding
through from the background. Now, my background's
not too bad, but you'll find that,
especially if you've got, say, for example, a fluorescent
orange behind the person, this definitely helps to
get rid of that color. And then over here,
it says output two, and we're going to say New
layer with a layer mask. And I'll just click Okay.
And you can see now it's made a new layer for
us with a mask in there. Finally, I'm going to
click on the picture. So I'm not on the mask. If you click on the mask,
you're on the mask. If you click on the picture, you're working on the picture. And I'm going to use a little tool over here
called the Spot Healing Tool. Now, the spot healing tool
has got a brush size, so you can adjust the
brush size there. I'm going to use
that to get rid of this little stray hair
that's coming down. It really bothers me. So
I'm going to zoom in. I'm using Command
plus on the Mac or Control plus on the
PC to zoom in a bit, and I'm just going to remove this by painting
over it like that. And you can see how
it's doing that. It's doing quite a
good job, actually. It's made a little bit of a mess over there, but if we
just go over that, we can clean it up a
bit, but once again, no one will see that
little bit over there. Anyway, have a bit
of a go with that, get this far, and then we'll
do the groovy background.
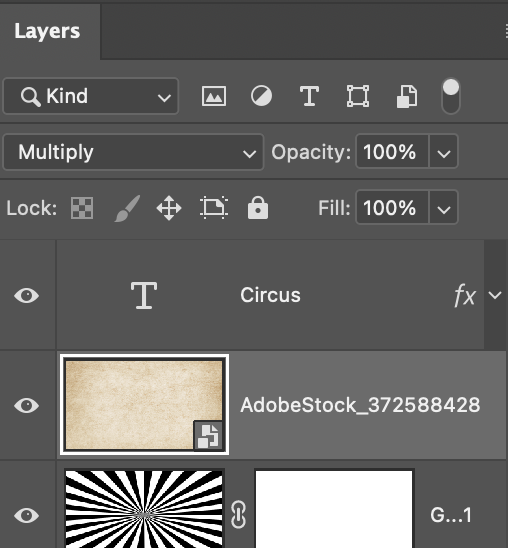
3. Make the Sun Rays: Now, for this groovy background, we're going to do
it on a new layer, so it's all going
to be editable. I'm going to go down to the
bottom of the layers panel. Let's move the layers
panel out over there. And down the bottom, we've got a number
of little icons. I'm going to click the one, which is a black
and white circle. This is the adjustment
layer icon. And I'm going up to the gradient because I'm going to create
a gradient on there. Now, that's not the
gradient that I want. So when this gradient
window comes up, if you move across to the drop
down menu, so go gradient, then onto the little
drop down menu there, you can see over here we've got a number of little folders with different
gradients in them. I'm going to open up
the basic folder, and one of those gradients
is black to white. By the way, just in case you're wondering where these
colors come from, those two colors there are
whatever you've got set up as your foreground and your
background color in there. And then the second one is the foreground to
transparent gradient. I want the black to white
one. I'm going to click Okay. Now, I'm going to
go to the filters, and we're going to convert
this for a smart filter. Now, if you've never
used smart filters before, don't worry about it. Just do it it's something
that one needs to do if you're going to be using
the filters on that object. I'm going to go to filter, and I'm going down to some of the actual traditional
filters in here. They distort filters. These have been around Photoshop for years and years and years. I'm going to start off
with the wave filter. Now, you can see over
here, immediately, I've got waves, but yours
might not look like that. You might find you've got some
weird and wonderful things going on. Like that. So what we do is we take these wave lengths
down over there. If you're wondering
about the settings that I'm using in here, it's sort of in the region of sort of over to
the left hand side, left hand side, over there. And likewise, with
the amplitude, I'm going to put these
two together over there and just move them
up a little bit like that. If you find things start
to look a bit weird, you can just adjust these and try different settings in here. I think I'm going to make those. I want to make sure that they're
the same top and bottom. Like that. Um, by all means, try out the generators
and see what you get. You can see as I'm
pulling this over, I've got from something which is quite fuzzy to something, which is a lot harsher. And then we want those
nice hard lines. Click Okay. Now, if you
look at this and you think, Oh, my goodness, it just
does not look very good. Those lines are too thin. You can go back to it
in here. There we go. You see it says wave,
just double click it, and you can go and
make changes in here, and we can then try
some of these ones. Let's try the number
of generators and take them down a little bit. Click Okay. That looks
so much better now. So the great thing about doing the filter
like this is you can just double click it
in there and make any changes that you like and then click
Okay to update it. Lastly, we're going
to go to filter. Once again, down to distort, we're going to use
polar coordinates. I like this one because
it takes one side and spins it round a polar coordinate to
get the other side. So polar coordinates there, and you can see immediately,
it just does it for you. You don't have to fiddle
with any settings. You got the polar rectangular. I'm just going to do the
rectangular to polar option. Click Okay, and it's done. It looks really, really cool. Of course, at the moment, we'll just take the couple and pull them in front of that. We need to go and get some
different sizes, sorry, different colors going
on behind them in the next video. Have
a go with that.
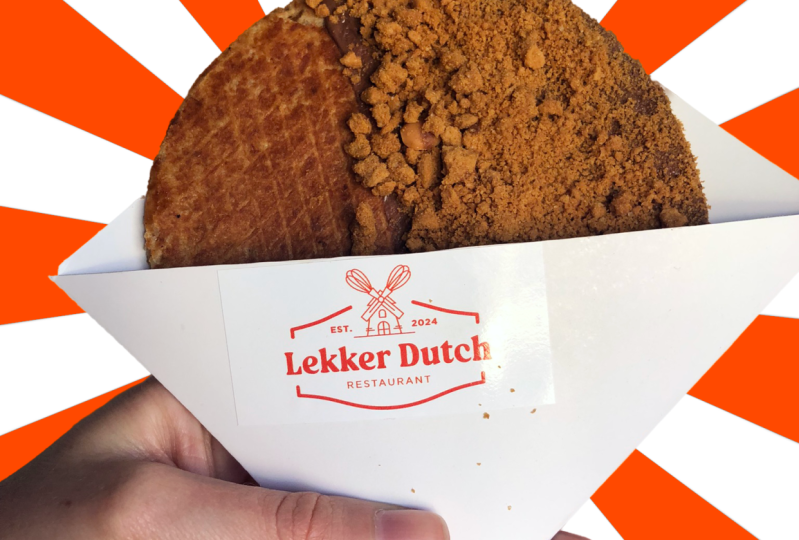
4. Change the Sun Ray Color: Now, as you can see, these lines are a little bit
fuzzy at the top. So there's a few ways
that we can go about it. First of all, I'm going to click on the weird shape itself. I don't know what one
calls that, sort of, I'm just going to call
it a groovy background. And I can go along to
image adjustments, use brightness and
contrast and push the contrast up and once again, image adjustments,
brightness and contrast and push that contrast up a second time over there, and that does look a
little bit better. It's not super super sharp, but it's perfect
for what I want. If you are into
Photoshop and you've used things like
levels or curves, you can use those
as well in here. I've just done it really
simply with two of these brightness and contrasts and one on top of the other. If you keep going, it will keep making those edges look
more and more sharp. Now, the next thing I want to do is to put some
color underneath it. So I'm going to go down to the little black
and white circle. I'm going to add a solid color. And I'm going to sample the
color from her clothing, so I'll just click on
her clothing there. Click Okay. Move that below. With the groovy layer. Click
on the groovy layer and go from normal down
to multiply, darken. You can see how we can get
different results in here. I can go to Lighten in there. I've got screen over here,
overlays, soft lights. You choose the one that you
think will work the best. I'm going to choose
soft light there. And the great thing
is, I can always double click that and then say, Well, what about if
we made it blue? Would that look any better? I'm just going to go back
to the pink of her clothes, but make it a little
harder in there, and I think we'll make
it more of a pinky pink. Click Okay. Lastly, we
need to crop this down. So I'm going to use
the cropping tool. I'm going to put in my
website web size in here. So in with heightened
resolution, I'm going to put in
1080 px for pixels. So this is going to
go onto Instagram. It's going to be square, 1080. Px for pixels in there. I'm going to click and drag
the rectangle in here, move it into the right position. I think I want something
like that over there, and I will click on the tick button up the
top. Looking good. But my background is
in the wrong place, so I'm going to click
on the background, use the move tool to
just move it around into the right
position over there. At any time when you're
looking at this, you can always go back and say, well, what about this wave? If I went and change the wave again? What
could I do with that? Let's take that down a
little bit over there. Click Okay, and
you can see how I can then still
adjust the wave even after I've created the
initial colored version. If you'd like to learn
more of Photoshop or see more of these type
of effect videos, don't forget to click
on my name right at the bottom and
go to my profile and have a look at all
the courses I do in Photoshop, Affinity, and Canva. And also click the
Follow button. That way, you'll be notified of any new courses
that I put out. Have so much fun with that. It's a brilliant,
brilliant technique.
 Tim Wilson, Adobe Certified Instructor and Expert