Transcripts
1. Stencil Edition Intro: makes me is one of my favorite things to do in my art journal, because I get to play with everything, especially stencils. But let's face it, there are so many out there, it's hard to know what to do and where to find them and how to begin. I know how tempting it is to go out and buy all the stencils you confined, but that will get really expensive. The Miss Class. I'll show you cheap and inexpensive ways to find stencils that already made, and then we'll dive into our projects. Our 1st 1 is using a hot glue gun to make our own individualized stencils. This is a really fun practice to do it kids, because they just think it's so fun and you get to play with your stencil. Almost immediately in our second project, we're going to make our own triangle stencil out of a piece of cardboard. We'll talk about design techniques cutting and also how to use different mediums as well as how to seal your stencil. Our third project uses my favorite piece of material a transparency sheet, and we will use your own drawing his inspiration. I go over design considerations. Cutting techniques, how to repair errors and how to make it blends seamlessly. Want to go ahead and put this in your art journal? You'll end up with a stencil that's truly one of a kind. Next we'll go over stencil tips and techniques. I know how frustrating it is when you don't get that clean, crisp image, and I'll show you how to avoid getting blurry images, and we'll also go more into sprays and talking about masks. Our last project together is to go ahead and make a dynamic, mixed media background. We're going to use stencils. We're gonna make bold moves, and we're going to really add layer upon layer to make it more dynamic to have a background . Or could it up to uses collage paper? After this class, you'll be able to use your stencils with more confidence and control. Your images will be more crisp and clear so you can add your layers and make their background more dynamic, more visually stunning and more personalized. So what do you say? You ready? Get started. Let's go
2. Ready Made Stencils + Masks: Let's talk about stencils. No stencils are a staple when it comes to making art and art journals and such. And there are so many things Teoh to use when it comes to stencils. So I wanted to show you a wide variety of stencils. Let's see. First, let's start with just the ones you can buy. Normally, this is a really great way to store them. I found a very candy with the sleep protectors of peace paper in between and then just the stencil stuck in. They don't clean my senses off on the time before I stick him in generally all, maybe just white from off, but, um, but, yeah, they're not too precious. So these are all ones that can be used can be bought. Here's an example. We'll talk about masks as well where this is the stencil. Put the paint or the medium through the plastic sheet, whereas this is a mask where you're covering up your masking an area that you don't want to get paint on, and then you add paint around it. So here's a great example of what a stents overseas them Askins and we'll, uh, do a little demo of these, uh, in a bit. So stencils you can buy. And then this is actually a vintage plastic doily that I get on eBay. I believe you can use scrapple paper. So these air all scrap pages that I just wandered through the scrapple Kyle to see if they had anything like this. These are nice and big, but they are paper so they can break. I did not steal these, but I could. You just want to get a paper that has cut outs in it. Have you sprays with ease of music, Krilic And they work really well and I like that they're bigger because they cover a bigger surface area. Another thing you can use his lace lace is a little bit tricky for me, though, Uh, it depends on what kind of least you get. You have to get something with a wide open pattern for the, um, thanks to get through. Acrylic doesn't work as well with lace, but if you something like a spray that will penetrate through easier. But you never get this beautiful lace pattern when I used it as a stencil. But I can always keep trying because sometimes even when they don't get the market doesn't get as clear as you would hope. It still looks nice. Let's talk about found stencils in this pal is just a bunch of recycled type stencils just , you know, to start looking at all the materials in your environment in a whole new light. I was at the gym one time, and they had these candle holders, those scented aroma for the room, and they had them in the garbage, and I just looked at the lay. That's like, Oh, my gosh, that would be a beautiful sensible. So this is the top of, Ah, candle. This was the front of Ah journal, and I asked my son if I could have it when he was done. So this is a fun little central. Now you can use your produce bags. This was like Clementine's, these air good for sprays and acrylics as well, especially on jelly plates. And then this was also a part of some kind of bag from a grocery store. And I saw that, and I was like, uh, anyone need that, Can I have it? Thanks
3. Glue Gun Stencils: you could also make your own sense. ALS. These are all made with hot glue. So when you are doing a hot glue design, you want to make sure it's on top of like a wax paper or a, um, one of those craft work sheets like this that resist heat and the glue does not stick to it , because then it'll be easier to peel the image off of it, and then you can use it later. And these don't offer clean, crisp engine images, but that's kind of part of the fun. You see, this one has a bunch of strands, even from when you move the glue stick from one place to another, and that just adds to the appeal when you use that as a stencil. So these are ones that my kids and I made for fun one day, and you can use these to come up with your own science and then your heart is completely and meekly all yours. So what you want is that Google and, of course, and then one of these trap sheets or parchment paper, something that is heat resistant and then you're going won't stick to it. So If you don't have this this crash eat been, I would experiment. I've never used the parchment paper, but I'm assuming that would work as well. And so I have my glue here said unload. I'm gonna see if that would work first. So all you do essentially is just drawn image that you want, uh, your sheet. You want to make sure all of your lines connect with each other because when you take us apart, unless it's touching another part of the pool, there's nothing for total down to. So I'm just making this up as I go alive, and I think of a design that I do not already have, - but carefully feeling each section up the beauty of that through then. But you can always reheated by touching it with this tip. Add more on tap. So if I want to try toe smooth out of section, it could do that. Embraer member stencil. Oh, leave a test here, but I don't know if you can see, but there's these little well offshoots from being glue them. But you know those strands I you don't like them. I like him, so I'm backing people off. Okay, some unions and clubs over here just passing up and down into this. We need a new steps up. The man pumped up ground up from down writes the bigger So So it's just a fun way to make the central easily that much time or financial investments. There it is. So go ahead and use other essentials is references. Look at mine at images and make your own stent ALS using the hot glue. Because then your art, like I said, is all completely yours and unique to you, so have fun.
4. Cardboard Stencils: you can even make your own. So here's just a hole puncher, and I could take a piece of paper that's a scrap of paper and just punch out the shapes that I want. And then I have my own little sense or a mask with the hearts. One of the first senses that I did is I actually made one of a cereal box. I just traced circles, cut them out with, like, an Exacto knife, and then I sealed it. I made it waterproof, like with magpie germ Joe Medium or something similar where it We'll create a protective layer so the paint doesn't get absorbed into it. So cereal boxes work. All right, let's go ahead and make our own stencil using a cereal box. Here's the original one I made years ago that I was just showing you in here is my new Sarah Bucks that we're going toe make our stencil on today. So you're gonna need cereal box, um, pencil the mod podge to seal it and make it water resistance, An Exacto knife and a ruler. Um, I really like the DEA metric shapes of the repeating circles. So I was thinking that we can do triangles. I don't have just a random triangle stencil. So that's really what I want to do for this one. But I also want to make it a smaller stunt. So because, um, and I just really like the smaller sizes have a lot of big ones, and then we want to make a smaller one, So this one is going to be about a five by five inch stencil. So first I am going to cut this cereal box down to five by five inches. When making this dental, you want to make sure to leave a border around the outside edge that you don't cut past. Otherwise, that's dental. Be too flimsy, and it will just not work. So before I start drawing my triangles inside, I want to go ahead and do a border for my own benefit. Uh, I'm going to do about an eighth of an inch all the way around and mark it with a pencil. Here is my border, and now I can start to draw my triangles. I am using a ruler to get straight edges, and I am freestyle in it. I just like to go ahead and jump right in and I will adjust as I need to. I am going to do all different types of triangles and tryto throw in some right angle triangles. I saw Seles. I don't think I will purposely do equal adul ones just because I don't wanna mess with measuring. But I, um um gonna goto tried to do a good variety here. So go ahead and do your triangles within the border. Now you can have triangles that, if completed, would extend beyond the border. But we're not going to cut into the border. And I think triangles not only are they really fun shape in general toe at artwork, they are easy to cut out just with straight lines. I think triangles to start will be a great cardboard stencils. Some things to consider while you're drawn your stencil, um don't be committed to which weighs up. Keep turning it around, getting different perspectives. Try to move bigger triangles around the cental, don't have a mop clustered. Um, same thing of smaller ones. It might be easier to go ahead and start with some bigger ones, and then you could fill in with smaller ones as you go along and just really go for it. Trust your gut. Um, if you don't like where it ends up at this point is just a pencil mark. You can erase it and put it someplace else. Don't be worried about messing up, because at the end of the day it's just a piece of cardboard. You can always make another one, and it's only investment. It's only an investment of your time. So have most of a drunken. At this point, I'm just free handing some extra triangles into open spaces. I'm not necessarily worried about making it precisely straight. Um, so I'm do light sketches here to just get the basic idea of it. And then I can use my racer to kind of thin the line down and tried to isolate the line that I'm going to be cutting. Here's a finished design I shaded in the bottom left triangle, just turned by myself that that is what I want to be cutting. Um, if this helps you, you can go ahead and shade in all the ones you're going to be cutting out when cutting it out. You want to pull towards you and not just benj Ariston. Wanna pull your whole arm? That will help keep the angle street. And, um well, keep your wrist from tiring out. So you want to go gentle pressure a couple passes through, usually about three passes for me. Got through to the, um, to the cutting mat. And you want Teoh. Always keep turning this dental. So you always pulling towards you. It's just This is a lot easier. You can a better control. Once it got the straight lines, I'm going back in and kind of just making sure of the corners. If it's not coming out easily, I go back and just put the tip of the Exacto knife right into the corner. And then I can clean up that corner with the A gym. I bleed. So take your time. I'm going to be cutting us out for a while As I'm coming out, I'm going to try to stay on that line. Uh, just having that drawn line definitely helps me keep it straighter. But I also might be editing as I'm going along if I see that I have space to make my triangle bigger than I'm gonna go ahead and go for it. I'm not tied to these lines. They're good guidance. I I'm glad I went through and put them in, but I can always alter it as I'm going along. So here is the finished cut out of Bobby preplanned triangles. Right now, I am taking a look at these empty spaces here, and I want to go ahead and add some more. So I am free handing some extra triangles here. Um, just going right for it. I trusting that it'll all be OK in the end And just take taking my time because the more I rush, that's when I start messing up. So same way that I have been cutting before, Always pulling towards myself, trying to use my whole arm to move the blade, not just my wrist or my fingers and cleaning up the corners as I go along. - Oh , that was a lot of work, but I am super happy with this design, and I'm excited. Teoh do the next step. So I'm grabbing my mind Pudge here in a little dish to put it in, and I'm gonna go ahead and seal this inside. Since the back has already got this plastic coating on it. I'm not going to do that one. Um, hopefully that works on the end for me. But for now, let's just go ahead and seal the cardboard side, the raw, untouched inside of the box, cardboard just skin a little. My patch on my brush here, taking off the excess and moving it around this cardboard. I am trying to also rub it around the inside of each shape because you can see the glue collecting there, and I want to not have it dry to ruin the sharp edges. So I just take my brush and kind of swirling around the inside as well. If you don't a mad pud, you can try using that. Got my glue can water that down a little bit? We pretty much just want to get a sealer on it. You can also use gel medium or Matt medium. It's a little bit more liquidy in seal it, I mean, And if you don't want to see that, you don't have to, especially everything like acrylic paint. You know that gives once it's dry, it's plastic, so that all kind of build it up on its own anyway. And like Joe, medium that is essentially acrylic paint with no pigment in it. So you could even just you some paint if you assume acrylic paint if you just to a light layer and that'll add a plastic layer, or even just so that's good barrier. So just go ahead and seal this. Ah, try to get the inside of the shapes as well. Don't get any. Let any glue dry and those angles and you will be good to go and then we'll get a test run . All right, it's party time going to give this stencil run, grabbing some red acrylic paint, and I'm going to use a cosmetic sponge here. So I'm gonna tap in some paint and then tap off any excess. So I really don't have a lot on my cosmetic sponge, and then I'm gonna pound into my shapes. Now I want to try and do not go over the edge of the stencil so we don't have that border. So I'm just concentrating on my triangle shaped themselves when I'm also not even doing this whole stencil. I often times will just do partial stealth stencil images and the now move the central to another part of my page, Alex, get. And then, um, you know, do more images over there. So here I have the stencil going off the page, so you'll get part of the triangles as they're going off the page. And I, um That's another thing I do a lot in my journals. I have Central's going off, but I am super happy with the stencil. I hope you guys are too. And I can't wait to see what you've made with, um awesome. So that is with the acrylic paint. And I want to go ahead and try with a different medium. I think I'm gonna do some spray inks. So obviously a spray is a lot wetter than an acrylic paint. So this is when you will want to make sure this stencil a sealed. Otherwise, a lot of the ink will get absorbed into the cardboard and weaken the integrity of it. Right? Someone got spray. Um, God in try a different color mixed with it to yellow to make some green and yellow and blue . All right. Sizing seeing is pretty messy, so there's a lot of ink on top, so I often use something else to kind of soak up what's on top. So I'm going to grab a piece of paper just pressed down on top, pick up any excess ink and, uh, drink. Come then. Um, nice. I'm gonna put this over in, push it down onto the page, but low because there's often still left over ink on these tents. Stencils. So anything left over will get put on the journal page to be used later. Cool. So there you go. I love it. Help. You guys love yours too.
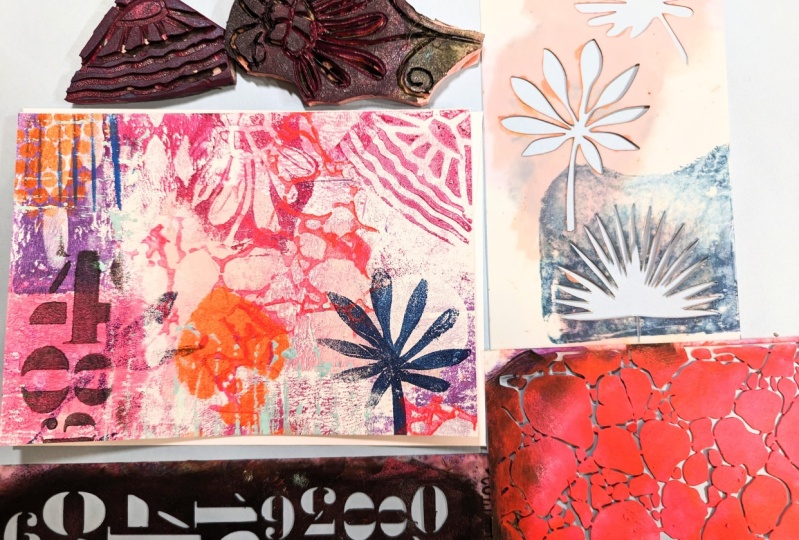
5. Transparency Sheet Stencils: one of my favorite materials to use when making a stencil is a transparency sheet. The reason I like these is authority. Plastic, their super thin, and the paint goes through it quite easily. For those of you who are familiar with crickets, the scrap of paper cutting, design cartridges and machine these. That's what I made all of these with these air with a cricket used with my transparency sheets. And I just use a cartridge that I thought had a bunch of really pretty designs. And I am putting them out in two different sizes. And I used like this one for classes when I teach in person, because I can easily recreate these stencils if they happen to get damaged. So crickets or silhouette machines are a great resource for making your own stencils. So let's go ahead and make our own stencil. We're going to use a drawing of your own, a transparency sheet, a cutting mat, a Sharpie and an Exacto knife. This technique is really simple, and you can use just about any inspiration that you have. You can use your drying. You can use a picture from designed to see out in the world around you. Anything can go. The really simple trick is to just take your Sharpie, line this up and start tracing your design. So here I have my outlined stri ng when I'm going to use to cut it out. Now, when it comes to making a central, you need to consider the attachment points. If I start cutting out everything that is black, then it will become loose and floppy. So you actually will want to cut out like I have here. There's a gap between this line and that rectangle and a gap between this line and that rectangle. So you actually want to leave a section of this transparent she she intact when it comes to what to cut out, it might make it easier if you just color in everything that needs to be cut away. So then you're focusing on everything black, so every shape and every line will get cut away. But I won't leave portions of the transparency sheet intact between each line and each shape. Same goes for here at the top. So the edge of my trades Parenti sheet is here, and I will actually want to leave that an edge intact, so I will not cut all the way to the inch here. I will make it just before I get to the edge. Transparency sheets are a really great way toe crack, this making stencils. They are inexpensive, you kicking in a big pack of them. And they're really easy for painting using with paint because the paint wipes off very easily. Linda, now that I've blacked out all my boxes, this is where I'm going to start cutting. You can see here. There is a small gap between the end of this line in this rectangle, using an example of the trans person sheet breaking too close to this rectangle. So when I'm going to do skin, a little masking tape, going to tape off mis top end and both sides bottom into that square tough much of the line that I'm going to cut away what I don't need to be covered. So it'll give me the little edging, but keep the stencil reinforced. Here's my central all cut out the one repair that I did here, and I think everything else looks good. So let's get this a trial run. You can see how it compares to this one that exact but pretty close. I'm going to test it out on this page here. I used some black just so and cosmetic sponge with the transparency sheets until they get paint on them. They're pretty klinsi and easy to move around. So if you are worried about messing up your image, you can always take some tape and tape it down, actually gonna turn its this way to see how it goes horizontally picking up some paint. And I need to tap it off because I don't want too much paint in there and then pouncing up and down all right, that it's exciting to me. So if you don't like having all these spaces and whatever designed is that you picked out, you can always come back later with a thin paintbrush or a pen. And just connect those dots or connect the open marks. You just need those areas there to keep the stencil intact and have integrity in that stencil. Otherwise, it's a flappy message. Then I would know because I trade the wrong way the first time. So I hope you have fun making your own stencils
6. Stencil Tips + Techniques: let's put some of these dentals into action. Now I'm gonna show you some tips and techniques to help you get that clean, crisp image. I know that is often One of the most frustrating parts of using stencils is that you just don't seem to get a nice, crisp image, and it's just really frustrating for a lot of my students. There are a number of different tools you can use when you are using stencils. One of them is a cosmetic sponge thes work out really nicely. Other ones are just regular paintbrush is. I like to use either a flat and brush or even an angled one, because they have a nice blunt end, as opposed to using something like a rounded tip, because this tip is the only part that comes in contact, and that's really not as useful when you're trying to stencil and cover a large area. So I'm going to show you using acrylic pain and the ink spray. When it comes to using a paintbrush, there are two things to keep in mind. One. You need that brush to be as dry as possible and to you use a lot less pain than you would think you would. So I have this added a couple of colors here. Let's go ahead and start with the paper stencil. So if I wanted, I could do this whole page. Be easy just to put this huge 12 by 12 cents on tap and then just start centrally. But I'm just gonna do a small area. So using the brush. So these already dry. If they were not, I would clean them off of my water. And then I would take my rag and squeeze out any water. You just don't want anything dripping down. Any water appear might sneak and drip down into your paint, and that makes it a lot more watery. And that's when the paint seeps behind the stencil and it gets blurred. So here we go, gonna tap it into this pain so you can see all this paint that's on it. That is way too much. So I'm going to even start tapping off paint. So there's barely anything out here then all I do is I pounds up and down where the central is. It's better to have too little pain than too much because you can always come back and add more. So right now my paint is pretty much gone off my brush. I'm gonna go back in, touch the paint, tap some off and then go from there, and that's pretty much it. That's how you get a nice, crisp and clean image using a paintbrush and acrylic paint. The same is true. When you use a cosmetic sponge, you can touch it and then tap it off. Touch it in the pain, tap it off a few times, then the big reveal. There it is a beautiful, nice, clean image. So remember the trick is a little paint in a dry brush or sponge. Whatever it is you're happen to using for you go back and use like this plastic thing. Same idea applies. We got a bunch of paint on here tapping it off, and I'm impounding it through my sense. All this is more pliable and not as stationary as my paper Waas. So I'm just kind of holding it in place. Well, I am stunned, Selene. If it doesn't come out perfect, that's okay. This is just the start of whatever I'm going to use this paper for oftentimes with stencils you just put this paint through so you can turn it over, press it down your rag, you don't get it all over yourself, and then you get to the reverse of the image. Oftentimes, this is all I do to clean them. I turned them over, tap on something else, and then they're good to go for me. So let's go ahead and try this candle lid. Get a different color. I'm going to switch my brush so it's clean. So this one's thicker. The bigger they are, the harder it is to get the paint brush through the plastic pieces, but it'll still suffice. I need to top that off its too much paint. So this one, I can't turn over because it doesn't reach. So here I would want to clean that off a little bit because I don't want many pinking and stuck in there, but I'm doing it on my paper. So as I rub, any paint that is on there could rub through and get onto the paper. I want to show you the lace and how often times David doesn't turn out as nice as I'd like . So here's this actually Spanish, you see how beautiful that is, And it would be amazing if that transferred exactly as it shows on the lace onto my paper. But I'm not holding my breath and most likely will not look that awesome, but to go. So let's try it with acrylic paint that my pain tapped it off, holding us in place and then pouncing through the fabric itself absorbs some of the acrylic paint, so I need to free apply more often than they would with just the plastic stencil. All right, time for the reveal. So as you can see, it's not as beautiful Jamie as actually is itself, but it still really cool. It's got those little bumps and you can see the flower image. It was almost like a mask where it didn't get any paint there, so you can see the flower leftover afterwards with lace. I often prefer to use it with a spray, something that's very fluid and can just go right through. So that's let me show you the history spray so springs can be kind of tricky. Sometimes they're concentrated in, like this one location. Sometimes they're spraying all over. The trick is to kind of be moving while you do it. Spray and move. Don't be too close. A good six inches or more away upto foot away spray and kind of move it. So it's a lighter. Missed the closer it gets to your page, and it's not just dripping all over the place, All right, I had to get a new spray because that one was clogged. It's a good thing to test out your spray first. I just prayed it in my water. First they came out of the straight stream and then it cleared up. So here we go. I'm about eight inches away, and I'm going to start spraying in motion with sprays. I got this better girl, all what I often like to turn it over everything, she says. Some of the image there and pick up any excess that left. I see that you get more of the image with a spray compared to up here. There's areas of darker saturation. Now the thing with think, though, this isn't permanent. So as I add layers on top of this page, it's going to reactivate it. But that's kind of something to just assume will happen if you're deciding team your sprays . Now let's use our masks. So I have with a cricket bat I mentioned earlier. I have a bunch of little pieces that I cut out to use as a mass, even just playing circles. Can I keep them in this section? Here you can see transparency cheats that I just traced images to create my own masks in my own stencils. Wishes for today's this. So if I Let's say I'm going to cover a big section of this, but I want to leave this image here, Then I will make sure that I have that covered with part of my mask because anything that is behind this mask remain and the rest around it will get covered. So I'm gonna choose a whole new color hair to cover what's already there. That's into a bright blue. The same idea applies, though, when it comes to covering your central, are you mask? I'm not going to just scoop up a big glob a paint here because if this happens to move in a well right behind it, so I'm gonna taps them off. I'm actually gonna work from my mask out. They move away from the mask because that will prevent the likelihood of me knocking this mast out of the way. I'm just clearing up this transitions with not just such a harsh line picking up some of the yellow, so I need to go back. Careful here again. I could put this over if there's any extra paint will get on this page. So it's always great to have more than one substrate that you're working on so you can prove off excess. Never waste any paint the tall. So there you go. That's a nice, masked image.
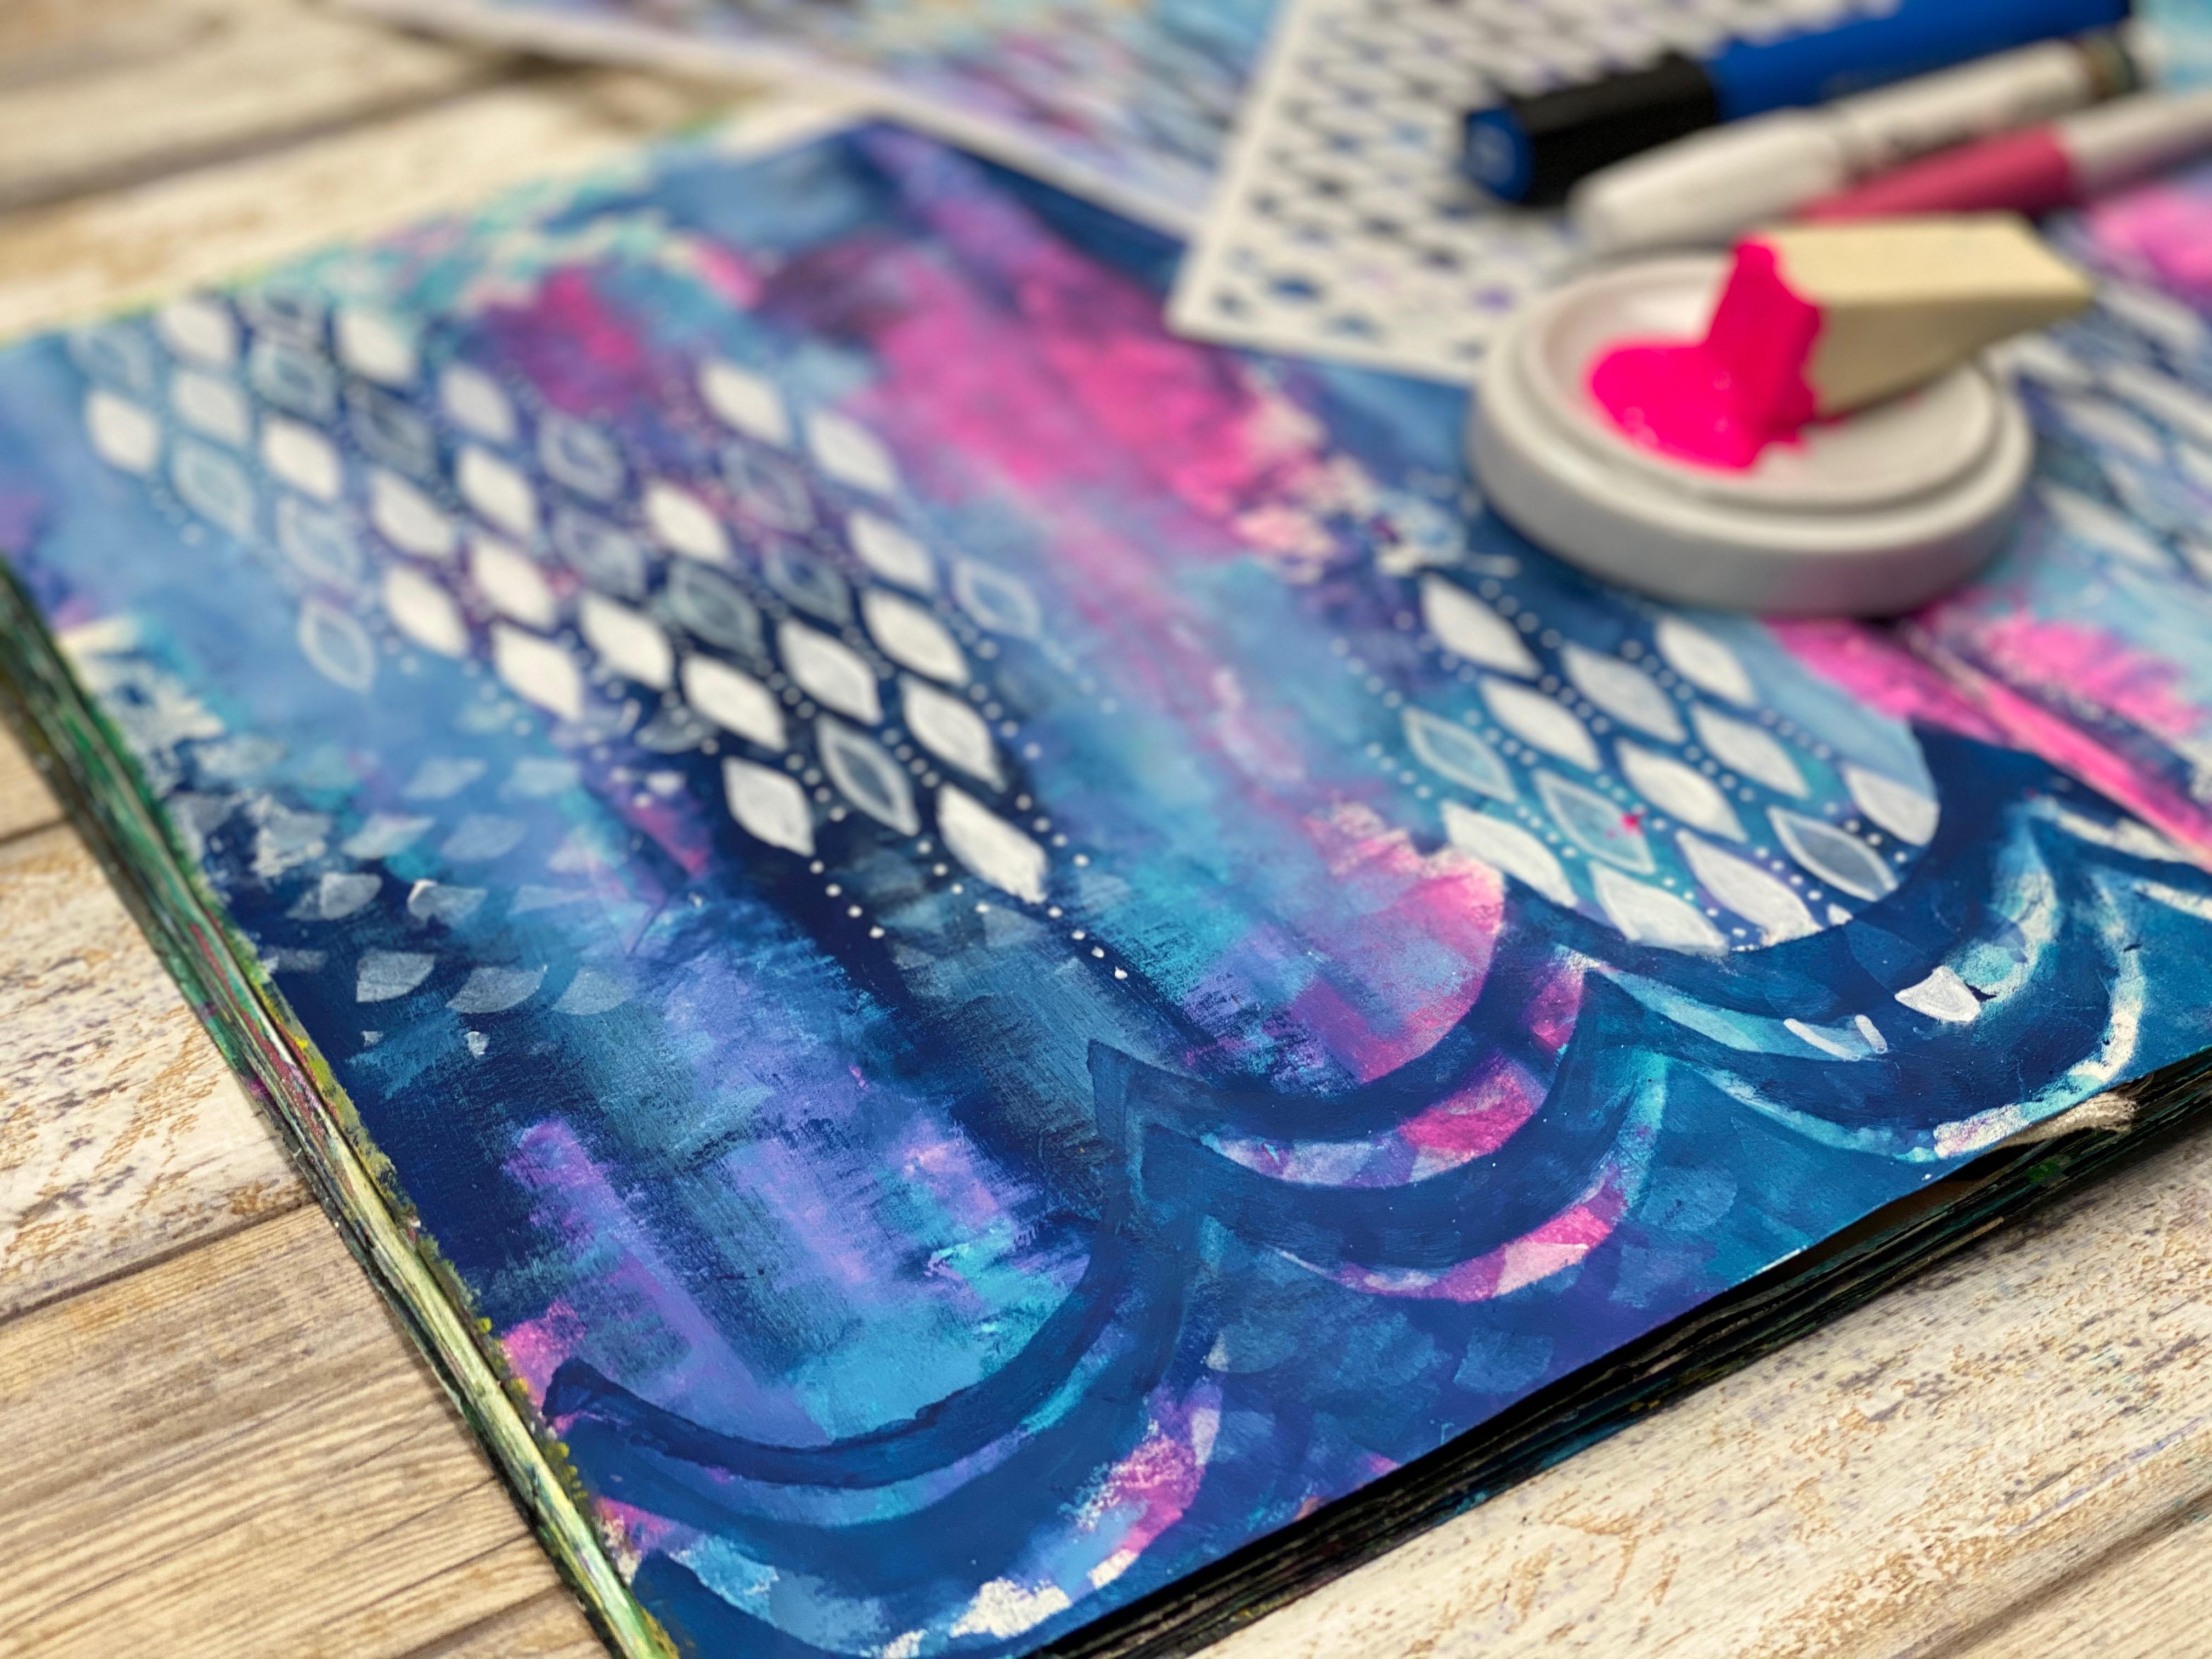
7. Building a background with stencils part 1: But my favorite ways to start painting is to this. Use like an old gift card, a credit card in to pick to paint colors that will blend well together. So you want to think of the warm colors. Red, orange, yellow. Those blend well. They're warm like fire because what? Any time you're mixing wet paint, you want the colors to be able to mix together without making brown. So there's the cool colors, which are greens and blues that those air blend all together. But if you blow in like a red and a green, those are opposite colors on the color wheel, and that'll make brown. And unless I want Brown, I'm going to make sure that my paint is completely dry before I add that color. So first I just grabbed a blue doing any acrylic paint, and I'm gonna go ahead and put it down. Not too much, because the credit card really moves the pain around a lot, and I don't want to come ton of paint left over, so I'm with my blue. I'm going to grab a line green these air to cool colors so they will blend well, and I just glad some paint down and I'm picking my credit card. And if you look around, it's such a pretty, very bathroom, and it makes a little pain to go a long ways. It also puts the paint on very thin, and this allows a painted dry a lot quicker. She's also a great benefit, so I have a lot of paint left over. Still, even though I feel like I wasn't very heavy and it's application initially, you kind of just have to keep trying, and maybe someday you'll get the proportions right. Some days you're like some days you're not, But it looks like this is probably just enough to cover the full area clear when it's dry. So now I can go ahead and add any color. Anyone on top of it I can. You warm colors now and they won't blend together. So that's the beauty of acrylic paints. Once it's dry, you can add anything on top. Now I'm gonna start layering some stencils. In some stamps, you'll see a number of varieties of these stencils and stamp. Some are handmade, some restore, but here I'm using a cosmetic sponge, tapping on my paint and tapping This is a handmade stencil that I just made from a cereal box that's also uh, a medium or substrate you can try instead of a file folder. Use cereal box that also provides a nice big surface area. Want to open it up and nice and thick, and, uh, there really cereal boxes air Really good Aren't tool to utilize. Here's a stencil. I made a pact glue getting color. So just at this point, all I'm doing is playing around. I'm just grabbing colors that I find interesting that I'm drawn to and just adding shaped variety color. Not really thinking too hard about what I'm putting down and where it goes. No, I paid, but just my paintbrushes dry. So I'm tapping on my pane and tapping off so I don't get too much on my brush in just pounding it through this glue gun stencil. I'm not worried about. If the whole image comes off, it doesn't have to be a completed stents old image again. This is just the beginning layers. This is just play time. Anything goes. Just have fun putting down a bunch variety, turn it over and get rid of the excess paint. Using a Breyer to push it down really gets the extent of flattened and all areas in contact . - Do a couple more stencils and then I'm going to switch to stamps. - That's a good idea to rotate or you're working in as you're going along. Gives your I a fresh point of view and keeps you creative juices sparked because your net committing to which weighs up or down and you just want to keep keep yourself on your toes , essentially rotating the stencil in different directions. - Always layer on top of working party. Put down because this gives dimension to your your painting. You work no, see parts of old areas peek through and just gives a layered effect have also not putting us down the paint down real thick. So here you can see the hearts are still visible, even though I put a flower behind it the next, it's actually change the color of the pink that I put on top. - I'm going to drive this and come back and do some stamps
8. Building a background with stencils part 2: So at this point, I want to go back in, add more paint, do more stenciling, maybe down so many areas, because, I mean, I do love this. This could easily be a stopping point, but why stop when you're having fun? Let's keep going. I am just using my figures to make marks on my paint. I really like touching what I'm working in, adding with me paint finger fingers of my paint paint with my fingers. I just makes me feel more connected to the piece of working in. I would suggest you can put on a barrier in your hands they use in visit love. It just protects your skin and makes it a lot easier to wash it off. When you're done, it's a lot of this pain is a transparent. So while I'm coming up work that I've done already, you can still see if you look carefully, adding some white because I wanted to be brighter. So when my pinks are not as bright as I'd like them to be, so first I'm going to put down white. Then when that dries, I can put down my pinks and other colors that I want to be more vibrant. I know you might think I'm coming up What I've done already. That's okay. I'm gonna come back and add more when I want to come back in Central on top of my white areas. But I'm actually gonna do I'm gonna do stencil, so it's not completely covering it. - Let's see. Break out some gold. It will be pretty. I'm actually still have pink in my airbrush. I'm really curious to see what it looked like and push it through this stencil. It's a little thicker. You don't really nice. Really like that. I like a lot. It's funny when you like you happy with what you do. What do you know? It was another gun stencil. So let's see, at this point, I still want a little bit covered up. This is a nice open stencil, so I don't have a good area coverage. I really like like this turquoise e color, and so I want more of that on my cards. Then we're keep overlapping. If you like a particular stencil or color, keep going. Do as much as make you happy. There's no right or wrong way to do this. There's no certain number you need of a of a central on a pain. It's all about what's speaking to in the moment because everything is cover up a bowl. Everything is flexible. There's no wrong way to express yourself. Put your kingdom. So as I look at this, I just think to myself What else? What else? What else do we want in here? And part of me just really wants to cover money. My purple. I want more purple and I want to be brighter So I'm gonna actually be brave and cover some chunks of this thing coming back. Add take away at more take away kind of the remix Media works this color. It just makes me happy. First, I want to do some more stamps. No, this is completely dry. So don't have to worry about re winning my stamps. You at this point, I can continue using any Sam's irony have used, or it can bring in some new ones. It's totally up to me this point. Start to survey what you've already done. Is there anything that you really love? That you'd want to recreate this I love. I'm going to recreate that, um, I like this white. I want more bright white popping out. So I'm gonna add some white with a stencil and then each step will lead you to your next but or your next idea. One central I want for sure is the punch in l. A. And I want that in white. I love white tax that will be very picky. And one other step sons do I want they want this one to. It's another form of that's coming to the swing in gold or silver silver, huh? Let's start with white and see where that leads me. I just love how that pops out in any peace I work and I always went Cem contrast whether be , um white, black or any other light and dark color. You want it to have a nice variety. And when you squint your eyes, you want to be able to have some parts darker and falling back into the campus or paper and other parts popping out at you. That's a good test. Squint your eyes and look at it. What? Stand out. What sinks back and then and either More lighter, dark. Okay, so I got some white going on here and said I wanted to do these circles even do gold does the white and silver would be pretty similar and just really I'm drawn toe these days. So atrocity brands that is really coming together, really enjoying this kind of one a little bit more blue here, So I was going to take it straight from here. So here I'm actually bringing this blue, our image back to the top. It had stamps and paint over it, and I just want to bring that back up to the surface. So I'm just painting these panels that I had previously stenciled on, and I could easily just start painting within these stenciled images. I could paint some of these diamonds with salad color, and that would bring in the blue. Yet keep with the design of the central that's already here. I love making Dutch of my fingers. As you can see, I think it just adds a nice variety. It also you know, it's your own fingerprint. Let's get putting on your work to hear I was coming up some of these diamonds butts with little. They want to end a few circles. Then I think this piece will be complete as far as painting goes, but there's a couple more detail works I want to put on the front here, but for the circles, I'm going to use actually black because you know there's some black in here, but there's not a ton. So it's add a few circles of black, - and my last up is to use this pink cap, which is a bigger circle in the same color black. While I hired he have black circles on here, I like to have, um, the shape, same shape, repeat and different sizes and put them next to each other. I like to overlap them and have them play off of each other in the whole spread. I like the uniformity of all these different circles around each other in the stencils and the pension. Ella, um, the white and the black, the different colors. And overall, I just really happen this piece. I hope you enjoy this class and hope to see you again. Thanks for joining
 Lulu Bea, Artist - Guide - Life Igniter