Transcripts
1. Welcome to Drawing Your Days: Hi, I'm Zoe and welcome
to Drawing Your Days. A class to help you capture
your daily life with doodles. Drawing sketches,
hand lettering, thoughts, reflections,
notes, and more. I'm going to guide
you in how to start a low pressure
practice to document the big and little things
that make up our daily lives. I have some great tips to make this a fun and
inviting activity. From date bubbles and
banners to hand lettering, to design elements,
to layout formations. These are just some of the
ways to help you get started. I promise this is a non
intimidating, fun activity. You'll look forward to
drawing your days just as much as you enjoy looking
back at these pages. You don't have to be
an amazing artist or brilliant wordsmith to
get into this activity. In fact, if anything, you will delight in seeing
your improvement over time. When I started my daily art
journal three years ago, it was because I really wanted
to write a graphic novel. But I knew that I needed
help with my illustrating. I knew there were lots
of things I needed to practice drawing and
I needed to improve. I promise myself that
if I spent 3 minutes every day practicing drawing
and capturing things, that I would definitely get
better. It was inevitable. Also promised myself that I would draw the things
that I hated drawing. The more intimidating to draw, the better for me to practice. If they came out terrible, then I would just write
a little description next to it and save the day. I'm a skillshare
teacher and I have classes in memory quilt making, sewing clear zipper pouches, tag art, and altering
metal mint tints. I really wanted to do this class because this was
something that really changed my life in so
many positive ways and I couldn't help
but want to share. So if you are someone
who's interested in a light daily art journaling
practice where you get to capture the big little things that
make up your life. Then this is for
you. Meet me back at the next lesson where we'll go over the projects
for this class, which involves you drawing your days in your
very own journal. I promise to set you
up for success with a new daily habit that you
won't want to miss out on.
2. The DYD Project: In this class, I'm going
to set you up for success. I will get you in the
habit of capturing the big and little things
that make up our daily lives. I have tips and
tricks to help you get organized right
from the start. Literally, at the
beginning of your journal, we're going to write
some of these down. My ideas and inspiration will keep you moving
day after day. No writer's block here. I have prompts for when you think you have nothing to say. I'll provide guidance
and structure with date, bubbles, banners, layouts, hand lettering, borders,
design elements, all of these things that will
help keep you motivated. You will get into a practice
with doodling, drawing, sketching, note taking,
reflecting writing, journaling. You'll have a routine so
that drawing your days is as much fun to look forward to as it is looking back at. And when you feel stuck, you won't be stuck
because you'll have lots of resources to go to. We'll even go over travel
journals and using the procreate app as a way
to document your daily life. Meet me in the next class where we'll go over some very
basic art supplies. Again, you don't have to
be an experienced artist with tons of fancy art supplies
to participate in this.
3. Supplies: For this class, you need paper
pen or pencil. That's it. Let's go. Just kidding. Actually, I'm not
really kidding. If you have that,
then you are ready. But I'm going to
talk about some of my favorite papers and pens
to use for this project. Many people, I have a
favorite pen and I just love to use it for anything I'm doing that involves writing. But when I started this
practice of drawing my days, I found that I also
liked using water color. Then I needed to find a pen that wouldn't bleed
when water hit it. My favorite go to pen is
the Sakura Pigma micron. They come in a variety of thin and thick
styles and colors. You can buy the multi pack
to see what works for you. In the multi set, you'll see the tips come
in different sizes. They're thin, they're fat. Some are even brush
like personally I like the three because it's
not too fat, not too thin. There are many waterproof
fade resistant, bleed free archival
pens out there, and I suggest trying some of them until you find
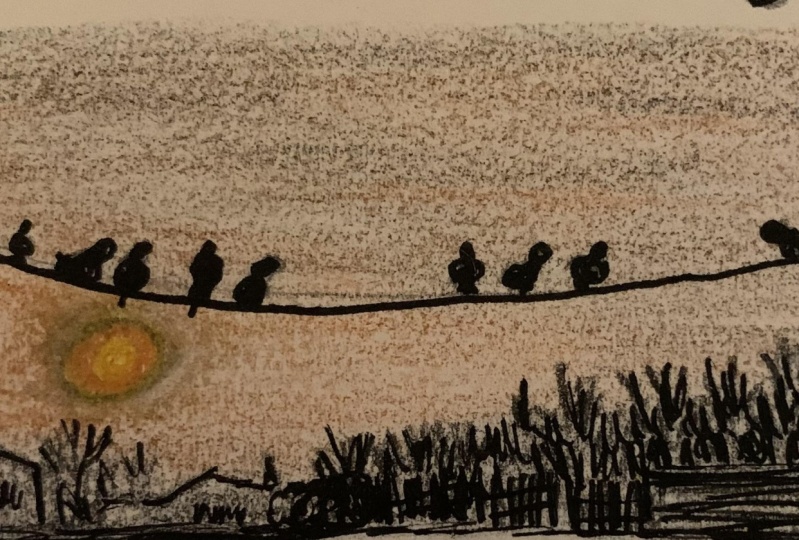
your perfect pen. I also like using
colored pencils that can double as watercolors. You just add water to
where you drew and poof, it becomes watercolor paint. I especially like
watercolors with this project because
they dry fast. If I'm on the go, it's an
easy way to add color and a little something
to a page without having to wait hours and
hours for it to dry. When traveling, I use small
portable watercolor sets. There are many of
them on the market. I even have a set I made
using an old mint tin. As a side note,
that's another class I teach on skill share
called alter tins. And I'll show you how to make your own travel set of
watercolors and an old mint tin. Now onto the paper. Any paper will do the job. But you might want
to ask yourself, if you're planning on painting, what kind of paint, how
long will they dry? And if you're thinking of using any kind of collage elements, are you sticking things down
with glue or scotch tape? If so, then you'll definitely
want a sturdier paper. Mixed media or watercolor paper are perfect for these uses. The size of your paper is
also entirely up to you. Sometimes I like
working on a pad that's a square shape and other times
I like a rectangle shape. I like big, I like small. Sometimes I like it
when it's spiral bound and other
times I don't care. Pick a pad that works for you. Size, thickness, type of paper, type of binding cost. These are all very
flexible options that you can change
up over time. Grab your supplies
and meet me at the next class where we
will set up your journal.
4. Getting Started: When I started this process, like many of you, I was
intimidated by the blank page. Despite the fact
that I felt I had 1 million things I wanted to
say and practice drawing. I often froze when I
saw that white paper, which is why I started using these techniques
for a new journal. I like to take the
first four to six pages of the book and use them
as reference pages. I make myself a guide, so I always have things to look at when I need inspiration. Let's start with banners
and date bubbles. I start with a page
or two of banners. I will go on pinters or search
the Internet for banners to get ideas and inspiration and then draw my own versions. I like to use these as
formatting for each page. I use them for my
date bubbles that go at the beginning
of every entry. Personally, I choose a
different style for every day. I can see how the same
format throughout a journal would look
lovely and consistent too. This is obviously a
personal preference as to what you decide. But later in this class, I'll share one of my sure ways to keep going with your journal, and it has to do
with date bubbles. Take a look in the
resources section of this class for a PDF guide
of some banners I drew. If this is new to you,
feel free to copy them into your journal and
even make some of your own. I'd love to see some
of your date banners and bubbles in the project
section of this class, so make sure to share. Next I have some pages
for hand lettering. I draw out a bunch of hand
lettering styles that I like this way, even when I'm entering
my journal and I feel like I have
nothing to say or draw. I can write something in
fun lettering and make it exciting when you're
out and about. Take pictures of signs and lettering that you
see that you like, and then use that as inspiration
in your own journal. And of course, you can find hand lettering inspiration all over the Internet in Pinterest. And of course, right here on skill share where there are tons of hand lettering classes. And you know, I wouldn't
leave you without my own PDF with some hand lettering suggestions
for you to look at too. Next elements. These are the
graphic design elements I use as borders to fill empty
space around fun ideas. I use leaves, dots, flowers, zigzags, shapes, lines, patterns, anything that
can fill some space or add some dimension
to your drawings. And you guessed it, I have an elements PDF waiting for you. Also in the resources section, check it out with all of your reference pages
at the front of your book. Remember, this is a
work in progress, so you don't have to
fill these pages. You can continue to add to them as you continue
your practice. This is just a way
to get started and always have something to
go to when you feel stuck. After you've filled
your first few pages with bubbles, banners,
hand lettering, design elements, meet me
back here so we can go over some layouts for
your very first entry. We'll get this journal
started any moment now.
5. Layouts: In this lesson, we'll go over different ways of
organizing your pages. I like using the
following frames. Comic strips, shapes,
numbers with arrows, free form, and even
the big ticket item. Sometimes I have
absolutely no structure to my pages and I just draw and it's chaotic
and other times I like to be more deliberate
about my composition. It's really fun when your book is different on every page. Let's take a look at frames
as one of our layout options. Frames are basically boxes, be more decorative
like a picture frame. It can be nice to have
some frames to call out a significant event from a day or just have fun
with embellishing. A second layout option is
the comic strip style. The comic strip layout is
something we see a lot. Now with the popularity
of graphic novels, I may start an entry
with a bunch of boxes in various sizes and then start entering my
day's information. I don't always go in order. And sometimes a box has words and sometimes
it has drawings. A third way of organizing
your page is with shapes. Shapes are a great way to
separate ideas or events. They can be circles, with or without
borders, or any shape. You can have straight
lines, wavy lines, or dotted lines or dots
or hearts, or stars, or really anything Shapes
help break up the page and set different events or
ideas apart from one another. The next layout I
want to share is free form or what I call random. A layout I often fall to is
the very random use of space. I may just draw and
write with no structure, but in order to reel
it in a little, I will add numbers, how to
help with the flow of the day. And lastly, there's
the big ticket item. This is the big thing you draw
in the middle of the page, and everything else
revolves around it. They don't necessarily
have to be related, but it's something that
takes up a lot of space. Don't forget that if you finish your day's entry and you still
have a lot of white space, that's a great place to
just fill leaves, flowers, any of those reference elements we put at the
beginning of our book. I'm hoping you are chomping at the bit to get started
on your first entry. If you want, you
can add a page of layout ideas to the
front of your book too. As a recap, we had
frames, comic strips. Shapes, pre form and
random numbers and arrows. And the big ticket item, think about these layouts and which ones you want
to try in your book. Turn the page and
let's get going. I'll meet you at the next lesson where we'll have some
prompts to get you started.
6. Prompts: Are you ready to get started
on your journal? Let's go. The very first thing
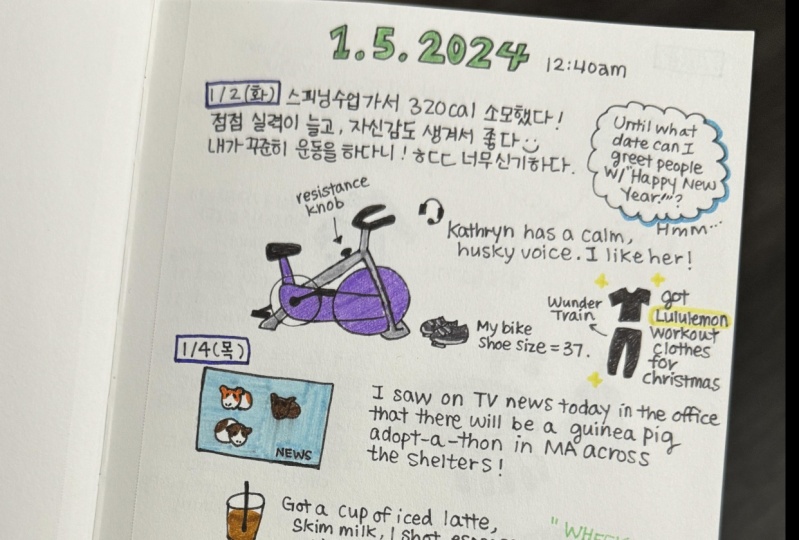
I do at the top of every page is the date bubble, I might do at the top left, the middle, or the right. Anyway, let's put that in. We're going to begin
with yesterday. Let's start small, think of
something you ate or drank. I'm sure everyone
of you did that. Let's start with
something like a bagel, that's a circle with
a hole in the middle. Then if you really don't
like your drawing, write a little story about it. And I mean little like one
sentence, two sentence. We don't have to be so detailed that it
becomes intimidating. Remember, this is supposed
to be light and fun. I'm promising you that when you don't like
something you draw, you can save it by
using description. Now move over to another
part of the page. We're going to put
something that caught our attention yesterday. It could be a news item, a book, something you read, something you heard,
something you saw, really doesn't have
to be massive. Just a little snippet of something that caught
your attention yesterday. Lastly, if you still
have more space, let's fill it with some leaves, or shapes, or stars or flowers. I wanted to start in a very low pressure way
for your first entry. But of course, if you have
more to say and draw, do it and share it. I really want to
see your work in the project section
of this class. Adding color is a way
to make your page pop. Enjoy another mindful element of journal keeping and just
an overall nice touch. By the way, when you write in your journal is
entirely up to you. When I started this practice, I wrote every morning, about the day before
I drew my entry, and then I used watercolor
paints to color it in. But as my schedule changed, I didn't have time
in the mornings. Instead, I wrote about the day when I was
in bed that night. And of course, I didn't want
watercolor paints in my bed, so I got in the
habit of drawing. And then I would sit down over the weekend and
paint in the week. As time went on and
on, I found I had less time to use the watercolors and sometimes I would
just use colored pencils. Honestly, it's fine. If
you don't add color, it looks just as good. That's a personal preference. But one thing I do
suggest is drawing your day the same
time every day. That really sets up a
good habit and pattern. This can be a three
minute activity, but it is so worthwhile to
put aside those 3 minutes. I know we all spend a lot of time scrolling
on our phones, and you literally could
have captured your day in the time it takes
you to go through some mindless scrolling. Other prompts of small
things that make up our daily lives are
groceries, outfits, transportation, books, movies, phone calls,
text messages, weather. There really are so
many little things. Now, for my biggest tip, when I'm done with today's
entry, or yesterday's entry, I opened to the next
page where it's blank and I put tomorrow's
date this way, when tomorrow comes and
I opened my blank book, there is my date and I
am ready to get started. No blank page. This has been a lifesaver tip and even
though it seems small, it really made a
huge difference. I was already in
the drawing mode when I finished my last entry. So putting the date on the
next day was no big task. And then the next
day, when I opened my book and I was
ready for my date, I was so happy to get started. If I skipped a date,
I just went back and filled in one or two
things from that day. It doesn't take long to recall these little things and really fun to look
back at some of them. Everything has to be
monumental events that make us happy or
make up our lives. My family love looking through my journal and when we
do travel journals, they love seeing all the little things
that we experienced. In fact, now that I'm talking
about travel journals, let's take a look
in the next class where I'm going to
tackle how to deal with travel journals and how to use the procreate app as a
way to keep a daily log.
7. Travel Journals & Procreate: In this lesson, we will go over some travel journal
tips as well as using the ipad and specifically
the app Procreate. Procreate can be
used on the ipad, just like a notebook
with multiple pages. This is a great tool for both
regular use and traveling. Before I take a
trip, I usually pull out one of my smaller
pads of paper. I like the small size
because it makes it more portable for going on trains, planes, cars to restaurants,
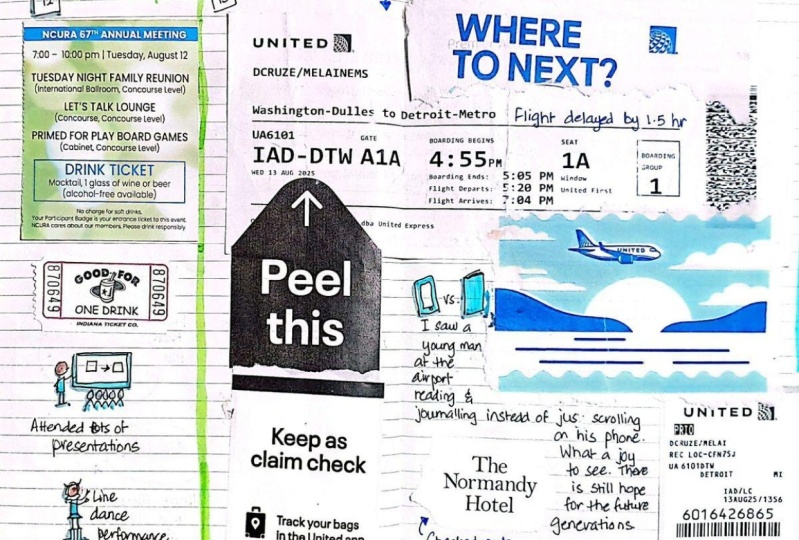
cafes, museums, visits. I'll tape down an envelope
in the inside cover or the back inside cover as a way to little pieces of
paper or tickets, or receipts or stubs or any little memorabilia I might
want to keep from my trip. I also always draw a map
of wherever I'm going. I do this as a way
to get excited for a trip and to get my
bearings before I get there, I may even add some
itinerary items that I'm planning to
do or a wish list. And of course, I always like adding a page of
what I'm packing or planning to pack personally. I have a regular home
day to day journal, and then I have a
travel journal which I take on all the trips
throughout the year. Depending on how many pages your notebook is or
how long your trip is, you may or may not fill an entire notebook
on one vacation. I mentioned the
ipad because this can be a great tool
while traveling. If you're taking a trip, then
you may already be taking an ipad and then
you don't need to double up and take a notepad. The ipad with the procreate app already has all
the colored pens, paints, pencils, everything
you would need right there. Very portable. Your
paper supply is endless. Let's start with setting up that multi page
notepad on your ipad. The first thing
I'll do when I open procreate is open a new pad. I'm going to work
in a square size, but when you're making a
piece of paper in procreate, you can choose any
size you like. Go under the wrench page,
Assist immediately. You'll see on the
bottom this timeline. That's where all the
different pages of my note pattern are going
to be. Here's page one. It can go like this
to add page two, page three, touching it. There's page one, there's
page two, there's page three. Just like a regular notebook. If I look in the layer section, you see them as page one, page two, page three. If you've worked in
animation in procreate, you know how the lower
layers show up first. The second layer is there, the third layer is there. Let's get back to the beginning. Okay, page one. You
can also go like this. You can say new page. If you touch it, say
duplicate or delete, you duplicate a page. It means everything
on that page. We'll go on to the next page. In the next page, this is really handy if you
decide you want to have date bubbles that are the same on every page
of your notepad. Let's say I decide I'm
going to have a date bubble that's going to be the same
on every page of my book. Obviously, I can
draw it every time, or if I always have
it ready to go, then it's always
ready on every page. I might keep the first page as the blank template so that
as my pages go on and on, if I realize I never
copied it enough times, like maybe I copied it 30 times, but this book is going to
be 60 pages or longer. I always have that.
I'll start on page two. The reason I'm saying
to keep a template is because unlike when
you work in layers, in procreate, you can copy and paste elements
from layer to layer. When you're using the notepad
or they call page assist. You don't really have
that flexibility. You can't copy and
paste between layers. Each page is its own solid page. If I wanted to
bring this over to another layer and I copied it, it would create a
completely new layer. Each page is like
a piece of paper. Another great use for
the template format is besides the date banner. However you have that, you can also create a few different layouts. Let's say you're
really interested in doing the comic strip, then you could have
these on every page. Let's say this one you wanted
to have more white space. You can have some
consistency throughout the notebook with your
three different layouts, or as many layouts
as you choose. And that adds a nice cohesiveness
to the entire notepad. Let's get started on an entry. I'll say it's Monday. One thing that's really
nice, obviously, is that you have all
your colors right here. So that's a beautiful thing about using the procreate
app is that you have all the colors
and paint brushes and tools easily accessible. Let's say I'm going
to start with something I'm going
to draw out today. And today I'm filming using procreate
filming with my ipad. I have my camera overhead, I have lights, I
have a ring light, I have all these things
going on that you can't see. But I'm telling you
about That's one of my lights. Ring light. Okay. So here I
am with my entry. This is just a rough sketch, but I've taken up a lot of room. Oh, look, that's so funny. I misspelled Monday.
I better fix that. When it comes to doing
a layout on the ipad, in procreate, you have a few more options than when you're just working
on a piece of paper. Use this tool to select
what I've been working on. It did take up a lot of space. I can make it smaller, move it over, thus creating
a lot more room on my page. Then I can add whatever
copy I'm going to choose, Do the same, select it, make it smaller, rotate it. Another great tool that you can use with procreate is
the reference tool. Now I have a new page here. Let's say I want to write about making some
vegetable soup. Today, I'll go up to the
wrench, I'll select reference. Up comes small mini screen
I'm going to import here. I have some carrots. Here I have a little
picture that I got from the internet or from my own
photo album of some carrots. Now I can use these as like a guide, a
reference inspiration. Obviously, I'm not
going to copy it, but I am going to
have it as reference. Get a better sense of the stems, the way the carrots look. This is great for when you're doing maps for your
travel journal, people, or just anything
you're working on. You can easily call it
up and have it right here for you can move it around, make it a little bigger. Move it closer, and close it up. One more thing, Obviously, when you're in the procreate
app, you can paint well, we covered travel
journals and setting them up with your map at the
beginning and quite possibly, a little envelope to keep yours. Then we procreate
the amazing app on the ipad where you can make your own notepad
with multiple pages. We discussed setting
up templates for your date banners
or your layouts. We went over sizing and reference photos so you can have everything at your
fingertips at all times. With all this information
and inspiration, it's time for you to share
what's on your mind.
8. Final Notes: Thanks for watching
Drawing Your Days. I hope this class got you
excited to set up your journal. Motivated you to try new
layouts and designs. And inspired you to capture the big and little things
that make up our daily lives. And lastly, got you in the habit of doing
it on a daily basis. Please make sure to
leave me a review. I love to hear what
my students think and I really love to see
what my students make. So share, share,
share your journals. I want to see your reference
pages, your layouts. I'd like to see what hand
lettering options you put in. There are so many big
and little things that I'm sure you made
that I would love to see. I promise you're going to look forward to capturing
your days just as much as you enjoy
looking back at the ones you already
captured in your journal.
 Zoe Balsam Biggs, Memory Quilts & Other Fun Art Stuff