Transcripts
1. Hello and Introduction: Hi, everyone. How are you? I am Samantha Deon Baker and I'm here in my studio
in Brooklyn, New York. Some of you might
know me already, who you've taken my
classes or read my books, or you're coming to this because you saw that I
shared a new class. But some of you
who don't know me, I'm the author of the dry
your day book series. Draw Your Day, draw your world, and draw your adventures. Depending on when
you're watching this, draw your adventures comes
out in a few months from now. And yeah, I draw
the world around me in the pages of a sketchbook and from everything from
teaching my process, teaching technical lessons
to teaching how to just be free and, you know, however you can capture your experiences
through art and line is wonderful and valid and
beautiful and whether you do it through very
loose abstract line, continuous line, which is
what this class is about, or you are super realistic and draw things very literally and clearly a little
bit like I do, anything goes, and so I have been working with this idea of continuous line for
a really long time. It's a process that
is dear to me. I talk about it in my
book Draw Your world. There's some
examples in the book and also there's a few
lessons and exercises. And it is an idea that you can use for so many
different projects and in so many different ways, from the basic simple idea of handwriting or
cursive handwriting, which in a way is a
continuous line, um, all the way to really
playful fun title lettering to well then move on to doing a whole layout in
your sketchbook or journal, um, with one line. Then at the end, we're going
to talk about taking this to drawing from the
simplest drawings to more complex drawings,
even with shading, you can do it all
without lifting your tool from the page, and the outcome is really
fun, really playful, can surprise you and you have to go with it and
whatever happens happens. Yeah, I'm excited
to get started. The next lesson, we're
going to talk about tools and materials and the class project.
Also side note. You might notice that
it's a little more casual my recording
and this class. I'm trying to be
a little bit more free in making these classes
so that I can do it myself. I can edit, I can
film in my studio, mostly using my phone
to record myself. I'm trying a new way. I hope that you enjoy it. I hope that it feels
really authentic. And yeah, it's a
little more casual, but I think it's going
to really work for me and also for my audience. On all fronts, I'm excited. I'm excited about this
class and sharing some of these lessons with you.
So let's get started.
2. CL:MATERIALS +CL PROJ: Hi again. Now we're
just going to talk about tools and materials
and the class project. First, tools and materials.
You can use anything. I'm going to be using a pencil, a permanent fine line
pen from Micron. And also some color pencils. That's it. You can
use anything though. I do like the idea of a pencil because as I'll talk
about in the lessons, you can really push and pull and add pressure as you go around. Let's say you're drawing
something and you want to go to another area like
my face or something. That's a hard one,
but don't be scared. We're going to do really
simple things too, but you want to get
to another area, you can really just drag
the pencil across with barely touching the page and
then you can add pressure. The continuous line almost becomes a dance with
the pencil on the page. So the thing is you're
not going to be erasing. So it's just pencil graphite, keeping in mind that
you can push and pull. The pen line is just one line, so it's a whole
different effect. So anyway, we'll go over it as we're working
through the class, but just know you can use
anything anything goes. Permanent pen in case
you want to paint over it, pencil, colored pencils. A ballpoint pen, anything.
That's from materials. Then for the class project, please just share
anything that you create with us in
the project gallery. Two to three examples are ideal. You can share one,
whatever works for you, but I encourage you to at
least share three pieces. There's a lot in the class. A lot is very simple, so there's no reason why you
can't share a few with us. I know you'll get through it. A, share, I will comment and I will love it all and I can't
wait to see what you create. So let's move on to
the first lesson.
3. Handwriting to Playful Lettering: Okay, so here I have
a plain notebook. It's just a plain, pretty basic sketchbook that
I'm just going to be sharing all
these exercises in. So any paper you work on, any surface, any diary
is going to be fine. This is really not about the exact paper because
that's your choice. This is about exercises
and fun things you can do on whatever artwork
you're making. So all I have that
I think is great for you to practice with
is a pencil. We're not. We have no eraser because
we're not going to be erasing. And a micron pen, I'm using an 05. A micron is permanent
waterproof, in case you want to color in any of your shapes
with wet materials. It's great to use a
permanent fine line pen. So we're going to start with some basic handwriting, even. We're just going to,
you know, just try and write words out without
lifting the pencil at all. The only place where this gets tricky because usually when
you're writing in script, the idea is that you
don't lift your pencil is when we have to dot
an I or cross a T or cross an F. That is the introduction when you get to those places on
how fun this can be. I'm just going to start
with writing my name. My name has a T in it, Samantha, we'll see two different
ways that I can deal with the I'm just going
to start to write. This one will be in lowercase. For the first one, I didn't
cross the T with my line. I'm going to actually come back and I just
had fun with that. That's pretty basic. We're
not getting too crazy there. The next one, I'm going to cross the T at the same time
that I'm drawing the S. For this one, I'll
start with a capital. I just had a little
loop at the end. We're going to keep going more and more and more
creative with this. Let's see. I'll do
my name one more time and we'll underline it. It's fun to exaggerate
that it's one line. I actually do little loops. There's another one. Now let's move on
to capital letters. We do. This is where it gets you can start to see
the playfulness come out. Because capital letters, we usually lift our pencil or pen. I'm going to come back up
here because I didn't want the H to connect at the bottom. So now we can move on to
even more fun creative ways. This will be a title, a date, a quote or anything
that you want to be have fun with more three dimensional lettering
or bubble letters. I'm going to start with
some basic bubble letters and we'll do the month. It's going to be April when
this class airs. Let's see. This is really fun because you get to these little holes in your bubble letters
and as you can see, I'm progressing into making
the lettering even more and more creative and playful
and not expected. So there's April. And you
can fill the letters in. Let's say I want to
color it in. Let's see. Everything that
is below you find the different shapes and color
them in different colors. Let's see, I'll just do. Some of these there's a
little space in there, so I'm just doing
the caught shapes, the shapes that are solid. There's so many lettering
styles and things that we do where we really want
things to be perfect. There's the pressure
to be perfect. But this is not
about perfection. This is about creative,
fun, quirky letters. I do believe there's
no wrong way of making letters if you're
coming at it from a more illustrative,
fun, playful attitude. No, I'm gonna just
close up that shape, even though it goes out,
there's a space there. I'm just sort of
filling that in. I'll do the same here. I'm just using some
colored pencils. I forgot to mention that. These are Karen Dash
luminos pencils. You can use anything that
you have. So there's April. And now I'll move
on and maybe do a bigger bigger maybe
little phrase, two words. I'll do one love. I always
like using those two words. Let's just see what
happens. And you know what? I'm going to actually be
brave and go with my pen for this one because there
are no mistakes here. So this is just to show what level let's take
it to the next level. So and I'm intentionally making more shapes with
my continuous line. I'm going to add some
more space here so that you can see the two words. One love. How fun is that? Now, there's so much
you can do with this. Once you have a crazy
line like this, crazy letters like this, you can color in the
whole bottom half. You can find little
shapes and color them in. Let's see. I'm
going to just fill in certain areas with stripes. I love stripes, so we'll
just do the big areas in each letter with diagonal
stripes and see what happens. As you can see, not
about perfection, but more about free form,
creative playfulness. Now I'll fill in some
of the other space with a dark color,
let's say, a dark blue. I'm only doing sort of closed
spaces here. Super fun. Very unexpected, very playful. One love in a really
unique fun way. So now we'll move on.
4. An Inspiring Full Planner Layout: I want to go do something really fun that maybe some
people will respond to. This is going to be a whole week spread in a diary or planner
or Bojo or sketchbook. I don't know if any of you might remember when I was part of
workshop week last year, I did a exercise draw your Day and shapes Draw
Your Day is one of my books, and we just divided
the pages into different shapes and it
really helped break up the big open space and
it was a little bit more freeing for people who see a whole sketchbook
spread and go, I don't know what to do and
I don't know where to begin. This is going to be a
similar kind of idea. I'm going to I'm working
with my pencil so that I can keep a light line. In case I do make any mistakes, I can go back over it, even just layer it on
top of each other, but then I can erase later after I go over it with my pen. So I do recommend you can
just go for it with your pen, especially if you have
some guidelines for your spreads in your Bujo. Okay, so I'm just going to
start down here and I'm really just having fun. You can definitely add flowers or anything to this line
as you get more confident. This is going to
be a March spread. And I hope that I do
this correctly as far as how many um, I'm just I'm eyeing
this. I'm eyeing this. Alright, and I'll end
with a little flower. I can even add some some
leaves to my flower. So there is the spread. I just had fun. I did not
lift up my pencil once. You can do the same
thing. You can even keep your line going and add
the days of the week. That's a bit of even
more of a challenge, but I encourage you
to do it. Let's see. Now you have a great start and you do have all
these fun shapes. You can fill different shapes
of the entire the outside. You can add more of these
flowers to your lines. I'm going to add the
days of the week. But what I might do is just go over this with a
pen and then do those in pen. I'm pretty much going to go over my pencil line exactly
here just because I don't have an eraser nearby and I want to make sure that we really honor the whole
no mistakes idea. As you do this, if you want to, as you go over it, you can
add some leaves if you want. You can thicken some
of these lines. You can do all sorts
of things to make them really once you have your pencil sketch, and
you're happy with it. So yeah, I might thicken some of these lines here where
I had that little jump. My pencil is still
there and I can erase it or, you know, I don't know. I'm of the I like seeing the layers when
I sketch and when I draw, so I might not even I might
not even erase the pencil. There's a really
fun basic layout. Then you can start to add
the days of the week. I'm just going to
do those in the consistent a consistent style, even though they're separated. I have not made them as part
of the one continuous line. Tuesday, as you can see, I just cross my T in one line. Just had fun with that. And then down here is I've got every day
of the week, right? So now I'll just do
maybe some notes. There you go. That's the idea of just playing with
one continuous line. I'll just play
around a little bit with coloring a few elements in so you can see
how that looks. Just color my leaves in. And it's really easy to just add some more
leaves if you want. It's up to you how strict and how much you want to honor
that one continuous line idea. Fill in some of these
fun shapes with just a little bit
of this light blue. I like this color. Just
for ****, just for fun. This is why it's
really nice to have little random shapes pop up so that you can add
these little pops of color filling them in. I'll do the same thing
even with my march. There's some holes in there. There you go. One
continuous line idea. It's really carefree and fun. Anything goes and, you can
just make it your own. That's another idea
of how you can play with one
continuous line and make it work for you
and your projects. Now the last thing we're
going to talk about is actually drawing things
with one continuous line, which is something
that I teach in my books and I talk
about all the time.
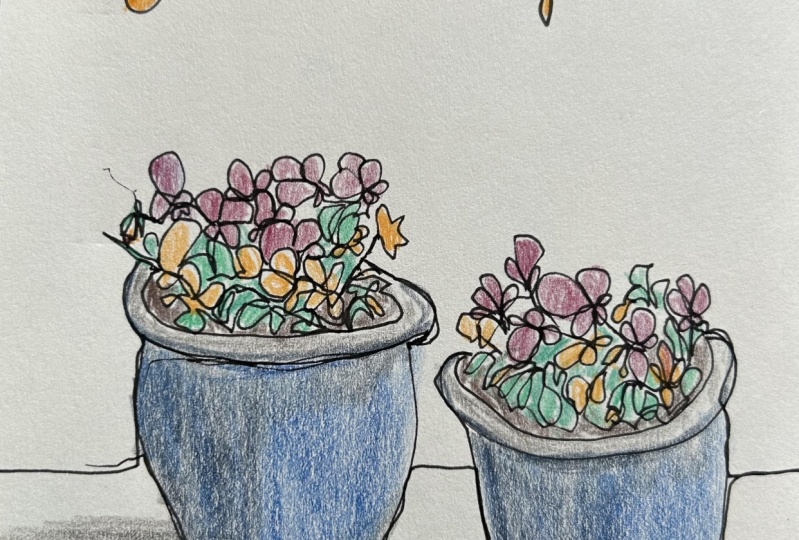
5. From Simple to Detailed Drawings: So I have in front of me a
jar filled with some tools. So I'm going to draw that. I'm going to stick it in
front of me and just draw that with one continuous line
and just see what happens. When you're doing a drawing with one continuous
line with a pencil, it's really nice because you can add pressure once you're confident about
where things are. So you can go very, very lightly as you're planning, as you're moving about as you're getting from
one place to another. And then when you are sure that you're happy
with where things are, then you start to add pressure. Let's see. I'll just start these drawings are similar to a blind
contour drawing, although you can look. So there's the difference. Um, you know, this is really it's it's not
about being perfect. It's about this really playful
carefree drawing style. I'm just drawing all the pens
and pencils in this jar. M. I'm looking, but I'm having fun with it. I'm really not trying to
make the perfect drawing. I'm making something
that gives the idea, the idea comes
across and then also then if you're making
your lines light, you can then, like I
said, add pressure. There's a word right on the, um, it's a yogurt. Let me see what does that say? I don't know what
it says exactly, but I'm just kind
of making it up. There's a little number there
probably for the ounces. There's one more little
paint brush back here. There's my drawing of a jar or a glass jar
filled with tools. The drawing has so
much character. I mean, I'm experienced
with drawing, so for me, it comes a little bit easier, but just think of
simple drawings. Let's say we're going to draw a just the pen
sitting on the table. If you want to just
practice drawing something. Try and draw something
really simple at first if something like what I
just drew is intimidating. These are little spot
illustrations you can make in your Bojo or as
you're going about your day. Let's see. This is
going to be just a pen. You just challenge yourself. You can go over lines. This is put the
little logo in there. You can add the
words if you want. Now I'm doing this upside down. Then the lid. There you go. Just
one continuous line. Practice drawing a face. Let's just do an abstract
face. Let's see. I think there's a lot
of artists who do this and you can do it in
your own unique style. Let's see, I'll just
start with an eye. I hope I don't make something
crazy looking here. Maybe this person
has glasses on. Maybe big hoop earrings. Maybe there's a necklace
with a star on it. There's one continuous
line funny looking person. And then you can get
to do, you know, more of a more serious
face, and, you know, I'm I'm going to make this up, but, uh I do it all the time. I'm not looking at
anybody right now. I'm just sort of making this up. But you can add shading and
get a little more realistic. And what I'm doing is
I'm only adding pressure when I know that things are
where I want them to be. I know where the parts
of the face are. I'm used to drawing. If this
is something that is like, Well, I can't do that. Know it comes with practice, but you can take this idea
from the simplest thing to to something more, more serious, if you want. You can add shading. And make a more serious looking drawing. I just made that up. I'm again, not looking at anyone, but I have not lifted
my pencil up once. It's really up to you how much you want to have
fun with this idea. You get the idea.
There we go. One line. You can add punctuation
and you can dot your eye. If you go really light, you can go around
anywhere you want to go and then you add
pressure when you want to. So that's my continuous
line drawing and lettering exercises for you to play with and have fun with. There's so many different
things that you can do. From the simplest projects, just writing your name and experimenting with
crossing your T to the more advanced projects,
whatever anything goes.
6. CL:CLOSE: I hope you like that. Thank
you so much for joining me. Again, please share
anything that you created during these lessons in the project gallery so
we can all be inspired. If you followed me exactly, share if you took it to a
whole new place and ran with the concept and idea and created something totally
different, share that as well. I just want to see
two or three things. Ideally, we all want to see what you do with this idea
of a continuous line. And that's it. I just, you know, the idea is,
you just go with it. You can't worry about mistakes. You have to keep moving forward. Don't look back, kind of like a concept for
life in a way. So let's just make those lines and have
fun creating them. And I can't wait to see
what you've created. Thanks so much for joining me, and I will see you soon. Bye.
 Samantha Dion Baker, Artist | Designer | Author