Transcripts
1. Introduction: Hey guys, welcome to the class. My name's Braden Messer. I'm an artist, author Youtuber, and I'm going to teach you
how to draw in this class, drawing the portrait,
a beginner's guide. I'm going to take two
tried and true methods. I'm going to fuse them together
and I'm going to show you how easy it actually can
be to draw portrait, even something as iconic as Michelangelo's David.
What can you expect? In this class, I've broken it down into eight
digestible lessons. The first lesson, we're going
to be focusing on how to begin drawing the proportion
for your features to come. And we're going to be
leaning heavily into the loomis method
for that lesson two, I'm going to be showing
you how you can start to place
features on the head. And so we will be
focusing heavily on the ear and the contour
lines of the hair. In lesson three, we're
going to be focusing on placing and drawing the eyes. That is where we're going
to be leaning heavily into. The sur method SR
method, of course, is how we break face down
into its basic planes. Lesson number four will
be all about the nose. Lesson five will
be the mouth and the subsequent sorrow
planes which frames the underlying form of
your subject's face. Lesson six will be
about the hair. Lesson seven will be about the beginnings of
hatching and cross hatching, lowering values and
giving the drawing form. And then lesson eight will be on tiding up all
your hatch marks, your detail work, and
wrapping the class up. That's pretty much it. I hope that you draw along with me. If the class is too
quick in parts, by all means, press pause, catch up, and then begin again. But if you find
yourself enjoying this class in the way
that it's broken down, it's flow, then I
would highly encourage you to pick up my book,
Drawing the Portrait. Step by Step Lessons for Mastering classic
Techniques for beginners. I'll have a link in
the description of the class to where you can
pick one up for yourself. I hope to see a
project uploaded from you and your review
of the class as well. Remember if you upload your project and liver review
for that specific class, I will showcase your project
in my monthly newsletter which goes out to
all the thousands of students that I have
here on skill share. So it's a way for you
to be able to get your name out there
amongst the community. Yeah, that's it, that's
all and hope seeing class.
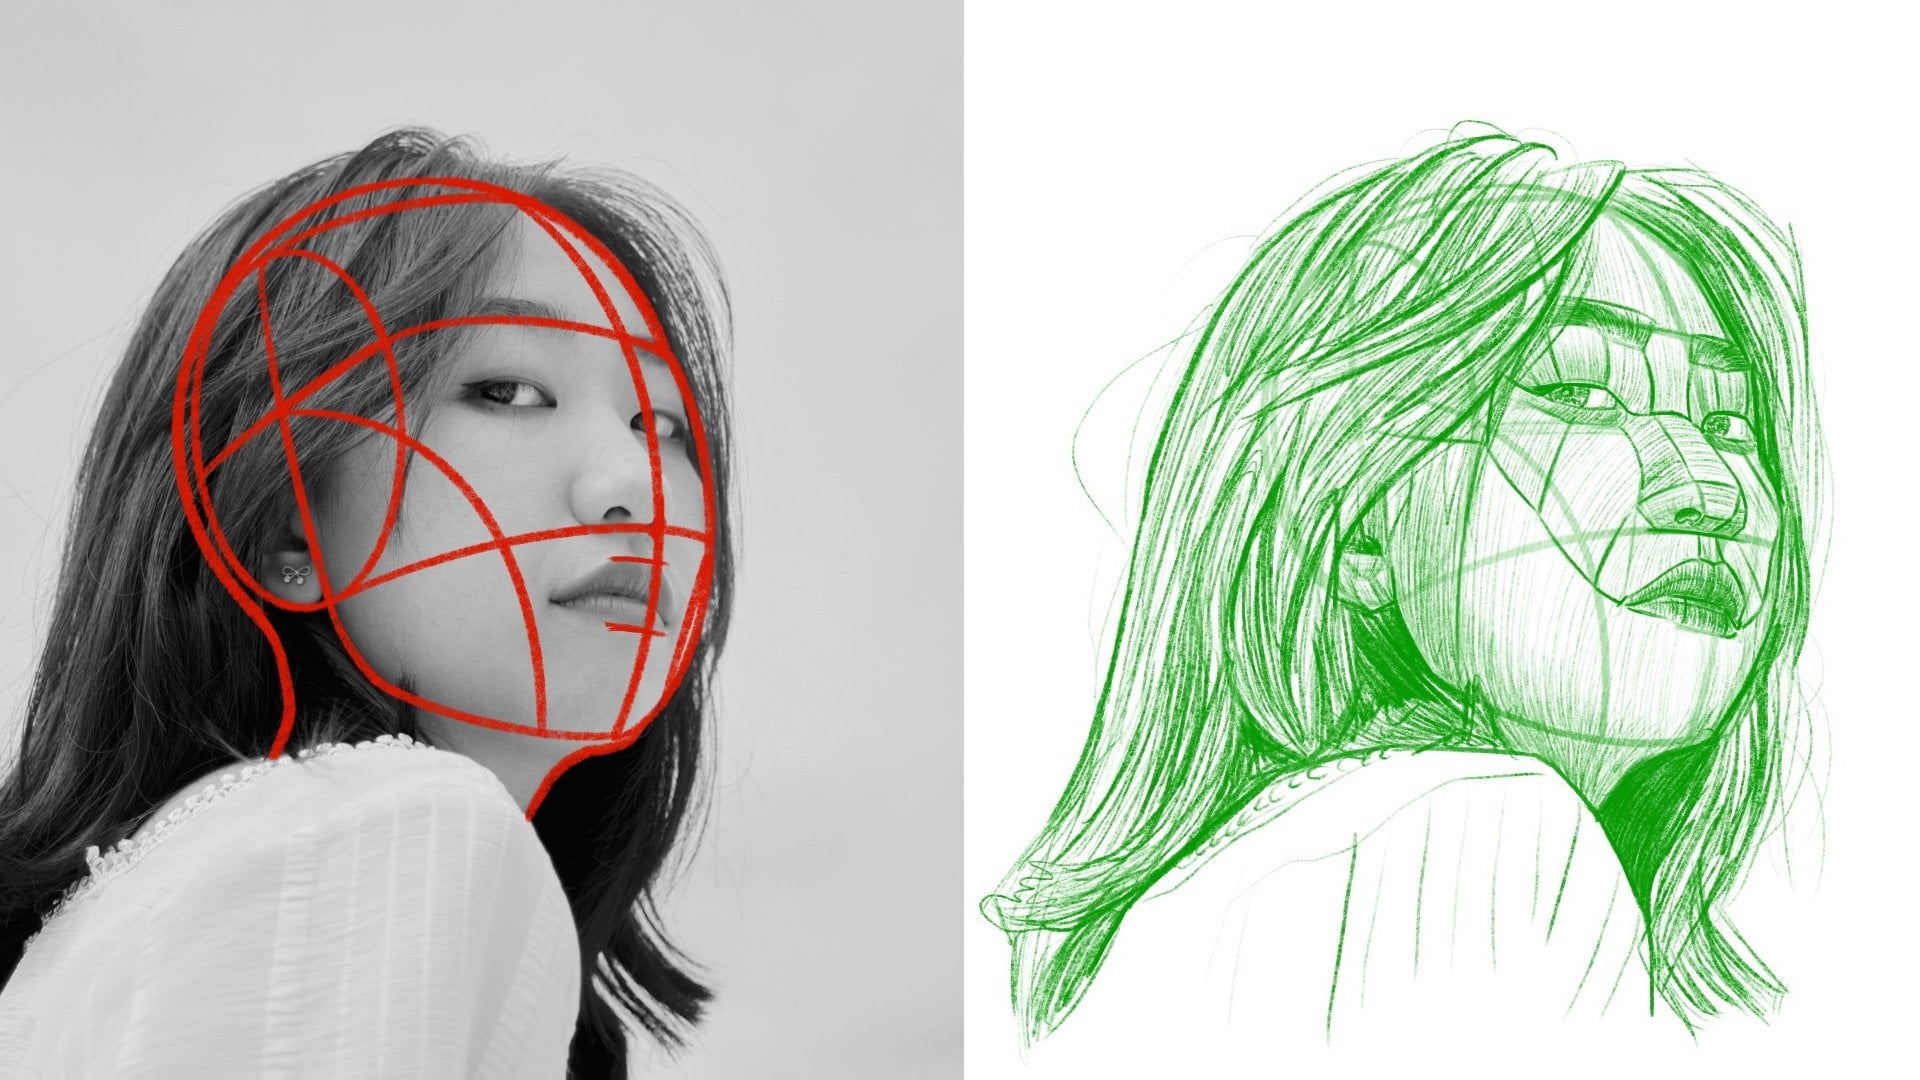
2. Draw your Loomis Head: Step number one is that
we want to draw a circle. Two different ways
that you can do this. You can use a compass tool, which will give you a perfect
circle with relative ease. Or if you want to draw your circle manually,
by all means, if you do choose
the manual routes, be aware that your circle
does not have to be perfect, so long as its height is
relative to its width. And then we're going to
place our side oval. Now this is to slice off the
side of the initial circle, effectively elongating
the cranium for us. Okay, then we want to
draw a vertical axis, and then our horizontal axis. This helps us visualize
the perspective that we're looking at in
space for the cranium. Then once we have
that established, we want to extend the top of that oval over for
our hair line. We then want to extend
the horizontal axis over to bring out the brow line. Then we want to extend the
bottom of the oval over, which brings out roughly where the bottom of
David's nose will live. Okay, So you've got the hair
line at the top brow line, in the center nose
line on the bottom. Then when it comes to the
center line of the face, we're going to place
that just like this. The center line is exactly
what it sounds like. It is the center
of David's face. It splits in between
the eyebrows, the nose to the
center of the China. Then once we have
that, we're going to extend the vertical
axis line down. And then we're going
to pull it over and connect it to the bottom of
the center line of the face. Then we're going to
pull up and over, extending that line up
to the brow line for the far side of the face. Okay. So your Lumaidhd look
something about like that. All right then just so we don't have a
floating head in space, I'm going to extend
this line down. Pull this over, and
we're going to bring out David's throat here. And his neck then. Yeah. I'm just going to do
some nice light lines here, give me a little bit of
form, but nothing too crazy. We're not worried about
details in this step, we're just focusing on the basic proportional structure of the Lu in this lesson. Okay? All right, so that's
looking pretty good. Now we're going to
erase this part of the initial
circle completely. Something just like
that. And then once we have that
initial circle erased, we're going to place
our cheek plane here. This effectively
elongates the face. We're going to extend this
nose line over all the way, and then we have our cheek
line on the other side. But in conclusion, your lomad should look like
this on your paper. All right, onward to lesson two.
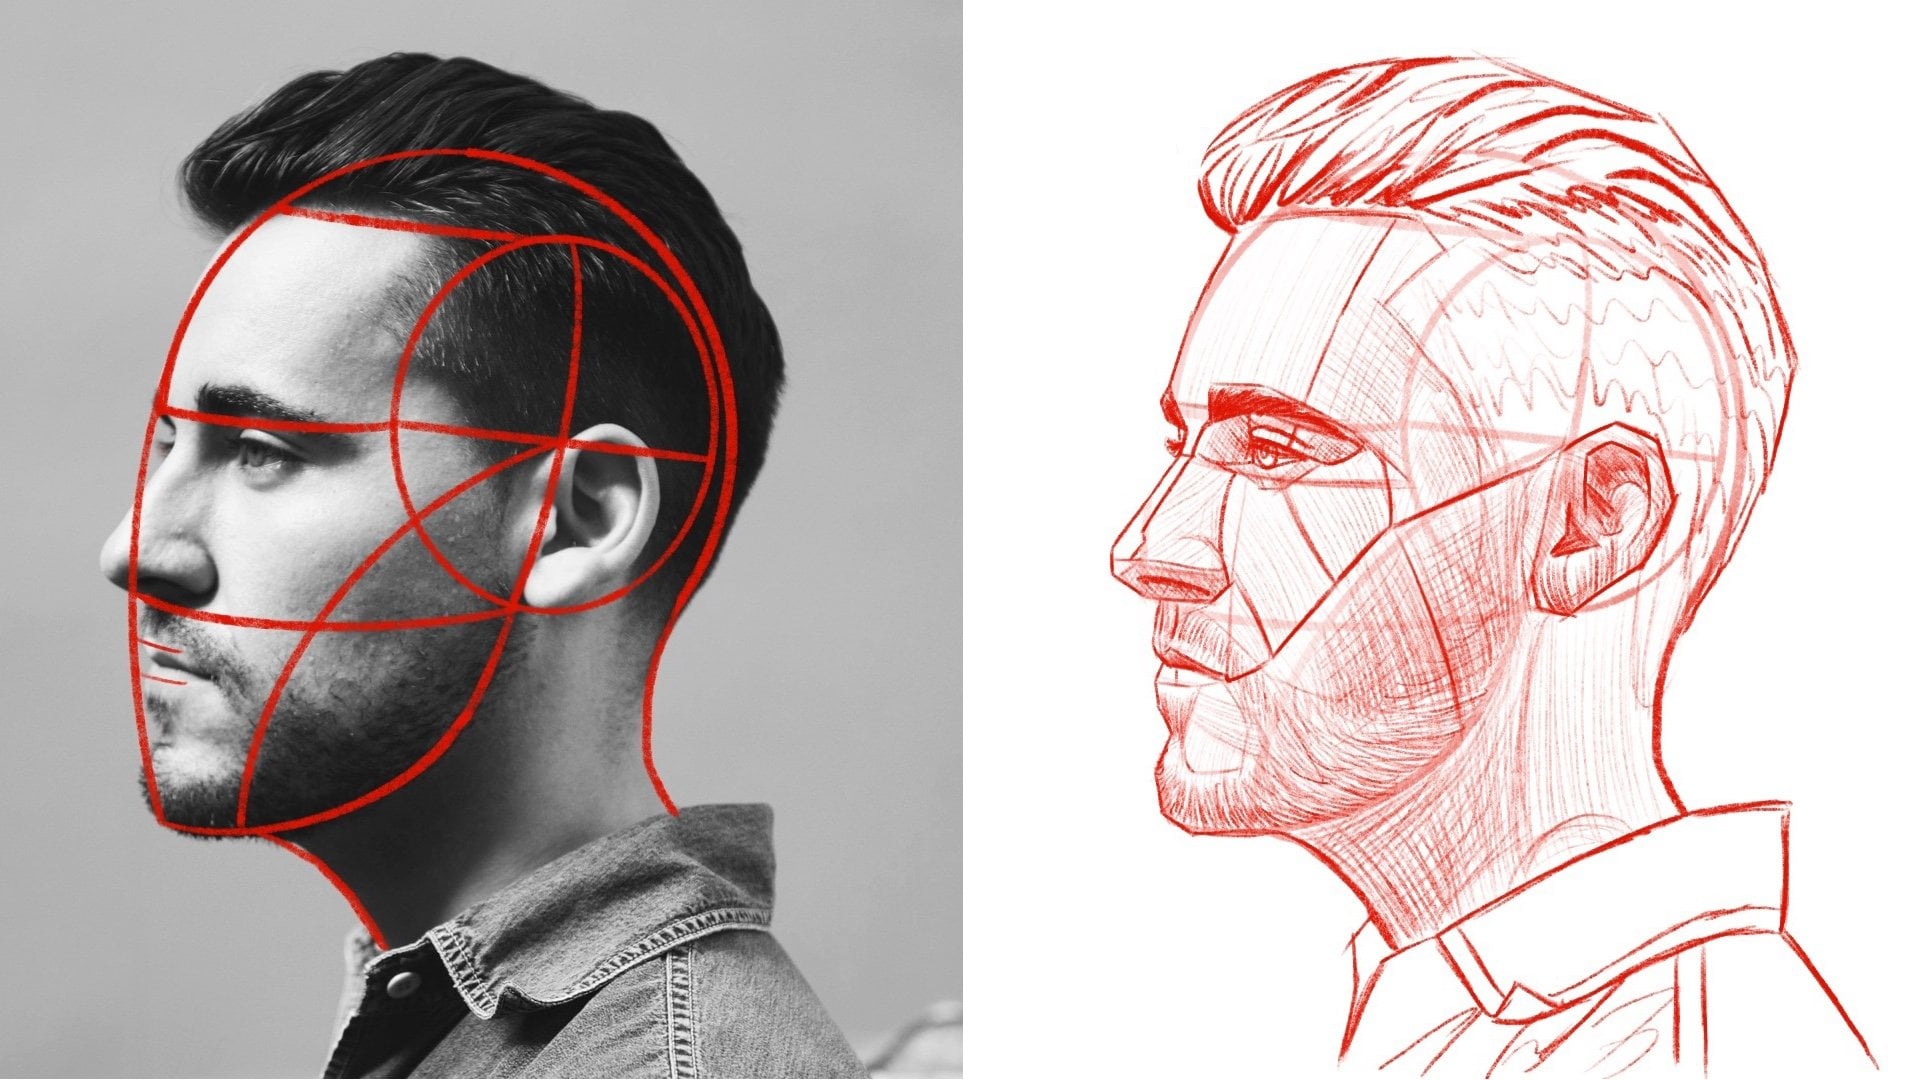
3. Place your Ear & Hair Outline: All right, so to
start off lesson two, what we're going to do is I want you to take a needed
eraser and I want you to lightly begin to erase your lumas head
so that it's more or less transparent
on your paper. Okay. Now what we're going to do is we're going to place
David's ear first. The reason why I
like to start with the ear is because we can use the ear as a proportional gauge for the rest of the
facial features to come. All right, notice we are just focusing on the contour
lines of the ear. Contour meaning the
outside lines first. Then once we have
those lines drawn in, we can go in and we
can start to bring out more lines of the year so that we start to bring out
the character of it. Okay, But just like this, I'm using nice light
pressure control here. I'm not pressing
very hard at all. Remember to notice the placement of the ear on the lumus head. The ear will always be placed in the bottom rear quadrant of the side oval
of the lumas head. Of course, when I say rear, I mean rear to the
front of the face. All right, now we're
using that ear. We're also using the
transparent lumus head underneath to help us place
these lines right here. Now obviously when it
comes to David's hair, it is very involved. It's actually going to take
a couple lessons for us to bring out the complete
character of it, but when you are starting out, use the Lumis lines to help you gauge exactly where
those lines need to be. Okay, now we're starting on the
back of the neck. Here we're coming up,
we're just focusing on the basic two dimensional
shape of the hair. We are not worried about detail
work at this point, okay? We're just trying to make sure that the contour
lines that we are laying down now are in
proportion to each other. So that we can go
in and start to dress it up with detail
work and more line work. But these lines should be
of a fairly thin quality. Do short polls, remember what I say about shorter polls as
compared to longer poles. Shoulder polls will
allow you to see proportional discrepancies
earlier than if you do longer poles. Okay, that's pretty
much it for this one. Let's move on to
lesson number three.
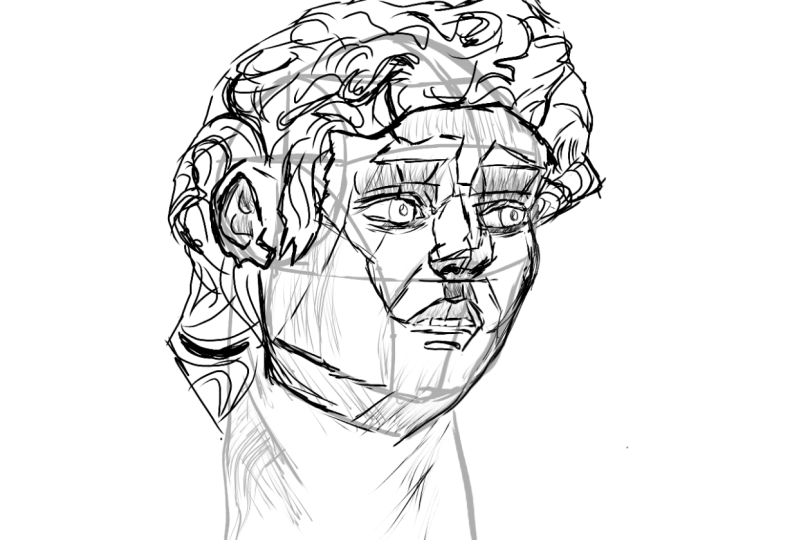
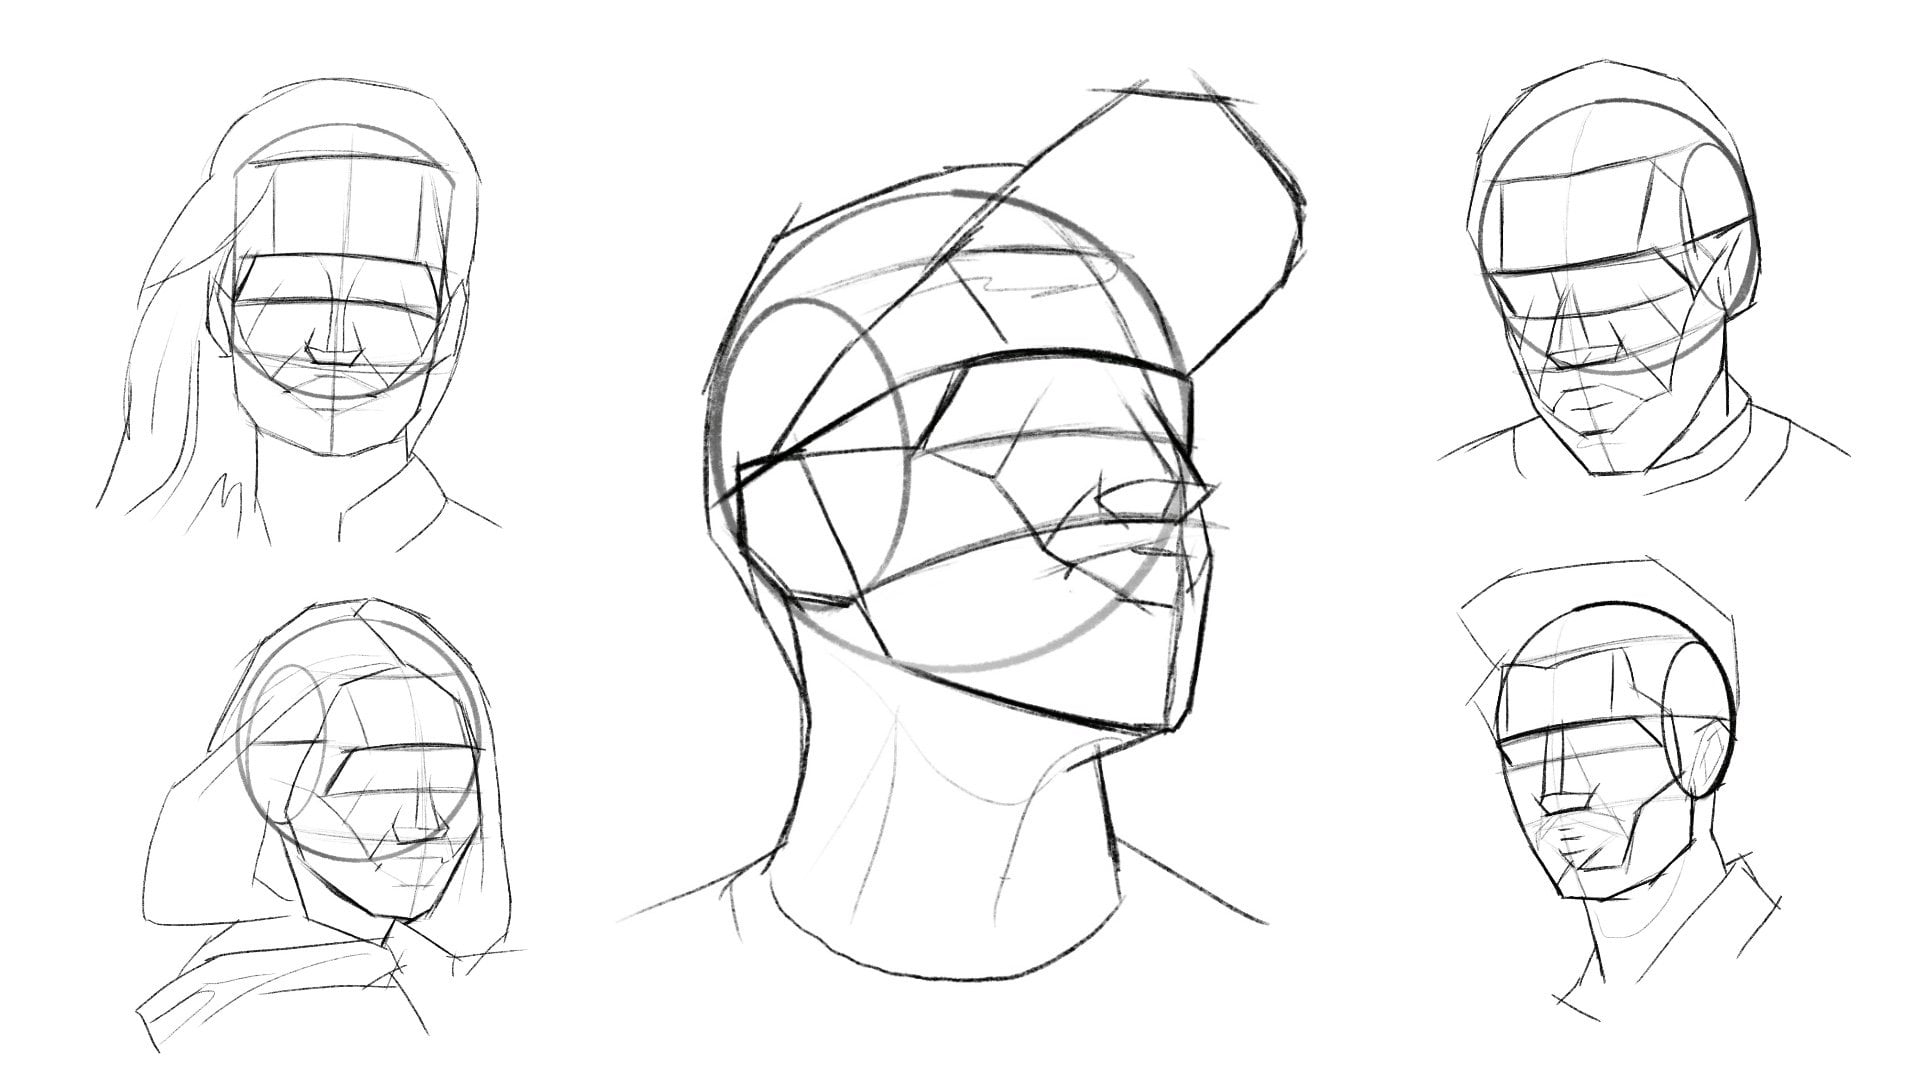
4. Draw the Eyes using the Asaro Method: All right, this is where
we start to have some fun. Notice how reference number
two has changed from the looms method to
the sorrow method, and we are going to use as plane lines to help us bring out the features
of David's face. This lesson focuses
specifically on the eyes. Notice how here on the far side, I'm just ironing out exactly where the edge
of the face lays. Then right here,
right about here. This is where we're going to
place the nose bridge plane. The bridge starts off with just a horizontal line and then we're going to pull two
vertical lines up from there. Then we're going to focus
on the contour lines, meaning the basic two
dimensional outer shape of the eyebrows. You can use a nice light
pressure control for this. Okay, Something just like that. The cool thing with
this method is you will always start
in the same place. The eyebrows plug in to the tips of those
vertical lines that extend off of the
bottom horizontal line of your nose bridge plane. Okay, just like this, you can bring this
back and then plug it in something just like that. Once you have the
nose bridge drawn in and then the eyebrows, then we want to
start right here. See this, this is the
temple plane and then this right here are what they call frame lines. You
have three of them. Technically there's four,
but three main ones, 12 and then three
here on the corner. These are to help you frame
the eyes from the top down. We're going to start
from that third frame line on the end, and then we simply connect
these lines just like this. Now that we know where to go to, we can then punch in the
second line for our eyelid. This is one of the reasons why I really like to focus on drawing statues for you guys in
these skill share classes. Because statues, unlike
real references, give you a lot more
room to work with, especially when
it comes to eyes. Specifically, most people
are going to have really, really big top eyelids like
David does in the statue. This is the perfect
way to practice. Then here we're going
to pull this line back. And what this gives
you is this gives you a nice two dimensional
framework for the eye. While we're here, I'm
just going to punch in the iris and then the pupil. Then I just have some other
lines here that I'm going to sketch in for the
shadowy work of this. On the far side, we
have these frame lines. We have that top eyelid, and then we have
the eye as well. If you need to pause
this to draw with me, by all means go
ahead and do that. That's pretty much it. Let's
move on to the next lesson.
5. Draw the Nose using the Asaro Method: Okay, so on this one I'm
going to show you how to draw the nose and how the
nose plugs into the eyes. All right, so what we're
going to do is we're going to refer to our
underlying lumis head. And right along that nose line, we're just going to sketch in the very bottom plane
of the nose here. Now we're going to
extend this line up here on the far side of
the nose, just like this. Remember nice light
pressure control, Nice short strokes,
short and length. Then once we have
this pulled up, what I want to do is I want to identify that bottom plane, which looks something like this. I'm going to pull this down and then I'm going
to bring this over. It's up and over. You want to make sure that
you maintain that structure. If you have questions
about this part of it, just refer to that as head
model in reference to. All right, because this
plane that I'm bringing out is specifically
linked to reference to. Once we have this
bottom plane drawn in, we can then identify the
nostril on this side. And then of course we have
a little bit of it here on the far side placement. I don't really like
that, so I'm just going to replace that there. Then we have the nose tip plane. Okay, I'm going to draw this. And you've got two vertical
lines that come down, and then you can connect
those on the bottom. Something just
like this. Then we can extend this down
a little bit farther. Now what we want to do is we want to bring out the
nose ridge plane. There's the ridge plane which is the top of the nose
and that extends up and that plugs into
the nose bridge plane. There's the bridge, the ridge. They're similar but different. So make sure that you understand the difference between both. Okay. But just like this then it's going to extend down on
this far side here. It's going to continue to
bring it all the way down. But those are the three
main planes that you have. On a nose, you have
the bottom plane, which is the one
that you start with. You have the nose ridge
plane on the top. And then you have
this plane here. You have what is called
the slope plane. That's pretty much it. So let's move on to the next lesson.
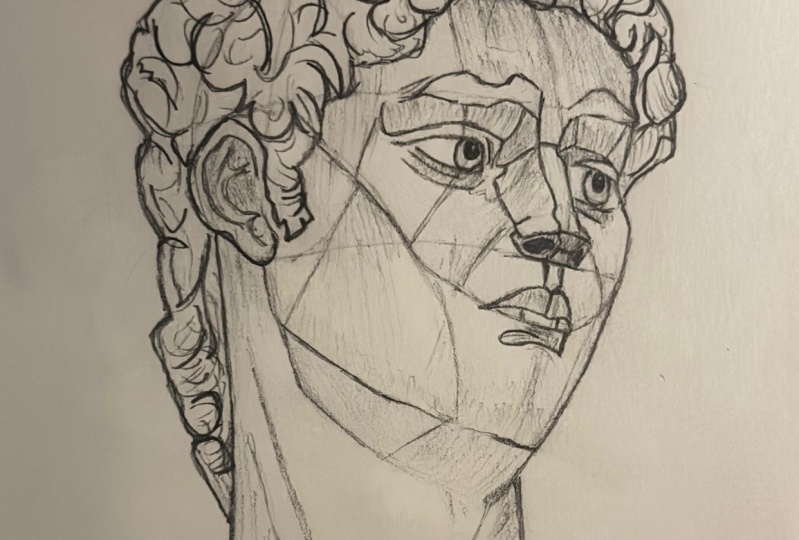
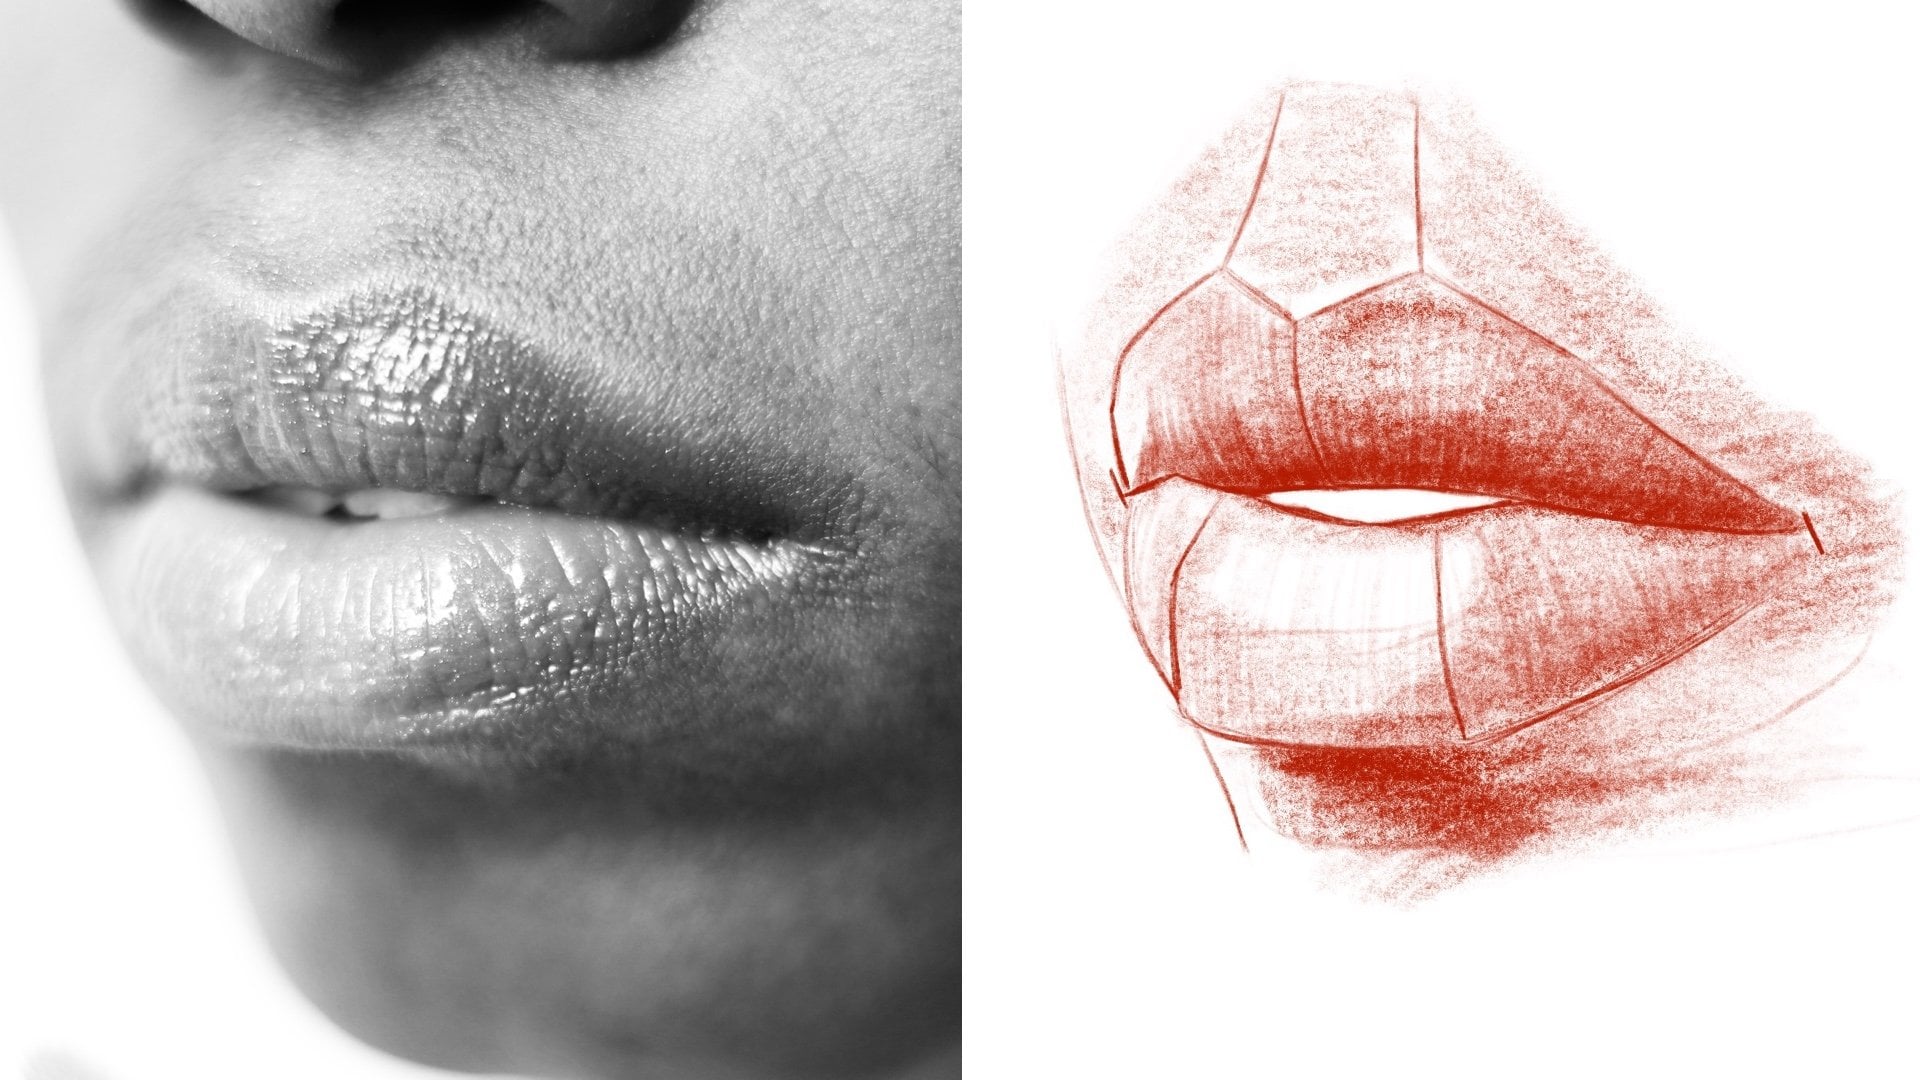
6. Draw the Mouth & Asaro Planes: All right, so working our
way down the face now what we're going to do for
the mouth is we're going to extend these
two lines down. And what these are, this brings out the filtrum plane, right? The filtrum plugs
into the cupid's bow, which is the center
top of the upper lip. Once we have that
drawn, we then want to identify the
corners of the mouth. This reference here, David
has a pretty small mouth. So once we have the
corner identified, we just want to pull this
line up and then we want to plug it directly
into the filtrum. Okay, the filtrum plugs
into the cupid's bow. Then on this far side, we just want to extend this
down to the corner. And that brings out our top lip. And then we have the
bottom of the lower lip. Then right about, here's center of each of
those two lips, we can just go nice and light and extend this line
into the corner. I'm not the biggest fan
of running lines all the way to the corner to separate the upper
and the lower lip, because a lot of times
it looks very cartoon, not nearly as
realistic as it could. If you just let it fade off into nothing as it
approaches the corner, that line quality gets thinner. Then right here we've
got a little shadow. So I just want to bring
this down, pull this over. Then extend this line
up on the far side. That's pretty much
it for the lips. Now that we have the lips drawn, what we're going to do
is we want to refer to our SRO head model here and we're going to
place the SRO planes. Now what the SRO planes are, is they are essentially framing the underlying
form of the face. Just like this,
this line comes off the corner of the mouth and
then it goes up to the nose. And then this line
runs vertical, and I'm doing very
nice light strikes with my paper to
extend this line. Then we have this line
here that goes to the eye, something
just like that. Then this line continues
to extend this way. Then right about here
is where it goes vertical again towards
the subject's temple. Then this line continues
to extend all the way back to roughly where the
top of the ear resides. Now I'm not going to extend
this line all the way simply because David's
hair is in the way. But then you have
this line right here, which from that last intersection
of lines comes down. And we're going to
run it all the way down to the jaw bone
just like this. Then I want to beef up exactly where the edge of
his jaw bone is. This is a little tricky simply because when you look
at the reference photo, he does have a very
smooth jaw, Very smooth. Then here, we're just
going to pull this down. Something just like that.
Because there is a plane here. And when you refer to
the aro head model, you can clearly
see what plane it is that we are
trying to bring out. Okay? Just like this. Remember this method that I'm teaching you is
extremely formulaic. Just follow the formula ABC
123.9 times out of ten, you'll come out with a
pretty cool looking drawing. Then here on the lips, we're
going to split the upper lip into two planes and then the bottom lip into three planes. Then we're just going to place these Asura planes on the
far side of the face. All right, that's looking good. Let's move on to
the next lesson.
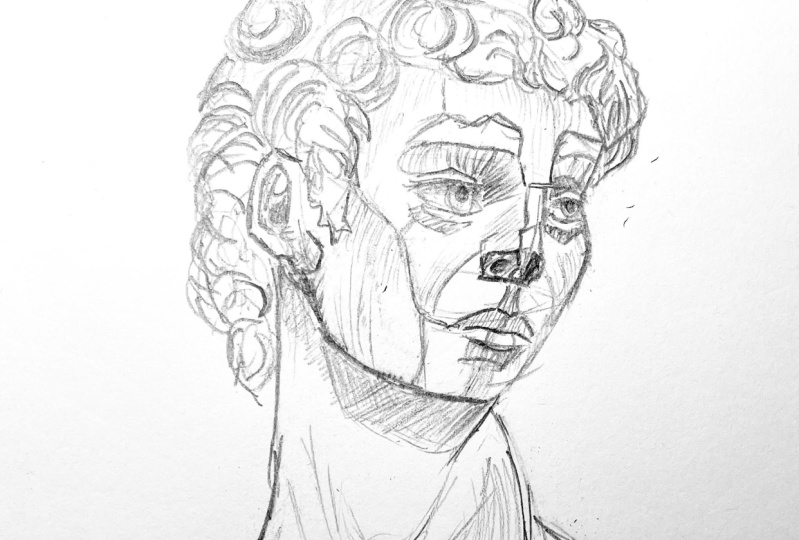
7. Draw the Hair Segments & Flow: All right, so I remember when
I mentioned that we were going to go back through the hair and get
it all dressed up. That's exactly what this
lesson is all about. When looking at the hair, what we want to identify are the main sections
or what are also referred to as segments of hair. It's pretty much the
same thing in principle, but notice how when
we're looking at this side of the face, we can clearly see how that hair is all clumped
together, right? It has specific parts of the overall mass that
are identifiable. And when we are drawing, we want to go in and we
want to start to bring out that underlying
flow of the hair. Now I'm going through fairly quickly and just
sketching these in. What I would recommend is if the speed of this class is too fast, just
go ahead and pause. Pause it as we're going through. Make it yours, right. There's no reason why you
should be getting overwhelmed. Just catch up to where I'm at. Then press play. And
then when you need to pause it again, absolutely. Go ahead and do
that. But what I'm doing is I'm going
through and I'm just very lightly identifying and bringing
out exactly how the hair sits on itself and the different directions
that it is flowing. Now, these lines should be
of a very thin line quality, they should have a very
light weight about them. Then once you get to about
this step where you are satisfied with the overall flow and dimension of the hair, then we're going to go in
and we're going to use a heavier pressure control
and we're going to start bringing out some
dimension to this hair. Okay, just like this, this is where you really go
in and you start to bring out the variation in
those line qualities are certain lines
you're going to keep, you're going to keep
them extremely thin, but other qualities you
want to thicken up. You want to saturate
those lines and give them a nice heavy line weight. But you also want to be
very careful that you only do this in
specific areas of the hair because there is
such a thing as having too many lines of one specific weight
throughout a drawing. It can make the
drawing look one and flat as a result. Just
be aware of that. But notice how as we're going through and we're thickening
up some of these lines, the character in that hair
is starting to be showcased. It's really starting
to come out and you're starting to see it
in its true form. Yeah, something just like that. Let's go ahead and move
on to the next lesson.
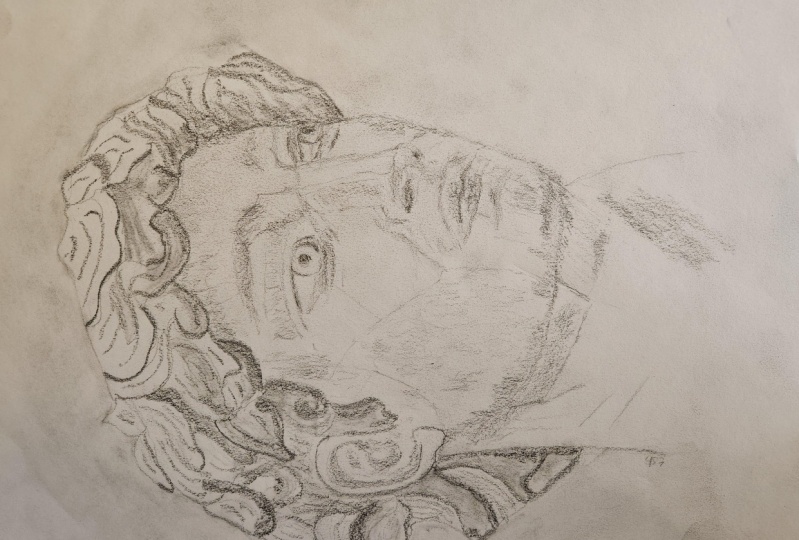
8. Initial Hatching & Value Building : All right, now that we have
that hair finished up, what we want to do is we want
to start hatching, okay? I'm going to start here
on that far islid, then here on this plane,
I'm going to hatch as well. Now, it is important to understand as you are
following along and we are hatching these
planes that you pay close attention to the
direction that I am pulling. I am, I am not cross hatching, not yet. Just like this. When you hatch what you do, you begin to bring out
dimension to the planes face. Now the structure that
we received from placing these sorrow lines helps
us and is very much tied in to this phase of the drawing right here along the bottom
of the nose plane. We can stay true to the
underlying flow of the face. Which in turn will help give us the form
that we're looking for and make our drawing look
that much more realistic. But if this is your
first time hatching, just go ahead and follow
the flow that I am doing. If you want for your
projects, for the class, you can also go in and you can blend your hatch marks
on your drawing too. I'd love to see what some of you guys come up
with in that regard. But for the sake of the class, I'm just going to be hatching, I'm not going to
be blending these, but I really want you guys to see that it doesn't
take a whole lot for you to begin to bring out the structure
of David's face. Essentially, that's
all I'm doing. I'm using mid to
long hatch marks for certain parts of the face, like the jaw and the cheeks, But for other parts,
especially around the eyes, I'm just doing
shorter hatch marks. Okay. But this is the perfect
opportunity in your drawing to really focus on exactly where those
lower values do live. One of the things
that's cool about hatching is the harder you press and the closer you bring
your hatchmarks together, the lower of a value that
you will be able to convey, not to mention,
say for the nose. Here you can clearly see the nose ridge plane in
reference number one, the picture, David himself, you can see how the
lighting actually showcases the ridge plane according to the SSRro
method, which is cool. Like these hatch marks
here I don't really like, so I'm just going
to erase those. That's the thing. Guys don't be afraid to erase and make
adjustments if you need to. Like how we've
been going through the whole process of drawing. David, I want you to practice
your pressure control. How you'll know what type
of pressure control you should be drawing with is when you are the most uncertain. That is, when you use the
lightest pressure control, When you're certain
that is where you use the heaviest
pressure control. If you abide by those,
you'll be great. Let's move on to
the next lesson. We're going to continue to hatch and detail out this portrait.
9. Final Hatching & Detail Work: All right, final lesson. Along the bottom
of the chin here, I'm just going to
continue to hatch this. I'm just going to
pull these this way. I'm just nice and light. Then here I'm going to pull
this one this way too. Bear in mind when you're
hatching like this. Look at reference
number one. Okay? Look at the underlying flow
that the photo gives you. Just pull your hatch marks in that same general direction. Now that direction is going to change depending on exactly where you are in
drawing the portrait. But that is what the Saro frame
lines are for. All right. Busted out into those
individual planes so that you can use those as your generic guide for exactly where you want to place
your hatch marks. Okay. I'd like to see you right here.
Right along the cheek. I'm pulling these down in this general direction
because when I look at the reference, that is the direction of the underlying form that
I am trying to follow. Hatching like this was really coined during
the high Renaissance, I'm sure it existed before that. But as far as some of the
initial publications on it, and really classifying
it as a method of the visual arts as far
as drawing is concerned, that is the beginning. But it's a fascinating study because all you do is there are some amazing hatch artists
out there and that can hatch drawings like
incredibly well. But they are all governed by
the exact same principles. And those principles are
their underlying form. Every artist follows
that principle. So just make sure
that you do too. Yeah, this is really
starting to come along. Looks a lot like David. I'm happy with that. I am very, very excited to see your
guys' projects. Okay. David is extremely iconic as far as the arts
are concerned. I think everyone should
have a sketch or two of Michael Angelo's
David, in their sketch book. Then here in the year,
I'm just going to go ahead and I'm going
to fill this in. I think I'm going to do
the exact same thing for the nose and then I'm going to do the same thing for
the eyes as well, and just really try to
make this drawing pop. That's the thing. If you
feel like you want to add more detail to
your David sketch, then by all means do that. I'd really like to see what
you guys come up with. Make sure that when you
upload your project that you also leave your
review of this class. I have a monthly newsletter that comes out
every single month. And students that
upload a project and then leave a review for
that specific class, I showcase your
drawing project to all the students
that I have here on skill share in that
monthly newsletter. If that's something
you think that you'd want to be a part
of, then absolutely. And get your name out there. I'm sure everyone would
absolutely love to see your art. Yeah, something just like this. Remember the more time
you spend on your sketch, the more detail will come out. That's it for this one.
Stay happy, stay healthy. And remember, never
stop drawing.
 Messer Creations, Artist | Author | YouTuber