Transcripts
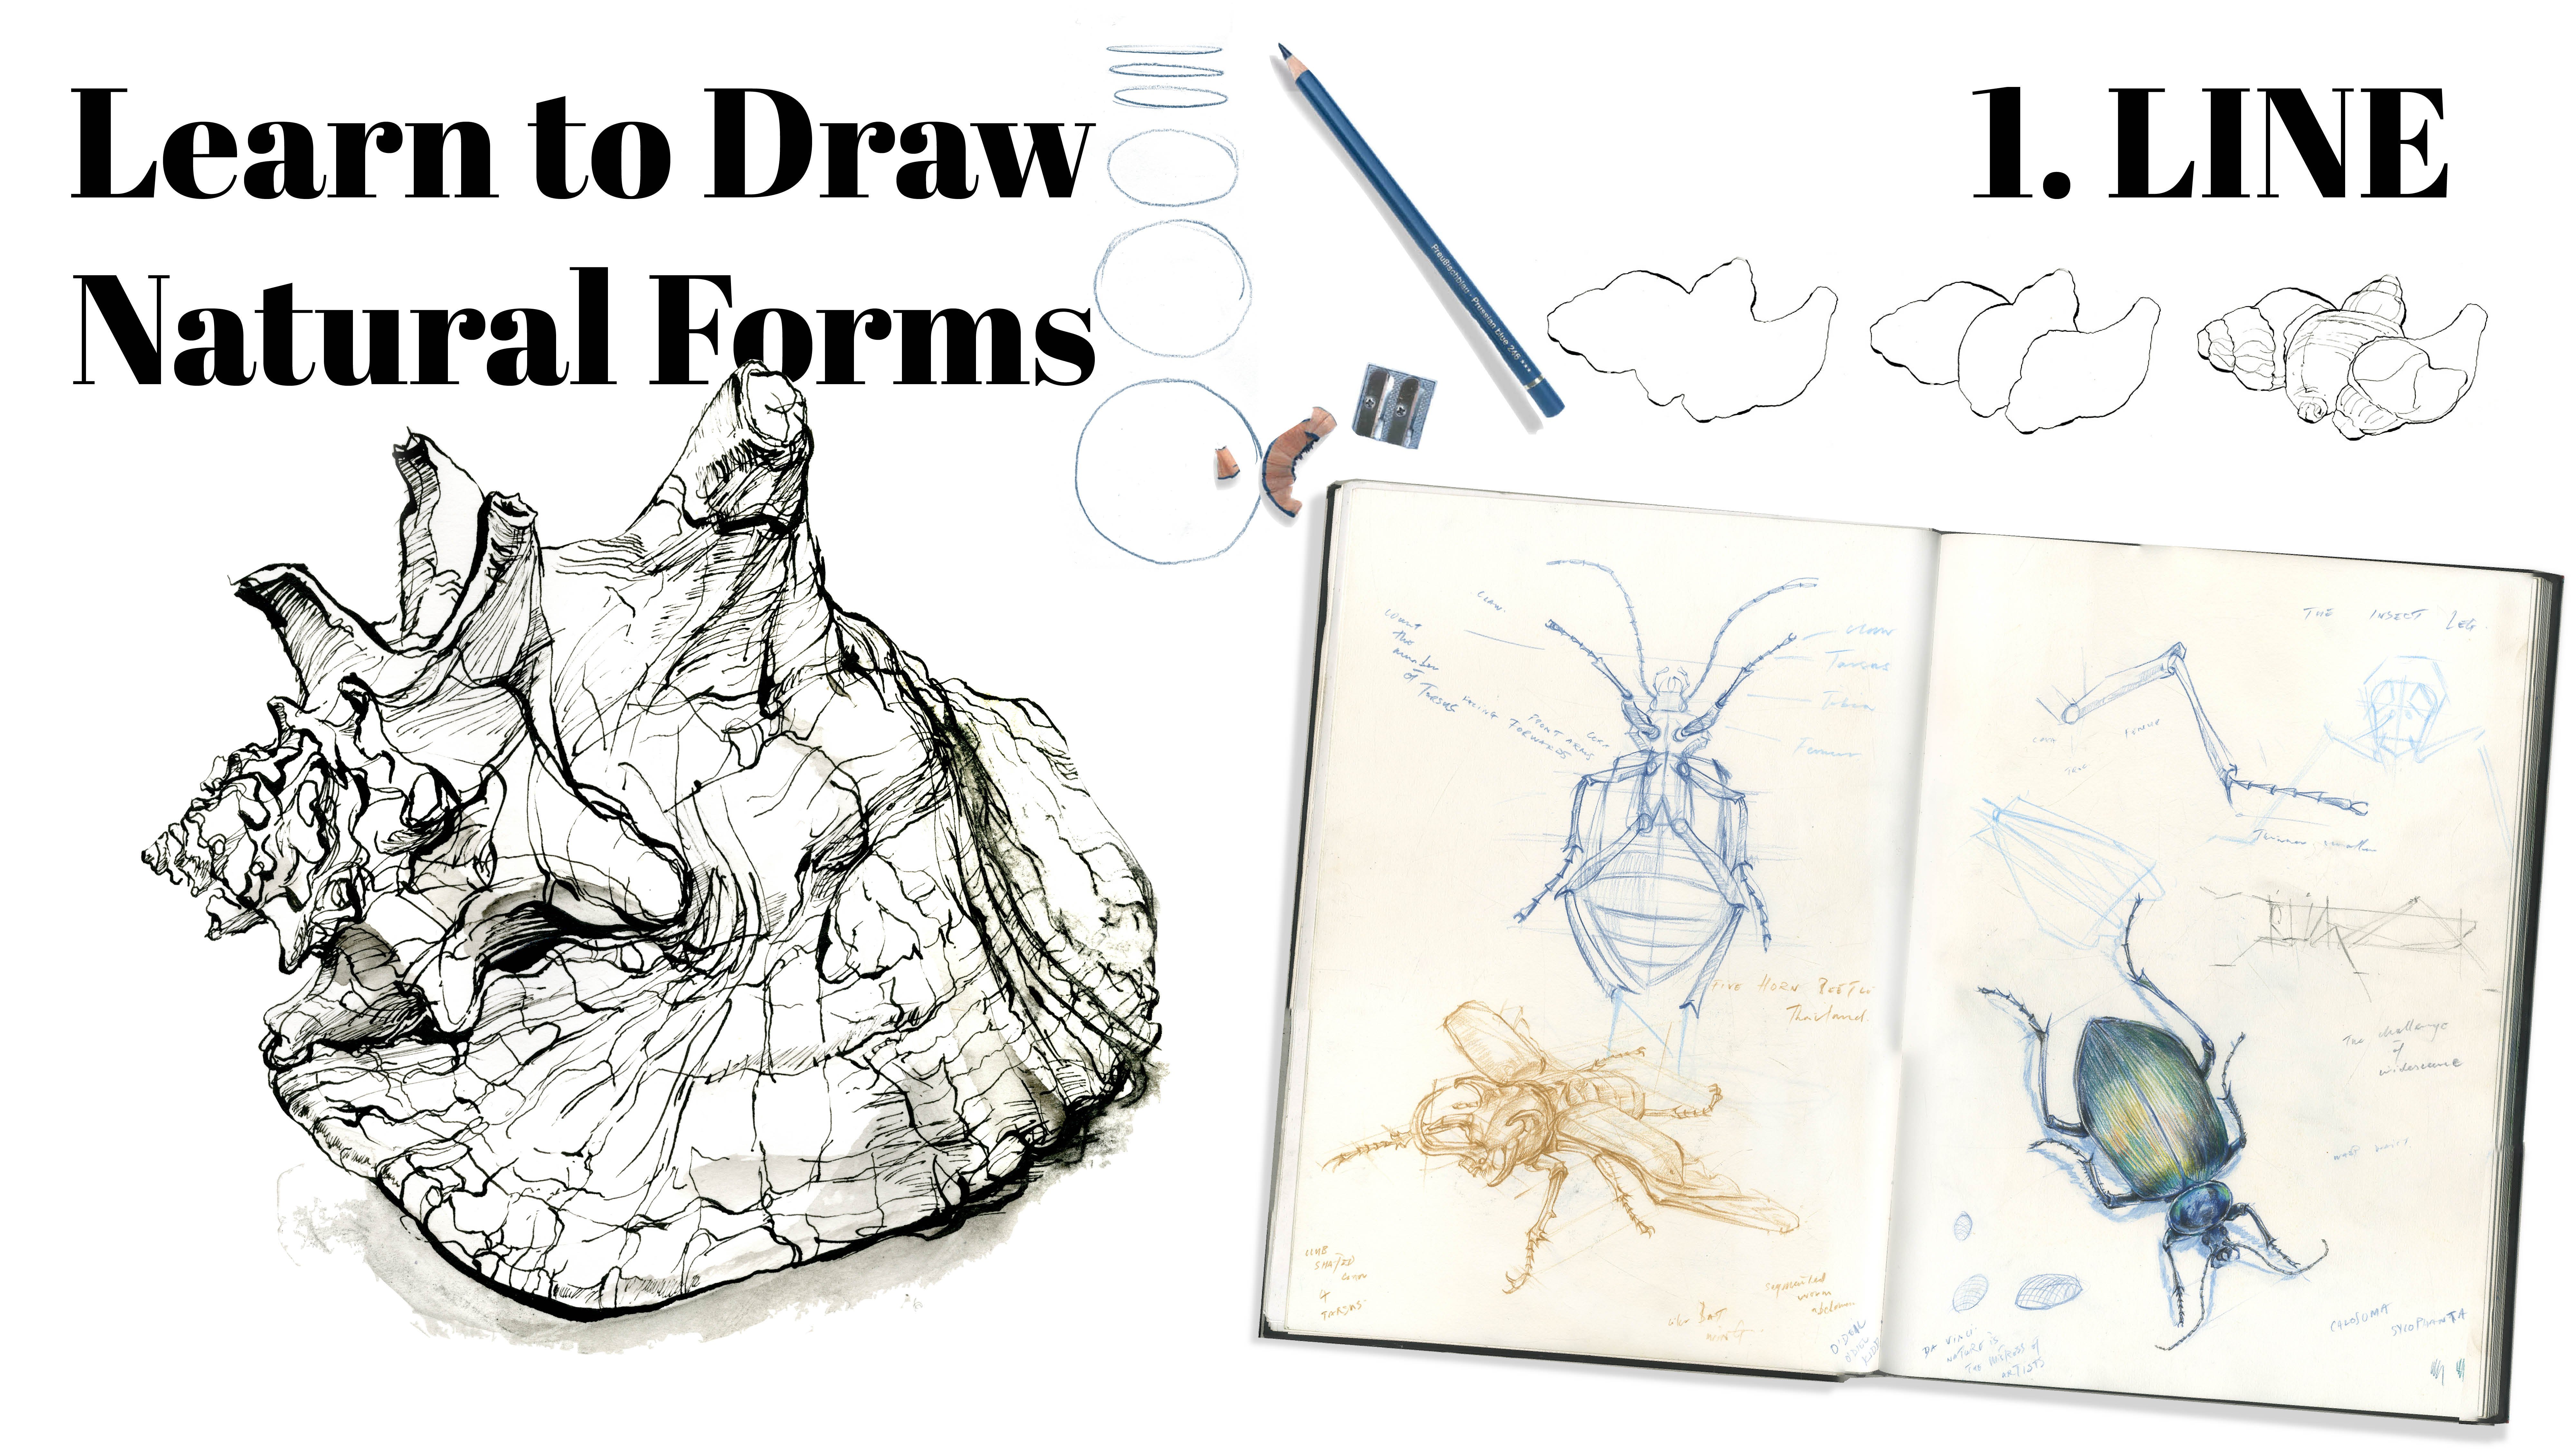
1. Shape: Trailer and Course Projects: Hi guys, and welcome
to the World of Shape. This is an engaging course that aims to transform
the way that you perceive And capture
the diverse range of shapes in the
world around us, from the very hard to
the soft and smooth. Join me on this
creative journey where you're sharpen your
observational drawing skills. Let's dive into those
class projects. The class projects are
designed to elevate your skills in perceiving
and capturing shapes, whether it's the spines of a cactus or the
vapors of a cloud. This course is supported
with a wealth of handouts providing comprehensive guidance
on each of the projects. I've put together a 31
page booklet loaded with vital resources and a detailed
guide on reindeer anatomy. After creating your sketches, please scan them or photograph them and post
them in the gallery, where you'll receive
valuable feedback that can help keep you on track. On each of the handouts, you'll discover an
activity box that you can mark to confirm that you've
completed all the tasks, allowing you to
track your progress and ensure you know
exactly what to do. Each project has been designed
to be easily approachable. They encourage independent
and imaginative thinking. Try to personalize
the project and reflect on your own
unique perspective. There's no need to replicate
exactly what I'm doing. Simply follow the step by step approach outlined
in the handouts. And you can adapt the
medium or subject matter to suit your
creative preferences or whatever you have available. Let's jump into assignment one. Assignment one is a comparative
measured drawing of a dinosaur or an ex skeleton. Extent means living where
you will learn to create a measuring rack
to ensure that you can get the entirety
of the skeleton, including the tip of
the tail and the toes. You're going to
learn to squint to create clarity of the blocks of tone in front of your eyes. You're going to align vertically and horizontally,
anatomical relationships. And create a drawing that
showcases your understanding of proportions by using a
comparative unit of measurement, such as the length of a head. Assignment two is all about capturing the
character of form. We're going to create
a negative and positive shape drawing
of a plant spring. We're going to
create a sight size drawing in this context which
is bursting with character. We've learned to describe the shape your plant by
using descriptive words. And then focus on the positive and
negative shapes and create either an two
or three drawing. Simply follow the step by step process from
planning and plotting, where you'll move
from an area that you understood to uncharted
territory and new shapes. You'll discover the
character of your subject, which will be revealed by focusing on the negative shapes. The final major project is
a reindeer study sheet. Join me at Riverway's farm
in the reindeer paddock, where you'll learn the
three main walking stances of animals. You'll also learn
the pivot points, how to articulate
the legs to bring a sense of movement and
dynamism to your drawings. We can learn about
how artists in the Renaissance such as
Leonardo Da Viucci and Gar mastered an understanding
of the muscles to capture a dynamic surface of the skin with grooves
and shading of these elastic mounds beneath
the layers of fat and fur. We're going to explore all
the tips and tricks I use in the field to sketch
animals from life, from breaking the body down into left and
right hand side, by sketching in the
bilateral line of symmetry, we're going to learn
different ways of starting. Understanding how to
draw the reindeer in fall short imposes by imagining
they're created from. There'll be a host
of fun activities including coloring in anatomy charts so that you can learn the placement of the
bones and the muscles. At the beginning
of each section, the learning objectives
will be listed so you can clearly see what you need to learn by the
end of the course. Without further ado,
let's make a staff.
2. Shape: Introduction: Hi guys, welcome to Shape. In this section of the course, we're going to be learning about all things to do with shapes. Shape is a fundamental
principle of drawing. It portrays a wide range of different subjects in
any shape and size. Shapes are the
foundations of form. They are the building
blocks of any drawing. They're generally created in the formative part of the
drawing at the beginning. It can also be the main
focus abstract piece of work be helped here
my plant, Twiggy. Twiggy was in the bathroom and wasn't doing
very well at all. We brought Twiggy
into college and the students fed Twiggy
the old paint, hot water. And she's absolutely
thrived and loved it here. Thank you to Twiggy. All shapes are two dimensional
and have a length, and the width bordered
by an outline. In its most basic form, shape is commonly thought
to have a closed contour, like a trapped negative
shape or gaps through here. However, I also feel
that shapes can be open, such as the sky line
against the horizon. Shapes can be created in a drawing by delineating
the boundary of the form. Or it can also be a
change in local color. If you think about
a leopard spot, you might draw a line around
the edge of the spots. Or even that of a Friesian
cow might also be shapes. All shapes are
essentially abstract, which when combined, create the illusion of
something at its heart. Drawing is really very
much an abstract process. And putting abstract
things together, again, working from first hand, you're going to get a
better understanding of the shape necessarily
working from a photograph. But again, in these exercises, I will put the photograph files in to support your studying. If we're drawing something
you can't get to firsthand, shapes will contribute to the overall personality
of your subject. If we think about
the spinly legs of a heron compared to the mighty pillars of
an elephant's leg. It can take time to tune
into your subjects shapes. After several warm up sketches, you'll begin to feel that
you know your subject much closer and the
shapes that they've got. It can be like a bird's beak
or the shape of its head, or the length of its neck
and things like that. White space is also
known as negative space, The empty space that
will give your eye some areas to relax whilst
taking away from the detail. It's a place to breathe,
a place to rest. We always need to not
over fill our drawings, allow your composition
to breathe. Negative shapes are
always there to help us identify the character
of the positive shapes. All shapes are loosely
classified into those that are geometric and
those which are organic. The geometric shapes have
been with us since childhood. They include shapes
such as the circle, the triangle, squares,
and polygons. And polygons are hexagons and those ones that the
bees love so much. Often, manmade forms
are geometric, such as the components of a car. Although a lot of organic forms are also highly geometric. From the petals of a daisy, we can think of a snowflake
or an or apple or orange, revealing the
mathematics that are behind all of nature's designs. Geometric shapes are typically characterized by
straight lines, angles, and come in many different
permutations, Set of course, the circle and a lit
shapes which have no straight lines
or points at all. On the other hand, irregular shapes or the ones that we
consider to be organic, are characterized
by free flowing, sometimes apparently
orderless forms. We can think of
shapes of ripples in the water, twisted
gnarled roots, organic shapes of big
cumulus nimbus clouds in the sky that can
grow and flow and move. Organic shapes are frequently
rounded and even uneven. They can appear erratic. You can enjoy looking
at organic forms and pulling out those imperfections as important as
their perfections. Of course, with organic forms, they don't always
repeat exactly. If I had a host of
different pebbles out here, which we might do later, we can look at all
the different variety of shapes within them. Nature shapes are more
abundant than the imagination. Sometimes stunningly
intricate and geometrical. From starfish, six sided
honeycomb cells, snowflakes, segmented fruits, shell spirals to spiders webs and tree rings. Other times, the shapes
are much more random. From meandering rivers to
the tributches in the sand, the rosettes and
jaguar, the multi, various forms of
coral or in shapes. I just thought I'd talk
about this drawing here. I did this one in Richmond Park, it's an oak tree in
dip pen and ink. I began this drawing by identifying a focal
point of interest, a window through the
leaves to the blue sky. I started with a single
sky window and looked carefully at its negative
shape, somewhere around here. I think drawing this style, the composition arrangement can conceived as a
collection of shapes, or I began to create the first
shape in the right space, which would dictate the whole composition to plan
that carefully. Then once you've created
initial negative shape, you can move from the
negative and positive shapes. A bit like putting a
jigsaw puzzle together. As it grows, you
finish the drawing completely in that area and
it's just going to grow out. I didn't attempt to draw
every individual leaf, which didn't seem impossible. Instead, I looked for
the cluster of leaves and looked for the shapes
of the irregular clumps. Some clumps were in
front of the others. A single line
overlapping the clump behind created the illusion of one clump being in
front of the other. Like a stained glass window I made the lines
describe the divisions. The trunk is th with a bolder line for the busy leaves, which
are a lot lighter. I tried to create
a lighter line, so that was sympathetic with the leaf mark compared with the trunk mark,
if that makes sense. Okay. I mean, that sketch there, if you wanted to
enliven it a bit more, we could just simply add a
splash of water color on top. Okay, so without further ado, let's get going with shapes.
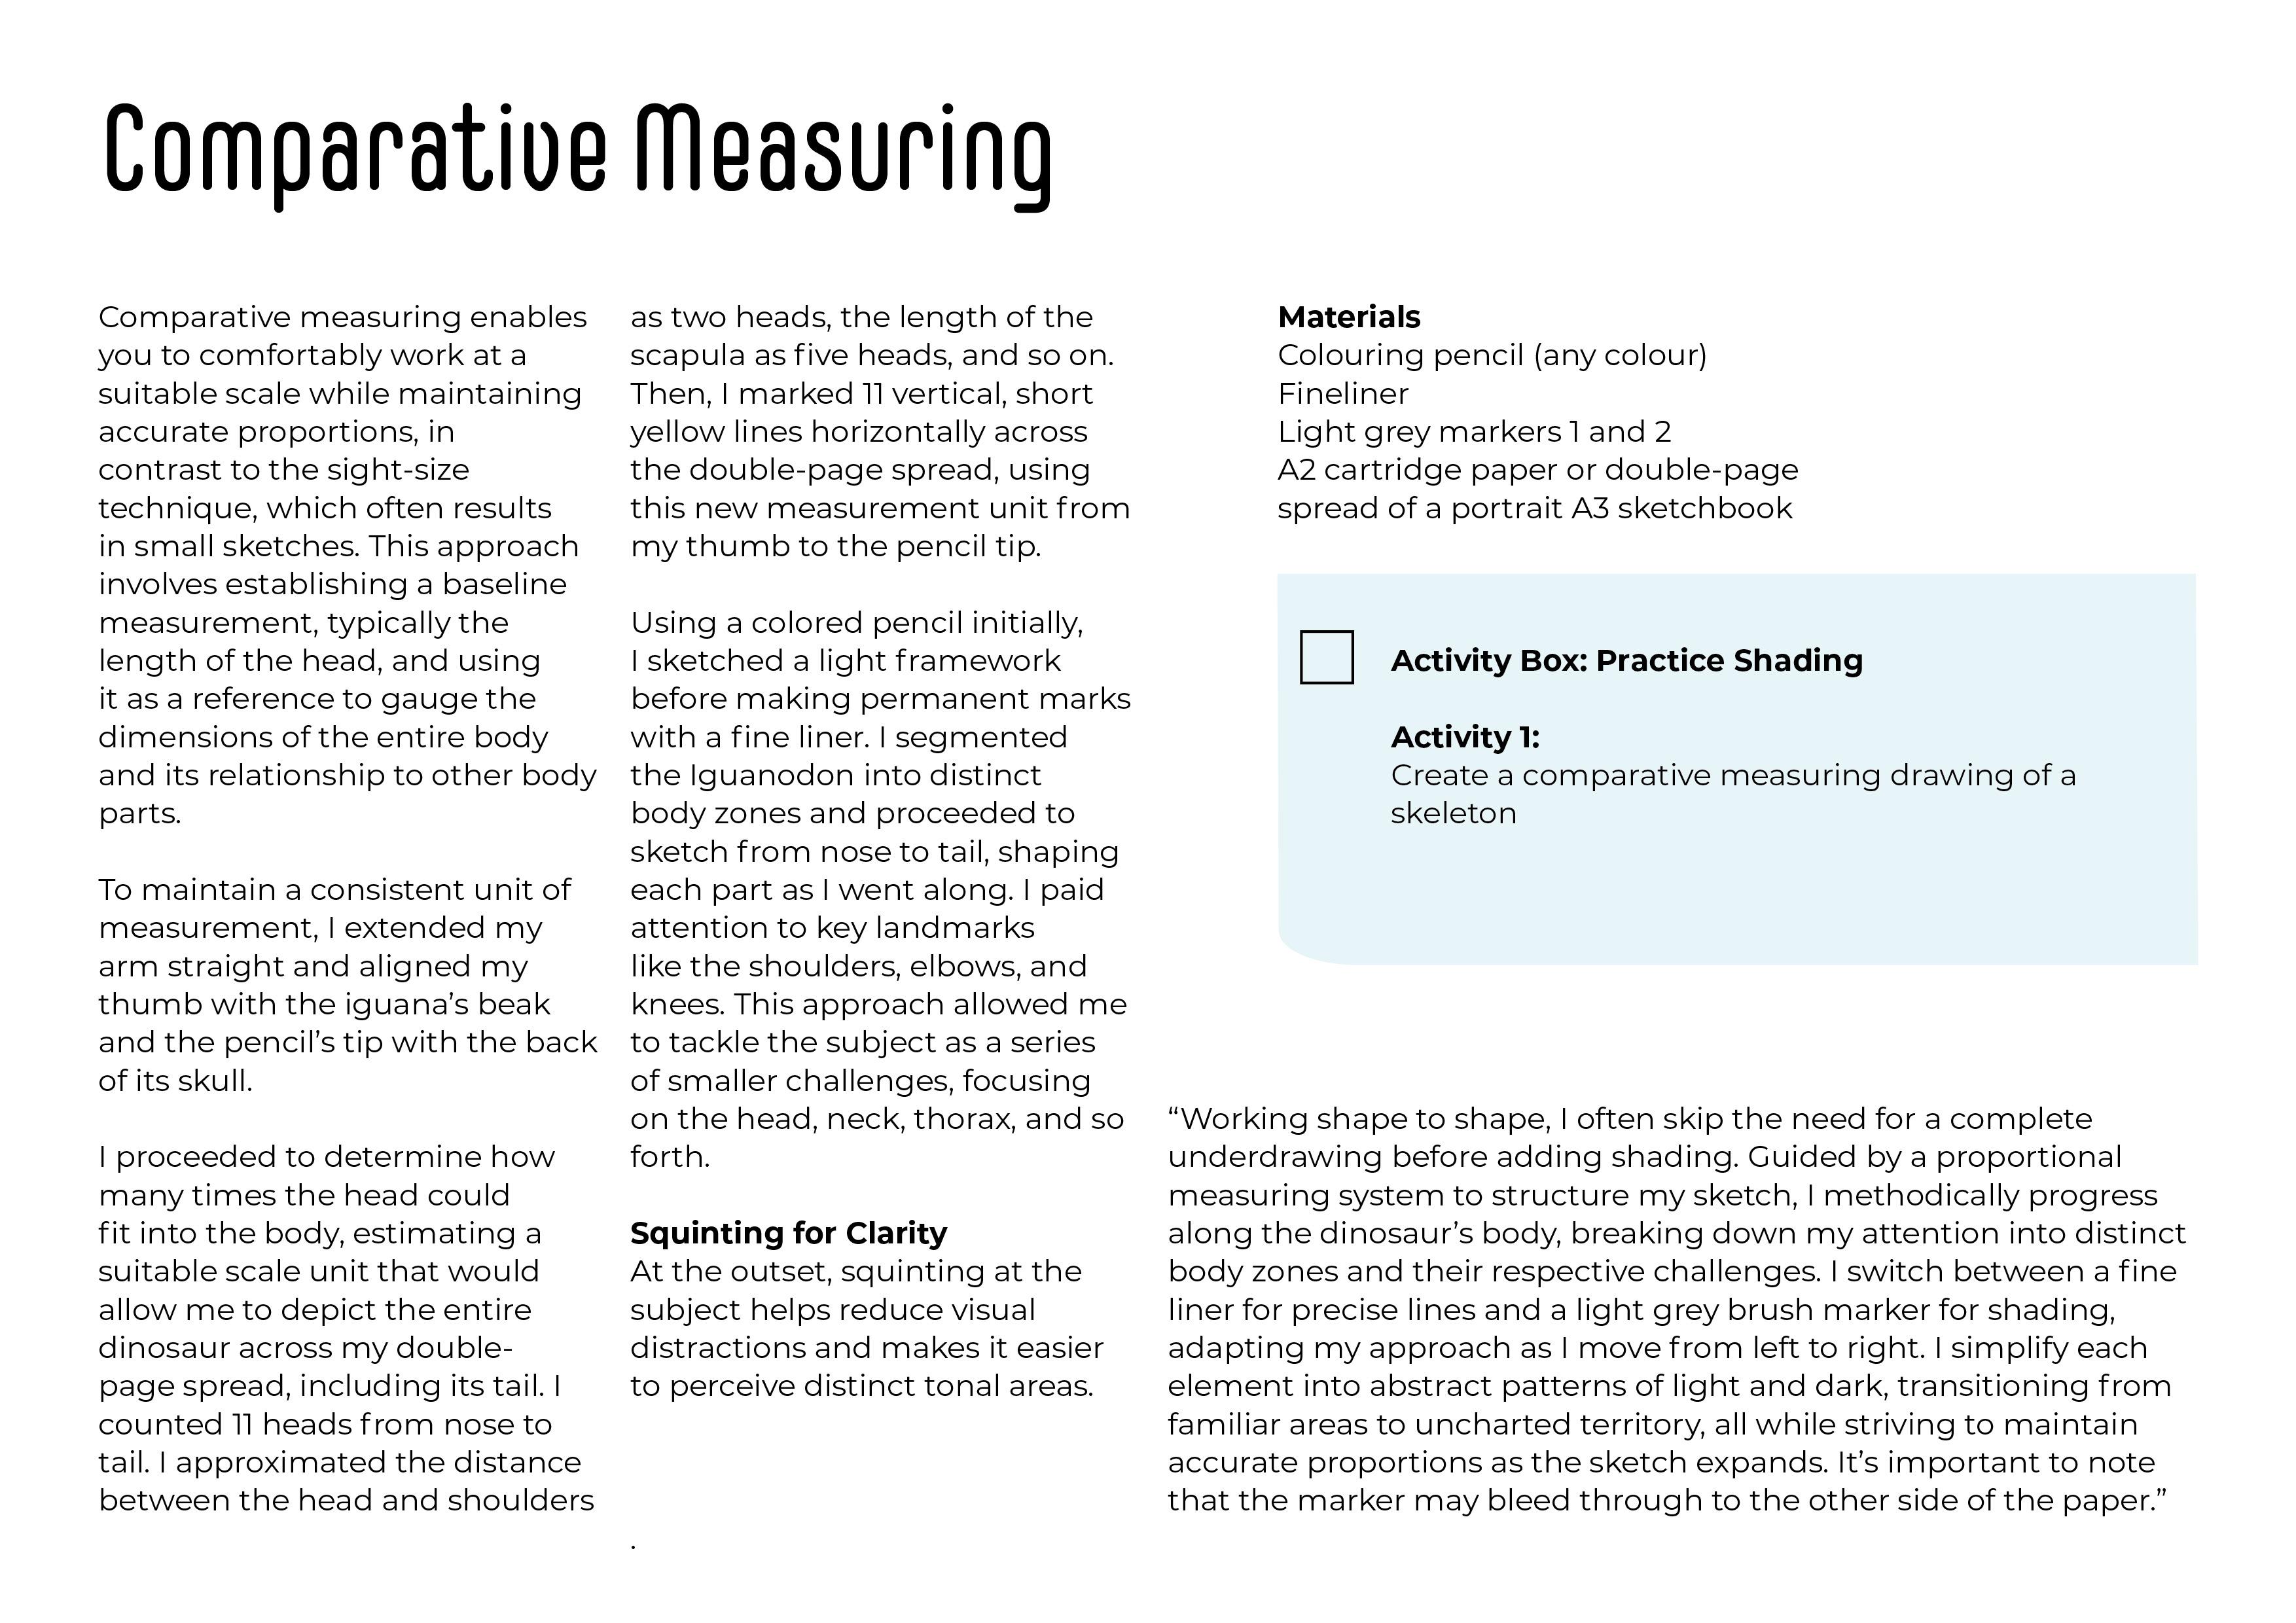
3. Comparative Measuring of a Dinosaur: Comparative measuring
means that you can draw at a more comfortable scale whilst maintaining
accurate proportions. Sight sized drawing sometimes results in creating
tiny sketches. Say, for example, a
life drawing class, and you're some way away
from the model and you're trying to measure the distance between the eyes and the chin. And it's literally the length of your pencil tip also might find is that when
you're sketching in museums, something like a dinosaur that a sight size drawing, if
you take the measurements, if you're sitting quite close, means you can't fit
the end of the tail, in which I find quite annoying. The answer in these
situations is to use a comparative
method of measuring. This method involves
taking one measurement, typically the length of the head or the height of the head, and then using this as a
unit to measure the size of the body and calculate its relation to the
other body parts. Materials are used
in this tutorial are a coloring pencil, a fine liner, some
light gray markers. And I created this drawing
in a double page spread. Sometimes I don't
find it necessary to complete an
entire under drawing before adding the tone
drawings can be approached in different ways with a
proportional measuring rack. Structuring my sketch,
I can navigate my way along the
dinosaurs body sectioning off my focus on
the challenge that each body zone
represents intuitively, I'm going to swap
between the fine liner, which is going to work
on the linear qualities, and then the light
gray brush markers, which I'm going to use for tone. Just because they're so quick, I'm going to work my way from left to right,
from nose to tail. Simplifying each item
into areas of abstract, light and shade before going onto an area I
haven't understood. So I go from an area I've
understood to new territory. An important note to make if you're going
to be using markers in this sketch is that they will stain the other
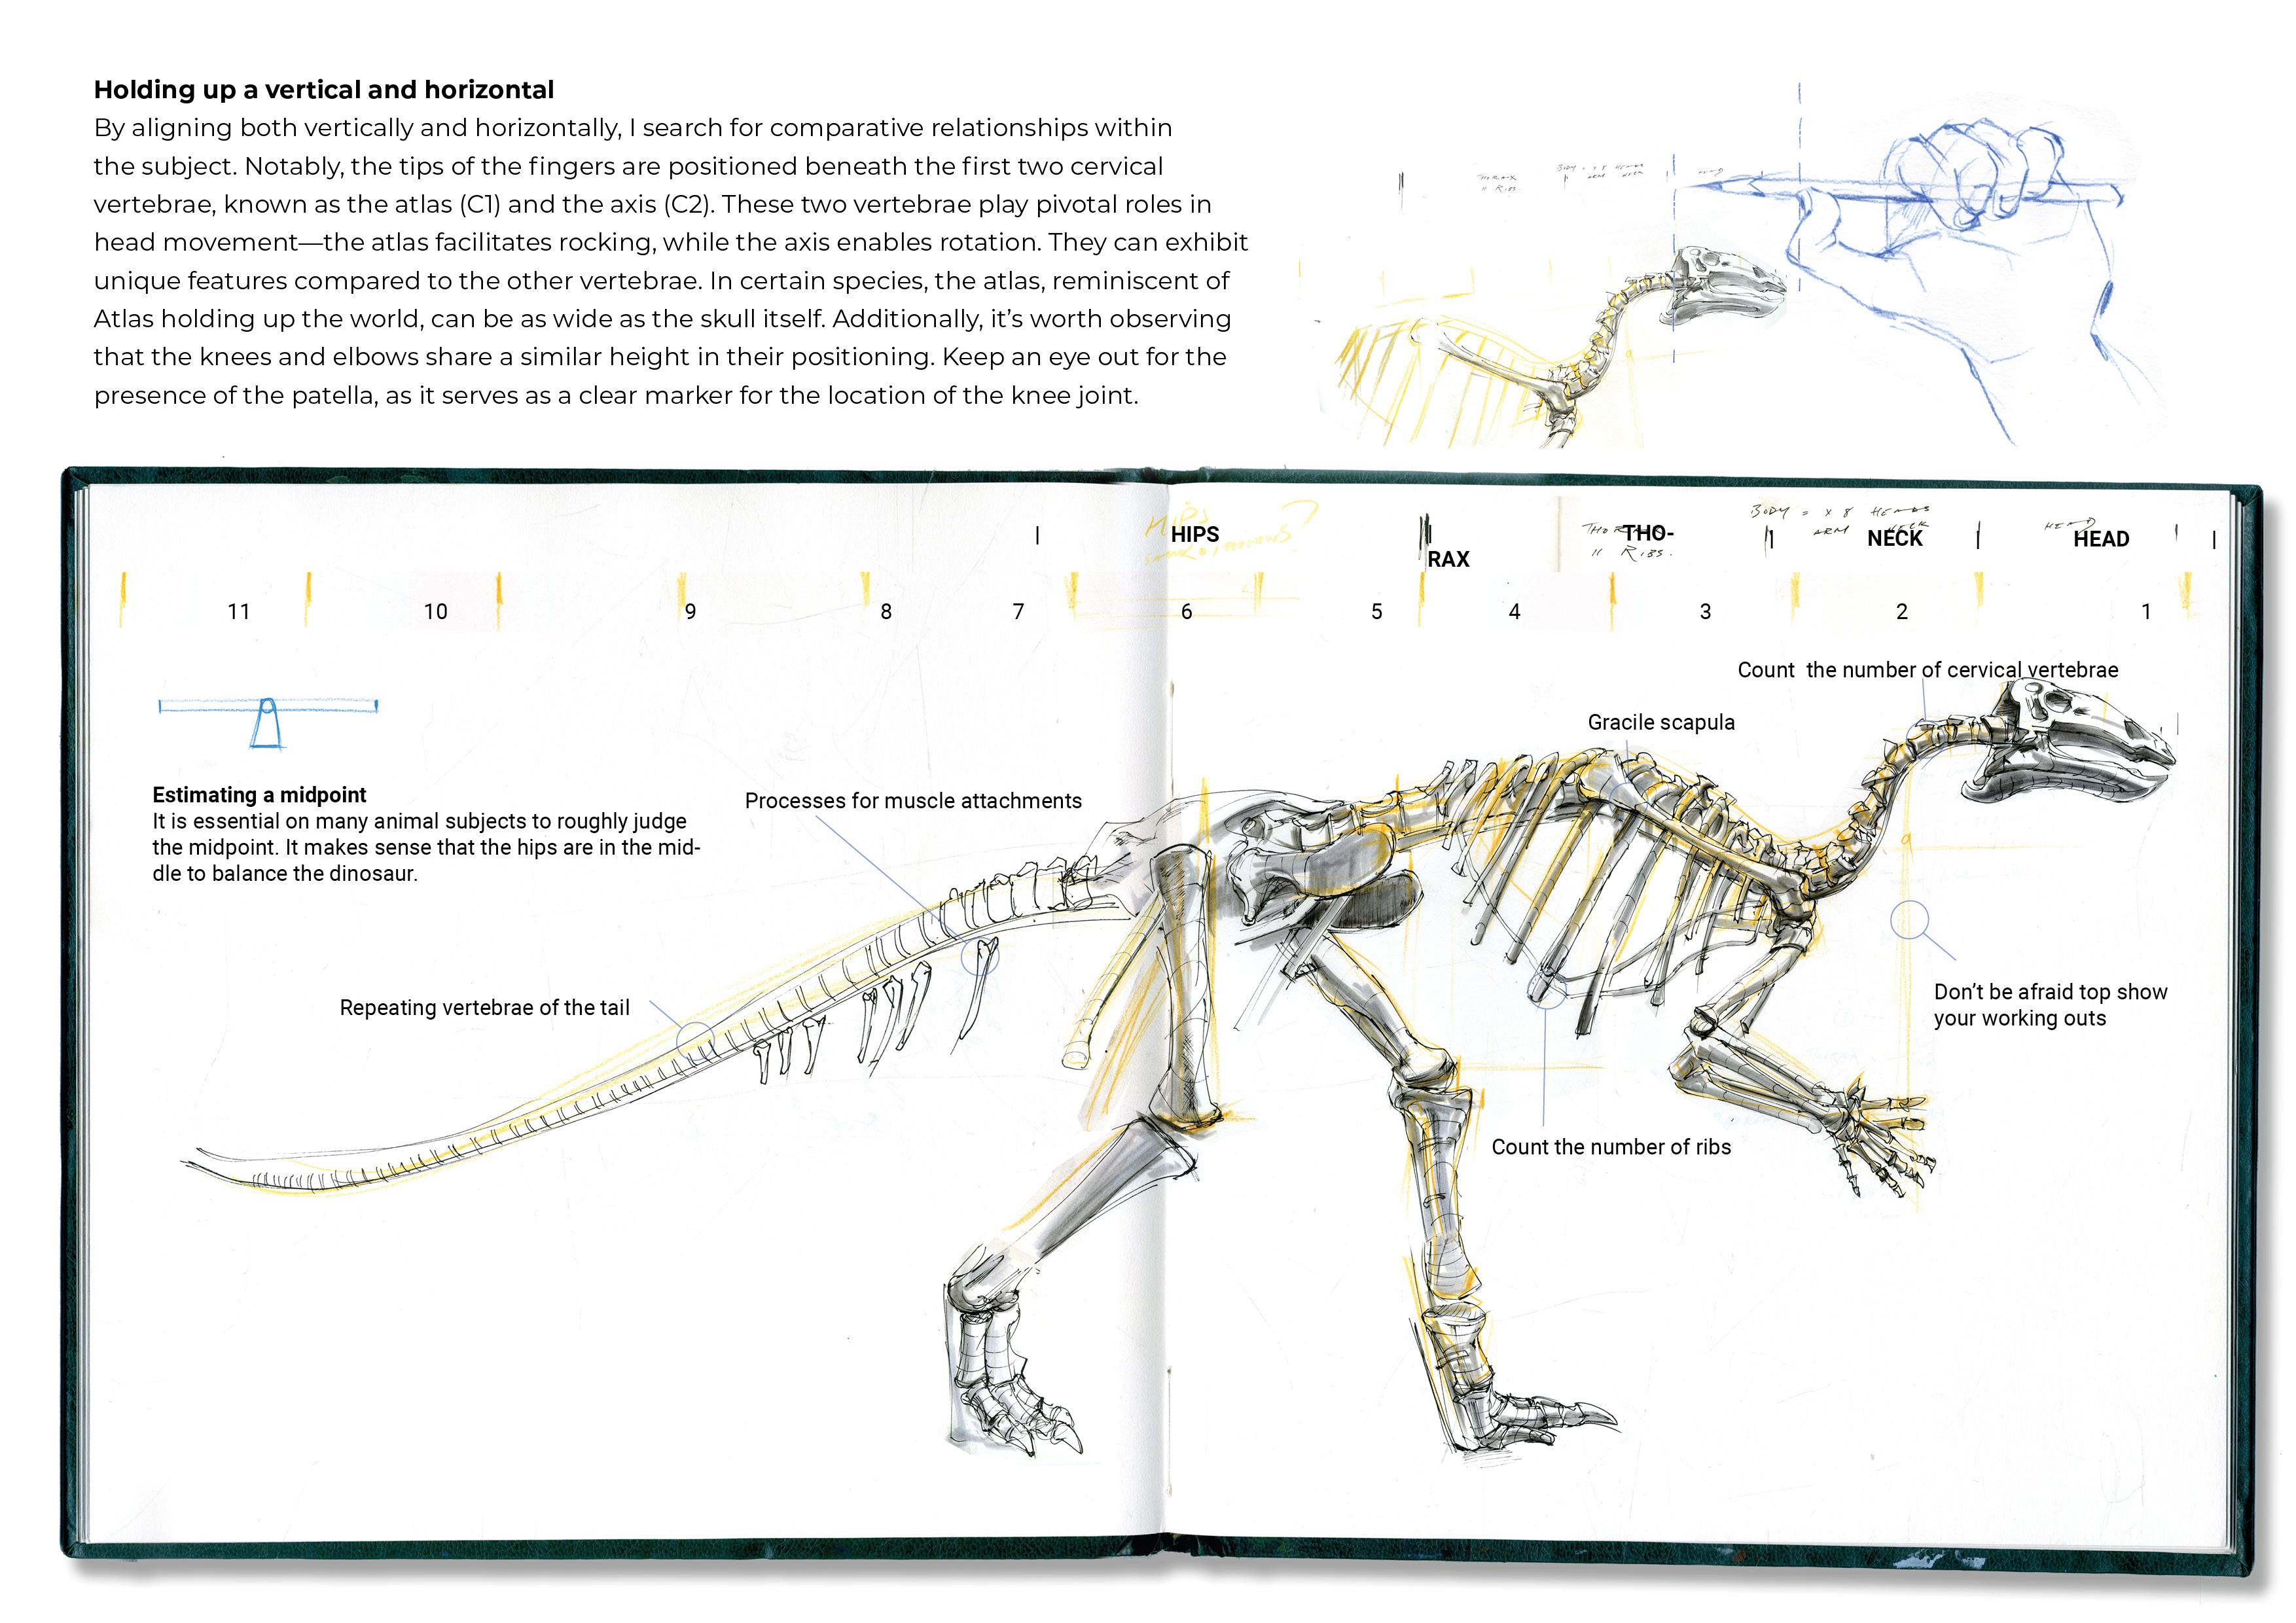
side of the paper. Initially, I held
up my arm straight to ensure a consistent
unit of measurement. I slid my thumb along the pencil till it was at the
tip of the iguanas, horny beak, which
would have been an ideal tool for tearing vegetation
from trees and bushes. The tip of the pencil was
at the back of the skull. Then I've got a unit
of measurement. I then counted the
number of times I could fit this horizontal measurement across the length of the body. Then I guessed at an appropriate
transferable head size, that would mean I could
fit in the entirety of the dinosaur across the double page spread
of the sketchbook, including the final tip
of the tail and the toes. Then I counted the distance
between the head and the shoulders to be two
heads and so forth. Next, I created 11 short lines horizontally across the
double page spread, which created a rack of proportions that I could
align my body parts to. Starting out with
the coloring pencil allowed me to sketch out a very light armature before committing to the
indelible fine liner mark. I've broken the iguana down into primary body zones and then work nose to tail
shape to shape. I'm looking at each
abstract shape and how they fit together. I'm looking out for landmarks such as shoulders,
elbows, and knees. By working my way down, I broke the subject down
into mini challenges. The mini challenge of the head, the mini challenge of the neck, the thorax, and so forth. I wasn't taking on
too much at one go. While I'm drawing, I'm always looking for comparative
relationships, both horizontally
and vertically, to see where things
are beneath each other or where they
are side to side. I noticed that the
tips of the fingers lie below the first two
cervical vertebrae. These are the Atlas C
one and the axis two. The Atlas allows for
the rocking motion of the head and the
axis, the rotation. They can look a little
different from other vertebrae. This is why I think
it's worth mentioning them because they often
have a wider shape. You can think of the Atlas as
the Atlas holding up world. In some species this can
be as wide as the skull. I also notice that the knees are a similar height to the elbows. When I think of knees, I always
look out for the patella, because where there's a
patella, there's always a knee. On many animals, I roughly judge the midpoint similar
to where our hips are. It makes sense that the
hips are in the middle. To balance the
dinosaur by measuring the distance from the head to the hips and the hips
to the end of the tail. I can get a rough idea of the seesaw effect of the
balance of the dinosaur. The Iguanodon was
a herbal of ore able to walk on all fours
and also on two legs. It had a large thumb spike
at the end of its hand, possibly to ward off predators. And the structures
of the muscles inside the head indicates
it had a very long tongue. Inguanodons lived in
the Early Cretaceous, 140 to 110 million years ago, and incredibly weighed
up to about five tons.
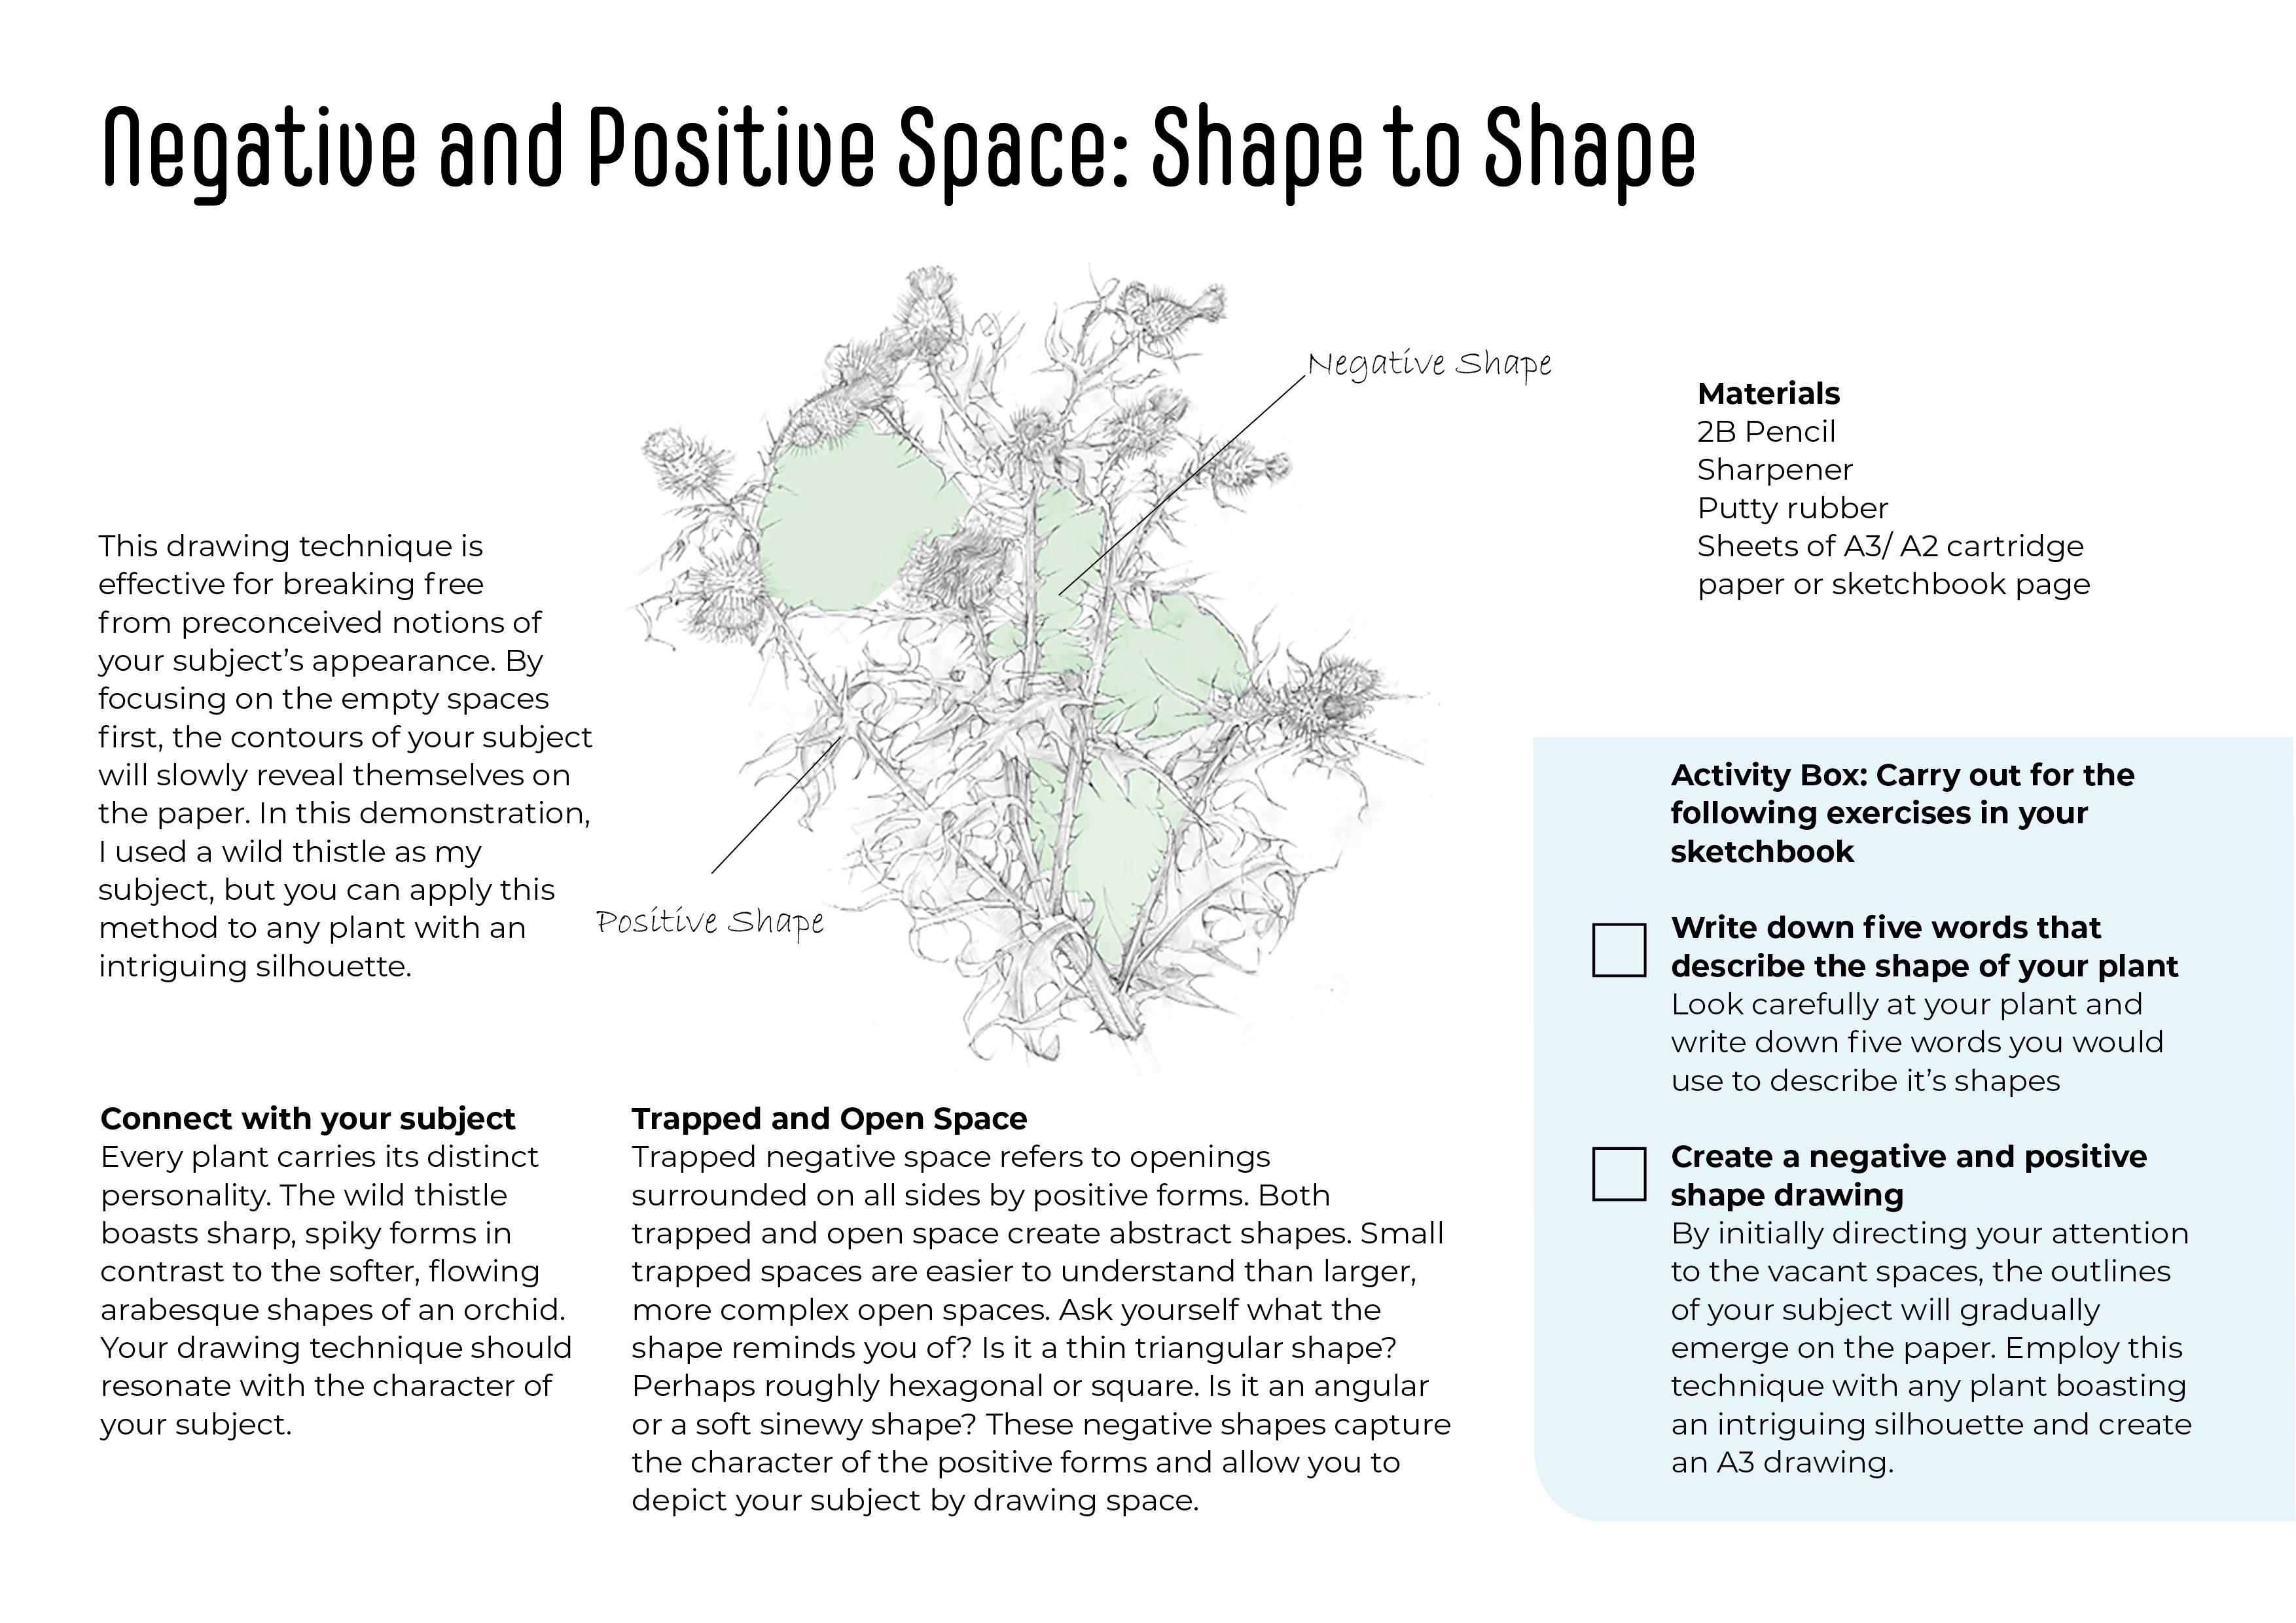
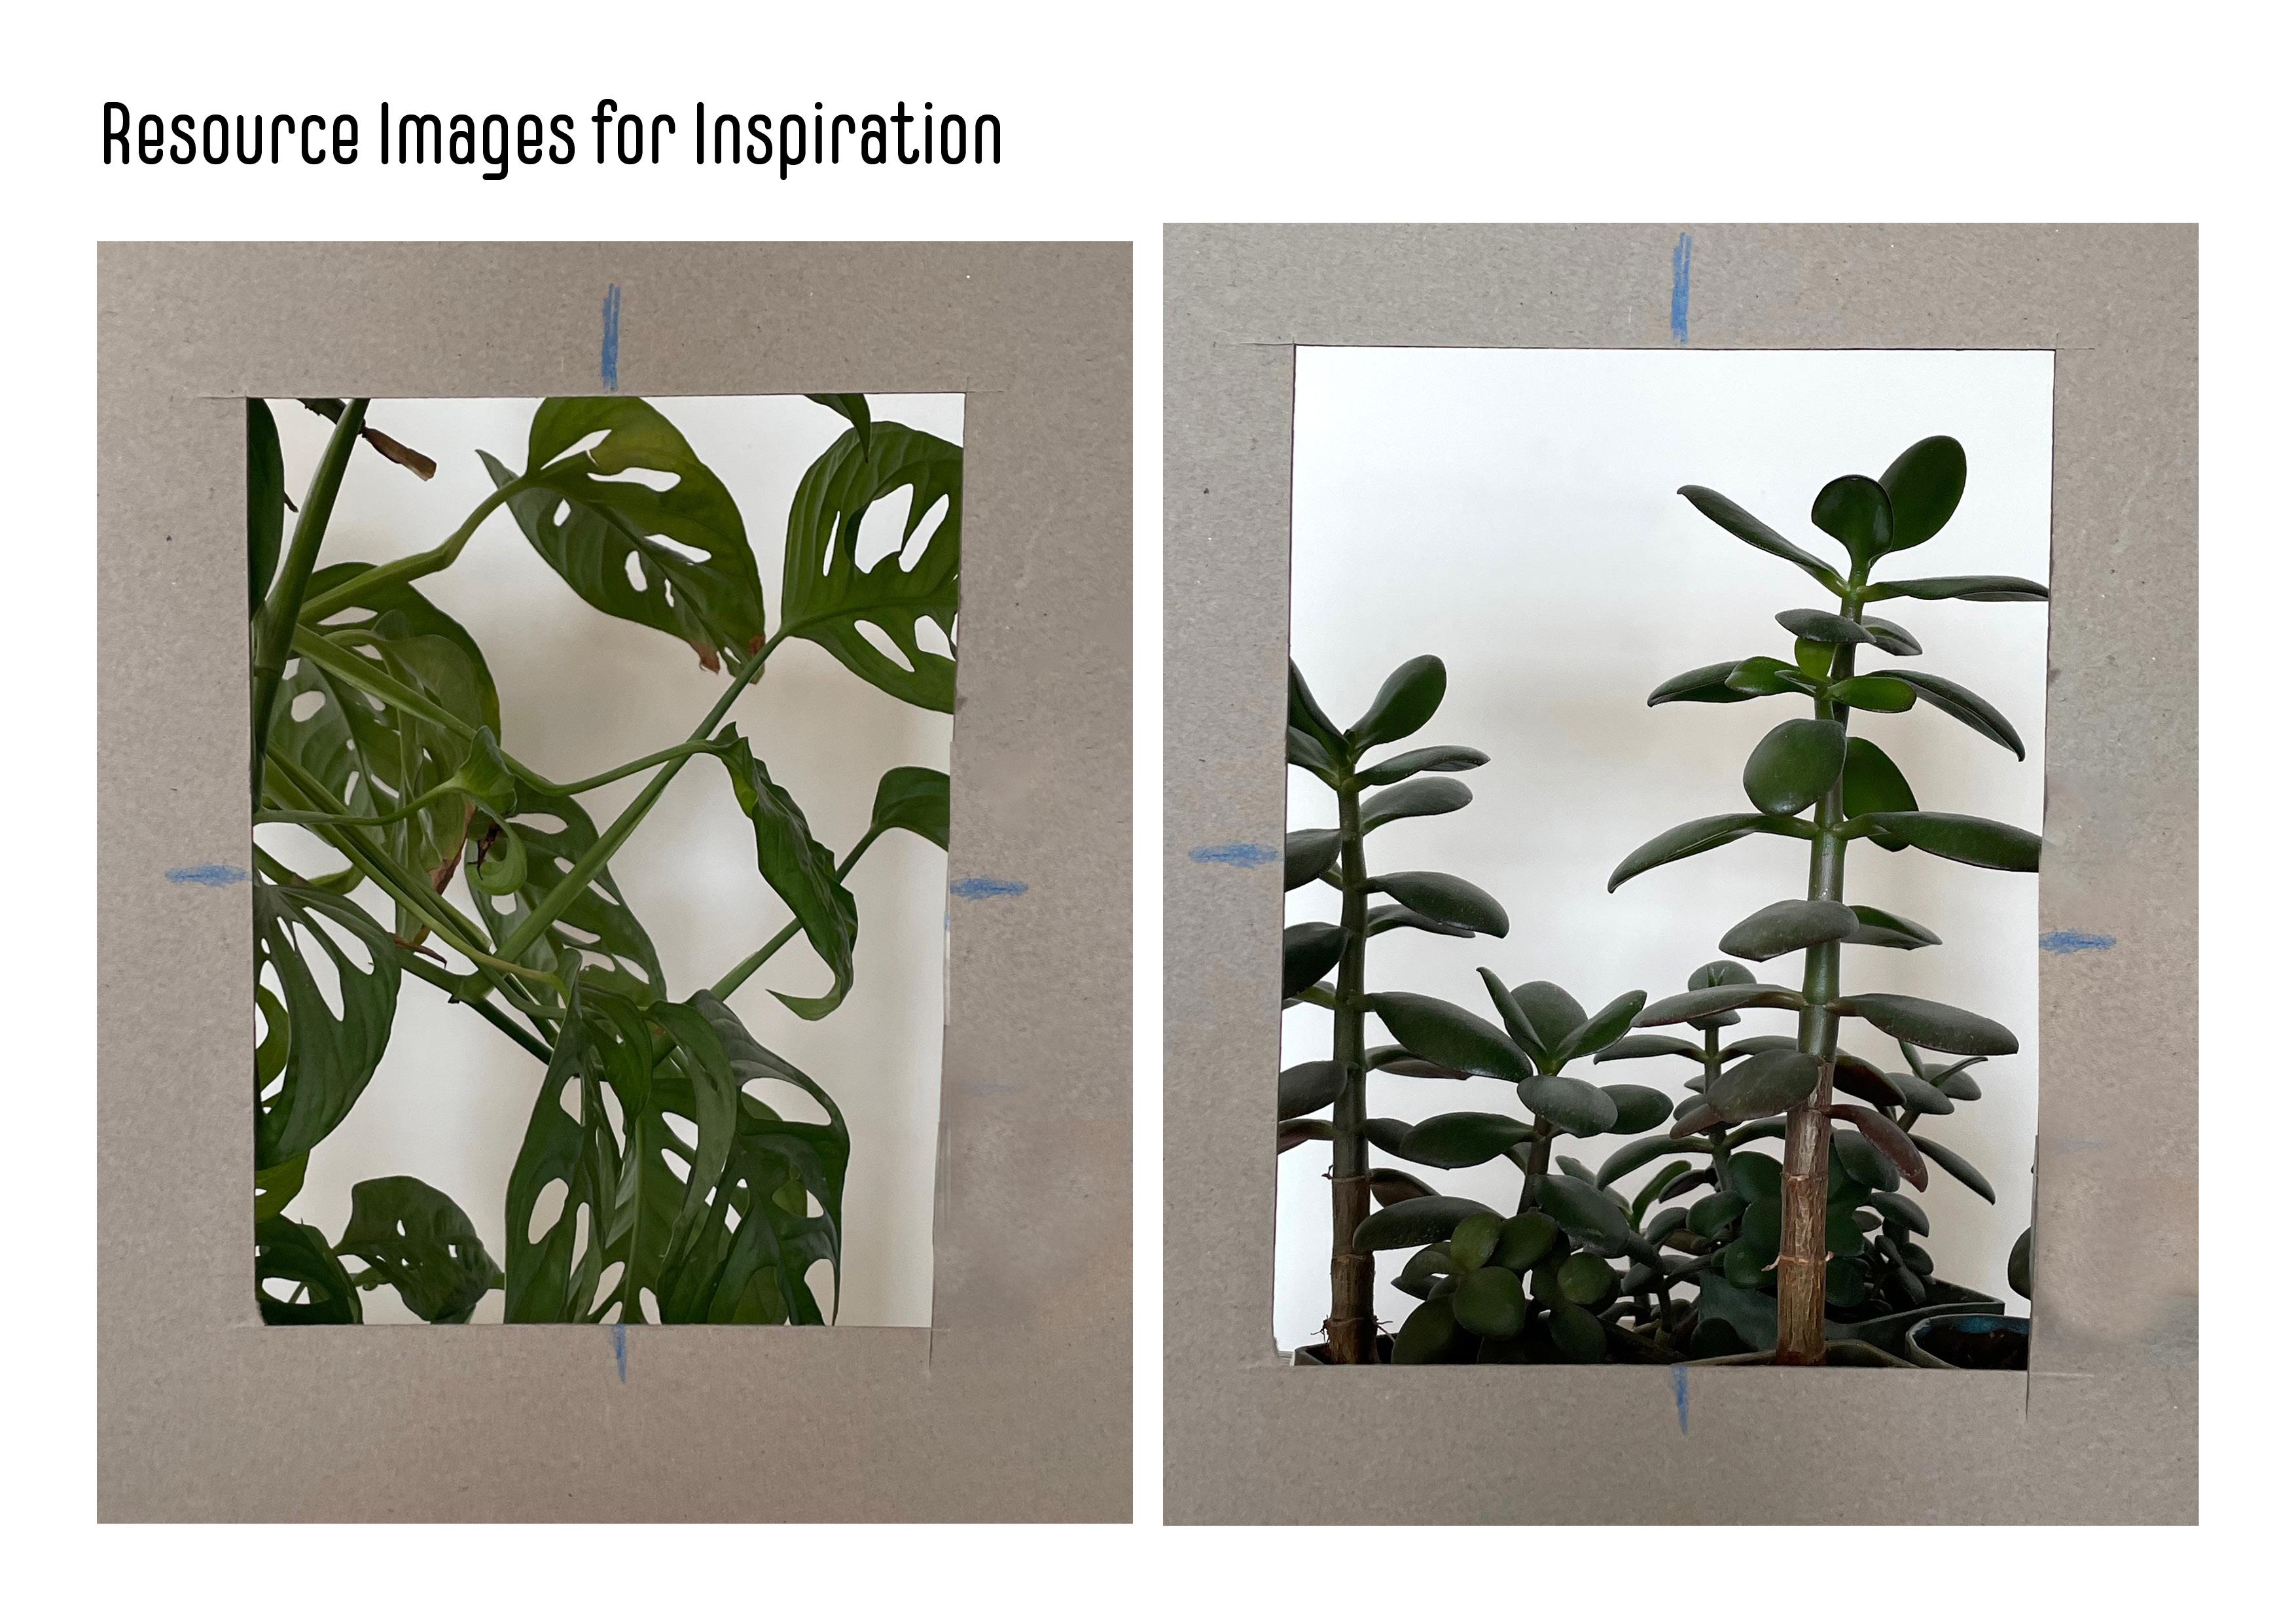
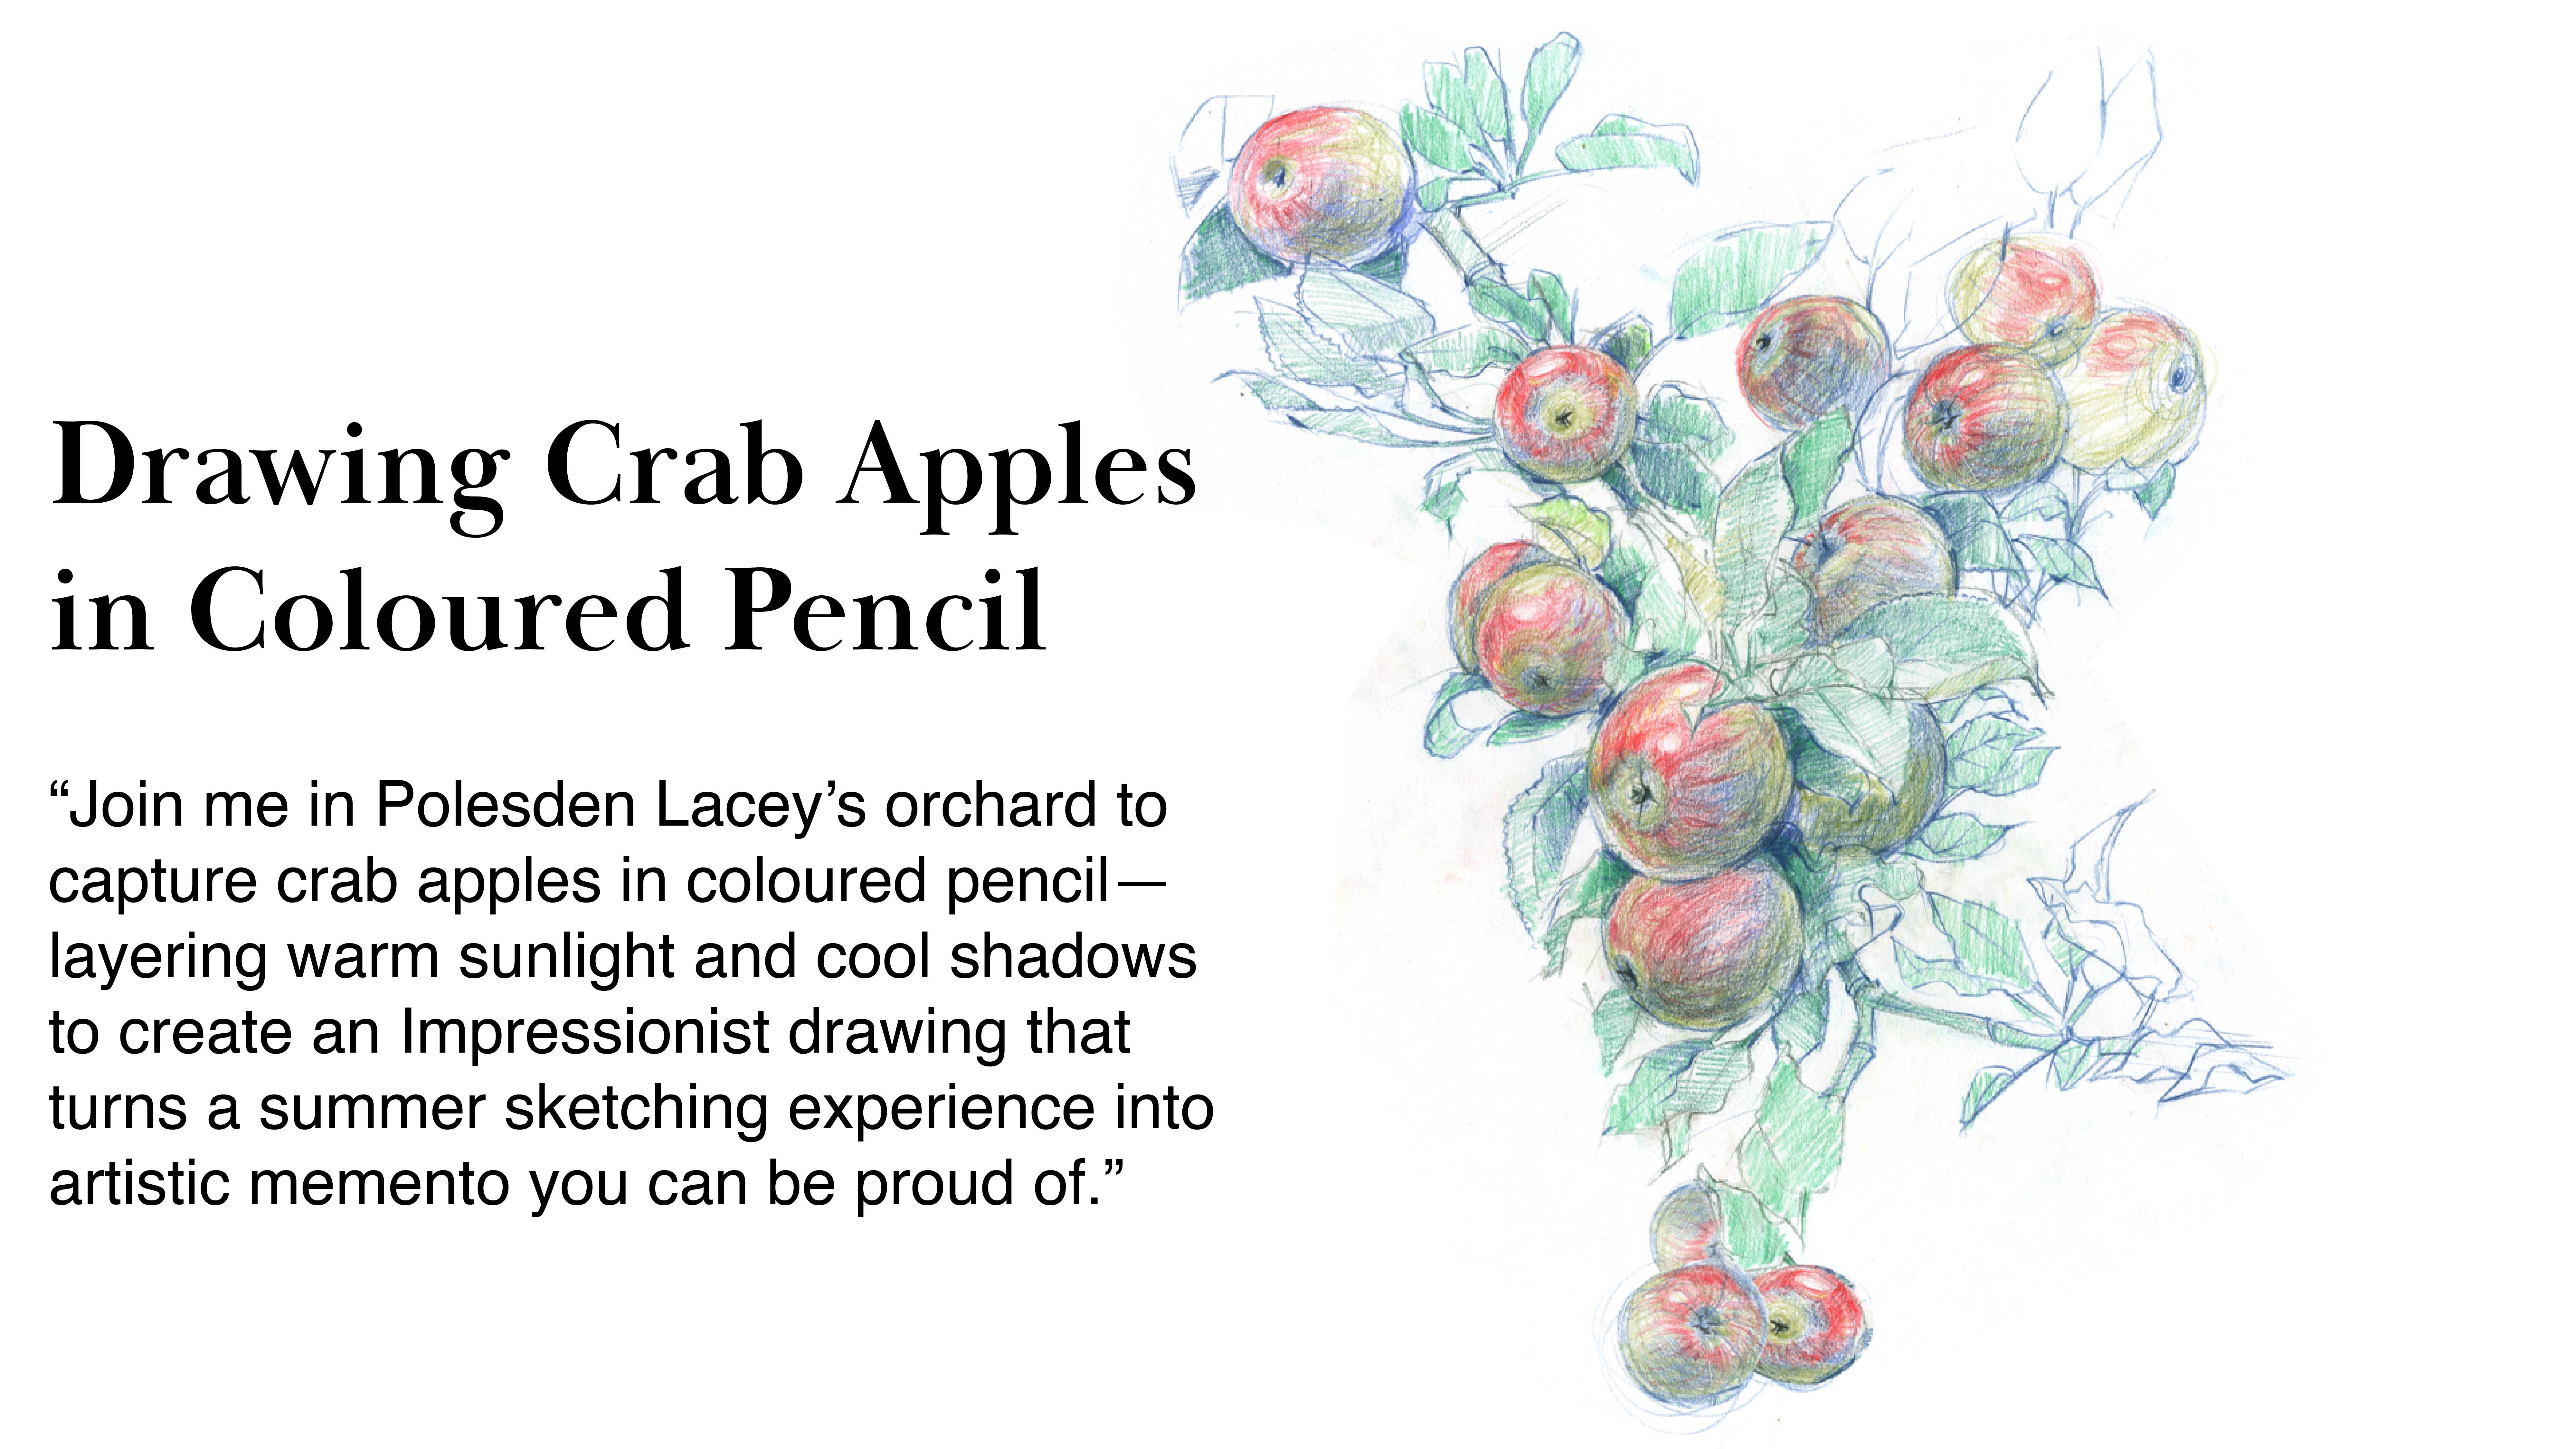
4. Wild Thistle: Negative and Positive Shapes: Guys, in this tutorial we're going to draw a wild thistle. By all means, please swap this plant out with a
different subject matter. It's nice if we all do
slightly different things. There will also be a photo of some holly in the resources if you want to use that instead, or maybe find your own
plant to work from. In this exercise,
we're going to focus on two aspects of drawing, which I find both
equally important, that of negative
and positive space, and also sight sized drawing. Being aware of the
negative shapes is good for getting away from your preconceived ideas
of what you think your subject should look like rather than what
it actually looks like. Initially, concentrate
on the negative shapes and the shapes of
your subject will gradually emerge from the paper. Positive shapes refers to the composition's
main physical stuff. These are the focus
of the artwork. There might be objects or figures that the artist wants to draw attention to and
capture negative shapes. On the other hand, are the areas around the positive shapes. They may not be the main focus, but they will provide
balance and contrast to the positive shapes and help to make a more
effective composition. Also creating what
they call white space, which is an area for
the eye to rest. A classic example
of thinking about negative and positive shapes
is Rubin's Vase Illusion. Where you can see
either the vase or two profiles
facing each other. Depending on what you focus on, the positive shape of the vase or the negative shape
of the profile. Trapped and open
negative shapes. Trap negative shapes
refers to the openings that are surrounded on all
sides by positive forms. Both trapped and open negative
space are abstract shapes. Small trap spaces are easier to understand than the
larger, more complex ones. Particularly the open spaces, the open spaces surrounded on all sides by physical matter. It might be. Say for example, imagine the sky line and then that moving
up to the sky itself. And the sky is then an
abstract open shape. Every plant has its
own personality. The thistle has sharp spines
compared with the softer, arabesque shapes of an oak leaf. The way you move your
drawing implement should be in sympathy with your
subjects character. Think of smooth
flowing lines going around the dog eared shapes
of the oak leaf compared with the harsh quick flick marks that you can make to capture those fearsome spines
of the thistle. In this tutorial I'm
going to be using two graphite pencil on
some two cartridge paper, but that could also be a double page spread of your sketchbook, a sharpener and a putty rubber. And I'm going to use a long, thin paint brush
handle for measuring. The sight sized
method of drawing is a practical way to
achieve accuracy, is the practice of
creating a drawing the same size as you
see the subject. For me, this method
works best when you can sit close to the subject
with far away objects. You'll find yourself
measuring tiny proportions. Keeping the proportions correct of any subject is a
lifelong challenge. The thumb and pencil method. There are a few tricks that are powerful tools to
enable you to estimate the length and
breadth of forms by comparing the components
against each other. When drawing, you can estimate
the proportions and check them with a fair
degree of accuracy by employing the thumb
and pencil method. This is done by
holding a pencil. Wooden dow, it could even be the handle of a
long thin paint brush, which works really well. I also think chopsticks
are good to use. Hold this in your hand, then bring it at arm's
length between your eye and the object you plan to
draw or the scenery. Bring the stick to your eye
level and shut one eye. Use your thumb as a gauge to measure the segments
of your subject. And then from the object
you're looking at, then place that over
your paper and make little dash marks to section
off those proportions. Besides measuring proportions, you can also measure angles. To measure angles, fully extend your arm while
holding your pencil, either vertical or horizontal
With one eye close. You can judge the angles
of your subject by almost imagining a protractor
attached to the pencil. You can check this angle on the page by placing
a horizontal, vertical pencil against
the line you're drawing. You can even copy
the angle by moving your paintbrush or
whatever you might be using from your vision point
to the point of the paper. I'm continually looking for
vertical and horizontal, and even diagonal alignments
to help with the proportions and the drawing process by holding up the
paint brush handle. This method is like projecting graph lines onto your subject. The angle of the leaves and the spines can be determined
by sketching a central vein. I then sketch one
leaf at a time, looking closely at the
negative shapes between them. Particularly at the
beginning, I am refining and modifying my
proportions and shapes. The initial lines that I've
created might be wrong. So this is the point to change them before
they get set in stone.
5. Reindeer: Introduction: Hi everybody and welcome
to drawing radio. On this course, I want to be your virtual companion and
your road to learning to draw a firm friend who's going to remind you of a
few ground rules. Each mark you create should
be the result of a clearly observed I look
first and then draw. Switching regularly
between the two, we can't really draw and look at what we're
doing at the same time. All our eyes have to flick up. All drawing to a certain
extent is about memory. Don't just work on one
drawing in a drawing session. The first sketches we often
make are a bit clumsy, and the more time you
spend drawing of subject, more fluent you get
as you warm up, as you get to know the shapes
of your subject better. The goal of this course
is not to create one polished
photographic drawing, but see drawing as a
series of attempts. All drawings to some
extent are hard, one in sometimes you
might feel like, which is a feeling I
think we can all share. But try to stay persistent, add additional parts
on the drawing, have another go, and often it
comes together at the end. Also share your work with
friends and other artists. They might point
out other qualities and things that
you haven't seen. We can always learn a lot by sharing our work
with minded people. For me, drawing is all about
experiential learning. Experiential learning involves
engaging in a hands on practical activity that you then reflect on to develop
your knowledge and skills. This approach is similar
to riding a bicycle. When you learn to
ride a bicycle, you have a concrete experience
of first trying falling, and then adjusting your actions to avoid falling off Again, through experiential learning, abstract concepts are formed
and actively experimented with to deepen one's
understanding of what one can achieve, go freehand. All these exercises are aimed at developing
physical confidence. So know rulers, ellipses, arcs, and go freehand. Unlike learning a language
or music drawing has a very few fundamental
conventions and that are relatively
easy to grasp. However, just like learning to walk or play an instrument, the initial stages
of learning to draw can be the
most challenging. An afternoon at River Ways Farm, I was thrilled to discover that a local farm had a
herd of 19 reindeer. And headed off with
my telescopic easel to join them in their paddock. I sketched them on a
polar blue tense paper, which I felt gave a feeling
of them being in the snow. And I took plenty of photographs to water color up the sketches. Later on, in the
comfort of the studio, I drew them as the season
was turning towards autumn. When their antlers
were covered in fur. The pelt is created from hollow air filled
hairs for insulation. In the summer, it
is thin and brown, and at the time I
was drawing them, it was turning
thick and grayish. Getting ready for the winter. Reindeer are called caribou. In North America,
there are species of, there are two varieties of
reindeer, tundra and forest. Both male and female
Reindeer grow antlers, which makes them unique
in the deer world. The female use their
antlers to defend food in small patches
of cleared snow. Unlike horns, antlers are
shed each year in males, this tends to happen in
late autumn after the rout. Females, however, retain their antlers until
spring because access to food is critical
during their winter pregnancy. I began filling my paper with lots of sketches in
different positions. I find it's really
good to get to know your subject by
drawing a front view, side view back and you get a good three D
Understanding of the form. When I first went
into the paddock, the reindeer are a
little bit unsure of me, but they soon settled
into seated positions, which allowed me to create
more sustained studies. I always find it's
good to start with a seated position or
a sleeping animal. When I first getting to know
them, think of anatomy. We tend to think of
muscles and bones, but also we can think of the
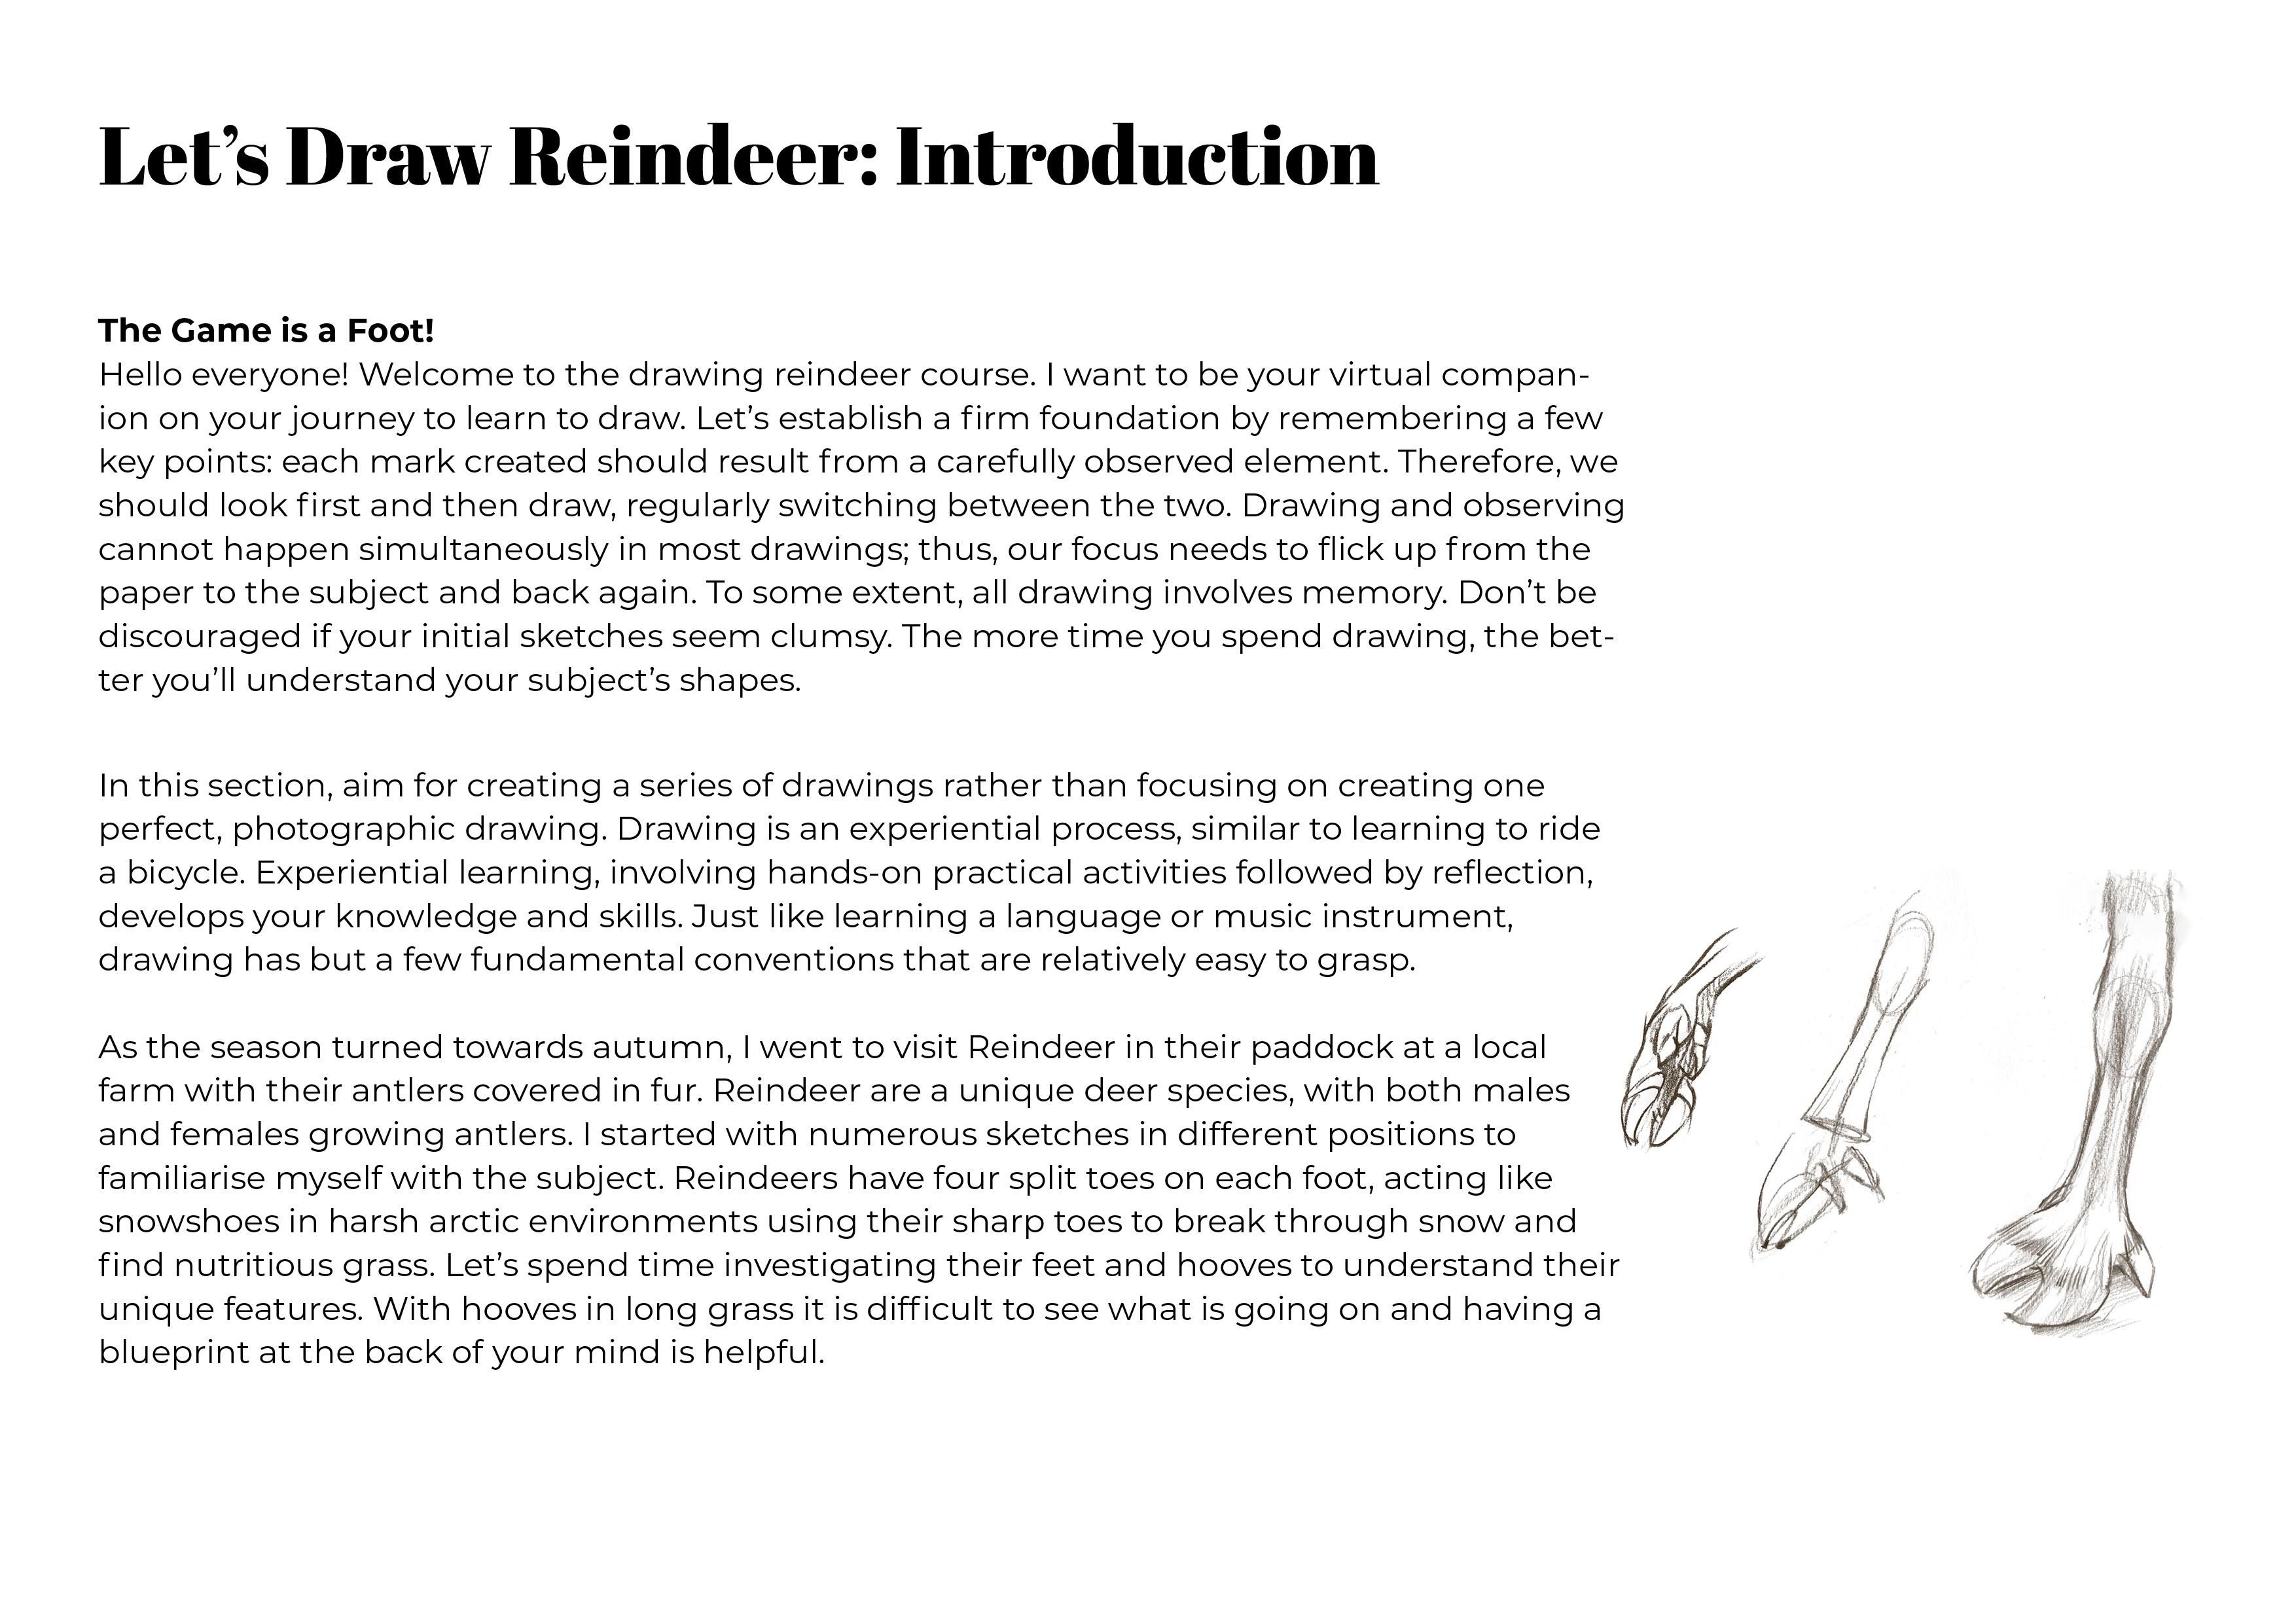
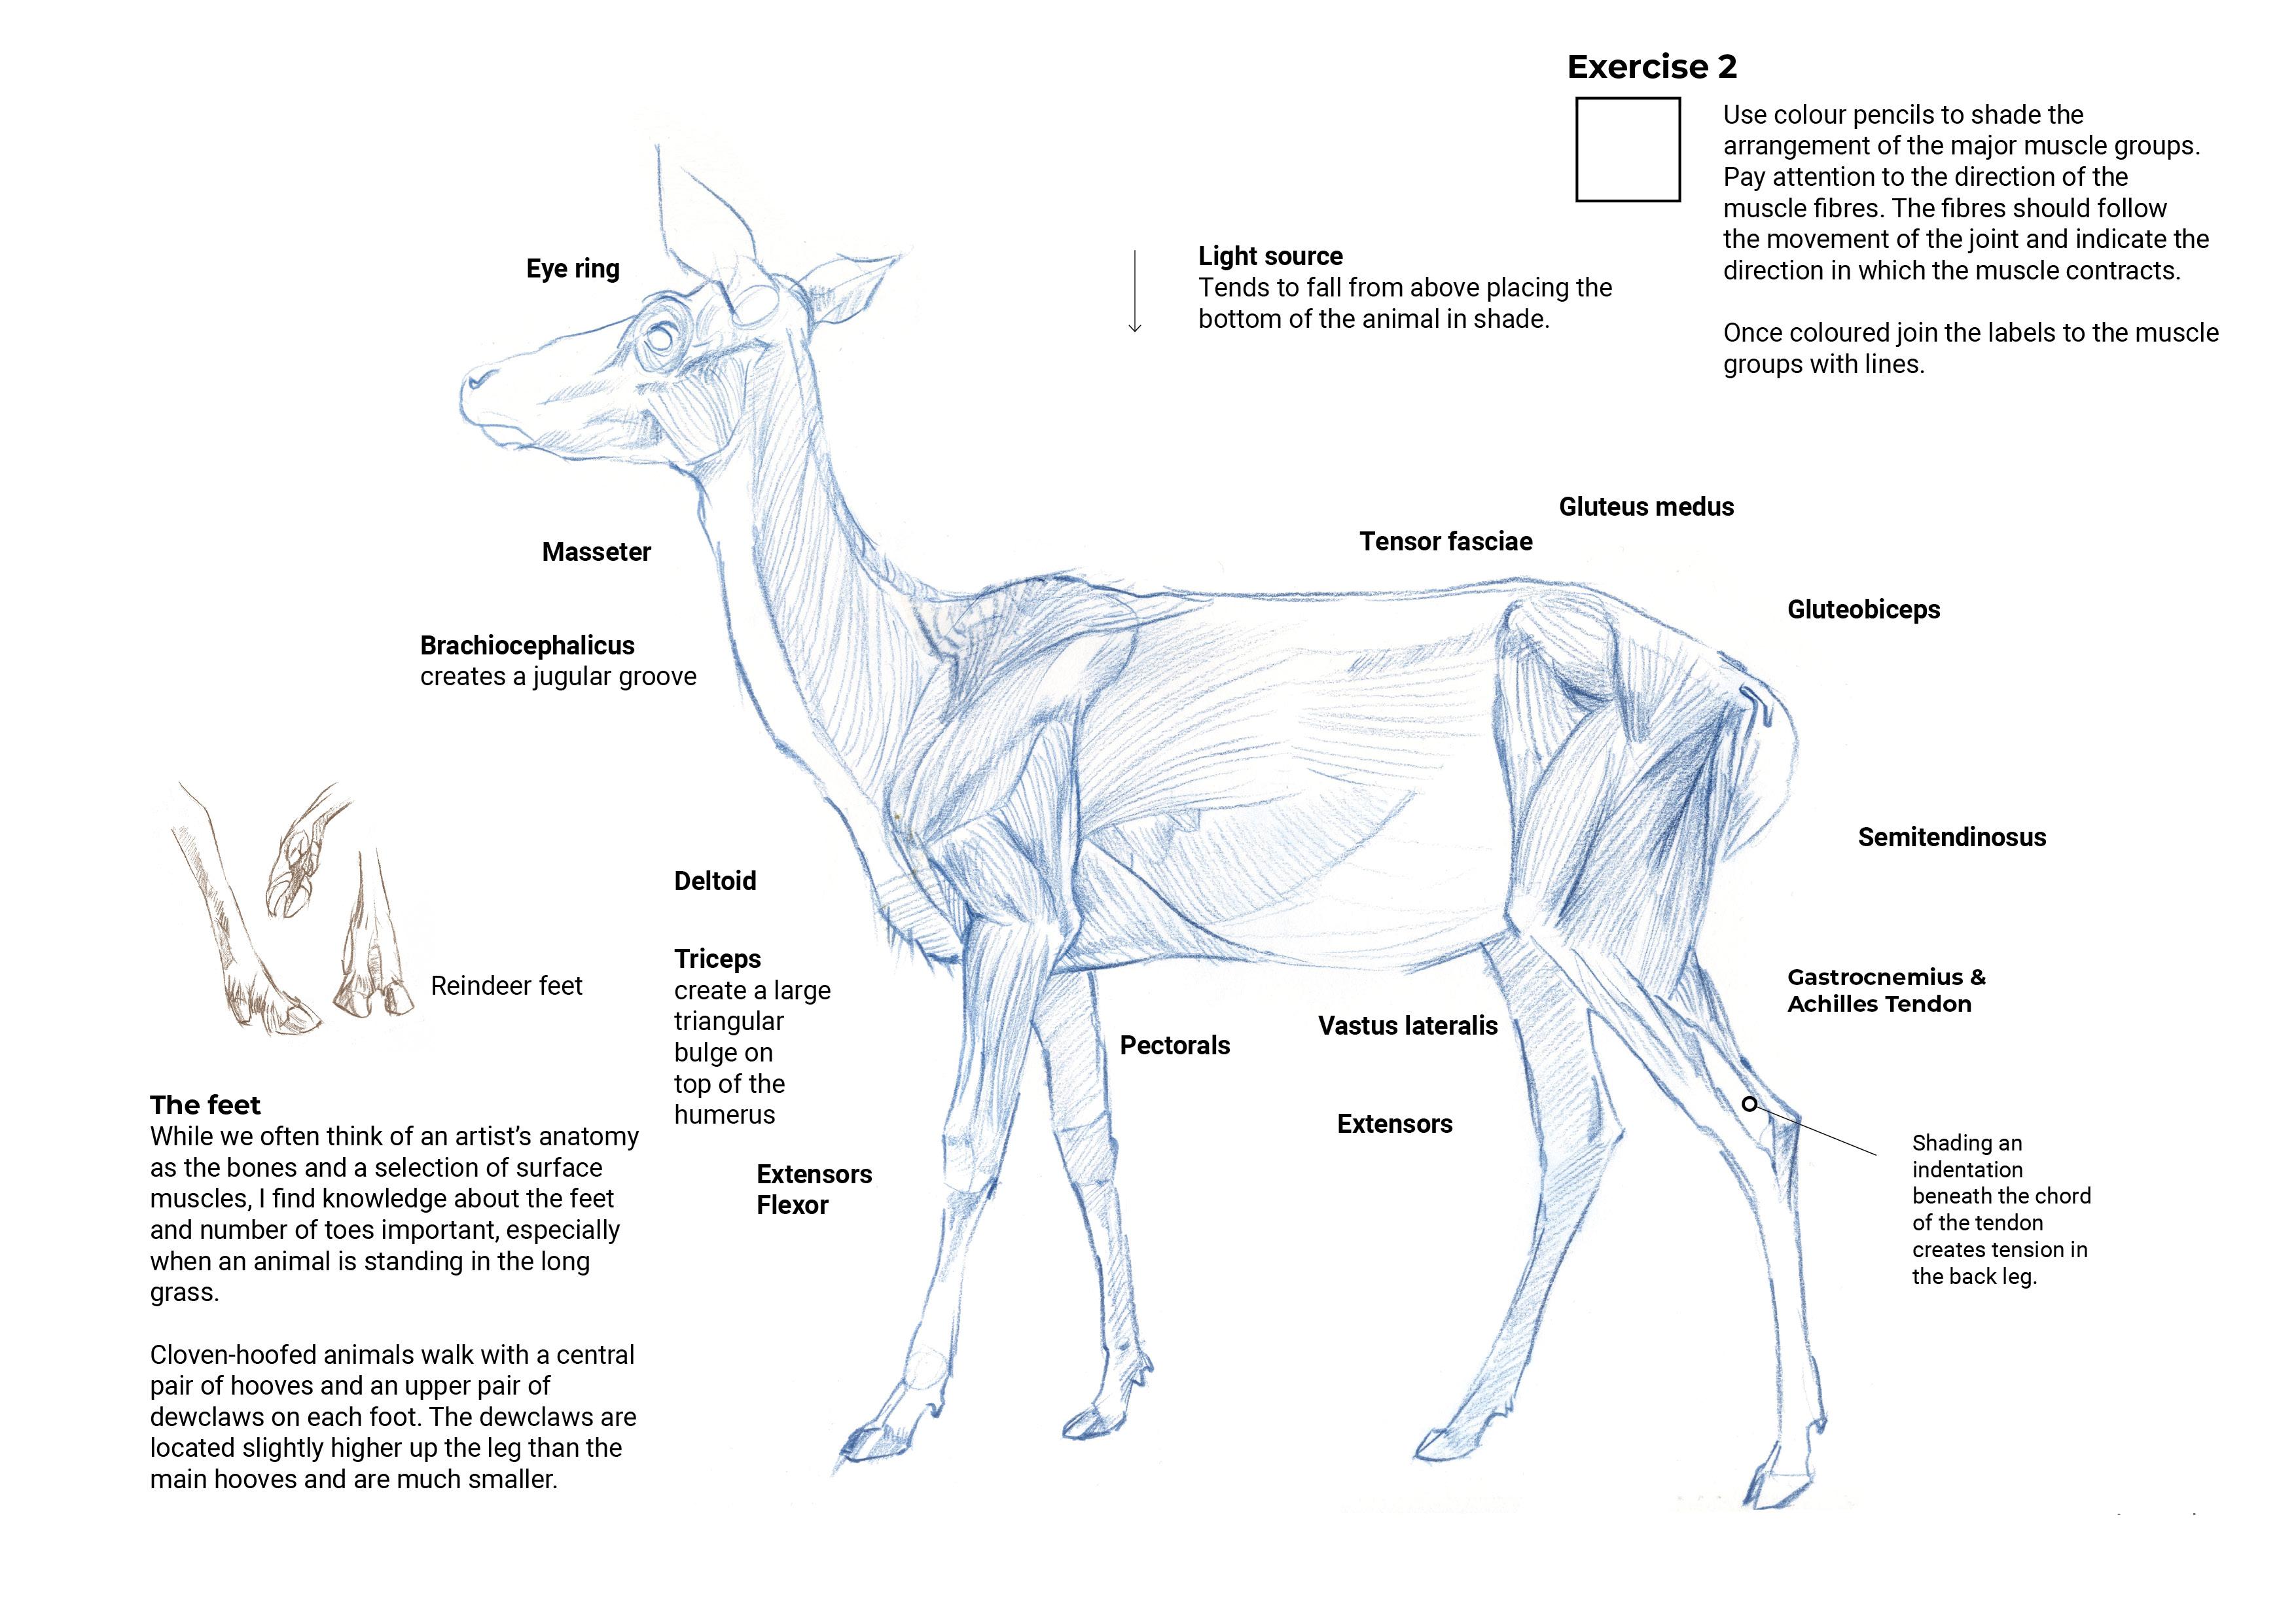
number of toes they've got. For example, reindeers
have four splayed toes on each foot that act as snowshoes floating on the snow in the harsh Arctic environment. And also makes
them really strong swimmers to get across
gushing rivers. The sharp toes can break through snow to uncover
nutritious grasp beneath. What we want to do is
to have a quick look at an investigation
of these feet Go. Claws commonly grow higher up on the leg than
the rest of the foot, such as in digi grade or unguligrade species,
a bit like a thumb. That doesn't make contact with the ground when the
animal is standing. You can try this with
your hand at home. However, they do
contact the ground when the animal is running and provide extra traction on
slippery surfaces such as ice. What I noticed about the
reindeer's foot as they actually splay out and do touch the
ground in a standing position. And then they retract and rotate round to behind the leg,
as in the movement. That was a really
interesting thing to observe while sketching
the reindeer, I continually heard a clicking
sound coming from them. This is created by tendons that snap over a sesamoid
bone in their legs. So think of a sesamoid bone
as a small round nodule of a bone within an attendant whose purpose is to reinforce
or decrease stress. Think of a patella for example. Experts believe the
clicking sound helps herd members stay in contact,
especially in snowstorms. Hi guys and welcome
to the game is afoot. First of all, let's talk
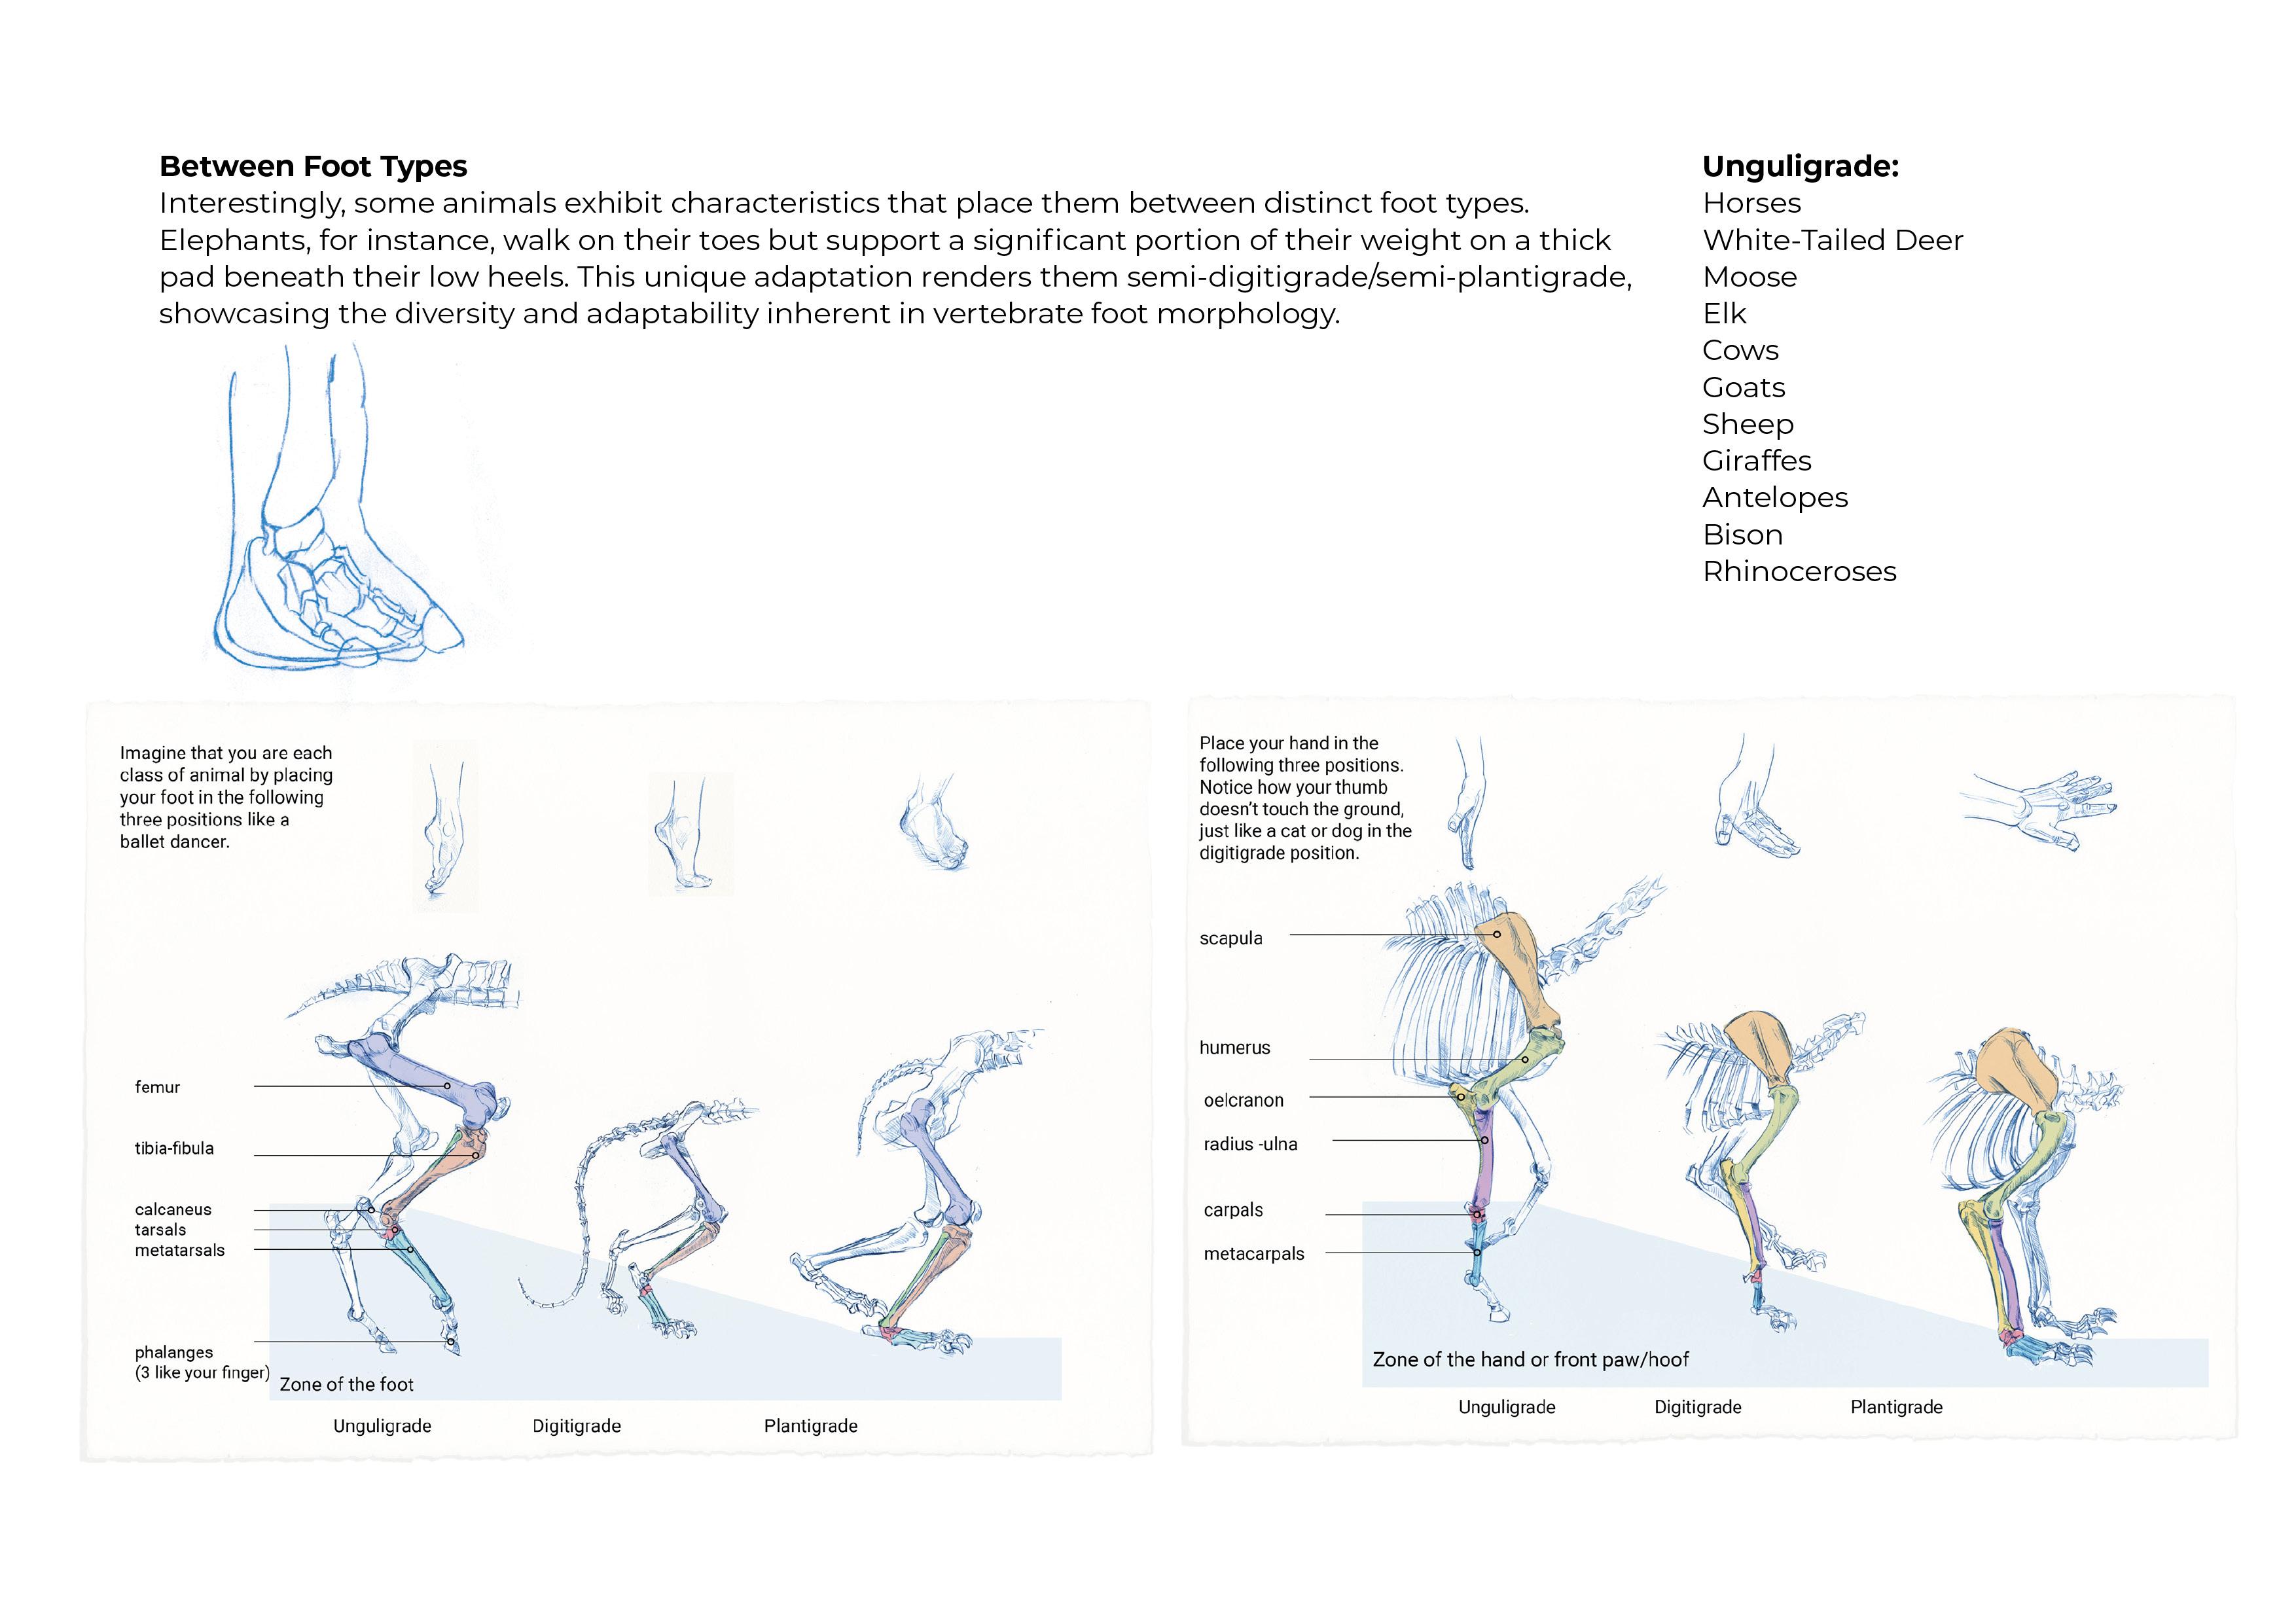
about the pentadactyle limb. Limb with five fingers
such as the human hand or foot is the template found
in all amphibians, reptiles, birds, and tetrapods,
allowing us to deduce that all these animals are derived from one
common ancestor. Sometimes these digits
are reduced down from the original five
to a lower number, but they're never more
than five Fingers hippos have four toes on each hoof, making them an even
toad ungulate, whilst tapias still
have four toes on their front feet and their hind feet have
evolved down to three, making them an odd
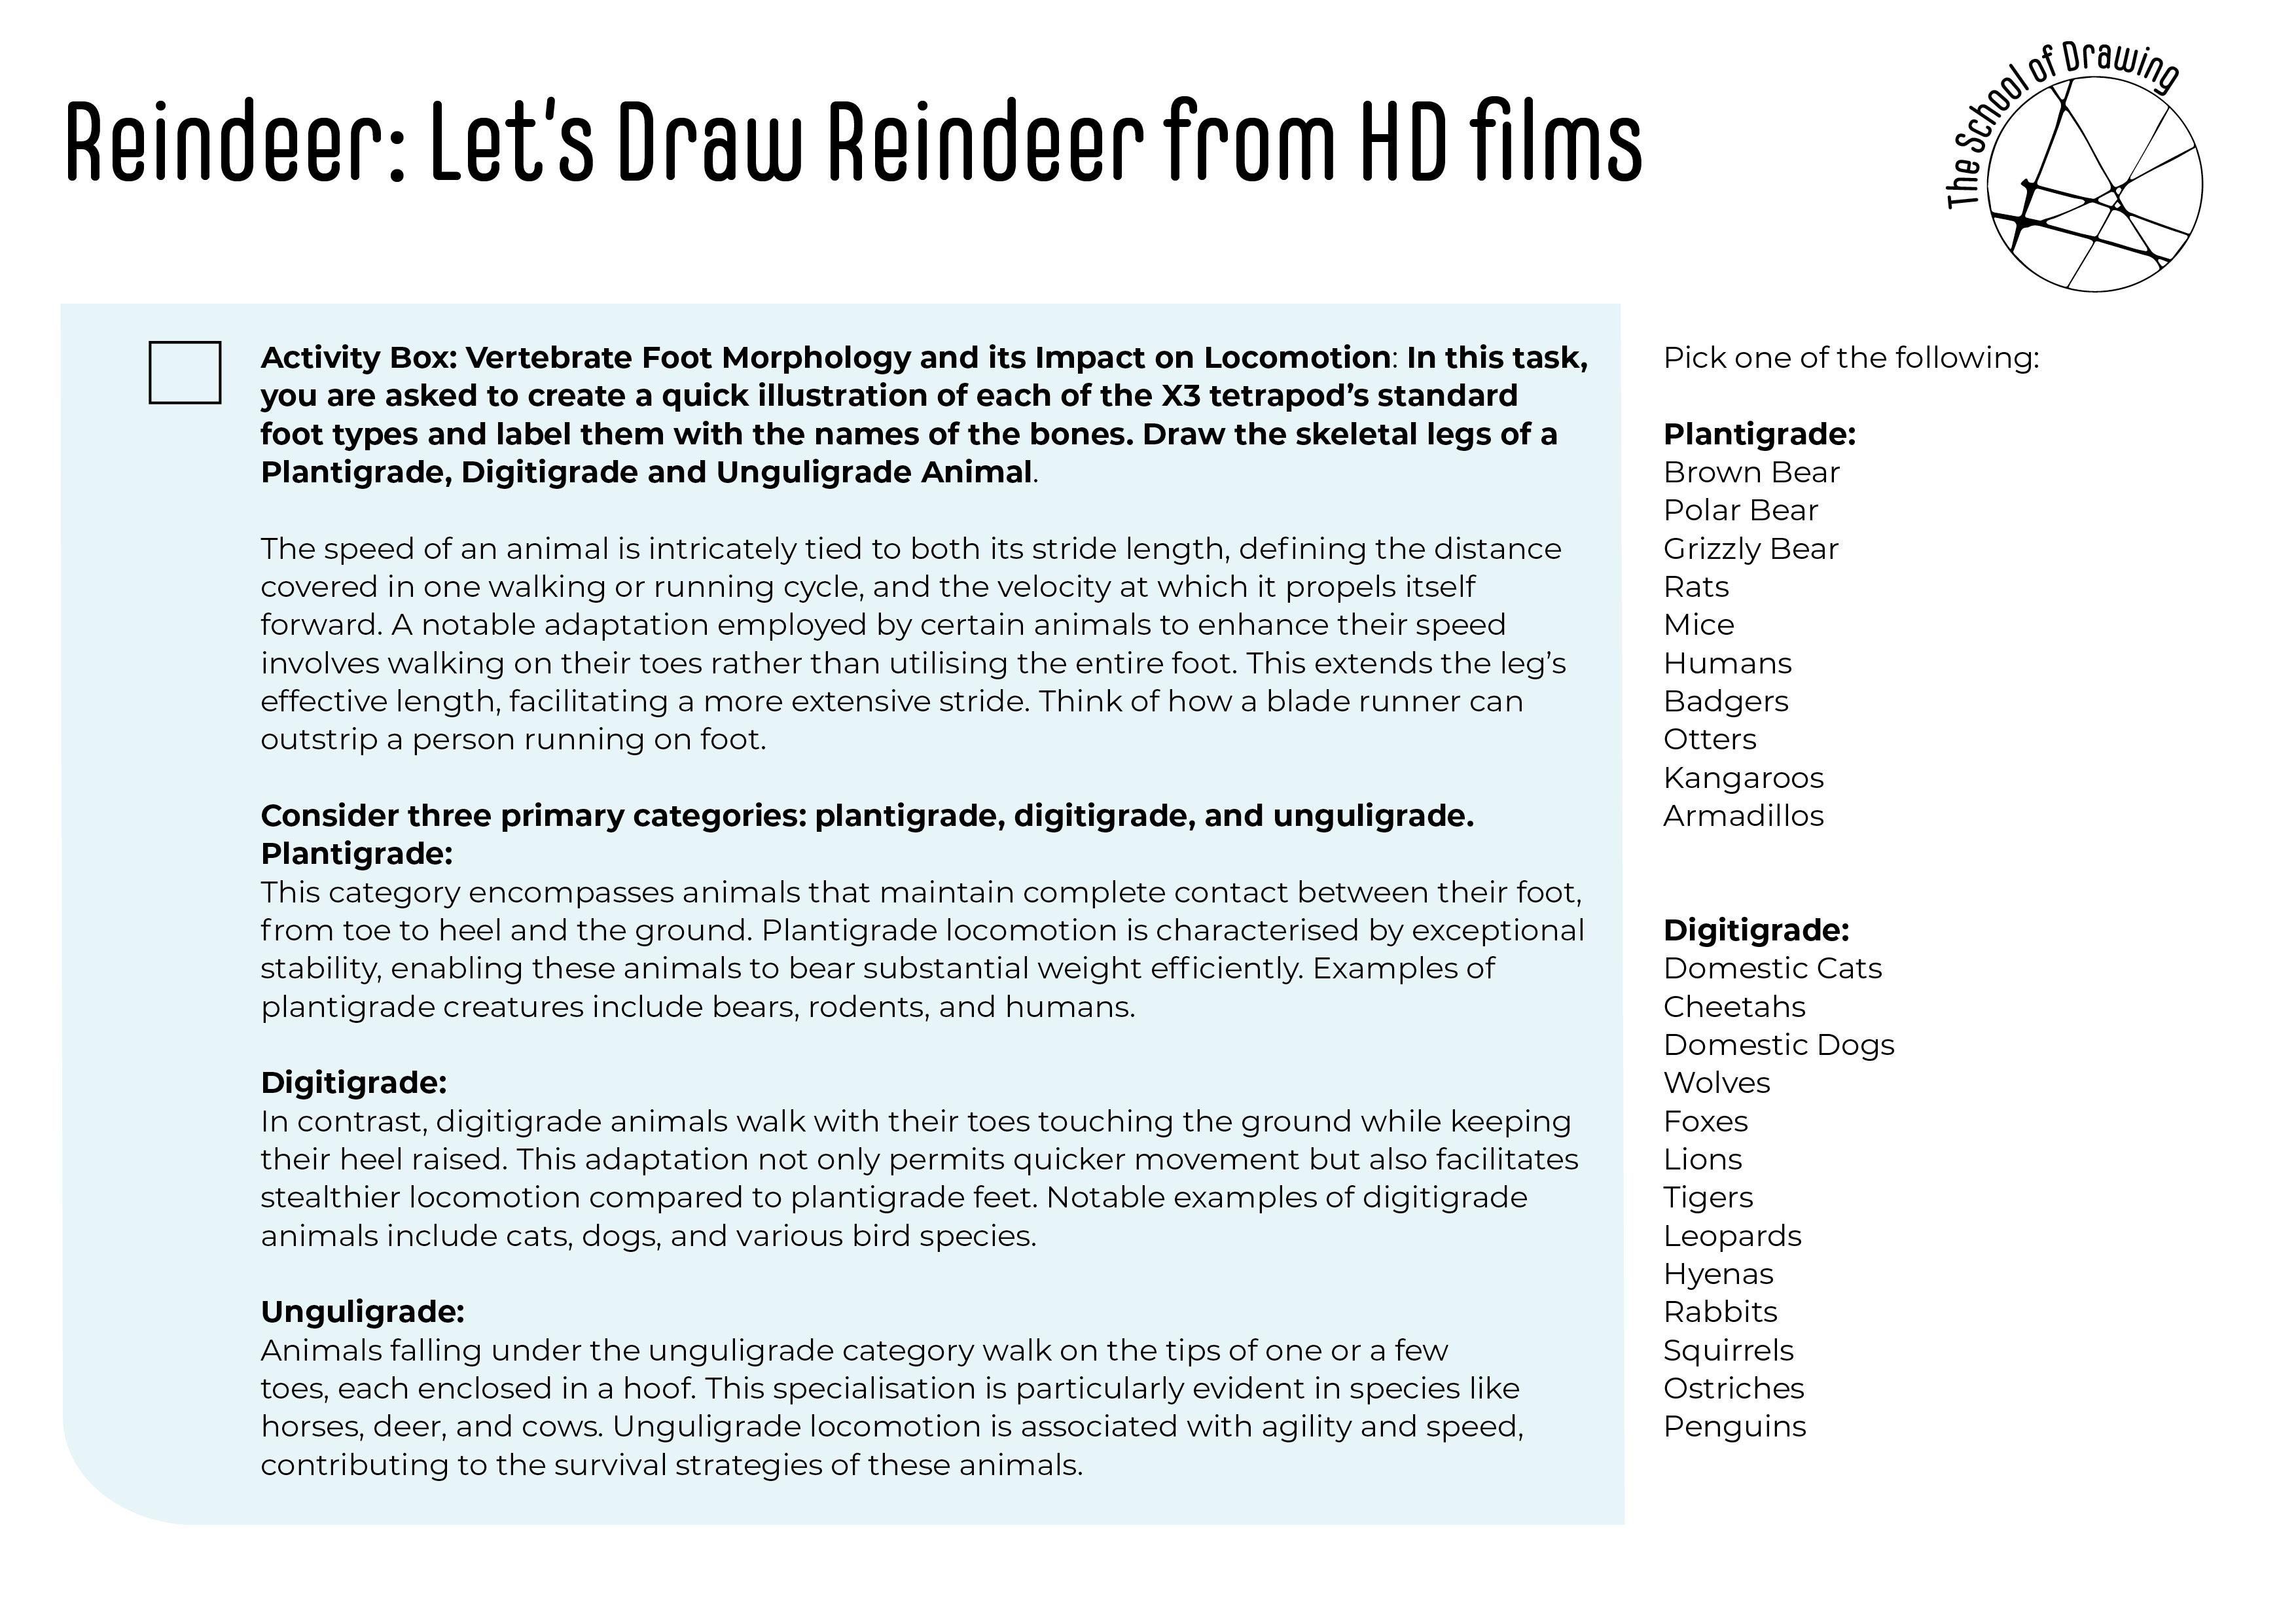
toad ungulate. There are three main
arrangements of the limbs of tetrapods walking
over solid ground. I think it's empowering to know what's going on beneath
the skin so that your drawing has structure
and doesn't feel too much like a soft
toy plantigrade. This is a footstance
that you should be familiar with as it
is your footstance. Remember this stance? Think about the foot being
planted on the floor. Some animals that have
a plantigrade stance, one of them is wolverines, which are powerful predators
and scavengers with the plant grade feet
of five toes on each foot that's padded to
help it walk in the snow. Now let's talk about
digitigrade animals. In terrestrial
vertebrates, digitigrade locomotion is walking or
running on your toes. A digitigrade animal is
one that stands or walks, with its toes
touching the ground. And the rest of the
foot or hand raised. Digitograde animals
generally move more quickly and quietly
than other animals. Makes it a great
stance for predators. Think of it as
someone tiptoeing, trying to sneak into a house
at the end of an evening. But also birds are mostly
classed as digitigrade animals, meaning that they
walk on their toes rather than the entire foot. A rabbit's survival
depends on how fast it moves and has
digital grade feet. Their hind legs are longer
than their front ones. This allows the rabbit to accelerate from a
still position. Wild rabbits are
generally faster than domestic ones and can reach an incredible speed of
up to 45 miles per hour. Domestic rabbits tend
to be slower at 30. I still find that amazing. Okay, the last foot
stance we can learn about is a bit of a mouthful. It's called unguligrade. Unglets means nail to nail, or nails on your hand. Uglets are a group of
large mammals that are distinguished from
all other animals by the presence of hooves. You all know hooved animals. These include odd toed unglets, such as horses,
rhinoceroses and tapias. They're even cousins
such as cattle, pigs, giraffes, camels, sheep, deer and hippotamuses, cetaceans and
whales and dolphins and porpoises are
also classified as, even to unglets, which
might seem a bit odd even though they
do not have hooves. They have evolved from
an ungulate ancestor. Equids are the only species of ungulets to have a
single hoof horse, the zebra. And the donkey. Hey guys, I thought we just
do a quick note to the tail, run through on
anatomical features that I notice while
I'm sketching that can enable to get a bit more sophisticated
with your drawing. The first thing we
start up with the head. Here the eyes are on the side. Animals with eyes on
the side are tend to be herbivores,
particularly in land. Tetrapods doesn't really
work so well in the oceans. This enables them to get a good peripheral vision of
anyone sneaking up on them. And of course, the
binocular vision of the animal on the front of a tiger and things
like that enables them to judge the distance between
them and their dinner. The forehead is hard and under here from sure
if you stroked a dog, under the chin tends to be soft, so that might kind of affect the way you make
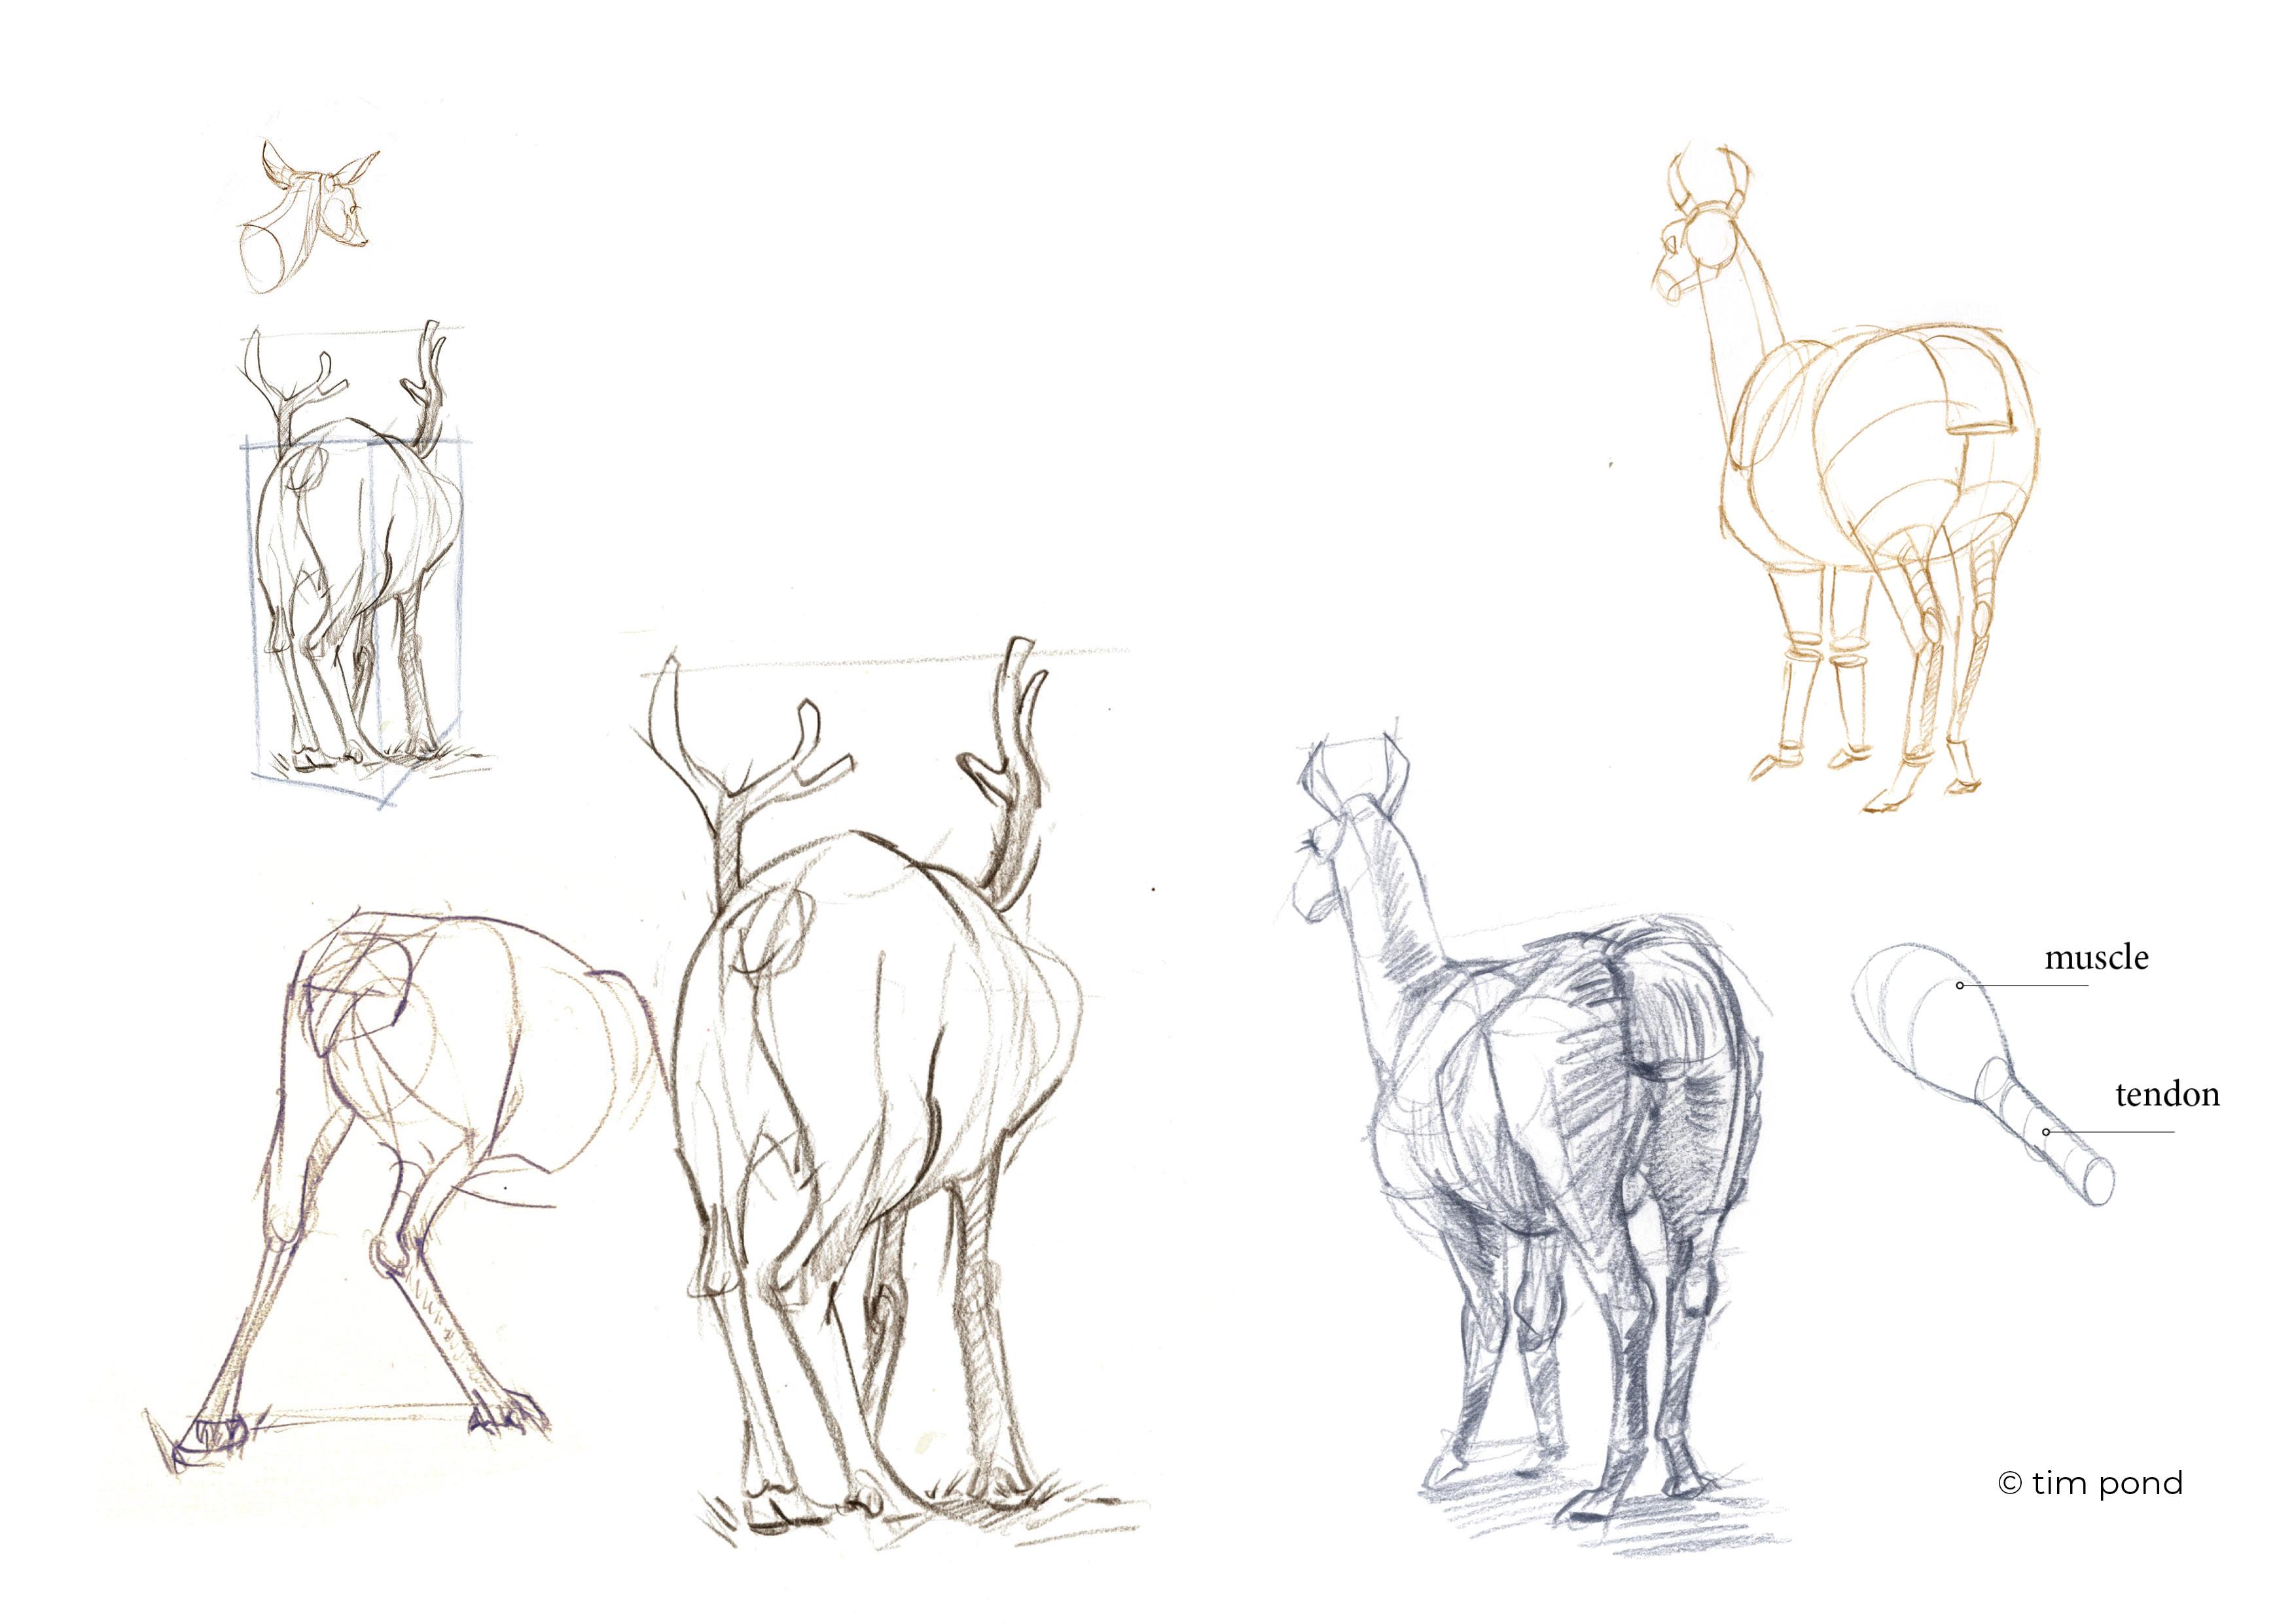
marks behind the eye. We have what's called
a zygomatic arch. You can tend to see a ridge, a prominent ridge of this
in coming out on top behind here we have the
seven cervical vertebrae. We have these long thoracic
vertebrae which support ligaments that enable
the head to be locked down when the animals running and stop it
from wobbling around. In particular, there's
like a cable that lions bite through when they're
attacking their prey at times to disable them, it's called a nuclear ligament, and it runs from these
long thoracic vertebraes to the base of the
back of the head. Think of it like the cable on a suspension bridge perhaps. Then that's the neck zone. We come up here, the
giant barrel of rib cage. You tend to see
these ribs coming through more than any muscle features on this
area of the body. We have the scapula, which is involved with rotating
the front limb. We then go to the humerus
there, the Elkrnon, you can often see a
protrusion here sticking out, and also a protrusion here of the front head
of the humerus. There we come down to
the radius and ulna, which has become fused. The carpals, this is
the point of the wrist, then this is the
metacarpals here, and then digits 123, and we've got the deuclause
to come down the back. The Iliac crest of
the hips here often protrudes and sticks out
on a cow particularly. And that the pubic
area here at the base of the hips that
often protrudes as well as we come down the leg is the
equivalent of our Fema. Go to the patella, where there's a patella,
there's always a knee. And then we come down the tibia and fibula that again are fused, allowing for explosive, running away but losing
that rotational ability. We go down here to the calcaneus is an important protrusion. We'll look at that when
we talk a bit more about the muscles down
here to the ankle, Tarsls and then the
longer metatarsls here. Okay, those are the ones
I notice, the muscles, the skin and fur of
some mammals are thin enough to allow us to catch a glimpse of the muscles
that lie beneath. Particularly if they're
very athletic animal. And you tend to see
the muscles clearer on wild animals than
those in a zoo. It's not just the thick fur
that obscures their shapes. A layer of fat often
softens their appearance, which on some Arctic
adapted animals, takes the form of a thick, insulating layer of blubber
that will completely obscure any visual way of actually seeing
the muscles at all. Also, if you're drawing
something like a bear, you're really not going to
be able to see the muscles. However, a basic understanding
of the knowledge of the varying shapes of the muscles is useful
for bulking out. Many animals and
creatures can really help with the expression
on the surface of the skin indicating
these malleable forms can bring a sense of tension and elasticity to your drawings enables you to know where to put your grooves and your shading. Many Renaissance artists like Leonardo da Vinci, also
skilled anatomists. These artists examined how the bones and muscles
work together to create more
lifelike depictions of human and animal bodies. Understanding the major
surface muscle groups is tremendously helpful
with doing your modeling. It's also quite satisfying
to be able to put a name to the lumps and bumps
you see in humans. Muscles are more or
less apparent on the skin to a range of factors. It can be athleticism, it can be youthful skin compared with the
sagging wrinkles of age. Can be someone who's a builder. It's really clear
where the muscles are antagonistic muscles. Muscles primary function is to create movement through
muscle contraction. Muscles attached to the
Skletal scaffolding of the bones via
elastic tendons. They are typically
arranged in two groups. To create complex movement
and counter movement. When a muscle contracts, it gets bigger and bunches up. When a muscle relaxes, its size returns to normal. Muscles can only pull and do not have the
ability to push. Muscles work against
each other in antagonistic pairs of muscles
that create movement. When one contracts and the
other relaxes the bicep curl. The biceps and triceps
provide one of the clearest examples of how antagonistic
muscles work together. Try this experiment yourself. Stand up and start by
doing an exercise curl. Start with your arm
loose at one side. Clench your fist, lift your arm while observing the
biceps muscle enlarge. Then in a controlled way, not just allowing the
arm to flop back down, push your arm back
down, and feel the triceps working
on the other side. The triceps is an
extensor muscle. It enables you to extend and straighten the
limbs of your body. The biceps, we all
know the biceps. The biceps is a flexer muscle. Flexer muscles reduce the
angle between the bone on the opposite sides of the joint and pull the arm
together like that. We'll do a nose detail
run through on a deer. The nose has that
interesting slit at the side that is for exhaled
air to come out of. Meaning that the fresh air
that the animals breathing in can have fresh sense on it. And it won't be obscured by
what it's previously smelled, enabling the deer to sense predators approaching
and things like that. We come along the head, we see a round bulge
of the eye ring. Then just behind the eye ring, we can see a little bit of
indentation on the surface. That will be the zygomatic arch, like making a little bit of
an appearance on the surface of the skin you have beneath it. Here, the patch of a Massa, we can think of the Masseta
being apparent on a horse. If you look at a horse's
head, that's apparent there. You can do a soft
round oval shape for the lip and you'll see
that the lip is controlled by some surface tendons that you'll see on the surface
just poking through there. Again, particularly on
animals like a horse. The big pink one
coming down here at the side is the
brachiocellphalicus. That creates a jugular
groove coming in here, which is quite apparent to see attached up here to the
high thoracic vertebrae. We have the nuclear ligament which helps to keep
the head stable. I think of it like a suspension bridge cable that sometimes is quite clear to see over the top of
these high thoracic, the trapezius muscle
like we have on us, curving over them. We have the deltoid here. We have the two muscle group, things coming down here,
which is the deltoid, a big pack of the triceps there, the pectorals, you
can see underneath. Then I group together the extensors and
then the flex there, which can also create some muscle surface
impressions over the body. Here the muscles are very thin, letitmus, dorcyte,
and external leak. They're not going to be really
that visually apparent. You're more likely
to see the rib cage, to be honest with you. We come back to the
rear of the leg. We've got the gluteus medius and then the glutes on cats and dogs and
animals like that. The glutes will become
separate muscles. Then the biceps is called the
bicep fomorus glutobiceps. You will see on animals like
hippos and things like that. So have a look at the back leg. One thing that's going
to be really clear is the gastronemus muscle here
and the Achilles tendon. And there's that gap beneath
the Achilles tendon, which is very clear to see and creates a feeling of
tension in the back leg.
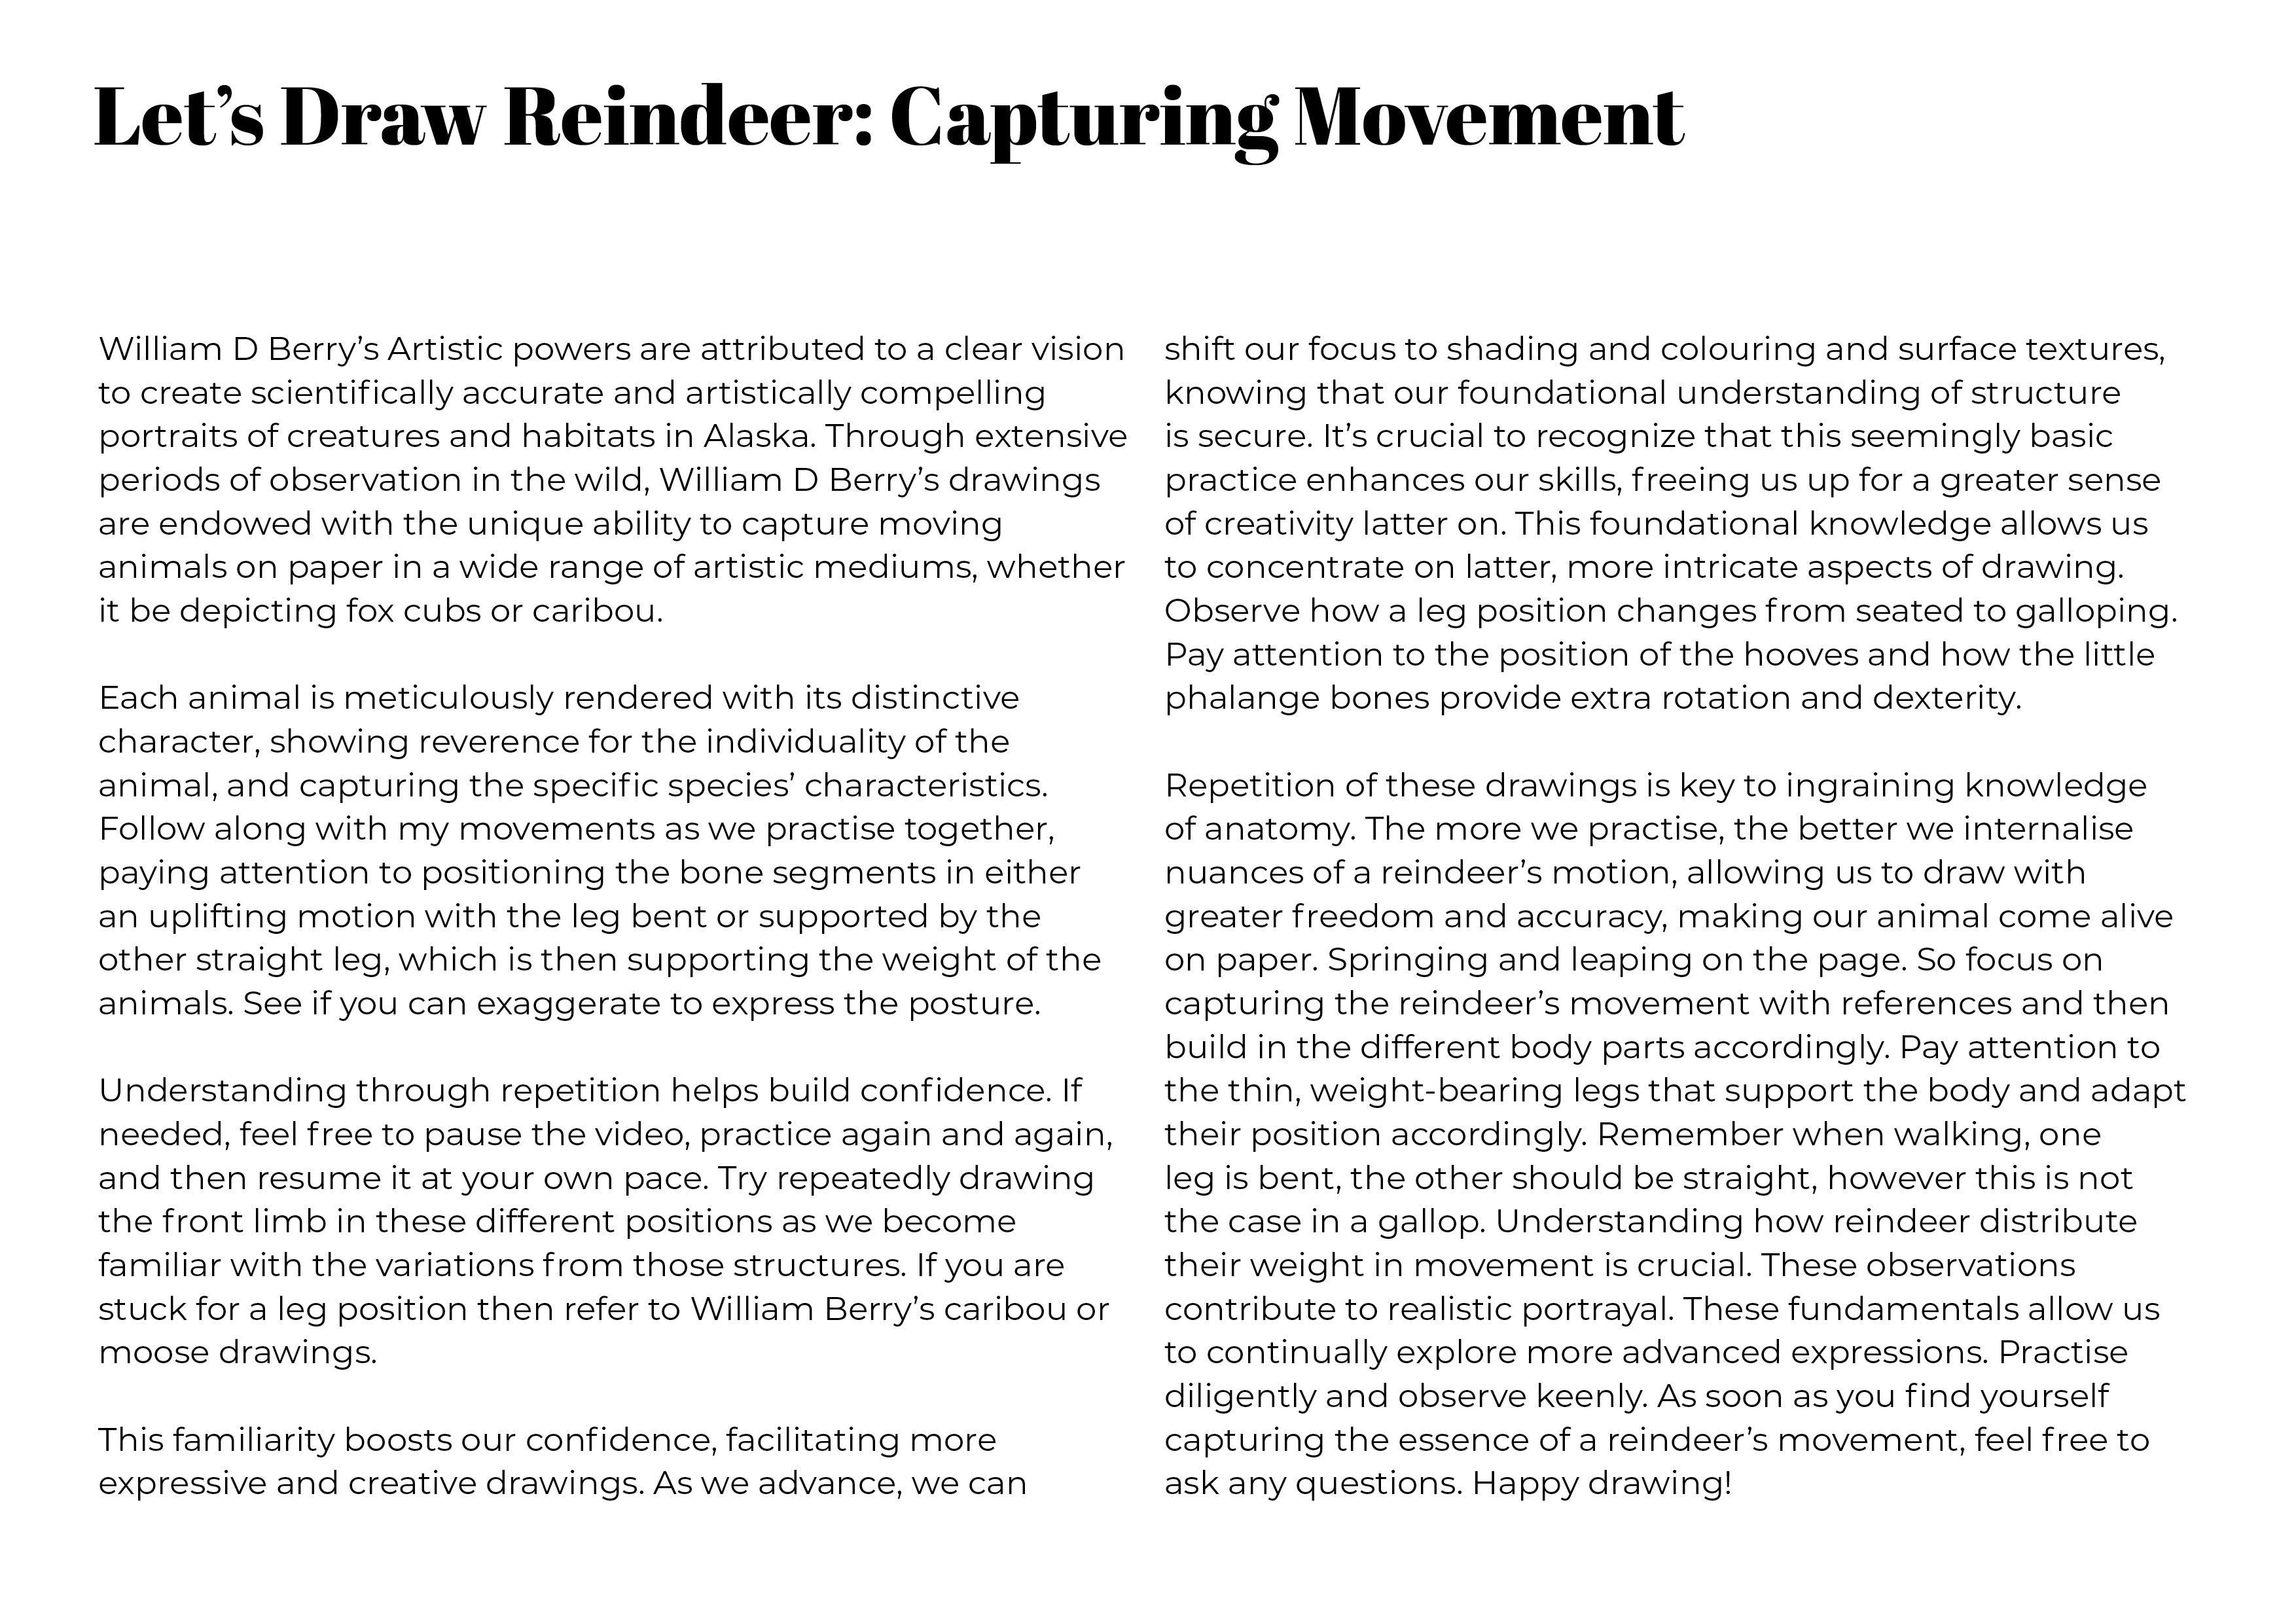
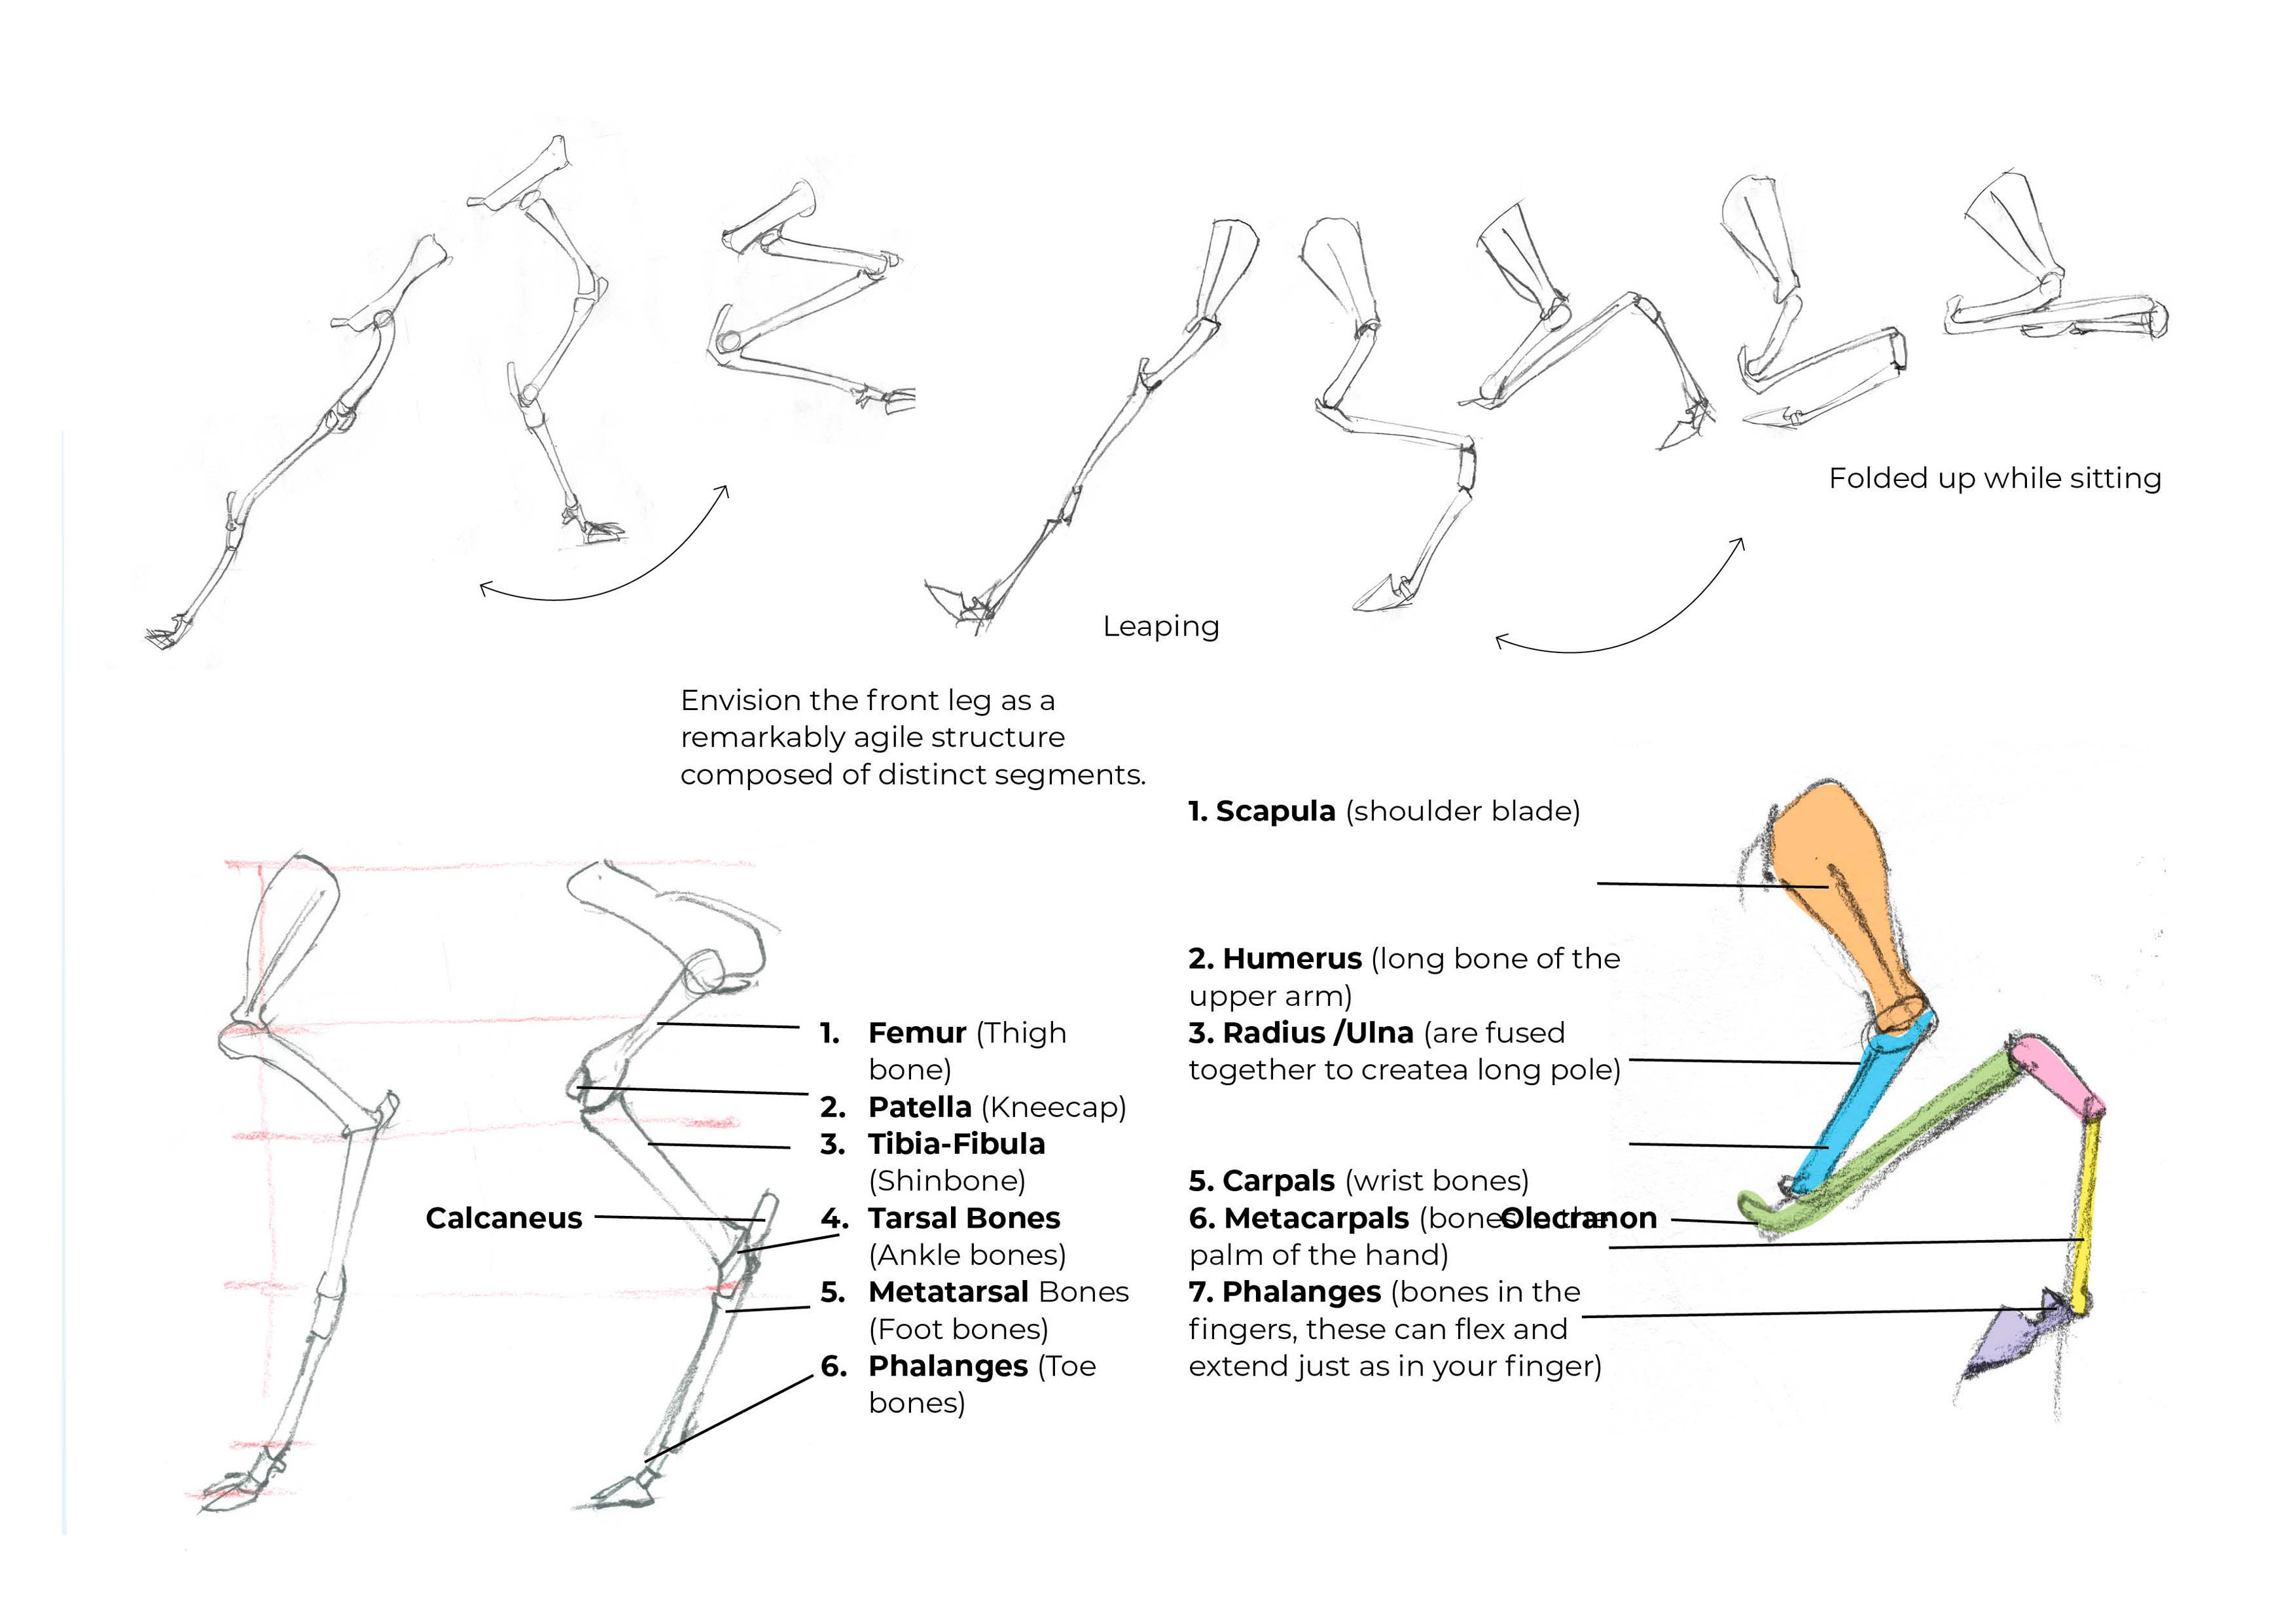
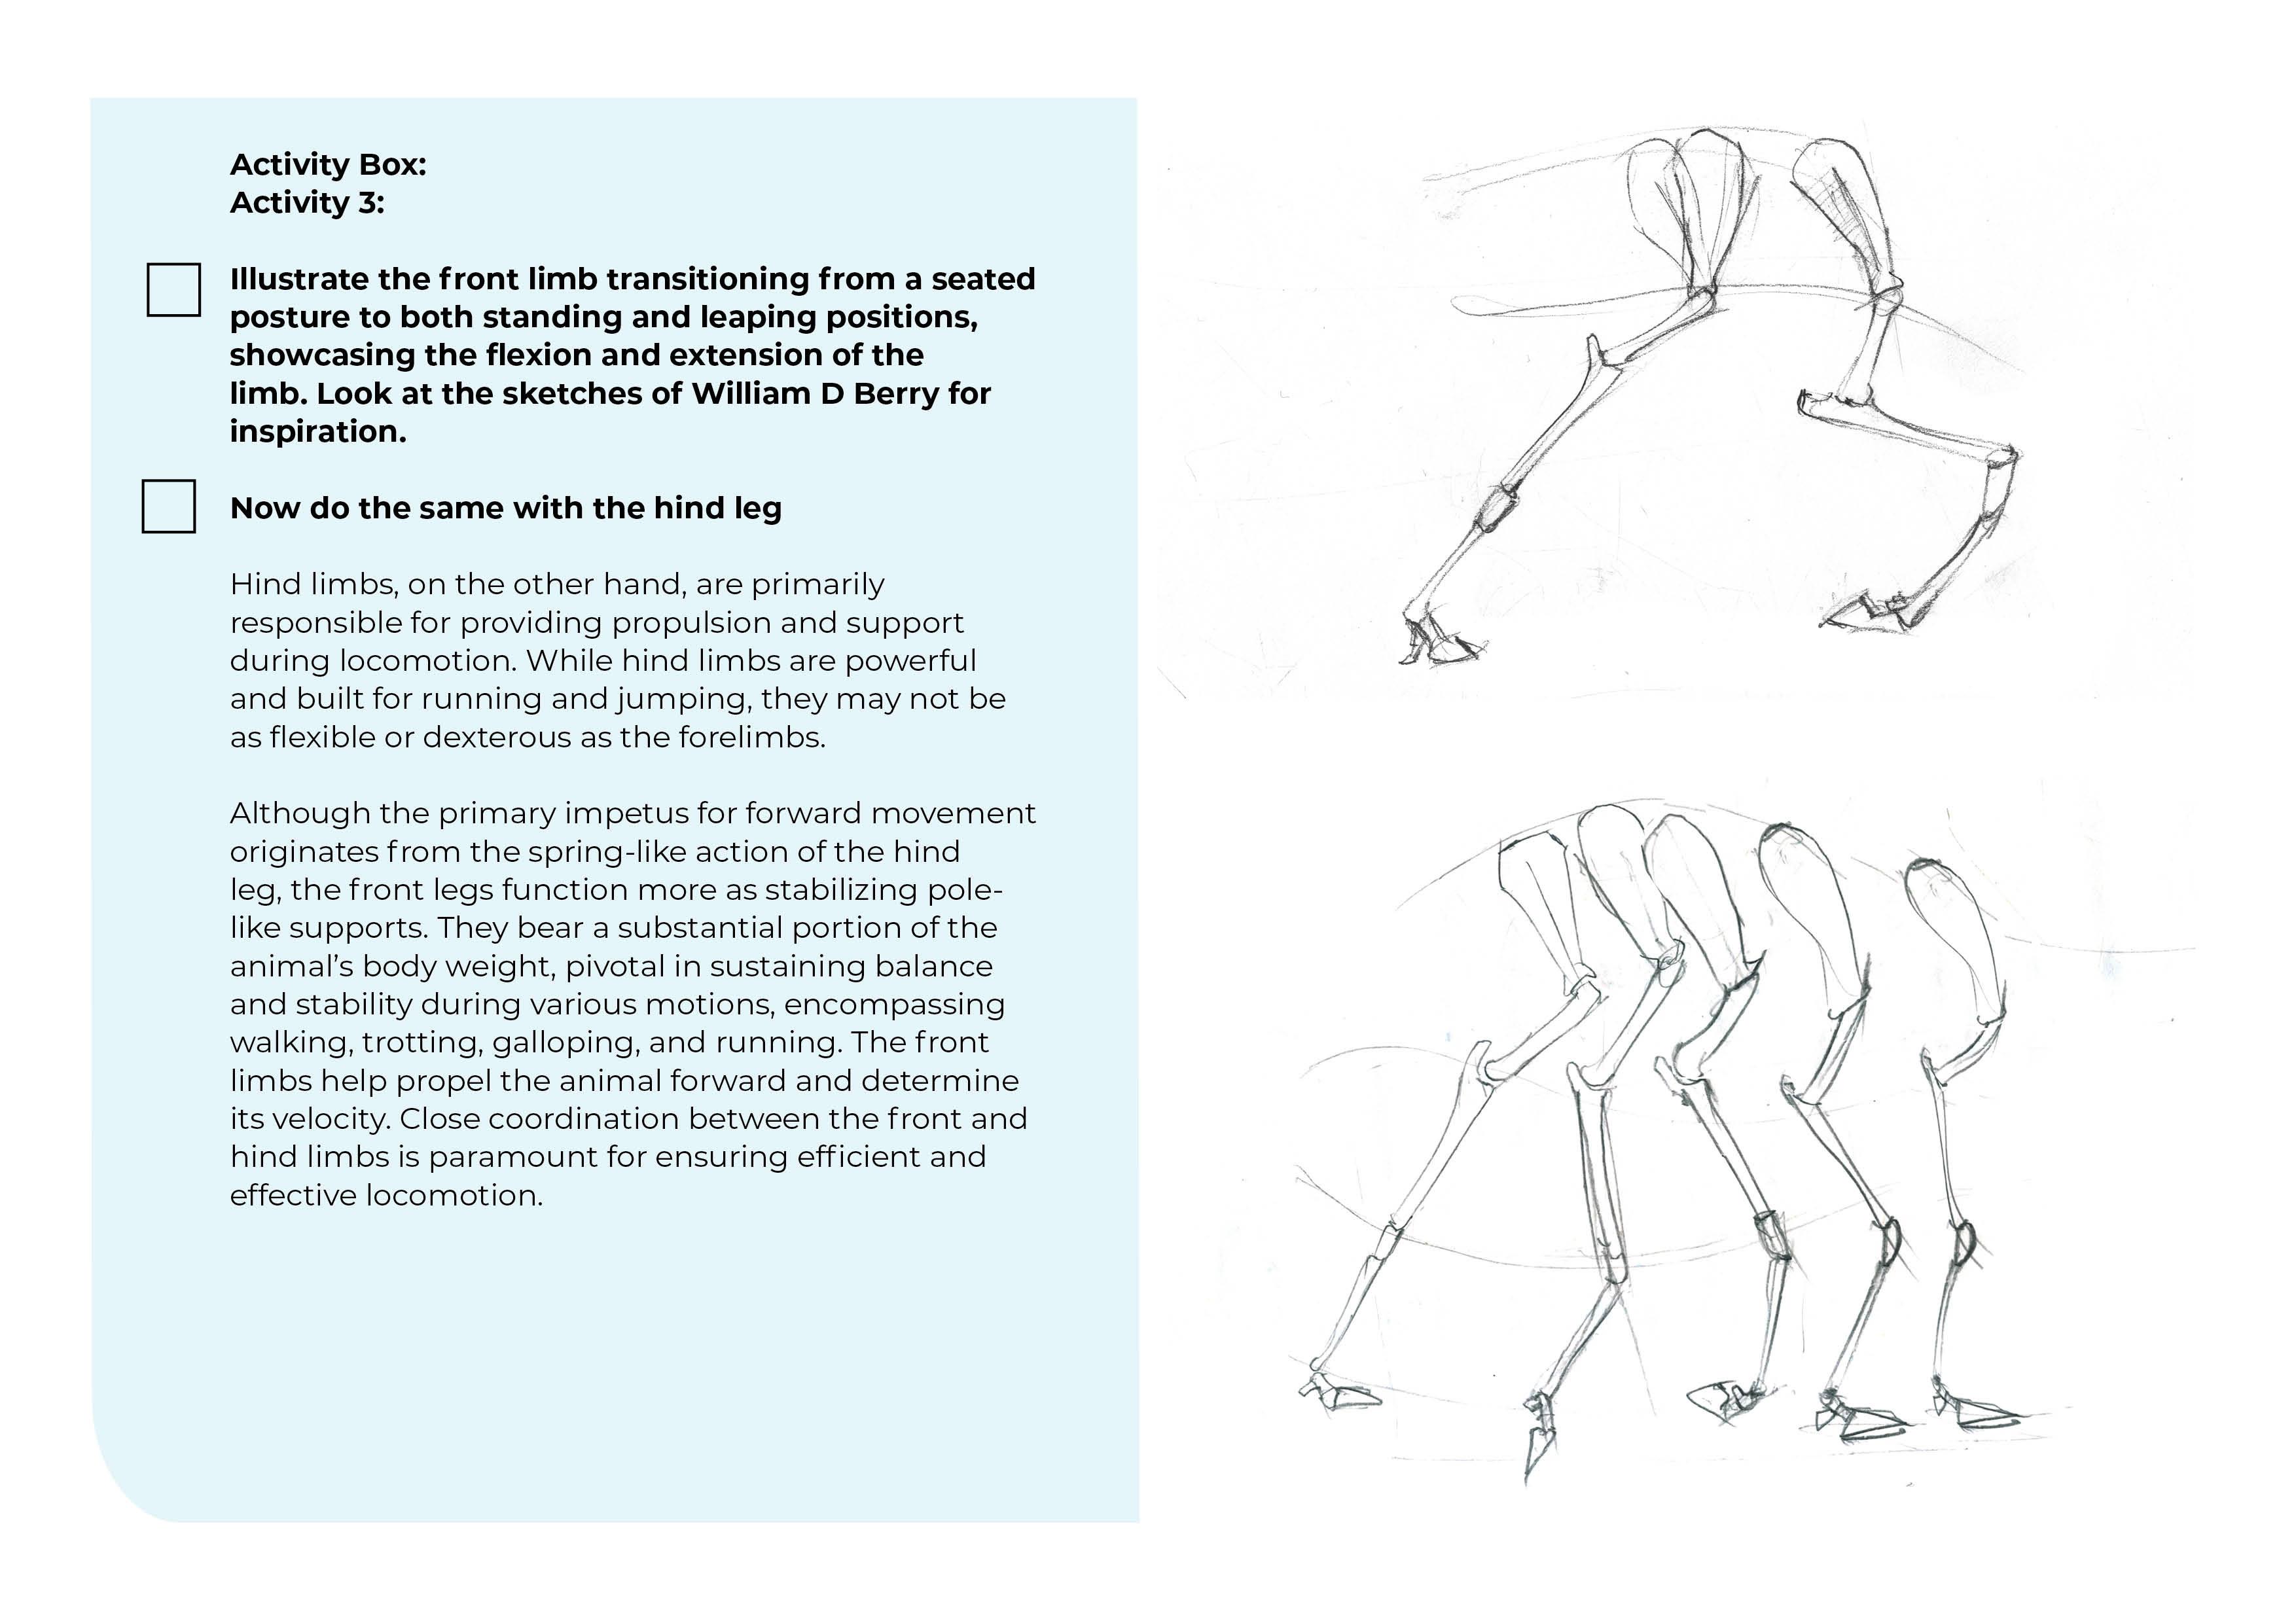
7. Reindeer: Articulating the Legs: William D. Berry was renowned internationally as
a wildlife artist. Through his disciplined
artistic prowess, Berry's clear vision translated a scientifically accurate and artistically
compelling portrait of the creatures and
the habitats of Alaska. Extensive periods of observation in the wild endowed him with a unique ability
to capture animals on the paper in a wide
range of artistic mediums. Whether it was
depicting fox cubs or Caribou Berry
managed to capture what you might encounter on a walk out in
the wild in Alaska. Each animal
meticulously rendered with its distinctive character, which shows a reverence
for the individuality of the animal and also capturing the specific
species characteristics. Throughout this course,
we're going to be learning to analyze the drawing process. Our goal in this
lesson is to learn how to accurately depict motion. Let's start by
drawing the scapular, which has a spine
down the middle, which is for muscle attachments. Connected to the scapula is the humerus bone,
which angles upwards. Sometimes you can
see the head of the humerus at the
front of the body. Then you have the two
pectorals between them. Let's extend those lines
downwards To complete the legs form by including
the fused radius and ulna. Remember to include the
elchronon. This acts as a lever. Then we move down further, from there to the wrist joint, which is the carpals. Which they create
a bulge on the leg and then move down to the
longer metacarpal and the three little phalanges bone follow along with my movements as we
practice together. Paying attention to
position these segments in either an uplifting
motion where the leg is bent or supported by
the other straight leg, which is then supporting
the weight of the animal. Try to feel the pose in your
own legs and see if you can exaggerate to
express the posture. This understanding through repetition helps
build confidence. If needed, feel free
to pause the video. Practice again and again, and then resume
at your own pace. By repeatedly drawing
the front limb in these different positions, we become familiar with the
variations in bone structure. This familiarity
boosts our confidence, facilitating more expressive
and creative drawings. As we advance, we can
shift our focus to shading and coloring
and surface textures. Knowing that our
foundational understanding of structure is secure, it's crucial to recognize that this seemingly basic practice
enhances our skills, freeing us up creatively. This foundational knowledge
allows us to concentrate on later more intricrate
aspects of drawing. Observe how the leg position changes from seated
to galloping. Pay attention to the position
of the hooves and how the little phalange bones
allow for extra rotation. Repetition of these drawings is key to ingraining the
knowledge of anatomy. The more we practice, the better we internalize the nuances of a
reindeer's motion. Allowing us to draw with
greater freedom and accuracy. Making the animal come
alive on the paper. Focus on capturing the reindeer's
movement rhythm first, and then build in the different
body parts accordingly. Pay attention to the thin, weight bearing legs supported by the body and adapt their
position accordingly. Remember, when one leg is bent, the other should be straight. Maintaining balance.
Understanding how reindeers distribute their
weight in movement is crucial. These observations contribute
to a realistic portrayal. Mastering these
fundamentals allow us to confidently explore more
advanced expressions, practice diligently
and observe keenly. And soon you find yourself catching the essence of
a reindeer's movement. Feel free to ask any questions, and don't forget to
download the resource pack for additional guidance.
Happy drawing.
8. Reindeer: Negative and Positive Space: I often like to draw with a color pencil that is the same color as the
pelt of the animal. Here I'm sketching with a
raw umber coloring pencil. Also what I do quite a lot is actually sketch in the
field on location, and then just use
the water color and put the water color in the comfort of the
studio because it's much easier
to do it this way. Next up I've done an
underpainting with a raw umber mixed with
a French ultramarine. This just puts in the shadows. I always think when you're
working with water color, you need to work out what
step by step will work. Obviously, if you're going
to do something like a zebra and you put the stripes in first and then put
the shadow on later, the shadow will all wash over
the stripes and muddy it. Up here I've blocked in
the undertone painting, which is a mixture of raw umber with French ultramarine
predominantly. The mixture is rich in
French ultramarine, which gives those lovely shadows that the impressionists
were so fond of. Next up, I've painted the pelt, and I've modulated the colors
between a range of hues. Sometimes moving more
towards the raw umber, sometimes more towards
the yellow ochre, sometimes more to
the burnt umber. And included varieties of
other colors in the mix to get this variegated color across the pelt that I could see on
this reindeer called Chili. Last of all, I've added
in the darker nodes, you work with water color
from light to dark. And just included a
few details because I was on the MetNse blue paper, this allowed me to put in
a splash of white color to pop out the dew lap and
the tail at the end as well. Artists can benefit from an understanding of
the pivot points as it enhances realistic depiction of movement, form, and balance. Mastery of these points adds
to the authenticity and dynamism to create
artistic expression. This is a sketch by
William Berry from his Alaskan sketchbook
in 1954 to 1956. It shows a caribou or reindeer
just in a walking pose. The first pivot point I want
to talk about is the atlas. The atlas forms the joint that allows the head to
nod up and down. It is the first
cervical vertebrae that we have in our mammals. It can be wider than the other
vertebrae in the skeleton. If you're drawing a skeleton, you might want to look at that. The atlas has a hinge joint, which means it can move in
two directions, up or down. Think of Atlas holding up
the world to remember. The next pivot
point to discuss is the axis which allows the head to rotate
from left to right. Next of all, we move down the neck vertebrae or
the cervical vertebrae, which also allow
for a great deal of flex and movement till we
get to the shoulder joint. The shoulder joint has a
wide range of movement. This is created by the
ball and socket joint. You can explore this
in your own arm. Then we get to the elbow,
which is a hinge joint which allows the arm
to flex and extend. The carpal bones are the
equivalent of the human wrist. Try to remember,
there's also flex in the digits at the end, or what they call the phalanges. These can also bend
in and out again. You can do that with
your own finger Working our way to the
back of the animal, we start with the hip joint, which is also a ball and socket allowing for a
wide range of movement. Moving down further
to the hinge joint of the knee and then further
down to the ankle. Then also we have the
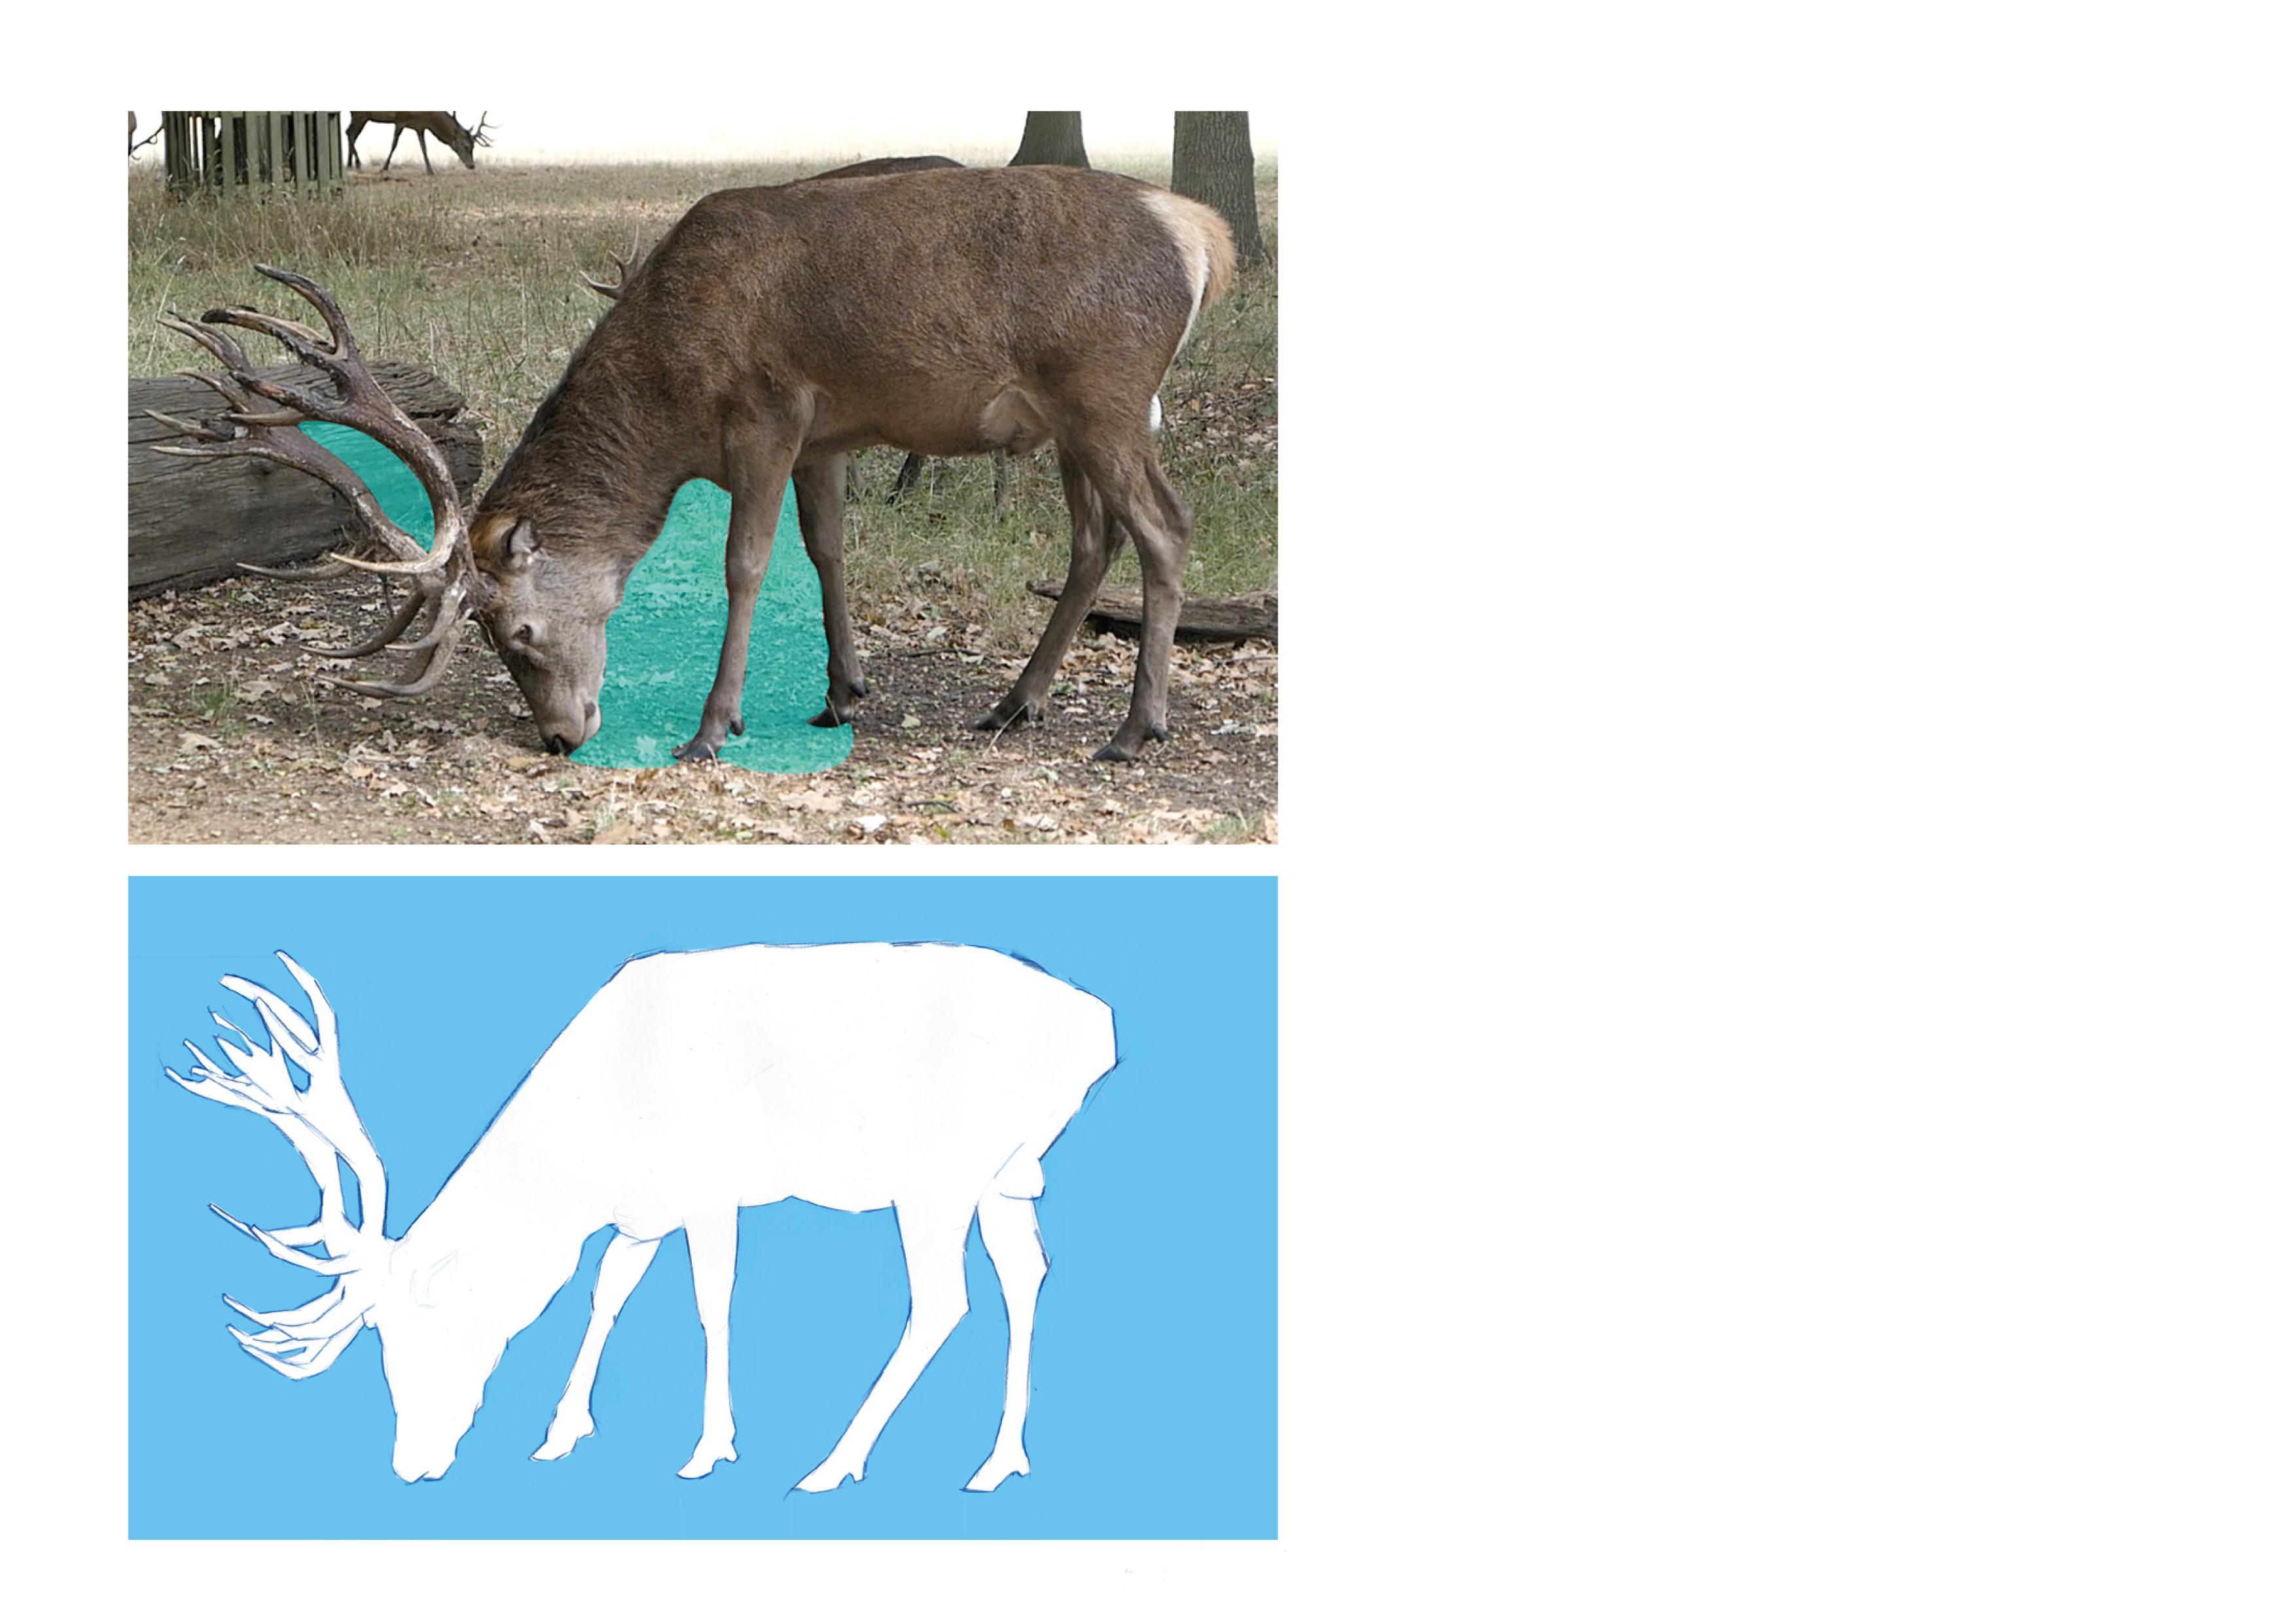
movements in the toe as well. Hi everybody, and
let's start doing some observational
drawing from HD films. I tend to start drawing the part of the body
that's closest to me. That might be the head, or it might also be
the rear as well. If you have the
animal turned around, we're going to have
different focuses in these drawing exercises. The focus of this one is
going to be negative space. This drawing exercise is really beneficial to help you let go of preconceived notions about how you think the
subject should look, what actually a reindeer is. Forget about that and just start thinking of the reindeer
as abstract shapes. The form of the subject will gradually appear on the page. If you actually focus on the
empty space around the deer, because of the unique
shape of the antlers, it's a good exercise to look at the negative
shapes between them. Try to develop a feeling
for your subject. Each animal has a
unique personality in contrast to the softer
contours of the body and the structurally sprung
legs that are full of tension in the hind legs
ready to spring into action. Negative space can be
both trapped and open. The openings that are
encircled by positive forms on all side are referred to
as trapped negative space. Abstract shapes are produced in both enclosed and open spaces. What does the shape remind
you of specifically? Is it like a tiny triangle? Perhaps it's a square
or more simple hexagon. It's an angular or supple
shape, sinewy and long. These negative forms aid in
capturing the positive forms. Particularly if we take a reindeer and we want to work out the length of the body, we can look between the
legs and actually really judge and look at that abstract shape
that's really helpful. There's a slight tendency to get the length of the body a bit too long to move from an area of understood to
uncharted territory. By looking both at the
enclosed open space and also the positive space, I tend to draw
adjacent body shapes from the one I've
actually understood. Be patient and let the
drawing develop until the deer's character becomes
apparent on the page. Try and capture these
abstract shapes that would combine to create
the character of the animal. Be surprised by the
shapes you see, and don't try imposing
what you think the deer looks like on any of your
observational studies. Representational drawing
at its heart is actually a combination of abstract shapes that when placed together, actually create the
illusion of something. Do, do, do, do, do, do, do, do, do.
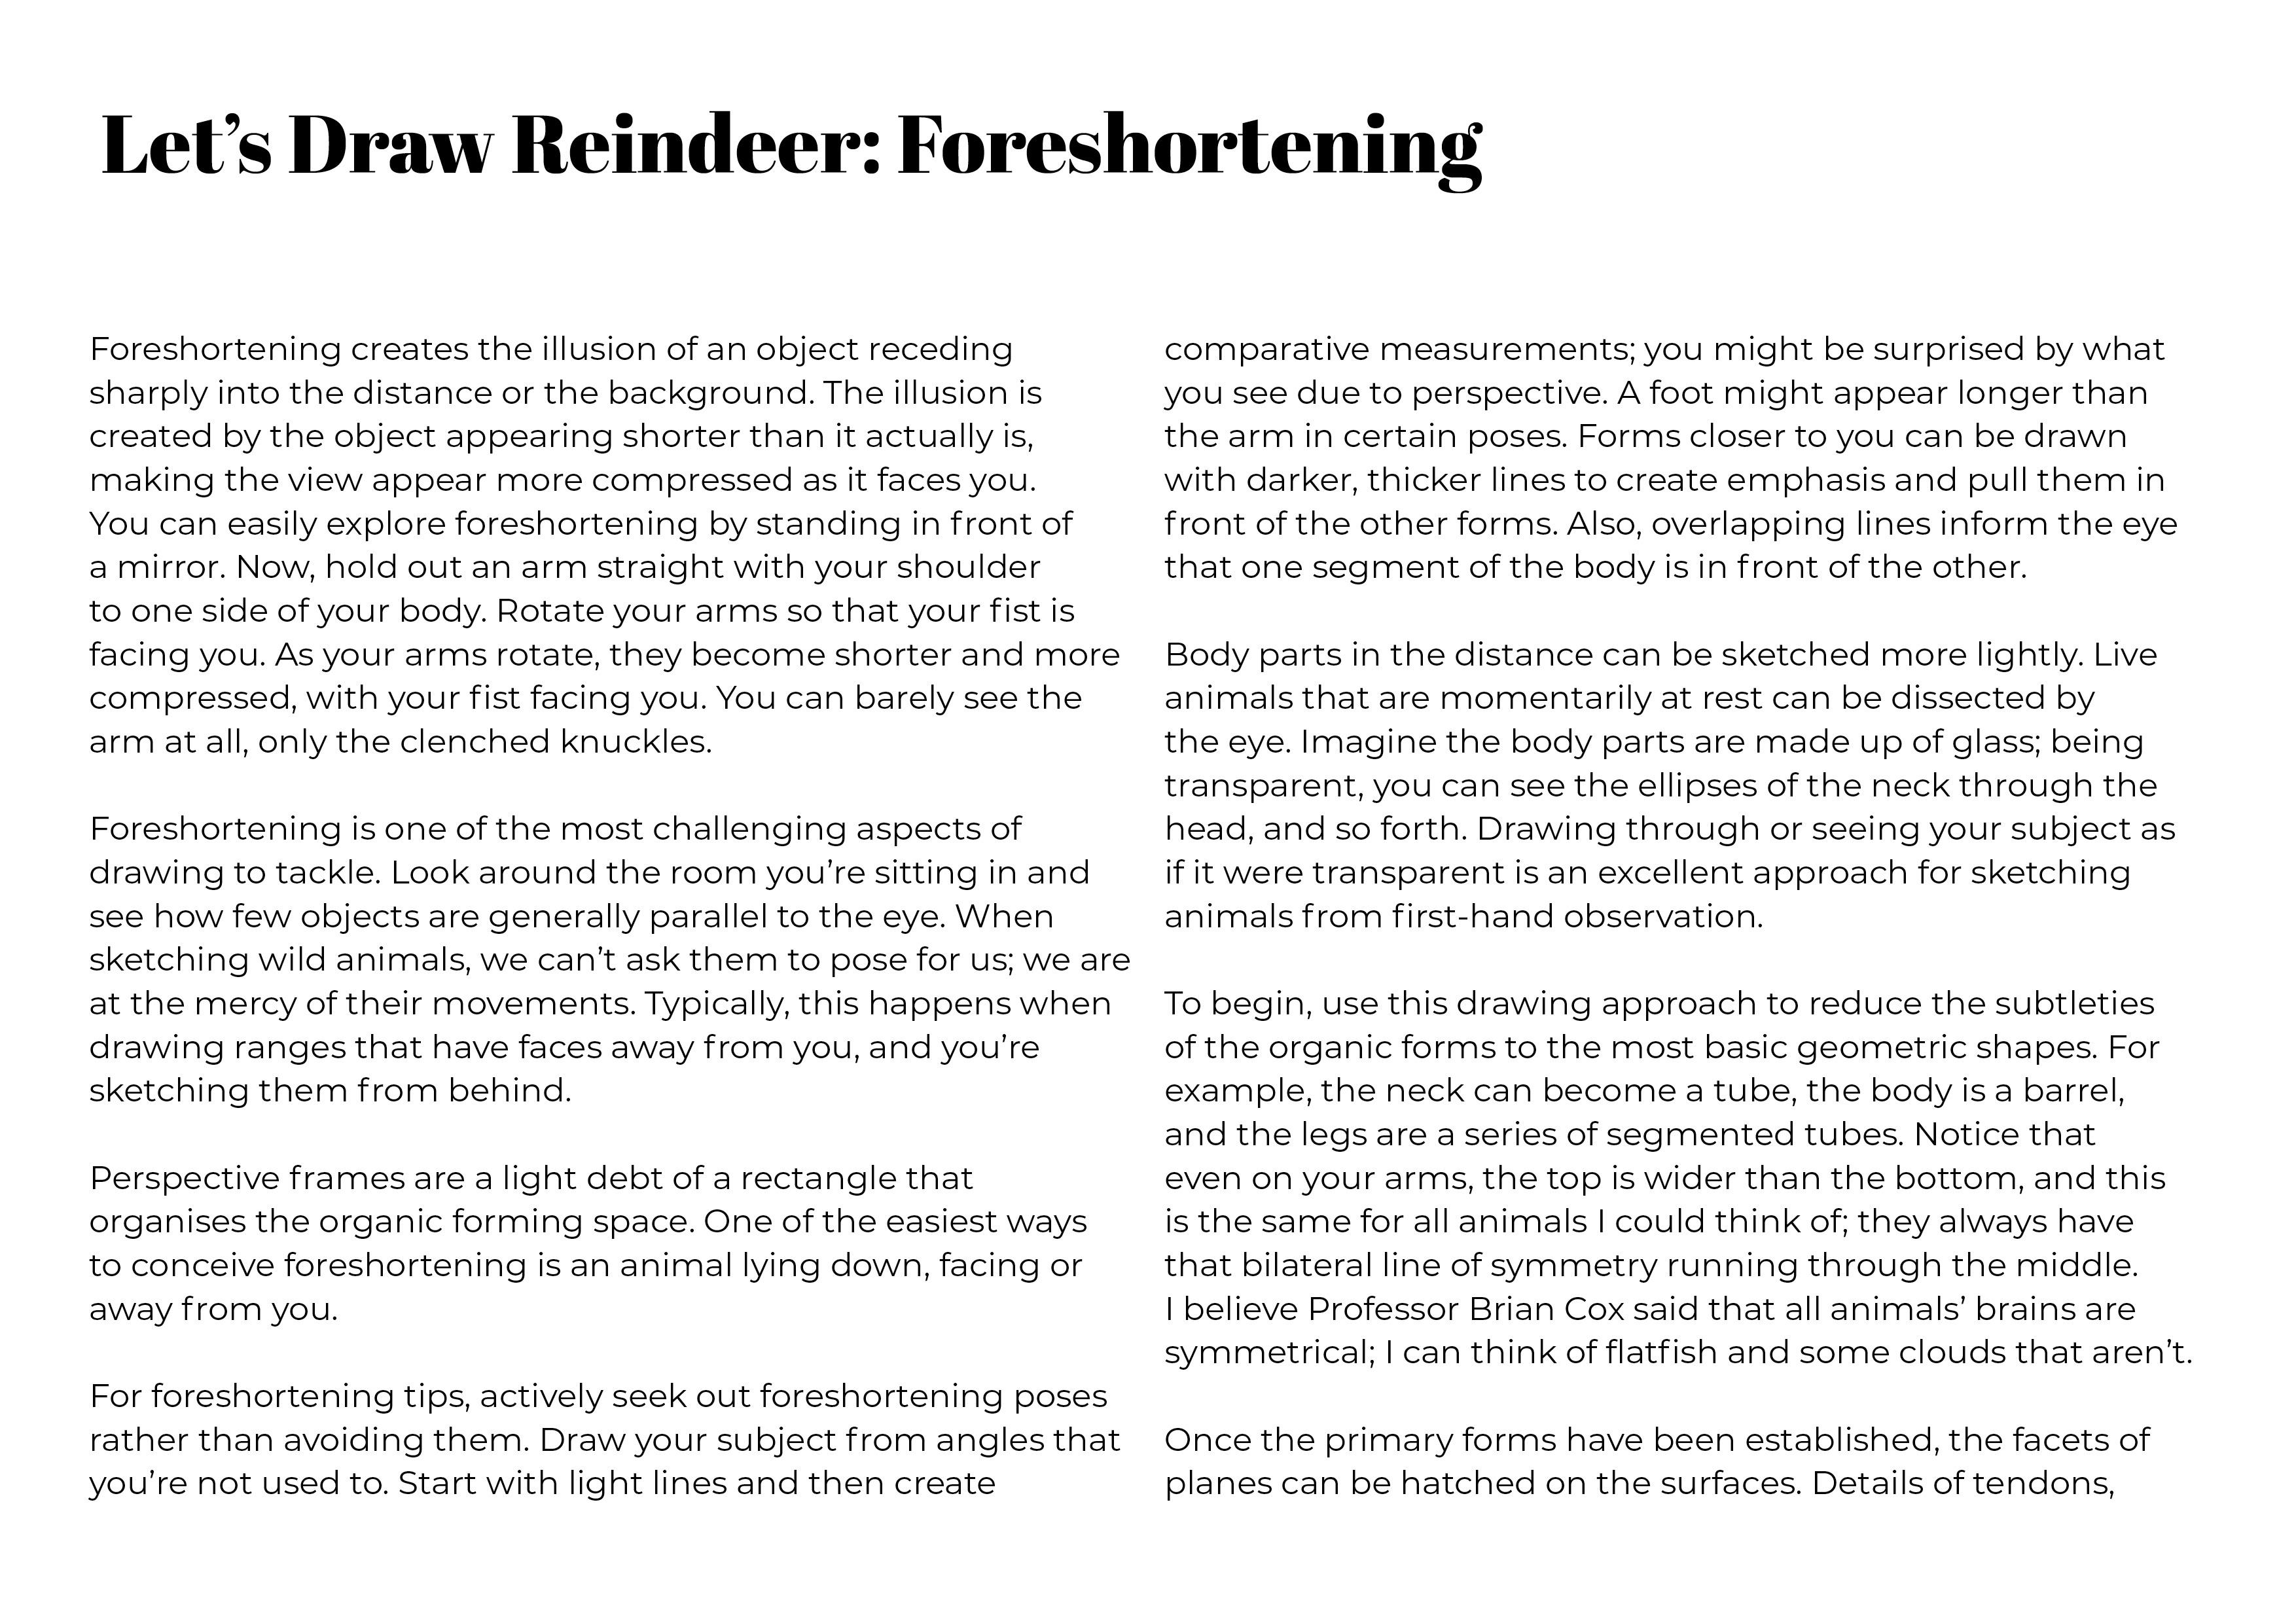
9. Reindeer: Foreshortening: In this film, I thought we would just focus on foreshortening. Foreshortening is a technique that creates the illusion of an object receding sharply into the distance or
into the background. The illusion is
created by the object appearing shorter
than it actually is, making the view that you've got more compressed as
it faces the viewer. You can easily explore
foreshortening by standing in
front of a mirror. Now hold out your
arm straight with your shoulder to one side of your body with your
fist clenched. And now rotate your arm so
that your fist is facing you. As your arm rotates, it becomes shorter
and more compressed. With your fist facing you, you can barely see
the arm at all. Only the clenched
knuckles foreshortening is one of the most challenging aspects of drawing to tackle. Look around the room you're
sitting in and see how many, few objects are genuinely
parallel to the eye. When sketching wild animals, we can't ask them
to pose for us, we are at the mercy
of their movements. Typically, this
happens when drawing reindeer that they'll turn and face away from you and you'll be drawing
them from behind. Perspective frames
is a light sketch of a rectangle that organizes
the organic form in space. One of the easiest
ways to conceive of foreshortening is an
animal lying down, either facing you
or away from you. The thorax and the belly of the reindeer can be thought
of as a massive barrel. Foreshortening tips,
purposely seek out foreshortened poses to work on rather than
avoiding them. Draw your subject from angles that you're just not used to. Start with light lines and then create comparative
measurements. Be surprised what you
see due to perspective. A foot might appear longer
than an arm in certain poses. Forms closer to you can
be drawn with a darker, thicker line to
create emphasis and pull them in front
of the other forms. Also, lines that overlap inform the eye that
one segment of the body is in front of the other Body parts in the distance can also
be sketched more lightly. Live animals that
are momentarily at rest can be
dissected by the eye. Imagine the body parts
are made up of glass. Being transparent, you can see the ellipses of the neck
through the head and so forth. Drawing through or seeing your subject as if
it was transparent is an excellent
approach for sketching animals from firsthand
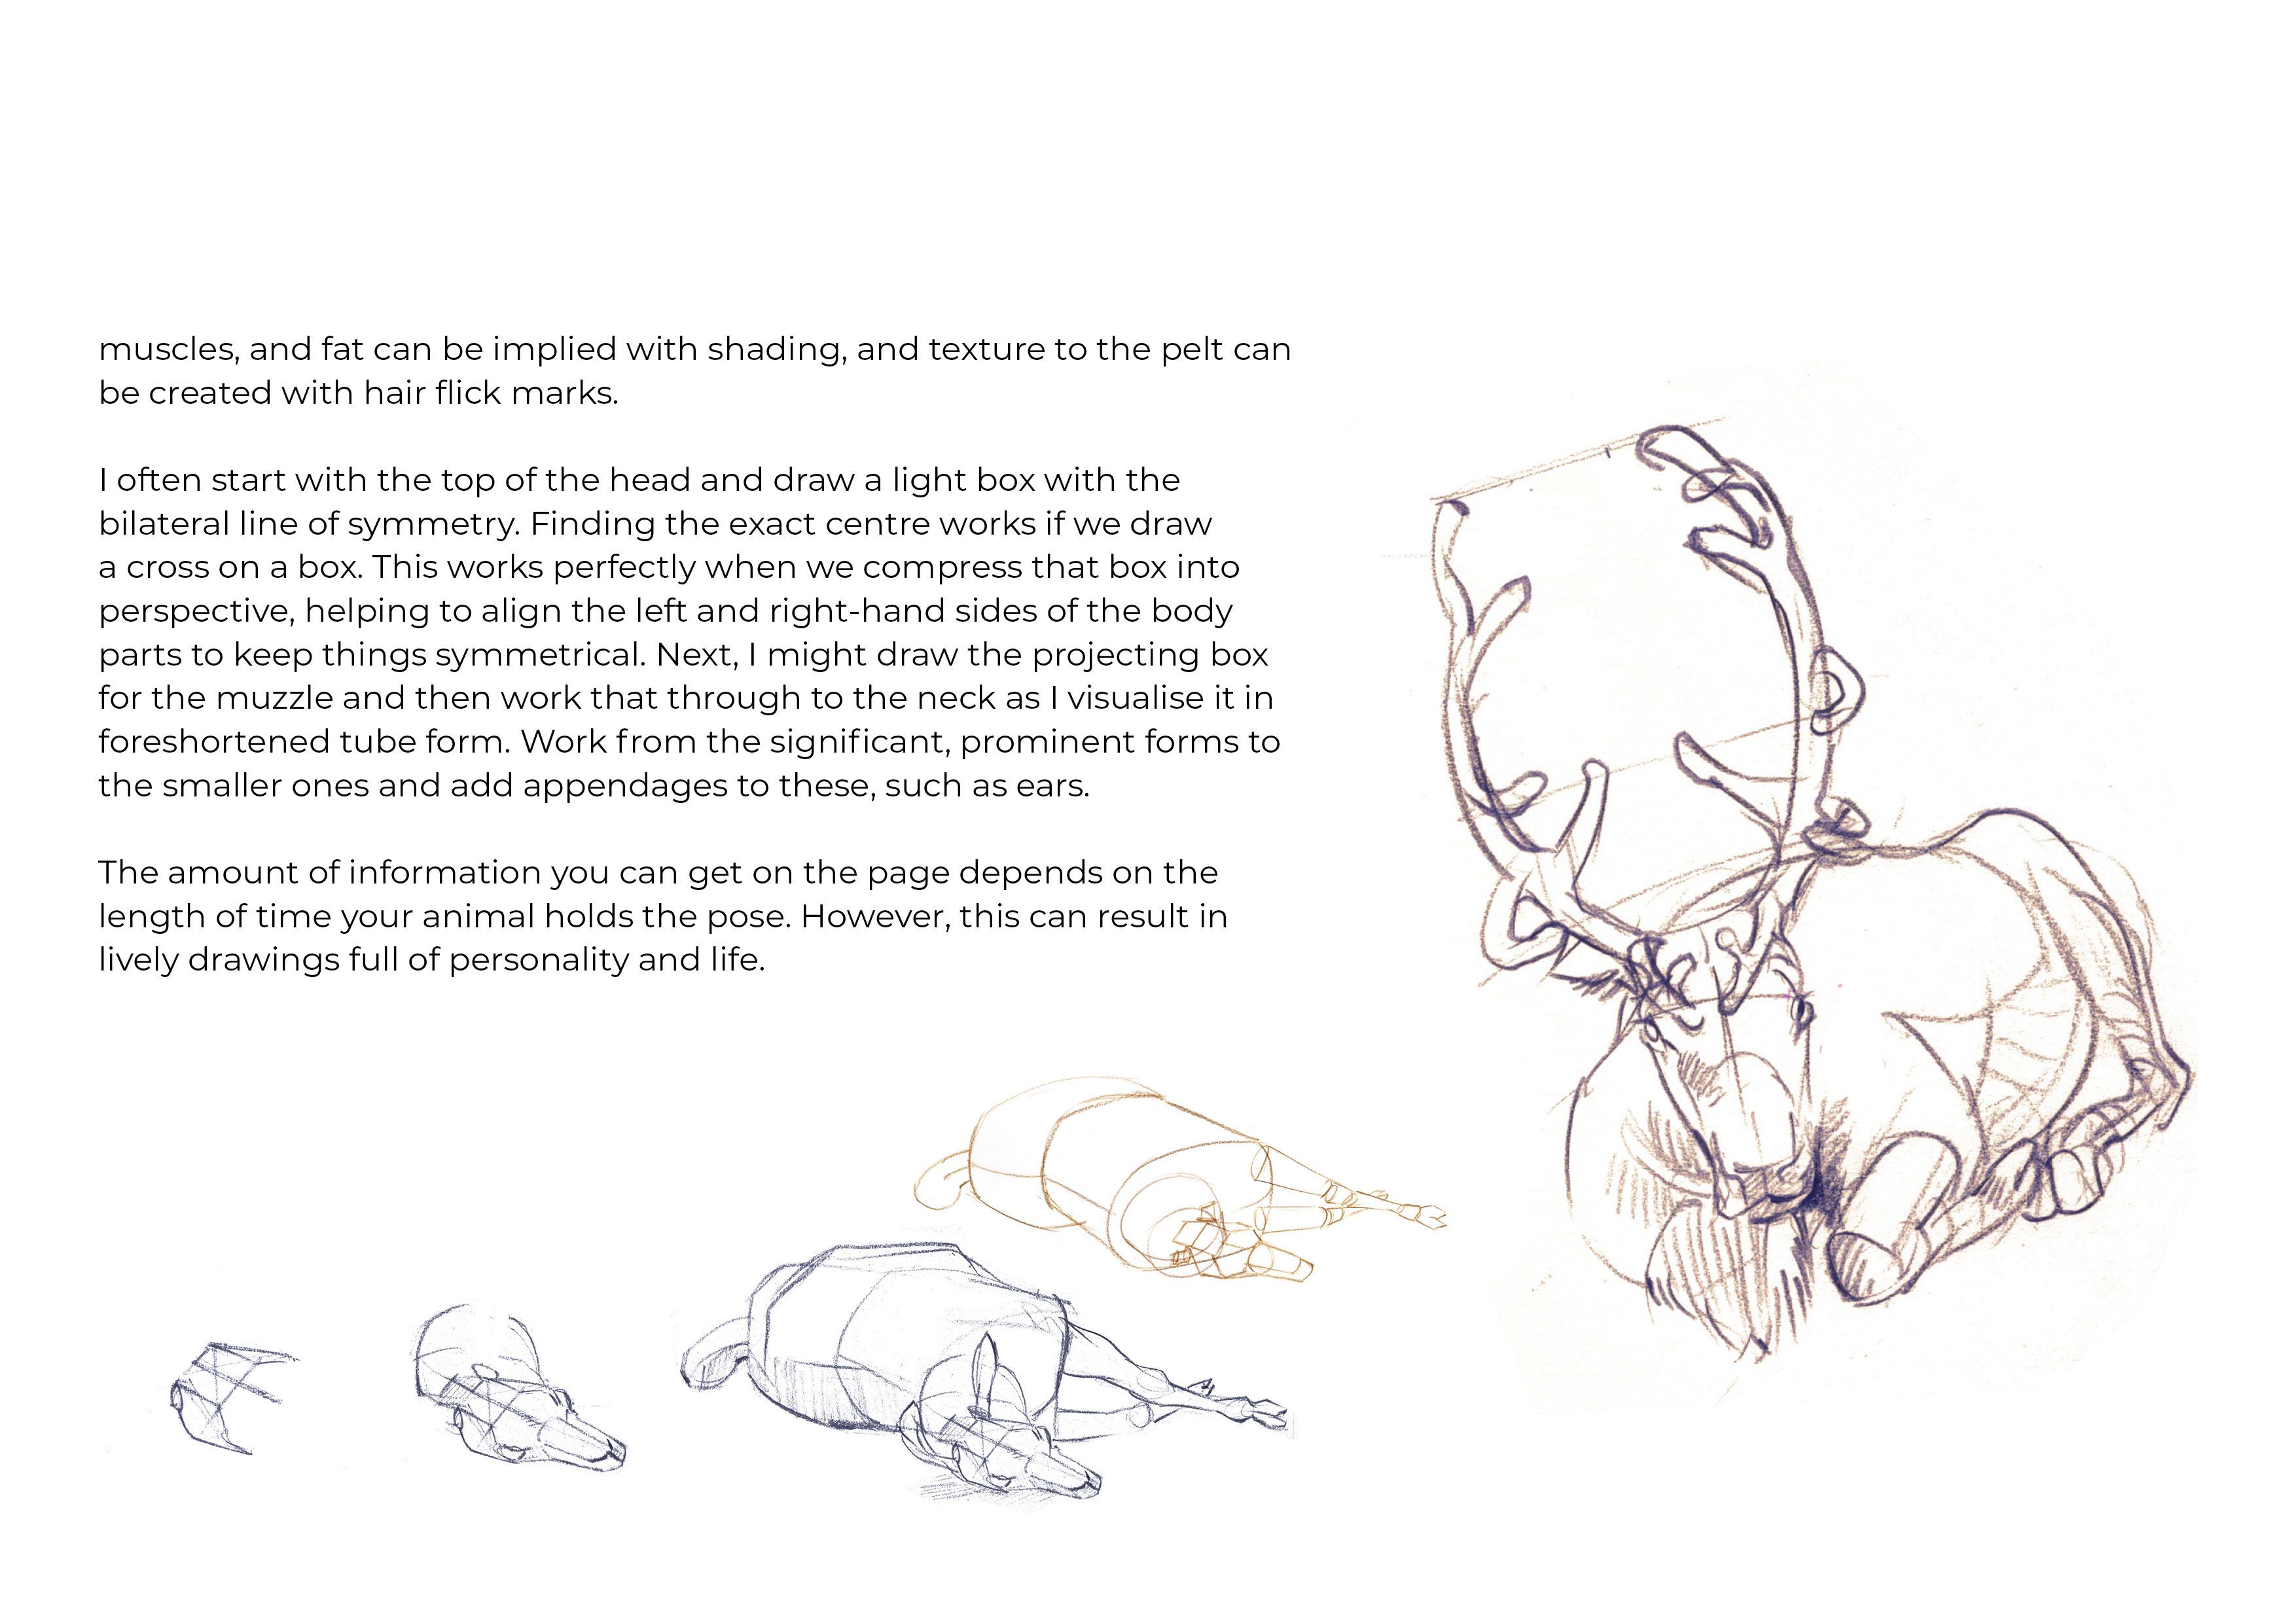
observation. To begin, use this drawing
approach to reduce down the subtleties of
the organic forms to the most basic geometric. The neck, for example,
can become a tube. The body is a barrel, and the legs a series
of segmented tubes. You'll notice that
even on your arms, the tube are wider at the top
and narrower at the bottom. This is pretty much the same, all animals I can think of. I've always got
that bilateral line of symmetry running
through the middle. I think I heard Professor
Brian Cox saying that I think all animals with
the brain are symmetrical. I can think of flatfish and
some crabs that aren't. Once the primary forms
have been established, the facets or planes can be
hatched on the surfaces. Details of tendons
and muscles and fat can be applied with shading, and tufts of the pelt can be created with
hair flip marks. Many times I might start
with the top of the head. I do a light box with the
bilateral line of symmetry. If we do a cross
across on a box, we find the exact center. And this works perfectly when we compress that box
into perspective. This really helps align the
left and right hand side of the body parts to keep
things symmetrical. Next, I might draw
the projecting box for the muzzle and then work backwards through
to the neck as I envisaged as a
foreshortened tube. Work from the big, prominent
forms to the smaller, and add pendenges to
these, such as ears. When sketching
from live animals, the amount of information you
can get down on the page is dependent on the length of time your animal
holds to the pose. However, this can result in a lively drawings that are
full of personality and life. The back leg in repose can be
thought as a cocked spring. Capture the dynamic
angle of the heel and the noble calcaneus,
which is the heel bone. And look at the pronounced
Achilles tendon, which attaches the heel
to the gastronemus. A gap between this
cord and the bone creates a prominent indentation. So you can actually get some shading in there
and really try and model that can feel this
is in your own body. And it's clearly seen, I tend to think of this muscle and tendon a bit like a chicken drumstick. Do, do, do, do, do.
 Tim Pond, Author, Illustrator & Educator