Transcripts
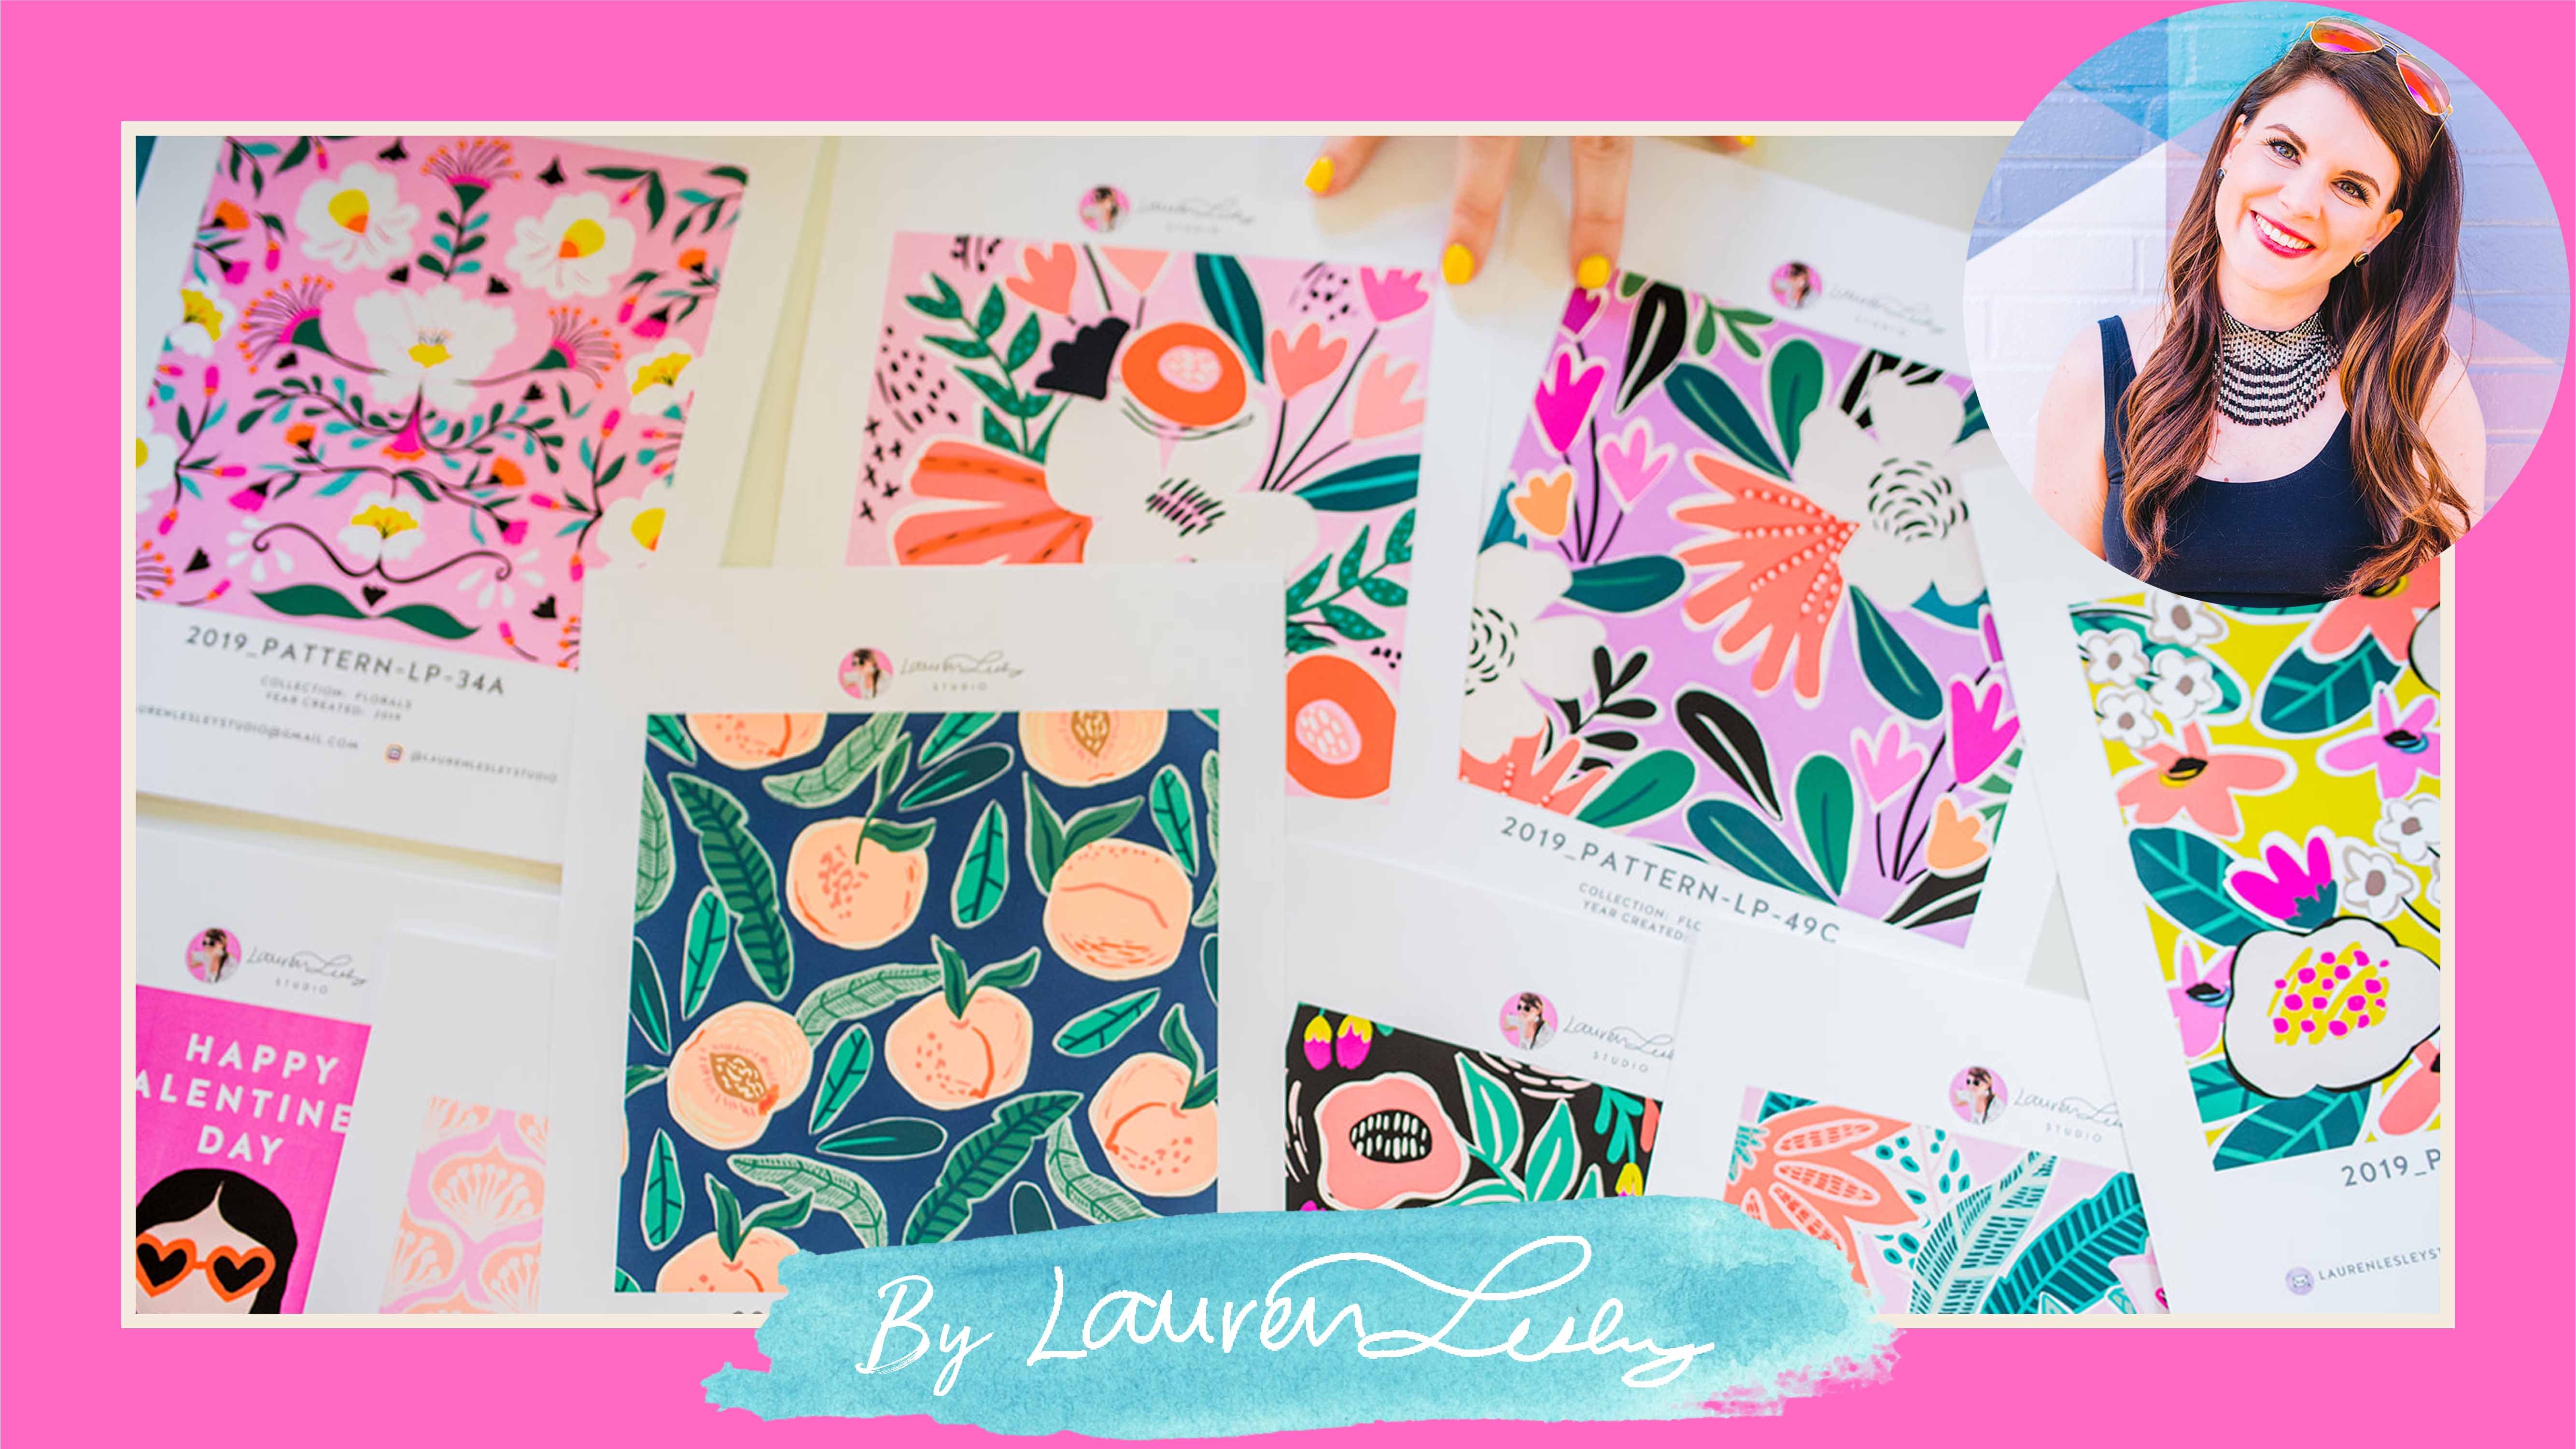
1. Intro - Hi, I'm Lauren Lesley!: Welcome to a drawing from life. I am Laureate of line Leslie studio. I'm an artist and textile designer. I was a fine art major in college and received a BFA and studio art with a concentration in oil painting. In this class, I'm going to teach you how to develop your life drawing skills and why it's beneficial to your overall creative process. But before we dive into class, I wanted to say that it's entirely possible to be an amazing artist or designer without drawing from life, it is not essential to your creative process. However, it does have many benefits that we will dive into in just a second. Drawing from life is a practice that I learned while being a fine art major in college. And sadly, when I became a textile designer, I gave up the practice for many years and kind of neglected in however, as a senior designer at the midpoint in my career, I started to realize the value of drawing from life. Again, there are so many benefits to drawing from life that I want to re-incorporate back into my creative process. And I want to share those with you today. Drawing from life may or may not be relevant to selling commercial work. I now work as an independent surface pattern designer, and I still highly recommend that you research trends and create syllable where good as viable for the marketplace, using reference photos is often the most efficient way to do this. And there is absolutely nothing wrong in working from reference photos. So I hope this class doesn't give you that idea that it's not okay to work from reference photos. It totally is that being said, artists aren't usually just one thing. A lot of artists are also musicians, are writers. A lot of commercial artists are also fine artists. They can be categorized as both sides. And so that's definitely a bucket that I fall under it. So please don't feel boxed in if you feel like you are not a professional fine artist, this class is still for you. So whether you're looking to get into fine art professionally or just as a hobby, drawing from life is a beneficial practice that really just helps sharpen your skills as an artist and sharpening my skills in becoming a better artist is just always something that I'm interested in. I. All right, let's dive into the class. All right, let's go over some of the benefits of drawing from life. First, it helps break your routine. Often as artists, we get into such a rut with just working from reference photos and never leaving our studios. And of course that can be more efficient sometimes, but sometimes it just helps to break your routine and kinda get out of your comfort zone. It also gives us a human perspective rather than a photographer's perspective. When we work from a reference photos all the time that we are kind of looking through the lens of what the photographer may have seen, even if we were the photographer from that shot. So when you are working from life, you get that human perspective where you're able to look all around you and kinda change things as you see fit. It also helps develop flexibility in your art. If a scene is moving or people are going by or animals or kind of moving around, then you have to work quickly. And sometimes you have to improvise as well. Sometimes you're able to get down a quick sketch, but you have to fill in some of the details later. And so it helps you become a more flexible artist. It also helps develop your observation skills. Again, you're going to have to be working quickly when you're drawing from life, especially when you're doing that initial gesture sketch, what you will get to in a minute. But it helps you really see with more focus and clarity when you are actually observing something in life, sometimes our brain just tends to blur everything together and we might see something cool and just say, oh yeah, that's cool. And then move on to the next thing without really studying all the details. And so you get better observation skills when you are really focused on all the details of what you're looking at right in front of your face. It also helps generate ideas. When you're in your artistic flow, then you are really getting inspired in real time. And it helps generate new ideas for your creativity.
2. Supplies + Gesture Sketching: The art supplies you'll
use when drawing from life will vary
greatly depending on if you're working in an art
studio where you can store your supplies throughout
the length of your project or if
you're on the go, moving around from
place to place. Throughout this
class, we'll cover several different methods
of drawing from life. Some of the most popular
ways to draw from life are to depict a still
life of objects ranged in the middle of a room or to depict figure drawing where a live model poses for the artists usually
for about 3 hours. If you have a setup
in an art studio to depict either still life
or figure drawings, then you'll most likely be able to use any art
supplies you wish, ranging from graphite or charcoal to acrylic
or oil paint. However, if you're
drawing from life while traveling or moving around
from place to place, your choices and art supplies will be a little more limited. You'll need to think about
bringing art supplies that are light weight and pack up easily in a bag
that dry quickly, if you're using
wet media and that won't make a complete mess as you're carrying them around. Oil paints are really not recommended when
you're on the go. It's not impossible, but it's
definitely more cumbersome. Regardless of what type of
life drawing you're doing, it's always best to start
out with a gesture sketch. A gesture sketch is simply a drawing technique where you
use very light loose marks. If you're starting out
with a pencil sketch, use a hard lead such
as an H or HB pencil, and that will be perfect
for a gesture sketch. The marks are already
pretty light, just remember not to bear down too hard on the paper
when you're starting out. The gesture sketch
really helps you map out your drawing
without making any firm commitments that cannot be erased
or layered over in the beginning when
you're starting out your drawing and getting
to know your subject. It really helps you
get in the flow as your eye moves
around your subject and begins to understand through that hand
eye coordination, where your subject
lands on your page, what the proportions are like, and how relative the
space is and so on. Once you write your gesture
sketch loosely laid out, then you could start
to add darker lines and firm up your drawing. You can start to
add more details and color with
confidence because you've already
mapped out exactly where your subject
lands on the paper. If you're working
with paints and prefer to skip the
pencil sketch, then you can totally
just your sketch with washes of large shapes. Just make sure you thin down your paint either with
water or paint thinner, depending on if
you're using acrylic, watercolors or oil paints. You can map out your
composition with thin wet washes and then build up your sketch
gradually with brighter, darker colors as you feel really confident about
where your subject is laid out on the page.
3. Your Own Backyard: Your own backyard. So if you're not ready to go out in the world yet been I totally understand your backyard is something that you have easy access to its private. You have a wider range of materials you can work with as well. Because if you are at your house, then you can maybe broaden your scope of art materials to things like acrylic paint or gouache or oil paint, charcoal or dry pastels, anything like that where you can easily take your work inside and store it in a place where it's not going to smudge and get all over other things that may be in your bag if you were going around and traveling from place to place. You can also take a break and come back later. So if you need to take a bathroom break or eat lunch or anything like that, you can kinda leave your setup in the backyard and go inside and watch it or just come back when you're ready when you are traveling and you are going for them. Please do. Please either downtown or in a park like if you need to eat or if you need to have a bathroom break, then it's probably going to interrupt the whole setup. So you really need that good block of time. And when you are traveling from spot to spot, you know, to really sit there for awhile and capture what you want to capture. And when you're writing in your own backyard in plain air with a set-up like this is going to be way more feasible. So yeah, like I said, you can work in oil paint, acrylic paint, gouache brush, charcoal, dry pastel, anything that's super messy and can be left alone. You can definitely do that in your own backyard. All right. So let's go outside. This is my backyard, as you can see, it's pretty green. I live in Georgia and we have nice trees all year round and it is springtime, so things are starting to blossom and it's getting greener back here. And so this is just the perfect place for me to sit on my deck in this little outdoor chair? Yeah. And I'm just working in graphite with these deer went to pencils, as you can see here, just a range of graphite and I have my blending stump as well. So I'm just gonna go ahead and sit in this outdoor chair and kind of set up. I have this really cool little lap desk that expands. It's made out of bamboo and then the back just tilts up so that I can sit up straight. And yeah, I just got it on Amazon and I really love it so I can just sit up straight as I'm drawing. And I'm starting out with really light pencil marks, again doing that gesture sketch that we talked about earlier. And you just kinda want to look at your surroundings and sketch out your page. You want to try to come up with a good composition for your page and you can add or subtract what you see in front of you so you don't have to add everything if you don't want to. But for this lesson I'm just kinda focusing on realism and going ahead and just kinda drawing out some of these trees. I'm using the blending stump to shade in some of the kind of the base layer. And then I'm going back and adding some more details. When I'm working in pencil, I always pretty much start at light and get darker as I move forward and add more detail. So you just want to keep looking at your surroundings and then looking at your paper and seeing what else you can add. I'm adding a bunch of leaves that are from this magnolia tree in front. And you can also understand which trees are closer to me based on if they kind of go off the page, if the scale is enlarged. Or if they are kinda starting higher up in the background or if they are closer to me, trees that are closer to me will be higher up in the foreground and may even go off the page, as you can see with this tree over on the right, it's expanding across the entire side of the right page and it's going off. We're not going to see the bottom of it. So that means it's much closer to me. And so that's sort of how we're able to read objects or trees that are closer or farther away from us. The trees the in the middle is starting higher up on the page, which means that it is farther away from me. And so now I'm just going in and kind of mapping out where my light sources. So that's another thing when you are sketching from life is you want to be aware of where the light is coming from. Now if you take a long, long time to draw, then the sun might move in the sky, right? So your light might change a little bit, which is what the impressionists did. They were trying to capture light at different points throughout the day. And so light was kind of Monet's subject, if you will, and he was trying to capture it at different times throughout the day, within one scene or within one painting. So that's pretty cool to know about Monet. Yeah, I'm just kinda mapping out where my shadow is here on the tree. I can of course go back and forth by using a lighter or darker graphite and just applying it in layers as well. And so it's really just depends on how you like to work, but you don't wanna go too, too dark too soon because then you're going to do a lot of erasing and it's hard to completely erase a really dark line. So that's why we like to start light and then get darker as we are getting closer to being finished, you can always add more graphite and a softer lead. But I'd really like to start out with an HB pencil, which is super light and kinda just map out my areas as you can see, it's starting to come to life a little bit more here. And I'm kinda filling in where the light is hitting this side of the yard and on the right side it's a little bit more shadowed. So I'm using my blending stump to kind of fill that in a little bit. And this other tree we have that's kinda leaning and I can see a little bit of my neighbor's house as well, kind of backing up to the fence that you'll see me fill in a little bit more here. Now there are a lot of shadows in the little porch in my neighbor's house, so I can go ahead and fill that in. If you're feeling confident about shadows in an area, then it's okay to kinda jump around and fill those in first, as long as you kinda like the way the initial sketches looking, you'll notice that I get a little bit loose, sometimes too with leaves or when I'm drawing foliage that's kinda more off in the background, or I kinda tends to blur things that are far away. So those don't need to have as much detail as the leaves that I'm drawing that are up closer to me. Those will notice a lot more such as these magnolia leaves that are kinda coming in front of this pine tree over on the right side. Those are going to need to have a little bit more detail than the leaves we see. For example, in my neighbor's yard, where am I kind of blurs them altogether and creates kinda squiggly little sketchy lines. So here we have the finished piece. It's not anything remarkable. I really enjoyed creating it and it was really fun to draw from life. Again, it's just a good practice to have. It makes you a better artist overall. And I'm always interested in keeping my skills sharp and becoming a better artist, even if it's a little bit different than what I do as a commercial artist in my day job.
4. Still Life: Still life. Still
life is generally, anything that you
can kind of find around the house and
animate objects. So the first one
is traditionally, a lot of times is
fruit and vegetables. You'll see like an apple or
oranges, something like that, sometimes paired with flowers and kind of arranged in
the middle of the room. I definitely had a
setup exactly like this when I was in
college and we had to kind of all paint
the center still life from different angles as we were all
circled around it. Vases and bowls are often you put in there
for different heights. It kind of helps the
composition as well so that you have a smaller piece of fruit
and then a higher vase. But really still life can be any kind of
inanimate objects. It could be your cell phone, a piece of gum, a lamp, it could be a bar of soap. It could be really
anything that you have lying around your
house that you want to arrange in a composition and then sit down and draw or paint. All right. So let's go into
the kitchen and see what we can find to draw or paint
for our still life. All right. So we have
this whole bowl of fruit here that I could pick
out a few things. An onion might be interesting. We have an orange garlic. Maybe maybe a bigger onion. But we've also got some
things in the fridge. Okay. Maybe something green would be interesting an apple. You would do like a red apple as well that might give
some nice color. All right. Let's carry
this into the studio. Okay Arranging the composition of your still life is going to be an important factor
to your drawing. You'll see me here
arranging the fruit over and over again until
I get it just right. You want to make sure
the fruit is interacting in a good way and that
all of it is visible, that it's a good height, and
that's just like providing some dynamic angles
throughout your composition. I finally arranged it here
in a way that I am liking. I'm going to leave it alone
now and start my drawing. So I'm just setting
it up over to the side of my sketchbook, and I'm just going to start this still life drawing
in my sketchbook. Here I'm opening this handmade sketchbook to my
mixed media paper. It is a gray mixed
media Strathmore paper, and I have my fruit
over to the side, so I'm just going to look at it again in real
life, in person. Because I'm doing this
still life in my studio, I'm really in the mood to
use these oil pastels. These are the Karen
dash oil pastels. They are a
professional grade and they're super creamy.
I love them to death. I also have these oil pastels that I've had since
I was a student, they are student grade, re
PA expressionist pastels. And they also work
really well and they really do just provide
some different colors. They're a bit brighter than
the options that I have in the arenas selection, if
you can believe it or not. Of course, the arenas has
an amazing range of colors, but I'm just going to have these over to the side just in case. And so I'm going to just
tape off my page here to frame the workspace that
I want for my still life. I'm using an H pencil also to sketch out my drawing
before I dive into the oil pestels you can
also use this pencil to measure the still life
that's in front of you. You can just put your finger
on the pencil and see how it relates in proportion to the other fruits or whatever
still life you're drawing. I'm just using this H pencil to map out the initial sketch, and then I'm diving in and just going in with my oil
pestels right on top of it. The oil pastels
are pretty thick, so I don't need to worry about these pencil marks
showing through. I did sketch pretty lightly, which I do recommend for
you to sketch very lightly, using a hard lead
which goes on lighter, such as an H or HB pencil. Then when you go on with
your oil pastels, again, I'm just using this
scumbling technique at first and layering on, using mineral oil and Q tips. I'm just getting a little bit
of mineral oil on my Q tip, and I'm going in and spreading
the oil around my paper. Now, it looks black here, but that's actually just the oil interacting with the paper. It'll dry clear. So it's not actually black. And then once I get that
oil on my oil pastel, it goes on a lot smoother and it just gets that
thin base layer down, and I can of course layer with these oil pastels
over and over again, which is why I
love them so much. I can kind of block in
some of my light areas and then go back in
with some shadow areas. Using these oil pastels would be probably too difficult if I am traveling and sketching from life with a bag and
if I'm on the go. But since I'm in my studio here, it's a really good opportunity
to use these oil pastels, and I really love
the fact that you can go dark or go light
and play back and forth. Again, I'm just
kind of spreading the mineral oil across
my paper just to get that base layer down
in stains the paper before you get a really thick application
of the pastels on. Next, I'm mapping
out this banana and just starting with this
basic yellow color. Again, just getting
that base color down, and this banana is changing
as I am drawing it. It is definitely turning brown, which was a bit tricky
because it's a little bit of a race against the clock when
you are drawing from life. But of course, you can take some liberties since
it is your art, and you don't have to copy it exactly from
what you're seeing, but it is a good
reference point. Again, I'm just using
this mineral oil with my Q tip to get that base layer down
before I start adding on more highlights
and shadow areas. Okay. I've also filled in
the green of this apple, and now I'm going in
with this brown color. I think it's a burnt sienna. And I'm just filling
in again some of these browning areas
within the banana. There's so much color
within this banana as it's starting to turn brown, and so that was really
fun to play with. The Q tip is also
wonderful for blending. It helps smooth the transition
from one color to another. And so if you don't
like that textural mark that the oil pastel is making, you can go in with your Q tip
and it really just smooth the color together and it provides a nice
blending effect. Now I'm just mapping out some of the shadow areas between the fruits and around
this green apple. And again, using
that blending stump to kind of blend these
colors together as it fades and gets lighter into the more
highlighted areas. Using the Q tip is a really
great way to add volume when you're just blending
because a lot of times shadows
are soft, right? They go from light
to dark or dark to light very gradually
and smoothly. It's not a hard crisp line. So that's what's really nice about using this Q tip as well. Next, I'm starting
on the red apple. I'm just going around and mapping out some of the
darker areas first, but I'm applying this
color very lightly. I don't want to overdo it as I am studying it in
life and really trying to understand how these
colors are working together and how the
volume of the apple is. I'm coming back in with a
little bit of a brighter red just to try to get some of these colors down
that I'm seeing. I'm noticing some of
the curves in the apple and it's a lot of
information to take in when you're drawing from life
because you can't zoom in and you are trying to study all that little
detail in person, whereas if you are working
from a reference photo, you can generally zoom in on the reference photo and get
that tiny detail really. But here, I really am just
trying to observe with the naked eye and try to do
the best job that I can. Again, the blending Q tip and the mineral oil are providing a nice base layer
for this apple. And of course, I will
go back in and provide more shadows and more details
on this apple in a minute. But I'm just going to
go ahead and sketch out the plate that
it's sitting on. I'm not using the brightest
white that I have. I'm using a more gray white, which might be hard to
tell in this video, but usually things aren't
clear, bright bright white. Usually, things are a
little bit off white. I'm just using naturalistic
colors to kind of get this initial drawing
down and just get all the information that I need from these fruits in real life. But as I get deeper
into the drawing, then I may play with some
more fun colors and get a little bit more
experimental with my cools and warms
and play with, you know, bringing in some
more arbitrary colors. But right now, I'm
just trying to observe these fruits
from real life and understand the texture and the color and how the
light is hitting the fruit, and of course, because I am
sitting by three big windows, and so the light throughout
the day is changing. And as I mentioned, this banana is turning brown before my eyes. So it is proving
to be a little bit challenging and a little bit of a race against the
clock, as I mentioned, but that's okay because it
prompts you to work fast, and again, just kind of get down that idea of the fruit and
what's in front of you. At the end of the
day, it is your art, and so you can take some liberties with
it if you want to. Now I'm going in
with some shadows around the banana that
are on the plate. The light is coming from
the other direction, so we can see some of these darker shadows that are playing out
throughout the plate, even though the plate
is a white plate, and so I don't want
to go too dark. I just want to kind of get
that suggestion of the shadows down on this plate
and blended out. Okay. If you're using a colored
paper like I am as well, you can also let that be
part of your drawing. You can allow the gray of the paper or the tan or
whatever you're using. You could even prime
the paper with a base color and you could
allow that to shine through. Now, I'm just going in and establishing this
shadow under the plate, and I'm getting a little
bit more playful with my colors using this blue
color and these purples. Cools tend to recede and warm colors tend
to come forward. So if you are playing
with some of the shadows, it is fun to use some cooler
colors and see how it looks. You can also get some
really great textural marks with the oil pastels. Of course you can blend
them out and make everything super smooth
as I'm doing here. But if you like that texture, of course, you could leave it. Again, I'm just going for that realism approach
starting out. I like to make the shadows super smooth as I'm seeing
them in real life. There is this dark area of
the garlic in the middle, which I'm just dotting the oil pastel because
these are thicker sticks. I can't get a super
fine fine point. You can use the edge of the oil pastel where it
might be a little bit. But a lot of times if you are working in a smaller sketchbook, this is an 8.5 by 11 size, then you do just need to give that suggestion
of what's there. Now I'm going back in on the orange and just adding
this highlight first. Before adding some of the more orange color that we're seeing going around this sphere. Getting the color
right is a little bit tricky because
in some areas, it does look kind of
a brown orange or burnt orange where some of the
orange looks quite bright. But the great thing
about oil pastels is that you can just
continue to layer. You can also scrape off
a layer if you need to. It doesn't dry the
same way paint does. It kind of stays malleable. And so you could take a
razor or just something like a credit card if
you wanted to and scrape off some of the oil pastels if you're really
not what you did. Okay. So now this orange is starting to come to
life a little bit more. I work and work and work it. I'm trying to get
those highlight areas as well as just the right color. I'm going in with the
grayish white and just adding some highlight
dots so that we can kind of see the pores
in this orange as well. There are also
some darker pores, so I'm adding those
as well. Okay. So this banana has turned
completely brown in one day. So I think it would
have to replace it. Okay. So now I'm ready to add some fun colors and just play with this still life
a little bit more. I am filling in the background
with this bright blue because it just really kind
of settles the background, even though that's
not really what the color is on my table
in front of me, right? I'm just making an artistic
decision here to kind of help the background recede and use a color that I
just think is pretty. And so you'll see me using
this mineral oil again. This will dry. It's not
going to look like this. You're seeing the light
reflect off of it right now, but we'll add another layer
here in just a second. But I'm just using this color throughout the composition now, and I'm really liking it, but it's a great
color that you can also just use in the
shadows of things. So you'll see me kind
of using it underneath the plate more and some of
the fruit areas as well. So I'm going over some of these brown areas with the blue, and now I'm using
a lighter blue as well to kind of fill in
some of those mid tones, which feels a lot more
fun and exciting. I'm also getting a little
bit more textural with my marks because now I know
what my composition is. I know where the fruit rests, and I can just play. This is the point
where my drawing is pretty much mapped out, and I've got that
good base layer down, so I can go in and be a lot more creative with the
color that I'm using. The soft pink also helps bring
in some highlight areas, and I love just building
up this color and letting it be just
fun and textural. So now I'm just kind of filling in a little bit more
of the background. This is where this window is. And so I am pulling
that from life as well, even though, of
course, it's not blue, but I am kind of just giving that suggestion of something
being behind this fruit. And that is pretty much
it for this still life. Now we get the satisfying
part of peeling off this tape and seeing
that clean clean edge.
5. Travel + Draw: Travel and draw. One
of the reasons I recommend drawing while you travel is because
you get inspired, and when you travel, you are in a new place
and maybe a new culture, maybe a totally
different language, and you're trying
different kinds of food and you're just totally stimulated because it takes you out of your normal routine, and it is super inspiring, especially if it's a place
you've always wanted to visit. And so I just encourage
you that if you are traveling to take a sketchbook
and try to draw from life. It gets you out of
your comfort zone and you can practice sketching. You can also document really special memories
in your sketchbook. I know that we all
take 1 million photographs and we all love photographs and sketches are not going to replace photographs. However, I know
that I always have that really special
feeling when I go back through my old
sketchbooks and remember a sketch
that I did from life, and it really takes me back
to that moment in time, and I feel more connected
to that than I do from looking through 1
million photographs that I may have
taken on my phone. Materials you may need when you are drawing while traveling. You definitely need
a packable bag. I recommend some kind of a
backpack or small, you know, sling bag that you can kind of carry the weight
on both shoulders, so it doesn't get to too heavy, a light weight sketchbook
or pad of paper. I tend to prefer
a sketchbook just because it keeps everything
together really nicely, and I don't like having
loose papers around. But if you have a
way to store that, maybe back at your hotel
or hostel or AirBnB, then a pad of paper also works. And you need your
portable art supplies. Again, if you are able to rent a car and paint in plain air, then I encourage you to do that. For me, and I don't think it's feasible when I want to see
a lot of things on a trip. And I also I wouldn't
know I don't think how to take an easel like
this in my suitcase. I think it would just be
way too much, but you know, if this is your cup of tea, then I don't want to discourage you from doing that whatsoever. I recently had the opportunity
to travel to Egypt with my husband and visit my best friend who
lives in Cairo. I knew it would be such
an amazing, adventurous, bucketless type of
trip that I didn't want to miss the chance
to draw from life. Who knows if I'll ever
go back to Egypt? This might be my only chance
to sketch the pyramids and the sphinx and Abu Simbel
among other things. Apologies that it's a little hard to see what I'm
doing right here. The sun was so so bright and the footage got a
little over exposed, but I'll show you more of what I'm doing in just a second. The small watercolor
palette I brought with me was absolutely
perfect for this trip. The heat was real and watercolors aren't bothered
by the heat thankfully. It's super easy to
reactivate them with water and this water brush that I'm using right here also
worked really great. It's not quite enough
water that's inside of the handle to rinse the brush part when you're
wanting to change colors. But I did have a little
old medicine bottle that's super small
and it's water tight. The lid just screws
on really easily. It was really easy for
me to carry all of these supplies around
in my backpack. I couldn't quite fit
everything on the page here, so the far left pyramid really isn't that close to
the other two, just FYI. But I did want to include
it on my page just because this was my chance to draw these pyramids from life, and I know that I'll always have this really special memory. And thankfully, we were
at a restaurant that had this gazing area with cushions. And so you want to find a place to sit and draw that's
comfortable and that you're not going to be in anybody's way and
that You can really sit there for at
least 30 minutes and sketch out what you're
seeing before your eyes. This is the final piece
that I ended up with, and I was really liking
just how it turned out. From there, we walk over to
see the sphinx unfortunately, the sun was setting
behind the sphinx. You're seeing a lot of shadows on his face in the footage. But in person, it was
really no problem. I was able to see well, and there were plenty
of places around the pyramids where it was
comfortable to sit and sketch. When you're out in
the sun like this, just make sure to wear sunscreen and drink plenty of water. I felt fully prepared being
out in the desert like that, but it was hot. So a few days later, we visited Abu Simbel
in the south of Egypt and it was incredible,
so incredible. We had time to walk around inside and explore
inside the tomb. I didn't miss anything,
but I wanted to save our last 30 minutes to
sit in the shade and sketch the majestic
tombs that I saw before me because who knows if I'll ever have this
opportunity again. It was just so incredible
and so surreal that again, I took tons of photos. Believe me, I have gazlion
photos from our trip, but being able to have this in a sketchbook is just
really super special. I want to encourage
you to Definitely take your art supplies
when you are traveling, whether you're going
on a family vacation, if you're going to the
beach or if you're going somewhere really adventurous that you've always wanted to go, then just being able to have those memories sketched out in your sketchbook is just really special and something that
you'll always always have. The nice thing about working in watercolor is that you can build up layers of paint as long as you work
from light to dark. You can always do an
initial sketch in pencil, but I really didn't find that necessary because I just
simply started out by mapping out the large shapes
of the tomb first across my two pages in a really thin layer of watercolor
like a gesture sketch. From there, I just built
up the sketch by using darker colors and adding
more details on top. If you're working
in watercolor and you're traveling with
your sketchbook, then I definitely recommend this method as it's
just fast and you don't have to worry
about erasing any initial gesture
sketches from your pencil.
6. Art Excursions: Art excursions. You can go on art
excursions around town, in a local park, in a coffee shop,
or downtown gore. Or you could even go on a
weekend trip and just get away or do a day trip and
get away for the day. Materials that you'll
need when you're going on an art excursion are
portable art supplies. You're going to have
to be able to pack everything up and
carry it around with you and you
need to make sure everything isn't too heavy. I recommend either a small
sketchbook or a pad of paper. Pens or pencils
are great to work with if you are
drawing markers or colored pencils also work well if you are wanting some color in your work and you
don't want to just work from monochromatic palette. And watercolors are
also great if you want to get a little bit
of color in your work. What's not recommended for portable art supplies
or for art excursions are charcoal because
it just ends up being too messy and it's
gonna smudge on other things, especially if you're
working in a sketchbook, It's going to smudge
onto the next piece of paper unless you went to
bring fixative with you. But that's again, just
another thing to carry. I prefer not to
work in charcoal. The same thing is true
for a dry pastels. They tend to get messy
and they smudge. I just don't prefer
those for when I'm going on in art excursion. I also don't recommend
gouache as much as I love, love, love working on gouache. It's too hard to work
with on an art excursion. If you're using regular gouache, it gets really crumbly and really sticky,
unlike watercolor, which stay pretty
smooth and they dry up nice and
quickly and they don't stick on everything
and they don't crumble and fall
all over the place. And mixing two other colors
and things like that. Gouache can be just
really difficult to use when you are trying to
go from place to place. As far as acrylic gouache goes, it it would be a lot of tubes to carry unless
you're working in a teeny, teeny palette, I think it would just be too
many tubes to carry. And again, the gouache is
going to dry up probably too fast if you are
outside and it's hot. And so you don't want to
waste those supplies either. Acrylic paint is the same
thing as the acrylic gouache. It's going to dry up too
fast and it's probably just too many tubes of
paint to carry around. And oil paint is not preferred
when you are going on in art excursion simply because it usually takes about a
week or more to dry. And so in my mind is just
like how are you going to carry that around without
getting it all over everything. Really not recommended as anything that's
gonna be too heavy, too messy, and won't dry fast. And so that's why I listed
those other mediums. Of course, if you are
set on using them, that is your decision. That's just not what I prefer
nor would I recommend them. Of course, if you have a more of a setup like this
and want to paint in plain air and you
have a car and you can pack up all of
this stuff into a car, then it might be worth
it for you to try it. I certainly don't
want to discourage you if you are super
excited about this. But I probably would work in some kind of acrylic
paint if I was going to paint in plain air or watercolor or potentially
a regular gouache. But other than that, it's just gonna be a lot of
tubes of paint to carry. If you don't have to walk
too far from the car, then that's something
to consider. Here I am on a little
weekend trip that I took with my family and
we're at a vineyard. This is from the inside lobbies, so it's really, really pretty. There's lots of sunlight and
my family already went home. So I decided to try
to find a place to sit down and
sketch from life. So I'm just walking around the premises and seeing
lots of beautiful scenery, theirs, gorgeous rose gardens. And of course, there
is the vineyard. There's just tons of
beautiful buildings and scenery all around. So I'm just walking around trying to find the perfect spot. A great place to sit down and sketch or paint is going to, of course, have a seat. It would be really hard
for me to stand here in the middle of the vineyard
and try to paint. But over here by the water fountains seems
to have some good options. There are some chairs and
even some side tables, which would be perfect because I would love to paint
with watercolors. So I found a little seat
and I'm just pulling out this small sketchbook that
I actually made myself, and it has lots of
watercolor paper in it. So that's gonna be perfect. I have this little pouch of different pins and art
supplies that I'm using and I'm just pulling out this brown pen that I am going
to start sketching with. You, of course, don't have to start sketching with
pin if you feel a little bit nervous about your skills or how to
map out your drawing. Then of course you
can start with a pencil and you can erase. But I felt like this
was a pretty easy. Drawing because the
building wasn't going to move and I felt pretty
confident about it. Anytime you're working
with watercolor, you want to start out with
the lightest section first. And so I'm just putting down some very light
washes to start with. This pin is not gonna be
reactivated with water. So I can literally paint
just right on top of it. And because it's a brown pin, I don't feel like it's
too dark or too jarring. Like maybe a black pen would be. Because this building is brown. I felt like it went
really well with the color scheme because
it's so hot out here. I am wearing a bathing suit
and loaded up with sunscreen. Yeah. I just advise you to make sure you are
prepared for the weather. Sunglasses were definitely a
must out in this Sunshine. This vineyard is in Georgia, and this was in the summer, so it was quite hot. And as you can see, there
are a bunch of people going inside for a wine tasting. So that's fun to see. You can of course, just put down some light washes
first and then add on top of it the watercolor dries super quickly
in the sun here, so I'm not having to wait
anytime at all for it to dry. You can also mix colors
straight onto your paper. I'm just mixing some brown and some blue for the pavement. Going back on top of this
light wash to fill in the color of the roof
with a little bit more of a red brick color. This car is driving
around and they end up stop being an wanting
to get my attention. And they went to see what I'm actually drawing
or painting. If that happens to
you while you're drawing from life,
don't be alarmed. I know artists can be introverted sometimes I'm
definitely introverted, but especially when you feel self-conscious about what you're sketching and you're just trying to practice
and you're like, I wasn't going to
show this to anybody. This is just from
my sketch book. But people who
aren't artists are often just amazed
that you can do anything at all and they just are really happy to
see what you're doing. And so try not to let it bother you or disrupt you too much, even though it can be a
little bit interruptive, and I totally understand that. But most people are
really friendly and they're just really curious
about what you're doing. Here. I'm going in and
just adding more details. I'm filling in some
of the shadows in the window and some of the greenery that's in
front of the building. Again, because I did
such a light wash on the building in
the first place. It's really easy to
go back on top with darker colors when you
are using watercolor. I love using watercolor when I'm sketching from life because an especially when I'm on the go
because it packs up really easily and it dries quickly in the sun and
it doesn't make a mess. It can be reactivated
with water. And it's just a nice way to add some color
to your sketchbook. I'm also using this water pin, which has water
inside of the handle. You can just squeeze
it a little bit to let some water come out. And so if you have any issues
packing water with you, this brush is a
really nice option. I do also have a
little jar of water with me because I
was in the hotel, so I was able to bring a bottle
of water and all of that. Now I'm just adding
this Posca pen. I don't know if you can see, but I build it. It's spilled all over the
place because it was so hot. These posca pens just melted. And I wasn't expecting that it should be fine and
cooler weather, but just be prepared to have some accidents
when you are on the go. But I decided to finish
the sketch anyway. I didn't want to let this mistake ruin
all of my progress. Because again, sketching from life is more about learning. This isn't going
to be a finished piece that I'm going to sell. It's really just to
sharpen my skills. And so whatever. I have a big pink
stain in the middle of my paper, That's okay. I'm just going back on top with my pen and that's another
thing you can do when you have these light washes
of watercolor is that you can mix
different mediums. And so I enjoyed going back in with pen and then with
watercolor and then with pen. And just to draw
these things on top. But because that big pink
stain did mess up my sketch, I decided that I was
done with that one, and I was gonna try to draw
this water fountain next. Drawing these inanimate objects
from life are a good bit easier than trying to draw
things that are moving like boats or cars or
people or animals. If you are new to drawing from life than I
definitely recommend trying to draw a
building or a statue or a water fountain or something that isn't going to move on you. It's a good way just to build up your confidence and
get that practice in. I do recommend also drawing things that are
moving around slowly, but this is a good way to
just really get started. Sorry, you can't see the
paper super well right now. I move the camera to get a
better angle in just a minute. But you can kind of get
the basic idea that I'm just mapping out the
initial drawing first and kind of making sure
everything is placed on my page where I want it to be. These water pins are nice because they have a
nice sharp points. So you can kind of use
them for drawing or for filling in large
blocks of color. Again, I'm just
doing these light washes first and filling in so that I know
where the pavement is, where the grasses, where
the water fountain is, where the trees are, where the building in the
background is, and all of that. And then I can add
more detail on top. Now I'm just filling
in some sections of the vineyard
behind the sculpture and filling in some of the
greenery around the trees. Just really mapping
out this background. Now I'm just filling
in a section of the sky just with this
really pretty blue color. Again, just mapping
out where things are. Our new page is a
nice place to start. Then you, of course, you
can let the watercolor dry and go back and add
more detail and more color. And tighten things up a bit if you want or you can even get looser whatever you want
to do with your art style. Now I'm just using the tip of my watercolor pen to
draw in these stones. There's a lot of shadow
on these stones. So it's nice just
to have more of a drawing hand on the stones
and the light is changing. I think the sun went
behind the cloud. It's going to change on
you when you are outdoors. It's things like that, but came to strengthen your
skills when you are drawing from life because the
conditions are not static. You can dabble your paintbrush
as well just to get some texture on the trees
are on the pavement. I've dabbled some dots
on the pavement so you can kind of see it
a little bit stony. I'm filling in this
really turquoise blue for the water fountain. I think I am done for the day, so that's my little sketch. It's nothing remarkable, but it was really a great way
to sharpen my skills and it was super fun and
just a nice way to relax and do some art while I am
on a little weekend trip. So I'm just going to
pack up my things. As you can see, all
my art supplies fit into this little backpack, which is really perfect for carrying around art
supplies that aren't gonna be too heavy or too crazy when I am sitting outside
and moving around. Good luck with your
drawing from life. Again, if this is something
that's new to you, I definitely recommend
doing a building or an inanimate
object to start out.
7. Class Project: Alright, let's dive
into the class project. For your class project will want to assess your
skill level first. You need to decide
if you consider yourself a beginner and intermediate or
an advanced skill level when it comes
to drawing from life. And that will affect what kind of Class Project will
want to start with. Choose one lesson that you feel is the most
approachable for you. Pick a place to draw from life. This could be at home
or venturing out. Choose your subject matter
and your art supplies. What do you feel the
most comfortable drawing and using as a medium? For your class project. If you're feeling
more like a beginner, then you should focus more on your own backyard or still-life
from your own kitchen. So we have two lessons on that. So I would encourage
you to start there. When you're working at home, either from your own kitchen
or your own backyard, your art supplies are going
to be way more flexible. But if you consider yourself a super beginner than
I would recommend starting out with
graphite or pencil so that you have a
racing capabilities. Or if you feel like you are a little bit more
advanced than that, then you could try pen and ink. Another option for
your class project if you are feeling like
kind of a beginner, but also slash intermediate, is to challenge yourself
to go to another location somewhere that you've
never been before to get out of your
comfort zone and draw. And you just want to make
sure that you're taking portable art supplies with
you like this guy has here. From there, you can just
draw the landscape. If you're feeling a little bit self-conscious about
drawing from life, then pick a place that
doesn't have a lot of people around that's remote. Maybe on a trail or in a park that isn't super
crowded so that you don't feel like people
are gonna come up to you and make you feel too self-conscious about
what you're drawing. Another option for
your class project is if you're feeling like you are an intermediate skill level, then go to a museum. You'll of course want to take portable art supplies with
you as being in a museum. There will be people around. And so that's why
I suggest this for an intermediate skill
level because you're not gonna be too bothered by people walking by you and maybe
seeing what you're doing. From there when
you're in the museum, you can draw the masterpieces. You can learn from all of the great artists
that came before us. This is another great option
for your class project. Another option is if
you're feeling like you're an intermediate skill level is to be in a more public area. Again, if you're
intermediate to advanced, then you're not going to
be too bothered by people being around you being
in a more public space. And of course, you're
going to want to take your portable art supplies
such as graphite, pen and ink or watercolor,
something like that. From there you can draw buildings or the
scenes around you. And if you're feeling a
little bit more advanced than an advanced tip would be to try drawing animals or people, or cars or boats or something that is going to be
moving a little bit. So that is a way to
challenge yourself. Another option for
your class project, if you are feeling a little bit more intermediate or advanced, is to take a figure
drawing class. In a figure drawing class, you're able to study
human anatomy and it's just a really great way to
get better at drawing people. And they're usually our classes. In your area. If you Google it, you can find a class either at a museum or at an art co-op. You may have to
drive a little bit, but usually you can find
something in a class like this. You do draw nude models, so just make sure that you
are comfortable with that. Another option for your
class project is if you're an intermediate
or more advanced artist, then take a traveling
sketchbook on your next big adventure or your next vacation or wherever
you're traveling next, you'll definitely want to take portable art supplies as
you're probably going to be going from place to place
and seeing different things. And this is just a
really great way to capture special memories. So this is a little bit more
intermediate or advanced, but it is something
that I highly, highly recommend and
it's an amazing way. All of these options
are an amazing way to sharpen your skills wherever
you're at in your journey. Just pick one of these
options to do for your class project and make sure to upload it to this
Skillshare class. Guys, thank you so much for
taking this Skillshare class. Be sure to follow
me on Skillshare and watch some of my
other classes here. I'm also on Instagram
at-large, endlessly studio. You can't interact
with me there. I can't wait to see
all of your projects. So be sure to upload
them to this class and I can't wait to see
them and check them out. I loved me so much
and I'll see you in the next Skillshare class. Guys.
 Lauren Lesley, Textile Designer + Portrait Illustrator