Transcripts
1. Introduction: Drawing clothing characters can feel like a real challenge, especially when you're still in the early stages of
your drawing journey. Yet, this is also one of the most fun parts when it comes to designing
your characters. Hi, I'm Pan Asia, I'm
illustrator and concept artist. And with this course,
I want to give you a simple approach
to handling clothing, so you get the fundamental
principles without overhand, and you can start
having fun with it. This course is the fourth
course of a series called Down to draw from beginner
to Advanced Skills. The first course
is being in order, how to draw faces, how to draw anatomy. How to draw hands. My goal with this
series is to give you just enough
fundamental knowledge to kick start your
dream journey by helping you develop a
simple functional style first and teach you how to
complexify it step by step. Like this, you can
start expressing your ideas quickly and build upon your basis to
achieve your art goal smoothly. In today's course,
we'll start by domestifying clothing
by summing it up to extremely simple shapes before seeing how it
sits on the body, what is the logic behind
the shape and folds? So you'll have enough
knowledge to start experimenting with it by
the end of the class. Now, if you're ready,
let's get started.
2. Project: Project for this class will
be to follow along with the exercises I give you
at the end of each lesson. These exercises are
designed to make you feel and remember
each point we will see during the video one
by one and shouldn't take more than 15 minutes
of your time in total. I put the references
on the mannequin I use in the resources
section so you can draw over. You can use the transparent
PNG if you're on digital art or print the other version and draw over if you're
drawing with a pencil. If you want to
remove the lines of the model, when
you draw over it, you can just use
some white gel pen or any correction fluid
that you have at home. If you don't have any, don't bother removing the
mannequins line. Just draw over it and
leave it like that. Don't worry if the
result is not clean. The exercises only serve to
train your muscle memory, so you can apply it to your
own drawings afterwards. Alternatively, you
can, of course, also draw the mannequin
yourself or trace mine. At the end of the class,
feel free to share your work so I can give you some
feedback and help you improve. Now let's jump into the lessons.
3. Basic Structure: We are going to start with a very simple concept just
to domestify doing clothing. Basic clothing can be simplified in extremely
simple shapes, and we are going to see what
it looks like right away. Let's start with a simple shirt, for instance, and let's
imagine we lay it flat. We could start with
a rectangle and stick two small rectangles
on the side like this and then draw a simple circular shape like
this to represent the color. And here you have
a simple shirt. Now same for the pens, we could start with a
little rectangle like this and then stick two
long rectangles like this to that first
rectangle and just erase the lines and here
you have a pair of pens. That's very
simplified, of course, and there will be a lot
of variations to this. But it's just to give
you a starting point. Now I'll see quickly
a few other examples. A skirt could be represented
by a simple trapeze. For a tank top, you could
draw first a rectangle, then stick two
small rectangles on top and erase the line and
if you wanted a dress, for instance, you
could stick that traps shape with the tank top and
you would have a dress. We will stop here for the
very simple examples, but remember that each time you want to
draw some clothing, the shapes of your clothing, when laid flat are just variations of very
simple shapes like this. So to recap when
drawing clothing, even when they are going to
get more complex than this, remember that you can
always simplify them into very simple shapes like
this as a first step. Now it's your turn. Start by drawing the simplified clothing, as I showed as examples. So a shirt, some pans, a skirt, a tank top, and a dress, so you can get the
first feeling of it. During the next lesson, we are going to start seeing
how the clothing behave on the body by talking about the thickness of the
cloth and the overlaps. See you in the next lesson.
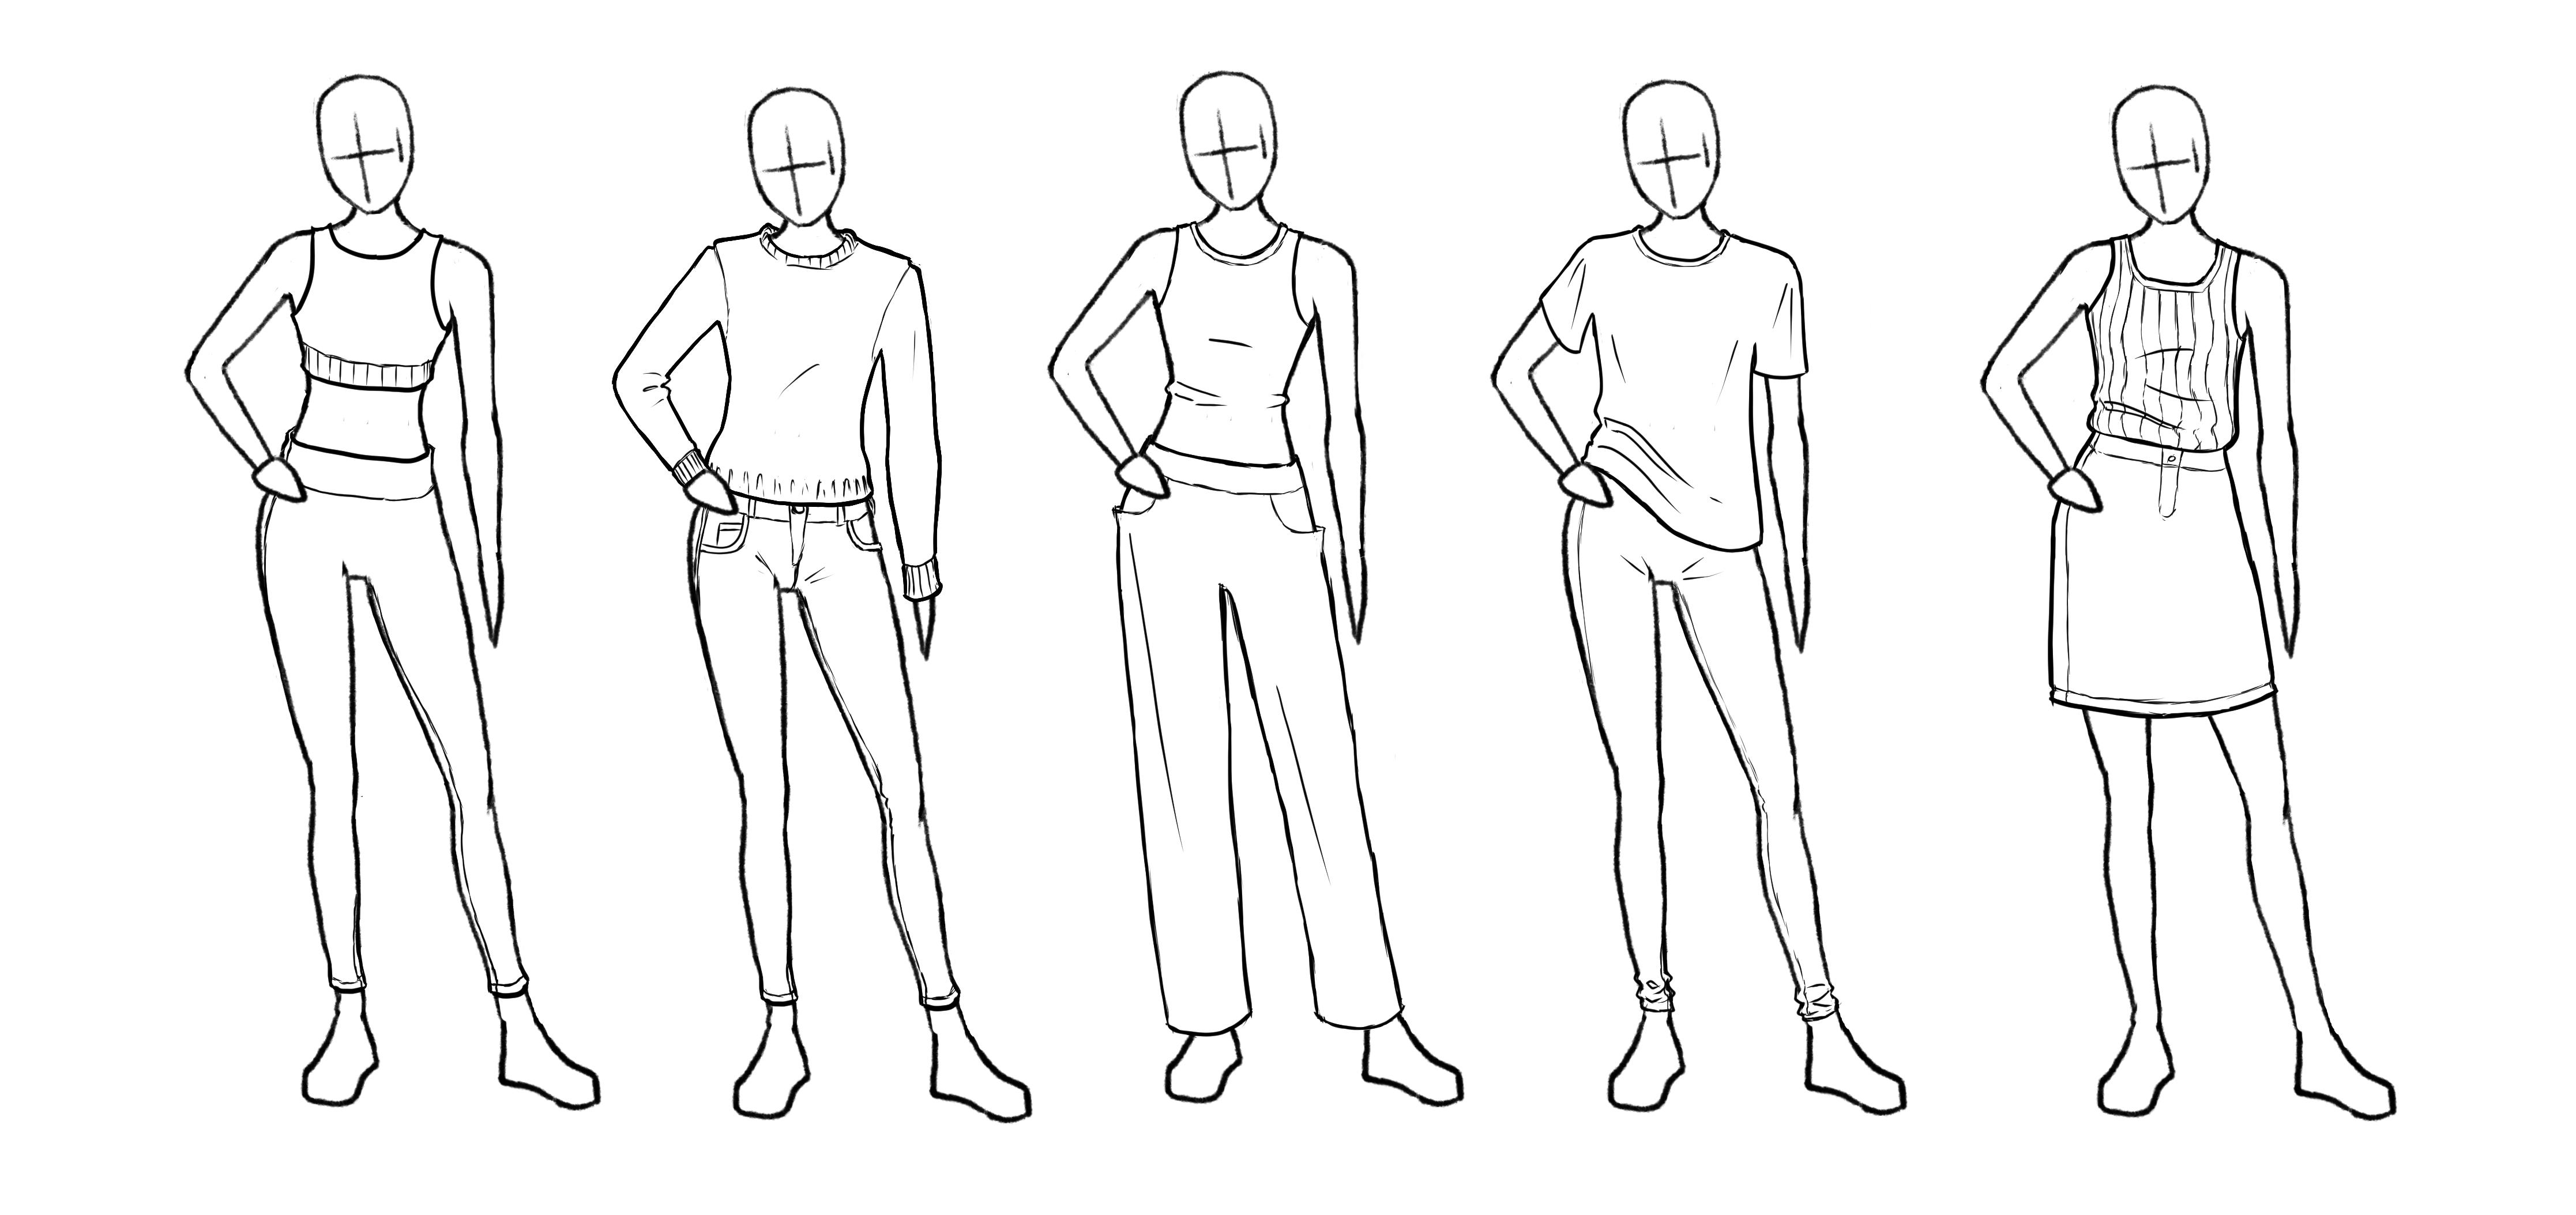
4. Thickness And Overlap: In this lesson, we
are going to focus on the thickness of the clothing
and how it overlaps. But before diving into
the heart of the lesson, we'll just make a quick point
about clothing in general. So clothing will be submitted
to several constraints. And to start easy, we will focus on three
constraints for now. The first one would be gravity. So by default, the clothing will be pulled
towards the ground. Then there would be obstacles. Most commonly, some
parts of the body will stop the clothing
from being pulled toward the earth while other parts will be
loose when there is no obstacles and will
be pulled by gravity. Then there is the fabric because every fabric won't look
and react the same. But to begin with, let's put all the intricated
flow aside and imagine our character is wearing tight clothing that is
entirely close to the body. So gravity won't matter
much in that case. Let's see what it
would look like. The obvious would
be to determine where the clothing
starts and stop. Here we can imagine some sort of fitness garment with some
tight tops and leggings. The first thing that you need
to pay attention to here is how I draw the clothing like it's sitting on a three D shape, it's not a straight line, but it's really wrapping
around the volume of the body. Then what you need
to consider is that the clothing will add a layer of thickness on top of the body, and here you need to be mindful about the actual
thickness of the cloth. For that type of garment, the fabric tends
to be fairly thin. I'm just adding thickness
in a very suble way, and I'm mainly adding it at
the edges of the clothing just to mark that separation in between skin and clothing. But otherwise, I
just consider that the clothing is tight enough to follow exactly the
shape of the body. I don't want to break its shape, so I'm letting it
just like this. Look at what it can look like when it's wrapping
around the body. We're seeing the thickness from slightly above the
waist of the pens here. You would see the
actual thickness of the fabric wrapping around against the body and the
external part of the thickness, if I can say like this,
going behind the body, which is why you can see it
creating that type of shape. For the bottom of the legging, I'm just considering
that the hem is creating a little bit of a curl to give a little bit of
movement to the line. And then I'm just cleaning
my sketch by erasing the lines of the body that
is hidden by the cloth. Now, let's see how we could
handle some thicker clothing, like a sweater, for instance. I'm going to draw on top of the previous sketch so you
can see the difference. So I'm going to start
with the collar that will behave the same
way as the pens. So look, I'm drawing the inside part of the
collar and I'm leaving a gap and draw the part of the collar that goes
behind the neck. And the gap in between the lines shows the thickness
of the fabric. I hope my example is
understandable. Make it clearer. If I had to draw the color antioly without the character to block the view, that would look like this. This is how the back of
the color would look. Even if you don't
actually draw it, you still need to imagine
the prolongation in between the two sides of the
color to make sure both sides are in
prolongation to each other. We could imagine that
there is some seam on the shoder area that could
make that type of gap. But the main point
here is look how I actually represent
the thickness on top of the body this time. As a sweater, even
if it's tight, will occupy quite a lot of
volume on top of the body. The other thing
worth mentioning is that clothing will overlap
on top of each other. You will have to
take the thickness of the other pieces of clothing into
consideration as well. And, yeah, I'm just refining, so I'm just taking that
opportunity to say that it won't look
perfect on the first try. So the process of actually making it pretty is
simply spending some time. To actually refine simply.
There is nothing more to it. And yeah, one last thing is that check the
symmetry of the cloth. You want things to land in a cohesive manner on
both side of the body. So to recap, determine the
shape of the clothe by deciding first
where it starts and stop and make it
symmetric when relevant, of course, and mind
the type of fabric to determine the thickness and
represent it accordingly. Now it's your turn. Follow
my example and copy the same clothing as the ones in the course and try
to apply what we saw. You can find the
drawing reference in the resource section, as well as a blank mannequin
that you can print or use the transparent PNG
format to use for digital art. During the next
lesson, we are going to see how looser clothing works and we are
going to focus on contact points and gravity.
See you in the next lesson.
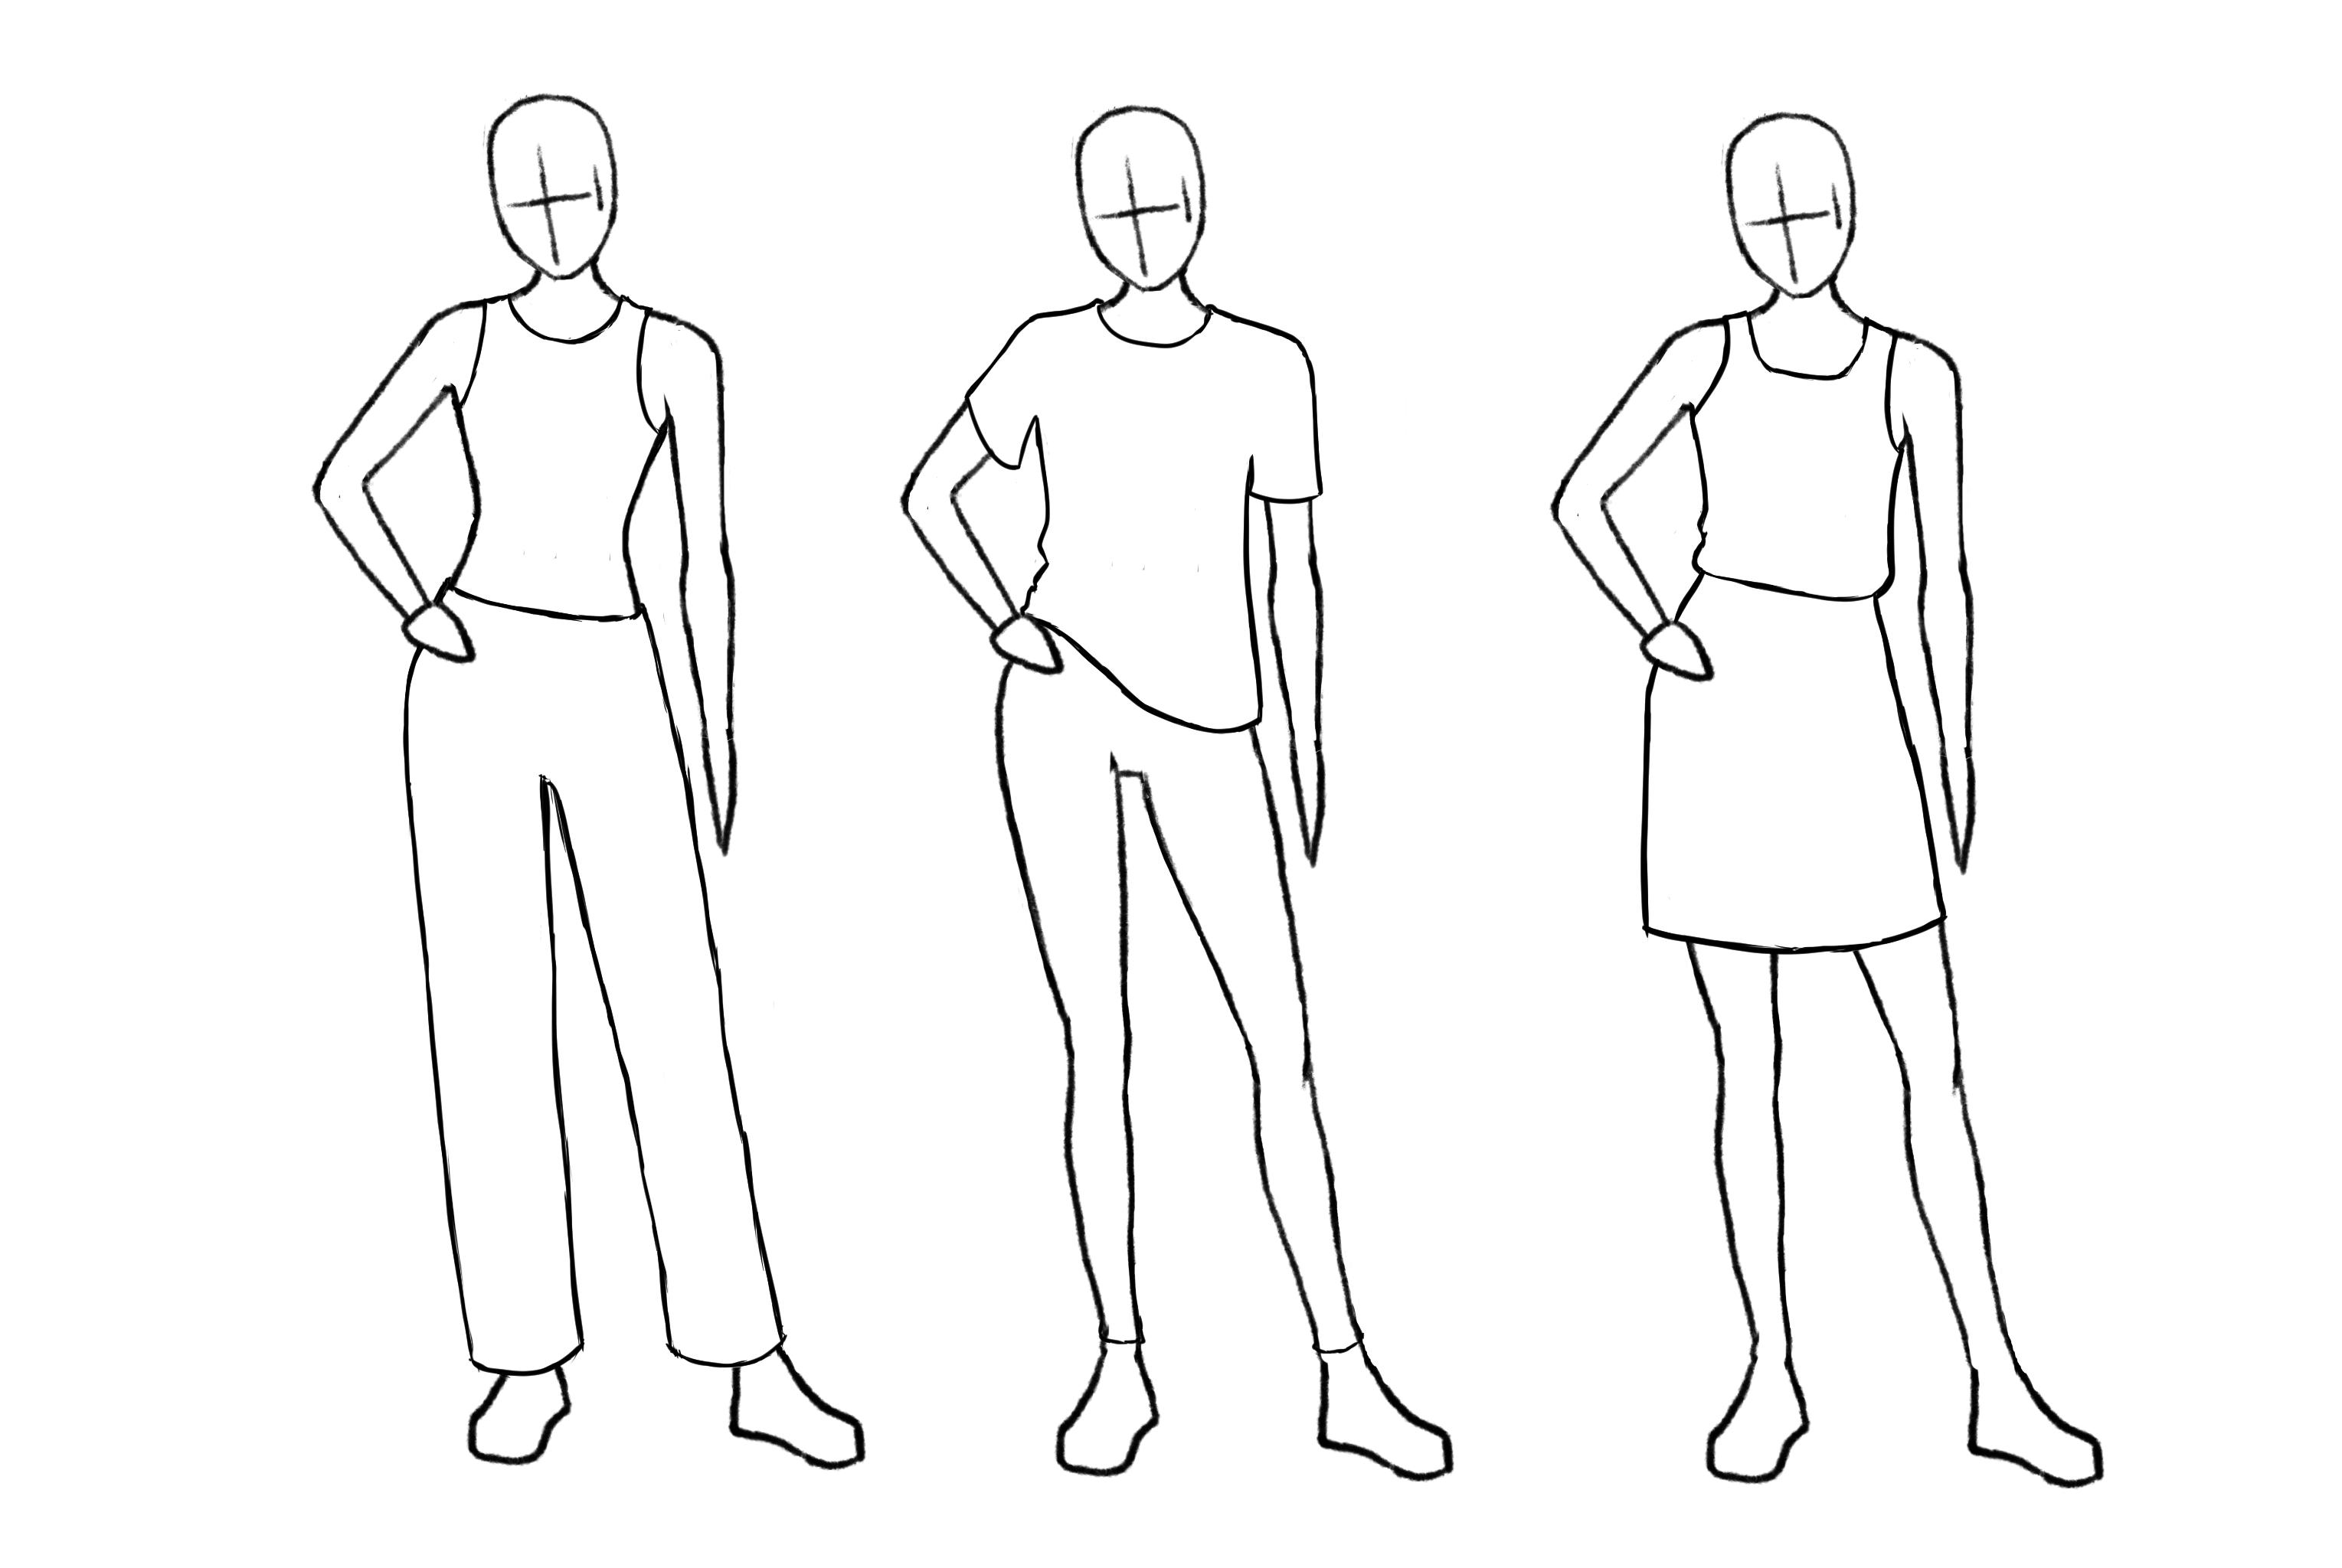
5. Contact Points And Gravity: In this lesson, we are
going to start to see how looser clothing
acts on the body, and we will start by focusing on contact points and gravity. We won't use any
reference for now, but we will use the basic
clothing we imagined during the first lesson and see
how it would behave on our mankin just so you can understand the
logic behind it. So even if our mankin has a pretty standard
standing position, there is a little
bit of movement in its posture that will help us understand how clothing behaves
on different ways. We will start with
our basic pens. Let's imagine this will
be a rather loose pair of pens to distinguish it from the legging from
the previous demo. So the first thing that
you need to consider is that it is attached
to the waist. And this is that attach that is preventing from falling
to the won basically. From that attached point, the fabric will try
to go as straight as possible toward the
ground due to gravity, but it will meet several
constraints and obstacles. The first obstacle
will be the heap. Here, the fabric would want to go from the waist to the ground, but as it counts, it will follow the
shape of the heap. Then once it went over
the warmness of the heap, there is no more obstacles, so the fabric will fall straight
directly to the ground. And on the other
side of that leg, there is no particular
constraints, so the fabric falls
directly to the ground. Now, on the other leg, the fabric will again try to pull all the way down
towards the ground, but because of the
angle of the leg, the leg will be an obstacle
to gravity all the way down. So what will happen is that the fabric will lay
onto the leg instead. Now on the other
side of the leg, there is not much constraints, so the fabric will try to go in a straight
line toward the ground. But what will prevent
it from falling completely vertically is
the width of the pens. So that line will simply join the bottom of the pens at
its appropriate width. Be careful to match the
width of both legs. And once you're happy
with the basic structure, you can just clean and be fine. Now let's see how to
handle the shirt. So here, again, you need
to first consider what retains the fabric from completely collapsing
to the ground. So this will be basically
the top of the body, so the shoulders and the collar that can also
meet some resistance. So the first thing we'll need to handle here is the sleeve, and this is pretty similar
to the pens before. The fabric will try to go straight towards the ground
as much as possible. But here we have the arm that
prevents it from falling. The fabric will follow
the shape of the arm. And then on the other
side of the sleeve, there is nothing to retain, so it will fall as straight as possible
toward the ground. But it will again be retained
by the width of the sleeve. And then the sleeve is
not a straight line, but wraps around the arm again. And here as our mannequin is
not in a straight posture, you need to check the alignment of the shooters
to align the sleeves. So the sleeves should be
parallel to the shoulders. And for that sleeve,
it falls right from the shooter
without any resistance. So this time it falls
pretty straight. Now for the body of the shirt, it would want to, again, fall straight
towards the ground. But here we have the heap
that will create a barrier. So what will happen
is that the fabric will create some
compression in walls, and you will have an excess
of fabric in this area, which is why it creates
some folds like this. We'll see more about
folds in the next video. But for now just try to focus on the silhouette
of the folds. And then again, the hem of the shirt will be
pulled by gravity, so it will go down
and wrap around the character to join the
other end of the shirt, which is what creates
that wavel shape. I'm even going to make it a
little bit more dramatic, so you can see better. And then, again,
when you're happy, just correct and we fine. Now, let's try to
draw the dress. We'll consider it as
a pretty loose dress, but attached at the waist. So I'm just starting by placing where the clothing
starts and ends. Okay. So here is going to be
fairly similar to the shirt, which means the fabric will try to go down
straight to the earth, but will meet some obstacle in the hip area and will create some compression
folds in that place. And on the other
side, the fabric won't meet any obstacle again, and it will fall
straight, and it will simply met the
attach at the waist. But you can see that
as it's fairly loose, there is a bit of
excess fabric that will hang like this and create
that roundish shape. Now for the skirt parts, it's pretty much like the pens. It's following the
curve of the hip, and then it falls straight when there is no more obstacle. And on the other side,
just like the pens, the fabric will follow the
shape of the hip and the leg. And now you will
need to consider the angle of the
bottom of the skirt, so it's parallel to the
touch at the waist, but it will go up and round the leg that is
pulling the fabric. In the end on this example, it creates a fay
symmetrical shape, but it's not always the case, which is why you
really need to think about the physics of
what is happening. And same as always. Once you're
happy with the structure, you just be fine and correct. A Mm. Mm. Mm. So to recap, when
doing clothing, always consider the
contact points. So anything that will create a barrier in between
the fabric and gravity. So it can be the places where
the fabric is attached, like the waist or that retain the fabric like the
shooters on the shirt or any place in the body
that will prevent the fabric from falling
straight toward the ground, like the curve of the hip or the angle of the legs or
the arms, things like that. It's your turn to
get the hang of it, draw the clothes as
shown during the lesson. Again, you can simply use my mannequin and
drew on top of it. During the next lesson,
we will talk about falls. So the different types of folds, how they occur, and
how we simplify it. See you in the next lesson.
6. Folds: In this lesson, we are
going to talk about folds. So there are several ways
of understanding folds. We could subdivide them
into many categories, but as it's your first
introduction to folds, we are going to keep
it very simple. Let's start by the
fundamental elements that will shape folds. Gravity, tension and
compression. So gravity first. So unsurprisingly,
if not retained by anything or submitted
to any constraint, the fabric will be pulled
down. Then tension. The fabric will have
several ways of being submitted to
points of tension. The points of tension
are what prevents the cloth for being
pulled down by gravity, it can be a shoulder retaining
the fabric of a shirt, and then of course, the rest
goes down pulled by gravity. Or it can be that the clothing
is too close to the body, the body will create
tension on all the area, and gravity won't really affect the cloth in this instance.
Then compression. This will be typically when
areas are bending inwards, bringing some excess fabric
that will create faults. Now let's see how to
apply it to our examples. The first rule to keep in mind, keep it simple, especially when we do in a simplified
style like this. The folds shouldn't draw attention away from the
rest of your drawing. So let's see what it would look like on our first drawing. There would usually be a
fold beneath the chest area, male or female, because of the difference in volume
with the rest of the torso. Then on a clothing that
is tight like this, we could expect that there
would be some fold that are created in the waist like this
that are in that instance, not created by gravity, but by the fact that the
clothing is a bit tight and the fabric is pulled
against the body, and that type of fold would tend to travel
towards each other. The shape looks a
bit like a tube. Here again, pay attention. The folds are not flat. They are wrapping around the shape of the body
as a three D object. Then on the pent, we
saw that there is some point of tension
around the hip area, so we can imagine that
there is some fold that comes from that point
and draws toward the ground. We can imagine that there
is the same type of fold traveling throughout the
other leg of the bent. On a style like this,
that's really enough. Now, let's jump onto
our second example. Here again, there is some
tension in the shooter area. So I'm going to put
two folds like this. One thing to be noted is
that for tension folds, when you have two
folds like this, they will travel away
from each other. Then here the shirt is looser. I'm imagining that the volume of the chest won't
be that visible, not flat against the
dorso, at least, but there could be some tension folds on the sides like this. It's really not an
exact science, right? I'm just choosing and selecting the fold
that I want to draw, but you could choose
to draw it in another way and that
would be right as well. The essential is to simplify. Now on the waist,
we already do have some compression folds so we can see how to draw them
inside the shirt. So for folds like this, you can often draw them as sort of very distorted
triangular shapes like this. Because it tends to create
profound gaps in the fabric, which is why we can draw
them as pockets like this. And here we can imagine
that there would be some force traveling all in the same direction and be pulled towards the other side
that is pulled by gravity and more attention
falls onto the other sleeve. Tight pens will usually have
folds in the going area. Again, those folds travel
away from each other. The bottom of pens can have a
lot of compression as well. I will create a lot of
close folds like this. And inside, we can find
faults that can be called Z act folds or X Y Z
faults or diamond folds. Those words are images to illustrate what the shape
of the fault looks like. Honestly, those are fairly
complicated faults, so the best is to not
do like I'm doing right now and use a reference instead of
drawing from imagination. But it's just for the example here so you can
understand better. You will also often find some
faults in the knee area. You want a wool that would be everywhere where
it bends, really. And you can just like this
try and see if it looks good. I thought it didn't I
just remove the fold. And I think that's
enough for this one. I also want to
pause here to show that depending on the fabric
and the posture and all, some clothing will have a
lot more folds than others. Like here, for
instance, the shirt is very loose and has a lot of movements compared to
the other clothing we have drawn so far. So this is why it has a lot more folds
compared to the others. But to know this, you won't have to improvise like
I'm doing here. It's just because
I have a lot of experience with this that I
can do it from imagination. But you will need
to use references to documents how things
actually look like. Now let's jump to
our last example. Here you see it's a bit lose, but I'm still placing that
little fold underneath the chest just to show you that you have indeed
different options. Then it's going to
be the same type of compression fold
as for the shirt. It compresses on
one side and travel towards the other and the lines tend to
follow each other here. On the skirt, I would tend
to say that this looks like the shape of a
pretty stiff skirt, so I wouldn't touch it. Sometimes you can have clothing
that don't have folds, but if it was a
very loose skirt, the folds could drape like this, creating a sort of
series of tubes. And here that would
be tension folds. So the lines would tend to
travel away from each other. Okay, that sits for this lesson. If you manage to wrap your head around those few principles, you should be capable of
handling most situations. So to recap, falls tend to
happen in points of tension, and when it's just
pulled by gravity, the lines of the fold will tend to travel away from each other. When gravity is not involved, like in a situation
where the fabric creates folds because
it's close to the body, the folds will tend to be
more parallel and create tubes that travel from one
point of tension to the other. So have a lot of folds in compression areas
where the excess of fabric gather and
that can create that type of deep
fold pocket shapes. And then you will have those zig zag folds that we saw
on the bottom of pens, but that will usually
happen in any tight tubes. And finally, we have that type of draping
folds that we saw for loose cats that
create a series of different tubes with lines that tend to go away
from each other. Now it's your turn. Take
your previous sketches and add some folds by
following my example, just so you can start to
have the feeling of it. During the next lesson, we
will talk about decoration. So what I call
decoration is anything from scenes to
patterns or pockets, anything that makes
the details of the clothes more interesting.
See you in the next lesson.
7. Decorations: In this sesson we
are going to talk about what I call
the decoration. Any elements that compose
clothing like seams, buttons, patterns,
things like that. I'll just give you
a few examples so you know how
to approach this. I took back our first
examples just to give you some more diosity
different clothing, even though they
don't have folds yet. So on the legging like that, we can imagine there
could be a sort of elastic band that would
compose the waist. And that would logically follow the shape of
the waist itself. And on the side of the legs, we could expect some seas. This is actually a
very good exercise to really understand
your drawing in three D, as you have to keep
a good understanding about how every shape of
the mannequin is oriented. We could find some seam
on the hem as well. And for the top, we could expect another elastic band and eventually that type
of strip patterns. So one thing you need to
understand about strips or any similar pattern that will wrap around
the character, it's that they
will appear closer together as the shape
goes towards the back. Then let's move on to a sweater. We could imagine there is some sort of seam around
the collar like this. And you see, you don't have
to draw a continuous line. For details like this, you can break the line
a little bit just to show that it's not
such a strong feature, compared to the
contour, for instance, and see how those strips would wrap around the color as well. Everything, even the
small details like this, have to be thought in volumes. Also, one thing to mention
about the line work, it's that you would want to keep the line of the details thinner
compared to the contour, just to give some hierarchy and the importance
of each element. And we could imagine some seam over here around the shooter. And also in the
wrist area, why not? And we're just
showing random things like this as an example. But of course, when you want to do some specific clothing, you will have to look at references to know
how it's done. And also when there is a seem
like that in the clothing, you can make a little
gap into the outer line, just carving it slightly so
that we look more realistic. Mm. Mm. Mm. Again, just playing with different types
of patterns here. Look how I keep my lines fairly broken like this because I don't want those details
to be overpowering. Then for the pens, I'm just
going to imagine that this is some sort of skin jeans
or something like this. I'm adding the typical
details you would find on that type
of garments here. Again, I have done
this over and over, but when you're starting out, really go and find
some reference just to really look at how
those things are done. And then you remember
the patterns. And I'm just drawing
attention onto the little detail I'm doing
with the pocket here. It's not going to be a
very voluminous pocket, but the seam will still tend to take a little
bit of volume, but just try to keep it
very stored like this. That will make the shape
a lot more realistic. Mm. And with decoration like this, you can also add the idea of folds without directly
drawing the folds. So here I'm just making
a few waves around the knee area to show that
the fabric doesn't lay flat. Mm. Mm. And then let's jump onto our
third example over here. So I'm just adding a
seam around the color, following the exact shape
of the color itself. H. And I'm again drawing some seam of
elastic waistband. And here, look, as
it's a looser band, I'm going to also make a
pocket that is looser. So look at how the fabric
actually goes more away from the initial structure
of the bent and how we can see the pocket
wrapping around the legs. And that already gives more interesting silhouette
to the overall character. And make sure the pockets
are quite symmetric as well. This is something that can be a little bit hard to
get on the first try. And I'm pretty happy
with this one like this, so let's jump on to the next. So on a classic shirt, we could expect, usually to find a collar
again like this. And look here again, I'm just
carving a little dent into the line just to show the seam on the silhouette
of the garment as well. And for last example, I'm just going to demonstrate
another type of stripes, a little more complex
to handle this time, but you're going to
see how it works. So when you're drawing stripes on a loose fabric like this, you will need to think
about the fact that the stripes will be
following the movements and shape of the garment
itself that won't necessarily be completely following
the shape of the body, you will really need to
be capable of imagining the overall movement of the
fabric all around the fabric. I hope that with my example, what I'm saying is
understandable. And I'm just going to add
a bit more details on that skirt as well to make it look a little
bit more interesting. And yeah, look at
what happens on the SIM when we're dealing with more complex
folds like this. Here again, you really
need to picture the seam following the three D
shapes that are the folds. So it's a bit more complex, but that will really train
you to think in three D, adding a bit more onto
the skirt as well. Same principle as before, but look at how it makes things look more
interesting right away. And just adding some folds over here onto that jumper
that we didn't do before, just make it a bit
more polished. And I think like this, it's starting to
look pretty good. So I hope those examples
would have been helpful to give you some Ds
to experiment by yourself. So to recap for decoration
like this, as usual, always think about the fact
that you're drawing in three D and that the decoration will
follow that rule as well. The line will be usually thinner than the
line of the contour. Stripes or any sort of pattern, honestly will get visually closer on the sides
when the garment is wrapping around the
character and you can indicate folds as well
with those decorations, even if you didn't draw
the folds manually before. Now it's your turn. Just add your own decorations onto
your previous sketch. You can just copy
my example or you can experiment and
do as you please. Just choose what you prefer. During the next lesson, we are going to talk
about movement. So how clothing is affected by movement and what are the elements to take
into consideration. See you in the next lesson.
8. Movement: In this lesson, we
are going to talk about how clothing
reacts to movement. It can be the movement caused by the character or the
movement caused by the wind. It will work for anything
that causes movement. For this lesson, I'm going
to demonstrate it with wind. I have put the arms of
the character out of the way just to demonstrate
movement properly. But of course, if his
arms were in the way, it would create a barrier for the clothing and prevent
it from moving freely. I'm just starting by
quickly indicating the level of his spans
just for reference. I'm going to demonstrate it
with a simple loose shirt again because as it's a very
light and flowy fabric, it will be subjected
to movement a lot more easily than stiffer
and heavier fabrics. Let's imagine that
there is some wind blowing from this
side, from his back. What will happen
is that the fabric will be pulled against his back, creating some compression
folds and on the other side, it will flow freely
creating that wave shape. You will often see that
very flowy movement at the bottom of the garment, usually showing part
of the inside of the cloth like this and
you really need to pay attention to keep your
hand very sople and your linework very flowy
for that type of movement. You can indicate a big fold
here to indicate from where the fabric is actually flowing away and a bit of
compression fold as well. And here we've got
some perspective going on with the arms. So that arm is
going away from us, so the sleeve will follow. And so we won't
see the inside of the sleeve because it's
turning away from us. And on the other side, the
sleeve is going towards us, as well as the arm, obviously. So same as for the
body of the shirt, we see the fabric pulled against the arm creating some
compression folds, and then flowing away in front. So you'll have again
that wavel movement. And here we can see again
the inside of the sleeve. Now, let's imagine the wind
is blowing in front of him. So the shot will be
pushed against his torso, creating the compression falls, and then it will be flowing
away from him in his back. With movements, it's really about finding where
the pressure is, pushing the fabric
against the body, and the direction where
it is flowing freely. So for the shape at the
bottom of the shirt, you will need to
keep in mind that it is flowing all along the line, even in the path you can't see. So if you had to draw the path that you can see,
it would look like this. You see it's still very flowy and you really
need to keep in mind that both sides are linked to make the
drawing feels cohesive. And the shape really
looks like a sort of infinite symbol that can help. Same on this example just
indicating a few folds. This time we will see the fabric of the sleeves pushed against the arms creating
compression folds and flowing away behind. The flow of the sleeve away from us will be mostly hidden. When you're cleaning
your sketch, it's the perfect opportunity
to clean a few lines that didn't feel very cohesive or to improve their movements. If you're wondering how to clean your sketch
for traditional art, you can go and look for my drawing for complete
beginners Anatomy May Dizzy in one of the characters in different postures
lessons to see a demo on how to clean
your sketch with pencil. Or if it's ink that you prefer, you can check my course
creating scenery restorations, a process for drawing and painting with watercolors
and gouache and check the two lessons sketching process and then
draw armonus line. Or otherwise, if it's on digital art that you want
to clean your sketch, you can go onto my lesson, learn digital art
with Procreate, a complete guide for
food illustration. Even if the course is
tailored for Procreate, it will be the same
principle with any software, and you can check the lessons sketching digitally
and line art, and that should give you
the necessary knowledge if you wish to get it already. But you can of course also keep it sketchy for now
if you prefer. So to recap to draw
movement on clothing, you first need to determine in what direction the clothing
is pushed or pulled. And when it's pushed
against the body, it will tend to create
compression folds, especially with thin fabrics. And on the other side,
it's going to flow freely, creating those very flowy lines, and that will reveal often part of the inside
of the garment. But as usual, you
will need to take into consideration
the direction of the mannequin and of each of its individual components and take perspective
into consideration. Don't hesitate to use
reference to help. Now it's your turn to
take the hang of it, copy my drawing as an exercise.
At least one of the two. As usual, you can find the Manakin in the
resource section. During the next lesson, we are going to talk about shoes or especially how you can begin with shoes as a
complete beginner. See you in the neck lesson.
9. Shoes: In this lesson, we are
going to talk about shoes. Shoes are complex to draw, so while you're still
wrapping your head around drawing volumes
and shapes properly, I suggest that you use this trick before jumping
into actual shoe studies. I suggest that you only start by following the
shape of the feet, adding just a bit
of volume around. Just be mindful about how
the volume is distributed. Some lines will touch the feet. For instance, here, the
sole of the feet is in direct contact with the
bottom of the shoe, so there is no reason for it
to have a gap in between, while the top of the shoe
has a little bit more space. As for the sole of the shoe, I suggest that you
simply do it regular and flat to get used
to the movement. He. Then another example
here you can see that the sole of the feet is
planted on the ground, but that the front of the
feet is slightly elevated. I will leave a gap in between
the front of the feet and the sole of the shoe
because it makes more sense that the shoe would drop a little
in that case. Okay. Ah. And for the other shoe, only the heel is in direct
contact with the ground, so I leave a little space
for the shoe to drop. Ah. Now, sometimes the perspective
can be a little tricky. I don't necessarily advise
that you start with the type of perspective right away, but I'm still showing you. So when you're ready, you
know what to look for. So here you might be
tempted to simply draw the contour of
the feet like this. But actually, his toes
are slightly raised, so the shoe would
follow the movement. And here we would
have a little bit of the sole of the shoe
appearing on here. And a little bit on
the heel as well, and the rest would be hidden by the angle on the perspective. And then drawing the food from
view is never really easy, especially that the sole
of the shoes distorted by the perspective will have
that quite peculiar shape. So I'm insisting
that you will need some reference to study
to get the hang of it. A good model of shoes to study
would be the conase shoes, as they have
completely flat soles. And here you can see that
shape I was talking about how the sole looks thinner
due to perspective. And one last example, this one is a little bit tricky because the
foot lays flat but is slightly rounded and
is a bit from the back. But I just want to
say that what I'm showing here is actually
a good exercise that you can do for yourself to
simply trace the shape of potential shoes on
top of feet pictures. You can really learn
a lot this way. So now let's try to give
shoes to our manqin. So the shape of the feet of the mannequin already
has a shoe like shape, so we won't have
a lot to modify. I'm just adding the sole of the shoe and a little bit
of decoration like this. Mm. And here I forgot to put the perspective on the decoration of the show. So as the show is
going towards us, those little little should also become bigger visually
as they come towards us. And actually, with the shoe on, the feet look a bit
small like this. So I just had to modify them afterwards and make them bigger. So yeah, if you want to use my mannequin as a
training support, try to draw over and add a bit of volume on
top of the feet. Now, if you want to learn
more about shoes quickly, there's only one way to go, and it's to try to copy
all sorts of shoes from references because they can take so many different shapes, so you really need to study the ones that you want to draw. So to recap, to start
off with shoes, try following the
shape of the feet, paying attention to
the point of contact, the places where there might be a little bit more
space in between the feet and the shoe
and also as usual, be mindful about the
perspective and the angle. Now it's your turn. Try to
choose 21 of your character, and don't forget that in the
future, when you have time, you can exercise yourself
by tracing shoes around naked feet or you can directly trace shoes
on top of pictures. That's a good way to learn too.
10. Conclusion: Congratulations for making
it to the end of the class. During this class, we first saw how clothing can
be simplified in extremely simple shapes or light plat to give you
a basic understanding. Then we talked about the
thickness of different types of clothing and how it
translates onto the body, and we mentioned to be
mindful of the fact that pieces of clothing
overlap with each other. Then we saw how the body
affects the structure and appearance of the clothes through contact
points and gravity. Then we tackle the most
complex subjects that are false while seeing
how to simplify them. Then we saw how to give garments a bit more personality by
giving them some decoration. And then we emphasized the fact that we should
always be mindful about the volumes and the angles of the shapes
we are drawing about. Then we saw the elements to take into consideration when
dealing with movement. And finally, we saw an
introduction on how to start handling shoes
using some simple tricks. If you like this course
on want to learn more, you can watch the first
crosses of this series and follow me to be notified when the next classes are released. If you're interested in my work, you can also follow
me on social media. I leave all the information
at the bottom of the screen. I would also appreciate it a lot if you could
leave me a review, so I know what you
thought about this class. I hope you enjoyed this
class and found it helpful. With that said, I
wish you to have fun with drawing and
hope to see you soon.
 Fanny Richard, Illustrator & Concept Artist