Transcripts
1. Introduction: When we think about drawing
an expressive character, we often think about
polishing his face, his posture, but hands are actually one of the most expressive things in
character drawing. They are also
unfortunately known to be one of the most difficult
body parts to draw. So my goal with this
class is to give you an approach to
drawing hands that break them down to their
most fundamental structure to give you a start
as easy as possible. Hi, I'm Pan Asia. I'm a fluence illustrator
and concept artist, and this course is part
of a series called Learn to draw from
beginner to Expert that aims to teach
you how to draw in a simplified way first to begin gently and then how to complexify your
style step by step. This class is the
third of a series. The first two classes
teaching how to do faces and how to draw anatomy. I think the best
way to learn how to draw hands is through
practical examples. During this class,
we'll start by getting a quick overview
of the hand structure. Before jumping into a series of different poses that we'll study together that are not too complex to avoid
overwhelming you. You can learn how
to break down and poses and be able to draw
what you want by yourself. If you're ready,
let's get started.
2. Class Project: Project for this class
will be to follow along and draw the poses
I use as examples. Just disclaimer, I've already
said it into another class. But even if the title of the
class is drawing made easy, the most correct
phrasing would be made easier because nothing is never truly easy when
you learn to draw. And this is particularly
true for hands. That's why I would
encourage you to only select the poses
that seem the most achievable to you
for your project and get used to them before diving into more
complicated ones. So don't feel pressured to
draw all the poses we'll see. A good way to make
learning easier is also to allow yourself to only learn a few bits at a time. I'm going to draw
digitally for convenience, but you can of course
draw traditionally. You will be able to find the photo references I use
attached to this course. Now let's begin with
the first lesson. That will be about
the hand structure.
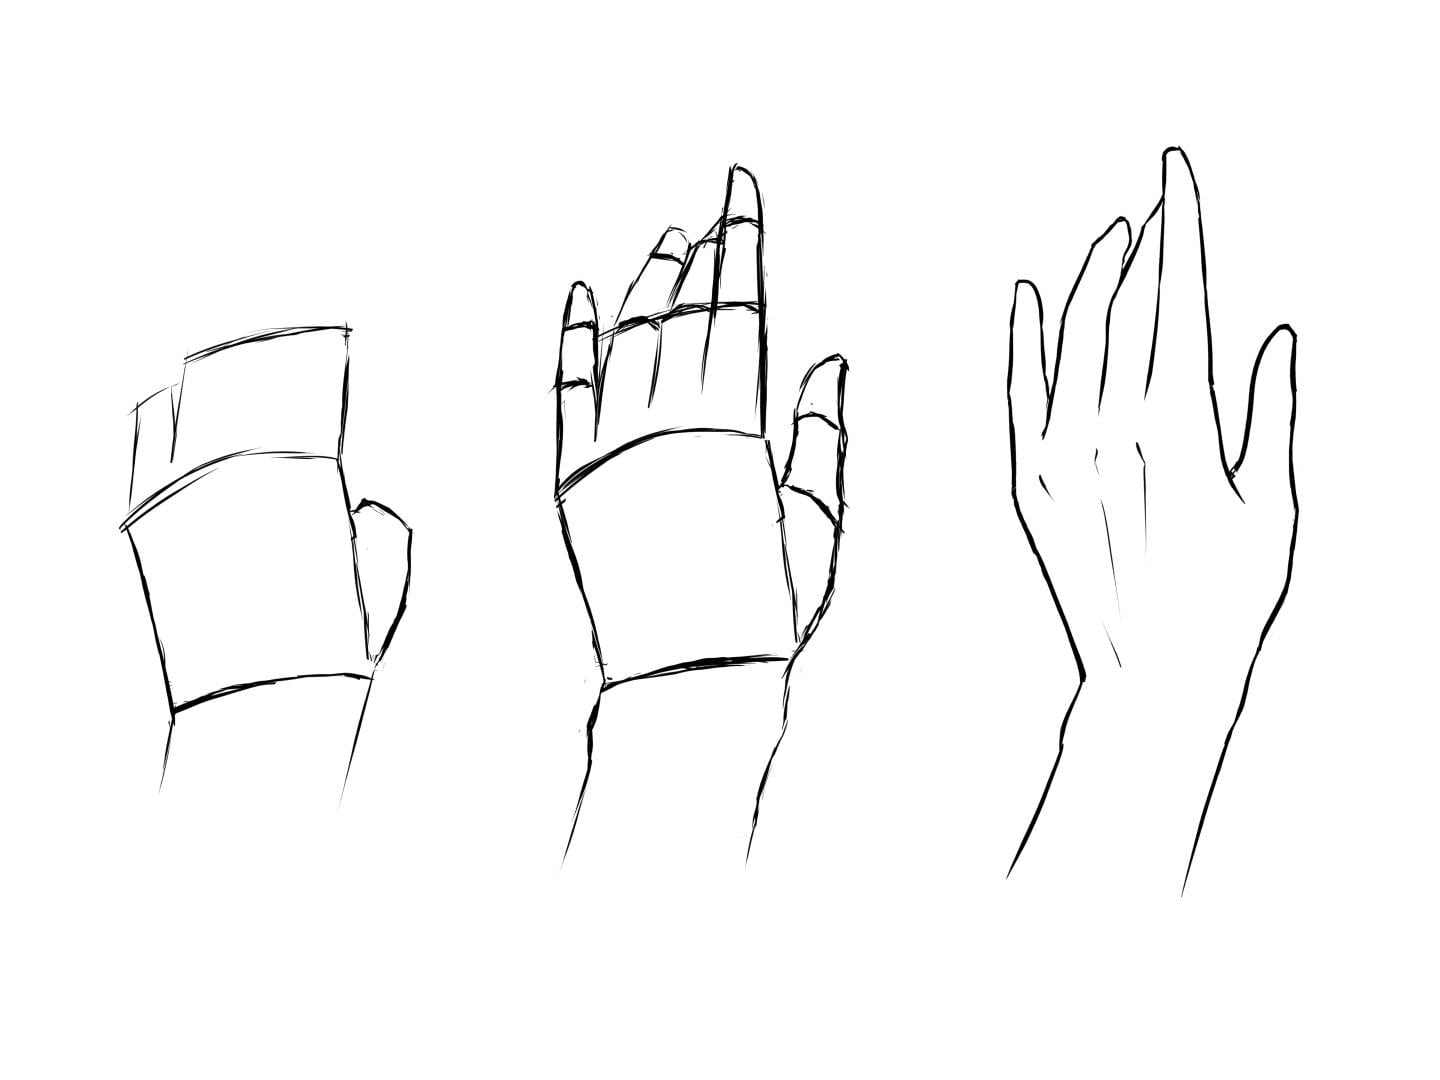
3. Hand structure: In this lesson, we're going to talk about the
structure of the hand. No complex accurate
anatomy here, but more like a few
tips to keep in mind that will help you structure
your drawing properly. We will start with
a quick reminder of what we saw during
the anatomy course. So if we want to summarize the structure of the hand
from a top view in two D, we can see that what
I'm calling the body of the hand is pretty
much squarish shape, a little bit wider
on the inside. And to that square, you
can stick a triangle. And then from that square, you'll have the five fingers protruding that you can start
by indicating like this. Each finger is basically an
assembly of three tubes, except for the thumb
that has only two tubes. Then if we want to represent our hand in three D
from basic shapes, you can consider that the body
of the hand is a big tube. A tube or you could also
draw it as a flat box. This is what you
prefer, then you stick that triangular shape for the thumb barrier
and the four fingers minus the thumb are basically
tubes next to each other. Mm hmm Then let's
see the proportions. You can see that
the tallest finger is about the same size
as the rest of the hand. And I also want to highlight that if you draw
a line following the tips of the finger and lines following each
articulations like this, those lines somewhat
follow each other. As for the tip of the thumb, it lands about in between the two first articulations
of the index finger. Then we can highlight
that the thickness of each finger rather equals. And for a given finger, its valanges are
fairly equals in size. The last thing I want to
add is that even if we represented the body of the
hand with a tube or a box, it is actually fairly flexible. This is what makes
the hand actually so expressive but also
so tricky to draw. It's important to
use references. To recap, the
structure of the hand can be summarized as
an assembly of tubes. Is tallest finger is quite equal in size with
the rest of the hand. The fingers are quite
equal in thickness. The phalanges on each
finger are equal in size. The thumb lands in between the two articulations
of the index finger. And the hand is overall quite flexible. Now it's your turn. You can start by doing
the structure of the hand by paying attention
to its proportions. Don't try to make it pretty yet. It's just so you get
familiar with it. For the next lessons, I think
the best way to learn to draw hands is by practicing
on different examples. For the rest of the course, I will show you how I draw different hands postures and show you the tips I
use to make it easier. For the first example, we will start fairly easy
with that hand posture. See you in the next lesson.
4. Hand Pose 1: So here we go for
the first hand pose. As you can see, this
pose is fairly easy. We won't have to deal with
the stem because it's completely hidden and all the
fingers are fairly aligned. So the body of the hand
would be in that direction. And even if we don't see it, I'm making sure I'm taking into account the whole
three D volume and not only the shape
in two D because it will help me understand better how the hand
is structured. And then instead of jumping right into drawing each
finger one by one, I start by simplifying the
whole shape as a block. So what I'm paying attention to here are that the
body of the hand and the tallest part of
the fingers are at an accurate distance
compared to the reference. And as a reminder, normally, those two parts are equal in
size, as we saw previously. But here you can see that
due to the perspective, the finger part appears taller. This is why even if you
know the proportions, you still have to check how
it appears on your reference. And the second thing I'm
paying attention to is the actual shapes that draws the fingers because I will
use it as a guideline. Once I'm happy with my shape, I start working on sub
divising the fingers. I make sure each
finger arrives at the appropriate place on my guide line to make sure
they have the right length, and you can see that
the pinky finger is a bit away from the others. This is something that you will find a lot while drawing hands. Some fingers tend
to come as a pack, but the pinky tends
to do it something. Another thing is
that make sure you don't draw the fingers
all the way to the articulation place because you can see on the
reference that there is some gap in between the articulation and where
the fingers actually begin. And in the previous lesson, I said that you can simplify
the fingers as tubes, but you can see that
I'm doing them as rather boxy tubes
because it's more accurate compared to the
actual shapes of the fingers. Also, make sure that the tip of the fingers are not
following the guideline, but are instead
fairly perpendicular compared to the long
side of the fingers. I'm erasing my
construction line to define the shapes of the
fingers a little bit more. So to explain what
it looks like, let's take a finger
from profile view. The fingers are bigger at the base and get
thinner toward the tip, a bit like a pretty
simple triangular shape. And we can simplify it saying that in between
each articulation, you'll have a dip, so that will make a sort of
wave shape but rather soll. And underneath it follows
the shape on the top. This shape is something that we can perceive a little
from that angle. Now before moving on, I'm just going to adjust
the size of my fingers. For those traditional art, you just have to erase and redo. But for those who
use digital art, there is actually a pretty
convenient tool to do it. You can select the Lasso tool and select the finger that
you want to resize with it. EclpsiaPaint, I'm not completely sure about the
terminology in English, but it must be
something like edit, transform and free transform. But this is something
you will have in every digital art software. Once you have it selected, you just have to
adjust the shape. Then I'm doing the same thing, but adjusting the whole
fingers together. And then I'm erasing
more construction lines and I'm adjusting the position of the base of the fingers. Then I'm going to redraw it
to make a clean drawing. I'm just lowering
the transparency of my layer and creating
a layer on top. If you're drawing
with traditional art, you can of cours erase
partially your drawing, and now I'm starting
to draw a clean line. Now, a tip to place
the articulations properly is to draw
the shape that it draws on the reference and then carry that same
shape onto your drawing. I and then you just have to draw your
waveshape following your guide. And then for the
body of the hand, I'm still following that curve that I can see on the reference. As long as you're
not comfortable, I advise against trying to draw the nails because there is quite complex
perspective involved, so it's wither I think to try to get more comfortable with
drawing before attempting it. And now as a finishing touch, you can see on the
reference how some of those bone shapes
can be more visible. You can place so little line on your drawing to indicate it. Those bones are in the
prolongations of the fingers, so be mindful about
the placement. And don't overdo it either. It needs to be discrete. And once you refined and you're happy with your
drawing, you're done. So to WCA, we first place the shape of
the body of the hand, then the wave shape of all
the fingers as one block. Then we subdivided all the
fingers following our guide. Then we've marked the path
of the articulations, and we've drawn each
finger more precisely with that waveshape.
Now it's your turn. Draw your first hand following my reference or a similar
one of your choice. Then don't hesitate
to post it in the project section if
you want some feedback. During the next
lesson, we'll try to complexify slightly
by drawing this pose. It's still not a
too complex one, so you can get a bit of
exercise before jumping into more complicated poses.
See you in the next lesson.
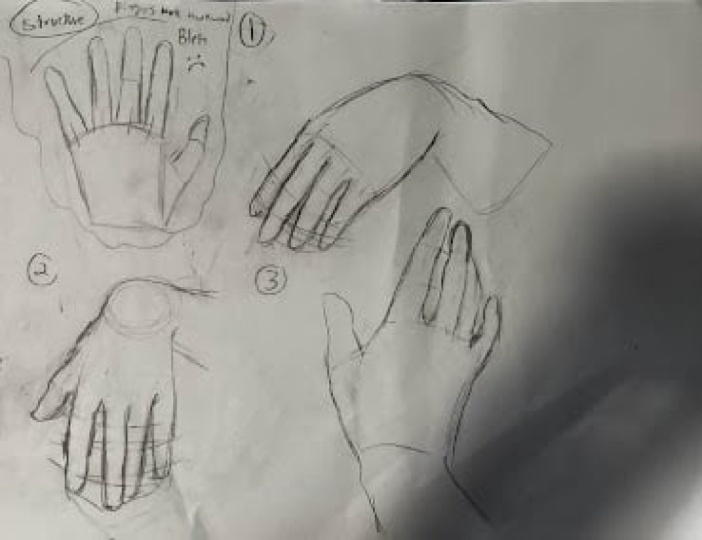
5. Hand Pose 2: So here we go for the
second hand pose. For this pose, the back of the hand is pretty
much facing us. There is very little
perspective going on, and therefore very
little distortion. But this time, we
can see the thumb, so we'll have to deal with it. So what we're going to do
here is to start by spotting our square shape that compose
the very base of our hand. And you can see how
it's not a real square, but it's always wider on the thumb side and actually
shorter on the other side, and it's also shorter toward the wrist and wider
towards the knuckles. So this is the shape that
I'm trying to draw first. And again, when you're
on digital art, you can adjust the shape very easily with the
frequent foam tool. I'm just going to make my drawing a little bigger
so I can see better. And then as we saw
in the first lesson, we can stick a triangular
shape for the thumb area. And then to place the
fingers properly, I first measure the size of the tallest finger and report
it to my squari shape, so I can see where
it actually lands. And here we can
see that there is still a small distortion due to the little perspective
and then to know where the longest finger
land on my drawing, I just measure the size of my squared shape plus a little bit more like
on my reference, and I place a little
dot on the right spot, and from there, I draw the
overall shape of the finger. I'm paying attention
to to do it is the alignment between the
square and the fingers. So here we can see it's
drawing a curve inwards, and on the other
side, we can see that the curve is
drawn outwards. To place the thumb, I'm trying to evaluate
the distance with the fingers and also
the overall shape it draws with the
rest of the hand. So here we can see
it's pretty straight, and I'm also paying attention to the right thickness
of the thumb. You don't want to draw it too big or too small, that
would look weird. Then I start separating
the fingers. Here you can see that
the two middle fingers are kind of glued together while the index and the pinky fingers are
away from the rest. And as the pinkylon, this is also something
that you will see a lot when the index and pinkies are doing their own things while the two of the middle are glued. And just like
before, I'm drawing the pattern of the
articulations, so I know better
how to place them. And from there, I start to erase my construction lines and I
start to refine the fingers. O. Then I'm going onto a new layer to clean
my sketch a little. Now, if you don't know how
to do it on traditional art, you can just quickly hop onto
my class called drawing for complete beginners
Anatomy Mads and go into the characters in
different postures, chapters. Like this, you'll have
a mo on how to clean the different phases of your
sketch on traditional art. But back on our current drawing, just precising that here I'm just trying to get
a cleaner sketch, not trying to get
an actual line art. So when you observe the
shape of the fingers, you can see that there are
places where we can still see that wave like shape
in between the joints. But sometimes it can
also be more rounded. There's unfortunately
no wool that I actually know to make
the work easier. It's really all about observing what each segment looks like. But if it's too complicated, just draw everything as a straight line in between
each articulation that will simplify your process
a lot and will look better than unfortunate
quantum shapes. You can see that I'm
also playing with a little bit more negative shape than what we have
on the reference. Negative shapes are essentially
the shape of the holes in your drawing and they are very powerful element to make your compositions
more appealing. But of course, you
don't have to do it now if you are not
comfortable with it. Now that I'm rather
happy with my shape, I go over again to
clean the line, and I keep on making adjustments here and there when
I spot mistakes. And in that direction, the knuckles will draw
more like a diamond shape. So don't hesitate to try to and a few more
adjustments, and we're done. To recap here, we placed
first our square shape, then the triangle
toward the thumb. Then we measured our
fingers on the reference to see where it land actually
onto the body of the hand. Then we checked the alignment of the side of the fingers
with the body of the hand to see what shape it draws before drawing the
whole block for the fingers. Then we placed the thumb by
comparing the landing point compared to the index finger and the alignment with
the rest of the hand. And just like
before, we separated the fingers and we will find everything until we're
happy with the result. Now it's your turn. Draw
your own hand following that reference and don't hesitate to post your
work to get feedback. During the next lesson, we will complexify again a little
bit more with this pose. See you in the next lesson.
6. Hand Pose 3: So here we go for
the third hand pose. This pose is a little
bit of a mix of the two poses that we
just saw previously. There is a slight
tilt toward the white with a little bit of overlap
with the two middle fingers, but the other fingers
stay separated. I also want to show
you another way of simplifying the
fingers, so here we go. So as usual, I'm
first determining how the shape of the body
of the hand is placed. And here, as the hand is
slightly turned to the side, I make sure to represent the thickness of the side of the hand with that boxy shape. And you can see that this time, it's a bit trickier because all the fingers
are not straight. The index finger is straight, but the two middles that are supposed to be taller
are actually a bit bent. And there is a tilt of the
hand towards the right. So we really need
to pay attention to the shape we see instead of
the proportions we know. You don't necessarily have to draw on your reference
like I'm doing. I'm just doing this for the demo to show you what to
pay attention to. But if it helps, don't hesitate
to do it yourself, too. So for my actual sketch, I'm first drawing my boxy shape. Mm hmm And then to
place the fingers, I watch the curve that is drawing with the
body of the hand, and I measure the ratio in between the back of the
hand and the fingers. And here the length
of the back of the hand is equal to where
the middle finger lands. So here again, I
place a land mark, and I see that the
index finger is going up compared to
the middle finger. So I try to match the curve. And then I pay attention
to the curve that is drawn in between the back of the hand and
the pinky finger, and I use it as a benchmark
as well to complete my shape. Mm. Now, let's talk about
that simplification of the finger that I was talking about during the
beginning of this lesson. There are styles, especially in mangas or comics or cartoons, where we won't actually draw
the three penges but we will simplify it
in two challenges like I'm demonstrating here. Now, while the shape
in itself is simpler, the tricky part
is that you can't really count on your
reference to guide. So a simplified rule would
be to consider that there is only an articulation
in the middle of the finger sometimes it
doesn't really work either. It depends really on the
posture of the hand. So it can be a lot more trial and error to see
what actually works. So if you want to
experiment with it, the best thing to do would
be to find an artist that you like that draw like this and study how
they draw their hands. But here is my attempted dis, overall paying attention to the overall shape of my reference and still
try to match it. Here, it works quite well
because there's usually only one art regulation that is bent. The rest is straight. But, I often find it
actually more complicated. You could also adapt
depending on if it's making it easier
or more complicated. As for the pause itself, after paying attention to the overall shape and
proportions as I showed before, I'm now paying attention to the negative space in between the fingers to draw
it more accurately. I'm particularly
paying attention to how the two middle
finger overlap. The middle finger is fully
in front and the ring finger lands a little below one
phalanges of the middle finger. And the first palenge
where it bends is a little lower than the one
of the middle finger, and this is where it's a
little tricky as we have to adapt to only two
phalanges on our drawing. But the overall proportions
have to stay the same. And spot the thumb, as usual, measuring the alignment
with the rest of the hand, paying attention to the shape
it draws with the triangle. By the way, this is very
normal if you don't manage to be accurate
on your first try. I'm not really accurate either. This is why I always spend a lot of time
adjusting afterwards. In drawing, we always
trying to go for an overall shape to
refining little by little. Mmm. And then I'm going over to clean
my sketch and doing some more corrections until I'm happy with the result. So to recap on a pose
that is tilted like this, draw your first box
as a three D shape to understand the placement
of the hand better. We also saw that we can draw our fingers with only two
articulations if we wish, but that we will need to make
some gymnastics in between accuracy to reference and
adjustment in stylization. As for the pose itself, to make it accurate, pay attention to the shape of the negative space in
between the finger. As well as the shape
and where everything lands when there are overlaps with the two middle fingers. Now it's your turn. As usual, draw a hand from that reference and don't hesitate to
post it to get feedback. You don't have to post all
of your hands by the way. You can just post
whatever you want. During the next
lesson, you are going to take kind of the same pose, but turn a little bit more than hand and see how we
can handle this. See you in the next lesson.
7. Hand Pose 4: So we are at the
fourth end pose. This pose looks a lot
like the previous one, but it's more tilted
towards us and the overlap of the fingers
is more important. It's actually a fairly
difficult pause already, so I still want to
demonstrate it to show you how to get
around with difficulties. But I don't necessarily recommend
that you already try to draw it if you're not already comfortable with easier poses. I advise that you try to
get comfortable first with easier poses before
coming back to this one. So as usual, I'm trying
to find my box shape. And you can see that this time, as the side of the hand is
more facing towards us, the side of the box
needs to appear bigger. We can also see better
that the lower part of the hand is thicker than
the top of the hand. And in a posture like that, I find it helpful to detail
the thumb shape more. I'm doing an assembly
of boxes here, and that allows me to understand better in what
direction it's facing. Then the most prominent
shape is the index finger. This is the one I would
be placing first and then the two middle fingers
act again as a block. When you sketch,
don't hesitate to draw across the object
that is in front, so here the index
finger because it will help you with having
the proper alignment. Lastly, if the pinky is again
separated from the rest. So now for sketching. I find that my picture has actually a lot of
distortion and that might happen a lot when you're taking your photo reference from your own hands as your
camera is so close. But that's an opportunity, so I can demonstrate how to
use a reference as a guide, but without having to be
entirely truthful to. So I place my box, and as the index finger is appearing way too big
compared to the rest, I will do a mixing
between what I see in the reference and what I know about the
actual proportions. So in the reference, when I report the length of
the index finger, it lands way below the wrist. So if there was not as much
distortion due to the photo, body of the hand will
still appear a bit smaller than the fingers because the index finger is
facing straight towards us while the back of the
hand is slightly tilted. With the perspective, it
would anyway appear shorter. What I'm going to do is to make my index finger bigger
than the back of the hand, but not as big as
on the picture. This stage, don't be afraid of not finding the
right balance. This is why we sketch
roughly first and then when we see the overall
drawing, we can adjust. Then as I was saying, I'm sketching the two
middle fingers as a block and across the index
finger that is in front. Here again, I don't
really bother with the details about how
the two fingers overlap. I adjust it later. And I just want to point out that interesting shape that we're seeing on the reference. You can see that line that
is drawn that seems to connect the wing finger
with the back of the hand. This is something that I want to translate into my sketch, and then the pinky finger really seems to come from
behind those fingers. Then I start detailing more
my middle fingers, as usual, paying attention to
the alignments of the joints and then
placing the thumb. Mmm. Oh, and another little
digital art trick is the rap transform tool. So just like before you select the area that you want to
transform and ing studio, you go into Edit transform and should be called the
rap tool in English. Like this, you can move
your shape around a little bit more freely by moving
around those dots. I just want to point out
that in that position, we can see some of the fat of the palm of the
hand appearing. Look at that rounded
shape that is drawing. You need to indicate
those curves too. We'll talk a bit more about that part during the next lesson. At this stage, you can see
that my hand is very ugly, but I insist that this
is when you should not throw everything away
thinking that you fail. Essential is pretty
much in place. So all that is left to
do is to watch closely your reference and
see where you made mistakes and just fine tune
your drawing to your liking. Don't fret, if it takes
sometimes, it's perfectly normal. The more you practice,
the quicker you will get. Mm hmm. Oh. Mm. To recap, don't forget that when you tilt your hand more
towards the side, the side of your box
should appear bigger. Then when you've got
a reference that is too distorted due
to the camera lens, use your knowledge of the
proportions and perspective to readjust the visual to your liking and don't
be afraid of mistakes. Trials and error and readjustments are
part of the process. As I mentioned, if
you feel like it, you can try to draw that
hand from that reference, but feel free to skip it if
that's too much for now. You can go back to that lesson when you're
more comfortable. During the neck lesson,
we will start to talk a bit more about the palm of
the hand with that pause. See you in the next lesson.
8. Hand Pose 5: During this lesson, we
are going to talk a bit more about the palm of
the hand with this pose. I also know that even in
my beginners courses, a lot of you still want to attempt to draw more
detailed shapes. I'm going to first demonstrate
a more detailed hand, a taste in terms of contour, and then I will show you
the simplified version. So we're starting with the
basic structure as usual. And you recall at the
beginning when we were saying that the
hand was flexible. In this posture, you
can already see that the case because our
usual box is curving. You can also see how
the heel of the hand appears a lot thicker
than the top of the palm. And then for the fingers, what changes here is that
we don't have to deal with the space left between the knuckles and the
start of the fingers. So we simply stick the
fingers to the box. My And then about the palm, contrary to the
back of the hand, we can see several areas of fat distributed
throughout the palm, one directly connected to the stump that draws
that round shape, one on the other side of
the heel of the palm, and one on the top of the
palm that goes toward the hand in that area
where hand can bend. This is just my observations and not any accurate
anatomy description. But hopefully it will help
you draw more accurately. But the main thing that you need to retain from that is that all those areas of fat will bring a lot of
roundness to the hand. Oh. Now for those who want to draw
more accurately, that part of the
hand, we could simply draw it with a soft smooth line. But some of you might be tempted
to draw that little dent in the curve that is caused
by the lifeline of the hand. Mistake that I see a lot
among beginners is that they will tend to
over exaggerate that type of little curve. But as you can see
on my demonstration, it's actually very, very subtle, like you almost can't see it if you don't
pay attention to it. This can often explain
why when you're wondering why your drawing looks awkward while all your
proportions are correct. Over exaggerating sole curves or movements in your
drawing might be the cause. So to avoid this, it's better to draw the overall shape
in a smoother way and kind of carve
your little nuances into your line very gently. And it's the same
for the fingers. Here I'm trying to
follow more accurately the little shapes that
my reference get. And I'm going very
slowly and gently to try to place each
pudal curves properly. Now, you can also
place those lifelines. I don't know if
it's the right m, but it's very typical of
the palm of the hand, but they shouldn't
be overpowering. And when you want to get
a more realistic result, you will need more
time to correct and observe every subtlety. It can take quite some time
to get the shape right. One last very convenient tool I want to show to
the digital artists here is the liquefied tool. So in ellipsio paint, it's over here, but I
believe most should have it. And here I am onto
the push option. And what it does is that it allows you to push
your drawing around freely like this
and you can adjust the size of the area
that you want to push. So this is what I'm using here to correct the
placement of my palm. Now I'm going to
show you how to make a simplified version
of that pause. So here I find that two
phalanges work quite well. So as you can see,
what I'm doing is that I'm basically
smoothing out every sodalt into
the lines while respecting the dynamic
of the overall shape. And as usual with stylization, it can take several trials to find something that
works. And that's it. I hope that this
video has helped you better understand how to go better from a realistic
shape to a simplified one. O. Now, to recap, the main thing that you need to
remember when drawing the palm of the hand is that the fat will bring a lot of
firmness to your drawing. Also, the fingers are
directly stuck to the palm, so no cause to
handle on that side. Lastly, when you want to
draw more realistically, be careful to keep
the small nuances in the line sodal and to place them properly.
Now it's your turn. As usual, draw a hand from that pause and post it if
you want to get feedback. During the next lesson, we're
going to see how to handle more bend finger over the palm with that pause.
See you in the next lesson.
9. Hand Pose 6: So let's go for six hampos. We're going to see how to
handle Ben's finger this time. So like with our
previous hampos, I'm starting by placing
the box that is curved. So here, again, the heel
of the hand is pretty big, and the side towards
the fingers is thinner. Mm hmm. Mm. Now let's see how to
handle the fingers. As previously, we're going to consider them as one
block to begin with, at least do three and we'll
deal with the index after. So to place the
articulations properly, we are going to consider that
this clump of fingers are composed of three cylinders that are interlocked
with each other. So here we can deduce that there is one that is going
in that direction. Pay attention to the angle
of the finger that you see and the thickness of the finger towards
the articulation. And then we have another
overlapping cylinder that goes in that direction. It's easier here because we can actually see the challenges. And the last cylinder
will be facing down. And then we can visually place the index fingers
compared to the others. So I start to place it
well free on my drawing. As usual, I will adjust the
proportions little by little. And I start detailing the
fingers like we do usually. The proportions of the hand are fairly complex to get right, so don't hesitate to spend
some times to adjust it. As previously, I indicate
the fat of the palm, and I keep on adjusting
until it feels white. So that sits for this lesson. So to recap, to draw
bend fingers like this, consider the fingers that are grouped together as a pack and divide this pack as three cylinders that are
interlocked with each other. Pay attention to the
angle of each cylinder, and then you can
proceed to detail your fingers as usual.
Now it's your turn. Dispose is already
fairly complicated, so if you don't feel like it, I suggest that you already
get accustomed with easier pauses and come back to this lesson when
you're more at ease. But if you want to try,
please feel free to draw this pause and pause
your work to get feedback. During the next lesson,
which will also be the last, we're going to see
how to draw the fist. We're going to study it in two different angles
in one video. See you in the next lesson.
10. Fists: During this last lesson, we are going to study
how to draw the fist. We're going to see two postures, one with the back
of the hand towards us and the other with the
front of the hands towards us. That should hopefully
give you an idea of how to cover most situations. So here we go for
the first pause. The first thing we
can notice is that the main box is curving inwards. And then the main thing with the fist is that it's basically composed of boxes that are curled onto each other this way. And then the thumb is also
wrapping around the fingers. So here I go slightly
curved box for a start. Then I draw the main
shape for the rest of the fingers without bothering too much with drawing
actual boxes. As long as you understand
the main shape, it's enough. Then the triangle going
toward the stated, and I wrap my thumb
shape around my fingers. I just draw the wrist minding
the shape of the bones. Now let's detail the fingers. As you can see,
we don't actually see the whole of
the forefingers. The shape of the index finger is actually taking the major
part of the picture, and then the finger
that wrote the top of the box is actually
the middle finger. And for the other two,
we only see the joints. This is because when
we draw a fist, our finger box is not actually
flat but quite rounded, so pay attention to what you actually see on the reference. And then it's again just
a matter of refining. The fat of the palm and the fingers are quite
noticeable here. I'm simplifying it a bit. And I'm also indicating
the bones in the prolongation of the finger
at the back of the hand. There's no absolute wool here. You just have to try and
see what looks good. Now onto our second hand pose, there's again quite a
lot of distortion here, but this time, I'm going
to respect what I see. In that pose, I
find it easier to start with the fingers
as they are in the front and pay
attention to how I try to capture the
curve of the fingers. We also have to deduce again the placement
of what we can't see. Here again, we're pretty much
drawing a spiral of boxes. I start drawing it without
caring for the thumb for now. It's easier to handle it later. Oh. So now that it's done,
let's draw the thumb. I'm mainly placing it visually
comparing to the rest. So the knuckle is towards us, so it will appear
bigger than usual. I'm also noticing
the triangular shape that it has at its base. Again, I'm drawing the wrist trying to follow the
shape that I see. And now to detail the fingers, it's the same as before. I'm paying particular attention to what surface
you actually see. So here we mainly see the
top surface of the index and middle fingers and a little
bit only of the wing finger. And for the pinky finger, we barely see the beginning
of the articulation. And then I'm paying attention to the direction of each finger. As you can see, they are not parallel and the last step is, as usual, refining until
we're happy with the result. So to recap, we
can sum up a fist by saying it's a
spiral of boxes. The boxes tend to be rounded, so pay attention to that and also the fingers are
not aligned properly. So pay close attention
to your reference to see how they are actually
aligned. Now it's your turn. I would suggest to begin with, to choose between this fist and the other one to
draw and submit, but feel free to draw both or skip them entirely
if you want to. So congratulations. You made
it to the end of the course. So now I'll jump onto
the conclusion video.
11. Conclusion: Congratulations. You made
it to the end of the class. During this class, we first had a quick overview about how
the hand is structured, and then we went
through a series of different hand postures to
see how to handle them. What you need to remember is to draw the overall structure first and start detailing
afterwards one step at a time. If you like this course
and want to learn more, you can watch the
first classes of this series if it's
not already done. I would also appreciate
it a lot if you left me a review to let me know what you thought
about this class. If you want to follow
me on social media, you can do so on
insta romantic T and find me with this user name. I hope you enjoyed this class
and that I served you well. With that said, I wish you a happy drawing and
see you next time.
 Fanny Richard, Illustrator & Concept Artist