Transcripts
1. Introduction: Lot of people give
up the D to learn how to do because they
think they have no talent, audio classes are too
complicated for them. In my opinion, a lot of it is due to the fact
that traditionally, we are told to
first learn to draw realistically before
being allowed to stylize our drawings. While it might work
for some people, a lot of us actually get discouraged by the difficulty
of the task ahead. This is why I think learning the other way around
is just as relevant. First, learn to draw in a
simplified and stylized way and work your way up to acquiring more complex knowledge
step by step. You're likely to find it a lot less overwhelming
and if you like me, a lot more fun to start
off by trying to develop a style that you actually
like. Hi, I'm Fani Richer. I started my journey
by studying in different art schools
and by getting a certificate as
itraator for comics. Since then, I have been
a freelanced artist for six years going on with learning new art
techniques along the way. This course is the continuation
of my first class, character drawing for
complete beginners. He drawings made easy. If you don't know how
to draw heads yet, I advise that you go
watch this class first. To follow up with it,
this potent class will teach you about drawing the
body in a simplified way. We'll start by demystifying the complex different shapes of the body by reducing them
into very simple shapes. Then we'll see how to
assemble them into a manquin that will be the base of our
character drawings. Then we'll learn how
to rotate around our mankin by first learning to draw our
simple shapes in three D, and then we'll assemble
them, and finally, we'll see how to use
photo references as a guide to draw our character
in different pauses. Now, if you're ready, let's
jump into the project video.
2. Project: Project for this class will
be to follow along with a demonstration by doing
the exercises suggested. I've only included two
publishing suggestions in the project section to
avoid overwhelming you. But feel free to post more of your work if you want to
get some extra feedback. Also, some exercises suggested can be a lot to do at once, don't hesitate to not
complete everything during this project and
instead go at your own rhythm. Slow steely steps are more efficient than rushing
and feeling overwhelmed. Like in the previous
course of this series, you will only need
very basic supplies, a pencil, an eraser and
paper of your choice. My personal favorites are
need a boy eraser for its versatility and cleanness and a pencil eraser
for its precision. For paper, it can be as simple
as some printing paper, which is what I'm going to use. I'm using some fancy drawing
pencils during this course, but you can use something as simple as a basic
mechanical pencil. For extra help, you can
print the workbook, the one in PDF format to
do the exercises on it. Otherwise, feel free to do
them on your regular paper. If you prefer to draw digitally, I've included a JPEG version that you can use
for that purpose. However, I advise against starting with digital
art if you don't already know how it works because it will make your
training more difficult. Lastly, owning one of those wooden mannequins
can be quite handy to have an overall idea of how to draw the simplified shapes and
proportions of a character, especially when we are
rotating around them. I'll be referring to it a lot. You can get one of your
own for an extra help, but if you don't, use my
own drawings as reference. Now if you're ready, let's
jump right into the lessons.
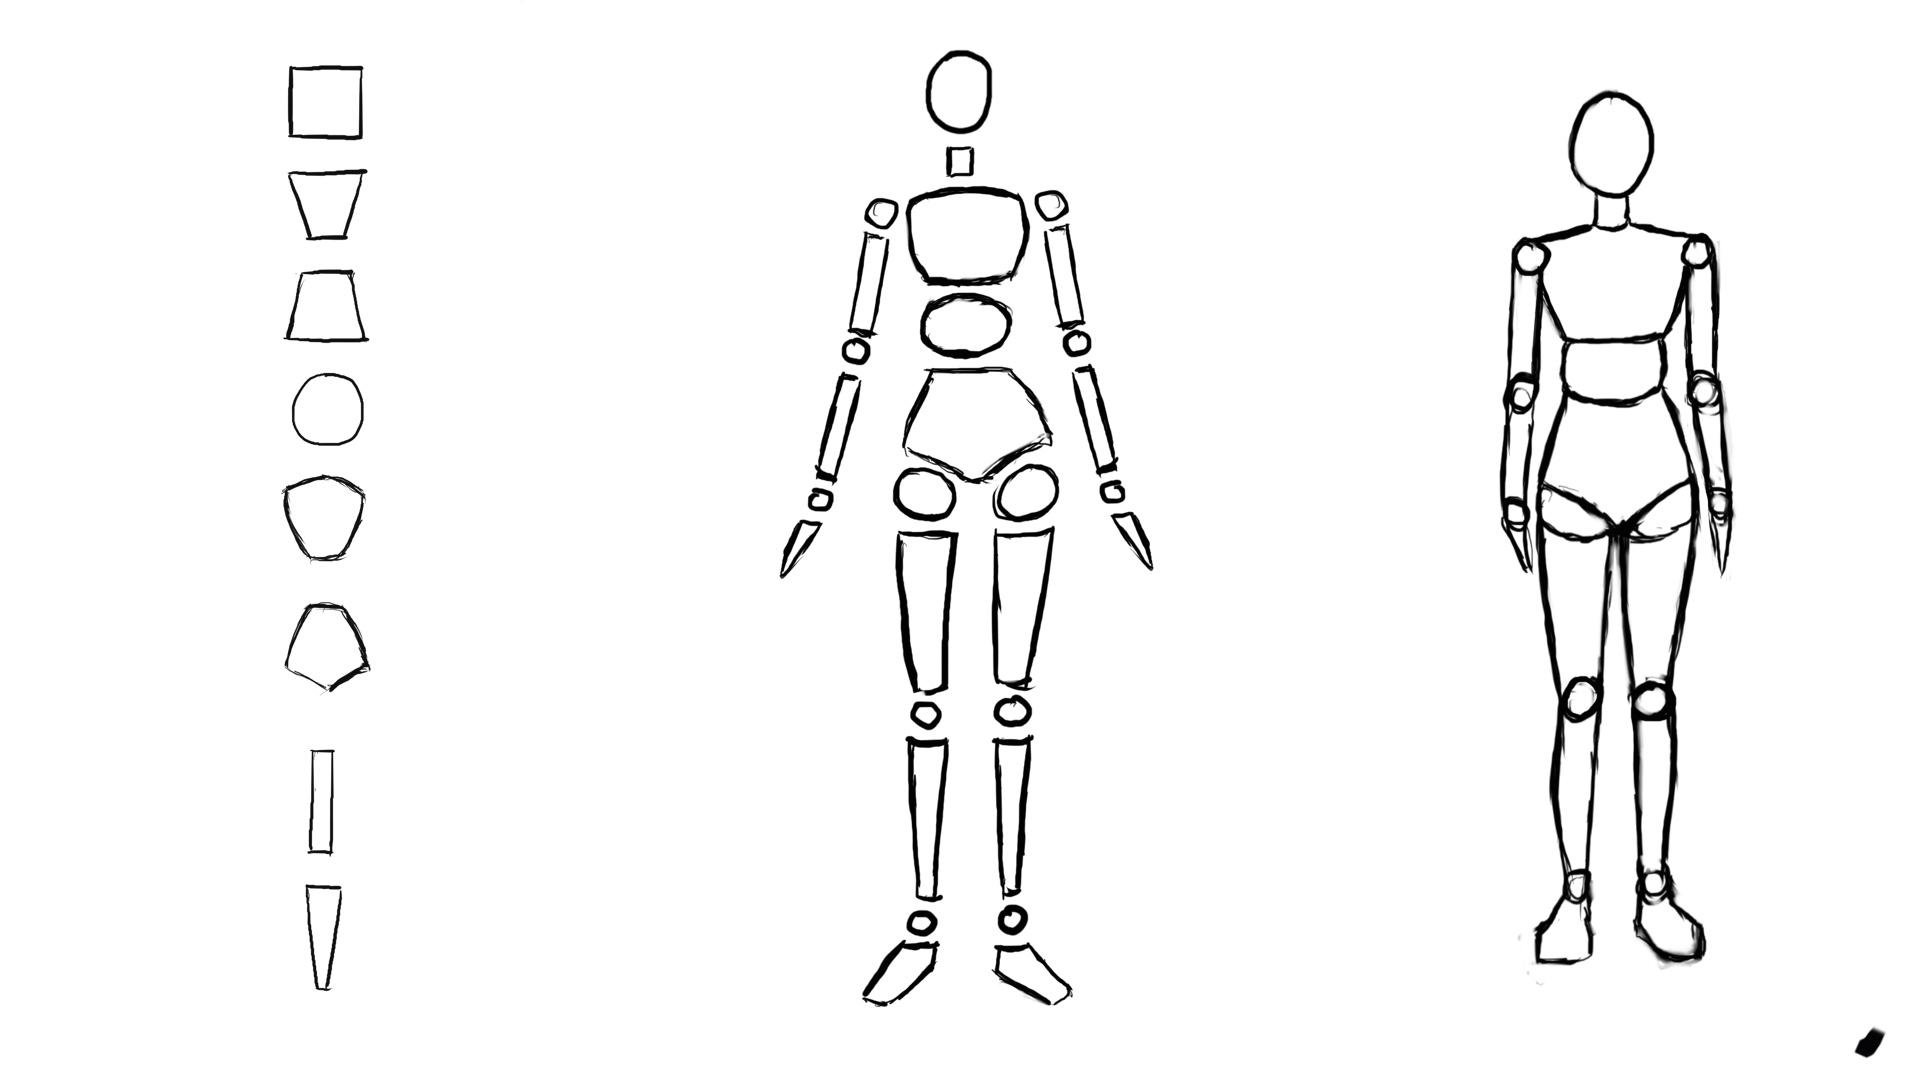
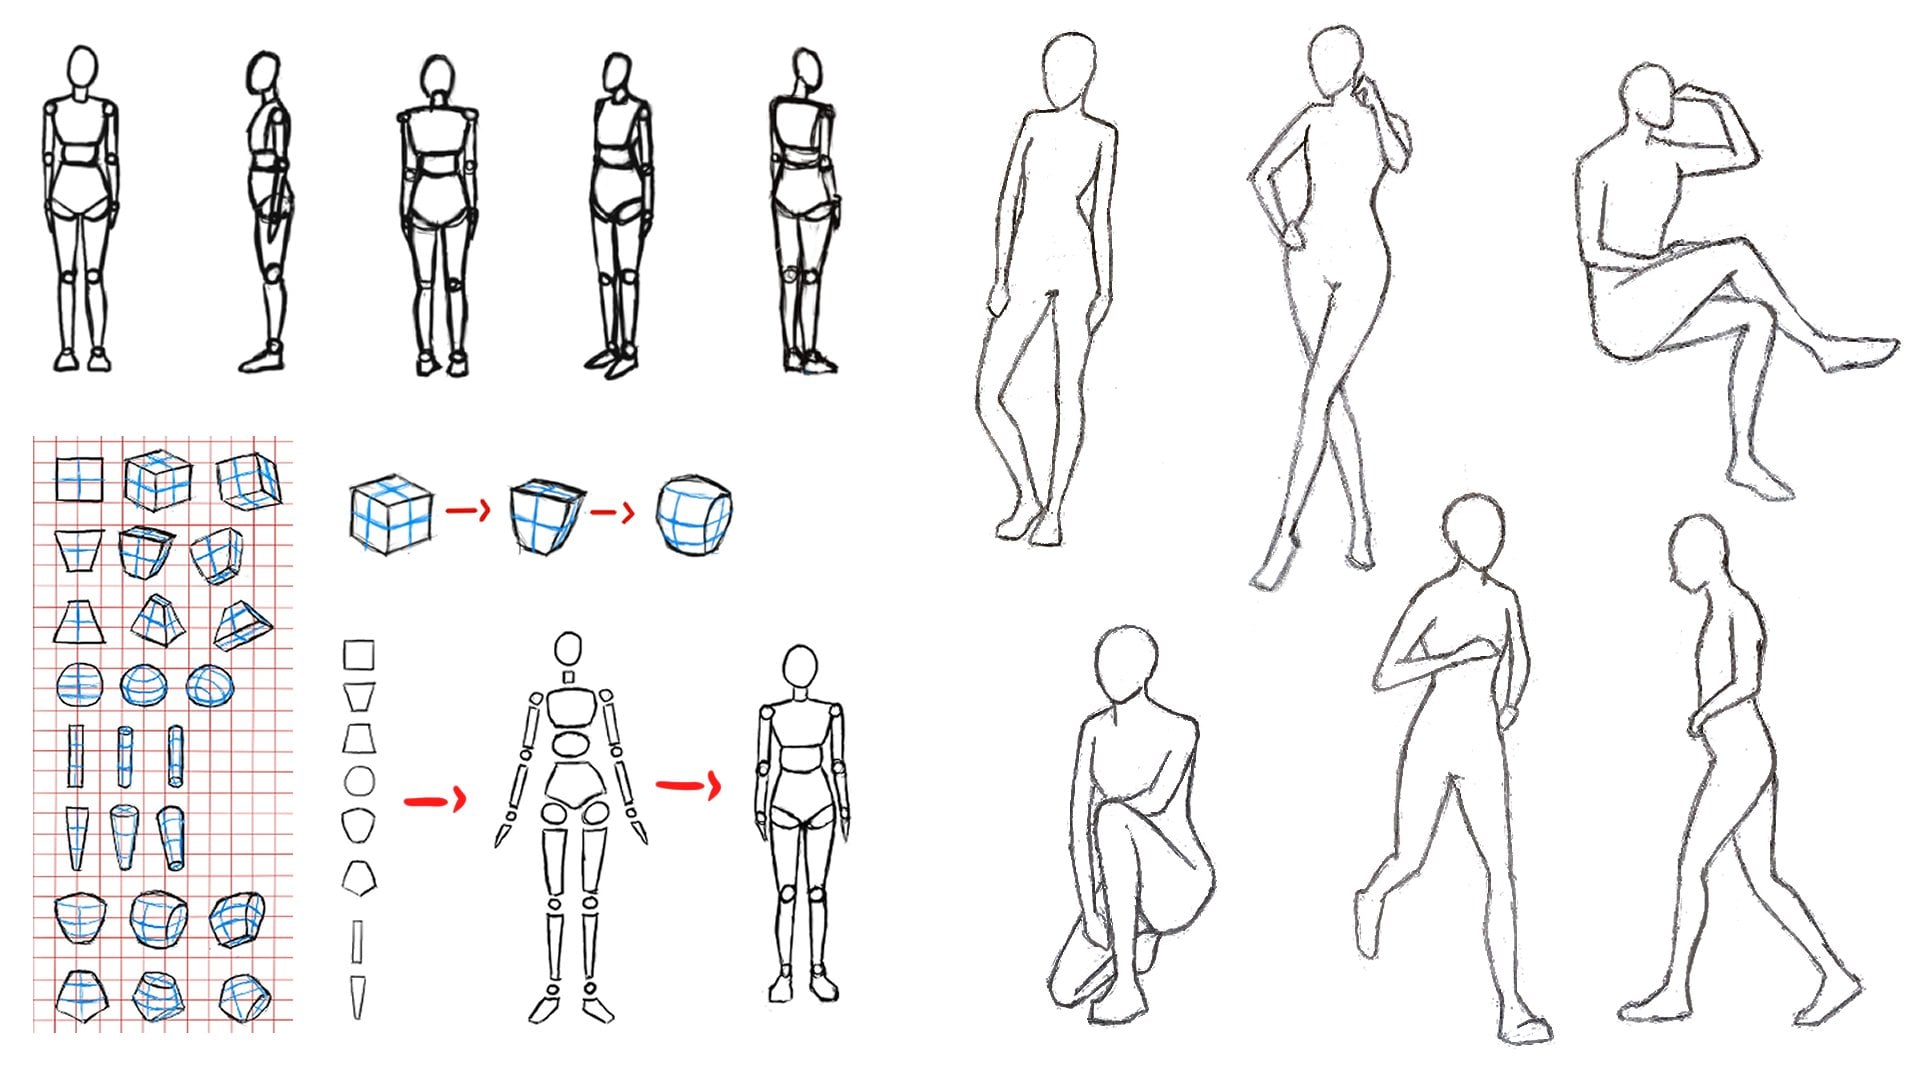
3. Simple Shapes: When you want to learn anatomy, the first thing to
be learned would be the form of the mankin
and its proportions. But even if we simplify it, it might still look
intimidating to jump right into it if you're in the
dristicFgure club. But like everything in drawing, that Manakin can be decomposed into a bunch of
pretty simple shapes. In this first lesson,
we are going to start by training on those
individual shapes first. Like if you are
learning the letter of the alphabet before trying
to write your first words. So in the first page
of the workbook, you will find a bunch
of flat shapes. We will start with a
very simple square, and you will see
how by tweaking it, you can evolve it into
more complex shapes. So your first job will actually
be to trace that square. I've given you a sheet with a grid to make it
easier to start off. But ultimately, you will need to be able to draw
on a blank paper. This should be fairly easy but if your hand is not stable, don't worry, it will
come with time. I still encourage you to draw a full line of
it like I'm doing, just so you get a
bit of practice with something that should
be achievable for you. Then do you see the first half of the torso of the mannequin? We can start going
in that direction, starting from our square shape. We are pretty much
drawing a square, but we are shortening its base. Same thing as before,
I encourage you to do a line of drawings just
to get comfortable. Don't be scared if your
drawing is not perfect. This is just a matter of understanding the
structure of things. Now for the bottom part of the upper body of the mannequin, it's pretty much the same shape, but in mirrors, you
start from a square, but you shorten its top line. Now let's introduce some round shape
because everything in drawing will be a combination of rounder and
straighter shapes. Drawing circles by hand is
a fairly difficult task. So don't worry if
your circle doesn't look good right away,
this is very normal. You don't have to draw it
in one movement either. You can scribble to
search for your shape. The grid should help you to
place it rather properly as each quarter of
circle should take the space of one
square of the grid. Again, it doesn't
have to be perfect. Even my own circles are
far from being perfect. Now let's come back
to our second shape that represents the
upper part of the chest, and let's try to
complexify it a little. So the only thing that we are
going to do is to introduce a little bit of our own shape
into our squarish shape. So we are pretty much
doing the same things except that we are going to
curve our lines outwards. Now we are going to do the
same with the bottom part of the torso except that we are going to introduce a
little modification. It's just my own preference, but I prefer to include the whole heap in the
articulation because it will be easier to
make the line flow in between the torso
and the legs later on. Like before, we starting
with our square shape that has been shortened at the top and we'll start
to curve the lines. But for the bottom part, we're
going to cut a little bit above the end of our line
and curve our line inwards, just so we can insert
the indication of an articulation later on. The main thing that you
need to pay attention to is that both
sides are symmetric. This one starts to be a little bit more complex,
so take your time. Now for the arms and legs, we can start by simplifying them as long rectangular shapes. The main thing that you
need to focus on is that the parallel lines are
actually fairly parallels. And finally, to
complexify it slightly, we can do as for the
square shape and make the top part larger and
the bottom part smaller. This exact study
that we just did that consists in
observing one object and decomposing it into simple shapes is what you will need to do each time you
want to draw something. Even when drawing or painting
the most complex artwork, the first thing that
we need to do is to establish our drawings
with very simple shapes, then you're adding levels
of details step by step. This is the same when you're
drawing from reference. Instead of trying to understand all the complexity
of reality at once, the first thing that
you need to do is to break it down into
very basic shapes. To recap as complete beginners, when you try to analyze
a shape to draw, start with a cube, a circle or a long rectangle and see how
your shape differ from it. Don't forget to simplify what you see. Now
it's your turn. Draw lines of each
one of these shapes suggested either on the
workbook or on the blank paper. During the next lesson, you
will see that making as a whole by studying its proportions and
assembling its form. See you in the next lesson.
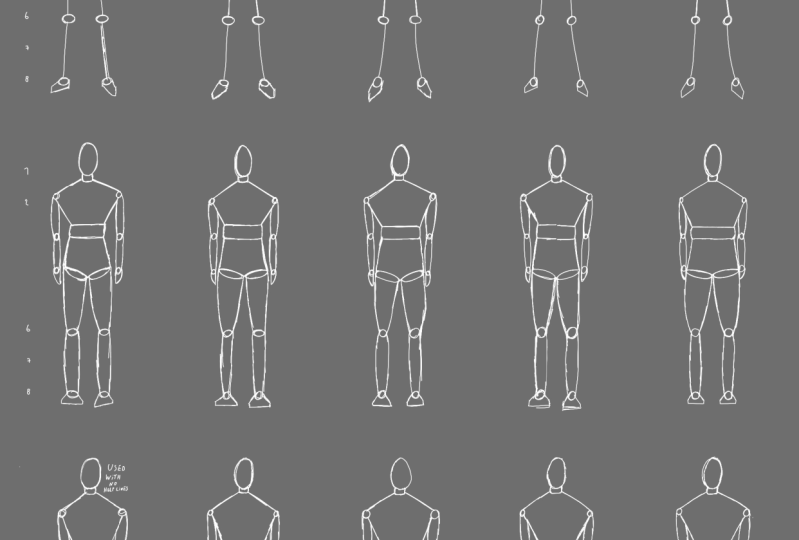
4. Proportions And Form: During this lesson, you will see the proportions and the
form of the mannequin. Now that you have
trained on drawing a few shapes that might
help you individually, we will start to see how to assemble them to draw a manquin. I will use the second sheet of the workbook which is named
proportions and form. If you have printed it, I
invite you to take it as well. You can follow along with the exercise on a blank
sheet of paper as well, but the workbook will hopefully make it easier to start off. We will still use our
wooden malekuin as a guide, but consider it
as a worth guide, not as a precise one. So now I jump into the lesson. So to begin with, let's take a look at the mannequins
on the workbook. You can see that I
have placed them onto a grid and that there
are numbers on the side. You can also see that
the head of the manquin is taking the whole head
of a square on the grid. And so this is because
when we measure the proportions of our
characters, we count in heads. Now, I just want to
make a disclaimer that this is a standard
model that we use, but that from one
artist to the other, we might use slightly
different proportions. And this is because if
you observe reality, you will see that
from one person to the other people don't actually have exactly
the same proportions. What we will see is
just a standard base that I invite you to use. But when you gain
more experience, you will be able to play around with different
proportions. Now let's study more
closely those proportions. To make it easier,
let's start by focusing on the proportions of the Mnequin only and let the
form aside mostly for now. You're drawing on a blank paper, use your index finger
and thumb to measure the size of the head and report it as I'm
going to show you. We put one head down and you
land underneath the chest. Then from there measure
one head and a half and you land on the pelvic
floor area, and then again, one head and a half,
and you land on the knee area and
one head and a half, and that will be
the anchor area. For the arms, there is one
head in between each joint. Now let's do a little
stick figure training. I just want to draw your
attention on the fact that a lot of beginners
draw the neck too long. So please pay attention to the actual size of the neck so you will not make
the same mistake. I'm starting by still indicating that square shape for the
upper part of the torso, just to still get a
minimum of indication. To start off, you can help
yourself with the grid. So count one head and you
land underneath the chest. Here I'm probably in the
middle of the chest, which might be a bit confusing, but this is correct as well. It depends on people
or character. Then one head and a half underneath and you land
on the pelic flow area. As you can see, I let
a space in between my two shapes to indicate the
area where we are mobile. Those indications will
help a lot when we want to move our
characters around. Then one head and a half below, we have the knee and one head and a half below,
we have the ankles. Then there is just the
thinness of the feet to add. And then for the arms, another indication would be that the elbow lands around
the waist area, and the wrist lens
around the hip area. We won't see it much, but the hand is around
the size of the face, and the feet when not put into perspective like this would
be the size of the forearm. But of course we don't
really see it right now. Just keep it in mind
when you need it. I just want to precise that the arms on the wooden
mannequin are very long. So when in depth
about something, don't hesitate to check
yourself in the mirror just to be sure you're not
misled by wrong proportions. As I said, not everyone
is done the same. The confusion from small
variation are put in a hole. Now let's go on the
line underneath and put the form and
proportions together. The circle I made you draw
during the last lesson will start by being useful for the head and articulations. Then the neck is basically
just a small rectangle. Then you'll have that
upper torso shape that we worked on
and you can place two small articulation on the outside of the shape
to indicate the shoulders. Then underneath, you'll have a round articulation to show how the mannequin
chest can rotate around. Underneath, you'll
have that bottom part of the torso shape that we worked on during the
last lesson as well on which we'll stick two
articulations for the hips. And then you can place
the knee articulations and draw two of the
shapes that we worked on. And then you can
repeat the process for the ankles and the
rest of the legs. Same shape, but just limmer then just indicate
the side of the feet. And then you can indicate the elbow articulation and just have that
long rectangle for the upper arm and that same modified w
tangle for the forearm. And then when you
want to go from mannequin to actual
character drawing, all that you have
to do is to erase partially your
construction lines and to redraw your
final lines on top. Feel free to re try
it if you want, but you can also just keep
the mannequin if you prefer. Now to finish with this lesson, I just want to show
you the difference between male and
female characters. Usually, we will represent female characters with more of an gular shape on the torso, and the thighs will be bigger
and more round on the top, contrary to the
male counterparts that will have straighter legs. And male characters will also have wider shoulders
and our hips. I didn't represent it here, but we will often find
them represented with three heads length on the torso
instead of 2.5 for women. But again, it depends
on the cara design. This is not mandatory. To recap the proportions of the human body are usually
represented as such. You count your head
size, one head, you land underneath the chest, 1.5 on the pelvic floor area, 1.5 for the knees, and 1.5 up to the ankles, for the arms, one head in
between each articulation. Then use the shapes
that we saw on the next lesson to put together the mankin.
Now it's your turn. Just like in the
previous lesson, fill the lines with
the different mankins so you get some proper
training before moving on. Once you fill the grid, try to draw the standard
mankin on a blank paper. Remember to use your index
finger and thumb to measure. During the next
lesson, we will go back to our simple
shapes and start imagining them instead of two D shapes as three D volumes. See you in the next lesson.
5. Simple Shapes In Volume: The last lessons,
we studied how to draw the manquin from
flat two D shapes. But if we want to
be able to draw it in different angles
and postures, we will need to
start thinking of it as a set of three D volumes. To make it easier, we will go back to our simple
shapes that we saw before and start by thinking of them as
three D volumes. You can go to the page of the workbook that is
called simple volumes. So to begin with, we'll
start working with our square shape again and
transform it into cubes. The style that we
are going to do during this lesson is
to imagine that we are rotating our shapes
to the side and down first and then
to the side and up. There are, of course,
an infinite amount of point of view that can
be applied to an object, which is why we always need
a reference to help you. But I think studying
those two angles are a good starting point. So let's start
with the exercise. I think that for most of us, it should be very intuitive. But to give a few explanations, when you are inclining
an object like this, the face on the side
on the one on the top starts to be visible and
for out to make it easier, we are pretending
that perspective is not affecting our object. So what you need to
pay attention to is that each parallel line
is actually parallel. Also, use your
intuition to convey the impression that each side of the cube has the same size. Depending on the
rotation of your cube, some faces might appear smaller. To explain how it works, the more a face will be
turned towards the viewer, the bigger it will appear, and the more a face will be
turned away from the viewer, the more squished it will be. This is true for every
phase of the cube, either on the side or on
the top or on the bottom. You don't have to draw it from the top of your
head of course. Now you can just use the
workbook as a model, but just try to remember
the principles. Also, when copying something, try to not analyze with your mind what you are
drawing because you will draw what you think
the object looks like instead of drawing what
it actually looks like. Instead, try to evaluate the
distance between two points because it will help
you to place your lines properly and have a
more accurate drawing. The blue lines that you see onto the reference
drawing are form wrapping lines and they
are very helpful to understand better the volume
between your drawing lines. I encourage you to
try them out as well. Here again, for our cube, you can see that they are
parallel to our my lines. Now from our salgo on view, it's pretty much the
same, but in reverse. Now let's jump onto
our second shape, which is between our first
cube and our final abs shape. Think of it as a cube, but that has been pressed
on two faces to make its thickness smaller and
that is now at the bottom. What used to be parallel lines are not exactly
parallel anymore, but their shapes are still
symmetrical from the front. Starting by tracing
our middle line is very helpful to draw
our shape properly. You can also start curving the line as I'm
doing if you wish. As you can see, some
lines are still parallel while others work
more like in a mirror, so pay attention to
that when you draw. Now that I jump onto that
same shape but inverted, don't be afraid if your
drawing is not very clean. It can take some scribbling to land on the right shape.
This is very normal. Also for now, don't be afraid if your drawing is not a
perfect copy of my model. The exercise is really about understanding how to
mentally rotate shapes. The models are just
here as a guide. B. Then we will transform the
circle into a bowl. As long as it's a perfect shape, the outline won't change. However, you can
still play around with the wrapping lines to show the direction
of the sphere. If you have taken a
previous course of the series about doing
heads for beginners, you're probably already
familiar with this. So here as well, make sure
the lines that follow each other are parallel and the
ones across are perpendicular. One. Now, let's transform our long rectangle into a tube to help with
drawing the arms and legs. Here I'm starting with a
flat circle on the top, which doesn't appear perfectly wound due to its inclination. I start by drawing a cross at the center to
indicate the direction, and then I'm doing the
tube shape which was the long sides of the rectangle and I curve it at the bottom. The trick here is to
make sure that the curve of the bottom curves barely
to the circle at the top. Here again, I indicate
some four mapping lines. To make it easier
for you to align the circles at the top
and at the bottom, you can start by drawing
both entirely before erasing the line that is hidden
by the body of the tube. And now we are going to
evolve out of shape by making it wider at the top and
smaller at the bottom. This shape will be very useful for the legs
and the forearm. Be careful to the
fore mapping line that indicates the center. The more it faces us, the more the line will
be in the middle with inclination halfway
in between the outlines, and the more it's
turned on the side, and the more inclination will
follow the closest outline. And now, here we go for
final torso shapes. Do you see how the four
mapping line are actually very useful to add more
information about the shape? Thanks to our line,
we can see how our shape is curvier
in the middle of the chest and how
those curves are less prominent above
and underneath, and also that on the side, the shape is pretty flat. Take your time to
understand that shape. With a bit of practice,
it will come easily. And finally, the bottom
part of the torso. To make it easier to understand, we can start by drawing
a shape that is very similar to our
cube shape actually. So the top and the
bottom are flat circles, the top being smaller than
the bottom and they are linked to each other with
our small tube shape. Then imagine that we cut out
a piece of it like this to interlock our thighs joined that would make another
flat circular shape. Here, it can be very useful
to indicate the middle of the shape right away so you know how to cut your shape. The form mapping
line can also help you see if you made any mistake. See how all the lines
align and are in the prolongation of each other and now stay
in bed in vers. So start by aligning
your two circles. And you see even me,
I can't draw without mistake at once, but
it's not important. What is important is to be able to correct it
when you see mistakes. I indicate the middle and
then I place my circles. So those last two shaves
are a little bit tricky. Don't panic. If the first
time you try to draw it, you find it very difficult and don't succeed to
do it right away. Just do it a few times,
and you might be surprised at how quickly
you get the trick. Okay. So to recap, to understand how to draw
an object in volume, first try to decomposite
mandally or on paper into its most basic
shapes like a cube, a bowl, a cylinder, et cetera, and then understand how it
varies from that shape. So now it's your turn.
Draw the volumes I gave as examples
several times, using my drawings as reference. For those of you who
use the workbook, I have included a few more pages so you can train as
much as you need. Then I recommend that you draw each one of those
shapes without grid, at least once for each. During the next esson we
will put all what we saw together and start to study characters from
different angles. See you in the next lesson.
6. Character In Different Angles: Now that you have studied all the shapes of the
mannequin individually, we are going to put
everything together and start seeing our mannequin
in different angles. To start off gently,
we will simply start to rotate around
our standing mannequin. As usual, if you're
using the workbook, you can go to the two pages named characters in
different angles. We will start with
the one displaying the side profile and
back of the character. So if you're ready,
let's jump into it. Let's stand by the
side profile view, helping ourselves with
the wooden mannequin. I put those reference
photos as an attachment. If you don't have
your own wooden manquin and wish to use them. So helping ourselves with
our simple volumes exercise. We'll start by using our
bow shape that we can slightly distort to indicate the overall shape of the head. Then let's use the
tube for the neck, see how I am cutting its shape, anticipating how I am going
to assemble it to the torso. And then for the
upper torso shape, you can see how rotated
from that side, it's curved in the front and
not so much in the back. As a reminder, you need
to count one head to land underneath the chest right underneath the
peak of the curve. You can also see
that the upper back is not entirely straight. You need to indicate
a little drop in between the neck and the back because remember that our torso is thicker
than our neck. Then underneath, let's indicate that board again for mobility. And then we'll take
our lower torso or basically hip and belly area. And from that point of view, you can see how it curves outwards on the front
before going inwards. This is because this
is where we have all our internal
organs over here, and the skin is
wrapping around and directing up to the
pelvic floor area. And on the other side, the curve outwards
is bigger to wrap around the bom area before
coming back towards the legs. So on my drawing,
I am indicating that cut to insert the
joints of the size. I also want to highlight that shape that you
can see on the back. The back is not
completely flat, right? There is some curves going on. So it's important to
respect that shape. Here it's just a mannequin, but when correcting to
draw an actual character, I think it would be even better
to accentuate that curve even then let's take that
modified tube for the thigh. I'm measuring one
head and a half from the pelic floor
area up to the knee. I wouldn't need it right
now thanks to the grid, but I'm just demonstrating it for those who draw
on a blank paper. I like to place the joint first, and then I'm linking the rest of the body with my join
with that modified tube. Then same thing for the chin. You can see how
there is actually a litan bump behind the knee
rather than a simple tube. This is a modification that you can already try to implement. Then for the feet, I'm just placing a sort of
triangle shape. Imagining that this is really
a strict side profile, the other leg won't show. But, of course, if we
tilted it slightly, we would have to deal with
the other leg as well. Now for the arms, you
can see that I'm placing the articulation not completely at the top of the pozo shape. But really, where
we indicated that the flat area on
the side started because you can see
in the simple volumes that the top of the shape
is slightly rounded. So this is why our joint
is placed slightly lower, and for the rest of the yam,
it's pretty straightforward. You place one articulation
at the wrist area. Another in the hip area and
you link it with tubes. And for a more natural posture, you can indicate a slight bend of the elbow like
I'm doing here. Now, let's jump into
the next posture, which is our mannequin
from the back. This is actually going to
be fairly easy because there is not so much difference from the character
from the front. But let's still see what are the few differences in details. Here again, I'm starting with the head and then
from the front, the base of the neck is actually located at the back of the head. So the top of the tube that
represent the neck will actually be flat at an angle
at the base of the head. And then unlike the front, the other side of the tube, which is against the epotoso
shape will be hidden by that shape as the neck is not completely straight but at
an angle towards the front. Then for the aposa
and the articulation, it's the same as for the front. For the lower tosso, I would start it the
same way but curve it a bit more outwards at the bottom to better
represent the bum area. And then for the legs, it's pretty much the
same as for the front. The only thing that
change will be the shape of the feet that we will represent a
little bit narrower as what we see mainly
now are the heels, but we will see hands and feet
more in detail after that. And then for the arms,
it's the same again. And once you learn
with a structure, don't hesitate to go over your line to
make it flow better. Now let's jump on to
the next page with the three quarter views from
the front and from the back. The one from the
front might recall a bit better the last lesson. As we drew the individual shapes from a three quarter
point of view. The only difference
is that we won't incline those shapes upwards
and downwards this time. For shapes, that means that the top or bottom sides
won't be visible. Might see a bit of the
bottom face of the shapes on the photo on the mannequin because this is not a
perfect front view, but we really know
that for exercise. As you can already see, I have reintroduced our
firm mapping lines, which are very useful
for that type of angle to make sure that we are drawing our mannequin
in a straight way. By the way, even if you're
drawing on a blank paper, to make sure that your
character is not askew, I would recommend that you draw at least a middle
straight line to help you see how your
character is centered. So start again drawing the head, and then the tube of the neck is slightly at an angle again, you can see how the base of
the circle at the bottom of the neck tube is
visible because it's placed slightly toward the front on top of the upper torso. And then the upper tosso is the same shape that
we practiced before, except that when you
make it straighter, the shoulders are aligned
at the same level, and the angle in
between the front and the side at the bottom
is less pronounced. And then again, place your articulation and
arrow torso shape. Again, pay attention to the curve that is
drawn at the back. Both protoso and
lower torso shapes are converging towards
the articulation shape, which creates that
wave movement. Then the legs are again
pretty simple tubes. What you need to pay
attention particularly here is that the front leg will have a slight overlap or bigger overlap depending on the thickness of your character, meaning that it will hide part of the leg that is behind it. That's going to be the same
for the armed at the back, which is the right arm
of the character here. You will only see a
very small part of it because it's hidden by
the character's body. Again, to know what
shows and what's hidden, before you get
comfortable with it, you will need to use
a lot of references. But even when you're
coping from references, always try to understand why things articulate
the way they do. This is what will
make you capable of drawing from imagination once
you have enough practice. Now let's go for three
quarter you from the back. Now we're going to tilt our own shape for the
head on the other side. Now for the neck, for the
backside that we saw before, it's the curve at
the upper part of the tube that is
visible on the neck, while the bottom of the neck is hidden by the torso shape. Here to help me having
the torso shape right, I start by tracing its center, so the so called
form wping line. Like this, I can balance the
rest of the shape better. Here again, the top
and the bottom of each shape are straighter because you are
facing the character. And then again, we place
the articulation in the center and make sure
that our back curve nicely. Compared to the
front here again, the cut for the articulation
of the leg will be tilted slightly towards the
front of the character, which means it will be a little bit less
apparent from the back. And here again, the front leg, so the right leg hides a
little bit the left leg. And for the arms, the right
arm, just like before, is hiding part of the torso and the left arm is partly
hidden by the torso. I didn't draw all the
foam mapping lines here, but don't hesitate to do so. They are shown on the
reference to help you. That sits for this lesson. To recap to rotate
your mannequin, use your knowledge
of how to rotate each individual shape alongside with reference to draw each
different point of view. Remember that the four
mapping lines are very useful to make
sure every shape is in the right alignment
and remember that the body is full of curves to make sure you're
doing it accurately. Now it's your turn.
Draw a few lines of each angle of the character, whether on the workbook
or on the blank paper. Again, you might find
it difficult at once, but you will see
that by repeating same exercise a few times, you will make
progress pretty fast. For those using the workbook, you have some extra space to
draw as much as you want. And once you're
done with the grid, try to draw without
grade as well. During the next lesson, we will take a little break from drawing the whole body to tackle quickly the subject
of hands and feet. See you in the next lesson. And
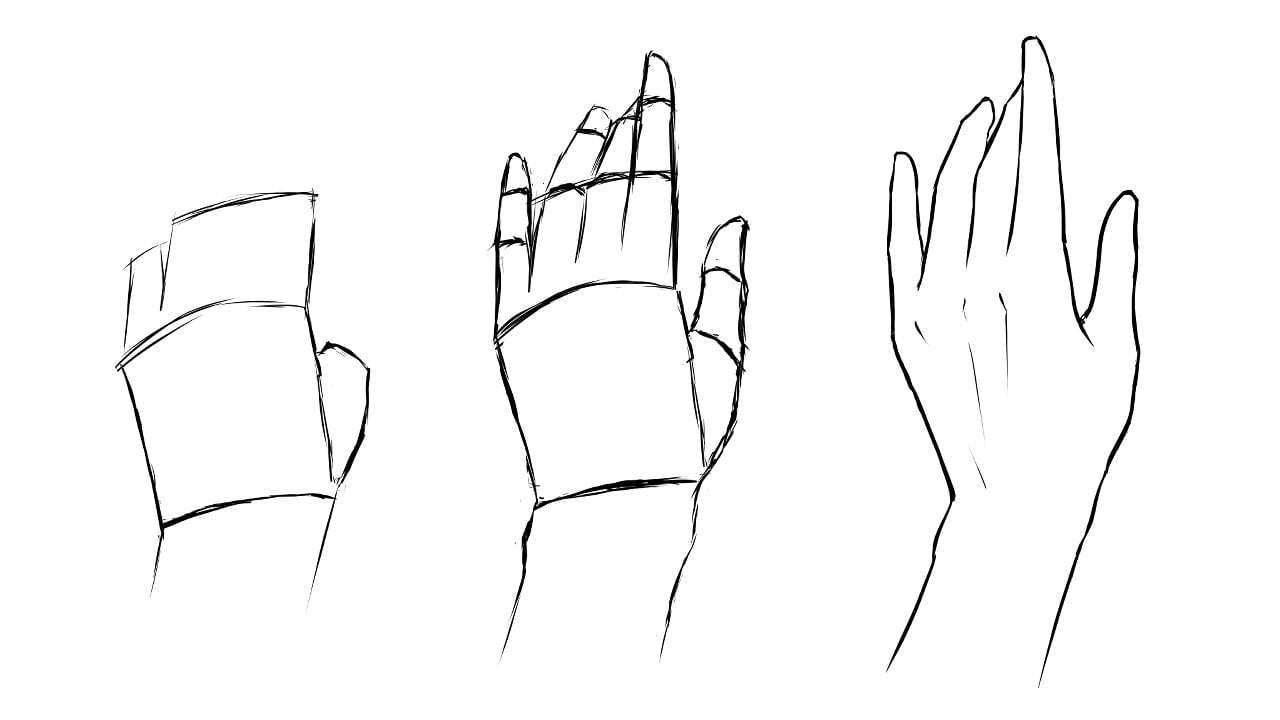
7. Hands And Feet: During this lesson,
we are quickly going to talk about
hands and feet. Hands and feet are
known to be very complicated to draw even
for advanced artists. I don't think that
would be a good idea to train it properly already, but I still want to
give you a minimum of knowledge and some sort of temporary solution so you can go on focusing on
anatomy for now. We try to do a separated course for hands and feet
in the near future. You can train on it separately once you've already got
some anatomy training. To begin with, I will
explain roughly the form of the hand from above
in two D. Overall, what I would call the body of the hand is pretty
much squarish shape, a little bit distorted, but still to which you can stick a triangular shape go
towards the thumb. And then from that shape, you will have the four finger
protruding that you can first indicate with lines as I'm doing to help
with placement. And then the fingers are
pretty much an assembly of three different tubes or we
could call it rectangles. We are speaking in two D, then you'll go to the thumb which is composed of two tubes. And now let's see it in
three D. So in three D, the body of the hand is pretty much flat tube to which you can stick that
protruding triangle. That's very rough for
now. This is just so you understand
overall how it works. Then again, you'll have
the fingers protruding, and you can see
already at this angle, you will have a lot of overlap
in between the fingers. And this is really what makes
drawing hands so difficult. It's the amount of overlap that is going on with
each hand posture. So how can you get
through it for now? Because with a
posture like this, you can see how complex
is the position of the. For me, honestly, I would need a lot of time to get it right. What I suggest is that instead of doing each
finger like this, it's that you understand the overall visual
shape of the hand while ignoring the details
because what gives hand is really more
about the overall, I would say, dynamic
or rhythm of the shape rather than the
proper exact anatomy. Here I would pay attention to the proportion in between
the base of the hand, where it bends, and the
distance in between each line, as well as making beautiful
curves and relevant. That might require
a little bit of trial and error to
see what works. But this is true for
everything drawing. And if you feel like so you
could complexify a bit. Like there, I would just
add the thumb and making sure its shape are
harmonious and pretty, even if not accurate. So this is up to
your own judgment. Tracing as I'm doing is
very helpful for studying. You could use digital art if you have the tools,
but if you don't, you can just put
your computer screen on maximum luminosity and put your paper onto your reference photo and
trace by transparent. I know tracing is a
little bit taboo, especially on social media, I guess, but it's a very
legit technique for studying. Yeah let's take another example. You can see how I'm focusing on the general aspect of the form rather than
trying to be precise. I mean, precision is important. You will have to study
it at some point. Beginning with
simplification will help you with understanding
the details later on. A. And last example, you can see how the
explanation with the simple assembly of
tubes is very limited actually when it
comes to drawing hands and how focusing on the overall aspect
and overall curves and rhythms can be a lot more relevant for
sketching quickly. So yeah, at some
point you will be able to put all the
information together. But for now, try
to keep it simple. So now let's jump onto the feet. So I think simplifying the feet is a lot easier
than for the hands, especially that
your character is likely to often wear
shoes or socks. So most of the time
you won't even have to draw them in details. But here's the very
simplified structure. So you can simplify it with a very basic flat box
or not exactly flat, but a little bit higher near the ankle to which you
will stick another box, which is where you can bend the feet and to refine
a little bit the shape. That last box for the toes
actually draws a circle arc. You will need to indicate even when your character wears shoes. And if you want to
detail the toes, it's a little bit like the hand. It's basically protruding tubes. So if you put everything together without the
construction lines, it basically looks like this. And now, from a
profile side of you, you can see better
how it's higher in the ankle area and how there is a soft curves that
goes toward the toes. You can indicate the
change in size of the toes by a soft curve
that goes toward the sole of the foot and pay
attention to how the heel curves outwards and
the ankle curves inward. I want to give a
full rotation of the feet during this
course, as I said, but hopefully you can have
an idea of what to look in references to
extract information that you need for
your own drawing. I will just still show a last example that I
think is quite relevant. We'll often have different
arch in the feet, as you can see on that photo. So here it curves
outwards down the toes. Then towards the toes, the curve goes inwards, and then you will
have that shape that curves slightly
outwards when the toes are flat on
the earth and then goes up and curves
inward slightly. The heel always have that pretty curve inward
and that little bump on the that oral shape
is the one that we will try to retain when
drawing shoes as well. Even if you will have
some different variation depending on the
type of the shoe. And so that's it for now. I will show a little bit
more concrete examples with the next lessons
of this course. But to recap for now, just try to understand
the overall shape rhythm, and aesthetic of hands and feet, helping yourself with
tracing if you wish. So you can keep on focusing
on anatomy for now. As an optional exercise, you can try to draw
your own simplification of hands and feet,
eventually tracing. You can have a first feeling on how to draw this. But
this is optional. You can also simply go to the next lesson and
apply it at this moment. The next lesson,
we will start to make our characters a little bit more alive and study how to draw them in
different postures. We won't use the workbook anymore because
it's not relevant, so you will need to grab
some blank sheets of paper. See you in the next lesson.
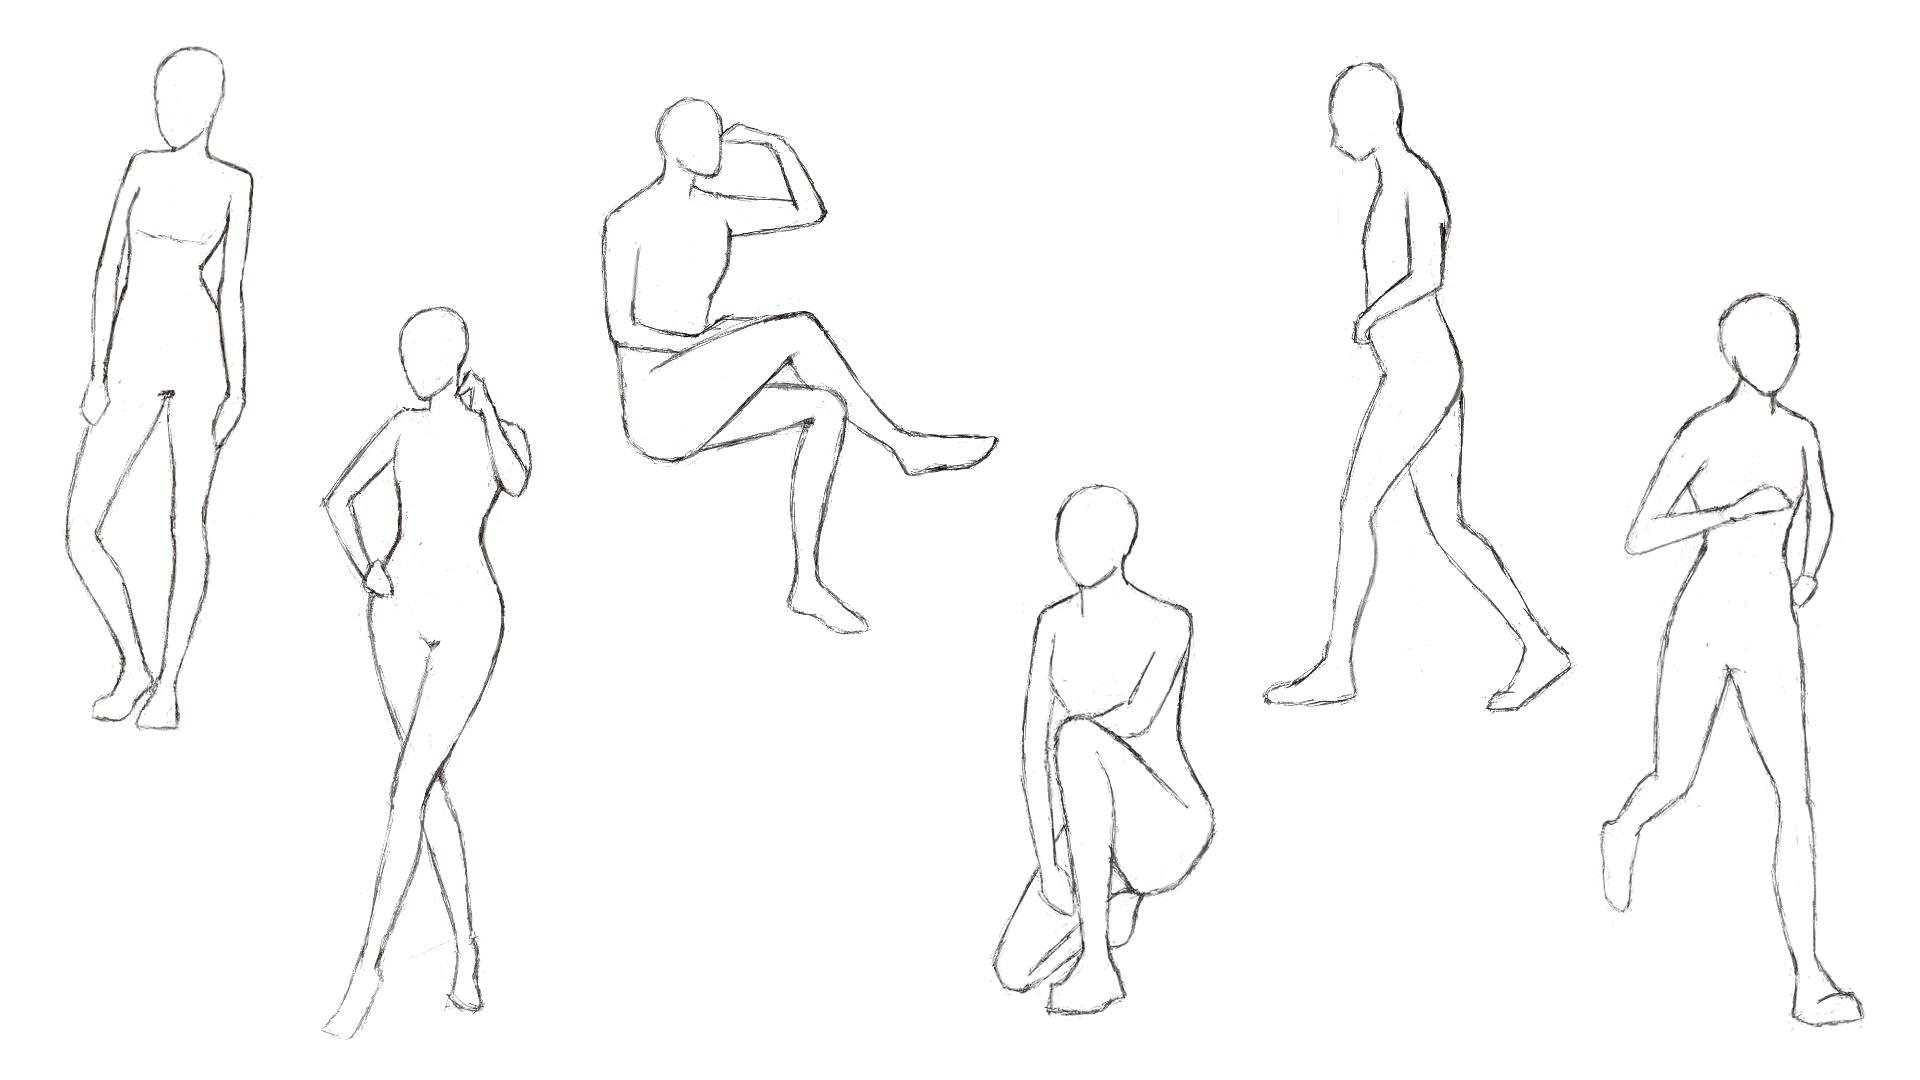
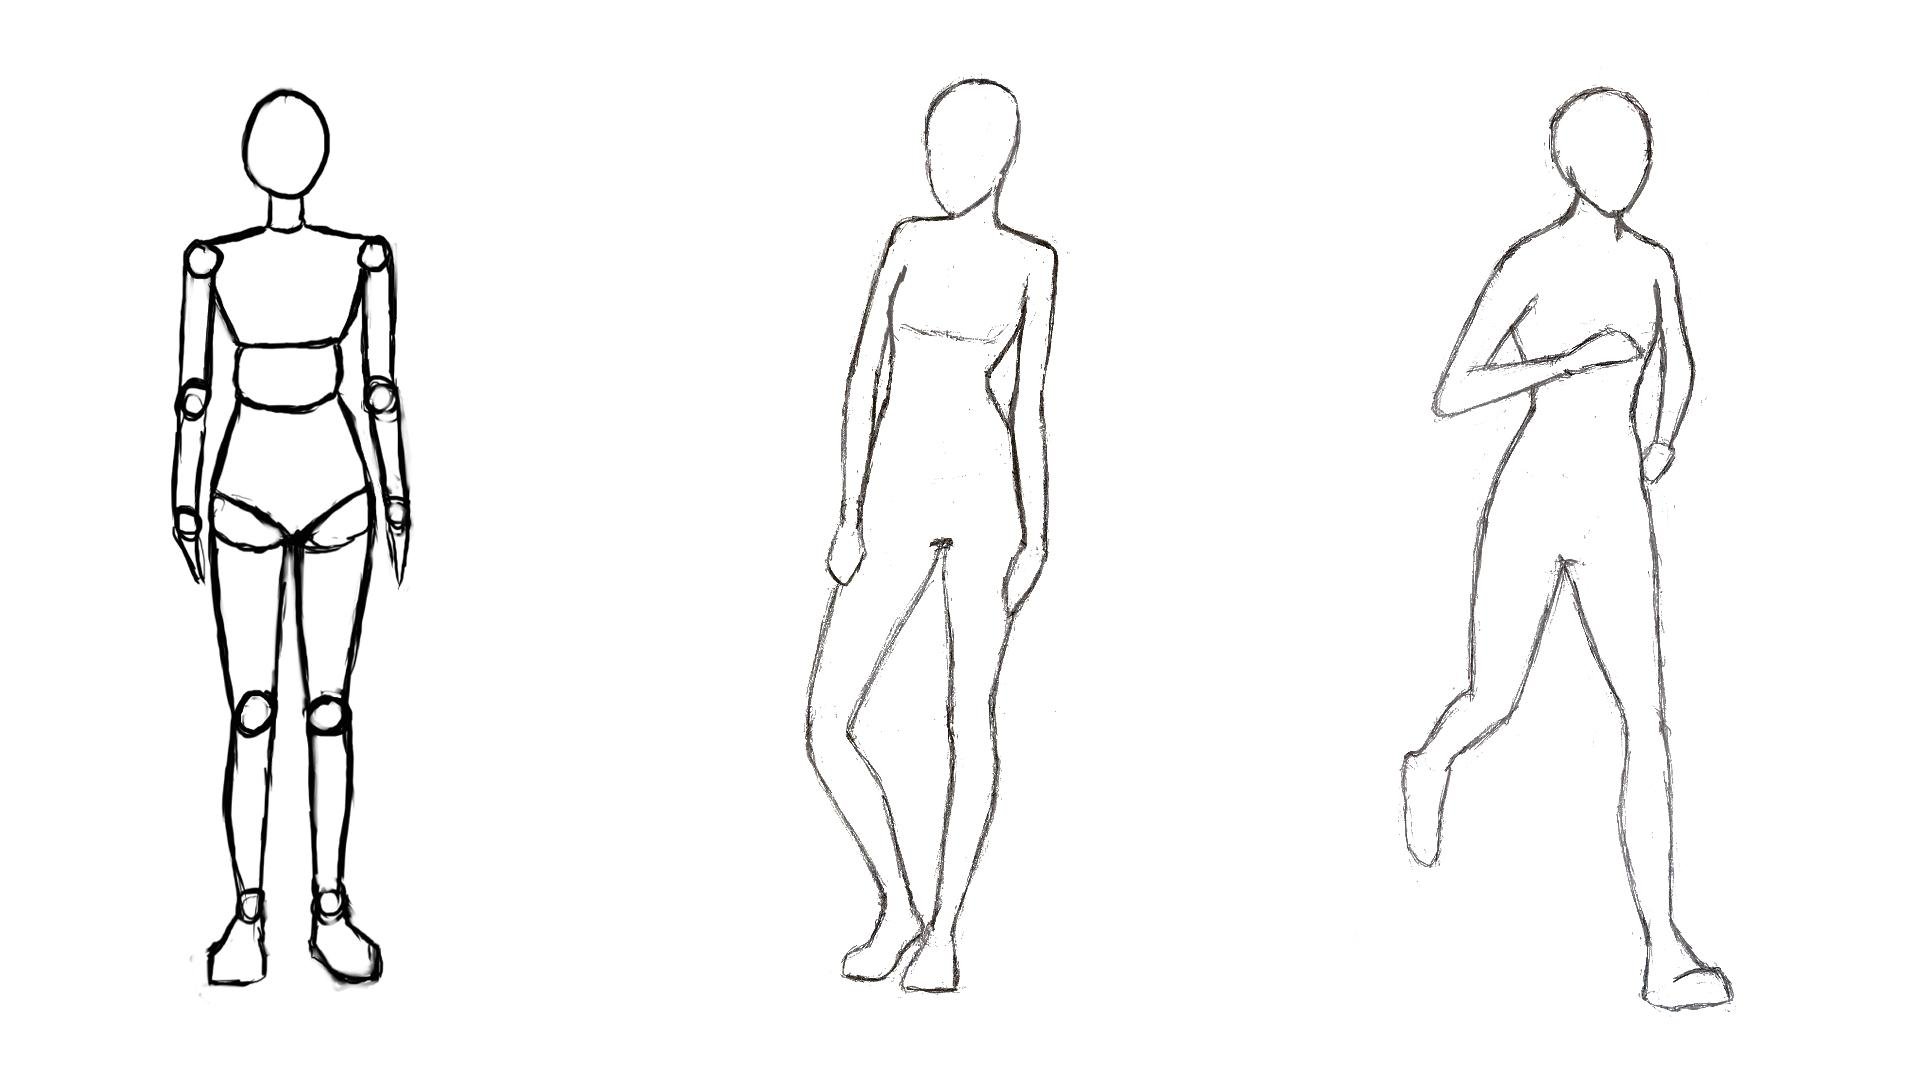
8. Characters In Different Postures Standing: From now on, we will see how to use our mannequin alongside photo references to make our character move and draw
them in different postures. We will start gently
with standing positions. Then we'll move on to
sitting or kneeling, which I put in the
same category, and we'll end up with movements. The process and
thinking pattern is pretty much the same
for each posture, but by breaking them down
into different categories, I hope I will show
you enough examples so you can manage to do
what you want as well. Let's jump into the lesson
with standing postures. So the first thing
I'm going to do for each posture is to decompose the model on the photo into a mannequin to help you see
what you need to look for. So I will start by detailing the head a little
bit more as well, like we learned into
the previous course. And if you're ready, I
invite you to do the same. But if it's too
much, just stick to a sort of distorted
ball for now. So I like to start by analyzing the placement
of the shoulders because they are often
very expressive elements when it comes to postures. And as you can see, I'm
not bothering to try to understand the details of
the mannequin right away, but rather trying to have an understanding of the overall
shape of the character. And let me just change
color because black, we don't see anything right now. So I'm just following
the shape of the legs so you can
just see properly. And see how I can already
spot a mistake in the shoulder area because
the line of the shoulders is a lot more askew
than what I do and also parallel to the other
upper lines of the torso. And with that leg, there
is a little solety. You see that slight
bend of the knee that pushes the leg towards us. This will modify the
orientation of the tube. In that case, the top of
the tube will be slightly facing towards us kind
of in a 45 degree angle. So there will be a
slight distortion due to the perspective with the top appearing slightly
bigger than usual. But here it's very solid, so it's barely visible. We'll see more drastic
cases with the ex postures, and you can see the shape that the feet are taking
in that angle. And for the arms, there's
not much that is changing, except that it follows the
inclination of the shoulders. And so here is the preview of the worth mannequin
without the photo. But hopefully that can help you understand what to
look for on a photo. Now let's jump onto
the drawing part. So I'm starting with
sketching the head properly and making sure that
the alignment of the eyes, the middle line, and the side of the head are rather accurate
compared to the reference. And by the way, the exercise is not to draw the
reference accurately, but rather how to extract information to draw
our own characters. So here again, I'm
placing the movement of the shooters and I'm measuring the placement
of the chest. And here as it is,
I have a bit of trouble understanding the
placement of everything. So this is now
that I will try to understand the form of the mannequin a little
bit more accurately. So let me draw everything
on the photo parts so you can understand my
thinking pattern of vision. And so what you need
to take from this is not understanding all
the information at once, but rather I'm researching and refining until I get a
good understanding of it. Usually, I don't
draw on the photo, but this is more
what is happening in my head when analyzing
a reference, and I'm usually drawing
directly on the paper. But once again, as beginners, you can benefit
greatly of tracing first on the photo before
jumping onto the blank Canva. Here I start to have a bit of trouble with the balance
of my character. So what I'm going to
look for is the center of gravity of the person
on the reference. So I'm trying to guess it really can't assure you that
this is accurate, though, but this is more a mix of, okay, her weight is mainly on her left foot, but
not drastically. So it's not too far from
being symmetrical overall. And yeah, that's my
thought behind it. So the line comes from
the middle of her face. So I'm inputting
it on my drawing, and I can start placing her
body relatively to that. So as you can see, it's
not drawing the perfect, accurate line on the first try. I know some artists do this, but I'm very incapable
of doing this. It's more a scribbling my way
towards the accurate shape, and as long as I can spot
and correct mistakes, this is really all that
I'm asking for for myself. And I'm kind of spotting a mistake onto my
drawing on the photo. So I think her bone
structure is more like this. There is always a part of
guesswork because of the cloth, and I'm trying to place the knee in the right position
compared to the line. It's supposed to be a little
bit closer to the line. And here to place
the second knee, the information you
need to look for is the angle compared
to the other knee. So here you can see it's
a little bit below, and that's due to the
distortion of the perspective. Her right knee is
going towards us, so her leg appear longer. So I'm reporting it
onto my drawing. And here again, her
lower leg is not completely straight
compared to her body, but more almost curving towards
the gravity center line. So when it's like this,
it's just easier to trace the middle line and
draw the shape afterwards. Mm. And here again, I've got a bit of
a mistake towards the hip area because
I've drawn it completely straight
while it's actually a skew on the opposite
sides of the shoulders. This is for the
type of cases that the articulation at the
center of the torso is relevant because everything
above can be tilted in one direction and everything underneath in another direction. And everything above and
underneath will be parallel. So I'm making sure
to straighten things up. Placing the arms. So elbows and wrist are
parallel to the shoulders. And here there's
one more mistake. It's that the right trudor
is bolder than the left. So I'm just erasing
and adjusting. And, yeah, that's pretty
much it for this one. So let's jump on to the next. And so here is the next posture. So let's see how to decompose. So the first thing I'm going
to do this time is to try to understand where is the
gravity center right away. Let's make it a little smaller. So again, working on understanding the
head position first, which is pretty
similar to previously, understanding how the
neck is positioned, and this one is
already a bit more complicated because there is more overlap and blind spots. So let's see how we
can work this out. So I'm more guessing where the shoulders are rather
than seeing them. This time we can
see that shooters, middle line and
hips are aligned, but the complicated spot
is more on the legs. So to make it easier for
me for my understanding, I again start by tracing the middle line and
for the back leg, again, there is a
part of guesswork. This is why
understanding anatomy before copying is important. Then I fill in the shape of
the legs and here again, pay attention to the
shape of the feet. With the heels, there is more of the top surface
that is shown. Then the arms are
quite tricky as well, especially the left because there is a lot of
foreshortening. This is why finding the
wrist and elbow placement first is more helpful than trying to draw the
whole arm at once. This is typically the type of situation where you
need to place elements compared to the rest
of the body because counting proportions won't
have you much in this case, the right arm is partly
hidden like the hair. Here again, we need
our knowledge to fit in the information
that are missing. And so here is what it looks
like without the photo. We can start to redefine our mankin to understand
the shapes better. And I just want to draw
your attention onto the overall movement of the posture because this is
what makes it interesting. So it's important
to acknowledge it. So now that we've understood
the structure better, let's jump onto the drawing pad. So like before placing
the head and the neck, And then the line
of the shooters. And then reporting right away the gravity center line that I'm just seeing only
now that I misplaced, but oh, well, let's still
try to make it work out. I'm starting to place the torso and she slightly
turned to the left. I find it important to
indicate it right away. Here again, I've got
a bit of trouble understanding her exact posture. Maybe the wrong center
line doesn't help, but what I'm trying
to do is to trace the four mapping
lines on her torso to try to figure out how
everything articulates. She must have an arch that we don't really see
in the back because her upper torso is more
facing towards the sky, while her lower torso is
more facing downwards. So I'm already trying to be more precise on my drawing
to make sure I understand the more
complicating form that I was expecting
properly before going on with the legs
because the placement of the torso will impact
the placement of the legs. Oh, and here I am seeing that
I misplaced my ity line. But this is actually
a good example on how to spot and
correct mistakes. It's really about
trying to evaluate each element relation to each other and correcting it until
everything makes sense, and then I'm placing my hips. The main point of preference is the going that is fully
on the gravity line. I'm making sure that the
balance of the shape is well distributed from one part
on another from the line. Then I'm measuring one head
and a half to the knee. The knee that crosses
the gravity line. And one hand and a
half to the ankle. And to place the back leg, it's pretty much a straight
line to the ankle. So I'm paying attention
to at what angle is the back ankle from
the front ankle and where it is situated
compared to the gravity line. And here I'm just realizing that the foot was a
little bit too high compared to the other foot and a bit too small as
well, so I'm correcting it. And here again, the right arm must have quite a
bit of shortening. So I'm just pacing
it relatively to the rest rather than
by measuring in heads. And same for the left arm. I think the main cause
of mistake here would be to draw the elbow to thin. So even if the
length is shortened, make sure that the
thickness remains. And just pay attention. The upper arm looks
very, very small. This is what happens when
the perspective is very drastic and so some more
refining and we're done. I want to recap for each of the remaining lessons because they work in a very similar way. So we'll see it at the end. So we'll stop for this lesson now and jump right
into the next, which are the sitting postures. See you in the next lesson.
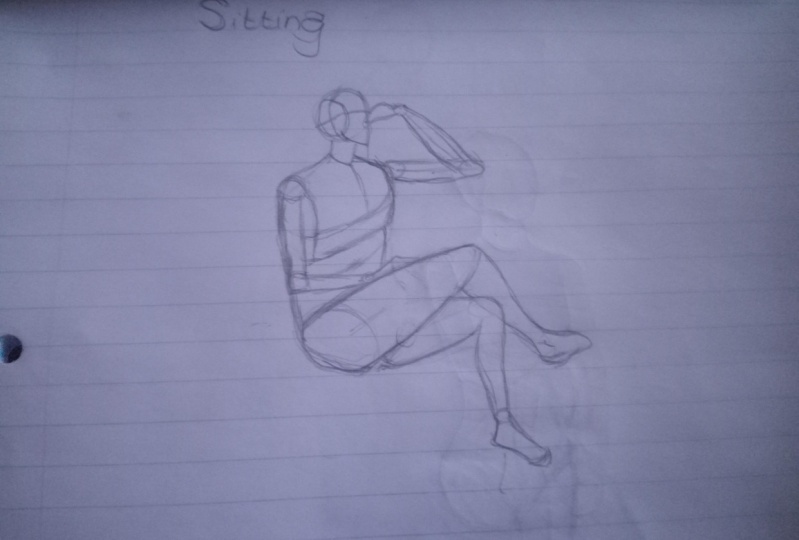
9. Characters In Different Postures Sitting: This session, you are going to go a little bit further from our basic standing mannequin by studying seating positions. The principles are very much the same than from
standing positions. So without further ado,
let's jump right into it. So we're going to start with that picture of a man
sitting in a chair. The first thing that we
can notice here is that his gravity center is dependent on the support
on which he is sitting. So here, the chair and also the chair in question
is hiding part of his body. We need to figure out what the hidden parts look
like all by ourselves. As usual, I start by determining the right
angle for his head. So here we see mostly his
head from the side. B. So I'm placing as usual, the neck and the shoulders
and here is the part where it starts to get tricky because he's very much slouched
into the chair, which means that his
torso is curving inwards. So that might shorten a
little bit the proportions. So if I need to do
a little bit of red demo onto the
wooden mannequin, what's happening
with his torso is that the upper and lower part of histoso are curving onto the bowl that serves
as the articulation, so that articulation part is actually shortened
on the front. But on the on the contrary, those to parts of the torso
are going away from the ball, so it lengthens the back area. Here the main
challenge is to try to figure out up to where
torso and leg go. I'm just following the
shape that I see and try to draw the rest
to see how it feels. Here again, it's a
bit complicated. Doing some form
wping line at least on the center can
be very useful. Thank you. And here I just see that my current proportion
absolutely doesn't make sense. Obviously, the torso
is way too short, so I'm just lengthening
it a bit more. What can be helpful
too in that type of situation is to try to find another reference of someone
in a posture quite similar to this one to try to get the information
that are missing. And in a case like
this, the legs are not parallel and the position compared to us are
not that obvious. So this is where
drawing the center of everything is very
helpful as well. So now I'll jump on to
skelching everything. So again, I sketch the head. Then the neck and I
place the shooters. And here what I'm
doing is that I am trying to sketch his hold torso, even the parts
that we don't see. So that will help me
articulate things properly. And I start by
placing the top leg, which is the easy part
because we can see it. But the part that is
trickier is the left leg because it's covered by the
right leg and by the chair. So this is where it's
even more important to understand how
manekin articulates. I So I don't know if you could understand
with my scribbles, but just to make it clearer, I'm going to make a little
sketch on the side as well. But basically, the tube
of that thigh starts from the hips and comes
slightly towards us like this. So when things start to feel
quite complicated like this, it's very important to simplify. Just remember your
basic shapes, guys. And then the tube
of the right thigh. The one that is near us is
actually going away from us. So in those situations, you can draw the actual shape of the tube a little
bit more precisely, just so you have a good understanding
of where it's facing. Also in posture like this, pay a particularly big
attention to the fact that the upper leg and
the lower leg and the foot should be aligned
in a cohesive way. Yeah, again, just trace the middle line and
see if it makes sense. And of course, it's the same
for the arms and hands. And then just going over to make it slightly cleaner
and we're done. So now let's jump
on to the next. We're going to study
the posture of the woman on the
right of the photo. So here again, we have
some for shortening onto the legs mainly and
also a few hidden spots. So we'll see how to handle this. So as usual, let's start by the little sketch
on the photo. So her face is mainly
turned towards us, but there is a little bit of the left side of
her head appearing. And placing the neck
and shooters as usual. By the way, for the neck, make sure it's always linked
to the back of the head. I often see beginners placing the neck too much to
the front of the face. But just feel
yourself when you're touching the back of
your head and your neck. The endosection is
almost a flat surface, even if flat is probably
not the right term, but it's smoothly linked. Maybe that's the right word. And what we can notice
about her torso is that even if she's mainly
facing towards us, it's just like the head, there is still a big chunk
of her side appearing. So it's important to really indicate the volume of
the shapes properly. And here again to handle the
foreshortening of the leg, place the hip, visually place the knee
compared to the rest. Here it's a bit under our chest and a bit
to the left and then link both with a tube facing towards us and that goes
slightly to the left. Really, you can be rough when the posture
is quite simple, but the more complicated
the posture, the more it will be useful
to detail your mannequin. For the second leg, we need to understand
the hip placement, which is a little bit
tricky because it's hidden. I'm just drawing
the whole hip shape and linking it to the rest. So here is how it
must be placed. And once we understand the hip, we just have to place the knee and to link both
to have the thigh. Here again, there is a
lot of foreshortening. The tube is going towards us. So the knee appears bigger than if her leg were facing
straight towards us. And her lower leg is
almost completely hidden, but we still need
to understand how it's placed to place
the feet properly. So to understand why it is, we can rely on some visual cue, so we can see the knee and from the placement
of her feet, we can deduce that the front
of her ankle is over here. And from this, we can deduce that the back of her
ankle must be over here. And as her ankle is
going away from us, we know that the part
of the tube that is her ankle should be
smaller than usual. So we can correct and
link it like this. And so we're removing the hidden parts and
adding what remains. So here the arms. And now that we've decomposed
it, let's start sketching. So as usual, I place
roughly head, neck, shooters and toso and I start collecting as soon as I see a little
bit more clearly. And here again, I will need some gravities underline to
place everything properly. So here, it seems
to be over here. Another thing that I find
quite useful to find the proper gravities underline is that I think on both sides, the masses should be
quite equivalent. So here I see it goes right
next to her left eye. So this is where I'm
starting from on my sketch. And here, I don't really see it, but I guess that her torso must be a
little bit curved inward, just like the
previous character. And those deductions
are very much about feeling your own body, thinking if I was
in that position, how would it feel on my torso? And so a lot of deductions
can happen that way as well. And here, there is
something that bothers me on the right side
of the drawing. And so what I can see on the
reference is that her hip is a lot more deported to the right compared
to her shoulder. So I'm going to correct
it on my sketch. I'm just drawing the
whole hip shape again. And as long as we hear, there might be something
that you find a little bit funny about
the proportions, and that the torso might
appear a little bit longer than what we saw previously
during the proportion course, especially that her torso is
a little bit bent forward. So there should be a little
bit more shortening and yet torso to her butt is a little
bit more than three heads. And that's because when we count our proportions on our
standing mannequin, we count 2.5 head from
the chin to the groin. But if you look at
your the mirror, you'll see that your butt is actually a little bit
lower than your grime. This is something that
we often forget when we draw and that I
did forget as well, by the way during
the previous sketch. Just so you see, I did correct
my sketch in the meantime. Back to our current sketch. All of this might look a little bit complicated, but in the end, what you need to focus on
is that find the place of each articulations
and link it with a tube in the right direction
and that will adjust it. You can draw all the
shapes completely at first and erase the
hidden parts afterwards. And don't be afraid
of misplacing it. Just erase and we do
when you see mistakes. And once you linked all your
basic shapes and tubes, you just have to refine
it to make it appealing. And that's it for this lesson. Again, no recap this time, as we still have
two moscehs to go, which are this time going
to be about movement. So see you in the next lesson.
10. Characters In Movement: Now I'll jump onto
the last part of our characters in
different position series, which is also the last
lesson of that course, which is characters in movement. Here again, we will
keep it rather simple with the first example, which will be a person walking, and the second will
be a person running. There are, of course, more
complex movements to be drawn, but it's better to go
one step at a time. We will study more
complex movements in future classes when you have
a little bit more practice. With that said, let jump onto
our first photo reference, which is that man walking. So the main difference
with movements compared to static
poses is that you need to understand the
direction in which the character is going to determine where is the
gravity center line. To make it clear, if that
man was actually static, quite a substantial part of
his weight would probably rely on his right foot as well to make him
keep his balance. While as he is going forward, he is actually projecting his weight more forwards
on his left foot. Like imagine if someone told you to freeze while you're
walking like that, suddenly, you couldn't
keep your posture? You would fall slightly
back on your back foot. This is essentially how our balance is
affected by movement. Now that we've explained it, let's start with our
breakdown exercise. Here, his head is a strict profile view
and as he looks relaxed, his shoulder are
slightly below the neck. And here again, I'm trying to place the shape of the torso. Even if it's a reference
already over which I'm tracing, I still find it useful to count the proportions because
with the black cloth, I'm having a little
bit of trouble understanding where
everything sits. Even if we don't all have
exactly the same proportions, it still helps me
estimate and be cohesive with how I
interpret things. Even if the arms are in the foreground and
hiding all the rest, I still make sure to draw all the torso first to be
sure it's well placed, and then I add the arms over it all and I erase what is hidden. Let's begin the actual sketch. Here I placed the gravity line at the base of his
neck on the reference, so I'm doing the
same onto my sketch. Even if it's not completely
scientifically accurate, it's not much of a problem
because the goal is just to have a visual guide to not
make it completely askew. Now I'm seeing that my head and torso are not aligned
like in my reference. In the reference, the
person has his head a lot more bent forward
compared to my character. If I draw a straight line
from his eyes to the ground, I can see how far away it
is actually from the torso. So I'm just trying to adjust
my head as much as I can. This is actually
where digital art is a lot more convenient than traditional art because
you can just adjust things as much as you
want without erasing. And and here I'm quite
bothered by his torso. I probably draw it straighter
than it actually is. That's again, a
problem of the cloth that is masking
his exact posture. But here I'm just going to
show you something else. When the mannequin
seems a little bit stiff and your model has
a lot of flow in it. Sometimes it's just more
interesting to capture the flow of your reference rather than the different
shapes of the mannequin. So that is what I'm
doing here on my sketch, you can see that I'm still quite following the construction
lines of my mannequin, that I'm more blending
both techniques. So I can still have a
sense of proportions. And here the legs
are a little bit tricky to place
because when we walk, all parts of our body are not strictly on the
side profile view, but everything tends
to be slightly turned on one way or another. So here with his left
leg to the front, the lower part of his torso is slightly turned towards us. So his legs are a little bit
tricky to place because, again, everything is black, so we don't see at all the
separation between his limbs, so we need to deduce it. And here to make it accurate, what I need to pay attention to is the angle to
which his knee bend. Then to place his
back leg and paying attention to white sets
compared to the center line. Of course, this reference
only applies to those of you who wanted to try to
trace onto your reference. But of course, if you didn't, just take another point of
reference to place your leg. And here is another good
example of why you should analyze what you
actually see instead of drawing what you think
things should look like. Here from my mind only, I would have thought
that his back knee would be at the same level
of his front knee. But when you look
at the reference, you can see that it's quite lower and it's the
same for his feet. His back feet is actually slightly lower than
his front feet, which from the top of
our head wouldn't make much sense because his
front feet is closer to us, that's caused by the angle to which the photo
has been taken. Contrary to what it looks
like on the photo lens, we can see that it's not
a strict profile view. But honestly, at your level, if you miss that type of
information, not too important. It's already for the
advanced details actually. To make sure that the placement of the back foot is accurate, I also look at the placement of both ankles relatively to the one of the sole of the feet. And then I just place the arm. That looks a bit
awkward like this because normally he has
it into his pocket. But we didn't learn
to do the cloth yet, so we will need to wait
for future lesson for that and then just making it cleaner again and
that's it for this one. M y. So now let's jump onto
our last posture, which is that man running. So with a posture like this, we're catching him in midair. So if you want to understand
what's happening, he's basically
preparing himself with his back leg and he's starting to land
with his front leg. So that means that
he must not have too much weight on
his front leg yet. And what stabilized
him upward like this is the impulse that he
put on his back leg. So his gravity center should
be slightly in front of him, but not too much, something
like this, I think. And so you should start
to know the drill by now. There's nothing complicated
with his torso. He's just upright, and we're lucky this time
there's no hidden spot. I show you a few
tricky things before, but things don't always have
to be complicated, right? And so the legs will have a
little bit of shortening. One is going away from us
and one is going towards us. The part that we have the more foreshortening is
his lower leg here. That leg is already
going away from us and on top of it,
he's bending the knee. So look at how the tube is
actually very shortened. However, the top part of
the feet is facing us. So make sure you don't
shorten it too much. Your mind might tell you
that the feet should be a lot shorter than the lower leg. So you really need to pay attention to what
you actually see, how the perspective is affecting our perception to
draw it accurately. Then the front leg is a little
bit easier because it's low straighter so the tubes are basically just
going towards us. Then pay attention to
his left arm as well. Look how shortened his upper arm is and it's really
going away from us, and then his forearm is bent in an angle that is way more
straight towards us, which is why it appears longer. Okay, now let's jump
onto the sketch part. So I'm sketching his head, which is slightly
tilted upwards. I'm placing the gravity line, and I'm making sure I'm aligning the torso compared
to the gravity line. Again, if you didn't physically trace it onto your reference, just try to imagine it. So his white leg is going
slightly away from us, and then his lower leg has
a lot of foreshortening. And here I'm keeping
things very arg for starting because it's not
a very complicated posture. But if you don't feel
comfortable yet, which would be very normal, don't hesitate to detail
your minor kin a lot more. Also, I just want to show
you look at the front leg. Instead of a straight line, it actually looks quite
curved towards us. This is a very
interesting movement to capture let put is
quite tricky here. We see part of the sword. We also see part of
the upper surface. Don't bother too much
with it for now. Just try to draw
the overall shape. And that's a pretty
ugly sketch for now, but the advantage of doing it very rough at the
beginning is that you won't have too much regret erasing and redoing a
bunch of it if you want. So here I've just shown
you mannequin that have rather similar
morphology to our reference. But what if you want to keep the posture and have a character that has a completely different morphology
from your reference? Well, you just have to
adapt your drawing and I'm going to show you
how so my goal now will be to make a
mankin that will be a lot closer to the one that
we used for training, a bit like the wooden mannequin. So here we have a mannequin based on the shape
of a full gonut man. But if we wanted to come
back to something more versatile from which we could work on different
shapes afterwards, we could just erase
big chunks of it, keeping our
proportions in length, but thinning it up to
go back to something that is more of a skeleton,
if I could say so. Like this, you can have more of a standard shape on which you can add volume where you want once you want
to syilize it. Sure to realign the
shoulders and the arms as well here because that man
has quite bold shoulders. And this is not the subject of this course, but, of course, the reverse of this process
is how you would make stylized characters with
different shapes and forms. And this time that I have
my mannequin as I intended, I can start cleaning
it up a little bit more to show
the final lines. With that, we're done
with our sketch. As I said in the intro, there are a lot more
complex movements, but also angles that
could be studied. But as your complete beginners, I encourage you to
start with postures and angles that are
easier to apprehend. And once you have gained some
experience and some ease, then you can start changing yourself with more
complex postures. So I've included my sketches
as an attachment file, one version with the
construction lines, and one without for if you want a bit more guidance
for removing them, I'm not including
a lesson about how to draw a character
into completion yet because I think it's
more relevant to first have courses about how to draw hands and how to do clothing before doing
that type of exercise. So you already know what are going to be the next courses. And lastly, about the
photos that I have used. I'm not sure I'm
allowed to share them even if they are
free stock photos, but if you want to use
the same reference as me, all lose photos come from pexels and I found them with
the keywords standing, sitting, walking and running, if you want to try to find them. Otherwise, maybe you can
just screenshot the videos. That's it for this lesson and let's finally jump
onto that recap. So to recap to make your mannequin move in
different positions, you need to analyze
a few things. The first one is the gravity
center of your character. Is his way directly on the
ground or is he balancing onto an object that will determine his gravity center,
or is he moving? In that case, in what direction, and where is he in his movement? All this will help you knowing how to balance your character. Then recall that your character is made of pretty simple shapes, and now you will
need to understand how each one of these shapes are tilted compared to the viewer and make sure that
all this is aligned, harmonious and cohesive
and a good way to check it is to draw
the four mapping lines. And the last important
thing to pay attention to all the overlaps
and foreshortening. Be aware that what your mind think how
things should look like, are not necessarily how
they actually look like. Always think in terms
of shapes and distance between one point and another when analyzing
your reference. Now it's your turn. One
or two different postures that you feel inspired by. It can be the same as mine or you can find your own
reference if you want, but don't hesitate to
reference my own drawings. At first, it will
be a lot easier to copy someone else's drawing
rather than a photo. And this is completely normal. It's because reality don't actually come with
an outline, right? Translating a photo into a
drawing is problem solving. And when you copy another
artist's drawing, it's like studying his solution. By the way, there's
nothing wrong with copying someone's art. This is called art style study, and it's a very common practice. The only thing is that you
need to keep it for yourself. This is for your own growth. As long as you're
not publishing it on the Internet without the
artist's permission, you can study as many
artists as you want. But yeah, for this exercise, feel free to copy
my own drawings. They are here to help. This
is it for that lesson. See you in the conclusion video.
11. Conclusion: Congratulations for going up
to the end of this class. During this course, you
first got familiar with simple shapes that you learn to morph into the mannequin's
different ones. Then you learn the
proportions of the human body and how to assemble the first simple shapes
to make mannequin. Then we started to imagine
our simple shapes as three D objects and we started
to rotate around them, which led us to rotating
around our mannequin. And finally, we learned
how to use photo reference to help us put our mannequin
into different postures. If something in the course is unclear or if you have
any more questions, don't hesitate to ask him
the discussion section, so I can answer
either by text or by doing another video course
as a demonstration. If you want to follow me
outside of Skillshare, you can do so at Span
HRR on Instagram TikTok. I'm honored that
you took this class and I hope I could give
you good guidance. With that said, I wish you a happy drawing and
see you next time.
 Fanny Richard, Illustrator & Concept Artist