Transcripts
1. Introduction: Hi. My name's Jeffrey Jacobs, and I'm gonna teach you how to draw birds. What makes me the best person to be teaching you? Well, here are some examples of my work in this course. I'm going to show you exactly the techniques that I used to do. Drawings just like that. I'm gonna do the drawings for right in front of your face from start to finish and explained every step of the way so that you can follow along with the pencil and paper and learn the techniques for yourself. Bird species that we cover include Al's parrots, Robbins, Eagles, penguins, docks, chickens And you're also gonna learn all about general bird anatomy.
2. Bird Wing Anatomy: before drawing any birds were going to actually talk about the anatomy off the bird's wing . It's really worth knowing this before you actually before he actually drew a bid. But it's not possible for me to give you specific proportions of the wing that I'm drawing , because the proportions of the wing gonna vary a lot from Spacey's two spaces. Some birds have a wing that's quite thick from front to back, others out wing that's quite thin from front to back. Some have very long wing. Some have a shorter wing, and the relationship between this length of this part of the wing and that part of the wind could be different in different species. So what would just gonna fix on the feathers and die tend to be different, different proportions and what? Not in different spaces. But the same feathers tend to bay there regardless of what space it is, even if the size and shape and placement of feathers is a little bit different. So the first thing to know with the bird's wing and we're looking at the top of the wing here, not the bottom. The bird, um, is located every here with the bones and everything inside of it. And then this area here is like the risk. And you have a section of the arm here which really basically like the birds hand, and they have separate some that comes off there, which you may never have noticed before. But next time you're eating chicken wings, take a look at that and you'll notice that I do actually have a thumb that separated from the rest of the hand. Kind of like waiting, but they don't have separate fingers. Most spaces done it anyway. And so over the top of this you'll have wings and mean so you'll have feathers in the fiddles will cover the until I wing. But you have different types of feathers on different parts of the wing. So this section here these feathers to connect to the on they're gonna bay what we call secondary feathers. And if it does it, connect ah to the hand like structure feathers around this area here, they're gonna be the primary feathers, and then you get fails to come along in different rice. So I'm just gonna draw that in to illustrate what I mean so you can draw bird wing with different levels of data. And we're just gonna cover the basics here. If you really want to, you can draw on every single feather, but that would be quite time consuming is gonna take you a while to do that. So what we're doing here is like short hand just outlining the most important feathers. So the feathers I'm just drawing over here around this area, you will notice that I'm drawing them over the top of the sun. The thumb does actually have a time. Feathers called. It's called the Aloul on. I don't know if I'm pronouncing correctly Aluar feathers and this just tend to be about three large fills around there covering the sun. They they're a bit separate from the other offenders. Where is the rest of the feathers you're gonna have? He born into groups. As I mentioned already, we've got the primary feathers around this part. We got the secondary feathers around here. They're also grouped according Teoh, Different rise. So when I'm drawing here, this group of fit feathers, primary fenders and it also called covert that call the primary chi vis. And the idea behind Cove, it is that they overlap other feathers, the's feathers air quite important for smoothing the airflow over the wing. And then you have similar feathers along here, in which he called the secondary chi vets. And you notice that Thea the covitz that I've drawn here, actually covered by another set of feathers here. I'm just approximating the shape of these on these feathers. Obviously, feathers don't actually have straight edges or very rarely have straight edges. And then underneath the car, over to you have the flight wings. I mean, sorry, the flight, my feathers. And he actually take a look here. The feathers that come out particularly around the end of the wing here, shaped almost like fingers. I don't have the building to grip on to things like our fingers, but I believe like the birds can actually write type. The fed is slightly individually, they tones and they're quite important to flight. They're also quite distinctive looking. You gonna drill beds wing outstretched. You do want to make these. It is quite distinctive. You tend to get, um, you know, five or six of these large feathers here can kind of separate. And then after that, you saw what's about a long flight feathers, but they tend to be more tightly grift unless distinct. And as I mentioned before, this is the top of the wing We're looking at the bottom of the wing is similarly structured in that you have a bunch of short on squat downy feathers at the top of the wing like this . And then you have longer feathers, covert covering feathers beneath them. And then, of course, the flight fins. So it looks pretty similar from underneath as well that one thing that is different from underneath is you do have a bunch you have, like, structured around here bunch of feathers around the armpit. And I believe they referred Teoh tertiary feathers. The ones around the outfit on turtles could be incorrect that they are also called axillary fills. I know that. Certainly if you call the maxillary fellas, you using the right turn and these downy feathers here, Um, really, you can You don't need to draw them all in. One thing that you can do is just draw in a few of them, but do a good job off them like this, and you drawing quite tightly packed in whatever and then you can just put little a little film knocks in other areas and it implausible additional data where you haven't actually drawn it. Okay, so we have the basic structure of the wing there, as I said that all very a lot from species to species. But just having an understanding of that will really be a great place to start when you're drawing birds. Because you're gonna nine now, Uh, what? How to draw the wing. And even in different positions, You could get a pretty good idea how to draw the wing, because this is almost like a Japanese fan or Chinese van, where the feathers overlap each other as the wing closes and folds up. So it's a great place to start. Maybe practice drawing that yourself before you actually draw full bird's body. And and? And yes. So you got one. Definitely try applying that when you're drawing beds
3. Bird Feet: Okay, so let's take a close up Look at bird fate. The first thing you need to know about Bird's feet is that they typically have four ties. Unlike mammals, which tend tohave five times per foot, not all birds have four times per foot, but most of them do. And the most common arrangement is this one here, which you find in a lot of species of birds. You've got the first toe, which has two joints to it, a lot like our knuckles, which have two joints. Then the second tie has three joints to it, a lot like out fingers, and then the other two times have even more joints, which we don't have anything to compare to. We don't have any digits that have this many joints in them. The third toe has four joints in it, and the fourth toe has five joint in. And just because it has more joints doesn't mean that this toes always longer. I've drawn up like that, trying to keep each piece of bone about the same size, but in reality you can find that this tale here is longer than this Tohir. Often that is the case that the middle toes the longest and then the second time in the fourth row can sometimes be the same length. Even they have different number of bones in the now. This, as I said, is the most common layout for feet in birds, where you've got three toes pointing forward and one toe pointing back Pastor rhymes, for example. That's the largest group of birds, about half of all bird species of Pastor Ryan's. They tend to have this kind of foot layout, and there are other types of birds which are not pass arrives, which also have it. So this is a very, very common foot layout for Bert now. Another quite common lay up is this one. He way of two toes pointing forwards and two toes pointing backwards. You tend to find this in birds that use that fake the climbing. So parents, for example, usually have this kind of foot layout. We got two toes pointing forward which of the second and the third toe and then the first time in the fourth toe appointing backwards and you'll notice that the toe with the most joint in it is next to the one with the least joints kind of equals out the strength on H side of the Foot's. They have a nice, strong grip. Now there are other types of foot layouts, which I haven't illustrated here. There's quite a lot of different foot louts. Some birds only have three toes. There is the case of the ostrich, which is unique, which only has two toes, and you get other cases also where birds can actually move the toes. So sometimes they might be back here, and then other times I can move them forward. So you do get quite a bit of variety. But these are the two most common foot shapes that you'll get inverts now below. Here I've illustrated, in example, of a bird foot that has webbing between the toes. This is something you tend to find in a water birth. Like the arrangement of toes in birds. The webbing between the toes can also be different from species to species it, but the most common one is this one here, where you have the webbing between the second and third toe and webbing between the third and fourth toe and no webbing around the first time. And this is what you tend to find in ducks, swans and guest. But as I said, there are other water birds with different wedding arrangement. And finally, you can't stayed in these drawings, he. But there's the skin that goes over the top of the flesh on the bones on a bird's foot, the flesh on a bird's foot or rather, the skin we should call it. The skin on a bird's foot tends to be quite Scalea, very similar to a reptile skin. Actually, it's not like a human skin. It's Scalea, and it's It's tough and it's hard, but it's not slimy. Reptiles don't have slimy skin, and neither do birds tends to be quite dry, and it tends to have quite a tough skin to it. So that pretty much covers what you need to know about bed fit. In the next video, we're gonna take a look at the anatomy of the Bird Wing
4. General Bird Anatomy: in this video, we're going to talk about general bird anatomy. It's important to understand this before moving on to individual spaces, because all birds have certain anatomical features in common. The 1st 1 to understand is the axis of symmetry, and I'm sure you've probably noticed this one before. Birds tend to be symmetrical, and you can say that I'm drawn this line down the center of the pelicans body. That is the axis of symmetry, so that everything on this side of the body will be mirrored on decided the body equal distance away from that central axis of symmetry line. So the breast, for example, will be symmetrical on the other side of the body. We can't actually see it there, and the wing will be a symmetrical on both sides, and they're equal distance away from this axis of symmetry, which have drawn going down the middle of the pelicans body. Now another aspect is quite obviously about birds anatomies that they have feathers. But some people get a bit confused because they say some birds like a muse, where the feathers look almost like for but all birds do in fact have feathers. Sometimes the feathers can be quite feel like in appearance, but they do always have feathers and later in the course will learn a little bit more about how to render them. So if you want to understand some other aspect about bird anatomy, that'll birds tend to have in common, we want to look at their skeleton. And what I have here is an illustration off chicken skeleton. Now the first thing you need to understand about Bird and out of me is that everything about their anatomy is designed to be as light as possible so they can take to the air. Birds tend to have very thin bones, and unlike our bones, they have some whole areas, and in those whole areas they actually have an internal waving structure, so it's not completely hollow. It's a little bit like honey came, if you can imagine, but it doesn't have quite the same structure. And what you do find inside these holy bones use this structure designed to keep the bones as strong as possible without adding much weight. You also notice the birds tend to have big. They don't have heavy jewels like mammals, and they don't have taste like us again designed to keep them as lightweight as possible. Obviously, all birds have wings, as you can see demonstrated here in this chicken skeleton and whether or not birds can actually fly, they all have wings. So Amy, or in Austria, for example, which cannot fly, does still have wings now as adaptations to being able to fly birds also have a few distinct bones around here. This year is the wishbone, which you probably recognize if you saw it from a different angle. The wishbone is actually the same as our collarbones, and they've just been fused together right at this point over here into a single bone. Bears also have a car, a coid bone, which is in the shoulder. Most mammals don't have that. We don't have that bone, but birds do. You're not really going to need to know about that for the outside of the bird body there, Um, they have a kale here. This bone is called the kale, and it is like that in front of the ribs. The idea of this bone here is to offer a huge surface area for the chest muscles too attached to the reason why birds have. That is because they require these enormous chest muscles in order to be able to fly. Those chest muscles helped power the wings. Now a bird's leg has this distinctive shape to it. You can't always see this shape from the outside. It tends to be covered by feathers, especially this upper area here. But the shape is not that different from the shape that you find in a horse or a cat or a dog where you got the hip up here. You've got the Navy here. This is the ankle, and then this is the equivalent of our foot, with the tires actually touching the ground. Now, if you take a look at the top of the spine, you'll see it connect at the back of the skull. In humans, the spine connected the bottom of the skull, But birds, like most animals with skeletons, it connects at the back, and that will affect the way that you draw them. One last thing to know about bird anatomy is that they really get beyond a certain size. Once they're too large, they can no longer fly Now. Obviously, there are some birds, like ostriches and a muse, which cannot fly there too big to flight. Penguins can't fly either, because they're more adapted to a life in the water. But most birds have to be able to fly, and to do this they need to be small enough and light enough to take to the air. So body size and birds tend to vary from very small to about the medium size. You don't get a lot of large body birds, and that pretty much covers what you need to know about general bid and out of me. We'll take a more date. I'll look at the feet and the wings so you could just understand them a little bit better before we move on to specific Spacey's.
5. Parrot - Head - Profile: all right. In this video, we're gonna draw a parrot's head from side view. There, about 370 species of parrot around the world see, knock unveiled to learn off him from drawing one drawing from side view. But where you're going to focus on species, which I think you're gonna really want to draw, Which is the skyline, the court. It's one of the biggest parents. It's very charismatic, and it's what a lot of people think of when they think of parents. So we're going to start off by drawing the head. Well, at least construction line for the head. And what you're gonna do is we're gonna draw what looks like an egg shaped but a very, very broad egg shot. It's gonna be an angle about a 45 degree angle. In fact, you want this side of the eggs and I'm drawing now. You want that to be almost kind of parallel to the ground, very much horizontal, Okay? And then you can curve it down after a little while like I'm doing here, and it's gonna come back to make the original point that we had at the beginning. Remember to draw it lightly because this is just construction line. You might want to raise some of that later, or you might wanna show it over the top, but you don't necessarily want to be able to see all that now. The very large parrots like McCall's tend to have a huge beak. So what we're gonna actually draw is we're going to draw a line also about 45 degrees about this angle. Here, not lines, can intersect the egg shape. And you want the big to be starting right here kind of where the the eggs type makes its horizontal point say that how it is like a a point where these this curve mates, that horizontal line. That's kind of where you want to be starting the bottom of the bake. So that's how you know where to connect this straight line here. We sick of line. It's about the point with this line made to that line. Okay, Now the top, the bay comes almost to the top of the head side. We've got a pretty good idea here of how big to make the bake. In fact, this launch probably connected even a little bit higher up May would do like that. Okay. Generally, I would draw these lines in lighter also, but, uh, you can always go back in a race. And if you do them too dark, so now we're gonna actually figure out where to put the bake. And you want the baked to bay about halfway between this point and this point here. Sorry. The middle of the bake debate, this point side that there is going to tell us with middle of the bake mates, the face. Okay, so this part is gonna be the top half of the big, and that's gonna be the bottom jaw off the big. So they're about the same size from top to bottom. So what you gonna do next is you're gonna actually drawing the bake, and then you're gonna have this very nice round, consistent curve. It comes all the way from the tip of the bake, which will be below this point here for the big down here and then nice, consistent curve comes all the way up to make this point here. All right. Like that. If anything, I've done a little bit too curved. Some parents like the highest into record of more curved big. So if you do it, more curves. It will start to look a bit like a different type of parrot, but it will still look like a parent Now, As I said, this is gonna bay where the bottom and the top, you'll make basically where the mouth ears. So we're gonna draw little construction line in here construction curve. If you will like that, because the bottom of the top jaw is not actually gonna be that shape, but we know can be able to get it into its final shape until we actually have the bottom George drawn in. Well, the bottom of the bakes, I'm gonna draw this nice, almost kind of horizontal curve. Maybe he is going to come up. This part's gonna be a bit highs and decide here. So curve it off a little bit like that, Okay, And now this bottom curve of the top bake, you're gonna get this kind of seeing happening there, where it actually starts toe, have down a bit and then come up with a bit of an angle. Say that, all right. Not quite happy with the curve that I did on the front of the upper bakes. I'm just gonna raid, rolled out a bit. Like say Okay, no, you have the top of the bottom bake So far. Now, the way in which they connect to the face is gonna be slightly rounded. So you're gonna draw that in also like, say, and if you want, you can stop to arise. Some of these construction lines are looking a bit ugly now, just above the bake here, you're going to get the fillers, which puff out a little bit. So you can kind of draw a bit of a roundish shape over here, and then they'll come back very much like a fat horizontal line here, and you're gonna go past a hit and it's gonna go back into the neck because what you typically find with beds is that thespian fine connected the back of the skull. The net comes out of the back of the head and you can also draw the bottom of the neck here about him in the head, very close to where the bake connects with the head. You're gonna find the neck connecting there also in drawing kind of like that. Now you're gonna want to draw the fleshy part, and you're gonna want to draw the eyes on there. So what you gonna do is your gonna draw this kind of shape Another sort of egg shape? Almost. You're gonna start. You gonna start here about halfway up the up on base in a curving around, come very much again, horizontal. And then at some point, is gonna I said, egg shape, but it's a little bit. It's a bit more of an angle to it. This is almost like a right angle that you're drawing coming down to this point, neither near where the bottom baked connects with the bottom of the head. And you get that kind of shut, maybe make it a little bit rounder over here. Okay, so now you're starting to see a bit of a parent taking shape. And where you gonna draw the arts? Well, the eyes are gonna be very close to this point here. This is the, uh this is where the Fed has made the flesh. I think I probably left a little bit too narrow here, so I can actually lower that a little bit, like so. Okay, the is gonna be very Kleist blood. At this point, I thought you also need to know where the eye is relative to the front, in the back of the head. So what we're gonna do is we're gonna measure in the front of the head over here. You got the back of the head over here, remember? So you got another point there in line with the back of the the head, and I'm gonna estimate about halfway back about there. Okay? So this is where I'm gonna draw the eye over here. Just notice how, even though the eyes halfway back on the head within this fleshy region, it's actually further back than halfway more flesh in front of the other than there is behind it. Now, the I is gonna have it's not gonna be completely round. You're gonna give it a little bit of an arm and shape with the one point here and the other point at the back. Higher up, like say, okay. And you can grow in the people to be around. You can also put shine on the are there and put a bit of shadow. Maybe if you want underneath the sean to get kind of a realistic looking on the course tend of quite wrinkled skin. Say, don't feel shy about putting extra lines around the are there. And to finish it off, you're gonna have these kind of concentric ah rivals. You know, these concentric rivals a lot of coming around here with the as the Santa, and these kind of rivals just kinda grow out of there. All right, No problem. That I've done here is that the ones on the outside doesn't look like I've also we're gonna actually start, but again, All right, so we'll start with the outside. One is gonna be easier that way. These rivals and just kind of construction lines as well. Do you want to drink them quite lightly? Okay, that will do. I think I'm not using further reference here, so if I wanted to get that exactly right, I would use fight a reference, but that looks pretty decent to May. So what we're gonna do now along each of these construction lines, you're gonna draw a few feathers and by feathers, they're not really gonna look like feathers days ones that kind of going along certain wrinkle. So what you gonna do is you've actually just gonna draw like it looks almost like it's been stitched in. You just got, like, a little bit of Yeah, I know something that gets stitched through the skin, and it's going to give this kind of appearance. Just noticed. I'm drawing his little kind of, I guess you could consider them very, very thin little oval shapes. Is there actually kind of feathers. And as you get towards the middle here, they get smaller and spot, sir. Okay. And as I get away from the center and I go towards the edge, come more and bigger growing to more lines there, give it a bit more ring cling. Now, the interesting thing about the Macaws faces that this region that we're putting the feathers on this tends to be white. Sometimes you will see they have a reddish tint to the skin, and that's actually a sign that the bird is stressed. It's probably not really gonna be that helpful for you and growing up, but I thought interesting little pace of trivia. All right, so you got you got You got a bit of a McCall going on now. And what you can also do is you can put a few of the wrinkles at the bottom here. At the moment, this could be just about any type of McCall, but one of the distinct things about the scarlet Macaws. The coloration on the bake So the top big is mostly white. But then you have this region here, which is black, and the bottom bake. Also, the bottom drawer of the Big 10 still black as well. You can just show days in color. You noticed that the pencil I use is not the best for shading. I just kind of use ah, shape pencil. But I think it illustrates the point that you don't need an expensive pencil or an expensive piece of paper to get started withdrawing. You can use just about any kind of material, okay? And we're really sound until it's really starting to look like a real parent. Now, what you can also do is you can you can just put subtle lines around here, which hints at there being feathers, a little bit of rendering just notice, like I used like, kind of curved lines, short little curved lines, which hints at the fact that its feathers not fair. All right. I'm just gonna eliminate some of those construction lines, so we get a nice idea of what a finished product is gonna look like. There you go. That is how to draw a parent's face from side view.
6. Parrot - Body - Perched: in this video, we're going to draw a parrot's body in a perch position. We're gonna be drawing the same parent that we drew from side view, which is a scarlet macaw. Or and you may notice that the camera is very zoomed out on this one. That's because they're very long title feathers, and we got to try and fit the whole power onto one piece of paper. Now, not all parents spaces have long tails. You do get a group of parents called Amazon parrots, which tend to have short, dark like tiles as an example. But scarlet Macaws have a very, very long time. So let's get started. All right, so we got the height of the head here. The body is gonna be another forehead lengths. So one, 12 34 So I'm gonna just estimate that's about here. He and he is not sure if I got that quite right. It's a little bit difficult for me to measure from the angle that I'm sitting up, but okay, so definitely underestimated that first mark. Okay. All right. That might be more like it. All right, so you're gonna have to measure that yourself, but because of the position that I'm seeing out very difficult for me to do that. So I'm gonna have to estimate I know that Thea the body is gonna come to about here. As I say. I'm kind of estimating this. I thought, based on what we have, I think it's gonna work pretty well. All right, So you got the head drawing here like we did in the last video. The Nick is gonna come out a bit of a forward position here, like, say, And once you get to the first head length below the head, this point here that's gonna bay that where the wing comes forward the most about that it's going to go back and belie that it's gonna go back also. Then the next point down, he is gonna be a way. You have the top of the foot. So we're just going to sketch in something rough there to say we're gonna put the foot here , and we'll firm in the rest of the bodies of the next gonna end that up here. Then you go the breast and the shape of the parrot's body is very much like an upside down teardrop shape like this where this tip of the teardrop is coming to that point, which is at the bottom, where we calculated before she got the first head length, the second head length, the third head length, which is gonna bay about in line with the top of the foot and then the fourth. And that's gonna be where you got the top of the teardrop. All right? I'll just firm them in there so you can see what the different points are. All right, so the 1st 1 is the bottom of the head. The 2nd 1 is where the wind comes for the Ford, both out and below. It goes backwards like that. Then the next point down is gonna bay where the top of the foot is, and then the next point down is gonna bay with end off the bodies, and the rest is gonna bay the tile feathers. As I said, Macaws have very, very long tail feathers. And in fact, they're about equal in length to head in the body. So we'll just Ruffin where there's again a guy like that. Okay, so we've got the basic shape off the body now. Now we can stop filming stuff in. So the point where the neck made the body, that's gonna be a way you can draw the top of the wing like so and you're gonna have a few layers on the wings of different feathers. You can draw one layer. Then the next letter comes in more of an angle and then finally can draw the next layer of something like this. All right, in the feathers on the wings are gonna come down past this point. I have you here, which is the top of the UPS story, The bottom of the upside down teardrop show. The figures of the wing are gonna come down past that to about here. Then they'll come back up now with each of those layers we're gonna put in different feathers. So what we're gonna do, we gonna put in the long primary feathers like this the last straight lines, but curved at the end and they're gonna defined outline of the wing around here, like so. Then the next liar up, you're gonna have some more nice long feathers on you actually have a couple of lives within this Lyle kind of overlapping each other like this, all right? And because of the way the wing is folded, you're also gonna have the next liar up. The feathers are gonna be going at a completely different angle, which is this angle here, and I'm drawing there. Those are just construction to show you with the feathers guy. So you start out quite vertical at this end, and then you'll have fiddlers start to move up into a more horizontal position, and you can have little lives within Lioce, as I'm doing here, what each of these lives actually represent on a scouting the core are the different colors on the wing. So this bottom section here are the blue feathers. This section that I'm drawing in alignment are the yellow feathers, which kind of disappeared between the blue and the the color above. And the color above are the red feathers case got red, yellow, blue. And you do get a bit of greenery here between the yellow and the blue, they kind of fade into each other a bit, but it's not very old. This okay? And at the top of the wing to feathers tend to be much shorter, rounder, smaller. I don't even need to draw them. You can just kind of hint They're more feathers up here, like, say, See how I draw a little bunch of fellows together and it hints that there are failures all over there without actually having to draw them. Okay, Brilliant. You might also want to put some separation between the feathers on the neck, which you do tend to find this kind of seeing. Okay, that's a nice to have. You don't necessarily have to do it up but can make your bird look more realistic. Tends to be like this on the neck of a parrot, at least on a scholar at the core. Okay, that should do, right, So we can put in a few little lines here to represent flat feathers lying on the bottom of the bed breast. Then over here, we're gonna have the fate. So I will just draw in a little branch, like from the course sitting on a branch of some kind. Like that. All right, you're gonna have the fate position closely together. And as we discussed in the video about General Bird Anatomy or rather the one after, which was about the fate parents tend to have two toes that point forwards and two toes that point backwards, say, from this view, you're only going to see two toes on each foot and inside one is going to be shorter than the outside one. So no time drawing the outside toe longer. I'm calling of wrapping them around that branches. If the branch were cylindrical like that, say, I've just drawn those round shapes in the branch to give you an idea what shape the bird is wrapping its toes around. And, as I said, the inside toe, which I'm drawing at the moment on the left foot, inside towards the shorter of the two toes the outside toes a bit longer. Okay, if anything, I've made the tires a bit sick. Parents to have powerful feet They tend to climb with them, but as is typical of birds, they tend to have quite thin toes. And you can even put some some of the raging guys horizontally across the ties there can use that to give him a bit more shape. That's it. Brilliant. Okay. And they do have claws on the end of their toes. But depending on how much the tires were wrapped around You might not say See the clothes. I've just drawn the claws on the inside toes and outside toes I've got wrapping around the branch of it more. We just arise Those two demonstrations circles that I've got. Maybe here. And if you want, you can also arise this part here because those feathers are going to be behind the branch . Okay, I'll just famine the branch a little bit more. Just remember that the outside of the wings and in fact, the whole silhouette of the bird's body is gonna be defined by where those feathers on what positions they're sitting in. Okay, almost there. Now we just need to draw the tail. So you've got the first section of the tail which sits underneath everything else in this part of the tale is gonna look very much like a normal bed tile. It's going to come into a kind of pointed position, and you're gonna have a few feathers overlapping each other. As you go higher up like this, they're gonna kind of fight into the body feathers like that. But then, underneath that or in terms of the bird's body that actually sitting on top of this, you're going to have these much longer feathers, and you're gonna have about It's a full liars and feathers that Come on, overlap the feather under nascent like this, with the very last feather being the absolute longest. Just say I'm drawing them long, thin besides almost parallel to each other, but a little bit curved and they tend to bay a lot of blunt around and to each feather. Okay, I'm gonna put a couple of different rise there, and what you actually get is that when the bird flaws, these feathers tend to spread out and you have one feather that comes down the middle things one or two feathers and absolute longest and the others kind of spread out a bit like a fan. But when it's in sitting position, they all tend to date Norse and strike brilliant. Okay? And I'll just for him in the head a little bit more. And there you have a parent body perched on a branch
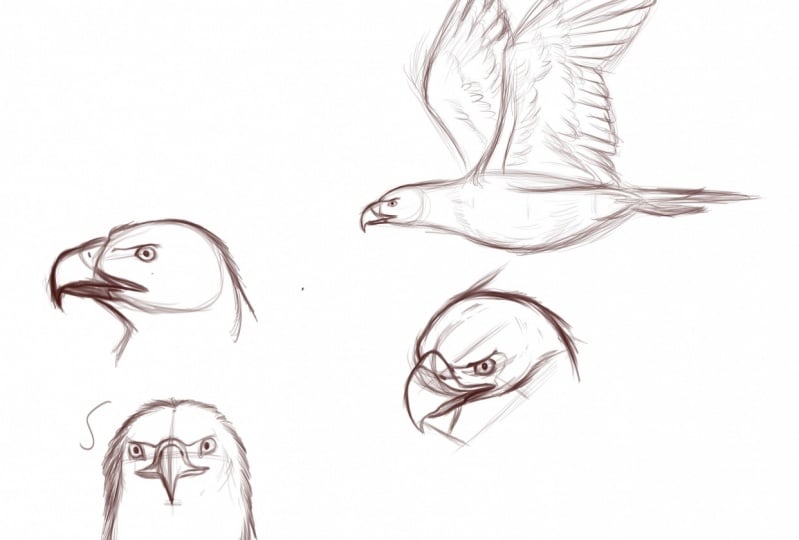
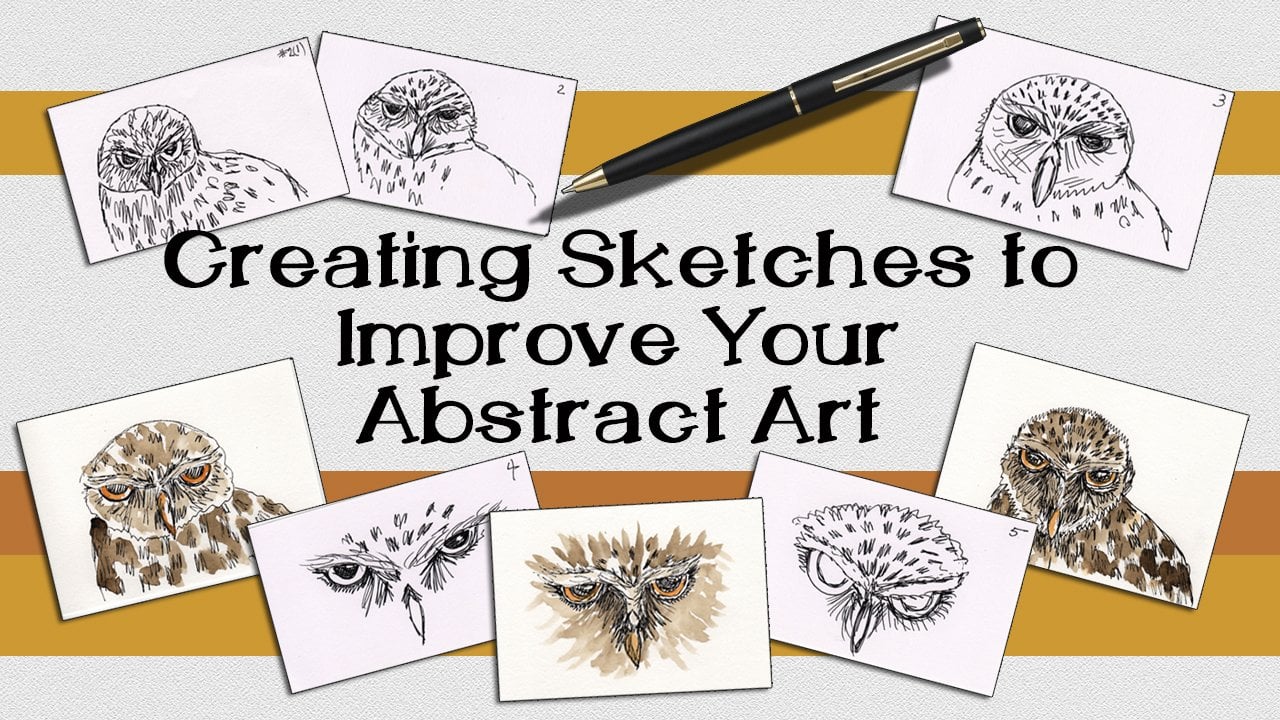
7. Owl - Head - Front View: in this video, we're gonna take a look at how to draw on Al Spice from front view. There are about 200 species of owl, so, you know, Camille to learn all of them from one video. So what we're going to focus on is the type of our known as the Eagle Owl. Its not a type of eagle, it's a type of out. And I suspect it's the type of al that you want to be drawing because it's one of those ones with the cool e shapes feathers on the corner of the head. So let's get started. The first thing you need to do is draw the big and for the bake. We're just gonna draw very narrow upside down teardrop shape like this. Okay, now I'm gonna put some construction points next to it, which you're going to divide it into equal thirds from top to bottom. And I'm just guessing how big ghost heads up there are a lot. Now what I'm drawn is the top of the bake here. That's actually gonna bay where the feathers on the face overlap the top of the bake. It's not where the top of the bake actually, inmates the flesh underneath the feathers. For that location, you would need to move up another one of these distances. Fourth distance here and that's gonna bay with bake would actually be touching the flesh in some Al's. You will actually be able to say the big old allow up to this point. But in Allah were drawing in a lot of tops of Alice You can so you would put the nostrils every here and then this point. He is going to be very useful because that is the midpoint full of the US in terms of hot and the bombers, the eyes will line up with this point here so you can actually draw in a construction circle. At this point, using this is the center and this is the bottom. Just try and get even all around. And the reason why we're putting construction circle in the middle is because, firstly, this is how big the Al Aqsa and the owl's eyes exactly one with pot from each other. So this will not only tell us how big to draw the hospital. Also tell us how far apart to draw. So I decided a circle in line with the circle It I've already sorry on either side of this circle, I'm gonna draw to more circles and they're gonna be the same size and they're gonna line up . You know, I'm sitting at a funny angle because we want the camera. To be able to get a good shot at this is a little bit difficult for me to say. What is actually correctly lined up drew that a little bit too high? Probably. You want to be using kind of lot pencils at this point because you never know. You're gonna have to raise some of the construction lines and you may make mistakes. Don't fam anything in too much at this point. Especially these kind of lines here, the Marc is next to the bake. Speaking of which, we should finish off the big and you're gonna do that by drawing some triangular type shapes like this. Come out here, then connect with the top of the bake. Like so most of the edge of the bake is actually gonna recovered by feathers. So you're not going to say that much of the bake in an hour and then from this top point here where the feathers make the top of the big. You're actually gonna draw two lines at approximately 45 degree angles. They're gonna be about 90 degrees apart from each other. So, like this. Just notice how they're overlapping the OSCE. Okay, These are going to be guidelines or construction lines telling us where to draw the eyebrows. So we'll get started drawing those eyebrows. You can have a bit of a curve around here, then just over the top of the eye. It's gonna curve in, like, so, given angry. So it'll look now I'll have something very peculiar about their eyes. Their eyes always face directly forward pointing, pointing towards you in the camera there. The reason why the rise, always point forward, is because they're so well adapted to sing at night time. And part of this adaptation means that the eyes actually become elongated so I can let more light him. It's got to do with the mechanic internal mechanics of the eyeball, and because of this that can actually turn there are in the socket. It's no longer completely round Sorry. They eyes always point directly in front to the face, and it's for this reason that they can actually turn their head 360 degrees because they can turn their eyes the same way that you and I can. Now we're actually gonna draw in the edge of the well, we're not gonna draw on the edge of the head quite yet, But before you do draw on the edge of the head, you need to know that the, uh the distance between the edge of on the edge of the hit is about another i with So we just put in the construction on or Construction point. Rather, we don't didn't draw another whole circle there and pretty and likes I Alright, so I've drawn this al a bit small Might have helped if I drawn a bit bigger. And what we're gonna do is we're gonna actually drool lines for the edge of the hair to you , which come up with a slight like that Simon this summer. And then when these arbor out where these are brown lawns, makes the age of the head of the edge of the head's gonna come around still curved at the top, but with a flattish sort of curve like that and you'll draw the edge of the face in which comes close to the edge of the head. Also going to come up to the eyebrow. Nice kind of curve comes all the way around, and then from the big you're going to get a curve that comes up, then makes this curve around the edge of the face like, say, now it's starting to look like a rail, Al, I'm gonna put in some of those feathers around the corners of the head here which really make it look like an AL You can render them a little bit given a fair the type shape we're gonna be coloring in this area quite around the eyebrows. And it's gonna continual the way up into these e shacks tethers. We'll do the same on the other side, destroyed, remembered to keep some around about the same size on H side. They don't have to be in exactly the same position, but you do want to try and keep it. The same sauce I notice here was starting to get a bit more into the rendering side of things. We're gonna do the eyes now and the eyes can really well, eyes are very important by the Al's face. They really give him a distinct look. So you wanna put quite a fin doc long around the OSS? Okay? And you draw the people. And as I said, the is always gonna be looking directly forward. Say, put the people in, put a bit of shadow over the I also cast body eyebrow, and you can put a bit of a reflective Sean Canadian. Me on top of that shadow do the same again here right now on the inside of the eye here, you can actually draw couple of straight ish sort of lines, and this is gonna actually hint at the grain of feathers. The direction was the feathers is quite unusual in out, and that's why I get its distinctive kind of face pattern. Now you're gonna start with the feathers actually pointing towards the bake on the inside here, and then they kind of changed direction. I know just how I'm using lots of little lines toe to render this and I end up being in line with this line here in this line here. So you want to gradually change the direction of those feathers until I hear me in that same kind of direction is this line and then from did I gradually just continue around the thise pointing towards the Are you want to keep these light for the mean time because this is going to be one of the lightest parts of the owl's face. So I'll just quickly sketch setting on the other side difficult for me to do a good job of this side of the Al's face because the angle that I'm sitting up, as I said, this part of the owl's face is quite lot in coloration. But the very edge of this this round facial shape, I don't actually have a dark lawn to it. And you confirmed that in a bit more. If you want, like this, consider getting more into the rendering saw things enough, which I think is quite important when you're drawing out. If you really want the, uh, well, particular about it, it's gonna be a very time consuming Why to do it. You can actually color in this long black, calling it in a science angle that the feathers are they're going thought that would take a long time. So I'm looking a day that in this video. Now, over here, we can still save it of the construction lines for the I. I'm gonna actually arises because the area that would be directly above those dark eyebrows it's actually also going with lighter parts of the face. So we're just gonna draw in a rage and above these liberals, which is gonna be preserved for lighter coloration. Well said, drawing the top of the eyes the only you like physicist also with the light coloration. Now, don't this a little bit too evenly. If you want your alto look realistic, you don't want you could still up to regular or to smooth. If you want to look cartoony, then smooth and regular lines are a good way to go. Now you'll find that the feathers tend to be small on the foreign, and I tend to point backwards, and what you can actually get is you can get a rise of feathers that form the stripes on the foreign because the tips of the feathers a darker than the rest of the pills I attended a Slavic. You get this kind of patent going on notice how I'm trying to keep those fears is not quite regular kitten laughing each other a little bit now. You could spend all day rendering this and getting it just perfect, but we don't want to do that for the sake of this video. We don't video to be too long, so I'm not gonna finish feeling, you know, the rest of that. But what I would do then is would color in this raging a bit DACA So you can say that rage in just about the eyebrows, his lot. And then we can have similar coloration around the edge of the head. But I was someone a friend of the feathers, a bit around the edge of the head, psy just gonna put in a few extra lines around their makeup. Look like the better just actually covered in feathers. Just notice how I'm actually sketching these bits in not drawing every individual fella describe hinting at them. Okay. And I could just shade in the rest of that pop better now. This region he would actually be quite light car tended very lot phases around here, just about your breast. So keep that lot. That will continue shaving in on this side here and you may find that you need to darken the eyebrows, Teoh. Give it a bit more contrast with the other feathers. Now one loss popped. We still need to. Rendah is the bake and the base tends to be a pretty uniform color. It's also dark sort of tackle, but it's going to reflect a lot, much more so than the feathers day. It's the way we're going to represent. That is, we're gonna actually leave part of a lot. Part of that is gonna be like, over here. The edge is definitely gonna be in a darker color, So color them in remembering that part of its overlapped by feathers. Okay, And we're gonna call coloring the main part of the baker as well. But I'll leave that lot origen the middle. What I'm gonna do to really give it a nice bit of realism is I'm gonna make it gradually get Dioko as we go down that rage. So I'm just gonna coloring from the bottom like this. This family in lines around the base, they have it an al Spice from front view
8. Owl - Head - Three Quarter View: Okay, so now we're gonna draw on Al's face from 3/4 view. Really? It's a bit. Mawr was not quite 3/4 view to a little bit less than that. But the principles that you learned from drawing owls head from front, you're really gonna be useful here. You are gonna have to apply some more three day thinking for this destroying. So I'm going to start again with the bake. But this time, because we've you in the face from an angle, you're gonna draw the bake. Also, I had a bit of an angle. So when given a nice kind of curve to it even throughout And this draw this kind of subtle curves that we've done here and at the bottom, you're gonna have a point going to come up in a shop angle. That's the topic. The bottom bake. You gonna have straight So little line coming up like that and you are gonna have feathers along here blocking out our view of most of the rest of the big. But we don't need to worry about details just yet. Okay. The main thing that you need to know is that if you draw a line straight up here from that part of the bake that's gonna line up with the inside of the on this song. Now, if you remember from the last via if we divided the beak into three equal sections then we got an idea for where the mid height of I watched by going that distance up again. It's about a here. So from here he is gonna bay. How told eyes can That's a little square there. Four sides, April. Then we know that this is gonna be the over here not doing a perfect circle because the angle that we're saying it from its gonna be a little bit school squished from side to side , but that squishes very, very subtle. Now you'll remember that the eyes one eye with the power we discussed up in the last video . So gonna try and estimate that distance that over here that's where I'm going to start the next I It's notice where the eyes are relative to the big. It's different now when you're viewing the hours face from front view the bakers in the middle, but from 3/4 view, the bake is in a different spot. Relative to the eyes. That's because the face is three dimensional. All right, so I'm just finishing off the outline for the second I hear, Then we're gonna move on to the next stage, which is drawing the library now, because we're viewing the owl's face from an angle here, we're not going to be drawing, uh, the eyebrows at the same angle that we did before. What you're gonna do is we're gonna start at the same point here where the feathers make top of the bake, and you're going to draw curved line around like this. Can I curve may change if you feel like it's it's not working properly. I thought we just leave it like that for the main tone. Now, on this, I hear the eyebrows gonna look a lot more similar to what we did in the last rowing when we drew the the Al's face from front view. So we're gonna draw up diagonal line that I have elapsed the top of the I. And if you had a strike line here crossing this curved line, then the angle he should still be about 90 degrees. So drawing this part of the eyebrow like Sai, then drawing the curve part comes over the either angry sort of look that you get on the al faced okay and eyebrows gonna come up to the corner of the head now the big here. She followed it from the tip. It would actually come all the way around and you get a bit of a curve. He and you, it starts to give you an idea. What? The curve of the foreign on the Alice like there's something like that. Now you'll remember that the width of the head going to another. I went to pot because the angle with viewing it from it might be a little bit less. Just grow a bit of a curve around here. We'll fix it up lighter if we need to. Then, as it makes the eyebrow top of the top of the head will actually curve around more like this very much like a bull shite. But a very broad one of that. Andi estimate that with again over here do the same. They could be it water on this side because of the angle that reviewing its head from In fact, it's not going to give us a good estimate for where the edge of the head's gonna be. It's going to give us a better estimate. For where? The edge of the faithful base we'll put in the face there and before around this curve for the edge of the head like that. You know what? I'm gonna write some of those sketchy lawns around you. Now you'll remember that the bottom of suffice, you have these curves that came up then they completely change direction. And they come around the edge of the face like this. That edge of the fights you can really drawing, doctor, if you want feeling the eyes of it. So we're gonna have these kind of straight lines over here. The feathers should be in line with us in the It'll change direction coming around like say , you know, feathers obscuring the view of much of the big. A lot of this from now on, his rendering is gonna be very much the same as what we did when drawing the the Al's face from front here. So, feeling the feathers around here gonna rush this so that video doesn't take up too much time, so it gives a nice, dark lines on the edge of the face There, draw the eyebrow fitters up. And from this, you it's gonna be a quite different T shaped feathers. You can just do kind of a bunch of feathery shaped object here, intimate to, uh too careful with it. I was gonna call them in and we'll do the same on this side here now, because we're viewing the owls head from an angle. The feathers might look a little bit different needed, and I actually like poking off at the corner. It's actually still looks like it's part of the owl's head. So and general distant Hillary shapes. Just notice how the the eyebrow curves around with the shape of the head. There, you got the code of the head here, and you've also got curve of the eyebrow there. Both curved around as if you're working with a bowl. Okay, we just sketching the top of that, a bunch of feathers. We're into the ours. And just remember that the Loss B I discussed that Al's Oz, always pointing directly forward, are there stuck in the sockets in my content. What's he going to render some shadow over the I Some reflective. A lot. Notice how from this angle A lot of the eyes I've left by the eyebrows. What you could do if you want also is you can actually drawing the islands of the hour where if the odds a bit close, you can give the the AL but of a different character. So this here's the top island so far, right after that, I'm still gonna cost a bit of a shadow over that color in the rest of the life. We're going to render the bake the site might be did on the last video. So I'm gonna Callum eyes to that in, and we're gonna lay of this region Watt along the talk, which is reflecting a lot, but gonna make a doctor at the bottom. That's gonna gradually great yet towards what? But you wanted to be doctor on the side, so called him in a bit more. Again like that, Mr Rana, draw some some of the dark take showing through the feathers there, render a few more feathers. Six I right now, I'm gonna write some of these construction lines. He use that weaken drawing a water area of feathers just about the eyebrows. I just have a lot of area of feathers, Gets a bit parole. What is it gets towards the top of the head. I think these fiddles ivy he can Maybe bigger, actually. All right, I'm just gonna shy done in now. I'm gonna run to some of the feathers around the age of the head here, Andi. And in order to do that, what I'm gonna do is I'm gonna draw a bunch of very quick, seemingly parallel lines. Looks a little bit like 30 united the first end of these feathers. I have a curved line, so it looks like feathers rather than fair. And it's draught like that kind of thing. And then you can also do like a few feathers sticking off the side that he drew the bottom of this well, and it really makes it look like you've got a surface he made up of feathers again. You can showed this party, and that's gonna be kind of a doctor here on rushing it a bit. You'd want to make the eyebrows, Doctor. I think you're gonna make him life practically black. More contrast, you have, the better. So you want the really dark in areas and you want to really lot areas to Now these feathers , he just belie the FISA, actually, kind of bunch of sort of downy feathers that point forward that there could be a bit difficult to render you do something like what I'm doing here. But you do it slash that they end up looking more realistic and these feathers gonna be quite white also, so you don't render them too much. But then they start to look like docker feathers. You can even put in a little bit of shadow on the face here, underneath the eyebrow if you want to. And if you want to really get into data looking thing, you can stop to put lines across the far so you can spend a lot of time rendering this. And the more time you spend rendering at the better it'll end up looking. You can also put a little bit of like, very light kind of shading on part of the face around here because it is a bit darker on these out of parts of official play. The light part is really above zero live below the line between I'm bake. But even this section here. It's gonna be a lot of than what you got out. So it Here. There you have it. An owl's head from 3/4 view.
9. Owl - Body: in this video, we're gonna draw an hours body in perched position. And typically, when owls were in a perch position, they hold their body at a bit of an angle, like 45 degree angle. In this drawing, we're gonna actually do it with a body more horizontal seek and see more of the legs. So you can say I've already drawn the face. I've used the same technique that we had used and learned about in the last video. Now we're going to use that to actually learn how to draw the rest of the body. So I'm gonna calculate the heart of the head and what I'm going to take us. The heart of the head is about one bake length beneath the tip of the bake. All right, we're going to consider that to be one head hot. Now what I'm gonna do with that, I'm gonna measure the length from there to there, and I'm gonna do an equal length below the head at about a 45 degree angle. So I think that was about there. And then we're gonna do the body tomb or head length after that age horizontal. So I've got that measurement again on a guy one to All right. That's about how long we're gonna draw our body. Now, I'm gonna estimate the shape of the body gonna put in a construction curve type show or rather, an evil type shut in a draught around like Theis. We are gonna have a bit of a slope in the back that is going to come down to some degree like that. All right, Bit of a straight line, because that's where the tiles gonna bay Curve down and the bottom is gonna bay a little bit slanted the same way that the top of the body is, but not as much quite flattish. And we do a bit of a construction curve meeting up with the neck, so you'll notice that the hit is actually turned quite an angle. And as I said in previous videos, Alice containing the heads 360 degrees because the odds are always facing directly in front of the face. Now you can see he this marquee where we have the 1st 3rd It's actually where we're going to calculate the beginning off the leg. Now, most of legs gonna be covered up by feathers and it's gonna be covered up by the wing over the top of the body. But we're just gonna draw construction lining. So you're gonna draw the upper leg and they will be about every here it's gonna get back and this part of the leg a bit about sign length as the upper leg there. Then you'll have the ankle over here, and that will come down also. So you want the title length of the leg to be similar to what you've already drawn here. So that link there should be about the same length is the leg which we've got about right here and the foot. You're gonna have a reasonably large fist tell you at the back there, then you're gonna have the other three toes out the front. But they're gonna be quite widely spread, like, say, and the length of the foot should be about half the width of the face. Got about brought there. All right. These are just construction lines. Obviously, we're gonna come back and famine the legs better later on. I would draw the leg in on the other side, like, say, right. What kind of shape of the wing. It's gonna be a something like this. It's gonna come all the way to the end and you're going to see the top part there. Nobody's gonna ever left. That shoulder will be up around here somewhere and you're gonna have a forum. So it's gonna be like, This is the shoulder. That's the Opteron. This is the forum. I have done it a bit long there, but Al's do have very large, powerful wings. And when the wings fold up on the side of the body, they tend to cover most of the body and then you'll have the wrist around here and the equivalent of our hand calling. It bends around like that. So that's kind of what you're drawing here like, so we'll go over the top of that with feathers in a second. The tail itself is gonna bay, have you here and use a bit of the back on top, and you might even see a bit of the wing on the other side picking out the back. Then that's the general shape that you want to be going with. Now, before we go any further, I might just mentioned that if you are gonna draw in hours body in a different position. Another measurement that might come in handy way did the body at three head hearts. And that's gonna be very useful if you're gonna draw the body strike. If you're gonna be drawing from front view with the body perched down in this position, the body is gonna be the same length. But if you drawing in horizontal, it's also useful to measure that the width of the head should fit here twice. So we've got three head heights. It's also to wits of the head. And the reason wide that works is because this head height here is that 45 degree angle. Let's continue with the rest of the body. So when you drawing the wing, you're gonna actually drawing a few lioce here like I'm doing here. And what you're gonna actually be doing with these lions is h of them is gonna be a way you put a different layer of feathers. Sorry. The feathers in the tip of the wing going to be the primary feathers going to be very long , straight ish kind of feathers like I'm drawing here and you'll say the tips actually defined edge of the wing. You're drawing those lines darker than the construction lines that we've already used. All right, the next layer, you're gonna have similar shaped feathers accepted. These ones are gonna be a slightly different angle. All right? You just gonna do them like this? The way I'm drawing here again, the edge of the feathers is going to define the edge of the wing. Like what we've got. Yes, I just found that in a bit. All right, Now keep doing the other feathers. Notice how the feathers overlapped the feathers on the lay of the Nathan. You want to make sure that these lines come up to make the feathers that are above them? All right, we got a second Liar implies there the feathers should actually be on this second line. They should actually take quite blunt. I've done some of them a little bit too pointed, but I'm just fixing it up here. All right. Now we do another lion. Similar thing again. Also long, quite kind of feathers. A slightly different angle to these ones in the most horizontal angle. And as you got H. Liar it guys, a little bit more vertical again, working with quite blunt sort of feathers here, if it is a quite tightly packed and the feathers on an owl's wings are actually quite amazing. Most birds when they flap their wings, you can hear them. But owls wings especially designed that the feathers kind of hard, the sound of their wings flapping. And if you've ever actually seen an AL flying in real life, it's amazing how quiet that you can't really hear them flapping their wings at all. Not so they can sneak up on their price. All right, I just noticed, As I'm getting towards the front of the wing, I'm actually changing the angle of the feathers even more so. It's becoming even more and more vertical Okay, towards the front here, it's gonna become less defined. And you're gonna have What if I was small feathers in that kind of thing going on so you can get a bit creative with how you do this? Brilliant. Okay, now the next liar above, we're gonna be working with smaller feathers, and this life is actually gonna have what a little layers within it. So you're gonna start with these kind of feathers that I'm drawing here, which spies medium length feathers. But each live that ugo up, they're going to get a little bit smaller and little bit squat off and the shapes gonna change. All right, You see this feather here? The line doesn't actually come up to make the feathers above it. So we're just gonna extend that line, so that does come up to the feathers above it. All right, Now we're gonna put in another liar of short of feathers. Make sure the days Feather's arrival laughing the feathers underneath. Um, and quite a lot. And then even short of feathers, Adopt that. And it comes a little less orderly at this point here. And h lie a becomes a little bit less well defined. I think we can be happy with up. Brilliant. Okay, we'll do a few lines up here on the back. Tell pose The wing is not gonna bathe at well defined, so it can actually locked in that up a bit. And what you are going to find the feathers from the neck overlapping the body to some degree, especially because the head is turned in that funny angle. Now, the feathers on the neck tend to be very long, thin and quite pointed. So it looks almost like fair going in two different directions, just family in some of the head, because my hand is actually smudged. However, he added, if you can say that on the camera, all right, I'm just gonna put in some of those feathers around the neck. You probably need to draw all of them. I might just rushed through them, so it doesn't take too long. Okay? I'm not spending two on each feather here. You can see these feathers are not as well defined as the ones on the wing. And just around the edge of the neck, he can do some feathers. Kind of standing up off the surface. You don't want that surface on the edge to be too smooth and too regular. Cool. It won't look natural unless you doing cartoon, In which case you may want that look. All right. The top of the head does have quite a smooth look to it, because I was very small feathers. Neural line. Quite flat, as we did in the previous video. You drew those tiny little feathers on the foreign. Okay. No, the downy feathers underneath the face. Maybe here, just above the long, thin feathers on the neck. Okay, we just firm in the tail feathers, which are also quite long, but quite blunt at the end. Awesome, Rounded, like I've done there, just a few of them like that. All right. Now, underneath the al's body, you'll say that we haven't actually found in the legs yet. You are gonna have a few kind of, I suppose, downy feathers. They're gonna be able to say, popping out the bottom here and just draw them almost like fair if you want, like so not found them in with too much detail. Now the legs. We're gonna put a bit of thickness to them to flesh it out a bit. And the AL that we're drawing, the eagle owl has feathers ago away to the clause. So legs are entirely covered by feathers like this. You can just say I'm adding a bit of weight to each side of that construction line. There can even put in a few little hatching lines here and there. So it looks like the leg is covered by feathers. Feel like feathers. This point Very sin. Small little feathers, then the tires themselves. These quite big, hefty looking things. And I tend to bay quite large towards the tips. Even then, they have these large curved talents coming out of the end of them a little bit to the top , like our fingernails not drawing the front of this foot because overlapped by the leg that's in front of it. But we will draw the entire foot that I've got my pencil on. Now, As I said, you want the length of this foot to be about the same as half the width of face talents? A nice, long and curved that middle toe is gonna be a bit longer than the two toes on the other side of it. And cause I'm drawing the ties of the baby an angle, this one and this one, we're gonna have some four shortening. They're gonna look a bit shorter than they actually are. And I'll just firm in a little bit more around the face there because faded my hands gone over the top of it and smudge it a bit. If you want to avoid smudging on your picture, I wouldn't use this in an instructional video But certainly if you're gonna be drawing it at home, what you can do is you can get a tissue or something like this, and you can just place it under your hand and you can move your hand over the top of the tissue and the tissue doesn't move around as much of your hand doesn't. Therefore, it actually prevents a lot of that kind of smudging, but you can get in a drawing. You might also notice that the year like feathers that I've done on the corners of the head here are a bit longer than what we did in the previous video. I took a look at the previous video and thought its feathers were probably a little bit shorter than they should have been in this drawing. I've made them bit longer, and I think the drawing has benefited from that. We'll just continue faring in a few of those tiny little feathers that you get on top of the head and those nice little stripey rose and docking in some of those areas around the eye you can show is still a little bit of a reflective shine on it, and around the edge like it's wearing mascara. Just make sure these feathers on the bottom of the body are obvious enough that I need to be very obvious. But you know too well to save them there. Femine to back a little bit, and there you have it in Al's body.
10. Penguin - Body: in this video, we're gonna draw penguins body from side view and the space is a penguin that we're going to go with ease the Emperor Penguin. It's the largest species of penguin. It's the most impressive looking. And it's what a lot of people think of when they think of penguins. So it's very difficult to give proportions for this because they can stretch their bodies out or their conscription, and it changes the proportions to a degree. So what we're gonna actually do is we're gonna start with a large oval shape here like that . Okay, this is gonna be a construction oval that's gonna give us an indication for where the body is gonna be in what shape the body will bait. Okay, now, above that, I'm gonna put the head head's gonna be a much smaller circular shape, and I'm gonna do it a bit of an angle. Say it's like a little bit longer this way than it is this way here. So it's not quite around a bit of an oval shut. Okay, now, from the body to the head, you're gonna have the next It's gonna connect like this. You have a nice smooth curve like this. And on the other side, you'll have something kind of similar. Also a nice curve. But it's gonna curve up underneath the head like that. The head's gonna be facing towards where my pencil is. All right. Now, at the bottom of the body, you're going to put the legs. So if we just follow the curve around and I would have turned him into the straight lines at the bottom, it is too little leg shapes, the very stumpy little legs. Now the majority of birds that we draw. In fact, the majority of birds in general they're gonna have the typical bird legs shot, which is like this. That is the shape of the bones. But penguins intensive a bit different penguins. Bynes. I intend to be more like this, and most of that is hidden underneath feathers and blubber and everything else. But that tends to be the actual shape of the penguins leg, so you're not going to see a lot of that. But I thought it was worth explaining because you might be thinking, Well, why have you got these strange little straight legs pointing down when with the other birds their legs were shaped like that. And that's because penguins have different shaped lakes. I'll just arise those now, obviously, you're gonna put the penguins feet at the bottom of the legs. Were just gonna put little placeholders there at the moment. Say, if you do these like straight lines, he and then you can even slight curves on top. Like, say, that will tell us where the the tires are going to go. And we'll come back to them a bit later and and we can put the tile in there. The title tends to touch the ground. It's like a little tuxedo detail, like, say, you can see it between the legs. They're also quite a broad sort of tile. Okay, so we'll put their head in now. Now the head of an emperor Penguin. Very kind of simple shape, Really. The baker's gonna bet Bay about same length as the head. So I would estimate that about here. We're gonna do it a bit of an upward angle, and the baked tends to be very theme and straight just curved right at the end. So it comes from the bottom of the bay. Comes from in line with the bottom of the head. The top of the bake doesn't come to the top of the head day. It's kind of like this shape that I've got there at the very tip. It's going to curve now. The top of the head is going to come up in a bit of a peak, very subtle, kind of pick those. It's very curved, and then it comes back down. And you wanted Teoh kind of turn into this very smooth curve that just kind of becomes the neck like this. So actually draw the neck a little bit differently so that the curves of it's moved up like that will just the front of the neck as well, said it lines up with the bottom of the bake there like that. That's looking good. Now. The placement of the wings is a bit of a difficult thing if we divide the body into body heart, if we divide that into, let's say equal thirds just estimating what equal thirds are here or if you divide the body into equal Harp's this he might be about 1/2 Okay, so that's probably the equal heart is probably gonna be about where you have the elder and then the bottom is the wing is going to come down below this third part here. But how far it comes down. It's a bit difficult to estimates of what you can doing from the elbow. You could draw up a little bit of the operator, Um, because I don't have a huge upper arms just quite small. And then what we do know about the length of the wing is that it actually gonna be equal to about half of the body hot. So if we take that hot there when we measure that from just under the armpit Here, take that. That is gonna be the length of the wing. All right, So if that wasn't clear what I did, I measured halfway up the body, putting the l by there, then putting the upper arm of the upper wing, which is very short. Little part. I just estimated the size of that, probably about the same as the heart of the head. Actually, that area there. And then I figured out where the bottom of the wing would bay by measuring what is half of the penguins hot just moving that up to hear from the El Bury to the bottom of the wing that there is half of the Penguins hot and you're going to draw in the wing. It's very much like a flipper shape. It's not a typical wing, because obviously, penguins can't fly, but they can swim very well. And in fact, if you've ever seen them swimming, it looks like they're flying underwater. So the thing that's gonna make it really look like a flipper is that this area, he is gonna be a bit of a club shape. And at the back, you're going to have a few very subtle curves. It looks like a single curve at first, but then, if you look closely, you can say they're a few little dividend, like here and here. All right. I pronounced the elbow a little bit too much. It's not. I don't usually quite that shape like I now we're just gonna for him in the back. Every here should be a little bit behind the wing, like so we can put in a little bit of the wing from the other side and we confirm in the Billy just so you're aware, the center point of the Penguins body here is along this curve that I'm drawing here. You don't have to draw this, but you want to be aware that it's there, and then, as the Penguins head is facing to the side, that access point caves around like so All right, so we're gonna putting the Penguins. I and I was gonna be a kind of below this. This peak here and it's gonna bay No, not quite. Halfway down the head, A little bit higher up. And it'll be this almond shaped the back of the arm and shake every He intends to be a bit hard in the front of the almond shaped over here, very kind of subtle. Now, the mouth of the bake about halfway up to bake, maybe even a tad high. And is this bit of cholera that is on the bottoms to bake their concert drawn the outline for it. They're like, So I'm just going to smooth out the big to the peak of the head there because it tends to be a very nice, smooth curve like that, an important part of the penguin YSL these really beautiful, smooth curves. Now, most of the head's gonna be black, But this part of the bake here, it's on the bottom part of the bottom drawer of the bake that's gonna be in color. So when we coloring the rest of the head, we're gonna leave that part on colored, all right. And you've got a curved line around here, the bottom of the head, and this is gonna turn into a construction curve because there's a bit where the curves appear to meet up. But there's actually white or yellow space in between them. So I'm just gonna follow this curve around like this might say. Then coloration comes down just in front of the wing there and the guys behind the wing. As I said, It's like the title of the tuxedo at the back here. Rule that in. And because this is a construction curve, we're gonna actually putting now the other parts of the coloration. So there's a curve that comes up like this around the back of the head, kind of what's actually the side of the head. But it's towards the back. And then there's this part here. Okay, there's no black line connecting to separate like that. All right now, we're gonna draw in the ties to drawing the ties of the penguins a little bit different from some of the other birds. You've got three very thick ties, and penguins do actually have 1/4 toe at the back. But I've never seen it. It tends to be covered by fat and feathers and everything else, and it tends to be very, very small as well. So you're not gonna really need to draw. You can basically drawing the feathers there, that covering whatever tugs at the back. So we're just gonna draw three very thick, powerful ties. Penguins have very short little fate. They do have close at the end of them and ember Emperor penguins tend to have quite doc flesh on the fate as well. Middle ties probably a little bit longer than the other two times. But really, there isn't much in it. And the toasting to be a little bit curved as well, My curve opposite living crunched like that. All right, we just dry pit in feathers from the top. You're not really gonna have to render the feathers in a penguin because penguins have very , very tightly packed feathers. Very tightly packed to keep out the water and also very tightly packed to keep out the cold . So what you get is a very smooth looking surface on a penguin, and we're just gonna color in now. The doc pops so in an emperor penguin got a lot of black areas, and I'm just going to call them in with my lead pencil. This part would typically be yellow, brought yellow, and then it fades out. So what? To the wings or a dot color? The back is also a dot color. Now the back typically is not pitch black. Usually what you have is actually darker border color over here like this. Not based. Simply call it what you have on the head. The back itself will often made it lighter, but it wouldn't be that obvious because it's still Kleist to black, like a charcoal column. All right, I'm just coloring in the bottom of the tuxedo coloration. The tail will also be dot color and the ties. As I mentioned, very dark flesh, no feathers on the ties. There you have it. That is how to draw a penguins body
11. Chicken - Head - Side View: in this video, we're gonna be drawing a chicken's head from side view and this quite a bit of complexity to drawing a chicken's head. Even though they've got these tiny little heads, there's actually quite a few steps to it, so we're going to focus specifically on this before moving to the chickens whole body. Now the first thing you want to do when you're drawing a chicken is or I'll just drawing the chicken's head. You're going to draw a kind of oval shape here, which is gonna be construction over. It's gonna tell you the size and shape of the head. Okay, notice how it's Ah, it's longer this way than it is from top to bottom. Now, from front to back, that's also going to be about the length of the chickens bake. So I'm going to estimate how long that is, and we'll side over here. Now we typically think of chickens is having very short bigs, but it's a bit of an optical illusion, and we'll see a bit of that bit lighter when we put more with the flesh onto the chicken. So what you gonna do with the big here? It's gonna start quite low. You gonna have a flat lawn towards the bottom of the head there, and then you're gonna have a diagonal. What's gonna be curved at the front, and then you're gonna have a diagonal on from there fairly straight towards the top of the head. Okay, Now, the mouth on the bake is gonna have this specific shape where it you got a small curve up and you have a longer curve like this. And then finally you have along that comes quite straight down here, meeting the head over there. You could draw little lip around that if you want. Now the nostrils gonna bay above this point. Here typically say something like this, all right? And that halfway back on the head, it's not big that every here, that's where the eyes going to bay and the eyes also gonna bay about halfway up the head. So eyes not around shape. We just kind of draw in like this. Notice how it's It's actually a bit of an egg shape, I suppose, and you tend to get quite wrinkled skin around there. So if you want to draw like a bit of a line around the outside of the eye. You can do that and you can put in the pupil, put a bit of a shine off the people there. Okay, Now, one of the distinctive elements off Chicken Spice is the bit of flesh above the head called the kind and the kind stops that have you here above the nostrils. And this is one of the things that makes the bake look quite short. So the came varies in shape for a male to female and also varies quite a bit from breed to breed. So what I'm gonna do is I'm just gonna do construction curve like this above the head and you'll see that what I'm doing it connects almost at the back of the head there and in the front here, the 1st 1 of the little finger, like appendages comes up before this point you need said before the face actually start. So I'm gonna draw the first finger like appendage over here. We'll do a few more. Typically, they have between five and seven of these things. And they could be different shapes, depending on the breed. Some have more kind of pointed finger like shapes and Some have more curves, single like shapes. Like what I'm doing here. Okay, Now you're also gonna have some fleshy parts hanging underneath the head, and they tend to be about in line with the front of the ally there or just behind the big, so will draw them in like this and again. These tend to be larger in my health and and females. So if you're drawing a rooster, these will be larger than if you drawing a hen. If you're not sure how lives to draw them on like let's say you're particularly doing a rooster, and you're not sure how large to do. You can go to Google images and just look up rooster and say How big day on the different on the different chicken braids now, depending on the braid, you also get a bit of flesh around here, hanging down like, say, just behind the eye. He tend to have the year, which tends to be hidden from view by the feathers and an ear lives. I can be a bit fleshing around there as well some chickens that most of this area is covered by flesh. Others they have feathers that come up quite a bit quite far. Forward on the face, or we're going to draw one that where the feathers come a bit further forward on the face. So just gonna draw some lines next to each other. They're better hatching. So over here you have the flesh, and over here you have the feathers. And this is kind of the transition between the two that I'm drawing over here. Then you have a nice curve around behind the eye, which comes up, and then it kind of almost touches the top of the I, and the curve almost touches the top of the orbit. Keeps going past that. And again, we'll put some hatching there where the flesh with the lawn between the flesh and the figures off and at the top here will draw the feathers over the top. Nice kind of curved shape like that. Okay. And then we're gonna put in the neck at the back of the head. And as I said, she comes have a really small heads. So you're going to give a dis relatively very large, nick. So the neck almost comes straight out the back and underneath here comes on my stripe down . So just notice how large that neck looks relative to the head. Yeah, they're a few things we can do to the bake here to make it look less obvious. As I said, it tends to be an optical illusion where we think of chickens is having a really small bake . But in fact, I have a bake that's about same length as the head. So often a lot of the beak is actually covered by flesh, and the flesh comes down from the comb up here so you can actually draw something like this . So you got the chickens lip and then turns into flesh up here. You can put a few more details to the to the Beko. He has to give it a bit more naturalistic looking curve. I'm just fanning in some of the elements that we've drawn stay far, and I'm just gonna rise a few allies construction lines because I think once we arise this , you say it starts to look a little bit more chicken like All right, I'm just gonna color in the pupil, and then we'll be done. And there you have it a chicken's head from side view.
12. Chicken - Body - Side View: in this video, we're going to take a look at how to draw a chicken's body from side you. So what we're going to start with is a little construction square, not too little that you're not going to draw the entire chicken's body within this square. So you need to leave space around the square as well. So I'm gonna draw. I'm just estimating that you can see I'm drawing in the square Freehand. And I'm just gonna estimate exactly what a square is. I'm trying to get the top the same length as the sides. Okay? You don't draw it too dark, because, as I said, it's only for construction. So you you gonna raise it later on? But for the meantime, just draw that in. Now what? We're gonna draw within the square about halfway back. This is where we're gonna put the leg and I'm gonna put that first part of the leg like so . And just remember that when we talked about General Bird Anatomy, we discussed the shape of the leg and we've actually looked at the chicken skeleton. And if you remember correctly, the leg shape was very much like this where you've got the fly here with Shin over there. And this is the equivalent off our foot and at the bottom you're gonna have the fingers or tires rather, But we're not gonna put them in yet because we want to draw the rest of the chicken first. So the next thing I'm gonna do is around about this part of the leg here. That's where we're gonna put the bottom of the chicken's body. And the bottom of the chicken's body is gonna curve up like this and we'll draw more of that in the second. But we're gonna just putting the top of the chicken's body also. And that's gonna bay at the top of the square here, and it's gonna be about in the middle in the front that's gonna curve up. That's going to turn into the neck and the back. It's going to curve up also, and that's going to turn into the tail. So I back at the bottom of the chicken. You're gonna get a little bit outside of the square and just want to pass there. You're going to start curving up. This is gonna be like the front of the chicken and it turns into the neck. When we drew the chicken's head from side view, you'll recall that chickens have very small heads. So we're going to draw the neck up in this like s shape here, and then we're gonna put the chicken's head on, and I'm gonna use the same technique that I used in the video about how to draw a chicken's head. I'm probably gonna give it a little bit more volume from top to bottom than I did in that video. I think I may be made the head a little bit too flat in that video. But I'm using exactly the same technique where the Bakers about the same length as the head and trying to keep the head small, Remember? And I'm just gonna put in a lot of different features of the chickens, face and head. Just putting in the time now on top of the head. As I mentioned in the previous video, there's fleshy parts that you're gonna draw. They're going to be bigger and more prominent in a rooster than they will be in a hand. Okay, We're not going to spend too much time on the head. I think just the sketchy looking head that I got there will suffice for destroying and probably drawing the head a little bit to fire back. So what I'm gonna do is I'm actually gonna move the entire body back a little bit, okay? Now the back here, you're going tohave the tile curve up and about in line with the bottom of the head. He that's about as high up as the tile is going to come. Then at the back, you can draw a bunch of feather type shapes around here, old y down. Now you've got the back of the chicken. Now the head looks to me like it's too, because as I said, chickens have very small heads. And when you try and draw it, try and given even smaller head than that. Maybe about decides like that. All right, so let's putting the legs properly. Now, most of this part of the leg is gonna be covered by feathers. So what you're gonna do is you're actually just gonna draw the the bottom part of the leg. Here, I'll arise The construction line we have for the lake there because that's a little bit too far forward. As you know, we moved the body back. All right, so these are the feathers, feathered parts, the legs. And below this, it's all gonna be flesh. So the legs gonna come out at this angle and at the bottom of the square here, that's where you're going to draw the fate. Now the foot is going to be about the same length as they head. And as I said, I've drawn the head a little bit too big. So I'm gonna make the foot a little bit smaller than that about this size here. Now, what you gonna do with the foot? Chickens have three toes pointing forwards and one toe pointing backwards and the back toes quite small. The middle toe, which I'm drawing here that's gonna be by far the largest. Even though it doesn't have the most joint, it's gonna be the thickest, and it tapers towards a point of the end. It's not like our fingers, which a similar with all the way along the chickens toe tends to be thicker over here in tapers towards a point at the end. Then they have a little chlor at the end as well. The shape on the side toes is similar, but they're a bit thinner and they come off quite a sharp angle from that middle tie there . All right. And then the first time, which is the one of the back, the equivalent of their thumb. Very small little thing. Just pop it in the back there. Like I did put little claws on to these. All right, you do the same on the other foot. Now, chickens tend to have very small wings. So you're not gonna have a win covering this whole area here. It's gonna be more towards the top. So I maybe about half way up the body here, a little bit below that, you can start drawing the bottom of the wing, and you can draw around like this. Say what to kind of straight ish lines which connect with curve. And then they connect with a curve here at the bottom of the wing, which comes in very much a horizontal line. Then, as I get towards the back of the square, not quite reaching it, draw it up again. I'm actually gonna try and shrink that head a little bit so you can see how big it should be so as I mentioned, the head should be about the same size while saying Length is the foot and I'm including the big here. So if we measure that about that length there looking at ahead and bake about dis length here, as I said, I'm using the same techniques that I used in the previous video, which was about how to draw a chicken's head from side view. Okay, so I'm just gonna draw the big straight up there. Put the came on top. Just notice how you can actually follow those steps and draw in almost any order. Put the I in that halfway back on the head and halfway up. All right, I'm rushing this a bit, so it's not gonna end up looking the best and because I'm drawing it so small it's a little bit difficult to get right as well, but it's turning out OK. It's looking like a chicken. Okay, we don't need to spend too much time, and that's the main thing is so you know how to draw a chicken's body from side view, and that is how you do it
13. Duck - Head - Profile: all right, We're gonna draw ducks face from price, fall quite easy to do this. And you're gonna start off with, Ah, an oval sort of shut. That's gonna be the main section of the duck's head. This little construction over and we want Teoh. You want to just divide that in third's from top to bottom, sir? Something like that. And we're going to draw in the bottom. Tate. EDS. Another I will type shot. Okay, now, that's actually gonna be with our guys. And this is about halfway back in the oval that we've drawn. Just keep in mind that that's actually not gonna be half right back in the head. There is gonna be a bit of extra head that comes out back here, so I'm just gonna drawing the eye. So it is quite high up. Conductor is placed on the side of the head, and you know, we're not not gonna put too much data on that are just yet. We're gonna draw in the rest of the face. And now this distance here, we want about equal distance again. Like, say, that's gonna bay How long the Bakers and Big the Bake is actually the tip of the big here should be about in line with the bottom is ahead there. So I'm just gonna drill like that Fairly straight line curved slightly upwards, which is very distinctive feature of docks With that kind of depressed curve, it is different from my spurred mice birds. The big tends to be a straight or curves outwards to integrate. And if you just kind of draw the big down like this near the bottom of the head there, that's where bottom of the big is gonna connect up and similar curve on the bottom. But you can actually say a little bit of that bottom bill, mostly covered, mostly overlapped by the top you'll be you can see a little bit there and on the top Bill here there is actually like a pointed shape and feathers. I've left the top of the bill like so, but a nostril on there and partners ahead here extends a reasonable distance. Actually passed maybe too. About the back of the are a little bit further back. That's where they had connect to the neck front of the neck. Anyway, As for the back of the neck, I connect someone like this and just say Audrey, like, fairly straight line down there for curving the the nick back So you can say the back here back of the neck. It comes out a bit further beyond that initial oval that we drink. You just draw it down like that and ducks tend a very dark ally. So you can actually just roll like a a lot reflection against it. There you can even color in the like so and there you have it to duck from Siberia. You may want to emphasize the chick structure here, which does actually come out from the side of the face a little bit. Well, say that a bit more when we draw the duck from front view.
14. Duck - Head - Front: all right, We're gonna draw ducks face from front view now, and like the side view, it's relatively 80 animal to droll on. So we're gonna start with an oval sort of shape and we're actually be applying with the knowledge that we applied in the side view drawing for ducks Face also. So start with an oval That's roughly gonna be the way that hideous. And I'm just gonna draw a line down the middle heats that I can divided into thirds and get an idea for where the different features should be. A on the docks head. Okay, so the eyes is you you may remember about stay out of the way out and they're on the side of the head site. The view that we're gonna be drawing them from, they're really gonna bay this. Uh, how would you describe it? I suppose seen oval like that Because we're seeing the eye from almost saw it on what we even think of a saw it on for dockets. Its front on because their eyes are on the side of the hit and put put the other one it called distance from the center on the other side like, say, and you can say, a little bit of the head behind the eyes. Like, say, the head behind the eyes is wider than the hit in front of the artists that you will say it it up. Then you get quite a diamond shot. Get quite a dame shape on top of the head like so moment looks a bit odd because we haven't drawn in the baker anything. But if you can imagine kind of two lines coming down like this, it's kind of gonna bay tip feathers here, going a bit higher up where I trade that converging point that he is a good point like, say, okay, and the next third of the white down. That's where the nostrils are going to go, so the nostrils are quite a bit smaller than the others. Don't make the mistake that I just made there may try and make them huge. It's better, small like that, and it also makes me think that the eyes of drawing too small I'm gonna make the eyes quite a bit bigger than it's a lot better Now. You'll remember that when we drew the duck from side view, there was Ah, like a chick section that we drew under the eye. Well, you're going to see that from front view. Also, because the head certainly wider underneath the authorities above the ours I'm gonna give it quite nice shakes that come out quite far away from the life like so come down, curve back in. And if you're gonna draw the neck on the dock in the Knicks, similar width to the head there could be coming off, like around about there. But we're gonna drawing the bake. And you remember the bait came down lower than the rest of the head. So we draw that in. It's quite a wide bake. The ducks have what we call the bill, I suppose, Um and just think of how Daffy duck, What Double doc is drawn. They've got that wide. Come on. A bake. Very distinctive looking big compared to all the beds except for gay. Since ones which opens. They have a similar big toe, a duck as they are related to ducks. And really what you want. Here's down to about the nostrils. You want these kind of straight ish sort of wines coming out angling outwards from the center of the head, and then at a certain point they just kind of come straight down. I believe that that's what they appear to do from front on now, actually getting strike down, really, and then they curve around towards the middle. Like so. I was about some of those construction lines. Just notice you can't see any of the bottom bill from this fear. Any really the top bill, you can say because the top feels quite a bit bigger, and I've elapse the born the bottom of the bake. Then there does tend to be this this ridge around the edge of the big. But you're saying you should say in most, if not all, spaces of duck and sometimes it's quite subtle there. But again, think of Donald Doc in, um, and Daffy ducked. I have that kind of bill around the edge of the big That really helps Kind of finish it off and again, uh, the are quite dark. So if you want color, I mean, you could put a little reflection on there, and that's ducks face from front view.
15. Eagle - Head - Profile: all right, we're gonna draw on a gal's face and the exact proportions going very from spaces to spaces . Good idea. Have cider handy of the spaces that you want to draw when you're doing it. If you're not drawing a specific species may be making up your own top of a go or something . Then you can use these basic steps on the back. Exceptional, Applied all spaces. Anyway, So I start off by doing a, um, a rough oval. This is gonna be the Eagles head and from the front of the head, which is gonna be on the left side here that works the other way around, too. We're going to have to bake popping out. It's gonna draw that in United's it enables Bake again. This depends beyond Spacey's. It comes quite far facial mist in the top of the head there. And even though the bake is curved the top of the big and the bottom of the bay Keith and most of the link they're actually quite straight. And what you should actually do here is the curve should not come back like that. Shouldn't go more than strike down, Really, And maybe a little bit further. Not you wanted to look realistic. So coming back here, the bottom of yours quite thin. So obviously it I collapsed. The in the top drawer overlaps the bottom. Jewell and you say what? Eagle spaces have like a little kind of extra point over there? Another David and the mouth will come back further than the bake. But when I can actually draw the whole mouth yet because to figure out exactly where the mouth comes, we need to growing the eyeballs. Before we do that, we're gonna draw the federal line where the feathers actually make the bake. And that's roughly along. This this line here with circle ends? Not exactly, but roundabout. We're gonna make that striped lawn till about here, up to 2/3 of the way down, and then we'll bring it back then and what you're gonna have is you're gonna have a lip around the mouth, which is not covered by feathers, but this long he you fully aware that lawn with two people and get your flying the point here at the bottom of the bait? That's kind of where the feathers would make up with the bottom. Jill you can, actually, Just putting the mark their show. We're gonna have some old feathers in their later on. Then we're gonna do the rest of the federal line here along that circle one. That's where you gonna have the lip. So the next day just actually go to the top of the bird's head. And this is where you bought the brow for the bird, Which eagles have quite prominent brow and how far up the head comes above the the top of the bake. Really? Polly depends on defenders. If the feathers air standing up erect as they sometimes do, you will come up further. But they can also be lying quite fat along the top of the head. So I'm gonna do them kind of somewhere in between and just roughing him in Not doing too much data all day just yet. Okay, then probably about halfway down the head gonna have the odd and the eyes also about halfway between the front here in the back here. All right. We said it's about half my point there. Decide to draw the and like this, you know the size of the I will obviously vary from spaces to spaces with smaller species of a goal, having relatively larger I on the bald eagles quite a large Spacey's. You would draw that I quite small for a bold eagle. The guy is quite circular, but there is some black. You draw like a little point here, the front in the back more so up front, and it gives the I'm much more realistic failed toe. Then I'm gonna put the ours in there like that. The name, time and one of the distinctive thing about in Eagles faces up Brow Ridge, which really gives a bit of an angry look to their face. It's just why the faces shaped, uh, and it's really just a long that shape that you can say that I'm drawing there. But there's not a whole lot to it, and it gives it that quite distinctive eagle like look, and I was gonna put in the nostril here, which is roughly in line with the I. It's angled here and it goes, tend to have a bit of ah, like a line here, which kind of delineates the back section of the bake from the front section, have a bit of a bump up there thinking what? Okay, I'm gonna rub out as long as they were not supposed to be there anymore. Okay? Just fix this up a little bit, get a bit better looking, all right? It may not look like I did much there, but you're himself happy with you drawing. So now the odd lines up with the back of the mouth mouth will not come back any further than with eyes. And you'll find the case with most animals. And then once you have decided where the mouth is gonna come back to, you can grow the lip around it And for the rest of the eagles head, it's really a matter of obviously, this is where the skull ends. But you're gonna have some feathers on the back here. And the the back of the skull will link Teoh the spinal cord. So, like humans, where the spinal cord links at the bottom of the skull. Sorry. The next gonna come for the back And you say, adding that bit to the back of the head actually helped quite a lot to give me a more realistic appearance. We've got feathers coming down here from the bottom of the hit, um, they will need to made up with the feathers of the neck at some point in the neck is about the same distance from front to back as the head is sorry, Good. Pretty much gives you an idea of the basics for the how to draw on Eagle's Head. We're gonna cover the, um, the basics of rendering and how to make a bit more realistic in a future lecture that this is This is really the basics of what you need to draw on Eagle's head from profile.
16. Eagle - Head - Front: I'm gonna draw the Eagles head from front view, and really, there's not a lot to it. And I'm gonna stop by throwing this kind of shape here. This is kind of the neck and the head together. If you really want to get well specific about it, you can. But in the whole circle for the head but in front of you, you're really not gonna say much. Very Jewell on any kind of when you look a day, go from front to, you know, see any lawns around here. Really? You can maybe just be helpful for you for placing yours, which you're about halfway down the head and but the line down the center very close. Also quite helpful. Helps you place bake. And and we're just gonna stop. We know the eyes at this heart, and we know that the big comes slightly hardened. So we stopped by on the top of the bake in the middle. Here we bring that down, I'm actually gonna rise. That bottom circle line is getting a bit distracting. All right. And the eyes, um uh, it's somewhat forward fasting in an eagle. They are very close to the edge. of the hit him so hard. I'm just gonna rough them in. Let's not forget that angry looking eyebrow. Very distinctive part of Eagles appearance. Just noticed this. The shape on doing with the eyes, he It's not a simple matter of just doing a round circle. You might want to look at some photos for reference to get an idea, I really try and get the on the shape of the exactly how you want it. And then, as you remember from the side view, the edge of the mouth is more or less in line with middle of the eye, and it appears today that life from front on also which makes it easy. You can transfer that knowledge to different point of view, and the mouth had come straight across here. But obviously you go that long Code big, which comes down here and really enables. Bake from front on looks surprisingly narrow, so production market, even Nairo Still in what I've done there probably, uh, that's more like it, I think quite narrow there. And it does start to Kurt outwards as you go further up, turning into the lip. Come on, girl, off a bit Yeah. And, uh um this here, which is gonna bathe fiddle on, gonna bring that up a bit here and then for the contour of the big around the outside, there and now what? I've drawn on the left hand saw Faison was gonna try and mirror that on the right hand side of the face. So we're gonna draw that I again he trying on the same heart. Get that Oh, eyebrow structure in that with the art itself. Remember that I was quite close to the edge of the head there in green, from front for you cold with the eagles. Like the bold eagle which have sica play image, they'll appeared baby more on the the Oslo Peter Bay further away from the edge of the head there. But you'll still have this big gap in between the oars from front view. It's quite different. Looking from a typical mammal ahead. At least, uh, on may, dating a mammal where the odds would typically bay a bit closer together. The eyes in a mammal predator Kleist together because it helps them judge distances and birds miraculously seem to be graded judging distances without having the same level of binocular vision of mammals. Just one of the reasons. What the eagle can we get away with having such widely, said Oz and still be successful predator? You know, I'm just extending the edge of the lip there because I do want to line up with the middle of the I trying to get each side of the face to mirror the other. That's roughly symmetrical and big should actually come in a bit like that. Um, and as we discussed in the other, dropped while drawing the eagle from side view, the shape and size the big does very from once eagle spaces to the next. But what I'm teaching, you hear general guidelines, which you can combined with a bit of fight a graphic reference. If you're gonna dio specific spaces and you really want to be accurate about it, I'm drawing this second curved line huge. You'll remember. There was this delineation in the bake along which you have the nostrils, which more or less in line with the OSCE, something going a heart. And I'm just gonna for him in the outline of that head a bit too much forward. They're probably no probably coming to the other extreme, and you're in its basic shot. And we just do a time better rendering on the odds there and because something that's important to know here is that because of the angle of the eyes way they aren't completely facing to the side, not completely facing forward data. When you view the angle from front own, these pupils are not gonna appear to be in the middle of the eye. They're going appear toe towards middle classes of the bake, and you might have some, uh, flesh around the eyes again, pending the exact position of the federal line. On depending on the Spacey's that you get the idea that's essentially the young the Eagles fights from front on. You can exaggerate. These are brow things. If you really want. Do you want to make it really clear that that eagle making, obviously it's not some other type of it in terms of rendering that you can help to make a bit more obvious. If you want to make the curve of the bake more or beef some front on, you can do that with lighting the when you shade it, so the top area is a big cubicle artist and then you'll have, like, come on the next lightest the area will be. This region here in the dark areas will be down by the sides. Here like this, it's gonna shine down in no makeup dockets. Still, no, obviously had documented pinched on the color of the because the eagles are not going toe have I am Oh, Pagels. Color of the big varies from species to spaces like a bold angle for exams. Gonna have quite a lot colored bacon's yellowish color and which Tyler Eagle tends me like a lot of gray color. You are going to a bald eagle. As I mentioned before, they will appear to bay a bit more bill, water out lawn around the whole thing because in the thick of feathers tend to live in cold environments. So, actually, just going to show you what that's a lie is my real quick way of doing feathers. I'm just telling them rough way here. Look me particularly accurate. You can say like down blood, this level that longer and hanging down where it's one set up in the head. I don't have shorter and spark. Yeah, we're just gonna actually just half the head there you be able to say what it would look like. No, arise the original line. We have them because you wouldn't be saying. I don't know on the bold eagle and that they gives you no idea what the ball day you will look like from the front front on wears warm weather Eagle. Like what we're getting in Australia. The wedge. Tyler Eagle. Look a bit more like that. And you can put but a shadow in the Oz the But that's essentially what theater was gonna look like from front zone.
17. Eagle - Head - Three Quarters: we're gonna draw niggles head for almost 3/4 view now and we're actually gonna draw it, pointing at a slightly downward angle. And the reason we're gonna have chosen to do it that way is because allows us to emphasize that really distinctive brow ridge that you get on a gal's angry looking face. So you're going to start off with what looks like what's gonna look like a sphere that's been slightly flattened on top and the bottom. So I'm going Teoh draw kind of center lines around up one, the horizontal one. And, as you may remember, from the side view of an eagle, that's about the level that we're gonna put the eye this line here. And then there's gonna bay. Another central on this is one is gonna go directly through the middle of the fais sigh. It's very cool cental on if you will get very go on and you're the horizontal. And we're talking about the plane to you because obviously this long I'm drawing is curved . It's not stripe line like that. So the first thing I'm gonna doing now that I'm happy with the shape of that flattened sphere type show looks a little bit like a watermelon, I suppose what I'm gonna doing. Yeah, I was actually just kind of rough in where I expect to put the bake and you'll remember from the side view and also the front view that the big meets the face quite high up on the bird's head. Sorry. The top is gonna bay something around here, and then it's gonna come down around the sod and you'll remember from the side view of the lip stretches back to the point where it's the same distance backers, the I and the I was about halfway back in the head. So and remember when I say halfway back on the head, I don't mean half my back on this spherical shape here, halfway back on the head was including the bake sigh. We might just that live if we say fit. Um, but in the meantime, we're gonna draw the rest of the bake, try and get that in rot. So So just drawing in the bake, their riches strike for a lot of it distance and then it curves down toward that shaft point number. See, You want the point today below. Below, where the bottom Juries because it is curved big. And you want that shop point in there like, say, and you remember, there's another little David not far after that first point. Okay, I'm just kind of approximated it in the moment. I want the bottom. Georgia, come right up to this point here on the big. Make sure I get on base. I find a food. You have the bottom of that big to be quite straight like, say, and the lip is more or less parallel with the bottom. It's a bake than, say, I've got him quite similar. All right, so I'm gonna look at that and decide if I'm happy with that. And I think that's gonna work with the bakes out length. You may need to play around with a bit. You might want to make the bacon bits small a bit larger if you don't get it right the first time. That's fine. And remember that I was gonna be about half my back on the head and because of because of the angle we're looking at it from measuring it like this is not gonna be completely accurate. It's not gonna be accurate. It'll actually, but it might give me some idea. Alright, what doesn't give me any idea? Really? You can imagine that if I was going to draw a line out from the back of the head here, a line from the front of the bake here, try to draw this line back so that it's parallel with the the Axis. The head here, which I don't years often fix that up a bit. Like, say, writing about halfway point on this line is maybe so over there. And that helps me approximately halfway point. That's without mates. The head. All right. This is about where the it's gonna go be here, and the lip is gonna line up with that, Remember? Okay, I know we're gonna come back to the highlighter on, but we're gonna draw the rest of the head first. I just wanted to get the I in place on you have far back to draw the lip. So you remember. There's that delineation on the bake, and we'll put the nostril just behind that every here. The distinctive looking brow ridge, which I mentioned with one of the raisins, were drawing the eagle from this angle. Um, we're gonna drop you notice. I'm drawing this line here for the marriage behind where that sphere is That flattened spheres shape is purely from four construction. It's not actually the shape of the head. I'm actually gonna draw the brown till it just about reaches that that line of drawing on the speed and then I'm actually gonna drop back and it's got from here. It's gonna come back all the way to the back of the head, and I'm not actually gonna draw in the back. He just yet because what you draw out the back here behind the head is going to depend on the position. You want the Eagles head to ban eagles, hold the head. Ah, Flat. I mean, I like I hold the head directly in front of the neck when they flying, but when they perched the neck might be a bit of a downward angle, so we'll come back to that in a second. Um, we're just gonna put in the federal on on the bake. You remember from the side view tutorial. We figured out where to put the the fizzle on. Okay. And I'm pretty happy now that that, uh, but the biggest. Pretty much finished, so we can move on to the I now. And we've got the brow ridge on this side of the face. We've got a center line here, so we can I want toe mimic this and get it. Ah, the same on the other side of the face. So you consume Just trying to think of the birds heading three day. If this line is at this angle here, what's it gonna look like on this side of the head? And I end up drawing a long look somewhat like this. Now, from this angle, I would expect that that Broward just actually be overlapping the I a little bit. I'm going a tad bigger. So does actually go underneath that Brow Ridge overlap is important for giving it done. What? I've been calling that angry will kind of space, which is not actually an angry look, just the shape of the eagles face. But to us, humans looks kind of angry. It's probably just there to protect the eye from glad, so destroying those pointy parts on the front, in the back of the eye. And from this, you, the people will almost be touching that we're not touching. But there were quite close to that. A brow ridge. And I'm gonna rise part of that construction line I used for the Brow ridge there and over here as well. That looks more like the rail. Dale. I've got a little bit potential. A little bit too much of a curve going on there with the brow ridge and my big it better. Okay. Appointed the back of your eye should also be higher up and what I've drawn there. Do you want something like that? And we just famine that people put in a little bit of, ah, shine on there and does color in those dark spots on the are. Okay, Sorry. We've pretty much done most of the eagles head there. But I did mention that we need to decide what we're gonna do with the back of the head here . So there's a couple of different things you can do. The eagles find connects to the back of the skull. And if you imagine the back of scholars here, that means that the nick, even when the eagle is, is, uh, like standing in a more upright position the next you're going to come out the back here and then guy down like, uh and that will give you pretty typical. I remember here, um, the bird's neck, and you may not know this already, but Bird's neck is about. It's quite thick to that same sicknesses. The bird's head. So you want to keep that in, Lord, when you drawing the neck on, it's not like some little, uh, it's not like something little stick that you're gonna draw underneath the head. You can say I might really sick. I made a a little bit too thin at the back there for some raising that line and fixing that up. Now, given that the bottom of the Haiti is here and you bake, then excuse my you can drew in. A little bit of you can draw on a little bit of a lawn here underneath the head if you want , but you don't want to do it too much. Just gonna raise some of the construction line because I might be getting in your way a bit there. You don't want the line under that. The head toe look a little bit odd, and but you can do if you draw too far back, and if anything, I've drawn a little bit too far back here, so it's looking a bit better there. So that's one way in which you can draw the head in the neck. But another one, which you can draw it is You might want to follow this line around here and and actually have the head there made up with the neck at the back is if the bed with flying or something like that. Okay, I'll just to rise the other lines. You can see what that looks like. Okay, that's another one. Which you can draw ahead is you can have the neck coming up back, and it will bring this position when the eagle is when the Eagles flying. And that's how to draw on a gal's head from 3/4 view. So give that a guy on. If you want, you can add more data. All the feathers tend to bay bits, you know in, uh, I'll draw the area for you. The feathers are often a bit sina in this region, around the eye and along the Federline, here at the base of the bake. But what we've done here today should give you a pretty good guide on how did draw niggles head from 3/4 view site. Give that a go and say I go with it.
18. Eagle - Body - Flying: we're gonna draw an eagle in flight now, in an easy way to do that is to draw it from side view. And I'm gonna make sure now when I do this that I actually believe myself enough room to fit the eagle's wings about the body here because obviously, when an eagles flying the wings flap up and down change positions, I'm gonna be drawing this evil with the wings above the body on a I'm gonna stop by just drawing the basic construction here for the head, as you may recall, from the video did about drawing a gal's face from so idea and behind the head, when the eagle is in flood, the hidden tends to be held horizontal with the body, the same hot. You got the neck directly behind the head. He has stretched out strike and the from the back of the head. Here it's gonna for about the length equal to the head. That's gonna be about with the wing mates, the body so right. That's where the wing meets the body. The body itself comes further forward than that about here. And eagles like old birds that can fly. I have a very large chest. I've actually got bone that sticks out from the front of the rib cage, which provides more area for the chest muscles to attach to it. So you you don't want Teoh? I mean, it's not gonna be that all this, but you do want Teoh. Make sure you get that that shape in there. You want there to be enough room to fit very last chest muscles. And the length of the body itself is gonna bay. That's three head links. So one to right, that's where the back of the body is going to come to. But the actual the actual end of the bird is going to come further back than that because you're gonna have feathers coming off the tail and what not? You're also gonna have the legs poking out back here because eagles tend to hold. Their birds in general tend to hold their legs out behind them when they're flying to make more aerodynamic. So you're not going to see a whole lot of the leg. It's gonna be tucked away, but you may be able to say part of it on by fold up the feet and everything to look to be more aerodynamic, also somewhat like that, and you may be able to see some of the scales and what not coming off the fit on the feet so you could draw some Skiles on the legs and the fate if you want, But it's probably better that you actually do the rest of the outline before you start getting into details like that and above the fate there, you're gonna have taking a little bit difficult to say. This faked it up, drawing them to famine, the law in their bits, you can say how drawn it. And above the fate here, you're gonna have the fittest that you're gonna come out for the fate. They're gonna kind of cover the fate, and they're gonna point out from this angle, anyone's gonna look like the pointing strike, and they're really add to that look of aerodynamic and fluid motion. Now, the back of the wing is actually gonna come almost as far as the end of the body here. So you're gonna have some. It is around here and and a goes wings A quite large compared to its body. It's not like a visitor, a dock where I have relatively small wings. The length of the body he is going to be about the same Is the length of the wing too? The wrist, at least from this angle we're looking at here and doing itself, Mac, you be a little bit longer than that. But because the wings leaning slightly towards us, we draw it. So I only showed up. And then again, imagine that length again, Every here, the next half. The wings actually be longer than that, because you've got these primary flight feathers coming off the tip of the wing here. So I'm just gonna estimate how long to do it. And you might remember actually, before I talk about that and the feather specifically one way in which you can actually rough this in quite easily before you before trying to put the feathers in here like I have it actually a good idea to imagine the wingers of Flat Shoot like this and you drily outlawing like Senate. And that gives you a pretty decent idea. It's gonna show you a little bit Where the fiddlers again? It goes well, but it gives you a days an idea of on just the overall shape of the wing, and then you can use a similar technic for putting in the other wing. I'm so do it like this. I do like to actually drawing a couple of those primaries that it helps me get the shape of the wing. Better that you just need to do whatever works for you are suppose because you managed to get the shape of the wing. Correct? That's the main thing. Really? Okay. It's gonna run about a few of those construction lines. We don't need that anymore. So now they've got the wings in place. You can say we've actually the entire eagling place. Now, there's no details in there yet, so we're gonna go through and start putting into detail. So we're gonna start with the wings. Because I was talking about that before, and I was mentioning how in the video we talked about how to draw the feathers on birds wing. I mentioned that you get this kind of area around, he wake up these eggs, Ilary feathers on a basically fit visited, covering the armpit, and you do get more feathers in setting rise along here. I'm not gonna draw in every single feather. I'm just gonna drawing enough to imply the data. How so? If I drawing a little bit of data, people will look at it and I'll say that it's a nagel. Now also know that eagles have feathers so they'll know the days of feathers and all night that I'm drawing a nagel it and it's not a naked eagle has feathers, but I need to draw every single feather from to be able to say that. So just gonna draw in the cove it some of these kind of feathers, the ones that helps train line the the airflow over the wing. And you notice that ever hear around about that wrist area here you can draw on a couple of dollars some feathers, but you only see them on the outside of me. But I think you actually say anything on the inside. Really, Cain, under these covert, you may get another right. As I said, you don't need to draw in a great amount of data. And of course, you want the main flight feathers themselves. Also, I'm going to draw in a few of them and these ones these want to hear the secondary ones or gonna laid back in a direction towards this line here, remembering that these figures ultimately grow a part of the arm and you get a bit of on the small curves noticeable around the back of the wing. And some places where the feathers link up may look fairly straight haven in the back there and then these other feathers here. Well, I doubt I seem to point towards the body. So you get, like, a bit of a gap ivy here and then the primary flight finishes again. As we discussed in the other video on how to draw a bird's wings, you're going to get, you're gonna draw them kind of radiating from this point here almost and you're gonna have a few probably indicating an ego is gonna be five. I believe five of these fingerlike fit is the really long ones, which quite separate. Getting these primary feathers right these once a little bit like fingers help make your drawing look more realistic. And I helped make the eagle it quite majestic. All sign anyone is observant will say those feathers and go. Yes, I've seen that kind of thing before. Bed Flyers. Okay, I'll put them in from this angle. Also, Wing, That was saying from the top. Okay. And again, on this on top of the wing gonna be able to say the different rise of feathers. And I'm not throwing them into much day tall but trying to get enough that it looks. Jason, it's really up to you. How detailed do you want to do those feathers, What style you're going for or how lazy you are on legacy being a little bit lazy here. And, you know, I felt works, and you stick with it. It's, uh you can use almost, uh, one of some random lawns like that if you want. Anyway, you get the idea. The feathers on the body tend to be less distinct. You can use the same sort of relatively random lines may be here on the body. I can almost render it like it's fair or something. You might want to give a little bit of extra attention to the legs when they folded back then. Not that all this, but it's up to you have obvious you want to make him look on your drawing, and obviously we gotta construction line here, the front of the body and what? Just arise that so we can, you know, eagles do tend to have and the differentiation between the neck and the body Does tempt 10 today quite know, sore because of the arrangement of the filters so you can actually draw than into drawing if you want the way that I have there And I think I've gone and done too much with age Random Auntie, it's starting to look more like kiwi feathers and eagle feathers. I'm gonna just rubbing out for the name time. Not gonna bother feeling in too much detail there and the bottom of the wing here because it doesn't actually connect right top of body connects to the side of the body. You might just want to make it clear where it where the wings connecting. We decide to sell out of the body. It's not necessarily directly on the side. Probably use further back further towards the back, but it's not coming right off the bed Anyway, we're gonna put in the head now and you already noisy, had a drawing. Eagles held a huge draw. If you which that video. So I'm looking a bother doing, explaining all the details too much again. Just gonna quickly sketch it in. Just noticed when the eagles headed at this angle, You don't have feathers popping off the bottom there. They're all strain line back. - I'm not going to spend too long on the face getting it. Just write us because we have already covered that. I just wanna make sure it does actually look like an eagle. Okay, I don't have to do for now. Now you have it. Tell you draw nagel in flood.
19. Eagle - Body - Perched: gonna draw Nagel in a perch position now and just going to stop by drawing the drawing the head in and using what we, uh, we learned in the previous lesson about how to draw the Eagles head from profile. Stroll that in quickly. It's remembering some of the stuff I talked about the previous lecture, where biggest straight for most of the length, but then it has that really obvious curve. The end, which comes caught straight down tip and the top always lines up with doesn't quite reach his highest top of the head. That almost does similar kind of angle the bottom deal, but enjoy. There's quite a sin in place of big compared to the top, just drawn into fiddle on their put the I in. And you remember that the lips in Long Miss Steele either Nostrils just behind that deviation in the bake and neck comes out back of the skull so we don't draw the the next straight under the head. There we draw going about back like this. Okay, now, when it comes to drawing the Eagles body, as with other birds, your division into three body sections like we did with the land animals. It's not really gonna bay that helpful t here because the way in which the wings fold up against the body in a nagel are, um and not what they gonna cover up all of those different three sections from the 4/4 to the hind quarters. So you don't really need to keep that in Monte much instead what we're gonna do, you know, like a largely kind of evil sort of shape here, remembering that birds have really caught from front to back, the chest is quite prominent. Um, the raisin bang for that is that you you've got to buying here, which sticks out the front of the ribs on attach is to really large muscles which are required for the bird to be able to fly se looking a really thick chest there, and you can't drawing it in almost a water drop shape with around and stick, ending up here and then slowly tapering off toward the Thailand. And I haven't measured this with with all spaces of a gal's, but a ones that I did measure it with. I found that the body was about three times the length of the head hears about that length that so we just measure that out? I stopped measuring from here one to three. That's about where the body is gonna come to. Well, has made put things in proportion. And I'm just gonna after that a few lines where the tiles gonna bay. Now, I've actually drawn a little bit low on the paper here. Tail would, um we're only just fitting the tail in there. It's gonna move it off a bit. You can say that. And the tail, Because of the shape of an eagle's body, a lot of the times went perch, especially at this kind of angle. The tile work, she come down while in the face. So I'm gonna do it standing on a flat surface. Thought you could quite just as well, you know, draw branch there and have its fake gripping onto that. And and you think of its body in terms of three day, that water drop shot. Um, just like I'm just gonna draw center line down there. So again, my dear, And this is a lateral line from side to side. It's giving you an idea of the shop that we've got going there and then the wings obviously start with a shoulder. And you know what? You can actually get away with not getting the wings, Teoh. Accurate in proportion. But you do. You do want get them as accurate as possible. And because you're aiming to get good at drawing these animals and from the shoulder, it comes down, you got an elbow, and then it goes back up towards a wrist here and the wrist cares back down. And when we look at drawing a nagel with an open I've been wing, we'll explore more data, all the anatomy of what's going on there. But the moment all you really need to know, it's very much like an arm folded up against the body with in this part here, where it fold down. That's actually birds wrist. Sorry. It's kind of like the hand coming down here, really a long guided hand, but you're just really drawing the the shape of the wing quite consistent with the teardrop shape of the body. You got a bunch of different feathers on the wing. Most will be most of the wing area. He will be covered by small, small feathers, but you will have a couple of Roy's of longer feathers. I'm just gonna sketch in a couple of lines of where those would would guy kind of starting over here. The feathers will start well, after feathers further down and these feathers, we'll update on further down, so on so forth. So you have the small feathers here, overlapping the longer feathers. He and these longer feathers. I've left along the feathers here. And when you draw in the feathers, you want to make it clear that there's an overlapping going on. He will give it that really kind of natural appearance. Now, underneath the wing here you have the beginnings of the leg, which, if you've ever seen Jurassic Park, for example, and saying the velociraptors legs a bit like an eagle's legs except eagles have much shorter legs. And you can see here that we agree to base the body down to here. The fate of not gonna be much lower than that and the feet look a lot like humans hands, actually. But with these huge curves talents on them. So just sketch that in there, just notice. I'm just sketching in the rough shape at the moment is trying get the fate in a position that I like. I know. I draw, you know, draw like a flat surface here like a a logo, something that would be standing on. And you got that? The loss of rap to talk leg coming up here from the inside underneath the wing. Now, birds do have very thin come on of legs. Um, because birds designed for flying any part of their body that can a lot white tends to be a lot. Wait, but we actually put a bit too much neck at the back of the head here. I think so. I'm just gonna fix that up and the legs and angles compared to a lot of other beds, I might Eagles legs might seem a bit FICA because they do have an incredibly powerful gripping. That fate on without the constant alive brilliance designed for him hunting and killing price, you might notice that their legs are actually can actually be reasonably thick for a bird. It's making small adjustments to the face there so that it looks get more convincing. But I was talking about leg so returns the legs and now birds and you you used to saying this kind of wrinkle looking skin on there on their fate, which are not covered in feathers. It's actually not very different from the kind of scaling that you would say on a reptile skin. So if you think of that as being part of Skylink with some of the scholars, think of drawing the largest. Kyle's here in front of the leg there that most of the foot is coming tienen old scales, which you don't necessarily need to draw on all the data. It really depends on how much data you want to put in there. Just gonna draw that talent really quite curved. I just it's going to illustrate to you on the side here the shape of the Eagles ties. You can imagine a Kingo. I feel like human finger. But, oh, he Harry, he really has, like people padding to it and then where the Nile would come out on Topi on the human finger on the claw has a bit more rooting if it does come from the same kind of the area and comes out curve like that so that what I'm drawing in here on drawing some of the times at slightly different angles. That's why this close looks different here. Don't make sure you draws close really nice and big because and they go is really deadly predator off. You want toe, You want to capture the aspect of the animal, and that's all in the bacon, the clothes getting pot Toronto And don't fiddle on their It's obviously above where the toes join onto the foot. But on the fiddle on does stop for the next joint and just gonna, um, starts kitchen a few of the feathers here. I mean, I know I know that the eagle would bay standing on a block of wood here or something. I'm actually gonna sketch What's behind that? Just so you can say. And this will very between space. Easy now. How long the Tylers thought you tend to have Long Geathers. I was gonna say I think that the knife thinner than the other feathers on the body. Really? Um, do you do a bunch of long, thin kind of feathers here coming up the back where the tile is and they can they can open and close, kind of like a Japanese fan, and I have a lap each other when they're closer together and similar kind of effect you get with the wing with there is overlapping each other and being able to spread out. And they actually have microscopic little hooks on the feathers which Kiptum attached to each other gives them a more even surface along the wing, which makes steady. If lot just noticed this second round of long, thin feathers here on the wing, I'm just kind of making up. It's probably not 100% accurate that what I'm doing it, But you can see just notice how I've drawn this this line here across kind of over this line here so you can see that the field is not perfectly lined up and it gives you that impression that this right or overlapping this right drawing like this right here is overlapping this road feathers here. I'm doing that by not perfectly lining up my lines for the feathers there and then above this, you will get these kind of short up feathers, which I'm not gonna gruel of men. I thought you're gonna you gonna have lately short, around kind of shapes going on them, and they're short around the shape, so going to not come up. It's far before their overlapped by feathers higher up. And you don't even need to draw in a lot of the feathers, necessarily. If you strategically to slide way, you're gonna grow in a few in more daito. And look, I haven't done it that accurately. They can spend a little time getting more realistic if you want, if you wanna use photographic reference. But if you want to give the impression if there being lots of feathers without without actually having to draw them in, what you can do is do something similar to what I'm doing here, where you just draw little patches of data all and especially if you're gonna be coloring this in in the consistent column on people's brains were just kind of fill in the rest of the day. Tell you can fill in all the feathers if you want, and this is just one technique. Teoh. Do it differently, if that's how you want to do it and similar to these feathers, he you get feathers of similar appearance on the chest. Here on the neck, you tend to foreign like more long, long thin kind of feathers. Almost like a mane. I got a call into her up around the head. The Okay, this is the upstage. It'll leg there into the body. The chest. This is the edge of the other wing. With birds. You can Actually you might be able to do this for other animals as well. But you can get away using some really straight lines if you want. You can actually end up looking really good if you don't know on but the style he chose to doing Maybe something that you develop from experimenting. I personally think beds that quite good with straight lines. That's how to draw up edged eagle.
20. European Robin - Body: more than half of all bed spaces fall into a grape called songbirds, and they're also called Pass Arriens. In this video, we're gonna be drawing one called the European Robin. You're probably familiar with it. It's a very cute little bed, So let's get started. The first thing you need to do you use your gonna draw an oval type shape for the body, and it's not very quite a circular over. It's not very flattened, like some of the other rivals that we've drawn so far. So this is just a construction oval that we're drawing in. All right, now you're gonna measure the halfway point in that oval every here, Okay, just estimating how long that is. That's about how long the head will bay. So we're going to draw another little oval for the head over here. That's half the length of the body, all right. And you want this this head to be quite close to the body, but you might need to estimate exactly where to put it, because they can stretch out their bodies and they can also compress them and end up looking quite round, almost like the heads of part of the body. So what you gonna do now is you're going to draw a line from the body to the bottom of the head, and it's gonna be a line that curves inwards like this. Only a subtle curve. All right, so the front of the body is gonna curve around, and then you're gonna have the inward curve is the bottom of the neck, which goes straight into the head on the other side of the head of the back. You're also gonna have a curved line from the body to the head, but this line is going to curve the other way. That's gonna curve outwards like that. Now, I think the next looking a little bit too long, Mr. What I'm gonna do is I'm actually gonna try and just add a little bit to the front of the body here. It's gonna fix that up. Same principle. The neck follows the curve of the body and curves in wood and comes to the bottom of the head. I'm just going to arise that other line that we didn't want there Okay, it's looking good. Now the tail is going to be about the same length as the body a little bit shorter. So this is the length of the body here. The title will bay about this long, and we're gonna draw the towel coming down a little bit, like, say, a little bit shorter than the body link. So go to about there and draw on the bottom of the tile. Just noticed there. How have used very, very straight lines for the tile? We'll adjust the body at the back there, So there's a bit of a smooth transition and you guys settle links up to the title nicely. In front of the tail day, you're gonna have the wing. The wing comes to about this point here, so certainly more than half way forward on the body. But there's still a lot of chest space in front of the wing. So you're gonna draw the wing like this also with a lot of straight lines coming all the way to the back of the body. Alright, so I've just got a curved line here very straight around here, and then we're gonna draw some of those primary feathers in so more straight lines. Thank a use a diagonal line up here. The top of those feathers, and we'll put some straight feathers on the tile as well. Okay, now the leg is gonna bay from underneath the wing. Here, it's gonna have that familiar bid bed shaped leg. You got the saliva, which is hidden my feathers. Is this just a construction line? Then you got the shin, which is also hidden by feathers, just a construction line and then just poking out of the bottom of the feathers. There, you're gonna have the ankle and the lost part of the leg. It was about that long. Maybe a bit longer. You control the leg coming out the other side of a bit more of an angle gives it a nice kind of pose, and the foot is going to be the same length as the head. So I've got the head there. Foot's gonna leave it. Be about that long. Now the European robins foot. Ah, the toes touch the ground. But this middle part, he actually generally a little bit lifted off the ground. So the toes will be this kind of shape, like so I with a claw on the end, and I'll put in the other the other two forward facing toes like that. The middle tie should actually be the longest sigh instead of made this stay here a little bit too long or it's gonna shorten up brilliant. And then we just put in the back tie, which is decent size some birds, this toes very small. But in European robins, it is a decent sized do the same on the other foot. Remember curving up so that this part of the foot doesn't really touch the ground and coming back down for the other three toes. These are just construction lines I'm drawing, and we're gonna actually put in a bit of flesh over the top of this in a little bit. All right, so I think we're ready to put flesh over the top of that. Say, you put a little bit thicker around the ankle here and north in leg, and we just put in a bit of flesh over less tires out of the front of each. Tell you draw that nice, curved claw like that and we'll do the first toe, which is a little bit like a thumb. The back there. All right, let's just do the same for the other leg if you want. You can actually draw the fate in the legs without these construction lines. But I find I help helps you get in the general shape before worrying about details. Okay, we can arise the construction line for the rest of the leg now. Okay, now we're going to draw in the head, and the bottom of the head is gonna cook strait around, come right into the bake. How long do you make the bakewell this oval that we've done for the head? We're gonna divide that into three equal sections. I'm just estimating how large they are. And the bake. Should they be equal to one of these links here? So that links there again should come to about here. Got a long, thin, more short, then bake. Actually, it's a short little big. Got almost a little kind of blunt into it. But for the most part, it's very straight and about the middle gonna draw the mouth mouth is gonna come back into the head a little bit. She got this kind of shot going on nostril be located right here near where the feathers feathers made the big and in line with the mouth. It's where you'll have the bottom of the I the is gonna be a in between the first and second said it's not gonna breach these lines. That's not gonna be quiet. Biggest that. So I should be something like this Now, the I should probably be about halfway up the head. So it looks like we got a little bit too much head on top there, so I'm gonna flatten its head a little bit. Not too much, though, because you flatten it too much. You wouldn't look like a Robin anymore. Okay? It's gonna make the bake a little bit smaller too. Bake is the right length. I thought it just looks a little bit too baby for a robin when you're drawing a robe in the one thing you want to remember is that it needs to look cute. If it's at the point where things are not looking cute thing, something isn't right. So I'm working with that principle here trying to keep the robin looking cute. Yeah, the guy put a bit of a shine on the I call the rest in black, but that in Australian again. Okay, now the pigment on her Robin's body. You tend to have the orange feathers in front. I'm just gonna draw the outline for them. I'm not gonna actually color in because we're not working with color in this course. But it gives you an idea where to put the color. If you were going to color it in, it's very difficult to depict this with black. And what because what you have Ah, great. In a brown color, which is very similar to each other. And then a bright orange, which is not a whole lot darker or lighter than the gray or the brown. Its a lot brighter, but you can't really depict out with the black and what drawing. So then you're gonna have feathers kind of curve around here, and the pigmentation of the orange into the gray just kind of. It's kind of blurs with feathers overlapping each other like that, and there's a much subtle of differentiation between a grain of brown color. I'm not actually looking at a photo here, so to be honest with you, I can't remember if it is the brown, all the gray that's in front. They're very, very similar in appearance to grind the brown. I live in Australia, so I've never actually seen a European robin in real life. So draw that Iran like that. And then the other delineation is over here. So just a rise. The construction lines. I'm just gonna make this look a little bit more natural. Top of the bottom. Well, famine, some of these lines around the bottom. Here, I'll arrives. Some of the smudge marks around here That's from my sort of my hand rubbing over the drawing. And there you have it, a European robin.
21. Drawing Feathers on Curved Surfaces: in this video, we're gonna look at how to draw Bird's feathers now. We've obviously already drawn a lot of bird's feathers in other videos, and you've learned a lot about how to draw them. The difficulty that a lot of students have is putting the feathers realistically onto a surface, which is not flat. That's why we're looking at a cylinder. So what we're gonna do, he is actually more of an activity than anything else. And we're going to start by drawing feathers over a curved surface, and you're going to see how the appearance of the feathers varies between being in the center here, which is almost a flat surface relative to us like that, and how you're going to draw the feathers when you're viewing them from an angle as the surface curves around away from us. So we're going to start off by drawing some small feathers up the top, and I'll get longer as we go down, because that's what you typically find in a bird's body is that the small feathers tends overlap the longer feathers and the longer feathers. 10 today, at the edges of the wings and at the end of the title. So we're going to start here by drawing a few short of feathers, okay? And I'm just going to draw them in kind of little semi circle shapes. You don't want them to be quite a regular is what I've drawn here. You want it to be a little bit, you know, some areas a bit straighter. And some areas, but more pointed than others. More like this kind of thing and gonna imagine that you're actually drawing it onto a bird's body. Just noticed as I'm going around the curve at an accelerating right, I'm gonna make the feathers, Tina and thin up like that. All right, So the feather I'm drawing here in reality would be the same size as these other fellas I've drawn, but we're viewing it from an angle. So it's got some four shortening on it, basically draw the same length here, but it's much thinner from side to side. And you could even draw a guideline if you wanted you to have a curved line. Imagine this coming around and following this curve here like, say, and you say the tips of the feathers all so far, that curve that'll the tips of the feathers attaching that curve. Say that you could even draw a feather here, overlapping the very edge off the ceiling dialects I. And then underneath that, you'll have another liar feathers, which being overlapped by the layer of feathers above them. But now these feathers, I'm not gonna be directly below the equivalent feather above them. They're gonna be in between them like this. So the tip of this feather is gonna be a about in line with over here. Or maybe a little bit to the right. So this point here, if you go straight down, that's where we're gonna put the tip of this fella and popping there. Just notice how this feather is not as wide as this feather. Every here. And also I've got the tips of the feathers again following this kind of curve shut. Now, the feathers next to each other won't always be the same length. But in this exercise, we're assuming that. Okay, just notice how I'm not keeping them completely regular. I'm trying to give him a little bit of a point, but not too much of a point. Got too much of a point. You say, just blunting that off a bit. Like say Okay, now, the relationship between these feathers in the fields of bottom is still a bit more regular than what you would really find with bird. What you're actually gonna find with birds is the feathers next to each other and not usually gonna made up Justus. They touch the feather above him. Usually. What you will find is in fact, the feathers made up with the feather next to them underneath the feather. That's about him. So you get this kind of thing going on. This is quite common, and again they get seen as you get towards the edge of the cylinder. You say that now, the feathers next to each other on actually touching each other there. Then you would have the next Lyle like this. Suddenly you get a much more lifelike looking feather again that you want to try and follow that curve around. Make sure the tips role touching the curve. All right, now, underneath that, you can start to put me May. We'll do one more layer of the small kind of feathers. This demonstrates something here. What you're gonna find is that these feathers he should not be directly underneath these feathers because the bird's body will be curved and it'll have all these natural shapes to it. So you can do the next level feathers a little bit to the side like this. Like, say, try and put a curve in there again. Okay, Now, this is getting a bit more complex here and cast, and you can stop them set on element of randomness here, and it starts to look a lot more natural, actually, that that issue come further down like that. You something here? You can definitely help if you got photo reference when you're drawing your feathers. Actually, look at how the feathers do lie in a bird's body. It's not always gonna be the same. And you can see that even though I struggle with it a bit at times now, what you gonna do at the next level is you're gonna make feel. Is it gonna be longer and longer so again, you're gonna practice making them thinner towards the edge. You can even have him coming off the edge there like that and draw them very much like this , um, wider as you get towards the middle of the cylinder like that. Do another liar. Feathers here. They don't all need to be the same length. If you don't want to, you can practice different things. Certainly on the wing, the feathers next to each other and not always the same length as you can see. I'm varying. The length is in there, but I am still making them thinner towards the edge of the cylinder. This feather here is definitely thinners in this fella here. Then you can try some really long feathers if you want. Just put a little bit more on the edge here, like you again on the tip of the wing. You could try doing this because sometimes you will need to draw a wing from an angle, especially when they're flying. So this fairly here, which is often if anything broader than the other feathers. I'm drawing thinner because viewing at an angle, I thought when it comes to the birds, when you're not gonna have a consistent curve around like we've got on the cylinder here, what you're gonna get then is some parts of gonna curve quickly away from you, like around the elbow. Where's other parts? Like the forearm. We'll keep going at the same angle for quite a length. So you end up with for shortening. So let's say you've got the wing here, all the feathers on this section of the wing, they're gonna bay kind of the same level of the same sort of you. We're gonna be seeing them from that. You're gonna be seeing the same angle. You'll draw them that similar wits, the same size feathers. Where is this part of the wing? Here? You probably be saying something different, but within this section, the feathers will be consistently reviewing them from a consistent angle. This section this line where you're changing views off them where them or angled On this section here and less angled on this section here, you're gonna have a transition zone over here, similar to what we've got here on the edge of the curtain on the edge of the cylinder. Uh, we just drawing a few more feathers here is to demonstrate the concept. And if you really want to get tricky, you can start doing feathers that actually go a different direction from the access of the cylinder because the curve off the bird's body is not always gonna be in line with the direction of the feathers. So you do actually get this kind of thing in real life and you can get this kind of thing going on, and that's a great exercise to try itself. So I've just drawn a free hand to under here. If you want to try it without doing freehand cylinder, you could maybe draw it up on photo shop or download one off the Internet, print it out and try doing this kind of activity. As I say, Good idea to use photo reference and really helpful for practicing, rendering those feathers. So give that a go, see what you come up with, a good luck.
22. Rendering Eyes: We're gonna talk briefly about rendering oddballs, and we've covered this quite quickly. Pass by in a lot of the previous videos. So I'm not going to spend too long on this, but I'm going to go into a little bit more detail. So what we've got here is in eagles I've drawn a couple of times here, and the basic idea on you can even ignore this all eyebrow section. They're the reason I'm drawn that in is because that's what casting a shadow on the rest of the I and putting the shadow onto the I when when rendering it really helps give it some realism. So the first thing really ist actually put Well, it's actually not the first thing you probably want to put in the dark marks that part of the ice structure before you put in the dark parts that are the shadows. So I'm getting ahead of myself here. I'll just backtrack a bit. What, on coloring in here before finish up in my shadows? Uh, the doc sections around the on and the pupil. Okay, that's pretty straightforward. Pretty easy to figure out. I'm sure we all know wouldn't eyeball Looks like it's, uh we'll go ahead and do it on the other eyes. Well, but, um, the reason I've done two eyes is because I'm gonna do one with dark pigmentation, and the other was a lot of pigmentation and principles of the science devices and thought much has been helpful for you to say, Uh, what it looks like went dark as opposed to what an eye looks like when it's light. Okay, So, as I was saying before, we've got this shadow here from the eyebrow Ridge which is cast over the I. And I'm actually gonna draw a little circle there, which is reflected light and the two most important elements in rendering. And I that looks quite realistic, really. A getting those reflective areas bits with a lot reflect and where the shadows are. You can also mean if you're really going to go into a lot of data, you can draw those lines that you get along the iris kind of like spokes of a whale. But I generally don't bother without a funds unnecessary. Nice to the time. So we've already covered this really when drawing other, when we're covering the animals individually. But what I wanted to talk about, he was, Why is it that you get that little bit of lot reflecting over the top of a shadow? We'll get to that in second thought. Unlike other parts of an animal's body, the eyeball is highly reflective, so any lot that gets shown on it tends to have some sort of reflection like that a little. What don't that are drawn in there? And because I'm drawing what pipe on rendering that What dot can often main coloring in everything else that helps that little white dots stick out. So we can say that it's a reflection now that this iris, he that not, are there's a lot call a bit if you're gonna do with an animal, it has a dark color like this. The people in the IRS could end up looking almost indistinguishable from each other. But you still want to put that a little. Uh, I spoke there, reflected a lot, and you want to make the spot big enough that it's actually noticeable that allies a bit rough, but you can see that I'm coloring in a moment which is Dhaka pigment, the structure and the way you draw. It's pretty much the same, is how you draw the lighter I It just involves more coloring in and you can see he that reflection there really stands out on the doctor on. So why do we get the reflection? He that little reflected bit of a lot over the top of the shadow. You would think that if shadows being cast over the I that you wouldn't have any reflected light them, not the lightest part of the arbol there that we've grown in. So why is that? And that has to do with the structure of the horrible. So I've got he 3/4 view. It's actually human eyeball that I've drawn here. But the principles of the sign, whether you drawing a nagel or a cat or a bear or whatever the structure, If the Aibel is the raisin, waking at the reflection in the shadow in the same place and what you've got here, I'm actually cut out 1/4 of the eyeballs. You can see a bit of a cross section, this liar here on the outside of the eyeball known as the cornea. He is transparent, but it's also highly reflective. So when you get light reflecting off the Aibel, it's it's the cornea that it's actually reflecting off. So I'm not droll. Little a round circle there, Watch sport. Way lot has actually hit the eyeball band stove. That's what we're saying. There is that block of light reflecting off the oddball. The next liar on June 8th have you here. That is the IRS, and that tends to be the college part of the arm. And when when a shadow was cast over the all the shadow. That way, see, is the shadow that's cast over the IRS. And so you considered the shadows actually on being cast on this flat liar here, which is underneath the reflective like a here, the cornea. So I let's just give the example here where Shadow is actually being cast onto the once the cornea like Sai and you can see you can say you the shadow. And although it's not directly under loaders, shadow here is not in exactly the same space places where I've drawn this reflected light. If I was to view this angle if I was to do this are from a different angle, like if I was standing here looking at the eyeball that reflected Part of lot is gonna look like it's right on top of this shadow that's cast over the IRS, and that's why you end up when you're drawing or rendering. And I That's why you end up with this effect. He when you have this, what sport of lot reflecting off the I in the same spot where you have shadow cast over the are. And it's a pretty sure fire way Teoh to render eyeballs and make it look realistic. And or even if you don't want them to look completely realistic, it does make the eyes more powerful and engaging. So that pretty much covers how to render rivals. Obviously, with individual spaces, you're gonna get different shed pupils as we've covered with cats. For example, when I have the elliptical people or this huge an eagle's eye, it's kind of an oval shape with humans. It's around circle, so give that a go while you're when you're drawing eyeballs on animals and you should find it, uh, it really brings them to life
23. FREE BONUS CONTENT - How to Draw a Hummingbird: in this video, we're going to draw a hummingbird. There are lots of different species of hummingbirds and they will have slightly different proportions. But the same general shape and we're gonna be drawing a ruby throated hummingbird. We're going to start by drawing very lied Construction Oval. This is gonna be three oval. It is the basis for the shape of the head. Theo Oval is slightly tilted, and the length of that oval was gonna be about the same of the length of the bake. Once I've drawn the bacon the same length as the head of then draw a couple of construction lines to smooth out the connection between the bacon, the head, then draw the neck coming off the base of the head. It's about the same width as the head, and the length of the neck is about the same as the height of the head, which you'll see me measure here, using my pencil, just going to draw a light construction line there for the shoulder. That's where the wing attaches to the body. You can see now I'm measuring out construction oval for the body and the length of the body is going to be about twice the length of the head. But of course, the bodies at a very different angle from the head. So I have to twist my wrist in order to be able to compare the two lengths once I got an oval shaped about twice the length of the head event. Also add a little bit of a stump at the end of that. That's the base of the tail, and then from that we're going to draw the tail feathers. The length of the tail, including the feathers and the base, is about the same as the length of the body. The length of the body is about the same as the length of the wing. I can now stop defending the shape of the wing. It's got a very curved tip at the end. The line of connection with the inner wing makes the body is not same. Angle of the access of the body, you can say tilts down towards the stomach, drawing the second wing behind that. Now I can start firming in the outline of bird a bit, start to fill in some details, like the feathers. I got a drawing some feathers at the base of the neck because they're particularly obvious in this species of hummingbird, drawing the way, just trying to perfect the shape of the scalp. There and here I outlined another region of feathers. You'll see as I work through this, drawing slowly starts to come to life. Try and firm in those pencil marks, make a darker, and while I'm doing that, I try and perfect the shape of it more starting to fill in some of the feathers around the nick now, and they tend to overlap with each other bit like fish. Skiles. I'm gonna put a little oval on the I, which is going to represent the light reflecting off it. Once I've got that in place, I can color in the rest of the I make it that natural dark color while leaving that little oval. What I'm going to adjust the wings of it makes him look a bit bigger whenever you drawing a constant process of Ray doing it massaging into shape. You shouldn't expect yourself to get everything perfect the first time. If you really want your drawing till the good, you've got to be willing to make adjustments as you go, I'm gonna start to distinguish between different layers of feathers on the wings. Now you can see the video about different types of feathers on the wings For more information about this to give you some more clothes on how to draw the wing. Well, I'll come back to the wing in a bit, but I'm gonna feeling some or feathers on the body. Now you can say different parts of the body have different shaped feathers. A definitely advise using photo reference. You can see what kind of feathers to draw in different positions slowly. Just gonna work my way through the entire body, adding the shapes of the different feathers in there. - I was gonna add in a few toes there, poking out of the feathers. As I say, You can't get everything perfect the first time. We should have probably put them in earlier. But better late than never. Now that the feathers air roughly in place, we can start rendering. Unlike the drawings of the birds, anatomy rendering process is less systematic. You don't need to follow everything in the same order that I do it. The main thing you should be watching here the techniques that I use because every rendering process is gonna be different again. Photo reference is very usefully. Different species will have different colors. You also have different lighting under different circumstances. The combination of the colors and the lighting is what you really need to observe in orderto render a realistic looking hummingbird. The tail feathers tend to be long and thin, unlike the feathers on the body, which tend to be short and wide in some places the feathers can look almost like for here. I'm starting to render them in the same way that I would do some types of for by using lots of little lines or pointing in the same direction as I go through the drawing, I continue to firm in some of the lines. Here is the big have actually left middle white, just like we have on the ideas, a reflection coming off the big. So even though the baker's a dark color, it has this line of white that goes all the length of the big feathers on the scalp tend to be really tiny, much smaller than the feathers on other parts of the body. Humming birds tend tohave feathers, which actually reflect a lot and gonna look different from different angles. Here I'm trying to capture the reflection off the feathers, trying to give them a realistic look. Notice how I leave part of the scalp on the throat light on than other areas, just like I did with the I in the big. This gives the illusion of light reflecting off dark fills in these lot reflective areas of the threat and the scalp. You can see the outlines of the feathers quite clearly played in the dark areas where there's more shadow. It's much more difficult to save the edges of the feathers, shadows and the edges of the feathers tend to blend together in a dark sort of color. As I feel in the hues and shadows, some of my original line work gets a bit lost, so I need to go over those feathers again just so that they stand out from all the other shading. Notice that this process of shading requires patience. If you want to do it, problem typical. That limb in the background will have more shadow on it than Liam in the foreground. That's what we can say. Having in destroying feathers near the top edge of the wing a really tiny. But towards the bottom end of the wing, you can see there very long and thin again. I feel like some of the outline needs to be firmed in a bit more. And there we have a complete drawing Arabi, Strident hummingbird.
24. Conclusion: Well, that is it. That is an entire course. Congratulations. Don't forget to use your skills regularly and improve over time. Getting good at drawing takes more than just watching a video course. It also takes a lot of practice. Now, if you're not getting there straightaway, that's OK. You just need more practice. Anyone can get there in the end. If you just persistent and you enjoy it and anyone can enjoy it, you just need to draw what you want to draw. Now, if you want to learn more about drawing in the future, don't forget to come back and check my profile. I'll be making more courses on drawing, and I'd love to see you again on another course, Best of Black.
 Geoffrey Jacobs, Drawing Expert