Transcripts
1. Introduction: Hey guys, I met Foy Chuck, and this is my class on drawing perspective
and backgrounds. In this course,
we're going to cover a lot of different topics. But mainly we're going to focus on understanding
linear perspective. So will approach a little
bit of the history of it and then really get into the
nitty gritty of how it works. We're going to start with
something simple, like 1, get on to 2, and then
even branch and a 3, 4, and 5 point. As we go through complexity. The whole time, we're keeping in mind how to draw backgrounds. You know, how we can place characters and
settings and so forth. So why don't you join
me here on Skillshare. And let's draw some backgrounds
using proper perspective.
2. Understanding Perspective : Hey, what's up guys and
welcome to how to draw comics, perspective
and backgrounds. I'm Ed for Chuck
and I'm going to be your instructor for this class. Okay, So where do we begin? Well, I guess we can start
with Philippa Brunelleschi. Yes, he's a handsome dude, but that's not what we
were looking at him. It's because prior to him prior
to the early 14 hundreds, we didn't really understand
how to draw in perspective. Instead, we did weird
pieces like this, right? There was always this idea that people understood
things would go off into the
distance and stuff and got smaller as they
went off and everything, but they didn't really
understand how it all lined up. So you had funky pieces
like this, right? Angles going everywhere, tables, slanted and stuff, right? The idea is kind of there
but it just didn't work. And then flip book came along, right? And what did he do? Well, he said, listen, all these parallel lines, I can draw them out and they run to the same
vanishing point. If they're parallel
along with each other, they're measuring out to
the same place, right? And it was revolutionary. It really helped for the
development of not just art, but even architecture
and engineering. Okay, so in this course, what we're gonna do is follow through a bunch of sections. There's a lot of bonus videos in here
and everything, right? But the key units are
one-point perspective. And you can see it's pretty simple, pretty
straightforward. We're going to work on
interiors and exteriors, right? Work on the basic fundamentals and cutaways and different
options with it. All right, then we're gonna
move on to 2 perspective. And this is really building upon our foundation of
linear perspective. We're going to get
a little bit more complex and it's going to
get a little bit tougher. But I think you'll be
able to handle it, right? One of the key points
that we'll encounter is varying vanishing points. We're going to see
that even if we have two vanishing points, sometimes they can shift. Then we'll move on
to 3 perspective. And this is where
you get those cool, funky bird's eye views or
worm's eye views, right? It can really add
a lot to a piece, especially in bigger
scope, right? So it's tons of fun. Once we've mastered that though, we're moving on to tougher
stuff for point perspective. And this is where things
get a little wonky. We're going to be sketching
and developing or patterns for really
understanding how four-point
perspective works. Because once we go
on through that, we hit 5 perspective and
it gets even more complex. You know, many courses will
teach you the first three. But I wanted to make sure that
we delved into 45 on this because it's really important as an artist to really know
all that's out there. It might not be easy at first, but I think after going
through the course, you'll get a good handle on. One key point in this course is working on all sorts
of backgrounds. So you can see we're going
to work on cityscapes, landscapes and understand the principles
behind them, right? I'm going to teach you
the six basic rules of backgrounds. Working through
saturation, line weight, depth, set dressing, and
even atmospheric occlusion. It gets tough. But we have some tools
at our disposal. We'll get into more
digital tools like the ruler options in
Clip Studio Paint. And even using stuff
like Google Earth. Speaking of Clip Studio Paint, I know some of you
are going to be using different digital programs
to be doing this, whether it's Photoshop or
Procreate or my favorite. That's fine. You know, this, you
don't need them, but they sure will help along
the way for this course, right? But hey, you know what? I'm a big fan of
traditional paper, right? So if you've got a pad of paper, a desk ruler, hopefully a
big ruler, pen or pencil. Really, that's pretty much
all you need for this course. You can get through 99% of it with just working
traditionally. Okay guys, I'm
looking forward to working with you on
this course and I really hope that it brings you to that next
level when your drawings. Let's have some fun with this.
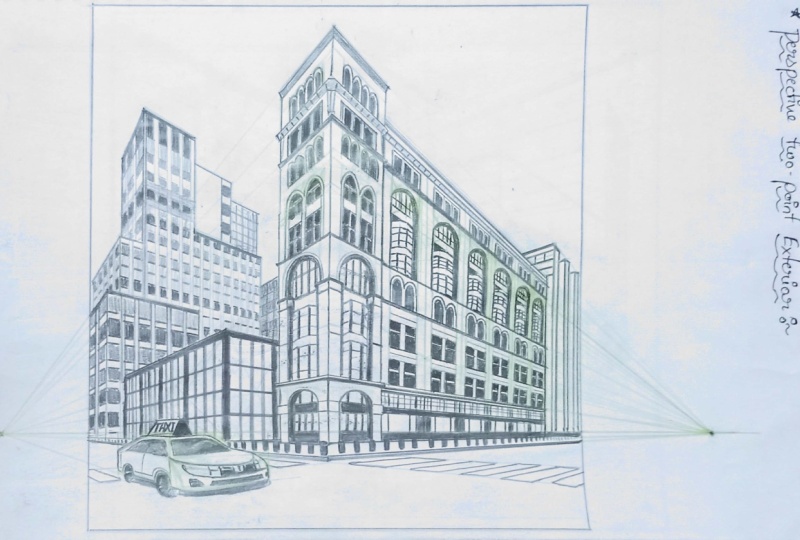
3. Perspective 1pt basic: Hey guys ed here. And this is our first real unit in the how to draw comics perspective class. In this class we're going to cover 1 perspective, just the basics, just to start out, okay? So I'm going to be explaining some terms to you and hopefully they'll make some sense by the time we're done this, right? So we've already had a bit of an introduction to what perspective is, but let's see how we can apply it, right? I'm going to draw a line straight across here. This is the horizon line. The horizon line is basically, we're, I don't know. You can think of it where the sky meets the land type of thing or sky meets the sea. It's often dependent though on the viewer, where the viewer's eyes at in the landscape and those types of things. Okay. This one, I'm kinda just throwing it in here. Not middle but somewhere a little high, right? And then I'm going to throw in a, let's see, right here, let's do that. So in a vanishing point, okay? So we've got a vanishing point here. I'll move my little word a little closer to it. And the vanishing point is where everything's gonna kinda Towards right. Now. Is this making any sense? It might, it might not. What I want you to do on your worksheet is to draw a bunch of squares, okay? So what we're gonna do is I'm just going to draw it really roughly. Here's a square. Over here is a square. Maybe here's a square. And you know what, even above the line will put a square over here. Okay? You'll notice how, I'm not too worried about if the edges are perfect or anything like that. I'm kinda just roughing it in right now. I'm doing this in Clip Studio Paint, but I'm not using their rulers or anything like that. I'm not using any special equipment. These are just straight edges the same as if you were at home using a ruler and a piece of paper. This is the exact same thing, okay? So don't worry about it. There's no tricks here, anything. We're just on the same page. Now, let's take a look. Why don't we take this closer square? And what do we do with it? How do we take this two-dimensional square and make it into a three-dimensional cube, right? What's the trick? Right now? It's just 2D, it's flat, right? What I do is you can take the three corners that are visible to the vanishing point as if, if this vanishing point was looking at this. They don't, it doesn't have to break through my 2D object right, this corner down here in the bottom left. This one, it would have to break through. We'd have to break the view through. And we might do that a little bit later when we get to transparent cubes. But for right now, I want to look at these three corners that are viewing the vanishing point. Okay? What I'm gonna do is grab this corner and bring a rough line up to that vanishing point. Grab this corner, bring a rough line up to that vanishing point. And same with this corner up to that vanishing point. Okay? What do you think? Starting to see some depth now it looks like not a two-dimensional square, but a really, really long rectangle, right? Something that's gone on forever here. All right, how are we going to cut this? What I can do is just put a vertical line here. And I'm just kinda guessing how deep I want it right does this. We're not measuring anything yet. We're not worried about it yet. And from where this, that vertical line hits that vanishing point line, we're going to cut it across. So now is this making a bit of sense? Now we can see it became a cube. And if I want to go over it in black, just for the, you know, making sure the lines make more sense to the eye. I can come here, I can come here, bring it across, Bring it up and bring it over. I can also do that with my, my line back here and here, and then just follow through on my perspective lines, right? Okay, and if I take that away, we've now got this awesome little perfectly constructed cube, right? Okay, but we're gonna keep these construction lines because we're moving on. We're gonna do it with a few more. Because really what it takes us a lot of practice, right? I want you guys practicing, practicing, practicing, and don't worry about erasing construction lines, even if you're doing it on pen and paper, I would advise you to keep them in. I want them there for now because we like one. It looks kinda cool. It looks cool with all these construction lines going across. It looks like some blueprint or diagram or something like that. But two, I want to make sure that, you know, if you ever catch yourself, something's wrong, you know, you wanna be able to look back and say, Oh, hold on. Now I see, I didn't bring this bottom line. For example, I didn't bring this bottom line to the right vanishing point. I was way a skew, right? I brought that one there, this one here, and this one over here. And well, you can see what happens is. It gets really wonky. It looks like somebody was pretending to draw in perspective, but really didn't know what they were doing, right? So that's a mistake that some people make. The mistake is, you know, each point was going to a different vanishing point, but they also weren't even matching the horizon line. They were creating their own horizon line here, right? Okay, so don't do that. Let's try to keep it nice, straight simple. We're going to this, this vanishing point here. We're going to do, we want to do it a little bit thinner? Yeah. Why not? Okay. So now we've got a little bit of a thinner tube going on here, right? Hey, what if I want to put in a few different ones? Like make a row of it. Yeah, that'll work. Okay. So I'm just going to roll it on out and then draw those straight horizontally across. And now instead of one box, I've got a rule of boxes, right? Okay. So what I'm hoping you're doing is you're following along rate. I hope that you've got whatever she did is in front of you or tablet or whatever, and you're kinda practicing that same thing. So, you know what, if you need to throw me on pause. I know you want to listen to my voice and stuff, but no, you gotta do this at your own pace, okay? So whenever you need to, you throw it on pause and you draw in all of these types of boxes in a row or something, Okay? Don't have to follow my pace. You make sure you follow your own. Okay, so now we've got these boxes in a row, but I'm going to be mean and I want to take some away, maybe every second one or something, right? If I was to come up here and you can see how I can make this one a more definite box. I'm going to go in black as if I was drawing heavy with my pencil or using a different color pencil or whatever and stuff, right? The choice is yours, but this is a little bit low. There we go. This is my first box, right? This is the one that I really like and want to keep and stuff like that. Right. But I don't want a box right next to it. I don't want this royal box of what I actually want to do is start taking some away. So how do I do that? It's crazy easy. Ignore this for now. Ignore what could be this box here, whatever. Let's go to the next one. And if I wanted to have this next box sitting in the same row with this one, all I would have to do is carry over this bottom horizontal and this bottom vertical. And if you look, if I actually kinda do through the objects, right, you'd see that that's that box sitting off next. And then I'll come, come back above and all. Draw in the more definite lines for it. Oops, sorry. There we go. And that's our q, right? Our next little box. Sitting behind this one in the front. Let's see if I turn off some construction lines. Perfect, right? Two little boxes in a row perfectly lined up. What I'm gonna do is I'm going to provide you this sheet that you can either draw on top of my drawings if you want for like a PDF or something like that. So you can sketch it out using my stuff or just have it next to you as you, as you start to draw along, right? Sometimes it's nice. I know you're drawing along with me as I draw here in the video, but it's nice to have that, that paper, write that paper sitting beside you. So what I'll do is I'll provide two types of this. I'll give you one, usually with me drawing all over it and then one with maybe some basic references and stuff for you to take a look at. Okay. We've got another one here up in the sky. Doesn't make a difference. What's the difference with this box magically flying in the sky? It doesn't. All we would do is bring it down to that same vanishing point. And do the exact same thing we've done so far. But you know what? Forget it, I am going to make a difference. This is what I'm gonna do. Because as we look at this, you know, we're kind of imagining this is on the ground somewhere and stuff, right? And we're kinda thinking up here is in the sky somewhere. Let's think of it as a magic box in the sky That's also transparent, right? So if it's transparent, we're going to start to see through it. And so now we're gonna take this back part and bring it on down to the vanishing point. Okay, Now how do I draw a transparent box? Well, going simply, you know, how we've done it so far. We've got this square that we've kinda got for everything so far, right? We know that this is, this is the front of the square as if we were drawing other boxes. And we also know that if we come down, we could draw this to here. And this across. Keeping in mind that I want you guys so far. Unless we're going to the vanishing point where they're distinct, vertical or horizontal. Okay? All these vertical and horizontal lines, I want you moving in this pattern. I don't want you coming diagonal and start connecting things and stuff. Not yet. Okay. Okay. But we've got this back corner here. So how are we going to find this if we're looking through? Well, we come along the back here until it touches there, and we come along here until it touches down there. And so now if you look, we've actually got this transparent box that looks like maybe it's made of glass or if we were to draw an aquarium or something like that, That's where something like this could come in handy. All right. We're going to come to the line here. And I'm going to draw through it actually. There we go. Okay, So there's our little floating in the sky transparent box. Everything going to this main horizon line with our vanishing point in the middle, right? And if I take away the construction lines, boy, that does look cool. I like that floating box. And they get and it makes sense, right? Like everything's working. It's working along the horizon line and the vanishing point. Okay? So just to review, this is what I want you to do in this unit. This is a short one. It's our first little introduction. One, right? I want you to draw a line across the page, right? And that's going to be the horizon line. You could draw it a little bit towards the top portion up here. You could draw it in the middle, you could draw it down and it really doesn't matter, but see if you can hit it around where I'm doing it right now. Disa two-thirds up or something right. Then anywhere, preferably not too far off to the side, but I would like it around the middle. Just for this exercise, you put in a vanishing point. Okay? So we've got the vanishing point rate and right about here, maybe I'll make it a little bit clearer for you. Oops. Give me an x. And there's our vanishing point. Okay? Alright, nice and simple. We draw in basic shapes all around. You can draw a rectangle if you'd like. Squares, whatever it is you want. And put a few of them around the page. Then you take those corners, those corners that are facing that vanishing point and start to draw them down, start to bring them down to two it, okay. And then you start to add that depth. Give it. Given that, you know, that 3D form, right. You just brought it. Look at that. We backup backup. That's 2D. I've got this 2D box in the middle of the sky there. Now, I just made it 3D. All right, that's pretty darn cool. And I'm going to warn you because I've seen students do it a bunch of times. Don't guess. Don't guess where things are going to don't just make it up. I know you're tempted to. I've seen it. You know, it's like, oh, I'll just bring the line, I'll just move. It just goes, it doesn't. And then things get really wonky and really messed up. All right, I hope that made sense for a little first unit for us, an introduction. I really hope that you're practicing. I wouldn't mind if you did 12345 sheets of this, right then you just for the next whether it's a day or two or whatever, you're just kinda drawing boxes everywhere. Whether they're floating or sitting, it doesn't really matter. Rosa them and then start cutting away, you know, start cutting pieces of a way. And that's what we're gonna do in the next unit is to actually cutaway shapes out of the boxes and see how that works. All right guys, as always, keep practicing, keep at it.
4. Perspective 1 pt subtracting: Hey guys, head here with another how to draw comics perspective unit for you. In this one we're going to look at one-point perspective and start subtracting things. And you're thinking, well, what's he talking about? How is this going to make any sense? Well, I'll show yet, right. Okay, So just like in the previous unit, we went with the horizon line and then we made a vanishing point, right? All simple. All good. And then if you remember, we also, what did we do? We started to make some type of simple geometry, very like a square, something like that, right? With me so far. Okay? You know what actually hope you are with me. I hope you are following along on some either a tablet or a piece of paper or whatever that you're kind of just keeping up with me here. Hopefully I'm not going too quick. Just like in the previous unit, we brought the corners down right from each point. And we'll write that one's a little off. I want to correct that. And that can happen sometimes right? There we go a little bit better, okay? Now we know we've got this elongated, crazy rectangle, but we want to chop it, right? So we're going to chop it here. Actually, you know what? I'm going to make this a little bit longer. We're going to chop it here. And we're going to chop it right about here. Okay, so now we've got our cube. And what was that? I was saying about subtracting, right? How's this going to make sense? Well, let's see if this makes sense. What we're gonna do. I want to start to take away things from this, okay? So let's see, I want to take away, Let's say I wanted to take away this part. I'm going to go from here and here. That means this shape in here. All even fill it in for you. There we go. Okay, so this is our basic shape that's, you know, are flat image to us and stuff like that, right? And hopefully that makes sense, right? What I'm gonna do is actually put this in another layer and see if I could fill it for you and have a kind of backed out just so this we can see a little bit of it right now, okay. You can just color in if you're on a, using a pencil or pencil crayon, just kinda shade this in. This is going to be our kind of flat object to us, right? So we, how did we cut this away then we started with this cube, but I don't really want a cube. I want kinda this L shape in the same perspective, right? So what I'll do is I'll take now my new corners that I've created. I'll take this one. I'll take this one. And I'll take this one and draw them out, right? Okay. So now this is kinda making bit more sense. It almost looks like an elongated bench rate. And from this corner up here, this is where it meets up here hold bring it straight down, touching where this flat part is. Bring it over. And there we go. So now you can kinda see how we've got these front surfaces here. And see if I can connect this. I want to fill this in just a little bit. Maybe what I'll do is fill it with a different color for you guys. So it makes a little bit of sense. These two front surfaces here, this one and this one, right? That are facing forward. And these other two surfaces here that are facing up. So these ones are on the horizontal plane, right? So what did we do? We started with a cube and then cut away from it and ended up making this bench, right? And you could do that a few times. You know, what I hope you do is just kinda practice with different shapes and they don't all have to be logical. And they don't really have to make a lot of sense or anything. We can start with a cube. And then what are we going to do? Let's, let's do what we normally do. We bring it to the corners, right? This is our rough ER, rough shape right now. But why don't we cut into it. There we go. We've got that. And we've got this this section here that we cut out, right? So we're almost kinda making a bit of a puzzle piece, right? And you can, I want you to practice this a few times, right? I want you to practice these little puzzle pieces and see if you can have it makes sense and connect and everything. Bring it up to the vanishing point. All of these lines now are going to come up to the vanishing point. There we go. And then now we're going to start to hunt down the plains. Sometimes it can get confusing with all of these construction lines and everything, right? So let's start with something real simple. We'll start with the depth on the bottom here. I like to start on one end or the other, whether it's the top end here or whether it's the bottom end, you pick your end and start from there. So I'm going to just do it from this first line, it comes up. Okay, so I know that this is. The depth of my little puzzle piece or whatever. And I know if I continue it up, it would actually come to here as well, right. This is that same line coming, all right? And then I know that this one's going to come in horizontally, okay? This one can come across horizontal and then it drops down. We're not going to see it because it's kinda blocked out and comes out to here. That's going to be tough. So how am I going to do it? I would continue this over here and draw that. It's the same depth. I can bring this down to here, all the way down to here. And here we go and carry it over. Okay, so if I'm going to start inking this over and making it look all dark and snazzy, right? That it makes sense. What I would do is have this, maybe I'll darken this line up a little bit. There. This should be easier for us to see. Nope, still not yet. Okay, so what I'm gonna do is draw over it and see if this makes sense to you. There we go. Kind of bouncing around a little bit here. I'll come in, zoom in a little bit. Obviously with paper, you can't zoom. That's the cool thing about going digital. And you know what, I see a mistake I made already, but I'm going to see if you can find it. I just went over it. So let's see if we can look and see if there's a piece that was missing. Okay. Sometimes when you have construction lines all over the place, those missing pieces are not always so evident. They're a little hard to spot sometimes because, you know, everything looks like it's working. There's lines everywhere, it's functional. And I just spotted the second one. I'm wondering if you're spotting them know to write it helps it. I'm saying that I spotted it, but you should be able to spot it, I think. Okay, So this is our nice rough little puzzle piece. Almost done. 3d puzzles. I'm surprised. Do they have that nowadays? If not, I'm surprised they don't think they should. Okay, her 3D puzzle piece is not done because we spotted some errors, right? Let's see if we back out the lines. There's some funkiness going on here. There's some pieces that are missing. Where are they? Where are those missing pieces? We didn't bring this corner over and we didn't bring this corner over. And that's where our problem is, right? We're still, we want to see any corner that might come over that isn't part of this main block dod area here. All right. Okay. So any corner that doesn't come over these two, these are the ones we missed. Let's see if we can do this. We'll do in the construction lines to begin with. I think we want to go here. There we go. And this one here. There we go. And now we can come back up to our final lines and see where did we miss? Yeah, much clear now, right? We should have drawn this one in here, and this one in here. Okay, So actually this would have probably went somewhere along this lines, right? Yeah. This one would have came over. There we go. Again, all ugly up in there though. How could I fix this? Okay, so what I want you to do is I want you to let's see. You can either work on the ones that we've already done here or cut into a few new ones yourself. Hopefully you're doing it on a separate sheet. I'm going to provide two different types of sheets for you, right? But let's see if we can make some, a little challenging for you here. Okay. We'll cut in here and cut in here. And maybe Yeah, that's good for that one. And for this one, maybe some, some slits. There we go. Okay, so you can imagine that if I take away some of these lines that might help you just a little bit. This is what I want you to do. I want you to take away some pieces of this shape and draw it in perspective, right? Okay. So homework. But you're not giddy about that, right? Yeah, I want you to do a bit of homework. And this is the subtraction one, very simple 2, but taking away pieces of it to try to see what you can come up with, right? Eventually what you're going to use this for is to construct everything from buildings to toys, different shapes, and even something complex like a tank or something. I've done it for that as well. Draw the cube boat and then start takeaway. Takeaway, takeaway. Okay guys, just to review, we started with just drawing a simple cube, right? Drawing the first 2D image and then bringing it to the vanishing point. Right? After that, we decided what we're going to take away on this big one here. It was making it into almost like a bench type of thing. On this one off to the left, we made it more into a puzzle piece and we started taking things away from it. All right. After that, you project out those new corner lines. Then you start either at the bottom, at either side, right? To just kind of ground yourself and start working up the horizontal and vertical lines from there. Then you can delve into where those pieces were cut away and everything. You know what? This is really similar to the one that we did with the, the one-point perspective when we're taking away a piece, remember if we had a row of blocks all lined up together, right? And then we would take one away. Well, that's basically what we're doing here. We're just taking it away in a little bit more of a complex pattern. All right? Okay, So you've got some homework set off for you. But what I really hope is that you kinda make some funky shapes yourself, right? It doesn't have to be exactly how I've laid it out. It could be however you want, right? Just make sure that you're pushing yourself on this, trying to find things that make it difficult for you so that it's not so easy. Listen, you don't want it too easy. You don't want to just be able to coast through something like this. You want to challenge and then try to figure out, okay, what did I do there? How did I get this to work or how did I get this not to work right? So I would recommend doing, let's say at least a dozen of these different ones on a few sheets of paper and stuff. And if you want to, you can send them to me. It's no problem. Just message me with them and stuff and I want to see him. Okay. So let's see. What do you do here? Let's see. Yeah, homework. Can you believe it? Out of school and still given homework? Good luck with the case.
5. Perspective 1pt refs: Hey guys ed here with another perspective unit for you. This time. What are we going to look at and why are we looking at what's in front of us while we're continuing with one-point perspective. But yeah, I did something that might get me in trouble here. I took some of my daughters juice boxes and decided to use them for our lesson here. Tell you what, you don't tell her and all return them and, you know, I won't get in trouble. Okay, so let's keep it like that. I've also got my cutting mat sitting here and hoping that it will help us align some edges and some lines here, right? So what we're doing basically is looking at real life, in this case, juice boxes and seeing how we can understand how they might conform to a one-point perspective. Okay? I'm hoping that you've got a worksheet in front of you that you're kind of following along with, or even some objects in front of you that you're maybe doing it too. You don't have to use juice boxes. But I find them easy. One little bit of warning though, whenever using any type of references or anything like that, especially photo references, cameras can kinda warp a little bit. Nowadays, it's awesome that we've got these cell phones everywhere in our hands and everything, right? But you'll see that if you take a picture of what looks to be a flat object to you, there's actually a lot of warping going on, okay? So there might be a little bit of warping on this and we'll address it as we get into it. But for right now, let's just see what we can do is see if we can figure out one-point perspective using some of these examples. Okay? So I'm using my little cutting board mat here and I'm going to follow the guidelines that I've got. Let's see if I just follow this up here. And maybe from this line over here and see if I can continue on. Oh, I didn't go far enough on that one. Okay. Gotta bring it up further. It'll try another one over here. And I'm just trying to see if I can find the vanishing point by intersecting some of these lines right? There we go. We're starting to head in the right direction here, right? I guess I could, I should make these touch. Okay? So we know that vanishing point is going to be up there and it might not be perfect or anything. Maybe I'll back this up just a little bit so we can get a better view from a distance, right? Okay. But I'm trying to adhere along. There we go. Okay. Now we're starting to find it and that's easier. I should have backed it out earlier, right? There we go. Okay, so it's becoming pretty clear that our vanishing point is right here. And that also means then our horizon line is along this line, right? That our horizon line for this image runs along there. Now, those are little Juice Box folders. Well, let's find out. If I take this 11, I search it down, go into the corners that are, would be visible right? To that vanishing point and see if the kind of follow the rules that we think they should. All right. Okay, Let's see. First one coming from this dot over up to the vanishing point. Yeah, no bed. This one coming to the dot over. Yeah, pretty decent. And this one this one might be a little hanky though. Not so much. Look at that. There's a little bit of folder. Now, why is that? Honestly, I'd say it's because it's a juice box. Any other parents out there? Yeah. You know that the juice boxes don't always perfectly have straight edges. They bend, they bow just a little bit, right? And so I'm kind of happy that I chose them for this example, even though they're not perfect. That's what I want you to realize is that just because what's sitting in front of you looks like, hey, that's a square, a rectangle, whatever, right? Doesn't mean it's perfectly square, perfectly rectangle or anything like that, right? There's going to be inconsistencies, errors, irregularities, all that kinda stuff. Okay. So what we've got this cool little juice box that if I was to draw it perfectly, you would follow perfect hard edges. But it's not going to write, there's gonna be some little pieces of it that, that aren't perfect and that's okay. All right. Not bad. Okay. So we've got one little juice box all by himself. We found the, the vanishing point. We also found the horizon line off of that, right? Let's see how it works with two juice boxes and we're going to roll a little bit faster here. See if it, see if we could find this a little bit quicker, right? Okay, We'll start from this corner. Moving on up, see if I can find a nice balance for finding that line. Right? Now I'm just using a straight edge. Meaning it would be the same as if you had a ruler at home or something like that. Alright, I'm Clip Studio Paint got some pretty awesome rulers built into it for finding perspective and everything. But I'm not using that. Well look how high this one is, right? I'm going to keep going way up here. I don't want to use those rulers because it'll feel like cheating and it won't really be the lesson that I'm trying to teach. You hear anything right? Where are we? Pretty good. Right about there. Okay. You'll see that once in a while it shifts just a little bit, but that's not bad. And we go. Here we go. So wow, horizon line and vanishing point, way up top there. Alright. And if we start following the corners, if we start following the corners, they'll also line up to this vanishing point, right? Even with a couple objects, they'll follow through to the same point. Why is that? Because these objects, specifically, we're all set to be flush to us, right? That's how I wanted it. That's how I set it. So they're all going to be sitting in the position of sitting flush to us and stuff, right. Okay. And then we've got, of course we can finish the rest of the corners and draw it in, right? And then we've got, of course we can finish the rest of the corners and bring it up to that vanishing point there. Nice and easy so far. Okay, so we've got one object, we've got two. And if we want to, we could easily draw these guys in. All right. Listen, you can be doing this free hand if you want. I wouldn't mind if you just took took a pen and just kind of drew it straight across, right? It doesn't have to be perfect. That's not what we're doing here. We're just trying to find the form. Right. And you can see how far it was off on these guys were just trying to find what it would look like. Ooh, that's less than perfect. There we go. Good enough. We're just trying to see what it would look like if if we were trying to rough this in. There we go. Are a little juice boxes, right? It makes sense. The camera angle is shifted a few times and stuff, right? It, it moved that horizon line weight back, right? Let's keep rolling and see if we can find some new examples here. Where things have shifted even more. Right? Now we've got a bunch of objects. We've got objects in a row, we've got scattered objects. All right, let's see if we can find it really fast here. Pull this up, pull this side up. There's our horizon line and vanishing point, right? And then everything is going to start to go to there, even the objects that are near center. We just won't see the sides of them, right? This, this one sitting in the middle here. We're not going to see the sides of okay, see how everything works the way that it's supposed to. It's not absolutely perfect because one of these little boxes might be slightly misaligned or something like that. But it all makes tons of sense once you start doing it, right. We can come in here, draw out the boxes and make some nice little juice boxes, right? I didn't bring that corner up. Let's do that. This corner up to the 1. Here we go. So what I would recommend if if you can do something like this at home, it's, you know, you don't necessarily obviously have to use juice boxes or anything, right? But it will help you try to gain perspective. I'm sure that's not the first time I'm going to use that lame joke. So forgive me. But it'll help you really understand how even though life isn't perfect and life throws irregularities at you, you're often able to kind of find rules and see why they make sense and how they make sense to those objects around you. All right, Let's back this up just a little bit. And we're going to search on this side, see if we could find that vanishing point, right? This grid is helping me. I could use the objects a little bit more if I wanted. Like that. I'm going to find that edge. But I think you get the drift that they're all nicely aligned. Their profiles are all laid out to us. And here we've got. A row of them, right? So what would we do with this row? If we were to draw it in how it's all laid out right now. We've got what One 234 for these little drink boxes, right? So we could draw them all in. And I'm just gonna do that really quick here. I was a little bit off. I'm just going to rough them in nice and easy for us. There we go. Okay, So if we get rid of the reference, we can see we've got four little drink boxes, right? Well, I've got to say I'm thirsty, right? So what if I want to take one away? It's this simple. Draw this down on the vertical plane and this across on the horizontal plane, come in here and erase it out. I like keeping construction line. So what I would really do is probably go over it with a different color here or something like that if I really wanted to draw them in. But how does that look? It looks like we've got one juice box that's been taken away. Right? And that means my daughter is going to be piston me, but I'm okay with that. Okay. So that's really how easy it is to take away objects to start cutting away. And that's something that we're going to work on a little bit later is cutaways and stuff, right? But for this exercise, I just wanted you practicing using real life objects and finding the vanishing point. So one more time, let's see if we could walk through it. All right, let's see where these lines take us here. We've got this guy on the left, somewhere close to the middle, right. And I can use this edge, see if I can find it. There we go. Right? We don't want things too difficult as we start out learning this stuff. Okay? So that's why I've aligned everything along the center here just to make it super easy for us. It's hard enough as a student of perspective to get it all down in, in your brain, right? This one has a lot of boxes that are off-center, that are, or rather that are, you know, they're not perfectly in line. So you'd have to go through, imagine this is like a warehouse with a bunch of, bunch of crates or something, right? But I would suggest is roughing them all to the, to the vanishing point. And this one can go over the same line there. And then once you've done that, then I would switch up and start to add in the colors and stuff. Once I've got my, my construction lines, what I do if I'm not doing this digitally is used like a, a blue pencil crayon or something like that, blue or red. And so that's why you see me often sketch and do my roughs in in one of those colors just because I'm used to doing it traditionally, right? And then come on in and go over it in either an ink, some type of darker color, even if it's just a darker pencil, you can come in, go over it again, and try to define a little bit better where those edges are. Alright? Here we go. And this last one over here. So this is how you could make this one. The juice box with a little off-center here. That's okay. There. There's our little juice boxes, right? Yeah, that makes sense. Okay. Now I'm going to warn you, and you've probably seen this already. There's some distortion because of the juice boxes, but also because of the photo. I took these with my iPhone rod on what it is, iPhone 5, get naught. And so what it did was it starts to warp on the edges a lot more. Okay? So what should be horizontal or vertical? You can see how some of these are starting to skew off of vertical. So if I was, and this is where we start to get into three-point perspective. But I'm not teaching three-point perspective yet. I'm not teaching the skew yet. So let's imagine that if we had to draw it from scratch, we would be simply going along these lines. Drawing a juice box, something like this or whatever, right? I would be drawing it out. Starting with my square and then finding my construction line all the way back and then coming in, roughing it in, finishing it up like this. So this is how I would be doing it if I'm designing it. But what I wanted you to see is the difference of trying to find it off of a photo, right? So yes, there's gonna be some warping going on and some imperfections, but I want you to be able to recognize those imperfections and learn how to deal with them. Okay, so just to review, when we're looking at a photo references, we can try to find some landmarks, right? On this one. It happened to be my nice handy dandy 84 or 83 cutting mat, right? I also set up some of my daughters juice boxes for us, right? And after you've caught a couple of these landmarks, then you trace them back and try to find one where the horizon line is, right? Because that's super important. And to where that particular item, the vanishing point goes to. Sometimes things will switch around a little bit. We'll talk about that, especially when we get into later lessons. But on this one we're keeping it nice, simple, straight one-point perspective. Okay? So then you can go through and find a whole bunch of different examples of different ones to look at, right? And we also got into doing this cutaway, right? That we can take one juice box away if we wanted, we could add one if we wanted, whichever. And then we talked about camera warping, how it actually is starting to skew even though this looks pretty good, you know, we would look at this and say, Hey, actually, yeah, that's strain on right? It's flat. It's not once we really break it down that there are some irregularities there and stuff. Right. But don't be scared to those irregularities just because they're there in the photo doesn't mean they don't teach us something. Okay. All right. That's it for the reference unit for one-point perspective. I hope you learned something. I hope you learned that, you know, 1 is not that scary, right? And I also hope you'll learn that I'm kind of scared to my daughter when it comes to these juice boxes.
6. Perspective 1pt interior: Hey guys, ed here and I've got another perspective tutorial class for you here. This one's going to be about one-point perspective. And we're doing some interior work here. All right, listen, this might be a little bit of a long one. So before we really get into it, you make sure you take that potty break or whatever you need to do, okay? Yeah, this is gonna take awhile. In front of us here we have an example of a living room is not my living room. My living room is about the size of this little coffee table here or something, right? I live in Hong Kong, so things are kinda tiny. Know this living rooms awesome. And I chose it because it's a great example of a one-point interior. Okay? So why is it such a good example? Well, let's see. I'm going to use some construction lines here to kinda figure out where our vanishing point is and where our horizon line is, right? Same, similar to what we did with the juice boxes before, right? Yeah. Let's take a couple of points of reference here and see if we could find out where everything's laid out. This one's going to come along that line there. And I'm just kinda roughing in following all these different kind of reference points that I could find and see how they line up and make sense to everything, right. And it's getting pretty clear. We're, we're finding that the, the vanishing point is somewhere around here, right? Somewhere around this middle point. As I kinda wavered little bit. There we go. Yeah, cool. We know that it's at this point. And then what does that tell us as well? This tells us, this is the horizon line. Okay? So we can see that anything below that horizon line, we're kinda looking down at it, right? That we can see the top of those surfaces, whether it's the table here, whether it's the sulfur chairs or anything, or even this shelf and anything that's above this horizon line. We're looking up at it, we're seeing the underside of it. Obviously the ceiling is one example, right? But also the lamp as well, this hanging lamp, right? Okay, so what are we gonna do? We're going to create it with our own selves. Echo, echo, echo. I mean is we're not going to use that reference where we'll keep it off to the side or something. So even if you're doing it right now and you're kind of working a little, you know, you've got the worksheets in front of you, the PDF, and you've got the reference. There were more gonna use it as a loose reference for pieces that we want to kind of add to add to the living room or something, right? To add in here. Okay, So this is our horizon line. I'm just kinda going to guess it. I'm just making it. This is we're creating our own room, right? So I'm just gonna say this is a rising line. Everything else is going to go to it, right? And there's our vanishing point. But you know what? This is where I start. I'm going to start with placing the back wall. I think that's a good place to start. I think it's important to start there. So why don't we have it sit somewhere around here? Sure. Somewhere up here. Here and maybe here. Okay. So there's our back wall. We know that the ceiling will come out from it here. The floor will come out from it on this side. The floor on this side will come out from it and the ceiling up on this side. Okay. So this is our ceiling wall. Floor wall. Makes sense so far. Good. Now where do we start? Well, we can work our way from what's in front of us and work our way back to the wall, or started the wall and work our way this way. You're going to find if you start with what's closest to you and work your way back, sometimes you run out of room, right? That things aren't laid out exactly how you would kinda hoped or anything, right? So instead, we're going to start with the wall and we'll work our way forward a little bit. And that's going to mean we've got tons of construction lines. So on this piece, I'm doing my construction lines in orange here. But the, I'm going to go over them with a little bit of a darker black or something just so we can start to see the forms and how they can separate from the construction lines, okay. For you if you want, you can just lightly pencil them in and then really go dark over top or ink it or whatever. Some way just for you to separate construction lines from kind of not the finished piece because this isn't finished or anything like that. But from the semi-finished look right. I'm going to draw an a door here. This is our rough door and this is, again, we're working off of this wall a little bit, right? So this is our rough door. Now. The door I can add in the door frame if I really want or something. I'm not that worried about it right now. But the door gives me kind of height ratio for almost everything. This door is probably a boat, seven feet tall or so. And so, you know, I'm gonna gauge everything around there that about halfway down as S3 and a half feet where we might have the door handle or so. And we can kinda figure that the average person is going to be roughly about this height. Okay, So this could be a six-foot person or something, something along those lines. So, you know, we're we're trying to gauge that, you know, how would a human, how would a person actually fit into all this, right? Even though we've got the reference picture, we still want to make sure we don't want get too wonky with her measurements, right? Okay. The first thing that I remember was there was a bit of a shelving unit next to the door. It came up almost to the door handle. It came from the wall and it jotted out. So we can come from the wall and we can kinda jut out, right? How far out? I don't know if that's kinda up to us, right. This is kind of a thing when you walk in to a room, it separates the room from well, the door from the rest of the room, the entrance from the rest of the room, right. So we'll kinda rough and some construction lines here. Why don't we bring it out? What do you say, Guys? Far? Yeah. Why don't we bring a pretty far bring it out to here. Okay. So then I start to ruffin. Oh, that's huge. L. Yeah. Okay. Well, there's there's our little we'll put a little lid on it. A little bit of a rim. There is not so little barrier that separates the entrance way. Maybe it's a shoe rack. Yeah, they can probably store shoes in there, something like that right. From the rest of the room here. Right. Okay. Looks pretty good. It's blocking out the door once we draw it in, but that's okay. It's not actually blocking out the door. Right? You can see that the door would open and have room to open and everything. Alright? Okay. The seeing as we're working on this side of the room when we come over here and I thought I yeah, there were some picture is hanging on the wall. Right. The picture is probably we'll start let's say a door level here or something right somewhere around there. And we can have one picture here and the next picture here. Something along those lines, right? And then the bottom of them can come down to about here. But right now all we've got is we're drawing the depth of them along the wall. We're not actually drawing the shape of them rather than the two-dimensional shape length the boxes that we would draw so far, that would actually be right here and right here. Now on this one, it's so close to the horizon line that we're probably not going to see it much. But this is how it would look. Here's that two-dimensional shape and then it comes down. Okay? Now this is all getting kinda hard to see, right? So why don't we black it all in just a little bit and see if it makes more sense once we, once we do that. Here's our shoe shelf. Let's call it a shoe shelf, okay. For you Americans, a lot of the world takes off their shoes in the house. I don't know. I think some Americans do it too. You know, it depends on what state you're in or something, right? Maybe if it's super snowy or something like that. Okay. This is our little shoe shelf coming along here. We've got the door coming over here. Unfortunately, I do not like this, this tangent. So I'm going to actually make this door frame just a tad wider. That line just comes to close to coming into this line. It confuses the eye and stuff, right? And that can happen in normal settings, but I just don't want it here for the sake of this drawing, it will confuse us a lot. Okay? We can start drawing in these photo frames. Actually want this a little narrower. There we go. Adding the actual shape to it and then coming in and putting the depth going down to the horizon line, right? Okay. Makes sense. You know what? Just for our own sake, why don't we add in the wall on the side. We know that not a lot of details are going to be happening over here or anything, right? So we can put this in just so it's starting to make sense to us when we start to take it away. All right. Here we go. And the ceiling comes up from there. Cool. So we've got this corner of the room then up a little bit, right? And I guess we gotta move in. What's next year? There was a little table, there was a sofa and maybe another little table, the air conditioner and stuff. Why don't we go with that big sofa in the middle. That makes sense. I don't even know if I want to put all the tables in. I want to have room for other stuff, but I definitely want to put this sulfate. So I'll start with the back of the sofa and work forward. Now the back of the sulfa is not going to be the wall. It's going to be just a little bit away from the wall. So I could draw it something like this, right? And then bring it forward. And this box here is the ground of the sofa. The base of the sofa. I might actually make it a bit thicker. I want it to come out a little bit more. There we go. And so we can build it up. And how high do we want to have it? Well, we know that the average sofas around shin height, right? So if this is 3.5 feet, maybe about halfway would be able to shin level. So bringing it forward, I would say somewhere around here. This might be where the sofa cushions are. Somewhere around there. Okay. This so forth also has armchairs, but you know what? Let's draw in the block first. Let's draw it all in. Have the cube of the sofa, right? It's coming out from the wall here. Coming out from the wall. This is our sofa cube. And then we can start to cut away at it. Well, let's go across here. This is where I want to bring it. There we go. So this is our sofa cube, just like how we drew a cube in the earlier, easier units right? Now it's getting more complicated, but you can see we've got a transparent cube here, right? But we want to add in some, some details that would make it a sulfa. What would do that? An arm rest. So in this first section here, we'll put in our midst and I'll carry that kind of across here. Just a measurement of it and put it in our midst. Okay, so we've got two arm rest here. We know that that's the average Sophia has this kinda raised arm restaurant. And we can bring these arm rest back to the one-point vanishing point. All right? Okay, so we've got these RMS. We've got this part where the arm meets the cushion will bring that one back to and bring that one back. But right now we have no, no back on this at all, right? Within this cube there's no depth right now, okay. Meaning for the backrest. So here's the back of the cube. We'll put this in here as the back. And then we'll carry it down to here. There we go and come across. And there's the back of this sofa. Does that make sense? And this will come down to here and to here. And come across. There we go. So that's our sofa. Now you're thinking, geez, all I see is lines. Maybe depends how you followed me on this, right? Let's see if we can make it have a little bit more sense if we black it out, right? If we do not finishing lines, but a little bit of a tighter, clearer look to it. We're going to start with the RMS here. Start with the arm rest on this side. Alright, I'll bring it back. Bring it up to the back of the sofa. Bring it across. And now you're probably thinking, Okay, Holden, I'm starting to see this now. That went too far. I was off the line. Like I said, you could be off of it a little bit, but you don't wanna be too far off. Just that one little millimeter of often measurement. People can see it with their eyes. They can see something's, something's wrong. Right? Okay. So I've drawn in the arm rest here, but I haven't drawn in the cushions yet. I wanted to add some depth to these cushions. You know, how many Christians were there? I think there was probably three of them or something like that. So I'll line in here and somewhere over here, right? Okay, these are our two cushion lines. The next thing I wanna do for these cushions is I'm just gonna kinda bend it a little bit. The cushions have mass a little bit right there. They're not perfect little rectangles or anything, right? So this is me kind of roughing it in and showing you that just because you draw something in perspective, doesn't mean it has to be always perfectly straight lines or anything, right? Okay. So there's our three little sofa cushions, but where do they go? I know this one comes back to around here. And I know this one comes back this way following the perspective line. Okay. This one falls the perspective lines, but I haven't plotted out where the cushions meet. So why don't I do that now. Switch over here. This comes down. And this is where the cushions are going to hit that back of the sulfur, right? And this is the line of the cushion. So I'll switch back into here. Put the put some black in here. And there's my there's my sofa. Okay. What do we think so far? Not bad, right? Everything's kinda roughed in looking good. It's making sense. The sizing is pretty decent. I I'm liking it. Let's see what comes next. Okay. Next up or too little side tables. All right. Why don't we do them at the same time then see if this makes sense. We can do it from a bit of a distance. We can actually start working forward and working our way back. And we can see how tough that might be. Here's the front boxes for them. Okay, they're going to be roughly similar height to this sofa. Here's the place them just off to this side. And then we'll bring it on back to the vanishing point. You can see how tough it gets with all these construction lines, right? What you might want to do, I'm not erasing them because I think students might want to keep seeing them. But you might want to erase, okay, you might want to erase some construction lines. It gets a little chaotic on your paper and stuff, right? Okay. So this is the box for the side table. I want it to be about yay deep. There we go. That's our little side table box. Bring it up. So what did we do? Once again, we're making little cubes, right? That's all we're really doing here is making these, these little cubes and then cutting away from them, right? This goes back to that kinda simplified piece that we did earlier where, you know, it was just a puzzle piece and we started cut, cut, cutting. And so I really hope that you practice like I asked you to practice tons on that on that piece, cutting away at things, right. Okay. So there's the top of the table. We can add in some legs here and the site as well. But we're going to give those legs a little bit of depth as these legs head back, they'll will be able to see see some depth to the leg, right. Okay. How much we're going to see on this I'm going to leave for right now. These are two little tables. We've just set them to the side, but there's some things in the way of them, right? So I don't necessarily want to draw all of them in. There's stuff that's going to be blocking them. If I remember from the video or from the picture, the reference picture, there was a bunch of stuff in the way and not want to draw some of that stuff. Let's see. I remember there was also a so-forth to aside kind of a lounge, your sofa. Right. So we can go off the wall here if we want. And come to about where this table might start somewhere around here. And we'll bring it up to a similar height as this sofa, right? Bring it across and bring it back. It's just a little bit away from the wall. Will draw it out here. Draw the base of it. And where do we want to end it? Maybe somewhere around here, right? We can do that. Bring it up to here. Bring it across. Here it is. This is our little rectangle for our lounge or a sofa seat, right? If we want to, we can carry this straight across. It's about the same level and this is where the cushions can sit, right? We want the cushions to, the base of the cushion to be at about this height. And the top of the cushion. Know, I want to draw it from the vanishing point to be at about this height. So these are where our cushions are sitting on our little lounges. Great. This lounge, your chair is a little bit different. It only has an arm rest at the back here, so we can draw it in here. This is where that arm rest is. It comes across to the back and then back down again. All right. And our cushions or this height. So they'll come across here and come in this way. Now, can you see how the lounges kinda sitting here? Does this make sense yet? Let's see if we black it in and see if we can find some details. We'll start in the front here. Work our way back towards that arm chair or the arm rest rather. Come back down here. Actually, we can do the whole arm rest. Here we go. Bring it over. Arm rest is going to come back. And I'm going to go in by hand and do all those cushions and everything myself. Just like I did, you know, I wanna kinda round them out a little bit so that when I'm doing this, when I do the final lines on this there there's some consistency going on. But you know what? I want to have a split about halfway this way. So I'm going to come back down to the reference layer. I want to split here. And the split's going to come across the cushions, right? Okay, so how do I draw these cushions in? Same way as I did before. I'm going to use this just a pen to kinda round it out a little bit. Bring it on back here. This is the back of the cushion. This is the next cushion comes to here. Comes forward and rounds out about here. There we go. Okay. That makes sense, right? We can put little throw pillows on here for details. I'll throw those in later. I just want to get the basics down for where everything's laid out. And now we can see where maybe I might add some details into where this table would be sitting, right? I can come in here. Start to add, okay, I know the table was here. I knew it came across here, came across here to here, came back. Came back. Came across actually, that's too high. Here we go. This came back as well. For the legs. This came down, this one came back and we can bring this one back just a little bit and then bring it up. That's the depth of that leg. And there's our nice little table sitting off to the side. Actually, there's a rear leg that's going to come down here as well. See if we can find it. Would be like this. There we go. That's the rear leg sitting there. And there's our little side table off to the side. All right. Yeah, it looks good. This one. I still don't want to draw it because I know there's some chairs in the way. And there's also, if I remember, there's also something right in the middle here, a coffee table or something. Why don't we do the coffee table next? Make it easy on us already. This is starting to get a little bit so convoluted in the middle, like they can converge, right? Well, the coffee table sitting here started as a rectangle forward and then we'll work our way back to it, okay? Okay, so we've got a little rectangle and we're looking to draw an a coffee table, right? So we want to make it into a cube, will draw some depth coming back here. Starting to look like a cube. How deep do we want it? Why don't we say just above this line here, okay? So I want to draw through it a little bit that I can see, especially on the sides right to there. And then this line is going to come from here to there. There's our little cube, right? This is our cube coffee table. And if I remember correctly, there was like a a towel or a blanket sitting on it or something like that. Right. And that can come down off to the sides. Okay. And you know what, there was also something sitting on it. Right. Wasn't there. Like some type of planter. Here we go. And we can use that as just a little bit of an extra detail thrown in. Cool. Now we want to head to darkening it in, right. We'll start in this corner, bring it over. Bring it down. Always easy to start with our initial rectangle. Bring it up, bring it over. Bring it down to that line, and back to the corner. Now you can see we're overlapping here, right? So what I'm gonna do, I have any race so far, but this is going to be the first time you see me erase. I want to erase this because I want to show that depth. And those finished quotation, finished lines aren't going to be there. There we go. We had a little planter thingy sitting here, right? And it looks like I'm going to have to do my next bit of erasing as well. This will come up a little bit too far off, come up. And we can bring it over. And there we go. And I'm going to come in here and erase that as well. Okay, even though the black lines are still rough, we're starting to see how everything's being laid in, right? It's looking like a living room, right? Everything's kinda making sense. The more pieces we add in, the more to look like something more realistic, it will start to look a lot more reasonable. And we go and we bring these straight down, even though it looks so strange, bringing them straight down. I know that's where they sit. Right. And if I remember correctly, there was like a plant in here. So we'll rough in this kind of plant. There we go. Nice little plant going on inside here, right? Cool. What else do we have going on in this living? All right. I wanted to show you these angled chairs. These are not always easy, right? Following along the lines. And we can continue along this line of the sulfa if we want just to make things easier on us, right? We can bring this forward and have these chairs inline with the sofa and in line with the back of these tables. So there's two chairs sitting next to each other. Alright. We'll draw them in like this. Here's the base of one, here's the base of another. And then we can build them up from there. Nice and casual. I want to make this first one a, into a cube to set our sizes and stuff, right? And see how this rolls. They would go from there to there. Okay, So this is our first cube that we've got going on here. Our first chair, right? We know that these cushions and stuff, the seat will be somewhere. The bottom of it here, the top of it here, right? And so we can continue these up towards the vanishing point. And we know the back of the chair, what do we make it a little bit thicker? There's something I want to do with it actually. So we'll use it from here. Bring it up to the vanishing point, and from here bring it up to the vanishing point. Okay, This is a hot mess. A hot mess. I don't know where that phrase came from. Putting in the legs. I wanted just to add in where the legs would go. Now, how do we draw it in, right? We've already kinda roughed in our box. We've sorted it out just a little bit. But I want to do something different here. What I wanted to do was add the cushion in, but I want to kind of round it up and have it come back to this point and back down again and over. That's how I want the cushion. Okay? So that means that anything here in this area where this chair's going to be a wanted gone as in for the those semi-permanent lines, right. Okay. So this is going to be one chair. It's going to come from here. And this is where the other part of it comes right along the bottom here. It comes along the vanishing point here. So this comes up like this. And then it's going to come back down towards the back here, okay. Now it doesn't quite reach it there because right around here is where that the backrest comes from. The backrest is starting here. But I want to do something funky with that backrest as well. I want to have it from here, but I want to have it leaning back just a little bit. So it reaches back towards this line and then come down. This isn't exactly what they have in the reference photo, but it's something that I kinda had on my mind to show you guys how to do this, right? Okay. There we go. So that's one share. The next one is a space between. So this next one, we'll follow it. Follow it. And we'll come up to there. You can see I'm kind of bouncing back and forth with where I'm drawing construction lines and and everything just because I want to make sure that I get everything going in the right direction. Right. We've got one chair looking good. I want to make sure the other chair looks equally as good. Okay. And I know that this cushion comes out to about there. Comes up, right? This is where we're drawing here. Comes back down towards this line. This is R, where the backrest goes right. This one will come back down to here and it'll fold up as well. To that point. There are two chairs. And I think I can adjust this line just a little bit. It's looking a little bit off of the flow of the rest of it. Right? There we go. That's part comes down. Got to add the legs in. And I'm just going to rough those in just a little bit. They'll come back like this. That'll follow along. Right? There we go. The back leg is going to be hidden. This next leg coming from this chair will come here and up. But, and we'll see a bit of the back of it. This one will come down, over and up and we'll see some of it come behind. Perfect. And now that we've got these two chair sitting here, these two ugly big foamy chairs, right? We can come in and rough out this coffee table. This one comes down to here. This carried down and see if peaks out from the side there. And there we go. This one will also have some depth to it, right? And this leg has carried down. And we'll show a little bit of depth to it. Following the same line. There we go. Not bad. Cup of coffee tables put in their sofa chairs. Coffee table. All those are sine tables, not coffee tables. And then I get to add in the remaining wall. Curie, this part down. Carry this over the walls, kinda hidden behind all this junk right now, right? Not bad. Everything's kind of framed in looking kinda decent. Yeah, I can't say it's looking really beautiful at this point or anything like that, but it makes a lot of sense, right? There we go. Yeah, our room is making sense. It's not the prettiest of rooms, but it's laid out well. Things are in the right places and stuff, right? And one thing I think we're missing the one that I wanted to add in. Last one for furniture was the air conditioning unit, right. So it's in behind in this corner. How are we going to tackle it? If I really want to? I can take away some of this. You know what, if I feed it back even more, it starts to get a little bit easier to follow, right? So here's, Here's the wall. And I'm gonna put it in line with the sulfites away from the wall. Comes to about here. And we'll bring it back to the vanishing point. Back to the vanishing point. And it's away from the wall behind. So it's about yea deep. So this is our if we were to look at it, this here would be our air conditioning base. Right. We're going to bring it up the air conditioning units pretty reasonably tall, right? Why don't we have it to about there. And we can bring it back down to the line. And remember this one came back to the wall or just in front of the wall. So we'll bring it up from there and that's where conditioning unit sits. Okay. It's quite big. This is the front of it. So if I want on the front of it, I can add in some type of, you know, grill box or whatever screen and all that kinda stuff, right? I can add a little bit of if I want to, on this side, a bit of a filter type of look or something, right? Where the there can be slats that go into here, that type of thing, right? Yeah. Why don't we draw it in, rough it in, right? And see how it fits. It all disappears behind this stuff here. Here we go. We might see a little bit of it. Underneath. Here. We'll see the top of it here. The wall will come down and then we'll bring it there. And that is the air conditioning box. Makes sense. Hey, one thing that I would like to do though, is, you know, above the sofa when we put in some little bit of extra pictures or something, this is where you can start to add in extra things that look kind of cool, right? So what I wanna do is add in the frame, give it some depth. They're not going to be hugely deep or anything like that, right? Just maybe coming out from the wall just that much. And then maybe divide it in threes, maybe maybe somewhere around here. And then we'll come in and we'll draw it up. I know this takes awhile. It it does. I recognize that it takes a little bit, right? I know that it's not necessarily the easiest thing in the world to go in and plot in all of these details of a building or anything or of a room. But it'll make sense. And it looks so much better to the, I. Remember even this partition is going to go towards that vanishing point, right? This is going to go towards a vanishing point there. Follows that line. Okay? It'll make more sense to the eye once it's all I put in there. So I hope this made sense. You doing an interior, that when you're doing the interior, maybe it's best to work from the background forward, especially if there is, you know, if you can set the frame of the room, That's probably the smarter way to do it, right? And then build towards the viewer a little bit, right? That you're not running out of room or anything like that to at the back of the room. If if we would have started with the coffee table and the lounging little sofa thing and stuff. I guarantee we would have ran out of room by the time we hit where the wall was supposed to be, right. So better to start framing the room and then building out from the walls and building out from the back. And that way too, what you can do is measure things, whether it's the door height or the handle on the door. And that'll help you gauge how high the sofa cushions are and everything. And then you can start to add in the finishing lines, starting to erase the construction lines, and then go gangbusters on it. You don't really finish it up making it into a beautiful look and room. Something that you'd see in some type of architecture magazine or interior decorating mag or something like that, right? Okay. I hope this helped you to figure out how to do the interiors in a one-point perspective. Guys, just keep practicing.
7. Perspective 1 pt exterior: Hey, what's up, guys, ed here with another how to draw perspective unit for you this time. And we're working on exterior one-point perspective. Yeah. Look at this thing in front of me. This is pretty tough because normally, you know what? Normally when we're redrawing something like this, we kinda just, what do we do? We make it kinda simple, right? We draw a line like this and then out from the vanishing point, we'll have this. And whenever you see somebody doing one-point perspective of exterior, as you see this, you see it like a city block. Here's a building here, Here's a building here. And it all looks really kinda simple, right? You know, next building is here, kinda goes down. And that's almost always what we see. We see these little, like maybe somebody throws a sidewalk in some marker for street lamps or whatever and they disappear down at the bottom. Or maybe you do the old train track thing as disappears into the distance and stuff. That's how we're used to approaching an exterior view. And it's right, but it's just boring this heck. All right. So we're gonna do something different. The other day I was walking home from the gym and I took a picture on the way home. And this is how cool Hong Kong looks. Yeah, it's a cool place, right? Some things that we're going to figure out here though, just a few warnings and a few challenges when we approach a more complex scene like this, okay? The first one, I'm going to throw in a little bit of a grid here, horizontal and vertical lines just so we can kind of see, right? And we're going to see that in this center area, generally things are pretty good. They line up vertically and stuff like that, right? These vertical lines, if I check the signage and everything, looks pretty good. Most of these buildings aren't tilting on me or anything. Everything looks quite good, right? Like even and let me zoom it in a little bit here we can see everything is nice and vertical. I was holding down my little pen ruler and stuff I got when I'm drawing it. Looks legit, right? Everything's up and down and how we'd want it. But look what happens when we move off to this side here. We start to get this slight skewing, right? We can see that by the time this, this comes up to the top here, it's no longer in a perfect vertical and starts to skew inside a little bit, right? And we'll probably see it more over here to look at this, this buildings all slanted. Alright. It's starting to get warped as it comes out to the side here. So what is this? What's happening? Why does it look like this, right? A lot of the reason is because my phone I'm using a what did I take this with? An iPhone six I think it was or something, right? And what you're going to find is iPhones have a slight curvature around the edges and everything, right? Okay. So be careful whenever using a photo reference that you're going to find, depending on the lens, you're going to have that lens distortion, right? It happens with figures, and it happens with even straight lines here and stuff, right? So that's why I brought it into here just to show you that, hey, listen, we've got some funkiness going on somewhere, especially up top here we can see a bending away from the straight line, right? Okay? But still, I want to see if I can find the one-point perspective here, see if it makes sense and everything right? So I'm going to come from this corner here. And I'm just going to draw a line down right along that straight edge there and see. So I'm going to start to grab some different lines here and see if they still conform to what I want. So you can see me kinda coming off of it and coming back down on, there we go. Let's see. This one looks nice. Coming down on a kind of double-checking. I'm actually not looking towards the center. I'm looking towards I'm looking at this area when I'm drawing it, I'm trying to see how it aligns here. Alright? So you might think I'm cheating, I'm actually heading towards that thing. No, I'm totally not. You've got to trust me. And it's not going to be perfect either. So you can see me bouncing off that line and making sure that I set on it where I think it should settle. Okay. So if we take away that grid, we can see that. Lets give me a bit of it. Sharper. Here in the middle is the one-point vanishing point, right? And if we were to draw a horizontal line going off of that, There's our horizon line. Okay? So this is where it gets really funky though, is why is this road like here, but these lines didn't go to that vanishing point, right? Kinda weird. Why? Well, hey, check this out. This will make it even weirder. Coming from here. Along here it goes to that vanishing point. And maybe we'll take it from here. And the buildings adhere to the vanishing point, right? The road isn't. The road is going. Way off. What's happening. While I think you kind of tell that these buildings start to, especially as we get up closer to this vanishing point, something's happening here. This is a hill, right? If we were to if this was a flat surface and everything like that, all this road, everything would nicely adhere to this vanishing point, but it does, it kinda goes up. And then over, right? We've got this hill action going on, right? So this road itself is going to be a little bit skewed. It's going to follow a different vanishing point here. Why don't we switch it up and see what we can see with this roads vanishing points. See if we can find some logic here. Okay. And let's see. I would bring that looks like it follows roughly there, right? This one's going to be a bit tougher though. We can't see it so much. I would say it follows no. We're going to follow the road right around there. See you my following the sidewalk. There we go. Okay. Lot tougher to figure out their right. And let's see if it comes down. Follows there, there we go. That makes sense. I can kind of backtrack it. Reverse engineer this perspective a little bit. So the road is following a little bit of a different perspective here, okay? And this is where we're gonna get into different points of perspective. But for right now, what I want you to do is focus on the buildings and then we'll just kinda keep this road how it is, okay, we will realize it. It's, it's it's this hill and we'll treat it as a bit of an anomaly until we get deeper into harder units 2 perspective, three-point perspective and stuff like that. Okay. So I'm tossing this tough when HE here, but I think you can handle it. And you know what, we're actually not going to really use it as it were not tracing over it. We're just looking at it now. We're using it as a bit of a reference and then we're going to put this off to the side and just refer back to it a roughly just like what we did with the interior shot, right? How's that sound? Okay, so let's disappear this thing. And disappear the grid lines. And let's make our own, right. Well, we can roughly make it around that same same level. Why don't we do that just to keep it nice and guided. You can put a little check in the middle. There we go. Okay, so this is going to be our, our one-point perspective here. I'm making a little bit bigger for you so you can see and our perspective lines are all going to come out from there. All right, one thing you can do is if, you know, if you want to, instead of trying to draw every single line in right away, you can just kinda rough things down. You can drag out of that vanishing point. Just make a little grid. And some people will do this. Actually, what they'll do is they'll have handy grids already made. And that saves you time and, and how can I explain like it kinda, in my mind, allows you to be a little bit more free form with it all. To sketch things out a little bit. So here's what we're doing. We're just kinda taking a ruler, drawing a bunch of lines out of where we want that, that center to be, right. And so this is going to be a different approach to the interior. The interior when we did really strictly and stuff to start off with, we measured it and all that kinda stuff because we wanted to get heights and everything. What I wanna do with this one is kind of rough it in first using these perspective lines that we kinda have roughed already. Okay, so let's see if we can do that. See if we can kinda look at the reference a little bit. So this reference is going to come and this is going to be me sketching. Now, there's no ruler or anything, right? This is just going to come down here. This is the, actually I want to bring this, maybe here. This is the building in the foreground or the one closest to us. And let's say it cuts somewhere around here. Okay. This is, this is that one building and coming across, we've got another building and say it came somewhere around here. Then we've got this one with all the little Chinese ornamentation on it. Pretty cool building, right somewhere around there. There's another one right next to it. Right on this side. This one's taller, kinda disappears a little bit. Okay. Then we've got a really narrow one here. And what else? Yeah, We can just kinda rough them in. They're starting to get narrower as they go, right? We can't necessarily discern where there. But one thing we did have was this cool sign somewhere coming out from, let's say, this building. And it's going to be something along these lines, this big advertisement, right? And it's going to be there and there's like a symbol in the middle there and some writing and stuff. I've got enough. Anything else that really stands out. What we've also got these little kind of awnings or whatever coming out. So we can bring that up to the. Vanishing point and have it come out that way too. All right, cool. Now windows, we can kinda rough in. Where are we going to put them? We'll start on this building. Actually, I got a pretty good Here's this line will go here. The next one will go here. Next one we'll go I'm kinda trying to space it out roughly the same, right? Yeah. And then maybe the bottom half here. So I've kinda got this all roughed in right? Now. I can come in, start to add a little bit more details to it. Why don't we go and gray. This building here is from here to here, right? Actually, that's way too light. There we go. This is the one building, right? The one in front. The reference photo, it's the grayish black one. And already we've got this kinda nicely laid out so that we've got some of these rough lines, right? So I know that I'm going to have these windows here, but you know what? I'm going to go back to that reference layer and kinda rough in a little bit more straight where I want the actual windows to go, right. And then from here, I'm going to follow my little marks, see if I can find the windows and stuff I think was good there. This was the bottom ledge, maybe. Good enough. I'm going to go back to the drawing layer, the actual drawing layer, and start to draw on these windows. There. That's looking pretty sharp. Cool. Now I could, I think I missed one here. What I can do is come in here and then I'm going to start to add some finishing them off here, adding the details. And this actually isn't a finished lines though, just like in the interior shot. We would do them a little bit different. One thing with these windows though is we want to have depth. All right, so we want to have this come in for the depth and come straight up. And that's the interior, that's the thickness of the wall there, right? And then we can draw that line in from there. This one can come in. And that's roughly going to be the same depth, right? Cool. Now if I wanted to measure that a little bit better, what I would do is actually bring it along this line on my rough. And you can see how that's off. Right? So do we want to fix it? Yeah. Why not? Well, I get in here and clean this up just a little bit. So how do I fix it? I measure it out. I bring this all the way out to where that actual ledger line would be and then this one would go up and that's how thick lookout what got thicker as it went out, right? As it comes closer to us, of course, things get a little bit bigger looking, right? They appear bigger to us. And in this case, that's what happened with the the window rim here, right? It appears to be bigger than to us. Okay. So there's a few windows put in there. Now if I really want to, what I can do is put the window pane, an example of the window pane in there, right? Maybe give it some depth. If I was drawing this, I might actually do it in a little bit of a thinner line or something. You know, if I was to be drawing this for a finished piece, which will eventually here, right? I'll be doing this in a much thinner line to show that the window is, you know, it's not a thick piece of wall or anything like that, right? Follow this along the line on either side. So what I would do is when I'm coloring or, or adding in details, I've put in some type of reflection on here, something like that, right? Okay. There we go. So we've got a few windows going on here, right? With the window panes and stuff for him. And here's our horizon line. Horizon lines in the middle here. This would be actually, this looks like it's sitting directly on the horizon line. So this window ledge we're neither looking down at or up at, strangely were perfectly looking at it. Right? It's right on that horizon line, right on her eye line here. Okay. So for this bottom section, we're not going to be showing much depth to it or anything, right? But that means that we're going to be looking up at this piece here, this section of window. So how do we do that? We want to add depth to it again, right? We'll come over, grab this, and give ourselves. A little bit of that wall depth, right? And if I really wanted to measure it out, I could come from down here and show that have consistency in the depth of the wall at each at each spot, right? Okay. So one way you could do it as just that. And this will come over that way. There we go. Hopefully this is making some sense here now. Okay, So actually I bring this straight across to that line, bring it up, and I measured this a little bit off. So let's see if I can fix it at some point here. It should actually be touching that flat line that's facing us, right? Come back down, measure the rough according to the vanishing point. Hit that corner. There we go. And then come in and finish it up a little bit better. Alright. Oops, got to switch to black. Don't mind me as I switch between colors here, I think it helps you a little bit, right, to try to make sense of what's going on here. And then these last, final ones up top, of course, we can't see the bottom of them right to the bottom window, sill or anything. Right? We're only looking up at them. So we will, what we'll see is this part of it. And this will come straight down. This will come up to here. And it falls our construction line. There we go. That's our building. And of course what I would do is start to do in the Windows, measure them all in and stuff I gotten have that window pane cut there. Right? Okay. So usually when we're thinking of one-point perspective, we've got the block, right, we've got this block and then it all goes to the distance, right? But what happened here with this block was cut. The actual block of this building is probably right about here or something right here's the block of the building. This is our big font squared to this building. And then the corners are starting to come off to here, right? So that's a little hint for you, is that one good example of dealing with one-point perspective or any perspective is cropping. You know, like tighten things up a little bit, bring it closer so you're not looking at it from this, from that standard study point of view. If that makes sense, right? You want to have a little bit more going on to it. Okay, so here's the ledge. And do I want to draw the air conditioning unit? Yeah. You know what? Why don't type. So there's an air conditioning unit on the wall here. I remember there was a couple or something like that. So what I'm gonna do is just draw a box here, a rectangle here, and then another rectangle here. And they're, they're kinda mounted on the wall or something, right? So what I'll do is just to show you how easy they are to rough in. This comes to the vanishing point. This comes to the vanishing point. And this comes to the management. I kind of missed it there. You know, like I said earlier that it's easy to mess up and a little bit of a mess up is okay. But geez, you go that one millimeter too far and you've now distorted everything, alright? So you don't want to, you don't want to bring it too far out there. Okay. So there's our two never ending air conditioning units and we're gonna RREF them in now. Give them some, some substance. And as we'll start with the the rectangles themselves, right? How far do we want it? This one, say the steep, and this one little bit less, right? There we go. And of course, if we're not going to the vanishing point, we're either going horizontal or horizontal or vertical, right? So this is my horizontal line coming across, right? And everything else is going to the vanishing point. Then it's either horizontal or vertical, or going to the vanishing point for one-point perspective. And there's our two little air conditioning units that have some type of mount here, right there mounted on the on the wall. Put that in. All add in details later or something. Those are air conditioning units sitting off to the side here. Cool. Looking pretty boss. So far. What's next? You know what cutaway? Let's do this side. Okay, So we're going to draw, let's say I want to start it from here. Bring it up. Bring this point to the vanishing point. Bring it to here and bring it up. This is our one building that's, that's kinda closest to us, right? Okay. But there's this weird cutaway that happens because the building continues on down here. And this building continues on down here. But then there's this missing section that has some pillars, right? So we'll put all that in there. We'll draw this block here. This is where the front of the building is. Right over on this side is continues on, right? And this part here. Okay? So do we want to add in some details so far? Let's do that. We'll put in this rim for the windows. This can be the top of it. Nice, easy landmark, right? And then we're going to put in a series of windows here. There we go. And we can add a little bit of a secondary line to that. And of course, like I said, this is still rough for me. This is just kinda plotting out where everything is right. Now. What's interesting is this is actually a box sitting here. Sorry, I want to switch to orange. Sunny here. So it's this box and then this one sitting on top of it, right? So what's going to happen is this is going to come down like this. This will come something along these lines. And this is what's supporting this mass, okay? And maybe the front of it will be here. And this can continue on, off to the side here. Okay. So this has been, it's got a little bit of a belt, unlike a ledge on this side, ledge on this side, and then this kind of part hovering over top right. We've also got, Let's see if I can get this put in here. We've also got some circles that are part of these pylons going in, right? So I think those would be the easier thing to tackle right now. I don't know if easiest the right word, but maybe the smarter thing to tackle right away. I think there was three of them. So we'll put one here. I'll put one no further down, I think. One down towards the end here. So what I'm doing right now is just roughing in kind of a square where I'm going to have the base of that, the base of these pylons go, okay. These pillars rather not pylons. Sorry. So I'm going to give them a bit of a square shaping to them. I want it to be here and to come to about here, right? Okay, so this area here is going to be the base of it. So I gotta fit in over one here, an oval and here. And then over in here, actually there's circles right. There are circular pillars that are Coming up here. But the shape of them is oval as we're seeing it because it's distorted. Okay? Okay, so how are we going to do this? There's a few ways to find it. I'm going to show you the quick away right now. And then in another unit I'm going to show you how to measure it out. Okay? So right now this is the square root I want to work within. It. Doesn't look like much of a square right now. But trust me, it is. It's just all slanted in funny-looking, right? How are we going to find where things should be laid out? One way to do that is to go from corner to corner. And actually maybe I'll make this a little smaller. Go from corner to corner there and corner to corner here. Now what we just did is found the center of this with this distortion, okay? Even, even accounting for the distortion, we found the center of this distorted square, okay, which is right here. Now, what I can do here is carry that across this way. And this way, this is going to be the center along from here to here. That's the actual center from here to here, that's the actual center. Look at how different it looks from here, here to here. You wouldn't have guessed normally that this is center, right? But because of the perspective distortion, that's how it plays out. We can also do the same thing going from here, right through the middle. Okay? So we've found the different points. If I'm going to be going and the pillars got to touch here, because this is going to be a circle. It's gonna, it's gonna touch this point. It's gotta touch this point. It's gotta touch this point and this point. So this oval has to have a curve that comes from here, a curve that comes from here. A curve that comes from here and a curve that comes from here. But here's a trick. Back here. The second half doesn't really matter, right? You know, it's not going to be visible because it's a thick pillar, right? We're only going to be able to see this one section of it, okay? Okay, let's see if this makes sense as, as I draw it in a square form, right? What I've done here is I've crossed from two corners and I've found the center. Then I've divided it. I guess I can move that up just a little bit. I've divided in half this way as well. Okay. This is how, and where does the circle then go? The circle has to go within this point, right? It has to touch here, here, here, here, and here. It won't touch in these areas just by the nature of it being a circle, right? Okay. So if you can imagine that this is now flattened out and distorted and pulled into this shape. Okay. That's a quick way, a quick hand way of finding the center mass of something in, that's been distorted by perspective. Okay, so what you can see what I did here was after kinda roughing this in, I took a sphere and a rough the same one in here. And kinda made sure it hit all these points, right? It's, it's hitting this, this point back here, here, here and here. Now, what would I do? How would I draw this out? Well, I would bring it straight up from this corner up to where it would touch. Right about there. I would bring this one straight up. There it goes, it touches. And then I get to freehand the line a little bit. As it comes along here and touches, this point, comes around, rounds a little bit and touches here. Okay, let's see if that makes sense. There we go. So that's one pillar. And then I know that, you know, if I'm coming in here, I can roughen this back wall that's been done here. Right? Okay. So we've got one pillar here. And how many did we say we needed? We said we needed three, right? So what would, what would I do? I would just copy this technique and bring it on down for each one of these, right? Okay, so you can see how the three pillars kinda work out pretty good here, right? And then we can go in and finish off that ledge little bit. Put that back line in here, that back wall, right? And it's a solid mass behind it. We know what's going on behind there, but these pillars are up in front, right? What should we do next? I think we should do this little awning down here, see how we would approach something like that, right? But you know what? Honestly at this point, it's starting to get ridiculous, trying to make sense of what's going on here with, with all of these lines and stuff, right? So why don't we get rid of some of this and just see if we can figure it out a little bit more. So what I wanna do is I wanted to have that the rough awning. I want to have a rough morning start about here. Here, and I'm going to treat it like a cube, okay, it's going to come here and here. This is how the awning is originally going to be treated as if it's some type of qb, same as we did with the living room, same as we've done when we were just drawing cubes and puzzle pieces and everything else, right? Okay, so we've got a little cube. We're going to make it a transparent cube because I want to see through, I want to see through where where the awning would finish, right? So the awning would finish somewhere around here. Cube would come up here and come across. Okay, so within this cube, this is where we're going to have the awning. Now I want to sketch in how I want the awning to go. We would go something along this line. Okay? So that means from here to the vanishing point, that would mean that this curvature would start here, right? And it would come up and go along those lines. And look how this awning starting to take shape, right? Okay, Let's see if we kinda bring it into a darker pen right now. Forgot to use my ruler. Here we go. This can come here. Here, up towards here, back down, right? And even in front here. This is where this can kinda roll through here, down and down. But now we're going to have to come in here right now in freehand that the details, unless we want to find a different way to measure a note, I guess that I'm going to show you how to measure these curvatures and, and everything. There we go. We can kinda add some for the bump here or something, right? And that would be the easy way to add in that opening, right? Does that make sense? And of course, it's attached to the building. I didn't draw the building in. So the building is going to come from, let's say here and come up. It's a tall building, right? So it's way up here. We're going to bring it down to I want to bring it that far. No, actually, I want it what I'm going to measure it because I want to just pass this awning. And that's where I want it to come from. So it's going to come here. And we'll just see the, the end of it there, right? So this will come, just pass this awning. Come down here. But That's key. You want to be able to draw that into show that this is actually the face of the one-point perspective. This, even though there's buildings hidden, the face of it is hidden, but that's where it's important. Okay? So here's this this front of the shop here, right? Maybe we can put in doors to want to do that. I don't know if the original shop had it, but let's take a look. There probably be a window. Again, let's kinda draw through here. Okay. Let's get rid of some of this construction, make it easier on us. Now, really what I would be doing is erasing that all out and stuff I got but digital, I get to just cut it. Okay. So there'd be some type of window here and some type of door along this line, right? Does that make sense? And we're going to have the window in the door, the same height. Under the awning. The top of the window, top of the door are going to be the same height. The bottom of the window though, maybe would be something along these lines, right? This looks about middle of the door, which would be where the hand and the handle would be in, stuff like that, right. So there's our the bid of it so far. Right? Okay. But you know what, already I'm not loving this. I'm not loving this because I don't think the tangent that's happening with this awning. So instead, what I'll do is I'll just bring the window up to here. And I really don't like how this awning, the breaking it came down to here and there's no reason to get stuck with it, right? Okay, so here's the first part of the window. And I want to give it a bit of depth. So I'm gonna come in here. There we go. Okay, But I think what, we can even give it a bit of a window frame, right? There we go. And that window frame itself is going to have a little bit of depth. There we go. And we can even give it a break there. Okay. Same with the door. We're going to have this door come along these lines, right? We can give the door a frame. It's going to follow that perspective line here. Okay. The door Let's see what kinda door Do we want? You know what, why don't we do this? And all those kind of push handles that we see on on business doors more so, right. So that can come along here and come something along these lines and see if you know what I mean by a push handle income. So what we can do here is have the big pad of the push handle, here and here. And then the, the bar of it underneath. Actually, you know what? I want to give a bit of depth here. I'll put it behind that bar. And we're starting to get pretty small here. So it's looking kinda little bit awkward, but it still makes sense. And then behind it all, we would have this another support beam going behind it or something like that, right? Okay. And then you can see if you want. And we'll zoom in here. Just to ease up my old eyes a little bit. Erase this guy here. Make these a little bit smaller. And what we can do is just start adding some detail lines along this long, the perspective here as if it's a bit of a grip on this door. Push handle. There you go. Okay. So we've got the door there, but you know what? We don't have any depth to the door jam itself. Right? So if this is actual door frame, what's going to happen is it's going to come forward just a little bit. It's going to come forward past the building, right? So this will be just the smallest. Of, of edges coming forward here. There's so many details that go into this, right? I think my pension be just a bit thicker. There we go. Okay, so this actually came to four out and see race. What I wanted to do here. What I wanted to do was this I want to bring this door frame down to let's say both their bring it to the wall. So this one comes down and it follows that perspective line. And then this is the depth to the door frame, right? It'll come up to here. This is actually the front-facing part that faces us. Does it follow that? Right, just the same as how we had it here on the on the window. This is the part that faces us. And the door itself might have something similar. But maybe because there's glass in there or something like that. We can even clean it up here if we want. Have become just a little bit forward, come out, come in, come out that way, right? Okay. So it depends how we want to design this door. Is it, is it thick? Do we actually, for example, do we see through the door and we can see some more door frame here or something, right? See how would we do that? I'll just change the opacity here and just show you what it would look like. The doors maybe in the middle here. Of what would be a larger frame itself, right. Like the depth of the wall to it. Right. Does that make sense? And then the door itself has a certain amount of thickness to it. Right? It's maybe a glass door kind of thin or whatever, right. So you'd see a little bit of thickness here on, even on the support beam here. Okay? So from a distance though, you're not going to see all of that necessarily. You know, as we back out, we don't see all of those details in there, right? You've gotta kinda make a choice. Especially when it comes to perspective work. Obviously the stuff that's closer to you, you want to put a lot of details into. You want to make sure it really shows what's going on. But even then you're choosing, you know, it's all about a choice. You know, put those details in the closer stuff to you, whether it's, you know, what we're talking about here with these window panes and stuff, right? But by the time I get to the second building, cheese, I don't know if I would detail in these window panes, right. Or some ornaments or something like that, like the logo on the air conditioners or something. I would have that up front here, but I might not have it on the next one. Yes, I would have signage, but as it starts to go, these buildings look how small they're getting. They're starting to disappear into the distance, right? Yeah, you want to be pretty thrifty when it comes to some of the details you're putting on there. Okay, one more thing that I wanted to add here was really super simple. This sign, this sign is going to be attached to this building. So if we were to come out here and we got this building, I want to bump that back up to where it was. This building is next to this one, right? It comes down to here, comes across, comes, let's say about two here, comes up. And that's this next building. Right? But there's a sign that's attached to it. Okay. There's a sign that's maybe the it's quite massive actually. There might be a bracket here, somewhere along this section here, right? And it's coming down to here. But this sign itself is flat to us. Okay? So it's above and below that bracket. So we can draw that sign in here. Okay? This sign itself as flat to us, right? So it just reads as any other flat rectangle, which means you would come to this vanishing point if I was to add any depth to it. Okay, So do we want to do that? Let's see. This corner would come here. And this corner would come down to this heart angle, down to the vanishing point, right? But how deep would we want it? The sign really doesn't have a lot of depth, so we would maybe make it only yay thick right there would come up to here and then come up to the corner. So this sign is is flat. It's facing us flat. Everything that it's attached to the wall here would read the same as it would be this part of the building or this part or this part. These are the flat parts that are facing us. This sign reads the same way. It's not going to the perspective. This is the flat section to us like this wall as well as over here. Okay. So that means all the hinges and all these kind of things that would be coming in would follow that flat plane, right? All of the attachments that we can bring this over and attach it into the building and stuff, right? We can put all these different supports here, whatever. See if that makes sense. Here we go and we can put numerous things. It can be irregular if we wanted, it doesn't really matter. And then come in here and clean it up. We'll get rid of this type of thing, right? Maybe the support itself could be rounded a little bit. Like a pipe holding it in place or something.
8. Perspective Circles : Okay guys, like I promised in the previous videos, I'm going to show you how to draw circles and ellipses. There's a way you can wing it. And there's a way you can get a bit more technical with it and stuff. And I'm going to the winging part I kinda showed you in the video already for the one-point perspective, I think was the exterior part, right? When we're drawing cylinders. But this one, we're going to explain a little bit of more how to break it down and you can see how I've already done that ahead in front of us here, right? We've got what do we got? We got boxes, right? And then we divided it up. And then we've got nice circles. We've got it on the frontal plane here, and we've got it on the side plane that's kinda warped into an ellipse because of the perspective, right? Some things that I want you to note. If we can kinda zoom in here a little bit. I want you to note that the circle touches the four corners of where it would touch the circle, right? Okay. And I also want you to note when we sub-divide and divide all show you how to do this. It's just a little short of 50 percent. There we go. Okay. So how do we do this? Let's get into it. We'll start with the first one here. See if it makes sense for us, right? Put some construction lines in here. We're going to divide it from corner to corner. And we're going to find the horizontal baseline, which is basically using the center point and just drawing a straight line across right. And the vertical line there. So maybe that's a little off-center there. Good. And straight down. Okay. Now, what did I say? How do I divide this up while I know for sure that the circle is going to touch here, it's got to touch here, it's going to touch here, it's going to touch here. So if I'm doing this on the fly, if I'm just winging it, I'm just going to do a nice, oops, I should use my pen. You know, I'll just do a nice rounding curve, right? And make sure that it comes up to that point, okay? If I want to be a little bit more technical with it, what I can do is back that out. Draw more construction lines here. And then I know that if I cut this in half, remember if I come back here, I cut it in half. From here to here. It's going to be just a little shy of half, right? I guess it had both the 40 percent mark. So this now gives me another marker with which to use for my curvature. And don't mind me, if you've got paper in front of you, you're probably rotating this already to get a nice curve, right? Comes along here, comes two here. Comes over and comes up to here and here. Okay. So what I would do then is coming here and kinda straighten it all out. Make sure it's all smooth looking, right? And that's how we get a circle. There we go, follows that line, right? It's okay. This one's a little off though. You can see it should have been a little bit back further, right. Okay. So if we're going from this point to this point, like I said, here's 50 percent, we want to hit it around 40 percent or so. From this point to this point, want to hit it not at 50, not cut it in half, but a little shy. This one was much better, right? I should've kept with this marker here. So how do we do that? For the next one here? Well, we could do it a few different ways. We can use this middle line that we already did here and draw it down to here. Or we could have found our center just by going from the corners and finding our center that way, right? And that's what I'm gonna do for the vertical line here. Okay? So now we can also bring from this corner to this corner. And you can see already this is a very warped from perspective, right? It's already bending and everything like that, right? And if I cut these two and half, half would be here. So a little bit. Inside that line, cut these two and half, half would be here. So I'm going to come to about 40 percent, cut these 2.5 right here. So I'll cut a little bit in here. Cut these 2.5, It's quite long compared to this one. Right? Half would be about here, so it's going to be right around this marker, right? Okay, so let's see if I kinda try to connect the dots here. Come up this way, round it, come down this way, round it. Come out this way, round it to here. And come down this way and around it down to here. And let's see how close it I get to the mark. Not bad. I think it was a little off on this side. But you can see this is the way to get your lips in. Now, I'm going to show you a digital way that will make this ten times easier. Okay, so we're going to create a circle. The circle now hits this box, hits all the corners. There we go. I'm going to duplicate that and show you how easy this is. All I'm going to do is drag this corner to here, this corner to here, this corner to here, this corner to here. And that all ready? Lines it up in perspective. Pretty amazing, right? You know, doing it by hand. There's a lot of room for error and stuff like that. Doing it digitally. Yeah, The math is their right it and it makes it way easier. So I hope you guys are doing this digitally. And then you can use some type of transform tool to drag the corners and warp it into perspective. Okay, so to recap, we've got our circle. We draw dividing lines intersecting at all, right? And then we sub-divide up here in the corners, making sure that of course we hit these four key points. But that at this 40% marker here, like I said, about 40 percent, right? We want to make sure we hit this part for the circle, right? For the curve. Here's 50 percent. We wanted under there, we want it about 40 percent. And that's how we get our circles. Okay, so sub-divide and 40 percent, see if you can remember that takeaway. Okay. It gets a little wonky sometimes, especially off to the side here. But I think you understand what I'm talking about here. Keep at it, practice, but if you have a way to do it digitally, it'll save you tons and tons of stress. Good luck guys.
9. Perspective 2pt basic: Hey guys, here with another how to draw comics perspective unit for you. This time, we're taking the next step, we're going into two-point perspective. This is going to be kind of introduction to it. So things might start off simple, but no doubt you can guess it's going to be a little bit more tricky than the one-point, right? Even starting off here, I've got something different on the go here, right? I've got to my normal horizon line, but then I have this square rectangle, square rectangle, rectangle. And I'm going to explain why. When we look at perspective, when we started getting into multiple points of perspective, you don't want the two different points being shorter away from each other than 90 degrees. Now this, let's see if I can explain this in a, in a way. If we put a 1 here and 1 here for this 2 perspective, it's going to get really wonky as it starts to get out here. Do you know, I mean, like this down in this area, it's going to look really, really strange, okay, in here, it's not that bad. So what I'd like to do, if possible, is have you draw at least one of the points off the screen. I'll keep them a little bit uneven, right? So what this is doing is it's giving you a lot more freedom to move. Now, I know if you're working traditionally, you're like Ed, How can I do this off the paper? Well, it's actually not that hard. Depending on what you're working on, you know, like on your desk, you could tape down your paper and then put these kinda points off to the side. What do you really just need is a long ruler, right? Okay, digitally, it's a little bit easier because you can mark points off of the side of where you're working and everything. But it's been done for years and I did it for years in drafting. Right. So don't worry about it. You can get it done. Okay, so we've got two points. We've got our horizon line and our two vanishing points right? Now What's next? Well, on 1 we started drawing squares and rectangles everywhere in stuff I got right? But that's not what we're gonna do here. What we're gonna do here is, let's say I'm going to change the colors a little bit. We have to use vertical line. So we use squares and everything when the flat surface is facing us. That's the one-point perspective, right? But when the no part of the flat surface is facing us, and that's when two-point perspective really comes in. So we'll draw a couple straight lines and see how these look. Okay, I'm just kinda drawing them around the paper. Looks a little weird, but it'll make sense in a minute. Now, why don't we start with this one. We're going to draw a simple little box. So I'm going to come from the top there to here. Let's see if I zoom in just slightly, right. Actually, I think those are off. And you know what? Even though we're doing it casually, we should still kinda try to be a little bit more accurate, right? Okay. So I know I went from the top here and the bottom and drag it over to this point. I'm gonna do the same from the top and the bottom and drag them over to this other vanishing point. Okay, I think you're kinda seeing that this would be one side of the surface, this would be the other side right? Now, depending on how deep I want this, I can just take a guess and say I want it right there, right? I can now bring this one over to this side, to this vanishing point. So we're kinda going opposite tracks, right? Everything on this side is going to be hitting over here and everything on this side of the shape is going to be heading over to your left, right. And what do you say? We want it here. Why not? So it comes up to there and it's going to come and draw up to there. And there is a 2 perspective cube. Not bad, right? Okay, I think we should try it a few more times. We'll grab it from the bottom here. Grab it from the top. Grab it from the bottom. Grabbed from the top. Now, that was a little bit off, but just to fix it. Now, why don't we do a little bit of a series of cubes in a row here, right? Okay, there we go. So this one's going to come to here. This line is going to come to here. And this other light is going to come to left, right? And this one will come all the way over here to the right. Okay, so it looks like I've got three in a row here. I think you kinda remember this right when we, we did it before for 1, right? And what am I going to do? Well, I'm gonna take one away. I actually just wanted to buildings here and now that I think about it, I don't want this middle one, right? So I'm going to draw from the bottom up there. And from this corner is going to come straight down. And I'm going to come in here and start erasing just a little bit. See if this makes sense. And there we go. Now we can see actually, sorry, this one should have been deadline there. We can see how there's two boxes sitting here, right? I can clean this one up if I want to. Maybe this line can be a little. And maybe actually I could probably clean up this line just a little bit, drag it over there. I'm still off. Here. We go. Better. Okay. So we've got this side coming down, the side facing us, decide on top. Okay, Not bad. So we're looking at how we're doing these different cubes, right? Different shape cubes. We did three in a row here, took one away. Why don't we do that floret. Transparent one, fluorescent shows that I'm sick, right? Let's do a transparent one and see how that works. Floating in the sky, guy. Yeah, let's do it. Bring it on down to here. Bring it on over to this one, to the right. Here we go. Now, however deep we want it, it's up to us. We can put it to their right, but we want to make sure we carry it over correctly. All right? And let's say this one here. And this one's going to carry over. But we said we wanted it transparent, right? So now we're going to start to run through these other corners that aren't usually visible. This one's going to come down to there. This one, we'll come back over here. And this one will come straight to here. And now you can see how this is a transparent box in the sky. Basically. If I was to give you a little bit better lines on it. There we go. You know, how many times you're going to be drawing a transparent box in the sky. Probably not that often, but that's not the point. Just like I showed you with the, with the one-point perspective before. We use these boxes as a bit of a guideline, as a base for all other things that are going to be coming, right? And so if you can understand it, this is the box that's hovering in the sky right now. Well, how can we apply that, right? I would start to take away and add things and subtract and curve and in all of these types of things, right? Um, same as we did with one-point, right? What do you think? Do we need to do one more? Do you think you have it? One more is always good. Just to review. So this will be our recap. This is, I think you're catching a little bit quicker now. But it's good to review. When we talk about two-point perspective. We want to set at least one of the vanishing points off to the side of the paper if possible. Or the psi off to the side of the scene or something that we're drawing, right? If we bring them in too close together, it a warp the photo. Okay. I'm going to warp the picture. So spreading them out. Yeah, it's a lot healthier for it. Also, we do 1.2 perspective because no flat surface is facing us. When the flat surface doesn't face us, then we, you know, we get to start with the, the edge and bring it on down and we start to create the flat surfaces. Okay? So this one's coming down here. This one's going to come over here. The ones on this edge come to the right, the ones on this edge come to left. We'll draw a rectangle. Block it out here and here, for example, this edge will come down to here, and this point is facing over here, and it comes over to here. And there's our Skybox, right? Okay, I'm gonna give you more examples in the following units to try to look at references and figure out where the vanishing points are on things and stuff. But I hope this quick introduction really helped you understand the difference between a 1.2 perspective. One-point easier, right? Do you think two points twice as hard? I imagine as we get on to like 34, it's going to get crazy. Right? Stick with me.
10. Perspective 2pt interior: All right guys, I'm getting a little bit impressed here. You know, we're like, I don't know, 10 units in or more now. And you're still sticking with it. Pretty impressive. You know, I know that it can get a little tedious at times, especially when we're getting into perspective and we're using rulers and measuring. Whether you're doing it digitally or traditionally, it can get a little bit grinding, right? And I get that. So for this one, we're going to try a slightly different approach and see how it goes. Obviously in front of us here is the two-point perspective, right? We've got an interior shot, okay. And clearly, it's a kitchen. It's not my kitchen. I wish it was. My kitchen is pretty cool looking. But I thought it was a good example of a nice two-point perspective, right? So we're going to roughly find where the, the two points are. Sound good. We can see that, you know, everything on this, maybe from here down, is probably below the horizon line. How do we know that? Because we can see this surface. We can see this surface and we can see this surface, right? And if we're looking up, well, we can see this surface and this surface. So we know that sum we're going to be around here is going to be where that horizon line is, right? Okay, let's kinda rough it. I'm just gonna kinda go like this. I know this isn't going to be perfect, but I'm kinda just bringing these over, bringing these over here. I know that these lines are going to be coming up this way. They're all coming and converging somewhere around here, right? Okay. And I'm going to flip it for my own sake. This one's going to come up here. This one's going to come here. If this one comes over, it's going to be converging. Let's see, any other markers that we can use. Probably this one's going to come up this way, converging somewhere around here, right? Okay. And I can see that this is a pretty good photo. It's got nice vertical lines for me here, right? So if I take this away, we can kinda see how this is roughed out already right here would be maybe their horizon line somewhere around here. And everything else is kinda coming this way and coming that way into it, right? So we can use this kind of sketch just as a, as a rough eyeball for things right? Here's the ceiling coming down this way. The countertop, I'm going to switch it back over. Countertop is coming across this way. The island, like I said, is here, maybe somewhere around here. We've got the countertop, the bottom of the counter down here, coming along this way. And this now would be how we would start to rough things in. If, if I was to want to just do a sketch, all I would do is simply put, let's say my 1 is here and 1 is here. I would just start roughing it and say, okay, well, here's my my island right? Roughly. And maybe there was a chair, right. Where do we want to put that? Maybe a chair here, something like that. Okay. A row of chairs, right. So I can have, you know, row and if I want to, I can measure those out. Remember how we did that, right. We were measuring it and stuff I got right. We're measuring it all out if we really want to, not what we're doing here, right? And then we can find the top of the chairs here and roughly have the chairs. Maybe this chair might come to hear something, right? So there's our island, there's a Chairs. Um, I could even put a chair on this side if I really wanted to. What else I wanted to have the counter-top, there may be some some windows above the countertop. And of course there'll be going to this plane here, right? And maybe a top of all tile wall or something. But remember, probably I want to frame this whole thing. Maybe something like this. I don't know if I want to have, I especially don't want to have both of these, both of these vanishing points on the paper, right? They, they weren't on this original sheet, on this original reference, right? They were off. I would want to zoom like tighten it up, crop it up somehow that I'm cutting, cutting out these vanishing points. I could cut one of them or I could cut two of them. It doesn't really matter. Yeah. So what I'll do is just kind of have this as my sketch and all faded into the background. And then I'm going to start actually doing some stuff here. So why don't I do this officially. I will have my horizon line. Well, that was way too high. No, I wanted it lower right around here, right? I'll have this as my horizon line. And we'll officially make to two vanishing points. And what do you say? Do we want to frame it within a certain? Certain yeah, I think we should. Here we go. We'll have it just inside of that, that line there. How's that we can draw outside of it? This is just our kind of our bounding box and stuff I got right. But now we know where this is going to be. Okay. So these are rough construction lines. Let's, let's do it a little bit nicer now with this, with this island, I'm going to have this one coming straight down. The island can come off frame here, right? It's going to come up to this point here. Going to come over. I'm going to come up to this point here. I'm going to come up right on the edge of the island will come here. And then this one will come over. The edge of the island will come here. And then this one will come over. Okay? And we also know that there's a lip to the island, right? And actually, you know what, we can even have this lip do what it's supposed to do. It's supposed to do a bit of an overhang. So I'll bring it over here. And this is where we're going to have to zoom in just a little bit here. The overhang would be something like this. And if true, then it would continue out. An overhang, something like this. It looks a little wonky. Let's see if I can stream it up a little bit more. There we go. So this true edge is actually right here, if that makes sense, and this one's coming off to this point. So now we can come in and kind of erase this. And the counter top edge is going to be just a little different than the actual counter top box. The frame of the countertop is a little bit different, right? It's a smaller box underneath this one on top. There we go. And maybe it the lip hangs off just a little bit on this side as well. Right. And then it's going to come over here. And it's going to come back here. Not bad. Of course we would come in and clean up these lines a little bit once we start inking things up and cleaning, cleaning things up, right. There we go. So that's our little island, I think are a little island is taking shape so far, right? Even though I kinda butchered this corner here. And it looks good. What do we think now? Bed? What else did we want to put stools, right? Okay. This is where we start drawing cubes, right? Like rectangles, vertical rectangles here, and then we're going to start to take away from them, right? Okay. So they're in a row. We've got a stool sitting here, kinda the first one on the edge here. What do we want to move it over a little bit? Yeah, Why not? Let's put it over here, okay? And this will come to our vanishing point. Good stuff. And it's top of the stool will come to our vanishing point here. Alright. We'll bring this over here in this part over here. And how deep is or stool while we know it won't go any further than touching this. So it probably lineup somewhere around there. There's gotta be a little bit of room here even if the stools pushed up against at her close enough to it. Right. So then we're going to have it come to here. Now. How big is a stool? Well, roughly we're going to want it to be a square top, right? So if we look at the square sizing, it would be somewhere around here. And this one can come off to the side here. Okay. We're gonna give it a little bit of a space. Maybe that's too narrow there. There we go. Another little bit of a space between the stools. Doesn't have to be totally irregular because stools don't always sit perfectly aligned. Right? There we go. And we can draw the top of the stools here. Right. Okay. So what do we have? Just like so many times before, we've got a row of boxes right now it's starting to get so tight. Maybe I'll make my pen size a little smaller here. And what do we do with this row of boxes, this rule of cubes? Well, we start to subtract right here is going to be the top of the seats for them. Okay? But you know, what I'm also gonna do is I'm going to draw the bottom here. And why am I doing that? I'm going to draw the bottom for each one of these. So it's remember our little what was that? See-through aquariums and stuff like that that we would sometimes do. Well, there's a reason for that. And let's see if this can make a little bit of sense. Why would I do this see-through aquarium thing? Well, think about it this way. Here's a leg. Here's a leg. Here's a leg. Here's a leg. I want to make sure that these are where they are supposed to be if they're at all visible. Here's a foot, right? These are all the foot pegs, the footsteps of these little stools, right? And so if I'm drawing in the details of this stool, Let's see if I remember correctly what the stool was supposed to look like. It's got kind of a bit of a beveled edge up top here, right? And this is just sketching it right now. It's got a bit of a beveled edge and then it comes down. And then if I remember, the legs kinda come down like this, That's a little bit too hard on an angle. And down the middle here and stuff, right? They come down there's a kind of metal and they come down like this. And I don't know what they look like at the bottom. Let's just call it a little bump for now. Okay. This one comes straight down and this one's going to come like this. And a little bump at the bottom. And then there was a connecting point underneath here. Right. So this is our stool, but remember there's a leg back here. Oh, sorry, back here. Right. We can't see it. It's this one's hidden. Okay? But this one's not from this guy. Where this guy comes down. It comes down, straight down to here. And this little leg would be coming up and visible. So we would see it here just like we were we would see this one coming in. Okay. So that's why this is what we call drawing through whether you're doing it with a body or whether you're doing it with objects like this, right? You want to kind of draw through the object and make sure that whatever is kinda peeking through should be seen, right? Okay, So I know that back here. Now I'm starting to see not this guy's leg, this guy's legs blocked. Know, a little bit. It's coming down here. I would probably see just a little bit on the inside here. All right. But I would see this next ones. So let's see if I can round this out a little bit better. Hopefully what this is showing you is that you want to draw through things to make sure you're putting them in the right place and you're not missing out on things. Because even if you're drawing a character, if you're missing, so this links coming down, right? If you're missing a leg of somebody that's standing there, people are going to notice it. Okay. There we go. We can see how these benches are all nicely aligned and likely there's some type of pattern on them or something like that. Some something that gives them a little bit more of a seat type of feel to them, right? Okay. So that's how we could draw something like that. Okay. Bunch of benches in a row, bunch of stools all lined up with each other, something along those lines. Okay. Let's see. Anything else we want to focus on for details? Well, how about a drawer? The one thing I want you to remember with drawers is that they have a little bit of volume coming, coming out from whatever surface they are, right? If we just draw one mistake, you'll see is a lot of people will do this and they'll just draw. This has a drawer and then a little handle and that's it. And that's not bad. You know, like yeah, you could kinda recognize it's a drawer and I don't think if it's a simplified background, people will fault you for it or anything like that. But would you really should be doing is making sure that you have that raised surface, right? Here's, sorry. We'll draw it a little bit better here. Imagine this line is going to go to this vanishing point off to the side here. Alright? This one off to the side. So it's going to come something like that. And then there's going to be. The drawer just slightly the lip of the drawer just slightly sticking out and it'll be along these lines. Okay. So even if you've got you can have it a 100 percent flush or you can have a just the lip of it coming forward. And you could do the same thing with cabinets. You know, if these cabinets are here, right, you're going to have the door slightly sticking forward. Like I said, this one, I plan to do a little bit rougher than what we're used to doing it. Okay, we'll jump back and forth between technical lines and and so do we remember how to measure? No. Yeah. Just to remind, we'll take it from here. Draw down the middle. Okay. Come back in. And let's say I want to find where this next one is, right? Okay? So this would be Here we go. So here's one cabinet door, right? And I would erase all these construction lines. He raised them all out, right. Here's one cabinet door and here's the other cabinet door. And you could draw handles here to signify it or whatever. You can have some depth below here. They could be wider, there can be framing, whatever you want to put there, whatever. But remember we measured these correctly now that this cabinet door is actually the same length as this one in perspective. Okay. What else do we got? Well, why don't we clean up some of these construction lines just to get us rolling in the right direction here, right? And then we'll start to add in some more stuff. Why don't we add in the bottom base board. We know the bottom baseboard is here, right? And the countertop we said was probably somewhere around here, right? Cool, looks good. And actually, you know what a way to measure that height is to go from here to here. Goes straight vertical, go from this countertop to here. And sorry if we're gonna do that, will go from here and that my guessed it right. I wanted to line this countertop up with the height of this counter-top, right? So I think we're pretty good with this one. We can be safe. We might have to go a little bit below it for the lip. Right? And that's our counter top over here. So that's how you start to measure things at distances. You use your landmark here. We've got a landmark here for for this main island that we're doing in the kitchen here, right? And then we use that as our, as our base. For all other things. Everything else comes off of this landmark here. So this one here is our countertop height, right? This, this we know is going to be our standard countertop height. Everything else is going to kind of bend to that proportion, okay, so this will be perfect. Usually if you go into a kitchen there's not a lot varied countertop heights. Sink might be a little bit lower or something like that. But other than that, it's usually about the same. Okay. So here's the one counter-top we've got off to this side. There's a little break, if I remember, for the sink and then another countertop running for a little while here or something like that. Right? And I think it runs into the stove or something like that. Alright, Okay. So we've got this countertop here. We've got a sink sitting over top of it, right? Why don't we see if we can do in that sink, I want to do a little bit of curved edges for us here. Okay. So let's do the sink at that level. Okay? We know the sink is running just below this case. So the sink is sitting on a little ledge here. Right? And we know the lip of it. The top of it is somewhere just below this height, right? Okay. How deep does this counter go though? How deep is this countertop? We know the vanishing point is here and we know there's a wall somewhere here, right? So I'm going to guess that this counter top goes somewhere around yay deep. There wasn't tons of room there anything. Okay. So that means that so that means that all of these lines running back here from this countertop are going to be running kind of in this perspective here. Okay, So we can do them over and black. There we go. But they don't go that far. But they do is they hit this wall. And that's the back of the counter. Drop, like the backdrop for the counter, right? Back to here. And then across it over and off frame. Okay. So again, we've got this sink though. We know the space that it occupies, it will rough in maybe there'll be a lip, some, something along these lines, right? And it'll curve in. And this will curve in. And it also be a lip following the back. Basically it's just a rectangle with curved edges. It's going to come down curve and curve and head towards the back there. Okay. And you can also have the inside of the sink. There's curvature inside here, right? There we go. And it's hidden by the lip over on this side. Okay. Okay, so let's do some cabinet working here. Maybe we've got some type of Drawer up top here, right? We know that it's going off to this point. And we know that there's maybe some type of NO, we can say two different shelves are something that are not shelves, but two different cabinets back here. This can be a giant drawer with with a nice little handle in there, something like that, right? Okay. Up above on the wall here, we've got some type of window sill, right? Why don't we put a big window frame in here. I'll make I think pretty big. What did we run it? We roughed it somewhere up to here. Right. Okay. And then this is just the exterior of that frame, right? So we'll put this as just the exterior of it. And then we'll add a little bit of depth to it. Going down into here to this point. This one's coming off into this point right? Now. I'm still just roughing things in yellow. There we go. Okay. This one's coming off. And then what do we have? We've got some frames, frames, right? And opening partitions. And then inside each window has more frames. You can see how this is starting to shape, just roughing it, right? Okay. And then maybe a little latch for each section of the window. There we go. Not too bad looking, right? Yeah. Okay. We know that these windows are moving in this direction. We know that there's counters also on this side that are going to be moving in, right? So how are we going to do that? We can come on in here and find this base frame here, right? Whereas the base board for this cabinet, but we want to have it at the same height. So, you know what I would advise, bring this all the way to where the corner is, find where you want the corner to be. Let's see. Let's see the corners, right. Let's call it right here. Okay. This is going to be the corner of the room. This is going to be the corner of the wall here. Okay. That means all the cabinets, the countertops on this side are coming towards here and they stop right there. On this other side. They're going to be coming from here. And that's going to be the top of the cabinet there. Leading off frame. Okay. This one's going to obviously come forward. But we know that this has to have depth as well here, right? So why don't we change the color a little bit and give the countertop a little bit of depth on this side. Here we go. So this will come here. We can zoom in a little bit. This will be where this counter comes to, right. And then this, the top will come off frame. This will also come off frame. And we know then that this is going to be the corner of the kitchen. Okay, So if I've got the corner of the countertop here, I'm going to bring it down to where it would touch the top of my island. Right. But I also know that it would continue on as I draw through and it would touch where the bottom of this, this part of the counter is, right. Actually know what now that I'm looking at it, I think this isn't very high. I think there's a lip that goes underneath this. Right. See if that makes sense. And so there would be this part of the counter that is where the shelves and all that kinda stuff would be. Right. And then there would be a secondary lip underneath it. There we go. Okay. And so once again, we can add in like whatever we want here. We can add in. Cupboards, cabinets. We could add in series of drawers that are split in various ways, right? Depending on how we want to to do it. Right. Okay. Like I said, I'm just kind of roughing things right now. Utensil drawers, whatever we want to put in here, right. There we go. Okay, So there's, There's tons of room for doing whatever we want creatively in here. But even if you want to get creative, there's still some limitations. If I remember correctly, this was actually a giant eventual cabinets they had here or something like that, right? I'm not interested in drawing that, but what I am interested in drawing is there was a little toaster oven sitting here, right? There was little toaster oven sitting on this countertop. And so let's see if we could draw that. All we know is that there's a line like this, right? Okay. So if I'm going to add in the details of this toaster oven, I want to try to rough it in just a little bit. I know that these corners can come off to the side here. And I know that this is going to come off to this point as well, right? And now I can do my little toaster oven. He will come here, come up, come over, come back, come back, come back. And then I can, you know, put in the details of the front section of it right here's maybe there's a little window or something for the toaster oven, right? There might be some. Let's put that there. Here's the window. I can come in here even deeper. Round the window just a little bit. All right. Put some buttons, a dial of some sort, right? Maybe I can put some grid lines or something for the air. And that's a nice little toaster oven. You can make it look like it's slightly above the surface. Ok. And there we go. We know that the toaster oven probably doesn't go all the way back to the counter here. This is pretty deep, right? But let's see, it goes reasonably far back. It goes back to a boat, let's say about here somewhere. Okay, this is about how Depot would be, right? And then I can bring this point all the way over here. And that's the depth of my toaster oven. So actually, if I was to draw it in, it would start to come to its end point here, right? That's the back-end of the toaster oven. Okay. Cool. Well, this looks like a hot mess, but that's the way it's supposed to look. This is all under construction, right? Everything is going to these two nice points. But in reality, we're kinda zoomed into, where's the frame? We're zoomed into? Right around. Even smaller maybe. Right around here. Right. Okay. I'm going to keep on sketching on this one. This kitchen got tons of details into it and I don't think you need to know them all. But what I am doing is looking through it to see if there's anything that jumps out at me that I feel might really throw you a little hook, right? And what's the one thing that always bugs us? The one thing that was tough to do in 1, even though we took a couple lessons on it wasn't cutaways. It was ellipses, right? And we've gotten an ellipse here. We've got one hanging it and just over top of the island, we've actually got two, but I'm just going to draw one for, for now. And instead of drawing the circular encasement and just free handing it, what I'm going to do is draw it as if it's a rectangle. Okay? As if it's a square, square, rectangle, whichever. And then see if we can figure out how this lamp would look correctly. Yes, I know you could probably free handed, but that's not what I wanted to do right now. Okay. So what we're gonna do is connect these corner points. Then take from the perspective, draw through the center. Take from this perspective, draw through the center. Is this starting to look familiar to you? Now, we've got this weird slanted bisected, and now we're going to cut it up again. And why are we doing this? While we're trying to find, you know, we know that the sphere has to touch this part, this part, this part, and this part. But we also know that it's going to come both 40% of the way here, about 40 percent of the way here, about 40 percent of the way here, and about 40 percent of the way here. Okay. Sorry, I keep saying sphere but I mean ellipse, don't My me as I just kinda keep jumping back and forth between them. Okay. It's just my brain not functioning right now. So what would we do? Well, we'd start to add this in and start to, start to round it. Touching all of these points right? There we go. We're starting to get it now. Okay? So hopefully what that did was reminded you how to draw an ellipse even in, we're doing it in 2 perspective here. Alright, we're going to back that out just a little bit. And what would I do? Well, here's a center point. Actually, if, if I'm doing this correctly, Here's going to be the center point. So that rope would be coming straight off of, off of there. And then this point would be here, right? And it could come up, coming up to this point here. This one's going to come down, hit that bottom section. And then I can start to rough in whatever housing was holding this together or something like that. I can't remember what it was. Right. But this and then if I really want to, the light bulb could be in the middle here or something, right? This would be how you would find that hanging lamp. Okay. Maybe it can be lower, maybe it could be higher, but now we've done it properly according to the two-point perspective rules here and stuff. Okay. All right. What do we think? Is this an ugly kitchen so far? I think it's getting there. I can't say I love it, but I know by the time I'm done sketching it up, it's gonna make sense. What I wanted to do was put some characters in a later and stuff like that, right? What I would advise you doing and all I'll show you later, I'm going to add in carpets, going to add in some floorboards, all those kind of things and stuff. And hopefully it'll make a lot more sense to you. The point that I want you to take away from this is when drawing in real life, these two perspective things are great to use, okay? Try to keep them off, off the scene just a little bit if possible. Okay. Don't worry about rounding objects. Don't worry about sketching them out, but adhere to the rules, okay, keep keep flowing with, you know, even if we have to kind of plot out the rough points of where the ellipse is going to go, make sure you plot that in, Okay? All right guys, I hope you like the sketch that I finish up with and the final look of it and stuff. I hope that it looks kinda cool for you. And I hope that it serves as a bit of a benchmark for you, for you to draw and to come up with a cool kitchen scene or something like that. Who knows, maybe you're making it for a comic book. Maybe you're making it for some type of interior design or something like that, right? For your own kitchen. Either way, I'm sure it look cool. Keep at it, guys and keep practicing.
11. Perspective 2 pt exterior: Hey, what's up, guys, ed here with another how to draw comics course for you. In this unit, we're going to look at two-point perspective exteriors. Alright, so what do we got in front of us here? Well, this is looking pretty cool. We've got a Japanese castle. Now I can't say I've ever seen a Japanese castle before like in real life or anything. But no, I dig it and I think there's a lot of details on it that I want to show you and stuff that we can explore here. A lot of these windows and these half the ellipses for the the sweeping arches, right? I think that it'll look pretty cool, right? So I'm hoping that this lesson will, you know, it'll have a lot in it for you. It's going to be a little bit short, but should be pretty cool. All right, so where are we going to start? Well, as usual, we start with the simple horizon line, right? I'm kinda guessing off where it was in our reference image. I've moved the reference image off to the side. I'm not going to look at it that much, but I'll keep it as just kind of a thought in my head, right? Just summed to look over at, right. We've got our two vanishing points, we off to the side here. And basically what we're gonna do is start as in like middle center line here, thinking that there's gonna be some boxes off to the left and right of it, but the main boxes in the middle here, it's kinda like rectangles stacked one on top of each other, right? So let's see if we can stack some little boxes going from the center line down to the vanishing points. Okay? Basically what I'm doing here is I'm thinking that I've got these little boxes all stacked up. Imagine a stack of Christmas present or something, right? And grabbing it from the center line, bringing it on down. And now I'm kinda going to look off to the side here and see where am I going to put the edges for my little stacked boxes here, right? I think right about here for the bottom one, looks about right. And then in just a little bit, step in, right for the next level, okay, you can kinda see now it's starting to look more like those Christmas boxes, right? Okay. So I'm going to grab the next level. I guess you could think of it as like maybe a cake on a layered cake. I don't really see many hard rectangle cakes or anything like that, right? But that'll work. Then I'm going to put something up top later, but for now, I'll will keep kinda tapering in having them. If they're stuck, they're getting smaller and smaller as it goes up. Okay. And then down below here, that's all going to be water later and stuff. So I'll deal with that a little bit later. I just want to know that it's down there, right? This might go below the water level. I'm not sure but we'll see I kinda I want to have that reference line there just in case, just for later on, right? Okay, let's zoom in here a little bit and we're going to start to get a little bit tighter on this. You know, what we can do here is our old school. Woo, I guess I should use a straight line here. Are old-school bisecting, right? We're going to find our center point by cutting from corner to corner and then going up from the center of their right. It looks a little off there. That's better. Much better. Okay. So I know that's the center of this, this side of the castle, of this rectangle or whatever, right? And if I want to find the center again, I can just do it one more time from corner to corner and want to find the center again, they're from corner to corner. Oh, no, sorry, little off. There we go. That's better. Sometimes I got to start from the middle, right? Okay, so now I know that I've divided up into four equal parts, right? And they're in perspective. And so I could sketch it in here and say, okay, well, maybe this is where I draw the doorway or something, or these big gates or something or well, no. What did the Japanese castles have on the sides of them? Either way, shutters, gates whenever we got on the sides here. Okay. I just wanted to show how we could easily divide it up and stuff like that. There we go. Okay. We'll put in a little door handles here and stuff again, just in case they want to swing open and step out on the ledge. The key point here that I wanted to show you was how to divide that one side up into equal parts, right? To four equal parts. Okay, So moving on to the other side, I want to do some a little bit different on this side. Remember it has a kind of partially ellipse, right? Maybe 11 fourth of an ellipse on the for each of this archway, right? And I wanna make sure I get it in perspective. Okay. I wanna make sure that I, you know, I I'm not just winging it. I could wing it. Right. But I want to make sure I'm doing it right. So how would I do it right? Well, I'd make two giant circles in perspective to giant ellipses, fully ellipses in perspective, right? Okay, so here's my setting up the box for my perspective for these. And I know it looks like I'm, I'm building more on this little castle here. That's not what I'm doing. I'm this is still a lot of rough construction lines and stuff for him. And so I'm kinda trying to find where am I. Where my, basically where my squares are, right, my squares in perspective. So what do I do? I bring it from the center right eye, and I've got my one box here, right? And now I crossed that center line. That was brought from perspective. And this is how we measure it straight across. So now I've got two equal sized circles, right? Perfect. That's exactly, you're not circles, squares, right? That's exactly what I wanted to have their right. I wanted to have two giant mass of squares. Because inside of them, I want to put these tiny little circles or ellipses here, right? So I can just get that one-quarter of them and to have it that perfect sweep that I want. Right. Okay. So a lot of work for just one corner. I get it. But it's something that for me it's important. That's what I wanted to do. All right, so I'm, what I'm doing here is just refining my boxes. This is the same stuff we did in one-point perspective, finding the centers. Making sure I don't flub it too much here, right? You can get close, but it doesn't have to be, you know, if it's too far off, it'll really mess you up for him. So I find my center from the vertical axis, right? And now I've got all my points. So now I can go from kind of tip to tip, connecting all the different corners that I know are going to touch the main points of my ellipses, right? Of course, these are the primary 4. And you'll recognize this all from a one-point perspective, right? And then now I'm gonna kinda go in. Well, why don't I zoom in here for us, get a little bit closer so we can get, make more sense of it. I'm going to go in and touch all of the different points, right? First you can see I go through and my primary for right. And then afterwards I'm gonna go in and hit the other edges, the ones that are little bit harder to measure, right? Okay, and so how do we measure them? Well, I measure that long line and inhibited about 40 percent, right. That exterior line marked 50 and then come back a little bit and do 40. Okay. You guys, I'm really hoping you remember most of this. It should be practiced from one-point perspective, right? But now you can see what I'm doing. Actually, I don't have to do the whole ellipse, right? Because I'm really just concerned with this bottom one forth here, just this bottom part. Okay? And so you can see how I'm touching all the key points, those three key points in that curve there, right? And that means that this now this curved arch use, I don't know, what does this lead your whatever is now perfectly in perspective. It, this is how you can do it. Okay? It's, I know it's a lot of work, right? It's maybe more work than it needs to be. There's a few digital tricks that I've kind of shown you before about stretching a circle or something that makes it a lot easier, right? But, and you can, you can add lib and kinda just do it straight as a street triangle if you want or whatever. Kinda play with it free hand the curves if you want the stuff I get. But there's something to be said of knowing how to do it, right? And then you can kind of play around with it after, right? But you gotta know the rules, you know the rules of perspective and then know to break it. Okay. Next up are these little ticks that are running along the, the ledges, right? You can kinda rough it in and kind of winging it, right? Just draw some little squiggly marks or whatever and stuff, right? But that's not what we're gonna do. I remember on the reference that it was a spaced little marker on them, right on on the ledges that every is it every five feet or two feet or whatever it looks like, right. That there's this this kinda not an icicle hanging down but legged downward tick or whatever, a downward digit, right? And so that's what we're gonna do. We're gonna go in and we're going to measure it out and space it out, right? Space it correctly and perspective. And how do we do that? Well, we start with our first measurement. Do the corner here. We can see that if we were to do that subdivision all the way across, it's going to get us what we want all the way down from perspective, right? So I'm going to drag it up and grab that center because that's how we know how to sub-divide and measure equal lengths, right? Okay. And then from there, well, I can grab from the corner, hit that center and hit the next edge, hit the center, hit the next edge. And I'm going to keep doing that. I'll zoom in here for us so we can see a little bit better, right? Okay. So I'll draw my vertical line here. Then I'll go from that next point, go through the center mark, hit the bottom. Next point, go through the center mark, hit the top, my vertical line and rinse and repeat. And I got to say, you know, you could do this for the whole thing. The cool thing is that once you do it for this one side. One lead on this one side, you can extrapolate and draw it. Draw these vertical lines going all the way up and stuff RAM. But it's tedious, right? And so you can do this correctly. You can measure them all in. And so you've got these little hanging teeth eclipse. Well know what these are, but they're measured all correctly. Do this across the whole tees. I know it gets tiring Right? But you can see how it would work. It would work across this whole thing. And then you could draw it up to the next level. And drawn up to the next level. You can measure it out that you don't have to keep rinsing and repeating, repeating that that equation the whole way, right? Instead you just draw these lines up through, through each of the levels and it'll work out perfect. Okay, you just continue it on down and your measurement holds because at a whole does it fades into perspective there. Okay. So in my opinion, it would be better to do the bottom-most ledge. Right. Because that'll be in this case the longest one. And then you can carry your lines all the way across and do this exact same thing, you know, being able to draw these little eyes. I can't think of a better name for these things. I don't even know. Let's come teeth that's ongoing with teeth. Okay. So you can draw them at the next level and have these little teeth hanging down or whatever, right? Depends how you want to do it. Okay. But the measurement is there. The distance is correct. And now you at least know exactly that. You're confident that you got it right, just in case anybody ever calls you wanted how to do it. You know it because you've done it so many times, right? You've repeated this again and again and again. And of course I was kinda free handing the lines there, but you can use a straight edge. You can use your ruler to bring it in and get a little bit more tight, tight with the accuracy and stuff, right. Okay. And you can see I'm kind of going over it now and stuff for him. Okay. Does that make sense? There you go. And so the measurements rate all the way to the end. I'm not going to bore you and do it on video. I'll do it up later. A warm bore myself, because that's kinda how I like to torture myself for him. And I'll show you in the final piece at the end what it, what it ended up looking like and stuff, right? But now you know, right. That's what you would do. That's how to do it. And, you know, it'll take forever, but you know, it's the legit way of doing it. So if you ever want to bend the rules, That's cool. Go ahead and bend it, right. Just know that. That's the way to do it to begin with, okay, to really understand the principle behind it and stuff, right? Okay, so what's up next here? Why don't we do those buildings that are kinda off to the side, right? We've got kind of two buildings that are a little bit apart. I don't know that they're actually probably behind and off to this side of our main building. Right. So will I know that there's that one off to the side there. Right. And I want it to be about there and I want it to be attached to that bottom ledge there, right? That the heights stays somewhat consistent. So you can see how it touched that, that one bottom ledge. And then there we go. So I'm kinda crossing through. So they're they're staying relatively consistent with the building in the main front rate that the floors, each level is staying around the same height. I'm gonna do some, a few different things here, but I want them around the same height, okay? Just off to the side and behind. Alright. I'm gonna do something different with this top-level. Yeah, it'll have a different roofing to it and stuff like that. Like I said, I'm following roughly the reference thing that's that's off to the side here, but I'm kinda making a few things on my own that I think will work. Okay. So now we can see how this bottom section meets the next one behind. So there's this one that's in front here. Right. And of course deciding or whatever. Oh, the teeth. That's what I called it. Right. And then what happens next? It's the same thing that happens in the next one, right? Is that these two sections meet each other and come up. And, you know, each, each building has its level and they kinda, some of them will meet up, some of them won't. You can see those. The first two, the bottom two I have meeting. But then as they start to get further away from each other, the one in the front is, is shrinking, it's getting, the boxes are getting smaller and smaller and further away from the base. So those ones up top aren't going to touch each other, right? And, you know, all rough out some type of roofing here, I think some traditional stuff, again with the nice, tedious elliptical archways there, right? A, I think that's the term I gotta use. I should go back and re-edit that in elliptical quarter archways. That's what I'm going to call them. How's that sound? So you can see as we review at all how we've gone through and measure things out to perspective, subdivided it, brought the our circles in perspective and then divide it again and divide it again, right? I know this is getting a little tedious. Uh, we keep repeating it and repeating it. But honestly, sometimes that's what it takes, right? We also went and added extra buildings. I'm going to add an extra one off to this side here. And you could see how there's still staying in perspective right there, just blocks behind our main block here in the middle. Okay? And I'm going to go through and continue adding these little teeth, the little awning teeth in or whatever and stuff I got. I don't think I'm going to do it right now for you though. I think you'd be way too tedious and I think you would drive you nuts. So you'll see as I load up my now finished drawing, hopefully you like it. You like the look of it and everything, right? You can see I've added lot of details, added some extra circles in those little quarter archways for the awnings, right? And then I've gone on to add in a final drawing. You can see how I've added in some textures and a lot of different patterns, right? And how the detailing generally fades off into the distance, right? The closer it is to us, the more details we can see in the bricks, for example, and stuff. And how as it fades off into the distance, we just can't make it out as well, right? Yeah. That detail obscuring it. I'm going to explain a little bit more in another unit for you, but I wanted to just touch on it in this one. Okay, guys. I hope you really enjoyed this two-point perspective example for exterior work. I hope that you picked up a couple little pointers. You'll notice that a lot of these lessons are getting a little bit shorter as we go on. Because already you've got some really strong fundamentals put in there, right? You've got the basics down. And it's just a matter of layering on top of that. You got that 1 perspective down. And now you've got that two-point perspective down, right? And every time we keep adding something to it, adding a detail, yeah, it can be tough, but it's it's just putting it on top of what you already know, Right? So if you guys keep practicing this, I know you've got it. So keep at it.
12. Perspective 2pt cutaways: Hey guys, ed here and I've got another quick video. I'm hoping it's quick. Hopefully not too long for you. I know some of these get a little bit bogged down, but it's perspective and backgrounds. That's what it takes some times, right? So what I want to show you here is cutaways. What we're gonna do is draw a basic rectangle, right? So I would take it from here, bring it up to the vanishing point here. From each point, right. There we go, right? And let's say wrong Woodside. It doesn't really matter. Draw one here and one here. And I know that this one comes here. And I know this one comes across to here. There we go. We've got our nice little rectangle, right? Yes, I can. Oh, that's getting ugly. I can start to zoom in just a little bit. Make it a little bit easier for us to look at. But just like we did with the one-point perspective, I want to take some stuff away here. I want to show you how, when we start to take things away, how it'll start to look, Okay. So from, let's cut from here, okay? So from this line over to here, and this line down to here, and up to here. Over to here, and over to here. Now, what did I just do? I cut away this portion of the box. All right. Does that make sense? But it's not quite complete because this one's going to come up to this side. This one's going to come over here and this one's going to come down a little bit off there, but there we go. Good. Okay. So this is what I want you guys doing is to practice various cutaways. See what would happen is if you took this deception away, right? There would be a line going back from here, back to this vanishing point, right? We already know this one's going off to here, right? And this one would probably come something like that. Alright. So what if I was to draw this in? So it makes a little bit more sense. I can just draw like this. Maybe cut it here for example. And of course, these are not perfect lines are a little wonky right now, but I think you're getting the point right. Here we go. Starting to take shape, right? And I can zoom in a little bit just because I want to make it a little bit better and easier on all of our eyes. I don't know how old you are, but mine are starting to get there. So I can connect some of these corners a little bit better, right? Listen, when you're practicing these cutaways, this will help you for down the road when it comes to Dealing with other at any type of objects. Like we don't live in a world of perfect squares or spheres or anything like that, right? Everything has a little bit of a curve to it, a bend to it, whatever it is. And so we want to be able to manage that, right? And learning how to cut away, whether it was a curved like an ellipse or anything, or cutting away pieces of a puzzle. This line is bugging me. It's not straight enough. This kinda stuff will really help you. Okay? There we go. There's our nice little puzzle piece cutaway on a 2 perspective, right? I really hope that what you do is, you know, practice here, practice here, practice here, practice here, and draw a few more of these around. Okay? I think no matter what, even pick one just below. Right, one right here. There we go. I'm giving you tons of homework here. It'll help you. It'll help you tons. Okay, so just keep practicing on it and send them off to me if you want, show me any sticking points you have or anything like that if you can't figure it out. Okay. All right, guys.
13. Perspective Multiple: I'm going to teach you something here that I wish I learned where he early on. So hopefully this will be like almost as eye-opening to you as it was to me. Yeah. We've studied 1 and we've studied 2. And I know you're going to go on to other various points perspective. But that's how I studied it. I remember studying it that it was like, okay, here's 1 perspective and here's 2 perspective, and here's three. And this is when you use it, right? And all of my drawings looked legitimately fine. Like this was a one-point perspective drawing. This was a 2, right? And then I looked at life, and life doesn't really work exactly like that. Sometimes there's an object that's flat facing you. Like this guy here, something like that, right? You know, this guy's flat facing us and this guy is, and sometimes there is, in the same picture, there's gonna be an object that has just one side of it facing you. And then the other one's going off to the vanishing points, right? So that's what we're going to look at here is finding multiple vanishing points within the same picture. Now this is a photo and my little disclaimer of things get warped through the lens and stuff like that, right? But I think it'll still be valuable for us, even just like just looking at this right now, just realizing, hey, life doesn't always line up perfectly, right? And so we have to recognize that sometimes things will shoot off and turn and twist and all those kind of things and stuff, right? But we can still try to find a little bit of order. So let's see. I'm going to try to see if I can find help if I drew a straight line here, right? I'm gonna see if I could find this one's coming off to this side. And of course, these, these guys, they're not proper rectangle is or anything like that. So there's a little bit of bowing and bulging baking soda. Oh, yeah. No drink boxes here, right? Yeah. Well, my daughter gave me trouble for taking those. So disk rounds what was around, right. Okay. So these aren't lined up perfectly, but we can see it's somewhere around here, right there, a little bit skewed because the irregularities in the boxes in the in the nature of what the object is. Okay, Let's see if this one can go off to the side here. Bring this one off. Bring this one off to the side here. Somewhere off around here. Oops. This one's also going to come up somewhere around here. I kinda roughed in this vanishing, or sorry, the horizon line and a little bit earlier, but it's working out pretty darn decent here, you know, it seems to be not exactly it. I think maybe it's a little bit low but still seems to be working. Okay, right? Let's see if we can find another one here. Let's do with do the tissue box. Okay. So I'm roughly thinking that's boat from corner to corner. Roughly seeming from corner to corner. Maybe that first one's off a little bit. Let's see if I want, I could probably zoom in here. I don't have to be so far away now. Now that I know roughly where the horizon line is, right? I know what's going to be right about here, right from that corner to that corner. And write it over here. From there you go. As as I come in closer, I'm sorry. It's starting to make a lot more sense. And if I was to do that bottom one, it probably come right up along there. Right? Yeah, That's the thing. I was pretty far back, so I was missing the mark a little bit, but you can see how all these are kinda working out, right? Maybe I want to switch colors again just to give you guys some variety here. Alright. My omega-3s. What did we say from this corner to that corner? This one's a little bit harder to see from this corner. Somewhere around there. From this corner to that corner. Somewhere around there. There we go. Okay. And we can bring it off to this side as well. From this corner to that corner and up from this corner to that corner. Right there. Right there we go. Yeah, not bad. Oh, we should have done that with the baking soda. When we go back and do some orange here. And look at all these different vanishing points, right? This is pretty cool. And like I said, you know, for some reason I was stuck in this mental trap. And you'll find that happens to you a lot. As an artist. You learn something and you're like, Okay, I got it, I got it. And then you get pinned under it. Almost, if that makes sense, right. Like you'd you'd disappointment little bit low, but yeah, that one's a little bit off. Let's see if I get back it out and see if I could find the mistake. I think it's bowing in the middle here. So try to find from the bottom here first. There we go. And like I said, of course there's going to be some distortion because of the photo and everything, right? But it all kinda works out, right? So yeah, don't get trapped into too much of like this is the weight. It's got to be done and I'm only going to do it this way. For me, it was perspective, you know, I got trapped into this thinking that, okay, all of these lines, everything that I'm drawing today must adhere to this vanishing point. Echo, echo, echo, echo. That's all that I was doing, right? And like I said, you know, that's that's kinda what they taught me in school was like, okay, well, you know, it goes to this vanishing point in that. But what they didn't teach me was mix it up. There's various vanishing points all around, right? Let's see if this works. This one's little off, but I have a feeling that's just because of the crayons and the stuff, how they're packaged. And my horizon line, I think is a little bit low here. But I hope that this is big revelation to you as it was to me. If not, you know what? Maybe this was just good practice of finding different vanishing points for you and stuff like that and then finding this horizon line, that's my guess. It's probably a little bit low, It's probably somewhere around there. And That's cool if it was just normal practice of finding various vanishing points. Cool. We've got 1.2 objects sitting on this, on this table in front of us, right? But if you're like me and you were kind of trapped in this thinking that everything must be one way. I really hope that this opened your eyes to it. I hope that you've got different way of looking at this stuff now. Cool. And I hope you guys keep practicing.
14. Perspective Digital Tips: Hey guys ed here and I've got another how to draw perspective unit for you. This one's a bit of a bonus with some digital stuff, right? I know not everybody's working with Photoshop or Clip Studio Paint or or digitally at all. Right. I tried to design the whole unit so that no matter what platform you're using, whether it's a platform, that's an old drafting table, your kitchen table, or a giant tablet right in front of you that the unit itself can be helpful there. I mean, the whole course itself can be like 90 percent of it can be applicable to what you wanna do. This one here though, this particular unit is going to be more along the lines of helping people just with a few, couple digital tricks and stuff like that. Nothing major, nothing groundbreaking, in my opinion, Clip Studio Paint has got the groundbreaking stuff for, for the rulers and everything, right? But this one, yeah, this just a couple of tricks I want to show you. Okay, so I've got a full screen here. What I'm going to come over here and do is grab a straight line, a straight edge, okay? Habit a good size here. Drag it along and this is going to be my horizon line. And I'm going to make just a little note in the center. Okay? Now what I'm gonna do here is start to draw through this center. Okay, so I'm going to grab from one side to the other, just start drawing lines and I make sure that they go through the center. Now each program has a slightly better slash, easier way to go about this. There's a few that give a nice little starburst type of thing, right? Okay. There's some that you can do like kind of a measured starburst, I guess. All right. That's cool. I don't want this to be program-specific, so I'm kinda just doing it in a, in a general way here. Just dragging from one corner through the, through the next, going all through this one vanishing point. So if this was a one-point perspective, we can see how a grid like this might set us up well, right? This might make things a little bit easier if we were plotting things out, if we're sketching things from the beginning, right? You can have these big spaces between them. You can get a little bit tighter if you want. Start to get a little bit more. Even tighter on the difference between the lines and stuff. You know, it's kinda up to you how how defined you want this. And like I said, you can believe it's Photoshop. I haven't used Photoshop in a few years here, a couple generations ago. But not My Generation. Programs, generations. Yeah, anyways, there's a few different ways to do this, but this is one way you can do it as you can rough in something like this, right? Okay. And then just kind of faded into the background and use this as your sketch and it's all good. All right, another thing that you can do, especially if you're gonna do something like a 2 perspective, is grab something like this, duplicate the layer, and then move one off to one side and move the other one off to the other side. And then you've kinda got the basis of starting from these 2 perspective, right? Okay, that you can come in here then and start using this as your sketch pieces. You can come in and draw. You know what's coming this way, It's coming this way, right? You know what's going to come off this way, come this way. And you can start to use this as your, your basis for, for drawing a sketch for 2. And obviously you could bump it up and do three points if you really want, right? So this is a little trick that you can do for using kind of a burst Perspective Grid, Right? Like I said, some programs have this way to burst it and you can choose how many lines are multiples you want. Or you can do it by hand and drag them all out or whatever. It's kinda up to you which program you're using. Photoshops good for those kind of layer actions and stuff like that. Procreate, maybe not as much. Bang. Some of the free ones don't have a lot of ruler options. Clip Studio Paint pretty much has the best for perspective rulers. But I'm going to get into that an entire, another unit here. Something else that I wanted to get into here is, you know, I've, I've laid down these lines and have kinda sketched out something for you here, right? Is a little box, right? Now we've got this little box. But I want to do some things to it. Remember before we were talking about circles and stuff, and we were talking about how to drag it into perspective, right? Okay, well, I've got this box here. And on another layer I'm just going to draw a little circle here. Now what do I do? I've got this circle, but if I move this circle directly into the box, no, even if I was to make it so that it kind of fit, it wouldn't fit in perspective, right? So instead what I can do is do a drop-down transform. And I could either do mesh transformation or free transformation. There's a few different options that you can use in different programs. Some of them actually have what's called a perspective transformation. But in the clip studios equivalent would be this free transformation. And so what I can do is grab each corner, drag it in, and you can see how it fits in perspective. I've dragged it out, right? Does that make sense? Okay, so that's one way to do it. Let's see another thing. If I wanted to remember when we were talking about doing ellipses and stuff like that or like the curvature. Well, I guess I could come here and make sure that this, this ruler is, this angle is going according to how I want it to go, right. Maybe move this up just a little bit. And I can even move this down as long as I'm going to keep it in perspective. When I do this, bring it to here. Bring this one up a little bit. I think you can see what I'm gonna do here is I can come in here. And I'm maybe going to adjust it again a little bit. But now I can cut away, you know, I could have this part here. And why don't I just figure this out just a little bit better. So let's keep it. I'm keeping it with a perspective, right? But then what I might do, for example, depending on how, what I wanted to do with this box, I might come in here, use this curve. And I would fix what's going on over here and stuff. I get used this curve as, as a correct curve for what's going on. And then obviously come out here. And this one would be fixed. Actually. I would bring it across to here. There we go. So that's, that's one way to do that kind of quarter ellipse in, in perspective here, right? Another thing that you can do is if we're going to draw a circle within here, remember we can find our, our dimensions and do all these cross sectioning and stuff, I guess. But it's not easy. It takes a little bit of time. So instead, I'm just going to go really easy here and drag this to the corners. Okay? And just double-check and make sure that it's kind of lined up. Reasonably correct. Not bad, right? Yeah, it looks okay. Okay, so now I've got this circle that's nice and in perspective, right? It's fitting exactly within. But what if I want to add like a Riemann side, a little bit of depth, what I can do is duplicate this layer and move it in. And not only that, but I can just double-check that it's following perspective lines and stuff, okay? That it's, it's moving along these same lines. I can use this upper guideline as a marker. And actually so what this is going to do is this will get slightly smaller. Okay? And if I really wanted to line this up and find the center and just make sure that my my center marker here is following the center marker here and it's following along this perspective line. Okay. Does that make sense? I actually know what, why don't we do that just to just to make sure that we're doing it right. Okay. What we can do here is find our center. When I do it on a layer here, find our center. Okay, I'm going to, then I'm going to back it out. And I'm going to bring it in perspective along with these lines here. There we go. So now I know that if I'm going to do this properly, I want to come back and I want to duplicate this circle that's in the middle here. And I'm going to move it back. And just double-check. I can see that it's off-center. Okay. That the center line has moved just a little bit. Okay. There we go. I would say okay, I could come in, start to delete. And that would be how that rim might look. Does that make sense? Okay. So there's a little, a few tricks to save you some time that you can use some straight edges, use some circles and ellipses and that kinda stuff. And really shave some time off of off your process, even if it's just to rough things out. Maybe you want to come back in here, oops. And start to do more technical stuff with it. You want to measure things out just a little bit better and stuff. That's okay. But it's honestly, instead of free handing your ellipses, if you've got a computer program, use it. I would really suggest using it to do your circles, ellipses, squares, all that kinda stuff. And it'll make things a lot tighter for you. There. That's pretty funky looking, right? Not the same depth. So what I would actually do if I was doing this as an official pieces come down here, measure it, and then measure through that this circles cut. So it's like a tunnel going through the middle here, right? But I hope these little tricks of help GOT using that burst idea for setting a perspective grid. And then using cutaways with circles, ellipses and all that kinda stuff, right? All right guys, I hope this was helpful for you. And I really hope that you're working digitally because it's so much easier.
15. Perspective Measuring Distance: Okay guys, I want to teach you here how to measure things as they recede into the distance. What we're gonna do is look at, let's say building blocks or buildings or signposts or whatever they are. But there are an equal lengths apart. Okay. So how do we measure it that it's equal lengths apart while I can say, okay, well here's one inch and then one inch and one inch in one inch, in one inch, one inch. But we know as it gets into the distance, It's going to get smaller and closer between, right? So how do I find that? Well, like I said, imagine this is the side of a building, or we've got to lampposts here, whatever it is. We're going to sub-divide here. Okay? We can subdivide that. And we're going to find the center. Now once we've done that, we've done this before, where this subdivision, we've done it a whole bunch when we talked about circles and a few other things, right? Okay, zooming in here, what I'm gonna do is draw from this corner hitting where this middle line is and continuing on through. So it touches that line at it touches towards the top here, right? I'll take from this back corner, draw straight through and come down and touch the bottom here. And then hopefully if I did this right, this goes straight up, straight up and connect. All right? Okay. And then I can do it again here. I just continue repeating it. Bringing it up to the top line, going through this next middle bisecting line, right? And then drawing it straight up. Okay, So I'll just gonna keep on going, go through the middle here, bring it down from the bottom, bring it on up, bisecting that middle line, and then coming on down, right? And you can see how, if we were to check it. Here's the length of 1234 and it's getting narrower and narrower. And I can just continue this on as I move to the end here, right? And these are gonna get closer and closer together until a point where I'm really not wanting to draw them anymore. All right? Okay. So you can see how it'll like whether we're drawing. Imagine we're drawing. I don't know, street lamps, right? I would keep doing that. I could draw these street lamps as they continue off into the distance. And what I would probably do here then as well, is measured at the top of the street lamp. I say go from there. And then the street lamps just continue on. Coming up, touching that this part coming over, right. Coming up, coming over and they would continue getting narrower and narrower as I measure them out into the distance. Right now it looks like a fence because all the construction lines are there, right. But if we take it away, we would see that it would actually work out perfectly, right? So that's a way to measure same size objects as they recede into the distance. Hope that little trick helps you.
16. Perspective 3 pt basics: Hey, what's up, guys? Ed here with another how to draw perspective and backgrounds video for you. Wow, you've made it this far. You've passed 1, you've passed to point. And now finally, we're going on to three-point. You know, it's funny because usually when we think about perspective, the basics are one-point perspective and two-point perspective, right? And when you start to get into a little bit more of the advanced levels, that's when we start to get into 3, 4, and 5. All right. So you've done it. You're advanced. Do you feel advanced? Yeah. Well, maybe you will maybe it won't at the end of the unit, right? Let's see how it rolls. Okay, lets go over just a few basics, right? We remember that with one-point perspective, everything was going to, and from that point, right? You know, like when, whenever we draw a box, all the points, we're going to that point, right? If we draw whatever shapes and stuff, right, we would draw it going fading off to that point. And then we'd figured out the size, depths of the shape and all that kinda stuff. And I taught you different measurement techniques, right? Then we got into two-point perspective, where instead of looking at the base, the flat surface towards us, usually this was when there was a fine edge towards us, an edge of the shape. And we'd have to find the actual shape by heading off to the different points, right? Okay. The key point about both of these were that in this case, all horizontal or vertical and horizontal lines were pretty consistent. The only variation was going off to the, to the one-point perspective. In this case, all vertical lines were persistent and consistent. And the other lines were either going off to this one of the two points of perspective here, right? So we've got 1, we've got 2. And I think after how many hours now? I think you've got it down, right? I think you've got it down. But what is 3, right? How do we do it? Okay, So there's a lot of similarities to 2. We can have this, this horizon line same as we would with two points. And we're actually going to have two points of perspective here. But where is that third? While the third is going to be either above or below the horizon depending on how we want to approach it. Okay, for right now we're going to start out with down here. Okay, This will be our third. And I'm going to teach you tons of variation on this, tons of different ways of doing it. Okay? So let's say I've got this central line going up like this. Okay? So that means that anything on this center line does vertical center line. Let's say I want to have a block starting here and here is going to look pretty darn similar to how we did it before. You know, we're gonna have these two going off to the right. These two going off to the left and don't mind my I'm just winging it right now, right? We're going to get more technical, but I want to show you this kinda quickly. Okay? So right now, Boyd is kinda looks like a 2 perspective thing. Right here is where it gets really different. Okay? I'm going to choose the depth of my block. Let's say here and here. And what did we do when we were drawing two-point perspective? We would just, you know, we would draw this straight down and draw this straight down, right? And that would be how it works, right? That's not how it works in 3. Instead, we're going to take this and draw it towards that third. This is our vertical point, okay? And so now our building is, let's see if I can make it a little bit more defined, right? Is going to be our building block. And let's not call it a building. Let's call it a building block is going to be like this. Alright? Okay. And then we come up and bring this part over and bring this part over. Very similar again to the 2. But you can see how this is giving this kind of warped perspective, right? Everything starts to work its way down, right? This is what is called a bird's eye view. Okay. And often used like the name implies, you know, when something's up flying, right? Okay. So when you're looking down a buildings are down at people, you know, you could use this as a bit of a building block for, for a person standing here as well. You know, their head could be here, their bodies coming down right? And you find your center points, you find your shoulders, you find this. We went over a bit in the anatomy courses and stuff, right? You would find that you can use this as in what's going to happen is the person's head is going to be much bigger than. Feet down below, right? It's going to be out of proportion because everything, the proportion is feeding off into this third perspective point, right? Okay. So this is the bird's eye perspective when somebody is looking at it from above. When, let's say you're drawing a character that's flying over the city or something like that, right? It makes sense to be looking down at the top of all the buildings and stuff. But there's also another one when we're looking up. Okay, so we've got bird's eye perspective and then we've got, we've got worm's eye perspective. That's right. A worm kinda underrated little, little dude's. But they're useful and they're useful for this. What we're gonna do here. So what are we going to do? Let's do what we did before. I've taken my daughter's juice boxes and they're mine again, right? We're going to find our second of perspective here, just roughly bringing it off to the side somewhere over here. That's way off. And we'll bring it off to this side as well. Not too worried about it. If there's a couple in accuracies here, I know what's going to happen. The juice boxes aren't perfect or anything like that. Okay, so we've got one vanishing point here, one here, and check this out. The horizon line is there. So this is, this, this block here in front of us is both above and below the horizon line. All right, that's pretty cool. Okay. So when we think of worms, I think of it as your, your, your perspective as much lower to the ground, right? You're looking at it from down here, looking up at almost everything, okay? Now, here's where it gets. It gets into the funkiness of three-point, right? Okay, so we've got this middle center line roughly, right? Then. Let's see if where these other guys come to. They come to a vote here. All right. Let's back it up just a little bit. Drag it on up. We're finding it somewhere around here. Where are we? There we go. Cool. So our third perspective, and this one is way above the horizon line, right? Neat. Yeah, I think this is very cool. And this gives that kind of distorted feeling and stuff that's a little bit more akin to reality. You know, our eyes kind of warp the edges just like I've talked to you before. Botha, lens warping from, from the camera and stuff, right? Our eyes do this too. This is part of this perspective warping and stuff. And so when we start to have more of these points, it, it starts to bend things a little bit, but it actually looks a little bit more like what we're familiar with seeing. We're used to things feeding off way into the distance on these multiple points. You stand in any big city and this is how you're going to feel, right? You're going to feel that things are going up into the sky, fading off into the sky, right? If you're looking up at these buildings and fading off to either side, all right? If we're looking at it from this, this two slash 3 perspective, right? Okay? So this is really important that we start to get used to drawing like this, that we get used to these multiple points here. That things can fade off in many different directions, right? We're also going to take another quick look at this one. I think that we can look again at the bird's eye view here. And you notice we're moving a little bit faster now, right? We're not just slow and plotting like we were in the one-point perspective. I'm starting to drag you along faster with me here. Why is that? Because we're going to slow before? No, because we know that we know some of this stuff already. Okay. So I know this one's coming way off to the side. Probably won't fit on the screen somewhere, right? I know that you already know 2 and if you know 2, then you know what I'm doing here, right? So I don't have to explain the entire way through it or anything like that. That one was way off. Let's take this one. I can just kind of work. And you can see what I'm doing as I'm doing it right? It makes a lot more sense to you as we're going through this. There we go. Okay. But the two points I'm not that worried about. They're off screen right now. And remember how I talked to you about how having those points being off-screen and how we wanted to have, you know, this this 90 degree kinda separation between them, right? Okay. We want this 90 degrees of separation that, that if 1 perspective here, the other point of perspective here, and we're looking at it this way, that we've gotta have enough gap viewing it this way. Let's see if I'm going to draw that against what makes a little bit more sense here. Okay? So we're looking at 90 degrees. If we're looking at this, especially when it comes to 2.3, here's one vanishing point, here's another vanishing point. Here's that edge that we're looking at, right? Okay, so as a viewer, we're looking this way. If we start looking too far this way, or if these points start to seem to come too close, then the whole thing gets really warped. Okay, so you always want to imagine that there's always this 90 degrees in between these two points. And if it starts to shift, this one starts to move this way. This one will then rotate, okay? And this, think of it as a pivot point on that one center. Hope that makes sense. Okay, so back to this. We're going to find the lower end. This is what we're here hunting him. I think we can go off with this one in the middle here. It's probably a safe bet. Will come off of this corner of my little building block. My daughter's juice boxes don't tell her. This one's going to come down. I'm starting to get off. There we go. Okay. I think my first one was off this one here. I think it should have went closer down this way. See how just that slight variation made a difference right? Here we go. Once again, it's kinda hard to read on some of these juice boxes because they, they bow and bend a little bit. I think you know what, if I was to do this again? I think I used Lego. My kids get in a little bit too old for them. But if you've got them at home, they've got that nice straight edge to them, right? And you can build up Lego and construct a bunch of scenes with and everything like that, right? So if you're going to practice on anything, if you've got Lego handy, I would do it. But now we can see that we've got these, these different vanishing points. We've got the lower one. So where's our horizon line going to be? Our horizon line is going to be way, way up here. Something like coming to these vanishing points, right? Okay. And you can see how their horizon lines way up here, maybe even higher up. Let's put it, I bet you the horizon lines further up here, right? Horizon lines up here. And this third vanishing point is way low. So how do we do a three-point perspective? Again, key point is in the beginning, you could kind of look at it as, as two points. You get your horizon line. You can hit your two vanishing points and stuff. You want to keep in mind to keep them quite far away from each other and stuff. If you can go off the paper. And actually I'm going to use the word panel instead. If you can go off the panel, means the live area you're working with that you want to display, the better. Okay, It, it, it, it helps it from warping social much. Unless part of that warping is what you want to achieve. And when you're practicing like this, sometimes a warpings fun to see, right? But in reality, you'd want your frame to be really tight, something like this or whatever. You want, those vanishing points way, way off. So once you've found your two vanishing points, pick a third. Choose whether it's going to be the worm's eye, right? That we have here. Sorry, the bird's eye that we have here. Or the worm's eye that we have here. And of course this is, this is depending on what kinda scene you want to, if it's going to change dramatically depending on what you're going for, what view would vantage point, right? Okay, So, you know, figure out what you want to achieve first before you start throwing down vanishing points anywhere, okay? And yep. Once you, if you want to, you can practice, like I said, with Lego blocks or I don't know if my daughter will give you her juice boxes, but anything that has a nice straight edge to it. I think looking around my house, I was grabbing Kleenex boxes and medicine boxes and just whatever I could write, you know, like something small enough to take a picture of that I can set on my table and have it all kind of lined up that it was easier to make sense. It depends if you live in a big city or not. I live in Hong Kong. So right now as I'm recording this, it's easy for me to step out of my, my apartment and find giant buildings that look exactly like this perspective and stuff and be able to draw them out. But maybe you don't, maybe you live in a smaller town. And the closest thing you could find, uh, something like this, as, you know, the one farm house a couple of kilometers away, right? It's okay. Work with what you got, but don't always think you have to go big, right? You can get smaller, go miniature, or go digital. And that's something I'll talk about in a later lesson, some little digital tricks for you. Okay guys, I hope this intro into 3 perspective was helpful for you. We're going to start working on some bigger pieces with it and stuff for him. But I think yeah, I think this was a good start to it. I hope that we're on the right path. And I hope you have some lego blocks at home to practice with. Have fun with them, and don't step on the list.
17. Perspective 3 point exterior bird: Hey guys, it's Ed, and I'm back again with another how to draw comics perspective unit for you here. This time we're looking at 3 perspective and trying to do an exterior shot. So what do I have in front of us here? It's Hong Kong because that's where I'm living right now. I did not take this photo. Don't have a drone and scared of heights. So not taking credit here, but I think it's going to help us. We're going to try to find our, our three points of perspective. And I'm going to cheat a little bit. I got to admit I already went through it and found it just in case right. But we're going to look at how we can recreate a photo like this. Hong Kong is a pretty cool place. We've got these giant skyscrapers and stuff like that. You know, that's what's interesting about Hong Kong. You've probably seen it, you know, the harbour View and all that kinda stuff, right? But something you probably don't know is 70% of Hong Kong's land is green space, undeveloped green space. And so you get a view like this, you know, would you use these jutting towers coming out of green space surrounded by a forest and everything. And there's even little monkeys by my house. If you watch my how to draw animals video, you'll see me hanging out with the monkeys, right? Anyways, okay, way off topic there. Back on topic. Let's check this out. So r, We're going to bring some of these lines down. This is r, We're coming down to this point here, right? This is our bottom point from our bird's eye view or third, right? Okay. That part's easy because I've already kind of roughed it in here, right. We know that it's going to be down here. Okay. If I wasn't if I hadn't done that, I think we would have found it pretty easy anyways. Here's what's more difficult in a shot like this is finding the other points, you know, where's it over here, whereas over here. And this is why it's difficult, because even though I know the horizon line somewhere up here, all of these buildings are a little different. This one's going to be coming off somewhere in this, in this area, right? This one's going to be coming off this way. This one might come off this way. Hopefully by now, you've taken my multiple vanishing points unit already, right? So what that tells us is that even though we've got a bunch of rectangles here are a bunch of shapes and stuff like that. They might not all be in line with each other, okay. The, they'll have some differences. They're all going to the same horizon line somewhere up here. And I'm kind of just doing it rough here, right. But they're not all perfectly going to the same spot like this building's vanishing points here, this building's vanishing points here. This one's over here, this one's over here. They're all going to roughly go along this horizon line though. Okay? So we're going to try to recreate this. And we're going to do it with not only three-point perspective, but three points in multiple vanishing points along the horizon. Dun, dun, dun. Was that dramatic? I don't know. I thought so, but most likely not. Right. So I'm going to rough some stuff in here for you. Why don't we do some basics, okay? We're just going to rough this in. And we're going to say, Here's our, our 1, we know that is there for sure, okay? And this is our bottom point, this is our horizon line. Any other vanishing points are going to be along this horizon line somewhere. Okay? So from here, going up, let's do our first record or first shape. Why don't we do it this way? I'm just going to assign two random vanishing points, okay? And I'll go from here, who? I guess I should use a straight edge that will help right? From here to here, here to here. Okay? We've remember this before, right? We'll bring this one down here. And this one over here. Bring it over here. And here. And now we've got our cool little building that we've got in the middle here, right? Okay. But what if the next building isn't quite in line with that? The next building, that center point will still stay the same. But I'm going to switch the vanishing points. I'm going to put one vanishing point here and one way off here. Okay? So let's see how this looks. This one's going to come to here. It's going to come across. This one's going to come up here. And it's going to come across. This is getting weird looking, right? This one's going to come down to here. We'll bring this one down to here. This one over, and this one over. Okay, so how, how does this look? Now, we've got this main one here. If I dark it in for us, right? Bring it over. Bring it up this way. That one's pretty clear, right? This one works as well. Is just following different vanishing points along that horizon. Okay? This one comes down to here. I think I'm off slightly, but I think you get the point, right. And there we go. Look in really warped. Why is that look and so warped? Because we brought this, this vanishing point way over here and stuff, right? So let's do the next one. And try not to have really distant vanishing points. Okay? So we'll go from here and where do we want it? Let's go extreme edge. And I'll use that one to there. Okay? So this one's going to come to here. It'll come over. This one's going to come. Well, let's do it here. To here. It'll come over. This one will come down to here. This one will come over. Here we go. Cool, right? It's starting to look like if I was to draw these little trees in here and stuff I get, it's starting to look like how we'd want it to look, right? Okay. One thing that I want to do here though that I haven't taught you yet, is how do we find like, if we're going to do a kind of a pyramid on top of one of these buildings. You know, usually we don't do it because, you know, like in the previous ones I was showing you how to do that. What is a one-quarter archway and stuff like that, right. But here we're looking down at the buildings and a lot of times buildings don't have these always totally flat surfaces. Yeah, they might have air conditioning units on it, everything. But especially in Asia here we get some pretty funky rooftops, right? So this is how we're gonna do it. We could do it one of the few ways. The easiest way for this one would be come corner to corner. Corner to corner. Okay. This now is our center, right? Okay. If I bring this center, actually, if I bring it from this point through this center and going up, that is the center point of the top of this peak. Okay? And then if I come down, all I have to do is let's say I want to take the peak here. I'll come to this corner, to this corner, come to this corner. And this back one would be hidden and I'll draw it through anyways. So now if I want to really do the outline of this correctly, I'll come like this. Come like this. And this is our cool little building with a little pyramid peak on the top right. Like the Washington Monument or something. We can have spiny coming up and you can even have, you know, these lines showing the ridge here and stuff like that. All right. And that works totally in perspective. That's like I said, it's better to have these perspective lines way off to the side and stuff, right? That's one way to do it. Okay. Another way to do it, which that was the easiest way. The other way is we could find the center line going through. Let's see. We'll bring it down to here. This is another building. Okay. We'll come up to this point, come over to this point, we'll use this vanishing point. Come here and come up to here. Okay? So if we're gonna do this, well we can do is draw as our transparent aquarium type type of thing, right? So we'll come over to this corner. Come over to this corner, come over to this corner, come over to this corner. And now we can actually see how we would find the center on the bottom is the exact same way we bisected like this diagonally and then come up to the top, bisected diagonally. And then I don't even have to come all the way down, way, way down to that perspective. That third vanishing point. I can just use this and kinda come through the top right. Okay, so that's one way you could do it. That's another way you can do it as just bisected at the base of the building, bisected at the top of the building. And then draw your central line going all the way through that center mark, right? And then we can bring it on down, bring it on down, bring it on down. Having too much fun here. Okay? So that's, that's same kind of way. You know, a lot of times there's different, different ways to accomplish the same outcome. So long as you're constructing it correctly, you'll find there's a little shortcut that works better for your brain or something like that. Don't fret too much about it. It should work just fine, right? Okay. So there's a few of our little pyramid tops, Right? Okay. We want to do a cutaway. You know, a lot of those those buildings had had cutaways on them and stuff I got right. So let's see if we could do it on this building here. Yeah, I'm going to cut some piece here. So we're going to come up, actually, I'll switch to back to orange. I'm going to come up from here up to this point. All right? From here up to this point, trying to remember which vanishing points I chose for each one. And you know what, I'm going to use this line here is my cutaway point. This is the one I want it anyways, I'm going to do that. Going to bring this over here so you can see I'm starting to cut away. I want to cut away this corner here. This corner, right? This is the one I want to get rid of. Okay? So how am I going to do that? This line comes over, this line comes down to our vanishing point. This one comes up to this vanishing point. Eventually. Let's see if I can do that again. And then I come in and I can come here, come down to here, come over, come across, come down to here, come over and come across, right? So now you can see how that's one way to do this cutaway, right? Do we want to do it on the other side? Sure. Why not? Let's put it about here. Drag it down. And we'll use that same baseline here, right? And this one is going to come over all the way up to this vanishing point, right? There we go. Okay? So we also know that this one will come over up to this vanishing point. Now, what actually gets drawn in here? Well, we're not going to see a lot of that base that's going on there. But what we will see and see if we can erase a little bit of this as it is, right? What we will see is this. This would be the parts that we would see. We'll come here and we'll come here. It's a little crooked but fix that easy, right. Come up to there. Okay. I'm missing something though. I should be following this line along that perspective and coming over, right? So now that's how we would start doing cutaways on a building like this, right? You can see how you would start to just cut pieces away. Or you can do an add on, you can put on a little little thing up top here, right. You know, a little helicopter pad. Do we want to do a helicopter pad? Oh, you know what we should do now that I think about it. Yeah, we gotta do a circle. A circle in this perspective. This one's easy to do the circle in this perspective. Okay? Why is that? Because we're doing it on this plane here. So the only thing that we have to worry about as these two vanishing points, okay? So we're going to come from this vanishing point over here. Drag it all the way through. And when I say circle, you know, we're talking ellipses, right? And from this vanishing point here, drag it all the way through. That's just a little bit off there. Right there. Well, that was even off. Let's do that again. There we go. Okay. So we know we've got this whole thing as a helicopter pad, but that's not really what I want. Okay. What I really want is maybe something along this line, this section here. Okay? So then what I've gotta do is I know it's going to touch here. It's going to touch here. It's going to touch here, it's going to touch here. Those would be my form. First points, right? I'll come through here, come through here, come through here, come through here. I could come bisect here. These are all just bisecting, right, that we've done many, many times. Okay? So again, this point, this point, this point, this point, and now this line is going to be at about 40 percent. This line through here will be at about 40 percent. This line through here will be at about 40 percent. And now we're going to draw on that nice little. Eclipse, ellipse, not Eclipse. And the ellipse is going to come through here. I forgot to draw that in. And there we go. Okay. I think I could probably draw that a little bit better if I was to be a bit more careful there. And so, you know, I could even measure in if I was to erase all this and put the H in or something like that. If I was to want to be all perfect with it, I would measure all the everything in there and put that nice little H in perspective or something, right? And that's our little helicopter pad on top there. Hey, you know, one thing that I noticed in the reference photo was they did a cool little thing on some of these buildings. They have these little pyramid tops, but then they took away the tip of them, right? So why don't we do that? Why don't we figure out how to take this tip away, okay? So what I'm gonna do is I'm going to back away just a little bit. I'm going to grab this corner, bring it in orange, bring it over to this vanishing point. And grab this corner in orange. Kinda remember to switch back colors, bring it over to this vanishing point. Okay? This corner here. We'll come over to this vanishing point and it's starting to get really tightened up in here, right? And this corner here. We'll come over to this vanishing point. Now, what's happening here? What's going on? Well, it's super tight, but this will come to here. This will come to here. This will come to here, and this will come to here. And then everything else gets erased on top of that. So you're basically it, it's so flat right now it's hard to see. Like, you know, it almost looks like this, this, this, but it's not, It's this, this, this, this, right. It's so flat up top here that it's starting to look like a horizontal line because it's getting close to the horizon line here, right? That's something you're going to experience as things get closer to the horizon line. The perspective of the flat edges narrow so much, they get so tight, they start to narrow so much that eventually they almost disappear, right? And they do actually be, they disappear once you get to this horizon line, alright? Okay. So don't fret about it. Don't worry about it too much. But that's how we would take the top off and one of those pyramids. Now, what if we wanted to draw a little air conditioning unit or something or some type of on top of these buildings. They often have little doorways, little box cut. They almost like little huts or houses, but they're not, they're just extensions of the building on top, right. How would we do that? Well, we know that we would kind of pick where it's going to sit first, right, by choosing from this third, oh, the vanishing. But then we can choose, it's, it doesn't have to have the same orientation as this building. You know, it can go to a different vanishing point. Basically think of it this way. Here's the top of the building. And the building's a rectangle, right? Does everything on that building have to align perfectly with this building? Sometimes, you know, sometimes, you know, one boxes here, one boxes here, and they they perfectly aligned with it. All right. Other times, even though the buildings horizontal and vertical, you'll get, you know, there's weird twisted and turned rectangle or something sitting up there. Okay? So why don't we do that will make two new vanishing points here. And go from this point over, this point over maybe here it's going to be a small box. Here, It's going to be a small box. And then it sits right here. It's going to come from this bottom. Third, right? It's going to come right through there. And when we pick the backend of it too, right there. Perfect. Okay, and now we'll bring this point, vanishing point on the horizon line and this point over to this other vanishing point. And they're strangely is a perfect little box that's in perspective, sitting on this rooftop, but not aligned perfectly with the rooftop. Okay? Don't always think that everything has to be perfect. This was something that tripped and trapped me up. Okay, so what this would be doing, we can then draw a little doorway in here or something like that or whatever it is. This is a box sitting on the box, but it's slightly misaligned. Just like. We've got right down here. Right. Okay. We've just got turned a little bit, but it works. It's in the same perspective, it's in the same plane. It's, it's, it's functional within this does perspective view. Okay. It matches this building down below. Okay, one last thing that I think we should give a try for here is drawing one of those old-style water tanks. The big ones that you see in the old Spiderman comics or something like that sitting on top of one of these buildings. Okay, So it's kinda that the cylinder types, right? So that means we're going to have to draw two circles in perspective here and match them up as cylinders, right? So how are we going to do that? I want to put it on this building here. And so I know that the perspective of this building is coming to this point here, right? So I'm going to kind of say, well, let's put it between these points here. And I want to make a square on this rooftop somewhere around here. Does a local kid looks a little bit less like a square and too much like a rectangle that I think is more what we would be going for. Something in this space here, right? Okay? So what we can do here is we don't even need to do that yet. What we're gonna do is find the center, right? We come in and how do we do this? We divide it up as if we were trying to find our, our normal ellipse, right? This is the same way we would do it with a 2 perspective or whatever grab from the vanishing, find the, the middle here, right? Grabbed from this vanishing point and everything we're treating so far as like I said, like a 2. Okay. So we're we're trying to make sure that we're finding all our points. There we go. Now we just divided this perfectly. Alright? Okay. How do we do it? Then? We divide again, divide again, divide again, divide it again. Now, do you remember where the points goal for the ellipse, right? We know that one's gonna touch somewhere up here, right? 1, another point will be here, another point will be here, and another point will be here. Okay? We know that this one will be about 40 percent, 40 percent, 40 percent, 40%. Okay. So if I was to come in here and I'm just going to lightly sketch this out. Who would come here, come around, Come touching this one, and come, come over here. Okay, that's where our ellipse would be on this plane, okay? But this is where it gets a little funkier, okay? Because we're doing it in a three-point perspective here. Well, one of the best ways we can do it is just to recreate this same square a little bit above. Okay, so we'll bring all these points up. Let's bring the corners of this square up and find out where we're going to match it up. Okay? So if we bring these points up here, where do we want to bring it from? How high? Let's say from here. Bring this one over this corner, this one over to here, this corner to this corner. And if we just bring this one over to this corner, There we go. So this is our square plane here, alright? And we can bisected here. We can draw through the middle on this side. We can draw through the middle on this side. And then we can come in and chop it all up again, right, from here to here to here, to here. And where's our next point is going to be here. Here, here, here. 40%, 40, 40%, 40% percent. Okay, so now we've got this rough eclipse that we can do up top here, right? That's the top one. But what is actually going to be visible? Let's back this out and I'll put it on a new layer. What's actually going to be visible is not this whole thing, right? Instead, all that work, and that's a lot of work is all for this. This edge and this edge. And now we come in. And basically, all that work was to do this, this, this bottom part here, this top part here. And this, and that is a whole lot of work to make a cylinder in three-point perspective, right? Okay, tons, I know. And then if we really wanted to, what we could do is, you know, have all of these vertical lines. If it's got siding or something like that. Going down to this perspective point, right? Tons of work. Three-point isn't easy. Oh, give you some examples that I've done before of three-point perspective here. You know, it's tedious stuff, especially if you're going to measure it all out. What I would suggest though, is that if you if you're gonna do something like this, just kinda rough it in, rough in these points. Sketch it all out. And depending on how technical you want to get is how much you want to measure anything. All those measurement tools that I taught you before, whether we're doing ellipses here, whether we're finding pyramids or whatever it is, they're all useful. And like I've always said, you know, learn it, learn the cutaways and stuff, learn how it properly goes. And then after, maybe you can fudge it a little bit Tokyo. But you'll have a better trained eye of how it's, how it's supposed to be structured and built for you to be able to fudge it a little bit afterwards and stuff, right? Does that make sense? One thing I wanted to show you on this last one is you can make a pyramid out of it. Now that I know that we're here, we might as well take one last thing. Go through this center mass, through those, these two center points here, right? Okay. Find where you want the top to be. Let's say it's right here. And then bring it down to the edges. So let's say you're drawing one of those ones where the roof hangs over top, right. You know, like it's kinda like, you know, it's this type or whatever. Right. Okay. It's hanging over top and then you would be able to follow that same sphere. I'm free handing here and it's horrible, but you can measure it out if you really want to. And that could be your little rooftop thing with all of your citing coming down this way. Right? Okay. So that's what she looks like. That's 3 perspective. I know it's tough. This is the first one that we've gone into and look at how many construction lines we've got going on. You gotta figure like with 1, you've got a certain amount of construction lines happening. With 2, almost double 3, you add another layer on to that of construction, right? Because you've got this extra point, okay? Don't let a phase you though. If you have to start erasing, if you're working digitally, start using multiple layers for your construction. Using guides if you want, roughing in guides to help you do it and stuff like that, right? Whatever makes it easier for you do it. And I hope that now you have a better understanding of bird's eye perspective. In three-point. Guys, send me your practice. I want to see what some of these look like. And yeah, don't complain to me that as tedious, I already know. I know I sympathize, but I know you can do it. Make sure you do it right at least once or twice, get it down and then you can start to wing a few of these parts. Okay. Good luck guys.
18. Perspective 3 pt worm: Hey guys, we're back and we've got a cool new union in front of us. We're going to look at 3 perspective doing another exterior shot, but this time from a worm's eye view. And you can see it in front of me. I've got Time Square. Not the traditional viewpoint of Times Square though not the one we're, we're looking straight at the center here, but I kind of backed away from it a little bit. And I'm looking at one of the other buildings off to the side here, right? So in this unit we're gonna do a couple things. Just a little, okay, not so different, but a little different. I want to teach you how to sketch things up a little bit. Okay? So instead of being all really tight with, with our drawing here, we're going to do it really sketchy and try to do a bit of as if we were thumbnailing and a little bit. Okay. So we're going to back out and we're going to try to find some of our points, okay? Some of our vanishing points. When it comes to 3 perspective, especially from this. Actually for many of you, I would start with the one up, either up or down below the third right. Okay. So we're going to see if we can bring this up here and start to find where our third is, right, it's somewhere up in this direction. I'm getting really loose here, right? Actually, this one's probably too loose. Should probably be up here. So, so far I'm I'm looking like I'm in this direction here, right. There we go. Yeah. Hopefully you're tune my little warm up exercise that I did. I've got loaded in there that has ways to warm up with connecting the dots and stuff, right. Okay. There we go. Okay. So I guess I can do it that way. Either way. That's our third right. Now, what we're gonna do is we're going to focus on this building and there's a reason why, and I'm going to explain it just in a little bit here. But we're going to focus on this building to find our first set of vanishing points off to the side here. Okay? So if I'm going off to the side here, it's looking like here. It's looking like here, right? This is our, our first set of points, right? Next one we can come off of here. And it looks pretty straight, you know, for drawing down this line down here, we're going to come somewhere around here, right? You can see pretty much everything is following along this line on this road here, okay? This road also falls it and you can see how this one also falls back to there. Okay, so when I got this, this reference photo, here is our little introduction into using some little tricks and stuff, right? I didn't take this photo. I've been in Time Square but I didn't take it. Well, I took it, I took it as a screen capture, right? But this was using Google Maps. And I think there's some really good things that you could do with Google Maps. You can just jump into Google Maps. You can get awesome pictures like this on the street view, right? You can pan it, turn it, you can do a bunch of things with it. Okay. There's a lot of cool stuff with Google Maps, but it has a little bit of limitations. And it'll trip you up if you don't know what you're doing. Okay, so here we've got kind of a zoomed out view of exactly where we were and where we were from. That vantage point was down here. Okay. So we're down here and we're kinda looking this way. This was our viewpoint, okay, we're looking at it this way so we can see how this building here, parts of it, the beginning of this, all follows this nice line, right? Okay? And this will follow this one. They're all kind of in that same plane, right? Okay, and this road follows it, right? And this road follows it. And so that's why right now, this is really easy to work out for are our two points of vanishing perspective if we were to draw it out. All right, okay. But there's some tricky parts to it. These ones are not on the same plane. You can see how they're following a different direction, okay? These are our position differently and we've talked about this in previous units. And bonus unit that I included was various vanishing points on in the same shot, right? Okay. And so not everything is going to be simple block with another block, with another block. Sometimes these blocks will be turned and that's what's happening here. We've got this block here, right? And likely equals back here. And so, but then we've got a block sitting on top of it that is not aligned with it. Okay, It's all twisted up. So if we come back to here and we try to follow these buildings, well, hey, hey, no, they're coming to a different vanishing point right there, coming somewhere off of here. And that's where it gets kinda wonky, right? That's why are we having, apparently, what's the same building here going to two different vanishing points on this side. That's not what's happening. What's actually happening is this base is in a different alignment than this. And even some of these other buildings, you can see the ones coming from behind here. They're in alignment with this building. And that's why, most likely why they put it this way to have this building all lined up with the other buildings. This block. And as we're gonna see, this block is a little wonky. This one, we've got our vanishing point coming down to here. We know that this is one vanishing point that's pretty, pretty used to being used here by most of the things on this block. So these ones are enlightened and this one is in line with this vanishing point, okay? But this front BCE, somewhere along here is misaligned and it's coming out here. It's not matching all of these. And let's take a look from up top. This is why, Here's Seventh Avenue, right? And so a lot of these buildings, we can see these buildings are running along this way, right? Most buildings are running in this direction back and forth, right? That's how they're aligned. Aligned with 77th Avenue, unlikely. That carries over through most of the city, right? What happens here is we've got a divergence in that alignment. Okay, we've got this part of Times Square with this display billboards here and stuff like that, and this pedestrian area and everything like that. And that throws this whole centerpiece into a weird, weird area. Things become misaligned according to these very basic grid structure, right? But it doesn't scare us because we know, as we've said many times before, sure, we can have blocks, but we can have other blocks align different on these, okay? They're not always going to be perfect. So having multiple points of vanishing points on the same piece isn't all that scary. Okay, so that's what's happening here is we've got this vanishing point and this vanishing point and this one, this third one stays pretty consistent through all of this, we can see how these, these are all coming up to this, this vanishing point. Okay? But the alignment on the block here is different. Okay? And now, now that explains why. So awesome. Using Google Street View, we can pan, we can turn, we can zoom in, we can zoom out. We can do a bunch of stuff with it and everything, right. And I think that just entering an address and and coming into that neighborhood and seeing, you know, seeing what's what the buildings look like. Well, the design and everything. It's a great tool that the artist didn't have even just a few years ago and stuff. But it can trip you up. Okay? So you really have to understand the basics of perspective and everything before you get into it. Now the next thing I wanted to talk about is we've kinda got our alignment roughly put in here, right? Okay. The other thing that I want to talk about is when we, when we frame it. Okay, let's see. I want to have a frame. Good enough, right? That's enough. Frame is frame, right? And depending on the frame, it's going to not change my perspective. The perspective will change, but the focus of what's in the frame will change, right? As I, as I move this around here, if I move it over here, or if I shape it differently, if I shape it more vertically aligned, you know, maybe I've got somebody coming in to like superman flying in or something like that. Right? Okay. If I've got a down here, maybe I've got, for example, yes, I've still got, it's interesting, right? Because if I zoom in here, You're not going to see that third of perspective in this perspective over there. But it's still there. I'm going to see just how it's formed into the shape of this picture, how this, even if I just had a Corner notch here, I would see how it's going off to the side, right? But a view like this might be good. You could have a galactose standing off into the background here or something like that, right? And then have people running, shouting all that kinda stuff, right? So what you would do here then is I can fade this out and I could just start working on this. I would start working on my thumbnail here. Right? Just roughing roughing in. Here's my sidewalk coming down this way, comes out to here, right? And I could start to plot in the stores, the base of the sidewalk coming around, right. Start to see, I've gotta be careful here, right? These ones down here should all be going to that point up there. Okay? They should all be coming to that. It's getting warped here at this point, right? But they're coming up to our third in the sky. Right. Okay. So I've got the signs, I've got the brakes and the signs there. And they're going to come up to this point in the sky, right? Okay, So I can start to rough in all these buildings. Bring it on down, right? And then get more specific in the details, street level details that are happening here, the edges of it and stuff, right? But just realizing that even if I'm bringing some of these buildings, Let's just draw this one in, for example, off to this perspective point, right? I'm still kind of adhering to this one over here, right? This one from here. So I would draw it down. And this is how you might thumb in just a quick sketch. Using. And if you really want to, what you could do is come back to your construction area, right? And draw a bunch of these lines coming down as just kinda guidelines coming from that from that vanishing point in the sky, especially if it's one you're going to be using a lot, right? This will help you line things up a little bit, right? There's some digital tricks to do this, but you can do it as just sketching. Okay, so I'll back that a little bit. And that'll help us line up some of these buildings going off into the distance and stuff, right? And remember, we know that this is aligned a little bit different here. Alright. There we go. Cool, right? And these ones are all going to be in line. Coming down to this vanishing point. And I'm not going to draw the cars in now, but that would be how we could have a little thumbnail, right? Of what we're going to do for maybe this comic strip or whatever. You can use a reference like that and then you can start to add in whatever details you want on top of it. All right, pretty cool. Okay, so that's an easy way to get perspective on something on a, on a thumbnail. It's just kinda either rough it in, you know, just by hand, by sketch, by using a reference. You don't have to trace over a reference, but just plotting in these various little points or whatever, right? You know, you've got 1 up here, the other one, the other one over here, and maybe another one over here, right, for that, the divergence if you want it or don't, you know, when you're constructing something by yourself. Sometimes that can be a little bit too complicated, right? So don't get too stressed over it, you know, try to keep it simple if you want, you get a crop this tighter. But just realize that if you want to go Advanced, you can start to add in those multiple vanishing points, right? And the lesson here I think is understanding that a tool like Google Street View and stuff I get is really, really awesome, but can really confuse you and mess you up if you don't know what you're doing. So always come back to the principles of perspective and just make sure you've got it down and then you can start to bend it, break it, that kinda stuff. And we're gonna get into more complex ones as we start actually bending the line, right when it comes to 4.5 perspective. But for now I think this was a lot to handle working on thumbnails. You can even plot it out again, right? Just plot out your vanishing points and just kinda be roughing it in and then seeing where your buildings might go. Maybe you've got a this is the main building here, something like that, right? Okay. This is your main building and then everything starts going off of, off of this point or whatever, right? And you start to rough in your your city. You start to rough it in and then you can go over, start to ink it out just a little bit, right? And realizing that it's all within this nice little boundary. Okay? So have fun doing these thumbnails. Just don't do them huge, you know, don't, don't even do them with a ruler or just keep it nice and loose. And see what you can put the focus on in your thumb if you want to. Make sure that you have a blank space right here, whatever, just frame your buildings all around it, right? And then you can have galactose in the background or whatever, you know, what's collected, his horn head piece. Right. You know, I mean, like this is, this is a thumbnail. So I'm not teaching you storyboarding here, but I'm trying to help you that using these backgrounds, these simplified thumbs to help develop your backgrounds. Using perspective in it. It all kinda comes together in making great pieces. Okay guys, I really hope this helped you out and have fun playing in Google Maps.
19. Perspective 4 pt: Hey guys, we're back and this one is the big one. Well, I can't say it's big. It's not going to be especially long, but it's as big as in it's a big step. I think. I think that generally we look at one-point perspective, two-point perspective as kinda being the basics, right? 3 perspective as being into that. A little bit advanced level and stuff, little bit intermediate. But four-point perspective. Wow, you know, not too many people tackle this and so I'm kind of impressed you're here, you know, heck, I'm impressed I'm here because I got to teach this thing. Okay, So what exactly his four-point perspective, right? Well, let's, let's break it down simply. We're going to throw a horizon line in here like we normally would write, okay? And we'll put on two vanishing points similar to 2 perspective. Okay, so this all looks kinda, kinda familiar so far, right? And of course, if this is our vanishing points, and now I'm just roughing it in here because I think that the accuracy is not as important on this section here. More so I want you to understand, you know, kinda what the purposes of these different points are. Okay? So we're just kinda roughing it in. Of course, if I was really doing this, I would use a ruler or line tool, whatever it is, right? Okay, but you can see it now this is an easy 2 perspective grid, right? Okay. This is something actually good for you to practice no matter what is just drawing in these grids, right? Okay, So normally when we're doing two-point perspective, we have this, this, this, or two little things, right? We end, we kinda go from 1 to the other point. And then our next axis is just a simple vertical line, right? You know, it'll come here and then our shapes will be defined by whatever point, vanishing point is on either side type of thing. All right? That's our normal way. This is where it's going to get different into this four-point. Yes, we're going to have a vertical axis. Okay. We will have it. But it's not going to be exactly how it was before. Actually, maybe I'll draw this just a little bit bigger. Okay, What we're gonna do is put a third, seems familiar, and a fourth. This is new. And this is where it's going to get an even want gear and stuff for him. Instead of trying to somehow use these points coming off like this and this point coming off like this. Maybe above and below horizon. What 4 perspective does actually is used curvatures. Okay? So I'm going to rough it in right now and kinda rough and these curves. As it goes like this, there's a few different ways you can do this more accurately, but just roughing it for now is cool. Okay. There we go. And you know what? Just for the ease of my hand, I'm just going to flip the board here a little bit and keep doing these rough curvatures until I get what might resemble a sphere. And actually I guess I could bump it up a little bit more on this side, right? Not that accurate, but you can see, Hey, something's going on here, right? We've got these 21.2, our normal vanishing points we're very familiar with. But with this third, fourth, this is where it gets kind of interesting. All right? Okay, so instead of just a straight up and down axis for, for our vertical line, we have something different here. So if I was to draw in a box, Alright, let's say this line is, we're going to bring it off to here. Okay? We're going to come up to this vanishing point, and this one's going to come over to here, right? The vertical lines would look like would be something like this. This would come off. This might come somewhere, maybe up to here. And this would come down right. Then of course, this can come straight over and this could come straight back. So there's this light curve here, curves here, Curves more here. And this is, these lines are straight going off to the vanishing points, okay? It gets here, it's a little warped. You know, imagine that we have these lines lining the box or something like that, right? And you can see they're starting to get warped as they make their way out. But as we do the same one for a box out here, you know, it, it's starting to get really, really warped. Something like this, maybe along these lines. And of course this is just roughing in right now. But you can see how warped things are going to start to get as they come really out here, right? Okay. So this is 4 perspective. Okay, So let's imagine this is in a room of sorts or something like that, right? We can have this is kinda the center of the room in the back walls back here somewhere. Well, we know that if we're coming from this vantage point, from this vanishing point here, it's going to come off of there. And maybe let's say it's in the coming in the corner here or something like that somewhere around back here. Right. And it's going to come almost in line with this top of the box, right? And then this exterior part of the wall can be here. And likewise, it's going to come from this vanishing point off to the right. Come back here, come from behind this box. Come from that vanishing point up. And then maybe we'll have the wall would be somewhere out here or something. Does that make sense? And now it looks like it's in some type of room, right? And of course you could put like a window if you really wanted to have it vanishing out. Something along these lines. Of course, more details would be brought into it and everything, right? And on this side, if we really wanted to, we can do the exact same thing. Have some type of big bay window here. Cool. And that's our little room. In a four-point perspective. Right? Now it looks cute. Almost looks like a happy face here we've got a big nose in the middle and two eyes. Don't mind me. What you can do. And I did this because my own time because I didn't want to waste your time, but I used Ellipse tools and stuff like that to draw this out. Right. Okay. So if I was to come in here, I could add in, let's see. I can add in my horizon line, put these two points here. I know that this point is up here and this one is here. And now I can just kind of fade everything back just a little bit and do the same thing here, right? Basically, it's, it's how I look at it as a warped two-point perspective. Okay? And that's, that's a simple as it can get, is just think of that anything's going toward your normal two points will operate normally, okay? Two points, 12, right? You can just think that anything that's coming to 0.1.2 is just going to behave the same way, a 2 perspective we'll write. But as soon as you want to start adding in vertical lines, that's when you've got to pay attention to the curve, right? Um, how you achieve this curve is up to you. You can rough it in like I did, kinda down here, right? Where are we? There we go. And actually, that's not that bad. You don't look at it. It actually kind of suits the purpose because what you're trying to do with four-point often is have this optical stretching right through this lens stretching. We've talked about how camera lenses can warm things and stuff. Well, this is the warp, right? This is, this is an extreme warp. So having it, playing it a little bit loose isn't the worst thing in the world. And even though I wasn't even trying on my elliptical lines here, it kinda all lines up. Not that bad, right? So if you take even just the littlest more care in it, it will make a lot more sense. And, you know, you can come out with something that's really cool. You can use this in like especially distorted things like security camera footage or something like that. Imagine trying to observe from a high point or something like that on a scene, a robbery scene or something like that. You can use it as a warped mirror image or something. Or those funky cityscapes, right? Where you have a downward bird's eye view, but it's all stretched and warped according to the lens, right? Okay, so that's 4 perspective, the key points of four-point perspective, of course, our points 12 on your normal horizon line, right? Make sure you plot it out normally. It's no biggie. And then do a vertical axis with points, three, points four. Okay? And once you assign those 34 points, that's when you start to add in your circle and then your ellipses within that circle. And really just getting a nice curvature to everything. And then realizing that It's either going to, the lines are either going to 12 as they normally would write. They're either coming off of there or if they're vertical lines, they are following this curvature right there, following the curvature there. Okay? All right, I hope that makes sense. I hope of 4 perspective is, is something that you want to try out. The theory is here. You can review it a few times and stuff like that, right? I think it's it's the truth is it's warped, It's weird, right? So how often you want to use it is up to you. But I want you to be able to use it. I want you to understand the premises behind it and to say, okay, no, I can do this. I gotta figure it out or I see how they did it. And yeah, I could recreate that if I wanted to write. Are you guys practice away with this for point perspective? And once again, congratulations, because this is some pretty cool stuff here.
20. Perspective 5 pt: Hey, what's up guys? Here with another how to draw comics perspective video for you. This one, we're coming near the end here. This is 5 perspective dun, dun, dun. I don't have any musical sound effects. Sorry guys. But seriously, like this is kinda cool, right? This is, this is as good as it gets. Is it? We're gonna find out, and we're gonna kinda find out if we can make sense of what's going on here, okay? You know what, it's going to start real basic, similar to how we've done it before, right? We can have a horizon line going off across the horizon, right? We can have 1 vanishing 0.2 to vanishing point, right? So this is two-point perspective basically at this point, right? And remember when we did was at 4 perspective we had kind of a center. Let's try to hit this somewhere around center. It doesn't have to be though, but we're going to do it anyways. We had this center point and we said, okay, well here's points 3 and 4 on our little axis, right? Horizontal and vertical axis here, right? And so we were like Woo, we did it. We've got 1, 2, 3, 4, we've got four points perspective. Yeah. And we're like, Cool, Right? That's really taking it beyond where we've been before him. But by the title of this video on, I guess you figure it out. We're doing number 5. Where is it though? Well, I'm guessing you can kind of figure it out. It's right here in the middle. This is number five. Okay? How does this all work? Well, treat number 5 as a 1 perspective. Okay, I can draw through it. Have it coming off from there. Think of it as a one-point perspective, okay? That center point is going to be our vanishing point for the center for that 1. Thinking, right? Okay, One and two, instead of going straight out, what we're gonna do is the same way we did 34. We're going to have ellipsis. Okay, so we can kinda rough the mean here. This is three to four, right? And I can rough it in on the other side. See how good I am at roughing it in. That was horrible. I've talked to you before about measuring these out a little bit better, right? Okay. But now we can switch it up and we're going to have it doing the exact same thing coming out here, okay? Rounding this way. And this gives that full fishbowl effect. Everything is bending, okay? It's going to bend to all of these points over here. There we go. Yeah, my circle kinda sucks. I gotta say I redid it with the ellipse once, right? Even this takes a little while, but once I've got this down now, I can kinda copy paste it and use it a bunch of different times, right? So I can take this and bring it into my next piece and just kinda set it in the background or layered over top and just have it sitting there. I'll make sure to attach it in the files for this unit. And so, you know, if you don't want to go through the trouble of printing this offer of trying to use a curve tool or whatever to do it. I've already done it for you. But what do it because I learned from doing it right. So I'm not telling you not to do it. I'm just saying, here's another tool for you. And there's that single point of perspective, right? That fifth or as we would think of it, that one-point perspective, right? Okay, so what do we do once we have all this late in, right? How does it work? Well, there's a few ways you could think of it this way. Imagine I was going to draw a building. This building is going to be here. It's gonna come up here to here. Okay? It's going to come towards this center point. Come up to here, come over, and then the back of the building is going to come back here and it's going to come down, right? Okay. So my sidewalk could be coming out this way. All right. And then I'll have a series of buildings that will be curving as they progress down towards the vanishing point there, right? Okay. It would seem the same thing would happen is if I was to draw a building on this side down to this point, right, bring it to there. And of course my measurements aren't really that all that great on this, right? Have a come to here and then have it come down. To that point, right? Okay, so I've got this and then if I want to have like 0 crossing a street crossing, I could do something like this. Alright? Okay. And here would be the sidewalk, right? Here's a sidewalk and the road would bend off to the side and I would have more buildings coming down this way as they fade off into this direction. Same on this side, the buildings would start to fade off this way, coming off into this direction, right? And you can see how this gets pretty cool. It gives that nice warped feeling to everything. All right, cool. One thing that I want you to think of two, and I'm going to redo this just a little bit for you, is I don't want you to get too stuck with a certain limitation. So for example, we did it like this and we did it like this, right? And we hit 12345, right? I still want you hit those 12345. But you can kinda warp things. You can have 1, 2, and then 3, and 4 in close. Okay, So we're kinda going further out here. So this will give you this. If we're going to be warping stuff, We might as well have some fun with it. That's how I see it, Right? Okay, So I can, I can even warp way out here and start to bend it even more. Okay? It's becoming so bent and so ridiculous, right? Okay. By the time it gets out here, it's, you know, it's got this weird warp to it, right? It's better if I follow, I find, if I follow the center out, then it kinda makes a bit more sense to me. If not, I, it gets all pinky and stuff, right? Okay. So that's, that's one way to do it. And then you've got, of course, you know, you can do this from the center. This is, it's going to get all warped this way, right? You know, like obviously it a war quicker. As it's stretched out here. There we go. Cool. Look at how funky that would look like. Imagine drawing buildings in this. This is going to look pretty funky. So I come in here and, you know, my, let's do that same kinda street scene, right? You know, my my sidewalk is coming here. My sidewalk is coming here. But now my sidewalk is starting to bend out this way and bend out this way, right? So it's going to come along this way. And maybe my zebra crossings are coming out here into the, the foreground, right? And then my buildings now, while this is going to get really, really kinda cool, my buildings are coming out like this. All right? Bending out this way. Alright. This building is going to bend kinda like this. It'll come inside here. Using this one-point perspective, right? The building will come out here. This one will bend over and come this way. So you can see how by stretching your ellipses, it can get kind of cool-looking, right? There's a lot of different things you can do with this here that don't get to hedged in with having the the vertical and horizontal axis the exact same distance from each other and stuff, right? The same measurement, keeping it within a very confined box. You can stretch, you can pull, you can play. Really have fun with and stuff, right? Okay, so just to refresh our memories here, when we're talking about a five-point perspective, where we're going back to our normals, 1, 2, and then 3 and 4 as if we had the fourth for point perspective that we've practiced in a previous unit, right? And now we've got this fifth. This is number five, right? I could fade it out just a little bit and put a big old number five right smack in the middle. So think of it as a one-point perspective that gets really trippy, right? And again, this can be used for scoping effects, for warping affects, you know, like if you're trying to do a massive lens distortion, you know, your sniper rifle or something like that. Security camera. Or just a weird sideview, you know, like watching Into the Spider-Verse or something and you see Miles Morales diving down into a city. Well, that's where you use this kind of thing, right? That's where you can use this cool. You know, imagine that these are your tops of the buildings. You started to draw them in here, right? This is the top of the building and then they're coming down to street level here. Maybe this is a street along here somewhere, right? And so Miles is now diving. And there's all these buildings that are in, in the perspective, in his way. How cool is that looking right? This, this can get really funky, right? So whether you're a big Miles Morales fan or spotty or whatever and stuff, right? It doesn't really matter. What you can do is use this as a cool way to show a huge cityscape and give the depth that's needed to it to really show how amazing a city might be from this angle, right? Okay. Yeah, I guess with technology, I guess the easiest way to compare this to a GoPro or something like that. You know how that lens warping happens in Go Pro's, right? So yeah, I really think, you know, five-point perspective is awesome. And I think there's a reason why beginners don't tackle it. You know, I think that it's, it's tough. It can get really bendy at times. You know, the tools that are needed. It's much easier digitally as you can see what I've got in front of me here, right? But you can do a traditionally you can't even do it free hand as you saw me me sketching it out. Rate. It's possible to do it. Okay. Don't shy away from it. Think of the scene that you're wanting to create. Think of a hero rushing towards you are falling into the city and stuff like that. And think of the impact that this bending would have on everything, right? Think of how the emotion it would elicit with all this feeling of, of, you know, the warping and stuff I get that. It gives you a kinda queasy feeling or something, right? That's where this can really come in as a powerful tool. Okay? All right guys, I hope this lesson helped you. And like I said, checking the files for this, I'm going to attach some of these predrawn grids for you and you can print them out and practice on them. Or if you've got them digitally, just pull them into whatever program. Fade the opacity just a little bit, and then sketch over top and have fun with it. And I think that's the main thing. Just have fun with this.
21. Perspective Clip Studio Paint: Hey guys, we're back with another unit and this one's one of my favorites, actually, one of my favorite functions in Clip Studio Paint. Yeah. This is almost why I got this program is is this function here, right? Like so I'm going to show it to you and I'm kinda giving you my whole screen here and we're gonna kinda zoom into some areas, right? But what we're going to look at within this program is their perspective tools, perspective rulers. They're kinda awesome. Okay, so we're going to start it off. We're going to come up here to Layer and then ruler frame and then Create Perspective ruler. Okay, And then you're gonna get this pop up here. And it'll ask you what type of perspective ruler you're going to create a Clip Studio Paint is limited to 1.2 and three-point perspective. Okay, I'm going to set this as creating a new layer. It doesn't really matter. I've got nothing on this layer that going on right now. But just for our sake, we're gonna do this and we create a new layer. Okay, now it's got a whole bunch of lines at pop-up that aren't really anything. They're just lines right now. But as soon as I click on it, now, this, this line here, this is my horizon line. Okay? I can actually tilt my horizon line if I want to, which is pretty darn cool. But let's set it just normal to begin with. Okay. We're right about there, right? Okay. Already you can see what's happening. Now. I can take this point and this point and show, you know, kinda where my, my, where the lines would be for perspective, right? I can take my my center. I can slide it around and everything right? Just shimmy it from side to side. One cool thing is that when we're using, I've got this vanishing point and I can kind of adjusted. But I don't know if you guys are noticing that, but I've kinda locked these into place. So let's say I want to find this point of my road and this point of my road, right? Like i'm, I'm saying, okay, well, this is a road to traditional road going off into the distance or train tracks or whatever it is, right? And I want my train tracks to be this wide when they come come towards me here, okay. Makes sense. I want my train tracks to be this wide, alright? Now, they'll always stay this wide. But as I bring it down, I brought the horizon line down and you can see how it tapers. Tapers off and we got more sky here, right? It tapers more quickly. Here. When I bring the horizon line way up, we would have this long road looking down on it, right? And yeah, it would be kinda cool, right. So let's see how we would do this. Just I'm going to put it normally in. Let's do a little drawing here, okay? So I've set my horizon line here, my horizon lines going across. Okay? Let's see if I can draw on this line right. Now. Every line that I draw that's not on this horizon line is either going to be vertical, horizontal, or going to the vanishing point. Okay? Sometimes Clip Studio Paint can be a little bit funny about dragging it to the point. So I've gotta kinda of like grab it and make sure I'm heading in the right direction. Do you see how that happened? How I always get pulled it up. Right. So it can be a little funky. You want to make sure that you are paying attention to the lines you're drawing here. Alright, so let's see. I'm drawing a little L shape here. And I could very easily drag all these down. And there we go. We can make this little bench super-easy, right? The cool thing about this too is not just does it act as a ruler, right? We can all use rulers I've been teaching, we've been looking at actual using just a straight edge, right? But what this does is you can have the thickness of the line right? In perspective, right? So if I bump this up, you can see how I can add different thickness to the stroke, right? Okay. So this is one-point perspective. We can get rid of that layer. Layer settings. Nope, sorry, Ruler. Create Perspective ruler. Can it go two points? Okay. Once again, we've got our horizon line, right? Which is kind of cool. But in this case we've got something funky going on here. We've got these extra two points of our perspective. And here's where the power of this program really comes in. Because often we're limited to the You know, the size of the panel that we're working on or whatever, right. The the the paper in front of us, the size of our desk, the size of the, even in digital, we're often limited, like it's really hard to imagine a vanishing point off the screen. But here, look what I just did. I moved this vanishing point way off the screen. I can move it way off. So if I want to get in here and start drawing a block, right? Look at how cool this is. Oops. And you can see how sometimes it doesn't totally fix. But look at how cool that is that I've got these vanishing points for this 2 perspective way off to the, off of the panel here. But it's still showing up really, really well, right? So I can come in here, draw to the vanishing points. And you can see my frustration a little bit. Sometimes it doesn't totally grab on, right? But it's not that bad. There we go. And that's how easy it is to just draw a cube with these vanishing points way off of the screen, right? Okay? Again, this is a massive tool. If you have a big art desk at home or something like that, you can set pins up, tape your paper down, get a big ruler and start measuring this all out and stuff. And honestly that's the way I was doing it for years years ago, right? Yeah. Let's call it eighties. Yeah. It was great and you learned a lot from it. But boy, it was a pain. If I had a tool like this, you know, it's so much faster, right? So much easier to do. And you could just boom, boom, boom. Drag it on down, and then make whatever shapes you want to make right? Now I'm not gonna say it's perfect though. I got to say sometimes it takes me a few strokes in the same pattern to, to get where I want it to get to do. You can see some kind of miss strokes is not firing the way that I wanted to write. Sometimes that's kind of just the luck of the draw on whether I'm aligning myself with the lines very well or not, right with there I'm hitting towards that vanishing point or not. Sometimes I think it's just it's just where sometimes you just have to do it a couple times, right. So even though this is a huge time-saver, yeah, there's a couple of things that are a little bit not a 100 percent. I would put it at the 98% mark, right? Okay, and for our last one here, we've got three-point perspective. So what do I do? Of course, I come up to Layer Ruler, frame creep perspective ruler, and I'm gonna go 3 perspective, create a new layer. All right, well, that looks exciting. I love it. It's pretty cool looking, but yeah, I can get a little bit tricky, right? So what do we have here? Well, we have r objects that we can select here, right? We've got our horizon line. Just like before. We've got this, you know, are 12 for vanishing points here off to the side. All right? And then if I back out, we've got a third. Okay. So it could be way down at the bottom for the bird's eye view, right? And way up top for worm's eye view. Okay. Which one do we want to do? Let's do. Let's do a bird's eye view, okay, using this ruler, I'm just going to kind of adjusted here and see if I can cut a center at just a little bit. It doesn't have to be centered, but it just for our own sake, right? Move these points off. And let's get in here and kinda start drawing a little bit. What do we want to draw? Our simple building blocks, right? So we're going to come and draw one off to the side here. Off to the side here. Cool. There we go. Yeah, look at that, that typical three-point taper going down, Right? So I think it looks pretty cool and we can have this building a little bit bigger. It comes above the horizon line, comes out right over to this side. Maybe brings it down. There we go. This one can come over, bring it down this way, right? Yeah, this is pretty cool. You can get some really interesting looks for buildings and stuff. If you're doing this, that obviously gives you that bird's eye, right? That's what it's for. You know, there's still a little bit of trickiness that goes on with this clip ruler that it doesn't always grab how you want it to. Once in a while, it'll go in a direction that I I'm not intending. I think of that as my like, my only sacrifice for perfection. I can't have it perfect. It doesn't want to be perfect for me. But it can come down close, right? And so I get it. I'm never going to have perfection. I don't know. I met the guys From Clip Studio Paint one time they came to a Comic-Con in Seoul, Korea. And so I chatted with him about it and I said I love your program and give them some really good feedback on it and stuff. And it was interesting after I gave them that feedback, they actually made some changes. It wasn't about this though, it was about some of their layer options and stuff, right? Color changes and that kind of stuff, right? But they seem to be open for feedback. So hopefully someday, you know, they might actually listen to me in kinda just helped the ruler snap, snap to a ruler. That's, that's the term you'll hear, right? So this ruler step could use a little bit more work. I think. It's good and you know, you get, once you start really rolling on a building or on us, on a scene like this, you start to get a lot more comfortable with it. And then all of a sudden I find them more than I'm doing it. The more things kinda seem to fall in line and stuff, right? So, you know, sometimes there's frustration and sometimes that frustration seems to compound on itself. In one day you'll be like everything's gone wrong, you know? No, but otherwise, the rulers kinda awesome. Okay, so I would highly recommend getting Clip Studio Paint. I can't remember if it's an in all versions though. I think you've got to check the different versions. There's pro EX or something like that. And I don't know if every version supports this function. So make sure you double-check it. So we've got 3 perspective that we've been fooling around with, right? Hey, you know, what we could do just a little bit is coming here and move these around. You know, I'm not going to move this horizon line, right? I want to keep that the same. Okay? I don't wanna, I don't want to mess with that module, okay, the horizon line will stay the same as on the same plane. Okay? But as we all know, buildings can, can shift and tilt a little bit, right? Not every building is perfectly going to be aligned with the others in its row. Okay, So we can start to shifted, shift this one around. You can see I, I pulled the vanishing points in just a little bit, right? And we've gone over this before in previous units about changing vanishing points in the same piece, right? So this isn't the weirdest thing that'll happen to you. But you can see how it can actually look kinda cool, right? That things can get, if I can ever get it to work here. There we go. There. So it gets more realistic that buildings aren't always perfectly in line, aligned with each other and stuff like that, that they start to shift around a little bit so I can maybe move this one here, move this one out. All right. I want to think of it like I talked to you before about a top, right and have this top always at 90 degrees, it's rotating and stuff. I don't want to go shorter than 90 degrees, right. So I can make sure I keep it. Keep it smart. Okay? Keep within the rules even though we've got this cool little tool that we're using here with Clip Studio Paint. You don't want to be abusing it, right? And abusing it would be forgetting some of the rules that we've got, right? Okay, so that's 3 perspective. We did the little bird's eye view and stuff. We're looking down at the top of these buildings, right? And they're going off down to that third way down below, right? Clip Studio Paint does not have a native built in 4.5 perspective rulers. But there are ways you can do it. There are Ellipse tools and everything that our president in Clip Studio Paint. There's some people that have done a little bit of plugins. I don't want to put them into the course or anything because that's their material, that's their course, right? Or not their course, but the construct. They painstakingly, I'm done. All these curves that perfectly help you with a four-point perspective or something, right? So if you go on Google and Google Clip Studio Paint, four-point perspective. You'll find it, you know, for Point Perspective ruler some. And if you can't find it, send me a message and I'll help you find it. I think I I think I paid the dude like maybe a donation thing or it's like two bucks or something like that. It doesn't really matter, but it's, it's just cool to have, right? And once you, if you ever get it, you'll realize, wow, this guy, but a lot of effort into this, right? So I like recognizing that effort when people put it up there. I'll pay for it. Anyways guys, I really hope that these, these built-in Clip Studio Paint, perspective options and ruler's really help you. Whether it's 1.2 or 3, it'll help you for being able to work off the panel, for being able to do bigger pieces. For really, you know, once you've learned the rules, this will make the process times faster for you, right? And isn't that what it is it's about sometimes, you know, kicking up to speed. Right. Okay, guys. So here's my unsolicited unpaid public endorsement for Clip Studio Paint. Go get it.
22. Perspective Lego Hack: Hey guys, I'm back and I've got another
video for you here. This time we're going
to talk about the Lego. I need a neck on that. What I'm going to
teach you here is just something really quick, really easy to help
you add lw half. So your way through
a perspective seen. This won't be a long video
because this is really easy to do and hopefully really
convenient for years something. But it's one that if
you're struggling, like, how do I set something up? How do I do something or
I want the camera or, you know, sometimes it's hard
to picture it in your head. I got the answer for you. Let's go into lego. Alright, let's see
what I got here. First thing I've got here
is a pile of little Legos. Now, you might say, that's not a lot of Lego
you've got going on. It's not specifically grab this little bag
from a cheap store. I think it was a
dollar for this bag. A 1 for dozen or more
pieces or whatever. That's all I want. All I wanted was this to
show you what you can do. So yes, nowadays you
can jump out to go to your local toy store
or whatever and buy like $50 sets where you can construct spaceships and beverage chimps, other types. Oops, that's not what
you need to do here. It's cool if you got it. I
got lots of toys behind me. But that's not what
I'm talking about. I'm talking about just
some simple bricks to help you do what
we're about to do. We've got these simple bricks. Looks good, right?
That's a dollars worth. Like I said, half dozen pieces and it doesn't pieces and half of them
are useless for me. What am I gonna do with them? Well, I'm going to set
them up in a certain way. And I'm gonna start with
this setup right now. What I did was I could
see I laid it out there. And some of this I'm gonna
do maybe with a ruler. Some of it I'm going to do with with just a freehand just to show you
what's going on here, you can see I kind of
laid out these blocks. I shall come down here. I actually laid
them out this way. I set my phone in-between them so they were even in imagine if this was on a wide Boulevard or something like that
and these buildings were aligning the boulevard.
What can you see? What you can see here is this
line and here's this line. And where do you think that
it will eventually lead me to keep keep a comment and I'm just free handing
right here. And it looks ugly. And that's okay. We can see if I was to do this a
little bit more nicely, that we've got a
perspective going on here. One-point perspective. Now the camera's going
to warp some things. So be a little bit wary of that. Depending on how close
you get with these, especially when you're
using phones and stuff. The lens warps
things a little bit, but this is a pretty nice little one-point perspective
that I can use and I can draw the
boulevard sections down the middle if I wanted to, and then the lanes of
the road and stuff. And here's maybe a crosswalk. I could use this
little sketch here. Awesome. We as this reference does legal reference to help me sketch out maybe
a bird's eye view of a convoy of cars
coming down the road. And then I've got my sniper
sitting up here laying down ready to take his shot
or something like that. It depends what you
want to set up here. But how simple is that? What I've got? I don't even know 123456, buildings laid out here. I can use them to setup. Start to draw my
buildings on here and stuff. How cool is that? I can use this as a bit of my guide for drawing
this city block. That's a rough sketch. If I come up top
and maybe I want to use a bit more of a ruler to plot things
out a little bit. We can see that
the horizon line, it has a little high. That'll work good enough. My horizon line is somewhere
right around there. That's my one-point perspective,
vanishing point, right? So all my little reference lines will start going from there. And so like I said, this using this label
trick will help you just kinda sort out your buildings
really, really fast. Once a fast and furious. But then we're getting
into another car racing. In one-point perspective,
this works really well. You're going to see
though, like I said, because of the lens
warping just a little bit. This is just a cautionary note. These are not, this would
be strictly vertical v. These are
starting to come in. So if this was how I
would draw it in 1, it would look
something like this. But because the
lens is warped it, they're coming in
just a little bit. And so just be, we've already covered
this In the perspective, of course, this is just
a little bit of a hack. And with every hack there's
some plus and minus to it, the pluses, it's easy to
set up a scene like this. The minus is the lens
warping effect. Right? Now I've got a 2
perspective here and you can see how this will
come off to one side. This will come off off the page. This is another
way to do it too, if you like, are too lazy, but don't have the resources or don't really
care that much for, for plotting out to the
both points and stuff. If you want to go off the page, use, use a little
drawing like this. Maybe it'll help
you plot it out. You can use this for
two-point perspective. This is actually not
true 2 perspective. This is now become a three-point perspective
because it's narrowing down. That lens is having that
warp, that warping effect. So we're actually, so this
will actually be three. Keep in mind though,
once you understand it, you can correct for
it if you want. Like if I ever really wanted to, this is I could just simply
put in and just say, well, I'm going to draw
it the way I want to. I can draw this as a 2 perspective and I'm just going to draw
the brick strength down this way and stuff. It's up to you. The point of this hack is to easily just be able
to say, okay, well, there's my buildings,
here's the block, here's, here's the city block. And I'm going to have
this crosswalk here. And this is how I'm
gonna have it in this building is
gonna be a hospital. It will allow you to really sketch things in so much faster. You can plot it all in and then plot where your motor vehicles and all that kind of stuff. Sketching the
action, whether it's spiderweb slinging here
or something, right? Lego. Is that inexpensive hack? And that's what I wanted
to show you in this video, was something that
was cheap, easy. Like I said, I bought this
pack for a buck, a dollar. You can get better packs and
you can build up way better. And yes, you could do it in 3D. 3d is cool. I loved
those 3D apps. There's a lot of
great ones out there. But something about For
me like constructing something in my hands and just like playing
around with it. You know, what I'll even do
is just as a reference point, I might plot somebody
else and then grab something and say, okay, well this is
the size of a person. It could be half
that, whatever it is. And move that within within the little structure I've built. Just to see, okay,
well, this is where I would plot the person, my character or the
figure in that. And then now we're don't
want to move that camera. Where do I want to pan it? Like I said, I know
there's 3D apps that do a lot of this. But for those of you excuse to go out and buy Lego,
I just gave it to you.
23. Perspective Planes: Okay guys, I'm back and I've got a new unit here for you talking about the planes in
relation to back. Now, does that mean airplanes? Know it means what I'm talking about the
planes and designing back. Talking about perspective. I'm talking about the
foreground, midground, and back. Okay? So I think you guys
can kind of understand what that would a foreground,
midground and background. We've kind of gone
over this a few times. But let's see if I
make a new layer here. What I'm gonna do is
just have fun. Here. I'm going to say, oh,
actually, you know what? I've got something right
in front of me here. I remember I was going over this work with a student and
he said I could use this. So we're gonna look
at the foreground, midground, and background
of this particular piece. Now in the foreground,
I'm gonna kinda go in yellow here and say, this is the foreground
along with this. That means this section is the
closest to us, the viewer. The midground is going to be in, why don't we do, the midground is going to be
this section here. This is the mid ground
here, this plane. And the background is
going to be purple. Background is with
this guy I'm making up the so let's see if I
could do that again. Just so we can be
very clear on the, I'm gonna do it in
a bigger market. I really want to
kind of feel thing. So the foreground
is going to be, I'm in pink on. So this is the foreground. And the mid ground
will do in green. Bigger. The midground is the midground means it's not the
closest to the viewer, but kind of that middle point. Nice and easy. And my ugly drawing
style here, right? And then the background, and we do, the background will be the furthest
away from the viewers. So even if I get rid of what's drawn on
here and kinda see, this is the closest, this is
the middle of the battle. There's a problem
though, when I was reviewing this student's work, they didn't adhere to
some of the rules. And that's okay because there are a few different
rules here and you can, once you know them, you can push and pull
them a little bit. But I want to make
sure that my students understand what rules there are. No. Okay. So when looking at it, rule number one is sides. Does that mean what does
rule number one meet inside? It means if I have a circle
that's this close to me, and it's in the foreground. That same circle, if
I move it on back, will be that big in
the mid ground and that we do that big in the back, some depending on how far back. So what does this mean?
What's the first rule? Same-sized objects, the closer it is to
you, the bigger it is. And the further away it is, the smaller it appears. Obviously it's the same
size like a human standing here would be stick here. So I can have a stick man
standing right here, right? And as we go away into the distance and
sending back there. So I want you guys to understand
using sides is probably the number one tool of setting
the planes in perspective. And we've studied this
a lot when it comes to linear perspective
already in this course. Another one would be details. So if I zoom in just
a little bit here, and if I want to
draw details, well, maybe this, this bowl, I can see the
circumference line, right? This one I might be able
to just barely see in this one I can maybe even
not see any tail, right? The one that's closest to me, I could see tons of detail, the Midwest and can maybe, maybe see a little bit. And then I'm seeing no details. And the thing that's further
details closer to you, details are more visible. Next one is tonal value. And this is where I got
into discussing this with this student because this
particular beast doesn't really follow that philosophy. Though. If I color pick here,
I'm gonna go here. Well, that is new
layer for you guys. That is going to a black, but this is our foreground.
I'm looking at here, right? And if I go to the mid ground and I color pick
from the mid ground, I can brown this
red, this one here. I'm going to drag
it over to a value. Meaning it's a tonal
Bobby with right here. So this is foreground,
this is mid ground here. And then I'm going to color
pick and you can already tell what's going on
here, the background. And something just happened. It went from basically darken the foreground to light in the middle ground or lighter in the middle ground to
dark again in the back. And this can be very
confusing to the eye. Really confusing actually. Because what's happening is this mount in the
background, whatever it is, Mountains are more Boris
dark forests maybe is punching very far forward. When we're looking
at this picture. It's making us think
that somehow that's maybe midground or maybe
even further in a way, like a good thing is
there's no detail in it, so we've kind of follow
that rule a little bit. But this just that
saturation, really, really, that tonal darkness to it
really punches it forward. So one fix could be
one, could be e.g. to take that and maybe fill it with something
lighter than this. So if I'm going here like with just a little bit
lighter and I'll fail. That's one fix that could
punch it back, right? So now I've got dark
in the foreground, medium in the mid ground and
light in the background. And you'll notice is, I don't know where you live, but I live in the mountains. And anything close to me has tons of detail and saturation
and all that kinda stuff. And as things go back, that atmospheric occlusion
kinda lightens it on. Those mountains in the
distance are just softer. They maybe not this far. I don't have to push
this bar on them, but they just don't
have that saturation, that tonal darkness to them
that any closer at, right? It's just too much
atmosphere in-between here, too much atmosphere
going on that it kinda, like I said, softens at tonal. One more thing though
that I could suggest maybe is color saturation. It's a lot like tonal value
that you can have something. Let's see if I could
do a color here. I could have
something saturated. I can have something
really saturated here. And as it goes back, it fades and as it goes
back even further. So I can use, even though
it's on the same tonal plane. I could use color saturation
a little bit to show that. When I was talking
with this student, I outline the main thing. I talked about using sites, using detail, using tonal value, and using color, saturation. Ie, we kinda decided on
he'd liked his style here. So we thought maybe
what might be good is if he took this green. Maybe just saturate
it a little bit more. Same kind of tonal value, but maybe colored it
in a little bit more. So it stayed in keeping with
what he was trying to do. He's a he's a great student like George is awesome, right? Sorry, I forgot to
say what I mean. Then we're talking
about doing this up, doing this lesson up. And we just said, well, how can we achieve what we want to achieve of separating
these blank, right? And I think we kinda landed on using this color saturate
to help him separating. Those are the four main
methods of separating plane. And those are the main ones
that everybody has taught. I'm gonna give another
one here that are another two little hints
that George could you, that I think would have
really helped him in this. So one more is
watch for tangents. What's happening here
is we've got this form coming and then it
kinda comes in here. And because this and this have so much
equality and tonal value, it feels like this is
all on the same plane. This has all this mid plane and he didn't want that,
that's not what you want it. Okay. So this right here, right here, I'm going to read to emphasize this right here, right here. This almost tangent just creates this flow of
linking in these planes. But what he could have done
was have it come here, something like this
and it might have helped with that separate. Okay. So that's one method. Another one that I
suggested to him that I thought could have worked
as well as in the front. He's got these nice
bulbous shapes. Like his design is very
bulbous, nice and low. So if you wanted
to, one other way he could separate it was
have the background, maybe a little bit more jagged. He really wanted to
keep this color, tonal saturation and
stuff in place rather. So I said, well, let's find some other ways
to separate it. And if he would have
went with this, separating the stylistic choice of the forms, that could
have been another. Alright, guys, George
was nice enough to let me teach you a little bit
off of his submitted art. He's a great student and
I have high confidence that you are looking
at how the art that another student submits
helps you as well. I mean, him were discussing this particular thing piece
and how to make it work. And I've given him a
few different options. And it's up to him as the
student, as the artist, to choose which one he wants to pull out of his tool belt and you my job is to give you all these tools
in your tool belt. Your job is to choose which one. Guys. I hope this was helpful
for you in understanding the plains of
designing background. Now, get practicing.
24. Perspective Thank You: Well, you did it. You made it through how
to draw perspective, learning buildings and backgrounds and all
that kind of stuff, but tedious stuff, right? But you did it. We brought you from maybe not understanding a
lot to understanding tons of different things about linear perspective and being more comfortable in
drawing your backgrounds. If though, if there's
something that I missed, maybe not miss, but you'd like a better
explanation of or you're curious about and you don't
feel like covered very well. Shoot me a message,
leave a comment. See if I can help you
with your questions. If I can do it and just a quick little blurb, I'll do that. And if it takes more like adding a new unit to it, no problem. I'm always updating my courses. So send it off to me. And chances are if you've
got that question, other students do too, and I got no problem adding
content here, right? Speaking of content though, I've got a lot of
other courses on here. So if you enjoyed this course, if you add as much fun as I did, well, I'll jump on
over to the next one. I think you'll like it too. And as always, those reviews, the comments, the
interaction between us. It just helps me
knowing that I'm on the right path in
creating content for you.
 Ed Foychuk, Making Learning Simple