Transcripts
1. Carnation Introduction: Welcome, students. I'm Tammy. I'm a mixed age media
artist from Texas, today, I'm going to be showing
you how to draw these lovely carnations from
a couple different views. You don't need a huge amount
of tools for this class, a pen, pencil, some paper, maybe an eraser, sharpener, ruler or just your
regular tools you would need for doing
little sketches. I'm going to be showing you
how to do these flowers from the front as
well as the side. And I'm going to show you how to take different
views and draw them for yourself in the future
because flowers come in lots of different
shapes and sizes. And when say you put
it in a bouquet, it might come out to the side, it might come out to the front, I want you to feel comfortable
going forward after this class with drawing flowers from multiple
different directions. I'm going to give you
some sheets on how to draw them from the
front and the side so that you have a clear course on how to draw these flowers. Like I was saying, you
need very little tools. These are a beautiful flower with lots of unique
characteristics, including these little ruffles.
This is a beginner class. You don't need much. I'm going to be showing
you how to take your first line on a flower
if you've never drawn them to the end and
feeling like it's really pretty and you've
created something unique, and that's just yours. So let's move on to
the next lesson. I'll go over all the
supplies that you need, and you'll feel confident going into making your first drawing.
So I'll see you there.
2. Supplies: You'll need some basic supplies for drawing this carnation. First up, you'll need a regular
just number two pencil, your basic pencil, some paper. It can be copy paper
or sketch paper, just some paper. An eraser. Any eraser around
your house will do. I have a few different
ones here at my house. A black pen. I'm using
these Pigma microns, which come in a
couple of different nib sizes here on the table. I have a number five
and a number three, and there's other sizes as well, but those are the two
I'm going to use today. But just use a black pen.
A black pen will work. A sharpener will be
helpful for your pencil. So optional supplies. If you have some pens, there can be some
different colored pens and that type thing
around your house if you happen to have something. Anything with a small
nib will be nice. Some colored pencils,
if you want to decorate your flower
with some color. I have this white
gel pen for using on top of colors to bring
that pop of white color, a ruler if you happen to have
one, but it's not required. And then if you have any
fresh flowers or carnations, it can be nice just to be
able to go over your flower and see all the little pieces that go into the construction. Next up, we'll do
some flower anatomy.
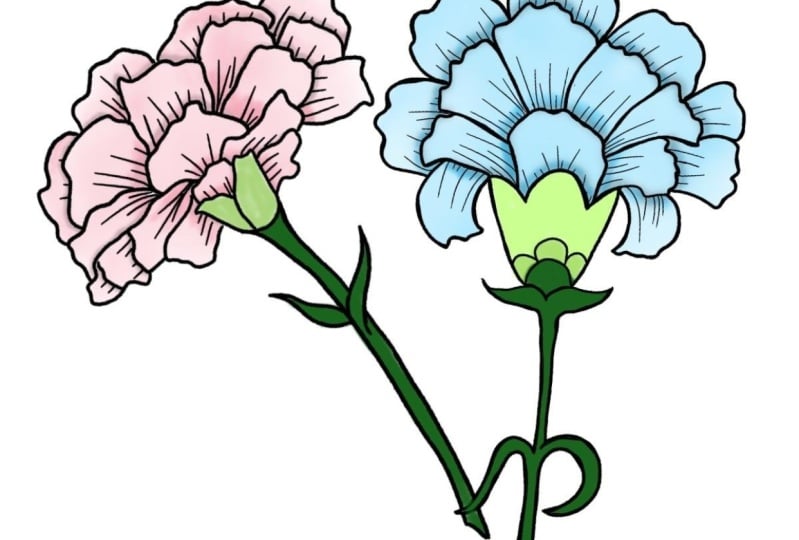
3. Anatomy: Carnations are known for love, admiration
and remembrance. You can get this carnation
anatomy sheet in the projects and resources
area of the class. So first off, we've got these beautiful rough old
petals here at the top. And then we have what's
called the supple. It's a really firm green
layer down here below. Then you have the receptacle. And it's got these
little arches inside. Then we have that long stem. Carnations are known for
their really long stems, and in the store, you'll
see them cut down, but they grow really tall. And then there's those
really cute leafs and there's a node
right in between them. So normally you have one on each side unless they've
been plucked off. And they have these
cute little curls. So I think the
carnations going to be a really fun flower to draw. So let's get into drawing
your first carnation. We're going to do
the front view.
4. Draw the Front View: Get your step by
step carnation guide in the projects and resources
area of the website. If you go over there,
you can download it, and you'll be able
to follow along as we draw out the
front carnation. There's also going to be
a side carnation sheet in there for you to download. So, let's get started
doing this carnation. So get out your paper and
pencil and join along. Step one. So first step, create a little crown
with a U on the bottom. Add an arch inside and then
two more arches on the sides. Finish with a little
arch on the top. Step two, create three
petals on the top. Make sure to have lots of ruffles and create
some width in between. Carnations are a wider flower. Step three, add in four more ruffled petals
on the top like this. Yours might be different.
Everyone's shapes are going to be a
little different, but just keep the
width on there. Step four, add three more
ruffled petals on top, then add two draped ruffled
petals on the lower section. You're going to do
one on each side. Step five. Let's add in
that really cute stem. It's thin and it's solid. Step six. Let's add in
some delicate leaves. These are really perky
and just really cute, and they have so much
attitude. I just love these. One set at the top of the stem and a set in the middle of the stem,
that's what we're going to do. The top ones are
short and perky. The lower set is a
little bit more droopy and curled in those
really cute little curls. Let's now lightly
erase our drawings. For me, it's going
to be a lot of erasing because I'm using
this really dark pencil. But for you, it
shouldn't be too hard. You don't want to lift too
much of the pencil up. You still want to be able
to see your drawing. So let's start inking now. I'm going to start off with
my number five pigma micron, that's the larger nib, but use whatever black pen you have. You're just going to do
the outside of the petals. The stem and that receptacle
area in this larger pen. If you happen to have
the smaller nib, we're going to do the little fine lines with that later on, and I'll let you know when
we're ready to do that. So try to do each petal as one shape and line and
then attach them all. I'm adding in some little
extra lines in here to show that sometimes the petals are on
top of each other, and it's just giving
it additional depth. You can do this if you like,
but you don't have to. It is still look great. Try to make each
arch individually. And this is a great time
to refine your drawing. Sometimes you have to erase and you want to change
where those lines are. Try to make long swooping lines and do those cute
little curls there. And then fill in
that center section. You can add extra dark area to show that there's more of
a shadow there if you like. Do So next up, if you have a smaller
nib, let's move to that. I'm going to be moving on
to the micron size three. So you just start and you pull, and it's going to
give those ruffles a really pretty shape. So go at an angle
and show each petal. You can do as many lines
as you like or as few, but you want to make it pop. And this is where I feel the
flower really comes to life. Otherwise, it just feels flat, but it shows all
those fine lines that you get in a
natural flower. That's it. Looks like
we're all finished. Make sure you give it
a signature if you want. I'm gonna give mine one. And in the next lesson, you're
going to learn how to draw the carnation from the side
angle. I'll see you there.
5. Draw the Side View: Make sure to download
your side view carnation, step by step guide in the projects and resources
area of the website. It's going to be there
with other views as well. So go get that and
enjoy a little guide. So first step, I'm going to have you get your
pencil and paper, and we're going to start in on drying this side
view carnation. Step one, create
a little U shape and add in these lines
to create the base. Step two, let's add in our
first layer of ruffled petals. Make sure to add in loads
of wiggles and tiny curves. Carnations look like a group of ruffles tightly packed in. So you'll want to get those really tight and lots
and lots of curves. To Step three, add in more petals on
the top of the last set. We're growing our flour up
into the air into the side. Step four. Add in
another layer of petals. Make some different shapes. Variety is beauty, and all of our petals are
going to be different. We're each making just shapes, and we're making this flower wide and beautiful and perky. Did I say perky too much? Maybe. Perky flowers. I love perky flowers. Step five. Let's add the
last layer of petals on top. Your finished flower petals
should look a bit round, but not as a perfect circle. We're just getting
the generalization of an overall flower shape. Step six. Now, let's
add in the stem. It's just long and
it's angled down. And make sure to
give that little cut as if it's like a
fresh cut flower. I think that adds
a little cuteness to it. Step seven. Add in some cute
and perky leaves near the top of the stem. And step eight, add in loads of lines to make the
flower ruffles pop out. You get to choose how many of those lines you want
to add in as you did when you were doing
the carnation prior. And each of us wants to add
a different amount of lines. It's just natural
that some people like lots of lines and other
people like limited lines. So you choose how many lines you want based on
your preference. Once you're ready, lightly erase your carnation, we're going to get
into inking next. Et's get inking. So try to
do each shape as one line. It's just going to make
it a little bit more bold and really make
the flour perk up. So you're going to
go over your flour and just do the petals, not the little inside. So let's try to do each one
as a shape and connect it. It's almost like
a jigsaw puzzle. Each of the petals
comes together in droops depending on which
direction it's going. Mm hm. So let's now move on to a smaller nibbed
pen if you have one. If not, keep with the pen
that you're using and just do the full flour with that pen. So what I'm going to do here for the little nib, just
pull and flick. Just pull and click.
It's going to create this really
pretty texture. So just pull and flick the pen. And it's really coming to life now as you're seeing the petals, not being more of like
a jigsaw puzzle where everything is just
connecting and being flat. But what you're getting is
each petal is feeling like, its own unique piece and really jumping out instead
of just staying flat. So add texture, add as
much texture as you like. Make sure to add your signature, and next up, I'll tell you
about your class project. I'll see you there.
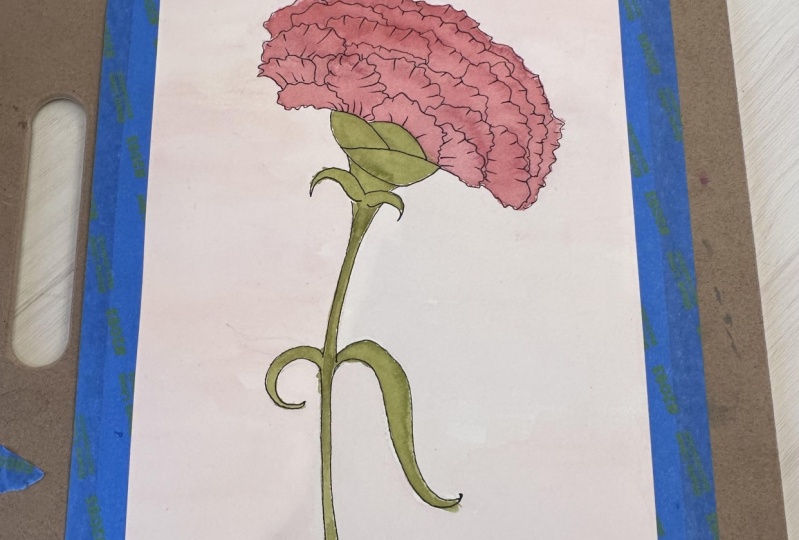
6. Class Project: Thanks so much for
taking my class. For your class project, I want you to take
either the front view or the side view of the carnation
and draw it for yourself. Start out with your pencil
and then do it with your pen. If you like, you can
add in some color, make sure you give
it the shading and the extra little flicks to
make it appear more alive. I want you to make it your own, do little extras, if you
like, do some embellishments. I want this carnation
to show you within the drawing and not just a duplicate of
what I've shown you. Make sure you give certain areas little extras so that it's
pretty and it's unique. Once you're done,
you're going to go on to skillshare.com and to the class
information and go to the Projects and Resources
area, the website. You'll be able to upload
your project right there. So let me show you how
to do that right now. So once you're in the
Projects and Resources area, the website, you're going to click the Submit Project button. From there, you're going
to upload your photo. You're going to give it a
title and a description. Once you're done with
that, you can do a few other things if you
like, but you don't have to. So you can just click Publish. Thanks so much, and I'll
see you in the next video.
7. Thank You: Thanks so much for taking
my carnation drawing class. I hope you had fun and you have extra confidence going into
drawing your next carnation. Make sure you're getting
in your line weights so that you're making
everything pop, and you're giving each
flower its unique vibe. Flowers are very unique. There's nothing that's just the same between flower to flower. You might have the same color, the same basic shape, but every flower is different
and unique in its own way. And make sure you bring
that to your art. Just as you're unique, flowers are unique, as well. So I'm teaching in this
class, carnations, but I've got classes on other
types of flowers as well. So take a look down in my bio for more classes on
drying botanicals. I'll be drying botanicals
in ink and also doing watercolors and other
fun things in this area. So if you would like
to find me online, you can look down
here and I'll have some different websites and stuff for you for
my social medias. On each one, it's
under a little bit of a different name based on how
many characters they allow. So keep practicing your drawing and make sure you're
sharing with the class. I'm very excited to
see what you have. I'll see you in the next class. Take care, and bye bye.
 Tammie Ann Creative, Artist & Crafter