Transcripts
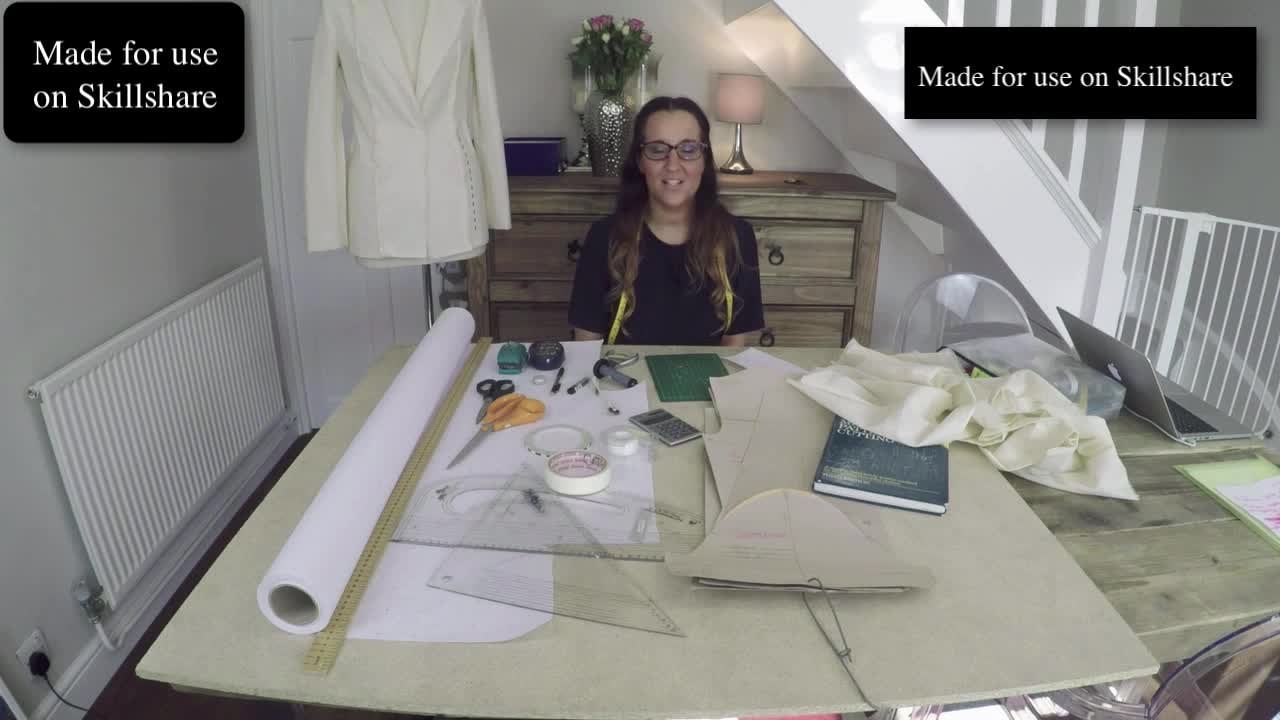
1. Final Sleeves Introduction: Hello and welcome
back to my courses. I am Caroline Morales
and I am here to bring you an amazing
new course on sleeves, drafting sleeves, sleep alterations,
adaptations to sleeves. You name it even if your cuffs thrown in for good measure. So a couple of things that
you'll need is, well, the most important thing is
your 4D block front and back. And if you don't
have one of these, there is another course that
I've got on how to build your body's block and slope
from scratch, front and back. So I've got my these
are UK based size. You can buy them online, you can find them
in other stores, but I encourage
you to build your own because they're
all so unique. And then with that, we can help draft your sleeve
block from that. So the first part of
the course is actually drafting the sleeve
from the body block. And I've had so much
interest about doing this. And that's why I bought
this course to life for you because I had all of these fab courses
on body blocks and, and drafting and upfront about policies and
everybody said, but I need to know
about sleeves as well. So this is one just for sleeves. So the first part of
the course is all about drafting a block or
slow car from scratch. My crafty little cheats
guide to help us do that. And then there's loads of
different lessons after that about different
styles of slaves. Everything from rag gland. We've got fled sleeve, shortening cap sleeve, a kimono sleeve,
right gland sleeve. Um, yeah, we're doing
all different ways of drafting as well and also some slush and spread
formulas and lots of cutting and sticking and
taping and me getting messy. But a few things, again you'll need is your blocks initially, and then you'll have your
sleep block after that. Or you can work on your half or quarter
scale blocks and it's absolutely fine. I do work in full-scale
measurements though, so just bear that in mind. Your rulers. I love my grading square, but this is a very handy tool for curves and your arm holes. This is a pattern master
or a French curve. Again, I've got an, I might begin as course and
my the slope because I've got lessons on there specifically
all about equipment, so you can go and check
those out before you join. A pencil and a trustee rubber your measuring tape most definitely a bit of sticky
tabs, always handy. And a calculator if you're struggling in that
department like I do. And it doesn't matter how you draft or
anything like that. I've just got a piece
of plywood over my dining room table and a
nice role of pattern paper. You can do it on anything you'd like. I've got
my mannequin here. You don't particularly
need your mannequin that just come with an open
mind and a sense of humor. And I'm so pleased to bring you this new course on sleeves.
I hope you enjoy it.
2. Drafting a Sleeve block from scratch the cheat way: Lesson two, drafting
a slave from scratch. So in this first
lesson about sleeves, I'm actually going to
show you how to draft a sleeve block from scratch. Now I do have a previous
course about drafting slopes, slope as and blocks. Lesson two, drafting
asleep from scratch. Now, in this first lesson, I'm actually going
to teach you how to draft a slave from scratch. Don't let all of this
confuse you right now. I'll go over all of this. But this is what a basic
bodies block looks like. This is a little bit
wear and tear, sorry, this is my regular block that I use for everything
and it's probably a, well, it's quite
a few years old. You can use also your half scale blocks
or quarter scale block. So they will look
something like that. If you find that easier to
work on a smaller scale. But I'm gonna be working with real size measurements
for a UK base size eight. So this, obviously,
this method can be used for all sorts of slaves. Don't take the
measurements as gospel, like I say, with all my courses, I do use a base size
UK eight, size eight, so the measurements can
all be interchanged. I also have a course on
grading if you need to grade up your blocks afterwards. What I would suggest
is you go and look at my course about making
your own block and slope, or if you're unaware
about what this is, I'm not gonna go over it
hugely here because I do have a separate
course all about that. But it is, you're really basic outline of your
fixed measurements, whether that be a US, UK size, 8101214, whatever, or your
own body measurements. It's just kind of almost
like the outer shell, the skin of your flat
pattern on the half scale, on the half block, the front and back looks
something like that. The back and the front. And that's what it looks like without all of the manipulation, but it's with all the
suppression that's built in. I've got a separate
course on that. That's your bodice
front and back and are from popular demand. I have been asked to
do one on sleeves. So what you do need
to have before you draft this sleeve is
your base size block, whatever you're
using because you do need that arm whole shape to create your sleeve block. So in the end it
will look like that. So in my blocks and
slope as course, you'll have a front
and back bodice, which we interchange into
dresses and things like that. And I've got other
courses all about that. And this one is all about
drafting your sleeve and sleeve alterations
and adaptations. But what you do
need, like I said, you do need this arm hole curve to create this
shape that goes in. Now, I have been taught how to draft sleeve crowns
and sleep heads. So many times over the years, I've been in industry
for nearly 20 years. I know I don't look
at but I've had it taught by Savile Row by I
won't name names because they, I've been taught by some really
prestigious universities and colleges and professors. And some of them have got
some really complicated ways. And then I went to one
person and they showed me this really easy way and it
might not be for everybody. It's with anything you find
your method that suits you. But like I say, I know quite a lot
of complex patterns, but some ways I was taught
was so complicated. I just thought, Oh
my gosh, I can't get my head around all of that
and it's just too much. And I was drafting
really quickly. I almost needed to have like
a quick fix cheats version. And I'm going to show
you that right now. Honestly, it's saved
me 15 years of pain. I think after trying and trying
and trying to get my head around whatever it was I was trying to achieve and
not achieving it. Again, the measurements,
they are fluid and flexible. I'm gonna show you
a really cheap, easy way of drafting asleep. And like I say, it
is interchangeable. It is fluid measurements. You do need to
manipulate a few lines. Pattern drafting is
like an artwork, so it doesn't have
to be so rigid. I get a lot of questions online about my arm holding
quite look like that. So do I need to move that is all fluid and
it's all smooth. So you do need to work with curved lines and move things around if it
doesn't look quite right, but that will come
with practice. So I've just drawn this little sketch
for you here just to show you basically what
we're going to do. So the most important
things is you need your front and back
body, like I just said. And we're gonna just
this red line here. It's going to marry up
to these ones here. And i'll, I'll keep bringing
this back to show you. So don't let this worry
you quiet just yet, but I'm just going to show
you what we're trying to achieve from working with these measurements
here that are set, these red ones are set
this from your arc, which is your, your balance marks on your front
and back body. This is your back with
the double notch here, and this is your front
with the one notch here. So these measurements
are incredibly important and they are fixed. This. Area here from the notch round
the top of the shoulder, don't forget, these will join up and become your shoulder. They are a bit more fluid and we require something
that's called ease. And that is adding
a little bit of extra length in the fabric
or lengthen the pattern. And that is again,
interchangeable depending on your fabric. Softer fabrics require a little bit more ease
than heavier fabrics. If you can imagine a shift on, you can manipulate it a
little bit more at ease, a bit more in than
you would with say leather or wool or something like that,
That's a bit stiffer. So yeah, these measurements here
are incredibly important. Just gonna move out the way. What I'm gonna do is
I'm just going to use my grading square. I've got my green
line on my body. I'm just going to
square across from my right on my
underarm point there. And then I'm just
going to square up on my buddies and that right there is a 90-degree angle and I'm going to do
exactly the same. Gonna square across
my center front. Here is my is my
vertical point here. Go into my underarm point, and then I'm going to square up again and then again that there is my 90
degree in point. So you can see what
I've done there. I've just squared
up, square down from my balanced marks here. These balanced marks,
they come from being the most inwardly
point of your block, the most inwardly
point of your block. And you see that right on
the if I was to carry up, you can't carry the lineup. You can't go anymore in those
balanced marks, sit there, there is lots of
terminology and lots of different measurements
that require certain balanced marks
for certain things. But this is just really
keeping it so, so simple. And this is just how I've worked and I just find it works for me. If it doesn't work for you. Apologies on that
one, but for me, this is my method
that works for me. So if I've got my block, my balanced marks on
the inwardly points, if you like, towards
the center front and center back balanced marks. And this measurement
here is always fixed. So the other really important
thing you need to do to draft the body,
you're asleep block, excuse me, is you need to have
your chest measurement and your chest measurement or your bust measurement
is your widest point. It really kinda whereas
the neutral point, the bust point is of
your, your block. Don't forget we're working on
women's wear, but it does, it is the same method
for men's wear as well. Again, the measurements
will change, but the theory is the same. So your chest measurement here, and I know my blocks are only on the half because that's
how we work with blocks because we work on a
half assuming a garment symmetrical unless the
design is otherwise, but we just work on the half at the moment so that
we always know we've got the same measurement
on both sides. So what you do need
is your full your full not half, full
chest measurement. Now, my Brock actually
says 89 cm here. I'm just going to round
it up just for easy math, just to keep it really,
really easy for you. So I'm just gonna
round it up to 90, which is completely,
completely acceptable. You can add 0s and a garment, but I'm just gonna
make it 90 cm, just make it really easy. So all of that on the half and all of that on the half life
laid out front and back. Total bust measurement
is 90 cm and that is what my total is for
my bust measurement on my widest point here
along my block. So remember, I've got 90 cm, sorry, I'm working
in centimeters. I'm here in the UK, but you can change that
up 2 " it all kind of, well, definitely stay the same. Now the other really important
thing you need to do, just to draft this block, we need to divide
that by, by three. So we need to
divide it by three. So that is 30 cm. So you need your
full chest or bust. Which is that for
my UK size eight. Roughly. Again, it can be fluid. I get this question asked a lot, but no garments the same when you walk into one
store and the next door, you never get one size
the same as the other. There's about a two-inch kind
of leeway between sizes. So again, this is
just very loose, flexible, set within
some guidelines, but yet we're just
using that as a base, divide it by three. And that's 30 cm. So to start off with
what we're going to do is I'm going to draft a straight line
right across here. Like that. Lovely, right? So then what we
need to do is get your body's block,
front bodice book. Can you see how I've laid
those lines up here? This line right across here. So I'm going to mark the edge of my point
here of my arm Hall, my front bodies arm hole. And I'm going to replicate that line there up to
that balance point. Only that bit there. And you have something
that looks like that. So you know, the underarm of your front will
be exactly the same as the front arm
hole of your body. So you know that those
two points will marry up. Now that 30 cm here with your
bus now comes into place. And again, this is a
very loose measurement. I know I keep repeating myself, but some designs or wide
sleeved and narrow sleeves, this all comes down the line with designs and the
fabrics and everything. This is really developing your block, your
skin measurements. You can add ease in afterwards, which is a little
bit more flexibility and all that stuff. But this is really just
to get your base shape. So again, I'll show you this late comes
later in the course, all sorts of different styles
that you can do after this. But this is really just to get your block measurement that
looks something like that. Front arm hole. You've just replicated. That's exact same shape. I'm going to just put that aside because we're going to use
that again in a minute. Then we need your back arm hole. But you're thinking where on earth along this line
do I put my back arm? Well, that's where
the 30 cm comes in. Again. So that's your
loose guide there. And again, all these up afterwards and
see what it's like. If it's a bit, you know, not wide enough, long enough. That's when changes come
in. You can see there. So I'm measuring from my
underarm point there right at the underarm point which
is where it hit there. I'm going to go across
my line to 30 cm. Mark a point there. And then I'm going to
do exactly the same. Just make sure that line is either going to do
exactly the same with my back arm hole here to my
balance marks, my double. Go to the top one just to
remind you it's your back. And then you've got your
back underarm point. So you've just done gone
like that across there. And there's your back
under arm point. So you can see it's starting
loosely to take shape. We've kind of got
a little bit of a, an underarm going on under here. So what you want to do
now is find the middle of your points here in the middle would be 15 because
we've gone across 30. So find the middle point here and just do a
little point here. And then what you want to
do is square up and down. Go quite far. Down here. We're going to draft
a long sleeve block. Now again, there are lots of different methods to
the madness, but again, with a UK based size eight
within really nice fitting, neat, tidy block,
which is what we developed in the first course. My measurement in my head.
Well, not in my head. The minimum from the
underarm point here, which is here, which is right
under the cuff, bigger arm. I always know in my head, which is this point
here up here. I always know there's
a minimum of 15 cm. If I go below that, I always know I'm going to have a really short sleeve or it's
going to pull on my sleeve, or it's going to pick up on
the outside and it's going to drag or it will make the cuff to shore
or something like that. So I've always got in my head with a UK based size eight with this really nice neat
fitting arm hole from your block development. That with a nice
fitting arm hole, I can never go below
15 cm on my crown and that will develop
the length of my sleeve. So from there as
the underarm point, that almost becomes like where my bicep will be and I'll
talk about that in a minute. And then hit from here upwards, the outside edge of your sleeve is where it
goes over the shoulder. So I always know if I've
got a point there at 15, I can never go below that. You can go above it slightly and I'll show you how
to do that in a minute. But I know if I go
below that point, i'm I'm in trouble. So what you need to do is this. This is where it gets
a little bit loose and you have to use
your imagination a bit, but it will come with practice. And yeah, it's worked for me. So hey, ** the top point here of my my top of
my back arm hole. You want to do is get your
measuring tape on the curve, on the edge here and
measure the exact edge. And this is your net edge. By the way, there's no seam allowance blocks on
no seam allowance. So this is your stitch line up, if you like that for me here from my top of my balanced mark, which would be here along the top of my edge of my sleeve. Arm hole is 12 cm. And then do the same
with the front. Get your measuring tape from the top of the
balanced mark here, run it along the edge to the top of the crown,
and it's 11.8. Okay? So with this, I always add again
at least 2 cm. Actually, it's
often between about 2.4 and this is where your
ease comes into play. So we're basically
from here, round here, we want to have roughly 11.8, and from here to here, we want to have roughly 12 cm. But what I would
do is I would add at least one or two to 4 cm. And again, 4 cm is quite a lot. And this comes a lot more
with thinner fabric. So it really does
depend on your fabric. Again, the easiest, really important because your
arms moving all the time. You're lifting your arm up, you're moving it forward,
you're moving it backwards. You do have that shoulder
bone, don't forget. So you do need a little bit
of extra and don't forget, we're trying to make
effectively a flat piece of fabric go over an arm hole, curve that bone
in your shoulder. So the extra 0s in that fabric, in the pattern here that will
then relay onto the fabric. It does give you
that little bit of extra movement in the top of that crown that would
go over the bone on your shoulder and it just gives you that little
bit more movement. So it's quite important
that you do have a bit of ease and when
you get into so that in, you can just do a little
tight row of stitching there and I pull it in and
you'll find that when you run, run a little bit of a stitch on, on that, on this piece here, just to kind of ease
that into place onto, onto your arm hole, you'll find that the
fabric wants to creep over a little bit and it will just form this like
natural little curve. And that's what we want to have on the fabric to creep
over your shoulder bone. So what I'm gonna do
is I'm going to add 3 cm is from here to this point. Don't forget this point here, and this point here
never changes. These are always fixed. Here. We do a bit of manipulating
because that's where your shoulder bone comes
in and where you are. Your movement comes in. This is your underarm point, which is always a net. So we've got 11 point 8.12, and then I want to
add another three. So we've got 11.8. Whoops. Don't know why my
calculator not working 11.8 plus 12, which is 23.8. And then we want to add three. So I've got a total of 26.8 cm to get from there to there. And I need a nice shape. So this is again where it gets a slightly fluid and don't
judge me on this one, but it will come with practice. So 26.8 on your measuring
tape is roughly well, it is put your finger on it. So what you wanna
do, and this is, this might sound a bit crazy, but somebody showed me this
years ago it was a somewhat incredibly respectable
as well in the industry. And I was like, Wow, if
you're doing it and you're doing courses on this and
have universities for this. I am doing this and
I'll tell you what, it's got me out of
some trouble in my years and I've
never looked back. I always do it like
this. So yeah. So you want to put
your obviously you're zero-point on your front balanced mark in your 26.8 on your back
balanced mark there. And you have your you want it just
kind of pop it in. It's incorrect, right? This is incredibly
loose to do magic, magic because my measuring
tapes a bit bit bent. So yeah, it's you can see what I'm doing. Yeah, it's it's very,
very, very loose. But what I'm gonna do now is I'm gonna get
my French curve. And I'm going just marry up. Basically your front balanced
mark to that top point. You remember I said
I put 15 centimeter, That's my almost like
my limits there. And again, I've put this
three centimeter easier, but it can again go either way. I feel like I'm going to
have a little bit more 0s going in here. So I'm just gonna put a nice, nice shape on it like that. And then here. I'm going to put a little bit and this will come
with practice. It won't come. What I'm gonna,
what I'm gonna do and this does often happen. Don't, don't worry about that. Because you, you know, if
I carried on that line, it might create this
kind of weird in my arm. Hold it I don't want,
but that is fine. We can just run that
back there and re-put my balanced marks in on that
line there, don't worry. Then you've got a really, It's incredibly loose but a
very nice shaped arm hole. And you will find that that will fit into your arm
hole, give or take. What you do want to make sure is your front which is here. This is your back. Your front always has a
little bit more shape. On that front. It always has a little bit more
than this one here. And I'll tell you why
because it goes over your front shoulder bone. It goes over the bone on your front shoulder and
the way you can do that, and I'll show you at the end, you, if you fold it over. Well, actually I'll
show you now. You want to have a bit more,
bit more curve. Let me see. If I fold that over
at those points. You want to have
a lot more curve on the front arm.
Then on the back. The back is a little bit
shallower because you've got your shoulder blade and it's
a little bit shallower. So from your balanced point
up to the top of the crown, you want to have a bit more
of a shape than this one. This one's a bit more
of a smoother line. That one's got a bit
more shape as well. And again, these can be
worked into these lines when you can see how rough and
ready my patterns get. The other movement
is you want to have your front curve more
scoops than your back. And that will just
become natural because of your blocks here. Because your blocks here, again, you've got quite
a straight back. So your back arm hole goes quite straight up the
back of your body, whereas your fonts got a lot
more of a horseshoe shape. You see that curves a lot more acute because it goes
around and under the front of your arm hole and your arm naturally
moved forward this way. So you need to the
fabric scooped out here. You don't want to
have that filled in, otherwise you won't be able
to move your arm forward. So that has a lot
more of a scoop here, which is evidenced in here. So the front arm, whole shape of your crown
always looks a little bit more inwards than
that one there. Can you see what's
going on there? I hope that's not too confusing. So bringing me back to
my original sketch here. So you can see where
the red and the red of your arc of your arm holes are the same as the
red here and here, and that's not to be moved. I've just moved that line
inwards a bit just to kind of join those lines
together quite nicely. But those measurements
don't move. The angle of it moves slightly,
but not the measurements. And it's only the yellow
line here with the ease, this one can be
moved a little bit. And you will find
when you just you can really measure
those lines back again. Here. 26. Oh, I've got I've
got about four, 2 mm more ease. I went to 27 that measurement
there in the end. That's not bad,
going from a to B. And I still managed to hit that minimum point
at the top there. So I know again 12 these
up afterwards and see, but this is just my
way of doing it. Well, it's not my way. I
stole it from somebody else, but it's a, it's a many of the garments out there. I've put
the sample on it. So what you need to do
now and you can see that your sleeve is starting
to take flips, is starting to take shape. So you've got this but you know, you need your length of
your body's in here. So again, a UK
states size eight, minimum length to your
wrist or standard base, and this is the
top of the crown. Now this is right on the
edge of the shoulder, right where the edge of
your I'm shoulder is zero point and that
point there is right on that tip of
the shoulder point. So then this is the
outside of your sleeve. Now, this line here
will eventually hit your wrist if you carry on down the outside
of your arm hole. So that minimum requirement
there for UK size eight is again
approximately 60 cm. So I'm just going
to go down there. So that was the
top of the crown, their chest to the bottom there and do a mark there for 60 cm. Again, you can have longer
sleeve, shortest leaves. I'll go through all of that. But that is what we're just
doing for our base size. Then what you want to
do is square across. Here, like that,
right nearly there. So this now is your
wrist opening. We're not going to worry
about openings just now. We're going to assume that
you can just put your hand in and out without it being too
tight or anything like that. Again, a minimum real requirement to get your wrist in and out of a slim fitting, a nice fitting wrist is
anything between about 20:21, 22, 23 centimeter something
along those that vibe here. Something, again, it's
not set in stone. Everybody's got different
size, Risks, blah, blah, blah. My block is 19.5,
That's very slim. That's a, that would
need a fast and again, it's somewhere, that's a
real skin measurement. So I'm gonna do 22 just so that we know that we can
get our hand in that cuff. Anything wider than that. It's going to be hanging
around your wrist of it at your own
risk measurement. Don't forget you've
got the width of your hand to get in there. So don't do it too slim, otherwise you will need to
have an opening in there. But 22, we know we
can get our hands in. That is very slim, like I said, but
this is the block. We're not doing
design at this point. We are just doing a slim fitting block so I can
get my hand that's 22 cm. I can get my hand
in there without an opening quite nicely. So right, so 22 cm. So we need to go
out either side of your line here and this will eventually become
your green line, assuming that we're
going to be cutting on a straight grain here. So half of 22, either side of that is 11. There we go. So guess what we do now. We join the dots up. Get my big long ruler for this one just so that
it's very accurate. There we go. There we go. And that is you're
incredibly simple. Cheats way of drafting a sleeve. And you can choose what
this is now the inside, this is your underarm here. This would run down that
point there to always, a good practice is to
just fold that over on the pattern and just make
sure that they join up. You can see under the paper they join up
and it would also be good practice to
put some kind of balanced mark along
there somewhere. You know, you can do it at the elbow or something like that. I'm just going to
use this as a guide so I know where my elbow is and marry it up
to the other side. Using this paper you
can see the other side. And so when you're stitching up, you know that they all join
together with long pieces. I'll just write the
measurements on here for you so you can kind of see. So that was roughly 30, That was about 60, and
that was about 22. And that minimum, that was 15. And that's a UK. Eight.
3. Shortening a long sleeve: Lesson three, shortening
a long sleeve. Great, So now we've got our sleeve or
beautifully marked out. There was just a couple
of things I just wanted to touch on that
are really important. The follow-on from drafting out the initial sleeve crown and the upper bit of the sleeve before we move on
to shortening it. And that is when we have that
initial measurement of 11.8 before the ys was put on
you remember I added on 3 cm is the best thing to do. Here's what I always do. And this is to get the really
important balance mark that comes so that the top of
that sleeve will join. At that point there
on the sleeve, we want to get that point. They're joining exactly
at that point there. On the sleeve. It would be that notch there, which is called our pitch point. It's right at that top of that point where
if you walked that sleeve crowned round
like that, you would, with ease, that would be
equal measurement between that balance mark there and
then that with a bit of ease. And then that point there would
be exactly in the middle. And it isn't always on that initial line that goes up there as I
will show you now. I'm sorry, I know we're supposed to be
shortening sleeves, but this is really important
before we do sleeve development from your
balanced mark there, if we remeasure up 11.8, I've just put a little I just
put a little mark there. From the top of that mark there, the pitch point, the soil, the balanced mark that up, that was 12 centimeter and you can see it's not
quite in the middle. So if I was to put my pitch
point at the middle there, my sleeve would be
swinging backwards, would actually go backwards and it would be balanced wrong. So it would actually be
balanced wrong if I put that pitch mark right on
that line up there is, you can see it's not in the
middle of the ys points. So what you want to do is measure in between
those two points, which should be about
the 3 cm because that's the extra
measurement we added in. Remember? So it's three. Well, I've got a
big fat sharpie. Don't forget to use
your nice pencils -3.2. So what you want to do is find that middle point right there. So mine would be 1.6
right in that middle. And then it would be 1.6. That point there. That point
there is my pitch point. That is when you're sewing, that is the point that then
would join up together. So we know we've
got an equal amount of ease between there and there and an equal amount of ease between there and there. And that's when you find
that your balance on your sleeve or sit
exactly right. And then the one other thing that's incredibly important is approximately 2 cm down from your immediate underarm point, about an inch or 2 cm, 2.5. I've just drawn this
dotted line in. This would be classed as your bicep and that would be the widest part of
your sleeve there. And whenever you have a spec
sheet or a measurement sheet and anybody asked to put
in your bicep measurement, It's never normally
the top right underneath your arm whole
point is always about an inch steps down where this
slightly the wider part of your underarm is. Let's get onto the cloth. And now we've got those
all important measurement. I am going to mark on
to my new fresh slave, my new Nice pitch point. There we go. So we can get rid of that. And there we have
our nice fresh leaf. And so we've got a full
length sleeve here. We know that this is
our wrist measurement. And so it really is that
simple of a task to do. What we want to
never move, really, if we're not moving,
the design of the sketch is this area here. Because that is that
area here where it goes over your shoulder
and your crown and that's where the ys is over your shoulder
bone that's here. So that will never
really be affected unless we move the design
of the arm hole here. But we're not moving the
design of the arm hole. What we're doing is
we're just moving. You can see actually it's just above the elbow point here. Or again, this is
all design pending. There's no set in stone. Anything now from design wise, you can shorten it, lengthen
it, do whatever you like. So once you've got your base
measurement is in there, it's all working within
your foundations. So what we want to
do is we want to keep that area exactly the same. Don't move that area. And this red line here is the line that we're
going to be moving. So it's from your
underarm point here, we'll let your bicep area, which is what I
just spoke about. We're going to just move
it from that point so we know we don't ever have
to move then our bodies, so we don't need to
touch this part. We know that that part
is going to be correct. The arm hole is going to fit
exactly in that arm hole. That's one less job you
need to do if your chest altering a sleeve or adjusting asleep length
or something like that. So it really is a case of just moving that line up or down. So it really is that simple. So we get that line and we're
going to keep it exactly at a right angle
to our grain line. And again, it's
designed pending. This is approximately
approximately my elbow area, which is roughly again, it's very loose
but it's about 20 cm down from your underarm. Again, that's quite
a loose measurement. But I'm just going to
use that as a guide to just show you. We're just gonna go above
that elbow point there. So if I know that, that's my elbow going to use that line to just
measure it on yourself, measure the design,
measure it on a mannequin,
something like that. But I'm just gonna go, um, let's say 3 cm above that. And then square across. That should match
perfectly like that. That's my new sleeve lengths so we can get rid
of all of this. This is now all void. And again, this is keeping
it a fitted sleeve. But we can make that
slightly wider, especially if we've got
something like a t-shirt. You often have a t-shirt with a wider opening or a
squared off opening. You don't often have it tapered in where the t-shirt
is quite roomy. Again, just make sure that
these lines measure up. You can flip these over. And she has married those
two underarm points and that cuff point now
just make sure it's all marrying up and that
should again run perfectly down on
that brain like that. So what we want to do is just square that from the underarm
point along that line. Marriott from the
underarm point, they're married that
down there and again, that's my right angle. We do the same on the
front of the sleeve. Again, that's now
my new right angle. So it's a complete square. So this line is now
void as is that one. And that is your
new short sleeve. And again, after
this is when you put all your seam allowance
and your markings. Don't forget with sleeves. And I've seen this
so many times. Never write on it. Cut two. We know we want a
left and a right. We're assuming we've
got a left and a right t-shirt if our
sketch looks like this, never write cut too, because what the cutter
will do is cut two of them. So you'll get to left sleeves
or two rights leaves. You want cut a pair so
that they cut one like that and flip the pattern or fold the fabric
whichever way, the factorial, whatever
way you're doing it, whether you've got print
or anything like that. But you never want to cut too, because you'll have
two of the same side. You need a pair, a
left and a right, and then that's your new slave.
4. Drafting a Flared Sleeve: Less than four fled sleeve. So we're going to
develop a fled sleeve, something like this sketch here. So again, we always
want to start with our base sleeve block
that we've got here, excuse me that we've
got here and we developed in the first lesson. We always normally
start with this before we do anything to
do with design, you can see it's gone from this. And then we're going
to add some kind of some manipulation to the pattern and create a flared sleeve,
something like this. And again, it will
varies with fabrics. Something like this
might be quite nice for a chiffon sleeve, a gown or something in
Jersey, something like that. Something that's
quite nice and fluid. Again, it's all fabric and design pending. So let's start. So as you can see, this is my initial block
here, which is here. And what we're going to
do is we're going to do some lines up it
marks and lines, and essentially do a method that we call slash and spread. We're going to slash up
those lines and open it out and create this volume here. So what we want to
do effectively, again is keep the crown
of our sleeve the same. We don't really want
to touch this area. We know that this sleeve here fits into our bodies
arm hole, again, depending on if the design has changed the arm whole shape, which we know in this
basic sketch, it hasn't. So we want to keep
all of these lines, stitch lines exactly
the same as the body so that they know that
they always join up. And we just want to tamper with the bottom bit of it here that effectively it doesn't
do enough to anything. So you can really just
do what you like. Okay? So excuse me. So we've got our
initial block here. Again, we've got a
full length sleeve. Again, this is variable to do with the length of your sleeve. In this sketch, particularly, I've just shortened it. I haven't done it to the wrist. You can have a long wide
sleeved to your wrist. You can have it
short if you want. It's completely up to you. But just for the
purpose of design, I've just done it around
about the elbow length, just to give you a
bit of variation. So what we'll do is we'll
do the class before, we'll shorten it up. And then we'll open it
out so that you get a shorter fled sleeve. Okay, so I'm going to do the formula that we did
before and we're just going to raise up that
line there from the cuff up to slightly our elbow
mark or slightly below. We'll do it slightly below,
something like that. So you can measure on
yourself or on a mannequin, or on a friend or
anything like that. This is your
underarm point here. So if I just measure my
own underarm point, oh, I'm gonna go something
like a really, I'm gonna go somewhere about, let's say 30 cm down. So it's kinda like a middy
kind of length underarm point down this inside our
measurement, 30 cm again. And you can obviously, like I always do, you flip that over, check your underarm points here, and then check these points here are joining
because you never know you could have a bit of a squiggly line or
something like that. So just always make sure
that these points obviously match because they will
be stitched together. And then you want
to square across using your central point there. And then square cross,
something like that. And again, we're using
net measurements. These haven't got
any siem announces on these artists blocks. I always developed the patterns where you do it on
your stitch line, your net line so that you know, all the lines fit together. And then the last thing I always do is add on all my
seam allowances. And if you're unsure
about that, again, I've got various courses about
adding on seam allowances. I'm not gonna do it so much here because we're not developing all the patterns into
12 and all that stuff. But on all of my blocks and my beginner's classes
for particularly, I've got lots of
lessons on how to label up your garments properly, adding on seam allowances
that the jargon we use, all the vocabulary that we use. But this is just purely about
the pattern manipulation. So we've shortened
that line up here. So this now becomes a void. So what you want to do, and as you can see in my sketch, I've just divided it up
into rough sections. It doesn't need to be
like perfect sections or you don't want to do is
just add in loads of volume on one area of it
and not another area of it. You want it to be very equal. You don't want to have
a really full front of the sleeve and a really
narrow back of this leave. If you want a really nice
fluid sleeve like that, you want to split
your pattern up into I'm quite even spaces. So i'm, I'm going to just
divide this section up. Use this as you obviously
your central point. Then I'm gonna go, I'm gonna
mark 5.10 and then 5.10. And again here, 5.10, 5.10 artists went out
either way like that. And then we're gonna
choose square up and down. Artists do that dotted line
just so you can kinda see. And again, this has nothing
to do with the design. It's all just to do. With how we're going
to eventually slash and spread this pattern open. So go right up to the top, right through to the bottom. And again, it doesn't need to be six sections or four sections, but you just want to
have it evenly spaced. So it looks something like that. Then what we want to do is
you're going to cut this out. Make sure you do it a
lot neater than me. I'm just doing it quickly
so that you can see, excuse me, losing
my voice today. Make sure you get a nice
and makes sure if you've marked your balanced March on
the outside of your paper, just make sure that they're
on the inside so that they don't get lost when
you cut it out. Let's get rid of
that. Excuse me. So it looks something like that. Now we want to do is because we've got the volume in the bottom and
not in the top. We open up the bottom and
pivot it that way out. So I'll leave that
there so you can see. So we're gonna go right
from the bottom of that slave all the way
up through the bicep. We're going to go as
far as we can and just don't cut through
that same there. Because we know that that
measurement and length of that seam there is the one
that fits into our arm hole. We just want that to stay exactly the same
measurement so that we don't work into that arm hole or anything
gets bigger or smaller. We know that our pitch
points joined the same. The only thing that
will be changing is the angle of the lines, but we know that all
the lines match back. Sorry if you can see the top of my head to try my best
to not get in the way. Alright, so we have something
that looks like that. Now can you see why we
call it slash and spread? Because it looks
Something like that. So get yourself
another bit of paper. And again, this is all
depending on the design. So you could open it really far out if you wanted to know. Let me get another
piece a bit better. I thought so I could fit it onto that piece, but clearly not. So what you want
to do now, again, this is all depending
on your design. So you could have it slightly
flared at the bottom. That's just like a little
little opening here. Or you could really go to town. Excuse me. Gosh, it's such messy work or this pattern
cutting stuff, isn't it? I get all my stuff
all over the place. Well, you could really
go to town and really, really open this up like this. But what the most
important thing is that we always know that that measurement at the top here is going to fit
into our arm hole. So then what I what I
do is I tape it down. You just want to tape
it down loosely. Try and make these pieces, these gaps even do
give it a measure. Again, I'm just doing it
quickly just for the sake of for you to see. But if I did this properly, I would be measuring
the gaps here. That's 10 cm. Oh gosh, not about 10 cm, 9.5, not bad. Let's do ten here. I'm just measuring these
gaps here too so that I get an e equal splay at
the top and bottom. Make sure these lay flat. Again. Make sure this
is all done nicely. I'm just doing this quickly
so that you can see what's going on 10 cm like that. If you're unsure, again, you can fold your
pattern over and just make sure that these
lines all join up. Then what you want
to do is just two. Now, this is your new cuff. They all knew him. And I'm just drawing
it in loosely to see, but this will now be a
really nice smooth line. Can you see what
I've done there? I've just married those, all of those points
back up like that. Then you draw in. Now the outside or the
lines of your pattern. You've got your
balanced marks here. Very important balanced marks. And then I would use my, I love using my greatest square, but use, now, you're nice
French curve to draw it in. Again, I'm just doing this
for the sake of you to see, but what you need, because we've opened this out, we've obviously got slight
kinks in our sleeve crown. It would be up and
down, a slightly bumpy, but that needs to be now a really nice smooth
curve and it can be worked into once you've
removed the pattern. And then if you're unsure, you can go back and
double-check that measurement fits in
with your arm hole. So let's lift this off. I can get rid of this now. There's your new fled pattern. So then what we can do is
we can fold this over and just check these
lines, come out there. The underarm point
to this point here. And I just folded it over and found my new straight
grain like that.
5. Drafting a Bell Sleeve with cuff : Lesson five, bell
sleeve and cuff. So now what we're going to do is develop what we
call a bell sleeve. And it has variations of names, but it's predominantly known
as a bell sleeve and it's very similar to the fled sleeve that we saw in the
previous lesson. But this one has it now tapered back in at a cough,
as you can see. But the first, initial stage is exactly what we did
with the fit and the flair stage before
the slash and the spread. So you cut up the
pattern and you open it out so that initial stage
is exactly the same. Now with the bell sleeve, I've just made this so that it ends up around the cuff area. But what I did before
I slashed up is I just removed that length of
what that cough would be. The cuff. I'm saying again, it's
all depending on design. It would be 5 cm
depth on that cuff. So what I did was
remove 5 cm from the initial length
of that sleeve to allow me to create then
a cuff to go back on. So they would go back
down to that measurement. Now, then what you
do is you minus that 5 cm off of there. But this is where
it gets a little confusing because
with the bell sleeve, you don't want it to just be
gathered and straight down. You want to have what we call a blues on, over that sleep. So a little bit of a lip, a little bit of a drag,
something like that. Um, so it was quite literally Blue Zones
over that measurement. To get that a little
bit more of a drag. Again, this is
depending on design. You could have a really over the top drag that goes
right down asleep. Or you could just have a little puff, something like that. You just don't really want like a bell sleeve just kind of getting straight down onto the cuff because if
you move your arms, it will, will pull up and
then you kind of lose that lovely bell shape of it
and that lovely blue zone. So uv minus the length
of the cuff width, that will create 5 cm. For instance, it could
be two, it could be one. You could have no cough in which you'd remove
know length of the bottom and you'd
gather it into maybe a nice binding or
something or a lining inside. But this particular one
for design purposes, much like a shirt,
I'm going to do a five centimeter
rectangular cuff. So that's just for my
purposes of showing you, but it doesn't need to
have a cough at all, which means you wouldn't
remove any length off of that. And it would do
exactly what we did on the last lesson and do
a slash and the spread, and that length would
always be the same. But I've shorten this 5 cm but just before you've
shortened it 5 cm, like I was just saying,
you want to add a little bit on for
that lip to go. Little bit down, a little bit caught up into that
calf measurement, so it's not quite so rigid. So again, just four, again, just for the sake of the
fabric and my design, I'm going to add on another
three back onto that length. So what I only did
actually is take off too. So I removed five for the cough, but then I added on
three for the blue zone. So actually, I only took off two from
that initial length. So in hindsight, if
we were to go back to our original block
measurements of that being 60 cm from the top, I actually only move to, so I've actually only move. That measurement would be 58 cm and then a five centimeter cuff. And that would allow me
to still have again, depending on design, still have a 60 centimeter
length sleeve. But I've got that little bit of three centimeter
lip of that fabric, Blue zoning underneath that. So actually on
paper it might look like it's gonna be too
long or too short, but don't forget
which is allowing a little bit extra for that
little bit of a lip. I hope that makes sense. Again. Try it out, see if it works, see if they still try
and trial and error. So this measurement here is going to be a
full length sleeve, but I've removed a
little bit for the cuff, but then added back on to
allow for that blue's on. So that's where I get
this measurement. And then I did the lesson
before and I did this slash, slash and spread opening. I'm not going to
repeat myself on these lessons all the time. Just flip back to the
lesson before and see that method of slashing
and spreading. And we know that that
measurement there will keep onto our body shape, which has concentrating
on slaves at the moment. So what we want to
try and do is get that men gathered back into
that cough and create a cuff. So we're going to work again
on a UK based size eight. And when we went again, my original video lesson was about block building
and the cuff measurement. And I used a guide of 22 cm. So I'm just going to stick with that 22 centimeter
risk measurement just for the ease
of this lesson. But again, the risk could
be bigger, smaller, wider. You don't, you don't have
to have anything at all. So what we want to do is create an opening on our cuff
that it sits here. So we have this nice
cough and much like a shirt that opens out
and then it closes back. And what you want it to, where you want it to sit in this area, you don't
want it to sit on. You can have openings on the scene which is
the underarm scene, which would sit there. And that's absolutely fine. There's nothing wrong with that. But classically or with a shirt, they sit just inside
the other side of that same towards the back
and it's normally where that wrist bone is
somewhere here. So to find that, you find the back of your
sleeve which is here. We know it's here because
that's our double notch for the back of
our sleeve crown. And this is the central
point of our sleep. This is the outside
edge of our sleeve. That point here is
somewhere in-between the outside edge and the
inside edge of our sleeve. So it would be somewhere around this point
because it's somewhere. This is the outside edge here running right
from our outside. That's the inside arm. So it wants to be
somewhere in the middle. So we quite literally find
the middle of this area. And again, it doesn't
need to be exact at all. This is a really
rough, loose guide. Just to show you. So I'm going to measure
along that line from that point there. 38 cm. So half of 38, and we've got 19. So again, measure back 19 cm. And that's your point there. And you want, you
don't want it to lie, lay parallel with that. You want it to,
because we've opened this out so it all needs
to run quite smoothly. So a nice opening for a cuff. Again, this is very variable, but I'm gonna do 10 cm
just to make it easy. 10 cm is quite a nice Rumi
amount for an opening. You can you can open
a cuff like that. You don't have to
have it that wide. But we're going to, if
I had an imaginary line marrying up to that kind of pitch point where
we've slashed open. You want it to be something like that and that would be your
opening for your cuff. And that lays it nicely, really nicely in line
with that opening. If I did it in line with that, it would be off grain
because it would be, it would actually
fall like wonky. So you want it to fall
in that sweep of that. I'm opening like that. So now something else, Just a little tip for a
nice little blue zone. Is that you just want to add
a little bit more length to the back here and then just shave a little
bit off of the front. So it becomes this kind
of almost like S shape. And I've done it
quite over the top here just for the sake
of for you to see. But can you see
that sweet there, sorry, it's back to front. This is the back here
that you're looking at, but it would be
longer at the back here and shorter
at the front here. When these two seems
married together, it creates a really nice circle. And you just get this
really nice kind of, um, It's, it, it won't
affect your dress. It was only very slightly. That looks very dramatic. So only very slight even
to a centimeter here. And then somewhere in the
middle here, a centimeter. And then this would
be your zero point. And so you would just doing this by high because I've
done it a few times before. That would be your kind of
back to zero point as was that'd be if shaved
off a centimeter here. Then you're just going
to add it back on here. And you don't have to do this. It's just a nice little
tricks of the trade. That's why I'm here. Can you see now that
that's lengthened 1 cm? So just make sure if you want
a ten centimeter opening, drop that down 1 cm. I'm just going to
leave that there. It's an 11 centimeter
opening now. It's absolutely fine. And we're going to remove that. So you can see I've got
this little wave here, so go shorter here and
then slightly longer here. Just make sure when these points get stitched up together, it makes a really
nice smooth curve. And again, you don't
have to do that. It's just something a little. A little pattern cutting hack. So what we now want to do is we will not now gathered back into a fixed measurement. We want it gathered back into your cuff measurement
and we set our cuff was going to be around about
22 cm on the full circular. So we said it's
going to be 5 cm. So I'm just going to draft
a really quick cuffs. So drafting along
here and square down. And then mark 5 cm. Sorry, I'm going to add on
mark 5 cm here and join these up and make a 22 by
five centimeter cuff. There we go. And it will quite literally
could be that easy. You can cut that out, cut that out and
that would be 22 cm. Add that, add your seam
allowance on a cut that out and then have one for the outside and one
for your lining and have it backed out
on that bottom seam. And what you'll find
is these two edges would, but together, they would but together
perfectly like, like that. And what you can
do, and it's very, very common on bridal dresses
or anything like that. U2 edges would, but
together like that. And you'd have a nice
little button placement or something here. Maybe you it's due. I won't mark it on,
but you can have button placements and rulers
or something and they, they would bump
together like that. But what is more common is you can have a
bit more of an extension. I've drawn a little bit more of an extension here and it's
particularly common in shirts evening where you would often find it like this where they just
bought it together. And that is literally
your pattern piece. Or you could have that
on the folded edge and extend that down
by another five and put that on the fold
and that would create your lining and back
out on the inside. But you can do a little bit of an
extension, for instance, we could add on to centimeters
to this edge here, just so that when your
edges come together, then you've got a little
bit more fabric underneath. Like that. I'll now show you 22 cm without the wrap, your edges would but
together exactly like that and that
is absolutely fine. And then you can have some
lovely little rule lows, coming and joining and
doing something like that, and some button
placements on that. But what I've done is
I've just added that to centimeter extension just so that you don't see skin there. And that's absolutely fine. Again, it depends on the design, but it just so that you don't see any skin if that doesn't join together properly
or the ruler loops are a bit loose or
something like that. You always see the fabric. Now what the most
important thing is is that this opening you'd think would join somewhere
at the sleeve edge. But the opening is here. It's exactly where this is. So when you've got this cuff on, that's where it sits. Where the opening is. Excuse me. That's where it would say
it's not on the inside there. It's just there
where that bone of your wrist is like I
was saying earlier, that there that point there, that green is that point there. And then so that would
gather into all of that and that would join there. So we know that that
measurement here is 22. So all of this bottom edge here gather to 22 centimeter
all the way from there. Right the way round. And this becomes an opening. What you would do here, because we've obviously
got a slash here, so you've got no seam allowance. You're thinking how
can, how can that be an open YouTube can't
just cut into the fabric. Well, you can cut
into the fabric. But what you need to do, and this is for
evening wears his very different to shirting. So with shirts, you
would actually cut out an actual section
here and create a pocket that would
go on to that. I'm not gonna do that
just yet because, um, I would do that in
my men's wear course and my tailoring course. But this is for
the women's wear. This is my design here. So you can see it's just
like a little flashlight you'd see predominantly in eating a gown or a silk fabric
or something like that. So you slash up
that FAB up there. But what you do on
this bottom edge, so I've just gone like
a half centimeter either side of that opening and that would just leave a
little bit of seam allowance and you really would
taper it off to nothing. That point is a very,
very delicate point. You just need to be very,
very accurate with that. You could put a little bit
of fusing behind that just to kind of put a little
bit of emphasis on that. But just be careful
if you've got a shear fabric that you
don't see that through it. But that becomes a really, really type point over very delicate area
where you're really putting the fabrics
going to nothing but you can take a smidgen
off either side of here. I've just done it
quite wide so that you can see it on the paper. But that would
become then create a seam allowance for you
so that you can turn that in and have a nice pin him or a nice binding or something
like that and turn those in. But I get out with lining. If you've got one of these
in a pair or something, you can drag it out and then take us MIT
enough either side. And then half a centimeter either side won't make
a huge difference to your gathering ratio. Again, this is all
designed to pending. You can open this up really wide and have it
already gathered in. Just make sure it always comes
back to that measurement. And then that will Blues on back to you or cuff measurement. And your cuff, like I say, can either stay like that with your seam allowance
on this is Net, don't forget this is
net measurements. This has got no seam
allowance on it whatsoever. Or you can have it on the
fold and you would put an extra 5 cm on the
bottom and fold that up.
6. Drafting a Capped Sleeve: Lesson six, kept sleeve. I'm going to be developing a
cap sleeve in this lesson. So I've drafted out the
crown of my sleeve. I haven't quite gone
down the full length to my full sleeve capacity. Don't really need to do that. So I've just kind of created a mini short sleeve,
if you like. I've just cropped it off a little bit further down that
I need just to show you. But by all means
drop the whole thing and you can measure backup. But I've just got the crown area because
we're just creating a little cap sleeve
which really only concentrates around this area. So it's a combination
of methods. It's a little bit of cropping up and also a bit of
slash and spread, just a small bit. So, yeah, learning a few bits that we've already done
on the lesson before. Again, this is all designed
depending you could just have a little tiny bit of a thrill on the outside of
a sleeve if you wanted. But this one, I've just got a little bit lower
than my bicep. I'm going to use
the underarm point and go a little bit lower just
so that I've got a bit of fabric to stitch
together and then create a little bit of a cap,
something like that. So again, just for
pure design purposes, I'm going to create a little bit of a cap area
here and then work into there. So first thing I'm
going to do is again, I'm going to go down
to centimeters. It doesn't need to be too. Like I say, this is just
for purposes of design. It could be nothing. It could the crown, the cat could start
here if you'd like and not have any
sleeve under the arm. I'm just going to have
a little bit to a so I've got a little
bit to stitch up. Then the length of my cap, I'm going to say is
going to be 8 cm, so it's going to sit
something like that. So I want to create a
really nice fluid shape That's going to join them. You don't want to
have a line that's going to join a to B, something like that because
it doesn't flow nicely. You want to flow
it really nice and echo that shape of
the arm hole as well. And also think about when it's stitched up, what it looks like, when it's like going round so that you want that
to be a nice curve, going round,
something like that. So you want to echo, again, I'm just
doing this by eye. That use your French
curve or something. Again, you can join these up, something like that so
it flows really nicely. And notice I've just done it to that central point because
what I find quite good. That's over to get
your other keys. You could echo
that line through. My Alexa is just decided
to try and join in with my lesson. Sorry about that. She can Whitehead term. So yeah, Did you see what I did? I just joined that line underneath and I can see
through the paper and then I know I've got a similar
line that looks like that. And you could actually leave that like
that and that would be an absolutely
perfect caps leave. That would be absolutely fine. I'm just going to open
it out a little bit just because if I just
stick it in like this, it's gonna be a really
tight fitting cap. It's gonna be really on the shoulder and it's not gonna be much room for movement. So just on my sketch, I've got it just a little
bit set out by that. So I just want to
kind of open out that bottom edge of it and it's not quite
like a short sleeve or the flair where we you could just draw that straight line in and it would be a
little bit wider. This is a nice curve. So I just want to open it out, but because it is so up in that crown off that sleeve head, It's it's such a
tight fitting area. I just want to open out that
bottom edge a little bit. So I'm gonna do that method
that I did with the, with the fit and the flair. And I'm just going
to divide this into a couple of sections and
I'm just doing it by eye. But it's exactly the same method that we did for the fit and the slash and the spread method for opening out
that bell sleeve. I've gone through
those balanced marks. You don't need to, but just make sure you go up in those lines. So this area now or becomes void and we're working
on that area there. So again, exactly
the same process as we did with the
slash in the spring. Again. Remember I don't have seam allowances
on these patterns. I'm working just nets. If you've caught up to those stitch lines and
walk through them, like I'll show you now. You know, that that line, as long as it's not
tampered with this one here on the crown is going to fit your arm hole because we know that this measurement
isn't going to be moved. So get a fresh piece of paper. And then we're going
to do like we did with the slash and spread method. Keeping our balanced smart, not cutting through
that top seam there. And then we're gonna chest
open those out like that. And you'll find what
happens is with this because we've gone shaped up
and now we've opened it out. This area now becomes
quite a bit flat. Which is actually, you know, that's part of the idea. That is, that is the idea
that this now like my sketch, becomes flat on this area here. So we're going to take
that down like this. And again, this is all
depending on your design and how you want your design to. How, how, how spread
out you want it. I'm just doing this quite
roughly just to show you to take down those sides like that. So you can see what's happened. We've opened that out now and that's become quite
a lot flatter. So we could do one
of two things. We could do what we've shown
you that and actually, excuse me what's going
on with my throat today, I've been talking so much. Extend that down of it. We want to find the
middle of this leaves. I'm going to just pull
that over again and find my two underarm points and find the middle of my sleep because this
is really important, That's my underarm point. Knows, will join together. So doing that, I've now
found again My, my, my center point, don't forget my pitch point is hang slightly off that
it doesn't always, it's just because of
the method that we use. But I can now go
straight across. I could manipulate. I could go here. And then I can kind
of go straight across something like like that. You know, so that's my new
cap, something like that. Or I could bring in
these side slightly Marriott up to
underneath the hood, just see a faint outline there. And marry that up. And I could have a new little shape like
that, just for instance. But we just need to make
sure that these edges, when they're stitched together, don't create these points, which is why I continued that curve there like that so that when
they joined together. But what's, what's happened
now is I originally wanted my caps leave to be 8 cm. So going back to my sketch, you can see what's happened. Now, I've opened this
up at the bottom edge. This length from the top of the crown here is
longer than eight. It's actually about
just over ten. So if I wanted that to now be a I could again do
one of two things. I could either go back to my a, which is well there at the top of my my
slashing and spreading. And I could shape that back and join these
lines together and make a nice curve and do
something like that. Or the other thing
I could do is have, this is my new point, my new him point, and go back up 8 cm, which means dropping
my crown down. So that's my new Crown Point. Then I need to redraft in naughty me using
my French curve. This is a little bit
more tricky this way, because what we didn't
really want to do was tamper with the crown because
we knew that that fear. But that is another option. If you want that
him to be straight, you can drop that crown back. But what you need to make sure
is that that measurement, again from that balanced mark at my balanced marks
here and here. This area here fits back into the top of your
area here and here. So it's back to front, my back my front here. You need to make sure
that that Mark would go. Now here. I'm just going to put
that point there. And then that balanced
monk and look, I've just done that roughly, but that is not Emilia model. That is actually spot on. I've just dropped that
down to centimeters and that crown fits
on there perfectly. So that is another
way of doing it. If you want to keep that
edge on the street, you can drop that crown down and you still got that
measurement there. So there are two options
of doing your cap sleeve.
7. Adding height to a sleeve head for shoulder pad: Lesson seven, adding
height for a shoulder pad. I always get asked this
question about how to add in for a shoulder pad. So it's not just a question of adding into the sleeve crown, which is this area here. Obviously, if we've
got a shoulder pad being added into a garment, we need to add in a bit
of height here and here. And that is just really important as you can imagine
with the shoulder pad, we've got that extra
thickness that goes in often that you find in
jackets and things like that. Again, There's 101 different
shoulder pads out there. This is no set rule for any shoulder pad
or anything like that. If you've got one
of these huge kind of bowel main style pads, you need to add in a lot
more height rather than something that's just for
a little bit of softness. If you've got sleeve head, well, that is all kind of
there's a whole world of tailoring and sleep
head roll and canvassing that I'm not
going to dive into here, but this is just a basic
guide for a kind of, uh, I'm gonna go
somewhere in the middle with this one of a shoulder pad. So I'm really going to
just show you the basics. So it's just adding
a little bit of height on the outside edge. But what we really need to do first on our block,
front and back, and I've just drafted
them out here, is we need to add a
little bit of height, first of all, into our
shoulder area here. These are my blocks,
as you know. And I'm just working
on the half because we're assuming that we've got a symmetrical government
at this point. And so that we know that the
both measurements are fine. But what we need to
do first is add into our arm whole length
here to add that high, excuse me, and front and back, and then add into
the sleeve crown. Now what you don't want to do is you don't want to just add on to the top like that. That is not what you want
what you want to do. I'm not sure if you
can see it's going to redraw that dotted line. What you don't want to do
really is something like that. And likewise on the front, it creates a
horrible angle here. And you can do it like that. It is not the best, it's not the correct
way of doing it. So we're not going to
do something like that. So what we wanna
do is we want to keep this area all the same. This is our underarm
point as we know, we want to keep this the same. The shoulder pad really just concentrates on this area here. A shoulder pad. It, it kinda predominately
just comes this area here where all of these
pitch bookmarks here, points that are here. We don't want to move this area. It really just is
in this top third, really of this arm hole that
we want to concentrate on. So again, find the middle. Really, again, this is
very rough measurements, but it's just for the ease of you to see a
measurements in-between your pitch point here and the top of your sleeve
outside edge here. I'm somewhere there and I'm
gonna go somewhere here. And then we're gonna just draw a line in
something like that. And then just do exactly
the same for the front. I'm gonna go somewhere in
the middle of these two, this pitch point here. And then go right up into the highest shoulder
point, front and back. And what we're going to do
is we're just going to cut up those lines, hit like that. I'm going to leave that
aside for a little bit. So what we're going to do
is cut the outside edge. Just give that a knit two so
that we can manipulate that. And then we want to, again, a little bit like the
slashing and spreading idea. We want to keep that higher shoulder
point exactly the same, but we just want to open
out a little bit of height. Again, depending on the
height of your shoulder pad. I'm going to just again for
the ease of the lesson, gonna go about a
centimeter height so you can measure
that gap there. And that's my son. Oops, that's my centimeter,
something like that. And as you can see, the lines
are now a bit disjointed. So we just need to make
sure that that's now a really nice curve
back in there. And marry those two lines up, making sure my outer
edge stays the same. And then it looks
something like that. Now we've got a new measurement. From the top of that pitch
point up to the top. It's now 13, which
makes total sense. Okay? So we just want to do exactly
the same with the bottom, open out from the outside
of the arm hole, right. Just to that little
nip there again, this has got no seam
allowance on it, so don't cut through there. And then just give a little nip on the other side
to just join it, just so that they
pivot round like that. And we're going to
do exactly the same. So we know our shoulders are
the same, the same length. We haven't changed
anything there. Everything's staying the
same and we're going to do exactly what we did
with the front to the back and open
that out just 1 cm on that outside edge. So it looks something like that. So we've tampered
with our arm halls is the first time we've
tampered with our arm hole on these, on these ones here. So this is very important
that we need to reflect this back
into our crown. And then once again, we just need to make
sure that that's a really nice curve back. Marry these lines
back in there again. So it looks something like that. And just don't forget, you can always walk your patterns back. That's just a scrap
of paper underneath. Makes sure that your
shoulders lineup again, we're ignoring that
line so that you've got that nice curve going
round all the pieces. We don't want any acute
angles of anything going on. So then remeasure again from that pitch point and to
your top of your shoulder. And that's 12.8 again, which makes total
sense because in our original blocks I
had here 12.11, 0.8. So that makes
complete sense that we've just added
in a centimeter. Now we need to reflect that in the crown and we need
to add in some height. So what we've done here is what we've done on this
bit of the sketch here. We've added in on
that outside edge, we've left the highest
shoulder points exactly the same as almost zero if you like an added
in a variable on that, on that arm hole. So now this is our base block. We just need to reflect
that on the sleeve head. So what we're going to
do is actually slashed down and open this crown up
so that it reflects that. So you want to find a
similar point as we did from here to here
where we slashed up. So we went something like 6 cm, 5.5, something like that. So find that similar point
from your pitch point. This we went up six and here, 5.5, something like that. I much prefer using my French
curve than I do with that. So it doesn't need to
be that exact point, but it's just somewhere
that we know that these areas are all gonna be the same measurement
because it's now, we've lifted up into this section here so that we know that
those measurements, we're going to be the same. So we just going to
draw a line up there. And then what we're going to do, I'm just going to cut that off. So I've got a bit
of spare paper. Then we're going
to slash down into that crown to that
point there like that. Then what we want to do
is open it out that way. And open it out that way. Like that. But I want to just cut down
here just so that I've got some pivoting points so
that I've got a pivot. Didn't quite do that enough. Don't go through
that line again. We know that this is our net measurement so
that we don't want to add or lose any
measurement of our crowns. This point here, go back
down to this point. So we've got these two
areas here that can pivot inwards and outwards. And can you see what's
happening here? Not only are we
adding excuse me, not only are we adding
in length to our crown, excuse me, curly paper. Not only are we adding
in length to the sleep around with adding in height
and that extra height, can you see that movement? That's the height of the shoulder pad and that's
the extra height that we need to compensate for the extra height in
those two shoulders. And that extra length
here is the extra length. That will compensate for that extra length in
that arm hole there. So I cut that piece off
so I can stick that down. And I would be doing
this a lot more, a lot nicer if I didn't have a Sharpie
and I had more time, but I'm just doing this
for the purposes of view. So this is my original
point where they joined in the middle as a guide. And I'm going to move that out From that point there where it's an imaginary
line if that continued, I've just moved
that out and up 1 cm again to compensate for that. And you can see it's
looking a little bit of a funky shape. So we're just going to redraft
my line back in there. And what we want to do a bit like we did to this
arm hole here. We want to make a really
nice now curve back in here. And you can add a
little bit more. You just don't want
it looking really elongated and looking really bizarre along an oblong E. So just make it look really nice. Curve and shape. You'll soon get to see
what he's looking. Looking a little bit
too long for me. I would rub that out if
I had a proper pencil, but I'm gonna just redraft. So yeah, I'm going to
redraw that line is. So I've added in high and
I've opened that out. So I've added in length here, and then I've added
in height as well, this centimeter
here, this gap here. I've added in,
this Lift up here, is that centimetre
that we added in here, that's an extra height. So now if I just give this
a quick measure back, so that front sleep and the pitch point to the
top of the crown was 11.8. Don't forget, we've got
0s on this as well. So I'm gonna put my 11.8
comes to that point there. And 13 on my back from that
balanced mark there up, there's 13 cm is here. So my new pitch point, it's pretty much spot on. Is there UCSC, it's off just
off that middle point there. That's absolutely fine. That's completely normal. And it means that
your pitch point will marry up perfectly, again. Back to those points
there and there. And it will stop your
sleeve from swinging. And that's that extra
bit of height you need. If you need to add
in more height, if you don't feel like
you've got enough 0s there, I've now only got
about 2 cm 0s there. I had three, so I could
lift that up even more. I would be inclined to actually lift that out even more if I was to do this for a nice
jacket or something, or you could leave it just with slightly a
little bit less ease, but I would be
inclined to make sure I've got as much ease
as I wanted there, but that is completely
acceptable. That is 2 cm ease to get from that pitch point to
that high crown, especially if this is for a
jacket and we've got a wolf, I would suggest that
that is more than, more than fine wool can be
a bit more manipulated. But yeah, that is
how you lift up the crown to compensate
for your shoulder pad.
8. Drafting a Gathered Sleeve head : Lesson eight,
gathered sleeve head. For this lesson, we're
going to do gathering into the sleeve crown
or the sleeve head. This particular style has got a very special
place in my heart. It's actually one of
the first things I got taught by a very dear
friend of mine, Mr. Leslie, who has now sadly passed, but anyone who knows him
will know what a legend he wasn't he taught
all over the place, but yeah, he taught me. This is one of the first
things that he taught me and, um, yeah, it's something that's a stayed with me all
this time and it's a really cute little it's like a puff sleeves, little crown. You get it quite a lot in children's wear
or evening gowns. I've drawn it here
as a long sleep, but I'm just going
to draft it up as a short sleeved because
we don't need the rest. We know that we could
extend that down, but we're just working into this top crown area
of the garment Just so that you
get what we want to achieve is the gatherings. So we want the the, the, the fit and the, sorry, the slash and spread
outwards but also, and also the height so
that we get that blue's on back on the top
of that crown. So you could add in some
tool under there or some netting or
something to give it some height or volume or organs or, or
something like that. But the idea is that we
don't have this really smooth, tight fitting shoulder. We want to add all
of that high-end, but we also need it
gathered back in to that neat fitting
bodice arm hall. So we're not altering the arm hole of the
body sees on this one. We need to make sure that
this stays exactly the same. And whatever we add into this sleeve crown
gathers back into that set measurement like these bodies box or whatever base that you're
going to put that on. What we want to do. First of all, is
we want to again, avoid the underarm area. This is going to
stay according to my design without any gathering. The gatherings just
going to start from the mid arm area roughly where these kind
of balanced Marx's. So again, I know that
these always marry up to the underarms of my
garment here and here. And so the only measurement I
need to worry about all the pitch points to the shoulder
point front and back. So I'm going to avoid this area here under
anything underneath here. And I'm what I'm going to
do just above it is just square across
something like that. And so we're just
concentrating in this area just for the
sake of this design. And then I'm just going
to divide each section roughly into another two
sections, front and back. Just something like
the slash and spread. I did. You know, it can
be two sections, three sections, but you
want an even spread, you want even gathering. You don't want loads on
the front of the back of the front of the sleeve
and none on the back. You want a really nice even
gathering in a nice even, even ratio, again, does
depend on the fabric. Thinner fabrics require a lot
more gathering or could do. So, you can open
it out quite a lot more rather than
something like a, like a leather for instance, that's on the other
end of the scale, that wouldn't gather
in quite heavily. So you do need to try out the
fabrics before to work out. Actually how much gathering out and back you want back in, but I'm gonna go
somewhere in the middle. So I've just divided
up the top of my crown into these areas. I'm just gonna get
rid of the bottom of this paper because
we can use that. Again. It's a similar
process that we just did for the shoulder pad idea. With the shoulder pad we we tampered though
with the arm hole, but we're not gonna
do that on this one. But it's a similar concept
that we're going to choose. Slash into the top of the
crown of this and lift, lift that out knowing that these pieces here stay the
same as our initial block. So we're going to slash down the middle point
there to that point. Then again, we're
going to slosh out. We want to do that on
all of the sections. Can I get rid of
all of this excess because we do something slightly
different on these ones. Ignore the extra that
isn't seam allowance. These patterns are all net, so ignore all of that. So I'm going to
again cut down here. Cut up that one, and cut that one. Okay. But we do do something slightly
different on these ones because if I was just to
open up these areas here, It's a similar concept
to the shoulder pad, whereas I just kind of get
high in this top area here, right on my shoulder pad. But what I want to achieve is gathering all the way around. So I actually need to add in a lot more length to
gather it all back in. So I actually need
to tamper with the whole of the
top of that crown. So what I'm going to do is draw on my line here. And I'm going to choose
stick down just so it's not flapping about this
pattern onto that line. And imagine it's
continued up there. So these pellets here, like I say, we don't
want to change. So we can cut down to that point like we've
been doing and have that as our initial lift on
these first bits here. And lift these up again. This is all design. This isn't, this is not gospel. I don't have to lift this up. 1 cm, 8 cm. It's all depending on the fabric and how much
gathering you want. But I'm just showing you
the theory of what you do. And so what we've
been doing before, it's just cutting
out to these lines and not going through
and just pivoting it. But I actually want to cut through these ones
because I want to actually add in height on
these parts here as well. Looking a little
bit like a locker, pieces of cheese or something. So can you see what's starting to take
slight bit of shape. I'm going to cut right
through that bit there, right through that bit there. Now, this is where you have
to use your artistic license. And what we don't want to
achieve is we don't want to have all of these or we don't want to have
a lot of big gap here, wouldn't hardly any gathering.
It's all off balance. We want to make sure all of these pieces are evenly spread out so that we get the height
that goes out and back in, out and lift out and
then gathers back in. So you don't want to have your sleeve that looks
something like that. I mean, it just looks bizarre and weird and we need to
have this nice shape. So we want to have
almost like work equally up as equally out if
that makes a nice kind of, you know, you want that
volume outwards as well. You want it to go round
and back in that blue's on back in these points
staying here, it makes for a very
long and thin sleeve. So what you'll find
is it's very narrow here and you just get all
the height at the top. But what we want is
we want to create some, some width around. You want that blue's on around
the sleeve on the crown. So that's why we want to open, open this out as well slightly. We don't want to have
it all long and thin and very, very narrow here. So we want to open
out some width here. And again, you can
really kind of start opening out even wider if
your design creates that. But I'm just showing
you a formula of, um, you know, and it looks
bizarre at the moment. And you're thinking,
what on earth? But yeah, make sure
these measurements, they're all equal
and they're all nice and everything like that. And again, it doesn't
matter that that high, it's fine but longer because
you want that blue's on it, but you equally,
equally want that to go outwards as well. Then obviously what
we need to do is redraft or crown and it is
going to look slightly odd. But by your pitch points, that's the bit that
gathers back in, so it will come back
into that measurement. So what we want to do
with our French curve is work with these lines as
you're very much a guide. And we want to draft a nice line back in there,
something like that. Don't use these lines.
I get this as well. Like a lot of people
asked me, Well, you know, my line went in there and then I had to kinda make this angle. It's all very fluid. No one's arm hole or
shoulder is straight. You know, it's all very fluid. It's like art work. You need to have a really nice soft curve if it's not looking
right, twirl it up. And Mary Mary that backup
there, something like that. It's looking a little
bit sharp there. So I would just Curve that off and it will, that's actually the
shape it will look like. Because the idea is that we're, we've not got any
gathering on the underarm and it's all
in that top crown. And if you're
slightly concerned, you know, like, uh, do fold that over, check that it's all
kind of looking nice. My Android can't quite see off-camera underarms
adjoining and my front is slightly more bulbous than my back as we learned in
the first lesson. And then what we need
to do is just add in now back or pitch point, which is the central point, not the central point in there, which we know is our green line, but the central point that
we know when we gather back, but it will lay perfectly
back to what we want. So what have we got here? So the way I would
work this out. So I've got 12 and it was 11.8. So I've got 12 that it needs
to fit back into an 11.8. Now there's no ys on the on this because there's no point because you've
gathered it already. There's no point in adding ease. You might as well eat the
ease into the gathering. So we know that these pitch
points and your underarm will fit into those spots
and placements there. And that's the gathering and that's the ratio that we need to work out from there to there. So I would measure I would add
both of these up. Hang on. Let me so that's 23.8. That's total from
that pitch point to that pitch point is 23.8. Net. That's what I need to
get back into my arm hole. But let's just see
what we've got. We can work out what ratio
we've got of gathering. So I'm gonna go to the top, measure all the
way over the top. And back down. There. It's about 3838/23, 0.8, which are net
measurement in 1.5. And that's our ratio of
gathering is it's 1.5. So you could really
go like huge. You could go 321, which means
every centimeter of fabric. You would add in three and
it would gather back to one. That's what the ratio is. So with that, we can find out where our pitch point will be. So I can times 12 by 1.5. Oh, hang on. I did that wrong. Sorry. 12 times 1.5 is 18. So I'm gonna go
up here and round and do a 0.18, which is there. And then I'll do exactly
the same on the front. So I'll do 11.8 times
1.5, which is 17.7. So I'm gonna get my 17.7 and just run my measuring
tape until I get to 17.7. And then in the middle
there measure in-between. It's about 2 cm, so I've
got 1 cm in-between them. That's my pitch point, and that's the point
that will join there. So then don't forget, then we'll trace that
awful nicely first. Don't leave it
looking like that. Otherwise you might get
it sent back to you by the same stress or
it will lose parts. You want to trace
it off or nicely, I just see my answers
on in your labeling, but don't forget to add in. Now, you're labeling gathering
to 12 cm to that point, to that point there. So that would be they'll pitch points so that they
will know that that is net measurement and
that's your pitch point. And then on the front, you would gather to 11.8. To that point there, I do a wiggly line and an arrow just so
that it's gathering. And I would normally
write it on the inside of the pattern actually because I need to add all my
seam allowance, but I've just done it
like that to show you because this is all a bit messy. Then the seamstress or yourself, we will know that from
that pitch point there where you've drawn the arrow
to that it's gathering. And then it will gather back into your sleeve
crown like that. And the underneath will be net.
9. Drafting a Raglan Sleeve: Lesson Nine, rags glands leave. So in this lesson, we're going to be doing
the rag land sleeve. And forgive me, but this is my least favorite sleeve
and I don't know why. Just find it really
awkward and annoying. And I just find the
shape really on, on, aesthetically
pleasing on the, I just find it really odd. But anyway, it's very popular. Again, depends on the
style and the design. This is what we would
see as a rag land. It's almost like the
shoulder or the arm hole. The top of the arm hole. More than anything built into the shoulder area of the sleeve. So you kind of get this semi
diagonal seam going from the underarm point
or the pitch point to the neck line
or the shoulder. Again, it's very variable. This line here, the designer could go up into the
shoulder, like I said. But it's very popular
and like I say, it's incorporating
the shoulder area here into the top of the crown. It's almost taking well, it quite literally is
cutting off that piece there and placing it on top of that piece there with
just a few little, with a few little ******. So the first thing we
need to do is draw in the design style lines onto
the front and back bodies. And again, I'm just
working on the half here and on my front
and back base size, I realized I was working with a whiteboard marker the whole
time I've been drafting, which is why I'm sorry that
the lines haven't been as dark as I would have
wanted and I couldn't work out why it wasn't quite so dark. And so I have found
my actual Sharpie and so I'm going to have a new
lease of life with my new pen. I do always use a
pencil, actually. This is my trusty pencils, but for the sake of the visuals, I'm just using this pen. So anyway, onto the design. So I've got my back on. Gosh, I'm so sorry. Oh dear. Here we are getting
excited about the pen that was about my pen
change right there. Anyway, we've got the
front of the bodies here, and the back of
the body is here. I've just drafted
out a little bit of it because we're just working into these shoulder
areas here they are. Here's my neck line, obviously my arm holes. I hope you understand
it thus far. So I'm just going to
use my balanced marks here just as a rough guide. Again, just to make
it easy for you, it doesn't need to be like this. It can, lions can move, they can go onto the arm. But I'm just going to
make it easy for you for the design purpose. I'll leave it like
that so you can kind of see what I'm doing. So I'm going to use
these balanced marks as my starting point
for my style line. And then I'm gonna go up
here somewhere in my neck. So just as a kind
of a rough guide, I'm gonna kinda go
somewhere like this. And if you've got a
mannequin measured down, see what's nice, put
some tailoring tape on it, see what's looking nice. Then transfer those marks onto your blocks so that you
can see what's going on. So I'm just going to make a judgment call and go
somewhere like that. So by all means, make a line that goes
across there and there. And I'm just using, like I say, these balanced
marks here just as a really easy guide
so that we know what we're doing
when we cut it out, trace it off, and so we
know where we're at. But these lines, you could
have your line like here. You could have it
going down here and you could even have it
going into the arm hole. It doesn't need to go
up into the shoulder. The highest showed a point, or here it really is variable. So I've drawn these
lines like this and it looks pretty much like
with spot on already. But what we wanna do
is we just want to add a really nice curve in here. And you don't need
to, just looks really nice when it
goes on the body. It creeps around the it
just flows really nicely. Like we don't like straight
lines really in the body. Everything's just
like it's very fluid. So yeah, this nice curve, I'm just gonna go inwards here. I'm going to say about eight
meal or something like that. A 8 mm centimeters maybe sometimes a bit too
harsh on this small area here. And anything else
is a bit pointer. So kind of using this
is your zero point. Just curve that round. Again. I've done that by eye. But you can use your nice trusty French
curve, something like that. Get a shallower point on it. Go from zero up here to there, Eight mil and then back
down to zero like that. So it looks a bit
more like that. So this line now becomes void. They are now your style
lines for your rag land. So these essentially will
be removed from your body, but in don't forget
on your body to then add a seam allowance back onto that line there so that you can stitch your sleeve
back into there. So your sleeve will
essentially get stitched up there and along that line and then become part of
the neck line as well because we've removed
part of that next line. Let's not forget the design, unlike the little sketch
that I've drawn there. So what we need to do is
basically put these sections of the shoulder now onto
our sleeve head. The best way to do this is
either cut these bits out, then you've got
those two pieces. But you can also
trace the mouth. That is absolutely fine. It's just another
way of doing things. Then. That is your neck line, like that. That's your back. And then I'm just
gonna do this just for the sake of fitting it
onto a piece of paper. Trace that on there. And again, this isn't about
ease at this point because the whole of the shoulder
is being now moved. Okay. So we've got your
front and your back. So quite literally, I always actually what I
normally do is I write shoulder because I
always get confused. Once I've traced those
off and cut them out, these little triangular pieces, they all start looking the same. And again, I'm going
to repeat myself, but this hasn't got
any seam allowance on. I'm just working here. Everything will get
added on at the end. Once all the patterns
are finalized. Cut that out. Lula, Lula, Lula. Again, make sure yours is
a lot nicer than mine. I'm just doing this for speed. So we know our front and bodies. Now. We know that these lines will join
on to these pieces. He wants seam
allowance of added and this will now
become a seam line. So as someone else needs to
get added back on there, if you're at all in doubt, if it's going to marry up, put some balanced marks so
that we know, there we go. We know exactly that. That again, a balanced mark isn't something
that's particular measurement is
just an indication of where we join
things together. And also for people like me that we know immediately
that that's front and back. I know because the machine is won't get those
pattern pieces. They'll have it cut
out and I'll just get the fabric so that there's
two Nazis in there. One in there. We
know immediately, we know that that's back
and that is our front. So now what we want to do is we want to add it onto
the top of our crown, much like we have
done like that. So we need to, uh, this is where I always
get confused and actually, oh my God, I always
get this big confused. That's it, right? No, no. Hang on. I still
don't get confused. Why am I getting myself
all a bit kerfuffle here? This is why I don't
like rag glands. Because I feel like it's
all a bit back to front. Okay. So then this is what
it then looks like, excuse me finding my tape. So we know that that point there was
that balance mark there, that piece right here. So this is the piece. We then join up to the balanced mark here that
will become that area. Likewise on the front. We know that that point
there was our balanced mark. And so we know that that
point there will join up here like that on
these two pieces. And so what we do
is join that and then leave a tiny little space. Now tell you why in a minute. But that will be
your placement here. I'm going to leave about
just a few meal gap. Sometimes. It's yeah, it's good to leave a point
and I'll tell you why. You hang on. Let me just stick that bit down there and that bit out there. Can you see what
I've done there? I hope that's clear. Sorry, it's gone off the paper
a little bit at the top. But what I've done there
is quite literally removed those two sections and use that balanced
markers just to guide. Again, it doesn't
need to be there. If we move that up, it would
start further up here. And if we move that
line up there, it would start further up there. But I've just done it so that you can see what's going on. Then taking those pieces. And so when those pieces
gets stitched back together, they close up and become
your shoulder point. The reason I've left a
little gap there, again, no one will say
this in any book, but it's just a
little life hack. When I like to curve off the
bottom point when they join. And then we'll just go to slightly lower than
your shoulder point. And it just makes for
a really nice curve over the top of your crown,
which would be there. And this is bang on on my
area where my pitch point is. This is my neck line. Don't forget here. My neck
line and that's my arm hole. Can you see it just
made up a bit of a kind of a bit
of a funny shape. Just want to go back into that like we've been doing and just make for a really nice curve. There's my balanced mark
and then that line, there will be that line there
that will marry up here. And that back one looks
a little bit funky. So I'm going to choose us make a nice curve,
something like that. So we know that again, that line here is here. And then that line there is that one there and
that becomes my back, neck. And then that will close
up like a giant dark. But the reason I left
a little bit of a gap there is because when
you've got such an acute, huge area that you close up, you get a really pointy bit. There's nothing
worse than having a nice RAG land sleeve with a really acute point right
on the shoulder tip. It doesn't look very nice. So I always leave a little
gap and just extend that dark point down a
bit and just curve off that end and it just creeps over that shoulder head point to so that you don't get a
really nasty little point. When you close that up
and you switch that up, it creates a really
nice smooth point. And then your neck client
and back then into your arm hole and
there's your rag gland.
10. Drafting a Kimono Sleeve & Conclusion : Less than ten kimono sleeve. So in this lesson, we're going to be doing
the kimono sleeve. This is commonly seen
in kimono, of course. And in things like
dressing gowns. I'm all in one, jump suits, things like that, and, um, uh, buyers, which you
will see quite a lot. I'm in the Arab market
and the Middle East. They have a lot of, um, these garments with
the joint in arm hole. So actually we don't
really, I'm not going to, for my method, use this
leave block for this one, it's all about the body's block. Such you are really
straightforward pattern. If you get the angles
and things right, I've just drafted my block out, but I haven't put any
of the dots oppression in anything like that. I haven't put it in
my design either. It's quite a loose
fitting Garmin. It doesn't have a
proper arm hole, so it's not very
fitted at the top. It doesn't creep
around the bust or anything like that and
you've got no suppression. And so you often have to
lose your dollar into your arm hole or lose it into the bottom of the garment
or rebalance your garment. Um, I do have a course all about rebalancing and all
the nasty bits. So I, yeah, with
things like this, it's very much like
an oversized gown, a dressing gown,
a loose fitting. Like I say, you haven't got
this fitted arm whole shape. You do often find when you put your arm down in these garments, that there is a lot of
volume up around this area. And that's all to do
with the fact that you don't have the bust dart and the fact that you don't have an arm hole to swing
any volume into. But that's all to
do with the design. And so you just have
to deal with that. And actually it's part of
the beauty about the chemo, the right plan,
the kimono sleeve. And that's the volume
just kinda falls in here, but it's a really lovely sleeve
if you can get it right. What you do have
to be careful of as well in a design like this. Because the, the, the
design will go from one length right the way
across to the other. There's no arm hole,
There's no slave, there's no like the
patterns all in one. You just have to be careful of your fabric consumption on this because it takes up
quite a lot of width. I know when I've done a
bias for my Arabic clients, on the back,
particularly there's no opening the openings,
nobody at the front. So I can have a half
bodies like this, but the back is normally
splayed out all in one. There's no vaccine. When you're going from
one risks to the next, your whole wingspan is sometimes
wider than the fabric. So just be careful about
this design on this, that it does take up quite a
lot of width of the fabric. So as you can see here,
I've, like I said, I've just drafted out
part of the bodies and the arm hole area that
we're gonna be working on. And I just have made
it slightly like it. I'm like I said, without all the fitting. So it is a looser fit here. You can obviously
have it very fitted. But for this particular design, I've just taken out the middle
dots and, and like that. So what we are going to do, and it's quiet, Quite a ton
of straightforward thing. Again, with my vibe, there's no kind of formula to do a particular
thing or whatever. But anyway, you'll
find it's trial and error with things
like this as well. So I'm going to lift my arm
hole on that outside edge. Just one centimetre, whatever you do here as well on the front door at
the back as well. So this is my highest
shoulder point on my font. I'm going to have
that as my zero. What I'm gonna do is
I'm just going to extend that out like that. And I lift that up a little
bit because you know, a kimono sleeve because you don't have that arm hole
and it's very loose fitting. You're lifting your
arm up and down. You want to have a
little bit of movement. And also, if I
continued my line from my natural shoulder
point down here, you don't have much lift. You do want to lift your arm
up more than that angle. So I often do add a
little bit of height. You can square completely across actually
if you wanted to. Which is what I do a lot
for my Middle East clients, is I go a lot. You can square completely across like that from zero here. But what happens is you do get this big pocket of volume here because
it's got nowhere to go. But it's nice and Rumi
and very flexible. But I've just angled mine down slightly just to
get rid of that. But you do see a lot of these
japanese garments that have very square arm and then they square down here and
it's all very boxy square. I'm sure that there's some
history behind all of that, but ignore that for now. I'm not going to be
going quite so wild. I'm just gonna kinda do
this natural line here. So just ignore that bit for bit. I've just lifted
that shoulder up. 1 cm and we're going
to extend down. Now when we drafted
our block right at the beginning, our sleeve block, we know that a size eight is roughly 60 cm from the outside edge of my
shoulder, which is there. So I'm gonna go down 60 cm. Haven't quite gone on long
enough on my line here. Let's just add a little
bit more in there. So I'm gonna go 60 cm from that shoulder point
down there, 60 cm. So I know that that
length there going to hit my cuff and it might be a slightly long, they
might be short. These are again, like I said, oversized garments or
you might find it, she has kind of ends up being a bit too long and that's
absolutely fine, you know, crop that down. Then what you want to do
from that line there is square down like that. So again, just
following the design, you could, this is
again so variable. But what you want, you don't
really want to do is create a line that goes right
up here from your side, right up to that underarm point and then joins down
there, you know, what you don't want
to do is that kind of thing and have a line
going there because it's just that that
link there is so narrow that front and
back around your bicep. It just hasn't got any room. It's not got that oversize
feel that you want. What you want to do is you
want to create your line from it can come from your waist and go for
natural progression out. Again, this is all designed depending there's no
rules or regulations, and it also depends on how
wide you want your cuff. If we weren't quite roomy cuff, don't forget, this is
just my front bodice. I would say she's got
quite a Rumi coffee know, there's quite a lot of room
to put her hand in there. So I'm going to say the total
of her calf is going to be something like 40 cm round, which is roughly double what are fitted
rest of our block. So I'm gonna go 40,
so we're doubling up. So 40 front and back. That's 20 cm on my front there, which I'd say is quite
a nice measurement. And then what you
want to do is to square up roughly from there. So then what we want to do, so this is my ignore
that we now want to just marry up our side seam
here to our cuff. And so what you want to do
is you can create, again, this is all design pending. You can go up, draw in something like that so that it's square off there and anything you do to the front due to the back as well. And just make sure
this is my waistline. So this is my waistline point. Just make sure your
waistline point going down on your front and back
is all married the same. Your underarm length and
shape is all the same, you know, get get your front, trace it off, or your
back-end and marry that line onto whatever
your back, your back has. Just a slight, slightly
more room through here, but that's fine because
it doesn't affect any of your lines here and here. It just has a higher shoulder at the back because it creeps
up over the shoulder. So don't worry, just as long as your highest shoulder point here and you'll cough are
exactly the same length. And again, when you trace
off your back body, you'll do exactly the same
method you've done here, but you just might have
a slightly deeper cough. Again, that's fine because
it's not joining to anything. It will just give you a little bit more
room and your cuff. But as you can see on the block, when you join these
two together, you go back, is slightly higher here on your
shoulder, your back. We'll just have a slightly a bit more room in it through here. But yeah, as long
as that line here is the same and the
angles are all the same, and you just trace them off to exactly the same front and back. And then when you stitch it up. But again, this is all a
design line as is all of this. I could have, I could
have a much, Let's go. I could do a narrower
coffee if I like, I could just do 15 cm. Don't forget this is
just on the half. So that would be a
30 centimeter cuff. And I can choose square that off slightly and
then I can maybe have a higher I can go up higher and have it slightly
neater on my underarm. We can draw that in usual nice rulers
and make sure again, whatever alteration you do to the front, to the back as well, That's given me a slightly slightly neater Let's ignore
that one for a minute. A slightly neater arm hole and
going into a tighter cuff. But again, it all
depends on the design. You could go even wider
and move that down there. So it is all variable, but that's a really basic way of doing your nice kimono sleeve. So thank you so much for
joining me on these courses. I really, really appreciate all the support and keep
your questions coming. And if you don't
understand anything, please email or write a comment on anything and I'll try to
answer you as soon as I can. Thank you so much.
 Caroline Barulis PurePatternCutting, Pattern Cutter & Maker