Transcripts
1. What's in This Classs?: Welcome to my Doodling
People class. My name is Tamas, and
we are here to learn to draw simple little human
figures moving around. This can be a great practice
session for you if you are beginning a drawing and you are afraid of
illustrating people. I plan to break down your fear related to this and to develop confidence by
showing you step by step how simple it is to
doodle tiny little people. I'll teach you how you can put some simple two D shapes
together, like rectangles, triangles, and ovals
and get all kinds of expressive human figures
in different body postures. Once I show you the principles, we will add further details to our figures and make them
look more realistic, even in their simplest forms. Doodling people has
several benefits. It acts as a form of meditation, helping process
your thoughts and emotions while enhancing
cognitive functions. You can improve your perception, observational skills,
hand eye coordination, and last but not least,
it's a great fun. During this doodling session, I'll be using an
inexpensive office paper and a regular ink like this. Alternatively, you can use
a pen or even a pencil. Your skills will
develop in similar way. You just get a different look. Additionally, I'll be using a middle gray marker for illustrating some shadows
on my little figures. This marker is optional. Don't worry if you
don't have it at hand. But if you choose to use it, note that the markers tend
to seep through the paper. So I'll be using this
paperboard below my paper to avoid traces
on my desk surface. Now, I hope you are excited to dive into my simple
doodling session. Let's make some fun by drawing tiny little human
figures together. I'll see you in the first idea.
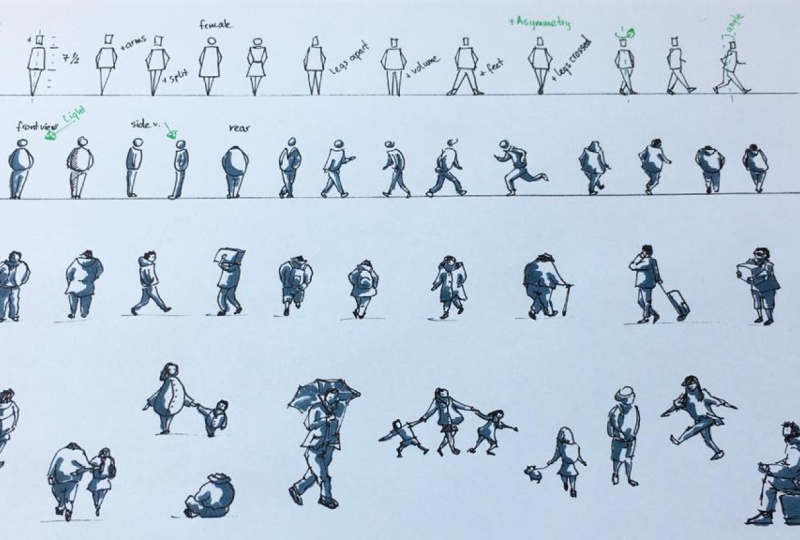
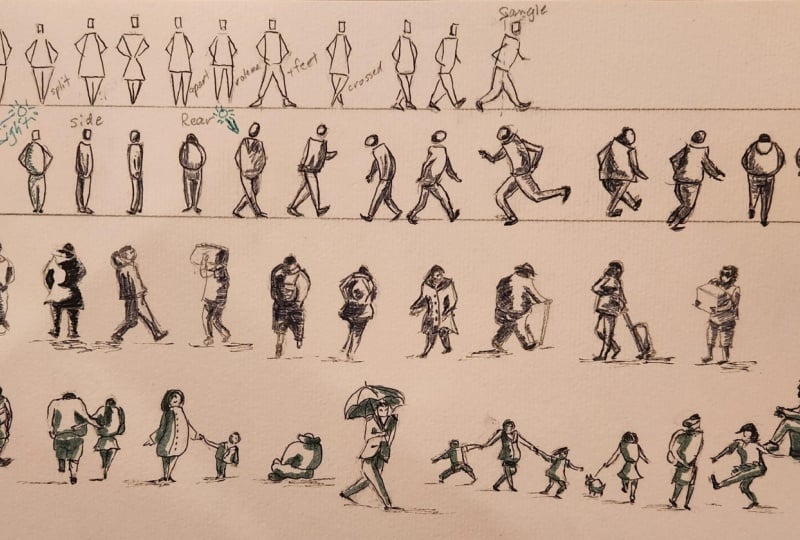
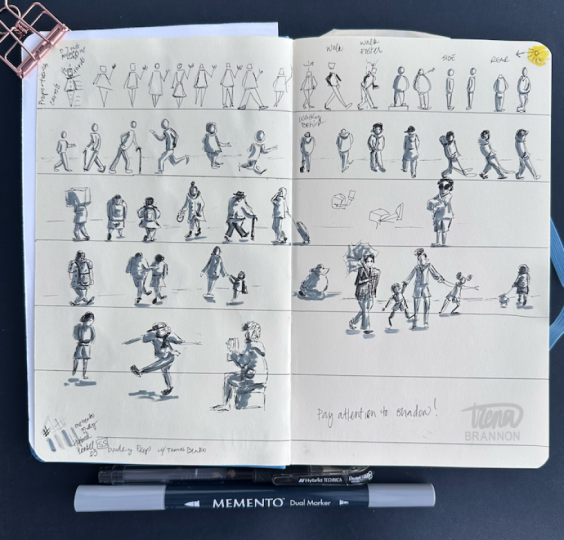
2. Figures Built from 2-D Shapes: It's great to have you here. Let's start off by looking
into how we can illustrate people by using some very
simple basic doody shapes. By the way, you can
get the most out of this doodling session
if you draw with me. For this reason, I'll
be making my figures very slowly so you can
follow along easily. But you can always pose
the video and catch up. So I have my A four or
letter size copy paper, and I'm drawing a line somewhere
here in the top section. This step is optional. I'm just doing this in order
to keep my figures lined up. You can also draw
this line by hand without a ruler or
simply just skip it. Good. First, let's see the
adult body's proportion, on a very basic
level. Don't worry. We won't cling to
it convulsively, but it's good to know about it. I'm drawing a
vertical dash line. This will be the center
line of the body. I'm making two parts
with equal length. The top one will be the torso, drawing a simple
shape like this, almost like a rectangle. It's just a bit
narrower on the top. Below that, I'm drawing two
straight lines like this. It's basically a triangle shape, which we represent the legs. You got it. Now, let's divide
each part into thirds. So we have six units by now. Now on the top of this,
I measure 1.5 units, which will be the location
of the head and the neck. But the neck is just a gap. We don't actually draw that. Very good. So we have a human body which is
roughly 7.5 units high. The size of a unit corresponds
to the height of the head. In summary, three
units for the torso, three units for the legs, and 1.5 units for the
head and the neck. Very simple. We can say that an average adult man is about 7.5 or roughly eight heads tall. Now, don't worry, we won't be measuring this each
time we draw a figure. Just look at this figure with these proportions and
get a fire for it. Now let's draw this
very same figure quickly without any measurement. Oh additionally, let's add two arms like
this as simple as that. Now, let's draw the same figure. But this time, we split the bottom triangle
in the middle. So we have added a little more
information to the viewer. If you want to emphasize that you are drawing a
female character, you can make the middle
part a bit bigger. You can illustrate the
head with a circle, around or oval face always
fits better to a lady. The arms will look the same, and the legs below with a triangle shape similar
to the previous one. The figure looks very simple, but it expresses
what it needs to. Awesome. What else can we do? We can also illustrate a
female figure like this. Imagine some kind of
an hourglass shape. Like so. The rest of the body
parts remain the same. Notice that we haven't
done anything complex. We were just drawing
simple two these shapes. But by sizing them
proportionally right and putting them
next to each other, we got an expressive human
figure in just seconds. Wonderful. Now let's see what
else we can add. Let's draw a male figure again. But notice that I don't insist
on drawing regular shapes. The head is far from
perfect rectangle, but actually it looks
better this way. One of the great
things in doodling that you can let go of
your need for perfection. Actually, imperfection is an
advantage in this practice. How reassuring is it? And you know what? We can
separate the legs like this. Now, let's draw a
similar figure. But this time, give some
volume to the legs. Like so. The same figure again. But this time, the legs will be spread by adding a small
triangle at the ground level, we have illustrated the
feet or shoes if you like. You see, as we are taking these
baby steps in complexity, we are getting more and more
complex figures that we can use to express different body gestures
just in a few minutes. Now when we illustrate human figures by
applying asymmetry, we can make the body
poses more interesting. So let's see what
options we have. We are going to
deal with the legs, so we keep the upper
body the same. As for the legs, let's draw
only the left one like this. And for the right leg, I'm shifting the line
a bit like this, so we get a slightly
crossed feet. Now, I'm drawing vertical
axis of rotation. And let's rotate the
body just a bit. Here is how the legs
position will change. Imagine our figure in a three quarter view
as he's walking. Now, let's rotate
the body further. So we get our figure in
a side view like this. Notice that the legs are
straight at this point. It's like he's walking
at a normal pace. Now, the upper body can
lean forward slightly. And by bending one of the knees, we can convey a faster pace. Like so. Very good. I hope you are still with me and we can move on
to the next level. See in the next video.
3. Figures with Shadows: Welcome back. Now, let's make
things more interesting. Instead of using block shapes, we are going to
use rounded edges, which will make our
figures look more natural. And on top of that, we are
going to add some shadows with the middle gray marker or with the ink if you don't
have a marker like that. So our tiny figures will start to look more like
three dimensional. This will be fun, you'll see. I'm drawing another
ground level real quick. Instead of a rectangle, let's draw a rounded shape for the torso and some curved
lines for the legs. Something like this. Two curve lines for the arms
and a circle for the head. Notice the gap between
the body and the head. We don't connect them for now. Let's call this front view. Now, let's add some
simplified shadows. I love shadows. They can add so much interest
to your drawings. But before we are
adding those shadows, we always have to decide which direction the
light is coming from. Let's say our main light source is somewhere at the top right. So I'm trying to construct the shadows on our figure
according to this. Now, the topic of how
light interacts with different three D forms is
a very complex subject. Today we are just having fun, so I won't be going
into details. We'll be just applying some very simple concepts that I hope will be easy to
understand and use. We can look at the torso
as a spherical form, and according to
that, the shadow will look something like this. We can identify a curve between
the light and dark side. We need to think through if the given surface is
facing the light or not. As the light comes
from the right, the left side of the leg will
be definitely in shadow, so I'm drawing a
dark stripe here. But in the meantime, the belly probably also cast some
shadow on the hip, so I'm drawing some
curve at this level. Between the legs, we usually
have some further shadows, so I'm making that ba dark too. The left side of the head also
faces away from the light, so I mark it with a
C curve like this. Furthermore, the left
arm is probably in shadow too. And that's it. With four or five
marker strokes, we have just illustrated a pretty realistic shadow
pattern on our tiny figure. Okay, in case you don't
have gray marker at hand, I wouldn't like you to stop
doodling these figures. Here's how you can illustrate
these shadows with the ink. I'm using the so called
hatching technique to create something similar. Simple parallel lines in about 45 degree angle
right next to each other. Feel free to use this style if you don't have
that gray marker. Or you can just throw the figures and purchase
a marker later. Anyway, let's draw this
figure inside you. Something like this. The shadow shape is
even simpler this time. Let's flip the viewing angle. So we can see the figure
from the other side. Now, the light comes
from the top left, and accordingly, the shadow
will look like this. How about a rear view? We can draw the head like this partially
covered by the body. Plus, you can illustrate
the butt like so, and the viewer will have the impression that the
figure is showing his back. And the shadow shape
will look like this. Kind of similar to the
front view. Awesome. Now let's take this figure as a reference and try to draw
the rounded shape version. We can actually
add some dress to our figure by simply drawing
a V shape below the neck. Now, let's observe
how the legs cross. This one will be in the front. Note that my outline is
not exactly straight. So these folds can
illustrate the pants nicely. And the other leg
behind will look like this along with the foot. Finally, let's add some shadows. We can leave some white gaps here and there to make
it more realistic. Good. Let's take this walking
man as a reference. We can add further details
like the hand if we want. The front leg is
in this position. The back leg is like this. And the arm on the other side,
not that difficult, right? Let's draw the shadows, mainly on the right side of
each individual pedi part. Now, let's show the same figure, but mirrored to
practice both sides. However, we have a slightly
different body posture. This figure has a hunt spine. And Now, let's take this running, man. He's in a hurry.
Something like this. Maybe there's too
much dark here, but no worries. We
are just practicing. Mistakes are allowed. Now let's see this figure
from the other side. In a bit more dynamic pose. So the limbs are bent
in a greater angle. Like so. We haven't drawn a figure with cross legs in rear
view, so let's do so. She is walking away from us. The light comes from the right. Now, let's see a running pose
in a similar viewing angle. We don't even have to follow a perfect curve with
the shadow on the back. The surface of the suit can
take any irregular shape. So consequently, the shadow will also have an
irregular shape. Now, let's take this
man as a reference, but alter the body
posture a little bit. Below the head,
I'm adding a curve like this to
illustrate the hoodie The right leg will be as usual. And here comes the
interesting part. The left leg is
bend in the knee, and we can see the sole
of the shoe like this. So he's in the move. He is walking, very
simple but expressive. And let's see another way of
illustrating the same thing. By showing the legs
crossed like this. This body posture also conveys the impression of a walking man just
in a different way. All right. I hope
you are enjoying the lessons so far and you are ready to
explore some more. See you in the next video.
4. More Complex Shadows: Welcome back. Now, let's add some
further details to our figures and see how they get more and more realistic with just a
few extra ink strokes. I'm drawing a man in a
jacket in front of you. The extra details
here are the jacket. A simple hairstyle,
two dots for the eyes, and a pair of jeans with
a more realistic outline. Something like this. Let's take the marker. Now, the shadow pattern
will be a bit more complicated, but
you get the idea. Good. Let's show another one
in rear view in a court. As he's turning his
head to the left, wearing a baseball cap with
light coming from the left. Now, let's draw a boy in a
hoodie walking to the right. If you are still afraid
drawing the head with all those intimidating
facial features, you can use a trick to actually
hide the head like this. Or you can hide the head by drawing the figure
from the back. He'll be walking
with a backpack, and as it is the one that's
closest to the viewer, I start off by
drawing the backpack. Note that the figure's shoulders are tilted slightly
to the right. With this tiny detail, we can suggest the
impression of a walking man. He'll be wearing shorts
with the right leg ahead. And the left leg behind. Like this. We can mark the shadows now. Good. Now, let's draw another
figure with a backpack. But this time, she'll be a lady. So I'm forming the
head like this. As for the legs, let's
use another posture. Like so. When I'm drawing these shadows, I'm thinking through, if a certain part cast
a shadow underneath. Like the hood cast a shadow or the backpack
cast a shadow on the coat and the coat cast shadow on the pants.
It's all logical.
5. Details to the Figures: A now let's go even further with the
details on the dress. This lady is wearing
a coat like this. I'm showing her hands. The buttons on the coat. And she's just
moving her left leg forward towards us,
bending the knee. Something like this. Now let's draw an elderly person as he's walking away from us. This will be his suit. He'll be holding a
walking stick in his right hand that we are
going to draw in a minute. He's wearing a hat. Let's draw his legs with the pants. And the stick. Notice that my ink strokes
are kind of wonky this time. You can actually
support the gesture of your figure with the
line quality you use. Just a small trick, kind of an advanced technique. And I'm drawing a figure. Holding a smartphone
in his hand. Yes. Okay. Wearing a suit,
walking like this. Pulling a carry on luggage
with his right hand. H Finally, let's draw a man holding
a box in his hands. It can be challenging to
draw the box in perspective, but don't worry
about it too much. Just draw something like a
box in a three quarter view. The man is wearing a T shirt. Wearing sunglasses. He's in shorts. Standing like this. Let's say he is standing
below a tree or something. So there are very few lights
on the surface of his body. Additionally, we can draw some lines to add some
base for our figures. We can also look at these lines as very simple cast shadows on the ground plane. Very good. We have completed another
series of tiny people. We were using the principles learned in the previous lessons and adding details to our subjects to make them
look more realistic. How much time did it take
1 minute for each figure? This illustration
technique can be very effective if you are waiting
in a cafe, for example, and you want to
make quick sketches about people around you, just for the sake of fun,
but we haven't done yet. I have some more gestures
for you in the next video.
6. Variety in Gestures: Welcome back. Now let's
see some more variety in figure gestures and draw
some people in groups too. I'm drawing a lady
with a back slung over her shoulder in a walking
position that we haven't shown. Her right leg behind
with her knee bent, and her left leg is her
head in straight position. We drew something similar,
but not exactly this. You can always decide on
how much shadows you paint. The sun can shine
from any direction around the clock in
many different angles. So we may see very few shadows, or we may see a lot. The only thing that is important if you draw a composition, I mean a group of
people, for example, that you have to
be consistent with your shadows on each figure. Otherwise, the viewer will be confused and that's usually
another good thing. Let's draw a couple,
for example, with the man on the left and
with the woman on the right. It can be a bit challenging to draw their arms in a
position like this, but you can cope with it, right? Let's show their legs like this. And we can take the marker. So now we have to make sure that the shadows are in sync with
each other on both figures. We have to assume the
same light direction. Now, that's true mother. Like this. In a long coat with
buttons on it. Holding her child's
hand in her left hand. We can add details to
the little boy, too. Let's draw the simple
shadow shapes. And that's it. They look pretty. Now, let's draw a man
in a sitting position. In rear view, y. Wearing a hat. Very good. Now, let's draw a man in a
suit with some accessory. He's going to hold
an umbrella in his right hand that we are
going to draw in a minute. But before that, let's
complete his suit. And draw his pants. Well, it's maybe a bit of proportion compared
to the upper body. Actually, his hip
is located too low. But no worries.
It's not that bad. Maybe it's just the
style of the pants. Let's show the umbrella which is commonly
composed of eight panels. So I'm trying to be
realistic in this sense. Only six of them are visible
from this viewing angle. Let's see if the shadows can cover some of my
proportional mistakes. I don't know. You tell me. Good. We can move on
to our next figures. A
7. Tell a Story: Now, let's show
another young mother in a challenging
situation with her kids. Her little boy is pulling
her arm to the left. Why, her little girl
has a different intent. She wants to go to the
right for some reason. We'll find out in a minute. Let's form the shadows. The reason of the
hassle is that there is a young lady walking with
her cute little dog. Okay. It seems that the girl likes dogs. Why the boy is afraid of them? Notice that the shadows are in sync with each other
on all parties. Now, let's show a young man. Turning back. Probably seeing something
interesting or someone. Let's make some shadows. A young lady in a cap is
making some dance moves. She's wearing a loose T shirt. Her legs are in
motion like this. Nice. Finally, let's draw
a man inside view. Wearing a big coat. Sitting on a suitcase or
something, watching all this. You know what? Let's make him a beard. Good. Now, let's do the shading. So this is how you can create some story
while you're doodling. Very good. We have completed our simple
People doodling project. Now let's look back for a few sac and see how we
improved our figures, starting from very
simple basic shapes by adding more and more details, applying different body poses, expressing real people
gestures in very simple ways. I'd also like you to realize how much power is in
light and shadows. Actually, a shadow is
more important than the shape itself if you are
talking about three D forms. Now, I hope you are having fun and you are impressed
by your own doodles.
8. Final Thoughts: All right. The fact that
you got to this point is telling me that you
have successfully gone through a series
of experiments with me. My hope is that you
can see by now, you can draw simple
but spectacular things that you haven't necessarily
believed in in an hour ago. Being able to draw is not a talent you
have to go on with. It's just executing a set of well defined simple steps
that almost anyone can do. And if you have patience, you'll get an expressive result. So what you need in
order to step forward in art is more like dedication
to learning new skills. Now, I'd really like
to see your doodles. You can upload your work in the project section
right below the video. If you feel like you
are getting some value, you have learned
something new or you have found some
joy in this activity, I'd like to ask you a favor. Please leave a review
or rating for my class. It can be very short, but I like reading
detailed feedback too. It can make me smile or
I can learn from them. If you like my teaching style, I definitely have some more drawing and painting
lessons for you. Make sure you check them
out on my profile page. I hope you had a
good time with me. See you in another class.
 Tamas Benko, Drawing & Painting Classes