Transcripts
1. Intro to Course: Hi, I'm Kari Ann Kearney, the artist who creates curiosities are dolls on Instagram and YouTube. For the past seven years, I've thoroughly enjoyed this hobby turned career, and I'm so excited to share with you today. Welcome to the first step of the doll customization process. Doll hair re routing this classes for adults who would like to learn the beginner basics of doll customization from taking a toy doll down to its base and adding new hair, new face paint and a new costume. Your creativity can run wild. You could make a doll of your friends or celebrities or even design your own characters. Try a fund barrier elf. Just have fun with it. Throughout this class, I will teach you how to remove the factory hair from a toy doll and replace it with new yarn hair. We'll talk about what types of yarn are best for routing, how to prepare the yarn and what a routing toe. Listen, how to use it all along with me as we cut down the factory hair and warm the head to make removing the factory here a little bit easier. Then we'll walk through the steps of how to root the hair for the best results at the end of this clash will have a beautiful new doll with a new head of hair. Let's get started.
2. Class Project: the class project for this course is to root adult from start to finish by removing the factory hair, prepping the doll and the yarn than rooting it with the yarn of your choice. Thes air. Some of the dolls I've customized recently they're fully customized with paint and costumes , but their hair has been rooted. Using the process will walk through today. The possibilities with doll customizing is endless. In this project is the first step at the end of this course. Will have a doll with a new rooted yarn hair. You can style as you wish and customize even further. Make sure to share your project in the project and resource is tab below and click create project. I can't wait to see what you dio Next up will go over the supplies.
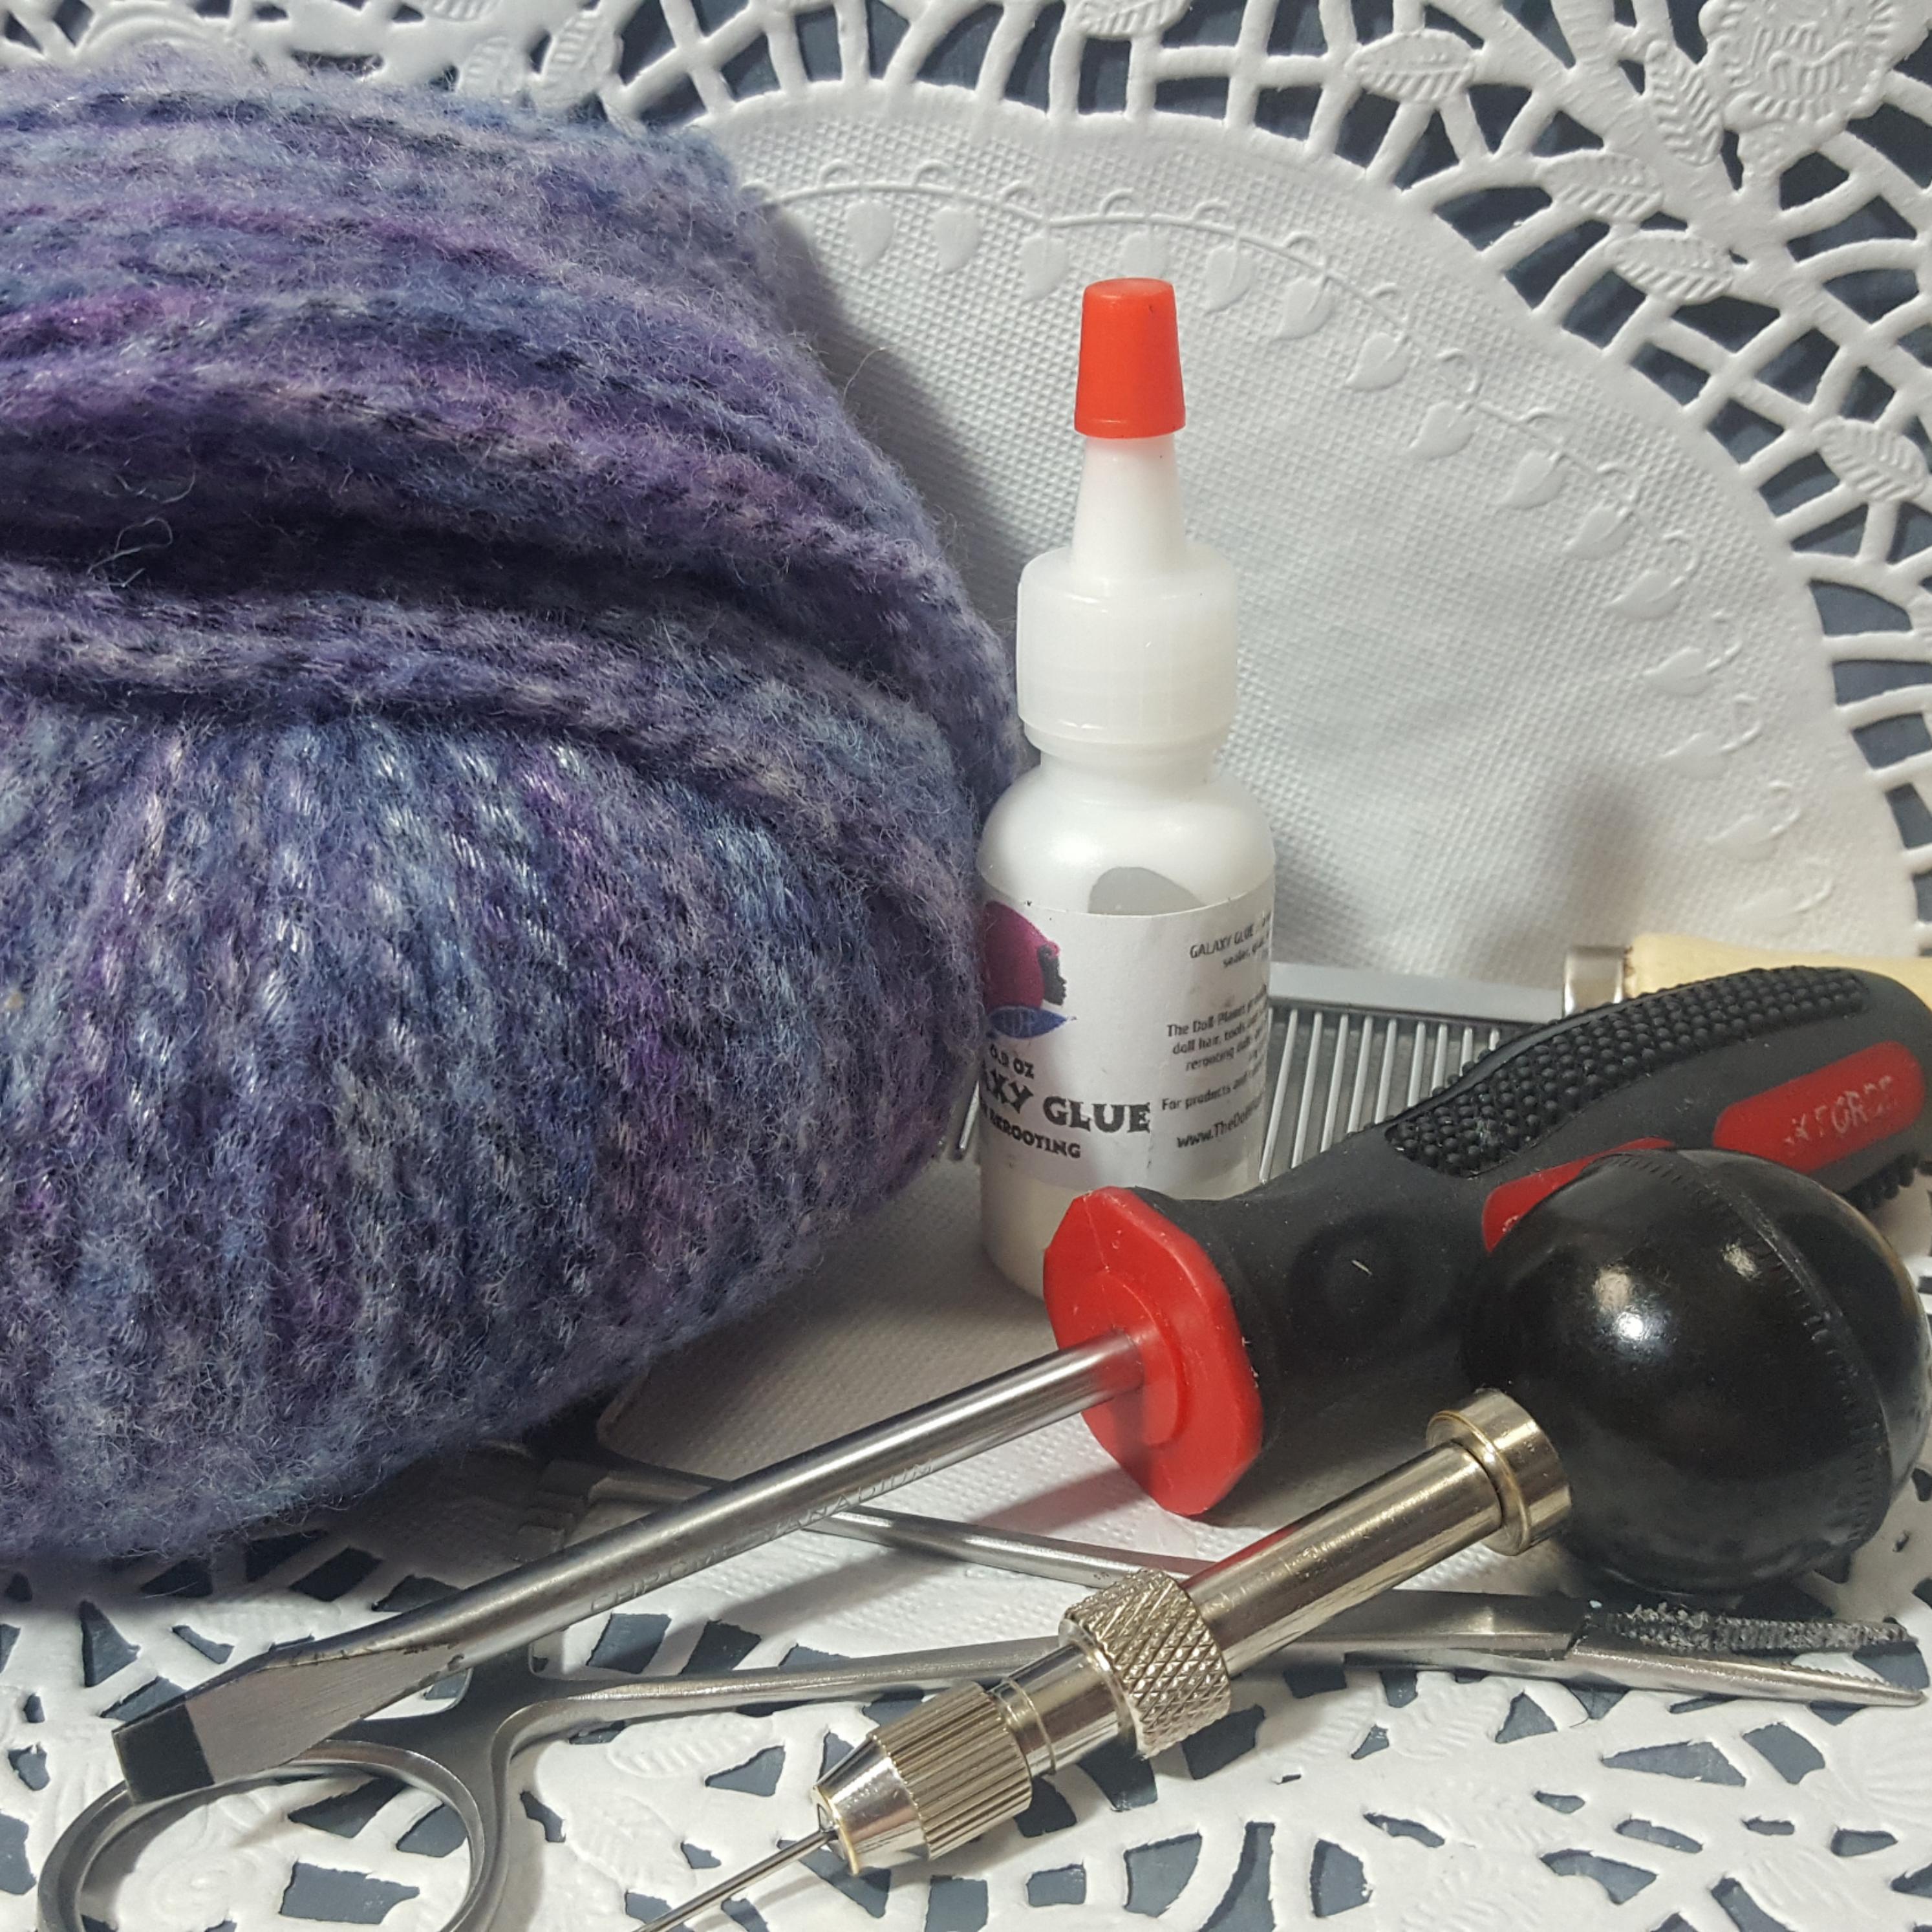
3. Supplies Lesson: before we get started, let's go over the tools will need for this project. I'll talk a little about how we use them, but we'll add more detail as we get to them later in the course. First, you'll need a vinyl doll to customize the doll you'll choose for your project will be referred to as your based, all for customizing The based. All should have a soft head with factory rooted hair, some of the options that will work well. Our Barbie Monster High for DC Superhero Girls There's many doll lines available on the market today that will work, but some of the options that are more popular for customizing may be discontinued. Like the monster high check for these at thrift stores or eBay that's relatable or among with near boiling water. This will be needed to soak the head for a couple of minutes to make the process of removing the factory head and hair a bit easier. Scissors. Any pair of scissors is fine, but the smaller scissors tend to work a little bit easier. A flathead screwdriver. This will ease. Discreet the glue on the inside of the doll head he must at these air used to pull the doll hair out through the neck. It works best because of the size and shape, but you can also use tweezers or needle nose pliers yarn in any color you like. Choose a medium weight or chunky, so it's easy to unravel. You also may want to choose a yard that has a little bit of shine for a more realistic look . Alpaca blends or acrylic work? Best a piece of cardboard or something similar that's about six inches long. This is what will use to wrap the yarn around Kreft paint or acrylic paint. Choose a color close to the color of the yarn you're using. We use this pain to skip to paint the scalp prior to rooting so we can hide any bald spots . Then you'll need a paintbrush. Any medium size pay fresh will dio. Now you'll need the re routing tool. You can purchase a routing tool on etc. They typically come with the needles you need and sometimes even come as a full root rooting kit. You'll use this tool for most of the process and could spend a couple of hours with it in your hand. Each time you revert a doll, so I recommend one of the more ergonomic versions. The economic aspect is the rotating mechanism. It allows for more free movement and makes the process much more comfortable. The version I use has a ball but the end. But dress breasts in the center of my poem. It's very comfortable, and it's what I've gotten used to. You can also purchase versions that are longer, like a pen routing needles. You'll use a lot of these because they tend to break the routing. Needles are placed into the routing tool, and it holds the yarn so it can be inserted to the doll head. It's basically a needle that has been altered. Once the head is rooted, we'll add glue through the neck hole to seal in the yard, so you'll need some sort of tacky glue. I like to use aliens, tacky glue, but any semi thick global work it needs to be running enough that you'll be able to easily squeeze it and pour it through the hole in the neck hole but thick enough so that it doesn't seep through the holes in the scalp. Frappe attack also works well, but Elmer's glue, maybe a bit too runny. Then you'll need a brush or comb. I recommend a dog brush or pet comb thistles to brush and thin out the fibers. Like I said, you can use a regular comb for this process. But a dog brush tends to work pretty well. So now that you have your supplies, will be getting a project by removing the head and prepping it for rooting in the next lesson.
4. Step 1 - Removing the Hair: in this lesson will be removing the doll's head and factory hair in order to prepare the doll for routing. Once you've chosen your based all, let's remove the hair. The first step is to cut down the factory here, shortest possible. I find that using smaller scissors works a bit easier. Since we're working with such a small surface. Now, you may want to pause this lesson to heat up your water. It's important that you take this step so you don't break the neck of the doll or the mechanism inside. I like to put about two cups of water in a bowl and heated for about three minutes. This gets the water to almost boiling. Leave enough room at the top of the bull to avoid overflow. And be careful not to burn yourself. Now that you have your hot water, you can place the head in and soak it for about three minutes. This helps with a couple of things. It warms the vinyl, making it soft, so when you remove the head, it doesn't break the hook inside, which holds on the head or the neck of the doll. It also loosens the factory glue so when we remove the hair, it'll come out a lot easier. After a couple of minutes, remove the doll from the water. Use a towel so you don't burn yourself and grasp the doll Head. Water will be escorting out in different areas against To make sure you use a towel, grasped the doll head and gently pull it away from the body. Well, see, that's a lot softer now. Then squeeze and pour out any remaining water out of the dry out of the head. Here's a tip to be able to remove the doll head without soaking at going further. You can clip off these little pieces off of the neck mechanism while the head is still nice and warm. Let's scrape out the glue from the inside using a screwdriver. A tip is if he stepped away from this lesson and the head is no longer warm. Try pouring a bit of asset own nail polish remover into the neck, and it'll loosen up the glue a bit. Since the hair is connected to the glue inside, the scraping motion will pull the hair hair out with the glue. This can take a little bit of elbow grease, but it is easier if the head is warm. Yeah, once most of the hair is removed from the scalp, you can use the hemostat tweezers or needle nose pliers to pull the hair out through the neck. This part is messy and sticky. For sure. It may take a bit of time and more elbow grease to make sure you have all of the hair removed, but you may want to make sure that it's all out so it doesn't hear. Interfere with the glue gluing process later, and some dolls have more glue and stronger glue inside than others. - Here's a tip. Once you're done removing the here, you can clean the head and the tools with adhesive remover or goo be gone. It works like a charm to get rid of that, all that sticky stuff. Now that we've re removed the factory hair, we can wash the surface was open water. Remember to share photos of your progress for encouragement for other students. Now we're ready for the next lesson. Where will paint the scalp and prepare the yarn
5. Step 2 - Painting the Scalp: so your doll head is all clean and ready for new hair in this lesson will paint the scalp to camouflage any bald spots. This helps the here appear thicker at the root. For this step, you can use any inner, inexpensive craft paint or acrylic pain. Choose a paint color close to the yarn that you're using. Here's a tip. If you're using the light colored hair and pain, you may want to remove the factory pain on the scalp first with some pure acetone or acid toe nail polish remover. Since my urine is a little darker, I'm just gonna go ahead and leave mine. Now let's paint the scalp. You want to be careful not to go over the last line of factory holes. One code is enough. More layers will crack when you add the hair, so allow the pain to drive for about 30 minutes, or according to the instructions on the label of whatever paint you're using. That's why your pain is drying on the scalp. Let's prepare the yarn to be rerouted in the next lesson
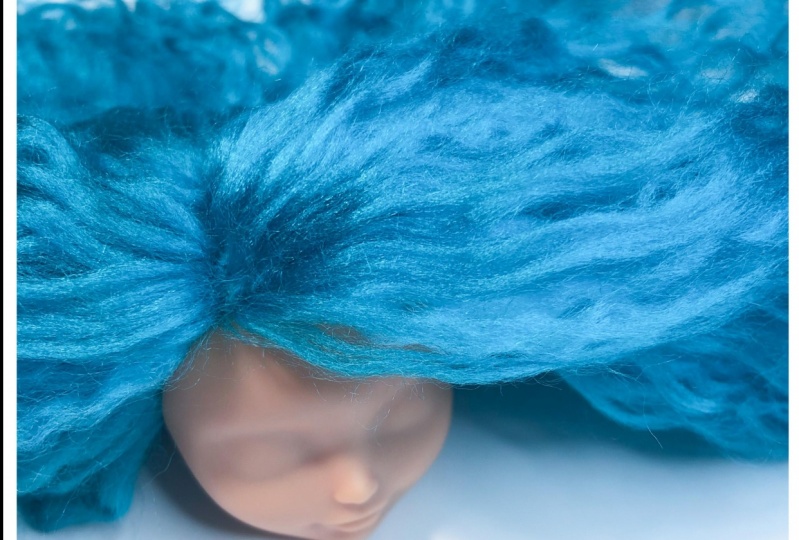
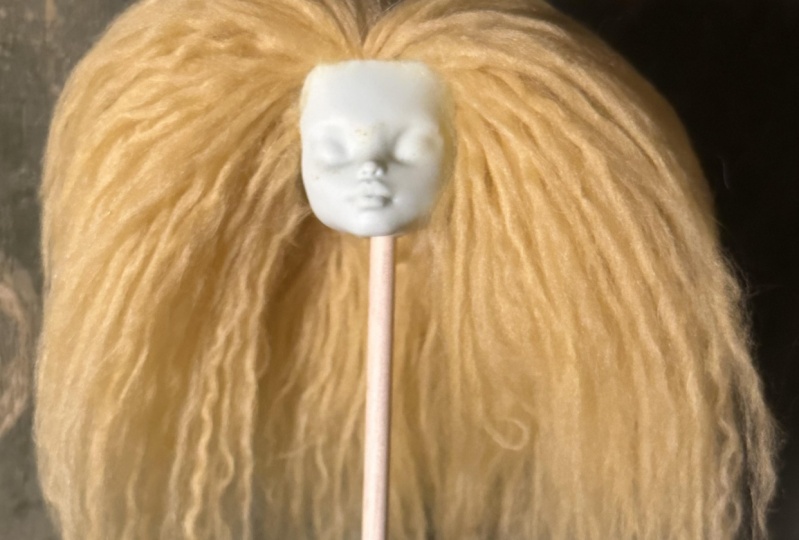
6. Step 3 - Types of Yarn & Preparing it for Rooting: in this lesson will be talking about yarn options and what works best for the lucky one. Then we'll be preparing the yarn for re routing. By cutting and separating the fibers, You can use just about any yarn you'd like for the doll's hair. You can use soft, shiny fibers for natural looking hair, or be creative with artistic textile yarns for a more modern style. In this lesson, we're going for a natural hair look. So be focusing on sharing how that look can be achieved. There are thousands of varieties of yarn, but don't overthink it. Most of them will work fine for re routing. But to be sure, here's a test you can do before you purchase. Pull out the end of the yarn out of the yarn ball about eight inches. First, make sure it will separate into two or more strands. Then hold the yarn with about one hand about eight inches up and try to tug out a bit of fiber. Okay, if it separates easily and gives you at least five or six inches of a peace, it should work fine, so that should work great. You'll also want to choose a color you like. That goes with your color scheme, and I like to use urine that has a bit of shine to it. So now that you've chosen your your ARN, let's get prepared for routing. So there are a few ways other doll artists prepare yarn, but I've developed my method to be more efficient and economical for my day to day customizing process. If this is your first reroute, I recommend trying my method to learn and alternating all turning it according to your needs as you become more familiar with other options. So first we're gonna take a piece of cardboard about the length of hair you want your doll . It's important to note that most yarns will not yield more than five or six inches of fiber before it breaks. So if you need longer here for your doll, you want to root with a synthetic doll here or a natural fibre with more length. So you take the cardboard in one hand and begin to wind the yarn around several times lined up quite a bit, but not too much that you won't be able to cut it. You may have to do this process a few times before completing your reroute. Once you've wound enough around the cardboard, cut the end piece away and then cut at the top and bottom of the cardboard. Now you'll have several pieces like this from here. You don't want to separate the pieces to do that. You'll take a piece holding it in one hand and then pull the other piece out at the other end. So grasped the piece like this and then pulled peace out. This one has four strands, so I need to do it a couple of times. Once all the pieces are separated, you'll have a pile of into individual pieces like this. You can stop the preparation process here and start re routing with these pieces. But I recommend one war, the more economical route, which is separating them one more time to do this. I hold each end and tug. Doing this extra step prevents yard waste because if I stopped at the last step, we would just lose a lot of this hair when we brush it out. Here's a tip. You can either prepare all of your yarn at once or alternate between the next few steps in this lesson if you'd like to break it up a bit. Personally, I like to have all my yarn pre prepared and stored in baggies so I can just grab it when I need it. So I'll be using one of these pre prepared colors for the next steps. So this process of separating can take a couple of hours, but it's well worth it. Now that you have your pile of fibres ready to be rooted, make sure to share your color and fiber choices by posting photos of your work. So far, next up will be rooting the doll, which we start in the next lesson.
7. Step 4 - Rooting the Hair: in this lesson. We're going to talk about the routing tool in needles and will finally route the hair. The routing tool is what you attach your yarn to it and inserts it in the sun into the Doll Scout. She's a routing needle that's large enough to accommodate the yarn you're using, allowing it to slip off the needle without snagging or getting stuck. You're going to need one a little on the larger. And when rooting with yarn but don't choose one to larger, it will make visible, gaping holes in the head. Sometimes this comes with trial and error. So start on the smaller end, just a heads up, that some needles can be finicky and break. This could be frustrating, but I promise. With practice, you'll start to recognize the needles that work best for you. First, we'll attach the needle to the tool to insert the needle into the tool, hold the bottom of the toll and twist the top piece counterclockwise. This will open it to allow the needle to be inserted, insert the bottom part of the needle needle without the I down into the middle of the tool and then turn it counter clockwise too tight. Now we're going to start the routing process. Have my pre prepared yarn pieces here and the head that ive pain tanesco peanut the scout purple to match. So take one of your fiber pieces and take the thicker end. Fold the fiber over your pointer finger on your non dominant hand, holding it in place with your middle finger and thumb. Then hold the routing tool in your dominant hand and take the needle and scoop up the arm. Use your finger and thumb on your hand toe. Hold peace down to the tool. This will start to become second nature with practice. Then you hold the doll head in the opposite hand and insert the needle with the yarn into any home. Let's try that again with another piece. Take the thicker and of the yarn pulled it over your fingers. Take the two on the other hand, and then we're gonna scoop that you're enough with the eye of the needle. Then we're gonna hold the yarn down with your two fingers, find a hole on the doll head and insert the arm. I like to start around the lower edges because it will eventually give me a nice bit of hair to grasp as I work towards the center. Fine. It's best to try to fill every hole but skip some that are super close together when using earned those holes won't make much of a difference because the thickness of the yarn will cover it. So when there's a cluster of holes, you can just fill in one or two of them. Here's an example right here. There's several close together holes, so I'm not gonna fill in all of this holes. Another tip. When you're doing around the frame of the face, it could be very easy to when you're using a larger needle. Connect these holes together and cause a tear along that line. To avoid doing that, hold the needles so that the two openings will be going up and down and not side to side. If their side to side like this. Then you could possibly pumps your two holes at a time, and then it'll cause a tear across the front. So I'm gonna do this whole. I'm gonna hold the needle this way so you'll continue toe Teoh. Repeat this process until the majority of the holes are filled, all right. And this can take 2 to 3 hours to complete a full re route. And that will be if you have a lot of practice. So you may want to rest your hands, rest your hands for a bit here and there just so you don't get hand cramps. This is definitely the longest part of the reroute. So just watch some movies or relax in a chair and just read away. And like I said, you'll start to get a groove where this will go faster. - Once I finished the reroute to kind of comb out the excess at the end to get rid of some of the shedding. Now, you want to double check that you didn't miss any around the outer border, since these can be more obvious if missed, depending on the hair style. So I just check around these holes to make sure they're all filled, find any holes than all refill them. I don't think about the style that you're going to use and determine where you want your part if you want one and separate it with calm. So I'm gonna have my part down this side just gonna separate the hair down. Now you can see that they're sports spots that are still needing covered. Fill in these areas with extra yard. You can push through the routing needle, even if there isn't a pre punched factory hole there. This will give extra thickness of the parts and avoid obvious bald spots. So now you can see since we painted the scalp and added the extra hair, there's no visible bald spots. So congratulations you've rooted a full doll head in. The next lesson will secure the hair and add some finishing touches.
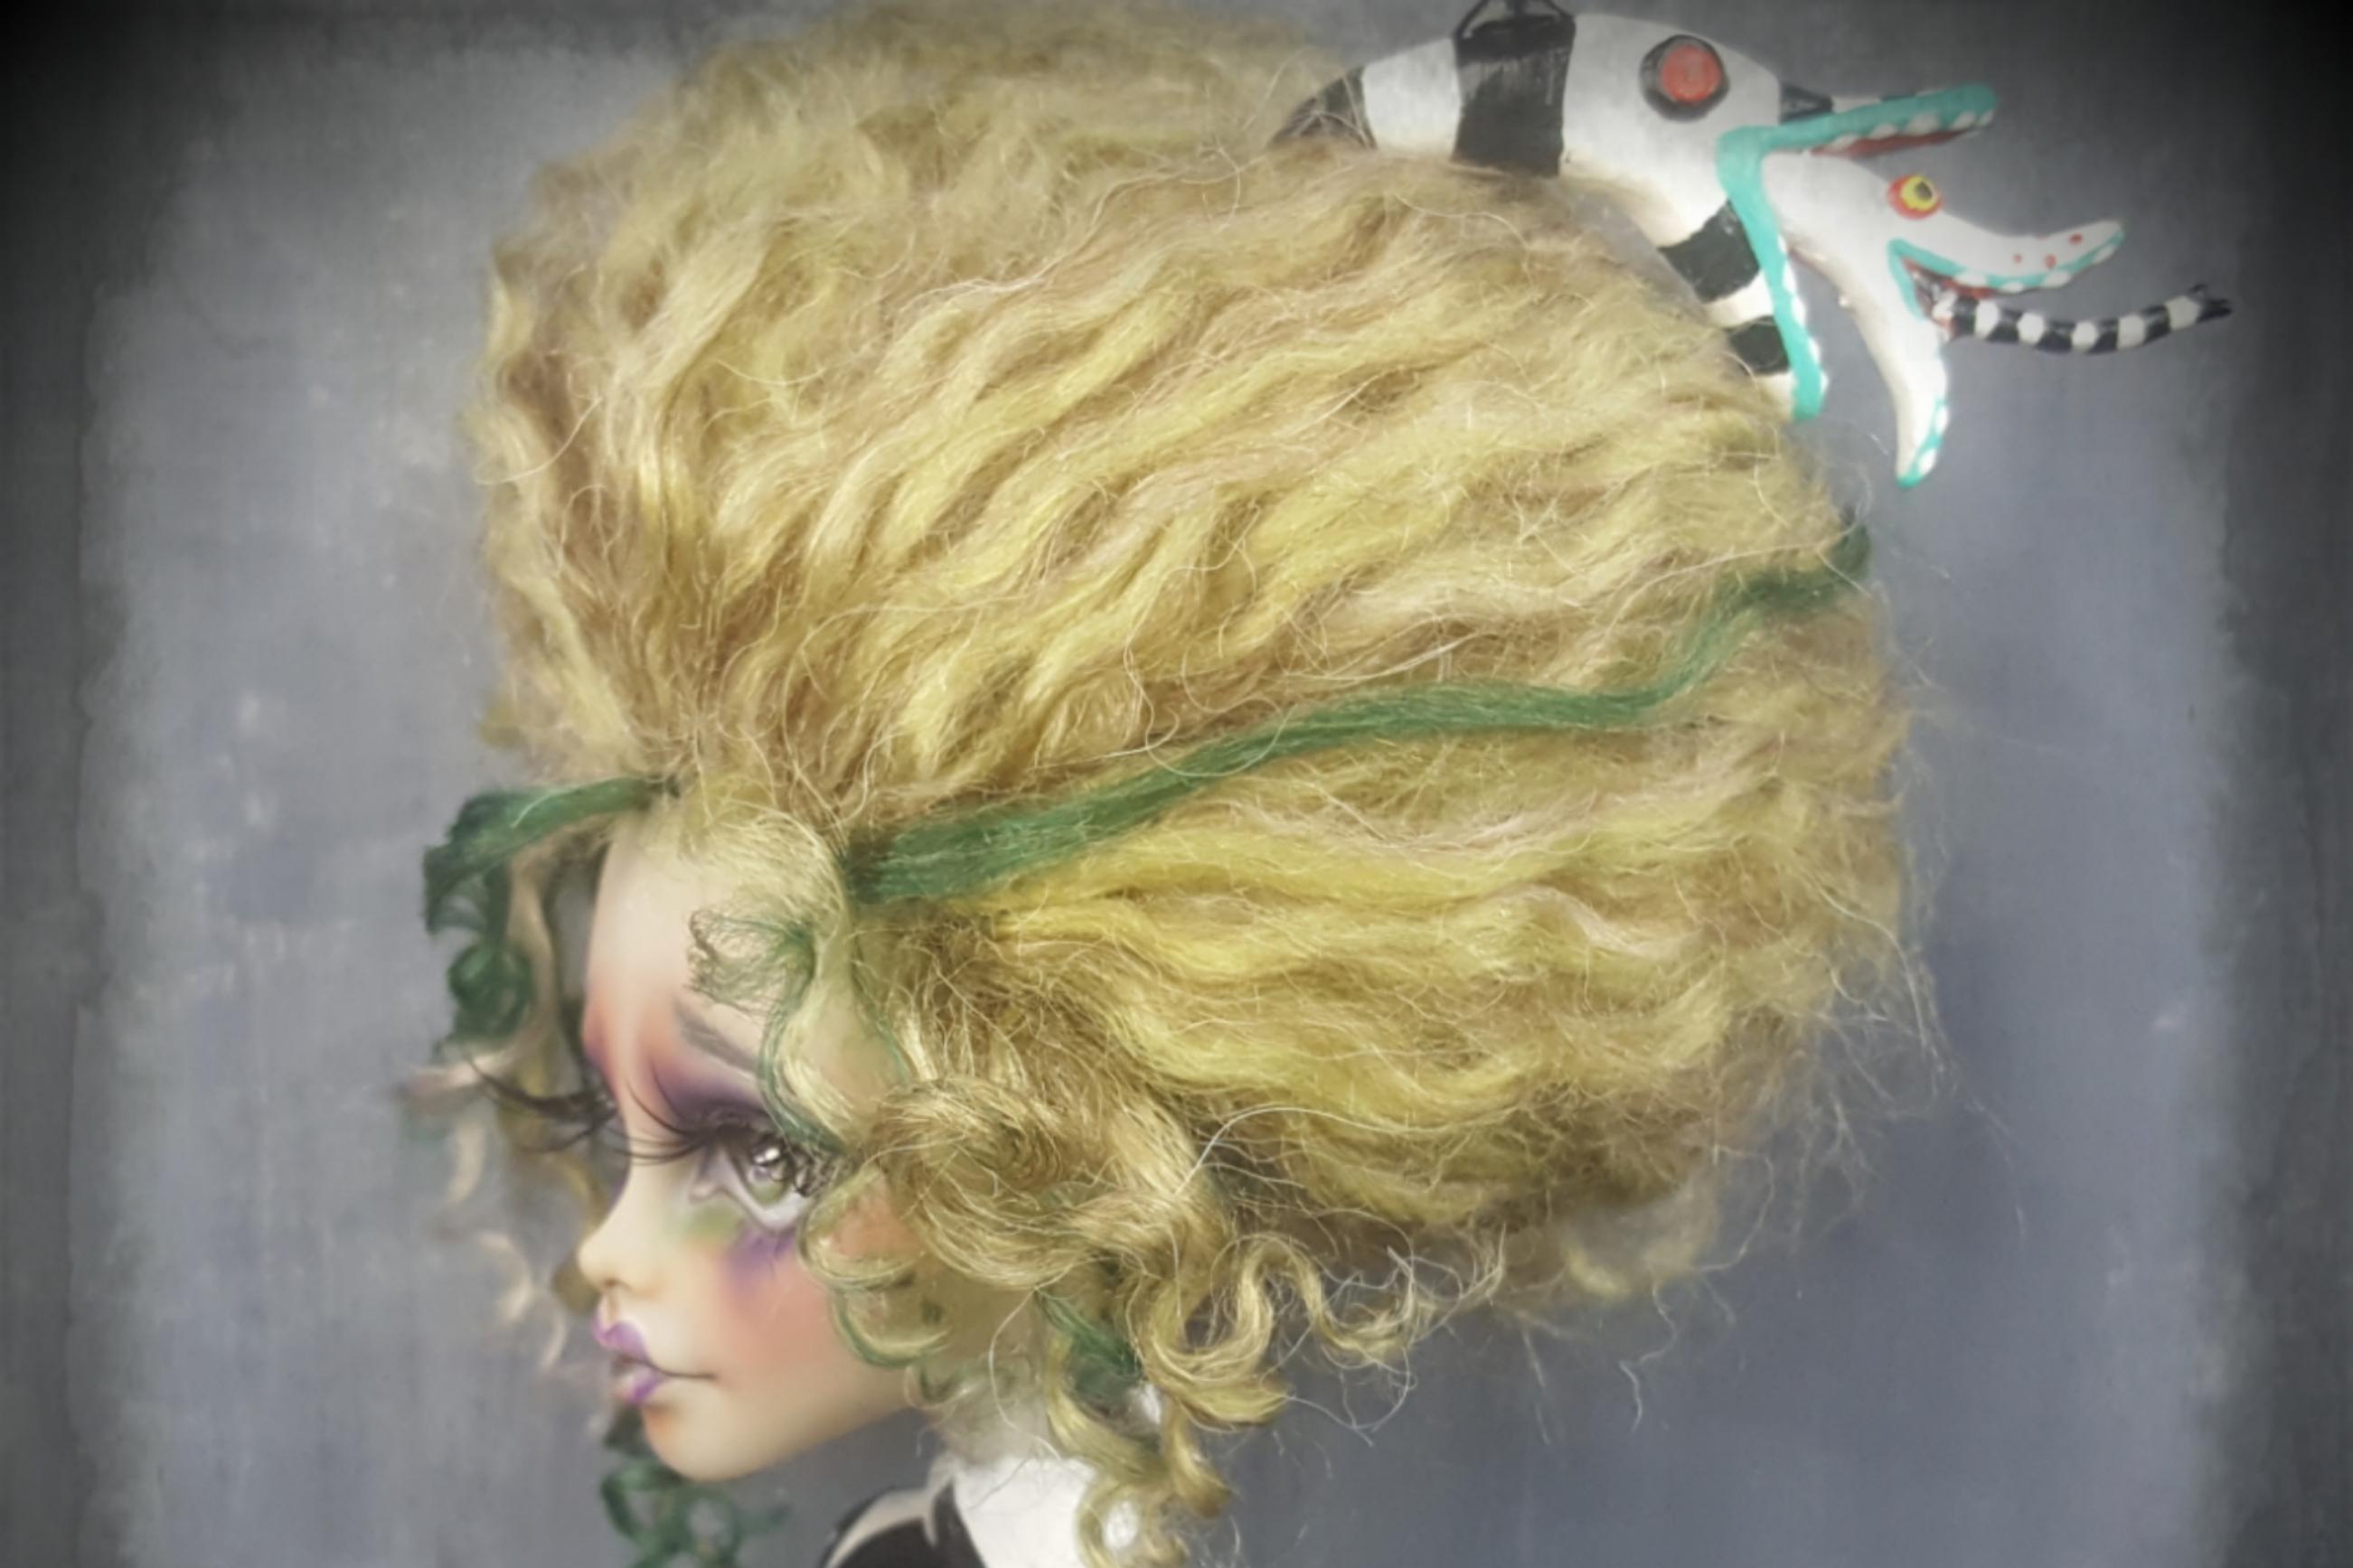
8. Finishing Touches: now that you're here is rooted. You'll want to secure the hair for styling in this lesson will glue the hair in place and finish the look. One of the benefits of rooting with yarn is that since it's a thick and texture that usually mats up in the doll head, so it's fairly secure, however, we want to give it that extra durability, so it could be style without too much shedding to do this will use glue. I like to use aliens tacky glue, but you can use any glue that's thick enough not to seep through the holes in the scalp, but then enough to pour easily through the neck hole so you'll take the nozzle and inserted in the head hole and squeeze a generous amount into the net. You want to squeeze the head of it to get it settled, states and insert a little bit more. Move the bottle around inside the head if you can. Using the coffee stir stick, the end of a paintbrush or a similar tool. I'm using a chopstick. Move the glue around on the inside to try to cover all the holes, kind of pushing the vinyl into the chopstick squeezing ahead. So wipe off the excess glue and allow to dry overnight before re attaching to the doll. Once the glue is dry, you can style the hair. So even though we've glued inside and let it dry since we're using urine, there will still be some shedding. Take your dog brush or comb and brush the hair until there's a minimal shedding. Now you can see brushing the hair gave it a less puffy and more natural look. From here, you can style the hair as you like. Be creative and try adding braids or twists. You can use many rubber bands to tie off pigtails or bobby pins to hold up. Do's. You can even use flat irons or curling irons to give them more, more realistic look. Make sure to test the hair for heat resistance before you try it on the doll in the final lesson will talk about finishing your class project and next steps in the customizing process
9. Next Steps: Now you have finished the first step in the doll customizing process and have a fresh new look for your doll. Congratulations. What we covered today, such as prepping the doll, removing the hair. Choosing the right yard for you in the reroute process is just the beginning of what you can create. I hope you feel inspired to keep creating and turning your doll into a piece of art. If there's one thing you take from this class, I'd like you to remember that with practice, many of the more difficult steps will become second nature, enjoyable and even a relaxing de stressor. I hope you found these lessons enjoyable and informative. I'd love to hear what she thought of this class through reviews. And if you'd like the class, make sure to follow my profile for more doll customizing art. Thank you so much for joining me today. Keep creating
 Keriann Carney, Skeriosities Doll Art