Transcripts
1. Introduction: Being a duck owner means
your camera roll as probably filled with hundreds
of photos of your dog. All of them are quite similar. You want to take
unique shots that will present the fun side
of your furry friend. By watching this class, you will get plenty
of inspiration and depths for capturing
funny dog photos. Hi there, I'm Clara and
I've been working as a photographer and videographer
for about eight years. I've been shooting
mostly weddings, engagements, and families. But two years ago I edit something quite
different to my niche. I started to photograph ducks. I'm a huge dopa lover and taking photos of them as a
dream coming through. There was a lot to learn. Every dog has a different
personality and over the years, I've found ways how to work with their unique temperaments. Dogs are my favorite creators
and I'm excited to share my insights about the dock photography
with other enthusiast. It's difficult to find a
person who doesn't like NMOS. So bad photography always attract much attention
on social media. Whether you're looking for original photo ideas to
grow your following, or you just want
to have a unique, long-lasting memory of your bet. You're in the right place. The magnus glass
achievable for everyone, I've decided to use a
minimum of equipment. Successfully
finished this class, you will need to have a camera. Dslr and mirrorless
cameras are preferred. But if you don't have a camera, you can use your phone. Editor. Beginning of the class, I'll talk about the preparations
needed for the shoot. I'll explain how to
find the best spot, where to set up
your home studio, and what camera settings are
used for the dog photos. I'll then show you
different ideas for the funny dog photos. Will play, dress up. Let them get some rest, eat. Gauge the flying food. Make them act like humans. And make fun of the well-known similarity
between the dark and its owner. In the end, our talk about post-processing to get the
most out of your shots. Throughout the
lessons, I'll keep sharing with you my insights and tips on how to work with your
dogs to keep them engaged. If you're watching this class, you're most likely
a dog enthusiasts. Let's share this
passion for dogs. Photography with each other. For the class project, choose one pose from the class and take a photo of your dog. Share your funniest
shot with us in the project section so we can all admire your standard window. After finishing the class, you'll be able to take unique pictures of
your family member, even without
expensive equipment. I hope you're excited to start
our fun dog photo shoot. Let's get into it.
2. Class Project: As a final project, you will choose one creative
dog photography idea that I'll talk about and
take a photo of your pet. It can be a dog or
any other animal. To finish the class project, you will need a DSLR
or mirrorless camera, Florida photos
where the pets then still you will be able to
shoot even with your phone. At first, walk around
your apartment and find a spot with the
best natural light, where you will set up
your home photo studio. Find a large piece of colorful fabric that you
will use as your backdrop. Get all the stuff
like props, entry, it's ready and you
can start shooting. You have to be strict, so the dog lessons to you, but you have to remember that
it is mostly a fun session. You should motivate the dog
with kind words and three, to reward them for
all the hard work. This assignment
is an opportunity to start thinking
out of the box. This is different from pet photography that
you see all around. Our pets bring us so much joy. I think they deserve to have their special fun photo branded on the wall and be shared
with the whole world. With these funny photos. You will have stuck
this for sure. After completing the class, check out the project
description and enjoy shooting. Upload your funniest photo in the project section to share your creativity
with everyone. And now let's dive right in.
3. Preparation: Surroundings, Light & Camera Settings: You have to prepare
everything well before you start
taking pictures. Ducks attention starts
to wane pretty quickly. And if you don't want to end
up with photos of asleep, adopt, make sure you have everything ready before
you start shooting. First, think about
your occasion, whether you want to shoot
outside or indoors. Choose the location without
distracting background. I like to have my
background simple so that I have all the attention
focused on the bed. I don't want trees
growing from its head or crazy colorful patterns
in the background. To make it simple when
shooting indoors, I like to use one colored
backdrop for playful, funny photos, quirky pastel
colors work awesome. But you can also use simple black or white backdrop or a solid color wall
will do the work. If you want to have some
colors in your photos, find a piece of fabric, a curtain, or a tablecloth, and experiment with
different background colors. Walk around your flood. And I'm pretty sure you will find something to use
as your backdrop. When you're choosing
your location, you have to think about the
light at the same time. Because I want this class
to be for everyone, no matter your experience level and using just basic equipment, I have decided I will avoid
using external light. As I feel not many
beginner photographers will have one at home. Therefore, we need to choose our location based on the light. It shouldn't be too dark
or with sharp shadows. We want to find a spot
with nice soft light. Set up your shooting spot
close to the windows so that your dog has nice soft
light on its face. Sometimes you need to improvise with setting up the backdrop, but I love these challenges. This is one example
of how you can create a simple DIY home studio
in your living room. The last thing we
should get ready before the shoot
is our equipment. I use a mirror less camera with various lenses indoors where
I don't have much space. I like to use a wide angle lens. I use ten to 24 millimeters
on a crop sensor, which would be about
15 to 35-millimeter equivalent on full-frame camera. Wide-angle lenses are
great for pet photography as you can be closer to your
pet and manage it better. This is especially
useful if you don't have anyone else to
help you keep the dog. Cooperating. Lighting
also gives you a different perspective and funny distortions that you
can use to your advantage. You can move around and
play with unusual angles. You set your shutter
speeds depending on how quick your pet is moving. If it's still, you can
shoot at 100th of a second. But I would rather use
shutter speed no longer than one 250th of a second, because your dog will
most likely keep moving. If it moves quickly, you'll need to go
even faster and use about 500 or one-thousandth
of a second. Let's talk about aperture, which can be tricky
when shooting Dogs. To separate the background
from our subject, he would usually go for a
very shallow depth of field. But because unlike humans, most dogs have a long snowed. I like to use aperture of about eight to avoid
blurring the nose too much. With boxers or bucks, It's doesn't matter that much. Madrid, all the other
breeds you need to decide if you want to keep
the focus on the eyes, the nose, or if you want to have their whole face in focus. The last thing that's left is to bring a lot of threads to reward the good boy and some props that we
will potentially use. And of course get
your dock ready. It is the main star
of the photoshoot.
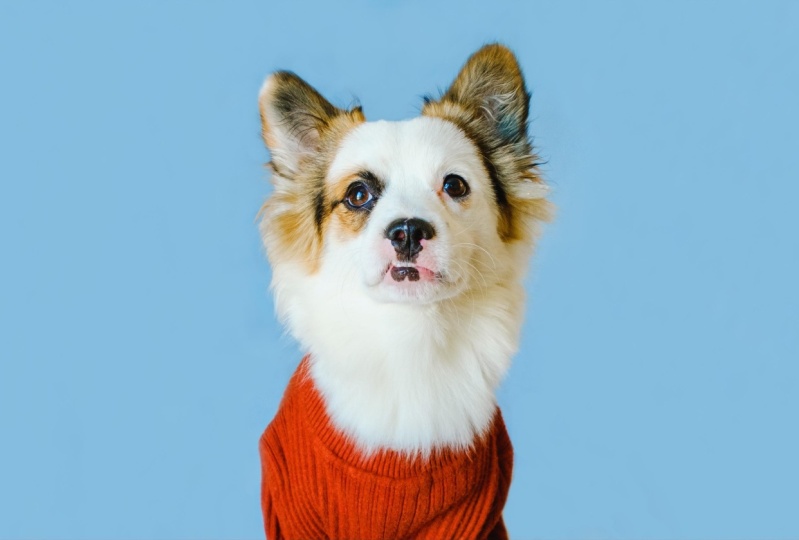
4. Dress Up: When shooting your dark, you always need to keep in
mind that you have to be patient with yourself into
your doggies mindset. You have to understand
that they have no idea what the camera is. In fact, the lens of a DSLR camera can actually
be scared to them. The first thing I'll always
do at the start of a short is still at every dog
get comfortable around me, the environment, and my
cameras. I loved them. Sniff, play and explore. After you become friends and you feel it's the right
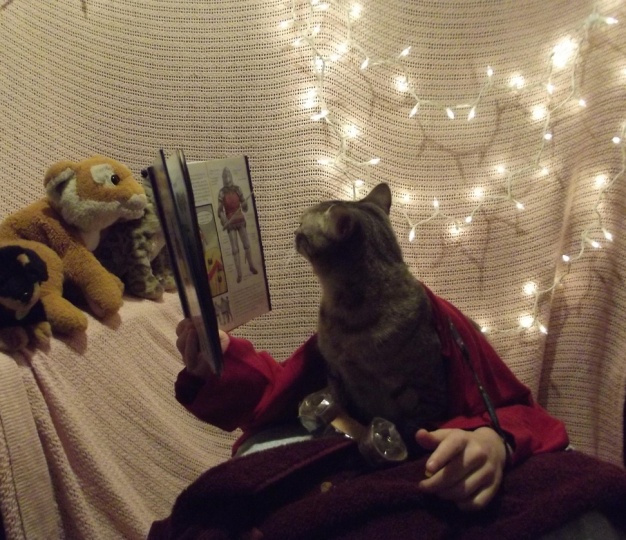
time to start, we can get into it. The first photo, I have chosen,
the colorful background. I have found this light blue
bed sheet and I want to capture figure dressed up
in some of my clothes. They are really bright
and colorful photo. I have never dressed
him up a bit for so I'm really keen to see how
he's going to like it. I have photographed
multiple dogs in past. Some of them were enjoying all the attention and dress ups. Others were more
difficult to work with. Beak is still above a
very playful and crazy. So it will be a challenge
to keep him in place. At the end, I have chosen this bright red
turtleneck to have a nice contrast to
the background. I have some ideas what
I want to capture, but with a dog, you
really need to improvise. Sometimes you can do
it the best styling, but the dog decides
to not cooperate and lays down and not
moving, looking set. The photos are always depending on the dog's
personality and mood. Be sure to offer
regular rewards. Otherwise, you might
find your ducks. Attention starts to wane. Take a lot of breaks and
treat it as a fun session. Always stop working when the dog stops having fun
and let him rest. I think that is quite
enjoying the shoot and I loved the photos
we took so far. Let's try some more dress ups. Most beds are won over by
either toys or treats. Once you decide which motivator your doc will
respond to the best, used it to get his attention. If you wave a treat under a duck's nose and
then pull it upwards, chances are that he will look
up at you and you can use those brushes seconds where he's focused on the street
to get your shot. Or if squeaky toys or tennis
balls are his things, you can hold them near him
to get him interested. And then shoot in burst mode while he is waiting
for you to throw them. Also works amazing
with most dogs, estimate a squeaky sound. The duck will be focused during its head
from side-to-side. So make sure you have your
camera ready at all times. When using props.
It's really about your creativity and this is a perfect way how to bring out the personality of your
dog through the photo.
5. Good Night, Doggo: Our second chute will
be more relaxed. I will shoot 50k in
his favorite position, which shows his
personality the best, laying on his back. It shouldn't be difficult
to get him to this pose as he basically does
it all the time. For duck photography,
I like to use colors. So for this shoot, I'll take a blue blanket and set up a bed for
him by the window. I want to have as much
natural light as possible, especially on his face. I tried to calm him down. He's really easygoing
and relaxed the doc, so I think we will
nail this pose. I calm him down by rubbing
his neck or belly, which makes him even more relaxed and he starts
to fall asleep. That's why I have decided to
include it in this shoot. Letting him settle and be
himself is the best option. When he starts to bite and play, I do a few more scratches
and problem-solved. You know, best, what
works for your dog? When I see he's very relaxed and doesn't pay much
attention to me. I can add prompts or do a dress up again. If you shooting
for a client with a dog that you meet
for the first time, it's important to
learn as much as you can about the dog's
behavior and habits. Spend some time with them
before you start snapping and ask the owner withdrew
dog likes and dislikes, try to include it in your shoot. After I get to know the dog, I start with the
challenging poses like the dress ups or
catching the food. And I started
shooting the length poses when the dog
starts to be tired. So usually towards
the end of the shoot.
6. Tongue Out : This is the favorite part of
the shoot for all the docs. It is time for yogurt. Some dogs prefer yogurt,
others peanut butter. It doesn't really
matter what you use. As you see, yogurt doesn't
come off in one go. It's texture forces your
dog to keep licking. And you will have
plenty of time to capture some funny expressions. When it comes to this
part of the shoot, all the ducks forget
about the camera and focus on the best
treat in the world, yogurt or peanut butter. And you have one
their full attention. This is best to do at the
very end of the shoot because these messy eaters will
have it all over the face. I like to shoot from
different angles and use various focal length. We can either go
really close with a wide angle lens and shoot
from different perspectives. Or go a little bit farther away to have some
space around in case you decide
to use some props or graphics for the final photo. These photographers sessions
have a similar intensity to a dog training
session and require the same sort of mental
focus from a dog. You will see that after a few
shots your dog gets tired. So make sure that
your photo shoot is fun and entertaining
for the dock. It shouldn't be too long. If it is, the dog will lose interest and we'll look tired, making it clear to
everyone that you forced it to let you
take it's pictures. I think we have some
really fun photos. This is one of the
easiest tricks on how to do creative pet photos. I didn't meet a dog who wouldn't enjoy this part of the shoot. And it's a great way how
to make friends with them. I include this post and
every of my shoots, and it doesn't
matter if the dog is big or small, crazy or calm. Day. All I love it.
7. Catch the Food: Our next shoot involves food. So get your dog's excited. Throwing streets in
the year to capture their expression is
always hilarious. It sounds easy, but capturing the perfect
split second for the opportunity requires
anticipation and timing. First, you need to
find the perfect tree, something that your dog loves, and it's easy to split
into small pieces of the same size to make
it easier for the dog. Were most likely
not going to take the perfect showed
on the first goal, but rather needs tens of tries. The streets should be
small enough so the dog doesn't get full and
also taste enough. I have tried to
teach week to catch the foot in the air
with normal dog food, but he didn't even bother
to try to catch it. Heated weight when
it fell underground. I know he loves
cucumber and he will do everything he can to
catch it in the air. Most of my images are captured
in a fraction of a second. To think in burst mode will
make things way easier. And this abate
movements before they happen and you're
ready when they do. Once you see the short grab
it as quickly as you can. For these quick movements, you'll need to set a
faster shutter speed. I would recommend one
thousandth of a second. This will also give you the possibility to use
a narrow aperture, which will make it easier
to get the face in focus. During a photo session, I take hundreds of images of which I chose above ten
to give my clients. I like to capture more
than I need to ensure I haven't missed any of
the pulses I'm after. It's always better to
shoot in burst mode and overshoot than to miss that
one millisecond, that one. Perfect moment. Any dog photographer should, I do takes longer than a family shoot because as
much as we love our dogs, they aren't easy to photograph. The photograph or dark. We have to enter their world
and play by the rules, be patient, the right
shot will come. Eventually. You need to have constant interaction to maintain the ducks attention. I sit very close to them
to keep them engaged. You have to work fast and capture the images
you need Wycliffe. By doing so, your dog
doesn't have time to get bored. Eats my bank. And you make some
hilarious moments.
8. Dog or Human?: For our next shot, our joint feet in
front of the camera. What I want to
achieve is a photo of a dog acting like a human. So I will use fixed dog
face with my human arms. If you have someone to help you, it would make things
so much easier. If not, you may need to
rely on a self timer on your camera and you will
need a lot of patients. I believe it will be
tricky to do everything by myself to set up the
camera and focus properly. And at the same time, act in front of the camera
without seeing what you're actually shooting or what's
your dog's facial expression? It's gonna be a challenge, but that's why we're here. So let's get into it. For this photo, I wanted to show fig behaving like a human using his head and hopefully some nice
expression and human arms. It needs to look like my arms
are growing from figs body, so I will use this
shirt to camouflage it. At first I have to set my
camera for interval shooting. I will use four seconds so that every four seconds the
camera will take a shot. And I will set a
start in one minute. I have some time
to get us ready. It will keep shooting
until I turn it off. The first shot I wants to
try is 50k reading a book, looking smart, thinking or acting like
he's giving a lecture. It goes to think about
what you want to achieve beforehand and activate
your hands accordingly. I'm trying to keep
both arms engaged, but I also have to direct fixed head and keep
him nice and gone. Let's try another outfit. I will let the intellectual
50k rest and I will do a more relaxed look now with a
bathrobe and a towel. Patients was the
first thing I had to learn when I started
photographing animals. And it's a crucial factor when taking portraits
of your dog. You have to motivate
the dog with brace and streets
during the shoot. That way it will connect
photographer with something pleasant and it will
be happy to cooperate. Repeating movements
and words Gormley and gently create a
chart atmosphere. And again, you have
to learn patients. I think we were shooting for almost an hour and it's been
too long for both of us. Maybe even more for me. I'm exhausted doing
this shoot by myself. It's a lot of running
back and forth, trying to focus and compost properly and trying to cover
yourself behind the dog, which would be much
easier with a bigger dog. Beak also likes to lay down
on his back all the time. So I had to hold him up with one arm and try to act
with the other one. It was more difficult than I thought my first day sessions where either out-of-focus
or badly compost. That's why it took me so
long to take the shot. If someone offers to assist
you with the shoe that and definitely pick up on that offer and have them
take care of the dog. That way you can concentrate
only on photography and it will make your
shoot so much easier. This shoot was definitely
one of the most challenging, but also the funniest one. I encourage you
to give it a try. I'm super keen to see what
you have created and shared a human-like photo
of your dog in a project section that you
will find under this video.
9. Pet and Owner: There is a general belief that animals and their
owners look similar. If it's still in your case, you can take really funny photos together with your
pet side-by-side. Remember to select your outfit accordingly and match
the hairstyle and makeup they gave to the extreme and style
yourself to look like your dog as
much as you can. Take a photo of your bed with some distinct facial expression. Do they tilt their head when
you make a certain sound? Do they do tricks on command? If so, take advantage
of it as these are, use things to capture. I have chosen two photos from our previous shoots
that I want to imitate. Let's give it a try. When you are happy
with the result, let them rest and
it's your turn. Try to mimic the
same expression, which together with
the matching outfit, hair and makeup at
the dissimilarity. You can then put the photos
next to each other in Photoshop and wait for
everyone's reaction. I think you will get
a lot of success.
10. Post Production: Photographing
animals is not easy. You can't force them, are rushed him to
do what you want. They keep moving and
running way datum poles or stand still in order for you
to get a mesmerizing shot. And you will most likely
need to spend some time editing the photos to
get a professional look. When I go through the
photos in Lightroom, I choose the ones
I like and I write the full dose with stars to make the selection process easier. It doesn't matter if the
composition is not perfect. I'm looking for great
facial expressions. At first, I do basic correction. I brighten up the
shadows and also the eyes so that they
are nice and bright. As the next step, I usually edit the colors. Sometimes I want to make
the background to more saturated or change its
colors a little bit. I play with the colors until
I'm happy with the result. Now let's move to the
most time-consuming part, editing the background. If I had a professional
and backdrop, the background would
be nice and smooth and I wouldn't have
to edit it too much. When I took photography
for my clients, I use a paper
backdrop on a stand, which makes it pretty easy. But because they wanted to make this workshop for everyone, we were using fabrics that
we found in the closet, like curtains and bedsheets. And I put them on a chair so it wasn't stretched properly. I can see faults and a lot
of shadows on the backdrop. I have to edit all these. It's easier to do it in Photoshop where I use
the patch tool for the biggest fault and clone stamp tool to smooth
than the background. I basically use just
these two tools. Sometimes I need
just a few minutes to make the background smooth. Other times, it takes a
little bit more time. I'm pretty happy
with the result. Now, I think the final
photo looks awesome. If you try to stretch your background
properly when shooting, you will have less
work with editing. But with stock photography, you will usually have to do at least some background
corrections and either grab the photos or clone the background as
dogs keep moving. Sometimes I captured
the best expression when it moves to the edge
or out of the backdrop. So I just cloned the background on the spots where it's missing. The better light we have when
shooting and the smooth ER, backgrounds, the easier it will be for us to edit the photos. So think about it when
you start shooting. On the other hand,
if you're not quite happy with the raw photo, don't throw it in a band
and give editing a try. If you have some practice
in post-production, you can fix a lot and do real magic with
editing software. Keep trying and stay creative. When I post on social media, I sometimes at graphics like speech bubbles or
comics bubbles, if it suits the photo. Don't be scared to get
creative in postproduction. It can make the photo
even more eye-catching.
11. Final Thoughts: Thank you guys for staying
with me until the end, and congratulations on
completing the class. You are now ready to capture some unique and fun
photos of your pet. If there is one thing I hope you take from this class
is that you can think creatively and out of the box with any
kind of photoshoot. Doesn't matter if
you shoot photos of people or animals
escaped the crowds. Find your unique
style and have fun. Because that's what life
should be all about. Share your best photo with
us in the project section, and don't hesitate to
get in touch if you have some questions about the class or if you want to
give me a feedback, I'm always happy to hear from my students and get to know you. If you liked this class. Follow me here on
Skillshare and livery view. It's really important
to help me grow. Feel free to follow
me on socials, on my personal Instagram
or on my doc Instagram. If you're keen to get
better at pet photography, you may find some
inspiration there. Now grab your camera and take
this as an opportunity to bond with your pet and create
some beautiful memories. Have fun shooting.
 Klara Zamourilova, Photographer/Videographer