DIY Packaging: Craft and Design Your Own Mini Box | Annie Liu | Skillshare

Playback Speed


1.0x


  • 0.5x
  • 0.75x
  • 1x (Normal)
  • 1.25x
  • 1.5x
  • 1.75x
  • 2x

DIY Packaging: Craft and Design Your Own Mini Box

teacher avatar Annie Liu, Digital Designer

Watch this class and thousands more

Get unlimited access to every class
Taught by industry leaders & working professionals
Topics include illustration, design, photography, and more

Watch this class and thousands more

Get unlimited access to every class
Taught by industry leaders & working professionals
Topics include illustration, design, photography, and more

Lessons in This Class

    • 1.

      Intro

      1:27

    • 2.

      Ideation

      1:18

    • 3.

      Materials

      1:09

    • 4.

      Sketching

      2:28

    • 5.

      Details

      6:56

    • 6.

      Printing

      1:01

    • 7.

      Crafting

      3:32

    • 8.

      Conclusion

      1:08

  • --
  • Beginner level
  • Intermediate level
  • Advanced level
  • All levels

Community Generated

The level is determined by a majority opinion of students who have reviewed this class. The teacher's recommendation is shown until at least 5 student responses are collected.

142

Students

4

Projects

About This Class

In this class, we'll create a fun and engaging project - in order to create our very own mini box packaging design! You'll learn how to spark your creativity and bring your ideas to life using both traditional and digital tools.

Whether you prefer using Procreate or Photoshop this class will be a fun project for you! Together, we'll create a cool mini box packaging design. 

So join me in this fun and easy class, where we'll get to use digital tools as well as get crafty to create something truly unique and memorable. 

To get started, here are the materials you'll need:

  • Adobe and Photoshop: These software programs will be essential for creating your cereal packaging design. (In order to use Illustrator you'll have to convert the Photoshop file into an Adobe Illustrator file)  
  • iPad or Laptop: You'll need a device that can run Adobe Photoshop, Procreate
  • Your creativity and imagination: These are the most important materials of all! Don't be afraid to let your ideas flow and experiment with different concepts and styles.
  • Paper: You'll need paper (preferably thicker paper) to print your designs. 
  • Printer: You'll need a printer to print out your designs and see how they look in physical form.
  • Scissors or cutter: You'll need scissors or a cutter to cut out your packaging design from the printed paper.
  • Glue: You'll need glue to assemble your mini box packaging. 

So gather your materials, unleash your creativity, and let's get started!

Meet Your Teacher

Teacher Profile Image

Annie Liu

Digital Designer

Teacher

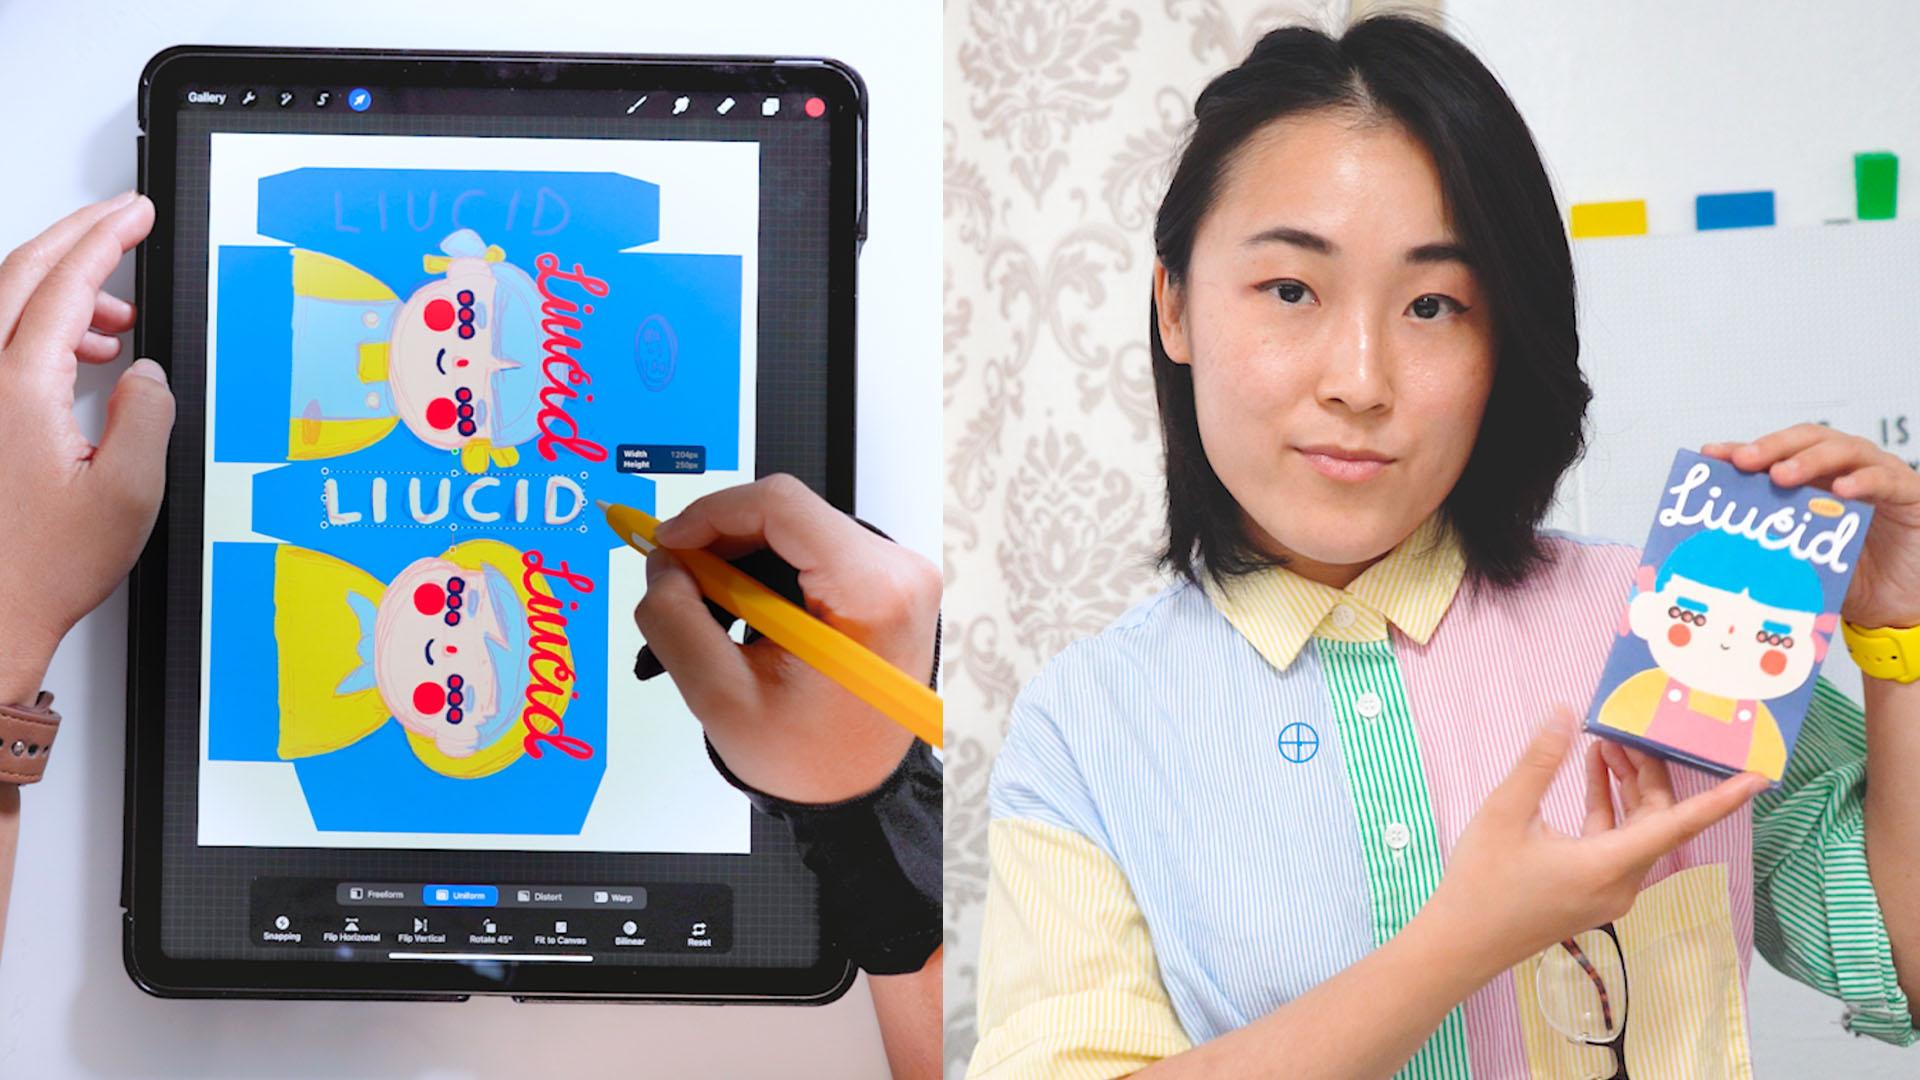
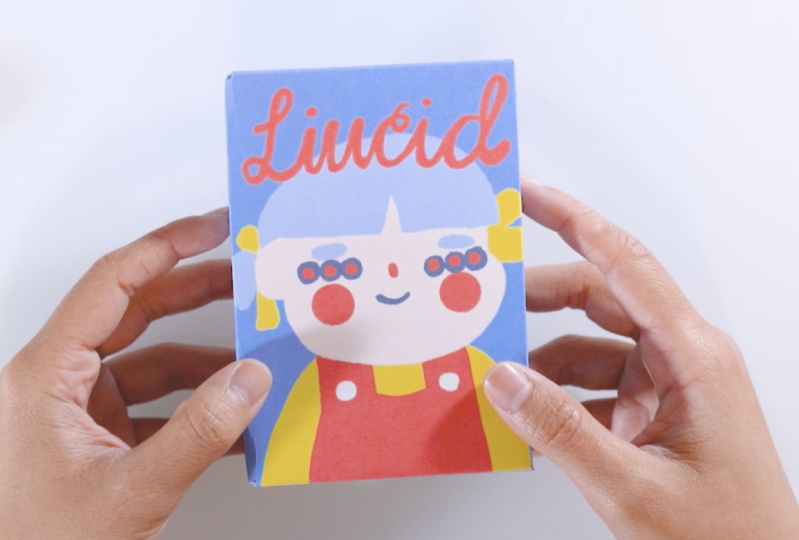
Hi I'm Annie or LIUCID and for the sake of brevity- the meaning behind LIUCID is two folds.

Clarity through connection (which is the basis of creativity) Light- keep shining, your spark sparks others.

And I'm all about living, creating and teaching with the above mission statement in mind as well as sparking it in others!

In order to give you a sense of who I am- listed are my related expertise when comes to the topic of creativity.

2025 Video Producer, Art Director & Editor for Rebel Girls' "Growing Up Powerful: Body Confident Sport" in collab. with Nike Webby Winner (Podcast Best Partnership or Collaboration 2025)

2024 Featured on SkillShare (DIY & Crafts Cl... See full profile

Level: Beginner

Class Ratings

Expectations Met?
    Exceeded!
  • 0%
  • Yes
  • 0%
  • Somewhat
  • 0%
  • Not really
  • 0%

Why Join Skillshare?

Take award-winning Skillshare Original Classes

Each class has short lessons, hands-on projects

Your membership supports Skillshare teachers

Learn From Anywhere

Take classes on the go with the Skillshare app. Stream or download to watch on the plane, the subway, or wherever you learn best.

Transcripts

1. Intro: In this class, we'll be drawing and designing our very own mini box. It could be a cereal box, maybe a candy box, or even a band aid packaging. It's all up to your imagination. Then we'll get the opportunity to get crafty with it. We'll print out our design, cut it, fold the paper, and glue it all together to bring it to life and create a tangible final product. At the very end of this course, you'll have a cute little packaging that you could use as a decoration, or even as a gift. And I'll be your instructor for this course. I'm Annie H i or Lucid. And for the sake of brevity, the meaning behind Lucid is twofold. So one is clarity through connection, which is the basis of creativity, and the second meaning is light. So keep shining because your spark sparks others. And that's my mission statement. So whether it's through doodling, gifts, wonky lettering, or face filters. I keep it lucid while sparking this in others, as well. Let's get to creating this fun and engaging project where you'll learn how to spark your creativity and bring your ideas to life using both traditional and digital tools. With that, let's get lucid. 2. Ideation: All right, to kick it off, let's start with the ideation process for our Mini do yourself box design by gathering some reference materials. A great place to start is by searching for box designs online. Specifically, we can search candy bandaid or even cereal, and this could be done by using Google Search. Pinterest or any other platforms that you prefer. By looking at existing designs, we can get a sense of what we're drawn to and what inspires us. For this stage, I love using pines, and here you can see what I've pinned onto my board. As you search for inspiration, pay attention to elements such as color schemes, topography, and compositions. Consider what catches your eye and what could work well for your own mini box design as well. Remember that while gathering reference material is an important step, it's also essential to put your own spin on things. Come up with your own unique design that reflects your own style and vision. With our collection stage done, let's move on to the next step where we'll download our needed template and begin to sketch. 3. Materials: So we've gathered some really cool reference materials. Now it's time to start sketching out our mini box design. But before we do that as a helpful resource, I've provided a template that you'll be able to use as a starting point for your design. This template is a basic structure of a box labeled with the front, back and sides, and you can use this template to guide your placement of your design elements and to make sure that they all fit correctly on the box. So download the file from the class resource section, and you can then import the template into your preferred design software, such as Adobe Illustrator or Photoshop or Procreate. And make sure that you're on a CMYK profile since we'll be printing this as well. So remember that this template is just a starting point, so feel free to modify this as it's needed to suit your vision and make your packaging truly unique. So with that, let's have your creativity flow, and let's create something amazing together. 4. Sketching: We begin to sketch, let's ask ourselves what elements should be included in our design. Of course, if you're feeling stuck or struggling with ideas, we can always turn to the technique of remixing. Remixing is where we'll incorporate elements we've seen and start mixing and matching and matching it all in our own style. Essentially, we're taking inspiration from the reference materials that we've gathered and combining it in different ways to make it interesting to create something new and unique. So we can start saving and playing with a different color palette to find the one that we like the best. In the next section, let's get even more detailed. 5. Details: So now that we have our initial sketch and color palette of our choice, it's time to start bringing it to life with some detailed drawing. So this is a stage where we'll be adding lines, colors, and other key details that will really help our box design pop. So let's get to it and go ahead and play with your choice of brushes. At this stage, it's all about finalizing our sketch. So now that we have our sketch finalized, it's time to pay close attention to our overall composition of our design and make sure everything looks clean and polished. And we'll take this opportunity to clean up any straight lines or that we want to ensure that our design looks amazing and professional and we crafted. And in the next section, take it to print. 6. Printing: Now we're about to enter craft time. Let's get our work ready for printing, and there's a few different ways to do this, depending of course on our preference and the tools that we have available. For example, if we're working in Procreate, we can choose to print directly from the app or we can export our design into a photoshop file and make our final adjustments in photoshop before printing. This is actually the option that I prefer the best because well, my iPad isn't connected to my printers, so I'll have to do that. Once everything looks correct in preview, go ahead and load in a thicker sheet of paper, and we can go ahead and hit that print button. In the next step, let's begin cutting. 7. Crafting: Alright, so we have our design printed, and it's time to get out our scissors or any cutters and start cutting along the edges of our template. Once this is done, we can start folding along those lines to create the basic structure of a box. Then, we'll apply glue to the appropriate tabs and assemble it together to form a and secure box. H. 8. Conclusion: Alright, Congrats, you've now created your very own mini box. Such a job well done. So whether you choose to use it as a fun decoration or gifted to your friend, you can be proud of the hard work and creativity you've put into this project. And as always, I'd love to see your finished design box. So please feel free to share them with me and the rest of the class, and as always stay creative and stay lucid.