Transcripts
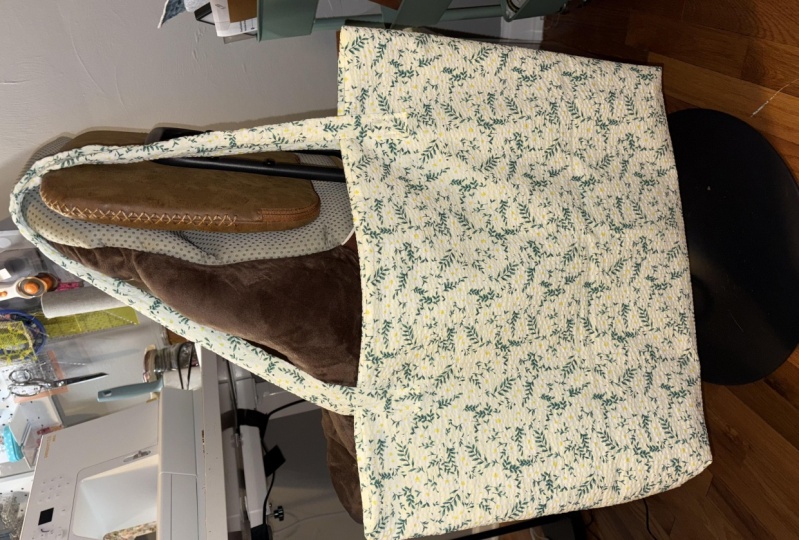
1. DIY Mom Bag - Introduction : Hello, welcome to this amazing sewing project. My name is Hilda and I'm a Dutch fashion designer. A few years ago, I started my own fashion brands called people. It means people, inspiring people. And I love to inspire you by making your own products. I would like you to experience how much fun it is to make something yourself. Well, wait a few basic principles. You can make so many beautiful things. So if I take you step by step into the process of making this amazing and beautiful mom back, including a free sewing pattern. I use this back every single day because you can use it for anything on the inside of the bag or may to small pockets. You can use this form for your phone or piece, for example. This is a really good begin AS project and you only need a regular showing machine and some other basic tools. But I will tell you everything in this course. Well, I hope you have fun by making here for mom back, and I really hope you love this class. So let's get started.
2. Tools And Materials You Need: Okay, now we grabbed our tools and gather the materials. We start with a pattern to make it easy for you. I uploaded the pattern in the link below. In this template, you find the exact dimensions of the bag. In the video cutting pieces. I show you how to read this template and how to cut the pieces in the right dimensions. Well, of course, you also need a piece of fabric. For BEC, I will prefer a thicker piece of fabric made from cotton. The fabric I use is made from ninety-five percent of cotton and 5% of elastic polyester. This means my fabric stretches bid. But for our back, you can also use fabric without any stretch. The dimensions of the fabric you need are 1500 millimeters by 840 millimeters. So this is about 59 by 30 inches. You also need searing threats in the right color. Suing pins, scissors, a pen, and a ruler. I use three different kinds of rulers. One normal ruler, Mang for longer distances, and a square to make it easier to make a square. But for this, you can also use a book. And of course you need a sewing machine. Normally, I use my luck machine. So if you have this one, you can of course use this. But because this is a beginner's project, I show you how to use your regular suing machine without having to use more complicated machines. You will see no difference in this. And the result will be just as beautiful.
3. Cutting All The Pieces: Cutting the pieces. I uploaded the template view. You can find it in a link below. So open this file. You don't have to print this document because I will explain every step included the dimensions in this video. First, you put your fabric tied on a table and you have enough space secured a fabric that heavy objects because it's important that every piece is cut straight. We start with cutting the outside of the bag to pieces with the dimensions of 550 millimeters by 430 millimeters. This is about 21.7 by 16.9 inches. We don't do anything with those other lines here. Start by creating a straight line on the fabric. I like to draw on the fabric because when we start suing, you will not see any ground lines anymore. We have drawn the dimensions on fabric. So 550 millimeter show 21.7 inches. We will start with making an angle of 90 degrees. You can use your square or a book and repeat this one more time. I find it easy to put the first part on the fabric so that I have exactly the same measurements twice. Check if the fabric is exactly straight by cutting out the second piece of the outside of the bag. On the left and the right bottom of both pieces, you cut the small square with the dimensions of 40 by 40 millimeters. This is 1.6 by 1.6 inches. Now we start cutting the inside of the bag. Those are two squares with the dimensions of 550 by 390 millimeters. So 21.7 by 15.4 inches. Duties in the same way as I explained by cutting the outside of the bag. The puppet also belongs to the inside of the bag. Could one square from 220 millimeters by 190 millimeters. So about 8.7 by 7.5 inches. Those pockets are big enough for a phone or keys, for example. But you can also choose a different size of pocket, just what you prefer. Maybe you want one big pocket or very small one. So feel free to cut the size you need for your personalized back. The last thing we cut out the strips, hidden dimensions of 840 millimeters by 60 millimeters. So this is 33.1 by 2.4 inches. So now we have all the pieces you need for making your bag.
4. #1 Sewing The Outside: The outside of the bag. Take the outsides of the bag and put the right sides of the fabric on top of each other. So the right sides together. Before we start solving, you have to set up the sewing machine. I use a regular straight states with a distance of 3.5. Now we are going to solve the outside of the bag in one straight line. You are not solving the small squares in the corners yet. Sorry. If you have sued those two parts together, you have to fold the squares against each other. This will be the bottom of the bag. This is also the part where the most weight comes up to make it more tight. You can sue this part several times.
5. #2 Sewing The Inside And The Pockets: Saving the pockets and the inside of the bag. We start by making the pockets for the inside of the bag. Take the piece, you cut out. The two sides inwards by one centimeter, 0.4 inches. You're suing pins two sides. Now we only see the top of the pocket. Also one centimeter, so 0.4. inches inwards. On this image you can see exactly where the packet should be placed. Should this with your ruler and place the right sides on top of each other. In the bottom of the pocket on the fabric. The suit is tight. Now you have to fold the two sides of the pocket, which you're seeing pins on the fabric. If you want to separate pockets, then you also pinned a middle of the pocket. Now you see the pocket neatly on the fabric. Put it right sides of the fabric on top of each other. So the right sides together. And now we are going to sue the inside of the bag in one straight line.
6. #3 Sewing Everything Together: Suing all the pieces together. Well, almost all the pieces. We saw, everything except the strips. Now we have two parts, the outside and the inside of the bag. For the inside of the bag, the part with the pockets on it inwards and put it on the top of the outside of the bag. Take only the top of the inside of the bag and attach this one on the top of the outside of the bag. It takes those parts with your suing pins. Makes sure that the side seams are lined up. Eventually you have more than ten centimeters, so four inches left. This makes a lot of sense because after suing, you have to fill the hole back inwards through this hole. Okay. It seems a bit of messy right now. But if you have followed the steps, well, and if you have looked closely at the instruction video, then it will be alright. Now we start suing. You start a few centimeters, about one before the seam starts, so that you are sure that they are rel, lined up. Now you see the entire top except the last ten centimeters. So about four inches. Now, full the entire back through the hole so that the right sides are showing up. Now you see the last centimeters, so the last inches on the outside, secured as neatly with your ceiling pins. And see you in one straight states. On the template you see four centimeters. So 1.6 inches from the top of the bag. You fold those four centimeters inwards. So you have to use your ruler. Pin the entire top of the bank on the scene. So four centimeters, 1.6 inches from the top. Okay. Now we are ready for the next and last step, making this trips.
7. #4 Sewing The Straps + Finishing: Making the strips. This is the last step to finish your back. Take the two strips and pin them with the right sides on top of each other. Except the first and the last five centimeter. So about two inches. You see this long piece together. So both strips to secure the beginning and the end by going back and forth several times. Now you fold the right-side out. This will take some time, so you have to be patient for it. Now you felt the sides of the two bottom squares, yards by one centimeter. So 0.4 inches attached to them which are suing pins. And see you dose tied. She also fold the bottom one centimeter, 0.4 inches in words, as secret as well. On the template you see the exit dimensions where the strip should be attached to the back. On the right place which are suing pins. Now you see the entire top in one straight states. You have to do is very precise because you can see this scene. We are almost ready. And it's very important that you tied into slept well after on a cross on the template, on the back in this way. So neatly CEO to cross and also the sides of all the strips. Finish everything neatly by cutting off the loose trends.
8. Your Class Project: Plus project. You did it, you made a beautiful Beck and how cool is that? And of course, this is also your class project. I can't wait to see your results and to receive photos. If you have any questions or recommendations about this video, please let me know. I really hope you enjoyed this class and that you have learned new basic suing skills. Well, I hope to see you next time.
 Auke & Jildou, Designer & Maker Architecture & Interior