Transcripts
1. Introduction: Lino cut printmaking is a beautiful and
captivating art form that allows us to create
handmade prints with simple tools
and age old methods. My name is Kate risani. I'm an artist and printmaker
from Portland, Oregon. In this class, we're going
to work step by step together to explore
the fundamentals of in cut printmaking. From understanding
your tools and materials to designing and carving your own unique prints. Whether you're a
complete beginner or someone looking to expand
your artistic skill set, this course is
designed to provide you with the knowledge
and confidence to start creating your
own relief prints and exploring the
medium in more depth. Trying a new medium
like printmaking can be both exciting and a
little intimidating. But pushing yourself to explore something that
seems overwhelming can be one of the
best ways to get inspired or to get out
of a creative red. Sometimes it can even lead to some pretty exciting
creative discoveries. I'll guide you through
my entire process with beginner friendly techniques and teach you the essentials
for relief printing, including understanding
positive and negative space, carving safety, inking and printing methods, and much more. So whether you're
just intrigued by the medium but have no
idea where to begin, Or you've made prints but had some frustrations
along the way. This class is for you.
There's really nothing quite like the feeling of seeing your print revealed for
the first time. And I can't wait for you
to experience that joy. Let's get into the studio
and start creating.
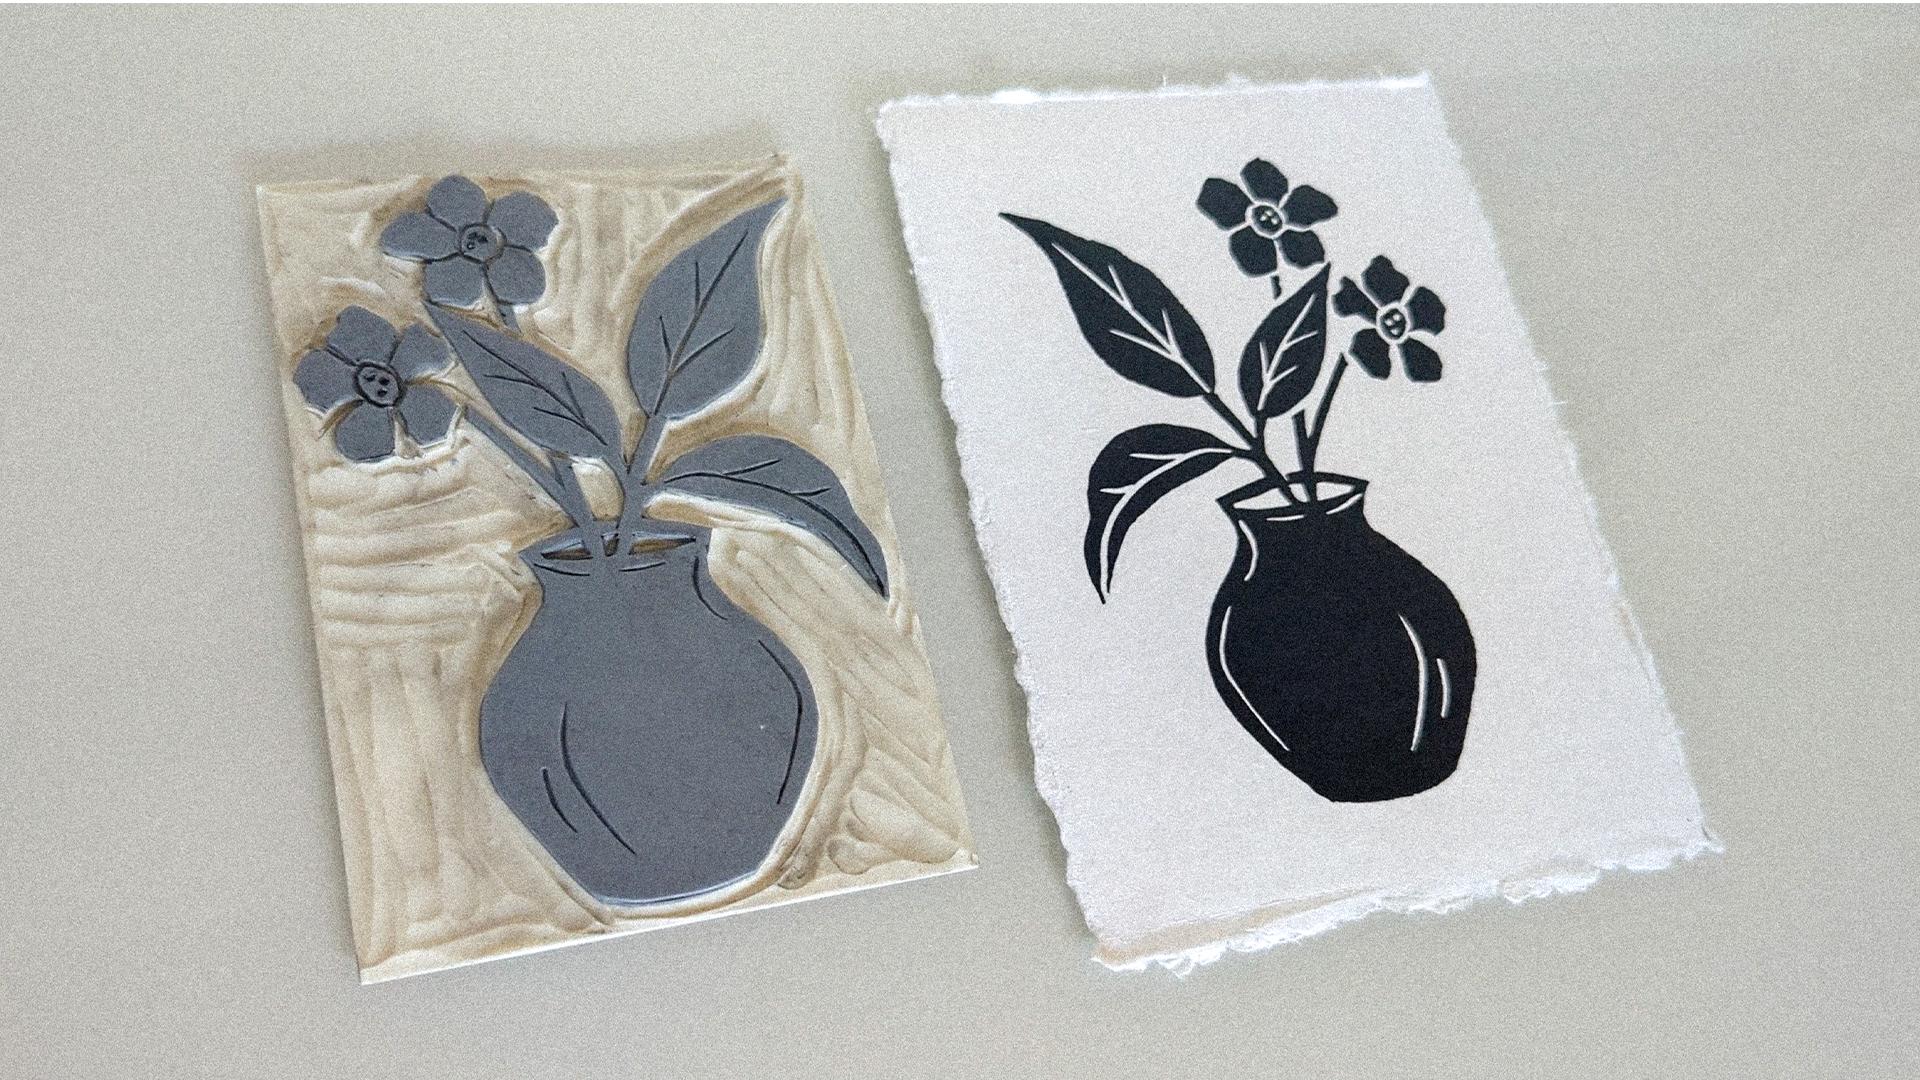
2. Class Project: In this class, we'll be carving this cute bed based block together to create
this final art print. While this design
looks very simple, it will provide you with all of the experience and
knowledge you need to move forward and confidently tackle your own
linocut projects. I'll be carving this design on a four by six inch
block to create a finished five by
seven inch art print. You're welcome to create and use your own design
for this project. We'll go over how to design for linocut prints and one
of the upcoming lessons. I'd love for you to share
your finished project so we can see all of your
hard work and cheer you on. You can upload photos of your finished print
by clicking on the Projects and
Resources tab of this course and
creating a new project. The Projects and
Resources tab is where you'll find all
of the class resources, including the design
template you'll need to create the print and
a full material list. In the next lesson, I'll go over all of the materials you'll
need to create your print.
3. Materials: Let's talk about the
specific tools and materials we will need
to create our print. As I mentioned, you'll
find a full checklist of the materials you'll need for this project in the
Class Resources tab, along with the design template
that you can print out. This list might seem like a lot of items when you
first look at it, but a lot of it will be
really simple materials you already have on hand. And I've added a few alternate options for materials where possible with items you might already have lying
around your house. While, there are a few
proprietary materials you kind of can't
avoid having to get, Sometimes we just need a little extra creativity
to get the job done. So I'll show you all
of the materials I'm going to be using
to create our print, and then I'll get into a
little bit more detail about each one of them in
the corresponding lessons. First up, we have a
pencil and eraser. You will either
need sketch paper. This is just 20
pound printer paper or the design template
printed out at your size. Just some basic scotch
tape, tracing paper. This is just a large
pad that I tear off. You don't need large sheets. I'll be using a soft lino block. This is the Blick
brand ready cut. You can see it has
a gray surface, and then the rest is white. When you carve, this creates a really strong visible
contrast and makes it really easy to see
where you need to carve and how your
design is coming out. If you do have a different
color lino block, you can do a really
light wash of ink or acrylic paint on it to create that contrast and make it easier when
you're carving. This is what a traditional
lino block looks like. It is a much harder
surface and it has a jute or hessian back that keeps
it together. Carving tools. This is a multi tool where the carving bits are
interchangeable. These are palm carving tools. You can see the different shapes and sizes of the carving bits. This is a piece of glass
from the hardware store. It is just turned over onto the cardboard
that it came on. I put a piece of white
printer paper in between for a white balance when I mix ink colors and then taped
up the sharp edges. A palette knife. The liquitex free style
ones are my favorite. We, of course,
need ink to print. I'll be using an oil based ink. This is the speedball
professional relief in. It is oil based,
but water missible. So it cleans up with soap
and water, no solvents. This is our brayer or a roller. This is how ink gets applied to the lino block.
This is a barren. This is used for hand printing. We will need paper
for our final print. These Strathmore print
making papers are great. I like to pull my test prints on these before I use
my nicer papers. And then I like to print my finished work on
Legion Stonehenge. It's a little bit thicker and heavier has a very
slight texture to it. I also love printing
on handmade papers. There's a wide variety of
those from thick to thin. In general, thin papers will
be easier to hand print on. Thicker papers will require
more pressure and strength. Paper is one of my
favorite variables to play with within a print. Simply changing the paper
type or color can give a print a whole new
life or feel to it and an apron because I am messy and this ink gets everywhere and
it will stain your clothes. Some cleaning supplies. I
like these shop towels. They're thicker and
more absorbent, so I can use them for a lot
longer and create less waste. An easy way to get the
more proprietary materials you need for printmaking is
the Speedball beginners kit. This kit includes a
carving multitol, a pink, soft carving block, black
water based ink, and a brayer. Go ahead and get
your supplies ready, and next we'll talk about how
to design for printmaking.
4. Designing for Relief Printing: This lesson, I'll
teach you how to design your artwork for
relief printmaking. In the class resources, I've provided you with the exact design that I'll be carving. You can download and print
it out at the size you want. I'll be using a four
by six inch block to create a five by
seven inch print. I've printed the design
out at four by 6 ". You can edit the
template to your liking, change the vase shape
or add a design to it. You're more than welcome to
create your own design too. Well, we'll be carving
different images, the same steps will still apply. But let's talk about some design basics for
block printing. Block printing or linocut is
a form of relief printing. Relief printing is
essentially when the printing surface
is carved away, which forms reliefs, and the non carved surface that remains is what creates
your final image. To learn this process, we will be working with
the foundational basics of a single block and black ink. Now, really, any concept
for your design can work. It's just a matter of
figuring out how to turn it into a carvable
and printable image. Print making can turn into a little bit of mental
gymnastics at times. I always recommend
starting more simple. The design process for
relief printing really centers around using
positive and negative space. When you look at
anything around you in the world and take all of
the visual information, we can understand and
make sense of scenes and objects by seeing
their different textures, colors, shadows, their
placements and space, and their relationships
to one another. When you're creating with
one block and one color, it means you have to create all of those shapes, textures, and the delineations between and within objects that
we would typically understand by seeing
that information and using other contextual
clues to fill it in. For example, if we see a red apple against
the red background, we're able to understand
what we're seeing because the apple has a slightly
different hue to the red. There's a different texture. It has a slightly shiny finish. There's some variation
in the reds and shadows create its
shape or outline. In printmaking, we have
the option of color or the absence of color to create all of that
visual information. So how do we convey that with positive and
negative space? Let's get into our materials
to help us visualize. Positive space is
going to be the color. This is the surface of
the block that we leave intact and is what gets inked up and creates
our final print image. Negative space or the
absence of color will be the areas that we carve away and do not get
ink or printed. These are the parts
that will show through to the paper
in your final print. Your design can be created with a foundation in positive
or negative imagery. For example, if I
carve out the word no in the positive, it
would look like this. If I carve out the same image into the negative, it
would look like this. A good real world example of
positive and negative space being used that most of you are familiar with is the FedEx logo. The word itself, Fedex is the positive imagery that we immediately
recognize and read, and it has the color, it
is the design itself. But within the negative
space of this design, an arrow is created out
of the lack of color. Our goal is to aim
for a good balance between positive and negative
space within our design. High contrast in print making
is visually very striking. Try experimenting with how
light and dark interact to create that visual play. Overall, simplicity is
going to be your friend. Add complexity over time. With each new block, try something new and
see what's possible. Think about art like
Matiss paper cutouts. They're really simple,
imperfect shapes and one color, but the use of shapes and how
they're designed and laid out is super effective to create something you just want
to keep looking at. Your designs don't have to be
complex and you don't have to be a master artist to
create beautiful lino cuts. If you're creating
your own design, trace your block a few times on your sketch paper
so that you have the correct size
to design within. When working on your design, keep in mind that really
thin detail lines will be easier to carve out in the negative manner
versus leaving positive thin lines
to be inked up. Carving directly on the
edges of a block can also be difficult unless
you're incorporating that straight edge
into your design. Just be mindful when you're designing and transferring
it onto the block, that if you have a nice curve that comes right up to the edge, you might want to bump
it in just a little bit. Following these guidelines
will help build your foundational
understanding of printmaking. By seeing the process through, you'll develop a
better understanding of how your design
decisions impact your final work
and how to create artwork effectively
for future prints. For now, simplify your shapes, reduce your details,
and thicken up lines. Once you have a feel
for the basics, start adding in more
complex shapes, detail work, and experiment
with new methods. All right. Let's get that
artwork onto your block.
5. Transferring your Design: There are a lot of methods for transferring your artwork
onto the block for carving. They all have their
pros and cons, but I think every
print maker is on a lifelong quest to find their
perfect transfer method. I certainly switch up
which transfer method I'm using depending on
my designs complexity. And if we're being honest, my patients level is probably
the determining factor. I'm going to teach you
one of the most basic, but tried and true never lets
you down transfer methods. It's easy, it's
cheap, it's simple, and it's something that
you can always come back to if other methods you're
learning, don't work. Now that you have your design either printed out at the size, you'll be carving it or your final design
that you've created, we are going to grab
our tracing paper, a pencil, and some tape, and We are just going to tape our tracing paper right over our image so that the whole
thing is under there. And I like to use
enough pressure. So we don't want just like
a light feather touch. You also don't want
to go really hard. So somewhere in between
enough pressure that you're getting some graphite
transfer from your pencil, but not going to make
a dusty mess with. So we're just going to
perfectly trace our design. If it's helpful, you can put
a light pad underneath or put this whole thing up against a window to assist in
tracing your image. I only like to do outlines. I don't like to color in the
areas that will be black. I just want to indicate the
areas that I'm going to carve and the outlines
I need. So here we go. Okay. And I have now
traced the entire design, and I can remove it
from my template. Now, everything that is on your tracing paper will
transfer to your block. So if you made a mistake or there's lines on there
that you don't want, I would recommend
starting over and getting a nice outline of
exactly what you want. So we are going to
grab our block now. I'm just going to hold this teeth over so it
doesn't get in my way. So with our tracing
paper with the design. This is the side I've drawn
the outline on and traced. We're going to turn it over. Unfortunately, the
soft lino doesn't seem to stick well with tape
and tracing paper combo. You can try to use it. It
might help a little bit. But because I have a pretty
simple design today, I'm just going to be careful and hold it in
place while I work. So this is my lino block. I've got the surface up here. We have our image on
tracing paper image down. And through my tracing paper, I can sort of see where it's going
to go on the block and figure out where
I want to place it. Once I have it, I'm going
to gently place it down. Now I'm going to hold it in the middle so that
it's not moving. And just with the
side of my thumb, I'm going to start pushing
and giving it some pressure, rubbing the image around
where I have pencil marks, and you can see, I'm
going to hold it in place I'll be able to see. Starting to transfer.
It's like magic. So you can see really easily and quickly it
starts to transfer. You don't have to do much. This is pretty quick. Just make sure you
get all the lines go around your whole image. And I'm just holding the
tracing paper in place, making sure it doesn't move
because this is nearly impossible to line back up if you pick up and then
try to place it back down. So make sure I get
over every bit. And I'm feeling pretty good. Let's see here. Yeah.
Looking nice. Okay. So if you did have
any parts that were missed or you
would like to fill in, you can take your pencil and
directly go onto the block. Just be careful
if your pencil is too sharp because
these soft blocks, you can really just pierce them and that will show through or you'll
have to carve it out. I went ahead and added a black outline over my pencil just so
that it's more clear for you to see on
camera and sometimes as your carving in your hand can smudge up those pencil lines. So I just added those to keep everything nice and crisp
through the process. One other thing you
might notice is that our image looks mirrored or
backwards at this point. That happens from the
transfer process, and it will be really
apparent if you have words or numbers
in your design. When you print, the image gets flipped back to its
original orientation. But at this stage, it's just important to keep in
mind that it's mirrored. So if you need to make any
on the fly adjustments, you're doing so accordingly. All right, that is transferring your design to your
line up block. Next, we will talk about
our carving tools.
6. Carving Tools + Safety: Now that we have our
design on the block, we're ready to start
carving. Well, almost. First, because these carving
tools are very sharp, we're going to go over
some carving safety and general carving guidelines. Your carving tools are
deceivingly sharp. These can cause some serious injuries if you aren't careful. I might be speaking
from experience here. Sharp tools are safe tools. Keep individual
carving tools sharp end and replace bits on
multi tools regularly. Always carve away
from your body. This is the number one
rule when carving. This means your carving tool should never be pointed
directly at you. But it also means the hand
you aren't using to carve should never be bracing your lino block in front
of your carving tool. Put your tools down when you
aren't actively carving. It's really easy to forget that the thing you're
holding is sharp. We don't generally sit at our art desks with
dangerous objects. So best practice is to just set it down when
you're not working with it. As you can see, each carving bit has a different size and shape. There are V shapes, U shapes, and large
clearing gouges. The size and shape of each carving tool corresponds
to how you will use it. So the tiny V is going to be
for small details and lines, and the larger U
shape will be for clearing out larger
areas like backgrounds. If you got the speed ball, beginner kit or you got
one of these multi tools, let's talk about how to use
and change out the bits. You're going to do that
a lot during carving, so it's important that you feel comfortable
using your tool. In the top unscrew it and you'll find all of
your carving bits. You can either put
them back in or you can keep them out
for easier access. This is a what is it? Tidy, Righty tidy left, Lucy. So we're going to go
counterclockwise to the left. Just a little bit.
Actually, we'll go all the way. I'll
show you what happens. If you unscrew this all the way, it comes apart into three parts. You've got this
little middle part, this other little U shape, and then the tip. So This I don't know
the names for these. So these are all just
the little parts. These little parts fit
together. Oh, I fumbling. They fit together like that. And they fit right on
the top of the tool, and then this just
goes right over. So easy to reassemble if it
comes all the way apart. Back to where we started. Just loosen it up a bit. Oh, there you can see. We have a ball bearing
in the middle. Well, what looks
like a ball bearing, and then we have that upper, and then the bottom is a. We're opening it
up and you can see the space in the top
is getting wider. That is where we're going
to insert our tools. So each tool bit, you can see has a carving end. They're magnetic,
they're going to spin to space them out, and the bit the part that
you insert into the tool. Carving bits. These are all the scoopy sides and that's the part that
goes into your tool. This little one here is
your smallest V shape. Can we beauty tuber here. You can just see the
tiny V shape there. We're going to put
the scoop side right into that little
gap we created. I'm loosening it
up just a little bit because I didn't
enough to begin. We're going to loosen it
up enough so that this bit goes all the way down
and inserts into the tool to the body
of the carving bit. Then we're going to
tighten it up all the way. The bit should now be at this wider body part of
the tip fully in there, and then basically
you don't want to don't poke that part. That's sharp. That is changing your tip out, then to do that again. We would loosen it up
just enough that this now Oh look I went too far. All the way back on. It's stuck. I know. See, this is why you
need to learn your tools. Because this one. There we go. Okay. Just got a little stuck. Shake it out. But now you
can see, I've got that gap, and if I want to put
a different one in, we can now insert in tight and back up, and
we're good to go.
7. Carving Part 1: First Outline: Now that we've learned some
safety for our carving tools, let's learn how to use them. In this lesson, you'll learn
how to properly hold and use your carving tools and we'll carve the first
portion of our block. Carving is the most time
intensive part of printmaking. This is not a step to rush
but rather relax into. Take your time and
enjoy the process. So whether you're using a
palm tool or a multi tool, it's going to as
this one indicates, be held in the
palm of your hand. So I put the round N into
the direct palm of my hand, wrap how it feels comfortable, and I use my pointer
finger on the body, and same for the multitol goes right in the
palm of my hand, wrap around, and
then I extend down. This pointer finger hold
just gives you a lot of controlled pressure
and you can really maneuver the tool
in detailed ways. I always start with my
smallest size tool, anywhere you have in your background that
will be carved out, I recommend using as a
practice area just to get a little bit familiar with your carving tools before
you go into your design. Starting on just an extra part
of background I have here. Using my tool,
pointer finger out, the blade should essentially be parallel with my
block as I'm carving. Just a little bit of
pressure to start the cut. And then I lean off that
pressure of downwards, and now it's forward
momentum pressure. Gentle glide
consistent pressure. It's not about speed,
and there we go. You can see you'll start to
get the material carving out. And this is what we're left
with nice little carve there. I always start with
my smallest V tool. The general idea here
is that we're going to carve an entire
outline on our design. This will be a safety outline. This first pass
will not be deep. We most likely will
not show the white through as seen with
this first cut here. This small tool is just
meant to give detail work. It is what I'll use to
do these detail parts, but it's not meant to
clear out the block. So this first pass again, will just be a nice safety
boundary guideline pass, and then we'll work
our way up with larger gauges and carving tools to clear out
that material. We always want to carve
away from our body. So I'm sitting back here. I'm always going to carve
this direction away from me. To help ease that, as I reach
certain parts in my design, I'm going to car or, excuse me, turn the block as
I carve instead of turning my carving
tool towards myself. I also want to make sure I'm holding my block back here to brace when I'm carving and not holding in front
of where I'm carving. So starting, like I said, with my smallest tool, I'm going to go ahead
and create that first safety pass around
my entire design. Just gentle pressure, and you'll see I'm already starting to turn my block as I work to create that nice smooth curve and release and that should
pop out the bit of line out. Now I'm just going
to turn my block to reset and start again. I can place the tip of this V tool into that little
channel I already started with and just go right
up to the stem here. And you can see I'm
using my other hand to brace as well with
my pointer finger. It just gives you that
extra bit of control. Now, you can see, I
did not apparently let my pen sit for long enough and fully dry. So
I've got some smearing. I'll have to be careful
touching my design here. So we are just going
to keep going. Keep turning the block and doing this nice safety outline. And it looks like I slipped just a little bit there
into my vase top. So I'm going to
leave it for now. We'll figure out how to
deal with that in a minute. But I think what I'm
going to do is basically just bring the top
of the vase down. So I'll just probably make
that cut a little bit lower to incorporate
it. We'll see though. I like to sit on my
mistakes for a minute and not immediately jump
in to carve them. Once you take away material,
it can never come back. So it's better to simmer
on your mistakes, figure out how you want
to deal with them, and then move forward. Often a really straightforward or an obvious fix when
you have an error. It's just a matter of examining it and taking it all in and making sure you're making the best choice you want for your design and how to fix it. So I'm going to leave
it for a minute. I think I already know
what I'm going to do, but we'll come back
and deal with that. And I totally slipped
again into my petal. So I'll have to deal
with that. Again, we're just going to leave
it. I come back. The fun thing about flowers too is that they're
completely organic. The petal shapes can get
as funky as you want. So if it feels a,
just let it be. Now that the design has a
full safety carving outline and separation from
our background, we can clearly see the image, and we're ready to
add our details. Okay.
8. Carving Part 1.5: Details: These detail lines will
ideally just get one pass. When you're doing
these detail lines, you can practice again
on your background. If you scoop up at the end, you can create a
nice tapered point. I'm just going to use
my smallest V tool again and let's start
on the vase here. I'm going to just do
really gentle line. Go really nice and slow,
follow it exactly. Use my other hand
to help guide it. And then a little taper off. Create our nice detail line. Come around, get this one. And then let's do the leaves do the middle vein and then
the little detail lines. Now, even though these aren't clearing down to
the white material, they are still deep enough
carvings that they will show and create that negative
space in our final print. And I'm just turning
my block so that I have the best angle to work at. This one is going to go all
the way through to the end of my leaf and split it. And then it gets the details. Let's get these little lines
on the vase that I missed. And we need to get this part
on the middle of the vase. To make this a
little more clear, I'm going to color these
in because we want to leave our stems looking like they're
going into the vase. So we don't want
to cut those out. Okay. Okay. Just some little markings
to make it clear for me, and then going to
clear this part out. Now, because this is
such a small area, I'm just going to keep
using my tool and clear out all of the material from that
space down to the white. Then we'll get the
middle section. These are just by tiny cuts. So I'm kind of placing
them and the material isn't coming out until
I get all the sides. And then it comes out in one go. And this section here, And same thing, we will just
clear out that little chunk. And now we've got,
wait. Miss this one. Here we go. Clear that out. So now we have the
middle of the vase. So now we are down to these little detailed
dots on the flowers. These can be a
little bit tricky. They really don't need
to be perfect to show up and have something be visually interesting
on the print. Just making a few little marks, even if they're not
perfect circles or shapes of any kind can
still be beautiful. I'm just going to use my
tiny little V to still. I'm going to almost stick it straight in and just
turn the block. And that should give me just
a nice circle divot shape that I didn't have to hardly
do any work to create. I don't know if that third
one is going to fit. We'll see. We'll just wear to
make a little. There we go. Little shape. And we'll go over
to this other one. Again, I'm just sticking
it straight down and just turning the block
and then scooping it out. And we'll do one more. All right. So we've got all
of our detailed lines in.
9. Carving Part 2: Background and Fixing Mistakes: So now we have all of
those safety guidelines, and we can go in with a larger bit and do
essentially the same process, but we'll start clearing out more and more
material each time. And this time, we will
start revealing the white. I'm going to jump up to
a larger size gauge and clear out and start in the exact outlines that
I carved the first time. Now, when I get to
areas like this V, I might have to sort
of scoot around it and then go back in
with a smaller tool. So I'll get where I
can with this one, and this is when
you're going to start swapping out your
tool size as a bunch and just doing what you need to get the job
done. So here we go. Now that I have a
second pass carved out, we can see a clear delineation between the design
and the background. So I'm going to go
ahead and clear out this background using my
largest carving tool, and then I'll go back with some various sizes to
clear out details, clean up some edges, and just get into those
nooks and crannies. And the goal here is going to be to clear out down to the white, nice and flat As you start using a tool to
clear out your background, you might notice that ridges are formed in between where
you place the tool. When those ridges get inked up and they show through
your near final design, that is what is known in
printmaking as chatter. Chatter can be intentionally
incorporated into your design to create beautiful
atmosphere and movement. I personally like to
clear my backgrounds completely and avoid
random ink spots. So I'm going to clear
everything down nice and flat. As you increase your tool size, more material will come out
at once, making it quicker. However, the danger of slipping and catching your design or yourself increases quite a bit as you go up with tool size. So be careful and
still take your time, even though it feels a lot
easier and less precise, you still want to
be just as careful. So there is the whole
background cleared out. Now, I just need
to go back in with some smaller tools and get all
of these areas cleaned up, and I'll probably hit a couple spots and
just a couple edges, and then we'll be done. So right here, I just
accidentally did another pass through this stem
leaf delineation. And I just want to even that out between my other
ones because I also have that sort
of large gap here. So I'm just going to do
one little extra pass on this stem here
to even that out. And I think that
should look good now, and I'll go back to
clearing out this spot. So let's take a look at those two little mistakes you made earlier and see how we're
going to manage them. Now that I'm looking
at this one, and we're farther
into the carving, I actually think I'm just going to leave this one. I don't
want to do anything. If I carve it down, it's going to leave
almost nothing of the back of the vase,
which I don't want to do. And I think that will be
hardly visible when I print. And I actually think Oh, no. This one in the petal
definitely is visible. I think what I'll do.
Let's take my pencil. Let's just reshape this petal. We're just going to make
it a bit more wavy. It'll get a bit
of a curve there. And then that cut will be gone, and no one will be
any other the wiser. I think with most mistakes, you as the artist, are the only one
that will see them. You know what you were
envisioning and you're the only one that is able to
see that mistake. So let's finish up clearing
out these little details, and I will show you
the finished block. Okay. That is the entire
block carved out. We did our safety first pass, a second safety pass. We did our details. We did the background.
We fixed our mistakes, and we did some tops, and we're all good to go. It's time to start printing. Okay.
10. Printing Set-up: We are ready to print. Let's get the materials
out we'll need for this part and set up our
printing registration. Registration is the alignment of the block and the
paper together. It's where you want
your final work to appear on the page. This is when I practice my printmakers version
of Ms and plus. I know I'm butchering it,
but the cooking when you set up all your ingredients
out before you start, I like to do that
with printmaking, get all of my supplies out
exactly where they're going to go and you're just having a
seamless printing session. So what we've got for
printing is our carved block, our bar in, I have some tape. I have an extra sheet of paper
at our final print size, my pencil, my brayer, my ink, palette, palette knife. For prints made with one
block like what we're doing, registration can
be super simple. To set up registration, I'm going to set this piece of paper where I want to work, which will just be
right in front of me, and I'm going to tape that down. Now, taking my carved block, I'm going to set it right where I want
my final print to be. I'm going to go just a little bit above center vertically. I think about that and I
want it centered this way. I'm just going to
take my pencil. I like to just do corner marks. Because we're just
doing a single block, we're not aligning
it with another one. So as long as it's
generally in that spot, I will be happy with it. So that is all we're going
to do for our registration, and now we're ready to print.
11. Printing: All right, get your
apron on and your ink. I'm going to be using the Speedball professional
relief Ink in graphic block. This one is nice and messy. Use my palette knife. Oh, we're getting down to it. So you don't need
a lot of this ink. Just start with a little amount. Let's see how sticky that is. And onto the palette, a little bit more
out. Lid back on. This ink is oil based, but it is water miscible, which means it cleans up
with just water and soap. It doesn't need any solvents or chemicals, which is lovely. I'm just going to
take a minute and sort of work my palette
knife around with the ink, spread it out, push it down. Just want to warm it up, smooth it out, especially
when they come out of tubes, sometimes the additives
and oil mix ins, whatever they're called,
sort of separate. So I just want to get it nice
and homogeneous and shiny. Should be nice and
shiny and smooth. Then I just like to work it back into the top of my palette. Now that our ink is warmed
up, we'll grab our brayer. And it's just going to be a couple of little dabs
onto the brayer like that. And then we will
start rolling it out. Now, as you can see, we're not getting a consistent
coverage on the roller. So it's important to pick up the roller and work it
around the entire barrel. You can work in both directions. You don't want to cover
your palette though. The goal is to work it
evenly on the brayer. You also don't want to push
and smear your brayer. It's a rolling, a
gentle pressure. The ink rolling out on
your palette and on the brayer should
start to look like a really nice soft velvet. You don't want to see
peaks or strings of ink. It shouldn't be sticky. Should just have a nice thin, even coverage all the
way around the barrel. It shouldn't sound
tacky or sticky. Just a nice smooth coverage. My favorite way I've ever
heard the sound described is that it should sound
like 1,000 ants clapping. Oh, that is up to your interpretation
what that sounds like. And I wish I knew who said
that, credit to them, but that is my favorite
way to describe that. So now that we have that, we are going to apply this the exact same way to our block. But I'm going to
take my block off of our registration
template because I don't want to get ink on it. So we'll pull it
right down here. Now, the first time you
put ink on your block, it's going to take a little bit more ink than
subsequent printings. So this one will require a
little bit of extra ink. And you'll see after we pull the first print that there will be a little bit of a
layer left onto here. So we are just going
to go right on, and it's a nice roll. This is sort of a magic
moment here, too, getting your block inked
up for the first time. Just with nice even coverage, keeping the brayer nice
and parallel to my block, I don't want to dip down
onto the background. Just making sure to roll over evenly every little part. Okay. Okay, I'm actually
impressed with myself. Usually the first time
I ink up a block, I always get some
sort of ink here. So let's just do
it so you can see. So let's just say I dipped
down and I was like, Okay. Got some ink there. We can take I'm
just going to grab my paper towel and some
windoxG a little bit on there. You can use a water wipe. You could use a soapy paper
towel, whatever you like. And just going to clean it
right off. Just like that. Perfect. So your block should
have now a nice shiny, even coverage of ink and it's
all clean around the edges. Except for this little spot. I like to do a double check. We'll put it back
onto our template, line up those corners. And I'm going to grab
my printing paper. And because we have just this nice registration of the same size that
we're printing on, I can just line them up. Hold it at the bottom
and just lay it, roll it down across the block. Now, if you were to slip and the paper falls and
touches your block. Once the ink makes contact
with that paper at all, even without pressure, just let it go and that's
where it now lives. It's like with the tracing
paper on your block, you really can't replace it
in exactly the same location. So if it falls,
that's where it is. Now we're going to
take our prayer, and with quite a
bit of pressure, we're going to start
hand burnishing. As you can see, as I
start this process, the paper and block might start to turn or move off
of my template, and that's okay because
the paper itself is not moving off the
surface of the block. Want to make sure you're
getting all of the edges. Now, because the
ink is sticking, we can hold one
part of our paper. We can pull up and check how
the print is going to see how much pressure we need if we're missing the
spots and all of that. So going to do a little quick mini reveal
and we'll see how it's going. Okay. It's going pretty well. Actually, I think I have too much ink on there
for a first go. Let's just a couple
of little spots. We'll just get those, and then I think we'll see
what we've got. All right. Here we go. Okay. Oh,
look at that. Okay. Not bad. That is pretty nice
for a first go. It looks like I have a little bit too much ink
up on this upper leaf, and I might have
slipped it a little bit when I put the paper down. Otherwise, it's looking
like a p nice first go. So now you can see the block has quite a bit of ink left
on it or so it seems. We don't have enough to
pull another full print. We will have to re
ink, but it will take a lot less ink this time
to cover our block. So to pull our second print, we will go back with our
prayer and our palette. We'll just get a
little bit of ink. We'll freshen up our brayer. And then we will go
right onto the block. Yes, I was supposed to
take it off the template. I know I'm going to
try and be good. No be messy. Famous
last words, huh? Okay. I think we're all right. So once the block already
has that first layer of ink, you might be like, how do I
tell if I am missing spots? So the best way is to
check light reflection, so you can change your angle. Look at it from all
sorts of angles, and you'll be able to see flat or dull spots where
you've missed ink. If you're working
with your brayer and you've got too much
ink on the brayer, you can take your palette knife and scrape up the area
that you've been rolling. And then you can roll
your brayer out, and this will remove the
excess ink from your brayer. Then you can scrape that
up and just start again. Now, similarly, if you get
too much ink on your block, make sure your brayer
is nice and dry and then roll over your block a
few times to remove some ink. We are all ready for
our second inking now. We've checked light reflection. It's all evenly inked. Just getting this one little
spot off of the background. And because I had that sort of slip on the first time
from placing my paper, we have such a
simple registration. I'm just going to go for
a straight down placement and see how that goes
with this design. So touched and let go. And now we're just
going to give it some nice pressure If you're finding that
you're not able to get enough pressure with your baron. This is where your wooden
spoon can come in. I'd like to just place this
part of my hand right into, right into the
spoon, and then you can get really
targeted pressure. I'm feeling all right on
this print with the baron, so I'm just going to
continue that way. Let's give it
another check here. Oh, that's doing really nice. Okay. I think we're about there. Let's get ready to reveal. Okay, so this is what I
consider my real first print. The first one is a test print. We can see if there were any alterations we
wanted to make, how everything went,
and now we are ready. Drum roll, please. Look at that. Lovely. Oh, right, I am very
happy with that. The placement on that
one worked a lot better. I don't have the smudging
within the leaf. The ink coverage is really nice. The lines turned out crisp. The only thing and
I'm totally okay with it is there's a little bit of
paper showing in the vase, and that's just from hand
printing and the paper choice. And we're ready to keep going and make our
whole print edition.
12. Press Demo: In this lesson, I'll
show you a quick demo of printing using
my tabletop press. This is from the
brand Wood Zilla. These presses are a
great entry level press. They're more affordable
than a full etching press. They're more space friendly,
especially this little one. They're super easy to
use, and they can travel. I bring this little one to all
of my in person workshops. Printing with this is almost exactly the same
as hand printing, just a little bit easier. So it opens up. I'm just going to place my registration template
right on the printing bed. For space reasons, I'm going to ink it up on the
print bed today. Get that ink. I've got
a little too much. We're going to scrape that up. Roll some of the excess
and onto the block. And I've got a little
too much ink still. So let's roll some
of that and then get some off of the
block. All right. Now, we just need to clean
up this mess I made. Okay. And let's use some fun handmade
paper this time. All right. And we're
going to line it up. Drop it on, gets a
little press blanket. We close up the press. And it just gets a couple of
little presses like that. And. Check her out. A. I love. So easy. Let's do one more because I have this really fun blue paper. So just a little bit more ink. This paper is really thin. So it's hardly going
to absorb any ink. It's more just going
to sit right on top, which means I need
even less ink. So just making sure we
have a nice coverage, but really not putting
too much on there. I'm going to from
a couple angles. Okay. I can see a
cat hair in there. I'm going to leave it, though. I don't think it'll matter
on this botanical paper. Go to take our
chances here, guys. So paper down. Blanket. Couple presses. Printing takes 4
seconds. I love that. I can already see
it. You're ready? What's so good. I love
it. That's so cute. Okay. Look at that. Ooh. There we go. Ooh. Pretty. So fun and easy.
Love this press.
13. Clean up and Drying Prints: So we printed. Now what? Unfortunately,
we do have to clean up. But, luckily, it's really easy. As I said, the oil based ink that I'm using is
water missible. It just needs soap and
water to clean up. This is why I wear an
apron. It's so messy. So here, I'm just going
to wipe my fingers off. If you are using a jar of ink, scrape up any excess
ink you have left over, and just put it right
back into your jar. If you're using tubes of ink and you have
a lot left over, you can use little glass
jars to store your ink. Anything air tight. So I'm just going to
take my block off my press or take it off of
your registration template. And I'm going to set that aside. I first like to
clean up my palette, so get all that extra
ink scraped up. So while this ink is water
misible and easy to clean up, it should be kept out
of our water systems. So no taking items to your sink. We want to clean
up at our station, which is why I am using
these thick shop towels. I can get extra use out of them. So I'm just spraying
my glass palette and my palette knife
with some winds. I know a lot of people
like to use simple green. I have citrus on hand, which works really nice as well. So just getting that
nice and clean, and then go into the palette. And just like that,
palette is clean. Now we just have our block
and our brayer left. I have a lot time staying
clean while I clean these. So I'm going to put on
my gloves. Correct. I'm also going to set out a fun fact bonus points if
you watch this clean up part, you can fabric print with
the same soft lino blocks, which is how you
made this rag towel. Put that down to keep our
space a little bit clean. I'm just going to
use these wipes. They are just plain water wipes and start to wipe
my brayer down. So I like to get the
bulk of the ink off, and then I go in with my citrus solve to get all of the oil
residue off of the soft. There you go. You can
see how well that Okay. Make sure you get the back
and the sides of your brayer. Those oftentimes will sort
of get little globs of ink, and then you won't realize
it until you're cleaning up. So that is good to go. I'm just going to let that air dry. Now, with our block, what I like to do is just take a piece of scrap printer
paper that I put somewhere. With the block, I like
to just take a piece of scrap paper and with our prayer, we're just going to
print off excess in. I could have done
this on my press. That would have
been a lot quicker. C. Ghost print. Let's fold it over and
do one more. All right. Now, it's got a
little less ink on. And I'm basically going to do that same process
as the brayer. Start with a little water wipe. I'm just going to add some
citrus right onto that. If you have a bar of soap, you can also just rub a
water wipe right over that and use a soapy water,
works really nicely. Your block will never look as pretty as before you started printing with
it, and that's okay. All right. One last
wipe clean up there, and then I'll just use this
to sort of give it a dry off. And I can pop my gloves off, which I save and reuse. Okay. There we are. We
are all cleaned up. Depending on your
environmental conditions, your brayer might become a
little sticky after it dries. I use just a little bit of
baby powder to unsticky it. And this will have no effect
on your future printing. If you're printing
with water based inks, your print should be dry to
the touch fairly quickly and should be fully set
within 24 to 48 hours, depending on your
environmental conditions. If you're using
an oil based ink, it will take considerably
longer to fully dry. Prints can be placed somewhere
safe to lay flat and dry, like where your cat
won't jump up on them or your kid won't use
it as drying paper. I use a simple line hanging
system to dry my prints. It keeps them safe from
smudging and out of my way without taking up a footprint
in my limited studio space.
14. 14 Thank you: You did it. Congratulations on creating your very first
hand carved block print. It's a huge accomplishment. I hope you're feeling proud and inspired by what
you've created. Now that you've gone
through the entire process, you may have noticed
that there are several distinct steps. This is really one
of my favorite things about the medium. There's a part of
the process for whatever energy level I'm
creative mood you're in. But also, printmaking can be a powerful tool for nurturing
your mental health. The meditative nature of carving and the satisfaction of
seeing your work come to life on paper can provide a much needed escape from the
stresses of everyday life. As you continue your
journey with printmaking, remember that the
beauty of it really lies in its inherent
handmade qualities. Embrace its imperfections, experiment with
different techniques, and let your artists
tan show through. But most importantly, enjoy the process and
the benefits that it can bring to
your mind and soul. I can't wait to see all
of your gorgeous prints. Share your photos in the
Projects and Resources tab and leave any questions you have in the discussion tab. If you're feeling generous, reviews are so appreciated. You can find me everywhere online at Kate Michelle Design. Thank you for taking your
time to learn with me today. Keep creating, keep carving,
and until next time.
 Kate Crisanti, Artist + Printmaker