Transcripts
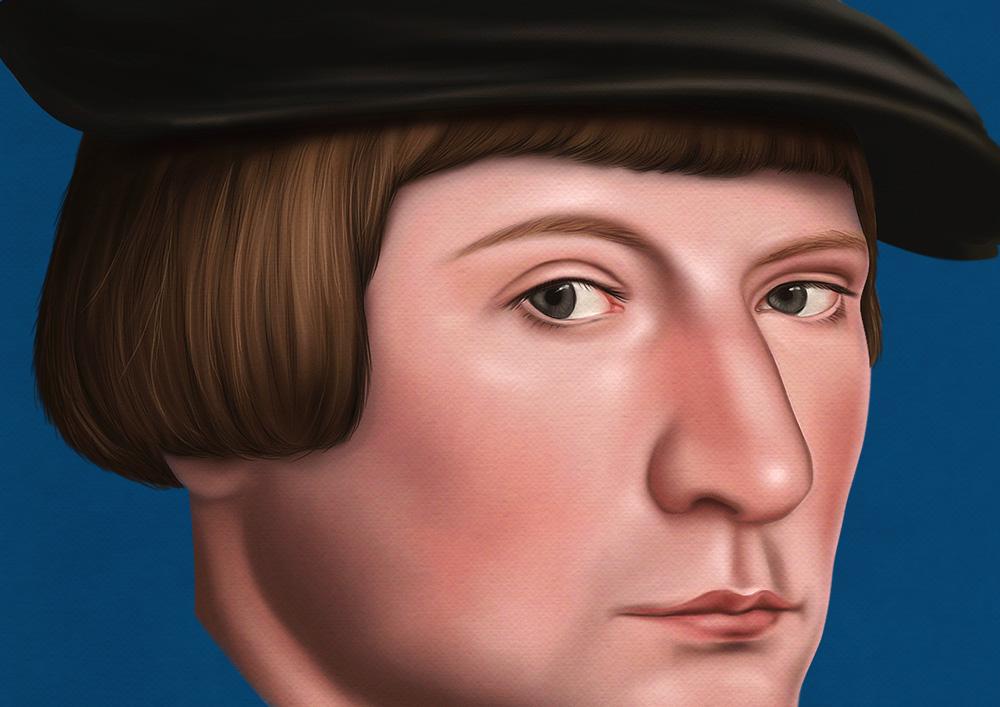
1. Presentation: in this one off lesson, we're going to learn how to paint what the majority of students and sometimes even professional artists find the most difficult part. We're making a portrayed the hair. We're going to reproduce the hair off the subject off this painting. This portrait was painted by Hensel Burn, the younger who was one of the greatest poultry artist off the 16th century. In my other digital painting cause Despont here I explained how to paint scheme, the beard and the clothes. I didn't quite fungus on the hair, so this lesson is just about the hair and out of pain them as we learning a method you can use. Any teachers will painting programs that you like amusing for the shop, but you can use prop, create affinity or fresco because you won't be about the tools that I use, which are basing to be honest. But it's more about understanding the approach, so let's dive into it
2. Painting Hair: Once you download and opened the filing for a shop, you left the reference on the left and the drawing on the ride. As you can see here, you're not going to have the same layer structure as he might document as well as the face as This'll Essen is just about painting the hair. So, first of all, if you have to brush selected, you can press B. You can right click on the document. The brush window appears. You want to select this pencil here? It's called the charcoal pencil. You can speech to the least you if don't find it. I create a new layer. If you have the brush to selected and you press, the all key is which is to the eyedropper. You can be one of the dark brown from the painting or the dark brown in a palate doesn't make any difference, and we can start painting from the darkest side, following the floor off the hair quite roughly. Really. We just want to sketch out the dark areas and block how the volumes I can now pick the lightest color from the reference. Actually, we can go lighter, and I'm going to paint in with this brighter color. If you're going to reproduce a subject in our case, it is. You have to compare your painting to the reference picture all the time. So it's a constant back and forth between the two hours. And that's why I put them in the same document because not against you. It's much easier in this way. Using the brackets, I can reduce the size of the brush you can actually see in the reference that this subject has got wife in hair. No, I can pick the lightest color grew brighter, and I can actually up this new color to the palate, which you already have. I want to up this new, brighter color in the most illuminated part of the hair you can actually see. There's a kind of highlights spot, and we want to recreate that. Now we select second color. We're going to make an in between transition. You can see this allies her town at the base, off the half fringe. That's when it started. Now we want to clipping. Must this layer with the lay on the news and you do that by pressing command or control old G If you keep on painting on this layer now, it would be visible only was contained by the lay on a leaf. I keep on painting and I'm going to Better to find the hair. - I can now select this meat brown tone from the palate slightly also changed the direction off the hair, and this could be enough for our first pass painting. In the next lesson, we're going to blend well, we have done using the mixer brush toe.
3. Blending Hair: Now it's time for blending, and I switched to the mixer brush tool right before we go ahead. If you're really watch my other courses, you might be familiar with the mixer brush tool. If you didn't, I strongly encourage you to watch list this lesson here. Blending demonstration, which is from learned, the foundation of digital painting and for a shop using basic brushes. In that lesson, I good for the blending process in there, and I actually also advise you watching this lesson here. Painting demonstration In those two lessons, I do explain out of paint and blend colors in foreign shop, doing a shading exercise, and you will find it's super useful, I'm sure, right? We go back to our hair. I can now merge the two layers forming the hat, and now we're going to blend them. We basically want to brush over the hair if we were painting, but in this case we're blending colors together, we mixing them. If you probably zoom in, you can see the effect. It's kind of similar to the blur, too, but the mixer brush to is much more effective because the mixer brush tool is set to a very low value. We need to pass over and over the same spot for many times to see an effect. But that's good, because in this case you have full control off this tour. - Now we want to blend this sharp margin. By doing that, we also blend in the face, meaning that if you try to hide the face layer, you would see some skin painted on the hair layer. - Now that we blended the painting, we cannot some additional details and refine our work.
4. Adding Details: now begins which to the brush toe we can select the heart round brush would decrease the sauce off the brush To be quite s'more, we create a new layer and we know where the capacity off the brush to around 47%. So with this new brush on a clear layer, we're going to on this fine ahead strings this individual her. As you can see, I'm not starting from the root and ending to the tapes. I'm just painting the middle part of the head of central part, and each hair has got us like different orientation. You see that I slightly changed the direction each time. You can clearly see here the change in direction. I'm short her some Carly ahead towards the bottom. Now we want to blend them a bit, so with which to the mix of brush toe how once again, we paint over the hair. - Now , if you press are, you can rotate your artwork. It's just a display thing, you know, actually rotating the document. This is helpful because sometimes it's just easier painting towards a specific direction. Eyes which to the brush tool I create a new layer. I rotate the artwork to its original orientation. I select the heart round brush and I can't start detailing the hair fringe. I can actually set the a passive 200%. - You can approach these as you want. Really? You don't have to do exactly one doing are just showing you the way I do a painting. - I continue detailing the hat. - Now I can make a selection Command shift, see to copy and command V to paste or control. And then I can move. The reference will be here. I actually want to make it smaller, so I will do command T control T and then shift constrained the proportions. But in a newer version of father shot, pressing shift is not necessary anymore. I'm going to define the have and as you can see, towards the ear is a big to blur. So we want to make a crease beer. I would take the artwork. I'm going to define this area. I do. The back of the year sometimes is good to pain from a certain distance. So you're not stuck with too many details. Now, the final touches with the lightest drug some rebel have the very last thing I want to do is to break up the shop margin that defines the hair we want. What? Some individual hair using a s'more size heart round brush the night peak. One of the doctor brown. I can try these out, and I think that's the correct size for the hair. I'm going to brush some hat popping out from the main mass. You can low with your pass iti to be around 40% and the only setting that you want to turn on his shape dynamics, which is this icon here that is related to this function here. And you can see the difference between on and off. We just want to pay a few her easing out this margin here we can differentiate in change color. - We do the same on this side. And also a few had there. And this is it. I think this could be enough for our painting and blending hair demonstration. I hope you guys enjoyed this short lesson. You can obviously apply what you learn here to any other hair painting. Feel free to submit in the course. Chandler, your artwork and being patch if you need any help, see you next time.
 Maurizio De Angelis, Scientific Illustrator and 3D Modeller