Transcripts
1. Introduction: Hi, my name is Sydney
and I've been creating exclusively character art for my entire career for awhile. Now, I'm here to help you with the most important part
of your character design. Eyes. You want the eyes to
stand out and reveal the personality of
your character. One long line can best
all up, but don't worry, I'm here to show you
a couple of steps, so make sure that
you nailed this. Every time. In this class we will
focus on painting several eye shapes that your
characters may have. We'll go over the personality of each eye and how to
create different styles. Then we'll finish it by
coloring the eyes and show different ways
of painting the iris. For this class, it
will require you to have a graphics tablet and the basic
knowledge of drawing, as we will be focusing
primarily on form and shading. I will be using
Clip Studio Paint. You're welcome to use any drawing software of your choice. Now let's dive in.
2. Anatomy of the Eye: Now there's a lot you
need to know about the eye before you
can start drawing it. Just because we're joining
and animate I doesn't mean that it isn't based
on reality itself. Look at this picture
of the eyeball. These are the things
you should know when drawing the I don't
let it intimidate. You were only going to focus on the most important parts
of the eye to get started. First, you have the eyelid, which goes above the eye, or the white of the eye. The tear duct, thorax,
Volcker uncle, also known as the pink and eye, the iris and the pupil. These parts make
up the entire eye which we will be drawing. Now let's you know what
parts you'll be drawing. Let's start by drawing
the eye itself.
3. The Eye and Personality: Before we look at different shapes of
the enemy I can be in, Let's look at real-life images. As you see here, the I can take many forms to convey the
personality of the person. Take number one, for example, with how it's formed along with the makeup that accompanies it. It looks seductive. Or number two is rounder to give a software
and younger feel. Just by drawing the
outline of each eye, you can tell that they were all composed of different shapes. Let's focus on the teardrop, which is what I would
consider the default, ie. If you notice here I'm drawing
the upper eyelid first. This is important. So you give yourself a
starting place for the eye. From there I'll draw
the bottom eyelid. This is where I usually add in some extra lines
underneath the eye. It's a personal preference, but I've noticed that helps
really set the eye in place. Which is important because
we don't want the eye to just be sitting
on top of the face. Next, I'll draw the
bottom eyelashes, which I will draw in
a crescent fashion around the bottom of the eye. But this gives me the framework
for the actual eyelashes, which we will fill in here. Then I add in the top lashes. As you'll see as I draw them, I'm going below the eyelid
a bit and as whooping the stroke upwards
to create the lash. And with that the eye
is complete after I add in the iris and the
eyebrow real quick. This is how I normally draw
eyes from my characters. Now I'm going to go over some different shapes as
you can draw the eye in. I would consider that I
just drew it the default, I have a few different
shapes you can draw. First we have the oval, circle, triangle, triangle
to chi and chi two. This is what it
would look like with the drawing methods that
we just applied before. Just like I mentioned before, the eyes can really make the personality of
your character. The oval looks innocent. Circle looks bubbly. Triangle looks tired. Triangle to look sultry. Looks mischievous, and
the chi two looks evil. The shapes here just if
you can draw the eyes and there's no limit to how creative you
can get with this.
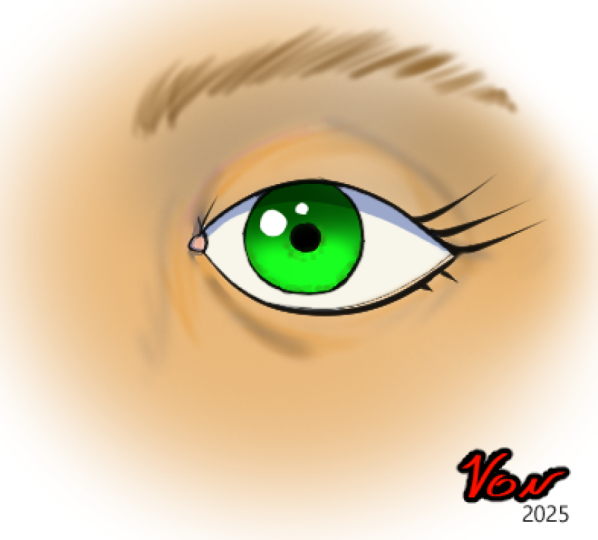
4. Adding Color: Okay, now that we figured out the shapes of the eyes
is time to add color. Here I'm going to add a
little bit more detail to the eye abroad just so
it suits the style more. To start off, we always start
by adding the base color of the skin, light tan color. Then we add an off
white for the Celera. You never want to go
completely white for this, since our eyes are
more naturally tended towards an off-white and photographs Covalent coloring in the iris and the eyebrow
here to finish off the base colors made
a mistake here by making the IRS and the same layer as the skin
and the sclera. Quick adjustment here. Now it's tend to
work on the iris. I created an extra layer above virus and clip mask it
to the layer below it. This is where I put the first
shade of the iris down. The next thing I do is take the complimentary
color of the iris and paint the area and the
pupil with an airbrush, adding a complimentary
color into the eye like this, live and die. And I'll keeping a silver
recognizable blue. Not take that
complimentary color and darker for the pupil. Adding a lighter shade inside of the pupil is simply
a stylistic choice, but I think it adds
a lot to the eye. Next, take this darker shade
of the complimentary color and add some lines around
top half of the iris. This adds another shade to the iris that it
didn't have before. Then we wanted to take
the base color and add some lines in the
middle of the iris. And to top it off, we wanted to make it even lighter shade of blue and make the lines near
the bottom of the iris. That way we have an array
of sheets of an iris. I'm going through and fixing some mistakes that I
made while painting that I like the shape inside the people and the direction
of little darker lines. To finish the pupil, I add the highlight or the
eyes make it stand out. Now it's time for me to shade and define the rest of the I. Start by switching
the line art to multiply any recoloring it. This is important to do if you want the colors to blend well. The next thing I do is to
find the bottom eyelashes. We do that by color picking
the darkest value on the eyelid and tracing the triangle shapes that
are formed. From there. We work on the shadows
around the eye by creating an additional layer
and setting it to multiply. Remember to use desaturated
violet to start off with. We will be sharing this into
a different color later. To share it around
the eye, I personally use this brush called a bog pen. I find it in grades, the colors well, I will add it in the downloads
for this class. Once you finish the
shadows of the eye, I want you to UPC lock
the layer and recolor the shadows to fit the parts that they
are on, respectively. Just like adding
a light blue for the eye and then the
orange for the skin. After you do this,
you will notice them areas needs some darkening. I will add another layer of multiply with a
desaturated purple. I added an uncle and last, since I forgot about it before. Data a little bit more
blending to the eye and merge the layers down and blur on the iris and
the bottom of the eye. And there is the rendered I. Now not all eyes have
to look like this. For example, I'm going to
take a couple of steps back and make a completely
new Iris to show you. This is actually how I
used to paint my iris and my older work would use multiply layers to add in the
second shape of the pupil. I always enjoyed adding
in an extra line around the pupil to add a
little definition to the eye. Now the thing that
I do differently from the other eyes
that I added in an ad layer that adds highlights instead of
manually picking the colors, this really brightens
up the eye, it makes its time. But remember when you
use the Add Layer Mode, use a darker color or the
shine will be too intense. Let's not forget about
the eye shine and little color dodge
to accident it. Looking back on both styles, I honestly prefer the look of my old style over the new one. In this case, it looks much brighter and look
at the new style. So it has its own charm to it. But this just shows
how trying out different iris styles can change how your character looks.
5. Conclusion: Now that we've learned
how to draw the eye, looked at different shapes
to draw the eye in, and how to color the eye is time for you to try it yourself. For your assignment,
I want you to draw your very own eye. And one of the two styles
that I demonstrated. If you're feeling
particularly adventurous, you can create your
very own iris style and have fun with it. Thank you very much for
checking out this class and be sure to take a
look at my other classes. As you may find
something that you are particularly interested in. Have a good one.
 Sydney H., Digital Illustrator