Transcripts
1. Introduction: Hello and welcome to this design basics course talking about color theory. My name is Ben Nielsen and I'm immediate design educator who's been teaching classes on design both in-person and online for over six years. I'm so grateful that you've decided to join me on this class about color theory. Color is one of my favorite things. I love color. I love to see color. I love to use color in my designs. And so I'm really excited to be able to share this class with you. Color. It's an absolutely massive topic InDesign, and you could take tons and tons of different classes and get tons of tons of different perspectives, color. And you can really dive deep into color and learn all kinds about different things. And there are differences in color when you're working with physical mediums like paints. Or if you're working with digital mediums like something like Photoshop or Procreate. And so there's a lot of different perspectives on color. And this course is just barely going to scratch the basics of it. We'll start out with some things that will probably seem really familiar to you, things like the color wheel. And then we will move on to some more advanced topics. But we still will just be getting into just barely below the surface of color theory. For that reason, I really encourage you to take several courses on color theory. There are a number of them here on Skillshare. Everybody comes to it with kind of a different perspective. Everybody sees color a little bit differently. That's both literally true in the way that our eyes work and figuratively true in the way that we each personally interpret colors. So it's great to get some different perspectives on that. In addition to taking some other courses on color theory to help yourself get well-grounded with color. You also want to look into my other design basics courses. If you haven't already, I have designed basics courses on things like the core design principles, sketching, and also how to use shapes in your designs. So it makes sure that you check those out as well after you finish this course if you haven't seen them already. But for now, let's go ahead and dive in and start talking about color. In the next video, we'll talk about the project. Okay.
2. Project: Every course that I teach has a project assignment. This helps you to learn by doing. It's great to hear something, but it's much better to actually apply that thing. And that really helps you to learn better. The project for this course is really going to be three mini-projects. So you'll want to submit each part of this, but you can submit just one and then come back and submit another later. The first part is to pick a design piece, something that you didn't make, but something that you've found out in the world and analyze its color. And we'll be talking about the way color works so that you'll know how to analyze a design piece and the color that's within it. This is really helpful, is starting to build your eye and starting to build your understanding of color. It's really helpful when you look at it as I'm paste to not try and think about everything all at once, but to kind of break it down. So we've talked about this with core design principles before, but this time we're going to be doing it with color, looking specifically at the color. The second piece of the project is to go ahead and make two different color themes based on two different color harmonies. So we'll be talking all about the way color works and how we harmonized colors. So don't worry if that doesn't make a lot of sense right now, you'll submit a set of swatches for two different color themes. And the third mini-project is to go ahead and take a design that you've already made and apply those to color themes to it. Apply them so that you can see the way that color changes, the way that you kind of evoke emotion. And what the viewer sees. The software that you use doesn't matter. The only thing that matters is what you turn in, and those can just be JPEGS. So you'll have a JPEG of the design piece that you choose to analyze. You'll turn that in and then talk about your analysis of it. Then you'll have jpegs just showing your color swatches. And then you'll have to jpegs showing those two color themes applied to the same design. And I hope you will take the time to do these projects because they really will help you learn better. And I love to see what you're able to produce. And I love to give feedback if that's something that you'd like. Now we're ready to go ahead and get started talking about the color wheel.
3. Color Wheel: This video, we're going to be going back to the basics you probably learned about and maybe even made a color wheel back in like third or fourth grade. It's one of the most basic ways to understand color, but it is really important to understand it. So we're going go back and review some things. The first thing that you have when you start to make a color wheel are the primary colors. You've got red, blue, and yellow. And these primary colors are where we derive all the other colors in the color wheel from. Now, there are things that are not necessarily considered colors. They're called achromatic and those are white, black, and grace that fall in between them. We'll be talking about those more later, but for now, kind of set them aside. We will use them like color when we're designing. But when we're talking about the color wheel, we're really just talking about those color hues that you're familiar with. So once you have red, blue, and yellow, you can start to make more colors. When you combine these together, you get what are called the secondary colors. When you combine red and yellow, you get orange. When you combine red and blue, you get purple. And of course when you combine yellow and blue, you get green. These secondary colors helped to fill out the color wheel and they give us the six basic colors. I know when you were a kid, they told you there were seven colors of the rainbow? Well, for our purposes, there aren't, there's only six to seven color thing is thanks to Isaac Newton and how he wanted to align his color theory with his musical theory with seven notes on the scale. Much to the confusion of six-year-olds everywhere who don't understand what indigo is and how it's different than blue. So we're going to work with these six basic colors. And then when you further start combining these, we get what are called the tertiary colors. And there are six tertiary colors. They have really exciting names, things like yellow, orange, red orange, and yellow, green. Okay, they're not that exciting and people have come up with a lot more exciting names for different types of colors, but there isn't a lot of cohesion around each of those. So for our purposes, it's easier just to refer to them as the things that combine them, things like yellow, orange. Now, you can continue to do this to infinity. This is why Isaac Newton was able to make seven colors to begin with, is because the rainbow is actually a spectrum and the spectrum can be infinitely divided into smaller and smaller parts. So you could continue on to make more and more colors out of these. But often color theory is taught using just these 12 colors. And so that's what we're going to stick with for now. The last thing that you really need to know about the color wheel is that you can divide the color wheel into warm colors and cool colors. Warm colors tend to have more energy. A cool colors tend to be more calming. So it's just good to kind of keep that in mind now that we've really kind of fleshed out the color wheel here, we're going go ahead and in the next video where I start moving on to a little bit more advanced topics and we're going to start talking about Hughes tints, shades, and tones.
4. Hues, Tints, Shades, Tones: All right, Now that we understand the color basics, it's time to start moving into a little bit more of an advanced topic. And this is where we'll probably leave behind what you remember from elementary school. All the colors that we've talked about so far on the color wheel are what we call Hughes. Hughes or just the straight color. And like we talked about in the last video, you could infinitely keep dividing the spectrum of the rainbow into more and more hues. But there's something else we can do to get more colors to work with, and those are called tints, shades, and tones. Now as we start learning a lot of vocabulary, it can start to seem overwhelming. We've already talked about things like primary colors, secondary colors, and tertiary colors. And now we start throwing in Hughes shades, tints and tones. So that can get a little confusing. But don't worry, I've got to have a handout for you in the resources section that you can use to kind of keep track and keep all of this stuff straight. We start with our straight Hughes and then if we want to make tenths, we're going to add white to that. And as you add more and more white, that tint will get lighter and lighter shades are actually the opposite of that we take are straight hue and we start to add black to it, and it gets progressively darker and darker until it becomes black itself. Tensor adding white and shades are adding dark makes a lot of sense, right? The last thing to talk about is tones. Tones is actually when you take gray and you add it into a color, and as you add more gray, that color begins to get more and more washed out. It doesn't necessarily get lighter or darker if you're using a 50 percent gray, but it starts to get more and more washed out once we start using tints, shades, and tones along with our huge, we get this whole world of color opened up to us and we can really kind of step away from the straight Hughes all the time. It can be great to use hues in something like maybe a children's museum or an elementary school classroom, or even like a fast food chain where you really want things to be bright and popping. But a lot of time, our designs require something that's more subtle. Something like branding for a bank or maybe a hotel brochure. They don't want to be as vibrant as in your face as somebody like maybe on children's television. And so this is where our world really starts to expand as we use these tints, shades, and tones to create new color themes that can really bring out what we desire in the design piece. So with that in mind in the next video, we're going to go ahead and start talking about color harmonies. The way colors are going to interact together.
5. Color Harmonies: There are lots of different ways to create color harmonies. And in this video, we're only going to be talking about the basic ones to just get you started. But bear in mind, there are lots of different ways to combine colors together. The first harmony that we're going to talk about is the most basic and it's one that many people are familiar with. It's called complimentary colors. You create complimentary color harmony by choosing one color and then picking the color directly opposite it on the wheel. So you get calming color pairings like flu and orange, red and green, and yellow and purple. You of course, can also do this with the tertiary colors, so that expands the amount of complimentary colors you can have. You can also do this with tones and shades. You just want to make sure that you are selecting the same tone or the same shade or the same tint of the opposite color. Now, straight hue, complimentary colors are used a lot, very popular with things like sports teams, universities, and even holidays. And so they can become a little bit tired and they can have a lot of associations with them already. That doesn't mean that you shouldn't ever use a straight q complementary color schemes. It just means you should make sure you are aware of the potential meaning your audience might draw from that. For example, I grew up in Colorado where the Denver Broncos played. And any color scheme in Colorado that uses blue and orange complimentary colors is invariably going to bring to people's mind the Denver Broncos. And if that's an association that you want, that'll be good. But if it's an association that you don't want, you and you would want to avoid those color schemes, but someplace else that would be different. For example, in Idaho you have Boise State and Boise State also uses blue and orange. That's going to be much more of the association there then say the Denver Broncos. So just be aware of what you're doing. Keep in mind that green and red are going to invariably in the Western world bring to people's mind Christmas. It's just such a strong association that we have. So keep that in mind when working with complimentary colors. The next color harmony that I want to talk about is analogous color harmony. Now, an analogous color harmony is done by choosing one main color from the wheel and then selecting the color on either side of it. This creates a very pleasing, easy to look at design, but it's kinda the opposite of complimentary colors in that it really lacks contrast. Have to be careful when doing an analogous color scheme that you still maintain contrast in your design. Contrast is a very important design principle that allows your audience to be able to derive meaning from your design. So keep that in mind. It's great to take an analogous color scheme. Choose one color that's going to dominate and then accent with the other colors. And then also supplement that with achromatic like white, black, and gray. The third color scheme that I want to talk about is the triadic color scheme. This is done by choosing one color from the wheel and then choosing the two colors that are evenly spaced around the wheel. Triadic color scheme really bring some contrast and pop to your design without maybe the cliches that are associated with a complimentary color scheme. And it also has the benefit of working with three colors rather than just two, so you're able to differentiate more. So triadic color scheme is a really great way to go. If you feel like you need more colors and working with just two or three colors can seem really limited. But it's a really great way to go about starting in your design. And the next harming that we're going to talk about isn't really a harmony at all. It's the monochromatic color scheme. And it's done using just one color and then using tints and shades based off of that color to fill out the rest of your color palette. So you can see sometimes we have to, sometimes we have three, sometimes we have just one. You can go as high as five or six colors in a color theme, but you really don't want to go any further than that when you're doing design work. This is very different than doing something like maybe illustration where you might have lots of colors in illustration, they often have limited color palettes to, but sometimes they make use of the entire color spectrum. But in design work, you really want to be able to help your audience 0 in on what you are saying and what you're trying to get them to do. And so limiting your color palette is a really important piece of this whole thing. So often the best thing you can do is start off with two or three colors and fill out the rest of your color palette with things like white and black. So we've talked about the basics of color harmony just to review the ones that we've talked about are the complimentary color harmony, the analogous color harmony, the triadic color harmony, and the monochromatic color scheme. These are all great places to start when you're trying to work with color in your design. Of course, there are lots more ways that you could divide up the colors in the color wheel, but these basics will help to get you started. In the next video, we'll be talking about different modes for making colors in digital workspace.
6. Color Modes: Alright, in this video we're going to be going over the difference in different color modes that you can have when you are working with a digital program. Now this can get pretty complicated pretty quickly. So we're just going to be going over them simply today just to kind of get you familiar with the terminology and the way that they work. But if you don't understand this, all right, now, don't worry, you don't need to be able to use color in your designs. It's just good to start getting exposed to these ideas so that you can learn them as you go along. Understanding of these different modes will come with time and practice. I'm in Affinity Designer right now just using a colored square to illustrate for you how these different color modes work. Most of these color modes will exist in most of the different graphic design applications that are out there. We're just using a clean designer because it's an easy way for us to see a lot of the different modes altogether. Right now we're in RGB. Rgb and CMYK are two of the most common color modes. And you will often hear them referred to as digital and print color modes because RGB refers to the way colors made by pixels using red, green, and blue dots in different intensities to show all of the different colors that are available. Whereas CMYK is going to refer to print colors that are created using different colored inks, namely cyan, magenta, yellow, and the key color black. So let's take a look at each of these. So when you have RGB, if you take red all the way up to 255, then you're going to have the straight red hue. Whereas if you take red down all the way to 0 and bring green all the way up to 255 regarding the straight green here. And the same thing with blue. If you take blue all the way up to 255 requirement the straight blue hue. But we can see we have this color picker down below. And if we start choosing different colors, you will see these change. And they'll change the mix of the different dots and their intensity to show all of the different colors that are available to us. You can see that as we go down here, we start to get shades, and as we go up, we get tens. So there are tons and tons of different colors that can be formed using any of these color modes. It's just about how they're doing it. So you'll notice that every color mode expresses color as some kind of numeric value. In this case, it's the intensity of the red, green, and blue dots. So for this particular shade of blue, we've got a read of 39, a green of 44, blue of 255, which is the max RGB numbers go from 0 to 255. So if you're ever getting codes, you want to know which color mode your answer that you can make sure you put in the correct values. Let's jump back here to CMYK so you can see the same thing here. Again, if we draw these all the way down, we'll have white because we're not using any cyan and magenta and yellow or any black. And remember that k stands for key, which is black. We have the same color picker down here. So we can again go through here and see how these numbers change based on where we're at. Now of course, when we're looking at CMYK mode on a screen, we are actually seeing these colors produced by pixels, not buy ink, but this is trying to approximate what the ink will look like when it's printed out. It's important to remember though that every printers a little bit different, every screen is a little bit different. And so you're never going to be 100% accurate because you don't know necessarily where it's going to be printed or if you're producing something digitally, the screen that it's going to be viewed on to can't ever be sure that what you see is what your viewer is going to see when the colors are reproduced, you can just do your best. So those are the two main types of colors that you'll see for digital work and for print work. Let's talk about a couple of other ones here. Here we have the HSL, and HSL stands for hue, which we're familiar with. Saturation, which is like tone and lightness, which is going to be tints and shades. I find the HSL is a very intuitive way to work once you kind of understand the color wheel and the way that you can use the blacks, whites, and grays to produce different versions of those colors. Hsl is sometimes also referred to HSB, which is hue saturation and brightness, or HSV, which is hue saturation and value. They all essentially mean the same thing. And you can see that these are also expressed numerically. The Hughes have a range of 360 going from red all the way to read. And then saturation has a range from 0 to 100, and lightness has a range from 0 to 100 as well. Now I know that these can be a lot of different numbers and letters that are being thrown around, so I don't want you to worry too much about it. One of the easiest ways to deal with colors when you get them from someplace else says to do it via a hex code. So if you come here to RGB hex, you'll actually see down here where there's this little hashtag and then a series of letters and numbers coming after it. Those are the RGB numbers expressed in hex code. Hex code is used a lot on the web. It's just a shorter way of expressing RGB values. It condenses the red down into two, either numbers or letters. It condenses the green down into two numbers or letters, and the blue down into two numbers or letters. So you can see you can select different things here and that hex code will change. So this is often the easiest if you're getting colors from the Internet just to copy that hex code and then paste that in to whatever program you're using. So hex codes don't necessarily make a lot of sense to the human eye because they were meant to be read by machines. But it's just a very easy in short way to be able to copy between programs. So those are the main ways that you'll often see color expressed in digital programs. There's the RGB, which is talking about pixels, CMYK, which is talking about inks, HSL or HSB or HSV, which you're talking about the types of qualities that we've already talked about in this course. Like the hue that tone, the tints and shades. Or the hex code, which is just an RGB value, expressed with numbers and letters in a little bit shorter, machine-readable form. Again, you don't need to understand all of this right now. It's just good to be exposed to this and to know what the different letters and numbers are talking about when you see them in a program or out on the web. In the next video, we're going to go ahead and talk about how we might make or find a color palette.
7. Color Palettes: Now that we know how the color wheel works and how color harmonies work, and how different colored modes work. We can now go ahead and start making color palette. So a color palette is going to be a confined number of colors that you use in your design. And it will often be based on one of the color harmonies. Sometimes a color palette will be given you by a client or the business that you work for. For example, if you work for a corporate brand, they probably have a branding guide that tells you exactly what colors to use. And those will normally include hexadecimal codes, like we talked about in the last video, that you can just put into your design program if you want to create your own color palette though, good to use some rules to do it. And it's nice to have a tool to help you get those rules and then associate the color palette to be where you want it to be. So this website is called color dot adobe.com and it's a free resource provided by Adobe so that you can go ahead and create color palettes that actually bought a website that did this called cooler and then have incorporated it into their creative cloud software. But this happens to be free if you just go to the website. So you can see that you have a color wheel in the middle here, and then the colored swatches along the bottom. And that's often how we refer to colors as swatches. Going back to, you know, like paint swatches that you might find in the hardware store, something like that. You can change these by actually moving the circles on the color wheel. You don't need to use color dot adobe.com. There are other sites that do something similar. This is just one that I find really helpful. You can see if I grab this and move it, it will change the colors as we go along. And it's using a harmony to do this. And if we look over on the left-hand side, we can see where there is harmony rules are, and this is analogous, which you probably guessed already. So it's just taking them right next to each other. And you can see that it's doing a five color color palette on this website, they always come in five colors. So that's just the way this website works, but you can do different things. Now, if we switch this to monochromatic, you're going to see that suddenly that line just becomes straight, right? And what it's doing is it's just selecting those tints, tones, and shades that go along with the same color. And so say we wanted some yellow monochromatic. We could just drag over here to find something that we like in the yellow range. And it's just going to kind of solve that for us. Now. Then if we come here to try add, it immediately jumps out to give us three different colors. And because it's working with five, it gives us two shades as well. But the three colors in the middle are really the part of the triad. So you can see this looks very similar to things that we've seen before. Okay, then there is complimentary colors. So of course, we get all the complimentary colors that we've seen previously. And then there's a bunch of other ones like split complimentary things that get a little bit more complicated. You remember I said there are lots of ways to do this, but those are the ones that we've already talked about before are Analogous monochromatic triad and complimentary. And when you do this, you can see the AD is showing you the RGB values down here, and it's giving you the hex codes. So this is the easiest way to go about doing this. You can just go ahead and copy your hex codes and take them into whatever program you're using. Most programs will take hex codes, but if they don't, you also have the RGB values here. And if you go over here, you can actually switch to CMYK or HSB as well. So you can always take those values into whatever program you're using to create. Another thing that you might do is take a screenshot of these swatches and then just go ahead and bring that screenshot in. And if your program has an eyedropper tool, you can go ahead and grab that as well. And it's really important that you work from a palette like this, and that you try to limit yourself to just a few colors in your design. I know we talked about this before, but it's really important to understand and it can be really difficult to do this when you're first starting out as a designer because it can feel very limited, but having constraints helps to improve your creativity. And using a limited color palette helps people to better understand what you're trying to convey in your designs. So I really tried to stick to just a few colors. So even if you're getting a color palette with say, five colors like this, you can, in a triadic color scheme, just stick to this. Maybe the three main colors or something like that. Also remember straight hues like this can be really overwhelming. So you can always drag this down to get into a more pastel range. Just depends on what you're going for. Always think about what the color is going to convey. Now, doing this in creating your own is great, but sometimes even easier is to click on this explore tab up here and find color palettes that people have already made for you. So if I'm doing some vintage work, I can just search vintage and I'll find color palettes that people have already made that convey that vintage feel. And you can see that some of these are drawn out pictures like, Oh, okay, this one's awesome. I like this one. And it's drawn from this image and image that already had a good color palette there, just drawing that out. And then here you get the hex codes. If you want to get other codes, you come down here to your color modes and you can get those right there. It makes it super easy to get different colors. So spend some time on this website or on Pinterest, or there's a bunch of different color swatch websites where you can get different theme ideas or make your own theme and then you just bring that in and work with it. I just can't stress how important it is to start working from a color theme. And one of your assignments for this class is to make to color themes. And when I say make to color themes, you don't have to make them yourself. You just need to find Q that you like. And you're going post a picture of those swatches. They can be here from this website. You can just click on it and take a screenshot and do that. Or you can take a screenshot of your color palette in whatever program you're working in, where you can just make squares in the program and fill them each with the right color. It doesn't matter how you get there, you just need to show two different color palettes. Those color palettes should range between 35 or six colors at the maximum. So make sure that you go ahead and do that. And then you will be using these color palettes to change the colors of a design that you've made for the last part of the assignment.
8. Analyze Color: All right, Now it's time for us to work on part of the project which is analyzing the colors in your design. This is really one of the best ways to build your own design skills is to analyze other designs according to the principles that you've learned. In this case, we will be talking about the principles of color. So I'm here on free pic.com. This is a site that gives that like fried design resources. So it's just a good place to go and find some things that have been designed and to then be able to take a look at them and analyze them. And I really encourage you to do this. You don't have to go to free pig into it. You can just look in the world around you and see billboards and advertisements, and commercials, and magazines and websites and apps. There are so many things you can look at to design, but we're just gonna look at the, so I found this summer flavors one here on the homepage for free pick and just open it up in another tab and we're going to analyze the colored. So this is what you should do when you're doing your assignment. And hopefully you've already selected something, but you can change that as well if you decide you don't want to analyze the one that you chose before, you can choose something new as well. But we're just going go ahead and we're just going think about what we've learned about color and apply that here. So for example, one of the questions we can ask ourselves is, what color harmony, if any, are they using here? And we can start out by identifying which colors are actually using. So they have a reddish pink, and orangeish yellow, which kinda have a gradient here between yellow and orange. And then they have an orange on these actual orange slices. And then obviously they have this teal blue color, which they have a gradient on, and then they have this green. So we've got at least red, blue, yellow, green, and orange, which would be five colors. And you know, five is kind of the top number of what I told you. This is obviously a more illustrative piece that you might use for some kind of an ad or something. So they can get away with maybe a little bit more colors and maybe different shades and tones of those colors in order to add kind of dimension to it. So they're also using white, but it looks like they're not using any black except right here, the watermelon seeds. So what color harmony are they using for their main colors? They're using a very primary colors centric theme, which is red, yellow, and blue. And that's really a triadic type of color theme, is to use red, yellow, and blue because they're evenly spaced around the color wheel, so we can see that. And then they're adding accents with the orange and the green five is a bit much. So I probably wouldn't use this many colors most of the time, but it seems to be working okay in this picture. Next thing that we want to ask ourselves is, how are the colors balanced? Is a specific color fulfilling a particular role? The color that you can see as fulfilling a particular role is the bluish teal color that is definitely fulfilling the role of the background, right? That is a cool color and the warm colors are standing out in front of it. The other cool color, which is green, is also regulated kind of to the corners, kind of creating a vignette effect here. So you see the green and the blue really acting as cool colors. They're not popping out, they're not drawn attention to themselves, even though they are very bright. And your attention is drawn straight into the reds, the yellows and the oranges, which are much warmer. So you can see them doing a particular focus here on that red Popsicle in the middle. They're using leading lines of the white to dry your eye into it. And then you have even those yellows and oranges really acting in kind of a supporting role there. The next thing that we want to ask ourselves is, is there enough contrast between the colors to understand the design? And I think there is, but they're really making use of you can see white to like draw out highlights on all of these objects. And that's giving some hard edges between them. And that's allowing us to really see the difference between them. They also are overlaying the warm colors on the cool colors, which is quite helpful. You can see over here where green overlays on green. There definitely isn't contrast there, right? And that could have become really muddled if they had done more like that. But they have contrast between their main focus and their background. And then we want to ask ourselves, are the colors symbolically or emotionally appropriate for the design? These are very fun colors. They're trying to fade the fun, carefree freedom of summer. So yes, these are appropriate for the design that they're doing here. So that's how we go about analyzing. Let's try another one. So here we have this app mockup. So this is showing us a design that's happening across a couple of different screens here. What kind of a color theme are they using here? This is obviously extremely different than what we just looked at, right? This is very subdued, it's dark, and it's not playful. They're using a monochromatic color theme based on some images that they're using here. So they've got different images of these plants and they're following that through into their buttons and their navigation. And then they're using whites, blacks and grays, those achromatic to accent that color and to draw attention to different things like the buttons. So you can see that a monochromatic color scheme can look really classy. Very serious, where we want to think about is air, these colors appropriate to the design. It feels like all of the colors do go together and they're tying together. Well, there are other things that we might critique about this design if we're looking at something other than color, but we're really just trying to 0 in on color here. So the next thing that we should ask ourselves is, is there enough contrast? And I feel like between this dark green of the buttons and the light green. The background for this social media menu that works, that's high contrast where I'm getting lost is the white text on the picture. So the picture is being used to bring in that green color, but parts of the picture lighter and part of it are darker. And so it's a little bit harder to read because there isn't enough contrast between them. And then this button here is really getting lost. It seems like the sign-up button should be friends. And our last what you want people to do is sign up for whatever thing you're doing. And this sign up by n with the transparent background and the white text on it, it's just getting lost. There isn't enough contrast between those colors for it to actually work. So this is how we go about. Let's do one more together and then we'll let you go ahead and work on your project. Okay, so here we have a social media post template that they've put together. And you can see the colors that they're using are very limited. They are using blues and this kind of goldfish, yellow. Now, what type of color harmonies this, well, it's complimentary, even though we talked about blues and oranges being complimentary. This yellow, which is kind of on the edge of gold, can be complimentary to this dark blue. So if we go up here to the color wheel, we switched to complimentary, and we come to this dark blue here you can see that we start getting into the yellow and part of this color theme as we go into shades, brings on more of a goldfish color. So I would call this a complimentary, and we'll ask ourselves, how are the colors balanced here? Well, you can see that throughout this. So this is showing multiple ways that you would do different, use these different templates in your social media, but it's always repeating the same colors. And the thing is, I'm not always clear which color means which thing, because sometimes you can see that the bottom borders blue and sometimes it's going to be the goldfish yellow color. So I'm not sure that they're conveying anything in particular with each of these different colors. And I feel like they could probably do a better job with that. There are places here where yellow is fulfilling a particular role of highlighting something here where it says help others and be happy. Helping happy are being highlighted. And there's other places like changing the world that I think works, but the seller doesn't always seem to be fulfilling that role. For example, in the main picture here, there's just a slight yellow border around this. So I feel like they could do a better job, maybe assigning the role to the colors. Is there enough contrast? The colors do contrast well because they are complimentary, but they are very similar in tone. So you can see if this were in black and white, you probably wouldn't be able to tell the difference between this blue plus and this yellowish gold circle here. That doesn't mean that the contrast isn't good. It's just something to watch out for when you are using things that are in the same tone, you can then lose contrast. If something has to go into black and white, then we want to ask ourselves, are these colors symbolically and emotionally appropriate for whether trying to do? It says this is for charity. So they're really trying to get donations that are trying to show off their good work. Blue, I think in this case, is symbolizing trustworthiness and kind of calm and doing good in the world. So I think the blue is working there. I feel like the yellow, this gold color could be a little bit brighter because they think it's point is to bring some energy to this, but it's very subdued yellow. And so it doesn't feel like it's fulfilling that role of really being that high-energy, warm color to go along with the cool and trusting blue. So I think they could have done better choosing the colors, but these are templates so they don't know exactly what there'll be used for. So it's kind of hard to judge that exactly. Hopefully you've got some ideas here for how to go about analyzing the design that you've chosen. You should go ahead and take that design and upload it as a JPEG to the class project section and then put your design analysis in there. Talk about these things like what kind of harmony are they using? Are these colors appropriate? Do they contrast well enough? And are the colors fulfilling a particular role within that design? So remember that can be anything, but I'm really looking forward to seeing your analysis of this. And in the next video we're going to go ahead and start talking about applying color to our design.
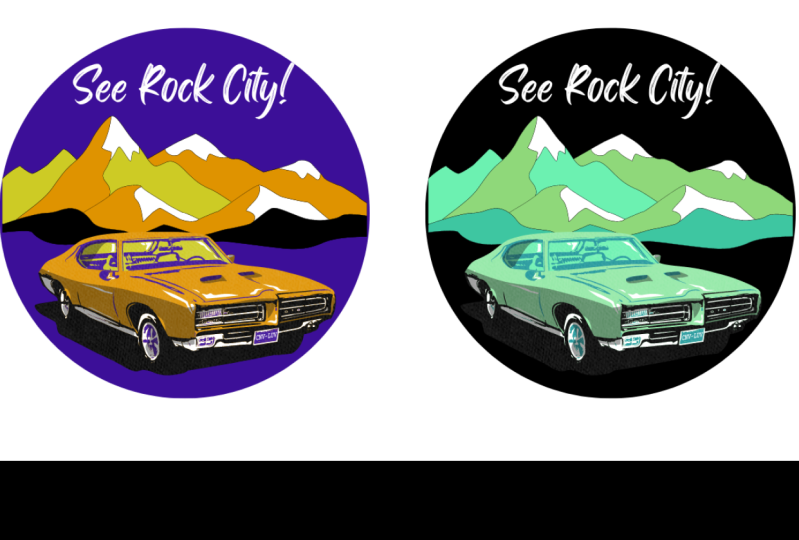
9. Applying Color: Okay, so now that we've learned to analyze color in other people's designs, it's time to go ahead and apply color to our own designs. The project is for you to apply to different color themes to the same design to see how different colors interact differently. So I've just made a simple design here, just a circus poster. And I'm going to go ahead and apply these to color themes that I found to it. I'm in Affinity Designer, but it doesn't matter which program you use for this. You can use fiend designer, illustrator, PowerPoint, InDesign, pretty much anything out there that you can use to create a simple design you can use to do this. And you just want to have to color themes that you're going to apply to it. So let's go ahead and do this. Of course, each of these has five colors in it because I pulled these from the color dot adobe.com. But I'm really going to try and stick to three colors plus black and white if I need them. So for this first one, which is kind of the lighter color scheme here, I'm going to try and go for a mostly primary colors, so red, blue, and this yellow because I think that will work well in plane, well to kind of the idea of the circus, red and yellow especially are good circus colors. So we're going to try this out here. And I'm just going to be using the eye dropper tool to add these colors in here. And as you're working with color, you can just experiment with different things and see what you like. Just try and build out our basic colors here first and then Z, where we wanna go from there. One of the things when you're working with colors, it's great to try out different methods of using the color just by duplicating what you're working on and then trying out different ways of the color. So I will just duplicate this artboard right here. And I just wanted to try reversing this, so making this blue and then changing the blue pieces to the yellow. Okay, So I'm liking where that data I think I've got two fairly good options there for kind of just this flat style circuits poster. And then I'm gonna come over here and we're going to try this different color set. And my goal here is to use the middle three here, the green, the yellowish one, and the pink. But it's nice to have these darker ones as backup if I need some more contrast. Sometimes you'll do something like this and you'll be like, oh, there's clearly not enough contrast there. So we've got to do something different about that text. That's why we can try out different things. It looks like I got the wrong color on these ones. It just seems like there is not enough contrast. So I'm going to have to bring in at least one of those darker hues to replace one of these lighter here. So let's go ahead and duplicate this one. You can see how that just starts popping a lot more when we've got this darker color green. So sometimes just a simple change like that can really add in the contrast. I'm definitely favoring both of these with a darker background. But the point here, of course, is for you to see that you can apply to different color themes, to the same design and get very different results. So this design is exactly the same as doing the same thing here. I guess this text is a little bit nine, the exact same position. It's meant to do the same thing here, but do you have a very different feel about what kind of circuits this might be when you see the red, the blue, and the yellow over here as opposed to the green, the kind of yellowish gold and the pink over here, right? So you get a very different feel just by changing out the color on this. Now of course, there's a lot of other things you could do to modify this design to make it better. But the point of this is just for you to take one design applied to different color themes to it to see what kind of different results you get there. So go ahead and do that. And in the next video, we'll go ahead and talk about next steps.
10. Next Steps: Thank you so much for taking this course on color theory. I've really enjoyed being able to put this course together for you, and I hope that you've enjoyed taking it and have learned something. If you have any questions at all, please go ahead and put those into the discussion tab for this course. I would love to do my best to answer them. Now, let's talk about the next steps in your design journey. If you haven't already, your next step should be to go ahead and take the rest of the design basics courses because you really need those basics before you go out and start designing. Then once you have the basics together, you really want to go and just start practicing designing one design, all kinds of different things. And I have other courses to help you out with that as well. There are four different types of design programs, but I try and do the ones that are most affordable and useful to you. So go ahead and check out my other courses if you wanted to learn to do specific types of design work, don't forget to go ahead and submit your project for this course so that we can all learn together. And if you want a feedback on your project, I'm happy to provide that as well. And if you want to keep learning more design things every week, go ahead and make sure that you also subscribe to my bend designs YouTube channel. Thanks so much for watching, and I will see you in the next recording.
 Ben Nielsen, Good design is the beginning of learning