Transcripts
1. Class Introduction: Welcome to my new class, designing banners for your
Shopify store using Canva. Are you ready to
take your Shopify store to the next level? In this class, you
will learn how to create professional
eye-catching banners that will help
increase conversions and sales on your Shopify store. We will take a look at other Shopify banners for
inspiration and ideas. Then we will go into Canva and create our own custom
Shopify banner. I will also show you how
to export your banner and add it to your Shopify
website as well. You will learn how to use
Canva to create banners that align with your brand and
appeal to your target audience. I will show you how
to add text images and other elements
to your banners. By the end of the class, you
will have a banner design that is ready to be implemented
onto your Shopify store. And you used on your website
to promote a product, sale events or even a promotion. Join the class
today and let's get started designing
banners that will help increase conversions and sales on your Shopify store.
2. Looking at other Shopify Store Banners for Inspiration and Ideas: Hello and welcome back. In this video, we're
going to have a look at some other Shopify
store banners for inspiration and ideas
for our own design. Because before we start
designing our own banner, it's important to gather
inspiration and understand the principles and
best practices for creating effective banners. So as you can see here,
I have opened Pinterest and I've made a search for
Shopify store banners. Now we're able to see a
few examples right here. However, I may like
to call them banners. Some other people
call them sliders. So as you can see
here, I've also done a search for Shopify
store sliders as well. They are basically
the exact same thing, but some people
just use the word slider and some people
use the word banner. However, don't let that
distract you because they are basically
exactly the same thing. So let's take a look
at a few examples. Now straight away, I think this one down here looks quite good. So I'm going to
click open on here and we can see the
banner for this store. So this is quite
a simple banner, is just got some
text and a button and an image of their
product on the right. So if I scroll down here,
we'll see some more examples. This one here, e.g.
looks quite good. This is kitchen where
we just have pots and pans and it's really simple
but effective as well. Then if I go back to the
other search on Pinterest, as you can see, this
is where I have searched for a Shopify
store banners. We can have a look at a view of the examples on here as well. So e.g. if I start by clicking
on this first one here, we can see that this is
a Black Friday banner. This first one, and
the second one is as well for a fashion
or clothing company. And the third one is a
simple fashion sale offer. Then if I scroll down from here, we have a few more examples
down here as well. So these first two
look quite good at this first one is
Black Friday banners, and this second one is old fashioned based
banners. Just here. You can see that this is a completely different
design style, is more bubbly and colorful, whereas this one has the black and red theme
for Black Friday. Finally, I'm going to
click onto this one here so we can get
a better look. Because this is a more
advanced style of banner, e.g. this first one is
more of a 3D banner. You can see that this
has skincare products. The second one is
a kitchen banner with food and kitchen products. And then we have more
beauty based products and then a sports banner. And finally another
fashion burnout as well. So we have a load of
different examples and ideas that I hope will give you some inspiration for
creating your own banner. I think we're now ready to open Canva and play around with the features within
Canva to see what we can create for our
own Shopify store. Now you may want to
create something completely different
to what I create. However, this would just
be an example guiding you through the process of
creating a banner in Canva. So that's all for this video. We are now ready to go ahead and design our own banner in Canva. I'll see you in the next one. Thanks for watching and goodbye.
3. How to Design Banners for your Shopify Store using Canva: Hello and welcome back. In this video, I'm going
to show you how to design banners for
your Shopify store, just like the one
that you can see on my website right
here, using Canva. So let's dive straight into it. First of all, we're
going to open Canva, and now we're going to do
is create a new design. Now I'm going to create
a custom size design, and this is going to be
2,400 by 1,200 pixels. So this can vary depending on the type of banner that
you want to create. But this is what we're going
to go with for this video. So then simply click
Create, new design. Here we go. So now we are ready
to start building our banner for our
Shopify store. On the banner that you saw on my Shopify store a
few seconds ago, it was split into two sections. I had text on the left and
an image on the right. So in order to do
that, first of all, I'm going to add the image
to the right over here. So I'm going to do is add a square frame element
for the image. I'm going to go to
elements and search. And then we're going
to click onto frame. So we're just going to find
a perfect square frame. So this one here is good. However, it has a white border, so that one is not what we want. This one here is perfect. So we're going to
edit to our design. And then we're going
to make it bigger. And we're going to make it 1,100 pixels high and wide as well. There we go, That's perfect. So that's 1,100 by 1,100. So we have the frame
added already. Now I'm gonna go
ahead and upload a photo to drag into this frame. And as you can see, I've
already uploaded some photos, so I'm simply going to
drag it in this one here. Then I'm going to double-click it and make sure that it's
centered in the frame. There we go. Now, I'm going to
click onto the frame again and make sure
that it is centered. I think for now here
will be about right. And now we're ready to add the text on the left over here. So what I'm going to do is add a simple square
elements that we're going to add our text on top of. So I'm simply going to go to
elements and type in square. Here we go. So this first
square is absolutely perfect. So now I'm just going
to move the square to the top left corner. And I'm going to hold Shift and click and drag to
enlarge the square. And by holding Shift, it will make the
width and height lock in so that they don't
randomly change. And so that we can keep
it exactly square. And remember we want it
to be 1,100 by 1,100. There we go. That's perfect. Now I'm just going
to align them both. And I'm going to select both
of these and group them. Then I'm going to send to
them both together as well. There we go. So that is
the first part done. Now I want to do is change
the color of the square. So I'm going to
click onto it and click the color block up here. And now I'm going to add
my own custom color. You can add any
color that you want. And you can make the square
any color that you want. Of course, you can go buy
your own brand colors. And that is exactly what
I'm going to be doing. So I'm simply going to paste
in the color code up here. And I'm going to click onto
the color that I have added. There we go. It's
not quite white. As you can see. It's slightly different to the background, which is exactly white. And it's not exactly the same as the background of
the photo Ivor. We adds a nice dynamic
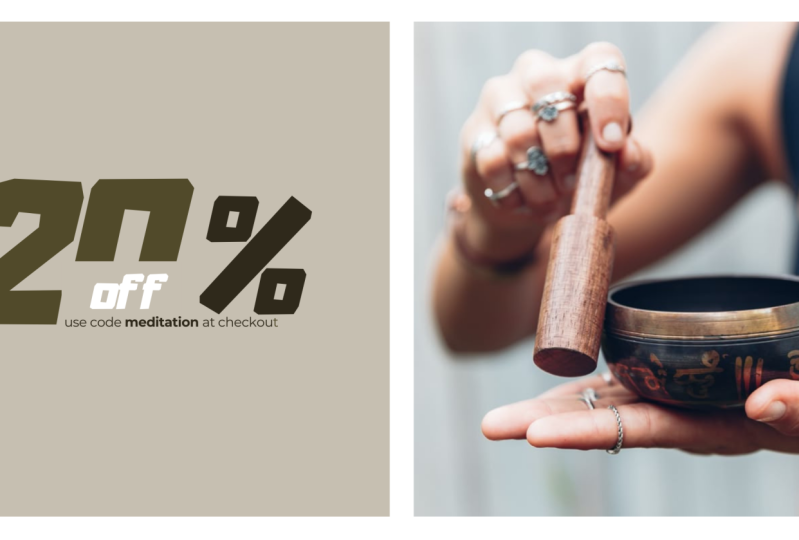
to this design. Now we're ready to start adding our texts to our banner design. So let's go to text on
the left over here. And we're simply going
to add a heading. Now I'm going to replace this text and I'm
going to write 20%. And I'm going to make
the text a lot bigger. In fact, in the bulks up here, I'm simply going to
make the font size 270 pixels and hit Enter. There we go. Now you can set the font to be anything you want it to be. However, I'm going to use the league Spartan
font just here. Now I'm going to do is
make sure that this takes centered in the box
on the left just here. In order to do that, I'm
actually going to have to ungroup these two elements. And now I'll be
able to center it. There we go, that's perfect. And now we can group
these two together again. Okay, So we have
the main part done. Now, we just have a
few more things to do and then this will be
pretty much completed. So first of all, I'm going to
add another square element. And I'm going to make
it the same color as the background of the left box. So that is this one here. Now what I'm going
to do with this is bring it in front of the text. And I'm going to cover
the bottom half of the zero. There we go. I think I could make
it a little bit lower. Now I think this will
add a cool effect. And what I'm going to
do is add the word off over the top of this box. So I'm going to
duplicate the text. And I'm going to write off. And of course, enable
uppercase mode. And this text only needs
to be around 70 pixels. So let's remove the 200
and make it just 70. Now we're going to
move the text into here so that it's in the
lower half of the zero. And there we go. I think this looks
absolutely fantastic. Now oil I'm going to do is add the final little bit of texts that we need to add
to this design. So I'm going to duplicate
this text here. And I'm going to make
it quite a bit smaller. I think about 15 pixels. I'm also going to
change the font to assistant extra light. And I'm just going to move
the texts elements down here. And here I'm going
to write use code. Summer at checkout. Now we just want this
to be on one line. Just like that. And I'm going to make
the coupon code bold. Now I'm just going
to put this below the word off about there. And there we go. We have created our banner. I think that this looks
absolutely fantastic. And of course you can add your own unique styles
to your banner. But I think that this is
a really cool design. Now you can go ahead
and download this and then upload it to
your Shopify store. However, before that, I'm going
to show you how to design another style of
this same banner. So what I'm going
to do is duplicate this page by clicking this icon here so that we don't have to design everything
all over again. And now I'm going to
ungroup these two elements. And I'm only going to
select this photo here. Now I'm going to do is make
it quite a bit smaller. I think about there is good. And I'm going to bring it in. And then I'm going to
duplicate it three times. Now I'm going to put
one to the right of it, one below it, and one
down here as well. We just need to
make sure that this is all lined up properly. There we go. Now I think that this gap in
the middle is a bit too big. So I'm actually going to have
to make these a bit bigger. So I'll start with
this one here. I think 540 could be good. Let's see how that works. I'll duplicate it
three times again. And I'm going to line it all up. We just need to make sure that it's all lined up perfectly. Then this one here as well. Okay, this is not quite
perfect, just yet. I'm just going to select
both of these two on the left and I'm going to
bring them in slightly. There we go. I think that this looks
absolutely perfect. Now I'm going to go
to uploads again. And I'm just going to drag
some other images in. And of course, we
want to make sure that all of our photos are centered in the image frames. And finally, this
one here as well. And there we go. So we have just created two
different Shopify banners. They are similar styles, but there are also
different as well. So this one here says
20% of US Code summer at checkout with the image of
a bucket tax on the right, or just any image you could add any product photo on the right. So this will allow you to
focus in on one product. And then we have
this dial down here, which is what we can use to focus on four
different products. So now what I'm going to
do is tied to our project. I'm just going to simply tie
today it's Shopify banners. And to enter. Now
to download them, I'm going to click
share and download. We want to download both pages and then I'll click
the Download button. Now you just want to make
sure that you save them to the right location
on your computer. And once you are
ready, click Save. Now I'm going to
click Show in folder. And because we downloaded
multiple designs at once, it has given us a zip file. So I'm going to
right-click it and click Extract to Shopify banners. This will then give us a folder with the designs that
we have created. Now let's go back to
our Shopify store and we can upload our
banners to our store. So I'm just going to
click on the online store on the left over here. And then I'll click customize. Before uploading our banners, I'm going to remove this
block in the middle. So I'm going to delete
the texts in the heading. And then I'm going to delete
both of these buttons. And now if I click back onto the banner and disable
the container, and also delete the
second image as well. Now, we need to do is upload the banners that
we have designed. So on the first image, I'm going to click
Change and select Image. Now I'm going to click Upload. And in the folder that
we have just created, I'm going to select both
of these and click Open. Now we'll be able to see how
these look on our website. So here is the
individual products. So they spent that
allows us to focus on the one product and then we
have the other one here. And this allows us to focus
on four separate products. So choose the banner
that you want to display on your websites. And then click Select at
the bottom down here, and Save at the
top right up here. Now we can exit the page
editor and we are now ready to view our store
to see how it looks with the banner that
we have just designed. Okay, this looks good, but there is still another
thing that we're going to have to change in the page editor. So I'm going to click Edit
Homepage again down here. And I'm going to select
the image banner. And I'm going to do is enable
this option here that says adapt section height
to first image size. So I'll click that and then I'll click the Save button again. And now we can exit the editor and open our
websites once again. And as you can see, this now looks much, much better as it's no
longer being squeezed in due to how the banner
was previously set up. So now let's have a look at how the other banner looks
that we have designed. We can edit the homepage again. And I'm simply going to
select the other Banner. So we'll click onto the banner, click change and change image. And we'll click
onto this one here. Then I'll go to
Select and save and exit out of the editor and
view your online store. Now if I refresh this
page, and there we go, so we can now see
what the first banner that we designed looks like. The banner that focuses on
the one individual products. So there we go. We have successfully
used Canva to design some absolutely fantastic looking Shopify website banners. That is all for this video. Hope you enjoyed it and I hope that you learned
something new. I'll see you in the next one once again, thanks and goodbye.
4. Class Project: Welcome to the final
video of the class. In this video,
we'll be discussing the class project and how you can put everything
you've learned in this class into practice. The class project is
to create a banner for your Shopify
store using Canva. The objective of this
project is to design an eye-catching
banner that will help increase conversions
on your Shopify store. To complete the project, you will need to
follow these steps. First, take a look at some other Shopify
stores to see how their banners look and to get inspiration and
ideas for your own. Then choose a template or
start from scratch on Canva. After that creates a banner
design that aligns with your brand and appeals
to your target audience. Ad texts, images, and
animations, if you'd like. And finally, save and
export your design. Once you've completed
the project, you will have a
banner design that is ready to be implemented onto your Shopify store and used on your website
to promote a product, sale, event or other promotion. I would love to see
your final Biodesign, so feel free to submit it in the project section of this
class if you need any help, be sure to send a message. And remember that
practice makes perfect. And the more you design,
the better you'll get. So thanks for joining
me in this class. I hope you enjoyed it and
learned something new. And I hope to see you in
another sometime soon. Goodbye.
 Anthony Isaac, Learn how to grow your business.