Transcripts
1. YouTube End Screen Class Intro: Welcome to my new
class on how to create an animated YouTube end
screen using Canva. In this class, we'll be taking a step-by-step
approach and creating an engaging and visually
appealing end screen for your YouTube videos. And N screen is the
last thing that your viewers will see
before the video ends. And it is important to make
it interesting and effective. We're going to start
by taking a look at some other YouTube end screens
for ideas and inspiration. This will give you
a sense of what is possible and help you to think about what
you want to create. Next, we will dive
into creating our own animated onscreen
using Canva, a very user-friendly
graphic design tool. You will learn how to
use Canvas animation features to create movement and engagements and customize
the color scheme and layout for your
YouTube end screen. We will then move on to exporting the end
screen that we have created and adding
it to our video. This step is important as it shows how to
take the N screen that was created and apply
it to our own video. So we'll download the end
screen as an MP4 from Canva. Then we will open our
video editing software, add the screen to the
end of our video, and then finally export our
video and upload it YouTube. Finally, once we have uploaded our final video to YouTube, I will show you how to
set up your end screen within the YouTube video editor. This step is important as
it shows you how to add the right elements
to your end screen within the YouTube video editor. This way, when viewers watch it, it will appear
correctly on the video. Once you've finished this class, you will have the
skills and knowledge to create an engaging and visually appealing and screen
for your YouTube videos. So let's get started and
creates an end screen that will have a lasting
impression on your viewers.
2. YouTube End Screen Inspiration: Hello and welcome back. In this video we're
going to have a look at some other YouTube end
screens so that we can get some ideas and inspiration for the one that we're
going to be creating. Now as you can see
here, I've simply typed in Google YouTube end screen. And I have gone
to Google Images. And now of course, if they
are animated n screens, they won't just be images, there will be video files. However, this gives us a good example of how some other YouTube
and screens look. As you can see, we have many
different styles and colors. But one of the most
important things when it comes to designing your YouTube end screen
is first of all, that it fits your theme
and it fits in with your channel so that it makes
sense with your content. And secondly, you want to
choose what you want to actually display in your
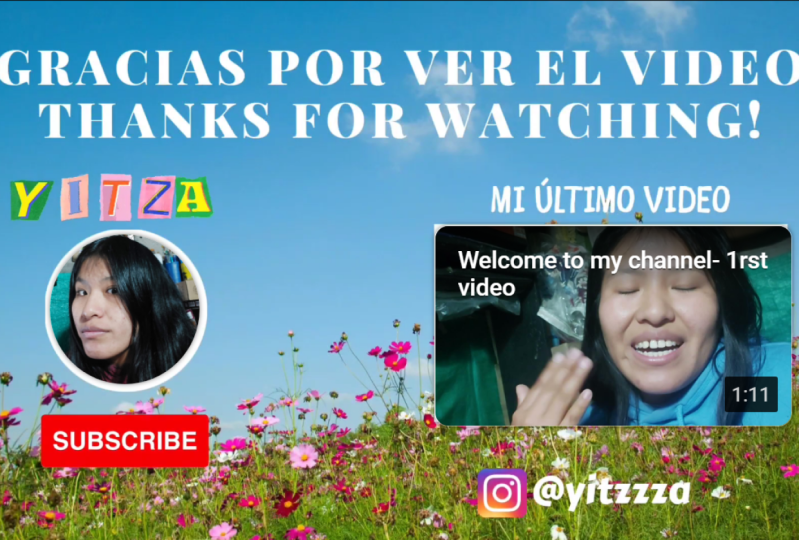
end screen. So e.g. if I click onto this one here, you can see that this one
is simply going to show two videos and a
subscribe element to subscribe to your channel. Now, if I compare that
to this one over here, we can see that this one has a video elements, a
subscribe elements, and then on the right, some social media usernames
so that the viewers can find the YouTube or on
other platforms as well. So this is another
good way of doing it, as well as this one
down here, e.g. this one has two
videos and then it says like share and subscribe, as well as the social
media usernames at the bottom down here. So it all depends on what do you want to display in
your end screen. And of course, you want
to make sure that it's designed to suit your channel. So if I close this image
and scroll back to the top. At the top here, you
can see that we have some other keywords that we
could add to our search. So e.g. if I click
onto cute, just here, you can see that these ends greens or for a very
specific type of channel. Now this could be
like a daily vlog or something like that. Now if I go back to the main
YouTube end screen search and click onto the
gaming keyword. Just hear. These screens are more designed to suit
a gaming YouTube channel. As you can see, this
one at the bottom. This is for a fortnight channel. You want to make sure you
know what content you want to display in your end screen. And also that the theme
suits your channel. So now that we have some
ideas and inspiration, we can go on to the next
video where we will start to design our own
YouTube end screen.
3. Create an Animated YouTube End Screen in Canva: Hello and welcome back. In this video, we are
going to be creating an animated YouTube end
screen using Canva. And I'll take you through
the process step-by-step. So first of all, you need
to open your Canvas account and go to your dashboard so that you can start the process. Now before I do anything, I'm going to show you
the channel I'm going to be designing the end screen for. Because we need to
know the theme of the end screen so that it
fits in with the channel. So this is the channel that
I'm going to be designing the end screen for.
In this channel. Basically it's a pack opening
channel for football cards, of soccer cards, if
you call it that, we need to make sure that
it's relevant to the channel. So let's now go back to Canva. And what we're going to do is type in this search box here. And we're going to type
in YouTube and screen. Then we can simply click onto either of these top two options. The first one says
YouTube, ends green, the second says YouTube,
video and screen. Both of them will take
us to the same page. So I'll just click onto
this top one here. This will now take
us to the page full of YouTube end
screen templates. If you want to start
by using a template, this will basically
give you a headstart to make it really easy and fast for creating your own end screen
for your channel. So you can pick through any of these templates on this page. As you can see, there
are tons to choose from. This one here is quite a nice, simple design and it's quite
a popular one as well. However, I want to
start from scratch. So because I want to
start from scratch, I'm gonna go back to Canva. And what I'm going
to do is click onto the video option just here. And this will create a
blank video project, which is 1920 by 1080. And that is perfect
for a YouTube video. We're going to click
onto this option here. And as you can see, this has created our project. Now straight away on the left, we can see loads of templates. If you want to find more
end screen templates, you can simply type in YouTube end screen,
like I have done here. And you can get a
head start once again by using any
of these templates. Or you need to do is simply click onto the one you want to use and add your own content to personalize it
for your channel. However, I'm not going
to be doing that. I'm going to delete that
template out of my project. Now to start with,
the first thing that I'm going to do is edit the duration of my
YouTube end screen video. And there are two ways
that you can do that. You can either drag
the page down here. And as you can see, the seconds is now all
the way up to 13.2. Or alternatively, you can go to the top of the page and click Edit timing and you can
enter your new timing. I want 15 s, so I'll enter
15 and then I'll hit Enter. So now as you can see, this page will ask 15 s in
the video. So there we go. The duration is now set to 15 s, which is absolutely perfect
for our YouTube end screen. Now what we're going to do
is set up the background. Now to do that, you
can either go to the background tab down here, and then select an image and
set it as the background. So let's say you want
to use this image here. This will be quite
a cool background for your YouTube end screen. However, I don't want to use
a default background image. I have actually uploaded an
image that I'm going to use because I want it
to be themed to the channel I'm creating
the end screen for. So I'm going to click onto
this photo down here. And now I'm simply
going to drag it so that it's going to be
covering the entire screen. I'm just going to
enlarge the image. Instead, it's bigger
than the entire screen. I think that's a bit too big. And then we're
going to center it. There we go, perfect. In fact, I'm going
to make it a little bigger and center it
again. There we go. So we have a background created. Now I want to customize my
background image slightly. So I'm going to select it again, and I'm going to click
the Edit Image button. Now what I want to do is
add a blur onto this image. So I'm going to click
the adjust option here and down where
it says Blur. You can have a drag this, or you can simply
enter in the number. I'm just going to enter ten. So we have now blurred
out background slightly. You can tell what
the background is, but it's not too overbearing because we have added
a slight blur to it. So there we go. I'm now going to click out
of this so that we know so that we don't have the
image selected anymore. And now what we need
to do is start to add the elements to our
YouTube end screen. So what I'm going
to do is click on two elements on the
left over here. And we're simply going to
click onto lines and shapes. And I'm going to add
this first square here. Now I'm going to
select it and go to color and make it white. Now I'm going to
do is make it the same size as the background. As you can see at the
bottom right down here. It is now 1920 by 1080. Now by doing this, I've made
it so that the shape is the same size as a video format. So now I'm going to do is hold
Shift and make it smaller. And as you can
see, what this did was locked the format so that the aspect ratio is still
the same so that a video will still fit perfectly
in this shape. Now if I did that
without holding Shift, as you can see,
the shape changes completely and we
do not want that. So what we're going to
do now whenever we need to change the size is hold shift and adjust
the size like that. Now I want the width to be 600. There we go. That is perfect. So now I'm going to
put this adjust here. Then I'm going to duplicate it. So you can either right-click
and click Duplicate, or you can simply click it
and click Control D. Then I'm going to move the same shape
to below the first one. And then I'll select both and
center them in this design. There we go. That is perfect. In fact, I will group these two together so that
when they are moved, they are moved together. So what this will do
is give us a place for the video and screen elements
to be added within YouTube. But that'll be later on. We can leave this half
of the screen for now. And now what we're going
to do is add a circle. Now I want to make the
circle whites as well. I think the default size
is actually perfect. So we're going to keep
it centered and just move it over to the left. I think just about
here is perfect. So this is where these
subscribe elements will go within the
YouTube end screen. Once again, this will be added
within YouTube later on. Now what we can do is add some animated elements
to our design. So let's go to elements
on the left over here and click back. And what I'm going
to do is type in the search box for
animated arrow. There we go. So let's click
onto graphics just here. And we're going to look for some cool animated arrows to add to our animated
YouTube end screen. Realistically, you
just need to add whatever you think
suits your theme. I think that this one
here could be quite good. So I'll click on today's
and I'll make it smaller. And I'm just going to put one to the left of this
rectangle here. And then I'll duplicate it and do the same for the one above. In fact, I'm going to
make them even smaller. Then I'm going to duplicate
it again. And there we go. I think this looks quite cool. However, I will send
to them to this shape. Then I'll duplicate these free. And I'll do the same
with this down here. There we go. So we've added some
animation to our design now. So now what I'm
going to do is add an animated subscribe
elements as well. So I'm going to type
in animated subscribe. There we go. I think this one here
will be perfect. The very first one on the list. However, there are loads of animated subscribed
elements that you can add. So add whatever you
think suits your design. Now this needs to be made
quite a lot smaller. I'm just going to put it below where my YouTube
channel icon will be. I think just about
here looks good. And I think this is
going well so far. So now I'm going to do is add some elements that
are going to make the YouTube screen for my channel unique and stand
out from other end screens. Now I found recently
that there are animated letters and
numbers within Canva. So what I'm going
to do is because the channel I'm making
this for is called A1 F4. I'm going to add those
letters in an animated way. So what I'm going to do is
type in animated letters. And this a down here is
what I was looking for. So I'm going to bring this into the design and of
course make it smaller. And I'm going to have A1, F4 at the top up here. Then we need to get the F. So I think if I go to
magic recommendations, this will give me more
similar animated letters. And here is the F. Then we need to find the
one and the four. There's the four
and here's the one. We're going to bring the one in and make it the
same size as the a. And then we need the F. And
finally the fall as well. Then I'm just going to make the one and the a
slightly smaller. And then I'm just
going to bring them all next to each other. Just like so. And then I think I'm going to make
them all a bit smaller. So I'm going to select all of
them and make them smaller. And then I'm just going to put them at the top right up here. Now in fact, I'm
going to move both of these subscribe and the icon element
slightly to the right. Because then I think
it makes all of the content more centered
and it makes it look better. So we're almost done. What we're going to do now
is add some text and I'm going to add it to above
both of these shapes. So above this one
I'm going to put latest video because this is where I would display
my latest video. And above this one, I will put recommended video. I'm going to add
some text right now. Then I'll simply
write latest video. And I will change the font. I think that the red ochre
one font will look good. So I'll use that. And I'm going to
bring that up here. And then I'll duplicate this
text and bring it down here. And I'm going to write
recommended. Recommended. I've spelled that wrong. There we go. Recommended video. For this video here. There we go. I think that is
looking really good. Now of course, you can
change the sizes and any other details for your
own YouTube end screen. However, now I
think I'm going to add some more animation. Makes sure that you have
unselected everything. So click off of the design. Just simply click
on the side over here and click the Animate
button at the top left. And by using page animations, you'll be able to animate
every element within the page in one-click. So e.g. if I hover over one of
these animation options, let's say disco, we can see how that animation will
look in our design. Now I think I want to use
the photo zoom option. And as you can see, that makes the background photo slowly zoom out
during the video. So if I go back to the
beginning of the video by using the scroll bar down
here and click Play. That is how my YouTube
end screen looks. Now, I think this looks pretty good. So if I click out of that again, we can now go back
and click Play once again to view the end screen
that we have created. Of course, once you've uploaded
your video to YouTube, you'll be able to add the
end screen elements on top of the circle and
these two rectangles. So we'll have the
latest video elements on top of this rectangle here, and a suggested video on
top of this rectangle here. And then we will have the
channel elements on top of this circle here with
a Subscribe button. So I think that once
it's all uploaded, it will look
absolutely fantastic. We have successfully created a YouTube end screen
within Canva. You can add some
other elements, e.g. you could add your
social media usernames or you could make it. So that is just a subscribe
element and one video. But I like these subscribe
elements and to video option. So that is what I have
done. So there we go. That is all for this video. I hope you have enjoyed it and I hope that you've
learned something new. I'll see you in the next one. Once again, thanks and goodbye.
4. Export your Animated End Screen as MP4 File: Welcome back. In this video, I'm going to show
you how to export your YouTube end screen from
Canva so that you have it as a video file and add it to your YouTube video within
your editing software. So in order to do that, first of all, you want
to name your project. So I'm just going to
call it YouTube screen. And now we are ready to
export our end screen. So what we're going to do is
click the Share button and we're going to go
down and click on the download button down here. Then you want to make
sure that MP4 video is selected and everything
else is up to you. But of course, you
want to export it to the highest
quality possible. Now, if you only have
the free plan on Canva, that means you'll be
exporting it to ten ATP HD, which is perfect. So then once you are ready, click the Download button. Now Canva will get
the video ready for you to download it
to your computer. And once it's ready, it will open the File
Explorer so you can choose where you want
to save the file to. And there we go. So as you can see, it has
opened the file explorer. So I'm simply going to save
the file to my desktop. But first of all,
you want to make sure to choose the file name. Now, I'm going to leave it as
default YouTube end screen. And then once you're
happy with everything, click the Save button. Now, you will have
your YouTube and screen downloaded
to your computer. So first of all,
I'm just going to click onto it to
have a look at it. So let's just click Play and we can watch it. There we go. As you can see, it is properly animated and the background
image is zooming out. And there we go. So that
is absolutely perfect. Now, we're going to add this to our video in our video
editing software. I have my video editing
software open right here. So all I need to do now is drag the YouTube end screen file
straight into this software. As you can see, like
I'm doing here. I'm gonna drag it straight in. And now I'll put this
into full screen. Now in the preview, we can see the screen over
here on the right. So what we're going
to do is zoom in. And I'm just going to
move the end screen above the other content about here. And then what I'm going
to do is add an effect. I'm going to go to effects and video transitions and dissolve. And what I'm going to do
is add a cross dissolve. I'm going to drag
this straight onto the top of the screen file. Now, if we watch the
end of the video, will be able to see that it
fades out of the video and fades into the end screen.
So let's click Play. There we go. That is
absolutely perfect. Now I'm going to do is slightly shorter than the end screen. And I'm also going to add a dissolve to the
end of it as well. So then when it gets to
the end, it will fade out. There we go. That is perfect. So what I'm going to
do is save my file. In order to export my video. I'm going to go to File and Export down here, Export Media. Now of course, you
might be using a different video
editing software to me. So this will be slightly
different for you. Now I'm going to do is go
and click onto location. And I'm simply going to
give the video a name. So for now I'm just
going to call it the video with end screen, just so that we know
which video it is. And then I'll click Save. And we're ready to do
now is export the video. So let's click the Export button at the bottom right, down here. There we go. So the video has now been exported successfully. So that is all for this video. In the next one,
I'll show you how to upload your video to YouTube and set up your YouTube end screen
within YouTube as well.
5. Setting up your End Screen in YouTube: Hello and welcome back. In this video, I'm going
to show you how to set up your end screen
within YouTube. So first of all, we're going
to upload the video that we have just rendered in
the previous video. So I'm going to click
create and upload. And then I'm going to
simply click Select Files. And I'm going to click onto
the video that we exported. So that is this video just here. Now we're going to
let the video upload. So I'm going to skip over
these details for now. I can sort this out later. So I'll click Next. And here within the
video elements step, we have the add an
end screen option. So I'm going to click Add. Now I'm going to scroll
to where we can see that the end screen
has fully appeared. And we're going to click the
Add Element button here. So first of all, I'll click onto the subscribe element
and I'll make sure that the channel icon
goes over the white circle. It's actually quite
difficult to center it. I'm going to disable this option here that says show
hover card outline. And I'm hoping that that will help me to center
it a bit better. Okay, that's not too bad. We can leave it
like that for now. And then I'm going to add another element and
click onto video. And then we're going to use the most recent Upload option. And of course, this will go
under the latest video text. Then we're going to
add another video. And for this we will use the
best for view our video. And that will go down here. Now we can make these
bigger, but we can't make them smaller unfortunately. So this might actually
go over the text. So we may need to redesign
in screen slightly. Then we want to change how
long these appear for. So we only want
these to show up, but once the screen shows up. So I'm going to drag
them to about here. And then I'm going
to move the player. And then I'll click space
so that we can play it to see where it all shows up. Okay, so it needs to show up. When it first starts appearing,
which is about here. There we go. So if I watch it
again and go back, Perfect. So we do have a few things that we're going to have to fix. But for now, let's click Save and go to next and next again. And I'll just click privates
and then click Save. Now I'm going to do is open the video that
we have uploaded. And there we go. So we have successfully added
our N screen to our video. And within the YouTube Studio, we have added the
end screen elements to our end screen in the video. So there we go. That is all for this video. I hope you enjoyed it and I hope that you learned something new. Once again, thanks for
watching and goodbye.
 Anthony Isaac, Learn how to grow your business.