Transcripts
1. Design & Make Beaded Fringe Earrings: I have been seeing beaded
fringe earrings everywhere, and it inspired
me to create my own. In this class, you'll
be learning how to design and make your own
beaded fringe earrings. Hi, I'm Kendra Ortner
of by hand at home. I'm an eclectic artist
and teacher and I work in digital design, surface
pattern design, illustration, wool, knitting, crochet, embroidery,
clay, paints, and now beads. In this class, I'll be teaching you
how to design and make your very own
beaded fringe earrings. This class is for
complete beginners. And my 11-year-old daughter has really enjoyed making
her own earrings. So I encourage you
to give it a go. In no time at all, you'll be making
your very own styles that can add sparkle
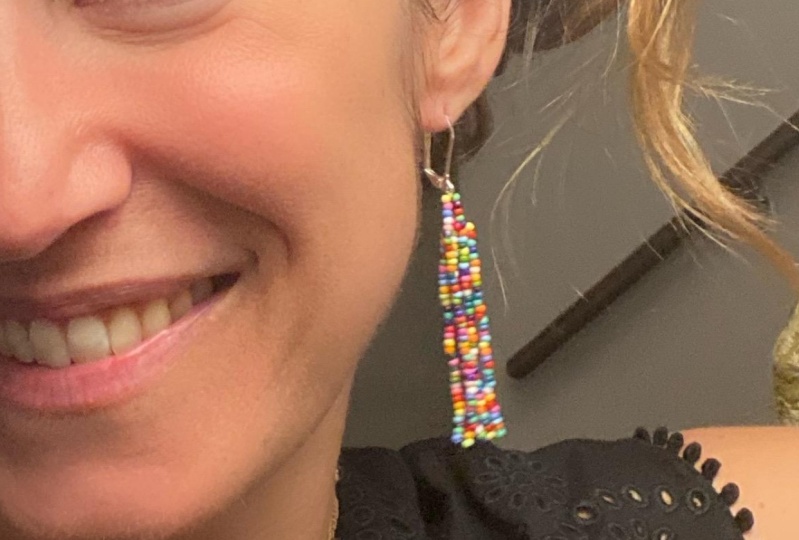
to any outfit. I love how they add
color, how they swing, how they touch my shoulders, and really feel colorful,
vibrant and alive. I think they go
with every outfit and I hope you'll join me today for beaded fringe earrings here on Skillshare. Thanks.
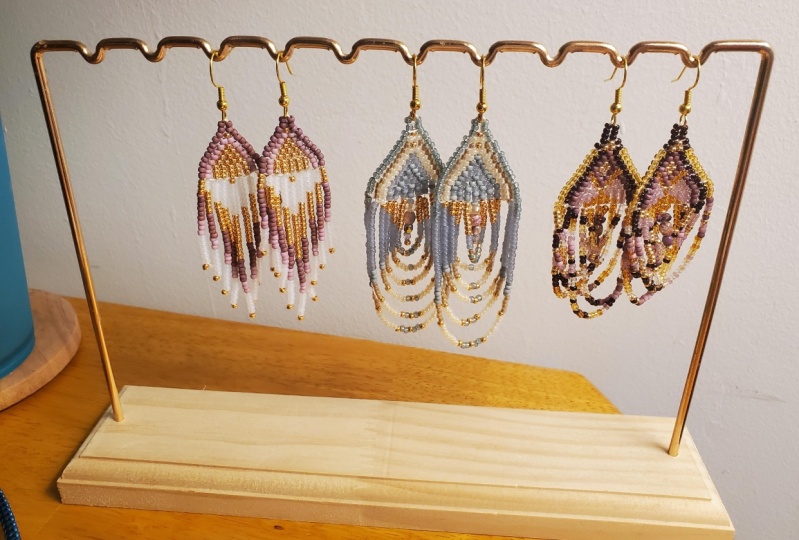
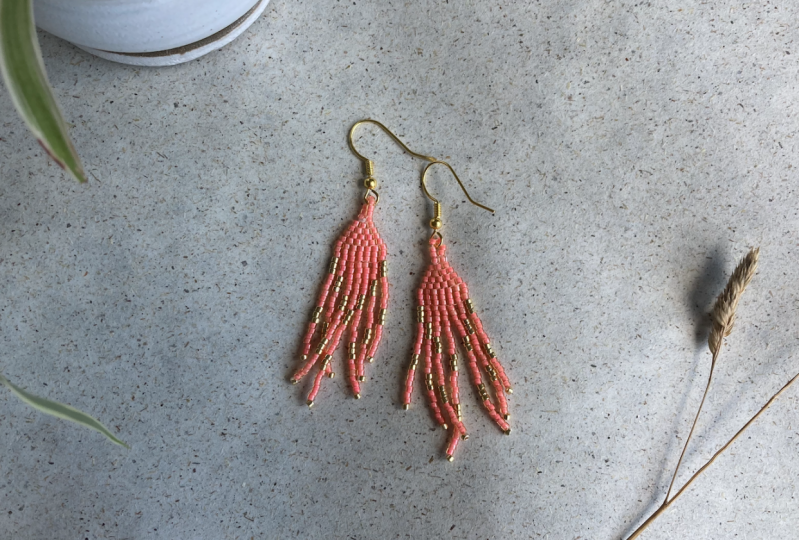
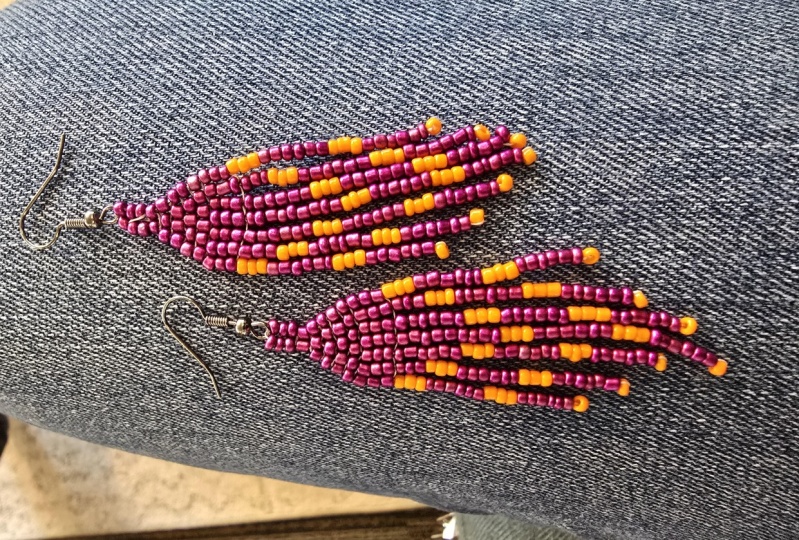
2. Your Class Project: For your class project, you'll be making your own pair
of beaded fringe earrings. I've provided you with some templates so you
can design your own. And I'd love to see
what you come up with. Feel free to share any step of the process
along the way from your design to the
finished project in the class projects tab. Now, you are welcome
to start with one bead color and make a monochromatic pair of
beaded fringe earrings. Some of my favorite pairs
are completely one color. Or you can work with two colors, which is what I'll be doing
if you'd like to follow along with the steps that
I'm taking in the class. Or of course, you can
let your imagination go wild and design as many
colors as you'd like. The possibilities are really
limitless with this. I'd love for you to upload
a photo of your finished pair of beaded fringe earrings even better if I can
see you modeling them. But feel free to share
any step along the way. I'd love to see what
you come up with. Thanks for joining me for
beaded fringe earrings. Now let's talk about the
supplies that you will need.
3. Supplies You Will Need: Here are the supplies you'll
need for making your own beaded fringe earrings. I began working with
a little piece of felt for making my
beaded fringe earrings. The felt prevents the
beads from rolling away. And I moved on to using some
other different objects, but I still put a large wool mat underneath
my work surface. I use this ceramic dish
that I made myself. It has a really great texture
that captures the beads. Any kind of dish or bowl
that has a little lip to it will work really well
for containing and corralling your beads. We'll be working
with size 11 seed beads and you'll need at least
one color. Two colors if you'd like to follow
along with my design. You'll need size 12,
beading needles, a spool of Nymo thread, scissors for cutting
your thread, earring hooks for attaching
your beaded fringe earrings. I found these specialty
hooks at my local bead shop. They don't require any fixing of your earrings onto the hooks. So they work really
well for keeping your beaded fringe
earrings on the hooks. If you do decide to use
hooks without a back, I recommend getting these
little silicone stoppers. They come in packs of a thousand
so you won't run out. If you get regular
earring hooks, you'll need pliers to close
up the back of the hooks. Fireline is another type of thread that I've
experimented with. You may want to
experiment with this too if you decide to continue
making beaded fringe earrings, I only use it for
the top part of the earrings and only
if they're very large, so they need a little
extra stiffness. That covers about all the
supplies we'll need for making our beaded
fringe earrings. Next step, we'll be starting
your beaded fringe earrings.
4. Earring Design: Now we come to the
design of our earrings. So in the Resources tab, I've provided a link to
some coloring pages. One shows you the form
of the earring we'll be making and gives you space
to design other earrings. And one is more free form. You can explore other types of designs once you get the hang of your first
pair of earrings. I'd love for you to print these out so you can color them in. I also have a file
for Procreate users. If you'd like to color
this on your iPad, you can do that if you are a
procreate user and I'll be walking you through how to use that file in the next video. I think everyone should start
out with a coloring page. So it's of course, up to your personal preference. But first I'm going to be walking through
the coloring page and the different parts of the earring on the
coloring page. With that said, you're
going to need to have some colored pencils that match your beaded fringe
earring colors. If you're only using one color, of course, you only need
one colored pencil. You're going to also
need them to have some contrast so you can tell
them apart in your design. And I like to have a pencil too if I want to make any notes such as the number of beads I'm
using or something like that. So the first part
of the earring that we make is the base. The base is kind of like where the top part of the earring comes from and where
the fringe hangs from, it's right in the middle. And we're using three beads on a ladder stitch for this
base of our earring. And for my design, I'm going to be coloring
this all blue because my entire ladder stitch is
going to be blue beads. So you can go ahead and do
that if you're doing the same or whatever color you are doing for
your ladder stitch. So after we do the
ladder stitch, the next part is actually
that top triangle. There will be a loop
of beads at the top as well, which isn't pictured
in the design pages. But this triangle part, we're going to be designing
with the same color. It's going to be
blue, all of it. You can of course, experiment with different
designs in your next earrings. But we're going to color
all of that blue as well. And this section is called the brick stitch because
it's like you're laying bricks between
every row rung of the ladder stitches, there's going to be one
bead on top of it and it'll kind of go like that
as it makes the point. So the top section, the little triangle at the top, is going to be the brick stitch. And we'll be coloring all
of that blue as well. Now we've come to the most exciting part of
our earrings: the fringe! So for my design, I'm starting with
three green beads on the first string of
beads in our fringe. Then I'm going to add three beads to each string
as we go towards the middle. So the first string
will be three green, six blue, three green, and then six blue. Our next string, we'll
start with three blue, three green, six blue, three green then six blue. After that, it will be six blue. Then three green, six blue, three green, and six blue. And the middle string
will be the longest one. And it starts with
nine blue beads, followed by three green, six blue, three
green and six blue. After we get to that
central string, we're going to mirror the
first half of the earrings. So the next string will match the one that's symmetrical
to it on the other side, and it will start with
the six blue beads. Then the one after that starts
with three blue beads. And the last one will be
the three green beads. In this way, the earring
will have a V stripe of green beads in two places and will be perfectly
symmetrical. So finish up your
coloring design if you'd like to color
this in Procreate, if you're an iPad user, I'll be showing how to do
that in the next video. If you're just coloring
on paper, that's perfect. And you can go ahead and skip that lesson and
we'll get right to sewing and putting together our beaded fringe
earrings. See you there.
5. Design in Procreate: Great, Now we're ready
to do procreate. So I'd like to introduce you to the layers in this document. Go ahead and tap on the layers. You can see there is my wordmark on one of
the locked layers, and then there is the reference layer
which is also locked. You'll want to
duplicate the layer. If you want to make
your own design, you could always duplicate
the locked layer as well, but then you would have to
unlock it in order to use it. So that's something
to keep in mind. You just swipe to
the left to unlock. So that's what
you'll need to do. Now, the first layer at the top is one that
I've colored in. So we're actually going to be
working on that top layer. You'll click on that
to make it show up. If it's not already clicked on, you see the little boxes
to the right are how you hide or show visibility
for each layer. So click on that layer and make sure you're in that
layer and then zoom in as far as you need to to
comfortably work with this. I'm tapping on the
document to grab that blue color
because I'm going to color in with the blue color. So I'm dragging the blue right to where I want to color
in and it didn't work. So I just tapped back and now trying it again and
then I can tap right on, continue filling with re-color. Now a crosshatch appears
and you want to draw, drag that cross hatch right to one of the spots where
you want to color in. And then you can just
continue tapping on the dots to color in easy-peasy
and really fun to do. And so I'm just tapping
all the little dots blue. If I accidentally
tap somewhere else, I can drag the cross hairs again right to where
I need them to be. So now I've colored in all of the blue on the top
part of the earring, the ladder stitch part and
the brick stitch part. And I think I'm going to even color in down
at the bottom, you see my crosshairs are
getting off a little bit. You just drag them right to
where you want them to be. And then I'm going
to go ahead and do the pattern with the blues up here at the top so that I know exactly where I'm
going to put the greens, I'm counting along with my pattern so I can
get the pattern, the design exactly right. And now I'm ready
to find that green. I've already got it here, so I just put my finger, hold my finger over the
color until I've got it. And then I'll go ahead
and drag it down with my pen again and
put it right there. Continue filling
with re-color and it tried to color
in the whole thing. And I'll pull it over to
where I need it to be. So now I'm doing my three green in all the
places that I want it. You can do this in any
order that you like. I just like to go
from the top down, make sure I've got it all
right where I need it. At this point, I'm going to
count down to the next area so I can get the next
stripe of green, right where I need it to be. You wouldn't even have to
color in the blue at all. You could just do the
green. Right there. I needed to drag it to
a different location. I kind of know how my design is going to finish up
just at this point, but it's so fun to do. I'm going to go ahead
and color in the rest because I'm really enjoying it. Whoops, I just made a little
green mark on my screen so you can always use the back arrow as many
times as you need to. Grab that color again and
continue filling with re-color. Super fun, super easy. And a great way to
make your designs. So you actually don't
need to color in a pair. All you need is a single
design to copy from, but I do enjoy having the pair and they
are super fun to color in. There is also another
procreate file that you can experiment with. This one is more freeform and allows you to do a different
number of ladders, stitches, and a different
length of fringe. And you can kind of go from there and design
your own creation. So enjoy, have fun, and I'll see you in
the next lesson.
6. Begin Your Earring: Congratulations, you're ready to start sewing your
beaded fringe earrings. So you're going to
need your Nymo
00:00:11.790 --> 00:00:13.685
thread and your beading needle and also a little
pair of scissors. We're first going
to measure about a wing span, length of thread. So I just stretch my arms out as wide as they go to measure. And then I'm going to
cut right at the end. And that is the amount of
thread I am going to be using. I'll thread my needle. And then I'm ready to go and
start with the next lesson, which will be the ladder stitch. So the first thing I'm going
to need to do is thread my needle and I do
wet the thread. To thread these. It's a little tricky because
it sometimes splits apart. And what you can do
is you can always cut a new start if you're
having a lot of trouble, if it keeps splitting. Let's see. There we go. Then you want to leave
a pretty long tail I would say six inches or so after you get it
through the eye of the needle because it won't fall off that way and
you've got extra thread, so there's plenty
to do that with.
7. Ladder Stitch: So now we're going to
begin our ladder stitch. You'll want to get six
blue beads on your needle. So I'm going to
pick those up now. 123. Whoops, I got four there 5,6. So I have all six on the needle. Now, I usually try to
pinch them in my fingers. For this part. What's really important is
the first three on here. You're going to want to keep pinched because you
don't want them to move. So let me get that last
little one in my pinchers. And then I'm going to
slowly pull this through. Not all the way. I want to leave about
a six-inch tail. I need to untangle
that a little. There we go so I can
see my tail coming. You can always adjust
the tail later, so don't worry too much
about being exact, but just leave a nice long tail. And then to make
this into a loop, we're actually going
to take the needle the same direction as
it went the first time. So when we threaded our 6 beads, That's what we're
going to do again, but only with the first three. So my needle goes through
the first three beads only. I'm still pinching them. And then I'm going to slowly
pull it through again. This first part is
always the trickiest just because of the
tension of the thread. So slowly pull it through. And then it will
make a little loop. You see the loop here,
mine flipped over. Flip it back so you
can see better these three that are going
straight up and down where my original first three. And then the ones that
are looping around are going to be the
next rung in my ladder. What I'll do to make them the next rung is take my needle down
through the top. Just the same direction that
they're facing. So 123. And then I'll slowly pull that. These might remain a
little bit loose because we're not going to weave that tail end until
the very last. So you can cinch
them up a little bit so you can see how it looks. But both threads should be
coming from the bottom. And you're ready to put on your next rung in
the ladder stitch. So what you'll do is
thread three more beads. These are all blue beads
in my design 123. And wherever the
thread is coming from, you're gonna put your
needle in the opposite way. So I'm coming in the top of these beads and slowly
putting my thread through. Because it's going to make
that little loop again. Right there. Just jiggle those a little. Okay, So I'm tightening that up so you can see which
direction the beads are facing and see how
that's going to be the next rung on the ladder. Now, since my thread
is coming from here, I'm actually going to go
right next to where it's coming out to thread that. And that'll cinch them together. When I put the next
three beads on, I'm actually going
to go in this way. So I wouldn't want a
thread it the same way because it would undo itself. This is more like we're weaving the threads together
with beads on them. Then we're weaving
the beads together so the threads kind
of catch each other. So now I'm going
to get three more. 123 and my needle goes
in this direction. 123. I don't really want to
split the thread there. It's best if the needle never goes through the thread because that could cause a tangle. So it's really going to
the side of the thread. When you're sewing these. You don't want the
thread to catch itself. Okay, so now to secure
this rung on the ladder, we're going to make the thread go down and see. These beads are
fussing a little. So I'm just doing two at a time since I can't get
that third one. And then I'll do the third one. There we go. Now I've
got them all going in the right direction
where I need them to be. Okay. And we've got four
rungs on our ladder, so we all need to do three more. So I'm ready for my next rung. Remember when you're
putting the new beads on, you're going to come
through the opposite way. If the threads coming
from this side, you're going to
come from this side every time you put the new
beads on the ladder stitch. So I've got my three beads. I'm going this way. From the bottom. I'm going to slowly pull this. And then once the beads
are on to cinch it up, you do go right next door, right into the hole of the top bead of this around through all
three of the beads. And that's how you cinch it up. On my next rung with the
thread coming from here. I'm gonna go in this side. So I'll grab three more beads, 123 and come in from the top through all
three of these beads. Oh, it looks like I caught
my thread a little, so I'm going to back it up. There we go. So I'm not catching that thread. I don't want to split the
thread with my needle or get any kind of tangle here because that would really kind
of put a snag in things. So this one isn't fully
tilting the way I want it to. There we go. Just kinda put it into
that ladder shape. And to cinch it, I'm gonna go right into where the threads coming right
next door to cinch it up. So now I think I've
got six rungs. I need one last one
for this design. So I'm gonna get
three more beads for my last rung of the
ladder stitch, 123. And I'm coming the
opposite way again. So since the threads
coming here, my needles going in there
and pull it slowly, not catching the thread. And cinch it up. Kinda pull it tight
here and then do my last little
cinch-er here, right? Oh, it only went through two. I need it to go through
all three. There we go. That's the last of
my ladder stitch. Yaaay! You did it. Now you're ready for
the brick stitch part. You can cinch this
up and you can also cinch up this little end. We won't fully, sew that in until the very end of our
earring making. So don't worry about it if it's a little bit out of
sorts right now. So this part can look a
little loosey-goosey. But we're going to cinch
it up while we're sewing. Great. Now we've completed our ladder stitch and we're
ready for the brick stitch. I'll see you in the next lesson.
8. Brick Stitch: So now we're going to
do our brick stitch. This will be the triangle
part of our earring. The top part, and we'll then be doing the loop after we do
the brick stitch. So each row is going to
be laid this way and then back the other way and you'll cinch it tightly
along as you go. I can't wait to get this part completed because
then you'll see your earring really
coming together and shaping up into
its final form. I'll see you in the lesson. So for the brick stitch, we're going to be working
with the threads between these rungs of our ladder
we'll call them the bridges. And for the first stitch on
your row of bricks stitches, you're actually going to
start with two beads. You'll work one brick
at a time or one bead at a time for
the rest of the row. But for the first of every
row you start with two. So I'm grabbing too blue 1,2. And then I'm going to go
not in the first bridge, but in this second bridge. And I'm going to go just
under those threads. You don't, you again, don't want
to split the threads, right? No splitting hairs here. We're going under the bridge
and not poking ourselves, just pulling the
thread gently through. So they're actually going to
lay on their side at first. This is what you want to
set up for this stitch. We're going to put the
thread back through both of these going
the same way. It's just basically
weaving threads. So both of these, you can do them one at a time. I usually do both at a time. So because it's
both of these and I want my thread to not tangle, so I go through both of them. 1,2 back the same
way I just came. And they're securing themselves
to that bridge here. So I'm going to tighten
that a little and then to get them to lay flat like we
want for the brick stitch, I'm going to go back
through the same direction, but just one of the beads. So I'm actually taking my needle through that
first bead, only. The one we first put our needle through to thread it back. And I'll slowly pull the thread. And then when I cinch it, it kinda lays those
beads flat. Do you see that? Pretty nifty I always
wondered how that happened. So it's basically the weaving of the thread that causes this. And we're gonna do the same
thing for the next stitch, except with only one
So thread one bead. Go under the very next bridge. Just the threads. Pull your needle slowly through. And then this time, when you go back through, you'll come from under here. Whoops, see how when I sent it, it wants to lay flat. When I put the needle
back that direction, it'll make it lay flat. So it's kinda hard to see
since it went up there. But I know that it will be
doing what I want it to do. You can always and
thread your needle and pick a bead out by loose, just loosening it and
pulling it off the thread. So if you do need to start over, you can unpick your
beads a little bit. It's up to you to decide how far back you need to
start over, right? But you can. Okay. So the next one, same thing. I'm picking up one bead and
going under one bridge. It doesn't matter which
direction you go. Like it could be this way or
it could be the other way. It just needs to go under only the threads on
the next bridge. And then you pull it slowly
and see the thread's going from the top of the bead here. And under the bridge, you want your thread
to come back out. The bead going the
opposite direction. So I'm going to put
the needle right here, being careful not to split the thread and then
slowly pull it. There is my next brick. So it looks like right here, I only have two more bridges two more bricks, two more beads. One at a time. You'll get those beads one
and go under the bridge and then pull it slowly and go back through the
same bottom to top. It's catching that thread
there to stay in place. Okay, and now my last one, this part is a little
tricky too because, you know, you've got that tail. So the bridge can get really big if you're not cinching that. I like to hold the tail. When I'm doing this last bridge. Have to be careful I'm not wrapping the thread
around my ladder. Looks like it's trying
to grab that tail there, so I'm just getting
it out of the way. And pulling it tight. So I'll start my next row of
the brick stitch with two. So two beads to blue
beads on my needle. And then, not the
first bridge here. I'll go under the second bridge. So not right next to where
my needle is coming. But the next one I'll go under. As I'm laying two
beads or bricks. with this first part, I'm going to go back
through those beads, pinching them right in place. And then to get
them to lie flat, I go, same way, but just
through one only. So right here. I'll go through just one. Okay! And that's how you
start your next row. If you have the hang of it, you can go ahead and lay your beads or bricks one-by-one if you want
to keep following along. I'll show you how
I do all of that. Or you can just do it on
your own without watching the video and skip to the
part where we do the loop. Great job. I'm happy to see you coming along
with your earrings. So I'm laying my next brick. I'm getting one
bead on the needle. And then I'm gonna go under
the bridge right here. Pull it through slowly. You want to have a
pretty clean workspace so your thread isn't
catching on anything. And then I'm putting the needle through just the
bottom of the bead. And that's how I lay my brick or bead. Okay so we have two more to go. You can kinda see there's
two more bridges here. I get the bead on
my needle first. Go under the bridge, pull it through, come back up through the needle. Through the bead. I mean, with the needle, and pull it slowly all the way through. Last one. I've got my bead going
under the bridge. Pull it through. Looks like my thread
got a little caught, so I'm going to pull it back and see what's going on there. What's going on there? And then cinch it right up on
that last bridge. Okay. So now I'm ready for
my next row of bricks. I'm going to start with two. So we get two beads
on our needle. And then we're
going to go under, not the first bridge, but the second bridge
from the thread. And we pull it through slowly. And then we'll go back through
both of those beads once. And then again just
through the first one. The same direction we just went. We're doing it again but
just through one bead. And when we cinch that up, it makes them lay flat. And we have two more bridges. You can tell too by counting
the number of beads. So the last row had five beads. That means this row is
going to have four beads. So we know we're
going to do two more. So this goes under the bridge. I threaded my bead first and
then I go under the bridge. And then I'm going
back through the bead. Looks like my thread is wanting to kinda loop around the ladder. We have to be aware of that and keep it where
I want it to go. So one last bead, I'm putting on my needle and
then going under the bridge, a little bit of fluff here. Let me get out of the way and go right back up
through the bead. That's the other thing about
working on a woolly mat. Sometimes you get
little bits of wool. So the ceramic, it's
really nice for that because I'm
not getting fluff. Okay, so now I'm starting
the next brick layer. This one's going
to be three beads and I'm starting with two. So you can guess
what that means. For the last row, you're only going to do the two. So there's two under my
second bridge Pulling it. And then I'm going to go back
through these little beads. Both of them one time and
then just one of them. Tighten that up a little. Seems like it needs a
little more tightening. So pull on that, a little, tug
those beads down. There we go. That cinches it up. And then I'll do my last bead on my needle so I can go under the bridge and back up through the same bead. In the next video, I'll talk about that last row. And the hook portion, or a loop portion
of our earring.
9. Make Your Loop: Now we're going to be making
our loop for our earrings. And we're going to be finishing off our last row
of brick stitch, which will just be two beads. And then we just simply string a few beads that will become the loop at the very top of our earring. For our
earrings today, I'm going to be using
six beads in the loop. And those two beads of
the final brick stitch. So come along with me and
we'll learn that part next. Okay, so I'm actually
going to talk about the loop portion
of our earring. We're going to just do the last row of bricks stitches
before we do the loop. And for the last row
you get two beads on your needle and you do go
through this second bridge. Right here. It's just like all the other
rows you've started. You're going to do
the same steps of going through both of the beads. See, I've I actually have
flipped over my work to put the needle through just
because it's easier for me directionally
with this needle. Put it through that way. And then I'm going through
just the first one again. So at this point, there's no more bricks to lay. This is the last part. And I've got my tail stuck, but I've got a little
top to my earring. And to make the loop where
you'll put your hook, you thread some beads, and then you go back down the
other side of the earring. So I'm going to actually
use six beads for my loop. And that'll look more like eight
because of this top row. But there'll be
three on each side. And I kind of just get
them all on here at once. So 2456 beads right on my needle and I'm going
to be threading them down. See, my thread is coming out
of this bead right here. So I'm threading them
through the opposite bead. And all the way down the
side of the earring. I'll even thread them through
those last two beads, but since my needle doesn't easily go through all of them, I just do this side first. And that is what allows me
to put on my fringe as well. So you can see these
kind of naturally just lay in a beautiful way
at the top of your earring. And you can always
do a bigger loop, or you could even
do a smaller loop. You could do ten
beads instead of six. You could do eight,
you could do. It's generally better to
do an even number for the top part because that way your hook can be
right in the middle. Now you do want to pull
this pretty tight. And you'll go through
however many beads are left for you to get
into your ladder. Cause at that ladder part is where we're going to
start the fringe. So I'm pulling my needle
through those last two that I didn't get
in that first pass. Since they're going
straight up and down, they don't easily go
with the diagonal beads. And now I'm actually ready to begin the fringe
portion of my earring. And the threads coming out
through this side right here. I've still got my tail that
I'll weave in at the end. You can cinch it up if you like. This part, you
definitely want to cinch up because you're going to
be starting your fringe. So now that you've
done your loop and woven the thread through
the side of the triangle, you're all set up and
ready to do your fringe.
10. The Fringe: This is the really fun part. We're going to make the fringe. So you'll want to have your
design close by so you can follow along and make sure you're counting your
beads correctly. We're going to start with our first strand
being three green, six blue, three green and six blue with a final
stopper bead on the end. So I'm ready for
my fringe, hooray! Remember with this pattern, I'm doing the green and blue, and I'm doing them
in sets of three. So for my first
fringe string here, I'm going to get
three green beads. I'm gonna get those
right on my needle. 123. These are all gonna go
on the same string. So it's kind of nice. You don't have to do any weaving or not as much weaving
at this point. So I just have the three green. And I'm going to go
ahead and push them along on my thread because next I'm doing six
of the blue beads. So I'll go ahead and get 12345. Six. And then with those, I'm
just double-checking. Yes, I got six. I'll go ahead and push
those along on my thread. And then that's
three green again. So back to my green side, 123. And then I'll push those along
on my needle because I'm ready for the blue 123456. So now that I've threaded all the beads that I'm
going to be using. in my design, I'm going
to add one more bead. That's going to be the end cap, basically for my fringe And I thread that
onto my needle. It's going to be a blue one. You could use green if you want, if you like the idea of having little green points at the end, but I'm using blue. I want it to be blue, so I thread that on my needle. But then I'm going
to pass the needle through all of the
beads in my fringe. And that way it's like that last little bead is
holding everything on. So I go up through
all the beads. You can do this in stages. You don't have to
do it all at once. If you're having trouble. You can even do it bead by bead. But I'll go through all of them and then I'm actually
also going to pass through the first
rung on my ladder as well. Where the fringe is
coming out from, so the three blue beads that
are right at the top. I'm going to put my
needle through those for this fringe and pull
it, slowly ,always. So it's not catching
on anything. And if you do do it in stages, there will be a loops like this. You just have to, like pull both ways to get
them cinched up. Another nice thing to do to get the beads to hang nicely
is to roll them in your fingers or even roll them on a table on a
flat surface like this. And that makes them lay nicely. So you can see we've got that
little bead at the end is just hanging on keeping all
of our beads on the fringe. And for my next fringe, I'm gonna take the
needle and go down the next rung of the
ladder in all the, all three of those beads. And then I'll be ready to thread the next design beads
for my earring. So if you've got the hang of your beading and you'd like to just go ahead and make the rest of your
earring on your own. I am totally for that. If you'd like to
follow along with me while I do the design, I am also totally for that. So you can choose
whatever you'd like to do if you'd like to follow
along with someone, I'll be going through
the entire design. And if you'd rather skip
to the finishing stage, you're welcome to do that. For our next fringe, we start with the three blue. So we'll grab 123 blue and we'll just thread those down the needle
onto the thread. And then we'll do
the same pattern. So it's going to be three
green 123, 3 of our green, six of our blue. 1234. five, six of our blue. I always like to double-check. And three green, 123. And then six blue 123456. We've got our whole
design for the fringe on there and we just have
to do that little end cap. So I'm threading them
all the way up onto my earring because
I like to have them all in place before
I do that ending. I'm working here so I can film. But I actually find laying
this flat on a table when you put your needle
through, works really well. So I would recommend
laying them flat. Right now I'm getting
my little end cap bead, the blue one on my needle, and threading it all the
way on to the string. And then I'm going to go back up through all
of these beads. So come on. There they go. And I'm also going through
the top three in my ladder. This rung of the ladder.
All three of those. I'm looking on the other side
to make sure I got them. Yep. I captured all of those. And so now I'm just
pulling it through. And that's fringe
number two, roll those a little in my fingers and make
sure they hang nicely. And then I'll bring my thread through the next rung So for my next rung, I'm ready to do one more
threesome of blue beads. So I'll do six blue, three green, six, and so on. So I'm going from the
ladder that I just finished to the next ladder
rung just those three beads. And I'm going to thread 123456 of my blue beads to start because our
last one was three. And the one before that I
didn't start with any blues. So this is making our
nice little point. And then we'll get
our three greens. 123. And then it's time
for six blue again. 1234563, green and six blue. And I like to get them all in a row before I do
that endcap bead. I've done it before where I do the end cap right
away and then I accidentally thread
through all of them and they all
go tumbling down. So I think it's a really
good idea to go ahead and get yourself setup for success and not try to rush it. I cutting cutting corners or skipping ahead
with your steps. Oh, look at that. I think
I got that seven beads. So that one could be my end cap, but I will do that after. So there we go. I've got that next row. And I'm getting my end
cap bead on my needle, threaded onto the
floss, the string. And then I'm going up
all of these beads. And my next one will
be my center row. So I'm excited because that
means I'm halfway through. By the time I'm
threading that one, That's our halfway
point on the fringe. And that means we're almost
all done with one hearing. It. I do like to make two. But hey, you could do one. You could do one in
one color and one. The opposite may be one
that's blue and then green and the other one is green and then blue,
that would be fun. Okay, so here's the center. And this time we're
doing nine blue. So I have six. I think I'm going to go
ahead and get the nine. You could do it Just
three at a time if it's becoming tricky to get that many beads on the
needle at once for you. My needles end up
being a little curved, I think after awhile
because I've been bending them to get the
beads on a certain way. So then after my nine, I do three green, six blue, three
green and six blue. Just like before. There's six blue and 123 green. And then our final six blue. Definitely past the
halfway point now. Six. And I'm going to grab that endcap bead, that last blue one. That'll be my little stopper. It looks like my beads
are falling a little bit. Okay. So that's the six
that are on the end. And I can thread
through all of them, as many of them as they can. When you've got a lot of beads, sometimes you have
to do this in steps. Just totally fine. Just have to make sure
you're synching it up while. So I went through my rung of my ladder and I'm pulling
it all the way up. See it has that loop from where I took a break and my synching. And one way to help
that is to take your end bead and hold onto it while
you're pulling the top. And that just says inches up, that little extra
that happens if you hold the top of the
thread and the end B. That's how you can
make that work. See if I pull this, it really undoes
the whole thing. So I can use both to cinch
it and make it nice. I'm going to roll
that in my fingers and go down the
next ladder rung. And basically I'm doing
the same pattern that I did for the first half. So I'm not sure if you need
to follow along with this, you could probably just
re-watch the first half, but what I'm going
to do is going to go down these three and do six. So I'll see you at the very end once we've
done the very last one. And we'll talk about
weaving in all of our ends.
11. Weaving in Ends: Great, we're almost
done with our fringe. In this next lesson, we're going to
complete the fringe, but also weave in
all of our ends So this will be where we'll take care of that little tail at the beginning and finish up our tail from our
fringe section. So now I've finished
my last fringe and I've gone through the three
beads on the ladder stitch. What I'm going to do next
is put my needle through the whole side of the brick stitch all
the way up to the top. Looks like I missed
that last little one. So I'm going to come back
and grab that one too. And I'll go all the way through my whole the whole
side of my earring. Oh, got it caught a little bit. There we go. Now it's uncaught. I wanna make sure I don't catch any of that
fringe either. So I'm just going to separate
the thread from the fringe. I don't want it to
actually catch. There we go. And that just pulls all the way through the whole side of the hearing and I'm going
to cinch it up nicely. Now that I'm up here
at the top of my loop. One thing that really helps is to thread it through
the entire loop. So I'm gonna go up three
beads on one side, being careful not to go
through my thread again. And then down the three
beads on the other side. After I've brought that
thread through my loop, I'm going to tie a little
knot here in the bridge. And I'm gonna do that by
just winding my thread around. And then pulling
the needle through. That will make a nice
little knot right at the top of my earring, right in that bridge. I actually have to re-thread my needle here, it came undone. So I'll be right back. So now that I've tied that
knot in the base here, I'm going to actually
run the thread through the other
side of my earring. I like to run it all the way down that first line of fringe. It's not actually securing it anymore because I'm not
going to tie anymore knots. But it makes it a
little bit easier to cut it off if you bring it
all the way out the end. Now that I have it
all the way through, I can just trim that thread
and I'm ready to weave in. The next tail. The tail we started with at the very beginning when we
made our ladder stitch. So I'll thread this
tail onto my needle. Okay, so now that we have the little tail
threaded on here, we're going to make sure
we're cinching it up tight and then take it from the bottom of this
rung to the next rung. And what I'm going to do is
just weave the thread in and out along the ladder stitch. So if it's going from the
bottom of this stitch, it goes up in the next rung. Then they'll go down the next. So there. And then down the next rung, up the next one. And it looks like with the
amount of thread I have, I might not be able to take this back up the
side of the earring. If I had enough thread, oops, I'm going to
unhook that from there. It caught the loop. So I just need to take the
thread off. There we go. As I was saying, if
I had enough thread, I might run this all the way up. It looks like I could
maybe right here. Run it up the brick
stitch portion. Now, I got it right there. It's not going to
be quite enough. I don't think. Here we go all the way up to
that bridge at the top. Because what I'd like to
do is make another knot up there to secure this tail. I'm pushing the loop down
so I can see that bridge. Then go right
through the threads. And again, I'm just
going to make a loop. I'm actually pulling
it with the back of my needle since
my thread's so short to make that a
little knot at the top. And then I'll put my
thread down through the other side of the earring. And if I can, I like it to go down at least a little
bit of that fringe, that first line of fringe. So there are at least
through the first few beads. At that point, I will go ahead and cut it. Awesome. Now after weaving in the ends, the last thing to do is to
attach our earring hook.
12. Finishing with Hooks: Alright, our final
lesson will be attaching our earring
hooks to our earrings. Depending upon what type
of earring you are using, you're going to need
a pair of pliers. So join me and we'll finish up our beaded fringe earrings. What I use most often is
this style of earring back. These are really cheap. You can get quite a lot of
them through Etsy or Amazon. I thread my earring
on here like this. So it can just
easily go right on that little area where I'll need to clamp this
into place a little bit. So with these type of backs, you don't actually
squeeze it shut. That could break your beads. And it's not really
how they're designed. They are designed to
kind of go away from your body and then be pulled
in towards your body. So they're designed to
wiggle from side-to-side. And you want to kind of make that motion when you're
closing them up like that. So you want them to be
as close as possible. So you don't lose your earrings, although I have lost one before. And the beauty with
these earrings is, you know how to make them. So if you do lose one, you can always
complete your pair. Okay, So these are the nice lever back
earrings that you could, you could actually
use these for all of your beaded earrings and
just switch them out. But that would kind of
wear on your thread. So it might not be a
good idea to do that. But you could
definitely use them for one of your earring pairs and have them in a really
nice secure style. This way, you're not going to lose them unless
they fall apart. They are definitely secure. They won't fall out of your ear.
13. Thank You!: Congratulations. You did it with the skills that you've
acquired in this class. You can now make
your own unique, fun and original earrings
to wear and to share. The templates in this class
will help you experiment with your design and come
up with new creative ideas. I hope you feel empowered to express yourself and
really have a lot of fun creating new ideas and
seeing them come to life. I really value your feedback, so please comment
or leave a review. I'd also love, love, love, love to see your projects. So please post in the
projects tab below so we can all be inspired
by what you're creating. If you enjoy making things, I'd love for you to check
out my other classes. I have one and knitting,
crochet and embroidery. Thanks for joining me
here on Skillshare. Bye!
 Kendra Ortner, by hand at home