Transcripts
1. Introduction: Hey, there. Welcome to this quick
design class where we are going to be making a very
cute little monthly Zen. This is basically a
single sheet of paper. We're going to design
this in Canva, print it out, and then cut it, so you can make this little
booklet that lets you save your photos into a
little memory object. It's a super cute
project, very easy to do. You only need a free
Canva account to do this. And this is a great starting
point if you've never done any bookbinding or zen making projects before
and are curious, but don't want to
do something high, difficult to get started. If that sounds fun to you, then let's head into the
course together.
2. Designing with Canva: To get started in this project, I have opened up a
new Canva document. Now, I am putting this
template in a link, both in the class discussion, and also there's a downloadable PDF that you can use to click the Canva template link attached to this class if
you prefer that method. So you don't have to
design this from scratch, but I'm going to show
you how to just in case. So I started with 8.5 by 11
inch file here or canvas, and that's just the size
of a standard piece of printer paper because we
are printing this at home. I have labeled these based on what page they are and
added some grid lines in. To add grid lines in Canva, you are going to need
this ruler visible. We're going to go
to file settings and then show rulers and guides,
which I already have on. You could just go up
to this ruler bar, click and drag and it'll bring a guide down that is not
visible when you print, but is visible when you design. In order to get these
equal spacings, I actually used the
guide tool in Canva. So if you go to file settings
and then add guides, it will open up this little menu that lets you type in
what you are looking for. So I did custom four
columns because we're going to fold this into four different pages
of our booklet, and I added zero inch gap here. And then I hit Add Guides, and it just adds
these three here, evenly spaced so that we know where the folds are going
to be for our zine. Then I will just
drag this halfway, and it lights up pink when
it's halfway, and there we go. Now, because we are working
upside down for the top row, you'll see the text is upside down just as a little reminder. But we have our back cover
over here and our front cover, page one, page two, page three, four, five and six. So if you are going to be just doing one picture per page, then you only need
eight photos total. But if you want to do
more of a collage style, you can totally do that. I'm just going to keep it a
little bit straightforward just so that we can move through the project
a little quicker. I'm going to keep this
page as a reference, and I have opened up a second page in this
file that is blank, and I took the text
off because I don't want it there in
the final result. But I can scroll up
and check to make sure I know what goes in
each box if I need to. Now, I've already uploaded a
bunch of photos from August, so I'm going to drag
and drop them into this little display and start to arrange them.
That was one too many. But anyways, I'm going
to arrange these. And for the ones
that are on the top, I'm going to rotate them,
so they're upside down. And keep in mind that the photos that are
beside each other, so like these two right here, these two here, here, and here are going to be well, not these two because
these are the covers. But they're going to
be facing each other. So I like to make sure that they are kind of cute and
match each other. I'll move all of these ones
out of the way for a second. As I'm placing this photo, you'll see that I can
make it snug within these grid lines and then just adjust it so that
it's the right size. These photos are
just off my phone, so they're a little bit tall. I'm going to just adjust
them to be within the constraints to make sure
that they don't overlap. Okay, so there I have
all my photos arranged. The next thing we're
going to do is use the photo editor to kind of make them all the same
saturation and brightness. So I'll just click on
the photo Edit image. And if you go to adjust up here, you can use their photo editors to make things a
little bit brighter. Usually just up
the brightness and the saturation because I want my printer
to do a good job, and I find that if
it's dark or dull, it looks a little bit more
dark or dull after printing. Okay, I think this looks cute. So this back cover is
going to be my dog, and the front cover is going
to have these berries. And I just want to put
some text here that just says August 2024. So I'm going to
hit T for textbox, and I will position
that right about there. And I'll go into fonts.
Obviously, you can pick whatever font you like.
There is no rules. I'm going to use this one
called Lost in South, and I'll type August 2024
and make it a bit bigger. Maybe like right
there. And because it is on top of a photo and
I want it to stand out more, I'm going to click
on effects and use the lift effect and
crank it to 100. And that's just going
to add a little shadow behind the letter
so that there's a bit more contrast against the photo. So that's
basically it. You can go ahead
and design one for every month of the
year or whatever it is you're collecting
your photos of, maybe a trip or your pet. To finish this off, I'm
just going to export it. I'll hit Download,
and I'm going to make sure I'm only
picking page two, which is the one that
I just designed. PNG is fine with me. I'll download it, and then
I'm going to print it on sort of a higher
quality printer paper, but you can use whatever
paper you like. And that's it for
the design step.
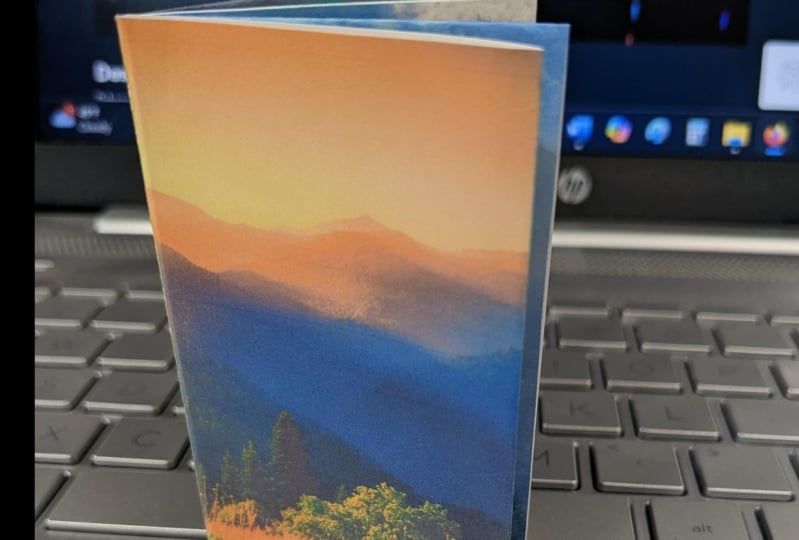
3. Cutting and Folding: Here is the little
zine all printed out. I'm just using regular
printer paper, but this is a
little bit heavier. It's 28 pound paper, and I use an Epson ecotank
printer to print it, which is why I have
so much colored ink. So what I'm going
to do is cut off the white margin
just from printing, then cut a slit right
through here in the middle so that it folds
into a little booklet. I'm going to show
you how I do that. You can use scissors if you like. That's no problem at all. I'm just going to use
an exact knife and a ruler just because I'm
working on this cutting mat, so it's a little bit faster. Okay, here is the
cut out design. So we have to cut this
slit in the middle, which is basically
going to go from this point right here to
this point right here because that will
allow this to open up and we can get all the pages
looking like a booklet. So, trust me, and then I'll show you and
then it will work. So I'm just going
to use my ruler. This is why the exact
knife is handy, and I'm just going
to line up with that divide in the design. And carefully as I can, I'm just going to cut along. You can also use scissors for this if you
want to just fold the whole thing in half
and use that as a guide, but this is pretty precise. So now I have this
slit in the middle. So that will allow me to fold
this whole thing in half. And then fold it open it up and fold it
in half the other way. And I'm just trying to
put some creases in it so that the pages will bend a little easier as I make
it more finalized. And basically, at this
point, you can take these two points that
are folded and pinch them together and sort of make your book
take shape like this. This is the front of my booklet, so I'm just going
to work from here, and you want to kind of start to fold it into a book shape. I realize this is a
little bit vague. But the key is to
get that slit in the middle and then
open up the back. You can fold all of these
pages as evenly as possible. Make sure that they're all
doing a book like thing. Okay, so there we have it. You can also use a tool
like a bone folder, which is what this is for book binding that helps
you make creases. And depending on your
proficiency at folding, you may not have little bits showing through here like I do, but this is a personal project. I'm not too worried
about it being perfect. I think that is one
of the bebe making zines is that you don't have to have it
look like it came out of a manufacturing facility. It can just be the little
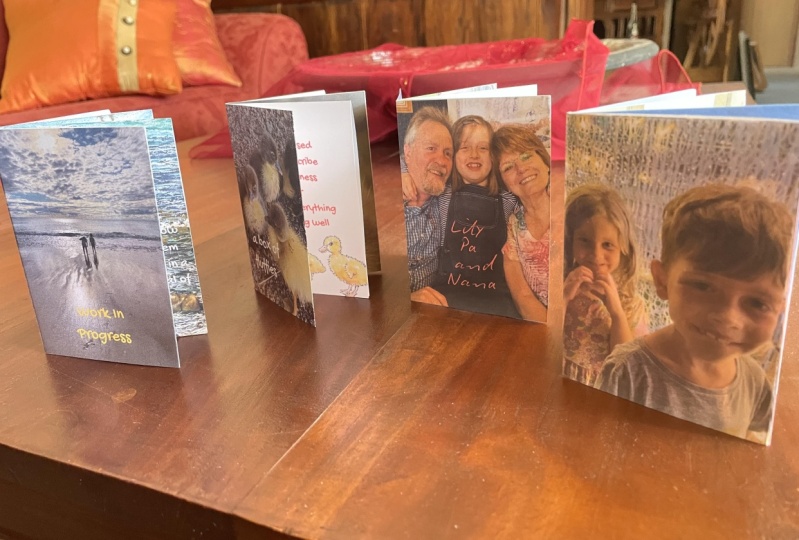
design that you made. So this is my finished Zen, and now we have our
front cover here. Open it up, there's pictures. Spread number two, spread
number three on our Bcver. I think this is
such a fun project. I'm really excited to do more of these and to make a
little collection, maybe put them in a box or something so that I can
remember each year. I hope you enjoyed
learning with me, and this project
was fun for you. If you create something cool,
I would love to see it, take a photo of it
and put it up in the class project so we
can all take a look. If you have any questions, pop those in the class discussion, and I'll be happy to
chat with you there. And if you enjoyed my class, I have lots of other little
fun Canva projects on the go and different classes you can take if you like
learning with me. All right, thanks so much.
I'll see you later. Bye.
 Rebecca Wilson, Artist