Transcripts
1. Introduction: I love to read as much as I
like my electronic devices. There's nothing like
a physical book. The feel of it, the
smell of the paper and feeling the breeze when
flicking through the pages. I think that a good book
deserves a lovely bookmark. I'm Lillian, also known
as Mary make well, and I love making things. In this class, you
will learn how to crochet and lovely
floral bookmark. To take this class, some previous question
experience would be beneficial. It would suit and advanced
beginner arguments. After taking this class, you'll be able to whip up to qt floral bookmarks
and no time at all, you can keep for yourself or gift to the book
lovers in your life. I hope that you'll join me
for this cute fun project. Stay tuned to find out what
you'll need to get started. See you in class.
2. Tools and Supplies: To make the bookmark, we're
going to need some young. So I'm going to be using dk
young that's double knit. And I've chosen to use a
pink and pink and green. But you can use whatever
color combination you want. You can also use different size, different weight yarn if
you want to just remember to adjust your hook accordingly. So we'll need some scissors
and a crochet hook. I'm gonna be using a
four millimeter hook and some adorning needle. So that's a blunt needle
with a very thick I. And finally, you'll need
some buttons or beats. Okay, so that's
everything you need. So let's get started.
3. Stem - part 1: To make the stem
of the bookmark, I'm gonna, you're gonna
pick your first color. So I'm using green, going to cost him
to the crochet hook as normal with a slip stitch. But I wanted to leave
a fairly long tail. At least 3 " three to 4 ", that's about seven to 10 cm. So we make our cost
onto the hook. And then we're going to chain. I want to make the first
chain a little bit large. So I'm just going to
loosen up this loop here. So rather than have it, rather than having it
close to the hook, I'm going to just loosen
up a bit because I want my first chain to be
a little bit loose. And then I'm going to chain 47. Okay, so we've got 40 there. Now. Most books are going to
be a five inch in size. So you can check to
see if it will fit. And it obviously has a
little bit of given it. So that's about right. Now. Clearly, you can add or subtract stitches depending on the size of books that you're
making a bookmark for. But as a general guide, 40 stitches is fine. Okay, Then the next thing to do is to create a loop at
the end of this stem. Now I'm going to
chain an extra 41234. And then I'm going
to go back into that first of those extra
four stitches. I'm going to go
through the loop at the back and then slip stitch. And then we're going
to crochet into this little loop
that we've made. So now we can cast off, cut your yarn, you
some better scissors. And then make a little note, okay, so that's our stem. Part, one of our standard done.
4. Stem - part 2: For the second part of the stem, we need to cut so we're going to make a tassel for the bottom. So we need to cut some
pieces about 10 cm, maybe 12 cm or four or 5 " long. So we're going to cut several
pieces. Let's say 53. Okay, so he's just kind
of the way that I have. Then we'll cut that. And then
cut these ends off here. Where if they're not perfectly
even because we are going to trim them afterwards. Take the strands
that you've cut and just arrange them
tightly together. Give me a little twist
because that will help them to stay together
more easily. Then make a little
loop. Like so. Then pick up your, your stem and then locate that first loose
chain that you did. Now I'd like to go through
the loop in the back. You see now why we made it loose so that we could pass all
this bulk through it. Then just get your hook
and guide your tassels. Quite this big loop through. Now, we want to encourage, wants to pass these ends through
the loop to make us not. You can do that with the hook or you can do that with your hands. Makes sure that this tail from the starting stitches also
pass through as well. And then just gently pull
everything together. Might take a little bit of encouraging that we just want
to make it tight and neat. Button. You can pull the strands through
individually just to make sure that each
one is nice and tight. And then when you've
got yourself a tassel, just go to the NCF, locate the shortest one, and then trim
everything to that, to the same link. You, That's why we
left the long tail so that we wouldn't end up with we wouldn't have to end up with a
really short tassel. Now we've got this
lovely young tussle. We can just trim
everything together. Don't worry if it's not perfect. And there we go. We've got a lovely tassel. You might say you see when
you spread it out like this, if you see any irregularities
or if it looks untidy, you can always just go back in and adjust what needs
to be adjusted. Now if you wanted to right? Now if you wanted to,
you could get like a comb and comb this out to
make it nice and fluffy. But I think I'm
just going to leave my life that I like this. I like mine like this. Okay, So that's part
two of the tail done. Next, we're going to move
on to make the flower.
5. Flower head: Now it's time to bring
in your second color. I'm going to use this nice pink slip stitch that's normal
to custom to your hook. And then we're going to
take the opposite end. So we put our tassel end
where we made this loop. You can maybe just see
there's a little hole here. And that is what we're
going to be working into. So pus your yarn and go
hook through that hole. Then I'm going to slip stitch into the middle. Just going to gather
the green and the pink Eon together and then I'm going to try to trap them behind my stitches. So the first thing back
through the center. But through the center, I'm going to do a
double crochet chain to I'm going to do a travel on to say we're going to change too. Then I'm going to do
a double crochet. Alright, that's the foundation
of our first petal. And then I'm going
to do that for more times all the way around. Double crochet chain
to triple crochet, chain two, double crochet. So once again, just to ease the stitches
around, if you can. Double crochet, chain to treble crochet chain two, double crochet. That's number three. Number four, double
crochet chain too. Triple crochet, chain two, double crochet. Then the fifth one. If you find yourself coming
up against this stem here, just make sure you just
tuck everything to the back and then
work around it. Go over the top of it. So a double crochet, Given that alter the back chain to triple crochet. Chain to the double
crochet to finish. Okay, so at this point now we have our first round of petals. You could leave it like
this if you'd like. I personally would
like some more volume. So I'm gonna go
around one more time. This time. Going to that first double crochet
that we did in round one, I'm going to go do
a double crochet in the double crochet, double in the double. And then. If you see the structure here, there's a chain to space, the triple crochet, and
then a chain to space. In the chain to space. I'm going to do to
triple crochets. And then I'm going to do
a double trouble crochet. We're going to wrap the
yarn around the hook twice through the chain, through the gap,
pull it through, pull it through the
first two loops. Put it through the
next two loops, and then put it through
the final two lives. I'm gonna do another
double trouble, but this time I'm
going to do it in the treble crochet stitch from round one twice around through through
to you to do two. And then the final
treble crochet in the next chain tooth space after the treble
crochet from round one. Okay, then I'm going to do two more trouble crochets in
that chain to space, 1.2. And then I'm going to do a double crochet in the double crochet stitch
from round one to finish. And that is our petal. So I'm going to do that
all the way around. So a double crochet, the double crochet, a treble, two triples in the
chain to space. A doubled trebled in
the chain to space. A double travel in
the treble stitch. A double treble crochet in
the next gene, two space. Two travels in the
chain to space. Then a double crochet in a
double crochet from round one. That's two. And
let's do that again. Doubling the double To travels
in the chain to space. Doubled trebled in
the chain to space. Travel in the treble
stitch from round one. A double or triple in the chain. In the next chain, two space. Two triples in the
chain to space. And a double and a double. That's three. So again, doubled in a double. T travels chain to
space, doubled tripled, and the chain to
space travel and the treble doubled
triple in the next chain to space travel in the chain
two space two travels. That's 12. Then a double in the tupple. One more time.
Doubling the devil to troubles in the
chain to space. Travel and the chain to space will travel in the
treble type of travel. And the next chain, two space. Two travels in the
chain to space. And a double in the double. Okay? Then we can cut off, pass it through the loop. And you can take these tails that you trapped
behind your stitches. If you pull, it will close
up the center of the flower. That's not critical. But if you're going to
be sewing buttons on or I'm beats a smaller gap
depending on the size of B, the smaller gap, right
me bought desirable. It's also good
practice because it reduces the amount of weaving in that you have
to do at the end. Okay, so there you go. That is stage three
of our flower done.
6. Finishing touches: So the next step now is to so on a bead or a button into
the central flower. So if you turn the flower
over and take the colored, the flower colored
yarn from the center. You just finished using. And then you need
your dining needle. Then just thread your
yarn through the eye of the needle and then pass it through to the
front of the flower. Now I probably should have
said at the beginning, but when you're casting on, make sure to leave a good
amount of yarn so that you can, so your button on. If for whatever
reason you haven't, you can just use the same
color and do it separately, but it's just easier if you use the one
that's already there. Okay, So threats your button
or bead onto your yarn. And then on the
opposite side of that, back down to the other side. Just make sure that
it's nice and central. Turn it over. They do a couple of back stitches just
to secure the yarn. So go behind where
the yarn came out, pass it through to the front. Then it same again, go back behind where the young came out, pass it through to the front. And then I'm just going
to change direction. For good measure.
I'm going to go here behind 21 more time. Then I can trim off this tail. So the final step then to finish our bookmark is to weave in the other, the remaining ends. Once again, get your
donning needle, thread, yarn through. And then we're here. I'm just going to pass the urine down through the
stitches towards the center. Then I'm going to do a
couple of back stitches like I did when I was
sitting on the button. So behind and then to the front, then behind the front, then behind where
the young came out, and then back in front. And the same again. Okay, So that will
keep your secure. Now you can trim off the tail. Then with the actual
bookmark, the stem portion. We view you're onto
your donning needle. Again, try and leave a
good long enough tail that to make this
donning bit easy. And then just locate
the first chain. And you just We your
yarn through the chain. So over, under and over
the top, under like that. Then pass it through to the top. We'll pass it through
from the top. And then you've gone from the top to the bottom, then just pass it
under another stitch from the bottom to the top. Put tight. Managed to get my coat. Then you can trim that off. If you want to be doubly
sure that you're not going to have any unraveling. You can just dab a little bit of fabric glue onto
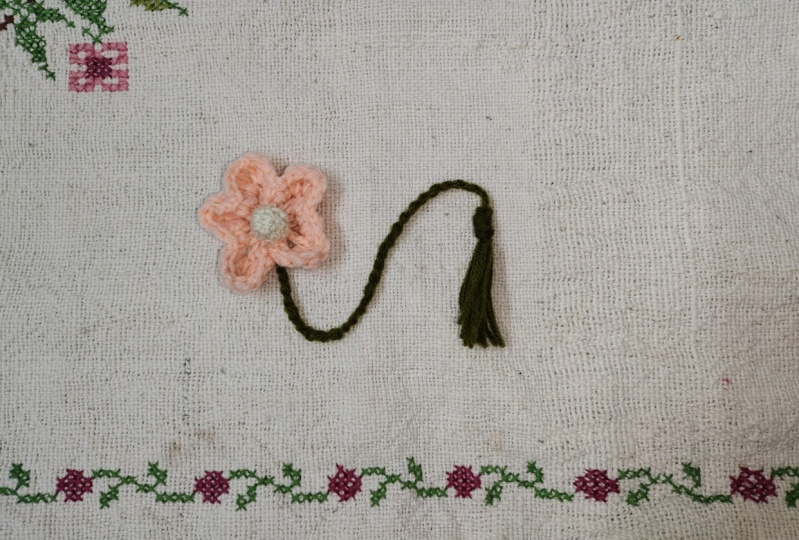
there if you want. Alright. There we go. We have our bookmark done. You can just place
it in your book. A little flower thing
goes at the top. And that's really cute.
7. Final Thoughts: You can make all
sorts of variations. You don't have to stick
to the colors that I use. You can use whatever
colors you want to use. Another one that I
made in a darker pink. Now, just to show you this one, these are all made
with the same pattern, but this one's slightly bigger. You can pop, you can see
that just about this one. I put in an extra trouble
in the chain to space. So with these I did two troubles and then a
double trouble with this one. I did three triples
and double triple. And you can see that it's
made a slight difference to the size of the flower,
finished flower. Another one that I
also made larger. This one that I made it
in green with a gray stem just because I've now just to show that you could use
whatever colors you want. I didn't put a bead or
a button on this one. It looks quite nice if
you're careful with how you weave in the ends, you can. You don't necessarily have to
put anything in the middle. But if you for whatever reason you don't have anything at
the time or you forget, you can always come back in
with some fabric glue or some hot glue and Sticker
button in the middle, or you can weave it in
or soviet on afterwards. Just have a couple of more
examples to show you. So this one I made using metallic yarn and a
three millimeter hook. I really liked the
idea of theming the bookmark to match
the subject of the book. E.g. you could use your metallic yarns for your futuristic and sci-fi novels. And you could make deep breath, deep burgundies and blacks
for your Gothic novels. And you could have bright reds for your steamy romance novels. I think that's, that would
be really cute to have a set per subject matter. Anyway. So this one I made
using metallic yarn. I've made six petals
as opposed to five. And you can see the
difference just in changing the hook size. So this is the standard pattern that I've, that I've done. You can see that this
is so much smaller. So if you're going to use a different size and
different weight yarn, be sure to adjust your number
of chains accordingly. Then on that note, I use this is pearl cotton, which is, I think it's used as an embroidery thread,
but I used it. You can also
crucially it with it. I use this with a
two millimeter hook. And this was the result. So again, you can see
them side-by-side. This one actually has 54 chains, so this one has 44 chains. This one has 54 chains and
it's still in progress. I just wanted to get you to
see what it looked like. So you can see that the
flower is quite small, quite a bit smaller than with the DK on and the
four millimeter hook, but it's very delicate and it has a much
more refined look. So if that's something
that you like, then that might be
a possibility for you to use the pearl cotton. This is pearl cotton comes
in different thicknesses. This is a size eight. So because this flower
is quite small, I went around again. So this was, this was following the example as I demonstrated in the
earlier video lessons. And then in order to make the flower a little
bit more prominent, a little bit bigger. What I did was I went around
around the flower again. But this time I used double
the number of stitches. So apart from in
the double crochet, where I continued with
a double crochet. I put two stitches where in
the previous round by w1 one. So if you remember we did
a double and a double, then two travels and
then a double trouble. So in order to do
the second round, I do a doubling the double for travels and then two
double troubles. Basically you double the number of stitches all the way around. And it gives you
this kind of effect. Okay, So now it's your turn. The class project is to crochet
your own floral bookmark, things to consider
to personalize it. Like I said, think
about color schemes. Think about yarn, size, weight. Think about Hooke's size. Think about young types. So there's, this
has metallic yarn, but you get different
sorts of specialist yarns. You can use threads, you can use chunky. There's all sorts of
opportunities for you to make the bookmark urine. So, um, when you've done that, please do post your
projects in the, in the class project section. It really does help to
inspire other students and it helps to give me a
dose of serotonin. And also consider leaving a review because it helps
the class to be discovered. And it also helps me
to know what I did well and what I could
do better next time. Thank you so much for joining me and I look forward to seeing
your question a creations.
 Lilian Barker, Papercrafter & Surface Pattern Designer