Transcripts
1. Introduction to Cricut Magnetic Bookmarks: Hi Tammy here from
Tammy and Creative. And today we're
going to be making some magnetic bookmarks. You don't need to have
any art experience, we're just going to be
crafting and I've created the bookmarks for
you and the art. You'll be going to be
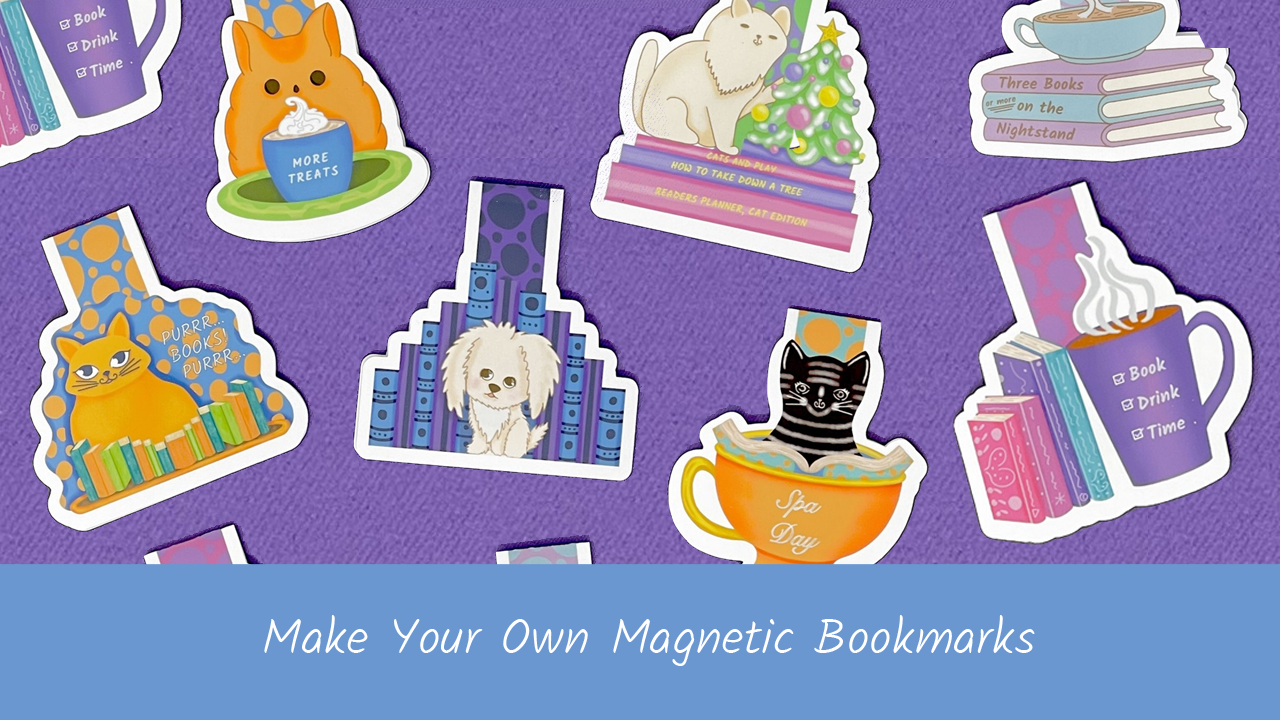
making a cute little puppy. A cat And a cup and a
cup with some books. These bookmarks are going
to be easy to make. This is a beginner tutorial. You're just going to
use the art that I've provided and your
cricket cutting machine. Some glossy photo paper
and some magnets. You don't even have
to have a huge amount of supplies to do this. It's fairly
inexpensive and I love inexpensive budget type projects when doing things
with a cricket. For this project, you also need a light grip mat that
goes with your cricket. I'll be going over all the
software that's needed, which is free when you purchase your cricket and how the
cutting process goes. Your bookmarks are going to
be cut out along the lines. I'm going to show you
how to make a margin, so you get a nice pretty
little border around the edge. Let's get started on making
these cute little bookmarks. I'm so excited to show
you this project. I'll see you in the next lesson.
2. Supplies: To get started, I
want to go over the supplies that you're going
to need for this project. There aren't very many,
but I do want you to know what they are and
where to get them. Most of the products I get off Amazon and I'll let you know
where you can get those, but you can get some of them at your local supply
supply store as well. Let's get started on looking at what supplies
you're going to need. First off, you'll
need your light grip, Matt, to go with your cricket. Then you'll need some paper. I'm using this cannon
photo paper glossy. I think I got 100 sheets for
about $20 off of Amazon. It's going to last me a long time and it's a
pretty good price. Last, you'll need these magnets. I got these 200 magnets for
about $10 off of Amazon. You can also find these three M 120 circle
magnets on Amazon as well. They both work really well, and I'll leave some
links down below.
3. Cricut Design Space: It's time to discuss
crickets design space. That's a software
that Cricket gives you to go along with
your cutting machine. If you don't already have that when you bought your
cutting machine, you can get that
at Cricket.com So please download that
now and open it. Please join me in the Cricket Design space right
around the corner. Open your Cricket Design space. I've got mine right here. What you're going to
do is you're going to click on New Project. Up there on the right
you have a white canvas. Quick tip, click over here on the lower right side
on blank canvas. Then you're going to
come all the way up to the top here where
it says color. And you're going to click Color and select a
color that you like. I'm going to go with
this periwinkle purple. I'm going to be able to do some really cool art on here now where I have white
borders and that white border is going to pop
on that purple background. We're going to now move
on to making a shape. When doing a print and cut here in the
Cricket design space, there is a size that Cricket
allows you a max size. We're going to make the size. Click on Shape and
select the square. Then I'm going to
click on the square. You're going to go up to the top and where there's
the little padlock, you're going to unpadlock that, if yours is padlocked. The largest size that
cricket allows for is 9.26 Type in 9.26 and then enter and then go
over to the height and type in 6.56 and enter. That's the size that Cricket is going to allow you to do
your print thing cut, you'll want to lock your shape. Then I'm going to hit
Shift up in the corner, You can see where it's creating
this little turn thing. I'm going to turn this,
it's in portrait. Now it's time to download the images that
I've provided you. Just open your browser
and go to the project and resources area to find this. It's right up here.
And then you're going to download this book. Drink Time books, cat
and puppy bookshelf. Once you download
all the images, you'll want to come back into
the cricket design space. You're going to be
uploading those images. Just click over here, all the way on the
left side says Upload. Click on that. And then you're going to click Upload Image. Then you're going to browse to wherever you downloaded
those three images. Browse, Select An Image, I'm going to do Book
Drink Time. Click Open. This is a complex image. You're going to
complex and continue, then apply and continue. Then click on Print the
cut, then click Upload. The image is now
in your library. We're going to do that for
the other two images as well. Now we have all three
of those images. You're going to click on
the little puppy there. Select the cat and the
cup with the books. You've got three items there. Then you're going
to add to Canvas. Now we've got all
three of these here. You're going to click off
of them and then move each one to its own
little section. I'm going to click
the book one here. And I'm going to come
up here to the sizing. I'm going to change
the height to 4.25 I'm going to do that for each of the
images, 4.25 and Enter. Now we've got these three images and they do not have
a border around them. Come up here and you're
going to click Offset. And then pit in 0.1 and Enter. You can see highlighted around the image how big that
offset is going to be. I'm choosing corner here
and I'm going to apply, it will always turn black first. If you want to change
the color, which I do, you come up here to
operation print thing cut, and you click the
little box here. And I'm going to choose white. Then I'm going to select Those images. Right
click and say flatten. That means it's going
to cut just around the white border instead of cutting in the interior as well. You're going to do
that same thing for each of the other images. I pick the puppy, offset one, it's already
selected. Still apply. Selecting white. Selecting
both of those images. Right click and flatten. Pick up the kitty
click offset A, select white, Select
those and flatten. Okay. All of them are now flattened
and we've got three. I'm going to pick up
the first one and I pit it all the
way up at the top. At 00, I'm going to pick up the puppy and
pit right next to that. And last off, the cat
overtop everything. Now I'm going to come
all the way over here into the layers panel
over here on the right. And I'm going to shift and
select all three of those. I'm going to come
over here to a line. I'm going to use this
distribute option. Distribute horizontally. Okay, now I'm going to
select all three of them. Again, up here, I'm going to select this little
plus up here in the layers panel
that's duplicate. You can also do control D. Now we have another
set of each of these to make sure
that we're using all our space and we're
not wasting paper. We're actually going to
make two of each of these. You're going to
have six bookmarks for yourself or
maybe for friends, or stocking stuffers,
Birthday presents. These are going to
be fun little things that you can use in
your books or giveaway. We're going to
select all of them. Again, We're going to do
what cricket calls attach. You're going to write,
click and attach. What this means is, no matter
where you move this around, these are all going to be attached and
everything's going to print and cut exactly
as it's shown, Doesn't matter where
it is on the canvas. Now we have our six
bookmarks and we're going to get rid of
that square rectangle. Now in the background, you're just going to come over here to the layer area and click
on the little eye. Now it's no eye, no viewing. Now I'm going to select Make it, let's make these bookmarks. You can see your
bookmarks and how they're going to lay out on
your printer paper. You're going to
click Continue now, we're going to send
this to the printer. Click send to Printer because we added a margin
already and a border. You're going to do no bleed and click Use system dialogue
and then click print. I'm going to be printing
on a Canon Pro 100 series. I'm going to click my printer up top and I'm going
to select Preferences. Your dialogue might
be a bit different, but the main thing that
you want to do is to pick the correct type of paper that you're going to be feeding
into your printer. And choosing print
quality high or best. Depending on your printer, it will say something
different area. Got one called bookmarks. Glossy photo paper, that a photo paper would be
just a good selection. If you're using
glossy photo paper, I'm going to use that and click. Okay. Now I need to feed the
paper into my P and click. I'll see you on the other side. Next up we're going to be doing the loading of the
light grip matt into the cricket for cutting. Very exciting time. Getting to see these designs
come out and be cut.
4. Cutting Time: Okay, I've got my
print out here. Depending on the type of
printer you have in ink, you might need to let it dry. Mine pretty much once it's printed it's dry and good to go. I'm going to load it onto
that light grip map. I'm going to place it
right here at the top. And making sure that
it's as straight as possible at the top, coming down here,
it's down at 11. And I'm just going to
turn that a little bit and give it a nice press. It's nice and solid. Okay. Let's come back into cricket design space and you're going to select the material. Depending on what material
you decided to print on, you'll need to choose
something different. I used photo paper, so
selected photopaper, maybe you did card stock or hard card stock or
heavy card stock. You choose whatever
you have printed on. I'm going to use regular
default pressure. Now it's time to load
everything into the Cricket. My light is flashing and
I'm going to hit load. Once it's in there, the
little cricket button will start highlighting and flashing. Then you just hit your
little Cricket First stop, It's going to go through
and read the lines. It has these little
black lines on the edge. It's going to read those and then it's going to cut
out the bookmarks. It shouldn't take too long here. Once you think it's
done, it says it's done. You're going to check it
before you unload the mat. First off, I pull up and did
it cut all the way through? If it cut all the way through, it's time to unload it. If it did not cut
all the way through, you're going to want to click a little cricket again and
it's going to go through, and again, I'm now I'm going to bring this
back and we're going to take off the outer area. You can see there they are, I'm just going to rip that off. And now we've got our
cute little bookmarks. A tip to get this off
really easy is to flip it over and then let the
little bookmarks come off. Okay, that's it. Now you've got all your little bookmarks and you're going to
put them out here. In this next step, we're
going to complete the process of putting them together and then putting
on some magnets. I'll see in the next lesson.
5. Creasing and Strong Magnets: Let's get creasing. First off, I'm going to do a
little puppy here. I'm just going to crease
it along this edge, making sure that it's the
same, all the way around. It looks really great.
And then I'm going to set him up, put him right here. I'm going to do that
with each of them. Just putting them
together at the bottom, making sure they're even. Once they're all creased, you'll want to
take your magnets. Magnets have a north and south, so pull up one magnet and
drop it onto another one. See where it really
goes together. Pull this. Where it's going naturally is where
you want to keep it. It's not going to
be exactly even, but it's going to be
nice and magnetic. You're going to place that right inside and then press back down. Just giving it a little bit
of a push to start with. And do that with each of
them pressing down, Okay? At the end you want
to pull them apart. Being careful, hold one
magnet and pull off. Place them down. Make sure you're in
a clean area and press really good
around the whole area, and then just let it go back. That little click is so nice. I just love that little click. Sound The three M
adhesive is really good. Once you have it there, it's not going anywhere. Okay, so you have
your six bookmarks now. Time to clean up. Okay. Time for a
little bit of a test, take all your bookmarks. Find yourself a book. Now you have yourself a
set of six bookmarks. Feel free to make more and give them away
to your friends.
6. Cricut Library Images - Strawberry Bookmarks!: Okay. Let's make some
strawberry bookmarks. This is a way you
can make bookmarks if you're not an artist, but you do have access to images from design space in cricket, including some free ones. This strawberry is free. First off, you're
going to click images, then you're going to click free. And let's search for
that strawberry. There's a, okay,
there's a strawberry. To click on the strawberry
and add that to the canvas. First off, your
strawberry is going to come in with multiple layers. If you were to do this
design right now, it would cut out each
of the little seeds. And this topper area, right now, you'll want to click
it and flatten. Now it would just
cut around the edge. Now you have your strawberry. Next step is that you're
going to come over here to the shapes and you're
going to make a square. And you're going to
unlock that square, we're going to make a width
of 0.5 by 4 " height, and then we're
going to lock that. You've got a 0.54 " for a
height of your total bookmark. Put it up here. Let's
turn that color red. I like a red. Let's come back to
your strawberry. We're going to resize the strawberry.
Let's bring it down. We want it to be about a half, if we're smaller
than our bookmark. Now we have our strawberry. Let's add a margin to the
strawberry, that opposite. Let's do 0.1. And let's go with white. White's a nice classic color. I'm liking that. Now
we have both of those. Like before you want to
highlight and flatten, now we have our
bottom strawberry. Let's bring that down to the
bottom here if you want to, you can change its orientation. It's a little more
straight like that. That would be the base
of my strawberry. You bring it down
a little bit more. Okay, then we're going to
duplicate this strawberry. We're going to highlight
everything here. And we're going to
say align horizontal. Then I'm going to take
both of the strawberries and I'm going to
align them to center. Now we have these
two strawberries. Now we just want to take
one strawberry on top and we're going to flip
it, flip vertical. Then we're going to go up holding the shift key so we can see all of it goes all
the way up to the top. Now let's highlight
the whole thing. Now we have the
two strawberries, and I think they're
too big for it, so I'm going to do size them, I'm going to select
both and downsize. Take this one, bring it up to
the top, and it's perfect. Okay, We've got our
strawberry here, and we're going to
highlight the backer area. And I'm going to
have you unlock it. We're going to pull in, pull in there until you can't
see it anymore. Sometimes you'll have
to click off and redo. Okay, let's go up. Okay, we can see that
our strawberry is going to be cutting on the same
line. Everything is good. If you're not sure, you can align again
and do center horizontally and get
it looking like that, it's another option for you. I'm liking that a lot. I'm going to highlight my strawberry, the
square rectangle, and we're going to now flatten everything's
flattened again. We've got a strawberry, and we can create
duplicates of it like before, lots of strawberries. Let's turn these
ones off down here. And we can now bring
these ones over, loads of strawberry bookmarks. Highlight them all the line, distribute, distribute
horizontally. And then duplicate again
for a whole another set. Remember, before you make it, you need to select all
of them and say attach. Now you've got all your little strawberry bookmarks
all ready to go. Let's make it, we've got
strawberry bookmarks. Here we continue and now we're going to send
it to the printer. No bleed going for my personal preferences
doing bookmarks. And I'm sending
it to my printer. Okay, I've printed
my strawberries and now it's time to cut. So I'm going to put
my strawberries into the cutting machine. Okay, now I have all
the strawberries cut and it's all ready to go. So I'm going to
just pull that off. I'm going to strawberry here. Just pulling them all off. Putting that back there. Just going to make one
strawberry here with a magnet folding the strawberry. Okay, so we've got the
magnet already to go here. Make sure it's going
where it wants to go. It feels good, and put it into my little
strawberry there. Okay, So we've got a
little strawberry there, and I think that looks so cute. A full freebie
that you can do on the cricket design space without having to
download anything. Let's put it into a book
here, and there you go. You can see it right
there in the book. Cute little strawberry. I'll see you in the next lesson.
7. Homework - Sharing & Feedback: You're wondering what
your homework is. Your homework just is to make the bookmarks that I
showed you how to make. Then if you made any
additional ones as well, you'll be putting those into the projects
and resources area. Just click the Project button and upload and I'll be
able to see your project. I'm excited to see
what you've created. If you've done any
additional bookmarks, be they from me or your own, I want to see what you have to share, share with the class. That'd be an excellent way to share what you've learned
from this course. That's it, That's your homework. And I'll see you in
the next lesson.
8. Thanks: Thanks so much for going on this magnetic bookmark
journey with me. If you're interested in getting additional designs
on my website, you can get those
www.tancreative.com I'd love to keep in
contact with you. You can find me on Twitter,
Instagram, and Youtube. And I'll be hanging out in different areas. Just
leave me a comment. And I'd love to hear
from you and how your experience was
with this workshop. I'd also love a review. If you enjoyed this, you just go down into Skillshare and
click the review button. I'd love to hear about your
thoughts on the class. I had a whole fun time here with you and I hope you enjoy these bookmarks
for years to come. See again soon. Take care. Bye.
 Tammie Ann Creative, Artist & Crafter