Transcripts
1. Welcome: Welcome to this
class. I'm Victoria. And in this class, we are
going to slow things down and spend a few minutes drawing
simple projects together. We are focusing on fun, easy shapes that anyone can do, even if you've never
really drawn before. We'll start with simple
circles, petals, and lines and turn them into cute little flowers
step by step. We'll start with very basic
doodles and gently build them into small floral designs you can use anywhere
in your notebook, your planner, or just as a quiet creative
break in your day. In this class, we'll explore even more fun ways to
spark your creativity. I'll show you how to draw with both hands
at the same time, a simple yet powerful
exercise that helps activate both sides of your brain and encourages
creative thinking. We'll also practice a one
line drawing technique, creating a series of connected hearts without
lifting the pen from the paper. These playful exercises are designed to help you
let go of perfection, relax your mind,
and discover that creativity grows through simple, enjoyable drawing techniques.
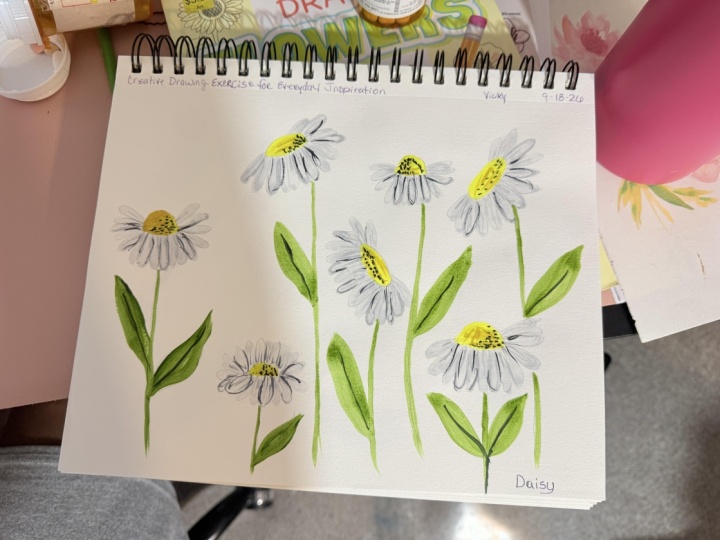
2. Class Project - Doodle a Daisy: This class project,
you'll create your own adorable daisy doodle using just a few simple
shapes and lines. Daisies are one of the
easiest flowers to draw, making them perfect
for beginners and anyone looking for a
relaxing creative activity. We'll build the
flower step by step, starting with a
simple half circle and gradually adding petals, a stem and leaves. Once you've mastered
the basic daisy, you can personalize it with extra details and
creative variations. Begin by drawing a half circle. This shape will become the
center of your daisy and serves as the foundation
for the entire flower. Don't worry about making
it perfectly symmetrical. A hand drawn look adds
charm to your doodle. Next, draw a row of oval shaped petals along the bottom
edge of the half circle. Let the petals overlap
slightly if you'd like. You can make them
long and narrow, short, and rounded, or
a combination of both. The petals are what
give your daisy its cheerful and
recognizable appearance. From the center of the flower, draw two parallel lines extending downward
to create the stem. Your stem can be straight
for a classic look or gently curved to give the flower a more natural and playful feel. Now add one or two
leaves along the stem. Create each leaf using two curved lines that
meet at a point. Experiment with
different leaf sizes and placements to make
your flower unique. Complete your daisy
by adding small dots or tiny lines to the center
of the flower for texture. These simple details bring the doodle to life and make
it look more finished. You can also add decorative
elements such as hearts, sparkles, butterflies, or little shine marks
around your flower. Once you've drawn
your first daisy, try creating a few variations. Draw flowers of different sizes, make a small bouquet, tilt the flower head, add extra petals, or create
stems with different curves. You can even draw a
small garden scene with several daisies
growing together. Once you've completed
your daisy doodle, it's time to share your
artwork with the class. Take a clear photo of
your finished drawing and upload it to the project
gallery for this class. Whether you've created
a single daisy, a bouquet of flowers or experimented with your
own unique variations, we'd love to see
your creative work.
3. How to Doodle a Daisy: This tutorial, we're
going to doodle a small cluster of cute
daisies step by step. Take a pen and start
by lightly sketching a few half circles across your paper. Don't just draw one. Place more of them in
different spots so you already have a little
field of flowers forming. Each half circle should
have the flat side facing downward like a small
dome sitting on the page. These shapes are your guide for where the petals
will go later. Try not to line them
up too perfectly. Let some sit higher, some lower, and maybe tilt
one slightly to the side. This uneven placement
is what makes your daisies feel natural
instead of mechanical. You can also vary
the size a little. One larger main flower
and a few smaller ones around it can instantly make the composition
more interesting. Now begin shaping petals around the curved edge of
each half circle. Draw oval or teardrop shaped petals that radiate
outward from the curve. They should gently touch
or slightly overlap each other like they're sitting snugly around the flower center. Don't worry about making
every petal identical. Let some petals be a bit longer, some shorter, some
slightly crooked. That imperfection is what gives daisies their soft
hand drawn charm. Work around each
half circle slowly, completing one flower
at a time or bouncing between them if you prefer
a more free flowing rhythm. If you want a fuller look, you can add an extra layer of petals behind the first row, peeking out between gaps. Inside each half circle, fill the center area with
small dots or tiny specks. You can press lightly and cluster the dots
tightly in the middle, then let them spread out a
little toward the edges. This creates a soft
gradient effect without needing any
shading skills. Each flower can have a
slightly different center. This helps your
daisies feel like real individual flowers
instead of copies. From the bottom center
of each flower, draw a stem extending downward. You can keep stems
straight for a clean, simple look or gently
curve them so the flowers feel like they're swaying in a breeze or leaning
toward light. Let the stems interact
with each other. Some can angle inward, some outward, and
a few can overlap. This creates a natural
bouquet effect instead of isolated flowers
floating on the page. Try varying stem
thickness slightly too. A few slightly thicker
or thinner lines make the drawing
feel more organic. Now place leaves
along the stems. Think of them as small
supporting shapes that balance the composition. Draw simple tear drop or oval forms branching
off from the stems. Usually, one or two leaves
per stem is enough, but you can add more if a
flower feels too empty. Angle the leaves differently, some pointing outward, some upward, some
drooping slightly. This variation makes
the whole drawing feel alive instead
of symmetrical. If you want a small upgrade, add a single light line through the center of each leaf
to suggest a vein. Keep it subtle so it doesn't
overpower the simplicity. Now, the fun part, color
your daisy cluster. Start with the flower centers and color them a warm yellow. You can press a bit harder
in the middle for richness, then lighter toward the edges
for a soft glow effect. Next, color the petals white. If your paper is already white, you can either leave
them blank for a clean, minimalist style or
lightly shade them with very soft gray or pale
pencil to give depth. Finally, color the
stems and leaves green. You can slightly vary the green tones if you
have more than one shade. This makes the plant
feel more natural and less flat. And that's it. You've drawn a little
cluster of cute daisies by keeping the shape simple and letting the lines
stay a bit loose, you've created a soft, natural looking flower doodle. Try experimenting with
different arrangements, more flowers, or even a
full meadow next time. Most importantly,
have fun with it and let each drawing
look a little different.
4. How to Doodle an Abstract Flower: Now we're going to
create a page full of simple doodle flowers with a fun, slightly abstract twist. These aren't meant to look like realistic blooms you'd
find in a garden. Instead, they're playful
little floral doodles made from basic shapes
and flowing lines. Let's begin by drawing several circles scattered
across the paper. Don't stop at just one flower. Fill your page
with a few of them to create a cheerful
little garden. Make the circles
different sizes. Draw a couple of larger ones, some medium sized, and perhaps a few tiny ones
tucked in between. As you place them on the page, think about creating a
balanced arrangement. Some flowers can
sit close together while others can have a bit
more space around them. Now, inside every
circle, draw a spiral. Start near the center
and slowly curl the line outward until it
fills most of the circle. Some spirals can
be tight and neat while others can be looser
and a little wobbly. Take your time with this step. The spirals give
these doodle flowers their whimsical personality and each one can look
slightly different. By varying the size and
shape of the spirals, you'll make each
flower feel unique. Next, draw a bigger circle
around each flower center. The original circle with the spiral becomes the
center of the flower, and this new larger circle creates the outer
edge of the petals. You don't need to keep an equal distance all
the way around. Let the larger circles
wobble and flow naturally. A slightly imperfect
outline gives these flowers their
relaxed, hand drawn charm. As you move from
flower to flower, you'll start to see your
doodle blooms take shape. Now it's time to transform
those outlines into petals. Draw simple curved lines from the inner circle
to the outer circle, working your way
around each flower. These lines divide the space
into individual petals. You can draw lots
of narrow petals on one flower and fewer
wider petals on another. Some petals can be slightly uneven or tilt in
different directions. There's no need for
precision here. The beauty of
doodling is embracing the imperfect lines and letting the flowers develop
their own character. From the bottom of each flower, draw stems extending downward. Some stems can be straight and simple while others can
gently curve and bend. Let them flow naturally
across the page. You can have stems overlap cross paths or angle in
different directions. This creates movement and makes the arrangement
feel more like a growing patch
of flowers rather than a row of identical blooms. Keep the lines
light and playful. Now let's give the
stems a few leaves. Draw simple leaf shapes
branching off the stems. Tear drop shapes work
beautifully for this style, but don't worry if they
aren't perfectly matched. Place the leaves at different
heights and angles. Some can point upward, others outward, and a
few can droop slightly. If you'd like a
little extra detail, add a single line down the center of each leaf
to suggest a vein. These small additions help fill the page and make the
doodle feel complete. Let's start adding color. Begin with the centers
of the flowers, the circles containing
the spirals. Choose your favorite colors
and carefully fill them in. You can make all the
centers the same color for a cohesive look or mix different shades for a more
playful and vibrant garden. The bright centers instantly
bring energy to the page. Next, move on to the petals. Color each flower
one petal at a time, taking your time and
enjoying the process. You can use a single color for every flower or experiment
with different combinations. Soft pastels create a
gentle, dreamy feel, while bold colors give your doodles a cheerful,
lively personality. Since this is doodle
art, there are no rules. Have fun choosing whatever
colors make you smile. Finally, finish
your doodle garden by coloring the
stems and leaves. Use shades of green to
bring everything together. If you have more than
one green available, alternate between
lighter and darker tones to add a little
depth and variety. Once the greenery is complete, take a step back and admire your page full of
whimsical doodle flowers. If you'd like, add a few
tiny dots, sparkles, or little hearts in the empty
spaces between the flowers. These simple details help
tie the whole composition together and make your doodle
page feel even more joyful. And just like that, you've turned a few simple circles and spirals into a charming
garden of doodle blooms.
5. How to Doodle a Rose: This video, we're
going to fill our page with a collection of
sweet and simple roses. Let's begin by drawing tiny
spirals all over the paper. These simple swirls will become
the centers of our roses. Start each spiral in the middle and gently curl
the line outward. Place some close together, let others stand on their own, and vary their sizes slightly to make the
arrangement feel natural. Even though these are
such simple shapes, you'll be surprised
how quickly they start looking like
little rosebuds. Now, let's turn those
spirals into roses. Around each spiral, draw a half oval shape that gently
hugs one side of the swirl. Think of it as wrapping the
spiral in a soft little petal or creating the outer
shape of the rose bloom. Once you're happy with
your rose blooms, it's time to connect them
to the page with stems. From the bottom of each rose, draw a straight line
extending downward. Keep the stems simple and clean. You can make some
stems a little longer and others shorter
to create variety. A few roses can sit higher on the page while others
reach down further. If some stems overlap or sit close together, that's
perfectly fine. It can make the
drawing feel like a small bouquet or a patch of
roses growing side by side. The simplicity of
the straight stems balances the softness
of the swirly blooms. Now, let's add some leaves
to bring your roses to life. Draw simple leaf shapes
branching off the stems. You can use easy
teardrop shapes with pointed tips placing one or
two leaves on each stem. You don't have to make
every leaf match exactly. A little variation makes the entire doodle feel more
relaxed and hand drawn. If you'd like an extra
touch of detail, draw a light line
down the center of each leaf to suggest a vein. Suddenly, those simple spirals have transformed into a
charming rose garden. It's time to add some color. Start by coloring
the rose blooms. Traditional shades of red and
pink always look beautiful, but don't be afraid
to experiment. Purple, peach, coral, yellow, or even rainbow roses can add
a fun and whimsical twist. Because the design is simple, bold colors really stand out and give the flowers
plenty of personality. Take your time filling
in each bloom, enjoying the process
one rose at a time. Finally, color the stems
and leaves using green. If you have multiple
shades of green, try alternating between
them to add subtle variety. Darker greens can create depth, while lighter greens keep the doodles feeling
fresh and playful. Once you've finished
the greenery, step back and admire your page. With just a few
spirals, half ovals, stems and leaves, you've created an entire collection of
adorable doodle roses. And that's it. With just
a handful of easy shapes, you've created a page full of sweet little roses that are as fun to draw as
they are to color.
6. How to Doodle a Berry Flower: This tutorial, we're
going to draw a charming cluster of
berry shaped flowers. We'll begin by drawing the
stems for our flowers. Start by placing your pencil
on the paper and drawing two gently curved lines that grow upward
from the same point. These lines should
stay close together, creating a simple stem shape. Next, we'll create the berry shaped
centers of our flowers. At the top of each
stem, draw a circle. These circles represent
the berries and will become the main focal
points of the doodle. Try to keep the circles
roughly the same size, but don't stress
about perfection. Small differences in size and shape can make the drawing
feel more natural. Inside each berry, draw several vertical
lines running from top to bottom or from
the bottom to the top. Start near the top edge
of the circle and gently curve the lines as they follow the round
shape of the berry. These lines add
texture and detail, helping the berries look
more dimensional and realistic rather than
appearing as simple circles. Think of them as
the natural ridges you might see on small
fruits or seed pods. Take your time adding the lines, spacing them evenly across
the surface of each bery. The exact number of
lines is up to you. Just a few can create
a simple look while more lines can add extra
texture and visual interest. At the top of each circle, draw one or more
oval shaped petals. Think of these petals as small leaves gently resting
on top of the berry. You can keep the petals
simple and rounded or vary their size slightly for a more
natural appearance. Once all of the berries have
petals and textured lines, you'll notice that
the drawing begins to look much more floral
and decorative, with each flower having
its own unique character. Next, add a few leaves
to some of the stems, draw simple leaf shapes by creating two curved lines
that meet at a point, position the leaves at
different angles along the stems to give the bouquet a more natural
and balanced look. These small details
add depth and character while keeping the
doodle easy and fun to draw. Finally, color the stems
and leaves using green. If you have multiple
shades of green, try alternating between
them to add subtle variety. Darker greens can
create depth while lighter greens keep the doodles feeling fresh and playful. For the berries, I'm choosing
a bright vibrant red. Fill each bary carefully, leaving the petals uncolord or coloring them
lightly if you prefer. The red creates a cheerful
eye catching look that helps the
flowers stand out. Once you've finished
the greenery, step back and admire your page.
7. How to Doodle a Tulip: In this doodle tutorial, we're going to create
a beautiful page filled with simple
and elegant tulips. Let's begin by drawing several U shapes across
the entire piece of paper. These simple curves will become the base of our tulip buds. Try placing them in
different areas of the page rather than lining
them up in neat rows. Some can sit higher, some lower, and a few can be slightly larger or smaller
than the others. Keep the bottoms rounded and
the sides gently curved. They don't have to
be perfectly even. Tulips naturally vary in shape, so a little wobble or isommetry
only adds to their charm. As you continue adding
these U shapes, you start to see your future
tulip garden taking shape now let's transform
those simple U shapes into recognizable tulip blooms. Across the open top of each
U shape, draw three points. These pointed shapes represent the tulip petals
folding together. Some points can be taller and sharper while others can
be shorter and softer. You can even let one
side petal overlap the center slightly to create variation
between the flowers. As you repeat this step, each tulip will develop
its own personality. Some may look like
tightly closed buds, while others will
appear ready to bloom. Now it's time to add a delicate detail that
brings your tips to life. Inside each tulip bud, draw a few thin lines extending upward from
the base of the flower. At the top of each line, add a tiny circle. These little lines and circles represent the stamens
inside the tulip. You can draw two, three, or even four stamens
in each flower. Some can be slightly taller than others and they don't have
to be perfectly spaced. This simple detail
gives your doodles extra charm and makes the
flowers feel more complete. Next, let's add a bit of
texture to the tuli petals. Starting near the
base of each petal, draw a few light
lines that follow the shape of the bloom upward toward the
points at the top. Keep these lines
soft and simple. They shouldn't overpower
the drawing just enough to suggest the natural folds
and structure of the petals. Now let's connect the flowers
to the page with stems. From the bottom
center of each tulip, draw a line extending downward. Tulip stems are usually
long and graceful, so you can keep them mostly straight or give
them a gentle curve. Tulips are known for
their beautiful leaves, let's add those next, draw long curved leaf shapes
growing from the stems. The leaves should
taper to a point at the tip and gently hug
the stem near the base. Some leaves can curve outward, while others can sweep
gracefully to one side. Try placing one or two
leaves on each stem, varying their size and
direction as you go. These elegant
shapes help balance the composition and fill
the page beautifully. Now for the most exciting part, bringing your tulip garden
to life with color. Start by coloring
the tulip blooms. Traditional tulips look beautiful
in shades of red, pink, yellow, purple and orange, but feel free to use any
colors that inspire you. Whether you're using markers, colored pencils, watercolors, crayons or something
else entirely, every medium creates
its own unique effect. Next, add color to the
stamens if you'd like, using small touches to
make them stand out. Finally, cover the stem
and leaves with green. If you have multiple
shades of green, mixing them can add depth and variety to your
doodle garden. You've transformed a
few simple U shapes into a lovely collection
of elegant tulips, easy to draw, relaxing to color, and absolutely
delightful to display.
8. How to Doodle a Muscari Flower: Let's draw some charming
Muscari flowers, also known as grape hyacinths. These little spring
flowers are easy to dodo because they are made
from just a few simple shapes. With graceful leaves,
slender stems, and clusters of tiny
round blossoms, you have a beautiful
floral doodle in just a few easy steps. Start by drawing two gently
curved leaves side by side. Make them medium width as they grow from the
base of the flower. Give each leaf a gentle curve to create a soft natural look. Then draw another pair
of leaves nearby, varying their height
and direction slightly. Continue adding several pairs
of leaves across your page. Small differences in
size and angle will make your flowers look more organic as they would
in a real garden. From the center where each
pair of leaves meets, draw a long, gently curving
line extending upward. Then draw a second curved line nearby to create another stem. Some stems can lean a little to the left while others
curve to the right. This gentle movement
makes the arrangement the lively and gives each flower
its own unique shape. Repeat this process
until every group of leaves has two elegant
stems reaching upward. Next, let's create
the flower heads. At the top of each stem, draw a few small circles arranged in a loose
triangular cluster. Make the circles slightly
different sizes, placing the larger ones toward the bottom and the smaller
ones near the top. This simple arrangement creates the signature grape like shape that Muscari flowers
are known for. Repeat the same
pattern on each stem, keeping the clusters
small and delicate. Don't worry if they
aren't perfectly even. Those tiny variations make your doodle feel more
natural and hand drawn. To add a little more detail, draw a single vein down
the center of each leaf following its gentle curve from the base all the way
to the pointed tip, then add a few
short angled lines, branching outward
from the center vein toward the edges of the leaf. Space these lines evenly, but don't worry about making
them perfectly symmetrical. These simple veins add texture
and movement to the leaf. They also help
leaves look fuller, more dimensional and much more lifelike without adding
too much complexity. Finally, it's time to bring your scary flowers to
life giving them color. Fill in each of the
tiny flower circles with a lovely violet
or purple shade, layering the color evenly while leaving the
outlines visible. Then color the leaves
with a fresh green using a slightly darker
shade near the base or along the center vein if you'd
like to create extra de. The contrast between the
vibrant purple flowers and the bright green leaves gives these little spring blooms their fresh,
cheerful appearance. And there you have it your own delightful Muscari
flower doodles. With just a few curved lines, simple circles, and
a touch of color, you've created an elegant
botanical illustration that's perfect for journals, greeting cards, planners,
or spring themed artwork. Experiment with different sizes, add a few extra flower
stems or combine them with other spring flowers to create a beautiful
floral arrangement.
9. How to Draw Chicken with Both Hands: You take a piece of paper
and two drawing tools, one for each hand, and you begin drawing with
both hands at the same time. There is no need to plan
anything in advance, and there is no requirement
for artistic skill. You are free to draw
anything you like, shapes, lines, animals,
patterns, or abstract forms. In the video example, you may see cute
chickens being drawn, which adds a playful and
light hearted element, but you are completely free
to choose your own subject. The most important path
is not what you draw, but the fact that both
hands are moving together. As you begin, allow both
hands to move simultaneously. They don't need to
mirror each other perfectly and they don't
need to be identical. The idea is simply to keep
them active at the same time, creating a shed rhythm
across the page. One hand might draw curves
while the other draws lines, or both hands might follow
similar flowing shapes. At first, this can feel unusual, especially if you're used to relying more on
your dominant hand, but the goal is not
control or precision. It is relaxed,
continuous movement. Seta drawing develop naturally. You do not need to think too
much about the final result. Instead, stay with the
process of moving both hands, watching how the lines form
and interact on the page. The image often becomes something unexpected
and interesting simply because it is created in real time without over planning. For this practice, I personally prefer using paint
sticks because they move very smoothly
across the paper and create a more fluid,
effortless sensation. That smooth glide can add an
extra layer of calmness and relaxation to the
experience making the movement feel even more
natural and grounding. However, this is absolutely
not a requirement. Any drawing tool
will work just fine, and the practice remains equally effective regardless
of what you use. This practice is effective for stress relief because it gently pulls your attention away from overthinking and into
coordinated physical action. When the mind is stressed, it tends to loop through
thoughts and worries, but bilateral drawing
interrupts that cycle by requiring
present moment focus. You have to stay
aware of both hands, the movement of the pen, and the emerging shapes on the page which naturally
reduces mental distraction. Another calming aspect of
this technique is rhythm. As both hands move together, a steady flow begins to develop. This rhythm can feel
grounding and soothing, helping the nervous
system settle. Instead of sharp
scattered thinking, your attention becomes
smoother and more continuous, which often leads to a sense of relaxation and mental clarity. It also creates a unique
sense of balance in the body and mind because both
hands are engaged equally, the brain is encouraged to
coordinate across both sides, which can feel stabilizing
and centering. There is no pressure to perform or produce
something perfect, which removes the mental tension that often comes with
traditional tasks. Most importantly,
bilateral drawing invites a state of
gentle absorption. You become focused
on the simple act of moving your hands and
watching the lines appear. Thoughts naturally quiet down, not because you are
forcing them to stop, but because your attention is fully occupied in
the present moment. This practice works because
it combines movement, creativity, and mindfulness
into one simple activity. By drawing with both
hands at the same time, you create a steady
engaging flow that helps calm the mind, reduce stress, and
bring you back to a more grounded
and present state, one line, one movement, one moment at a time.
10. How to Draw a Bilateral Star: We are drawing a star using
both hands at the same time. Place a pencil in each hand and bring both tips to
the center of the page. Start at the same moment, letting the first two
lines of the star grow outward in
opposite directions. Imagine the star already
exists on the page and your hands are simply revealing it through
mirrored motion. Don't rush and
don't target speed. Just draw steadily
and continuously. Let your hands move as
reflections of one another. Think of them as
two equal partners rather than a dominant
and a helper. Avoid planning each
line too carefully. Instead, allow the movement
to guide the form. Each mirrored stroke
builds part of the star. Allow the star to form through cooperation rather than control. Bilateral drawing
like this is known to support cognitive balance
and emotional regulation. Because both sides of the
brain participate at once, the effect is often
described as centering, clarifying, and
quietly uplifting. Continue until your
star feels complete. Repetition deepens
the coming effect and strengthens the
sense of rhythmic flow. The page becomes a record
of harmony in motion, a visual pattern created
through balance and presence.
11. How to Draw a Bilateral Butterfly: In this video, we will draw a butterfly using
bilateral movements, allowing both hands to
move together in harmony. We'll start at the center drawing the butterfly's
head and body, and then let our hands sweep
outward to create its wings. This practice is not
about following rules, about presence, balance, and the calming rhythm
of mirrored motion. As we draw, we'll use
each line to connect with our bread and cultivate a
quiet meditative focus. Bring your awareness
to the head of the butterfly with soft
mirrored movements. Let your hands trace
a small, gentle oval. Draw the body of the butterfly, a slender line extending
from the head, slowly begin to shape the wings. Each hand is as a reflection of the other moving in harmony outward from the body
of the butterfly and responding to the gentle
guidance of your breath. With every sweep, notice how your body naturally
finds balance, how the mirrored
movement feels like a quiet conversation
between right and left, internal symmetry made visible. Let your hands trace
long and flowing curves, feel the rhythm and the way it grounds you in
the present moment. Allow the lines to unfold naturally with each
outward sweep, breathing, calm,
breathe out tension. Observe the space forming
between your hands, the space of stillness that
grows as the wings expand. As your hands move, notice the meditative resonance
of bilateral movement. When both sides
mirror each other, the mind often quiets, the body eases and
a subtle alignment emerges right and left hand
and brat thought and motion. Let yourself become
aware of this alignment, letting it deep in with every curve you draw
as you continue, feel the connection between
movement and presence. Each curve, each sweep is
an act of mindfulness. Take this moment for yourself. Let the butterfly unfold
freely on the page, a reflection of quiet
joy and harmony. With each line, feel gratitude for the
simple act of moving, drawing and breathing together. When your butterfly
is complete, pause. Observe its wings, its symmetry, and the calm it carries. Feel the gentle satisfaction of having allowed your hands, mind, and bread to move
together in unity.
12. How to Draw a Bilateral Flower: Imagine the center of a flower before you
and begin there. Draw small gentle circles, letting each movement unfold like a quiet whisper
across the page. Allow your hands to move freely, guided only by their
own natural rhythm. There is no need to control
and no need to force, simply let them find their path. Feel the motion as it travels
through your fingers, your wrists, your arms, a soft pulse mirrored on
both sides of your body. With every circle, notice
how your hands find harmony, how even the simplest gesture carries a subtle
grounding energy. Let yourself linger
in this rhythm, the quiet ebb and flow that arises from simply
being present. This is your quiet meditation, a dance of presence
and ease held softly in the gentle
movement of your own hands. Now, let us move outward, allowing the petals
to take shape, feel your hands drift
gently, tracing white, sweeping arcs that radiate from the center as if the air itself
bends to meet your touch. Each movement is
soft and deliberate, carrying a rhythm
that is unhurried and natural like the slow
pulse of a quiet stream. Notice how each gesture flows
seamlessly into the next, how your hands almost
instinctively mirror one another. There is a delicate
symmetry in this motion, a subtle dialogue
between left and right, between movement and stillness, that feels both
effortless and precise. It is as if the petals
are speaking back to you, responding to the
care in your touch, opening wider with each
passing breath, they grow, each one settling into
its own perfect place, yet part of the whole
unfolding in quiet accord. Breathe with the movement, let the rhythm guide you. Feel the center from which
everything emanates steady and alive and notice how your
awareness stretches outward, following the gentle
arc of each petal. Pause and observe the
flower you've created. Feel gratitude for
this simple practice for the way your hands, your mind, and your breath
move together in harmony.
13. One-Line Drawing (Chain of Hearts): The practice begins with a fine liner pen and a
blank piece of paper. Using a fine liner
is important because it encourages a light controlled
and intentional line, which naturally slows
your drawing down and helps you stay present
with every movement. You start by choosing
a simple subject. In this video, I'm
drawing heard that are all connected in
one continuous flow. However, this is
just one example. You can choose any form
you like flowers, faces, abstract shapes, waves,
objects from nature, or completely
imaginative patterns. There are no limits and
no need for perfection. Once you begin, the
key rule is that you draw everything in
one continuous line. You do not lift your
pen from the paper, the line flows across the page. Turning, looping and connecting different
elements together. This creates a sense of
continuity and focus because your attention must stay with the movement of the
pen at all times. As you draw, you may notice that your mind
naturally slows down. You are no longer
jumping between thoughts or planning
ahead in detail. Instead, you are
simply following the line one curve
one connection, one shape at a time. This steady focus gently anchors you in the
present moment, which is why the practice
feels coming and grounding. After completing the
one line drawing, the second phase
begins coloring. You can now bring
your drawing to life by filling in the
shapes with color. This step adds another
layer of mindfulness because you shift from
continuous motion to slower, more deliberate
filling of space. As you color, you stay fully present with each area you fill. You might choose soft
repetitive strokes or slow, careful shading. There is no rush. The coloring process
becomes a way to extend the calmness created during
the line drawing phase. Together, these two stages form continuous line drawing and mindful coloring create
a balanced experience. The first part focuses your attention through
uninterrupted movement, while the second
part deepens that focus through slower,
more detailed engagement. This practice is
especially helpful for stress relief because it gently
reduces mental overload. When the mind is stressed, it tends to fragment into
many thoughts at once. One line drawing brings everything into a single
thread of attention. You cannot rush multitask
or drift too far away mentally because the line constantly requires
your presence. The same time, the
act of coloring adds a soothing repetitive quality that helps regulate emotions. Feeling shapes with color can
feel rhythmic and steady, allowing your nervous system to settle naturally without effort. In essence, this practice works because it combines
flow and focus in a simple creative
way by drawing continuous forms and then
slowly coloring them, you guide your
attention away from stress and into a calm,
structured creative process. It is not about making
a perfect artwork but about staying present with
each line, each color, and each moment as it unfolds. A
 Vicky, Small Business Mentor