Transcripts
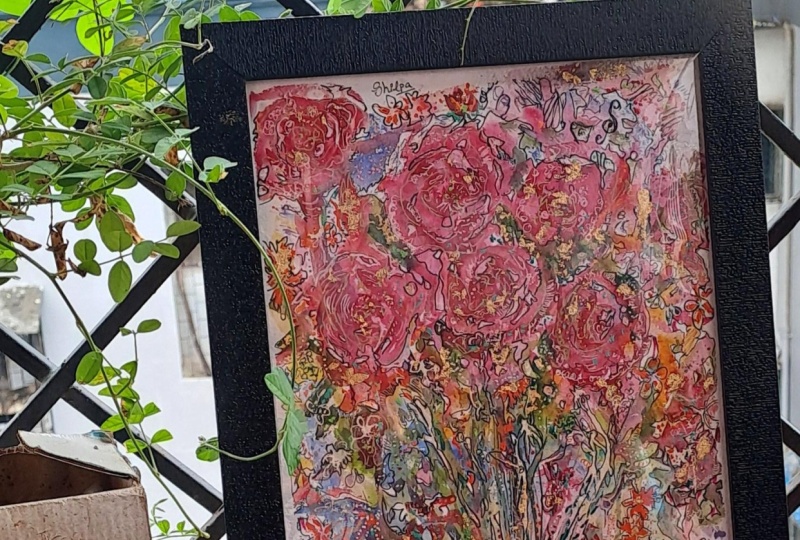
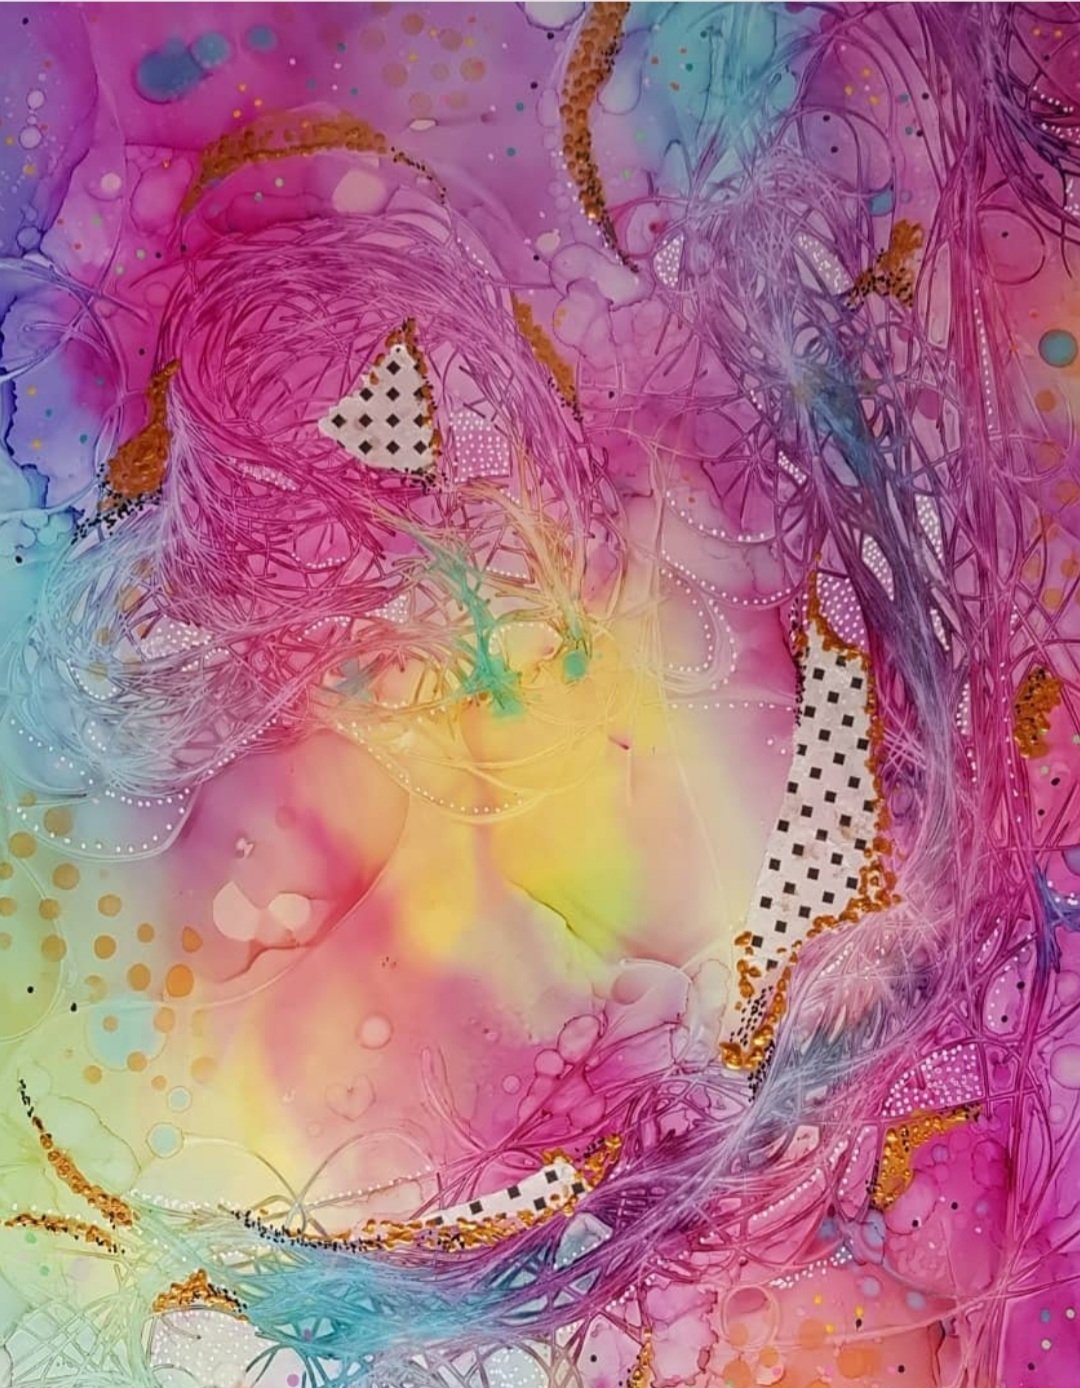
1. Introduction: Thank you so much for joining me and you're all very welcome to my class, creative development, True or colors, or we're going to be learning. And then today's class is how to connect to creative energy and how to stay connected once we start our process. So it can be quite challenging as artists when we sit down to connect to the creative flow of energy, both when we let go of fear and when we let go of our idea of our finished piece and we become immersed in the actual process of painting. We connect to that energy, staying connected to or it can also be a problem. So in this class I'm going to be teaching it. The tips I'll use to prepare myself before I paint to stay in the flow. Once I hit that flow energy, when you're in the zone, that you don't have to be pulled out of a for any reasons. Some are going to be discussed and collect area. Am I going to be having a basic understanding of the color wheel? And we are going to be discussing color schemes as well. We're also going to be discussing a training process, a warm-up process before we paint so that we can loosen our energy and we can really become immersed in this kind of creative, playful style. And I'm going to teach it today. So we're going to be learned in war colors and you're going to need it what we'll call a path similar to this. Now in most of my classes, I say what I'm doing is a step-by-step guideline. You don't necessarily have to use the same size paper is me, the same quality paper and the same paints. And he paints that you have any colors that you have. But I will show you what I will be using in the class just in case you want to follow along exactly what I'm using. So I'm just using a standard, this is a standard watercolor paper on it. So there's no need to stretch this paper, so it's very good for beginners. I'm going to be used in various different water colors. So I'll be using the palette from Art, Philosophy and hostile and tropical. I'll also be using a palette from Winsor and Newton, a palette from a Tesla. But again, you don't need all these variations. Of course, a few colors is all you need to be done. And lots of Oracle as a home toggle shop to buy anything expensive to practice, you can use any cheap watercolor tubes or ponds. It doesn't really make a difference. This kind of these kind of tutorials, I do ourself flexible. It's about learning. It's about having Pfam and especially in these creative development classes, but I'm deal, you just have to participate. It's more about the mindset when we paint. That's what we're trying to really learn in these classes. So you're going to need a couple of paint brushes. And again to paint pushes this fine. I have just different shapes that I'll be using. But you can work with basically whenever you have a home, even if you only have one paint brush, you can work with Tesla. I will also be used in posca pens in various colors. So what I recommend that you do have is a black Posca pen and a white posca pen. They're probably the two most important. And then on your corners that you'd like or you have a home are perfectly fine. And if you wanted to participate at the very end, we're doing gold leaf. And so I'm using PBO, Guild and paste and some Golgi's. So what I will be creating in today's class, I'm going to show you an example. So these are my watercolor sprays. It's like a fantasy flower. They look quite complex. When you look at them as a finished piece. When you're going through the process, you'll see that they're easy to build layers that reveal themselves as we're walking through the process. So this is a very attainable piece of artwork for even a beginner and intermediate, if you're looking to stretch your style to try something that you haven't tried before. Looking into loosen up. If you're looking to find your own unique voice in paint and on your own unique style as artistic can take us a while to find the style.css uniquely ours on I think that for me, I spent the first couple years of my artistic practice when I first started to, when I first started on Instagram and on social media. And I was exposed to all these different type of artists. And I was just so blown away. I wanted to do everybody's work. I wanted to do this thought and thought style and I didn't know which one with myself, so I tried all of them. And this is why I recommend that you do. There is There's nothing wrong with practicing different artists styles. And in that, you will find your own voice eventually. So if you are on the beginning of the journey or you're ready to branch out and find your own style. This class is called to be beneficial for both those type of people. So if you're interested in coming along and learn and this watercolor style with me. Then click onto the next video on that C in the class.
2. Creative play: All right, well, I understand that this might not be the most exciting thing to do. I want you to think of it like an exercise like Hallmark. When we're painting. It's a women artistic journey. It's vital that we invest the time into exploration and learning as well. A lot of ofs and I'm guilty of that myself. That's why I'm speaking on a we just concentrate on the paint and we just wanted to paint a certain way, a certain style out of certain level. And we concentrate and gone straight to there. And we miss all the steps that lead us to that point. And some of them stacks are, creates, play, exploration and experimentation. These are where if you invest time into this, I promise you, you will find your style. You will stumble across techniques and abilities that you didn't know you had, what you didn't know existed. You will develop your own unique style. This happens generally by accident. What happens to me is when I'm, when I'm painting in a way that I'm not concentrate now focused on how good I'm going to be or what is peace has gone to look like. I allow myself to become immersed in the process. I allow myself to let go. And that's all we need to do. And we can only really do without When does not matter at stake, if that makes sense. So what you need to do is you need to take paper that year. You don't care. You're gonna told us in the benefit, most of the time we won't still end up in someone's Muslim isn't pieces. But we have to have no expectations. So we plan to put this in a drawer told and have been it's just it's just like it's not, it's not an important piece. So this is the mindset that we're going into this and we're going to learn how to and use our tools. And we're going to learn how to use our hands. And thus may sound really simple and assemble idea and it is a simple idea. It is as simple as that we start off simple and when it gets more complex as we grow as artists. So when you hold a paintbrush in your hand, there's not just one way to paint on it. Like dependent on the style of the paintbrush, the thickness of the bristles, how it's called the lender of the handle. And there's a lot of variables factor in where more paint. And so what we want to do is we want to understand our tools, we want to understand our hands, and how they connect together and how I feel. And we're going to concentrate on bus or dots. What this lesson is about us on this and this little experiment is about where you're going to take our paintbrush and we're going to paint nothing. We're just gonna paint lines were competing shapes. We want to see how the paint brush fields in our hand. This is very important like this is invested in your artistic talent, is invested in your journey, has invested in yourself. We, we need to do this to bring ourselves to the next level. I believe that this is the part of the creative. So take your paintbrush in your hand and think about how fields, when you put that on the paper, just feel the bristles flow on the page for your hand move and let your hand loosen up because this is another this is another part of why we're doing what we're dealing with, trying to loosen ourselves off, we go into our pieces sometimes rigid, you know, we don't wanna make mistakes or Holden that really brought my paint was really toy and study and I'm coloring in between the lines, but that's not what this is about. A hoarder papers. Let it flow on page, see how fields use different pressure. What does it feel like are what happens when you put a little bit of pressure on your paint brush and you pull it up off the page. What if you gently glide along the page, put some pressure and then pull it off, what does that look like? What's happening when you do that with the paint? What's happening with the bristles are kind of a factory. And how about if you hold a paint brush border, the handle will happens that this is what we're down here. Hold it up on the top of the paint brush and see how other fields, how does that feel? What does that look like on your page? What kind of shapes that you make and what kind of movement doesn't look like anything. And how is the paint has the paint dry? And in comparison to heavy loading the paint brush, I'm putting pressure on it. And this is what we're doing here. So the same thing with your pants. We're going to do the exact same thing where your pens on your markers. We're going to do we're going to drag, we're going to cite it. So putting your pen, your pen at the side like this. So instead of doctrine or Dragon, we're going to dot like this. What does that look like? How does that feel? Different pressures, flicks, but on Flickr, what does that look like? Flicking around. How does that fit? This is a really good movement to loosen yourself up. So I got to be doing a little bit this now flicking around, flicking off how was the paint splatter? And you'll find that the different tips on your POS compounds are going to make and different splatters. So I find the ticker ones. And when you flick them, they don't supplier to paint. Both. The tenant wants to paint is loaded up here, and there's plenty of space for it to go at the nice foamy chips, so-called while the paint. So you're not gonna get that effect and as much, but these are important things to note when you're working with these tools is, can I control the process a little bit more? One and free and myself and as well because we want to loosen up, but we also to loosen up and to get rid of the fear over on in the PCR, have to have an understanding of what's going to happen when I do a, B, and C. And then you can trust this is going to go for the best via you've tried to on your scrap piece of paper, you're ready to bring it into your urine and bigger piece, the piece that you're more emotionally invested and I know area is when we're emotionally invested into a piece and it's a, it's a catch-22 because when you start a piece, you want it to be gone. But it's known as the state is looking like it's good. You're stacked column back, use that got all like and what happened in here? I don't want to go any further with this waterfall, your retina, this is a Jew was the most limited mentality we can have as artists that I know, you know what I'm talking about, we've all been there and that moment where you realize some goods happen. And here we want to be sure that I'm confident in our ability, that we've got pushed through it up and it's going to be amazing at the end. And if it's not, we're going to learn some at the end. So we are not afraid. We're learning or regrowing or succeeding. And I mean, either way we're succeeding. So we'd have to have the mindset of it's, it's all worthwhile When you're, when you're an artist and you're investing in your practice and in your journey. It's all worked on every single bit of it. And we want to enjoy every single verb. And we don't want to just enjoy a beautiful finished piece. We want to enjoy the practice that is Oxford got to get there. We want to enjoy the process of creating that particular piece and just everything in between. So please don't skip this important part of our lesson today and let's just have some formula. So what all the important information being said? We're going to get started on our little practice today. So I just have a Walcott apart here on some watercolors. And I'm going to lay down some base colors so that we can overlay when our pens in a few minutes as soon as our paint a straw. So we're just gonna kinda keep in mind how to paint brushes, feelin, how it's reacting, how much pressure reporting on a while we're going through this process. So I'm different hair into the blue and I'm just making basic circles on trying to loosen up the wrist, get into a kind of flow state where my pen or my brush, excuse me. And so picking it up and pushing it down, different pressures, different points on the paintbrush I'm going to hold. So we're going down close and then we're gonna go to this end. How does this look? How does it feel? Dragging it down, hadn't pressure, or just getting to know our palette or get into newer tools. We're having a look at what colors look nice together. So I'm going to put this brown just beside this blue here. Let it run into it. I like, I like how this kinda rusty brown looks beside this blue. What happens if I put my paint brush flat down? What kind of effects on again? How does it look with the pink? Not as crazy about the pink and the brown together. So we're learning something here. Now I'm pushing it down and twist around and I wouldn't recommend doing this with some of your more expensive brushes. Will take some cheap brushes and experiment with them. I'm going to flick and pull the watercolor. I'm seeing what will happen here now if I use less water and more color. So I'm twisting it into the paint a little bit more. What does this top effect look like? So we're just trying to have filmic this now, we're really trying to push this lesson as far as we can. So I'm going to fill the page as much as I can with different color because it's again, it's the base layer for practice again, with our pants that we're going to do it. I want to sound as a stroke. Now what happened there is I seen a little bit of this green and drop off my paintbrush and spread over and it was lovely, so I'm going to do it all over. This is a mistake. Now last part of our creative play practice lesson, our world co-design out dry. So I'm going to take my posca pens, going to dot. What I'm doing here is I'm seeing how this bright peach looks on different colors. I'm dragging that all. And I'm putting a bit of pressure on it. And dotnet around. So just again, getting a feel for our pen and seeing how the different tips will loosen and APA style and flicking the paint around. So when you go into your detail and on your piece, you're going to be more confident. You're going to have an idea of how depends work. You're going to be loosened doped to how colors are matching together. And as well, this would be a good place to kind of push appends nib down to see what kind of ink is coming now that will kinda paint is going out of it. I would generally say don't pump your pan on your article, but this is different. You'll get a feel for how much you can pump it before start to float into the page. So our test in here, different colors on different colors, hold them at the top. Scribbles, just mark may come. This is a really free and loose process, so don't overthink it. Go into my fine liner now. So these are my black pens. And I'm just kinda outline and here where the darker colors, Eric's going to see what this looks like. If I pull these darker colors forward. I circle around some of the colors. These dots idea of what does this look like? Some more dots on top. Going on with thicker one. Now, I've decided I like this one a little bit buried and do a run smoother. The ball on the top is obviously thicker than the one I use previous, which would be a really fine on, on. I find alkaloids easier so I can mill faster with this. I have to go a little bit slower. I realized way that thin R1 because add the ink doesn't flow as easily. So if you want a coherent line, we're really find what you need to take a really slow, the thicker the nib is, the faster you can go with F. So this is another lesson that you're learning while they're just playing around. So now I know now, take my time with this finer ones. Go a little bit crazy with the thicker ones. And anonymous, way white now as well. I'm going to see where it stands out more, or colors or colors. My wasted my time. If it's really like pasta, you're kinda wasting their time point and the y on if it's a really washed-out color, you can't see it like here. Very difficult to say. But on these darker purple dots, we can see that it comes out a little bit better. So I'm just tracing around the Black Sea what this looks like as well. And again, we're just going to flick and pumped down, see if this is see if this is flown. I'm going to just drag it along the sides here. Okay, this is a nice coloring, gotten kind of a gapped color. Some lines on some circles. So again, just keep going as far and you can go as far with this as you like, As much do as much water as you like, play for as long as you like. But I recommend that before you do any kind of piece, if you're going into your main piece to do a little warm up, a creative warm-up before you get started. And it makes it so much easier getting into the flow before you even start your main piece. You're already now in a place of creation and you're warmed up and ready to go. Okay.
3. Watercolor: Okay, ladies and gentlemen, let's dive in to start in our p.sit. So I'm going to be using these corners. The bottom layer are Winsor and Newton. And on the other side I just have an R Tesla palette placed inside the lid of this. So you can see there it's a separate one. Quite messy. I'm a messy painter. I'm also using these AM passed out pallets from Art Philosophy. I like to use that loads and loads of different colors when I'm painting and various size paintbrushes. And I have a little spray bottle of water as well just to keep my colors kind of wet. So I use this acrylic TOB on. It's like a makeup separator on a has different compartments here. And while I do is I wash my brush and mourn and then clean in the order. It's really handy to have armor painting with watercolors to keep our bush clean. So I'm going to begin by spraying my watercolors with a little bit of war. It keeps me in the flow when I'm painting that I don't have to overly wet and wet the colors. I have a mixing palette as well here. So they're already starting when I'm ready to go so can move quicker. And I'm not getting stalks. I'm going to start with this graduate at paint brushes, size 12. I dipped him war, they're just adding a little bit of water because I want this to be extra way. I'm quite aggressive with my paints. I really liked to have really bold colors. I wish I was more gentle artists sometimes both. This is my style and I'm trying to embrace my strengths and weaknesses when I paint so that I can connect to the flow and I encourage you to do the same. Find out what it is that you do as an artist. And don't change who you are. Try and incorporate that into your painting process. So if you're messy, don't try not to be messy. Some artists are just messy. If you're neat, work with that. So I'm using this purple here and I'm dragging a true. And then I'm using a little bit less precious. So light lines and down I'm pressing it down to gag and bigger bloom of purple, Anna. And we'll discuss that towards the end. In paint play with my learned and have to use our brushes and more land and how to make marks. I really like using them yellow when I use poor powder, really cool colors together. And that's another thing that we're going to learn when we have a look at color theory towards the end of this tutorial. So you see I'm using the force compartment and then having that spotless clean brush coming off the second compartment bus saves a lot of time as well. And this again is, I know I'm a messy painter. I don't like having to change my war or once I'm in the flow. So I work with that. I tried change in it. I was just fighting with myself and I was lazy when it came to clean and the bush is, my paintings are common and moody and messy. So I had to find a way to and be myself and make it work. So that's that's how I came up with the idea. I'm sure it's not original idea of having multiple War compartments so that I can stay in the flow the whole time I'm painting without having to get up or and do any toy in. So this is just, just kinda preparation. So I'm making a blue flower over this circle. At the moment, what we're doing is there's not really going to be any comprehensible shape pair that we're looking for. So I find that, I find, I find that I find painting realistic flowers, again was something by hetero blue. I have trouble with prospective and I had trouble with realism. I had trouble and understanding color. So I couldn't see the tones and the flowers and stuff like that. I sat and I asked myself what all of these traits that all you find difficult can I walk on? And it was have an allele for color. So I decided I was going to get to know corner a little bit better. But as far as perspective, undrawn realism, that wasn't really working for me. It wasn't something that it's not my personality. And I didn't really find it that interests in eater. So what I decided to do was I decided to, because I love flowers on I wanted to paint flowers. And I just wanted to do it my way and decided I was just going to paint. I was going to decide what flowers look like. I'm not. Draw from life. I'm just going to sit and I was going to flow with this. And I just like the feeling of the brush in my hand and watching the color combo that I was going to decide myself where artists we get to make the rules there. I decided on my version of flowers, how I'm capable of drawing fairs. That's going to be the WACC. And it really changed my whole perspective on art and how we create. So I went with my strengths. I'm creative, I'm energetic. I have imagination. I'm like, okay, these are things that I'm quota. It might not be realism. So we'll set that aside and that's okay. Look, we can learn that if we're really passionate about on the side, but we still have this orange to create am finished pieces and feel good about them. So I'm just going to play with this and that's what I did. And I encourage you as well to sit with yourself and ask yourself, what is that? I am going out when it comes to art? And I go to color. Am I good with bold shapes on my go-to doodle and sketch and incorporate that into your walks up fight and the things that you feel your Nakota and invest in, the things that you are good. So big, bold shapes, I love them, I love just mess him at the corner. My messy, they're all blend in together. This is what's happened on, this is what's happening in this process. And Newton really coherent about this painting. Yeah, we're just enjoying putting down paint onto the page right now. We're just enjoying the feeling and enjoying the process. So this is what I want you to do when you're following along to this tutorial are if you're watching and you're going to do it layer, keep that in mind. You're going to just be pointing down shapes on the page. Don't be thinking about ways Eagleman at layer. We're just in this moment right now and join a color and giant blend in together. You will have a little look, a colored area at the end. And you will have in the back your mind a little bit of a better idea of where you're going to place the colors in relation to each other. I don't think too much about this. I just, I have an idea. I like sand colors to get a pink and green I've decided, yeah, like this together. And purples and yellows, I liked them together. So I'm taking a thinner brush here. And I'm going in, we were starting to pull a little bit of shape out of it now. So I'm going to make some passed out, but I'm going to make these really, really concentrated. So they're going to be not as washy as the force layer. So this is kind of basically the mini second layer. All my paintings I do in layers. And the fourth layer would be that wishy-washy colors. We're going to start pulling gently a little bit more shape of our piece and you're going to see a common together. I mean, when you're doing a piece like this, it's just trust the process, quoting be true because we can look at it now and we kind of think about what's happened in here. And doesn't really look that great. It's messy and it's kind of childlike because our client we're called to hone our creative skills, why we're doing this. And you will see as our piece progresses, we're going to see some more shapes development. So the first kind of layer with the big brush was the washy pieces round pull in long leaves, leaf-like structures on. Now we're going into and smaller leafs and the lip, the littler details. So I'm going in with more concentrated color over our washes. I'm not really thinking too much about style. I'm like, where's their space? Where it looks like it could use a little bit more of something. A little bit more paint, a little bit more detail. And I'm adding more color tiff two to the piece is to have one color like our blue leaves and am I'm just adding extra color to herself, layers, all different colors. Very interesting. We're going to give the viewer a feast for the eyes. And when we're painting this piece, so I am taken my angled brush now. And I'm just stick Berlin on these lines. So again, we're just gently going into finer detail. And remember it's all about the layers. We can't do a piece like this and Mongo, we, we have a structure even though it's chaotic, there has to be some structure somewhere. Though. Structure is not my favorite thing. And it does say ever swelling this. So we have a plan and when we have a plan, we can trust the process a little bit easier. So I'm going to hold my paintbrush just folder or the handle. And I'm going to gently let the tip pull onto the page so you see we're getting these wispy kind of shapes. So our detail and asthma gone through this process kind of gets a little bit finer and sharper as we move through. I'll be checking in with your piece as well. Have a lock step back and say, You know, what color, what color does this piece need? I'm looking on, I'm seeing a lot of blues and we have lots of pinks and purples. Okay? I'm like grain. We need some green at the floral piece. So let's get some green leaves and some green strand. This bright green. That's just going to pop off the page. And I'm going in onto the leaves because I know when I go to my last layer of detail and with this one, I'm going in with my pens on my markers. I'm going to be looking for and to pull out different shapes within the leaf. So kind of like shading. So that's why I was going in there with a green on top of dark blue. It's gone to give me something to work with when I'm painting later on or where I'm drawing on that later on. So that's why I'm down here. I'm adding color to water colors. I'm the middle bath, my flower. Now, we're only now starting to decide what way this is. Kinda go on a walk where we're going to pull flowers from what's going to be a leaf. What's going to be an abode? Are Pell. The image both start to reveal itself to you. As, as you go on. It's kinda like looking at clouds here like all. It doesn't look like a leaf or it doesn't not kinda look like a Copia rows and we'll work on without that. So I'm going to just speed up the last bit of it. Let's listen to a little bit meals that can watch the rest of this process. I think I've talked enough under section.
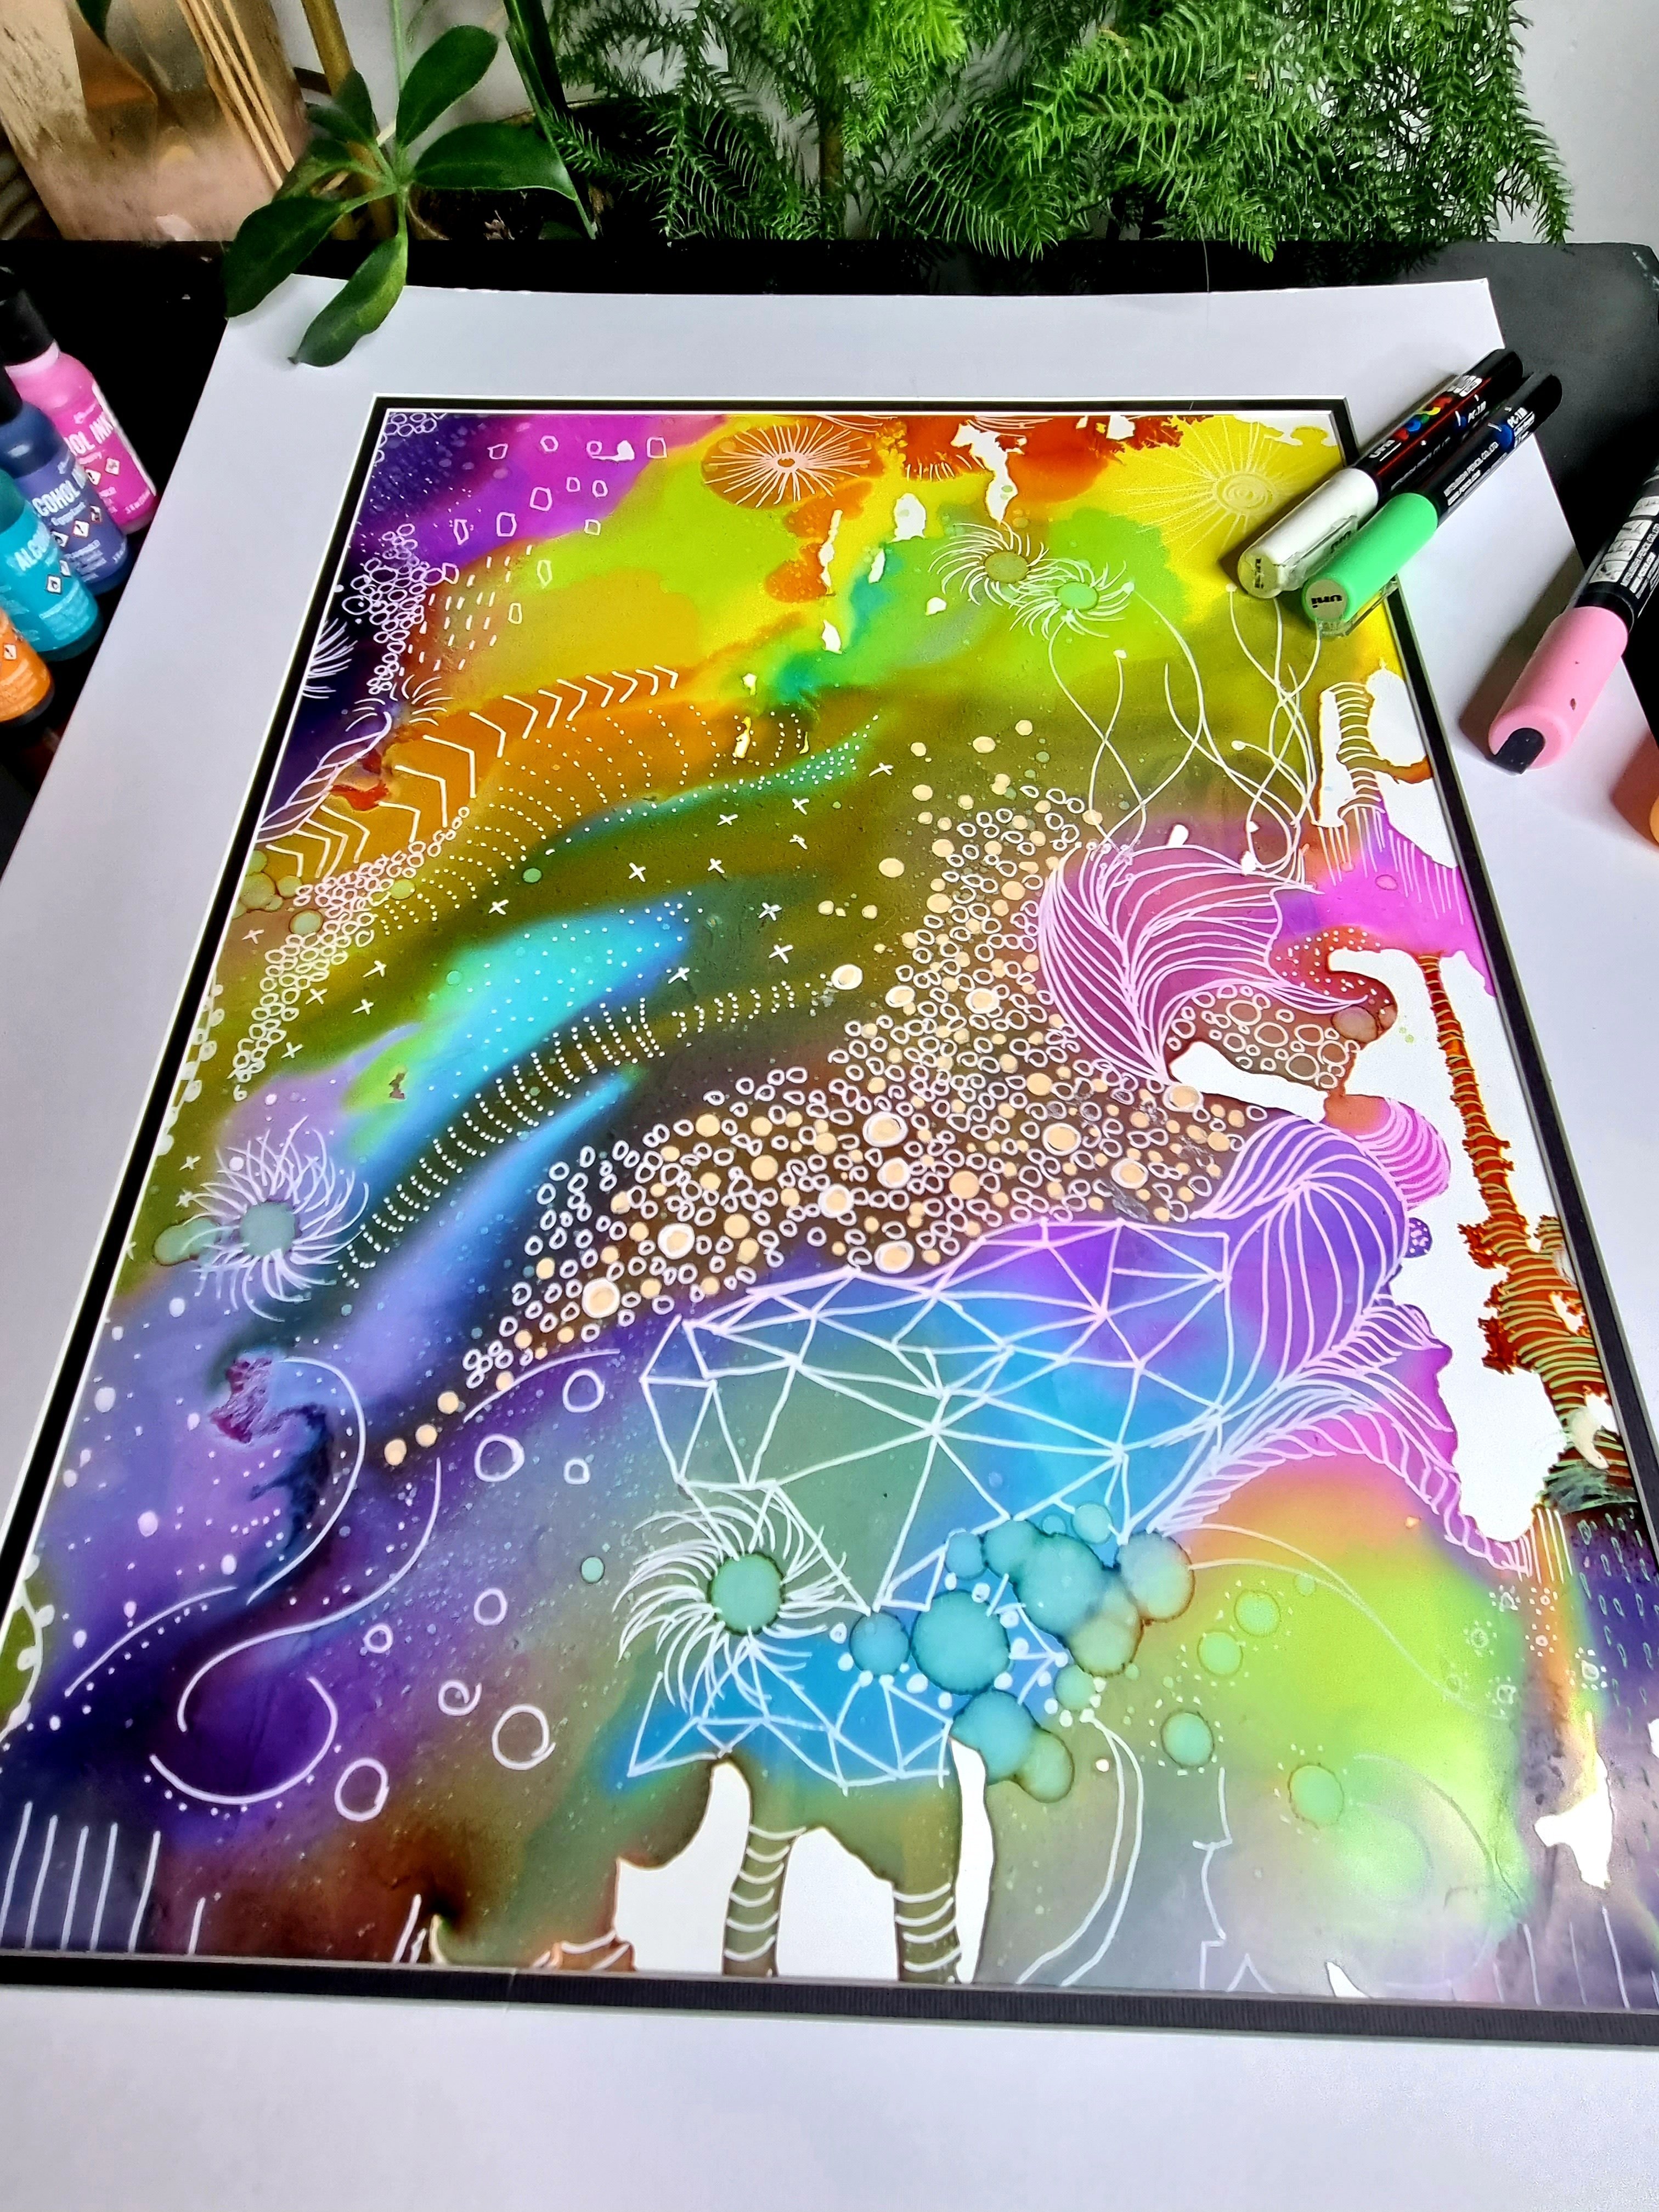
4. Posca details: We're gonna get started now on the best, in my opinion. And that is the detail in with pen marker. So these are just some of the posca pens, some of my favorite colors and posca pen. And I'll also be using a fine liner pens, the black ones. So they're unique. Posca. I'll be using various tip sizes, so brush tips, fine tips as well. So this is where we really are going to start seeing our peace come together. You're going to start seeing some coherent kind of shapes getting pulled from chaos. So I'm going to start by just adding some dots with this aqua pen. Now I just pull an O shapes. I'm kind of like am using my imagination too. So we're just picking parts of it. I'm picking some of the darker blues on adn, the Aqua over. And I'm going to do with these lines. I know later on I'm going to be using a black pen to find line. So I'm going to find line over some of these lines, I'm done and I'm going to add some Dalton. So this is pretty much the same as our forced layer. We're just going to go no-go in loops. You'll see you starting to come together towards the end for further minute. We don't need to be taken too much about where we're potent the lines. I just want to add some contrast in colors. Again, you can be referring to your corner WEA when you go into this part of this so you can do your complimentary colors. The complimentary colors kind of look best at this stage. And we'll be doing some highlights. So I'm just picking out areas where there's empty space. And I'm adding some color to it. And I'm picking out areas where it might look a little bit dull. And I want to add a little pop of color to that as well. I think the yellow really brightens everything and pull it over to poor. But again, this is a really kind of contrast pop and decision here. So it's bold. Again, we keep in mind that this is playful. It's foreign, it's energetic. When you, you will have E can reference again the section that we did on mark-making, on brushstrokes when we're experiment. And so we're keeping our wrists nice and loose. And we can kind of flick that color around. I find working fast when I'm doing a piece like this is very helpful because it gives us, it doesn't give us too much time to do. You don't want too much time to think. Because then we start overtaken. So we want to kind of move fast through this process. And we've already done our practice and we've, we've done our bit of sketching and we trust ourselves now. So we're going to go into the process nice and quick and even crazy lines, big marks. It's going to start coming together and we're going to see to all our hard work has paid off. Can avoid pump in your posca pen on the page just if you've seen what I did there. I have a ceramic tile underneath and I use that to pump my pen on. And if I spill ink, if I spill paint, that can be wiped down easily and protect your surface. I bought this in them, a DIY store. It costs me, it has a tiny chip out. Decide this cost me like €2. So if you go into your DIY store and if you ask them if they have any like damage soccer, anything like that, that you're looking for a big, large tile. This is absolutely one of the best investments I've made into my art. I had ruined my table. I had replaced the world on the top of it. And it was a cheap kitchen table. I replaced the ward because, you know, it got so I couldn't even see my piece anymore because there was so much paint everywhere it was distracting me. So by in this, this toy was I had a great idea and really helped me kind of focus on the walker hand. I get easily distracted by colors and mess and stuff like that. So that's just a handy little tip to half. Get yourself one of these tiles. Keeps your space nice and clean. I find clean, even though I'm messy artist, I find when I'm starting to paint, I like my area to be organized and mess free so I can concentrate on mom down. I'm taken these blank leaves and I'm just drawn lines over them. Again. I'm going to go in with the pen, details on after the black pen. So I'm adding some pops of green. I usually leave the green till the end, even when I was painting, I did that. And it's because it really, it's so vibrant. I like to wait until I have all my details down and an odd and the brightest colors on the loudest colors, the last because it's so busy. It's such a busy PC. You don't want to go too far into it with them. Crazy colors. Well, generally I don't, and I know that like you might look at this and think, Wow, It's crazy from the start. Well, the neon colors I tend if I'm using them to leave them till the end of the piece. So this is just mark make, and at this stage we're just adding color, are making marks. Little flicks here, little dots here, little lines there. It's not really, I have picked out the main blue flower and the circles as flowers and the rest is just kind of chaotic accessory to my piece. So what I'm gonna do now, I'm going to just speed up the rest of it so you can watch through the process because it's not much different than this. We're just adding to our piece. And I've a little bit more to do before I'm satisfied with this. So I'm just going to let it play true and sped up so that you can see and you're not bored to death and watch and every single little detail in realtime. I see. No, no, no, no, no. So now that we know.
5. Posca details 2: So this is basically a continuation of our last lesson. We're just going to be layer in detail. And so I'm going to speed this up so that you can just get a brief overview of how I continued on with this next layer. So again, picking out colors that contrast complimentary colors, keeping my color scheme in my mind. Blues and pinks. So this is just a close up of exactly how I'm doing, the kind of smaller detail and green and pink is one of my favorite color combinations. So I'm just adding some dots, some lines, some interesting elements. And white or low VD and white. And I think it's one of my favorite colors. It really starts bringing the piece together, the added some highlights. So here's an example of a piece I've done before just to show you how much you can go with this and how creative you can really get with them. So here's another one. I like the black and white dots here. So the white dots on my hard black pieces or sections. And this is a gentler kind of pasta L1. So yeah, you can really take this as far as you want. And I would take my time with the doodle and don't be trying to work through it. We're trying to get to the end. Again, stop thinking about the finished product. Really enjoy you want to be while you're doing this, when you read a good book and you're sad that it's over year. You want to have that feeling Azure command to the end of your piece, instead of rushing to the end, that you just really enjoyed taking your time and soak in at all.
6. Black pen details: We step into the next section of our lesson to add our black pen. So I have some Copic markers here. This isn't a navy. I'm just going to press down on the side of the marker, so I'm not using the tip or more gotten a palette shape. I like to do this to add a little bit of contrast to the duck into the brighter colors that are in the painting. Or I won't overshadow this painting with too much of this. So I'm going to just add a few elements. I'm bringing these lines down. It just makes the colors behind the kind of pop a little bit. Now again, you can decide yourself, if you want to use an AAC market is dark, you can use a lighter color as well. If you prefer to keep your piece. All right. You don't have to go over with the black marker or any of the black pens I'm going to be using in this lesson. It's entirely up to you. That's the freedom of this process, is that you get to decide where you want to call it and how you want it to look, because it is creative exploration that we're doing here. So if you feel drawn to add one more dark colors or less dark colors to get messier with the process or even neat nibble a little bit. We're looking to strengthen our, we'll look, we'll look into strengthen our, our strength or look into it to concentrate on our strengths here and to make them part of our process now. So I'm going in with our black pen now. And what I'm doing is I'm just trying to pull a shapes now. So the piece is going to become more flowers African become more visible. So instead of just abstract shapes that we started with when we painted our war colors, we're going to be the fine and the outline here. So what I'm doing is I'm just going around the edges of what looks like parallels, what looks like flowers. And I'm using my finest pen here. Hey, you can get a little bit of a better idea of exactly what I'm doing. I am, I'm taken the colors and I'm just tracing around the darker ones here. This is just one way of going about with, so it's just one kind of technique to add some extra detail. And so I'm blocking them off like they're little puzzle pieces on a doughnut based on tone. So the darker won't. I'm Holly light and I'm just given an outline to you really want to just have fun with this process. You want to just let yourself completely immerse in a completely relax while you're downing. So here we are again. I will take a piece and I will go into the darkest area and I'll just dot the darker areas. So you can see here that's exactly what I'm doing with that brown. I'll just pick random colors to do this where so this just happens to be the brown dark decided to deal with on this one. So we're just don't in a way. So we're using our loose rest methods, like when we're doing our sketch him that we've practiced already, we're just flicking the black around. And again, you can see here that I'm just taken various lines and I'm just adding these smaller lines down the pipe. Another this is like what I like to call detail and on detail. And I will just keep on doing this until the pieces starts to build. And you can see already now that we've gone from some kinda had no kind of form or reason to something that's starting to look like a floral spray. And so I'm really happy with our progress and like this. And we're just going to continue on like this until we have enough layers that we feel like, you know, this piece is don't. So pay attention to that as well. Pay attention to how the piece starting to feel free. If you feel, and if you're looking at the Oettingen world's gotten a bit too busy. You might take a step back and reflect what I find a really good method when I get stuck on if I'm going to continue what a piece or if I'm going to decide that it's stolen, call it a day. A really good tip is to take a picture of your piece and look at it on your camera, or hold your peace soap in the mirror. And usually when you do this because you're looking at a kind of from a fresh perspective. It can be quite difficult when we're in the middle of a piece, especially if we do lose ourselves and become a Marsden, uh, to see it as a whole because we're doing so much detail and we're looking our piece in individual sections. So it can be hard, especially on pieces like this where we're ADH analog data to know when to stop. So when you look at it from a different perspective, like dot-dot-dot will usually happen is if you relax and what I kinda like to call Latin the piece speak to you. You'll look at it and you might see there's a big area of it that has very little detail and, and you might want to add a little bit more to that. Or it might look very busy in one area and then you can tone it down a little bit of white over some of the brighter colors, will look in the mirror or on your phone, will give you a fresh set of eyes to know, is this piece finished or is this piece now it also works. If I do this because I like to quickie, I want to keep going. If I need to keep calm while I'm still under flow state. Or if you have the time, you can put the piece down and walk away, leave the room, go have a cup of tea, go make yourself a snack wherever to take yourself out of the process just for a minute. And I generally would only do this as an equivalent to the end of the piece because I don't want to interrupt myself. I don't like to pull myself out the flow state if I can help it for if I'm unsure, That's what I will do to figure out whether I should keep calm with the piece or not. I'm going to take, if you've noticed here, I've been walking from the thinnest lines that the finer line pens. And I'm working my way up into a darker kind of bigger nib. So this is the Posca pen. If this is the marker pencil, I've gone from fine line pens to this as a paint pen. And it's quite dark. And I do this as well because we add the fine lines and lots of that detail and we're coming towards the end. We don't want to overdo it. So going in with a darker, heavier on at the very end when we have all of our details down and there's nowhere else to go. What are we? We're ready to finish up sale. So this is a playful process here. I'm just drawn lines around the shapes. These are going to be the darker ones. Definitely, definitely try not to overdo this, but it can look, if we go too far with these bigger marker pens, it can start to look for a cartoonish. Although it is bright and bold, it starts to take on a different kind of illustration lock. So I tried to be careful not to do it on last one I'm particularly looking for on It's not in this piece. I'm wanting to be a whimsical kind of a liar kind of piece instead of a bolt, the cartoony type piece. So I'm comin towards the end and I'm asking myself, what colors seem to be missing in this or what colors are not standing out enough for me. So I'll go back in with some yellows. This is just a few little teardrops before we finish up completely. So a woman to the end. Now, while I'm looking at this piece now I have checked in the mirror, are decided that yes, I'm happy with all the black dive added. I'm going to take these fine liners to just really thin colored pens. And I'm just adding some like loose duly lines, scribbled. I'm scribbling around the outside of my flowers and the rest on just the very final touches. We don't want to go over the top, but we are going in now our last bit of white. And I'm pretty happy with how this is torn down. Now, I hope you enjoyed trying this with me. I found a lawful.
7. Gold leaf: Okay, In this segment, we're going to be down a little bit of gold leaf, and now this is preference. So I'm going to be used in gold gilding paced by PEBO. And this is a cheap paintbrush and some gold. So like I said, this is preference. You can finish a piece here and say, that's, it's dawn. Or you can go an extra step and at the gold as well. So it's wherever you kinda prefer. So I'm going to pick some different sections here where I like the color and it's darker color. So I'm going to put the golden near the dark pinks on near the dark blue. So you're just going to wet your paint brush with the guild and paste. And you're going to paint it on to the flower. And exactly where you want to, you don't need to make this two records are going to wait till it gets a little bit tacky. So the only problem here is just remembering where you put the paste and let it dry a little bit. I would recommend leaving it for a little bit longer, but just so that we can Chile, I will work on a label. It's, it's easier to wear your finger along with the gold leaf. On field way to talk, Enos is whatever we're open to all ones, it's a little bit drier, so if you forget where you put it, That's a good way of figuring a LPF to leave it for a couple of seconds longer. So I'm just placing the gold over random spots. Really. You're afraid to breed when you're welcome a gold leaf because if you sell much as take a deep breath and exhale too quickly, you're going to be snow and gold leaf all over your area. Some just build an au pair. Now, I'm going into this darker circle up the talk. I'm gonna pull up here because they, Sam, this flower over here is quite dark. So that's kinda go pin down on top. You find if it's not sticking, am I, you know, I I just haven't let this get tacky enough. Um, so if it's not sticking straight off your finger, you need to leave it to dry a little bit longer. I usually leave a piece alone until there's some element of gold in it. So that's why I'm completely obsessed. Pull. It does change the dynamic of the painting a little bit, especially when it's warmer color. Usually I would use an acrylic paint. If I'm used on more pool, I wanted to add the goal today. So you can see it does become a little bit, you know, it's just because it's blurrier. Now when it's busy maybe is the word I'm looking for, it is quite busy. So it's a perfect personal preference if you want to go that far with it. I generally do like to add details over everything and keep going and going and going. So it's up to you. But this is handy to know anyway, that gold leaf needs a specific glue. Conscious shows unequally standard glue. So goals fingers now. And we're going to wait till this dries so that we can push it off. Now, the best part of the process, I'm going to take a soft bristle brush, so that's a fine brush. And I'm just going to gently push the excess gold leaf and away. Now the harder you do this, this I'm using a software. So Porsche forced just because I don't wanna take too much off. I wanted to have control about how much gold I'm lifted. And for the best heart, it's broken up pretty nicely. I like a broken, I don't like solid pieces of gold anywhere. Like you can see down here beside my Tom on the left is quite solid piece. So that's what I'm talking about when I say, I want to break it open level. So this is a harder brush you can see here. And I'm going to go into the more solid gold bits like this one down the bottom. And I'm just going to try to break it up a little bit so you can see the edges I gotten a little bit more ragged. Is that the technical term for? So another solid band here. And that's basically the process of your Goldie. So I hope you enjoyed this lesson and I hope you're happy with your piece.
8. Finer details: Let's now take a look at some finer detail in, on a smaller piece. So we're going to just go in for a closer look at a section of what we're Joan before. So I'm going to start off by taken some of my royal blue paint. And I'm putting it down in a wash forced on. I'm going over it with a little bit of a darker blue and a little beef pork around the outside. I want it to be interesting to look at. I'm going to add some yellow to decide because I'm going to add some orange in the middle. And so the combination of orange, blue, and yellow is going to make a split complementary. So for looking at blue and orange together, that will be complimentary colors. But when you're using yellow, red, orange, and you can see that orange just going into the pink got decide they're making a kind of red. And that's a split complementary color palettes of wildlife piece dry. I'm going to just add little elements around us just to brighten it up a little bit. We can practice on these as well. So this is basically like our warm-up that we did at the start. You can also use this method before you go into your piece to get an idea of what shapes they are looking for or what colors that you want to do. But it's not necessary. I just want to show you close the finer details of sections like this. Hopefully that will be helpful for you. So we can see that these pieces, they don't make much sense. Yeah. And it's usually when you're putting them together and layer in them that you are going to start seeing a coherent piece. But this is just an exercise right now. So Notre dry. And you can see that they have lovely patterns inside them. Usually I use the parent's doc develop after the piece has dried to help guide me and where I'm going to call when I'm detail and with the finer pans, the black pens on the white pens. But for now, I'm just going to show you how I add my posca pen detail. So again, I'm using this peachy kind of orange color over the blue because it's complementary. I'm I just choose a lighter areas of blue here to add the aquifer. So it's not going to be too overpowering. And I'm adding some flicks as well around the sides just to highlight some areas. I'm trying to avoid the darker blue for now. So pump and a little bit of yellow around these lighter areas here. And brighten up the yellow on the left as well. And I'm doing the same with the orange and in the middle, I want that to be a little bit farther. So that's why I'm adding the orange into that. I'm going in with one of my finer line pens. You can see here I'm following. I mean, I'm letting the piece dictates me kind of where I should go with. Psi could see already that was a little gray kind of lines had dried into the US are just kinda highlighted them. I'm going to take the yellow bath aside because it's quite light and it's not as imposing in the piece by really liked the color. So I want to bring people's attention to a little bit more. So I'm going to make this kind of pipe and up the side. This would be how I would make my piece pieces a little bit more funds when I'm odd and even more detail. And so it we're not just doing them dots and scrapings or we're doing that patterns. Now. When I say scrape enzyme name, when we take our panel, we just kind of flip it across and our page making kinda like eyelash, like I have down at the right-hand side there of the piece. But this is a little bit more of a solid kind of do woodland dotnet. This area here as I see it kind of gray as well. So it's kind of shadowy. So you can see now it's time to conduct data or some a little bit more interesting. I'm picking out the colors here, so I'm picking out the oranges, where the orange meets the pink. And I'm separating. Following how the line of the paint dried all the way down to the end. I'm adding some green on top of the orange here now in some flicks. And down along the length of where the blue meets the orange here. Just to add a bit of contrast. I hope this, and this is a helpful part of the tutorial where you can see what my tall process is as I'm going through to do limb process. What makes me pick a certain space? What makes me draw certain space? There's no really hard and fast rules or, or I just find myself following kind of a certain template when I'm doing the doula. And when you recognize that it can help you as well as connects to the flow and stay connected to the flow when you're in it because you'll know, you'll, you'll get into a, a pattern where each piece makes, each part of the piece makes a bit more sense to you. And you know, all I'm going to do a line on this side are usually to do dots here. It brings the piece together and kind of helps make sense of it when it looks, when it's just paint on the page and it's quite messy and chaotic. Having some sort of a template helps bring a little bit of structure to your piece right here, process. So we'll just continue on. As many elements, colors, shading, scratches, dots as you like. Sometimes I like to take this pipe and dive dawn on do every second piece with often side. So that's an example of what I mean by having a bit of a template already in place. And you can draw these on a page. You can draw your doodles, and you can decide what way you're going to, what kind of doodles that you're going to incorporate into your piece. Have them in front of you on a, on a page, on the scrap page, even just little fleet on. And so you can check in with that as a reference to the side where you're going to go. Say you're not running out of ideas. You're always having fresh ideas on hand. Highlight pink. And now I'm going to show you the piece on the left here, the little yellow and red piece. I want to show you why would usually do as a template with glass. So I would draw with my pink lines all over. And then I would go back in with black pen. And I would highlight the areas that weren't pink. And then it looks like a kind of webinars around the board. These are fantasy flowers. They're just made open your own headset. I don't have to make sense. And that's the beauty of a C can see now it's making a really cool kind of web. Pardon? So I hope you found this lesson in trusting and you're fired off to start your own piece and get experimental.
 Stacey Oflanagan, Thecolourfulheartist