Transcripts
1. Introduction: [MUSIC] Hello everyone.
I'm Denise Love and in this class, we'll delve into the fascinating
world of Stencil Art, where we'll learn how to craft
our own custom stencils to create truly unique marks
that are entirely our own. We'll be flexing our
creative muscles with some drawing exercises
and generating fresh ideas for the
stencils we'll be creating. Then we'll transfer
our favorite patterns onto some Yupo paper, where we'll use an
exacto knife to carefully cut out our
one-of-a-kind designs. Finally, the moment we've
all been waiting for, we'll be using our
handmade stencils, we'll unleash our inner
artists and produce stunning and completely
original abstract art. Come join me and discover the art of making your
own mark. [MUSIC]
2. Class Project: Your class project is to come
back and show me some of the yummy stencils
that you've created from the techniques
that we did in class, and then if you're inspired to test them out and
create some art, I'd love to see the
piece of art you created with some of
your new stencils. So I'm looking forward to
seeing what you're creating. So come back and
share those with us and I'll see you in class.
3. Supplies: Let's take a look
at the supplies that we'll be using
in class today. First of all, you're going
to need some type of paper to create your
stencils out of, and I'm a real advocate of using what you have on
hand a lot of times. If you happen to have some Yupo paper that I thought in my mind the
other night I was like, "Yupo paper is plastic paper." I have plenty of that
because I play with alcohol inks and do lots
of different things, and this would be a great
paper for stencils. It's a plasticky paper
that you can draw on and then take an exact dough knife
and cut stuff out of. It would hold up over again if you're careful
with your stencils, because it doesn't tear easily. I thought this would
make fantastic stencils, so that's what I'm
going to be using. This is the 74 pound, and they do make these Yupo
paper a little bit heavier. I've got the white Yupo paper, they also make it in like
a translucent color, and I think for stencils,
it really doesn't matter. What I'm going to be doing
is drawing on my paper, and cutting it out with a knife, and then you could also
use stencil blanks. Which is plastic pages that are made specifically for you to cut stencils out of, and you can get those at
a lot of craft stores, you can get it online. You could also use things
like transparencies, that's plastic,
they're usually clear. Any type of plasticky
sheet that you could draw on and cut out could
be a stencil material. I thought that was pretty cool, let's make a few of
our own stencils on Yupo paper or whichever
paper that you choose, is because it's
completely original. Nobody's going to have our stencils that we created ourselves with our
favorite marks. They're not mass produced
and it's only going to be something people
find in your art. Anytime that you can be a little more original and a
little more authentic, with your supplies
and you're creating, the better it is, and so I love using elements that nobody else is going
to ever have but you. I'm going to be using
this Yupo paper. You can definitely
use the same thing or you can look around at
some of the other options. Stencil blanks is
another good option, and I've just got a paper cutter here because these
are 9 by 12 sheets, and a lot of times I like to use this
size in my stencils. I have a little stencil stash here of ones that
I've purchased, and you can see purchased
ones are a similar material. They're semi translucent,
they're plastic. They're meant to be
used over and over, and they're 6 by 6 size
is the size that I like to use for a lot of the
art that I like to create. It's really interesting
to see some of these in person and
look at it and say, I can see that as long as I keep some element of the
background connected. I can do as many cut-outs
throughout the page as I need to create whatever pattern
it is that I'm wanting. So you're just be
creative when you're cutting so that your elements
are still connected, but super fun, and you could probably
create stencils to if you have one of those
cricket cutters, those cutters that seem to be at the craft
stores and such. You could probably cut your own stencils out of the stencil blanks
with that too. But I really like things that look organic and hand-drawn, not perfect, so I like
this handcut stuff. You'll also [NOISE] need
some type of cutting mat. Have a cutting mat here, it's a self-healing
mat that makes it very easy to just continually
cut things out of on it. I'm going to be working
on that cutting mat, you also want to cut your Yupo into the sizes that
you might want to use, so I've cut several
pages into fours. Then I've played and experimented with some
different shapes, and things that I wanted to do. If you want to
make big stencils, keep the whole sheet together. If not, you can cut that
into smaller pieces. You could even go
even smaller if you want a variety of
little stencils. Some of my favorite
stencils that I've used from StencilGirl
has great big sheets, with lots of different small
patterns cut out of it. Then a lot of times I cut
these little sections out so I can move this around without it'd be in this
whole big piece of paper. I think it's interesting
to check out other ideas and stuff that people have done
and I love that. Cutting out different
little shapes and having lots to work with, so you can cut
these even smaller because some of those are
small and it works great. I also am using an X-Acto knife. You want to have one of these
was several sharp blades. You could also use
something [NOISE] like retractable knife
or the edges cut. As you move the knife up and
get to a sharper edge again. [NOISE] These are like
wallpaper knives, but yeah, either
one would be great. [NOISE] I have several blades
for my exact dough knife, so if that gets dull and seems to not be
wanting to cut again, and that's the one I
can change that out. [NOISE] Also, we'll
be using a pencil, these are perfect for
drawing on the Yupo paper, and creating your design, and then having
something to cut around. If you make a mistake, you can just erase it
and then try again. These are very
forgiving paper and we can plan out to our
heart's content, and then cuts all of that. Then I've also got just in
case I want to use them, I've got some random
paper punches. These are fun because
[NOISE] you can create some little areas of say, punchnello like if you
don't have punchnello, you could create
four lines of this. Really, if I cut this side here, I could have done two
more lines and I could've had a nice strip of dots. The punchnello is my
personal favorite stencil, so you can see it's a lot wider, but as a homemade punchnello
for strips would be perfect. So I could just cut this up and do two more strips in here, and that would be fantastic, and these come in [NOISE]
different shapes. So I've got some
little leaves that would might be fun
for something. I've got some little flowers, these came in several
different shapes, that I've had for
a very long time. I just think it's fun
to play with those. I don't like [NOISE] it
when the head is super short because then you
really only get two rows. But if you get this longer head, you might get three rows, and then cut that paper
and get three more rows, so you could get wide row
of whatever these are. Then I got just a regular
[NOISE] round ones. Those are super
fun to experiment with if you've got
any paper cutters. [NOISE] Then once we
make some stencils, then we're going to
play in whatever our favorite medium is, and creates some more abstracts. Here's some that I
was testing out, and looking at some like, those are super cool. Once you make your stencil, you test it and see if it's
what you were thinking, and then you're ready
to create some art. Basically the
supplies I'm using to create the stencil and
then we'll test them out. Let's get started. [MUSIC]
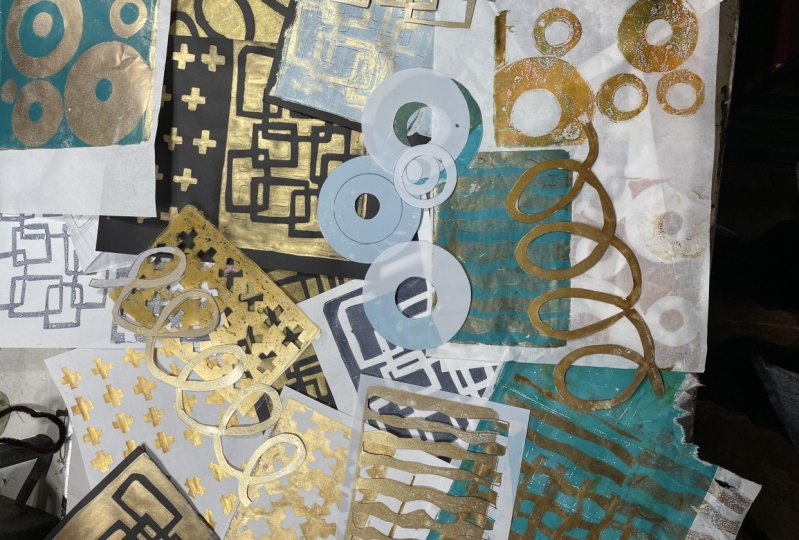
4. Stencil Inspiration: [MUSIC] Let's take a look at a few commercial stencils
that I love to use and just see how they're constructed and get some idea of what
we might want to create. I've got some that are bigger. I've got a lot of
them that are much smaller because I
love little stencils. I was going to say, let me get the back of this here and we can actually see these. I like looking to see how
did they create that? With this one, it's
really organic. The shapes are not uniform. I can see as long
as certain parts of this are still left
connected to the background, then I can cut out
other parts and create enough to make up a
cool pattern out of. If I've cut too much, or I cut this whole
circle and then the circle outside and
that piece comes out, then I'm like,
that wasn't right. You definitely want to
just figure in your mind, what are you looking for and where can you leave it connected enough to still be part of your stencil
without breaking off? I love these. The reason why I thought let's make
some of our own stencils, because I just ordered some
stencils from StencilGirl, which is my favorite
resource to get commercial stencils
because they've got so many artists that make
stencils for their site. But I spent $100 on a
little stack of stencils. Because you'll spend 8, 10, 12, $15 for one stencil, and with a pad of Yupo paper, maybe you spend a little bit
of money for your surface, or a stencil blank. Stencil blanks are
pretty cheap actually. You can probably get a 12 by 18 sheet of stencil blank in a pack of three.
I think I saw. It was $5 at my
local Hobby Lobby. That's pretty cheap and you
can get a lot of stencils out of that if you cut that
down into other sizes. But I think it's cool to
look at these to get ideas. You could look at online to see the different types of
stencils that are out there. Look how fun that is. It's like a random brick or stone surface,
something super cool. Just to give you
some ideas here. I love these that
look like wet liquid. We can, of course, put coffee
on the bottom of a mug or paint on the bottom of
a mug and stamp that down. But this could be neater
and more uniform. This is a neat idea and something that you
could consider doing. If we look at this, it's a round circle, just like I was saying. If I cut that round
circle out, it's gone. You have to leave enough
little connections in there so that
it's still attached. They don't have to
be big connections, but they have to be
big enough not to just tear the first time
you're trying to use it, and it really depends on the
material that you pick as to how much of that space might really need to be before
you wear your stencil out. I'm just giving you
some ideas here. Look at that. I like that. That's real, random shapes
and sizes that looks like something you
would take with a marker and draw on your piece. That would be a perfect idea. You can take your favorite POSCA pen if
that's what you like to make marks with and make your marks on
your stencil paper, and then use that to cut around. That's an idea for us. I really love this thing here that looks a
little bit like waves. I'm thinking I could do so much with a
pattern like this, and I could create some
more of these myself. Looking at this, I can see how it's still
attached to the sides. We've left somewhere
that's still attached. I can see a center section here that we've left so that all of these pretty
little waves, these little arches are still
connected to each other and none of them are out
there waving on their own. Cool to look at that. This is another one that I know is going to be a favorite. What I like looking
about this is because I created one with
lines for myself. I could tell if I had created
lines all the way the whole length of the stencil without any little
breaks in here, that would have been too long, and then the page
problem, it just tore. Because one of these that
I've played on myself, see I did a little
bit longer and I can see if I went all
the way how this is almost going to be
too weak to really last as long as I might
like a stencil to last. This was very interesting
to study a stencil and see if I put a break
about a third in, maybe a few at the bottom, and very up where I'm cutting, it's a lot stronger
and it's going to last a lot longer in my use. Look at these fun
unusual shapes. This one I love, it's not exact,
it's not uniform. I like things that are perfect. I don't know that I
would try that one. That one's a lot of
cutting in there, but interesting if you want to do something really
random like that. I love this one. Different things that are elongated without
being a straight line, and then we can see
there are still little tiny sections
connected in here, letting those still
all stay together in the stencil instead of coming out because I don't
want big giant gaps. This one, super fun, it's like a big spill
and again connected just enough to give us
some stability there. Then great big stints at
last. Check this out. This is one I got
recently because I wanted it and the little
sides come off. I haven't cut those out
yet with my X-Acto knife. But how easy would that
be to draw big circles, keep all of them connected, and then you would have this as a stencil for a bigger painting? Same with this right here. Again, you just clip these with your X-Acto
knife very carefully, and then you've got this great
big center circle piece. Just looking at this and
how these stay connected, even though you've got the
big outside piece cut, then there are little pieces cut and connected in the middle. Just keep that in mind, where do I need to
leave a little spot connected around my cutouts? This was just to
give you some ideas, some inspiration, figure out what do I
want to try to create? You could do a
little research on what's out there and then say, what are my favorite
marks and then be like, I think I've got
what I want to make. Because some of my favorite
marks are dots and lines so I was playing in some
stencils that I made. I made some lines. Let me get these and
I can show you a few that I've made before. After I was inspired
to make these, then I thought everybody needs to have their
own stencils. Look at these with the dots. I could have filled
the whole page, but it's not necessary if you know that you're going to
want little sections of, say three or four lines. You don't have to
cut the whole page, just cut out enough and then
let the rest of the page be the stability of the stencil for you.
Same with the dots. I could go a little further, but in general, do I use
more than that big area? Maybe, maybe not. Could I move it
around as I'm going? Yes. Look how cool those are. [LAUGHTER] Then I
was playing with even more of a big pattern. Look how cool that is. That's going to be
fun to play with. You can see on the backside, it's like a window
that I created out of there, super fun stuff. I can't wait to show you how
easy these are to create. I'll see you in the
next video. [MUSIC]
5. Creating Your Stencil: [MUSIC] For cutting our stencil, I've got my stencil
mat out here. I've got a pencil, I've got my Yupo paper
cut into little squares. And I've got a sharp
knife that I'm going to be using to cut out of. This is going to be just crazy
how easy these are to cut. I started drawing on this
one a little earlier. Let's just do
something. Let's see. I want to do something I
have and already created. I've already created
a few patterns. I thought this wavy window
look was pretty cool. You can see on the
backside how cool that is, and I just drew sets of lines, window panes and then
cut the squares out. That was a fun pattern. This pattern I really liked. Let me just show you
how easy this was. I just created some
yummy circles like this and then I'm not
looking for perfection. I like how uneven an oddly
shaped some of these are. If you're looking
for perfection, just go slow as you
carve and I move the stencil paper around
with me as I'm going. I really want these circles didn't even pick the knife up. But you can get in there and
get real exact to cut these out and you can see the
Yupo paper is very thin. It's not like you have
to press really hard. You can have a lot of control or you can make it more organic. Just depends on how
careful you'd like to be as you're cutting and remember you're working
with a knife here, so keep your fingers
out of here. Keep safety in mind. But you can see how easy those are just to cut and
then with the lines, the same thing, I
actually didn't even draw any lines on this. I just took my knife and came down to about
the same distance. Cut it like this, came back up. Keeping in mind exactly
where I started. Cut across and then
I can take my knife and any areas that might
still be attached. I can take my knife from the backside and just very carefully unattach
it and then look, we've got those lines. See how easy that is to create? [LAUGHTER] I like the lines, I like the dots. Let's create something
that I have not created because I
did lines, dots, yummy squares, got
some Punchinellas, so those are easy to do. You just punch those
like a border. This one I could have cut
right over here and down three more lines and
then that would've been a really big piece
of shaped Punchinella. That's super fun too.. Using these little
paper punches. Just the one I got there, yeah. Really, I could
take my scissors. These paper punches
are ridiculously easy. I can just eyeball
double the size. You can do exact too. Then just come back and this is why I like
them with a longer neck because I can get further
in and three more rows. [LAUGHTER] Super fine and then I could just go
ahead and work that. Now I have some flower
shaped Punchinella. I'm being real careful that I'm not right up on
top of the other flower. I still want there to
be a connection inside of each flower
there. There we go. We can make some really niced, sized Punchinella
with paper punch. I like those, good idea for us. That's a nice size,
a bookmark size. We could do a lot with that. I'm going to go ahead and
finish punching those out. But let's do some type
of yummy odd shape. Because I love odd
shapes in my work. I'm almost thinking, what if I did some elongated and I'm looking at it, thinking, am I
leaving enough room for there to be
stability in between? I don't want to accidentally cut a circle where
I didn't intend to. I want to leave enough
space there for myself and you can draw
and be as intricate or as exact as you'd like. Keep in mind you have
to cut around these. [LAUGHTER] What do you think, Oh yeah,
I love that pattern. If you hate it, just erase it, draw on it again. If you think, okay, I love that. Then we're ready to start cutting and that's preference
on how you're going to cut. But I'm going to start say on one side and just bring
the knife around. Be very careful. It's very sharp. Your fingers are
holding your paper and then I'm going to turn the paper as I go cutting my shape out until I get
back to the beginning. If you can't tell where that is because of your pencil marks, you could always
look on the back. Let's see that
punched right out. [LAUGHTER] I got it. I'm just going to
continue working, being very careful not to cut the little piece in
between my two pieces. I want that little piece in
there to be stable so I don't want to cut it too tight and I want that
divider to still be there. If I miss my lines,
it doesn't matter. I'm not looking
for perfect here. If you're looking for
perfect, getting real close, go real slow and take your time. If you cut it and you get too close to your next structure, I want you to leave room there. When you're cutting, just
follow where that is, so that you leave room in between there instead
of making it too tight. You'll see I moved over with
my knife mark and gave it some extra space there and we can look at that
from the back side. Look how cool those are. [LAUGHTER] I love things
that nobody else has. They're going to be
completely unique to you. If you've got your favorite
marks that you're always consider making those
into a stencil. You can see there if
I'm more careful, I could follow
that line exactly. If you're going slow and
you're being more careful, you can very easily follow
the line you created. It's just about
taking your time. This is going to be
something that maybe you're going to be able
to use for years. You don't have to be in a
hurry cutting these out, just go ahead and
take your time and follow those lines as
close as you can see. Very easy to really follow it. Now if you're trying to make a perfect little
tiny circle like the Punchinella circles
that might be harder. But when you've got
something that just rounds on the end
like these two, you could just go slow, take your time,
follow those lines, follow those curves, and you
could get that a lot closer. Then I got that first line. [MUSIC] Check it out. Super happy with that. I'm going to be
using that a lot. I like how it's not even, it's a little organic, it's not straight. I love it. That is how easy that was
to cut some stencils. I hope you loved how
easy that was to create a stencil and I'll see you
in the next video. [MUSIC]
6. Sketching Ideas: Now that we've seen how easy it was to cut us a little stencil
out of YUPO Paper. I want to start
brainstorming ideas for ourselves on stencils that
we might want to create. So you might look at commercial
stencils to get ideas. There's several
websites out there. StencilGirl is my
very favorite one. You might look at different
ones and think, oh, I love this stencil here because this is one
of the ones that I love. Look how pretty that is with
all the little cut lines, and you see how
easy that would be. This we might even
get more exact with. We could start off say, drawing a line like this. We could decide how
big we wanted these. If you know right
off the bat that you're definitely going
to want to do this and cut these on the stencil
without brainstorming, you could certainly do that. But just taking a look and evaluating how is this created. I can see we've got a
real thick line here, and then we've got these pieces unevenly in-between there. So I could very easily just
draw lots of little lines. Then as I'm looking at that, and if you're thinking, do we cut every line? Well, you do but it's more like we cut the
pieces like that. So we're going to leave one connected and we're
going to cut one out. So that's one idea. Then we'll have one that's
completely different than any other stencil out
there that's like this, but it's different, so I like that. So that's one option
that we could do. Another option that I really
like is circle cutouts. So we could do some type
of stones, cuts like that. That would be a
really cool stencil. Little stone cutouts. I like that. Another thing that we could do is odd shapes. We could do teardrops, maybe something like this. Doesn't have to be exact. But I want you to
start thinking, what are some other shaped, unique stencils
that I could make, and make yourself a
little catalog idea. So if you're out eating lunch, which is when a lot of ideas
come to me because my mind relaxes and I'm
looking around at the crowd and all of a sudden
ideas just start coming. If you're thinking
of a good idea, pick up a napkin
and draw that idea down and see what it is
that you can create. Then just start
keeping these ideas. Keep track of these ideas
as you're thinking of them. Then you've got something
to work off of when you're ready to sit and
make some stencils. I love things that look like long lines of
maybe brick thing. If we offset where
our little lines are, we'll add some strength
to our stencil. So keep that in mind, so we can go ahead and
finish off our idea here. Because this one here, this
is my favorite stencil. I love that stencil. Does all kinds of fun stuff. I can make it bigger, and I can make it more unique, and I could decide how it is, and I'm going to use
the stencil versus. You see how easy
this would be just to draw on our YUPO Paper? But I like having a sketch
book of ideas because I'm not always wanting to
sit and carve stuff. So maybe there's a day
that I want to carve. Now I have four stencil ideas of things that maybe
I want to create. Some I want you to start
brainstorming some ideas. A little catalog for yourself. That way too you
have it later if something's happened to
one of your stencils. I like weird squares. I like lines. I like dots. Those are some of my favorite. Then I also like
these little lines. So I could easily
make something like that with different
sizes or shapes. I like the little
odd stone shapes. So think about things
that you like. Start brainstorming
some ideas of a stencil design that
you might like to do. Then I'll see you back
in class. [MUSIC]
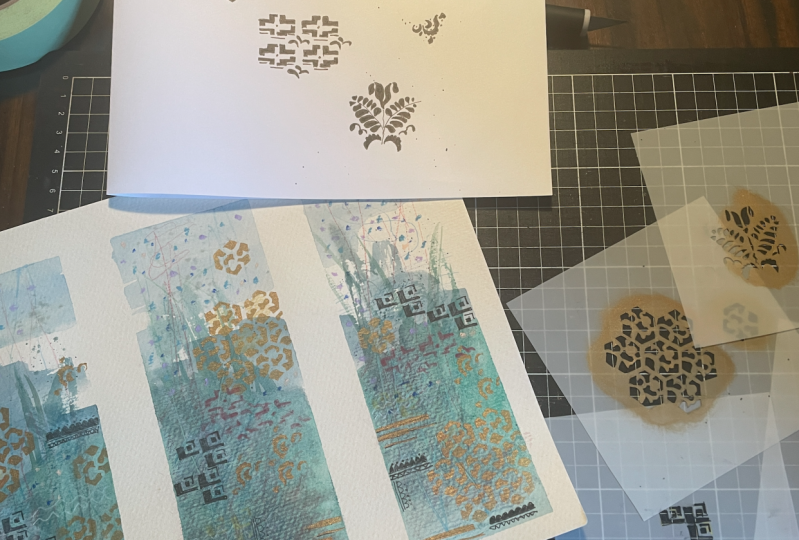
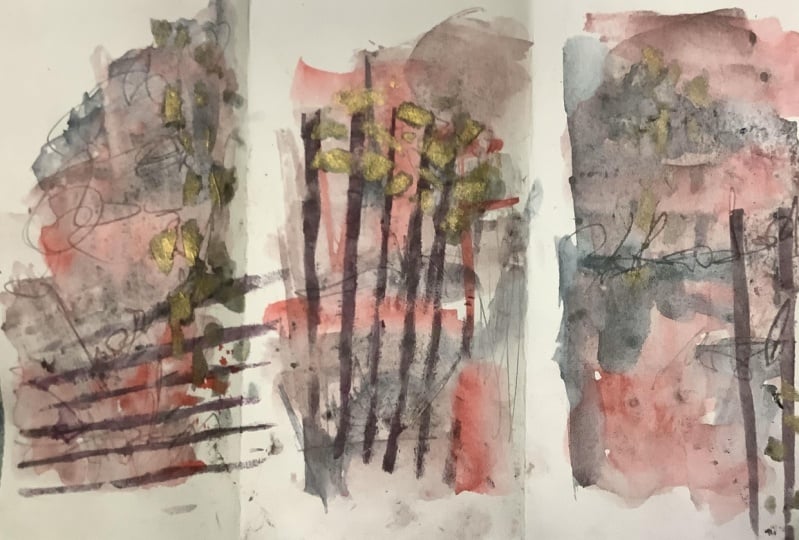
7. Making Art With Stencils: [MUSIC] All right, so now it's time to test our stencils. This is test your stencils on any artwork that
you want to create. You could go back to any of
the classes on painting, graphite and gold,
random abstracts. Anything that you want to paint, I want you to pick something. Now we're going to paint and create with [NOISE]
our stencils. First I'm going to
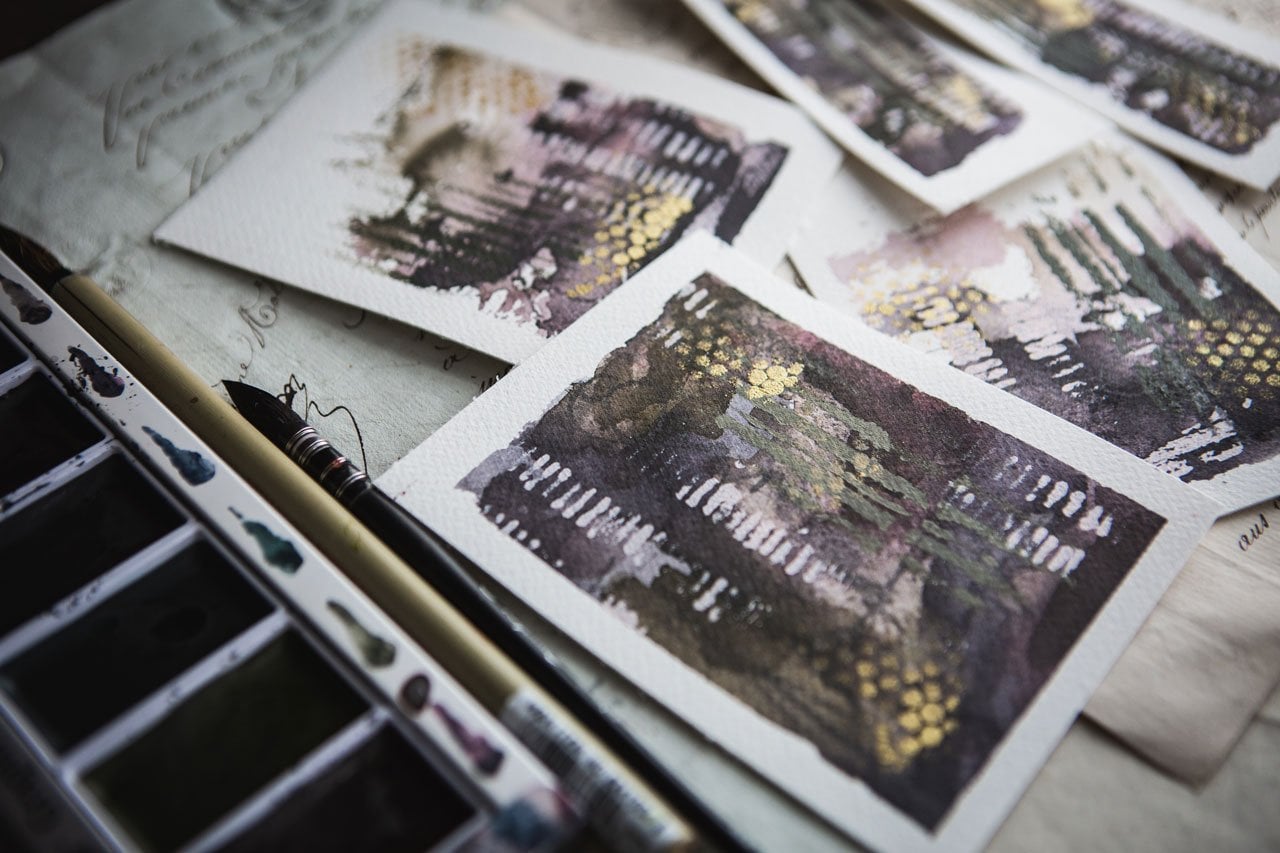
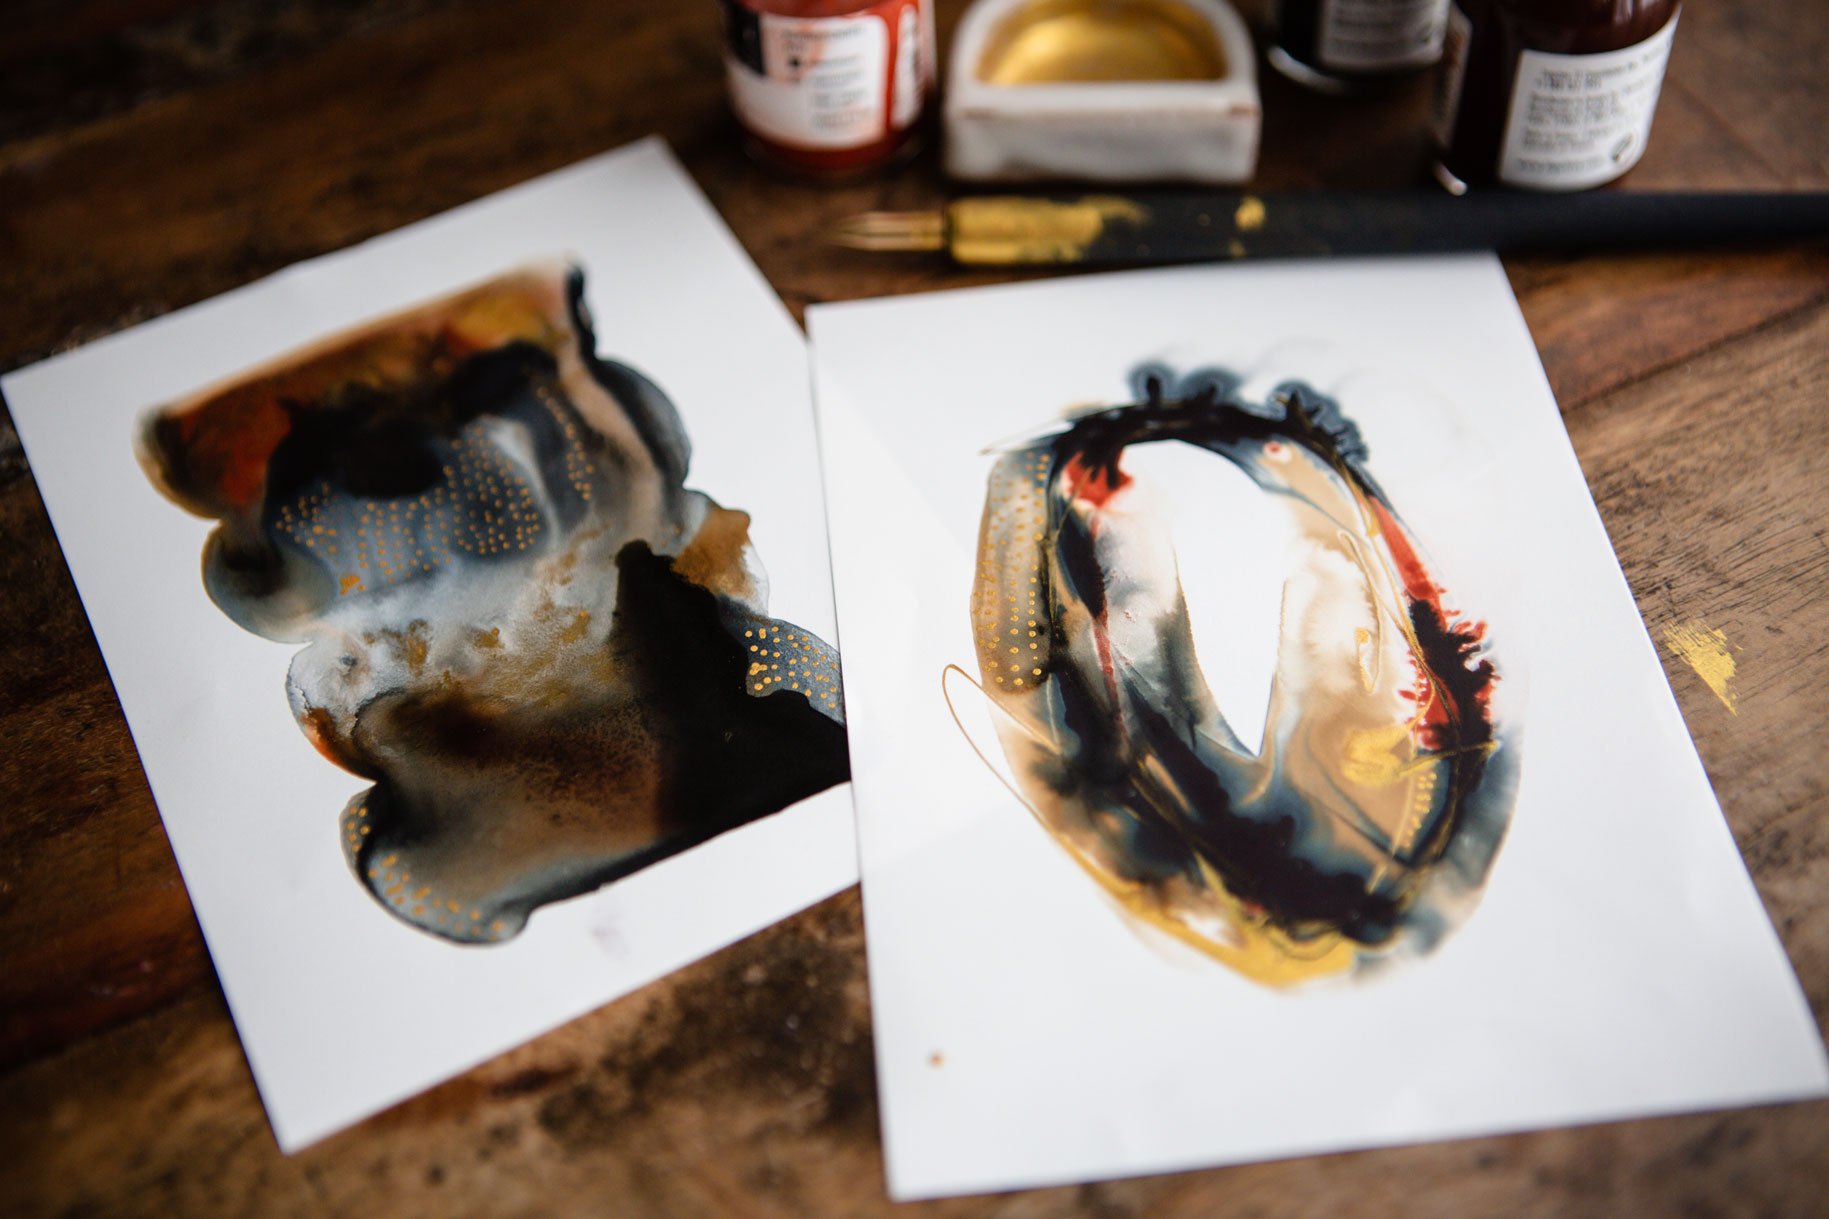
paint something and then stencil on top of it, which is my normal workflow. [NOISE] I really love
the set you sent to me of the Kuretake Gansai
Tambi Watercolors. This is the Art Nouveau set, it's 24 colors and I'm obsessed. I am obsessed with these. I'm going to make a
beautiful landscape and take a little
bit of water here. Let's just go ahead and
pre-activate some of these colors and just see like, what can I make today? I'm feeling like a beautiful
rosy pinky collection. Let's just do it. I'm going to start with this yummy Number 303,
pretty pinkish color. I'm doing just a little
set of three colors. I like it. I'm using a bamboo brush, but you could use like
a quill paintbrush too, those would be good for
this type technique. Again, I'm not looking
for perfection. I'm looking for things
that are a little more interesting and that's
why I like this brush. I'm just creating
a little triptych. I may level them, I
may not. That's okay. Let's just [NOISE] come in
here with another color. [NOISE] I don't know. Let's try this.
Look at that pink. Oh, yes. Oh, I love that pink. So pretty definitely. I'm calling it a
whole landscape, but you don't have to enact
to be a landscape really. I'm thinking in my mind like we're at the mountains
and it's a foggy morning. Oh, look at that. I used 303 and then 304 and
then this is Number 19. But it reminds me of a
morning in the mountains, and we got up early, and it's foggy, and I'm seeing the fog and mist rise up off the mountains. It's what this looks like to me. It's abstract, let's try our non-dominant hand
and see what we get. that's why I love these. I'm just obsessed lately with these landscapy feeling things. [NOISE] Let's see, is there
any other color I want to, maybe I'll try a
little of this purple. All right, so I'm
going to let this dry and then I'm ready to do
stencil work and marks on top. Before I let it dry, I just happen to think, I think I want some
texture in here. I'm actually going
to come back with just a wet brush with
some water on it and tap in some water
swatches because they balloon out really beautiful
in this watercolor, the Japanese
watercolors, even the ones I make with my
Japanese pigment, make the most gorgeous texture when that stuff balloons out, and you need to do
this before it's dry, but not when it's sopping wet. If it's sopping wet,
they just blend back in. But if you get it
right before it's dry, the balloons and
texture are amazing. I think that will add to
the interest of my piece. I didn't want to do that and you think,
how did she get that? You can put salt on these
if you like more texture, like if you'd like salt texture, that would be something great
to do on some of these. I do salt a lot. I've got some salt up here, but I'm going to
just do the texture and come back in stencil
[NOISE] I'll be back. All right, our piece is dry and ready for some stencil work. What I'm going to do is maybe
do some mark making too, I actually like some
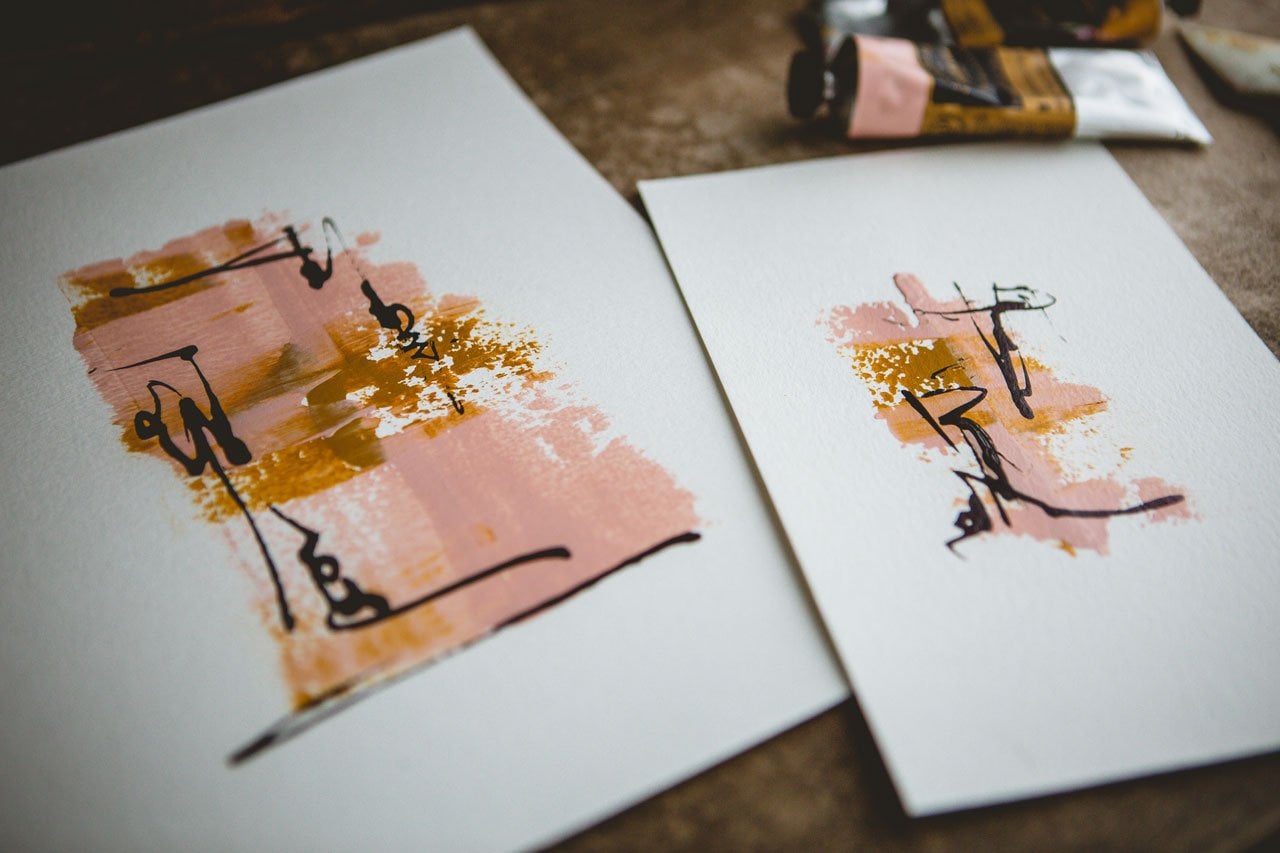
mark-making in my pieces. I have a Copic Multiliner
waterproof pigment ink in this yummy brown
that I recently got, and I think that that
would be really pretty as just some marks that
they don't stand out, they're not super dramatic, but if you get close to these, you can see it. Let me set the
watercolor to the side. Then I could even come in here with maybe a little
bit of writing. You're not sure what it says, but as you get close,
you're like what is that? We can do some of that in there. I draw in the little
watermarks that I made. [LAUGHTER] Let's see if it'll
little focus in on that. Look at that random little
heart hanging out in there. [LAUGHTER] I love it. That must have been a little
more dry for it not to balloon like some of
these others did. But how cool is that? All right, so I've
got some fun marks. I've got some fun writing, might come back
and do some marks, but let's do some stenciling. I'm a little bit obsessed
with this ash violet, some feeling like
stenciling with this sharp and ash
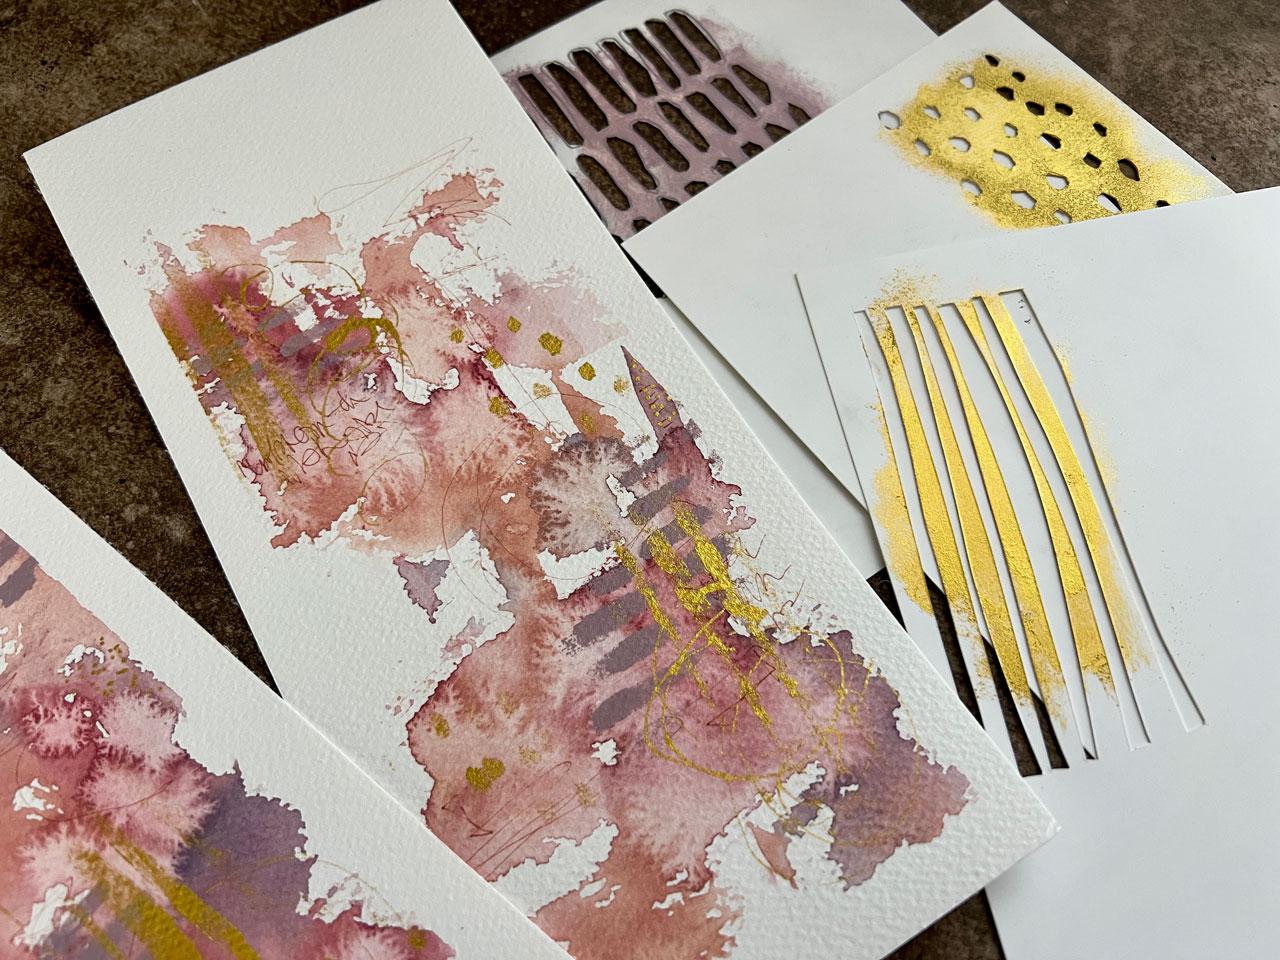
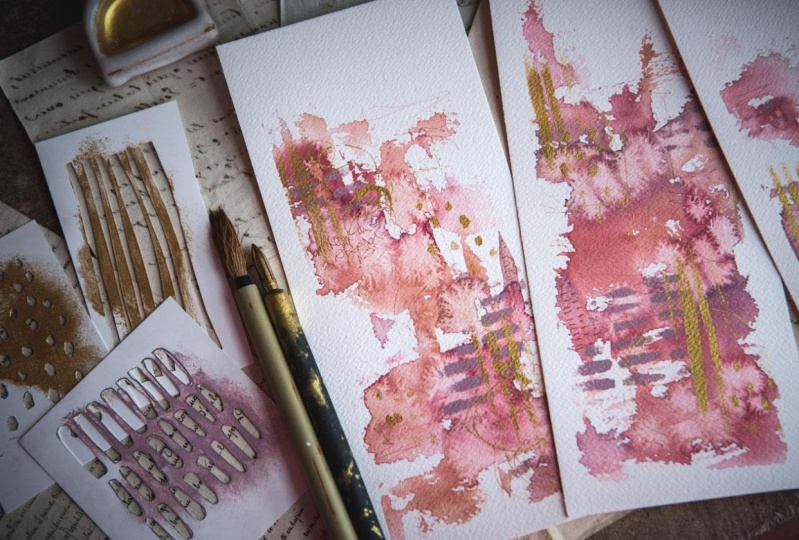
violet lost the lid, set that to the side. For the stenciling, I like to use these little art sponges, I'm a little bit obsessed
with the little sponges. You want it to be dry. This is an art sponge, I just Googled that
online and got them after I saw them in an art
store that I didn't get. I just cut it into little squares because this
is perfect for stencil work. You've got a whole
bunch of pieces when you cut it into squares. What I also love about it is they wash out and they're clean. I've used this a
ton of time and you don't see any paint
stuck in there. I wash those out really good. Then I'm loving this. I'm loving the marks and
I'm loving the dots. I got lots of choices here. I want to do some gold, and I want to do some
of this ash violet. What are we feeling like? I think I'm feeling
this in the ash violet. You want a thicker
paint because the inks don't work as good
in a dry sponge. Then we can come in here and just start stenciling
that paint right on. Thicker paint and dry sponge
keeps it from going up under your stencil so you get
a nice shape in there. I did it not edge to edge. Personally, I like it to
be a little more organic. Look how good that is. So good. We can see right there
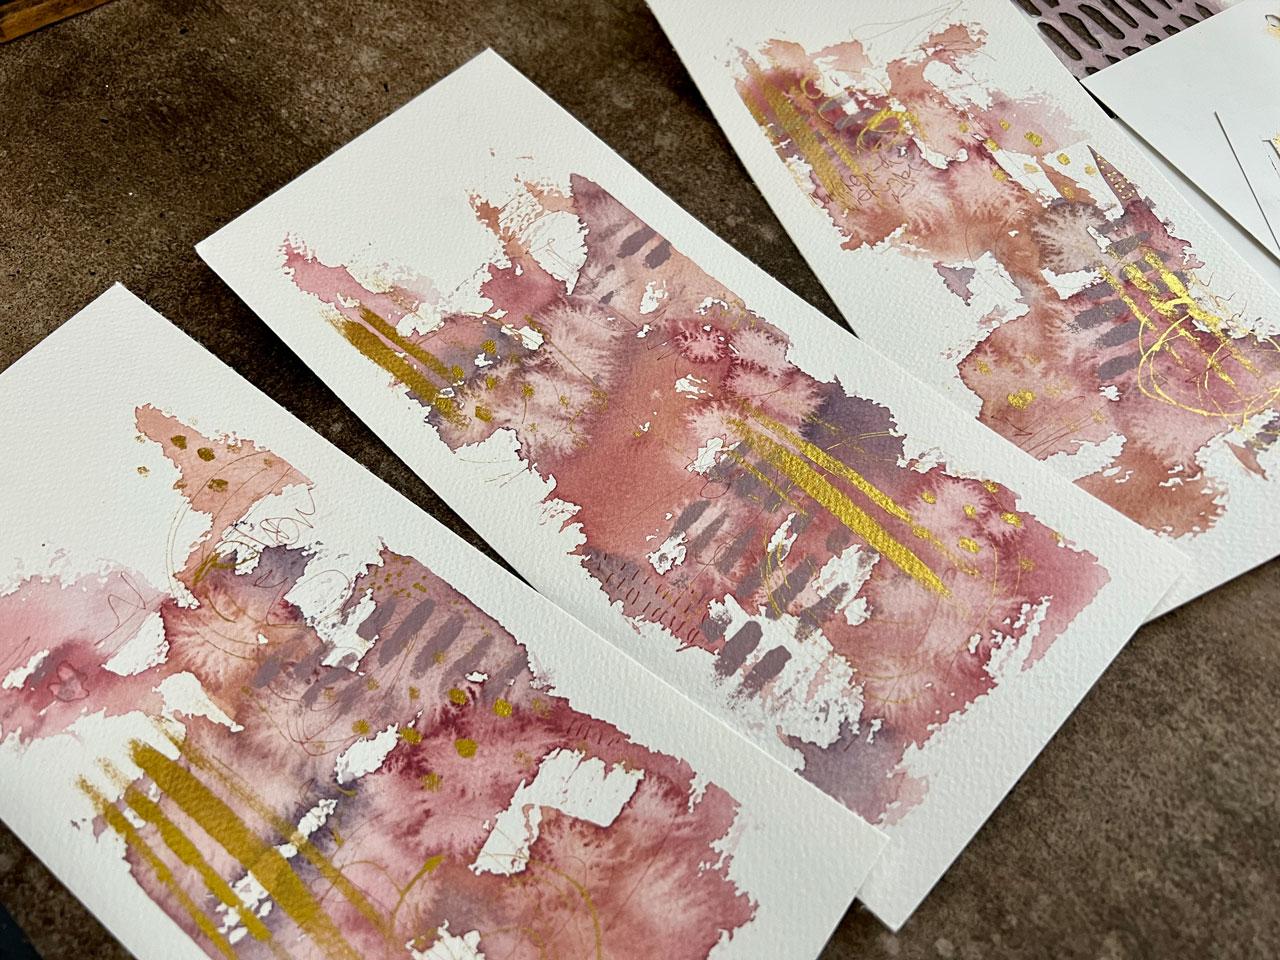
our stencil work, yum. I love that one. I love it. Let's do some over here. I like to do a little bit of the similar patterns in all the pieces of my
little piece here. If I'm doing a triptych, I want each of these
marks to echo each other. Oh yeah. Look at that one. Let's do that a
little up here too. Yes. I love that
little tiny extra. Perfect. If you'll just
throw your sponge down into your water until you're
ready to go wash it out, it'll keep it nice and
moist so to get clean. I love dots and I love gold. So let's do this with the gold. This is my Kuretake Gold Mica
Paste that I love so much. Got my little sponge. Now we're going to dot this set. I know I'm random, so I'm going a
little bit random. Perfect. Let's do
some down here. I can see as I'm using this, how I would definitely
like a set of this with an even tighter dot. These are very spread out. I can see as I'm using this that a tighter one would
be even good too. I think that I need to
make another one of these, and I need to make these closer together instead of leaving
so much room there. That's fun as you're
testing your stencils, you'll be able to say, oh, I think I'm going to
make another one. I don't want these
closer together. Or I'm going to
make another one. I don't want these
further apart. We could judge, what is it? How did it work, and what
would we want to change? I love it. I like these two. I feel like even though
I just did some gold, we're going to do
some more gold. These are so pretty
I might even get my gold pin out and do some
pen work or something. I don't know. I'm
obsessed with the gold. Now I can do lines this way
or I can do lines this way. I'm fill in this way and
they don't have to be exact. I'm not necessarily going
to even go line to line. Oh, see that little
bit of extra, oh see, I like that. It's really nice too, is if this paint is dry and fairly thin
because I'm putting it on, yes with the sponge, I could move it over
and it not ruin it. I'm not afraid to scoot
the stencil over. There we go. Let's
do this up here. This even works good
if we smoosh it. I need a little bit over here. I'll do this just right
down here a little bit. Yeah, that's what I
want it right there. Oh, yeah. Look at that. Then we can look at it and
say, okay, are we done? Do we need any
extra little marks? Even though this is
a stencil class, I do want to [NOISE] finish the pieces off and then
we can look and see what our little
masterpieces look like. I'm going to do maybe
just some little marks. Some extra finishing. Maybe dots. [MUSIC] Perfect. I like to see my pen out here. Let's peel some tape
and look at these. Take a second for that to
dry, but that's all right. We're going to go ahead
and peel the tape anyway. Because I just wanted you to get an idea of how I'm
using stencil work in really more of
an elevated way because these are some of my favorite things
to create lately. Beautiful landscapish
material, atmospheric. Like it's looking into
the distance and the foggy morning of the mountains. They're just so beautiful as a little trip to stick with
that stencil work in it. You could go have this
framed and it would be gore. Just look at those. Oh my gosh. This one
could be my favorite. Look how pretty that turned
out with my stencil work. Little three stencils
there, love it. Got a random little
heart up in this one. Yummy stencil work. I love the gold. This is why I used
that Mica gold, because as we shine
that in the light. It's really the most beautiful
sparkly little shine. You don't have to
do that obviously. You can definitely pick
what's going to work for you in the piece that you create to test out
some stencils. But I thought that'd be
really fun to play with the stencils on something I'm currently having fun making. I can't wait to see
what you do with these. I'll see you back in class. [MUSIC]
8. Final Thoughts: As our time together
comes to a close, I hope you feel inspired
and empowered to continue exploring your
creativity through stencil art. Remember that unique
patterns and marks you've created a day are not only a reflection of your
artistic skills, but also your individuality
and personal style. Creating your own stencils
and abstract art is a wonderful way to express yourself and to share your
vision with the world. Whether you choose to
continue using stencils in your art or explore
other mediums, I encourage you to
keep experimenting, taking risks and pushing
yourself to grow as an artist. Thank you for joining me in this class and for sharing your creativity
with the group. I can't wait to see what your artistic journey
takes you next. [MUSIC]
 DENISE LOVE, Artist & Creative Educator