Transcripts
1. Trailer Skillshare: My name is Marco Smilio. I'm a freelance character artist working in the game industry, and I will be instructor
in this course. In the second part
of this course, you will learn how to create a style game ready characters ready to put in
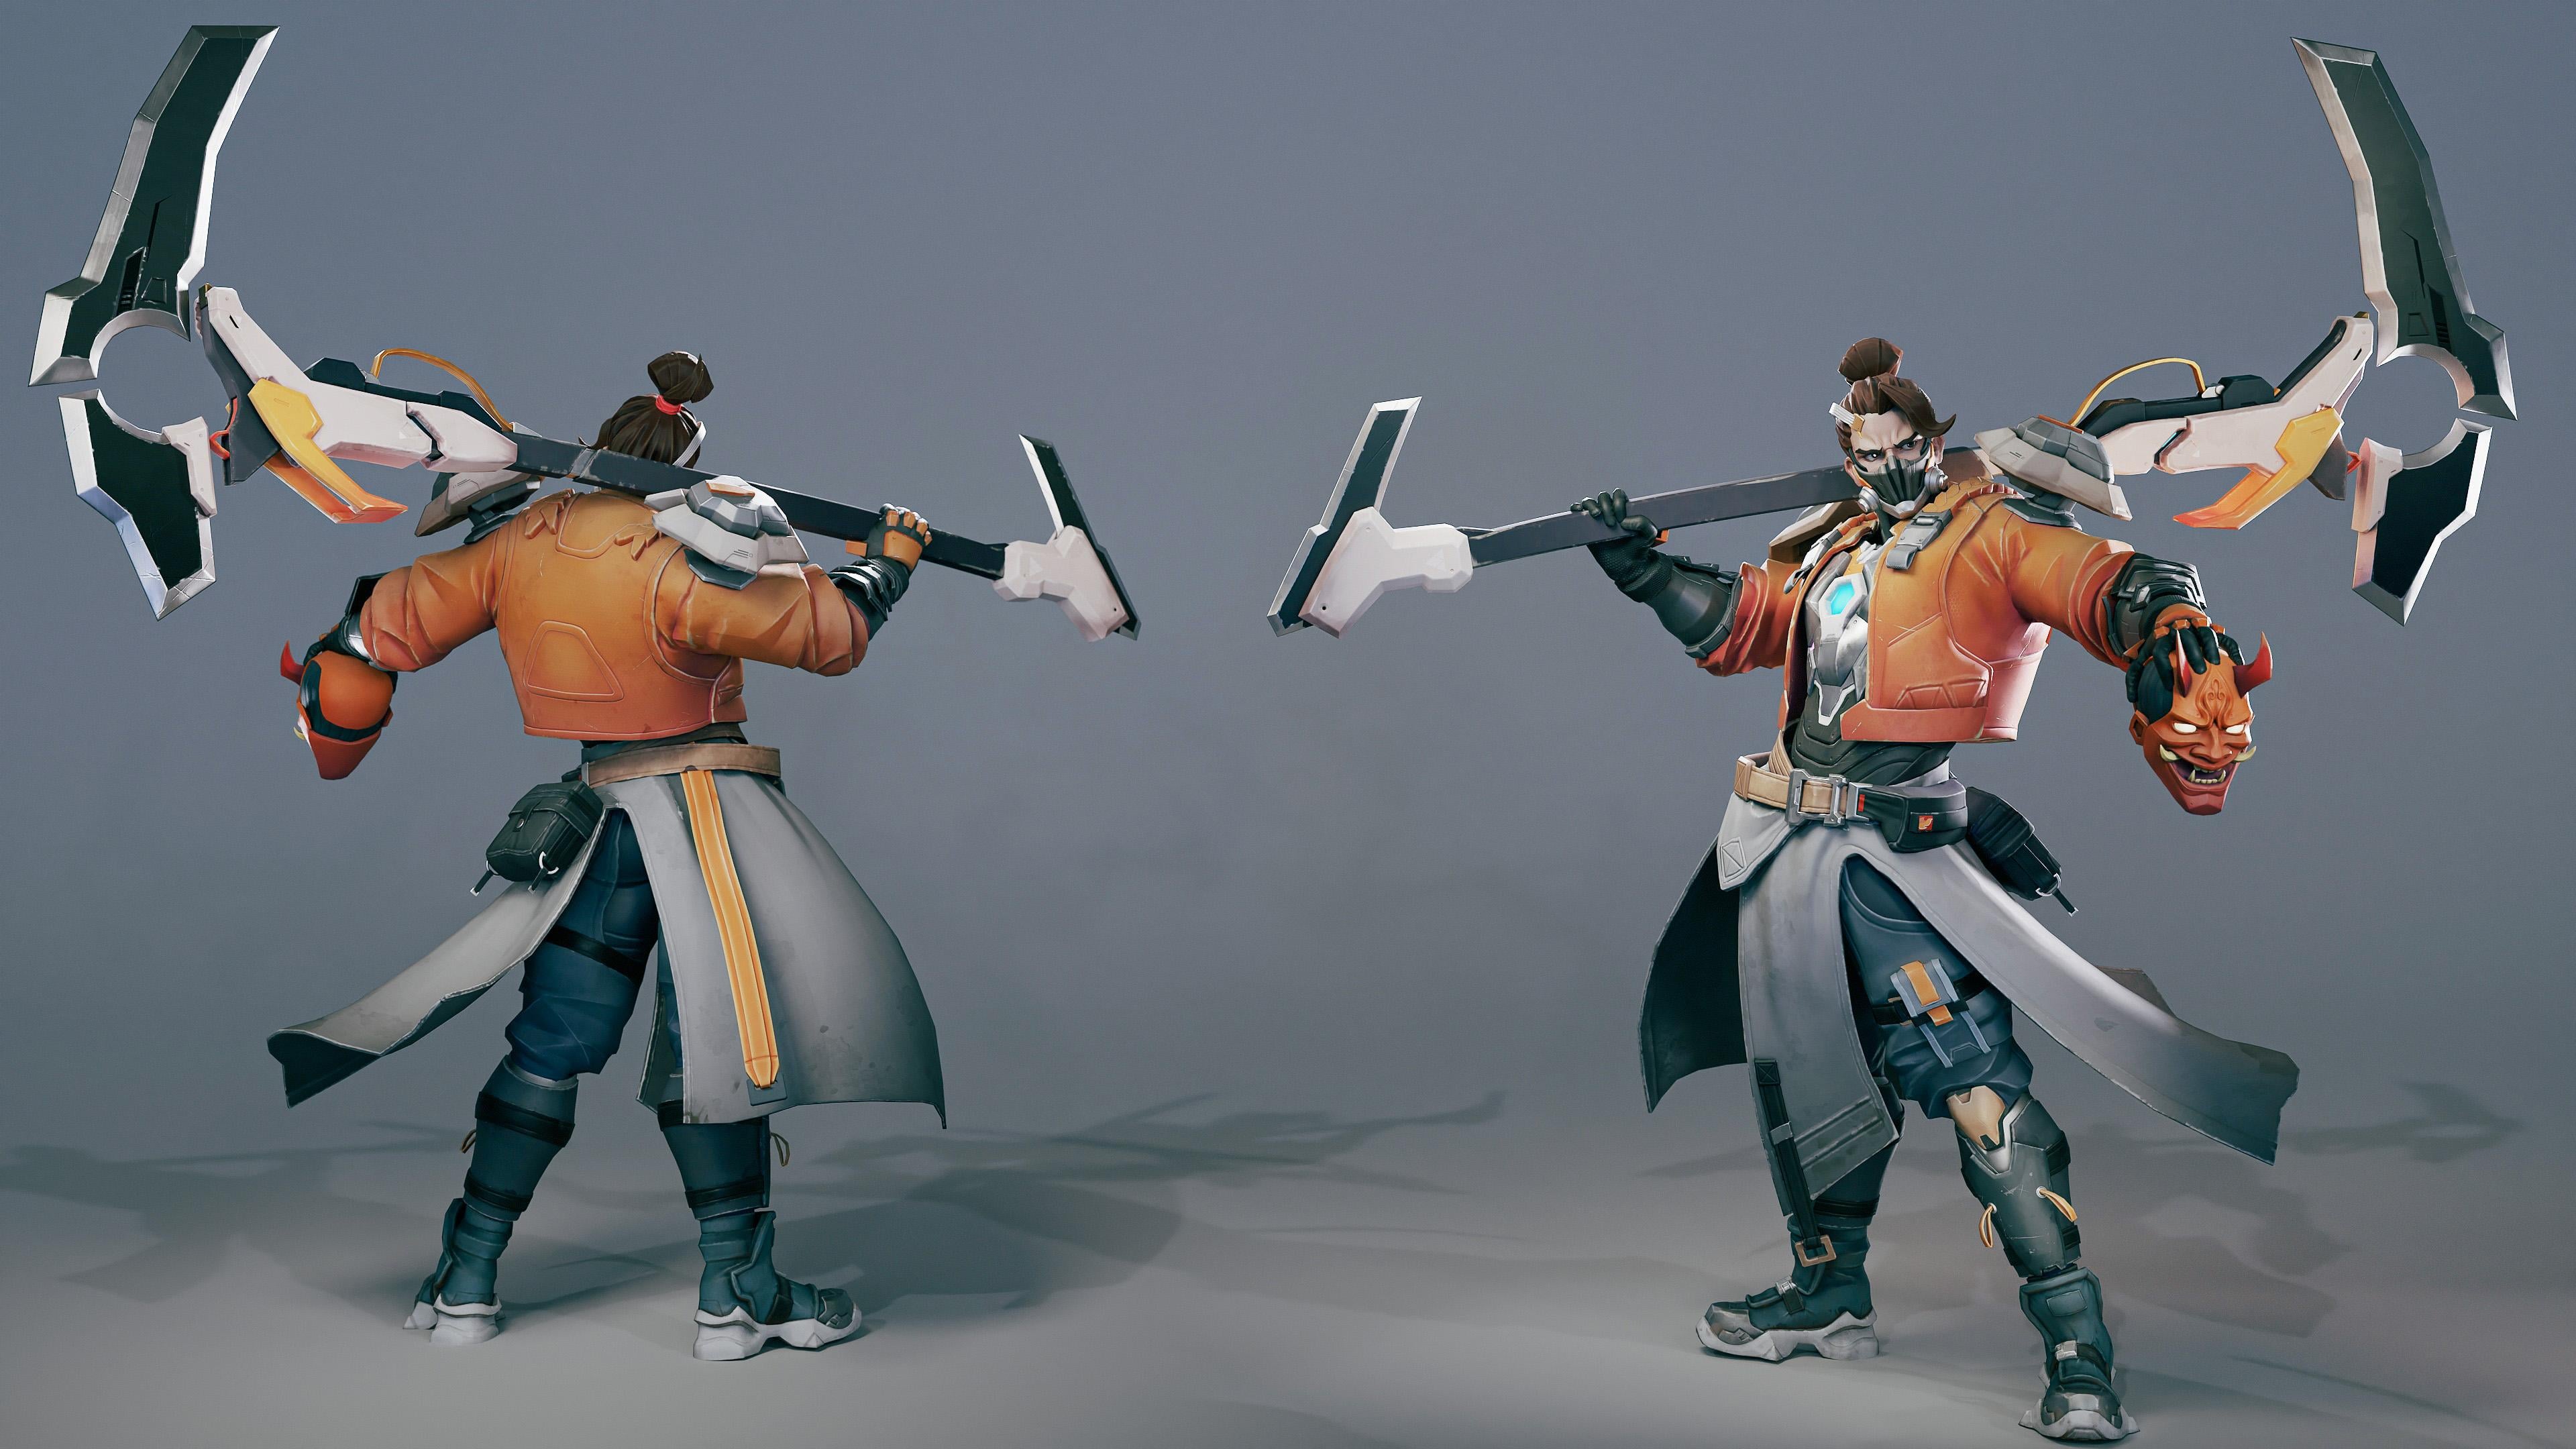
your game engine. The part one of this course was uploaded at an earlier date. In this course, we cover how to make this high
pool character. In this course, we will cover
the entire workflow from taking our hi poly base and turning it into a
game ready character, narrated in real time. The key chapters
are cretpologizing our high pol character. You've been wrapping
our character, making the texture
from high poly to low poly on our character, sextoring our entire character, adding a basic aging and opposing our character
for the final renders. And finally, taking final portfolio screenshots
of our character. The way I just seeing about is that at the
end of this course, you will be able to create exactly what you
see in this writer. And you can apply these
techniques for any type of stylize and even realistic
treated characters. We will be using Zers and
blender for the topology, Ubon wrapping and rigging. Substance Painter for
the text ring and MarmosetTolbak five
for the final renders. With a total of 39 plus hours of video content in this course, it's considered a large course, but I feel confident that
at the end of this course, you will have the
knowledge on how to create efficient game
ready stylish characters. This course has also
been completely done in real time with not
a single time lapse. So you can follow along
with every single step. We also added a
keyword registration so that you can see which
button we are pressing. This course is intended
for intermediate artists. It is essential to have a basic understanding
of the tools mentioned. I hope that you will
enjoy this course, and it will have a positive
impact on your life.
2. Preparing the Model for Retopology: Alright, guys, so let's
continue with this model. In this video, what
we're going to do is to prepare all the Subtool
for free topology. So before that, we're
going to explore the lowest subdivision of all the Sub tools in order
to reuse them if needed. So let's do it. Let's go here the
Subtool palette. Now, let's click here
in all O that way, all the Subtools will be
in its lowest subdivision. So what we're going to do now is just to go to Zip
logging, visible. Let me hide the
weapon because I want the weapon in another file. But let's go here
to visible, export. Now, let's go here to
the character folder. And now let's export
our character. Alright, maybe we could name this male character demon under the male character lowest to B to B or topology. Let's click here in Accept. And now let's just wait
for this to finish. Alright, so the
character is exported. Now, let's do the same
stuff with the weapon. So let's go here to
the weapon area here. And now I'm going to
export the entire weapon. Let's click here in
Lowest subdivision. Here, right. Now let's
export everything here. Visible export. Let's click here, M character. Weapon, lowest
subdivision for topology, right? As export this. All right, so the character and the weapon are exported in
its lowest subdivision. Now, to get back all
our subdivisions, so let's click here in all high. That way, all subtols will be in their highest subdivision. So what we're going to do now
is to decimate everything. So it doesn't it doesn't weigh
that amount of polygons. So before that, let's
do some quick save. Alright, before doing
the the destimation, let's go here to plugin. And now let's find the
clean Tool utility. I think this plugging it doesn't come by the
fault with CbRush. I think you need to search it. Let me see if I can
search it for you. Al right here in
the Maxon website, you can find the clean
tool utility that you could download and
install it in CRH. So, let's go back. Let's go back to CbRush and now what we are going to
do will be to go here. Let's put it in the left side. And now let's go here to
dynamic subdivisions to real subdivisions in the
all visible objects. So before that, let's make
sure that we have all that all the pieces
that doesn't have subdivisions have
dynamic subdivisions. In order for this to work, be careful because this
will increase quite a bit the size of the file. So I'll be safe again. All right. So let's click
here in this button, DSO. Now zebras will go through all the subtols and I will apply all the
dynamic subdivisions. So this maybe will take a while. You can see how the polygons
are increasing quite a bit. So let's just wait
for this to finish. So now you can see that
our total polygons are increased by quite a lot. I think we had
before 80 million, and now we I mean, 18 million, and now we
have 35 million polygons. So in order to reduce the
total amount of polygons, we need to do the dynamesh. So in the same step
plugging stuff, let's go here to
decimation Master. And this will be the most tedious part of this process
because we will need to go through all
the subtols and applying the settings
that I will tell you now. I could, like, click
here in preprocess O, but in my experience, I got a lot of issues and
errors using this preprocess O. So the only solution
that I found is just doing one by one
to each sup tube. So I will just do it once, and then I will let you
do it for the rest. Basically, it will
be the same thing. So let's go to the jacket. Maybe to the first
soup tool that we have the first
visible soup tool. Also, we need to clean our file of the
Invisible sub tools. One thing that we
could do to erase all those sub tools is just use the soup tool muster and then click here,
delete Invisible. Before that, I would
like to save again. Sorry for me to
save in that much, but I don't want to
lose any progress. So let me save this. Alright. So let me go down. Let me make active
again my weapon here. And now I will just delete all the invisible
Subtools that we have. You will see how to do it
in just a sec. All right. We have everything here. Perfect. Now let's go to SubTool Master. And
now let's click here. Delete Invisible. And this will delete all the non visible Subtools
that we have in our file. So let's click here. You can see a warning here, this says basically that this
action cannot be undone, so we don't care. So let's just press H. That's why I saved before
just in case I needed, like, one of those Subtools. But let's click here. Now you can see that cebrus will go through all the
visible subtols and it will start erasing
of all of those subtols. All right. Alright,
it is finished. You can see that this
deleted 2 million polygons. And now this is the real amount of polygons that our
character have right now. So now that we have erased
all of those polygons, I will go to the
first Subtool here. And now, what I'm going to do will be just maybe with this, I think I need just a
tiny bit more solution in that in these
panels, give me a sec. I think I need more
solution there. Alright, let's go
to this sub tool. Now, let's click here. I use and keep poly paint. This should be active. Now, this should be active just in case
you want to, like, keep your poly pain
that you have made here inside zebrs and this could be really useful to use all the polypin that we have made to make
like some it map later. Although we could change
it inside blender. It doesn't care. All right. Let's click here and now let's click here in
preprocess current. This will do some
calculation and cache the information of the Zuptol to be able to do the
actual decimation. And now let's click here
in decimate current. Let me put this maybe in
20% decimate current. You can see that
from this amount, it drops to this other amount, right. There we go. And now, what I'm going
to do will be just go through all the sub tools. Through all the sub tools, doing the same thing
that you saw me doing. So let me go here
to so to be able to see the stuff
that I'm decimating. So let's click here,
preprocess current. This will go through the
mesh and analyzing it and saving it for decimation. All right, you can see that
from 1 million polygon, it drops to 200 I
mean, 200,000 right. I mean, do it one more time. You see this inner, I mean, middle or piece, we could We also divide
it a little bit more. Let's click here again,
right now, let's click here. You can see that these
drop quite a bit. So that's basically what
I'm going to do with all these sub tools
to you in a bit. Alright, guys, I estimated all the subtols
on the character, also on the weapon. So you can see that from
34 million polygons, we dropped down to
11 million polygons. That's quite a big difference
in the size of this. Now it's more
manageable to blender. So that's basically it for this video that
was the preparation. In the next video, we're going
to explore everything and start doing some rit
pology on this character. So see you there.
3. Preparing the Blender Scene for Retopology: Alright, guys, in this video, we're going to export this model to blender and
prepare the scene there. So let's go and do it. Alright. In the previous video, we decimated this model. You remember that this model was around 34 million polygons, and now it is 11
million polygons. So now I think it's perfect
to explore to blender. So we have this. I think I have exported
the lowest subdivision. If I don't remember. Well Alright. Let me see. I think I have exported
fully remember. Alright. Alright. We have already exported the
lowest subdivision. So let's export the
highest subdivision or the decimated version. So let's go here.
Let's click here export visible
exported. Alright. Let's see. I said to export
this decimation. Alright, simation for to play. Alright, there we go. Perfect. All right. Now my model is exported. So let me also export. Oh, it's not exported. That's my bad. Alright,
let's wait for this. Alright, now, the model
is already exported. So let's export also the weapon that we
have also decimated. Let's go here, visible export. Let me export this so quick. This would be right. Weapon. Summation for rapoloyr. Let's pave it. And now this
will export it. All right. Now, our model is
already exported. So let's go here to blender, and let's start
doing some stuff. Let's import the FBX. We have that we have exported. Let me see. Let me find it. Alright, here we
have the character. This is the lowest subdivision. I have imported it
here inside blender. Now, before importing
the rest of the things, I will make some folder
just to organize better this scene and be able to
work nicely and clean. I will call this collection low. And also I will put
I will do a right click and then select this green color
for the collection. So now we have here the
collection for the lowest stuff. Now I will make
another collection. I will call this
character character. And now everything here, I will just drop it
inside that other folder. I will create a new folder
and I will call this weapon. All right. Let's create
another collection. I will put it on top
of the low collection. Alright, I will call this high. Perfect. Now I will
do some right click. Now I will press
here this red color. And now let's create a
few more collections. I will call this character High. And this will be character
weapon high also. Perfect. Let me put it here. I suffix of low. Alright. Perfect. So now we have the and now we are going to
keep importing our stuff. Like here, this is the weapon if you need to click
in the collection in order for Blender
to export it. I mean, to import it inside
the collection that you want. You can see here if
I hide the body. As here we have our
weapon so perfect. Alright. Now, let's import the high poly of our
character. Let's go here. Alright where it.
Thinks this one. Yeah. It's imported. This will
take a while since this is a quite big poly count, a little bit, we'll pause. Alright, here we have our high
poly. We can see it here. Perfect, super nice and good.
Let's import the weapon. All right. There we go. The summation here, right? The wait for them pot. All right. So now we
have our stuff here. Let me hide the body. So here we have also our weapon. So there we go. We have our scene to start
making the topology. Also, I think that
we will need to make collections inside
these other collection to keep organizing our scene
and be able to work better and nicely instead of having this mess here of
tools and stuff. All right. So before the video, I will move to another folder, the pieces of the low poly
that we cannot reuse. I will drop it just
instead of deleting them, and we just drop it
in another folder. I will call this usable. All right. It's just in
case maybe for some reason, I need something
of those models. I don't need to report
those models again. So I will just hide it
and remove the checkbox. And now I will see which
models I cannot reuse. Like this one, for example, I will just drop it here. The inner suit I
cannot reuse it, so I will just drop it maybe
this will be an option, but now I will not reuse it. I mean, we can reuse models, serious models that
has good topology. But there are some models
that I will not reuse because I will make them a bit differently in the
actual low polyversion. I mean, this stuff,
we could reuse it. I will delete the floaters. All right, admit the floaters
because in the low poly, they are not needed. Or the can be reusable. They think, I mean, it has good topology. Indeed, maybe we could reuse it. This stuff here, we
cannot reuse it. These straps, we could obviously
reuse them these straps. They can be reused. This piece can also be reuse. Let me delete these floaters. I don't want the floaters
in the low poly. All right. This piece, I will just drop it in
the non reusable folder. Obviously, the pouch
cannot be reused. Neither these things
will not reuse this. Although I think I will
not also reuse this piece. Maybe we could just
make it in the same in the same polygon cluster that we are going to
create for this strap. I will just make it one
single piece of geometry. So I will not reuse this also. All right, give me a second, so I can drop it here. These pieces also,
I will fuse them. Alright. All of this poach will be not reused All
right, drop it here. This head also. I will just drop it in the
non usable folder. This trap, we could reuse that. Also, this little piece
would also be reused. The shoes cannot also be reused. I think I will just
delete the shoes, maybe. My not these pants
also. Let me hide this. All of these here. I mean, they have good topology, but they cannot be reused
because the way it is created, maybe we could use it
as a starting point. I think we could reuse
that in some way. Maybe I think so. We could reuse All right. This strap, I will just make
it with the pen, maybe. All right. This stuff here, I will not reuse it also. All right. As this entire piece, I will not reuse it
because I will make it one single polygon stuff. The jacket chary
will not be reused. Also, these pieces will not be reused for the topology in the low poly version. All right. All of these. All right. This ad will not be reused. Let's see here. If
we could use kind of some of these would
be, but I don't think so. I will just drop this because
I don't want to lose it. I'll just put it here. Also, this piece. I don't know what that piece is, so I will just drop it there. I will not reuse this band. Wraps could be, but no. Let me just drop this
inside the folder. Alright, these pieces here, we could reuse them. Also the other armor. Here in the mask, I
will not reuse it also. All right. Of these
will be here. Also the hair will
also drop it there, or write this cable piece, we could reuse it
and maybe extend it. So I would just leave it here. Alright, I will just put
the tips of the strap. I mean, this piece would also be reused.
I will just leave it. Alright, this little piece
here would also be reused. I mean, yeah. All
right. The body. The body cannot be
reused because we will need to make the entire
topology for the body. So this entire body, I will not reuse it. Also, these eyes
cannot be reused. This Corin costne
cannot also let's see, maybe this eyelash
I don't think so. Let's see the eyebrows. Maybe they can be reused. B also a little bit optimized. I will just lift them.
Let me move these there. I don't know about these pieces. We'll just rub it in
the other folder. All right. So this will be basically
all the stuff of the geometry that we had
that we maybe reuse. But I'm not sure. Maybe we will just delete all of these and make the hypology from scratch. But yeah, there we have some
base geometry to work with. And here we have
our poly version. So I will end the video here. And in the next video, I will start making the
hypologyO the face. We're going to make the ry
topology of this handsome guy. Yeah, it's pretty handsome.
Yeah, yeah, yeah. Alright. So see you there. Alright, give me a second.
4. Making the Face Retopology: Alright, guys. So in this video, we're going to start the
rhtpology of this character. So the first thing
that we are going to do will be do the
rhetpology of the face. That's one of the
most important things in the face right. So how we are going to make
the rhtpology of the face? Let me see if I can just hide
everything. But the face. Give me a sec. All right. All right. So what I just did, it was just press
Console E. I mean, Console Y and then H, we're sick, just like that. All right. Now, what we are
going to do right now will be to define what are the
main loops of the face. I will show you real quick, which ones are the main
loops of the face. So the pace needs to
have some loops in order for the face to deform
well and animate correctly. So there are a few
ones. Give me a set. Alright, we have like one loop
that goes just like that. Like, if it's like a mask, we have another loop
that goes down around the mouth and from the nose around the
mouth, just like that. For this part of the nice label
fold to deform correctly, we also have a loop
around the mouth. The mouth itself is
like a circular loop, you see, a circular loop, and also we have another
loop that goes around the jaw all the way to the
forehead, just like that. So this is basically what we
are going to do right now. It's easy, it's not
that hard to do. So let's start. Let me erase everything
that I have here. All right. So now what we're
going to do? Let's go here. Let's create Give me a sec. Alright. Let's create
another collection. I will call this body. And now I will press Console A, and then appent a flame here. Oh, this is too small, I think. I think I exported it wrong. Yeah, I mean, scale the
scale is not correct. Let's see. Kale is not correct. Item properties? Yeah, it's not correct. Let me see something.
Alright, so I just export it with the wrong
scale from zebrus. So let's try to see how we
can fix that without need it without the need to
export everything again. So what I'm going to do, I will just add like
a cylinder or a cube. And now I will just make
it the length of the body. You can see the scale
of the character. Now I will go here. I will in export, I will scale I will just
put some ten in the number. So if we put ten there, once we export the model, it will be in real real
scale, real world scale. So now that we have
put ten there, let's go here to login,
right, FBI export. Let's switch from
visible to selected. And now let's export. I think, give me a second. Let me export it real
quick. All right. Real quick, right,
scale reference. All right. So let's go back. All right, West Mic Alright. Let's go back to blender. And now I'm going to import
that health reference, you can see, it's quite big. Alright, let's go
here to this icon, and now let's press
this cursor here. And that is the function
of that cursor is to enable or disable each
object from being selected. So you can see if I
just disable this, I cannot select anymore from
the viewpot this object. So now what they're going to do? I will just go here then
scale this up like that. All right. Let's go here
and put this in this 1.01. All right. Yeah, I just want to
put everything in 1.01. Just like that, I
think would be good. Around here. Perfect. Just a
little bit more. All right. Alright, I think my
blender is freeze. I think I just press the
wrong key. Give me a sec. All right, so let's just
leave this around here. I think will be good. All right, let me hide
everything again. All right. Let me hide the scale reference. All right. Let's go here. Let me select the body. Control Y and then H
to hide everything. All right. Now, let's
select the body collection. Let's press Console A. I mean, Chief A and then plane. You see that we have
our plane here. And now let's start doing
something. All right. I will just go to Edit
mode with tab and then go up I will just go here, and I will start
making some stuff. As you can see, let
me draw it with my there the notation here. This is what I will
basically do I changed the color,
there's the color. Alright. Let me see if
I can change the color. Right. I will just make
like this in this area. Who was he? All right. Sec. Let me change
this to erase. Perfect. This cannot
be your face. Yeah. All right. Let me annotate it
again so you can see better the guide. All right. So this is what I'm
basically going to do. So now let's go here
to this magnet icon. Let's press here in phase
and then this phase project. And now let's go here
to the modifier step. Let's go here and
let's type mirror. With this icon here, let's select the
body. All right. And now you can see that
we have like two planes. That's because the
mirror modifier is mirroring our plane. Let's click here so we
can see the polygons, the actual vertex stuff
from the other side. And now, let's go here. I'm using a plug in just
for some visualization. It's called speed topo, but you can use a blender
vanilla for this. I'm just like this
type of visualization. In case that you don't
have this plugin, you can go here to this icon. Now, you can go to Bp
display and put this in front and you can
see your playing there. Even you can change the color. Of that plane, but you need
to switch here in this area. Let's go to this arrow, and let's switch this
to attribute, I think. Yeah, you can see it here. Now, it's with the color
that we have put here. You can see. But I
will not use that. Let me switch that to
white again. All right. So I will just active
my topology shading and I will start
placing some polygons. All right, and see also, don't forget to active this
option here, the clipping. So the edges and vertex will merge at the
center of the object. At the center of the mirror is the origin
point of your model. Also, you need to be
sure that you have applied all the transformations by just selecting everything. You can see you can
select everything, and then let's press Console A and then K here or
all transform here. That's very important to do. With all the models,
even before exporting. So now we have this. Let's
keep adding some stuff. All right. Let's
keep string with A. All right. Kip making this loop here. Let's try to have an edge
that goes around here. You can see that's aligned with the corner of the
eye, just like that. Maybe we could with
this one around here, just to follow the
flow of our shapes. And you can see that we
have a plane change here. I will want to hold
that in the topology. So let's keep adding
some more polygons. All right, let me
delete. This one. Alright, now we have
our first loop there. So let's add the loop
that is around the eyes. Be sure that you have
the same amount of faces on the top of the upper eyelid and
on the lower eyelid. So let's go here. I will put two here. Now I will have one. No one. No one. This is just for
the eye to close nicely without having any issues while closing the eyes with the rig. All right now, let's
put this one there. All right. I think
this could be good. Let's see how many
phases we have one, two, three, four, five, six, seven, eight, nine phases. So let's try to do
that also. One here. We have two right
now, two phases, two we move this
around here, three. All right. Let me
select this or five. All right, six, seven,
eight and nine. You can see that we have
it here. All right. So now we have the
main loop of the eyes. Now, let's create
the main loop of the nasal label
fold from the nose. Let's just extrude this now. One thing that you
need to have active is an atom that is
located here in tons, I think, it's called F two. You need to activate that. If you cannot find it here, you can go to get extension and then just type F two and
you will find it there. So what that addon
does is if you select one vertex that is
in the middle of two other vertex like this one is in the
middle of these two. If you select that
and then press F, you will create a new
phase as you can. I will use that feature a lot. So just to have it in mind, now let's select the edge, and now let's extrude
all of these and make it around the mouth,
just like that. All right. I'm not
caring too much about how many polygons
there are here. All right. Perfect. So, what other thing we need. We need a loop that goes around
the shin at the forehead. So let's duplicate
one of these phases. All right. Put it around here. Maybe here we could add another
loop just to hold better, the shape of the
shin, just like that. And now we can start extruding. Alright, we could just extrude, like, big shapes here just
to make these quickly. And now we can subdivide them. All right. I just want to have the
loop placed nicely here. And now we can start
filling everything. All right. Now that we have
basically the main loops, we need to add a
loop around the ear. So let's just do that quickly. Let me select this. Just a quick loop here around
the ear, a circular loop. It's like that. Perfect. I would not care about
much of the amount of pass that this loop has because
we we can add more later. All right. Perfect. So now we can start filling the spaces that
we have around the face, like connecting all
the loops together. I need also one of the most
important loops that is the loop that is
around the mouth area. All right. Perfect,
just like that. All right. Like this. Now let's start
filling the spaces. So you can see here. Maybe we could add a
few more edges there. We could also add
a few more here maybe to better capture sp. All right. Although I think
that's too much here. I think, yeah. Let's
just leave it like that. Let me connect these two. Maybe Let's add just one here. All right. Another
one here to support better shape, another one here. Will also add
another edge here to hold the shape of
the eyebrow here. I mean, this could
go just around here, better support the shape and flolow that we
are having there. All right. Let's start
making some faces, connect everything
together and see it here. All right. Just like this. It let me add
another edge there, and now we'll just
extrude like that because I want
this to connect or maybe what we could
do is just to continue this edge
rope just like this, and that would be it. All right. Let's see.
What else we could do? Let me place this edge here, another edge loop there,
another one here. Now let's start
filling the gaps. All right. My one more
here, another one here. Perfect. All right.
I bet this one. Not in the right place. All right, let me delete
this edge. All right. Let's move this edge there to redistribute
the polygons around. Alright. Perfect. Let's keep filling the gaps. Et's add two edges there. One more here. All right. One. And now, what I want here is to have this loop, like a circular loop. So let me delete this stuff. Let me add another
edge loop there. Now I will just keep
rooting this just like that to have this
circular edge loop there. All right. Let me slide this a tiny bit there. All right. Just slide
this a tiny bit. Let's add two edges there. All right. We can have it. Let me erase that
red stuff here. Alright, now we have
our ring clean. So we could connect
this edge here and continue These were
low just like that. Maybe not. Not that good. Let me delete that. All right. Let's add another
edge group there. Perfect. Now, we could add
another edge there. Perfect. Let's see if this is an equal amount of vertex,
unequal even number. Let's go here to this arrow, and let's just click here in statistics so we can
see how many verte that we have and polyols
that we have right now. And you can see that this is
not an even number. It's 25. That means that we have more vertices in
one area than the other. All right. Let's see what
we could do in this case, when we just need
to add one vertex. We have 11 and 12. So maybe we need one
more around here. So we have 12 and 12 in the upper eyelid
and the lower eyelid. So let me add another
edge loop there. All right. Let me try
to close this there. Alright, let me add another
sub here so I can close this. Let me just put two
instead of one. And now we could
just close this gap. All right, one thing
that will be helpful for us right now is the
string crap modifier, as a modifier that grabs the
geometry around one object. In this case, we're
going to use the body as the source for this to grab. So let's select here in target. Let's select the body. Let's put this on above the surface or maybe this
could be on surface. So now what we can do, we could use in scoop mode, we could use, let me put this wife frame on so
I can see my polygons. We could use the
smooth brush here just to relax the vertices here, and the shrink crap will stick the faces and the
vertices to the surface. All right. You can see it here nicely made. Pretty good. All right, let me apply
the shringcrap modifier. All right. Let's see if the
middle edge loop is not broken because sometimes if you apply the shrink
wrap modifier first instead of mirror
of the mirror modifier, the middle edge loop can break. All right, let me put this
edge loop back here to support the eyebrow
shape around here. This one will be here. Perfect. All right. Maybe here we could just, like, move this around here so we can have one edge roots that goes
around this plane change. All right. Just like that, this will go down
all the way to this. Maybe we could just
add another one here. All right. Alright. Let's just keep extruding. All right. Just like that Here. Let's see what we could do. Let me add another
group there so I can have a smaller group that I will go and just create a polyrup around
the nose, just like this. Perfect. Just like
that. Nice and easy. Alright. A All right. If we could start
filling the gaps. All right. Just like that. All right. Let's
try to close this I would like this to end there. We have a triangle there. I mean, since this
is a game character, it doesn't matter if
this has some triangles, but the triangles
could not be in areas that form too much, like in the elbow. Like if the triangle
goes against the flow of the polygons,
that cannot be there. Like this triangle,
I don't like it. So I will see how I
can make it better. Because, I mean, I
need this to be here. What we will do is just
add another edge there, so we could close this. Just like that.
Now, let's go here. Let me add another edge
there so I can close this. Maybe, let's create
an edge loop around the nostrils, like that. Perfect. Let me a sea Let's see. I like that. All right. Perfect. And now,
let's just close that. So now we have one hole here that we could
just fill this up. Let's just select this circle and then just extrude it with A, and then just shrink it,
extrude it again, shrink it. And now what we could do what
we could do is just see, we have an even number, so we could go here to face
and then do some great fill. This only works if you have
an even number of purchases. They'll be sure your best friend here is the even numbers. So you can save a lot of time
by just using great fill. So now here I need another edge Alright, but that's too much of
perdics to have there. I kind of don't like that idea. Let's just keep working
on another part. Just to think a little bit
of how I can fix that issue. Alright, let's merge
those two polygons. Let's see how we can
distribute these better. Alright. This call goes up. Just like that. We
could add another one. This could be merged together. This can go around here. All right. Just like that. We could merge these
together. Maybe not. All right. Let's see. All right. And now we
have an end going here. We need to fix that end gun. So I will do something. Well delete these four pass, and I will just pebble this and adding more
polygons there. Now we could just connect these
together in a nicely way. You can see it here. All right. Nicely made. So now here, I don't want these many edges
to go down here. So I will do just one trick. All right here. All right. Let me add
this another one, or maybe we could just connect
them without any problem. I think that amount is good. So I will show that
trick later now. Because it was necessary. Maybe we could use it right now. Let's see. Maybe not. I don't think we go. It's
just to an incept there. Maybe we could just
leave it there, yeah. Let's delete these polygons
and then just let's attach those merge those
middle edge loops. Right now, let's keep
adding more polygons. Be sure that it's
the same amount of polygons in the upper lip
and in the lower lip. Alright. Just like this, we have one, two, three, four, five,
six, seven, eight. We have eight there. All right. Let's go here also. 13, four, five, six. Let's see. Let's try to not have any triangle here with
the body topology, because after we
do the hepology, we need to take back this model back to ibrush because
we need to reproject it. Why? Because we need to make the inside of the mouth that we're going to make
here in a topology, and then we're
going to bring this back to ibrush to reproject everything and do some
cleanup in the mouth area. So let's keep working on this. I need one more polygon.
I will just add it here. Perfect. Now I can just merge
these together. All right. Perfect. And just
merge that together. All right. All right, perfect. Alright, let me do
something here. I don't like how that's flowing. I just like it like that. This could be stitched together. Maybe not. All right, let's add another polygon there. Let's keep adding more polygons. Perfect. Just like this. Let me add again the shrink
crab, select the body. So I can just relax this
area. Just like that. We could also leave
the shrink crap here and just keep working with the magnet and
the shrin crab activated. Just be sure this is
active. This icon. All right. So here, what we have here. We have six. So, how we could do
some great fiel. Would be an option.
Yeah. Alright. Now, let's select
the circle here, the hole on the mouth area. And now just break it down. Move this one around
there, just like that. Perfect. Now let's move
this one up just like that. Perfect. Because
we're going to leave that part open so we can
we can make a mouse back. Let's add another Edgeup there. Let's add a few more dgop
around the lab. All right. Now we can save.
Save incremental. All right. Perfect. Let me just merge in these vertices. Let's go here. Let's
bridge those. All right. If we could add
another polygon there. All right. Oh, here.
Let's bridge those. All right. Let me
just do this here. Right. All right. Let's keep adding more polygons
to fill that empty area. We could just add,
like, a few more. Here and there. All right. Just like that.
Perfect. Let's just keep adding more polygons. Et's see how many
vertets this all have. Let me add another extra. We could have an even number, and maybe now we could
do some great film. Let's switch these pans. Let's see what this
give us. Not that good. Not very good. I think
this one would be. Maybe this one or this
one would be awesome. Let's I don't think
this could work. It's too nasty. No. I will not use secret
fill in this part. Because I will just do
it cleaner by hand. Because I want one edge loop
around this cheek area. I mean, this plane
changed there, we could. Now, let's see what
else we could do. We just keep bringing the
flow just like that here. Alright. Et's see. I think that one is an overkill. Maybe we could merge these ones? No. All right. Perfect. All right. I Let's see. Let's add one edge there. Let me connect those. All right. And now we could add just another edge there
and now let's merge that. Let's go here to scoop mode, relax this area
on the shi there. All right. You can see here that we have
our main loops in place, the eyes, and everything there. I mean, this loop here, I don't like it that much. But we have our
closed loops here. So maybe we will not care
too much about that. Let me add a few more loops
around the eyes. Perfect. Just to have more density there. So so that the ice
cold close better. All right. Now, what we need to
do is just to fill the gap in the forehead
at the temporal area. All right. Let's. Alright, let's just keep adding
more polygons here. Perfect. Just like that. So let's adding more
polygons here and there. Alright, around here, go be Perfect. Around
there. All right. Well, how many polygons
we have there? I don't want to add more
much more polygons here, although we need more polygons, like, at least one
or two more there. But now it's not
the same amount of polygons on the top eyelid
and the lower eyelid. But my face is already clean. If I add more loops around face, it will be a little
bit too messy. So that was cool too. I want to hold the shapes. But also at the same time, I need more edges. Let's think about
that a little bit. Alright, let's just keep adding more hooligans here like this. Maybe here I will just
keep adding more stuff. Perfect. We need
like four or three. Let's just keep with
three. All right. Yeah, we need another one. All right, let me
use my smooth brush here just to relax that area. Let me do some safe. Alright, now, I need
to close this area. A we are going to
do that. Let's see. Let me add a few more hooligans. Alright. Just like this. Perfect. All right. And you can see that we have the space now to close that area without adding extra,
nice and good. Let's select the face and let's click here in
shade smooth so we can see how it looks with
the smooth shading. You can see that now we have our low polyphase
without triangles. At least for the phase, we will have no triangles. I mean, for the body itself, we will have no triangles. Now with the clothes
and all that stuff, we will need to a triangle
for these to be optimized. But for the bodies right now, I want a triangle because
the reason that I said before because we're
going to import these zeros and reproject
and all that stuff. All right. So let's just keep. Let's put that Edge
there. All right. So I think that I will
end the video here. And in the next video, we are going to maybe we could do something
better in the shin. Let me just do it real quick. Sorry, but I cannot ignore that that we could
do something better. Alright, let me bring this edge loop around
there, just like that. This also could be here. Perfect. That's cleaner. Alright. That's a lot cleaner than the thing that
we had before there. Also, maybe we could maybe do some stuff there in
this area be better. Indeed. But I will just
leave it there. All right. Give me a sec. Sorry,
but I will just add a few more stuff here
before ending the video. Alright, now, now we're
going to end the video. So in the next video,
we're going to continue with the topology.
So see you there.
5. Continuing Head Retopology: Alright, guys, so let's
continue with this model. In the previous video, we
did the face topology. So now we're going to
complete the head topology. So let's start. So let's just keep taking these edges and just
keep extruding them up. Like this. Let's just extrude, like big big extrusions, just like that
with big polygons, we can address
anything else later. Let's just make something
and then later, we could start cleaning them up. All right. Let me use my my
sco brush here, my smooth. All right, just
like that to smooth this making this nice and even. Just like that. Good.
Perfect. Now let's just extrude around here. Alright. Perfect. You can
see now that now we need to put some more plylops
Alright, let me do something. I will just apply
my shrink wrap, and then I will just reapply that shrink wrap or
select the body. Perfect. All right. Now this is poked. Oh, I had this in front. Alright. Let's continue. Also, I will do something. I will go to BU and I will
change the clip start here, and I will put just one
point, I mean, 0.001. So the clipping
start a lot later. All right. Now we could merge these
together, vertex together. All right. Let's see. We could add maybe two
edge troops there. Perfect. We need more
egg loops in the area. Perfect. Let me put three here. All right. Let's just keep adding
more and more polygons. Till we feel this entirely. All right. Right now, we have a lot of polygons going through the phase
going through here. We need to reduce that
amount. How we can do that. We can do that by doing some tricks in the topology to reduce the
amount of polygons. I will show you in a bit. Just let me try to redistribute
the nicely and good. All right. Perfect. All right. This not working too good.
Very good. All right. Just stitch. Those verte? All right. Now, what can we do to
reduce the amount of polygon that goes
around the scalp here, the school all right? So let's go here. I will
show you one of the freaks. It's like a reduction from three polyloops to
one, I think it was. Yeah. So let's take this. Let's take this middle the middle edge from these
four vertex. This one. Let's just slide
slide that like that. And now with the knife brush, let's just add an edge here. Now, we could just
saw those edges, and we got rid of the do
atrops you can see here, this is a quad. This is another quad, and we have reduced
the amount of polygons that goes there. All right. Let's
just keep working. Perfect. Let me put this in front because I want
to see what I'm doing. Right. Like that. I think it's a lot better. Yeah. Perfect. All right. So, let's keep adding
more polygons. Perfect. Let's feel this here. All right. Here also. Perfect. Let me add a few more here. I think there is much polytons
going on in this area. Yeah, indeed. We had another edge there. This could be like that. All right. This could
be like that. Perfect. All right. It's just a let me move this here. The other edge there. Now I will just merge
those together. All right. Perfect. We need to solve more
parts. All right. Let's just try to
close this gap. Alright here, I think we
will do the same brick. Let's just press F in this area. Alright. Okay. I quite not like the way that it is
flowing in this area. So let me just delete one of those pass because I think we
will do it in a better way. All right. There is definitely too
much polygons going here. Alright. Let's say we could
add that there. The, let's add another one. I need another true there. Perfect. Let me use my mouse brush to
relax the polygons. Perfect. I need
smooth this area. I repeat. Perfect. Let's add another group here. All right. Is most also? All right. Let me
say real quick. All right, and now let me apply this shrink wrap and
then add it again because I want to apply the stuff that the shrink
wrap modifier is doing. Right. Let me put some music
Alright, perfect. Because their rhtpology
is a little bit tedious, so I like to do my rhetology with some
music in the background. All right. Here, we could merge
these vertex together. We could also do the
same to those vertex. Let me add another edge there. Perfect here also. All right. Just keep adding more polygons. And now let's add
another edge there. Perfect. I All right. We could merge these two
together just like that. And now let's just try to stick these ones just like that. Perfect. All right, let's just continue
the topology here from the the jaw just like that. We will need to do some
reductions here in the chin also. Yeah, I did. We will need to. So I will do something. Let's see what we could do. Let's just do this basic kind of the same thing that we did
with the other pieces. We could now both those two. Perfect. Is it the same here. All right. That's better. All right. Let's see what we could do here. Like this could be. I think
so. This could be an option. Let me try to make that
these gon stretch. All right. Let's just complete this part. All right. That could be there. Let me add another edge here.
I think that's good there. Perfect. Now I will do, another loop that goes around here to start truding down
to the neck. Let me save. Right? I look that goes like this. So we can now extrude down. All right. I think we need to do more reductions
in the topology. I think it still has a lot
of polygons going down. Like here, I will do
another reduction. Perfect. All right. So now, let me safe
incremental again. And now, what I'm going to do? I will just deactivate the
magnet and I will just extrude down this edge here. Let me fill this down
to make it straight. Let's just press S, then C. And now
let's press zero. This way, this is supposed to be straight as you can
see, straight there. Let me use the
proportional editing maybe maybe not.
Maybe active that. Let me put nicely the polygons here. All right. I like that. Real
quick and easy. All right. Perfect. Now, let's add a few
more a tropes there to support the formation here. All right now, I
will start using my my magnet snap the vertices on top of the neck. Alright I will need to do more,
even more reductions. Yeah, indeed. I will add another
one in this area. I will just reduce
starting from here. Maybe it would be better
starting from this area. Not there, maybe here. All right. Let me just remove those edge
loops. All right. All right, let me do something. I will apply the
shrimp crap again. And now I will just do more Let me apply add
another shrimp crab. All right. Perfect.
Now I will just start relaxing the polygons. Nice and easy. All right. Let me see how many. I need to add more
edge loops there. All right. Perfect. So now you have the
neck. Let me save. Perfect. Let's try
to make the ear. The ear is always a complex part to do
in the topology stage. So let's just try to do it. Or I will just make some So edge rope that goes around in this
part is called the helix. I don't remember well, from this part of
the ear, all right. And that group will
be attached to the other edge Perfect. All right. Now from here from this area, we're going to keep rooting
this just like that. All right. Just like this. And easy. And let's see later if
this is still easy. All right. Perfect. All right. The most
complex part is this inside of the ear
and also this other part. Let's see how we could do this without adding
triangles there. Because, as I said before
in the previous video, I don't want to add triangles,
at least right now. We could add triangles to force the triangulation
in some areas. But at this stage, I
don't want to do it. Alright. Let's add that polygon there. Let's try to make some
ops that goes around. This part of the ear. All right. Perfect. Let's see. All right. Just keep adding
more stuff here. Perfect. We'll add another edge there. All right. This could
be attached to here. Another edge there.
This will be attached. Now I will just make whole here or the art. To be. Perfect. Let me add another edge up. There we go. Alright. Let's see. Let's see
what we will do here. Let me extrude this
one here also. All right, this will
not be a good idea. All right. We need another
loop that goes down. All right. I like
that. Let's feel this. Perfect. All right. Maybe just like this could be an option. Perfect. Let's keep adding
more polygons here. All right. No, I will just ditch
these together. Perfect. Let's see if I'm not
talking too much, I need to be a little bit
concentrated for this. All right. Let's see how we could
make the nicely and good. It's just two days. Perfect. Let's add another edge there. Now, we could just extrude this. Let's add that polygon there. Let me remove that. Right? Perfect. Now, I will extrude this in. This is nine. It's
not an even number. I need to add somewhere
another loop this works nice. Maybe from here. Now what
I'm going to do I will just do some great fiel and maybe we could
do some smooth. Alright. I don't like
this that star there. I don't like how
that is flowing. Like having the vertex attached. I just don't like
that. All right. Let's just keep adding
more stuff here. This is kind of better. All right. It's a better. We don't have anymore a vertex that is attached
with text edges. All right. Here, I think I
will just reduce the amount of polygons that comes
through the ear. All right. Perfect. Now we need to close this
in the back of the year. Let's see how we could do it. Let's just add a net up there. Let me save. All right. We could do this I may do B with the F or some bridge right now, we could start placing. Maybe here we could
add one H loop. All right. I like that. All right. I think we will
add just one more aria. All right, perfect. Let's just relax
that from there, And now we have
our face and head. We've apologized nicely way. Let me see how this
looks without the frame on down. Alright, perfect. We still need to do some
stuff like do the iVaCs. It's kind of easy. Maybe we could do it now. Also, I have noticed that I don't have my wrinkles active. Or my lacrimo. Let's see if we could make it. Quick. Let me just try to
find my my lacrimal mesh. The hi poly. It should be
here. You can see it there. All right. Let me remove this. I
can select everything. Now I can do some Abe
and then some hide. Now from here, what
I'm going to do? We'll just do some little
extrusion, just like this. And now I will just
merge I mean, not merge, just some bridge just
like that. Big and easy. All right. Just like this. Perfect. All right. Quite nice and good
for this part. I might not make it maybe we'll just throw it
there, just like that. I think I will do that.
Just push it back here. Just like that. Perfect. Now, let's just extrude this in. Just like that. All right. We could do more cleanup once we reproject our
mesh inside Zers. I like to fix all of
these imperfections. Now since we have
an even number, let's do some great fill, and this would work. But this in a nicely way. Alright. Let's do some
shrimp crab. Like the body. Let's apply this.
Oh, before applying, let me do some relaxing t. Just like this. Not
working that much, indeed. We could do more
relaxing side brush. Let's just leave that part. Just like that just for now. Alright. Let me try to stick together. Then let me try to snap
this to the surface. Alright. All right. Right, I think I will just
leave the video here. In the next video,
we're going to keep working on the r topology of this character.
We'll see you there.
6. Starting the Body Retopology: All right, guys, so let's
continue with this model. In the previous video, we
left the model in this stage. We did the hepology of the head. Now we're going to start making
the topology of the body. So let's bring back
the body. Let's see. All right, we have the
body here. All right. So like we did in the head, the body have like main loops that we need to
add before adding the rest. This is just for this
to deform correctly. So let me show you what are those main loops here
in the body. All right. We have one loop that goes
around the shoulder like this. We have another loop
that goes around the pectoral here,
just like this. All right. So we have another
loop that goes around the leg just like
this. You can see it here. All right. And now the
rest is just, like, start adding more loops
like here in the torso, this belly area will be like this normal loop, you can see. And then that basically
are the main loops. So let's start making this. Let me erase everything. All right, so let's
start extruding. Let's make the loop that
is on the on the shoulder. For now, I will not care about how many polygons
this loop has. Also, I forgot to
activate my magnet. Alright. Let's just make that
loop real quick. I just want to have it there. So later, I can tweak it
more if needed. All right. Now, we can add the other
loop that we have here. All right. Let me
remove that edge. Alright, let's keep. Let's keep adding more polygons. Like maybe some
middle ones here. Perfect. We need a few more edges here. Now, let me do something first. This loop will go around the
shoulder, just like this. This will go down,
just like that. And then this will go here, the back, this will
connect all the way here. Alright, there we go. Let's make the loop that
is here on the waist. All right. This will go just
like this around the butt and the inner
part of the legs. All right, just like that. Perfect. Let me try to connect nicely that edge here. Alright. Just like
that. Perfect. All right. So we have that. Let's make this other
loop around here. Let me reduce the size
of this just like that. All right. Perfect.
All right, we also. I will just do it later. All right, let's focus on the first although we are not
going to use the body itself, we're going just to use the head because the body is
covered by all the clothes. But the body, having, like, the actual body can
help us when we need to rig this character
because we can rig this body, and then we can, like, transfer the weight
to the clothes, and that will save
us a lot of time. In the rigging process.
So let's continue this. Abe, I quite not like how
this is flowing here. We'll just leave it like this. Perfect. All right. Now, what I'm going to do will be just to start
connecting everything. I want to connect
first the head with the rest because if we made the body and then we need
to connect it to the head, it will be a tiny bit
tricky sometimes. So let's just start extruding
from the head to the body. So in this way, we don't have too much
trouble while trying to connect the body
with the with the head. So let's keep adding
more polygons. I think there are some
places that we could reduce. Yeah, we could do that. All right. I want to
have a loop around here. Perfect. Let me distribute. Also, I will add
another shrink crap. All right. Perfect. All right, this
part, I don't want that to flow like that there. Right? Let me start adding
some edges. Perfect. This area we could start adding more polygons
just like this. Let me do some
Alright something. Let me do some relax here. All right. I will add a few
more edges here. Also here, we need
more polygons. Let me connect this
middle edge rope. A few more polygons. Maybe not now. Let's add
more polygons in this area. Wait for this. Let me
save just in case. All right. Like four edges, I
think would be good. Just like that. Let me put this edge there. Alright. Perfect. I need to reduce
this area because this area is a little
bit too dense right now. So I will just move that
edge just like that and then just do the trick that I show you the previous video, how to reduce some edges
into less amount of edges. And now we will add
more edges around here. All right. Let's keep adding
this stuff real quick here. All right. I think we could reduce a tiny
bit in this area. A little bit too dense. This area doesn't need
to be that dense. Indeed, we could maybe
remove one of these edges. All right. Let me
connect this middle one. All right, Let's skip. Alright. My Blender
is a little bit back. Perfect. All right. It's like that. All right. Maybe in this area, we could do something to
reduce the amount of piss. I mean, of edges we have there
and just do this instead. All right. And now this area, we could just bring it here like this. Two, three, four, five
purchases. All right. No one there. I fact let
me do some productions. Just like that. Let me merge those middle edge
loops. I will save. I will apply the shrimp crab. I will add it again. Alright, let me see
how it works now. All right, it's
better, a lot better. All right. So lein
geometry here. We try to clean this
part by hand. Alright. Let me apply this shrink
crap again. Add another one. I'm applying, as I said,
the previous videos, I apply it and adding again the shrink crap
modifiers because I want to apply the deformation. I mean, the snapping that
the shrink crap did, I just want to apply
it and commit to it. Alright, we have an even number. Although I don't think
it will be too wise to use the quid field. Let's see if there are some configuration
that we could use. And there is not. Because we have a lot of
polygons in this area. All right, let me try to
connect these ones here, and then we will
see what we can do. Maybe three could be good. Let me connect one here. Move, move, move. Alright. Perfect. Alright,
perfect in that area. Perfect. Perfect. But now in this area
will be a little bit tricky because we
have a lot amount of polygons and we need to address All right and
see what we could do. Perfect. We could do
another one, maybe. But we could do here. All right. Maybe here we could add this P. We could add another one
here there and then do some more relaxing in this area. Perfect. Let's apply
this shrink crap. Let's add it again. Let's see how many polygons we have in the arm.
It's another one. So we have uneven number. We had 17 before. Let me save. Perfect. All right, we have a little
bit of the upper body. So I will just
extrude all of these. We'll go to my edit, look to us and make this circle. All right. Then I will just
put it here around here. Perfect. I will add
a middle edge rope, another circle here. Perfect. All right. A few more edges here with
this amount will be good. Now in this area,
I will just rotate it a little bit, just like that. Because this way, we
could emulate how the forearm deformate
because you know that the forearm can
rotate into itself. And if we left like
these parts like this, once we dis rotate, it will, like, crunch on
itself, you can see. But if we made this twist before deformation will be better because
when this rotated, again, like that, this will just regain its form
just like this. It's a tiny rotation. All right. Let me add a few more edges. Perfect. All right. Let's try to keep
this a nice here. All right. I will now
apply the shrin crab. I will add it
again, shring crab. All right. Let me remove that in front. Where is my speed topo. All right. Remove
this upfront here. All right. I will add more a troops around
the joints like here. Also, maybe we could
add another loop around here, the All right. I need another loop that comes
all the way to this area. So I will just cut it with the knife brush
and add it manually. All right. Is right
let's merge those two. Also, these two. Now I
will add this shop here. And then I will just connect
it with a knife brush. Perfect. Where is the gap
here or right this here? Perfect. Now, we could do somos. All right. Perfect. Now I will apply
this string wrap. I will add it again. Perfect. In this area, also,
in the elbow, I will add I will do some
inset just like that. So this has a tiny
bit more of geometry. So the rigor can
use this to, like, keep the shape of
the elbow while bending the arm Alright. So this part will be basically the same as we did with the arm. So let's make this circle. Let's go to edit, make circle. If the Alright, this works. Also, these loop tools, you can find it here
in preferences. You can search for loop
tools in get extensions. You just need install that atom, and you can have access
to these loop tools is a really nice piece of stuff. A really nice tool, yeah. Alright. Let me try to get
this nicely made. Alright, if this lets me. Alright. This would be basically here a a
few more polygons. And now we could just
merge these ones. All right. All right. Let's see. Maybe three. Let's add two that because we could do some reductions
in this area. I will add more polygons here. So now I can do some
reduction here. All right. It's all edges. Perfect. I know I one here. Let me remove this. This stuff. Alright, give me a sec. Alright, we are back. So let's
just keep working on this. Here quick and nice. All right. One more edge loop
there. All right. No one here. Perfect. Remove that edge. All right. Let's
just keep merging these these vertices together. All right, just like that. I need to add new one, new edge. All right. Now, I could. I can add more edges there. Perfect. So now we
have that area. So now I can I can do some relaxation. But before that, let's
apply the shrink wrap. All right. Merge these ones. And now let's just relax
all of these polygons. I like that. Alright,
let me save. Alright, let me apply
again this ring crap. Perfect. Heather. Alright. One thing that we
could also maybe add wait, we have some junk geometry here. What happened there. Um, it's really bag. Oh, what happened there? Oh. Let me read the activity clipping because
something happens here. All right. Why this happens? Who knows? Let's try to merge these ones
in the middle and try to regain how this was before. Stuff like that. I think could be
good. If incremental. Alright, let's keep
working on this area. Right to see how we
can connect the pod. I think we will need to
do a lot of reductions. Alright. Indeed, I
think that we will need to I will need to add few
more edges in the pod area. Now we can connect this
one. With this one. Let's add a few more few
more stuff there. All right. Let's ready to connect this. This other one. Now we could do this and then do some
relaxation there. Let's see if my shrink
wrap doesn't get bugged. Alright. Do some fave. Let's add again, the shrink
crap modifier, let the body. Let's keep adding
more more polygons. Let's just extrude these
middle ones. All right. All right. Let's keep
adding more polygons. Let's see how we can be cooled. Let's do this. Alright. All right, perfect. Afraid to add this middle
once. What is this? Where that polygon
belongs? I don't know. Alright, let me
remove the cliving. This belongs here.
Alright, let's active again the cleaving. Right now, I need to add two more edges in this area so we could
connect these nicely. Perfect. It's safe. Let's see what people
do here in this area. X, let me add a few more edges. We could connect this one. Alright. Hey, we could connect this another one. Yeah. Let's see. Maybe in this area, we
could do something. Be. Alright. Perfect. That's
that another one. And now we need to
do something about these two polygons there. Mm. Bit tricky. Indeed. Alright. A little bit tricky. All right. Maybe we could add another
edge around here. Then connect these two. All right as to some relaxation. All right. Let's see. All right. I will
do some extrusion and then I will just
scale this down. Just like this, this middle egop for
the belly bottom. A little bit deep, indeed. A little bit too deep. Maybe I will not
make it that deep. Let me apply. Well, well. I I don't care too much. Maybe we could just leave
it for the normal map. It is not that important
for us right now. Let's add a few more edge
loops around this area. All right. Perfect. This is
just bugging me out. This clipping. All right. Now, we need connect this area. Just like that. Let's
add a few more. It just All right. Just like this, safe. If incremental. All right now, I will just keep adding more
polygons here and there and then just try
to neck this nightly way. All right. Okay we could remove this one. Let me save. Maybe in this area. We could have code loop. Those are round. It's like that. And it could be nice
to have it here. It's like that. All right. Let's see how the refill
works in this area. If it does some decent job, maybe we will do some relaxtion. All right. Let's go to it. 105. So here, let's move S disease. Let's put this in 500. This actually did a pretty
decent job, indeed. This did a pretty decent job, the grit feel, in my opinion. So now I can do some relaxation. But before that, let's apply the shrink wrap
and add it again. All right. That's great feel really gave us a really
good amount of time. All right. So now from here, we can just through this down. Let mix it just once. I will make it like that with S, C, and then zero. Just make it straight down. And now from here, I will just extrude down just like this. Perfect. I will do basically the same that I did in the arm, adding like a middle
atrope around the knee. A few more telopes here, a few more other tropes
around here in the cal. Alright. Let's apply
the shrink crap. Let me add it again. Let's do some relaxation. If this ones to work nicely. All right. Maybe another
shrink crap. All right. Just like that. All right. I will apply it again. Add again the shrincrab. Now this part, I will just clean it by hand
with the magnet. Alright. I like that. Perfect. Let me add more edges in this area, although they are not necessary. All right. We need to also do some cleaning the spice something
like that, Cop. All right. I All right. So I think this period
is a little bit long. In the next video, we are going to continue working on this. I think we have some
duplicated vertices there. Let's see the rated. What I did basically was
just do some console. Select everything with A, then do some control M. No. It was it is with M.
Let's select the body. Let's press M and then
everything selected, M and then by distance. You can see that we have
removed five purgess they were the ones
that were duplicated. Now the shading is nice. Alright, we almost have
our pins with the body. In the next video, we're going to continue with
the hands and feet. The hands are a little
bit complicated at the fits because we don't
have any toe in the fingers. I mean, in the fits, it will be easier to
do than the hands. So let's just do that. Then after we finish the body, we can start retropologizing the armor of this character.
I'll see you there.
7. Finishing the Body Retopology: All right, guys, in
the previous video, we left the model in this stage. So let's continue. All right. So now we are going to make
the fat and the hands. And if we have time,
we're going to reproject the model
inside the rush. So let's see the fits. This should be pretty fast and straightforward because we
don't have any fingers, any toes in the feet. So maybe let's see
what we could do here. I will do maybe I will do some edge loop or polyloup
around the ankle. All right. We have this here. Let's do the same here
in the other side. All right. Perfect. And then one more. All right now, I will
just connect everything. Just like that. Let me add another one there. Perfect. Let's do the same here. Alright. Let's wait for this,
right, perfect. There we go. Let's add
another sub there. Perfect. Now, I will
just peel this. Perfect. Now here. All right. Let's keep extruding.
Just like that. Don't stop extruding. All right. Let's see. In this area, from here, maybe I will just
extrude this way. All right. Let's connect it
to this area here. Perfect. All right. Let's see. Perfect. Al right. Let's just keep adding more polygons here and there. All right. Let me connect these
ones and maybe add a few more edge loops. I mean, edges there, yeah. All right. I think
this could work. Let me keep struding this. I will just make an edge loop
around fied just like this. Holloop. Yeah. All
right. One more edge. Let's connect this. Alright, let's connect
this around there. And now let's add the edges
that are missing. All right. Now, let's bridge everything. Perfect. One more
edge here to better capture the roundness
of the tip of the feet. All right. Let's
keep making this. All right. All right, let's see what are
here. All right. So when it closes Perfect. Let me deactiv magnets and add some more at
tubes around there. And now with the relax too, let's relax a little bit
the polygons in this area. Let me apply the shrink crap. And now let's apply add another shrink
crap there. Perfect. All right. Now, we need to
close these caps. So let's do that real quick. Perfect. There we go. What we have here have 12. Let's see how we can close this. H. Have some trouble. We are in trouble. All right. I think this will
cause some vital. Fidal are not that good. I mean, I'm trying just to avoid these spitals all right. Let me do some smooth here. Now, I will just keep shooting more polygons to close this cap. All right. I like that. A All right. You more Let me close the EtchesTeubs. All right. Or let's
close that there. And there we go. So smooth. Not working through very
good there. All right. I will add another edge loop around that area.
Another one here. All right. Perfect. Now I will just apply
my shrink wrap. All right. I will say incremental. And now let's work
on the fingers. It's a another spring wrap. Let's see what we can
do here. All right. Here we have 18 vertices.
This is an even number. All right, how we can
handle the fingers? Let's see, we could
add a cylinder here. Reduce that to maybe eight. Yeah. All right, give me a sick. Perfect. I just deactivate
the clipping because I want because the cylinder was like tucked in the center
because of the clipping. All right. Now I
will just remove and delete these phases. And now I will just
add a cylinder. Here in each finger,
I will just do that. Let's make the first one, let's align it
better around here. All right. Let's come here. Let's add another edge
loop around this area, another one around here. So I will just copy this to each finger I like that. We try to align this better. All right. Let's keep duplicating this. All right. One more time. This will be here
the pinky finger. All right. A little
bit more work. Alright, let me copy this, and I will do the same, but with a thumb, I will remove these parts. And now I will just
try to fit this there. Alright. There we go. Perfect. Now, let's see how this looking with the connective. It's like preview of the modifier to see what that is actually
doing in edit mode. Let me align feather the edges to the
joints of the finger. Perfect. Now, I will just close
these gaps with Phil. Maybe before that, let's
do some extrusion first. All right. Let me just do
something just in case. I had one duplicated
vertices somewhere. Who knows where it was. So let me duplicate. I mean, just extrude
these holes just once. All right. Just like this? All right. Let's do something. Let's change this from medium point to
individual origins. And there we go. I would
add maybe. All right. Let me move this better. All right. Now we can
close this just like this. All right. One here. All right. Let's
do the same here. When I shop there and
another one here. Perfect. All right. Perfect. Pinky. All right. Perfect. Let's go here also. Right here and
here, perfect here. Here on here. All right.
All right, perfect. Let me try get this better here. A All right. Now, what we are going to do, we are going to bevel all the group that
are on the joints. So let's do it quickly. Let's do some console
B to bevel them. With the mouse wheel, the middle mouse will let's just increase the number of
groups that we have. Maybe I think this is too much, maybe Like this could be good. Not that much. Like
one in the middle, just like that would be nice. Now, let's add edge loops
in the middle areas. Just like that. Perfect. All right. Let me try to capture better
the silhouette of the thump. Alright, now we can start bridging each finger. But first, let me apply this shrink Shing wrap
right here, perfect. Sring shrink wrap. Alright. Now I will
just bridge all of these fingers together. In a way that I have like
a middle plylop like this, you can see that I have
now a middle polyp. All right. Also from here. Let's extrude this part
down to this area. All right. Perfect. Let's keep extruding. Perfect. Let's me add another loop around here just to capture
this part of the thumb. All right. I will do another extrusion. It's a little one and
another one here just to capture this other
part of the hand. All right. Let's see. We to Hart. Reading everything. All right. Just like that. Perfect. I all right let's keep adding more et loops
this time in the middle with fingers like this. Perfect. All right. Now, I will just extrude more Alright. Let's keep extruding. Let me do some safe incremental. Perfect. Let me remove these bases. All right. Let's keep adding more polygons. All right. And let me close those gaps. I will add more edge loops. I will connect this one. All right. I will
connect this other one. Perfect. Oh All right. Let's keep working. Give
me a middle one here. Let's add another
edge troop there. A few more here. And now
let's close this area. All right. Let me close this
area in this part. Alright. Perfect.
Just like dead. All right. Let's
add few more here. I will do something
here. Perfect. So we don't have that
many polygons going down. Perfect. Let's keep working in this area. Perfect. T is. I don't like how
Isaia is looking right now. I don't like this. Alright,
I don't like that. Or maybe believe that. Let me know. All right. Let me remove that. All right. Let me bridge these areas in this way. So we have nege loop in each finger like
wrap in each finger. I just would like to
have this in that now we have a net robes that is around each finger. Is that another ship there? All right. Is one here? Perfect. There we go. All right. Let me
separate these polygons. Maybe no. Maybe we could separate them. But et me remove all of this area. Let's wait for this to
respond, all right. Perfect. All right. Let's see how we can do this. All right. Just like that. Perfect. All right. Let's see what we can
do it in this area. All right. Let's keep
adding more polygons. Perfect. Let me remove this. All right. I will need more hooligans. Let me just feel this again. All right. All right. All right, perfect. All right. Perfect. All right. And now I will
just deactivate the magnet and add a middle loop here. That's nice way. But this part is not connected correctly? No, it's not how
this could happen. This need to be connected here. All right. Perfect. All right. Let's see what we could do here. Close this. All right. Let's add another
edge rop there. We could just remove that. All right. Let me see. Why
is this not working for me? This will go down. All right, I'm doing
something wrong. Let's just merge those. All right now, it's Perfect. Let me remove that edge. Perfect. Now we could add
the middle up isaria. All right. Perfect. But let me save incremental. All right. But let's continue. May continue exhoingth this part just to have
a close edge loop. All right. Perfect. Let me save, and now I will just
apply this ring crab. I will add it again. Ring crab. All right. Perfect. All right. Let me try to have some close
edge loops in this area. Perfect there. All right. We could add one edge there. Right. I need another edge here. Perfect. Alright, maybe another one here. Perfect. Yeah, seg. Perfect. Let's continue. All right now, let's just
connect the perfect. As a few more edges there. And now I will do some relax with the shrinrap adtive
Alright just like this. Perfect. Do the finger. All right. Perfect. Here in the palm. All right, let's save this. Perfect. Let's see. Let me apply the shrimp
wrap. Let's at it again. And now we can keep struding more edges. All right. Just like this. All right. All right. Let's add few more. I just there. Perfect. All right. A All right. So we need to connect this. We don't have enough
taste to be able to add. Maybe we could, maybe not. Let's see what this does. I mean, we will need to
add another one here. All right. Perfect. Let's see. What else we will do here. All right. Let me reduce the amount of polygons that
are coming down. All right. Like that. Many polygons are here, and here we have 18,
and here we have 20. All right. Let me
do something here. All right, perfect.
Now we should have 18. So now let's select this hole, and let's select
this other hole. Let's go to here. I think it was here. And now let's click here
and Bridge troops. You can see that now we have bridge the hand to the
main body geometry. Alright. So let's just add
a few more troops there. Maybe we could just pebble
this part a little bit. And now, let me just
apply the shring crab. I will add it again. Shrin crap. Alright. And now we can smooth this area
a little bit more. You have a clean flow of
polygons in this area. All right. Me to subside. I will add
another edge loop there. Perfect. All right. So. Now we have our body made. The only thing that is
left is the mouth bag. Let's do it real quick. So now we need to
apply the shrink crap. Let's go to the mouth. Let's select the
whole of the mouth. And now let's just
extrude it inwards. Let's make this straight by
selecting that edge loop, then pressing Y,
then you drag down, Y, and then you drag your stuff. And without doing a
click, let's press Terro. And now this will be
aligned to the Y axis. So now, see, let's try
to make this a circle. Not working. Let me select
the polygons from this area. All right. Now, let's see
if this makes a circle. All right. There we go. Let's try to just to close
this area. Like this. Perfect. All right. All right. Now, let's add
a few more polygons there. All right. And now from here, we could
do maybe some relaxation. Select these polygons. Let me select all of
these without selecting the parts that not
belongs to the Mud bag. Y All right. Relax. All right. We know that much. Right click and then
press spa diss 500. We not working
correctly? All right. So let's try just to increase
the size, this part. It's like that. Perfect. Now let's go to scot mode and just smooth this
Area a little bit. Alright. Perfect. There we go. Maybe one H loop here inside
of the mouth in this area. We feel more just
like that. Not a pig. I think that could
be nice enough. Or, right now, we
have a mouth bag, but we need to refine it
a bit, a little bit more. So I'm going to end the video
here in the next video, we're going to
import this model to zebrus and reproject
and everything just to clean a little bit more
this mouth. So let's do that.
8. Cleaning the Body Lowpoly in ZBrush: All right. We are
here. We are back. So now we're going to take this model and then
importing it back to brush. Let's do that real quick. Let's export this for FBX. All right. Let's go here. Let's just export this. All right. Low poly
body. For fixing. All right. Let's click
here in selected Objects. Perfect. Apply transform. Let's remove all of these. I mean, yeah, let's just
last the applied modifiers. Selected objects, this
is really important. And now let's just
export this FPX. Now let's go to Zbrush, here in our file. Let's click here in Import. Alright, let's find our model
that we have just exported. All right. Let's click in Okay. So here we have the model.
Alright, let's go here. Let's click here and let's
write ten in the scale. Now, let's copy this
and just paste it here. You can see that our model
is here nicely and good. Alright, now, I want to hide
everything but the body. So I will just click here. Let me get back my body where it
was in touch Warm. We'll just drop it here
in body. All right. Just want the body
and my low poly body. Perfect. We have those here. Perfect. All right. Now here. Let's just do something. Let's let first, here, I will make a polygroup to separate this
part of the mouth. And also, I will just
separate the mouth back. Let's do some autogroups. Let's repair this lecture. Let's do the same
here autogroups. Now, I just want these two to be one together. Perfect. All right. I think this could be good. All right. Now,
let's do something. Subdivide one. Now,
let's store more target. And now let's go
here to project O. Let's click in yes. All right. Now, let's go to the mouth area. With the morph brush. Let's just clean that part out. Where is my morph
brush? Let's press M. Here is it. All right. Go here. Now, let's just clean this area. All right. All right.
Let's go here also. This inverse desolation. All right. All right. Let's do it another time. All right, Let's delete the morph target that we
had and store it again. And now let's project all
again, just like that. All right. Let's cling this area again. Perfect. This part is like that. Alright. Let's like
this. All right. Let me hide this part. Let's see what happening here. All right. It's just clean that. Let's try just to
smooth this tiny area without destroying the form. Just like that. Perfect. Aye I think it's good for now. Alright, let's see
here. Let's start refining the mouth area. All right. Let me try to get the lower part with the Alright. Let me hide this area. I just want the lower part of this to be together with
the green polygroup, the lower jaw, as well
with the upper part. I like that. All right. Now, let's go here. And let's try to clean this out. Let me hide this other part. Perfect. Let's go with our tibio. And let's just try to scope
the either part of the mouth. Alright. Just the form The forms of the lib. Remember that the lips, lower lip needs to have a
shape that is more like this. See a shape like that. Do the lips look good? All right. So that's why what
I'm trying to achieve here. All right. But you can see that we need to get a lot of volume that we have lost
in the projecting process. All right. I like this. All right. I think this
could be good enough. Let's go to the upper lips. Now let's just try to make
the volumes of the upper lip. Let's remember that the
upper lip has, like, three bumps around here in the middle and
in the other area. So I'm just trying
to make the volume the ear volume of those shapes. Like here, a tiny
bit. All right. There we go. We could just keep refining
a little bit more. This now that we have a better topology
work with in this model, it's just some
general adjustment because I will use now this one has the high
poly for the body. I will just explore the highest
and the lowest version, the highest subdivision
level will be the high poly from now
on for this model. All right. I would not care about
too much with the body because I'm not going to use the body itself in the model. I mean, I will just
use the body as, like, a tool to rack
this in sier way. What we are going just to
use will be the head because everything else will be
covered by by clothes. And if and if the
body is not visible, there is not a purpose
for the body to be there. So I will just delete
all those faces once we have the clothes. We apologize it.
Obviously, we're going to duplicate the
body to have, like, a full body version and just the head version
of this character. Alright. Perfect. F more adjustments small ones. I like that. Perfect. All right. Right? There's a few more. Trying to define a little bit
more these plane changes. Alright, I think I will
not do anything else. So now, we have this. Let me try to fix
these parts too quick. So now we have this. So now
we need to export this. I will export two
versions of this of each one of each the low polyerson
and the high polyerson. I will export a closed mouth
and an open mouth version. So let's do that real quick. I mean, yeah. So let's first open the
mouth of this character. We go here. Right? Yeah. Let me select a All right. And now just bring the coarser here and then just
open the mouth, a tiny bit, just like this. But before, let's add a layer. Alright, a layer here. Now let's just open the mouth. So in this way, once we bake the model, we don't have any aztefac
in the lips area. All right. I have just remembered that I
need to do something here. Right? You need
to push this out. All right. Just like that. A. All right. So now, let's export this
closed mouth version. Let's go here, see blogging, export, selected. All right. Now let's create another folder just to be a little bit cleaner. Body. We just got a folder body. Let's go here. Body, low poly U B, close mouth. All right. Just like that. Let's save this. Let me do some quick save
also. Let's wait for this. All right. So now let's export the
open mouth version. This Alright let's export this. Open mouth. Safe. Perfect. Now, I will export the open mouth version
in the high poly part. High poly. Perfect. Let's wait for this to export it a
little bit heavy. All right now, let's export
the closed mouth version. Alright. But I think that
we are not going to use the closed mouth version
of the high poly, but I will just export
it just in case we for some reason need
that closed mouth. All right. Where is my cursor? Alright. There we
go. Lepot that. All right. So now, let's go back to our blender. Now I will just put
this in old Old. Perfect. Now I will just bring my My fixed models here body, bring the closest mouth
version of the low poly. There we go. I may do
some stuff before. I may go to this triangle icon. Now let's click here include
custom split normals. And also, I want this
material to be there. Now, we'll call this
body, closed mouth. All right. Let's call this
closed mouth score low. Let's bring now a
open mouth person, or let's just call this body. Body low, we'll just call that. Body low, all right. We have our open mouth version. So let's click firsts. Let's click first
closed mouth version, and now let's click or
is the other way around. Let's click the
open mouth version and now the closed
mouth version. And now let's go here with data. Let's click in this plus icon. And now in this arrow, let's click in Join
H shape let me hide the open mouth version. And now you can see that
we have a plain shape that is the open mouth version. So in that way, we can add our Ubis without
needing to add them twice. So now we have the open
and closed mouth version in one object here. So I can delete the other one. Now, here in the hi poly, I will just bring
my high poly stuff. All right. Now here, I will just import, let me
hide the other hi poly. All right. Let's import
the hi poly versions. Let's just import the
open mouth version. That's the one that
we are going to need. Alright, so there we
go. We have it there. Perfect. So now we have a mouth
bag here, nicely made. And also, we have the mouth
bag in our high body. So in the bake, we
don't have any issue. So there we go. We have finished
our our body rhetpology. So I think we are ready now to start making the
topology of the clothes. So in the next video, we're going to do that,
to see you there.
9. Making Retopology of the Inner Suit and Armor: Alright, guys, let's continue
with this re topology. Now we are going to start
making the clothes. So the first piece of
clothes that we are going to re topologize
will be the inner shoot, since it will be the easiest one to do because we are going to reuse basically all the
topology of the body for this. So let's select
with our Selection. Let's select all the topology
where the inner shoot is. And then we are going to duplicate it and
then extract it. So let's select everything here. If you press W, you can
select this circle selection. All right. So let's
just select everything. And why you may ask Because the silhouette and everything is really close to the body. So we could just
reuse everything, and we don't have
to think about it. And also, since we are not
going to use the body itself, just the head, we could
just reuse the topology. From here, give me a second. I will go to the
orthographic view. So I can select these
parts nicely and good. Select these parts. All right. Now we're going to press
Shift D to duplicate and then P to extract. All right. Let me move this
to the low I mean, the inners inner
sued collection. Let me call this, I will
just call it like that. Then I will call the
inner too low, all right. So let's hide the body. And now let's start making
some twigs to here. All right, this just need a
little bit of adjustments. All right. I will do something. Since everything is symmetrical. I will just delete
one size and then apply another mirror modifier. Let me apply a mirror modifier. And also, I will delete
the plain shapes. We'll just delete that.
Alright. There we go. We miss some pass
here. All right. So, let's activ the clipping. I now start working. All right. Let me activ my proporternal
editing to do this quickly, and I will just stick this
bird disease to here. Nice. Perfect. I will basically
stick everything. Oh, I just miss
that part, right? Let's stick everything here. Perfect. All right. Perfect. Here in the back, we still
need to do some stuff. All right. That's like that. Perfect. All right.
In the borders. Just like that. Tiny
bit just Alright. Let's keep working on this. Let's see. I think
the inner shoot is just one piece of geometry. Now, I was thinking
on the string crap, but the string crap needs the light surface to
be a one piece of geometry. All right. Skip taking these purchases to the surface. Perfect. Just like that. All right. Alright. Let's keep just taking this. All right. A little bit more. All right. I think this could be enough. Let's work on this in the neck. This needs to be on top because this part will
be on top of the neck. So the need to cover
the neck nicely. A and since we are using the same
topology as the neck, we should not have any
clipping issues while reading because the topology
from this mesh topology, from the neck matches. All right, I will keep
that stuff there. I don't want to change
too much to topology. All right. Now here, let's see
what we can do. All right. I All right. Just try to get this
nice around here. Perfect. This will be around here. And this piece, we could just tick it with that other piece. And there we go nice and easy. We could maybe
delete this polygon, add another loop here. Let me try get this on top of the surface. Alright,
just like that. Perfect. Now we could
delete that other piece. We could just take this. If we delete that. Alright, let's see
what we can do here. I don't want to add
another stuff there. So All right. No, I don't like much that idea. Let me add another
love here. Alright. I don't like how this
is connecting. No. Let me do this, maybe. Any tops. Yeah, we
could just do this. And now from here,
we could do this. We could just stick
that together. Alright. But now we have some white area. I'm using out triangles because this apody will
not be subdivided. The other one, like the body, we didn't use triangles because we were going to import
that back to brush. But this topology will
not be imported to brush. So we have the liberty
and the freedom to use triangles because the game
engines works with triangles, so it doesn't matter if you have triangles
in your topology, because once you import your
model to a game engine, the game engine will
triangulze all your model, and all these squads
will become triangles. So we use triangles to
save time and to be more efficient and have a
more optimized topology, because there are some
areas that are really complicated to solve
without using triangles. Where you don't are allowed to use angles
or where you should not use or angles
is when you are making models for
films or cinematics. In that way, you
cannot use angles because those model
will be subdivided, and they will use
displays and maps. So they need a really
clean geometry for those stuff to work nicely. But since this is not going to be subdivided, we don't care. All right, I think that
could work just for now. I mean, these parts will be will not be seen
neither of these. So we just need to make, like, a fake thickness around here. And I think that will be it. Let's just try to do it. Alright. Let me do
something quick. Alright. There we go. Perfect. All right. Let me deactivate my
proportional editing, and let's just keep adding this sickness because we're not going to make
sickness for this piece. We can just save time
topology on this. So let's see how this
looks with the body. All right, let me hide
the inner shut hi poly. You can see this match
is nice and good. Alright, there are some areas
that needs to be adjust. Let's see. Let me hide the body. These areas needs to be stick. All right. Here, I think here in that area here also in parts. All right. Now, I think
it's good enough. Let's see, hi there. There are some more areas. All right. Like here. All right. Is a few more. I think
this should be enough. Well, we don't care about those like stuff because we are
not going to the inner body. Alright. I will just leave
that part just like that. Alright, I'm just worried
about the neck area. If it's not visible, right, I think it
should be good. So we have the inner suit. Let me put an underscore. All right, just like that. So let's see what
else we could do. Maybe we could start with
apologizing the inner armor. So let's get the inner armor. This will be maybe
kind of complex. But we can do it. All right. So let's bring a polygon
from the inner shoot, separate out that polygon. And now I'm going to hide
the body and the innersoot. I will create
another collection. I would call that collection inner armor just
to be organized. Alright, I will call this inner inner armor
low, just like that. Unless it starts really
apologizing this All right. So we're going to make this
armor an entire piece of geometry because these don't need to be a separated
piece of geometry in each part because this is
like one single objects. So let's do let's
do this. All right. Just like this,
let's try to make the polygons follow the
shape of this armor. Just like that. Let's
extrude one more here. All right, maybe here, perfect. Let's add another polygon. All right. Maybe three, I think,
could be good. All right. We'll need
one here. All right. This doesn't need to
be like too high poly. I mean, the low poly
doesn't need to have a high amount of topology. It could be simple. All
right now, let's go here. Perfect. Just like that. I will make this a
triangle just to get better this shape run there. Alright. If you were doing this
armor for a cinematic, there, you need to make every piece of
geometry a single one. And these floaters
needs to be like sculpted or modeled
in the armor itself. You cannot have this freedom
of just adding floaters and then baking it and
everything will be nice. Alright, let's just make
this piece around here. Perfect. All right. Maybe two polygons
there, two ages. Let's try to get
this pebble here. Perfect. All right. Let's shoot that and
then just tick it there. Then we close this area. Alright. Let's add another edge. Perfect. Alright. Let's bridge dose.
Let me do one thing. I will just save incremental. All right. All right. I will need to do
something. I will just, like, dig that there. I will stick this
other piece there. I will add another edge and
just do this. All right. Alright, let's continue. I will need, like,
a mold triangle here just to capture
this shape nightly. Alright. Let's keep extruding Me polygons. I need to capture
this shape nicely. All right. So I will just
add another edge there. All right. Let's keep
adding a topology. Perfect. Alright. All right. Around this area, I think I
will need to add Me topology. Let's extrude that.
Just like that. Let's keep extruding. Perfect. I will need hatch angle there. All right. I will
add one edge loop. All right. Perfect.
Just like this. This too noticeable. All right, let me
redo this area. All right. Just like that. I think this is better.
Yeah. Let's keep extruding. Perfect. All right. And Perfect. Let me, like, just close that. All right. Perfect. Let's just keep adding. More polygons, get this shape. I will need I don't want to
add another Edge Loop there. I will just do this instead. All right. Perfect. I would like to, like, model in this home. All right. So let's
just do this. I will not care too much
about these pebbles. They are too small
to be modeled in. The normal map can
take care of those. Let's make this hole with a tiny bit of inclination
in the polygons. Though the bake can this
part can be baked nicely. Alright. Let's just keep
adding more polygons. All right. Let's see. I think this part,
we will need to add. Maybe not. Maybe, yeah, I would like to have the
silhouette of this plate. All right. Let me do something here. All right. Let me see how this is looking
without that, all right. Let's just keep adding
more more polygons. Alright. All right. Perfect. Let's just keep proroting these polygons. All right. Let me extrude. But just like that. Me polygons. I would like to make, like, a cut here. All right. And Perfect. But now, I have a pick
two stretch polygon, so I will just split
that into two. Two triangles. All right. Perfect. I will need
one more polygon here, another more polygons. Let's just merge
these two vertices. And now let's just fill that
with some more topology. We'll separate these and then merge these ones. All right. So now we could
continue with this. Perfect. Here, I will need
astra angle. All right. I kind of don't like the way
this polygon is stretching. Um, maybe we could just
split that into two. Like just to force
triangulation there. Because sometimes we need
to force the triangulation. So when the models triangulate it triangulate in
a nice way because each software tends to triangulate at the
models differently. But if the model is triangulized before the game engine will
not triangulate the model. I don't know if
you can understand me. But let's just continue. This is two
rectangular polygons. Let's try to split
that into two. Alright, let's just
keep extruding this. Perfect. Try to get these shapes. Alright. All right, perfect. Is pep of ties to have
two polygons. All right. Perfect. Perfect. Et's have that there. We'll just add that
tiny triangle here. Perfect. So we could get this bebel All right. Now I will just extrude all
of these all the way down. All right. I will add two ups here
so I can connect these. All right, here and here. All right. So we have that. We could do two
things like we could follow the floor of these or we just don't
care about them. Let's say we will see we'll
see what we could do. I mean, because they can
be just be baked in. We don't need to care about those stuff that
could just be baked in. All right. Let me just
continue these s. Let me extrude this down. All right. Let's
just keep extruding. This could be just
a triangle there. This one also could
be just a triangle. All right. We'll
need some All right. Perfect. Let's make this a triangle and add
another edge there. This would be a triangle here. All right. Let's just keep
pruding More polygons. All right. This part will be
just few more edges. All right. Now, let's try
to get this nice and clean. All right. I just try to get this nice and
clean. Alright, let me save. What, what could you
do is just, like, to follow to use the knife
brush just to follow, like, the shape and the flow without, like, destroying the
cylindrical loops that we have. Just like that. All right. Perfect. Let's see here. All right. Just like that. Perfect. All right. Let's add
another loop here. Perfect. Now in this area, it would
be nice to have another one. Perfect. Just like that. So this would be like, be baked a little bit nicely. All right. So we have
the front part made. Let's try to complete this. Maybe we could do
something here. All right. Perfect. Just like that. All right, Extrude this way. Let's add more polygons. All right. Just like that. Let's just keep extruding
more polygons here. Perfect. All right. Let me add another
triangle here. Perfect. Just like that. All right. I All right. Let's keep adding more
polygons. Give me a sec. All right. Continue.
Few more polygons. Just ready to fill
all these gaps. All right. Perfect. All right. So here. This part also. It's just fell. These caps. Perfect. This part also. All right. Let me do
something here real quick. Right now, we have
two triangles here. We don't care too
much about them. All right. It's like that. That isn't good. Let's
just try to complete this. All right. And Perfect. Et's just try to get this
batter nice and good. All right. Perfect. All right. Let me safe
incremental. A little bit. All right. Now here we will start using
some wrangles there. All right. Just like that. Perfect. All right. Perfect. All right. So we have the front part of our inner armor. We could continue
this. All right. Let's try to get this
part nice and good. Alright. And I mean, the bad part will not be seen basically because we
have the jacket on top. But would be nice to have it also just in case
maybe taking the game, the catcher will take his jacket off so he has something
to show there. Alright. To get this thickness
nice and good. All right. A few more edges here to
hold better this curvature. All right. Here, maybe another
one here would be. Like here or right. Let me move this part
without another troop. Let me fix these
areas real quick? All right, and now
we could extrude one polygon from here
down just like that. All right. Now we just keep extruding more
and more polygons. There we go. Perfect. All right. I will need a few more polygons to get these shapes nicely. All right. Let's just keep proting this stuff. All right around
here would be nice. All right, let's see here. Let's add one there. Alright let's add another
loop around here. All right, another loop here. I think, well, we could
just leave that. All right. And now let's just add enough loops just
to close this part. Alright, there we go. Perfect. All right. Perfect. Now here we will just
continue this just like that. Alright. Here, here we cannot
use the moth Brush. Because we are not
using the shrink wrap. We will need to clean
this all my hand. Alright. Perfect. All right. All right, right.
Let's continue. Let's continue. All right. I like that. Perfect. Just a few
more extrusions and we will have everything done
for the inner armor. Right. Let's see what we could do here. Let me add maybe
one triangle here. And All right. Another look there. All right. Perfect. Let's just keep
extruding here Perfet All right. Perfect. Alright, let me say real quick. Here we go. Give me a second.
Let me see something. Alright, let's
continue. Maybe we could just extrude this part. And now let's add
ara angle there. All right. More extrusions in these areas. All right. And Let's add up one more there. There we go. Perfect. I will want a little bit more
of resolution in Dataa. So let's just continue this. All right. All right, perfect. I All right. Just keep extruding. A bit more. We are close to finish this topology at least
of this inner armor. Alright. Let's add another there. Perfect. There we go. All right, perfect. All right. More here. All right. Get this polygon. All right. Perfect. All right. Right to
get this nicely. A, see, let's see, we will need to add
another triangle. Perfect. All right. And All right. To get this correctly. All right. Get to get this nicely. All
right, let me see. Will you extrude
this big polygon. All right. Perfect. All right. We'll not care that
much about that. All right, so let's
see. Let's see. Way to get this
nicely connected. All right. Perfect. All right. Let's try to
get this nicely in place. All right. This doesn't want to be extrude
right now. It's working. All right. Yeah, we could
just use triangle. We could use another
triangle here. Perfect. All right. Let's add another loop
there. Angle here. North angle. All right. And there we go. D incremental. Perfect. So there we go. Now, let me try to
complete this here. All right. Perfect. Let me
increment all this. Now, let's see how this is
looking without the high poly showing up
spring back our body. Let's see how this is looking. So let's do something. Let's get back our inner body. I mean, our inner
armor high poly. Let me try to select this. And now on the holes, I'm going to do something, and that will be, let me see something here. I haven't completed this part. Let's try to do it quickly now. Alright.'s a tiny bit here. Wrangle, not triangle. All right. That part will not
be seen anyways. We need to connect
that in some way. All right. Now, I will add
just try and goes here. All right. Now, I think this could work. A will not be seen. All right. Now, let's do something. Let's select the the edge of this hole and now I'm going to do the
activate my magnet. I will extrude it, get
it down, bring it in. All right. Bring it down like
this. All right. Now going to just collapse all these polygons
down because I want to close the gap that
this hole is making. And since we have
the body there, it doesn't care too much, although this parts
is looking too much. I don't think that
would be a good idea. Indeed, let me just
delete this stuff. Alright, let's see
what else we could do. I see. I think we
will need to, like, to continue the thickness in, and then we could
do that that stuff. Yeah, I think so. Let's try to do it quickly. Let me bring back
my inner armor. All right, we could do
that here with this part. All right, let me
just collapse this. Now I will just do that. Perfect. That part, we
could just do that. But here we will need, just to continue the thickness in order for these to look
correctly and shade correctly. All right. Perfect. Let's continue. It's like that. Perfect. All right. Perfect. L et me say
incremental again. Yeah. So let's see how
much this is looking now. Let me hide my stuff there. Yeah, I think that
this could work there. So I will hide the body. I will take the hole
that this is making. Oh, we could just make
it a bit thicker. I think that would be nice. All right. Perfect. Let's just continue. All right. I would not care too much
about the shape there because that part
will never be seen. All right. Now we
could just take this, extrude it, i it
inwards, wrap it down. All right, let's gal again. All right, let's collapse that. Now we will just close
that just like that. Here, we could do like
something similar. Let's make this. All right. Perfect. Ready to get some
thickness here. We are almost finishing
with the inner armor. Perfect. All right. All right. All right. Let's just continue. Perfect. All right. I All right. I would want to something here. Maybe we could just take this
part and get the sellout. All right. Y Array, let me safe. We quick. We are
almost finishing. Just need to make some little adjustments
and we are done. Alright. At I think this go to the shop. All right. Let me just straight close this. Like that. All right. Now we could just select
everything in that hole. Let me see how this is
looking with the body. All right looking nice. Now, let's just extrude
this, push it in. Alright, push it in. Not that much, just a tiny bit. Let me add another look. All right. Now, we'll just do it again, and then I will
just collapse that. Perfect. All right. We try just to have the areas a
little bit cleaner. All right. All right, I think that
now this could work. So now we have the topology. Oh, our inner armor. So let's see how
this is looking. Looking nice, looking good. There we go. Let's
take the head. You can see how this is looking. All right. So now I think we are ready to start working
on the jacket. So we are going to make
rtpology of the jacket. In the next video.
Are you there.
10. Starting the Retopology of the Jacket: Alright, guys, so let's
continue with this model. Now we are going to make
the topology of the jacket. So let's start. Alright,
here we have the jacket. Let's begin with
this. Alright, let me take one polygon from
the inner armor. All right. And now I'm going
to make a new collection. I will call this
jacket. All right. There we go. Now, let's bring that jacket
into that collection. All right. We call this Jacket. Hello. Perfect. And now let's
start making some polygons. I will make this a
separated object. Alright. So let's begin. Alright, there we go
with our first polygon. Alright. Maybe we could
continue this here. All right. Something like that
would be good. Perfect. I think I will need I will need some more edges around here to get nicely
that rounder corner. We want polygon here more. Alright, let's keep with this. Let's keep extruding.
Just like that. All right. Perfect. Let's keep adding more polygons. Let's keep extruding this. I will make, like,
big extrusions, and then I will just
make it smaller. All right. Here, I will make another extrusion. All right. Maybe let me take out one of
those polygons. All right. Let's keep adding more polygons here to get this panel done. In this model, I will need a thickness,
like real thickness. So we will need to make the
inside of this model also. So let's keep working on this. I will have, like to erase the back part of this
thing so we can have, like, a clean stuff there. Alright. Let me try to get this nicely. Alright. Perfect. I just extrude more here. I will add three edges. Skip extruding more polygons. All right. All right, perfect. Let's keep working
on this. All right. Let me do something.
We'd like to have a part just like that. All right. I would like to have more density of
polygons in this area. So I will just make this here. Perfect. All right. Let's keep
working on this. Perfect. All right. There we go. A bit more polygons here. All right. Perfect. A bit more polygons here. Just keep extruding. We'll just extrude
like big Big polygons, and then I will just cut them. It's like that. All right. Perfect. Let's just keep
sorting this quick. It only nice. Alright. Perfect. All right. Sometimes blender box and while extruding. And make the extrusion like a few moments after
present F, a bit annoying. All right. Great to
get this nicely here. Perfect. Let's keep extorting
this real quick. All right. Just like this. Perfect. All right. All right perfect. Let's just make more
polygons here and there. All right, one more
edge loop there. We need another edge loop here. Let me lice this
a tiny bit light. I mean, All right. Let's just keep extruding this. All right here. Alright, let's wait for Blendt to respond or right perfect. There we go. Perfect. A
bit more polygons here. All right. We need to make a
triangle in these parts. All right. Let's keep the loop from this area. Alright. Perfect. Let's make the thickness of this
part. All right. Perfect. Yeah. All right. Let me put two. Just add two there. Perfect. Make a triangle here. We'll add another one. Another one. Let's
wait for this. And now let's just move this to redistribute the polygons. All right. A Perfect. All right. There's
something here. All right, I would like
to have this polygon, just like that. All
right, perfect. I will need to split
these into 22 triangles. Because when a polygon has
a phase that is like that, it's called like
generated polygons. And those type of
polygons cause problems. The way to fix them is just to split those polygon
into two triangles. That way, everything
will be good. All right. Let me say
incremental real quick. Now here, let's try to get this nice and good
into the topology. All right. There are some issues
with the novels. I think I will re export
without decimating this area. I think I will have to do that. Alright. Let's just keep
adding more polygons. All right, I would
like to have model in each like base here. So let's make it. We'll just make
some triangle here. All right. Okay. Perfect. All right, there we go. Perfect. We have a hole there. That's interesting.
Why do we have a hole. I think we will need to fix
some stuff inside ebrush. All right. Perfect. All right. And Perfect. Let's just keep adding
more more polygons. Till we get this all. Alright. A all right here. Perfect. I will need to fix that, indeed. I want, like, redo that part, I will just try to fix manually those holes
inside brush and then export them because I don't
want to redo this retopo. I think that before
continue this apology, we will need to go to cbrush
and then fix that there. So give me a second. All right, guys, I have
fixed kind of this part. You can see that we don't
have the whole anymore. But I have tiny
bit of sharpness, but I don't think it's
a bad thing. All right. So let's adjust this nicely. I also, like, pick more this
entire piece to the jacket. So now we will need
to adjust it nicely. I thought so. All right,
let me do something. Let me hide this.
I will take this. And now I will just move
that where it should be. All right. Let me put
this in median point. All right around here should be more close to the
body or the jacket. Just like that, I
think will be good. Now, let's do something. I will delete the other half.
I will delete this part. And now I will add
a mirror modifier to the poly of that buckle. I will apply that mirror, and now we could
go back here and just keep adding the
polygons that we need. All right. That's nice. Let's just keep working on this. Let's adjust these pieces again. All right around there. All right. But we have something
weird in this high body. Let me see if I'm correct. Yeah, we have some
flipped normals puking out this high poly. So let me hide the low poly. And now I will go
to sculpt mode. I will get my grab brush. Then I would go here to brush
and then select topology. I would active asymmetry. And now I would just let's
see which one it is that is. Alright, let's go
here. And now let's just fix that real quick. Also this piece. Alright, there we go. Let's keep working.
Let's get back. Our low poly. Let's see what we could do here. Alright. Another one. Perfect. Right to
get this nicely. Here. All right. Perfect. All right here, we need to do something. Let me do something.
Again, in the high poly. I will just, like, make this touch more that
other panel. Perfect. Let's get back our high poly. I mean, our low poly. All right. Perfect. Let's get this here nightly. Perfect. All right. So, now we need to
do the other part. The other half. All right. Let's see what we could do here. I will add maybe let's just reduce the amount of polygons that we are
getting this area. All right. Perfect. So let's keep working on this. All right. Now I need to have some stuff
here to take that polygon. All right at last merge at last. All right. Perfect. All right here. All right. Let me
split these into two. There we go. Perfect. Now, let's just try to
get this. Good here. All right. Need
another triangle here. Perfect. Let's just take this here. All right. All right. I will add a
middle edge up there and just close those gaps. All right. Perfect. No, I don't like that there. All right. Here, I
think would be good. I think so. Maybe not. Let me do this here. All right. Here, I will just take
this. Just like that. Here, I need to do another
stuff. Get this nicely. Alright. Perfect. And let's just complete this here. Let me save
incremental. All right. Let me just reduce
these polygons here. They are too much. And now
let's work on this area. All right. I will need
a troy. Oh, here. Perfect. All right. Let's try to get this nicely. Perfect. Let's get this. Here I need. I will
add just another E. Right. Perfect. Al right here. I don't
like this that much, so I will just make this in that area.
That triangle there. All right. Here, I will need this polygon. All right. Great to make polygons
stick to that. All right. All right, let's see. Let's see what we could do here. A All right. Perfect. Another head troop. Here. All right. Let me just take this here. Not like Ads. Just make this part
just like that. All right. Let's continue with this. I quite not like the
way but this is there. Y. I think I would just leave it like that. I wouldn't care that much. All right. Let's keep working. Perfect. Keep adding
more polygons here. All right. All right. Et's just keep adding.
More and more. I know. I'm just repeating myself. But it's because this is
like brainless process. It's just add more and more
polygons till the end. Obviously, you do need to think. You need to use the brain, but in the long term,
it's very boring. Alright. And there we go. We have that part of the jackal. Let me see how this looks. There we go. There we go. Have something weird
there. Let me see. So, have that part. Perfect. Let me see if I add a weighted normal pedo Let's continue with the jacket because we need to
make the sleeve. Now, let's start
making these sleeves. I know it's a little
bit pain in the ***, but we have to do it. All right. Perfect. There we go. Just try to
get this loop nicely there. It's just a sickness. And All right. Perfect. And this
will be around here. All right. There we go. These type of polygons, they are good for the
subdivision models, but I don't like them
in this real time because this tends to try and triangulize a little
bit randomly. I don't want these
type of polygons to be triangulated in a different way. Every time I ip this model
into another software. All right, so let's
say incremental. All right. Let's see what we
can do here. There we go. I just like to get a loop around the
sleeve, just like this. A little loop around here. Alright, there we go. Perfect. All right. Let's see what we could do. Now, I will just preaches All right. Perfect. All right, here. More polygons. All right. I All right. Let me get more
solution in this area. Perfect. All right. A Perfet. Let's make this piece here. It's not an even number of
vertices is 29. Is not even. All right. If incremental, just keep working on this. All right. Let's see.
Here we have it. I can do this to reduce
the amount of polygons. All right. I would like to do something. I will just take this
gated, separated. Go here, shrink crap,
take this jacket. Alright. Let me active magnet and now I will just extrude this down.
Just like this. Just like that. Again, and again here. Perfect. All right. Perfect. Sometimes this type of geometry
that have an interior, thin crap tends to push
down the vertices. So we need to bring them back. So let me add few
more loops here. If this ones to work nicely, It doesn't. But I think
we will work with this. All right. All right. Now,
what I going to do? I'll just apply
that shrink wrap. Perfect. And now
let's work on this. Et me try to get
this disease and edges to get the
shuetO this leaf. The set of the wrinkles, of the slips or the folds. Slips. That's the
worst. No wrinkles. Alright. All right. There are
some parts that I will just use like split the knife
brrush using the triangle? Oh, I didn't have my
magnet activated. That stamp from my part. Alright. All right. Like that? Let's keep working a tiny bit more on this. Let me safe incremental. All right. Get a few more icks. All right. Let's see what we could do here. I'm just fixing this by hand. All right. All right. Perfect. All right. Let's see. Whatever we go. Now, we need to get
the silhouette. Of those big folds better. I will use now my knife
brush to get that. I will need more Eglops
around some of these areas. Here, for example, Just get this polygon
stick to the surface. All right. Perfect. Last, for this part could be here. All right now, let me use the knife brush just
to get this stuff. Nice and good. All right. Perf perfect, perfect. There we go. There we go. Alright. There we go. Et's get this. All right. Perfect. Were you get this nicely. One more cd here. Let's add or steak
this hooligans here. All right. I'll add a cut
here or another cut here. What I'm doing now is like forcing the triangulation
in some riots, so this can hold better shapes. All right. I like that. Here, maybe we could
add one more here. Be aware to not make guns. You can see that I don't
have any angun here. But you could make guns in case. That you do like this, you can see that now
it's created than engon. Just try to avoid that. Let's just merge these three. Alright. Perfect. There we go. Here, I need. One more loop. There we go. Perfect. All right. All right, There we go. Perfect. Let's try
to get this nicely. Just like that. And just like this. Here in the inside, I will need also to do some cuts like
here in this area. All right. Let me say perfect. We go. Another cut here. We have to cut the
int. There we go. Although I don't think
this loop is needed. Yeah, it is, yeah. Let's just leave that here. Maybe not. Let's see. It is not kneaded, so I will just not add it. All right. Perfect. I think it's good there. Let me see incremental.
All right. I think it's getting
a, the shapes. Let me delete this No. Now, let's merge that sleeve with the main body
of the sleeve. Now let's see if we
could do some merge by distance. All right. Let's do Subsi. In order
to get this cl there, I would add an loop here. I will delete that
loop so I have a gap. Now I will get these two loops. Now I will just bridge them. Let's see where it is bridge. I think it's in edge. It should be here. Bridge
loops this option. Now I will just delete
this other loop. So now I have them
merged together. All right. There are
some issue here. So here we have
kind of the jacket. I will end the video here because it's a
little bit too long. There are some more
stuff that we need to do to finish the jacket
phy topology, like, make the interior. The interior of the
sleeve will not be necessary because that
part will never be seen. So I will just make the interior
of this part, that part. But I will do that
in the next video. So Are you there?
11. Finishing the Jacket and Making the Retopology of the Gloves: Alright, guys, so let's
continue with this model. As you can see, I have
upgraded my screen, so it's bigger. So let's start. So in the previous video, we left the jacket
in this stage. So now we're going
to complete that, and maybe we can start making
the gloves. So let's begin. Alright, we need to make
the inside of this jacket. So let's do it. Let's make
the rims. Alright, let's see. Make this All right, let's just extrude oligus around the rims, just like this. Before that, let me
do something here. I will just, like, do one extrusion in just
to make that little rim. And now I will extrude
inside the jacket. Maybe just like
this, another one, and I will just collapse that
down so I can have this. Alright. Now from here, let's keep working
on this so quick. Just like that.
Perfect. All right. Let me make the rim of
this part. All right. I haven't put the magnet active. I haven't active the magnet yet. All right. Let's see
what we could do here. Pass. All right. Let's see. We could get a little bit more
of curvature in this part. Alright, maybe here we
could just do this. Alright, perfect.
Let's keep working. Maybe one maybe we could
put one triangle there or maybe not. Maybe just like this. Co be right now. I don't like it that much. Wanna see. Maybe
we could do this. Alright. Basically
the same thing. Let's keep working on this. Perfect. Alright. All right, there we
go. There we go. I think I need a bit more
of curvature in this area. So let's add another
edge loop here. Perfect. Let me collapse this. Alright, there we go.
And now we don't need anymore that edge there. Alright, this is better. I captures a lot
better the curvature. But here, we need
still this water. Yeah. Alright. There we go. Let's keep
extruding this rim around here. Alright. Alright, we have this. Let's see. I would like
to add another polygon. I mean, another edge. Alright, let me try
to get this close. All right. Let's see. Perfect. All right. I will end this
one here in this area. Alright. All right. So let's see
what else we could do? Let me try to add or make
this part a tiny bit better. All right, so let's
keep working on this. Let me do something
here in the hi poly. I will just try to get
rid of this part here. That let me hide the low poly. All right, let me do something. I will just delete all
of these polygons around here because they are
getting in the way. Alright. Let me delete that. All right. Faces. Here we go. Now I will just make a mirror. Let me delete a tiny
bit more of this area. All right. A tiny
bit more. Like that. This should be
enough. All right. I think this should be enough. All right. All right. Maybe not that much. Perfect. All right. I think
this would work. Perfect. And this part here. Let's try to fix that. Alright. Here we go. Now we have a
cleaner bology here. What is this? All right.
Let's try to fix that. Alright, now we have
a cleaner inside. Alright, let's do something. I will delete that part. I
will make a mirror here. Alright. He also right there we go. Let's bring back our
low poly jacket. And let's just keep
working on this. Let me do some tape incremental. There we go. Perfect. All right. P here. We need to bring
that closer together. I think like that should
be good. All right. There we go. Let's
just keep making this. All right. Perfect. Now, I will just
continue this here. Alright, I will need
to do some stuff here. Alright, let's
bring an edge here. Perfect. I can have another edge here just
to hold that shape. And now I can just this Alright, I will
add another edge, maybe not there in
the other side here. And then we could
merge these ones. There nicely and good. Alright, we have some
stuff here that we need to get rid. We need to dress. We are not getting this shape. That silhouette that will
cause troubles, while Baking. Alright, let's try to get
that I think here could be. All right. Let's be
say incremental again. All right. There we go. Now, let's do some stuff because I'm lazy,
a tiny bit lazy. I will just copy the same
topology that I have here. I will just copy that, Chief D, stick that stuff to the inside. And now let's just reverse
the normals and there we go. And we fill that part. And now we can start just merging at last
this re disease. All right. And now we have a
bunch of this nicely. Now, let's just continue
this by hand a little bit. All right. There we go. We add another stuff there. Alright. Perfect. It is important
that the inside have, like, a matching topology,
like the outside. So we don't have any clipping
issues while rigging. So have that in mind. Very important to
have it in mind. Also, if you had a naked body, your clothes needs to
have a matching topology. So we won't have any clipping
issues while rigging. All right, let me try to
get this nicely here. Alright, perfect. There we go. Let's rebirth the normals. Perfect. Now, let's just merge this the ties. Alright, let's merge
that. There we go. Right to get this nicely. Alright. There we
go. Let me save. Alright, let's see.
Let's see, let's see. Or why let's try to
get this part also. Perfect. Normal flip. Let's fill this cup. And now let's just get
all of these merged. There. Alright. Perfect. All right. Here. There we go. Let's feel this. All right. Perfect. All right, right. Let me try to get when
this circular looks. If I can get it. All right. Let's
try to get this. All right, let's just
reverse the normals. And let's just fill those gaps right, let's wait for Brander to
respond. Alright, there we go. We could use the
solidify modifier. But in this occasion, I think it will cause more
troubles than solutions. So I will not use
that All right. Just try to get this
clean and nice. Perfect. There we go. All right. Let's just keep brooding. And now let's save
this. Real quick. Alright. Perfect. All right. Let's continue from
this part also. All right, here.
Another one here. Another one in this area. Another one here. Alright. A few more There we go. We just feel this.
It's like that. Perfect. All right. There we go. Then just try to feel
this this aptly. All right. Perfect. There we go. A few more left and there, and then we could continue with the rest of the
stuff that we need to do. All right. Here All right, there we go. Let's see. More polygons. There are more
and more polygons to come. With this model. A lot of pieces that we need
to do free topology. Don't not be afraid. Embrace the free topology. Yeah. All right. I will just make
a triangle there. I don't care. All right. And now here, I will
just close this. Alright, now, in this
area, I will do something. I will just extrude it a bit. It's like that. Let me
try to get this here. To get these edges around here. Now, here, we're going
to strut it again. I just one more time, and then I will
just elapse that. Why? Because there are not need of the inside of the sleeve because it
will never be seen. And also, these part
will never be seen. As you can see, that
part will never be seen. So now we have complete the
topology of the uh, yeah. We have completed
topology of this jacket. But now we're getting
a tiny weird spot. Here, you can see that we
are getting like that. Alright, I think it's for this. I think it's fits now. We had a tiny polygon poking
out. We have a hole here. I didn't notice, but this
is not correctly merged. All right. Now it is try to stick that again
where that belongs. Alright, here. Perfect. Now, we have
the inner armor, the inner shoot, and the body. We apologized. So we could continue
with the globes. So let's start
making the globes. Let's bring the high
body of the globes here. Alright. I think that
we could use we could reuse the topology that we made in siver for
these metal pieces. So let's see, I think
I haven't lit them. Let me make another
collection here. Lobes. And now I will just
get these objects. Let me hide this. All right. Now we have some
topology for free for the for these objects, for this armor,
maybe we could just delete a few edges
that are not needed. Alright. We don't need that
amount of edges here. Let me hide the rest.
We don't need that. I think that could
be good enough. Yeah, I will delete this also. But there we go. Let's
do the same here. Alright. Let me see something. There we go. Here. Perfect. Here also. Let me do something first. I will take this. Here. All right. Now in this audio. There we go. Let me delete this polygon. Putting polygon there. All right. What is this? Let me hide that stuff. All right. D incremental.
Let's continue. Let's hide the
rest. And now let's get this nicely. Alright. Here, here and here, Dissolve. I will just erase
those, and there we go. We'll call this glove
armor low. All right. Let's get the hi poly
of the clothes again. All right. We could also reduce the topology
that we made for these pieces. So
let's get them back. All right, let me hide
the hi poly. Perfect. This just needs a little
bit of reduction. This way we can save
time because we already made this piece as a low
poly at the beginning. All right here, I will just remove those
supporting edge loops. Alright. Let's just remove them
from all the pieces. All right. Perfect.
From here, also. All right. Let's see here. We could do some stuff. Let me DeactiveRtplo is shading because it's
bugging me out. Let me see topo. Let's deactive that so I can see better what I'm doing here. Perfect you A. This one's it. This one. Yeah. Perfect. And those here. Let me do something. Perfect. There we go. Let's now. Alright. Let me name this. Mm Armor. Low Perfect. And all of this. I will just name it
later. All right. Let's continue with this.
I will say if incremental. Perfect. So let me
hide all of this. I will do the same in here. This is the body. All right. So I will
do something here. I will just take the
topology of the hand from here because I'm going
to reuse that topology. I'm not going to
make the topology of the hand again from scratch. I will just take
this Bleed heating. All right, I will bring these
to the globes. All right. I will just inflate
that with d and C and now I will just use some shrink wrap modifier to stick that to my surface. And there we go.
So free geometry that we can work with
start making these globs. All right. Let's just
fix that real quick. There we go. We're ready
to go. Save incremental. Perfect. All right. Now, let me keep with the shrimp crop
for a tiny bit more, so I can make this easier. All right, here. Alright. All right. There we go. Now let's
just get parts nicely in place. All right. So we'll just add
few more edges. But a few more edges here and here. All right. And now I will just
apply that string crap. Ah, yeah. We need
to delete the shape keys before applying a modifier. All right. So let's continue
the topology here. Here. Alright. Just continue this topology. Perfect. I haven't taken this to the surface because I forgot again to have
my magnet active. All right. Two more
polygons here and there. I would like to have like one seam around here. I have to have this here. I can take that and use it
as a place to add scenes. Alright. This part, it disperse
a little bit too much, so I will just leave that alone. Alright. Something. All right. We have weird stuff here. I'm not really fog. Alright, I see. It's poly
gonna don't like it. Alright. Let's just
try to get this nicely in place. All right. There we go. Tina. Will you slip that. Just like that. Alright,
let's just continue. Continue with this model. All right. Right to
get the clubs done. Alright. Perfect. Al right. Let's see. More we should have it. All right. Two more
polygons here. All right. Let me add one more here. All right. Perfect. There we go. All right. I need another one here. Alright. Let me see
something here. All right. This part is not. We just push that in. This led me to it. I think now it
would work better. Right? We just put that push that
in a little bit more. This full loader. Alright. Here, also. It was a little bit too
far away from the surface. Alright. Let's just get this. Perfect. All right. There we go. This should work. Let's save. And now let's just
continue with this. You can see that we almost
have this club done. I'm getting some issues here. Ready to see what problems are. It's just a little bit
******* out, right. There we go. All right. Let's just continue. Perfect. Here. Continuing D Sadia. All right. Perfect. Just a few more polygons. There we go. We hide this. All right. It's too way far. All right. Get to
get this topology. Right? There we go. I would like to have something. I see in a sep would like to
have more polygons around these corners just to
have a tiny bit more of a solution there. I will just split
these into two. Now from here, I will just start adding a few
more polygons so I can have more solution
that curvaturia. All right. Something like this
be good enough. All right. Perfect. If we go, I will do something
here. All right. Here. Perfect. Now here. All right. That's better. Let
me safe incremental. It's just complete this. All right. Perfect. All right here and there. Perfect. And there we go. We need to do a few more stuff. I can add one triangle here. I'll be at last. Alright. Alright, let's see. Let's see. Let's see. What else? What else we could do? Let's try to get this stuff here. Alright, for Blender to respond, sometimes blender
takes a few minutes. I mean, few seconds
to respond directly. I will also need to
add more subdivisions around here just like that. Perfect. There is just this
part that is left. All right. Perfect. All right, and see. I need to add another.
Another one here. All right. All right. Do more stuff, and there we go. I get this like that. No, I haven't at Magnet again. Don't be like me, please. Don't be like me. Let's
just try to finish this. Alright. Let's just finish here. All right, we got something
weird. All right. It just close here. All right. Perfect. There we go. All right. Just a few more. Alright. Let me do something here. Perfect. All right. All right. Let's save. We still need to finish this. Let me just screw
all of this here. Perfect. This entire strap. Alright, this one, also. All right. Perfect. All right. All. All. Let's see. A little bit more. We
are almost finishing. O. I think this stuff
will cause troubles. This area will cause a
little bit of troubles. So let's try to get
this nicely here. All right. Perfect.
Few more polygons. Alright. All right, here, here, here. Perfect. Let me hide the body. Just take erythropology. From here, I will just
make a big polygon here. All right. Now, I will
just take this whole. I will just extrude it inwards. Rare to get this
cubator nice and good. Just like this. Alright. The sickness saria All right. Now, I will just
get this grid it inwards to the inside.
It's like that. And now I will just do it
again and just close this. And now we have the
globs apologized. You can see it here.
It's safe incremental. And this should work.
All right, there we go. Bring everything back again. All right. Let's add
a mirror modifier. You can see it here. All right. We're
getting some stuff. So I will end the video here in the next video.
Let's see what we could do. Maybe we could start making
the htpgy of the pant, and then we could start making
the rhytpgy of the boots. So we have already, like the main
character apologized. Not that quite
because we still need to rteplojate a
lot more of stuff. But at least the main
principal piece of cloth topologizeT see you there.
12. Making the Retopology of the Pants: All right, guys, so
let's continue with this model right here, we're going to start making
the topology of the pens. So let's begin with that. So let's bring our
pens hy poly here, and we're going to
make the hypology of this Alright let's see. Analyze in a little bit
how we can make this. It should be
relatively easy one. Alright, I think that I
will reuse the topology of the of the legs that
we have made before, but we'll reuse that
in order to speed up the process and not
start from scratch. Alright. Around here, I
think will be good enough. Perfect. Alright,
let's split that. Here we go. Let's go
back to perfected view. Alright, let's make
another collection. I will call these
Hence, there we go. Now, this topology, we call
this hands low, all right. Let me hide the body and
also the rest of the things. Alright, so we have this. Alright we could
delete this Edge up. And now Alright we have
a floating phase there. We could bring this down with a with the proportional editing. Also, I would like to delete one half of this model because I'm going to use
the clipping function. All right. Perfect. I have just decrease the distance of
merging because sometimes it tends just like to merge very close polygons
in the middle trope. So I don't want that. All right. Now, let's bring
this up around here. And now, what I'm going to do, I will just inflate
this just a tiny bit. Not as much because I don't want this area to merge right? It has a bend merged
together, I think. Oh, yeah. I did it. All right. Let me
bring All right. Console C. That Alright. Let's bring the shrink wrap and use the pant as a life
surface or the target. Now let's see what to give us. What this give us
really strange. Why this doing that. All right, let's see. Well, I think that we will
need to do some stuff. Alright, I will just
delete the middle one. The middle area. Perfect. Let me increase the size. Alright, let's see here depend. Oh, I see. Now I know why
it doesn't want to wrap. Well, because this is split
into multiple objects. So let's take that by hand. All right, here we go. Here we have our stuff. Let's acti the magnet with
the proportional edting. Now, let's just fly the geometry, the surface. All right. Also here, I don't like
how that's looking there. I'm really not fun I'm
not a fan of that. Alright. Let me the
active, the magnets. Alright. I will just decrease
this just like that. Right, there we go. Just try to keep this nice there. All right. I will do something. I will hide this pose. And now I will just merge the
rest of the pant into one. All right. Now I will
take this as a surface. There we go. I mean the active part. All right. Is Area
kind of Al right there we go. All right. I will take this around here. So this is not that distorted. All right. Let's just keep fixing the polygons
here. All right. Here we go. Perfect. Here, we have a good
place to add a seam here. I mean, just align this edge to this seam
here to this crease. Alright. Perfect. Let me try to get this lightly
placed right in front. There we go. Perfect. I'm just pushing out some
of the topology here. We'll have to clean this area. All right. Now we can
just apply the shrincrap. Let me apply the
shrincrab. All right. This mesh has shape keys. Now we can apply the shrincrab. Alright, let's fix this. Now, let's make let's
make some middle e troop. Around here. Perfect.
There we go. Tiny bid here. M one
here in the middle. Alright. Perfect. There we go. Perfect. All right. So First, let me see how
the poach is placed there. All right. I think we could make the
pouch, the perded object. Yeah, I think I will just do that just to avoid
maybe some issues. Alright, it'll be easier
to make the pouch, a separate object rather than, like, make the pouch, a single object with the pens. It will be kind of
difficult just to do that. I mean, it's faster
to make it this way. Like, just separated objects. And then we don't
have to think how we could have them together
in the same topology. So let me just continue trying
to clean this out so we could start making the
same treatment as we did with the leaf in the jacket. All right. A here,
and this would work. We're here. All right. Perfect. All right. How many polygons are left? Please stick to the
surface. All right. Now, let's use our knife brush. Let's press K. Let's cut here. Yeah, we will just do this. All right. Here, I will
just make like this. All right. There we go. Also, I would do something
similar here just to get this hold nicely. Alright. There we go. Alright, let's get this nicely. Here. All right. Just remember to not
destroy your flow, the cylindrical flow
that we have here. Like, just adding I mean, adding these triangles won't affect the flow of the topology of the
cylindrical topology. So that's why we are using triangles in this
part that will be bend. All right. Y another more here. All right. Last, There we go. Let's get this. Perfect.
We're not in that part. Let's try to get
it just like that. Alright. There we
go. Alright here. Great to get these too. Alright. And Perfect. Let's just try to get
this nicely here. All right. This will
be around here. Perfect. And now this will be here. Perfect. Let's just
safe incremental. We have made a lot of
progress without saving. That's dangerous because maybe sometimes blender
tends to crash. And it's really annoying
when that happens. So please remember to
save your projects. I will always say that
and will never get tired of saying that
because believe me, that's super important
if you don't want to lose all of your
work that you have spent a lot of time
making All right. I like this. We still
have more big folds. All right. There we go. All right. And there we go. More folds here. All right. Let's try to get this nicely
see how we could get this. We'll just do this
up we don't care. All right, there we go. I think we are almost
perishing with this. All right. Perfect. All right. All
right, there we go. I think we have all the
Siluet already catch. We could get a tiny bit more of Siluet here by just doing this. All right. And Perfect. Let's save this. Alright, let me try to
get this nicely placed. Just like that. All right. There we go. All right. So basically, we have made pens nicely way. All right. Oh, yeah, here. I need to get this hiluet from
this part. Just like that. Alright, let me add another soup just to get
this in a better way. Alright. Perfect. Let me add
maybe another edge loop. There we go. Let's
stay incremental. Alright, here we will
just inset because that part is where the knee will be A right here from the top. Let's just extrude
right scale it inwards. Just like that. There we go. All right. Let's try
to get this nicely. All right, let me try to
get this in a better way. Alright, we need to get this little piluet
although it's not that necessarily. Get a Silet. All right. Here,
maybe we could do the same thing to get
this more billed. And now, we could just extrude, sce it inwards, dig it here, and now we're going
to extrude it again and then just collapse those vertex and
just close that gap. Alright, let's go here. Let's do basically the same. But I need to align
the better in a better way All right. Perfect. All right. Let's get this again. Call it down, push it up. And now we could just pull
up this, and there we go. Let's safe incremental. Alright. So we have the pens. Let's apologize
it here. Perfect. I All right. Let me save again. So, we need to make the
topology of the poach. Let's wait for this to save. Alright, I will just save again. Sorry, but I'm a little bit paranoid with the crashes
and all that stuff. So let's continue. Let's see. Let's bring back
again our poach. We need to do the topology
of this All right. Mm. Alright. I mean,
this part will be kind of a pain in the
*** to reapologize. All right. Let me see if I have. So I think we could start with
the base topology of this. All right. B habit. Oh, it's here. Is not all right. Let's see. Let me see how this
is this place. I think we could reuse this. But it will get some
baking issue in this area. Let me see just a tiny bit. Alright, I have an idea. So I think we will
need to, like, modify a tiny bit body because that area will be a little bit
of a problem while baking. So I'm going to reuse this
topology for my pouch. Alright, let's bring
it to the pants. Alright, let me hide
this again. All right. Let's go to item.
As you remember, I forgot to set the scale at the beginning before
exporting the mesh to Zerus. So let's just put
this into 0.1 there. All right, there we go.
Here we have our poach. So I would like to
separate the ring part. From the from this other part. So let's go to brush. Let's active topology here. Maybe we could just push this a tiny bit in just to separate a little bit more that part from this rim from
this part of the pouch. All right. Sometimes
we need to do this in order to get
some good results. All right, let me just
inflate this tiny bit. And now we can start
making some stuff. Like, I will add another edge here because I'm going
to start sticking. I'm making the
topology of the rims. We will need to do it twice because we don't have imagery. Alright, let's get
this nicely here. All right. There we go. Perfect. Alright, let me hide. This piece, we just hide it. I think I will make that piece a separated maybe equal to it. I don't want to make,
like to separate, too much separated objects
because when rigging, they maybe will be a little
bit pain in the ***, you know, but I didn't
see here we have problem. All right, feel more. All right. Perfect. Let's get this. All right. Here we go. This would be around
here. All right. All right. Let's add
another sorp here also. All right. So let's try
to get this here, good. And nice. Alright. Perfect. Get to get this here. All right. A All right, perfect. Let's get this nicely. There we go. Let's go with this. No All right. There we go. We have to kind of poach. Ma trying to make these straps. It should be easy. Let's get all of these polygons. And now let's just extrude
them. Let' spread out. The scallet along the normals. Let's bring back our our magnet. And now let's just stick. Is polygon to the surface. These objects. Alright. We'll have to do
something in this area. You will see in a second
what we are going to do. All right. Perfect.
To get all of this. Let me save. All right. Now here, I will need
to do like this. And now I will just delete
these to those faces. And then this edge
and this edge, I will just bridge them, make some other triangles
here. There we go. Let me save this. Alright, we need to make
this part of the strap. It will be a little bit
kind of more difficult, right, and see maybe we
could get this area. Let me do something here. All right, let me just do that. There, I another one here. I will try to get
these hooligans. I will do, like, a nameset And now let's just
try to get all of these holgons align nicely here. Let me make a hole there. We just extrude that like
that. Another polygon. Let me say incremental. Perfect. Let's make more
extrusions here. All right. Perfect. Let's go here. There we go. We'll make like two loops there because the Oh, no, we have misses there. We'd like to get a little
bit more of curvature here. Alright, now let's close this. Let's just close that. All right. There we go. That gets the nicely here. All right. It will be here. Perfect. I will
add another edge. Look in this area. All right. There we go. I all right. Let me save that. And now, here we have our poach. We topologize in a nightly way that hopefully will not create baking issues
in this area. All right. Maybe we could stick this topology the surface of the interior. All right. All right. Try to get away
some of this stuff. Try to stick Curtis is
in the corner here. All right. Perfect. All right.
Let's go here. And let's just try to manually
fix all of the dishes. All right, let's go
here. All right. All right. Let's see.
What we have here. Let me try to get these
edges around the rim here. All right. All right. Perfect in this area
also. All right. Perfect. All right. A more stuff here. All right. There we go. So I
think now it is ready. Maybe here, we could just merge this stuff together because that amount of topology
there is not needed. So here also. Alright. I there we go, Let's save this. And now. There we go. Here we have this. And I think that will be it for this. I think
it's ready to go. But we have one
misplaced polygon. I mean, vertex. So I think I will
leave this video here. Oh, I just forgot
about something. We need the strap
that goes around This strap goes
around this pouch. But I will not
complicate myself, and just reuse the mesh
that I have here available. I will just take
this, throw it there, and I will not care
about that piece. So here we have make clear there could
some split normals. All right. So here we have our pants with the
pouch there nicely placed. It's on high, everything. All right. So now, I mean, you can see that we have
some clipping area, but we don't care
because we're going to, like, just have the head show and the rest of the
body will not be shown, so there will not be a purpose for the
geometry to be there. I will not care about
that clipping issue. So yeah, now we
have made the pens. We're making some progress. We still need to make the boots. Like the boots here. And then we need
to make the skirt with the belts All right. And also the cow armor. There are qui a little
bit of work to do still. But we are getting there. So that will be for this video.
See you in the next one.
13. Making the Retopology of the Boots: Alright, guys. So in this video, we're going to continue
with the model. So let's start
making the topology of the boots. So let's begin. So I will just take 11
polygon of the leg, I will just split that
into another object. So now, as usual, let's create another collection. I will call this boots. And now I will take
this polygon and I would call it boots low. All right. So let's start this. All right. There we go. Perfect. I would like to be the most symmetrical as possible in this. So try to be kind
of symmetrical. All right. Perfect. There we go. Let's keep extruding. Perfect. More extrusions. H. All right. There we go. Let's just keep making this up. It's like that. We'll have to add maybe another
edge loop in this area. Perfect. There we go. All right. All right. Perfect. Let's add
another edge loop here. I will add another loop here
with the triangle trick. All right. There we go. Just a few more stuff here. All right. I think I will
need another loop here. All right. There we go. Let's just keep
making this part. All right. Perfect. Let's take this polygon. All right. I'm just trying to
follow the shapes. Add in some clean geometry. Alright. There we go. I don't want to add more
polygons in this area. So maybe I can do this instead. All right. Perfect. All right, so let's continue with this piece,
this buckle piece. All right. Let's extrude. Perfect. More extrusions here. All right. I will try to get this shape because it's
a little bit pronounced. And it will be will
look a little bit weird if it's just a normal map. So we'd like to have it
model in the topology. All right. Perfect. All right. Let's make a triangle in
this area. Just like that. All right. Perfect. Another issue up here. Perfect. All right. A if I'm not speaking too much, but this is kind of
more of the same that I have been doing in
the previous videos. Is the same process? Nothing have changed at all. All right. Let's see if this
ones to bridge. There we go another
triangle here. All right. Let's just keep adding more
polygons. Give me a second. All right. All right, so we are here. And now we can do this just
to get the strap shape. Alright. Perfect. Let's just keep
adding more polygons. I think this is too much. Maybe 22 atrops there
would be more than fine. So here I will just
continue the apology. I would not care that much. Alright. Here we have it. All right. Alright, there we go. We have just a portion of
this booth. Let's continue. Alright. Round here. Perfect. There we go. And All right. We'll add another edge like
this. Another one here. All right, there we go. Let's keep working on this. And All right. Make a triangle there. All right. I All right, we will address the soul later. Not now. I would like to have the same amount
of polygons in each size. Alright. Let's make this here. So now, we'd like
to have iango here. All right. Perfect. Let's see. Perfect. Just more polygons
here and there. There we go. Perfect, let's just continue
with the same process. All right. Like this. Basically the same All right. It's safe. All right. Let's just
continue with this. We're quick All right. There we go. Let's just close
these polygons here. All right. Let's continue. All right. Here, you do something. All right in this area, I would like to have angle here. There we go. Let's just keep with this All right. All right. No, let's just keep extruding
this just like that. I feel polygon
serious to feel that. Alright, let's go here also, and let's do the same all right. Let's get this. Perfect. Safe incremental. All right. A et's just continue with this. We still need to make some like the other half
of this model. Just continuing with this part. All right. There we go. And Let's try just to fill this cap. All right. Perfect. I would like to
have some triangles here to hold. Those polygons. We'll add another edge loop. All right now, let's go here. Let's see what we could do. We could add also
some triangles there. I'd let's just continue this. All right. Try to get this area now. Perfect. There we go. Let's
save incremental. Let's do the same in the
other type. Just like that. Alright. Let's just bridge these two together. All right. I have
some problem here. All right. Try to get this
better nicely here. All right. I All right, perfect. We could just continue this add another up. All right. Let's say
incremental again. Alright. We're
almost getting this. Alright, I will add
another edge loop. And now I will just
continue this here. Alright. Another tub. All right. There we go. Let's
just keep with this. All right. I'll just add
another red slup here. Alright. Let's just continue with
this rtropology Alright, let's see let's see
what people do. All right. This is most likely
a midless process, as I sta before. It's just a polygon after
polygon, after polygon. All right. All right. We like to act to act.
That's why go there. Maybe. Maybe not. I don't like
how this behaving. Maybe, uh, let's just leave. Let's just do like these big
rsions to get the shape. And then we could start
refining it. Tiny bit more. Alright. This is just to get the shape
and make things quickly. Like, just to speed
up the things. Alright. I go extrude this big hooligans. You get this nicely. All right. Alright. All right, let's
just kip with this. Now we could bridge. Alright, now, let's
just close here. Let's just close the loop. All right, now we could
start filling this gap. We'll start adding
more polygons. Start refining the All right. Perfect. Other polygon here. Mm. I need something here. I think I would have to
attack right angle later, but let's just keep this. I mean, I don't want
to have another. We'll just add a triangle
because I don't want this lip. Maybe we could just
leave it. Maybe not. Let's just add a triangle
here because I don't want to add unwanted resolution. Alright. Let's just add this here. There we go. I still need to add more
polygons into this. Add one more polygon here. Another one here. In this area. All right. Let's say incremental. We are almost finishing. All right. A let's just continue with this. Alright. Let's just keep working on this. Y. There we go. I was trying to get a
troop? In this area. A Alright. Almost getting there. Let me safe. All
right, it seems. Here we go. We'll
add another tube. In this area? Alright,
almost getting there. Almost getting there.
Few more polygons and we are done with this boot. All right. Perfect. We could add another trip here. I like that. A There we go. Et's just keep adding more
and more polygons here. All right. Perfect. I All right. Here I will have
a like triangle. This will be a tricky
area for 40 baking. So, let's just simplify
that by just doing this. All right. Now, let's get this. All right. I Perfect. Get few more stuff. All right. There we go. I don't know it's
very good there. Alright. A Here we go. G more polygons. We are almost finishing
with this piece. Alright. A All right. Need to fill this big gap with something with
more polygons. So let's just keep adding them. Alright. Or right at me at
another triangle here. Perfect. There we go. All right. Perfect. A All right. Let me try to get
this hooligan out. All right. We're
almost finishing. Just a few more hooligans. Let's just try to
fill these caps. All right. Perfect. Let's just try to get
this nice and good. Alright. Let's just take this. Perfect. A All right. Almost finishing with this. Let's safe incremental again. All right. Just try to complete this here. All right. Perfect. All right, something
that bugged. I hope this doesn't or
let me see something. I hope it was nothing. All right. I just I have just saved again, just in case something
happens. Who knows? Alright. Almost
finishing with this. We need to make this so also. So let's just
continue with this. Alright, let's just
make this like that, like some deep deepness. Another of the edge loop. We could take this around here. Let me continue that. Just like that. I don't care too much about what it is behind let me add a triangle here
just to get the shape. Here we go. All right. And Let's say here what we could do. All right. Let's just get
another angle here. Perfect. And now I will
just continue that to here around here. All right. This is
kind of tricky area. Just try to get it right. Around here, we have
something weird. Where at last. Alright. That's here. All right. I really don't like this polygon. I really
don't like that. All right. And Maybe we could add
another edge loop there. Just get this done in that area. All right. Get a few more stuff, and then we are good to go. Alright, here. I'll be good. Perfect. There we go. No one. Here, I will need to
force the triangulation. This piece. Alright. It's like that. It's at another group there. All right. Now, let's get this.
Part. The knife, Brush. Alright. Perfect.
Let's get this. Right now we could just take this scale it down. All right, extrude it, and then scale it down again. No, we just take this
and then collapse. All right. Perfect. Here we go. Alright, now what we
need to do is the soul. Let's just connect
all of these here. Let's just try to connect that a All right. Let me try to get this
nicely here. All right. This area, we just
at the triangle. The boom, triangle,
and then boom. There we go. Let me just feel that we don't have uneven
mound where this is. This will be a little
bit complex where width. All right. But we have this,
and now we have an even amount volumes. I will just make a loop there. All right. Perfect. Let's just Dave incremental. All right. Let's just keep adding
more polygons here. Trying to follow like a
circular closed loop. Alright. Perfect. Now we can close this gap. Just like that. Alright. Let me try to get this in a better
position. Just like that. Let me do some smooth purchases. Perfect. There we go. So here, maybe, here we
go to some great film. With a little bit more of spans. I think this is the
best distribution. Let's stick with that. We'll just scale it
down just to get. These are a little bit cleaner. So here moves purses. Alright. Here we know. We just like that could be. All right. Well, let me try to get all the high poly
inside the low poly, so it bake correctly. All right. I think we could
leave this here. So now we have the
boot, which apologized. There we go. Right,
you can see it here. We have the boot, the pens, the poach. Re apologize. So in the next video, we're
going to continue with the calf armor with
this with this piece, and then we're going to
continue with the skirt and the belts. So see you there.
14. Making the Retopology of Calf Armor, Knee Armor, and Skirt: All right, guys, in this video, we're going to continue
with this topology. So now let's begin with the
calf armor, free topology. So as usual, let's make
another collection. I will call this calf
armor. There we go. I will take just
a random polygon somewhere. I will split it. I will move it to the folder, and then we call
this calf armor low. Alright, let me
hide the knee pad. And now we can start
working on this. Perfect. Let me just active this view. I will act embed the
magnet. There we go. All right, let me hide this too. I think I have some
apology for that here. If I'm not bad, I
have delete it. Now it's here. Perfect.
I will just take this. All right split. I will put this in
0.1. There we go. Let me hide everything. We'll just move that
where this belongs. All right. Here.
Perfect. Now I will just hide again those stuff. All right. Let's continue
with the topology. I think it will be
kind of fast to do. I know I say that before, and it took me a whole video just to finish that trypology. But trust me, I think
this time will be faster. So let's make this.
Alright. Perfect. Let's add this here. I will try to go symmetrical. Alright, let me add that there. All right. Perfect. O here. Let me add another one because I want to get in the topology
that little stuff. What I'm going to do, I
will just take these two. I will do some console B. And now I will
change the effect to bird disease or
write do something. Let's go here
individual origins. And now let's just
cut through here. Get this split it into quads. Just like that.
Perfect. Now here. There we go. Now
we can take this. Let's go to the loop tools and edit. Let's
make this a circle. You should convert this into
a circle in a nicely way. You can see it there. Here also. Perfect. Let's just
increase that. Let's extrude one time. Let's extrude another. Again, there we go. Let's go here. Let's do
the same. Let's extrude. There we go. Let's
extrude again. There we go. Let me hide
the hypodes quick. Perfect. There we have it. Let me add maybe some
supporting edge loop. I think this could work. All
right, so let's continue. Perfect. All right. All right. Perfect. Let's just keep
adding more polygons here just to get
the shape and form. Just like that. Alright. I we hide the boot on the body and the pant. Alright, let's
continue. There we go. The rest should be easy to do
because it's just matter of extrude and get that cylindrical
shape right do it. Extrude a few times right here on a middle edge
loop around here, maybe. I think so. Continue. We
have one, two, three, four, five, one, two, three, four, five, three, four, five, six, one, two, three, four, five and six. There we go. Here should be Alright, we have an even number. That's good. Let's get
this here. All right. I'll have to add another
polygon there. All right. Let's see what we got. No uneven number anymore. Now we add another one there. Perfect. So here let's see if
I can add this one. Extrude this up. Let me get
this right there we go. Perfect. Let's just
extrude this up here. Perfect. Let's keep extruding this. All right. There we go. Here, maybe I can add. Maybe we could add troop
here, another one here. Yeah. B or maybe we
could just do this. I would like to have the mount
of polygons. I don't mind Maybe not. I think that's
too much for this area. Et's just add some
triangles there. Just like that. Let's get this. You can see how triangles can
save us a polygon budget. All right. Get this here. Just remember that if you
are making a topology that is meant to be subdivided, you should not make I mean, you should not make
triangles in your topology. So have that in mind. All right, there we go. Et's get this. Perfect. Let's make a lower strap also. All right. Perfect. Et's just keep extruding. There we go. All right. That is here. A All right, let's wait for plunder.
All right. There we go. All right. W here. There we go. I let's see how we can get this. You know, a very good way, but I think it works. Let's try to get this
in the other side. Perfect. Yes. Let me try to
get this close here. Perfect. Now, we could attach this here, and we could close this here. All right, we have
a really big gap. I mean, stretch polygon here. But let's just add
another to put in a troop we go, let's add another
egg shrub here. There we go. Alright, there we have it. Perfect. Let's just close this. Let's do some grit fill. And there we go. Let's do the up part. If incremental. All right. Let's add another edge up here. Perfect. And now let's
just close this. There we go. Go here. And All right. I think I need another
edge loop here, just to get these areas. All right. To get in a better way. These areas here. All right. We are almost finishing
with the call Farmer. It was a really
fast recht, indeed. A Alright. Let's try to see here. We could get this
to work, right? Perfect. Let's just keep
adding more polygon still. We get this done. We'd like to add some edge loop here just to get this
nice thickness ataria. Let's do the same thing
on the other side. Alright. Perfect. Where you go. A Alright. Here we have it.
Let's keep extruding. Make sure just a bunch, and then we could just adjust them just to save time because I want
to finish this fast. Alright. Let me save
incremental. Real quick. Perfect. If we go. All right. If I go, o Alright, we are
almost finishing. There we. All right. Now, let's add
another edge here. All right. Let's go here. Alright. Let's
through this to here. Let me try to see if
Lender wants to respond. Alright. Let me keep shooting more
just to get this shape. All right. All right, let's add another edge Loop. Let's just attach it here. Alright. Now I need to add one more here. Maybe not. All right. At another edge here. There we go. Another one
here. Let's try to get this. All right. What was I did in
the other area? I think it was this. No, it wasn't right, I think it was Alright, let's just leave it like
that. I don't care. So it's extrude here. All right. All right. Let me keep just truning
almost done with this piece. I think we could do also the knee armor in
the same video. All right. Let's just
make a triangle here. Perfect. All right. U Perfect. Just feel more extrusions
and we are done. All right. Feel more. Just feel more.
Stay with me, please. Almost done here. All right. Let's do another
extrusion around here. All right. Few more, few more. What's it here. All right now, now
let's get this. Oh, I just forgot
to fill one area. All right. Wait. Now, let
me do something here. All right. Now, let's
get this. Crude it. All right, just like that. Again, again, and now
let's just lapse it there. Perfect. We could maybe just for the
triangulation in this area. All right. So there we have
our calve armor. Let me get the knee pad also. Let me hide this. So there
we go with our calf armor. So let's try to make
the knee pad here. Also, we have this.
Knee pad should be an easy thing to do, I think. Alright, let's just hide this. All right. Now let's just
extrude. One more time here. Medi active in the
middle this option. I mean, the magnet. All right. There we go. A Perfect. All right. All right. More Perfect. Another extrusion here. All right. There we go. All right. It's not there. All right. Now we'll
go at that triangle. And now here, let me just keep adding This it's not there. I should go up a triangle
should come here. All right. Let me
safe incremental. Perfect. Let's get the sickness here. All right. This will be here. All right. Let's try to get to
edge loops here. Perfect. And now let's
just close here. Just like that. I Perfect. Here, maybe we will get a little bit more of a solution
just to get in a nicely way this corbatre Perfect. Alright. A All right. You more. Perfect. Now, let's just extrude here. One more there, one more here. All right. Let me add another
edge in these areas. All right. There we go. I All right. So let's get this Extrude
it one more time. With this activated. All right. So we could just try to get this attached there. All right. There we go. Et's see what the
Whitfield give us. If we can save time. Let's just move. Alright, this is basically perfect.
I will just take this. And I don't care anything else. Here we go. Maybe we could make. Since they are too close, we could just make
it right angles. Alright. Try to get this nicely way. It's in a better way. Alright, I think I will
have to do something. I need to add another
edge loop around here. We'll just increase the
volume with A and C is to, like, scale that along the
normals and see how it works. With and Snug and C, that's what my bad
A and S Alright. So there we have our knee armor. So let me hide the cow armor. I mean, the knee knee high body. All right here, you
can see now we have the cow armor and
the knee armor also. All right now we need
to make the skirt and the belt and all the
stuff that he has on top. You can see it here. All right. I think
we could reuse the low poly version of that since that is kind
of the low poly is basically a good topology. Let's see, skirt. Alright, let's get skirt. All right. Let me hide this and
also let me hide the hi poly just a little bit. I see. I think it looks pretty cool. Let me see if we have
the other part on top. I think it is here.
Con fine it here. Perfect. I will just
take this All right. I will scale this up. Let me safe incremental again. Alright, let's just
take this and type 0.1. And there we have
it. Nice and good. Although I think we we could have maybe some
issues while this is rigging. I mean, it doesn't match. Is apology. I kind of don't like
the shape of this. So I will do a small herttpology
just for that piece. So let's get back our art And now we could
get this polygon. Alright, let me just turn
on the wireframe because I want to get a topology that is matching the one
that is beneath. Alright. Just like that. Another one here. Perfect. All right. All right. There we go. This is just a small topology. Let me just fill this up. All right. Let's
just get this here. We need to add, obviously, more
resolution to this. All right. Perfect. Now let's get this shape. Nice and clean. Perfect. All right. Let's move that one here. I don't like this part. I
just leave it like that. Alright, I think this
could work nicely. So let me safe incremental. And now I will just
do some solidify. To get this. And also, I will do something. Alright, let me try
to get this too. I need more resolution
in this area. I mean, we have it here, but we don't have it
in the other side. Just like this. This
around there. All right. This one around here. Now, I will do some shrink crap. I will try to get the shape. Perfect. Now I will apply the solidify the shrink crab and
then just adjust manually. These pieces. All right. Let's save incremental this. All right, there we go.
We have this piece. All right. Perfect. Let me de
active the wireframe. Let's me add that. Just port in the
triangulation there. Oh, we have an angon here. Let's just make that
just like this. I don't think Ah,
in the back part, we have the same engon. Yeah. Perfect. Thankfully, we
noticed that we also need to make this part here. Let's try to make it quickly. Also, I will just remove these edges as
they are not needed. All right. Let's do the same here. Let me get back. My skirt mesh. Around here. Perfect. A Alright. All right. Let's just keep extruding this. All right. Maybe we could add one
more hooligan here. All right. Now, let's
just shoot this one. A All right. Another one here. Let's merge dose. Perfect. Let's add another one here. There we go. So for this little piece, I'm a little bit lazy, so I will use the geometry
from our low poly. So let's get that. G here. Let's select this one.
We'll just move it. Alright. Let's hide this stuff. Spe 0.1. All right.
There we have it. Alright, I think I will
leave the video here. And in the next video, we are going to start making the rh topology
of the bells. Yeah, maybe we could start
making the rtpology of the bells on the
poach. I think so. Would be good start with that. And after that, we could start
making the shoulder pads. And then the mask and the hair. You can see we also need to make this big
strap and the demon head, the eyebrows and all that stuff. But we are making some progress. So see you in the next video.
15. Making the Belt Retopology: Alright, guys, so let's
continue with this model. Now we're going to re
topologize the bells. So let's begin with this. Alright, so let's
take this polygon. I will split that. Alright, let's wait for this. Now now we have that. Hmm. Maybe we could reuse some topology that we
have in here. Let's see. All right. I thought that I had some other topology. But it seems that I
have not have it here. Where is that? No,
no, that's weird. I really thought
that I had, like, the strap topology here? That's weird. Alright, I will just export it from
Sibrus. Give me a sec. Alright, so we have it here. There we go. We have
the belts here. So let's move those belts
into its own collection. All right. Also this part. Right, let's just
move that here. Perfect. Let me hide just
for a minute the hi poly. So let's reduce the amount of polygons that this belt has. Like, these parts here are
not needed. All right. Here those parts are
not needed also. So let's just delete them. Perfect. We could even
delete those here. I need to reduce the amount
of polygons that are going horizontal. All right. Let's work on these belt first or maybe let's
just work here. It will be easier. Right,
let's just remove that. Alright. Let's just select all of these polygons and
then just remove them just to reduce the amount of topology
that is here. All right. Pages maybe Alright just like that. Perfect. I think
that could be good. Let's go here also. Let me bring back this
because I will have to delete basically from here to let's
see, to here, kind of. Yeah. Let's just delete
that part. All right. Let me just delete those pass. Alright. There we go. All right. I have
moved out of camera, a little bit this strap in. So I will have to
fix that also here. So let's take that
and just push it in. Theater, we can fit that nicely. All right. So I'm thinking if
making this belt, I'll incite the
topology of this belt. I think I will make
it, maybe not. Hm. We'll see. We'll see. Alright, let's just
align this properly. Let's delete all of
these polygons there. Let me hide this belt. Let's just slide that. This one also Perfect. Let's see here. I know why my camera go blow away that's that's weird indeed. It's just trying to
adjust this belt. Alright. Just put it here. Let me just isolate this
polygon these polygons. Let me also take the pouch, all of these because
all of these polygons maybe this won't be
with the same topology. Let me see. All right,
just take this. Why do we have this
weird this weird thing. It's really weird.
Now we have a hole. What is this? Alright, see? We just close it just like that. It me delay custom
split normals perfect. Let's try to keep
filling this nightly. All right. Alright. All right, let's just
keep doing this. Here we get this fitted. Let's do something. Let's just slide
it down. Et's see? Just like this. All right. Let's see. We could put
this in the long normals. Like this would be. Alright. Here we go. I think
this could work. All right, here, this needs
a little bit more of work. Also here. We need to fit that. All right. Perfect. All right. I guess, let's just
put this nicely here. All right. There's a few more. All right. This one here. Perfect. So now we have some stuff that we need
to include in the topology. Like this stuff,
these other ones. All right, let's just take it. All right, let's see.
Here we have this piece. I will just delete the
entire section here. And now I will just extrude and include
that in the topology. All right. It's like that. There we go. Perfect. Alright. There we go. More more stuff. Let's just extre this
up here. All right. A more polygons. Let's wait for blend to respond. We'll make a triangle here. Maybe not. Here could be good. Although this is too closed. Whatever. All right. Let's just exhot that there. I need one, two, three. So let's just add
three more polygons. Alright. Perfect. Let's just take this. All right. Et's just add another
one here just to get that nice nice curvature. Also here, I will
need another one. All right. Also here. Pebble this one. Now, I will just
extrude it once. Stick that to the surface. Now we could do some
we fill. There we go. Boom, or right here also. Let me continue this so quick. Perfect. There we go. Y. All right. Seems that we need to stick
some more stuff here. All right. A few more. Perfect. That led to the same. Like the si. What I say, great feel.
What's happening? What I'm getting
an error message. It stays like two edge loops or close edge loops which
the two edge calculated. Oh, that's weird. We'll
just do it manually. Oh, we don't have an inert. Even amount of polygons. So let's just get
this back here. A now we could do the grit fill. Not in nicely way. Let's just try to
organize this better. So we don't have any vital for some reason,
we're getting vitals. I'm getting spirals.
All right now, we're good. Perfect. Me. Let's continue with
this All right. So we have this piece
included in the topology. So let's do the same
with the other area. With this pouch, I wanted this to be included
in the topology also. But I'll have to do
something. Alright, I see. I don't have another
piece like this. I have I did that. No. Alright, let me just
duplicate this one. We'll move origin to geometry. And I will just
add this one here. Just like that.
Spokle just here. There we go. Let me hide this. Maybe we could also stick
that to the surface. Alright. Let's just take all
of these with us. And now this one,
I will just put it closer to the
strap so we don't have any problem
when we bake this. Let me also move this around here just to be a little
bit better with the rest. All right. Perfect. Maybe move. This one, a little bit more to the tour
face around here could be. Just like that, I think
this could be good. But right now, we could
just extrude it and start including this
here in the topology. Alright, this one,
this part also. Perfect. All right. We could treat it once here. Perfect. All right. Let me move this bit
in. Just like this. All right. This should be here. All right. Just like that. Let me delete that. Maybe not. Just put this here. And now let's connect
this this area. All right. There we go. This one here also. Perfect. There we go. All right. Perfect. Let's just keep going with
this. Just like that. Let me just hide that 'cause I think that I will
just make it a separated. A separated topology. Alright, let's just keep with this. Alright. Oh I will add eventually
more topology to this area. I'm just making
these big intrusions just to gather topology fast, and then we could just add more density to capture a
little bit better the details. All right. All right. And Let's just extrude it here once. Perfect. Now I need another
way to add a loop. Let's just add this triangle. Just to get these parts nicely. All right. Here, also. Perfect. Et's try to
get this. All right. Perfect. I All right. Let's continue. Let me try to hide a little
bit this inside the pouch. Although this part
will not be seen. Let's just get this nicely. Alright. Per ft. All right. This is continue this to here. All right. Right to continue this here. Perfect. Let's add another
one. All right. Let me try to capture this
part here. All right. Let me just make a hole here. Alright. Perfect. All right. Let's try to get this fix. Perfect. Alright. I Let's just get this there. All right. Let's
save incremental. All right, there we go. Perfect. Let's keep adding a little bit more politons here. All right. Perfect. A few more All right here also. All right. Let's
just add this here. And let's continue. With this. Just like this nicely and good. Here we go. All right. Perfect. I will need to add
another loop here. Just like that. We'll need to force the
triangulation in that area. Also here, I will just force the triangulation in
this way. All right. Now, let's just try
to lose this and not get spiral because
it's here that we are getting circular loops. I don't like this. All right. Perfect. Let's add
another edge up here. Just like that. There we go. Perfect. Let's add another one here. Let me delete this. We
could add another one. Alright, I will just close
this just like that. I don't care anything. Just go here. We just
make a triangle here. Just like that.
Alright. There we go. I need more topology
in this area. So I will just remove this triangulation and
try to get something. Maybe we could leave
that. Yeah, I think so. We could just add it
here, put it there. And then I think we are good. Alright. I All right. Let's just save this. And now we have this
belt, pyropologized. Let me hide the high
poly. There we go. Let's clear custom
split normals. Maybe we could just
add weighted normal because shading is
better in this way. Alright. Perfect. So we need the buckle. I will just bring it from here. Since we have that. We have done that with poly
modeling inside Zerush. So let's just reuse that
I will scale this up. Let's just put zero point
on one. There we go. We have it there. Bring back this right. It's nicely placed. Perfect. Let's also drink
the rest like this wrap. Let me take this. All
right. Let's put it here. Let's hi again this stuff 0.1. All right. We have it there. Now, what I'm going to do, let me hide the hi poly. Let me do some safe incremental. Now, what I'm going to
do is just try to match the poly from the part
that is under this trap. So let's just remove a lot of these vertices that
are not needed. Just like this. All right. Here. There we go. Perfect. I here also. All right. I think it's
good. There we go. And here, let's see if we
have excellent apology. Yeah, let's just remove
these supporting edge loops. Just like this. All of these
supporting edge loops. I will just remove that All right. Just like that. I
think we're good. Let me remove the custom
split normals from here and also with a
a weighted normals. All right. Let's bring also
the other strap. Alright. Maybe I could just push
this out a little bit. It, it will hurt no one. Alright, let's go here. Let me just remove all of
these supporting edge loops. Alright. All right. It was no. I think we will keep
this. All right. I think we could re use
entirely this part. All right. So here we
have these straps. So in the next video, let's
see what we can make. Alright, we have the strap. We need to make
the second pouch. This one. Where is it? It's somewhere here. Or we need to make this pouch. And then after that,
maybe we could make the diamond head
or the shoulder pads. We will see see you there.
16. Making the Second Pouch and Shoulder Pad Armor Retopology: Alright, guys, so let's
continue with this topology. Now we're going to continue
with this pouch here. I think this will be a really simple one
to re topologize. So let's start. All right. Let's go here. Let me right. Let me hide all of these. Real quick. We'll hide
just all of these pieces. Even the jacket. All right. Now let's make a new collection. Let's call this second poach. I will just take a
polygon from somewhere, maybe from here. All right. Let's split that. Let me take this polygon to here. All right. And now start working on this and maybe we could do something. Let's see. All right. We don't have a
senor in this area. Maybe maybe we could use this
as this sender. All right. Push or to select it. Right now that's that three recsor is in the
center of this pouch. Let's see if my idea is correct. Now, let's click here
story into three courser. And now we could
maybe do a mirror. Mm. Not quite good. Alright. This is
not what I plans. Alright, maybe around here
would be a little bit better. Let's like this. Let me treat your in. All right. So now we have this. Let's click here A line
attention to Target. Now, let's just take this. All right around here,
I think would be good. All right. And now let's just flip this polygon and put it here that we can have
symmetrical topology, using the mirror modifier. It would be not perfect,
but it will work. So let's start making
this topology. This should be
really easy to do. Let's just first make
some big intrusions. Just like this. Just to
cover all of the pouch. Let me hide these
ones lead selection. Alright, I will
just hide this Now, let's just keep extruding and
covering the entire jacket. I mean, jacket, that's
not what I meant to say. This entire pouch. Sorry. I'm just a
little bit dump. Alright. Let's just
continue this. Alright. I will do anything. Alright. Let's just
keep extruding here. All right. Now, we could start adding
more resolution to this. Here, we could add this H group. Here, also, maybe here
we could add this one. Here we could also add this one. And from here also few ones. Alright. Let's just
have this here. And now let's start
taking all of these polygons to the surface. All right. Just like that. Really nice and easy. Round there. Also,
this one around here. All right. Perfect. All right. There we go. Just
a few stuff more. Alright, let's add
another eggp around here. I would like to get
this part here. Let me just move that there. All right by reasons. And now here we could
make a triangle. Maybe not. Let's just continue this just
like this. Perfect. At last. Alright. Now let's take all of these polygons
to the surface. All right. Perfect. All right. From there, Perfect. Let's add another edge soup
here just to get it nicely. This This parts here. All right. Perfect. Okay. All right. There we go. Let's do something now. I need to get this part here, or let's see how
we could make it. All right, let me delete
all of these phases. Maybe this one also may not. We could do we
could just extrude one part and then do
a triangle there. Perfect. I All right. Perfect, here and here. All right. Almost done. I like this. There we go. All right. All right. A few more stuff here. I
think this could work. Maybe we could add
another polygon, I mean, edge loop
here and here, maybe. And this should be good enough. Maybe we could just
put it here and try to get a little bit more
of silhouette in this audio. All right. Also, I need more
silhouet in this area. All right. Perfect. There we go. Perfect. All right. A few more stuff here
and there. There we go. I was around there. All
right, safe incremental. And I think this could be good. Now, let's apply
the mirror because this is not perfectly I met riz you can see there are some caps that we
need to fix them. All right. This will
take some time. All right. Since this will be
basically the same process, I will just pause and I
will do this out of camera. And then when I have
something to show, I will continue the video. So let's see you in a moment. All right. So everything
is stick to the surface, right? Let me fix this. Also, I have added a tiny edge loop here.
You can see here. It's just to get this part this area here, that silhouette, that part of right
so let's continue. Now, for the rest of the, like for these traps, I will just reuse the topology that we have
already made inside Cirus. So let's go here. Let's bring back our low polymodel Alright, let's see what we
could reuse from here. Alright, let me take this. I will just split that. I will take these three things. All right. Yeah. Maybe
take that to here. Now I will hide again this body. I will just scale all of the Objects were in the
correct scale for this model. Later, once we finish
all the topology, we are going to apply the scale. So this is one because if we are going to export
an even inside zebras, the scale should be one. Because if it's not, it maybe will cause
some problems. So now we have this topology. We have this other topology. Maybe we not need that. Alright, let me hide this so I can see a little bit
better what I'm doing. So let me fix this maybe we could just
remove some of those of those models. I mean, polyps. Yeah. All right. Let's just remove. I mean, just stick all of these to the surface where
they should be. Alright, we need
to stick this to the surface also around here. Perfect. This one around there. Alright, I will
just remove this. Alright. Perfect. So this. Alright. Let's remove this other one. All right. Alright, let's
just continue with this. Perfect. There we go. All right. Let's
just get this done. A perfect. Let's just get this here. Perfect. Let's just keep adding more polygons here to get this
piece inside the topology. All right. Yeah. Let's get this one. Perfect. Alright. All right, a few more. All right. Just get
this nicely here. All right, let me just safe. And now, because I don't want to repeat this
in the other side, I will just duplicate this
and just put it here. Alright. Let's just rotate that. And now let's just try to get
this place correctly here. Et me do something. All right, shifting. X. Here we go. The normals will be flip. So let's get the measure
normals flip. All right. Here and then just add it
rightcly in this area. There we go.
Basically, like that. All right. Just like this. There we go. I Alright. I think here, everything else
could work nicely. Perfect. All right. This around here. Perfect. There we go. Now let's get the other
parts. Like this one. We don't need this. This could
just leave it like that. I don't care. So now
we have the pouch, the second pouch already made. Let's remove the custom
split normals. Perfect. Let's add maybe
weighted normals, also to this other thing. Here, also, let me remove
the custom split normals. There we go. Let's bring back all of the
pieces that we have hide. Perfect. This jacket in your
armor, body. All right. So we have the second pouch. All right. This one is the
app that I don't want. All right. What is this? Perfect. If incremental. Now we have the second pouch. And now we could start making
the shoulder pad armor. So let's start making that. Let's wait for planter to save. And now let's work
on that piece. Let's create another collection. I would call this shoulder
pad, shoulder pad. Perfect. Let's see if Alright. Here we go. Little bit rotated,
I think. Yeah. I think we are going
to do the same process that we did with the other one with the poach just to
make this asymmetrical. Let me split this.
Alright, let's take this jacket low and just throw it on
the shoulder path. Alright. Now I will just set
origin to geometry. Perfect. Align these objects
with a surface. Let's see. All right, so we will
need to make this by eye. I like that. Try to get this nicely
placed around here. Here we go. Around here, I think it's good. Let's see. I think
here is good enough. Maybe not here. Yeah. I will save incremental. And now let's start making this. This shoulder pad. All right. Let's just try to
get all the shapes that this shoulder pad has. Just like that. Perfect. All right. Let me add another
polygon here. All right. A Perfect. Let's keep just
adding more and more. More and more polygons
till we feel all of this. Alright. All right. There we go. A few more stuff. Let's just get this all
of these pieces nicely. Just like that. Alright. This repology' been easier since these are
basically simple shapes, like super squarish ones. So this type of shape is
really easy to repologize. All right. Perfect. All right. Let's try to get this one here. Perfect. Let's go here. Two more. All right. Try to get this straight,
all right, perfect. Now, let's keep shooting
here and there. Perfect. More. There we go. Let me just hide all of this. Alright. There we go. Let's just get this. All right. Perfect. All right. There we go. Just a few more. A few more, and
then we are done. All right. There we go. Perfect. Let's get
this piece done here. All right. Maybe in this area, we will add some triangle just to get this
piece this part here. Maybe not a triangle. Maybe we could just do
this and get this nicely. All right. Perfect. There we go. Alright, give me a second.
Alright, let's continue. Alright, let's wait
for Blanda to respond. Maybe here. We will need
a triangle. Maybe not. Let's just add this polygon. Alright, let's just add
another polygon there. Perfect. Alright. Et's just try to get
the shape lately here. All right. Perfect. A All right. Is a few more extrusions. Is a few more extrusions, and then we are good to go. Let's just add
another group there. All right. Let's close here. Let me add another group. Perfect. All right. Perfect. All right. I will just extrude this. I will just leave
that part just for the bake. I don't care too much. Alright. Anyway, that part
will not be seen a lot. Let me just maybe make
it deeper just like that for this to catch a little
bit more of light. Alright. Let's try to get this nicely. Alright, around here. There we go. All right. All right. Perfect. Let's add one more. I stop there. Let me remove that. It is here. It's like that. I cannot. All right. Yeah. Hm. That's weird. I cannot get this to
work. Why is this flip? Oh, I see. That's why. All right. Let's see what we could do here. Let's remove that. Let's just trying to get this nicely here. Alright, I mean,
that's too close for the bake properly, I think. All right. We will see. Let's just make this part
all the way to here. So we can attach that here. There we go. Maybe we
could add another polygon. In this area, All right. Try to get this nicely here. Perfect. The safe incremental. Alright, just a tiny part more, and then we're finished
with this piece. Alright. Perfect. Alright. All right. Let's get this. Let's just put it here. There we go. Alright. Just try to close this nicely. Let's add another one
here. There we go. And here we have shoulder
pad armor topology. Maybe we could add one. Oh, I forgot about this. Let's just complete that just
like this and there we go. So I think should be good. Let's hide the high
poly of this part. There we go. Older pad. This is basically perfect. Yeah. The symmetry is nicely done. All right. Safe incremental. And I think this will
be for this video. First, let me add these
weighted normals Wilfre. And I think this will
be for this video. Let me unhide everything. Alright, let me add
another mirror modifier. Alright, there we go. So, this
will be it for this video. We have made the
second pouch here, and also we have made this
shoulder pad armor topology. So what's left to do
is the demon head. We need to do the demon head. And the mask, demon head, mask and the hair. Also, we need to make the
rhpology of the weapon. You can see it here. We need to make the topology
of this piece. So we're going to
make that later. Let's first focus
on the character. So that's basically it. See you in the next video.
17. Making the Retopology of the Mask: Alright, guys, so let's
continue with this model. Now we're going to make the mask retopology.
So let's start. Alright. As usual, let's
make another collection. Let's call this collection mask. All right here, let's
call this mask. Now I will just
take one polygon. We'll split that polygon, and now I will just move that polygon into the new collection
that we have created. And now let's rename
this polygon. Let's see how we can
put in the name. All right mask low maybe. Alright, I think
this could work. Yeah, so let's continue. Let's start making. Retopology you real quick. Alright. If Lender
wants to respond, I will be more than
happy that it happened. Everything is hide.
I really hate that. All right, you think now
everything is all right. This not behaving. How this is intended All right. Let me a sec. Around
now, let's continue. Alright, now, let's start putting some polygons
here and there. Alright, let's put one here. Now, let's just continue this. All right. Let's keep
extruding more polygons. Perfect. There we go. Let's
see what we could do here. All right. There we go. Keep extruding just like this. Perfect. All right. Another one here. All right. Let's keep making this thing. Let me add one edge hop
around this circle. Just like that. All right. Let's keep
adding more polygons. All right. Let me complete this
circle. Just like this. All right. Maybe here
we will do this. Alright, I see. Let
me delete that. I mean, I don't want to Oh, let's just do this. I mean, I want to have a
closed loop in this area. Alright. Let's keep adding more polygons. A All right, whatever let's just continue
with this retopology we are having some issues with
the high poly All right, this is clipping out. But let's just push that back. Now, there should be good. Let's just keep adding more
and more polygons to complete the ropology I All right. Let me put that there. This one should be here. All right. This one here. All right. There we go. Perfect. I try to fill this up. It's at a triangle here. All right. Let's continue. This should be here.
This other stuff should be around here. Perfect. See if I'm not making a spiral. So, let's just continue
this just like that. And let's just keep
adding this stuff here. All right. More polygons. Right now, let's just do this. Scale this up here. Scale it again. Just like this. Alright. Perfect. Now, let's just stick
this to the surface. Just like that. Perfect. Alright. Now here we could do maybe just shoot
it inwards once, and now we can just collapse
this to close that edge. Alright, now let's continue. This will be baked. Alright, let me add
another edge loop there. Perfect. All right. Here. Let's see. Perfect. Let me add
another edge there. Alright, I will
need some triango. Perfect. Allright. Let's add another one here. All right. Let's keep adding more
polygons in this area. Perfect. All right. A Perfect. All right, let's just at this
right angle in this area. All right, perfect. All
right, let's continue here. All right, let me do something. I will need another
triangle here to be able to capture that edge nicely. I would have to add another
edge troop in this area. All right. Perfect. All right. Here we go more hooligans. We are almost on. I really thought that
we were going to have more trouble making this
pry topology in the mask. But it was kind of
straightforward. All right. Let's just add one triangle there just to get these shapes. All right. Let's just wait
for Flander to respond. There we go. Alright. Let's just continue this. All right. A bit
more of polygons. All right here. I think I
will need to add a triangle. Perfect. Let's add another triangle here? Perfect. We're more here. Perfect. There we go. There's one more here. I Perfect. A few more extrusions. We need to get this site also. I think that part could
be a separated object. Just to simplify
ourselves, I think so. We just make a separated object
because I don't want to, like, complicate myself, right. Let's just bring back
our tiny guy here. Also, I don't think
that we could reuse No. This her topology
is not that good. I was thinking of reusing the
topology of the hair, also, but I don't think so
because this hair topology, it's also not that good. I mean, it's automatic topology, it's good for maybe sculpting, but not for production.
This is not good. We have to do some
proper topology. All right now, let's go here. Let's get this this piece, just take it, drop
it here in the mask. Now let's just scale that in a corred scale 0.1, all right. Now let's hide that.
All right, there we go. All right. Here we have our piece. All right. Let me hide this too. Also, let me hide all of these. Just to be able to see
better what I'm doing. All right. Let me say incremental
real quick. There we go. Alright. All right, perfect there. Alright, let's just try just
to get this pebble here. All right. Perfect. Et's just close. All right. Here in the Saudin. Alright. Perfect. Let's just keep adding more polygons. Maybe we could get
this stuff here. Just like that.
Yeah, I think I will need I will need that
silhouette there. But let's just try to
get this hiluet Alright. Perfect. Let's just add that there. This also could be here. I will delete that edge. Now, I will do something. I will just do that. All right. And now I
will just do this. Perfect. Also, here, this
piece is not a great. This part is not a great. Perfect. There we go. All right, let's try
to get this nicely. All right. I just make this. Maybe
what we could do is this. So we don't need to
add those triangles. Alright. Safe encromental. Et me hide all of these. Let's continue making
it this sickness. Real quick, real nice. All right. Something like this. All right, here. Try to get this lower part done. Every here, we could
just collapse these two. All right. Let's also try to get
the Shuette nicely. Let's wait for plants
to respond someday. Alright. There we go. Let's add one edge loop, maybe two edge loops. Maybe we could just put
this in a triangle. Perfect. Just to say
say polypjet Alright. Here. There we go. Let's save this. All right. Here we go. Let me add another
another one here. Another Edge up. Perfect. Now, we call
close here in this area. Alright. A All right. What is this? All right. Let's just keep adding more
polygons in this area. All right. Perfect. Let me close in this area. Alright, now we have
a weird spinal. Well, face. I would make a triangle? Because I don't
want that spital. Alright. A Let me say incremental. Almost done. All right. A here we go. Let's just try to close
little by little. The bag die of this mask
be safe incremental. Alright. Let's see. Let's just drop it there. All right. Perfect. This will not scare. I will just close this, however. Alright. A's just try to close all of these nicely. Good. Because the mass will
not be the form. There's no need to be too
picky with the topology. I just want to close this gap. All right. When we Alright, there we go. Let me just start making big hooligans to
close this Alright. Perfect. There we go. Alright, there we go on. So now we have the
mask topology done. Perfect. Let me
hide the high poly. There we go, here
we have the mask. Also, we have this other piece that we need to do some twigs. Let me hide everything, but this just to just
this stuff better. I will just do some shrimp
crab just like that. Feel quick and easy. Alright, let's just
apply that string wrap. And now we have correctly
made the masks. Let me unhide everything else. Alright. Let me get the hair. Alright, we also need
to unhide some stuff. All right. So we are almost
finishing this model. I mean, this retopology, at least for the
character itself, because we need to make the
retopology of the weapon also But at least, I think that that would
be a lot easier to make, since this is just a
hard piece of metal, basically. W be easy. Alright. So in the next video, we are going to
continue the topology. Maybe we are going to start
making the demon head before the hair itself.
So see you there.
18. Making the Retopology of the Demon Head: All right, guys, so let's
continue with this rpology. Now we're going to
continue with the topology of this demon head.
So let's start. All right. As usual, let's make a new collection. Let's call this demon. Let's see if this
wants to do the job. All right. Demon head. Perfect. Now, let's just select
one polygon from here. Move it to that new collection. It's called the
Dimon head again. And now we can start
making some stuff. As you can see, I move
the Dimon head from here to the middle of the world. I did that in Zebras. So I can have symmetry
without a problem. And also, we could use symmetry inside a substance fainter when we start making
the textures. So let's start this re topology. All right. Since this mesh will not deform, I will not care too
much about the, like, essential edge loops because this mesh
will not be deformed. So just to speed up things. Let's just do this in that way. Alright. Perfect. All right. There we go. Maybe we could make that. All right. Although I don't think we
need a triangle there. Alright, let's wait for this
to work if this wants to. There we go. Give me
a sec. All right. Let's just keep making this. Y. All right. Let me make another edge loop. I mean, polyloop here just
to get that part nicely. Let me add a new
edge loop there. All right. Perfect. Let's try to
close this edge oop. Just like that. Let
me move this here. All right. Maybe now we can we
could close that. Perfect. Let's just keep
adding more polygons. All right. Perfect. Another up
here. All right. Let's just keep
adding more stuff. Let's wait for this
to work this one. Alright. Let's just get the nose shape. Perfect. All right. It's not optimal.
I don't like it. I try to get this
cleaner if we can. All right. Let's see. Let's see if this works better. I kind of don't like it either. Alright. Maybe we will
remove this edge. Maybe not. Let's
just merge it here. All right. Now we can do this. Perfect. Alright. Perfect. Let's keep adding more polygons. Now, let's get this check bone. All right. Here's a few more. Perfect. A Just like this. Alright, let me do something. I just did merge by
distance just in case I had any double verticas. Alright, let me try to get a closed edge look
around the eye. Alright, I see. Perfect. Now, let's just close this. Perfect. All right. There we go. Let's just keep
adding more polygons. Is that another troop there? All right. Is that another troop here? Perfect. All right. Did we go? A All right. More stuff here. Perfect. Now in this area, we just make an edge loop
that goes like this. Let's continue this edge loop in this area. Let's merge those. All right here. Now we could merge these edges. Perfect. All right. There we go. The most complex part of this model is just
this demon head. The rest is basically simple. It's just this part that is
the most complicated one. But it's not impossible. All right. Perfect. There we go. Perfect. Let's just
keep adding more stuff. All right. All right. It's I just tried to get this form
in the topology. Alright. And All right. Perfect. Another troop here. I mean, yeah. Perfect. There we go. All right. Let's see. Here, two more polygons. All right. Just try to close this
part in the center. All right. A Perfect. Few more polygons. All right. There we go. I All right, let's just wait for this. Perfect. Just keep trying
to get this shape. All right. Perfect. There we go. Let's see how we
could close this. We'd like to get this part here. All right. Another up here. Perfect. All right, there we go.
Let me say incremental. Perfect. Now, let's jump here. And now let's try to get. I think this teeth, I will
make it in a separated object. Alright, let me separate those. Like these ones. All right. I see. This is not what I wanted. All right. To get all the teeth. All right, let's wait for this. Alright, I hate
blunder. All right. I have separated the teeth
from the head itself. So let's continue with this. For now, I can hide the teeth and just focus in this part. All right. Perfect. Let's just make
extrusions to make this fast, and then we can add more later just to get
better the shapes. All right. Maybe
we could do this. All right, merge,
merge, and merge here. All right. Perfect. There we go. And Let me try to get the inside of this. Just like that, maybe
let's add another one. All right. Another group here. Another one here. Perfect. And now let's try
to get this nicely here. Let's wait for blender. Alright. This one should be
here. Maybe not there. A little bit more like this. Also, this part should be a
little bit more like this. All right. Perfect. All right. A new troop there. There we go. I'd be safe incremental. Alright, now, let's
try to get all of these shapes in this area. All right. Let's try
to get the chin. Just like that. Now, let's just make
some big extrusions to get faster these flat shapes. All right. Perfect. All right. There we go. A Give me a sec. All right. We are almost
getting the pace entirely. Let's try to get this part here. Wait for blended to
respond someday. All right. Perfect. Now, this area will
be really dense. Yeah, as you can see,
it's really dense. I think that we will need
to do some reductions. All right. Let me add another
egg rope here. And then I will do some
reduction in these areas. All right. Just like that. Now it's
better, more manageable. All right. Let's
keep extruding here. All right. It's not good. Now it is nice. All right. Let's just add
another e strop here. Perfect. All right. It's a bit more polygons. All right. Here and here. And Ds, yeah, let's just try to
close this out here. With for this. Alright. There we go. Perfect. All right. Bit more polygons
here and there. All right another edge in this area to get
better that shape. All right. Let me try just to
reduce the amount of polygons that are
coming from here. All right. There we go. Let's just
try to close this up. All right. Wait for this.
Perfect. All right. Let's see how we can make this. Alright. I Perfect. Another edge loop here. Now we can close there. There we go. Now I will need to make an edge loop in this area
just to get the thickness. Alright Perfect. All right. There we go. Perfect. Let's just keep
adding more and more polygons. Trust me, we are almost
finishing this topology. There is just this demon head left at the hair and the weapon. And then we can finish the pology and then start
making the textures. I mean, the UBS, the
baking and the texture. The UBS and the baking are
relatively fast processes, not like the pology that
is super tedious to do. So we could get more fun once we start making the textures again. Alright. Perfect. That was All right now, let's just try to
add some stuff. Let's see how we could make it. All right. Maybe just like this. Alright, let's get
this stuff to work. I really hate Liner one. It does that I would like to get another
up going around here also. But I will do it later. All right. Perfect. All right. A little bit more guns. Let's just try to close this. Alright. There we go. I'm finishing from this part. We still need to make
the horns and the teeth. All right. I will add
one edge loop here. Y. All right. Give you another edge here. Perfect. Here we go. Alright. Et's get this four dices, and let's just make
another phase. Alright. Maybe we could make
another Step incremental. Let's see how this is here. Alright. Perfect. Alright, let me see how
many stuff there is here. All right, nine edges. Here, I think this could work. We have three edges here. All right. I just ring. I mean, all right. Now in this part, we could just reduce a little bit
of those polygons. All right, because we don't
need that many polygons in that area. All right. So now let's just close here. Alright, let's just
save incremental. Now, let's get the horns. All right. Maybe here we could just
collapse those edges. All right. Now, here Oh, W W did happen? Let me just type incremental. All right, something weird
happened. Let me see. I really don't know
what those errors are, but let's just hope that
those are not big errors. So let's just continue this. All right. Perfect. There we go. Let's
go here, also. All right. Perfect. Let's keep adding more polygons. A All right. All right. Perfect. Alright, now let's just
get these parts nicely. Alright. Alright, it's not working. Alright, there we go. Perfect. Let's say incremental. All right. A Perfect. All right. S more. All right. Let's see. Perfect. I think I will need
another edge loop here. Perfect. A All right, I will just collapse these
edge loops here also. Here, also, we will
collapse those. Alright. It's not that good there. It's very good. All right. Perfect. All right. Over here, we will
just collapse those. Alright, let's make a triangle
here and there we go. Let me say incremental.
All right. Let's make the here. This should be fast, I think. Yeah. Perfect. Here. Perfect. Then here at last. Last, perfect. All right. There we go. Perfect. Alright. And let's add triangle
here. Maybe not. Let's add this there. I'll just try to get
this other edge top. Now here we could add a triangle and now
we will close that. Perfect. Now, let's just try to get this
shape a nicely way. Perfect. There we go. I All right. Let's see. There we
go. Safe incremental. Then we have the ear. Let me separate the
eye from the head. All right. Let's try
to get the eyes. Now, let's split
them just like that. Or right now because
we are going to oh, I haven't closed that part. Oh, I just forgot I
haven't closed this part. So I just tried to close
that. There we go. So let me hide the high poly
and also this low poly. And now what I'm going to
do I will just try to get this first the top polygon
and this bottom polygon. And now I will just press Chief S and then
Cussor to selected. And now the cursor will be in
the center of this sphere. And now I will just create a Ubi sphere and scale
it down just like that. But before, let's
make the UBI sphere, and let's change this to
16 and this 16 to 80. Perfect. Now we could just Pre
scale it down, Chase mood. Let's do some mirror. Perfect. There we go. All right. Let me hide the demon head.
You can see it there. The incremental. All right. Then we have the I. Now let's
just make the eye socket. Let me hide both eyes. And now, let's just
scale this down. Let's see if this wants to. Alright, one more time. And now we could do some
grid fill. Let's see. I think this could be good. Yeah. Maybe we could do
some smooth vertices, just like that and
perfect. Safe incremental. And now we need to
make the teeth. Alright, let's hide both stuff. Okay. Let me just duplicate one polygon
from the head. And now let's just make
quickly the teeth. All right. All right. All right. A little bit more polygons. All right. Let me just close that
with the collapse vertex. I don't want to maybe not. It would be more a problem
than anything. Alright. With Phil. Maybe maybe like
this could be good. I All right. Now we have those he. Let's make this one. Let me separate this front
one from the other one. Alright. A All right. Perfect. Another up here. Perfect. Right now, let's just
select these ones. Let's do some bisect. Let's select here where the
knife is, where is my knife. Let's just select
bisect just like this. Perfect. There we go. Now, let's just do this is All right. Plead. Perfect. And now let's just cover
these teeth just like that. I will not care too
much about the shape. Fats. All right. That's that. There we go. All right. I Perfect. As you more stuff here. All right. There we go. All right. All right. Perfect. All right. Perfect. There we go. Let me say incremental. There is just this piece. The lower is left to do the hepology and then we are
done with this demon head. Alright. Perfect. All right. And Perfect. Now, let's just copy the one. Let's just paste it here. Let's go mesh normal slip. There we go. And now we can
close in this way. Face. All right. Let's just continue this. Perfect. All right. Perfect. Here also. All right. Almost finishing. Perfect. Perfect here. All right now, let me
just apply the mirror and get these edges where
this should be. Alright. I Perfect. Now, let me just add a few more edges just
to get tiny bit better. Those shapes. All right. Perfect. L et's get this part. All right. Let's go here also. All right. Et's say incremental. All right. And then here we
have our cheese. Alright, now, there
we have our teeth. Let's hide this. Alright, now, there we have our
demon head which apologized nicely and good. So the last thing for the
character to do is the hair. Also, we need to
make the eyes and, like, tweak a little
bit the eyebrows. And these piece, maybe we could even make the reductions here. It will be pretty fast. Let's just delete those. These ones Perfect. Something like that. There we go. These
two maybe this or let's just add
one and there we go. We go here. Lets split normals. Maybe here, we could add some weighted normal. If incremental. Alright, so I think we could
leave this video here. In the next video, we are
going to start making di topology of the hair.
I'll see you there.
19. Making the Retopology of the Hair and Making the Eye Topology: Alright, guys, so let's
continue with this retopology. So now we're going to make the retopology of the
hair. So let's begin. Alright. Let's get one
polygon here from the body. Let me just separate
that from the body. I will also make
a new collection. Let me just close of all
of these collection. Alright, let's make a
new collection here. Let's call this hair. Perfect. Now, let's get this polygon in that hair collection,
I will rename this. We'll call this I will split
the hair into three parts. So let's call this. Let's make first the front one. Hair front srand. Alright. If this wants to work. All right, front strand. Lo. Perfect. There we go. Let's select that and let's
start working on this. Alright, let's try to make
this with closed loops. You will see what I
mean in a moment. It's most likely like
cylindrical loops. I mean, closed
loops, circle loops. That's what I mean. Yeah. So let's try to do that. So if we do this, the topology that way, will be easier to do the UVs and the ngrab and almost
everything later on. Alright. Alright. Let's see. Perfect. Oh, I think I will have to make some triangles
in some areas. All right. Let's add another stuff here. All right. There we go. All right. Just like that. Maybe we could add
another group. Let's just continue
making this topology. All right. Let's just keep adding more polygons till we
get all of this done. Perfect. Two more polygons. Just like that. All right. There we go. Let's just do a few more. This should be here. All right. There we go. And a few more polygons. All right. Perfect. There we go. S a few more. Let's
just close these loops. All right. I will just collapse
this into one edge loop. Then I will just
merge these two. Perfect. Let's just keep adding a
little bit more of polygons. Let's see how many polygons
has this O. It has nine. So I will need a laps. Another one, maybe this one. Perfect. Now what I
could do is just extrude this round here and then
do some great fill. All right, like this. Dig Redfield. All right. Perfect. I think
this could work. Yeah. Maybe not. Let me do it again. Maybe this could be better. Well, now here, let's
just continue this part. Alright, let's wait for
blender to respond. All right. Perfect. Let's just get all
of the apology. All right. I There we go. Let's see how this is looking. We still need more geometry to get the complete shape of this. So I will just get
the whole then just extrude to get this part. All right. I think
we could leave this mesh open in that area. It will not be a problem. All right. Now, this should be okay. All right, let me
hide that high poly. Perfect. Now let's see I have
already the band. We need to get these two meshes. So let me just copy a polygon. Let me hide these ones. And now let's get this mesh. Alright. There we go. I think I
will use work for this. Perfect. This should be the easiest one. Really easy to do. All right. Or let's just
activate the clipping. All right. Perfect. I Perfect. Let's just keep
adding more polygoms. Alright here, maybe
two would be good. Here we need more
topology in this area. So let's add one here. Perfect. Here, also, let's add
another another one. Perfect. All right. Perfect. Alright. Almost done with this piece. Let's just get them, we need to get that hole there. It will be important to get
that hole in the topology. So let's see. All right. I think I will need to
make a collapse there. I also need more density.
What the **** is this? All right, I see. For a fetch Now, let's get this topology. All right. A little bit more of density. Now, let's just keep extruding. This disease we get
the shape here, maybe another one in this area. I think I will have
to do some reduction, so I will add a triangle here. Maybe in this area
also we will need to reduce all right Now, these parts, I will just
make it the same topology. All right. There we go. Perfect. We need
to get that hole. Or maybe let me see
if in the concept, that hole is there. Hmm. It worth it. A trouble. Let's see here. I will not even be seen. So, forget it. I will just modify
a little bit this. Let me get the topology here. All right. Let's see if it's right, my God. I just want to close this gap just to
save time, right. Now, we don't need to make
that hole in the topology, because if we make that
hole in the topology, it will cause some troubles in the baking that I'm not
willing to try to solve. Alright. All right, see. Let's just get these close. Let's see how many
polygons are here. Maybe we could just make
another collapse there, and now we could do some merge. I mean, grid fiel. Perfect. There we go. Now, let's just
press do something. Let's do another grid field. Alright, I think this is better. Maybe we could do some
smooth bear disease. All right. Like
that. There we go. Alright, perfect. All right. L et's just close
this and there we go. There we have this piece
done. Let's hide it. Let's get these two pieces. We'll just split that
into two objects. There we go. Let's get
one of these polygons. Oh. I hate this. All right. Perfect. Let's separate this. Let's remove the mirror. And now let's just get
this strength. Apologize. Perfect. All right, it will be a little
bit trouble. All right. Maybe not. Let's just
continue this around here. Perfect. Perfect. Is that another one?
Let's close here. All right. Perfect. We still need more
apology in some areas. All right. Let me just close this. Just like that. Let's just keep adding
more polygons till we get the complete All right. Perfect. There we go. Perfect. I Alright. I need another one of these. Let me add some shrinkrap. Perfect. Perfect. I et me just go here. Now, let's delete that. Perfect. Let's see what we could do here. I will need another
edge loop this area. I will add a triangle here. Perfect. Let's get this. All right. All right. And All right, perfect. Just a few more. And then we are good to go with
this hair strength. All right, let me add
another edge look there. Alright. Let's see how many
polygons are here. There are five polygons. I think we need this one. Yeah. And we need more Siluet. But that means that we need
more resolution in this area. You get this. Alright, and now we have seven. Let's just collapse this. All right. Now, let's just close this. There we go. There we have it. Let
me apply the trim crap. Let me delete the shape keys. What? Let me do this. Apply shape keys. And now let's just delete that. If incremental. Very
important to save. Always save your stuff, please. Alright, let's make
the other one. Let's make the other one here. Let's take this, lit that. Let's get that brand. And now let's just keep
adding more stuff. Let's add another shrink wrap. And now we can start
working on this. Perfect. All right. Perfect. This one
seems to be easier. Perfect. A Alright. There we go. Let me close this concrete fill. All right. E, let me do this when in set. All right. Perfect. Perfect. All right. And et's just keep adding or topology. Til we get all of these done. Alright. Perfect. All right. I All right, let's just add a few
more stuff here. We have nine there. We need to lift the collapse. All right. I also need that resolution. All right let me just
add another one here. Maybe we could collapse these two or maybe a little bit
higher, maybe from here. We could also redistribute I was looking, I see. I was looking the grid feel. Alright. Unless also at the in front. All right. Right you try to just to distribute that
a little bit more. I think that could be good. Now let's just close
this with a grid feel. It's like this, which fill. Perfect. Y Alright, there we go. Let's apply shrink crap. Lets Alright. Thanks. Alright. We're here. Let me remove the
grid field from here. I mean, the water
frame from there. And now let's get
the base, the hair. Alright, let's wait for this. Let's get this split heading. I mean, yeah, split the
polygon from that object. And now let's just add a mirror modifier and
also a shrimp wrap here. And now we could start working. Clipping. Alright. Face. All right. Let me just try to get all of
the loop in just like this. Perfect. All right. Perfect. I All right. Let's also get this one
and close it right here. I will just close it to
collapsing the polygons there, maybe. We will see. Alright. A Perfect. Perfect. Let's see. Alright. And Perfect? Let's just close this
this area. All right. Perfect. All right. A Never. A to get this nicely. All right. There are too much
polygons in this area. Close these two. All right. Perfect. There we go. And now let's just
try to close this. I don't like how many
polygons are there. Alright. Here. Oh
maybe few more times. Alright. A here. And then one more. This will be good. Well,
it's not It's not good. Alright now it is nicely placed. Let me use this wireframe in front to get this
nicely placed there. All right. Let's also get this area here. We need this part. All right around here. A a Perfect. And this would be it. Let me see how this looks
without the hiding. All right. I think we will
add another edge group. All right, perfect. There we go. Alright, let me apply
the shrink wrap. If incremental, let
me apply the mirror. And also let me apply this
stuff, the shape kiss. But for some reason,
I still have it by the mirror
because I want to get ilut of that air strand. It's like that. All right. Perfect. Let's get also this shape. All right. I think we will still need to
add a few more stuff here. Just like that. Also, let's do the
same thing here. Perfect. There we go. Now I
think that will be it, but that is right. Now, there we have
our main hair. Alright, let me just
merge this to a center. There we go. Now
we have the hair apologized. Nicely and good. Let me do some stuff
before airing the video. Alright, let's wait
for this to save. Now, what I want to do, maybe we could just do
this in the next video. Alright, where is
my speed retopo? All right. All right. I think I will have to do this in the next video. All right, where
is my able here? Let's bring our tiny guy here and get all
of these pieces. Alright. Let's just move them down here. Perfect. And now, let's scale
this correctly. Also here. All right. Let's make some
quick eye topology. Let me see if I have
my eyes in position. I don't think so.
Yeah, I have it. So let's do this. Let's get this top one and this lower one. Now, let's press S. I mean, chief S, and then click
here Cursor to selected. So the Trey cursor will be
in the center of our sphere. Now, from here, I will just add, let me hide the body. Maybe not. Now, from here, I will
just add a Ubisphere. I will put here 16
and here eight. Now we can scale this down. Maybe we could leave it
where it was 24, 16, maybe. Alright. It's just Felis Moore. Let me do that again. 12, here's better. All right. Now let's just rotate this 90
degrees, apply some smooth. And now we need to make how big the iris would be because I'm going to
make model the cornea. Let me see in the attribute. And All right. Where is my my sphere. Alright, we need to rotate
this a tiny bit out. So he is looking at
the I mean, forward. Maybe we could scull this
down. Is a tiny bit. All right. Around here let me hide this. I I think we could
get this here. I mean, we are not going to use the that I poly because I
was just a placeholder. We're going to make
the actual ice now. That's what we are basically
doing just making the ice. Now, it's just me or this eye. There we go. Let me hide this. And also let me remove
the white frame. Remember that the eyes
need to have a rotation, an outer rotation so they don't look like he's
crossing the eyes. All right like that. Let's
see how this is looking. No, not like that. That wouldn't work. Alright, let's see. Let's do it again. Just
like this could be. Let me just hide the interface. You can see it there,
maybe a little bit less. But he needs to have this outer. So he need to have this outer angle. You
can see it there. He should not be
like this bright. Let me see if my I see. He should not be looking
like straight down. The eyes should
be with an angle. You can see it there
with an angle. All right. Because if you make the eye look
straightforward, it will look like he's
crossing the eyes. So the eyes need a little bit
of angle to work properly. All right. Let's see. So we basically we are done with the main
character topology. We still need to make the
retopology of the weapon. That will be easy in. We could use a lot of the stuff that we have already
made for that weapon because we are a little bit
lazy and want to finish this fast So there are
nothing wrong with reusing that topology
because we have made that with polymodling
inside ebrush. So let me just remove a
little bit of those polygons. And here we are. Let me see
the high poly of the weapon. R small. Yeah. Really small. We will need to scale
this up I mean, this would be easier if we just reuse most of the measures. I think. I mean, this
could be baked in. We could reuse a lot of these. Alright, so here we are. We have finished this retopology
of the character itself. We still need to make
the retopology of the weapon. So see you there.
20. Making the Weapon Retopology: Alright, guys, so let's
continue with this hypology. Now we just need to finish
the topology of the weapon. So let's bring our
weapon hi poly here. Perfect. So now what I
will basically going to do is first just to fix the flip normals that
has this mesh flip. All right. Let's go and fix
it also in the high body. Mesh normal, flip. Alright. Now, let's
see which pieces we could use to make the low poly. Like we can reuse all
of these pieces here. Let me just remove the
importing edge hoops. Just like that. Perfect.
I don't need this one. All right. And that's what
I'm basically going to do. I will just delete the floaters and reduce the
amount of polygons that it has because we made this weapon using
already polymodeling, so we could reuse most of
the things that are here. All right. Let me also
delete these ones. Perfect. Oh, let
me see something. I think I don't have the
floaters. Oh, yeah, I have it. All right. Perfect. Let me just keep deleting these floaters because they are not needed in the low poly. Alright. Perfect and the other side here, this one and this one gone. Let's also delete these ones. Let's go here and delete
these other ones. Perfect. Let's delete that
here, let's delete this one. All right. Let's say we
could delete this inner one. Also here. Let's just delete this
stuff. All right. So here we could
bake this cylinder. So I will get my hi poly. And what I'm going to
do, I will just delete that cylinder and do some
free topology for that piece. Let me just delete all
of these also here. We'll just delete
all of that pieces. Perfect. So let's just keep working on this. Let me delete one half, add the mir modifier,
the Y axis. Maybe the C axis, yeah. There we go. And now let's just
keep working on this. Alright. Perfect. Did we have it. Let's just keep
adding more stuff, and I will also remove the custom lit normals to
have a better shading later. All right. Let me also ask if my topology is shading so
I can see what I'm doing. Let me hide all of
these pieces. Perfect. Let's just connect
these ones. All right. Perfect. Let's go here. Get this all here. There we go. Extrude this. Alright, let's
just keep working. All right. There we have it. Perfect. I wouldn't need to do a lot
of tweaking in these pieces. Let me remove all
of those who pour teenage soups because
they are not needed. Also, I will just remove
one half of these pieces. I will add another mirror. Alright, the Cx is. Yeah. Need to add a edge
in that corner. Alright. Alright, let me do something. Let's just be more smart. Alright, let's just
add a shrimp crap. Let's just select this. All right. There we have it. Maybe we could delete
this edge loop. All right. I think
I can delete it. Yeah. All right, perfect. Let's just keep tweaking this Perfect. Now, let's just apply
the shrink wrap. There we go. All right. Let me also delete the
custom split normals. Maybe we could add
a weighted normals. All right. Here, we delete all of
these subordinate groups. Because they are just extra
polygons that are not needed. All right. Perfect. Here, I will just reduce a little bit amount
polygons that are here. Maybe maybe we could just leave it like it is. I think so. This area we could delete some some of these polygons
that are not needed. All right. This one is needed. All right. Let's
just do this here. Perfect. That one is needed there. All right. There we go. Let me save
incremental. Let's take this. Alright. Maybe I could leave the amount of the pool
that is here just like that. Right here, we need
to do some twigs. Perfect. There we go. I think this could work.
All right, let's see. Let's remove the
supporting subs from here. There we go. All right. Perfect. Let's see
what else here. These supporting age groups,
let's just delete them. Perfect. All right. This stuff All right. Let me
just select this. All right. This solve. All right. Perfect. Safe. Very bad. I'm really just R R lazy to, like, make the same method of phryopology that
we did in the body. What happens? I truly
hate when this happens. Alright. Let's just get back our
weapon. It is here. Let me hide a character. Let's just keep working on this. We could remove a bit of those stuff that are
not needed. Perfect. Here, maybe we could
add shrimp crap. Alright. All right, let me see. Let me just try to get Topology. Get this one. Yeah. Perfect. Let's do some
prin crap. Perfect. Alright, let's go here.
Let's also remove. A is already under removed. I think so yeah. Well not not quite
much. Is like that. Let's add shrimp
crab this piece, so it'd di a tiny bit more with the rest
of this weapon. A right. Let's also do the
same with this. All right. Perfect. Apply. All right. Let's go here. I think I will need, yeah, remove some of these unwanted apology
that are not needed. Perfect. Right. Where is that be? Just removed that. But now
I have an engun there. I don't like that engun. I will just leave it.
I don't care. Alright. Let me also add that same. But first, let's just remove
do some split normals. And now, It's a
another shin crab. Perfect. Alright,
let's just get this. Perfect. Actually
placed. There we go. Let me see you the inside. Perfect. I think
it's almost perfect. This also, I will just remove the support teenage
groups Perfect. I think we could
use this indeed. Here, let's remove
all of these greases. All right. There we go. There we go. Here, also. Let's remove those
custom split normals. All right. Clear accustom split normals, clear acusom split normals. Here, also. Alright. All right. So basically, there we are with this do. It's just safe. I think we could use this
as our low body. I don't see anything
wrong with it. So this is basically it for
this video for this topology. If I see something
that is not well, maybe some that I miss, maybe I will make another
video for this model. But for now, I think
it's completely fine, what we have here. So we have our character. You can see there, the
topology of our character. Yeah, the topology
of the demon head. Perfect. And the
topology of the weapon. That's nice. In total,
is 83,000 palons. And that is quite good. I mean, a really good number. We are not too high,
we are not too low, really nice number here. 83,000 polygons and 41,000 bird disease.
That's pretty nice. Also, just remember as I said, beginning at the
beginning of this model, we are just going to use
the head of the body. What I did was just to
duplicate the model. I just duplicated the model
and just delete the body. I left the head here. For further use later. So basically that. Let's see. I have also the
full body version here because for rigging, will be easier to rig
this full body and then just transfer weights
between these objects. That would be the best way to do the rigging in this case. So basically that. So see you in the next video. Maybe in the next video, we are going to start making
the US see you there.
21. Making the UVs of the Character: Alright, guys, so
let's start making the UBS for this
model. So let's start. Oh, the first thing
that you need to have in mind when you make UBS is to look what
shape is your model? Like what primary shape your
model resembles the most? Like, for example, this leaf, what shape this leaf resemble? This resemble, like a cylinder. You can see that the pap that resemble the
most is a cylinder. So how you make the
UBS of a cylinder? You basically just need to add an edge in this vertical
way, its longest axis. And then if you do that, you will get basically, let me just make
add the UV editor. And if you grab that, you will get your
UBs already made. So the same logic
applies to here. Like for example, if I were
going to make this UV, we need basically to add a
UBI to separate the leaf, this leaf from the main body. And then we are going to add
a crease that goes, I mean, this is a seam that goes all the way on the longest
axis of this leaf, all the way to here, kind of. And then let's just separate this inside
from the outside. And if we make the UV of this, it will be nicely and good here. So that will be basically
the logic that I will be applying to basically
all the models. I will just see what shape this resembles the most and just applying basically
the same logic. There are some shapes
that are really complex. Like, for example, this let me remove the
retopology shading. Like, for example,
this main body is kind of complicated,
but it's not hard. I mean, you just
need to know how to place the UBS I mean,
the SIMs correctly. If it's not really that hard. So before doing anything, let's go here to
the shader editor. All right, let's bring
a material here. Let's press chief A and then let's check for
check artexture. Now, let's go here
to preferences, addons, and let's type
for node grangler. You should need to
have this enable. And now let's go to
the had editor again. Let's press Console T, and let's put the UBtexture
coordinate the UBS in vector part and the
color to the base color. Increase this is scale. And now let's go to the
view per shading and you can see how our
sleeve is looking. Here, you need to make
sure that these squares here are like the most
have to be like square. It doesn't have to have
too much stretch in it. It could have just a bit, but not that much, that much, it needs to be
like square all the way. So let's start making the
clubs for the jacket. So let's use the mirror
in our advantage. Although once we finish
to add the seams, we will need to apply it. So let's see how we're going to make the UBS from the
main body of the jacket. So basically, we
need to separate the inside from the outside and how we are going to do
that by just adding a seam in this area. Let's just do this real quick. Just like that. Around here. In this way, we're going to
separate the inside from the outside nicely and
good. Now, let's go here. This will cause some
problems if you leave this part like that. So we need to split that to make it so this doesn't
do anything weird. This is most likely
like displaying your model in two dimensional
in a two dimensional view. Also, it's like, kind
of doing papercraft. I don't know if you have
made papercraft before, but it's basically
the same logic. So if I do this, if I apply the Sims in this way, this part here will
like displgate to here. Keep in check. Like
this part here will displgate to this size
once we do the unwrap. So let's keep working on this. Let's add a few more
edges in this side. Alright. Perfect. All right. So basically, we have this. Now we need to separate the front part from
the back part. So to do that, we need to apply
like two seams in two areas like here in the shoulder area and
here in this side area. So let's apply the seam here to match the seam that we
have apply in this leaf. So it is a continuous sin. Also, we maybe could
put it on this area. So it will be like hidden
under this part here. We could put it there
just like that. All right. Let's just do this. So it is hidden. You also need to put your sims, your UB SIMs in areas that
will be hidden and it will not look like they will
be not too noticeable. Let's see here
where we put that. I think that in this area, I will just go all
the way like this. All right. Let me just move
this all the way to here. Perfect. Now, if
we do the unwrap, we will get our UVs nicely made. Let's apply the
mirror. Give me a sec. And now if we do the
unwrap, we will get this. Now, these phases
where they belong. So to see in the
treaty viewport what you have selected
in your UB Editor, you just need to
press this bottom. And you can see that anything
that you press here inside the UB editor will
be selected on here. So let's see what
are these phases actually what are those phases? So, this looks like they
are internal phase. So that's basically a
non manful geometry, and that's bad. You should not have it. It will cause problems while baking and basically
doing anything. So let's just move the the US these UVs to
the side because we are going to organize
them later once we have made all the
UBS in our model. So let's go here to
the armor. Let's see. Let's separate the
inside from the outside. I mean, yeah, this part. Just like that. Alright. Let me add the sm.
Let's go here. All right. Now let's do
basically the same thing that we have that we did on this
jacket will be the same logic. This area, I will add
the sim in this area, so I can separate
these in a nicely way. All right. Let's go here. Maybe I could add
the sim Alright. Let's see. We could
move this around here. Perfect. Supplied it there. Now, I need to add
the seams here. Let's see how we could
add it. Alright. I just want to add them
in a way that they are not too noticeable. Maybe we could also use
the high poly as a guide. Like, let me just hide the weapon and let
me get the armor. Armor. Where is my armor? In the armor, I
think this is the one or lets weight
from four Blender. Alright, let me hide anything. I mean, everything,
but the inner armor. All right. So I can see what I'm actually
doing. All right. So here, let me active
my taboly shading. And now we can see in a better way where we
could add our seams. Like, for example,
here under this area, seems to be a good place
to add those first here, we could add a seam in
this area. All right. I think that's the best place
in this area to add them. All right now, let's go
here and see where we could add the SIMs Alright. Maybe here could be I
know, I don't think so. This area, let's just get the
seam go all the way down. Alright, let's apply them there. And now, oh, I didn't get
perfectly this shape, but I think that will
not be visible anyway. Maybe, yeah, it will. Lets you do something. I will just get this. I
will just push it in. It's like that. All right. This should be
here. Now, continue the seam all the way to here. Also, I need the seam. The seam is not correctly
placed in this area. Let me remove that sim, this should be
here in this area. Let me remove that seam. All right, so let's add
the seam on this area. Right at the steam. All right. Perfect. Let's
go here. All right. Let's see. Perfect. So maybe now this would be good. Let's apply our new material
that we have created. Let me hide in the inner body. Let me change the name of that material to something
like checker material. Just like that. Let me
rename the name again. Let me add an
underscore, like that. And we go here. Let's
apply the mirror. All right. Let me remove
the topleshading. Let's do another ankle pace. And now let's just throw away that those Ubis because we're going to
organize them later. So let me bring back
again all my stuff. Alright, but where is my body. Alright, let's go to the
inner shut my inner suit. Alright, we're going to
make the face Ubis in a Vd. Let's just finish these ones. So the inner suit to UVs, they will be basically
the same thing, like the jacket,
basically the same shape. Go here, and now let's go here. And that will be basically it. Let's apply the
mission modifier, and now you can see that we
have our UVs perfectly made. Let's apply the
checker material. You can see that the
UVs are nicely made. Let's go to the mask, all right. Now here, I will need to
separate these tubes from the main body of the
mask and now let's separate this inside part from the outside
part of the mask. Let's apply the sim. Alright, let's go here. Mark Sim Perfect. Let's go here, mark sim Alright. So maybe if we do the the grab, this will be nicely
made. It is not. Let's apply let me see. There is a place that
doesn't have seams. I think it is this one. Right? Let's look it
for that markem right. It's there. Now, if we
add another perfect, apply the checker material. Nicely made. Let's
apply the mirror. Alright. And now let's do
another good base. Sof here. Maybe we're getting some
stretching in this area. Maybe what we could do is just add a little bit more
of seems to the chin. Like here, for example, we could add a sim in this
way to relax a little bit that Oh, it didn't anything. And we need to add
another sam here. So you will see what this
will do in just a second. Alright. Let's see. Now, this area is more relaxed. You can see how we delgateT area from being
here now is more open. It takes a little bit
more of UV space. I think it's a price that we have to make if we don't want to have that stretchiness there. Also, what we could
do it's just to write and play with
with the vertices here. Let's see, apply our
proportional editing, and we could start tweaking
just like that and see how we could get this area with a little
bit less of stretch I mean, I want to
have it like that because it takes
less texture space. So I think that we could have it just like this. I don't think it will affect too much the texture quality. So here, let me also
separate this part from the tubes and let's add a seam
in this part of the tube. So it doesn't it doesn't have too much
stretch, just like that. All right. I don't want
the tubes to be like that. I mean, the shin, not the tubes. The way, something
like this could be something like that. Alright. Let's see
here the globes. All right. Let's see. Let's add a seam here to separate this inside
area from the outside. Now let's add another seam here. We have basically
a cylinder here. And like I told you before, we just need to add a seam that goes through the longest axis of our cylinder all the way. All the way to here,
basically. All right. Now, here, you
remember we have added a middle edge loop in our
retopology of the hand. So let's use that although
we have a little bit of We have a little
bit of spiral here, but I don't think it will
cause too much problems. I mean, a All right. Let's get this. Let's try
to get this edge loop. Oh, islet it. Wrong. Let me try to
di select these ones. Let's apply the SIM. Now let's go here. Let
me select all of these. From here to here. Dime clear SIM. Perfect. Let's go here also. Lear Sim. Clear Sim. Yeah. Go here all
the way to here. Lear Sim. I mean, that spiral there is not
that's good, indeed. We should have and at it. That spiral. I
really don't like. I really, really don't
like that vital. Maybe we go to triangle there. No, I will not be good. At triangle there,
maybe we'll just do this instead and try to redich the change it the
direction of our stuff. Because I really
don't like that. Well, let's just
leave it like that. I will not be that
much of a problem. Now, let's just continue
this here and this here. Alright, we need to separate this piece from the rest
because it will cause troubles. Also, et's go here, let's add some steam. Now, let's make it in a way that this will displgate
in a nice way. All right. Perfect. Let's
add our checker material. Nice and good. This time, I will not apply the mirror because
we're going to do something. We're going to leave the mirror, and we are just going
to texture one area, and then we are going
to mirror that mesh, so we have the other hand. And in that way, we could save UV space and maximize the texture
quality of our model. All right, let's go here. Let's make the Ubis
of this armor. All right. Just like that, I'm just separating the inside of the
armor from the outside and adding some edges to the pig so it doesn't stretch
once we do the unwrap. Let me hide them. Just like that.
Perfect and good. Let's just add the seam there. Alright, like that. All right. Now, let's select this one. Hide Alright Perfect. All right. You know,
I think that way. You know, we dish.
Alright, perfect. Alright, just like that.
Mark Sim unhide everything. And now let's do some grab. We have this. We're going to do the same logic
as the other one. Maybe we could do
maybe what we could do is we could have this
with their own UBS. So once we duplicate the globs, they don't look that symmetrical because
we're going to have this with a little bit
different details. So it will be asymmetrical. Kind of. Yeah, maybe
we could do that. Yeah. Now, let's
apply the mirror, and let's do just that. Perfect. All right. Let me unhide everything. Let me add also the
checker material. Perfect. Now, let's do the Bs
for these are more pieces. They will be more of
the same process. Basically just this. Is is nothing fancy indeed. It's just a really simple
repetitive process. That is really easier
than the upology. We could do this in a lot
less time than the pology Because erythropogy is
really pain in the ***, so let's just do this
quickly and jump to the textures that I
know that you want are making some texture because
myself wants to do them. Alright, let's just add some creases for the stuff. Just like that. All right. Almost done here. Perfect. Wrap. Alright, I think we could
do the same logic as the other armor pieces
with these ones. Just do the unwrap and let's
apply the checker material. So the globs doesn't
look that symmetrical because that will be covered
of non symmetrical pieces. So let's press Console L, and let's just select here
link materials to apply the same material to the rest of the objects
that are selected. So let's go here. This is basically a ring. We just need to
separate the inside from the outside to make the UV. Just like this. Maybe we could separate the
poach also. Just like that. Let's go here and separate the
poach. Just separate that. Perfect. So let's go here. Let's see
how we could make this. Maybe around here.
Just like that. Let's put a seam there. All right. Mark Sim. Just like that. Also here. Also here. Let's do the same
thing in each other. Perfect. Let's remove the seam from that other area.
This should be good. Let's apply the sugar
material and do some ungrab. Oh, I just forgot to
add another seam to separate this to cut this ring. So it is just like a strap
in here in the Ub Editor. Perfect. Just like that. This is not good. What did happen.
Alright, let's see. What did happen here? Oh, I haven't ad. What the **** is this broke. Alright, let's just continue. They seem all the way to there. They seem all the way to here, to the on Grab, M getting this. We are sold. Let's just add another
Sam in this area. And this will be problem solved. Alright. I think I will
just leave it like that just to get a little
bit of UV space. Let's jump to the other strap. This one. And let's do basically
more of the same here. Let's just separate
the inside from the outside, like that. I will show you a trick
that we could use to make our you'll be straight. So basically, it will be
select one select one polygon. Now, select the top edge. Right click, align horizontal. The bottom edge, right
click, align horizontal, the right edge, left click, align vertical, and the left an edge and left
click aligned verticals. Now, let's select this polygon. Select the rest. Do grab. And now these photoactive wads. You can see that our
stuff is already made. But you can see that we
have some distortion. And that's the issue of having this, like,
yanket topology. But I will not care too much. I will just leave it
like that. I mean, it's straight enough who cure. A right let's just continue. Let's ungrab this. Let's add a steam in this hole. Yeah, I think we will need to separate this hole
from the outside. Let's do something. Maybe we could add a
seam in this area. All right. Just like that. Marxim separate the back parts. Buckle. Just like that. Im Marim Mark im Marxim and then
another sem here. Let's do some
unwrap ankle paste. Checker checker material. We are getting weird. Deformation, let's do another
unwrap wid minimum stretch. Heel weird deformation. Let's see. Let's see.
Is he's the one? I see. Let me see
just a little bit. Let's just do this.
Maybe this will be not the best way to do this. But let's just add
another seam here, and this should be good enough. Let's remove all of
these other seams, and let's just left one there, and this should resolve
everything perfectly made. Alright. We have the half of
our character made. Let's go here. Et's separate the inside
from the outside? Just like that. Let's go here also. Separate
the inside from the outside. Let's see here. All right. Let's just remove
maybe in this area. Maybe Mark Sim. Let's see what this give
us sucker material. We're getting some weird issue. Let's add a seam this area. Oh, it's behaving correctly. We're getting this weird issue. Alright. That's because
of this M here. It doesn't look right.
Let's clear that em. Let's see what this give us. This give us a bit of
a weird result there, maybe grab with minimals. Arch. Maybe it's good. Maybe it is not. I think I
will just leave it like that. Let's do the same
from this piece. That will be basically
more of the same. I like this. All right, perfect. L material. All right. Let's select this. Perfect. Mark him. Let's do something. Instead of having, like these
pants bulleted and like, net loop like this
goes just like that. Like an edge that
goes like this. I would have it like
that because for this, I would like to
have it just like this to have less
distortion shim grab. No right at that
we could actually add an e loop. Here. Perfect. This could
be good enough. You can see that we have
a nice looking hand UV. Apply the mirror. Now
we have these pens. UVs, supply the checker
material. Perfect. We almost had the entire
already made. As to the pouch. We could separate
the top part of the poach from the body of
the poach. Let's go here. All right. Just like that. I like the perfect. Alright. Perfect. All right. Like this. All right. There we go. And now let's just add
another seem here. Is that another
one in this area. Let's do some iron weld. I mean, not iron
weld. That's my bad. Just grab. Sorry. It's a
really different word. Let's find sugar
material. Us like this. Incremental, let's me something. Alright. Let's do the same of this piece. Just like that, Mark SM
select these four edges. So it doesn't have a
stretch in those areas. Let's apply this
checker material. If incremental.
Alright. Continue. Maybe here we add a SM in
that in that edge loop, and I think that would be
enough for this piece. Grab angle base. Checker material is
basically perfect. So let's just leave
it like that. Let's go here to
this calve armor. This calve armor, they are basically like a
cylinder in shape. So that will be basically
the same thing that we were doing with
these type of shapes. Let's add a seam here. Thi should be good enough. Perfect. Let's add the checker material. Let's add the seams to these
slices, just like this. Alright, Mark. Um Here. Perfect. There we go. Yeah, we could do the trick that I show you to make
this stuff straight. So let's do align horizontal, align horizontal align
vertical, line vertical. Let's select these
follow active quads. Here, also align horizontal, horizontal vertical, vertical. Do in the other area. A line horizontal, a line
horizontal line in vertical. All right. Let me just
active this life sync. Now, let's just select this
edge vertical, vertical. Let's select this
fulctive watch. Perfect. Now, let's select
our checker material. We need to do the
same, the other area. Let's do something.
Let's see if this works. Let's select this. Let's press Let's
copy our defuse UV. Now, let's select this. Let's press Let's click here, paste DefuseUB and
it didn't work. I mean, if the
topology is basically the same with the
same vertex order, it should work nicely. But here, it doesn't have
the same vertex order, so it just didn't work. Let's just add seems
perfect grab base. Maybe what we could
do we could clear them from this area. And then just do
this and then do the the alignment on the stuff, and we have two UV islands
instead of four UV islands. Perfect. There we go. All right, let's do
the B for the shoes. Let's separate the sole from the rest of our shoe,
just like this. Let me mark him. Alright, now, here, here, all right, perfect,
just like that. Mark him Alright. Let's go here. You're perfect Work Shim. We need to separate also
this piece from the rest. Well, let me separate
this piece here. From the rest of the model, so it doesn't display
in a weird way. All right. Mark Shim Pier
Shim and from Pier Just like this. Oh, we
have something weird here. I'm going to look
that in a minute. Let me try to get
this nicely here. Alright. And Mark Sim, now let's try to fix this. What do we have here? What is the Where is this, bro? Is supposed to be like this? Yeah, it is supposed
to be like that. Alright, let's just
unhide the boot so we could place it in a good way. Let's just play it way where
it should be around here. All right. No. Go here. We need to add
another seam here. Let's see. Just like that. Maybe right. Let me add a checker texture. We have an Area that doesn't have the V is correctly placed. All right. Let's see. Alright, let me
separate also here. Mark sim, this will
be good. Enough. It is not ab grab
with minimal stretch. It works. What is this? I think it works too much. I All right. I will just separate bow
from the rest, you see. If they do a better job. From grab. Perfect.
A not perfect. Yeah. Alright. I I do something here. Let me select our
proportional adding. And now with this, I will just try to move in place this stuff stuff just to get this straight line. I do the same here. Something like this.
Now let's go to relax. It is not doing anything. Get the crap. And now let's just try, like, sculpting our stuff. It is not good. Alright, let's do something.
Let's do it again. All right. Let me see what happened if we add
a middle edge loop. I mean, a middle
middle seam Sam wrap. Alright, we get this Now, maybe, what we could
do is from here, we could align
them a bit better. Try to do it with
minimal movement. C here. Just like this.
Now, let's go here. And now what we will
do just to place it there and now select these
pchs and start merging them. And there we go. We kind of have this piece correctly placed. Alright. It is not merged. Go here, let's remove that seam. Now, let's go here. Now, let's try to merge them here. Alright, I think this
could work. What is this? This piece piece. Alright, let's add maybe a
few freezes in these areas. Alright. Mark Sim. Mark him Mang base. Oh, I just forgot
that we fixed this. Oh, no, what a ft. All
right on grab. It is worse. All right, like this.
I should be like this. Alright. I think this
cool to the shop for us. Alright. Let me
wave incremental. Let's see from this area. Alright. Mark Shim Mark Shim. Let's go here. Perfect. All right. Let's do some record material
there. Just like that. G here. Let's select all of these and let's do the
seam of all these pieces. Let's add the seam in the
back area of this pouch. You can see that this pouch
resembles more a cube. So you should add the seams on the corners so these
behave correctly. Around here. Just
like that. Perfect. All right. And now one here, and you will see
how this will work. Right Grab perfect. Let's apply the checker. Nicely made. Let's
select these ones. Let's add the seam
in the inner area. Mark him and another
sim in this inner area. Grab perfect. Let's
apply the checker. And now here, let's do
the same trick that we do before. We
have done before. Perfect. Let's just make straight these Ubis
Just like that. Perfect. Let's select
these sines straps. Let me say incremental. Perfect. Let's go here. Perfect. In this area. Mhm. Let's go here. But first, maybe we could remove one of these seems right
like that. Your Sm. Perfect. All right. All right. Perfect. Wrap. Then now we are getting
this weird shape. Alright. Let's see why we're
getting that weird shape. Oh, I see. Marking. Now, this should work nicely
for both craps. There we go. We need to add bis to this other shrap Mark shim. Grab. Perfect. You car
material. Let's go here. Basically, let's do the
same. Let's separate that. We'll also separate this piece here from the rest,
just like that. Alright, just like that. Mark Sim. Let's see what this give us. Let's apply our sugar tecture. We're getting some
weird stuff. Let's see. Separate that grab. We're getting more weird stuff. Let me see Oh, I see now in this area. Mark him. All right. Grab good paste. Now, from here, we
could add him, relax. I speaks Just like that. There we go. Nice and good. For all the family. Let's apply these two
these two mirrors. Grab. Here we go. Before
applying the other mirror. Need to get something done here. Need to keep tweaking this. All right, let's see. Here this piece. Let's
just add a seam there. And also this areas not good. It is not good. All right. Perfect. Your him now this
should do the job. Right now, everything's good. Let's just put that to the side. Let's do the piece
for this piece. Mark Sim. All right. Oh, what a **** o. Has Oh, I see. I see, I see. Let's do
the same thing here also. All right. There we go. Checker. Oh, I also forgot to make the ye lashes. That
would be easy to do. But I will not do in this video. So for this face
for the face UVs, what we need to
do is to separate the ibaxs from the
rest of the face. To separate the eyebads
from the rest, like that. Let's separate the ear
also from the rest of the face are from
around this area. All right. Perfect.
Let's go here. Just like that, Mark Sim, Mark him there and
also the mouth back, separated mouth back, the
rest of the base around here. At that, this should be good
enough. You can see it here. But we have we also separate the neck from It Mark him. All right. All right. There we go. We have our face here. Something that we
could do, maybe. We're not it will
not be that good. Maybe I think it would
be a good idea indeed. And we could just do this Mate UBs I think it would
not be a good idea. Let's just leave the face UV, just like that. Checkered
material. Perfect. All right. We could make the UVs for
the nose, a tiny bit less. Sorted, just like that. Could be here in the shin. Also, a little bit of tweaking. I think this could work nicely. Now the UVs of the eye, let's just add a seam in this area in the
middle of the eye bow. And now let's just take this
and put it to the side. That would be enough.
Per material. There we go. Here, also. All right. Mark Shim. Alright, Mark Shim here. Alright, just delete
that s at a mirror. There we go. Here, I think we
will just do this. I want stretch. Packer material. Alright. This could be also good. You take this and
put it to the side. Take this hair strand. This is basically
a cylinder shoe at a seam in the longest axis. All right. There a checker texture. Maybe we could get some relax. All right. A All right. Let's go here. Let's see how we could do
the UVs for this. Maybe we could add a
SM here. All right. Maybe a seam here. Alright. Mark shim there. Let's see what they give us. Material. Let's apply the UVs. I mean, the mirror. At
this half shaped keys. Let me remove those shape keys. Apply apply all
shape keys right. Now let's apply the mirror. Let's redo the grab
and there we go. Let's do the same that we did
with the front brand here. All right. So here. Now, let's just
select this piece. All right, just like that. Perfect. There we
go. There we go. Let me add the sugar texture. Oh. Perfect. Now this should work. It was. Let's do the same
with the other part. With this Alright. Hiroshim. Perfect.
It's like that. Let's apply the Checker
texture. Here we go. Let's do the UE for this. All right, it should be good. Checker material. All right. Now, this piece, oh, I forgot also to
add the checker. Architecture here.
Let's go here. Mark Zim. In this corner, also, another Mark Zim. All right. C material. All right now in this tiny You. All right. Perfect. Decker material. It's great for Blender
to work. All right. This will be more of
the same process. All right. Just like this. All right. Mark Shim. Grab. Perfect. There. With this tiny piece, I will do just this. Mark Shim. There we
go. Sleep incremental. Or let's separate the
horns from the head. Just like that. Let's
add a seam in this area. Mark shim Perfect. Let's also add a
seam in this area. All right. Just like that. All right. I don't think that we should separate
the mouth back. Maybe maybe, all
right, I see here. We need to separate the ear. Maybe this should
be good enough. Alright, let's see
what this give us. Let me apply this
mirror modifier. Alright, now it's working. You car material. Let
me separate the ear. We're getting troubles the ear, so we'll just separate it. Alright. I would like to add another way the bottom
part of this space. Maybe. Let me see how this
looks without the inner seam. I mean, this MutbacIM I think it looks better all
right. There we go. Then we have D Dmonhad UVs. Let me save incremental. And now, why I need to do
the tasks. I should be easy. All right, let's just go here. Mark Sim Lear. Mark Sim. Lear Sim. And here will be just like this. Alright, let's just
collect this mom on wrap record material.
Let's go here. All right, let's just do that, and this should be good enough. Grab a good paste,
check our texture. You guys say that this is nice. Alright. So we have made almost all the UVs for
the main character. So let me do this mo Alright, Sugar texture. Here we go. So we have made all the UBS
for our main character. We need to do the weapon UBS. So let's see. Yeah, we're going
to make the weapon U Biz in the next video
to see you there. And then after we made
the UBS of the weapon, we're going to start organizing our Ubis and then prepare everything for baking to
see you in the next video.
22. Making the Weapon UVs and Organizing Them: Alright, guys, so let's continue with the UBS of this model. Now we're going to make
the UBS of the weapon, and maybe we could start organizing the UBS.
So let's start. Alright, let's
unhide the weapon. So let's start making
the UBS for this. All right, here, how we could
do the UBS for this piece? We could just add, like, a middle seam
just like that. And then we could
add some seams in the corner so this
can displgate nicely. Alright, around here, maybe. Perfect. Here we go. Is uneasy. Let's bring the checker texture. Checker texture here. Perfect. All right. Now, let's
continue with the rest. If we here, let's see, we need to separate the inside from the
outside in this piece. Mark Sim there, here, I will add maybe another sim We around here, just like that, mark em. We could also add a seam here, so this could open nicely. You can see it here, or eyeless at the
checker texture. All right. Let's go here. This will
be basically super easy. Let's just add a
middle edge loop. I mean, a middle seam,
and that would be it. Becker texture.
Perfect. All right. Let's continue with the
blade here will be the same as the lower blade will
be just this perfect. Let's add this sugar material. Here will be more of the
same maybe a middle a troop with a few themes around here. So this can open nicely. Alright. I think
this would work. Alright, check our texture. Here we could also
need just like that. Here. Perfect. Let's continue. Maybe this piece would also be Alright, just like this. Markim there we go. Maybe we could remove one side. So this is just 11 UV island. More check ar texture,
Checker texture here. Perfect. There we go. All right. Let's continue with this here. We'll just separate
the inside from the outside as always. Just like this. There we go. Maybe some seams
in these corners. Mm around here. All right. What is happening?
All right, I see. This stuff is from where? Oh, I just forgot to add
a seam there. Right? Now we have a seam
in this area here. Mark him. There we go. Let's bring the checker
texture. Perfect. Let's do the same thing here. Let's just separate the
inside from the outside. Just like this. Mark him. Perfect. All right. And now I will just
add a middle them there so this could
displayate nicely. More checker material. All right here would be more of the same stuff. Let's see. Just to separate the
inside from the outside. This should be good
enough for us right now. You card texture
material or wt. Perfect. Let's take this. Now, let's do the textures of this these Mark Sm. Perfect. Checker. Checker
texture. All right. Let me try to make this straight horizontal align vertical now, align vertical, select that polygon,
then select everything, and now it is completely bright. What is this, bro? Let's see, this would
be really easy to do. We just remove these
extra polygons. I Perfect. Sra. There we go. So checker architecture. So here, it will be like
grabbing a cube, just like this. Maybe we could add
some seams there. Mm. Dear Sim. All right. Checker material. There we go. Right now, this cylinder
should be easy. Let's just add one seam there, another seam here, and
another one in this area. Let me see which part is the. All right, so let's add
the seam in that area that this height and space
perfect. There we go. Check our material. Now
that this little piece, as usual, separate the
inside from the outside. Just like this. Mark sim
me apply this mirror. And now let's do the
unwrap car material. Perfect. This should be
good enough, kind of, but not quite much with
this cool to something. Yeah, it's better. Go here. This will
be basically square. Alright. Let's just do this. This should be good enough. Right, apply the mirror
and then do own wrap. S here that this is perfect. The material. All right. Let's go here now. All right. Another
ube like shape. Just like this, it'll
be good enough. Grab a good paste.
You car material. Alright. Let's do this
little piece here. Let's just separate the
inside from the outside. Just like this. Perfect. There will be some
teams in these areas. Making grab checker material. And there we go, we have made the UVs for the weapon
for a safe incremental. And now we could start
making the UBI layout, which means we're going to
start organizing our Ubis. So first of all. Before organizing the Ubis, we need to set the texture
set or the material groups. What that means is, for example, we are going to have one
part of the model that we share at the same UBI space, like the same material. So you can see here.
That part of the model, we share the same material, and another part of the model, we share another
material, and so on. Let me show you with
a little example. For example, here, the face the face will have
its own material. We could just add a
new material I will call this head Perfect. I will change the
color maybe to a red. That will be the texture
set for the head. All right. Also the eyebrows to have this texture set head. Perfect. The eyes we could make the eye its own
texture shed maybe. Let me we could do it, or maybe we could also put it inside the texture
set of the head. But because this is more
a personal project, I will just add it as
a new texture set. I Alright, it's here. Perfect. Let's add some
bluish color. Alright. So let's keep working. Maybe the jacket should
have its own texture set. Let's remove this one. Let's add jacket. Perfect. Or maybe this
could be instead of jacket, could be upper body. Let's see here could
be upper body. We could add the globes jacket. This one would be, maybe not. I think the inner shot should
be its own texture set. All right. We could add all of these in the
same texture set I think. Yeah. I think so. Let's go here. Let's press
Control L link materials. There we go. Here, the suit should have
its own texture sheet. Inner armor. I will change the color
to maybe some yellow. Here, the inner suit should
have its own texture st inner sud All right. So also, we need to
add the lower body. Maybe we could put all of these
in the same texture shed. All of this stuff. Let's see. These should be or could be
in the same texture sheet. Yeah, I will call these
texture sheet pants. Pants. And boots. I think materials. Maybe this could be some pk. Let's go here. I have
hide some stuff skirt. Here we go. I think
we just that. I just forgot now the skirts, maybe we could add it in
this own texture set. It doesn't work here. I don't think quite like quite much rehiness
that this has. I think that's
better. All right. Let's add the skirt and maybe this pouch and
belts, all of this piece. We could just add it in
its own texture shed. A skirts, belts, or materials. Let's add maybe which
color this color here. Let me put UB on
this. All right. Perfect, perfect. Perfect. Xm, grab. There we go. All
right, the mask. Maybe we could add the mask
with the inner armor will be. Perfect. Let me
just add that mask in the inner armor texture set. There we go. Is piece also. There we go. The hair would be in
the own texture set. For games, maybe you should have less tex use that
I'm doing right now. I just want the most of the
quality that I could get. Like here, maybe in a game, maybe you could have retraction of having one textuset even or two textuset and you need to lay out your UBs in those
two texture set. But for this case, I will use like few more texuht just to have a little bit more
quality in the textures. Alright, so let's go here. This called Air. Materials. Let's
call this maybe. I mean, with that orange. We need to lay out
this somewhere. This cable here. I need
just to put it somewhere. I don't want to put it.
Maybe I will just add it with the inner sut Yeah. Like materials. Perfect. All of this piece would be the demon
head texture set. Demand head. Texture set. Perfect. All right. There we go. We have quite a
bit of textuSets. H one, two, three, four, five. I mean, I got lost. And two, three, four,
one, two, three, four, five, six,
seven, eight exost. Maybe the eight Ext
are quite a bit. Yeah. I think they
are quite a bit. The ice, we could make it
with the head, indeed. We could add the ice
with the head. Yeah. To reduce a little bit amount
of textuct that this has. The hair should be its own
textut Just to work easier. All right. I think good. Let's make the texture
set of the weapon. Let me hide the character. All of this weapon will be basically the
weapon texture set. Weapon Texture. I mean, just weapon. Let's just call this
weapon. All right. Control L, Marlink materials. Let's put some random color. Alright. There we go. Now we could start
organizing the UBS. Base it on the texture set. So let's begin with the head. Let's select the head. Now, let's select here,
select linked material. So now we have selected
all the texture I mean, all the object that shares the same UV space. So
here we have this. What I'm going to do now first, I will just to adjust the face to the maximum space
possible that this can get. So now for this will be really important
to have this ton. It's called texal density. I think the texal density ton, it will be found here. You could type Texl
density checker. You can see it here. You
just go to preferences, get extension and then just
type ex density checker. So you could get this atom
why this ton is important? Because in here in the UVs, there are something
that's called texel density and what
the texel density is. It's basically the
resolution that your UV island is getting
from the texture. So like, for example, space has one text
density that differs, like, from here from the eyes. Like, you can see compared
the e to the head, you can see that the ice has a lot more resolution than
the head because in the UBS, the UBS of the eyes are bigger. So we need the model who have to share the same textual
density across the UBS or at least in
the same texture set, they need to, like, share the same texture set. I mean, the same textil density. There are some cases
that we could, like, sheat a little bit
and make some parts bigger and some parts that
are not that important. Let's big. Like we
could make it small. Just to prioritize the parts of the model that will be seen. Like, for example, these eyes, I want them to be with a
little bit of resolution. So I will take the front part. The front part is this. I
will just make it quite big. And the back part, I will just scale it down and put it here, just like that. So now this part is the neck. All right. So try to organize this. Maybe we could make it
great just like this. But now we got this
problem. All right. Alright, let's go here. Perfect. Let me do
something here. All right. Let's type P. Now, let's select this on grab. It is not working. Right pink. All right, wrap. Just like this could be good
enough. Select the scope. And let's just
bring this up here. Let me see with records texture. See how that part
is behaving? Yeah. Let's at the head material a so the neck part will be mostly covered
with the inner soot. So maybe we could make it less important and
just make it smaller. You can see it here. Now, here, we have the eyebrows. So if we want to
make some UV island, the same texturing, I mean, the same textil density,
we need this atom. Now, let's select the UV
island that you want to get the textal density
from. Select them. Let's click here
and calculate TD. Now calculate set value. And now let's select the
textil density that we I mean, the texture the UV line that we want to apply
that textil density. So let's select these ones, and let's just go here
and set my density. You can see it here that the UBI island scales
up or will scale down. This is the mouth bag. We could just put it here. Maybe these ones are
the ears, I believe. Yeah. Maybe we could
just add it here. We have a lot of space that we could use with another I
mean, with other pieces. Yeah, we have the.
These are the eyeballs. All right. Here, maybe
here. I don't care. Now we have the eyebrows. This is the back
part of the eyebrow, and this is the front part of the eyebrow. Let
me do something. I will just apply the mirror. The eyebrow. Let's
just get that. All right, normal. Here
Fro X. Oh, I don't know. Let's just add this here. All right. We scale
that down a little bit. Se this down a little bit over. And there we go. We have a lot of haze left still. Alright. I think that
cool would work. All right. At my TD. All right. Right,
so we have this. I mean, I think this could work. I think for this piece would
be better, there we go. Let's start making the UBS. I mean, the layout
for these pieces, let linked material or right here, let's
do the same thing. I will use as the reference
for the text identity, I will use just the front
part of the jacket. But first, let me apply or here. Just for the jacket,
not for the gloves. Oh, we have already added
the mirror on the gloves. Whatever, we could just delete one part at the
mirror again, right. Perfect. We have a little bit more of space in the dexters. Here, I want this
armor be with mirror. I mean, without mirror. So these we could maybe No, they are quite big piece. I would like to have it mirrors. I mean, they could
be a mirror mesh. But they will have text on it. And if we mirror object that has like text in the lectures, the text will be also lipped
so let's apply the mirror. Alright. Let me make
the US again for this. Perfect. Now, let's lift everything. Migues has reference point
my back part of the jacket. Let's go here. All right, calculate Telecity, calculate set value,
everything with A, set my TD. And now, this is just like
making resolving a puzzle. You just need to
make everything to be inside this square Alright, there are some atoms that could make your life a lot easier. Like, for example,
the UBIPACmster, this is a really
amazing atom that will help you to
save a lot of time. I will use it also here, but I will show you how to make, like, pack your Ubis manually. But if you can't
afford this atom, please just buy it because
this will be really useful. So now just to make this, let's try to put all the
right to add all the shapes, all the UVs for the jacket. All right. If you see that
you need a little bit more of space and you cannot get where to put
more textil density, I mean, more UVs, you could just fill them down. I let's see. I think I could stick a little bit more of stuff
here or maybe not. All right. Let's try to see. Alright, this is the globe. All right, it will be here. Right around here. Nicely, good. Perfect. What is this? This piece will not be that important
because that is just, like, one of the apps we added. This other piece
is from the glob. We just add this here. These are the armor. Let me get all of these parts. I will scale this down
because those these are the back part of
the panels armor. And now maybe we could
just rotate this. Maybe we could try to
add them around here. All right. Just
like this, maybe. They are always space
for more pieces inside. All right, maybe here could be. This one could be around here. All right. Now, these pieces. All right. Scene
could be right here. Just like that. Perfect. And this one's just like this. All right. Perfect. Perfect. This one here. This one here, perfect. Now, these pieces
are the other armor. The hand armor, I mean.
Alright, let's see. We could just add
it. Let's see how. All right. All right. Perfect. Let's just add this. This one's here, maybe. You could add all of
these around here. Alright, I will just do this ectuset manually,
and the rest, I will do a mix of using the UBIPACmser along with so manual work just to
save time, you know? All right. Perfect. There we go. Alright. I let's also add these ones. Or right the knee,
we need now to somehow add shoulder armor. All right. X M. Perfect. We need to be able to add
the shoulder armor somehow. All right. Just add those here. Let's save incremental.
Let me see some. All right. Maybe this. We could
add it around here. Close as possible without touching. All right,
just like that. All right. Aye here. Let's see how we could add it. I'm sure all of this
could be inside. Would be All right. I need to add this piece inside. What how? How we go at it. This one could be here. This one could be around here would
be more of the same. Or maybe, yeah, now we could do this and stick that here. Not I intend, move
this to the side. This part around here. Just move the more
to the side also. These two, a little bit up, not touching. We will add. Now this one here. Right, without touching.
It is touching. This is out of the UV layout. Make sure that all of your
UVs are inside the square. We could make this one
a tiny bit smaller. Just a tiny bit. We have a little bit more
of space. All right. Now, maybe we could add, let's see, the rest somehow. Alright. And could be here or maybe here. Perfect. This other one could be around here. All right. All of these. Let's see
how we could stick them. Let me copy thenty from this. Calculate exaltinty
calculate set value. Let's select all of these. Let's set MTD. All right. Perfect. And All right. This one could be around here. This other one
could be let's see, I don't have more space. This one could be around where. Alright. All right. Maybe this could be around here. Per quit. This one's a little bit like this. All right. Yeah. Perfect. Alright. Let's see. They are not touching, right? Perfect. This one could be here. Now we need to add this stuff. What is this? Those
stuff are what? All right. They are small
caps that are not important. We need to add this
one somewhere. Somewhere, we need to add them. C reuse paste from here. All right. Be around here also. All right. Perfect. Now there is just this one left. Perfect around here. There we go. Let's
save incremental. And let's see how
we could add this. Don't where? Maybe here. This one could be around here. And this other one
could be Where? Let me try to fix that. All right, I see.
Where I can put this. Maybe here. No.
Maybe here, yeah. Think so. Let's take this one. Let me just add this
one here. Perfect. Let's move this. And
now let's just put this somewhere else
like here, for example. And now you can see that
we have all of the pieces inside the ex rosette. All right. So let's
save incremental. Perfect. There we go. Then
now for the rest, I will use my UV pack
master just to save time. Let me show you in a bit a
little bit how this works. Let's select linked
material here. We have this. Let's
select, for example, the front part, this armor. Let's just put it here. I let's calculate at the texltt. I calculate height value
like everything at my TD. Now with everything sharing
the same textil density, let me see maybe this stuff. We could just make
them a lot smaller. Now, let's select everything. Let me rotate the things nicely here with its
correct rotation. Maybe this one will be a
little bit smarter. Alright. These ones would be like this. Perfect. Alright. Perfect. Now, I will just select this and then go to my Ubi PAC Master. Let's select the Uistic search. And now let's remove
this rotation enable, and let's just
click here in pack. And you can see how these get tags inside here
in a nicer way. I will use this All right. Let me show you
another example here. Let's link it material. All right. Like this. Maybe let's get the
actity of the pan, like everything at my TD. All right. Maybe this
stuff could be *****. Which one would also be smaller. This stuff also small. Let's see if we
have another piece. Male also. Alright. Perfect. All right. I will apply the
mirror for this piece. Perfect. I select everything
here. At my TD. Now I will use just
my UiPaC master. Pack UIS. And you can
see how these get packed with the maximum
quality this could get. Perfect. Nice and
good. Good and easy. Perfect? Let me just
rotate this tiny bit more. Alright. Now with this select
linked material. All right, maybe
let's get the skirt. Exaltenty calculate extenty
calculate set value, everything. Everything. Here cable set value, right. Now, all of these pieces. I will just make this inside that pack there, there we go. Perfect. Inner suit. This could
be just like that. I don't care too much. Just like this. It's
nice, you know. Now, this piece, we
could just add it here. These are the horns. Let's just add the horns there. This one's here. This stuff here and the ears around here. Let's get the the hair. Linked Linked
material. All right. Except that
texaldntity. All right, calculate value set MTD. And now let's just pack this. Perfect. There we go. Yeah, we go. All right. Let me do another
pack. All right. Perfect. Now,
basically everything should have their UBS organized. You can see how this
UBI PAC master is like black magic. All right. Is that stuff really
save you a lot of time. So let me incremental. Let's do the weapon. Let
me hide a character. Let's go to the weapon
here. Let this. Let's select the weapon. Perfect. Let's select
maybe this one. Let's calculate
the text density, calculate Texel density, calculate value,
select everything. Let's set MTD. Now let's go here and then
just click in Pack. And there we go. Nice and easy. This way, we have our blade. Nicely placed. Maybe the blades, we could just rotate them like in the same direction that they are in the
Treaty Viewbard. All right. Let's also go here. Perfect. All right. And this should work. All right. Let's say if incremental. And this is basically
it for this video. We have already packed
all of our UVs. In the next video,
we are going to do some preparation for the
baking and then the baking. Maybe we could do we
could do the baking or the first bake and
the preparation for the baking in the next video together. I'll see you there.
23. Preparing the Model for Baking and Making the First Test Bake: All right guys, let's
continue with this model. Now what we need to do is to prepare this model for baking. So the first thing
that we're going to do in order for us to prepare for baking is
just rename the objects. So how we're going to
rename the objects, you may say, it's easy. We need to make like each
object will have a unique name, and at the end of the name, it should have this suffix. So we need to rename all of our low poly models
and add the suffix. And in the equivalent
part of the high poly, we need to add the
exact same name, but with other suffix. So let's start. Let me show you what I mean. So what we are going to do
basically will be this. Let me see if I could
get something here that is not that is not name, maybe could be all of these. All right, I think, maybe I could get all of these
pieces separated though they can bake separatedly. Let me see. I will just prepare all of these
lit by loosing parts. Alright. Maybe let's also hear. I will need to separate by
loosing parts. All right. Maybe this skirt. I don't know if I name it. Well, the skirt is not named, so let's show you what I mean. Will be basically this. I will just name this like
skirt on the score low. Now we can go to
the high poly acid. The skirt here, let's find the high poly version. Let me hi for a second. The low poly, I will
just make all of these pieces one all right, you should make the pieces that you have merged
in the low poly, and you need to also merge
it in the high poly. So now we have merged all
of these belt under skirt. So I will rename this to
skirt underscored high. This is really important
when baking because when you bake and your objects are named
in the right way, you can select the option of
peking by matching names. So what will the program do? We'll take all the
objects that are the exact same name,
and we'll, like, match them together, base it on the low and high suffect that
you have put on your name. So that will be basically it. So I will just name a few other objects here in video because this is extremely repetitive process. I don't think that you want to see me
renaming all of these. So let me separate this part. All right. Alright, here. Just select this
selection. Alright. There we go. So you can say that I
have already named few of the subjects while
making the retopology. So now I will continue naming
this with the mask low. We'll call this mask to
low maybe. All right. Go here, maybe the
hair strand low. I will call this hair main body. Low. Then here, this can
be like hair bun low. This could be hair
Btrand low Batra low, right, let me just
copy this name. Then just paste this. And then this could be
like hair hair band low. Hairband low. There we go. Be the eyebrows. Eyebrows low. This one could be like this
tiny piece or head is low. All right. This
could be the cable. Cable low. This could be like cable run heap low. And the other one could be like other name like this
one would be hair. I mean, table a
tip, there you go. And this will be the eyes. I. Hello. Perfect. So I will keep doing this the exact same thing
with all of my pieces. And then I will get
back to you once I have finished making
this Alright, guys. So now we have all of
our model name properly. You can say that now I have my entire model name with the suffix and all
the **** that it has. Alright. All the stuff that he has perfect. It wasn't good. The
hair. I need my hair. Perfect. All right. There we go. There we go, there
we go. There we go. Alright, let me bring
back everything here. And also here. Perfect. You can see that I have used
my eyes as the low poly. And this, what is this piece? Let me see. Let me find it. I don't need this. All right. Where is my eyelashes here? Oh, I see. My eyelashes
are not placed correctly. The eyelashes, what
I did just was like extrude like extrude
this erb here. Extrude this part, all of these. And then I just make
it a tiny bit longer, and from them, making the
eyelashes is not Is not fancy. And for the high
poly, I just take the supporting robes
and then subdivide it. So that basically Let me try
to place this correctly. Around here. I think so. Yeah. Perfect. So now what
we could do now? Maybe we could start
making the baking. So let's export this. Let me save incremental first. Alright. Let me open
Substance Painter. Alright. Now that my
Substance Painter is open. So let's go here. Let's export the low poly first. Also, before anything, Let's check if we
have our ID map made. What the ID map is, you may say, it's basically like the vertex
colors of our high poly, baking in a texture map
just to be able to select better like some pieces
when we start texturing. So let's see let's go here. Let's change this
attribute to see all the vertex colors
of our object. And you can see here that I have p vertex colors that I have
made inside the brush. I think this could work
maybe. I think so. Let me see. Let me
hide the jacket. I think this could
work. So let's keep working on this. All right. Let's export the low poly. All right, export FPX. Go here, FPXk baking baking. Let's call this Damon hunter. Demon Hunter, Lo or Bake. Let's click here
selected objects, flight transform, Adlai phones. I don't want to apply the
modifiers that I have put. So let's click here in Export. Because I just want
to bake one side of few objects and then just
mirror them later on. Let's go here also with the IPO. Let's let everything here. For FBX, let's put
this in i for bake. Let's export this C and wait
for the high poly to export. It will take a
while. There we go. But I think I had this selected, so I will just make sure
although this is already i, I don't think that
will be exported. But just in case I will
just export it again. I don't want anything else to be exported in the high poly. All right, exports. All right now that
our hypos is not. Alright, let's start
making the Peg here. Alright. Let's
click in New there. Let's put this in four k
because I want to get the most of the quality
for this project. So for the normal mob format, we're going to render the
inside Marmoset Toolbag five. So I will recommend you to put this in OpenGL because the
three package softwares, they use OpenGL for
their normal maps. And if you are going
to export this model, if you are going to
render this inside a game engine like on
real engine or Unity, you should put this
in direct X because the game engines uses the
direct X type of normal map. The only difference
between those two is just the green channel in
the direct X number mops. The green channel is flip. So have that in mind. I will just put this in open Ye. I will select my low poly here. Make sure to leave
this as it is. Don't change anything else
let's just click here. Oh, I haven't failed. Let's see. Why is it? It seems that in the
full body on the jacket, I have some Ubis that are not that are not
inside the Ubi square. So let's see, let me hide this. So the full body
here, full body low. Alright. I don't want to have
this. I don't want this. Also in the jacket
in the jacket, I had some stuff that was
******* out, I believe. Yeah, this one. Go here, straight to. Push this in. Alright, now everything
should work fine. Let's export this again. Alright, let's go back
to Substance Painter. New. Alright, Open Y. This in four K. Let's
select our object or model. And now we should
have our stuff here. You can see there's
something weird. I think I haven't layout
the Demon head Yeah, it seems so. All right. Let's just clicking pack. I will just leave
this like it is. I will not care too
much about this. Maybe just a few adjustments. We could put this on top here. These tasks and the teeth. We could just add it there. Alright. Perfect. Maybe it could be a little bit bigger. All right, I will
just re export this. All right, let's
export the low poly. Port FBX, low poly for Bake. So here, let's
click here now and reimport Msh. There we go. So now, what we're going to do? Let's do some stuff. First. What I will do I will duplicate this mesh. I will active the shape give
that we have created before. Let me hide the mass. And I will call this Let me call this closed mouth and I will just re export my thing with the open
mouth version of the head. I all right. Port FPX here. Let's go here. And now
let's reimport our objects. There we go. My hide the inner
shoot just to inner armor. No. No. Alright, let's go here and
let's apply the shakes. Now this should work nicely now. Here, we export FBX. Alright, let's
go here. Import mesh. They go in armor.
Alright perfect. So now, let's go here. Export. Let me see if I have my high poly with
the open mouth. It will be funny if I don't
have it with the open mouth. Let's see mask. Let's hide the low
poly mask also. Oh, yeah. This is funny. I thought I have I have exported my
poly version of this. I think so that I have
it somewhere. Let's see. LX. Alright, buddy. You
gonna see it here, I have it there.
Let's import this. Et's wait for this
to be imported. Alright, now we have
here our objects. It's quite a bit of polygon, so the Blender is a
little bit too low. Alright, so I have now my
high polyverson of the body. I will just export all of these. Again. Let's just export this quick. Let's wait for Blender. Alright. Alright, I have
exported my eye poly again. So let's go here to baking. And now let's just import our poly wait for
this to be imported. All right, so I have
all my poly here. So now let's go here to match. Let's select Patch by mesh name. This will get all of your stuff. You can see how Substance
Painter is matching the object that has the same name which
is with each other. But now, it seems that I
need to fix some stuff. All right. Their rap step. All right. Let's
try to fix those. They are mostly
in the high poly. So let's fix it. Right, let's bring
back our high poly. All right. So let's go here. I had this capital letter there. All right. Now, these
two should be one. And what is this? All right. I see. Let's go here,
strap the cloth. Go here, perfect. C is high. And this should be
here with one. Yeah. So let's re export
the high poly again. All right, so now we
have our high poly px. Here, you can see that
there are not errors. So let's tweak some
parameters here. Let's go to the ID. Let's click here and
select Vertex color. Let's just crank up a little bit the secondary rate
on the Ametoclusion, and in the curbaor, let's crank up this also. Let's see ametoclusion,
let's click here in self occlusion and select
only same mesh name. And now we could do baking test with one K textures just to see how this is looking. But before that, let's try to play with the frontal
distance with the cage here. Oh, I just forgot to add
this to the clothes. Oh. I just forgot it. Well, anyways, let's just test this to see if
this is working nicely. So let's start. Alright, so substance
has finished of baking. So let's see what we have here. So you can see here that we have some funny stuff because
I just forgot to add, like this piece here
in my low poly. I don't know if I just
forgot to unhide it or if I just didn't made
the low poly itself. Anyways, that could
be easily fixed. Let's see the rest. Alright, what is this? You have this like that?
This is super weird. I don't know what's
happening there. But the rest is looking fine. Nicely made. But we're getting
some stuff here. Alright. It is looking good. We need to fix the head and fix these issues and these
other issues here. So let's try to see if we could get what is the problem
is happening here. Let's see. I believe that is
an issue of flip normals. Let's see All right. Let's click here
this orientation. Now you can see that I had my normals of my high body left. That was the issue there. Like here, mesh, normal, sleep. And we should be good. Now, but we are going to
continue this in the next video. In the next video,
we're going to fix. I mean, we already
have fixed this. We just need to repake the head, and we're going to
fix this issue here. We need to add another another Another stuff there. Also, maybe we need to tweak
a little bit more low poly. But most everything
is looking fine. We also need to clean here. In the floaters, we need to
clean the NBT occlusion. So they look well integrated. Also here, there is an issue. There are some stuff
that need to be fixed before you
start the textures. So next video.
24. Fixing Baking Issues: Alright, guys. So now
we're going to fix the baking issues that we are having here. So let's start. So in the previous video, we fix the phase part, but we need to report. We need to re export the
model, the fixed model. So now you can see here that we also have some flip
normals in this area. So let's just flip those also. All right. Let me
see where else A, we need to fix this error here in just a
minute. All right. Let's see, also, we need to
fix this error. All right. We also are getting, like, some weird warm there and it's really fun of A but
everything else seems fine. Here also. We need to fix
that. Alright, right. We will need to fix to
tweak the low poly. So let's go here. Select
this one. All right. Is it here that we are getting this polygon to down there. I quite like it, how it is. Alright. Maybe we could
get maybe it is like that. Just force the
triangulation there. Just like that. We're getting also
this rim nice. All right. Let's do
the same thing here. All right. I think that should fix the error that we
are getting there. Also, we need this strap
that I forgot to add. All right, so let's try to search it here and see it here. Let's go here and now. Let's scale it up. All right, 0.1, perfect. There we go. Let me hide this. Oh. Alright, let me
just take that piece, and we'll throw
it in the jacket. Where's my jacket or
right there we go. Perfect. We need to make
some UBS for this. Also, we need to adjust
the position of this. Let me delete one part. I will make will add a mirror. Perfect. So let's go here. Unless
just try to get this nicely. All right. So I think I will delete the inside. I will
take this too. O here I will need to decorate those pieces
just like that. All right now, let's take this. Perfect. All right. Now let's just stick
this to the surface. All right. Just like that. Perfect. Just like this. Try to get it nice and good. Just a few more. All right. Now, I will root here. Perfect. All right. There we go. Alright, here. Maybe we could add
another edge here. Just like that. Let me just twig a little
bit the high poly. All right. Just like this. Is a little bit, a little bit of tweaking
in the high poly. All right. There we go. Just like that. All right. Here. Perfect. All right. There we go. Perfect. Now let's just
add all of these phases. Maybe two edgelps here. Just like that. Now, let's just try to
make some quick ibis. All right. Oh, I need to
pull lose in this area. All right. Let's separate
this part. All right. And now I will just
split the inside. Let me move this
more to the edge. And now we should get this. All right. Let me select
all of those edges. Let's mark C. There we go. Now I will just
make this straight. Well, let me try to get all of this straight
inside the apology. Alright. Perfect. Perfect. Now, I will just make
all the polygons straight. All right. Let's go here, two. Alright, let's get
this. There we go. Now I will change
the name of this. Let me go here. Let's
call this jacket. Shoulder wrap high. Let's go now to the low poly. Let me also remove the
custom split normals. Now I will go to here, and I will just put here low. So now we need to add
that to a material. So I will just add
this to the jacket. All right. Let's
put here jacket. All right. Let's select this. Let's see what else we could
add inside the jacket. Let me s incrementt all this. Select linked
material. All right. So let me get the text
dexty from one of those islands text,
created value. Now, let's select our straps, and let's just
click in set value. We could fit it here. There we go. So now that should fix the error
that we were getting. Now, let's see if we are
getting another error, right? We're getting the baking issues. I think that those issues are because of the cage distance. Also, this, we need to fix
this. So let's go here. I think that issue is
because we don't have this pouch on the same
object that has this strap. So let's go here, Let
me hide my low poly. Let me just make it one and
that should fix the problem. Let me also hide this tiny guy. All right. So here, these issues here, I think they are
because of the topology are not in the correct position. So let's go here. And you can see how this is under the strap. This stuff should be
on top of the strap. So let's just move it there. Be sure that you have
your magnet activated. Snap those vertices
on top of this strap. Alright. Perfect. Let me hide this pouch. So quick. There we go. So I want to add some
extra topology, indeed. We'll move this here, or now I will just add, like, a loop that follows this
strap just like this. Perfect. Did we go? All right. This should not make
an error in the UVs. However, we could
re grab the UV. Let's stick those polygons
on top of the surface. All right. Let's go here. Maybe we could also
add another one. There, perfect. All right. Little bit of topology
to get this crease. All right. Perfect. There we go. Perfect. I need a little bit
more of topology here. Just like that. Perfect. So, let's add the other one another edgep that goes
here around this strap. Just like that. Perfect. All right. Now, let's just move this. And let's just snap those
vertices to the surface. All right. Perfect. There we go. I would like to get
also this crease. Perfect. I will add that same crease here
also. There we go. So now, what we are
going to do will be just select the outer part
of these UV islands. Just like this. Let's press P. Now
let's just select these two and then just click
in minimal stretch. That way, we should get this without any
issue of distortion. Let's wait for the Blender
to respond. Let's see. All right. So let me
hide the high poly. Perfect, without any issue. So now that should work. So let me keep looking for more baking issues that we
could address inside Blender. All right. The hair. Those baking
issues in the hair, I think they are because we
need a little bit more cage. So let me export what
we have already. Oh, here, we got a problem. Let's see if there is something here that is a
little bit packed. Right? Mm, there should
be no problem there. Alright, let's just export this. Let me first export my
character, my low polycharacter. So let's see if
Blender wants to work, and then we are going
to export that. All right. Let's
select our character. Click here, export
FPXFPx baking. Let's just export it on
top of the previous one. Let's just remove all
of those options, and now let's click Export. Now we need to export
the high poly. So let's go here. Help me
bring back all of my stuff. I think so. It's good. Al right now, let's select that, export PX as exported here. Now let's wait for
this to be exported. Or right now that our
meshes are exported, let's report in the low poly. Let's just click here and
report mesh. There we go. So now, let's click here
and let's go and let's just rebake everything and see
if this is working now. Let's just wait for
Substance Painter to report the hy poly. Right now that our
hypoly is imported. So what We're getting some
issues. What is this? Was pouch and pouch. Oh. Let's see what is happening. Ah, I see. All right. Let me bring back
my pouches here. All right. Now, here pouch pouch strap,
skirt strap high. I see. All right. Now, everything
should be activated. Let's re export the high poly. I mean, the low poly and also, again, the high poly. Now, let's go here. Let's re export
the high poly PX. Hi. Let's wait for this. Right now, we have no
errors here in this step. Let's switch from
experimental here from automatic to
distance space. And let's just inflate
this cage until we don't have this tiny spots like these tiny red spots there. Also, like in these pieces, they are red because we don't have we don't have the mesh there because we're going to
mirror those meshes. We could also go to the high body and then
just delete all of those pieces in the hydy
that will be mirrors. We could just
delete those. But I don't think that
would be a problem. So let's go here. Let me just increase a tiny bit
of frontal distance. Maybe this could work. Let's just bake this and
see what this give us. All right. All right, this has finished baking. So let's see what this give us. If we fix all of the
baking issues that we had, let's see it seems like so. I don't know why this
part is still happening. It's happening here. I think some mesh is
overlapping here. Like some UV is overlapping
in that part. There we go. We got a piece that is
overlapping. All right. Let's go back here to Blender. G here. Let's go to this part. Let's select link it material. And then let's just fix those pieces that
are overlapping. Like this one here. All right. Let's see. We could get this to work. Maybe if we scale those down just a tiny
bit. No, I don't think so. I don't want to scale this down. We could move this to the
side, just like that. Maybe this a little bit up. Just like that, so
it is not touching. Alright. And now
I will move this more here and it's not
touching anything. All right. Kind of. Yeah, I think this could work. Nothing is touching each other. Safe incremental. Now, let's re export
this port FBX. Go here locally. Let's go back to
Substance Painter. Let's remport the mesh. Now what I'm going
to do would be to bake again this in
one K because we're just making we're making est bakes before doing the
final four K bake. So let's bake this. Alright,
see this finished baking. So let's see what we have now. All right, we have fixed
that issue. Let's see. You can have almost any issue. We're going to do something here in the
hair in just a second. All right. All right. We're getting
some of these hairs. We're getting issues in this
hair because two things. To Substance Painter is
triangulting in the wrong way. The polygons in the hair. And also, we need a little bit more of
cage in those places. Let me see this place this. You can see here,
these issues here, like this stuff is usually made because Substance
Painter is just triangulating in the
wrong direction. Your piece, you can see it here, is not triangulated correctly. So let's fix that in a minute. Let me try to see
the other stuff. We're getting everything good. Everything nice. Everything
good, everything nice. All right. Just a tiny spot there that is also triangulating
in the wrong direction. Alright, we got
that baking issue. Let me go to the pant. Let me see if we are getting
something overlaping Hmm. We are not. Alright, we
will see how to fix those. Most perfect here.
Basically perfect. Here, we still need
to tweak this piece. So let's just go
and tweak those. All right, here. We're getting an issue because I think something is triangulating in the
wrong direction. Let's see, this piece. Let me just add
equate a little bit more of solution here. All right, like this. All right. Let me continue this one right here. Perfect. We should not get any problem. Metriangulate, this
polygon because I don't trust Elton
Spender much. Right. Perfect. We still also need more
resolution in this area. Just let me do this. Yeah,
I think we will it do. Alright. Around here maybe. Let me hide the pouch. Alright. Just like this will be? I think so. Maybe we could
add another one here. Just like that. There we go. I think we should be
good enough there. But we also had an error. I just forgot it. We
got an error there. Like one tiny spot right
here, the back view. Why we're getting that error. I don't know. We
got an error there. Who knows? Why? Who knows why? Maybe could be some. The back view. Maybe would be
I think I know what it is. I think this is triangulating
in the wrong direction. I really hate triangulation. You can see it here.
That's the triangulation. We need to fix it here also. So let's just go and fix it. Just like that,
maybe I can do this. Maybe not. Right. So here and also let's
triangulate a piece. Alright, there we go. Let me see if we're getting
another error. Pay we don't. So let's go to the hair now. In the hair, we're going
to make some stuff. Alright. If we go, let me
take incremental. Now I'm going to
hide my high poly. I will get all of my hair stuff. Alright, I will make
another collection. I will call this hair old. I will take all of this, will duplicate this, throw it there just to have a
backup just in case. And now, what I'm going to do I will triangulate
this by hand. I will add a node of
triangulate just like that. And then I will just apply
it to all the pieces. On throw L, copy modifiers. And now, right click
convert to mesh. We have this triangulated. And now we should not have
any issue with the hair. So let's see. Let's export this Port
high here. Alright? Oh, I just forgot to
put my skirt back. That sounds weird, but, yeah. It sounds really weird, indeed. What is this? Alright, let's just export this. PX, low. All right. Let's go back
to Substance Painter. Let's click here in Report. Here, Report mesh. Alright. Now let's go here
to bake mech maps. And now let's just
rebake everything again. And let's see if we
got any baking issue. Alright, so this
is finished again. So let's see what we have now. If we have any baking issue. Alright, everything seems clean. Everything seems clean. All right. Let's just inspect. I think we still
need a little bit more of age for the skirt part. Alright, let's see the hair. I think now what is missing
is that we need more cage. Let's wait for
substance to save. All right. We still need to
fix this weird part there. Let's go here. Just try to do some
topology work in here. Because I want to
get this nicely. We just took this
this around here. All right. There we go. I think this would work. All right. There we go. I think
this could work, maybe. This could be. So let's go here.
I'll just copy this. Maybe not. Let's just
do the same here. M. Perfect. Just taking a little bit more. All of this. With that polygon. We're getting some weird
polygon here, all right? Just at it there. Let
me do something here. Merge. I what? Last. There we go. Also here. I will do the same thing in
the the other side. Perfect. There we go. There we go. Oh, here. There we go. So let's go here. Perfect. Maybe we could add a tiny bit more of resolution
by doing this. Maybe not. Maybe by
doing this, maybe. Y All right. Let's go here also.
And let's do the same. I full purgese. All right. Getting some weird stuff.
All right. Let's go here. Perfect. Remove pitch. Right now, I think
this should work. For us right now, let's go here. What I'm going to
do, I will just redo the UVs and keeping the position because I spend a lot of time
making this UV by hand, and I won't make it again. So let's just be smart and
keep the Ubis where they are. A so let's do some angle based minimum stretch right here. He let everything
grab minimum stretch. I think should be good. No, I think that's it for that. Alright. Let me see the hair. I think it's mosly because
we need a little bit more of cage inside the baking. So let's export this. Let's remport it here. Import mash. All right, let's go here to bake mesh maps. And what I'm going to do now, I will rebake
shirt, just jacket. Alright, let's come
here, re Bake jacket. And now this should be good. Let's see if this
wants to Finish. Or right this has finished. And now this is a lot better. You can see how it is
is way, way better. Alright, so let's now
tackle the hair issue. Let's go here. Let's just
deactivate the jacket. Let's go to the hair. Let's increase a
tiny bit more decage let's see if that resolves the issue that we
are getting there. Let's see if it doesn't
resolve the issue. We will see what is
causing that All right. It's a lot better, indeed. Let me just hide
the demand head. Perfect. It's better. Yeah. I think I will just make it
a tiny bit bigger the cage. All right, just like
that. Like here could be selected textures. Let's wait for this to bake. All right. I always
recommend you to do the test pages on one K because it is faster
than doing again, again and again in
four k. So you can see that we have fixed the
issue here in the hair. So let me rebake also the skirt. So let me go to the
skirt around here could be cage and let's
rebake the skirt. Alright, so let's wait
for this to finish. Alright, this is finished now. And it's better. It's better. It's better. But you'll need a little
bit more of adjustment. Oh, um, we should make this inside when we made
the four cake bakes. I'm just dump. But, well, you can see how I just fix this because we will
need to do it again once we made the bakes
for the The final bake. So. Let's basically
do the final take before doing anything else. Alright. Let me just add
this where it was. I think it was in 85. I mean, you now
58, I'm just dump. Alright, let's do
the four k bags. Maybe we could just remove
the skirt and skirt bells and the demand right the hair here just to bake all of the other parts
that are working. So let's switch to
that. Let's see. Birds color. Alright, perfect.
Now, let's just back this. This will take a while. Alright, guys. So there we are. So we have a really clean bake. You can see it here. There's no baking issues
anymore. Everything's clean. See from the bag. Alright. I think everything seems fine. Alright. Yeah. So now what we need to do, and we're going to do that
in the next video will be to clean this
ambient occlusion because I don't want to have any ambient occlusion
under the floaters. So we will fix that that's in the next
video. So see you there.
25. Fixing Ambient Occlusion: Alright, guys. So in this video, we're going to fix the
ambient occlusion. You can see that
in the floaters, we are having some
ambient occlusion that I don't really like
it. So let's start. So first, let's go here
to the texture settings. Let's add a new channel. Let's add an ambient
occlusion channel here. Perfect. Let's change the ambient occlusion
mixing to replace. Alright, we are in
the Dimon head. Let's start maybe first
with the Alright, Yeah, let's start first
with the jacket, maybe. The jacket only has these
two floaters, I think. All right. Now let's go here. Let me delete that stuff there. Now, I will add a field layer. Alright. Why is not my
ambient occlusion there? Alright. We will need to add the ambito cluson channel
in all detector set. The change this to replace. Now I have my stuff here. Perfect. Put it here. Now let's get our baked
Amtoclusion, right? I I need the jacket
baked jacket at clusion. Let's see if I can find it. All right. That's
the inner shut. This is the armor. This my jacket. Yeah, this one. Perfect. So now, let
me call this ambient. Oh, bullshit. Fix And they made a folder. The dropped that there. I will put in some color. I will call this map
Alright Map fixes. Alright? No. Let's add a
paint layer here. Let's just paint in the
amid collusion channel. We're going to paint
in black. All right. I don't know whether this
is that doesn't want to work right now. All right. Well, we need to
do that manually. So let's start removing
ametoclusion from these areas. Naming white would be. Yeah. All right. Let's go here. I forgot just to do something. Let's go here. Let's change from base color to
amtoclusion and let's change. The layer type to normal, so we can paint without
the layer being multiply. Because in the multiply,
we cannot paint, like the lighter colors, but just the only darker colors. And in normal, we can
paint anything with, like, Alright, so let me
select my basic stuff. I will add I will add a flow. Let me reduce the flow. Perfect. And now we
should be able to paint. Let me put this in symmetry. All right. I cannot paint right. This just went back. All right. Let me just remove that again. Let me add it add another one. Let's put this in normal. And now we should be able
to paint some stuff. Let me reduce that Hello. All right. Around here. Right. Let's see the difference. Seeing now the
difference without the fix and with the fix. Alright, let's keep working. We have more floaters
in the like these ones. This will be like a bit
time consuming process because we need to
fix all of these. If we could select this gray is this
one. Put it here. Let's see if I can
paint something. Perfect. I quite like it. Right. We need to fix
all of those areas. It will be a little
bit complicated. Since I cannot pick the color to be able to
select these gray colors. Alright. Let me do something.
I will do something. I think that I will Alright. Let's do this instead. I will duplicate this layer. I will change from AO to color. I will add my Ambetoltion
map to the color. And now you're in
the field there. Now, I will paint on the color. All right. Now I'm able to select stuff that
I want to paint. And after this, I
will export this map and report it here
and drop it into here into the fake textures
so we can use it easily. Alright, let's go here. Like this. Let me see something. Alright, let's keep working. Alright. This is in four K, I think. Yeah. This would be
in four K. All right. Let's just use our eyedropper to elect the colors easily. All right. And just fix this. You like
this real quick, real nice. Perfect. All right. Perfect. All right, let's fix these ones. Perfect. Let's just
keep doing it. Alright. This will be a really
time consuming process. It will be basically this, but in entire model. I don't think this will
be really interesting to watch because it's
basically the same thing. I will just do, like, the jacket only, and
then I will just cut. And then when I finish, I will resume the video or
maybe I can do a time lapse. Let's see. Alright, I think that we may
be goal to a time lapse for this because there is nothing interesting
to say about this. It's just the same
process all over all. Again, again, again, yeah. But work on this. I think those ones
are nice there. Here, we need to fix those. All right. Around here. I have made bake in four K. I just forgot.
Yeah, it seems so. Just continue. Do it in this part. And also, I suggest to not delete this layer
because in case that we need to do
a rebake of this, we have these strokes
already safe, and we just need to replace to replace the texture
in the field layer. All right. Perfect. Let's see what
else these floaters. We need to fix them. All right. All right around here. Go here to the base color. We. Let's do the other part here. There we go. All right. Perfect. I think
this should be it. For the jacket? Oh, yeah, here. Do some fixes. And also, we have
some baking issue. So straight to fix those. We have another floater. So let's test the thing
that I have told you. Let's do a rebake of the jacket Ole let's try to get that
vacanaor there fixed. Maybe let's increase a tiny bit more the frontal
distance, the jacket. All right. We are getting
some issues in this area. I think those issues are because we don't
have that state. Let's do something real quick. Let's go to Blender. All right. And now here, let's
go to the area that is making the issue. I think it's around
here. I think so. Yeah. Now let's bring
back our high poly here. Let's wait for
Blender to respond. And now we need to put this
edge on top of this fold. Alright, let's
just add it there. I will force the
triangulation of that that polygon
still the same here. Let's just at this here, and then just force
triangulation. In this area? No. I will re export my character. X, X here, baking. Low. Yeah. I think I haven't add
the settings for this. Alright, let me re export again the model,
the low poly model. But this time with
selected objects active. Alright. Let's export it. Let's go here. Let
me reimport my mesh. And now we will do
another bake here. And now we shall get
nice result. Alright. We need also to move a tiny bit. Those Those polygons here, a tiny bit maybe more here. It's a little bit more
like that. All right. Perfect. Let me see the
idea that we are getting a little bit of issue. Alright. Perfect. Let me export this. Port FX, low elected objects. Alright, let's go back to here. Now, let's report our stuff. Report mesh. Et to debate. Ah, getting some more
issues. Those places. All right, when we need to
do more ties. That's it. We will discover more issues while continuing
with this process. Maybe even in the
texturing part, we will find more baking
issues that we will need to address to get
some nice resolve. All right. Here. We're getting some baking issue in this area. And also in this one. All right. Now, let's
try to export this. The other area also Alright to re export that. All
right. What did happen? All right. Let's let this. Port. FPX low, yeah. Port. Let's go back to
our Substance Painter. Let's reimport our mesh. There we go. Now, let's bake our map. Perfect. Also we're getting some
baking issues there. Let me try to put
this in automatic. For the jacket. Automatic. And let's see what this gave us. All right, let's wait for this. Yeah, this is not good. This is not good, indeed. Let's just leave it
in decent space. All right. This problem, we
will need to go back to Blender to try
to resolve that. Alright. All right, let's just
move. A tiny bit. These polygons to match them better with the
shape, be just like this. Any bit more like this could be. This one could be
more like that. Perfect. I don't want
to distort too much. Maybe we could. Let's do some slide so we don't
distort the UBS. Alright, I will need to do
the same thing on here. Alright. I'm just like that. Let's just move this. More like this. Yeah. All right. Let's Let's export
this again and let's see if we could
get this to work now. Go back here, return to paint
mode, import mesh, right. Let's see if we are able
to get this nicely. And it seems that we don't It could be easier to do inside
Marmoset Toolbag, indeed. With a little bit more Not not working there. All right. We will address that baking
issue later, not now. So let's do the
baking right now. Let's just bake this.
All right, everything. Perfect. Yeah. So I will come back after
this is finished. All right. So we are here back. So we are back, yeah. We have fixed that issue there. We're getting a
little bit of that. I don't think it's too much. We could fix it.
Right? The only issue that we are getting now
is just this problem. We will see how we
could fix them. So let's just continue
fixing this Amtopltion. Go here. Let that
color. All right. Let me reduce the
size of my brush. We could fix here. All right. Perfect. Just like this. All right, let's go
here to the other side. We try to fix that. Now, let's just
fix this floater. All right, like this. Perfect. You just
keep fixing this. Perfect. Right. Right. Paint out this. That's real quick. Just that. All right. All right. A But this need to clean this better. Just like that. Alright. Wait. Let's keep fixing this quick. There we go. We're just a
little bit in this area. Yeah. Alright. What
else we could fix? I think everything here
in the jacket is fixed. Let's go here today. To this part. Let's just
pick the surrounding color. Let's just fix all
of those loaders. Perfect. Just like this. Perfect. I think that's all. Oh, yeah, we need to fix. Also these pieces, the bracelet. I All right. Just keep painting out. All of these I met occlusion. All right. All right. I see. All right. There we go. A little bit of cleanup. Y All right. Like that? Let's go
to the other area. Let's just try to fix those. Just like these. All right. Yes, a little bit
of cleanup there. All right. Maybe
this could work. I don't want to stay
too much there. I think this could work now. I think there is
no more loaders. Alright. Let me do something here. Let me fill all of these
with this reddish. I mean, what reddish, no, this with the black color. Let's change the
alignment to UV. Let me increase the flow. Alright, and let's just paint the inside of this real quick. A All right. Just like that. Let's see how it looks like. I think it's better. Oh, but we are getting also that issue. All right. Bro. Let me go back.
There is an eraser. Yeah, I think so.
Yeah. Raise this. Perfect. I think that everything else. Ah, I missed this floater. Alright, let's just fix that. All right. Let me just make my symmetry in the
correct place. 0.10 0.001. No. Maybe two negative. 109, maybe 0401 here. 02. Yeah, there we
go. Let me save this. Let's wait for this to save. All right. So let's
just fix this floater. All right. Let's
see. Just like that. Right. A There we go. So we are going to
leave the video here. I will do the rest out of
camera because it will be basically the same
thing that we did here will be applied
to the entire model. There will be nothing fancy, same thing on the entire model. So I will leave the video here. In the next video, maybe
we could start making the blockout of our
textures. To you there.
26. Making the Texture Blockout: Alright, guys. So now we
have our Abtoclusion fixed. You can see that I have made some painting some
areas to fix them. And also, I have rebake my amtoclusion using
removing the vi mesh name, no, here, in abit occlusion. Here, removing this putting
in self occlusion, always. And I was, like, baking, hiding I mean, selecting one textuet and then hiding the other ones and
then baking it. And it will be like that for all the textut so now
we have our ambit clusionRmember that we set the ambitcuson map
in the color so we can paint it in a better way. So now what we are going to do, we are going to
explore the textures, just the paste color of each texture set
because we're going to use that as our
ambient occlusion. So let's remove all of these, select folder to explore that. Let's put these textures. All right. Let's click here. Let's add ambient occlusion. Let me do something real quick. I will go here to
output templates, and now I will
duplicate this one. I will remove all of these. I will change the name here from base color to ambient occlusion. All right. And now
we're going to export. Use that as our porting plate. So now let's export
that. So quick. Let's search it. It is here. You can see that we have our
Amt occlusion now there. So we're going to do now. We're going to import that
again to our project, select this and
then drag it here. Perfect. Now, let's select
here the texture option. So they will be
imported as a texture. Perfect. So now
we're going to go to each texture set
and then applying it the mbed oclusionoption, the new ambit oclusion the embed occlusion
here in the mesh maps. So let's select the
demon head let's added here. Go to hair. Let's add the hair go to head, let's add this into head. Armor Dimon Hunter Armor
was the armor, yeah. They go to inner suit. Let's apply the inner suit. In the jacket, then
we wear a jacket. Pants we go with the pants, dirt and bells,
let's add this one. Perfect. Now, let's go again
through all the textures and just hiding this layer
because we don't need them. Please do not delete that layer because
in case we need to do another fixing in
the ambito clusion, we could do it easily, and we don't lose all the
work that we have done before because if we
rebake the Ambetoclusion, the things that we have changed will remain
in this layer. So please don't mess it up. Alright, we are having
some baking issue here. I haven't noticed. That's weird. In the normal map. That's really weird. I haven't noticed that. Let's rebake. Hack it. To quick. Let's wait for this to work. That's really weird.
Alright, let's go here. Alright, let's put
this in Alright. Now, let's bake this.
Let's see. Alright. Maybe this could work.
Alright now, let's bake this. Is something? Let me
watch my amio occlusion. Let's bake this. Bake
the med occlusion. Right, let's bake this.
This will take a while, so I will pause. Alright, this is done
the bake though. S. Alright, we have that fix. Don't have any other issue. Yeah. Oh, it's still there. Did I have bake the jacket? Yeah. But we are getting that dish. That's super weird. Matic. Let's see
what we are getting. This is super weird. I don't
know what's happening. Let's wait for this
to finish saving. Alright, and I did another
bake with experimental active. So it seems that it fixed it. I think so. This error here is just a mech
that is not properly, like, inside the armor globe. Alright. But you can see
now that our floater looks like detail that
is, like, sculpted. It's looking way
better. Look at this. Nice way to add some detail. You can see it
here, how it looks. Really good. So now
that we have this, we're going to do the
blocking of our textures, which means that
we're going to set the base colors and basic
materials for our stuff. So let's begin. First, let's import our model inside
Marmoset to back five. All right, render.
Let's imported. Let's go to our model. All right. Let's go to baking. Let's import our low poly. There we go. Yeah, what
I'm going to do now, I will export the normal map. Let's go to export textures. I will use the real package. All right. I will remove all of these. I'm using the real
one because there we don't we get less texture. I mean, like, yeah, like, the real template uses packet textures for the
roughness AO and metallics. So it is just like three maps in one file. That's really good. I don't want to deal, like, too too much texture files. Alright, let's export this. And we'll export it here. All right. Let me do something. I will create another another folder. Textures one just in case. Leg, and let's just export this. Alright, this finished
the exporting. So let's go back
to our rms five. Let me see which type of normal map we have
because we have Open Ge. It would be fine. So here, and now let's import all the the deextus
that we have imported. This is the demon head. Let's import the demon head. All right. There we go. Perfect. Let's see the
demon head. All right. This looks like it's flip. Let's flip the Y. Yeah, this seems to use the
direct X normal maps. But if you click here and
flip Y, it doesn't matter. All right. G here. Let's import our
hair. There we go. Go here also. Let's import our This is the
head, yeah, here. Inner mask. All right. There we go. Let's go
to the inner shut. There we go to the jacket now. Perfect. Depends. All right. And now
the skirts build. There we go. So here
we have our stuff. Nicely placed here. So now let's start making the
blocking of our textures. Let's save this. Right,
let's wait for this to save. All right, so let's begin. So let's get our
references, right? You can see that we have
here our references. So let's start maybe with the
demon head, like in order. Like, the first texture set is a demon head, so
let's start with it. So let's go here. Let me
add this to another folder. We'll call this Map
fixes. All right. Now I will create
another folder. I will call this
maybe diamond head. Let me add a red
color to that folder. Now let me add a pill layer. Now, let's add a black
mass with color selection. And let's select
this orange color. I will copy the hex color. I'm going to use that
same color here. Perfect. I will be like orange. Let me create another folder. I will copy the mask of this. I will call this orange
Alright orange base. Let me remove this mask. I will add it here. Black.
Let me paste into mask. Perfect. Let's continue. Another folder, I would call this maybe synthetic muscles. Let's add a fill layer. All right. Alright. Let's select
this grayish stuff. All right. Now the
fill layer Perfect. Ray, let me add some
roughness here. Let me tweak the roughness also. Just like this, maybe. Alright. So let's keep making
some folders. Let's call these horns. For selection. Let's
take these ones. Right, let me copy the color. I will add that same
color here. Perfect. Let's make more colors. This will be ice. Black mask, color selection. This time, we're going to select the eye without
color selection. Let's add a paint
layer into the mask. Now let's select this
one polygon fill and just select it. Right now, let's add
a few layer there. And now I will go here to ID
and select maybe this color. Perfect. Maybe even just like that. All right. This will be tasks. All right. Color selection. Perfect. Now go here
and select this one. All right. Before, let me
remove that color selection. I will add another paint layer because I'm going
to select this. All right. There we go.
So there we have it. Let's go now with the
character itself. Let's go to the hair. Maps. Fixes. Alright.
Perfect. So here, Here we add a color
Let's go here. Let's just get this color. There we go. Here I will
add a color selection. There we go. And this
one will be the band. Let me add another
folder and hair band or let at a red color. Alright. Let's add a paint layer. Black mask with a paint
layer. Olygon fill. Let's select that hair band. Alright, let's go to ID, and let's select
this reddish color. There we go. Let's
go to the head now. Let's add it here. Maps fixes. Perfect. Another folder. This will be Ed. We'll add another folder
inside this one in All right. And now, what I'm going to do. All right, let me
select or perfect. Let me add a fill layer. Now I'm going to select the pink color that
we have there. I will add a color selection. Maybe nod. Maybe a paint
layer also paint, going feel. Let's just select that. Let's put here the eyebrows
and lashes. All right. Black mask. Let's add
some field layer ID. There we go. There we have it. Now, let's add the I Is Black mask. Paint layer. Let's select this one. All right, let's add
two paint layers. First one will be the sclera. Clara, this one will be the ids. This is just, like, a
basic stuff because I want to have some
color in the ids. So let me elect a dark color. I will add now a black mask. All right. Let's go here.
Let's add a paint layer. Go here to the brush properties. And let's select
alignment to UB. And now let's just
paint this entire part. Give me a sec. I can
make this bigger. All right, just like
that. And now I will add a roughness channel and
increase the roughness there. Here we go. Also, I will add IMAP. Let's do something right. Let me at the anchor point. All right black mask, fill layer to anchor point and select the anchor point
that we have created. We'll call this Iris concavity. And now let's go here. I want the mask. Let me see. Yeah, there we go. And now, what I want
is just the height. And I will just drop
the height, like this. Now, let's go here. And let's add a
filter, a blur filter. I will increase this
filter, the blurriness. Alright, let's go to mask
and see what is this do? All right. Now I will
add another fill layer. We'll go to the iris mask. I will invert the levels. And now I will just
select here and subtract. So we are making that blurrineess
just inside the iris. Maybe we could also we
could make some blur. Let's add another
bloodinesst that. Just like this. There we go. Here we go. All right,
let me save this. All right, so let's keep
working on the other elements. This way for this to
save. Alright, let's go. Let's go now to the inner armor. So here. Here, we will
need to do a bit of work. All right, let's put here armor. Inner armor. Perfect. Let
me add another folder. This will be mask. Another folder, this will be pable Let's add
different colors. Just like that. So let's see. Here, we have a lot of stuff. So let's just name the folders by the color
that we have here, like this dark gray. Darker gray feel
there. All right. Let's add a mask with color selection. Let's
just select that. There we go. Let me just copy this. I will call this meat
on gray. All right. Let's go to dy, select this. Now let's just select
this one again. All right. There we go. Duplicate this.
Let's take this one. Let's go here to ID and
select this lighter color. Lighter gray. Perfect. For some reason. We don't have that stuff. Oh, what is this? What is this? We're getting some
weird stuff here. All right, right, right. I will need to go back
to blender and do some fixing and do
another baking. I will just do it real quick. Alright, guys, so
I have fixed it. It was just an error that
I misplaced a vertex, so it made that were error. So let's keep making this. Let me call this space. All right. So let's see what we have now space. All right. Let me see the ID. I see, I see. Also, let me get
this white color. Increase the tolerance.
There we go. All right. Let's
add another folder. I will call this orange
metal. All right. Color selection.
Let's take this. All right. Full layer base. Let's go to ID here
and let's select that option. Here we go. All right. Now we
need just to do the demissive Alright,
emissive emissive. Alright, let me add two folders
inside that other folder. I would call this emissive blue. This will be like the purple
one, purple one, right. Let's go here. Let's color
select this bluish color. Let's add in the mission, I will put the base color in
black because for emissions, we need to have the Albedo map. That part of the
mido map in black, so the missive can work without being influenced by the
Albedo or base color. So let's get the ID one here. Perfect. There we have it. Now, let's copy this.
We'll do the same here. Perfect. We'll just add it. Let me select this purple one. There we go. There we
have our inner armor. Yeah, inner armor. I need to put
another color here. This will be like
some leathery stuff. I don't know. Let's Let's
add another folder. And we need to put this
brownish color brownish Black mask. Color selection. Let's take this. All right. There we go. There we have it. Maybe let me tweak a
little bit of roughness. All right. So let's
go now to the mass. Let's start doing
some stuff there. Maybe we will copy the same. Let me add a Black mass. Alright. Let me just take the This Alright I will
copy the layers here. Unpainted here on
the mask. All right. There we go. We need
to do some stuff. It's dark gray, ID. There we go. Perfect. You have it. Maybe with a little bit of
flour for the edges. Let's see, Blur Let me add maybe Another filter. Mask border. Inside or maybe outside, inside. Perfect and blow. Maybe not that much. Alright, let's just delete that. Let me remove the blurriness. All right. I don't have. This me tones like this. There we go. We should have it, but we don't have. Why is that? All right. That's why. All right,
base color. ID. This lighter color
will be here. Perfect. And now we need to
add some dark color. Dark. Color. Kind of
some kind of black. Let me remove that. Black mask. Color selection. Now let's get this
blackish color. All right. Let's add a field layer there. All right, there we go. Perfect. Save. Alright. We still need to do some more work. This way for this to save. Alright, let's continue. Let's go now to the cable. Go out here. So let's
see what we have here. Let me put here like
this bronze color. I would just call it
like that. Bronze color. I don't care anything. All right. Let's add
some other selection. Let's take this. And
also, I will take this. Here we go, and now the cable. Let's add some color
selection here. And now let's get this. Here. Let me take
this grayish color. Perfect. Some roughness. Maybe some metallic. Alright. For the selection. Just
maybe a paint layer. Let's just get this. We have, for some reason, some floating geometry there. That's weird. Now,
let's a emissive. Amissive. Let's take this orange color. Let's take it.
Perfect. Fill layer. I would be in black. Alright. Now, let's just
paste this color. Increase the tolerance. There we go. All right. Now, we have the inner soot. I mean, the inner armor, let's go to the inner
soot, what we have here. All right, let's
call this a black fabric and gray fabric. I will put some different
colors for this. Let me also add M fixes folder. All right, let's go here.
Let's add some fill layer and also a mask with
color selection to the folder, select these colors. I will do the same here. Color selection, let's just
get these other colors. The we have it some
rough All right. There we go. It's safe. All right. Now, let's go to
the jacket. There we go. Call this jacket. To more folders. We have quite a few pieces here. Let's call this folder pad. This will be four or more. This one will be lobes. It would be armor. There we go. All right. So let's start. Let's begin with the jacket. Jacket is basically one color. So let's add a field layer. Go for selection. There we go. We need to add
those buckles. ID. Let's add those buckles. Base. Aric we'll just throw this here. I will copy effect. We'll add another stuff. Let's add a mask,
let's paste effect. Now here we call these focals. Let's add a field layer. Let's take this. And also, let's take this and this. Alright. What What did I select? All right. Me little paint. I will just take all of
these here for selection. Take this, this, and this. There we go. Perfect. No. There's something here. We're
getting some weird stuff. Now. Let me change the color. It will be like base buckle. And now I will add the strap. So black mask. Paint. Alright. There we go. Is that a paint? I mean, I feel that there. Let's just take
this. There we go. Let me add another roughness. There we go. With a base buckle with a need. Metallicness. I don't think so. I don't think so. I mean, it doesn't look good. We're just a tiny
bit of metallic. We just a tiny bit
just like that could be or just like
this, also could be. I think this layer of
metallicness could be good. I think so, yeah. So
let's keep working. Let's go now to
the shoulder pad. All right. Shoulder pad. Here we have three colors. It's at three folders, would be lighter metal, would be darker metal, and it will be
orange metal right. Color selection, perfect. Perfect. Base. All right. Darker color and
the orange color. There we go. Increase the tolerance
for the orange stuff. Yeah, we have some issue. We don't have it
there. That's weird. All right. Let's continue. A having some issues.
Making issues there. I mean, those doesn't
look like acing issues. Yeah, they are not
facing issues. They are just like amet
occlusion issues. All right. Let's keep working on this. But I will add a black mask. I will add another paint layer and select all of these right. There we go. Let's save Let
me go to the jacket. Let me. Alright. So. Let me go to the jacket. Roughness. Produce a tiny bit of
roughness on the jacket. There we go. All right. Let's go now to the
fore arm armor. ID. This one. They are two colors only. One folder, another folder. Let's call this midtone gray. And your selection. Take this. Fill layer and take this color. That another color
selection like this would be darker gray. There we go. Go here. There we go. Perfect. Let me add a mask. We'll
just take these three. There we go. Let's go to the globes. The globes, we have two colors. Two folders. Lobe. I will just call
this glove. Lack mask. At color selection. All right. Perfect. Let's just take this. There we go, copy. For arm armor. I will call these
for arm plates. There we go. This should work. Let me add a color
selection here. All right. This strap also needs to be with its own color. But we will need to paint
a mask because I didn't add different color for that. Maybe we could re export the hig body with a different
color for this strap. Maybe we will do it. But later not now, I don't
want to rebake more stuff. We could also paint So masked for that. It will be also nice to do. Alright, let me add
some black mask. And let's also add a
paint. There we go. Now, let's pull this hand armor. I will be just one color. This orange color. Fill layer I. Let's
just select that. Let's also go here,
add a paint layer and remove the stuff. There we go. Let me s. All right. So now let's go to the
pants and the boots. Let me hide a
skirt. There we go. Let's see how many
colors we have here. All right. They are quite a bit. All right. I let's add maybe
one, two, three. I mean, this is a
little bit too much. Let's at three folders. It will be pans. This one will be
armor and knee pad. This one will be boots. So now let's bake. Let's do some bakes. I
mean, what bakes, no. Let's add some colors that I want it to mean. I don't know. All right, let's just add
some colors to the folder. Alright. This will be a little bit of pain
in the ***, indeed. Alright. Let's just take this. All right. Let's
add a paint layer. There we go. I will need Let me
adjust two folders. This will be darker blue, and lighter blue. All right. Let's at a color selection here. Perfect. Let me select that
at a color mass, right. There we go. There
we go, Let's see. And this should be
the darker one. All right. There we go. All right. Let me just
reduce the roughness this. Also, I will active
the metal channel, and let's just leave it in zero. Alright, let's go
here. Let's add. Let me see. A few folders more Like one here. Let's call this strap for
selection. Let's take this one. Alright, let's just take this. There we go. Perfect. All these coach rings. There we go. As with
color selection. Let's take this. Let's
add a fill layer. All right. Let's go here. Perfect. And now let's go. Let's add another folder
and call it orange. Color. Selection. Alright.
There we go. Let's take this. 80. Alright. A Perfect. Let me add a pan. There we go. All right. We need to add a little
metal map metals. All right. Selection.
Let's just take this. I will also copy the color
and then just paste it here. There we go. In the layer. There we go.
Perfect. Let's safe. Alright, let's just
continue with the rest. Let's go here to the calf armor. ID, two, three, four,
five, six, seven. There are quite a
bit of this right. Let's add a black mask
with paint layer. Let's just go here, ect all of these. There we go. Let me add three maps. This will be let me see. Like darker metal.
Color selection. All right. This will be other late There we go. It will be inner metal. Inner metal. All right. Here I will add another color. I will add a metal
map and a roughness. All right. Why isn't working. All right. Let's add another. All right. Let's call this rap Rap. There we go. Dy. Let's select the strap. There we go. Just the strap. All right. There we go. Perfect. Let's
select those lass. All right. Aces. Or selection, this orange color. Alright. Here. Here we go. Back mask, paint. All right. There we go. Remove mask. It doesn't working. That's weird. All right. There
we go. All right. Let's keep working on this. Let me reduce the amount
of metalness that we have in this plate. All right. There we go. Let's go to the knee armor. All right. Ke. I will change the color of this. All right. And add three more
folders there. Alright, let's call this
maybe Broonze metal. Color selection.
Let's just take this. File layer. Let's just
take this other one. Color selection.
I would call this like dark Pat, maybe. Alright, let's just take
this. And also here. Perfect. Let's call
this gray color. Just take this grayish color. There we go. F selection. A paint. There we go. Let me add other stuff here. There we go. I All right. Perfect. Maybe the pads should be
a little bit less rough. I mean, more rough. There we go. There we go. There we go. Let me save real quick. Alright. Now, let's
begin with the boot. Alright, let's go here.
There we have it. We have one, two, three, one, two, three, or five folders. I mean, one, two, three,
three, four, five. Yeah. It's that two
folders for now. All right. Let's call
this made tone gray. I mean, that's more a
blue, mid tone, blue. Let's add a color
selection here. Alright. You layer.
Let's just take that. All right, now let's go
here for our selection. Let's select this darker one. Alright, darker color. Let's just select this here. Perfect. Let's select that. There we go. All right. And let me also add some black mask with a paint let's just
select the boot. All right. Here we go. Go to the strap. All right. G here. All right. Let's see. The knee. All this crap. Black mask. For a selection, let's just take this little layer. There we go. Another folder,
buckle. For selection. Alright. Perfect. There we go. It will be metal. All right. And All right. This will be heap front metal. All right. A little bit lighter. Just like that. Perfect. All right. Let me go here. Color? All right. And now let's add the
color of the sow. So right. For selection, let's
just take this. All right. ID. There we have it. All
right or right or right. This color should be a
bit darker like that. Maybe even more. I'm just color picking
some color from the coset. But we need to tweak it more
for these too much better, what we have little bit darker. Not that dark. I think this would be the color
should be darker also. This metal. O metal
should be darker. Just like that. Right? Perfect. Now, let's go. Do the skirt and bells. Go. I mean, I think I will do the securiton
builds out of camera. I mean, it's basically the same process that you saw me doing in this entire video. There will be nothing new. So I will just end the video here because the
video is already too long. So that see you in
the next video.
27. Finishing Texture Blocking and Starting Texturing: All right, guys, so let's
continue with this model. So, we need to finish the
blocking of the skirt part. So let's begin with
that. All right. Let's see in the ID map how
many colors we have here. Perfect, we have the belts. Also, we have the buckles
on these metal pieces. Let's try to do them.
All right, first, let's do this folder. This will be the skirt. Girt will make two more folders
for this all this gray. And it will be like this
dark color dark strap. Perfect. Also, I need that
bronze bronze color. Perfect. So let's add now our
color selections. All right here. And now would be here get this. Perfect. Let me add a
paint layer just in case Alright. All
right. Perfect. Let's start making
the folders ID. I mean, the layers base, right? All right. This one will
be this dark based dark. This one will be these prawns. Base praws. All right. Let's go here. Let's just keep working on this. Right. There we go. Let me tweak the
roughness of this skirt, the roughness of the strap. All right. Maybe this we could
add a little bit of metal. We just a tiny bit,
not too much perfect. There we go. Let's work
now on the on the belts. Belts. All right. So here, what do we have here?
Let me do something. I don't want this dark
color to be on the pouch. Alright. Let's paint out those. Beggs. There we go. Alright,
let's keep working. All right. Let's add some
color here, color selection. Alright, let's get this. Perfect. All right. Maybe we could increase
tolerance Hany bit, maybe a paint layer. So maybe we will
paint this part. There we go. Now. Alright, I don't want
this. I do something. Perfect. Now, let's make the medals
for the metal or selection. Let me just get that color. Let me also choose
this gray color. Perfect. Let me taste
that gray color. All right, maybe a
little bit of metalness. Let's make this a
little bit lighter. I think this could work nicely. Right? I think that metal
like that would be good. A tiny bit darker, that. Let me add a paint
layer. There we go. Let me remove the
other influence from this All Just like that. And Perfect. Let's continue. Let's make now the pouch colors. All right. Go to the ID. Let's make the pouch Pouch pouches. All right. Black mask.
Let's select this. There we go. Here we know. Let me add a few more. Folders. It will be dark. Fabric. All right, color
selection. Like that. Also, I will paint this part. Ad. The layer, take this color. All right. A bit of
roughness. All right. We remove this mask. Let me paint this quick here. All right. There we go. There we go. Also, I
will increase tolerance. A little tiny bit.
Just like that. Let me paint out this
part here. All right. Now, I would like to have the same metal from the
buckles in these two stuff. There we go. There we go. Perfect. Now, let's get this darker color. Darker fabric. For selection. There we go. Right. We go. Perfect. That I paint layer. Let's just paint in. This errors's increase a tiny bit. The influence Me had a white mask. And now, what I'm going to do. I will just paint out
dirt There we go. Now we need this
belt ID Alright. Orange billed. Black mask. Get this filled here. Let me open my references. Alright. Let's add the layer. There we go. There we go. Go to the poaches. All right. Also here, I believe. Yeah. There we go. And now there will be like some plaster, some
plastic material. All right, let me
also get here. Color. All right. With the paint layer, I will just select that object. Base, reduce. I mean, crank up the roughness. All right. Let's add bolder. And I will call this
dark deep, maybe. Alright. Color selection. Maybe not color selection. Black mask, paint.
Let's just get this. Here we go. Base color ID, go here. There we go. All right, now
that we have this, let's start exporting
these textures to Marmoset and start setting
things up in Marmoset. Alright, let's go
here. Let's export all of these All right. Let me remove the height. I just did some modification in the template because
I needed to explore the height map or to make the parallax effect in Marmoset
Toolbag five for the eye. Let me show you what I
just did. Where is it? It's a real I just modify
the real template. You can see that I just added a gray channel and
added the height there. And then I just copy one of these names and paste it here and change the
meting for the height. That was basically it. I don't want to export
the height or the rest, just for the head. I just want the height, but I have already exported it. So I will stay
active that for now. And now let's just export it. Right. Alright, the textures
have been exported, so let's go to rmoset now let's start importing all
the textures that we have. But let's go here at
the diamond head. Let's go to the Alvedo. The Albedo is the base color. So now let's select
the base color for the alvedo. Let me change this. Perfect. Want to put
there a white color. Because this color is
just like a color that is multiplying the input
that you put here. So now, let's import
the roughness. Where is my packet map? Is this? Yeah. All right, we have
imported the roughness, but we need to select
the green channel because the roughness is located in the green
channel of the texturing. You can see that RGB occlusion, roughness and metallic,
R for occlusion, G for roughness and
B for metallic. So let's import again
that same texture. And now we're going to
select the B because the B is for the metallic. There we go. Let's
go to the hair. Let's import let's import
the albito All right albito. There we go. Now, let's
import the roughness. Let's change the channels. Let's import the metallicness. All right, there we go. Let's go to the head. Let's import this. Let me change the color to white because I just did
a modification here. I just put that gray color
to all the material just to better visualize what I have here before
applying the textures. All right. Let's keep importing all the
stuff that we need. This will be here, G, and this will be metallic Let's go
to the inner shoot. All right. Let's
just import that. There we go. Let's
import the rest. This will be here, all right. Now, let's import
the metallicness. Lou, A right. Let's go to emission. Emissive. And now here, it's
important missive. We're getting some
weird spots here, but that is because some issue related to the
triangulation of each software. The best way to fix that is just export your mesh from Substance
Painter using this one, like sport mesh or triangulating your mesh before exporting to Substance Painter. So what I'm going to do now, I will just export this mesh, apply triangulation or
and now let's go here and export this VX, call
this Rangulated. This will be character
Damon Hunter re angulated. All right. There we go. Perfect. Let's go back
Marmoset Toolbag. Let me import that FBX. All right. Here we are. Let me hide this. And you can
see that suddenly we don't have any more error
like this weird spot. You can say, let me
hide the previous one, and you can see that all
of those error are fixed. Let me delete the previous one. All right. And this
triangulated version is the one that you
ideally want to import into a game engine because if you let the game engine to do
the triangulation, you will get these
kind of errors like those weird spots
on the normal map. That's because the
triangulation related. Alright, let me increase
intensity of this. There we go. Let's keep adding more
stuff inner suit. Let's import our textures
for the inner suit. All right. Roughness. Where is my roughness
for the inner suit? Here. There we go
at metallicness. Where is my metalness? There we go. Let's
go to the jacket. Where's my jacket
here? There we go. Roughness. Let's
import our roughness. All right. This one. Blue. Perfect.
Let's go here also. Keep importing all of
these. Look at the pans. There we go. Here and
the metallicness. Blue. There we go. But what we have this is another color that they should not have. Let's go to the pants. This knee pads
should not be gray. Th should not be gray. Let me see why is
that in the booth. Let me add some paint. You just affect. It's not the boot on metal. Alright, let's go
to the ID. I see. I think it's where it sits. I think it is this? Yeah. With that. All right. Let me just move
this metal to the boot. This will be here in
the boot. All right. ID will be here. There we go. And now we need
to color that little area. So I have added some folders that
should be in the boot. I just added them into the area. All right. Let me re
export this. Just depends. Perfect. There we go. Let's go back to
Marmoset Toolbag. See here. Perfect. It's
automatically reimported. Let's go here to the
skirt and builds. And now let's start importing
the color for the skirt. All right roughness map. There we go. Let's
put this in green. Put this in blue. There we go. Perfect. Maybe we could change the home mapping or
the color space. I think it would be best to
leave it in AGx just for now. All right. Let me see the
render properties. I have the renders
in red raising. Also, I have something noising. Let me turn it off just
to see what this give me. All right. It's
kind of good. Yeah. So now, maybe we could
change also the SDR. Let's go to sky here. Let's search in our library
of Marmoset Toolbag. We have a few more
SDRs we could test. Alright. This one
looks really good. Perfect. But I think the best thing that we could use
is studio lighting. So let's go here. And now let's go to here, and let's just select one of
the studio studio lighting. Alright, so the Tomoko.
I don't like this. This looks kind of good. Let me see the other ones. Do you have black self? No. I don't like
this, either. No. I like this. I think I like this, yeah. Maybe we could also use. This one is the stuff day
five day light studio. We could also use
a studio Tamaco. This one, it's good also. But this one is really good. I really liking it. The thing is that
here with this HDR, we are not getting
those highlights, so I will just stick with
studio tobacco so we can get these highlights and guess the amount of roughness
that we have. So once you have your DR, let's find it here Studio you can see here that
we can find the SDRs here. All right, so let's go
to the studio to logo, and let's just click here
and export resource. Then when you export that, let's go here to the
sky and then image, and let's just import your SDR. Alright, it should be here. I have already exported it. So it's the SDR
that I was using. So I will use this HDR
for the texturing part. So let's start making this. Maybe we could reduce the
brightness or maybe not. We could also play some
lights, let's see, Control L. To place a light. All right here. I don't think that we
need lights right now. Maybe some rim light. Perfect. Maybe a rim light would be nice. All right. Here we go. All right. So let's start
making the texturing. Let me save this. Let's go
back to Substance Bender. Let's begin with what? Let's see. Let's begin adjusting
maybe the skin color. See, we have a lot of
stuff that is a bit hard to guess with
what start right. I think I will not
touch the skin for now. Maybe the only thing that I will do in the skin would be just to decrease the roughness of
the skin is really rough. Just like that. And in the eye, I want this to be super shiny. There we go. Alright. Maybe we will
start with the jacket. I think so. Let's
start with the jacket. So I will do one thing. I really like to
do in my textures, and it's just add
a bake lighting. A layer on top of everything. Let's just add a field layer. Let's call this Bake lighting. I think this helps to push a little bit the details,
to enhance them. So now let's go to filter. But this is just, like, things that I do
that I really like. You maybe don't want to use
it isn't your decision. Let's go to Bake
lighting, this one. Let's change diffuse
to diffuse only. Now, you can see
that we have this. Let's go to sunlight. Let me change this to white. Perfect. And this I will
change it to mid gray. And the sun color.
Bit to white also. B, this is a tiny bit. Less. I think this is looking good. Perfect. Let me copy or maybe
do duplicate effect. Let's put this in
screen or overlay. All right, let me
change the direction of the particle around here. Perfect. A Alright, this part here is looking
weird because this is flip. I mean, this is just
a flip geometry. So it would look a tiny bit
weird with the bake lighting. But that I think is just in here because in other
software, I mean, in marmosets, this stuff will be the one that
will be located. So let's go here
in the base color. Let's put this in
multiply maybe. Maybe spring. I think screen
is looking kind of good. We not ring here. No. Olay doesn't look good. Let's just keep watching
this is soft light. Let's keep looking. Hard light. All right. Vivid light. I'm kind of liking how the
soft light looks, indeed. I really liking it. Let's see
how the multiplayer looks. This is just darkening stuff. I kind of like it, also. But I really like how
the soft light looks. Indeed. I think I will just stick
with soft light here. Perfect. Let me reduce the
intensity of this layer. I don't want to add it too much. Now let's work on
the jacket itself. You can see that in the jacket, we have tiny patterns like these tiny patterns that we could add easily
inside substance I mean, here substance matter and also in marmoset with some
high level maps. But let's just
start working now. So, let me just keep tweaking
a tiny bit inclination. This just like this. Tiny bit like this. The upper
one will be a tiny bit. All right, let's see. All right. Let me hide this. There we go. We just like that. I mean, this could be like this. We just leave it like that. Alright. Let's start. Let's add fabric. Fill layer. And now, this is all real time. So please forgive me. I'm still too slow here. So let's add a layer I would
call this ambient occlusion. Just to have a tiny bit of
detO in the ambient occlusion. It's at a black mask. Let's add a unilator. Let's put this ambit
occlusion generator. Let's invert this mess. Let's maybe reduce the amount
of intensity that this has. Maybe something
like that could be. And now let's change the
color maybe to a like this. Just push it more to this side. All right. I think
it's looking cool. We reduce even more the
intensity of the bake lighting. I don't want to affect too much like having that
lighting information. I don't want to affect too much. My Albedo map. That's a tiny bit could
be like that, maybe. So we have this. We could
decrease the roughness. I mean, increase the
roughness in those areas. Maybe, yeah. All right. Now, one thing
that I like to do to add a tiny bit more detail without adding too much noise is
just adding a grading map. Let's just add a grading map, generator or black
map with generator. Let's put this linear gradient. We'll call this gradient. Now here, I will
invert that gradient. All right. Let me reduce That gradient. All right. So now let's go here and maybe we
could add a color. I mean, we don't have
a gradient here, but we could add it by our own just to have a tiny
bit more of detail. These gradients looking cool. All right. Maybe like this purple one. I be good. I think so, yeah. It looks kind of good. I think it's looking
cool. This color. All right. Let me just
get this gradient. All right. This purple
one looks cool. We'll leave it here. I
think it's too much. Let me reduce the
opacity of this mass. I know. Right? There we go. So now let's see let's see
what else we could add. Maybe we could add
a curvature map. Let's add a curvator. This all procedural. Later, we're going to go
through the mesh through the model and doing
some handmade paint. Is that a curbature here? This is just like for a base. Now, maybe we will
tweak the balance. Contrast, maybe. Alright, now we could tweak these sliders. Just want the fine. I like the fine, a fine line, just like that. Like this would be good. Let's wait for this to To
save. Alright, let's go back. I think that looks cool. Alright, let's change the color, maybe to bright yellow. Would be. Alright. I think it looks cool. Let's add a breakup
to that Curvatur. Let me do something. Let me change the name Curvatur. And now let's add a field
layer to that mask. Let's search for crunch. Maybe this one would be. Let me change the layer type of that fill layer to abstract. Yeah. Perfect. Looking cool. All right. Just to have these
breakups around the mesh. All right. Like that. Maybe we could add another filter
that I really like to add is the lure slope. I know, but I really
like that filter. All right, let me change this type of crunch
to another one. Maybe this one would be. I've been reduce the
density of that blur slow. All right. Perfect. Maybe we could add a height to this curvature to have
this layered texture. Now, it looks like this
jacket it has been used. We need to paint out a lot of this stuff that this is making. All right. I would like to also add
a small color variation. So the way that I'm
going to do that would be just to
add a field layer. Now, I will add one
of the textures like these crunch texturing
that I have find on Google. I just type crunch texturing
and then find all of these. This is a good way to add
weak color variations. So let me select maybe this one. Let me put this in multiply. Maybe maybe overlay. Now I don't like it. Surf light. My just leave it. Satellites
could be good now. Multiply, maybe
reduce the intensity. I will add a filter
with bluer slope on it. Perfect. Let me increase the tile. All right, maybe this will
be in ten. Maybe not. Perfect. Now, that we call
this color variation. I will add a black
mask with field layer. And now here I
will add a crunch. Maybe this one will be. Let me add the blur slope. Let's decrease the
intensity of that. Base color and let's see
what it's giving us. Let's go to the field layer. I think it looks cool. Yeah. Maybe we could also add some
roughness to those flushes. All right. I think
it looks cool. Well, let's go to the rough
roughness channel here. Maybe decrease intensity
of the roughness. Alright. Perfect. No. The video is too long, so I will maybe leave
this video here. Before in this video, I will export this texture. Let's export the jacket. Port. All right. It's finished. Let's
go back to rmoset. Let's wait for this
to be reported. You can see how this looks here. I think it looks cool, but this needs more work. Maybe this gradient
is a little bit too saturated, a little bit too red. Maybe we will have another
color there. Who knows? Maybe like a darker color. But we will see that in the
next video, so see you there.
28. Making Jacket Textures: Alright. In this video, we're going to continue
with the textures of this model. Let's continue. So, I think that this reddish, I mean, that purple red
is a little bit much. Maybe we could change that. I mean, I really
liking that color. But maybe the intensity
is a little bit too much. Let's go here. It's gradient. We could tweak. We get it a tiny bit more. All right. This could be I mean, not that much. Right? Something like
that would be. All right. Let me export these fexurs. Let's export the jacket. Let's go back to marmoset. I think it's better. All right. So now I will remove
this cubatur from some areas because I don't
want this cubator to be in all the edges. So let's go here.
I really like to use one brush that is
called knife brush. Alright, so let's try to
use that. Give me a second. Alright, so let's paint
out the the stuff, let me go to the curvature. Let's add a paint layer there. There we go, maybe
with symmetry. Let's select this knife brush, and maybe we could start removing that
curvature from here. All right. Maybe we could leave it
there just a tiny bit, but not in the entire edge. Maybe just like that could
be good. This could be good. Maybe here, we could
also remove it. Also here in this area. We could add another batur
to enhance all the edges. But this corbatu will be
just for this rib detail. We'll just remove it from
some of these edges. From here, also, I don't want
it too much in this wrap. Alright, maybe from
here, there we go. Perfect. All right. Maybe from here, we could
remove a little bit that we could paint a
little bit more also here. I remove another
punch just like this. H I'm just removing that
little from the areas that are like inside and the edges that are
inside the jacket and not outside, like these borders. This edge is inside the jacket. So it's not like
this outside edge. So let's try to
have that in mind. Maybe we could
remove a tiny bit of this damage from
here also, right? I here. There we go. Maybe we could add another curvedor below this one. I will add a black mass. I will just remove all of these. And I will change the
color. Maybe something. And let me remove the height. Maybe just like this. This could be. Let me
see my base color. This could be let me
reduce intensity of this. There we go. This could be
perfect with this on top. There we go. We could also add a little bit more roughness
variation in this jacket. So Also have your references in your PureRef in hand. All right. Let me add a little bit of
roughness variation. Let me create a folder that will be just for the
roughness variations. Roughness variations. All right. We will layer just
the roughness mask. Well layer. Alright. Let's add a little bit of this Let's see the roughness. Let's put this roughness
variation in the screen. Alright. Let's go here to roughness
in the layers roughness. Let's change the type
to screen maybe. Or maybe overlay. I think overlay is good. Yeah. Looking good. Just like that. Could be. All right. This could be right. Let me watch my
references. All right. So, let's keep working on this. Maybe we could do a little bit more of work in this curvature. Alright without symmetry. All right, maybe
something like this. Let's just add some painted
details like this will be. Here we remove a little bit of this edge here and also
from here and also here. This amount of damaging
the edges are not needed. Maybe we could just
leave a small portion. Alright. It's like this. Perfect. What is this? I have something
overlapping my mesh. I don't think so. No, I don't have it. Maybe that is from here. Books. Yeah, look it here. That's the issue.
Let me select this. Here we go. It's okay. Let's just
keep working on this. All right? Go back
to the curvature. Let's just keep tweaking the textures. All right. We're here to remove it. Any bit Here, we could have our symmetry. And here, maybe we could
do a little bit of work. They not not there. They just leave that small
that small damage there? Go here, maybe. Let's
remove a tiny bit of this. I don't want too much
that much in here. Let's go here. Perfect. It maybe a tiny bit. W damage here. The real also here
in this corner. We could add a little bit of that Alright. Let me reduce the amount of
damage that is in this edge. There we go. Just a tiny bit. All right. Maybe here we
could paint another stuff. All right. There we go. We're not there. All right. Also, I would like to add maybe some scratches.
I will duplicate this. I will remove that generator
and all of these effects. I will add field layer. I will call this
field layer scratch. I mean, let's find some
scratch crunch here. Maybe this one. Let's call this
field layer scratch. All right. Let's go here. Maybe we could
reduce the amount of scratches that this
has All right. The tiling. All right. Let's increase this
also the tiling. All right. This could be. All right. Now, what they're going to do, I will add another fill layer. It would be a crunch.
Maybe this one. And now let's just put
this and multiply. Maybe in subtract Alright. Just to tackle down a
lot of these scratches. We don't have those
all over the place. All right. Maybe something like
this would be good. I think it's looking cool. All right. Let's save this. And now, what they're going
to do will be just to export this and see how this
is looking inside marmosed. Right, let's wait
for this to save. All right, it's already safe. Let's exported ex All right, let's go to marmoset. There we go. You can
see how it's looking. Maybe here we could reduce a
little bit of brightness and add these lights to pisualz
any bit better that we have. All right. Maybe I could take down this the stuff or maybe not. Let's just add it
again. All right. Maybe here in the camera, we could pick a tiny bit of these lighters to have a
better view what we are doing. All right. Let me duplicate this light to the other side here, maybe. All right. I think it's looking cool. We still need to add a
little bit more detail. Alright, let's go back to here. Maybe let's see if we
could increase the edge. I mean, the
whiteness, the width, I mean, what's the word
width of these scratches? Just a tiny bit. All right. You go. I'm just tweaking
these sliders to get a bit better resolved. Maybe this could be nice. Let me add another brunch map. Let's put this in subtract. And now we pul at a
paint layer and start removing those scratches from some places that
doesn't have sense. Here, here. I don't want to have those
scratches all over the place. Alright. There we go. Maybe here. Here also. All right. My here
also. Perfect. So now, let me add
another color variation, but this time will
be a color itself. Let's go here. Black mask, paint. Let me put it under this maybe maybe even under
the gradient. All right. Let me add a fill layer. Let's try to find a brush. Let's see if we could
find some brush. Brunch. Maybe this. I don't think so. Maybe,
yeah, it could be, maybe not. Those. Right? I don't know. It could be. Let's
change the color. All right, based on,
let's see what we have. All right. All right. Let's change. Maybe. I kind of I don't like how
this big spot is looking. So let's go to the
color variation. At a paint under the slope. Now I will just start removing a little bit
of this dirtiness. From here, I need to tackle
down a lot of this batur. I still think it's a little
bit too much. Let's go here. Start removing here. A bit of these edges. Maybe we could add
some stuff here, maybe just a tiny bit here. All right. Let me also remove
a little bit of these crutches from some places. I All right. I will also add, like, a color under the shoulder pad to like painted
amid clusion maybe. Just to represent, like, a darkening under this. Maybe, maybe we could even
use the same amclusion. Let me use my basic stuff. All right. Let me
go here. All right. We will start painting
a little bit. The invent clton there. In. Maybe another folder. Paint. Let's take this with a darker color would be right. Just add a bit of this here. We go. Let me go to
here to the ambitusion and let me remove a teddy
bit from here also. Right. There we go. But I didn't
add it in symmetry. I'm just dumb. All right. Let's go here. Let's
remove this from here. There we go. Let me save this. Right? All right. This is not for this. What we're going to
do now, we're going to add maybe a little bit. Maybe another color variation. Yeah, I really like to add
more and more color variation. Color variation. Crushed. Maybe we could add a scratches
pot just with color. Like here, let's type scratch. L, let me reduce the amount. These are too much. Alright. A be Let me reduce the opacity
of this a tiny bit. And also, I will
add a little layer, some grunge on it. Just to mask tiny bit of
those tiny scratches. Alright. Where is my stuff. Right. There we go. And now, what I would
like to add is like this effect in the roughness. Make this more It maybe. Go here to the roughness. Roughness. Let's go here. Add
another layer. Roughness, All right. At a I mean, a black mask. Feel layer. Right to
search for maybe where. Let's try to find
four patterns here. Where? All right. A border square rectangle would be All right. Put this in maybe
a little bit more. Well, maybe we could
use some hexagons. This, I think it looks
better, in my opinion, for this roughness
overlay. Alright. Let me put this dragon pattern under the first things
that we have here. Under all of these. Perfect. Just like that. Maybe we could even
add some color. Just some small, any color. The Maybe not. Now, let's just remove the. Let's just leave it like this. Maybe height map. I think it looks cool. Yeah. Let me set
this. All right. Alright, let's just
continue this. Maybe we could make this. A it's solar twole. 50. I think this looks good. Let me put this on top of the curvatures because
I want to do something. I will add some anchor points here in this curvature,
maybe here perfect. Anchor point, another
anchor point. And now I will go here, add two field layers. We'll add those anchor points. I put here a substract. There we go. So this pattern is now going on these places All right. We could also. Let's see. Let's export these
four textures. Four the textures of the jacket. All right. Here, let's
see what we have. Let me see how this looks with just roughness and
not with height. All right let export this, also. All right export extras. Alright let's wait for this. Real quick. Let's go back here. It's there. It remove. I noising? There definitely. All right. But of substance, what
we have here, here, we could add a little bit of roughness here in
the scratch also. Just like this. All right. Perfect. Let's go
to the Egg pattern. And let's just add that. Maybe, I don't want this pattern
to go around this strap. So I will just remove
that from there. Alright. Just like that. Perfect. There we go. Maybe also I'm here. Perfect. I'm here, maybe. Also, in this in this stuff, I would like to add some
roughness variation. You see my roughness.
I just like that. And also, I want to reduce
the height from this pattern. I think it's a
little bit too much. I guess like that
would be perfect. And from here. Just to have a little bit
more complex roughness map. Let me see something. Maybe we could add a tiny
bit of metal this jacket. Make it look a little
bit high tech, a little bit more high tech. Maybe. This could be quite good. Let's export this. Let's see how this is looking
inside Marble set. Here we have it. Let
me do something. And here, I will add in
the scubator and scratch, I will add the metal channel. So these layers override the metal net that this
has maybe a tiny bit less. I mean, I kind of like the
fact that the metal net is giving a little bit like that. There we go. I really liking it. Yeah. Something like that. Let me safe. Looking a
little bit more high tech. Alright, let's put this. All right. Now, let
me copy this pattern. I will add an anchor point here. I will delete all of this. We're at a field layer and
get this anchor point there. And now I will add a filter, and I will invert that pattern. Where's my invert all right. Let me see my mask. Let me remove all of these. I want the color. There we go. Let me do something. I
will invert the mask itself from here, filter invert There we go. It's a tiny bit. But right now, let's go here. Let's choose maybe this color and let's see how
this looks like. All right, let me export this. Alright, let's go here to Marmoset and this
is looking better. Yeah. Let me remove those lights and
get back my HDRI. I mean, I'm kind of still not convinced about
the height in the pattern. Maybe we don't need the height. We just need to crank up a
lot more roughness there. Let's see how this looks like. Let's go to Marmoset. Yeah. I like this a lot more. I like this a lot more. Maybe a little bit less. Just like this. All right. This export is. Let's
go back to Marmoset. Yeah, I liking this a lot more. All right. Let me
see other mappings. Right, in hard. Right, aces this much. I don't like the Aces. This looks cool. The held
or however this is called. All right. This rain hard also looks cool. I mean, I kind of don't like to saturate it that
looks here in ATX. I really like this rain hard. I think I will keep with
Finthart just for a while. Alright, I think I will leave this video here
in the next video, we're going to continue doing the ectures of this guy.
I'll see you there.
29. More Work on the Jacket and Texturing the Shoulder Pads: Alright, guys, so let's
continue with this model. So let's keep working on
the texture of this guy. So let's see maybe I
could reduce a tiny bit more these damages that
he's having in the edges. So let's go to the
jacket. All right. Now, what we're going to do, we're going to take down a
little bit of those damages, just like this would be right just wait for substance
to process everything. Alright. If you ask All right. Just tackle down a bit. Those damages there. Also here, I would
like to reduce the amount damage
that this has there. There we go. Perfect.
Maybe let's see. Maybe we could add a cavity map. Let's at a black mask,
a generator, corbatre. Let's go here and change
mode from edge to cavities. Alright, so now we have this. Perfect. Maybe we could get
just the sharp ones. A little bit. Alright, let's just
tick these sliders. W be let me select one color. Let me grease it. Just like this could be. We could add also some
global blur just like that. This could be nice. Let me change a
little bit the color, maybe for more reddish tone. Just like that. Could be let's see how
this looks in the model. Alright. Maybe we could
reduce the opacity. I think it looks cool. Alright, let me also add Let me add some
roughness to this. Maybe just like
this, just to make the roughness map a
little bit more complex. Perfect. So now, I think that we could start working
on other areas. Let's see. Alright, let's go. So in the buckle strap. Let me change this to paste. All right. Let me add
some fabric pattern. All right. So let's search
maybe for Nylon Nylon webbing. I think this is the
one. All right. Let's increase the
tiles of this. Alright. Me remove the polar. All right. Let's
see the parameters. All right. All right. This doesn't have any This doesn't have any option to modify. Let's see what we
could do with this. Alright. Maybe here
in the height, we could reduce a tiny bit the height that this is getting. Let me see the roughness. Alright. Oh, so this normal map is flipped. All right. Let me see the color. Or it's just a flat color. Alright, so I will take
this just the pattern. And now, let's maybe
tweak the roughness. Here, we could add maybe some
batur map here in the edge. All right. Perfect. We're just like that. I think this would be good. Alright, let me make
this a tiny bit darker. All right. Let's go here also. Maybe something like
this could be good, a little bit of roughness. There we go. Right, let me increase a tiny
bit more the tiles of this. Maybe not that much. Something
like this could good. All right. Perfect. Let me also add this would
be like four about four. Let me also add amteltion map. La MskNator, amtocltion bird, that amtapltion
Perfect. There we go. All right. So we're getting some gradients. Let me reduce all of this. Perfect. Maybe in the
corbator we could add a filter with
some blur slope. Let's put this in ten
maybe. It looks cool. And also maybe we could
add an anchor point. I want to have some
variation, maybe. Let's see if this works. Right, let's add lack mesq a field layer,
to anchor points. Nylon webbing. We see my mask, getting
anything to hide. Alright, so we're getting this. All right. Let's clamp the value in the levels here. Alright, let's wait
for this to save. Alright, so let's clamp
this mask to this. This is just, like,
black and white. Now I want to invert the mask
because I want the creases, not like these shapes. I just want the
lines, the creases. So let's go here
and add a filter, and let's add some
invert There we go. There we have our invert. So there we have it. Now, I will change the color of this. Maybe like that. I think that's too much.
Maybe this could be. I think it's looking cool. Let me see the
roughness. All right. Let me export this to Marmosete to see
how this looks there. Four textures, the jacket just. Also I will export
the head. All right. Let's export this. I haven't done
anything to the head. I just want to explore
the roughness map. So let's go back to Marmoset. Alright, there we go. There we have it. I looks cool. Maybe we could make the edges to pop out
a little bit more. Maybe with something like
this could be I think so? Let's go and see what is that? Perfect. I think it looks better. So let's go and
texture the buckle. Let's go to the buckle here. So here we have our buckle. Maybe we could make
it entirely metal. Let's decrease the roughness. I think this would
work. Or maybe we could reduce metallicness. I would just leave it on
100% metal as for now. Maybe, I kind of like this. This look. So let's add
some color variation. Yeah. F here. I will use the same
maps that I have imported like this grunge map, where are my stuff
in your asset. Alright. So let's
search for them. So maybe we could use this, let me add this here. And also, I will increase this. I will add a filter
with blower slope. Let me put this in ten. There we go. I will now go to base color and change
the layer type, maybe to multiply or soft light. I think soft light looks cool. All right, something like that, just to have some
color variation. A bit, not too
much. There we go. Maybe here we could the buckle. We could increase a tiny bit. No, I don't think so. Right. Let's add a few more colors. Alright let's add an edge. A curvature? I mean, yeah. Inator. Maybe this
curvature one. And All right, let's
go to Base color, and let's see what this give us. Alright, maybe we could
increase a tiny bit. The color of the layer. Something like this
could be good. Let me add some breakup. A fill layer with some grudge. Alright, let's put this
in multiply maybe. Yeah, I think so. Maybe not. Let me
change this mask. Maybe this one could
beat a filter, slope with ten in the
intensity divider. Alright. Now here, I will
add another roughness. And let's see what this give us. Perfect. All right. So now I will
add an ambient occlusion. It will be the H. Now I will
add an ambient occlusion. AO. Black mask, a generator. Maybe we could add
this one there. Let's see what this give us. This is looking too dirty. Let me change from dirt, maybe what could reduce the
amount of dirt that this has H this to ambient occlusion. Invert that amenocusion. Now, we could start
playing with this maybe with a little
bit of B slope. Sorry, but it's just really like the effect that this makes. Alright. Something
like that could be let me also add
another roughness, and I will increase
the roughness of aye something like that. Let's see the roughness
here. There we go. Let me also increase a tiny bit the roughness of
the metal itself. There we go. We could
make this a tiny bit brighter and also the edge, we could make them brighter. Just like that. We could add some paint. All right. G here
with a knife brush. Let's add a little bit of hand painting detail.
Maybe something like this. Be let me see the base color. A little bit of hand painted
detail could be good. All just like this in the
edges, maybe. All right. Maybe a tiny bit in this
floater, like here, maybe also here would
be here in this edge. Perfect. There we go. Let me see like this. I think this looks cool. Let's see what this give us. Let me export this and
see how this looks. Also, let me see the roughness. If we could add a
roughness layer. Black mask or here, I just want to roughness. Alright, let's add
a field layer here. With some noise on it, maybe we could add another
layer with this one. This will be multiply
or maybe not. Maybe in subtract. Multiply. I think so. All right. I think
this looks cool. Here. Not quite. Good. Let me reduce a tiny bit this
dirtiness from this trap. I guess I want a little bit
of spot here and there. There we go. Let's export this. Alright. Perfect. There we go. Let's
go back to subs, I mean, to Marmoset Pullback. Let's see how this looks like. Looking cool. Yeah. Perfect. There we go. Maybe we could
start making other stuff. Yeah, let me reduce the sky brightness and
bring back my lights. And let's see how this
looks with light. Maybe we could also see this in another color spaces
like Reinhart. Although Reinhart looks
tiny bit saturated. Alright. Let me go
back maybe to hell. But what? So here. This is the ACS one and AGX. I think I will just take
with GX just I mean, yeah, AX just for
a while a while. So let's go back to the sky. Let me add it back to one. A All right. So now, maybe we could start working on the maybe let's let's see what
we could start working on. On the shoulder pad will be. Let's go there. Shoulder pad. Well, this is a bug. Yeah, that's a bug. There is, like, a
popping of shadows, but that is a bug
from substance. All right. So here in
the in the shoulder. Let's see what we could do. This stuff. All right. We should
make that a metal. I mean, it could be, but also no. Let's see. Roughness. I will just add a tiny bit
of metallicness there, but not quite too much. Aye, not that much. I think this could be. A little bit right. So now let's start
adding some stuff there. Let's add an amino clusion AO. La mask, unilator. Let's see how the
dirt looks like. It looks a little bit too messy. Alright. Maybe a little bit of flour. Let's see how the
floor looked like. Let me add the meto collusion
to see just the difference. All right. It basically
looks the same. Let's use the amend
occlusion for this one. All right, let's
change the color. Maybe something like
that would be good. Also, we change the roughness of these Alright. Baby, let's add a little
bit of blur slope. Just a tiny bit. I will
not change the divider. Perfect. There we go. Something like that
could be good. Now, let's add. Let's see my references. Let me make that a
tiny bit more Alec. This stuff could be a
little bit brighter. You think so? Yeah. Let me see my references. All right. Let's add. Maybe something like
this could be good. Let's add some curvature. Black mask,
generator, curvature. Let's reduce this. Let me reduce also these sliders just a tiny bit to see
what this give us. All right, let me add
some fill layer maybe. Let's search for a rag map and then add this
into multiply maybe. All right, perfect.
Now, let's go here. Little bit rougher, the edges. All right. There we go. There's something in the AO. Maybe we could increase
the roughness a tiny bit more. Even more, yeah. Also, let me put
this in curvatur. I mean, this in edges. Let me duplicate this and change the curvatur
from edge to cavities. Let's go here and let
me change the color to a low I mean, a darker color. Just like that. All right. Maybe we could
increase sliders here. There's a tiny bit, just
like that. Could be. All right. There we go. All right, maybe a little
bit of color variation. All right. Hey, we
could use this one? Multiply. Maybe suf light. All right, floor slope. All right. Here, maybe
we could add or we could use some roughness. Let me add that same
map has the mask. Let me also add a filter
with some door slope. Now here, I will increase the roughness of this Roughness. Perfect. Let me go
here to roughness, and let's add this to
overlay with the rest. All right. I think that looks cool. Is that a field layer. Let's go and add
another raunch map. Let's put this under the filter. And let's put this
multiply maybe. Perfect. All right. I will add this collaboration around here because I don't want the collaboration to
affect the rest of the color of the AO and
edges and all that stuff. All right. Let's see
what else we could do. It's a tiny bit darker. I think like that could be good. Yeah, just could be
a tiny bit brighter. We could add also a
little bit of scratches. I would like to add
those scratch detail on all the shoulder pad, so I will add that
scratch detail here. On top of all the layers. Scratch. There we go. Give me a sec. Alright. Let's search
for scratches. Not in filter, and fill layer. Rach this one. Let me reduce the
balance with the tiling. We call frank upp the tiling. All right. Let me go here. Also the height.
That's a tiny bit. Alright, let's start modifying the parameters. I
don't want spots. All right, dirtiness. All right. A It's increase the tiling. All right. I think
this looks cool. Maybe we could remove a tiny bit of these
scratches from the base. Let's a paint. I remove that one from here. Also from here. All right. You think so? Yeah. Now, let me save this. Let's work on this
lighter metal. It doesn't look like
a metal itself. I mean, I don't I will not make it like with metallic, maybe. We can make this as
a painted metal, maybe, like, a ceramic stuff. They can metal with some sort of paint on top. So let's see. Here, be a layer, black mask, inator,
and metocltion. There we go. Bools. All right. Let's take this. Perfect. There we go. All right. Let's
go here roughness. Increase that roughness. Maybe a little bit of re slope. That's too much. All right. All right now, I
would like to add. This would be like the A. I would like to add
some scratches. I mean, yes. Just watching as my
references a tiny bit. I have a bunch of
references like here, like this over watching stuff. This Balarant right,
let's do something. I would like to have a more complex roughness
map in this metal. Let me add another roughness. Blackness, fill. Let's go here in roughness. All right, let's add
some fill layer. Grunge. Maybe this
could be not that much. Maybe we could add.
We could add another. Another one. Maybe another one. I think so. Yeah. Let's go back here
to this metal. All right. Let's add some
curvature in the edge. All right. Black
mask, nator Curvatur. Let me try to get
cream color and increase the ttese
just like that. Alright, I don't
like quite much. Alright, let's see
how this looks. Oh. I that's could be. Let's reduce these sliders. Like this big, large medium. All right. I like this. Yeah. Now, maybe a little bit of
roughness variation. There. Don't think so. A little bit of or lobe will be? Let's see my blur lobe. Here we go. We could also add a gradient to this or maybe a little bit
of color variation. Let me add a gradient. Like mass generator,
maybe inter gradient. I Was it like that. All right. I think
this looks cool. Let's add a tiny
bit of roughness. Radiant. Let me save this. Alright, let's add roughness. Lack mask, Inator,
maybe no fill layer. Let me use now some
noise texture. Maybe this cloud. So here, Roughness. Right? Now, let's increase
this cloud texture. All right. Also, I will name
this roughness one. Let's duplicate that. Let's
call this roughness two. I will change the noise. And this one I will make it
a little bit less rough. Just like that. Perfect. Maybe we could add some edgewar. Lack mask, maybe this
one would be in a layer. Lack mess, let me
remove this mask. Alright ninatorEdgware. There we go. Let me reduce the war level. All right. There we go. Now here we could add some d just like this. A metallic Let me increase. No. All right, let's add
that some fill layer. Let's put that crunch. Alright, let's put
this in multiply. Alright, I will
add a paint layer. Now I will start
removing a tiny bit of these edges because those
edges to be were have sense. I just like, like this
damage in the pointy edges. No in these inner edges. Just like that. Perfect. There we go. We will export
this to substance. I mean, to marmoset to
see how this looks. Let me do something
first then let me save. Alright so let's export this. Perfect. Alright, let's
see how this looks here. I think this needs a
little bit more of work. I think so, yeah. The AO let
me put that the AO in 100. Maybe this could be
a little bit darker. Maybe with a little less
Alright There we go. All right. All right. Let me add a global Abentocltion
for the shoulder but. All right. Rater. And be. All right, there we go. And now, maybe we could
decrease it a tiny bit, let me add blur slope. Blue slope here. It's like this. And Here we go. Alright, there is
some metal that I think is this one let
me increase this. Here we go. Perfect. Global AO. All right. Let me export
this texture again. That global AO is just
for the shoulder pad. Yeah, that looks
better. Perfect. I would like to have
more color variations in this lighter stuff. All right. Let's use maybe this one. Let's change the
type to the light. B. Mabe not. Et's use this one. Let me put that variation
on top of the gradient. Multiply. Green. That, I think. Perfect. Gilterslop. I think looks kind of good. And also, I would like to
add some details by hand. So I will use some
Alphas that I have. Let me search it.
Alright, so I will use this Alpha that Mark
Max Dickson made. These are, like some Alpha that are like highlighted with
the style of overwork. They are really good Alphas, so I will just use them. So let's import them. I have it here. All
right. Let's just add it. Let's put this in Alpha. All right. There we go. There
we go. All right. Import. So now, I would like to add more color variation to
this using these Alphas. Alright. Let's see. Be color variations. Let me add a new folder here, and I will just call it Secondary day color variations. Alright a new field layer with black mask
with some painting. Now, let's get some
basic heart or maybe basic suff and
let's get one of these Alphas and we will start adding some
splashes just like that. Perfect. Do we here B. Also here a tiny bit. Let me change the color of this. Would be some darker
ones like that could be Just like that. I think it looked cool. Let me remove a few
of those like here. Maybe would be change
the color also. Add some roughness. Alright. Perfect. So let's export this. All right. Tap the substance.
Now let's go here. Right there a little
bit more detail. Need to crank down that
color it bit too much. All right. Let's wait
for this to save. All right. So here. Let me reduce the opacity
of this just like that. Perfect. So they are subtle. All right. Also in the gradient. All right. Here we go. Maybe, with a little
bit less of contrast. Just like that. Let's explore this All right. It's just like that. I
think it's kind of feather. As we have to add some mask in the color variation
here, like mask. It's a field layer
with some crunch. Let's search for one. I All right. Maybe we could use another
one with some blur slope. I just like this. There we go. Also, let me reduce the amount of
roughness that this metal has All right, it's at a paint. We go here to dirt. At removing a little tiny
bit of this roughness. Also in the edges. I don't want those edges to be on the entire piece, right? Let's add some paint. Just like this. Here we go. Let's
export this again. Perfect. Let's wait for this. Alright. Here we are. I think it looks kind of better. Alright. All right. Let's see. Alright, so maybe I will
leave the video here, and in the next video,
we're going to keep working on this model.
So see you there.
30. Making the Gloves and Forearm Textures: Alright, guys, so let's
continue with this model. So you can see that I have
changed the background color, what I did was just to go to the sky here and then
change the mode from ambient sky to color and
then choosing a dark color. I just did that because
I don't want to have, like this a bright, a gray color because I want to focus a little bit
more on the character. I want to have more contrast between the background
and the character. So let's continue
with this model. So you can see that
in the shoulder pad, I just did like a small pass. It was just like a
knife brush pass. I just added a little
bit more of variation. Let me show you what
I basically did. All right, where it was. It was this, I think, knife knife brush
pass. Let me show you. All right. This wasn't a pass. All right. I think
it wasn't that. It's this one, I
believe. Yeah, this one. You can see that what
I basically did, I just choose like some reddish, reddish material with a
little bit of roughness, and then I just paint
around the edges just to add a little
bit more of variation. It's wait for a
substance painter to calculate all of that. All right. Let's
wait for substance. All right. All right. Perfect. You got to see the difference, right. So let's continue. Maybe we could add
a little bit of color variation in
this orange metal. Let's start. All right. Let's go here. We could add a
metallic of some roughness. All right. I don't think so that this
should be a metallic. No. I don't want that to
be a metallic piece. I just want here a little bit of color variation. All right. Let me see. Let me
crank up a tiny bit more the tolerance, this. Let me do remove the mask.
Alright, there we go. Let me add another fill layer with some black
mask, a generator. Let's add some a mentocltion. All right. Why is that doing? Why is that doing this? I have another thing. That is Oh, yeah. Now I find it. Is this one. Let me paint out shoulder pad. There we go. Let's go here. Now, we keep tweaking
the metoclusion. All right, let me
add some color. All right. All right. Let's add a fill layer
with some color variation. What what I'm searching. I just want the crunch. Alright. Just a little
bit dump sometimes. Let's add a lure
slope. All right. Let's make this in
soft light, maybe. Alright, just like this. Maybe we could put this in ten. Alright. That's in bit less is too much way
for this to save. All right, but let's
continue. All right. Let's change. Let's add Black mask. All right. Here we go. Let's find the crunch. Maybe this one could be. Something like this could be. Alright. Let me add
some roughness. Let me reduce a bit more
the color variation. All right. Color variation. Let me add Tomech All right. Let's at a curvature. There we go. Let's
reduce these sliders. To this one. Perfect. All right let me.
Increase. I mean, add like this
yellowish color be. Alright, something
like that could be. All right. Perfect. Let me add a paint. Maybe we will do something. Let me select my knife brush. And maybe we could start
making, like, some detail. Something like this
could be in the corner. Alright. In the edges. I just like a lot
my knife brush. It's a really good brush for me. Just love to add
detail using that. All right. There we go. Maybe we could also
add this pattern here. Let's try to do that. All right. Let's go. Do here on top. Other pad. All right. Deco. All right, like a square
and then the two lines. So let's try to add that. Fill layer. Black mask, and now a paint
layer in that black mask. So let's go here
and let's try to find some square, right? I see cube. We Alright. I think this could work. All right. Let me increase that. Let's rotate this. Make it decrease it. Let me reduce the border
weight. I mean, width. Let's add I just not working. It should work. But
this doesn't work. All right, let's
see. Basic heart. Where? Alright. Now this should work. Alright. Sat square, a little
bit more of width. All right, maybe a
tiny bit smaller. Just like this, a
little bit more. All right. Perfect. Also, I will do like two lines. Let's select the as All right, square. Let me reduce the size of this. It's a tiny bit just like that. All right. There we go. Let's create another one. There we go. Now,
what I'm going to do I will just add the color. Me color pick the color
from the conceit. Alright, which would
make it darker. Just like that would be a
little bit of roughness, maybe. There we go. Alright. Perfect. We could do the
same in the other area. All right. And square there. And now let's add
those lines one here, and another one here. All right. Let's export this, but
first let's save it. A right now, we can export that. Let's export this. There we go. Let's wait for this to export. Alright, let's go to
Parmost you can see how our stuff are updated. Perfect. Nice, nice. Now, I think
we will start working on the forearm armor and the
globes and all that stuff. So let's go there. Alright. Let me work
first on the globes. I want to do some stuff there. Alright, let's go to the globes. Alright, let me reduce, I mean, increase the roughness
for the gloves. Like if this like, some kind of rubber material. Alright, let's call this space. I would like to add, like, a pattern there. Let's go and add a fill layer with another
fill layer in the mask. Let's search for the hexagons. Guns, maybe let's see, we could use these ones. Increase these maybe to 60, 64 will be maybe bit bigger 80. I think so. So now,
I will invert this. Or maybe instead
of inverting it. All right. Let's just
leave it like that. I make this to pop out. Now, what I'm going to do,
I will add a paint layer. And now let's select a fill UV and then just
feel the top part of this. I think this gonna look
good there. Let's see. I kind of look cool. I think we just
leave it. I like it. Now, let's select
our soft brush, maybe or maybe the basic heart. And let's start painting this pattern hire just
to fill the pa Mia. Alright, let's remove
the tablet pressure for both of these. Oh, what? What's happening? All right, I think I know. At the multiply? Yeah. Alright, there we go. What's
happening? All right. Alright, let's keep adding
around the same area. Just like that. I think this could work. All right. Like, if this pattern is to
give the clubs like better grip while holding
something Alright. All right, we need to
tweak a lip tiny bit more. This something like
that could be. There we go. Perfect. All right. There we go. I let's just clean a tiny bit more this round here, we should add or let me change
this to triplanar maybe. But we are getting
this weird right. We just leave it like that. Alright. Now, I would
like to add a filter with some blu Let's at a blur All right, I put this maybe multiply. I say like that could be All right now, I will add right, put this like some extra on. Pattern. Here we go. We'd like to add
also some roughness to this. Maybe like that. We could
increase the roughness from the globes itself.
Let me say like that. Be All right. So now, I will add some color
variation to these globes. So let's add an
amtocltion All right. Black mask, erator amtocltion Let's impair the ambient
dilution, just like that. There we go. Let me
change the color. Let me do something like this. Well, the ambitltion doesn't
is not doing too much. With a little bit of roughness. Let's see what this give us. All right, something like that
could be alright, perfect. That's right. Ambient
Occlusion All right. Sec. There we go. All right, let me
add Curvatur Layer. All right. Let's add Black mask. Fill layer. Fill
layer no generator. And let's add some rubatur. Et's go here. Maybe let's
decrease all of these sliders. All right. There we go. With a little bit of
slope will be, maybe not. All right. Oh, here. I like this could be. Maybe with some roughness. But any bit rougher. All right, let me add
More roughness variation. All right. Let's
add some roughness. All right, Mac mask, bell there. Let's add maybe this will be. I think so. I think
this could be. Just like that, roughness. Let's see what this
give us. All right. Let's export this. Et's wait
for this to be exported. There we go. Let's see
how the globe is looking. I think it's looking cool. There we go. Now, let's start working on
the forearm armor. Alright, let's go there.
Let's focus on these plates. I All right. I think I will do, like, global stuff
for these plates. So let's add some ambientoclusion
to those like mask, nerator, a met occlusion. All right. There we go. Let's say the color. Yeah. Maybe this could be? Let's increase the
global balance. Let's add some roughness,
increase the roughness. Alright, there we go. Let's add some metal. Let me go to the metal. I will also increase the
metallicness of this. This should be like
this. There we go. And All right. And this one would
be like, less. No, I don't think so. Alright, let's go to
the ambient oclusion. Ambient occlusion. There we go. Perfect. So now, let's
add some color variation. Let me add that multiply with a really low intensity
on the layer opacity. I there we go. Let me change this one. Make it a bit rougher. There we go. A little
bit of metalness. It's just like that. Maybe without metalness. Yeah. Let's add some curvature. There we go. Lack mask, Inator. Batur Alright. Perfet. Maybe a
little bit of slope. Here we go. Perfect. A little bit of roughness. Just make them a little
bit rougher would be. All right. Just like that. We could add a little bit
of scratches. So scratches. All right. This cutter had a black mask. Fill layer, change this to hide. Alright let's bring
these scratches. All right. Perfect. This could be let's
reduce the balance. Let's increase the tiling. Maybe not. Let's rotate this. I think this, like, big scratch give a
cool detail there. Alright, this crutch also
makes a cool detail. I like it. I don't
think I will paint out too much of this. Let's add more
roughness variation. Black mask, roughness,
a little bit rougher, or right let's add. So fill layer here. Let's search for some
maybe noise texture like this one could be. I think this is too much. Maybe we could increase it. A tiny bit. Let's
add another layer. Let's add a crunch this time. Alright. Let's put this in substract. Maybe our multiply
would be I think so. And let me export this. Let's see how it looks in size up Marmoset toolbagqat for this. Alright, let's go to Marmoset.
All right, there we go. Looking cool, in my
opinion. All right. Sec, I think we should add a little bit more color
variation on this, maybe we could
duplicate this one. At this one. Let's add
some filter ler slope. Alright. There we go. Not that much. Alright, let me read this one. And now I will use the alphas that I have imported will be here,
those Alphas, yeah. And I will paint in a tiny
bit of, like, colors. Let's add another field layer. Uh, painted ration. All right, like mask. Let's see. Let's go to basic heart. Maybe basic stuff. Let's select our
stuff here will be. Let's make this rougher. All right. I changed the color. All right. There we go. There we go. There
we are. Maybe more. Would be All right. I think we could
export this again. It's exported. And let's go back to here and see there
are some nice buds. All right. There we go. Let's save this. Alright. I think
now we could start working on the fore arm armor. Alright, in this part. Let's go to lobes or arm armor. Let me reduce the roughness. We could increase a tiny bit
of metallicne that piece. I don't want to make
it fully metallic. All right. Just like that. We could make right, let me put this like let's
make another folder. Let's call this strap. I will make another fill layer. This time, I will just
remove the metallicness. And now I will paint this layer. All right. Let's go here. Now, let's paint
this white mask. All right. Let me see Let me change
the alignment to UB. Let's go here. We could
remove that paint from there. Alright, let's keep
painting this. All right. There we go. Et's just keep painting. Just like this. All right. Perfect. Let's remove. Of these, right, A here. This is read white. Let's just keep painting. You will get this painted. Let's also go here. There we go. Just like this. Alright. And Let's just keep adding a bit more
of paint there. So here, let's clean
this a tiny bit more. Just like that. There we go. Perfect. Let's change
this to tangent crap. And now we could change the color and the roughness for this piece to
something better. Something like this could be. All right. A tiny bit lighter. All right. So Let's just keep
adding a tiny bit more of variation into
the forearm armor. Let's wait for this to save. All right. Let's add a
tiny bit more variation. Let's add some ambit occlusion. Occlusion. All right. La mask nerator Amdocltion here, invert that ambient occlusion. Where it's my am to
pollution. All right. Little bit of flour. All right. Let's add some par. And also, I would like to add
some roughness into this. Alright. All right. Let's add some
surface variation, more, more surface variation. Let's add maybe, let's
say, more color variation. So does multiply a flight. All right. A tiny bit. There we go. Maybe with a
little bit of roughness. We got a black mask. Also the layer with
the same grunge. All right. Making the same stuff. All right. And Alright, let's do this. Let's add a fill layer with some other ranch texture on it. Just like that could be. I kind of like it.
Here we have a seam. But I think that's because
of the met occlusion. And also this, let me
just add it in triplanar. There we go. Also
here in this one, I will just add this
interplanar do. There we go. Things
looking cool. Go here. Let's add maybe let's
call this base variation. Strap base. Let's add some edges. Rvatur here. There we go. Let's see what this give us. All right. Here we go. All right. Let's add
some blue slope. Would be maybe with a
little bit of roughness. Oh let me decrease a tiny
bit the color of this. All right. Let's work now on this strap. I will just add,
like, some stuff. Like, some ambient occlusion. I like that. B mask, generator. Alright. So generator here, an
ambient occlusion one, Bird. Just like this. All right. It's decrease the
brightness of that color. All right. Let me Alright, let me
add some curvature. All right. Lo mask, paint, urbatur. All right. Let's dirt I mean, let's reduce these
lighters. Just like that. Just like this. Let's add some fill layer
with some grudge. Let's just put this
grudg multiply. Maybe this could be. There we go. Let me also
add a little bit of roughness to that stuff
and a little bit of height just like this. Also let me change the
color of that dove here. Alright. There we go. Let's take this, and then we are going to export this to Marmotet to see how
this looks like. All right. Let's
export the textures. Here. Perfect. Fourth Alright, let's wait for this. Alright. Let's see
how this looks. Looking good. Maybe this is looking a little bit
a little bit too much, but I think this
metal looking nice. All right. All right. Maybe I think
we could add just a tiny like third layer
into the jacket. Just a small one. Let's go here. A mask. A fill layer. Let's go for maybe third. All right. Let me add
some filter here. It will slope. Let's add another filter here. I will put this in multiply. And now search for another one. All right. Maybe let's add a
paint. All right. Here also. I will add
maybe some brownish color. Alright. Just like this. Let's go increase the
roughness. All right. And now let's just start erasing that dirt from
some places like here. Let me remove the blur
slope just for now. All right. Let's just try to remove them. Alright. It's like that. There we go. Perfect. Here in the back, we should raise All right. Here we go. Perfect. I got tiny bit more. I think this could work will be. Let's export this slope on. Let's see the
difference for jacket. Let's export this right.
Let's wait for this. All right. I think that adds a tiny
bit more variation. Yeah looking kind
of cool. All right. Remove. I annoysing. All right. I think I like it more
without the noising. All right. Let me add maybe the lights. Maybe without the first one
to have these shrimp lights. Maybe even with that some color. It. Uh, where is the
color of this light? All right. This could be. All right. Here we go. So I think I will leave the
video here for this video. We have done quite
a bit of progress, like the forearm armor at the plup tiny bit of work
on the shoulder pad. So let's see let's keep working on this and maybe
in the next video, we could start making
another piece of this model. So see you there.
31. Starting the Inner Armor Textures: Alright, guys. So now we're going to continue
with this model. So let's keep working
with the textures. So in the previous video, we were doing the
textures of the globes, the armor, these armor plates, this forearm armor and also
the shoulder pad and so on. So now we are going to make, like, a more adjustments. Maybe in the jacket, we could make this pattern a
tiny bit more noticeable. Maybe we could increase the
roughness from those parts. So let's wait for substance. All right. Now let's
go to the pattern. Here, the econ pattern. Let me increase a tiny bit
more roughness real quick. All right. Let's see. Let's wait for substance
to do the calculation. All right. Maybe it could be. Something like this,
I think will be good. I just want it to
be more noticeable. Let me export this
again to marmoset, and let's see how this looks. Or right let's wait for
this to be exported. Or let's go to Marmoset. And now it's
supposedly to be yeah. Now there is I think it's the same. Alright. Maybe we could reduce
the roughness, those patterns or maybe not. We could lift them
like that. I think so. All right. So now let's see what
else we could do. All right. Let's just
see how it looks. Alright, I think we
could start working on this hand armor that I forgot to do the textures. So let's go back to substance. Alright, let's go here and now let's start working
on this hand armor. All right. Let's search
for the and armor. Perfect. Let's call this base. All right now, let's
add an ambient ocletion AO or black mask. Let's add a
generator. All right. Let's add some ambient
ocletion there. Let's invert this
ambientocletion. And now we have this. Let's change the color
or something like a reddish bone,
maybe even darker. Maybe something
like this could be. Could be like this. Alright. I kind of like that color. Alright, we'll just select
maybe more reddish. There. Alright. Let's add now a
filter through slope. Maybe in ten. I kind of like it,
yeah. I like it. Let's add some roughness.
I feel like that. Now, we could add some
edgewar for this to be like some painted metal that has been shaped in the knuckles,
something like that. All right. Alright, first, let's add
an edge generator, right. Let's add a curvature here. Perfect. There we go. Go here. Let's reduce all of this. Right now we have this. I would like to add
a brighter color. Just like this, maybe. Not quite like it. I like that. All right. Let's go here. So we have this. Maybe we could add some
flur slope it could be. Let's add also a fill layer with some grunge Just to do
some breakup in the edges. All right at C. Let's put
this fill layer in multiply. I like that could be Alright, let's wait for this to save. Alright. Maybe we could crank up the brightness of this
color just a tiny bit more. Maybe we could even
paint a little bit with the paint layer and
our knife brush. Alright, let's just
add few few strokes here and there in
the corner, maybe. All right. Something like this. Perfect, this is kind of slow
right now, the Sam spender. A little bit slow. All
right, sweet for this. Alright, let me see something. Alright, let's
continue. I think it's a little bit better with
some spiner with a stroke. Alright. Still slow, but
let's try to work with that. It's a little bit of
color in the edges. Let's go here in the knuckles. Maybe we could add some here. Something like this.
Maybe, Perfect. All right, maybe here
could be. There we go. Also here. All right. One thing that we could
do if this is too slow, we could turn down the
resolution of detecture. Maybe we could put it in
two K if this is too slow, let's wait for substance
vendor to do the calculation. And now we can work
maybe kind of better. I'm still looking at
it a little bit slow. Yeah. Let me just
add it again to four k to better visualize this. Let's just keep
adding these edges. All right. I noticed that I
have been adding these edges. That's color on the
edges with symmetry. So I think we will have to do some work on the other hand. So let's just keep
adding this stuff. Real quick, just like this. All right. Maybe in base color could be
a tiny bit faster. Right. There we go. It seems to be slow just with
the tablet. That's weird. Right, let me see. Yeah, it's just with the tablet. This is being slow. All right, maybe let's
go to the layer. Let's maybe adds a bit
of roughness there. We could reduce the
roughness in those edges. Alright, let's go
to the base layer. Let's set some roughness. Maybe something
like this could be. Roughness. Perfect.
Now, let me add, let me call this urbatur now what I will do, I will add another layer. This will be for the roughness. Roughness layer. Like mask. Let's
had a field layer. Now let's search
for maybe a crunch another crunch like this. Let's put the
roughness and let's see how this looks. All right. Let's increase the tiling. All right. W be. Also, let's add
another curvature. I will add another corbaor here. I will call this edge were because I want to
add some wearing in the knuckles in those corners. All right. Let's
put a black mask. It's at a generator. Let's search for edgeware
metal edgewaar here. Perfect. Let me reduce the
amount of wareness that this has All right, let's reduce the amount
of let me increase the hemmed clusion
Maybe we will increase the scale of the
grungrng amount. Alright, let me add
another field layer. Maybe this one, multiply Atation we will put this in triplanar. All right. I think
this could be good. Let's add some height, some metalness some
roughness to this. All right. Let me see like that, let's increase the metalness. Perfect. And the
roughness, there we go. Here, I will add. In the shrubbery channel, I will put the top layer in
overlay, just like that. Maybe in screen,
let me see screen. No, I will just
add it in overlay. Perfect. All right, let's go to the
grunge and now let's paint out a little bit of these parts. Like in that place, here also could be
in this area here. All right. I will want to add
that on these places maybe. Something like that. My just add it with the
mouse. It's a bit faster. Maybe something like
that. All right, could be here also. Perfect. Let's go
to the other area. Let me add a little bit of
this paint in the corners. Alright. All right. It's a bit more here in this area. Will be. All right. So now what I will
do, I will just export this and
see how this looks inside the engine port, jacket. Alright. Now let's wait
for this to be exported. And now let's go to
Marmoset. Here we go. It's updated. You can see that I have torn down rate raising. We could add it or we
could leave in fraser. I don't recommend you to use hybrid because this
looks super ugly. I really don't recommend you
that this looks super ugly. I don't like it. All right. Let's see how it looks in retraining. Looking pretty good. All right. Let's save this. Let
me do something. Let's just continue with this. All right. So let's go. I would like to add a little bit of detail with the
knife rush in the A O. Maybe we could do this. I just drop my pen, a little bit dumb right. We could maybe do a little
bit more detail here. There we go. It'll be there. Perfect. Maybe here all. W be. All right. Let's just add a little bit
more of brokes Alright. Here we go. All right. So let's see. Maybe we could start
making another piece. Alright, I think we have
make the textures for all the jacket texture
set, I believe. Maybe later, we
will make a video to add more details if needed
in all the texture sets. So now, maybe let's see
what we could do now. I think that I will start
making the inner suit. So let's start making
the Inner suit, now, the inner armor. Yeah. Let's go here. And now let's go to
the inner armor. Let's start making these pieces. Base. Let me start with
this darker color. I think it's the mid tone. All right. Let's add roughness
and some metallicness. Let me see like this could be. All right. A little bit of metalness. There we go. It's a black mask. I mean, a field layer with
some black mask, right, a generator, or let's
see, some amen seclusion. Invert that amid seclusion. It will be basically almost the same in all the materials, the same procedure, like adding amid occlusion,
some curvator maps. And then after we add those, we are going to do manual work, like hand painted work
to enhance it even more. Occlusion here. There we go. Let's see. There we go. Let me change the color of this. A more dark color. Let's go back to the
ambient ocltion mask. Let me see like this could be. All right. Maybe we could add some blur slope to break up
this thing a little bit. Let's add it in 100. W B. All right. Something like that. There we go. All right. Let's add now. So curvature map. Black mask, a
generator, curvature. All right. Let me decrease all
of these layers. All right. Maybe something
like this could be. It's a field layer
with some crunch. Now let's put that
crunch and multiply. Maybe we could
select another one. Something like this could be. Another filter, maybe
some bluer slope. Put this in 100. I ten, All right. Let me decrease here the
opacity of this layer, a little bit. Some roughness. All right. Now, I
would like to also add some color variation. All right. Let's add some
color variation to the face color. All right. Go here. And now we are
going to add some of the grunge map that I
have found in Google. All right. Let's just search
for our stuff here. Let's put this multiply or
maybe it could be in overlay. Let's reduce reduce the
opacity of this map. And it could be this one to have a little bit of surface detail. Alright. I'm just looking
at my references. All right. All right. In here, in the base, I will just decrease
the roughness, little bit more and crank up a little bit more
the metallicness. All right. Let me increase the opacity
of the corbator map. And also, I will move
more this crunch. Yeah. Alright, let's go to the
color variation map, and let's add some filter
floor slope again. Alright. I just like lower slope parting. Let's crank up a tiny
bit more rung here, and maybe we could even add
a little bit more purvatre. Alright, let's see
how this looks with the jacket on top. All right. We could add a paint layer and start adding tiny
bit more of detail. Let me see like this could be. Here, the stroke is faster. Alright. Any bit
of detail there? Maybe here in this edge will be. All right. Alright. Here we go. Perfect. All right. I would
also like to add more color variation into that metal. Let's put this here. Color variation one. We could select one
of these smart mask. Let's see what this give us. Maybe let's search
for some dust. Maybe this one could be. Let's just add that smart mask. I really like these
looks indeed. We could use it, right now, I will change the color
of the, the roughness. I will just crank up the
roughness and change the color. Something darker. We could even put that dust layer
on top of everything. Like here, maybe. Yeah. So it's a global. All right. Maybe here. Perfect. There we go. I think
it looks cool. Maybe we could even
reduce the metal ness. I think so, yeah. Perfect. Now we could add even more detail with the
Alphas that I have downloaded. Here, let me search it. These Alphas, let me
add a paint layer. Maybe here, rotates. All right. This is not working
again. Why is that? All right, let me do something. Let me select my heart's
basic card mask. I mean, brush. Now let's
try to add that again. Alright, there we go. All right. Let me select another one. Something like that
could be here. All right. Have you changed the color? I like that. Perfect. We could add
more details like this with other types of colors. Let's go here to the tone gray. Alright, let's change
the color of this maybe. I don't know. Let's see. Alright. Let's
add a black mask paint. Let's see what we could do
with some greenish color. Maybe, something
like this could be. All right. Again, my basic
heart is not working properly. Oh, it's there. All right, change
the color of this. All right, something
like that could be. All right. I mean,
I just want to add some color variation
here and there. Perfect. Something here. Another one could be here. Maybe not. Let's wait for this. All right. Let's see. Maybe something
like that could be. I think, so let me see how
this is looking right now. Let's expose this to marmosets. I will export both texture sets. Just in case I haven't
exported the jacket because I don't really
remember if I did it. Alright, let's wait for this. Let's see how this
is looking like. Alright, the materials
have not been imported. Let's go to the
inner sut Alright, give me a sec to import
all the textures. Alright. It's here. I just exported the
wrong texture set. I mean, I was exporting, like, the inner sut and instead of
the inner armor. I'm sorry. I just got confused. I think this is looking nice. We could add maybe found some scratches here here
and there would be? Yeah. Let me see how
this looks without the retracing the raster. All right. This looking cool. Go to hybrid racing again. Let me add some, like, global scratches
in the inner suit. I mean, inner armor. Alright, let's go here
on top of everything. Let me add some
global scratches. At all right. At mask. So fill layer. Let's search for
the scratch map. Search for the scratch
map. Let's try this. I think it's a little
bit big right now, the type of scratches. Alright, but maybe we could
mix it with the other ones. Alright. There we go. Let me
do something here. Now, let's add the height, maybe some roughness, even. Now let's just add
those scratches there with a little
bit less roughness. There we go. Let's me also add
the other scratches, like these big ones. Alright. I will reduce the amount of the reduce the dots or spots. Alright. Let me add another fill layer. This time, I will add also. Let me put these
scratches in overlay. All right. So they are layering. And now here, I will
add some grunge just to take down some of those scratches and they
are not all over the place. Multiply. Where are my
scutches. All right. I don't think this is the one. Let me change this map. Maybe force this one. It's not. For some reason, this map
just knuckle down my mask. All right? What is not? Why is this not working anymore? Alright, I have my
scratches here. Let's put this in screen
or right now it's working. Let me add the field layer. Alright, let's put this in
screen screen no, multiply. Alright. Perfect, something
like this could be. Let's add a paint layer. And now let's remove
a tiny bit of these scrutches In place that doesn't have sense to
these to have scratches. Maybe here in the
back could have some. I think so. Could be. Let's add a tiny bit
of color to this. Maybe something
darker, just like that. Let's export this. Let me remove a tiny
bit more amount of scratches that is here. There is something like that. Let's expot this. All right. Without the jacket this time. Remember inner armor. Let's see what this give us. Let's go here. You can
see some scratches there. All right. Without the raster? I mean, without the tracing, sorry. All right. I think
it's looking cool. Alright, let's keep working with the other metals that we have. Maybe let's work with
this lighter one. All right, lighter gray. We could copy some of these
maps right console C, Console B. All right. Let's call this is in the
brown. Let's add it here. Base. Let me move
that that base. So we have this. I
think this could work. Let me also copy the
curvature, add it here. All right. Let me rack up more
curvature here. The brightness or white
on the blue slope. Let's add another. Maybe we could even
remove this one. Maybe not. Let's paint a
tiny bit of these maps. All right let me select my knife brush and
let's do some work. All right. All right. Here. Perfect. Let's go here. All right. Let's see the base color. There we go. All right. There we go. Just had a few more. Now I think that's a little bit. Too dusty or dirty. We could knuckle down a
tiny bit of this dirtiness, we see the cvaration? No. Metoclusion? No. Or
is the global roughness, the global dust
that I have here. Let me take down a tiny
bit of this it like that? Will be. And also, I will go here to the lighter gray and add
some roughness to this. I like this and maybe maybe
a little bit of metalness. Maybe not that much of
metalness, a tiny bit. All right. Or maybe we could even
not add that metalness. All right. I don't think I will add
metalness in that piece. I don't like it quite much. All right. This could be like some
pated metal, indeed. Let me remove a tiny bit
of this curvature also. It's making it looks a
little bit too dirty. Alright. I like that, let me expot this. A, let me search
in the other ones. Maybe we could add a tiny bit of metalness. That's the corbator. Alright, let's go to the base. We could maybe add
just a tiny bit of this metal ness,
something like this. Let's keep. Alright, first, I will just export this and
see how this looks like. Alright. Let me now save this. And now let's go back to
Armoset two back five. All right. We go to Raster. Perfect. All right. Let's
see my references. Maybe we could hide the jacket and see how this is looking
without the jacket. Let me remove also those lights there so I can see in a better
way what I'm doing here. All right. I would like to add more variation
into the roughness. Let me bring back the jacket. So I will just do that now. Let's maybe add some global
roughness on top of this. Roughness? All
right. Black mask? No. Let's add one field layer. Roughness, let's change. Then layer type of this
roughness into overlay maybe. And now let's add
some black mask. And field layer. And let's add maybe some grunge
that's fine for something. I like this could be. All right. We could maybe let's
call this roughness one. Let me copy this. I will
change the grunge map. Wait for something like
this. Roughness, let's go here and maybe we could use some tiny bit roughness in this time. Yeah. We did. Let me see my mask. And
now we could maybe add another one with subtract to knuckle down some
of those roughness. Let me see like this could be. Let me see how this looks. Let's export this. Wait for this to be exported. And now let's go
here and see how the metal and the light
is reacting together. It's a bit better. All right. Let's save this. Let's go back to substance. I would like to make
this lighter gray, a tiny bit er. Just like that. Just to separate more, to have more contrast
between these two metals. Let me export this again. Y. Let's squat for this. All right. I think that's
a little bit better. We have more contrast
between the colors of these two metals. Let me. Let's me hide the
hacker Perfect. We could maybe even add more metalness to this
the brighter color. Yeah. And the other me toon gray, maybe we could knuckle down. A bit of that metalness. But making it a tiny bit darker. Let's see how this
looks. I don't like it. This should be more
like this. Right? Let me go to my ID map. Now I will select the
color, the gray there. Maybe just a tiny bit brighter. Also, let me tone metal. All right. Perfect. Let's go to the rider one. We we do the same. Let's
see how this looks with these two metals
with full metallicness. Or let's exports. I I don't quite like it, indeed. I will just reduce the amount of metal
ness that each one has. I quite not like the way how
it looks inside the engine. Maybe we could add maybe, like, some surface noise to
this darker metal. Let's see. Alright. Let me add in the mid tone gray black
mask with some fill layer. We could add this.
It's at some height. Like that. Let me go to the height and
also reduce the amount. It's like that maybe to separate materials, little bit more. Maybe this one could be. Go here. Maybe we
could add this one. Let's see. It could be. Perfect. Just want some
surface variation. Alright, let's
explore the textures. Also, I don't think I
have. Yeah, I added. Yeah, let's go. I think this looks better. Go here to rate raising. All right. Let's maybe add some radiant. Got a little bit more of detail. Per face noise. Perfect base color. I have All right. I don't have the bake lighting. Let me take the the bake
lighting from my jacket layer. I just forgot to add it
in this texture set. I will just copy
this. Then go again to my inner armor texture set, and I will just add it
on top of everything. All right. Looking
cool. Perfect. And now maybe we could
add a tiny bit more of radiant into this. Let's add some black
mask, inn dator. Let's add some linear gradient
invert Alright Perfect. Maybe with a little
bit darker gray. Maybe even with some blue right something like this. Would be. Let's see how this looks with
and without the gradient. Let me export this again. Right let's export this. Alright. Now I will
save this again. Now, let's wait for
this to be here. All right. I think
it's looking cool. Let me see the alveto map. Right. Quality to the raster. All right. Perfect. Let's go back here.
Maybe, let's work more on the dark gray. This one. Is darker gray. All right, a little
bit of metallicness. With this to be more
rough and everything. I would be Or maybe we could make
it like some rubber. Maybe not. I don't I don't think this is much like rubber. All right. Let's add maybe some
color variation. All right, and maybe
some ambient occlusion. Let me make
ambitoclusion darker. And I will change
the color variation. It's like that. There we go. Let me add another
gradient here. Let me copy the gradient.
This is the gradient? No, that's not the
gradient. All right. Let me put here spots. Let's search for the gradient. This is the gradient. Let's
copy that into this one. I will make this darker. And now let's tweak
the gradient. All right. Pre flex expods All right. Let's see. Good. We will have to maybe
do more work there. I think we could do more stuff. It's at some curvature or
right black mask, a gnator. Curvature. We reduce
everything here. Just like that. Perfect. Let's add maybe some
bi layer with this. And let's put this in substract. A this one no is this one, this layer, substract
or maybe multiply. All right. Perfect. Let me reduce the
brightness of that edge. Here we go. I still don't know
if to leave it, like metal metallic or not. We will see. Let's just
keep working on this. Alright, Bridge raising. Et me add like a big spot here. Where are my spots. I'll also like to add spots
that doesn't have roughness. This spot doesn't
have roughness, yeah. Alright, let's go
with our basic brush. Let's select this one, maybe this one.
Add a paint layer. Like some big stuff here. On here, maybe. Perfect. So let's go, Let's copy this. Let's go to the lighter stuff. All right. With some more colors
here and there, just to make it
uneven, like that. Perfect. Let's go to the
darker darker color. Let's make this gray
more dark, perfect. All right. There we go. Perfect. Let me go to the spot one here. The principal spot. I will just remove
that from here. Something like here. Let's see how this looks like. Word Alright, let's go to Marmoset. I think it's looking
a bit better. Yeah. Perfect. So I think I will
leave the video here. In the next video,
we are going to keep working on this.
Those are you there?
32. Making the Inner Armor and Making the Mask: Alright, guys, so let's
continue with this model. In the previous video, we were working on the inner armor. So now we're going to keep
working on the inner armor. So let's work. I just bit a few
adjustments into the ambient occlusion
of each metal piece. I just have cranked up like a little bit more the
ambient occlusion. Let me show you I just added a little bit more of ambient occlusion with
a little bit more blur. You can see it here,
without and with it. I just wanted to have a more
amen occlusion intensity. Now, what we're going to do? We're going to keep working
and making this stuff. Maybe we could start working
on this orange metal. I think about this metal like I think about
it as painted metal. So let's treat it
as a painted metal. Alright. Let me see something. Have here my stuff. My add also some metal. Maybe we could make
them full metallic. All right. In. All right. So let's
work on this piece. All right. Let's go
to the orange metal. Let's add a little bit more of amd occlusion
on that piece. A, perfect. Generator. I don't want
a cba right there. I want amide
occlusion. All right. Convert that mask. Maybe we could keep with this. I think so. Let's select
another color for this. Something reddish,
something like this would be All right? Perfect. Let's add a tiny
bit more of roughness there. Also, I will add
a base roughness for this piece right
there. All right. Let me see. Base color. All right. Let me
go to the missive, and also I would like to add a little bit
of base roughness. All right. Let me make this emissive
stuff a little bit rougher. Also, I would like to erase
some scratches from this. It doesn't have sense to
have scratches there. Alright, let me also
paint a tiny bit more. Here and here. There we go. So now let's keep
working on this metal. Let me maybe remove a tiny
bit more of these scratches. I I could leave that
scratch there. I think so. Let's go to the toss. Maybe we could remove a
tiny bit more of here, W B. All right. Perfect. Let's add a little bit of color
variation on this orange. He's let's go here. Maybe we could add
some edge color. Let's add some curbatorO
maybe we could add. Actually, we could add mask. I think it's this
one, mass editor. With the mass editor,
we could tweak a lot of a lot of things at once, like the ambient occlusion
and the curbator. Let's use the curbator for now. All right, let me
decrease all of these. Maybe. Yeah. Let me increase
the corbator opacity. All right. Global balance. I like this could be good. Alright, let me change
the color of my ambient. I mean, my ambient no my
curvature. I'm say like this. Let me do also something. I will add a paint layer here. I will turn on my my symmetry, and I will just start
painting a little bit here. There we go. Also, I would like to increase
the tolerance for this so we don't have those white
pixels just like that. Also here in the
back. Let me remove a tiny bit more of
these crutches. We will remove them. All right. Something like this. Perfect. And there we go. Maybe here. I'll make this
a little bit brighter, a tiny bit more roughness. Let's add a bluer slope. With not too much
intensity. Just like this. And now I would like to add
some paint layer and start painting a little bit of
detail with my knife brush. Alright. We go. We could start painting a
tiny bit of these edges. All right. Something like this. Just to
add a tiny bit of detail. All right. Perfect. I think that could work. Where's my my other
stuff. All right. I think the here is a bug. I kind of see my entire
character. That's really weird. Yeah, let me do something. Alright, I think that what was happening was that I
had this icon active, and that is like that's an
option to hide geometry. I had it active for some reason. So now we're going to
keep working on this. Maybe we could start maybe
working on the mask. I think so. So let's see. I really don't care about
what's happening inside here. All right, I think this is good. Let's just export this maybe before starting
working on the mask. All right. Let's go to Marmoset. And let's see how
this looks like. I think it's looking cool. All right. Maybe what we
could do we could add this. Alright, this is on
top of everything. Perfect. Alright, let's add a little bit of work on
this emissive stuff. Alright, let's call
this maybe Base. Now we are going
to add like a rim. Let's go here, and let's
just duplicate this. It's a black mess. Let's make this color more
dark, just like this. Now we're going to add here, I would like to add let me see. I would like to add an
anchor point, maybe. And now here we're going
to add fill layer. Here, let's select this space. Layer, Let me see the mask. Missive. Not doing anything. So let's do this instead. Let's add a color selection. And let's just select
this this middle piece. Let me increase the tolerance. And now I will add a filter, a less type mask outline. This will be the filter that we're going
to use right now. All right let's see it
is not working properly. All right, let's change
from upside to inside. Let's reduce the
width. Maybe the blur. Let's put this in both, maybe. Or let's see how
this looks like. Something like this could be. Could also add a little
bit of painting work here. Make some manual work. Let me also increase
the tolerance. All right, this doesn't working. It's this in the blue, where I should crank up
the tolerance. All right. Something like that, let me also add maybe some blur here. It's a a plur mass, plur filter. Alright, let's see
how this looks like. I think it's looking
kind of cool. Alright. Let me add something. Here. We're not. Let me just
remove that lure. I mean, I really like that lure. Let's add a paint layer. Let's select this mask. And now let's just paint. I mean, let's select
the symmetry. Not the mask. Sorry, I mean, just a little bit
dump right now. And now let's just start painting a tiny bit
to cover those areas. Alright, just like
this could be. Alright. Perfect. Maybe we could crank
up the blurriness of this. Well, not that much. Something like that could be
maybe not that much either. Let me just erase one of these. Alright, let me do something. All right, maybe not.
This not the way. I like to add that lure. Let me select my basic soft. All right. Maybe instead of having
the blurre effect, we could add it
by hand using the basic soft just like this. Would be, and it's
better, my opinion. All right. Maybe we
could add another layer. Let me duplicate this one. And now let's change the
mask or another black mask. And now let's add a paint layer. I will make this layer brighter. So let's turn it more
to the green and increase the brightness of this. I would like to add
it in the middle like some middle light there. Alright, just like that.
That could be good. Also, I will do the same in these pink parts.
It's called the space. I will duplicate this
at a black mask, at a color selection. Let's select this pinky color. Now, let's add a filter. But before adding the filter, let's make this pink
a tiny bit more dark. Maybe to the red,
maybe to the purple. The purple, I think, yeah. All right. Now,
let's just go here. Let's at the filter,
select mask outline. All right, there we go. Let's add this in both thighs. All right, maybe we could
lure this a bit more. All right. We could twig with
the fresh hole, maybe blur this a tiny
bit more just like that. Pull B All right. Perfet. There we go. This could
be a tiny bit darker. Or I let's add some painted work and maybe with a knife brush. Alright. Just like that, maybe could be. Siting few strokes. Let me also duplicate this one. Let's add a black mask. Let's add a paint layer. Let me go here and
make this brighter. Maybe just like this could be. Alright, let's go here. Maybe we could paint
tiny bit here. I don't like that so much. Let's go to the
basic self again. And now let's just
add something here. Like some highlight
just like that. Let me explore this and
see how this looks. Four textures. All right, there we go. Let T. Perfect. Let's save this. Let's go to Marmoset. All right, that looks cool. Let's see how this
looking faster. Looks cool also. Perfect. Let's go back to rate raising. Maybe we could increase also the intensity
of the mission. Just like that
could be All right. I don't like hybrid. Perfect. Let me save this. And now let's just keep
working on this armor. Let's see what
else we could add. Maybe we could start working
on the mask just for now. So let's start
working on the mask. But let's go to the mask. This dark gray should be maybe super rough or
it's not a rough. All right, let's go to this
one. This should be rough. Just like that. All right. And now
this darker gray. Let's see. Make it
a tiny bit rough. Maybe a tiny bit
metallic, maybe not. Like the same type
of metal as this. Maybe we could reuse some
stuff that we have made. Maybe we could
select all of these. Maybe just ambient occlusion. And this one et's just copy that, Let's go to the mask. Let's just paste that there. Alright, looking cool. Yeah. So now, I would like to add Maybe some more
roughness to that piece. And roughness or let's add maybe a random
roughness that we could find or like mass, the layer or let's type crunch. All right. Let me reduce
the balance of this. This could be change
this to rough. And now we can see
what we could do. All right, something
like this could be. I like this. So let me make
this dark color even darker. All right. Maybe this one. We could not make
it a dark or maybe a would be let me
go with the edges. I would make these
edges who metallic. All right. Let me
do also the same with the other stuff here. With this part, I will also make these edges Ooh metallic. It's like that. Perfect. There we go. Let's go to the mid tone gray
here on top. In the mask. Let's go to the mask. And let's select the mid gray. Let's call this base. Let's add. I think this should
be more metallic. Alright let me also opy the layers that we have created for
the midtone ray here. We like the ambient occlusion, the curvature, that's
it, I think, yeah. Let's just select that and go
again to the mask section. Space this Alright. Maybe we could make
the color a tiny bit brighter or this piece. Something like that could be. Maybe a tiny bit of
color variation. Let's copy the variation
from the chest piece, and let's just add it here. Would be All right. Maybe I can increase a tiny bit more the ambient occlusion
or maybe not. All right. Let's see what else we could do. All right. We could add another
roughness there. All right, just a
field layer with a black mask,
another field layer. Maybe this one could be. All right let's go here. Let's just put the roughness
right, just like that. All right, Let's go here. Let's add some fill layer. Let's add another one. Let's put this in substract. There we go. Perfect. All right. Let's go to the curvatur Maybe we could start
painting some stuff. All right, right? Let me paint some stuff here. A tiny bit. Here we go. A All right. All right. Let's see. That color is from
ambient occlusion. Yeah. Let me remove a tiny bit more the ambit
clusion from this piece. I mean, from this place, I meant to say,
something like that. And now let's go to
this field layer. I will add a paint, remove the dirt from there. Right? Perfect. Let's go to
the orange piece in this mask and let
me just increase the tolerance. It's like that. All right. G here. Roughness. All right. There we go. Let me stave this. Alright, let's wait
for this to save. All right. So let's
keep working with this. Here also in the lighter
gray. Let's copy this. Let's add a black mask, unilator and let's put
this in ambitocltion. All right. Perfect. Let's add some
amid occlusion there. All right. This could be a color. Let me decrease
also the roughness. And this piece, I would like
to make it metallic maybe. Fairly tiny bit lighter. Just like this. There we go. Et me add some blur slope here. Perfect. Let me put this in 100. Alright. All right. This will
be the ambient. Pollution. So now, what we're going to do is to add
maybe some edges. Let's add the black
mask, inator. Add some curvature. All
right, Global invert. Let's see the base color. Let's reduce the
balance of this. And also, let's reduce
these sliders in this area. All right. We could increase this. Perfect. All right, this is
not working properly. Oh, I have some globbing bird. All right. Maybe we could add some roughness. Like this would be
I think so yeah. Now for this orange piece, I will just copy what I have done in the orange metal piece. I will just add it here. Perfect. Just like that. Let me paint
out some of these edges. Alright. Just like this. Alright. Perfect. There we go. Just like this. Perfect. Maybe a little bit
more of roughness. That a black mask,
that a fill layer. And there for something, maybe this one could be. Let me see my roughness. Here in the roughness, we could this is not
doing anything. Alright. Do I have
roughness, global roughness? No. Why is this not
doing anything? Ah, it's doing anything, but it's quite low. Let me copy this roughness. Roughness, I would
call these edges. Alright, let's go
down. Pace out here. It just roughness. Here we go. Let's explore this just to see how this looks
inside Marmoset. All right, see? All right. Let me see how this looks. In Razor. I need more roughness variation in
this and also in this place. So let's just do
that. All right. So let's go here. And now, let's add. This is the mask, right? No, that's the inner armor. Let's go here to
this darker gray. We have some roughness, but it's not enough. It's not enough roughness. We could add another
layer of roughness there. Just like that. Also here, we could add
another layer of roughness. Maybe with another layer
with this one would be. Maybe with another one. Maybe this one. Let's
see how this looks. All right. Let me
put this in here. Let me put this in overlay. Perfect. Let me also remove a tiny
bit of this Corbatur stuff. I don't quite like it. Maybe we could paint
just a tiny bit. Just like that. All right. Also in
the mitoclusion, we could paint out a tiny
bit of this stuff here. All right. Something like this. All right. Perfect. All right, let me
see how this looks. Inside the engine again. All right, let's see. Let's wait for this.
Alright, I got an error. So let me restart my Marmoset. Alright? It seems that was
like a video card error, but this is fine now. So let's just keep to
see what we could add. What else we could add. Alright let's go here. Maybe we could add a gradient. Let's call this base. Bukpis, black mass,
inator, linear, radiant, maybe a
little bit darker. All right. Let's go
here. Let's inverts. All right. Let me
see my base color. All right. Let me see like this could be. Let me see my roughness. Let me increase that roughness. Let me increase one
of these roughness. Just like that so I can see better what's happening
inside the engine. Let me change the names. All right. Let me also go to the hair. I will just add some rough
to the hair, just like this. And also in this piece. All right. So now let's export this again. Let's see what this give us. All right. Maybe we could keep
doing more work on this. I think so. Let's see, maybe we could reduce the
brightness of the sky. Alright. I think
it's looking cool. We need to make also the textures of the face
and here of the clothes. So I think I will
leave this video here. In the next video, we
are going to continue making a texture for
character. I'll see you there.
33. Making the Textures of the Inner Suit: Alright, guys, so let's
continue with this model. Alright, in the previous video, we did start working
on the mask. And also, we need to
continue this cable. But first, I want
to do some stuff. So, I basically did something out of camera
and was just to, like, increase the contrast between the color
of these metals. I just made this dark
metal a little bit darker. So let me go to the inner armor. But basically was just to
make darker the color of that metal because I have noticed that before
the contrast was, like, the same and it
wasn't looking that good. So I just wanted to make it a little bit more with contrast. Other thing that
we need to do is to do more contrast
between these metals in the roughness map because
it's almost looking like the same material,
the roughness. And I don't think that
it looks that good. So let's go to the grunge here that that roughness, let me see. I think it is the glow of
roughness, this one, maybe. Let's see how this looks
like without the dust. Let's wait for this. All right. It is not the dust. And then let me add
it again. All right. So let's start working on the
roughness of these metals. All right, maybe here. We could make this dark metal, a little bit brighter. I mean, it a little bit
rougher, just like that, maybe. This piece, this
middle gray color, we could make it a tiny
bit shiner just like that. Perfect. Just to have a little
bit more of contrast. Alright, let me see
what we have here. All right. Alright,
let me change. If I can find roughness of this. Alright, let me see. All right. All right. Let me Alright, I have something like a global roughness in here. Yeah. Let's see. This global roughness let's make that global
roughness, right? That roughness is in overlay. Let's put the entire
folder in overlay. You can see how this looks now. Sometimes the layer
type doesn't work. And the reason is because those layer are inside a folder. So in order to make
those layers to work with the rest of the to the layers that are outside
of those of that folder, you should make
the entire folder the layer type that you want. For example, here, I just put this roughness
layer into overlay. So now we could keep
tweaking a tiny bit more. Maybe we could change the
type of layer that this has just to see if we get
a tiny bit better result. All right. Let me make this darker metal, a tiny bit shinier. Let me see my reference. I mean, my reference
my roughness, got it. A little bit dumb.
Yeah. All right. Let's see. Maybe we could make this a tiny bit
brighter at white part. Let's go here. Just like that would be, maybe. All right. All right. Let me export these textures and see how this looks
inside the engine. Let's export this. Now let's go to Marmoset. Let's see. Let's see
how this looks like. All right, this is supposed to be to be updated. I think so. Let me see my roughness map to shake if this is
correctly updated. Material values. Let's
go to roughness. And it is not. Though,
something is happening here. Let me see export textures. I think that what happened was the texture
wasn't exported properly, and it makes a
duplication of that. Look at this. Alright, what
Substance Painter did was it didn't erase the
previous overwrite the previous textures and just created a duplicate
of those textures. So what I'm going to do I
will import those textures, and I will delete the
previous one maybe. Yes, don't have like this
conflict between textures. So, let's do this. I will export all the textures. And I will remport
them inside marmoset, so we could keep working like overriding the
textures real easy. So let's do that. I will be back in a second. So now I have reported
all the textures, and let's see what
this looks like. Let me go to the inner
mass because I forgot to import the missive texture
on the inner armor. Alright, you can see
that looks better now. Let me see the roughness. The roughness. Now we have a little bit more of contrast between
these materials. Maybe we could make this
a little bit less rough. Let's go to marmoset. I mean, substance painter. Sorry. So, let's go here. Let's go to that dark
to that dark metal. And let's go now to
roughness, let's see. Let's twig just a tiny bit more. Let's leave it a little
bit of roughness. Also, I don't think
that this piece should be metallic, indeed. Alright. Maybe this metal piece, that gray metal should
be completely metallic. So let's make it a tiny
bit more metallic. Just like this, maybe. Maybe we could
make it a tiny bit lighter or maybe brighter. Let's see how this
metallic nest looks like inside the engine for this. Let's export just
the inner armor. Alright, let's see
how this looks like. Let's go to marmoset. Let's go to full
quality. All right. I don't quite like
that that reflection. I mean, I don't quite
like this metal to be, like, a fully, fully
metallic piece. Maybe we could just increase the metallicness
just to here to 0.7. 0.8 will be let's
see how this looks like fourth inner armor. And let's see how
this looks like inside mammo set pullback
I think this is better, a better look for that metal. Also, I think I
have all that here, but I remove the roughness
also from this wide piece. So now, let's see what
other stuff we could do. All right. Now we have a tiny bit more of contrast between
these roughnesses. Let me also add a little
bit more contrast in the roughness of this orange piece.
All right, let's see. Maybe something
like this could be. Maybe. Alright. Let me expot that. Also here. I need to make more contrast
between this black color. Alright, let's do that.
This should be this one. All right. Let's
see the roughness. All right. I think we have
enough contrast in the mask. All right. Maybe here. Well, I don't think so that some amid occlusion
will be good there. So let's just export this. Alright, this way for
this to be exported. Alright. Perfect. Maybe we could add a pattern
in this in that place. Let's go back to marmoset. I mean, Substance Painter.
Let's call this space. Now, let's apply a black mask. Maybe we could add
some dots. All right. A fill layer with
some dots. Alright. I don't want these hexagons. Let me search here
for some dots. Maybe instead of dots, we could search for
sphere circle maybe. Their colds. Well, I
think this could be. Let's just put that there. Let's increase the tiling, maybe to this number,
a tiny bit less. 84 could be Alright. Now, I will just change from color to height and decrease
the height just like this. All right. I will also add a paint layer to this pattern because I don't want that pattern
to be repeated in here. All right. There we go. So, let's add some color, maybe. We could add some
dark color there. Maybe this could be a tiny
bit lighter. All right. Perfect. Let me
see the roughness. Let me see how this looks like. So we could make this a little bit a little bit
more interesting. Let's export this. Let's see how this looks like inside the marmoset two pack. Alright? I think that
looks cool. Yeah. Also, I will want to
make this dark color, that dark metal and
tiny bit more brighter. So let's find the base
layer for that piece. Let's just make it a
tiny bit brighter. Alright. Just like
that, could be. Let's explore the
texture second. Let's see how this looks
like inside my Morse. All right. Alright, that looks a
lot better, indeed. Alright, that looks way better. Alright. Perfect. So other thing that I have
done is in the jacket. I just added a little
bit of where is it? Here the jacket. I just
added a little bit of chin. The chin is like a property of the materials that gives like
this effect in the rings. You can see that, there
is some ring light there. That property is useful to like for the fabrics
or the clothes. I just added a little bit
because I just wanted to have that little effect
that doesn't have any other piece that
is not a fabric, just to have more contrast
between the materials. So what I did was just I just
exported the mask that I have made inside inside
substance painter, I just exported, like this jacket and also
these buckles and just overlay them on top of
each other in Photoshop. And the buckle mask, I just make it like in birds. So it's like extracts
stuff from the jacket one. Let me show you just real quick. Alright, so we have the mask that I have exported
from substance painter by just going to
here like this one unless unless just
to here export mask. All right. So we
have the jacket one, and we have the buckle ones. So why we want the buckles mask? It's because like this jacket one covers the entire a mesh. But inside that mesh, we have some pieces that are not a fabric that you can see here. So we're going to use that. Let me select this. We're going to use
that to subtract from here and have just
the fabric to have, like, a mask just on the fabric. So let's go here. First,
let's change the type, the mode of this texture from, like, index color to RGB color. Now let's just press
Console A, Console C, Control Shift B,
and now this layer, we're going to put it
in substract here. Yeah. This one. And that way you can have
just only the fabric pieces. So I just made that and exported it and imported it
back inside Marmoset. You can look at here. Perfect. So let's just keep
working, Dave. Alright, let's go back here. There we go. We have this. Alright. Now, what
else we could do? Let me see my roughness. Yeah. All right. Let's try to, like, make some texture in this
cable. Let's go to the cable. Alright, let's go to
the bronze color. Let's add some roughness
as some metallicness. All right. Maybe a
tiny bit metallic. Yeah, it could be. Now,
let's add some amtocltion. Here, let's make a black mask. Let's at a generator, and now let's search for the ambient occlusion.
Let's invert this. All right. And now let's
just make it brighter. I think I will not add, like, too much dital on those pieces. Just enough amount of ditil. All right, let's just add, like roughness to that color. Let's change the color. Maybe this one and a bit
darker. Just like that. Is color, let's see. Roughness. All right. EO. So let's do something. Let me add some roughness
here. That a massive one? All right. Now, what we're going to do would be
just add maybe some curvature. Add another field layer
with some black mask. It's at a generator. Let's at a curvature. All right. Let's make this less visible. Let's go to these sliders here and let's just
decrease them. All right, just like that.
Maybe just like this could be. Right. Perfect. Let's add some lighter colors there
with something like this could be not like that. Alright, let's wait
for this to stave. Alright, so, so let's
continue with this. All right. Let me just go
back for what I had before. All right, I will just color pig that maybe a
tiny bit lighter. Tiny bit saturated,
like that could be. We could make it this
bit. Less rough. Could be. And also we could add a
tiny bit of lure slope. Let's put this in 100
and increase this. It's a tiny bit though
it breaks up all right. W be now let me add a
field add a field layer. Let me go and find to grunge. Maybe this one. Let's
put this in multiply. Maybe subtract. Let's
just increase this. Let me put this
in multiply that. Alright, something like
this could be. Alright. Something like that could be? Maybe. Let me see. Maybe let's select another
one. This one could be. Now, let's name this urbtur. All right now, I will
add a roughness layer. I will make a roughness here. It's at a black
mask, a generator. Let's just generator or no,
I don't want a generator. I want some fill layer
with some crunch to eat. W this one would be or not. I think it's too much. I don't like that. W this one, there's a tiny bit there, tiny bit less. We could be. So let's also add some
colors to this cable. Let's go to the cable, and let's see what things
we could do here. Will make it metallic or maybe no. All right. Let's add some
amtocltion there also. L mask at the paint or
maybe some urinator. It's fine for AO here. Let's invert this. All right. So let's invert the
amido cluton like that. Let's make the color of
that amido gluten a tiny bit less, just like that. Perfect. Let's call this. I will also let's
maybe increase this. I will also add some curvature, and this time, this curvature
will be in the cavity. Here, let's put how it is. All right. Let's decrease these sliders. All right, so let's
change the color of this. I mean, something
like that could be. Let me add some roughness
to theirs. All right. Let's put the roughness
of this piece. Let me put this here. All right. Let's see the
roughness channel. All right. So we have this I let's
see what we could do. It's a roughness there. It is. Let's add
another corbatur. But this time, that
corbatur will be in the edges, just like that. Let's reduce all of these sliders and
let's just leave the sharp. Like this sharp. Alright. With
something like this would be Alright Alright in the roughness. Where is my roughness. Let's go here and add some
roughness there. Black mask, but let's
add a fill layer. Maybe something
splashy like this. Let's change the color to rough. Maybe with a little
bit of color. Let me increase
the tiles of this. Let me make the
roughness overlay. All right. And let's make this thing
also, a tiny bit less. Let's reduce the
opacity of that layer. Just add a little bit. I will change the type of
range Bab that we added. A more, something like this. Let me export this export.ort
inner armor and mask. Let's see how this looks
like inside the engine. All right. Maybe we could remove
the blur slope on the curvature in
this bronze piece. All right. We could leave it
this just like that. Let me reduce the opacity
of this layer also. Something like that could be. Let me just explore this again. And let's see how
this looks like. Alright. Let's see here. Alright. Why I have my hair? Why do I have my hair metallic? I should not be metallic, right? All right. I think this is
looking cool. It's safe. Perfect. Let me hide the
jacket just for a second. Perfect. There we go. Let me bring back my
jacket. There we go. So now we basically did the upper portion
of our character. We need to do the inner suit.
We could do it right now. Let's start doing
the inner suit. I think will be
something good to do. So let's go here. Let's see what we could do in
this inner suit. And maybe we could add some pattern in maybe one
layer of this fabric. Let's see. I mean, this inner suit looks like
it is some sort of rubber. We could add some
tile, normals there. All right, so let's just
do that. All right. So maybe instead
of having, like, some normal variation,
we could have some roughness variation
like we did in the jacket. I mean, like a
roughness pattern. So let's go and do Alright, maybe here in the
darker color base. Let's call this
space. I will add just first the roughness
stuff that I want to add. Let's add a fill layer. Rough. Let's see what we
could add there. Maybe we could add some squares, square maybe this one. Let's just add that here
here. Let's increase that. Let me reduce the bother width. Let's make these
squares pioneer, maybe 90, maybe even more 200. Let's rotate this 45
degrees. I select that. Could be a tiny bit tinier, 150, maybe 300 would be also. Maybe 350. I think so. So now in the lighter
fabric in this gray fabric, we could add another
field layer. So let's go and see
what we could add. La mask, go to roughness. All right. Maybe we
could add some dots. All right, let's add
some fill layer. We could add some dots or
let's see, Here cools Circle. Let's just get this here. Let's put this maybe in 300. Let me invert. Let me invert this or we could decrease the
size or right here. I kind of like this pattern. Maybe let's add some filter. So let's add invert here. Maybe it could be. I mean, I think it is a lot of noise. It is a lot of noise to have those repeating patterns there. I think it looks better without
that pattern. All right. So let's start adding some
aminocltion those stuff. Let me change the name of
this layer to patterns. Now I will just add
some fill layer. And let me put that
on top of everything. Right black mask, erraor
let's add some amidocltion. Real quick. There we
go. Let's invert this. A right maybe we will decrease this ametocltion a tiny
bit global blur. Maybe no. I think that ametocltion
will not be the answer here. We could make this
a tiny bit darker. Alright. Maybe something
like that could be. But it makes the
rest a lot dark. All right, so I will not use
the amid occlusion layer. What I will do I will just go to my inner armor or any other texture set that
we have worked before, and I will just copy my
fake lighting layer. Let's go to the inner suit again. Let's just add it there. Alright, let's wait for this. Or right there we go. Have some color variation
here. All right. There we go. Perfect. All right. Let me do something. Instead of this, I would change the generator to curvature. All right, let's see my
mask. I don't like this. Maybe amid closen should be a invert this this
could be, could be. Let me make this darker. Well, I mean, I don't like so much how this is
making the rest. Like this dark All right. Let's see. Curvature here, maybe we will do
something. Let's go here. Let's decrease all of these. Hey some blur. Something like this could be. All right. Perfect. Maybe we could
change this how it is. Something like that, I will add a paint layer and
I will start removing. All of these weird looking
lines just like that. Alright. Perfect. I mean, let's don't use that. I mean, it would be but
no, at the same time. Alright. Let's just
remove all of these. Alright. Perfect. Maybe we
could use this. Alright. There we go. Let's call this Curvatur. Maybe let's add some
color variation. Let's go to our asset here. Alright. Let's wait for this to
respond, all right. Let's just add some fill
layer with some lack mask. Well layer, and now I mean, no. Win the Yeah. Let's
remove the mask. Let's just add this one, and let's put this in
multiply, maybe. Just like that. Win this one. Alright. Maybe this one
could be like this. Let's add the lure slope. All right. Comes like that. Let's make this in ten. Let's increase the slope. Let me decrease the amount
of color that this has. Just like that. Like that could be. Perfect. Let me also add a
roughness here. All right. All right. Let's see. Maybe we could add
also some stuff here. Let's go there. I mean, maybe we
could add some dots, but they could be super small. Let me just go to the
roughness. All right. We could make it a lot
smaller, maybe 500. I like that. All right. Let's type circle. Let's see if, right, we have these circles.
Let me change that. All right. Let's
select these circles. All right maybe 100. Something like this would be All right. Just something like that. Let me invert this. Perfect. Maybe we could make this
a brick some height. Pets. Let's see how this looks like with the rest
of the clothes. Maybe without. Yeah, I think so. Maybe not. Maybe we could
just add the height. But not that much. Maybe not. I don't like it. I don't think so. It makes
a lot of noise there. Let's make the circles a tiny
bit bigger. Just like that. Alright, now let's go here. Perfect. There we go. Maybe a tiny bit bigger, even. Just like that. Let's add. Let's see what we
could add here. Maybe we could add some color
variation. I mean, yeah. That and also some
rougles variation. Let me copy this
color variation. Copy and paste here. All right, let me change the
type of that or variation. Let me make this
a tiny bit less, and also we could add some roughness variation
to that piece. Let's go here. Let me add a black mask. We layer. Now let's
find some crunch. Maybe some noise will be. Maybe one of these
maybe the clouds. Let me put that
in the roughness. Let me see my roughness. Alright. Maybe something
like this could be. Perfect. Let's add also. Don't fill layer. We'll
add a grunge now. Something like this would be. Let's put this in overlay and let's decrease the amount
of roughness that this has. Maybe we could change the cloud
for other type of crunch. Something like this
could be, maybe not. All right. So let's see. All right. Let me see my roughness map. It doesn't look Too too good. I like this could be Alright. Let me
just change that. Let me add another
roughness variation. Let me delete that layer. I will just duplicate
the roughness one. Let me put another
roughness and let me make that roughness
variation a bit less rough. Alright. And maybe we could put this in
overlay and also this. Let's see. Maybe it could be. Something like that
would be good. Let's go to this other one. Maybe we could add some
roughness. All right. Let's try to use this one. Let me copy this
roughness variation. Maybe we could use this One
let's see our roughness. All right. Let's wait
for this to save. All right. So maybe we
could change that here. At a tiny bit more of
contrast, more balance, even maybe a tiny
bit more of tiling. Let's change this All right. There we go. Maybe this one. I'm just trying to find the
correct, a good roughness. All right. Let's
put this in normal. Let's export this and let's see how this looks like
inside the engine. Port both of those. And let's see how this
looks like. Let's go here. Now we have some stuff there. But that is still looking
like to flat in the do map. We have something,
but I think we could add a little
bit more stuff there. So let's go here. Let's
see what we could do. Go to the Curvatur. Maybe we could add
another layer. Let me duplicate that one. We'll just erase all of
these that I have there. I will add a color selection. We color pick this gray, I mean, dark color. I will add another mask filter. And let's add mask
outline. All right. Let me see my mask, all right's leg
inside. There we go. All right. Let me make the with or the
blur a tiny bit bigger, just like that. Perfect. Its just because I want to have, like, some gradient
on the rings. And let me delete this
stuff from the teams. Alright, maybe here,
let's activ the flow. Let's remove that from here. All right. There we go. Let's do the same, but with
the gray fabric, maybe here. Let's change from
outside to inside. All right. Let me see like this could be make this color a
tiny bit less dark. Would be this. All right. Let me see my roughness. Would be Alright. Perfect. So let's
explore these textures. The inner suit just this time. Let's see how this looks
like insur Mamoset. I think that looks better. Yeah. Let me hide this
and also hide this. Yeah, it's looking
cool. Looking cool. All right. So let's bring back our jacket, an hour an hour armor. I have noticed that I haven't removed that line
from the seams here. All right. Let's go here. Let's call this mask coat line. Now let's just remove that
mask from these size. All right. Just like
that here also. Perfect. There we go. Alright, let's just save this. And maybe we could
end the video here. In the next video,
we're going to keep working on the textures
of this model. Maybe we could even
start working on the lower portion of our
character. So see you there.
34. Making the Textures of the Skirt and Belts: Alright, guys, so let's
continue with this model. So now maybe we
could start making the textures of the
lower part of the body. So let's start making
that. Let's go here. And let's see what pieces, we could start
making the textures. Alright. Maybe we could start with a skirt or
maybe with the pens. Let me see something real quick. Alright. Alright, let me go. Let me do the skirt first. Et's go with the skirt and belt. Since they are in the
front of the pants. So let's begin with this. Alright, let me just
close all the folders, and now I will get my
baked lighting layer. Alright, let's copy that
and then paste it here. All right just like this. There we go. Let me see my base color. Perfect. Alright. Maybe we could pick a tiny bit more direction of this just like that would be. Anything like that,
maybe. Perfect. So now let's start
with the skirt. Do we have this? All right. Let's make it a little
bit more rougher. All right. Let's
take my roughness. Alright. Now maybe we will start making ambient occlusion
fold that layer. Let's put a black
mask, a generator. Let's go with the ambient
occlusion. All right? Let's invert that
ambient occlusion. All right, something
like this could be. All right, let's go here.
Let's change this maybe to a darker gray.
Something like that. Let's put some rough
roughness there. All right. Let me remove a
little bit of hue. All right. So we could add also gradient. Let me put this as AO. Let me add a gradient now. A generator inner gradient, let me invert that
gradient and I will just reduce
the amount of it. And now I will choose a darker color for this Alright. Maybe this one could be or
maybe it should be pre gray. Let me leave it as a gray
gray color, a gray gradient. Alright, maybe we could increase the amount of gradient with a little
bit more of contrast. Let me see like this could be. Maybe not that much
like that could be. All right. Perfect. We could also add first let me change the
name of this gradients. Let's add maybe a little
bit more variation. Maybe with some color variation. Let's go here at a field
layer, black mask. Let's add a field layer. Perfect. Now, let's search for the grunge that we
have search in Google. Let's wait for this to
respond real quick. All right let's just
drop that there. Let's change the layer
type to multiply. All right. Let me increase this. Alright here, we could
make this darker. And now I will add a filter
with some blur slope. All right, let me add
another fill layer here. This time will be like a grunge, a little bit splotchy. Maybe this one could be. Let's put this multiply. Perfect. And now I
will just reduce the amount of opacity
that this has. Something like that
could be. All right. Perfect. Let's just
look at our reference. Let's see. All right. So now let's add a
little bit of corbatu. Let me call this
color variation. Now I will just add a little bit of
corbatre in the edges, right, unilator Corbat
unilator right. Let's reduce the amount
of these sliders. Let's just reduce them. Perfect. Just like that. Maybe
the balance also. Alright, so now we have this. I would like to add
a fill layer also. And now maybe let's
select this one. I will just put this in subtract so that that cubatory
is not in all the edges. Maybe I could reduce
the balance and also increase the
tiling. Maybe not. I think this could be good. Maybe we could add a
little bit of llo and say, but it's like some choice
of personal style. I just like the
blur slope effect. Maybe something
like this could be. I like it. Alright,
let's go here. Maybe we could add a
little bit of rough. Let me see my roughness,
a little bit rougher. We could even add a
little bit of height, a little bit of negative height. Maybe. But in that case, I mean, I don't want to have these
breaks in all the edges. But I like the fact
that this gift without without the breakups. So I will just add the
breakups in another layer. So I will just
duplicate that layer. I will lift this one that One. Let me change the color maybe. Let me see like this. And now I will add
a paint layer, and maybe we will start
painting some stuff. Maybe we could remove a little bit of this
corbator from here. Just like that. Or let's add a little bit
more here, maybe. Also here. Alright, let's see. Maybe we could add a bit
of curbur in this place. Also would be. And now in this
one, I will make, I mean, I will add another
raunch with this one. And now I will add
hide. Just like that. Let me increase this rough something like that, maybe we could reduce
the balance of this. Let me see my mask. All right. Let me change that crunch maybe for this one,
increase the balance. Something like that could be. Alright. All right, perfect. Let me
add another paint layer. Now I will just
remove paint layer. And now I will just remove this curvator from
some of these edges that I don't want to
be, like, damaged. Maybe this damage
could be more on the lower portion instead
of this upper portion. Maybe around here, we could
add a little bit of damage. Alright, something
like that could be. All right. Let me remove this painting
that I have done here. Alright. Perfect. Let me change. Alright. Let me change the color a
little bit of this. Alright. Perfect. Maybe. Alright. Maybe we could
add a little bit of spots. Let me just copy that. Let's just call it rubato two. We need to tweak a
lot the roughness. We still need to tweak
the roughness for that. But now let's just focus on add a little bit of more
color variation. So I would add a black
mass, some paint layer. I will select my
basic heart brush. And now let's search for the for these, like, Alphas. And now we could start, like adding a little bit of crime and a little bit of
dirt or this type of pots. Let me change the color also
on the roughness of these. Maybe this could be let
me make them rougher. I like that. Let me say like this.
Let me see my roughness. Alright, let me make the
base layer a little bit less rough so we could
have more contrast between what we have ready.
A little bit like that. Let's go to the spots here. All right. Maybe we could
make those spots a little bit less or lets twig also here. Let's make them a little
bit rougher. Maybe not. I think so. All right. Let's keep adding
this type of spots. Maybe we could add few here. What is this? Was it like that? No, I don't like it. All right. Perfect. A there we go. We could add another
roughness variation. Let's call this pots. I will add a layer I will call
this roughness variation. Now I will go here. I will add a black mask layer, and I will just select one of these crunches that we
have here with this one. I don't like it. WT one, I don't like it at all. This one could be All right. Let me remove the color. Let me make this a little bit. Just a tiny bit less raw. Just to have some highlights. Alright. Maybe this one
could be. All right. Let me in the color variation, also add a paint layer
because I want to remove a little bit
of these spots. Like, I want to remove. This one's from here, let
me select a knife brush. I don't like that spot there. This one either. All right. Let's export this and see how this looks
inside the engine. Right, let's export
it bells and skirt. Let's export that. Perfect. I will also export the skirt mask so I
can add a little bit of pus inside Marmoset. So let's go here. Let's find for this skirt export mask to file. All right, I will just call
this skirt, fabric mask. Perfect. So now let's
go to the engine. Alright, looking cool. Let's go here to materials. Let's go to the skirt and belts. I will add in diffusion, I will put this in microfiber. And now I will just
select here my mask. Let's go to mask, let's
select skirt mask. Alright. So now let's reduce the amount of sin that
we have. Hiny bit. Let me change also
the color of this. Maybe we could use the tint would be This
doesn't do anything. All right. Could I see a difference
without and with? Yeah, looking kind of cool. Perfect. All right. Perfect. I think it's looking cool.
Let's jump to the belt, maybe. Where is my belt? Alright. Let's go to substance
painter? I mean, yeah. Alright. Let's start
working on these belts. Alright. So for the bells, I want to use smart material
that substance painter has. That's called stylized
stylized later. I really like this
smart material. So what we're going to do I will just put this
in pass through. And now I will just
remove this base color. Also this noise, maybe
instead of sharpen, we could add a blue slope. Let me select the blue slope. It doesn't do anything.
It's doing something. Yeah, kind of dark
touch the curvature. Let me change the curvature
color or something brighter. Something like that could be Maybe it's dark touch. I don't like I don't
like it too much. Alright. Maybe I could just lift the roughness or maybe
reduce the opacity of this. All right. Perfect. We have the cavity. Alright, let me add some base
roughness or these peels. All right. I would like, also to have right. This part will not be seen because in that part
will be this head. I will not care too
much about that. Alright. I will want to have this piece
here without that layer. So maybe we could let
me add this there. I can duplicate this unfolding. All right. All right, let's see. Now here we could add a mask. Also, we'll make this a
little bit less rough. I mean, the mask should
be where we're here. Yeah. Let me remove the mask. We'll add the mask in the new
layer that we have created. And now let me use my
basic heart just to paint this All right. Let me paint this. And we
could paint it with this. All right. Just do this
would be. All right. Let me see my mask. All right. Let's just keep adding the mask. Perfect. Just like that. Now,
I will just put this in here in the third
one, mesh fill. Right. Now we have
isolated that piece. Let me remove that
from here also. There we go. Let me
add the curvatur. I just want to have
another roughness there. Like, if that's a plastic stuff, maybe we could make it with another color. I don't
know about this. All right. Let me see how this
looks with the rest. Let me add a little bit
of roughness variation. Here, I like maybe we could make it a bit less
with another layer. Maybe this one would be. Alright. Perfect. I kind of like
this. I like this. All right. We want to add a AO map. All right. Let's add a black
mask, a generator, or right let's search for ambient occlusion.
Let's invert this. All right. Let's change the color. Or let me see my mask. In here. All right. Something like this could be. Let's make this tiny bit rougher. All right. Maybe here in the corbator we could also add a
tiny bit of hide. All right. Let me copy
the mask from here. Let's just copy
this. Copy effect. Where is the copy
effect? Copy effect. Let's put that on here. Let's add a white bass. Let's paste effect. And now I will just do
some subtract there. All right, there we go. We could add a generator. I mean, a generator
now a fill layer. And now let's add
some grunge with this one which subtract
maybe will be. Maybe we could
select another one. All right. I say like this could be. All right. We could add a paint layer. And we could paint a little
bit of le scratches and also some waress just
like this could be. Let me see like that. All right. Maybe scratch or maybe not. Let me also remove
a tiny bit of this. All right. Just like this would be. Let me export that to the
engine for textures, skirt. Let's just go to Marmoset
let's see how this looks. All right. Oh, so I had another
error from my UVU. So let me pause and I will
get back to you in a second. All right, so we are here and let's see how the bells looks. All right. Looking cool. All right. So maybe we could go and
start making this buckle, working on those metals
that this stuff has. Alright. Let me say
at my reference. But let's just start working on those metals. Let
me save these first. Alright, so let's keep
working on these metals. So let's go to the
metal the metal layer. Let's call this base. Alright,
we could add a tiny bit. Less roughness. I mean, more roughness
would be like this. Alright. Maybe we could do the same here in the jacket.
Let me do something. I just want to see
some stuff there. Let me go to the
jacket. Roughness. Maybe in the jacket here. I know it's in the inner
suit, not in the jacket. Let's go to the inner suit. Let's wait for this to respond. Alright, let's go maybe here. No there. This one. We could make
this a fully metal piece. Let's see how this looks like. Alright, with a little
bit less roughness. Let me see my roughness, how it looks. Maybe not. Let's just leave it how it was. Let's just keep
working on the metals in the bells. Alright,
let's go here. Now, let's add maybe let me increase I mean,
decrease the roughness. Alright. Let's add some
color variation and some AO. Let's add a Black mass. I mean, fill layer. Let's add a black mass
on that field layer? Alright let's add
some amine occlusion. Alright. Let's just invert
that ambient clusion. What? All right. All right. Yeah. Let's go here. Let's make this darker. A little bit darker. Let
me add a blue slope. Let's put this maybe in 100. All right. Just like that. Perfect. Let's had a little
bit of roughness there. Just like that. Let's
make this a lot darker. All right. Maybe we could reduce balance a little
bit more of this ao. All right. Let's call this AO. Let me add also some
roughness variation. Let's go here. Black mask. A generator. I don't
want a generator. I mean, a field layer. Let's just choose
a random one this one. Let's increase this. Maybe another one.
This one could be. Because I just want some
roughness variation in the surface of this metal. Maybe another one, let me
select another raunch map. Let me see metal, maybe. Maybe we could use this app that we have unloaded
as a raunch map. I think that could be. All right. If
something like that. Alright, let me add
also some curvature. This should be a black mask. Alright let's add a generator. Curvatur. So here, let's
reduce all of these. Alright let's search for
the Curvatur where it is. Alright Maybe something
like that, could be. Let me make this metal
at any bit darker. Just like that. And now I will just
make this rough a little bit more
rougher. Just like that. Could be. Alright. All right, let me
export this and see how this looks
inside the engine. Let's click here and Export. Let's Export it, and
let's go to Marmoset. Alright, so we are here. Let's see how this looks. Maybe we could add a little
bit of painted title. Urbatur. Alright, let's add a little
bit of painted title in this. We could add like
something like this. Alright. A little
bit more detail there. All right. Let's add something here. A little bit slow. Just give it a
little bit of time. All right. Perfect. Let
me see how that looks. Also here, I could add maybe
a tiny bit more of detail. All right. Let's
just export this. And let's see how this looks. Alright, let's go here. I think it's looking
kind of cool. All right. Perfect. Maybe here in the
roughness variation. We could add a
little bit of color. All right. Let me put
this in maybe overlay. Let's just add a little
bit of darker color here. All right, let's search
for another grunge. Maybe this one could be? We could add a little
bit of us low. Yeah, kind of. Let's
export this. All right. Let's go to marmoset. All right. So this is
how it looks here. Maybe we could make this color, the base color a
little bit darker. So the highlights and
show up a tiny bit more. A little bit rough also. Alright. In this corbaor I will also add a tiny
bit of lure slope. Just a tiny bit just to add
a little bit of breakup. I would say, like this. Alright. Let's just
export this again. Let's see how this looks
inside the engine. Alright, let's go to
pharmast. Perfect. I think it's looking
kind of cool. Maybe we could add another
roughness variation duplicate this,
the outpler slope. I'll add another one. Let me select another
Another color here. We a tiny bit darker, let's go to roughness and
let me add this in overlay. In screen, maybe. This one
also will be in screen. Let me remove the color. All right. All right. Just like that, a tiny bead. All right. Let's
explore this again. Let's see how this looks. Alright, looks kind of better. Alright. Maybe we could start working in the fabric
of these pouches. So let's go. Working
on the pouches, here in the dark
fabric here perfect. All right. Let me select my pouches. All right here. Let me change
the name of this base. Alright, I will add. I mean, this is already dark. So let's see how this
looks amid occlusion here. Alright, let's add
some amine clusion. Let invert that, here. All right, something
like this. All right. Maybe with a little bit of hue. Alright, I will add some blue
slope, but not that much. It's a tiny bit. It's like that. Alright. I'll just reduce the
amount a little bit. Also, I would like to add, like, this red stripe and
also this dickle here. Oh, let's try to do. All right. Let's go here. AO, first, let me work
on the fabric itself, and then I will just
add those details. Right. Maybe we could add a
tiny bit of color variation. Here, let's just add
that there. Lack mask. Fill layer, select
something random, maybe see this one
could be good. Let me increase the
tiling of this. I put this in multiply. Let's jump to the
base color channel, and let's put this in multiply
to see how this looks. Is that a little bit of lure slope there
just to break up. Lu slope. Alright. We call that also a
little bit of roughness. Just like that. All right, let me increase the
roughness here. A tiny bit. Not that much.
Just to have something. All right. Perfect. Let me add those details. I'll make a new folder. We'll put, like, color details. Right. So let me add a
field layer here. We'll make this red or maybe just color pick the
red color from the consent. All right, now I will
add a black mask. Is that a paint layer. And maybe now, you could
make that red detail. But I will just select my basic heart let's
just paint that. If you like, press left click
and then you press Shift, you could make or maybe it was, if you do a stroke and
then you press Shift, you can make a straight
line just like this. Et's cut a tiny bit here. Maybe something like this.
Perfect, and also here. Maybe a little bit more in area. Remember, you just
need to, like, left click and then press
shift and then drag your cursor to do these straight lines like
these straight lines. All right let's do the same in the other part. I like this. And now let's start
removing a tiny bit. Of this just to make it a
little bit more squarish. Just a tiny bit like
that. Would be. We could add a tiny
bit of rough or maybe not of height we could
add just a tiny bit. All right. Let's save this. Alright, let's just
keep working on this. Maybe we could add now
like this, dial here. Let's add first this
red color in that area. I will maybe change the Alpha, maybe to something more square. Maybe to this one. All right. Something like this. Oh, Yes. Something like that could be. Let me just put it in
a better position. Maybe here could be.
Just like that, maybe. Like this, all right. Now, let's add a little
bit more colors. You can see that this has, like, orange color and also has a white color with a little bit of a darker orange.
So let's try to do that. Let's call this red. Let's add a neopl layer. Let's call this orange. Alright. Let's add a black mask. Now let me reset my basic heart. And we could make
like this flame shape that this has to make
that flame shape. Right, this doesn't
have an Alpha. Seem so? Yeah, now it's working. Let's just try to paint that. A tiny bit slow. Alright. It's super slow. Right? Let me add an
anchor point here. And now I will just add a feel and let me select
this anchor point. I will put this multiply. Now I will add a
paint layer, right? Maybe let me do this with the mouse since for some reason, with the mouse,
substance doesn't lag. I don't know why substance
does that kind of weird. Maybe a tiny bit of
this flame pattern. Alright, I will need my
tablet for this. Alright? Let me remove the pressure. Let like this. Alright. All right, something like that. Maybe we could remove a
tiny bit more of this part. I like this could be. Alright, I think
this could work. All right, a tiny
bit of p there. Alright. There we go. Let me I will copy this layer. I will call this white. Let me turn it off. And now let me change the color with the one
that the confit has. Maybe let's just color
pick that color. All right. Here we go. Now, let's horn on
the white layer. Let me remove that paint layer. Let me make this black entirely. We'll add again, the field
layer with the anchor point. Let's put that anchor
point and multiply. I'll let's add that paint layer. Let's put that paint layer
under the anchor point. And now we could start
painting like the rims here. You can see those rims. All right. We need to make this
a tiny bit brighter, so it has a little bit more
of contrast like that. All right, let's just
paint this real quick. Maybe what we could do, let's use maybe let's
an anchor point. Let's use the mask
outlined filter. Let's add a layer. Let's add the orange mask. Let's at a filter. Let's add some mask outline. I mean, I think it should
be easier to paint it by hand instead
of doing this. Let me put this in multiply. I should be inside. All right, just
like this will be. I mean, I don't really like it. I mean, this could
be. This could work. Indeed, let me add a paint
layer on top of this, right, and now I will just
remove portion of this. Just like this. Put
a tiny bit here. Now, I will copy this orange
and now I would make it. Let me remove the
anchor point from here. I will make this a
tiny bit darker. Alright. Let me erase any bit of
the mass that this has. I like that. Let me copy
the color from the concept. All right. Maybe like this, you can see
that this part has, like, this darker color, and the other half has
the brighter orange. Let's just try to do that. Maybe something
like this could be. Maybe this could be. Alright, let me add
the orange mask here. Perfect. There we go. I right. Maybe we could explore this. Let me see my roughness. Let me add a little bit of
roughness in the red channel. I'm like this. And here we have some stuff. But for some reason, yeah, this one. Let me go here. Let's go to roughness. Let's put this roughness in
a screen. Just like that. There we go. All right. Let's export this, and let's see how this looks
inside the engine. Alright, let's export this. Right? I will also save. Alright, it looks cool, but this fabric is a fabric, so we need to add a
little bit of chin. So what I'm going to do we
just wait for this to save, and then I will export the
mask for this dark fabric. So let's wait. Alright,
this is already saved. So let's go to the dark fabric. Let's go here. And now
let's click here and exports mask to file. Let's call this pouch Poach, dark fabric. There we go. Let's go to marmoset. Let's go to materials. But in that case, we shall need to split
the material into two thing that we don't have. Maybe we could add
some layer material. At a layer material here. Let's see what we could do. Efficient All right. I will choose here the
mask that I want to add. No, I was, I was, like, in the I was in the jacket? I should select this one. Let's add a mask layer. Let's that a mask. Let
me select the jacket. I mean, the pouch Ar. Now I will just
disable all of this. I will just disable
all of this and let's just add the chin there. All right. It's a tiny
bit more of chin. All right. I think it's
a little bit too much. All right. Just add just
a tiny bit of this. There we go. Let me
save this scene. Alright, so here we have this pouch with
a little bit of chin. W be. I would also like to add some curvature in
that dark fabric. Let's go here. Let's
add some curvature. All right. Black
mask, a generator. Curvatur. All right. Let's decrease all of these. Let me like that. There we go. Let's add. So filter here. All right. Let's add some slope. Let's put this in 100. Alright. Looking cool. Let me add some
rough my roughness. Alright, I will just leave it like that. That's
tiny bit rougher. There we go. I will also add a field
layer. Now, let's select. A garnge. Let's put
this in substract. So this could make a
little bit of breakups. All right. This could be There we go. Let me save this. And now I will just export that back to Marmoset and see
how this looks. All right, so let's
export this to Marmoset and let's see how
this looks. Let's export that. Alright. Let's wait for this. Alright, let's go to Marmoset. There we go. Alright. Let me close this. Now, let's see. Let me add again my light. And let me reduce the brightness
of the DR. All right. Went to see with another
type of lighting. Alright. There we go. I think this is looking cool. All right. Let's work a little bit
more on this like piece, that darker piece in the pouch. Let's just add a tiny bit of color different roughness
there. All right. So it has more contrast between the material
of the fabric. All right. Maybe here I could
add the stylized leather. Stylized leather.
Let's just add that. We'll move this base there. All right, I will
remove this base layer. All right. Let me
change the color of the corbaturTiny bit more. Maybe something
kind of like this. Maybe not that much. Let me see my roughness. All right. Perfect. I think this should be enough for this. All right. Now, for the
curvatur I will want to remove a little bit
of this curvatur here. So, I think it's this one. Let me change your name. Alright, something like this. Perfect. Go here also. All right. Perfect. There we go. AywayF this orange piece, we could add some stuff. I also we need to work this
leather. I mean, this belt. But right now, this video
is a little bit long. So let's continue
in the next video.
35. Making the Pants and Other Adjustments: Alright, guys, so let's
continue with this model. In the previous
video, we were doing the skirt and the belts
and also the pouches. So now we need to do a
little work on the skirt. Like, I need to make I need to work on this belt and
in this other one. Oh, let's do that real quick. A for this belt, I will just copy the previous work that
I did for these ones. So let's go to the
skirt and belts, and I will just copy
the layers and paste it in the other art. All right. So let's search for those
layers where are they fabric, layertyliz. I think
it's this one? Yeah. So I will just copy this. And now I will go to my
skirt where is the skirt. All right. Skirt here. Perfect. Dark strap. Let's just paste that there. Alright. There we go. Wait for substance to
late that. All right. It's just that my computer is
a little bit old right now. I need to upgrade it. I have a RTX 2060, so I need to upgrade
my graphic card. That's why substance is
sometimes a little bit too low. Let me increase the tolerance to get rid of those white pixels. Alright. Perfect. I think that's great,
just like that. Maybe in the curvature. Let's see. Let me
see the curvatur. Yeah, I think it's good. Alright, I will just
leave it like that. I will also copy this,
but I will change the color for this orange strap. Let's go to Belts. Let's select the orange strap. Let me see where it
is orange belt here. I will just add this all right. I will just take this. Let's change the color of
this basic noise. All right. Let me try maybe
change the type, the layer type of light. Also here this dark touch. Let's select some dark orange. All right. I find out
like this effect. All right. Let me put
this in multiply again. It wasn't multiply. It was
in overlay, I think. Yeah. Let me change the color, maybe. Maybe without color. Me to change the
curbatur Something bright something
like this could be, maybe I could add
this dark touch. But let's add some blur slope. We'll just add some blur
slope here. Perfect. Let's put this in 100 maybe. Maybe something
like that could be. Alright. Is this
on the curvature? All right, let me add
another fill layer, and I will put that in subtract. Let's search for some grunge. Maybe this one could be, let's put this in subtract. Let me make this layer a
tiny bit less noticeable. Alright, basic noise. Let me see the base color, and also let me see the
roughness or rather have this. Maybe we could make
the roughness. I mean, this part, a
tiny bit less Alright. Maybe this could be. Also, that part, this
piece has roughness. Yeah, it has I think I
will just sleep like that. I won't care too much
about that piece. All right. I think
it's good as it is. It's a small piece. All right. So I think now that we could move on with the pants and
boots and all that stuff, we are almost finishing
this character. We just need to texture the pants and all those pieces
and also the demon head. All right, go here. And now let's texting the pants. Let's texture the pens, right? Alright, let me
hide all of these. We have a lot of layers here. Let's start with
the darker blue. All right. Let's go here. Let's call this space. I will add a new fill layer. Let's set a black
mask at a generator. All right. Search for
this ambient occlusion. Let's invert that. Is
a little bit too much. I think I will have to paint out a lot of this ambit occlusion. So let's add a paint layer and I will search
for my basic soft. I will active my by symmetry, let me put the tablet
pressure in the flow. I will remove the tablet
pressure from the sides, and now I will start painting out some of these
ambient occlusion because it's really too much. Let's just try to erase
I know some of these. Alright just like that. It's way, way too much. Alright, let's just keep
erasing a little bit of this. All right. We could add
just a tiny bit there. Alright, something that I have thought maybe
we could use, like, the basic stuff to make, like, adds a little bit
more gradients in the jacket could be
like some white stuff. I mean, bright. Let's see how that
looks in a second. All right, maybe now we could
make this a darker color. Let me select the color
of the base layer. And now let's just
paste it here. I will just, like, move it more to the purple. And now I will just
make this a little bit darker and desaturated. Alright, let me
see my base color will be All right. Maybe I could add a blur. I could add a blur filter just to make that a
little bit bigger. Just like that could be. Let me see like that, let
me add also some rough. Roughness there. Let
me see my roughness. Alright, there we
go. A little bit of roughness to have
some variation. Alright. So let me
go to the jacket. Let me see if we will
do something here. Maybe we could add
just a tiny bit. I don't think it would work. Let me see my base
color. I don't think so. But let's just see in case, let me go to my fabric here, I will add a base I
mean, a fill layer. I will add also a paint. Let me copy the color
from this orange because, I mean, I like to
experiment a lot when I'm doing these textures. So let's add the color here. There we go. And now
let's add a paint layer. Oh, we have already
added a paint layer. Alright. So let's just
paint a tiny bit of this. All right, let me make this
brighter more to the yellow. Athing like this. They think
this would be kind of good. Let's add it. Let me see how that
looks on here. All right. Maybe it could be, but this is too much. Maybe we could just add
it as a subtle effect. You can see how that
affects the surface. It's a subtle, subtle effect. I don't want that to
be too much All right. Perfect. Looking
cool, in my opinion. If we could keep adding more
of these here and there. All right. Maybe here also. Let me see like that.
I'm like this could be. Perfect. Let's also
add it in the bag. Just like this. Alright. Perfect. Let's also add it here. Let's add a little bit
more of this color. I think it's looking cool. All right. This is
too much, indeed. This stuff here is too much. I don't know why this happens. But this is too much. I
don't know why this happens, but that's too much. Alright. For some reason, my
substance keeps lagging. I'm using my, my tablet. Like my pain tablet,
yeah. Alright. I think this is looking cool. My we could make it a
little bit more saturated. All right. This could be? Let me see how the jacket
looks inside marmoset. For this, let me also the skirt and bells
and also the jacket. So let's export
that to marmoset. And let's see how
that looks there. Alright, let's wait for
this. Right there we go. Alright, let's see. Perfect. I think it's adding a little
bit of a cool effect there. Maybe we could make it a
little bit less noticeable. It was a tiny bit.
Alright, let's export this again. Just jacket. Let's go back to Marmoset and
let's see how that looks. Alright, I think this
is better. Alright. Let me see with
some real lights. I mean, SGR is a real light, but you know I think
you know what I mean. So like Placet lights. All right. I think
it's looking cool. Alright, let me active those. Let me put this back to one. We'll deactiv all of
these lights. Alright. Let me see how this
looks also in Raser. But Raser often, like, consume more DRAM than the
tracing for some reason. So that's why sometimes I'm getting crushed
here in marmoset. All right. Looking
cool. Looking cool. Maybe we could add
a little bit more of variation in the
roughness of the skirt. Maybe some less rougher
areas will be. Let's go. Alright, let me put this
back to raising, right? And now let's go
back to substance. Substance is saving, so
let's wait for that to finish. All right, there we go. So let's go back to the skirt. Maybe we could add
a tiny bit more of variation in the
roughness there. Let me see how my
roughness is here. Maybe, yeah, I need
some more darker spots. All right. Let's go to the
skirt in gray area. Let's add another
roughness variation, but this time that
roughness will be with another grunge
map and less rougher. Maybe we would add this one. And now let's push that
more to the darkness. This could be this
could be right. Let me change the tiling. Let see like that could be maybe a little
bit of rotation. Alright, let me add
another fill layer because this one will be
some subtract layer. Let me put this in substract. All right. There we go. All right. Now, let me go
to the roughness channel and let me turn
down the opacity, a tiny bit of this
roughness layer. Let me see how that
looks here. All right. It's a tiny bit, just like that. Let's see how this skirt looks. Right now, let's go
export textures. And now let's just export
the curt and belts. Let's see how that looks. Alright, let's wait. Let's go back to Marmoset. Let's see how the light
it is responding. I think it looks better. Let's see. You can see how the
light is responding there. We could add some light. All right. There we go. Let me save this. Perfect. Let's see, Let's go
back to substance, and let's keep working
on the pants. Alright? Let's go here. Let me hide the skirt. Let's see what we could do here. I don't care too much about this part because that part will be covered by this. So it doesn't it
is not noticeable. I mean, it's it's heating. Alright. Let's go here. Maybe we could make
this a tiny bit darker. Just like that. Perfect. Let me also add some corbatur. Let me call this AO. I will add a corbatorOlr
let's add a uniator. Let's add some corbator. There we go. Let me
turn down all of these sliders. There we go. Alright, we have some
weird stuff happening. I will not make it like
that that access this. Let me add some lower slope. Just to do some breakup. Let me put this in 100. Let me increase the intensity. Maybe we could put this it
a little bit of brightness. I mean, let's see. Let me see my
reference real quick. Oh, I forgot to
add something very important here. Our
baked lighting. I have just forgot the
The baked lighting. Alright, let's try search that. Let's bake lighting here. Let's go back to our
paint and boots. I mean, to our pants and boots. Alright, let's go here
on top of everything. Alright, there we
go. There we go. Let me see my colors or
right or right or right. Right? It's at the curvature right here, we have something. Maybe we could change. I mean, like move a tiny
bit more this light, a tiny bit just
like that, maybe. There we go. Let me also do the same
with the other sunlight. Just a tiny bit. Just like this. Maybe. All right. Let me color select this one. I will just make it
a tiny bit brighter. Just like that. All right. Now I go here and I
will add a little bit of roughness to that curvature. Maybe now with some layer
with some grunge on it. All right. Grunge There we go. Et's put this in substract. There we go. Right, we also like to add
some variation in the urafas. So, let's try to add some of these crunches that
we have search on Google. I mean, it's like, it's the same process for
all these pieces. Almost the same, maybe with a little bit of changes
here here and there. And also, we could add some, like, detail, like fabric
ditail to the pens, maybe. We will see what we
could add there. Maybe let me see my
preference to see how it is. All right. Don't mind that. So let's
go here to your assets. All right. Add a field layer, let
me add this crunch here. I will put this in multiply. I will also right
this is in roughness. Let me move that here. I will put this
layer in multiply. All right, is in base color. Why is this not doing anything? This should be multiply. There we go. Let me
decrease the intensity. Right, let me just
move dust here. I will add a filter
on there slope. There we go. Maybe
a tiny bit more. I think it's looking
cool like that? We could also add a tiny bit of roughness
variation here also. Let me go to the
roughness and I will just grease all of these
almost to zero. All right, let me put this in maybe overlay or maybe screen. What add this in overlay. Perfect. Maybe a tiny bit more just like this. There we go. Alright. Let me see how this
looks with the pants. We should add a detail, like fabric detail here. I don't think so. Alright, let's just go to the pants again. Right, I will work on this fabric and now
this lighter blue. It's called this base. I will do the same procedure that
we'd have done before. We copy this layer, add a black mask, crenator
some amido cltion. Let's go here and
change this to AO, and now I will just
make this darker, more to the purple. Let's just make that darker. Let me invert the mask. Let me try to make
this list right. I will add eight layer, and now I will go back
with my basic suf. Alright, so now with
our basic soft, let's go and let me
maybe we could tweak. Now, so let's go
with this basic suf, and let's just work and erase
some of these amid clusion. Let me put this in
black. Let's just erase. Tiny bit here and there. A tiny bit here
will be here also. Let's remove a
little bit of that. Let's go here. I erase a bit
more of this mid glution. Oh, I didn't add it. My sorry, sorry, sorry. Right. Let me erase
that paint layer. I will just add it
again. All right. Now with symmetry, let's try to erase a little bit of this. All right. Of this ramclusion maybe we could keep erasing
a little bit more here. And also here, let
me add a tiny bit of this metoclusion. All right. We'll also reduce
that All right. Go. I would like also to add a brighter color to this fabric. All right. Erase a tiny bit of this darker color. All right. So I will add another layer
with some black mask, paint. And now I will just make
this a tiny bit brighter. I mean something like
this, could be. All right. Let's go to the paint layer
that we have just created. Now I will just make this
flow a tiny bit less. All right. Let me change
the saturation of this. A little bit less desaturated
more desaturated. Alright. Just like this could be. Let me also reduce the opacity. Let's go to the
base color channel. School be. Perfect.
Now, let's just keep painting a tiny bit
with this brighter color. I will reduce the amount this layer that's visible.
Just a little bit. All right. Paint here also. Just a tiny All right, a tiny bit more here. All right. There we go. A tiny bit more in this area. There we go. I think
it's too much, maybe or maybe not how this
looks with material on. Alright, for the
ambit occlusion, I would also like to
have the roughness. Alright. I already
have some roughness, but I will just decrease that. I will not add roughness
for this brighter colour. I just forgot how to that works. I'm sorry. English is
not my main language. I will just call these like ther either color either.
Color, maybe. Alright. So now I
would also like to add urbatur All right,
let's go here. Let me produce all of these
sliders and also these. Let's just add a little
bit of curvature. Maybe something like
that. Let's go here. Let me color pick this one. Make this brighter. Comes like that.
Alright, what is this? It's from here.
Yeah. I don't know why these books happens.
I really don't know. Alright. Let's go
back to the curvator. Alright, let me add any bit of lure slope with this in 100. And now I will add, also a fill layer. Alright. Let's move
this to subtract. Alright maybe multiply
also could be good. And also, I will just
reduce the amount of that curbatu opacity
of that corbature also. Maybe we could increase
I mean, not that much. I think it's looking cool
without that fill layer. Let me bring back my
my skirts and belts. Alright, let me see. Let me see the contrast. I think I need to make
this darker blue, a tiny bit darker,
just like this. Or right now, that
has more contrast. Alright. Perfect. I There we go. I would also like to
add a white mask and a paint layer because
I don't like how Oh, alright, that's not
from the from this. Let me just remove this mask
from the bake lighting. Alright, let's Where
where is that? It's not from this. Oh, it is. Let's add, again,
the white mask. Let's go here. Let's
add a paint layer. Maybe we could remove a tiny
bit of this brightness here. Just like that. Perfect. I think
that's looking cool. Alright. Maybe we could add a brighter color here
in the curvature. Let's add some stuff. Let's go to the curvatur here. I will add a paint layer. I will use my knife brush
because I just want to, like, result, maybe
what's the word. I just want to add
a little bit more detail in these creases, so they are more noticeable. Something like that
could be Alright. Let me also make
this corbator less. Something a little bit less. There we go. Let's go also here. Let me see my material. Alright. Perfect. Et's do the
same on the back part here. Let's go here. And with the knife brush, let's just draw tiny line there. I mean, this stabilized stroke, we could just erase I mean, just add a tiny
bit of this there. All right. There we go. I think that could be good. Let me also reduce
the opacity of this. All right, just like that. W be. I will also add a
gradient to this part, I mean, to that fabric,
this lighter fabric. All right, let's add a field
layer with some black mask. Let's add a unilator. Now, let's select
a linear gradient. Let's invert that gradient. And now let's just make
it just like that. There's a tiny gradient there. Let's try to color
pick something here. And now, maybe we
could just make it. We could just add a
little gradient there just to add a tiny more detail. Maybe we could go to the onsets just to
select some color. Like this one. Maybe we could make this
with some blur slope. Let me see how the mask looks. Alright, I think that's
too much. Alright. That's too much. Et's go back. I think that there could be
good. Let me explore that. Oh, ah, I need to also add some roughness variation
into these pens. Alright, I would like to have a little bit
more contrast in the roughness within the
skirt and the pants. Maybe we can make the roughness. If this a tiny bit
more achievable. And in the darker blue, we could make that roughness, a little bit less rough. Maybe it could be. Let me select this
color variation here. I will add the
same in this area. There we go. But I will
change the crunch. All right. Just like that. And also a little bit
of roughness variation. Alright. There we go. Let's at a roughness layer. Let's at a black mass now. Let's add a field layer. All right. There we go. There we go. Maybe this could be. Let
me also copy that layer. Let me call that
roughness variation. One. Yeah. So let's wait
for substance to save. All right. Maybe we
could make the gradient. A tiny bit less purple. All right. Maybe
more to the blue. Let me see like this
would be right. Maybe. Yeah. Let's go here. There we go. Alright, I have this, but I don't like that buttered goo here and let's make
that a tiny bit less. All right. There we go. Let's export this. All right. So I have, so let's
export the pant. Let's wait for this.
Alright, let's go now to the Mamoset and let's
see how this looks. Alright. Looking kind of cool. We but I think this should
be a little bit darker. I need more contrast between
the pants and skirt. So let me make a
tiny bit darker, and also the base here, I will just make that darker, just like that because I want more contrast between
the skirt and this color and also here, I will just make
this even darker. Let me see how this looks. Because I'm not
seeing this gradient. In these areas, let me remove the tablas around
here, maybe could be. All right, I think
it's too dark. Something like this would be maybe with a little
bit less opacity. Something like that around here. Let's make this roughness. Let's put that in screen. Perfect. Let me also reduce the
amount of that roughness. Also, this one, I will just
put the tire layer in screen. All right. Perfect. Let me export this back to Marmost and let's
see how that looks. Word. All right. Let's export the pans. Let's go here. There we go. It's exported, yeah. Let's see. Now, we have some variation
here in the roughness. Looking cool. Alright, we could add
also a little bit of chin on that fabric.
So let's go here. Maybe this fabric in this area could be
maybe some plaster, and this fabric could
be some acal fabric. So let's go to
that lighter blue, and let's export the mask. All right, export mask to file. IghterFabric. Hands, lighter fabric. Mask. There we go. Alright, so let's go
back to Marmoset. Let's go here to this material. Let's change the
diffusion to microfiber. I will add this one
good mask, SelegP one. There we go. I will decrease the amount of
chin that this has. Alright, because
that's too much chin. All right, something
like this could be. It's just a tiny
bit. Not too much. A little bit. Let me put this more saturated. Perfect. Just a tiny bit. Not too much. There we go. I think now we have more contrast between this
skirt and this fabric. Alright. There we go. We need also to work on the face of this guy. The texture of the face looks basically it's
just one color, and also the ice, we
need to work on the ice. Alright. So I need to keep working here. I will just for this belt, I will just copy the same like layers that we have
added to this belt, I will just copy those same
and I will just wrap it here. I don't care anything.
And also in this belt, I would just copy the same
material all over here. All right. So let's do that, real quick. Let's go to substance. Let's go to skirt. Real quick. There we go. That's right. Here we are. Now let's go to the dark
strap and I will just copy this letter stylize Alright. Now, let's go here, and I will just drop it there. Wrap Perfect. There we go. Just like that. It may also go to the boots. All right buckle. Ready with that.
I don't think so. All right, where are
my my my belt there? Oh, I see. Let's go to strap. All right. There we go. Let me move this. All right. Let me copy this. I mean, yeah, I will just move it out of here because it
should not be there. It should be in the Bod. No. Maybe not. I will
just leave it there. All right. Let's add a tiny bit more
colors here and there. Let's work on this wrap. Maybe on that strap, we could
use the same nylon webbing. Could be, or maybe not. Let's go to the orange
orange color here. Base. Let me add
some curvatur first. Layer a mask curvatur let me reduce the
amount of this here. There we go. Let me make
this orange bit brighter, turning more to the yellow. Let me add some blue slope. Alright. Let me
add a paint layer. All right. Let me also change
the roughness from here. And I will make this maybe
rougher, more rough. Yeah, let me make this strap
a tiny bit less rough. Let me see like this could be. Alright. Let me go here. Now I will just start
removing a tiny bit of of this curvature. All right. A a tiny bit of detail there. Maybe here also. Let me remove a little bit of
corbaor from these layers. All right. There we go. Everything like that would be. Now, I will add some
ambient clusion. At mask later. Amen to clusion invert. I like that. Alright,
there we go. Let me make this more rough. I like that. Would be AO. Let's add some color variation. I will not add any grunge
in the base color. I will just add a fill layer this time with some
splashy grunge. Maybe this one, I will
add a filter your slope. I will select maybe
some darker color. I will make the opacity
little bit less. Just like this. Perfect. Maybe this could
be in soft light. Alright, let me add a little
bit more of roughness there. Alright, let's make
this bit bigger. Maybe the cbaor we could
make it. It's a bit lighter. Just like that. Well, let me explore this and let's see how that looks
inside the engine. Alright. Looking cool. Alright, so let's
work on this rim, and I think that will
be it for this video. All right. So let's go here. Maybe let's add a little bit more of cubaur I
mean, a corbau there. Go to the pouch rims and
that's cold the space. Maybe we could keep it
with that roughness, a tiny bit. That's rough. Maybe just like this. I
mean, more rough, yeah. Top it is? Lack mess. Let me make it a
little bit rougher. It's a little bit lighter. All right let's go
here, a generator, right? Corbator here. Let's impert Corbat Let's
not invert the corbator. All right. Looks
like this could be. Get a bit lighter? Not that much. This amount, I think would be good. Let me add a little bit of
fill and also some grunge. Maybe this one. Let me
put this in multiply. I don't think so.
I don't like it. All right. There we go. A little bit of color
variation. I like this. It doesn't feel
like that could be. Put that rim. Alright, let me put that and
let's see how that looks inside Marmo set. There we go. All right. I think it's looking cool. I think it's looking cool, cool. Maybe we could add a little
bit more of curvator, but I will add that Cubaor
in this recess by hand. Let's go here to
the lighter blue. Let's go let's go to the
This is the lighter blue. Select this. Let me go with my knife Rush. By with symmetry. And now I will just maybe
not with symmetry, maybe. Not with symmetry? Maybe,
well, we could add it. Maybe not. Yeah, let's
square with symmetry. Now let's just make
a stroke here. I just want to emphasize
these creases in the texture. Let me see how that is working
on this part. All right. I don't like that there. Alright, so let's
work on symmetry, and then we are going
to raise some stuff. We could do this
also on the jacket. Like this painted
diselo also here. I don't know why this
back keeps happening. Alright. Let's add
something here. There we go. Maybe also here. There we go a little
bit more here will be. Maybe this last one, tiny bit more of that. Let's go here. We
just a tiny bit of this a little
bit of this tittle. I just want to enhance
like these creases, a tiny bit of this way I
will sleep it like that. Let's see the
difference. I think it's looking cool, my opinion. Alright, let's
remove the symmetry, and now I will just
erase this stuff. Alright, I don't like
these strokes there. We could also add We could add
a tiny bit this curvature. Here also in the pouch, just to enhance these creases. All right. Let me do something
similar in the jacket. But first, let's export that. Let's export that. Alright. So it's looking cool. A There we go. Maybe this trap could be
a tiny bit less rough. I mean, yeah, a tiny
bit less rough, yeah. Let's go to that orange. Orange color. Let's make
it a bit more rough. Just like this. Maybe we could make
this curvature, hide. Just like that to add a
little bit more detail. And now, let's go to the
jacket and let me do something similar of what I
did in the pent, but I will do
something similar in the jacket. So let's go there. Maybe we could select this curvature and we
could start painting. Like a little bit of these
creases on these folds. Let's see how that looks. Alright, let's wait for
substance to calculate. Alright. That's just a bit
of this maybe here also. But I don't have imagery. Alright, let's wait for
this to save. All right. Let's add maybe
some color there in that crease maybe not in that lower part. Maybe in this stuff, we could add something
just like that. All right. Let's
remove it from here. There we go. Let me
see my base color. Here in the back. You
could add some stuff. Maybe here rope. All right, let's go here. Add some stuff. There
we go. Maybe here also. Alright, I will
just export both. The pants and jacket. Port both. All right. Now let's see how that looks. Right now, we have
here our stuff. Alright. Looking
cool. There we go. We could also add that, that same detail, that same cubator detail
here in the skirt. And also, in all places
that this has holes, Alright, that's just, like, just for enhance the
fault and the creases. That is, like, some personal
decision that I like to do. Like, for my style. I just like the way
that that looks, right? I think I need to paint
something in the ice. So, I think this will
be all for this video. It's already too
long, 1 hour, yeah. So in the next video,
we're going to keep working on this
model. Those you there.
36. Making the Textures of the Knee Armor and the Calf Armor: Alright, guys, so let's
keep working on this model. A right in the previous video, we make some texture
for the pants and this pouch and so some
more refinements. So now in this video, we're going to work maybe on this clf armor and maybe
a little bit on the boot. So let's start working. So let's first work on
the knee knee armor. So let's go to the
pants and boots. Let's wait for these
to respond, right. Let's go here. Alright, let's go now to the pants and boots. All right calf,
armor and knee pad. Alright. This is the knee pad. Let's work first with
this bronze piece. I mean, it's not bronze. I will not make this
material like metallic. I will maybe just reduce the amount of roughness
that this has. Something that I
would like to do is, like, adding, like,
some peeling. Like there is another metal
exposed under this layer. So let's call this base. Now, what I'm going to do, I will add a field layer
with some black mask. Let's add a generator. And now let's add an
ambient occlusion. Let's invert that mask. There we go. Let me
also change the color, make it and the dark. Something like that could be. Al right, let me add a
paint layer because I don't want this to happen
in this area. Let me remove the
tablet pressure from my thighs right and
now let's keep working. Just like that, maybe. Yeah. Maybe we could use our knife
brushes to add, maybe. A bit detail. All right. I'll be tiny bit of detail here. Maybe we could make
this any bit reddish. Just like that.
Let's go here also. Maybe we could paint.
Any bit more there. Perfect. I All right. Let's remove a tiny
bit Oh, maybe not. Let's just leave that there.
Alright, there we go. Let me change the
roughness of this. I will just make it rougher. Just like that. Let
me see my roughness. All right. Why my
roughness is like this. So since we're happening, that what rights go here
wheels at the base roughness. All right. This should be good. Maybe not that much. A with china. Just like that. Alright, let me also
add a curvatur. Let me call this AO. Just add another fill layer
with some black mask, again, with some curvatur. Alright, let's just
reduce the balance. And also these sliders, just a tiny bit more, maybe a little bit of that, maybe a little bit more of this, maybe some big big stuff here. Now, let's select a brighter. Something like this a
little bit more yellowish, like that. I think could work. All right. Let's add
some blue slope here. Put this in 100. All right. Something like this
could be good. We go here, I will
add a field layer. I'll search for some of this. Let's put this in subtract. I so it's not in all places. But I think this looks cool. No, I would like to add like some scratches
here in the knee pads. Yeah, because maybe he just fell down and he fell into
with his knee pads, and that makes some
scratches there or he made, like a knee kick or
something like that. I don't know how
to say in English. Um, yeah. So let's call this
patur. Perfect. All right. So let's
add some scratches. Scratches? All right.
Let's add some black mess. Let's find. Alright, let's put this in fill. Let's find the scratches. Alright, something
like this could be. Or, let me make this metallic. All right, with a
little bit less rough. I mean, a little bit of
negative height, bit rougher. There we go. Let's go here. Let's make this bigger. Maybe we could make this right? Tiling. Something like this
could be good. Let's wait for this
to save. All right. So, let's keep working on this. That amount is too much. So Alright. Maybe we could
reduce the balance. Alright, let just
leave it like that. I will add a paint. Let
me use my basic soft. Alright. And now I will just
erase more a little bit of these scratches because
I don't want them to be in all the places.
Something like that, but. And maybe we could even add another paint layer with a
little bit of chip in here. Like a brush. That would be maybe not because that would be too obvious that
this is a mirror. Let me not add
that detail there. I like this could be. Not. Let me just erase that. Just like that. Let's just
leave it like that. All right. So let's go for the dark pad. Let me here add a paint layer, some black mask
to that knee pad. Let me see my mask. All right here. There we go. Now, for this, like, poofy part, a At there. We could call this pace. Maybe we could search
for maybe rubber. Let's see what type
of rubber are here. Maybe this could be
Rubber raw. Maybe. Maybe we could reduce
the amount of height. Let's go to the
high channel here. And let's reduce opacity. Little bit more photo variation. Right? All right. Just like this would be. Let me remove the hide because I want to
add another stuff. Went to add like
some little pattern. I would add a pattern there. Ask. At fill. Let's search for some pattern. Let's go to Alphas. Here. That's that is alphas. Those are filters. Let's go to Alphas. Just try to find some pattern. That could be good here. Let's see. Maybe the hexagon. Yeah, maybe we could use
the hexagon pattern. So. Let's just go here. Let's type agon. Each one. Let's prepare that.
Right now, let's make this. Maybe bigger, eye like that. Maybe something like this. Let's add some height to this. I'm seeing like that could be. Maybe not that much. Tiny bit of roughness. Let's go to the
roughness channel. Let's put this roughness
into ring though it takes a tiny bit of the
roughness that is under that. Alright, I will add a paint layer because I don't
want this stuff to be here. I mean, I don't like
this stuff here. All right. Let me
add another pattern. I mean, another color. So black mask, color
select, this gray. All right. Let's
just make that here. Let's just make that
dark like that. Let me put this around here. Right. This should
be in the bronze. Maybe something like here. All right. Let's export this, and let's see how this looks
inside the engine. All right. Let's see. This is too shiny. Let
me reduce roughness. I mean, this should
not be that shiny. Yeah. Okay, look at this. This is perfect, like that. Let's save. Let's see be more
here how this looks. Maybe we could add some
cropau in that cushion part. All right. A S. Alright. Let me see my reference. Alright? Oh, I don't like this
pattern in that area. So let's go here, let's remove that
pattern from the boots. Alright where is my pattern. All right, it should be here. This is the butter, I think.
Let's call this. Pattern. All right. Here, let's add some fill there. Let me add a curva tour. At inerator curvatur here. Perfect. There we go. Maybe some blu. All right. Something like this,
a little bit more of blur. We're not that much. Let's reduce the amount
has. We're not that much. Maybe the big Let me add some blure lobe. All right. Maybe just add this that just to have
color variation there. Roughness. All right. Perfect. We will make this. Let's just leave it
like that bright. Perfect. It's looking cool. All right. Right, this
that is like that. We need to add some metal
there in that calf armor. This is the calf. Right knee, wrap other
metal, darker metal. But for some reason,
here at the boots, this is using having pegs on
my stuff on my call armor. All right. Let's
go here, Awesome. Why is this not working? Is this metallic being affected? That metallic looks like metal. No, it is not metallic. What are you talking about? This should be this piece. Why my metal ness
is not working? I mean, the roughness working, but the metal net, it's not. Maybe there is some layer that is overriding or is
not in the boots. All right. Everything is
overriding my metal. And I don't like
that. Not a buck. Alright. Know what's happening here, why my metal is not working. I mean, it looks like it's buck. Right. It's basically
not working. It's not working there. For some reason? My metalicness
doesn't want to work. Right. No, I think it's
doing something. No, it's not. Not doing anything. And why is that? Is it by metallic. Metallic is going good. I don't have any
metal net there. Seems like I don't have
any metallicness. Here. Oh, I think I know
what's happening. Oh, my God, I'm so dump. Let's see. Let me put this
back where it belongs. Alright, there. Inner metal. Let's go to
this one. Look at this. I had the bake lighting
with this stuff. Now, the shot work. All right. It should work, and it's not working. Doesn't have lighting anymore, and why this doesn't
want to work. No, I had that
inside the lasers. Now it's working.
You can see there. Perfect. Absolutely. Perfect. Let me make this reddish. Alright. I will also increase the tolerance Those
are white pixels? No, let's just
leave it like that. Maybe we will add up
a little bit of lure. All right. All right. Let's just work a little
bit on this metal. All right. Let's add, maybe. Base. Let's add some roughness
variation to that metal. Mass. Feel layer. Go and add some grunge. Maybe some noise first. Noise. Let's add some noise. Roughness? All right.
Let's go here. Perfect. Maybe something
like that could be. Metlnes. Metals, no,
Roughness variation. Roughness roughness
variation here. Perfect. It's another
roughness variation. Maybe with another another
type of noise, louds could be. Let's go to the roughness layer. Let's put that in screen. Perfect. Maybe a tiny bit brighter. Roughness could help. Maybe something like that, Olay. We go. And they put
that in slight. Right here. Alright, let me add
some amid declution. Ask the same as
always. Amdocltion. Bar that amid clear. All right. Here, ugness in that amdltion. Harkness in that amid lution. Let's just keep working
a little bit on this. Just a tiny bit Everything
like that could be. Let me add a curvatur. Let's call this to. Let's add just a
curvature right now. Back mas generator,
Curvatur base color here. Here we go. Fight. Perfect. So here. All right. Let's maybe
add some blur slope. This is 100 roughness. Base color. Here we go. All right, let me export
that to Marmoset. Let's see how that
looks. Wait for this. Alright. Let me save this also. Let's go to Marmoset. Let's see how this looks. Here we go. I All right. I think it's looking cool. Let's see how this looks
with the frasterRndering. All right. It's
also looking cool. I like it. Alright. All right. Let's go back to rate racing. Right. Maybe we could save this. Let's keep working
with the other pieces. We have, do some work
in the curvatur. So now let's do some
work in the rest. Maybe this darker color,
this darker metal. It's a metal. It's like a plate. Make this more rough. Just like that will be. Alright, for this one, I will add again, some fill layer, base, AO here black mask
at a unerator. I add some ambient occlusion,
as inverted amenusion. Bye. Alright. We could do something. Let's add a paint layer. Let's select our basic
soup and let's paint out a little bit of
this Amit opltion. Let me twig. This right? Let's just erase or this ambient oltion I don't
know why this is just, like, too slow with the tablet. Right. I'm just doing this with the mouse because
for some reason, this is too slow with the
tablet. I don't know why. I think I just need to
upgrade a graphic card. Maybe it's time. An RTX
2060 is now too old. All right. Let's change the color of this. I make this darker. That is a little bit. Uh, roughness. Let me add some
filter, loose lobe. Let's increase it. Maybe with ten, I say this. Also cold All right, let me add some color
variations here. Let's add some blue
slope to that. Let's put this in soft
light in the base color. It should be in soft
light in the base color. Let's see. Will be to add
some variations there. Maybe this. Maybe this one could be. All right. Alright, let me also add some roughness variation
to that darker plate. Alright, let me
see my roughness. Alright, perfect. Let me add some roughness
variation there. I back mask. Bill. Let's
select some grudge. Maybe this word.
Let me select that. Alright. I think
like that could be. Alright, and now I will
add some spots. All right. Let's call this and
let's just name it like roughness variation. It's like this. Let's
add another fill layer. We had a black mask.
Let's add a paint layer. We'll make this stuff. Let's color pick
this. All right. From here, basic heart. Let's go do your starting at project and let's
select one of these. These off just to
add some roughness, be some spot there to have to add more variation
to the surface, make it looks more believable. Alright. All right, let's go here. Let me add some bite layer. Perfect. That. Here in this strap, we could
also add a lighter color. Muscular at a pain. Add also some spots. Be like that. Right. All right. Let me add a filter.
Maybe a warp. May also decrease pacity. There we go. Let's go
to the dark dark plate. Pods. Let's add a curvature. Lack mask. Nator Curvature. Let me reduce the amount. These liners. Alright. A little bit bigger. Just like that. It's
at some filter. If we go your slope, let's put this in
100. Just like that. Let's go pick this. Perfect. And now we need to
make a plate in here. Let's just do that. Oder plate. I think I will do maybe a treatment kind of same
like we did in here. So let's do that.
Also outer plate. Let's call this space.
Duplicate that. Add a black mask. Uh maybe we could name
make this darker. This would be the AO. All right. AO, the niator amido clusion. Remember that Amdocltion. Alright, let's make this A bit more rough. Maybe here we will
add a paint layer. Paint layer. We go
with my knife brush. We'll start painting some
stuff. Something like this. I just to add maybe more detail? Something like that complete. All right, let me add
also a curvature. Let me just copy this. We'll space that here. Now I will just change
color this. Alright. Let me change also
the grunge map. Maybe a no one, maybe this one. B, I think it's too
much. Maybe this one. With something like this could be All right. So no. No. Let's Let's see. Let's at some scratches. I will just copy this layer and I will just paste that here. There's a lot of
scratches there. Let me reduce the balance. We pull that just a bit more. But this is a lot. But a paint. Alright. And now let's remove
a little bit of this. I mean, you should not
put the scratches in areas that's where
it will not have tents for the scratch to be
like here near a corner, there should not be crutches. It doesn't have sense and areas that are
protected like here, that is, like, a part that
is going under something. I mean, it's like, push in, like, push in. Like, in this darker part, there shouldn't be
any rug and so on. But just keep working. And we keep removing a
tiny bit of the Alright. Let me also change
the roughness. Let's just make this less rough. This is too rough right now. I mean, is just crack up
a little bit roughness. Alright. Just remember, white
is to be more rough, and black is to be less rough. I just got confused sometimes
also, so don't worry. Right? If we could keep
erasing here and there. Perfect. Just to add a little
bit more of stuff there. Let me copy this pot. This is the pans, dark or metal. Let me copy the
spot layer there. Let's select the basic heart, right, starter assets project. Maybe we but now start
working start adding a little bit of this right. I we're here also. This one. Alright.
It's like that. It's expodi and let's
see how that looks. Let's save it first, and then I will just export it. Alright, so let's expo
this port right here. Perfect. Just wait for
this to be exported. Go back to rmoset look at this. Right in the that looking poll. We need to add also some
roughness variation into that frontal ease off right let me add just maybe one layer of
roughness variation. Ask you. With this, we'll just make this
with plur slope. Just like that. All
right. Let's go here. Just cork up this
a little bit more. Perfect. So it has it bit more
of roughness variation. Let's export that, and
let's see how that looks. Alright, let's go to Marmoset. Alright, so now there we have a little bit more of
variation in the roughness. All right. So now we just need to
work on this g stuff. Maybe I will add some nylon webbing pattern also in this strap. I think so. So let's go to that strap. And now let's search for
Nylon Nylon weaving strap. This one. Let's
just add it there, increase the tiing.
It's like that. B cool Let me reduce the height. Let's go to the this channel. Well, I don't think
it's that cool. Right. Let's just
leave it like that. Right, let me copy
this and I will just put it here, also in the laces. Just like that. And
I will copy also. No up some of these. Copy. Orangy color and now
let's just paste it here. Nice and easy. And Alright. Maybe that is big with a little bit of less
normal intensity there. W B. Alright, let's put this, and let's see how this
looks inside the engine. Safe. Let's go to Marmoset. Let's see how this looks.
Alright, looking cool. I think so, yeah. Perfect. Also here looking good. All right, let me see. Maybe with another DRs. Right, let me just add I'm blight HDR, let me change the HDR. I just want to,
like, test it with different HDRs to see how
these respond to those DRs. It's looking cool in need. It's looking cool. All right, maybe this Aa construction. Let me know Alla taka, looking cool, so I like it. So here. Maybe this one. Right. This one, it's
also looking cool. All right. Let me just go
back to my previous SDR. It was Studio Tamoco. It's a SDR that did that you could extract from
substance painter. There. There we go. So I will save. And this will be it for this video in the
next video where I keep working on these
textures on this model. I think that the
only parts that are left to texture in this
model are the boots, the face, and the hair
and also the eyes. Oh, I just almost
forgot the demon head. All right, just to finish the texture of the
character itself. Then we need to texture we
need to texture the weapon. But the weapon will be faster
too. So say you there.
37. Texturing the Boots: Alright, guys. So let's
continue with this model. In this video, we are
going to maybe make the textures of the boots and
let's see what other piece, maybe yeah, we could start making the texture of the boots and maybe a
little bit of the hair. Let's see what we could do. So let's focus in
the boots right now. Alright. Let's
start working here. We have a lot of scratches
here for some reason. Let's see. Why do I
have those scratches. Right it's not from there.
I think it's from here. I think so. Let's see. Let's wait for this to calculate substance fainter. Alright, let's wait for this. Let's see. Yeah, it was this. Alright. Let's see where
I have my scratches. I have scratches there. All right, let me
add just remove the boots from these
scratches. All right. I will add scratches
but in its own layer. So let's go with
this first color. Let's go here. Let's
duplicate that. Let's a a black mask,
add a generator. Not want a curvatre. I want an ambient occltion
or right let's invert that. Let's make this darker. Let me see like
that. Maybe let's move this color
more to the blue. Alright, let's make
this more rough. Alright, let's see
how this is looking. Alright, let me increase my AO. Something like this could be. Maybe we could do some blur. All right. Maybe something
like that. Perfect. Maybe let me erase some stuff from here from the bake lighting that
I don't really like. All right. All right. Something like this
could be perfect. I don't fully like
this that color. I will just erase it a tiny bit. Alright. The knocking down that Alright. Let me see like that. Could be. Alright, let's just
keep working on this. Let me call this AO. Perfectly, let me
see my roughness. Maybe we could make this base
a little bit less rough. Something like that could be. Alright, let's go here.
Let's add a blur slope. Maybe to make the
ambient occlusion a little bit more stylized. Alright. Let me increase
this blur slope. There we go. Now,
I would like to add maybe some color variation. And also, I will add some
dirt maybe to these boots, like a general dirt or right. Let's call this color variation. Let me add maybe here
some of the crunch. Let me make a blur slope. I let me put this
in maybe screen. No soft light, no
multiply will be. Let's decrease the opacity
of that. All right. There we go. We have
some variation. All right. Maybe a tiny
bit more. All right. Let's add a curvatur now. La mask, a generator. Let's serve for curvatur. There we go. All right. Here we go. Alright. Let me color pick maybe
one color from here. Let's move it more to the green, and let's increase
the brightness. All right. Let's
call this Edges. And now I will add a blur slope. As I said, I just
love blur slope. All right. Maybe we could, like, paint a tiny bid with our
our knife brush. Let's see. We could add maybe
some painted detail. Let's add a paint layer. Let's select this knife brush, and maybe we could
do some detail. Like here could be a little bit of detail
in the corner there. My Let me just move from here. All right. Here, also
in these creases. Let me decrease a tiny
bit more opacity. Let see like that. B. Alright. Let's remove a tiny
bit from here. There we go. Maybe another one here. All right. There we go. Alright. Let's just keep
working on the rest. Let me see my map. All right? I just want to
see the color of the boots. Let me see. Alright.
This is a metal piece. And this other one is
another metal piece. All right. I mean, that buckle in the compet
is a metal piece. I don't fully remember, but I will make it
as a metal, maybe. Alright, let's go here. Maybe here in the color
variation we could add some roughness
variation also. Let me go to your assets. All right. Let's add
this color here, maybe. There we go. We have
some variation. Let's go here now to the
roughness channel and let's decrease tiny bit the
opacity of that roughness. So it's not too noticeable. There we go. Maybe in the edges, we could add also
some roughness there. Maybe maybe some height even. I don't think that the
height would be a good idea. And let me rebook
the height. Yeah. Let me see like that. Let me see also the
contrast that I have from for these colors. Alright. Maybe to make this a tiny
bit lighter or brighter, a little bit more desaturated. Obviously like that
would be write something or like this could be just want the boots to be
separated from the I mean, in saturation value
from the coal armor. I think this could
work. Could be. All right. So let's
keep working on this. Let's do the sole right now, because that's one of the biggest pieces.
But let's go here. Base. This would be like, some plaster of some sort, or right or some like
accustion material. Who knows? Let's add an
amienoccltion there. And also, I will
tweak the roughness, maybe a little bit
rougher right black mask inerator ambient ocletion Let's add some roughness. Let's make this darker,
like, some gray. Let's go here,
let's invert that. Let's see what we have here. All right, something like that. Let's see the soil.
Alright, there we go. We have something. All right. Let's go to material. All right. Let's search
maybe for All right. No. Let's search maybe
for some rubber will be. Let's see if we could
find something good here. Alright. Maybe this plastic
rubber maybe could be. I just want the surface
noise that it has. I don't want the color. This could be,
actually, I think. Maybe a tiny bit bigger. The tiling, right here. The tiling just a
little bit bigger. All right. But I don't know about that. I don't fully know about this. All right. I'm still not sure
about this noise. There, I think it could
be good for the soul. All right, we have
some them there. Is here. That surface detail. Alright, maybe if we could
decrease the height, let's decrease opacity of
the height. Just like that. Could be good, yeah. I like
it now. Something like that. Let's I have added
Oh, yeah, here. This is the, the emit o clusion. Alright, let me make this omit
clion a little bit darker. Just like that. Let
me see the color. Maybe we could increase
tiny bit more the balance. Maybe not that much. All right, let's add now some curvature, black
mass, curvature. Alright, let's go here. Make this more bright. Let's go here. Let's
add a curvature. Let me also increase this. All right just
like this perfect. Just to get rid of
those white pixels. Alright, let's go back
to the curvature. Here, let's decrease
all of these because I just want like
these sharp edges. All right. Something
like this could be. Alright, I will add a the
bl slope, not right now. So here maybe let's search
for some big crunch. Maybe this one. Let me put that in abstract. W be. Let me add now the blur
slope filter. Blur slope. Let's put this in ten.
Maybe it could be. All right. Let's go here. Let me make this cubatora
tiny bit less bright. Just a tiny bit. I will also make this proffer. All right. Just like that. Alright, let me do something. I don't want this or the
sole to affect the buckle. So we just remove
the mask from there. Just like that. Perfect. Maybe we could go back
to the soul here later. Let's work on these metals, the buckle and this one. Maybe what we could do
is just maybe, like, copy the layers that we did for the buckles
of the jacket. I mean, the jacket know
the skirt and belt. Don't just wait for
substance to respond. And let's see what we could do. Alright, let's wait. Here we are. Let me
go to the belts, and now maybe to the
buckle or the metals. Here we have the metals. I will just copy all of these. Let's go back to the bood
Let's wait for this. Al right. Let's go
here. Let's go. Now for the buckle. We could add that stuff there. Something like that
could be perfect. We could make this
tiny bit rougher. Alright, I think that could be. Let's go now to this
front hole piece. All right, let me see. This is a darker color or
front metal will be outside. Alright. Let me copy
the same layers here. Just like that. The difference is maybe we could make this
a tiny bit brighter or maybe let's actually make the buckle a
tiny bit brighter. It's like that. And Oh, so maybe we could
change the color or even? No. Alright. So here, maybe we could
change the color. Maybe not. Let me make the ale. Let me see my ale. Alright. Let's go to
the frontal metal. Let me see how this is looking. I need to make that darker. Let me make that metal darker. All right. Let me also make my
am tuition darker. It's super white right now. Right, also the curvator. Everything will just
make it darker. Just like this. Let me change also the
roughness variation. Maybe with another
low slope type. We will select this one. And here we could
select maybe this one. Alright. All right. Now, I will add some scratches to these pieces. Let's add a black mask. Let's add a fill layer. Now, let's serve for the
scratches. All right. Maybe we could add
maybe one of these. Let me decrease the number
of these scratches. Let me make that in height. Alright. F B. Let's make those tiny bit. Just like that. Alright. All right, let me add
another type of scratch. Alright, let's add
another fill layer, and let's add this other one. Like mixing both
types of scratches. Just like that, let me
decrease the balance also. All right. Maybe that is just making this to be to
look like, too similar. I mean, like this
is a mirror pod. I think I would just leave
it with the first one. Let' make these
scratches bigger. All right. Just
like that. Scale. Fell random. Let me paint out a tiny bit
of these scratches that are in places that
there should not be. Alright. Now, I would like to add some spots in this fabric. Let's add maybe more variation. Let's call this spots. Alright, let's add a black
mask, and paint layer. Let's select now
our basic heart. And now let's select the offas that I have
added to this project. Maybe some seed
like that could be, let's just add this here. Maybe here. All right. Maybe around here. There we go. Alright. Alright. Alright.
Let me do something. This Wanzu? It's like,
processing some stuff. So let's wait for
this to finish. Oh, it's just me. I'm just Yeah. Alright, let's just keep working. All right,
let's continue. So let's select one color there, and let's make that darker. Alright, like that. Let's keep adding
more of these spots. Maybe one around here would be. Alright, maybe here. Alright. Here, let's. Let's make them rougher. We need to add a
roughness variation that this to make this a
tiny bit less rough. Maybe just some spots. Let me add a fill layer
there, black mask. A fell layer here. Let's
search for some garnge. Maybe this one could be. I like that could be indeed. Could be. Just to have a
little bit more variation. Let me make the roughness, the pagety of the roughness, a tiny bit less. Now I will add. Maybe I will just
leave it like that. All right. Let's make the scratches at a
little bit rougher. Let's go here. Let's search the scratches,
the frontal piece. Let's call these scratches. There we go. Let me
add some roughness. All right. There we go. And now, I would like to add some general general stuff
to the blue to this boot. Let's search maybe here, a white mask or some
smart mask here. Like maybe, like, let's
see some dust and dirt. Alright, it's dirty. Now, a rush Done, it's blue. Dust surface. Maybe
this could be. Let's see how this looks. All right. I think
it's looking cool. Let me see what these
do in the mask. Yeah, I like it. Like, integrating all
the different parts in one, looking cool. Alright, let me change
the color of this. We will make it darker. With roughness, rougher. I maybe maybe a bit
brighter again. Maybe something
like that could be. Like this is some dust. Let's add another stuff. Maybe some dirt this time. Let's search for some dirt here. Alright, let's put
this here dirt. Their cavities, the crown. Let's add some dirt ground. Here, let's see how
this looks now. Let me make this a tiny bit. Like this brown. Let's now tweak what we
have here. All right. This is too much. Let's reduce the curvature. Maybe the ao also. All right, a little
bit more of ao. Let me see what this
doing the mass. I All right, let
me do something. Let's sp go here. And now I will go to
environment Alignment to camera so I can see
what I'm doing here. I think This looks cool. Let's make this rougher. All right, that's looking
pretty cool, indeed. Alright. My we could
increase the AO bit more. Will be. I mean, not that much. A tiny bit. Just
like that could be. Let me see my reference. There we go. Let's make
this even tougher. All right. There we go. Let's export this and
let's see how this looks. Let's save this. And then we are going
to export this. Alright, so I have
exported the textures. So let's see how
this looks here. I think they look cool.
I think so, yeah. Maybe we could have some dirt
splotches here and there. Let's go here. Maybe we
could add some paint. Now, let's select here in project, some of these pots like that. Would be. Maybe we could make this bit more brownish,
just like this. Maybe a tiny bit less. Something like that,
let me wake this with no metal because this should
not be a metal, right? Let me move a little
bit from this area. It doesn't have sense to
have dirt on those places. I just want the
dirt in the areas that are more close
to the ground. Not in every piece. All right. Maybe we
could add maybe one. But there here and there, right. We keep removing from here. We will add some stuff,
something like that. Alright. Something like that. Could be. Let's export
this again, export. Bod. Let's see how this looks. Alright. Let's wait for
this to be exported. Now let's go back to Marble set. Right, there we go. We have
some stuff there in the Bod. Is looking cool. Maybe we could make this
metal a little bit rougher. Let's go to the
front metal here, front metal, we make the
base metal more rough. Well not that much. Yeah. Comes like that. W B. Let me explore this again. And let's see how this looks. Alright, let's wait
for this. There we go. Alright, I think it's
looking cool. All right. Alright, we have some Emisue. Let me see what is
making that seam there. Maybe it's the dirt. No, it's not the dirt. Dust is here spot edge. Or maybe it's this. Yeah, this is making some issue. I will also remove
that from here, let me use a basic
soft just like this. And now I will just start removing this baked
lighting from this area. Right. Just like that. Perfect. All right. Em see like this could be. Now it should be fixed. Let's see. That's squad. Alright. Let see. Now it's fixed. All right. Let me see something. I will go here to
the main camera, and I will just wrap
the saturation just to see the value or right. The value of this
fabric is too close to this to this call farmer. Maybe we could make it darker
or we could make it er. I think that for our case, we could make it darker. Let's go here to this fabric, and I will just make it darker. Because you can see in the cost, this fabric is darker
than this metal. So let's have that in mind. Here, let's just drop
the value. All right. This could be maybe. Now I think it's too close. I here, it doesn't
look that close. I don't know why it seems to
be almost the same value. Is it far far from the far We a tiny bit brighter would be. Let's explore this and let's
see how this looks inside the engine. A little
bit different. I think now could be. All right. There we go. And boots. Perfect. Let me see
how this looks. First, let me save this. Let me see how this
look with raster. All right. There we go. Increase Vito cluion. All right. Et's just go back to it
raising. There we go. I think we have the boots. And now we could are making on the hair or
maybe in this demon head. Let's see. Maybe we could do that for the next video.
We'll see you there.
38. Texturing the Demon Head: Alright, guys. In this video, we're going to start
texturing this demon head. So let's start. Let's go to
here to Substances painter. And now let's start
making some stuff. Let me save real
quick because I'm, like, making this video
after the previous one. So let me save everything
before we could start. Alright, so let's
keep working on this. So now let's work. Let's go the demon
head tectucht. But first, let me take
my bake lighting layer. Let's wait for this to respond. Let me take this, I
will just rub it here, right on top of everything. Just like that.
Alright, base color. Perfect. If something. Let's work on the orange part. Alright. There we go. All right. Maybe this is some ceramic,
something like that. Maybe some type of
painted metal could be. I will not add a
metal ness map to this orange part.
We some roughness. Let's twick the roughness,
just a tiny bit. Make this kind of tiny. Now, let's add Let me
duplicate this layer. I will call this AO. I I just read it wrong. Alright, let's go here. Go here. AO, right. Let's add a black mask. Let's at some generator
here. All right. Let's see some
ambient occlusion. There we go. Let's go here. Let's make this
darker, and more red. Let's go here to the
ambient occlusion. And now let's invert that. There we go. Let's increase the ambient
occlusion here. Be. All right. In the roughness, we just make it more rough in those places. And we go again here if we
could keep tweaking this. Let's add some blur
slope with this in 100. All right. Perfect. Now, let me add some Curvatur. Let's go here at a black mask. Let's add generator, some
Curvatur. Let me add this. I mean, reduce these sliders. Like this, let me
add. Some filter. Alright. Let feel
like this. Would be. There we go. Blur slope. Like that. Let's
see the face here. Let me add some substract. At a field layer. So grunge,
or something random. Maybe this. Let's put
this in substract. Right? There we go. Maybe we could add some gradient would be maybe a little bit
of gradient. Let's call this. Alright, let me
add any gradient. Back mask, eratorRlinear.
All right. Something like this could be a little bit more of contrast. All right. Let me
make this reddish, like, more red. So
just like that. Let's see my base color. All right. Would be also
a little bit purple. Would be also a tiny bit purple. I think it is looking
cool, indeed. Maybe something
like this could be. I think it's looking
really cool. All right. Let's call this radiant. And now we could add any
bit more of color here, maybe a brighter color, right. And I will not add a generator because I will just
add it by hand. But maybe select one of these
brighter colors, right? Maybe a little bit desaturated. Let's go now with
the paint layer that we have just added. Let's start maybe painting
a little bit of this color. Maybe here just to emphasize the forms. Let me see like that. Alright. I think maybe
here booby There here. Let me decrease the
opacity of these mess. Oh, I'm the roughness channel. Alright, let's go
to the base color. Let's just increase the
opacity of this mess. Of this layer, I mean, right here would be
Awesome. Right here. There we go. Also
in these places. Here, here also. All right. Maybe even here. All right, so maybe no. And maybe this color
around here also. There we go. Let's decrease a
tiny bit more, this. Perfect. Maybe here also. Let's see the difference.
With that, and without that. Integrating, maybe we could add a little bit of fluor slope. Alright, let's select
that us blur slope. Let's see what this is making. Icy flu slope. Let me see my mask. Right? I we can make this bicker. I don't see any
difference in this. Alright, we have that. We'd like also to add some roughness. Variation we add also
some roughness in that in those In this brighter color. Brighter color. Perfect. Let's maybe add
some roughness variation. Roughness variation. All right, let's add
some black mask. Feel there. Go here. There we go. Alright. I just added in the grump. Oh, yeah. I'm just a little bit dumb. Just ignore me. Alright, let's add
this roughness. Let me see this. We could add this roughness. Maybe we could reduce
the balance of that. Like that, just to have
some surface variation. Your roughness, maybe we could
add another field layer. Maybe something like that.
Let me put this in screen. There we go. All right. Perfect. So now, let's do some
job on this task, right? For this base. We'll add some
aminocltion in the yield. All right. Ambient clusion
Let's make this darker. Let's go here. Let's invert
that, ambient depletion. Something like this. Let's make this more
orange and more like this. All right. There we go. Make that. Rougher. Let's make. Let's add also some
roughness to those task. Let me add also some
painted gradient, Black mask. All right. I will just make this
just like this a little bit more that soft with the same basic soft
that we used before. Let's add some color here. All right. I like that could be. There we go. All right. Let me add. Let's call this A, and I will call this
painted gradient. Alright, let's add some corator. Or right let's add
some black mask. A generator, yeah? Bator. Right let's reduce all of
these. Just like that. Let's select this color. Let's make those
edges it a bit more. Let's add a filter with
some blur slope also. Is in 100 and let's
increase this. This could be I think so. Let's work on this type of
muscle, something like that. Synthetic muscles. So here, have some roughness. I think of this, more of a rough like some muscle. So for those pieces, guess what I going to do? Yeah. Indeed, I would
add some inclusion. Ambient eclusion here and there. More and more Ambien Alright. Let's go here. Make this darker. Let's make this rougher also. Alright. We'd like also
to add some pattern. Ambien clusion All right. Let's add some
pattern. Let's add a black masks white mask. Let's add a black mask
with a fill layer. Let's search for some pattern. Maybe what pattern
we could add now. Let's see what patterns we have. All right. I don't
want to add circuit. I think would be good. Let's test that Let's
make this in height. Let's add some height
there border with. I don't think so. I kind of like it. I don't like it,
indeed. Let's go here. Let's see what else we could do. I don't like that either. Right. Let's see. No. Good. No. No. No. Alright let's see. 8 seconds. Add this. I think this is nice. I like it. So let me go here. I will add a paint layer. And now I will just remove You just erase this pattern from
there. Something like this. I don't want this pattern
to be on the horns, and for some reason,
this is on the horns. I don't know why.
But that is there. Let's just raise
it. Just like that. Alright. Now the pattern, let's make the pattern bigger. I like this, maybe we
could add some color. Alright, let's make this bicker. And some roughness.
Alright. Alright, I would like to have
this in between lines. To be darker. What we could do actually, instead of painting
them by hand, we could add a cavity. All these cavities.
Alright, let's go here. La mask arraorPurbator. And now in the curbator
let's go to here, Let's change from
edges to cavities. There we go. There we go. Et's make this like this. All right. Maybe
let's add some blur. Let's make this darker. That, let's add some roughness. Go. Let me see. Perfect. All right. There we go. Maybe we could add
a little bit of color variation in
the orange part. Let's add this. Go to your assets. All right? Let's
put this multiply. Let's add some blue slop. I don't want the
roughness to be multiply. I want the base color
to be multiply. Low that decrease
the intensity of that layer acetaman
Alright, there we go. To make it even lower. Let's add also some
roughness variation there. Here. Now let me go to roughness. Now let's reduce the amount
of roughness that Tiny meat. Let's put this in screen. Let me see my roughness. Right. All right. There we go. Perfect. Let's do something
here on the horns. Maybe just some basic stuff. Maybe I will make the lit
the horns like this tiny. Let's go to the horns. All right, let's
go to the horns. Let's add the
roughness. All right. Let me make this patters
synthetic muscles. A bit more rough. Ravi, a tiny bit less. I was like that could be. Base. All right. Let's work on this. Let's add some here. All right. Let's add some gradient. All right. And All right. Let's change this
to be some purple. More on the reddish tone,
something like that. Let me make the horse. Let's increase the tolerance
here though. There we go. Alright we're going something. This will be radiant. Let's add some ambient oxition. Here later. A Itoclusion as always. Alright. Like this arc. Arc. Add some roughness. Like this rougher. Let's call this AO. Alright. Let's add
some black mask. Another unator more
corbatur corbator corbator more corbatoria
Alright, let's go here. I mean, I just want to have, like the edges to pop out
and tell you a bit more. Right? Maybe we could put this in softlightT in roughness. Like this suf light, maybe or screen or har light or tint will be un tint. I think so. Maybe first divide. We're like, let's just
leave it in normal. Let's just select
one color here. Put this in int.
Alright, let me reuse. What's it? No, I don't like it. Hey, let's just leave it here. I will add a paint layer, and I will just remove
that water from here. Let's add some slope. With this 100. Alright. Let's increase this. Perfect. Maybe we could add
also some painted stuff here. Some painted detail. All right, some il like that. All right. Let's wait for
substance to save. Right substance is
working again. All right. So, let's make some roughness here in the gradient
ocean. It is rougher. We could make this Alright. Then let me see about
roughness. There we go. There we go. There we go. Right? Maybe, let's see how this looks inside Marmosete
L sport this. Ah, I just forgot. I have some emissive, right? No, I have not missive. In the eyes, I want to
make them emissive. We color copy these. Yeah. I will just like this. Alright, let's call this Base. But actually, let's
make another layer. Put it on below. Let me turn off that layer. I will just make this a
little bit more dark. Right. We'll add this one. I will add a black mask, paint, select the basic stuff. Let's go here. And let's change gin to UV. Let's make this. Just like this. Alright. A Alright, there we go. This should be t to be more maybe more to the reddish. Maybe not. Like this could be. Alright, select that emissive. And here also, we
select this emissive. Alright, let me see my emissive. There we go. Now let's
export these two substance. I mean, two MarmostTba. Let's see export here
selected demon head. Let's here export. And let's see how that
look inside the engine. Right here. This looks pretty cool. Indeed. All right. Maybe we could position the demon head on
the body right now. But this will be
just for this apos. We could post that later inside Blender once
we made the rig. I don't know if I
could be able to add the process to this course. It will be really simple. I will just maybe use the refi add on just for simple pause. All right, let's add all of these objects to the demon head. Now, let's select the
demon head object. Let's go to transform. Now, let's move the Pivot. Where is my Pivot. All
right, let's move the Pivot. Be what is then let's
just move it here. Till we reach the demon head, so it's easier to
tweak the demon head. Let's just put it here where
this should be around here. Let's make this smaller. Maybe we could make it
smaller just like that. All right, something like that to be would also like to make the edges of that wrap rider. Let's go here to
skirt and belts. Alright, let's go here.
Let's wait for this. Right. I think it's this
curvature. Alright, let's see. Yeah, this is not that. Alright. Something like that. Let's wait for
this. I All right. Let's just wait a tiny bit for this curvature to work.
Let see like that. I think this could
work. All right. Let's export also the garden
belts. Wait for this. And now let's go back to here. There we go. Right. I All right. So here we have our demon head
Aicly made, looking cool. Let me add in the demon head, let me add the missive. So here to emissive. Let's dirge or the
emissive texture. Try to find it is
here, emissive. There we go. Maybe we
could reduce the opacity. I mean, the intensity
of that emissive. The glow. Right? There we go. So now, basically, the only the only part that is left to make is the hair
and the skin and the eyes. So we need to make that and we are done with
the character, I think. Yeah. So in the next
maybe one or two videos, we're going to finish the
textures of this character, and maybe we could start making the textures of the weapon.
I'll see you there.
39. Texturing the Face and Eyes: Alright, guys, let's
continue with this model. In this video, we're
going to focus in the face of our character
in the face and the eyes. So let's go to our
substance fainter. So here we are with the head. So we're going to start
making the stuff. Alright. Oh, let's
see our reference. I have this reference here, so you can see which color are like the main in each zone, like here, the forehead
is the yellow. In the cheeks area is the red and the chin
area is the blue. White Because here, the
yellow is more like the places that are more like in the skins more
close to the bone. They those sauce has, like, this yellow tint. And for the places
that have, like, more blood, we are going to like painting
with this reddish color. And for the shin will
be with this blue, like, for the beard
and all this stuff. Alright, so let's begin. Also, you can see that
we could also, like, mix a little bit of yellow here, some more yellow
here. So let's start. All right. Let's first let
me get my my baked lighting. Here quick. Let's wait
for substance to work. Let me copy this. Let me go to my head. I will put it on
top of everything. Let's see how this looks. Alright. Looking good. So maybe now, we could
add some amine occlusion. I will not use blur slope for
the face of this character, Ryle's at an aminoclusion, like mask or eyelets wait for this or let's at a generator. Let's add some ambient
occlusion there. All right. Just like this. Maybe we
could put this something dark would be something like this could be. Maybe this could be more purple. Maybe more reddish. All right. Let's just leave
it like this red. All right, so let's begin to
add some colors. All right. Let's add some red color. Let's add a black mask
and a paint layer. So now let's choose
some reddish color. And now I will select
the cement brush, this one, because
this brush is smooth. Alright let's select this
brush. We can start painting. Alright let's active the flow. And now let's paint this reddish color to add
more life to our character. Alright, there we go. So let's start painting
this here in the cheeks, a little bit on the nose
here in the cheeks. We could cover, like, the face, but I will
not I will add, like this red in the
entire face kind of, but I will keep it the
main zone, the check area. Also, I don't want
this check I mean, this red to be too predominant because that will look
like his like blush. And I don't want that. Right here in the ears could be we could add a
little bit of red. All right. Perfect. Maybe let's
erase a tiny bit. Maybe here a little bit more. All right, let me
duplicate this color. Now I will make I will
add a black mass again. And now I will just move
the yellow All right. And now let's start painting. This yellow in the areas that
are more close to the bone, like here in the forehead, in the shin area, maybe
here in the clavicle, but the clavicle were not
we won't see the clavicle, so let's just focus in the face. Like, here a tiny
bit in this area. A tiny bit All right. Here in the sheen, also. Let's add a tiny bit of
this yellowish color. A tiny bit. Like, mix it with
this reddish color. Here will be right. All right. Let me make this yellow a tiny bit
less pronounced. Alright. There we go. Let me now add the blue color. But first, let me call
this yellow color. Let me duplicate this red again. We'll move it here. I will add another black mask
with some painting. Let's move this maybe to the
blue here, kind of, right. And let's start painting. Here, let's focus this blue in the chin area,
just like this. Alright. I like to add like this blue
for the male characters, but for the females, I don't like to add that. All right. Let's make that blue
less pronounced. It's too pronounced right now. But let's just decrease the opacity and also
the flow of this brush. Alright. We are
having some stuff. Let's see how this looks here. All right, maybe here
around the nose. A bit of this blue here also. All right. Let me decrease also the intensity of this red. Alright, let's see how this
looking with everything. Alright, this AO is too much. Alright. Alright I kind of don't like
it the AO effect there. So here we are. Alright. Maybe we could add
some highlights. I will add that
with my knife Rush. Let's put all of these
colors into one folder. Let's call this folder, like main face colors. I will create another folder, and I will call
this like details. We need to also we
need to make the, like the lips and mouth
color, also the wrinkles. So let's call this mouth. Let's add a layer. Let's add a black mask, paint. And now let's select
like this maybe more reddish with something like
this could be this color. Alright for this, I will
select my basic salt. I will ask the tablet
pressure and I will decrease the flow so let's
just add this here. This color real quick.
Let me change it. Let me saturate that color a little bit more
like this could be. A less bit less right there
we go. I think that could be. All right. Perfect. I mean, it's too much.
Let's decrease it. Just to have some color there. All right. A bit more reddish. Why it like this could be. Let me also feel the inside of this mouth with that color. This one. Let's click here. I will
just feel the inside. All right, let's go here,
and I will just remove a tiny bit from the
border of this mouth. I like that. Just a tiny bit. All right. Let me see the
base color. All right. Go here and now let's
start painting here. There we go. Also here. Let me change
the alignment to UV and let me go here to the UV let's
just start painting there. Some stuff. All right. There we go. Go here. Something like this
could be. All right. Maybe we could increase
a tiny bit more redness. Maybe the blue, not that much
the blue, maybe the yellow. Let's see how this is
looking. All right. And let me decrease the yellow. A bit more. Alright.
The color here. Let me add some roughness to this color just to have a
little bit of shininess. I will also use this
color for the crinkle. I don't care anything.
Alright, let's go here. La crimo. Now, let's just paint
this tiny place here with that same color. And also, I will
paint the ebads here. There we go. A tiny bit on this
area in the eye. All right. Perfect.
Let's just paint. Like this area, real quick. There we go. Perfect. There we go. Now let's add a little
bit more of detail. Let's call this. Let's
change the name of this. I just leave it in
mouth. I don't care. Alright. Let's go here. Let's call this like highlights. There we go. Let's add maybe this lighter color I paint and now I will
use my knife brush. And I will add a bit tiny bit of highlights in smas Let's
see how they look. Like, maybe, for example, here, we'll tad some stuff
here, in the detail. All right. All right, there we go. Maybe here also. Here in the nose. All right. Here in the shin also we
could add some stuff. All right. He also
here in this area. Let me add a tiny highlights
here in the nose. There we go. Also here. Alright. Let's see where else we
could add some stuff. All right. Maybe
in the forehead, just a tiny bit of this, like, highlight let me
see the difference. All right. I think it's
looking cool. All right. Maybe we could decrease
intensity of this. All right. Definitely adding
something. All right. Maybe we could also do the same stuff with the
shadow. Let's duplicate this. I will just make it
dark paint, darkness. Let's justle maybe
some darker color. Maybe something like this.
Maybe this brownish. Let's see. If this dark
color doesn't work, I will just go into delt. This is just, like, some
testing to see how this looks. I'm just tasting
right now. All right. I don't know about
this. All right. The tea we could add, like dis color around
here could be Alright. Maybe we could make this a
tiny bit more saturated. Now, let's wait
for this to save. So I will be back in a sec.
All right. Here we go. So let's just keep working, adding more detail
in the paste color. Here we could add some stuff. Alright. Maybe just like this. Would be All right, also here. All right, perfect. L
et's see the difference. Let's add just a tiny
bit more of detail. I like it. All right. So now let's add a little bit of roughness
variation to this phase. So let's go here. I will add a new folder
under the details. I will call this roughness
variation or maybe on top. Let's add a fill layer. Let's call this roughness one. All right, let's just
add the roughness there. And now let's add
some black mask. With some field layer. I will add a noise. All right. There we go. Let's see. Let's
see my roughness. All right. Here we go. We could use this. There we go. Let's explore this, and
let's see how this looks. Let's explore the head. All right. Let's wait for this. And perfect. Let's go
to Marmoset. Let's see. Also here in the head, I have active in transmission,
the subsurface scattering. Right now, I think it's a little bit too high this subsurface. I will just decrease
it a tiny bit. I don't want, too much
subsurface right. Looking kind of cool. All right, let me
see my reference. Yeah. I think we could add, some eyeliner here in the eye. Alright, so let's
add that stuff. Let's add a little bit of eyeliner here in
the lower eyelid. Let's go to detail. All right, add a new folder. Let's call this folder.
Eyes. All right here. Now I will add a new layer
with some black mask. Let's add a paint layer. Let's call this eyeliner. I will select some dark flor. We also need to adjust
these eyelashes. I will just adjust that later. Not right now. All right. Now I will just activate
my stabilize stroke, and now we could
add this eyeliner here in the border
of the eyelid. Like that could be. All right. Let me delete a bit
here like this. All right. A bit more. I don't I don't know. Maybe we could
increase intensity. I don't know about
this eyeliner, indeed. I kind of don't liking it. I definitely don't like it. Maybe just a tiny bit here. If we could add just a tiny bit. Just like that. Let me
remove this. Just like that. Alright, let's go here. Let me change the alignment to HUB. We could add some stuff here. Let's see. Maybe that
could work, indeed. I think this could work.
Let's explore that. Let's see how this looks. Alright. Let's go here. There we go. I think
that's better. I think, Joe. I think so, yeah. We could also try and select or use this smart material that has substance that's
called human human skin. Alright, let's see
what this thing does. Let's just add it here. Alright, we have a bunch of layers that we are
not going to use. Like, for example, I will
not use this base layer. The surface skin,
I will not use it. This top color, I don't like it. These dots, maybe
we could use it. This fractile sun. I
don't know about that. Let's put this skin human
symbol in pass through. All right. There we go. Maybe we could reduce the amount of this fractal sun
that is right now. Maybe just like that. I kind of like the effect
that these dots are doing. Yeah, I like it. The top color. I don't like that. This o, I like that eo. We could leave those
dots, I think. But maybe no, I will
just remove them. And the ins Alright. I think I like it. Yeah. So let's
export this again. There we go. Let's see
how this looks. Alright. It's just like a subtle change. Let me see material
values, Salveto. There we go. Let's go
here to substance. Maybe we could increase also the intensity of
the bake lighting. All right. And there we go. Perfect. So let's
work on the eyes now. So for the eyes, we need to do some stuff. Here we have the eyes.
Let me see something. Right here, we have
the base iris. Let's see which color we
could put in this eye. Maybe some blue,
maybe not a blue, maybe some darker
brown, I think, could be a dark
brown. So, let's go. So let's let's change the color of the iris
to more brownish, some dark, brownish color. Let me see like this would be. Let me add a folder, I will just drop that iris in that folder. Alright. Iris base. So now we have the base layer for
the Iris Iris. So now let's go to our paint
soft, maybe. All right. Let me add maybe
duplicate this layer. All right. And now I will make
this a tiny bit brighter. There's a tiny bit. Little bit, and let's make the second layer of
the color of the ties. Alright, let's go here to base
color. Where is my brush? It's already very big. So here, let's just add this color here in the
middle. There we go. Now, this will be like
Iris second layer. So now we need to add the
highlights and the shadows. So here in the ice, the highlight is
on the lower part, and the shadow is on
top of this sub part because this is a
concave, a concave shape. So in a concave shape, the highlight will be
in the lower part. So let's start doing that.
Let me duplicate this layer. I will just increase it a tiny
bit more and make it more. Let's add a paint layer, and now I will use
my knife brush for this task. All right. Perfect. So let's see. I think this could be more a little bit more
desaturated and brighter. Here, now let's add
this highlight color. I don't like it too much. I mean, this color, I don't think that's good
for that type of brown. So let's just tweak
the color right now. Maybe something
like this could be. Something like this, I
think it could be, yeah. So let's just keep
tweaking this. All right. Just like this. Like, following the flow to the pupple
something like this. We could reduce the
opacity of this layer. All right. All right, I cannot let me
use here this one. UV, but I cannot make it less. Ah. Let's use the tablet
pressure for this. All right. I'm just erasing a tiny bit to add a little
bit more of detail to that. Just like this would be. Just to add like this
effect of the fibers, let's me make highlight I
will add another highlight, but this time will be brighter. Maybe something like this. A little bit more saturated. Let me write this paint, and let's add
another paint layer. All right. Let's add another pass of highlights
just like this. Alright. There we go. Now we could start
erasing a tiny bit more. Let's erase just
a tiny bit here. All right, just like this. Perfect. I Perfect. Let me see how this
looks with the material. All right. Let's add the purple. So let's add a fill layer
with some black mass. We'll just make this full black. I will now select my basic soft. Let's add a paint layer. Alright. I sat a purple here. Something like this could be maybe not. Not in
the center this. Let me activate my where is my wire frame
here in the middle. In the middle should
be around here. Think so? There we go. I think we can make
this highlight a tiny bit bigger, brighter. Just like that. Just like that. Perfect.
And now let's add, like, some shadow on top. Let me make this darker. That will be with the basic
stuff. Is that a paint. And now I will just
make flows darker. That is just making this like this gray overlay will be abstract darken no supply. Let's just leave it in normal. I will just decrease
Ecrease this. All right. And now
this should work. I will also erase. Let's put this in white mask. I will erase the back
lighting from my eye. Just one the eye. There we go. Let me add a field layer. This will be with the
Iris anchor point. And I will add that Iris
anchor point in multiply. There we go. Let's go here. Maybe we could add some blending
between these two. Let me see it like this.
In this other layer, we could add that also. Let me see it like this. Maybe, let's do some control C, and let's just erase
just a little portion. Something like that could be. So now let's make the
redness of the sclera. Let's add in the sclera, a new fill layer with
some black color, pain. And now let's select some
reddish color like this. Go here, and now let's
just paint the redness. I will make this back
piece completely red. And now with a knife brush, I will just keep
working on this. All right, so let's paint
here in the borders. And let me put this back to UV. And now let's just paint this in a circular way, just like that. There we go. Perfect. I mean, not that much. Just a tiny bit. This could be. Alright. Let's export that to substance, and let's see how that looks. Let me say this first, and then we're going
to expore that. So now let's expore
the textures. Right head. Let's export that. There we go. Let's
go to substance. Let's see how it looks our
character with the eyes. I think we need to
realign the ice. It's a little bit. I think
it's a little bit too dirty. But we're going
to do that later. We could do that inside Blender. Not too much of a problem. Let's do it right now. It's just open Blender. Let's try do that. Alright, let's wait
for this. Here we go. Let's go to our male
character. Right. Right now, I will make the ice, like, not too much,
not too much therapy. Just like this. Let's
put this in local. We're not All right. Active elements. Here, individuals. Alright, let me do something. I will just erase this
right eye or left one. I don't know. Let's
add a mirror modifier. Right. Let's select the head. Let's just make this
look more forward. See, the eye should
have a tiny bit of like a tiny bit of rotation to the outside to make the character look forward,
but not that much. Maybe we could just
decrease that a tiny bit. Maybe this could be
good. All right. All right, perfect.
Let's apply this, and now let's export
our character. Also, I will just pose my Dama head here. Let me click here, right? Let me just apply all of these modifiers here
in the demand head. Let me select this right click. Let's set this to convert
to mesh, all right. And now I will just
position them to here. Oh what is happening. All right. Let me
do something here. Story into geometry. It you into geometry. If cuss to global
cursor to select it. I will select everything here. Right click Story in
to treat the cursor. White on everything.
Now it's aligned. All right. Let's just position this
into the right place. All right. Now, also, I will try to fix these
clipping issues like this. Also here. Just a tiny
bit, a little push. There we go. Also
here. All right. Just like this. All right, maybe let's go
here. There we go. So, let's expot this. Let's export this. All right. There we go. Let's
go to FBX, baking. Let's put it here. Maybe baking selected
applied transforms. Atlet bones. Let's remove
that. By modifiers. Allright let's expot
this. All right. Now, I will import that
back here with substance. Let's go here. Let
me set this first. So now let's go here to
edit prior configuration. Let's select the
new file that we have exported from Blender. Let's click here
and let's wait for this to recalculate everything
this will take a while. Alright, now he's
looking more forward. Alright, so let's
we explore this. Let's go here, export, mesh with triangulation active. Go here. And now let's just override this previous
folder, like pile. So let's just do that. Yes. Alright. So let's wait for this. Okay, let's go back to here. And now he's looking better
to, like, straight up. There we go. Perfect. Alright, something's
happening here. I think it's the
height map here. Yeah, that height map
is a little bit weird. Oh, uh a a tiny bit of dipness
Not that much. Write a little bit better. Let's save this. And now
what is left is the hair. All right. We have basically everything. There is just the hair and the weapon left
to do some work. So let's do that
in the next video.
40. Texturing the Hair: All right, guys, so let's
continue with this model. Now in this video, we're
going to focus in the hair. So let's begin. So, here we have our hair. I mean, this layer doesn't do anything. All
right. So let's start. Let's make as usual,
ambient occlusion layer. Let's go here. Let's select
our ambient occlusion. All right. Let's now
get a darker color. Just like this, AO or
this will be the base. Alright. And now I will just get my bake lighting, this one. Let's put that bake
lighting on top of everything. Just like that. Maybe we could decrease the intensity of
this bake lighting. Let's go to the AO. Let
me invert the abitroton. Just like that.
Maybe we could make this abitrolon a bit bigger.
Just like this could be. Al also we have some stuff
here. That doesn't look good. Let's see why is that
Alright let's go here. Maybe we could paint this
up, or right there we go. So Alright, so the roughness, the hair could be a little bit shiny because we're going to use the anisotropic flow map to make this highlight follow
the flow of our hair. You will see in just a
second inside Marmoset. So let's add a few more colors. Maybe we could add
an edge color. Alright. Bring a little bit
of highlight into our hair. Alright, let's see. Something like this could
be a tiny bit of this. Alright, let me get a
little bit brighter color. We be this. There we go. I think it's too much wendy
I don't want that be that pronounced just a tiny color there just to give it a
little bit of variation. Alright. There we go. Maybe we could the roughness decrease a tiny
bit, Is a tiny bit. I don't want to mess it up too much with the
roughness of this hair. Maybe, I won't even touch
the roughness of this. We'll just use this
basic roughness. Alright, let's export
the texture to Marmoset. All right. Here. All right. I think we
will need to reimport all the textures again
because we changed the FVX of our
character that maybe we'll make that we need to reimport all our texturing
inside my worse. Let's see. If that's true. And it doesn't been
reflected here. And that's, we will need
to report everything. So let's go to our
textures and let's report all of our stuff again. All right. Like that. Let's select
roughness. All right. And the metalness. Alright. So I will do something. I will report all my textures again for the entire character, and I will get
back to you again. Alright, here we are again. So now we're going to
go to the hair here. And now let's go to the GGX section and let's
select anisotropic. Now we are going to
increase the anisotropy, and we could tweak the
direction of the anisotropic. But you can see, it's a
little bit messy right now because we need to
add a direction map. So how we are going to do that? We are going to go
to this program. It's a free program. It's called Krita. You can find it in Google. We're going to go
to this program. I'm going to use this
software because I could not find any
other software that we could make this easily. I mean, Marmoset has it, but we need to set up like a texture project for
that and all that ****. I here is easier, a lot easier. So let's begin. So what we need first is
the normal map of our hair. Let's bring the normal map
here. Let's just paste it. There we go. Here are our
normal map of the hair. And now we're going to
select the normal brush. You can see. With this brush, basically we could paint
normals, as you can see. But what we need
is like the normal to change for following the
dissection of our brush. So we're going to go
here to this tab, and now we're going to
select the rotation. As you can say, I already
have it selected. Let's select the rotation, and let's select
this option here, the angle of drawing here. And now we're going to go to the pencil tip or the brush tip. So let's go here. The proportions,
let's just leave it. It will be like here in one. It will make the brush
to be this circle, but let's just drop it to 0.5. So this brush has
its more oval shape. So now we're going
to rotate our brush around here, 260 70 am. And now I think that will be it, rotation angle of
throwing all right. I don't think so that there is any other change
that we need to do. Just copy my options here. I will just go
through all these, copy all my stuff. All right. There we go. So now that we have our brush. Let's add a new layer. And now, what we're going to do, we're going to paint on top, following the flow of our hair. As you can see, let me see. As you can see, we're
going to, like, paint just following the flow of our hair, just like that. Just like this, maybe. Just following the flow. This will be the direction
of our highlights. So try to make like one stroke, just like I'm doing. Don't like this. It will look weird. Just make it like
one long stroke, just like that as I'm doing. Alright. Perfect. Just like this. There we go. Et's just keep drawing our stuff. I like this. Also here. We're going to do this
with all our hair strands. All right. Make, remember to
make the strokes. All right. Perfect. Remember to follow follow There we go. So now let's go with another
one. Let's go with this. I will just do this one, and then I will just cut, and I will do the rest
because this is basically the same process
all over the place. Alright. It will be boring. Just see me do this
again and again. Basically, it's the
same stuff that I'm going to do with the rest. All right. It's
just this. Perfect. Oh, let me do also
this main hair here. All right. Just do this. Quick. Alright, let's do this one. Let's just paint this following. Flow of our hair
just like this. We. I think I will make this
brush a tiny bit bigger. All right. And let's just make
this follow the flow. All right. Just like this. This will be a little
bit time consuming. So let's keep going. Don't stop until
we have this done. All right. Just
like that. Perfect. This is to make
the direction map. So the highlights follow
the flow of our hair. Just like this. A
little bit more. Little bit More. We are almost done here. We are almost done. Just wait a tiny bit more. Keep painting. Just like this. All right. I will not paint this one
because that's the hair band. Right. Just like this. Alright. So I will do the
other two hair strengths, and I will get back
to you in a second. Alright. So now we're
going to export this. Let's export this, right? We're going to export
that as PNG, maybe. Let's search the PNG format. And now let's just save it. These will be like
hair, low map. Let's just save it. All right. Let's go to our Marmoset Toolbag and now here in anisotropic here
in the direction map, we are going to select that flow map and you
will see the difference. You can see that our highlights now are following the
flow of our hair. You can see the
difference without it and with the direction map. Now they are following
our hair a bit better. Alright. See it here. Perfect. So maybe we could
decrease the roughness. I think it's a little
bit to too shiny. Let's decrease the roughness. Our hair just a tiny bit. Maybe this could be.
Let's export this. Let me export just the hair. Just like that,
let's see, Marmoset. Alright. This is
tiny bit better. Let's add a little bit more
interest to this hair color. Maybe we could increase
our unbent clusion. We could increase it
just a tiny bit more. Maybe would be maybe with
a little bit of blur. Alright. We'll
increase this stuff. Right? Why is this not? Alright, let me just
remove this mask. I don't think so
this will look good. Let me see how this
looks with that. Maybe we could decrease
it a tiny bit. Leave it in here. Let's see how this looks inside Marmoset. Let's wait for this
to be exported. And now let's go to Marmoset
let's see the difference. It's kind of good, yeah.
I think it's good. Maybe we pull decrease a
tiny bit more the roughness. So here, right? I want this to be
like that roughing. All right, let's
decrease a tiny bit more the roughness of our hair. Let's see hair.
Let's export this. There we go. Let's
go back to Marmoset. Alright. There we go. I think that looks nice. There we go. Alright. Let's add a little bit
of ambient occlusion and a little bit of
stuff in this band. I will call this just
pase, just like that. Let me duplicate
this black mess. This will be AO. All right. Let mecreaz the color. I mean, the brightness. It's at a generator. Now, let's add a meto
glutien generator. And now I will just increase the amount of this
color that is here. All right. There we go. We could add some roughness, make it even rougher. This time we could add maybe
a curvator map, a generator. Curvature. Let's go here. Let's decrease all
of these sliders. Alright, let's just
leave it like this. Maybe we could select
a brighter color. Alright. Tiny bit
brride like this. Maybe this could be it for this. Would be maybe we could add a little bit
of lure slope here. But that's lure directional. Let's add a little
bit of lure slope to that curvature. Increase this. There we go. O, now let's
explore this again. Right? Now let's see how this
looks inside the engine. Alright. There we go. Perfect. So there we go. I think this looked cool. Alright. I don't want to add,
too much stuff on our hair because he doesn't have too much
diesel on his hair. I think this is enough. So I think I will
leave the video here. Maybe if I have more
stuff to add to the hair, I will just do it
in the next video. Maybe we could actually we could increase maybe
the curvature. Let's see how this looks. Here, right? Maybe we could increase the
patity of this urbatu color. Let's see how this looks. Alright. Let's see marmoset. All right. Maybe we could even increase
the balance, right? Just like this. Maybe we could add a little bit of
floor slope, let's see. Lobe with this in 100. Alright. Let's see
how this looks now. All right, let's go to
Marmoset. Let's wait for this. Go to Marmoset. Alright, let's go back. Alright, I think this could be. So. What's left to do, maybe actually we could
increase it a bit more. Sorry for this back and forth. Alright. I'm just,
like, testing. Maybe in this spot
could be good. Let's just explore this. So what is left to do is
to texture the weapon. So let's do that
in the next video. We will need to bake the
weapon and also texture it. It should be kind of
straightforward, indeed, maybe. Y, basically, here we have our character already textured. I think I'm not missing
any pot or place. I think everything
is texturing, yeah. So in the next video, we're going to start
turing a weapon. So see you there.
41. Starting the Weapon Textures: Alright, guys, so let's
continue with this model. Now we're going to
texture the weapon. So let's create a new
project for this. Right, let's put it in four k. Let's leave it all as it is. Maybe we could also leave. We could put it in direct X. I will just put it in open J just to match
the rest of our character. But you could leave it in
direct X. Alright, now, let's select our low
poly weapon, this one. All right. And now let's
create a new project. Let's save this. All right. Let's wait for this to save, and I will be back in a second. All right, so let's continue. Alright, here we have
our low poly weapon. So now we're going to bake our high poly
into this low poly. Oh, I just pressed the
wrong icon. Let's go here. And now let's import
our high poly here. There we go. All right, let's go to ID. Let's change the color
to vertex color here. All right. Let's go to
the ambient occlusion. Let's increase the
secretary rays. Let's go here to a curvator. Let's also increase
the secretary rays. Position thickness. I think all of those
could be like that. And now what we are
going to do will be, I have already imported
the high poly. I don't fully remember
where we are. There we go. We could do a test bake with the automatic to see how this looks. I think it will be fine. Alright. So let's
just do the bake. All right, let's wait
for this to finish. All right. It's basically good. I don't see any major problem. Oh, I see this one. We have this normal slip. I don't remember if it's
in the high poly or on the low poly. Let's see. But, I mean, this is
already pretty good there. Oh, I haven't
ungrabed this piece. So let's just unwrap
it real quick. Maybe just like this. All
right, something like that. I think this sch be
good right as to the Unwrap. There we go. Now we are going to add that
on the rest of our weapon. Let's select this little piece. Let me go to my text dentity. Let me select another island. Let's click here, calculate TD. Now let's go here, and
then we're going to select our island and just apply that textil
density with Sam ITD. All right. Let's just
put it somewhere. All right. Now I will
re export this weapon. There we go. Let's go. Now here. Let's go to Edit and RemportMsh. Let's do, again, the Bake. Let's see how this goes. All right, there we go.
Now it's good. Alright. Getting I think those
ties are for because no, those are I will
have to see Alright. Yeah. I think we will
need to tweak our low poly fully match this curvature. Alright, let me go to
the low poly here. I will just tweak it a
tiny bit. All right. This is not matching very
well, our table here. So I will just tweak it. So this match nicely. Alright just like that. Maybe we could add another loop here for
these to match nicely. Here also at another loop here. All right. Here, also, let's put it here
at another loop. Let's do the same here. All right. Move this. We need to move this also at another loop
there. There we go. We need another loop here. All right. There
we go like this. Maybe this could be. Here we need another loop. All right. Maybe with this, we could just make it higher,
just like that. Alright. I think
this could be good. So I will re export my low poly. Let's go here. We
export that low poly. Let's go back to our absence. Let's click here on report. Right now, we're going
to rebake our weapon. And let's see how
this goes this time. Alright, give me a suck. Alright. So the bake in
that area, it's better. You can see now that
it's way better. Alright. I think that
for the rest, it's nice. All right. Alright, so what we
need to do now will be just do the final, like, the full resolution bake in four K. And then we're going to need to fix the ambient
occlusion as we did with the character itself. Let's do the bake with four k. I will pause because this
will take a little bit. So I will get back
to you in a second. Alright, so here we are. Let's see how this looks right. Let me do another bake. But this time, I will add a
little bit of antaliasing maybe in subsample 44
times four, right. Let's just click here and
there we go, Let's wait. Alright, so let's
see how this looks. Here we go. Feather edges. So now, what we're
going to do will be the same as we did with
the character. So let's add to symmetry. Let's put this symmetry maybe in the C axis. You
can see it here. And now, right, this piece, why this piece is
looking like that, I think I have this piece
without being grab. There we go. I don't have
this piece and grab it. Why? Because I'm dump. I just forgot to grab this. Let's go. Let's do some quick
ngrabO this little piece. Alright. All right,
grab minimal stretch. Ah, I just forgot
to add the seams. All right, grab minimal stretch. Let's see how this looks. And let's just add it with
the rest of this weapon. All right. Let's add it
around here will be. Now, let's re
export this weapon. All right. There we go. Let's go back to our Substance
Painter. Let's click here. Import mesh, and now we're
going to re bake this. So see in a sec. All right. So let's go back
right that's baked. I think that's the only
thing that's missing. Oh, we have some
overlapping here. Yeah, I just forgot
to actiive always. I mean, the match by name. I will do another bake story. All right, so let's keep
working on this right. Now, it's good. We don't
have any overlapping. Maybe the overlapping
of the amd oclusion. But we're going to fix that
amd occlusion right now. So let's make a feel layer. Let me also add an
amtoclusion channel. Al right now, let's
go to project, and now I will just drop this ametoclusion
into the base color. Alright, let's go to
the base color channel, and now I will add
a paint layer. Because in this way, we
could select the colors from the detector itself, and we can pick this
real quick and easy. So let's maybe pick this one, and let's try to fix
maybe this one here. Let me put the flow with some tablet pressure and let's decrease the
flow itself also. And now we will start
painting here to raise that stuff there. All right, like this
will be perfect. All right. There we go. Let's go here also. All right. Perfect. All right. Let's select these colors. Let's just keep tweaking this. Alright. We're going to do the exact same thing that
we did with the character. All right. Let's erase this
weird ambit oclusion All right, just like this. There we go. O let's do the same here. And all the floaters
that we have. All right, just like that. Let's go to the rest. We have quite a few floaters. So maybe I will just fix few of these ones and then
we're going to pause to do all these out of
camera because I already have shown the
process of how to do this. So it will be basically more
of the same again and again. All right. Let's just keep painting
this ambient occlusion here. There we go. Just like this, go here also. Let's remove this weird
ambient occlusion. Alright. Go here. And let's remove this
metocltion from this part. All right. All right. Let's see. There we go. All right. Let's fix the inner ones. Just like this. Perfect. Let's also go here. Let's try to clean these
ones, these parts here. All right. There we go. I think this could be good. There are still some areas
that we need to fix. All right. Like this. All right. Here a little bit in this area also. There we go. I think this will work. We have already fixed this area. Let me do some work here, maybe to blend this
better. All right. So, I will basically do
the same thing that I did here for all the other
floaters that we have here. So I will get back
to you in a sec. Alright, so I think
everything is correct now. Alright. So now, what
we're going to do, we're going to export this base color that we have painted
this ambitocltion that is in the base color. Let me just write like
rename that layer, MpfixO let's go to
export textures. I will just export The
base color. Let's go here. Let's select a direction
for our textures. Let me call this weapon. All right. Let's
go to that folder. There we go. Now, let's
click here in Export. Now, let's go to that here. And now what they're going
to do, I will import the map that I have
just exported. I will just import it here. And now I will replace
my ambitoclusion with that new map that we have
just created. There we go. Let me remove I mean, like, hide the layer
that we have painted. And you can see that now our floaters looks
good and nice. Perfect. There we go. We have our
floater nicely placed there. Perfect. Everything
looks perfect. You see it there,
and see our floater. There we go. All right. So now, maybe we could start making like some basic
colors for these. You can see how many
colors we have. We have, maybe one, two, three, one, two,
three, four, whatever. Let's just start
making the maps. Let's call this blade. Alright, let me first
save this real quick. All right. Alright, there we go. So let's make a black mask
with color selection. Let's select this blade. I will copy a color. All right. Let's
add a fill layer. Let me paste that color there. Maybe we could add a little bit of roughness and metallicness. We could make this
blade full metallic. There we go. Maybe we could make this
also a little bit brighter. Or maybe not. I will make
it a little bit more rough. And there we go. I think
this would be nice. Now, I would make these
outer plates ayer. Let me change the name
of this. All right. Oder plates. Let's do a color selection. Now, let's just color
pick This prim color. All right, let me change
the color of this. Let's add a field layer. Here, I will just
drop that color. There we go. A little bit of
roughness, maybe. Maybe not as rough. There we go. Let's select now, like
this color on the handle. Let's create a new folder, let's call this handle. Let's do black mask
with color selection, and now let's select
this darker color. Let me copy the color code. Now let's make a
new field layer. And let's call this. I mean,
let's just drop it there. Right. We have some weird
stuff happening here. Just like that. Or right now maybe let me
see my ID map, all right. Let's make a folder
for this piece. All right. Handle, middle piece. Let me put a blue
color into that. Let mask with color selection. Let's select this color. Let me copy the color code. I will add a new fill layer
with that color inside. Alright, New folder. This will be for the
orangy s. New folder. Let's select this menu layer. There we go. Now we need a
new folder for this metal. Orange parts. All right. Let's
make a new folder. Let's call these males. And now let's make a new
math with color selection, and let's add a
field layer inside. Just like that. Something like this could be. Alright. There we go. Now,
we just need like this copper metal here. All right. Let's see. Let me also select
that here, that color. I will make a new folder. We'll just drop this metal here. Metal white. We'll make color selection because now I will
just select this one. In this bronze, we just
add a new color selection, and I will just select this one. Also, I will copy
the color code, and I will just wrap it here. Ethaic right. A little bit rough. Now let's make a new folder
for this reddish piece. I will just copy, paste this one, red, hard. Let me change the color of
this piece with this one. All right. There we go. So now we should have
everything with colors. Also, this metal should be here. So let me add a metal there. We could paint that. All
right. Paint it here. Or maybe we could
select by polygon. It would be easier to do that instead of
painting it. All right. There we go. Perfect,
here and here. There we go. Let me
copy this effect, and I will just drop it here. Haste, effect. There we go. There we go. There we go. Now we need to add
some emissive here. Let's animisive All right. A massive color
selection. All right. Let's add this. Let's select this color. I will put the base
color in black. There we go. So now, what I'm going to do? I will just export this and then import it back into Marmoset. Let's select the Unreal. The real preset
for the exporting, maybe we could select
maybe the basic one, this real packet, right. This one will be. Let's just export this. There we go. Now
let's go to Marmoset. As you see, I have
imported my weapon here. All right. And now
let's import our stuff. Well, let's go to
textures weapon. Let's import the
normal map, the Y. Although I will do something. I will do I will export the mesh with the
triangulation from substance. Do not get any weird
shading issue. Alright, let's call this
trangulated. Just like that. Alright, let's go to Marmoset. Let's go to Marmoset here. I will delete this one. And now I will import the new triangulated
version of this weapon. Trangulated. Let's import
that. There we go. Let me move this to the side. Here we are. Now I will import my base color. I go to textures. Weapon, base color. There we go. Also,
do not forget to activate your flip Y
in the normal map. Since we didn't make the
normal map with direct X. So let's go here
to micro surface. Let's select our
packet, our packet map. This is the roughness, so this should be the
green channel. Now in the metalness, let's select the
same package map. Let's put the in the blue hannelO right
now for the missive. Let's add a mission. All right. Let's select the missive
map that we have created. All right. There we go. Perfect. Maybe with a
little bit of intensity. There we go. I think this would be good. All right. So I think I will
leave this video here. In the next video, we
are going to continue making these detectors of the
weapon. I'll see you there.
42. Continuing the Weapon Textures: Alright, guys, so let's
continue this model. In this video, we're going
to texture the weapon. So let's begin. Alright, let's go back
to Substance Painter. And let's see what
we could do first. Maybe we could start
making the blade. All right. We have this blade. I would like also to
have the edges, like, more like brighter, just
like that. All right. I will make I will
call this Base, and then I will duplicate this. I will call these edges. And now I will make this
brighter. Just like this. All right, let me
add a black mask or write a paint layer
into that black mask. Alright, let's go
to our basic heart. And then we're going
just to paint this. Like, we could left click
and then press chief, and we could, just make
a straight stroke. Alright? Let me remove the
toilet pressure from this. Or we just like this could be. Also, maybe we
could use our pain. I mean, feel polygon, make this real quick and easy or write just like
this in this easy way. There we go. It's a little
bit more. The said yes. Alright, maybe here we
could well, I think so. Yeah. We could add
them. Alright. Just like this. Let's
just keep filling this. Alright. Few more. There we go. Alright. Let me clean this
part a tiny bit more. All right. Just in this area. There we go. Perfect. Just like this, right? There we go. All right. Let's just could leave it like that or
maybe not that we'd like to fill this gap here like here. All right. Like this, I'm just
pressing chef. All right, just a few more. Like this. Perfect. There we go. Let's get this nicely here. All right. And this could be. Alright. For this edge, I would like to make it less rough and the other
one. All right. Maybe we could make this under
ye know it here would be. Alright, let me
see my base color. Alright, we could make the middle piece a little bit less, I mean, more rough would
be, maybe even darker. All right. Let me just keep fixing this. All right here. Okay, let's just try to get this right in a
clean straight edge. Clean straight stroke,
yeah, something like that. All right. Something
like this could be. All right. I think so. Yeah, this could be. All right. Well, I think this could be. Right? Maybe we
could fix this real quick in this area. All right. Now, let's add a base I mean, a base, ambient occlusion. Alright, let's just
add a new field layer. Let's add a unit ator. Let's select ambient occlusion. Alright. There we go. Let's invert this
ambient occlusion. Alright for some reason. I'm quite not getting my
orientation here in substance. All right, let's just continue. We will make this brighter or let me make
this a bit darker. Just like that could be
a little bit rougher. All right. There we go. Perfect. Maybe now,
let's call this AO. There we go. Maybe now we
could add a curvature, black mask, a
generator, curvature. There we go. Maybe even we could add one of these smart masks
maybe some edges. And it could be this as strong. Let see like that
could be All right. Right, let me add something. I will add a filter with
some blur slope in 100. Let's increase this blur slope. And now I will add Alright
let's wait for this. Now I will add a field layer. Let's find some grunge.
Maybe something like this. Let's put this
crunch on substract. All right. Let me see
what this is doing. Maybe in multiply,
this would be better. Maybe we could
select another one. All right. I would like also to add
some color variation into the surface of this
edges, all right. Let's add a new field layer. Now, let's search
for the grunges that we have search on Google, maybe to add some
color variation there. Let's wait for this to
respond. All right. Maybe some of these, we could add multiply
Let's decrease The patty of this. All right, like that. We could also add, like, some roughness into this. Right? Just like that. Let me put this in roughness and now I will just decrease the roughness as well. All right, maybe we could
do something interesting in this. Let's see. Maybe we could add a filter. Let's see, H is MT. It's MT. Matt effects. Let's see if we could add
one of these effects here. Alright. Hammered. No, with this one. No, I don't think so. It could be something like this. Or maybe we could
use this galvanized. Let me reduce the intensity will be Let me
increase the scale. Ie not that much. Let me see my roughness. It's an interesting look. I like it. Alright, we could keep
working on the roughness. Also, we could add a few
scratches into these. Let's call this color
variation. All right. Let's add more roughness
variation into this. Let me find a grunge here. Maybe this one could be. All right. Let's
select roughness. And now we're going to make this a bit rougher or less rougher. Just like that. Maybe could be. Alright. Maybe we could
select another one. Something like this. All right. Now, I would like to add,
like, some scratches. Let's call this like maybe
roughness variation. We also add we also
are working here. We need to add the edges. Also on this area. So let me select
the polygon fill. And now I will just
start filling this with this lighter or brighter
color in this area. Like this, real quick. Pets All right. Let me see here. I think everything is fine. All right. Let's just
keep working on this. Let's add maybe some scratches. Let's add a new fill layer. Let's add a black mass.
Let's add a fill. Now we're going to add a
scratch Maybe some scratches. Maybe this one. I kind
of like it, yeah. Yeah, I like the scale of this. So I would just
leave it like that. I will add a high channel, maybe even some
roughness channel. I will make this a
little bit deep. Maybe not that deep. Maybe something like this could be I would like to
reduce the dirtiness. Let me know the dirtiness
is not the option. Maybe the dust. A little
bit of dust could be. All right. Let's see. Maybe the spots. I think
the spot the spots here. R double scratch. Scratch dirtiness? No, that's not the
one. All right, dot intensity, little
bit of dots. All right. Just like this. Let me see here. All right. We are going
to add a paint layer. Let's add this paint layer, and now let's start
erasing paint layer here. And now let's start erasing scratches from where they
don't have sense to be. Like in this area
that is super close, that is super close
to this plate. That doesn't have sense to
have scratch in that area. All right, something
like this could be. Alright. We could add also some
manual scratches. I mean, not in that place. Maybe here will be. Let's go here. I don't like
this scratch in this area. I don't want any scratches
in this inner area. All right. So let's just keep
erasing some stuff. Alright, there we go.
Let me save this. And now I will export this to Marmoset and see
how this looks. So let's do that. Let's
go to Marmoset now. And now let's see
how this is looking. I think it's looking good. Et's just keep working
on the rest. All right. Now, for this handle,
let's go to the handle. I would like to add some This is supposed
to be the handle. Alright. I see. Let me reduce the tolerance
of the handle middle piece. Just like that. All right. And now I would like to make this color
darker, just like this. All right. And now I would call this space. I would like to add some roughness also,
a little bit rougher. And I will add another layer. This time will be
with a linear mask. I mean, with a linear
gradient here. Just to add a little bit
more of detail. All right. Let's see if we could
make this darker, maybe. Could be, C B. Alright. I need the missif
also to be there. Let me add a paint layer. And now I will just make
this area a missif Alright. Perfect. Now let's go back to the gradient and we will add a little bit more of contrast
into this gradient. Maybe not that much. Let's make the
gradient a little bit more smooth, all right. Now, we'll call this Gradient. I will add some AO. All right. Let's go here,
a generator. Go to this. Let's add a metocltion right. Let's invert that
amocltion. All right. Let's select a darker color. Let me see like this
could be maybe purple. Who knows? All right. Let's
add some roughness channel. Just like this. Let me see my roughness. All right. Let me make the base of this a
little bit less rough. All right. So we are there. We need also. It's not that we need. Let's add a baked lighting, right as we did before. Let's add a field layer. I will just remove the
color from the channels. Let's add now a filter. With bake lighting stylize. There we go. Here we are. And now let's see let's change this output to diffuse only. For some reason, are not
getting any light this. Or right now, we are
getting something. Let's just leave the
color there, right? So I want this to be gray. Like this white, let
me saturate this. Alright. This will be like this grayish and the
sun will be white also. All right. Maybe we could use this. All right. Let's put this in soft light. And now let's reduce
the intensity of this. All right. Let's just
reduce it a little bit. Let me see the
difference quite a bit. There we go. Now, let's go back
to the handle. Let's call this AO. Now I would like to add
maybe some curvatur. A generator. Let's add
some curvature here. Let's reduce all of these
sliders because I just want the sharp the
sharper curvatures. Like that maybe
we could increase this fine and this sub will be. Let me add this blue slope
in 100 or maybe in ten, let's say, maybe 100, at 1,000. All right. Let's add now, some grunge some grunge. Alright, let's put this
crunch and multiply it could be Alright with a little
bit of your slope. Now, I will get
this reddish color. I will just make it brighter. Just like that. Alright, maybe we could add a little bit of roughness Into this will be There we go. Let's see. Let me see my roughness. Alright, maybe we
could make a little bit more of contrasting
the roughness. All right, let's go to the base. We could make this
rougher or maybe I mean, less rough or maybe rougher would be would make this right. Let me see my roughness again. Alright. Let's add some color variation
into the surface of this. Let's go to your acids and
let me call the edges. Now I will add a field layer. Let me add this this time. I will put this multiply, and now I will add just a blue slope
filter, just like that. Now let's decrease
intensity of this. We could add also
some roughness. All right. Let's add some roughness there. Let me go to the
roughness channel. I will decrease this. All right. And now I will just
put this in a screen. Let me see how this is
looking in Marmoset. So let's see, let's wait
for this to be exported. Now let's go to MarmosetTolbg. There we go. We'll be Yeah, let's work on these,
like, white metals. G here. Call this base. I will just add some
roughness variation and some amidoclusion. Alright, let's go and
add a black mask inator. Amdoclusion invert
this Amdoclusion. Let's make this darker. Maybe we could even add
some roughness into this a little bit rougher and maybe even
some metallicness, just like that. Or maybe not. All right. We could decrease also this. Let me see like
this. There we go. All right. Let's just continue. Let's add. Let me call
this in the handle. Like color variation. Let's go to the metal.
Let's call this AO. Now let's add maybe
some color variation also to that piece. Maybe this one could be. Let's add some blue slope. Lo slope. I just love are slope. All right. Let's make this here. Let's just make it
less noticeable, and this will be multiply. Something like that
could be All right. This will be variation. I will add another
type of roughness. Let's just add some fill layer. Let's search for some grunges. Maybe this one could be. Let's add the roughness. Maybe like this. Let's go. Maybe we could add
some blue slope also to this. All right. It's in ten. Alright, maybe. I'll be maybe not that rough. I just want a subtle
roughness difference. Alright. Now, let's call this
roughness variation. Now, I will add some curvatur. So here at the curvatur. Let's invert this, yeah,
that's the curvature. Let's just decrease
all of these layers. All right. There we go. Let me add a little bit
of your slope into this, so the edges are
not that straight, and we could have a little bit
of variation in the edges. Just like that. Let
me see my base color. Let me see my mask. There we go. All right. Let's see what else we
could do here. Let me save. All right. Maybe we could start working on on these orangey peas. Let's serve for the orange part. This should be like a cable maybe instead of
this type of plate. Yeah, I will just split that, right, let me duplicate this. And this would be with a paint layer here
with this in black. All right. So let's work on this part. Let me also add a
paint layer here. There we go. Let's
call this face. Duplicate that and
add a black mass, I will call this AO, add generator, add
ambienocltion. There we go. Let's see inverts,
let's make this darker. All right. Perfect. Let's add a tiny
bit more of abentocltion. Maybe not that much. I think that's too
much Abentocltion. Let's make a little
bit of roughness. C B, could be, could be. Alright. Now I will add some curvatur. Alright. Alright, so let's go here. Let's decrease all of these. Now, I would like to
change the color, maybe for something
more yellowish. Just like that. Let's add a little bit of
fluor slope here. Hundred. Let's increase that. Let me add another grunge. Alright, that's a
filter. I want a crunch. Let's add a fill layer. Let's put this into multiply. All right. Maybe we could add
tiny bit of manual detail. Let's select our knife brush. Now we could start painting the edges of this orange
plate just like that. Would be maybe we could also add a little bit of roughness. Have maybe some roughness
variation to this. Alright, let's make
this less rough. All right. Let's just keep
adding more stuff. All right. Maybe here all in this area. A little bit of detail. Alright. I Just like this. Right? Let me decrease this. A bit more like that. Perfect. Let's just keep
adding this detail. Just like that. L to have a little bit
of tainted detail. There we go. All right. Here, also, we need to add some stuff. Maybe something like that
in the corner. Right? There we go. Maybe we could
add a little bit of high. Let's see how this looks. Is a bit of high. Would be in the All right, I would like to add a little
bit of color variation. Maybe this color variation
will be with a fill layer. Lack mask, let's a generator. I don't want a generator, I want a crunch. It's a leg. That's a filter. Let's see. Feel one of these slushy
ranges with a blue slope. Let's get a darker color. Alright, just like
this could be. Overlay. Maybe it could be in
screen or soft light. I will just leave it in normal. I will add a tiny bit
of roughness variation. And to this right now, I will import into
here my Alphas. So I will be back in a sec. Alright, so I have
my Alphas here, and now I would like
to in this layer, let me call this layer
like edge this will be like dark color variation. I will duplicate this we
remove the blue slope. I will make even this
a little bit darker. All right, I will
add a paint layer. Go here, select one
of these alphas. Maybe we could start
making some detail. Just like that. Let me add a tiny bit of this Alpha here be Daria. Alright. Maybe we could change the Alpha something different. Something like that. Alright, let me go here
to this variation. I will just start
removing a tiny bit. This maybe we could
even make it smaller. All right. Let me reduce the flow.
Maybe just like that. All right. Maybe we could start
working on these plates. Let's work on these,
like cream plates. All right. Maybe we will save And now we could
explore the textures. Let's see how this looks. All right. Let's go to marmoset. Right looking kind of nice. Yeah. There we go. All right. Let me
see my reference. All right. Maybe
for these plates. For the screen plates,
we will add where are my plates handle outdoor
plates for this space, I will add a field layer
with 00 roughness. I mean, the roughness
would be one with color black, maybe. And now I would
just select this. I will add a black mask because I will make
this stuff dark. All right, to here. All right. All right. It's see Maybe we could clean this a
little bit more. All right. Here this detail. Alright, this is
not doing anything. Right now, there we go. Let's add. Let's
call this like hold. Now I will add. I will duplicate this layer. I will add a black mask erator
Abnocltion. Impar dish. Let me make this a little
bit darker. Even redder. Just like that could be. Let me add a little
bit of roughness. All right. Let me see
my roughness here. Maybe we could have a little bit more of contrast
in this roughness. Right? Maybe something like this
could be. All right. And this one would
be even rougher. And it's at a paint layer. And now, I would like to
paint like some tough hair, like some manual, gradient, but I want to have this
brush stroke effect. Into this maybe could
be something like this. All right. Just keep painting. A bit more here and there to get
some interesting result. Alright. Let's just
keep working on this. Maybe we go even. We remove. A bit more here. Let's
just add it like that. Maybe a little bit of
painted exclusion here. I also in this area. Just like that. Let's add some stuff here. All right. Like painted gradient
in this area. This is just to let I'd like
a little bit more video. Into the zone. All right. Maybe we could tweak
the color a little bit. Is like this. Let's add now. Put this ao. Maybe we could even
increase the ao. Let's add now some rough, I mean, some edges. A curvature. Alright,
there's a curvature here. Let's make all of these in one. Maybe we could at a little
bit of this fine slider. We add up blure slope
100 There we go. All right. Something like this, let
me see my reference. A little bit brighter. Alright, let's go here. Let's add a feel there. I will just put it under the
blue slope. There we go. Abstract. Alright. Let's see. I this cool be good? Let's call these edges. All right. Now I would like to add
another color variation. By this time with this,
maybe with this one. Let's make this multiply. All right. Let me
add some filter. Filter, no, I don't
want to filter. A field layer. Alright. Maybe something
like this will be. A little bit top or slope. Something like this. All right. Here in the edges, maybe
we call raise a tiny bit. These edges that I
don't want to be there. All right. All right. Let's see. Maybe here would be we could even add
some painted detail. This one in this area. All right. Can we hear also? This part. All right. Maybe we could keep adding a tiny bit more of this. All right. Any bit more detail
in this area. There we go. Maybe some
painted stuff here. Perfect. Let's go also here. Now, I will just add
more stuff here. Like that. Let me raise a tiny bit more. This. There we go. Alright, maybe we could
even add a tiny bit of curvature in this
area, just like that. All right. Now, here in
the color variation, where is my color or variation. I could add a tiny
bit of roughness also to that roughness. Maybe something like this would be let me Explore these tectors and let's see how this looks inside, Marmo said. Let's go there. Alright, I
think they are looking cool. There we go. Maybe we could have
a tiny bit more of like contrast in the
color of this weapon. Let's see. Let's
go to this camera. I will just throw
up the saturation. I would like to see the weapon. We have the value, the handle is different, right? It's darker than the other ones. I would like to have maybe
displayed maybe darker, maybe brighter. Let's see. Let me crystal again, the saturation into one. All right. So let's see
let's go to the blade. Let me add an effect here. Filter, maybe it
could be brightness. I think it's around
here. You know there. Contrast. Contrast luminosity. Maybe we could make this
a tiny bit brighter. I just want this perfect
the color channel. Maybe this could be.
Let's export this, and let's see how this looks. All right, let's
wait. There we go. Let's go to marmoset. Right, I think
that's kind of good. All right. Let's
see my reference. Alright, I think this piece
here should be darker. So let's make that
middle and part darker. Just like this. Alright, let me add some
roughness into that. Just like that. Maybe
a tiny bit less dark. Maybe something
like that could be. Alright. There we go. Maybe also, let me drop
again this Alright. Maybe we could make it darker. Let's see how this looks darker. I think it's too much. Let me, like, tune
off this stuff and let me make this one
instead, a little bit darker. Maybe something
like this could be. Let's see how this looks
like. Four textures. All right. Let's see. Let's go back Marmoset
here. There we go. I think it's looking better. All right, so this video
is a little bit too long. We're going to end the video here in the next video where we keep working on texturing this
weapon, so see you there.
43. More Weapon Textures: Alright, guys, so let's
continue with this model. The previous video, we
were doing the weapons. So let's continue with that. Let's see what we could do here, what we could do to improve a little bit more this weapon. All right. Let me just see my references. Alright. So let's see. Let's just keep working on this. There are some
places that doesn't have any any variation. Let me do something
here in the weapon, I mean, in the plate. Maybe we could make this darker part a little
bit less metallic. Let's see how that looks. Alright, let's wait
for this. All right. Almost done. Alright,
let's see how this looks. A little bit metallic. Maybe it is even darker. Let's see how this
looks in the engine. Let's export this
for the weapon. And let's go back to
Marmoset and let's see how this looks
how this looks here. Right. Maybe it could be. Well, maybe, maybe not. I don't think so. I will, maybe. Just
leave it like that. Just a tiny bit of metallicness. Alright. Let's go to the
other pieces that we need to do some
work handle with. We have already done
some work there. In this orange part, also, let's work on this
little piece. Alright. Let's do that. Also, we need to do a
little bit more stuff here in the weapon. A little bit more
of color variation there. This metallic. All right, let's just
start working on this. Let's call this space.
Duplicate that. Add a black mask. It's at a generator. I will
call this AO. Perfect. Let's go here. That's a
curbator want the cubator. I want the ambient occlusion. All right. Let's invert that. W make this darker would be maybe a little
bit to the purple. Let's see the color. All right. So like this could be with
a little bit of roughness. Just like that, we could maybe increase the roughness
of the base layer. Something like that. Let's see. Also, we could add a little bit of blue
slope into that piece. We just a tiny bit. If we just like that would be I mean not that
much, maybe 100. Let's see like that
could be. All right. Let's continue. Let's at the black mask, a
generator, rvatur. All right. Let's decrease all
of these sliders. Alright. Perfect.
Let me add layer. Now I will add a grunge. All right, maybe
we could add this. Let's put this in multiply. And something more
splashy, we like this. Do these breakups nicely, surface, let's at a blur slope, just to make this
a little bit less. A maybe something
like that could be. Let me change the color of this. Maybe this could be a
bluish, just like that. We call decreased intensity. And let me just duplicate
some color variation, and I will just paste it there. Let's go here. Let's see what we have area. Maybe we could add this one. It's a bit of color variation
there. Maybe it could be. Let me see my
roughness. All right. There we go. Let's just keep working. Maybe we could do something
in this orange cable. Base. Let's see. Maybe we could
just leave it with the same the same layers
like the other piece here. All right. Let me do something
here. I will just add a pain in this top layer, and now I will just remove
this layer from from there. Or right, let me copy the AO. I will just put it there. Maybe even the edges. Let's see. Mask. Let me go to the mask. Here in the roughness,
I will just add one. Maybe even some metallicness. Just to make that like that P look more like a cable
or something like that. I think that looks
cool there. Right? Maybe we could copy some
of these color variations. All right. Let me go. What Some of these
colors variation, right? Let me go to the roughness. Maybe we could put
this in screen. All right. Maybe let's
copy the other one. Is not doing anything. Got that because
that's the spots. I so let's go. Select this one. Let's select our
basic hard brush. Go to Project, and I
select one of these dots. We will start applying it to hear maybe a little bit more
variation into the surface. Something like that could be. I think it's looking cool. Let's save this,
and now we're going to explore the
textures and see how they look inside
Marmoset Toolbag. Alright, let's go
back to Marmoset. Pay, we have some
stuff there. Perfect. Perfect. Alright. We need
to texture this piece. What I will do I will
just copy basically all the layers that I have
here for the orange part. We just copy all of these, and then I will
just paste it here. Anything that I will change will be the color of these layers. But the other thing will
be basically the same. Like, these edges
could be a little bit more reddish final we could increase the
grunge like this. You could add a paint. Let me like my basics off. I will just start removing
that from the middle. Even from here, it doesn't
have sense to have, like, those such wear edges, right? Maybe we could make this
a little bit shinier. Would be maybe
here in the blade, we could add a little
bit of gradient. Also, let's see. It's at a fill layer, black mask, unittor
linear gradient. And now let's see
what we could do. Let's go to the position
position channel here. And for the start, I'm going to select like
this one. That's the end. I should be the start and
the end should be this one. And let's see how this looks. All right. In bird. Will be, let's say,
make this darker. I think that's giving
some cool detail. Et's see how this looks
in the engine. All right. Let's see. Go to Marmoset? All right. I kind of don't like it how the roughness in the
edges is working. All right. I would like to have a
different roughness from the inside and from the
outside. Let's see. Maybe for the outside, I could add anchor point. Here in this roughens, I will add again
that argon point. Let's add a field there. Let's go here, select
this edge anchor point. Let me see my mask. Now, I will I will put this into subtract, just like that. A could be. And this could be also
with some blur slope. All right. And maybe these edges could
be with some defects. Let's see what we could do here. That's rough raw perfth
hole, hammered, grinded. W be grinded. Let's see how the grinded
effect looks here. Oh, I didn't select anything. This is the one grinded. I'm just selecting
that in the mask. Alright, let's just
select that here. Let's see how this looks. I don't like it. Let's see if we could
select another one. Maybe this could be. All right. Let's reduce intensity. All right. Maybe maybe not. Well, Let's see how that looks in the engine. Let's export this, Right?
Let's wait for this. Let's go. Marmoset. I think
it's looking kind of nice. I liking this better. Right. Perfect now. Maybe we could add a little bit of
gradient here in that in that emissive.
Let's go here. Go to the missive base. Now we'll duplicate
this a black mask. We'll just make it
this more going to the purple and darker. And now maybe we could do
some at color selection. Let's select the missive here. Let's increase the tolerance. Tolerance from here. I will just increase
the tolerance. Is it like that. Let me paint out of this. All right. There we go. There we go. Maybe we could just
add it by hand this like pattern in the
grading. But let's see. Or right now, Let's go here. Color selection.
Color selection, no. Let's go to here to filter. Let's select edge
mask mask border. Let's put this in inside. All right. Just like this. What? What is this doing? I just added the wrong place. It should be here. Filter,
mask outline. Inside. All right. There we go. Something like this could be. All right. Let's decrease with All right. Let like that could
be Let me select this one. We had a black mass, I will just make this brighter. All right. Let's add a paint. And now I will just, like, draw a little bit of
highlight in this area. Let me see like this could be And also here in this
little emissive. All right. Let me see my reference. If there are more detail
that we could add. All right. I would like to add,
like some dickles here, maybe some names or
something like that. Let's see. Let's go here. All right. You folded dickels Alright. It's a new layer and black
mask and now a paint layer. So here to the basic heart, I would like to
select this isalpha. We make this we make this smaller here could
be around here. Now we could add some text. Let's see. Maybe not. Well, I think it would be good. Select font. Maybe something maybe this one. But where is my text brush? Alright. Maybe let's put this here. Let me think in a
name for, like, the company that makes or
fabric darmor these weapons. So let me think a little bit. Alright, maybe we could
add something like that. I just call this like
still nova military tech like for the name of the company that makes
these type of weapons. Alright, so let me
make this in hide. Maybe we could add this as a as a carve like this
is carve into the metal, something like that would be with a little bit of roughness. Different roughness there. Would be Alright I think this is looking cool. All right. Maybe we
could add maybe more of these Alphas around the model. Maybe one of these, let me select go here
to the other plates. I will add a new field layer. This will be like the coals. It's a paint layer.
We'll select this one. I will active my my symmetry, and now I will just add
this IPO detail there. The one there will
be another one here. Maybe. Let's see what
else we could add. But other Alphas, we could add. Alright Maybe this one could be here. All right. I think
this is looking cool. Let me make this a
little bit brighter. I'm like this. And now I will add
some roughness. All right. Let me put
that roughness. I screen. All right, let's see
how this looks inside the engine. Go here. Let's export this. All right. And now I will save also. Let's go to Marmoset
let's see how this looks. All right. I think
it's looking cool. Like some detail there. All right. Maybe we could even make
that even brighter. Thing like that, So
it's more noticeable. Let's explore this again. Et's see. Let's go
back to our weapon. All right. Maybe we could add a little bit grading into this orange piece. Alright, let's go to
the orange part here. Let's add a little bit
of grading because I feel like that part
is a little bit flat. Alright. The layer
with some plaque mass. Let's go and add a generator. And now I will select the
three linear gradient. Alright, I will go to my
position position mass. And now I will I mean, channel, and now I will start this color for the
end like this color. Let's see how this
looks. There we go. Maybe we could invert
this like this? W be I'd like to make
this red, right? Something like this W be. Let me go to this part. Maybe we could select vision. Maybe we could
select this color. There we go. K. All right, let me save this. Alright, now in the metals, I will select maybe these ones. Would be these ones,
select those Ts. Now I will go to
the bronze and I will add those same layers. That's I'm a little a little bit too lazy to do them again. So I will just add
the same stuff. And that small piece, so I won't care too
much about that. So let's just export this and
let's see how this looks. Alright here we are in Marmoset. I think that's looking cool. Is bit more detail there. That's nice. All right. Maybe we could turn
down the opacity of that that color, go here. Maybe we could
turn down opacity. That reddish color
cost a tiny bit more, so it's not that noticeable. Let's see how this looks for textures Alright,
s clicking sport. Let's see how this looks. A bit better, you know? Maybe we could add a little
bit more opacity here. A little bit more just
like that would be. Let's explore this again. Let's see how this looks. Perfect. There we go. Go here. Alright. I think this
is looking cool. Looking nice. Alright, maybe we could
add a little bit more of the goals here, these areas. Also, I would like to remove
those emissive pixels. Let's go to the missive here. I'll just erase all
of these emissive. Let me select my basic
heart. All right. I have some white dots there. Maybe we could make this
tolerance, we could increase it. So it's the tolerance of this handle middle piece.
Just increase that. Not the tolerance. What? This should be the issue
that's in my ID mask. You see it there. I think
I know the problem now. This is the issue.
Getting anything. All right. A little bit better, but not quite. Right. Let me here in the paint. We select all of these. All right. Maybe not. Maybe we could fix
those dots by hand. Let's just add don't
paint there let's just fix those by hand,
like, perfect. This and good. Here we go. That was going to
do. I was going to add some digles here also. Let me copy this layer. I will go to the
handle middle piece to change maybe the color, maybe to more white. Right. Let's select one
of these digles here. Et's add this one. Maybe here on top. Around here, maybe in
the middle could be. Anything like that
could be Maybe this one here. All right. W could be there, maybe
a little bit smaller. All right. Could we also, maybe we
could make this a tiny bit less less bright. I like this could be a
little bit of height, some negative negative height. Let me add some blurre to this. These dickles from normal blur. Maybe not. Maybe not. Let's just delete that
filter. All right. Maybe here we could
also add a deco. Go to the handle. This's
go to the handle here. Add this right
remove that paint. Now I will add deco here. All right. B. All right dickles. Let's just drop it down. Alright, I will save this. Now I will explore
these textures, and let's see how they
look inside the engine. Alright. Right at fixed. Right? I think this
is looking cool. Indeed. Maybe we could tweak a little
bit more this would be. I would like also to change
the hue of the handle color. I will change the hue. Something more bluish. So it has a little bit more of contrast between
this and this color. Something more
bluish. I like this. Right? The gradient also. All right. Let me see how this looks
in the engine for this. Let's see. I think it's looking
better, has more contrast. Contrast. Maybe we could put this a little bit
more to the purple. Be something like
that. All right. Let's go to the gradient. All right, let's see how this
looks inside the engine. Maybe something like
that could be better. Yeah. So now this has a
different hue from this color. Los better, in my opinion. All right. So we have
the weapon there. I Here we go. I think this is ready to go. If I have, right. So maybe I will leave this year, maybe we could add some painted ditto there in the handle. See the handle, see the edges. Let me add a paint. Here, I will select
my knife brush, and maybe we could add
some painted ditto. Here, maybe would be
something like this. Yeah all right. It seems like this
could be painted stuff. So, this doesn't
look too procedural. These parts. All right. Also here would be a little bit. But There we go. Let's save this. Now I
will just export this one. There we go. Let's
go to Marmoset. There we go. I think
that looks better. So I think I will
leave the weapon here. If I have maybe more
stuff to change, I will record another
video, but for now, I think we are done with the
texturing of this character. Maybe, yeah. So in
the next video, we could start
making the week of our character who pose pose him and make
the final renders. Finally, we are almost at the end of this course.
So see you there.
44. Small Tweak on the Texture of the Weapon: Alright, guys. They are just one thing that I missed
from the previous video. I forgot to add like the
folder here in the plate. So let's do it that real quick. Let's go to the plate here. Alright I would make a new
folder around here, maybe. Could be. Let's call
this like maybe. Yours could be? All right. Let's add a fill
layer with some black mask. Let's add a paint layer. It would be like this
dark gray color. Even darker. Something
like this would be. Maybe we could paint
in the inside. Alright like this. All right. There we go. Perfect. Alright. Let me do. Let's just try to
get this better. Let me use my tablet. Let's see if I could
get this nicely. Alright, let me remove
the tablet pressure. Something like this. Go. Perfect. Maybe here, we could add a
little bit of roughness. Make that even rougher, maybe even make it. But be metallic.
Maybe we call lic. We call this archer gray. Now I will add this black
color into these dittals. Let me add a new field layer. Let's add a black mask. See a paint layer. Put this like this black color. Let me remove these
paint layers. All right. Oh, I just I
mean just dump it did. Alright. Oh let me call this gradient. And this will be darker
gray duplicate this color. We remove this. And now I
will just make this darker. We go and add a new paint layer. Now let's just fill these caps here.
They're like that. And here. We or right now, I will add some roughness
at those pieces. Maybe I will also, Alex. Maybe I will just leave it. Let me try to get
this now. Right. I All right. I will add also an anchor point
and I will put that here. Let's add a field there, like that anchor point. And now I will put
that anchor point into substract Like that. So here, right? Barker color. Aarker gray. This one. Yeah, perfect. Etstry to adjust more is right. Perfect. Like this would be. All right. There we go. Now here, we could keep taking. There's a tiny bit more. Maybe we could make this line. Should be All right. With some help here we remove one. There we go. Maybe I will duplicate this. I will remove. Here, I will remove there
and now this one would make a height and
make dipness there. All right. That could be let's
go to the here. Where is the scratches, right? Let's call these scratches. Chess. Right? This will be like like that. That's an anchor point. There we go. A little
anchor point there. So to these scratches. There's a field layer. Let's add that anchor point. Let's select this
one. Now I will put this in substract. There we go. Pus in that place doesn't
have sense to have a scratch because
that's like concave, sword or the thing that make this scratch will
not reach that area. Alright? My me a little bit. Be less steep. Maybe something
like this could be. Let's see how this is
looking in the engine. Safe. And now I will
explore the textures. Let's see how this
Go to Hermost cool. Right. I think it looks kind of nice. I think this will be
it for this video. It was just a little
twigs that we had to do. So, so you in the next video.
45. Starting the Rigging Process: Alright, guys. So now we're
going to rig this guy. So let's start. So let's go to Blender here
in our Blender project. I will use the
triangulated version, not the squadd version. I will use the
triangulated version. So let me hide this. Alright, I will make
a new collection. I will call this
rigging. Alright. Let me right now, let's import, let me call this character, and this one will be weapon. All right. Let's go to
the character collection. And now let's import the triangulated version of
our character, this one. All right, let's import
everything. There we go. We have our character here. And now let's import the weapon. FBX, import weapon. All right. I will move the
weapon to the side, and maybe I will also
make it one polygon. Let me see here in the UB right. We have different UV sets
here that we should tackle. All right. Let me see. Everything should
be the same UVs. All right. Everything
seems to be the same. Be set there. Alright, so
I will just select this. And I will make like merge
everything into one piece, one object for to make this
easier rig this is just, like, basically one piece. Alright, now, let's go here. I will get from
the quart version, the full body version
of our character. And this is full body, where is my full body. This one is the full body. Let me bring it here to
the rigging collection. Alright. Why I want
the full body? Because it would
be easier to rig the full body version
and then transfer the weights on onto the
clothes instead of, like, trying to make the rig, using the clothes as a base. I will use my full
body as a base, and then we could transfer the weights and all that stuff. So now let's begin. Let's go here to
edit references. Let's go to addon
and let's get the gi fi this Rig fi atom, let's make it active. All right. And now,
let me click here. I will make a new collection. I will call this rig
right here in the Rig. Let's right click
or maybe Chief A, and let's go to
armatur meta Rig. And now let's select this
human rig. All right. But first, let me reset my pretty cursor cursor
to world origin, right, Chief A, armature,
human armature. Perfect. Let's make this a little bit smaller,
just like that. I will also apply
all transforms, maybe scale it a little bit
up or right apply transforms. Alright let me go to here
to object properties, and I will make this in front. And now there's
active de symmetry. I will delete these bones. And now we could start
tweaking this, right? Start tweaking this.
I suggest you, for the legs to leave it straight because
if you have maybe like this type of rotation or this type
of inclination there, once we make the rig, it will have problems. So try to leave it
straight as possible. Alright, Stry to get this. Alright. Let me try
to get it in place. It be around here. Right as possible. Something
like that. All right. Let me bring this here, right, and this should
be around here. Perfect. This could
be like this. Alright. Now, let's go with the
clavicles, an arm. Maybe we could put this here. Let me select the arm. All right. I will just
move this around here. Perfect. Let's just
add it add this here. All right. Let me try
to get better. The arm. I should be nice.
Also, let's go here. I think it's here or maybe
it's pu per display. Let's active this option, the axis so we
could see the axis of our bones so we can
align them properly. May be around here, right? The clapicle would
be around here. Perfect. Let me try to get also the spine nicely. Alright. Let me the leg the
head with the face. Alright. There we go. Maybe something like
that. Could be. Could be maybe. Let's
select the pace. Alright. So this. Let's just try make it smaller. Something around here. Perfect. All right. So let's
work on the fingers. I will select the magnet and
I will put this in volume. So our selection will be in the center of the volume
that we are working on. Like, you can see this
sphere will be on the center of this
volume, just like that. So let's select this. I will put it by hand here. Right into eyeball lead, maybe we could make
this even bigger. Let me also get my
wire frame so I can see in which places we could
add it or let me active. The magnet All right this
should be around here. All right this also. All right. Maybe this could be around here. You can also you can turn off the magnet to adjust
further the bones. All right. So now let's
press N and let's go here to item so we
could roll these nicely. So what I'm going to try to
do the C axis should be in the direction of the direction of where your finger
is going to bend. Just like that, maybe
let's just try to align this better, maybe
something like this. Perfect. Right let's
work on this one. A around here. Or right let me
activate my magnet. A right here. Perfect. There we go. I will align that later. Et's just put this
in place. All right. This one should be here, and this one should be
around here. The center. Let's work with this one also. One should be here. This
one will be around here. This one will be around here, this should be around
here. There we go. Let me hide the body bones. Let's go with the pinky
finger around here. All right. This one in that. All right, that joint. There we go. Perfect. All right. This one should be like this. Alright, now, so let's roll and align these bones
like this would be. Right let me also try to
align by hand we are doing. Alright, let's try to get a straight line in
the bone chain. This right, maybe this
one is good. Maybe not. Right? Something
like this could be, or maybe something
more like this. All right. Let's go here. Perfect. All right here. Let's just roll these
bones, right? Perfect. Here also maybe sub like this. Per Now let's just try
to align this better. All right. There we go. So now we need to
adjust this face. Let me hide everything,
but the face. The face is a pretty like a pretty tough part the rig here in the rig five because
if it's not placed well, this could make an error. It can give you an error. So give me a second. All right, so we could use
this image as a guideline for the placement of our bones
here with the wig pi. So let's start. All right. Let's begin. Let me
hide the face itself. I will pose the ears here. Let me put the ears where
they should be around here. Also, now, I will just put this in pace and
fight face projection. This should be on the surface. So the magnet and the face projection
is really important. So this doesn't give
us an error, right? Perfect. Let me try to make
the face even smaller. All right. Let's go here. Select these bones. All right. Let me deactivate the magnet just right now. Just for now. Also, the middle
bones to stay in the exact middle of the word because if they are not
in the exact middle, it will also give us an error. So be aware of that. All right. Let's just roughly
place this all right. We also have this like
upgraded base rig, right? E. Let's just place everything and maybe we could experiment
with this feature. All right, so let's
start placing our stuff. This one, you can see this
change is this red one. You can see where it is around
the jaw line. All right. So let's try to place that
nicely there. All right. Let me hide all of
these bones for now. A right let's go to
this joint here. This should be on the
corner of the mouth. Alright, let's go to
this chin. All right. Just like that. This time, I will select the vertex, so I can snap it in the middle. Right? Perfect. There we go. Something like that. Perfect.
Maybe in this vertex. Perfect. There we go. Alright, I will also snap all of these maybe into one vertex. All right. Let's change phase projection let's start adding the
bones to the surface. Alright, let me change
back to vertex. There we go. All right. This one should be here. Perfect. Let's move
this around here. This one should be
around here also, right? Maybe a little bit
higher like that. Perfect. The nose here right is already placed. Let's go with the eyes emits
a leg face projection. Let's get this ice nicely. Let it remove the
face projection. I will just outline this here, and then we are going
to tweak it even more. All right. This one
should be on top here. This one should be here. Let's active the magnet. All right, face projection. Just like that. Perfect.
Let's select this one. All right. Let me move
this around here. All right. This should be here. There we go. Let's start placing an
aligned the eye bones here. There we go. Perfect. Excellent. Alright, maybe we could change the bone type to
stick so we could see better what we are doing
instead of octaeralR? I think this is
better. All right. Now for the eyes, I will get my character, and I will just align this
eye bone with the eye itself. Let me select this edge loop. Maybe we could select. Yeah, I want this edge loop. So let's just try to select that All right. Oh. What did happen? Go to the I. Let's just
try to select that. Right? Let's press Chief. Push all to select it. Now I will go to my rig here. Alright, let's go.
Here to this bone. I will select this joint.
I want this joint. And now I will press he I mean, chief S, and now I will just
press selection to Cursor. All right, let's
go back to this I. Let's select this
middle polygon. Let's press Chief S, push or to select it. Let's go back to the bone. Select the front joint, and let's click in
chiefs and selection to cursor so our bone
is correctly placed. All right. So now, we should not have any error right
now, hopefully. All right. Here we
have the teeth, the teeth and the tongue. Teeth and tongue. Bones we could delete them since we don't
have any and bones. I mean, tees and tongue. But I have an asset that I created of a teeth and a tongue. I mean, it's an asset that I modify because I just
want to save time. I don't want to make teeth
every time I do a character, so I reuse that asset. So I will just bring it here. Give me a sec all right, so I have this teeth mesh, and let's just place it here where it
should be around here. Maybe we could make
this even bigger. Something like this.
The only thing I mean, I download these teeth. I don't know I don't
remember where. And I just redo the textures for the teeth
because I didn't like it. The ones from which
these teeth come with. I've just redo that. So let's just place the teeth in the correct position
around here. And now we could put these bones a little bit
better where they should be. A here. Also, let's add the tongue bones around
here could be, there we go. All right. So now, this should not have any problem once we click
IngenateRig and try to, like, bind the
mesh with the rig. So let me save
incremental or right now, I will select this.
I will click here. Let me see my scale and make sure that your
scale is all in one and also your other transforms are in zero. Let's click here. Generate RC. All right. We should not have any issue. There we go. Let me hide
the previous metac, right? Let's go here. And now we should not
have any problem. Also, I forgot to
this nice there. That's the nose. All right. Let's do something.
I will delete this. I will duplicate this
just in case. All right. Backup. Let me put this
inside that folder here. Let me click here in
Upgrade Base Rig. All right, there
we go. Now, let's just click Injury trick. All right. Master
could have found mouth corner. All right. It seems that we
have mouth corners. Right, get this nicely. Right? All right. Nose glue. All right. Let's see if you go. Alright, we're
getting this error. All right. Delete that. Go to the metal rig. Maybe it's because we
don't have the middle. The middle joints
properly aligned. Yeah, I think that the issue, right to regenerate the rig. Feel you are getting the
same error. All right. Let me delete this rig. Here. All right. I'm like this would be. We should not have any issue. Topkos click here and generic trick. You know, Sin glue. Alright, we're getting
a lot of errors here. This is your master? Oh. It may do also something. I will select all
the middle bones, and I will click, I mean, press S X zero, and everything should
be nice right now. And now I will just press
G x and write to align everything to It everything too. Want to constrain this stuff. Anais, I want this to move. Why is this moving? Stop. All right. Let's see. Greek. You'll get in the issue. Original in and glue. What is that issue. Original and glue in and glue. All right. I should be the
issue. All right, there we go. Let's click here E Euro. This is not properly zero, all right, S zero. Now, let's just move
that place. All right. Also add this pulse in position. Let's see if our
rig working now. It is working. Perfect.
Actually made. But we are getting
this messed up. For some french reason, for getting this stuff.
This is the teeth. All right. Let me delete that. Let's go back here. At this bone, it's
not properly placed. This is the top teeth. And for some reason,
this just got, like, like that. Don't know why. Let's just try to put
it in the middle where it should be around here, maybe. Go, let's click IngeniRik. There we go. Let's hide in this. And now we should have
a rig nicely done. Let me safe incremental. Let me see how this bends. Al this is not bending
nicely that arm. Let me see the legs.
Alright, the legs are bending a good. I think so. We should
we even more this rig. Right, let me modify the
row a little bit like that. Be. There we go. Let me also move this ankle
on a tiny bit just like this would be a and the arm. Let me try to align this better. Alright, let's see
how this looks. All right. I just add it in the backup. I just dump. Let's do it here. I will need to redo
everything I have done. Cause I just did
it in the backup. All right. Let's place this here. This one here. Perfect. Let's
move this a little bit. There, right to
realign a bit better. These bones. Let's see
how this looks right rig. All right. This is looking tiny bit better, but not quite y. All right. First of all, let me parent, I mean, bind my mesh with
the skeleton with the wig. So let's click
first the skeleton. I mean, the mesh. Now let's click the skeleton. And now let's console P and
select automatic weights. All right, it should be nice. All right. There should
not be any error. If there is some
error like here, it's maybe because
of the face rik, maybe you have something
wrong with it. Maybe one bone is not correctly placed on top of the surface,
something like that. But let me see how
this is bending. All right. Bending kind of good. I don't quite like it. All right. Let's see here. This is bending nicely. This finger, this one. This one. This one are bending nicely. Can let me see the arm. It's not bending quite nice. All right. Let's see this. Per Alright, let's see the face, how this is working. Right, let's see the jaw. Right. Let me see the Alright. Let me find the rest. For the teeth, I will just
select the teeth and tongue. I will just select them
and now select the rig. Let's console P. This time, I will just add it
in empty groups. So let's first select
the top teeth. Let's select the armature. Let's go back to the top teeth. Let me hide the body. Like the armature? No, let's say top teeth, right? Let's go here. In the armature. Let's select the
armature. Let's go here. Let's go down and let's select
these deformation bones. Let's active them, select
the armor or the teeth. Let's select this teeth bone, and I will just apply a
weight of one to that. Something that I like
to do in my brush when I'm weight painting is to change from
sphere to projected. So I can paint and it will project my my weight
through the model. All right. Perfect. Let's do
the same with the lower one. Hide this one, this
one. This lower teeth. All right. I will hide the teeth. Now I will just
select the tongue. But with this one, let me
also put this armature in front right less weight frontal, fill this point maybe. We could smooth that go here. Also, we could do the same. Smooth that and now here. Perfect. Moove
that. There we go. There we go. There
we go. There we go. All right. Let's bring
back our character. All right. Everything
working nicely. Have some bones, some teeth. All right. Let me turn off
the deformation bones. So let me save. I want to get this nightly.
So let's try to do that. Let's go back to
the metric, right? Here. In the row. Let's go back to item. Right? We are in edit mode. Let's just try to get the
correct role here, right? Just like that. Let's see if
this works. We get a rig. Now, that didn't work. Alright. To get this better, maybe something like this
could be regenerate rig. Right? This is better, indeed. Let me hide this
meta rig, all right. Now, it's working
better. Alright. Maybe put this in local. Let's see how this
is working, right? I still don't quite liking
how this is pending, son. All right. Let me go
back to my metric. Let me try to align
this a bit better. Want to get is joined in
the edit mode. I'm here. We're going to rig. All right. I think this should
be a tiny bit less. I mean, the giphy defines the direction of the rotation by the
inclination of our bones. Like, if this is like that, this will, like, bend
on this direction. If this is like this, this will bend this
other direction. So let's just try
get this nicely. All right. Go back
to our metro rig. Where is my generate rig? I think I'm blind to be
here through generate Rig. Alright, let's see
what this looks. This is better or right. Perfect. That's better. Let me save the incremental. So now we need to
work in the weights. Let's do some weight painting.
So what I'm going to do? I will hide almost
everything here. I will just add the arms, the legs, maybe the face, torso. Fingers, and that will be it. Here, I will just go down
and select the deformation. Now, let's select our body and let's start working in this. Let me move the bones to
see how they are behaving. For some reason,
this is not working. It's symmetry, or right
now it's working. Right? Let's move
this like that. Select this bone. All
right. Let's go here. Let's select the one paint. Right, let's press Control. Let's go here to two
or this project. Now let's start erasing some of that unwanted weight
there. All right. Let's like this. Maybe we could smooth this
a tiny bit more. Maybe in here. Let
me go here also. The blur, let me put that in project. Right,
let's go back here. Maybe we could erase tiny bit. I All right. I will do the painting
without symmetry in the painting because you
can see that we are getting this weird weird stuff there. Alright, I will just do it like, do the same in each side. Just like this. Let's
smooth tiny bit. This stuff. Alright. Me like that. Let's erase
everything from those areas. All right. Perfect. This should be good enough. All right. Let's see how
this is behaving. All right. I think that's good. Go to the other one. All right. We go to this part, I will add a tiny bit more
of weight into that area, that chest area, maybe
a tiny bit more. Let's see how this is behaving. But let's go back here. I will remove the influence from the neck area
not looking good. Maybe we could do some
moth, go to the other area. Let's do the same Let's see how this looks.
That's better. All right. Better. I think this is looking nice. Let's see here. This
also looking nice. All right. Perfect. Let's see the
joints on the face. Let me bring face joints. Let me go here. Item
primary phase Dadios. Alright. Here. Let's see how this is
looking. All right. You can see that we are
getting some weird issues. All right. So let's just try to
fix that. All right. Let me here, let's go back
and add this in sphere. Let me hide This one? Alright? Maybe we are getting
some weird issue. Add a tiny bit more of
influence there, right? Something like that would be. Help me decrease the
strength of this, right? Here. There we go. So with this upper one, we could also add a tiny bit more of influence
with these ones, maybe also in these ones. All right. Go back here to maybe some blue All right. Let me erase. A bit from here. Here we go. The face
is a tricky area. So let's have some patience. Alright, let's go here. I think that part
is looking good. All right. Something
like this could be. Let's see here. We're
getting some issues. Right? Let's go here. Let me, remove influence
from this audio. Right? Like that That a little bit more
of influence here. Here we go. Let me see how this is looking
without the interface. Let's go to three viewport. Let me just click here
to the active influence. I mean, the interface or we're
getting some weird stuff. In this audio, let's remove
the influence from there. Alright. There we go. Let's just keep doing this. Let's see if we could
get this nice and good. A All right. We will have also to
do this, the other I. So really least have
patient on this. This is a little bit of
a tedious process to do. I quite not getting this nicely. I think I will just
leave it like that. Looks decent enough, maybe. This one looking good.
Alright, let's go here. The other eyes do the same. Perfect. Here we go. We could
remove a tiny bit. Of influence from
the upper area. Just like that. Let's
also do the same here. All right. It's a little bit of
influence here so we could get a
smooth transition. All right. We'll apply more
influence to this. All right. Go to this one. Let's also try to get
this nightly there. All right. I still don't know why this
doesn't want to get affected. Well, that means looking
kind of decent. All right. Oh. But. You just messed this up. Let me do this second. All right. I think I will just
leave it like that there. I think that's the only issue. Here, let me remove
fishing bones. All right. Looking nice. All right. Let's bind the eyes. Let's go to the character. Let me high everything
but the eyes. All right. Let me
high everything here. Right? I just want the
eyes to be visible. So let's just get that go here. Let's be safe
incremental. All right. We have this? Right.
Let's select this one. Let's click here empty groups. Now, I will add again,
my deformation bones. So The I should be, like, attached to this
deformation bone. Deformation, I
master. Let's see. Let me increase strength again, let's put this in project. Right? Now, that should be good. No. No, no, no, I just put
it in the ground bone. Right, should not
be in that bone, should be in the smaller
one in this one. This one should be.
Let's just add it there. Let's see if it
is working right. You can see it's now moving. Let me remove the
influence from here also. Right. Let's do the same here with the smaller
bone for the right eye. Alright, now, it should
be looking good. You can see how this looks
looking nice and good. We need to do more work here. I don't want these lower eyelids to affect that much
in the cheek area. So I will just remove a
tiny bit more this area. All right. Let's just keep removing. More influence from there. Let's do the same here. All right. Perfect. There we go. Also here. Alright, let's
see how this looks. Alright, looking nicely now. Perfect. Right. Let's see. All right. Let me hide the
deformation bones. Looking nice. A With this check bone, not working that nice. Well. Alright. I think this
is looking good. So now, maybe I will
leave this video here in the next video where keep working on this rig.
I'll see you there.
46. Continuing Rigging: Alright, guys, now we're going
to continue with this rig. So in the previous video, we left the model
like this, right? Oh, this is a little messed up. All right, that bone
is still messed up. Alright. Maybe we
could just roll this and put it in place. Just like that. I like this. Alright.
Let me safe incremental. So now we are keep
working on this rig, getting some weird issue there. Alright, let's go here. Let's add, again, the
deformation bones. Let's just try to
reduce the influence of these bones in the forehead, so it doesn't squash
down the head. Alright. There we go. Any bit more here. All right. This last one. Perfect. Alright. Let me hide the
deformation bones. Let's see how this looking
it's looking better. It's still scratching
down, I know. But there is not much that
I can do to fix that. That's one problem after
gifyrcT issue there, I really don't like it. But that's how it is. Maybe you know the solution, but right now, I don't know it. All right. So let's just
keep working on this. Everything's working nicely. So now we need to transfer the weights that I have here to the actual character topology. So how we're going to do that? Is it. So let's start
with the character phase. Let's see if we could
find By this one. That's the one, yeah.
So let's go here. In this one, let's
add one modifier. Let's select It's not
transfer attributes. It's here data transfer or write vertex data by vertex group. Now let's select this full body. Also before doing all of that, let me bring my
entire character. No. Let's just do it one by
one. Let's select this one. Let me get the rig. All right. Now, what I going to
do? I will start, parenting my messes to the Rig. So let's just do this
console P t groups. Now here, I can do the transfer attributes,
this transfer, and now this should have the exact same Vertex data
as the full body version. Right? Working nicely. You
can see it there. The exact same vertex data. Also get the textures of the character also here
just to visualize the better. So I will just
import all of them. Let me show you real quick
how I'm going to do that, right, in the shader
editor here down. Let's click here and
select Shader Editor. Now I will go to my textures. And now I will just rack
my texturing All right, I will just track
my textures here. Perfect. And I will just start light
them where they should be. This is the base color of the head. Let's
just put it there. This is the metallic.
Like the metallic and the normal map should be in linear this
interprets correctly. So now we need to do add few nodes for this to work
correctly inside Blender. For the normal map, we need this node, this node that's
called normal map. So let's just link the
texture to the color. What? Not working.
That's the jacket. This is the head, right? I just imported the
wrong normal map. Let me get correct normal map. All right, this one.
Let's just put it there. Alright. I think this normal map is lip. So let me get an RGB curve here. I will just increase this, or right now, it's
working nicely. Now here, I will just
add a separate XYZ. And now this XYZ
represent the RGB. So for the roughness is the
Y. Let's just put it there. And for the metallicness, is the C. So let's
just put that here. You can see how this looks. So I will do the
same exact thing for all the texturing set. So I will back in just a sec. Alright. So now, here I have the character with the
textures inside Blender. So let's just keep
working on this. Alright, let's see how this
looks with the textures. All right. Looking good. So now we need to do
we need to append, like, attach the eyebrows
and the eyelashes. So let's work on that. Let's select the eyebrows. Let's select the RIC, Console P, empty groups. Now let's go to the eyebrows, and now let's do
some data transfer or write vertex
data, vertex group. Let's select the
face, Console A. Let's do the same with the
eye lashes. All right. Let me select the eyelashes, the RIG Console P,
right empty groups. Let's go back to the eyelashes, select the face vertex
theta, Vertex groups. There we go. Let's see how
this looks right looking nice. Now, I need to do some
adjustments here in the eyebrow. I mean, in the eyelashes. Let's go to the eyelash. I have this affecting these
bones affecting the elas. So let's just try to
remove them the infants, and now this should
be nice and good. There we go. Also, I will like to position a
tiny bit better. These eyelashes. A, so I will just delete one side because I will
use my mirror modifier. All right, let's just
put it on top here. So it's better aligned. It's not a mirror modifier. Let's click here, a pen I
mean, apply that mirror. Let's see how this looks. Looking better. Let's
see the eyebrow, right? We need to do some
adjustments in the eyebrow. I like the eyebrow. All right, let me delete all
of the influence from that. All right. See how
this looks. All right. Need to also do the
same in this side. Alright. Let's see how this looks. All right. Looking good. All right. So let's just keep
working on this. Oh we work. Keep working maybe
in here. All right. We select my head in good provide the mask. I will just merge the subject
with the main mask, right? And this one, I will also merge
them together. All right. Perfect. And now let's select
the mask, P empty groups. Let's go to the mask. Let's add some data transfer
or maybe not that transfer, what we could do this time because data mesh
that will not deform. We could do it by hand. Right. Let's select the
mask. Let's electric. Let's select this headbones
go to the mask, the mask. I mean, the headbone. Now this should be good. Perfect. I'm going to do the same exact thing with the
hair and with this cable. Maybe with the cable,
I won't do it. I will do maybe
some duct transfer. Let's see. Go for the hair. I would like to lift the
hair like separated. So maybe this one
maybe this hair band, we could merge them
just like that. We'll select the entire hair. Select the entire hair. Right? Maybe we could merge
these together. Maybe not let's just
leave it like that. All right, Control
P empty groups. All right, let me select
this one transfer. Let's just start painting a full influence from the
headbone just like this. All right. O here. Let's do the same in that airtrand here,
let's do the same. All right. It's like this. All right. Perfect. All right. Let's go
now with this cable. Let's apparent the
cable with the rig. Let's do some data transfer. All right. Transfer
verte groups. Let's select the head. Right. Now they should be good. Let's test this. All right. Working nice. Ah. What? No, this
should be good. Where do I have
another in the palm. What have the
selected in the palm. Be working nicely? If you're not selected, anything right. Nicely? All right. There we go. So now the inner suit. For the inner suit, I will end the inner soot with
the rig, just like this. And empty groups. Let's select the inner sot. All right. Let's do
some data transfer. Let's select this
time, the full body. In that way, we should get
this nicely, just like this. See how this former
Looking good. All right. Let me
hide the jacket. All right. That let me hide also. These ones. There we go. Now, let's select this one, this inner armor. Let's pairing that with the rig. Let's select that. All right. Let's add a data transfer. All right. Let's
select the full body. Just like that. Apply that. Let's see how this looks. All right. Looking good. All right. Maybe we could
tweak a tiny bit more. This. Alright. Seal prick. All right. Let me modify
a little bit more. I mean, the vertex paint here. All right. I think
it's looking cool. Maybe let's try to get the middle piece not
be form that much. Alright. I mean, I don't want
the middle piece to be deformed that much. With something like
this could be. No. I would be just like that. All right, let me
erase a bit more. The influence from here. Daria. Me, Ense. Et's do the same here. Me also Ense. Let's
see how this look. Right? Perfect. Perfect. Looking better. All right. Right. There we go. Let's keep working on
this. A incremental. All right. Let's attach
also the shoulder pads. Let's go. Console
P empty groups. Let's select shoulder pads. Now I will just attach
them to this bone. Let's select that here. Go to this bone. Let's
just attach that there. Alright let's go to the bone. Like this. Perfect.
Alright, looking good. Now for the loves, what I'm going to do would be just to parent the parent these, all right, empty groups. So here, that's a transfer
by Berea pertetGroups. All right. Like that. Let's see how this looking. Alright, looking nice. Looking good. Everything
is getting live now. Alright? Let's just keep working on this. All right. Maybe we need to do
some little twig. Maybe here, we could make
this red, just like that. Let's do the same thing
in the other side. So we don't get any
weird distortion here. So also here, remove that. Right. Now we should not get that weird distortion that
we were getting there. Alright. All right, perfect. Now, let's select
all of these plates. I will just make them one. Now I will just paren
them to the armature. Alright. And now I will just
paren them to this bone. Alright? Let's go to the other
one to this bone. Perfect. Let's see how this is looking. Alright. Perfect. Now, let's work on
the hand armor. Let's just do this one by one. WOE empty groups, let's go here. I will just append
that to this bone. All right. This one, right. Let's Maybe let's
select everything. Right? Select the armature P, empty groups, let's select
this one. The armature? This one? All right. Let's select this hand bone. I will just paint that there. Let's do the same
in the other area. Let me go here. I will do the same
in the other area. Perfect. So here now,
like the armature, you know, this one, Perfect. So here. There we go. Alright, that's not the bone that I want. This is this one. There we go. Here
select this one. Perfect. Let's see
how this is behaving. Looking cool. All right. Let's
select the other one. All right. Let's do
that in the other bone. All right. Perfect. Et's go here, select armature, then this knuckle armor. Let's do the same
here. This one. Perfect. Go here. All right. Perfect. Let's go here. The pinky finger. There we go. All right, the arms are rigged. Alright. Let's bring
back our jacket. Now, let's a pint jacket. I will merge these little
strap with the jacket itself. All right. Select the jacket. Let's select the RC Console P, and two groups. Let's go here. Now, let's add some
data transfer. Let's select the full body, vertex data, vertex groups. Perfect. Let's see
how this looking. Looking nice. And All right. Maybe we will need to do some
a little bit of work here. My smooth this entire piece. Also here, a little
bit of smoothing. The other area as
well. All right. Perfect. Let's see
how this looks. Now it's working
better. Perfect. Let's safe incremental. Alright, we have the top piece of our character rig. All right. Now we're going to
rig the lower part. Let me hide first the belts and the skirt
because we will need to add custom bones for those
for those pieces. Let me merge. Piece the eyes
to the demon head right. Eye that also here, I
will just merge them. Maybe not the straps. Maybe we could leave it
like that. Maybe not. Let's just merge them. I Alright, let's go with the pens. Let's select the
rig empty groups. Let's go to the pants. Data Transfer or write
vertex data, Wull body. All right. Let's see
how this is looking. Perfect. All right. Let me also
select This poge. I will just merge this
wrap with the poge. All right, select
these empty groups. All right, let's go
here, data transfer. All right, vertex data, select the pans. Perfect. Let's see how this is looking. Working nicely. All right. Let's go here with
the knee knee armor. Let's select these empty groups. Select the knee
armor that transfer. All right. Let's select
the pants. All right. Let's see how this is looking. This is stretching
too much too much. All right. Let me see something. Maybe. We could lure
a little bit more. Right. Here also All right, Let's bring back the knee armor. All right, ras Vertex eta. Let's select the pants again. Let's see how this is looking. Still not working properly. Et's see. Let's do some smooth. Let's see how this is looking. It's stretching a lot. So maybe I will just remove
the influence from this bone, and I will just add it here. Let's see how that looks. Well, like, maybe
we could do the, the other way around, let's
remove that from here. Let's just appent that here. Let's see how that looks. That looking good, either. Alright, I will left like the knee armor for the last
because I think that I will need to add a custom
bone for that knee armor. So let's just leave
it for the end. All right. But Alright, let me just remove
that from here. Alright. Perfect.
Let me save this. Let's go to the calf armor. Or right empty groups. Now I will go here
to my calve armor. As transfer vertex data, full body, let's select the
full body or right perfect. Now, let's select the choose and rig empty groups.
Let's go here. A transfer vertex data, verte groups, and let's
select the full body. Alright, it's working nice. This should be with the cow farmer. Just like this.
Right here, awesome. Perfect. There we go. Let's save this. All right. Now I will go here to the
rig and I will add Another. Let me remove all of
these controllers. Alright? Let's go to the
edit mode on the rig. Alright. Let me go here. We'll add a new layer. Where is my new layer? Bones. Drop it down. Boston Bones right? All right. Now, let's
select this layer. I will press Shift A
with a new bone here. Let's select the bone. All right. Now I will
just put it in here. And maybe I will like this one. And let's just put it in, maybe. I don't want this to move. Right, let me just remove that. I'll select this one
and just put it. No, the lower one, this one. Alright. Asel B. Keep offset. All right. Maybe not that.
This one. All right? Keep off the. There we go. Let me make that with smoter. Right? Now, I will call this bone death it. All right. It's important
for you to have this suffix, the L and R because in that way, Blender will know which bone R on the left side of
your model and on the right. Like, for example, this bone is in the left
side of our model, so this will be called L. If this bone were
here in the right side, this will be called
R. So you can see what we could do
with that feature. Now, here in the edit mode, here we could select CymetrisT
should be working nice. But this is not working. But what did I rename? Let me see. This one, indeed, this should
be the one. All right. Let's call this de
underscore knee right now, this should work nicely. Metris, there we go. Let me select the
mirror. All right. Maybe we could tweak the role a little bit,
just this perfect. Now let's go here. I let's
weight paint to that bone, its entire knee pad,
like that. Perfect. So here, right. Let's see how this is looking. Let me bring back
my layers, right? My controls. Now we could just adjust
that properly there. All right axis. Perfect. There we go. Alright, I just added
like a constraint. So this bone stays in place
when we bend our knee. So what we did was in this
bone in the pose mode, I just went here to
bone constraints, and I just added this constraint
that is copy rotation. Then I just select a target
the rig of our character. Then I just select
this bone here, and I applied like the
copy rotation just in the X axis and in local space with
the influence and 0.5. Let's do that in the other area, so you can see what I
did, right copy rotation. Let's just leave
it in the X axis. Let's just put this
in local space. This will be in 0.5. And now let's select the rig. Let's select this
bone. All right. Now, this should work nicely, as you can see, all right. So everything's looking nice, working good. All right. Now that we have basically
the pants already rigged, we could let's do
something first. Let's go to the jacket. I don't want these bones
to influence the jacket. All right. Spell these bones. I don't want them. All right. Maybe I
could remove that. Would be right? Let me apply this
influence to this area. All right. Just like that. I don't have any other. Fine one. All right, we'll just leave
it like that. I don't care. All right. Let's see. We could smooth any bit. But this in here. Let me see how this behave. We need to I need a bit more This bone fall here. I mean, the influence
of that bone. All right. Like this, smooth that a tiny bit more. Maybe we could add This be Alright. Maybe not like that. All right. And let me separate
these straps. Let me hide them. Right, like this. Let's smooth that a bit more. Let's go to the other
hand. I mean, clavicle. Here reduce the influence. Is clavicle. All
right. Save this. Let's just test that right. Let me bring back
again, my straps. Let's do some data transfer
or lets select jacket, Vertex data by vertex groups. Let's see how this works. Alright, it's not
working nicely. Ryle's selected
straps. All right. Go here's the same. Let's see how this works. All right. I quite
not liking it. Alright maybe, I
mean, you know, like All right. All right, let's see. Maybe let me do again, the data transfer, vertex data, vertex group. All right. Perfect. Go here, smooth. Go here, smooth go here,
smooth and smooth. Perfect. Let's see how
this looks. All right. I will use that from here. And now we should be good. A All right. I mean, I quite
liking it, indeed. All right. Let me do something. All right, I will do something. I will merge them. And now here, I will select
everything here with, and now I will select this vertex and I will
just press copy to copy the entire influence of that vertex into
this entire piece. All right, let's go in the other side or
right here, go here. Copy. There we go. Now, this should work nicely. You can see this works better. Alright. Let's safe incremental. Now we're going to
bring our skirt here. Alright let's bring
our skirts, right? Now here, I will
select all of these. The select my
armature unless just do some empty groups. Now, for these pieces, like for this strap, I will append that
to the pelvis bone. Let's go here to
the pelvis bone. I will just append that there. All right. Let's do the
same with this buckle. All right, of this bone. Same with this wrap. There we go. And the same with this strap, I mean, this cloth. All right. For this pouch, I will
add another bone. All right. Let me bring
back also my demon head. I will add two bones,
let's go here. Let me hi everything, and let's just leave
the deformation bones active here to the custom bones. I will click. If A in edit mode, if A, all right, here we have our stuff. I will add this custom
bone around here. Let me roll these
just like this. There we go. We'll
just put it here. And now I will select the
pelvis, this bone here. I will press conto P, keep upset. All right. I will copy this one. Maybe I will call
this death poach. I will copy that and I will
just put it here. All right. Let me roll this just
like this. There we go. This will be de Demon head. There we go. All right. Let's save this. All right. Now, we need to add
some custom bones for the skirt and this strap. So let's do that real
quick. Let's go here. Maybe I will make another layer. Let's call this third. Oh, now, right. Now,
what we're going to do? I will append, a bone. All right. Let me just rotate
this 100 180 degrees. All right. Let's just
put that in the center. Maybe something like this. Now, I will click here
and subdivide this. Maybe let's change this. Let's put this like the
third subdivide this. Right, subdivide Let's make this with Arthur. It should be 02 means, yeah, 02. 02, one, 02, four. To be four. Why five. Alright, I think this is good. Yeah. Now, I will copy these bones. I will just put it in this side. Even here, I will need a new
phone here. There we go. I will just add the suffix
of L, just like that. Let me select the suffix. I will just add that at
the end of everything. Just like that. All right. Now I will
select this stuff. I will click here
and symmetries. I can work with symmetry now. Let me add maybe three chains of bones maybe something like this. Another one, this area would be All right. There we go. Let me try to do some roll here and
align that nicely. All right. Like this. All right. There we go. Here,
let's do the same. All right. Perfect. There we go. Let's select all of these bones. Select everything here. Now, I will just click here
and let's do some Control B. If offset, all right, this should work nicely. Al right now for this. I will select maybe this one. Let me duplicate this. I will go to my UB editor. Now, in the duplication
of that skirt, I will delete the inside. All right. Let me also delete the
thickness of this. All right. Do that in the duplication. Not in the original
skirt mesh or writing. Now, I will right? I will select this mesh, and then this one, I will
click here automatic weight. Why I'm deleting the inside part of this skirt Because the automatic weight
doesn't work too good. I mean, it doesn't work nicely with meshes that have
thickness like this skirt. So I'm just deleting the inside for this
to work properly. So now let's test
how this is working. This is not connected.
Maybe I'm dump. Yes, indeed. I think I did
something really dump. Right. I will have to
fix it all by hand. P connected. PET Control P. Connected. What Heeneh my God. Here. When this one. I should be connected here. And connected Connected. My God. Let's go back again. Let's see if this list let
us the enough console C. All right. You said something
really dumb. Oh, my God. All right. So We need to get, again, the parenting
of this nicely, again. So let's see connected But right, connected. Alright. Connected. Now,
this should work nicely. B let's do the same here. Oll B connected. One'll B connected. B, let's go here. Ontll
B connected, go here. C B connected. All right. Let's do the same
thing with the rest. B connected. A, C P. Connected here, all right, Console B. O
let's select this one. CP, connected, all right. And here, C P, connected. Let's do the same here. Control P. Connected. Console P. Connected. Control. Chief Console P connected here,
Console P, connected. Or right now, this
should work nicely. You can see there, all right. Let's duplicate this one. Again, I have already here. I have it already
here. All right. So now let's select Earth,
and they are mature. Let's click here in
automatic weights. Let's see how this is looking. I think it's looking nice. Let's go to the
three D Viewbard. All right. Looking good. All right. Now, let's
transfer the weight from this like plain skirt to
our skirt with thickness. So let's select our
original skirt. This one. So here, that's transfer, select the other one ertext
data, vertex groups right. And now the should
work nicely. Oh. Why? Is this not working? I should work. All right? Is this one, all
right? Let's here. That transfer all right
Vertex data, Vertex group. Let's select this one.
All right. Let's see. It's not working. Why is that B, empty groups. Let me do the same thing again. At a transfer Vertex
data, vertex group. Alright, now this should work. Alright, now it's working. Let's hide the other one. Let me say incremental. And now this is working rapidly. Perfect. All right. Let me go here. Just the
armater and the skirt. I don't want to have any
influence in this top area. All right. I don't want also these
bones to affect skirt. Right? Let me just erase the
infant from the top. Apria here. All right. Here, it should
be attached here. Just like that. There we go. All right. Let's go back. Here we have it. There we go. Let's go back to our rig. Let's bring back our controls. Let's see how this is looking. Let's go to pose mode. Torso. Alright, now we could
also pose our skirts. Alright. Empty groups. Let's select this
one. Here. Right. There we go. Now, let's go here.
To the demon head. Like the armature, P, entry groups, let's
go to the Damon head. Let's select this bone, and let's just fill that with red. There we go. Now we need
a chain into this wrap. Will be basically the
same of what we did in their All right. Now let's go and select the armatuEmpty
groups. All right. Now, I will go to edit
mode in the armator. Let me hide all the
trolls of the rig. If A, all right, maybe we could move
this it'll bit better here. All right. Let me try to adjust
the roll like this would be All right. Now, I would call this De Ba belt. Let's subdivide this a
few more a few times, maybe five times. No these ones. Alright I think we can Alright, maybe we
need one more bone. Right? Let me readjust the bone. This And now I will go to the strap and
I will select each bone, and let me select
the pelvis also. Let me apply red into that part. Alright. So let's start adding the influence for each
bone just like this. Perfect. There we go just like that. All right. Let's
do the same here. Or to P, and two groups. Let's go to the strap. Rap no. This one. All right, there we go. There we go. Let's go to the strap and
then just do some smooth. All right. Just like
that. All right. There we go. So basically, we have our entire
character already rigging. That's nice. That's
good and nice. Alright, let me bring
back my controls. There we go. Let's make a bone for this weapon. So we could add right. We could add an
armature, a single bone. All right, let's
just put it here. E. All right. Now to this bone, I will add on constrained. On constrained, I will put
this set child off, right? I will select this rig, right? And now inside that rig, I will select this bone. The palm, deformation hand here, let's select death Alright. Here and R. Perfect. Let's select here,
click Set inverse. Now, this should be good. Perfect. Go here. Let's parent this stuff
with that groups. All right, with that Armage. Let's set one in here. All right. I have also
this for some reason. This is curd. It should
not be like that. I have R there. Let me do something.
I will go here. I will add a transfer per group, right, and then I will just
select this skirt, right. I will just move this maybe outside this proxy mesh right. In this one, I will change
the type of the bone, maybe to stick or maybe to
be bone envelope, fire. All right. Maybe some B bone. All right. Every stick, right. And now we should have
everything already rigged. All right. Let's see. Let's test this. Right? Let me go here. Let me put that Right. We'll put this in the
center of the world, right? Well, I will just put that
in the hand his hand. All right. This is just
a test. All right. Let see like this. All right. And now we pull the hand. I mean, the arm. See it there. All right. Now we have
our character, Rick, and that and I think that means that there are
just two videos left, like for the posing
and the rendering. So basically, we are almost
finished with this course. So see you in the next video.
47. Posing the Character: Alright, guys, so
let's pose this model. Though, for the post, I'm not going to use the post that is here in the
concept because I don't have this we didn't
make this hoverboard. So this pose, it's made
for the hoverboard, but we don't have
the hoverboard. So I will do, like, a
variant of this pose, like for standing, something more like
this, as you can see. I just did this pose before
just to test some poses, and I really like this one. So let's begin with the posing. So, the first thing
that we are going to do will be to add
a floor because we need some floor to
put the fits on top. No? All right. Let's add a cube. Let's just squash it
down, just a tiny bit. All right, let's just put
it here. There we go. Now, let's start doing dispose. So let's analyze
dispose. All right. You can see that we
have a line of action. Let me see it like
this. All right. Also we have some contraposto. You can see the shoulder. Let me change the color. You can see that we
have some contraposta. I mean, for get
the poses nicely. We need to have
this contra posto. I mean, yeah, you can
see how this comes. Like, the shoulder and
the waist should be, like, crouching in in
the same direction. You can see it's going
down and it's going up. That makes the post
feel natural and nice. So let's begin with the posing. All right. So let's
get this model. Let's put it on
place or let me get the root to rotate this a
little bit. Just like this. Perfect. All right,
let's move the feed. Let me remove the
symmetry. All right. Something like this
would be something like this here, let's go here. Maybe we could move
this part here. This maybe could be. Alright, let me rotate the
waist. Let me see like this. Alright. Let me put the feet
on the surface. Just like that. All right. So now let's
bring let's rotate. Let me put in global, right? Let's rotate this stuff. So we have a better
line of function. We could exaggerate a little
bit more the line of action. Oh, we have some
floating geometry here, so let's go back to
the rest position. All right, let me bring
the former bones. Now let's select that piece. Let's select the armature right. Let's go to this piece here, and now I will just add the full influence
into that piece. So we could go back now to the pose mode and keep
refining the pose. Here, let's add a little
bit of contra posto. Something like this. All right. Okay, something like this. All right, something that
I will want to remove will be the influence
on the jacket. Like, for the influence of
the neck on the jacket, I just want to remove that. It's gohe to the neck
bones. All right. I don't want this
influence there. Also the head. The stuff. This one maybe could be
let's see how this looks. Alright, let's go back to Rs pose. I think this
is looking nice. Alright. Let's just
keep going with this. Alright, let me move this
feed more like this. Maybe we could start
moving now the jacket. All right. So like
this would be right. We have some weird
stuff happening. Alright, why is this
not moving properly? I think it's because we don't have Let me see what the
influence of this bone. It doesn't have anything. Let me go back to rest pose
here with this object. Let's go here at a
transfer vertex data, vertex groups, select sort. Right now, this should
be good. Not good. A All right, maybe it's because I need
to parent it again. All right. Let's go.
Let's do this again. That transfer data verge
group, let's select the skirt. All right. If this is
working nicely right now. Yeah, it's working. So let's keep
working on the pose. All right. Let's rotate this
a tiny bit more. All right. Maybe we could rotate
a tiny bit more, just exaggerate, like
the pose, a tiny bit. We could also move the waist. Alright, let's go here. Maybe we could even
ate a tiny bit. Per torso try to get also some siluet Alright. Nothing more like this. All right. Let me move this more like this so we can see the
feed A bit better. Let me put this in
individual orange so we could move this more. That the same here. Alright. Let's also move poach. This. Let's try to have an angle that we cool and we can
see what we are doing. All right. Let me move this
a tiny bit more, just like this would be. Maybe something like this could be. Alright. Maybe we could reduce the
irritation that we did here, rotate it rotate it back
a tiny bit more, right? What we what I'm going to do, I will add like a camera. So I can see better
what I'm doing. Let's select a camera, Aline. Alright, Align camera to view where is viewpars
supposed to be here. All right. Let's click here. Align active camera
to select it. Right? That's not
the option. Not that All right. Cameras dead object has active camera. So
let's move this. All right, let me put the camera here just to have the
angle where we are going to see this character. Looks like this copy. All right. Maybe we could put this aperture to be like square.
Some like this. We could. We could make
this just like that. Right? Let's just rotate
this. Tiny bit more. Alright. Let's go here. Let's keep posing this. All right. Give me a sec. All right. Let's just
continue with this. Maybe we could make this cloth
tiny bit more like this. We could even rotate this cloth. Right, something
like this could be. Maybe not that much. Let me put this back into local space. All right. There we go. Somebody
like this could be. Alright let me try to
get this hand nicely. Alright, let me make
this character to look. Maybe it's not looking
at the camera. Looking somewhere else. We call rotates. Base. To me bring back. Just make it. That go here. All right. Let's select the eye. Maybe he's not looking
at the camera. He's looking like the side, maybe there is something there. Maybe it could be. Maybe he's looking
at the Let's see. Like this. Let's make this to look bit side could
be a tiny bit. All right, let me add this
weapon in position. All right. Move this here. I will
start posing the weapon. Maybe the weapon. All right, maybe the weapon is around here. All right. Let's see Let's put the
weapon in position. All right. I like this could be. All right. Maybe
something like that. All right, select the weapon. Select bone of the weapon. Let me put the bone in front
so I can see it better. We could bring it more like this so we can have a little
bit of siloet of the weapon. All right, maybe we could move it more like this to
be better in the hand. All right, let me come here. Maybe we could rotate this. A bit more. This, let's go to this bone.
Let's rotate that. Then Alright, let's just put it. Put this weapon around here will be Maybe. Alright, I would like to remove the constraint
that I have on this bone. Alright, I will
just remove this. I just apply it because I want the transformation
that I did, but I don't want
the weapon to move. Every time I move the hand. At least for this, I don't want the weapon
to behave like that. Alright. So let's continue working here. Maybe we could maybe rotate
this a tiny bit more. All right. Let select this
active element. All right. We put this in median point. Working rapidly
again. All right. Here should work. All right. Something more like
that would be, let's go back to local
individual individual orange. So, let's just keep
working on this. Maybe we could pose this
stuff a tiny bit better. Maybe we could have a tiny
bit of ilouett in this area. All right. Perfect, let's select
a chain of bones. Let's move them just like this. All right. Let's go here. All right. There we go. Let me move this more like this. W B. Alright, maybe I could move
this more like that. So it's a little bit further
away to the other leg. Alright. Be rotate more. That rotate this even
more here. Would be Perfect. Here. All right, we're getting a
little bit of issues. See what's happening
there. Like this one. No. Let's go back to Res pose. Here. Maybe we could remove
influence from there. Just like this a little bit. Alright. Let's see how
this looks when posed. All right looking kind
of better. All right. Maybe we could increase
the focal point, I mean, the focal length of our camera. Maybe something more
like this would be maybe 670 All right. Something more like that. We're not going to render this
character here in Blender. I'm just getting like
this camera just for for posing to have a
better visualization of my silhouette
and all of that. Alright. Maybe it
is more like that. I All right. At tiny bit more like this. Let me hide the skirt. So I can see better
what I'm doing here. Let me rotate this
leg just like that. All right. Also, this one, we'll just put it here. And let me bring back my skirt. Alright. Go here. Let's just put this, make this arm, like, to hold the weapon re
something like this. All right. Let's go here. Back. All right. We could open a little bit more. This This finger, maybe, let's bring up the arm. Let's bring, like the
detail finger controllers. Alright, so we could
move the better. Let me hide the deformation
bones just like that. Perfect. All right. Move the more like this. And now we could wrap the finger around the handle or like that. Alright, let's go with
the thump. Alright. Maybe we could make this
hand more like this. All right. Let me move
the weapon and even more. Alright. Around here. Let me make the weapon
a little bit smaller. Just like that. All right. Maybe not. Let's
bring back the scale. All right. Let's
select this one. Let's close more this
finger. I like that. Perfect. There we go. This let's try to get this
hand good and nice here. Maybe something
like this could be. Because he's not holding, like, pull the weapon because
the weapon is, like, on top of his shoulder, so he don't need, like, to wrap his entire
hand in the handle. He's just holding the weapon
so it doesn't fall off. All right. I quite not like how
he's doing that. Maybe it's more like this here. All right. Let's get the
finger nicely there. Also get this other
finger nightly there. All right. Write more like this. Go back to the hand. Maybe something
like that could be. Maybe we could even
wrap this a little bit down something more like that, so we could we could close a little
bit the hand even more. All right, so let's go here. Let's pose this other hand, maybe some simple pose, like some neutral pose here. All right. Maybe he have on his hand, he have the demon head. Alright, let's
just put it there. Like, he has he's holding his demon head right to
add the demon head there. So this has a little
bit more interest. Alright. With something more like this, all right, at this. Let's just take it and put
it on the hand, right. All right, let's go start making this hand to hold
the demon head. All right. Let me bring up a bit
more this demon head. All right. Here. Let me
rotate this A bit down. That There we go. Like this one. Let's
open it a bit more. Alright, let's go with
the other fingers. Quite dog like the way that
he's holding the demon head. Even more like this
would be good. Tiny bit more of power, more like that. Right? We could move a
tiny bit this and let's start using the details, controllers for the finger, so we could pose this hand a tiny bit better and
more interesting. All right, something
more like this. A All right. Perfect. There we go. Maybe we could even
rotate this more like this. All right. I There we go. All right, let's move
the demon head just a bit more. Like this. I Would even rotates like this. All right. Let's just tweak more these controllers so we
could have nice looking gold All right. Perfect. More like this. All right, now
it's looking good. All right let's go here. A All right, let me parent this
bone to the hand bone. Let me get this bone from here. I will just parent
that here parent. And now I will just
parent that bone into the hand bone here. Let me remove the fingers, the arm or I select this bone. I select this one and then need this one on P. Keep offset. All right, so I will have
to repose my demon head. It's just I want this demon head to move with the
hand if I move it. Alright, the demon head in
that angle looks clean die. Maybe maybe not. And Alright, let's just
add it at this here. Just keep rotating this head so we could match again the
pose that we had before. Nothing more like this would be. Alright, let me
bring back my arm. All right. Right? Maybe we could. I should this demon
head a tiny bit more. More like this could be. I think this way looks cool. Alright. Maybe not. I think like this
also looks cool. Alright. Let's make him look more like this. Let's make him also angrier. All right, something
more like this could be. Let me hide the
deformation bones. Something more like
this could be. All right, there we go. Let me safe incremental, Louise. All right. There we go. Toing a tiny bit more. This leg rotation. Like this. Perfect. I think this could be. I think this looks Ooh. All right. Here. All right. The deformation bones. Maybe we could do some smoke. Here in this area. Like that. All right. I think this looks good. Maybe we could also
accelerate a tiny bit more like the perspective. This more like this. Let me also see
the other angles. Is a bit more like this, aria. Would be. All right. Let's keep doing some
twigs into this. All right, maybe a little bit more of twigs into this cloth. All right. There we go. Alright, I think this could be. Alright. So I think this pose
is nice, at least for me. You can do your pose. An pose that you want,
you could do it. So now, to get this pose out
of splendor, let's do this. Let me Dave incremental first. Also, I will do another
save, but this time, I will just call
this post post it. Alright. Perfect. So let's hide the rig. All the rig hide everything. I will get all of these. Now I will click here in left. I mean, right click
convert to mesh. So now we have baked the
post into the mesh itself. So now we could just export
this as a FBX just like this. Go here. Let's make a
new folder and call this post, just like that. All right. Let's call this Dimon
under post. All right. Let's do this selected
objects, applied front form. Don't apply any modifiers, remove Athletes
bones and animation. We don't have any
animation here. So now I will click
here in Export FBX. Now we could go back
to Marmoset Toolbag. Let me hide the
previous mesh that we had before All right. Now I will import my
new host mesh. Alright. There we go. Here
we have our stuff. But this is not the
right materials. So I don't want to add, like all the materials again. I'm a little bit lazy indeed. Right. So we just need to apply the materials again to each
piece, and that should be it. Let me leg Alright.
I don't want to eat. I don't want to
do it one by one. I think we will have
to do it I mean, this is just because Blender
change material names. All right. Let's do this. I don't want to wrack my head. I will just go through
each material, and I will just remove
the suffix that blender, add it automatically, like that. There we go. Let's go here. Third, all right. Let's go here. Perfect. A. That. Perfect. Let's
select the weapon. Perfect. Let's go to the hair. There we go. Let's go to
the skin. There we go. Let's go to the inner armor. I mean, inner suit. And I think that should be it. Alright, let's select our
model again and let's export this to Marmoset. Let's import this back. We should be good. Go. Right let's
click here. Import. There we go. Alright, now we have our stuff with
the material supply. Your material
material should have the same name of what the
material on Marmoset are. So here we have our Demon
Hunter post nicely and good. I didn't like, post
this. Oh, my God. I just forgot about that
strap strap, indeed. Maybe we could just hack it. Tiny bit. Let me put
this in medium points. Alright. Anyway, that strap will
not be think in any angle. Maybe we could make it, so it doesn't trespass our mesh. We go to my speech topo
because I have something there at hiding or the
retopology shading. I don't want this. All right now, let's
just put it here. All right. Let me
go. This strap. I will just tweak it a
little bit, just like that. Alright let me export
this x export post. Let's go back to Marmoset. Alright, there we go.
Now, the only thing that is left is to
render this guy. Let's make some renders
in the next video.
48. Render Scene: Alright, guy. So let's
do a breakdown of the render scene that I have here in Marmoset. So let's see. I have basically nine lights,
counting the skylight. Alright. Let me tune
off everything. And now let's see. So the
first thing is my skylight or my DR is the studio Tomoko DR
from so Substance Painter. I have just exported that DR from substance
and bring it here. Like going here in image, just go where I save my DR and just select
this one studio Tomoko. All right. I just drop down the brightness just a
little bit because I don't want this to be like in one. It's too bright. I want this to be more
subtle, just like that. Alright. So let's go with the first light that is my
key light, like this one. You can see what this does. It brings a little bit more of like interest to the upper
portion of our character. Let's go to the second light. Is this rim light just to have a little bit of highlights on the silhouette
of our character. I have another rim light. Like this strong yellow light. I really like how this
looks in the edges, like, to, like, pop out the character
more from the background. Let's bring this one here. This one is just
like a feel light. So this part of
the skirt doesn't look that dark because
without that light, it looks basically black. I don't want to have, like, any full blacks in my render. So I just added this light just to feel a little
bit in this area. So it has a little bit of light. This one is basically
another ring light, I mean, feel light. Just like for the same
purpose that I have this one, maybe just to make it feel a
little bit more these areas. A little bit subtle,
but it's there. You can see what it does. And we could increase
the diameter, a little bit even
the brightness. All right. Let me decrease
the brightness a little bit. All right. So let's
go to my other light. All right here. Let's
see what this does. This one is just a rim
light for the plate, so I can have the
same rim light that I have here also on the plate. So the plate can pop out
more from the background. This light, let me see. Alright, this light
is a light that I added to the eyes area
because without that light, they looks a little bit
dark because of the shadow. Maybe we could increase a tiny bit more the
brightness there. Maybe it could be
maybe not that much. All right. I do something here. Sometimes I hate the navigation of Marmoset, right. Let's see. Look, right, give me a second, so I can align this propidly. All right, you can see it there. The difference. Alright. There we go. And also, I have this
other feel like just to feel a little bit more
the blade with light. Alright. Maybe we could
bring this up, maybe. Maybe we could decrease. Alright. Is the diameter, right? I have another light. I don't like Alright, let me see. Something real quick. I have
this like the light five. That light is this rim light. So let me do this feel like, let me do something real quick. We'll drop this and also
reduce the spot angle. So I don't have that highlight on the eye here
because I was having, like, the highlight of
this light on the eye, and I didn't like that. So basically, that was it. Let me go here. Also, I have here in the
backdrop in Amed Sky. Alright, let's see the camera. Alright, for the camera,
I have done a few tweaks, for the post processing. Like here for the tone mapping, I just selected the GX. I crank up a little
bit the highlights. Also, I crank up a little
bit the mid tones. I drop down the shadows and also create a
little bit of clarity. The contrast also a little
bit and the saturation. Because you can see the
difference from this camera to this camera is quite
a big difference. Also, I added a little
bit of sharpen, so the image is more sharp. Yeah. You can see the
difference here. All right. Let me unlock my camera, copy the same value
that they have, right. It's not too perceptible, but you can see
the difference if I crank up these to ten. So I just added a tiny
bit of this sharpen look. Also, I have a
little bit of bloom. Let's see, with
the bloom without, I just added a tiny bit, maybe just in here, I have a little bit of bloom. You can see it
there. It's there. All right. I also
added a little bit of ignete just to make the focal point the center of the image. You
can see it there. You can see that there
is a black radiant around the corners of our image. That makes the focal
point our character. Also, I added a little bit of digital grain here
just a tiny bit. Maybe we could also
drop down a tiny bit that grain. Alright. So also, I added this
floor that flourish as a shadow catcher
that I just, like, turn on these two options here and also drop down
entirely roughness, so I can have this ice looking
reflection on the floor. You can see it there, maybe with a little maybe a little
bit rougher would be. Something like this, right? So is it not a
perfect reflection? So also, I added a turn table, so we could see him in
rotation just like this. All right, add the turntable, right click in an empty area. And now let's select
the ton table here. Next, you should just, like, drop your FBX under that
turn table and then select the tone table
that you have just created and click here
in sick Loop speed. That will like sync
the rotation speed of your turn table to the
timeline of your scene. You can see here
like this timeline. So it do a full rotation in the time that you have
added on your scene. All right, let me delete that. So that basically is for the
final scene for the render. Maybe you could do it
differently than me, but I just like this result. So this will be this video. Tia.
 FastTrackTutorials, Premium 3D Art Education