Transcripts
1. Introduction: Once upon a time, I was told that great
Melangary is very complicated and only
sewing fairies can do. I believe that for a long
time we think the same way, but it's just a bunch of words. Anyone can do this. Welcome
to my master class. My name is Katrine. For over six years, I've been immersed
in a wonderful world of creating the spoke underwear. It all started when one
day I simply decided to give it try and sold
my first luxury set. If you've ever flirted with the idea of making
your own underwear, then you've found the
perfect place to start. In this masterclass, they're
going to venture into the creation of a soft and
elegant brill made from mesh. I will guide you through
every the process, from taking precise
measurements to constructing a tailor made
piece that fits you perfectly. We will choose suitable fabrics
and materials together. Step by step, we will go through the entire
sewing process. My class is more suitable for people with basic
sewing experience. But if you are a beginner,
feel free to join. I'll answer your questions
if you have any. While we primarily
will work with mesh, I will also share insights
of how you can nutilize other materials
like cotton scores. By the end of this class, you'll be familiar with
all the materials, tools and techniques
involved in sewing brill. You'll need a sewing
machine capable of straight A teaches and the rest of the materials can be found
in the description below. I will also provide more details about them
in all of the videos. In this master class, we're going to dive into a
world of delicate fabric, beautiful Luxery, Haberdashery, and the art of handmade
craftsmanship. Maybe it won't turn out perfect, especially if you will do
it for the first time. But I can promise it will be a good next step to your
independent luxery creation. Join me on this exciting
journey and let's create something beautiful
together. Let's get started.
2. About the project: Welcome everyone. I'm thrilled
to introduce our project. I bespoke Bralette that we
will be crafting together. As you can see, I already
have a few of these. I had a chance to thoroughly
test everything in advance. This piece, constructed without side sees, ensures
optimal comfort, free from ribbing
or discomfort in those areas finished with an elasticated edge and an
alum crossover at the front. This bralette reveals tasteful
triangle of bare skin. Its base is neatly
bound with white, elastic and adjustable straps guarantee the perfect field. This bralette offers
gentle support. It makes it an excellent
choice for every day wear. While the unique
design makes it a stand out piece in
any Lare collection, our bralette design is especially suited for
those with cup sizes ranging from A to D. Its design doesn't involve
underpass narrowing. As I've already mentioned, there are no side seams. For those with larger bus, the area under the
bus might feel a bit. Um, you can determine
your cup size by substracting your
under bust measurement from your bus measurement. If the result is greater
than 18 centimeters or 7 ", then your bus is
larger than a cup. If your bus is larger and you would love to try your
hand at this project, please leave a comment below. If more than ten of
you express interest, I will create an
additional video, especially for you while we'll be creating our
piece using mesh. I want to emphasize that you can also make it using Jersey silk, with Ella stain or any
other stretchy fabric, there won't be any difference. So feel free to get
creative and make the Bret as either more basic or more
elegant as you like. Our master class will unfold in three stages,
materials and tools. We'll begin by familiarizing
ourselves with the required materials
and tools for sewing. I'll guide you through the necessary quantities
and specifics. Pattern creation,
our next step will involve drafting
a custom pattern based on your measurements. This simple process takes just 30 minutes and ensures
a more fluttering heat reflect on your
personal dimensions and the specific characteristics
of your chosen fabric. Cutting and sewing finally, cut out and solve
the bralet using a song machine capable of
straight and zigzag stitches. My underwear holds a
wealth of advantages. The choice of high quality
fabrics and fittings, meticulous craftsmanship, affordability, compared to
popular lanerie brands. The freedom to create
any design you desire to bespoke feet since everything is tailored
to your measurements. In the next video,
we will explore all the materials and devices we will need for our project.
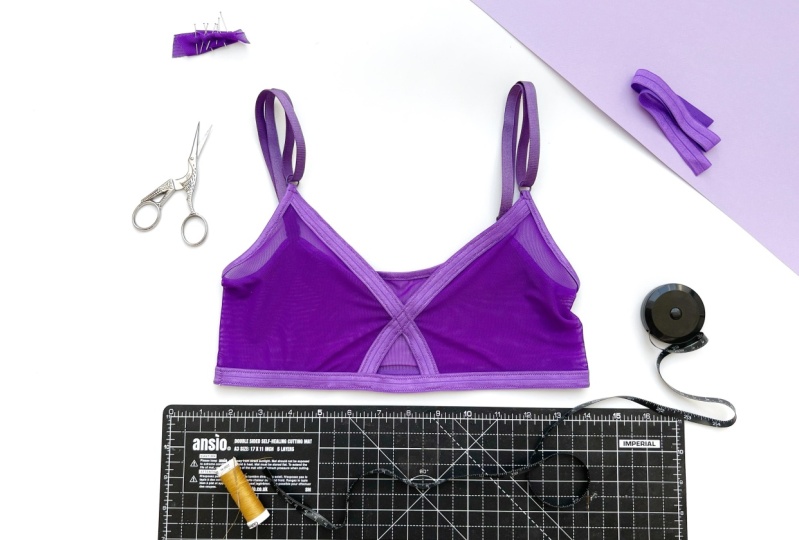
3. Materials: Firstly, we're going to
need our main fabric, a soft and stretchy micro mesh. Which is readily available at fabric shops or online at
stores specializing in bra making supplies or sites like this fabric provides
four way stretch. You'll need a piece
around 30 centimeters or 12 " long for a single bralette, though the standard selling
unit is usually larger. Next up is Biota Bitstic. To finish our edges, it's designed to fall evenly in half along its center line. Creating a neat and
polish edge will require about 3 meters
or 3.3 yards of this. We also need straps which
are denser and more robust than regular elastic yet soft to touch on
the reverse side, you'll need around 1 meter or
1.1 yards, for the straps. Further, we'll need Brac
hardware comprising of two sliders and two rings. You can select a matching or contrasting color
to your brillant. Ensure the hardware size aligns with your
strap elastic D, If your strep is
approximately 1 centimeter or 0.4 " wide, it should easily fit through the hardware with minimal slack. You have a choice between
plastic or metal hardware. Next we will need thread one. Spool should match
your elastic color. You may need a separate one if your main fabric
color varies. To create our pattern, you'll need basics
such as pencil, paper rulers, and pins. Rulers with rounded
edges are not mandatory, but they will be
a useful addition if you plan to continue
pattern drafting. In this master class, you will be able to draw
your lines by hand. For taking accurate measurement, we'll use a tailor tape. Separate pairs of
scissors for paper and fabric are a heal to preserve the sharpness
of your fabric scissors. Lastly, a sewing machine
with the capacity for straight and zig zac stitches
is essential to summarize. These are all the
materials and tools we'll need. Let's proceed.
4. Measurements: Well, let's get
our measurements. We will need seven in total
for your convenience. You'll find a printable table beneath the video where you can easily note down your
measurements To enhance clarity, I'll be measuring and
recording my measurements in both centimeters and inches
across separate columns. That way you can opt for the
metric that suits you best. Here are the measurements
you'll need. I'll start by
entering mine first. We need to determine
the stretch factor of our fabric. How do
we measure this? We need a work, the fabric
we're plying to use. Let's fold it in half and align the beginning with the
start of our ruler at zero. Then we mark 10
centimeters for 4 " of fabric and start
stretching it sideways. The fabric should stretch well, but the fiber should be
distorted excessively. For example, if there's
a pattern on the fabric, it should maintain its shape. The stretch factor will allow our gain to sit more
snugly on the body, might stretch to 12
centimeters, or 4.75 ". Whatever number you measure, divide the unstretched fabric
measurement by this number. I got 0.8 which is
our stretch factor. This will vary depending
on the fabric for mesh, It's usually between
0.8 and 0.9 Next, we need to know our
bust measurement if you're taking measurements. So standing in front of a mirror can facilitate
the process. Ideally, you should do this either bar or
wearing non padded, non push up underwear. This helps you accurately identify necessary
anatomical points. Maintain a straight posture until you've secured
your measurement, all the while
observing the mirror. It is 80 centimeters, or 31.5 ". This measurement needs
to be divided by four, and then multiplied by the
fabric stretch factor, which gives us 16
centimeters, or 6.3 ". Next, we need to determine where the straps will be located
at the front and back. This is a matter of
personal preference as to how far apart
they should be. Simply hold a tailor
stape to yourself. It measures the distance that feels most comfortable to you. The distance between the front
straps is 20 centimeters, or 8 " from the
center of our brat. It will be half of
that measurement. Alternatively, you
can measure this on an old bra that is
comfortable for you. I would like to
make the distance between the back
strips the same. Then we need to establish
the tops high on the chest. This measurement is easier
to split into two parts. From the most prominent part
of the chest to the nipple. Let's decide how
high we want the top to rise and how far
it should descend. For these measurements,
I recommend wrapping the elastic you will use in the
project around your chest. Better visualize where the bottom part of
the bralette will be. For me, I chose 11
centimeters or 4.5 " at the top and 6 centimeters
or 2.5 " at the bottom. Remember a rather white elastic will run
along the bottom, so make sure it doesn't
constrict anything. Thus, the tops done, ward height, should
account for the elastic. Seth, I want to emphasize how vital
accurate measurements are. The final fitting comfort of your ballet depend
greatly on this step. It's worthwhile to remember that a perfectly fitting ballet begins with precise
measurements. Lastly, let's define how wide our top should
be under the arm. I decided to go for 11
centimeters or 4.5 ". This is a random figure. I chose to consider what
would be most comfortable for you if you
decide to go wider. Bear in mind that it shouldn't encroach too much
into your arm pit. It's always a good idea to double check
your measurements. Even a small discrepancy can affect the feet of
your final garment. So take your time
and measure twice. It's better to spend
an extra minute now than to find your finished. Bralette doesn't
fit quite right. With that, we've completed
our measurements. Let's move on to
driving pattern.
5. Construction: Let's get started with
our construction. It's simple and won't take long Chances are a standard
four paper won't be enough. I suggest using a
larger piece of paper. You can stick
several four sheets together using rustic or tape. Alternatively, you can use
a roll of paper if you have one or torso three sized
paper at a hobby store. First, draw a long
line down the middle, sitting it about five centimeter or 2 " from the left side, The start of this line, point A. From point A, we'll mark the value calculated
using a formula. A quarter of the
bust measurement multiplied by the
fabric stretch fact, we can find this
calculation here. For me it's 16
centimeters, or 6.3 ". We'll label this as point B. Also from point A measure
out to the right, the horizontal distance
for the front straps. For me it's 10
centimeters or 4 ". Mark this as point. Now draw vertical
lines passing through these three points from point measure upwards to represent the bralette upper
part measurement D one. For me that's 11
centimeters or 4.3 ". Then measure downward for the bralette lower
part measurement, for me that's 6
centimeters or 2.4 ". Measure this point as D two. Draw a horizontal
line across D two. As you can see, this has given
us two additional points. Let's label the
one extending from point A as and from point B as. Next, let's define the triangle cut out at the
front of our blet. Making this too
large might cause spuckering where the elastic is placed over the
curse of the body. I suggest a triangle with five by 5 centimeters or
two by two inch sides, but this is a rough estimation. Adjust as you see feed
from point measure, half the width of
the cut out 2.5 centimeters or 1 " to
both the left and right. Label these points G
and H. Now place your elastic between points A and the center of the elastic
should align with these points. Lightly sketch the boundaries of the elastic repeat for points A and H. Next we'll determine the
sight height of the. Let refer to our measurement
table for this value. In my case, it's 11
centimeters, or 4.3 ". Starting from point F, measure upwards by this amount, your measurement may vary. Mark this point. I now
smoothly connect the lines. The elystic should
directly lie here, curving gently to
avoid sharp angles. The elystic needs to rest smoothly from the base
up to the straps, so slightly round ow
this line like saw. Then sketch the side
curve of the bralette, ensuring and merged seamlessly
into the bralettes base. Notice the triangle formed here. Don't forget about this as
it's a part of the pattern. The hardest part is behind us. Let's move on to
the back section, which is much simpler, from point F measure
to the right, the D of the bus, which
is again 16 centimeters, or 6.3 " for me
and label this J. From J measure upwards
the side high, 11 centimeters or 4.3 ", marking this as point K. Draw perpendicular
line connecting points. And K from measure out the
distance to the rear strap, marking this as L. I prefer to elevate this point slightly
for aesthetic reasons, about 3 centimeters or 1 ". Naming it L one. It's your choice whether
to keep at level or raise. Connect all with curve lines. Now we are set, cut
out the pattern. Let's label our sections. This is the front
top and button, here's the fold for the back. I also recommend dating your patterns and jotting
down a brief description. For instance, August 9, violet ble fabric stretch factor 0.8 also sketch a quick
design for clarity. Sadly, after some time, it might be hard to recall
which pattern was for what. This way you can easily
revisit and replicated design. Now let's cut the fabric, hold it lengthwise
to form a fold, just like in the pattern. Align it closely with the
edge and pin it in place. We don't need seam allowances as the edges will
be finished with the elastic imply this is the final garment size
with fabric, scissors, cut out the pattern, then unpin the potter. If the garden seems too small, remember that the fabric and the elastic have good stretch. Moreover, it should snugly feed your body that we're ready
to move on to swing.
6. Sewing: All right, let's dive into the final and most
enjoyable stage swing with your creating the bralette,
using expensive fabric. I strongly recommend creating
a mo up of the bralette, using the fabric with
similar properties before proceeding with
the final version. This way you can
try it on and make any desired changes to the
feed before the final cut. Now let's get down to, so essentially we need to finish all the edges of the
bralette with a lice stick. Start by joining
the front pieces. Align the top part of the
bralette with the elastic, ensuring that the edges
of the fabric and elastic much in them together. Manually avoid
stretching the fabric and elastic too much, they should lie flat. Next step is crucial
and deserves your full attention as it significantly impacts the
quality of the final result. Take the opposite
side of the bralette and overlap them at
the center such that a small diamond shape is formed
from the fabric Crisco at the middle in this pot in place. If everything is done right, the bottom continuation of the elastic would naturally
align edge to edge with the bottom fabric of the pallet
pin everything together. Here's how it looks
from the back. Now let's base
everything with threads. Our goal is to stick just the fabric and the
elastic edges together. When we reach the diamond
shape in the center, we need to secure the
thread with the knot. Then continue
stitching the piece from the opposite
side of the elastic. Repeat this with the
second half of the ballet. First the top, then the bottom. Here's how it will look for
those with sensitive skin. I recommend finishing
the inner layer with elastic as well. This way the mesh
edges won't scratch your skin and the bralette will be more
comfortable to wear. Just attach the same
pieces of elastic, align in the edges and beat
them with the Meno stitch. Now let's go to the
sewing machine. I choose Isicac stitch to make this stitch look more
elegant, narrow it down. I decided to set the
stitch length to 1 millimeter and the stitch
width to 2 millimeters. Then, without rushing,
carefully sew along the elastic as close to the edge as possible H, in the mesh edge. If you're sewing the elastic in this way for the first time, do it at a slower speed. The elastic is slippery
and highly stretchable. If you try to speed
up the process, the seam might go away and it will be very noticeable since
this is the front part. Do the same on the other side, also secure the opposite side. Then there will be two parallel
stitches on each elis. Stick at both ends
of the elistic. Let's remove the basing thread from the Republican Listic. Then trip the ends to align with the meshes shape angled on the top in horizontal below. This is what the front of
the garment will look like. Let's move on to agent the top part of the
plate with lytic. Attach it at the strap
attachment point at the front giving an extra
2 centimeters or 1 ". We will use this two centimeter
tail from the Elis stick later to attach the ring
without stretching. Start pinning the fabric
and elastic together. The fabric should fit
into the elastic up to the edge pin until you
reach the back straps. Start securing
everything with tread. To neatly finish the
edge of the back strap, you need to hold
the elastic to form a sharp ample secure this corner with a few
stitches to prevent it from shifting while
swing on the machine. To make it easier to navigate
this area on the machine, let's saw a few threads into the corner that you can
pull during the process. The area between
the two straps on the back is best finished
by slightly stretching. Only the elastic just a little bit deep, the
fabric unstretched. This will impact
the appearance of the garment when it's not war. If it's not stretched, this edge may ripple and
slightly curl inwards. We don't stretch the fabric and the elastic part after
the second back strap, either trim the edge, leaving 2 centimeters or 1 " of elastic on the other side. Let's secure the elastic on the machine to easily
pass through the corner. Slightly pull the
heads just like this. It will turn out
something like this. We're done with the top part. Now let's move on to finishing
the base of the ballet. Measure the length
of the elastic equal to the circumference
of the bottom part of the let That will be four bust measurements
from our formula. Add 2 centimeters, or 1
" for securing the ends. Join the elastic to form a
loop in the edges together. Then base the edges with thread to ensure they don't
shake during soil. Now stitch both edges of the elastic using a Zig Zac
stitch on your machine. If you have some elastic
left after this, I suggest doubling up the base of the top
from the inside. If there's a little
elastic left, at least partially, for example, from one side to
another in the fold, join the edges of the
elastic and the fabric at the bottom and secure
them with hand stitches. Then saw everything on the machine using
the zigzag stitch. Now let's remove
the wasting thread. Sometimes this can be
a bit challenging. Try gently stretching
the public first. This will force the
thread to bunch up, making it easier to pull out. Now all that's left is to
prepare and solve the stress. To determine the stapling, you can measure them on
a bra you already have, or you can simply cut out stabilized stick in half
and adjust it later. First, let's thread
the stuff through the slide over the way
this will create a leaf, secure it with on the
other side of the strap. Leap on the ring. Then thread the end of the strap
back through the slide. The ring will be trapped
within the sloop. Now grab the tail end on the cup of the braller
and thread it through the ring, secure with the pin. All that remains is
to attach the end of the strap to the back
part of the bralette. Let's do that. At this stage, you can try on the bralette, but be careful not to poke
yourself with the pets. With this set up, you can adjust the strap
length is needed. Now, all pin treas will be
sold on the machine first. So the initial look with the slide tag that
back and forth a few times and trim the excess step. Then attach the ring
to the main part. Be careful here ensuring the needle doesn't
strike the ring. It's best to manually turn
the section on the machine. It takes longer, but you want
risk breaking the needle. Now throw the strap to the inner side of the
ballet at the back. Here's our finished piece. Let me show you how it
roughly looks at the monk, but trust me, it will
look much better on you. Now let's move on to
the conclusion video.
7. Conclusion: I want to thank you for
watching this video. I hope you enjoyed watching it as much as I did filming it. If you have any questions,
please leave comments. I will be happy to answer them. There are sections under the video where you
can pose questions. Share your work and
write comments. Your feedback would be super helpful for the
development of my account. Don't hesitate to write. In this video, we discussed all the materials necessary
for making a bralette. Created a top according to your measurements,
cut the fabric, completed the sewing process, added a beautiful item
to your wardrobe. Just for fun, let's calculate
the cost of our bralette. I purchased all the
materials online. Of course, I have
a lot of fabric left after sewing
just one bralette. I'll be able to sew ten
such pieces from it, or maybe a couple of body suits. If we only consider
what I spend including the fabric listic
straps hardware. It amounts to about 89
pounds or $10 Not bad. Right. I'm planning to create a Regi made pattern for
several basic sizes. Follow me on Instagram. If you don't want to design the garment according
to your measurements, you can simply download the
Regimde pattern and sew it. I'll announce the pattern released there as
soon as it's out. I also hope to release several more videos soon
about sewing backpacks, underwear, and embroidering
on clothing. See you soon.
 Catherine Never, Embroiderer, Artist & Designer