Transcripts
1. Introduction Trailer: My name is Sam Cipla. I'm a three D weapon artist
at Tire Interactive, and I'll be your instructor
for this course. In this highly
anticipated tutorial, we'll dive deep into creating a three D Caltech shotgun
from start to finish, resulting in a full game
ready and textured weapon. This course will guide you
through several key stages, blocking out the
weapon in blender, creating high poly and low
poly virgins in blender. UV unwrapping in the most
optimal way using RSM U V, texturing with
substance painter and rendering final images
in MarmosetTolpag. By the end of this
course, you'll have a comprehensive understanding of how to create high
quality weapon models for both games and cinematics. These skills you can apply to any weapon type and even
to other model types. For this course, we'll be
using Blender for modeling, substance painter for texturing, RSM UV for UV unwrapping, and MarmosetTolbag
for final renders. With over 37 hours of content, I'm confident that
you'll gain the skills needed to create impressive
three D weapons and models. All project files,
including the weapon model, save files and final
renders are included. This course also comes with auto generated subtitles in English, Chinese, and Spanish. I hope this course brings value to your journey
in three D modeling.
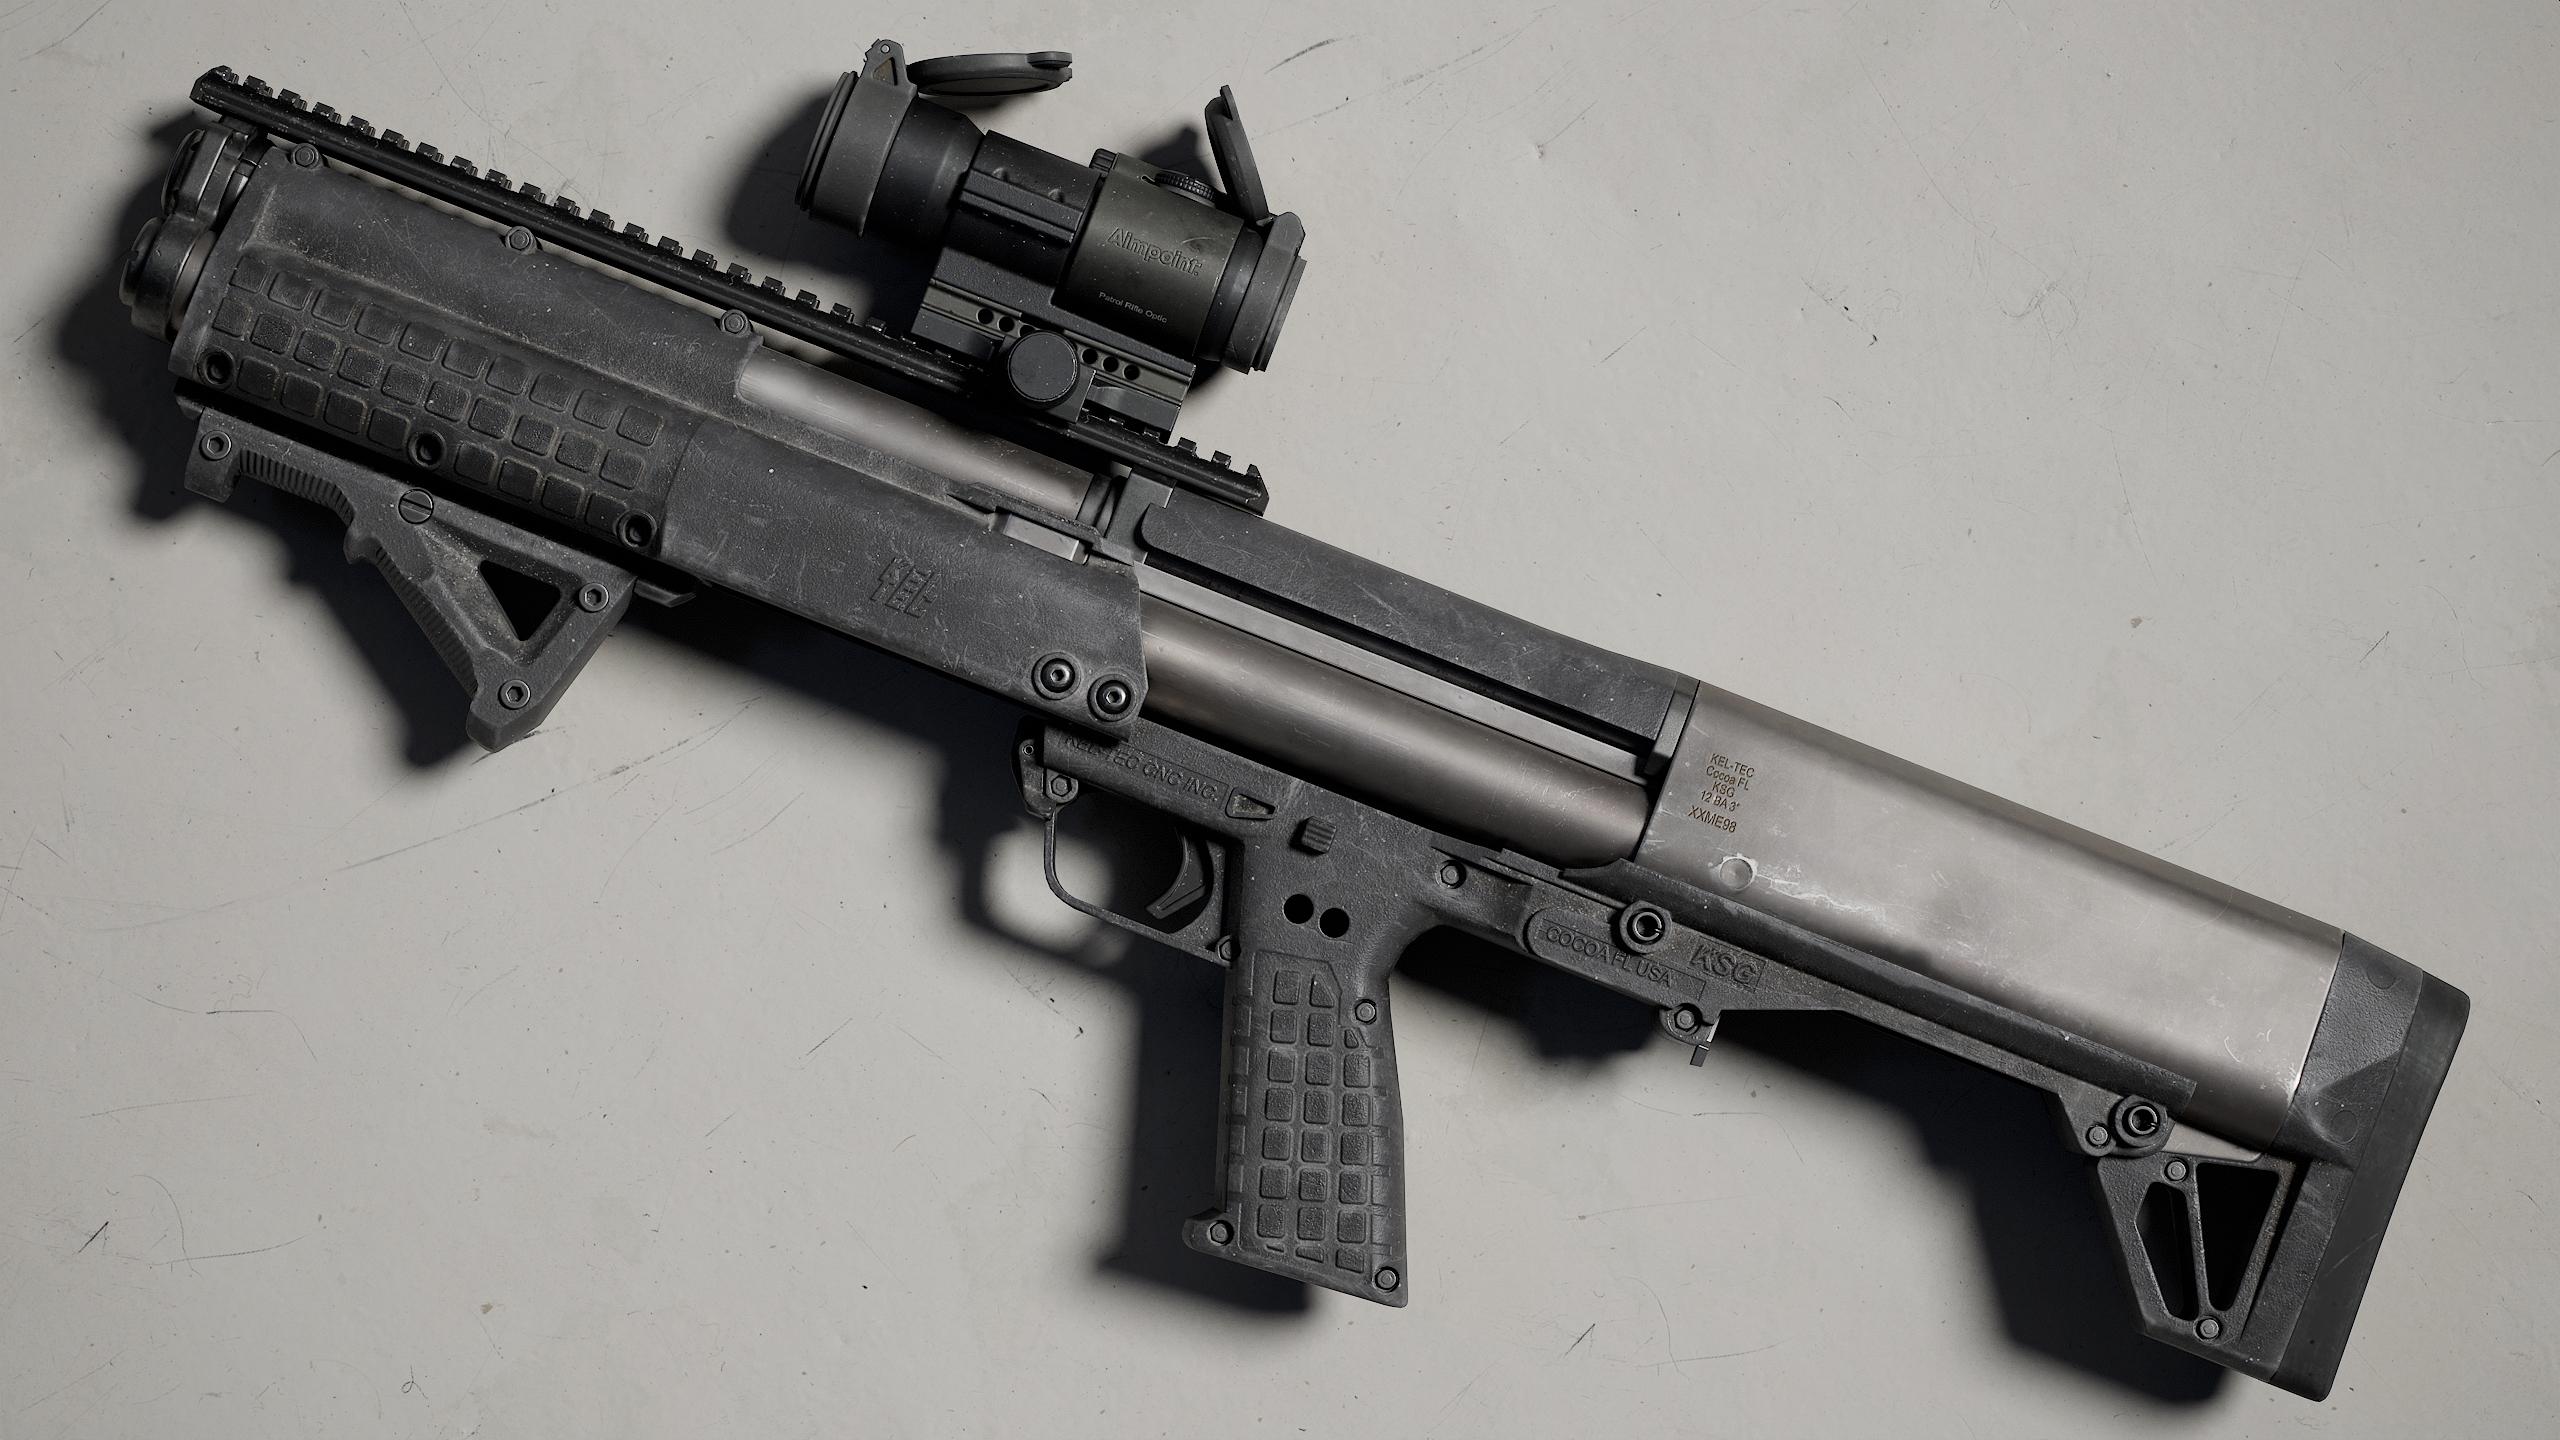
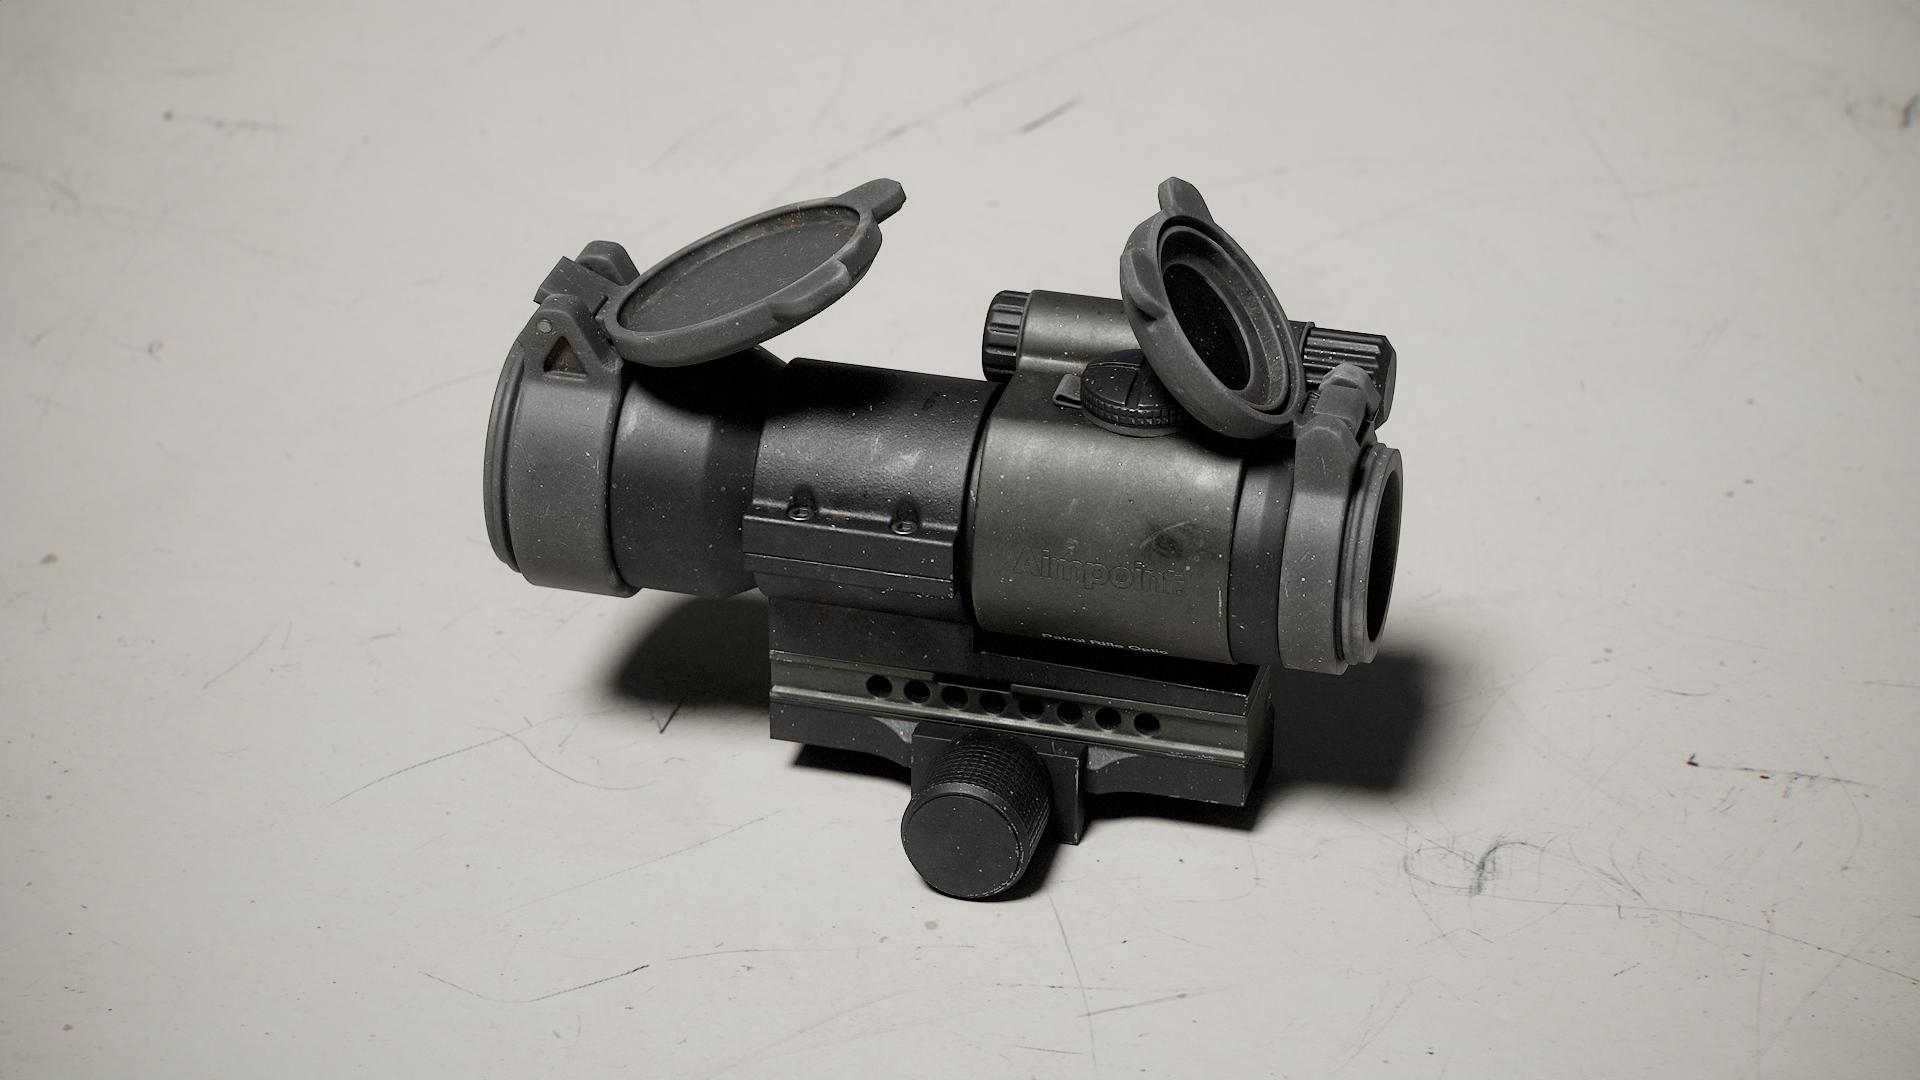
2. 00 Ref Gathering: Alright, so I just want to share a few resources where I
look for my references. Good places to find them. And I guess we can go here. Yes, I wrote four
different spots. So the first, you can
just look up the gun. Right on the website,
go Celtic KSG. And Celtek has a website, and you just it's simple. And this is a lot
of times you can get really high quality pristine looking
like spec beast. You can get measurements, too. Like, this would be a great
reference for modeling. Another, so gives you all the the specs, too,
measurements, whatnot. This is, you know, if you're modeling a gun
that is still for sale, you can't go wrong visiting
this, you know, like, the website for the gun
because it just gives you all the information you need clearly displays
the gun like this. And if you say you
want this exact, you want to save this exact if it doesn't let you do that, then you just go to Snipping
tool and then just do this. Then you can save it,
do whatever you want. So And then the next way
would be what would it be? Go to like an auction website. So I'm on gunbroker. Guns.com is good. So you just do Caltech, KSG for sale as if
you're going to buy one, gun broker is a popular one. And then a lot of these are
Airsoft, some are real. But. This is where you get a
lot of the texturing ones, like the good like,
if you look in here, you get all that
guck that you see, and this isn't
exactly what we made, but it's pretty close. Yeah, you get reference detail. You know, some of these, you can usually find some yeah, like, some nice clocks up here. Look really good. And, yeah. And then just straight up Google Images, is
a great one, too. Um, yeah, you can't
go wrong with this. Google images gives
you a big variety, and then the last one is
YouTube, so this guy. You just type in, blah, blah, blah, and then there you go. This is good because
the close ups are like, really ideal. Usually, stuff like this. Tons of close ups, always. All the angles, too. This guy usually this
guy's pretty good. Well, a lot of this stuff. Uh there's usually some
close ups here, yeah, okay. Like, some of these some of these you get some motion
blow when you pause it, but if he holds it still enough, like this is where the oils are, and it's been touched by
somebody a lot, you know? So you can really
get a good idea. First of all, like, proportions, he's holding it in an angle that people
don't really see a lot. And then, like, the texture
detail, the roughness, you can really see a lot of
where oil actually builds up in dirt and simple
stuff like that, like the seam line for this
plastic molding piece. A lot of people miss that. Just basic stuff like that. Yeah, like, this is amazing. This is just
awesome. Keep going. Yeah, so basically, that's that's where I
find most of this stuff. I'd say YouTube is one of the best four
texturing, actually. This is a pretty popular gun. Good pop yeah pop
culture, too, John Wick. Yeah, there's some close ups. It's overall YouTube
videos you K go wrong. Just kind of find out good one. The one with four has
better close ups, I think. Yeah, that's basically it. So that is that's basically how I find
my reference images. And, um, yeah, it's
pretty straightforward. Takes a little bit of time. The more time you put into it, probably the better your
result is gonna be. Yeah.
3. 01 Gathering Our References: So when it's time to
gather our references, we want to make sure
we have a good amount. We want to get them from various places, gun auction sites. You can get them from Ebay. You can get them from
the company website. That's where you get the good orthographic
guys like this. You can model from those ones. Yeah, and you want
to make sure you can you get a good variation. So this is a good
one, in my opinion, for texturing, shows
good roughness. It shows good angles of the gun. It's also good for
modeling, to be honest. Yeah, so in most cases, the
more you have, the better, trying to make sure that it's the exact gun is pretty important for
modeling, obviously. But for texturing, it doesn't
matter quite as much. So if you have a
variation of the weapon or if you have a gun that is
made of the same material, but the texture, the
look of the texture, the quality of the image
is so good, it's worth it. You use that
instead, definitely. But yeah, it's pretty
straightforward. We just got a couple
of images here, good refs, great
material breakup here. We can get a lot of
information from these images when it comes to how sharp we want
our edges to be, you know, where we
want specific details to be in certain areas. Yeah, super helpful to have
a good reference in general. Totally worth it to put in
that extra, you know, 1 hour, 2 hours of really
looking hard to try to find good references. A.
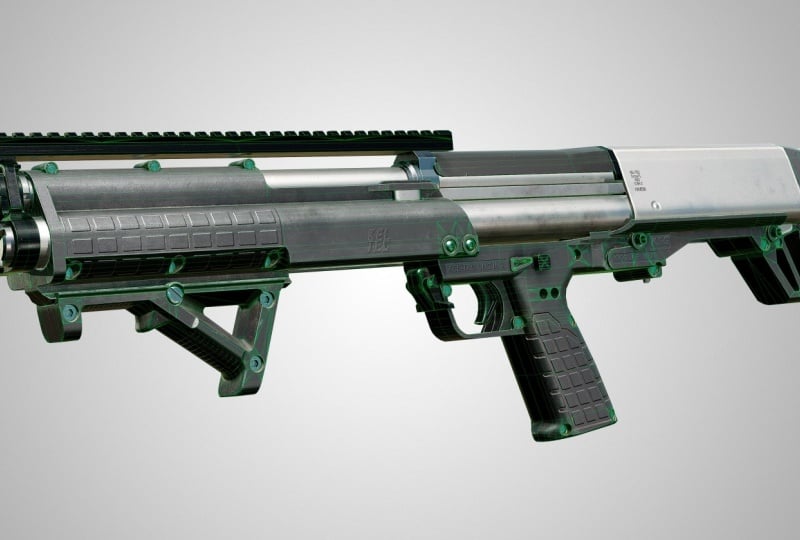
4. 02 Creating Our Blockout Part1: Once we're satisfied
with our references, we're going to go ahead
and move on from that. So the next thing we're gonna
do is start our blockout. Let's start with? This guy. So we just want to
block this stuff out. I'm gonna pick a piece. Pick a piece that we should
get the scale down, too. That's This will be pretty
awful blocking out pieces, so we don't have to model, you know,
like, the whole thing. This we don't need this
part. Never gonna see it. It'll just be hitting in
the gun the whole time, so whatever we see,
we should model. Seems like a good
one to start with. Easy to outline. Okay. Start with that one. To
start here, actually. Okay. You know, we should get
the scale down first. Rookie move. So I get the guy, this guy here. That
looks right, right? About to scale. Our guy. Okay, for real, though. We got that, and then if
we go to dimensions here, Like, overall, like, 261 inches. Yes, I'm an inch person, dear. O here in America. Sorry if you hurt
that inches okay. 261. Just make a fake 261. Kasi. That's for these photos. The wrap photos? What six. I want to be able to see
to them a little bit, so I can see the mesh, at least. Okay. It's okay if it gets messed up. Something like this. Not gonna be an
exact match ever, but do the best you can. That's actually
good there. Okay. We'll just start with this side. For some reason, I struggle to figure out which
side it's on. I don't know why. So right
side we should be seeing? So it's not the side left side. Okay. Got it. So, got our skill.
It's this long. And then, if you know that you can get the dimension
correct from there. Okay, so I'm just gonna
keep this nowhere. Okay. I guess we can
just start going. Let's get this piece going here. Yeah, it's kind of confusing
from here, isn't it? It's not an issue. So just around. I was like there. Pretty pretty simple stuff here. We're just outlining it. Giving an outline. It's
pretty rough at this point. Not much is going down.
Just outlining it. We're not gonna make
the whole piece, but, uh, you know, we're gonna
make as much as we can. As much as we should. We
don't want to get too far in the weeds or else if we
got to make a change, good chance I'm gonna
mess something up here. We'll have to fix
it, and that's it. So that's that. Basically, just get
this outlined down. It doesn't have to be perfect. You can copy exactly
what I'm doing. There's a bunch of
different ways to do this, though. Right. It could be kind of
peaceful, to be honest, but, uh, it's super rough. Even to the point where I don't know about other software. I'm sure other software
have this, too, but it's like this knife tool. It's super helpful,
especially for this kind of, like, a rough blockout. You can literally just
carve out what you want. It's pretty nice, actually. Pretty nice. I'll just delete
the excess here, and then we can move
on to the next part. Pretty simple. This part here. Yep. But yeah. Man, I used to do
tutorials all the time. I still do. It's just
the best thing to do. If you don't know something and you don't have a friend
that's gonna teach you, you know, get a mentor or
buy a tutorial, honestly. Such an easy way to
learn something. Can be kind of painful.
Some tutorials I've done. You know, they teach
you what you want. They teach you they
accomplish the goal, but, you know, by the end of it, you're about to claw your
eyes out. It can be tough. Nothing on the person, either. I mean, sometimes the matter at hand is just
boring. That's all. I can just be boring.
So we're at the point where you can start delete some stuff. Just
getting the outline. Like I said, get the outline. You know, this is not this ref
isn't a perfect, you know, orthographic ref either, so it's pretty much impossible to get everything
perfect, you know? But, uh we can do our best
here with what we got. From there. I don't know
why I did that, but Okay. Actually, yeah. Yep. Just get the outline. That's if you want to fast forward to
this, go, go for it. We're just chilling. This part is pretty modeling in
general can take some time. Just takes a bit of time.
That's all. It's worth it. Can be a fun thing.
This line here. What that line?
Move this guy up. Take up too much space.
Keep that level. Try, at least. Okay.
I don't know what this turned into. Okay. Yeah, so this turned
into this, so, I mean, one thing we can do
pretty easy is just, just delete this, get
this out of here. Yep. As long as we have this outline, it
doesn't really matter. You can get it back pretty easy. Bring us to I think I
lost some stuff here. Sorry about that. We're just. I was just looking here. When in doubt, use this knife tool. Changes lives. Oh my dear. Okay. Use the knife tool. When in doubt. Use
the knife tool. Trying to straighten all
this stuff out so we can keep our mesh nice. Now, we're making a nice
simple blockout here. But our blockout at the end, we're gonna run
through everything, make it some rough
detail like this, everything we're going
to do that with. But before we move on to the low poly or the
high poly or anything, we're going to make
this pretty detailed. Not to the point where it's
done, but pretty detailed. Like a mid poly,
you could call it. Call it mid Polly. Call it a mid. Okay. So before we get
too in depth here, let's let's actually
delete that. You can delete this, right? Okay. Extrude it. Recalculate L Just extrude it. It's a little off center now, so just I'm gonna place
the origin my points here. Just bring it back. Kind
of offset it a bit, but just realign it pretty easy. Okay. Just realign that. Push this in. Gonna
get this here. P like that. This guy. Bring him in, push him forward. Try to keep this straight. Don't let that rough
thought fool you. Okay. Okay. This would be a pretty important
point. Nice curb here. Yeah, this gun's pretty cool. John Wick used it. Some cool YouTube videos on it I watched. I actually didn't really
know how it worked, to be honest when
I first decided I wanted to try to make it. But it's pretty cool.
Loads shells and, like, has two barrels. As two barrels. Things kind of bad ***. Yeah, like, they're
both they load into like you load Ammo into year from the bottom
somewhere. Yes. See, there's like two
spots. You can load it. They each hold
like seven rounds, I think, according to
the chart, the specs. This is from the
website. Yeah, the MG capacity seven plus
seven. It's pretty cool. It's apparently, it's a pretty
small shotgun in general. Never seen it in real life, but Let's brought I'll
be funky, okay? Just our general blockout here. Yep. I kind of want critter. Probably could just
delete this, huh? Brick dear. Just line it up. Nothing crazy. No
details, crazy yet. Don't even need this yet. We're just making
making the silhouette. So don't need this yet. Just the silhouette.
Far as With goes, With making sure it's not too wide. He is important.
5. 03 Creating Our Blockout Part2: Nick Next piece. Let's go for Let's
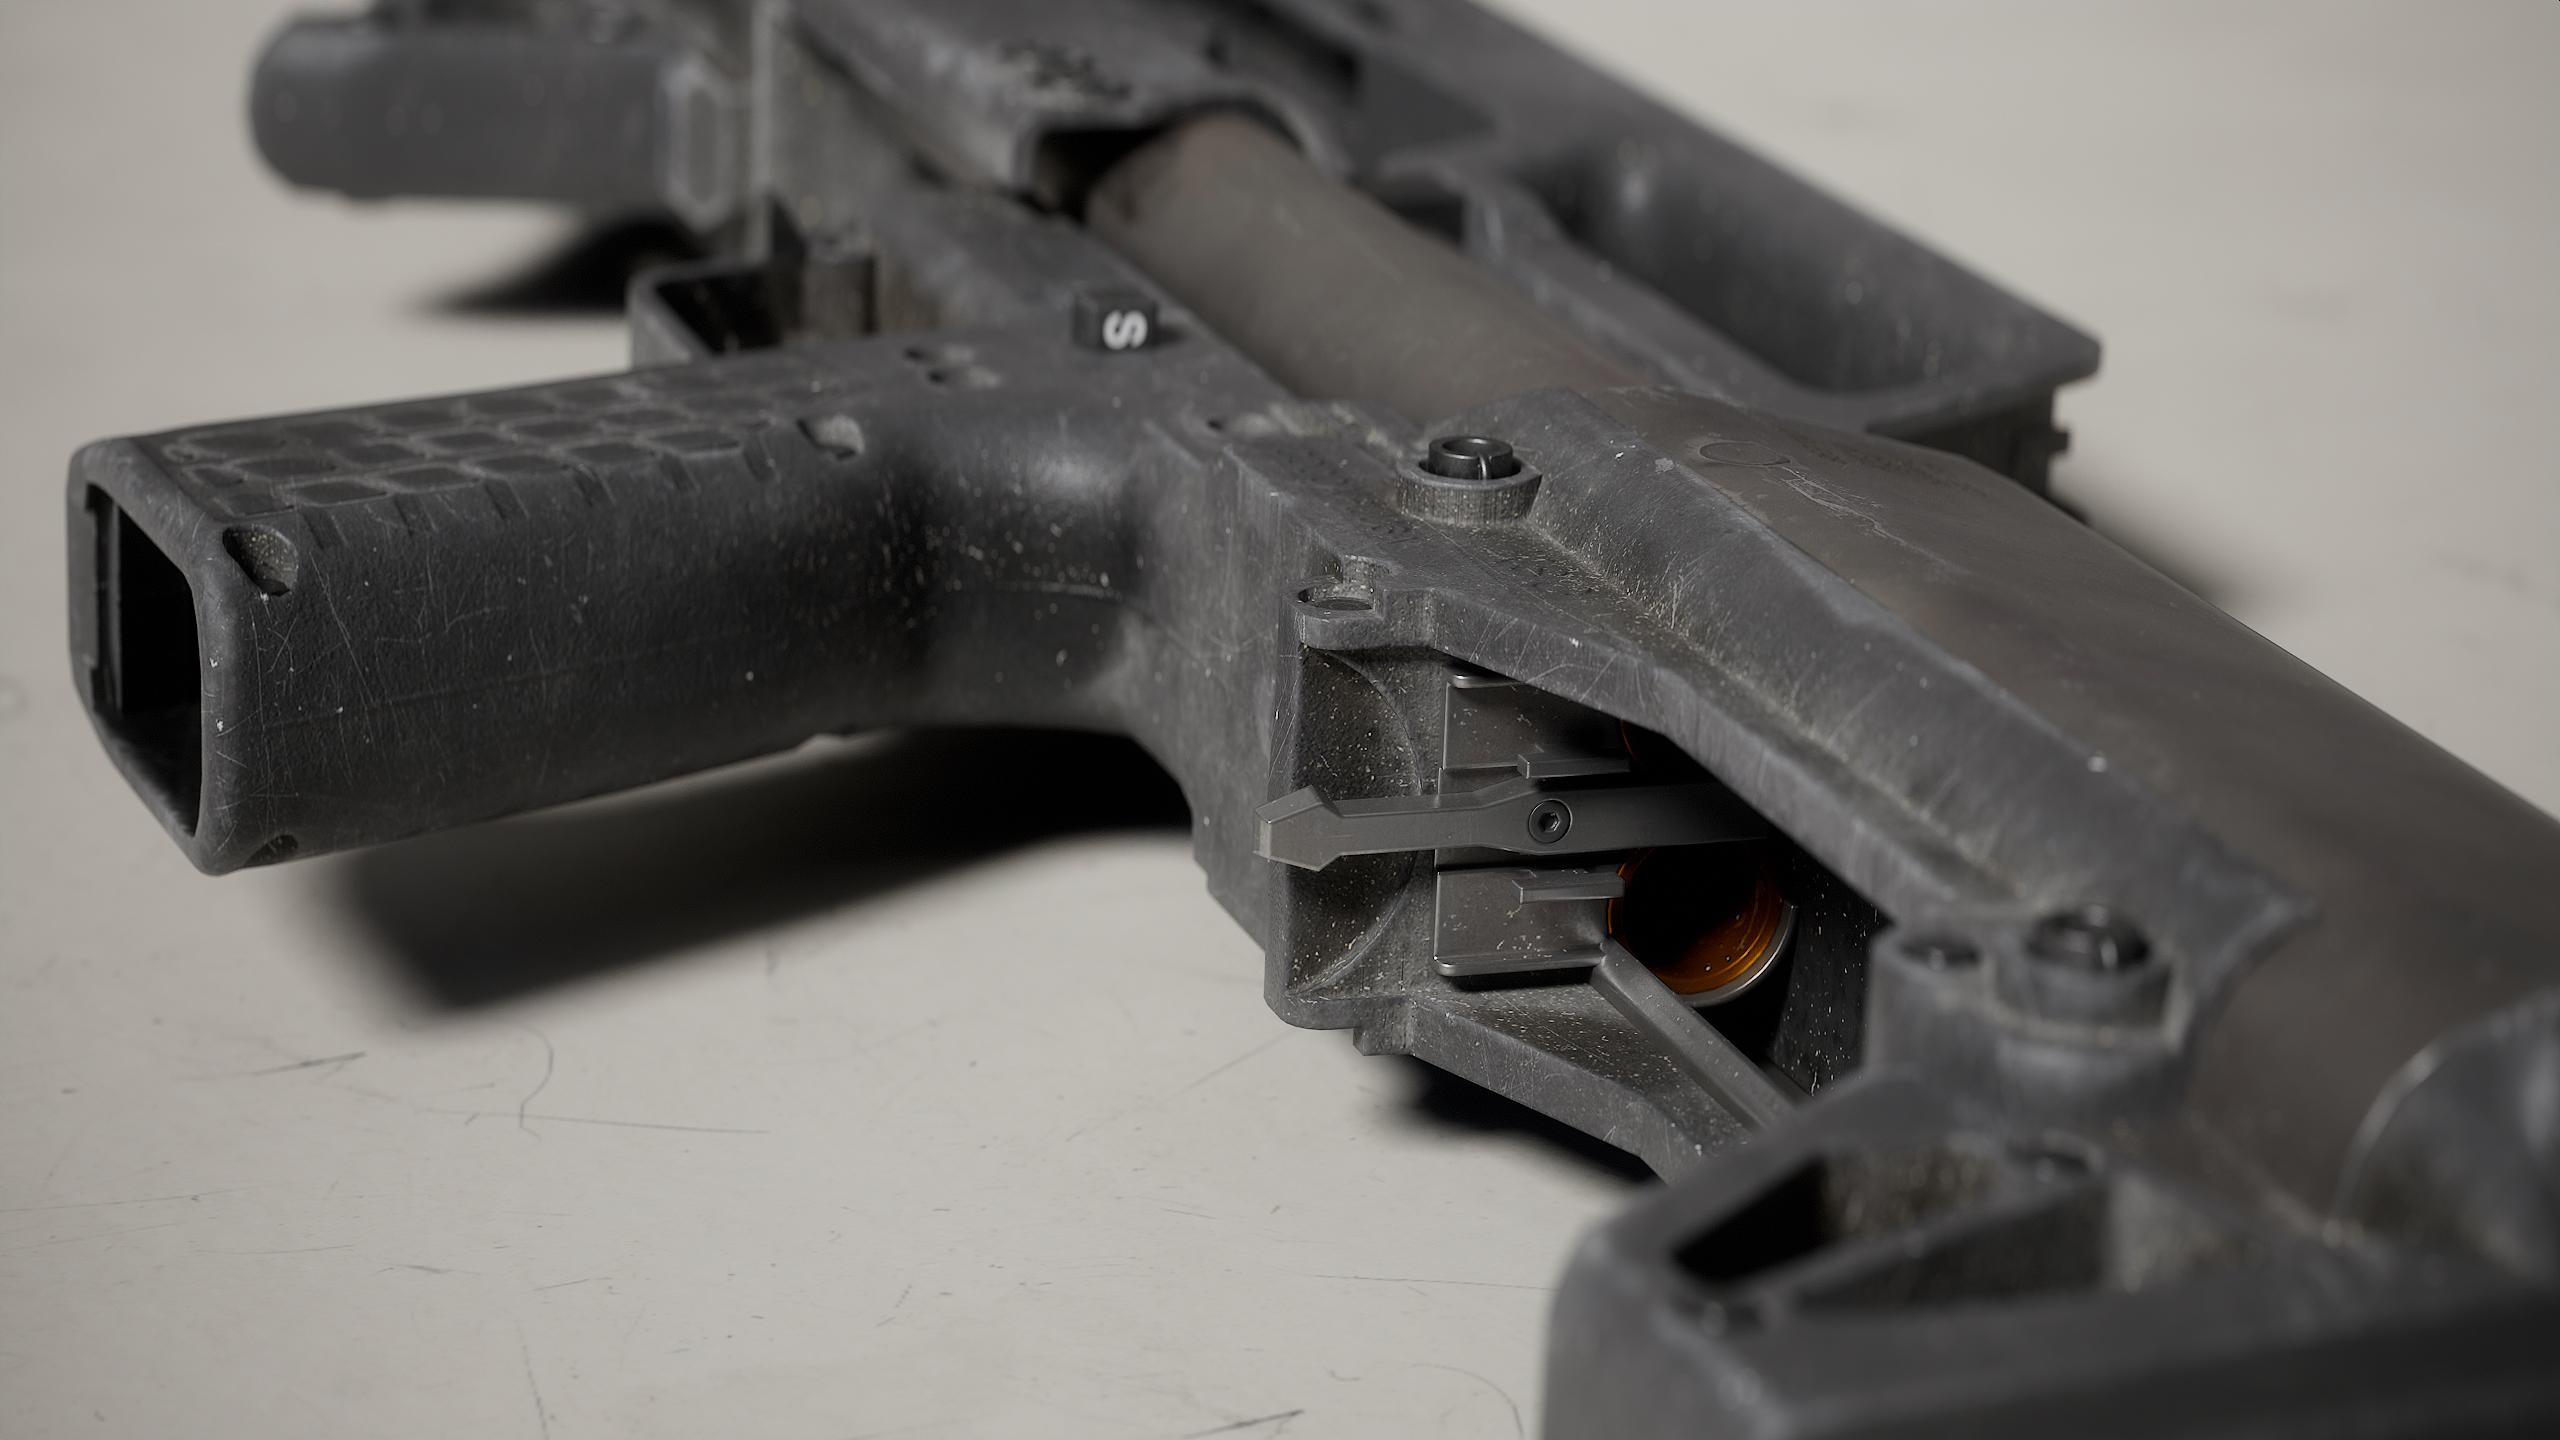
go for this thing. This barrel. It's not
it's not the barrel. It's like the Wait is this? It's like the
breech. This is two. It's the loading. This thing. To barrels going into this guy. You can see it from
here. Nice piece there. So owed it up there. This piece looks like it's
kind of like a sharp. This corner here,
goes straight there, so got to keep watch for
that. This piece here. So we'll terminate it right here for now and then after,
we'll add that little thing. But this is one of those, uh pieces where we don't want
we don't want all this. No, that's Unless we'll
be able to see it. At any point, we got to test it, but good chance
we won't need it. I can unbear this. Okay. Yeah. No thing we could do here. You should. You know, nothing. Doesn't have to be. Oops, is to. What is this sort the
freak? We want a cylinder. We're just gonna try to line up this just make it a bit easier
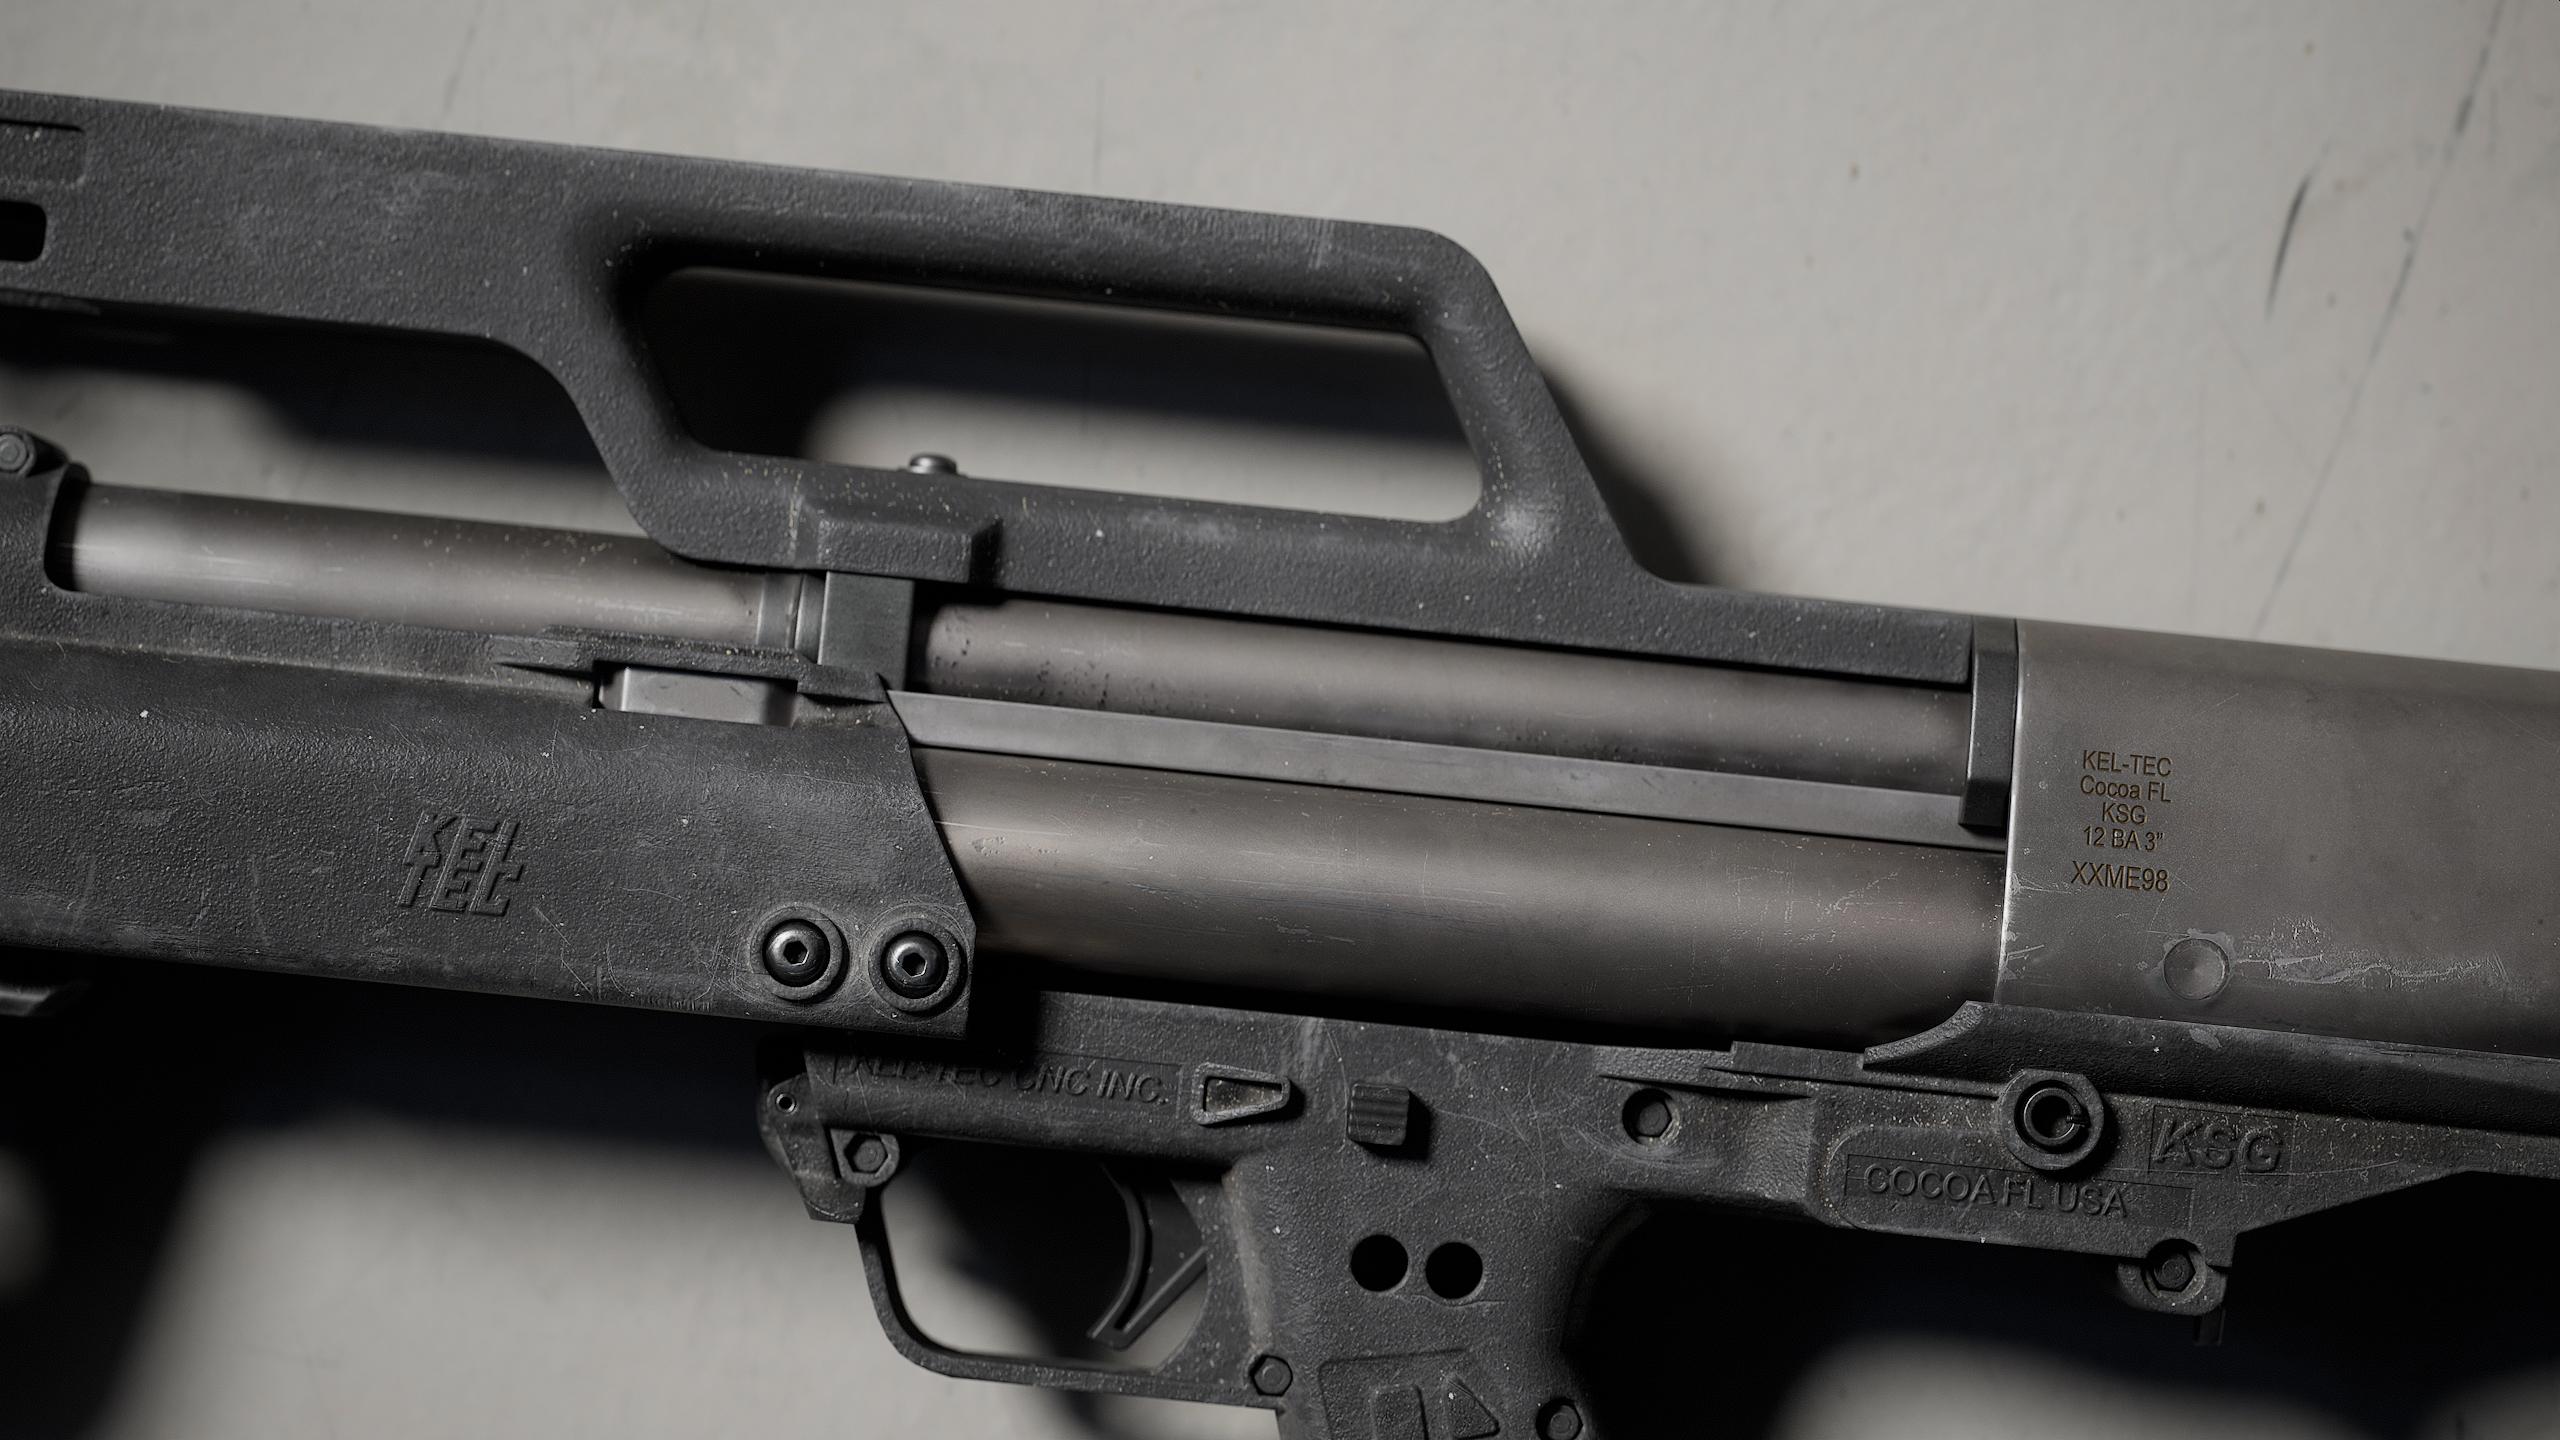
to make it, to be honest. Yep. Knowing the shotgun measurement
before this gets decided. We're just blocking
it in there for now, so I'll get back, but then measurement,
and then we can be on our way with the
whole thing, so well. Dear. We're just trying to, uh, get that nice curve in here. Got a nice curve. That's off. Yep. Well, this is
gonna be interesting, well, yeah, so it's
kind of hard to tell. You know, there's no there's
no image of a straight on. Uh, how do you say? Like, this is a
pretty good angle. You can see it's
pretty circular. But I'm talking about
the angle here. So, something like this, it's kind of tough sometimes to realize how steep we're going.
This looks pretty good. But you know, it
looks okay, actually. It looks pretty good,
but it's one of those things maybe you got
to eyeball a little bit. But, yeah, I think we
locked out good guess. Good guess, but there's always iterations that you'll
probably have to tweak, which is why the blockout
is so important, you know? These aren't exact. I want to but once I get
the dimensions of that. So shock and hills are two. What do we got here? Okay. 12 gauge, three
inch meg capacity, two, three quarter inch shells. Okay. So let's just try to get this
organized a little bit. Get this guy in here, too. We're just gonna move
him into reef's Refs. This is the left side here, so I just left side, and then Right side. You can hide again. And then make another one, get somewhere. So Celtech KSG. Throw it all in here
for now. Might get a little bit more specific
as we get further in, but yeah, as you can see,
yeah, way off here, right. Which means this
probably off, as well. I'm gonna delete
this whole thing. Now it's a lie, but
it just goes to show. It's really easy
to make mistakes, so something like this. Okay. A little bit closer. So our way around this is we just delete a
couple edges and then redo it. Okay, so. See how close these ares. They look really they look snug, so they look,
they'll from there. And there's dog,
though. They look they look pretty much hugging, so just get as much close
as you can realistically. Okay. Okay. This doesn't look great still. A Looks a little wide. Top looks a little
wide, doesn't it? This is something we can do. Looks a little bit. For sure. Definitely. Just looking at this here, so if we go back to, uh This one's been
pretty helpful. Yeah, it's open.
It's not a block. It's just a Open. That's right now.
Don't let that. That's good enough
for a blockout. No, as long as these tubes
going on just far enough. Here. You know, he'll a bree
all the way back here. You're never gonna see.
Keep it like that. These guys, uh This
slide goes back, so this slide moves
on this rail here. Goes up and down to here. Yep, so I don't think we need
6. 04 Creating Our Blockout Part3: Just for now, keep
it like that. Okay. Et's get this one.
Just what we can see. Let's get here. Keep
that right there. Oh cute. Could be
useful to just do this. From here. Duplicate it.
Make it its own thing. Okay. Looks like right off the gun. It's got a slant
throups, doesn't it? So if we go right,
looks angled, as well. I can see these
they go right in. Kind of a weird piece, huh? So let's focus on modeling
this thing as a whole. And then afterwards,
we can slice this out. Or let's just see
how it goes here. This whole thing. We want to get this,
this follow this line. All the way. Okay. So this
guy to here got that. And then from there, Okay. It looks like we
have this bend here. I've covered that.
This is not an issue. This is a quick booling. I've extruded down here. It looks like there's a little
curve at the end there. It's well, but we can
save that for the end. And it looks like after
this, this piece here. There's a bit of
a gap after that. We're gonna just go down here. To there line that
up pretty well. Go to here. Go with this piece. Then, uh Yeah. The pick. Disconnecting this
stuff. Disconnecting. Okay. Yep. So this might be worth a uh we
return to this for a second. B to the piece of
it disconnected. Looks like this hole exists. So I'm gonna guess this is
attached to it, right here. Well, the goal is to
make this accessible. We them there. Bring it down.
We're gonna bring it down. Okay. Write that one down. Doesn't line up
quite yet, but, uh, you know, we have this
detail established, and that's the most
important part because it means we
won't forget about it. Okay. So just getting the
blockout, the blockout. That's all we're folks. No. This blockout. So that slant just
covered that slant pretty well. Where's the other one? I got to organize these
roughs here, okay? This is the guy I'm using. I don't have as much as I think, but they I keep losing the good ones. This
is a pretty good one. Here it is. Okay. For blockout purposes,
looks pretty good. This curve has to
be established, but I'm gonna wait. Hey, might not even be a
need to wait at this point. I mean, it might be
more efficient if I, uh that booling will go a lot better if
I do this, I think. We're just gonna separate this. Okay. Get that guy covered. Okay. Just get this based
out, get the base out. The basicect of the basics. So, this needs to be
straightened out. It kind of actually formed
into a circle, as well. So one thing that might
be worthwhile is to, uh, Just try to
reshape this a bit. Okay, so it looks round there. Basically, you could
start with a circle. You could probably
bubble this, as well. That's 'cause it doesn't all
look like a perfect circle. And this liz looks
like more like a square bubble than a circle. So I got some lines there, there, and it goes up. And this plastic piece
meets perfectly with that. So that's our we just want
to get the form down, so we should try to. It looks like this may maybe something that goes against Dear Yeah, well brand delete this for sec. Okay. This looks a bit wide,
still, doesn't it? This you look at this, it looks almost like this
doesn't look like a circle yet, so I think we could
do here is, uh I'm just trying to
find a almost like a template I can use
to line this up. You know, there's a chance to these barrels sizing
is pretty good still. Kind of wanted to just meet
these this stuff here. It actually looks like this. Me like and like this. Kind of. Yeah, it almost has
that edge to it, so it's I would say this is slightly more fitting
to what the shape is. It's not a circle.
That's what I do know. But we want it to eke
closer and closer. Want to keep this even. This surface needs to stay even. But we want it to be bit more towards the, uh, circle side of things. Okay, that's almost to the
point where it's in the right. It's in the right
direction, that's for sure. We're in the right direction. This roof looks a
little bit whiter, but maybe just a hair, a hair. Just a hair. Wir. Okay. So this part cuts off to
line up perfectly with this. No, theoretically, we
do something like this. We do not want h going back to this really making sure we get
this circle down. The more circle
than it isn't, so. Okay. This booling part, basically, we want to get a nice. We can mirror this, too. So it's just we need one good one. We just need one good one, huh? And. It's out? This is mirrored already, so I got this It's
called Bool Tool. It's just you can get it here, go to add ons. I think it comes with
blender. I don't know. It's pretty good,
though. I recommend it. It's easy. Become, like, a part of my tool set. I have a huge tool set,
but it's pretty good. The reason this happened
is because this so let's just get
all this covered. Let's see. Good part about this, you know, you can kind of just
move it however you want. Move it up, B down. It's good. It's good. So, it's kind of
not This is not it, but we're you know, I this could just be kind of like a temporary
reference here. S. Yeah, we just wanted to line up. We just wanted to line up, and, uh, that's it. Don't cause any trouble. If you look here, it's
a bit easier to see. He. Looks way off. E. Close, closer,
closer, at least. We're getting there. We're getting there,
that's for sure. Eh, closest. Woo it away, rotate it in. Close. Close, but looks like. We got the line up here.
This line? Pretty good. Pretty close close
enough, I'd say. Got the curve starts
at the same time. I think we need a little bit
more of an angle, though. Push it in on the Z. This is my peak here
on the boolean. That's pretty damn
close. And then here. We need a little bit more here. Something like that. Yeah, that's looking
solid. I'm liking that. So look at solid so
far. Looking solid. Is piece here. So, since
we're making a mid poly here. We do We want to make sure that we
have enough geometry here to ther take this get
this to the hypol stage, get the details union. But we're still in the blockout, so I'm gonna just leave
this here for our sick. We're gonna continue on
our blockout journey. And, uh, yeah. So there's always something. This Okay. Let's let you see
things about that. All right. It's parked. You can see that it's, you know, it's not a per it's not
even a bebble here. It's more like a something like like there's
a gap, you know? That's what it feels
like. Like, for example, when I make the hi poly, I'm gonna do
something like this. You know, something
like it's got that kind of framework to it. But this you can achieve
that with what we have now. So Okay, so that shape is done. Um, looking good so far. Looking good so far. This actually has a bit
of a curb down, as well, so and it goes a bit
farther than we think. You can see this this
goes way up here, so this can stay down here. This part should be able
to go up just a bit. So, it can be a bit, uh, we're gonna we want to
move this guy as well, so move this guy. Just trying to make this easier. Tai visualize it when you have both sides going
in at the same time? No. Just a simple simple
thing we make. Okay. Got that. This type thing. I want to match this, no. Yeah, only on you look here. Only this part has that slat. This part, you can see here. It's flat. This part's flat. Like, I'm talking, like,
scaled on the Y to zero flat. Like that. If we go back to
our skewed, call it some. We can establish that. Okay, so established that
that is gonna be there. That this is going to remain
flat. And this is yacht. So this stays how it is because we got this
lined up well with this, this and this lined up good. But then this part, kind
of rides up along here, rides up right along there to about, you know,
I'd say here. It's kind of it's like this
type of thing going on. Maybe not quite that severe. But yeah, like, it's it's definitely doing
something here. Maybe around there.
Around there. Not exactly, but Whoops. Something like that. It just gives it that look
that direct look look at. Yeah, and then you just kind
of connect those averts. Nice. Good. Oops. This bad boy opened up
again. I don't know why. I do know why 'cause I
just did that, obviously. Yeah, it's okay after it's
a hole. It's all good. I might need to go one step more up, actually. Yeah, it looks like
it's if you can see, it's kind of like meeting
at the corner here. You just got to takes me a
while sometimes to realize. But, yeah, I just break out the knife to
kind of add line. Get rid of this. Yeah,
this guy that guy. Yeah. Same type of
thing we're doing. Connecting these. Okay. No, I can do this, can I? Nice. Ct this little. So it looks more straight like that. Like that. Yep. But this
part, it blends in. It's very curved, but actually looks like yeah looks like it
lines up pretty well. One thing we could do is
just Dad back off a Ted. To go at T. Just looks good. Still looks pretty good.
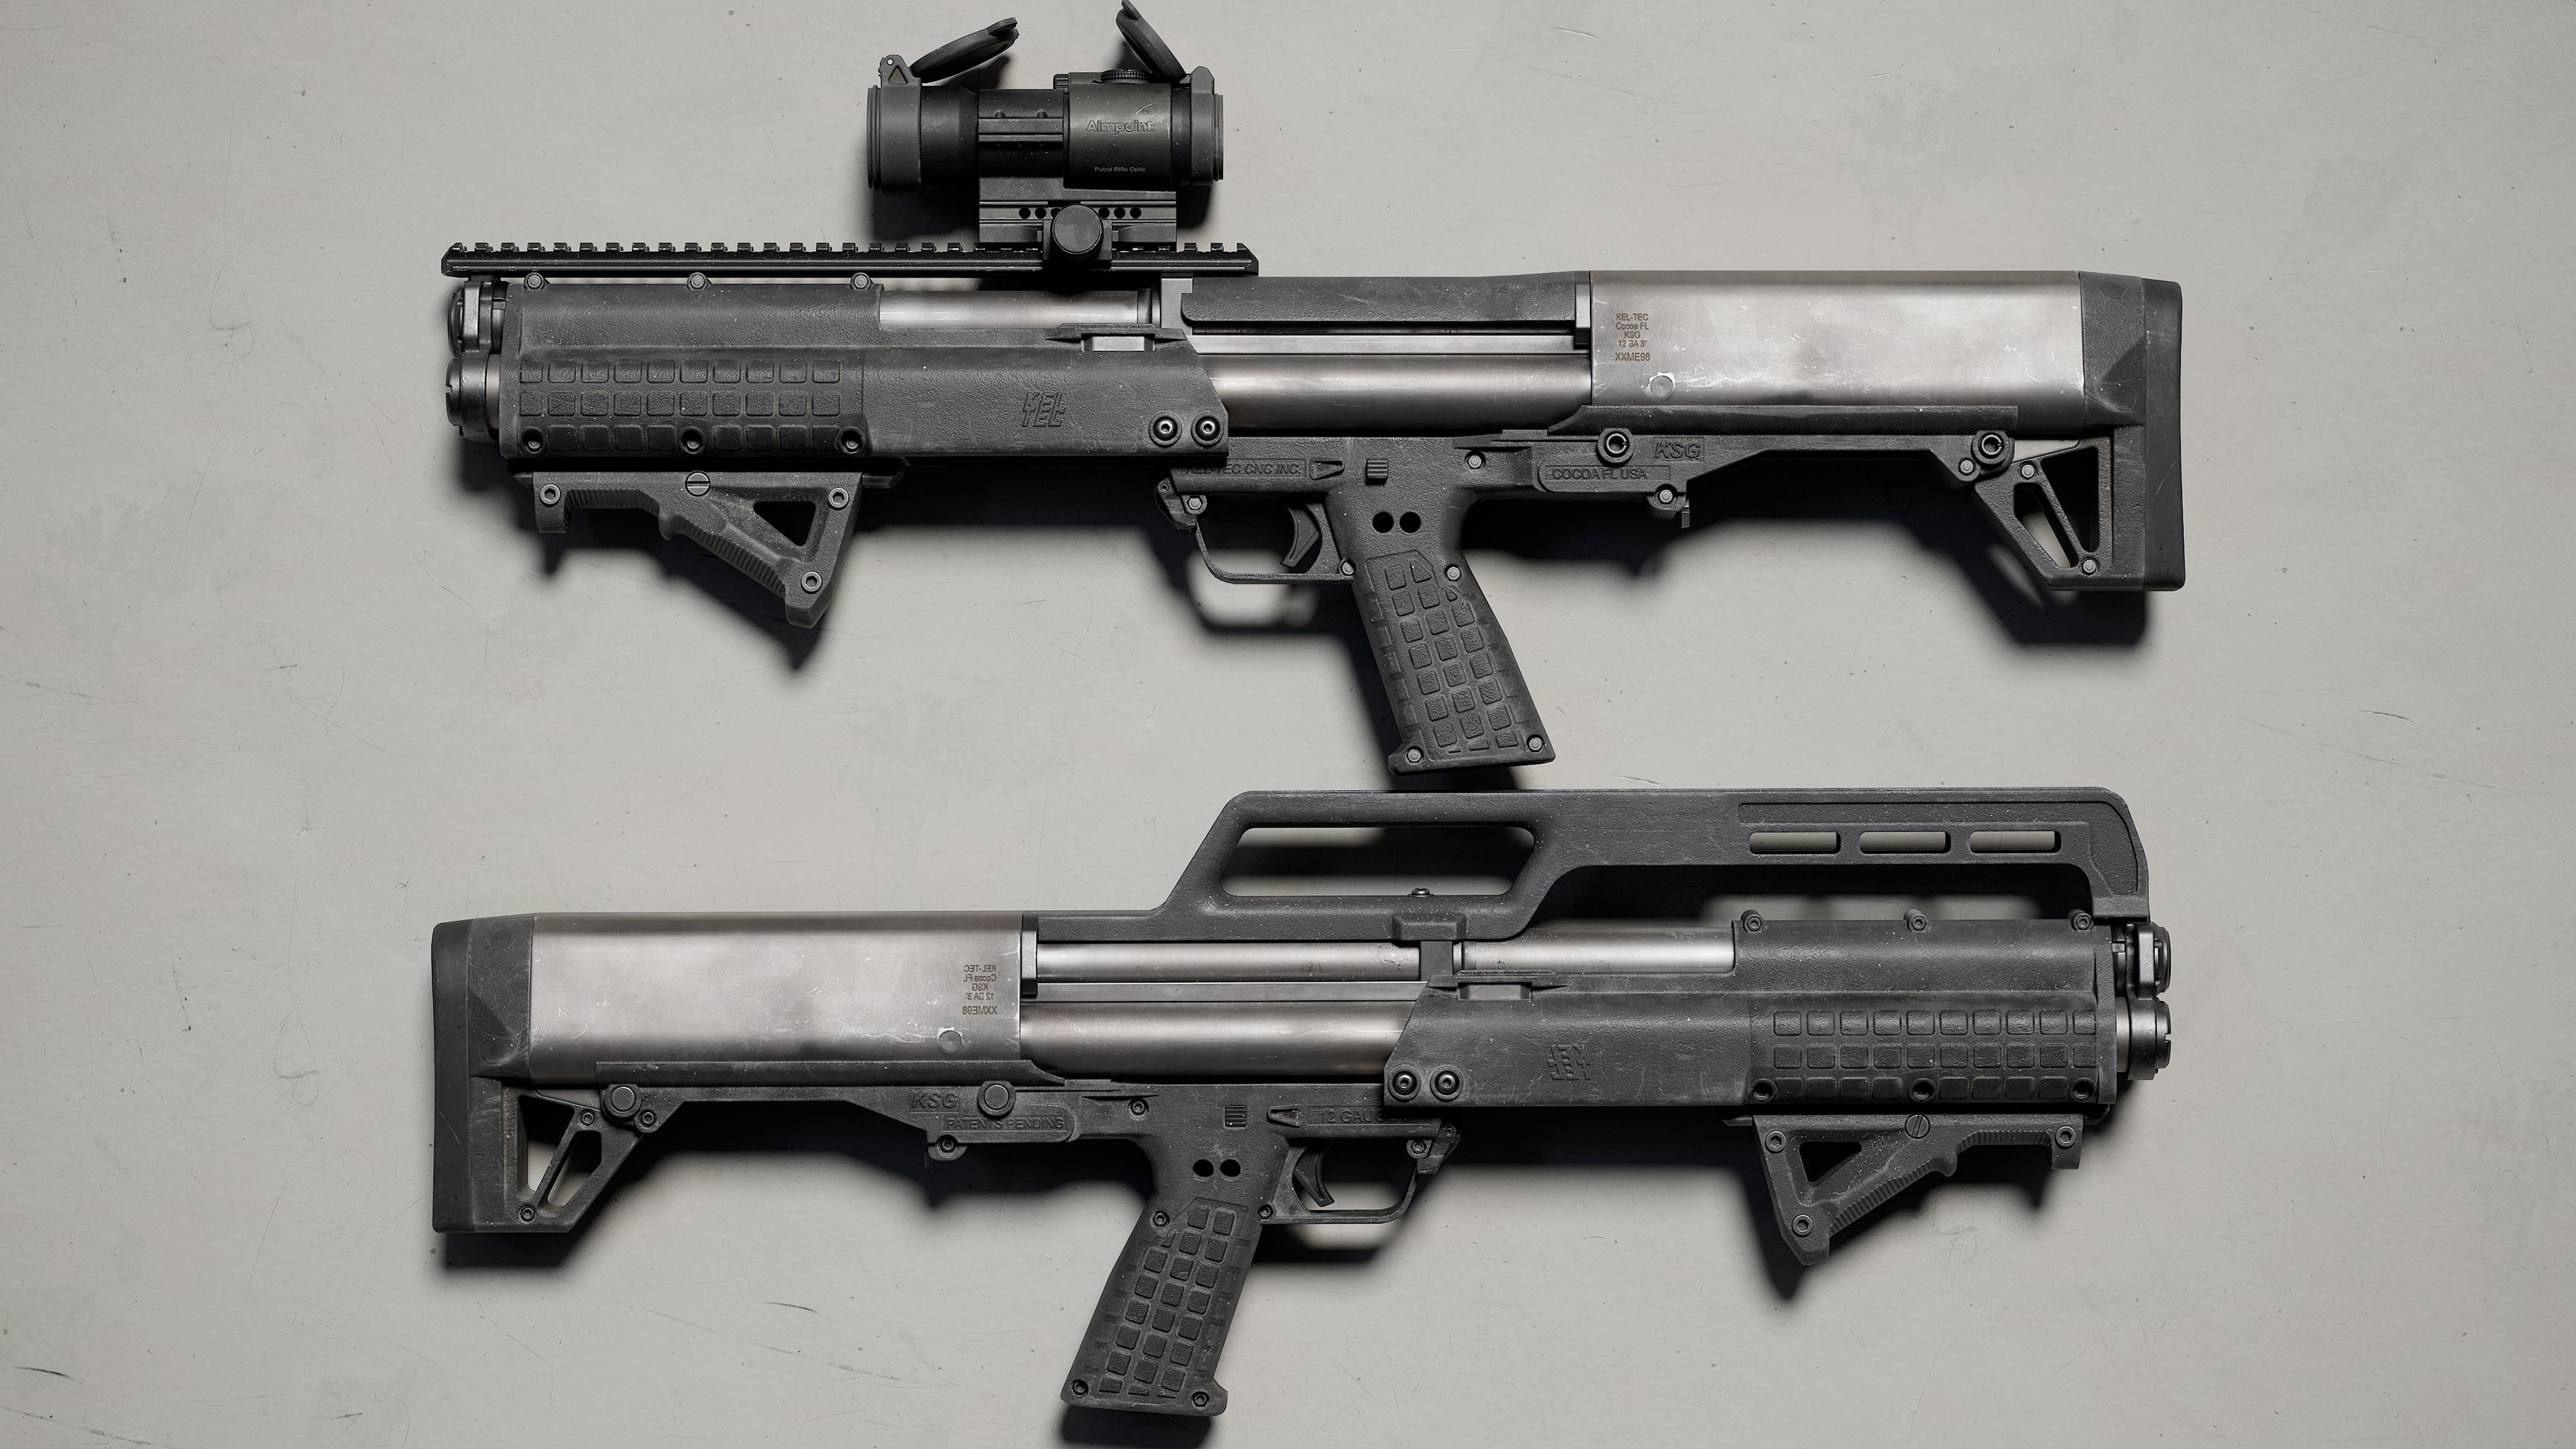
7. 05 Creating Our Blockout Part4: Okay. So I've gone ahead, I've imported a reference for the shell that
this gun uses. It's just the length, so two and three quarter inches. I know I'm a classic American uses the
imperial system still. I know. Just as a reference, we're gonna use
these, so shell if. We can call that Shell if, whatever. Put it in here. And it's just to help
with your adjustments. You know, when you're trying to find it
looks good enough. It looks like it makes sense. It's believable. Um, yeah,
it looks pretty good. And this is gonna be
especially useful when we go to, uh, you know, loaded in and whatnot to Yeah. Can leave that here from now. Ride you. Hey. The whole point of this gun the whole concept
is pretty cool, actually. Pretty cool. Something like that.
You load them in? Ready to go. Nice.
8. 06 Creating Our Blockout Part5: All right. So the
bullets are good. For now, and then next
piece we should go for to lay the barrel on. Let's get this gout. Yeah. Okay. Back to the middle, bring up. Yeah, a All right. You can see it kind of gets a little bit more complex
than maybe a normal barrel. No simple, super simple. But this part is the it's
the part you slide back. And it rotates on her it
slides on this barrel. Hope for a video of
it till we're out. Okay, so good. To that. It's okay. Is there
a way to speed this. Let you really
look at this here. He shoots it, bull. So this whole unit, this guy. That unit is moving. Just this bot's moving. Okay. So as far as
lining this up. I'm gonna use the top of this
guy as a reference here. We eventually want to, uh, add a solidify, kind of, like, kind of like this. This is how we're we're
gonna handle it this way. So I guess we could
just keep have that. Come on. The thickness. So it's about that. In that vicinity, I'd
say, right around there. It's a game, so a little
bit thicker is not gonna make it look much
worse, necessarily. But we're not gonna
apply that yet because the the shape of it says you can see it is not perfectly rare. So it's actually more kind of
it's got some angle to it. I guess we could
tackle that right now. So I'm gonna push this out. And then let's see
if this will work. What happened to weakness? Yeah, something like this. Just kind of pushed
the node a little bit. Something like that is
what we're looking to get. Just where it's flat on the
top here, flat on the top. And then we got that angle
going down. And when we add. It's start showing
the best, actually. Okay, throw us a little
fit until it started. Yeah, that's kind of
what we're looking for. Okay. Nice. As for fitting this barrel into the right
spot, this is pretty good. There's a bit of a gap, yeah. There's a bit of a gap. Kind
of like what we got now. I'd say it's in that vicinity. C. Got that gap.
The rail, as well. Then this piece, too, we
should be making soon. But let's go, yeah, let's
go with this guy right now. Just continue this blockout. What shape's the best here? What do we think? Probably
go to square off the bat. Might have to push a circle
in here at some point. Let's start with a Wonder if
there's a different angle. Yeah, sometimes,
honestly, sometimes too many regs can mess with you. Sometimes. I'm just looking for a
y right, right, Jim. This one's pretty good. Angles kind of works
out. Tiny better. Tiny bit better with angle. One's pretty good,
though. Yeah, we'll just we it go back
and forth, anyway. What's switch What's switch out. Both sides. Okay. I'm gonna do a similar thing to, uh, block this out. We're
just gonna trace it out. Goes up to here, rounds off here. Bring it all the way out. Can be kind of peaceful.
Just try to relax. You know, you know what to do. That shapes make itself. You just got to be
a little patient and it comes together
pretty nice. Looks like this rail's built in. Yeah, it looks like it's
like it's part of it. We're gonna leave it
out just for a second, just so we can get this
thing, uh, established. Looks like they have a rail on the rail with this
four grip thing. That's funny. We're gonna get the mirror
going, also, right away. Kind of helps with getting
the proportions correctly. Correct. Okay. That's okay. Let's start with this part.
This part right here. Quickly delete that. From er. Pretty nice guy in. The Yeah, so let's not worry
about this real quite yet. Let's
bring it up to here. Like that. Easy blackout. Next steps would
be, we want to get those isolate this guy. He's gonna be his own line. This can be a pretty
nice bullying, as well, so maybe that's that's
better for that. It's worth it to leave
that here for now, though. We want this line
to be unique here. Okay. I Looks like it rounds off here. It goes in pretty tight here, so it's pretty close to the
barrel here at this point. Pretty close to the
barrel. Under the rail. Okay. So, we're gonna take this here. We'll go with this
guy, too here. We're just gonna do this first. Just get this
extrusion established. Then we're gonna
select everything. This is easier. Just do this. Then we're gonna
bring it in, too. Bring them pretty tight. Yeah, something
kind of like this. Okay. Looks like this barrel is sitting a little
lower than we think. Just a bit. If we bring it down too far here. It's no good. Thickness
wise, pretty similar. Actually it looks a little
bit thinner, if you. 'Cause just the buckshots coming out of whatever the
slug or whatever it is. So it's a little thinner. It's funny. It doesn't
really look it. But. That's pretty cool. That's the extractor, I think. Well, that's sick. Yeah, so it looks
like this part here. This isn't This is just kind
of like the the muzzle. These just holds everything,
holds it all together. It looks like but it does the barrel itself does
look a little bit smaller, especially in this here. Not a ton, just,
like, a little bit. Uh, so for the sake of accepting that things are
not always perfect at games, let's let's just do what we can to try to make this work here. Not stress out too much over it. Can I actually bring
this up a little bit, or does look a
little little low, but Yeah, 'cause if
you see this part, right around this gap here, kind of lines up
at the bottom part here, bottom part of here. Yeah, it looks pretty close. Looks pretty close. Worst case scenario,
we make these kind of these barrels
line up correctly. Looks like in this gap here, we're gonna have this slide. Looks like a little
probably connects to the bolt somehow. I go here. I yeah, it looks a little
smaller, definitely. Yeah. What have we got
185? What is this? 185, sir. Yeah, the bulk
carrier. This moves the bolt. This is what the
carries the bolt, which carries the extractor. 172. Hard to find. Okay. How do? This thing takes the shell,
pulls the shell out of it. Right there. This guy. Okay. Anyways, Raise this up a bit. I'm just trying to get
the proportions down to an acceptable to an acceptable level before I move on 'cause
it can really get messy if you neglect
that at the start. This looks a little off. Yeah, it looks just a little higher. So a
little bit higher. Just a little bit.
Something like that. Yep, but we're
gonna have to raise this a little bit. Just a tad. Us to Tad. Yeah, 'cause we just want to get
it right over here. Steph we gotta push it
up a little bit more, so be it. Okay. Got that. H This guy same here. Just a little bit.
It's going out. This curve peaks right
around the right at the start here.
This curve is here. Well, it'd be right around here. Okay. Yeah, that's right. That's that's pretty good. We're not gonna beble
anything just yet, but yeah, this will
be added afterwards. Same as a rail, will
be added afterwards. This is really, like, a
really robust blockout year, but I think it's worth it
to just move on per sec, 'cause once you start
beveling stuff here, things get kind of solidified. We just want to make
sure everything's tight, everything's good. Nothing's crazy, so got a
little bit of space in here. That was on purpose
'cause we want to be able to fit this plate in this little fitting
perfectly in here. So that makes sense. It's
checking out for the most part. Might be a couple of errors, but for the most part,
it's looking good. For most part, it's
looking pretty good. L. Next piece. Starting to get the shape
of it. That's pretty nice. Yeah, this is it's
a long process, so you got to be patient
here. Really just Let's go with this thing here. Then after that, we can
throw the rail on there. So this is let's get
this fitting in here, and then it's just
we're gonna go off those lines that
we have from there. So what is this looking
like these days? Looks better than I thought. Well, I haven't
cleaned it up at all yet. Looks pretty damn good. I wonder if this will do
anything a little bit. Pretty plus. Thanks. What we're gonna do, though, is we don't want to
solidify this yet. The changes, so we're
gonna duplicate it. Click on this and then
confirm that, confirm this. And now we just have we
have an extra piece. But it's just gonna help
us get the line for this, then we'll delete it after. But we're going right
to the give her a take. Just do that, then we can
just duplicate this guy. Hit P, and then selection. That can go. And now here, we can extrude Y. Just about that big. Maybe and a bit more. Just a little bit like that. We want to delete this thing. And, uh, throw that throw
that mirror on there again. Like that. No. I'm not sure exactly
what this piece looks like. That's the at least
the blockout for now. This is This has been really
helpful so far, Holy Crip. So this is it, Gray. This guy. Am I wrong? Probably. Yeah, this is so it goes
all the way around. Dips in between these and
kind of sits on top of these. This piece becomes
like kind of a block, and it'll sit on loads. So it comes out like that. Is that correct? No. It doesn't look like that. It
just kind of looks like it goes in and This is the main
part we got to worry about, honestly, but some way to tie that in would
be kind of nice. Okay, let's you can't forget
about it for a second. The next thing we want to do is, uh we're gonna just
switch switch again. I'm so annoying I know. Okay. Here. Ok. Yep. So just do the same thing. Just duplicate it. Penner. Yeah, we got this This guy. Okay, go back into Ortho. Looks like from the gun, we're gonna get a
bit of a we can see a bit of a About to here. But as you can see, this part stays straight
the whole time. So one thing we're gonna have to keep in mind is
the fact that we just moved this bottom
piece. I made a mistake. So we can move it out to say we can go the full
distance for right now. Right about to here, right. We're gonna have to trim
this as well, so Definitely. I working on the right
side right now? Yeah. Oh, yeah, this is just
pulled back. That's all. So it. This slide is up here, and then this image,
it's just pulled back. That's why I was confused.
It's late, okay. So we're gonna get
that going there. In the delete that. Get the face back sharp edge so don't get that
annoying shading. Okay, so we got this piece
kind of established. We need to put point here. We're gonna select
all this, Make sure the bottoms deselected. We're just gonna, like, lower it just so it fits that
silhouette a bit better. On a basic level, looks like it goes from top to bottom, and then
it straightens out. I think that's
easy enough to do. We'll just do this just to get
that establish that curve. Help. There's a bevel there?
Gonna leave that for now. But this looks like a support
for at least the rail. It looks like a little bit. What about here? Does
it show anything? Looks like the rail
attaches into here, and it kind of just
stabilizes it. So I think one of the next steps should
be the rail, for sure. Okay, so B D B Bluck it out. D here. Right around there. As you can see, it's perfectly
aligned with our weapon. So go back to origin.
Got to realign it. It's centered now, though, so Something like that. Nice. And then the widths gonna have to look that up real quick, but I always forget what it is. You just kind of
pull it for a sick? Yeah, this is another
good landmark for, like, establishing
your proportions. 'Cause you know 100
times out of 100, this is needs to be certain away for it
to fit, and it's, like, very standardized
across all weapons, 'cause attachments are
certain measurements and, you know, heat shield. Nice. All right? Yeah, that's honestly good enough for
just the blockout establish that it's there. And then we can go for
this little this part. This whole mechanism
here can be next. So, if we look at it here, um, it looks like it just goes. Looks like there's a
**** load of pieces, but which ones do we need to specifically
worry about for this? Juicy. This is a good one.
Pretty good one here. Got these caps. Can
be pretty easy. This, I wish theories. These are really good book. One for the side. Would be kind of
ideal. We need behind. I just want to see what it
looks like right behind it. I really don't have one. This one kind of, it kind of looks like
there might be Ooh. There's some stuff going
on back here as well, so got to be caut to that. Man, it's just gonna be such a good texture reference crib. So, I'm not sure if this
is the barrel or not, but heard the feed, like the I guess you can
call it the MAG barrel. But Definitely something there. Let's worry about
this for right now. This looks like one piece, this whole thing
going into here, especially if we go
back to this guy here. This has been our
saving grace, honestly. Go back to the specs
when in doubt. Whoever made this is a legend. So this is one piece. Looks like this
goes in somewhere. These guys might attach. Anyway, so Looks kind of. Yes. What? Not sure what this is
in other programs, but it just kind of allows
me to edit it individually. So it's kind of helpful. In this specific
case, especially. Yeah, it just serves
like I'm just trying to get that this curve, then I'm gonna disconnect it. So Even can go a
little bit more. Something like this. I know
this looks really thin, but it'll bake a lot better
if this is a bit bigger. Well, hopefully it doesn't. It's a. We're gonna apply that. And, uh, isolate
this real quick. And Yeah, we kept after. To make the holes,
we'll just boolean. We'll basically do
that same thing again. But we can actually
just do this, duplicate this, make
it its own thing. Gonna just join all
these to be a one mesh. Yep. So why? Kind of like this. Bring it out. Just leave it. Gonna leave
it there for a little bit. Okay. Back to this. Got kay. So that we want to delete
basically all this stuff, right? We don't need this. And this is going to go from here to here. Bridge that gap. Don't need these faces,
honestly, up to there. Gonna just select all
those, delete them. And we can just um I guess
this is a way to do it. Gonna go back to the normal. Now I I'm just doing it scaling them on the Z on
the X axis to zero. Um, and now just connect
them, merge them. Not sure if that
was even necessary, but My brain works on
certain steps at a time, so it's not the most
efficient possible way. You know, I'm not surprised. Takes me a little bit sometimes. Okay. Another way is just
merge them like this or you can
take all of them. I'm not sure what's going on. Interesting. Ah, that makes a lot of
sense because they're not. We just got to make them,
one piece now, okay? Large those. Okay, nice. Looks like I messed
something up here. Uh we're just gonna backspace. Selected in by
accident. Bad call. And So in order to try to make this a
little easier here, go for the mirror,
you know? Okay. It almost looks like this
goes up to the halfway point, not quite the halfway
point, maybe, like to there, and then
it starts to go up. So we're just gonna add faces here. It looks like it goes up. At least to a straight
line, maybe up to here. So we could just extrude out a little bit and then
go down like this, delete what's inside there. I'm actually gonna continue just morphing this stuff
together to be one thing. Yep. Okay. So yeah, so it looks like
almost when it gets up to here, boom, right about there. I kind of takes a turn up. But that doesn't look
dead center, though. It looks kind of
like a little bit off dead center
around this area. It looks like it goes
straight up, actually, so it looks like it
goes straight up. And then right about
it starts to curve maybe like a little
bit more than halfway up. It starts to curve. So that means when we bevel it, it will have started
a little bit. I just inverted my dole,
so that's Control N, but I just did I
wasn't able to double, so it starts there, you know. But okay, so yeah, we're gonna just
connect all this. Boom, boom, boom. Connect it, and then hit F to connect that. So we've established
this so far. And then This is well. Nice. We can actually
do this, too. Ah. Is it worth it? Yeah, it's worth it. Got it halfway. We're gonna
just cut off the half that is has all the open faces 'cause
we're lazy. And just hit. Um we're gonna set a new point here. Control three. Looks like Z is the
lucky one today. So Z? Okay, we'll apply that and
then just do it again. That should have got easier.
I just messed something up, but we made it made
it to the end. Yeah, that's funny. Okay, for visualization
purposes, we should go, uh, get these guys
back, isolate it. So we're just gonna
we want to eventually um We would like to have these just rip
a hole through these. So we wanted to kind of If I scale it,
that might help. Sometimes this booling
tool is just a mystery. Sometimes it works,
sometimes it doesn't, I'd go it a 7.5 out
of ten, though. Usually does the
job, eventually, so it can't go wrong there. Did I make this cut too early? I'm not sure, to be honest. I think we might
be good, actually. We might be good
to just leave it. Um, I obviously know this is
not the finished product, but we're pretty close. We're missing, like,
a key part, though, so I got to look
at this closely. So we got basically the
bottom is pretty good. But the right about
like like here ish, right about there, where
you got that piece that comes out, goes up. Kind of, I I duplicate that, get it a little extrude. And then we can work on the normal axis for
a bit scale axon. We're going to we're just gonna try to
make this real quick. Extrude. Bar. You know, it's robust.
It's kind of a I wait, it's rough, not robust. It's not crazy
detailed right now. We're just getting the blocking. We're gonna make this
look a lot prettier. If you double click
Z in blender, you get the the default, the global, again,
kind of what we want. And then it curves in again. So it'd be an easier way
for me to do this for me. Separate that say, delete this. And then from here,
we're going to one. This to kind of Um, it's actually quite a
bit higher up, isn't it? Quite a bit higher. To the top. Basically, on the top
here, right around here. But if we were to, you know, that's kind of what we're
looking for, right? That piece there Nice curve. And we're gonna be
able to thicken this after so we can fill
up that space again. This is a nice point
to have, though. Okay? So the next thing
we'll do is take all this. Extrude up on the Z axis. H Z zero. Now we got that kind of
extended piece we want. Um, From there, it's got that kind of little
got that curve going in. And it looks like the
wall is a bit thinner. It's a bit thinner. And we think. So we got a little
bit more space than we'd like at this point. I wonder what would
happen if I do this. If it ruins it or what? You know, you just
kind of push it in. You can make up this guy. It's just the blockout, too. I keep saying it's
just the blockout, but then we're eventually
gonna get to the point where, you know, we're on the high ply. That's kind of gets important
at that point, you know? I know how to do
three D, I promise. Okay. So this part kind of pushing it like that. And I think we can just
go ahead and delete all these just to make our make it a little
bit easier to visualize everything and move the geometry how we want it. So got this. I think it's time to do
the mirror thing again. And if you're also using blender and are
wondering how I'm, like, cutting through
the whole thing, I remember when I did
the it's just K and then Zaxis and then you hit
C. And you can see, like, on the bottom there, it's like knife cut through, cut through, you
want to cut through. Cutting through is good. Where's that? The world's
smallest face. Okay. Go back to mirror. I'm gonna keep an
eye on this part, 'cause if it's your mirror
can get messed up if you, if you go too close like this, you know, Looks good, though. This part goes up. We got a
little bit of curve here. You know, this might be able to be beveled at this
point, honestly. You know, just to
bevel like that, and then just cut out all this. Looks good, right? Keep that. Okay. I like that. This
curve. This curve. This is what we need. So it's
just a nice, gradual curve. We want to keep this part
established because it's gonna come back to this
point right about the top. So where is this part?
It's right at the top. It looks like. So we
want to just make sure we're right at the top
with it, can meet it there. Okay, this lines up fairly well. And now we want to just
have it actually T. Yeah, if we just kind
of push this in here. It's straight up until
when right about halfway. Right, well, here, then
we start getting pushing. Starting to push in
a bit like this. Boom. Here we have
it almost there. Close enough, huh?
Something like that. If we just test the beble, you know, you can right
click to cancel it. It's always nice to
just test it out, see kind of what angles we're
working with at this point. You know, so if
we're around here, can right click out of that. And we see our vertical here, we can knife cut
through on the X. And it looks like that part
goes in just a bit, right? And then maybe actually a little bit deeper than this
curve is gonna go. And then if you double tap X, you can kind of move
freely and get up to here. So that's kind of
almost what we want. It's close. Something like that. And then this is
also beveled, right? Looks like we lost the face. What's the decor
there? Into, like, a nice easy bevel. Okay, this looks pretty
wide, too, doesn't it? Looks a little bit wider. This looks the right width. But this looks like it needs to, uh just get pushed back a little bit.
Something like that. Yeah, right around there.
Something like that. It is funny, though
in the rough, it does not don't want to
get too sidetracked here. Yeah, I guess this
part's pretty big. Okay. Okay. Did I lose my I did at nights?
Back to the real one. This is that piece,
huh? That's the piece. This is our curve that
we just made nice. This looks pretty large.
Looks pretty large. And it goes up to
this flat piece, too. This flat piece, I can
guarantee you will have to adjust at some
point to fit the rail, so we can just do this. Want to raise this
a bit. Just give you that bit of a beefier look. And then this is this guy, so it looks like it's
a direct impact. We can go to a little bit
of a cleaner look here. This bell is gonna be cool. So I'm gonna give it
a little bit more. Probably end up
bringing it back in, but it looks like we're at a bit of a This
hole looks too big. Doesn't it looks way too big. Hope you go back to here. As well we can bring it up one. I think that's fine.
If we bring it up to here, bring it up to here. Like this one. Maybe even here. It looks right around
here, doesn't it? Something like that, and
then we bring it back down. It's gonna connect right
up perfectly with this. That's a goal. Half there. That looks pretty good. Yeah, I think that looks a lot better. And we're gonna give it
a nice juicy bevel, too. Just a nice one. That
looks pretty close. Good photo. Yeah.
It's around that. You can I actually looks kind of pushed in, like,
slanted almost. So we redo this. The beauty of three D, huh? Yeah, it is. ****. It looks pushed in.
You gonna do this? And now we can do this. Okay. And this needs one as well. Something like this. Okay. Bring this into around here. Okay, and this is
where we're gonna have to try to do this,
see if it works. We're gonna scale it just to get that real life
measurement back, okay? The bevile The beble. Something along these lines
is probably pretty good. Something like that. Oh, it's looking Looks like almost done. Wow. That looks good. Wow. Okay. Yep. And you can see that
kind of kind of lips in. D lips in, so, if anything, give this a
little bit more slack. Cut it some slack.
Delete that guy. Bring this one in. We want
this guy in a bit more. He's in. Okay. Then it's gonna
curve up, Boll Aart rail. Something like that. That piece was kind of a pain in the ***, but we still got to
get the bebls and then get these caps going too, so get these caps. So the caps are gonna be We can make the
caps just from this, duplicate this out. Make
them the wrong thing. So we got a mirror right now, so yeah, I just extrude them. Kind of like this. How is this looking? So these look a lot smaller, don't they? They look quite a bit smaller. And let's get a good idea
what they actually are. So the two caps looks like
these guys. So they're screws. So they're like screwed almost plugs so we want to just scale them
in and screw them in. It does look like here. Um, if you look here, not here. It goes all the
way through here. It's one thicknes, but it kind of bebles in here
or extrudes in. So let's go back into this mode. And just quickly, we can, uh, we can add this looks like
it's right about here. We're gonna get kind
of a Hang going. Is this needed? Is the question. So I haven't. I'm thinking real
time right now, so it almost seems
as if we cap this. If we just cap this, though, just for a second,
if we do this. And these caps going on? Will people be able to tell the difference too if
they were not there? It's guy. It doesn't
seem like it. Seems like we're
good if we cap it. Uh, those holes won't even matter. It doesn't seem like it. So they're not they're not you're not going
through anything, so yeah, let's keep
let's just cap this, then make it easy for ourselves. We're gonna decap
it for a second, and then cap it. U one thing we should do
is Yeah, we could do this. So we're gonna tap this boom, easy peasy, and
then here as well. Do the same thing there. Okay, so that's
the piece we need. And then from there, let's we can kind of freely
adjust this stuff. So we're gonna scale
on the X only. And just kind of get the we got to take into
account this bedw too. It's gonna shorten it. So
gotta keep that in mind. But if you look at the gap here, it's pretty close, pretty close. Something like that is probably
pretty accurate, right? Looks pretty accurate
to me. Okay. And then as far as, uh, width goes, not much use there. This is pretty
good. They'll look they look a little
shorter than this. Gonna push them in like that. And then boom. So that part's good
to go for right now. I think just for *****,
we can add this, too. Um, yeah, let's add this. Give it just 24. Okay. Just scale it. Oops, I don't know how
I do this sometimes. I just hit a shortcut
really fast and then accidentally get put into orthographic note.
I don't know why. That happens, but it does. Doesn't look like
it's as tall as those guys. Looks pretty good. Something like that
should hold up. Maybe a bit bigger like this. We'll come back to
it, but good job. And then the last piece
for now for this part is, uh This this guy. Yeah. So it just
kind of looks like, holds this or something. Go back to our fly grail. The, uh these are the two
plugs. This guy goes in gear. Looks like it let go to the back or A little uncertain there. Feel back here. Could be another one of those
case scenarios where, you know, what's visible is what is there type
of case scenario. That's all we might
need to have to do. Okay, we're gonna do
this. Same thing. And, uh, Yep, so it's hugging
it's hugging the outside. Definitely. And here, it looks like it lines up
pretty well with this, too, so we may need to adjust this, give or take, to
fit this design. We're about to make
this. We got that. We just want it to
line up right here. And then this push it up a bit. Okay, so keep this base. We see an obvious line here,
right? That's obvious. Next, we can go and cut
this down a little bit. Actually, one thing
that might be worth our trouble 'cause we're
taking this pretty far. This is a mid pool. So one thing we want to make sure
is we have enough. Um, just these slots. So I'm gonna give this guy
a little bit more geometry. So I'm gonna actually leave that there and just make a new one. I was gonna give it 48 just so I have a bit of options
when I'm modeling. Okay. Bring that down. Bright about there. Okay.
Something like that. Bring it in. Okay. Extrude scale on the Y axis. Um, I guess how did I do that? So I just you S. S shift? No. S and then shift to Y. S and then shift to Y.
And it gets you there. Extrude this. And, uh, pretty much pretty close. This is significantly
larger than these, so bring that up. Something like here.
Maybe even more, but these guys
almost look too big, but I think they're good. Bring them in a little bit. Okay. And we can just
pitrude that to here, and then let's
isolate this briefly. We're gonna go and let's just do this for
now. Same with here. And we'll go extrude,
Y, bring it in. And then we're gonna kind
of get as close as we can. Do this S Y, zero. And then I don't know,
this is an easy trick. F. And then you just
hold F after this, and then just kind of hold
F. When do you do that? Okay. Blockout. Not too serious here, but, this is kind
of a cool detail. This is, you know, you might do this with
the normal normal map and painter, you might whatever. But it's a cool thing
to, be able to do. So we're gonna just
scale this up a bit, try to get this
kind of like this. Just give this, like, a nice a nice deserving bevel.
That doesn't look right? That doesn't look
right at all. Okay? This Yeah, that's not
gonna bake right, though. I just is if we do that, one thing I okay,
so it's Control B. And then for it to
stop perfectly, you have to hit C for clamp. Complete that and then just
merge them. Merged them. So from there. Yeah, this might
not bake too well, so you can see this kind of a little
flat line going on there, so let's just get this kind of in a spot we
want that we think is okay. Um, Yeah, this is kind of ridiculous
for a low poly though, so maybe we can reverse that a bit when we bevel, we can
just leave that there, and then we're gonna want to just make another
ring on the inside, make this part, you know, uplicate make it its own piece. And then extra scale on the Y. Okay, so it's perfectly
lined up there. We're just gonna
give it maybe here, GG, lets you move. This kind of, like, freely
how you want it, okay? Option, select all. Then we're gonna
just bring it up. So that's pretty
close. Pretty close. Okay. That's about as detailed I want to get for that with that as of right now, but it looks like let's just reorganize
this really quick. We want all this. So Celtic.
Okay, we're getting there. Slowly, but surely
we're getting there.
9. 07 Creating Our Blockout Part6: Okay. Let's get back at this blockout. Okay. Just trying to move this so it fits into the
shape pretty well. It's all here. It sinks up pretty good, so that's the main goal here. We're just pushing edges at
this point. Real simple. Okay. Is the bottom here, still a little bit, uh
unfinished looking. That's pretty. A bit
of a curve here. Another thing to note, see, it goes from, you know,
this piece up here. You just make a line, you know, it's almost like
a straight line. To kind of prove my point here. If you look at this, it's not. You can tell. This is
straight, but then it goes up. We want it to just kind of
something simple like that. And this looks too
long, of course. So just roughly move it in. Gonna move that in. Maybe a bit more. Everything. Seems like a safe
distance for now. Safe distance. Gonna push this up here. This edge here, reminding ourselves we need
to establish it. So and then ask for
the bottom here. Pretty good image here.
I was just looking. I was just looking as
far as Bevil Land goes. Is this ready? Could be. Trying to think would we be
messing anything up, but Okay. Can clean this up briefly. Seems. One thing we
can do here is before. Small adjustment here. Something kind of like that. I don't think we
want to get much more in depth than that. Looks like we got clipping here. Okay. So for now, that'll be good
enough for this part, this butt stock area. We eventually want
to give it a nice beble but not right now. Looks normal? Look. Nice.
Good step done there. This part could be
the next thing. This looks like a release
bolt of some sort. We just want to get the
landmarks in there, you know? Get the landmarks just shift right click if you're in blend. A super basic Super basic. This is the edge of
this. So probably can move it up a bit
right at the edge. That's there. Ah. I'm going to
select everything. Deselect some stuff. Ah. I just want to try to see logistically what
we got going on here. Mm. Just thinking about
moving it, but, you know, that might disrupt a
bit too many things, too many moving pieces we have, so it might not be worth it. But, aside from that, Okay, let's continue here. As for this piece, this is
a pretty important part. It's kind of like this half circle quarter circle
thing that we see here. And it's just hugging this part. So pretty easy thing
that we could do. Just grab any piece
kind of like this. Just duplicate it.
Looks like it's already got the solidify modifier on it. Make it its own piece. We could just, you know, make it the opposite, turn up the opposite. Okay. And mirrored, go into edit mode. And we're just going to
move this up to, you know, right at the start here, right where the edges. So something just kind
of like that for now. We're just establishing
the main features drag this one all the way down. And we'll just put
a point there. And, uh, yeah, for now. Looks a bit shorter than
what we have, doesn't it? Looks like ours goes up a
lot a lot more ours goes up. So I'll go into face mode. We can delete this one for now. Still, if we compare it,
it looks pretty tall. Let's go ahead and
delete another one. Looking a bit better there.
Okay. And more circles. Let's just go and, uh,
just lay these out. Why they are. Just the
important ones for now. Okay. Got that. It doesn't have
to line up perfectly, as you know, from the
reference. Definitely does not. So as for this piece here, we've established
pretty good shape here. We could maybe work on getting
these booleans cut out. Um, let's see what we got. Let's see what we're
working with here. So it looks pretty simple. Where's that guy. We do have to establish
these points, too. These bevels, I mean. Right now, we got sharp corners. So adding a bevel
probably is gonna help. Just, uh establish that.
Let's try this here. If we isolate this, I was gonna play
around with this here, see what it could
turn into either way. This might be Yep. We'll take that guy and
then let's solidify this. Make that sold. And then I do remember This
was not perfect. I remember that.
Yeah, okay, here. This part was kind of messed up. So one thing we're
gonna want to do here. I understand that people aren't gonna really see this part. But, I mean, this looks crazy. This is so unsatisfying
to look at. No human in their ray mind
wants this to stay here. So let's go into the knife tool. Honestly, just do this. Headache free. Headache free. Did that fix anything?
I don't know. Oh, yeah, look. Okay. I can live with that. So this part, bevel
and then that part. And let's just do this
at the same time. So we know we can do this.
We know the other one. So let's go in, select this. Bevel at the same time. We're just trying to
hit this shape here, and we can worry about
that gap afterwards. So something something
kind of like that. Something kind of like
that. Looks good. Quickly clean it up.
Get rid of these ones. And yeah, we can just leave
it like that for now. No need to clean anything up. Any cleanup here.
Looks pretty good. Okay. So this piece is pretty well established
at this point. And if you look at if
you look right here. Um, yeah, this is
kind of similar, so we can just although you may not see much
of this, um, why not? It's one of those things. It just might help making it a little bit easier when
we have to go put our pivot points in certain
spots, you know? Okay. There Now, let's bring this
down just a bit. Just to hear. Okay. Nice. This is gonna be a good detail. Go back to our roof here. Okay, so. And, uh, let's just see if
we got as far as refs go. That's different. Looks like this
is KS seven, KSG. These look kind of similar. Wow. Is this also? KSG. Okay. KHC
12. Who a little worried. Okay. I can also This this would work, right. GY. So if we wanted
to move this just to kind of line up this curve here
correctly, we could do that. Yep, this curve. But as you can see,
that's happening. So one thing you can do select this or just select this
hide it in edit mode. And now we're able to, you know, do whatever he we want
for a little bit. Just kind of have it
like this for a second. Control O or Control
Control Option Okay. Get out of this. And now we can just kind of
adjust it however we want. So whatever thickness
we think is good. Just something simple as for right now. Okay. And now let's just trace this, uh All right. Could do this, as well. Something like that. Take all of it. Select. To get the edges, it's just control. Select. Okay, I'm gonna leave this
one out up first. Bill this like this. Something like this, yeah. And, this one made it
a little bit more. Scale it if it looks
weird. It still looks. It still looks weird. Okay. Something like that. A k? No, this doesn't it
doesn't look right. This It looks like
it needs a bevel. It looks like it needs
a two piece bevel. And then from there, it just needs to be
a bit more circular. I think that looks a bit better. Build a lot of it. Yeah,
that looks pretty good. And we want to just
do the same thing, but then over here. Okay, push that out.
A little bit more. Got the general shape down. Control A, all transforms. Got this now. Devil that. Backtrack a little bit. I just want to have this
established, you know, if you see here, you can just it looks a
bit more established. T. Set origin to geometry. Just a big scale. That's all we're doing. You so as far as
this piece goes, this boolean, we decided
this was good, huh? This looked pretty good, in my opinion, at least. It did not look half bad. Putting a support loop there. And we can kind of, there's not much we can do to prep it, but it looks pretty good. This edge is solid. This
is gonna be helpful. Having that edge, tail end edge. So yeah, it actually just looks like
a like we may have missed. It just looks a bit
different in the f. So it looks like it
flattens out on this pig. And you can already see
the curve has started. So we wanted it to be
something like this. Um, but I don't think that's
crazy easy at this point. Um, here. This kind of thing
is what we want. I don't think I
altered it too much. And it looks like this is
not exactly lined up either, so um, yeah, it looks like we can actually
manipulate this a bit, as well, just to make it a bit more round,
a bit more rounded. That's all. Looks good. And, this part is actually
going to be around, too. Yep. This part kind of
extend there. Nice. And then before we
lay the boolins in, we want to just get the
this bevel established. We do that. What
happens if we pebble? Yeah, it is real simple. That little bit less, huh? It's a little too strong. Just like that? Something
like that. There. And then yeah, we're gonna
actually just leave this edge. So we'll bake this
edge and This edge. Looks nice and soft, but,
you know, it's in the back, so it's not of
crucial importance, especially when you're making
a weapon for a game engine. It's not the priority, the back unless you're focusing
on that for some reason. Okay. And this is the last
intruding piece. So this part, really needs to be put on. So bring it around here. If we just give this a
huge bevel, what happens? This not what we
want, but scale it. So this is too far down. We need to separate this a bit. Tied some parameters before. Okay. This here. That
will be this one. Here. Yep, don't worry
about that right now. Okay. We don't need right here
that we can delete, fill in these gaps. And then as long as we just
stay on track with circle, making a circle,
shouldn't be an issue. What does that look
like? The goal here is just to establish, you know, the circular. Keep the circle alive. Perfect circle. So adjustment to be made is
We can go for this again. But the adjustment could
be this gets moved down to be something like this. Something like this. It's hitting this wall, but not a ton. This is really hitting it. So I'm gonna just reverse
a couple of things here. Bring this down. Um, and then bring this kind of
right in the middle. Try this again. That
looks pretty good to me. I like that a lot.
Something like that. Probably would work. Okay, we can make this a tad bit smaller. Okay. That looks good for now. Yeah, so this is gonna
I actually think this is we don't have
to redo it per se, but just bring it
down a bit more. Bring it down to, like, there. Bring this down. Yeah, we just want to make
sure that this is a That looks better. Okay, nice. And then this guy duplicate
this down to this. And we just want to try and establish another
circle on top of that. So Rw here. Look different on
the other side. Same thing. Okay, so what are we looking at exactly? Line this up. Back up. So there's space here. This is roughly the
size we're looking for. Something like this.
But when we move it, um, so we got this
shape here, goes down. It doesn't even look like it looks like it just
kind of curves out. Kind of curves out. Like,
there's a gap here. Like there's a curve here, kind of, but it's this
has moved forward. Kind of like this. That's what I that's what
I'm seeing from here. This has even moved
more forward, isn't it? Looks like it. Yep. So we're gonna continue to try to
establish that circle path. Like that. Oh. Okay. Bring that out there. Looks like we're on
the right track here. Definitely on the right track. This here. What would happen here? Got that curve. What a weird and
confusing shape. Please make it make
it end, make it stop. Doesn't even look
correct, actually. But I think we might
be able to work with it 'cause I see a
bit of a curve here, and we could potentially just
curve this type of thing. Just curve it in. But Okay, yeah, no, I think we're good
right now here. Good right now here. Okay,
we'll come back to it. But it's out of the
way. So let's go ahead and booing this. Pay attention to
these small gaps. Where's the corner?
Proximity. How close are you to certain things? We look pretty accurate here. We should go down a bit. Um, and then how much space
are we left with here? Can we fit this guy here? All these things we got
to take into account. Not much space here.
That is very small. So very small. These look to be the
same size as well, so all the same size. So we can bring this down a
bit, give this some space. And, uh, This here. Push it back a little bit. We got a little bit more
room than we think. Right about here.
This looks straight. This looks like a straight line. So make sure this is lined up. Um, yeah, might be
an issue currently. So looks like these are
lined up pretty well. These are lined up
lined up there. How lined up is this?
Lined up to me. Only issue is this guy here, so how are we gonna solve this? Is there a pain free
way to solve this? It's always a little
painful, let's be honest. If anything. So if we do this, what
do we mess up here on the quest to Alex straight. So bring it down a bit. If we turn that to there, Okay, so it looks like we may
have messed up a bit here. So just for the sake
of making it correct. Hit P, separate it, delete the body, convert
back to three points. Whenever you mess up, just
go back to the basics. That's what my boss tells me. Just go back to the basics. What are things we care about? We care about this
straight edge. So we'll make that straight, and we care about this
being parallel. So is this parallel? Not quite. We just want to move this
up a bit. Almost there. GY. Okay, looks parallel. And then how close
About this close. That's the gap here.
We're talking, and then to there, we have quite a bit more space, so this just looks overall bigger. Now
that I think of it. Now that I look at it, that's why we have
so much space. Okay, we don't need
that much, though. It is bigger, but
it goes to here. That space is about right.
This is about right. The only thing that isn't
right is, uh, this gap. So we do know this
is correct, though, so let's get this. Something like this. And then
this, something like this. Want to do the two thing again. Let's just get this
way out here for now. Put it on the normal. We just wanted it to
be kind of like this. Oh. Boom, boom. Looks good. Combine
that dot here. Boom. Okay. So it does look
like if you look at this from more angles. Looks like we can bring
this in a little bit. Go back to global. No mess it too much up
there. Except this. So we're gonna take all of it, move it in a bit, take
all of it that we need. Okay, move it in. Move it in to our reference. And it does mess
up a little bit. It's just all it's all
just give and take here. And then on this side, we're gonna apply this mirror and
then apply the booling. Okay, so we have
the booling now. Very basic. Yep. Yeah, it seems like this piece, just goes out a bit further. So We're just gonna
bring it out. We'll do that manually. Something like this.
And then here, do this. And we're gonna
bring this to here. I got to make sure
that it's level. It's level there.
It's level here. That is one of the
frustrating things about three D is that sometimes it just
doesn't want to work for you. It just doesn't want to work. So we're gonna just veer off from ref here and
just kind of feel it out. So this is we need to lineup. So if we do this, it
kind of an issue here, but something like that's Okay. Extrude it out. Normal. Okay. Next is, uh, click that that. Make sure there are no
modifiers and whatnot. I'm just gonna try
a boolean here. Difference. So satisfying. Nice. For the sake
of a clean bake, down a little bit,
just a little bit, just to get a nice this edge to have some surface to
it, some density to it. What's going on? Boolean.
Okay, same thing here. Just establishing
these booleans. They look fine.
They look normal. Look normal. Let's just, uh, Okay. Apply it. We do this. Okay, they're all they're good. Okay, so that was messy
as hell. I'm so sorry. That was awful. Okay. Okay. Throw in one more of these continue to just try to
establish these points here. So it's obviously not there. What we want to do is look at where it is and just kind
of use good judgment. So It's roughly here, actually, so it's a
little bit lower. I would say it's pretty
believable if we put array here. But as you can see, it's
not breaking the seam line. So well, we should
just raise these up. Instead of tweaking this, let's take this guy
and select this. We're gonna hit L here, go into X ray mode
and just bring it up. We just kind of bring it up
and ruin the whole project. So if we bring it up, what
are we sacrificing there? That's not gonna
work. Scratch that. We may have to just lower this. It's more so finding what the issue is
proportionally speaking. You know, is this
the correct size? Yes, that's correct.
What's the gap between here and here? If you look here, this gap
looks smaller than here. But this gap looks
maybe a bit small here, but the point is, I think we should
actually go for this, but it will take some
adjusting afterwards. Yeah, so let's just kind of
an uncomfortable move here. So the damage we did
was throwing this off. So we'll just go
and delete this, and it will straighten
itself out. This side as well, Okay,
not much damage there. Maybe I'm not
realizing something, but it's still pretty clean. We're not dead in the water
after that. Thank God. Um, okay. So that means we can let's see if we can move
this past the gap. Nice. Looks like we're
able to do that. And it looks correct. So I'm gonna save
so I don't mess up. File, export. Where am I going?
Okay, Cel tech. Okay, saved. Save that.
10. 08 Creating Our Blockout Part7: Alrighty. Today, we're gonna Well,
it's the next day for me. This is just a continuation
for you, isn't it? We're gonna hit this up today. The grip the grip
this whole thing. Gonna see what we
can get through. Just keep picking away. Okay. Got to break out the knife tool here. Start cutting into things. Right to there. All right. It's a little congested
here. Thin these out a bit. Okay, and now another
thing we can do is bring this over here. This right here. This looks a little
weird, doesn't it? The knife tool. The
best tool in the game. Was that efficient? I have
no clue. Probably not. Okay. So this piece here? Gonna just Well, it looks
like we did already. Nice. To an extent. We did to an extent. Let's find it up here, see what's going on. So it's a clean cut off there. Okay. What's going on? Right under here. It's
in a good spot, so Okay. It does look like what happens when we
start getting out there. Okay, so it gets a little
funky over here, huh? This part looks
like we got down. And then we're gonna follow this all the
way to this part. And if we go into
orthographic mode here, it looks like this
is one level here. Um, Yeah. We're gonna arraise
this, actually. It does look like we're
missing maybe, like, a little bit of height, and it just looks like it starts
a little low as well. Like, it seems like it should This looks a lot better here, but we're kind of,
like, pushing in, so this lines up. Um, Hmm. Thickness wise, we
could check that. Um, grip looks pretty thin, actually, so compared to here. This is one of the
more complex parts, so it may take me a second to be
able to get this down. This is a nice angle. Los wide as hell from there. That looks pretty damn wide. More so than here, we got a nice bump
up, right here. And then there is
also a bump down, so. Push that in. Push this down. We're just trying to establish
the important points here. I see this has a
nice curve to it. Gets pushed up there
and then this here. And there's another
one it looks like. So Yeah, this don't look right. This part. What happens if we, uh just move it to
this side here? How's this sitting?
This is this edge here. Is it lining up? Almost, almost. Not quite, but almost. And we've really
established this already, so Um so that being said, this also is quite
a bit pushed up. So all hope is not
yet lost, folks. All hope is not yet lost. We want this to be pushed up. We're gonna select
these all the way up. So push it up. Okay, this this, this. It's basically all
this, isn't it? I don't know why I'm
hesitating here. Sometimes hesitation's good. Okay. Yeah, we're just gonna
do this thing. Do that. We just want to get this up 11. Just do this. That's
it. I just to push up. This here, this edge. What's this gonna look
like something like that? Don't worry about
that side right now. Actually, let's
establish this here, and then Okay, step
one, complete. Is it already centered? Looks
like it's already centered. But we have to find Mmm. Push this off a little
bit to the side. Okay, nothing to go yet. Nice. Cut this off. Mirror, clipping.
Grab these edges, pull them and Okay. Got that. That looks good. Goes up like that. We're not
gonna worry about this yet. But, uh, Yep, this
is another thing. Just bring it in. Okay. And then from there,
this piece here. Yeah, this is a
low key confusing. But we want a
little bit of rise, but only until here. So this is weird. We're gonna do, just
something like this. And then Yep we'll bring
this down a little bit. Um kind of like this. Why? And then we're gonna bring this down a little
bit to, like, here. Oh we just we just want to make another one. And, uh to there, and then we want to select. This guy? This guy. Well, here. Okay. That I select that. Raised that up, and then we
wanted to put this here. So we could probably get
away with this, as well. This might make it
a little easier. There, there there. Pin try this here. Just a little bit of
a raise. That's all. A little bit of a raise. And then this kind
of gradually falls down kind of like this. Something. Maybe Okay. That's up now. This
gets cut off here. And, uh Yeah. And now, this piece
curves up along here. So can we work from
this Probably? Damn. Just bring it to
where we think it is. And then up here. You know, Yeah, I think
we should cut that. So from here, seems pretty good. We just want the
outside, though. Something like that. Bring one more up. Duplicate it. Okay, we
get that mirror now. We're a little bit high, so right about here. Boom. We want this to
be on the outside. Yeah, we're getting
the same thing here, so there's a clear thing. I'm just not may not be
understanding, but Oops. So when we do this,
it is very low. Very low. Although this
does looks like it fits. Looks like it fits. This piece looks like
it kind of just bumps up and it goes right to
there. That's the start. Okay. These are the same size as well, so if this guy's good
lined up, size is right. Um, if that's the case, then. Alex's okay. Alex's okay. From this
angle, it looks correct. Not always gonna be perfect. We just got to make
sure it's established. And it goes until about here. We can boolean this afterwards. Same with this little
flat piece here. That's part of this piece. Okay, so that looks pretty good. Duplicate, bring this over. We're about there. And it looks like lines
up pretty accurately. It's that perfect circle
where we got to make sure we get So this part goes
in there pretty well. Okay. There. We want to establish
this circle. The best we can. Oops. Okay. These are also the same size. This actually goes pretty
far on both of these, so it's kind of like that. All right. P like that. Oh It's a little high still. It's kind of town
like that, okay? Now, let's just apply. Let's take the
miro for a second. Apply the solidify.
We got a block now, so that's good there. This part. So this
is part of it. You know, it's
fully a part of it. Um, Okay, so this part is a
bit difficult here. This is its own height.
This is all one height. The same height. So
in order to do that, we have to extrude up. That's probably the
easiest thing to do. And then we'll attach
this guy afterwards. So we can do this first. Boom, 32. Yeah, we
can that'll work. Might be a little much.
We can go go 24. Or why? Scale it in. Okay, so then we're looking for something kind of like here. Take out your knife tool. Cut that down, delete
this part. Delete tattoo. Extra Y. Boom, we're gonna kind of, like, shrink this a little bit on the X axis a little bit. And then actually, we
should do vice versa. Should actually just raise this up. Raise that up like that. Um, and, yeah,
something like that. We just want to get
this in here somehow. 'cause it's easy to trace. It's real easy to trace. We could even get this
bottom out here like this. Like that. Union. Bring it in. It's just that elevated
par we needed. Okay, and then this
will take some cleanup, but boom, boom, boom. Um, here we can do this. Okay, so we got that. Delete the bottom.
Connect these guys back. Okay. Can that one in. That looks good, but okay. Keep track of the goal. We
just want to flatten this. That's the only
thing we want to do. That's all we want to do is flatten this. Get
this part flat. At the end of the day,
we can just do this. We don't want him.
Okay. Pretty flat. And Okay, that's there and then we want this to be
raised up, as well. So from here, oh, this circle is kind of like the defining saying, I
guess you could kill it. So we're gonna take the knife to bring it up to the circle. And now we could have done
this a number of ways. I think I've picked a
weirdly difficult one, but stick with me. We're gonna be saved
by the booleans, so we're gonna go up EX. Boom. This remote. Just like that, we're gonna just clean up what
we can right now. I saw this fish.
Let's delete that. Looks like there's
still a little bit of stuff to clean up. Boom. Okay, that's. Alright, so this looks
pretty good. Pretty good. It's kind of hard to see, so it looks maybe a little bitter. This in there, This part is kind of a
little complex here, so it looks like we
can handle it after. It's tomorrow's problem, eh. Okay. So this elevation, getting the thickness right
is important. That's the important part here. Getting the thickness
right. Start at the grip. So start at the grip. Okay. Let's just get this
going a bit more. I'm just gonna do it manually.
Sometimes that's easy. Leave some pebble there. Just bring this guy out. Okay. Okay. That's down there. This is good. Let's try to get some good
topology in here, topology. Topology. Whoops. Just moving edges along. Stuff. Edge flow. Is that cool? Yeah, we need that angle. Okay. What's it okay? A little bit more established. Can't even go as far
as a little bit more. I know some people
like to bevel it, but, you know, sometimes
it works for me. I just it all depends if I, like, set it up neatly enough. Then it can work really well. Feel free to do
whatever you want. But I'm just giving
you a general idea of, like, this is where you should what you should
be kind of trying to do. This industry, there's so many unique workflows
that people use. You know, some people
use like three D print, like, what is it called CAD? CAD software is pretty
big now. I've used it. I do use it in my personal work. It's pretty sweet, to be honest. Yeah, like, it's, uh, super fun. But my point with that
is that, um, you know, bevels and stuff are, you know, super easy. It's easier to bevel everything. Everything is easier. It's easier to bevel it all, bevel it all. Just
pushing this up. But, yeah, this is
a tedious part. It's kind of calming for
me, for some reason, but we all have our own
parts that we like. Hi poly's pretty nice, too, except when you get a crease
when you're sub demodeling. That's actually the
worst thing ever. But one of my friends
really likes UV unwrapping. I think it's I guess
that's a good one to like, you know, 'cause if
you do a good job, it really pays off, but It's
got to keep disappearing. So is this height good enough? That's what we
started at the grip. I was trying to establish
just more edge flow, and then we're gonna
curve the grip. Uh, yeah, we're gonna
give it a curve. Oops. Destroy your mesh. That's good. There
can connect it. Um. Okay. Well, I see. This actually seems
a bit better. So we're getting there.
We're getting there. Bit by bit boat by boat. Brick by brick.
Vertice by vertice. Okay. You could do this
all day, honestly. So this part might be ready
for a curve, to be honest. Could be ready for a curve. Scary thing, huh? So, the curve definitely varies. Here, it gets a little funky
with a little piece here. I would say if we
add a piece here, having it mirrored is extremely
helpful in these cases. Um, So yeah, the
curve stops here. That's where you
don't see it anymore. So if we just kind
of bring it to here and then do our
best to line up, you know, I'm going to
try the bottom here. And then you take the bottom,
get that out of there. And now you're left with
maybe go for this piece. Once that's good, get
that out of there. And then this is where it gets a little difficult sometimes. I'm focusing right
here. That looks good. Go up just trying to
keep it straight and, you know, in line with what we want our topology
to look like. And yeah. So here, it looks like
right around here, this piece is probably gonna
need a little bit of love. Let's see what we can do here. It's okay there. Um, and now here it does look likes this piece? We just kind of want to
establish another piece here. We can do that. There Okay. Yeah, let's go ahead and erase this. I have this weird problem. I haven't figured out yet, but it's like my sharp edge is just, like, automatically go on. I have another computer
with a blender on that, and it just doesn't have that same I'm on
4.1 or whatever. Weird. But yeah, okay, so
we get to grip down. Very very basic. Uh, it's not finished, but this here, Curve tops there. We want to kind of
raise this as well. Cutting in here. You know, might mess up. That's okay. You may mess up. It's a risk you got to take. If you mess up, you can
always just hit this, uh, Control Z. Always. Okay, maybe we can
keep that off. We might want this
on for a second. So this piece? What happens here? Can
we establish that? And then this piece, we do
want to get rid of this edge, just for the sake of
making a different one, but okay, I can kind of
see it. It's coming along. It's coming along.
We'll be honest, this is one of the
more challenging parts for me personally. Ah, but I think we're
doing a pretty good job. As of now, I think we're
doing okay. Got that. So if we want this part, let's try to get
another angle view. Nope, that's not gonna do much. Yeah, just kind of comes in, got a nice beble. Oh, good clean AF image. Wow. This is great. This is my texture
F. I know that. Holy ****. Okay, that clearly
shows some good anglage. So good angles. Yeah, we just kind of
want to do that p here. And give it this guy. No. We're in the
danger zone right now. Danger zone. Wow,
I don't like that. We just want this.
Delete. Connect. Did it connect? Okay. Nice. Okay, good job. It looks similar to
what we're looking for. It's gonna need some
tweaking, of course, but we're on the right track. If we give it this. We just want that little
lip. It makes a difference. It really does. Doesn't that doesn't back spacing
a lot, okay. This goes up to here.
This is clean, hard edge. Boom, boom, we're gonna hit
this. This is pretty gradual. We can keep it kind
of hard for now, but it does look like it kind
of just kind of folds into here. Folds into there. Up like that, boom, boom. This is a nice clean
angle, as well. We can go and just
kind of morph it. Morph that. Go into here. We do kind of want We
do want this kind of, we want it to come
into there and then, like, become this. Yeah. What happens
if we do that? Um, Okay. We do this. Oh, I don't think that's
we want this flow. We want the flow to be
kind of through here. And then get that in there. It might not even need
to go that far in. It just needs to kind
of funnel into it. Um, I just needs to funnel in. Just the flow has
to be good enough. While we're at it. We can kind of push
this in a bit more. Yeah, I don't think this
is necessary. These guys. This is something we could
come back to, as well, so it's all it's
not all dead here. But just for the sake of
marking that up, let's do that. Okay, we got a nice we got the gist of it. The gist of it. Okay. This piece has potential to. So I know, one thing
that I did do a lot was sometimes a cool thing you can do with these types of, like, angles is you can, like, maybe not this one, but sometimes if
you pull it down, it just bakes better, but I don't think it
as of right now, we can cross that bridge
when we get to it. But yeah, it's kind of hard to see, of
course, now, right? But get what I'm saying, I hope. Maybe not 'cause I
don't make any sense, but okay, so this
shows this shows here. So if we push this
out even more, that may be the move. Push this out even more. And it looks like we can
almost even just extrude this. Just go for the extrude. Just something like this. Push it out like that. Hold on. Now, why did I do that? To be visible. Yeah. So we
want this to be visible. Now, we push it out.
We can just do this. We don't need to
extrude anything. Nothing needs to be extruded. This angle does have to
follow suit, though, so it does have to be like this. So we may have to do something about
that. Definitely, yes. We want this part. We want this piece
to be visible on this side because it's
currently lodged in there. So overall width could be
a factor where we just go. Overall, we increase
the whole thing. So that would mean
along the lines, 'cause we like our
current proportions, but we're not seeing
everything we need to see. So something currently
like this, let's try that. Width of grip is a great indicator of
what we're dealing with. Is a good one. It
looks pretty solid. I think ours might be
maybe a little thicker, to be honest. That
looks pretty accurate. We only got one, two bebles in, but for the most part, it looks accurate. Um Yeah. Looks pretty accurate. Okay. So we're gonna have to get
width from a different spot. Um, That side shot
was really good. We look on this here. We got all this. This goes up. It goes up again. It looks pretty accurate what
we have to be honest. Oh. And, uh, It does almost look like, you know, this this fits, but it's it's all tight. So what's the size we got going? Mmm.
11. 09 Creating Our Blockout Part8: Okay. So these this thickness
here looks pretty accurate. Our problem is we
need to make space because our exact this guy
still needs to be seen, okay? Long story short. That still needs to be seen. And we need to get it to
the point where, you know, if we do this, sure, it's seen, but it's not it's not
accurate to the actual gun. Um, Yep. That. And then yeah, so if we
pull this down, I mean, we're looking at A, we have to maybe adjust
these a little bit, it's a little bit overlapping. So one thing we can do, just a quick scale
on the x and y. Something like that.
It just has to be bigger than the barrel barrel. You can see there's
a size difference. As long as we keep that
size difference noticeable, which it is still in my
opinion, we're good. So that's there.
We have room now, a bit more room. Uh, yeah. So this in up with that that as you can
see this part here. This was the whole issue
that we were dealing with. So we're just gonna bring this, we're just gonna
bring this down. Up. It's gonna sit here. So, it goes boom up like this. We got the up part up
to this quarter here. And then the corner up to this. So, this part is
not gonna be seen. It will be buoyed away. So we should just be able
to lower this a little bit. Just to kind of keep
it in play, keep it. And now this part. This part needs to
find a way up more, but it seems like we're
struggling to fit it correctly. It should be, like, right here, but it just doesn't seem
like it's like that. Yeah, that might
sickness wise, though. Like, I mean, it just
seems like it's, this is definitely no good. Yeah, so as far as stickness goes, we want it to be able
to hit that find. It needs to be it needs
to be on that lip. It needs to be here. But that's not possible, this is This is where
it stays, you know? That's where it's gonna stay, then we can move
this a little bit. Or at least let's see what that looks like
when we do do that. Can move it all. So if we move this down, you know, enough. What is that gonna take? What
is that gonna look like? You need to keep
everything else is in, so something along these lines. Like this. Looks good. Okay? So I think that covers
that issue that we have. And this is air tight,
so um yeah, maybe even. This is kind of what we're
looking for, I guess, yeah. We just need to look at
realistically where this is, and there's a gap. The gap is a little too big now, definitely. That is obvious. Um, Things we can do. Can raise it a bit. You know, we can't don't
want to move that. So if this is too thick, if we raise that
up back to here, just to go here is just to try and get this to not
be crazy, this gap. But this right now this
is a good spot, I think. And then this can
Oops. Also, this part. Just bring it down.
Yeah, this part. Just bring it up. Okay. Okay. So it looks like we tackled a
pretty difficult part here. I know. So good job. Good job. Good job. These go out
further than you think. Weird. Okay. O.
12. 10 Creating Our Blockout Part9: The sago right here. Wow. Look at something like this. H One thing that could be helpful before this is, I'm just going to
realign this a bit. Okay. But, yeah, give
it a couple more edges. Yeah. 'Cause it deserves more. We just want more edges
'cause baking will be easier. We don't have insane budget, pretty much, so this
is a no brainer. Scales it down to zero,
look kind of weird. Okay. That seems good. Looks a bit more
smooth than a bake W. Okay. Um, some sometimes, one
thing I'll do is just, like, I'll take this and this, just duplicate it, and then hide it because there's
always a chance you just totally f something
up, and you have to go back. And then trying to,
like, go back from this, of course, you can
just kind of cut it where it's just easier. Long story short, just to aid. I don't have to explain
myself to you guys. Give me a break. What happened? There we go. Looks good. Okay, we'll
eventually connect that, not yet. We also have this part here. Ah, this. Let's do this. Okay. Something like that.
Cool. This part. Now, that's established. Other stuff. We got
this pretty good. We got this to a good point. This part here? This is not. Yeah, this is nothing yet, so we ought to keep going here. Let's do that.
Let's cut this out. Let's establish this. Okay. How do we want to do this? I guess we can go. Let's use this. Bring it across. This this stuff is fun.
This aspect of it. I kind of like that.
Just making them booleans and whatnot.
It's kind of fun. Not gonna be exact. You know, this orthographic is not it's
not perfectly orthographic. It's just a good idea
of what we have. What am I doing? That I can't. We want to scale all this stuff. And just so this bevels normal. That looks good. That'll
bake good. A here too. I'd give it this. This go to edge mode. Hit C for Clamp. Yeah, something like
that and then up here. Go back to Vertex mode.
Something like that. Okay. Got that. Colate it. It's way over here. I'm actually just gonna go around
the the edges here. And, uh hit P. Delete that. Got this. Basically cleaned
it up for myself. I just did something, okay? Um, clean that up. This might need a thing,
but for right now, just extruded, set
to the middle. No, I just need to
get it back over. I don't know how
that got over there, but where you got
the middle here? Boom Okay, got to reset
this a bit. No problem. This also couldn't hurt.
Sure, something like this. Just give it a trial on there, baby. It's all this is. Um Okay. Yeah, this is okay. We just want different ways
to do this, right. Let's just mirror it. Okay. Y, bull. Put that go up there.
Bold. Okay, we got that. This part's got to go in here. Nice, we kind of set ourselves
up a little bit here. Then, yeah. Okay, so from here, this is all one
indent type thing. Uh, Here to here. We're just gonna want
to go from here, select the stuff. Delete it. Take all that, Tate
all this. Center it. Does any merging stuff, and then just merge it.
Merge it and move on. So we made that,
step one complete. This part, we got it
kind of like a lip. Similar to this, actually,
that annoying lip. So freaking annoying. Just establish establish that it's there. We're gonna make it. Okay, go back to the ifs. This part. Okay, this is the if you want to empty
rounds, I looked it up. So you just kind
of pull this down, and then all the
shells will come out. You can kind of cycle
through the gun that way. But, yeah. Okay,
simple stuff here. This cube cube it up. It's just better.
Alright, there. It doesn't look even. Like, it almost looks like
a right triangle. Let's see. Yeah, it looks kind
of like a right triangle. A little bit of free
styling is required here. It's kind of like
that kind of vibe. Kind of lines up. Scale it, then we can bevel it. Let's get this guy down first. Something like that. Okay, what's going on? They said Um I need
a clear view of it, so Ooh, this is tall, wow. And it's flat up here. Tall. It's about this
height, actually. Wow. So, let's just do the same thing
here, and Bolin yeah. Something similar to this here. Nice. And, uh we can tackle
that this way. We want to extrude
in and then X zero. Kind of. How badly did I mess
this up? I just happened. E X. S X zero. Okay, good. That looks
way thicker, Holy crap. Okay, it's, uh, looks like that. That looks crazy thick. Okay, it looks looks like
it gets thicker, as well, so This bar looks chill.
That bar looks normal. Looks chill. We
can even do this. Now, let's not. Let's
just leave it like that. But then this part, you know, it goes I totally is
dipping in like that. Can't even lie. It is. Let's get this in here for some reason. It's like that. Like that. Okay. Something like that. Then he SX zero. Bring it back up
just to show proof. Okay, that can sit there
for now, like that. This This is actually a bit more It's a bit
more not like that, for lack of a better word. What's this gonna do? That mess everything
up? Maybe a little. Well, let's just
let's deal with that. Okay. Nice. Is it on both sides? Looks like it, right? That
side, this side, okay? We'll do that. Nice.
This easy one here. Something like
that. Height wise? What are we talking? Safe? When it's safe. In that we're
on the right side here? Yep. So when it's safe, we have It looks, like, kind of like this vibe. Size wise, W we similar size or Looks a little bigger, but looks about the same
size, actually, so. And this is seemed it's uh Safety. Yeah, I mean, it would
go through, technically, but I think it
would make sense to just have two separate
separate objects. We're not gonna see it. That's why we're
not gonna see it. So let's just get this origin
back and then mirror it. Oh. Okay. Why is this guy. Fall off. Looks okay. Okay. Something like that. And it comes out here, too. How's this looking? When does it flatten out? Um kind of looks like kind of looks like,
up here, it flattens out. And then it gets, maybe, like, we're kind of close
right now, actually, so kind of close. We're not there. We're close. Gradual taper like that.
Looks pretty good. And then this curve here. Can we do that now?
What's the deal? Ooh, nice. So curves in quite a bit. We're talking, like, to the point where we
got to push that in, push it in, something like that. Something like that. And then that's kind of close. Not bad off the gun. Give
this guy some support here. Let's do this. Nice. We may have made a mistake though, done this too early. Um let's see what we can
do right now with this. This can actually stay. Then yeah, so this part we're gonna want this to all come back to,
like, here, basically. That part. What's
this look like? So it looks like clear, pretty clear right here's
the cut off for that. So we can I want to end there. Yeah, just have it end here, so we can actually how would
it be if we totally just, uh, took it out for a sick? Just this part, this part. Okay, this part here. Do we care about
this right now? No. That part. Mm. We could take this, as well. That wouldn't
be a bad idea. I'd be a good idea.
I wouldn't and then leave this.
We can take these. Okay, that seems good,
and we can adjust that. So we're gonna hit
P, separate it. We leave anything behind. For the most part, it
looks pretty good. So just to establish
that this is different, push it in like that, push this in even more,
it seems like, so something like that.
Okay, and then next part, we will attach this again. But for now, we're just gonna do our best to
get that shape we want. And then from the shape, we're gonna reconnect it
after we have what we ought. So try to simplify this the best we can. Simplify it. If we need it, we need it. We don't don't just for the sake of
clarity right here. Okay. So here, this roof is so good I
might just be annoying and Well, did I apply something? I just want it on this
side. I just switched it. Okay, so we want this
curve is something we want to get kind
of curved here, too, but it's mostly
flat on this plane. So I'll tell you, one of the first things we
can do is sorry about that. Just make sure this thing's not gonna I can support itself. That's the main thing here. So, the curve should
stop around there. Bring it down a bit more. And then this part
Something like that. Okay. Bring the chin a little bit. Good job. If we do this, let's
include this in here. So up to here. You know, I think I
messed up earlier, so I'm gonna just this is easy enough where we're not dead in the water
if I delete it. That's not the end of the
world. It is annoying. I will say that, but
that's part of T D. The D is annoying. Let's get this ref back in here. Well, so that that Mm hmm. If I bring this in that
part gets a little weird. Establish that bevel. And then this part here, it
kind of needs, like, its own. Like, if we just do this, sure, it kind of gets
where we're going. But it's almost like we need a booling piece in there
or something like that. Like if something
we could do that would because this yeah, this is pretty honest
the whole way up. So one thing let's
just try that. Yeah, that's probably worth it. We're gonna just
remove this piece and then try to establish
this the best we can. I don't know what's
going on there. Why have you a different color? Okay. That and then here Just super super simple. SY Z, S E or Z. Okay. Yeah, this is we're
just gonna make this try and make this
as easy as possible. Boom, leave that there. Okay. From there. Let's just, uh we're gonna scale this. This I'm not sure
what that's doing. So how does this look? Okay. Bevel acquired. To there? Yeah, it's gonna give
us that bevel we want, and then we can
just boolean it in. Okay, so probably to
right there. Boom. And then just to make it easy. It's gonna go so this part, maybe almost at the
end of this triangle. So it's a good reference. Right about there, we
want it to tape her out. Just tape her out. Stop. So
we can just go like this, bring it up a little
bit, like that. Or if we keep this
steady like that, this can be brought down
to become even again. Keep that like there. Okay. Something like that? Add another support loop there. Okay. I think we're good for
a test run. Is this good? That's Blinable. And then
it's got to be closed, so. Okay, connecting
the easiest thing. Okay. Yeah. Oops. So that we want
this to be smooth, seamless, smooth and seamless. So we can even just
bring this up more. It's all gonna disappear. So whatever we don't want, throw it in the
mix. You in here. We do want, like, so
maybe we can just Give it that piece some more height. Same with this.
Something like that. And then before
this gets boolined, let's establish maybe
one more line here, one more line here, and
then just pop it out a bit. That we're looking there. Adjustments probably
have to made up, but overall, it looks okay. Bring it down. This one on a Okay. Let's get some good
support as well. Union. And then just generally is it
meeting the shape we need? I would say, yeah, it needs a little bit of cleanup,
but yeah, it is. That's metal, supposed to
disappear. What the hell? Useless. Yep. So we want
this is the plane. Match it. Match this plane. These guys have to match that. Go up like that. Okay? Clear sharp, clean
up inside here. It's kind of annoying, but it's a good way to
get a good shape. Boom, boom. What's
going on here? Let's just redo this part. Well, Okay. And then from there. Nice. Crisp. So, this looks incredibly messy. Keep these lines straight.
That's important. Makes it a lot easier. In a case where you
got both lines, this is, you know,
that's all good, but that's mirror time. Nice. I don't know why this stuff
is so fun. It just is. It's probably not fun for you, 'cause I mess up
every 5 seconds, but it's fun. What can I say? I never thought
this would be fun. Match this a little bit better. Keep this line, though. Try your best. Keep the line. My pila just let's
leave it for note. And then what is this?
This should not. Let's get these guys up here. Uh, So we need this curve. These lines are needed.
This curve here. This part needs to close in. Um, so these lines here we
could look at our fien. Okay? Kind of do something like this. Alright. Yeah, this needs to come back, in that case. Reel it back in. Get rid of that
weird sharp edge. I wonder if anyone else has that problem. I don't know what. I updated Blender and
it just was like that. It's kind of annoying. You can't hit on blender,
though. It's free. The best. No Okay. Looks okay there. That defining shape we have, that's all that matters.
We have the shape. That's all that matters. This
is actually not a bad idea. Goods. Establish this so
we don't forget about it, we're F it up in any way. Simplify that part. Nice. Looking awful. Now we got to add back
in other parts, too. Okay. Add in a support type loop. Add one here, too. Nice. Trigger also. All right. Gonna let my head reset
for a second before I just automatically try
to go to the next step. That's what people cut out for. Okay. This part connected there. Hey, now this part also
needs to be connected. We're gonna boolean it,
so it doesn't matter. If it's perfect. These connection parts
are perfect or not, it does not matter.
Just get them in there. Up here, too, get it in there. Can fix it after. What's going on? This, this. Yeah, That can be added afterwards. This piece can be
added afterwards. Mm. Let's get this piece blocked out before you get any
boolins in there. What's that piece? Okay. So no All right. All
those points here. Mine The best thing to make at the
start. I'm not sure. I have no clue. Just
roll with it, okay? This part looks to be
pretty decent widths. So we're gonna cut
this part off. Cut that part off. F. Done. What is happening? Am I just not in this
when I think I am? We are we're swapping
details right now, totally. We can delete this for a second. Did I just mess something up? I definitely did.
Yeah, we want this. Alright, so we got that that. So Okay, see. The classic knife slice. Easy. Too easy. Yeah, modeling is it's like a constant problem that you
just have to solve always. And it can get kind of tiring. Can get kind of tiring. So width wise, this guy seems less wide than the
one we have currently, so good thing we
didn't booling it. But yeah, it looks like push it in
just a bit, just a tad. Just a tad. Something like that. And then this guy probably
push it in a bit. Push it in a little bit. Mm. Okay, this part has to line
up with this pretty well. Yeah, that's okay. Like that. This part has to be round. Like that. Um, yeah. And now we can add
the other part. It's probably, like, like this. That's the best way to do this. Well, we got all the
faces we're gonna need. Maybe extra Y. And then we can I it or a bool? Maybe a boolean would
be a better call. If we give this little
room, we can just, um, take this cube, maybe, make it its own
thing, shrink it up. Then, maybe that's the move. Something like that. Extrude it, and then we'll
just boolean it in afterwards. Something like that. X R
Z. Something like this. El What? Something like that. This guy looks okay here. This looks okay.
Okay, and do that. We have kept our mirror. Like that. 'Cause you're ripping
Bbbles right now. Dangerous. He doesn't
need one or she or the. Okay, apply that union. Generally, that's good. We could actually just to make life a little easier,
a lot of easier. Oh. Something like this. Then we'll union up nice. Yeah. Boom. Move this in. Move this in. Okay. We do this. We do this. Was this Ws Oh. Give it 28 RY 90. Gonna just establish this
point. Make it easier. Something like that,
how's this looking? So we can model around this. If these lines look
okay, then great. But, you know, just adjust
it however you need to. That's really what's important. Okay. There. So line wise, the
next thing we need. Yeah, it would be just you
could kind of see it, right? It's just kind of
like a just a line. But needs to be beveled. And then the corner
needs to be a bit more established. There. And then this actually
can go up like this. Established. Those lines. Yep, I get this curve does
not look like it should. So we're gonna work on that. Just getting the width out
is kind of my priority. And we should bevel
this, as well. Definitely. Okay. We
can add this guy, too. I there. Just make
it a bit bigger. Something like that. Okay. We're getting there.
13. 11 Creating Our Blockout Part10: Okay. So taking away. It's a good one here. Okay. Stand of that. See, clamp it. Okay. Go to kind of keep
this for a bit here. Keep this height. It does look like it's a bit on the decline at this point. So definitely. Yeah, this just looks like
a pretty basic bubble here. Pretty basic looking. We might be able to get away
with this just being one. Maybe we have to bid might
have to be with this. I just don't think I think I just didn't speak
English right there. So sorry about that.
Something like, yeah, something something easy. Okay.
14. 12 Creating Our Blockout Part11: Uh, Just continuing to
block this out. Best I can. Get these inlays,
helps with modeling to get stuff proportionally
laid out. It really helps. So Greg. This is coming along. This one is also here
we just kind of want to hiding. Something like that. Looks like there's a bit of a
it's not a complete bubble. It's like it curves up to here, and then the curve changes.
The plane changes. Last keep keep mindful
on that and whatnot. Just trying to get
this thickusUm in a good spot before I
pull the trigger here. M now, this is actually
somewhat of an important. Think of this as you're in
an FPV environment here. FPBThs was made for FPV. I can't speak, Sir. You
want this to be bebled, you know, pretty good. Enough where it doesn't
look latch gen, you know? I'm talking, like, when you
see these, it's important. You should I this
is for a company, which, you know, it's not. But if it was, you really want to try to make
sure that you know, it's hits that standard of, you know, being you know
what I'm trying to say. It's important. This looks
like there's a gap in here, you know, it looks pretty close, and this thickness
doesn't line up. So what I'm gonna do is just
try to push this in a bit. Um, yeah, try to push
it in a bit more. And then just bring us
up. Leave it for now. And then try to bevel it
again, see what happens. Something something like that. Okay. The shell here. And then, um What's going on here? This is This is no good. This is the wrong.
I've been tricked. I don't know if I'm
gonna delete this out of the mid yet.
That's messed up. Damn. That's annoying. After this tutorial just we
looking through the refs, cheese. This is a good one. Same thing, though, okay. Same concept. Can I bring
it down a little bit? Of course. We just nothing. Something like that.
Well, you want, uh lock it down. Okay, and now we're gonna
just utilize a let's do this. Perfect orthographic. How far out we talking? Not even at the curve. Something kind of like
this. Generate the array. We just want three of them. I wanted to go that way. So I just go until
boom right about there. Something like that. Actually, this looks like it
goes all the way to the end, so it starts on the right spot. So All the way? Yeah, basically, all
the way to the end. Could go on do. Alright. So it's there. This real we can
tifle at some point. This piece here. This is a
good one. Get in this also. So what am I looking at here? When I see this piece. This piece? Uh, I think
I'm looking at it. What am I looking
at here? This guy? I think so. Yeah. Are
you around there. Okay, so we can
just lodle this in. This let's use our this thing. Scale, why? Scale way down. It is a little bit bigger, as you can see, so hang it up. And do you want it
to just fit nicely? Just fit nicely. Scale why. Boom. On this, we're
gonna scale it out. Give it a little bit of
room, line this edge up. It's okay if it's a little
bit too scaled out. Totally fine. Um,
that's correct. Yep. It butts right up
against it, though. So. This all the
way pulled back. This sits just about in
the right spot here. And then this is
gonna sit right? Yeah, it's in the right spot. There's a piece here that
we have to make as well. And it's looking like lampces harder than I thought to find. Looks like the real
rail note of some sort. Is it this thing?
This right here. We 35 barrel extension. This this guy? No. It's this. But where the hock is this ship? I literally sits right next to this right under this.
It touches this. I think it's this. Site Base. I think so. Site Base sits there and system Base for the site. So in
order to make that. As far as this goes Sight Beach. This kind of links up
with that. Let's see. We were raising it a
bit that disc much. Okay. It's kind of sideways. That, that. Move it
along. This part. Definitely wanted to be noted that there was a
clear line year. So I'm just going my
best to establish that. It's pretty important. Okay. Yeah, this is a bit
of a curve, as well. Do This I'm using this rough. Yeah, it looks like they're
pretty close to the bottom. Using it as a race. Then
this rail was built in, so we're gonna have to
pump this part out. Yeah Okay. This part. Yeah, we're gonna still that in. But this is, like, the it's
the the This guy slides on, go back and forth,
keeps it straight. Um, So, yeah. Two of us to make
this. Just bring it back to roughly here. Why not go to roughly here. Okay, and then bring it out. Roughly looks like it's
kind of hiding under that. Maybe a little bit
more than this, but something kind of like this. Looks pretty good on this end. As we get closer here, it hides behind this. So it goes in, and then, as you can
see this for herem. Something simple. So it is indeed a straight
straight line. Okay. I think that this part
needs to come out a bit. So we're just gonna take this in this, do this. Just pull it out. Don't make
it too complicated here. Okay. Yep. Yeah. Yeah, I was great. Something like that. We go in. Realistically, we
want it to look like that, but then it just
looks so far in. So it just makes me think that it's just overall
very wide still. And this comes out in a weird, uh Okay, it's not crazy far. A lot of things look right, so I think we're still
on good track here. Yeah, we're still on
good track, of course. Yep. What's that worry
about with this? I don't want to be like this. It's a matter of I got
to fit that in there. Got the waist pretty good. Yeah, it's pretty wide already, so Okay. This piece here? It's like a looks
like this beach. This beach. I think it's this piece. Is this up a bit. Okay. This lines up with this here. Okay. We're gonna
match this first. Something like this. Then here we'll also match it. I'll have to pull
out a little bit. We can also, if we need to, just go up like this. I try. As long as we match
it, that's what's important. Okay. And then the ian he's missing. One, two, three. I'm just trying to fit
this proportionally. Okay. Quickly, we can do this. Uh, so we're just gonna
do wondering here. About this much.
About this much. Okay. Something like that. I sorry what's that? Okay. I can't leave
that like that. This one down here. Uh, it looks like a barrel. Let's see what do we got. Who's that looks. What could be these guys. Okay. Most part here. From yeah, like roughly a year. We could establish this edge
a little more, actually, but I just want to push
it out just a bit more. Up until maybe here. I want it to seem like it's
a very smooth transition. It looks pretty good. Try it here, even. It looks better, I
think. Okay. Looks like we got there by accident, okay? Let's do this first.
An insurance merge. There. There you. Got that general base down. Okay, this is looking
pretty similar to the riff. Pretty similar. I see this
little piece, too, it's fill. Looks like a little pop up. Okay. Okay. All. This is crazy. This is too wide. Am I crazy? This is way too wed. Well, actually, I'm not crazy. That looks okay, but
then this that's crazy. Oh, gosh. Funny. Geez. We can just cut it probably. I just cut this out. Would I hire somebody
to do this tutorial for me? Okay, Alex. Let's That's crazy. Geez. That looks cool
from this angle. Okay.
15. 13 Creating Our Blockout Part12: Mm hm. Okay, so I just did the
spacing for the rail. I'm going to boolean this. So basically, all I did was I looked up the space between
each rail. This is the gap. This is the space you should
have 5.5 millimeters. And then the space
from here to the next one from here to here is ten. That's
the space there. So with that information, we can we can set it
up pretty easily. But we want to try
to make this rail, so try. We shall succeed. We shall do. Huh?
16. 14 Creating Our Blockout Part13: Okay, so I just picked out this metric
measurement of a rail. W. So 19 millimeters,
baseline measurement. 19 millimeters we
want, boom, boom. Down. And then we're just
gonna try to adjust it to the real at this point.
Adjust it to the real. Once you get the baseline
measurement down, the rest is easy, so Okay. Okay. Looking for a top
one now, top view. Okay, it looks like it just
goes straight through. It's nothing special,
nothing fancy. Okay. Ooh, nice. Wow.
That really works. Yeah, it's fine. Okay. Okay. A, U Yeah. Okay. Same as usual blockout here. Just looking for the trigger. Oh, right in front of me. W. Yay. It kind of just
continues up like that. Something like that. Doesn't have to be exact.
You're crazy if you're gonna waste time on
a game ready model making the trigger up
you're exact. You're crazy. Not worth it. That's
all I gonna say. We just don't want people
to see it. That's all. That looks good. Don't want people
to see the back. You don't want the
player to see. That's all. Sorry. Simple blockout. Okay. Sometimes you can
just do this by hand. It's not a huge deal.
It's kind of satisfying. Okay. Is it worth this? Not
even worth it to do that? We're just gonna we're just
gonna make another one. And, uh, yeah. A. We can adjust that and then this Okay. A little bit of cleanup. Would I do force it
with the blend tool. Okay. This part Interesting. Okay. Yeah, this looks
like a mess, wow. Really? Yeah, just keep it simple
at the end of the day. Does not need to be complicated. Something like that's
definitely not. Try to keep it nice and
neat, as neat as you can. Sure. We'll add this
after and then the space. Can add that after? Do we have a This guy. Got that. It's kind of hit up
here a little bit. This is thinner. It just
doesn't look this thick. It's more so
something like this. Just get it unioned in there, and then this part just
kind of has to match, and then we're we're
living large after that. Yeah. A This is gonna morph into it, so I wouldn't worry
too much about it. This got to seal some stuff
off. Yeah, that's it. It's gonna no more
fright into it, so Okay. All right. On the center here. Yeah. Mm. That looks better. We want this to go
in, but perfect. Yeah. Okay, got that. Same goes with this. Looks to be the same size, so, so that was a mistake. It's the same size circle. Ah, great. They're pretty similar. I mean, might as well
just keep it. It's okay. That's one of the last things people are gonna notice when
they're shooting people. They should they're
in different sizes. That's prepped. I'm prepping it for the booling. So this whole thing. I just wanted to attach
smoothly. That's all. There's a curve here.
I think we can get that after, though. Afterwards. But Okay. That looks a little too
intense right there. I just looks tall. Looks tall. Okay. Yeah, with Bolins you just got a little bit
of cleanup after, but to get those shaped, it's totally worth it, I think, in my opinion. Totally worth it. That's good. Yeah, just as far as
connection points go. Yeah, we can connect these guys. And then here This part is the same height as this. Nice. This looks a little
smaller, and so does this. It looks more like like this, and then this looks more like h This guy looks
connected, as well. Kind of Ban.
17. 15 Creating Our Blockout Part14: It's rail here. Then from there. Looks like there's a little
bit of overhang, right? So bringing up to here. Okay. And then bring it down. To ab. Okay, it
looks about right. And the next thing we could do is Alright, duplicate this. Put this to zero, right, zero. We want to boolean that piece, and then we need to get
another boolean in there. Actually, we can probably Well, it looks like we already
got it set somehow. Okay, I guess that's fine. 90. Or 45. Probably something
close to this. Yeah, I want bring this
in. Give it a mirror. It can be easier to get the
proportion down when you have it when you're
booining a mirror. So you can tell this is off, but um, looking at
something like this. Something like this. Ah. More so like this. Yeah, that looks pretty
good. I'm happy with that. Let's call it a day. Won't waste too much
time over this. We do have to do this now. You already know what's coming. Good old mirror. Our Savior. Nice. Alright. Got that. Rail is basically done. Uh, it doesn't look like
there's a piece back there, but like any sort of weird. Actually, it does, so it looks
like it's just mirrored. So one thing we can do. What can we do here? Well, one thing
we can do forgive me if this is just
not not a good idea, but I've done this in the past. Kind of a new situation. So I'm gonna take this, duplicate it, make
it its own thing. And, uh, RZ 180. You already know
where this is going. Same thing. Same thing there. Just delete this stuff. And then just a simple
Yeah, that looks normal. Okay, we're gonna do
this again. Boom, boom. Apply it. RS 180. Move it way down here. He had to put it there. Okay. Apply this. Then we want to do Control J to just link them up. Hit that here. We just gonna try to get as
close as we can. Call it a day. Call it a day. Okay. Looks like we got a lot. We don't want this going
anywhere. Or this? Okay. And I knew there was, uh, this issue here. Other than that, was there anything crazy? I
don't remember. Okay, for the most part, air rails are good to go. Next thing we can do
is mark these up. So you just want to establish So let's wait. I don't get a clear view. These look to be pretty similar. Like, the same location,
I'm trying to say. These look to be in the same
location, different nights. For the most part, they
look pretty identical. I think it's it might be worth it to try to do the same thing. Something like that. Okay. This Okay. Oh yeah, it's probably best to we got to thin
down this side first. Select sharp edge,
chick or deselect. Into that. Yeah,
that's pretty good. And just make sure we have
some real estate to work with. We prep it a bit, give
it the edges it needs. It deserves. Okay. Yes, I understand these are
perfect, but it's okay. Alright, so you can
probably go ahead, and we should duplicate
this, as well. And then Just do this. And as for this, I'm not gonna
worry too much about that. This could easily
be a high polytail. So same with this. We're not even gonna bother looking at that at the moment. Not even gonna bother. These screws. Okay. We just need the screw
head, of course. Something like this is okay. And then it looks like they sit. You know, you can't
really see them. So, you know, put them
put them around here. Okay. And that here six. Alright. Got the array. This bottom rail is, uh, it's coming along here. It just looks plastic, so it
totally just looks plastic. Um, let's bang that
out right now. So G r, 180. We are going to start
on a fresh note here. It looks different,
so that's why. And then until when
here about right there. Right here. Okay. Oh. Looks like
I made a mistake. It at here. Okay. I'm gonna
choose this route. Get this separate for sick. If All right. So if we're looking at this from this angle, you know,
this is obvious. That sweep. It is built in. That is the thing
we should first realize. It is built in. So it looks like it's
missing one pin here. So an easy way to fix this. Is just do this, scale zero. Delete the face. Merge them. Delete the edge. This part is gonna remain for some reason. Merge. Merge. Okay,
so that's there now. Tata looks pretty good. Looks like it's
kind of angled up a bit more drastically, too. Let's see if there's
another angle. This guy is good. Good angle. Looks like it's kind of an
angle cut off there as well. So it might be another
one of those scenarios. I think this one had it, yes. Nice. Wow, pretty close. Alright. Looks like there's little a little line here. And it looks like the
obvious thing here. And that is that well, okay, one thing we
have to notice here. This is not the correct front
area, which is unfortunate, but Somebody's trying to set me up, giving
me a little roofs. False fs. Okay, still, this S Y zero. And then merge, go to face mode. Delete faces. We can keep that. Ah, yeah, let's just
keep it for now. Okay, almost done. There's a slight angle
here. Let's go 45. R 45 scaled on the X there. Okay, and we're gonna just, uh just to try to make
things easy here. Right in the center
center point, change this to the center.
Throw on a mirror. Scale it. Reigin.
What is happening? Okay. And then Something like that. Okay. Gonna take
this here like this. We got to check out
the front again. It looks like it's got
a little bit of, like, a little bit of a little
bit of room going. That cut off is right
around the breakpoint. It's looking kind of like this, yeah. Okay. Something like that.
Boom. Difference. I don't kay. Apply. We're just gonna move it back a little. Okay, looks pretty good. It looks like it just
kind of bleeds into this. It does. Yeah. These look lower. They look lower. They just do. They just do. I'm gonna delete this part out. I'm gonna fix this. Perfect. Make it a own piece. Okay. Just to get the general location back. Then we got to move it all down. Just down enough. Okay. And now we can do this. Nice. Okay, quick fix. All right. Back to this rail. We can just leave it
like this for now. We should fix this
first. I do this. Okay. Looks a bit more slender than that. Yeah, it looks like that. It almost looks like this part. Starts to curve, like, a little bit earlier than I'm thinking. So I'm trying to think if I
just pull it in like that. I'm talking it just a hair
earlier than I'm thinking. Just to give the curve
a bit more of a curve, but, you know, I think that
actually that looks okay. Let's keep moving. These right here. We
can take this on. These little stub parts. We can lay this part into. Six already set up, nice. Okay, just about this. Just like that. Boom. Alright. And now these guys we're
gonna want a bevel like this. Similar. And then
just a simple X. So making an X. So we'll go here. Cube.
Make our X shape. Um, we wanted to go
in about this for. And then RY 90. So
we do this guy. Okay. Okay, we got that? Go for another one.
Let's go for 24. Something like this. So we're punching all
the way through there. Okay, apply that. Well, apply all. We're gonna want re mirror this. And instead of
just deleting one. Whoops. That's exact. Okay. Good. And then you
can kind of see, see how it gets like
it gets deeper. From here to year, it's, like, slightly deeper. So just a simple
pull in like that. And then a top it off. It doesn't look like it'll
give us many problems, so good to go. Yeah, this was recorded
over multiple days. Some days, you know, I feel better than others, but I just find it
funny that's the case. A lot of the times. You can definitely tell anyone
who's watching this. Some day some days I just do not feel good. And
some days, I do. I feel much better
today than I did maybe the last recording. But it's just it's hilarious. Okay. This part. This is a rounded thing
this is normal detail. We have to etch this out, so one, two, three, four, five, six, one, two, three, four, five, six. My guess is six. One,
two, three, four. No. Where's this bad boy?
Right in the front. Very tip. Is it this one?
One, two, three, four. One, two, three,
four, five, six, two, six, one, two, three, four, five, six. One, two, three. Six. Okay, six, it is. Six, it is. Right on that breakpoint,
you're gonna get that. So let's feel it out
here a little lower. It's like, right about here. Looks a little smaller, and it goes all the way through. This looks This
seems like too much. Maybe Dural project. So check or deselect. That's a bit more what we want. This is a part you're
really not gonna see much. But we're going to go to empty. And then scale this. Normal cursor back to there. We're gonna go array
six, we decided. BbjectOfset. Tag this guy. And do math, if you can. I'm not that smart, though. Okay, so 60 or 60. Done. Okay. That can be set,
delete this guy. And then probably smart to
just do something like this. Protect those edges a
little bit, at least. And, uh, yeah, maybe here. And then, that seems good. Difference. Yes. Okay. Nice. Yeah, and we're gonna
adjust all these, like, little uh, you know, like this type stuff, make it not super perfect. That's all after. You can do
that literally in Marmo set, so that can be a super
last minute thing. This bevel is something
we don't have yet. And, I actually looks like
it's two separate pieces. But this here. Oh we're gonna just go
ahead and attach this. Make it Blinable. Okay. Yep, we can
keep doing this. Finish the job. Alright. Okay. Her We're gonna apply this. Apply these T two. Union. Okay. Just bring it back over. Eight, we got eight.
We got eight, folks. We got eight. Okay. Connect that and then here. Good. It seems I've
made a mistake. All right. And I'd here. Okay. Boom, boom. Quick. Attach here, why not? We got to get this curve.
We need to curve here. So one thing we can do
is just just do this. Curve curve Alright. This is like a perfect
perfect curve. And then up here is
a little closer, but still pretty far. Yep. Good old fashioned mirror. Oh, no. Alright. That looks pretty good. I'll tweak it a little
bit as we go on. This can even be a normal, but this little piece down here. What am I looking at?
Alright, let's connect this. And apply that put
this down too. Union. Cleanup crew inbound. First of all, we can do this. I always lay this cut just in case I had a new
geometry that hasn't been symetrified yet,
whatever that word is. Equal. Okay. Do that thing. Okay. Looking good. Success. It's part bevels. I think it's time.
Laying a bevel like that. All right. We're still going to have
to haul this out, too, so that step is
coming up, isn't it? I guess so. Et's mirror
this real quick. Well, it's not directly
in the center. Dice. Alright. This part. Also, you can see a bevel. A nice bevel. Nice. Getting rid of that sharpness. Alright. Started to look pretty good. I can really see the gun now, so good job, everyone,
making it this four. Um, it's not easy sometimes. I've gone through and still
do go through many tutorials, even as someone who
works in the industry. And my God, I will tell you. Although they're
necessary, I think, if you need to learn
something, you know, by all means, just
do a tutorial. But, man, they can get boring. It doesn't help that my voice
is extremely monotoned, too, so I sound like a zombie. But trying to think there's no there aren't many ways to make Tutorials
interesting, to be honest, but I guess just trying to
be like a normal person, talk about, you
know, just whatever. Trying to relate to
people, I guess. That can be good. And
most of this stuff, you know, there's a
lot of this stuff. I'm sure where did this just go? Right here. Oh. A lot of this stuff you
guys probably know, but, you know, some stuff
you don't, et cetera. So it is good to just
do a tutorial every so often, and, you know, I always was appreciative of
the people who could just, uh, do a tutorial. You know, you learn
from it, and then boom. This also looks so
equal. What did I do? This is gonna be the
This is gonna be the best texture
reg ever. Honestly. Okay, what am I
doing here? Perfect. Oh, okay. So we're
we're not too far go. Yeah, it still
looks pretty good. And there's a bit
of a alluring that happens here, so Boyfit. Boy fit right here.
Sneaky busted. From there, we'll go down. One thing we could maybe do here is G here. This is an experimental Okay. And then if we do intersect Slice slice and dice. Baby. Apply. I want to apply, please. Please let me apply. Oh, my gosh. Apply. Did not. Something happened. Okay, so basically all I wanted
to do there was just create something that
I did not need to do. I desperately want
to reverse that. Okay. Looks like we messed that up. We want to throw
this guy in here. But before we do that, we
want to beble this lad. Honestly, I have no clue what the hell I just did right here. I might just backspace
the whole thing. Don't try that at home.
Yeah, that was not smart. Okay. Take this from the
top until here. And we're gonna
beble it like this. About this much. This? Yeah,
that looks good. Do that. Distance, you know, the drill. And that's okay this
is kind of messed up 'cause we're gonna just
fix it in about 1 second. So What is happening? These sharp dgets just
great, great, great. Whoa. Alright. So now, this guy. Oh, it was this guy. This
is our guy. Our guy gal. Lock that in. We're gonna lock that in. Ah, it looks like we did that. Yk. A little bit there. Boom, boom. Boom. Okay, that's
the deal here. Good texture ref. Wow.
This is gonna be awesome. Correct. This looks worrying. This looks This looks
This looks as I expected. It can go into the abyss. Please travel into the abyss. You're no longer wanted garbage. Feel this. Same here. Fill please. Okay. Looks Bully now. That's the goal to
here, I guess, Union. Okay. Down wt yet. Apply. And we back. We back. Alright.
That's set there. Okay, so it looks like we can't even Oh, that makes a lot of sense
now. What the hell? You want your peace to
look like this, please. What has happened? This Delete. Redo. Okay. That looks more like it. And then the next
thing we can do is This guy got some space. This needs to be dropped a bit. I think everyone will
agree with that. This needs to be just
dropped a level. A way we can do that
kind of painlessly is we can just go
within the bounds of this circle here and
take all this stuff. I got to clean this up. And we just want to drop it. So we just want to drop it. Another another another level. So Yep, we just want to drop it. To there when I
drop it to there, we want this to
remain, and by God, we did it except it doesn't
look like a circle down. We're gonna have to
repair step by step. All right. This part. Lastly, Nothing yet there. We do want this to
kind of come out here. So that part we may have mistakenly
dropped mistakenly. Till there. So All right. All right. Just something easy. Something like that. Something like this. It's
okay to force it a bit. Just kind of get
that shape you want. Alright. This topology is
top to top tier topology. Can't find this anywhere else. Crusty knife tool. Okay. Alright, and then from
here, we just went off. Give this a booling Yep
we want that to join. Join. Okay. That's good there. As crazy as this
looks, it's still, like the topology that
it's even somehow. All right. And then here. Okay. Get that guy in there. Yeah, that this guy, as well. There we go. It's
looking real good. We want we want this
circle in here, so we want its
origin to be there, then we want it to be here. Make sure di
Something like that. Cats coiled up a bit. Pops out a bit. Okay. This gonna need a clean up run, but we get the shapes down. That's pretty important.
Shapes are down. Got 'em. We can't leave her
like this for now. For now. And we can actually
just 'cause I will most likely forget not. Just throw in, like, something. Something to remember
that this is a something hint at it. Just don't forget me. And I'm here. What
do we got? A nut. A bolt. Bolt. I wonder. Nut. Okay, okay. A lock nut. This looks
like a lock nut. I think I might be
right. Does not look like that. A lock nut. I think we should go with this. I think we should go with this. By the way, if you think, Oh, damn, I can't do this. Sam's an *******. This is
just a It's a blender add on. So it's just one of
these Wherever this is, where are my add ons. Bolt Bolt factory. Do that. Then you're chilling
with the big boys. The cool kids. Nice, clean. Yippie. Alright. One more thing here. Six Or 90. Or what to get here. Or 30? Genius. Bring hope. And then I just noticed that it was that's like what it
actually looks like. Well, I have to
really start showing the concept more or the refs. This is, you know, you get what I'm Get what
I'm looking at here. Scale down, scale down. Something like this insert Okay. Also, this bolt is too powerful. I do wonder Div count. Oh, that's what I'm
talking about, yeah. 20? Mm. Titch. Damn. Bm. The best screw ever square. Okay, it starts to look. Like, I guess this is probably. Okay. Like that. But here cylinder. Let's just do the same thing.
Let's see if it lines up. A 90. Great. Okay. Something like that.
And we can easily just normal put a normal
here for a thread. And then we're
chilling after that. So that being said. Okay. We're getting there,
folks. We're getting there one step at a time, here.
18. 16 Creating Our Blockout Part15: It's rail here. And then from there. Looks like there's a little
bit of overhang, right? So bringing up to here. Okay. And then bring it down. To a Okay, it looks about right. And the next thing we could do is Alright, duplicate this. Put this to zero, right? Zero. We want to
boolean that piece, and then we need to get
another boolean in there. Actually, we can probably Well, it looks like we already
got it set somehow. Okay, I guess that's fine. 90. Or 45. Probably something
close to this. Yeah, I want bring this
in. Give it a mirror. It can be easier to get the
proportion down when you have it when you're
booining a mirror. So you can tell this is off, but um, look at
something like this. Something like this. Ah. More so like this. Yeah, that looks pretty
good. I'm happy with that. Let's call it a day. Don't waste too much
time over this. We do have to do this now. You already know what's coming. Good old mirror. Our Savior. Nice. Alright. Got that. Rail is basically done. Uh, it doesn't look like
there's a piece back there, but like any sort of weird. Actually, it does, so it
looks like it's just mirred. So one thing we can do. What can we do here? Well, one thing
we can do forgive me if this is just
not not a good idea, but I've done this in the past. Kind of a new situation. So I'm gonna take this, duplicate it, make
it its own thing. And, uh, RZ 180. You already know
where this is going. Same thing. Same thing there. Just delete this stuff. And then just a simple
Yeah, that looks normal. Okay, we're gonna do
this again. Boom, boom. Apply it. R s 180. Move it way down here. I had to put it there. Okay. Apply this. Then we want to do Control J to just link them up. Hit that here. We're just gonna try to
get as close as we can. Call it a day. Call it a day. Okay. Looks like we got a lot. We don't want this going
anywhere. Or this? Okay. And I knew there was, uh, this issue here. Other than that, was there anything crazy? I
don't remember. Okay, for the most part, air rails are good to go. Next thing we can do
is mark these up. So you just want to establish. So let's wait. I don't get a clear view. These look to be pretty similar. Like, the same location,
I'm trying to say. These look to be in the same
location, different nights. For the most part, they
look pretty identical. I think it's it might be worth it to try to do the same thing. Something like that. Okay. This Okay. Oh yeah, it's probably best to we got to thin
down this side first. Select sharp edge,
chick or deselect. Into that. Yeah,
that's pretty good. And just make sure we have
some real estate to work with. We prep it a bit, give
it the edges it needs. It deserves. Okay. Yes, I understand these aren't
perfect, but it's okay. Alright, so you can
probably go ahead, and we should duplicate
this, as well. And then Just do this. And as for this, I'm not gonna
worry too much about that. This could easily
be a high polytail. So same with this. We're not even gonna bother looking at that at the moment. Not even gonna bother. These screws. Okay. We just need the screw
head, of course. Something like this is okay. And then it looks like they sit. You know, you can't
really see them. So, you know, put them
put them around here. Okay. And that here six. Alright. Got the array. This bottom rail is, uh, it's coming along here. It just looks plastic, so it
totally just looks plastic. Um, let's bang that
out right now. So G r, 180. We are going to start
on a fresh note here. It looks different,
so that's why. And then until when here. Just about right there. Right here. Okay. Oh. Looks like
I made a mistake. It right about here. Okay. I'm gonna
choose this route. Get this separate for sick. All right. So if we're looking at this from this angle, you know,
this is obvious. That sweep. It is built in. That is the thing
we should first realize. It is built in. So it looks like it's
missing one pin here. So an easy way to fix this. It's just do this, scale zero. Delete the face. Merge them. Delete the edge. This part is gonna remain for some reason. Merge. Merge. Okay,
so that's there now. Tata looks pretty good. Looks like it's
kind of angled up a bit more drastically, too. Let's see if there's
another angle. This guy is good. Good angle. Looks like it's kind of an
angle cut off there as well. So it might be another
one of those scenarios. I think this one had it, yes. Nice. Wow, pretty close. Alright. Looks like there's little a little line here. And it looks like the
obvious thing here. And that is that well, okay, one thing we
have to notice here. This is not the correct front
area, which is unfortunate, but Somebody's trying to set me up, giving
me a little refs. False fs. Okay, still, this S Y zero. And then merge, go to face mode. Delete faces. We can keep that. Uh, yeah, let's just
keep it for now. Okay, almost done. There's a slight angle
here. Let's go 45. R 45 scaled on the X there. Okay, and we're gonna just, uh just to try to make
things easy here. Right in the center
center point, change this to the center.
Throw on a mirror. Scale it. Reigin.
What is happening? Okay. And then Something like that. Okay. Gonna take
this here like this. We got to check out
the front again. It looks like it's got
a little bit of, like, a little bit of a little
bit of room going. That cut off is right
around the breakpoint. It's looking kind of like this, yeah. Okay. Something like that.
Boom. Difference. I don't kay. Apply. We're just gonna move it back a little. Okay. Looks pretty good. It looks like it just
kind of bleeds into this. It does. Yeah. These look lower. They look lower. They just do. They just do. I'm gonna delete this part out. I'm gonna fix this. Okay. Perfect. Make it a own piece. Okay. Just to get the general location back. Then we got to move it all down. Just down enough. Okay. And now we can do this. Nice. Okay, quick fix. All right. Back to this rail. We can just leave it
like this for now. We should fix this
first. I do this. Okay. Looks a bit more slender than that. Yeah, it looks like that. It almost looks like this part. Starts to curve, like, a little bit earlier than I'm thinking. So I'm trying to think if I
just pull it in like that. I'm talking it just a hair
earlier than I'm thinking. Just to give the curve
a bit more of a curve, but, you know, I think that
actually that looks okay. Let's keep moving. These right here. We
can take this on. These little stub parts. We can lay this part into. Six already set up, nice. Okay, just about this. Just like that. Boom. Alright. And now these guys we're
gonna want a bevel like this. Similar. And then
just a simple X. So making an X. So we'll go here. Cube.
Make our X shape. Um, we wanted to go
in about this for. And then RY 90. So
we do this guy. Okay. Okay, we got that. Go for another one.
Let's go for 24. Something like this So we're punching all
the way through there. Okay, apply that. Well, apply all. We're gonna want re mirror this. And instead of
just deleting one. Whoops. That's exact. Okay. Good. And then you
can kind of see, see how it gets like
it gets deeper. From year to year, it's, like, slightly deeper. So just a simple
pull in like that. And then a top it off. I don't want to click it
will give us many problems, so go to go yeah, this was recorded
over multiple days. Some days, you know, I feel better than others, but I just find it
funny that's the case. A lot of the times. You can definitely tell anyone
who's watching this. Some day some days I
just do not feel good. And some days, I do.
I feel much better today than I did maybe
the last recording. But it's just it's hilarious. Okay. This part. This is a rounded thing
this is normal detail. We have to etch this out, so one, two, three, four, five, six, one, two, three, four, five, six. My guess is six. One,
two, three, four. No. Where's this bad boy?
Right in the front. Very tip. Is it this one?
One, two, three, four. One, two, three,
four, five, six, two, six, one, two, three, four, five, six. One, two, three. Six. Okay, six, it is. Six, it is. Right on that breakpoint,
you're gonna get that. So let's feel it out
here a little lower. It's like, right about here. Looks a little smaller, and it goes all the way through. This looks This
seems like too much. Maybe Dural project. So check or deselect. That's a bit more what we want. This is a part you're
really not gonna see much. But we're going to go to empty. And then scale this. Normal cursor back to there. We're gonna go array,
six, we decided. Object offset, tag this guy. And do math, if you can. I'm not that smart, though. Okay, so 60 or 60. Done. Okay. That can be
set, delete this guy. And then probably smart to
just do something like this. Protect those edges a
little bit, at least. And, uh, yeah, maybe here. And then, that seems good. Difference, yes. Okay. Nice. Yeah, and we're gonna
adjust all these, like, little you know, like this type stuff, make it not super perfect. That's all after. You can do
that literally in Marmo set, so that can be a super
last minute thing. This bevel is something
we don't have yet. And, uh it actually looks like
it's two separate pieces. But this here. Oh we're gonna just go
ahead and attach this. Make it Blinable. Okay. Yep, we can
keep doing this. Finish the job. Alright. Okay. The We're gonna apply this. Apply these this to Union. Okay. Just bring it back
over. Eight, we got eight. We got eight, folks.
We got eight. Okay. Connect that and then here. Good. It seems I've
made a mistake. All right. And I'd here. Okay. Boom, boom. Quick. Attach here, why not? We got to get this curve.
We need a curve here. So one thing we can do
is just just do this. Curve curve Alright. This is like a perfect
perfect curve. And then up here is
a little closer, but still pretty far. Yep. Good old fashioned mirror. Oh, no. Alright. That looks pretty good. I'll tweak it a little
bit as we go on. This can even be a normal, but this little piece down here. What am I looking at?
Alright, let's connect this. And apply that put
this down too. Union. Cleanup crew inbound. First of all, we can do this. I always lay this cut just in case I had a new
geometry that hasn't been symetrified yet,
whatever that word is. Equal. Okay. Do that thing. Okay. Looking good. Success. That's part of bevels. I think it's time.
Just laying a bevel like that. All right. We're still going to have
to haul this out, too, so that step is
coming up, isn't it? I guess so. Et's mirror
this real quick. Well, it's not directly
in the center. Dice. Alright. This part. Also, you can see a
bevel. A nice bevel. Nice. Getting rid
of that sharpness. Alright. Started to look
pretty good. I can really see the gun now, so good job, everyone,
making it this four. Um, it's not easy sometimes. I've gone through and still
do go through many tutorials, even as someone who
works in the industry. And my God, I will tell you. Although they're
necessary, I think, if you need to learn
something, you know, by all means, just
do a tutorial. But, man, they can get boring. It doesn't help that my voice
is extremely monotoned too, so I sound like a zombie. But trying to think there's no there aren't many ways to make tutorials
interesting, to be honest, but I guess just trying to
be like a normal person, talk about, you
know, just whatever. Trying to relate to
people, I guess. That can be good. And
most of this stuff, you know, there's a
lot of this stuff. I'm sure where did this just go? Right here. Oh. A lot of this stuff you
guys probably know, but, you know, some stuff
you don't, et cetera. So it is good to just
do a tutorial every so often, and, you know, I always was appreciative of
the people who could just, uh, do a tutorial. You know, you learn
from it, and then boom. This also looks so
equal. What did I do? This is gonna be the
This is gonna be the best texture
reg ever. Honestly. Okay, what am I
doing here? Perfect. Oh, okay. So we're
we're not too far gone. Yeah, it still
looks pretty good. And there's a bit
of a alluring that happens here, so Boyfit. Boy fit right here.
Sneaky busted. From there, we'll go down. One thing we could maybe do here is go here. This is a experimental Okay. And then if we do intersect Slice slice and dice. Baby. Apply. I want to apply, please. Please let me apply. Oh, my gosh. Apply. Did not. Something happened.
Okay, so basically, all I wanted to
do there was just create something that
I did not need to do. I desperately want
to reverse that. Okay. Looks like we messed that up. We want to throw
this guy in here. But before we do that, we
want to beble this lad. Honestly, I have no clue what the hell I just
did right here. I might just backspace
the whole thing. Don't try that at home.
Yeah, that was not smart. Okay. Take this from
the top until here. And we're gonna
beble it like this. About this much. This.
Yeah, that looks good. Do that. Distance.
You know, the drill. And that's okay. This
is kind of messed up 'cause we're gonna just
fix it in about 1 second. So What is happening. These sharp dgets just
great, great, great. Whoa. Alright. So now, this guy. Oh, it was this guy.
This is our guy here. Our guy gal. Lock that in. We're gonna lock that in. Ah,
it looks like we did that. Yk. A little bit there. Boom, boom. Boom. Okay, what's
the deal here. Good texture, ref. Wow.
This is gonna be awesome. Okay. This looks worrying. This looks. This looks This
looks as I expected. It can go into the abyss. Please travel into the abyss. You're no longer wanted garbage. Fell this. Same here. Fill, please. Okay. Looks Boley and bull now. That's the goal to here. I guess, Union. Okay. Don't want that yet. Apply. And we back. And we back. Alright. That's set there. Okay, so it looks
like we can't even. Oh, that makes a
lot of sense now. What the hell? You want your peace
to look like this. Please. What has happened? This delete. Redo. Okay. That looks more like it. And then the next
thing we can do is This guy got some space. This needs to be dropped a bit. I think everyone will
agree with that. This needs to be just
dropped a level. A way we can do that
kind of painlessly is we can just go
within the bounds of this circle here and
take all this stuff. I got to clean this up. And we just want to drop it. So we just want to drop it. Another another another level. So Yep, we just want to drop it. To there. But when
I drop it to there, we want this to remain. And by God, we did it except it doesn't look
like a circle Damn. We're gonna have to
repair step by step. All right. This part. Lastly, Nothing yet there. We do want this to
kind of come out here. So that part we may have mistakenly
dropped mistakenly. Till there. So All right. All right. Just something easy. Something like that. Something like this. It's
okay to force it a bit. Just kind of get
that shape you want. Alright. This
topology is top tier. Top tier topology. Can't find this anywhere else. Crusty knife tool. Okay. All right. And then from
here, we just went off. Give this a booling. Yep. We want that to join. Join. Okay. That's good there. As crazy as this
looks, it's still, like the topology that
it's even somehow. All right. And here. Okay. Get that guy in there. Yeah, this guy, this will. There we go. It's
looking real good. We want we want this
circle in here, so we want its
origin to be there, but then we want it to be here. Make sure. Something like that. Gets coiled up a bit, pops out a bit. Okay. This is gonna need
a clean up run, but we got the shapes down. That's pretty important.
Shapes are down. Got them. We can leave her
like this for now. For now, And we can actually just 'cause I will most likely forget if not. Just throw in, like, something. Something to remember
that this is a something hint at it. Just don't forget me. And then here. What do we got? A nut. A bolt. Bolt. I wonder. Nut. Okay, okay. A lock nut. This looks
like a lock nut. I think I might be right. Does not look like that. A lock nut. I think we
should go with this. I think we should go with this. By the way, if you think, Oh, damn, I can't do this. Sam's an *******. This is
just a It's a blender add on. So it's just one of
these Wherever this is, where are my add ons. Bolt bolt factory. Do that. Then you're chilling
with the big boys. The cool kids. Nice, clean. Yippie. Alright. One more thing here. Six rY 90. Or what to get here. Or 30? Genius. Okay. Bring hope. And then I just noticed that it was that's like what it
actually looks like. Well, I have to
really start showing the concept more or the refs. This is, you know,
you get with them. Get what I'm looking at here. Scale down, scale down. Something like this insert. Okay. Also, this bolt is too powerful. I do wonder Div count. Oh, that's what I'm
talking about, yeah. 20? Mm. Titch. Damn. Bar. The best screw ever square. Okay, it starts to look. Like, I guess this is probably. Okay. Like that. But here cylinder. Let's just do the same
thing. See if it lines up. Now at 90. Great. Okay. Something like that.
And we can easily just normal put a normal
here for a thread. And then we're
chilling after that. So that being said. Okay. We're getting there,
folks. We're getting there one step at a time here.
19. 17 Creating Our Blockout Part16: Try to get this piece down. Okay. That didn't work. I just want to
straighten them out. And then, uh, from here, so this piece. That's X zero. Zero that out. And yeah, I'm just gonna do
this quick and easy. Quick, easy. To the point That's that. We're getting closer. We're
getting closer. This piece. Make sure it's
lined up correctly. Okay. Without this
reference. Left side. That's okay for sights. Pretty good. You can actually
take some off of this. Um Yeah, well, let's see that. Okay. I want this to be there. B.
20. 18 Creating Our Blockout Part17: Okay. Here, here. Just want to clean
this up a little bit. A. Looks like there's a
little mistake here, S. Was it some Yeah, it's a bit of a mistake. Um, so we basically want this part to be like this. And we want it to come out. Um, basically, just about to hear. Like this. Okay. Weird. Basically, we
just got to get this, this thing in the right spot. We need a bridge here. Nice.
And we need this roundness. Looks like we're gonna
have to just move it. So We do this. Okay. It goes all the way to here, though. Okay. That's what we want, but
then we do want it to be a little bit bigger. Also, it could be
worth it to do this. Just try and bridge that
gap a little bit better. That's right about
where we want it. Thickness kind of
matches up a bit better. Yeah. It is important. This is I always it's easy
to get reminded that Yeah, it can be pretty easy to
dig yourself into a hole if this type of thing you know, if you mess it up off the gun, it's sometimes not the
easiest thing to fix. But three D is all
about just, you know, improvising, doing the best
you can with what you got. That's really the
name of the game. That's about the width
we're looking for. Okay. Yeah, we can fix this. Don't worry about that. Okay. Okay. I think that kind of meet expectations
a bit better. Okay. Okay. Basically, I mirrored
the wrong side. So I'm just this part. I don't have any detail here, but it's here, basically. Got it. Good. Get that mirrored. Nice. Join. I'm just gonna mirror it
again, mirror it again. Just for the fun of it. I guess. Uh All right. That looks pretty good. Let's get one of
these put in there. 28. Seemed pretty good. Looks like we're
dealing with a side totally the wrong thing. Yeah. Let's scary. Put Math. What do we do in here? I'm too stupid. Oh,
God. Calc later. Where are you? Three, 60. Divided by six. 60? 60. Did nothing. 30. Why?
30. Books. Alright, 30. There we go. 30. Genius. Okay. Yeah, something like that. But then we got a
hexagon drill in there. Oh. Oh, cool. No. Cool, but no. Looks like we got a different
couch. That's always fun. Well, to be honest, we
don't even need all this, so let's just leave it at this. She looks like that. Pull it all the way through. To a difference pull. Okay. Okay. Yeah. Generate mirror. Okay. Oh, where it go. All right. So the shell here pretty
much just a shell. That sounds Yeah. Duplicated. Boom leaned. A Okay, we got that part. And then this, it has to kind of match the circle
that we're going for. So we're gonna have to tweak this to be a little
bit less rigid. Specifically this bird. It's too angular, and it needs to be
gradually gradually, uh you know, less steep. I don't know how to
say it. Less steep. It's a little too
steep right now. You know, we can do that by broadly speaking,
this type of thing. Okay? So if we I'm gonna
have backspace lot. Don't even copy
this. We basically need to get it to be
something like that. Um, something like that. Okay. This needs to be raised a little decent
starting point here. Start from here, can kind of climb down the ladder a bit, give it a bit of height. And we're just trying to
match it. That's all. Just match it the best you can. We're dealing with this angle, so this is gonna get messed up, but we can just normal scale
it again. Not a problem. Not a problem. In an ideal world, we get this the first time. But hey, nothing's really
ever ideal, is it? Okay. That was dark,
but it's true. It's true. But there's always something you
got to deal with. Okay. All right. Well,
something like that. And then we can
fix it like this. Get the normal base laid out. Okay, sometimes the mirror just doesn't want to cooperate. So we'll just have to redo it. Okay. So that's back. We can take a look
at this again. Curves down, and
then it's, you know, kind of a sin more of a sin Okay. All right. Looks to be a little
bumpier, too. Oh put a bevel in. Yeah, something just
easy. Easy for right now? You know? Okay.
21. 19 Creating Our Blockout Part18: Larry. Okay. Yeah, there's a gap. There's a gap. Or
the bottom here. And I know this
isn't the correct. This one ends. Yeah, there's a little
bit of gap here. It goes down kind of
right until this rails fell missed it by just a bit. All right about until there. Okay. Let's go Just stab a little bit ago a base here so we can
we can do this. Cary w. Union and then. Yep. Okay. Six might be worth it to just, just tried to rand it
at him more than I was. I can we could look at that. Guide. Okay. I'm going to add this No. Okay. Another thing that's
important to always do is whenever you can, try to try to backface
something like this in case you don't want any
light to be leaking through. You want it to be, like,
watertight, people say. So as you can see, like, it's not perfect.
There's a gap here. And it looks like
there's one here, too. So yeah, the goal is just
to not allow any lighting. I don't know if you
didn't know that. It's good to know. Point is. If you knew it,
great, if you didn't. All right? I can mirror
these guys. These boys. Okay. That guys over there. It's coming along pretty good. It's coming along, definitely. Hollow at this side. The snag. This tweaked down a bit.
22. 20 Creating Our Blockout Part19: Looks like these
are the same size. Roughly. Maybe not. No, these Okay. Yeah, that seems pretty good. No, try to prepare this a little bit, cleanly. Then our result will
be a bit better. It'll just be a bit easier to that **** together. Okay, that should
be good. Do that. Okay. I to keep these quads. Okay. Yeah. You want to keep
the link the same? Gonna have to make
some adjustments here, but I goes right around there. Then with all these. Yeah, we just need to get the circle. There's a circle in here instead of this hexagon, it's a circle. So best thing we
can do up here is, uh just line them
up the best we can. Okay. That's roughly done. Uh One thing that's important
to note is, like, here. So if we go up to
this area here, see it's that like
a little you know, it's got the thing in the thing. This thing. T one. Yeah, this stuff
needs it as well. It's got the hexagon within
the circle type of thing. Hexagon within the circle. So leaving a little bit
of space here is fine. Definitely, I want
to try to get it. Place. Okay, clean up a bit. So if we can do
something like this, we should cap it, actually. Yeah, okay, so that's
we can just do that. Easier than I thought.
Give me a break. It's 6:00 A.M. Here. I
can't think straight. I just got to find
a good size for this. I think I got it. Well. Let's Sometimes Boeing just doesn't want to work. Okay. It seems like this side, you know, the screws part. Makes sense. Makes sense to me. Um,
23. 21 Creating Our Blockout Part20: All right. We need a trusted piece here. Looks. It. Okay. This guy use that
fit in as well. Actually, it looks
to be the size. Looks to be that size, right? Do my eyes deceive me? A Alright. Now we're gonna place
it here. Insert that. Nice. Take this guy, duplicate him. Same old story. Same old story. All right. We're moving along. This is it's coming along pretty well. It's a good accomplishment. We can go ahead
and boooling this. Why not? Just take this. Boom. Um, Oops. Just enough here. Duplicate it. Boom. Safety. We want ours on safety. So lush lush you go. No shooting today.
We're on safety. Alright. I see. Yeah. All right. We're gonna just duplicate these and then edit
bring it all the way in. Not all the way. Pretty far in. Okay, and now Boolean. Apply. Apply. So we got that there now. Looks like the same type
of thing where it's just, you know, one side
is nuts, one side, bots right side has this looks like this side is the one that hold on. It's opposite. Okay. Put that in there. Like that. All right. So this side, we're going
to just apply our mirror. And then this side. We want some form of this Actually, There. Something like that. Really should optimize
this beforehand. P. I'm gonna do that afterwards. Yeah. But, uh Yeah, we don't need any of this. I'll do it once, and
then you can just scale time latch it, but W. T. Okay. That looks pretty good. So for this rail, we have
this and this mainly as. One, two, three. So we got this guy. This guy and on the third one. Right here. The circle belongs there. Looks like it is affected. Just kind of like that, though. And then another one
on the second to last. Okay. This one. Okay. Thickness. Shouldn't be too crazy. Something like this.
Duplicate that difference. Alright. That looks
how I want it to look for the most part. And then we're just
gonna cap this. We're gonna put Okay. Just for the sake of saving
time, keeping it neat. Throw that in there. Shrink it up a little bit,
bring the top down. And it's a round one, so we're gonna have to probably
scale this a bit. Oh. It's like that. A round one. Ooh. I didn't know
you could do that. No, that doesn't look
how I want it to look. Mm. What thing we could do? Is bolt. And then cap or dome. Yeah, that's no,
it's really not. I kind of is, actually,
yeah. Give it a shot. Okay. Sometimes it really is just
as easy as that. I do that. Alright. Something like that.
That's what we want. Alright, and then it has
a cap on it, as well. Before we booling it,
I'm gonna give it one more layer of protection
for the sake of our normals. Okay, that, I'm gonna just
throw a six on there. Good old six. Something
nice and simple. All right. Celta KSG. Okay. What about in
the rail here or in the butt stock? No screws here. It is kind of rounded. Might be worth it to give it a small boolean
or a small bubble. Just so it looks soft. It's always nice
when it looks soft. Well, that's good there. All right. And then this can be normal detail, don't have
to worry about that. Um yeah. We should carve this
out at some point. Yep. This has to be carbed out for. So this thing fits in here. That's where that's gonna fit. Okay. Oh Alright. You got that Bolin out. Get these attached. All right, so Yeah, it's just about the right. Height, these are, so
can you even go up a little bit? Can I, though? Not really. Not really. Alright. Cthing like that. Um Okay, nice. And now from here, not yet. Scale on the X. This looks like an
actual hex Hix dilemma. But then if we look
on the other side, that's hex, and then it
looks like just nut okay. So we can just go right from
the gun with our guy here. Eight. We're gonna need this
to line up some stuff. Okay. This two, this guy. Alright. Looks like it's pretty much
towards the perimeter, so for the sake of our bake, let's just shrink it a bit. And, I mean, let's just scale on the X a little bit. Okay. That, boom. Something like that.
Connect them all. And now go to the center here. Get a center point. The rail looks awesome. I really like the
look of the rail. All right. So before that This is good here. I'm just gonna take something like I'm gonna take this guy. Duplicate him up to here. Gonna optimize him real quick
and then get back to it. Pull that out. Okay, so All right. Okay. Oh Alright. It's almost even worth it to
make an executive decision. I'm cutting you up. Get rid of those cool, although
useless threads. They are utterly useless. Base that. Okay. And then extrude in. Okay. I'm gonna just go ahead and
replace this afterwards as well. Extrude out. Oop. Alright, look
pretty good to me. Don't even need this. We're not even gonna see it. So it's a pain in
the Rs to even wrap, so it's just totally
not worth it. New and improves. How do you like me now? Nice. Size. Oh, All right. Nice. That looks a lot better. Okay. Yeah, I'm gonna want
to do that with this, as well, so sad. By all means, just, uh, speed through this part.
You know what I'm doing. Okay. Hey. All right. Pretty
good job there. This thing's coming
along pretty good. I'm gonna just save this
for the sake of saving. Alright. Yeah, it's coming
along real nice.
24. 22 Creating Our Blockout Part21: Okay. Right up until this
point here, so But Alright. Oh. No. Yeah, something just like this. Okay. And now, it looks like there's
some sort of peace here. Some sort of peace we
want to establish. Something simple
like that for now. All right. And then here again. We got another bit of
a longer piece here. Alright. This piece. Try to get the scale pretty good. Oops. Yeah, we just need a pivot now. No. Noticing these are a lot
smaller than the barrel, and they're closer together. So I'm not exactly
sure on the logic there, but it's okay. At this point, it doesn't
really have to make that much sense, of course. It's always good to make sense, but it doesn't have to too much. Not too much sense, just enough. There's still a pretty
good gap there. Yep. That's just what we'll do. That's just what we'll do. I'm trying to find that piece. I think these are some of them. This piece makes sense. Oh. Hmm. Okay. Well, somebody
else found it, screenshot it. Stop it there. I didn't find it. I didn't find it. Okay, so we need this to We need this to be flush. That's what we're
dealing with here. We also want this here. Duplicate it. Okay. Actually, what's All right. We're getting there.
We're getting there. I go to float. We're not going to
get too complex here. It's a waste of your time. Alright. Okay. Duplicate P I'm gonna give this a little
bit of room here. I'm not spending a ton of time
on this just 'cause it's, you know, it's a fraction of what you're gonna see.
It's not worth it. But just getting the
basics of what I'm seeing and just doing my
best to recreate that. That's all. And then I'll
add one more thing just to Just super simple. Nice. Okay. And then whatever this is. Uh, yeah, that's fine. Simple. Looks like we have some
sort of thing here. Super simple. All
right. And then here. Okay. Yeah. Alright. Okay. Covered the basics there. We got a little bit
of a the leak here. No, we don't. Yeah,
a little bit. And this is a case
where you can you can just just do a simple, you know, make a wall. That's all. Nothing crazy. You're not gonna see
it. It's not gonna see you. We're chilling. For the sake of, uh, not bleeding through
anything, though. It's Let's go to Beble just
to get it out of trouble. Okay. Looks good to me. Gonna have to clear this out. At some point, but
other than that, it looks pretty
damn good, I think. O Okay, so I'm gonna
just take this. Take that out now. Actually, we all
want that. Collapse. Collapse. Right. Tough to like this. Yep. Alright. That looks pretty good. I mean, there's still a
little bit of work to do, but we get the basics down. That's the important
part. Good job. Let's still go to 50s. This is hilariously small. That's the deal here. There
should be that. Okay. Yep. Best way to deal with
something like this. Okay. And we're just going to
cover this up again. Yeah, we're gonna
just do this again. All right. Next
thing is take these. All right. Okay. It stayed surprisingly
symmetrical throughout this whole process. Alright. Inside is looking good. That was pretty
quick. Looks nice. This part looks a little
wide, but that's okay. This thing is looking
pretty sick. No gonna lie.
25. 23 Creating Our Blockout Part22: Thing. 249. Okay I Oh. All right. We're just gonna
keep it like that. And All right. And now, this is well I actually looks like This has a bit of a curve, so Alright. Looks like there's a little
bit of a bubble here, so we can do both
of these at once. Scale on the X. So this piece needs to get boolined and we're
gonna use this piece. Yeah. Something
simple like that. A. Okay. All right. Okay. All right. All right. It's all pretty basic
stuff, isn't it? Nothing crazy. It's
nothing crazy. It's all stuff we can do. All right. Little lower. Looks like we're
going way lower. Something like that. Okay. It's kind of deceiving.
They look like hexagons, but I mean, the other side is the that's the part that gets that's where the nut
is on the other side. Here, that's the hexagon. Yeah, you got to be able to
twist it out somehow, right? That's my logic. Whoops. Okay, next would be here. Alright, we're doing
pretty good here. Gonna just save obligatory
spam save out of anxiety. It's coming along.
Internals look okay. I guess we can thin out
this barrel right now. Just want to give just
something like this. 'Cause that's great. We can just do the
whole thing, huh? Extrude scale, Y,
zero. Scale, Y zero. Mesh, delete face. Delete edge. Okay,
echoes in now. Yeah, we want this
to be able to to go. The whole point of this
is Boop boop, pop pop. This way or that way. You know, it just it's a
double barrel loading system. So it's pretty self explanatory. Pretty self explanatory. This can be a normal detail. Alright, we're just kind of we've really come
pretty long way. Good job, everyone. If you've made it this far,
congratulations. We still have some work to do, but we're well on
our way to victory. Well on our way. We're doing good. Um, I'm gonna leave
this part out, too. I guess we could just
extrude it in, right? Technically, we could do that. Um, let's just play around with the first
sex, see how it goes. We can really kind of do
this mess around with it. Something like that. Well, maybe get a little bit inset. They we can scale it
in. How's that looking? Better, but now, hope, still no. Yeah, this happened. So the reason this is
happening is 'cause I should have done this booling
operation afterwards. What it looks like I waited. Um, I waited too long. Too long. These are the guys I want. Okay. Hit Oops. Yep. Okay. Kind of this thing, this
type of leave it like that. And then just get a quick booling in here. Okay. Might have to do a little
bit more work in here, but for the most part, it
actually seems pretty nice. Pretty good. If we go back in here, we can kind of just
define it a bit better. Want to be a bit taller. This can be a bit
more aggressive. Yep, there's a bevel there. We can hit that in a second. It does seem like
the whole face is kind of squished in
a bit like that. This part is kind of
going up like that a bit. This can be normal detail. This riveting. It can
be normal detail. Yeah, then we'll
just edge this part. We're gonna do this. That Okay. I'm here. 656, six, just six. X 90. Okay. Quick booling. In and out. Okay. These look to be taller, more towards the front. Bring them down a little bit. Okay. Can normal this, too. It's
just not worth it to have it. I mean, it's not if you see
it in a reload animation, that's the only time
you're going to see it. Some sort of like a weapon
inspect you might see it, but it's not worth the glimpse you're going
to have, you know, it's it's not at an angle
like this, you know, where you're going
to see this rail literally every second you're holding this weapon in the game. So it has to be perfect, has to be, you know, defined well and whatnot. You know, like this curve we
should bump up a little bit, add like a couple
more edges to it. Because it's in
the line of sight. And that's the
important part when you're making a
weapon for a game, you got to make sure
that the parts that are going to be seen the most
have the most definition, the most edges to them. So that's one thing we do when we finish our high poly and we go back to prep for our UVs and make
our low poly model. We go back and we really
just try to make sure that the edges that are going
to get the most showtime, the most screen time have
the most detail to them, the edges, the details,
whatever it is. Whatever you're going
to see, we want to make sure it looks the
best it possibly can. Oh, so, yeah, that's
just important to keep in mind when you're It's one of the big
points you got to hit. It really is a crucial step, 'cause if you miss it, you
know, it's a big miss. You notice everybody notices it. If you miss, everyone
knows you missed. First thing, people notice. Oh, this looks low Poly. I wonder why. But
I wonder why. Oh. Oh, I guess I should have, uh, not done that. You get the point. Okay, we're gonna bring this down here. D, it's flush. This gap doesn't seem nearly
nearly the same. So I'm gonna bring
it down to here. We're gonna also
bring that down. This guy. Same thing.
Bring it down. And then here we're gonna just
bring these guys down too. Just so they fit fit correctly. This is the detail
we should get. Okay. It actually looks huge. This part. It looks way
bigger than I'm thinking. Mmm. Well, if we bring
these down again, I'd say we could get away with it right there,
right about there. But that just means we got to
bring everything down kind of Is that right about here. Overlapping, probably. Okay. Yeah, as long as
it can cover, you know, this, as long as it can do
that and block an entry, that's all we want.
We can revisit that. But yeah, okay. All right. So we're gonna want to
make this four grip. It's time. Come on. Generate mirror. A little bit of cleanup. All right. Can do
that. Let's do this. Keep it quad. Nice. All right. Why? Got a little bit of room. Okay. Up to here. So we just go
straight from here. Scale it on the y, so at zero, right to the curve,
right to the curve. Okay. Gives us some space we can
try to get this going here. Just start attaching it. Honestly, one, two. Get some get some stuff going. Let's make some stuff happen. Whoops. This guy. Alright. That's still rough. Got this guy. Okay. All right, so we get that base. That's kind of relieving.
We can get that over with. Um. Nice. All right. If we can actually just go
ahead and go up with it, we just want to block in
another normal or another, just another edge to lock
in our normal to make it. So you can't see through it. Just solidify it a bit more. Come on. Come on, guy. Alright. Perfect. Alright, right about there. Yeah, we just locked
that in here, as well. And then we're good to go. Should have done
that as one unit. Yeah, just connect that.
Just connect that. H. Alright. Okay. Looks good. Can I see you very far through? Yes. So we got a parent
that's that's the main goal. We're pretty close. Just I
think you would bring that up. This is the part in games
where you can kind of, uh just for the sake
of optimizing it, you can fudge it a little bit. It's okay. Yeah,
that's totally fine. Nice. Alright. Okay. Yeah, there's nothing, no. None of those back faces
showing. Here, as well. I'm gonna just give this a
little bit more love here. I throw it down
there. That's okay. Well, Alright. Now we can kind
of send this guy. Clean it up first, then we
can send it, uh, down there. Line it up. Get it out of here. See how close we were. 12. We got it. It's part EY. Okay. All right. We can go ahead and
connect these guys. And then same Alright. I've still got a little bit
of leaking going on here. Other than that, it looks
pretty solid. I'm liking it. That's looking really good. We've done a great job so far. Here. Okay. A
26. 24 Creating Our Blockout Part23: A I I I So
27. 25 Creating Our Blockout Part24: Alright, we're going to make
this aim point P. Okay, so we're going to just
get the measurements down and get that straight
configuration. So that's the whole
thing. Length is 136136. With 70. And then height 81. Okay, so next we just got
to fit this Fit this into That's looking pretty good. I say we should keep it at that. Okay? So this is correct. This is a reference block. Way in point. We can hide it and just model
away. We can go for it now. Cut these references. So let's just get the
body blocked out, right? Cylinder. We're just
going to go with 72. Okay. We can stir right here. Okay. This cap here looks a
bit wider than this one, so, we're just gonna upset. Alright. Yeah, it's one of those
things, remember, we want to make it air tight, so like both scale and the zero. Can always adjust afterwards, but this is a bit taller.
Looks a bit taller. Bring that up to there. Get some within there. Okay, and then the cap, as well. We'll add the cap. And the
cap looks to be a different. They don't look symmetrical
at all, so, yeah. Just a to there. Okay. And then try to get another angle here. This part here, this body part. It doesn't look like
a complete circle. Looks more like a bit
of a curve going on. Bit of a Yeah, it looks like a circle,
and then it kind of tapers up a bit
at the end, but Okay. So we're going to just use this circle to try and
establish this part. Okay, so it does look circular up until about the halfway point
about, like, this area. And then it starts
to go up a bit more. And this part is flat. So that can be established
pretty early on. Yep. It's got about this
type of space. That's much space.
And then flat. Do something like that. Okay. Yep. We're
gonna want flat nut Okay, we're close. We
just got the wrong. It's kind of
something like this. Just got to find the right one. Might be this guy here. Okay. Something like that? Yep. And from here, we're gonna
put this guy down here. Keep it watertight. Looks like this piece here. I'm not sure if it's
a separate piece yet, but keep it looking like that. And then we got I want
to keep this width from this piece or the like
the circumference. We're working. That don't work great. Well, that's
because of this. Okay. That's a little bit of a scale. This kay. Okay, yeah, this looks
smaller, to be honest. Bring it down there. We'll
raise that up afterwards. And, uh, yeah, we can do this. Oh, All right. And then same with this here. It looks like slightly. Yeah, it looks
kind of like that. Nice. Do this as well. Okay. This. And then the caps.
These caps here. They're trying to line
them up with this here. About the same look
roughly the same. Just got to cover this,
cap that cap one. This one looks a bit taller. Shape is a bit different. Cap that. Looks just a bit different. Okay. Okay. And then we just got to
get the centerpiece, which we can do by
duplicating this. And then from there, we can quite simply do this. Looks like there's a bit of a thickness there. Yeah,
it's rain about there. And then we're gonna get from
about here to about here. Is that first piece
we want to extrude? Extrude. And then our second piece. All right, about I'd
give this something. We can keep it like this. And just do that.
Keep it like that. Okay? And then from there, we're gonna just
go and Mirror it. Mirror. Okay. And then we got this part here that comes down
right about on this curve. It go see it, so a little
bit before the curve. I'll start. Yeah,
something like this. KX. Go. Maybe get one more in there. Okay. We're gonna just do this, just to get back on track. Alright. So we got that now. This part. Yeah, we're gonna make the caps and then flip them
up after that. Just makes it a bit easier. Okay, so this is one piece here. Try to establish
that angle. Check. And now from there gonna go to this bottom
part, duplicate it. We're just going to
erase all this stuff. Okay. And then this looks
like one or two pieces. Looks like some sort
of riser to give it a bit more height for these sights so they
can both exist. So we're just gonna keep this design for the
sake of copying it. Yeah, so it just
looks like to here. Looks like one piece there. Don't really need
a mirror for that. Okay. And then it
looks like we got There's something
simple like that. Okay. Okay. Alright, something like that. I ain't what. And then from here,
we're just gonna make a gonna try to make this here. Oh. Okay, yeah, pretty good. Did a pretty good job. As far as getting the height
established and whatnot. Good job. Alright, so this is a little funky. We can just delete this. And then, uh, just do this. Alright. Okay. Got that established. And we just get the
little this point here. And it looks like this
back part hangs over and it does not
look symmetrical. Alright. Oops. Yep. That right there. Just trying to find this
out get this guy. Yeah. Pure if. By it over. Okay. This gives us a
better angle to work with. Overall. This gives
us a better angle. Okay, so this is a cool
knurling pattern. I like this. So it looks like this part, uh, kind of extends out like that maybe until here, a little less. Yeah, it looks like it
just kind of extrudes out, and then we just
kind of give it a little bit more of a
push and then bubble it, and then it kind of boom. Looks like it's on a bit
of an angle, though, so, before I bubble it, you can just push it
down. Just a tad. Okay. So that's there. Um, and actually, you
know, before I do this, I should try to establish
this little piece here. It's kind of important.
It's a cool detail. It just sometimes that
stuff stands out, even if it's
literally just that, so there is definitely
value in doing that stuff. So it makes you stand
out, to be honest. So worked well thing. Okay? Maybe I pushed
it out a bit too far. I'm thinking this probably
is more accurate. Okay. Yeah, it
looks pretty good. And then right here,
we're gonna connect a a square a square. Give it a bewil cut it open. Okay, something like this. And yeah, following the shapes. That's all. Just following the shapes until we get something
that looks half decent. Okay, kind of like that. And yeah. And then we got a big
something like this. Looks a bit more. Okay. This right here. Looks like it comes up a bit
more like it sits on it. Pray bow And it's a bit
further out, actually. So it's maybe here,
locks it in there. And then here, we have this, you know, just make sure it kind of lines up how you want it to. This actually goes down a bit. Kind of a little space going. And then, that seems pretty
somewhat accurate for now. Yeah. Yeah, okay, I can live
with that from now. It does look like there's
something like this going on. I didn't want to mess with
it too early, though. Something you wonder if it's
worth it to do that, but, yeah, I'd say it is.
Let's see, it's worth it. Okay, we got that. And we're just gonna
attach the, uh circle. Not gonna give it 72, though. Let's give it 48, 'cause it's prime
time, you know? We don't want to
see any any BFs. We don't want to see that stuff. Yeah, this looks a lot
wider, doesn't it? So we can just do this
and call it a day. Yeah, the attachment point
is kind of it's floating. It looks like it's
floating a bit, so got to respect that. And then, but I don't have an orthographic
angle or anything, so we're just gonna scale it up. Jeez. And it is huge. So Compared to, it's
like this big seems. Jesus. Oh, looks like I Did I
put it on the wrong side? Yeah, it does look like I did. Oh, no. Okay, so this stuff. All this stuff, yeah. So, it's not the
end of the world. We can fix this by Let's try a couple of
things here. RZ 180. Looks like that fixed
that. Keep this. Now we're gonna shut this
to the three D curt RZ 180. Okay. Did we fix it? Looks like we fixed Yeah, it looks like we're
in the clear. All right. So next would be Next would be just keep doing
this. Get rid of this. Just kind of Yep, looks something like that. And then this kind of push out. And then we can push this out. Okay. And then here is some sort of thing like that. So the urling we're gonna
make a normal detail, even though it's prime time. Yep, we're still gonna
make it a normal detail. The reasoning is it's, you know, it's just a it's a lot of
poonsT make all that knurling, it just takes a long time. So, I mean, it's very heavy, so I don't think there's
much value in that. And then this is gonna be
this can be normal detail, or we can just separate
it into two pieces. This This could
be a cool detail. I'm gonna leave it out for
now just for a second. But it's easy hi
polydtail as well. So Okay? This looks so out
of place, well. It's 'cause this part
isn't punked out yet. So it looks like we got to just kind of push
this out a bit more. Just till it gets out enough
working. Grab on, you know? Looks like I already
got set out. Okay, so we got that. Um Yeah, something like this. And it goes down to about here. Alright. And from there, I'm
gonna go knife tool. I'm doing it. Be precise, but use the damn knife tool. Okay. Yep, something like
that. Then just delete this stuff
you don't want. Yep, what's wrong?
I was confused. Okay. Now that that's
established, that's good. And we can go ahead and
also establish this. Looks like it rage right
up to the point there. Got a little bubble here.
I'll just get out of the way. Nice angle. Okay, we're doing pretty
good at this point. Looks like this pushes
out a bit more, actually, so Um, let's actually let's try to
match this a bit better. So this just pushes out more. Something like this we can
probably get away with. And, yeah. Something like that. That doesn't look outrageous. That looks pretty good.
Alright. And then we got how many holes you got? Okay. You can get that
out of way, as well. Okay. Yeah, that'd be a
good indicator of the size. Right here. Let's just do 20 fours for this. I'm gonna be pretty small, so the edges are gonna
be a bit harder to see. Those imperfections. Okay, we want just
about that size. What's this looking
like? How close to the? They're pretty damn close. So we can go ahead and, uh, just kind of
leave it like that. I can't get over how big
this thing is, Jesus. Is this correct? It just
doesn't look right. It just looks way too big. Yeah, I'm just kinda doesn't
look normal, like it. Just a bit smaller. I'm bringing this in
a little bit more. Same with this.
Just try to normal. It looks crazy.
Looks outrageous. Alright? How many
we got here. Ray. Negative two. Put this in zero. One, two, three, four, five, six, seven,
eight. We got eight. We got to make start here, go here. Something like this. We're going all the way through, so it's pretty good. We can just establish So safety
points here. Every other. Just so you get
stuff to attach to. And it will make the booling
a bit easier to deal with. So, something like that. Okay, ready to go. Nice. And
then it looks like here, we got some sort of
thing going on as well. So we can tackle that, too. Alright. Well, delete this. I can. Looks good. Okay. Yeah, it looks right. Looks like slightly thick, T. Good to leave it
like that, I think. And then, uh, yep. Okay, ah, we got
a lot done. Well. Look solid. Come on. Okay, let's continue here. Okay, this is where it starts
to get a little dicey. It starts to get a
little confusing. So this type of thing,
we're gonna make that. And this cylinder. Trying to get a good
angle of this cylinder. It's a little tough right now, but um Okay. Okay. Yeah, that's really looks somewhat complex, so Okay, so just to try to get
this thing established, we got we got another cylinder. We'll give it a 36. Okay. O X 90. Get it on the web,
bring it down. We're just gonna bring it over. Yeah, we're gonna take a
little bit of eyeball. Um, you know, we should
just import this as well. This guy. Just line it up. Yeah, just smarter to do that. Um, okay. No. Look I'm just flipping it to the same to the same length here. We're gonna hide this for a
second. Bring this to fs. Call it Aim point. Left side, hide it. Bring this out. Okay. Give us a pretty good scale. Alright. Right about to
there, bring it out to there. Okay. Yeah, it looks like we got to bring it
way out here, though. And it's also on this side, so got a bump of that. Got to remember that. Yeah, it looks like
it's just kind of chilling right there. Just trying to get a
scale of where it ends, where it begins, et cetera. So it looks like we got a
general scale, which is good. And now we're gonna want
to establish the cap. Something like this. Okay. Got this cap here. And actually, something
we should do before this. I've learned this the hard
way a couple of times, but okay, so we want to select, check or deselect and see
experiment a little bit. So this actually looks
pretty accurate. It's okay if it's not perfect, but it looks pretty good. Yeah. Just keep it in and
do something like this. How does this bubble? Yeah, that looks pretty good. Okay, so we're gonna just go
around, select these edges. It's a pretty heavy piece, so get away with
the best you can. This isn't gonna be a
fully optimized piece. Like, like a fully optimized,
how do you say it? Model, it is, but it's not
gonna be like I don't know, how do you say it, pull us
to the wall type thing. Not gonna be all out, you know, like, make or break. Our studios closing if we don't if we don't get this
engine running smooth. It's not nothing like that. We're just I'm basically
just showing you guys how to make this stuff
quick, efficient. Later down the road, there's gonna be my favorite part is, obviously, texturing. I love texturing. I
could do it all day. It's my favorite
thing to do at work. Um, but just trying to establish some points here that you
guys can take with you. Hopefully, it'll be worth
the money, you know? Like I said before, I mean, really, some
tutorials, you know, they're just a lot of tutorials. Maybe this one
included, I don't know. Are boring as ****. They are brutal. Brutal, brutal, brutal. But you just need to do
it. Like, there's not really you have to
just do the tutorial. I mean, you can do it yourself, but at the end of the day, it's gonna take you a
hell of a lot longer. If you just bump
around by yourself, scouring YouTube, we've all been there. How do you do this? By all means, you can do it. It's possible, but
it is not fun. A tutorial, it's like
biting the bullet. You just get it over with.
You get it over with. And then you're done
on the better things. Wow, this looks crazy. Geez. Okay. What did I get myself into here? Geez. And okay. Something like that. I'm pretty happy with that. Yeah, just a combination
of Bolin, et cetera. That's all it is. We're gonna just bring this
back to earth a little bit. We're gonna scale it so it's
not hitting us too much. Okay, that's there. And, yeah. In a decent spot, as
far as that goes. We got to get this cap, as well. And this one looks
pretty different as far as what it's gonna give you,
how we're gonna make it. Looking a little different. I so yeah, I would say, might be worth it to
bevel that's beforehand. Yeah, give it a nice
bevel beforehand. And then we can just
go ahead and Hmm. One, two, three,
four, five, six. Maybe 15. Something like that. One, two, three,
four, five, six. Yeah, around 14, 15 slots. So if we do I don't think it as actually worth it to bevel it beforehand. We should keep it real simple. And, uh, yeah, selected. We have 18, so that's too much. Um, so 18 is too much. Okay, so one thing I
think we're gonna do is cylinder 12 Mm,
maybe it a bit more. 18. RX 90. Scale, Y. Scale Y. Scale, Y. Scale up. Yeah, something
like that. It Edit, bring it up, so the
origin stays the same. You got to do that in edit mode. Okay. And then from there. We're just going to kind
of continue that up. Got lucky with the
sides there, I think. Okay, and then array, we'll give it a
14 object offset. And then we're gonna throw
in a plain x it's empty. It's gonna get
messed up, I think. Yes. The scale is off, so bring
it back to the origin. Okay. And now we're
just gonna rotate it until we get I got to break
out the calculator again. Calculator. 360/14. Divided by 14 is 25.71. Great. Or, 25.71. About as even as we're
gonna get. Okay. Alright. Give it a test here. It looks a little too
deep, to be honest. So we can go ahead and do this. That's looking better. I think still might look a bit too deep. Um, I think a little bit. This is looking a bit better, I think. Something like this. Okay. And as you
can see, you know, we're gonna get a lot of uh, as far as the lines go, a little bit of
inconsistency here, but I think we got enough to make it kind
of still convincing. You know, you can see this. There are little incongruities, but I think that's okay.
I think that's fine. We're gonna continue
on like that. Just for the sake of
simulating as if it were, you know, the real deal. Okay, so S all there again. We'll give this a 36. O X 90. Okay, just for now,
go to do this. Boom. Extrude. Scale. I want my dad. Okay. Yeah, so we're gonna want scale it or whatever. And we're just gonna
want to get that look, you know? We want that look. So Play gonna
slowly bring it in, do this type of booling where it doesn't finish the job yet. Um. And yeah, okay, we're kind of Scale why? If we scale why here. Yeah, we can bring
it down a bit more. Okay. Um, a little bit more. Yeah, that look pretty good
cover the whole thing. Looks pretty seamless. Yep. I think that'll do it. Okay. And then just kind
of scale it to your proportion that you want.
Looks kind of big there. I did that little scale down. And we're just trying
to gauge, you know, this height gap to
that height gap. It's kind of a good key to go off and you can see there's a little
rubber washer there. We can toss that in right now. Okay. So as far as the
washer goes, you know, 20, we can just just
duplicate this. Trying to keep it
look seamless, too, you know, B Okay. Skill. That's, boom. It C. Keep that bell real low. Hey, something like that
is gonna do just fine. Do just fine. Okay.
Nice. Coming along good. You know, Dad, some
of these stuff, too. Some of this stuff. And Yeah. It's looking like
this part here. Yeah, it looks looks flat. It looks pretty flat, so from
the point of attachment, we're gonna just try to get
this guy locked in first. Give him a 36 or Y 90. 36. Yep, he's about
that wide, that height. Okay. Can deal with that. Um, something like this. Okay. Yeah, and we're
just gonna want to basically try to bring
the center out here. From when do we want
this to be flat? We want this to go
up, and we want. So we're gonna want from here to basically here to be XYZ. Okay, don't have to worry
too much about the top part. It's more the bottom
that I'm looking at. And then Alright. What is that looking like? Zero? Okay. Yeah, something like this.
Something like that, and then we're gonna just
want to shrink this in a bit. Just a little bit, with that. Kate, G x. Gonna go out a bit. Okay. Yep, that's
there, that's there. We flatten it out successfully? Well, the next thing
would be we can see if we can kind of tighten it or is that gonna
just sabotage everything? I think that's pretty good. But we might be a bit big, so we can actually got to
backtrack a little bit. Yeah, it's more maybe
a bit more like this. That look some bit better?
Something like this. Okay. Back. And while we're at it. We're here already, so
flatten this guy out. We're gonna boolean this guy, so this line up,
something like this. We don't know how far
it's gonna go into. It looks like it kind of
establishes itself there. So instead of boolining a
square, we'll duplicate this. Isolate it real quick. Use our fellow knife tool, cut right through the middle. That out, Extrude it down. That's gonna give you a nice booling setup that
we should use. And, yeah, yeah. So we want it to be right
around right before that curve. Something like this, Boll, nice. Okay. And, yep, so that's that. Trying to line it up.
That curve. Okay. That's kind of like that.
That's how it is for now. And it looks like this part. Yeah, we're just gonna kind
of cut this open, too. We can just go ahead
and cut that out. Yeah. Something like this. Yeah, it looks pretty good. That looks like
this part as well. Yeah, some sort of this here. Nice. Okay. I delete finel. You have to make sure it looks a bit Orian No, I think it. It's all adjusting on the fly. That's really
what we're doing. We're just adjusting stuff. All this **** is
just on the fly. It doesn't look good, change it. It doesn't look good, change it. And then you just it's
good enough at home. L Because it's kind of
a fast paced industry, and if you can't take
too long, basically, if I had one thing of advice
here, you got to do it. Well, you got to
do it pretty fast. So if you don't, then bad stuff happens. Okay, scale that,
bring it there, there. And we just want. Bring
it in a bit first. Scale it up. Boom. I'm gonna want to scale this guy as well. Just that establish that, nice. Okay. Boom. It does
not look great. Oh. Looks a little. Let's This one's always good
for this type of stuff. That kind of lets you Let
you work it out a bit more. Gives you a couple chances, you know, then it'll rush. Alright, and then we
got a little oval here, which I'm gonna guess is
connected to this thing, somewhere, so it looks like we did a good
job lining it up. Pretty good job.
Okay. Get our oval. Keep that 20 pets. It's probably pretty good. Well, I 90 boom, boom, boom. Okay, one thing we can do
here is just cut this part, bring it out, set a mirror, and then clip pop it in. That doesn't look good. Extrude. Oh, yeah. Okay, so that's
looking a bit too. It's like that with. Okay, we just want this just
enough to fake it. We're faking it today. Okay. You gonna just keep this one. For some reason,
I have a feeling I'm gonna need it again, still. That's p here. Bring
that in, like, a Looks. Pop that in there. Okay, so we want to
establish Y C here. Okay, I see. Alright. There. And, you know, we might
actually just be better off, doing something
like this instead, so we're gonna just
take this out. We're gonna keep the shell. And we're gonna expan it. Okay, so extrude scale Y, something like this
and make it taller. In the scent there, we're
gonna put 28 is probably good. Scale this down. Got to think, how can I best make
the shape here? What's my best bet when it
comes to making the shape. And then you just do your best. Alright, so we got
that established. And then we get, boom, boom, boom. Cut that part off. Are we, though? I don't
think we should do that. I think I'm crazy.
I think I'm wrong. Okay, this Get rid of those. Okay, so we got right now, you got this part. It's good. And then we just
want these parts to kind of just fall
into place here. It looks huge. Oh,
yeah, yeah. Of course. Okay, so we'll try this here. Scale this up. I bring you in. Scale it like that.
Boom. We just want to try to get something
like this shape like that. So um, something like this. Doesn't look super
smooth right now, but we're gonna want to Uh, yeah, so it totally looks
like I messed something up. Yeah, I totally did.
So gonna move that, and then we need
to just move this. I don't know how that
got by me, but I did. Alright. We're gonna chancel
this out, collapse it. Get rid of this guy. He move
all these guys kind of up. He right about there.
Right about there. It's true then and then
give that the Bool. Didn't work. Well,
it did, yeah. Okay. Yeah, something like that we're gonna be looking for and then. How this guy kind of great
where we want him to be. So just scale it
up, to be honest. And we just wanted to
fit in a bit better. Something like
that it's perfect. You can make that
work. T you got a good piece going. Okay. Yeah. Yeah, that's fine.
Keep it like that. Keep it like that. Then just running
with the knife. Just running with
the knife. Okay. A little bit of cleanups
probably required, but other than that, you know, it looks looks pretty good.
It looks pretty good. The site is huge. Wow.
Did I make a mistake? This This gun looks
pretty solid. I'm pretty happy with
this. I'm proud of this one. Not bad.
28. 26 Creating Our Blockout Part25: But radio. Mm. One thing that
we could do here bully that, and then we can
we can probably just do this. Okay. Okay. This part, we're
going to use normal. You bet like that for now.
We got this piece in. Um, it looks like there's a
similar type of piece here, but it's not rubber,
it looks just metal, so we can we can still use this one and then just shape
it differently. Okay. Looks like it kind of matches this. This shape. All right. We want to morph these together. Okay, are we gonna
need to do this? Oh Okay. So actually, if we want
to use this in game, we're gonna just go
all the way through. All the way through. Make the whole body 'cause we're gonna want to
look through it and shoot. Okay, so we're going to go ahead and try for
this piece now. Just trying to get
a good idea of when when it starts to kick up. That's all. Okay. That's too much. Mm, it's almost there,
I think. We're right. It's gonna take a little
bit of eyeballing, so yeah, I think
this could pass. So if we bring this up Um, yeah. So we're gonna raise this
whole thing up about to hear. No. Okay. I was like a uh It does look like this kind of
tapers off into its own, uh, you know, so something
like this happens. It's looking like
it on a kind of maybe and Something
like that is happening. Yeah. Okay. I'm here. Something like this. Spring it up to
there. Like that. Okay. And I'm starting
to think that maybe we shouldn't be nearing Let's Okay. So B. And then we just need a curve
here so that make it curve. Okay. Well, that curves, but we want a little bit more. That's good right
there. Nice chop. Then there's a slight beblee Something kind of like this. Okay. Alright. That part's good. We got to put in
the bool this part. We got to round this off a bit. And then there's
a little lip here that we got to take into
account that we did not pray. So that's where the candle this would be this Okay. Yeah. I'd have to do
something like this. And then it just goes out more. So Yep. Alright. Okay, something like that. We can trace over this Okay. I just kind of stamp that in. But I think prior to that, we should establish this one. So I just do this basically. All right. Alright. Hi out here. Yeah, I just want it to be basically thinner
this thinner. I was saying this
one go a bit of it. Something like that. Wings caps. Give it a bible first. Trying to establish that basic
form before anything else. And then we can ten
by some match in you. Nextran. Pull it over, do this first.
We're gonna pull it over. And we just wanted to
line up with, you know, right around there.
Can't be a bit higher. And we want to curve it. Alright, go to there. And we're gonna do this to him. So. It's from there. Pretty close, pretty close. Something like this. Right Yeah, right. It looks like there's a bit
of a inset going on there. And then it's got
those two tabs. It's got those two tabs. Yep, almost looks like we can. First of all, let's just
wear it really quick. Mirror. You know, we're
gonna just take off one of these because
as you can see, it's clearly thinner
than I thought. Okay, that's pretty painless. Then we can Yeah, it was a pretty s one. We got to add the kind
of, like, this thing. Add that circle. Get to 12, something like
that. Something real light. Okay, we're in there. For the sake of
lining everything up, let's just try to
make this long. Okay. Yeah, that should work. Something like that? Sure. Just straighten it out
again. You should be good. God. Realistically, it's about that wide, so we should just Do our best to make it look
how it is in the roof. This could be, like, a tad bit wider. Got a little bit
more left to give. Boom, nice. Something like that. And then this Okay. Looks good. This This could even be normal. And then these little
flared things. Okay, so from the bottom, it's looking something like
this kind of etches out. Little flare. Bring it in a Ted. Okay. Yeah. Yeah. We're gonna have to
go to nom up here. Skeleton on the Y a little bit. And then we can reach Yeah. A little slap there. There. Hmm. Yeah, it's almost
like we want to get this kind of a look.
Yeah, something like this. But I think if it was, uh the show was just
down here instead. It's gonna take
something like this. Get out of and devil. Okay. It's gonna be two there. And we'll go
something like this. But then we want to reconnect. These guys want to
reconnect these guys here. You can hip it. And
then from there, we can do this stuff. Lock that in. And
then we can bring this bring us to,
like, here, ditch. Something like that.
Bring it to there. Okay. What can I want? Yeah, just try to set it up. Tell these vertexes, for the
seas, whatever they are. They just got. They have
a chance in this world. So they have a chance
in this cruel world. Twisted I know I'm gonna delete whatever
is under this crap. Boom, boom. Dad, something like that. Something like that. Mm Mm mm. Something like that? I curio if we give it. Go back to Norman first
heck I tell you go. Freebll Is that legal? Can we do that here?
What's good to make. Freeblling legal? Yes, it is. Ten guess now. This story gets me assessed, but we scale it in. I mean, what's
that doing for us? And the pearl cows here. Yeah, it looks pretty good. Good shading. Yeah, okay. Nice cap. Got a nice cap there. All right. No mercy. Yeah. We can try to do this is. Kind of, if you can kind of, like, steal it inwards. Well, I guess that
is Oh, no, do this. Just do this. Forget that. Forget everything
you said. Whoops. Just forget it. At it? Good. Hey. Success. Fooling this cap was identical. But we don't live in that
kind of world where we make identical caps because stuff needs to work
a certain way. So we got a chunky one. A real chunky one, and this triangles messed up, and it's way thinner. Yeah. Looks like I messed
that up. Which is fine. Mess that flow. As long as you know how to fix
it, it shouldn't be good. You're just cutting
right down the center. Right to there. Nice. Bring that in. Bring this in. This is our cap, isn't it? Isn't it? Yeah. And you're gonna just, we gonna duplicate
this per around. C with the good
old G 180, Z 180. Scale it down so it
fits on the, this ****. I mean, stuff. This stuff. Scale it up again,
scale it down again. Scale it up and down again. Why not? Yeah, that
looks pretty good. And, something like that. Just not enough stuff
right there, though. Got to push it all
in a bit more. Yeah, that's what
I'm talking about. That's that's what I'm doing. When it's fully closed, though, that thing is locked in. That thing is
sealed to the brim. So let's seal it to the brim. What about this one.
Yeah, like that. That is seal a F. Okay. Nice. This is what
you love to see. You would love to see
something like this. Good stuff. Good work. I significantly smaller. Okay. This part. It's got
some chunk to it. It's got a lot of chunk
to it. So much chunk. You're gonna need to
do something like this and extrude that thing. Then you're gonna have to
do something like this. Bend it. This part. Got to delete this guy. He served his
purpose right there. Boom. Wow. Served his purpose. Before I seal that
forever, though. I think we should think
about what is that? We should think about
moving this out. Move it out. It's
chunky, you know? Got to get the chunkiness. Chunky, but this part stays Man, only the back window
is getting loved here. Only this guy. Well. Okay,
this is pretty good. Yeah, overall, it's
pretty, pretty good. Window comes out.
Blah, blah blah. There's a window here, though. Okay. Window there. And it looks
like this continues. This circle continues into yeah. Okay, I'm gonna try
something risky here. 'Cause that's what you're
supposed to do on tutorials. You try risky stuff instead of trying to convince people you actually
know what you're doing. So I duplicate this
and then just do this. Okay. Can it its own
thing. Delete that. Mm, extrude it out.
Kind of like this. And yeah, this is just a
random thing I'm doing, so that, okay? I mean, hey, that did
something. I did something. That gives us what we need. It gives us exactly
what we need. Exactly. We're gonna go back
to that mirror life? No, we're not. Why would we
do that? We're gonna Okay. Please. Nice. Get a little
thing going here, though. The proud it. We took a risk. Now we're gonna face
the consequences. It's a good way
to learn, though. Yeah, just kind of
send it sometimes, and then, you know, if it works, it works. If it doesn't, then go
back to what works. You know? It's not gonna work every time.
That's for sure. But, you know, take
those times it does work and run with it, man, to run with it. Has around with it.
Nice. That's for worst time real quick. Clean up our issue here
before it gets worse. So that didn't
solve it this girl. Good old Cena merge.
That's always good. Same here. Good old Cena
merge. What are we doing now? That looks clean. I think we got a little bit
of tremble on the top, maybe? No, I think we're in the clear. Okay. Making a bit chunkier. Oops. Now we're gonna extrude down. Okay. We're gonna go in and then come out again
and then go in again. And then that should be
a good resting point. And then in and then we
can put the glass here. This can be where
the glass goes. It lasts. Okay, that's where the glass is gonna go. You like that? Nice. Okay, so we want glass here. Glass here, and then glass here. Skill down. Do your best to try to
make them the same. You know, make
life a lot easier. Okay, so we're
just gonna go with the We're gonna go
with the Extrude. I know it's kind of a bold move. Okay. Extrude Y zero. That was a bad result. So Y zero. Okay, we're gonna merge. Delete all the extra stuff. So we're left with
this Dolete that face. And now we're gonna go F. Gonna go F. Take that out of trouble. This face here
will be our glass. But still got this. Ooh. Hey. Okay. Well, as long as we got a circle down, duplicate it. Select. Click until
you get that line. I'm never getting that line. Boom. Just extrude it
somewhere. Move it in. That's about the size of
a glass these days, huh? I don't know what the hell
just happened there, what? F. Old depth. So is
that right here. Okay. Old death. We Lass. Cool. This part? Uh, yeah, so it's still still. Still. Um it looks like there's some sort of some sort
of a thing going on for. Okay. From here. I have a moment of silence for
my brain right now. Just a quick moment of RAP. Come on, Brain. You can do it. I believe. So if we extrude out. Yeah, that kind of gives
what we're looking for. Yeah, okay. We're still in it. We still got it. Hey, I'm still in it, man.
We're still in it. I've still got you.
You think we're done? Get rid of that. Boom, we back. Just like that. Okay? That looks so weird. I want this back. I'm scared. Okay. This guy, bring that out. Okay. And Brandon bring that set. No. Okay. That's better. Okay, that's our glass.
That took a long time. Took a damn long time. I can't think of there. A little bit of spunk there. Alright. That's fine.
Boom, boom, boom. Yeah. Alright. Finish that out. Okay. Smooth that. And then we got to make sure that we
can get through this guy, so get this back going. I'd say that's important. By any means necessary. Yeah, that's doable. Ero. This guy. Dad itch. Yeah, we just couldn't make it. Yeah, this. We're not
out of the weed yet. We just got to set this
thing up properly, and then the d Okay. Grocery. Yeah, so that's
not I'm looking for. Oh, I don't know
how that got there, even. Looking for that. Okay. Yeah, something
like that. That's good. Dad. Here. When was for this? Okay. Yeah. Why I open
this back part out? No, but there's no
glass here, though. You don't need a.
There's no glass. This my high risk, my low risk high reward mode. Looks like it gets
me to pay off again. Give it off this.
Nice sheets, man. We're still in it, though.
We're still in it. Why? Still baby. Trot Union. Got to the little. Apply it. Were we perfect game. Okay. Yeah. We're in it. Nice. Yep, we're gonna do something like this, as well. Just so it and grab
on to this part. This s. Okay.
29. 27 Creating Our Blockout Part26: Okay. Okay. We are going to move this. Yeah, we'll keep it the same but we're gonna duplicate it. We're gonna bring it. Okay. Okay, so clearly looks a little different
from how we had it, so and another thing
would be this. Yeah. All right. RY negative 90. Bring it down to here, R Z 180. Okay. Push this down. EqorEtr that on cake. And we're just gonna give a little bit of space here. Yeah, something
kind of like this. Let's try to get this guy set up first before we get too far. So we can go ahead and do this. Okay. Okay. We're gonna take this,
give it the Boling. Okay. Looks to be a little
too big, huh? It looks pretty good. Alright. Take this
middle piece here. And we're gonna hit P. Okay. We can just extra Z on that. And do something
simple like this. Okay. And that on these
guys the remaining. We're gonna file these in. Okay. And then it looks like, so we should do this. Control. Boom Alright. Mirror. Yeah. Kick. Something like this.
He got like that, but we wanted to have
a little bit of, you know, like, a little lip. Get that going like that. It's actually it's looking
like a little bit too thick. A little bit. If we keep
something like that out there. So I can start from
here. We can go out. We want to go up a little
bit. Just a little bit. Go out again. Then we'll be at the peak here. Out again. And then finally, we
can connect these here. Okay, so we get kind of that
lip that we're looking for. Connect that. We can
delete that part. Boom. Okay. Okay. And then here. H. Yeah, we're gonna extrude
this. This is gonna be normal. But we're gonna just keep it. We're only gonna have
this, this part. This part only. Just to give it that
raised look and then Yeah. You know, might be
smarter to do this. Mm. It's looking more like that
type of thing than anything, so Go trick here is we go control I hide. Take this here. And you can adjust it. Take that control. Nope. Option Command
H or option. I don't know. I have a Mc
keyboard for some reason. Just never got a new one. Okay, so we got this down. Uh, for some reason,
looks a little weird. All right. I I Okay Hey. A little bit of a bubble here. Maybe a little bit more bevel than what a beak
would be able to do, so I don't feel
bad beveling that. Maybe here a little bit, too, just to separate the two pieces. Alright, so we got that down. And now the next part would
be to get these pieces in. Let's go with 24. Nice. Something like that. Okay, test it out. It looks pretty good. Okay. Get these pieces involved. Generate the mirror. And then down here. We're gonna have that
piece again. Like that. Oh Yep. Yeah, it's kind of
the same thing, so we don't have much of
a choice at this point. We never had a choice. Nice. We could do this, though, yeah. Noise. Mission complete. Okay. Screws. Goes all the way down. Okay. You already know six
piece six piece McNugget. America. Okay. We can swag out a little on
this screw. Why not? Okay, so we got that down. This is faking it right here. We're faking it. But
hey, we're making it. Faking it till we're making it. Okay, can I please reverse this? And no. No, we can't. Congratulations. You messed up. Okay. We got this here. Delete
all that. Boom, boom. Yep. Yeah. Yeah. Okay, so we're gonna
take this piece again. I'm gonna shrik it though.
Just about a year. Alright, that's a lot better. All right. Do that. Do that. Connect these guys. Mirror, run out the center. Okay. Yep. Yep, yep, yep. Okay. That's that. Kate. Getting closer. Yeah, it's just so much bigger. Well. So much larger. This seems so damn complex. Wow. It looks kind of sick, though. Looks kind of sick.
30. 28 Creating Our Blockout Part27: Okay, so we're gonna
add this part as well, this little carry handle. Shouldn't be too difficult. Okay, I guess I
should preface this. So what I did before did a little bit
behind the scenes, okay? So I made a folder for sight, and then I basically
included the rail, as well as this piece, and
then as well as the sight. So, yeah. So I tied that carry handle. Something like that. Okay. This guy. Just wanted to give more refs. Okay, so this can be our
main thing we look at. But, as you can see,
like, this piece here, the shroud that was there gets taken out and
replaced with this. So just looks a
little bit different. This is also a different weapon, but the carry
handle is the same. But this is the carry handle. And as you can see, yeah, it just kind of just
looks different. It just looks I mean, it just replaces it. That's. Okay. Start off with a cube. This is just like what
we're used to doing. Just modeling, blocking it out. That shouldn't be all too hard. Shouldn't be too hard, huh? Just trace them trace them out. Put them where you think
they should be. This one. Looks right about
here like that. We can boolean this.
Looks good to me. How does that look? Okay, we
got good old mirror trick, cut our time in half. Alright. So first things first,
we can delete this. I'm gonna add the faces
back, just hitting F. That didn't work. Okay. Oh, yeah, it's mirrored. Clipping. Select
all the outside. K. Got that in there. Looks like there's a
slight bevel here. Like that. And
then here as well, looks like there's a beble. It looks a little bit
more not perfect. Something like
that here as well. BbleTs one prime time, so give it a couple
more pieces. This here. And down here. Having
trouble for some reason. Okay. Nice. Alright, so we're gonna worry about this piece
a little bit after. So compared to the barrel, this is not as wide as it. So really got to thin
it down to about here right around there, about the width of the barrel, but then we're gonna
chop it up a bit. Alright. So we can go ahead
and do that booling now. Go ahead, do that booling. Just gonna add a cube, make the shape,
basic stuff here. You guys can pause it, go ahead. You know exactly what
I'm gonna do, so. A lot of the techniques
I use they're nothing. They're not, you
know, groundbreaking. A lot of booleans,
just basic modeling. But you're gonna need me for the texturing.
That's my specialty. That's my specialty. That's probably the best skill I have right now in three D, 'cause it's the most fun to me. If it's fun, you're
gonna be good at it. That's just a fact. Don't get me wrong.
Modeling's fun. It's kind of relaxing, as well, I think, personally, but I like the texturing. I think a lot of people like
the texturing, as well. I don't think I'm
unique in that sense. It's just fun. Just
a fun thing to do. Okay, so now this, we got to basically push this stuff out,
you know, to here. That's about where it goes, too. We can do that using
this guy, as well. Just keep one level even, at least, you know,
keep that Z even. Okay, right about to there. We're just gonna move
it so it's even. Alright. Move that
out to it ten. And we can actually get this
in the mix, too, this guy. Gonna have to adjust,
but it's still pretty good to have this, as a piece. Early yelling. Okay. I didn't look
good, actually. I regret that. I take it back. We're gonna move
this out like that. Nothing like this. And
now we'll move this out. And this needs to
go up hand out, so the up one we can get
away with having the, uh, you know, all these Okay. Okay. Oops. I'm taking the
wrong thing with me. Yeah. Something like that. Also, sorry for my sniffing. I know that's probably
annoying as well. People get sick, okay?
What are you gonna do? Alright, we got this. We do want to carve
out the middle, but let's try to further
define this real quick. Best way to do that could
just be push this in a little bit and then add another loop and
then just pull it out. Give us a curve we
want. Everyone's happy. Everyone's happy. I'm just tapping G to
move it along the axis, and then kind of
pull it out again. Alright, and if we shade,
do we get a curve? Yeah, we get a nice
curve. Pretty decent. Yeah, that looks good. Now, there's a good chance we, uh we just use the
if you can see, it's a lot smoother
in the reference. There's no hard edge there. It's just kind of, like,
kind of like this. But, you know, you can see that is pretty
affected the normals. One thing we can do there
is just select that, scale it in inset it, and it kind of gets rid of
our outside normal issue. So, yeah, I think that's
probably a good way to go it looks cooler and it
looks more like the reference. And this this type of display. So, yeah, we got that. And then just for it does look like it's
straightened out in the middle. So this part, you
put a screw there. So we'll just flatten that out. We're gonna actually
put our origin there, and then we're gonna add looks like a
little screws there, so give a 28. Okay, scale it up.
Screw cry around there. Okay. Bring it over. I'm scaling that on the Z. Okay. That's about where we want it. And then it looks like on that, we got another
one. So, um, yeah. We're gonna bring
this up, just so it looks like it's sitting on
top, bring it up to there. Scale it into here. Okay, and now we're just
gonna bell that top piece. Give it a three piece.
That's really pretty good. The one thing, we'll just do this and then break
it down a bit. Scale it on the y
a little. Okay. And then here origin again, add a cylinder, six piece.
We want a hexagllon. Okay, and then right end there. Give it a straight boolean. Okay. That's good
to leave for now. I can get rid of that part. Alright. Nice. It does look like it's out a
little bit more, to there. And then that means
this can go out a little more, just to here. Nice. It's looking pretty good, I think. I'm liking it. We're gonna bring
this in a bit more. Bring it down. Just a to there. Nice. Okay. That looks good. And now we can add these parts. Yeah, it looks like this part
here is attached to this. So we're gonna just
add origin there. Um, you know, we could
probably get away with something like this. Okay. And that looks like it
goes right to the bottom. Yeah. Nothing like this. And then right about here. Extrude out scale on the Y
to get something like this. We're gonna bring
this over. We want it to cover it.
That's the goal here. We want it to get covered. Bring it over, bring the
screw over. It's okay. Something like that? I don't
know what this is doing. Okay. And finally, we're gonna go here and bring this down. Scale it up. Okay, looks good. And, uh, yeah, that'll
be good there. All right. This part. We're gonna
try to carve it out now. Also got to try to get this
piece, this little extrusion. Take that into account.
Can't leave that out. Yep, we're just gonna basically
pull this one part out. And it goes if we're
looking at this piece here. It's sitting on top of this. So All right, there. Okay, bring this out. All right. And it does look like there's a little thing going on here. Skill X zero. Give it a little
sharpen or sharp. Yeah, yeah. So from there. We are going to quite blankly. Uh carve this out. Starting here. It's
about this stick. Carve it out. Carve it out, carve it out. Okay. And then it looks to be
31. 29 Creating Our Blockout Part28: Okay. So I've gone and found these references of
this beautiful old man who has generously made
a video on YouTube. Not of the same weapon. It's slightly different, but the carry handle is the same. That's all you can ask
for in this world. So we got a nice
angle of this thing. And we can go ahead And just go extrude, scale X. Okay. That's gonna give us this. It's been scaled on the X. We want to bring it
down a little bit. As far as that's concerned, and then cut that part off, cut that part off, and
then bring it way down. Way down. To the point where that's where it cuts through
right about there. Okay. How does this look? It's not bleeding through there, so we can cut that off. And then this part here, there is a lurking issue. So we're gonna take this and this and just bring it in. We're just gonna
bring it in to the We want that to be like that. Okay. Yep. So it looks like pull
back a bit more. Maybe two right here. We're trying to line this up. Okay, it's looking pretty good. And now we have to get it
to basically curve in. We basically want it
to go in like that. But first, we should scale it. So this roughly this bring it in,
something like that. And that's that's
a good job there. Okay. Dad. We got a lot of it done, so and then this part we also want to bring No. Extra it up. Okay. Now we're gonna get this
Bolen out of the way. We, we can use a square 'cause you can see it's
not a perfect circle. It's just more of a I'm
looking at these things here. More of a bevel. G. Nice. Difference. Okay. I see. I see. Okay. Now we're going to go for this bowling. Okay. Got the basics there. Now we just bevel what
we need to bevel. The details that we
need to bevel. Okay. There. Okay. Something like that apply. Good to go. Pot that on this part, I think is best
if it's just normal detail. This part can also
be normal detail. So those details are good. We got the main ones
out of the way. We need to get the sights and then this little piece that flares out and
locks it in, also. So, the sights look
something like this. Pretty basic looking sights. Kind of weird looking,
to be honest, but how they even? Yeah. Yeah, it looks like it kind of collapses into a Okay. This is just gonna try to smooth it
out for now that. Okay, kind of turns into a bit
of a wary situation, yeah. Okay, so we can move on and add It's basically just like
an extrusion from here, it looks like like you and Yeah. I there now. Yeah, if we wanted to maybe add this this part, I think that would be
worthwhile, as well. Just something real small
that we think can help it. Yeah, I think that actually
looks pretty good. Okay. This can be a normal detail, too, we want our UVs to
be supa supa straight. Okay, then this piece down here. Got another image coming in for you guys. Are
you ready for this? Boom. This part it's along. It is. Give it 28? OX 90. And scale on the nine. Hi. We just want it to
be pretty thin. Looks like it's right about
here about this long. And it flares up, too. So, how's this story effect. Yeah. Something like that. And then we want a strap
there and a strap here. So what we're gonna do is
duplicate these P selection. Okay, and extrude to the
Y or to the X, go X. Okay. Isolate them. We're gonna
delete half of them. Take these, extrude them down, scale them, normal
clearance, add a solidify, even thickness, and then put our offset to Okay. One 9 millimeters 0.5? Yeah, that seemed good 0.5. Okay, so we got that piece
looks a little bit rounded. When that happens, we just need to scale it that'll work good. Okay. Yep. Good aim. That's
the sight. Alright. Now finally, we want this piece. Where you want this past? What I'm gonna do
is go back to site, get this guy, duplicate it, bring him into the
open, hide site again. Now we got something like this, which is basically basically
what we're looking for. Basically, but not quite. Delete that, get the mirror. I don't gonna just delete
this delete this part. Delete that part. Okay, yeah, that's that
looks pretty good. This part is kind of flat. So we're gonna have
to flatten it. Um, scale down on the X. Nope, 'cause it's
actually has to be has to end right
with this one, right with this guy, so
we can't bring this in. Scale on the X. Yeah, it looks really, I just looks really I don't even
know how to describe it. Not correct. Does
not look right. Boom. And we only care about
connecting right to her. I think this needs to just be a bit wider, huh? Looks wide. This looks a lot wider. Not a ton wider,
just a little bit. Not this part. But we want to bring it
out to about there. And we could also one thing that might be worth
doing is just, uh, kind of starting from
scratch here a little bit, but it would just be we can even 'cause we ultimately want
to line up here, right? So if we duplicate it, extrude, something like that. Yeah, it just isn't
looking super wide. Like we need it to just
be, a little bit wider. So we can get rid of that, too. Bool, Extrude. Yeah, we're looking
at something like this is realistically what we want or what we want to
try to get, at least. So once you get that
down, scale down. Bring it down 'cause
we're gonna bully in it. It's gonna disappear
in about 5 seconds, so bring this one
out to about there. And then keep that like that. And that's gonna
give you what you want, believe it or not. Gonna do that. My yield this too. Union. Okay. And, boom. All right. And we're going to just
take this off again. I put one down the middle. Get our Get this good. Mirror. All right. And you see this curve here. There's a nice curve. And let's see how easy that is do here. Let's see how much trouble
this bell gives us. Alright, so this needs
to line up here. Right? Nice. So it's able to be pretty smooth. Kind of what we're
looking for here. Nice. Alright. We're almost done
with this piece. Trying to think what
else we got left. I mean, yeah, I think
that's good to go.
32. 01 Turning Our Blockout Into High Poly Part1: Finished with our
blockout. We're gonna go move on to our high poly. Alright, so we're gonna
start the hi poly now. So we have this right here. Uh we're going to
just go through this, I guess. Just do this. See all the parts that
we need D'll need. Yeah. Yeah. Okay. There. We can hide the site. For now, we're gonna work. This is going to be our main
piece that we work with. And then this or you can
do whatever you want. But this is, like, what
we're gonna end with. What's gonna be in
the renders and what. Okay, so We can,
uh, new collection. Just do low poly here. Throw it in there. Boom Boom. Well, it looks like I
messed something up. Carry handle. Put it in
low poly, and then sight. Low poly. Okay, so
we got our low poly. This is gonna become
our low poly. Okay. So it's gonna become
our low poly. We're gonna duplicate
the whole thing. And this will say hi Polly. This is now our hi Polly, and we can go for
it as far as Yeah, let's let's give it a shot, huh? So I'm gonna be using a
mix of Z brush as well as just normal
subdi normal subdi. I guess we'll start
top to bottom. Just a mix of it all. The hypol personally, I
think, is extremely fun. I know people like different
parts of the pipeline, but to me, it's
awesome. It is so fun. O. Okay. We're gonna take this here. I'm gonna use the
sea knife edge. Bring it down, and then
we're just tracing it. You know, we can
There's other methods, actually, so we can try to
be a bit more neat here. Get rid of this, this. Okay, so maybe you're right to here doesn't
need any help. Doesn't need anything, so Something like that. And then we're just
connecting it. We're just connecting it. I'm gonna push this down. This is going to come out. I'm delete all this stuff. Don't need it. Okay. Yep. So instead of this, we'll just go. Yeah. It's just where do you
want your edges to be? It looks pretty rough
at the beginning. It gets better towards the end. That's just how it goes.
Looks rough at the beginning, gets better towards the end. Just how it is. Same with this. Yeah, we're just gonna
give it a nice edge. I give it a nice edge edge. Okay. We're gonna leave this part out. Okay. So perfect. Okay. Plastic. All right. I guess I want to give it some setup line too. All right. We're gonna do just a slight. This is gonna be one of the more complex pieces funny enough, so it's good that we're
doing this right off the gun. Right at the start. It's good we're doing
this. Yeah, the other ones aren't gonna be nearly
as difficult, so Dorry. On that. Just want them to all I'm
gonna do all of them first and then do that cause I want them to all
be kind of even. Okay. Okay. Just adding edges, add nettles. Another day in the
life three the artist. All right. D not sure. I'm not sure. I was dumb. Yeah. Okay. Yeah, leave it like that.
Leave it like that. We're just putting
in supporting edges. That's all it is.
Supporting edges. Okay. Okay. Almost there. Hold on. Okay, we can probably start
to try to do something here. This cray cray. Alright. First things first, get rid
of all those sharp guys. And now we're gonna throw
on a sub D. Keep it at one. It's enough to where we can see our mistakes
pretty clearly now. See what we need to do. So this just needs a little
bit more love here. And then inside here as well. Okay. But the shape is there, which is the important
part, you got the shape. I bet no one can guess
what graphics card I have. It's bad. Real bad. Alright, just a little
wanky right here. They just not clear. So many gonsGta
break out the knife. So many engons. Just break out the knife. One dot, break out the knife. What an awful s. Geez. Alright. This area
needs some wove? Some details like
this. You question whether you should leave
it in the hypoly or not. It's kind of a nice
detail. Nice detail. I'm not gonna but Just
those little flats that just kind of
something about them. They can just work with the PPR. Tip string. They
go well with it. Alright, this piece
is coming to an end. I didn't enjoy working
on this at all. I'm gonna be honest. But it's one of the necessary
evils for art surface. You have to do it. I could
have thrown it in Zbrush, which is what I'm gonna
do with a lot of pieces. Uh, but I did subdi
because I don't know. I just want to do.
It doesn't matter. If you want to do
subdi do subdi. You want to throw
it in ZBrush, cool. If you guys have no clue
what I'm talking about, when I say throw it in ZBrush, I'm going to show you
probably in a couple pieces. So all it is is just bringing
it in and then using this. I'll show you when we get there, but it's pretty it's very easy. It seems like
cheating, basically, but yeah, it's just
super convenient. Can't argue with it.
Can't argue with it. It's convenient. What
are you gonna do? We're just connecting the dots. We set ourselves up pretty good, so it's not crazy, difficult to just connect these dots, you
know what I mean? Pretty simple. Insides looking good. Looking clean. Okay. For the most part,
this is good to go. There are some parts like here. Still need some work. No. Yeah, that's good.
Throw one here. See this, you know, just lay
it down lay down a line. Just fix that. And. All right. Looks pretty good. We can change it
whenever we want. Let's bring it back down to a one so my computer
doesn't explode. It looks pretty good. Okay, so next. This screw? What
are we gonna do? We don't know how to do
sub D. It's too complex. We'll bring it into ZBrush. No. Just a simple double
thing at my bob. Done. Boom, muddy. Keep it at one. Don't make it any more complicated than
that. I'll tell you that. This year, we got, like this. Bring that out there.
And we're gonna delete this outer perimeter
and with this one. And we're just gonna mm, I've done this a lot,
and I always forget, but I would actually. But we want to make
these cuts all around, and then we want to
select them all again. And then just bevel them 22
bebleR about here, I'd say. Then we'll just connect them. Just connect the
important pieces. Just the important ones, right? We don't want to do more
work than we'd have to, 'cause there's a lot of
monotony in three D currently, still, so I haven't
even got to UBs yet. Yep. It's just very basic.
And that's that. I mean, take away the sharps. You know, we got to just
lay down one of these. Yeah, something like this. Looks good. Bring
it in even more. Yeah. Yeah, something
is real simple. Real simple. Next. We're way down here for some reason. Okay. Say what that super easy. Super easy. Okay. Done. Okay, these guys, we don't even need a
mirror them at this point. Since they're one piece,
we can just do this. B. They need to be a bit thicker that Just a little bit. Looks good. Looks good still. Okay,
in this situation, we bring back both
low poly i poly, and then just give it a nice
drag back your reality. Nice. See you later, LP. Quick fix. Okay, so
this carry endle is good to go. Carrendle. Something I don't know
why these are here, but Mm. Okay. So Looks like we made a slight error here. Usually fixable. Yeah, it's not even
really an error. It's just Fixed.
33. 02 Turning Our Blockout Into High Poly Part2: Alright, we're gonna
instead of going to ZBrush, we're gonna just continue on trying to do as much sub
D as we can get away with. Uh, so yeah. Let's just start with um one
thing we're gonna do also as we do the sub D
is delete as we go. So, I mean, hide Hide as we go. Give it a one piece. Alright. Hi that bad boy. Yeah, we got this one, too. It's so simple we can G. It's a good way to line it up, doing exactly what I just did. Exactly what I just did. That didn't work. Looks pretty good to me. What do we think? I can't
hear anyone's opinion, so I'm just gonna do
this, and then move on. E one of these. Nah. Okay. I'd push it in more. That sounded weird. Okay. Hi, low. Back to business. These guys are easy. Since
they're different distances, 'cause one's pushed in
and the others not, let's just Mmm delete these. This this Boom. You know, it's here, it's here, scale on the Xpring it out. And then this finish
it off. Okay. Looks like we'll need this, too. I'm doing this because
there's a bit of a sag, you know, that's kind
of rounded off here. You know, we just want
to I'll show you. You guys probably
know this already. If you don't here, it's
a good thing to know. It just strains it
out a bit more, you know, makes it more flat. Lines up better with a
little poly for the bake. It's a better day for everybody. Everybody wins. Trigger. Are we gonna handle
this bad boy, okay? See you why. Think we got move this down a little bit. That This is well. This year, Alright. Now, here. I'll lay that one in there. Gonna bring this over
to here, add this here. But we also got this
we got to worry about. We can branch it.
Add it up there, add it up there, add it up
there. Chain of reaction. Nice. This. What do we got? What do we need? What
you want in there? Here. Yep. Yep. We're just
trying to line it up. All right. Alright, now I got this piece. Bring all this Just dragging it over. Alright. Looks good. Good job. This one. Can we do this in
one go, I believe. Alright, hide that. And we're just gonna
duplicate this. This year, I'd both move on. This guy already done. Wow. Look at that. Here. No, not yet. These here. Okay, in order to save
time, you do this. We're just gonna
make one, obviously. Just one. Probably already made one.
I take breaks recording. So if I made one literally
1 second ago, for me, it was like a week ago, so please forgive me. Looks good. Okay, so mirror, boom, boom, done done. Cool it. Call it. All right. Call it. Pack it up. Okay. Just try to reach
that silhouette, if you want these gaps to
be a little bit filled, so do your best. And then coal it.
This piece here. That does not look normal. Still. Are we gonna try it again
a third time? I think so. Nothing. Okay. Dumb.
That was dumb. The only way to
learn is to fail. Hawaii's thing once said Okay. Somehow, this is messy, but we're rolling with it. Okay. There's piece here. Great. Alright, how are
we gonna fix this? We're gonna duplicate
this thing. Isolate this with the
duplicated piece. And it looks like we are safe to boolean right through it. Fixed. I'm a problem solver. What can I say? Solve problems. Fix problems. Learned this off YouTube
this trick yesterday. Whoa. Didn't work. I'm a pro. Okay. Coll it. Ooh, let's do these first. Mm. Speed Run. Speed running. Okay, can we do this? Cooperate? Yeah, I
kind of cooperated. Kind of. Get some
similar stuff here. Tricked you. We're
gonna move you back. Nice. Boom. Boom. Same goes here. Okay. Oh, yeah, it's on a slant, obviously. I'm thinking to myself,
Why the hell is it making this curve? That's so annoying. Come on, you as one of it, uh We want this and this gone. It's a lot of trial and
error. What can I say? I'm not perfect. Okay. We get done with this. Make sure this is the same. Leave that one there, hold
our origin point for us, and we're gonna go discover
a new world with this thing. Line it up right there. Boom. K XC. KX C. Blah, blah, blah. Alright. That's what we're
talking about here. Nice. We have the curve
we're looking for. We have the curve
you're looking for. We have the curve. We
have the second curve, as well. And the third. But Looks great. It looks phenomenal. Alright. What do we do wrong? I don't even know it.
I just hit there. I hit Option Control Option J. Oh, yeah. Okay. Uh Alright. Now we're gonna take
this point back. Are we? Yeah. Take it back. And we're gonna mirror him then. It. Mirror Delete. Wow, that looks disesty. Let's go. That looks good. Ooh, that looks nice. Looking good. Get
it out of there. Speed run this nut. Who Nut, speed run? I'm in, okay. Boom. What do I do? How do Control
J. T. Tries to quads nice. Did it? Whoops messed up. It's okay. See if
we can still get what we want. Oh. Yeah, I just started
learning like CAD software. It's actually Gated.
It's actually really good. I highly recommend. It's so fast. And it's easy to, like, if you mess up, you can just kind of fix it, and there's no problem. Honestly, that's, like, the most simple way to describe it. If you have something
up, you can just, like, like, booleans
and whatnot. I don't know if you call it
a boolean in CAT software, but, man, it is like hell easy. You mess up. Did I mess up here? Well, Okay, we're gonna
just cut this guy in out. Wow. Regenerate him. Nice. Same with all these parts. Make them one. Make
this point there. Give it the point. Mirror,
other way, other other way. Okay, got it. This and this. First,
hide this Low Polly. See you later, buddy. See you later, buddy. Don't need you. Oh,
boom. Yes, yes. Duplicate, M, low poly, this. And now to double check. Okay, we're good to go. I'm trying my hardest
to just leave all the nuts, if
you couldn't tell. Why is he not doing the nuts? I don't want to do the nuts
yet, okay? Give me a break. Give me a break.
Tutorials are hard, you. If I was doing this alone, let me tell you, the amount of shortcuts I would
take is monumental. I would make so many
purposeful mistakes. I wouldn't correct any of my mistakes. I'm
gonna be honest. If I mess up, I would just hide it because I would only
make a personal piece. Even in games, sometimes you
just hide it. Just hide it. If you need to hide it, then
just hide it. Just hide it. It's all you need. Just hide it, man. Just hide it. This looks so weird. Okay. This how does one solve this majestic issue by doing this fall into
your mistake headfirst. Hide, no. Okay, the most unseen piece in all of humanity
has been fixed, and it probably won't bake well. But hey, we're doing it anyways. Hi, the low Bally. Back to this. Back to this. That didn't work. What the hell?
What did I not do? This piece. Well, you know what? We're gonna leave
this. We're gonna leave it with all of its issues, 'cause that's the kind of
people we are. We're leavers. We're three D artists. We don't take responsibility
for our mistakes. We just move on to
the next project. Okay, there's a clear
issue here, though. I think it's like, this, okay. I think we've solved it. We've solved one problem
yet only to make another. Nice. Nice. Okay. So this is the
desired piece now, so we can go to opoly
and execute it. Execution style. Get rid of opoly duplicate this. Hit M, LoPolyKltech, kits out. I trust it. Back to High Poland. Couple of things there, a couple of things here. One, two, here you go. Something's not right here. We're on two different
wavelengths. Okay, problem solved. SY, zero. SY, zero. This part here needs to
be transferred over. Wow, that worked. Okay.
Nice. That's there. This issue here. What was the issue? Weird. Oh, I see it at night.
No, I don't. Yes, I do. Covert operation. Oh, I hit I hit the normal. Oh, we're good. We're
back, we're back. We're back. I
inverted the normals. Quick inversion.
Whoops, did something. The double stack. It's
always safe. Double stack. Nice. Elite. We're part of an elite
class of modelers. Modelers. Elite modeler class. We back down to nobody. All right. How's it looking? Good way
to test to see if it's where you want it is if you just
spam spam this button. Okay, that could give us a
half decent bake. It could. This is an issue. There.
Whoops. Here. There, there. Remember, folks, we're not dealing with your
ordinary circle here. This is a highly trained circle. It doesn't stand
down for anybody. Highly trained circle.
Don't forget it. Alright. How's this looking?
That'll bake. Yeah. This part looks too intense. Immediately, I can
I can understand. Even I know that. Even
I can understand that. That looks pretty good. Send it. Oh, this is the inside. The inside. Okay, we're
gonna take this barrel out. Do we need to realistically? No. This barrel is
not important if we're we're speaking hi
poly, we don't need it. We don't need to see
it. We never see. We're only gonna see the
part that let's leave it, but we don't need to we
don't need you know, we don't need a hipolt.
We don't need it. We're gonna go through again
anyways and double check the things that are important
to us, not, et cetera. So just leave it for now. We'll be back to it soon
after the break. Thank you. Back to you. Okay. Just going with the knife tool, taking names, taking names with the knife tool,
left and right. Don't give a single ****. Brain up there. Alright. We're gonna do the
same with this here. Taking names, cashing checks. Almost, almost. Looks
a little weird. Looks a little weird.
What if we just do a simple That seem to
fix a lot right there. That smooths a lot out. Got a little bit left to go. Here, I'd say, is important, but we're gonna get
rid of these sharpies. How's this looking. Looks
pretty bad, to be honest, but we're gonna for
the sake of time, because that's just what the world goes that's the world's currency
right there, T. You can only sit on
the couch for so long. For so long. I sit on the couch
for a while today. Maybe 3 hours. It's Sunday. Give me a break. Either way, it's kind of a long
time, can I be honest. It's a long time. But I'm
here. It's all that matters. I'm here. Doing this tutorial
'cause I love weapons. I don't even how
real guns. I have. I have before. I'm
gonna make that clear, but regularly? No, no way. Only when I'm on,
like, vacation. That is the only time you'll
see me shoot something. If I had a gun, I live
in, like, Northeast, Massachusetts, so New
England, America. Yeah, okay, I know people are gonna say,
Oh, you live in America. Everybody has guns, you know, all the gun incidents. No, not a lot of people,
at least in the Northeast. I can only speak
for the Northeast. I would assume
people in the South, like Texas, et cetera. They definitely have guns. That's just a guarantee. But I don't have guns. No,
not a gun. I'm a gun guy. I know how to work. I like watching videos
about it, you know, just kind of for my job, 'cause I'm, like,
a weapon artist, but I like playing Airsoft. It's like fake guns. It's kind of dumb, kind
of fun at the same time. But yeah, not a gun person. Not a real life gun
person. I know. America, even though
I'm an American. Guns. They're
pretty cool things, though, if you really
think about it. Same with, like, Same with
what was I gonna say? Like engines car engines,
plane engines, whatever. Just the combmbusib
combustible combustion engine? What is it called? It's also, the internal
combustion engine. Just a cool concept. Somebody just made that up. Somebody just was
just mocking stuff up one day and just made the
internal combustion engine. Prototype, you know, real
primitive. Crazy to think. Like a rotary engine, too, like in planes or, like, the those mazdas like
the RX seven Rotary. It's like a famous one in a car. Man, those are cool. I love them. They're
like, the coolest things. They really are. I used to be into a car called a
car brand called Sab, it's a Swedish brand. Man, those are cool, too. They were they were
pretty good quality. Weirdly enough, in America, you're only gonna find
sabs in the Northeast. I swear that's like
it's like a fact. It's a factoid. Small
factoid of the day. You'll find them other places, but mainly in a you're
gonna find the Northeast. They're fun, though. They're
cheap. They got turbos? Is yelling, sorry. They got turbos in
them. They're nice. Nice and cheap in my first car, I had six sabs in my life. Six of them. It's fun. I crashed one into
a tree, actually. That was not the last one I
had. They're all manual, too. No, all the ones I
owned were manual, as well, 'cause I'm cool, you know, but they're just fun. I could I'm not, like, a huge mechanic guy, car guy, but, you know, I did it for fun in college. It was fun. It was a good time. I learned a lot about cars. Gained a big interest in, like, the JDM scene. Cool stuff. I don't know. Cool culture. Nice
little sub car culture. Y'all got their own
little cultures, huh? But you got American
muscle car culture. That's like all
the old guys here. Yeah, we love Chevy
Corvettes, Stingray. Yeah, 1969 Mustang. Get it. Like my dad. A Plymouth duster. Fun stuff. Alright, call it. If we add
a two, we're good to go. It's actually looks
awful. What did I do? Doesn't look that bad. It
doesn't look that bad. It actually looks
better with the one. Looks better with the
one. Alright, this piece? Yeah, we actually need to
make this piece, as well. Quick speed run this guy. Speed run. Quickest speed runnwn to Man right here. Call it. Good to go. Right into that. Okay, we're gonna Z brush we're gonna
Z brush this piece. This is a Z brush
worthy right here. Is it stuff? Actually seems I don't know. We're gonna
procrastinate even more. Even more. Boom, boom. I've said, No. I'm not falling for that. It's the oldest
trick in the book. Boom. Hoy. I fell for it. I'm quick. Sometimes
I just don't know. Sometimes I just don't
know. I'm fast, though. F P. P. Alright, right down the line here. Carve out some, some nice lines we can follow. Nice, nice. Speed running, living the
life in the fast lane. It's the only lane I ever knew. Fastest lane in the West. I'm gonna leave this
as a power move. Taking a risk, okay? Taking a risk. I think
it's gonna pay off. Did it pay off? I have no clue. Ah, yeah, we just got
to connect this g. And I think we're gonna go. Yes. Took away too much brainpower. Ooh. Connect that. Connect that. Connect, connect. AI is going to take my job. AI, Connect. Maybe AI will be able
to connect those soon. Just connect them. God, damn it, connected. Get connected. Okay. Nice. Moving it up, moving it up. You know, instead
of fumbling that, we're just gonna
back to the basics. What my sense taught me. Yay. This is okay. No one's gonna see it.
We're gonna hide it. 'Cause that's what
dridy artists do. We hide stuff. That
barrel. Just hide it. These barrels hide them. Just hide them. This piece,
we're gonna zit that.
34. 03 Turning Our Blockout Into High Poly Part3: Okay, so I decided to Z
brush this piece instead. So I put a one
subdivision on it, and then I put creases on all
the sharp edges, creases. So if we do this,
it shrinks down. Okay. Got that how we want it. File export to how we want. I just use a single
file called Z Export. Alright, we're gonna
open Z brush now. Okay. I don't know
why this is here. I don't really care. So you rush Import Mats as
Subtool. Have that on. Just left click,
hit this button. F to focus. Now you
can move it around. So I have this setup where
it's just easy for me. I don't know, these
exist somewhere. I just forget. So resolution. We want the resolution
to be here. Points. Start out
with 500 resolution. D No, we need more. We need, like, that'll
do it. That'll do it. Right around. And then
we want to polish it. See how easy this is?
That's how easy that was. Now we just got a nice perfect that we can just keep polishing
until we want to stop. Yeah, I want to stop there. Perfect. Okay, I'm
ready to I'm done. Already done. So pre
process current. That's the next thing
you want to do. I honestly have no
clue how to get these. They're in, like, like Z Z plug in, is it? I'm just trying to look for it, but preferences you want
to do config or custom UI, and then you can kind of,
like, move around the pieces. But anyway, decimate. We're at 20 K now, which is still kind of a lot, but Yeah, we're
gonna just back up. We're gonna do a 613 K. Looks good to me.
Get it out of there. Export FBX, you want. And we're just gonna
put it as Zep. That's our guy. Zep.
Export, export. Okay. Back to blender.
Alright, so pile. Import. Also, one thing we should do here,
New collection. Just hit Z, and
these are the ones that so we're going to put this into the Z pile
because it's a Z tool. It's a Z piece. So
it's easy if Z, Z brushed piece is
messed up in any way, if we don't like it, we can always go back
to our Z folder. And fix it very quickly. So. Looks great. Looks better than all the other high poles I've done
up to this point, so looks really good. Phenomenal. Alright, hide it. Good. Moving on. Quick,
easy. Quick, easy. What's the name of the
game in three D. Quick and the name of the game. If you quick, good. If not, get quick. Got to be quick in three
D. Got to be quick.
35. 04 Turning Our Blockout Into High Poly Part4: Quick one there. Is that right? Looks good. I'm gonna go hit. Um Holy. 17. Holy crap. Big number. I can leave it. Well, I'm gonna hit, Shift G. We're gonna select
all the sharpness, turn it into creasiness. Give it a one sub D to the road. And, uh No, that's
not what I wanted. It's just not what I wanted. Alright. Alrighty. All right. Mm. Okay. Yeah, we're back. We're trying to z
brush this here. All we're doing here
is just lining it up. Just lining it up. T. It's not perfect right now, but you just got to trust
the process a little. Z Okay, so we got something
that looks like this. Just bump up with the ris. What about two. You
just look at the edges. You know, if the
edges look rough, you know, these look okay. I'm gonna just go for
a little bit more. 380. Yeah, that
seems pretty good. And change this to
smooth and then polish. Okay. It gives a nice piece. Um, and it gives those
edges that we look for, especially on those kind of
hard to see pieces where the light is really gonna be its best friend when it
bounces off the edges there. Pre process. We're actually going to do
six decimate at 22,000. Edges look fine.
Okay. Export FBX. S. Okay. So this is gonna go into Z, just in case we we
need to fix it. We get this piece.
Okay, get to go. Nice. Alright. Yeah, I guess we can do this, too. Okay. Something like that. Is a lot of times there's
this little dimple. I'm not sure I'm
gonna use a shell, but it's just a quick way to just to model one real quick. Hide that. Okay. Well, let's
go with this piece here. This piece right here. Well, yeah, just
leave that as it is, and then X C. We're gonna do the same
thing that we just did. We're making use of
this remaining topology here and just trying to get these edges to the point
where they're gonna look good in a one or
two subdivision setting, so we can just
blast it in Zbrush and move on Okay. So same type of thing. The sharpness, crease. That didn't work. If we don't get
all of them, just hit select sharp
edges that'll get all crease Yeah, keep it. Go to one piece. Okay. Two piece. Starting to
look a bit more normal. These stay tight. Um, yeah. I just decide we got
to fix right here. Okay. Okay, something like that. Yep. It looks disgusting in bladder. Absolutely disgusting. Just checking the edges, making sure they're legit. Gonna polish. Give it a 500. 600 k is a little steep. Let's try four. Four, ten. Ah. Yeah, let's do it. Let's do. Okay, something like
that. Go to process it. See the damage this does. Oh, hoops. Okay, not terrible. Hordge might be a bit bit rough. Do a nine. Yeah, let's do that. Export. See you. I was just looking. Alright, I just look
they look okay. They don't look crazy good. They look pretty good, though. Enough to get an edge
out, huh? I think so. If you see something like this, you just got to
basically do this. The probably gonna
be a couple of them. Just leave some if you want. If it's real bad, fix it. If not, don't touch it. But it's easy, right?
Compared to sub D, this is quicker,
I'm pretty sure, unless you're a
subbGd, which I'm not. I'm okay. I'm not a god, though. This is undeniably quicker
for your average modeler, I would say, if you
want to just whip out a piece, quick, efficiently. This is your way. This is it. You know, it's the way to do it. It's the way to do it, A. We're gonna do the
same with this. Just get the piece out the door. Just get it out the door. We got better things to do here. This piece is sauce, okay? He Yeah. I actually brought
this up somehow. Sometimes you just click buttons too fast. What are you gonna do? Okay. Looking good, buddy. Okay. File, Export, FBX. Z. Go to Zbrush. Who Import, Z. Yes. Okay, new boy
on the block here. Looking Mint. 488 off the
bat, looks good to me. Give it a polish.
Get out of here. This is polymer, so we, you know, look at
your reference. You want it to be thick, the edges polymers
like that sometimes, but sometimes it's
not at the same time. So sometimes you want
to back it off to here, sometimes you want it to
be all the way up there. I want to go right there.
I think that's a good one. It's safe. We're
good right there. Pre processed current. I'm gonna give it a nine piece. I think that's probably good. These are pretty strong looking. Decimate. Okay, I think we're
still in the green here. What I worry about
is the edge here, deteriorating to the point where the bake
looks like garbage. But I think we still got a
decent bake on our hands. Export, get back to our folder. Boom, boom, boom. Alright, we're gonna
go back. Blender. Z. Welcome to the club,
buddy. Okay, Import. FBX, Z. Looks good to me. If you can see this little
these little artifacts here, you can see them
really good here. Go to your normal clear
custom split normals. Then they kind of go away. Yeah, they kind of go
away a little bit. Not all of them,
but a little bit. I'm just gonna clear up
this guy and be on my way. Okay. Good to go. I think, great. Yep, good to go. Are these okay.
We're to hide them. Just move them to
this spot. Alright. And then, uh Okay. We got a lot of screws left. That's all I know. Yeah, we could start with
this piece, too. Why not get this
one out of the way? Okay. We're gonna Z brush this
piece. Yes, I said it. I said it, alright. This
piece is getting Z brushed. Whether it likes it or
not. Luckily, we can. Luckily. Okay. Alright. Yeah,
let's go for it. Let's let's just
get this separated. We want to cut in half, right? Just keep it simple.
Keep it simple. I'll let this side. Pick your
side. Got our point there. Mirror. Check it out. Looks good. Alright. Yeah, we might This
could be a UV sheet. So what we want to do
get all these things. Get them all, I tell you. Just get them all. And
just bring them in one. Just bring them in one click. Bring them in a click. Alright. This. Okay, we might as well
just do this here. Just an easy way to add those lines, you
know, that's all. This here, easy way to add this. Just get that in there. We're just drilling
lines in there. Get the lines in there. Like you said before,
it doesn't have to be perfect because it's gonna be perfect after ZBrush
is done with it. It has such a I'm not
an expert in ZBrush. I'm gonna say that first. But, you know, it's it's
really a great program. Just can handle a lot of pools, and it can smooth them down
just so well. So well. I can't talk. My
brain's using all of its power to connect these
vertices as fast as I can. I hope there's a tool out there that I just
haven't heard of yet. I can just get rid of this ****. This is the most annoying thing in the world having to do this. It just feels like, so
unnecessary at this point. But it's just a part of the
process, I guess, right? Just is straight up. Where does speed run in
this thing? Straight up. Okay. Okay. Don't pay attention. I just did that
you have business. Okay. This Yep,
sometimes just, uh, for the sake of actually, my attention span has
brought me to this point. My ability to focus is second
to naught except everybody. Boom. I feel like a
baler when I do that. Okay, here. Here. Breakout C. We're just going
to do a a little inset to try to make our life easier. Okay. Okay. We're just connected stuff. We're just connected
stuff. That's all. Mm. It M Do. Don't do things like that. I We just want to get
rid of the line. So it looks like we
got some okay, yeah. Mm. All right. You want to just
establish real quick some few boundaries here. Okay. This guy, remember the seam. Go. Got him. Hey, we're almost there.
We might be there. We're gonna just
do a testern here. See how this stuff
deals with it. We could always do a two piece. To piece might be the way to go. It's a little bit more
heavy on the machine. But most machines these days
can take it. I'll be right. Cleanup in here, then
we're gonna export. Oops. Okay. I got
these pieces here. So we're currently at
91 K. Give it to 500. Two, this is not nearly enough. So this is what
I'm talking about. See, this is we're
gonna need try 1,000. Might even crash. Sometimes
it crashes 1 million. 1,500. We're gonna
need even more. 2,500. Give me 5
million. Good guess. What have we got? Foke. And now we polish. Nice. Now, this is a little
too much of a polish, as you can obviously see. It's close. You
know, it's close. We might even be able
to go with this. If we go back one step. You know, it's close.
I might go with this, actually. Yeah, I'll do it. Sure. I'll do it. And then this part right here, I see a little bit
of a crease here. We're gonna bring
our draw size down, hold shift, and just kind
of go over it a little bit. That's all. Smooth it out. And that's all we're
gonna do with that. This is gonna look great. This piece. We did a good job. We did a good job. We do unfortunately have to go
back and fix this part, but I don't think it's an issue. Other than that, I think
we're looking good. Yeah, so it should
be a little bit, just a little bit. Okay.
36. 05 Turning Our Blockout Into High Poly Part5: No. I I I See these little things here, these little If I take
the subdi it goes away. It's just the subdivision
showing itself. You just want to try to hide
that as much as possible, get a good bake.
That's pretty much it. This one's pretty simple. I'm thinking. I'm thinking. Okay. Well save Wile export FBX. Z. No Import Z. Okay. I'd say a bit more. 600. Yeah, that's straight. Yeah. I think we should.
Go a little higher. Yeah. Looks good. Okay. Let's go. But
37. 06 Turning Our Blockout Into High Poly Part6: I oh Nice. Piece turned out really good. 4.7 million. Get your GPUs ready, get your RAM ready. Get those CPUs ready. It may be more
convenient this way, although the caveat, because there is always
a catch to everything. It's more compute heavy. It's just harder to do. ZBrush is efficient,
so you can do it. My specs, I have, like,
on this computer, a 30 60 TI 32 RAM and then
an I seven something. So it's pretty it's
a mid computer. It's okay. Can do this
pretty well, though. The occasional crash, you know? But let's see what we get 280. That should be more
than fine there. Yep. Okay. We're gonna process it again and
go for, like, 50% now. See what we get there.
So that's too low. Let's go for 75%. Did I do it? That
looks pretty good. Still very still looks good. Yeah. Grep process. T. Might call it there. Now 160. Yeah, that
looks good. Do that. We're gonna close
this. Hey, hold on. I should be safe
here. Should be safe. Don't be down. This is our most This is our heaviest piece,
right here, so. Yeah, so it has this stuff. Let's just get rid of that. Go back in your We're just smoothing it out,
that's all we're done. Okay. So we can get it to
around 160 polis. Or yeah, Polly kill. So after this, we
just have the screws, and we're just gonna make one. We're gonna find, you know, just one similar one
duplicated across. I have set. So that's gone. We
polished it out. Looks looks nice, though. Yeah, this is the This is
really an awesome awesome tool. It just looks great.
There's some flaws with it, of course, but, you
know, it's totally good. It's just a good tool. Uh huh. All right. So all
these scurries here. These in particular. Um Yep, so we're gonna just
make one and then duplicate. So we're gonna go
back to our Back to our sub D and Yep. We can just take
our time with this, you know? We got nowhere to be. We're just having fun. Spending time, making a good
piece for our portfolio, or whatever it is
you want to make here. We're just chilling. We're just having
a good time here. That's all. I start
working a little bit. I'm chilling, though,
for the most part. That's it. This That's her on one more. Okay. And the idea. That's so be luck. Okay, so this is also
you have this involved. So when this is involved, what do we want to do here? What do we want to do?
We should separate this. We should separate this
and make it its own piece. That's it. This may be easier to just throw in Z brush real quick, too. Sharp Grease. Yeah, let's do it. File, Export. Z. So it looks like
it's inverted here. I have a thing set up
flip flip your null. Right, 2,170 seems
more than enough. Call looks that back,
boy. To about there. Maybe a little bit
more, actually. 300. Okay, right there. Pre process. You know, we're gonna try to
get 6% out of this. 20,000, do it again. Try to get 65% out of this. 15,000. Try it again. 10,000. I think we can stop there. Export Z, boom, boom. Okay. Move that to Z. We're going to import,
le Import FBI. Okay. So that's our setup we got here. Guess for the sake of a. Okay. So next steps are take this. Looks take this here. Duplicate. Bull delete this guy. You get the point. And there's this here. Okay, sure, points is
kind of lost here. So still looks like a mess something up. Nope. Nope. Yep. Okay, we're gonna
go back to, uh, Z. This guy. So what do we go here?
We got the whole piece? We adjust this part, and we're gonna Just that top up there. I D again. And then that's
gonna be our new area. Yep. That's our area there. Io. By much form. Okay, perfect. And now
with this one as well. Just get that border. Okay. Oops. Looks like I forgot
to forgot. Of course. Of course. As long as it lines
up, good to go. So this top shelf. That's all good. So
we can hide Dad. These, we're gonna do
the same thing here. Yep. Okay. Are they all the same size? So They're good. Don't need those anymore. These. We're gonna duplicate
this whole thing and just send this Oop. Alright. All right. So those are good. We can go ahead and hide these. Okay, so. Oh, great. Or, 30. Wow. Give me the PlzerPrize. Oops. Those are good. Good. Good. Whit.
These are not good. They've snuck by me. Okay. All right. This is the only
one of its kind remaining. We can go ahead and send
that one off as well. Are there any, like, that that are the same size? Does not look like it. I'm gonna hide that and then
just move on to these three. And actually, before I
when I just do this. Okay. It's gonna need two,
it looks like, so. I made a mistake. All right. Yeah. That
looks that looks good. All right. Okay, so this one is good. Well, yeah. Uh, All right. Those are good. All right. That's good. Look to be different sizes, so it's not an issue. All right, help. Okay. Looks pretty sexy to me. Nice. Good job. Everyone if you made
it this far. Good job. Alrighty. Looks pretty damn cool to me. Okay. I really love
the front here. I think that looks awesome. Yeah, we don't have
to worry about this. Don't worry about it. I'm gonna treat it as a high
poly, but, yeah. Can't believe I sub died this while. Actually
not have done that. Oh, wax that il. L. All right. So we got this main part done. So the next thing
we're going to do is do the site this part. The site and the remaining, you know, the rail, et cetera.
38. 07 Turning Our Blockout Into High Poly Part7: Alright, so we're gonna
start the site now. Let's actually do
the rail first. So, this is a classic Zbrush. Classic. Shouldn't be too hard. I give it a one, one, uh All right. We're gonna just select it all,
triangulate it. Quad it. Read this. Mmm. We just want to check
for any sort of loose loose tangent here. So we got, yeah, like
this type of thing. We just got to locate it
now. It's crawly right here. Okay. No. Watch this thing right here. Gotcha. Got you
red ended, buddy. Is this, this Bing
bang bong done done D. Still. Probably way down here. Yes Okay. Solution this time. 67. Alright. I'd say
this is good to go. File Export FBX. Z. C. Z brush. Import Z. Okay. T Edit. The longest rail ever. Okay, this is getting pretty poly heavy, I guess
you could say. Let's start with a 1,000. Are we gonna get a crash?
No. Boy, this is pathetic. 200 K only rough. Okay. Let's go 2002, one mil. That's it. Not nearly enough.
Not nearly enough. 2000 3,000. Two mill. A ferocious
amount. Not gonna do it. 3,000, 4,000. We're maxing out brush.
We're gonna get a crash. 36 mil Let's see what we get. Okay? I think that's
just barely acceptable. You go to five, eight, polish. Start off. Okay. Can't
do a bit more than that. Ten piece. Ten piece. Okay. One more ten,
then we're good to go. Okay. Hey, one more. Pre process. 3 million. It's clean looking.
That was quick. That was quick. Imagine
having to do that all sub D. Probably could do
some array stuff, but this was This
took 5 minutes. It took 5 minutes,
we had a eye polyl. 5 hours later. Just loading. Okay, we're gonna
give this a 6%. Decimate at six. I think we still got a lot
of real estate to work with. Gonna do this. Well, we're gonna
try 25% from that. I think we're a little too
low now, unfortunately. Let's try 50 piece. Uh Yeah, I think that's good. 100,000 holy ****. Okay. Alright, goes to the Z pile. And then this, we're in psych, so site, sit, sight. Import this site. Wow.
Looking fire. Okay. Nice. You know, I'm just
gonna leave that. It doesn't even matter.
Clean it up if you'd like. Okay. H. Okay. I accept this piece. Hey, let's just do this here. I I
39. 08 Turning Our Blockout Into High Poly Part8: H Alright, I'm gonna pretend like I didn't
just try to work on that. And we're gonna we're gonna
just take this one duplicate, bring it back. Okay. I want to just save that for
start from the bottom here. I just woke up, guy. Come on. All right, piece looks good. File export. Okay, so this area here, h. Okay. 1,000. That's good. Try six. It looks fine. Try 75 on the next
one. That looks fine. Try another. Okay.
That's probably good. Got to be a nice hedge, that thing. Looks good. Good up, me. Uh huh. Okay. I had too many edges. We needed to make it a bit sharper more dense and
then you can take away. More of it. Well, it still
holds its integrity, you know? Yeah. Just to give it a we
want this sub 20 keg. Okay. We're just cranking through stuff. I don't
even need to talk. Okay, so right here, we're going to want to duplicate
this and then boolin it. Yeah. Pre process that. Okay. Yes. Yeah, it is worth it. Okay, so even if we're not
gonna animate this thing, we still want to we want to, uh, just make a clear
path through here. Even if we're not
using it in game. And just gonna
actually keep this. And just have that duplicated. Oops, it looks like Okay, so we get this
extrude Y S zero. Bit distance, get
the face out of there, delete this edge. It's like you were never there. Okay. All right. So that's kind of the look we're
looking for for that. And then this is gonna
be see through glass, so we can just go ahead and go ahead and give it three. I don't. Okay. Got the glass good. We're gonna need a boolean
through here as well. We're gonna duplicate this
so we can use it again. Blast through this guy. EY at zero. Oh Okay. Okay. The milli. We don't need that. One mill? Okay. Wow. Ooh. Does me Alright. Just cranky these pieces out. I'll be done in no time. Home stretch, baby. And stretch, then we go UV. Then, uh, yeah, low
poly texture done. Bake. Got to bake
somewhere in there. That's gonna get us on
the bake, I know it. We bumped it up one. If anyone's watching this, you
see what I did? It's a little rivety here. So I just bumped it
up one. Easy concept. The Inevitable error. That's
okay. We went a long time. We had a good streak going. Well, it looks like seabrush
just changed. Why is it a different
color? Interesting. Okay. These aren't the
same size, right? Nope, okay. I was gonna say we could just use
that, but Yeah.
40. 09 Turning Our Blockout Into High Poly Part9: Import Z. T F. Looks good. 320. Oh, off the
bat. That's no good. Saving after a fatal
crash, what is this? What is this blasphemy? One thing we can do is
go back to blender, while that destroys itself. Just scale this and then make sure its
normals are correct. And then we can just go and
do the same thing again. I might leave it in
just in case you have that experience, so close. Open. Pre process. That's am. Yeah. Alright. Alright. So this beast the one we messed up on earlier or the one
I messed up on. He's our final boss for
HipolyO HypolyFinal boss. Alright. No. So it looks like we got all
the pieces modeled out. And we are ready. So
this hypolys complete.
41. 01 Creating Our Low Poly Part1: Okay, so today we're going to be shifting gears and focusing
on optimizing our low poly. We're not going to do Us yet. We're just going to make sure
that it's fairly optimized. And it can be used in the game. So once you get the gist of this becomes pretty simple,
pretty straightforward. We're just making sure
that it's good to go. It doesn't have to be
insanely optimized, you know? But give it a good shot. With cases like this, I want to go check and
compare with this hi Poly. So it looks like I
brought this part down to basically meet
up with die Poly. So we can hide this down. All right. This can go
all the way down here. We can probably inch or
something right here. And what I just
did was, you know, control T. It's just a
shortcut to triangulate. We're gonna see if we
can get away with this. A lot of it's just
seeing what you can do, seeing what you
can get away with. Looks still looks pretty valid. This is a support, but this park can go up. We're going to put
one here just to try to straighten out some of the potential
normal difficulties we're going to have
with this piece. Okay. Something like that. This might actually lead to some issues, so I'm just gonna before
it gets too bad here. Okay, that's a lot
better, actually. A lot better. All right. Just to make things simple,
let's just do this. We can do another one here
and then just connect that. Do the same thing here. This is it's pretty boring. It's a tedious part. It is. This is, uh, some
people like it. I have friends who
love doing this stuff. It's just, it's a nice it's a nice calming
thing that they can do. So they enjoy it.
It's more of like, yeah, it's just it's
a calming thing. That's all it is. Or if you're sometimes like me, you just want to get
to the texturing. So you develop these
tendencies to, you know, want to get through
it as quick as possible, and then you run into all sorts of
problems down the line, whether it comes to your
bake has a couple of missing pieces or you see some sort of
issue with the bake. And even if you get
it in the painter too quick and that would
mean you rush the bake. It is better, safer. It's more worth it in general, just to put in a
bit more effort, a bit more care and really take your time
with these parts because, man, it is annoying
when you have to go back and forth
and back and forth. Uh, yeah, it's totally worth it. To just chill out,
focus on this, say, Hey, what do I need to do? How do I make this
the best it can be? And then just focus
on doing that? And that's it's a good
formula for success. It requires a little
bit more patience than a lot of
people are used to, but it's worth it in the end, I think a lot less headaches
you're gonna experience. Some pieces are
better than others. This is a pretty
complex piece, I'd say. So what? No particular reason I
did that looks like, sir. And if I miss a
piece, that's okay. We're gonna go back at the end and just do a quick
check through. Try to find any missing pieces. Alright. There's a lot
that's good there. Here, we can we can
optimize this a little bit. Not gonna be crazy
optimized. Like I said. We're not gonna spend
that much time on it because people can do that in their own
time if they want. But this is, uh you're gonna get an optimized
piece, for sure. That is the case. All right. This might be skewed
if I do this. Looks good. Looks good. That looks good, too. Alright. That I see compare here, is it gonna really
skew my stuff? It does look like it is. So if it affects the
silhouette of this bake, especially in an important
angle like this, it's probably just
best to leave it. It is best to leave it. Not probably. It is 100%. 1,000% better. This
could be a mess here. We got to figure this out.
So I got to figure this out. This looks disgusting, but this is just
how the model was. Alright. Looks
pretty. No, I bat. These inner parts. Oh, forget about them. Okay. I might not be perfect, but we got a good base here. Mirrored it, make
it easier for us. These parts we can clean up. Yeah, so whenever
it stops needing normal lap support, I
guess you could call it, you just stick it to the
nearest the nearest, uh whatever it is. The nearest vertex. You just stick it there. Okay, we're gonna do this
comparison thing again. Is it different without this? It doesn't look too different. So we're gonna just combine
those. Probably can. Hold on. See what happens here. Does not look too different. Still looks pretty normal. And then lastly, would be this. Does that change? No, no, it doesn't. Alright, so we got that. Here. That looks pretty good. If we wanted to really optimize this, you know, we're talking. We're just doing all sorts
of stuff like this to just line up this high poly the
most efficient way we can. The best way we can. But this could fit in the game right now,
which could be good. As is, this is
looking pretty good, actually. Fairly
optimized, clean. Looking good. We're gonna move
over to this now. We're not gonna lower
this site anymore. It looks almost too
low to be a site, but it's pretty
far down the line. So what I mean by that is, uh like if you're our
sight it's so far away, you know, it's away at the end. Our eye is here. We're
looking down there. That's pretty far, I'd say. So it's good. It still
looks like a circle. Collapse that. We might be able to
get rid of this. Yep. And then this and
then collapsed this. And that's done with that. That was pretty easy.
These. Yeah, we can probably just
get rid of these. Probably worth it. And then those are all set. Okay, we got that nice. Hi that, hi this.
And then this screw. So we can get rid of that optimize with
the collapse there. And then here, we're
just going to do that. Okay, so for a screw, as well, you know, this stuff is it is
pretty heavily optimized. You know, this is pretty high poly if we're talking
about a baked screw, you know, a low poly screw. We're just gonna really just try to optimize
this a little. Yeah, we can't can't
be letting that slide. Like, this is still crazy. There's still a lot of, uh, we can get away with
much, much more. You'd be surprised how good a normal map is,
how strong it is. Really. But, yeah. So if we keep doing
this, you know, we're gonna get to the point where it actually
starts to look bad, and then it still
looks good, though. I mean, it still looks good. That might be the
tipping point there, but let's try it. Don't be afraid to push
it until it just looks hanky till it looks awful. So it's starting to
get a little bit of stuff going on
that we don't want, so This is a low poly. Yeah, that's pretty much it. Okay, we can even just so it bakes well
enough. Just do that. Give it a little boost.
A little boost there. Co little boost here. We just want it to cover
that, you know, that's all. That's all. Alright.
Alright, that. So that's good to go. And then this we can delete that face, and then we're just
gonna collapse that. Boo good to go. And I think that's
it for carry Andel. Yeah. We got it
down. About 2000. Alright. So carrels good to go. And, uh, yeah, I guess we'll
just get started here. M, let's just start from back here. All right. Yeah, we could delete this.
We could delete this. Just need to make sure that
it's there's no, you know, like back facing
normals, or I mean, there's no you can see
there's a gap here. So let's change this Let's
just correct this before it gets out of hand
because you know it will. Okay. We're gonna do that. And then G Y. It's just simple. Maybe even push it in. Alright? You know, we can
get rid of that. What does that look like
just with the high poly? Yeah, that looks fine.
Looks pretty good. We're to move just this. Yeah. Looks fine. How's this. That's where I was. Okay. Alright, so we're just gonna
keep this 'cause we can just it's not crazy Polycount. And we can easily make the UI small, so
it's not an issue. Not an issue. Here here. Okay, this looks good to go. A lot of these pieces are easy. Some of them are more
difficult than others. And that's just how it is. Quick like that. Like that. All right. This part could
probably get away with this. We're gonna have to
branch off a bit here. That'll be theirs.
And then this one. Collapse. All right. That's that. Can we get away with this? Think so. Okay. Looks like these are different. Okay, so here. Go along here. Select. Okay, so we
have 32 edges here. And this is 16, so we
had cut this in half. This is another good
up the wisingtonteck or deselect, dissolve the edges. And then it's basically you
just manually move them over. It does change it a little bit. So maybe one thing we can do here is take the top,
put it to the bottom. We got that line still. It's still a line, so what we admit to there. We just want a clean
bake. That's all we want. I don't think this would
give us a clean bake, so Bleek that. Okay. Alright, we're gonna
see how this works. It looks like we just need
a little bit more room. We maybe push this up. That'll make our
bake a lot smoother. But it's never perfect,
and that's okay. Yeah, it's never sometimes
you do get a perfect bake, but I can tell that one's
gonna be kind of a up. So just got to be patient. You know, it's not
the end of the world. I remember when I
was learning how to do baking in marmoset, whatnot. Oh, my gosh. Oh, my gosh. It was awful. It
was so stressful. Unbelievably stressful because I didn't know
what I was doing. I was just kind of freebing out. I was baking everything,
and it was awful. It is kind of there's something to be said about
having a mentor when you start three
D. I think it may have taken me a little bit
longer to get to maybe, like, a professional level. Uh, just because
because of that. I just a mentor is, you know, they're just gonna
get you to where you need to be quicker. That's short and sweet. They know all the stuff
that you need to know. They get the stuff you need. That's it. It's nothing more to it. They know all the
mistakes you're gonna make because they've made them. They've already made them. We're gonna throw this in here. Get back that normal
we just lost. Looks good. All right. Alright, this is looking pretty good. Looking pretty good. O Okay. I'm gonna hold off
on this stuff again. It's clearly, you know, we need to optimize this, so clearly we do. Clearly, Hmm. I would say we can, uh m It's a tough call here. Let's just see what
it looks like. Looks good to me. We're gonna need to just
make it a little bit. Ah, I just don't want
to deal with that. Okay. Now, we're just gonna we're gonna give it
back its girth. We're good. Okay. Those are just the issues you run into with
that high poly stuff. It's too, you know, the
edges, good old edges. Alright. Good to go. Can get rid of this. Inside job here. That, don't need it. Hide it. Pack it up. Same with this. Don't need that. Collapse that. Good to go. This one, too. We'll do it in reverse. Good to go. Starting here. Alright? Still got it
good there, right? Make sure it still lines up. Okay. Collapse that. Bull, it was quick. See how the silhouett's
being affected? Just leave it leave it as it is. Got that there. Alright.
Can move on from there. We can optimize this guy. All right. Looking good. This We can get rid of this. Good to go. We're gonna mirror
this just for the sake of, do we need to? Yeah, let's mirror it.
Let's you marry. Mirror. Okay, that's part.
Get rid of it. Same with this. Oop, looks like I got too much. That part. All right. We'll get this going. All right, this part.
Go to bring it down. All right. That's good. I'm pretty sure this has
a hot it. It does, okay. So Alright, that's fixed. Well, if we leave these
like this, we can, uh, Oh, actually, we can
just probably do this. We just got to keep
comparing it to the ye poly, see if it lines up. And that's Alright. It's there. We're just doing all
the little stuff. Right now, that's all doing
all the little stuff. That should be pretty good. U Okay. This two. I think we can make that work. H
42. 02 Creating Our Low Poly Part2: M. Oh.
43. 03 Creating Our Low Poly Part3: Is h Do I Sony.
44. 04 Creating Our Low Poly Part4: M. Things like that things like that I I I sss.
45. 05 Creating Our Low Poly Part5: I I I I n. I and D. D. D. D. The h. It
46. 01 Preparing For Uv Unwrapping: Now we're going to
move on to our UVs and our baking. Okay. So this is how we're going
to set up our UVs here. I've gone ahead and made
three different groups here. Sit UV, set one, set two. Sit UV is pretty
straightforward. This is going to
be its own UB set, and we're going to
use two K resolution. Okay. And then set one, set two, as you can see
here. I just hide this. You know, it's just the
gun to it's the gun. And it either has the rail on it or it
has this carry handle, but I'm grouping them together. They're gonna share
the same UBs. And we're going to split
this whole everything here into two sets, and they're both
gonna be four K sets. Um, so yeah, pretty
straightforward. I've tried to split
them up according to how much UVspace I think
they're going to take up. And also, I've referenced
this image here. You can see the tan
parts are the polymer. So it's really kind of, like, convenient if you can just have all
these on one sheet. So when you're texturing,
you don't have to copy this material and then paste a huge file
onto another sheet. And that, in turn, just really bogs down your
substance painter file. It makes it twice as
big, essentially. Um, so I've done my best to
get plastic plastic plastic. All there if you can see here, you know, they're all
on the same sheet. So it's just one plastic
that I'm going to need. And then I've put the
wretched on the sheet. So yeah And I think we're
going to just mirror this. I don't want to get too
deep into mirroring. It kind of tails
off of what I was talking about earlier
about optimizing. There's levels you can optimize. And I think this is just a good for people who don't
know how to mirror. I mean, this is just
a very simple basic. We're going to just copy
the UVs and put them here. So, yeah, that's it. And we're going to get into
the UVs. Yep. Alright.
47. 02 Uv Unwrapping Part1: Okay. I'm gonna be using
this software called RSM. Okay. We're gonna start with sight o. Okay. LTlaw. I'm going to put this little thing
in the other monitor. But basically all I'm doing is just using this to select item. For example, selects
individual my items. So it's just I go down the line. I start at the top, and then I'm just gonna put it off
to the side, though, hell. That's what you should
expect if I just have random objects being selected. Okay, so to start. No Okay. A little bit of stretching,
that's fine, though. One thing also is that we're
gonna change this too. We have hard edges, and that's one thing you just
got to keep in mind. This is the only hard edge. Got to be a seam
there. So Hartage got to be a seam
there. Same with here. Okay. Do h I an No. UV are good, but none
the normals are off. So Hmm. So at the point where
most of our UVs, well, they're pretty
much done at this point. My pers two K.
That's just the pay. Target. Okay. So it's really good as at this point, but we're just going to Well, I see. Okay, so
48. 03 Uv Unwrapping Part2: Okay, so I brought my match
back into blender here. We're gonna take a
look at the UBs. So they're all the same as
how they were in Rizom. Everything's still
the same. Um, yeah. What we do next is we're going to mirror a
couple of things here. It's pretty easy. We're just going
to take these two, I think these are the only
two things we want to mirror. And then, yeah, we
can leave those. These two are pretty simple. So we're going to look
through the scope here. And mirror the left
or the right side. We're gonna clip the right side. One thing we the origins good. Boom. So we save this. All this is gone. That's
more room that we have now. And so we're going to go
export it again to sit low. Open up Rizo, load with Us You can see this here 4941. Okay. So now, now we're gonna go back to here. And I'm just gonna run
through them again. But this time, we're not
unwrapping anything anymore. We're just we're doing
this thing called biasing, so UVs that you're
never gonna see those UVs we want to do this, just make them small. One thing you just have to make sure when you do this is that, you know, your whole UV
is good to go, basically. It's ready to go. It's
set up correctly. This is the final thing. You do. You tweak the size of the UV, and then you configure it again, you pack it again, but without changing the size
of any of the shelves, and we'll just
reconfigure it in a way that's more
efficient, et cetera. That's done. Okay.
Well, this here. That there. Just
leave it like that. That's the other one this here. And you scale it based on what's important,
what's not, you know? That's it. So we're
not gonna scale it. We're only going to
scale stuff down, too. Up, we can also go. But making sure to scale
it down is also important. So this is prime real
estate, obviously, right? So we want parts of it to go
up, parts of it to go down. So we're gonna isolate it
realistically, you know. It's part It doesn't matter too much. Here. This, this, this.
So all this here. It's taking up a hell
of a lot of space. We want to shrink it down. Just a little bit there, okay? And then This is well. It's just you're not seeing
any of it, basically. Just this part. We're
gonna shrink it to there. Alright. That's like that, pool. Can do that with this one, too. It's too good. Isolate to back here. You know, we're not
gonna see anything. Not gonna see much, at least. Sam on the insides
here? Not much. I part, we are
going to see a bit, so yell it up. That's the type of
thing. Oh, here. We're only seeing these two. Yell its way down.
Alright. We're just kind of running through
this here. Yes. Okay. So this is actually
pretty prime stuff. We're just gonna
only scale it up. Maybe that's a little bit. Okay. This is also prime. This is a movable piece, too, so we're going to scale
everything up just to Tad. You In the bottom here. All right. This is a visual
interesting visual, so L, I I All right. File, Export, FBX. Site Lo. Okay, so that UV is good to go.
49. 04 Uv Unwrapping Part3: Okay, so we got UB set one
now that we're gonna UB nap. Gonna do the same thing we did. Hit this little
button, get our tool out and just start going. Try to set that to 35. It's the angle at which a edge will get recognized, I believe. With the easiest one I've done. Looks like it's a hard edge. I want to see if we can
get away with this being a, you know, not. Totally can. We can
leave it like that. Yep, we can adjust all
this stuff afterwards, but it'll be
something you Simple. I'm gonna keep it it looks
pretty normal still, even though there's this
level of stretching. Yeah, I'm gonna I'm gonna
keep it like that, and then It's just weird.
I don't know why it's I don't know why it's
stretching like that. But maybe we could
do this instead. Just get this set this set. Bit cleaner. We can just leave that. It doesn't need to be It's not even it's never
going to be seen. So actually, yeah, it might. No. Yeah, when we don't
have perfect quads, like this, you got to, like, manually do this thing. It's kind of
annoying, but, yeah. I don't know what
else to say there. Okay, so that's Okay. Okay, so for this one, yeah, it might be easy as easy to, uh Okay. Yeah. Okay. That works. Got to check here. She what's going on. Okay, we go sharp guys. Big one here. Okay. It's a mess. It's just a mess. Okay, we can see the light. We can see the light.
We can see the light. We're just trying
to find a way to split this into two right now. I think our missing
pieces are, uh yes. Okay, finally. A lot of work
to do as far as cleanup, but I just did this. I'm going
to get that piece off. M. Okay. I probably is pretty hidden. I'd say that would work as well. Okay. Yeah, overall, we're
in a pretty good spot here as far as you get nor though. Got to do some
optimizing afterwards, of course, but overall
it looks pretty good. Just finding these loose ends. Oh. That confuse the hell and I would say this is very far in the back. Just trying to find this piece. That's quite a bit
of UV space, so. We just need to see that
and that. None of that. So that being said, so Okay. There's no distortion, much or worst pieces
right here. Very hidden. That's okay. There are
little pieces everywhere, though, which is something to
look at at the very least. Yeah, the big boy. Okay,
let's tackle this. I'm gonna need some
water for this one. Okay. All right. One go. Let's see. Okay, we
can already see the light. Great sign. What that there. Okay. Well, that was actually
much less of a hassle. Of the bat. The other one, I really thought
they were going to be equally as bad,
but maybe they are. I haven't realized. Now, this Okay. Okay. All right. Call that what it is. Done. Okay. Okay, so for this we're only going to unwrap one screw. Yep, just one. We just w one. That's all. That's this one. We got the bottom right on
the left side grip. Screw. Gonna write that down. This guy only. Yeah,
and we're gonna just, we're going to mirror these all or at
least a lot of them. I call it day. So they're all going to be we're basically
almost up at this point, so. We're in here. A m D Got lots of tiny parts that we don't want.
50. 05 Uv Unwrapping Part4: I I I
51. 06 Setting Up Mirroring: Okay, so we're back. We're done with the
main part of the UVs. The next thing we're
going to want to do is I've actually
already done it, so I'm just going
to go through with you and kind of walk
you through what I did. So, for example, we
have set one here. As we know, this is going
to be its own UV set, and I've gone ahead and deleted the parts that
I want to mirror. So, for example,
these two screws are going to share the same UVs
as these two missing screws. Okay. So generally, basically,
what's going to happen. I'm going to bring this back in, optimize the UVs, bias the UVs. I'm going to go through
that in a second. But mainly what's going
to happen here is I'm going to do that,
bring it back in here, and then apply a
mirror modifier, so I'm going to
bring it back and then apply the modifier. And as you can see,
the UVs are the same. So we have these
highlighted, nothing. These highlighted,
they're the same, right? If you apply they're
on top of each other. Okay, so what we're
going to do the concept of mirroring is
we're going to move it out of the UV space. So GX negative one. It's one exact tile
outside to the left. So when we go in and bake, it's just going to
share this data. Whatever's on here is
going to appear there. That's the concept. Okay? So that's basically
what we're going to do, and I'm just going to
go through what I've mirrored before I go into another segment
of optimizing UVs. So I have a little I
commend you do this, too, it helps you keep organized
so you can bring it into the UV unwrapping software, whether you use Blender
or Risom like me. So I have a mirrored items
collection that I've made. It's like a subcategory
for this set. So if we go through the line
down the line, we have this. As you can see, I've
deleted it already. The next one is
this piece in here. These are exact on the
Yaxis mirror elements. So then in here, boom, this one I
just showed you. The next is this barrel.
There should be one here. And then this screw,
so we're going to basically add this
screw everywhere in many places because
this just the UV space is just crazy what
this takes up. So we're going to add it here, here, here, here, here,
here, here, here. All sorts of as here, and these over here as well. And the reason we're doing
that is because we're going to have one really
high quality screw. Realistically, this
screw isn't going to see a lot of damage
in real life. So there's not really a need
to add, like, some crazy, unique scratches to it because it would hit here
first realistically. So if we just have one really high quality screw, you know, maybe it's gonna have
some good textures on it, but nothing that is so distinct
that you're going to say, Hey, I saw that on that screw and that screw and that screw. No, it's just gonna be subtle enough where you can look
at each screw and say, Okay, yeah they look
different to me. Um, that's the goal with this. So it's going to all these
other empty spots where the screws are supposed
to go into will go into are just going to share the same data
as this one thing. So instead of having
1 million little UV shells scattered
around like this, we're going to have
enough space to make, you know, maybe the shell
can be this big now. And it's so much of a difference it's going
to make as far as quality. So it's the same
exact concept as, say this example I showed
you just a second ago. But instead of doing an exact duplicate and exact
mirror we're going to, uh where does this thing? We're going to basically once
we're done with everything, we're going to take it, put this and we're going
to bake it, as well. After we're baking it, we
just basically duplicate it and then put it
wherever we need one. And that's basically
what's gonna happen. So it's just that.
It's very simple. It just takes a
little bit of time. Actually, it's pretty quick. After you are basically done with everything
related to UVs, that's one of the final
steps you're going to do. So yeah, I don't know if I covered everything or if
I went on a tangent there, but we're here, here. Yep, we got another one.
These are slightly different. This is a circle. And then this is a rectangle we
have on the side. Um, I don't know where it is. It's the same, like this. We've got a rectangle
on this side. Basically, we're going
to duplicate this down, and we're going to take
individuals and put them in the hexagonal areas. Hexagonal hexagonal,
I don't know. And then finally, we have the small one, very insignificant. So, yep, that's basically
what we got for set one, and I'll go in set
two really quick. So there's nothing
really going on here. I forgot to do this
one. So let's do that. Yeah, we want to
mirror this as well. So we're going to
that one out and then move the bolt into mirred items. There's a lot less items
in this set in general, so it's a lot easier to cover. So we're going to go, This
screw is going to be mirrored. It's like a bolt
rail type thing. The bolt moves along
this or I mean, the pump action element
lines up on this, so one on this side as well. The screws we're just
going to do a 180, like just a mirror onto the other axis,
all these while wrap. I think we're going
to have a little bit more space on this UV, so we might have to actually
move a little bit from set one to set two it's that if there's a huge disparity with the UV quality,
and then a barrel. So this is probably why
we might have to add some more items to this UV set
is just because, you know, if you look at a barrel, I mean, it takes up one tenth of the whole sheet if you
really look at it. So we're obviously going to want to take this element here
and scale it way down. We're going to do
that momentarily, but it still takes up
quite a bit of room. So if we're able to save all that space by
mirroring this, then it's totally
worth in my opinion. It gives us a lot of space for this rail because
this rail is crazy. I know a lot of people
when they UV rails, they tend to try to
do this with most of the rail angles just because the more
little areas you have, it needs as much, you know, three times the space
between elements. So it just takes
up so much space, as opposed to if they're
all connected like this, you can see you can
fit just about this much in there in just one
little area like this. So if they're connected, they're much more efficient, and you can get away
with a lot more space. So people tend to, you know, smooth biangle really
heavily like this, just to save so they're able to now this is shell, one shell. And actually, it's a pretty
good way of doing it. And it can lead to problems sometimes, but usually
it's pretty good. This is almost always people
do this in game development because when they're actually making it an asset for a game, they're always going to
do that with the normals. Not going to do that
here just because we have normally for this size gun, we're going to fit it
on 14k texture seat, and we're going to mirror maybe a little bit more elements, maybe even the rail will mirror. But yeah, we're
for this project, we're going to leave it
just because we have two sets to play with. So that'll be good for us. So yeah, those are the
elements I chose to mirror. And I guess the next um thing we're going to do is bring
each one of these sets back into Rhizom and tweak
the UVs a little bit more and scale them in certain areas that we want
to have more resolution, which would be like the player
facing areas, et cetera. So, yep, that's
going to be next.
52. 07 Uv Biasing Part1: Okay. So we are in Rhizom again. We're gonna be going through
the list of each mesh, and we're going to
decide how much each should have
as far as you eat. So right off the start. This is number no, not number. Number one is that we're
not gonna touch this much. I could stay. I'll have a
base level, like a baseline. Just a baseline, you know. Uh, so we still have these. So we should go down Dos. And we just want to make sure
we have the correct item. That one Unwrap. And then it looks like
we're missing something. We'll just take we'll take
the one on. It's sad. Yeah, this one.
We'll do this one. It looks like we're gonna have
to unwrap it a little bit. That's fine. So file export. And we had the same
issue here, actually. So we have that, too. And we'll just do that.
And then we'll move these into our UV set one
mirrored items. And then we will
launch it back into rhizome and see what
we're dealing with. So UB one. Simple file load load with UV. Okay. So it looks like
we still have this here. That's our main perpetrator
and probably this. So let's just get these out of the way so we can tell whether or not we need to go
back and forth again. Okay. We got that? The BVG. If we can get that launched up? Nope, takes a little
bit longer sometimes. Good. We're gonna sometimes
you have to rotate it. That's just how it is. I just sometimes takes a little bit. And sometimes you actually have to cut it in half and then kind of re separate it
or re that's one. We want to keep that
one, at least. Okay. Give this one that O and got to If we go delete that
unwrap it again, now we're going to curb
it a bit and just go for the type of thing. Okay, we got that. And now
we click here, W. Boom. Oh. T V M here. Here that stays. I lost no. Okay, we're gonna keep
it like this, then. We're just gonna
keep it like that. We're not gonna cry over it. Okay, and then our second
one was here. We're here. Okay. Yeah. Yeah, it looks like it Why? And then this here? It looks
like it was part of, so. Ooh Yeah, this in here. We can just delete
that afterwards. So I wouldn't even worry
about it too much right now. That gonna affect anything. All, so we just need
to organize it. So this is what our final bake to an
extent it look like 40 96. We're gonna pack it. Okay,
so that's a pack there. And then we're gonna go down
here again. We got that. Just going down the line. Here, nothing crazy. But just stuff like this. We
never we're gonna see this. I with this. Never gonna see it. Here. Never gonna see this part. One thing we can do to really just make sure
we're not gonna see it. Just line these up. Yeah,
we can delete that, sure. Or hide it. Don't
delete it, please. We're not seeing that.
Okay, so we got that. Back to, uh, We're not even seeing that where
that scale weigh in, right? There's no way
we're seeing that. We're in here. We're
only seeing that. Okay. Even less is fine. It's totally, utterly useless. It's at least there. All right, isolate this
in here, here, here. Now we're going to use it. That's okay. These are okay. The trigger up up up
goes all the way around, so what much you can do there? Yeah, we can leave it as is. This block. No, it looks like we
actually forgot A EUV, but we can just add that there. Um. That's fine. I think the bottom is unseen, but I'm going to
just check again. We're going for this
block here, this block. The bottom is unseen, so, yeah, we can we can minimize that. And Big Boy, so just stuff
that we're never gonna see. We don't care about
all sorts of stuff. All these holes we don't need. Alright, especially
in here, useless. We just never see it. Alright. There, there. Okay. Here, here. I'm pretty sure this
is unseen as well. Yeah. Oh, look at that. Wow. What
about this farm piece here? Probably looking. That is seen. So I think with that, we can shrink a lot of this. About that level.
Huge gain there. We can move on from there. Okay, this all these Yeah. Okay. Ather big one here. One thing I did I just
check again real quick. Okay. There. All in here. And We got to be careful when we're doing
this because we don't absolutely do not want
to mess up something. Yeah, you can fix it, but
it's okay either way. This might be a mistake. Probably. Okay. Um, yeah. So a lot of this is
just good, good, good. In here, Inner here, we should let go. These. And these just shrink
them a little bit. Not in fund, but okay, that's huge also.
We've got this space. And then. There. Good to
leave that, probably. Pretty big piece as well. But, uh So, here and here are good
in the back is good. Here and here in the back?
Oh, this is a big one, too. Big, big piece. Okay, something like that. Okay, leave it. Can leave it. Leave it. That piece there. Yep,
you can leave that. Leave it. Yep. These three. Yep, good to go. We have anything here. It's at the very least inside here, can go down quite a bit. Oh Y, leave it. It's here. Inside
can go down. Here. Leave it if it's really small, you know, we're just
nitpicking at that point, and this is not what that is. Now, we're just uh we're not doing it that
intense, you know? That's weird. I'll go. No. Yeah, I know that. That's actually good. Make
that smaller. This here. Little bit small here.
Leave it. This guy. Okay, in here. That's in and then the back? Maybe leave. But then
definitely the back in there. Yep. Good to shrink. And this cat. No one needs to see
inside of this cat. Okay. So very nerve
wracking now. What do we do with this? We
have this this cap here. We have this arrangement of
pieces that we have created. And we're going to just do
a couple control delete. This is our highest s, 52 30. We're going to select them
all and hit this button, and this button packs it, but it doesn't change the size. It keeps all the size
relatively the same. So I packed it. As you can see, this part is big still, and this part is now 6,000. So we've gained on the resolution
and force that matter. And it's stayed pretty
useless in areas that don't. Okay, we can just
fix a couple of these for the most
part, this is Gopi go. And we're just gonna rotate
and just rotate stuff. And it looks presentable. And that's it. So it's somewhat of
a process, right, but it's definitely not,
you know, impossible. Of you're not impossible. Just get these going.
When it's triangulated. Makes it a bit more difficult
to straighten these, but with looking out
where we are. Okay. And we just want
to wrap it here. This turns into nice,
that's what we want. But you see it's gonna lose
resolution just a little bit. So we'll just kick it up a bit. So it's back to
right around there. Yeah. Thanks guys. This one, too. Just nice simple. Don't stress that this too much. It's not worth V And then you looks
like it's bending. We don't want that right. One thing we can try
is to unwrap it again. And Okay. We're only gonna want
just a little bit here. Yeah, if this happens,
it's really annoying. As you probably already know. And here we're gonna
just try to continue. It's just T. Okay. And you just slowly but
surely straighten it. And once it looks
kind of like that, go one for the final. There there. Takes a little
bit longer sometimes. We want 6,000. Ops thousand. You just scale it up. So we're at 6,000 now. And don't worry about
lining this up again. We have all of these, too. Okay. But see how this is lined up straight. That's
good. We want that. We want that. This one. Just doing it. This
is the trigger. You can kind of tell
what it is, right? You can kind of tell. All right. Grip one as long as it's lined up
where we want it to be. Ideally, we have it tilted
in the correct way. You want them tilted
the same way. All right. Okay. I think it would
be for the best if we have for that and
then send it off. Yep, let's go there. This it's important to know. Alright, fix that. And we're just going through, like, the whole patrol. It's cool. Just doing the right thing. That's it. The trigger would be a sin to not
do it to this one. There. So close. Now, what if we remove this. Alright. I'm not complaining. That looks good to me.
Alright. What are these? The bottoms here. Uh, we can probably do that. You guys get the idea,
though. Just like that. Yep, perfect. That. De It's always nice when it works. Yeah, we can find loose pieces
like this, line them up. Just put them back on track. Looks like we've
found this. This one. Okay good. When were you with? All right. That's the back here. Well, it's never
going to be seen, so I wouldn't even
worry about it. This is a pretty prime time one. Let's get this one going. Yeah. One. The same All right. Well, you're gonna
select it all again. And this is currently
6,000 6,000. 6,000. Okay. So we're just gonna go ahead
and pack it again. It's gone up a little bit. Okay. So this is actually a pretty
good spot to do this. So we're at four k, six
k. That is our target. We want to hant
with the next set.
53. 08 Uv Biasing Part2: Okay, so we have
the set two UE set two imported into Rison now. Everything is wrapped
for the most part, except we just need
to basically do this, to straighten things out, and then go from there, yeah. Just doing your best to
straighten stuff out. Orient them properly, just
to do that the best you can. You do get the
occasional steak here, which is totally fine. Okay. H. Basically, we're just trying to
line stuff up, right? You know. You see
what I'm doing. Pretty self explanatory. It just takes a little
bit of patience, and it's definitely worth it at the end of the When you
look at the end result, it is definitely to just put in that little
extra time to understand, you know, what you're doing, why you're doing it, et cetera. It is definitely worth it. We just have to look at LIP. 2,500 intelectalIF. And now it's back to its scale. That's what it should
be. It's equal to everything else
now, basically. Okay. So everything seems
pretty lined up. You can, uh, We can move forward from that. Okay. So let's start
shrinking stuff. This rail can be shrinken,
I'm pretty sure. The bottom, it can
be a little bit, not holy, but yeah,
a little bit. Like death. In the barrel, of course, This, of course, can And then in here,
we can do that. And Okay. Just save that real quick, and we're just going to select all and then
pack it like this. Okay. We're going to
also change this to 40 90 64k and then
pack it again. Increases the padding
a little bit. Yeah, we're gonna
test what we have. So 8,000 we currently have. So we select all this, just quickly go to 6,000, which is what our others was. Um, it So we get quite a bit more
room, you know, 8,000. So we're much ahead.
We're very far ahead. So we need to add. We need
to take this, save it. Now we're gonna go back
into blender here. And we're gonna
take set two here. We're gonna hide mirrored
items just so I remember. Um, Oh, it looks like I actually forgot that so that's
important to add back. So let's do that. Yeah, let's do Let's
do that again. Looks like I made
a mistake. Export. We're gonna just add
that that piece again, that rail. Um Kp. So Actually, I make
this mistake a lot. So we're going to want to hide this rail, hide mirred items. Okay, and then we're going
to select I'll delete, and then I'll import
what we just had. To. While. Import too. Did we already have it? No, see, we don't have it. So, we're just gonna want
to continue to do that. While. It's real time. Give
me a break, okay. You can only move so fast. Have I heard this? Okay. Do that. File, Export FBA. While load with UVs. Okay. So this is now we
just have to select this. We want it to be 40 96. And we want eight,
one, two, three. 8,000. We want it
to become 8,000. This is 8,000. And
it's gonna shrink, but how much we
don't really know. We got a lot of space left here, and it is now 6,000, so that's exactly where
our other one was. Okay. This is 1,000. Okay. Here. Okay, pretty much the same. We need to orient
this stuff in a way. That's just gonna pack a
little bitter. That's all. So Okay, nice. We got a full pack. As
long as it covers it, the padding makes the
percentage look lower. Okay, we're at
about 6,500 biopsy Okay. We want to
just add one thing. Basically just one
thing. One, two things. So we could pick this. That's something we could add. Yeah, it's safe
safe thing to add. I think we should add it. And just that. So
it's this and this. We're going to transfer from
UV one to UV two except two. Okay. So that's
been transferred. You have to do this, as well. Mirrored items from UV one
to UV two, mirrored items. Okay, we can go ahead
and hide that again. So we perceived that And, yeah. Okay. I'll export. We're just going to
do the same thing. Pile load with. Okay. This is sideways.
That's a good way to check. At sideways. Okay. And we want That locate our new objects. This. And that 40 96. 6,500. We can actually
just go to 5,000. 5,000. Change that. And now. Back again. 6,400. But We can add one more thing, we're gonna save it. Wisave. Wile X. While Import BX. Yes. Do we have the
same movies here? We just get to add
one more thing. Let's add. Let's add these. All
of these in here. To set two. Set two. And then mirrored items. This is also to set two. Okay. And then from there. File export TB. That, too. Load with UV too. 14 96. We want our, let's say, 5,000. We want it. And which ones this Okay. And now pack. 62. Good to go. File, Save. Back in the blender. Set two, file, import FBX, two. Okay. And we can see
good to go there. They've that. We're
going to export one now. Explore one, go back into here. Load with UVs, one. Okay. And we're just
gonna hit Pack. Here we get 496 62, 46, exactly the same. That's how we do it, baby. That's how we do it. Hi there. Did that? Well,
import FBX one. Okay. So we got basically
the exact same taxil density on both sides.
54. 09 Additional Mirroring: Okay, so I just wanted
to quickly go over. More UVs that I mirrored. I decided to mirror it because the textile density was too low, so you can just
carry it into it. First would be just like
everything I mirrored extra that was done off camera
is just cut in half. So it's not a big deal. This mirrored the rail. This piece was mirrored. This piece was mirrored. And when I mirror
it, I just think and I've got it in half,
that's a mirror. You're gonna attach it later. This piece, this piece. And this barrel. Now, the barrel, you
know, Okay, picture this. Cut the barrel and half. It's gonna be the
same on both sides. Um, if we go to the low here, you see this whole
shrouds covering it. So, of course, this is going
to move back and forth. You'll be able to
see a lot of it. But, you know, if you mirror it, okay, sure, you're never
going to see the inside. One. And you can picture both, and you can just rotate it. So that's the other you
can rotate the other side. So those are the
pros. Dog doing that. Okay, so that one? Yeah, I think I did this. This one I mirrored that. What else? Back here. I mirrored that piece. Yeah, that's pretty mark. It's, it's pretty much it. But I was able to get the
pixel density around. Um, to 70. Your TD unit has to
be in D centimeters, and then your MAPs is 496. You should get rive 74. I also put geometry here just because this is
never going to be seen ever. So it was worth it to put
the extra geometry in there, and just shrink it because
they're never going to see it. So we have these bigger
ones that are displayed. So yeah, it was
probably worth it. So, yeah, that's what
we're doing now. And then the next thing we're
gonna get into is beaking.
55. 10 Bake Grouping Explanation: Okay, so I'm just
going to quickly go over how to prep for the bake because
that's the next step. So we've got all of our UVs
decided. They're optimized. And we still haven't
mirrored yet, but that's for after baking. So we can just go through
set one to start. Okay, so basically, we
want to get them in groups that aren't going to interact too heavily
with each other. So, for example, you
combine the objects. So I have three groups here. That makes up the whole set one. I have made one bundle of objects, I guess
you could call it, named one, and you put the suffix on
low to help with baking, so it matches up with one high. You know, they're the same
thing. You do exactly. You mirror the same
action in the hi poly. So the hypol also
has three groups. So one, and we can the
reason I put all these together is because they'll
bake well together. They're not right
next to each other. Something that wouldn't bake
too well maybe or could have problems is if I bake this
and this in the same group. See how there's no
space between them. So you need a little
bit of room 'cause there's a cage that goes around
the object and bakes it. Okay, so the next one is two, and you can see it's
just the same thing. Just, I'm getting
these screws out of their spots so they don't get messed up
when the cage expands. They're not gonna hit
the walls of this and cause a bunch of
crap that we don't want. And then three is just the
bigger pieces, bigger pieces. Um, so that's
basically what it is. It takes a little bit of
time to, like, believe me. I didn't just crank
this out in 5 seconds. It took maybe an hour, at least an hour to
just kind of decide. And then you have to line it
up the same with die poly. So, for some reason, it was difficult for
me. I don't know why. It just was. But yeah, so the same thing can
be said for set two. It's the same principle. We're just taking a group
and basically separating it. You could do a completely
different setup for me. It doesn't matter. If you want to focus
on moving parts, that could be something
that you could do. So just to go through, this
is just what I've done. So you can just pause the
video if you need to. And it will just be a nice. This is like three objects. Yeah, that's set two set one, just to go through
it again for people that want to copy
exactly what I have. Um, and you got to take
into account, like, these. You know, I've mirrored
them, so they're not on the other side. Two is that two is this here. Didn't pause it. And then
three is just the big pieces. That's it. Three. Right this. This is three. It's
pretty self explanatory. That being said, it took me a really long time to figure this out just
to organize it. So don't feel bad if
it takes you a little bit of time to organize, but we want to get
the texturing. So let's try to get this
bake over and done with.
56. 11 Baking: Okay, so we're going to
start with the site, and this is one UV set
that we're going to bake. Right now, it has nothing on it. Just to go over the setup here. So what I've done
at this point is I've used Quick loader here. So you quick load
and then we're going to load site Bakes. And basically, what
Site Bakes is is just site and the
high poly site site. Okay? So it's just this. We've got our groups
assigned so you can see they're both
named the same thing, but just high, low. And we've exported it with the Suffix BC so if we
go back into Painter, or I mean, marmoset for baking, we're going to go Quick loader. We're going to find
site site Bakes. And I clicked on that,
loaded it in here. Next, we're going
to find an output, and you want to just
wherever you're going to put your maps,
output it there. I have a um, baked folder that I've made site maps. This is
where they're going to go. We're going to do
sample size 64, format 16 bit and resolution four K. And
just at the start, we're going to do anal map and an AO map just to make sure
that the bike is clean. Okay. This is the first bake. Okay, so just looking at it, it looks like it was
pretty successful. One thing you can do,
if you click on Low, see how I have this check
exclude when Ignored. Okay, so this is going to
hide AO from other objects. So I'm going to bake this again, and you're gonna notice
this looks different. I guess it doesn't,
but there's one Okay. This here. Let's keep doing it until we notice
something different. Y'all got darker. It's baking the A O from this onto there. Um, and, yeah. So one other one. This is a good one here. I believe this this clath. Has yo got darker? Now we can leave it like that, actually, it actually
looks pretty good. But for example, if
you had a moving part that you did not want AO on, for example, I mean, we could use see this AO. I just eliminates that. So for example, here, if you hit exclude,
we're going to bake it again, and we're
going to chick again. Okay, see how it got later. That means there's no AO from other objects that are
not in the same group. Therefore, it doesn't have
that extreme darkness. But we're not going
to move this part. So we're going to
throw this back on. We're not going to
move these lens caps, but it would be a prime
the lens caps would be a prime candidate for
that type of thing. Definitely. So the lens caps, just because if they move, you know, the AO will
show it or it won't show. If we're going to bake
it again, this is going to turn darker, give
us that AO back. AOs going to really help for
texturing where we can add dirt generators and dust
and et cetera, whatnot. But yeah, this is
looking pretty good. And another tip
I've learned is you can sometimes just to get
a better idea of the bake, you can darken your object, get an idea if the
bakes actually good, if you see any decimating
marks from your high poly, from zebush, et cetera. There's all sorts of things
you have to watch out for, but this one looks pretty good. I see there's a little bit,
you can see this lining here. It's just from Zbrush. When you decimate
your high poly, it kind of gives you those
lines when it's optimizing it. But other than that,
it looks pretty good, and I'm not going
to worry about that because our textures
are going to cover it. It's not extreme enough
where I'm going to need to back and
redo the hi poly. But for the most part,
it looks pretty good. I'm keening some hard edges here that I don't
know if I want. So if you run into
an issue like this, all you got to do
is go back in here, uh, find your spot you
want to investigate. So we have hard edges here, and then we have to
go check our UVs to see Okay, are these
actually here? And as you can see, a hard edge has to come with a
broken UV, a seam. So these don't. So we can just go ahead and get rid of that. It's
going to look like that. And we can go and just
basically re export this. And this is just site bakes. That's all we want
to do. And this is a process that
you could repeat. I kid you not 20 times, especially if you're
me back in the day, AKA two years ago,
trying to do this. So bake again, these
lines should fade. These are just the bake
lines from the our bridges. This looks normal
now, as you can see. So I think that is that's
pretty good for this. So we can go and
add more maps here. We want to just add thickness
as well and position. And then that should
be pretty good. Make sure it's four K
again, and then c it. And we're going to
see Okay, pages. And you can see
our bake maps have appeared here in our folder. The more organized you are, the better off you're gonna be. Alright. So Dave, and we're
gonna go to set one now. So I've already done this. But we can just do it
again. Not an issue. So I have literally
the same setup as, uh, as far as, like, these settings,
same thing. So yeah, like, if you
wanted to animate the trigger or you could just group together the
parts you want to animate. So maybe this
slide, the trigger. As you can see, I've
connected it with a bunch of other stuff because I don't
plan on animating this gun. But if you wanted to do that and then exclude from groups, and it will make sure there is no AO that affects your Bake. But I kind of want AO because I don't I'm not going
to have this move. So we'll make sure it's
in the right output. All the settings are
correct, get bake, and it should work pretty well. Okay, so you got
all the maps on. And you can see there's
a little bit of pinching here or I guess riveting,
you could call it. Um, and you can either go
back adjust the low poly. This isn't the part that's going to be seen much on the camera. And then from this angle,
you know, it looks fine. You can also see a
little bit of here. But if you look at,
I guess, references, you can see that this material here has a lot of height on it. So we're going to make sure
that the heights on there, and it's not really
going to you're not gonna see this riveting. It's going to be
so filled up with pictures that it's
honestly okay. Um, So it's looking pretty
good. Our AO is here. That's okay. This is
never gonna move. Um Yeah. That's there. So we're just looking around?
Same with this. That's okay. Well,
this is interesting. You know here, exclude.
So I've hit that already. It doesn't look like this
has baked properly here. It looks like there's an error. So I'm going to go
back and troubleshoot this.He we go to UV site
we're on set one right now, and it's this bolt right here. So first thing I should do is make sure the
normals are correct. Okay? And sometimes to understand if they're actually correct, you have to scale them. You have to up ly scale. Okay, they look correct
still looking around. With the mirroring, you
know, you can get caught in the red sometimes cause you can see the inside of objects, but okay, so this
is still no good. We got to see how
the Us look next. Okay, it looks like
it was unwrapped. It also looks like there
are sharp edges on it. Um, Okay. It's not being sit
on by anything else. There's a chance this exists
in where we're at here. So set two. Let's make
sure it's not in set two. No. It's not in set two. Okay. So we're gonna want to
get rid of sharp ige there and just add them
back normally. Okay. So that looks pretty
good, though. Yep, looks fine. That's what
it should be the outside. Okay, so we're
gonna compare it to the high poly and see if it's in the same same group
that I grouped them in. Two and it looks like
it's on two for low. And in high poly, it doesn't
even look like it's there, so two for low. Hi poly doesn't look
like it's there. I think it's because it's
just not there, to be honest. So what we can do this
is the same exact piece. So we're just going to take it. Do this. This is your
high poly, keep in mind. Okay, we're gonna set
the origin there. And we're gonna need in order to set the origin properly here, we're going to need we're just trying to add this to
the bat group. That's it. So we have iPoly we're gonna go back to the low poly
here and just do this. So we're going to set
it, give ourselves that anchor point to set it
and then lock it in there. And now we just have to line up. I actually could use more.
Just kind of line it up. And now that we see it, we can actually feel free to
adjust it if you need to. And I mean it looks
a little thin. The high boe is. Well,
yeah, feel free. Okay, so that looks
a little bit better. And with this, just
adjust it. Bring it down. Nice. Alright. So we have this and we're going to line
it up with our low poly. And as you can see,
it's not lined up. And you can just slowly
just do this. That's fine. Okay. Looks pretty good. Okay. That's lined up there. And we're on two, right? This is two. What's that one? Two, set one, number two. Okay, so this is a one. To lock it into two. So we're going to do this, this. You know, we're gonna
convert this to a mesh just so it doesn't
give everything else a subdi. So we got two. Approached
the board looking good. And we're going to export again. Set one bakes. And this is just an
iterative process. This is really like it just
takes a little bit of time. But if you put in, you know, good enough time,
it will pay off. It'll be worth it. Good bakes
are good. Okay. I got this. So it does look like it
baked. It does, right. Okay. Looks like it
was pretty good. Exclude from B groups. Okay. Does look like there's a
bit of an issue there, which I'm going
to look at again. Okay, so we have this here. And it might be because if you can see here,
it's through here. Okay, so we just
want to bring it out out just a little
bit. Just like that. And then I'll try it
again. Set one baked. Okay, go back to one set. And we're gonna just bake
it again. Just keep going. Okay, it looks like
we got to change, but not what we wanted, per se. So if we move this out, um, it's not giving
us quite what we want. We get this? It really blew up
there. Bake again. Well, it's 'cause I moved
it from the highball. Okay. Okay. And then as a
last resort type thing we can do is we can push it
back in to where it was. Yep, let's do that.
Push it back to there. And now we're gonna separate
these and call them 44 high or low. Yeah. Lo. Okay. And now go again. Export FBX. B. Go back. Okay, looks like I messed
up the, uh this thing. That's okay. High, four low. Too high, too low. Okay. Whoops. That's gonna load. We don't want this. Okay. Exclude fake. Okay. A real engine. But These are just things you run into. Can't
do anything about it. You just gonna keep going. Keep going through
your checklist of stuff to troubleshoot, and sometimes you if
you've done it a lot, you can still get caught and have a great
example of that. Okay, so it looks like, it's just a huge disparity of, uh what this is, though. We're just going to extend this. Extend it way out to
here and extend this out as well. Extend that. Just bring it down to
there. A little bit path. And then, even though
our UVs are sent, just do this a little bit. Uh, bring it in. Like that. Okay. And it should be good. File. FBX, don't want to bake. It just is over and over, you know, I remember. Sometimes you bake,
it's perfect. That's very rare, but most
of the time, you know, it's just one problem
after another, you got to solve,
blah, blah, blah. And Yeah. Yeah, so this looks good to go. Looks like we fixed it. Hey, it was right
where it should be. So, for example,
if we hit Exclude, if we check this off, so
now it's susceptible. We threw it out to
the dogs, basically. This whole match is
just gonna eat it. See that? We don't want that
a bolt sitting that low. Any AO generated map, any map that uses AO is just gonna absolutely
not work properly. So, this looks pretty good. Yep. One more. Okay. And I
think aside from that, we're pretty good
on this big here. Yep. Pretty good there. Um, I did see a sharp edge. I think right here.
It's right here. That is usually a sharp edge. So we're here looking at
the high polyly right here, we don't want this sharp edge. Okay. Set up this again.
Do the same thing. Okay. And it's going to have
some residual from the bake. So this is just the normal map that's making it look like this. This isn't nothing other
than that old map. So we're just going to hit bake again and then it
should fix it pretty well. Okay, so that's good to go. And yeah, it's
looking pretty good. So we're going to probably
close this out and move on. Keep keep going.
Okay. Good job there. Save that, close it out. And now we're gonna go to the
last one, which is set two. And set two, I've
already baked it, so it's the same type of thing. I'm just gonna go through and see on one I did do exclude. I think I did for everything. I've excluded them
just for the sake of them kind of being
close to each other, you know, in this But yeah, it all looks pretty good. Um the inside area here. I had a little bit
of UV res, not none, but probably get a couple
shots in the back here. It's looking good. The rail. The rail baked really good, looking pretty round, but
it catches the eyewll. Um, yeah. We're
good job with this. And we don't need
any edges here, just because they
opt into it after. They're never seen, basically. But yeah, so it's
the same thing. Did I bake these? Yep, I did. Okay? So that's gonna be
that from the baking. And the next thing we're
gonna go onto is setting up our substance paint the FBX.
57. 12 Mirroring Sets: Okay, so we're actually
going to mirror our final. We're gonna create our final low poly, and
we're gonna mirror it. That's gonna be the
last step before we go into our exploded mesh that we're gonna
bring into painter. Uh, yeah. So that's basically
what we're gonna do. First things first,
we want to duplicate our UV bake thing
entirely, just to clean. All I did was, boom,
duplicate, and I hid this. You want to preserve
this in case we have any bake
errors, we need to fix. And then I just called
it final low poly. And when you open it up,
you're going to just get the same as you got in here. So it's the exact same
thing. Got the same sets. So we're going to go
through one by one here and basically Add our
mirrored parts into here. Okay. So let's start with sight. Let's hide these so we
can stay focused on this. Items I mirrored are here Okay, this is one and ten dogs. Okay, so we can move
these as one unit. Okay. And then we're
going to move this. It's now here, so
we're gonna put it in mirrored so we can
keep track of it. Okay. So that was mirrored. What else did I mirror here? Mm hmm. That may have been
it, to be honest. That may have been it. Yep.
So what we got to do here? I think our center
point is still there, so it's just a simple
mirror like that. Then we can apply
it. And then, boom, all of a sudden,
we're good to go. So you can see it's
just the same location. We're gonna go GX negative one. Alright, that's good to go. That's mirrored. It. Okay. So we can talk with
that back and forth. The next one is set two. Alright, so got a bit
more going on here. I think one thing we can do is identify what does
not need to be mirred. It's okay if we
lose our sets, too. We can separate that because
we know it's mirred. Let's start on this. We know this is gonna be
married, as well. And that's. And they're all
symmetrical to each other. There's no special piece there. So this is not needed
though. This one. All right, so this here, put it in mirred see where
I'm going with this. Okay. O here. Yep. We got. This piece here.
A needs a mirror. We're just going to attach it. This piece is good.
And in this piece. We get these sharp
edges sometimes. You're just gonna
have to go through. I know for blender, at
least I get to weird shape, but I got to go through
fix them pretty easy. Alright. Next would be the
obvious here, here and here. Okay. This piece here. We're gonna leave this
separate the double mirror. Don't want to get too
confused. The rail. Awesome, can add that. And Yep. So that might be pretty much
it. Anything else we see. Not seeing much else. And
then these there too. Yep. Okay, so we do. So
this and then all of these. Also. Okay. All right. I think we're good to
go and mirror it now. It's just a quick generate
mirror on the side. Make sure our merge isn't
too high of a number, so we don't get any connecting
geometry we don't want. And boom, it's already
looking better. This sphere. We're going
to have to just quickly. Set this point to cursor, and it's just one
more little step. Now that we have
this, that's good. We're going to do that
and then send it back to the main area. We're going to
mirror it once more. Okay? So here, we're
going to select all that. That's all going to be mirred because it's the same as this. If you look at it, it's
the same exact stop. So here, GX negative one, boom, our barrel is mirrored. Okay. For some reason I'm seeing that. Edges just keep popping up. Okay, we can deal with
that in a moment. Um, this here. This is just because I cut two areas through the e. Let's deal with
that in a second. It's a nice super. Bu right now, it's it's not game ending. We're still in it, okay, so. And then here also we want this Clect that's exactly how. Okay, looks pretty good. Make sure you get everything. And the C negative one. Okay, wear that. Good to go. Looks good. I'm a big guy. The big boss here. So we late. We want this one. Do the mirrored. Okay.
We're gonna leave it open. And then these all along. Also. So we're gonna want not these. But this No No these. But these. We that yet. That's and not. So we have another side that
we have to worry about too. So these are all
going to be mirrored. Pete. Okay, I gonna
bring this to mirrored. And now this year, that's
gonna be mirrored. These are going to be mirrored. This This gonna be mirrored. Actually. Not these. Let this run out. So mirror. Here Alright. We're so close. I can
taste the texture. Alright, this, this Mirroring if we hide it all. This guy. Miriam. We moved quite a bit
on this one, well. Yeah, we actually
didn't mirror these, so those don't have to
be in Not these ones. These can stay in these? No. Didn't mirror this.
Or these? No these. And we did. Mr this. I think so. Okay. Mirrored. Okay. I think that's it for that part.
58. 13 Finalize Mirroring: Great. So we just want
to open this back up. And mirror everything
on this side first. Okay. We can do that. While right Mirror 0.1. Okay, go have to fix it here. Hold on just a second.
Separate this. I'm just noticing that
the normal's here. Shade those if that's
with you, too. And then we're gonna
bring it back. Mirror. Okay. Got it. He's here. Okay, so just to check, we're going to go back
to our low polyar we have a lot of
circle screws here, and then hexagons here. So if you're looking
at the gun nose down, the right side is going to be hexagons, and let's
cover those first. All these are hexagons. We'll find a little
poly. All these. We're going to take this year, we actually want to
separate this briefly, and we'll just call it X. And then this here, we're
going to separate as well, because that's the other side that we're going to
mirror everywhere. And we'll call it rab. Okay, so after that, we can continue to bake
or I mean, never got it. Why want? Okay. Now we're just gonna do what we've always
been doing with time. Okay. GX, negative one. No, that piece is good to go. This piece and this piece. These mirrored on
this? I'm not sure. So we're gonna go to poly. Do we have hexagons here
versus big ones here. These don't get mirred.
No mirroring there. H hexagons on both sides. Okay. What? This is correct. Okay. It just has to fit. It doesn't have to line up to mirror anything in particular. We're just duplicating it
and send it over to there. And then an added
thing we can do. There. One thing we can do here. Just to offset it a bit. That. We're just gonna rotate
it so it's not mirrored, you know, wink wink. Okay. This thing. Duplicate Sight R Y. Okay, so that's good. These
are all gonna share this one. Okay. We're going to show
this. Well, we do this. There there. Okay. Okay. And then we can go ahead
and take this one, which is going to
be another pinnacle Wart peak peak
performance right here. Okay. We go to bring it here. Duplicate, Asaate.
Little rotate. Bring it up. Bring
it up like that. Dear. Duplicate and sate. And then a little rotate.
Okay, same thing. Duplicate and sate. Okay, just to make sure. Yes, I've made sure about 1,000. That's duplicate, I see. Okay. But we're gonna combine these. This is our ring
leader for this one. These are all sharing.
This guy's ****. ****. Hey. We're gonna add one more, actually. Tree. That G X, negative warmth. Good to go. It's good to go already. And we're gonna want to
duplicate this right out. It's going to origin. It's like that. Bring
it up a little bit. And I sit like that. Okay. And we'll attach it
to this crew here. Okay. So technically, they're all
kind of the ring leader. GX, negative one. Okay, so those are good. These are not
mirrored. These ones. They each have their own
specific stuff going on. Okay, so I think that
side's actually good. And now we're going to
go to the next one. It's brain up kind of like that. What's math here? What's some quick math? This 60. We're going by 30s, okay. So R 90. R 120. We're just trying
to rotate here. 18. Duplicate. Or. Go. Very tedious
process, isn't it? Okay, so that's good now. We're gonna bring one over here. So duplicate wide.
Bring it over to here. Looks like I ruined everything. One right bud. Low goes doll. Okay, so you got this. You got a little bit more
rum, pump it up. Or 60 duplicate here. As eight. Like this. 91 20. Okay. So right
here, it starts to get R 30. That'll do it. R 90. And here. 01. Okay, I think we got
all that covered. As far as X goes. X, we got all the hexes. Okay, so we're gonna combine and then GX negative and boom, you just like that.
The mirror radio. Okay. There's a lot of
space doing that. We'll check that. And that map is good. Next one, it's also
been mirrored. And our site as a little bit
of mirroring, not too much. Okay, so on to the next thing. We're gonna go in and just test them to make sure
that they work.
59. 01 Defining Base Materials Part1: Okay, so now we're gonna
input our exploded mesh in the painter. See how things are. I might not stay at four K.
I just like to start there. Import, select I think FBX. I made a substance
folder. Exploded mesh. Import Bake maps. Okay. Bakes we want set one. And also set two. We're gonna leave the
sit out but this one, we're gonna text
that separately. And uh okay. We got that. I've just moved out. Ws that I think are important.
We're gonna texture it. This is the base
look of the gun, so we're gonna start
like that. Set one. Set one, normal world
space AO curve. I don't trust that
I'm gonna redo. Tick. Okay. Set one? That's pretty good. Let's change our HTI
to studio Tomoko. This gives more real lighting. Accurate. And then we
got set two normal. Set two world KO curve. Set two positions,
set two thick. Okay. So for the most part,
it's looking pretty good. We are 100% going to encounter
problems on the way. So don't freak out if you get
stuck where it's You know, I'm probably gonna
get stuck, too. We're just gonna
work through it. But yeah, not seen any
major things here. He was good. This can move. That looks good.
Okay, so we're just gonna I guess just start. Start set one. Just establish
some materials here. So going to my rep here. Pure rep with the
update. Not bad. Alright. So this is, uh, just a good model to look at, I guess, or material breakup. Let's look at this. Let's leave it nice
and small right here. Just. Okay. So we're starting off with
let's just do plastic. Everybody's texture style is different. So this is just mine. A folder, plastic,
all caps, whatever. Okay, and then
within that folder, just lay down a base material, make it, whatever, gray. Gonna select. This is plastic. Well, it looks like it's
on another set though. Okay, so we can save
that. Plastic, Elastic. Elastic. This is metal. Plastic. Those are the main
pieces I'm seeing now. Yeah. I guess we can we can
just copy this go to two. Paste Plastic. It's so it's the right collect, so it's cohesive with what
we're doing. So we'll go back. It's just gonna be black, but just trying to get an idea
of what the base roughness is and set them up
just very gradually. We can continue you know, it just looks something like
this, I guess, for now. Don't have to get super
deep into it right now, but Yep, that's kind of what
we're looking at for that. Next matrix here, I see metal. These look pretty similar. This is also metal. Got a
little bit of a painted thing. This rail is metal, and the
screws are metal, as well. So we can do another one
that's gonna be like a bulk texture
type deal. Screws. Get that going. Just make the
metal one or one, not 0.1. Roughness, bring it up
a little bit and color. Yeah, it looked a little darker. It had a tint of
the slightest tint. We're gonna call that base. We're just gonna go collect
all the screws now. That was pretty quick, right? The screws are there. And they're all just
kind of similar. Even these ones, you know,
they're a little similar. Okay. That's a different set, right? What's the front looking like? Uh, Almost, but no,
I don't think so. Maybe later. Okay.
Do we get screws? Plastic. Get that if we can. And then we're gonna go with
what call it rough metal. This can be rough metal. Okay. Rough metal. And before I lose all my work, we're gonna just save
save that saving project. Real. Okay. Rough metal. Gonna
throw a base in there. We're just gonna make
it a little bit darker. Maybe give it a point b eight just for distinctness
at this point. What gonna call it base. Just to look at what we got. This This is a barrel type deal. They look similar, don't they? They look pretty similar. And if there's tints we want to
experiment with, so be it. Okay, that's just, yeah, I'm getting ahead of
myself this part. This block doesn't actually
does look grea somewhere. This is raw. This also looks of the same cut
from the same cloth. This looks metal metal. And then. What else? Okay. The trigger that. We'll
go back to plastic. Cover that. We almost
cut everything. And, um, these just
look like raw metal. They almost do look
like the screw metal. Um, so we can probably
just make that. Similar. And you can add
all sorts of variation. Okay. Okay. Rough metal. Okay. This looks to be the
same color there. This go black, though. So we're gonna do
this at a white mask. And just call color darken. Okay. And just put the color
on and bring it just dark. We just want it to be dark. Well, firstly, we have to
add a white mask here. And then we'll paint it black, so it doesn't um we want this. It's currently a quite nice. Rough mew. Whoops. Gonna copy that, delete
it. The plastic. Color darken. Select. H. Okay. So we got that? Anything else? That's plastic but
a little darker. The trigger and then this part. This part is so you can shuffle. You can just let your rounds out without
having to fire it. It's like a cycler.
By white mask. Here. We're gonna
paint it black. Okay, so we got this? Here
we're just removing it. No. Well, you know, we do want to have the same
roughness information. I actually made a
mistake there. Base. We want back. Watching back. Okay. Tarkin. Base. Nice. Okay. And then on the plastic, we're going to just lay
down a three of dirt. This is good for making height. Little brand to about 10:10 ish. So just, you know, you can tell there's a
little bit of height it height info and then we'll do plus 'cause
we're gonna put it height up. Just put your channel to height, I hit Alt and then held Alt to click tight it selects
just that 0.01. So we got pretty
good setup there. Of that. And I actually think
that this plastic is just it's just lighter. So I'm gonna save. Go back
to base. Just click on this. Yeah, it's not purple, but it's it's like dis, I'd say. Let's say it's like
that. More so like that. Maybe even a little later. Nothing. Light. Alright. And we're gonna go just venture off now into
different textures. I kind of looks
crazy, doesn't it? It looks just a little
bit everywhere. So the textures just
sometimes harder to read. Well, this is a really
good one. So, yeah, it's got if you're
looking here, height. And another thing
right off the bat, we're going to just put a
layer on top, add a filter, sharpen filter, put it to 0.2, four, two, three, two, four, and then set
it to pass through. And that is going to just
sharpen our detail quite a bit. Height info. We're
going to put that there duplicate it want
another height info. Okay. We're gonna just hit a
seed. Gonna change it. And we're gonna change the actual to six. See
what that looks like. And we're going to crank the
balance down a little bit. It just helps with the
variation. See that? We got some bigger ones there. And we're going to do one
more right now and call it. Em fo minus. Okay. Item fo minus. And we're going to see it again and go to height and hit invert. Then that's going to
make little pits that we want in here just to
add more depth to it. Okay. And in those pits, we're gonna introduce
color first time. Alright. It's just gonna
be a little bit darker. We're gonna go base
color, normal to overlay. And it's just overlay makes
it so that, you know, it can be involved
in the layers, but it doesn't overpower
any certain specific layer. Well, so overlay is a very subtle way to add
detail really effective. But you can definitely We
don't want too much here. Just enough. There. When I go back to our
roughness and just bring it up to Ted. Go about here. Alright. And I'm actually gonna
just take this color off. Ah, maybe. Yeah, we can
do it the other way. Go the other way,
make it blacker. Now we're gonna duplicate this, rename it. Noise, color. White. We're gonna get
rid of the height, keep the color, all
white, and seed. If I'm going too
fast, just pause it. Alright. And another thing we can
do our normal height. This is our main factor here. One thing we can do
here is add a layer, set it to subtract. And then we're just
going to add, you know, any sort of subtract layer. And if you hit Alton and
click on the mask here, you're gonna be able to
see what's happening live. We're going to scale this
up to about four Uh, I kind of just let go
a little bit here. We're gonna put it to triplanar. Maybe even something like this. Yep. And now we're gonna
take this subtract and just subtract to subtract. And it adds these
inconsistencies. Maybe you can Just
something like 40 40 ish. That's good. Okay. We're just getting
the base set here. That's all. Just base material. Okay, so we're gonna
move away from plastic right now before we
get too involved with that. Make sure you save. Um. And
now we're gonna go to screws. This is a good point to just kind of look at
something like this. Screws or roughness, 0.42.
That should be good. 0.43. Tate we're gonna make
this a little bit darker. Like that. Okay. We're gonna add, not yet. We're gonna add a fill
layer, and we'll add five. Live. Gonna scale it
up to, you know, 13. Okay, the roughness, only
roughness we want to see. We want to see the shine. We're gonna go to
roughness channel here. Call this noise roughness. Okay, teen from you overlay. And we're actually
going to go venture into our roughness channel. By adding X or C. I
forgot what I just said, but one of those, but we're just gonna
make it like this. Just very subtle. We don't want to do anything too pretty yet. 33, something like that. Good. Just like that. Alright, ish. Duplicate it. Now we're gonna change
it to just color. Okay. Go back to base color. Put it on overlay. Bring that color all
the way up to one. Pure white. And then
I'm going to venture into a base color. Just like that. Make sure
to heat it properly. That's gonna give us
just a nice look. That we want for metal. All right, a couple more
things we can add here. Noise roughness, so
we'll call this noise. Noise, color. White. Okay. I'm gonna add our
first generator. Just a metal edgeware. So, it helps with that actually a good base
material building tool, so that's where that. All these It doesn't
take too much. And it just adds an asperation. Okay. So we're gonna take that like this and
we'll just go metal. Oops. We want it metallic,
so we turn that off. Roughness to be about 0.367. We want it to be
rougher. So that's good. Thing like that. Color. Okay. That's good to see you here.
These are pretty good. Okay. And we'll call this
edge Roughness. Edge color. Edge color. We're gonna do two
edge color and also edge roughness. Which color? We're gonna go and add fill, subtract, we'll throw in. You know, you could probably
do anything I've been rough to get some nice
aggressive looking. But the whole concept
here is we're just taking from what we just made. We'll scale it up to about four. You know, and you can
start to see it just takes stuff away gradually. Do that. Yeah, that's all we're
looking for. Stuff like that. And then just to
enhance it a little, we're gonna add the levels
and just push it in. Just a little. We can now just call this edge. Edge waiver. General. And we'll just add a little
bit of roughness. Okay. Well, my computer's
about to blow up. So I'm gonna go 2048 2048. Was it down. Yeah, just keep it manageable. Okay, well, that's good. Okay. Now we're going
to go add edge. G red again. Pedal. Okay, and this is
going to be just edge C. Add it to the overlay,
change it to one. I'm gonna take this
rust, add it to it. Seed. Let off a little bit. Want it to be a
little more gradual, so we can even add another one. Weed. Right plant.
This one can be. Dry plant it just makes it so the seams can't get
you, basically. You got to tie it up a little
bit to match it, though. I well, it's adding just a
little bit around the edges. Okay. We can maybe if we
weren't at the levels. Yeah, something like that. Okay. And Mr. Bruce. Okay, plastic. Height down looks a
little extreme, actually. G go. We're going
point oh oh five. Okay. And then height
up point oh oh one. 15. We're gonna go. Or. Same with this one. Just
bring it up a little bit. Save. And we're gonna go
and just set up in. Barbara said, no, so I'll
just do it live here. It's save, and then we're
gonna go hide set one, we want to export bio export
textures, one check set two. And we're gonna go. We want four K textures
we don't need. Color, roughness, metallic,
normal height, and missive. We don't need that. We
go to global settings. Keep it like that,
and we're gonna go to Miltech FBX substance or
we can just go to final. Make a new folder and
call it texture maps. Okay. And we're gonna just
not get two folder over here. Elective folder. Okay, and it's okay. That should be good text work. Take a second. Okay, we're gonna open
the output directory, so we have these maps
now. Save again. It's going to psycho, go
down to the place we go. Okay. And we're going
to go to set one. And instead of having
our big map in there, we're going to go to
vinyl extra maps. This normal. As you can see, we have our map in there. That's correct.
Albedo, base color. Roughness. Roughness
and metallic. We're gonna take out AO just cause a tracing is going
to do that for us. So metal we do need, though. Okay. Decent start here.
That's a good start? Okay. And it looks like this might be
inverted might not be. And if it is, just flip it. Actually. Yeah, so it was. No. Looks good. That's funny. It never does look the
same in painter versus in it just never does.
Never, never do. It's always different.
Okay, so we're gonna save this Go to racing. Now we got that no one. I working distance start setup, change our camera to 100 makes it look a
bit more dynamic. You can fit more in it. I
also have these in here, but they're just
not textured yet. And, uh, also in set two, I have this which
is not set up yet. Okay? Or textured, I should
say. So we have that now. You know, we're gonna just
go to camera settings. Stay frame on is always good for test renders. Always good. We want to just have this other window,
draft quality perspective. And we're actually going to
just find a different HDRI. Um, C use this one? A bump. They're all pretty good. Webst
kind of download this one. Sheet. Alright. Pretty good. Yeah, it looks kind of nice. We're gonna put it to 0.2. And then from there, we're
gonna go completely vertical. At a light, and it's gonna be a directional, so like the sun. And then we're gonna six point. This is usually pretty good. Yeah, we just kind of
want to like this. That's all. We can tilt it. Sometimes fun. Negative 15. The
light just hits it, maybe sometimes a bit
better. Well, worse. Okay, sky on this light, we want to make our
sun not too bright. It's not a spot shadow, but something like that. I'm looking at the shadow here. The diameter,
something like that. Okay. And we're just
gonna go with Black. It's just whatever. Cool. Blared. Just a
little it's nice. Okay. That's what we currently got. We're just checking it out. I'm gonna change my thing again. Image. I think I have, if you have your own HDRIs, by all means, then use that. Sweet. Don't want that one. Image. Yeah, I like this one. 0.2. You can just get a feel for what
is looking like? A Okay. Looking pretty good. And we can turn our
sharpening up to about 1.7. We want to eat pieces as well. Distortion. I don't think
we need anything yet. Sharpening is
important. Got that. So we have that in
our render settings. Image output, we can
keep it at that pn upw. Let's change this to 2048. Open image location. What we want to do. Images
you're gonna be sent to FBX. We'll just have nl new older, that's what it
should be renders. We'll say right to there. And we'll just do one. Sogopen location. Render. It should appear here. You know, it's not
gonna be anything good, but it's We have
everything set up, so that's the main
lots right now. Okay. Pretty good. Working good.
60. 02 Defining Base Materials Part2: Okay. Hold on. So I'm going to
keep plugging away. Alright. Ws. Looks like it might have
small coding on it. Rubber. The barrels products. That's the darker maybe. It's actually looks similar. Raw metal, we can
just take from two? Okay. Okay. This looks like some sort of
black oxide or something. Okay. Every looks good. This looks glatsti.
I don't know. Lost. It actually
looks kind of metaly. We can change it on the way, you know, never set in stone. It's called orange. That never is correct, but
it's always that's not W. Okay. We got everything.
Maybe except that. Okay. I'm just looking for the carry handle version. I can't find it. Pretty sure it's oh like the green. But we can just leave that for
now, and catch up to them. Yeah, just to look
back at this here. There's a couple of
different you know, this isn't a KSG, but, you know, just take
guns you like, and you can just
picture them with, you know, combination
of details you like. That's what you do on three
D, basically, unless you, you know, 'cause those
details are gonna be on the same plastic as this. They just look maybe
a little different. But I see noise here, and I see, like an edgeware that's
a little bit like brown. I'm gonna go go to the metal. You just raise it up a little. Raising that to tear. They just call it to call noise. I'll just duplicate it
and call. Noise rough. You know, but a three in maybe I five. Okay. No but to sound. Got B. Make sure they're set
it. Yeah, just color. Okay. Looks like there's some black and white,
so we can just that looks pretty good.
Don't worry about this part. An tactical move. Okay. You go to take this sharpen
too. Yeah, I'd enhance it. Okay. I start probation materials.
61. 03 Defining Base Materials Part3: I going to use these refs. Sometimes it's better to just stick to a couple instead of, I had a lot going, so. So it looks like I'm
just going through my basic parameters
from my base materials. I have height that's going up and minus height just to give
the material more depth. Yep, and I'm adjusting the balance based on how
much I want to show. You got to adjust the seed
as well in the tiling, so everything is a
little different. So it's unique. That's the idea. We're gonna adjust this
one as well, a little bit. Give it a bit more. And So I put my height to overlay. And the height has, color. I mean, I put the base
color to overlay. Sorry. Oh. Just adjust my
mic in real quick. Yeah, so I'm basically trying
to get the main materials, the base base base materials. Uh looking half decent before I go into
any weird details. I'm exporting these
in the marmoset now just so I can get an idea of how they're going to
look in my final engine. So this is the last place I'm going to see them,
the final renders. So even though they look
maybe good in painter, that doesn't mean that
they're gonna look the exact same in
substance painter. In fact, they're not gonna
look the same at all. Well, relatively similar,
but there's going to be differences that are pretty hard to make it look
how you want in both. It can't look the same in both. Looks like I exported
my textures. I'm gonna continue to just
scan through my references, though before I go into
Marmoset to check. Probably gonna add
a little more. I'm looking at the colors and
my HDRI is studio Tacomo. Um, it's known through
the industry as, like, one of the main neutral, HDRIs. So it really gives you,
like, an honest color. So that's always good to use that one. I'm going
back into that. Yeah, it's important
to try to get this down early, get the details in. Looks like I'm
adding a new layer. And But making sure that your base materials are
solid is really important. It's important for
all aspects of this. You know, if you think about
your reference gathering, your initial modeling,
your high poly, your bags, making sure that the
first time you do a really good job is critical
because down the line, you're gonna notice, Oh, this
maybe isn't good enough. And it just causes
a lot of problems. Yeah, sometimes it's better
to just stick to a few reps. In this case, I chose this one. I'm going to probably go to
a couple others, though. And I'm just going through
all the layers again, making sure that they look okay. The process really
goes by quick, if you like texturing,
just like anything, but by far, it's my
favorite part, so And there are, you know, you
can get smart materials, and you can make your own, which is definitely
a smart idea. If you are always using
the same material, and you can just kind
of tweak it from there. But in this case, I just chose
to make it from scratch, just to show people how they
normally would do that. So I went into the roughness
channel and changed that height overlay
from normal to overlay, just so it sits a bit more
transparent in the layer. It doesn't cover anything. It sits within everything. So you can see it through. You can see all the other
layers through it, basically. That's what that means overlay. I'm going to say export
my textures again. Just need those four maps. Alright. Hey, you can see the polymer looks a little bit different than
that reference. Mine has more of a
blue tint to it. And that's partly
because of the HDRI, and I think I maybe added a
little bit of blue to it. Yeah, each model is gonna
be slightly different, so it's okay if it's not
exactly how the picture looks as long as you're taking a real world details
and adding them to it. Not just making up
details in your head. So I'm gonna add another layer, other full layer. Okay. Yeah, and right
away, you can see that hole I missed in modeling. And I just added, I'm going
to add a circle soon, but I'll realize it soon. I'm narrating this now after
I've done it, so yeah, you can see that was
probably the main mistake I made through this
whole project, but luckily, it's in the
very back of the gun. And if you're using
this for games, I mean, one lesson you can take
away from this is that, you know, you're not
going to see that part. So if you're going
to miss a part, that would be the part
to miss, to be honest. So yeah, everybody makes
that little error sometime, so I'm not going to be too
hard on myself for it. I think we did a pretty
good job overall. And yeah, I'm not gonna let that one little error ruin
the whole project for me, so maybe next time, another thing to take away
from this is that, you know, just make sure to double triple check your work before you
move on to the next step. Like I said, because here I am. Yeah, I missed it at two, three, four different
stages of the pipeline, and now we're at
the very last part, and I see it in texturing and there's
not much you can do. Of course, you can
go back and if uh, if this was for work or, you know, some big project where it had
to be exact, exact, exact, you would probably have to go back, adjust the UVs. Of course, the
model, you'd have to rebake and you'd have to kind of tweak every part
of the pipeline and go back and adjust the
inner workings of that. And it takes a
little bit of time. You know, it takes an
hour or two to do. So it's kind of a pain, but in this case, we're not going to
worry about it. We're just going to move
on to the texturing. So yeah, it looks like I'm
yet again exporting with les. And I should go set up, I marmot set the scene
soon enough, and yeah. I'm really just taking
my time on this polymer. Um, yeah, and you just really
want to take your time. Don't let anybody rush you, of course, unless it's a
deadline for something. But if you really want
to get a good result, you got to really
take your time, really look at these references and see what kind of detail you can get from them because
at the end of the day, real world references
is what's gonna get you the real
world looking result. So I'm scanning through the
polymer, other details. I'm going to add
another layer here. Okay. I'm going to go through
the layers again. And you get to the
point after a while, where if you're looking at all this stuff and you keep going and doing what
I'm doing right here, it might be good to take
a break, go for a walk, do something else
that's not three D, because we all every artist knows this when you look
at something for too long, you know, nothing good
is gonna come from it. You just get into this state of mind where it's really
difficult to try to find a solution or your sense
of what looks good or what doesn't look good kind of goes out the
window for a little bit. That happens when you get tired. So it's pretty important
to just, you know, when you see maybe maybe future me would
tell myself here to say, Hey, go take a walk. Come back, take a
break for an hour, come back, 'cause
when you come back, you feel very refreshed. And yeah, it really
makes a huge difference, in my opinion, it looks like I'm changing this height
roughness channel to overlay. Um, so it blends
in a bit better. I don't actually know exactly what overlay does,
technically speaking, but I've watched a lot of
tutorials myself where they do overlay a lot for those details that they want to
see all the time. So, yeah, it's a good one to add for base
details specifically. Those fundamental details
like the noise on polymer. You want to overlay that stuff. It keeps it subtle, but it also keeps it there. You'll always see
it with overlay. Those are my main three reps as for this base
material, for sure. That's what it's
been so far, so. So I've gotten to
this point with just, you know, one set of references. Just it goes to prove
you don't need a ton to get started or even in general, but as you move forward, you use whatever gives
you the detail you want. Similar materials are okay. It doesn't have to be one reference where
you get everything f. He wouldn't get very
far if that was the case. I'm gonna add
another pill layer. What am I gonna do here? Looks like I'm searching
for something. We. Back in painter. Not exactly sure what
I'm even doing here. All I know is I need a
break at this point. I'm gonna continue on. I think I'm frustrated that my desktop icons are showing
through my task bar, and they're not
supposed to be showing, but for this video, I
could not get it to work. So I'm just going
back and forth. I think this is the fourth
time I've done this. Really just taking my time here. Uh, if you I'm gonna just continue talking
and narrating this, but until, you know, you should definitely fast forward if you're at this point already and just see
what I do, Nick. So yeah, I won't
be insulted if you fast forward through
this part because I am clearly taking my time, but I'm gonna just
continue narrating this as we go along. That bake, I think I did
a pretty good job there because it's soft enough where the light's
gonna catch it, but it still holds its form. It's not too mushy.
I don't know. Yeah. So we got, you can see the different colors there
pretty well, actually. Back into my reference
channel, my height. Looks like I'm changing
at the overlay. Just getting all the
angles I can on it. Save war textures.
Boom, boom, boom. And you notice I'm
editing in two K. But I am exporting in four K. My computer specs.
What do I have? I have a GPU. I got a 30 60. Not a TI. The 30 60 is good. I think it's better for three D, just because it
has the high VRM. I think it's got like 12
like 12 or something. Whereas the 30 60 TI, I think is like, has more
cutcors or whatever, but it has eight VRM, so it just can't handle a
lot of this creative stuff. But I have. Okay,
so I got 30 60. I think I got 32 RAM. I got an I seven, something, I think 1,100.
Normal motherboard. And yeah, those are, like, the basics what I got, so it's not a crazy computer, but definitely you
can get the job done, but my point is that I'm
editing in two K just because it would take
fever if I did not. So You know, it looks like I made that
small piece there black. Obviously, it's metal, so
it shouldn't be that dark. Um, but it looks like I just
got it got the material in there just to differentiate it from being white or
metal or whatever it was. Just getting it in there so I can come back to it and realize, Okay, this is its own material. I have to texture
this one, as well. All right. So that's going to be up for this first section, setting up the base. Oh
62. 04 Texturing Part1: M.
63. 05 Texturing Part2 Timelapse: [No Speech]
64. 06 Texturing Part3: So it looks like I'm just
going into that mask. Just making sure
it's not cutting out with the UVs, adjusting
the roughness. Important. Getting the paste, so
we get color going into overlay, adjusting it. So edge colors gonna
be roughness, as well. Just as a general
rule, you know, you want to put edge
roughness on most things. And then the severity
is gonna just depend on whatever
the material is. So it's important to just
keep a reference going, keep looking at a reference, and from there, you can decide. But it's always smart
to have edge color. And that goes with edgewar
noise, roughness, base color. It's all kind of a
nice template to use. On everything. So I'm gonna do
another fill there. And I'm going to add
some noise, scale it up. Like that. 515, go back to
the mass, check it out. And then that is going to
become color variation. So you can see that there might be a little
stretching on the UV, so you can probably
paint that out after change it to overlay, base color, change to overlay, so it kind of sinks in there. You see it a little less,
raise up the color to just be able to see a bit more that just gives a nice Uh I just gives a
nice differential. You know, I just varies it up a little bit,
looks a bit different. Yep. I just breaks up to cover. That's all we're
looking for. Don't want it to be too intense, either. I don't want it to
be too intense. Just checking it on. So this
mask is gonna apply to all these materials,
noise, roughness. And we just duplicated
it, changed the channel. We're gonna go to the color here and just have it
on overlay as well, and then adjust
it as we need to. And it gives that material
that pop that's so important. All right. We're going
to move on here. Y. Okay. I go to add geword generator, and we're going to
have some roughness and color break up. A lot of this is just it's honestly guesswork for a while. You have an idea of what
you want it to look like. You have a reference that you
want to try to replicate. But sometimes, you know, the first time around, you
know, you got to tweak stuff. It's not always
going to be perfect. So a lot of times you're
gonna come back to it, you know, a couple of days later and be
like, What was that? Why would I do that? And it really just sick
and gets yourself. And that's good to an extent. But, you know, if you find yourself
doing that for a week, you know, just decide it's
good enough or whatever. But sometimes you
need a little bit of a break to just kind
of let your decision making the decision making part of your brain kind of
rest and reset and whatnot. So we had put down
edge roughness. We're going to do the same
thing just with base color. And the reason we don't put base color on that
edge roughness with the roughness is because
we don't want it to be on the exact
same detail pattern. We want to be a little
bit different because it allows the material to look a bit more unique
and a bit more imperfect. Because the color and the roughness aren't
going to align perfectly. And here, it actually looks like I went for a scratch map. So I put metal
Edgeware on multiply. Put a fill scratch under it,
scale it up the scratch. And now you're getting
just height information. I just have height going
now, probably negative 0.01, and it's just height
information on just the edges. So
it's realistic. That's the purpose
behind that and you can paint out if you don't
like certain areas. But, yeah, it's a good
method for getting height damage or whatever
kind of che damage you want to get on the edges. So I'm going to add levels to kind of
increase the contrast, make it a bit more intense,
less scattered around. We reset it. Okay. Yeah, and afterwards, you just paint out, you know,
what you don't want. So for screws, there's just one. I mirrored all of them. So maybe these are individual
mirrored all those. Okay. Well, those screws. Yep. So throughout
the whole model, those screws are going to
share the same material. What's that one. Gonna go back to the plastic here. Okay, so we're going
to add a metal edge again and get the edges,
some nice details. So edge dense, we're gonna
do basically the same thing. You can even copy that layer if you don't want to go
through all the steps again, but edge dense. So yeah, wear level. I'm just adjusting, you know, the grunge, the wear level
contrast, triplanar. It looks weird. We're going
to put height h color. So, just kind of eyeball
the height up first, and then kind of hone it
in as the mapGs applied. Put it on overlay,
the base color. So it looks a bit more embedded, looks a bit more natural. Base color, Edgeware
put on multiply, and we're going to
add a fill layer, put it below the edgeware and add whichever map
you think is best. Whichever one you
think is best at a levels, increase the contrast. And scale it up to about three. Alright. And then
adjust the balance. Yeah, it's nothing crazy. We just want to
show some scupping. No, it's it's just
a work in progress. So From there, the next thing to do change a map out and test out a few different ones,
play with the scale. I know you're looking to me for, you know, straight advice, so you need to put
X here, y there, but realistically,
after this tutorial, you're gonna be you know, people aren't gonna tell you
exactly what you have to do. And this storia is
very, you know, rough and kind of running gun
type thing. It's real time. So you're going to
see me make mistakes. You're gonna see me go back. But generally
speaking, you know, this is kind of what
you want to do and just play play with the
settings, you know, us because I have one thing set a certain way
doesn't mean that, you know, you have to
do it exactly how I do. Our edge dents, we
raise roughness because when you scratch
plastic, it gets rough. Um, it's just a real
reference thing. So I added a blur. Make sure to put it on
top of your levels. Yeah, we're going back. This is added to roughness, actually. Sorry. So we're back
there. And, yeah, it looks terrible right now, but it all kind of
comes together. Alright, so we
copied our subtract. And that's basically
to break it up. So I put a cloud fill layer set to subtract on the very
top of the layer stack, and it just kind of takes
away from your map. Very straightforward. And
then that gives you kind of a much more
tame, mild result. That's more realistic
looking, definitely. Okay. Yep. So that's one of the
first main details we're gonna add to
this base material. It's always good to scratch
it's general scratching. It's always a good
first material. You feel like
you're left behind, being left behind and, you
know, pause the video. Take your time, go
back, see what I did. Again, it doesn't have to
be exact as long as you get the details roughly in
the same area, you know. So yeah, I'm gonna open
Marmoset check it out, see what the PBR looks
like if I'm way off, if I'm close, whatever. So Alright, so we're checking it.
Looks pretty good. It actually doesn't
look bad at the stench. It looks very raw, but, you know, the base
material, you can see it. You can see the shimmer,
the height, the roughness. It's kind of coming together, but it looks like it looks
like a blank slate, basically. Yeah, it looks like
a blank slate. God I try to look at
it at all angles. I've set it up on just
a normal a plane. Set it on like, I've set it down
180, 90 degrees. I've silted it, and
then I just put a just put that one light. Just need one light. That's it. Just a single. You know, you want to get a couple of
test renders in, feel free. Base material likes these.
It looks pretty good. What test render. I find myself rendering a unthinkable amount
through this tutorial. So, you know, seems like
every two details I add, I just export the textures, and then check it in Marma
said at six different angles. You know, it's excessive, but at that point, I'm thinking to myself, Well, it's probably time to go for a walk or
something like that. Ta a break, get a cup of coffee, do something, just get away from the computer at
that point. Yeah. You get caught up in
the little details. It looks like a good
noise variation. Yeah. My favorite part about
texturing specifically. I guess the pipeline
is just trying to make it look as real as possible. That's
my favorite part. I think a lot of people
enjoy doing that, too. It's a nice challenge. You know, you get good reference. You can see other people's work, and you're like, Wow,
that looks awesome. You just want to try to
make it close to that good, you know? I feel that a lot. I look at a lot of these
people on our station, and it's just extremely
motivating to see that, you know, Wow, somebody can actually be that
good at three D. You think, Wow. I mean, if I tried to do, for example,
if I tried to do that, it would take me, you know, five years to make
a gun that good. And it's really it's
a very linear curve. I guess at the beginning, it's fairly exponential growth, but it does taper off. And you get to a point
where it's like, Okay, these little things
actually start to matter. Like how much you,
you know, like, hi poly softness and where you put seams and
how well you pack UVs, all that stuff at
the end of the day, even if you're the best
texture, you know, East of the Mississippi, all that stuff really makes a difference in
the overall product. Because if one of
those things are lacking to the train eye, you know, you can really
see it. You can tell. It's one of the first things you go through when you
look at somebody's work. You're looking, Okay,
do I see sharp edges? Do I see, you know, textures that are going
through the UB lines? You know, they cut
off on UB seams. Stuff like that is ugly, and it really shows. And you can tell when
somebody's a good artist when they can hand paint
those things out or just avoid the problem
in the first place. You know, um stuff like that. But here I am adding
some color variation. The concrete map is really
good because it kind of has this nice directional
contrast to it. It's not super contrasted,
and it has a nice, you know, scraped look
to it, very even. And it allows to get these
nice color variations that look very natural. I'm sure people use all
sorts of different methods. And I'm sure there's 1,000
methods better than this. But this is just a nice way
to add color variation that I found from watching
other people. Good way to check your
color is to go into, uh, you know, your albedo map. It's at the overlay
here, which is smart. I don't think it should be red. Color breakup one. We're
gonna add another color. Set it to red, and we're
gonna put the strength to 12. We barely want to
see this thing. We don't want to see it a lot. These are the small
details that actually can actually make a pretty
big difference. You don't want to see the
red, but you want to see it. You want to see it
without seeing it. Is the best way I
can describe it. Whether it's red or blue, Yep. You want it to be so subtle, you can't directly see it, but strong enough where
your eye sees it. That's the best way
I can describe it. I'm gonna make a new layer. Ambient occlusion. Send new generator for us here. And this is gonna be I'm gonna Well I change
the curvature. Next thing I'm gonna
do here, invert it. Change the balance,
bring it way up. In contrast, probably. I want to get in the crevices and darken them.
That's the goal here. So dirt might be the move. Get rid of the grunge. Call tract up a
little dirt level. Then we're going to
add. So it's just AO. That's where we're
gonna have it as. Just color. We're gonna
bring the color down. See, I kind of adds that
shadowy it gives you a bit of a cist the tracing. You know, I just really adds
that shadowy look to it. Go into our color map. We can see it's darker. That's exactly what we want. That looks really good.
That's it with it. That's what As that
next contract at depth. Nice. Okay. So I copied that
material, control. She went to a different set, and I pasted the new one. I copied the paint mask, paste that one,
delete the old one, delete the old material. And then, boom, we have
our material pasted over. I know there's other
ways to do this. There's, like, a
parent material. But I honestly
haven't learned it. I haven't learned I
just discovered it was a thing. Uh, yeah. Yep, it's kind of embarrassing, to be honest, but that's okay. This isn't an
optimization tutorial. This is mainly texturing. Texturing, texturing.
That's what people want. That's what the people want.
They want the textures. Back into Mar It's looking
the same, to be honest. I can see that AO. I can see that. I can also
see that color variation. Yeah, it's looking pretty good. A little Yeah, and
it just looks bare, but it's at the early
stages, so it's okay. Change up the lighting. We just got one directional
light at about a 6.5. For some reason, it just
goes to 649 every time. I don't know why,
but it just does. We're gonna render out an image. It looks like go from there. It's good to get these
little checkpoints in marmoset because it'll stop you if you're on the path to something you're
not you don't want. You know, this is where
you're going to see it. If this is a portfolio
piece, et cetera. If it's for a game, you're
going to see it in unreal. So check it in unreal. If it's for folio, you know, check it in whatever the last place this
thing is going to be seen and in this case, I'm going Marmoset for
portfolio, whatever. Just for fun. Marmerset's good cause
it's looks realistic. It's, you can it's pretty quick. And it's very intuitive. The whole interface
is easy to use. Okay, so this looks, looks solid. That's
stuff up there. That's normal detail.
It's just get in there. Slowly, but surely. So we're back in
substance painter, changing the color of this groom Lots of export. Okay. Okay. I just delaying. There's a lot of
changes that are gonna happen throughout this
whole process, too. I'm narrating this.
If you can't tell, I'm narrating this afterwards. Um, in case it's not perfectly
synced up, et cetera. Or I say something
and I don't do it. It's just because I I didn't talk much while
I was doing this, and I had to go back and properly narrate
what was happening. Yeah, by the time
this thing's done, you know, so much changes. So just the key thing
here is just to understand the main details I'm going for and just
roughly how I did it. You don't need exact stuff. I highly recommend
you don't try to do exact details unless it's, like, a super specific hand painted detail or
something like that. But with procedural stuff
like this, you know, it's pretty important that you
kind of have your own take on it and your own freedom on where it should
all be spread out. If you understand the
principle, then, you know, you're much better off
in the long run as far as being creative
with your own stuff. So, I think I
mentioned it earlier. I messed up that part there. Which is fine. It's kind
of a pain in the ***, but what are you gonna do? Well, I already said
what you could do, but I'm not gonna I'm not
gonna go back and fix it, but, uh, that rubber
is looking good. It actually looks
good PVR value there. This, I'm trying to
get this to be like a coated metal, just
like the reference. So if you scratch it, you know, you sit your metal setting to 0.8 0.85 right around there. It's like a thin coating of
metal you have on there, and Yeah. I'm liking
the height there. It's pretty good.
Might need to paint out a little bit of it with
a subtract paint brush, but it's looking pretty
believable to an extent. There are some parts that it's in that's just not realistic, but got these screws just with a single
material on there. Um, you know, we baked on the detail of the screw
coming out the other end. It's setting up to be
a pretty good texture. That just the lighting,
get a different angle. Pro tip tooth. If you have a you know, if you get your this type of lighting is going
to show off roughness. This direct lighting where you don't see much of a shadow. You're gonna see most of the
roughness that's on this. So it's gonna be
sparkly when we zoom in on the polymer
cause the roughness, the noise roughness is gonna kind of be on the spotlight
a little bit there. It's just mimicking reality. And when you. So we'll just wait on that
and see and by all means, I think I've said earlier, there's a lot of fast
forwarding that you could be doing right now if you I
just sick of me checking in, and Mama said, I do the
same thing every time. I just check the lighting, a couple of different angles. And a few renders, check the material, see what it looks like and get
back to texturing. That's basically all I do. So Yep. And I believe I have a reference
going off screen here. I just don't have
it shown right now. Um, but oh, it's just
rub earlier videos. Have that one up. Is
the main one. Yeah. So it's looking a
little liny actually, like the polymberH the white. See, when you do when you
do those strong shadows, long shadows, you get
to see the color. The albedo, the base color
map shows a lot more. You can see the white, the
white outline on the edges. That's base color only. And you can see that it's
pretty strong right now. So gonna have to adjust
some of it at some point. Yeah, the focus. Post
effect, depth to field. It's one of my favorite
things to do when rendering. This is a dark scene, but I'm
just getting a feel for it. I mean, now. Absolutely, one of my favorite
things. It's the key. It's one of the many keys. There are many
small little things to do to make renders look realistic and I'd say one of them is to
add depth to field. It's pretty crucial,
especially on a on a shot like this where you want to focus it on one part and leave
other areas of rest. Um, it's pretty important. It just really adds a lot. It's funny. It adds so
much by taking away detail and focusing your eye
on where there is detail. Just like a photo. Yeah,
so that looks too white. Right, of course.
Anyone would know that. You look at that, it's okay. This doesn't look real.
It's real white looking. So we'll tone that
down eventually and do some more to
get through that. Yeah, fast forward. Feel free
65. 07 Texturing Part4: Alright, so I'm gonna
add another itch, middle tchwarG into the height. Change it to normal
because we want it over whatever is
there behind it. We're gonna invert
it? We're not. Just play with it. Doesn't have to be exactly
how I have it, get an idea. Play with the grunge. I copied over that fill layer with the concrete map in it, and I put the edgeware
generator to multiply. I'm in the height map now. I throw levels on it, too, to contrast parts I want. Spread it out. I'm using the same process
over and over and over, so you might have an idea of what, you know,
how it's gonna look. You know. Put the roughness on. Bring it up. Should be rougher
than the main plastic. Itch height. I'm gonna bring all the way
down to the bottom. Cut the brick sheet out again. I'm gonna try to get this
coated metal, I think. Get that going. E. It smoothness, grunge mo. And then wear level are
pretty important toast here. Hey, the levels. You really can't go wrong
at the levels to anything. It's just such a
such a good tool. It can really transform your mask. It's
just a good thing. Mm. We're gonna have some
scratches, it looks like. Scratch generator. Got to
avoid that mirror over there. Scratches. Roughness scratches. Primarily gonna be in
the roughness channel. Yeah, so basically, when you when you have
direct light on them, they'll show up, but
when they don't, they're a bit harder to see. Overlaying the
roughness channel. Let them kind of fit into the layer roop
a little bit better. Still pretty hard
to see right now, but add some color just to help with the
visibility, base color overlay. And we might want these to be
a little darker, actually. Not super dark where you
can see it in the shade, but yeah, just enough where
you can see it, actually. Adding dirt, scale it to five. We just want white dots here, so for some reason, white dots make things look
more real for some reason. Just mimic the dust
that's in real life, so Yeah, bigger is
okay, in this case. We want a few to show. But the roughness on
overlay so it's not as intense, doesn't
block everything. And it looks like these dots aren't white.
They're just royal. They're like little oil splats. Yeah, they're pretty
small details, but these are some of the details that
you really don't see, but they're important. I know you say that with
everything, but, you know, there's just so many details to disgusting amount
of details in this. Probably I probably use more layers than I
should, but, I mean, I should I should see what
other people use as far as, like, layer stack, how many
different layers they have. Because I know I have
I know I'm not the most efficient when it
comes to painter files. Like, some materials can share. There's there's, like, that instancing what do you call it instancing like ability
between texture sets or just materials in
general that allows you to share between texture
sets that I need to make us. Because I have set
one and set two. You know, I have plat. I'm doing a copy paste method.
That's pretty primitive. So I'm thinking if I had, like, that instance setting, it would be just a little bit easier. Me optimized, as they would say. S another layer generator. Hedge wear inverting it.
Put the wear level up. All want maxed out. I'm
at 96, even higher. Well, it looks like
I just changed it. I said, screw that
Color variation. What are my n to use here? The concrete? No,
grunge galvanized. Galvanized, galvanic,
galvanized, galvanic large. This is great for a metal. Maybe raw metal, but, you know, it works pretty
good for this, too. It just looks pretty cool. Super good for colour variation. Yeah, it's real easy to hide. It's, like, a nice,
distinct, unique detail. It almost always looks good. So, you got to just
really make it subtle, put overlay on that base color. And then we're gonna
bring it down a little bit and just keep we might
paint out that mirrored part. And yeah. Looking pretty good. Overlay roughness. Kind of lessen that a little
bit, bring it back. Yeah, just we want it real subtle because it's
a strong detail, otherwise, that subtract. We're gonna just paint that out. Just paint out that
stuff that's mirrored. That looks awful, so Go up to set two pace
the white dots. White dots make the
world go round. Let me tell you.
They just look good. Okay. Like sport into Marmoset. Check that out. Looks pretty good. Got that
cool background, too. Okay. S, it looks a little different
like that. That bolt. It's like the slide.
You can see it. It looks kind of dark. It's the piece of metal
where the pump slides on. Yeah, it's like a guide, the
reel. Looks a little off. It still looks pretty liny
too, like the polymer. It still looks like the
white on the edges. A little too strong. My 30, 60 is putting in work right now. Yeah, that coded met
looks pretty good. The galvanic, it's a
little too strong. And those dots look
a little weird, too. Looks alright, though. It's getting some
more character. We just got to refine
a couple of details. Yeah, that guide
rail looks awful. Go for another render. Wow. Yeah, it's always good to
just take a few renders. Every time you kind of get to a point where you're
getting a little tired. Just take a break. Go render, see what
it looks like. Will you finish,
like, a tough detail? Just take a break. Hop up morset or wherever
you're render. Yeah, that's it. I've wanted to try Kia
for a while, actually. Yeah, I've been
seeing some people in art station who use it. Uh, my God, it looks so cool. It's like, I don't know
how to explain it. It's just super crisp
looking, clear. Yeah, so this render
looks pretty similar to. Same problems, lining, whatever. Yeah, key shot
seems pretty cool. It's just fairly expensive,
I'm pretty sure. But the ones I use
mainly are Marcedes, like, the main one, of
course. Then we got blender. I use cycles, actually. It's actually really good. And then I throw them
in Photoshop, too. I'll show you after, but Yeah, Ira is in here. It's in substance painter. It's pretty. There's all sorts of. Here's Arnold and Maya, I'm pretty sure. Could be wrong. And then what else do we got? Tony Co. There's a lot of
them. I know that, though. MormerstF realism has
been pretty good, though. So this Clonoids Yeah, we're just trying to
decrease a little. It just looked too intense. It didn't look real at
all. You could see it. It stuck out like a sore thumb. M he sets. It's dense. We just want to
break it up a little more. I'm just playing around
with the settings levels. It's height. H Big height. Decrease a little bit. Put it in the negative, so
it's actually height. And we're revealing
it via this map. So the tried and true
grunge concrete. We'll try a blur.
See how that looks. Bring it to 0.12. Looks okay. Height at negative one. Okay. Roughness, way up. Way up there on that roughness.
Bring it down a little. Right. Subtract. Wherever we don't think it's realistic, get
it out of there. Up there. Also a mirror
issue. Get it out of there. What else will I delete? That bottom, nice. Well, no, I faked you out. I hit I hit Control Z.
I did not delete that. 'Cause it makes sense.
Bottom of the grip, yeah, you bang it up
a couple of times. Makes sense to me. Glad. We just increased our
subtract to try to break it up a little
more on both. As I said earlier, it was
looking lining, remember. Finally got around
to fixing. Plastic. Looks like I copied the plastic material,
went to set two. I'm gonna go to this
plastic material. I'm gonna paste the new one. Copy the old one I want. Place that new brush, and then we got
the new material. Boom. That's it. Looks not bad. Going back to set
two. Coated metal. Subtract on the edge of this. Oh blow on. Yep, and
we're going to delete. We're going to lower
the control bar from 100 on the
subtract to about 75. And it just tames that without ruining the rest of the
things it's applied to. So you can kind of B and
get that specific bar, even though edge
roughness is applied to many the whole material
like this part, too. So that's a good tip to go in with subtract Box and
then you can kind of, like, lessen the power of the subtract,
which brings it back. It's kind of like a weird
little trick thing. Kind of scratch
layer, fill, Brush. We're gonna go to this is
just a random stencil I got. The idea. I mean, you
don't have this stencil, but maybe you do. It's
the weapon group. The weapon the weapon discord, the weapons I don't even
know what they're called. They released these
stencils, though, so they're free
to the public, so I guess I can just throw free. They're pretty good. Well,
they're really good. Yeah, they got a lot of
extremely unique details that you really can't
get anywhere else. Straight from actual
guns, they made them. Looks like. Yeah, they did a
really good job. Uh Junk that in the stencils. Yeah, we just want to,
like, try to make it cool. You can do this with the
normal scratch wrap or you can get cool
stencils and be cool. You just paint
them in, whatever. You're gonna get 1,000 bad ones before you
get a good one, so don't worry. Just takes a little bit of time. Adding the details. Gonna go UV, paint them
more than U. Yeah, it's just a smarter
way to add them. You can get a nice unique angle. Get it in the right spot. Delete that little residue part. Yeah. Then that's a good detail. That's a pretty Like, that would happen in real life, so I'm totally cool
with that detail. Totally cool. It's well placed. Yep. Roughness channel, Wo Relay. I'm an open book. I do the
same thing every time. I just make I do slag
variations. That's all. That is it.
66. 08 Texturing Part5: Go back into that scratch layer. Base colour Ovalt. We want them to
show a little bit. Dial that scratch
back a little bit. Sometimes it is nice just
to hand paint stuff. Gonna go ahead and
try to add some more. Give it a little bit of
height, negative point on it. That might be maybe
a little too much, well we'll see down the line. Yeah, have that. That
looks pretty good. Notice how it's less rough than the base material
of that coated metal, too. Raw metal is usually
a bit wetter looking. Break out the stencil again. I don't know. Just using the UVs. That looks a little intense. Yeah, if you want those
stencils, go to discord. I'll look it up now.
What's it called? Yeah, it's a nice
discord they have. I think it's pretty new, so. It's called Weapon Group. Yeah, if you go into resources, they have all sorts of cool
stuff, stencils and whatnot. Basically, just trying to
get as many angles as I can. Trying to find cool ideas. I might have to make a
new layer, actually. Just painting it in. Yeah, this looks a
little too strong. But uh Yeah, I'm trying to find a just a
nice sensil to put in there. I'm not sure if that's
gonna work, though. And you can see that cut off for the UI shaped UB space just 'cause you'll
never see that part. Had to wear. Turn rocks. Keep it on. Yeah, so we wanted to be a little
bit in the black. Black, color black. We don't want white.
Darker. Wetter. That's what we I'm just trying various details
here, different stencils. Trying to get realistic
looking markings. Sometimes it can be difficult to find the stencil that you want. Try a different one. And Yeah, if this doesn't work, then I think what I
end up doing is I put a gradient, a mass gradient. So we'll see that
in a second here. But yeah, maybe the
reason why this isn't working is
'cause I'm looking for a gradient just to smooth. It doesn't have to
be super unique. It's just more of a
big colour change. That's all I'm looking for. So We Where we're gonna try a
little bit of height. Don't think I'm happy with that. Okay. Add a new layer. Scratches. So we're on the plastic now. I go to add some nice
scratch layers here. You want it to be
rough? You use stencil. You know, I'm using seven
different stencils, you know, so it's not an issue if you want to use
your own stencils. I know you don't
have my exact ones, but I told you where to get
them if you want to use them. Looks good. Good. Trying to get the
red angle here. I just try a little bit
of everything here. Just keep rolling
to the stencils. I'm just adding them. Areas I think there
could be contact. I'm taking my sweet time. You know, it's it's
pretty simple, though. Scratches. Just lining it up. Paint it out. Repeat. That's my main method
for texturing. Adding those cool details. Well, I guess, well I do this. Um Yeah, you can just focus on fine
incidentals that work for you. I think these are
stentils for, like, old. It looks like they're old guns that have a lot of wear
and they're all raw metal. Like this is nine. And this is some piece of a like like a like an hate gay but they're super good. He Yeah, some dice. That's good. Okay, so, that's pretty
straightforward what I'm doing. I have a scratch layer. And I'm just using stencils. This is going to be pretty
much completely manual. Looks like I added a sharpen. Unless if you didn't see that, it's set to pass
through, not overlay, not normal pass through. And it's set to 0.24
on the very top. So it just makes
everything else pop. You just add details
and build off of them. One little detail
turns into another. Yeah, I'm going on a spree here, so it's just that
scratch mask, stencils. Get every place you can with
the plastic. Take your time. That's it. I guess what I do that I
can talk about uh you know, like, this could be a great portfolio piece for somebody that wants to get
into the game industry. One thing I would maybe try to I know me telling you this now kind
of defeats the purpose, because you're so
far in already, but it's a good piece to show that you know how a texture. It shows good
techniques that I learn from people that are
a lot better than me. So people will be, you know, an employer will
be happy to know, Hey, this person
knows how to texture. It's one of the most
important things, I'd say, knowing how to texture. I think I covered it
earlier in this tutorial, but you know, if
you can texture, that's the biggest thing because it's real easy to
teach somebody how to, you know, optimize like a
low polymesh or something. It's real easy. But
texturing, you know, maybe requires a bit
more of, like, a sense. I'm hesitant to say natural
sense, but, I mean, if you have a natural
sense for it, it's a lot easier to improve. So you can, of course,
build a sense. What I mean by
that is, you know, just a good observation. Good sense of how
many scratches, how much scratch, where it
should go, that type of thing. Adding a new layer
here, dirt inverted it. Right, I'm using
triplayer not invert. It's messing with
the setting. Okay. Dirt general is gonna be our first layer of dirt
that we put on our plastic. We're gonna put it
in its own older called dirt roughness way up. Height, I mean, color,
dirt color, roughly. We'll change it throughout. It's kind of puke
color right now, we want maybe a little
bit less saturated. Orthing like that,
but dirt Gen one. Okay. Keep it at normal. I got to fill, subtract. And I'm just trying to break up this lininess I've been saying. My boss always says
he calls it lineas. It looks liny. Just break it up. Make it look more natural. Throw subtract, concrete on it. Maybe do a couple,
but til it up to two, play with balance, contract. Call it a day, throw s
in there, see what I do. Add another one seed. Playing with the color here. We're gonna take
away a little bit of color. It was pretty strong. Our roughness is really strong. We're gonna go into roughness. Take it down a little bit. Something like that, yeah. We're gonna make
a whole new one. New layer, seed the dirt. We're gonna do something
a little different. There is going to be
the multiplier now, put a fill under
it, set the normal. And we're gonna throw
in a dirt three. So we're going to make
actual specs here. Contrast up, balance down, tiling Somewhere in the 20s
you want your balance to be? Not showing up yet,
'cause our Yeah, that's perfs There it is. This is my favorite part
adding these specs. Uh, still incorporates some
of those subtracts. Could break it up pretty well. It's okay if you leave them out, though. Balance up a bit more. Spec one. Duplicate spec. Two, 21, two, Spec two. Set the dirt. See that dirt. Change the scale a little
bit. Change the color. Not all dirt is the same color. Change the hue. It's just
a little different color. That's all. See that. See this one, too.
These subtracts, so it's completely
different layer. Just unique to e, the new layer. Everything's different,
same concept, though. Now we're gonna look
at it in marmosete see how bad it is and fix All right, what are
we looking at here? What we got? Yeah, one of my biggest
my favorite things to do to get ideas and inspiration for projects
is to go on art station. Find do this. This is the ultimate way. Go find a piece of
artwork you like. Go to that person's
profile page. From there, go to their likes. It's like a web. A web. When you're in
that person's likes, find something you like there. And then keep going.
And you find, like, infinitely infinite
artwork that appears. I. I. That there? That's a nice detail.
This looks a little bit pursuit like a
little bit unnatural, but I could see
how it gets there. It's great. Going back
to the reference. Add some dirt in there. Just trying to add the dirt in areas to where it
is in real life, which is the crevices mainly. So Change our lighting a little. Yeah, it still looks very bland. I'll add abnormals
at some point. Dirt is helping break
it up a little bit. Tracer looks really
but really black. Same with the safety. And then inside the grip is dirt.
You got to paint out. But yeah. Yeah, that dirt. 'Cause it's so low
resolution UV. When you put the dirt specs, they're just huge because
they're so low res. And it just looks awful. They can immediately
draws your eye away from anything that
was supposed to be cool. I think I'm looking at the
Render off screen right now. There it is. Hey, it looks less lighty. You'd say that at
least. Los less lighty. That's for sure. But yeah, Yeah, we got a little bit of UV cut off there for our dirt. Go fix that. And, uh, yeah. Yeah, I copied my dirt
folder to set two, which is where the metal and the rails and all this stuff is. So to just adjust
it. That's all. It's not the same. Roughness. It's very strong.
So if we change to put it more metallic to dirt, it doesn't become metal. It just becomes
less strong dirt. That's basically it. So Specs. Specs are pretty easy to adjust. Duplicate it again. Wow,
I'm a crazy person. Seed. Same type of thing. Skip this. You already know
what I'm gonna do. I have a hair hair
Alpha picture. Black and white. What do you even
call that Alpha? You call it an Alpha R? I mean, it's just oh, a
gray scale, great. It's like a gray scale thing. We it's just a map. It's like an alpha map, yeah. Black and white, but it's hairs, so you can see, it's just not exact dirt. It's not the exact same
as the dirt specs map. It's more hairy. Scale that up or down. Yeah, so if you got something
like this, just fill it in. I don't know where I got mine, my friend smuggled
it to me somehow. That is too much. It is indeed too much dirt. Yeah. Here. I won't
probably name. Yeah, I guess, uh, another thing I can
dive into, well, you pause and follow
this Satori along is important things to
include in your portfolio. No, I would say
the main thing is, it depends what you want to do. For example, if you want
to be a weapon artist, which may be the case, or you're a other
disciplined artist coming to this tutorial because you want to learn how to make
a weapon, et cetera. Welcome. But if you
are trying to break into the industry and you're wanting to be a weapon artist, you
should make weapons. You should make one
really good one. One really good weapon is
better than two shot weapons. I would say. I'd say most people
you ask would say the same thing because it shows what your
full potential is. You know, if you go
85% on two guns, 85% effort, I mean, on two guns versus 110%, you lose sleep trying
to make one gun, but you have one gun, but it's just amazing. That's going to get
you a lot further, and it's going to get you
a lot of interviews, too. Yes. Another thing is if you can
show your technical ability, because if you have
experience, for example, there's not a huge need for, you know, showing you can do loople if you have more than two or three
years of experience, people know you can do opo. You've optimized stuff. That's what your
job is, you know. But if you're new,
you're a fresh graduate, you're self taught, trying
to get into the industry, Yeah, people want to know, okay, is this person just, you
know, texturing wise? They're really good,
but they don't know what a normal
map is or, like, they don't know how to you know, do upper tri count, their topology looks
disgusting, et cetera. There's a slew of things that I guess I could
go through them. Like so if they
see Ju picturing, they're going to want
to look at, Okay, can you follow concept? Can you follow, you
know, real world specs? How accurately can you scale
things? That's at the start. You know, how what kind
of pipeline you use? Like, are you
blocking stuff out, or are you using
the latest stuff? Like, these days, people usually go to they use whatever package, Blender, Maya, Max, whatever, Moto for their blockout, you might go to ZBrush
for your high poly or do SubD hi poly, et cetera,
that kind of thing. Go into Marmoset for BACE
or substance painter, people might still do for fake. UVs, people use rhizom like
I did in this tutorial. People use, you know, various add ons for their
TD modeling package that has great UI
tools like blender. UP Master is good for Maya. I have a friend that does that. But, yeah. There's a bunch of different areas there
just to touch on this. I'm using direct
I'm trying to get some directional lining here. So this is where having straight UBs comes in handy because you can
do stuff like this. Give it a little height, little
roughness, little color. Little height,
that's it to start. Negative 0.0 oh 25 down. You're not seeing much. I'm going to make
it a little bigger. Five. Barely seeing it.
It is there, though. Add a little roughness. Overlay the roughness. Take away a little bit, add some. Base color. Add a little bit overlay
so it's not so strong. Put it up or down, down. Something like that.
Subtle details. Looks a little too scaled up, but aside from that. So anyway, yeah, so you want to continue to show your work. And the perfect portfolio
piece doesn't exist, but something close to
it would be, you know, 100% effort put into it. You have one in it, you show your wire frame, which means that will show how well you've
optimized your mesh. Um and when you optimize it, you want to focus
on one P details. So when you're Game when your weapon is held
by a character in a game, which is the job
you want to get, if I'm correct, it
is held by a person, and those details
that the player sees have to be
the most detailed. By detailed, I mean,
not just texturing. It has to have cool
scratches on it. That is important. You need
hero scratches, et cetera. I'm talking more
like match density. You want it to be realistic
in a lot of cases. And you want it to not
look achian low poly. You want it to be, you know, looking high poly as if you
baked the high poly, right? I mean, as if you
textured the hi poly. So add more edge loops in areas where you're
going to see it a lot. So you can display that with, like, a one P render. So people can zoom in and see, Hey, oh, this guy
actually knows you. This person actually
knows what they're doing. Wow. So that's important. And then another thing
would be you know, your UV sheets, trying to you
should post that, as well. So you got your wire frame
and then your UV maps. You generally want
to do, you know, depending on how big the gun is, you're going to do 14k
map or 24k maps, depends. But uh yeah, and then
if you have a muzzle, you throw that on a two
K map, one K, whatever. And if you have a site, put that on a two K map, make sure the glass
is on like a 512 on its own material and UV
sit, scale all the way up. Um, and yeah, the magazine, throw it on a two K, give it its own sheet with the
bullets, include the bullets. And that's basically, you know, if you can show
those UVs, that's, like, like, a pretty
nice addition. It really shows the
employer, okay? This person actually
knows how to, you know, attack UVs, and they're not just good at texturing
and fooling us all. They actually have some
game dev skill here. That will get you
interviews, definitely. Texturing will get
you interviews. Showing your work like
that will get you the job. I think that's a
fair thing to say. But yeah, another thing is, I know there's this
I don't know if you can do it in any
other three D package, but marmoset tool bag had
marmoset viewer file, and it's where you can
basically your mesh can just be like, it's like, bake lighting scenario,
but I think it's baked. Might be I don't know
if it's real time, but you could
basically just, like, view it, and you can adjust the light and see all
the maps and stuff. You can view it in
a three D space, but yeah, it's super, like, intuitive and really
helpful for people to see, like, every part of the map. So yeah, yeah. Here I am hand painting out
a metal edgeway generator. Just 'cause I don't like the symmetry that
the mirror makes. Oh, yeah. That's there. Head roughness. Yep,
making it a little bit little bit less, identical. That's the name of the cab. Yeah, that's my advice. If
you listen, great, not okay. That's all good either way. Alright, we're gonna
check, Marmst again. Are we, though? Are
we gonna do that, or do we just fake
ourselves out here? We're just end the
color here a little Trying to look at it
again in Marmson. M scratches. Make our changes there,
adjust it again. Just making slight alterations. I have a tendency to
just do little changes and then go right to Marmost. It's just a weird thing I do I'm a control freak and have to have immediate change,
immediate satisfaction. I can't just work peacefully in substance painter
for more than, like, two big detail changes before I have to go back
into painter and look at it. It's just how many?
I was looking. It's looking Skip Skip here
if you want. It's okay. A lot of times for
tutorials if I do them. Like, I'll just skip
through parts like this. Hopefully you do too, yeah. Because they're long. You
paid good money for it. Just go through the parts
that are important, you know, Texturing you want to see what I do
for the texturing, so hopefully by now, you have a good idea of, like, the systems I use. I only use a few, you know? I don't have a ton, but I use them in just
different ways. Canceled it. That's correct. No correct correct. Yeah, it still looks pretty bland without all the
normals on it, huh? We'll get those on soon enough. A lot of people do those first. I tend to do them, like, midway through just cause I
love making base materials. Yeah, it's, like,
my favorite thing is to make the base material. I never make smart materials, even though it's
probably smart to do so. For work, sometimes I do, but just for the sake of, like, saving time, of course, that's why you make
sworn materials. But for something like a personal project type
of thing like this, I love just going from
ground zero for some reason. That looks like I'm gonna
change it. That looks okay. I might keep that might not, but that block, no reason for
it to be brushed like that. Yeah, I varied from the
concept on that one, but yeah, so at this point, I'm just
gonna continue to add damage to areas on the
edges and whatnot. So we're gonna go to Photoshop. Old move. What are
we doing here? Okay, Photoshop. This is a quick titsorial. Now I do Photoshop stuff, camera raw filter, convert
it to a smart object first. And then even though it's aces, do the contrast a little
bit. Exposure, if you want. I'm probably going
edit this terribly, but I'm by no means a professional in photo show. I can do it in this way. I'm talking like a photographer. This is basically
photography rendering. Basically. Saturation. It's looking
a little It looks okay. It doesn't look. I mean, the textures are only
giving me so much. You can only make it so good. Grain. I do play with
all these sliders, though, that is important. Like a vignette, I'll
do maybe a little. Vignette's cool. Detail, sharpen it.
Yeah, anywhere from, like, 30 to, like,
50 or something. It varies every
project, basically. It'll vary, but yeah, I mean, this looks
awful right now, but I just kind of wanted
to add a fun thing. And I'll add lens correction, go into custom,
change that to 50. Plus 50. The second
one negative 50. Okay. And it adds, like, a cool chromatic aberration
especially the metal. See how it's like that
purple and whatever tinge. Real as a baby. That's what I like. Yep. Yeah, it still looks
pretty pretty basic still, but we're getting there, that's
all that matters, right? And we're getting there.
We are 100% getting there. That's the important
part. Yeah, I like editing stuff in photoshop. Sometimes I'll
only use marmoset, or it just do
contrast saturation. Excuse me, chromatic aberration. As will. Yeah. I accidentally barked
in the tutorial. I hope I can cut this out. Yeah. Okay. All right. A
67. 09 Texturing Part6: Alright. So we're gonna try
to make this grip here. And we're gonna start
with a nice outline. Using the mask we
got our reference. So just mask the
outline of the grip. Turn on mirror, as well. Just colour the whole thing in. All right. Switch to only height. Negative 0.2. Really get that noble map to show up with
the negative 0.2. Alright, paint out any
stragglers we see. Looks good. Guilt there. We're gonna
blur this a little. Make that edge a little
bit more appealing. 0.1, two, that's okay. Yeah. Get out of our
brush again. Yeah. Yeah, we're gonna set this
as our background layer. I make a folder to contain
all that stuff, call it grip. Alright, and then we're going
to duplicate that layer, hide the background
layer for now. We just got this one
and switch the height. Okay, we're going to add
hide the blare real quick. We're gonna add a fill layer, and we're gonna put tiling. We're gonna put a tile,
whatever you call it. Tile texture. Got to put that in there,
scale it way up. And at this point, I
realized that we've made our grip to angled so the squares aren't gonna line up perfectly like they
do in the reference, but we'll just play with
the scale a little bit, try to get the scale we want. A And they're more rectangular, so do that. Scale it up a little bit. Contrast. We do want the
contrast. It's scale it. So we're going to just kind
of get an idea ballpark. Change to multiply. So we get it all ged up. We're gonna try to align it now. Okay, so just rotate it. That's rotated the best we can, the more lined up with the
grip that it is gonna be, so keep it like that. I'm gonna take our tail,
try to rotate it again. It's ultimately gonna stay,
like, right around there. See us lined up. Yeah, I'm just confused now
because, uh, ripped. But okay, so we're on back. I'm trying to paint out those
nubs, but I'm on the wrong. Tiny Mbaber? Yep. So I'm trying to I'm on
the right layer now, and I'm trying to trace out the space that's gonna be between all these
changes to white. And I'm just not I'm just subtracting. We take the outline.
And your texture. Just increase the
background a little bit. So I'm counting the number
of tiles, one, two, three, four, five, six, on
the far right row. U. So you can see how it's
not lined up, right? And that's just it was you can take it back
to it's a modeling yar. You know, it's too
angled because I have to both line it up. Vertically. As well
as horizontally. It looks like some modeling area where I made the grip too steep. So I was in error. Can't do much about it now, but Background negative
point oh five. Add that blur to those squares,
make them look better. Turn off mirror when you do
this because it wasn't exact. So yeah. I just made that
perfectly somehow. I don't know how I
did that, but yeah, just as with that extra stuff. Like that. Just added a bit more in. Now we're gonna go into
the background layer and just carve out those lines. Don't worry about them all
being the same length now. We'll fix that afterwards, but use the middle as a guide. The middle at the two
squares as a guide. Looks like that's a
little too close. Adding a little lip thing. Just to give some space between
the screw and that's it. Make sure it lines up tangular with the rest of it. Yeah, kind of like
that. Kind of. Turn off symmetry. To like that. Normal map is
looking pretty good. Yeah, I think I miscounted the tiles, too, if
you can notice that. But, yeah. Big grip. Now we're gonna go to the front part and do that. So just kind of make
some space for it. Just fall along with
how I'm carving it out. Yep. Just kind of
rough head first. Are the way around those bots, too. Yeah. Get the inside there. And we're gonna just use that as with the tile on multiply, and then that brush that
we just painted out, throw it under the multiply, just like we did with the
tile or with the grip. We just got to fix
the rotation at will. Alright, we just transferred
a paint brush there. And so it's on its
own thing now. So we have a UB seam there. Best thing we can do. Probably change it. Try planar Looks okay. We'll try cleaner. Yeah, it looks hub.
It looks okay. It maybe looks a little stretched
on the edges like that. But actually looks
somewhat manageable. Yeah. Count them. Ten. Three by ten. Am I wrong? Yeah, just paint out the excess now. That's the main thing. Line it the best you
can with the reference. Kind of carve it out there. I'm gonna make that
herumeter around. So it looks like
we need to make a new or we'll label that. Yep. So just a brush here. Yeah, we'll go to UBs. Oh. They look a little stretched, so you might be better off. Just going from the model view. Yeah, that doesn't look right. Change back to tangent or. Good way to line it up here. Yeah. It's a nice chip away. Don't zoom away. You'll
lose your sizing. You want them all to
be the same, right? Yep. Okay, all the way to
the far right one now. Keep the same size. All right. We're gonna delete all
this stuff on the inside. All right. And this is mirred so we don't need to do
it on the other side. So we're starting to attack
most of the normals here. That's when it starts
to look really good. So we've got the base
material normals now. Hint coming, though. We're just trying to
etch at that rectangle. Sizing it up correctly.
Test out the height. Yeah, it looks pretty good. All right. Yeah, we don't want
to put Tokyo Marui. That's just like
the ner soft brand, so we would I would suck. We do want to match that
like background texture, though, that the text sits on. Yeah, it's just
kind of like splank but a little rougher and darker. Try different things
with the roughness. Looks pretty accurate.
Pretty close. We like a pretty good. All right. We're gonna
go do the other one now. Same process. Just trying to get the
rectangle shape right. Cocoa, Florida. I believe I have the stencils attached in the
source files, too. I'm not sure if they were
included in the tutorial, but might be worth checking. If not, they're they're real
easy to make in Photoshop. So I'm sure you guys
are good with that. Yeah, it's real
easy to make toast, so Tan be kind of hard
sometimes trying to figure out which fought
like, exactly to use. You can use Fat finder
and stuff like that, but sometimes it works,
sometimes it doesn't. But a lot of times you can
kind of just eyeball it, too. Yeah, some people like different parts of the project, too. I mean, that's probably one of my least favorite
parts, to be honest, making, like, normals and whatnot. I really don't like it. It just seems like a hassle. Even it's such an
important part. But it just is it
just seems like, Oh, my gosh, that type of thing. Oh, my gosh, I
have to make this. Alright, I'm going back in marmosette kick it out in there. My 40 60 is working right now. Looks pretty good. Yeah, it's getting there. Even though the
normals are blank, it's looking a lot
better with the grip, too, it's looking
quite a bit better. Yeah, that part is still
that's just the detail. We've accepted our
fate at that point. Come back in the paper. Alright, so we're going
to add a generator dirt. Anchor points. They're good. Yep, they're good for getting
in the cracks like that. So our goal here is to get
dirt in between the grip. The spaces in between the grip. All right. So set to multiply. With the grunge underneath it, it's a nice breakup. Kind of hard to see right
now. Yeah the levels. The levels is good
because it allows you to amp up the current state. I don't know how to explain
it. Like, you can't make it. You just make it a
bit more intense. Like, you like your design,
your current pattern, your current mask, but you
just need to amp it up. Levels is so awesome. Alright. Dirt specs, also. So
it's the same concept. Our map is just gonna be dirt specs. That's
the whole idea. That's the whole
idea. We're gonna make a couple of those,
probably two of those. G get different
colored dirt, as well. Yeah, you can just layer
that stuff on there, try to mimic real life. Yeah. No, we just changed
the color there. Yeah, and we're gonna
add some scratches, too. Again, similar concept,
but we're gonna throw in a metal edgewaar. Okay, we're gonna add
it to the anchor point. And, uh, just a
drifts from there. All right. So that's
our current mask. Change to an old rush. Subtract. We don't want it on any of that, though. We just want it on the nubs. Yep, do broad sweeps to
get rid of all of it. H Turn it to overlay. The base color. Yeah, this one it's a bit
of a challenging detail. Yeah, it's pretty subtle. And, yeah, I'm literally just hand painting a
lot of this stuff out. Sometimes it's easier than continuing to mess with
the procedural stuff. Honestly. That's the truth. Sometimes it's just easier. Might take a little bit longer, but it really doesn't
take that much longer. If you take into account how much how much time it takes to just fumble
around those generators. I had a player, I
might do something. Just altering that grip dirt to maybe be a different color. Like a whitish brown tan
dark color, you know. Yeah, so we're just
continuing to add some dirt. It's one of the most
important pieces, so We're going to add This is a, you know, it's a gradient. So when you slide pump action,
when you pump it back, you do it for enough time for
long enough, you get that. So to get detail there. Yeah, it's one of those
big details, you know? It's a big picture detail. It can help break
up the monotony of an otherwise spring
piece, you know? Yep, so we're gonna
overlay that roughness. And when coated metal, you know, it gets it gets rougher. I mean, it gets I
guess you could say looks more wet,
more glosy looking.
68. 10 Texturing Part7: All right, so we're still
working on the engravings. This safety pretty basic. We're just putting
stripes, normals on it. Just so it reads well
from a distance, too, we're gonna leave it leave
those lines kind of larger. So it doesn't alias too much. A reference here. A All right. We're just going to use
a basic S for a safety. Okay. I just highlighted it red so
I could find it on the UV. Alright, we're
gonna re put a map. And the way too big. I'm going to just
go at that so I can use on the model, I can play. It's a little too
difficult because our stencil and our UV shell
don't line up perfectly, so this is the way to do it. Yeah, something
simple. That works. Maybe the font. Oh, okay, so I'm in rapper Photoshop. Make it bold. Export it. The reference again. We're going to just maybe increase a little bit
of the roughness. Coated metal with a new layer. Slideware gradient. Yeah, we could blur it. We're just messing
with it a little bit. We're going to add
a couple things. Looking at roughness detail too. Who's fingerprint areas. I'm going to go back
to the Plymar here. I and we're going to add a seam line. So, there's different methods
to do this. Throwing a map. Yeah, just keep it red
so we can identify it. Change the this to
play a projection. I think I fixed me a second
terra whipper. Oh, yes. We're going to scale it way
down the X axis, I believe. Rotated, yeah. Yep. We want to make that line. It's got to be a
little bit skinnier. Yeah, nothing like that. And it's just gonna be height. So something like that is good. People add all sorts of, like, subtraction, distortion,
whatever you want to add. But I'll throw in, like, a blur slope blur with scale to 100 and then whatever
you want to do there. Yeah, just to give it
that non linear look. Yeah, so we'll add a little
bit of subtraction, too. We want the line to continue, though. That's the main thing. We don't want any points
where the line is kind of blending in with the elastic, it's going to continue
the whole way, but it can dip and rise, you know, I can never
fully disappear, though. I'm just going back to the base heights,
trying to adjust that. It doesn't really like, it's totally up to you. Each reference is going
to be slightly different. So I like this one
a little better. Just because the height
shows a little bit better. Just going through
all the layers. Checking to make sure
that they're good. Yeah, that ck is a good detail. A couple of things here. I y Okay. Change that to multiply. And we're just gonna paint in the areas where
there will be yuck. We'll ladder levels to
concentrate it a bit more. Yeah, something like that. We definitely want
color. We want height. It should be a little bit, you know, less rough
than the coated metal. Gucky looking, you know. Yeah, I basically used the same the same methods that
had all these details. It's basically a couple
maps, maybe I multiply. Almost always IA levels
and this kind of thing. Just gives you control over how you want
the detail to look. H. It wherever you want. Some grease too. So we're using that reference here
to find grease spots. Yeah, just use the cement brush. Mess with the spacing
if it's then all the Yeah. Just restyle it. Yeah like that. Yep, get in there, too. All the cracks. Wherever you would
think there's, like, you know, grease that
could leak out or anywhere. You could even add
some hand prints to grease that's gonna be the
same map, I'm pretty sure. Anywhere oil has been. With a gun, it's a
lot of places, too. M. A a Yeah, something like that. Nothing too invading. Yeah, we want the
grunch to show up, but we don't want it
to be too strong, where people look at it and
it's like, Oh, what is that? Same with the oil the grease. All right. So this is prints. This is hand oils. Yeah. You just want to just
spread it out rotate it enough where the map lands
in a spot that is realistic. That could actually
happen, you know? My hand actually goes there. But, you know, if you
don't have one everywhere, like in every realistic spot, don't worry about
it because, you know, people handle guns. You know, you pick it up
in 1,000 different ways. So just don't worry about it. But just cover the basics,
you know, near the grip, kind of like this where the left hand would
go if you're right. I'm just going through them
all again, all the scratches. A tested that and more said now. Let's
see what we got. Okay. A it's looking pretty good. I can see the grease,
which is good. A lot of times if it's the
roughness can kind of hide, but the lighting's good I trust to lighting
a little bit. Takes a while to run into this. Do you guys, I wonder
what you guys have for TPUs and whatnot,
computer setups. Mine is okay. It's
like mid level. Yeah, that white ware
is looking too white. It's just too white looking. Enjoy lighting
again. Yeah, don't be afraid to just play
around in here for a while, really get an idea of if
your values in pain are sitting or not or if they're
good or if you're way off. You don't really know
until you do that in here. So make sure to just
spend a lot of time in Marmosit just looking at the values at different
lighting conditions. And it'll give you a
good idea of, you know, if you need to tweak it more
or less add more, whatever. Yep, different angles, too. But what's standing
out to me a lot is the whiteness on the plastic. Just some of the edges
are just too white. It doesn't make any sense. Yeah, the scratches
would be more, like, gray, if anything. It would not be that white, though. That is for sure. Yeah, when you add dipped the
field, did this stuff do? I probably broke a record. You know, I probably
said a lot, but, uh, add so much. So, so, so much. Can't forget about
the inside here, too. Yeah, it's important that we at least detail
it a little bit. I know the resolution is not, uh, crazy good, but it's
definitely not bad. And it's definitely, you know, it'll hold up in a
game if you reload. If you do some sort of, like, a weapons check of some sort. Yeah, it would hold up there. Just a quick Check. Yeah. Just do some
slight alterations. Bring it back in. A a That's good. That's good. Yeah. You got
to play around with it, too. Sometimes it's the
UVs are too, I mean, the the FOV is just too intense, but other times it's fine. The orange is a
nice focal point. Yeah, it's a nice thing
to focus on here. Yeah, we can tilt it up, too. It's all about just
kind of exploring with what's What looks cool or not. The black background
looks pretty cool. That's like a nice contrast with the plastic
for some reason. Even though the
plastic is, like, black, you would say it
just kind of looks nice. Okay. Yeah, so the grip
looks a little white. The hand grip looks a little bit too white, and
then so does that. Still looks pretty white
on that pump area. In my opinion, but and everything looks
pretty dirty, too. Like, the trigger is
filled with dirt. So we can change that then. Be ideal. One thing I do a lot
is I make, like, a list as, like, I go into the view like
this and I'll make a list of stuff that
needs to be fixed. And so, 'cause it's so easy to just say it has to be fixed,
then forget about it. You can say 50 things, and if you don't
remember them though, then, you know,
it's a worthless. Yep. Try the other side now. Looks pretty good. Yeah. Yeah. Yeah. So that. We're going to add to as cheap. Che Logo. Yeah, we just want to
darken that a little bit. I'm just subtracting that out. So that white stuff is
resin onto this, as well. Scratches? Yeah, it's on a
couple of different maps. Kind of got to hunt
it down a little bit, unfortunately, but it's
not the end of the world. Base color. Just add a
bit more color to it. Overall, get those specific
points dialed down, but scratches. Yeah, we're
just going to add some more general scratches to Okay. Yeah, so I got
these stencils from the weapon group Discord under their resources. Super good. Super, super good. I don't know how they made them. But where they got the stuff to make this
I don't know what, but it looks just fantastic.
So good job to them. They deserve that
shout out, for sure. Yeah, by all means,
check them out. They're free. They
didn't cost anything. They're just in the discord, the weapon group discord
under resources. And they're super good detail
stencils for just weapons. Like, they are weapons. A lot of times I get my Like, I make my own
stencils sometimes, so I'll get them from, you know, paint chip images and
then I'll you know, make them in Photoshop, but they're not for
weapons, per se. But these are actually
from weapons, so the details are, you know, spot on, spot on. Spot on. Here, we're just going
to add a bit more height variation
or lack thereof. I mean, we're gonna subtract this map or whatever map
we decide to subtract, but Yeah, so that's too intense. Dial it back. You just want
to dial it back a little bit. You still want to see the bumps. Okay. All right. We're going to go back in the Barba sit here,
check it out. That's okay at this point. I'm going to just look
at the rail now too. We haven't textured it at
all. Just don't look at it. Okay. Yep, so we're going to put that a striped texture
where I guess normals on the just to make the just to make the bottle look a little
bit more interesting. Set it to multiply
and then select that. Give it a little bit of a blur. I just rounds it off well, so Yeah, I like that. That's nice. That's where your hand needs
to grip, so it's realistic. Yeah, it's realistic. Gee. You know, as you can see, each reference is they're not all the same, you know, different
materials sometimes. They're definitely
not all the same. But this is kind of the
reference I went with. This two, kind of the reference. Yep. They're all a
little different. Which is a good thing
because, you know, getting something perfect is
difficult. That's for sure. Yeah, nailing a
material is not easy. Just take all the best parts, all the cool details. After you get the base down, take them all from the
best Best references you at let it rip. I Hmm. I'm gonna add some more
details to this plastic here. This is a metal stencil. This stencil is taken from beaten up metal, it looks like, but you can still use it for other materials.
Of course, yeah. Where contact has been made? Yeah, small details like good Some entry marks there. That's good too. That's a heavy contact spot. Okay. Yeah, try some different maps. That's all. Okay. Yeah, we just want to get some
All of variation, whatever we want to get here. So roughness. Small amount
of roughness variation. What the roughness on overlay. Adds realism, roughness breakup. When we look at
our roughness map, it looks kind of blank. So it's nice to add
some variation in there so it doesn't
get too boring. Yeah, we want to paint out
some of that mirrored stuff. That's a zone, you
know, get the middle. Yeah, you want to kind of
hide the fact that it's mirrored with good texture. That's an okay job. No,
that's pretty rad still. Yeah. Nothing there? Throw it away. And where did this de? This is the metal
ware currently? Hmm. Yep. Is painting out all this stuff
that doesn't make sense. It doesn't make sense, leave it. So just continuing to add these scratches. Okay.
69. 11 Texturing The Sight: All right, so we're
gonna be texturing the site this time. Alright. Is it gonna be a bit
simpler compared to, uh, the shotgun was, but still gonna be cute. So we're just blocking
out our materials. Just like normal. Yep. They're all red right now, but we're going to change
the colors to identify Okay. No, no, plastic. Looks like all the
plastic there. Okay. And then
we'll have screws, which is I know it's metal, but Screws. They're
different metal. G. Good, good night. Only a rookie would
have missed that one. Oh, boy. We're going to make corn
for the land as well. I Yeah, four total. Save it before it gets your painter crashes and you
have to redo all of them. That's happened to me before. Alright, so this
is our main riff. This material is, like, it's like a coated metal. We'll try that percentage
metallic for now. Might switch it later. Looks fairly similar. All right, so the plastic base. Now, we'll keep it
just a little lighter. Obviously, no metallic value. Roughness. Okay. Good base PBR. The cap, too. Yeah. So we're going to
just go through the basics, again,
noise roughness. We're gonna put dirt five, dirt three, whatever
you want to put. You can use fractal noise, blue noise, white noise. It's all good er. Keep in mind, this is two K. So when texturing it, you know, we're not going to put
crazy detailed stuff, big details that I read
well at low resolution. So you can see, like
this noise looks kind of pixilly 'cause
it's two K, you know? I believe I'm texturing
in two K as well, so All right, so we're going
to add Mal generator. The classic here. We're gonna subtract a couple of concrete just to get
that unique look. Kind of hard to see right
now, but, uh, yeah. Turning roughness
to overlay as well. So we basically duplicated that and now we're gonna
make head scratches. We don't want a lot,
and we just want a little turn our base color to, I guess, screen or
normal. There's a couple. Normal. Edges are a little
too strong now, so we're going to go
into the concrete maps, uh, seed both of them, and then kind of just increase the subtraction we got going. And see how that works. Give a little bit
of negative height. And we want 100% metallic. Right. A a and roughness. Bit scratches. Mm. I'm just trying different blood modes
because that corner. Ah. Okay, that's better. We're
getting all the corners now. We want each side of
the UV to get hit. So that's the reason
I'm doing that. But we're getting some
of the wear that's not, you know, it's not super. Like, I guess it could happen, but it's kind of protected, you know, we don't want
the scratches there. If you look at the
reference, too. The reference doesn't have
many scratches at all, but Yeah, we don't want chips on the top cap or at
least too much, but paint that out
with the brush. This point, it's just, you know, painted out by hand in spots you don't
think it's realistic. That's what it's basically that's texturing what
I want, I guess. It's just really.
Sometimes you're going to be precise
when you're working on, like, a precise
object like this. You know, if it's
environment art, it's one thing, it's a
little different, you know, if you're texturing, you know, a street sign you can get away
with leaving some details. But everyone's going
to see this, you know, and they need to know
that a lot of work went into and it was accurate. That Make a new layer, a fill layer. Small wet spots. So this
is just going to be a dirt map with dirt map, we're going to contrast
up, balance down. Same thing. It's just to help
enhance the base material. Keep our roughness
on and keep it low. Low roughness. Roughness channel still looks pretty blank. So this is another color variation thing we're
going to do here. Adjust the parameters. It just gives a great
overall colobration. Trims the overlay
the base color. Taint just the color and then
bring it down a little bit. And it gives a
fantastic variation. If you can make
it subtle enough, I actually really
stands out quite a bit. I know that's kind of
whatever you call it. Contradictory, but
Yeah. Pretty nice. All right, white dots. It's another important thing
to add dough base material. It just helps it look normal. Helps it look. And we're gonna
do overall sharpen, too. Put it on pass through put
the sharpen at about 0.24. And it kind of
enhances everything. It sharpens it. We're just painting
out edges still. A lot of stragglers. Alright, so this is
just going to be a chip. Add some chips. And we're gonna just thin
it out a little bit. We're adding this to
the base material. We're going to add a
scratch layer too. Keep this real simple as well. And we're gonna go and do
the same thing, a scratch. We're gonna just subtract
the ones we don't want. It's a sure way to get it
to look as good as you can. You can see you can really
see that pixelation. Yeah, it just looks choppy. Pixelated with the two K map, plus the sharpen plus the
levels. Kind of adds up. I Yeah, we're going to DAO thing
again like we did with the plastic on the Celtic. Yep, keep it on overlay. In the glass, we're just going to put the roof test
all the way down. E. Color noise to our plastic. You can add a lot more details to plastic without looking, you know, overstimulated, I
guess, overused, too busy. Metal, you got to
kind of be careful. It's easy to make
it look cloudy. But plastic you can
get away with a lot, especially if there's
height involved, there's not in this case. Yeah. This is it's
a white noise. Adding different colors
as well, purple. We're just gonna subtract
some of the color. So these clouds I'm using. It's just so it all. It doesn't have a shade of green around it. So it's broken up a little bit. Add a metal edgeware layer. Color, hedge color. So probably going to add
a blur to this, as well. Hitch color overlay.
Bring it up. Hand color roughness as a separate layer so they can be slightly inconsistent
to each other, which makes the material
look a little better. 0.2 on the blur. This might be a little
extreme the edge color, but we're gonna we're gonna
bring it into Marmost and see how it looks in
there before we do anything. A All right, so this is an effort
in the plastic to try to curve the edges? Yeah, just make them look
a little bit dented. Just more plasticy
looking the main. A little bit more
plasticy looking. Y. Yeah, I guess one of the main identifying
characteristics from metal and plastic is that clapsti is
just a little bit more like, malleable, usually. It doesn't chip more or less. I mean, it does, but it'll squish a lot of times
beforehand and kind of morph. Metal also does, but it
just the wear pattern. A lot of times you'll see
chipped metal versus kind of, like, mushy plastic,
I guess, in a way. It's just a good
identifying characteristic. Yeah, it looks a little
extreme to me now, but I'm going to just
wait until we get it into Marmoset before I decided to
change it too drastically. 'Cause you can get into
a pretty big cycle. Better to just get and see what it looks like
in Marmoset first. Yes. We're going to duplicate
our base color. Add a black mask. Change the color and
then colored it. It's more of a gold color we're
looking for a brown gold. It's like color variation
for this middle. Screws amp up the
roughness a little bit. Man on this day quick generator. So scroll color variation. It's a loud noise color. Okay. And we're gonna add
some dirt, too. I got to be careful
cause a lot of the dirt generator is
just gonna find its way maxed out inside that
lens base there. You can see it's
totally filtered out. We want to do our best to just subtract. It up a little bit. Just to avoid some seam issues. Change it to triplanar. Seems to work better. Okay. All right. Two different
dirt generators. Just to vary the amount
and also the color. It just gives it a bit more of a dynamic look when you
have two different colors. Okay. That looks good. Now, we're just mapping out where the specks
are going to go, so we want them to fall within this range right around there. And now we're going to
make it multiply the dirt, throw the fill into the dirt, set to normal, and then add
a five or three, whatever. Scaled up the dirt speck and then good. Those are dirt specs. Indtrass up, ballots down. Maybe even at a sharpen if
they're not showing up. Yeah. All right, so we're
going to export it. Settings. All right. Just make sure it's
at two K. I mean, do whatever you want, but two
K is it's cool when you can texture out something cool at two K. Means you got a
little bit of skill, and it's great for It's good
to show that sometimes. I think I got these steps from Quickle before they became fab. Yeah, just add it to
the scene. Why not? Simple setup. Simple setup. Hide
that piece and then. Make sure your normals are the right white
channel, green channel. Lipped. If you need to, it depends if you export
DirectX or OpenGL, but I never know it'll
do for some reason. Y. I just imported that
ramp from Linder. I just modeled it. The site is looking Yes. All right just this lighting. Okay, it's looking pretty good. It's looking better. Los maybe a little
bright the lighting, but it looks pretty good. Well, I can continue
a little bit. So this is a This
was a real time. Basically real time. Uh,
tutorial on how to make this. I'd say texturing would be one of the main things that somebody could
take away from this. Um, the modeling was good, too. I used booleans, et cetera. Just like a standard, I guess, current day,
modern day pipeline. So if you are wanting to get into games
or at least weapon art, and we're curious about that, hopefully that solved
your problem as well. But yeah. I hope it was somewhat enjoyable and you
got something out of this tutorial as it's
kind of winded down here. Uh huh. See how this looks with the
depth of field. Plastic looks good. Yeah, that metal catches
in the light pretty nice. Another or two. All right. We're just gonna add
a little bit of noise there. Noise and the height. Height noise. And set the dirt
map to multiply. That's the trick
we've been used. We've been using
this whole tutorial. And select the parts you want. I selected that middle clamp. Go back in the Warmst It's a nice detail to add to help differentiate it from
the rest of the materials. And we'll render that out. Maybe you could use a
fingerprints map or something that
needs to turn gold. All right. What do these renders
look pretty good? I like how the scratch
shows on there and the roughness variation
on this one is good. Yeah, it looked pretty good. A
 FastTrackTutorials, Premium 3D Art Education