Transcripts
1. Introduction Trailer: My name is Emil Siegas. I am a senior TE
environment artist, and I will be your
instructor in this course. This course will be all about creating destroid
assets for games. These include assets like collapsed ceilings,
concrete rubble, broken wood planks,
and flooring, broken pillars, broken
windows, and more. For this course, we
will be using Tres Max, brush, wheel engine five,
and substance painter. However, to make sure that
I do not exclude anyone, I also are the bonus
chapters on how to do the non universal techniques
in Maya and blender. This means that as
long as you have a good understanding of your
three D modeling software, you should be able to follow along with this tutorial course. We will start this course off by going over our
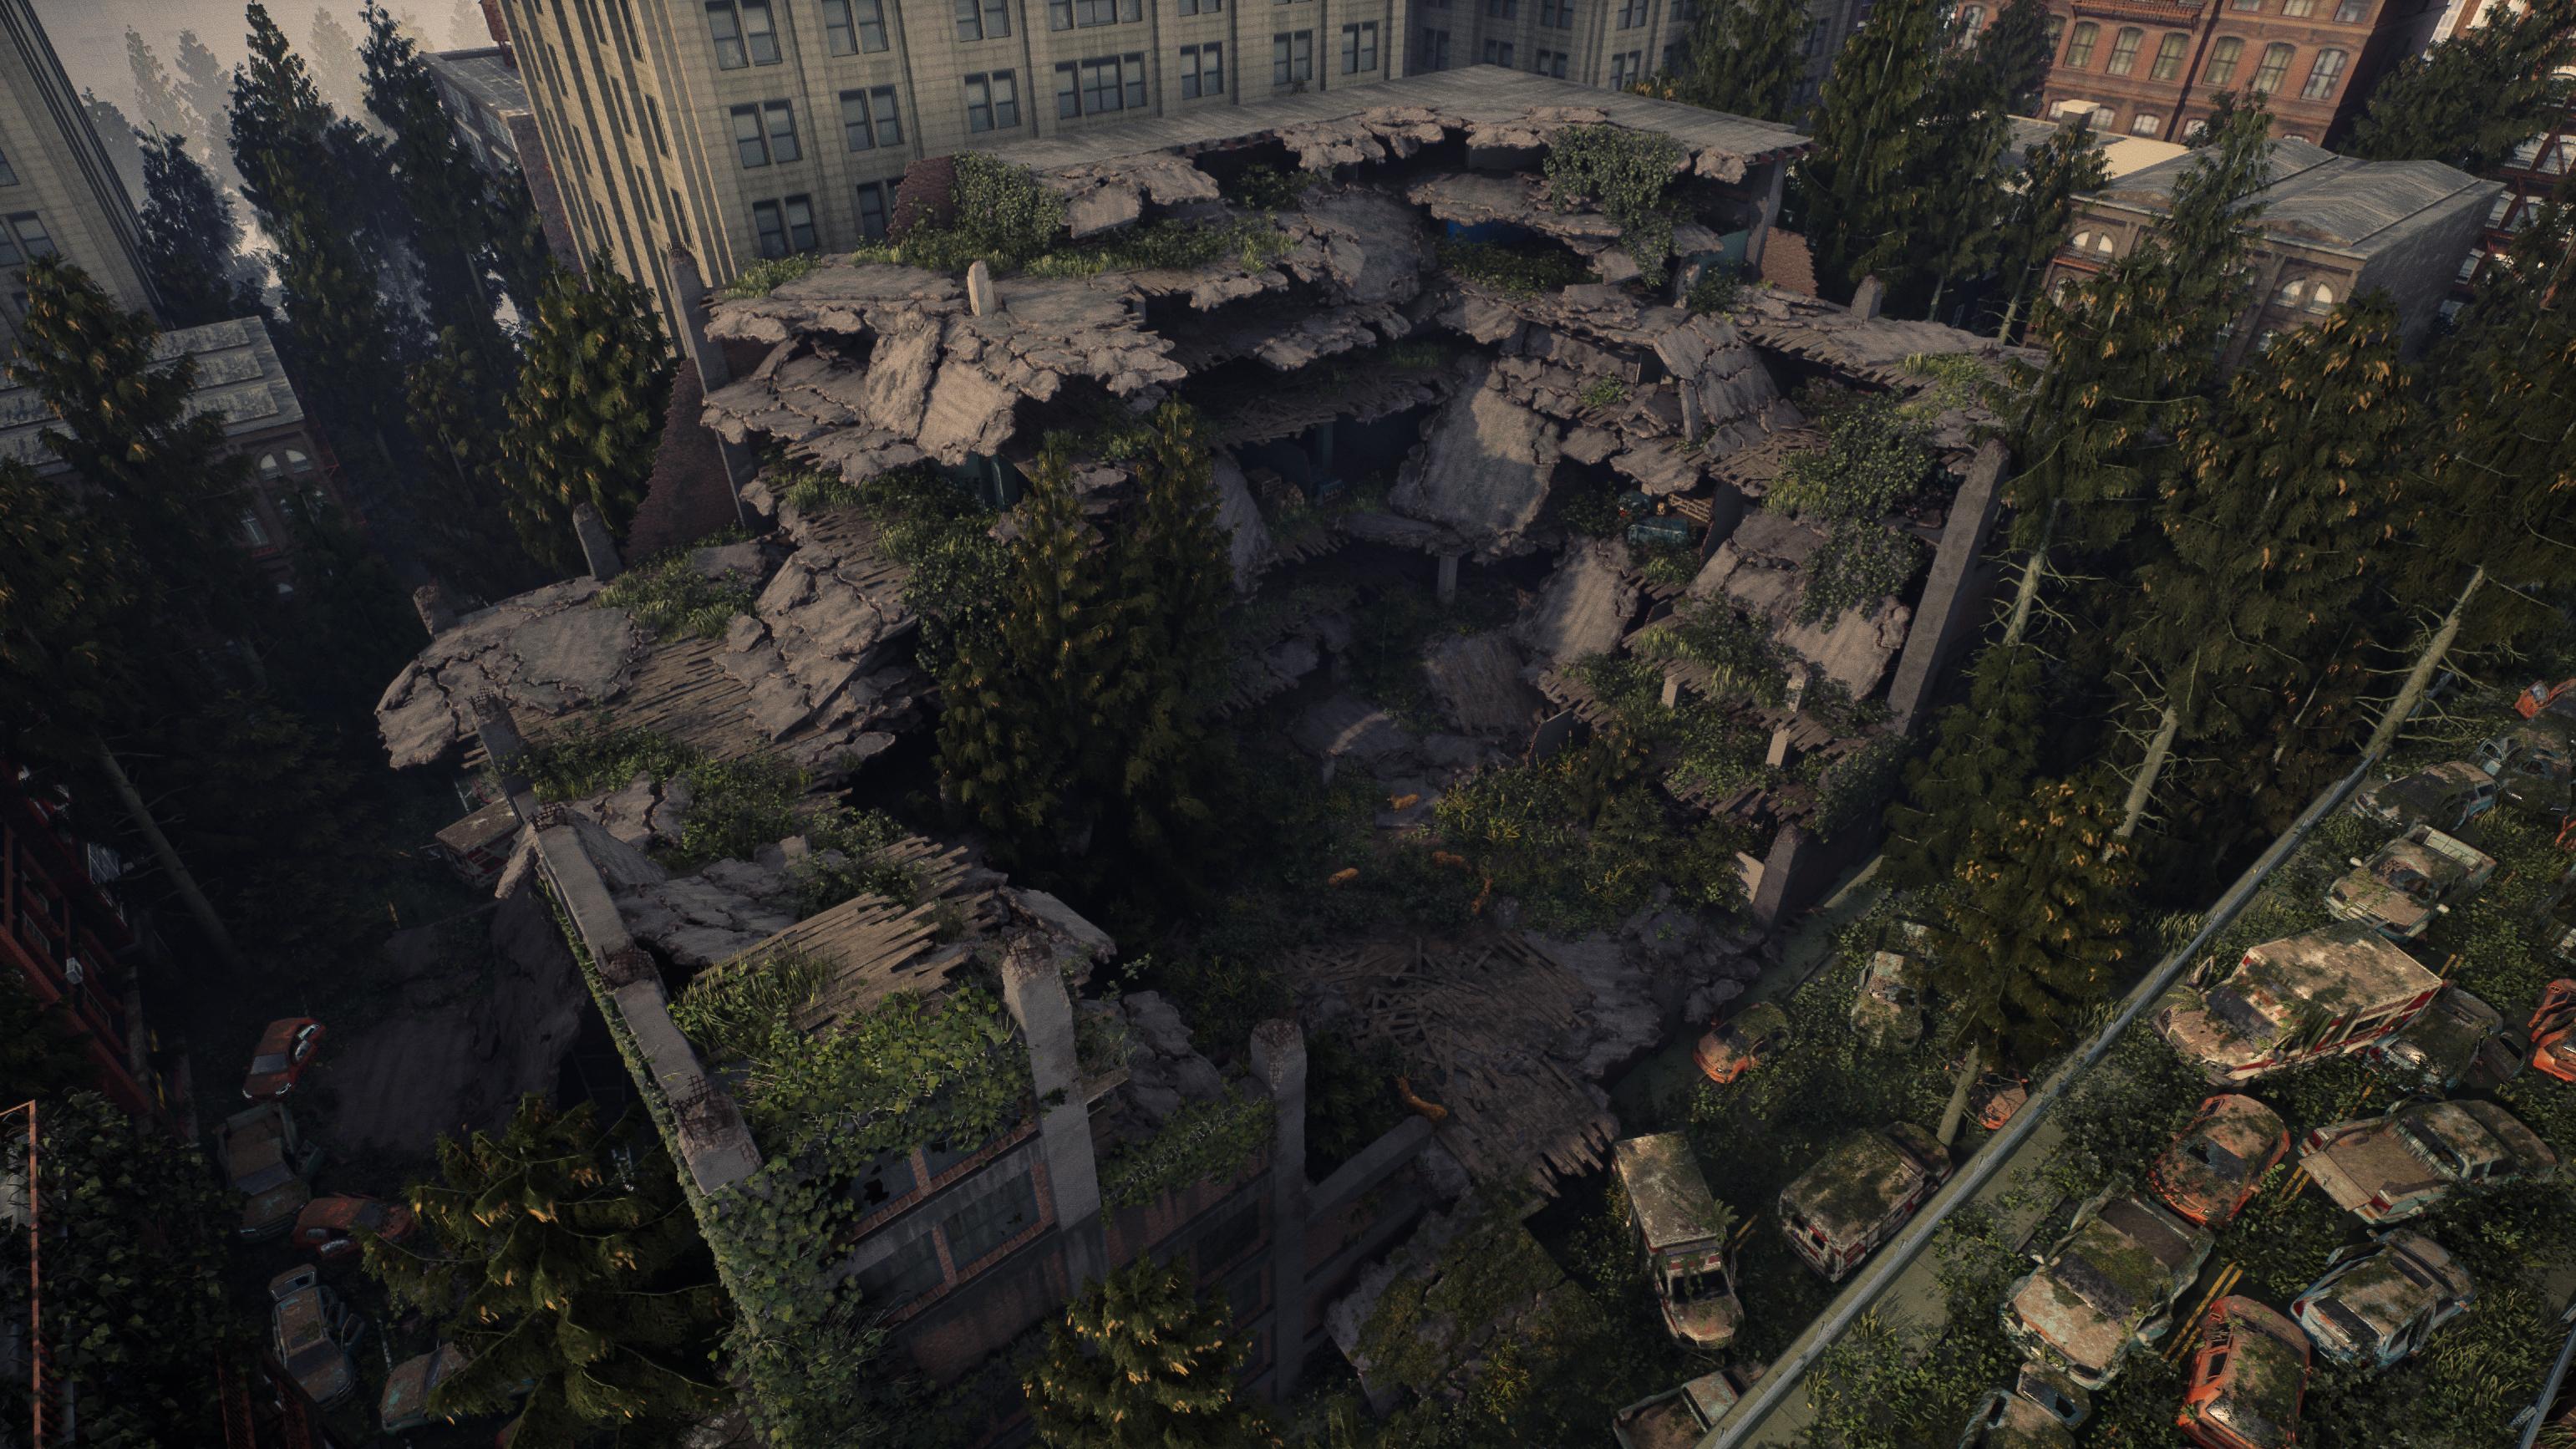
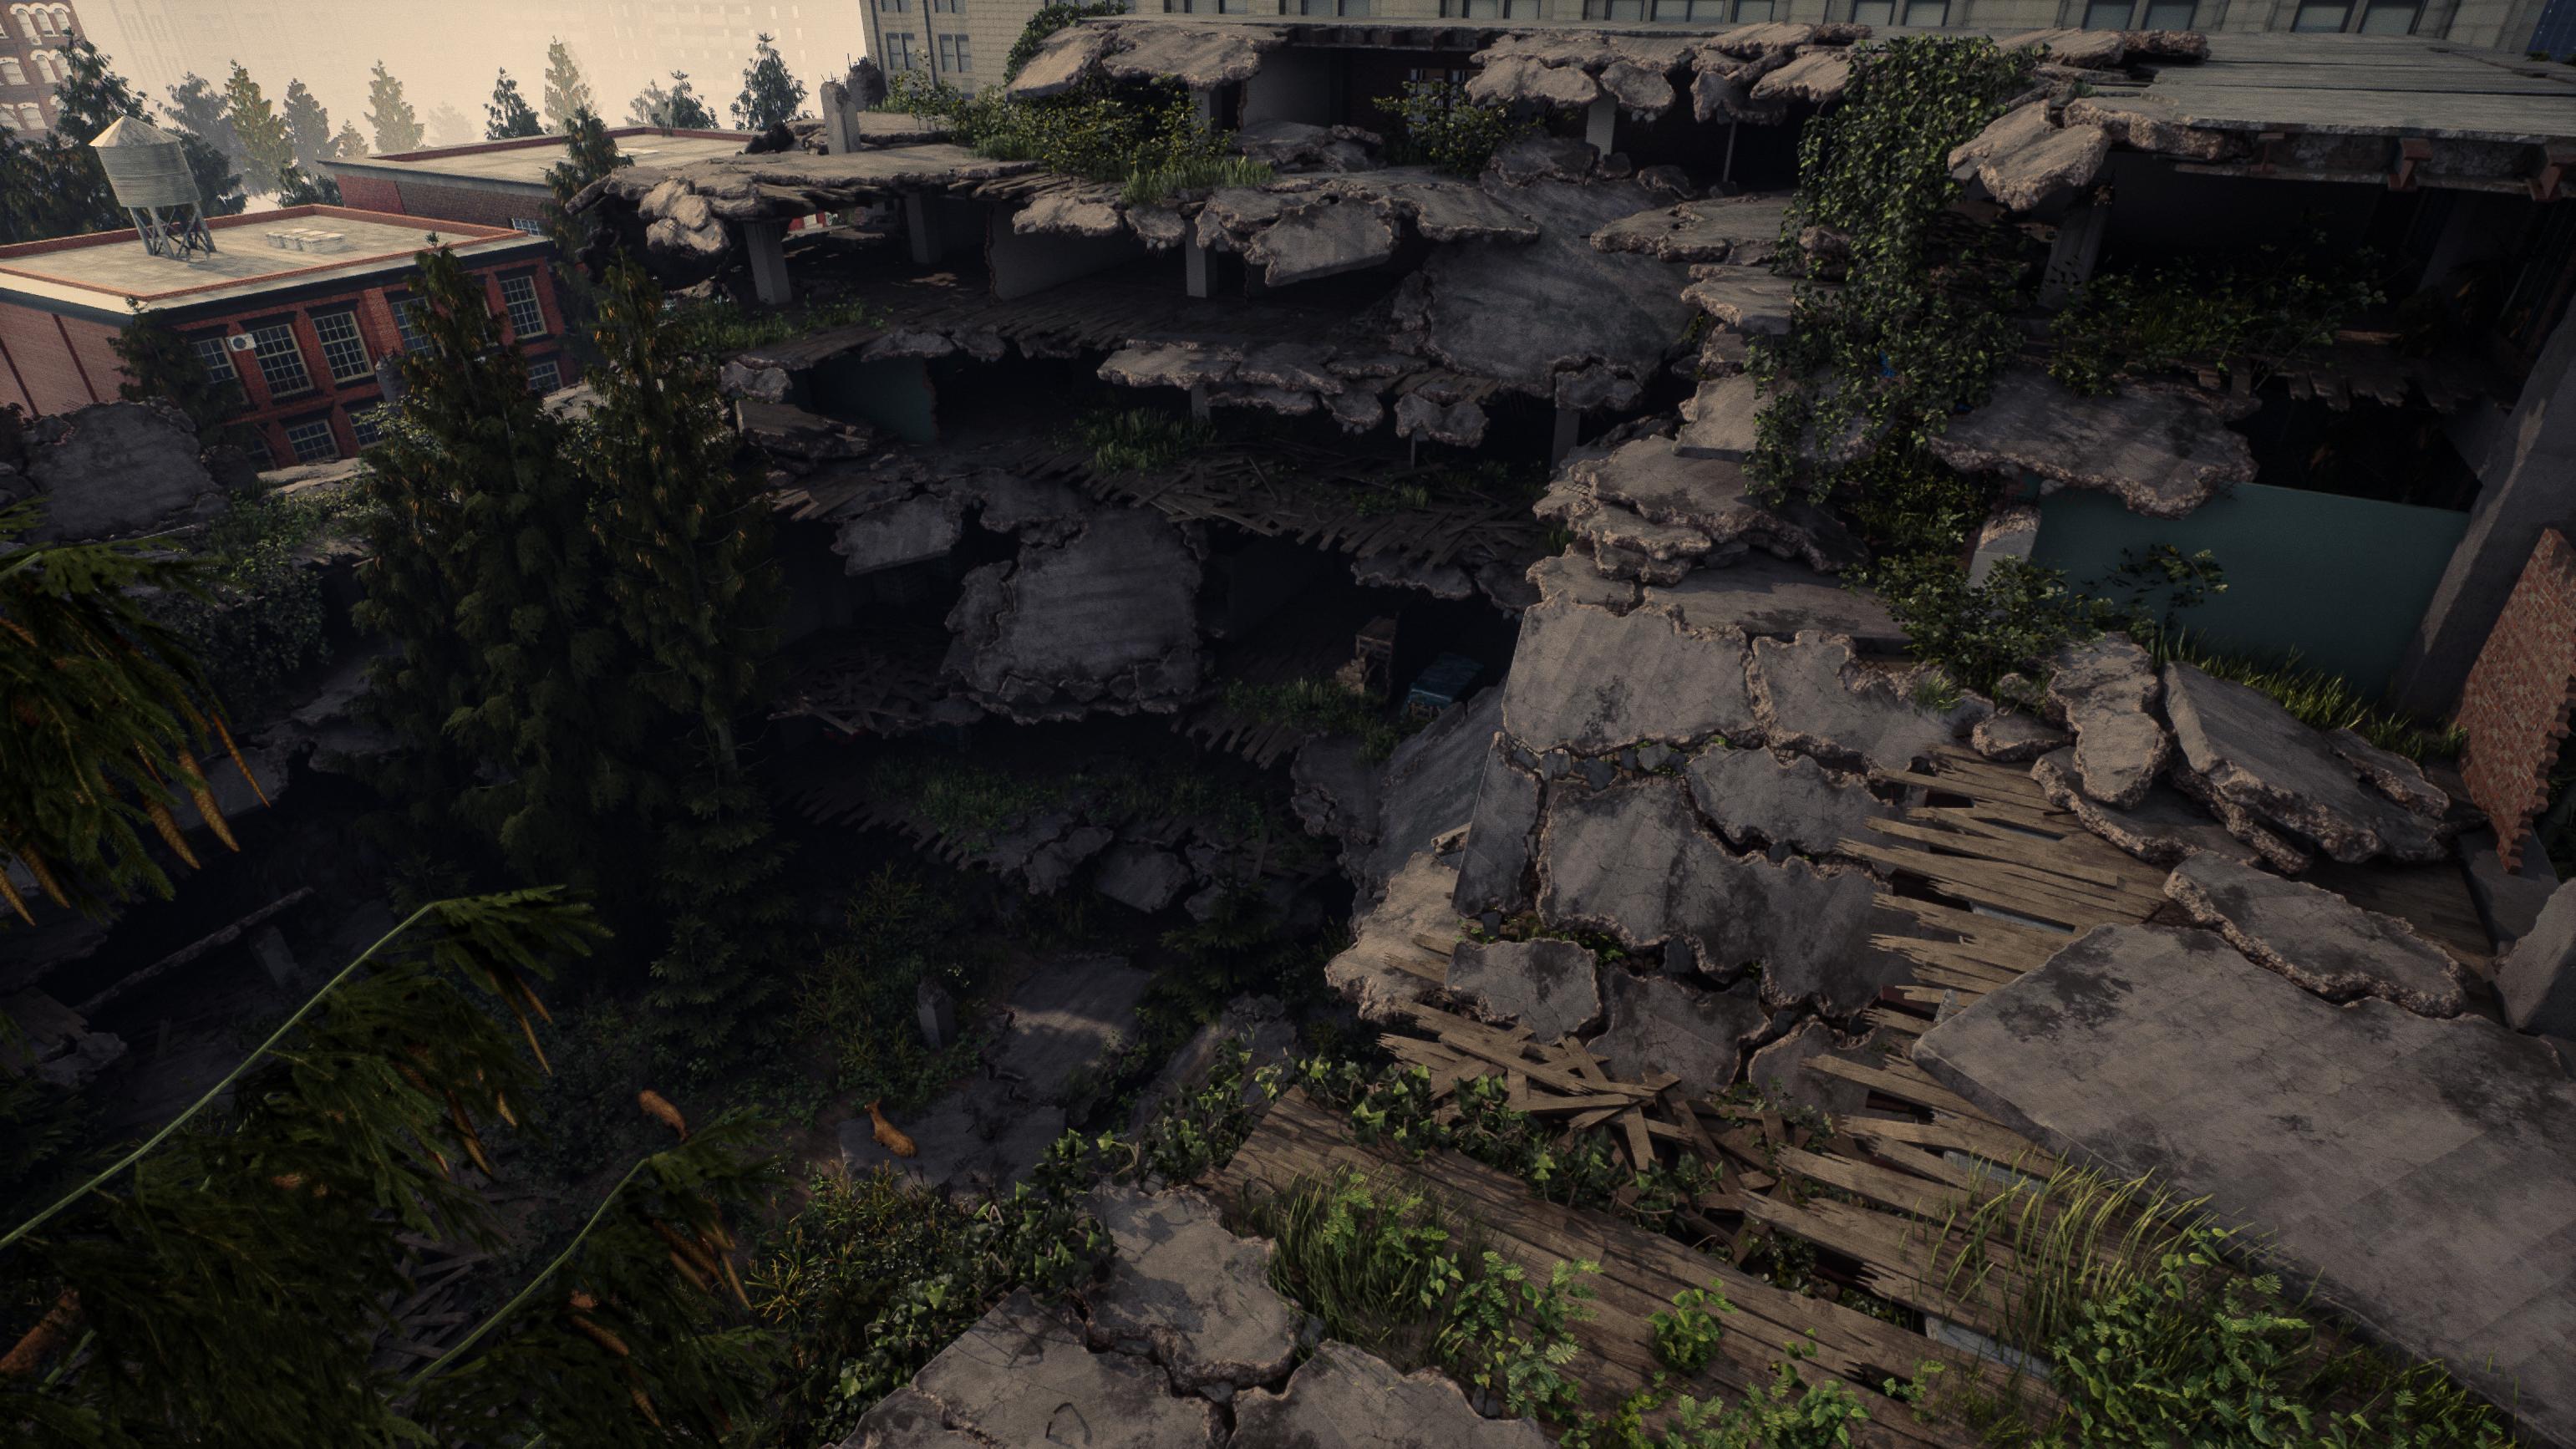
reference and planning. This is vital because creating destruction is a very
time consuming process. So we have to use the
modular workflows, and we have to have
good planning. After that, we will be creating an entire blockout of our level. We do this to make sure that the general shape of
all of our destruction is correct before we spend a lot of time creating
the final assets. And speaking of final assets, this is what we will be
doing after the blockout. I made sure to split up this tutorial into separate
destruction categories. For example, we
will first finish off all the non destructed
modular pieces. Then we will be creating all
of our destroyed pillars. After that, we will start
with the biggest ones, which is creating our
concrete rubble pieces, and then we will move on to creating our destroyed
wood flooring. Finally, we will cover how
to create rubble textures by simulating objects and turning these objects
into a texture. And we will also
go over on how to simulate rubble piles
like wood and concrete. At this point, we will be done with the real time paths of artitoal and we will have a completely
destructed building. As a bonus for after that, I have included a few Tenpse chapters where
we'll be going over some level at like
placing foliage and extra assets and taking
our scene to final. Now, this tutorial does include a few time lapses for
very repetitive things. However, these time lapses are also included in real time. They simply will not have
any narration under them. All of the source files are
included in this project. However, some of the assets used in the level time lapses, like the surrounding
buildings, trees, and cars are not included as they are from
the unreal marketplace. With a total of 27 plus
hours of video content, this course is considered
quite a large course, but I feel confident that
at the end of this course, you have the know
how on how to create many different types of
destruction for games. This course will
also come with out generated subtitles in English, Chinese, Russian, and Spanish. I hope that you will
enjoy this course, and I hope that it will have a positive impact on your life.
2. 01 Gathering Our Reference: Welcome everyone to
the very first chapter of this tutorial course. So what we're going to do in this first chapter is we are actually going to
gather our reference. Now, if you've watched any of my previous tutorial courses, you know that I often already have all of the
reference in place. But I figured, like,
Okay, this time, I'm going to just go ahead
and show you how I gather reference just as a little bit extra. It's not too difficult. I already do have a main reference image here
because I need to know, of course, what I'm
going to roughly create. This image, full copyright
goes to Nati Doc, because this image has been
copyrighted by Nati Doc, since it's a concept
art from the last Rust, I'm not allowed to
give you this image. So keep that in mind. However, you can find
the image if you look on ArtStation
for Maria provska. I hope I say that correctly, then you can find this
really nice image, or you can just follow along. Now, what we are using to gather all of our images
is we are using PUR Rv. This is where we will
be displaying all of our images. This is very simple. You can get it for free simply
by going to prerev.com, and it's a software
that is very handy. Many artists use it, and it just allows you
to drag in images, organize them, scale
them up and down, and just in general, it will just make
everything a lot easier. So, for our reference, this is going to be the
plan for this chapter, and maybe also the next chapter. We are going to get
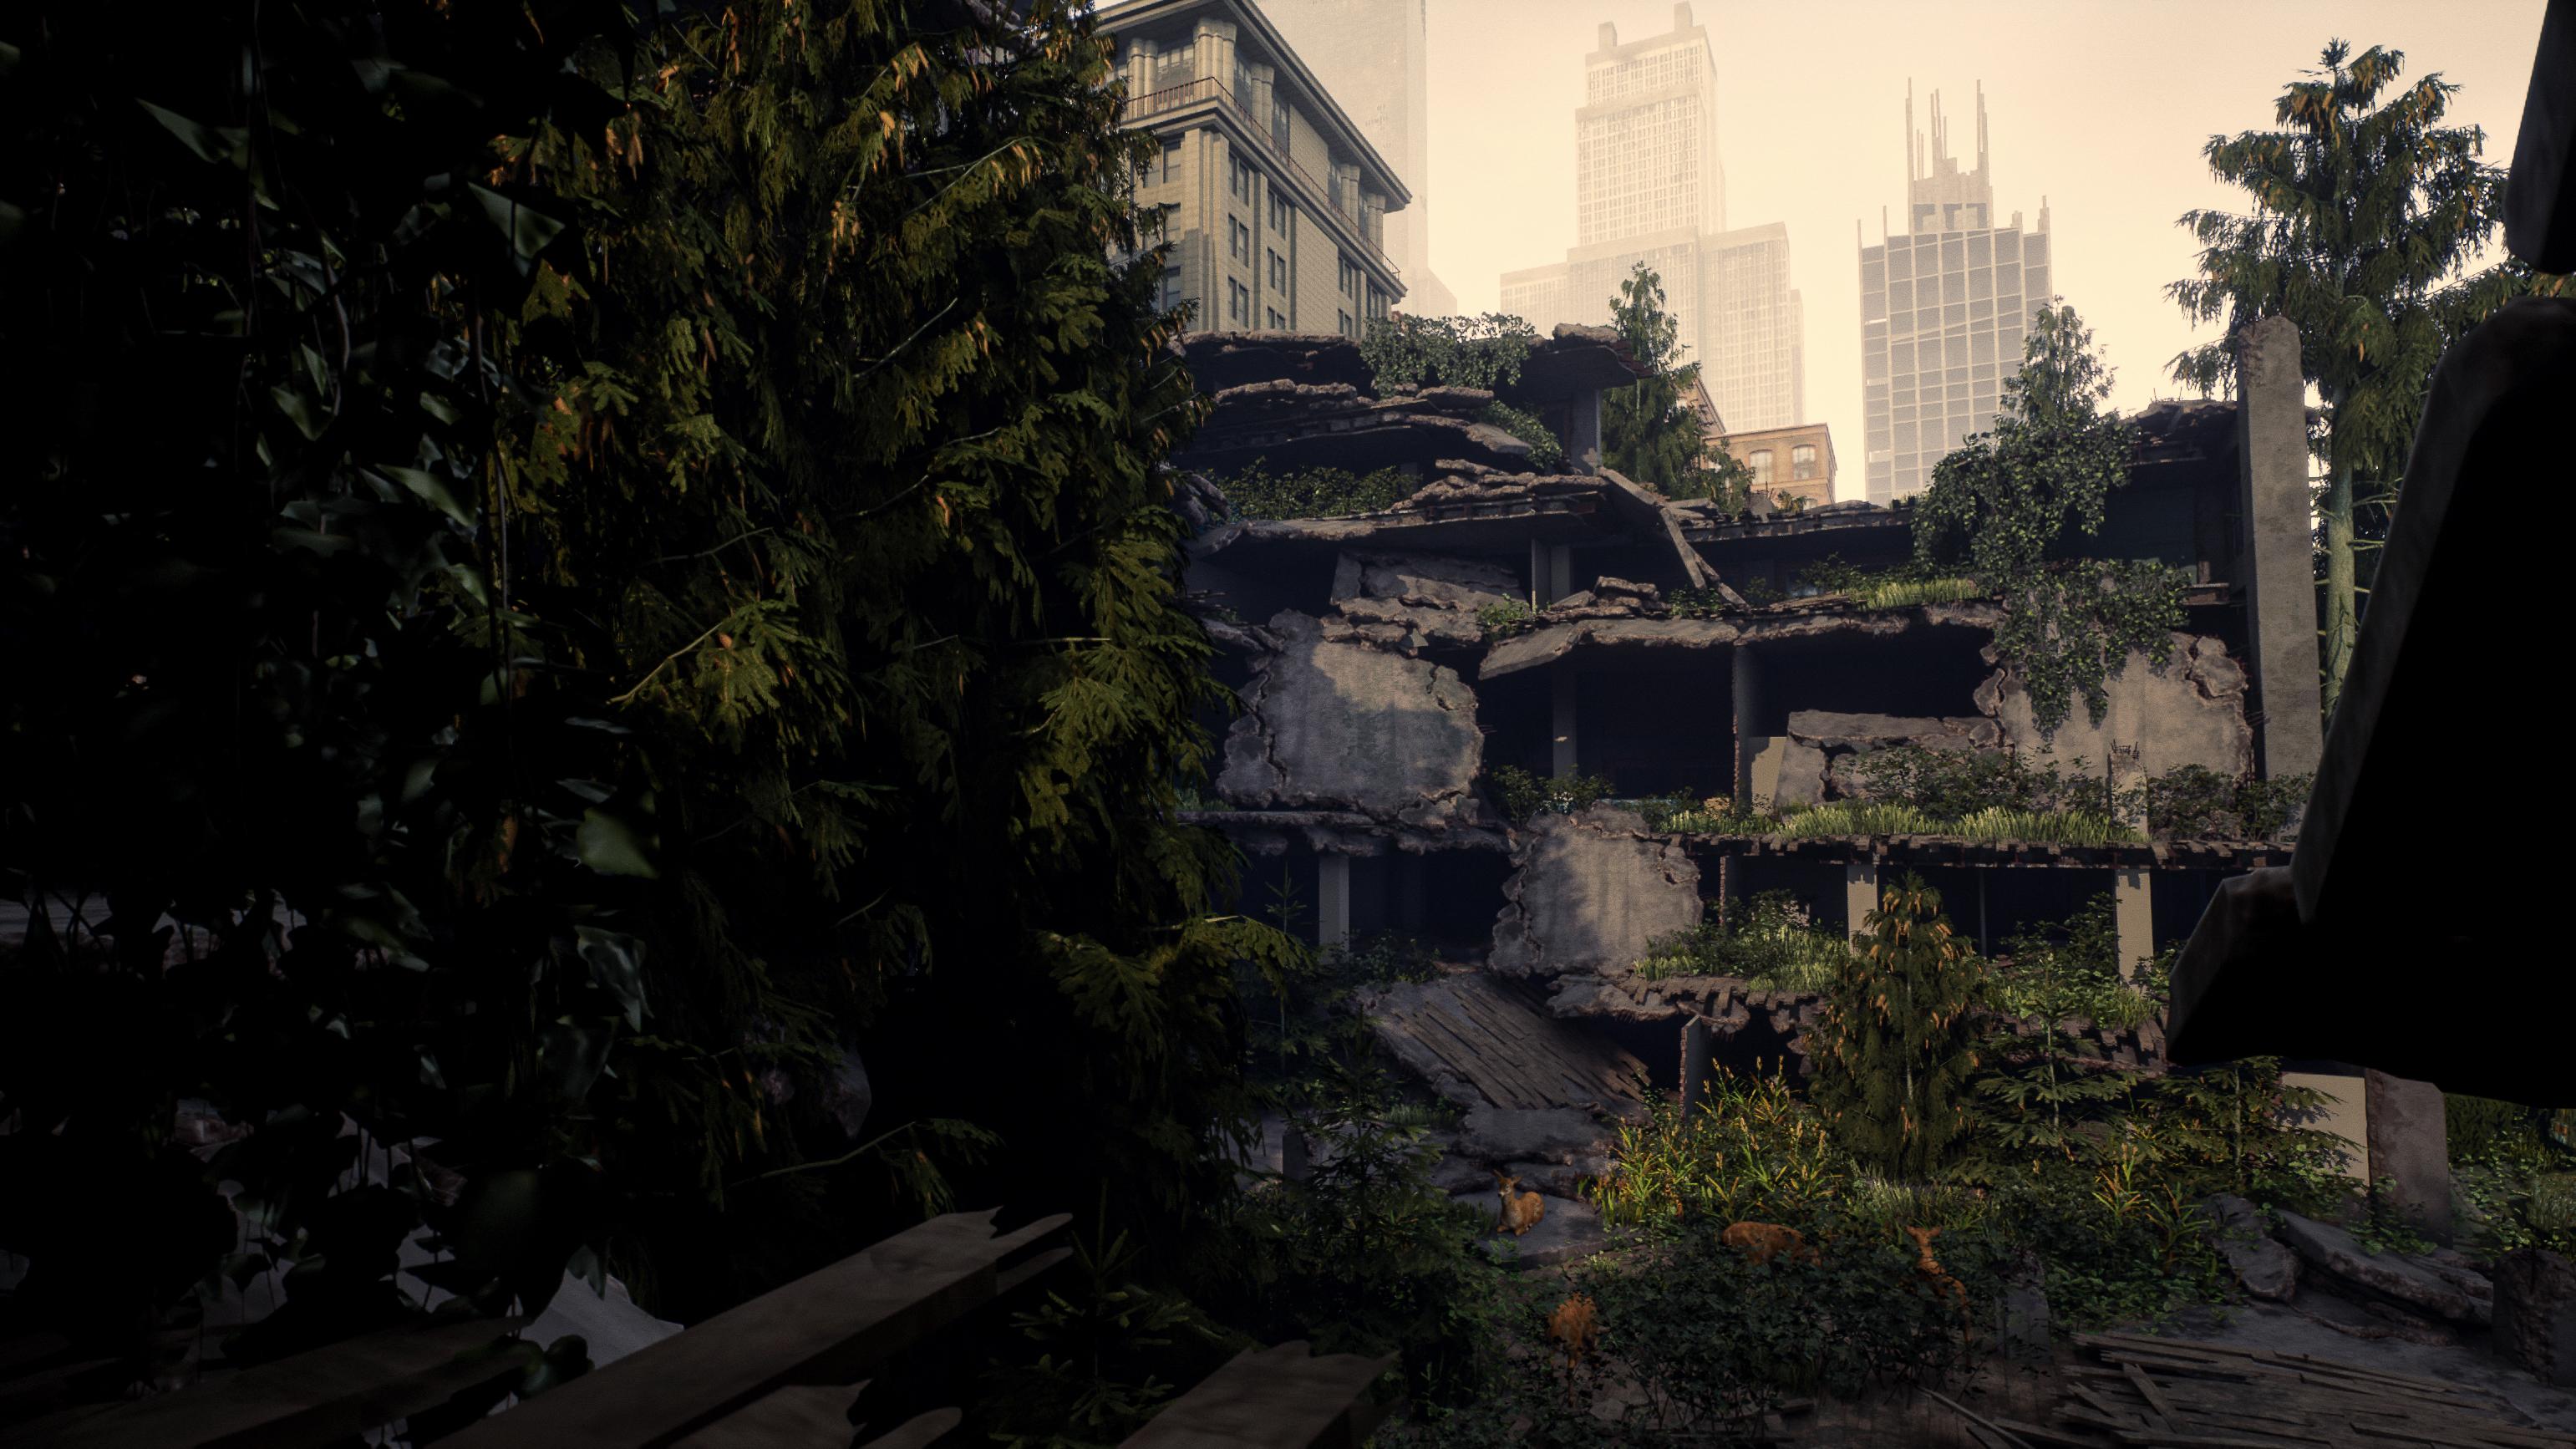
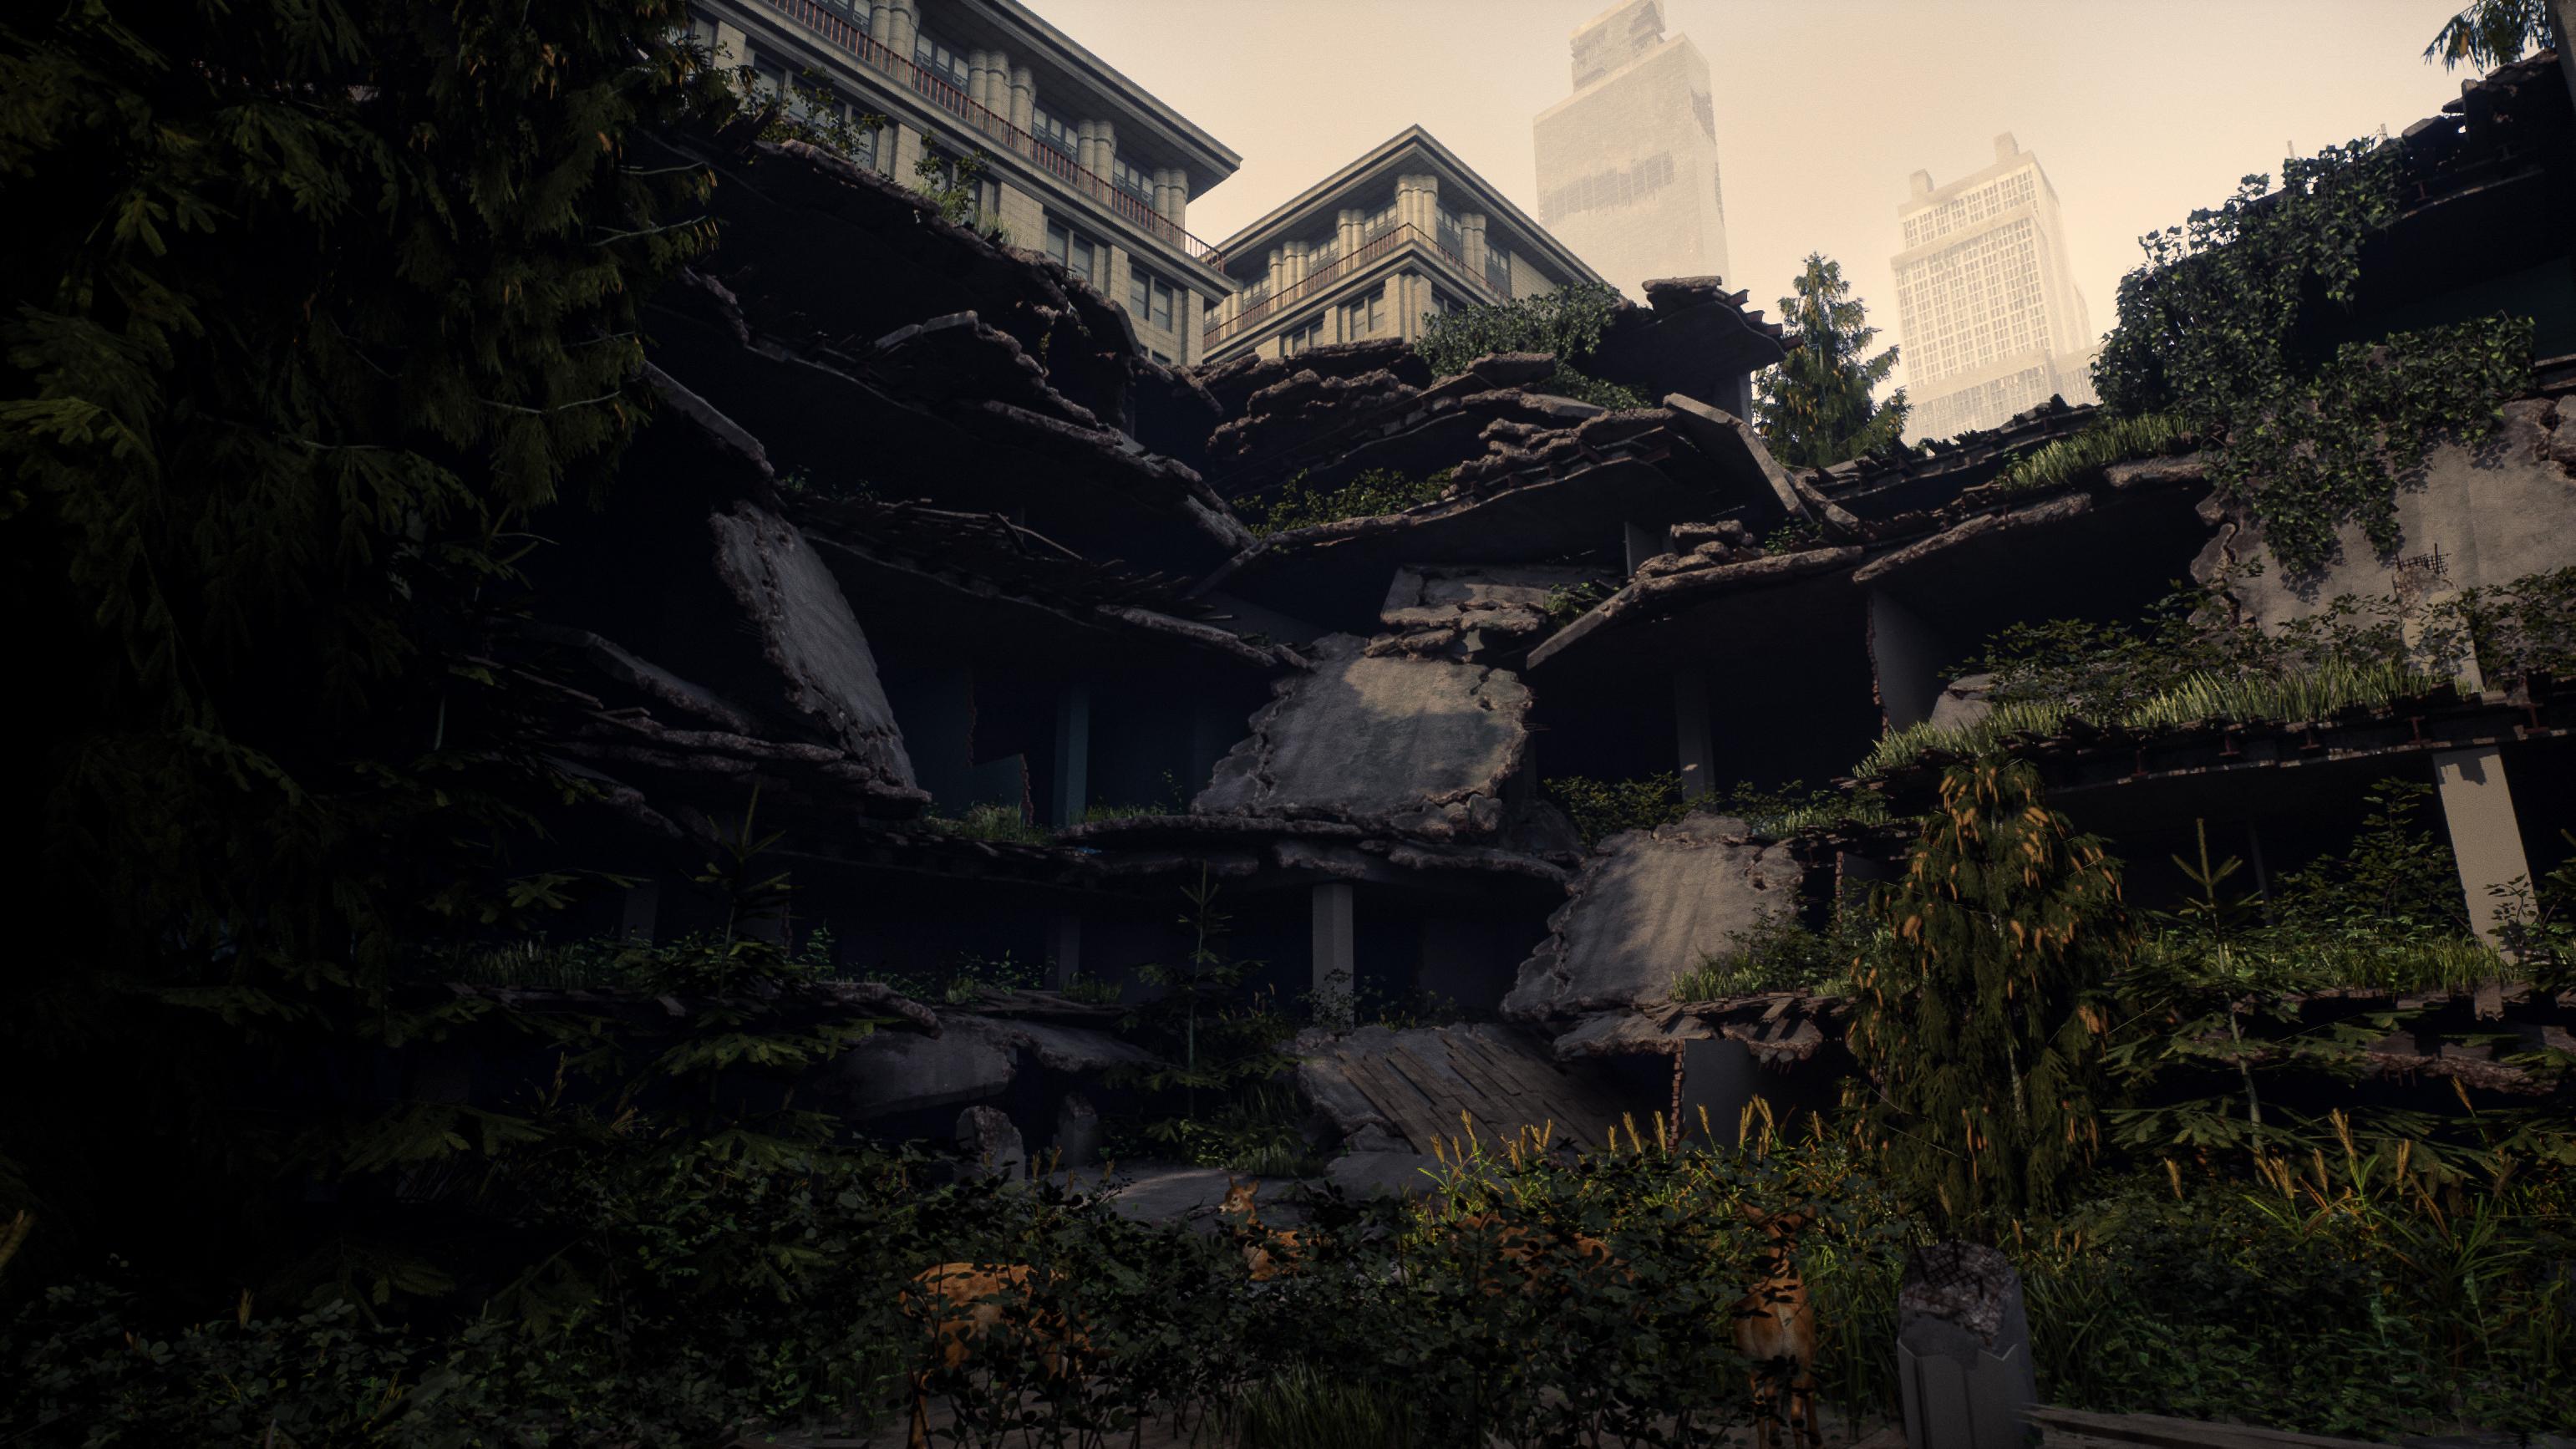
started by just getting some generic reference of, like, destroyed buildings, like damaged wooden
floors, stuff like that. Just anything that we
can kind of see in here. Those are things like
collapsed ceilings. Those are things like
walls that are like here, broken like walls with
plaster and everything. It's going to be like
these broken up floors and all of that kind of stuff. Once we've done that,
we are going to make a game plan because we cannot
just follow this reference. As I said before, first of all, it is copyrighted
by Naughty Dog, so I'm not allowed to just
copy one on one reference. But the second
reason is also that it is good to sometimes
stray away from the reference and
just to see if we can make it slightly different
and see how that works. So we are going to get
it quite close to this, but we are going to just add
some extra changes and just give it our own
little flavor to it. Now, for this tutorial course, one thing that we also
need to keep in mind is we don't really need to get a
reference for materials. At least I don't have to because creating
destruction is a very, very time consuming thing, and it's actually also quite
a difficult topic to create. That's why this
tutorial is really like intermediate to
advanced artists. It's definitely not
for begin artists. But basically, because
it takes so much work, the only material we will
really create is going to be a rubble material for some rubble piles and it's
going to be a rebar material. All of the other materials
like the concrete materials, the wood materials
and stuff like that, I will supply them
with this project, but they are already pre made. However, of course,
if you want to go ahead and you want to learn on how to create materials for games like
Wi advanced materials, then what I recommend
is that you have a look at over here, we have our ultimate environmental texture
creation course and everything that you need to know about materials
you can learn in here. And that course itself
is also quite long, because else this course would just become 100 plus hours, and we simply can't do that. Okay, that's enough
talking for now. So what we're going
to do is we are going to go ahead and
gather our references. Now, there's a few ways that you can gather your references. One of the ways is that we can simply go ahead
and go to Google, and in here, I always go ahead and gather most
of the reference. Now, one thing you
need to keep in mind is that for Google, it also has copyright, so I
will not be supplying it, but I will supply the pure afile that has the references in it. I'm just not allowed to supply
the actual files itself. It's just a copyright thing. Next to this, I sometimes also gather references
from paid sources. However, these sources,
of course, in this case, doesn't really work, because then you guys would also
need to pay for it. So we'll just find a workout. So what we're going to do is
we're going to go in Google, and we'll just to
start with going for, let's say, collapse building
just to get started with. And then, of course,
you all know it. Just go to oh, sorry. Images. Yes. For some reason,
it was still in Dutch. And one important
thing is that I do definitely need high
resolution reference. So I always go to
tools, and in here, I just set my size to large so that I only get these
large images over here. And then it's just a matter of looking at what we
are going to do. Now, I'm less interested about these really large views
that you can see over here. Some reason his image is
also very small still, even though he said too large. I'm more interested in,
like, the close ups. So stuff like this is great, like these type of close ups. And down here you
can see the size, which it's an okay size. But what I'm going to do is,
I'm just going to middle, click on it. Sorry,
middle click. Right click on it, and I'm going to open the image in a new tab, and then you will see the image. At which point, you can
just go ahead and drag it into a folder just like that. Okay, so just like that,
we are going to go ahead and let me just
close this stuff, and we are going to do
this quite quickly. So let's have a look like
this one seems quite interesting because
we can kind of see how everything is just kind of, like, folding and collapsing. So let's open that one up. And like this, we can do
a few search results. Over here, I quite like the
pillar. So let's open this. And just like that, we can,
like it is always quite sad, look at them just because
it's just chaos often. Over here, it's quite good to just look at, like,
rubble piles. So one material, that is
going to be quite good. And then we can do, like,
collapsed ceiling, for example, and we can have a look over here so we can see like, Okay, oh, should set this to large. Let's have a look over.
So these kind of things, I am going to take into
it as an advantage, I'm going to take the
fact that this is quite a far away model so that I can still show you the
techniques of destruction, but I do not need to spend as much time just making
it look perfect up close, and I can just
leave that for you. So this one's quite good
with like collapsed ceiling. Um yeah, these type of things, it's mostly just
like these bars, and we are going to
have metal bars. So we can also have a look
at clicking on abandoned, and then it will show us
results that are closer to, like, these abandoned
ceilings and everything. I'm not sure for that one. Yeah, here, let's also
do this one over here. And just in general,
you can just find some interesting stuff. So if we now go ahead and go for destroyed building rubble,
maybe, something like that. And that's pretty much
it. So if you want, at this point, you
can pretty much like, skip the video and
just continue on. So it's like a bunch
of this kind of stuff where destroyed rubble. So this like great
for like a rubber piles that we can, like, get some reference over here and also like this more like what the rubble pile
is going to be about. But this all like
great reference. So we can just go
ahead and open it up. Now, the second method, so let me just quickly drag
these images all in here. Here we go. And this
is pretty good. So this image over here, this is a web P image. If I go to details, you can see that this is not actually
an actual image, wow, it's really long, because it's not a JBC or PNG format. If you have an image
like this, it's annoying because I don't think that does PUF support it. I'm not sure. Okay, so
they do support it. Just in case, if it does not
support it for some reason, sometimes it does
not support it, you can always go ahead and just create a screenshot
of it. Like that. That's just a very
simple workout. So I use Share x, which is a screenshot program, and that makes it
very easy for me to just create screenshots
of whatever I want. So over here, let's
just continue on dragging in these images. And now, what I'm going to show you is I'm
going to show you a few sites where you
can find paid resources, which are sometimes
also very handy. So the first one is if
we go ahead and go to ArtStation and then on
the marketplace in here, you can also go ahead and you
can find reference often. So you can go for
like well, actually, you can just do most of
the time you would go for probably a band or let's do post post acalyptic reference,
something like that. And then you can often find, Oh, hey, that's
one of my courses. That's ironic. Here,
this kind of stuff. Like Graft Studio is
quite a good one. And then you can often also
find that in these images, they also here contain lots of collapsed images.
So this is great. As you can see, I even
already bought it. I just cannot use
it for this toil because I got a
personal license, not a big license. So this is like a great way if you just very quickly want
to get hundreds of images, and also great if you like, not yet sure what kind of
environment you want to make. Sometimes there's actually just like a nice image in
here that you can see, like, Oh, hey, I want to
make stuff like that. Same with this
kind of stuff over here, you can also find that. Another handy website
is photov.com. So in here, you can
also go ahead and you can also find lots of Oh, yeah, here, this kind of stuff
is perfect, so building. And then I can also see
like, Oh, wait, demolition. I forgot that word, so I
can just go to Google. But just like that, in here, you can also just find, like, really great references of, like, demolition and
everything like that. And also, we have also
ch reference.org, which is shameless
because it's owned by me. Freeference.org also has a lot of completely free reference, including if you go
to object reference, you can find a bunch
of different objects in here and also construction
and stuff like that, although it does
not have buildings that are collapsed
and stuff like that. So just know that there are many ways that you
can find your reference. So we are now going to go
ahead and go for maybe, like, demolition over here, and Oh, let's remove the rubble part. And you do need to always just
set your size back again. Demolition maybe let's
do demolition rubble. Nah. Waltz. Come on, just
give me something good. Because these are like
these really large images which I don't really care for. Let's do maybe, like,
concrete building. So once we found
a few buildings, then we are going to go
for more specific stuff. Oh, yeah, stuff
like this is great. So let's open this one.
Ah, now we got it. So the concrete
that did the trick. Having concrete
in it seems to be quite good because that's exactly like the kind of stuff
that we are looking for. This one's a little bit blurry. Did I have my tool
set to Let's go to large over here? And let's see. Oh, nice. So this kind of
stuff is great because that's the stuff that we can look that we can use for, like,
reference over here. So, let's see. What else
do we have over here? Great to just show a little
bit more like close ups. Perfect. So that's one. Sometimes you just hit
like a sweet spot, and you just find,
like, a gold mine off reference like this. Yeah. Like, all of this
stuff is really good to also show how we can have, like, plaster, and
then the plaster is like chipping away
from the concrete. Like, we can create
all of that kind of stuff. That's no problem. So let's open that one up. And once we've
done, for example, these pieces, so let's go ahead
and once again, add them. What you can always
do is you can always go in and you can do, like, more specific searches. So just give me 1 second
because I'm trying to taq still need to drag
all of this stuff in. Okay, so let's say that
now we have, like, a good general overview of,
like, destroyed buildings. Now let's go ahead and
let's do, like, flooring. Now, this one is
going to be probably quite tricky to find
a good reference for because what are
we going to call it collapsed wood floor. So I might need to
actually just do it more out of my head or not. Or we can literally just find perfect reference here.
Okay, fair enough. I did not expect that. I did not expect that there
were so many images of this type of, like,
broken flooring. Let's see if we can also find some larger images over here. By the way, I'm just
going to close these. No, that's not really.
I think, yeah. So I happen to have just found
the two images I wanted. Let's just quickly
go back, see if there's maybe like a
smaller resolution image. Okay, that's way too small. But this is quite good. So this already gives
me a good idea. And then on top of this, I
personally can, of course, rely on experience because
I've created many types of destruction in my life when
I worked on the division. So I can, of course, just use that experience and
relay it to you guys. So for the rest, it
seems about fine. Yeah, I don't think
there's, like, much else in here that is
really high quality reference. So let's say that, okay, that's enough for the
collapsed flooring. I can take it from here. Maybe we can do, like,
broken wood planks. Yeah, yeah, because I
just want to go ahead and show you this kind of stuff so that we can also use this reference so that we
have the ends of our wood, that we kind of like
have like realistic looking broken wood over
here. So, that's great. So that's more than
enough for images. Just the show, and
then we're going to use a cool
technique where we use both Alpha maps and geometry to basically create some
really nice looking, broken flooring, even though most likely
from this distance, you cannot really see
it, but, of course, I will still show
you the techniques that you need to have
for, like, up close. Because, of course, if I would really make it
from this distance, I can just, like, take
away 80% of the detail. But I don't want to
do that. I want to give you something a
bit more interesting. The metal, we don't really
need a reference from metal. So let's see, broken wall. Broken brick wall,
maybe? Oh, God. Do we really get this type
of Let's go to large? Um, this one is pretty
decent. This one, yeah. This one, I guess,
it's decent to see how that the bricks
itself are broken, but of course, it's
a large piece. Oh, over here, you
can see how it kind of works in PhotoScan. Oh, nice. So PhotoScan, we can just use that image because it is based
on real life. This kind of stuff
is quite cool. Let's art it just as
like inspiration. Yeah. And for the rest,
I think this is fine. I don't think there's
anything in here, so we can go like bricks. Bricks. Yeah, I think because this reference is more focused on when you want
to create materials, so it does not have actually
very specific other types of reference in here,
which is too bad. But that's no problem.
So, okay, we got these. So that one is also
out of the way. And then adding plaster, that's no problem.
We can just do that. Adding plaster,
it's just a matter of basically throwing on a plane and giving the plane or a mask or you can
do extra ometry. We will probably do extra jom try because from a distance, a mask does not
always work as well. Okay, so that's great. So
now we have reference on how to do our walls and that we
have our wall spoken of, how to do our actual
the biggest pieces. So this is going to be like the most difficult stuff over here, the really, like,
collapsed pieces. We're going to go
over how to do that. We have now some flooring over here and over
here that we can do. And then in between, we also have some
reference for, like, these really thick
pillars and how to do, like, metal beams and
everything like that. The metal beams are not
are not that special. They're just like this
kind of stuff over here. Here, let's just do like maybe I should always
find reference, even though I know what they look like just in
case when it's toil, because the way
that they bend and everything, this is thick steel. It needs a lot of force in
order to bend like this. So that's something that we
always just want to kind of keep in mind that
whenever we create them, that we don't just snap
them in half like twigs, because that's not
how it would work. They would often if they would
not tear, they would bend. Tearing is really, really rare. And often if they snap, they snap at the joint at, like, a point where two
of them come together. So a lot of this
tutorial is going to be about the way of thinking,
but we are almost done. So we almost have this
kind of stuff ready to go. I'm just going to go for,
like, a Highway bridge? I don't know what we call this. Oh, yeah, okay. So
that's what we call it. It's just that I can
roughly, like, see, because we are also
going to, like, create a highway,
but we are going to make it super, super basic. So I just want to see,
like an underpass. Let's do an underpass like this. There we go. That's
all we need, because you can barely see it anyway. So let's have that one in here. Okay, what kind of reference
do we need to have? So we don't need foliage,
that kind of stuff. We don't really need
materials because we are just going to use materials
that I already have. Of course, you can create your
own materials if you want, if you really feel ventrous, but this environment is already big enough without
the materials. So we got this kind of stuff. So broken glass we
will do later on. So I guess you can do,
like, broken window. She would want to
really have, like, a look at how the glass
breaks and stuff like that. Most of these you can
also find on text.com. But let's just say yeah, like two images or
something like that of broken glass just
to give you an idea. There we go. Like,
that's totally fine. Throw these in here.
Okay, perfect. Now we are approaching
20 minutes, so I kind of want to wrap it up. So the last one will
be broken pillars. Broken concrete pillars,
just to show how that the rebar and everything
just really works. Typical most of these
are all three D because it's typical of three artists to call it the broken
pillar like that. But it has some
cool stuff in it. We will not make it this
intense, of course, because we are going
to make it really just like if you would be working
on a game in production, that's how we would be
creating this kind of stuff. And not so much about, Oh, yeah, you get to spend days on
just like one single pillar. Unfortunately, we cannot
really do that in a tutorial unless we make the
tutorial about only pills. So let's open that one
up.'s open this one up. This one is already an image. This one. And then maybe
we do like broken pillar. Broken concrete pillars bar. See if we can find
a little bit more. Yeah, I want to stray away
from this kind of stuff. This kind of stuff
is pretty cool. We can maybe do
something with that, because we are going
to make it on modular, so we are going to make
multiple variations of it. So let's go ahead
and do this one. For the rest we just make
up something at the top. I don't need very
specific reference for that, to be honest. So let's go ahead and
let's leave it at this. I feel confident that with
this amount of reference, we are able to just gather
everything that we need. So at this point, what
you want to do is you pretty much just
want to go ahead and grab all of your
reference images, except for your main
reference image. Actually delete that
because it makes it easier and simply drag
them all into pure ref. Now once you've
done that, you can right click while
they're all selected, and then you can go to
images, and they can, first of all, go to normalize
and set normalize size. And then you can once
again go to images. Then you can go to range
and then do optimal. And like this, you will just nicely have all of
your images here. And then if you want, you
can just go ahead and gather the specific
images together. So, let's say that we have
some windows down here, and then this, of course, is just our main reference. Let's say that we have
some broken pillars sitting at the top, and
you don't have to worry. So the images, the
nice thing about Puref is that the images will
keep their resolution. So if I zoom in,
I will still have the same resolution of
the original image. So we can just go
ahead and do this, and then we can go over
here and say, Okay, let's contain all of
these pieces together. I can remember I had more
of them. There we are. These ones together,
then we can say, Okay, so now I want to
have my brick wall, my broken brick wall. Let's have those over here. And then I can say, like, Okay, I want to have my
wood and, like, my collapsed ceiling and everything down here and just
move these out of the way. And just like that, you
can just nicely, like, organize let's do this
one somewhere else. We can just nicely
organize everything. And then over here, this
is just going to be like, Well, okay, so we
have the overpass. But then for the rest, we
are just going to have, our collapsed buildings and our rubble piles and
all that kind of stuff, which going to be most
of our reference. So we want to have
this one quite close to our main reference. So let's just go ahead,
move these all together. Perfect. So we got all
of this stuff done. So have this one right next
to our main reference so that we don't need to
navigate to it too often. And there we go.
So now we have all of our reference ready to go. So what we'll be doing in the next chapter is we
need to do some planning. So it's going to be like
this for next few chapters. We are going to start
with some planning. We will do first a very,
very rough blockout, which will just be almost like cubes just
like for the scene. And then we will do a
blockout phase in which we will create all of
our modular pieces, and we will actually
turn those into blockout so that we kind
of, know how to do it. This is very, very
important when working on destruction because you are
going for a specific look. And if you do not
have a blockout, you have no idea about
the scale about yeah, how large everything
is and angles, look and all of
that kind of stuff. So we really need
to work on that. It will take quite a while, but we will save a huge amount of time if we do it
properly at first. Before we start actually
creating our final pieces. So let's go ahead and continue with this in the next chapter.
3. 02 Planning Our Asset Creation: Okay, so now that we've
gathered our reference, the next step is
going to be planning. And for this, what
we're going to do is we are going to go ahead and open up our main reference
image here in Photoshop. And once we've done that, let's
go ahead and also open up a simple notepad file over here in which we are going
to create our asset list. So the planning that
we're going to do is we are going to
decide what kind of assets we are going to make and how many variations of
it we are going to make. So first of all, we kind of need to divide
this building up into different pieces because if we want to make this building
as like one whole piece, well, first of all, it
would be incredibly inefficient and
also unoptimized, but it will also just be
really, really time consuming. So we need to go ahead and go
for, like, a modular route. So what I like to do is in hotshop I like to go down here, and I like to always
grab a solid color and just make a solid color like red, for
example, like that. And then what you want to
do is you just want to go ahead and you want to
go into your mask, and then you just
want to press contro I to invert your mask. Once you've done that, what you can do is you can
just go ahead and you can probably duplicate this
layer a bunch of times so that we already
have a few of them set up, it will
save us some time. So let's just go ahead and
do these ones over here. So we kind of know roughly
what we are going to make. So just go ahead and change the colors for these by
double clicking on them, and then we can change colors. So yeah, we kind know what
we are going to create. We just need to really
put it down on paper. So let's go ahead
and get started with some structural pieces. These pieces are not
going to be very special. They are just going to be
these basic structural pieces. What you want to do is
you want to click on your mask and then go up here, and then if you click and hold, you want to grab the
polygon lasso tool, and now we can
basically get started. So in terms of
structural pieces, I think what we need to have is, let's go ahead and grab like a concrete block
piece like this, and you basically just want to click around it and select it. And then in your mask,
you simply want to go ahead and press X to flip around your color and then press delete to basically
add it like this. You've done that, you
can go ahead and you can set the opacity a bit lower. This will just make
it easier for us. We have this one, and now
we are, first of all, just going to go
through the process of having a few pieces. So we have this one, and then we will have a plane
while sitting on top. Or sorry, this is actually
going to be a window piece. So let's go ahead and
go green window piece. So the way that you
need to think about is because it is modular,
we are going to repeat it. So for example, we now
have these two versions, and we know that
these two versions we can now have all the
way along our building, so we don't need to worry
about those anymore. Now what we can say is, Okay, let's go ahead and let's
have a broken pill. But what we are
going to do is we are later on going to just
make a few variations of it. So for now, we just
need to select one. So now in your passage that
we can see it a little bit, and that's pretty much
all that you need to do. Okay, so now we have covered this entire side
of the building. Then what we want to do is
let's go ahead and go for like a straight floor piece, straight wood floor piece. So
let's go ahead and do that. And then we're also
going to go ahead and select next to it, a broken wood floor piece
next that, just like that. And that's basically going
to be the general idea. And then at this
point, we do need to go ahead and we
need to duplicate our fill layers a few more
times so it's duplicated. Let's go ahead and just pass so let's go ahead and just
delete the mask out of it. And now let's duplicate
this a bunch more times. And then later on we get
quite a colorful image, but we know exactly
in what pieces our building is going
to be divided up into. And that's basically how I
plan for modular pieces. So now can just go
ahead and go in here, and I just want to, like,
slightly change the colors. They just need to be slightly different. You don't need to go. All perfect would like the
differences in colors. It's just for you to
check, basically. So at one point when you have
gotten all of the colors, you just kind of
like want to just move your slide
around like this. Okay, so we've
done those pieces. So with these wood pieces,
along with their variations, we are able to create all of these wood flooring over
here and stuff like that. Now the next one would be that we are going
to go probably for, like, although you
cannot see it, let's do, like, a wall. That is just like a
straight wall that is just already working just fine. So let's do straight wall, and then we're also
going to go for some broken wall variations. So let's say that
we probably end up making three variations. These variations, next to this, we are also going
to have pillars. Now, these pillars
look very thin, but we are probably going to
go for some thicker pillars. Wait, let's keep, okay, so these are internal pillars. So let's just keep those into their own category
because they will probably need to have plaster
and everything on them. So we will have some
internal pillars. Now, another thing. So let's see. So we can
create all of our windows. We are going to have some
variation of our windows. We're not going to do, like,
balconies and everything. We are going to create probably
like one and then like three variation or four
variation pieces of these really large
chunks over here. Let's go ahead and
before we move on, let's duplicate
our fill layers a few more times. So
let's have a look. So, we are going to have variations of those
large chunks. We are, of course, also going
to have some rubber piles, although you cannot
yet see them. But here, let's first just
go ahead and fix this, and then we can
have a closer look and see if we missed anything. Okay, so these pieces allow us to create pretty much the entire outside
of the building. The floors allows us to pretty much create
all of the floors. Then what we're going to
do is we are going to have a see, we need to be in here. Then we're going to
just have, like, a ceiling piece that has, like, all of the structural
pieces in between. So the ceiling piece is going to be both like a simple piece, and then also we will have a
broken piece on top of that. So that's going to be
variations. Let's see. Then we are going to
probably do like almost like a double door piece that we
can just randomly place in some locations that will just give us an
interesting effect. So let's just have a
double door that has, like, some broken glass
and everything in it. So those pieces,
the floor piece, I can have the ceiling piece
below the floor piece, if I ever want to, like, have those boats
like separately. So we've got to play
walls over here. Here you can see even here, you can see everything
coming back. You can see the doors just
coming back and everything. So even here they did that. We have do we need, like, a special trim no, I don't think we need a special
trim around the building. I think we can just use these
beams over here for that. Oh, yeah, so let's go
ahead and for this one, let's have a straight. So like a perfectly fine
straight version of our bridge. And then let's also
have, what's going to become like a broken
version of our bridge. I'm not going to spend too
much time on these because it's more like an d on piece,
but it's good to know. And also, of course, all of the water and
everything we are not going to art because that would be very technical and
very difficult to do. But let's say that
this is a pretty good. Yeah, this is pretty good. Like, at this point, I think we pretty
much have everything. Most of the pillars
can be created using these two outside pieces. Yeah, we're just going
to do some variations. So let's say that,
as you can see, there are not that many pieces. Of course, we need to
create variations of them, but most time creating variations, it's
not that difficult. So once you have the
proper pieces down, it's just a matter of just
adding more and more and more. So this is what we
have right now, a few modular pieces,
as you can see. What we are going to do now
is now we are going to really just write down all of the
assets we are going to create. This will give us a sense of how long it's going to take and it will give me a
sense if I need to add any time lapses or not. But I don't feel like
I will need to add too many time lapses just
for really boring stuff. Let's get started
with a window piece. And whenever I say clean, I just mean that it is
not destroyed in any way. Piece, broken. Um Let's do sideways,
concrete beam. And let's see. So if we do, that
should be fine. If we just do one of them, then we are going to have
concrete pillar variation one. Concrete pillar variation two. So we are going to have two variations that
are broken off. Concrete. Oh, sorry, standing,
concrete pillar, clean. So we'll have a clean
variation of those also. So then we can kind of like
cover these pieces over here. Now we will have a
internal pillar, clean and let's also do
an internal pilar broken. What we can do with a broken one is I can show you some
cool techniques on. Maybe if we make it like a pilar that has,
like, tiles on it, I can show you how to have
the tiles broken off, or maybe if it is like
a pilar with plaster, I can show you how to
have, like the plaster broken off, so
that's no problem. Internal wall clean Well,
broken variation one. So basically, the way I decide how many variations is how often I see it in this
type of reference. So the internal walls,
we will see quite often. You can see it here,
here, here, here, here. So it's just because
the internal wells are, of course, quite prominent. So knowing that, I'm going to create two
variations, let's say. Of course, if it
was not a tutorial, I would probably do like
three or four variations. So just double whatever
I'm writing if you really, really want to push everything. So we will have the
internal wall cleans and two broken variations. Collapsed collapsed
concrete variation one. So that's these ones over here. Let's do concrete
big variation one. So we are going to do
variation one to three. So we will have
three variations. These will by far
take the longest, so they will be the most
difficult, take the most time. And then we will also
have a small variation. But this is also one that I cannot just grab
mega scans because even mega scans does not have the assets in the way
that I want to have them. So I cannot just add mega scans to enhance the
environment a little bit. While I can do
that, for example, for the foliage and
stuff like that. So collapse concrete, small variation one
and variation two. Then we will have
a roof clean roof broken edge variation one, and a roof broken
edge variation two. And then we will have a um
Overpass highway overpass, highway, clean overpass,
highway broken. Okay? So I'm going to leave that very limited because I don't
want to spend too much time. And what we can do is we can maybe even combine these pieces to then enhance the broken highway and,
like, the feeling of it. Okay, so now we will have a
wood flooring clean Oops. Wood flooring, clean. Wood flooring broken. Variation one, and let's
have another variation. So we'll have two variations
because these are also often used here and there. So we'll have two
variations like that. And then we're also going to
have a double door broken. Let's do double door,
clean, double door broken, which will just be
like some messy looking like wood frames and
double doors that are just completely broken and everything that we can just randomly smack in between of walls to just give it an
interesting effect. Okay, so that will take care of quite a bit of
stuff over here. Now, sure there are some smaller pieces that we also
want to create, although they are probably in the concrete collapse small, which are going to be like these little bits bobs over here. But I don't really need
to add those two list. Those are things that
just kind of get added while we are working.
So we got this stuff. Now we need to go
for some pieces that are not included in here because we are going
to enhance it a little bit. One is going to be rubble
pile yeah, just rub a pile. So I only need one
variation of it. And then we also need,
like, a let's do, like, broken pieces.'s 1 second. Broken asset collection
for rubble material. And this is going to be
a bunch of small assets, going to be everything from,
like, bricks and, like, small bits of concrete,
small bits of rebar, a bunch of stuff getting
thrown together. And I think at
that point, we are pretty much good over here. Then we can basically have a very solid overview
of everything I want to teach you in
creating destroyed pieces. Because now you know after this, you know how to create
destroyed wood. You know how to
create let's also add some metal later on,
like destroyed metal, how to create
destroyed concrete, how to create like Wile
advance concrete rubble, how to create destroyed walls. And I believe that
at this point, destroyed glass also destroyed rubble pieces and
rubble materials. So yes, once this is done, you will have a really, really solid overview on how
to create destruction for games that you can use to
easily, enhance your portfolio. And because having destruction
on your portfolio is actually really
good because yeah, it's just like a
really wanted feature, especially in these
types of games. So we now have this done. So we got our list over here. It might seem a bit
overwhelming, but it is, it is quite a bit of work, but we will get
something really nice. So what we're going
to do in the next chapter is we are going to go ahead and we are
going to start with the first phase of our blockout. This phase will include setting up an unreal
engine project and creating only the absolute,
very basic shapes. So we will not even go into creating our actual
modular pieces. It's just going to be
like massive cubes to just lay out our environment. So let's go ahead and continue with this
in our next chapter.
4. 03 Setting Up Our Unreal Engine 5 Project: Okay, so we are going
to get started by setting up our UnreelEngine
project and to get the general feel of just like the buildings and how everything is laid out and also get already like a
base camera angle. So I already set my
project location. We are using Unreel
Engine five over here, and I'm just going to go
for, like, a blank project. And unfortunately,
the character names, because I have such
a long folder name, I cannot have more
than 130 characters. So I will just
call it Destroyed. Target platform desktop maximum, and do we need starter content? I don't think so, no. So we can just go ahead
and press Create. And we will be using three
years Max, of course, for the mondling which
I have over here, but we will not
need it just yet. So first of all, we
just need to wait for nil engine five to start up. Okay, so here we go. So I think the only
difference between my nuLlayout and yours is that
I set the content browser. If you go up here, you
can dock in layout, and then it will just stay here, which feels the same
as nu engine four. But for the rest, here is our base project and we have nothing in our
content browser yet. I am going to already
get started and just create a new
folder that I will call um destroyed asset tutorial. And in this folder,
we are going to go ahead and create a
folder called assets. We are going to create
a folder called saves, create a folder
called materials, and let's create a
folder called textures. There we go. And then
for our file over here, we can just go ahead and
file save current levels, and we're just in
the saves folder, we are just going to call
this main level. There we go. Okay, perfect. So we
got that stuff done. Now, for this scenoe, pretty much we can way
use the base of this. We do not need this floor. We do not need to play or start. We do not yet need the
reflection capture. So yeah, all we need is
the atmospheric four, wow it's still difficult
for me to say, even after all those years, light source, sky sphere,
and our skylight. And for the rest,
everything is set to be real time lighting, so that's all totally
fine over here. Oh, no, it's not. This one sets to
real time capture. Oh, that's why because
of the ignore. Um, I've got to do that, but we are going to do
the lighting later on. Okay, so the first thing
we probably need to do is let's go ahead
and create a train. That is probably
the easiest way. Yeah, you can create a cube, but let's just create a train. So for train, what we're
going to do is let's go activate landscape
editing mode. Now, our train is going
to be completely flat. It's just going to be like
to have a floor over here, although it might be cool if we maybe create like a road Oh, that might be cool, yeah. If we do, almost like
that the road goes upwards towards a hill and it kind of does
something like that, but we need to be a little
bit careful with that. So for now, let's go
ahead and go with flat. But the reason I say
that about the road, it means that I
might want to just give it a bit more geometry. So if we go to our
section size over here and set this to be probably like one to
seven by one to seven, what this will do is it will
scale up our environment. But then what you can
do is if you then go to your scale and set this to, for example, 50 by 50 by 50%. Will scale up our environment, but because we are
scaling it back, it will push in more geometry into our environment over here, which might come
in use later on. So at this point, we can just
go ahead and press Create. That's all we really
need to do. And then over here we have our terrain. So now we can disclose of our material or our
material, our landscape dor. And now, the first thing we want to do is we
probably want to define roughly
where the buildings are and also the scale of them. So for this, what
I want to do is I'm going to go to create,
and we're going to, first of all, just create
this building over here, and we are just going
to do a rough guess. So let's go ahead and create shapes and create a
simple cube over here. And then in your location, if you press a
little arrow button, it will reset the
cube back to 000, at which point we
can move this up. So this is one by
one by 1 meter. So we kind of know that
if a person is 1.8, yeah, 1.180 centimeters,
so 1.8 meters, we can go over here and we can look at this building
and we can see that, for example, this
building, let's say, if we just imagine it, one, two, three, let's do four floors. Let's say that this
building is four floors, which means that if one
floor is probably 210, uh, 840 plus, let's
say, a little bit more. So let's nine.
Let's do 9 meters, along with the trims and
all of the other stuff. Let's make it 9 meters. So what we can do
is we can just go up here. We can
look at the color. So this is the blue
color, which is the ZXs and we can
set this to 9 meters. And then it's just a
matter of moving this up. And then we know that technically
this is 9 meters high, although it does
not feel 9 meters. So I just need to double check. You can double check
by going to create. And then if you go to
empty character over here, Okay, so yeah, this is 9 meters. So here if you grab
an empty character, this is the size of a person, basically, although a
person is slightly higher. So yeah, okay. Then nine meter doesn't
feel that high, but maybe maybe we need to have a little bit
more spacing in between. So I did not I only gave it an extra 60
centimeter spacing. So maybe we need to go probably
for let's say 20, 40, 60. Let's do 10 meters.
Let's just do ten. Just makes it a little
bit bigger because, of course, it does need
to feel correct, also. Once we've done that, we
can go ahead and go for, like, the width of it
and for the width. And we only need to
define this one. Once we have one, we
can do everything. So for the width, let's say, I'm just having a
look at my windows, and yeah, let's say
the two, four, six, eight, then let's make
it like maybe 14. So we can go like
40 meters long. Now, we probably want to go
a lot longer, 24 meters. And then if we go over
here to the Z axis, Z Y axis, and we go like 14. So let's say that this, if we
look at this from the top, because this is where our
building is going to be yeah, it feels still feels a little
bit small, to be honest. But we can go ahead and, like, finish the
scaling later on. So let's say that we now
have this cube over here. Now what we can do is we can basically now start
defining our building when it was just completely
hole and then we can start defining all of the other buildings
around it, also. Although the other
buildings around it will later on just be
replaced by place by, like, very basic buildings. And yeah, I still need to decide if we have the time
to actually make those or if we are just going to use something
from the marketplace. So having this one, we
can now go ahead and we can duplicate this. And then what you
kind of want to do is you kind of want to also define. So if I set this back to one, I want to define my street, and a street is often, let's say, 4 meters per lane. So let's say 8 meters
plus plus pavement. So let's say that street
is often like 10 meters. If it is just like
a small street, yeah, 10 meters
probably feels correct. So this is roughly how we
are just going to guess. Of course, we don't
need to make it absolutely perfect
because we are not going to have a game
environment where we are literally just like
this close to the ground. If you have that then of course, you probably want to
spend a bit more time. So we have this one.
Now, let's say that the height of this one
is pretty much double. So we probably want to
go for like 20 meters. Although even 20 meters feels like really low, but
we can just have a look. And next to this, what we are going to
do is, let's see. So it's probably also
like a lot longer. Let's get started with
just like the Y axis. It takes a bit of
thinking work for this. So 24 feels that's 232. I do like even numbers. And it looks like
this one is pretty. It's just beyond
this size over here. So it's something like this. And yeah, that
does feel correct. So we have this one, and
so we set this one to 32. And then we want this one
probably to like let's say 64 to get started
with. Oh, damn. What was this one
10 meters wide? This one, and this ten. There we go. We do want to try and like, at that, correct. So let's say that this is
going to be a building, maybe 32, maybe 36 makes
it a little bit longer. There we go. So that now when we are roughly
looking at this angle, we can kind of, like, guess how large this building
is going to be. So if I have this,
I do feel like the building just does not
feel as long. Let's say 52. We, of course, are not going
to make it exactly the same, but the composition
is really nice. So that's why I want to
capture that. And let's do 20. Let's add another two, four. Let's add another 5 meters
for like two extra floors. Yeah, because then it will
be completely broken up. I think this is pretty good. So we got this
version over here. Now what we need to do is we
just need to go ahead and create an extra
street over here, and then we can start to define
roughly our camera angle. So if we go ahead
and for our street, we are going to make this. I think it is already 10
meters on a way that's top. Set this to ten.
Although we probably, yeah, let's go let's do like double lanes. So
let's set this to 20. So it sets to 20, so
we are giving it, a lot of space, and this just
going to be like our road. And then next to our road, we are going to
have our overpass, and our overpass is just
going to be two lanes. So let's make this 110. And then it's basically
just going to run along this point. Here, by this point, we
can delete this one. So it's basically going
to run along this point, and we are going to
have it quite high. So let's have this
like 15 meters in the air to get start with. So this might be a bit tedious
because we already spent 10 minutes and we only have created three cubes over here. But this makes its normal
that it takes a while. You need to be able to
properly define this. So what we can do now is we can go ahead and
we can go down here. Let's roughly set your camera
angle the way you want. Then go down here and
create a camera here, and we just want to
create a cinema camera. So cine camera actor. This one, it gives us a little bit more control over how Dutch we want
to have the zooming and the field of
view and everything because it acts more like
a normal real camera. Now if we go from perspective
to our cinema camera, what we can do is, first of all, we can go to film
back and we say, Okay, 16 by nine. This is pretty much also
like a 16 by nine image, so it might be pretty good
if we just keep that. Then what we can do is we
can roughly set over here. Our camera. And then
what you can see is that the focus points I look at,
I look at this building. I look and make sure that
this entire building is in view and that it still has some space around the back. And then I can also
see over here part of our overhead of our highway, and then we can also see
like a building here. So seeing this, I have a feeling that I
need to actually go for probably a slightly
higher version over here, something like this. And then what you can do is you can actually just grab this one. And if you want,
you can already, like here, let's go
outside of a camera. Let's move this around a
little bit on the red axis. So if we just go ahead and
just select this cube, and then over here
on your red axis, you can actually
just move it around. So we can kind of, like, guess roughly where we
need this one to be. Let's have it right next
to the overhead over here. Okay, so we got a
cube over here. We got this cube, and we
got the roads next to it. Now, as I said before, I think I do actually want
to go ahead and create, almost like a higher point over here that it goes up
with our terrain. So when we have this version over here, that is pretty good. Let's go ahead and
duplicate this version. Let's make this version
a little bit longer. And at this point, you don't need to do as precise anymore because this version is going to be outside of your camera view. So you just kind of like
want to have it sitting over here and maybe have
a bit further back. And then what I can see is okay, I can see that this
version over here, it needs to be a lot longer. I think I just underestimated
the scale of it. So let's make it 20 floors. Here, see that works a lot better, and it
is a lot longer. And what we can do
now is we can go ahead and we can grab this
really large building, and we can just have, let's say, if we go over here, let's have one of them, which is quite large also, let's have it around here. At this point, I
also don't really care too much anymore about how large the roads
are going to be. Then we will have a
smaller version over here because these
buildings they will change. I'm just going to have them
here so that I kind of like, get a good guess
for composition. So here we have this building, which is going to
be a lot smaller. There we go. And then what we will do is
we'll have another. Yeah, let's duplicate
this one, Control C, Contra V. And when I said that, I forgot I realized
that I forgot to set my shortcut registration
on so that one is now on. Sorry about that. Luckily, we
did not cover too much yet. So this one is just
going to be a little bit higher and maybe a
little bit further back. And then at that point,
we kind of like just E C. So we will just
like, populate this with trees and like
a bunch of stuff. The main goal is that this
is looking really nice, and then maybe what
we can do is we can have another building, let's say, a bit further back, so we push it back, and then we push it like this. Then maybe have another building that is sitting way in the back. And at this point, we will
probably have let's see. So yeah, here. Because over here, you
cannot actually see that. So you can maybe want to rotate this building
around a little bit. But now you can see
that we already get a general feel for the space. For example, with this feel, what I feel right now is that this needs to
be a little bit closer. And just like that,
I can just very quickly just make sure that everything just
looks a little bit nicer. I can say, like, Okay,
so I want this one to be a little bit wider
so that it sticks over, which gives us a
little bit more of a nice silhouette
going between here. And then maybe I
like let's say you have it a little bit closer. Let's have a look over here. Here, so a little bit closer so that the road feels a
little bit more logical. Okay, so that's pretty cool. And then this one
will, of course, also maybe be moved
up a little bit. We are going to work
on that probably now. And then over here, what
we will do is we will cover this with trees and everything so that
you cannot see it. So what we're going to
do is for our road, if we go ahead and just
save our scene over here, just by pressing Saal, let's click on our train and
let's go into our train. Now, the cool thing about
this train is that we have a ramp over here and
we have a flatten. Now, I believe the flatten there used to be
a way inside of, oh yeah, wait here, flatten
target. That's better. So we can set a flatten target, and we can roughly decide how high we want to have
this stuff to be. So if I go here, right
now, it's set to zero. If I set to 10 meters high, Is 10 meters just very low or am I not making this correctly. 100? Oh, wow. It's just very, very low. Okay, in that case,
we need to go really high. Let's say 1,000. I did not expect it
to be that high. And let's set the tool
strength all the way up. And let's set our brush v
to be just like a square. Okay, that's a
little bit better. Yeah, that looks like
a decent height. So let's say that at this point, Our twain basically is
just on another height. So it was sitting on a hill. And what we can do
is we can basically just like it might look
a little bit silly, but you won't be
able to see these external points later on. So we are just going
to flatten our twain. And then down there, oops, it will just go ahead and it
will just, like, fade off. And then at this point,
it will be outside of the camera so we can no longer see it, so we can
just ignore it. Unless you, of
course, are making an entire game
environment where you can just walk around
and everything, then sure you want to go ahead and you want
to maybe make sure that you cannot see any of
this messiness anywhere else. But what we can do is
we can just do this. Okay? So that's the
flattened version. Now what we need
to do is we need to give it a ramp over here. And basically, what
you can do with a ramp is you can go ahead
and you can set. It's a bit dark only. And let's go ahead and let's
go outside of our landscape, and let's press height just by pressing H, and let's go back. So for our ramp, we want to go ahead and grab a ramp
point over here, and then decide roughly where we want to have
this one ending. And then what you can
see is over here, if we do this,
let's see art ramp. You can see that it
will art like a ramp, but I'm not yet happy with it. Now what you can do
is you can click on these points. You can
move them further back. What we can do is we can say, I want to have this
ramp over here, and then I want to set my
width, probably quite oops. Be careful that if you
move your ramp that you hold shift or you cannot
hold shift in this case, but that you just
move it together. We have this ramp and we want to have quite a white width. Let's add the ramp over here. Then at that point, yeah, because we will have a
twain. We have this one. That's annoying that
we cannot just here. So let's add ramp again. And let's do this
again. For some reason, I can remember that you can
just select the entire thing. Oh, God. And then you
can see we mess up because I accidentally
moved tramp? Okay, so I did not
mess up to add back. So we can do this
one, and then we can also just go
ahead and go in here. And for this version, let's
set this a little bit lower. Even though you
cannot really see it, it's just good that we then
also add the ramp over here. Okay, so we got this. Now, if we go back to our
flattened tool over here, maybe set our brushis
a little bit lower. We can go ahead and
we can just nicely start by just flattening
this like that. At which point you
can no longer see it. And next to that, what we
can do is we can go to our Smooth tool and we can give this like a nice
smooth transition. So that now it just
looks like it here, if I also give the
smooth trasition here, it just looks like it's a hill and it's just going up the hill. And that's exactly what
I was looking for, which if I press Control H to nhight and let's go outside of our train sculpt mode and
into our camera mode, you can see that now it is
just giving us a nice hill, and we can fake it and just give it like some
quick streets over here. That's no problem that
should not take too long. I have a few streets laying around that we can use for that. So we can just have,
like, a nice street going up here, going up here, and then we will just
have it covered with foliage to really make
it home that this is, like, abandoned and
stuff like that. Perfect. Now, what we're going to do in the
next chapter is we are going to go ahead
and we are going to define this blockout
slightly more, just like the very rough
shapes and we are going to use the built in modeling tools inside of Unreal
engine to do this. And after that, we are going to go and get started
with the big task, which is going to
be creating all of our modular pieces and
then placing all of these modular pieces actually
inside of the engine and just already get a very
nice looking blockout. So let's go ahead and continue with this
in the next chapter.
5. 04 Creating Our Base Blockout: So what we're going to do
now is we are going to grab our main building
over here and we are going to define the final shape. With this, I mean,
the bulk shape. Like, over here, you
can see that the shape goes from high to
low, pretty much. But of course, we
want to change around a little bit to make it more our own. So that's
what we are going to do. Now, for this, we
want to go ahead and want to export this model
to three years Max. However, there is
this bug inside of Unweel engine that if
you right click on a normal default cube and then press Convert
cube two to static mesh, what it will do is it will
forget the transform. So it will just give
us a basic cube. A workaround for it is to go to create and create
another cube over here, move it somewhere close by
and then select both of them and then convert
actors to static mesh. And for some reason,
when you do this, it will actually just save your cube with the correct
scaling and all of that stuff. So the other one we
can just delete. And once you have converted these actors to a static mesh, of course, you can
delete that cube. All you want to
do is you want to go ahead and you want to right click on your mesh, go to Asset actions
and go to Export. And we are going to export this. So in my source files, I've created a folder called Export and another folder
called From Unreal. Because we will be
using this technique quite often, in this folder, what we can do is we
can go ahead and call this one base building
scale and press save. And if you have anything
like this checked on, just turn it off and
then press Export. Now, once that is done,
we can go to Tres Max. I don't know that
was a previous test. Once that's done, we
can go over here to Tres Max and we can start by importing our
mesh so we can go to File, Import, and then just grab your FBX over here
and press open. Give the second.
And there we go. So here is our
cube that we have. Now, first things first, if we go ahead and go in here, right now it is
an editable mesh. So just right click
and convert to edible poli because we will only be working
with the Additbpli. The editable mesh is like an older version of
three years Max, like it's from past
version of three s Max, and the added Bpoli has all of these settings that we need because there is a
difference between them. I then simply press five to go into my lm select
and I just delete that little cube and then the last thing that
I'm going to do is, well, first of all,
two things, actually. One of them is that I'm going to go into my materials over here. Loading it in the first
time always takes a little second because
it is just trying to load in all of our
materials over here. But what we are going to do is we are just going to give it a material and then just
tone down the color. So give the material.
Oh, and already tone down the color so that
it is not as bright. Now we want to
untriangulate this. You could go in and
you could select all of these edges and then press control backspace
to get rid of them. Or what you can do is you can go to geometry and quantify, and that will automatically just get rid of all of
your triangulation. Then I'm just also
going to go ahead and select all of these center bits, press Control backspace
again to get rid of those. Okay, perfect. So at this point, let's say that I believe
that this is the front view, because here we
can see the font. So this is how our
camera will be. We are going to go up
here to Swift Loop. If you do not have this tool, it is probably because
you just need to double click on it to
get the tool open. And then we can just
go at Swift loop, and then we can just
add some loops. So we are just going
to add some loops to roughly get an interesting
effect over here. So let's have a look, and
we do want to change. So let's make our let's
say that the thickness of our first wall is
going to be this. And then our second wall
is actually going to have a little bit more space. And then over here,
we have, like the back wall I like this. Now, so this will kind of
divide up our general shape. Now, what I want to do
now is I want to just go ahead and I want to, let's see. I'm going to keep
this one quite high. So let's set a loop here so
that we can remove this part. Let's set a loop here because I want to probably have
this one quite low. Maybe's have a loop here so
that we can remove this. This will make sense these
loops once I actually show you what I'm
doing over here. So this is what I'm doing. If I now go ahead and press
four to go into my face mode, I want to get rid of this
one because I want to have this layer a
little bit lower. I want to get rid of
these ones because I want to have these
layers even lower. I want to then get rid of this one that there is a
little bit of stacking, and this one because this
one is going to just be our entire floor. Now, we probably want to
go a little bit lower. So we probably want to go ahead and go down here because
if I have a look, turn off my angle. Yeah, so over here,
it is pretty low. Although it can be a
little bit hard to guess, so we later on do need to just probably make some changes. Let's double click Bpressing
two to go into Face mode. I do expect that you
already know how to switch to face mode
and all the stuff. So at this point, I will forget I will
not tell you anymore, but one is furtsT is edges, three border, four faces,
and five is elements. So, yeah, I do expect that have a basic
understanding of this. Now, once we've done
this, what we can do is we can go ahead and we can
start by selecting these two, simply hold shift, and then
we can just move these out. And don't forget to then
in these points over here, select the vertices
and press collapse. This way, they are connected, and now we can also
select these two edges and press bridge to,
give it a little edge. We can then go ahead
and we can do the same over here where
we move this one down. And like that, we can start to define the actual
shape of our building. So we can go ahead and we
can go and press collapse. Oh, not collapse, press
bridge over here. Okay, so the first problem
that I see over here is that this looks a
little bit silly. So this is fine, but
then if we go down, it looks a little bit strange
when it is still held up. I feel like if we place
a swift loop over here, and then if we maybe do like a shift like this and then select these two
and press bridge. Now, if this is not
at the correct angle, what you can do is you can
simply select this face, and then you can go
ahead and you can, oh, click and hold and make sure that you
use the first one. Then you can go ahead
and you can, like, over here, scale it
flat to flatten it out. So what I'm thinking about is that I'm going to
make this a little bit lower, but not as low and then
bridge this version. So that from the top, we can see over here
and then we can see that it is still standing a
little bit like over here, and went is still
standing like that. We can also go ahead
and go in here and I'm going to actually
lower this one, and I'm going to then
hold shift over here. It's collapses, and I'm
just still figuring it out. So we are going to probably make some small changes
once we get into a reel. But for now, just
take your time. You want to figure
out the final shape, and it's important to
do that now because else you will later on
waste all this work, and then you change your
mind, and we don't want that. So we can just go ahead and hold shift and just move this down. Once again, we can collapse
this one and this one. Over here just to make it neat. And then we can select also these outer sites and we can
collapse this once more. And at this point, these two,
we can just press collapse. However, if they are too
far away like over here, simply go to the target toool which is your Targets Well tool, and it allows you to click on one vertice and then just
merge it down into the other. At which point, we can go
ahead and we can over here, it's often easier for me to go to my target Well tool and just weld
this Vert C down here. And this one down here
because it allows me to then probably bridge these
ones over here. Okay, so let's say that this is now currently
our building. Let's see. So I feel like this area is
a little bit too thick. Maybe I just want to make
it a little bit thinner. So at this point,
we can just easily, we can move this down over here. And what we can do
is we can maybe, what if we do like a swift loop over here and then these
versions, let's delete them. So now if we just select these etches and
bridge them here. So now we have some
spacing going over there, and we can probably
have this collapsed and then we have a pillar
sticking out over here. So it would be almost like yeah, it would be like having
like a single pillar that is just sticking out
at the very tip like that. So that will give
a nice focal point and like an interesting area. And then it will just have some collapsed walls
sitting over here that will slowly just fall
into the rubble like that. Then over here, we
can see like in here, we can see the insides. If you want, you can already
visualize the insights by going into the Insert tool, clicking it, and then simply insert it and
then hold Shift. And like that, you can kind
of just create the insights. Now, it is a little
bit annoying if we also want to do the
insights over here. But it can just give you
a general visualization. Another thing that
we can do that's probably a lot easier over here, but I will first define my
shape a little bit more. So I will go over
that a little bit later because one thing
that we need to define, so we need to define
the actual scaling of our floors because the rubble kind of needs to interact
with the floor scaling, if that makes sense,
because that's where, of course, the rubble will
kind of switch and overhe. I'll see that at the
end of the floor, this is where the breakpoints
are most obvious. So at this point, what we are going to do is
let's first of all, actually save our
scene over here, and we can go ahead
and we can just make another folder called
saves in our source is. And in this folder, we
can just save this as basic underscore
blockout and pre save. So now let's go ahead
and file export, Export selected, and we can
just go ahead and in exports. We can also make a folder
called two unreal. And we will call this
base building blockout. Here we go. And just press Okay. You don't really need to worry about settings at this point. And now all that we
need to do in here is so we have our assets over here, the folder that we
already created. So we just need to go ahead and then in the two unreal folder, just drag your FBX in here. Only thing that you
really need to do, which is good practice
is if you go down here, make sure to turn
on combined meshes, because if you don't
do that and you forget about later
on, at one point, if you are importing a
model with 100 meshes, you will get 100
different meshes. And for the rest, we
can just go ahead and just do a uniform scaling, and we will not be using Nant
for this project because I want to go for industry
standard techniques, so we can just go
ahead and press Import, and there we go. Okay, at this point, we just grab a cube,
and or actually, we don't need to grab a cube. We just need to drag in this cube and then
pretty much move it. Can we do that? I wonder
if the scaling will match. Probably not. Now, no way
that the scaling will match. You can try. You can
write click and copy on the location, scaling
mean position. Yeah, it was sort of close, but because the PIV point is at a different location, it
doesn't work that way. So we can just move it here and then delete the other one. Perfect. So I don't know why it is giving
me green material. Let's quickly go into this
default material over here. Click on the color and just
make this like a white, like a not too bright white over here and
just press save. There we go. Okay, so if we go ahead and go into our scene, this is what we got right now. So we got pretty
lucky because we got really nice and close
with this area over here. Now, at this point,
the building does also feel like a lot smaller, and I do want to go for a
bit more that grand feel. And I don't know if it's
just a matter of trying to fix our scaling and our
placements a little bit. It could be that case. Let's move this one
a little bit more. But, yeah, the focus point is not so much in
the area I want. Let's move this a bit closer. So I really want to
have the focus point to be like this building. We can try some general scaling. Oh, turn off your snap
scaling so that we can do some general scaling
over here just to see. Okay, so it looks
like that we want to probably make this building
a little bit higher. Now, we will, of course,
go ahead and we will do this inside of Tris Max, but I just want to get
a general feel for it. Yeah, let's do something
like this height. Okay, so knowing that, what we're going to do is we
are going to keep this base. We're just going
to basically make everything a little bit higher. So I'm going to get
started by probably just pressing W to go
to a multi viewport. And then I probably want to
just go ahead and press L W again on a front view and
then just select one. So I'm not really going
to do this precisely. I'm just going to
go ahead and just move these up a little bit because we are going to
do this precisely later on. So first of all, let's go ahead and export, once again to this same FBX file. At which point you
just need to go into real right click
and Passi and part, and then it should scale up. I don't know why it takes
so long. There we go. Okay, so that's good. So now the scaling is
working a lot better. Now that we've done
this, at this point, all we need to do,
and of course, we will later on have small variations that you can see over here where it's not
just one flat piece. But now that we have
this, what we're going to do is we are going to go ahead and let's see if
I have a look at this. Yeah, probably define
the floor levels. That's probably the next
thing that I want to do. So if I go over here, I want to define
my floor levels. I can do this by, first of all, go to go ahead and grab a box. I don't know what my
scaling is set to. So I don't know if this is
the length or the weight, we probably need to
go for the height. So if we do 5,000. Okay, so this is the height. I just want to go ahead and have a look and see that my scaling, so a floor height is probably because we
are in oh weight, we are working in millimeters. Well, it doesn't really
matter if it's millimeters or centimeters because the
export works the same. So if it is 5,000, let's say that
5,000 is 5 meters. We want to probably
go for 2,500. Oh, that is very low
for a floor height. So that is not completely logical if the floor
height is like that. In that case, we just need to
do some extra measurements. So if we go ahead
and go over here, it is probably right, but it just does not work
for our environment. Because if I grab an empty
character, where are you? Oh, press G. Okay, so yeah, to be honest, I
am it is probably correct that the floor
height was like that. It just does not work for our version unless we are
giving it a lot of floors. Hmm. That is interesting. So it is working
from this angle. I do want to make this
building really large. I'm going to make
the floors a little bit larger because that
is quite flexible. One, two, three, four, say that it has like
five different floors. So if I'm going to make
it a little bit larger, let's go ahead and
yeah, you know what? Let's just make it like 5,000. I think that is
fine if we do that. It all depends on the type
of game that you are making. But 5 meters. So the room that I'm in
right now, yes, okay. That one is probably 2.5 meters. But this is a
commercial building. And what you often see is in offices and
commercial buildings, it's often a lot more space. So I do want to kind of, like, get it because for me, what is more important is
the grand feeling of, like, a large building like
this, compared to, for example, the logistics in how high that the floors are. So knowing this, what we can do is we have a
floor height over here, and then we will have
an intersection. Always, we will have
an intersection, and that intersection is
probably around so let's do 500, so it's like half a
meter or maybe 1 meter. So 1 meter. So we have floor height intersection
floor height intersection, if that makes sense. So you basically go ahead
and you just duplicate this by holding Shift
and moving it up. And once you've done
that, you can just go ahead and you can set
the number of copies to, for example, three, which will automatically also just
keep it moving up. Oh, it looks like we even
did not go high enough. So maybe, and then
that's the top. Knowing that this is going
to be our floor section, what we are going
to do is we are basically going
to define roughly where all of the
endings end over here. What I'm going to do is this one is a little bit
tricky over here, and the reason for
that is because, of course, we all
have it collapsed. For now, what I will do
is I will go ahead and not worry about our
train, instead, I will move this down to
roughly this level over here. Now what I'm going
to do is over here, what you can do by the way, if you going to add
a poly and turn on ignore back facing
and turn on bi angle, if you set the angle low
to something like five, you can immediately
select the tire angles. I'm going to move this
one roughly around here. I'm going to move
this one roughly around here. Actually,
you know what? Probably around here, or do I want to move
this one higher? We basically just want to
match it up with the floors. So yeah, yeah, okay, let's make this a
little bit higher. And because this
one is broken off, it does not really
matter where it is. What you can also do is if
we just go ahead and select only these pieces over
here, right click, convert to add a pool,
and then go to attach, and then we are just
going to go ahead and just click on these
pieces to attach them. Makes it a bit easier for
me to just move it around. So we have over here. This
one is pretty good, actually. So the only one that
we need to do is maybe move it down a tiny bit. And then this one,
at this point, let's keep into account that the roof is probably
a little bit thicker, but let's move it
down a little bit. And then we can just go ahead and go over here, we can say, Okay, so this one is
also pretty good. We just want to go ahead
and move it down here. And now we roughly have, correct floor heights, as
you can see, like this. Okay, great. So our floor
heights are now also sorted. Now at this point, we are pretty much done with our blockout. If you want, you can go
ahead and you can add a lot more diesel into this blockout to really
get a good feel for it. The way that you can do
that, and I will show you the quickest way just
to make it very basic, is to go to the Create tab, click on a box and
turn on Oto grid, and simply go ahead and
then click on your model. What it will do is because
of the outer grid, it will automatically place your model on top
of our other model. And then if we go
ahead and do this, and then if we go ahead
and go in here and maybe, like, let's say that
we scale this one up and then go in here,
scale this one down. You probably know what
I'm going at with this. So I'm going to use
something called Booleans, where I will
basically just very, very quickly carve out
some of the shapes. So at this point, I can turn on my rotate snapping over
here, rotate this. And now I will just
go over this very quickly because this is
absolutely unnecessary, but it's just a nice
thing to do sometimes. We can go ahead and
go in here and we can just go in and carve out our shapes. So we
can do this one. We can move down, and then over here, you
can say, like, Okay, I want this one to be split
up into two versions. Over here, like this. Finally, I'm also going
to just go ahead and carve out a single
version down here. Like you can see
over there, like that. And you know what? That does mean that
this one, for example, needs to go a little bit higher, and this one then also
needs to go a little bit higher over here and then
maybe make this one, like a little bit wider. It does not really
matter too much. It's just so that we have
a general idea of how this is going to look and where all the holes
are going to be. So I can do the same over
here where I just move this. And let's say that I'm going to call it a day at this point. Now what I can do is I can
temporarily if I want, hide both my building and this measurement tool. So
press height selection. Click on one of the cubes, convert to addi poly and
then in your attach, just press the little
button next to it. Because then what you can do is you can basically select all of the measures that
are currently visible. Now once I've done
that, I can unhide and now it's a matter of
just selecting my base. Building, go down
here and create, go to compound Objects, press B Boolean, and we will go over this a
little bit more later on. And then in the
advanced options, just press remove only visible. This will make sure that
the jump tree is cleaner, and then just start
picking and just pick this one. There you go. And then you can see that I accidentally Make sure
that these ones are not sitting beyond this point because else you
can look straight through the building,
and we don't want that. There we go. We can just go
to P Boolean, pick again. And at this point, you can
just go ahead and export this, and you don't even
need to clean up the geometry because
it's a blockout. We just want to export
this and just make sure the triangulate is turned on over here in your
export functions. And now that pretty much marks the end result of our blockout. So at this point, we can just go ahead and re import that. Okay, that's never
happened before. But it can happen because
it's Unreel agent five. So we can just go ahead
present and restart to help out unreel. Here we go. So we are back and it managed to just restore the building. So now you get a general sense of how
the building will look. And then later on
you can, of course, always just go into your
train, go, for example, to flatten and set
it to like 900 and then just make sure that or 800. So this low and then just
make sure that there is no flattening
going on down there. Okay? 500 then? There you go. There we go. Just make sure that
there's no flattening going on inside of the building. Okay, so perfect. So we now
got the general building. We know how everything goes. What we will be doing in the
next chapter or the next few chapters is we
are going to get started by creating all
of our modular pieces, and we will slowly use
these modular pieces to build up an actual building
that looks like this, although it will
still be a blockout. So that's going to be
quite a long progress, but it's very important. So let's go ahead and continue with this in the next chapter.
6. 05 Creating Our Modular Blockout Pieces Part1: Okay, so now that we have a pretty decent base
and we kind of, like, know what our building
is going to look like, we are going to get started by creating our modular pieces. And as you remember, we have our little list over
here. This is the plan. We are going to create only one variation
whenever we can. And the other
variations we will just do completely in
final right away. And we are going to
get started with structural pieces which
are going to be pillars, walls, floors, all
that kind of stuff. So I'm going to go ahead and I'm going to go
in three years Max. I want to go ahead and
use this thing over here. Um Let's just go ahead and well, first of all, let's
do a save us. I'm just thinking if I want
to keep this building. Let's do modular pieces. Save this over here. And we
are just going to use layers. So most of these pieces, but I'll just stay
in this one scene. So this building,
yeah, you know what? Let's just keep the
building. Why not? So if you go up here and
click on the Layer Explorer, we can just organize
this nicely in layers. So all you want to do
is select a model, press the little plus sign, and just call this one, um building underscore
blockout, for example. And now wanting to keep in mind, whenever you create a new model, it will place the model
in the layer that has the blue like layer
structure activated. So we want to set this back
to default. Okay, perfect. So we already now know roughly all of these
sizes over here. I don't know why I'm
a little bit laggy. It's a bit strange. Oh, wait, we probably want
to just save this. Let's do not a saves. Let's do a saves copy. And let's just call this
modular planning. There we go. We are going to
get started with, as you can see over
here, probably like the wild pieces and
everything like that. Yeah, I don't need to save it now because I
already did that. So let's go at the
Four wall pieces. Let's get started by
just defining this size. And this is why I wanted
to kind of, like, keep the building the same. So let's say that this going to be probably like
a default size, but honestly, we'll see. Just go ahead and turn
off using little ICon. The little button. Now, if we go, oops, one button. If we go over here,
you can see that these sizes are actually
massive compared to the grid. Now, I do want to, however, do precise modeling. So we need to decide what
our metrics are going to be. If we go to customize
and go to unit setup, right now we are
set to millimeters. Maybe it's easier if we
just work in centimeters just because most of our assets are going
to be quite big. Now, in terms of the grid, I tend to just scale
my model down by 100%. So if this is 100, I
would set it to 0.1, and that often goes a little bit better than trying
to go in here by right clicking on your
snapping and then to go to the home grid and
tight, set the spacing. Because even though
you set the spacing, it will actually also increase the spacing in between here, which in turn will
make it useless. So we are going to do this. We are going to go
ahead. And Gulzwick, you will see me do
this very often. Go into your hierarchy,
press effect pivot only and center object to pivot. And this will just
center your object to the pivot and then just
turn off effect pivot only, and we are going to
scale this down to ten. So this is going to be basically the scale
that we are going to work with because what we
can do is inside of unreal, we can just set the
scale to 100 again, or we can set the scale to ten, and then it will
just compensate. But I like working on a grid, so this is just a
lot easier for me. Okay, so let's get started
with our window pieces. For our window pieces,
I don't think I actually have reference,
okay, here a little bit. But I don't think I actually
have proper reference of fill on window pieces
that you can see over there. So what we can do is we can just quickly
go to textisdt com, which is another really handy
website that you can use. And then it will have often just like some window where
are you windows over here? And then probably
like industrial. This feels like an
industrial style window. Maybe something like this, or shall we maybe go for, like, a longer window? No, I know what
because over here, it also quite works quite well. So let's just go ahead
and just middle click, and I'm just going
to open up a few of these windows so that I have some reference to look at when
I am creating my windows. Yeah, you can try to go for,
like, something like this, but let's just go for this one. And then it will be surrounded
by concrete pillars. However, we will be using probably bricks for the outside. So I'm going to go
ahead and you need to have you will need to
create an account. However, you have 15
free credits per day, so it is completely
free to create an account dragging in over here just by
pressing download, dragging your texts in
your reference folder, and then it's just
a matter of for me. Selecting them, and let's
just throw them down here. Perfect. Okay. So and I quite like to just
show you whenever I need some extra
reference where I find it. So what we're going
to do is we are going to get started
with our window piece. This is quite important
because it will kind of define the scale
of everything. Once again, everything
always defined the scale. So I'm going to go ahead and this is going
to be a blockout, remember, it's just a blockout. Go to a box, and let's
turn off our outer grid. Now, what I like to do is because these
pieces are modular, we need to make sure that
we have at least one point on 000, which is the center. The reason for this is because Unreal engine always places your pivot point
on this 000 point. So as a pro tip, just go ahead and whenever
you create a model, turn on snapping over here and make sure if you
right click on it, it opens up the
setting s panel that you have grid points
selected because now you can just click and see I can drag and I can just make it
as long or small as I want. At this point, I can
just go ahead and I can go in here and I can say, so we are working
in centimeters. But remember that it's
going to go bigger. So if we go for a
width of, let's say, 100 centimeters, it basically means that it's going
to be 10 meters. Yeah, so 100 centimeters. Oh, God, this is so confusing. Yeah, 100 centimeters
is 10 meters. So we just need
to say 10 meters. And if we compare
this to our building, so let's just go ahead and grab our building over here and
set the building to ten. That's the only thing
that's a little bit confusing, getting a start. It's easy to do, but just
getting the first two, three pieces down is always
a little bit confusing. So if we would go ahead
and we have this one, we kind of need to guess
if this makes sense. So first of all, I am going to quickly just get rid
of it off the plane. So let's say that we have,
one of these pieces, then you hold shift, and then we have a pillar in between. So how many windows
would we get? One, two, three, four. So we would get around four, and it would also not really
have a nice division. However, ten does feel yeah, it does kind of,
like, feel logical. Let's have ten, and then
if we need an extra piece, we can just have
a single window. So let's make it 10 meters. Now that we know that,
we have the tenmeters. All we need to do is you need to go ahead
and you first of all need to snap
your pivot point to this verts over here. We do this pretty much the same as snapping it to our grid. We turn on effect pivot only, and that's the only
difference. Turn on snapping. But this time, right click
and snap also to vertex. So now what you can do is you can simply snap
this to your verte. Turn off effect pivot only, and because it is also
still snapping to the grid, we can then snap it to our grid. At this point, all you need to do is decide for a thickness. In our case, the thickness
is probably going to be like 5 centimeters. Okay, that's unfortunate.
In that case, you can also use
scaling if you want. So if I want, I can also just go ahead and go in here and just scale it because the thickness
doesn't really matter. You can see down here,
you can see the scale. So I'm going to
scale this to say, I need to have some space. Let's do probably 25. So 25 thickness so that I have some space
in between here to actually Oh, God, brain freeze. To actually extrude this in. Sorry. Okay, once
we've done that, all we need to do is we need
to go ahead and figure out our floor height for which
we have this version. So this looks like that it's
going to be 50 centimeters, which, as you can see, it's
pretty much like 5 meters. Perfect. So this is all working correctly the
way that I wanted to. So now what we need to do is
we can turn off a building. All we need to do is just
go ahead and turn this into an actual window piece. So if you have a look, let's go for a double window piece. As I said before,
it's just a blockout. We are going to convert
this to an added pole. Let's go ahead and
just select with the edge mode over here,
all of these edges, and we are going to go ahead and let's go to connect
connect settings, set these the two, and then
just move the second one, which is like your offset
and just move it out. This way, there will
be brick wall here. There will be brickwall here. And actually, now I look at it, I want to actually
give it more space because we also need to
remember that we will have pillars running
most likely along it. So let's go to 80. So we
will have a brick wall here, brick wall here, and
this brick wall can be partly covered
up by a pillar. Then we select the center again. Another connect and this
time we set this to, for example, 20,
that's way too low. Five I said five. Okay, never mind.
We need to go in minds. I didn't realize that. In any case, make this
one the thickness that you want just
like the center bit to be. Let's say -70. And finally, select
these etches, connect, double connect, and set this to be the thickness or the
size of your actual window. So let's say
something like this. Once again, I just want to give it some space
all the way around. This point, all I need to do
is I just need to go ahead, hold Shift and just extrude this in to indicate that this
is going to be a window. If you want to push these
a little bit further, you can add a swift
loop down here. Then what you can do is
you can, for example, select these two pieces
and then extrude these out and maybe give them a
little bit of an angle, like you can see over
here, just to show that there is going to
be a balcony on this. And that's it. So
that's basically the level of detail
on our blockout. Now what we're going to do is we are going to
create the next one, which will be, for example,
a pillar sitting on top. And then we also can have a
pillar sitting on the side. But for that pillar, oh, way, that's going to
be like these pillars. So we still need it
anyway. It's quite big. Hmm. I wonder if
that's going to fit, but we'll see how it all depends how we
build our building. So we can go ahead and we
can go in, create a box, and I'm just going
to, like, kind of make it down here because then I can set my width to 100. I'm going to set my height to so 100 to 10 meters, so ten. This is like 1 meter high, and that's pretty much like what we were looking for right. I'm going to drag in my modular planning over
here. G bit smaller. Yeah, so we are going
to have a beam that is 1 meter Maybe two
met. No, yeah, okay. Because I think 1.5
meters, you know what? Let's do 1.5 meters. I think 1.5 meters
should be fine. And once you've done that, you can also choose
the thickness of this. I'm probably going to go
ahead and just make it a square because it is a lot more flexible
and it's a square. And then all we need to do is
so this one will later on, come on top like this. But for now, we
select our window, throw our window
into a new layer, which we'll call
window piece clean. Turn it off, select this beam. Effect pivot only, and just snap this to your
Wertz over here, and then effect pivot only
and snap this to the side. And we can add this one and this one is going to be called a some horizontal
concrete beam clean. Sometimes when you accidentally still have your window selected, it will try to place the
layer inside of your window. Then just go ahead and click and drag it
outside like this. So we got those ones done. Now what we can do
with this one is we can probably just go
ahead and press Contra V, make sure that it is a copy. And then with the just
copied model selected, we can add another
one and we can call this vertical beam clean and this one will later on
then also get broken versions. So we can turn off
the horizontal beam. This one, I'm just
going to go ahead and rotate it with my snap
rotation turned on, and you always want to
have the angle consistent. If we have everything not surpassing these three
points over here, we want to try and
keep it that way. Now, for this one, this one is quite a bit thicker. So maybe we want to make this 20 by 20 centimeters,
and that should be fine. Add a pivot, snap it to Verzi, turn off add a pivot,
and then snap it back. So you can see how
quickly that this goes. And then it will also have
a ten meter increment, which in this case, I want to have the
increments to be the same as a window and like a
horizontal beam piece. To make sure that
it is the same, I'm just going to turn
on my window clean. And then what I want to
do is I just want to grab my horizontal beam and place it as if that I'm
placing it inside of an reel. So inside of reel, what I would do is I would place
it like this. I would maybe, like,
move it out a bit. And then I can see
that this one is going to be what did we make this? Height. I forgot. Well, we can figure
out soon enough. So if it's not 20,
it's probably, oh, Was it the length? No, it was the width over here. It's because we rotated it. See, so length, width and height mean nothing because as
soon as you rotate it, it means something
else. Let's see. So if I go 80, no 50,
Oh, wait, that's why. In that case, just
temporarily move it. So let's see 80.
80 plus too much. I know it's an even number,
so that's why I only need to go ahead
and just select 70. Was it not an even
number 60, 65? 65, see, even number. Okay, so now that we know
that we can delete this one. We can turn off
our vertical beam. Oh, no, our horizontal
beam and our window piece. And now it's once
again just a matter of affecting pivot only, throwing it, no
turn on snapping. And then turn off effect pivot only and
have it over here. There we go. So now we are able to just duplicate this
over and over again. And that's what the modular
pieces are all about, so that what we can do
is later on we can, for example, if I
would do snapping, you can, for example, snap
it to ertzes and then you will be able to
just move it up and up and up until
we reach the top. So yeah, module pieces
are repetitive. I just realized that
I did not actually explain what modular
workflows are, although I'm sure many of you have heard of
it quite often. So we already got those
pieces over there done. Let's have a look at our list. What I like to do is
whenever I'm done with it, I like to set B behind it so
that I know that it is done, B, and then we have a
concrete pillar, clean B. Okay, then we also have
some internal pillars and some internal walls. Let's go ahead and
get started with those because those
also need some clear defining on making
sure that they all fit. So for the internal walls, we now already know the height. This is our height for
the internal walls. White? Yeah, because it
would have an extra bit. No, wait. I feel like this would be the height
of our internal walls. Yeah, that makes
more sense so that the walls actually go a
little bit higher inside, so it will have an extra bit
of concrete. That's nice. So what I can do is
I can once again, in my layer, turn
this on to default. I'm going to grab my box. And this time I'm
probably going to make my internal wall square
because it makes it a little bit easier to create texture and
everything to do the texturing because square is always easier
to make tilable. So what I'm going to do
is I'm going to go ahead and I'm going to set my
width and height the same. So we had 60 white. Let's just turn on my
vertical beam over here. 65. And then because we
do need to of course, look at even though this wall
is going this direction, we need to look at it in
the opposite direction. 65 by 65, and then we are going to make
the lengths. Let's see one. I want to sorry, the internal wall,
I want to have space for two layers of
plaster and a layer of bricks. So if you guess for that, let's see that two is like around 20
centimeters, I would say. Doesn't make complete sense, but at this point, we are kind of like
eyeballing it. So I would say that two, which is around 20 centimeters. So yeah, like, I feel
like that should be a decent size to
get started with. Actually, maybe 2.5 if I show it a reference
based upon that. Let's see, our window over here. Yeah, here you can see that our window is pretty
much like the same. Let's do 2.5. At this point, it's not the worst
case if we are making it a little bit too
thick or something like that. If it looks silly, we will just change it. That
does not matter. So don't not worry
about it too much. So we are going to
make 65 65 by 2.5. Over here. So that
one is looking fine, although maybe I want to go, because if I do 70, it is
following our grid points. Oh, no, wait. We cannot do 70 because we need to have
a specific height. So, okay, sorry about that. I'm talking too much. I'm going to go ahead and just add this do a layer
and call this one, uh internal wall clean, and then later on
we will also have versions that have a door in it, but we can always just go
ahead and replace those. So we have internal wall clean, and now for our internal pillar, that one, I basically just want to create
a smaller variation because here you can
see that the pillars are working pretty
much the same. So if we have a vertical beam, I can just go ahead and I can do Contrave to s a
new layer and call this internal pillar score clean over here and turn
off a vertical beam. So internal pillar, 65 is fine. So right now it is 20, so two meter wide. So if I make it ten by ten, yeah, I think one by 1 meter. Oh, 15. Let's do 15 by fifth Wow, that's such a large difference. 12 by 12. There we go. Builders don't really
have that much of an exact size just
depends on the building. So internal wall
can be turned off. If fact pivot only,
snap it to the corner, and I just snap
this pillar back. And later on, it will make
sense why we are doing all of this snapping when I
show you inside of unreal, how that we can snap
everything together. So we got this one
done over here. The only tricky thing often, but it does not
matter for a pillar is that when you go
with uneven numbers, although technically it is even, but it means that on
larger snapping values, you cannot properly
snap it together. That's why you kind of want
to go in steps of ten, if possible, and Le
in steps of five. But if both of those
are not possible, then I tend to go
in steps of two and not really one because
then it becomes too small. So we got this one
also done over here, so we can go internal pillar B. So you can see we are
making good time. Now, at this point, we have reached the end of this chapter. So what we will be doing is, let's say in our next chapter, we are simply going to go
ahead and I think we are just going to work on some
floor pieces and some wood pieces,
roof pieces, I mean. And this because
as I said before, I first of all I want to get the structural elements done, and only then we
are going to create the destruction because those
are a lot more complicated. So let's go ahead and continue with this in the next chapter.
7. 06 Creating Our Modular Blockout Pieces Part2: Okay, so we are just going
to go ahead and continue. So we finish off with
our internal pillar. Now what we're going to
do is we are probably work on the roof pieces and, like, the floor pieces
and stuff like that. So for this one, this one is probably a little bit trickier. But we kind of see. So
they need to be square. So if we go ahead and let's
grab our window piece, yeah, we probably want to
use the same size as this. Yeah, yeah, I'm
going to do that. I'm going to use the
same size as this. Did I Oh, of course, I already forgot the
actual values of it. So let me just go ahead and just grab if we go to snapping, turn off snapping to ertzi. And we basically, Oh, see, this is what happens
when you accidentally have a Wong piece selected. So you can just press
Abt object creation, just go back to the default. And I'm just going to go
ahead and Oops, turn on box. Now, I said before this
going to be a square piece, although I kind of
already forgot so yeah, 100 by 100. I think
that's what we did. We made it only 10 meters, so that's actually quite easy. So at this point, 10
meters by 10 meters. Now, for the size, that one can also
be quite tricky. So I think because it
is the actual roof. We also want to add some like those really
thick metal pillars, metal beams that you
can see over here. So if we want to add
those in between and like, keep an
eye out on that, right now we are not
going to add them, but it just means for the
thickness, 10 centimeters. So 1 meter thickness. 2.6 maybe. Oh, wait, sorry, 106? Yeah, let's do six.
6 centimeters, which is, like, I don't know, 60 centimeters or
something like that. So let's go ahead and go
for effect pivot only. Turn vertex back on, snap it over here, throw
it in here. There we go. Okay, perfect. I'm going to
just move you out of the way. And I do not want to do
that with snapping turn on because then it
just becomes a mess. Okay, so this is going
to be like a roof piece. However, we also need to
create broken roof pieces. But I wanted to give a
little bit of an angle. That's actually a tricky one. However, we could use
the modeling tools inside of UnLgenV to kind of, like, save us some time. So I will most likely do that. So if we know about
our modling tools, what we are going to
do is our broken piece will basically just
be like a piece that is just kind
of like cut off. I do already want to
create my broken piece just because it is a
very important piece. So I'm going to go ahead.
And you know what? Actually, I'm going to
make this 10 centimeters. I changed my mind after all, because I need to have,
like, roof, metal, and then I need to have
even another little bit of sealing on top of it. So
I'm going to add this one. There's going to be a
roof on the score, clean. Now let's go ahead and let's
do a contra V to duplicate. And this will be roof underscore broken underscore
variation A or 01. I will always say variation 01, even if we only
have one variation because you never know if
you want to add more pieces. Now, what you can
do with this one, if you want to make your
life a little bit easier, convert it soon at a Polly, select the top face,
and just press Contra I and just
remove everything else. Because when you do that, you should be able to go into
your modeling tools, grab the cut tool and
you can roughly just create a general cut and this
is going to be blockout, but it just so that you
can see that works. And it will be a little bit
easier for us to then just go to face mode, selected one. And now if we go to border, select overhead, which
is number three, we can go ahead and we
can turn on snapping again and we can just go
ahead and we can actually, we don't even need
to do snapping. Just go ahead and just move it down and you want to set
the centimeters over here, the Z axis to zero, and then you will snap it
automatically to the bottom. At which point you can just pass CAPPly which you are to face
at the bottom and the top. We do not really need
to connect it yet. It's just that we have some kind of a broken roof
that we can use. So having that done, roof broken or roof clean, B, and roof broken variation, B. So now we are going to
do like a wood flooring. The wood flooring, we
probably want to have the same measurements
as the roof. And, so for the wood flooring, that one, we have
a clean version. That one, we probably
need to have a few variations because I think it is quite
an important feature. So over here, we will
probably have also some chunks that we will
just scatter around. We won't make those
now, but for now, let's go ahead and
let's grab a box, and I'm just going to
use this version again. Over here so that's
immediately ten by ten, or sorry, 100 by 100. And just artists and
call this wood floor, underscore, clean, and then turn off the wood floor broken. So for our clean version, we are going to make
the height only like not even two,
maybe like one. So it's going to be like this
Wille thin sliver of wood. Then what we can do is
we can do a Contrave, copy it again and call this
wood floor, underscore. Broken underscore variation one. Then later on, we
will, of course, create all the other variations. But before we do that,
we first need to see if everything works the
way that it works now. We will create blockouts for most of the
other variations, just not right now. We have the broken variation. For the broken variation,
what I'm going to do is I'm pretty much
just going to go ahead and let's move let's
convert to add a poly. Let's see. How do I
want to move this? I think I just want to have
everything from this side. So let's go ahead and just
move this roughly down here. Oh, do we still have
the wood for clean? There we go, turn
it off. Yeah, let's just move it
somewhere along here. And then we are going to
do is we are going to press T to go to the top view. And I'm just going
to very quickly create some boxes like this. And these boxes will just
indicate where we are going to have our flooring. So what we can do is
we can just go ahead and we can here, let's actually just
move it over here. And then if we go ahead
and just duplicate this, move it back to an
off snap rotation, give it a small rotation,
duplicate this again. Move it back,
duplicate this again. Rotate it a little bit. And once we've done a few of these variations like over here, so we have this one, then we'll have a clean one
that goes like this. Now what we can do is
we can pretty much just duplicate this a bunch of times and just set the
number of copies up, which for blockout is fine. Over here, it will just give us an indication that it's
going to be a broken piece, and we will just improve it
later on a little bit better. So I'm just going to go
down here to isolate, or you can press
Add Q if you want. Select the first one and then just go ahead
and attach all of those other pieces on
top of here. Like this. Perfect. That one is also done, which is going to be our
wood floor and clean, B, wood flooring broken, B, double door clean
and double door broken. This one is a little bit tricky
so the double door clean, what will I do for that?
Let's turn this off. Let's go into our
internal wall over here. And let's go ahead
and just copy this. I just call this
double door clean, and we will only have
the clean version. And's for the internal wall. So we made this 65 height. Let's say that we make
this to around 65 height, which is 100 centimeters
is 10 meters? Yeah, we made this really large. So I'm just having
a t. Let's add it to like fifth no eight. We do need to keep this at 65. We just need to set this one to, like, half of that, maybe, maybe like 20 even. Maybe 230. This one is a
little bit trickier because I'm not completely sure, unless I go to unreal,
how I want it to look. So we might need to change some metrics around,
but that comes later. So over here, let's
go ahead and Oh, keep snapping turn on. Let's snap this back,
and let's say that this for now is just going
to be a double door. So because I now want to go
ahead and go into unreal, I want to start placing
my models around, compare it to an actual
real life model, and see if we can make it work
with metrics that we have. If we cannot make
it work, then we just need to slightly change our metrics and maybe simply add some more flaws in order to compensate for everything. So we are going to go ahead
and save sin at this point, we can start by
exporting these pieces. So let's go ahead and grab,
for example, the first piece. We are going to go
file export selected, and we are going to export
this in the two unreal folder, and just always export it
using the same name as your layer over here because then you will
not get confused. So horizontal
concrete beam clean, and we can just export it.
And what you can also do. So once you press okay, you would then go
to the next one. And then what I can do is I can right click on
this, press Rename, and then press contro Z so
that when I export selected, so I select this
one, I can just go ahead and press CtraV
and that will save me, again, a little bit of time. I can then go ahead and go
to the next one over here. I can rename, select, export there we go. See, this is always
good for organization. If you just go ahead
and make sure that the naming is always consistent throughout all of
your applications, you will not get confused
once you get a lot of assets. Right now, we don't even
have a lot and of course, this environment will
not have that many, but imagine you are
working on a game. And for example, if you are
working on a large game, let's say that we
pick ddivision. I believe that ddivision which
I worked on had like oh, 1 second. I think I'm messed up. Yeah, here, I accidentally
copied the Wong name. So let's say a game
like the division, at one point, it
had 16,000 assets. So you can imagine
if you do not have correct naming then,
it will be really bad. Of course, with
that many assets, you have entire systems to
just manage all of the naming, so we won't have that stuff. So every name has or
every asset had an ID, along with the name so that
you will never get confused. But now, it's just good to just have
everything consistent. So we are going to export
selected this one. And we're almost there. Some of these blockouts are still
looking really bad. We will definitely go
ahead and improve those. But I first of all, want to see if they actually work before we start putting in any actual time or actual
longer time in it. Yeah, for example, the broken
wood floor, of course, we would not have it just
a straight row of wood. That would look very bad if
we do something like that. So we will go ahead and improve those things
a little bit later on. Rename. And finally, we can go ahead and we
can export this one. Okay, so wood floor, clean sa done, and we will finish this chapter off
just by going into unreal. And if we then go ahead
and go into our assets, we can just use this one. We are going to go
ahead and I'm just going to select them
on my other screen. Feel like we are missing
a few, but we'll see. Do not import the base
building blockout, of course. And then it's just a
matter of importing this. However, remember,
we scaled it down, so you want to set the
uniform scale back to ten, so that it scales
itself up again. And that's basically the only
compensation that we need. For the rest, we can
just go ahead and press Import Al and there we go. Those are now imported. Looks like that they do not have a material, but
that is no problem. You can, if you want art, your
default material to this. But if we would go here and
let's say that we grab, for example, our
window piece, Oh, hey. Did you not do what I said? Oh, that's strange. Must be like a bug or something?
That is strange. So let's go ahead and open
it up for some reason, even though I said it to ten,
or maybe I made a mistake. I shouldn't say that
it's a bug right away, but well, it is an
early access program. So of course, there are
things that can happen. So in that case, just double click on your
model, open it up, scroll down to input
settings and set a uniform scale back to ten
and then just press re input. And that's we do the
trick. So if you just go ahead and do this
for all of them, I know it's a
little bit tedious. And then the next time
we are importing pieces, I will just double check to make sure if I did something
wrong or not. But in this case, we can just go ahead
and press reimport. Like that. Same over
here, reimport. Oh, yeah, I see, see.
So it looks like it only did it for one asset and
not for the other assets, which is a bit strange
because then I expect it to just have a pop up
normally that says that. But that's okay. We
are almost done. Just two more. And then we can start by
comparing it, of course, with our actual scale reference, just to make sure that it
still has some logics to it, because that's also the
thing with concept art. Sometimes concept art does not always take into account
actual real life scale. So you need to find
a balance here. Because here, if you see
this is like the guy, come on. Why doesn't it? There we go. So if we can see this is like
an actual person. So we can see that we need
to change our metrics. This is way too large. It would not work logically, even though it
will work in here. Compared to this
person over here, it will simply not
work very logically. So we need to go ahead and
we need to see if we can make it work with
correct scaling. That's what we'll be doing
in the next chapter. In the next chapter, we will go ahead and sit
down and we will make sure that all of the
scaling works and that we can still create the
mesh that we want to create. So let's go ahead and continue with this
in the next chapter.
8. 07 Placing Our Modular Blockout Pieces Part1: Okay, so what we're
going to do now is we are going to
fix our scaling, and we are just
going to make sure that it is still all balanced. Now, you might
feel like, Oh, no, I've just wasted all my time because my scaling
is not correct. But that's absolutely not true. Fixing the scaling is
actually very easy. It's just a bit tedious to figure out exactly
the right scale. That's why I didn't
bother with it until now. So what we are going to do is I actually ordered
something that I thought that might be useful. I ordered a scale
reference over here. If I import it for
you into our scene, Uh, yeah, I'm not
exactly sure how big it is because I have not used it in a
while. Okay, perfect. So it is already the right size. So as you can see, this
is the correct size of, like, a human person. So we can kind of,
like, use that. Makes it a little bit easier. So what we need to do now is we basically to figure out how many of these
windows we can add. So if we want to have
two windows here, it's going to, of
course, be a bit tricky because of the
scale of our building. But we can simply just
add more windows. We just need to
figure out the exact scaling for this one version. And if possible, I want
to keep it even numbers. So right now it is ten, which is perfect because that
means that I can go even. If I set this, for example,
the five and press reimport, I can oh, Okay. So, fair enough. So
it looks like that. If we set everything
to half the scale, so we set it to five, it
should be pretty much fine. And for the rest, we can pretty much keep
everything the same. This scale reference
we will use later on when we create our final
meshes because then we just need to make sure
that the windows are the correct scale based
upon an actual person. Only thing what this
means is that instead of, for example, having one window, you would go ahead and you
would turn on snapping. And now you can see that
you would probably just like over here, snap
it to two windows. But because we
said this to five, I believe that see, is this already
correct? Okay, perfect. So it's already
snapping correct even with a ten grid value. So yeah, you would
basically just build the environment and we would
just have a lot more floors. Although what you
can argue is you can argue that the
first floor could, for example, become
much larger floor because it's like an office
building, for example. Now we are not going to do that because then I
would need to create an entire first floor and all of the pieces that
go along with it. But just keep that in mind. So now that we pretty
much know our scale, all that we need to
do is we do need to go ahead and just
open all of this up, and I don't worry, I will not have this on camera. So we are going to open this
up over here and just set everything to five and then just go ahead
and just finish it. Because we made all the scaling relative the same compared to, like, for example, window piece, which is very important
that you do that. Do not just randomly go around
and change the scaling. All we need to do
is we just need to simply go in here and
just set the scale. So set it to five and
then press reimport. I will pass the video and
I will do this for you. Okay, so that's now done. So what are we going to do now? With these pieces
that we have here, we are basically going to ty and create already
this building. One thing that we
do need to keep in mind is that down
here in this slope, of course, if we have
windows in this slope, these windows will
just be cut off, and that will not
look very nice. So what we can do is we
can just quickly go in Max and that's another piece
that we then need to create, but it's going to
be a very easy one. If we go for a window
piece clean, over here, we can go ahead and
press Contra V, copy it and just call this
plain while score clean. Over here. And once that's done, let's turn off
window piece clean, smooth my keyboard shortcut. And all we need to really
do with this one is I'm just going to go
ahead and I'm just going to select all of these
outside faces over here, delete them, and that
makes it possible for me to select the inside just by double clicking
and deleting it also. Yeah, so we have, all of these segments, which we do not need,
of course, anymore. Even though it is a blockout, it is just easier for
me to just remove them because then all I need to
do is select these two, bridge them, and we can go ahead and just
export this once again. So this is plain, well clean. Here we go. And now if we just
go ahead and import this I'm just trying to find it on my other
screen. There we go. Plain will clean. And just remember to set your
uniform scale to five and simply press
Import. There we go. Okay, so we can use this one to basically stack it all up. So most of this, I will just make a plain wall, and then I will continue
on with the windows, or I will just make an
entire row of plain walls. I don't know yet. So we
are going to get started. Oh, damn, I'm using
my camera actor. I did not even realize that. Let's set it roughly back in
location and then click on the button to not
move it anymore. So basically, what we're
going to do now is we are just going to start
by building our building, using the pieces
that we have, and then we will notice soon enough if we are missing some
pieces and stuff like that. Looking at this, yeah, so like the flooring
that we'll do, we will go ahead
and we will create a collapsed version
of this later on. But for now, this
should be fine. So what we are going to do is let's go ahead
and prepare this. Let's delete this one. Let's grab our wall over here. What's this one? It's
just an empty weird. Okay. Let's delete that one. Maybe it's a leftover from
that case that we had before. I'm going to create a folder and call this folder
main building. And when you have your
building selected, it will automatically
throw it into the folder. And I will call this I will
select all of these pieces, a folder, call it blockout. And finally, we have
these pieces over here, except for the scale
v and the landscape. Let's just call this rendering or lighting or
whatever you want. There we go. That will make
it a little bit easier. Now, whenever we have
our main building, I can just turn it on and off whenever I start building it. So let's grab a corner
and get started. What we want to do
is we want to go ahead and probably get started with adding a vertical
beam clean over here. It might feel quite small
right now, but that's okay. So we have this
vertical beam clean. And then what we can do is we can have a window
piece over here. And at this point,
I can actually already just turn off
my main blockout. Now, we are basically
going to decide, first of all, how far these
vertical beams stick out. I think I'm just going
to have my window piece slightly in here just to
make it a bit easier. And for us, that seems
like a pretty decent yeah, if I have a look,
that seems like a pretty decent location for
us to have it sticking out. Now, all that we need
to do is we need to go ahead and yeah, let's go ahead and duplicate
this and move this up. And the cool thing
about unreal is what you can do is
whenever you move it up, you can always
replace the model. So I can go ahead and go in
my horizontal and art this. And this is why it's
so important to have everything in the same
direction because even though this is like
a horizontal pillar, it still works perfect. So I want to have this
pillar not completely, but like Pagni sticking out. So that's basically how it
is going to be made up. Then what we can do is
we can go ahead and we can just duplicate this one, Control C, Contrave it, and then we can go ahead
and we can move it over here and then simply
move it out once more, and now we already have
a corner ready to go. At which point that
we can basically just build a bar corner. So we could now go in
the main building and because we have snapping here at the top turn on
and it's set to ten, it should all snap
perfectly fine. Just double check. Okay, so this time we need to
probably snap at five. So whenever the snapping
of ten does not work, just go to small
increments. There we go. So it seems that because
that wasn't uneven, remember, it was, I
think we said like 65. Because it is uneven, you sometimes just want
to snap it lower. So what we can do at this
point is we can just go ahead, build up this site
wall and then start duplicating the rest of these
walls together with it. And that's basically the trick to this. It's not too difficult. The only thing is
that we need to make sure that the transition
that we are going to create that looks logical
because Montel, of course, they have a transition
that looks very nice, even though it is broken, that it is like a little
bit collapsed. So how do they do? Okay, the transitions, they basically have the
transitions as, like, a ceiling and then they
kind of make it fall off. I just wonder at this side, we probably want to
have a broken pillar and have one side of the
pillar which is completely broken and we can always just
use that pillar wherever we want to basically
have an ending. Now at this point, what
we can do is we can grab, for example, this pillar, move it up because remember, we want to have a
little piece like that. Now if you turn off
your main building, you can see that now
we already have this. One, two, three, four,
five, six, seven floors. That is quite a lot. What I'm going to do is
just for this building, I'm just going to use the
plane while clean over here, just to give it a little
bit more of, like, logics. Let me say it like that.
So once we have this, now what we want to do is we
basically want to go ahead and we want to duplicate. Let's go into main building. Okay, so, yeah, we basically just want to go
ahead and duplicate these pieces. Start
off our main building. And first of all, we're
going to place these, and then it's just
going to be a matter of copy pasting our assets. Now, you might be tempted
to right click and convert them to static asset and then use them, but
do not do this. They are modular for a reason we do not
want to break that. So we are going to go
ahead and we are going to you know that
let's sets to whoops, satis backa to ten over here. Okay, so we have one. So
now he sits exactly on top. And then we want
to go one further, like that. Okay, perfect. And now I just need to
guide in like, Look, okay, so this one goes along
for one more time, and then we go
another level down. So we can turn off
the main building. We can now just go
ahead and say, Okay, I want to have all of
these pieces over here, and it might seem
very repetitive, and it is very repetitive. However, this is also where things like foliage
would come in, when you are making an
entire environment, you would make it
less repetitive by making more variations
of your windows. We will create one
more variation, and then also to add
foliage and everything. So at this point, we can
just go ahead and we can click once more. Then if we go ahead
and have a look, we can turn on our building. I want to go two down. So we can turn over
main building. We can hold Control and just
de select these versions. One in. Was this one? Yeah, okay? That's one
in. And I want to go. Okay, so to the end. So this one is pretty much
like level, so one in. It's sometimes just
easier to push it once in because it will just save
any accidental problems. So we got these
pieces over here. Perfect. So now you
can see that we already have the side of
our building ready to go. And now over here,
what we can do is we can just have one pillar, and then we can
once again go down, and then all we need
to do is we need to add later on destruction pieces to basically make it
transition correctly and, of course, have more variations in our pillows and all
that kind of stuff. So I can go ahead and do this, so we duplicate it
or copy paste it, one in And now we can just
go into our main building, and I can see that I now
want to start here, yes. And it's probably I think
we only want to go once in. Of course, we need to
work with what we got now because the blockout still
uses these really large areas, but of course we
don't want that. So we can go ahead and we
can Control C, CtraVO in. Perfect. Okay. So that is
all looking totally fine. So that's one will
nicely flow over there. Around these areas,
this is where later on our empty walls
will basically come into place where we
have our extra walls. And we do want to
probably have a ceiling. No, we want to have
a wood sealing on top of this most likely. So that's something
that we need to play around with and
see how we can make it work because you would not have the wood sealing going all the
way to this top over here. But for now, let's go
ahead and first just continue on with our
outside walls, shall we? So I'm going to turn
off my blockout. I'm going to go ahead and
grab these ones over here, duplicate them, and one in. And then what you want to
do is just like this one and just replace it
with a plane while. Because at this point, also, at this point, it will
be really low down, so you won't really
be able to see it. But we need to go ahead and
continue this I'm guessing, like four times,
four, five times. 123 times maybe. No, no, so four times. So I was white.
And one in. Okay. So at this point,
it will come up, and then we will
probably still have, like, up until the first
level, a brick wall. So at this point,
let's turn it off. It basically I cannot
even see it anymore. There we go. To
basically, like, come up. And delete that. I need to have this one, this one, this one, and this one, and I need to
set my snapping back to five. There we go. Now we
can work with that. So this one would come up
and then deselect this one, set this one back to ten, and now we are just going
to continue it. Are we hitting it? Just.
Nice. Perfect scaling. So we just hit the end. I forgot to actually do
some flattening here. Yeah, let's just quickly do that because else it
just throws me off. 1,000 white. On a weight I did not forget to
do the flattening. Set the brush fall off. Down here, I did not forget
to do the flattening. I removed that flattening, but I do need to give it a
little bit more over here. There we go. Let's close this off. Yeah, that should be fine. At that point, of course, later on we will make this
look very, very nice. But at this point, we
got this one done. So we are basically now going to go ahead to an
offer main building, and we are going to grab
these pieces over here, and at this point, we can
go in and set this to five, duplicate this And before
we duplicate it again, just go in here and replace this with window pieces over here. So this is like an easy way. If this would be
a real building, you would go on Google Maps. You would find the
building. You will probably see a
building that has, like, a really nice, big looking entrance
that could be as big as over here as like
two floors over here, there's, like, nice doors for commercial building
where people can go in. You would have like service
entrances on, like, the site for garages and
all that kind of stuff. And the real floors would not start probably up
until this point. That in mind, if you want to extricate like a
fill on building, but this is a
destruction tutorial, so we can cheat. We can cheat a little bit. So we are going to
go ahead and I'm guessing four times one. Two, we are pretty high. I feel like it's three times, in that case. Yeah, three times. Okay, see? So we are
slowly starting to get the hull of our building.
So we have these ones. These windows do not
have a backside. How would we So it will
probably be very dark, so you won't really
actually see the walls, but we will probably
just throw on internal walls on the other
side so that you can see it. But let's do that a
little bit later on. I know it's a bit tedious
to do it later on, but I'm not yet sure. So for now, let's
just go ahead and see I'm going to go
ahead and grab these. At this point, you can no
longer even see the building, but just for the
sake of consistency, I do want to go at
90, push this out, it sets to ten again, push this one in
and back like that. And then what we
can do is we can grab these pillows and you can just nicely sink
them into the ground. And now it's just a
matter of moving this. I believe that this building can actually go all the
way here because then we just duplicate it
and just move it up a little bit. I think one more. Why do we need to do another
one? No, so that's it. Okay, so we got these pieces, and at this point, what we can do is we can simply go ahead and
select these bottom ones. Yeah, so right now it
does feel very boring. I will not deny that. But we'll get there. In the end, we will get blockout
always look quite boring. So worst case, I will just slap on an extra
chapter where we will just make a
bunch more variations just to make it look
a little bit nicer. But that would probably
be a bit of a waste. 1 second. Okay, so, yeah, we have the roof on
top of here, which also are thickness.
So let's leave there. That would be probably a bit
of a waste in terms of time because this is not so much a tutorial about creating an actual fully
fledged building. It's more about just
showcasing how to do all of your destruction and everything and just happens
to be that we need to create the entire building
in order to do that. Okay, so that's pretty good. Now at this point,
what we can do? Wow, scrolling up starting
to get quite slow. Now at this point, we can
also create the back. So for the back, Yeah, it would still be logical
if we just do that using the same pieces instead of just grabbing a cube and
just placing it there. But you already see we already get the bare bone
structures in place. So I'm going to go ahead and I'm going to grab these.
And you know what? I will just turn these
into plain walls. And the reason I do that is just for the sake of optimization. Like if we do not really see it, then it is no point in me using all this geometry
that we will use for windows when we
can just go ahead and turn these into plain walls. So you can also do this by
multiple at the same time, let's grab these plain walls. Select this stuff,
and we are just going to run this one all
the way to the other side. If it allows me to select it, which for some
reason, it did not. There we go. We will run this all the way
to the other side, and then we will just go
ahead and finish it off. Now, you know what
I have an idea. Let's just add already a
few extra levels on top of this so that all we
need to do is just delete instead of the
other way around. There we go. Then I can just go ahead and I can
delete the rest later Okay, so we got these
ones over here. And now what we can do is set
the snapping back to ten. One, two, three, four, it's a big wall. It's a very large wall. And they should end
up exactly like that. Okay, yeah, that fits. Cool. So we got these ones. So now all we need to
do is we just need to load up our main building, and then we know soon
enough, like, Okay, so this one and
this one and this one we can get rid of
then at this point, we do want to continue. And basically, the way
that we are going to then end it on these type of cases is we will have internal
walls that are broken up, and we will just create a
variation of the pillar that is like cumbled on both sides. So almost like the pillars
are still standing, however, they are not
in good shape anymore. So we have this one, and now
looks like at this point, we need to go two levels up? No. One level up. At this point, we
need to go one level up, turn off main building. Grab all of these pieces. Oh, wow, time goes by fast when you're just placing models. Set this back to five. But
this is a good point to end. We have the outer side
over here, ready to go. Perfect. So we have,
like an empty shell. But the empty shell, at least, it is our place. So that is now working great. So now we have all
of these pieces. And if we would go
to our camera actor, yeah, here, we can make
this look nice and grand. It will not look
exactly the same, because we need to
make it look logical, but that is no problem. That's always the case when
you are working on games, and it's still a
very large building, if you see, compared to this. Okay, let's save our scene. In the next chapter,
what we're going to do is we are going to mostly focus on starting with all of the internal walls
and all that kind of stuff. And we are just going to slowly shape this entire building. Let's go ahead and continue with this in the next chapter.
9. 08 Placing Our Modular Blockout Pieces Part2: Okay, so let's go
ahead and continue. Now we are going to work
on the internal walls, and that one is going to be quite an important one because we are basically
going to design how far out all of the walls in the environment
comes and everything and just like the
general shape of them. So if we have a look over here, what I'm going to do is I'm going to turn off
the main building. Maybe I would need
to create, like, a floor first so that we
have something to work with. So yeah, let's create the
floor from this point to Mm. Yeah, we can
probably have, like, big rubble piles
that would kind of, like, cover up those areas. And there's, like,
a lot of rubble. So probably best for us to just create a main floor around
these areas over here. So let's create a main floor
probably around this area. And we'll take it from there. Yeah, that should be
fine. For this floor, what I'm going to do is I'm
probably just going to use a cube because it
would be a little bit bigger if we just added
the wood floor to this. Then I will show
you how to create a material that has
basically world space UVs, which means that you do
not need your UVN wrap it. Let's just go ahead and go
to create a cube over here. Let's make it a
little bit thicker. I can barely see
anything from it. Can I maybe just
grab my default? And like, tone down the color because this is just
way too bright. Tone down colour,
press save. Come on. Still not working? Well,
we'll see how it goes. First of all, let's see
where we actual the places. So we probably want to
do say one over here, and I will just have the floor probably sitting just
below it like this. And then it's just
the twig to cover it up with like a bunch of
other different things. So let's say that disc is just going to
be our base floor, so we will carefully just move this probably
up until this point. I know about the terrain.
Don't worry about it too much. I will see if I can paint
it away a little bit. So let's go ahead
and first of all, just finish placing this one. Here we go. Double
check that it's not like sticking out from our
side or anything like that. There we go. Okay, so we have our base
floor that we can work with. Now, for our terrain, let's see if we can maybe,
edit it a little bit. Let's go to our train over here. And you know the draw
Let's go to flatten. Let's set us to like 500
to really push it low. And let's just carefully
see if we can Okay, so it looks like we actually end our walls at this point or not. Yeah, here, so I will need to add an extra layer
of walls to this. But for now, let's just
go ahead and do this. And just make sure that it's
all pushed out. There we go. Because I do not
want to bother with Twain inside of a building. And then all I need
to do is this side, let's say, Well, yeah, we don't actually
have anything here, so let's wait with that one. Let's go ahead and
duplicate this. Then over here, we basically want to go ahead and duplicate. This one. You know what? We
can probably just do this. Just select all of
these. Duplicate them, and then we can see
that we still have some areas that have train
clipping through it. So now let's select these
pillars. Here we go. And what we can do is we can go ahead and quickly go
back to our train. And carefully, click it away. There we go. Let
you do the trick. Sure, on this end, you will probably get some
holes, but that's no problem. If you would make a game, you would just have a road probably sitting
on top of there. So, we got these pieces. Now, we are basically
now going to divide like the internal walls, and we are almost
going to build this up like an actual building. So we'll do one floor, next floor, next floor,
next floor like that. So with this, let's have a look. I'm going to have an so we
have an internal wall clean. We do not have a broken version. It would actually be nice to have a broken version
because we can make the broken version smaller in case that we need to
cut it off early. So we have our internal
wall clean over here. There we go. So
what I'm going to do is I'm probably just going
to go ahead and copy it. Contrave, call
this well, broken. Turn off the
internal wall clean. And then for this version,
I'm just going to go ahead. Oh, convert it to an dditPly
then simply go to Edge mode, select these edges, do a
single connect like this. Select these edges,
go to connect and go down to the button next to it and go to
connect settings. Here, let's do
something like this. And then it's just a matter
of deleting this version. And maybe like breaking
this up a little bit so that we know that it is going
to be a broken version. And then don't forget
that you probably just need to go ahead
and hold contra and select these edges over here so that you can bridge them
just to close them off. So let's go ahead
and export selected. Whoops, I do not have my export
folder open. There we go. Exports to unreal discos
Bernal, well broken. Here we go. So now
we can just go ahead and we can go in here,
internal wall broken. Let's input it. And all of
the settings are still saved. Perfect. So I'm going
to go ahead and go for an internal
wall broken over here. Let's set our snapping
values probably to like ten Rotate, there's 90 degrees. So this is kind of
like the endpoint. So I will just have a nice internal wall broken over here. And now we are going to
basically divide up our floors. So the first floor, this will be the
floor that has, like, a lot of rubble and everything. You can see maybe, like, a tiny bit of the
floor here and there. But this first floor, it's definitely just going to be mostly big open areas,
lots of rubble. So we basically just set
this wall into the end. And then we first of
all, decide how far this out or how far out
this one is going to be, which is going to be roughly
around this point over here. Now, these walls
will actually also decide the variation in between, because if we just make
this perfectly straight, it would look nice. But if we make some of the walls slightly more and
some of the walls slightly less sticking out, it would actually make
more of a difference. So what I can do is I can,
for example, go over here. Oh, and I realize that
because we use 65, that's unfortunate because
we used a scale of 65, we need to snap by
points of five. So let me just
quickly redo that. See, this is probably the most important
bottom floor that we are going to do because
it will decide how far out. So let's say that
we have this far. And then what I can decide is I can decide that the next one, I want to go ahead and
make it less so I can go like this far out. So that our walls are actually
basically going like this, and then they are
being collapsed, and then they go basically down, and then they are kind of
like ending over here, but over here they are
inside of the corner. So we have this one. Now we are, first of all, just going to
focus on the outside walls. So at this point, I'm probably
going to duplicate this. Quickly rotate this 180. Oh, that's another
quite annoying thing. So over here, it will not work with the snapping because we didn't make it
to snap for this. So then we can just
turn off snapping and we can just quickly
do this by hand. You will not really
notice it too much. It's just because
of the piv point. Another thing that you
can do is if you go very, very close over here,
you are able to hold V, and when you hold V,
you can snap to ertzes. I I just move this
out, if I hold V, you can see that it
snaps to ertzes and that often does the trick to make sure that it is
perfectly aligned. So that's like a
little workaround for. So let's have a look. So we got these walls over here, and I'm just trying to roughly look at this building, but,
of course, not follow it. Still have our own
little thing going on. I'm going to have maybe, like, these, duplicate them, rotate them. I'm going
to probably have. So if this is the corner, it might be cool to just have, like, a little piece that
is sticking out a bit further like this over here. Um maybe make the last one a broken piece so that it's
not sticking out as far. And then for the broken
pieces, at this point, we are just going to go ahead
and do snapping to vertex. So you just want
to go quite close because there are often a
lot of futses going on. Hold V, and just try and
snap that like that. Okay, so we have a broken piece. So basically, it will stick out, then it will kind of
go back and there will be a bunch of rubble
collecting here. Then we have a broken
piece over here. Do we want to have
sideway walls? Probably not. So these are
just to define the main walls. Then we are going to go in and just add more walls to this. S, it's just a bit
of thinking work. That's why you see
me going quite slow because I'm just
thinking about how I want this to show. Let's say we have one here. Let's have another one here
that's a little bit shorter. And now we get to this
point, let's duplicate this. Let's have another one
probably over here. What we can do is we
can grab one of these, throw on like a
broken wallpiece. Oh, you need to be on this side. Hold V and snap it. There we go. So we got
this one also going on. And then what we can do is
we can later on just start by creating our floors and just make sure
that everything works. Okay, so we now got
the biggest areas. So now what we want to do is just in case that
you can ever see it, we are basically just going to break this up a little bit. So let's say we do
stuff like this. We basically grab
another floor over here, and we just throw this
kind of like in here. And then it is a matter of
just trying to, like, fit it. So you can just sometimes
with these types, you can just scale them down carefully just to make them
fit a little bit better. So we will have a
ceiling over here, and then over here, the ceiling probably starts like break. We will have some internal
pillars also on these end. So it'll probably have
like a pillar that is on the same line as this one. And then we'll have an
internal pillar here. Then we can also have like maybe some internal pills
that are broken off that are just
sitting over here, that are just
surrounded by rubble, but they are just showing
like a tiny bit over here, so we can have internal
pillars like that. And like that, you can slowly start to create a little bit of a floor or like a
floor plan, I should say. So at this point, I'm
going to probably have an internal pillar
sitting over here. And this internal pillar is pretty good because
it will give us a break point where we can switch from like
a sideway angle. And over here this
angle in general, it's going to be quite
interesting because of all the rubble so let's just go ahead and also grab
another internal pillar probably over here. And I'm not using too much
logic in the internal pillars. You could do that if you
want, but I'm not really in the mood to use an insane
amount of logic on o, but for our structural elements, the pillars need to be exactly
on this spot because of the US code of conduct and other stuff like we're not
going to do stuff like that. We're just going to
keep quite relaxed. Else we will be
here for 100 hours. So let's see, we got
this stuff over here. Maybe it is good if we start
already building out a bit more of, like, the floors. So let's say that
we have this one. Now, we need
thickness, actually. Yeah, we need it looks like that I remember that what I was
planning is to go for, like, a roof piece in
between every floor. And then on top of
this roof piece, there would be like
a wood wall piece. Which way is easier. This
way is easier probably. So let's have a look. So we basically have like
a roof piece over here. And then we will duplicate that. And then we just
switch this out for a wood piece like this. So it would have the wall
just sitting on top of it. And then what we can
do is we can later on, go ahead and then
here at the end we again just turn this into,
like, broken pieces. Let's go ahead and
give that a go. Oh, wait. I need to probably push this one all
the way back in. Oh, no, wait, because
we are going to have probably another
wall piece here, aren't we? Yeah, we are. So these windows, they are more like show from
the back side, but from the front side,
we are going to go ahead and just make this a
little bit different. But, okay, so we have
these pieces over here. Because we did not compensate
for our actual pillars, it can sometimes happen that we have some
extra space left. First thing that you
want to do is you just want to see if
you can push this out. And do this. And then worst cases, we scale it up later on. So we basically
would go up until, let's say this point.
Let's push this one back. And then it will just
have some broken rubble that is falling down, and that's like falling around here. So
that's pretty good. Now, around these points, we probably would hide it with foliage or
hide it also with broken rubble just to make sure that it all
looks correctly. You can ty and do an internal
wall also over here. And that one would
basically be so here. So it would be like an
internal wall like this, or maybe we will probably just make it
like an external wall. That is basically
sitting over here, and then it would need to
be pushed further back. So if we know that we can go
in here inside of Tres Max. We can go to our, where are you? Window, I know way,
plain wall clean. That's the one that I want.
I'm going to go ahead, Contrave and call this one play score while
score. Broken. Oh, for some reason,
it did not add it to our layer over here. And then I just need
to quickly check. Okay, so my pivot point
comes from this point, which means that I would
probably want to have the broken piece
sitting roughly around, let's say, this point over here. So let's go ahead and
just delete a part of it. And then maybe have
this crumbling down a bit more like that. There we go, just to
showcase. Bridge it. And we are going to
go ahead and export this plain well broken
score variation one. And then this one will
only have broken brick, so it will not have the layer
of plaster on top of it. So we got this one over here.
Let me just import this. Plain, well broken
variation A, import. And then it's just a
matter of replacing it. There we go. That kind of, like, maybe push it out a
little bit more just in case. Select all of these vertices
and just push it out a little bit like that. Plain, well broken variation A. Here we go. Let's re input this. Nice. See, so that can kind of cover up those kind
of things along with, of course, other models and
foliage and everything, which we'll add later on. So we got this floor. Now, at this point, the
floor would start like, Well, it would have almost
like a cutoff over here. So let's have a look and see how this cut
off would happen. So if we grab these
floor pieces, which I realize might not
always be the easiest thing to have because I need to do this in order
to properly grab it. And those pieces,
shall we just do this? Might actually be easier if
we just push it back out. But of course,
logically speaking, we should be at this level. But if we are at this level, then our walls will always
be sticking into it. And I'm not sure how
nice that would look. So then it would mean that
we would probably want to reduce our walls
a little bit. But then again, it
would make more sense, most likely, although
probably one higher. So it probably would be one highest that our wood
is sitting above here. So yeah, yeah. Okay,
let's do this. If we do it one higher, it should not be
that big of a deal. And then what we can
do is we can just carefully move this around. So we have this floor
over here. And let's see. Probably at one more, it starts to break off. At this point, it
starts to break off. So we want to just go ahead and continue this floor like this. And then over here,
unfortunately, you cannot just drag and
deselect inside of reel. So you kind of just
re select this. See and then this one does
pretty much fit like that. So we do have a floor over
here, so that's fine. Then these pieces, I'm not
too worried about it yet. I'm going to have this one. So this pillar will probably be here because if we have
the pillars over here, it will kind of tell us that this is where the
supporting basically ended. So these pieces over
here would be like the roof broken variation A, although this variation Oh, we switched it around. Didn't we? We switch
that variation around. Let's go Roof
broken variation A. Yeah, here, so I kind
of like need to switch this the other way
around because else it will be very annoying. So let's center our
pivot to our object. Turn on snap rotate. Rotate is 180 degrees. Effect pivot only, and this
time snap it to the vertice, turn off effect pivot only, snap it back. There we go. That's why we always need
to go from one direction. So roof broken variation
A because now, at least it will
work just instantly. We don't need to do some
weird rotating or anything. We can just do re import,
throw it on here. Okay, fair enough. In this one instance, it seems like we do need to see. So if we are this one I
probably had to place my model like this. Let's see. Yeah, here, see, I had
to place my model like this in order to do it properly. I don't know if it's as easy as just switching back
or if I actually want to change it because if I need to do this for
every single one, it might be a
little bit tedious, but it might not be that
bad, so let's just see. So let's have two broken
pieces over here. Yeah, here. So
it's not that bad. And then these pieces over here, they are the floor pieces,
which let me guess. They are also broken.
Yeah. They are also in the wrong location. I don't know why I did
not think of this. I keep saying it
and not doing it. So that makes me kind
of an hypocrite. I think that's the word for saying to do stuff and then
not doing it then myself. But let's do, an easier
rotation for this one. Wood floor broken 01. Reimport. Yeah, and then it looks like we do need to do the same
thing where we just need to rotate this and
then move it around. Now, with our wood or
with our wood floor, there is another
thing to worry about, and that is directionality. These bottom pieces,
they don't really care about directionality
because it's concrete. However, all of these other
pieces because it's wood, they all need to be in the same direction in
terms of how they lay. So we cannot just rotate
stuff around like that. That makes it quite tricky, actually, to be very honest. One thing that we can do
is we can quickly test it. The way that we
can test it and we will just use a test material, let's go to content and let's grab the Quicksaw
bridge over here. And that's the last
thing I will do for this chapter, test it out. And then I my Quicksaw bridge. So this is mega scans.
It's completely free. You can use it,
whenever you want, I just need to quickly sign in. Here we go. So I sign in. So you can just sign in using your simple Epic Games account, same account that
you need to actually download this engine. So we are going to go
ahead and just type in wood floor, for example. It is a little bit
slow sometimes. So if we do wood floor,
there we go here. So we can just
grab one of these. Doesn't really matter.
It's just a test material. So what I can do is I can just go ahead and
press download over here and just keep it at medium quality and
then just press art. That's what add this
material to your texture. So you can see that
you can just as easily just over here, drag it on, and then
we can see direction. So this is what I mean
with the direction. Of course, our visa not correct, but we can already see
how the direction works. So what I'm going to do
instead is I have this one. I'm going to just for this one version because
it needs to be correct, I'm going to manipulate it. I'm going to effect pivot only, and I'm going to snap my pivot
to the center over here. And once I've done
that, I'm going to go ahead and I'm going
to turn off snapping. And let's see. Let's see
if we rotate it like this. See which direction is
the right direction. Because I also I am not sure exactly which direction
I need to go into, but it's as easy as
just giving it a try. So you can just go ahead and reimport this wood floor broken. And now we would
rotate this back. Okay, so this is on
the right location. I believe. The only thing that we need to flip
around with our UVs, but this is something that we
can also do in the engine. So let's see. No, wait, no, this is not the
right location. I want to when I
drag it in 50 50. It is in the right
location, 50 50. If we really want to
make this perfect, what we would do
is we would now go ahead and just snap
this and carefully, like snap this to this point. Now it should
technically be correct. Let me just quickly
try and export that because I want to be
careful with this because if I mess this up now, it means that I would need to go back in and fix it later on, and I'm not really in
the mood for that. So let's see. So if
we now snap this, does the snapping
correct itself? Okay, so now it looks like
that it does correct itself, and it just has these
bits over here. So if I would drag this in here, it would. There we go. Okay, now it is working. Now, for your UVs, don't worry about this too much. If we keep everything like this, all we would need to
do is, in your UVs, and I will show you very quickly there is something
called the UVW map. These modifier
buttons, you can find them by going down here
and pressing show buttons. And once you've pressed
that, you can go to Configure Modifier sets. And in here, you can choose the amount of buttons you want, and then you can simply drag in all of the modifiers
that you want. So if you want, you can
just go ahead and you can copy over the same
modifiers I have. So that is these ones over here. I will not call them out. I will just pass for a second. There we go. And you can
pass the screen and, like, just copy paste them. So those are all the modifiers that you can also find
in your modifier list, but you don't need
to, like, scroll. So I'm going to
just use a UVW map and set this to be a box. When I do this, it is
basically giving me a projected box map for my UVs, and it's a very quick and
easy way to just add some Us. And then it's just a matter for us to export this and make sure that it is in the right direction and else we just want to rotate our UVs. So we can click and reimport. Now we can see that it's
not in the right direction. So we can go to the UVW map, and we can simply go ahead
and we can set our rotation. Alignment, most likely to Y? No, wait, that's not the one. Normally, what I do is I
just basically click on it, and then with snapping turn on, I just rotate it like this. That's what I tend to do. But I can remember there
was a button in here, but oh, wait here, flip. In the UV tile. You can
also flip it around. But same basic concept. So we can now go ahead and
once more export this. Re input this. There we go. And now it should
also be tilable. See? So now we have a perfectly tilable even though
it is two pieces. And that is enough for now. That's more than enough
than what we need. So that's good to know that
we now have these pieces. At which point, I'm just going to go ahead
and I'm going to just revert my material back. Wait, unfortunately,
you cannot revert it back to the true default. Oh, no, wait, sorry. I did not have the material selected. That's why I didn't
see it. Okay, so just like that we can
do this kind of stuff. Now, at this point, we kind of need to figure
out exactly how we are going to so this
one would go over here. So we would have some
walls sticking out, some wells sticking
out over here. At this point, I
feel like, yeah, we would have a bunch of, like, wood and clotta just
coming down here. We cannot really
visualize it yet. But let's see that
at this point, I will probably go Let's stick it out less and
then more. Let's do that. So let's go grab these pieces. So we're gonna stick
it out less first, so let's duplicate this. Maybe like two times. And then for the third time, we are going to say, I want
to stick it out. Oh, wait. Yeah, but here I am
minimizing that, but that should be no problem. I want to stick it out a
bit further like this. And then later we
will just once again, comply with our
walls and just make sure that the fits a
little bit better. So let's say a broken
area like this. And then later what
we can also do is we can also just make it
once again shorter. So what we can do
is we can do this, for a few floors and then push back the walls and everything
a little bit more. Yeah, here. So this looks
like quite a good floor plan. So we got this one, and then we basically go
ahead and go in here. And then some of these wells, you can no longer see as
well, but that's no problem. We can just fix that later on. Oh, that's interesting. So we are not even close to
hitting the end properly, which is a bit of a pain
because then that happens. That should be no problem. We can probably use our
modeling tools like cut it off. Or what we can do is
we can just have, like, a version that
is, like, halfway. So for now, let's just
go ahead and do this. And for this version, so this version, we are pretty much doing our
own little thing. We need to have three. Yeah, let's start with, like, three across or 2.5, I guess. Yeah, let's use to, like, a simple 2.5 across. And then basically the goal is, so we have these ones over here. That would also cause
problems over here, but we can probably
just grab one of our broken wall pieces. And then what we
can do is we can grab one of these pillows
and one of these pills, we'll just have a broken
version behind it like this. And don't worry too
much about this. So, yeah, it will basically
be broken around those areas. This is still quite clean. And the reason that
we are doing this is because we do want to make
this nice and realistic. So we want to basically
give off the feeling. Let's place another here. Now, the only thing that's not realistic is the pill place. Basically want to go
ahead and give off the feeling that
for this building, even though we are
looking at it like this, if we would go closer, we can still look inside. Now, of course, we will
not make anything inside, so it's not like you
will see office building or office supplies and
all that kind of stuff. That's not the goal for this. But it's still to just give a good idea of
how everything looks. For example, you can
also do at this point, is you can do like
a double door. Now, before we move on, we kind of want to fix
our walls over here. So we are going to make those a little bit lower in order to accommodate for the compensation of our flooring over here. Yeah, that is the
right thing to do. So if we have our
walls, oh, wait. Wow, we are way over time. Let's go ahead and do
that in the next chapter. So we already have a
pretty good, like, first floor, and like this, we are slowly just
going to build it up. But you can see that it
doesn't take too long. We already almost halfway there. So let's slowly start building this up. In
the next chapter.
10. 09 Placing Our Modular Blockout Pieces Part3: Okay, so let's go
ahead and continue. So what we're going
to do is over here, we are going to get started by changing up our walls or
internal walls, I should say. And I think that we can
just if we just go to W Um, actually, I'm not completely sure how low that we
need to create it. So, of course, we can just twy. So the first thing that
you would probably want to twice is turn on snapping and set the
snapping to be grid lines. And then you see if we can,
like, maybe snap this back. Excuse me, why not working. Okay, it's acting a bit weird. I have it set to grid
lines, right? Huh. Fair enough. Well, okay?
No grid lines, I guess. In that case, just
move it down and do this. Doesn't really matter. It's just a bit off putting why it doesn't
work this time. Maybe it was because
I was in, like, a different view, but
it should not matter. So always like a lot
of stuff going through my head when something does not work the way I
expect it to work. This is going to be
internal will clean. So we are just going to
basically use this one as like our guinea pig and then make
everything the same scale. Luckily, we don't need to do perfect snapping because
we can just wait and see how it looks. In here. Here. So now I can
see like, Okay, I went a little bit too far. So I can just go
ahead and again, move this up a little bit. And honestly, you can
even do it just this easy that I'm not even
looking at my grid point. I'm just going to go
and turn on wall clean. And then I can just re
input this and see. Yeah, we are pretty close. So just needs to
be like a tiny bit more I do want to have
it probably clipping, like a tiny bit inside
of the roof just to make sure that everything
properly always fits, even when there's,
like, small changes. So internal wall clean. I think this will do a trick. You know what? Maybe
it would be good if it is actually tiny bit off. Yeah, I think that might
actually work better. Okay, so we got this one. And now it's just
a matter of going into our internal wall
broken over here. And what I'm going to do is I'm just going to go to Vertex mode. And let's select
the first three. Move it out a bit, hold Control, so hold Alt and deselect one. Move it out a bit, hold Alt, deselect one, and then
move it down again. And then this one
we will just fit like exactly on top of here. So that's going to be our
internal while broken. And now, finally, we will have our internal pillar
clean over here. And we can just go
ahead and convert to Adipoli, grab this face. And just pretty much
move it like that. I know it might feel inaccurate, but honestly, you
will never notice. So internal wall. Oh, sorry, internal pillar clean.
That's the one that I need. Perfect. Okay, so all of
that stuff is now done. So we have our internal
walls, pillars. Let's reimport
those. There we go. Okay, so at this point, for these pieces, I
probably want to, like, move them
back a little bit. Maybe they also
move this one back a little bit more
for consistency. So we got over here this stuff. So this one will be broken, and that means that
it will have also some collapsed pieces over here. And when I say collapsed pieces, I mean, like these
type of pieces. So it will have these small collapsed pieces
you're sitting there. Or it will have also like some wood. We are
going to switch it up. Sometimes we are going to have the actual
ceiling collapsed, and sometimes we are just
going to have like wood. And then I think we
will need to end up creating a few more pieces
because it looks like that we have a lot more
that we need than I tot. So now that we have this point, so this one is going
to be like, oh, yeah, double door, but I'm not too worried about it
yet to fix that up. So if I have a look over here. So this one is fine,
this one is fine. This one is fine.
This one is fine. And then over here,
we do probably want to go ahead and just like, move this one bit forward. So let's duplicate this while
still having snapping on. So that from a distance, I
can kind of see that there is a wall over here. Maybe
move this one also. Let's go ahead and just
grab a pillar over here, another one over here, and then we have two more over here. And then these ones over here, they will also be
completely collapsed. Maybe it would be cool if we give it like a
hole like this. Yeah, you know what that
might be pretty cool. I think that will
give a nice effect. And then these pillars, they
would of course be broken, and then we'll have
rubble and everything. And then around
here, we would just have wood and stuff like that. So it would just be.
Then at these points, we get this problem again. But in this case, this
problem is expected. What you want to do
is you just want to rotate is exactly 180 degrees, and then the tiling
should still work. There we go. So we would just
go out and we would have, like, woods sticking out,
all that kind of stuff. And then these pieces over here, you would become like a broken, of broken, roof broken. 90. And let's push
this back in here. Same over here, 90. Let's push this back in here. There we go. Okay, so it's just to indicate where that we are going to have all
of these pieces. So that's good for,
like, our first floor. Now, for our second floor, what we're going to do is we are probably also
just over here. So this one is
straight right now, but I did want to actually
go in and I want to give it like how shall we do that? So I want to give
it like a sidewise, that it's not perfectly
just straight. I just want to give it like a little bit of movement here. And I'm just having a think
maybe we can push it back in. And then have some
sideways rubble sitting over here that
will kind of push it out. Yeah, you know what
that might work? Let's get rid of this one. Let's grab like internal
wall broken over here. Rotate this 180
and maybe hold V, and then just snap
it There we go. Okay, so we have this one. And then basically
over here, what we will later on do is we will just push this further in and just make it feel like
it is actually angled. I know it is tough
because right now it just means that you
kind of need to look past it because we don't have the blockout pieces yet to
really create that effect. But now that we have
this, now what we want to do is we probably
want to go ahead. Grab these pillars,
push them up. Maybe also push
them out. Maybe do the same over here.
Not that one. Same over here. Here we go. So at this point,
the higher we get, the easier it will be
for you to actually see all of these pillows and all of the stuff and all
of these things. So what I'm going to
do is I'm going to go ahead and I'm just going to
push this out over here. Same over here, so
just push this out. Okay, so we got
our pillow bases. Now what we're going to do
is we are probably going to replicate the same walls. Let's see how they
do it over here. So yeah, the same walls
are often just standing. Yeah, you can also see, all
of the pillars in between, there are a lot
more pillars here. So we might end up just making more pillars, but I just
want to have a look. Yeah, okay, so it really
is divided into blocks. It's just wall, wall,
wall constantly, and then you will have stairpiece and
everything in between. But of course, we will not
create those stairpieces. But now that it is good to know. So what we can do is we can go ahead and
just grab these walls. And then it's basically for us, just a matter of deciding how far in we are going to keep these walls
and all of that stuff. Yeah, I'm going to only
grab, for example, this one. How far we are going to
make them stick out, all that kind of stuff
is basically it. And you know what? Let's
select the broken walls just because it will probably
make our life a bit easier. And yeah, I'm doing this by hand because I just want
to have full control. I know that the lighting
is not yet ideal, but I'm not going to
really change it yet. So we are going to
push this one up like this so that we have some
internal walls here. And now we are just
going to have a look at how we are going to create
this. So we got this one. So this internal wall, let's push this one right
up until this point. And let's do, like
a double door in between here like that. And I will just go ahead and
I will very quickly then, Okay, double door, clean. Convert to an napoleon, just quickly grab it
and just push it back. We will make sure
that it properly fits when we actually
create a final. Export double door, clean reimport. There we go. Okay,
so we have this one. So this kind of where it ends. And then maybe it would
be cool if we have a wall over here
that is kind of like just blocking off our
view and everything. At this point, let's
skirt this in. There we go. So we have a wall over there that's
blocking off its view. There's going to be lots
of collapsed pieces and maybe that the roof is sunken in a little
bit here and there. So over here, because this
is going to be angled, we probably want to
end it over here because this is where we
are going to do a lot of work where we really have all of these collapse
pieces coming together. Then this one over here that is probably let's move
it back once more. And then this one over here, let's push it in here. And maybe if I then
duplicate this, I can throw this
back in here, maybe. Yeah, so we can see a little bit more stuff
going on over there. At this point, I probably want
to keep this one actually quite close to the edge because this is the
most visible ones. So here you will really notice that there is some
closeness going on. So that's pretty good. And see, we are getting close to
the caps of our roofs. So the next one, yeah, we will start working on that. What might be cool is also
if we create a double floor. After this one, what if we do, almost like a double floor? That's just too high. But I'm not sure if that would look correct. So we'll see. In any case, so we have
this one over here. Let's go ahead and
push this back. Let's push that back. So over here, there will be more destruction
happening because we are nearing the end, and all of this stuff over
here will have been collapsed, and it will also be on the outsides and
everything like that. I know about this. Don't worry. I still need to work
on that later on. So that is looking pretty good. Maybe, can we duplicate
you and rotate? Maybe throw you in here. This one, it would
not make sense if the pillar is not at least
supporting, part of it. And to be honest,
the same over here. So do that and then maybe, like, one pillar just sitting in
between here that will be, later on, like broken off, so it will be like
a lot shorter. So we'll have one of those pillars sitting
in between there. Let's do another two over here for the structural base.
That's looking pretty cool. Let's go ahead and
save our scene. So yeah, you can see that
now we are slowly getting that everything gets a little bit faster on how we
are going to do it. I'm going to go ahead and now I'm probably work
on that double floor. And that will be the
last floor where we will use this exact profile. After that, we are
starting to chip away from this profile
the higher we get. Doing this, it is
probably easier if we grab all of our roof pieces. In one go in our
world hierarchy, and it might also be
easier if we actually. So let's see. These
are roof pieces. So let's go ahead and
throw it into a folder, and you can do this
by going up here, selecting the folder and just
call this first floor roof. Just like your blockout.
You can do stuff like that. Yeah, so we're going
to go one more, and it's same with
all of these pillars, although at this point, we might be a little bit late. So yeah, at this point,
let's just leave that. We have a first floor roof. Right click on it, press Select and select
immediate children. And then at this
point, we can just go ahead and we can duplicate this and carefully snap this upwards like
this, and there we go. Now we have our second roof. I'm going to do let's
let's remove this one. Maybe also remove
this one just to make it a little bit different. And then at this point, yeah, we will still keep
these a little bit. And now what I was
thinking about is to do a double floor style
thing for this. So we have our first
roof, which, of course, at this point, you know what? Let's undo that. 1 second. Let's undo it up
until our selection. An artist do a new
folder and call this second floor roof. I should work a little
bit more organized. So we have now our
second floor roof, which we can just drag into
our main level over here. Okay. Now we delete these pieces and if we would then go ahead and
just see how this looks. Um, Okay, so there so we
cannot do that over here. So if we go for a
second floor roof, we can right click
Select Media Children. And I was basically thinking of, let's temporarily
throw this into, like, a third floor oof. I was basically thinking
of like a double floor. So it would look something. Oh, I messed up the
pillow placement. Whoops. Let's quickly select you and you push it up a little bit. Wow, over here, it
gets really dark. But that's something
we can edit. I will do that in the
next chapter, probably. Next chapter, I
will go ahead and just edit the lighting
a little bit. Okay, so basically what I was saying is we grab a
pillar like this, and then we simply
throw on another pillar to measure out the height. And then if we go to
our third floor roof, right click select Immediate
children, this was my idea. So we have a double
floor like this. That's a lot bigger. So it small small, and then we have double and maybe we can even
do another double. Now, let's then do some
smaller ones again, as if it's the center of the building. And
sometimes they do that. Sometimes really big buildings, the first floors
are like the very, very ground floor is
often really large. Then you have a
few small floors, and then there's an
intersection where it's like a lounge and it has like a restaurant or
something like that, and it has longer
floors like this. Now, of course, one
thing that we need to keep in mind is
that this floor, we need to probably have
one floor over here, and that means that I
kind of want to decide where I'm going to end this or if I'm going to
just push this all out. So what I can do is this
one I can like delete. Maybe it would be
good if for this one, we then, that would save
us a lot of hassle. If we just grab these pieces and just push them up once more. Because I also
think I just think it's not really worth
all of the effort creating an entire system where
it goes on the same floor from one height to
another height and all of that stuff when I
can just do this, and you probably, you
won't even notice. Yeah, no, yes, no. Let's see. Yeah,
okay, to be honest, it might actually look
a lot better if we go in, like, a different level. Let's say that we grab
these pieces over here. I'm just thinking
of the transition. Like, how would we handle
a transition like that? Probably just with
some collapse pieces like you can see
over here where it just kind of like sinking down. If I had more time, I would say, like a staircase system or
something like that to, like, show off everything
a little bit better. Oh, wow, we're still It looks
like you have it selected, but you actually One more. Okay, so at this point, then I just wiggle
it around to make sure that I have
everything selected. So this one would probably go, and I know that's a little
bit annoying because I know I didn't measure it, but I should be able
to just measure it like this, basically. Let's see. One down, and then one above it. Careful. There we
go. One above it. And let's see. If we go
from like this, yeah, okay, so that does look quite cool if we do
something like that. And this on just completely
broken wooden flooring. And then over here we will
have, like, broken walls. And those broken walls
they will be like the plain wall variation
broken, all that kind of stuff. And yeah, we will need
to go ahead and, like, maybe make a few variations so that what we can do is we can basically push it back
in and out like this. Roughly roughly in that logic to give it the idea as if it is like a longer broken wall, even though we only have
one or two pieces of it. Same over here, we
can just go ahead. And I will at this point,
probably also create like a half variation that we can cut over here because
there is another way to do it where we use our
modeling tools inside of reel, but I do not really
feel like in this one, it would be very logical, and this will be like a
broken off pillar. So that's pretty good. So okay. This one is I feel like pretty much split
in half, but we can see. Let's go ahead and go
start with our roof. Now, the nice thing
about splitting stuff in half is that we can just
create our full roof, and then it's just a matter
of just splitting it in half. So it's not actually
extra work so much as that it is just a
bit tedious to keep in mind. So we have our roof clean, which I believe there
we go, our roof clean. So if we are going to split
this in half, of course, it will be annoying to decide
where to split it in half. Since we know that we
are only going to use the half piece on one
side of the building, it would be easier
for me to just connect it. And let's see. Let's split this in half
and just first of all, see. Oh, Make sure to contra v and actually throw it
into its own layer. So this is going to be roof, clean, half, like this. And for this one, let's
just split it in half, bridge it, and let's have
a look, export selection. Roof, clean half. And that will be
the last thing that we will be doing
for this chapter, splitting this in half. So we have a roof, clean half. And it's always struggle trying to use as little
pieces as possible. But that's the goal
of modular pieces. So we grab this. Seeing
that the piv point is here, I'm already not happy
because that means, well, actually, no, it
might not be too bad. So here we have
the half version. Okay, that is even
worse than I expected. How the 90 degrees, I believe. So if we would go probably like a 90 degree rotation and then effect pivotoni and
snap the vertex over here, turn off effect Piotoni
and then snap this one back here. Epot selection. Roof, clean half.
So, as you can see, it might be a little
bit tedious at first. We just hide this because
we would need to, like, probably move this. No, that's not the one.
Move this one forward. And I basically just want
to make sure that it is fitting correctly,
which it is. Okay, so that is no problem. So if we do that, we should
not have any problems. So yeah, it might be a bit
tedious creating a blockout, but you can see how
important it is. And it already starts
to give you, like, the feeling of how the building is
actually going to look, and then we can just, like, mess around with it
until we are happy. So we have our roof clean half. I'm just going to
go ahead and have my wood floor clean over here. I'm going to Contrave it. Call this wood floor, clean half and turn
off wood floor, clean. And for this one, because we now know which direction
we need to go to, all we need to do is just
place a connect like this. Delete half of it, quickly
bridge the empty hole, let's go ahead and export this. Wood, floor, clean
half. Here we go. And for that one, all we
need to do is if you press Control Control H means unhide, but of course, then it will
also unhide the building. So wood floor clean half, let's import that one,
throw it in here. And then this one
would be a matter of just pushing it back like this. And at this point, what
you can do if you want, is just go ahead and quickly
delete all of these pieces and then just select these
and just replace them. And it should be fine. We'll
see if the texts line up. If they don't, there
are many solutions with the easiest
one being literally just changing the UVs around. But doing this is a
little bit better. And then over here, you
can do the same thing. So for all of these pieces, just to make sure that we have a nice clean side building because the side building
you can see from my camera. If it was the back,
then you could be a little bit more forgiving,
but not for the side. So we are basically just
going to swap these around, and we are going to swap
the roof clean half around. And now, oops like this
one, roof clean half. And now if we just
select both of them, maybe we can do this
at the same time. You can twine go to unlit mode over here at the top to see
everything a bit better, but it does not always work when we do not have
materials yet. Seems to work this
time pretty decently. And then just maybe because
we have the default material. If this was white,
this would not work. You would just see only white. By yeah, we can just do this. There we go. And off we
go back to lid mode. So now we have that also
done. Okay, perfect. So we are starting to Wget already like a
nice shell over here, and I think that like
the double floor, yeah, that looks
quite interesting. So what we will do next
chapter is we will just go ahead and continue
designing our double floor, and then we have only two
or three more floors to go. And then we are going to get started by probably creating the blockouts of our
destruction pieces, which will add a
lot to the scene. So let's go ahead and
continue with this in our next chapter. A
11. 10 Placing Our Modular Blockout Pieces Part4: Okay, so we are going to go ahead and continue with
our building over here. So if we have a quick
look at this one, yeah. So it looks like most of it
is pretty much straight. Like, it is tapering
off a little bit, which basically means that it's sticking out further
and then less and less and less
in some locations. And I do want to capture that. So if I have a look over here, I'm going to probably here, let's start by tapering
off these ones over here. So these become less. Yeah, that can make sense. Then over here we already have everything being destructed. What I'm going to do
is I'm just going to go ahead and grab my pillow. Oh, hello. I do not have these on other locations.
That's interesting. And also, by the
way, I don't feel like it would be logical to
have them inside of a wall. So let's just have them
against the wall like this. Okay, so what we
want to do is we pretty much want to have
them on the same locations. First of all, what I'm
going to do is I'm going to grab them because
for some reason, I don't have them on the
first floor over here. It's really weird. Let's just
duplicate them and throw them down here, it
makes no sense. I don't know why we
don't have those, but maybe I atntly
instead of copying them, I just move them up. But in any cation, we
are just going to have double pillars over here,
that should be fine. So these are a lot more
structural. Let's see. For this one, I can have, like, a single pillar that is standing over here and
it will be broken off. And maybe then grab
the back pillar over here because this
is a larger area, which means that we
will most likely be able to see everything
a lot more clearer, as you can see over here, even though we are going to have, of course, our walls
and everything in here. So we have these
pieces over here. There will be rubble, most likely on these areas. What I will do is I will place pillars around here to give it the logistics that it
can support the weight. Same over here. And then this pillar, you know what I'm going to just
move this pillar, let's delete it so that I
can do it properly straight. Let's move this pill
down over here. Okay, so we have
these three pillars. So you can see that
they can support the weight of this
corner over here. I kind of also want to then place a pillar probably
like over here, even though we most likely
cannot even see it. So, okay, there will be destruction over here,
that is no problem. If I want, I can even turn
this into wood floor broken. Oh, just duplicate
this one just as easy. Okay, so these pieces over
here are going to be broken, which means this one, we can just go ahead and
do this. There we go. Yeah, so these pieces are going to be broken, stuff like that. That's no problem. We will have some collapsing
going on in these areas. And this one, let's
maybe actually delete it. Yes, let's delete it. Then make this like
a broken pillar. Yeah, that should do the trick. And maybe let's move
this one further. Maybe place another pillar
over here just to kind of spot that because the pills are the only thing that would
kind of keep these things up, along with, of
course, the walls, but we are not creating
the walls yet. So we have these
pieces over here. Do I want to do like a wall? Let me just quickly check if I want to do a double
wall around here. Doing a double wall
would make our lives easier if we just simply
place a wall over here. But maybe I don't want to
go for the easy way out. Let's instead, have
a wall over here. So we are going to
have quite a big wall. So like this. So we will have a
double wall like that. I probably need to later on, grab my roof and just move
it down a little bit. So double wall over here. And now I'm just guessing. So yeah, at this point, it is a double floor, so you would probably have quite large open spaces going on, and maybe then in the back,
the spaces would be smaller. So knowing that's what
we can do is we can, for example, grab like
here, these double walls. Place them and then
duplicate them, and then simply go ahead and
continue them on like this, at which point that yes, they are sticking out, and it's up to you to decide if you care that they are sticking out because you can never
see it at that point. So we can have a
double wall here. Then another thing that
would be cool is you can go ahead and grab another
double wall like this. But then for this double wall, just duplicate this and grab
our internal wall broken. We can basically go V C, you can do it snap. And then what we can also do
is we can also snap it over here. There we go, see. So now, later on when we
have our proper wells, it will look like it is
just slowly breaking off. Another thing that
you can do to even enhance the feeling is to maybe push this a little bit
further back so that it is a little bit closer
when it is broken off. Okay, so we got
floor over there. Now, let's first of all, put our focus on maybe
the right side. So if we have a look
at the right side, so a lot of this stuff will be covered up by rubble.
It will be massive. It will just be completely
collapsed because all of the debris that is here
needs to stay somewhere. So it will be collapsed
in this area, and then it will kind of just fall down onto the ground and everything and just trying
to get like that feel, that's going to be difficult
but also very important. So at this point,
let's have a look. Let's grab Let's do a double ball over
here. That is broken. So we are going to
just grab these walls, duplicate, add a quick
broken piece, press V. Okay, so we have one
piece over here, maybe just add some
extra interest. Let's go ahead and maybe
have a random smaller wall. That is kind of like going from one side to the other side. And if we want, we can throw on, I guess, doors later on. This last one, let's
just push this back in. Yeah, we could do that. We
could throw on doors later on. And it's almost
like these walls, they are just like
walls that are placed so they have, like, doors, but they are not
for like the big pieces, just to, like,
separate the rooms. You often see this in offices where it's almost like a
cubicle kind of thing, but then with an actual wall, because I don't
think we just want to, if we close this off, that would be a shame
because then we are just taking away interesting details. So we got this one. Now
at this point over here, we probably we want to
have some overhang? No, it would not make
sense to have an overhang. If we want to do an overhang,
we would probably, like, do that over here so that we
can probably just rely on doing it using, ooh, you know what that might that might be interesting if we do something like so
as you can see, I'm just playing around with it. That's all I'm really doing. I'm just messing around with it, seeing if I can get something interesting because
I on purpose, did not plan this
building so that you can see completely organic
how it will work. And, of course,
to be fair, also, to keep the costs down
because if I would need to create an
entire prototype, the tutorial will be
double as expensive. And I'm sure that you guys
wouldn't want that for the little extra benefit of me knowing immediately
what I want to do. Compared to me just
trying to figure it out. So that's pretty cool. So we got big open spaces here. It will be covered by
concrete, so that's fine. Over here, it will just have all of the wood of the flooring. It will just be sinking down. It will be hanging off the edge. There will be like
wood piles that we oh, wood piles that we
will do 1 second. Let me just open up. Notepad.
Okay, so let's do wood, rubble pile. There we go. So we will have some wood
rubble piles over here, and later on we'll have foliage sitting in between and
moss and everything. It's going to be
very cool. I think it will be a really
cool environment. I kind of wish that I could
spend like 200 hours on it, but maybe some other time. Okay, so we got this
stuff over here, big empty space, totally fine. Do I want to maybe
have some walls that are hanging out or
something like that? Let's see. What does that
how would that look? So if we grab like
a wall over here, well, actually, we couldn't
have them hang out. But what we could do
is we could here, just try and duplicate this and just really have
it on the edge. But then it would not be logical for a wall to
just be hanging there. Although, yeah, it can be walls because of
the interlinking, they can be held up
by some empty space, but it would be probably not
this big of an empty space. So what I'm going to do
is I'm just going to set my scaling ternal snap scaling so that I can snap
this ones back, and then it will still
work with our here. So we do this. That's fine. So if you do snap scaling, because you are scaling
with even numbers often, it will still allow you to snap your actual
models together. So we got this stuff over here. Do we want to have a clean
break here probably? So let's just duplicate
this, rotate this? Hold V, and maybe it's good
if we didn't end up with, like, come on, you can do it. Snap. There we go. Maybe it's good if
we didn't end up with maybe two variations of our broken vals that we can just switch between the variations whenever we have a double sided, like you can see over here. So that is looking pretty good. So we got this stuff
going on here. We are starting to get quite an interesting integrate biding. On this side. So this side, it basically
ends over here and is broken, but this is still going
to be like our wood. So let's indicate that we probably want to have
like wood piles and, like, broken wood
flooring on this side. So let's, yeah, let's
delete to these two. Let's go ahead and
rotate this 180, carefully move it up and out, so that we nicely
snap it altogether. Okay, so this is
just to indicate that there will be broken
wood flooring over here, and then later on
we'll scrip like a variation that has like
a corner on it like that. Okay, so broken wood
flooring around these sides, and then maybe over
here, we kind of just have a nice snap off. We'll see what we
are going to do. So that is all looking good. Okay? Yeah, so that
should be fine. So I'm just thinking. Over here, these walls they feel
a little bit boring. Maybe if I do another
intersection where I basically just push it further back. Let's see. If we move this
one more towards the center, yeah, so that already looks like a little
bit more interesting. Then over here, what we
later need to do is we just need to have
a wall that has a door in it so that you can basically kind see through
it and stuff like that, just in case that you can look through all the
debris that you can see. But over here we start to get a like an
interesting structure. And that's basically
it. We are building up a building just like you would
in real life, pretty much. So we set the foundation, then we start adding
the internals. However, in this specific case, of course, we are already making it broken and we are not first building the
entire building clean. So we got this
one. Now, let's go ahead and let's
focus on this area. The walls are broken off here. So I might want to do like a single double it's tricky one. This is a tricky. Hmm.
Okay, let's do this. Let's grab. So let's say that we grab a double
version over here. I need a pillar. The pills
are pretty much the ones that I used to indicate
how high I am. So let's say that we have a because there's two
things going on. Let's say that we have only
one pillar sitting over here. I guess it would make more
sense that this pillar is the also roughly
in this location. So okay, we have one
piece over here. And a half 1.5 piece. I need to use the half piece, because ls does not fit. Let's try that. So, one, two, and then finally we
will have the very top. Actually, very top, we can delete this one because
this is going to be the actual roof. Or not. No, wait, the roof
would be there, so we do not want
to delete that one. This one is still
going to be wood. We only want to
have the bare roof at the very tips over there. But basically for this
one, let's boost it up. This pretty much is
going to be like a single piece that is just kind of like
sitting over here. There we go. And
then it will have like wood clumping down
over here and over here. Oh, that's a shame. Yeah, that does not fit. Yeah, okay, so it
will just have that. And then this piece
will probably also sunken down like that. Something like that
is what we will do. If you want, you can already
indicate it just using this. And then we'll change later on. So it will kind of start to sink in from these areas
and over here, it starts to
collapse, and all of these pillars and everything will be just completely broken. Okay, so that's pretty good. So we got this area
done over here. Let's save my scene because I feel like it's been waited
long since I've done that. Over here, we are
also just going to figure out how to make
this nice and broken. Maybe just have some
rubble hanging of it. So in this area over here, I'm pretty much happy with it. So now what we're
going to do is, shall we just do like
single floors again? So we will do like
three single floors and that should do the twig. So look at my camerangle. Yeah, let's go
ahead and do that.
12. 11 Placing Our Modular Blockout Pieces Part5: Okay, so let's just go ahead and continue
with our building. So at this point, in this area, I probably want to
go ahead and yeah, some I like, just get
rid of part of it. So what we can do
is, first of all, we just kind of like
need to grab our roof, and I believe we have it
over here in the folder. Almost, we still have
these pieces over here, selected, which I
don't want. Whoops. So I believe what was it
contralt you can use to drag. And then if you
release Alt, no, wait, so contralt and release Control, then I was hoping
that that would work. Looks like it
doesn't work because contralt allows you
to drag select. However, it turns
out it does not allow you to drag unselect, or maybe it does, but
I never really used it because it is not
that needed often. In which case, I'm
just going to do this. She's already getting
really annoying for me to just Come on, contra Alt. Control Shift. No, contralt. Nah, sorry, people. I don't think this
is going to work. So what we need to do is
we need to go through the tedious process of actually deselecting
every single model, which I'm sorry
might take a second. But I tried my
best to not do it. I'm sure there is a tool for this. I can't know everything. So in this case, I forgot
how to exactly do it. Make sure that when you
deselect that you do not accidentally move like that. It's being a little bit
annoying, but there we go. Okay, finally. So we got these pieces, and
what we can do is, let's already just throw them in a folders that in case we
need to edit it later on, let's call this third
floor the score high roof. And now what I'm going
to do is, first of all, I'm just going to go
ahead and I was going to set it one lower like this. Yeah, that should
be fine. And then what we're going to do is we are going to go ahead and
let's say duplicate this. See, you know what? Let's first of all, just grab a pillar so that we can
kind of measure it out. So we're going to
have this one, and then later we will
have another pillar. So let's go ahead
and third floor. No, they did not
add my pieces to it. That's so you know this. For some reason, it did
not add my pieces to my No, wait, I did. Okay. Okay, so we duplicate it. But it looks like we had
the folder selected. When you duplicate when you
have a folder selected, it will also duplicate
the folder with it. So that's why I was confused. So it has already placed it
into its own little folder, and then we removed it, because we removed
it, of course, the folder is the
only thing left. So this should be actually fine. So we can just select
media children, and we would just
go ahead and want to place this over here. Now interesting is also
that the offset at this point has
pretty much changed, which is quite curious
that over here, you see, the extra
offset has changed. Now, at this point, I don't think it is that big
of a deal if it has changed. So what we can do
is at this point, and this is then where
the offsets would probably we would need
to change it again. Let's arts to another folder. Fifth floor roof. And let's just add
this one back into our Here we just
in the main level. So we have blockout
first floor roof. This one, if we just
select immediate children. Okay, so this one, right click, add it rename, and this one is going to
be fourth floor roof. So let's just clean this up. So we have fourth floor roof, drag it onto your main level, third floor roof, there we go. Okay, let you do the tricks. And now we are able to
just like this, this one. Okay, so that now works. So we got this floor over here. Now, I wonder if we are maybe able to compensate
for the height. I'm not sure exactly why
the height is happening here because we simply have to Oh, I know why
it's happening. It is happening because
we this time do not have this intersection
in between here, see? So because we have
a double floor, we never created an
intersection like that, and that's why it is
causing this problem. Knowing that what we can do is we can try
and compensate it. By simply having one floor
that is slightly scaled. So we have this one, and
basically this floor, we'll just have the walls and the pillars just
slightly higher, and you won't really notice
that, so that should be fine. And then we have
this floor on top. So at this point, I'm
just going to go ahead and select all of my floors
and just place them. I believe that that one
is already correct, so I can double check. Oh, no, we want to
probably go one higher. So let's select this.
Here we go. One higher. So we got this stuff. Now, at this point, we
are really going to, like, start
destroying this roof, and it's just going
to basically be almost completely gone by the time we get to the very end, which is what we will do lastly. So let's duplicate
this once more. Call this six for roof. Once again, drag this outside of our fifth floor roof,
and let's move this up. And this one will be the final roof for which I'm going to probably
push it over here, and this one can also you
can get rid of finally all of your wood
pieces over here. So now what we're
going to do is we are basically just
going to start by deleting some of
these roof pieces that we can get a more
interesting effect, and then we will
take it from there. Okay, so we have this. What I'm going to
do is I'm going to go ahead and first of all, at this point, we can
pretty much just, like, delete this,
and then over here, it will just be like destroyed. And then what we can
do is over here. Yeah, you know what?
Let's do this. It's delete even further, but then have like one
piece sticking out over here that might here, this might look
quite interesting. And then maybe we
can do something with still having
some pillars left, and then it will just
have some debris sitting around here,
and then this debris. Let's have it fall
also down here. So the debris is
sitting down here, but because basically this roof has collapsed down here,
this would not be clean. So it has collapsed. The
weight of the collapse has then broken off part of
this roof on top of it, and then part of
this roof over here, it's finally got to
hold the weight, and here we will just have rubber piles and
everything like that. Yeah, that's going to be pretty
cool. So we got that one. Now, at this point, maybe we want to
do, let's do that. And then over here, we need
to get rid of these pieces. Um, maybe do this, I
don't know, or this. Yeah, maybe do this, and then this will just
be a broken edge or not. Maybe that's art
like one over here. No, I don't like that. It's because I want to just get rid of some
pieces over here. So most of the collapse will
happen around this area. So if I delete these
pieces over here, yeah, that gives me quite
an interesting shape. And then once again,
so there will be many collapsed
pieces and everything that will discover all of this ugliness that
we have over here. But they should sort
of do the trick. So we got this one. Now, let's go ahead and also
actually, let's undo that. Let's delete these two. And maybe this one. Yeah, then this one then later on we need to scaled
up like this. Okay, so we delete these
two, and this one. Oh, this is looking quite cool. It's quite an interesting
structure that we have here. So we got that stuff done. The only thing I'm going
to do is let's grab a default and I'm just
going to make it a lot darker so that kind of
fits the same Here we go. And safe. There we go. Because that cube
now at least it fits the same building style. Sometimes if you press G, you can hide all of
your selections and all of your pivot points and
anything else that you have. This is looking quite cool. Now, we have a pillar over here. Let's say that we yeah,
so at this point, we probably want to
just grab this pillar, this pillar, this pillar, and these ones over here. So we are just going
to include those. So we're going to get started by just placing it once here. And then this one we just need
to scale up a little bit. And then what we
can do is we can probably just re select this one because we want to have
the normal length ones. And these ones will
be placed up here. This one, at this point, yes, I guess that we can do something like
a destroyed pillar. Then we can also have over here, we can have some of
these pillars that are going to be
destroyed later on. So we will just make this like a really destroyed
roof at this area. So we got these
pillars over here. Oh, it looks like that. They are still not placed
completely correctly. Oh. This one is going to
be an interesting one. What we're going
to do is let's go ahead and just grab
both of these. Yeah, let's just push it
back a little bit more. No one will notice
that. Same over here. I just need to move these
up a little bit more. To compensate for that scale. Okay, so over here,
this is quite good. Like it has like a point
where it just kind of ends. Now, I feel like, so let's not have pillars here. So these pillars will be
enough to hold it up, and then we have a
pillar over here, and this stuff over here will probably
just also be broken. So we will later on also
just turn this into like a broken roof piece that
you can see over here. Turn on snap rotation. Don't even know why it was
turned off. Here we go. So it will be like some broken
roof pieces around here. And then for these
ones, we can also go for the broken, nice. Finally, one that is already
in the right location. There we go. So that will also then be indicating
that it is broken. These will be broken.
That's pretty good. So our pillars, we just
need to do one more. Scrab a pillar over here. Let's push it back a little bit. Scrab a pillar over here. Et's grab pillar over here. And you know what?
Let's also add a pillar. So these ones. I don't know why I'm still so off in terms of,
like, the positioning. Strange that I make so
many mistakes in just simply positioning
stuff. But okay. So we got those. I want to
grab one of these pillars. Are you floating?
You are floating. Scaled up a little
bit. There we go. And I want to just duplicate
it and just push it roughly around here because
it would not make sense if we have such a large area without a single pillar in it. So this pillar over
here will be broken. This chunk over here will
also be a broken roof. No, that's a broken wood. Here we go it will be like a broken roof chunk,
so that's fine. Okay, so that's pretty good. And then yeah, this
builder, we will, of course, go ahead and
also sketch it off. And then these areas will also
be just completely broken. So if we have a look at the general look of this,
that is pretty cool. It might be a little bit thin on some of the sides
like over here, you can see there's quite
a bit of thickness going on, but that should
be no problem. Once we fill it up with
actual debris and everything, it will still hold quite a bit of space. So that's quite cool. Now, for our walls
in these areas, it's a matter of just once
again messing around with it and seeing where that we want to have
our walls placed. I'm going to move one here and move it in
here. Move it back. And remember, we
need to just scale up these walls a
little bit like this. But that doesn't mean
that the snapping breaks, so we can go ahead and we can
do that and then maybe have a broken wall around this area. Cannot see it because
of Oh, yeah, wait. I was going to do that in
this chapter, wasn't I? Yeah, we can temporarily
go into unlit mode to get rid of the fact that you cannot actually see
inside of here. Of course, because
we have lumen, it's a little bit trickier. But what you can do is we will go over
lighting way later. But for now, go ahead and go to create visual effects and
create a post process volume. I believe that we do not
yet have one of those. I will clean up my scenes
soon, don't worry. So in your post process volume, this is basically all of your post effects that
will be dded on top of your camera after it's things like color grading,
vignetting, all that stuff. We want to scull down and
go to infinite extent. And this basically means
that wherever our camera is, it will always be affected by
these post process volumes. And then if we go to exposure, we simply want to set the
minimum and maximum brightness of our exposure to
the same value. So let's say 0.1 by 0.1 because
now when you go in here, you can see that it holds up. Of course, the lumen
will still make it dark. But now even if I go here, where it would have
been pitch black, now I am able to just
look outside of it. So that's basically the
post process volume. And for now we are just
going to hide that so we don't need it anymore after
this point until way later. So we got this wall over here. Let's make these rooms
quite a bit smaller. So let's have a wall
also over here. And let's also have
a wall over here. So these walls are all
just kind of like ending. They're kind of like office
walls or something like that. Let's go ahead and push
this out once more. And then maybe give it like
a little corner over here. At which point, the corner
ends up into, like, a broken wall because we
are reaching the end. So it'll be like a nice
broken wall like that. Over here, delete or actually,
we don't need to delete. We just need to replace this
one for this wall over here. Hold V. Snap that. So we got one over
there. Over here, let's now just leave this wall. I just first of
all I want to see. So this floor, let's
do another wall. From this point on, and for some reason,
my wall is floating. Scale this down. That's
probably why it is floating. Okay, that's the only place
where it is floating. Let's turn off snapping. Just quickly move it down. There we go. Okay, so what
we are going to do is we are going to rotate
this is really bright. I know it's really,
really bright. That is probably
part of the Jesus. Okay, let's go into
our post effects. That's way brighter
than I ever expected. Let's set our post
effects to 0.2. Yeah, that's fine.
Maybe 0.4 for now. Okay, 0.4 seems to be
working a little bit better. So anyway, what I
was saying is I was going to this area over here. I was just going to go
ahead and later on, just add like a door
or something in here. Doesn't matter too much. Only thing that matters
is that it does. Nicely lined up with
our pillows over here. And then over here,
we will just like, add something there
just to break it up. What I'm going to do
is let's go ahead and find a directional light. It's going to rendering
here light source, I mean. So with our light source, you want to temporarily set
your indirect lighting, what was it intermission or indirect lighting
contribution, set it to three. What it will do is
it will basically just increase the GI. So it will just add, if
we set this to five, you can see that the
lighting reaches further into our building. It's just so that we can easily, have a look at everything and just make sure that all works. So having that done because we are going to go
over lighting later on, but now it's just focusing on actually getting
a building set up, we can now just go
ahead and continue. So I'm going to
continue with like Um, first of all, let's
scale this down because this is like the
normal floors again. Let's replace this one with, like, a broken wall. And now what we can do
is we can kind of, like, just use this one over and
over again, this wall. Let's go into unlit mode. Okay, so we got this one, and I'm also going to axi
F this wall just over here so that it is still
a little bit leftover, although maybe this wall,
we will just go ahead and it's still floating. Why are you floating? You are
floating. Ah, that's weird. Why does it keep floating? Well, it's weird that
I just don't see it. Maybe I'm tired or something, but it's not even that late yet. Okay, so we have
a wall over here that's being broken off.
We have a wall over there. Let's go ahead and just
continue this, rotate. Let's see. We have maybe like a wall just sitting over here. Maybe a wall over here. And maybe like another
wall sitting over here, and then this one, let's
just move that back. Okay, so let's see.
So we have this wall. Let's move this wall back to once again,
add some variation, not just have all the walls
the exact same length because that would
not look as nice. Okay, so we got this
one, and then over here, we are starting to really
get into the territory that there's almost nothing
left of the building. So we got a bunch of
walls here and there. We will, of course,
later on, improve this. This blockout is
still fairly basic. So we are going to later on just really spend
our time making this look absolutely awesome and
just slowly start adding more and more pieces to it until we get exactly
the look that we want. But for now, let's first of all, just see if we can even manage with what
we have right now. Let's do another one, like
here and then this one. Oh, nice. I didn't even
have to do some scaling. And maybe, like,
have another wall over here that's just
broken like that. Okay, so that's pretty good. And then we can have one of these walls over here and maybe, like, scaled up a
little bit more. There we go. So that's
broken over there. And then over here,
you can do the same. You can just pick the
plane broken wall. But okay, so as you can see, now we have quite an
interesting looking building. Don't worry also about the shadows and
everything like that. You can see me sometimes moving, and then the shadows change. So that is pretty good. What we're going to do
in the next chapter, now that we have this done
is I still want to just put my focus firmly on the building before I start working
on the highway. Although what you
can do is you can temporarily just already change the materials because
you can see that your environment is greatly impacted by these super white, shiny buildings here see? So that makes actually
quite a big difference. So I'm going to go ahead
and in the next chapter, if we have a look at our
asset list and our reference, I think what we're going to
do is we are, first of all, with the assets that
we already have, we are going to make
blockout variations. That's going to be like broken pillar variations
and stuff like that. So that all we need to do is we just need to swap those out. And after we've done
that, we will have a dedicated chapter to these
collapsed pieces over here, because they are very different in terms of how we
are going to create the blockouts for those because we need to make the blockouts also properly for
their final mesh. So that's going to be it
for the next chapter. For now, are getting quite
a good looking building. It has quite a bare bones
look, so that's quite good. So let's say I scene, and let's continue with this
in the next chapter.
13. 12 Doing Our Second Blockout Pass Part1: Okay, so now that we have our
base setup done over here, now what we're going to do is
we are going to get started with our first pass
on our blockout. This pass will basically
be a lot more refined. It will not be final
yet, of course, but it will give us
a really good sense of the big shapes and how
they are going to look. This pass will come
sort of in two ways. So because we need
to be a little bit careful on how we do it and that we don't spend
too much time, the first one that
we're going to do is we are going to do all of
the modular pieces, we are going to add
our variations. And then the second one
is that we are going to start by doing our destruction passes that you
can see over here. For these destruction passes, especially the wood is
going to be tricky because if I spend too much
time on the wood, it would just be a
little bit of a waste. So I'll have a
look, and I'll have a T off camera on the
best way to do this. Normally, I would
spend the time on it because I'm normally not
that much in a rush. However, I do not want to spend one half 2 hours on woods that I'm going
to throw away again. Because, of course,
when you are making an entire environment and
modeling and everything, one or 2 hours is nothing. Its very little time. So what we're going to do is, we are going to get
started probably once again in, like, our corner. Oh, yeah, one thing I
wanted to do is we had, like, the Oh, no, wait. Yeah, sort of. Let's see. We did like the
large opening here. And I'm just curious if we can maybe switch these
out with plain walls, just to add, like a bit more
variation to our scene here. And it might not make too
much sense, but for us, it's important to just
like a bit of variation. Only the structure
will really make sense in this type of tutorial. So this one is pretty
much like this, one, two, three, four,
one, two, three, four. Yeah, so this one. So let's go ahead and also do
the same over here. Yeah, we have the
wall sticking out, but I don't really care
about that. There we go. I just adds like that extra
breakup all of a sudden, just to make things look a
little bit more interesting. Now the next one that
we're going to do is we are going to work probably
on like these pillars. So we already have
our clean pillar. As you can see over here,
we probably want to create, let's say, two variations. So because these are
the outside pillars. Oh, yeah, we want to have,
one pillar that's, like, broken on all corners
and one pillar or two let's do three variations. Let's do three variations. So we have, let's say over here, standing concrete
pillar variation A variation or variation two. Let's go ahead and also
do variation three. And now if we go ahead and go into three as Max,
we can go in here, and then we have our
you need to go in boot. Oh, no, wait. You need to go
in, Oh, you're already here. Sorry, I got confused
about my layers. So we need to have
Horizontal beam. No, where's the vertical one. Vertical beam clean. There we go. That's one I need. So what I'm going to
do is, first of all, let's like the Asia
variation, which is Contrave. And this one we
go add two layer, vertical beam
broken variation A. And then if we turn off the old one, basically, for this one, what we're going to do is we are just going to
go ahead and give it a bit of a round top and then stick out a bunch of
metal just to indicate that that's where
this is going to go. So what I'm going to
do is I'm going to go ahead, go to phase mode, and I'm just going to select these phases here at the top, and then go to CHNFR and
click on ChenFR settings. This way, I can just give it like a bit of a
round bit like that. And once you've done
that, all I need to do is I'm just
going to go ahead and just do like bit of,
like, movement like this. Once again, it does not
need to be precise. It's still a blockout. I just need to some movement just to indicate that this is going
to be like a round bit. I don't really like the
movement, Let's move this down a bit more. Here we go. If your smoothing does
not look correct, what you can do is you can add a smooth modifier and then
just turn on out to smooth, and that will often
fix the problem. Now, another thing that
we will very often use. By the way, by this
point, this one, we can just go ahead and hide. One thing that we
will very often use is we will use our splines, which is the line tools
because they are very, very powerful inside
of Trees Max. And I will show you why.
Let's say that we just want to showcase a bit of
metal sticking out. All we need to do
is we just need to go to, like, a side view. In the Create tab, go to
our shapes over here, and then we can grab a line. Now, the way that the
line works is very easy. You just click, and then you can click again
to make it sharp. You can press backspace Undo, or you can click and drag to basically give it like a bend. And then it's just a matter of right clicking to
accept your shape. So what we can do is we
can go ahead and we can basically do something like this where we basically just
stick a few of these in. Once you've done that,
you can go over here, go back to our three review, and all that we need to do
is let's place them in here, and then we want
to add something called a Sweep modifier. A Sweep modifier,
what it will do is it will surround your
shape with a mesh, or it will guide a shape along or geometry along your spine. Let me
say it like that. So we go in the built in
section and we grab a simple, well, a cylinder over here. And then in the interpolation, you can choose how many segments you want the cylinder to be. And then in the radius, you can choose how thick
you want it to be. So what I can do is I can give it some thickness
and some radius. And then it's just
for me a metal to quickly just
move this around, and that will be more
than enough indication of how this is roughly
going to look. So once we have these, the next thing that
I'm going to do is I am going to go ahead and I want to make it a
little bit smaller. So it's just go that was weird. Let's just go ahead and
convert this to add a poly and excuse me. Sorry, I accidentally I pressed the wong
button. Try it again. Let's go to add a Poly
and let's move this down a little bit so
that we are giving it like a smaller shape
because on no weight, we don't want to do that, do we? Yeah, so if we do that, then we will get it would
be great over here, but we get into trouble over
here. So let's not do that. Let's just find a different way. So let's just have it
like this. And let's just say that this
is the first one. You can always go back in and, for example, change the
radius if you want later on, but we will, of course, create proper proper rebarb
pieces later on. So once you are
happy with this and it is all looking correct, now what you can
do is we can just go ahead and continue
with the next one. So first of all, let's
go in, export this one. Call this one vertical
a broken variation A. Now we wanted to go ahead and create another
variation of this, so we can go and press Contra V. Artists do a new
layer and just call this vertical beam
broken variation B. And then we can turn off
variation A. There we go. And for the variation B broken, all I'm going to do
is I'm just going to, for example, sink this
down a little bit. And maybe here, maybe just like, give it a bit of, like,
a point like that. And for us, it's just
a matter of maybe, like, re moving these to, like, different locations
just so that we can differentiate
between the two. So yeah, here, I'm just moving and rotating,
all that kind of stuff. Nothing too special, maybe
moving things up and down a little bit
more. There we go. So this one we can once
again file export, export selection, vertical beam, broken variation A, and just change the name to variation B. And we are going to
also now save this. And finally, all that we
need to do is we need to go ahead and grab probably
our clean version. No way, because we probably
also want to have the end. Let's see. No, you know what? Probably, we probably want to just create a clean version, and maybe then we
will also just create a broken version that
is a lot smaller. So basically what we would then do is we probably just
select all of this. And another cool
trick that you can do is if you select
multiple objects, of course, you cannot edit them. However, if you add an
added poly modifier, which once again, you
can find in here, the added poly modifier
basically allows you to all edit it almost as if there
is an editable poly on top, and we can move this
around like this. It would be handy if I actually, first of all, clone this. So let's call this one vertical beam broken variation
C over here. So we select turn it off. We select this. We
basically move this down over here. There we go. So this is going to
be the short version. Now, don't worry
about all of this. Once we've created the
variation A and variation B, it is no problem for us to
just quickly also create a variation C that's just a bit shorter. So we have this one. But right now we are
really just figuring out how many variations
we need of everything. So this is going to
be variation C, save. And then finally, if
we turn this one off, we can go to the vertical beam clean and if we just
press Contra V, let's this and call
this vertical beam broken variation D. And then we can turn off
the clean version. So for this broken version, let's just go ahead
and convert to Adipol. You want to go to Swift Loop. And yeah, at this point,
I am doing this quite quickly because we have a
lot of stuff to go through, and this is mostly just
creating very basic blockouts. So for this one,
what we are going to do is we are
going to basically change or basically
move this around a bit. You can try to chamfer
pieces like this, which will basically
create a here, it will basically
create almost like a broken section, sort of. It can sometimes be nice. Of course, we will do
it very differently because we will most likely actually be sculpting this
in our final version. But for now, you can
just basically do this quickly to add some
broken variations. Maybe let's add like a
swift loop here and you can see that I don't even
care that it's not connected. I'm just adding a swift loop
here to basically give it a bit more straightness back,
like you can see over here. So just like vertical beam
that is quite broken. So we can export this
and this one will be vertical beam broken
variation D. And there we go. That's it for our
vertical beams. That should pretty
much cover everything. So let's go ahead
and input them. I'm just navigating to them
vertical beam broken A, B, C, and D. So we can
just go ahead and input all of these. Let's input. Perfect. And now that
we have these pieces, let's move this up a little bit. We are basically
just going to side. Let's say that these
ones over here, they would need to have
the variation D broken. This one can also have a
variation D broken like this. Now what we are
going to do later on is we will just
go ahead and make a habit of for example
rotating them, although I'm not going
to do that just yet, and then snapping
them back like this, and they should still be
aligned because now you can see that they are not broken in the exact same
spots over and over again. So I can go ahead and
I can go in here. And with these pieces, I'm
going to then duplicate it, and I'm just going to add
the variation C on top, which is a little bit shorter. Here we will go ahead
and also do like a variation C. Once again, maybe rotate it and
bend it a little bit. This one, we probably need to go ahead and art a variation A. Variation B, so there we go. So you can see that now
it is not perfect yet. We still need to also make
these ones over here broken. But you can see that now this already arts like quite a bit. So on top of this version, we can have a variation C again. And then over here,
we can just go ahead and we can
just cycle through variation A and
variation B, basically. And sometimes it would
be cool to just maybe add one on top and then
use a variation C. C, to basically add a bit of
height difference between them. Over here, I can do the same. I can go variation D. I can then add this on top
and turn it into variation C. And just like that, we can very quickly here
that asks quite a bit. That's why we already
want to just like art some extra Ribar like
you can see over here. So at this point, I
can boost this one up, variation C. I can boost
this one up, variation A. This one I can
just do over here, and this one I'm
going to boost up also and maybe
another variation C. And then later on, we will
just nicely snap it like that. So yeah, that kind
of stuff is great. Maybe a variation A over here. So you can see that
now you can see that the pills are still
slightly left, but it's not as intense anymore. This one is a perfect
candidate for variation C. And just like that, we are very quickly just
going to move through. And then these ones,
they are fine. We can do, maybe a
variation D over here because they are getting
a little bit destroyed. This one is great for
like a variation C again. This one, we can probably
do, something like this. But yeah, for those versions, we definitely need to create a vertical version
that kind of, like, slumps down on the ends
just to improve that. Variation B, variation C. Oh, sorry, B again,
variation C, maybe. Yeah, here, C. So
now we are slowly already getting all of
the outsides ready to go. Okay, so that's pretty good. So now we have most of
our outsides targeted. So that's great.
Cool. Now we are just going to go ahead and
go over to the next one. Let's save sin if we just
go ahead and go in here, B, B, it's good to keep
your planning intact. B, let's go for a
sideways pillar, beam. Beam broken variation. One, and let's also go ahead and do another
one that is variation two. And these two variations
are going to be one is very subtle, one
is quite heavy. So what we can do is if
we have a look at this, the subtle one is for
this kind of stuff over here or this kind
of stuff over here. The very broken one is for the stuff in here,
these ones over here. Those can be quite broken. So let's go ahead and go in here and let's have our
horizontal beam clean. We can do a simple Contrave. And we can say horizonttal
concrete beam, very broken underscore
variation one. Turn off the old
one. So this one is going to be quite subtle. So we are just going
to once again, converting addi pool
artife aref swift loops. Sorry, I misspoke. You know what? I'm
actually for this one, because we need to keep here, let's add some edges here. The reason I'm doing this
is because we need to pretty much keep
this quite intact. It's one here so that we do not accidentally
have clipping or we see some weirdness going
on whenever we have a window because these are
always linked to other pieces. So I can go ahead and I can
do this because I don't know exactly from which directions,
everything is shown. Let's also do like
one over here. And of course, if you want, you can always just
go ahead and do a quick chav like this. Maybe that's okay
and can even just push this down a lot more if you want,
something like that. Okay, so that is a
variation number one. If we now go at Contrave it, we can also do another one. Tall, concrete. I don't know why it concrete. I could have just said Bam underscore broken
underscore variation. B, white? Yes, no. I'm sometimes mistaken
because in some projects, I call it underscore A, B C, but I'm trying to
come on, let me rename. I'm trying to not do that
anymore and go with numbers because in case I make pieces
more than the alphabet. Turn off the old one,
and then for this one, what we're going to do is
we are basically going to select this side and this side. And just give the hanf to
indicate that this will become maybe the
chanf bit lower. Here we go to
indicate that it will become like a tapered off site. Maybe make some changes
like this where we like to move this around Here we go. And that is broken variation 02. Now what we can do is we can
start with the first one. Export, selected. Horizontal beam clean. Let's turn this into broken underscore variation
one and save it. And now all that
we need to do is we need to go to number two. Export selection broken
variation number two, and's save that. Perfect. Okay. And that's the last thing that we
will do for this chapter. We will just go ahead and
input these and assign them. And then we already out, so there's going to
be broken window, but the broken window
is more going to be in the textures probably
instead of actual geometry. So let's say for this one, you probably want to go ahead
and go for variation A. Yes, and then over here,
probably also like variation A. So it's just a
little bit broken. And then these ones are going to B variation B and
stuff like that. So they are going to be
really, really broken, same over here and over
here and even over here. And then this one we can just
do like variation A again. Are supposed to be one
down. There we go, see? So you can see that
just in general, even though it might
not make perfect sense, just in general, it will
feel like it makes sense. Over here, what you can also
do sometimes for these, we can turn these into
variation B just to give it already some
damaging going on. This one is like the extra
broken versions over here. These ones are the
less broken versions, I shall call them. So variation one. These ones, I'm going to go
to variation two. This one back to variation one. This one, variation,
one over here. Oh, this one, I forgot. Let's go ahead and
actually, you know what? Let's just replace this like this and then have
another variation two. And let's see let's also
make this one variation two, in that case, and that's
going to be the top wall, so we don't actually need
to do anything there. Over here, we want to go ahead and set this to variation number two. Same over here. Just whenever we have these
really broken pieces. Let's just do this
one variation one. It might sometimes be nice to just change it up a little bit. But yeah, just in general, you can see that this will work. Let's maybe duplicate
this and turn this into, like, a variation two. And maybe what you can try, you can try to
secretly like kind of, like, push it inside
of this mesh. You will never
really notice that, and it will just
once again, like, add some extra variation because we need to try
and get as much variation as possible with
the least amount of work because it's a tutorial. You can, of course, get more variation if you
are taking your time. But now you can see
that now over here, you can see that
everything is already, a little bit more broken, and it just in general, it looks a little bit more like an actual
broken building and not just like blockout. So we can go to our
cameraangle and here, see, that translates quite well. Okay, in the next chapter,
what we will do is we will go ahead, B, B, work on so this
one we don't need, so we have these ones done, internal pillars,
internal walls. Yes, I think we well, do we really I don't think we really need
broken variations of the internal
pillows and walls yet. Oh, water, internal pillow
broken we will create. But the internal wall, having one broken piece
is fine for now, let's go ahead and continue
with this in next chapter.
14. 13 Doing Our Second Blockout Pass Part2: Okay, so let's go
ahead and continue. So we left off by
starting to create a over here for the internal pillows,
like a broken version. If I see these pillows, I think I want to probably have two versions
because we have too many. Oh, no, you know what? No, we probably don't need to because we are going to have a lot of rubble
covering everything. So yeah, let's do one version. So go in here, internal
pillar clean. There we go. And let's just do a very quick
contro V. Eternal piler. Broken. Here we go. Okay, so that's looking good. So for this pillar, I do
know that I want to already, make it quite a bit shorter. And for the rest, what I'm
going to do is I'm going to go ahead and maybe this
time, I will just, like, give it some segments
myself so that I can just, like, do some
movement like this. I feel like even though
it's a tutorial, I also like to just
try out new stuff. So normally I would
just quickly bevel it, but who knows maybe
doing this here. That can also work
quite decently. And then next to
this, all we need to do is just W and go to, like, a site view over here. Now, the internal pillows, they will have probably
less of, like, the Wily tick beams, and
then, like, a lot of, like, thinner beams, thinner rebar, but we are just going
to go ahead and give it like a few of them. Like that, it should be fine. Let's go into our Trey view. And then we are just
going to once again add a simple sweep modifier, tone down the
radius. There we go. That should already
do the trick. That's all we need for blockout. Oops. For some reason, my tres mix is a
little bit laggy, which is a bit strange because it should not be this laggy. But okay, so we have our
internal pillar broken, so we can go ahead
and export this. Internal pillar broken
score variation one. Safe. And now the question
is for variation two. I do want to somehow make
it a little bit different. So what we can do is let's go ahead and
start by copying this. Call this internal pillar,
broken variation two. And I do realize that the
original internal pillar does not have
variation in its name. Sorry, that's a buck
inside of Tres Max. If you try to rename
and then just press the arrow button because
you want to end at the end, it will just use your
scroll wheel for some reason, nscore
variation one. So this one we can turn off. And for this version, what
I'm going to do is I'm going to art and di poli while
selecting everything. So we are going to make this
one a little bit longer. Then maybe make this one down and then add like a
chamfer over here, and you set this chenfa to one. So we are basically
also going to break up these angles over here. So this one is perfect to have especially on
the ground level. And then maybe also if we go over here, we can
do another chenva. There we go. So we
are really just breaking up the shape
even more for this one. So this one will just be
very, very broken basically. And now at this point, I
can go ahead and move this down. Go down here. Still a little bit worried
why my trees max is so laggy. Of course, if you
ever feel like, Okay, something is really wrong, you can have a check by going
into your, Where are we? Um, customize preferences,
there we go, took a while. And then in here, if
you go to Viewports, you can see what it is using. So for me, it is
using my RTX 30 90 and not like a built in driver. So RTX 30 90 should be fine. And you tend to just pick
the recommended one, which is the direct three D
11. So it should be fine. So I don't know
maybe something is crashing or bottlenecking
my PC for some reason. But in any case,
does not matter. It is still workable, so we are going to
grab the first one. Export, selection. Internally, let's select it. Internal Pillar
broken variation one. Oh, did I already
export that? Ahoy. I'm very forgetful that I even forgot that I
already did that. But then we can just go ahead
and just select this one. Export, export selection, internal pillar
broken variation two. Oh, yeah, of course I export it. Wow. I'm really forgetful. But okay, let's go ahead
and go into unreal. And let's just import these. So it looks like we
need two variations. The nice thing about
the pillars is that if we are doing any type
of sculpting on them, we can pretty much do both
of them at the same time. Or we can actually just clump
all of the pillars together into the same no map because
they are such small models. So at this point, we can go ahead and we
can say, like, Okay, this one is variation two, variation one, variation two. Let's do variation one, one, two, two, one. Let's see. So this one is still
floating for some reason. But that's like small stuff that we can also fix later on. Let's just go ahead
and add this on here. Let's do a variation. One add this one on here because it
would still be logical if they just are
slightly at the top. So we got that one over here. Let's do like this one. Same over here. I almost feels like it's a
little bit dinner. Oh, no, no, just feels like that, but
it's not actually true. And we can have a variation one over here, and there we go. So now we already
have these also done. Perfect. So with
that stuff done, now what we're going to
do is let's have a look. So at this point, we have our window pieces,
internal pillar broken, variation one, B, and let's just duplicate
it because I want to always keep track of
all of my meshes. Variation two. Okay, so our internal wall clean and our internal wall
broken variation one. We can also do B because
we already created. And we don't really for now, we don't really need
a second variation. So we got this
one. That is fine. I'm not going to bother
creating one like that. So the collapse concrete. So yes, I think that
is the next one. Or shall we first
do the ceiling? Um yeah, You know what? Let's first just go ahead and start by doing the concrete. So that will be a nice
little challenge. So for our concrete, what I
mean is we are now going to create the actual variations
that you can see over here. These concrete pieces,
we need to in the end, use the blockout also
to turn it into final. Because of that, the blockout
needs to be quite accurate. It still can be big shapes, but it still needs to be like the actual general shape
needs to be pretty specific. So knowing that, we know that we want to create a few variations. And what you can see over here, we are mostly just
going to create some flat variations and we
will take it from there. So what we are going to do is
if we go ahead and go into three Max, we can, first of all, just clean up our
layers over here, and I will pretty
much show you how we are going to do this. The only thing that we
first need is we kind of need to guess the scale of it because these scale links are
a little bit strange. So what I see here is we
have collapsed concrete, big variation one, two, three, and then small variation. Let's get started,
but just like some of these really big pieces
that you can see over here, we are simply going to
use cubes for those. And then for the smaller
variation pieces, those are also pieces that
we can use that kind of like hold on most of
these other pieces. So I'll show you what I mean. So what we can do is we
can go ahead and grab a simple box, bog object creation. Let's create a new layer, and let's call this
collapsed concrete, big, big variation one. And now for this one, I'm going to go ahead and I'm
going to just create a box, and I'm going to make this quite large, like you
can see over here. So we still want to just keep, very simple shapes for this. But what we're going to
do is we are basically, first of all, going to
decide on the thickness. And for that, I do want to
go a little bit thicker, although it would not be
logical because technically, the thickness would need to be the same thickness
as that you can see in between our ceiling. But fast that's
like 30 centimeter, so we're not going to do that. So we have this
version over here. And let's start with
a simple version. So this version, what I'm going to do is I'm going to
scale it in a little bit, and we are just going to give
it like a general shape. Let's say that we
convert this to an added poly and let's
say that over here, I'm going to do a massive Java, set to zero in the size,
and then go down here. Then I want to see if
there's any shape. So we are going to do
this in two variations. The first one is the absolute,
like the big shapes. Like I'm talking just
entire cuts and everything. The second one is that
we are actually going to use a fracture tool that we can throw on top to then make the shape look a little
bit more organic. So before we can continue, we need to install a plugin. And this plugin,
it is called well, I don't know I think it is just called Ray fire over here. So you can find it by
going to firestudios.com. Now, this plugin,
although it is paid, it has a demo version,
so it's paid for commercial use like
people like me. But if you are just a student, you can always just try
out the demo version and you can still follow
along with this tutorial. So demo version is
completely free. Because I do believe
that there are small changes between the demo version and
the fill version. What I will do is I will also be using the demo
version just to make sure that
there's no mismatch because they said like
that the UI changes. But in any case,
this stuff is magic. It's really, really nice. So we have a base
shape over here. What we are basically
going to do with fire, it is like a fracture tool I can just break up your
messes in many different ways. So we can use it to basically like these type of etches
with the breaks up, with the breaks, sorry. And just in general, we can also just cut out more organic, really large looking shapes. And that's basically
what we're going to do. I will create one
of these pieces, get it into unreal engine so that we can have
a sense of scale, thickness, and just
how everything looks. And then you also kind
of know the workflow. However, creating the
actual proper pieces, it can sometimes
take quite a bit of twice because we are going
to go for composition. We want to make sure
that it looks perfect. So you download that.
It's a simple XC file. Just make sure that you restart trees Max after you install it. And then where you can
find it is you can go down here into
your modifiers, and then there
should be a modifier called Ray fire over here. Now there are a few of them. You can play around with them. I did play around with the
other ones a little bit, but most of them
don't really do much. So the one that we want
to use is Voronoi. So Ray fire Voronoi. So when we select that one, what you can see is you can
see these points over here. By the way, make
sure that you are in edge and phases because else you will not be able
to properly see anything. So Did I crash? No. Okay. So the
cool thing about these points is that this
doesn't feel it dynamic. What I can do now is I can press fragment over here and you can see that it has
now broken up my mesh. But the cool thing
is because it is a modifier, I can literally, for example, go
to my point cloud and I can simply move it. And just like that, I can
make my, for example, localized in one area because
let's say that we do this, you can kind of see
it happening here. Big area, small areas. So just like that, we
can play around to that. Now let's go a little bit
over the setting, shall we? So first of all, over here, we have some settings
that we can turn it into, for
example, a cylinder. Would be pretty
cool if you have, something very
specific or you want to give it like a nice
round feeling around here. You can do a sphere. You can do a radio, which I guess for glass maybe, something like that.
I believe objects. What you can do with objects is you can pick an actual object, and then it will just use
that object for scattering. We will not do that. So we are going to probably
stick with cube for now. Now, this is why I love this because I can
literally in real time, I can set this lower and
it will just update. See? So as you can see
over here, theoretically, I could literally just grab these pieces and each of
these pieces would be great for all of our small pieces that you
can see over here to use. So that's what I mean
why this is so useful. So for now, we are
just going to go ahead and just work on
like a large piece. So we are going to set this up to probably, like, quite high. Let's do 180,
something like that. And then at that point, you can also set the width
and the length, but that's basically
just like this box that you can see over here. If you want, you can also just
do the scaling like this. It won't make too
much of a difference. The one that is cool is
if you go into where are you here in the no
side, that's a wit of. Where am I fragments? There's a lot of
settings in here. There used to be a setting, but I cannot find it.
Wait, is it this? No, that's not the
one. Where are you? So let's see, point filters
with ditch and width, there is one that you
can basically scale it. Noise. You can add
noise if you want. Not sure. I've never actually used a noise
function before. Yeah, here, so it won't do too much for what
I'm looking for. Now, but basically the one
that I'm working on is, Oh, here, it was in fragments. So here you have stretching. The cool thing about
stretching is that we can also create wood with
this because what we can do is, for example, the X axis, we can
stretch it out, and then you can see
that we can very quickly get like a
wood style fracture. Now, we won't do that now, but I just wanted
to show you that. For the rest these fragments over here, I
don't tend to use them. Most of these settings I
just don't tend to use because they never really give
me the result that I want. Oh, okay, let's say that we have this piece over
here. That is fine. Now what we can do is
we can go ahead and we do want to kind of make sure that you don't
have a lot of segments here. If you do have a
lot of segments, you can try to use your
point cloud and push it out. And that will basically
make sure that down here, we will not have a lot
of separate pieces. So we have a fracture. Now for the breakup, what we can do is
we can add and add a poly and then we simply press five to go into
our elements select. And it basically goes so Oh, this one looks a lot smaller. Or a lot bigger Robson. It
basically goes like this. You can basically just go
ahead and you can start by simply selecting and
deleting some pieces. And like that, you
can kind of create these broken edges that
you can see over here. Of course, they are really,
really broken right now, but that's just because
it's a blockout. When we actually go in
and do some sculpting, it will look a lot nicer. So I also sometimes like to just keep
like a straight area. So what I can do is I
can do it over here, and then down here, it
is clearly broken off. I can, for example,
cut it like that. And now you can see that
you can nicely just like, create an interesting
looking shape like this. Of course, another cool
thing is that later on, if we want, we can have some of these pieces just,
like, kind of hanging. So we could do it as
easy as, for example, let's say that we grab
this selection over here. Let's deselect this
one and this one. And then you could go
ahead and you could do like a turn off snap rotation. And then if you get this problem where they are all
rotating separately, you can go ahead and go down here and just make sure
that you press the plus, and then it will
rotate as one object. So yeah, yeah, you can imagine that this is quite powerful because we can also
have some pieces that are hanging off like this. So it will kind of like just give some hanging
and everything. It's always a bit
tricky to see what modular pieces were exactly
that you want to do those. So we are going to create
a few versions that is just like it's sitting
basically on top of something. Then we create a version
that is just like hanging. So this pretty much the
version we have created now. Then we will also
create a version that's really sitting on top, but it's like collapsed. And then also just
like a version that's like a bunch
of different pieces. So don't worry about the
fact that now all of these meshes are technically
all separate chunks, because they all have faces. The way that we are
going to solve this later on is we are
simply going to use dyna mesh inside of sebush to collapse all of those
back into each other. So at this point,
we have this stuff. We can go ahead and
we can still she, like, rotate this one
maybe a little bit. And just like that, also, if
you have some larger chunks, you can go ahead and you
can add some variation. Most of this variation
we will not keep, so I'm not going
to do it too much. It's mostly just
the general shape over here that I want to keep. But yeah, I think that
it is like a good start. So we now have this
piece over here, and now it is basically just
a matter of exporting it. So where's my layer relator? Let's go in here, collapsed
concrete, big variation one. We can just go ahead
and we can export this. And let's export it in the
two real folder over here. Collapsed. Concrete.
Big there one. Now, I am aware that the scaling will most
likely not make any sense. So that's something
that we can fix when we get into in real for these pieces specifically.
So we have these. Where are you?
Collapsed, Concrete. So I'm just trying to
find it. There you are. Over here. For now, let's just import it
at a scaling of five. And then if we just
have rough guess, like how this would be, let's say that it
has one over here. It would basically
just sit here. It would have a larger scale. Okay, then this one
would probably we would also probably
have a sunken in piece. But you can imagine that we can just mess
around with this. And we can, for example, have this hanging over here, and then we can kind
of do this corner. And now you can imagine
that if you have something like this,
then on top of this, also have a model that is
like a sideways model, it will be like this,
and it basically just sits over
here in this area. Even doing it with this
one, you can see that, if I just I don't know, rotate it a little
bit so that you can see that it is a
different piece. Yeah, you can see
that we can very quickly create some
interesting looks with this. So yeah, we just
need to go ahead and create a few
more variations, and that's basically
what we will be doing in the next chapter.
15. 14 Doing Our Second Blockout Pass Part3: Okay, so the plan is now
that we have these pieces. I think the easiest thing
that we can do is to simply just move
along piece by piece. So let's say that we decide what kind of piece
that we want for this. Let's say now we want
to have a sunken in piece that can
handle like over here. Then we simply make that stuff. So we have over here,
for example, yeah, so we're just going to go
for more of like a sunken in piece that we can use
in specific locations. Do not make it too bespoke. You want to make sure that you can actually use this piece in multiple different locations because else you will
end up with ten pieces. We do not want it. I
want to try and end up with maybe 44 or five pieces. So make them count. Big pieces. Small pieces will be extra. So for the sunken in piece, what we can do is so
we have this one. We can just go ahead
and get rid of it. And I'm just going to go
ahead and create another Oh, by the way, almost
forgot the thickness. Yeah. Actually, yeah,
that is a good thickness. Okay. You know what
I'm going to do? I'm going to create
the box first so that I am sure that the
thickness is correct. There we go. So now the
thickness is the same. Yes. White? Yes. So new layer, collapsed, concrete, big variation two. Turn off variation
one, let's have look. This one will be sunken in. If we go ahead and, um, I'm just thinking if I want to have it
sunken in after fraction. Yeah, yeah, I do
want to do that. I want to have it
sunken in, like, after we've done the fraction. Because if we just
add a bend to this, it would make sense because the concrete
will not bend like that, especially not when it
has rebar in between it. So I'm going to have this one. Let's make it a little
bit like a white piece. Convert it to an added
ply. Let's grab this. And then later on what we are
going to do when we create our finals is just
going to trace around the shape and
then just remake it, but we will make it
like really properly. So let's do one here. Let's
also do a chamfer over here. But what I'm going
to do is on purpose, I'm going to grab one of these and just push
them all the way back, which will give us, like, a
weird looking cut like that. And over here, I'm just
gonna do another chamfer. Um, let's just push this back. Just give it a bunch of unevenness that you
can see over here. Like that. Okay, cool. I'm just making stuff up here. Now that you have this one, we can go ahead and we
can add a fracture. Or what you can do is you
can go ahead and probably grab the previous one.
You can grab this one. Right click Copy.
Then if you go here, I don't know how
good this will work. Paste Okay, yeah, so that works pretty
decent. So we got this one. This one will be fractured, so we are going to bend it. So let's see if we can give
like a tiny bit of, like, the stretching to almost make the fractures a
little bit longer. So let's make the number
to like 250. 300 maybe. Well, that does not add a
lot 250-300. Interesting. But well, actually,
you know what? I think it's probably
because a point cloud. Yeah, we just want to
kind of like stretch a point cloud to make
sure that it works. Okay. And now that's going to our fragments, and now
let's have a look. So I need to have the
stretching done on the I never know which axis. Oh, on the x axis. So if we do a little
bit of stretching, let's say 30 maybe. Now it needs to
be a bit more 40. Here we go. Now,
it will hopefully look quite cool when we
start breaking it up into, like, a few different pieces. And then later on what
we'll have is we will have cool rebar in between those pieces to kind
of hold it together. So it will look quite nice. So we got this one over here. What you can also
do is you can also always after you've done this, you can, for example, do
an added ply and then you can select like an area and you can fracture it even more. So I will show you. We will not do that now, but
what you can do is you can, for example, select
this area over here. Deselect these. Oh, sorry, I'm in face mode instead
of element mode. Make sure that you
are in element mode. So let's say you deselect these. So you press detach. And now what you
can do is you can simply grab these pieces, maybe do a quick sent to
object on your pivot, and then you can go in here, you can fracture it again. So like this, you can
just keep adding more and more here, see,
smaller fractures. So if you want to do way
more precise damage, which we will also be doing, that's a great way
to just do this. So let me just quickly
do this. There we go. So having this piece now, yeah, we are going to go
for our added boli, and we are going to get
started by just adding, like, a bunch of Ooh,
it is quite cool, actually, this will
not so it is quite cool that we have broken
up pieces like this. The only thing is the
techniques that we are going to use because we are using
sculpting techniques, you will not so much see these pieces as clearly
this broken up anymore. It will be a bit more of like
a softer rounder technique. And then we will like maybe
some extra stones just to, like, enhance the feel. But what we can do is we
can give the go here, so just for the fun of it. So let's see let's say let's not stick them out too far because if you
stick them out too far, yeah, I'm just worried that
it will not look logical. So let's see, we are going to break it
up from here to here, which means that most likely both these ends would be
like, slightly broken. So I can go ahead
and go in here, give them a little bit of, like, damage over there. And over here, I'm not sure. We probably want to just keep
these two intact for now. So once you've done that, we are basically
going to do this. We are going to grab
a piece, detach. Grab another piece like this. Maybe like this, Detach. Grab another piece, detach. And maybe grab another
piece and detach. The reason I'm doing
this is because the way that we are
going to place it. So now that we have
these pieces here, we are basically going to go
ahead and we are going to give it a nice placement. So if I see this, it
might actually be easier. I can do it out of my head, what I can also do is I
can go to my side view, grab a quick line and kind of, like, just make it
like a bow like this. So just click and
drag your line. And this way, I can
just kind of go in here and I can match up my pieces with this line. So if I go ahead and go in here, let's first of all, let's select all of my pieces, and we need to go ahead and
we need to center them all to object so that we can
actually select them properly. Yeah. So we have this
piece over here. And then this piece. He'll see. So just kind of like make
it go along with the line. And then after we've done that, we will go into our
perspective view and just make sure that
it is a bit more perfect. For this kind of stuff,
it's great if you don't do the fill
rotation of the line, but you kind of just sink
it in partly like that. And then maybe over here, we kind of just have
it sitting like this. Here we go. So now we
have these broken pieces, and now you can see kind
of like what I mean. So we are going to go for this nice broken look and give it a little
bit of spacing in between and make the
rotation slightly different because that will just all add like a little
bit of extra interest. So we have this stuff, and then this one
looks like this one, we need to start bending it out a little
bit, pushing it out. There we go. See now we have this more fractured
looking piece. And if we want, we
can maybe also, say like this one, detach. Yes. And, I want
to first of all, center the pivot
and maybe, like, rotate it a little bit more and then make it a
little bit more flatter. There we go. So now that
we have a piece like this, we can just go ahead
and give it a try. So let's delete that line. And for this piece,
we can export selection, collapse,
collapse, collapsed. Where are you? Am I not? Here, I was not
sorting by alphabet. That's why I always
am so confused because I'm used to
looking at it like that. So big variation
two, safe export. And then we're
just going to give the go. Let's go to reel. Go in here, and
let's go and grab our big two import. There we go. And one this one will be
great as like maybe like a really large version over
here. Oh, you know what? Actually, maybe instead of
a really large version, we can do a version that's
like sitting over here. And then it has one of
these pieces that we, for example, at this point,
we can just rotate it. It's good to rotate
stuff. We can rotate it. The only thing
that's annoying is that when heel
steel does not have a rotation center
that you can just freely rotate it's
Alex at the same time. But I will most likely
not make it as large. So we'll probably need like a hanging piece if
I look at this, or maybe we can go
for like a sideways. Piece like this that could also work and then have some hanging pieces
sitting in between here. So, yeah, that's basically
how we are going to plan it. Then that's why it's
so important to the blockout because I
would like to have you imagine doing this
without a blockout and just jumping right in and just trying to make a shape and then still trying
to figure out, like, exactly where the shape
needs to be and everything. But that's pretty cool. So we got this version
sitting over here, and we can do the same kind
of stuff over here where we, for example, scale it
down a little bit. And then a little
bit more tilted. And like that, you can
also basically cover up all of those nasty looks. But of course, these pieces over here will also be broken, but it just shows you how you can slowly
make everything connected. So, next one would
be that we need to have an edge
version most likely. So you can see that over
here, this is broke up, and just keep looking
a little bit more like all of your reference
that you can see over here. Just here, this kind of stuff is great or
this kind of stuff. Over here, you can
see how everything just kind of like still is sticking together because
of all the bar in between. But yeah, just like
that, we can have a good look and just make sure
everything looks correct, although we will have more of a look at those things later on. So over here, what we can do
is this is also collapse. So and you know what? These type of versions,
it would almost be cool. These versions that they
look like gameplay elements. You can imagine a character
just running up here, like it is here
specifically so that the character can go from
this floor to the next floor. That's a classic that they
often do when creating games. And then we can also
go ahead and we can, like, like, add some
extra versions over here, maybe have this version hanging, and maybe let's have it
a little bit smaller. So let's say that we have
like this version hanging, and we probably need to have another version that
is quite similar. It's just like
another variation so that when we are hanging
them, we can kind of, like, have them almost hanging like in tandem so that they are kind
of, like, just combined. But let's see how far that we can push it with
these versions. Because that's the
goal. Try to make as many variations as possible with the
versions that we got then over here,
we will have a spill. So that's the next one that
we need to create. Let's see. Over here, we can
do another one and maybe like sideways
so that it's not constantly the same
position and everything. Scale it a little bit.
That's no problem. You can mess around with those
things a little bit more. Here we go. So now we already starting to get a
few extra pieces. Okay, let's go ahead and start with like a sideways piece, and then we will close this chapter off and then
move on to the next one. So for the sideways piece, what I'm thinking of is let's grab our original
ones that I can grab a box. And it's basically just going to be a box, let's say, from here. Oh, a box objection. Temporarily just add
it to this layer. So it's going to be a box
from here, basically to here. I just need to make
sure that there we go, that the
thickness is correct. And now I can add this
to its own layer. Collapsed, concrete, big variation three
ton of the old one. And then for this one,
it's just going to be a matter of once
again fracturing it. So let's just quickly
add like a fracture, node over here, fragment. Yeah, you know what that's
actually quite fine. If we do maybe even 150. There we go. And let's go
ahead and add and add a pool. So we are going to get started by going into Element select and just breaking this off. There we go, just
to get start with. Now, over here, what I'm going to do is I'm going to
do the same where I'm just basically breaking off these etches to make them look a little bit more
logical. Let's do this. And then what we're going
to do is we are just going to split this up.
So let's detach this. Detach this, detach this. And let's go ahead and
detach this one over here, select them all.
Affect Bivd only. And then this one so it will slightly be
hanging over the edge. So it's kind of like
still sitting here. So it is quite broken, but it's just slow
starting to hang over the edge as if that
it's like a walkway. So here we go. So we do like
something like that, maybe give it like a bit more random rotation
here and there. Just the main goal is that
it is like the point where those really large
pieces start to break off because it just
couldn't hold the weight. And let's move it a little
bit forward so that we have our pivot point closer
to the end, and that's it. We can go at it,
we can expedite. So you can see that
doing the blockouts for these are quite quickly. It's just like figuring out
collapsed, how to use them. With as little pieces as possible, that's the
difficult thing. So variation four we can go in here and we
can grab variation four, throw it in here, import. Okay, so this is great stuff, for example, over here to use. And then what we will have is later on, like rubble piles. Also like maybe
around these areas. Let's see. And it's okay to sometimes
have clipping like that. When we are working on
something that is this messy, you probably will
not notice as much. So, yeah, we basically need
to figure out the logistics. So this entire area would just be completely collapsed
because as you can see, like, half of the
building is missing. Even over here, we would
have collapsed pieces. So we kind of want
to figure out, Okay, so how would these
have been collapsed? This one would
have, for example, wood still sitting on top. So we would have this,
for example, like, sitting just below
it, and then we would have wood meshes
sitting on top of it. So here you can see that it's starting to
collapse and everything. And we can do pretty much the
same with multiple pieces. And you can see that
that already starts like look quite interesting,
same like over here. We probably want to also
have a variation of this one that's a lot
smaller, like halfway. That variation, we can art because it's literally just going to be us
cutting this in half. So it's just going
to be us copy. And what I will call this one
is just to make it easier, collapsed, concrete, big
variation tree underscore half. That's what I'm
going to call it. So if I just remove this
one, I can go in here. I can, like, detach this
nuke everything else, push this in here,
see? That's it. So that's how we are also
going to do it with the final so that technically, it's almost not like
making another variation. Uncribq variation three. Why did I call that four? Did I seriously, I call it four. I cannot change the name now, so I guess that this will
become four on the score half. Export this, and then in here, we need to change the name because else we
will get confused. Let's rename four, rename and then we
will just create a variation tree later
on. We got this one. We can go in here, import. Then for example, if we
duplicate this version, we can then just
swap it around with a half version and
you can see that now, if we place one like
let's say one over here, that's will sung to angle down. Don't forget that all of
these like chunks over here, they will have roof
and it will have like metal beams and everything in it and sticking out
and all that cool stuff. So we will create a blockout of those after we've done
these large pieces. But here you can
see that now, see, we can start to get
like Willie that collapsed L. This one, I'm just not happy with
what I'm going to do. See, let's replace this
with variation two. No, you know what?
Let's not do that. Let's just duplicate this one. And let's just have
this sticking out. Scale maybe like a little bit. So we have this one basically maybe scaled in a
little bit more, sticking out, and it's okay for it to stick over it like that. Like that can happen. And then we have
a variation four. That is sitting
neatly under here. And then this variation,
it needs to rest. So we will have rebar
holding things up, but we still need
to kind of make it a little bit
logical because it's still a lot of weight to
hold, even for metal. So we got this version, and
then maybe like this version, we can, like, push
it up a little bit. See? There we go. So I'm basically now just
going from point to point and just trying to figure out exactly how we want
to go ahead and, like, make this work. So what I can do over
here, for example, is I can have this sideways. And just like that,
we have added the sideways piece or a
sideways look, I should say. So we can do the same over here. Now, let's see what
else we can do. Let's say we have over
here variation two. Can we maybe have fallen over? H. See? And just like that, you can use multiple
variations for the same thing. We just need to make
sure that we make a proper bottom and a top. And then, yeah, so we will
have piles over here. We already have stuff over here. So that stuff is looking
pretty good. Maybe scale this. For this one, yeah. So
the next one is going to probably be like creating
another variation of this, just so that we have
a different shape. I don't like that too much.
Look at my reference. Yeah, I quite like it over here, like it's not too intense. So we do not want to have it just like clutter everywhere. Yeah, something like
that could work. So we got that one
over there, cool. Then we would have a variation for sitting just over here
or something like that, maybe, like, slightly angled so that it also fits properly. And then you would have,
for example, down here, you would have secretly,
like a variation too, just to give it like that fallen off look and
everything like that, that when from a distance, it will look quite
cool. Okay, perfect. Let's save our scene. And in the next chapter,
we will continue this and probably the next chapter after that, we will still
continue this. But as you can see, if you have a look like this, it is starting to
look quite cool. So it looks like a
collapsed building, but it still also feels a little bit like a
game environment. So that might actually
be a cool way to do this, that we created. It's like a game
environment, sort of. So let's go ahead and continue with this in the next chapter. Um,
16. 15 Doing Our Second Blockout Pass Part4: Okay, so we got a pretty good
thing going on over here. We start to get really
like destruction here, and then imagine having a bunch of pilots
and everything else. Next, I probably want
to put my focus towards this area because this is such a large area
for us to work with. Okay. So I really like
this kind of stuff. Like that it is almost like just being covered up
in certain ways. I just need to have
a looks over here. Yeah, it is kind of broken off, so I will not have the variation
for all the way along. So we will have most like
wood just sticking out, but I still want to
have it in some ways, especially like where
the roofing is. So let's work from the
top to the bottom. So we have this type
of roof over here. Now, most likely this roof
would then be collapsed. We want to do stuff
like this anyway. So what we can do is we can
maybe here, even do this, that it's on the side, and then maybe if
we duplicate this, we can grab the half
version and go over here. And we are also
going to by the way, you can check this
button over here to switch between world
and local rotation. So another one that
we were going to do is we were going to create
another variation of this one. Let's first do that
just to give us a little bit more
flexibility to work with because I had a good idea. What I wanted to do is if
we look at variation one, I wanted to basically
select the layer. I wanted to basically
create a box over here. Same thickness as always. Throw on a new layer, call it, collapsed concrete,
big variation five. No weight variation three because remember,
we had number four. And now what I'm
going to do with this one is I'm going
to turn it off. Okay, so the cool thing that I had in mind is that
we are first going to fracture this one
to basically create an interesting
looking shape instead of doing it the
other way around. So what I can do is I
can go ahead and throw on a ray fire Voronoi over here. And we are going to
make this, like, really low in terms of
settings. So let's say ten. Okay, that's even too much five. Yeah, let's do five. And then if we go ahead and convert
it to an added ply, we basically just want
to grab one piece. Let's say we grab
this one and then just contra it and just
delete everything else. So this is basically just
going to become piece. Now what we can do
is we can go ahead and we just want to scale it up, but only scale it on the
X and the Y axis because, of course, if you scale it on Z axis, the thickness changes. So we got this done, and now
if you add another ray fire, fanoy on top of this
Um, so that is fine. Now what we can do
is we can fragment. For this one, I kind want
to do something special. So I kind want to keep, very large pieces in some area, and then maybe like
a smaller piece, C. So I guess that around here is where
it would be broken up. So let's go ahead and just
like mess around with this. Let's do something like this, set this to like 200. There we go. Let's try
something like this. And then let's draw on and add a ply. See what we
can do with this. So we got some pieces
over here that are broken out. And here. Okay. And then we kind
of like, let's do this. Because the other one is
a little bit too big. Of course, we will
make this like perfect when we do the final. Yes, something like that
seems like it could work. Maybe have one piece missing, maybe here or maybe like three. There we go. Let's do
something like this. Okay, this one can pretty much stay straight as
far as I can see. So we got this version, go ahead and just throw
it into our center. File Export, export selection, and this will be number three. And then we have fixed my mistake where I
messed up the naming. There we go. Okay, so
let's have a look. If we go over here in Tenil, throw in variation number three, and now we can see like, Okay, how are we going to use
this one? Let's see. Maybe this one we can write
away throw one in here. And sometimes I just switch
between world positioning and object positioning
makes it a little bit easier. No, that's too flat. So what I want to avoid, what you can see over here,
which is really nice, is that you can see,
like a flat area, straight area, flat area. And so there's quite a bit of
difference between the two. Of course, our building
has a lot more floors, which is why it is a
little bit different. So what we can do
is maybe we can, like, throw one in here. And let's see, so we got
one hanging over here. Let's see if I can, like,
Ah, another one here. So this is where most of
the rubble will be located. So this is going to be
like our focal point and our showcase point,
mostly for distutorial, in this case, and also like if you are making
an environment like this or you're making this entiting out
of an environment, this is where we would
have that stuff. So if we look at this, your focal point would be
here and here, mostly. Because of that, I
want to make sure that it looks really nice. So that's why I need to, like, kind of figure out
the best position. So I want to have
a location here. Maybe if we do, like
this stuff over here, I basically want to have
a resting point where we can have some
pieces just resting. So let's have two of these
variations over here. Okay, so we got that. Now, over here, we will
have some wood most likely. Or what we can do is we can
grab like a variation three. And let's see where would
this have No, wait. It would not really have
had a proper chance to fall in that location. Over here, however, it would
have had a proper chance. So, kind of, like,
think about the logics. So how would this
have been collapsed? Of course, we will not have
as much destruction as a real building would because else this would just be
completely filled up. So we don't want to
do that. We want to have it like it's collapsed, then they try to
excavate, excavate. Sorry, I forgot the word.
I think it was excavated. Basically, they tried
to, like, clean it up. But then let's say
that our story is that during the cleanup,
things got too dangerous, so they just left it, and then nature started to take over because then apocalypse
happened, whatever. So that's the general
idea. Over here. So this is quite
cool that we have, like, this long bit, but it does mean that
we need to, like, have a quick think about how we are going to showcase
this being here. Like, it is cool if you can
sometimes find these types of things where you can see that we hit it right
around like a pillar. So remember, we will
have rubble piles. So if we have, this
stuff hanging over here, we will most likely have like rubble piles just
sitting below it. So we are able to already, just for the blockout,
have this stuff hanging around like this
and just in general, place it as if it is almost floating because
we know that there will be massive
rubber piles sitting below it that will kind of
hold up all of this weight. So I can have this one. You'll
see that looks quite good. So this roof over
here gets collapsed. So this one is this piece. This one is just like part of the roof that gets
completely fallen off. Now, over here, let's see. What if we like let's see, so the broken up pieces would be probably
around this end. So what if we like,
grab this one? And yeah, these
pieces are too heavy. They are resting on
top of other pieces. We cannot just have them hanging like these pieces over here, although it would be tempting. So they need to have,
like, some weight on them. So if I have this one down here. What I could do is I could grab, for example, piece number four, and I have a feeling that
we are going to need to have another variation
of this piece because we are using it apparently so often that it would just not look nice if we don't have
more variations. But for now, what we can do
is so we can have this piece. And probably this piece, what we actually want
to do is later on, just like sink it in
here instead of just laying it on top because else it would not make
too much sense. So we would sink it in here
because there would be like, like broken edges and
holes and everything. So that would be fine. So we have it almost
like sitting over there. Then this piece maybe like rotate it a little
bit further back. And see over here. Okay, so I think if we
like the spilling piece, let's make that
one the last one, and I think we can then pretty
much has something decent. This one, I'm tempted
to replace it with variation two and just set the scaling temporarily back to one and to have it like this. So to have it as if it's
starting to, like, sink in. I feel like that would
be a little bit more logical for this area. So we do this, and let's say that then maybe we
can have another variation one sitting on here and maybe then have a
rubber pile sitting behind it, and that rubber pile behind it would kind of just
hold the weight of it. So we got that stuff. If we do that, then
maybe it would be nice if we replace this
one with variation one. This one is a little
bit more forgiving because it's like a thin area, and I do not want to
have two variation twos. Just sitting right next to
each other because then it is too noticeable that
it is the exact same piece. To be honest, over here,
it's also quite notable. So you can add more variations. But for now, let's
say we have this. And now what I want to
do is let's go ahead and create one more variation that's going to be
like variation four. However, it will be hanging over a little bit
more. Hey, that hymes. So what I'm going to do is I'm going to go ahead
and create a box. Let's do this width over here and just make sure
that thickness is correct. Collapsed, concrete,
big variation five. Turn off the old one. And
for this one, basically, what we're going to do is, yeah, it will really be hanging over. So if we go to our
Voronoi over here, fragment by the way, sets to like 200, maybe give it like a stretching a little bit, maybe like 30. Okay, 50 Let's do 50. And once we've done that, let's go ahead and go inside. So just click once on
the ray a Voronoi, so you go down. And I'm going to maybe, like, do something like this. So it will have one
piece that is straight. Once we've done that, it's
a matter of going in here. First of all, let's break
it up a little bit. So that is not just like
a perfect square slab. But instead, yeah,
let's do this. And then maybe like the corners. I feel like corners would be one of those things that
are the first to go. So we have the corners gone. I don't have a lot of
because it is straight, so that might not be the
best area for us to then break it up unless we
are going to Yeah, maybe what we can do is we can now go ahead and
detach this one. Let's then also detach this one. And now, basically, let's see. So we are going to probably
have this in split up pizzas, let's detach this,
this and just give it some broken up
pieces, this. Okay. So you've done that,
then for these pieces, I want to go ahead
and add one more for noi. It's a bit slow. Fragment, and it's
fragmented like 50 times. Copy this, throw
it also on here. Oh, it looks like we need to
move our It's a bit slow. Here we go. Let's move this. And now let's add an added poly. So this one is just
so that we have a better breakup around these ends because I do want to have these a little bit
broken up like that. Same over here,
like an added pool. And that's a nice
thing also about non destructive modeling
inside of three Max. That's everything
we can just keep. And when I said that, I decided that I'm going to now just go to lapse
everything down into normal added poli just because they make everything
a little bit faster. So basically, we got
this version over here. This version, let's get
rid of these pieces. And let's just set everything
to convert at a ply. See in these versions,
they will basically, they are like the
hang pieces over it, but they are hanging over
it quite a bit more. So they are really like
they are starting to just crumble and collapse
and everything like that. Here, I wish that Unreal
had this version. That would be great for this
kind of environments where you can just move it
around like that. Even in Unual agent five, I believe that they
have not added that yet, which is unfortunate. But basically, so
we are going to really have this hanging over. This version needs to be
moved down considerably. There we go. So it is not
hanging over too intense. Although it is quite far, maybe you want to go
a little bit less. Let's start by just
getting rid of some of these so that it's a little bit shorter
when we hang it over. And then maybe, like, make the last bits even more
intense like this. Over here, let's just
get rid of, like, some of these areas.
Okay, so let's see. So we have this one, delete
that and let's move this one. I don't know why I'm
running so slow. So it annoys me when all of a sudden TresEc
starts to run slow, even though it has
never done that before. So I'm not sure why it is. In any case, let's move
this down. There we go. So that should be fine. So we got this one over here. Let's move it back
into the center. Export, export selection. And this is going to
be variation five. And I think that marks the end of all of
our big variations. So five variations. That is still quite
a bit of work. Don't get me wrong,
but we can probably combine the work a little bit to make our lives a bit easier, because we are
later on needing to UV unwrap it and create
masks and everything. But, yeah, I feel like that
we can combine the work. Worse case, I end up time lapsing a little bit
of it because they, of course, you are making
them the exact same way. So at one point, UV unwrapping and everything,
it's just a very, very boring work, but it's
work that has to happen. So let's test this out
over here, for example. Like this really
large chunk in here. And as you can see, also, this chunk is laying on top, but then this chunk is,
for example, broken off. So that's why I have it
under the ground like that. By the way, do I still
have snapping turned on? Let's just get rid of
that. So let's see. So we have like that, and
maybe then over here, it would be also cool to, like, have it and just
sitting in here. And the good thing
about when it's sitting in here is
that we can just, like, push it in
as far as we want. These areas I will
get back to later on. So we got this stuff over here. Yeah, so it's not yet. I want to have it, really, like, large clumps
at the bottom. Hmm. I'm going to, large
clums at the bottom. Okay, let's just have a look and see how far
we can push all of this. So we push this one down here. Like that, we can push maybe
like a variation four and have sitting on
the top as if that is far off from these areas. Then we have a variation five, and we have like
sideways like this. And then we will have wood
sitting on top of it. So we have like, that
looks quite cool. Doing sideways areas like that. Over here, we can have
another variation five. We can just have
pushing in a little bit more Yes, okay. Down here, we can have maybe, like, let's do a variation. Tree that is like
laying just here. So like a variation one that is maybe laying on top of here. As I said before,
there are going to be really large piles
and everything. So we need to keep that in mind that those piles will probably make everything
a little bit higher also. So we can, pushing
everything on top. So the bottom is definitely an area that we
will revisit again. Let's have this one over here. It feels like a better spot because then what we can do is another variation five and
have it just slightly angled, for example, like that. Maybe like a variation two, no, maybe like a
variation three. That's just kind of
hanging out here. And that's when we'll
most likely also be later on added to a pile. So we got this stuff
now over here. I feel like this could
be a variation four. Let's push in like that. Okay, so this area over here, it's starting to look
a little bit better. Let's just keep
continuing on with it. So let's say a variation
five over here, and it's important that we do this now because we need to make sure that everything works exactly the way that
we want it to work. You know, trying like,
what if we push this out? Yeah, see, and then I
can see like, Okay, so pushing it out does
not feel really good. So often just have a
look at it in context. And with that, what
I mean is, like, from your camera angles that
you want to create this. So I sometimes just go to that, but I should actually just do this because here I can
see my cameraangle, and you can see that
from this camerangle, everything is a little
bit further away. So I realize that, of course, I will take
a big screenshot. But I realize that the pieces, they will feel a lot
smaller than when I, of course, I'm
standing over here. So we kind of need to just
make sure that we get also some really nice
big chunks in here. So what I can do is I can maybe have a variation one that's like a little bit bigger, and just be careful with
the scaling up because, of course, you are changing your thickness if you do that. But here, we have like this one. And now if we just get our
attention to this area, let's do a variation
four that is sitting in here like this, then we can do maybe like
a variation two, that is, in this case, just laying
here pretty much like that. So that one has been
collapsed from here. Then we can have a variation
five that is sitting here, and this is where most of
the collapse happened from. So this variation
five, we can push in, but we can make it
so that it's still, it doesn't look like
there is a corner there. Let's push it out and up
a little bit. Here we go. So we no longer have
that sharp corner. And then maybe we do
like a variation four. See, after a while,
you start to get into that mood and you start
to get the hang of it. And that's why I'm
slowly getting in now. So I'm just messing around, just seeing how everything
will work nicely. Okay, so we got this
stuff over here. We got some of these.
So that's quite cool. This is quite a nice area. I kind of want to have something over here that is just massive. Let's do a see a variation tree that
is hanging around here. So that's already
a variation one. So maybe we can do
something like a variation two and have it. I don't know. So let's say that we
pick like a variation five and maybe we can use this one as
like a resting point. So here you have
a variation five, and then we can have a
variation one and throw it sort of like twice and
throw it in between here. I know it's really big, so Let's see, N to kind of here that's
maybe just held up like that, and then we have some more
piles sitting over here. If you want, you can
even go ahead and do a variation two. Let's go to unlit mode. Unlit mode at this point
is a bit tricky to see. But we can have a
variation to just to indicate that there
is more rubble sitting around this area over here that is holding it Nice. Yeah, that works. These pieces, I will just have nicely broken. I will have some
wood hanging off. I don't want to have
concrete everywhere. I will have some wood
hanging off there, this one, maybe go for this direction
and then over here, you can do is we can maybe
push it out at like an angle. And then over here, as some variation three maybe. And that's the variation tree
is kind of fallen off here. So this one would
be variation five. So it kind of fell off here
and it landed down there. So here we have survive and it will have broken
edges and everything, which is what we are going
to work on in probably the next chapter. There we go. So let's go ahead and look in our cinemaar also
cool thing that you can do is if you make
this a bit bigger, you can go down here, set your
screen percentage to 200, which will double
the resolution, and it will give you
a much better look at the final result. So here we can see,
Okay, right now, if I have a look at this,
it is looking pretty good. However, it is still
looking quite noisy. So I think for now, it is fine. We can, first of all, just
work on our roof pieces. However, right now, I feel
like this environment does not yet work as
well as overall view. However, it works great already as like
this type of view. So like a close up view,
it is working good. However, now we like this
over here, that's great. Only now we need to start also working or making it
work from this view. So in the next chapter, we will go ahead and we will
do we will work on the roof, and then we will work
on some more placement. So we're just going to do a bit more placement
here and there. I will also start making a blockout for like
a rubber pile. So let's go ahead
and continue with those things in
the next chapter.
17. 16 Doing Our Second Blockout Pass Part5: Okay, so what we're
going to do now is we're going to focus over
here on the roof piece. Now, when I look at this, I pretty much see that
we need two pieces. We need one that
we already have, which is like this,
but I want to improve the blockout
a little bit. And we need a piece
that just is like on two sides broken because that
seems to be the only case. We always have one
that is all on two sides except for
technically this. And for the rest, it
is always on one side. So that's kind of like
what I want to try. Now, if we go, first of
all, to the one side, so let's just minimize
these things over here. Wow, we have a lot of pieces all of a sudden.
But that's fine. No worries. So we
will have our roof clean roof half roof
broken. There we go. Okay, so for our roof broken, now we are just going
to go ahead and we are still just making
it like very basic. What I'm going to do
is I'm going to go in so I'm just having a t because
I want to split this up, so I'm going to do a swift loop. The only thing that
I'm thinking about is I want to kind
of extrude this in. I'm just not sure if I should
give it a ring around here. I guess it does
not really matter. I guess for now, what we can
do is we can just do a ring. So we can basically go,
actually, you know what? We don't even need
those Swift loops. We can select these pieces, and we can just go ahead
and do like an inset like this and then just hold
Shift and push this in. And now what you
can do is you can just go ahead and let's
go to our side view. Geez, I don't think that
is the correct side view. So it's out of saving.
Give it a second. There we go out saving
none. There we go. This is the correct side view. And basically just do this. We're going to have one line. But object creation. I just want to have it in here. So we are going to have one
line that is just straight, and then maybe have
another line that at the end starts like bend down. And maybe another line delete that one that kind of does
the same where at the end, it starts to bend down,
but maybe not as far. Let's just hold press one to move this line a
little bit further. There we go. So we have
these three lines over here. Now, the cool thing
about these lines is that if we at
the Sweep modifier, there is an actual
sweep modifier that looks like the metal
that we need, see? So all we need to do with this
one is we just need to go ahead and in the
sweep parameters, set our angle to maybe like 90, and then it's just a matter
of setting our length lower say that we
like push this out. I probably want to go ahead
and actually make this a little bit here we go. I want to make this
a little bit thicker because I do want to have
this thick beam of concrete. Oh, that's annoying. It
sometimes does this. I believe that if you do this, you need to go down here and once you get to the plus because else it doesn't treat
it as one object. So when you do that, you are able to scale this down. And at this point, let's set the corner radius, right click. If you right click on something
inside of threes Max, it will just reset it to zero. For the width, let's just set
this down, and there we go. So at this point, we can copy and then we can just
go ahead and we can paste the Sweep
modifier in here. And just like that, and this
is also how we are going to later on pretty much
create our final version. So we will just have these sitting over here to give
the effect that there is, like, metal beams and
everything in here. And that's pretty
much it. So this one, we can already go ahead and
just export export selection, roof broken variation one. There we go. And then if we
go ahead and go in here, we definitely I'm really glad
that we don't need to also create our materials
because then this would take very long this toil. So we are going to go ahead and grab our roof broker
variation man reimport. There we go, see. And you
can see how much it arts. That already arts
like a huge amount. So now that we have
done this one, now what we're going
to do is we are going to go ahead and let's just do a simple Contrave. And let's now go ahead and
just do roof broken variation. 02. Well, I'm really inconsistent with
just doing two or 02. And then for this version, what I'm going to do is let's go ahead and simply grab our roof. Actually, let's attach everything
to our roof like this. Let's center a pivot. And then I feel like
that if we now just go ahead and throw on
a symmetry modifier, the symmetry modifier
inside of trees Max is awesome because you can
rotate it however you want. So I can just do like
a symmetry like this. I can say, we probably
want to flip it, and then all I need to do
is just go into rotate, go into the actual mirror
modifier and turn on my snapping for my rotation,
and I can do this. So I can simply move this out. See. I believe that, I believe that we need to be
on this point over here. And what you can do is you can keep your symmetry on here. So let's now go ahead and we
probably need to move this. I'm not completely
sure, so let's see. But now what I can do
is I can go back into my Adi poly and I
see that over here, like I need to push these further down a little
bit because else, the symmetry is not working. But now you can see
that now we immediately have a basic looking corner. If you want, you
can add an added pool on top of this and you can, like change the corner a
little bit, if needed. But let's say that we
have this corner now. We can go ahead and
we can export this. Roof broken variation 02. Let's go ahead and save. And let's just see if
this works or if we need to go in
opposite direction. Roof broken variation
02, Import. Import. Okay, so let's say that over here.
We grab this one. Let's move this up a little bit. Okay, so that will not say that does not have
to say anything because I am aware that we need to
turn on our snapping rotation, and sometimes we need to,
like, swap this around. So let's see if this works. One back, I guess, one back. So it does have an
intersection here. Is there maybe a place this one? No, wait, because this one is most likely in the
wrong direction. Yeah, see? So that one is
in the wrong direction. I want to kind of try and find one that is already,
the right direction. But I guess that all of them are pretty much in the
wrong direction. Well, that doesn't
matter too much. As long as it works,
then it is fine. So let's grab this one and let's see. So what
would we need to do? We need to then rotate
this 180 at which point, we are just going
to basically place it over here the way
that we want it to. Yeah, then and then this
stuff for now, we can, delete it so that I can have
a better look Okay, yeah, it just broken up here, and then this one you might
want us break somehow, or you want to just
kind of keep it. Yeah, I guess that
that should work. I'm just making sure that
it works in all instances. So 90, and we basically move it forward
until it hits the same level. I do feel like that
we need to go in here and let's go ahead
and go to our top view. Here, that's what I mean, because I can see that
there's like a tiny, let's push it out
a little bit more. Zoom in. Let's push it just
over the line for now. There we go. So just to make sure that we do
not have any gaps. So we can export this
roof broken variation 02. And you do the trick. So
we have these two that will take care of all
of our roof pieces. And after this, what I
want to do is, yeah. So yeah, I can live with that. So after this, what I
want to do is, yeah, I need to do some planning to make sure that for the
pieces that we have now, that it will not
take too long for us to change them up
or to create them. But that's just some
general planning. It's not too difficult.
It's quite interesting, actually. You just have
to think about that. Let's go ahead and just delete that one because we will not have broken pieces like that. Push it back in. There we go. So we have, like,
this broken piece. Okay, so these ones
over here are fine. Yes, we have, like, a
half piece over here, but honestly, I'm not going to create an entire
new piece for that. So I will just go
ahead and ignore that. I'm going to go ahead and use this roof piece over here to, like, Art is this one. We can do, like, a
piece like this. And I guess that we don't
need to have it everywhere. So it's just kind
of like a guess. Where exactly do we want to
have all of these pieces? So that's basically
the goal for this. So here we see this one and this one has a lot of
destruction around it. So that's like maybe
a good candidate to rotate it and move it. Closer, and there might be
like gaps sitting behind here, although we cannot
really see them. So that's where I'm going to justify that the gaps are there. You can fix these gaps simply by creating more
pieces if you want. So let's see. So over here,
it's completely broken. That's great. This piece, I'm going to leave because whenever we have this
type of concrete, it's sometimes is
good to leave it. This piece would be like a
good candidate. Ah, perfect. So this one is in
the right location. And it looks like that. Okay, so it is a little bit
offset whenever we have that. So that's the only thing,
but that's not too bad. Yeah, I can live with that. Maybe it's even
offset like this. So that's like a good candidate. Then over here, what I'm
going to do is these pieces, they can benefit from just like having a straight roof version, a spot height temporarily
on the floor. Yeah. And then this, of course,
pushed back a little bit. And then over here,
we can do the same When we move this out, paschontr H to unhide. Oh, yeah, here's the
blockout building. I forgot about that one. So we probably at one point,
we can remove that one. This one is the last one
where I will most likely Oh, wait, that's why
this one was lower. Now I remember. So this one over
here, I will do, lastly, and then we just kind of keep it in this
one. I'm not sure. Yeah, maybe, maybe we can
just throw it in here also. At this point, it's difficult to even
see what's going on. So that is where we
take our advantage. This one is a good candidate
for a corner, like this. Good over here. Another good candidate
for like a corner. 90 and push it back. And over here, we can just do like a normal broken version. 90. Let's press
heights temporary. Push this one back,
and then also let's put height here, the lead. Yeah, and at that point
you cannot see it. So let's just do this one
over here. Control H. Of course, once again, just hide your blockout
building. There we go. So that one is now nicely broken C. That adds so
much to our scene. Over here, I guess this one is one that you can just do
like a straight version. I already in the right location. This one, yeah, this feels
like a corner version to me. This one. Okay. Let's just make it like the broken version. Of course, do not want
to do it always because then it will not be as unique anymore to have
these broken up versions. By the way, this corner
version over here, let's also push this
back a little bit. Yeah, so then this
one would be like one more corner version that I will just push back a little bit because the scaling is
just slightly different. But I'm okay with that
slightly different scaling. In this case, that
is totally fine. Over here, we have this version. It's just turn off
our snap rotation. See, this version
will go in here. So I'm not too
worried about that. And then maybe over
here, what we can do is we can just
continue this on with our normal broken version. And then you can become
a corner version. Yeah, it is quite far off, which is interesting, but it is quite far off because
we have cut this off, of course. That's the reason. So that's why I'm not
too worried about it. So yeah, we got, these corner versions over here,
that's totally fine. Let's push this probably
back a little bit. Maybe up a little bit, I don't know if we also, okay, I guess that works. So we do this, and
then here at the top, we will probably have maybe like an extra half
version to kind of, like, make sure that everything is just nicely
blended into each other. Maybe have this half version, pushing up like
that. There we go. Okay, so we got those pieces also done.
That's looking great. This is looking great.
We have this one. Now, over here, there's
a lot of stuff going on. You seem like a corner
version to me. They are. So let's just create
like a corner version, push this back a little bit. You seem like just like
a normal broken version. Let's rotate this 90
degrees, push this one back. There we go. So
we've done that one. So that also when I want to take screenshots
like this because this would be like cool ways or cool places to have
screenshots and everything, I still want to be able
to, see that extra detail. If we make it, we better as hell, throw it in
here, of course. Here, we got some plain
versions that will work great. And then we'll have
some wooges sticking out of it. So that
stuff is fine. These ones are super easy to place because we just
need to drag and drop finally instead
of all the rotating. And then over here,
you can pretty much do the same thing where we are just replacing
those a little bit more. Here, this is like
a corner version. This one we do need to rotate
90 degrees and move it out. Maybe go to unlit mode
and then have a look and make sure that it is
sort of like lined up. Roof broken, roof broken. So we got those. Even though
all of these are the same, it doesn't feel that much
like it is repetitive to me. Of course, you can just
have a few variations of the metal bars if you want. That's all, no problem.
We got that one. This one, seems like a
corner version to me, 90 degrees and let's just
move this nicely out. I'm doing this quite sloppy. Of course, make sure
to do it properly. You don't be like me, do it properly. Of
course, don't worry. I am teaching the proper ways, just that I do it quickly. Let me say it like that
instead of taking my time. So we got this one over here. Nice. This one, not so nice. Let's rotate. Push back, and this one seems
like another corner. To me, maybe push it out a little bit more
just to showcase it. Nice. So look at that. This is starting to look
pretty cool over here. This one. I forgot
about that one. Wow, this one needs
to go fill 180 even. Well, I'm just going
to kind of stick it in here like that. So we got those pieces also done. We have
those corners done. Let's just go ahead
and do it like a quick. Something like that? Oh, yeah, I barely actually
did anything here. So we can do like
this one over here. Yeah, so this area,
we still need to art all of our pieces. I've been so focused
on these areas. I just completely
forgot about it, but we need to do it
anyway over here. So if I have a look at
this, It's looking great. Maybe here, a few more. This can be like a corner piece. This can also be a corner piece. Probably the only piece that is sticking out
completely on all sides. But that's no problem. We
can just do like one side because we have the other
side we have covered up. Um, Yeah, you know what
that can work also. In a way, this is
another piece that is technically sticking
out completely. 90, push it out. See, for these pieces, just
make sure that you can see it mostly from
the areas where, um, where we do not have
these overlaying assets. But that's looking pretty good. So that's one is also done. We can go ahead and
we can save scene. We are getting near the end
of this chapter over here. So what I will do is I will go ahead and so there will be
some smaller rubble over here. That's what we're going
to do next chapter. We are also going to
work on smaller rubble, but maybe already just
have a little bit of rubble in some of these areas, I'm going to turn off my
snapping and my snap rotation. So I can do this.
And then maybe have another piece that's big
that is sitting on top. And all this piece will
do is just kind of like hide the fact that it does not look as nice in terms
of, like, the transition. So here, like this.
We can also do that. And then we will also have
some big rubble here. So you can even do, like, make it extra big just on purpose, as if it has, like, collapsed. And you can make it like that is sitting here against the side. Maybe have another piece that is really big that's sitting around here. Stuff like that. So we can have some pieces that are just completely
collapsed and everything that might be a little
bit too big for my taste. Tone it
down a little bit. But, yeah, just in general, we can make this look
quite interesting. I can also have this one here, and then maybe I can, like, rotate this and place it also
like over here and maybe, like, have it pushed up a
little bit. So it fits. There we go. So in
the next chapter, we will go ahead and finish off placing everything in this
side of the building. Once we've done
that, we will create some smaller concrete
pieces that are just like little piles, but they are not like
the rubber piles. And after we've done
that, we are going to continue on with
the next big one, which is going to be that
we are going to actually work on the death of the wood. So that's what we
basically will be doing. But for now, this is
looking pretty good. So let's go ahead
and continue with this in the next chapter.
18. 17 Doing Our Second Blockout Pass Part6: Okay, so we are
going to finish off by just doing a little bit of
this site on the building. I'm not too worried
about this site because I do not see
myself making a lot of renders on this specific area because also the background will mostly be
focused around there. So what we're going to
do is if we have a look, something would need to,
like, come down here. So, let's say we grab like
this one, and it's like, throw it in here, and
then maybe we also grab a variation four over here. Throw this one in
here. There we go. And if we combine this with some wood and everything,
that should be fine. So it has a little
bit like there. Let's go over here and maybe. You see, now this
guy makes sense. Oh, I kind of like in real life, just want to stand near
a building like this. I've never seen an actual demolition building
in real life. It's quite surprising
that I've never even seen something close to that,
but that would be cool. So we will have some
piles over here. Let's go grab Ooh, maybe we can use this pillar. At this point, it is
getting a little bit dark. That's most likely because
of where our lighting is. But what we can do
is we can probably, use this pillar as a
little stepping stone for our large block piece. Just have it in front of
the metal. That's fine. And then what we can do is
maybe have a variation number three that is sitting
here on the corner. We will have a pile
sitting below here, maybe like a variation five
that is sitting around these areas over here
to showcase that it is, like, starting to,
like, fall off. Maybe like in the
corner a little bit. That might be nice. Okay, so we have
this piece that is, like, fallen off
there. That's fine. We will have some
wood here and there, maybe have a collapsed
piece tree that's maybe a little bit smaller over here. I all of a sudden have the mood to stop playing
loss of us again. Yeah, I'll probably
do that. Like, I literally finished
it a few days ago, but I'm halfway
through just talking. I'm just starting to get
into the mood to play it again just because it's
such an awesome game. Let's see. We have that stuff over there. It is
being collapsed. Let's have another
collapsed area maybe around here a little bit. So let's rotate it a bit. And then it would
also, later on, have some areas or some
pieces that are like this. And then we just throw in, like, a bunch of extra rubber piles and we'll have some trees
growing and everything. So that's pretty cool. There
will be like wood over here, so I don't want to overdo it. Yeah, that's fine. So in this area, let's just finish it
off over here where we go like maybe like half a piece. Like that. Yeah, a little bit
of clipping is no problem. Like in the grand scale,
you won't notice it. If you're making a game and you are literally walking
in this environment, of course, make sure
that you don't do, like, massive clipping
and everything. But for, like, small pieces, that's not really
that big of a deal. I'm going to maybe, like, rotate this one and stick it in
here a little bit more. Maybe, like, stick it
in like over here, that would be better, probably. There we go. So it's like this is
like part of, like, the last bits of roof that is still fallen off and
that's leftover. And you just see me
switching my pivot point constantly between local
and the other one. Maybe have another one
that's just kind of like nicely relaxing
against here. There we go, see? So that's
already looking pretty cool. Okay, so another thing
that I want to do is, I just want to have a look and I just want to make sure that it is not too overwhelming
the stuff that I see. Over here, this kind of stuff, it might be nice if
we duplicate it. Grab variation five, push it quite far back because variation five almost has like a fall off. So that might be
nice because then it would almost give us
the effect that over here, the concrete kind of stops. If you want, you can throw
on another few pieces here, maybe, like, rotate it on here. And then along with some piles. So this is where pretty much
the end of the road is. There we go. Rotate it a bit. And then it will have a bunch of wood clutter in these areas. Over here, it will just
be mostly wood clutter, because if we have
concrete everywhere, there's no place
for ice to rest. And it's actually something
you see in real life. If I look at here,
my eyes can rest. I see like really cool
concrete and then I see like empty, empty, empty. So there are like spots
that are empty in between. And then, of course, we
have the back over here. However, you can see
that in real life. Now, here your eyes
can sort of rest, but here your eyes cannot rest. And that's
quite important. That of course, we
are making art. We need to have it
looking nice to look at. Like, over here, your
eyes can sort of rest, so you see concrete and rest. But over here also,
there's so much going on. Like I have rubble here, I have rubble here,
I have rubble here. It's just all over the
place, also over here. So we are trying to
get a nice separation. That's why it's nice that
we have an area over here. We have like an area over here. We have an area over here. And then for the rest, yeah, so this is pretty good. So maybe no wait, we need to have concrete
mostly at the top, because that's where
our roof will be. So let's see. So this area over here can be like wood wood wood. This area over
here. To be honest, if we are doing concrete,
I'm kind of tempted to maybe grab a variation
four over here. At least, have it
like a little bit of concrete still left. Maybe we can rotate it a bit. That will maybe improve
things a bit more. There we go. So, that
area is resting, this area over
here will be fine. And then over here,
yeah, we do need to have some of that
collapse stuff. Another thing is that
from a distance distance, I want to get some big shapes. So when I look at this, I can see here there are
some big shapes going on. There are big shapes
going on over here, and I quite like
this gap over here, but I almost feel
like I would want to have something on this side, increase this one or on
this side. So let's see. And it's a bit hard to explain
why I decide these things. It's just trying to get a bit more balance between
big and small shapes. So it could be as
simple as maybe deleting this one and
just making this, like a really large
piece that just got stuck in between these
areas over here, see? And that will give us a
slightly better effect. And then maybe it would be cool if we like
scale this down, rotate this over here. And maybe, like, stick
this in between here. I don't know yet if that
will look interesting. No, maybe here. Or maybe here. There. That's the spot.
So you can just, like, mess around with it, and then once you
found the spot, you can zoom in and
just place it properly. There we go. So that is
looking pretty cool. So we got a nice big
resting spot here, here, and then we have
these areas over here. Okay, so that's pretty good. It still feels a
little bit noisy, but let's first of
all, add the wood. And then, of course,
once we have our materials and everything, then we can just
change it around. So that's a nice thing about
keeping this quite modular. But this is looking really cool, especially like from
these kind of views. I can see that we can get some really nice looking
things out of this. To be honest, I'm
not even sure if we really need to have the viaduct broken once we've
already had all of this stuff because it's
just like the same techniques. But we will leave untiltil last and we will
see how it looks. So knowing that, we are now just going to
create a few small piles. Doing these few small piles, I only need maybe, like, let's do, like, one. So first of all,
let's clean this up. Maybe like one of them or two, maybe two at the max. So collapse concrete
variation B, B. Oh, yeah, so here, two. Variation three,
four, five, we did. Four, five, B, B and B. Okay. And after that,
we are going to work on our wood and the wood that's going to be quite
a difficult one. Oh, yeah, and our rubble pile. So for our small concrete, the way that we are pretty
much going to do that one, it's a little bit more simpler. We are just going to
create like a box. Oh, a bot. Object selection. Let's go ahead and just use this one temporarily.
Create a box like this. Now we are going to add
this to a new layer and call this let me
just have a look. Concrete, small
unscoe variation one. Let's do that. Turn
off the old one. So we got this piece over here. Now, we are going to develop a few new or we are
going to discuss a few new techniques
that we will go into much more detail later
on for now, it's very simple. What I want to do
is I want to go at an alter ray fire over
here so I can just go Voronoi and maybe set this to
like ten and then fragment. Ten, maybe seven.
Let's just seven. Okay, so we now got
these pieces over here. Because it's a blockout, we are just going to
keep them like this. What you basically now want to do is convert this to an a pool, and then on every single piece, just go to elements select and detach like this so that they basically become
their own little pieces. Like this. And then what
I will show you is I will show you how to do
actual object simulations, which is something that
we will use later on, but now we are just going to use it in the most basic way. So we got this piece over here, our pivot point is
set into the center. And now, what we're going
to do is move this here, is we are going to move this up and then just grab
them one by one and then move them almost on top of each other like this and give them a little
bit of rotation. So we are going to animate them falling down using gravity. And hopefully it will give
us an interesting look. So we want to have them quite
close together like this. And just give them a
little bit of, like, a rotation that is
always nice to have. There we go. Okay. So
we got this stuff. Now, we might need to create
some borders around this, but let's just see
how this works. What you want to do is you want to right
click on here and you want to use the mass FX toolbar.
You need to activate it. I already have mine activated. So just activate it once
and it will always be here. And then this is the toolbar
that you get over here. Now, this is super simple. All you want to do
is click and hold, and then you want to set this
as a dynamic rigid body. Dynamic rigid body
basically means that this is the object
that will be moving. Static rigid body are the
bodies that will not be moving, but that will still
have collision. Once you've done that, it will just alter that rigid body, you don't need to
do anything else. All you need to do
is you need to click once on this button, which will give us our tools. Go to the third
button over here, which is the green
one and just set the preset to be
concrete over here. Actually, I don't want Let's
do, concrete is fine act. And then all you need
to do is you just need to go ahead and go
to the second button, and you can just press Play over here and just
see how it works. That's it. It's so easy to do simulations inside of Tres Max. So then we can see that this is pretty much like our simulation. Do make sure that down here you have ground
collisions turned on. So with this being
our simulation, that is looking okay, but what you can do is you can sometimes just rotate this, press play again, and then it will just try to
simulate it like this. And it's just about
trying to find an interesting
positioning for a pile. So we can do the same over here. There we go. Like that's
one I quite like. Now, once you're happy
with your animation, now what you can do
is you can press reset simulation once and
you can press Bake selected. And that will actually bake this animation down
and if you want, you can even import this
animation inside of Unreal. So you would
literally be able to import this effect inside of
Unreal that it falls down, which could be cool
if you want to have some kind of
cool dsuction pieces. And what we're going to
do is we are going to go ahead and with all of
our models selected, you can see over here
your animation tabs have all these keyframes. You want to select the
second to last keyframe. Oh, that did not work. Try again and press delete. And then you want
to click and drag and delete everything else. You want to select the
very last keyframe, hold Shift and move
it to the front. What I'm basically doing now is I'm removing all
of my animation so that no matter where I
am in my animation bar, it will stay in this position. At this point, the last
thing that you need to do is right click, convert to added poly, and now these are all
just normal added poly. So now I can just go in and let's say that I
just want to change one or two pieces just to make it more exactly the
way that I want. And the cool thing is all of these simulations
and everything, you can do it also with
your final models. So you can imagine
that we just need to go ahead and later on, create these models to vinyl and just make them
look really nice, and then it's just a matter of playing the animation or
just doing the simulation. So I can go ahead
and let me just delete this one and maybe
rotate this one a little bit and have it less sunken into the ground because
you can see that these are a little bit
sunken into the ground, so let's move them up a bit, and then we can just move
this into the center. At which point, we can export. We can call this collapsed
concrete, small variation one. And we can save this over here. And like that, we can also
create a variation two. However, I don't think we personally need
a variation two. I think I just want to
create my rubber pile. So variation two, I will just create later on if
it is really needed. So import variation
one over here, import. And then it's just a matter of dragging it, dragging it in. And then you can see
that now we can create these little rubble
piles or well, little. They are still quite large, but compared to the rest. So we can just create these
rubber piles and have them, sitting in here and
have them mostly like areas where it
would make most sense. So like over here, it's like a good area where it would make a lot of
sense that there's, like, a lot of rubble going on. Same over here. You
can do the same. So we have one
sitting over there. Over here, the rubble
would have just fall on past it,
fall and past it. Of course, then it would have
some larger rubble piles sitting down here. And if you want,
you can even have these really large
pieces and you can even later on grab those, simulate them and have
massive rubble piles. That's all up to you if
you want to do that. So another one just
sitting like round here. Another one sitting like round here, rotate it a little bit. And maybe like another
one that's just sitting around here,
something like that. And just like that, you
can also go in here. You can give this really large or really small rubber
piles like that. So from a distance, it will just have some interesting
stuff going on. Here we go. And then
there was also sometimes, yeah, like in here, you can also do rubber
piles if you want. Let's have a look. So we
got a few small ones. I don't really think that we need the second
variation Now I really look at it. Maybe like one here. Maybe like one here. Like that. See, I'm not sure if we
will need a new variation. Down here, let's do
collapsed variation three and kind of just
sit it on top here, and then also number five and
have it, sunken down here. These ones because you
cannot really see them. From this distance,
you kind of want to just make them more visible
basically by just trying to, like, rotate them, for
example, stuff like that. Over here, they are
visible, however. But that's a tricky one. So I feel like over here, we do like variation one. I don't know. Maybe we want
to do a variation five, but we don't really
have space to sync it in because that does not
really work in this case. So maybe we just
go for variation four and we just still move it up. Scale this down. You go still move
it up like this. Move it down, and then maybe
call for this up with like a variation two
maybe Here we go. So we cover it up with
like a variation two. And I don't know if we
then maybe we want to have a collapsed rubber pile in here. Just to Nah, no,
let's not do that. Let's Let's have one
over here, maybe. Sink it into the
wall a little bit. Okay, so that's
looking pretty good. So we got, these small
variations over here. So this now starting
to look really nice. So we got already, like,
a nice looking blockout that you can then
turn into final. Is there anything?
No, we've done that. We've done that. Perfect. So these are also resting areas. Even though in real life, there most likely would be
more rubble in these areas. For us, it is just nice that it is a little
bit more calming. So we got this stuff
done over here. The next one was to
create like rubble pile. However, that one is
literally just going to be almost like just a plane. So what we can do with that one, just as like a blockout is we can go ahead and
create a new layer and call this rubble pile 01. That's variation one, I believe. Create a plane, and let's just make it as big as our grid. In the plane, you set
the segments quite high. It set to 100 by 100. And then all you will
need to do is convert to an not an edible mesh, converts to an edible poly. And then if you go into
your modeling tools, you will also find
a free phone tools, which allows you
to sculpt a bit. So if you press the push
and pull over here, you can see this little window, and although sculpting
tools and trees max are not perfect,
they still work. So you can set the
size to, for example, 50 and then over here you can see that now
we are able to sculpt. So what we can do is let's
set the size to sevity. And here you can see that
if I go from the side, I am able to sculpt
in this rubble pile, so I can give it like a slightly interesting look over here. That's maybe bigger on one side. You can hold control to basically push it in,
but for some reason, control is always more
sensitive than the sculpting. So the removing is more
sensitive than sculpting. Then what you can do is you can lower down your brush
size, hold control, and just make sure that these
bottom edges over here, they are pushed down so
that they are basically sinking into the ground
because you do not want to see the ends
of these meshes. Then maybe, of course, mess around a little bit
more with it to give it more interesting look. And finally once you've done some really harsh
lines like this, what you can then
do you know that one is you can go
ahead and go to the relaxed and soften and you can just soften
this out to make it like one messy looking
blob, basically. Something like that.
Once you've done that, all we really do is we just need to go ahead and
export selection, and we can just go
ahead and export this. So this will be a
rubble pile variation. One, now it will
look really bad, but later on when we have
an actual texture on that with parallax and
everything, it will look good. Or maybe that's maybe one of the few ones
where I would use nanite even though I didn't say I would not use nanite in here,
but I can do that. That should not be
really a problem. It will be quite cool if
we do something like that. So over here, these type of things, they
are great for, like, if we push them just down, we can basically
sing them down here. And whenever you get close, at least you can see the
rubble pile sitting below it. But you can also, of course, do this a little bit more visible, like you can see
over here, where the rubble pile is more
visible in these areas. And we can also
later on just have larger ones that
are just kind of like sitting in between
here and stuff like that. Maybe like that we like scale
them down a little bit. But that is to be negotiable. I still need to see exactly how that we are going to
cover this up because, of course, over here,
there's a lot of stuff going on, so we will see. So basically, let's not
do this one specifically. So we got this one. We can
go ahead and maybe, like, also place one if we
just go into unlit mode. Scale this one up, push
it just into the floor. And yeah, that's the only thing that's a little bit tricky with these that we need to be sure that we do
not accidentally have, like, a corner sticking out. Although we will most
likely later on, we can also like an Alpha to
make it like blend better. But I'm not sure
if that is really needed because
they are just like this extra little feature
that's just kind of like sitting in the background
and watching us. No, I just kidding. But, yeah, so it's just like
one of these things. It's just kind of like
sitting here and just like rubble that's going to be like concrete and stone and like, bits of wood and just like a mesh up of
everything, basically. I don't know if maybe it
would be cool if we do, like, a really large one like over here that you can
see, like there's, like, a really big rubber pile, maybe also like a more
larger one that is sitting like over here. Like that. So we have
another one. And let's see. Yeah, then over
here, you can also, but we will most likely
do that later on when we actually are creating our final meshes because
there's only so much I can do in a blockout without
any textures on it. And sometimes I just notice that when I have proper
lighting in textures, then I start to notice where we are too many models
or too little models. So that's just something
that we need to work on a little bit later on. Let's do one more over here. That we just basically,
you can only just, like, see it a little
bit like that. Uh, maybe. No, I don't think so. Don't think this one. You
can do it if you want, but it won't add much
value to your scene. But okay, so we now have these rubber pies over
here, so that's pretty good. You can kind of
see them here and there. So that's quite cool. Okay, this is starting
to look really nice. I'm quite happy with how the blockout itself
already looks, so you can imagine when
we have the final, it will look a lot better even. Now, the next stop that
we are going to do in next chapter is we are finally going to start
with our wood flooring. The reason I kind of like
weighted with this is because it is trickier
than you would think. So we will go ahead and continue with this
in the next chapter.
19. 18 Doing Our Second Blockout Pass Part7: Okay. So before we get started
with our wood flooring, I want to do a little
bit of housekeeping, and I'm going to get rid
of the double doors. I feel like they're
simply not needed. It's just going to be overkill, and we will not learn
anything new from it. So let's just go ahead
and not do that one. So we have our
double door clean. We can go ahead and go in here. Double. Oh, yeah, I think it did we not even
use it? No, we did use it. I just cannot find
it for some reason. Door. Ah, that's
where you replace it. That's a little bit annoying. It just means that we will probably come
across it later on. Here, it's probably
like this one. That was a double door, and I'm not sure that
might already be it. Like if I save and press
the lead again, here, see. So we literally
only used it once. So we can just go ahead and
get rid of that and save an entire hour
just for one door. So this stuff is done. Now we're going to work
on the wooden floor. We are going to start with
a wooden floor variation that is just hanging
over like this. After that, I'm just
having a tink here. So we will have one
that's hanging over. Then we will have
another one that is probably like a corner over
here that you can see. So it's like hanging
from a corner. And then we will probably have
one more variation that's also hanging over because
we are using it so often. We kind of need two
variations of that, especially for these rows. And then we will
have a pile of wood. Yes. Okay, so that is the plan. How are we going to do this? Very easy. Sort of easy. So we are going to get
started by where are you? Floor. So the tricky thing is for a blockout,
it's easy doing this. Come on, where are
you wood floor. So for a blockout, it is easy. However, when doing
this for final, it's a lot more trickier because
then we need, of course, transition from
actual geometry to a tilable material because we cannot just make
everything geometry. That would not look very or that would not be
very optimized. So we got this one over here. Now, what we're going to do
is basically we first of all, want you create like a
bunch of different planks. So we grab a board. Let's go ahead and do
this, select your layer. So we're going to grab
like a single plank, like you can see over here. Then for this plank,
let's go ahead and just scale this in. And once you've done
that, this plank is the one that probably
will be hanging over. Let's make it a
little bit longer. We are going to have another one that's a little bit wider. Another one that's maybe a
little bit thinner like this. And then what we're
going to do is we are going to probably
duplicate this, let's say, two times, something like
that, for example. Now, you might have guessed what we're
going to do with this. We are going to fracture it that we can break up the ends, and we're mostly just
going to break it up in one area and maybe
somewhere in the middle. Nah, you know what? Just do
one area to get start with. So we can just select all
of them at the same time. We go into our modifier
list and we go to our ray fire for noi. And let's immediately
just fragment it. Now if we go to our fragments, I believe on the Y axis, we probably Oh, that's way
too much. Let's do 50. On the YX, we need to split it, and then in the number points, that's set it to like 200. Oh, 300. Let's also split it
on the Let's see. On the YXs no, we don't split it on the YXs. Cxs No, does not better also. Okay, then maybe make
this stronger 70. Come on, stronger 80. Yes, and then maybe certain
number points to 400. Later on, we will, of
course, optimize this. And let's also then go into our Voronoi and just try
and scale this up a bit. Yeah, okay, I think
this is fine. So once we've done
this, we can go ahead and we can right click, convert to add a poly then each model is still just
like its own little piece. So what we can do now is we can just go ahead
and delete this. And then you can see
that now we get like this typical broken
off boot thing. So what we can do is we
can go ahead and we can just start by deleting
a few of these areas. And then the back side
we will most likely keep whole because
the backside is one where we will it will go
inside of the actual mesh. Sometimes you can also just
do something like this, maybe like chip away in
some of these areas. We are also going to later on, just grab some of these areas. And then basically, what
we're going to do is we are just going to break
it almost in half. But it's nice to just
do a few of these. And the nice thing
about the Voronoi is that they are
always different. So we immediately just get the
look that we're going for. So that's the big
difference between blockout and between final. Final needs to be optimized,
but in the blockout, we can just get really
quick look deaf, which basically means
loop development. Convert to an added pool, go to Element select and get rid of all of these
pieces over here. And then basically we
want to get started by placing these pieces pretty
much in here, I believe. Maybe they are a
little bit to take. Let's push those in like this. And then what we're going to
do is we're basically going to move all of these very
close together like this. Actually, you know what?
Instead of snap rotation. Let's already give them a
little bit of rotation. We are also going
to give them like rotations going outwards, but in this case,
let's first of all, just get started by giving
it some breakup over here, and then we'll kind of
see how that we are going to proceed with this. Okay, so we got those. Now what we can do is because it's still just
like the blockout, we don't need to have
as much variation. So let's go ahead and
just duplicate this. Delete the last ones. Let's push this out and give it maybe a little bit more space so that at least
everything is kind of like spaced out a
bit more in here. And now what we want to do. So now we are basically going to add a little bit more variation. So that is the tricky
thing about this one. Like, how do you want
to split this up? The easiest thing might be I
can show you two techniques. One technique is that you can
add a modifier over here, which is the split
or slice modifier. The good thing about this one
is that you can rotate it, if you turn on snubbing, you can rotate this 90 degrees and you can
see that it has a perfect is 90. Yes. Then you can see that it's like a perfect
line over here, you can basically
like this, place it over here, and then
you can selected. Another technique that you could use if we just delete this one is by creating a box like this. Moving it down, placing it where that you want
to cut your meshes. Although the thing
with this technique is that you would then
need to go in and you will need to assign
every single mesh. So you need to attach it. And this technique I
probably will not use, but just to show you, you
would need to attach this. And then what you would
do is you would go down here into your Cretap, go to compound Objects, grab a pro Boolean object, quickly go to
Advanced Options and turn on remove only visible. What this will do
is it will keep your geometry a
little bit cleaner and then just press start
picking and click on your cube. Uh, okay. That's weird. That's it. Normally,
that does work. This case, it
decide not to work, probably because our
mesh is too messy, but normally that
does actually work. So that's a little bit awkward,
but just keep it in mind. We will use it later on.
I'm not going to, like, try and make it work now because I can just well
use this technique. So I just simply I don't
have to make it work. Let's do YXs over here. Because what I can
do is I can just push it pretty much
like down here. Convert to add Polly. Oh, yeah, I did merge
everything together now. I should not have kept going
with the merged version, but again, then what we're going to do
is just press four. Select all of these behind the line and just press delete. The reason why it's annoying is because the only way now that I could get rid of them is by select every
single plank, see? And that is just not very handy. So you would like me to do
this and then select it. So I guess what you try to do
is you can try to do this. I don't know how far
back we go. There we go. So we are able to do this. And then I will
just very quickly add a slice one last time. So sorry about the weight. Z axis. Move the
slice over here. But yeah, basically, the
reason that we are doing this is that then if we now added
pool and just cut it up. Basically, the reason that
we are doing this is so that we can easily
do some rotations. So if we just set these
two faces, come on. Over here, it does not
want to There we go. Yeah, and the slice is not
always perfectly accurate. So now what we can do is we can basically select everything, effect pivot only, move the pivot to the
back side over here. Do the same rotation
just by pressing E to go to rotate and then it will snap to
the same position. Let's go quickly
to the side view. Looks like that we need to move this a little bit further back. Yeah, something like
this should be fine. Okay, so effect pivoton is done. And now what you can do is
you can basically do this. See? So we can turn
off Snap rotation. We can give it a little
bit more of the effect. And then later on
we will, of course, make this look really nice
and proper and everything. But for now, because right now without
the other textures, it just does not look good. Because what we'll
be doing later on is we will have
this flowing over. So we will have even more meshes just
sitting behind here, and those meshes then
kind of fade into our actual geometry or
into our actual textures. So for now, what we can
do is we can do this. But you can also do
it, you can sometimes just go to Element select. And if you set this once again to the Plus button up here, you can go at it and you
can rotate this a little bit to give it the
effect like it's broken. That's also another
thing that we would like, do later on. And something, if you want, you can even just like literally
just move it like this. Just completely random. Come on. So we got this stuff over
here, this one over here. And so let's see. So this one will showcase, okay, that it's broken. Yeah, then up here, we do kind
of like one, two later on. Let's for now just leave
it like this and we can create another variation
of this on top of it. So this is like the
first variation. Then we also need to
have a corner variation, but that variation
might be nice if we just have it almost
like sitting on top. So we can export this
one to get started with. So let's go ahead and
this is going to be wood floor, broken
variation one. Though to be honest, I'm not really
happy with it yet. So I might want to just spend a little bit more time on it, but let's first reimport it
so that you can already, see the difference here, see? So that does make quite a big difference if
you do it this way. Just because now the wood, yeah, it just feels a
little bit more organic. Okay, so the way that
we want to break this. So we really want
to have the wood We almost want to create
an entire piece of just wood, so to speak. These pieces we cannot do entirely because they
go too far back, but unlike the corner pieces, we almost want to create
an entire piece out of wood and then have that piece just
completely breaking up. The only thing is
that that piece with this concrete behind it. It would most likely
not work because, of course, it has
support below this. We cannot do this stuff
where it is just falling down because it would only
fall down if we have supports. However, there are instances where we do actually
want to use that. So I think that we need to
create another variation. I think we need to have another
wood flooring variation, number three, so this one
will be a simple corner. And for the corner,
we are going to now, almost like a structure
we are going to create that will
just be completed. Should have probably
saved these ones. That would have saved me
a little bit of work. But let's basically
create a floor clean, and we are basically going to create this floor
entirely out of mesh. So I'm sorry, let's quickly go to floor clean so that I can create a few pieces. So I'm basically going to, like, here, let's do this. Let's
create these planks. All you need to do is just quickly make sure
that the thickness is correct, like this. And now it's basically
just going to be a matter of we have
our floor over here. So what we can do is
we can push this out, and then I will, of course, later on, nicely place it. So let's say that
we have this floor convert this to an added pool. Actually, this one
also. Then what we're going to do is we're
going to push this back. And now for this
floor, you do want to change these center
values over here. A very, very nasty,
quick way to do it, which is absolutely
not accurate is to combine these two together so that they become one mesh. Then go ahead and just
duplicate like this. Go ahead and set the
number of copies. So you hold shift, and you
just drag to duplicate. Number of copies,
set it way high enough so that it
ends near this area. Then what we want to do is we
just want to make this fit. And sometimes it will
not fit properly. So what you need to do
is you just need to grab the last one and just quickly move it because remember,
it's a blockout. I don't want to spend time
being super accurate, but I still want to
get it, somewhat done. So we basically have this
And now what we're going to do is I'm going
to push this down so that it is on the
same level as our floor. Artist at this one is
going to be Oh, God. What did we call it broken? Now, wood floor,
broken variation. Two. Probably said
it one, didn't I. Wood, floor, Oh, no,
I did say it's white. So now we can turn off
the clean version. And basically, what
you're going to do just to very quickly, change things up is
in every version, you basically just
going to quickly select the center and
you just move it. And just move it randomly. And that's a very quick way
to just break things up, see? So it almost looks like we are creating a
texture, so to speak. So we basically push this out. And then what we're
going to do after this is we are going to
break up our pieces, like in various different ways. And once that is
done, we can use bend modifiers to basically bend it to our
wheel, so to speak. And I will show you exactly
how this is going to work. So with this one, we still need to be
a little bit more careful on how much that we are going to bend and break everything because this one
we'll have as an underground. I will have our broken rubble. So what we're going to
do, here we go, see. So now that looks a little bit better. So what
we're going to do? So, this one is going to
have the underground, which means I probably
want to create a backup of it as soon as I've
done my ray fire. So let's go ahead and go into our ray fire Verni over here, give it probably
like 400 segments with a stretching
of what did we say 70 fragment, 70 90. I almost want to
do like it's 280. And yeah, I'm always surprised, like it does 400, but I don't feel
like if I do 800, I don't feel like it
actually arts more. Let's do 600. Oh, no. Okay, so it does
add more fragments. So we got this stuff over here. Fine. That's totally fine. We can now go at it and just
convert back to an Adipol. So this piece over here, we are going to maybe, first of all, just quickly. No, you know what?
Let's first of all, cut it open. Let's just save it. So we're going to
well, first of all, press contro save, and then
press Contra V, clone this. And this one will become
floor underscore, broken underscore
variation tree. And just turn it off for now. We will get back to that one. Oh, wood floor, of course. Rename because I do want
to make it consistent. Wood underscore floor,
underscore broken tree. Tree. So for this one, we are going to go
ahead and basically, I'm going to steal my roof
broken variation two. This is the one I'm
going to steal. So let's just go ahead
and just clone it. Quickly drag this into our floor broken layer
and turn off the old one. So we are throwing this on here so that I can basically guess roughly
where this needs to be. I probably feel like we need to push it back at this point. There we go. Now I
can basically guess where the woods would
kind of, like, go. So at this point, we
are going to go ahead, go into our layers over
here and delete them. Yeah, let's do just one by one just to give it a little bit more of like cool look. Let's have maybe
some still intact. Don't forget if you ever have these floating pieces over
here. So just delete them. There we go, and we can
just keep doing this. And then what we're going
to do is these ones we are going to
pretty much bend, but I have way less space
than I actually expected, to be honest on like how much real estate I have to work with
with the bending. So we might for this one. Yeah, just not have
the bending as much. Like the bending will
mostly happen like around these areas, which is too bad. But oh, well. So let's see. Are we already at the end? No, almost. Oh, that's pretty cool that we exactly
made the bend over there. And then for these ones,
just sometimes also cut it up in some of these areas because this is where it's
really starting to break up. Okay, that's way too much. So let's just do
like a cut here. Maybe also like
another cut like this. And then I will show you basically just like
the power of, like, simple bend modifiers and
how we can use those. Okay, so let's say, maybe a
little bit more over here, maybe a little bit more
like this one over here. Okay. So we got these
pieces over here. Now, because they are so shoddy, meaning that they do not
actually have a lot of polygons, what I'm basically hoping will happen is that when I
try to bend this stuff, it will actually move the
entire pieces around, which would be great
because that will give us that typical look
that you get with wood. Worst case, it does not
do that and means that we need to do a bit more
manual work most likely. However, what we're going
to do is we are going to do this in the next chapter because
this is quite a process. So nice cliff hanger. I'll see you all in
the next chapter.
20. 19 Doing Our Second Blockout Pass Part8: Okay, so let's go
ahead and continue. So we left off that we were
going to bend these pieces. So if you add the bend
modifier over here, the first thing you always
need to do is just mess around with your
angle and just make sure that you are
in the right angle. Looks like that we need
to be on the y axis, and then we need to set our
rotation to 90 over here. Now what you want to do is
you want to, first of all, go ahead and set the
limit effect on because we want to basically limit
the effect to one area, which is going to
be the lower limit. So you just want
to move this down. At that point, you can set
your angle a little bit. And then if you click
once on your bend, you can go into your Gizmo, which I'm sure that by
now you're familiar with, and we can basically set the
end of the bend like this, and then we can stick this out. So it looks like that it is not bending exactly the way
that I was hoping to, but it is good enough
for a blockout. Here you can see that now I'm just kind of bending like this. Now, the cool thing
is I can literally just copy this bend, right click and paste it again. And now for this bend, I can
turn on my snap rotation, and I can just rotate it
like 90 degrees like this. And I can simply set my
bend also over here. And then for this
one, we probably want to lower down the bend
a little bit more. But yeah, basically,
just like that, we can go ahead and
work with that. Cool. So just like that, we can do, like, a very
quick flooring like this. And the next flooring
that we were going to do it will just not
have these pieces. It will just be like a single wood floor thing
that we can just, like, slap everywhere
and just work like that. So at this point, for this
one, we can delete the bottom. Do I need to move this forward? I don't think I need
to move this forward. So let's just select this
one Expot selection. And I'm not going to
place it everywhere yet. I'm just going to
see how it works. So wood floor broken variation. Two and export. We're getting close to
finishing our blockout. It's always cool because then the real party gets settled. Like this is really awesome to, of course, see how everything
just comes together. But it is yeah, just seeing the actual or starting to make
the actual final models, it's just different. Wood floor broken to Import. Okay, now let's see
how this works. Let's say that we
have one over here, and let's say that I drag this
into, like, my wood floor. Okay, not too shabby,
not too shabby. So that works quite
well for, like, a corner, and then you can see, like, here we have some pieces. The only thing that we
would probably then do for our wood flooring broken is, let's say that we just temporarily
convert to an lipooli. I would almost be
like something like this where we like
slack part of it. We then move this part, like up and then give it some
small rotations like that. I will do a few of
them just to indicate. However, this is something
that we will do in the final. So basically, we move
it out up and we do, stuff like this to
basically indicate that, oh, hey, look at
this, these pieces. They are actually so broken
that they are just kind of like laying on top of each other and they are also
like broken in the center, because this is also
where breakage happens. So it's not like that
they're just calmly bend. No, there was a lot of force. There was a lot of
weight coming down here, and this weight kind
of, like, snapped them in half, almost like twigs. So and I said twigs, not twigs, just for the
people with my accent. That's always difficult
stuff to say in my accent. Twigs. But yeah, in any case, so I'm going to do a
few more like this, maybe like one over here
just more to indicate. And maybe also then have a few that are just
like doing this. That doesn't take
long to do. You see? Just like something like that.
And you will see that that actually makes a big difference doing something this small, especially with, like, the
lighting and everything. So if I do this one, yeah,
and it should be fine. Okay, so that is this model done because
it is working fine. Wood floor broken variation two. Let's go at an export. Okay. Let's save scene. And now if we go ahead and go into reel, we can just re import this, and you will see that it
makes a big difference. See? That makes a
big difference. So now you can see
that it's like this messy looking wood that just completely broken
and everything. And yeah, this wood
you can kind of, like, in some other locations, I don't know if these
locations will work. Yeah, you can probably, like, give it a go in some
locations like this, even though they are not
exactly on like a corner. But they will still look quite nice if we do
something like this. Oh, yeah, I forgot to
turn on the snapping. Not that it is too
bad for this one, but for later on. You know, we like tone
this down. There we go. Okay, so in any case, that is that stuff. So we can later on just use these in some of these
other locations over here where we would rotate them 90 and then just move them
forward a little bit more. Yeah this one is probably
also one of these areas where Well, for these areas, we actually need
to choose exactly where we are going
to bend it because, yeah, it's not always as easy. In any case, what
I'm going to do now is so for our next piece, it was a piece that
was just completely broken and just all
over the place. That piece basically
will look like this. So we have our variation
three over here. I'm going to probably do like an added
poli on all of them. And then I'm going to do
like this where I have like the very first layer
like this over here. Same over here, just like
the very first layer. And then on the sides,
also go ahead and, like, break it up a little
bit. Like that. And now for this model, let's do it in a few
parts, most likely. So the first part that we
all do is we will go ahead and let's see how do I want so I'm just thinking
how I want to bend this. It's sticking out, and
then it will bend. So it means that we
probably want to do the parts like
this where we have, almost like the concrete.
So we have this one. We can have another
part like this one. Maybe we have another part
like be a bit more careful. Yeah, there's only
thing with when you are attaching pieces.
So let's this one. Okay, so we got like those, and we basically just would
go ahead and we would select some of these parts. It's quite nice that it's
still kept them separately. I did not honestly expect that. And so we first of all, just do some general
large movements like this where we
can see like they are just starting to fall
down and everything. Now, next to this,
we also want to do some of these movements, again, where we grab some
of these pieces, push them out in over
whatever you want. However, this time, you can
kind of do it on all sides. So also on these sides,
we can also do that. It's just that only this
side will really sink down. And another corner syte. Well, probably both
corner sytes will also sink down.
No, let's do one. Let's do one cornersyte
will sing down. So, let's quickly center
our pivots to everything. Makes it easier for me to, like, select and move like that. And if we have a long one, we basically just
move it ourselves. Sometimes it's also actually
good to just do like this as if a heavy weight
fell on top of it. And that's why they are kind
of like moving like this, or sometimes we can
even say, like, no, they are moving like this because these other
pieces are moving down, so it snapped and then
it pushed basically. Yeah, so it snapped
and it pushed like these pieces upwards
and stuff like that. So we can just do some
storytelling in here to see how we can make
this work the best way. We have this really, really broken bees.
Okay, that's fine. Now what we're going
to do is we are going to have some of
these that I'm just going to take out a much larger chunk as if there's almost nothing left
anymore in some of these, and they are falling down
or something like that. Maybe do the same over here
for just a couple like that. Okay. So we've done that stuff. And now what we're
going to do is we are going to go ahead
and grab everything, throw on a band modifier on
the YXs direction of 90. And what I'm going to
do is limit effect and limit it only on
the lower limit. And then let's move this around, and we are basically
going to just set a band like slightly
angled like that. And let's just focus the bending really
on like one angle. I think that will
look quite nice. And you can make more
variations using the bend. So once you have this
as a final final, what you can do is
you can duplicate it and just move the bend
around a little bit. So again, like art semexaO what you can even do
is you can even go ahead, and now here if we have this, we can on a way,
sorry, never mind. I wanted to add another
band down here, but I don't think that
will look very nice. Like, we can twy another band. So I'm just duplicating
this, copy paste. And my idea was
then for this band, we basically push it even further, and then we
just kind of, like, give it some last minute extra strong looking
curving over here. But as you can see, there is a point where the curving
will become too much, see? So that's why I'm probably
going to do that. Okay, so we have this version. This version, let's
just have it in the center that will
most likely be easier. So we export this broken
floor variation three. Save. Okay. So let's go ahead and import
this version over here. There we go. Okay, let's see. Where are we going to test this version out the first time? Oh, up here, maybe. So we just basically
have this version. Let's not turn on snapping and the grid stuff
and everything. So let's see. We
have this version. Looks like this
one, sets to local. This is basically
the perfect stuff where we can use this one. We just don't make
it too precise. We're just going to
kind of move it around, mess around with it a
little bit. Like that. And then you can see that over here from distance,
that looks really cool. Okay, so we got this
stuff done over here, and this stuff is also great
to have in these areas. The only thing I'm not
really happy about is, I think that the bending might be a little bit too
strong in some locations. So let's go in here,
grab this one. It's at the bending
angle a little bit less. Let's go for, like, 6.5 that will work probably
a little bit better. This is number three.
Yes, I'm going to export. Thank you. And yes,
I want to re import. Because we have so many meshes, it always takes a
second to input. Okay, so this stuff
is quite great. We can also use this
stuff over here. Remember that we had like a pum. Although for this, it becomes interesting how our wood
direction is going to go. So we probably want
to at one point, we will need to change
wood directions just because of the way that
we are structuring this. However, don't worry too much about it because what
we can do is we can simply cover up
those directions, like you can see over here. We can cover them up
with more pieces. So we can have this and also
this clipping over here, don't worry about it too much. At least, I'm not going to
worry about it too much. And this one is probably
variation two here, you can see, like, okay,
so we push this out, and then maybe we grab like, okay, so that is
an annoying one. I'm going to admit that
is an annoying one. Uh, let's push it out
and then grab like a concrete variation tree over
here and throw it on top. See? We fix our small mistakes. By just using gigantic
concrete pieces. There we go. So just like that, we can go ahead and
we can now go in and just change
things around a bit. We want to do mostly just on the very visible
stuff like this one. You can use concrete variation
or wood variation three. At which point we will turn
on snapping and everything, and we are going to rotate this 90 and then move further
forward like this, and that should
already be enough. These variations, we probably want to do like wood floor one, 90, and push this forward. And what we can
do is we can most likely duplicate this
one also over here. And I will do another
pass later on. Indo this. Let's foot this one, throwing like one of
these floors over here. Just go ahead and maybe
rotate it around so that it is on the flat
end. There we go. So we can just do
something like that. And just like that,
from a distance, it will just look like we have a lot of messy
flooring going on. Same with like these
ones, wood floor one. Once again, we need to rotate this 90 degrees, sit
it out over here. At this point, we
will have concrete, so I'm not too worried
about that one. Let's see. Down
here, I am worried because this one
is really obvious. So let's grab wood 190. Nicely I push this out. Delete these few over here. Actually all four of them. Because there are so
many, let's just make sure that this is
sitting correctly. One, two, three and four. And now I want to give it
a little bit more flavor. So let's also add like maybe like some extra pieces that
are, like, completely broken. I don't know which direction you are bending that direction. So let's, we can, of course, not just rotate this. But we can, add a
bunch more like this. Whenever I maybe, like, let's
turn off my snap rotation. I do want to do something
like special with this one. So I'm just going to go
ahead and I'm going to move this forward a little bit. Move this one back. Move this one up. Actually,
no, let's move this one. Actually, let's delete
that one. There we go. So we got, like, some of that
wood going on over there. That's pretty cool.
Save sin, by the way. This one is like a corner, so we can just turn on snap rotation and just
snap this into the corner. Like that. This
one probably also. So let's just duplicate this
version, throw it in here. This one's pretty
much also corner, so we can just once again,
rotate 90, and move it up. Over here, those
pieces are fine. This piece could
be like a corner. Okay, that's really annoying. Let's turn this into, like, wood broken variation
three and just, like, really make it
sticking in there. There we go. So that's
just like why broken. So yeah, that kind
of stuff is fine. This needs to be a corner. Then later on we
can even also use these wood blanks to
just create a wood pile. So the woodpile will then just
keep track of that stuff. This one is like a corner. So 90 and move it up. This one is going to be
like 90. Move it up. This one, we're just going
to go ahead and duplicate. There we go. That one
is now also broken. Over here, what I'm going to do is I'm just going to go ahead and have some of these floorings just to give it a bit
more of like a difference and these flungs we can even if we want
if we are careful, we'll almost have them bending down completely because if you then have another flooring, just sitting on top of
it, that is bending back. It can give us also
interesting look like that. And sometimes it's nice
to just have the floor not exactly in the same
position everywhere. So like, have this one, a little bit shorter than the other
one, stuff like that. Maybe rotate this one around. Here we go. So that kind
of stuff we can do. This one. That one does
not look very nice. Can we replace it
with maybe like number three? There we go. That looks a little
bit better because else we just have like
this flat edge over here. These ones are floor number one. Once again, turn on
your snap rotation, 90 and move it forward. This one I can just delete so that I can
duplicate this one. There we go. Oh, this
is looking cool. You start to get
like some really nice looking like wood
and everything here. If I go, for example, for
like this, this is, like, a nice shot to look at and just have everything
sitting here. So that's pretty good.
So we got this wood. I wanted to do
something special here. So I was going to,
like, go like, really intense with,
like, the wood and just have it almost like
all sinking down. Sure off our snapping
and everything. So I wanted to have this one, really, like, sinking
down and everything. Later on, have wood piles, also sitting below it
and all that stuff. For now, what we can do
is we can have this, and then we can duplicate
it, rotate it a little bit. Have it sitting over
here. Yeah, that's fine. Having that stuff
there. Rotate this one and maybe have it like here, move it a little bit like that. Yeah, that's going to look cool. This is going to
be a nice looking, destructed environment. Not many jobs where
you get to say that. Look at how nice this destructed building looks and
stuff like that. So we can do another one, pretty much like over here. These pieces can become
wood variation 01. Oh, perfect. I don't even
need to change them. These ones can also
become wood variation 01. And maybe on here,
I'm going to use, also a 03 to, like, enhance the look
a little bit better. The rot it is. Like that. You are going to be 02.
That's unfortunate. You do not have a correct angle, but we can use the third
variation for that. We grab these, and then we grab the third variation that
you can see over here. And let's just rotate this
and just have it down here. So this is one of the few types of environments where clipping is just not as bad because
there's so much going on that you can not really
differentiate between them. Just going to have a single
version like this over here. The lead the old one
that's sitting below it. There we go. Okay. Lots of wood and stuff going on
there. We have this. So the next stop
would be wood piles, which we are going to
do in our next chapter. But this is looking pretty good what we got
over here already. Yeah, so we got, really, like the nice wood
or broken wood. These areas would
also be nice if you just change them up
like this kind of wood. Because it is so flat. I just adds something if
you all of a sudden just have like these
really sharp pieces. Sure, it will be more geometry. But as you can see that just looks a lot more interesting. At least to me,
compared to the rest. So for this one,
we can push this out, rotate it a little bit. And yeah, you can, if you want, you can also do that in
some other locations. But let's have it not
too bad everywhere. So we are still going to have points where
we are resting. Another cool thing that you
can do is you can grab like this version and
almost like like, sit it on top or to
the side over here, and then just rotate it with it, almost to showcase like no, like this entire piece just came down with the floor itself. And that can also
look quite cool. If you do this, and
then you combine like some extra wood rubble
pieces and everything, that can give quite an
interesting effect. So over here, let's do
another one where I like just sing this down
and then maybe like duplicate this and sing this one out let's give this a
little bit of a rotation. I know it doesn't make sense
to have that rotation, but else here, you can see that that makes quite
a big difference. So that's looking all pretty good. We got that stuff done. Save sin. Let's go ahead and
go into our cinema actor, and then if we just
go to, like, 200, one thing that I definitely
notice is that at this point, I feel like the presentation that we got over here
for our building, it just does not look as nice. So what we would do is we
would most likely go for, like, more close up things. Because of that,
I'm not going to do a destructed version of, like, viaduct, because we already
have enough work on just creating
this environment. And doing the viaduct, once you know how to do these pieces, it's even easier than
these pieces over here, because you are lily just adding some bar and just throwing
some concrete on top. So I will create the viaduct, but we are just going to
have a simple modular piece. Then these outside buildings, I will need to have a look
and see where exactly that we can grab those from if I can find something so that I can supply it with this project. Worst case, I do not have something that I
can supply with. But yeah, let's say that
for this environment, we are going to end up
going a little bit closer, you can see over
here or maybe like a cool shot that is just
sitting with an overhang. Here, this is a nice composition or maybe like a grand
shot like that. So I think that we
have enough quality to get a little bit closer, not super close,
but still closer. Perfect. Okay, that's what we'll be doing in the
next few chapters. The exact thing that
we'll be doing in next chapter is we are going
to work on some wood piles. So let's go ahead and continue
with that in next chapter.
21. 20 Doing Our Second Blockout Pass Part9: Okay, so let's go ahead and get started with our final blockout, which is going to
be some wood piles. Now, over here, it
is still quite flat. We still, of course,
need to place some extra blockout
pieces and maybe just have some really
massive rubble piles. But we can do those later on. Because there's also going to be quite a bit of foliage
and everything on here. So we'll just figure
it out later. For now, I think everyone has had enough
blockouts for now. So let's go ahead and
let's go inside of Max. Now we can pretty much use this one over here,
so that's perfect. So this one, let's do Contrave
Adam skunk to call this like woot rubble pile,
underscore variation one. And don't worry, we will only make a variation one for now. But these ones are super easy
to make more variations. You can easily create ten variations in half an
hour or something like that. We got these pieces
over here. We are just going to go ahead
and convert them. Oh, no, wait,
sorry, let's delete the bend so that they
are pretty flat. Convert them to an added poly and now just double check.
So this is pretty cool. Now we have all of these
little pieces that are just broken up and all that
kind of fancy stuff. Great. This is just a simple
simulation once again. And so you basically want
to move it over here. Now, at this point, what
I'm going to do is I'm going to show you another plug in that
is completely free, and it is called Soul
Burns Scripts over here. Now, I highly recommend
that you get this one. It's basically a
collection of scripts, and it's really, really awesome. So if you go ahead and just
go to Google and just type in TS Max Soul Burns Scripts,
then you can find it. Or you can go to neallevins.com, and there you should
also be able to find it. And they will show you
how to install it, although it's simply
a dragon drop, so it's nothing special. So in any case,
what is this stuff? This is basically a script. So you can add it
to your toolbar. The one that you want
to add to your toolbar, that's actually good
for me to show you because it's sometimes
a bit tedious. You want to add the
listener to your toolbar. So if you go to
toolbar over here, so customize, Customize
user interface. And then in your toolbar, you can go ahead
and go down here, and here you will find the
Solbn scripts in the category. And if you scroll
all the way down because you can see how much
stuff it there is in here, because you can literally add every single script
to your toolbar. But you ought to grab
this one Solbn script, listen on Y, and simply drag
this into your toolbar. So the reason why you
want to use this one is because it has all of the scripts as like a collection. So it's really had. It's mostly just to speed up our workflow. So all of these things that
we are going to do for the Blender and Maya
people that are following this tutorial,
you can still do it. It's just a little bit slower to do it in Blender and Maya. So over here, what we want to grab is one
of my favorites, which is called a
transform randomizer. Once you select it,
you can just press D, and that will close
the old window and then it will
give you the new. So the cool thing about this
one is that first of all, just turn off treat
group as one object because I want to
have all of these as their own little object. You can randomize
the transformations. For example, I can go to rotate
and I can say -90 by 90. And then if I just go ahead and randomize every single
axis separately, you can see that this happens. It will just randomize it. But this is great if we
want to simulate this down. You can also randomize
the scale if you want. Like, I can go up
here and I can, or randomize the entire
thing in one go, or I can randomize
the different axes. And of your course,
if you want, you can also randomize the position, which is one that we
do not need right now. So basically, we have
this stuff over here. Now, I have a feeling that if we are going
to simulate this now, it will most likely
just completely break, or at least it will shoot
all over the place. This is because whenever you're simulating something
that is intersecting, in the first frame
of the simulation, it needs to get rid of that intersection,
and it tends to then, push the models away
from each other, which sometimes because it is
a simulation with gravity, the actual push is
seen as a force, and it will actually just
blow everything away. So we'll see. So we
grab these pieces and we turn on a dynamic
rigid body over here. Or we can just go
ahead and go in here. These ones in your preset, I tend to set these
two cardboards that they are not really
bouncy or anything like that. Then if we just go ahead
and go to our simulation, we can press play and
just see what it does. Oh, okay. That's very mild. So that's quite good. So you can have multiple
different variations. Let's go ahead and for me, I'm going to duplicate this. So just hold shift duplicate. Let's do it all as one model. So I'm just doing that little
trick over here where, what is this called, actually? Use pivot points Oh, I always forget
what it is called. So let's do this one, and
let's once again simulate. There we go, and
then what we have is we have a cool wood pile. So that's for
blockout good enough. So now I can just go ahead
and press Bake selected. I did not select it, so it will most likely
not have baked. Yeah, that's not
very logical of me. Let's select it and then
press bake selected. Now, you can see that it's
probably going a lot slower. There we go. Now it is working. Okay, so now it is the same trick as
those concrete pieces. We can close this
basically, go up here, delete the second to last frame, delete everything else, select the last
frame, hold shift, move it to the first frame, and then you can just
move your slider freely. At which point you can just convert this to an added poly. Perfect. Okay, so we got
this stuff over here. I'm going to go ahead
and delete this one. Oh, yeah, of course, we need to be careful about
that later on that we do not have these pieces which have a tiny bit just sitting
all the way in the back. We don't need to care
about it too much now, but just keep that in mind. So we got this one over here. At this point, there
are a lot of measures. When you get this many meshes, it can be a little bit slow
in taking it to unreel. So I recommend that
you just go to isolate to make sure that
only these ones are selected. And then if you just
go ahead and go to the attach and then
attach list next to it, and then just go
ahead and select everything and press attach. Now, sometimes this happens. This basically that the
smoothing is broken. If you have this super simple, just go ahead and out
the smooth modifier. Oh, and if that does not work, then the next thing that you
can do let's convert to iPl. The next thing that
you can do is you can try to reset the X forms. So if you go to utilities, reset X form, reset selected. And what that will do is it will basically just reset all
of your transformations. And then if we out
the smooth modifier, no, are they flipped? The next thing, so this
is basically debugging. We are seeing what is wrong. So the next thing that we can
try is we can right click, go to object properties and turn on backface curl.
And if we press Okay. Okay, so that's not a
problem. That's interesting. Basically, what I expected
is that the black was like the backside of the face so that there
was a problem there. Don't worry. There are lots
of ways that we can fix this. Another one is to add an STL
modifier. It doesn't work. Another one is to
add the material. So yeah, there are many
different ways that we can just like In
a debug this one. Black faces, yeah, it can
come in many different ways. So let's go ahead and
just like arts material. Okay, so it's not a material. That is interesting. Weighted normals modifier? Okay, that's one that we can. The weighted normals
modifier only exist in Max 2021 and up, I believe. So you basically are the
weighted enormous modifier, and that we kind of
like reset the normals. Now, that does make me quite surprised because
if that one works, you would think that the
smooth modifier also works. Let's try a technique that
every TDS Max user can use, even if you have older
threes Max versions. Let's add a well, I added normals over here. And then just go
ahead and select everything and press average. Okay, so that completely breaks. Now, let's Unify. Let's try to unify or break.
Let's do break. So let's go ahead and press break and convert to an dipole. There we go. Now that works. S. So as I said
before, in three Max, there are many ways to debug, make sure that
everything is fine, and sometimes it's just
like a specific problem. In this case, it looks like
that the vertex normals, which is something we will go
over later on, are broken. So pressing break, it will
basically just completely remove all of the vertex normals and just reset them so that we can do
something like this. So that is fine. Sorry for
the little turnaround. Let's now go at an
export selected. Wood rubble pile variation one over here. And let's export. Yeah, I think it's
always good to show you if there is a problem, how to actually
debug it because I see many tutorials where
if they have a problem, they magically fix it. Like they just cut and
then it's magically fixed. Wo rubble pile variation
one. Let's import that one. Here we go. Perfect. And now, this one we can go
ahead and we can use. So for example,
let's say over here, it's like a perfect location. You can just have these wood
pieces. Same over here. We can just go ahead and they
do feel a little bit big, but they should be pretty
much the same size. So we can do that. And just like in areas
where there's, like, a lot of activity going on
and wood and everything, you might want to
just try an artist. Sometimes it's okay.
Well, this one, it is bordering too much, having too much like clipping. But maybe if you can just get it right, it could work, also, especially if foliage
on top to kind of hide the fact that there is
so much clipping going on. But yeah, rest, we can also just go ahead
and, like, art this. Right now, it's really hypole, but you can see that this
does give you the options to art something really
interesting because broken wood is quite an
interesting shape always. Like just looks so sharp and I know, it's
quite interesting. So over here, we can
do, another one. So we have a lot of wood there. There isn't a lot of
wood going on here, so it would probably
be a bit overkill. Yeah, I probably want to even
place my camera over there. So that would probably
be overkill to have it in those areas maybe. We can do, like, a
little bit over here. Let's do this. And then
if we go for, like, a concrete rubber pile, where are you? Over here. Yeah, I feel like we are
later on just need to. Basically, later on what we're going to do is we are
going to grab all of these really large pieces and just simulate them
into a pile also. So now at least we have a little bit extra bits
and pieces here and there, maybe like another one
over here. There we go. Okay, so lots of wood here, lots of wood here, maybe
even more over here. So yeah, this gives a
nice contrast where we have an area that is
just full of this wood. So this is really where, like, the heaviest breaking of, like, the wood happens, and
you can see that it looked quite Wow, I
can't speak today. So it's morning. So I took
a break since last chapter, so that it looks quite broken.
I was supposed to say. And that's where your attention then also gets drawn over here, but not that it is cluttered, because if we place this
wood, literally everywhere, we will not know
where to actually look whenever we
have, like, the wood. So even here might
already be too much if I placed over here. Let's see. Okay, that's doable. So we got this stuff
now over here. I don't need, like, a lot
of wood breaking going on. We can try maybe doing some
wood breaking over here. And that is pretty good. So try to keep some
contrast, even though, yeah, because in real life, it just doesn't really
work this nicely. As I said before, in
real life, it's a mess. It's just noise because there's so much debris and everything that is inside of a building. That of course, if it collapses, that debris does not
magically disappear. Imagine this building,
if it still had all of the debris that would
have come of it in here, it would just be a massive pile. There would be nothing there, so it just wouldn't be interesting. So, in any case, now that
we have this stuff done, let's go ahead and
give it a little bit more Let's move this up. Let's give it a little bit
more like callata down here. So let's go for, like,
variation five big. Yeah, let's do this one,
maybe like a variation three on top of this over here, variation one on top
of this.This maybe, like, kind of on here. Then we can have a variation two that is kind of like just sitting or
resting against here. So a little bit same as what we have on the other
side of the building. Like this. Maybe have another bits of, like,
collapsed concrete. Maybe even more bits
of collapsed concrete. Maybe grab like a
variation four and just hide it under the
collapsed concrete. Yeah, the scale is down a little bit of that actually fit. There we go. So we
got that stuff, and then maybe we can do
something with, like, some extra boot on top of here. I don't know. Or maybe
the wood just kind of comes from this
area over here. And then we will have,
like, lots of moss and foliage is running
in between here. So at that point,
where you have, like, a bunch of grass, you're
sitting randomly, and you have moss and you
have, some trees and, like, some bushes and
everything is covered up, then you get to a point
that you just simply won't see much specifics anymore. So maybe we can do like, let's do like a pillar
like this and just, like, kind of break it and just kind of, like,
hide it in here. Just give it also like some
of those looks like that. And that's also something
that we can do later on we can add some extra
pillars and maybe, like, just in general, make it look a bit more interesting. But, okay, so we have This
one, let's move it over here. Yeah, so this will later on
just become like a road. Although the road is going to be the most basic thing average, it's going to be tarmac with some extra line decals
and everything like that. Oh, this kind of stuff,
be careful about. As you push it back. Okay. You know what that's
looking pretty cool? Let's go into our camera actor. Yeah, see, here, so that's
looking pretty cool. Okay, what we're going to do
now because we still have some time left is because
in the next chapter, we are really going
to start by just turning this into final. So in this chapter, let's end
this off by first of all, cleaning up our
scene a little bit. And this just basically
means throwing everything into like a folder that
we will call assets, except for the ones that we
already have in folders. Wow, look at these.
These are all. Oh, wait. We are still
in, like, a search mode. That was already surprised. So let's see, we
have a blockout Oh, yeah, that's that stuff. So here you can see how empty it looks just like one building. So we have a blockout
fifth floor roof. So these are our roofs. At this point, our
main building, see, we kept quite close to our main
building, so that's good. But thank you for your service and the lead. Let's
get rid of it. Our rendering,
second floor roof, sixth floor, third floor. Over here, we are going to just go ahead and select
all of this stuff. And we will just call
it assets, basically. Just to keep it a
little bit more simple. I'm going to yes, literally select
everything, actually. Yeah, let's just
select everything. And then just quickly
scroll and just make sure that you're only
selecting your meshes. So as soon as you see,
like a post effects or anything else
that is not a mesh, and you can see it
by the icon over here, just deselect it. Scale v, yes. So here, post fax, hold Control deselect,
Landscape control deselect. And I think that's the only one, but let's just double
check because it's a pain to later on find it
again. There we go. Folder assets. Turn this off and throw our post effects into
our rendering over here. Okay, perfect. So we've
got that stuff done. Now, let's go ahead
and just give it a little bit of lighting overall and just see if we can get some more interesting
lighting here and there. And the way that
we're going to do that is simply
going to rendering. And for now, we're just going
to keep like one light. So first of all, that's going
into our skylight, okay? That's movable. And then we also have a light
sources also movable. With our skylight, I probably want to go for real
time lighting. What will happen
is as soon as I do real time lighting over
here, things will change. So let's say real time
lighting capture, and then we'll say skylight but real time
capture is enabled. So it requires at least
the sky atmosphere and components and other stuff. So that one, we have our four. So we need the sky atmosphere
and a volumetric clouds. Those ones you can find
by going to create. And then we have what was it visual effects, sky atmosphere. And then we also go
create visual effects, volumetric clouds over here. And then you can see, and now
it has real time capturing, which often does
give a better look. Atmospheric four, we can now
delete, and there we go. Now, we have a new rend
setup with a sky atmosphere, volumetric cloud,
and our skylight, we only do this just to have it real time because you
can see that there's quite a difference between not real time and just having this nice
real time lighting. So that just feels like
a little bit better. Okay, at this point, let's
just run quickly through my sky indict lightings. Let's go ahead and
set this to two. And what this will do is
if I set this to like 100, A, you cannot really
see too much over here. I showed you before that this basically controls
like your GI almost. Intensity, two, Let's
do 1.5 in my intensity. I'm not yet going to
worry about light color. Over here, the occlusion, I tend to set this to multiply in the distant field occlusion. This means if you
ever have some AO, it will not overwit the AO. I will just go ahead
and multiply it. And I like to set my max
distance always to 1,500. You can do cloud occlusion, but I'm not going to do
that, maybe some other time. So that's about it
for our skylight. This is all very basic. We will go super in depth
into lighting later on. Now let's go into
our skylight over here, and this is the big one. So first of all, let's
go ahead and let's see. So three, if I set my yeah, here, I quite like the
overcast, actually. The I'm not going to
go perfect overcast. Like that's just
absolutely no sun, but it's quite cool to just give it a little bit of, like, a grim look because it
just makes it feel like, Oh, yeah, it's, like, depressing almost
like this stuff. While if I go for, like, five, it's like, Oh,
look, it's happy. It's sunny. It's nice. So let's do 2.5.
In my intensity. Now, another one that you can do that does not always work is the source angle. If you set it's
higher. Okay, this time it does work probably. It will basically make
your shadow sharp or soft. So I'm just going to always give them a little bit
of softness to it. Now what I'm going to do is
I'm going to go ahead and so here we have our volumetic
lighting already of five. If we do ten, Yeah, okay, so ten does increase
that a little bit, that it just allows us to sort of see a
little bit in between. Don't worry, we are still going to work on some more stuff. Let's leave it at ten for now. And then another thing that will probably make a big
difference. Two things. One of them is just give it like a slight bluish tone, I think. I think going for like a bit blue for now at least is fine. So let's give like a little
bit of, like, a bluish tone. Oh, maybe a little bit stronger. You need to give the
second to update. This is the Lumen
network over here. So just give it the
second to update. Okay, so I don't
actually like the blue. Yeah, let's just leave it very close to
white, in that case. The next one is that
if we go to create, and then if we go to
visual effects and add a exponential
height for over here, it will just add like a
little bit of fogginess, which also you can see
a little bit over here. Now, the cool thing is if
we make this like white, and then if we scroll down, we can turn on volumetric fog, and that will just make
everything like volumetric. It will take a hit in your FBS. I'm not sure for this case. I think for this case, it is
still looking quite nice. And then you basically let's set the view distance
all the way up. But let's set the
extinction scale down. So what this will do is
in all of our dark areas, it just gives a little
bit of fogginess, which can help us
over here. Let's see. So if I turn this off, I just want to
basically see if I do density. Now, here, see. So yeah, it looks way nicer with volumetric four over here. So now we get a little bit more like that we can
look inside of it. And if we set the scale
to like 0.1, there we go. Just still keep the
darkness because, of course, we don't have
anything sitting in there. But for now, I think that's what just like add a little bit of extra interest. Let's see. So you've
done that stuff, strike this one into rendering. Over here. Lastly, if we just quickly go
into our post effects, there's not much
that we need to do. Yeah, let's not just
work on any of these. I will go over them later on. That's why I'm not doing that. In your image
effects, if you want, you can work on the vignetting, give it a little bit
more vignetting. But actually, 0.4 is fine. If you want, you can
also just change these sliders and you can give it a little bit of a grain, which is something you can
literally see over here also. So if you want to go for that effect where
your grain intensity like Wi low to like 0.05, just to give the
tiniest bit of like a grain or a grainy look,
that would be nice. If you want, you can
do color grading. Maybe the only type of color
grading I'm going to do for now is I'm going
to go my shadows, go into your Gamma and
make them slightly bluish. This will give a
slight cinematic feel often if you just make your
shadows a little bit more bluish because they are
basically taking up the light from the
sky and those lights, even though shadow
looks often black, there's always
like a tone in it. Now, if we go down
to global animation, that's set our lumen global
animation quite high, the two because it is
we rely on it a lot. Okay. Sometimes there isn't lighting bug happening,
but we'll see. And for the rest, yeah, all of this stuff we just don't need
to touch anymore. We probably don't even need
to touch it in general. So this is all pretty good. Yeah, we got all of
this stuff done. I don't think there's anything
else we really need to do. All of this stuff right now, it is using a world
grid material. What we can do is we can give everything its
own little material. I will do that off camera, but I will already create
the material for you. So if we go ahead
and in materials, right click and create
a new material and just call this plain
underscore master. Double click on
it to open it up, and all we need
for this is this. We need to right
click and type in constant t vector over here, and this is basically
a RGB color. And now what you want to
do is you want to right click and convert
it to a parameter. What this will do, so if we
call this one base color, it will allow us to create
a material instance, and this material
instance allows us to basically change this color
in real time in our level. So we can go over here to the default value and just give it like a white color.
Throw it in here. Next, you want to type in scalar parameter or you
can just called roughness. But the shortcut is to press
S and just click once, and then you can also find it. Set this roughness
to around 0.7. Roughness, the lower you go, the shinier it looks. So zero is very shiny, one is very dull, and just
dig this into your roughness. That's all we're
going to do for now. You then just want to go ahead
and go into your material. Right click and create
the material instance and just call this gray. And the reason why we do this is if we double
click on this one, you can see that now
we have our roughness and we have our base
color over here. So with that done,
what I'm going to do is I will not show you. I
will do this off camera. But basically, I'm going
to open up my model, and then I'm going to
go into my material, and I'm just going
to drag in the gray. And here you can
see the difference. And then, of course, we do
need to tone down the colors. But that's basically
what I'm going to do. So let me just pass the
video and do this for every single model. Here we go. Okay, so the reason
why we are doing this and right now it's
really intense bright is same as before. It's just for control. Also,
drag this onl your plane. Because now we can
just go in here, go into our base color,
we can say, Okay, I want this to be a lot darker. So I'm just going to give
it quite a dark color. And I can also go
in my roughness, and I can, for
example, set like 0.2. And then if you want, you
can make it very shiny. So you can almost
make it look wet. Let's say if I do 10 point, actually, you know
about 0.7 or 0.6. Let's just leave it at 0.7. I'm going to make it a little
bit lighter over here. This lightness, how
lighter you make it, this will all affect
your lighting. So it will also all affect
all of these areas in here. But this is pretty
good. So now we have just fill control
over our material. At which point, the
last thing that we really need to do is,
yes, of course, safe. And then if we go into
our cinema camera, Oh, yeah, my scream senses
or why you said the 200. I'm now basically
going to create a few different cameras just
for presentation purposes. These are the cameras
that we'll most likely use until the
end, pretty much. It depends they will
move a little bit. But let's say that
we have this camera. This is going to be one of our
main presentation cameras. I'm going to move it
a little bit closer, we will still see a little
bit of the viaduct. Maybe what we can do is we can even move this stuff a
little bit closer over here. Because this is just
our pre station. That's maybe a little
bit too close. Let's move it back a little
bit more. Here we go. So that is one that
we are going to do. And once you've done that, all you need to do is basically select your camera actor,
Contras Contrave it. Go to the second one, and it will be in the same location. But then this one, we can just go ahead and we can, like, see. So I quite liked the Oh, here. Let's see this one, for example. And once you're happy,
so you can see, which floor that you want to do, say, um, yeah, I'm going to go for like
this floor over here. And it's quite nice if you have something on
the foreground. It just works with,
like, your composition. Then we're going to
duplicate this number three. For number three, I'm
going to go ahead and let's do, like, one that's maybe like
I'm just trying it out, of course, seeing which
ones work the best. And I'm just flying
around just trying to find nice angles. I feel like I do
want to have one. It's like somewhere over here. But especially for me, presentation is very important because if I don't make
a nice presentation, you guys would
probably never have noticed this soil because
you just weren't impressed. So that's why presentation
is often key, but it works the same
with like portfolio. If you have a recruiter,
having, like, really cool presentation
just really helps. So over here, I'm not going to just do all angles yet.
Still want to do a few. I want to ty and cut out as
much of the foreground as possible to make sure
that we do not need to, like, lots of foreground pieces. I do feel like I want
to do something, didn't the last one, let's see, three, two. Yeah, they're all quite similar. So let's go ahead and try to get one that is
from this angle. That's a tricky one, because, of course, I have nothing here. I could just, like,
throw it up with, like, some Yeah, I guess I can, like, throw some tweets or something in there.
Let's do this one. And maybe have,
like, one last one. That's like a super close up or somewhere what you can also
do something pretty cool, is if you have this
camera reactor, you can go ahead and
go into the film back, and then you can set
your sensor width lower, and it will basically give you a presentation
like this where you can do you often see
those on the art station, probably, where you can see a presentation that
they basically just almost make it
like a phone scaling. And then what we
can do is we can probably do something over here. For me, Okano wait for me, it doesn't make any
sense because I cannot actually show you product
images like this, but just for the fun of it,
let's just do this one. Okay, there we go. So we now have a main angle. So
that's all looking good. Last thing is, what I still forgot to do is rotate
your son around, see what different angles work. I quite like the
angle that we had, but you can always just rotate
your son around like this, just to see if there's some
interesting angles going on. Yeah, maybe maybe it hits
the light a little bit. You can, of course, also
just move your son up, and then it will be a little bit more like a sunrise
kind of thing, because we are still using the real time lighting
or the day night cycle. Yeah, give the second. Just have a look around, see what works,
what doesn't work. Example, this I think this
one works quite well. Okay, and that's about it. So we are way over time at this point. But in the next chapter,
what we will do is we will finally get started by turning these
pieces into final. So let's go ahead and continue with this in our next chapter.
22. 21 Taking Our Window Piece To Final Part1: We are now going to get
started by turning all of these blockout pieces that
we have over here into finl. Now, for this, if we
ever look at the folder, I have added a few textures. So as I said before, we will not be creating
the textures for this environment
because I want to have the fill focus on
just our destruction. So what I'm going to
do is I'm going to run quickly through the textures
that we are going to use, and then I will also show you
a few resources where you can find free textures in case that you want
to change them up. So if we go to our textures, we have a very
simple brick wall. This is a photogrom tree
texture that I created myself. So I might need to make
some small changes, but as you can see
over here, you know, this is nice and
high resolution, and it's just a
simple brick wall. Then we have concrete.
So the concrete. So by the way, the brick walls, we will use our windows and actually just our windows because these are
going to be concrete. Then over here we
have our concrete, which is our main concrete,
and it has, like, little lines on it, and
that will be used for, like, all the flat areas
that we have over here. Then we have this
broken concrete that has the rebar exposing on it and everything
that will be used for all the broken edges that
you can see around here. Then we have a concrete
rebar concrete broken that just doesn't have
the rebar included in it. And this is just so that in case we have any
blending problems, we can use a mask to
basically blend better between our concrete
and our concrete without or with rebar. Basic plaster, once again, just a photogramt material
with some plaster. Basic rust, once again, it's just like some very
basic looking rust. Sounds like a plain colour. Most of that rushed in
the roughness over here, as you can see, like that. Then we have a basic damic
that I created in substance. So it's just simple damic that we can use nicely for
all of these pieces. And then for our Wood, we have a plain version of
our Wood over here. You will learn how to
create this wood in our course that we
posted previously, which is about how to create
a Western game environment. I think it is called full
Environment creation in UnuleEngin five and Blender. And then we also have
a planks variation of it that just has the planks. Oh, you cannot
really see it here you can see it
pretty much in here. So you can see that it
has a planks variation, and that should be it for
our textures, pretty much. That's what the ones that
we are going to use. In terms of resources, the resources that you
can basically use are, first of all, the one that
we already disclosed. The one that we
already showed is going into content and
using the Quick or Bridge. Pretty much every text you will ever need is
already in here. You can simply go to services
and you can find thousands of ready made materials completely photogramry
at high quality, including bricks and everything. As I said before, the
reason why I cannot use these is because I am
selling this tutorial. And the thing with quick or Bridge is that you are
allowed to use it for free. However, you cannot
directly sell the files. In other resources because I'm giving you guys these files, that's why I cannot use them. So keep that in mind
for your projects also. The next one is going to
text.com, and in here, you can also find PBR
materials like brick walls, you can also go ahead and
you can even download. These ones you can. They do have as far as I can remember, the lower files, they have
full commercial freedom, so you can use them
in any way that you want, except for, of course, directly reselling them,
but you can use them in projects and sell those projects.
So that is pretty cool. So you can also use these. The only thing is that as
you can see over here, sometimes you can only
go up to 512 by 512. And I myself like to just go at least two K when I
work on tile bob materials, especially when we have so few. So those are two and then
the next one would be substance source and
substance source if we just go ahead
and navigate to it. Over here, if you have an
subscription to substance, you automatically get points every single month unless
it's a student subscription. And in here a substance source, you can find huge amount of materials,
atlases, everything. So you can also go in
here, go to like ground. You can even find
models and everything. So here you can find all
types of substance materials. So that is another
resource that you can use. Okay, enough talking
because I just wasted. I wouldn't say wasted,
but I just spent 5 minutes just
discussing textures. So what we're going
to do is we are once again going to
start fairly simple. We are going to start with our windows and our plain walls, and I will just show you
a quick overview of that. And once those are
done, then we can slowly get something
more difficult, like, for example, our
pillows over here, and then we can just
increasingly go more and more difficult
and we end up with, like, the wood and these pieces, which are the most
difficult ones. So for our windows,
if we have a, let's go into Trees, Max. Sorry, plain I
shouldn't have that. So we are going to go ahead
and we are going to grab our window piece
clean over here. Now, I was thinking
of maybe, after all, also making a broken
piece because I feel like if we would
break those windows, it might be cool because
we can then kind of, like, just see, like the rubble sitting in between here also. So we will have two variations. First of all, we need to create
a clean variation anyway, even if we would
create a broken. 1 second. Let me just make
the smaller. There we go. Okay, so for our window, we were going to go for
something like this over here. Now, I will also just
go ahead and create the window frames in
terms of the geometry. So this one will be its
own separate model, and I will show you how
to use weighted normals, which is a very powerful
tool to make basically your mesh look hypole without
it actually being hypole. So the first thing I want to do is I want to
have a clean start. So what I'm going to do is I'm going to go ahead, create a box, and then I'm already going
to turn on snapping, but I want to snap to vertex, so I right click on
it, snap to vertex. This way, if I just look
at my entire model, I can start at
this vertice and I can end at this top verte. And like that, we
have the exact same dimensions as our blockout. Now at this point, what we
can do is we can go ahead and I'm going to
just go ahead and, like, delete the old one. I just want to redefine my
windows also a little bit. So we got over here
our window piece. We can convert soon at a Polly. And now that we know
how everything works, I can see over here that, yeah, it's nice to just have a little bit of
spacing in between. So actually, that was a
good thing that we did. So we start with that.
We go to connect. Give it some spacing like this. And then there's a few things
that we do differently. So let's set this
to 80 over here. Now, another thing that I
wanted to do is I wanted to go ahead and go to Assets and grab our
scale reference over here to see how they are looking
outside of the window. So that's also pretty
good. So they are looking nicely outside of the window, if you
look at it like this. So they are nice big windows, but they are not
insanely huge windows. So if I have a look at that, I'm going to go for maybe
a little bit bigger. So let's go in here.
Connect. Oh, 80. Hm. How does this
connection end? It ends on the concrete,
which is fine. So let's do 75, probably. So 75. And finally, what we need to do
is we just need to create one extra
connect over here, and we can just tone this down, so we need to go into the minus. And for this one, I do probably want to go
perfectly square. Let's do let's do -80. Oh, sorry, -70. And then to make sure that
it is a perfect square, what you can do is
you can create a box. Then in this box, just make
sure that the length, width, and height are
exactly the same as let's say 30 by 30 by 30. And now all that you need to
do is just push it in here, center your pivot on this box. And then what you
can do is you can basically just scale it. And then it's just a
matter of scaling it up until we hit the
top and the bottom. So it's a little bit
sensitive for Zia, like this. And then we know right
away, like, Okay, so here I can see
that I had to just push this out like a little bit to make it a perfect square. And then this one should pretty much be the same. Yeah, see? So we just push it
out a little bit to make it once again,
a perfect square. So as you can see, we are now working quite a
bit more accurate. So we got these
pieces. Now, instead of just extruding them in, what we are going to do
is we are simply going to delete all of these phases. And then if we just go ahead
and we are going to see, let's select all of
this and bridge it, and you can bridge multiple
at the same time or not. Maybe it's ex. Excuse me. Huh? That is strange. You are normally you can bridge multiple
at the same time. Or I must be mistaken with
Maya or with blender, that can happen
with me sometimes. Wow, that's really weird. Okay, in that case, we are just going to bridge
them one by one. It's not like that
big of a deal, but just weird that it happened. Okay, so we now got our
bare frames over here. As you can see in these frames, you have a nice round
corner over here. However, we do not
want to do like texture baking or
something crazy like that. That would be way
too much effort. Instead, what we're
going to do is we are going to add
weighted normals. So what are weighted normals? Weighted normals are
basically a way to manipulate the smoothening
on your model. Remember how we like the
smoothing over here. And what you can do
with this smoothing is you can make it feel like it is hypol simply
by adding a few bevels. If you go to Fast Track
tutorials on YouTube, you are able to find a super
in depth tutorial on this. We won't go too in
depth in this case, because we will not
be using it too much, but this is the
general gist of it. We are going to select corners and we do not want
to select the outer corners. The outer corners do not
need weighted normals. The reason they do not need it is because they are hidden, so I'm not going
to waste geometry. So I'm going to select mostly
like these corners and then deselect these lines over here. And you basically
want to art bevel on every single corner,
just a small bevel. Also, don't forget
these sideways corners. And so we want to add a bevel or a chamfer or whatever you
want to call it in here. Set it always to zero
because you only need a single bevel, and
then you can set this up. So this is brick, so I will probably go for like 0.25 so that it is
still quite visible. Now, once you've
done that, you need to define your smoothing groups. The way that you can do this is I always just go ahead and I press Contra A,
select everything, and then I move down here
into my smoothing groups, and I just press clear
and then select one. So inside of threes Max, you can give it multiple
different smoothing groups. It's a good way to dividing your mesh into
different sections. So what I can do is I can
give it one smoothing group, which means that it
is completely smooth. Then what I can do
is I can select one. I can go ahead and
just hold Control and double click over here, and I can select my outer ring. Remember, because my out
ring does not have bevels, I do not want to have
weighted normals on it. So what I can do is I can
simply say to the system, I do not want to have
weighted normals here by turning off
the number one. And then we get this stuff. Now, the last thing you need
to do is you need to add a weighted normals modifier.
You can find it in here. The weighted normals modifier
is only in three years Max 2021 and 2022, I believe. However, there are plugins. You can simply type into Google three S Max weight
normals plug in, and then you can
find it for free. But we will be using simply
the weight normals modifier. And then we will use our
smoothing groups over here. So using our smoothing groups will make sure that over here, it just splits those up. And at this point,
you can see that if I would turn off
my action faces, you can see that this now
feels like a hipolymsh. At this point, you can go
ahead and you can well, I leave it to default. So yeah, the blending needs
to be one. What was it? Like one of these things. Oh, no, wait, sorry,
that was in blender. In blender, you are able
to also control it. Snap to largest phase sometimes makes a better
result over here, and then you get like messed
around with your blending. That is a better result
for larger phases. But as you can see over
here, this is now fine. You could now go ahead and just convert soon and add a ply, and now it will work
totally fine like this. So we are pretty much ready to, like, simply texture this. But we are first going to go ahead and just
create these bits. We are going to do this in a separate mesh just
because it makes it easier. So let's go to the side view. Create a simple box,
and want to create this box and just have it
clip into the corner of, like, your bevel.
That's no problem. Over here. Just turn over
our edge and faces again. And basically, for
this box, so, oh, God. This is, this is the font. So what we need to
do is we need to push this into the
back. Like this. And because we are
also going to already prepare this model that it has like a backside
that you can see, let's push this a
little bit further out. So we push this a
bit further out. We push this into the bevel over here. Actually, you know what? No, it might be nicer
if we do not do that. Might be nicer if we push
it right in front of it. And also over here, nicely,
right in front of it. Now if we press to zoom in, what we're going to
do with this one is we are going to move it here. I'm going to make this
a little bit thinner. And then I'm just
going to hold Shift. And at this point, we just want to nicely like move this down. I believe that we actually
want to keep this straight. I think that will give us
a better effect compared to if we rotate this. Or not. No, wait it's rotated. So let's go ahead
and just give it a little bit of a
rotation like this. And that is pretty much it. So at this point, you
can always go in. And if needed, you can make
it a little bit thicker. Don't forget that if
you make a ticker to just move this out
a little bit more. And if you want, you can
also go to your site view to really make sure that
it is nice and straight. Once we've done that, we are going to go ahead
and we are going to actually art the
bevel everywhere. Yeah, because I also want
to add the bevel in center. So I'm going to select
the entire thing. Ara chef. And just know when I say Bevel or
hanf I mean the same thing. It's just a different name
for the exact same thing. So we are going to add a
nice bevel, not too big, 0.0 0.15 over here. And then if you have bevels all the way
around your model, so you know that you
don't need to break it up into smoothing groups, you can just art a
weighted normal sire away and then press maybe
like snap the larger face, and then it will just automatically smooth
everything for you. So now you can see that that's
all working totally fine. Okay, so we got this one. We are not yet going to
duplicate this over to the other window because
we first want to texture it because else we would need to texture it twice, and that is just overkill. But first, let's go ahead
and create our window frame. So we are going to keep
our window frames nice and simple because we never
get close to them. So why spend half
an hour creating the most amazing window frames where you can never even see it? So we're going to create a
box and just set it like here at the top and end it on top of our
extension over here. I still at your faces. Now, at this point, I'm
just going to go ahead and I'm going to give
it like some thickness, so set it a little bit
lower the thickness. Probably something
like yeah, like this. That seems like a decent
thickness for a window frame. And you just want to push it
back, but not all the way. So just have roughly in
the center over here. Okay. Once we've done that, we can convert this
to an added poly. Let's go ahead and just move down here and just
make sure that this is sitting
nicely on the top. And over here, nicely
on the bottom. Okay? The reason why we
want to make sure that this is sitting only just on the edge because we
are going to inset it. And whenever you inset, you just want to
make sure that it still is perfectly even. So as I said, insetting, we can now go ahead
and we can select both sides or you can use a symmetry modifier if you want. It doesn't
really matter. We're going to go
to inset settings, and this will basically control the thickness of
our window frame. So let's set this to zero. Actually, you know
what one was fine. Let's set this to one. Then what we're going to do is we are going to go ahead and I'm
going to extrude this, set the extrude to local normal. This means that both faces will just extrude in the direction
that they are made, which means that over
here, I can go in. I can give it a little
extrusion like this. Then I can do one more inset, so I can go inset once more, tone this back a little bit more like this so that we
have a little trim. And then let's delete
this, and let's just see how much
space we have left. Okay, that's looking
pretty good. So now at this point, we can just go ahead and we can bridge. These pieces, if it allows me to. Let's go to a site view. That might be a bit easier.
Bridge. Bridge. And bridge. Feel like something is wrong. No, it looks fine. If you ever feel
like something's wrong, you can press contre A. You can go to weld into
your weld settings, and then you can just double
check that whenever you weld it on a very low value, that the before and
after is the same. If it is the same, it's good. If not, it might be that
you have double vertices. But in any case, okay, so
we got this one over here. That is all no problem. Now what I'm going to do
is I'm going to go ahead and just divide this up. So let's make Rs. Let's
do one connect over here. And let's do oh, yeah, we first of all need to complete this
connect, actually. So we have this one
connect over here. We can then go ahead and
chan for this connect. And when you cha for a connect, on a flat area, it will
simply just make two lines. So we can decide carefully how
thick this is going to be. So let's say we
make this 0.3 ish. And once you've done
that, what I tend to do in this case is
maybe just bridge it. So if we have these pieces,
and also these one. Sorry it's sometimes been annoying to rotate
around with big pieces. Just bridge them.
And then what we can do is we can actually use
these edges over here. If we go down here and
set a little plus, we can already like bevel these because we need to bevel
the rest later on also. Go over here, say, do this down. There we go. Now, it might give
us a little bit of trouble around this area over here because it might decide that there is still a face sitting in between there, but it looks like it is
handling it quite well. Worst cases, we just
like connected. So we got this piece over here. We got a edge now. By the way, do I
need to actually don't think I need to give
weight to normals to this. But what I can do now is
I can just select all of these pieces over here, and then I can decide
how many times I want to have a windows. I can also go ahead and
you can, if you want, just move this out
because sometimes there's a little difference between
the thicknesses of them. So let's set it around
here. Let's do three. Let's go ahead and chan
for this. Over here. And now the one thing that you want to do is because
these edges are not perfect. You want to basically
double click on them and then scale them
flat on the x axis. Oh, yeah, over here, you
can see that it's starting to do something with the normal. So I feel like that the
normals are not perfect. You can test it out
by moving this up. Yeah, see here. So another thing that we can twice we
can try Control A, and once again, do our weld
thing like a low level. And here you can see
that now we do have some pieces that are welded
around these areas over here, m best way or the easiest way
for you to fix it might be to temporarily move it down or move it up or
down, doesn't matter. And then just press the cut tool and place a cut
from here to here. And what you're
basically doing is you are connecting these pieces, which then gives
you the opportunity to merge them together. So here, you'll see what I mean. So we cut this one from here to here and you can just right click to finish
the cut like that. And then you want to
go ahead and just select these few
vertss over here, move them straight like this. Now what you can do is you
can use your target wealth to connect this down again. Let's do this one. There we go. And now they are properly
connected like that, and then we don't have to
worry about them anymore. So let's just quickly
do the same over here. I know that we are a
little bit over time. What I will do is I
will finish this frame, and then in next
chapter, we will do the unwrapping
and everything. And yeah, doing it
this way, it's easy. It's also a nice warm
up, including for me. But for you, it's
also to take it slow and not dive into
deep wt away and go with, like, the most difficult
techniques that we can use. Because there might become a point where things
just become a little bit hard to manage just because you have
later on with destruction. The thing with Dsuction
is that you often have so many matches and so many things that you
need to think about. So I'm going to try and make
it as simple as possible for you guys. So we
have this one done. Now, this one is a little bit easier because
as you can see, it just has these three bits. So what we can do is
we can go ahead and select the bottom. Oh, wait. I've got to flatten this. Whenever you flatten it because you are all
flattening them, they will come out
at the same level, so you don't have to worry
about them having shifted. At least, should be. Yeah, Hell C. So
it should be case. So just make sure to
flatten them only on the Yaxis and to not move them. Oh, yeah, don't do that. So just only flatten. Okay, so at that point, it's going to be a matter
of selecting your faces. Oh, if we do this over here, it will most likely, then we most likely need
to do that again, although we might be able
to get away with it. And I also realize that I need to just quickly
give you guys a metal texture because
else we cannot do this. So I would say that
if you want to art weight normal to
this, for example, your windows are a lot
bigger, for example, and then you would want to art weight normals because the
camera can actually see it. Then what I recommend is that you go through the process again to clean up these etches the way that we did it
over here in the corners. If you do not need
weight normals, then you can probably get
away with just doing this and then giving it some
small bevel pieces. So what I can do is
I can just go ahead and bridge these over here. And then I will see how it
looks if it looks good enough, or if I need to add
some extra stuff. Because right now
it does not look good enough for my taste. So what I'm going to do is play some bevels in
strategic places. Here we go. So we bridge this. So what I'm going
to do is I'm going to select these faces over here and do the same
on the back now, at this point, what
you can do is you can go ahead and you
can set this back to only be the first one
because then whenever you scale your face and when
you scale your face, it will just give the bevel. It will scale every
single face individual instead of one big object. So that's where it
actually becomes handy. And then at this
point, if you want, what you can do is you
can give it a bevel. But I think is it still broken? Let's pass control A. I did not expect that one
to still be broken. No. Okay, that is unfortunate. So it looks like that there's
still something broken. We can try to, like, select
all of these corners, then deselect the sides like this because basically what I want to do is I just
want to give it to HNF. So that seems to work if
you really want to do it. It's just that for some
reason, selection broken. But 0.08. No, that's too small. Always make sure that
you also zoom out so that you can see
everything a bit better. So I'm going to go
for 0.15 probably. Okay. And then I can just go
ahead and also select these. These select these outer sides. So for some reason, the
selection is broken, but the geometry
itself is not broken, so that's an interesting
one. Then we chan for it. I will most likely remember
our old values like this. And at this point,
we pretty much have a window frame
that we can use. So what we will be doing in the next chapter is we will
quickly just add our windows, which are just going
to be some planes. And then what we're going to do is we are going to unwrap it, move it to the other
side, and then it's just a matter of importing
it and seeing how it looks. Oh, and we need to probably create some window
textures also, but those are going to
be quite simple to do. We actually just uploaded the
tutorial on how to do them. So let's go ahead
and continue with this in our next chapter.
23. 22 Taking Our Window Piece To Final Part2: Okay, so now that we have our frames and our walls
and everything done, last thing I'm going to
do so I'm just going to create a basic window. Let's see, we only need
to we need this window. Yeah, we only need glass here. So what we can do is we can just make the windows in
like a unique texture. We are simply going
to grab a plane, and what we can do is we
can just move it over here. Now, make sure to
quickly go into your modified tab and just turn off the length
and the width segments. Sorry. And once you've done
that, it's pretty much it. Yeah, let me just quickly
scale it down a little bit. Now I just go back into
my perspective mode. I placed this into place, and now it's just a matter
of duplicating this. All right and here
we can see that there's a slight
difference in scale, but I'm not too
worried about that. We can just go ahead and scale this up a little bit,
another one here. Then the last one I assume is going to be smaller.
Yeah, there we go. Okay, so we have these four, and what I'm going to do is I'm only going to UV unwrap and texture these four
because then I can just as well
reuse them down here. So we now got
everything into place. The first thing that we're
going to do is we're just going to texture
these bits over here. They're going to
be super simple. So let's go ahead and open
up our material Editor. S grab the first one and
call this brick over here. Let's go to the second material, call this metal over here. And the third one we would then, of course, call
glass. There we go. Okay, so we are just
going to go ahead and select the first one, select all of the pieces
you want to become brick, and then just select this little button assign material
or two selection, select metal,
assign a metal one, and select your glass, and then simply assign
the glass one. Now, once we've done this,
we can go back to our brick, and we are just going
to assign a base color. That's the only one we
really need to assign. So we can go at and click on the little button next
to the color slot, scroll all the way down and grab a Bitmap lookup over here. Then what you can do is you
can go into your text folder, brick wall, and just grab
the base color and open it. And once it is loaded,
it should pop in. There we go. Then we can do
the same with like a metal. We go in here, bitmap lookup, and now for this one, we go to metal and we just add our metal. Of course, our metal
is going to be a lot more basic, but
that's about it. And we do not yet need a glass because we don't
have a glass yet. We need to create a
unique texture for this. The way that we are going to do our unwrapping is super easy. That's the handy thing
about tree is Max. The unwrapping it is
really easy to do. Inside of Maya and blender, I would recommend or using a manual wrap that you
do the unwrap yourself, or you can twine an
automatic unwrap. Inside of TSMC, all that we
need to do is add a UVW map. Set this to be a box over here, and then you simply want to
make these numbers even, and then you will have
an instant unwrap. So let's go ahead and
make this like I know, 50 by 50 by 50. And what you can see that now, everything is just
nicely already unwrapped and that's
the power of this. At this point, we can decide what our unwrap is going to be. Now, because we also
have a flat wall, we kind of want to keep
our unwrap the same. So instead of me just scaling it because
you can select your gizmo. You can press R to go to scale and you can scale
this up and down. However, that is
not as accurate. So I'm going to go
in here and see if I make this 30 by 30 by 30, I should become a
little bit smaller. 30 by 30 by 30 seems
pretty fine, actually. It would be nice if I can have these bricks over here and
down here not to be cut off. So let's do 31 by 31 by 31. There we go. That should
kind of do the trick. So now these bricks
are not cut off, and the cool thing
about this is that we can also make this tilable. The way that we do that
is we click on our Gizmo. We turn on our snapping and we want to snap this
either to grid or vertex. Doesn't really matter
because we just need to snap it into this corner. And when you snap this
into this corner with even numbers, it
should be tilable. Now, we don't need to make
this tilable because, of course, it is being
separated by pillars, but just for the people
that are interested, if you would now go ahead
and duplicate this, it should be tollable
unless I made a mistake. Uh, can I it is not tilable.
That is interesting. Oh, wait, of course,
why I know why. So the reason it's not tilable is because I did
the scaling won. If you want to make this tilable just to very quickly show you, it's almost the same technique. So let's just
quickly remove that. We do a UVW map. We set this to a box, and I need to make
sure that the top and the bottom scale stay the same. So if I look at this,
the height is 50, so that's the one most likely. Here we go. So if we
go 50 by 50 by 50, then it will be til, because now we have a top and the bottom of our UVs
are exactly the same. And then what you want to
do is then you want to go ahead and do this
technique where I showed you where we turn
on snapping and we snap this guy over here to
the bottom, like that. And then if you want
to do the tiling, you can actually set this tiling instead
of doing it here. It kind of depends the
previous method I showed you, that's just very,
very quick to do. However, you can also
do a little bit more precise where I set this,
for example, to two by two. And also you have
more control with the other technique because here I need to go in
incremens of one, one, tiling, two
tiling, three tiling. However, if I do this, it should be tilable now, and else I will be sad. But now here, it
is tilable. See? You cannot really I did
not properly place it, but it is definitely tilable. And I'm just showing you this because many people
often ask me, how do you make modular
pieces tilable? So let me just once in all
show you or turn on snap. That now see it is tilable. So personally inside
of three Max is the easiest way I find
to make your texts dilable inside of Maya, it's better to keep your
tax into like a square. Same with blender. So anyway, that's tlable done it. Okay, so for this one, this one, we're just going to go
ahead and as you can see, these are single bricks. But the way that we
have set this up, we do not really
have single bricks, so we're just going to
cheat a little bit. We are going to go ahead
and add the UVW map box, we're going to make this one
let's say 40 by 40 by 40. And if we just click
once to go into Agismo turn on our Snap rotate. We are going to rotate this
nine degrees like this. And then I'm just going to
scale this because this one does not need any type
of tiling like this. And basically, what I'm
going to say is I'm going to justify that there are multiple bricks by the fact
that we are far away from it. If you really wanted
to do this properly, you would need another
texture that is just bricks laying
next to each other. So that is just like
a flat area of bricks and not in the ixag
pattern over here. Okay, so that is that one. Now, for our metal,
all we need to do is because we can barely
even see the texture, UVW map box, and just
make it like 50 by 50 by 50 and just trust
that that is already fine. So yeah, for the metal, we
don't really need much. Also, another thing
that we can do for the metal for these type
of shapes over here is you can add a smooth modifier and just throw on
like an outer smooth. And sometimes with
the outer smooth, if you turn on prevent
indirect smoothening, you can actually control how much of the
smoothening you want. So what we can do is we
can set this higher, and then you will add some
extra smoothing here. But I'm actually not
going to do that. I'm going to set it back to 30 because else I cannot see
the difference anymore. So that is all fine.
We've done that. Now for these pieces, what we would need to do
is we would need to do some UV unwrapping
manually for these. Let's go ahead and save
us, at this point. To unwrap these manually, I'm using a tool called Text tools. You can
simply go at it. You can go to Google, type
in three ISMAx text tools. And it's a very handy
UV unwrap tool, and it's also widely used
within the game industry. So what we can do is
we can just press Edit U V when we have
these tools open, and installing it, same
as with Solburn scripts, it will have all of that sorted. And if you really don't
know how to do it, simply go ahead and go
into YouTube channel, Fast Track Tutorials, and
then we actually have a tutorial on how to install it inside of threes Max
and also how to use it. But what we are going
to do. The nice thing about text tools is as
soon as we press Add UV, it will also set
up some settings to make the selecting easier, and all we need to do is we
need to select over here a plane and press iron and do that for every
single one like this. Once you've done that,
you can go ahead and you can go in here in our UV tool, select everything and
move it out of the way. And then we can just
go ahead and we can basically select
one, move it here. Select next one, move
it white next to it, maybe scale down a little
bit to make it like a nice scale.
Select another one. Let's move this over here
and maybe for this one, what we can also do is what
was it control to do even scaling and this one to
also select over here. And now because it needs
to be a unique texture, last thing that we need
to do is we just need to hold Control and
move it down here. If you do not have these
orange bars over here, you can select them by going up here and just selecting
this little button. So now here, if you want, we
can even add more windows. However, let's just leave it open because maybe we need to add more windows later
on. But that is it. At this point, you
can just right click convert to added poly, and now we will already have a unique texture for our glass. At which point, we can go
ahead and just like randomly, let's say that I grab this
one and I throw it in here. So you can see
that I on purpose, change the position
so that I do not have the same texture
sitting white below it. So over here, I'm on purpose just going ahead and changing this like you see over here. And if you want, you can
even go ahead and go as far as to rotate this 90 degrees. Like this, it all
doesn't matter, except if you want
to have leaks, which I might want to have. So then you do not want to rotate it because else your
leaks are upside down. And then finally have the
last one sitting over here. Perfect. At this point,
we can select everything, hold Alt and deselect
our actual wall, hold shift, and simply move
this over to the next one. And that's basically the end.
So this one is now final. So what we can do is we can go ahead and export this
to a real engine. Then we first of all want
to create our glass text, and then we want to start
setting up our shader, our master shader,
which will also take care of all of these
bricks and everything. So what you're done with this, what you would do is you
would simply select them. You would add them back
into your windows. Let's just go ahead and drag this into window piece
clean over here. And then what you can do is
you can just go ahead and you can export export selection. And then simply go to exports to Unreel and this one is
window piece clean. So we can go ahead and
window piece clean. And yes, I want to replace this and save it. And there we go. That's it. So now
if we're going to Unreel it will just
simply update. So we can go in here. We can quickly select our window
and press the search button, right click and re input. And it will also detect all of these materials.
Everything it will detect. So you just press Done.
And there you go. Now this is a much higher
quality window piece. Okay, so first of all,
what we're going to do is we are going to create
our glass material, and that will be the last thing that we will be doing in
this specific chapter. So basically what
we want to do is we want to open up
substance painter. Here we go, and we will spend quite a bit of time inside
substance painter, I think. So having substance
painter open, the next thing that
we need to do is we just need to go
ahead and we need to export our glass material. So let's go in here, and we just need to export
these top four. So what we can do is
file export selection. And what we can do is we
can do another folder, and we'll call this folder. Let's do two underscore
painter because we'll most likely have
quite a few messages that we need to send to painter. And what we're going to do is we are going
to organize this, so this one will be glass. And then just call
this like glass panels underscore 01 and press Save. There we go. Okay, so
inside of painter, we want to go to file and New. I do expect that you have
the basics of painter, because we are only going to really cover basic
stuff in this. And unfortunately,
I just cannot do, like, a full
introduction for this. So what we can do is template PBR metallic roughness
is totally fine. We can go ahead and grab
our glass panels 01. Set this to two k,
OpenGL, and just paso. So yeah, I'm not
going to go over what all of these settings
mean in this case. So what do we need
for this? We are going to create fake windows. So all we need is we need to
go into our text set list, make sure that it is class. If you don't have any
of these windows, you can always go
to Window views and you can find them in here. And then the only
thing that we really need to do is we need
to go into our layers, create a simple fill layer and call this layer
base unscore glass. And what you want to do
with this layer is you want to go ahead and set your
metallic all the way up. Your roughness quite shiny. Your base color to be a bit
of a bluish color like this, and you can turn off your
height and your normal. Then on top of this, we are basically going to add
the roughness variation, and what it will do is
that will basically create for us the
fake glass effect. So we add another fill layer. Roughness underscore axis,
we would call this one. And we only need a roughness
and we need a base color. So for our base color, we can go ahead and we
can just set this to a brownish, slightly darker color. And our roughness,
let's just set this midway so that it
is quite a bit duller. By the way, if you
want to have a much more in depth
overview on this and actually having me explain
what all of these settings do, then I recommend once again
to look on our YouTube. All those little extra
workflows that just are time consuming but
are not as important, we often cover those
on our YouTube. So you can just go ahead
and go down here and art a black mask so that what we can do is we can
start painting. What we are going to do is we are going to go into our brush, and we are going to grab, for
example, a dirt one brush. And then it is as simple as just going ahead and
going around your edges. Maybe let's say the
size a little bit lower and my position
jitter a little bit lower. And then I'm just
going to go against my edge or around my edges. And this will just give us
this nice roughness effect where the edges are really
dull and really old. You can imagine
that having this, if you combine this with some leaks and some
grunches and everything, you can get this really
old worn looking window, and that is basically the goal for what
we are going to do. So you can see me not
using the same shapes. I'm just randomly painting in and sometimes
it might even be cool to just add some
extra larger variations, but don't go too large, because if you go too large
and specific, whenever you reuse
these windows, you will be able to see it. So let's say
something like this. Nothing too special,
but there you go. You can press X if you want
to paint some details out. The next one that we're
going to do is we are going to right click and
duplicate these roughness edges and call this
roughness underscore leaks. Then while having your
black mask selected, just go down here and
add another black mask. That will basically
reset your mask. And what we want to do in this one is we want
to add a grunge map. To add the grunge
map, you cannot add the grunge map directly
into your mask. What you want to do is
you want to go down here, and you want to basically
add a fill layer. And in this fill layer, you can drag in whatever you want. So we are going to
drag in a mask. So if we go down here,
the one that I always use is the grunge leaks
large over here, because as you can see here,
that looks quite cool. And then you can play
around your balance. Let's say that we
make it a little bit stronger because this is
like really an old building, so we just want
to get that nice. If you want, you can
set the scaling of your UVs like this, but I can see some
repetitiveness. So let's just keep it at one. And lastly, you can always go back into your base
class and play around a little bit more
with your roughness to make it stronger
or less strong. So once you are pretty
much happy with this, and it's hard to
really know if this is how we want it to look for that we need
to go into in real. So what we will do is
we will save our scene, and we can just go ahead and we can create a new
folder textures. Oh, sorry, texts. And let's call this one glass. And in here, let's
also make folder called final in which we
will have our texture maps. So let's go ahead and
glass underscore 01. Let's go ahead and save this just in case we ever
need to make more. And then we can simply go to
our final output directory. Let's navigate to
the final folder. PBR metallic roughness,
everything is basic. The only thing I'm going
to do is I'm going to use the tagaFle and then I'm
just going to press Export. There we go. That's a super quick way
to just create some glass. And even in the
export, honestly, we don't even need anything except for the base
color and the roughness. So if you want, you
can just delete the other ones to
save some space. And now that we are here, what we will be doing
is in the next chapter, we will start
working on a shader and also apply our glass. The only thing that I'm going
to do at last is I'm going to create a fool good glass and just import my
two maps over here. Okay, so let's go
ahead and continue to the next chapter where we
will go ahead and we will really take this to final
and start already working on our master material.
24. 23 Creating The Basis Of Our Master Material: Okay, so what we're going
to do now is we are going to start working
on our master material. Now, this master material, it will basically be developed throughout this environment. We are starting with the basics, and then later on we are going
to go ahead and add more. I will try to name the chapters
correctly for the people that are just interested in seeing the entire
workflow in one go. But we have now, so what we are going to do is go
into our materials, create a new right
click new material, and we will call this,
main underscore master. Now with this material, if we just double click on
it and open it up. So there's a bunch of
stuff that we need. So right now we
don't need a lot. We just need to have access to the maps and we want to
have control over the maps. Later on, however, later on, we need to have access
to dirt painting. We need to have
texture blending. We need to have on top of that, additional blending, maybe
even have dust and everything. So it is going to be a
lot bigger later on, but for now, what do we need? We can say that we can add
a constant tree vector. Right click, convert
Suprema and call this base color and base color. Sorry, rename. You can
rename it in here. Color overlay, I mean,
and we need some maps. Let's go ahead and just
use our brick wall as our guinea pig maps. So we can just drag in our
brick wall maps over here. So the first thing
that we're going to do is over here we have
our base color. Now, what we want to do
is we want to multiply our base color using our color overlay and make sure to set your color
overlay to white. What this basically will do is it will give us control over this color so we can basically control this color
using this color. Now, on top of that,
what I always like to do is I like to go ahead and I like to have a desaturation node that
we can also control. So if we right click and
add a desaturation node, what you can do is you can basically plug in your multiply. Remember the scale pemeter as click to do a
scale parameter, and we are going
to call this one deset on the score amount. And just leave it at zero for now, but this is quite nice. If you ever like
one to just make your texts look a
little bit duller. Now after this, the
next one, was it? No, it was not lightness. The next one that we
might want to do is we might want to do
one last multiply, and then another
scale parameter, so a click and call
this one lightness. What you can do with
this one is basically we can control if we want to make this darker or brighter. So what are we doing now? First of all, we give it
control over the color, then we give it control over
the general desaturation, and then we give it control over the darkness or lightness. We throw this into our base
color, and that is it. Now we have a lot of control
already sitting in here. Now, what we need to do
is we have a norm map. For our norm map, we don't
need to do anything yet, so we can just plug this into our normal and our
roughness map. Oh, no, ways, we can do
something for normal map. We can add a flattened
Sorry, flatten normal node. And what you can do with
a flattened normal node is if you set this
into your normal, and then if you go ahead and you add a scalar
peremter that you will call normal underscore strength, you can see it already
normal strength. You can basically control
how strong your normal is. Now, this one goes
into the minus. So if you set this to minus
one is default, basically. If you have direct X textures, then one is default, but we have open GL textures in this case. There's
a whole thing. It's just basically
that for our texts, the green channel is flipped. Lastly, we have a roughness
and for roughness, we just want a simple multiply, and we want to multiply
roughness using a scalemor that we'll
call roughness amount. See, Easy does it,
if I can spell at least. Roughness amount. There we go. Plug this into your multiply, and this
is your roughness. So now what we have is we have a roughness map,
and we can control. So let's say this
to one by default. Okay, perfect. So we've
got that stuff also done. Now finally, the last thing that we probably need
to do, by the way, I think I need to set my
desaturation to one. No, zero? What's my lightness
to one? B I can see in my preview my lightness needs to be default by
one because else we could no longer see a texture. Now, two last things that we need to do add one
scale a perimeter. That we will call metallic and sets to always to zero and just adds to
your metallic map. In this case, we can choose if we want to have
it metallic or not. And the last one
is we need to have a texture coordinate node, and this basically
controls our UVs, like the tiling of a material. Now, unfortunately, you cannot turn this into a parameter, so you cannot
actually change it. However, a workaround is to multiply your
texture coordinates with a scale parameter that we will call tiling I always forget how to write tiling and just set
the tiling to one. So what basically we'll do is because it is
multiplying one by one, although it starts technically
at zero, it's confusing. Basically, if we
set this higher, UVs will also tile more, and we simply want to
drag these into UVs. Like this. Unreal loves
to go like zero, one, two, and then another
time, one, two, three, in terms of the
sorting and the order. And sometimes it
can even go into the minus if you really want to. So it's quite confusing. So, as you can see
small little material still, but quite powerful. So what we can do is
we can just save it. And it has almost
all the same notes. It's very basic still. So we can now go
into our main level, and let's say that we have
for example materials. So we have a main master, right click create
material instance, and just call this
brick while score 01. Let's move this
over here. Then we can go ahead and we can create another material and call
this window, n score Glass. And then finally we can have
one more and we can call this painted underscore metal. Now, that's one thing I forgot, and that is that I
need to go in here. And in your texture samples, you want to convert
them to parameter, call it base color because else you cannot change
out these textures. Convert to parameter, normal map and right click convert
to perimeter roughness map. Because what we can do is
when these are peremters just like that we can change
the values of peremters, we can also change
the texture maps. So we basically save this. And now if we go ahead and let's open up our window glass, and what we can also do, we can also open up a painted metal. Tracks down here. And actually, let's just open up a
brick wall. Why not? So, finally, in here, most of this we can
often leave to default. You want to make sure
that your first material. So if you would like, have a clean instance,
that it just works, that there's no settings
that you really need to change most of the time, only change it when
you want to change it. So for this one, what I
can do is I can say, Okay, I want to have a color and
I want to have a roughness. Okay, so what do I notice now? I notice that I don't have
a normal map in here. So I can make a choice. I can create a flat NOR map. I can use a norm map. Or what I can do
is I can go into my Shader and have a control
to have a norm map or not. In this case, you need
to say what is easier? Now, let's say that,
for example, over here, because we only the only material where
we need a norm map, it's easier for us to just go to like a texture like
the painted metal, and the painted metal has like a normal that you can
almost not see. Yeah, it's even like,
it's quite decent. So then sometimes
easier to just quickly throw this normal in here
and just cull the day. Because you most time
will not really see it. If it is too visible, because it looks like that this
time it is too visible, you can always set the
normal strength to zero. Honestly, actually, yeah, you don't even need
to replace normal. You can just set the norm
map strength to zero. Painted metal, you just want
to go ahead, open it up, and the painted metal
is great for us to then change the color overlay to give it like a
different color. That's why the painted metal is often white, in this case. And now we have a brick wall, which is for now fine. So we have these
three materials. Now it is a matter of opening up our window piece over here. Then what you will most likely see is you will see
this little bucket, and you can see that
you can click it. These ones you cannot
click. This is because this is the old
material that we had assigned. So we can delete it. And if you want to know which
one you need to use, you can simply isolate
and then you can see, Okay, so this is my wall. So drag in your
brick wall. Isolate? Okay, so this is my window, so we can do painted metal. And then the last one is,
of course, our glass. Oh, yeah, I keep
forgetting that now you can add your content
browser in here. That is really cool, actually. So now you can actually
also navigate in here, so I can technically do the same where I can
go window glass. See? I just keep forgetting it because it's kind
of like hidden, and then I can save my scene. So this is what we
have right now. That's really bright.
But that's okay. So that's what we are
going to work with. So having this one, that's why we have all of
these controls. I can now, for example, go and let's just turn
on these over here. Okay, so what's the first
thing I want to do? Let's go ahead and set the
lightness a little bit down. Let's set it to like zero. No 0.2, maybe 0.4. Yeah, I think 0.4 seems fine. You can also next to lightness, you can also use
your color overlay to kind of make it a bit darker. And what I'm going to do is I'm actually going to
set my color in the opposite of red
because my bricks are red. If you set this
into the opposite, what you get is that
it will kind of, like, cancel out the
really strong color. Now, next to this,
I can say, Okay, so my roughness, it's a
little bit too shiny. So I can go into my
roughness amount. Here, I said it's to
zero, it's like wet. So let's set my
roughness mount to 1.5, so that it looks a
little bit duller. I can then go into my
normal strength and say, I want to have this minus two to make it a little
bit stronger. And just like that, we have very quickly changed
some of the values, which will make everything
look like a little bit nicer. And just like this, you
can play around with it. I'm just having a
look and see if it looks often nicer if we adjust the lightness and
then also adjust the color. So we got this one over here. So I do want to balance
these out roughly based upon the colors based upon
the lighting that we have here because it's a bit like this overcast lighting. So there you go. It's that easy. And if you want, you can
also change the tiling, but we already did this
inside of three years Max. So what we can do
now is we can go on to the next one, painted metal. We can go ahead and
we can say, Okay, I want to give this
a dark blue color. Make it really dark.
I can then say I want to make my tiling like two so that it's a little bit smaller. Maybe even three. There we go. I say my roughness amount
is a little bit too strong. Let's set this to
1.5 or maybe two, three. Let's go for three. Here we go. That looks
now a little bit duller. For the rest, I don't
think 0.5 in lightness, maybe now I think if we just have the lightness
to one, that's fine. So there we go. So
we can do that. Normal strength. I
believe I need to go to one actually to make it. Yeah, one means turning
it off, basically. In here, I can say metallic, one because we want
to Let's do 0.5. Because we want to give it a
little bit of a metallicnes. I can then go into
my color overlay, makes a lot darker. Like this. And then what I
can see is, Okay, let's say that I want
to increase my dirt, so I can always go
back into painter. I can go into my grunge leaks
and just set the balance a little bit higher.
Export textures. It will save your setting, so
you can just press Export. And then it is as simple
as going back to unreal, clicking on your glass textures, right click and press reimport. See? And now we have
this really dirty glass. We can go into our roughness
and maybe set this to 1.5 to make it even
duller. Let's do one. 1.2 or three. Yeah, it's a 1.2. And you can always also
go into your metallic, if you like set that's
a little bit lower, you can make it a
little bit less shiny, and don't forget you can
always go into your lightness or go into your color overlay and once again balance it out. And there we go. Just like that, that we have a nice
looking material and nice looking wall over here. So it really it's that easy. And of course, what you can
do is let's say that we now have our extra wall. We can go in here. We
can copy our UVN rep. So let's pass copy,
turn this off, go to our plain
wall. Here we go. Right click Paste because we know that it is
the same value, and then it is as simple as just adding our brick wall again,
and that's already it. So we already immediately
have created our plain WOW. It always takes second to
load for the first time, which is a little bit annoying. There we go. And then
you can just assign it. File export, export
selection, and luckily, we do not need to create any lightmap UVs or
anything like that, so that makes our
lives a lot easier. Else if we needed
to do lightmap UVs, tutorial would be a lot longer. So we can just go ahead and
call this plain WOW clean. Yes, I want to replace this. And then I simply want
to go ahead and go, not in painter, go in here. Assets, open up your
plane will clean. First of all, just
press reimport. Delete the gray
material over here, and then just go ahead
and click on your, I need to learn how to do this. You can just go in here and arch your brick wall. Save that up. There we go. Now
imagine that later on we are going to
add some decals on here to make it look extra nice. But as you can see,
that pretty much works. So just like that, we
have these two textures. Now, if you want to go
ahead and break your glass, which I did want to try out, what we can do is at this point, let's quickly close this. What we can do is we
can go into Tres Max. We can grab a window
piece clean over here. Let's go ahead and just
press a contra vie. Call this so this doesn't take long Window piece
broken underscore zero, one, or soil variation
one. Here we go. Now we can turn off
window piece clean. So the cool thing about
this is that we can once again just use our
ray fire modifier. So we can go ahead and
we can grab a few of these windows and then just
like once again reuse them. So let's say that we
actually this one is a little bit more tricky
in terms of, breakup. So it might actually
be easier to just do the ray fire
on all of these. And because these are planes, we are going to keep
this very basic. Let's first just do this.
Maybe we can get away with, like, rotating it
and then placing it. So we have these few over here. And what we can do is we
can go modify our list. Grab like a fire Voronoi. And yeah, for these
ones, I don't really here I have some
reference as you can see. So you can see that it pretty much looks like a Voronoi, see? That's just cut out. So we can kind of, like, do that also. We can start with
like a fragment. Oh, it looks like that
the fragments really do not like it when
we have planes. In that case, just
quickly delete it. And this is just like
a temporary thing. What you can do is you can go ahead and
art and add a poly. Go to border select, select everything, hold
shift and just pushes out. So we are on purpose
giving it some thickness. And then if we just
go ahead and got ta, press cap over here, and cap is the
same as fill hole, which will basically just add
some geometry at the back. I assume that this will make everything a
little bit better. So I assume if I
now go te Voronoi over here, press fragment. Fragment. Hello.
150. Well, that's broken. Let's delete that. Let's go ahead and just
convert to added poly. Let's isolate this. Just down here. Okay, let's
try this again. And if it doesn't
work for multiple, we can always just go ahead
and do it for single, but I just did it. So fragment. Interesting. Let's
try a single one. By the way, let's go
ahead and go down here to utilities and
reset our X form. Sometimes it's
just good to reset your X form because if
something strange is happening, it could improve things. For noi, fragment. Wow, you really do not
want to work, do you? And it's not working
because I have my edges and faces
not turned on. That's why it is not working. Sorry, people. I even checked. I checked, and I
still didn't notice. Try again. Fragment. Thank you. Okay. So as you
can see over here, now we have, something a little bit more interesting
that we can work with. So having these pieces,
yes, you can, like, play around with
them, maybe, like, do some stretching or
something like that. Nah, you know what? I'm going to just
leave it at default. Maybe 100. I do want to get, like,
quite large shots, 150 maybe. Yeah, let's do this. So basically, once you're happy with it and you
got your Voronoi, all you need to do is just convert it back
to the added pool. And then if you add an added
another added poly, sorry, and you go to phase mode, you can, first of
all, oh, yeah, here. So that's the cool thing
also about Voronoi. It basically selects all
of the inside phases. So you can immediately just
press delete if you want. But what I'm more focused on is I want to go
ahead and go to my top view This is
the front over here. You want to select the
front and then hold Alt and then deselect the back. This is the front right?
Yeah, this is the front. So that you only have
these front face selected. Press contra I and just
press delete. Cool. At this point, all
we really need to do is we just
need to go ahead and delete some of these pieces
that we do not want. So you can just choose however much that you
want to break away. And just make it
around the edges. Don't have it like the glass. I would often break
first around the edges, and then it would crumble.
So let's have one. Well, actually, no, let's
not have one that is whole. I can just pick one of
those if it's still whole. Let's do one of these. And just like that, we can very quickly create
some broken glass. So see, even though we are
not doing the double door, you are not missing out on
anything because we still got some broken glass going on, some broken glass action. Yeah, let's do this.
See? This is also the reason why we need
to actually have a lot of the same pieces
because else it will be way too easy to tell
that there is a difference. So what I can do is I can go
ahead and I'm just going to swap these two around
over here already. I'm going to keep this
one and this one final. Yeah, it's a tricky one. Like, you will be able to
notice this very quickly. But what we can do
is we can go ahead and delete these three and, like, try to negate
the effect as much as possible by moving it somewhere else and then
rotating it like 180. And then what you can even
do is you can then place it, and then you might
even be able to, like, select some
pieces over here, and you can go ahead and, like, detach them, rotate them. So I effect Biv done. Yeah, 90 or 95 or
whatever. Let's do 90. There you go. You can,
place them also in some Oh, the whole reason
why I detached them was so that they would
still stay over here also. But, yeah, you get
the idea, right? So let's just delete that.
Let's just change it up. So we got this one over
this one because this one does not feel like
it's very bad. Also get rid of some of
these really small bits that you can sometimes
notice when selecting. And finally, let's do
this one over here. Once again, let's get rid
of this really small bit. And then with this one,
let's rotate this 180, move it down here,
and maybe let's go to element select and select
a few more pieces like that. Okay, perfect. So we got now
this one over here so we can go file export,
export selection, call this one window piece broken underscore
variation one and save. Now, I did realize I just
did something pretty stupid, and that is that I accidentally forgot to duplicate
all of these pieces. I actually did it
on my original one. Oh, no, wait, no, wait. I did not because we only have
one broken variation. Wow. Sorry about that. I
just misspelled it. Let's go variation one. There we go. Sorry,
that's my fault. For some reason, I thought
we had two variations, but of course we only
have a clean variation. What we're going to do now
is we are just going to go ahead and go into Neal Assets. Import or version. Let me just try to find it. Window piece broken
variation one. Yeah, let's call it.
Import. It's all good. Let's open it up. And let's use the content
processing. And let's see. So we have our brick walls, then we will have
our painted metal, and then we will have our
window glass and safe. And now it is as simple
as let's say that we have let's say this one,
we want to replace it. We can simply drag it on here, and now it will be replaced, and then we can see through it. So that's what I
mean with like here, it's quite a strong look, so you need to be a
little bit careful because if you place
them next to each other, it will basically
be very obvious. That's why you might want to create a few variations of this. I think I will just create a few more variations later on. I like the very, very
end of this environment. And then for now, I will
only do a few of these. But even in here,
it will be so dark, you won't really
be able to see it. I'm only going to do this
on the very obvious places, which most of the time just at the top over here and maybe also let's say one over here just because there's
almost nothing in between here. But okay, perfect. That marks the end for our window pieces. So what we are going to
do in the next chapter, is I believe that
we are going to get started with our concrete
pieces for the first time. So we are going to
start by creating some proper concrete
and it will have some nice sculpts
and everything. So that one will really
be an introduction. And then it's just a
matter of pretty much upscaling that technique
to these pieces over here. So let's go ahead and continue with this in our next chapter.
25. 24 Taking Our Broken Pillars To Final Part1: Now, what we're going to do
now is we are going to get started with our first
true destruction pieces, and we are going to
take the spiller pieces over here to final. This is going to be
all of the pieces in one go just to save a
little bit of time. So for that, we just need
to keep in mind that they do all still need to
keep linking together. So if we go inside
of three years Max, the way that we are going to do this is, Blexi, you know what? I will show you how to do it. So we will go ahead and we
will get rid of these damages. We are going to take
this one, first of all, nicely to final,
meaning that we are going to add some
bevelled etches to it. And then what we're
going to do is we are going to export this one, and then inside of push, we will make a variation
like this that is broken. And we will also go ahead
and we will make a variation like this that's also broken
or actually two even. So once we've done
that, what we can do is inside of Cebush
we just need to go ahead and convert this back into actual low poly measures. And then, along with some other cool techniques
that we're going to use, we are going to go ahead
and then bake it down. And in our shader we are
going to add an extra no map, and then we will continue
on with the rebar. So let's just go ahead
and just dive right in. So over here inside of
TS Max, first of all, we need to go ahead and
we need to let's do the internal pillar separately because I want to do
something special for them. So we are going to get started with the concrete.
Where are you? Horizontal Okay, so we
have the horizontal beams, and as you can see, they
have a few broken versions. What we're going to do with
these broken versions, we are just going to grab
the horizontal beam, and we are first of
all going to turn this into sort of like a final. The way that we
are going to sort of turn it into a final is we are going to go ahead and
convert it to an added pool. Now, this one, yes, we probably also just
want to sculpt this one. If we don't do it,
it would just be a waste because we are
going to do it anyway. So we are going to go ahead
and select all of our edges, give it a small chamfer. Oh, just make it like
a single chafe this. And we're just going to
give it a little bit of, like, an edge, like
you can see over here. Then the next thing
that you want to do is you want to add
a few swift loops. The reason why we
these is because nothing in real life
is absolutely perfect, especially concrete,
which is sort of organic. It's like an organic compound compared to, for example, metal. Concrete will always
have a little bit of bending and just
slightly uneven edges. That's basically what we want to capture with these lines. We are just going to give
some small movement. These are not going
to be destruction. These are just going
to be very small movements to indicate that this is just like it's
already getting a little bit old and it's
just a little bit worn. So we are going to go
ahead and just give it some small
movements like this. Very, very subtle.
Now what we need to do is so we know that we need to have two broken variations. We do, of course, already know how they
are going to look. But what we want to do is
we want to go ahead and we want to duplicate this twice. Like this. I don't know why my trees max is so
slow, but okay. And just give them a
little bit of spacing. So these ones are now ready to then already take to Zebrah. However, we are also
going to go ahead and do the horizontal ones
or the vertical ones. As I said before, we are just going to do all of
them at the same time. So the vertical ones
have two broken pieces, one smaller, but we are not
going to count that one. And this one is just like a normal piece that is still correct at the top
at the bottom, but it is broken in between. Okay, so knowing that, here we have a vertical beam clean, and this vertical beam
is slightly different because we need to have it repeating on
top of each other. So these ones here, they need to perfectly
fit on top of each other, while these ones are always
cut off by something, we cannot just give
it like a bevel at the top because then you
will be able to see it. So what we're going to do is we are going to
convert it soon at the poy select these
sites over here, and we are going to go ahead and just give only those Java. So just set the
segments to zero, and just give it like not
too large, maybe like 0.3. Yeah, let's use 0.3 in terms of, like, the bevels, like that. Okay, after that, we just
want to keep the top. We are going to go
ahead and give it like these pieces over here, and you know what? What might actually be
smarter for us to do? Shall we get rid of the
top? It's a tricky one. So at the top, it
might be easier to get rid of it so that
we avoid having, like, bad edges over here. But the problem with
that is that we are going to dynamesh it later on, and then it will just re
art the top on top of it again. So that is
the tricky thing. So, you know what? Let's for now, you know what? Let's keep them. I know. I kept you in suspense. Let's just keep them.
We'll deal with it when we are inside of Sebas. So you can see that I
now have given it like some small variations so that when I look at
it from the side, there's always something going
on, except for this one. Maybe like move this
a little bit out. Don't cook too
much. There we go. Okay, so that one is now done. So having this one done, what we can do is we can
go ahead and we know that we need to have three
more variations, one that is just
whole and two that are going to be broken
off from the top. Perfect. So knowing that, now what we can do is we can get started by
exporting these. So for this, we can just
simply save our scene. Let's give these probably
a little bit more space. Over here. Then just to export this, what we're going to
do is because we do want to make sure
that these stay in the same location, this one, at least, and then
we could just replace them. Let's export them separately. We are going to,
first of all export these export export selected, and now we can export
this in a folder that we will call Z as in two Z. Let's make sure that
it's an OBJ format, and let's call this vertical
beams underscore two Z. Save it. And then
in your preset, just simply set the preset to Zbrush, and then
you can press Okay. Now if we just go
ahead and go to our horizontal over here, horizontal beam clean, this one. We can go ahead and grab this file export, export selected. Horizontal beams On
the score two Z, safe, and there we go. So those are now all
exported and ready to go. So our next stop is to
grab your drawing tablet. If you have one, I would highly recommend because
else it will be a lot more annoying to do this process if you just
need to use your mouse. And let's open up brush. Okay, so here we are
inside of C brush. The first thing that I always
like to do is I like to go to document and just tone down the range a little bit
over here because that will just reduce the really strong
gradient that we have. Okay, this point,
what we want to do is we want to go
ahead and we want to start importing our pieces, which is our vertical and our
horizontal broken pieces. So for that, all we need to do is just go ahead and go to, Galaxy, I'm going
to copy my part, and then I'm going
to press Import. And then if I paste
my part and here, so you don't need to navigate, we can go ahead and
we can go to C, and we first need
to import this one. Then you just want to
basically click and drag and then turn on
edit again like that. Now, as I said
before, we are also going to add the
other one to this. So for that, what
we are going to do or shall we do it separately? Now, let's go ahead and add it. For that, what I tend to do is I tend to go here
and just click on, for example, a sphere or
Pol doesn't really matter, just click on any other one
because there when you press Import again and we grab
our vertical beams, it will automatically replace
that model with this one. Now, if you get this
message over here, it basically means
that we have guns. Normally, it is fine,
but we have to have. So if we press okay, Okay, it's not fine this time.
This is what you see. Sometimes it can
handle the end guns, but sometimes it
is just completely broken and looks like that, in this case, it is broken. If that is the case,
all you need to do is you just need
to quickly go into Tris Max and we need to go to our vertical beams over here. And yeah, if you want
to do it quickly, what you can do is
you can just go ahead and you can
select all of them. Art and Apli, go to Vertex mode, press Control A, and
simply press Connect. That's the quickest way. Or you can go in and
you can do, like, a nice cut over here, but I'm not really in
the mood for that. So just doing this gives
me the opportunity to then go to Export,
Export Selected again. And these are my vertical beams. There we go. And now we can
just redo the same thing. So we can go to Zbrush. I'm going to go
ahead and I'm going to go down here and let's just
press delete on this one, okay, so that we get rid of that one so
that I don't get confused. And then if I just go to Import, I can just re art them again. See? And now they are
actually working. Sure, you can see the
segments over here, but don't worry about that,
those will all go away. Okay, another thing
that I like to do is, I like to go into my material and you set it to
my basic material. Now, the UI that
I am using here, it is a custom UI. Not much has changed. It just means that
I have some of my brushes down
here at the bottom, while you can also go ahead
and you can select them here. And over here, I
have my directional on my orientation selection. This orientation
selection you can find by going into Oh, God,
it's been a while. Where was it? It's
somewhere over here. Picker? Oh, yeah, picker and then orientation. And
here you can find it. However, what I will
do for you guys yeah, why not? I can do that for you. I can go ahead and go in
here and I can do Z brush, and what I will do is I will export my UI so that
you can use it. If you go to preferences
preferences, Cf I'm going to save UI. You want to do load UI and then you just
want to go ahead and open the stuff over
here inside my Zbrush. Here we go. I've exported. So you just want to go ahead and press load Y and just
load this one in, and then you will have
the same UI as I have. Okay, perfect. Last
thing that we need to do at this point is let's go
into our horizontal beams. Now let's go ahead and just go into your subtol down here, and you want to press insert, and then you want to just
click on your vertical beams. So now we have both of these inserted over here like this. So at this point, I probably do want to keep these two
at the same location. If you want, you can
move, but we will most likely just be working
in isolate mode, so we don't need to
worry about that. So having these
pieces, at this point, what I'm going to do is I'm
probably, first of all, just going to turn on dynamesh, and then I'm going
to separate them. So to get rid of this one, all you need to do is quickly go down here and press solo, and that's the same as
isolate inside of brush. Now, dynamesh, Dynamis
basically is a remeasure tool. That allows us to push in a lot more jomtry
because we need that. We need a lot more
jom tree in here. So we can just go to
Jome try, dynamesh. And often this value
is often way too low. Here, I I would press it, what you can see that it is too low, but the goal is
that if you look at the jomtre you can see
that it's all even. So we want to go ahead and
probably go a bit higher. Let's go to 600 and press dynamesh up until the point that you can pretty much not
see any difference anymore. But don't go too high
because if you go too high, you have less
flexibility when you, for example, want to
smooth something. So that's looking pretty good. So round 600. We can go ahead and go
to our vertical beams. Geometry, dynamesh, set it
around 600. There we go. Oh, we are able to really see those sharp bits
over here. Not sure. Yeah, actually, you know
what I can make that work, but I do want to probably here. See, I want to go a little
bit higher for this one. So let's go around
to, like, 1,000. Press dynamesh, give the
second to load. There we go. So 1,000 looks better
on my edges over here. Okay, so don't worry. I
will get rid of this. You can also get rid
of this to simply only have the triangulate
on top and the bottom. I personally am already regretting that we even gave
it the top and the bottom, but for now, I can
get rid of this. There's no problem you just need to run and brush over it. So we got these pieces now. You can now turn off
dynamesh on both of these. Over here. And now the last thing that
you want to do is you want to go down into your subdol, go to split, and you want to split to parts
and press Okay. And what it will do is if we go outside of isolation mode, it will split up these
pieces into separate pieces over here so that we can just
work on them one by one. Do the same for your
vertical beams, split to parts. Okay. And here we go. Now that
is all ready to go. And now we are
ready to basically turn this into a
proper geometry mesh. You can hold Alt and click to basically select your
meshes like this, or you can, of course,
select them in your subtols. But let's get started
with the first one. This one did not
have much damage, but I still want to show you a little bit of
like the damage. At this point, what I'm going to do is I'm going to go ahead and switch over to
M drawing tablet. I highly recommend
that you use one. So if we have a closer
look over here, yeah, there should be
pretty much enough jomtry. But if you need more jomtry, you can always go into
Jomtry and press subdivide. Yeah, actually, yeah,
let's just do this. So a few notes that we need. We often will need
the trim dynamic. That's the biggest one. But sometimes what I like
to do is I also like to use the trim smooth border note. Now, this note you can sorry, brush, but this brush you
cannot actually find in here. You will need to go to light
box over here at the top. Then if you go to brush, you can find it under the trim, and in here, you can find
a few extra brushes. So we want to use the
Trim smooth border. As soon as you double click it, you can see that it
also gets added to my UY because it has
been led in here. I will show you a quick overview of the ones that we want to use, and then we will switch over
to next chapter where we will start by painting
everything in. Trim dynamic. What you want to do with the trim dynamic is
you want to go to your Alpha and set this to be a nice square
alpha like this. When you do that, if we
go ahead and I have on my drawing tablet a way to control the size over
here of my brush, but you can also
control it up here. Here, if we just have a look, you can see that it basically
gives this nice sharp look. I'm not even doing anything
special. I'm just like here. If I go sideways or this way, you can see that it just very quickly gives that
typical concrete feel. And over here, you can just very quickly create
something interesting. So, of course, this one, Oops. I went one too far back. Of course, this one doesn't
have a lot of damage. So what you want to do is you would probably, like,
go ahead and, like, do damage like this
and sometimes give it a little bit more damage
like you can see over here. Now we have another one,
the trim smooth boiler. The trim smooth boiler is a
lot harsher, as you can see. So you can do, like, really
sharp cuts and everything. But the cool thing is, remember that orientation that you
can find in the picker. If you go into your
orientation and click on the little pencil
and just move it around, what will happen is you can set the actual direction
of your brush. So if I paint it now, you can see that the direction is super sharp because I'm painting
it in via this here see. So based upon this location, I can give it
different directions, or I can also switch between
count i which is less sharp, as you can see over here, so
it will try to go around it. And once i orientation is that it is sharp
again. Why is this cool? You can imagine that
if you for example, have a little chip
that is coming out, what we can do is we can
do for example like this, and we can say, Okay,
so there's like oh, sorry, maybe the
other way around. You sometimes need to
find the direction. So let's say that's,
Oh, there's a chip, and then we can go ahead and
go back to our trim dynamic. And then having this chip, we can go ahead and
then nicely like fades out over here in these areas, and then you can just
get an interesting looking concrete broken piece. Now at this point,
you can see that we are lacking the jumtre. You can hold Shift to
smooth it out a little bit, and then you can
just very quickly create a nice little chip,
like you can see over here. See as if that has
just fallen out. That's basically
the goal for this. So I'm actually going
to leave in this chip, and I'm going to
leave in these edges. And what we will be doing
in the next chapter is we will go ahead and we will basically just run
along this edge. Let me just do one edge so that you can see
how quick it is. And I'm just going to go ahead
and run along this edge. Mostly like sideways. Sometimes I make a rotating feel and sometimes I just go
like horizontal like this, just to give it a little
bit of like a cut. And just like that, you can
just go in and you can give it just some general damage
like you can see over here, and we have already
reached the end. And yes, of course, we do need to do this with
all four of them. So in the bigger scheme, this will take a
little bit longer, but the ones where we are not
going to do massive damage, those are not as difficult. So just like that, we have
a nice looking broken edge. Okay, let's go
ahead and continue to next chapter where we will go in and do this for all of the other ones. So let's
continue with that.
26. 25 Taking Our Broken Pillars To Final Part2: Okay, so now I went over pretty much like
all the techniques. Now, what we're going
to do is I will do this one very, very quickly. I decided to still
do it in real time, but you can see that I will not spend a lot
of time on this. I will probably do it like three times the speed that I
would normally do it. And then what we
can do is we can continue on to the next one, which is going to be a
little bit more damaged. So we had three variations, but I kind of forgot why that we had three
variations, to be honest. I need to have a look inside real because this one is well, it's not completely damaged, but I'm already giving
it, like, some damage. So I just wonder if we really need three or if we
can get rid with two. That's something that
we can just discuss. So here you go. So you can just
see me doing this. And I will not really use the trim smooth
boiler technique for this one just because
it's nice to have like, on one side, but for rest, I'm just not going to
go through the effort. That's something that I will do later on with the other ones. Because the other
ones, of course, they are properly damaged. We got this one, for
example, done now. I want you can also maybe break up the edges a little bit, but don't change them too much. There we go. Switch
over to the other side. Get rid of these corners
over here. Here we go. Okay, let's have a look. We
have The variations here. I don't know why it is
flickering like that, but okay. So we have our three
variations here, but I just need to have a look. One and a damaged one. Oh, I used one like the ends. Ah, now I remember. Okay, so for the ends, we can basically just
use the damaged one, duplicate it, and just
mess it up a little bit. So knowing that, we are
going to grab the next one, press one subdivide on it, and let's go into solar mode. So for this one, we
want to go a little bit bigger in terms
of the damages. What I tend to do if I'm
in a hurry, at least, is I tend to pick my trim
smooth border and first of all, just give it some strong cuts. So let's say that I
give a cut over here. Okay, that might be a
little bit too big. Yeah. So let's say I give
like a cut over here, move my direction, maybe
like another cut down here. And these are basically just
going to be the big cuts. Instead, meaning to
switch back and forth constantly between
maybe like two here, constantly between the pencil and trim smooth board
and everything, it is just sometimes
easier to do it like this. So we got a few cuts over here. Then the next thing
that I'm going to do is I'm going to
use my move tool, and I'm just going
to give this maybe some more drastic movements
wherever the cuts are. So that will give more of a stronger effect that
these cuts are really hitting home and it really just like messed up the
shape here, see? And it will also
just make everything feel like a little
bit more organic. So that's what we're going
to do with these ones. We are going to, like, break
them up a little bit more. And then what we can
do is we can just use our trim dynamic to basically finalize
things. Here we go. So this is looking quite
damaged over here. So at this point, we
are going to damage it, but we can damage this one quite a bit more
than previously. So let's okay, I don't know which one is up and down anymore, but
that does not matter. What we can do is we can go to our trim dynamic and just leave your brush a
little bit bigger. So let's have a look at this. Yeah, that looks
like a nice size. So what we can do
is we can, Jesus. Sorry, sometimes
for some reason, my alt brassing alt
does not register. So what I can do
is I can sometimes just make like, big
ones like this. Sometimes I can just leave
it a little bit intact. And then what we
can do is, Okay, so we're getting closer to
our cut so we can go in here. Make it like quite a bit
stronger, just in general. And then we can
just, like, move on. So maybe like here on the sides, break it a little bit, and then we are just
going to move on. Wow, my aunt Willie has a lot of trouble
lately registering. So over here, we
can do sometimes like a big cut like
that and do this. So now if you can see, and also have, look at
it from a distance. So from a distance, this is pretty much
what it looks like, which is fine to me. So what I'm going
to do now is I'm just going to go
ahead, going in here. These ones are also
like big cuts, so you just want
to kind of, like, still break them up
a little bit more to make them feel a little
bit softer like that, just by carefully going
around it with your brush. There we go. And then
what we can do is we can just go ahead and
we can continue on. Like this. Here we go. And let's reach
the end over here. Okay. Now, if we go
ahead and go in here, I feel like doing
like a large cut like that so that I can sometimes just rotate it and I can just display this really, really large cut in here. I feel like that would look quite interesting if we do that. So sometimes you can just
boost up your brush size, make like a really large cut, and then we can just go
ahead and we can continue. And let's over here, fade it
out and just have it almost like just a soft
damage edge like this, and then it kind
of ends over here. Okay, so we get that one done. Now the next one, let's go ahead and give it
some smart cards. Here we go. Break it over here, maybe give it some more
damage in these areas. And then we can just go ahead
and maybe make it not too damaged like this and then give an extra
bit of damage again. And like that. Okay,
so let's have a look. So we got this one over
here with the large cut. We got this one with some
smaller cuts here and there. This one over here, let's just have a quick
look at our blockout, see if it kind of fits. I feel like our blockout does
have some more sinking in. So maybe where is
that large cut? What we can do is we
can try to now go to our move tool, use
the large cut. Just kind of move it down. And then if you basically hold Shift and then click
once in empty space, it will snap to whatever
view is closest. So this is pretty good
because what we can do is we can snap to the
view that is closest. And then what we
can say is, Okay, so now I want to just make sure that this is nice and uneven. And don't worry
about it too much. Like you can exaggerate
it a little bit, that will just make it look a little bit
more interesting. So here you can see
me just carefully, moving it down a little
bit here and there, stuff like that. So
that's pretty good. Now, what we're going to do
instead of going in and Oh, wow, really upside down. Once again, I don't know
why it's doing that. It never does that, but okay. So what we're going
to do now instead of going in and doing another
sculpt on this one, just to save some time,
what I'm going to do is I'm just going to go ahead and I'm going to delete this one. Always okay. And then I'm
going to select this one, press duplicate, and
then for this one, we can just go ahead
and go up here to our Move tool and
simply move this up. It doesn't matter
where exactly we move it because remember, these pieces, we are going to
turn into low poly anyway. So only the position for this one and this one
matters because I need to use that position to
basically make sure that it's still in the exact same position as my blockout. I can, of course, also do
it with my bare low poly, but that is always a
little bit tricky. We got this one, make
sure to go back to draw. And then for this one,
what we're going to do is I'm going to
show you a little bit of the technique that we're
going to use on the pillars. And this is also
the technique that we will use to
basically break up the edges of our bigger
concrete pieces. So over here, we
want to go ahead and we want to just mess up these edges quite largely
like this over here, so that it is just
like quite broken. Now, let's go ahead
and do the same over here, and then
I will show you. And the cool thing this
one we can actually also use inside of
our rubble pilots, so we can just like sometimes
have them sticking out, actually. So we do this. Now, this is basically going to the technique on how to add some extra noise to this and still make it look
like fairly interesting. So what we want to do is
we basically want to go ahead and hold Control
and mask this out. It's a little bit
easier doing this on the larger pieces because you can just click and
drag the mask. But on here, you
cannot really do that because it's all the
way around this mesh. And you basically want
to control where you want to have a really
strong looking noise. So what we can do is
we can go ahead and mask this over here. And then we just
need to go ahead and also do the same
on the other side. So hold Control,
carefully mask this. Now, it does not need to
be absolutely precise. So that's a nice thing the
workflows that I developed. I made them in a way
that if I was in a rush, I can still easily do
them, because, of course, that's important to also have that option whenever
you are working, for example, for production, and you are just in a rush. You just need to
get something done quickly. So we got this one. Then we hold Control,
and just an empty space, we click once, and that
will flip out our mask. So now what we're going
to do is we are basically going to go to
surface over here. And then if you press noise, you can basically
add noise to this, and we are going
to give it like a really strong looking noise. So I'm using my Zoom
and move tools up here. And basically, we are
going to define a noise, and we will be using, yeah, we will be reusing this noise on almost every single piece. So make sure to do it nicely. So first of all, let's go ahead and go
into our noise scale. Let's make this quite large. Then what we can do is we
can go into our strength, and I want to probably, I
think I want to push this out, but I'm not sure
how it will behave. So let's just have a
quick look and see. So let's set this to 0.001, two in the strength. And then what you
can do is you can use over here these curves. If you just click and hold, you can basically over here, change your noise around a
little bit in case you want to give it some more
interesting effects. So let's just give it
a little bit more, sometimes I want to have
a little bit stronger and sometimes I want to
have a little bit softer. Doing this, it will just
give some variation. Now, to test this out, we are going to press Okay, and then we are going to
press applied to mesh. And basically, what I
want to see is I want to see if it is working correctly. Okay, so if I look at this, I can see if I just
undo this twice. Going to edit, I can see that this is a little bit too strong, so we just want to
tone this down. Press Okay again, Apply to mesh because you can see that the applied mesh is
always a bit different. And now you can
see that that does resemble the broken concrete. So this is looking pretty good. Maybe set my strength like, Oh, you know, this one more. Maybe set my strength, like, a little bit stronger. Oh, God. What was it -0.0, I did -0.012. Let's do -0.0, one, two, one, five. Press okay. Apply to mesh, hold control, and just drag to get
rid of your selection. Okay, so this is
looking pretty good. Once you've done this, let's
just do this one more time. We want to go into Edit
and we want to press Save. Because what we are going to do is we are going to save this. So in our source files, we are going to go to
Zbrush and we will just call this main or actually, let's do noise profile. Underscore zero, one, and press save, and then
we can press Okay. So now what we can do
is we can hold Control. Oh, don't forget to press Apply. Apply to mesh, hold Control. And then what I tend
to do is I tend to use a plainer brush and then go over my flat areas to basically
cut it out like that. Now, over here, I can see that
it doesn't really do much. You can see it
like a little bit, but it does give an
interesting effect. This effect will be much
more interesting when we are actually doing this
for our broken pieces. And then we are
also going to add a few more extra techniques. So do stay tuned or at least watch one video
of how we do that one. Um before you think like, Oh, I now know exactly all of the techniques because that one is still slightly different. But as you can see
now, from a distance, it feels like this really
strong, broken concrete. And of course, if you want, if you have really strong pieces, you can also add it over there. So here, what I can do is I can, like, do like this. And for the rest, that's
fine. So with my planter. But then if you, for
example, say, like, Okay, but this one is really strong, you are able to just go in here. Hold Console. And now what you can do is you can
basically just like here. Apply this, and let's say
that's where we are going to end it. So we select this. We go to noise. And because noise will save our
settings in our scene, that's why we only really need
to use the noise profile. Whenever we are in a new scene, we can just press Apply to mesh. Holds Console, and now you
can see that over here. This one might not
be as nice because it is not like in
an ideal position, but we can use the trim
dynamic to basically go around the corners and just
kind of like fade this out. Like that, see? And sometimes you can also use a
trim dynamic to just carefully go over your mesh a little bit like this to
basically break it up. So using trim dynamic, it will just almost
like shave it off. It's like a wood shaver. Also, if you sometimes
have these areas, where you can see
that the mesh is basically kind of
like clipping in, it's not too bad if it is
happening, but if you want, you can go in here and
you can just, like, paint over it with
your trim dynamic, or you can hold shift, and you can, like,
do some smoothing, although I tend to just stay
away from the smoothening. So as you can see over here, this is like a really
interesting look now. And from a distance,
it will definitely look like a broken
concrete pillar. You can imagine that when we are starting to do this
on the bigger ones, we can just completely
destroy them. We can add this concrete, then we can add some rebar
and some cool Alpha ticks, and having that along
with all of our shaders, we can get a really
interesting look. So these are now done. Now what we can do is
we can go to this one. And this one it's just
like a fairly clean one. So all we need to
do is just go ahead and break it up
like a small bit, but make sure, in this case, absolutely make sure that
you do not touch the top. So you basically want to
just break it up like this, because if you are
touching the top, it will no longer be modular, most and then over
here on these corners, you can see that I just
sometimes paint out these triangles over here
that are a little bit strong. I was quite surprised how
obvious that they happen, but you can just make your
brush a little bit bigger. And if you want, it
can either out a little bit of extra
texture to your mesh. You can go ahead and go in here. Like that and just
paint them out. And by the time that we
have done the baking, you will not be able to
notice them anymore anyway. So, okay, let's go ahead
and continue over here. So we were just going to go
ahead and give this, like, a quick sculpt like this. And you can see me that
I almost hit the bottom, so be careful about that. So, this one is going to
be like, nice and clean. Maybe sometimes give it
like a tiny bit of, like, an extra bit, but also this one is being
repeated very often. That's the thing
with ding details. If you have your model modular and it is repeating
very, very often. Let's say that you have
ten next to each other. Of course, then you will
see the same detail on all ten of them, so you want to be
careful about that. And that's basically
the whole deal why we are adding variations because
else we could have just, of course, have one broken piece and just have
it everywhere, but that will not look as nice. And even though it's a tutorial, it is key for me to
make it look nice. And I think also
for you because you learn from it if we would make it almost as nice as that we were doing
the AA game industry. Of course, we cannot go fully A because even though the workflows and
techniques are the same, we simply do not have the time. So this one is going to
be slightly damaged. I believe, yeah. So this one
is going to be this one, so it will be slightly damaged. In which case, we
can go ahead and we can solo, subdivide. Maybe give it like a really
large slash at one place. Oh, you know what,
actually, that might. Yeah, that's more what I meant, but let's not make it as strong. Like a sometimes also, this is based on your
camera location. If I do this, it's a
lot stronger than if I, for example, do this, so I'm just trying to
get a camera location that sort of works
something like that. It's pretty good. You know what? Here. Let's leave
it at this point. Let's go back into our trim
dynamic and then just give us a strong look like that. And now let's go
ahead and reduce our brush eyes so
that we can go in. And this one, as I said before, this one is going to be
quite a bit more damaged, especially around these areas. So let's just go ahead and
paint this in and give it. Let's give it just like a very thin edge paint over
over here, and there we go. So that's like a really broken piece as you
can see over there. And this would probably also be like a good candidate to give like some extra broken sorry, I pressed the wrong
button to give it some extra broken looks
with our surface, these. Then over here, what we
can do is we can make this one pretty
clean and just say, like, Oh, no, yeah, so this
one did not get damaged. And this will give us the
opportunity to sometimes rotate it around if we do not want
to have super strong damage. This one, of course,
make it quite strong. So you can see me over here just making my brush a bit bigger. And it's basically the way
that I make stuff stronger. I just make my brush
a little bit bigger. But we are still going to
make it quite soft like this. And in this one, we can go ahead and still make it quite strong. So just give it some strong
pieces here and there, and I'm just going sideways, and then I'm going to, like, paint over it again. And
that's basically it. Now let's make a brush a
little bit bigger and just add a little bit more breakup
in these areas over here. Like that. So
that's pretty good. And then finally,
what we can probably do is we can just go
ahead and go in here. We are going to use
the noise technique, but we are just
going to then paint it out a little bit to not make it as intense as that we
would on the very tops. So let's go ahead and
just grab this one. Oh, yeah, auto saving. Oh, it's good let me just
do like a proper sale. After we've done this, I'll do proper Savile because sea brush is not always the absolute
most stable thing. Let's make my brush a
little bit smaller. There we go. Yeah,
that should be fine. So let's hold Control click. Let's go into our surface noise, and we can Oh, looks like that. On this one, for some
reason, oh, yeah, because it resets per model, it does not reset per scene. So we just need to go ad
and we need to press open, grab a noise profile, and press open, and then we
will have a settings back. So then all we need
to do is press okay. Apply to mesh, hold control, and then with our trim dynamic. Having this one, first
of all, actually, let's do a plainer mapping
and just carefully cut away these corners because it does
often give a cool effect. Same over here when you cut
away the cords if that this, where the concrete
still kept intact. And then if we do
like a trim dynamic, we can go in here and just don't press too hard on
your drawing tablet, so just press on it lightly and just kind of
go over the noise. And if you press on it lightly, then you can see that
you get this effect. It's a bit harder to do it. Once again, we like your mouse. So I highly recommend that
if you are doing a lot of sebush work or even a little bit to just invest in
a drawing tablet, even if it's like a basic one. But over here, you can see
that I just carefully, go over it like this. And then you can see
that it almost like transforms the noise into
something else again. Like you can see
over here. Okay, so we got this one done. So that's number two.
Malays all the way in the Wong area. So these ones are going to be the ones that we have
broken up from the top. So for these ones,
let's go ahead and just continue on
to next chapter, and we are going to get
started with this one, and we will just have basically
two variations of this. What I will most likely do
is I will once again, like, grab this one, duplicate
it over to next one, and just change it
up a little bit. So let's continue with
this in our next chapter.
27. 26 Taking Our Broken Pillars To Final Part3: Okay, so we are going
to continue on, and this will
hopefully be our last sculpting pat for
this one, at least. So, okay, if I have a look at
this, just keep it in mind. No. Oh, yeah,
that's a short one. Let's see the long one. Are
they all short? Here we go. Here's a long one. Okay,
so here, fairly long. Let's do one that
is not as broken at the top and one that is
just completely messed up. And yeah, that should be good. So let's do this
one which is not as broken to the top
to get started with. So geometry, subdivided ones. Okay, let's have a look. First of all, just go ahead and go down here to the side and just here we go, kind of, like, mess
it up a little bit. And then what we need to
do is let's have a look. I'm going to so the
top we don't need to worry about anymore because we actually go to cut this off. Let's do like one over here, which just actually, let's
not have, go that far down. Let's then tone down. And then, kind of, like,
fade out the damage that it can still transition
onto another piece. Then over here, maybe you
like a trim smooth border and give it like I don't know. Maybe actually let's
do it on this side. See Yeah, maybe I can make
it work with three pieces. If I then break
them up completely. Here, so I then do this, where I just really,
like, ruin them. And maybe like this one, maybe, have it fade out a
little bit more. And then I'm going to, like, add a noise to this
that should work. And then over here, once again, fade out into nothing
or into the default. Then over here, even
though it is quite broken, this one can still
be fairly basic, like you can see over here. If you want, you can later on also add quacks and everything. I will not be doing
that unless I maybe do it in like a
texture or using decals. But doing it inside
of geometry often doesn't show as well as doing
it inside of your texture. And because we are
using table textures, that's why I'm not doing it. These damages, they
are basically what they're going to be is there going to be like extra
normal on top of everything. That's basically what
it will look like. So we have this
one over here now. I'm first of all,
just going to use my move give it some extra movements so that
we have that out of the way. So, I will show you everything. Like all of the
sculpting we do now, we do it all just
for a norm map, a norm map and to get the
general shape of a mesh. That's the whole reason
for us doing this. So what we're going to
do inside of unreel is we are going to go ahead and we are going to then later on, well, we are going to bake
this down into norm map, we are going to
grab that norm map, throw it into unreal
along with like a mask, and then like a special shader and we'll take it from there. So let's go ahead and
just mess up top. Let's go into Trim dynamic. And sometimes, you
know what so is sometimes cool if you go
to Trim Smooth border, send it to the once,
and then to do a cut. So let's say once, and then
you just kind of do this. So you sometimes just give like a few extra cuts like this. And once you've done that,
let's do like one over here. Like that, you can
basically give it almost like a cutting going off. And then what we
can do is we can then go to our trim dynamic. We can just like here completely mess this
up a little bit. Be careful for this stuff. If you have this line where the jumtres almost,
like, folded double. You just want to go
ahead and you want to try and go over it with your trim
dynamic or smooth it. And then with our trim dynamic, we are really going to,
like, break this up. So you don't need to keep the sharp edges
because they will go away using the noise anyway. So let's do something like
this looks quite good. Now, once you're happy with
that, we are, first of all, going to now duplicate this so that we can
already reuse this, and then we will go
ahead and alt and noise. So let's go outside
of solo mode. Let's go ahead and switch
to this view over here, and I'm going to hold
Alt and just subt. So I'm selecting the one that
we did not do yet, delete. Select this one, duplicate, move and just move it over here. Okay, so we've done that,
and let's go back to draw. And then if we just go into
solo mode for this one, I'm gonna see, let's
make this over here a little bit more like it
is a little bit softer. This one is fine. This one is
fine, and this one's fine. And then what I'm going to
do is for, like, the top, I'm going to
probably, let's see. Let's grab a trim smooth border. Let's cut out like
a top like that. This, maybe like
another one over here. And let's just really
like this one, it's just a lot more broken. So we can go ahead
and go in here. We can just not care about
anything, just paint over it. And then down the edges also
just fill on breaking them up almost as if they just keep running down the edges like
that and also over here. And if we go here, I just want to make my brush a
little bit smaller, just because this
one looks a little bit strange with like
this bulge over here. So let's just go ahead
and like, there we go. L fade it off like that. So this one is like,
really, really broken almost like the side. Okay, cool. So let's go back to our original one. Over here. Then what we're going to do
is let's go into solar mode. Now what we're going
to do is we're going to start with the masking. But before we do
that, let's go ahead and quickly go over
here to the top, press Save S because it
would be nice if we actually save our scenes.
Let's go to saves. Make a new fold that we call
Zbrush in our saves and I will call this one beams
underscore sculpt. Spreads, okay. And that will
now have saved our scene. Okay, so now it's just a
matter of going in here. Let's start by masking here. And then sometimes just
tone down your brush size. And then down here,
we are just going to run the noise
all the way along. And these ones we are not going to tone down as
much as the other one. So these ones, because they
are originating from the top, we are going to just keep
them really, really strong. So let's go ahead and grab all of this stuff
over here and just, like, nicely mask it. Maybe let's run this down
a little bit over here. Okay. And then it's
inverter mass, just by clicking on it on
empty surface, noise open. It will always remember
our previous folder. So we do now need to
quickly navigate to Zbrush, grab a noise profile and
press Okay and press Apply. Okay, so this one, you can
see that it is quite broken. Let's go ahead and go
into our trim dynamic. Oh, sorry, I'll play
a map actually first. Yeah, let's do a
few cuts like that. Just around. And now if we go into our trim
dynamic over here, let's go around the
edges and just kind of like still fade out the
edges a little bit, not like the actual centre. So here you can see, I'm just careful fading out the
edges a little bit more, and that often gives an
interesting effect if we do that. And then if we have the
strong cuts over here, maybe not fade them out as much. This one here, you can see
that it's very broken. So I'm probably going to
hold shift to first of all, minimize how broken
it is and then just go over it using
my trim smooth border. It does mean that we, of
course, get rid of the noise, but it's better to
just not have a lot of noise there than to
have it as broken as this. And there we go. So now we
got, like these pieces, maybe go a little bit more
around these edges over here. And then where it's like, where the edges
are really sharp, that's where I do not want to, like, go over them. So, over here, I want to leave it because it will give
an interesting edge. But then over here, we can just continuon like that.
Okay, so let's see. Let's a little bit over here. Over here, there's
like another one that we just need to, like, cut out. It doesn't need
to be everywhere, like if you have some
very obvious ones, that's where you want to kind of get rid of it. And there we go. So that's like this
pillar over here. You always want to
kind of exaggerate the details because
you are losing some of that strong detail effect when you are starting to
do all the baking and all the low polies
and everything. So now what we're going to
do is we can go to this one. This one really just
runs all the way down. So let's start by masking. And we are just going to
mask this one all the way to the very end, maybe make a brush
size a little bit smaller and then,
like, there we go. Do like that. Over here, once again, let's make the brush eyes a
little bit smaller. That's why it's
handy when you have your control for your brush yes in your actual
tablet because just very quick to just swap around for these instead
of meaning to move my mouse to the top.
Over here, same. Let's make this a little bit smaller and let's just go ahead and run it down here. There we go, and we're
already at the end. And then we have sculpt all
of these pieces already. So these ones are
going very quickly. The other ones, they will
probably also go quickly, but because we have
so many variations because those variations, unlike these ones where we can do everything in one scene, those variations we cannot
really do in one scene. We kind of need to
have them separate. So click in empty
space to invert it. Noise Open, noise profile, open, Okay, and press Apply. You can see that
this one has some really strong breaking points. Oh, for the rest, it's fairly
clean here a little bit. So these really strong
breaking points, yeah, these are like too strong. That's what I mean with
when it is too strong. But that just happens.
That's why you do not want to keep sharp edges. If you keep those
really sharp edges, although you might think,
like, Oh, but it's stone. I need to have sharp edges. This is the problem
that you will get. That the edges,
they come together and the noise doesn't
know what to do, so it just completely breaks it. But honestly, for, like, the stone yeah, like concrete, I just concrete can
be quite brittle. Although, of course, we
have bar in between. But for these kind of things, it is no problem
to do this stuff. And also, you won't
really notice it. Like most of this
detail, it will never, ever look this strong
inside of the engine. So you will not notice
these random spots of, like, softness. Then over here, what we
can do is we can go ahead and like paint of course,
if you have the time, which I don't, I
would go at nicely, go around these edges
just carefully, maybe sometimes have it go inside like this and
stuff like that. So you can create more
of a hanging effect. So you can do all
that kind of stuff. But I personally, of course, I'm just going to show
you the workflow and then continue on quickly. Because normally, let's say
all of this destruction, if I have all of
this destruction that we are going to create now, and I would make
it for production, like I would make
it, for example, for DDivision two, I
would probably get like three to four weeks of full time work
for it to do it. While over here, I want to try and keep this story
under 30 hours because else, it becomes a little
bit boring to watch. Probably 30 hours
is already a lot. So so basically,
I'm trying to do four weeks of work into, like, not even one full time
week while teaching it. So imagine that. But
it should be fine. Over here, like, the basic
techniques are here. Sometimes I do want to,
like, kind of get rid of, like, some of these
really strong bumps. Because they will not be as intense unlike
the other pieces, but over here because we
have such a large amount of real estate where
we have our noise, it will be stronger. But as you can see over
here, this is now done. What we can do at this
point is we can do a saves and we can
go ahead and go into our saves
Zbrush beam sculpt. Do you want to replace it? Yes. Okay. So now what we need to do is we
need to export these, and then we also
need to go ahead and we need to bake them. Now, I'm just having a t because if I want to go ahead
and export these actually, two, three max, it will
be too much geometry. But remember how I
said that I kind of did not want to move this one. But however, I think, now I think of it, I don't
really have a choice. So I think I'm going
to move this one over here so that there is a little bit of spacing in between them so that
when we do the baking, they will not intersect,
and now what we can do is we can just turn
these into low plies. Then we will just worry about
making sure that it is on the exact same location when
we are inside of trees max. So we got all of these
pieces over here. What I like to do is I like
to go to my CZ plugin, click on it on the top corner
and just drag it over here. And then if we go to
our decimation Master, the cool thing is that
the decimation master, which we will use for our optimizations just to
speed things along, but we can actually go
to Export All Subtools and that we'll just export all
of these at the same time. So we can click
Export All Subtools. We can go to Exports. Then we can go ahead and go from Let's do like
sculpts, for example. And then in here, we
can do like beams. And we can call this one
beams underscore HP. So hipol that's why it says HP. And let's go ahead
and save this. There we go. That is now
pretty much exported. Give the second to reload. So what we are going to
do is we are going to use decimation master to
basically optimize them. The reason we do this
is mostly speed. Now, the geometry
will not be clean. However, we can have
a workaround for the uneven UVs because
of the unclean geometry, and this workaround will happen
inside of unreal engine. If you really, really, like all the time in the world, you can do topo. However, I often only do re
topology inside of Maya. The trees Maxtolss
aren't up to part, in my opinion, or you
can use twit code. I have used that
one also before. So I recommend all
Mayo twin code. Um brush also does
have a retopo too, and Tres Max does have
a modifier for retopo, but that modifier
is a bit the same as the XR measure tool inside of Cebush where it does
not actually here, it will just make
all the faces even. So it will not actually
make these big phases and then around the
edges smaller faces. So basically, what
we're going to do is we have now
exported everything. We can go ahead and we
can do another saves. And if we just go ahead and do save Cebush and call
this one beams, sculpt, score LP, so low poly, so that we at least
have this saved. Let's grab this one
and go to solar mode. Basically for the
decimation master. All you need to do is
you need to go ahead and press preprocess
current over here. Then it will basically
calculate and just check how your model looks like and how everything
is structured. And then what we can do
is we can press decimate. What that will do is it
will optimize our geometry, and we can just keep pressing
decimate until we have a good looking geometry amount. So over here, you
can see that, yes, it took 18 seconds, so I will pass the video
for the next ones. But then what I can do
is so the first one, because we are at
like 1 million poles, we can always set this to 1%. That will mean is it will
optimize 99% of this. So if I now go decimate current, you can see that
now we are at nine. So we started with 900,000, and now we are at around 9,000. But you can see that this
is still way too high poly, as you can see over
here, we don't need 10,000 polis for
something like this. There are two reasons
why we want to go really low. One, optimization. Of course, we are
working for games, even though games can handle
a lot of geometry lately, it is still important
to optimize. And two, it is annoying
to UVnwap something like this when it has
still a lot of polis because we would need to
run our UV along here. So instead, what we're
going to do is we are going to press preprocess
current again. And this time, let's
set our scaling to 20. So 20% to press decimate. You can see that we are 2000. However, I feel like that we can go still a little bit lower. Let's press preprocess
current again. Let's set this to 50% and
press decimate again. Let's see. Now we are at 900. We are getting pretty close to **** I'm going to
do one more at 50%. So pre process current. Why are you taking
so long for 900. Hello. Maybe it crashed? Let me just pass the video
until it's done calculating. Okay, so, yeah, we crashed. But that's okay. So what I got now is 300. Let's do one Undo. So basically, you can just here at the top by,
you can kind of, like, switch between there
to see and make sure that you do not get rid
of too much detail. So I'm mostly focused
that the edges stay fairly much the same around here,
like the sharp edges. I'm not so much focused on like, all the small little
details in here. So yeah, I think this
is like the limit. Let's say 400. Once
we've done that, as you can see over here,
looking pretty good. Of course, it will
look very sharp, but that's because we
still need to bake it down and everything and art
smoothing groups do it. What I am going to do is I'm just going to keep saving after every single one because yeah, I'm just not worried that
it will crash again. We now know that roughly how many times we
need to do this. We basically need to
do one preprocess current and then set it to 1%. Then we need to do another
one that set it to 20% and another one and
then set it to 50%. So whenever it's processing, you will most likely just hear the audio cut off because I will just pass the
video until it's done, and we will just go through
this process quite quickly. But it will not be a time lapse because I might need to
talk about some stuff. Here's a one, preprocess, preprocess go and again, and then the second one
goes really quickly. So then 20 preprocess. And now if we just go
a little bit closer, preprocess again and
this time, let's do 50. And sometimes, for example, this is like a simpler shape, and you can see, Oh, yeah, wait, we are 90. Let's preprocess again. Okay, so we need
to do 50% twice, which means that we can
pretty much probably do 20%. But there we go. So the only thing that I'm a little bit worried about later on is like these edges that
they do properly stay. That's something that
we can, of course, just make sure that it works, and else we can fix it
inside of three Max. Not for these ones, but
for the vertical ones. So we got this one done. We can go ahead and go to
the next one, preprocess. And let's set this
now back to 1%. Decimate, preprocess. Let's do twice, 20%,
one, preprocess twice. Yeah, that is doable.
So that's pretty good. Okay. Now what we can do is we can just go over
to this one preprocess. And once again, one decimate. Let's see if we can do twice 20 on this one also
because of course, the dimensions are a little
bit different for this one. So once, 20, twice, 1,000. That does give let's do
decimate current again. Let's do 50. I think that's pretty much like
the limit for these ones. I don't want to go too
much lower because I'm worried that I
break the top etches. So 120, 2050. Okay, should be doable. So for these ones, what
we can do is we can go ahead and decimate. These ones are a
little bit more. And you can see also
because we are now at 2 million polis instead
of just like 1 million. Okay, so let's have a look because I want to
make sure that this one, of course, is still
pretty decent. So let's go at pre process. So 20 2050. 2020. Yeah, I think that
these ones can also handle yeah. Yeah,
you know what? No, this is fine. This is fine. You can go maybe, like,
a little bit lower, but I think actually, this will look quite interesting if we just
keep it like this. So let's go ahead
and do just two more to go. This one over here. Why did I have Oh, yeah, wait, this one was, like,
slightly broken. This one was not broken. I keep forgetting how
many variations we have. Okay. Almost done. Two more to go.
Decimate, preprocess. Decimate preprocess. And I just like to
preprocess after everyone. I can, like, fiddle around
with the percentages, but I just like to
do it this way. There's no real reason for it. Like, you can just set
it exactly the way that you want it. I just like this. So, okay, so that one is
also, yeah, that's decent. And now we can go ahead and
do the last one over here. Here we go. That one took surprisingly long
compared to the other ones. So one, preprocess. 20. Oh, yeah, for this one, I need to be extra
sure that the edges stay intact because else
will not be modular. Preprocess 20 Okay,
let's try 50 reprocess. Yeah. Okay, so that works. Okay, perfect. So if we go at a press F,
you can zoom out. So these are now all done. Now all that we will need to do, and you can see that now the
total all of these is only 3,000 polis pretty much.
So that's pretty good. So now what we're going
to do is actually Oh, let's go into our
decimation master. We are going to export
all of these subtle. Exports, scalps, beams. And this is going to be
beams underscore LP. And then what we will do in the next chapter is we are
going to import this into TresMx and we are going to do our UV unwrapping for them,
do our smoothing groups. And then what we are going to do is we are going
to go to Mum's at Tolbag where we will be
doing our baking for this.
28. 27 Taking Our Broken Pillars To Final Part4: Okay, so now that we have
exported our pillows, what we're going to do is we are just going to go in tres Mx. And in your default layer, this is where we are
going to just import them because we are
combining multiple pills, it's annoying to just throw it into already an existing layer. So let's go to import.
And let's go ahead and go scalps, beams
scopoli'iput, these. And then when you input just
turn on Import as d B polio, for the rest, you can pretty
much just press Import. And yeah, for these ones, so we are going to
they are upside down. Oh, I messed up the position. That is awkward. Yeah, so
that's the thing with Cebus. So basically, I made
everything upside down. But these ones are,
these ones are correct, so I just need to go in these, and at this point,
I'm just going to go ahead and I'm just
going to rotate them. Oh, no, wait, I
can't rotate them because we need to bake
them. Don't worry. We will rotate them later on. So in this case, we will just need to work
on it upside down. So what we are going to
do is we are going to turn these or add some UVs. As you can see, the smoothening has already been added, which, as you can see, already works a lot better with this geometry. So to create these UVs, what we're going to do is we are going to combine
all of these into their into one UV so over
here, we have this one. Now, you can try to use
the UVW map technique, but that often just
doesn't work in this case. Here, if I would like artists, the reason it doesn't work
is because of the SMs. So if I would artist
and then we would add a unwrap UVW modifier, you can see that green R SMs so you can see how
broken that they are. Instead, what I tend to do is
I tend to just do manually. It takes a little while, but it is often the best way. So we just go ahead and use
our text tools as before, and then we are going
to go in and we are, first of all, just going
to select the end. So you can just press Iron
and then press relax. So relax is quite good
because it will just relax your mesh and fold it out to make sure that there's
no stretching going on. So I often just select
these ends over here. Then what I tend to do
is I select the ends, crass contra I to
select everything else, and then I basically
iron it once. Once I've ironed it once, all I need to do is I basically just need
to break this up. Now for this, I tend to do it this way where I simply
select over here, a continuous edge because
this is a square, this makes it a
little bit easier. So I basically just select
this edge around here, and I try to keep it fairly much on the corner, as
you can see over here. And then once you reach the end, we are going to
basically press break. And what break will do is
it will split up this edge almost creating a seam
here. I will show you. So we go over here. And then
let's say we ended here. Then you press this
button over here, which is the brake button
because now if you press relax, what it will do is
it will fold it out. And I'm just trying
to Oh, so over here, it seems like we still not have that we forgot to
break something? No, it seems like we
got it over here, so that is quite interesting.
Let's have a look. Let's select these
pieces so that we can kind of see what is going on because that's quite strange that
it works over here, or that it looks totally fine. Now, there are two ways that
you can try to fix this. One of them is convert it to an Arapol and just quickly add a reset X form and then
convert this back to Apool again because
you do not want to add it on top
of a reset X form. And then if we open this up,
let's have a look over here. So now if we go ahead
and select this and relax again, Okay,
so that doesn't work. Another thing that you
can do is you can try to go down here to Vertex mode, select this area,
and then try to relax this area specifically
a bunch of times. If that doesn't work,
another way that you can do it is you can go down here to the peel and do a quick peel, which is like the Outcle method, and looks like this one worked. So as you can see, once
again, many ways to do it. The easiest way is often just try a reset X form and
relax a couple of times. However, you can also
do the quick peel, but the quick peel
does not always work with geometry like this because this is
quite difficult geometry for a unwrapper to work with. In any case, this now works. If you want to double check, you can go up here.
Select the checker map. And what it will do is it
will add the checker map, and then you can see, and you basically want to make sure that nothing is stretching out. So you do not want to have stuff like this where
it looks like that. But this is looking pretty good. At this point, we can convert this one to
the Added Polly, and that's pretty much it. We are now going to
just go ahead and keep doing this for all
of our pieces. So, for example,
we have this one, and after we've done that,
we are going to combine it. So at this point, I will
still do it in real time. UVnwpping is one of the few
things that I will need to time maps later on because they are incredibly
time consuming. But here we can do invert, iron because you can
imagine just me selecting stuff like you will not
learn anything from it. But at the end, if we combine all of the pieces, I could easily spend
an hour just doing this with all of the
pieces combined. So you can imagine
that I do not want to record 1 hour of me doing this. But as always with
this tutorial, all the time laps are
also added in real time. So we got this stuff over here. And this one, and
we just break it. And honestly, at this point, I will just do a
quick peel because I'm worried that else it
will just break again. So it looks like that
for these pieces, quick peel is working well, and because the pieces
are so similar, it means that we
can just use it. Okay, so this one, of course, is a little bit more intense. Let's go ahead and just open
it up. Let's isolate this. When it is a little bit
more intense like this, what I tend to do is
I tend to go to the select and I tend to turn
off these two selections. This means ignore back facing, and this means that
it selects by angle. Then go ahead and I go
in here, select this, hold hold controle, hold Alt and deselect
everything else. And then I just carefully deselect the faces
I do not want. So let's say like this. And then what we end up
with is we end up with a pretty decent selection,
like you can see over here. Yeah, let's do
this. There we go. And this one we can
iron and we can relax and you can see
that that still works. So that's basically if you have a much more complicated Look, it's sometimes easier
to just do it this way. And you just want to try to keep your UVs fairly straight. So that's why you don't see me selecting like this
because if I select this, it just looks strange
because all of a sudden has, like, a point sticking out. And once we've done
this, it's the same way. It's just called her I iron. And then all we
need to do here is we just need to have a look at our green line and then just
go in and just follow along. So can you now understand
why we optimize this so much and why we didn't just leave extra polis
even though we can, if we want, we could leave an extra polis without
a performance hit. It's because else we had to do all of this selecting
to much more polys, and that would
just take so long. But over here, this
one is now also done. We can convert soon, add a pole. As always, if you want, you can just go
ahead and you can, press checker on them and you
can double check your work. But we are later on going to nicely just pack them together. So over here, we can go
on with this one at a UV. Once again, it's
the same technique because it's a square,
we grab the top. We grab the bottom,
select them, C I iron. And then in this case, I like to run my seam near a point where
the damage is not as intense. So I'm trying to
avoid these points because this is something that you will be
able to see often. Theism we cannot get around it. There has to be a
seam unless well, actually, even if we
do WorldSpace UVs, there would still be a seam. Although that one would
blend a little bit better. But in this case, here, let's do a quick peel. There we go. See, so that the most important areas that
we need to bake, they do not have like a seam running through
them just to avoid any accidental,
ugly looking UVs. So we have this one. But the way that we are going
to make our Shader, it will make the seams very forgiving. So don't
worry about that. Like we are going to
do it in a special way where we are basically
going to blend actual UVs, along with world space UVs. And the cool thing
about that, by the way, let's just do oh,
let's turn this off. And so the cool thing
about doing that kind of blending means
that we can Sorry, I shouldn't talk
while doing this. Yeah, it just means that
we can basically blend out our seams using
another texture, almost. It's a little bit more
expensive in terms of a shader, so you probably
wouldn't often do it in a video game unless the destruction in that game
is very, very important. So I can imagine, like in the Las ofs Chart and
everything, they would do it. But inde vision, it would be probably too expensive in terms
of, like, the shader. I'm doing this one over here. I think I will actually
also just know this because else we have probably
too much stuff going on. For these ones,
you need to check. You just need to select these and it looks like that
I accidentally missed one. So you need to iron
this and you need to relax this a couple of times. And then you just need to
go ahead and add a checker. So you need to make
sure that there's no intense stretching going on. In this case, it looks fine. So we can now select this
contra I and iron this. And for this one,
I'm going to run it along this area over
here most likely. So it is not a
difficult thing to do. It's just a boring thing to
do. That's pretty much it. So we can just go ahead
and select this stuff. Break. And then let's
do a quick peel. Over here, there we go.
That one also works. And then later on we, of course, just need to rotate this round
because that's my fault. But, yeah, that's the
thing with a square will just look the
same from every angle. So it's just difficult
inside of seabush to really know what the top
and what the bottom is. Of course, I could have checked, like my values and my
axis and everything, but I didn't think of that. So that's just my
fault. But it's almost no extra effort
to do it this way. The only extra effort is that I just need to rotate something. So let's go ahead and this one, this one is a little
bit trickier. I think I'm going to
end it over here. I think we cannot just keep it running down there because
else we will get stretching. So let's end this over here.
Let's add the checker. Just make sure that it still
looks pretty decent, yeah. Ctraod, iron, and this one, it is a lot more broken, so this is probably the
least broken side. So what we can do is
we can go ahead and we can select this. Do a break, peel,
and there we go. Okay. So here, this is
what I mean with the seam. See? You can see that there
will always be the seam because we just don't have a clean enough UV
with this geometry. But even if you would
retpod UVs would still look they would look
a little bit nicer, but there would still
be a seam visible. So let's go ahead and
just grab the last one. So let's iron this one.
Move it over here. And in the end, we only spend around 10 minutes doing UVs, which for UVs is not that long. So iron this one also, and this one, it does not really matter where I run it along. I will run it along here. Oh, we have left a little bit
more jom tree in this one. But luckily, because
the edges are so clean, the jom tree is still
quite long pieces. So I don't need to do
too much selecting in order to get to the end. There we go. Break. Peel. Oh, this is
a really nice one, see. This is nice and clean. Okay, so we got now all of
these pieces done. Perfect. Now what
we're going to do is we are just going to go
ahead, select all of them, and the nice thing
about these is because we are using
tilable materials in this, we do not need to care too
much about our actual UVs. What we can do is we can just
go ahead and go to our Onap and I mean that we
don't need to pack this all perfectly together. So we can add the UVW unwrap. And all I'm going to do is I'm going to select everything
just bit Control A, and then I want to
scroll down here and we are going to do some
automatic packing. First thing very important is
to press rescale elements. This will do is it will scale our UVtils based upon the
scale in the tree worlds. Now you can see that
everything is the same. Often people call
this textile density, where the textile density between all of our
objects is the same, and they all have like
here, the same scaling in terms of the checkerboard
that you see over here. The next thing that we're going
to do is turn on rescale, turn on rotate, set
the padding to 0.001. And then what we
can do is we can pack normalize like this. Now, there is another thing that we need to
have a think about, and that is our concrete. Our concrete has stripes on it. These stripes go into
specific direction. So you want to
keep that in mind. So let's say that we
look at our concrete and let's look at the norm map. So the stripes over here,
they go into this direction, which means that if we
create our pillars, we probably want to have this
going along our pillars. If we keep that in mind, that means that if
we grab this one, for example, so the
stripes are going, Yeah, everything needs
to be in this direction. So these ones,
what we want to do is we want to turn on
snap rotate up here, and we just want to rotate
these 90 degrees like this. This one is fine. This one needs to be
rotated 90 degrees again. And this one needs to
be rotated 90 degrees. And this one needs
to also be rotated. So we basically just want to have the stripes all going into the same
direction like this. And this one is this piece is good, everything is now good. Once you've done that,
just press contra again. But this time, turn off rotate and then simply press
back normalize. So now you can see
that now everything is just very quickly
packed together, and we will only use these UV specifically for a
normal map and a mask. For the red, the
dilable materials, we can just die as
many times as we want, so we don't care
about that as much. So we already got
our UVs done now. At this point, you can just go ahead and convert everything to an added pool, and
we can export this. So make sure that all of
your faces are smooth. If they are not smooth,
you can go ahead and go to the smoothing and just
set the smoothing to one. Another thing that you do want to just keep track
of is over here, I can see that this edge
is going a little bit won, so I just want to move it
back a little bit like that. Don't worry, it will
not mess around your UV too much if you do
small movements like that, and else you just need
to relax your UV. But that was one small little arrow that
we just had to fix. So we got our pieces here. We are now going to go
ahead and we are going to export this export selection, and we want to export this as
sculpt beams as a FBX file. That's important
because OBJ files, they do not triangulate, and we want to make sure that
we triangulate our mesh. When we import in unreal, it will automatically
triangulate. However, that triangulation
is not always the same as the one that we would
be doing in Max and the one that happens
in Maya and in Painter. Basically, what
can happen if you do not triangulate your model that you export
from Max is you can get a mismatch in terms
of your no map baking, which can result in smoothing problems and in
normal map problems. So we basically call this
beams underscore LP again. But this time, it's
just an FVX file, and we can save this and just make sure that
triangulate is turned on. And that pres okay.
Perfect. That's now done. Now, what we're going
to do to finish off this chapter is we are going
to start with the baking. For this, we want to
open up Mum set Tolbag. Okay, so here we are
in Mum set toolbg. Now, you can do the baking
in a substance painter. However, the reason
I'm using Momset is because it feels a
little bit quicker, and it's a little bit more
forgiving when it comes to messy geometry because
of the cage, basically. So when we have complicated
geometry like this, I personally prefer Mm set. So what I'm going to do is
I'm just going to go into scalped beams and import your
hipoly and your low polyVX. So hipolyopj low polyVX.
Let's move this over here. Give it a second to load
in because, of course, our hi pool is about 12 million poles, I
think, something like that. So it might take a second
for it to load in. But once it is loaded
in the first time, then it will be fast. See? So now we have everything. So we have our high
pool and our low poly. So Cebush is very
power or Sebush. Marmset is very powerful. So you can see that
we can just move around in a high frame rate, even with our hypol just
completely selected. So only that when you
start moving around, you can see that it's a
bit snappy like that. Um, often it's
important material, so I just press delete until
I have one material left. And all that we
need to do for this is I'm going to quickly go to my sky and set my mode to color and then let's
set color down. This is just a preferred
viewport for me. And then all I need to
do is go up here to the new Bake project, which is this little Brad icon. Grab your low poly,
throw it into low, grab your high ply, throw it into high, just
click and drag. At that point, you
just want to go ahead and turn everything on. Using these ice, you can
turn it off on or off. However, it's just hiding, it will still be reading
into the system. Then in the low, we are going
to set the outebak to none. If we set the outebak to quick, we have not yet set
up any setting, so it will just
not work as well. Then what you want to do
is you want to zoom in and zoom in a really intense
point over here. Then you can see the difference, you can see the hypol
sticking through the lopol. This is where your
cage comes in. So you grab your cage
and you just tone down the max offset and have it just above your hypol like this. Now the system will
basically make sure that even though the hypol is sticking out above the
loply which is normal, the cage will make sure
that it will still be included so that it will be
properly baked everywhere. Now, baking is quite
a complex process, so it could actually be
its own tutorial course. So we are just going
to leave it at this. I do recommend that you
look a little bit more up the technicalities of baking.
But this is totally fine. At this point, we can
turn off our high, and we can go into
our bake project. Now, first of all, let's
just do a safe CNS. And what I'm going to
do is I'm going to make a text folder, and I will call this one, um let's call this just bakes. Yeah, that should be fine.
So let's call this bakes. So in here, I'm going to, first of all, save my scene. Or shall I save it
somewhere else? No, you know what? I'm going
to do this in Sage folder. This one I will call bake scene. So we will be using this scene for everything. Press save. But we are going to
use the Bakes folder. So in the Bakes folder, let's
make a folder called beams. And in here, we can
basically bake these things. So let's give the
second to save. Once again, hypol you need
to take a second to save. Now all we need to
do is in our bake, we need to set an
output, and for output, we can go ahead and we
can simply grab the beams folder and call this
beams and just pass save. Samples, I like to set to 16. This will give us a
bit of a crisper look, I always tend to bake at
a high resolution like four K because in unal you
can very easily tone it down. But you cannot actually
upscale a texture properly, but you can always downscale it. Then all we need to
do is in configure is we just need to go ahead and let's turn off
everything except for your normals over here. So all we need is our
normals, which is a norm map. At this point, press BC. Now it will first load in our tmp, and it's
already done now. And then what you can
do is you can press this P button to preview.
And there you go. This is your low ply, what's
your baked high pool. And as you can see, it's
working really good. So this is still
completely low poly. I don't know, yet, they changed the way to
show you wire frame, but it still works totally fine. Like here, I can go
to, like, WY frame if f. So this is still
our low poly meshes. And that's the cool
thing about baking. So this is looking great. We got all of this done.
I'm not worried about it. It's working totally fine. So what we can do
is we can save sin. And now what we are going to do next chapter is we are probably going to completely
take this to final. We are going to
export these pieces properly to unreal engine. Then we are going to
set up our shader. Then we are going to go
in painter and paint in a mask to go along
with this shader, and then we are going
to work on our bar. So let's go ahead and continue with this in our next chapter.
29. 28 Taking Our Broken Pillars To Final Part5: Okay, so now that our BC is done and we have
our vs ready to go, what we are first going to
do is we are going to start by getting this
into unreal engine. So for this, what I'm going to do because all of these
variations are the same, let's first of all,
actually's select everything, and let's do a center to pivot, just make our lives
a bit easier. Now, this one, we are basically
just going to drag it in. So this one is going to
be horizontal beam clean, right? Yes. Oh, wait. Let's first of all,
just turn off default, go to our horizontal beam clean and delete these extra versions. And we probably also
want to do this for our vertical beam there we go. Is that we only have
these two left. Now, once we've done
this, we basically go in, we grab one of our pieces, we drag it into like
horizontal beam clean. This one is most
likely going to be horizontal beam
broken variation one, and this one is
probably variation two. So let's focus on
that one first. So horizontal beam clean. That one is now pretty much still on the same
level, so that is fine. These ones are quite forgiving. Then what we can do is we
can go to variation two, and for variation Oh, variation two needs to
probably be Yeah, here. We need to swap
these two around. This one goes into variation two and this one goes
into variation one. There we go. So for this one, what we're going to do
is we're just going to go ahead and move this down. There's a few ways
that you can do it. You can go down here to align, and then you can
click on your mesh. If you align the current object into the center of
the target object, make sure that the X, Y, and Z position is on,
and then you can press. That's one way to align them and the other way is
just do it by hand. Now let's say that
we delete those. And then we finally go in here, and over here, we
can do the same. So line select this one, and we remember our
settings this time, press Okay, the ldalt
one. So that one is fine. Like I'm not too
worried about that one. The one that I am worried about is that we need
to make sure that our vertical beams over
here that they are correct. So here we have our
vertical beam clean. We can turn on our default, and this one is our vertical beam clean
so we can move it down. Then what we have is we have
vertical beam D. This one needs to become in D. Yes. Vertical B broken variation
C is the short one. And at variation B, I will grab it doesn't really matter which
one we grab for that. Variation B and variation A. I did it in a little bit of a strange
order, but that's okay. Variation A over here. Okay, perfect. So we
got that suf done. Now, if we go and get
started with the first one, these ones we can
go ahead and just center to objects like this one. Oops, one button and press
line and align it here. Okay, so that looks pretty good. We can now go ahead
and delete or one. Okay, so that one
looks pretty good. Now, we will know soon
enough if it's wong or not by going simply
into unreal engine. So we have this
one, variation A, that one is going to probably be a little
bit more tricky. So we are going to start
by I miss clicked. We are going to get started
by rotating this 180 degrees. And let's just do a line
to get started with. But then for this one,
we do need to make sure that we align it properly. So what I'm going to
do is that's snap. Let's turn on our
edge and faces. Let's effect pivot only. Let's snap up pivot
to the lowest point, which is probably this
corner over here. So turn on snapping. Snap it to the vertex of this
corner. There we go. Turn off effect pivot only. And now what we can do is we can go down here and
just right click on the Z axis to snap it down. Now, at this point,
for these ones, we can just go ahead and we
can already, delete them. Then what I want to do is I
just want to have a look at vertical clean also and then see if it pretty
much matches up. So here you can see, we do
not have a perfect matchup. So that means that we will
need to first of all, see if we can make it work, and if we cannot make it work then we will need to adjust our
geometry a little bit. So for now, what we can do
is we can hide this one. We can go over to next one, and then for this one,
we can do the same. So we can rotate this 180. We can nicely align this, and then we just
need to go isolate mode effect pivot only, and snap this pivot to the
very corner over here. And once we've done
that, we just want to make sure that over here that it is exactly on the center, and then we can delete the old one. So that
solves no problem. And then we have variation C, which is like the
small variation. We don't need to
do that one yet. And then we have this variation
which should be just like a normal align as
far as I can see. Yeah, so that's like a novel align and then
delete the old one. Okay, so we have
these pieces done. Now, first of all,
I want to just go ahead and go into unreal
because we need to create our material anyway or a shader in order to
make this all work. So we can go and
export this stuff. So this one is the
if we go exports, export selection, let's go ahead and this one
is too unreal. So we have horizontal
beam clean. See, now we immediately like doing multiple objects
at the same time. And that's basically
our way of saving time instead of
doing it one by one, because that would
take a lot longer. But Gus now already
once this is done, we already have six objects
in one go, just done. Variation two is this one. And this one is variation
make sure to select it. Export. This one
is variation one. Okay, so that's it for
the horizontal beams. Now what we want to do
is we want to go to our vertical beam clean. This one I'm not
too worried about. It's more like the
other ones when we need to transition
between them. So vertical beam clean. Number D. I don't know why I said ABCD instead of zero, one,
two, three, but I. So there we go. C was like that old one, which we will do
at the very end. We are not going to
worry about that now. Variation B. Okay,
and variation A. Perfect. So we got
that one done. Now, if you just go
ahead and go into UnreL, there's a few things
that we want to do. First of all, let's
create a new folder that we'll call normal
underscore maps. In this folder, what you want to do is you
want to drag in your beams normal map
that you have just baked. So you can just drag it in
white way, double click on it, and make sure to go down here
and flip the green channel because we did all of
our baking in OpenGL, however, Unreal
reads as direct X, with the only difference being that the green
channel is flipped. If you want to go ahead and
go for lower resolution, let's say that you want
to only have two k or one K because you need to
have an optimized game, for example, even if
you have mobile games, you can go down here and
set your resolution. If we set this to
2048 and press Okay, you can see that now it has
optimized the resolution. If you just leave it off zero, it will just revert back to
four K. So having that done, now all we need to
do is we need to go ahead and go into our assets, and this one is always
a scary moment. Let's go ahead and grab all of our horizontal and
vertical beams over here that we have all of them. Oh, wait, sorry, that's
the internal pillars. Let's move this up. There we go. And right click reimport. And then just press Reset
to FBX on all of them. Okay. Okay, almost.
Come on. There we go. Okay, so we can see it looks like there's
like a smoothing problem. However, this can hopefully be resolved when we
do our norm map. So over here, these
beams seem fine. Let's first of all,
just go ahead and add a nom map to this. So we can go in materials. Now, this is all concrete. Knowing that what
we can do is we can get started by let's
say we duplicate our brick wall and just call this one Beams
underscore concrete. Let's do this and open it up. Then the first thing
that we're going to do later on is we
are going to just add a normal map to this.
So we have this one. We want to go ahead and go
into our concrete and just drag in our concrete
textures in here, and we can temporarily set our lightness to
what was it one, and our roughness amount can revert back to one and
our desaturation zero. That's fine. Or maybe just set our color to like white
again so that we reset it. Now what we're going to
do is we are going to add something to our shader. Let's open up our main master, and the one that we need to art is over here in our normals. We have our normals.
We just want to drag in our beams underscore
normal over here. Then what we can do is
we can add a what was it normal blend Angle, Blend, angle, corrected
normals. That's it. Wow. It's always like a big name. Basically, what this does is
it will combine to nom maps. So what we can do is we can
go ahead and grab this. And then if you want, you can even no weight. You never actually
want to change the strength of this
because it's very specific. So we just can artist who a adigial normal and throw
this into our normal slot. Now, important, do not
add your UVs to this one. This one has very specific UV, so we just want to keep it. However, what we can do is we
can add a switch parameter, static switch
parameter over here, and you can call this one has underscore detail,
underscore normal. And doing this, it will give us the opportunity to say
that if we have it false, we just ignore this
extra nom map. For example, our bricks do
not have a detail normal. So having it by
default to falls will mean that we have more
flexibility in our material. So that when we save this,
all we need to do is we need to go ahead and we have then our material, beams concrete. We just want to go in here
and turn on a detail normal. Oh, another thing is right
click and converts to premor and call this
detail underscore normal. And let's save this once more. Okay, now that we have this, we can go ahead and go
into our assets. We can open up our
horizontal beams over here. Oh, yeah, let me guess we'll
open it up all at the top. Sometimes a bit annoying
that it does not always register that I have
dragged my window down here, and now it's sort of tries to register but still
doesn't do now it registers. Okay, so we now
got all of these, and all we need to do is, I'm just going to
do it over here because else I would
need to navigate to it. I'm just going to add
my concrete beams to everything and
then close it off. And once we've done
that, then I know if my normal maps are correct or incorrect or
anything like that. Also, I might want
to actually get rid of the stripiness because
I think that in this case, the stripy concrete
does not work as well, especially because
of the way that we have our UVs unwrapped. But that's no problem. I have another version that has
the stripes removed. So here now you can see that now that we have
that are normal, you can see that it is
pretty aquard not perfect, but pretty aquard Enough that we can then add some changes. So over here, you can see that
now we have our concrete. From a distance, you
will not notice it even, but I would just want
to go up close and make sure so there's two things
that I'm going to do. I'm going to add a concrete over here that is not a
paneled concrete, but that basically just does not have any
of the paneling, and it's just a flat concrete. And we want to just make sure that these pieces
transition properly. So if we have a look
over here, here, you can see that they
are not transitioning absolutely perfect. So although over
here, they seem yeah. Okay, so they seem
pretty perfect, but we can just go
ahead and fix that. So if we go into our
vertical beam clean, what we can do is we can
basically go ahead and snap our pivot to
the grid point. So turn off vertex, snap your pivot to the
grid point like this. And then what you want to
do is you just want to go ahead and we are
going to hold shift. Oh. Let's go ahead and go to
our side view. Hold shift. Oh, that's annoying. So it does not do
like a proper ship. Well, it's not so much annoying. It's just too bad because
what I'm going to do is I'm just going
to go ahead and I'm going to move this over here. And now I can actually choose. So I can choose to perfectly snap these vertices over here. Or what we can do is we can
simply move this up and just cut it into
the other shape. So I will show you
both techniques. One technique is that
you grab your vertzi. You go to snapping and you
said only vertex snapping on. And you basically snap
this to those verses. Doing it this way, at least, and you can even
also do this one, although this one is
a little bit far out, so maybe not the best one. But doing it this way, you can go super precise and
like the transition, see? And you might want to add some extra edges or over
here on those areas. But in general, if you
really need to fix it, you can do this. And then this one is a bit
trickier where we probably want to do one here. And then what you
might want to do is you might want to
quickly isolate this. And then use your cut
tool because you can just cut without actually
adding extra new geometry. The only thing is that
you need to be careful because it might change
the smoothing on the top, but on the other hand, you cannot even see
that smoothing. So now I can basically
select this one. See that I can carefully move
it into position like this. So let me just show you both techniques.
So we have this one. Over here, we can do
the same. We can, like, cut grab place. And that's where you
can basically just make sure that this is
exactly lined up. And then this one I wouldn't
really bother too much. Maybe I can do, like,
a cut over here. And I also don't
really care about whatever happens
below it because you cannot see that stuff.
So we basically do this. I guess over here, we
can do another one. So let's move this. There we go. Oh, no, wait, that actually might not be. Yeah,
you know that. Let's not do that. So over here, now, we need to be
careful about the cuts. If we do really big cuts, you are able to actually
see the difference. So this one over here is
also not the nicest one. But yeah, so you can
just try it out. You can also go in here
and you can, like, wine move this,
although there we go. That looks a bit
better to minimize it. But I think that this
is already good enough. So we have this one. We can now go ahead and we
can re export this. So this is vertical beam clean. So that's the very
precise way of doing it. And now I will show
you like next way. So if we, let's close Momset
we don't need it anymore. So now if we go in here, we have our first call beam clean, right click reimport, here, see. So yeah, okay, so it looks like that IU Vs are still a little bit more messed
up than I expected. So that might be something
that you want to fix. Now, I'm not too worried because of the distance and everything. Another technique if we, for example, grab, Oh, this one, we probably
cannot even do that. The other technique is that we would literally just push it in. So we would basically
do this, where, let's say that we grab our Yeah. So this is the broken version. Let's say we grab the
variation A, for example. White? Is that the example? Oh, no way, this is
the broken version. Well, we can use the broken
version as an example. So what we basically do is
we grab our broken version, which is the D one over here. I just temporarily Oh, I had my snapping turned on. Sorry. I just
temporarily move it up, throw it into my clean version. No, sorry, I am doing
this incorrectly. I need to, no, no, wait. I'm doing this good. So throw it into our
clean version and turn off the old one temporary, but then we are going
to later on replace it. And then if you basically just
move this down, like this. It's a little bit
tedious to do this. That is why I was so
worried when doing the sculpting to make sure that everything just properly aligns. We need to move this
up exactly like that. Then what we can do is we can basically go ahead and go in. Let me just line
this up exactly. Then we can basically
go in our vertex. We can push this
down so that it is clipping slightly into our mesh. Then what we can do is we can
go in here and we can just carefully have this clipping in here and just see if it
if it works good enough. So here, you can
just, like, do this, where we are clipping it in. So it's a little
bit less accurate, but it's also a
little bit quicker. Especially when we are way off so that we can just
kind of push it in here. That's basically how we
take care of things. And then very small etches, like you can see
sometimes here and there, those small edges, basically
what we will do is we will justify them as being that
they are just damages. So we basically move this,
and we just say, Oh, no, those etches, they
are just small damages. You will not be
able to see them. If you can see them, you
throw decals on top of them. And that's like if you are
in a rush, which I am. So that's like the
quick way. So I just wanted to give
you the two options. In the end, the difference
will be very minimal. So that's why it's like heady.
Like, I can do now this. And having this
done, I can now go ahead and I can grab this one, throw it back in variation D. And then here in variation D, I just want to go ahead
and I just want to snap this to the center. That's okay. And now this
should be the exact same model. So if we now go ahead and it should be on the
exact same position. If it's not, what you
can also do is you can also go ahead and just right click and
set this back to zero, which still does not do exactly the thing
that I wanted to do. Let's effect pivot only, and let's snap my pivot. To the very last C, like that. So an off effect pivot only, and now right click. Yeah, that's a lot closer. Okay. So we got that one. If you want to get right
click and press height, delete the old one,
and then write, click and press nhight again. And I don't need you. Go away. And then we have this one. So
this is variation D. So yeah, that's the only
tedious part about this. First car beam
broken variation D. And then what you
just need to have a check is to see how the
other ones transition. So that can save L some time. So here we have number clean and now
variation D reimport. That's not correct. Did I accidentally I thought I
exported selected, white? I have a feeling that
I did not extend any export selected but
exported my entire scene. Yeah, here, see. It's plus done. That's really bad. But
let's try it again. So make sure to do exports
selected. So I did that white. File export exports selected because now it's
trying to literally import our entire scene. So I'm lucky I do not have
any hipole measures in here. Let's go ahead and try it again. Here, see, try to
import my entire scene. Let's just quickly re
import this. There we go. The only thing is that now it
has all of these materials, which we need to go
ahead and delete. There we go. Okay.
Sorry about that. Now you can see that now
the transition here, it's not perfect, but it
is a little bit better. See? That's the quick
way of doing it. Then, of course, we have dt
later on that we can use to cover this up and we have
decals also later on. Having these measures, well,
this is the short one. This is just like my texture, so I need to also work on that. So just in general, we basically want to go
ahead and work on that. For these pieces, you can also argue, like, Oh,
no, this is fine. If you want you can push it in. It's all up to you how much
time you want to spend on it. I personally, I am not going
to spend time on this, and the reason for that
is because we will never, I believe, get close to it. So if I have a look or at least close enough that we
will be able to see it. I recommend if you are creating environment
and you for example, have a game environment, if your player gets about
this close to it, then I would go ahead
and I would just do it. Just ignore these themes.
These themes will go away. We are just talking about Jontry mismatch that you
can see over here. So that is my take on
it. Now, I'm going to go ahead and I'm going to leave the longer ones, the way
that they are right now. And what I will do is
in the next chapter, we will go ahead and artery bar. And then what we can do
is we can go ahead and we can also create the
short variation. So let's go ahead and continue with this
in the next chapter.
30. 29 Creating Our Rebar Textures: Okay, so what we're going to do now is we are just quickly going to swap out this texture because this is like the
texture with the lines. And I have added a new texture that is just called
concrete plane, and this one will be a
little bit better for these pieces because the concrete plane does
not have any lines, so there's no direction
we need to worry about. And there we go. So
you can see that that already works quite
a bit better. Maybe make it like a little
bit darker at this point. If we look at our reference, this is quite dark concrete. Although our concrete is also
not as rough as this one, but we can just go ahead and
go into our color overlay. Here we go and tone it
down like a little bit, maybe even give it a
little bit of, like, an orange feel to make it like a little bit
more like a warmer tone. There we go. And then
later on we will, of course, decals, balance it
out, all that fancy stuff. So, in any case, right now,
that's looking a lot better. You can almost not
see the tiling. You would need to go, willy
up close to properly see it, and that is the stuff
that we will fix later on. So that's pretty good. Now, what we're going to do
is we are going to create our bar in this chapter. However, one thing that
you need to keep in mind is that the bar that
we are going to create, we will actually create
it for everything. So the bar that we are going
to create here is very, very important
because we will use the same textures everywhere
else. Keep that in mind. So what we're going to
do is we are going to go ahead and we are
going to open up substance designer this time. Now, you can do this in three years Max and
substance painter by completely modeling
out your rebar, baking it down onto a plane, going into painter, texturing
it, all of that stuff. But as you can imagine that would take a lot longer than
what we are going to do. We are actually
going to create it procedurally and
just do it that way. And that's basically how
it is going to work. We are going to go
file new package and create a new
substance graph. And we are just going
to go ahead and call this rebar underscore. Actually, let's
just call it rebar, and we can just have
everything in here. PBR metallic roughness and
just press Okay. Here we go. Okay, then the first
thing that we need to do is we already
have Russ texture. So we can just go ahead and grab this Rush texture over here, and we can use it
as a base simply by importing it and pressing
Import resources. And then just prek.
As you can see, I clicked away my three review. Sorry, that's a force of habit because I never used it in here. So yeah you also don't need
it for this specifically. So we are just going to wait for it to import. There we go. And now we already have
these three textures over here, ready to go. Great. So what are
we going to do? First of all, for this one,
we want to go ahead and we want to make it almost like
a tilableRbar texture. Now if we go ahead and just grab some reference images of rebar because I don't think
we have actually, yeah, we have
included it in here. But let me just grab one
more extra reference image. Here we go. I've added an image, as you
can see over here. This basically the pattern
that we want to create. And what we are going to do
is we are first going to create this pattern
tilable material. The reason we want to do
this is because we are later on also going to make
JumtreRbar for those, we do need to have, of
course, a tilable texture to make our lives a lot easier. So what we can do with
this is we can go ahead and here we
have our Bitmap, and we are going to go
and just create a shape. So we will most likely
need to do this on our no map over here. To create this shape,
as you can see, it's pretty much like a line
that is ending at two sides. So that's what we
are going to do. Let's go into patterns and let's go ahead and grab over
here a shape pattern. Come on, where are you?
There you are. Thank you. And then what we can do with
the shape pattern is we can already create almost
like a height map, which we will then
turn into a norm map. So sorry, let me just assign line of my windows over
here. There we go. So what you want to do
is you just want to go ahead and grab the X x over here and tone it down so that we basically create
these little ends, which are going to become these little bars that
you can see down here. Then what we need to do is
you need to press space, and you need to
add an input node. Once again, I do assume that you have a basic
understanding over here of substance designer. So we invert this
because white means up, Black means down
when we are creating heights or when we are
creating height maps. So we are inverting this so
that we have this shape. Now, if you press space, you can see that this
shape is actually a lot thicker because it repeats. Once we've done
that, all we need to do is we just
need to go ahead and add like these extra
crossings over here. The way that we can do
that is we can blend. So space and a blend
to this shape, and we will later on
go a lot more advanced into substance designer when we are creating our rubble pile. But basically, we
are going to blend this shape along with
a stripes over here. Because the stripes,
as you can see, we can actually control
the shift of them. And as you can see over here, it almost feels like they
are slightly tilted. So we are going to just
roughly get that effect. We don't need to make
it super specific. The reason we don't
need to do that is because you will only
be able to well, you almost never will
be able to see this. Just in case the camera gets close, I want to
create this DDR. So let's set the width
to something you like. Let's say, 0.3, for example, and you want the artist on top and then set the
blending mode to art, which basically
means that it will art whatever is white
on top of this. Now at this point,
we can say, Okay, I want to make my stripes
like a little bit less. Less amount of stripes. Let's do five. And then we have the
layering over here, and then you can play
around with your wit. I'm going to make it
a little bit thicker. So actually, yeah,
let's leave it at 0.3, just to make it really
show that this is going to be a ticker line so that
you can clearly see it. Now what we want to
do is if we would add a normal node which would convert our height member into normal and turn it to OpenGL, you can see that this
does not look very good. So we need to go ahead and we just need to work on
this a little bit more. We need to basically blur it. We can do this in two ways. One is to add a bevel note
and see how that looks. And what you can do
with the bevel note is you can literally give
it like some bevels. So we can push this
in, for example, and then you can
see that over here that would give a better effect. Although I'm surprised that
over here, it does not do. Oh, wait, it's because we did
not assign it. There we go. So now you can see that
it has that effect. And then what we can do is
we can kind of like -0.02. And over here, as you can see, and like that, we
can add a bevel. Or what you can try
to do is you can try to just add a simple blur, high quality gray scale, if you just type in blur. And this one, it will
not be so sharp, but we do want to go for,
like, sharp a little bit. And here, so you can,
like, blur this out, and that will kind
of, like, also give you a softer effect. Now, what I'm going to do is
I'm going to grab my bevel, and I'm actually going to
then blur it a little bit, just to give it a little
bit of, like, a softness. Although, actually, you know
what our bevel has softness. We can actually just
go out and go into our bevel and just turn
on the smoothening. And that will pretty
much do the same. So although it does give often like a
sharp edge down there, but yeah, for rest, if you turn on used
non uniform bur, Does that give a Yeah, that does give me
a better effect. So let's turn on
non uniform bleu. Smooth this a little
bit, and there we go. So now we have this shape.
So this was quite simple. We are simply constructing the shape into like a
black and white mask, giving it a bevel, and then adding a nor node to
convert it to a normal. So now what we need to do is
we just need to add a note which is called the
normal combined node, which is similar to the one
that we used in unreal. And you simply want to plug in these two normal maps and then set the technique to
be nice and high quality. And there we go. That's it. That's our rebar texture. We would be able to now
go ahead and, like, throw this into our normal
note and be done with it. However, there's still a little bit more things
that we want to do. So we are going to now,
let's see, for this one, I'm going to throw these
into our base color, yes. So we have this and we
have our roughness. And we don't need anything else. So we can just delete all of
the other notes over here. So, this one is going to
be our tilable texture. However, we also
want to basically create an Alpha mask of our bar. And like that, we want
to just give the bar, like a cool looking Alpha. Now, once again, this
is where you can, bake it inside of Trias Max, but what we are going to
do is just follow my lead. It's a bit tricky to explain exactly why we are making it in this specific
way without showing you, but I can only show you
when it's completely done. It's like a tricky one. We
have this stuff over here. Now what we can do is we can go ahead and let's say that we duplicate our base colors and we are going to
create three variations. We can go ahead and
duplicate all of this and call this
base color underscore. Um Rebar sheet
underscore or yeah, base call score bar
sheet underscore 01. Copy the underscore bar sheet and also artist to our label, and then go into a normal
and then go ahead and keep adding this name
because this naming will come back into our
actual texture files. So now what we can do is
we can go sheet underscore 02 and go ahead and go in here and in here. And then what we can do is 03. Over here, and there we go. So now what we have
is like we have some outputs that we
can later on use. For now, we can just delete these pieces. So what
are we going to do? We are going to first of
all, tile our textures. And then what we're going
to do is we are going to basically give it a mask. Now, if you have a look at this, we most likely do not
even need to tile our base map and our bitmap. We basically only need
to tile our normal map. And I would say
that next to that, we would also need to go ahead
and create an Alpha map. So let me just have
a So the bitmap and these two bitmaps
we don't need. So let's get rid
of the base color. We do need a norm map, so we can get rid of the base color over here and then turn the
roughness map into a mask. There we go, because
we can just use this output. So let's do that. Let's turn this into a mask. So that we only end up
with a normal Muse. This is nice and
optimized, because else we would need to create
textures for, then every Alpha would have, complete textures
for all three sets, and that would
just be a waste of time and a waste of memory. So now that we have done this, the next thing that we need
to do is we need to go ahead and add a normal
transform node. Here you are. And let's
just do this one, and then we can go ahead
and just copy it over. With the normal transform node, if you just go ahead and
set this to minus two, you can see that you
can tile your norm map. So we basically want to
just tile it quite a bit probably to
around this size. And now what we need to do is we basically need to go ahead
and create an Alpha. So you can throw this
into a norm map. And the way that your
Alpha is going to work is you are going to grab a shape and we are not going to make
this filly procedural. So basically we grab
a shape like this, make it quite thin, 0.01, and maybe I'll set the Y axis, like, a little bit
less like this. Or can we use stripes
for this? 1 second. Let me see if we
can do the stripes because if we set our shift, Alright, that's the
thing with stripes. I know a better way. Let's use a tile generator
just to save some time. Let's use a tile generator. And then let's set
the Y amount to one. Yes. Then go ahead and set the pattern
specific over here. Yeah, you know what? No, we can leave the
pattern specific. Let's go ahead and
go down to size, and here you can basically
control the scaling. So we want to set the
interstise Y to minus one, which will basically make sure that it pushes all the way out. And then the Intersize
X, let's just tone. Let's boost this
up. There we go. So we basically want
to create like a grid. And this grid we can then
later on cut pieces out of. But now we have full
control also over the over the thickness
and everything. So that's quite nice to
have it all in one go. So let's say we have a
grid, 0.85 like this. Then what we are basically
going to do is we are going to add a transform node
after this grid, and then we are going
to blend these two. So you basically art to blend, you blend your tile generator
with your transform node. And all you need to do
is in your transform, press a little 90
button over here, which will rotate at 90 degrees. And then in your blend,
set the stone art. Okay, so now we have this
grid pattern over here. At this point, we
are going to stray away from the procedural method. And what we are going
to do is we are going to art another plant. And this time we are
going to right click Art Node and Add a
Bitmap node over here. Then what you want
to do is you want to press from New resource. What you are basically
doing is you are creating a custom bitmap. Now with this bitmap, what we can do is we can go
ahead and call this one Grid Underscore
01 underscore mask. And we want to go
ahead and yeah, let's set the two K. No, two K is more than enough, actually. And we
need to go ahead. You can even get rid of or you can go with like one to
eight, even if you want. We want to set the bit
background color to the Black. Yes, yes, to black.
And press Okay. Now, what this will do is it
will create a new bitmap. And the cool thing is, it allows us to paint in the bitmap. So what we can do is we can
set this to a grayscale. We can plug this into
the top over here. And now for the stop, if
we set this to subtract, as soon as we paint
something white in this bitmap, so
click on it once. Go up here to your brush,
and you can paint in white. So here we paint it
in A we set to white? I think we need to set this, I think we need to set this
one to white over here. There we go. And
now, if you click on it, there we go, see? We can basically paint it out. So you can imagine if we now go ahead and just set the brush
size by right clicking, so the brush size
is a bit bigger, you can imagine that
now what we can do is we can go ahead and just
create like a pattern. Let's first of all, just
go all the way around the corners over here like this. And now what we can do
is we can say, Okay, I want to basically just, like,
have this grid over here. And I'm basically just
like painting out, and I'm going to give this
grid like an interesting look. So let's just go ahead
and let's do this. I'm just making this
up. There we go, see? So we have an interesting
looking grid that we can use. So it's like broken off, all these fancy things. Now, the cool thing about
this is that now what we can also do is we can go
into a ti generator, and set by scrolling all the way down and going
to your random mask, you can randomly
remove some pieces. See? So that's also quite cool. So you can do that, too. But as you can see, now we have a mask. So the way that you
can imagine this working is we have our
texture over here, our rush texture,
and our norm map, and we are basically cutting out everything that is
black out of that. And then what we end up with is we end up with
like a rebar look. Now what we want to do
with this one is finally, we want to add another normal
combined note over here. And then we just
want to add a quick blur, high quality gray scale. And what we are going to
do is we are going to blur this mask over
here a little bit. Actually, no, let's do something called a non
uniform blur gray scale. That gives a better effect.
And then you basically want to just plug in
your gray scar and blur map and have both
of them to be this map. The reason we want
to do this one is so that the outsides stay sharp. But then if you boost
up your samples and tone down your intensity, the insides become round. So if you add the norm map to this, what you
will see happening, if we said this to open GL, you can see that now
it looks round, see? So it has like this
actual roundness. And we basically want the
artists to basically give it the effect as if there's
actual roundness going on. So we got this one over here. Now, a normp I'm not really sure if this will work the way
that I want it to work, we can split up the norm map. Basically what I'm
thinking is, yes, I know how to make
it work, of course. We can split it up, but I'm not sure if that is even worth it because you most likely
will never notice it, to be honest. And that's
what I'm thinking about. So what we can try to do just to see how it works is we have
our norm map transform. We duplicate it and we
set this to 90 degrees. So we flip this
around over here. The only thing with
flipping it around is that it often also flips
around your norm map. So then you would
need to set your norm map format to OpenGL. There you go. By the way,
also do that over here. Set this to OpenGL. And then you will basically
blend these two norm maps, and you would blend them using
a single site of the mask. So if we duplicate
this blend note, we basically want to grab, for example, this one over here, and then you can see that we are cutting it out and
we're blending it together so that now this
direction becomes sideways, the other direction becomes up. So if we would go over here and just for the
sake of showing you, let's add a blend
and on this blend, let's throw on um, you know, I'll just show you. You don't need to
copy me because that's something a bit
annoying. There we go. S. So now you can
see that now we have our rings going
one direction, and whenever they are shifted, they go into the other
direction. So that can work. Maybe we want to dance at
minus two once more on our normal here we go, just
to make it a bit smaller. See? So that will work. So
let's do this technique. And if you press backspace, you can remove a node. So we now have a norm map, and we have over
here a mask because everything outside of the
mask will be removed. You don't need to
worry about it. So that's basically it.
Now, it might feel like a lot of work or a
lot like a big thing. But now that we
have created this, all we need to do is we
basically just need to go ahead and duplicate a very
small part of the structure. We need to go ahead and
duplicate these and this one. If we go ahead and just
add this over here, and then we can just
duplicate this structure, and then all we need to do
is just create a bitmap. And only if you want to change
some stuff around in here, then we can remove it. So at this point, what we
can do is we can right click Art Notes Bitmap from New
resource and call this Oh, God, I already forgot
what the other one. It's called Grid 01 Mask. So bitmap from resource. Grid underscore 02 underscore
mask and just press Okay. Give the second to generate, turn to grayscale, and then we can go ahead
and go up here. Now, one of them I actually
want to make really long. So the third one, we will go ahead and make
quite different. But now what we can do
is we can just go in here, click on our Bitmap, go to our brush, start by just removing all of this stuff, luckily, because it's styling. Here you can see
that it's kind of like we'll always
remove this stuff. Here we go. And
let's see that we remove this corner over here. You do want to make
it sort of round because round is an easy
shape to work with. It may be like very
close like here, see, very closely cut
it off like that. It would also be nice sometimes. Let's see. So we got this stuff. I'm going to get rid of
most of this let's see. This also. This maybe. Will that work?
No, it's too evil. Let's undo a bit of this. Sorry, I think I'm actually
going to undo everything. Let's try this again.
Let's paint this in. Okay, I'm going to go ahead
and let's start with, like, doing maybe like a
shape that we are painting out like that. There we go. And then what we're going to do is we can
go into the shape, and we can just,
like, cut out some of these really badly
blended pieces over here. Yeah, I think something
like that can work. If we just also cut this
one off? No, actually, no. You do not want to have a lot of pieces that are
just completely empty. That's basically it. So that's
why I'm just trying to do, like, something
interesting like this. S, let's cut this
one of straight. It's nice to sometimes have
it like cut off sideways. You can even just go in and just on purpose, like,
do it like that. See? Okay, so let's
cut this one off. Maybe make our brush size a little bit smaller
and then do, like some on purpose cutting like that so that it
does not look as round. And I think that this
is looking pretty good. Et's cut this one off
there. There we go. Okay, so let's do something
like this, for example. Now what we can do
with this one is it will have automatically
generated our normal, and now it will also have
generated mask. So that's it. Now for the third one, I want to make it quite a bit longer. So for this one, what
I will most likely do is I will go ahead and, like, edit the actual base shapes, which means that everything
except for the normal, we just need to redo. So let's just go ahead and
grab this one this one. Wait. So this one needs
to be This version. Yeah, let's duplicate this. You need to go up in here. There we go, because
else it doesn't go into the right direction. There we go. That should work. Okay. So it might get a little bit confusing with
all these notes if you're not used to it. But for now, let's
copy these ones, this one, this one, this one, and these ones. Copy them, and let's
move them over here. So what we're going to do with this one is I'm going to go
ahead and I'm going to start by reducing the amount of lines that we have by going
into our tile generator, scrolling all the way down
and in our random mask. Ooh, that does not work. Let's do check a mask, maybe. No, that also does not work. That's a tricky one, actually. Um that is a tricky one. How would I maybe if I just
go ahead and completely, like, get rid of one site? Yes, that might be the trick that I
literally just do this. So I literally just
grab these pieces over here and just delete
everything else. Yeah, you know what?
That might work. Okay, yeah, that
might work. So now let's go ahead and art a bitmap. New from resource.
Grid underscore zero, three underscore mask. And then for this one, because
we only have one side, these ones will
basically be hanging, so they are really going
to hang out of our shape. I always do a shape like this. So let's just plug this in
over here and over here. And then what we can do is we
can go in here, basically, click on your Bitmap, brush, make it quite big. And we are going to
get started by just getting rid of the
first two, probably. And then over here,
just do this. Like that, pretty much. Ah. Yeah, actually,
that should work. I feel like adding a little
bit more bar here and there. So we can twine go into our tile generator
and just secretly set the Y amount or the X amount
up in different values. But I'm not sure. So
I guess ten is fine. So let's just leave it at ten. Let's see. We are then
masking this out. We are masking it in
the wrong way this time because of the way that
we are flipping this around. So what we are going
to do is we are going to flip this one here and throw this
one into the top. So we are basically
just flipping around our texture. There we go. So this is our norm map and this one is still
called roughness. Oh, it's called roughness
because of the usage. So if we sell this to mask, it would become a
mask down here. I always forget about that. So for cleanliness,
you can do this. And then we have
our mask over here. Where are you over here?
Okay, so that's number three. So we now have three virgins. Let's just see how they work. And we, of course, have
our tile boom material. So let's go ahead and
let's save our scene. So we are going to go in here, right click and press Save. And now, what you can do is
just make a folder called bar and just save it as bar. So yeah, you can
find this in your explorer in case you didn't know how to save inside of
substance. And there we go. So in the next chapter,
what we will do is we will export it,
we will set it up, and then I will show you, an
example of how everything basically ties together
and all becomes perfect. So let's go ahead and continue with this
in our next chapter.
31. 30 Adding Our Rebar To Our Broken Pillar: Okay, so we left off
with creating a bar. Now I can finally show you how this actually
all ties together. It is sometimes a tricky
thing with vimtat that I need to do things that will only tie together
like hours later. But, okay, so now
that we have our bar, oh, I'm repeating myself.
We need to export it. So we can go ahead and go into our textis folder
and go to rebar. And in here, let's
create a new folder that we will call final. And we can just export all
of our textures in here. So just right click
on your rebar, go to Export outputs as Bitmap. And then in here, it
will ask you, Okay, where do you want to export
it into our final folder, target file, and for the rest,
it's the same as painter. And if you want, you can
turn on automatic export. Basically, what this
means is whenever we make a change to this file, it will just
automatically update. So we can export, and then you can see everything start
rolling in over here. I think after this one,
I will take a break because I cannot speak
anymore for some reason. You can sometimes notice
that where the words are just kind of like blending
in one whenever I speak. It's just my accent
at one point. So now what we're
going to do is we are basically going to
create our rebar pieces. We are going to go ahead and
go create planes over here, and we just want to make
them nice square planes. So let's do 30 by 30. And yeah, edges
and faces turn on. So that is fine. Now, as you
know, we have three of them. So one, copy it, two, and three. Now, if we go ahead
and go over here, we can go ahead and we can
assign our textures to this. So it looks like we
already have metal glass, so let's call this one
rebar underscore tile. And then this one rebar
underscore mask one. Rebar, underscore mask two. And finally, rebar
underscore mask three. If you want, you can also
try to combine all of them into one texture
for optimization. However, right now it's
not too important and does not really
add too much value to the technique that
we are going to do. For our rebar tile, we just want to
go ahead and once again, just add the bitmaps. The only difference is that
when we do our actual masks, we want to also add
the transparency map. Excuse me. Come on. It's twe a different
one. Okay, I think I need to
restart Trees Max because something is
a little bit broken. Okay, I restarted Trees Max, and now it is working again.
It was a strange one. But okay, bitmap
look up over here. Let's go ahead and
navigate to Ariba, and we just need to have the
base color for this one. That's slow. Let's go ahead and for this one,
we want to do the same. But for this one, what we are
going to make different is that we then go ahead
and go up here to the map and go back
into your bar mask, which is like your parents. Then in your transparency, go ahead and art this
over here and then add the Bitmap Lou and grab a mask. Now, I forgot about all the
settings that I need to set, so let me just first of all, add this to one of our planes. Just make sure, something's
wrong with trees, Max. It is way too slow. This transparency sits a Hmm. Am I missing? Oh,
not transparency. We need to do it in cutout. Sorry. Scroll down into special maps and
grab the cutout map. That's the one. As I
really thinking like, transparency is a Maya. So over here now it is working. If we give the second
to actually reload. Although it should be working because you can even see
that working over here. I'm just not
completely sure why it is not assigning to
this specific plane. That's a little bit strange
because as you can see Okay, so I guess we will need to set this to high quality
in order to work. I do not like high quality because it's trying
to add shadows. So set this to high quality, but then go into
lighting and shadows and turn off the shadows
and also just turn off the ambient occlusion and maybe also like the
progressive skylight over here. So yeah, because else it will just look a
little bit strange. So, okay, then high quality.
They actually changed this. Like in the old versions of Trees Max, you
didn't have to do that. But now that you have this one, we can just go ahead
and go to Ribar mask. This was one, rebar mask two. Quickly grab a base color, which is just going
to be over here. And then let's also go
ahead and go back up. And then we want to just
grab our cutout mask, which is this one over here. And then what we
can do is we can just go ahead and
assign this one. There we go. So
that's number two. And then finally number three. Go in here, rebar base
color set this back up. Scroll down, cut out, bitmap, and let's grab this one. Okay. So we got this
one now also done. So now the next net we're going to do is we are
just going to fit this plane to properly
be closer to this mesh. The way that you can do this is you can go ahead
and first of all, just select all of them and convert them to an added poly. And then if you select one, select the top over here, and then you just want to
take this preserve UVs option under your added jomtre tab. What this will allow you to do is it will allow you to move your jom tree without
squashing your UVs. So we can now go ahead and
we can just move this down here. You can grab this one. Here, see, this is when I get to turn it on and then
move this down here because set will just be wasted space and harder
to manage and everything. So you just want to kind
get this quite close. And finally, we have this one, preserve your Vs.
Move this over here. Over here, down here and here. Perfect. So the next thing
that we're going to do is we are just
going to give this a little bit of geometry. Let's go ahead and
just add here, like a few segments like this, and maybe also like a few
segments like this that are not as evenly spaced. Maybe do like one
here and one here. The reason we want to do this is so that we can easily
bend it around. You can give it less
segments if you want, if you want to have
this more optimized. But because these are
really important pieces, I'm just going to give
this enough flexibility. And then for this one, same
but then for this one, let's give it a bit more. And yes, you can use
the connect if you want to do it more evenly, but I personally don't
really care too much. So we now have
these three pieces. So you can imagine that we can literally just add
these pieces on here, and then they will
look quite nice. I don't know if we have,
like, a reference for this. Most likely not for
this specifically. But yeah, you can kind
of see all these here, you can see, all these wy
thin wires coming out. So over here. So these will basically mimic
these thin wires, and then the thicker ones that we are going
to do they will basically mimic these ones
over here that you can see. So like the internal ones. Over here, you cannot even see. Well, always here
you can see bar, although you can see that it always looks like string cheese. Okay, so that's
basically the plan. So what we're going to do
now is we are, first of all, going to go ahead
and for these ones, yeah, let's leave
them into default. And now let's switch over to
our vertical beam broken A, just by going into our layer. Then if we go ahead and
come on, three Max. It really should not
be too difficult. What do I have open? I
have substance open. Nah, but I have a
38 I have a 30 90, so it really should not bugger
out on this kind of stuff. Maybe now, it cannot have
to do with my sapils. So I'm just thinking out loud, why it could be this slow. So let's go ahead and just go into our splines and we're
going to do the same thing. We are going to just create
some splines over here. This time, just
make sure that you set them quite correct. So we are just going
to really have a look at our reference over here. And then I can see
there's sometimes like a small one that's
cutting out like this. Let's do another one
that's like this. And maybe like another one
that is over here like that. So we only need to have a few of these because we
are then going to have the actual this type of bar to basically enhance
things a little bit. So let's say we have
these over here. We are going to do
the same technique where we are at the
Sweep modifier. We set this to be a cylinder. And then if we go ahead
and for our cylinder, let's set the interpolation
down a little bit because we really do not need
this much geometry. Give it a thickness
that you like. And then what you
can do is you can go over here and
you can start by just moving and rotating
this kind of stuff. And I would most likely just
keep it near the corners. It would make more
sense if it is near the corners because this
is often where those we tick rebar pieces are extra supported, like you
can see over here. So we now have some of
these pieces very basic. If you want, you can go in, duplicate like one of these
and then rotate them, maybe, like, move them down a
little bit more like this. And once you're happy with it, what you want to do
with these pieces is you want to go
ahead and select them and then add your
texture over here. And then for this one, it is actually a little
bit tricky too. So I tend to just do UV unwrap and send
it to cylindrical, and that often does a twig. So if I now go, I believe that yeah, something feels a
little bit warm. Another thing that we can do is we can go ahead and, like, isolate this and we can just reuse these pieces
everywhere else. So let's isolate this. Let's very quickly convert it to an added poly and just
attach everything else. Then quickly get rid
of these pieces. I'm just going to
do this very quick. So get rid of these
pieces over here. And then at the top pieces, what we're going to do is we are going to add a text tools, open it up, select all of
these points down here, whereas my text
tools here it is, iron them and just
leave them like that. And then for the other
pieces, what we want to do is contra I iron and then just double
click somewhere like this because then what we can do is we can
basically break them. So we just double
click somewhere. We need to have a seam anyway, so it doesn't really matter. And then go back into your
normal view, relax this. And then what you can do is
you can go ahead and go in here and you can start by, for example, here, let's
turn off snap rotate. I mean. First of all, let's go ahead and just set
them straight like this. On top of each other, doesn't matter because this is
the table material, so we don't need
to abide by all of those rules. Like this. And then the last thing
that we're going to do is we are just going
to select all of them, pretty much move them down
here and just scale them up using holding control like this to make them
really, really large. And then what we can
do is for the rest, we can just control
the tiling inside of unreal. So doing it this way. Now if you go ahead and just
convert this to add a ply, they are all textured. You cannot see it, but
they are textured. At this point,
what we can do for these pieces is I'm going to go ahead and I'm going to add these fall to a
layer called rebar. Let's do the same
over here. Let's grab these pieces over
here, duplicate them. Artists do the same
layer called Ribar. And now what we want to
do is I'm just going to grab these two over here. Those are the only
ones I really need. I'm going to once again
duplicate them and throw these ones into
our broken pillar. And at this point,
all you need to do is just move this up here, give it a scaling that you like. Here, let's scale this a little
bit less like over here. And here, maybe like a rotation. And then all you
need to do is just quickly out like
a bend modifier. And with this band modifier, you can set the angle on
the Y axis direction 90, like this, maybe set
like an upper limit. And then like set the
bend a little bit lower. And then what you
can do is here. You can literally
just nicely bend this out and you can just
play around with it. And at this point,
you can also just go ahead and you
can grab this one, for example, throw this one
in here, scale it down. Uh, this is complete This is not exactly what you would call
truth for some reason. That's weird that it
behaves like that. But in any case, what we can do is over here. We can probably copy our bend, paste our bend over here. And then rotate it
and just kind of make it work. That's nice
thing about the band. They're so flexible. You
can just rotate this, and you can even just have
it sticking through here. As long as you have it going through one of
the holes like this, it will just work totally fine. But I'm actually going to
push this further back in. I don't want to have these
as intensely visible. They are just like these extra little bits and pieces that are just sticking out here
and there, like this. And then we can,
like, for example, duplicate this again,
rotate it, maybe scale it. Set the scaling or the
bending a little bit more. And what we can do is we can just keep doing
this until we get a nice overview of some
cool bend pieces over here. Here, so let's move
this one over here. So what you will end up
doing, although I don't know, probably because of the backface calling that you cannot see it, you can probably
just right click Object properties,
turn on backface go. Will that work? No,
that does not work. Okay, so that's just
like a limitation, but that is no problem. Oh, yeah, here, see. So the backface culling
was not a problem. In any case, I'm once
again talking too much. What you can see
over here is now we have some stronger pieces, and then we have some
of these extra pieces. Let's go at and export this and actually show you how
it will look in real, and then everything makes sense. I think it already makes
sense most likely. But let's just go ahead and
go Export, export selection. Oh, I forgot that I restarted my three years Max and then it will forget your
folder location. Export two painter vertical
beam broken variation A. So let's go ahead
and export this. And now, if we go ahead and
go over here into unreal, vertical beam variation A, reimport, press
done. There we go. Now you can see how that looks. And then if we go ahead
and go into textures, right click rebar and I'm just navigating and I'm
just going to import all of those textures that we
have exported like this. And then we do need to create a quick new material.
So we got these ones. Don't forget to just quickly double click on your normals and flip them around in
the green channel. My going down here, flip
green channel on all of them. Okay, so that is totally fine. So now that we have done these, what we can do is we
can go into materials. Let's first of all, just
like duplicate or maybe, right click our main master, create material instance,
rebar on the score tile. And if we then go
ahead and just turn these on rebar tile, normal and roughness over here. There we go. So those
are now assigned, so we can work with those.
Let's for now save. And then if we go ahead
and go into materials, let's get rid of my keyboard
shortcuts, new material, and we will call this one
mask underscore master. And basically, all this
one needs is it will need a we go rebar. It will need a base color, a normal roughness and a mask. Okay. And then if you just
go ahead and just plug this in here, base color, normal. And then you get, of course,
art on this if needed, roughness and our mask. And for our mask, we need
to go into our mask master, set the mode from
surface to actually, no, the blending mode
just to mask over here. And that's where it
is, and turn on two sided down here so that you
can see it from both sides. So now you can just plug in
your opacity mask like this, and then you can just go ahead and you can do
whatever you want. So let's say that we add
a very quick multiply and a scale parameter
roughness amount one. There we go. I think
that's all I need for now. So just some roughness control. So now what we can do is we can just go ahead
and just quickly convert these two parameters
called this base color. Convert perimeter,
normal roughness. Mask. So as you can see I'm doing this very quickly
because it's a very easy one. And once we've done that, we can just go ahead
and mask master. We can just create a
instance and call this bar, underscore mask, underscore 01, and then just duplicate
it 02, duplicated 03. Now, 01 is already
fine with the default, and all we need to do is we
just need to switch out the normal and the
mask on 02 and 03. So if we go here, we can just
go ahead and go to our bar. And here we have 02, mask, normal, 03, mask, normal. That's it. You can save all
of this stuff if you want. Well, I highly recommend
it, of course. But once we've done this, I will show you how to
just assign it over here. And then what we can
do is we can find work on making our concrete
a lot more interesting. So vertical beam, open it up. Go to your content browser, and here we already
have our materials. So we can just press isolate. Can I doc? Yeah, of
course, that doesn't work. Basically, what we can
do is we can go in here, and this one is like
the Rebar tile. And then we have
mask 01 and mask 02, I believe. There we go. And you can see that
the normal maps are working quite
well over here. So having this stuff and
you can see that over here, the tiling is also already
working pretty decently. Of course, there's
still a seam as always. But as you can see, now
you just have some rebar. And you can, of course, make this more or
less if you want. It will be a little bit
more difficult to see it from far away, basically. But at this point, we
can just go ahead and go in our materials. Let's start with our rebar. Let's just quickly go to
the color overlay and make it a little bit more
like a darker red color. Maybe like a bit more
orange and let's make it a bit darker, safe. And then what we can
do is we can go into a mask master and just add a simple multiply with
a constant three vector, which is going to be our
right click convert perm color overlay, sets to white. Once you get the hang of it, of course, everything
you can do fast. I understand that you
are all students. So most of you
cannot go this fast. So just take your time to do it. For small functions like this, I just have to go a little
bit faster because yeah, else we will never
get this done. So over here, we can just go in and I can set my
color variation on. And what I can do is I can
actually just quickly grab my rebar texture or my bar tile, and then copy the
SRGB over here, which I can then go
ahead and then add back in here just by pasting
it into the same SRGB. And there we go.
Okay, so that is it. So what we will be doing
in the next chapter is we will go ahead
and we will work on our mask to make that a lot more interesting and also
dirt and everything. So that will make everything
look a lot better. And once that is
done, maybe, like, improving these a
little bit more and then applying that
to everything else. But as you can see,
that's already starting to work quite well. So let's go ahead and continue with this in the next chapter.
32. 31 Improving Our Master Material Part1: Okay, so what we're going to do now is we are finally going to start by preparing our shader to make this turn into
like a final mesh. Now the techniques that we
are going to use will not be as intense as we are going to make them on the large
pieces because it simply does not work as
well these pillars, but it is still the
same techniques. So what are we going to do? We are going to go ahead
and we are going to create a mask inside of
substance painter. And what this mask will do is it will basically blend between our concrete plain and our
concrete broken over here. Now what we are also going
to do is in between those, we are also going to use a blend that is going
to be no rebar. What this blend will do is
it will basically later on, improve like any seam placement. Now, on here, you
will not notice. However, on these pieces, we will definitely need it. So what I will do is
I will first of all, create a shader as if it works perfectly for our pillar
and then I will adjust my shader to also work
with these pieces because else we are doing extra work that is simply not needed. So what do we need? We need
to have substance painter open. Here we go. And we are going to
create a brand new file, and we are going to for now make the file PB metallic roughness, but we will change this
into a preset later on. Then let's go ahead
and go into our file, and we're just going to select and select our low poly stuff. So exports, sculpt, beams, and just grab the beams, low poly FBX over here. Once you've done that,
you can go ahead and set this to let's say two K, although we probably can go way, way lower for this, non map format OpenGL. And just for the sake of it, let's also go ahead and import our non map because it will probably look a
little bit nicer. So if we go in here, aren't
there supposed to be like, Oh, yeah, bakes, beams, there we go. And presso. So that we load in.
Then all we need to do is we need to go into our
set settings over here. Assign our norm map
like this and give the second and that should
load. It should load. I don't know why
it is not loading, but we'll figure that out. So what we're going to do now
is we are basically going to set up a template so that
we can use it later on. So what do we need? We need simply one texture with a mask. This means that we can
get rid of a height map, roughness, metallic map, and norm map. We don't need those. The only reason why
we keep a base color is so that we can actually
see what we're painting. So our mask is going
to be R, G, B and A. Those are the slots that
we are going to have Red being texture one,
B being taxa two. Oh, sorry, G being taxa two, B being Tex three, and Alpha being the dirt mask so that we can actually
paint in dirt. So we want to go up
here to channels. User channels, and these are custom channels that we can use, and we can input
whatever we want. So we can just do
user one or sorry, user zero, one, two,
and user three. And we can call this one R, G, B, and A. And if you want,
you can even say texture one, texture two. Dash, texture three and
then dash dirt like that. So once you've done that and
we have this all set up, now the only thing that we need to do is we need
to go up here to file, and then we want
to go ahead and we want to save as template. And when you save
this as a template, it will open up the location
where you need to save it, and we will just go
ahead and we will call this destruction
underscore mask. This is nice because later on when we create any new files, we can go to file new
and then in here, you will have a destruction
underscore mask, and then we do not
need to set up all of these channels anymore. Now at this point, it looks like that it accidentally,
yeah, that's bad. So it looks like that it has separate materials for all of
them. We cannot have that. So we just need to quickly go into over here into three Max. What I'm going to do
is I'm just going to temporarily turn that stuff off, save scene, turn on default, and just very quickly like
import your FBX file. So exports, scalp
beams, low poly. Let's just very
quickly import it. Oh, God. Sorry,
reset your No reset. Let's go preset and modular
pieces and don't save. Basically, what has
happened is because some of the files are the same as the files that we
have in our scene, they have overwritten the
files, and we do not want that. Don't worry about the light
stuff. That's no problem. So what we need to do instead, although this is really, really slow, let me just
pass the video. Okay, we're back. What we
need to do is we need to go to NewL and just
press Don't Save. And what you then want to do is you want to input it in here. So file import Import your
beam slope ply in here. And now they should
just probably import everywhere over here. The reason why all the materials are different are because of
our checker box over here. So we now need to go ahead and we need to just add a material. So we just want to go and
then grab, for example, the first material
and just assign this first material and then re export this again.
That's all we need to do. So now we can just go
ahead and go in sculpts, beams, low poly export. Yeah, that's all I care about. Okay. Okay, so we just need to go over here inside
paint create a new scene. But this time we can just
use our destruction mask. Once again, we are
going to select our poli beams over here. And what we're going to
do is also art nomp. So this is probably why the
no map was also not showing. So that's re art or no map. And now if we press Okay,
discard this scene over here, you can see that now we
only have one material. So we will call this one, simply call it beams.
That's all we really need. So over here, you can see that now the template has worked. Assign your norm map, and now you can see that
the normap is also working. And then the next thing
that we need to do is we need to go
to bake mesh maps. Set this to the
document resolution, so two k, and you
simply want to turn on, use low polymsh as high polymsh and turn off
the normal and the ID. Basically, the reason
why we need to generate these masks because we are
going to like our generators, which are dirt generators
and everything. And these generators,
they need these maps. So we can press BC and we can simply go ahead and now give this a second over here. Now all of these maps are
baked, that's all totally fine. And the last thing
that we need to do is we need to set up
a SMAC material, which we will later on also use for all of our other pieces. So let's go ahead
and create a folder, and let's call this destruction,
tooth, underscore, mask. And in here, I want to
create a fill layer. And this fill layer is
going to be called base. And what you want to do with
this fill layer is you want to basically set every red, green, blue, and Alpha to black and set your base
color also to black. So just set everything to black. Then what you can do is you can create another fill layer. Call this R texture one. And what we want to do with this one is we want to turn off everything except for our base
color and our red texture. Then we can duplicate this, call this R texture two. Duplicate this again, R texture three and duplicate this
again and call this one. Yeah, so A underscore dirt. So we have R, G, and B. So that's now organized. And then in the G, just turn off your base colors so
that we only have the base color activated for
our red channel over here. So this is now what
it looks like, doesn't look very impressive, but it's got to work. Then simply go down here and add a black mask to every single one like this, and that's it. This is our base
material that we need. So now all we need to do
is we just need to right click and create a SMRT
material out of this. And once you've created
the smart material, it will always stay into
your smart materials folder. And that's great, because
this means when we later on have more destruction pieces,
we can just drag this. Okay, so let's get started
with the first one. Now, the red channel will automatically actually
control two textures. It will control our clean
and our damaged texture. So that is the one that
we need to work on first. What we're going to do is we are going to go to our
brushes and just pick, like, a nice looking brush. For example, your
artistic head brush over here or artistic heavy. Sorry, Artistic heavy sponge. Then what you want to do is you want to go ahead and
you basically want to just paint in wherever you want to have the really, really
strong destruction. Now, in here, it will only
be in these areas over here, maybe also like a
little bit over here. It does not need to
be super precise. But do make it look fairly nice. So we got these ones over here, and we will just see how many of our shadow
where we need to create. But basically, we
are now creating the mask because we need it
if we want to do anything. So these two do not need any
heavy destruction painting. This one, we can set our
size a little bit lower. And let's go ahead
and just give it like as you can see over here. We go a little bit
more destruction. And also over here, if you
hold Shift and right click, you can rotate your sky around that will sometimes make
it a bit easier to see. And this is why we
needed that base color because else we
would not be able to see where we are painting. So we can basically
set this over here. Now we can go over
here, and these are the more important ones. So for these, you just want
to go ahead and really like everywhere where
we want to have this really strong destruction.
We want to paint this. And that's a nice
thing about also having these norm map details. We can just simply
see where we need to paint because we
literally have already added the broken
concrete inside of our nor map details. So
we can just do this. And this one will be
like the rebar texture. The texture that is concrete that has rebar included in it. That will be this texture. So we can just go ahead and paint in our damages over here. And once we've done
that, we can actually already for now ignore
all of those other masks because the first thing that
we're going to do is then add some dirt and then just change the chader and just make sure that it
all is working correctly. And especially like with
the dirt and everything, you will see a big difference. Once we start to really
art everything on top, it will not look
like this boring plain looking
concrete pillar that has like a little
bit of damage on it, but it will actually
look a lot better. So over here, the only thing is that this is a little
bit tedious to do. And especially with
the other pieces, this can take quite a while. So with the other pieces,
we will most likely time laps those chunks where we
need to do all of that. But I think with
destructive pieces, what we will do is
we will first do one completely real time, and then all of
the other pieces, all of the wily
boring stuff like the mask painting and
like the UV unwrapping, we will just do all of them
at the same time into, like, a time laps, and then I will also include the
time laps in real time. I think that's the best
way to go for this because else it will
take a long time. But in any case, we have now painted in all of the
dirt that we need. That is great. So the next one would be that we
would temporarily turn off our base color over here and turn it on our dirt. Doing it this way, we can
now preview our dirt mask. And then all we
really need to do is we need to go ahead and go into our smart masks and find
something nice in here. So let's go find, for example, our surface worn down here
and just drag it on here. And now you can see that this
will then become like dirt. It's a little bit tricky to see because of its upside down. But having this one, we can then go into
our mask editor. And if you want, you can play around with this a little bit, make it less or stronger. One thing that is very important is because
we need to keep the styl add a
paint layer on top. Make your brush size
a little bit bigger and press X to set
the color to black and just make sure
that you do not have any dirt in these transition
pieces over here. See? So if you have those, you just need to paint them out because if you leave those in, it will be very obvious that these pieces are not tlable or that they are not
properly modular. So over here, you
can see me that I just kind of like
paint those out. I like that, you can later
on also add more dirt, so we will just make
this look really nice. But for now, let's
work first on just creating the system and just making sure
that that all works. So that's all looking good. And for now, we can already
just export this mask. So we can just go
ahead and save this. And what we will do is we will call these ones, we go textures. Let's create a folic
called masks and call these ones beams
underscore mask. And then let's also go ahead
and let's also export this. So masks, select folder, and then in here,
what we want to do is we are going to create
a new output template. To create a new output
template, very easy. You can go over here to
the output template, and you just want to press
the little plus sign, and we are going to call this one destruction
underscored mask. Now, if you want to have a
super detailed overview, have a look on the substance
Adobe YouTube channel. In there, I actually made a
tutorial for them on this. So what we're going to do
is we are going to grab the R plus G plus B plus A. And then what we
want to do is we want to remove the name. Click on the dollar
sign and say texture set and then underscore
mask. So what will happen? It will call our
map texture set, which we set over here, which
is beams, underscore mask. Then in the RGB and A, we just need to scroll down
and grab User zero in R, and press gray channel
user one in G, and then over here, make
sure that you use this one, RGB and then this one. A, you can see that the order
is a little bit messed up. So just do this. RGB
and A. That's it. Now all we need to do
is go into settings. Scroll down to destruction mask. Set this as a target file, and let's go for one K. That's enough resolution,
more than enough. And then simply press
Export and press Save. So into unreal, we can
create a new folder that will call masks and in here, drag in the mask that you have just exported. And this
is how it will look. It will look very silly,
as you can see over here, we have a red channel and just double check that
you also have an Alpha, and it looks like we do not have our Alpha channel properly. That's a little bit
strange. Let's go in here. Oh, it's because I still
said it's the red. Sorry, this one needs to be B. This one needs to be G, and
this one needs to be red. Okay. Let's export that again. And now if we right
click reimport, there we go. Now it should work. Yeah, see? So we now have a red channel and we have an Alpha channel that
has the dirt in it. So you can see the dirt in here. So what are we going to do now? Let's go ahead and
just close over here these and let's go into
our main master over here. Let's move this
out of the way and already drag in
your mask in here. So we have all of this stuff. Now what we're going to do is we need to use this as
a blending note. So what we're going to do
is we are going to get started by preparing
our blending. Like this and grab
like something else. Let's say that we
grab like concrete broken and use these
as a placeholders. So what you want to
do is just over here, set this below each
other like this. And the way that you can blend two textures is using a lurb. So it is called a
linear interpolate. Once you have this one,
all you need to do, you can see this as a
blend inside of substance. We have number A, we
have texture number B, and all we need to do is
then grab the red channel of our mask throw this into our
Alpha and simply plug it in. That's it. It's that easy. Right click converts to
Parma and call it mask. Actually, let's go ahead and call this blend mask over here, and we can just do the
same lurp Let's copy, paste this lob over here too
and just make sure that you do it all in the same order so that you do not
accidentally mess it up. The first one in A,
the second one in B, and then simply grab your red
channel in Alpha and Alpha. This is why we can
use one Alpha for both channels unless you
want to blend more textures. Now the next thing that we
need to do is we need to go ahead and we need to add a multiply and a
constant three vector. Now, this constant
vector convert this to perimeter and
call this one Dt, color and then in
your default value, make it like a bit of
a brownish dirt color. So this will be like
our dirt. Like this. Plug this into number A and plug this multiply over here at
the very end into number B. Once we've done that,
we want to lub this, linear interpolate, and
grab number A in here. Grab number B in the second one, plug this into your base
color and then grab our Alpha channel into
the larp, like that. Now we don't need
that for our nor map, but it would be nice to also
have this for roughness. Let's duplicate our roughness
amount and call this Dt roughness underscore amount. Then what you can do in here is you can go ahead
and you can add a up and you can add a multiply. So we are, first
of all, going to multiply our textures
with this dirt roughness. And then what we're going
to do is we are going to larp this over here and throw this larp into our roughness and just
plug this into your Alpha. So that's about it. You use larps to basically blend between the textures and also
blend between the dirt. The reason we multiply
it first is that the dirt color will also contain a little bit of our
base color in here and that it will not be just a flat color smacked on top of it, because if it is a flat
color smacked on top of it, it will not look very good. And then we are simply
also larping that. Now, the dirt, we
still need to balance out and make sure that
it works correctly. But for now, let's go
ahead and save sine and then one thing
that will happen is all of our other textures
will also use this mask, and that's a little
bit of a bad thing. But let's for now just
not focus on that. Let's first look in here. Okay, so what do we
see? We see that we need to fix our material.
That's the first thing. So we need to go ahead and
duplicate our tiling and call this one damaged
underscore tiling and plug this into
your map over here. There we go. We do not
want to, of course, do this for our mask, but
these pieces we do need to, of course, do some
proper tiling on here. Let's go ahead and
start with that, save your scene, and then we can do some
balancing already. So here we have our texture. Let's open up our material. And then the first thing
that we're going to do, that is also actually a
problem that over here, that can be a problem
that we have the mask, but we'll see how bad it is. We can go to our damage
tiling and set this to like ten or five. And then what you can
see is you already get this better blending effect
between the two of them. E. And that's the
first stage of this. So if you have any
problems, like for example, we have a problem a little bit like over
here with a mask. This is where the second
technique would come in, and I think that this is then a good practice for us to
do that technique also. But let's first of all,
just work on our dirt. If we go to our dirt color, temporarily make it really dark, like make it black so that I can see if it is
properly blended. So it looks like that it is
properly blended over here. Let's just know that.
So we have our dirt, but we want to have
a little bit more control over the strength of it. So what we can do is we can go ahead and we can add a multiply, and we can multiply
our mask using a scale parameter that
we'll call dirt amount, for example, and just
set this to one. So you can go ahead and you can plug this in your multiply, and then you just want
to plug this one into the Alpha masks over
here and also over here. See? Now what we
can do is we can simply change this
value over here, and that way we can go ahead
and control the dot amount. So if I go in and just press Save, take surprisingly long. Let's go ahead and go in here. And now, if you go up
to our dirt amount, you can see that now
if I increase this, I can make the dirt a lot
stronger or less strong. So we are going to set
this probably to 1.5, 1.2. And for the rest, we
are going to change the dirt inside of painter. So let's set this to 1.2. Also for our roughness amount, let's set the roughness to maybe three to make it look very dull and that will
also increase the look. Finally, for your dirt, I feel like that our
dirt I made a mistake. I think our dirt but we need to do is we need to after all, not multiply it. So we
just need to do this. I think that there
might actually be a little bit
of a better look. I was a little bit worried,
but now I think about it, the mask is not perfectly white. That's why it can work
a little bit better. Here or see and now we also have a little bit more control over the color of the dirt. So we can make this
a little bit like a darker brownish color. And then what we can
do is we can always go into painter and say, our dirt. Let's go ahead and just increase the balance a little bit more. And then on top of all of this, what we can do is we
can add the levels, and with the levels,
you can basically push out the intensity. And just make sure
that everything is completely white, as
you can see over here. So let's go ahead and export is. And then what you
should see is if we go back to unreal and we go ahead and we grab
our mask over here, we can right click a Rinpot. Here you can see that it
works a little bit stronger. And then you can always
just go in and like, let's say, make it
more or less strong. Let's actually set my
dirt amount back to one. So here you can see
that now we can start adding a bit of extra dirt. Now, what we will do
in the next chapter is we will go ahead and
continue with this. First of all, what
we need to do is we need to have a
default black color, and doing that one, that is as easy as just opening
photoshop and adding it. And I'm going to show
you how we can get rid of these seams using
a little hack. So let's go ahead and continue with this in our next chapter.
33. 32 Improving Our Master Material Part2: Okay, so what we're
going to do in this chapter is we
are going to add general improvements over
here to our pillar by, for example, removing a seam
and creating that system, and also in general
other things. So right now, what
it is doing is it is applying our
material everywhere. So what we want to do
is I imported over here a black texture,
and you can see it here. I just went to the Photoshop, created a black texture
that is 512 by 512, and I exported it to the engine, and we just want to go
ahead and select it. Go into our main
master and just go ahead and then
select it in here. Because a plain black texture cannot have a black Alpha because black just
means nothing, we just want to go
ahead and go in here. Let's do this one. Let's do a static switch parameter
here and call this has dirt. If it is true, we grab this
one and if it is false, we want to have a
constant three vector. That is just default black. There we go. And we just need to go ahead and
we need to apply this one once again to our as
over here. There we go. So now we basically
have a switch that can be turned on and
off just like that. And what I'm going
to do now is I'm just going to leave
the default to false. So if we go ahead and save this, it should snap everything
else back to default. So without a mask, so let's have a look Okay, there we go. Now these pieces do not anymore have a mask or
anything like that. Now what we need to do is
just go into our materials, and then we can just
go ahead and beams concrete and just turn on
the hair dirt. There we go. And then this one will
have the dirt included. Okay, so next stop
is that I wanted to show you how to fix
this kind of stuff. It is actually really easy. All we need to do is we need to go ahead
and go over here, and we need to find out where exactly these seams are located. I can seem them over here. Turn off your dirt. And then what we want to do
is we just want to pick the second
texture or G texture. And then for this one, yeah, we do need to find
the seams properly. There's a few ways
that we can do that. So first of all, I
know that it is here, but it's really
difficult to see. What you can try to
do is you can try to add the texture temporary. So if you just add like
a quick fill layer and just your base color, just click on your
base color and just grab texture like something like this. And then
you can see them. If, for example,
grab this texture, go the UV Transformation, set it to like three, and now we can kind of see
where this is heading. So what I can do is I can go
into my G, and over here, I basically want
to go ahead and I want to paint over
my seam like this. And sometimes you can like
a little bit of variation. What we can also do is we can also go ahead and like arts over here just to make sure that
everything has been covered, like you can see over here, and I will show you why
that we are doing this specifically once we've
created our mask. Here we go. So this mask is basically just painting
out the seams. That's kind of how
you need to see it. We are going to use
the technique so that there are no seams in this
specific area anymore. And that's what kind of
just hide everything. But this technique is
very specific to unreal. Like you will need
to have access to, of course, purple shades, if you want to do all
of this kind of stuff. So what we can do over here is we can make this a little bit bigger because I
think there's a, the variation is
not as accurate. So we have this, for example, over here, and that's about
it that we need for SMs. So we can now, for example,
get rid of layer one. So we now know that there
are seams in this area. So once that is done, we can save our s export
our textures once again, just with the same stuff
as as we have done before. And then if we go
into our masks, we can just go ahead and
we can reimport this mask. Now what we need to do is we basically just need to
have another blend, and that's going
to be the concrete broken without the rebar. So we basically drag
these pieces in here and we say, let's
move this one down. Let's move this one
down, and that's one. Still don't have enough
space over here. And once you've done
that, you basically want to add a lub. And then we are just
going to blend once more. So we have a lp.
Let's do number A. We are going to have a main. And number B, we are going
to have that extra concrete. Over here, plug this
into the output, like you can see
over here, so I'm just doing Alter
at the same time. And this one is the G channel, so then the Alpha will
become the G of a mask. And that should do the trick. Now, there's one thing
that we don't need to do. So first of all, let's
just make sure that this looks correct or that
it is at least working. So save it. Okay, see,
so that is now working. Now, next thing that
we need to do in order to basically get rid of these seams is we need to
make these UVs world space. And the way that we're
going to do that, it is super easy. The first thing you want
to do is you want to right click on your
texture sample, convert this to a
texture object. And then you will see
that in real crashes, that was not part of the plan. Let me just go
ahead and restart. Okay, so it looks like we are
back and it looks like that everything was able to
get restored over here. I don't know exactly
where the bug is. It is nvulenin five, so it can sometimes happen. Let's go at a right click and
just break the node links. Maybe that is
causing the problem. For some reason, I have a
feeling like that is the cause. What we're basically
going to do here, let's right click
break note links, we are going to
grab this texture. Let's try again, right click, convert the texture object. Now it does work, and then right click and
then convert it to Beremeter and call
this one a Concrete. Blend. Actually, let's do blend concrete base color,
something like that. And we can do the
same over here. Convert to texture
object, right click, convert to pemter, Blend,
underscore concrete. Actually, we don't even need
to do underscores, but okay, underscore normal and finally, one more, convert
the texture object, convert the pemter, blend
concrete roughness. Now, as you can see,
whenever you do that, there is a bug that it
will reset your texture. So you just need
to quickly go in your textures, grab
your concrete, broken, no rebar,
select the base color, and then you press a
little arrow button. Go back, select the normal, press little arrow
button, and go back, select the roughness and
press little arrow button. Okay, so this is how
it is going to work. In order for us to create
WorldSpace UVs on this, which are basically UVs that are spending across
the entire level, because they are spending
across the entire level, they do not actually have UVs. They do not follow UV maps. Instead, what they
do is they basically project your texture in a cube, and then they softly blend those projections
where they meet. So this is something called
a world aligned texture. That's what it is called.
It looks like a big note, but you actually don't
need a lot of it. All you need is you
need to plug in your texture in here
and that's why we had to convert this to an object because these pieces only
accept object textures. The next thing is that it needs a texture size and
these are your UVs. What you can do for this is you can create a scalar parameter, so as click and we will call
this one world space UV. You want to set it
often quite big. Let's set it to
250 to start with. You simply plug this into
your textucise and then you plug your X YZ
texture into the erb. That's it. You now
duplicate this map. So where you plug in our texcise and this one you'll
go to our roughness. X YZ in here. Now, our normal map
needs a specific node. Its because it is a non map, it cannot blend the same way because else lighting
will be incorrect. So this will be a world
aligned normal node. You plug in the texture object, you plug in your
worldspace UV size, and you throw the XYZ texture into the Lubblend over here. Okay, so now that we have
done that, that should work. So we are going to
save our scene. And hopefully, what
you will see is that the UV seams are
basically gone or at least minimized to a great extent. So
it's save our scene. And now what we need to do is
we need to go in our model, and we need to go ahead and see, there's something that we not do the lub oh, yeah,
the lurp is in. Maybe I need to re import this. Maybe that's the only
thing that got lost. So let's re import. There
we go. Now it works. So that's when we crashed. That's what got lost. But what you can
see now is this is almost like a way to
paint out your UVs. You can see still
like a tiny bit here, but you can see that it is far too difficult to even
see if there are, like, problem UVs right now. Now, the only thing
that I see that I accidentally did is
that I overhear see, I kind of, like, cut out my UVs. What I can do for this is I can just go
ahead and quickly go in Press F. Let's
quickly going in here. And like these areas over here, just hold axon just
like paint this out. If it is flat, we will most likely not have
any UV problems anyway. So it's better to
just paint this out. And same over here if we
ever have these type of obvious flat areas. We
can just paint them out. Yeah, definitely, this
is the one. There we go. So that's just a matter of making it a little
bit more clean. So let's go ahead and
just re export this. Go back into unreal, right click re import, and that we'll fix that area. So yeah, yeah, you can
see, like a tiny seam. If you want, you can, like,
paint this completely full. But now what at least
can see is that, especially from distance,
like you won't really notice that there
is actually Seme. I would need to go this close, but we never get this close.
We only get like this far. And even then I could probably even get rid of
that seam just by increasing the area where I'm doing of my
blending over here. But that's something
that I'm not going to really bother with because it's just you won't need it. Yeah, you won't need it. So having that done, that will already,
include another thing. So what do we have now?
So the next thing would be that right now the
dirt is way too obvious. So I think for these ones, I would need to have
more specific dirt because the ones that I have
right now I don't like. So if we go into our
dirt, over here. So this stuff, it just
doesn't work, in this case. It will work great.
Will this dirt will look amazing on
the other pieces. But on these pieces itself,
yeah, let's not do it. Let's go ahead and get rid
of our paint and our mask. And maybe let's grab something
else. Let's have a look. What if we do like
a dust occlusion most likely won't do much. Tone down here. Now, dust
occlusion doesn't really work. We can always just do
some manual stuff. Dust subtle, maybe?
Yeah, you know what? I don't see this working. So instead, what I'm going
to do is I'm going to art or I don't even need art Batey and just grab my base mask. And I'm just going to go ahead and I'm just
going to, like, go in here, grab like a dirt brush, dirt
one, for example. And maybe just paint
in some random bits of dirt in some of these areas
just by clicking on them. Just like a little
bit of interest. It doesn't need to be
absolutely amazing. It doesn't need to
be completely fill. It just needs to have something of interest in these areas. And maybe it doesn't
even need that, but it's just something
that I want to try. So I can just go ahead and go in here and do this kind of stuff. Y here we go. Let's just go ahead
and export this and see if that does
anything better. So let's go into
InmalR click reimport. And you can just
keep working on it. So like this, for now, this dirt is fine
for what I need. So I'm happy with that.
Yeah, that's looking good. So as you can see, that has some pretty
decent blending now. And this blending
will automatically also translate to these
pieces because we, of course, did all of
them at the same time. So they will instantly
also have the blending. At which point it is pretty
much just a matter of going in and also this great. See? That it like arts
to the sides like that. But for rest, yeah, that
is all tiling nicely. It has some extra
dirt here and there. I'm quite happy with that.
I'm just going to go ahead and end of this chapter
by going into unreal. Let's go ahead and all
of these pieces, we can. Oh, sorry, I'm still
in my other scene. I need to go into the
modular pieces scene. Here we go. And then we have
our vertical beam broken A. What I'm going to
do with this one is let's press Z to zoom in. I'm going to give like one extra of these rebar pieces
like this. There we go. And then what I'm going
to do is I'm just going to go ahead,
select all of these, Contrave them, and simply throw these into a
vertical beam broken B. So if we go into
broken B version, we can go ahead and
we can move this up, rotate this around,
and then instantly, you can already just, like, do some extra small movements, and then you will
already have something pretty decent going
on right away. So that will save
us a lot of time. Let's go ahead and go in
here and just make sure that these are working correctly the way that I
want them to work. You can always go ahead
and give it some rotation, move it in and out,
just in general, like, play around with it. See, we got these
ones. Let's move this one a little bit
more out because we do, of course, want to
change it up so that it looks a
little bit different. That's the whole goal of having these variations to make it
look a little bit different. And maybe let's add another one. Rotate it, stick it out
a little bit further. Maybe like bend it really
strongly like that. Okay, that's about it. So we can just go ahead and
we can export this one. And the other ones, they
do not really need rebar, not like this, at least. So we can export this to unreel vertical beam broken
variation B. That's this one. Yes, I want to replace it. And let's go ahead and select. This one, export selection, vertical beam
broken variation A. And then we are pretty much
done with our concrete beams, which was a nice overview
of just like the basics. And then, of course, what
we'll do is we will cover it a little bit more in depth when we do more difficult pieces. But at this point,
we can go into ESetsGrab our vertical beam
broken A, B, reimport. Just press done. So this one we now have that extra
bits added here and there. And then the other one,
all we need to do is we need to go ahead and let's see. This one is bar 01, I believe. This one is rebar 02, I believe. Sometimes it changes up the locations of your
materials and rebar 03. So we now have this one over
here. Working just fine. And then we also have these ones over here, which are
also working fine. So from a distance,
you can see that now this is all
working quite nicely. The last thing that we
really need to do at this point is we just need to go ahead and we just need to add like a
short version of this. So we can pretty much grab the broken variation
broken, for example, and it needs to be number C. So if we just go ahead and do a Ctravi on this and just drag the stuff
into broken variation C, now here in broken variation C, what we can do is we know
that it needs to be shorter. Temporarily plus height
because I want to select these pieces and remove them. Okay. And now that
we have these, the only thing
that's tricky about the shortening is
that, of course, the transition might break. So I need to see how
that we are using this. Oh, we are using it
literally on a transition. That is a little bit
annoying to be very honest, having it on transition bad
because that means that we cannot just go ahead and, like, cut it out
most of the time. Instead, it means that we almost like need to make
a cut in between, but that will of course
not look as good also. So that is why this one is a little bit tricky to have a think about
how we are going to do this. Um just having a think here. I think the safest bet
is still to cut it off and then just make sure that it is still
sort of matching. So if we grab this bottom
layer over here, detach it. If we then go ahead
and go down here and go and add a slice modifier, which I believe I
already showed you. So the slice modifier, it allows us to basically
move a cut wherever we want. So what we can do is
we can say, Okay, I want to have this
cut around over here. At which point I can
convert it to add a ply. I can then go in to a site
view, delete this stuff. And then what I can
do is I can carefully grab all of these pieces
and I can move them down. Oops, wrong button. And then once I've
moved them down, it will be a little bit tricky, but we basically need
to just see if we can match it up very close
to the end over here. So let's go ahead and go into our vertex mode and just
try to match it up. Try to just grab these
pieces. Match them up. If we are careful, it will not change
our UVs too much. And we don't need to be like too insanely precise because you will most likely not notice it. There's some leftover pieces. This one is like the
biggest one where it will probably where we need to be careful where we are just basically pushing
this out like this. But then we also
just want to, like, move the upper
vertices a little bit to basically compensate for
the stretching that we have. Let's move this one like this. Yeah, these ones
are not too bad. You know, we cannot really
move that one too far apart because else
you will notice. So the only thing is this one. Maybe we can, carefully place a cut over here, push it out. And let's see. Oh, God. That was not even
the easiest ones. Or that was not even the
most difficult ones. We still need to do
this entire site. So we got these ones over here. You can place these.
And, if you want, of course, you can
also just go ahead and quickly jump in and
create another variation. However, I do not personally really feel like that
is too necessary, not for my
environment, at least. If you had the time, I
would probably do it, but not right now because we are not even at 50%
yet of this entire course. So we still have
quite a bit of stuff to get through, to be honest. Okay, let's see if we can
somehow make these work. As I said before, it doesn't need to be absolutely precise. I'd rather have it
smaller than bigger. Also, if there's a little bit of stretching going
on here and there, I can live with that for
this one piece over here. So let's just try
something like that. Let's go ahead and delete the bottom and let's
just see if this works. File export export selection. We might need to snap
it better on the grid, vertical beam variation
C. Okay, let's see. Let's see if this works. Right, click reimport. Press done. Let's open it up. Go to materials, press isolate. Okay, this one is
the concrete beam. Then we have our rebar tile, and then we probably have number one and number two rebars. And basically, if we just
press G, this, of course, over here, that is logical, that it looks a
little bit strange. But I think it is not that bad. I think if we would go ahead and combine this with some details, it will work quite nicely. So at this point, yeah, the only thing is
like our dirt over here. So this variation A. So that's the only
thing I would probably do is I would press X, and I would just get rid of the dirt on the lower
levels for these sites, just to make sure that
we do not accidentally, have the dirt sitting on those. Let's go ahead and
quickly export. Right, click reimport. That is not low enough, I see. Okay, so what I will do
is in the next chapter, I'm going to import some degals and then I will kind of give you an overview of how we would basically improve these seams
and everything like that. I I wait act, I need to
right click and reimport. There we go. So that
already, fixes that stuff. So I just want to give you a quick overview of how we would on the outside of the
building on how we would, like, improve this a little bit better because I think
it is quite important. On the inside, we don't
really need to do that because these are all just, like, broken pieces. But, yeah. So that is the tricky thing we're doing damage
on modular pieces. That over here, they are
a little bit broken. However, what we can
do is we can make sure that on our walls
that it is not as bad. So let's go ahead and
continue to our next chapter, which is going to be
a very short chapter, just showing you some
extra additional stuff. And once we've done that,
we will continue on with probably maybe like the big destruction pieces
or maybe like the floors. We'll have a look
at that. So let's go ahead and continue
on with this.
34. 33 Adding Decals And General Polishing Of Our Outside Building: Okay, so this is a little
bit of an in between chapter where I will just
show you a little bit more on how you would dress the outside to make
everything look a little bit more interesting and also how to cover up seams
and stuff like that. Now, the only thing
I will not yet cover is the actual foliage. So this is just an
example chapter. You can ignore it if you
want, but it's just here. So what I got is I imported
a bunch of decals. I got these decals from
one of our other courses, which is the post
apocalyptic game environment course that you can
find on our channel. And basically, these decals, they are just a bunch of
different leak decals. If you want to know
how to make them, you can find many
also free tutorials online on how to create
them inside or reel. Or you can, of course,
if you have the money, buy my post ecyptic course, although that one will cover
much more than just decals. So how would this sort of work? Let's say that over
here right now, this is perfectly clean looking, um, concrete and
all of that stuff. The first thing I'm
going to do is I'm just going to go ahead and
go into my materials. Let's open up my brick
wall and my concrete. Now what I want to
do is make sure that I'm in a high random mode. Let's do 200. And then I'm just going to move
this over to my screen. Let's go into my camera actor. Okay, so my camera actor
actually doesn't go too close. So in that case, I'm
just going to set my camera roughly over here
so that I can have a look at it a little bit
from the distance because that gives me a
better idea of what to do. So if we go into my brickwall, what's the first
thing that I see? And I'm also just
having a look here, although I don't actually have reference for brick
walls in here, but I can see that maybe
I want to go ahead and, like, make everything
a little bit darker. It's going to my color overlay. You know what? Let's
also make it. Let's see. Let's just play around
a little bit more with our colors until we get here, a little bit bluish
until we just get quite dark looking bricks. I don't want to have
them stand out as much, especially not when we have an overcast style environment. For roughness, I
want to go ahead and set my roughness
probably to one. Let's do 1.3 so that it is still a little bit
shiny but not too shiny. And once you've
done that, what we can do is we can
go ahead and see. So our tiling is fine. If I would say it's
still like 0.5, 0.8. Never do this. But it's
just for me to see. If it looks better on like
a larger tiling mode, but it looks pretty
much fine on one. So now if we go into
our concrete beams over here, we can
do the same thing. We can just go ahead
and just like I say, we are going to tone this
down a little bit more. So we want to make a little
bit dark, dull grime. It's maybe like mess
around with our dirt a little bit more and
give it a little bit more of like
this softer dirt over here. Let's do this. So a little bit darker. But then if we go up and
go to our dirt amount, let's set this to 0.8 to basically tone it
down a little bit. Okay, so now we just have
some general balancing, and you can see how much
difference that makes, just like small balancing
pieces like this. Then what we're going to do
is we are going to go into the PAE course and into
materials and decals. So as I said before, I have
a bunch of decals here. The way that this
works is very simple. So we are just going
to drag in this decal. If you press G, if
you cannot see icons, you can see that we need
to turn on snap rotation and we need to rotate
this 90 degrees. And these are
basically the decals. Very simple, just
like a leaks decal. This is how you
would then later on also be able to cover things up. We can, for example, scale
this decal down here, fit it in here, and then
we can have some leaks. However, let's say that we
want to have a different one. We can change up the material just by dragging
it in and like that, we can just go ahead and
find something that we like. Can grab, for example, this one, and we can just basically
mess around with it until we get
something that we like. What I can do is
I can go in here. And I can basically
art these leaks, and sometimes you switch around
the leak look over here. And that way I can just add some general
dirt and everything. Here, let's see that over here like I have this
one, for example. And then I can go down
here and I can once again, some much stronger leaks
that you can see over here. What I can also do
is for this one, I can, for example,
make my leaks very, very large like this and have them pretty much
spanning all the way across. That's also sometimes nice. Do make sure that if
your box gets too big to just scale
it in a little bit, that will avoid
problems later on. So just like this, I can
then just grab these leaks, go ahead and move them in here and maybe
also like in here. Duplicate it again,
and then this one, let's grab a different style. Let's do number
E. We can move it here and just give it a
second to reload, like that. And just like that, you
can just keep going. Now on top of this, we also have patches, as you
can see over here. Basically, what we can do with these patches are they are just like decals that you can kind of randomly stick on top of things. See? So the nice thing about these patches is that you
can just randomly move them, and you can also move them, for example, on your seams. So what I can do is
I can for example, I can scale this up and down. And if I want, I
can use this to, for example, cover up my
seams a little bit better. Although there are
often better ones in here also that can do that. But the general idea is that
you can use these patches, for example, if you make them, let's delete this one.
Let's try a new one. Let's go ahead and over here. So you can make them very large. You can just have these
general dirt patches. Now on top of this, if you
imagine that later on, we will have foliage
sitting on top of it, then you can see
that this becomes a really interesting
looking building. So what I'm going to
do is, for example, I'm going to move
a bit more here. This is why you
need to be careful that you are not making your cube too big
because on the side, it will try to project it, but it will not do it it
will not do a very good job. So okay, let's say I
now have these leaks. What I can then do is
I can go ahead and I can open them all up in here. Because just like my patches and everything, I have controls. So I can go to my control over here and I can set this darker, and I'm not sure
which one this is. I don't think we use
that one. Only there, for example, we can go over
here to this one. Here we go. So this is this one over here. So what I can do is I can say, Okay, I want to
have this darker. And then I want
to just tone down my opacity a little bit
more. Let's say 0.8. I can then go to Leaks D, which I don't know
which one this is. Ah, this one over here,
I can once again say, Okay, I want to have
the bit darker because I want to match it
with my environment. And just like that,
we can go ahead. I don't know which this one is. Oh, this one's down here. We can just match it all
up with our environment. And of course, later on if we have some nice lighting
and everything, it will just make everything
look a lot better. Here we have our
patch, as you can see, so we can also go ahead and
make that a bit darker. For example, let's not
make it this dark, but just in general. You can also go ahead and maybe make it a little
bit more brownish, for example, just
to match it up. And then finally,
we are missing one. So if we leaking G, we
are missing over here. Let's go ahead and also
tone this one down. See? So now very quickly, if I would go ahead and
just grab these decals, add them into a
folder cut decals, you can see that I did this
very quickly, of course. But you can see that
if you would do a bit more effort, you
can see the difference. So without width, without width. And just like this, also
these extra dirt decals, just in general, you can make everything look a lot nicer. For example, for these pieces, what you can also do
to avoid the seams. So like this one is
difficult to avoid, it's in a really
awkward position. But we can always
just try to rotate this and just match
this a little bit better from the angle that
we can see it so that it becomes harder to
see from a distance. Now, of course, these ones, there isn't really
that perfect of a solution for these ones specifically. That
is unfortunate. Now, there are solutions
that we can do. However, they are
not really worth for the quality that
we are going to reach. Like, I know how to
make this look perfect, but it's simply not worth it, and it would take up
the entire tutorial. But in a nutshell, it would be to basically grab your original low
poly before the sculpting, and then what you
would do is you would cut off the bottom
of that low poly. You would then add
segments and you would merge that low poly
together with this one. Then you would go
ahead and bake it, then you would paint in
all of your damages, and then basically it
will blend correctly. But as you can hear, the only difference all of that work, and it will take probably
2 hours of work, 1.5, 2 hours will be to make your edge go from this
point to this point. And that's why I decided that
it is simply not worth it. But in any case, as
you can see over here, now with these leaks, we
can always just go ahead. We can grab these decals and
then down here, I leave it. And later on once we
have a cool overcast, because right now it's
still our lighting just isn't really fitting. But what we can do
is we can always just go ahead and
duplicate this, rotate this 90 degrees, move it over here. Like this. And you can just go out and
you can just nicely, like, match all of this
stuff up over here. And let's say that
we now duplicate these, move them over here, and just in general, I forgot
to duplicate this one. This was quite an important one. We can just add like a
bunch of extra pieces on top of here to make everything in the end look really nice and
interesting. There we go. You can also use your
decals pretty much to do a little bit of
opacity and everything. But yeah, so in general, you can very quickly
add interesting looks. I can just go ahead and
keep going in here. Duplicating this over
here, it is, of course, a bit tricky because
of the wood, but that is not too bad. So we can go ahead
and I don't know, like leaks over here. Of course, at this point, I will kind of like
stop because you cannot really see it anymore,
but you get the point. Just wherever you can see it, you can add these pieces. And then also the grunges
are very powerful, especially in these areas
in these really large ones, where we can just go at it like let's say scale this out a bit. And we can just add
like these really large looking grunges over here. And they will also
immediately just make your windows look a
little bit more dirty. So in general, it will just make everything feel
like a little bit nicer. Yeah, we can add
this one over here. Maybe also like over
here and, like, move it down over here. So, yeah, that's like
a general way that now if we would go to
our main camera actor, you can see that now
this looks quite dull and quite depressing, which
is what we are going for. The next thing that we
can do is later on, we can add some extra
foliage on top of that. We can add some
more mossy decals to really make it look like a little bit how do you say it? Yeah, just as if, like, nature takes over, that kind of stuff. But in general, over here, I am quite happy with this. So that is it for this
in between chapter. We now already have a pretty good outside building over here. So what we are going
to do is we are going to much later when we
have most of our pieces done, do another polishing pass on it. But for now, I think the nice thing would
be if we first of all just dive right
into the deep and get started with these really
large destruction pieces. Once we got the hang of those, then it is very
easy for us to go ahead and just add all of
those other extra pieces. Let's go ahead and continue with this in our next chapter.
35. 34 Taking Our Big Concrete Rubble Pieces To Final Part1: Okay, so what we're going
to do next few chapters is something that I feel like many people have
been waiting for, and that's why I'm going
to go ahead and do these first before we do more
of the boring stuff. And that is that we are going
to work on actually taking our really large concrete rubber pieces over
here to final. So that will be the focus
for the next few chapters. Now, this will take
quite a while, but once we've done one, you kind of know how to
do the other one, so it's pretty much
the same process. So over here, inside
of three is Max, let's just get started
with the first one, and I will take this one
completely to final. And once we've done that, then what I'm going to
do is I'm going to do all of them
at the same time. So like all of these pieces, I will basically go
ahead and go in and at the same time do every
single function. So at the same time low poly, at the same time high ply, at the same time UVs and baking
and everything like that. So for this one, let's have a look because we do, of course, want to
improve this quite a bit. And I think I want
to mostly look at, um, yeah, probably like
this one over here. Like this is quite a
good look to look at. So what we're going
to do is we are going to go ahead and
just remake this. So I'm just going
to create like oh, sorry, press a bot
object selection. And I'm just going to go
ahead and create a box. And I just want to
create the same shape. So we are just going
to redo our version. Let me just quickly scale it. So we are going to redo
our ray fire stuff. So we are going to
convert to an dipole. And let's go ahead and move this one roughly like over here. So do try to get,
roughly the same shape. So that's what you see
me doing over here. I'm just placing the same shape. And I'm just going to like a quick swift loop over here so that I can
move this one out. There we go. So that
should be enough. Now, this other one over here, maybe it is good to
just create like a quick new layer and call this layer backup just
to keep these things. So with the backup layer, we can just go ahead and we can, like, turn off this
stuff over here. And now we have our
basic shape over here. And we want to kind of keep
it into the same position. So yeah, that is pretty much the same
position, so that's fine. Sorry, it was not
selecting properly. So having this one, what we're going to do now is we
are just going to go ahead and add a ray
fire Voronoi on this. And if I have a
look at this one, I really want to focus on
larger pieces, smaller pieces. So what I'm going to do
is I have my ray fire, and I'm going to just have
a quick look over here. So we probably want to
have one side yeah, most likely, we want to have this top side to be fairly intact and everything
else to be quite broken. What we can do is we can
already turn on a fragment, and then what I'm going
to do is if I just go ahead and turn on my
fragments over here, I'm going to go
into my point cloud and I'm basically going
to move this down and I'm going to maybe scale this in a little bit to direct most of my point cloud into this direction over here
and maybe set this to 200. Here we go. So most of
this point cloud is being directed into
this area over here. And then what we
can do is we can also add a point
cloud in this area. So having this ray fire, we can now go ahead
and press copy and then just go ahead and
press paste on top of it. And then for this ray fire, we are going to only set to 100. Give the second. I've never actually done it
right away. Oh, wow. I was just saying
I've never done it right away. Okay, fair enough. Let me just restart, Max.
Okay, so we are back. I did lose a little bit of work, so I'm just re adding it. But, fair enough. We now know that we
do not want to add two ray fires on top of each other because
it looks like that, then it simply breaks. But that's no problem. So we
got these ones over here. That's pretty much fine. See, do I want to maybe
scale this up a little bit. The reason I might want to
scale this up is so that we get different areas and different pieces
over here like this. So let's just go ahead and move it mostly
around these areas. And then what we
will do is we will just break it up a
little bit later on. So what we're going to do now is we are going to first of all, break up the edges like
we've done before. And once we've done that, then what we're going to
do is we are going to basically break off
little chunks of it. So I'm going to go in here, and this time, I am going to
do it a lot more precise. So let's do element select. And let's see. So over here,
this one is quite fine. As you can see over
here, so I'm just going to keep some of
these edges in here. Like this. Okay, so
that looks pretty good. And then if we just go at an RA and also go around
this area over here, and around this point, we are getting into a little
bit of trouble. So these ones, we do need to break up a little
bit more later on. Let's see. Let's undo this one because I want to
keep that area over there. Maybe remove this and maybe grab these two vertices over here and push them back a little bit more because I do not want to have it
sticking out as much. Okay, so we got something
like that over there. Now if we just go ahead
and go over here and that's unfortunate that this one is really large over here. Let's just ignore it for now. And what I want to do is
I probably want to, like, at this point, I kind
of want to go straight. So let's go ahead and just
do a breakup like this. Wow, that's really
not a good breakup. In that case, what we're
going to do is let's go ahead and just select
these pieces over here, and let's start by
detaching them, and let's add another Voronoi
on this one that we can at least give it a little
bit extra segments. Only set this to like 50, for example, then
press fragment. Yeah, here, here,
even 50 is too much. Let's go like 20 maybe. Let's move it around until
we get, like, a nice look. And now let's go ahead
and convert it back to an added pool. So let's see. So now I should be able to still not exactly the way
I was hoping it to go. Like over here, it
is. Looking good, although this one is once
again sticking out too far. So what I would do
is I would like delete those and then just
go into my vertex mode. But, yeah, that's the
thing with these type of pieces, as you
can see over here, it has all of these
messy vertices, which you would then need to select press control backspace. And then once you've done
that, then you can go in and push this back a little bit to the point that it
looks a little bit better. Okay, so that can work. For this one, let's
just push this back because that's way
too sharp of a piece. Um, I'm not sure. Yeah, I guess that like having
a gap like that can work. And now that we've
done this, we can also go ahead and
we can go in here. We can just go in and select all of these really
large pieces, and let's go ahead
and detach them. And let's also another
Voronoi on these ones. Ray fire Voronoi
over here, fragment. Maybe sets like 40 or 4,400, so that we are making
it really small, and let's now convert this
back to an added ply. And the reason I want to
make this one so small is because I do not want to have
these chunks as obvious. I want to have them
like this, like just some random
chunks sometimes, if it happens to look nice, like you can see over here, maybe like around the corners, let's break it up
a little bit more. Here's another good
corner where we can break it up and
then maybe, like, blend it out like
that. There we go. So that's something
that we can work with. Don't like that one.
Let's Uno that. We're just going to
follow the Voronoi. There isn't an exact look that we're going to
go for specifically, because the Voronoi
kind of just helps us decide on what the
look is going to be. Let's go ahead and over here. Let's break this up. At this point, let's
save my scene just in case it feels like
crashing again later on. Well, let's do
something like this. I do feel like it would
be nice if I have a little bit more broken edges around this area, actually, just in case because we are
using this in so many ways, it might sometimes just
be nice to just give it a little bit of an extra. Let's see. So that
looks quite okay. Let's go down here, maybe, that's quite a large cut, maybe just this cut over here. Here we go, see? So we still
have some broken edges, but it's not too over the top. Okay, so now that
we have done these, I do want to make them kind of come apart like
we've done before. So, for example, this one,
we can already do that. We can just go ahead and
center our pivot to object. And let's say that we
push it out a little bit. Move it down like this. But this time we are going
to make our placements a lot more better. So we are also going
to then go in. Don't forget to set
this to the plus that it treats it
all as one object. So we are also going
to break these pieces up and sometimes, push
them down even more. Now, we need to be a
little bit careful by adding this type of gravity
because as you can see, it is being used in
many different ways. So we cannot always be sure that it will look
exactly like this. That's why we have these pieces for the very specific
gravity look, that they are falling down.
We have those pieces. And then for the smaller pieces, we just want to make
sure that they are still staying fairly flat. So rather than gravity, we just push them out. So over here, I'm
going to go in here. Let's detach this one. And let's go ahead and
crab like these pieces. Let's detach this one also. Yeah, let's keep this one
fairly flat over here. I don't know if at this point, maybe I do want to detach, quite a large chunk like that. Let's see. So we got this
one. We got this one. As I said, I want to
keep this quite mild, so I do need to be a little bit careful about
what I'm selecting over here. Yeah,
let's do this one. And let's leave it at that.
So we got these pieces. Now what we need to do is
we need to just center up pivot and just add some
very small movements. So this is like a nice chunk
where we can, move it. And the reason why we are
moving it like this is so that we can then go in and we can add some extra bits of bar in between here as if it is like fling next so we don't need to do
that much of an angle. We can just, like, move it
out a little bit like this, and that will be
already enough for the bar to basically take place. But of course you do
want to kind of have an angle because you
do assume that most of the time we are going into
it will be in this flatness. It will not be turned around. Of course, we do
have some instances, but if we have those instances, we will just make it work. So let's go ahead and
just move this out of the way and then
maybe go in here. Rotate this and then move this out of the way and
make it a little bit lower, you can see over here. And then what we're
going to do is later on, we are going to sculpt
in between these pieces, which will break
them up quite a bit, and it's up to you how much of the sharpness you want to
keep in your sculpting. I'm not going to keep
the sharpness a lot, so I'm going to go for quite a smooth effect
that you can see here, not as smooth as this, but more like this type of
smoothness over here. This is like too sharp for me, but this is like
the nice amount of smoothness that I
get that you can see over here in these areas and
over here in the top area. So or here. So that's like the general plan, that's what I'm going to go for. So we got these
pieces over here. Oh, yeah, we like a
big chunk that we are going to rotate
like a little bit, push it out, and maybe
then in this chunk, if we then grab another
one of these pieces, push those out like this. And we are mostly just going
to go like the big chunks. Later on, if you want, you
can add extra small objects. Let's just delete this
one that we will just add on top of it that are in
between these little bits, but they are just going
to be separate stones that we need to also texture and create separately so that we can use them
everywhere, basically. So for now, this is
looking pretty good. I think I I turn off if I
turn off my edges and face, you can see, this is like a nice flat area
so that is still intact. So yeah, that works quite well. I know you might be
tempted to delete some random pieces like
this, but in the end, I found that it often just does not look as good
because over here you can see that concrete just
like it stays very flat often. And when it does break,
it just breaks into lots of little rubber pieces
like you can see over here. So we got this one over
here, that's pretty good. Now, at this point, we
are basically ready to export this to Zbrush, so we are going
to turn this into high pool and then a low poly. What I want to do is I
just want to go ahead and attach and I'm going
to attach the objects. That I want to
sculpt separately. So the way that this works, this is pretty much one object,
so I can just leave it. This is one object,
so I can leave it. However, for this one,
I want to then go in, select these objects over
here and detach them. So that basically this
becomes an object and this becomes an object
so that inside of brush, we have space to
sculpt in between here because if it is
staying as one object, we simply do not have the space in there
to properly sculpt. Now we have this one and
we want to do the same. So face mode, detach that extra piece, and
now we have these two. And over here, this one,
we want to once again. Here, let's select this one, and let's also do a detach. There we go. You know what? Let's get rid of this little
bit because it would be, I don't think it
will look as good. Oh, we got these ones over here. We can now go ahead and
we can save our scene. And once you've done that,
we can select everything. And we can already, most likely it will
give us a lot of errors because of
all the phases. So what I tend to do is I
tend to select everything, add an added poly on top, then go into vertex motor, press Control A, and then
simply press connect. What that does inside
of trees Max is it is the same as
triangulating pieces. So when we connect
and triangulate everything, it will look arful, but the goal is that now every single vertice
is connected, so we do not have any end guns. Because then if we
export this to Z brush, in Z brush, we will
just dynamize it, so it doesn't matter how
messy our jom tree is. So we can now go ahead, navigate to the two Z folder
in our export folder. OBJ and Cal this collapsed, concrete, big 01 score two Z. Save it, make sure that
the preset is Z brush, export, and there we go. Now in next chapter,
what we will do is we will open up brush, and we will go ahead and start with the
sculpting process.
36. 35 Taking Our Big Concrete Rubble Pieces To Final Part2: Okay, so in our last chapter, we left off with this
piece over here. And now, what we're
going to do is we are going to jump into Z brush, and let's go ahead and import the piece that we have exported. Supposimport, let's
navigate to our folder. And it was this one,
collapse concrete, and just click and
write it in and turn on added so that we can properly rotate and everything. Yeah, let's go ahead and
get rid of the red one, and let's go for
our basic material because I prefer looking
at it in this material. So the first thing that we need to do is
we need to split this up into parts so that we can
properly work with them. So let's go ahead and down here. We need group split, yes, because if we do
split into parts, it will detect all
of those elements. So I believe if we
do group split, and let's press Okay, there we go. Yeah, so that's the one. Now, let's go ahead and
let's grab this one. That's like an example for you. So let's go ahead
and go into solo. And this is what we're
going to do right now, as you can see the geometry, it's super, super messy. It has all of these random bits sticking out all of that stuff. So what we're going to do with this one is we are going to go ahead and
dynamise it first. So let's go into our geometry. Let's go ahead and
go into dynamesh. And let's start
with one to eight. Okay, one to eight is
quite a bit too low. Let's do maybe like 500. And basically what
you want to try to get is like a balance
where you don't get, all of these top bits over here, but still get everything
quite smooth. And now it doesn't need
to be totally perfect. So let's say that
we do around 650. And if you set your blur
a little bit higher to, for example, five, it will just blur everything
a bit stronger. So let's say
something like this. Now, at this point, I would
go ahead and I would, like, move over to my drown
tablet over here. And for these bits, that's the thing with
whenever we have elements, it will try to still have these edges in here when
it smooths everything. So we can just go ahead and hold shift and just very quickly, paint them out a little bit. It's no problem if they stay in a little bit because you will never ever be able to see them, but I do like to work a
little bit more cleanly. Then spoil still at
the low resolution. I also want to fix these type of bits by just holding shift. Let's go into our trim dynamic. And remember, let's
go into the alpine. That is to be a
square, and we already going to just paint out
some arrows basically. So these I consider arrows. Those are, like,
the really, really sharp pieces that are
sticking out like that. If you want, you can
also do this one. There we go. Okay, so now that we've done
this, let's have a look. So we are at 400,000 polis. I feel like we could
use a little bit more. So let's turn off Dynamesh
let's press divide. And then the first
thing we need to do is we need to break
up these edges. So remember, we are going to go ahead and we are
going to go for this type of an
effect that you can see over here and over here. You can kind of choose
how strong that you want to have it in this part. So first of all, what we need to do is we just
need to do this. Just super super basic, break up your edges like this. And sometimes I
do like to, like, keep this edge over here. And here, if we do that, it is basically just to give
it like a bit of, like, a round feel to it. And then down here,
yeah, this one is, like, a little bit more
tricky. There we go. So we can just go ahead
and just break it up. You don't need to give
it any shape like last time because these pieces, they will basically
be completely annihilated by the noise. It is just here
so that the noise actually can properly go around the edges and not that
it just completely breaks everything and that it just collapses
into each other. Also, like these tips,
they are not good. Do not have like those type of Wi actually, this one also. Do not have these types of
really sharp tips over here, because then your
noise, you've seen it happen a little bit where it collapses
into each other. That's what will
happen in that case. So you can kind of
choose what you want to do if you first
want to do the front or the top and then the bottom or if
you just want to kind of do it randomly like
I'm doing right now. So what I'm going to
do is, here we go. Let's break this up. This one is also like a tricky one in here where we just need to see how strong that the
noise is going to be. If it is really bad, then
what you can do is you can always just paint
out noise in that area. So basically, this
is going to be oops, the general workflow
for every single piece. So it's not going to
be too interesting. I will go ahead and do this
one completely in real time, and then what we will
do is in the next one, this kind of stuff, it's
like perfect time lap stuff, just doing these
edges over here, because it does not matter. You do not even have
to follow my leads. You don't have to use the same edge strokes as
me or something like that. Oh, we got this stuff. Now what I then tend to do is I tend to go to hold Shift and click and what it
will do is it will snap to a specific
area over here. And then I like to hold control. But instead of my mask pen, I like to grab my mask lasso over here because
the mask lasso, it will also read
the back faces. And basically what we can do
is we can basically hold, and then you can see that
we can literally just draw out roughly our shape
around our edges. She can see over here, like this, and now it
will also stay over here. And then what you can
do is you can hold, Console again, go
back to the MS pen. And then if you
want, you can go in, give it maybe a little bit of
extra bits here and there. Like that. There we go. Okay, so we
now have done this one, and it's already in
the right order. So the next thing that
we're going to do is we are going to add
our noise to this. So let's go ahead and go. And this time, you
can see that now that we are quite
over the edges, you can imagine that once
we use a plane on this one, it will actually
be really obvious. So let's go surface noise open because we did
already create we go, we did already create
our noise profile. Let's open it up and
let's press Okay. And I just need to double check that this is not too strong, so let's press applied to mesh. If you want to have
control over it later on, you can also go into layers
and press this little button. And what that will do is it will record whatever we do next. So if we then press
Apply to mesh, what we could then
do is we could go back into layers,
turn off record. And then if you use the slider, you can basically
set the intensity. So first of all, what I want to do is I
want to have a look. If I have a look at
here, I feel like my noise for these ones need to go in the opposite
direction, see? Because here it is
kind of like clamping down while here it
is pushing out. But the pushing out,
that is tricky. So the pushing out will
give us a better effect, but then we do need
to keep in mind that it will adjust our
shape a little bit. So knowing that, let's
go ahead and Undo. Over here, up until
we do our layers. And then if we just go
ahead and go to surface, it, and let's set our strength, simply use your
arrow keys to add a minus if it allows me to. No, that's not what I wanted. Cancel, dt. Come on. So it does that.
It's quite annoying. That's where you try to,
like, set something, it sometimes registers as if that you want to
move it. So minus. So now it is inverted. If now press okay, there we
go. Now, it will be inverted. So if we press applied mesh. Okay, so that's working pretty well. Now let's
have a quick look. Around these really strong
pinching points over here. So they are not too bad. So once we've done this, let's go ahead and
just make this a protype and just make sure
that everything looks correct. Let's say that we have this one. We can go ahead and if you want, you can go to your noise, edit, press Save and just call
this noise profile 02. Save o, and turn it off again. Now if we hold Control and
just drag in empty space, this is why you do need to
make sure that dynamesh is turned off because else it
will try to re dynamesh. Now what we're going to do is we're going to turn on planer, and we're basically going to
cut it out like that, see. And that's what I meant
with like that you get that typical look over here, sees that you can see over here, where it kind of just cuts off. So we have this one. Let's have a look in context. So it looks like that. Yeah,
so the shape is not too bad. So once you've
done this, all you really want to do is
if you have the time, it's not completely
necessary most of the time, but you can just go
in and just have a quick scan and just
sometimes flatten things out, especially like around
the broken areas. Yeah, like that stuff, like, just cleaned up a little
bit, I would say. This one is fine if we keep it. It's so pinched
together that you cannot even see that
there's something wrong. But like here over
here, those things, I do like to always just, like, a quick scan around, paint out any errs that I might
see. And there we go. So then we get,
like, this kind of soft looking but still
good looking effect of, like, a broken concrete. Which at that point, once we like at our Riba
and everything, that will look quite
interesting. So there you go. So that is the general
look that we can go and you can see that it is quite similar to what we
have over here. If you want to go for this look, you just need to make your
noise a whole lot less strong, and then you can pretty much go for this specific
look over here. So it all depends on what you
want, but then over here, you can see that it does,
again, look the same. And here, it also
looks the same. So, yeah, it's pretty
much whatever you want. So we are going to go for,
like, the strong look just because it's a
classic, I would say. Now at this point,
what we can do is we can just go ahead
and first of all, dynamesh everything
at the same time. Well, not at the same time,
but just one and one. So we did like
600, ten dynamesh, next one, 600, ten dynamesh. Oh, yeah, so the dynamesh
does not always works. 600, I said, ten, there we go. That works. Next one, And I guess that we could
have done this in the very beginning before we
actually do a group split, but oh, well, it
doesn't take too long. We're almost done already. 600, ten, and it gives you
a chance to make sure that all of the resolutions are exactly the way that
you want them to be. 600, ten, dy and mesh, and the last two bits. Oh, it's going to be
two. Already messing up. Dynamesh. There we go. Last one. 610 Dynamesh. Okay. Perfect. So we've
got this stuff done, and now what we
basically need to do is we just need to go into
all of our edges and we need to break them up.
This will take a while. I will do it in real time, but it will take a while,
just so you know. So at this point here, you always just want to turn off dynamesh, turn on smoothening. And then the reason that I'm doing this one
in real time is specifically so that
I can show you like these type of areas
where you just kind of, like, want to here, just
destroy it like that. And whenever you have
this pinching over here, there we go. Just get rid of it. As I said before, you can see of the noise how much that
it destroys everything. So you don't actually have to, like, art in any effort. You just want to break it
up a little bit so that the noise does not flow over as badly because I found that whenever we
sculpt the edge like this, it will just read everything
a little bit better, and it will just in general, look like a little bit nice. And it will also give us
better access to the edges. So yeah, once we've done
that, we can just go ahead and we can move
on to the next one. Duplicate it. Oh,
not duplicate it. Dynamesh Nah,
subdivide, subdivided. That's the word I
was looking for. This one, Oh, no, wait, this one is
not super thin. I thought for a moment that it was this is quite
a tricky shape. I feel like this
shape is going to become a problem when
we do our noise. Yeah. Yeah, I think it is. I think it is going
to be a problem. So we might, like, cut
off some pieces or not, but we will have to see when we do our noise how bad it is. And else you just
maybe want to just completely destroy
the mesh even more. Yeah, yeah, I'm
quite worried about that area over there,
but we will see. So for now, let's go ahead
and move on to the next one. Cause see for these ones, we don't really
need to hold shift anymore to break up these lines like they
look pretty good. Hey, yeah, this one, no, I think this one is doable. Like it will not affect
the noise too much. Just go ahead and just very quickly go over the
edges a little bit more. You could try to do
a technique where you detect the curvature of the edges and then mask them and smooth
them out and everything, but I still feel like
that doing it by hand like this because it will
give you a specific pattern, as you can see, this
typical pattern, I still feel like
that it will add to the quality compared to
just smoothing the edges. I feel like smoothing the edges. Yeah, it will not give like this difference in thickness and all of that,
other fancy stuff. There we go. So we
got that one done. Let's do the big one at this
point. Subdivide this one. Okay, so for the big
one, I am going to make my brush a little
bit larger also. Oh, this stuff is,
like, really messy, so try and get rid of it. And I just do a
combination of holding shift and sculpting to basically
try and get rid of it. And it doesn't need to
be like completely gone, but we'll see how it looks once we've done our noise on it. So for the big ones, I
am going to just do, first one side and then
move on to the other side. Wow, I must say that this one did not expect the
larger ones to be more trouble than
the smaller ones. But of course, because of all these extra bits
and pieces over here, I can understand that the edges are a little bit more broken up and a little
bit more fragile. So we basically go at and
like this one, yeah, here. So just paint this kind of stuff out just by going over
it a bunch of times. And the trim dynamic
is your friend, in this case, for this
entire environment. Here again, like I hold
Shift and just carefully go around the edge until it gives way and it starts
to really just, like, that is bad. This kind of stuff can sometimes happen if
you do have that, we can just undo it.
We can try again. And worst cases, what we need to do is we
need to cut it off. I will show you how
that I cut this off. So if I would do
that, I would go ahead and I would
grab my lesser tool, and let's say that
we want to cut off this shape over here. What we can do is we can
mask it out like this. And then what I tend
to do is I tend to go ahead and well, for this, we do need to delete lower over here in our geometry. And basically, what
I then do is I go ahead and I go
to poly groups. Group mast. And if we hold
Control and click, if you then go ahead
and just click once with Control Shift
selected on this piece, and then click on it again, it will basically
hide the piece. At which point, you
can go to geometry. You can then go to
Modified topology and pass Delete hidden
to get rid of it. And then all you need
to do is a dynamesh. Over here. And as you can see that dynamesh,
it will break it up. But at this point,
we do need to make our dynamite a
little bit higher. So that's to 1,200, because else it will lose all of that stuff
that we just did. And then what we can do is we can just go
ahead and continue. At this point at 1,200, this is quite strong. So now you can see that here, as if it was never there. But as you can see, I kind
of want to avoid that because it is time
consuming to do. So that's why I try to just always paint
them out normally. Like this is like
another one where yeah, this one, we would
just need to cut out. So for now, just go around it until we have
reached the end, which is already here. Really? Okay, that did went
quicker than expected. Let's just do one more
cut out over here. And if you have any more,
so let's have a look. These ones we can probably fix. Yeah, so this is pretty
much like the only one I can see that I
want to get rid of. So I can watch again,
just quickly go to poly groups, group mask, unmask, click click using Control Shift, then go to geometry, modified topology,
delete hidden, dynamish and just re art
your dynamesh to it. There we go. And now we can just go ahead
and paint this out. And then, yeah, it will
have a missing piece there, but it will not be that bad. So now what we can do is we can just go ahead and
do the other side. Over here. Just do, like,
this kind of stuff. And believe me, this can get a little bit
boring after a while. So be prepared for that, have some music,
have some snacks on. But it is good to still
take your time with it. Because especially
like these pieces, these pieces are
super important in this environment because
they take up like, I don't know, what 50, 60% of the entire environment, probably more in terms of
like the field of view. Yeah, probably more even. So we just want to make sure that everything looks correct. Over here. Oh,
yeah, outer saving. Would be good if we
save this scene. After we've done the edges,
we will save our scene. Let's just hope
it does not break or does not crash
in the meantime. Although brush is quite
good that like saving backups when it comes to that kind of stuff.
But there we go. Okay, so that one
is now sa done. So we already got this
entire side done, so just four more pieces to go. This one, turn off dynamesh,
go and go to divide. And let's go ahead
and just continue on. I'm going to make my
bi size a bit smaller. Here, this is why you do not
want to do a divide before. So if I know that because else, I can barely do any
smoothing on flat surfaces. That's why we want
to first smooth it out and then do the divide. There we go, and now divide. And now what we can do
is we can just go ahead and we Going here. Oh, that's a very thin edge. We need to make
this edge bigger. Let's just go ahead and paint it away like that. There we go. The tricky thing also with following this kind of stuff is, I know that your
pieces will look different because it's
partly generated. So we can never control
exactly how it looks. So I just encourage you to not try to follow along with this too specifically
in terms of, like, how did your pieces look, but rather
just kind of, like, go your own way and just use the same workflow and apply
it to your own pieces. That's probably the
goal for this titoil. Okay, we've done
those. It's all shift. Sometimes you get like this
close quarters over here, which I'm already
worried about also with the noise because it probably
doesn't like it as much. But maybe what it will do is it will add so
much noise in there that it will just fill it
up with the other one. Okay, so that one is
done. Also for noise, make sure that you always
have enough geometry. That's why we also subdivide
not just for the edges, but also so that we have
enough geometry later on for noise because that one needs a lot more than just
like some broken edges. Like these broken edges,
I could, of course, do without subdividing,
but it would not look. Or when we do our noise, then we would need to
subdivide it anyway, which would in turn
smooth out the edges. But I want to go ahead
and keep this look of the edges specifically.
That's the goal of it. Here we go. Okay? So I accidentally miss
clicked something. Let's go ahead and
go on this one. Oh, we need to do
another holding shift. This one is interesting. Let's subdivide it. Ah. Let's make a bug not
too large over here. There we go. Let's try that. Say, you will learn soon enough by using
the surface noise, you will learn what will
work and what will not work. So that's something that
comes from experience. So I already identified a bunch of pieces that
will probably not work. But here, like this kind of
stuff, it will never work. Like that will just
completely break everything. So what I'm going to
do is I'm going to go ahead and I'm going to
lesser tool this one. I'm going to lesser
tool this one. And let's see, was there
anything else? You know what? Let's also just go ahead
and get rid of this one, because I just know that
it will cause us problems. So let's just try to do all
of them at the same time. Let's delete lower. Let's go
to poly groups. Group mask. Click, click using
Control Shift, Modified topology,
delete points, Dynamsh. Jet is a bit higher and dynamsh. And then we can just
go ahead and continue on as if nothing ever happened. So we got that one. This one. This one, I do think I
need to subdivide it once more because else we won't have enough jom tree for noise. And you can just kind of
see it because you can sort of see the jom tree, like the pixels almost. You can see the
faces, basically. Over here, I'm just
really breaking this up. There we go. And let's see. So over here, we also
just want to go ahead and paint away the old look. And then it's almost like
there was never thing there. There we go. So that looks like a
nice little chunk now. And this is the last one
over here. Old shift. Subdivide this. Feel like it actually needs
another subdivision, to be honest before
we do our noise. Yeah, this stuff is
not going to work. Like if you also want
what you can twice, you can try to use like a clay buildup tool and
you can use it to basically paint in
geometry almost like that. And then what you can try
to do is you can try to, like, mesh everything together. So what you do is like this, and then let's say
that we try to sorry, let me just press
the lead lower. Let's say that we then
try to dynamesh it. And then if we subdivide it, here, see, so we can then
kind of like pain down. That is technically another
way that you can break it up, but you are adding jomtree, which is always a
little bit risky because we need to
see how this is used. Like it's this one,
now it is fine. But for the same reason, it would be like cutting
into something else, which would now be clipping. So that's why you'll do need to be careful about this stuff. But it is another way to just
very quickly fill in holes. See, I tend to use the clay
buildup brush for that. And then at this point, what we can do is we can go ahead and we can Go on here. And there we go. Okay, so all of those
edges are now done, and it has the geometry needed. So what we can do is
we can quickly saves, and we are going to
save this in saves, sebush, collapsed concrete
big 01 underscore, sculpt. Here we go. Now what we're going to next chapter
is we will go ahead and go to the
process of adding our noise, cleaning it up. And once that is done, we are already done with
the sculpting parts. Then all we need to do is
we need to turn this into, of course, low poly, do
some UVNwrapping later on, bake it all down,
generate our masks, get it into the
engine, set it up, and then we will have a
broken concrete piece. Still quite a bit to do, but let's go ahead and continue with this in our next chapter.
37. 36 Taking Our Big Concrete Rubble Pieces To Final Part3: Okay, so let's go
ahead and continue. So now what we're going to do is we're going to go one by one. And for these smaller
pieces over here, yeah, you can kind of, like,
just subdivide it once more if you see the
resolution quite clearly. For these smaller
pieces, what it is easier to do is to just use your mask pen over here,
compared to like the other one. It's more like for
the bigger pieces. It's easier to do
the latter two. But here, you can
see that it's quite different. Which
is what we want. We want to have the two sides to be a little bit different. So basically what we can
do is at this point, let's just take them
to final one by one. So we would grab this
surface, noise, open it. Grab number 02, press
Okay, and press Apply. Now you can see that
over here, this is what I mean with
the edges that they are just completely sinking
in, but we can fix that. Now we go plainer, make your brush a
little bit larger. Here we go. We have done that,
and then we need to clean up this mess,
Skizzy over here, which you can often
clean up with a simple holding shift to smooth then just going over
it using your trim dynamic. There we go. You know the
drill by now, I'm sure. But this time, we've
covered this quite often. Like these ones, I
will do it quickly. You don't need to
do two perfect. It's mostly the really,
really strong ones. Those are, like,
the important ones. Here we go. And once that is done, we
can call this one done. Though that's like a really
strong chunk, but okay. Or like a really large chunk. So sometimes you might
just want to do this, and quickly just like
kind of get away or get rid of it if it's like, it looks strange,
basically. But there we go. That one is done. Let's
go ahead and for fun, do like a large one over
here. So we got this one. So for this one, we would hold Shift click to basically
snap to the side. And yeah, for this one, we definitely would
use laser tool. And you can see that
this will take a second. So you basically
just want to trace all the way around. Over here. Although I must admit this
is a really large piece. Like, I'm not used to
working with pieces this large because
normally the pieces that I work on they are more
contained and they are like, Wow, I'm really
going off the mark. They are more contained, so they are a little bit smaller, or they are more broken up. But of course, for these pieces, we don't need to have them
all broken up because this time we are creating
an entire building instead of just a collapsed
ceiling because I'm more I often most time just
do, like, collapsed ceiling. It's the same basic
concept, of course, but it is, of course, slightly different
in terms of looks. So let's go ahead and just here, because I went a little
bit too far off the edge. So let's just go in. Let's see over here. Yeah, there we go. Let's quickly switch
over to the other side, and then we can see that
there's still a lot of stuff we need to do. Especially like around here.
But that's nice because it will just give us a
difference in look. If everything was
perfectly even, then it would always
be a little bit boring because then
it doesn't feel like the concrete really
got ripped off and just away and everything like that and that it
just started crumbling. Then it would be more
like someone just went past it with like a
sa or something like that, and that just doesn't work. Okay, so noise. Open it up. Profile two. This one might have quite a bit more
problems, but we'll see. So we are going to press apply. Oh. First instance doesn't seem
like a lot. Let's go planar. Let's go past the
edges with the planer. And sometimes you just want
to click a few times on it. Don't just click once and go
through the entire model. Just click on it a few
times and then you can see that because of the slightly different angles
that are happening, it will nicely cut away, same over here, see? So I'm just clicking
a bunch of times, cutting away my shapes. There we go. And now if we just go to
our trim dynamic again, this one, of course, it's a lot of work for such a large piece to
find every single bit. But if we just go past it quickly and just look
at the bigger ones, like you can see over
here, that's like a big one want to get rid of. And then like the small ones, I'm just going to strategically
ignore them, so to speak. Yeah, like these ones,
they're just on the edge of needing to fix
them or ignore them. So let's just skirt
and fix them. Around here, you can see that it still has some broken edges. Here's another one. So sometimes it is quite difficult to see, but
if you can see it, then most likely when
you start baking it, no one will be able to
see it, especially not once we have all of our
materials and everything on it. That's why you don't often
have to worry about it. Like, technically,
at this stage, it might look as good. But at the very end, you will just simply
not notice it as much. Around here, we have another
bit. You around here also. And we have arrived at the end. Perfect. So as you can see, doesn't take that
insanely long to do. But yeah, it just it's
a skill to it to do it, but it's not too difficult. So let's go ahead and just
continue on with this one. This one is going
to be interesting. Let's set this to,
okay, mask pen. And let's go ahead and see what we are going
to do with this one. I feel like this shape,
I'm going to actually make my mask go
down here and make my mask also go down here to basically make sure
that it does not have noise everywhere in these areas because I feel like
if we do that, it would basically
just break everything. Around here, it also
feels like it just does not really need that noise. Those areas, we can have noise. I'm fine with that. And if we just go ahead
and go past here, paint in It's not have any noise here because
I know that if we have noise there and maybe over
here, it will just break. So let's try, let's make it a little bit
bigger over here. There we go. Let's
try this. So noise, open profile number two. Okay, apply. Then we are going to do
a planar pass over here. Although this plaanar pass will probably be a little
bit different because it has some noise
sitting on the side. And you want to be
careful because here, plain air can be really strong. So we do always need to
be a little bit careful. And let's now do a
trim dynamic pass. Noise looks a little bit loolia. I should have probably just done this where we just like
an extra subdivision. But at this point, only adding subdivisions
to noise after, it will just make
everything like a smooth mess, which
is not what we want. So then I rather just want
to keep it like this. It should not be too bad. And that's just
paint out some of these small problems
here and there. There we go, should be fine. Okay, it's a weird
looking piece, but it does sort of work. So, this one is another one where it is
quite a weird looking piece. Yeah, maybe we could have
split them up, but honestly, at this point, does not
really matter too much. Splitting them up could
have maybe, like, looked a little bit better, but it would not have been such a massive difference
or anything like that. Just go to run this one through this entire bit over here. A Here we go. Oh, yeah. So over here, let's just
also art that just like these Willetin
slivers of concrete. We just want art to our mask. Now if we go ahead and
open up our noise, press apply to mesh, plain writ over here, bit over here, over here
and over here, there we go. Yeah, like that. There we go.
That should do the trick. Yeah, let's move on
to the next one. Actually, at this
point, let's do a quick save. Here we go. Just to make sure that
everything is correct. And now let's go ahead
and just move on to this one over here. This one I feel like we
can use our lesser tool. And honestly, with
the last steel, even the unevenness of my hands actually works
because it will just add, like, a little bit of
more variation to it. Then yeah, down
here, we just need to go ahead and paint
in a little bit more or what you can also do
is you can also hold alt, sorry, contra alt
and then paint out some of the mask like that. And now we can once
again surface it, open it up, grab a noise, apply it, plane it. Can I really see a few problems over here that I need to fix? There we go. So
that's plan are done. Okay, let's have a look. So out here there's like
a little issue. Yeah, we need to start
subdividing this stuff more because I feel like it is we are hitting the low spots
a little bit too often. Like, for the small
pieces, that's fine, but we do want to
just if we can, make sure that it has
enough resolution. But this we still bake correctly.
Don't worry about that. Just. Just try and make it
look even nicer than this. Even though this is a tutorial, I still want to, of course, push the quality so
that we hit at least like near AA quality, I would say, so to speak. Over here, this could
use another plan. Like that. There we go. Okay. That piece is also done? Oh, wow. Look at that. I can see a piece over
here that get rid of that. There we go. Okay, so one,
two, three, more to go. Start with this one. For this one, I can probably
just go ahead and just, like, paint in the mask by hand. Should not take too long.
Here we go side one. And here we go sit
number two, noise, open it up. That's okay. Apply. Yeah, it's the same process
over and over and over again. It's just that sometimes it works slightly
different per piece. And also like these
type of feces, this can also sometimes happen. It's sometimes nice
to just quickly paint in a little bit
like that so that it flows in a little bit better, and that's not just
like sticking on top. It all depends kind of on the angle if that
happens or not. This one is pretty much intact. Looks like not much stuff
going on that's song. So let's go ahead a solo. Let's go ahead and
go in this one. So yeah, for this one, definitely
subdivide it once more. Let's go ahead and
just hold control and paint in our mask over here. You know what? Let's go down here and just keep
this also intact. There we go. Surface
noise, open it up. Apply planet, a little
bit wherever needed. There we go. And dynamesh
it wherever needed. Dynamic trim dynamic.
So many names. I always get confused. Because it's
surprisingly hard to sculpt and talk at the
same time for some reason. I don't know why. Modeling and talking is not that difficult, but sculpting and talking
for some reason for me. It's always a bit
more difficult. For this one, let's just go
ahead and just subdivide. And let's just do a simple
by hand masket last piece. Finish this thing
off. Over here. And then we are going
to make this piece absolutely perfect
to the engine. We're going to make sure that it is perfect in the engine. And then once that is done, then we can go ahead and just follow the same workflow
for all the other pieces. At which point it's
just spending time creating them, which no problem. Takes time. Surface
noise, opening up. A press apply to mesh. Let's go a plain
writ. Here we go. And the other side
also. Trim dynamic it. Let's give it a little bit
more broken areas over here. Oh, this one is
quite bad, actually. I am going to make my brush
a little bit smaller. So that's one. That's one. And see it over here also. Yeah, you know what? That should pretty
much do the trick. Okay. Perfect. So all of our pieces
are now finally done. So here we can see our high polymsh it's looking
pretty cool. If you want to do like a
cool, quick render, you can, like a nice angle
like over here, and then just press
the PBR button, and then it'll create just
a nice looking render. But in general, that's
looking pretty good. So having this done over
here in the next chapter, what we will be
doing is we will be turning this into
a low poly mesh, and then we will go over to the UVN wrapping and just
the general process. So for now, let's go
ahead and save this, and let's continue with
this in the next chapter.
38. 37 Taking Our Big Concrete Rubble Pieces To Final Part4: Okay, now that we have
these pieces over here, D, what we're going to do
now is we are going to turn them into low polis, U Von rep, bake. Then we will do the rebar, then we'll do the mask creation,
then get it into reel. That's roughly the flow
that we're going to go for. Let's go ahead and go
over here to this one. You can, if you want to
combine them together and then do a decimation
master. Let me have a dk. Yeah, that might actually be a little bit easier.
Let's go ahead. I just hope they will
properly divide everything. That's the only thing I'm
worried about the divisions, because some of them are higher resolution than other ones, that the divisions would
not work correctly. Let's do one last saves, just make sure and then
the next save as would be, of course, is a low poly. Just grab the top one, go down to merge and
press merge down, and then just press always
okay and then just click on it a bunch of times until everything
is merged down into one. Now what we can do is we can go into our decimation master, preprocess current, and this pretty much like the same
thing that we've done before. We are only at 2.8 million pool, so it's not that much, so I will pass video until
it's done. Here we go. Let's just get started
with 1% because I believe that that is yeah, okay. So as I said, we do need to be a little bit careful. So
let's have a look. Okay, it looks like that it
nicely evened everything out. So now if we just have a
look mostly at this area, let's go a little bit lower. So let's decimate Gerns again. We are at 28,000. I want to get it around probably like 8,000 or
something like that. So let's do 50% because I do
want to be careful about it. But these ones it's
always like a guess, so I'm not completely sure
how low polar I can go. Yeah, this is probably
good 7,000 yeah. I might look like super, super sharp and everything,
but don't worry about that. That is looking, I
can live with that. That's looking good. So now
that we have done this, all we need to do is we
just need to export this. So let's go ahead and go into
source exports, sculpts. Damn. Oh, yeah, collapsed.
Collapsed. Concrete, big 01. That's what we called
it. So let's do this. Collapse, concrete, big 01, underscore LoPly and export. If you want, you can
also go ahead and do a quick saves and this time, do a saves, underscore LP. And you're safe. And once we've done that, we
can also go ahead. We can also maybe,
click on the sphere, load two and grab our
sculpt over here, and then we'll
just load that one in and then go ahead
and do an export all subdols and we are going to export these ones underscore HB. There we go. Okay, so
that's not all exported. Let's go ahead and
jump into TresMx. So we got these ones over here. What I'm going to do is I'm
going to go ahead and let's start by probably just
attaching everything. So let's just go to attach Oh, we need to convert this all
into an added poly first. So right click, convert to added pool and now we should
be able to attach it. It's because we added
poly modifier on top, and then it doesn't
allow you to attach it because it is
linking together. So we got this one, and I'm
just going to drag my backup. And now what we can do is we can go ahead and make an import. The other ones, let me just
quickly navigate to it. Here we go. Sculpt, concrete,
underscore low pool. Once again, just have import
as at the pool turn on. We can go ahead and we
can input this over here. So that's all looking fine. Now at this point,
what I'm going to do is I am going to
go ahead and just detach these because it makes it a little bit
easier for me to unwrap. Unwrapping for these is a little bit more of a pain compared to, of course, what was it called
the pillars or the beams. But it's still not the
most difficult thing. So I will just show you once
again like our example. So this is looking pretty good. Yeah, not to hypolO
course, if you want, you can do actual topo,
if you know how to do it. But that would take so
long for this many pieces. I'm talking about full time days worth of time just
to do that stuff. So we are not going to do that for now, not
in this tutorial. Let's center all of our pivots. Let's isolate and let's
have a look at this one. With these, what we are
pretty much going to do is we are going to select
the top, select the bottom. Iron those out. So as in set those as their own UVlins then we just grab basically one
edge somewhere. Or sometimes if we have
a really long shape, then we will grab two edges, and then we will go
ahead and unwrap those. So if we go over here,
we can select top, and we can select the bottom. Then go ahead and just
turn off your ax, you can leave on your ignore
back facing and then go in and basically make your
edge a little bit cleaner. Remember, we do have a
technique to get rid of these really strong edges inside of unreal using the mask. However, that doesn't
mean that we can go too messy with the edges because then it will
still look strange. No, you know what? I'm
going to keep this one. And I'm just going to
go ahead and do this. Here we go. So this is often the quickest way to unwrap
this kind of stuff. And then over here, we
can go ahead and we can. Let's can, nicely go around it. Let's select this one. Let's go around here. We have these ones over here. Ah, yeah, let's also keep that one nicely like
run along here. And here, we just need to
make it look very decent. Don't have any
really strong cuts. This cut is probably big enough, but if you want,
you can remove it. Fresh, just make sure
that you don't have too strong of these type
of cuts here and there. Here. Sometimes I
just like to do this. And then what I
will do is I will just go ahead and
continue on like that. Once you've done that, we can go ahead and we can iron them. And let's see. So
we have this one. Let's relax a couple of
times. That one looks fine. This one, we definitely
need to relax. Okay, that's weird. Let's go
ahead and do another iron. It can be because the jom tree is a little bit too broken. So if you relax,
here, there we go. So sometimes ironing them at the same time is not as good as just doing
them, like, separately. In any case, now that
we have these two, we can go ahead and
just press contra I press iron so that
we have this shape and then just find
a place where it is fairly much hidden and
places seem there. I tend to just go ahead and go for in between a
cavity like this. Now, it depends on how long your shape is that you
want to stretch it out. If I do this one and
just do a quick peel, you can see that this one it's not too bad, so
it's not too long. Also, don't worry about it, like being curled
and stuff like that. If you would want to
make it straight, it's a real pain to do it
and it's just not worth it because of the way that
we have set everything up. The quickest way if
you want to make it straight is probably to
just go ahead and like, add another here to select
another line and break it up. It's probably the
quickest way because then what it will do is
if we break this up, it allows us to unfold these. Do same over here. And basically, you can now here, it's a little bit straighter,
but it's not perfect. But it does mean
like more seams, so I'm just going to go
ahead and know that. There we go. Okay, so
this one is now done. And now what we need to do is we just need to go
ahead and go through the process and do that for
all of them. Let's see. For these ones, yeah, I think the way
that we are using it is already the fastest way. So to be very honest, I don't know if there is, like, a faster way that we
can really do this. It's just some things
are just time consuming. And there is a point where we just cannot optimize
it any further. Now, I'm sure you can
use maybe some type of automated tools that are external from TreeSMX or
that are like plugins. But I do want to keep Oh, I do want to keep this in
the basics of TreeSMx. So let's go ahead
and just iron these. And then what you can
do is you can also, if you want to just
iron them separately, once you have them selected. This stuff looks strange. See? Here, that's broken. Maybe if we do a quick peel. Okay, so quick peel, let's
just use quick peels. I do not use them often. But then again, I use them. The ironing I use mostly
for hard surface. So maybe it is better
for this because it feels a little bit more organic
to just do quick peels. So now, once we have
invert selection, we can select this
stuff, break it up. And then what we can do is
just another quick peel. There we go. Yeah. So it doesn't take too long
to do this kind of stuff. What you can do is you can
just right click and hide whenever you have one done just so that you do
not get confused. And then what we can do is we can basically just move on to the next one definitely doing the face selecting
is, in this case, easier than if you would need art edges and everything or art
sems because you can, of course, art seems
also inside of Tres Max, but it would be very
time consuming. This one is a little
bit trickier. Let's see. Let's go around here. Let's go ahead and let's see let's select
this around there. Yeah, this one is
definitely a messy one. So we will have some seams over here that might not
look as amazing. Um let's see. We cannot have them connected. So let's just do this. Don't
forget, these small bits. So that is it for this one. Wow, there's, like,
some serious problems going on with the
edge over there. So that's stuff that
we do want to fix. So let's first of
all, just finish our selection because I don't want to thirst, throw it away. Here we go. So what we can do is we
can just quickly iron this and we will get
back to that later on. If you ever have like
a selection dis, just convert this
back to Addipol and these are surprisingly bad. So what I like to do is, I like to just look inside of the mesh, select it, and press collapse. And that will basically
just collapse all of these verts
together into one. And by looking inside of it, it will kind of help us
here to just improve it. We merge it down here. We make sure that there's no
weird face going on. Wow, this one is really broken. I'm surprised by it. So let's go ahead and once again,
collapse this one. There we go. You
can still change the shape in this low
poly that's no problem. That one is not so much bad. Oh, yeah, here's another one. But yeah, a little bit strange. If we see them on other places, we will, of course, fix them. Over here, it does
not even want me to. Here, it doesn't
even want to weld. Which is sometimes a
little bit annoying. If we cannot collapse that, can we cap? There we go. So we are able to cap Boley. Okay, so that should be fine. So yeah, that's the thing
with doing out optimization, your geometry will
simply not be as clean. Not even close to
being clean even. So what we can do now is we can just go ahead
and select this one. Let's do a proper
iron and unfold. Select this one, another
proper iron, unfold. And now what we can do
is contra, iron it out, and maybe in this area over
here, we can do, like, a cut. And I don't know if
that's all that we need. You know what Let's also
do like a cut over here. Let's split this up into
That's one and number two. Okay, so that one is
also now working. And then later we
will, of course, also just make the
rotations properly. Over here, it has some stilts. So this is probably
where things broke, you can see inside
of the geometry. That does mean that if
they are broken here, we most likely need to go
back into the other ones. Let's right click and nhight. So this one we fixed, maybe these ones like
I did not notice. Oh, yeah, here I did not notice
because it's a little bit hidden that it also has
like some broken jumry Hmm. Normally, it doesn't
break this much, but it's good that
we notice this now. So the only thing that
we really need to do is we just need to do a
double check on our models. And for the ones that
we already unwrapped, just go ahead and select everything and do a
quick peel again, just to make sure that it
is all nicely correct. Or you can, of course, just
do like a quick relax. So let me just have a
quick look over here. Oh, how did I not see this? This is what happens
basically with the noise. Remember how we said that
if your noise breaks, that it will look really bad. Yeah, this is dead. Let's see if we can literally
just collapse the entire thing over here. Okay, so that works
surprisingly well. Now I'm going to go
ahead and I'm going to delete these faces over here, and let's do Capli. Okay, any other ones? So these are quite hacky
techniques to clean things up. But even though they're hacky, they do work, but now, of course, I do need to
make sure that here, let me just quickly
delete some stuff. I just need to make
sure that, of course, I find all of these problems because wherever I
don't find them. On such a large model, it will be quite notable if we get the camera closed if
we have a problem like this, and it's a real pain if we would need to fix this later on. So this one, let's
just do a Capli. And what you can also
do is you can do a cap, and after the Caple,
you can target wealth, and that often does also work. So we've got that one done. I can see like a little
one little bit over here. Just go ahead and collapse that, push it out a little bit to
give it some more space. I believe that that is it. Okay, so that one is now done. There we go. Okay, so what
I will do is I will add one more thing to our workflow, and that
is that basically, before we do the unwrapping, we just move around it
like this and we just make sure that everything
looks correct. So this one all of
a sudden does not have any prompts, typical. Okay, so let's go
ahead and open up, or did we already do this one? No, see, we did not do this one. So let's go ahead
and select the top. And the bottom, we do need to go ahead and select
like a few like that. Let's turn off our
angle select so that we can do more
precise selecting. Surprised I didn't note it for the other ones because I'm, of course, looking at
it quite close up. So you would think that you'd
notice stuff like that. Well, maybe I'm just blind. When you do something over
and over and over again, you tend to forget,
small stuff like that. Okay. That seems to look
correct. Let's do an iron. Let's do a quick peel both
of them. There we go. And let's contra iron. And this one I'm going to go
ahead and leave, let's say, over here to cut over
here. Quick peel. Yeah, see, that's a nice one. Okay. Alright. Selection. Let's move on to a
larger one over here. This one I can already, see
some problems over there, but let's move up close. Machines maybe it
is not that bad. Whoa, for some reason, I was
starting to speak Dutch, which would not really be useful for many people
that are watching this. So over here we are
just going to go ahead and collapse these pieces. We have this one, just delete
like one of these faces. Let's try it again. Collapse. There you
go. Now you work. Oh, yeah, see, this one
definitely has a bunch of them. Actually, no, you'll
want to keep this one. Can wily see another
one over here. But it looks like
that's all it needs is just here we go, target. So yeah, once we did
like the element select, it will have basically
not selected all of those errors,
which, in turn, for us now kind of helps us
because it makes it easier for us to see if
there are problems. It's just a bit
tedious that we need to double check everything. So yeah, let's see. So the edge, sculpting, and adding noise, that one I
will do in the time lapse. The UV unwrapping, I will do the fixing in time
laps, but then yeah, in the UV unwrapping,
I will most likely also do in time laps just because it is the exact same thing
over and over again. I know you guys don't
like time lapses, but we kind of need to push
them somewhere because we have already spent I don't know how long on this one model. Let's delete these phases. But the general idea is that if we need to do all
of these in real time, we will probably have 10
hours of just doing this. And well, I'm sure that no one is really in the mood to
see 10 hours of that. So that is going to be the
plan for next chapter. But of course, other important
parts we will not do. Oh, yeah, you can see, like, some leftover pieces
that we just need to delete Here we go. It's by this point delete
that size reference also. Let's do this one.
Wait. What am I doing? I didn't unwrap, did I nhight. Yeah, I didn't even
unwrap this one. I'm just going too fast,
like Ntaxy select this. And now I feel like
I saw something wrong. I'm not sure what it was. Hmm. Strange. In any case, I, of course, still
need to unwrap this. It's not very smart of me, so let's go ahead and
actually do that. So I was so focused on
fixing those problems that still quickly do this. You know what? I
will actually make this one go a little bit
further out like that. Um, Okay, so that one is done. Okay. Let's go to the top
one. And you know what? I'm going to also have this included because it's
such a large area. And I do not like to have
these large areas in, like, the rings around it. Let's include this one. Actually, let's
also do this one. Here we go. Oh, I can hear a bell on the background from
like a church bell. So what I will do is once
we've done this selection, I will probably pass the
video until that is over, just in case you
guys can hear it. I don't think you guys will
probably be able to hear it, but just in case because there will be a lot
of silent moments in this. So let's do, like, a quick
peel for this called I. So another iron over here. And this one I am going to probably split up
into two pieces. So let's go ahead and have
one over here and one, then probably on the other side, let's say, somewhere along here. Here we go. Let's cut. And let's then do another
quick peel. There we go. Looks like that we have
one leftover piece sitting in there,
which I do not want. Let's just go ahead and
select that leftover piece to another iron and a
quick peel. Let's see. Is that piece now? Okay, so
now it is properly there. Okay, so now what Go away. Now what we can do is we
can convert suit at a poly, and at this point, we
can save our scene. So we already know that
we've done these pieces. Oh, the church bell has
stopped, so that's fine. So let's just go ahead and immediately move on to this one. Now, this one, we already
do the check for it. And else maybe just do it again. No, here, we definitely
did not do that yet, because here we can see
a lot of broken pieces. So let's go ahead and just collapse all of these into one. There we go. Do make sure when you do the
collapses that the shape is not too far away from the original shape because else it will mismatch
with your hypo. But this is looking. Yeah, this one is
luckily not as broken, so we can go ahead
and we can unwrap it. We are quite a bit over
time at this point, but let's just go ahead
and just finish off this unwrap and then yeah, it will just be a
slightly long chapter. Let's go ahead and
let's get rid of these. Yeah, yeah, like these. I just don't like those
really sharp edges like that. That pinching out. There we go. Oh, what happened to
my other selection? I thought I made two
selections, butterca. In that case, let's try again in case I did not
make two selections. Let's go ahead and it's
like this, this here. There we go. Okay.
It's another selection that's just working fine. Select it, contra I, iron it. This one. Yeah, let's also do
two cuts for this one. So one over here and
one on this side. And now, let's go ahead and do a pelt or unfold or whatever
it is called. Here we go. Okay, three more shapes to go. Let's go ahead and go
for the big one now. And for the big
one with your, we just want to go
ahead and clean up some of these extra
bits that are leftover. Normally, it's not this bad, so maybe in the next chapter, I would do them separately just to double
check the geometry. Oh, sorry, I almost lost my
voice there for a second. So yeah, for this
one, we will need to go ahead and do
an entire check. Though I wonder if this one
has, like, a lot of stuff. I feel like that the shape is so big that it wouldn't
have as many arrows. It's more like for those
really small shapes that it starts to
break a little bit. Okay, so so far so good. And you see me often just like selecting because if
I select something, the camera often just rotates
around that selection. So that's why you
see me randomly like selecting some vertices here and there. Hmm. Really, not a single mistake. Ah, when I said it. I found one. Let's collapse. Looks like we need
to delete the face. Collapse again. There we go. And let's go ahead and continue. Only one is not too bad. Or it's not bad at all, even. Okay. I believe that we are
reaching pretty much like the end or like the beginning, it's a bit difficult for me to see exactly
where I started, but it seems like this is about the place where I started. So, unless I see something very obvious, I think it is fine. Okay, so check done. Now what we can do is we
can go ahead and iron this. Let's go ahead and
select these two, turn off our select by angle. Let's go ahead and just start by nicely selecting around here. Yeah, this is going
to definitely be like a really long chapter. And probably also
for many people, a really boring chapter. So I do apologize for that. It cannot all be fun and
games, unfortunately. I'm trying to go as fast
as I can while still, of course, keeping this
a little bit neatly. Let's just get rid of these. Let's go over here. Yeah, that's probably blend this one out. Let's not include that stuff. Yeah, we can include
that. Can include this. Let's not include this one. Maybe only include
these few over here. Yeah, I think that's
pretty much it for this side over here,
maybe like almost. Yeah, there we go. Let's
flip over to the other side. Do the same thing. Just
make it look nice. Let's see. Over here, this one has, like, a
lot of stuff going on, so just do that. Same over here. Let's just kind of,
like, move it along here and here and around here. There we go. Okay. Yeah, this should all
work. Almost there. For this one, at least, that we still need to do
two other pieces, but at least this
is the biggest one, so this is like the one that
you kind of want to get out of the way. Okay. Okay. Was that it? See? No. Missed a big
gaping hole over here. Do you want to make
sure that my back side is still properly selected. Oh, I think we're not
even that close yet. We still have quite a
bit of stuff to go. Let's get rid of
this site over here. It just keeps on going. Come on. Just let this be the end. Sorry, it takes long guys. Can't really do
anything about it. It just needs to happen. I believe that now we have
finally reached the end. So let's iron this and let's
do a quick peel on it. No, we are missing something
over here. You see? So I still that's
what happens when I try to do stuff too quickly, or I must have accidentally deselected something while
selecting the other side. So maybe next time I will
just do the sides one by one. Yeah, definitely,
next time I will do the sides one by one because I feel like I'm missing
a lot of stuff here. I don't even want that one.
Okay, let's try again. Yeah, so now that
is looking correct. Get this small one over here. Okay, let's tw it once more. Quick peel. Move it over here. And don't forget that we now have some leftover
etches down here, which we can then
move back in here. Okay, so we have
these two pieces. Let's go ahead and select them. Contrai iron. And this one we definitely
need to split up into, like, quite a few
pieces in order to make it all work properly. So what we will do is we
will go ahead and let's see, say, split it up over here, and then maybe like
another split Here, then maybe a bit further
along another one. Over here, and maybe a little bit further on. Another one. Let's see. You guessed it a little bit further
on another one. But there we go. Let's cut this all up. Let's do a quick
peel on all of them. Double check. That's
looking correct. On things that we do have a
few pieces sitting over here. I don't know exactly where
these pieces are coming from, but it looks like
they're hidden. That might be because they
are a little bit broken. I select like one.
You cannot see it. Those might be broken.
For now, that's fine. Let's just go ahead and cover to Apoli I'm not too
worried about that. We have two more pieces
to go over here. Let's go ahead and do this one. Let's go ahead and open oh, yeah, we need to
do a quick check. But this one, yeah,
it looks fine. So as I said before, let's
just do this time one by one. So I do want to extend this
out a little bit more. You can see over here.
Let's do this iron. If you want, you
can do an unfold. Actually, no, I don't want
to do that one. Iron unfold. And now let's go ahead
and go to the other side. Do quick angle select. There we go, iron, quick peel, select both
of these, contra I, iron. And you guessed it just select
like one line somewhere. In a sort of hidden place. I know that we
cannot always hide it perfectly, but there we go. And then there seems to be
like one edge over here. Yeah, so that's when
we do need to go ahead and select because that one is supposed to be
within this one. So let's iron and quick fold
unfold again or quick peel. There we go. And finally, we have the last one over here. So let's go ahead and oh,
I'm going too quickly. I need to, first of
all, double check, and this is why I
need to double check because we have this kind of
stuff going on over here, which is quite insane. Let's see. So let's why
is it not giving me my Grid. Let's just do a quick. Oh, that's why I accidentally
add something turn on. There we go. Now we can see it. So for this one, I
need to double check. It seems like that there's like a double pace over
here that I want to, like, kind of, get rid of and
now if I collapse this, no. Let's go ahead and just delete these all of them.
Collapse this. Let's do a cap poly over here, and then let's go ahead and
use our cut tool to basically cut between these two
pieces over here. That one was really broken. Hopefully, nothing
else is broken. Now it looks great. So let's
go ahead and do an added UV. And let's go ahead and go in and select the top to get southward Here we go. Iron, Quick pew. And now let's go ahead
and select the bottom. Well, the button is
actually selected Wi good. Finally, one, one out of all of them that selects
pretty decently. But let's invert selection iron. This one can probably
also use two splits. I do see another
you'll quickly just convert to an added pool because I see another
problem over here, but I just want to quickly
collapse and maybe move up. There we go so that you
can see it a bit better. And now what we can do is we can just go ahead and art
our added poly aain. And if you want, you can
even just do another iron. And then what we're
going to do is we're going to
select one here and one probably like down
here. Here we go. Break. And let's
do a quick peel. That one's looking good.
Another quick peel. That one is also looking good. Okay, perfect. So
that's it for our UVs. What we will be doing in
the next chapter is we will go ahead and we will
set all of these UVs, of course, within our
one by one square. And once we've done
that, what we can do is we can start with
the baking process.
39. 38 Taking Our Big Concrete Rubble Pieces To Final Part5: Okay, so what we're going to do now is we
are just going to go ahead and pack everything
together in our UVW nwp. Let's add a Unwrap UVW modifier
or you can, of course, press the Edited UVW, and then here we have
all of our maps. Let's go ahead and press
Contra and select everything. What I do like to do is
let's just quickly add a reset X form in our utilities because this often just make sure that the
scaling is correct. Because sometimes it can
be small mismatches. It's a little bit
hard to explain, but you are safer if you just do a reset X form and then press the rescale elements
over here. Like that. Now at this point,
we can temporary just to rescale and rotate, set up padding to
0.001 and press back. And now all that we need
to do is we do need to, of course, rotate this in the correct location.
So let's have a look. This one, Oops. I miss click. This one needs to be
rotate like this. Over here so that the
stripes are going this direction because
these ones we are going to go ahead
and use our stripes. So we do want to make sure that all of these are rotated
in the correct direction. This one needs to be
rotated like this. This one needs to ironically be rotated back. This
one like this. It does need to be absolutely perfect in terms
of the rotation. But you do want to just
make sure that they all kind follow the same
rotation pattern. This one needs to be
rotated over here. This one here. This one here. Yeah, like these I'm
not too worried about, so I think that is it. Yes, stripiness. Stripiness, that's fine. Okay, yes. So it looks
like that, that's it. Then you can just
pass Contra again, but this time just
turn off rotate, and then we can pack it
again together like this. Now, of course,
as I said before, you can make the packing
a lot better if you want. Like over here, there is a lot of space left for you to maybe, like, hold Contra scale this up a little bit
and stuff like that. I personally will just
leave this as it is now because I'm not too worried about that small extra
bits of resolution. So this now all done. We already have a smoothening
on, but just in case, let's add a smoothing group or a smoothing
mollifire and turn on one in smoothing and then
convert it soon add a pool. And now, this one is
ready for baking. So now all we need
to do is just go to file export export selection, and this one's going
to be in sculpt, collapse concrete big 01, and don't forget to
export it as an FBX. Let me just quickly click on the name because if
I click on the name, I can just do this
score low poli, save FBX, triangulate turn on, and then we can press Save. And now all that we
need to do is open up Mm set and start the baking. Okay, so I have loaded
up our baking scene. Now, if you want,
you can right click and you can duplicate
this baker. However, I know that by the time that we have all
of our high polis in here, that would be a lot of
data inside of Mm set. So I rather just
delete my old ones. And then import my new ones over here and give that a
second to import. There we go. Then we can just go ahead
and on our materials, just press the lead like that. And once this is done, all we need to do is we
need to go ahead and just drag in the hypol into high, low pool into low,
turn on a hipoly, quickly go into our low
poly and just double check. Now, what it will do
is it will just keep the same cage as that we
used for our pillows, which happens to often
already be totally fine. So yeah, you just
want to double check. Now, of course, down here, yeah, there's a little bit of, like, squashing going on, but I'm not too
worried about it. If you are really,
really worried about it, you can technically
grab this piece, both in high and low poly and
then, like, move it away. So I don't know if
the hypol here. The hypols like separated
and the loply separated. So you could
theoretically, like, select Subtool number five, then go in here and just try
to, like, also select it. But that's always a
little bit tricky. Yeah, I just first of all, select this one and then
stop do number five. And then what you can
do is you can press W, and then you could move
this away like this. So there are ways around
it if you really want to. I personally do not think
it will be a problem. So I always have the mentality that I will fix it if it becomes a problem and not so much before it when it comes to this
kind of small stuff. Then all we need to do
is set our location, so we are going to go bigs. Maybe it's better to just create one folder
for everything. So let's call it one folder,
concrete, big collapsed. Concrete. I know the name
is not exactly the same. And we call this collapsed. Concrete, big
underscore zero, one. And that's safe. Four
k, normal, that's fine. So all we need to do now is
just go ahead and press Big. Give it a second to load in, and there we go, and
then press P to preview. And let's have a look. Okay,
so that looks pretty good. So we got, like,
the typical look. Of course, you can see that it feels a little bit
lower resolution, especially like on these areas. So you could, if
you want, improve that resolution by increasing
the scale a little bit. However, because it
will not actually apply as much when
we are unreal, I think I am fine with this. So let's go ahead and we have
this one let's save scene. And, yeah, that's
looking pretty good. So our bake is done now what we are going to do
is I think it's time to just quickly in
unreel already set up a little bit more of our rebar
and everything like that. I think that would
probably be next step. I am now going to go in here and I'm just
going to move this out to reduce the
clipping a little bit. In some locations, because, of course, now our shape
has changed a little bit. So sometimes there might be a little bit of clipping going on, but we can just do this because after
we've done the baking, that is no problem to just
then move this around. And now what we can do is
we can work on the rebar. So the rebar is going to be
in a few different cases. Let me just quickly
have a look over here. So we do need to be a
little bit careful. If we place the rebar too much or too far
along the outside, what would happen is
that we would get a lot of clipping going on in like these difficult areas over here. So just keep that in mind. So, let's first of all, just work on the
bigger rebar pieces. Now, I believe that
we can just steal it from the rebar folder over here. So we got these ones. Let's just go ahead and
hold Shift and just drag to copy it and then drag this into collapsed
big variation one. Turn off rebar. Okay, so these ones, I do need to separate into
their own little pieces. But yeah, these
are already fine. So what we need to do
is we just need to go ahead and just select
one plus detach. In your Solbn scripts, which we have used already, there is also an
object detacher note. If you have a lot of
these and you want to detach them all
at the same time, you can use a note called
the Object Detacher. So just have a look in your Solbin scripts and
you can find it there. Now, at this point, I'm going
to go ahead and for these. Let's start by just
turning on snap rotate, rotating them 90 degrees, and then it is just a matter of not turning on snapping. Sorry I
didn't need to do that. Just placing them randomly
in some locations. So let's say that I
place one over here, I can turn off my Yeah, I can turn off my snapping. I can place like another one, probably like down here so
that it is really holding on. So let's say something like
this over here. There we go. Then we can go ahead
and do, another one that maybe let's see, let's grab this one and maybe it will hold on these pieces. So like this, we can
nicely make it as if it is really like holding
on to everything barely. So it is only just. And
then we, of course, have those much more thinner
bar pieces that will then enhance the effect that it is still
holding on to pieces. So we are now really working
on this stuff over here, where even you can see that it's completely hanging
thanks to the rebar, it is still sort
of like in there. So I'm starting with just
placing the ones that I have, and then it is just going to be a matter of copy pasting them. But yeah, this one, I just want to take properly to final, and then you know how
to do everything. So that will be
very handy for you. So let's go ahead and
duplicate this one, and let's just rotate it and
just, like, stick it out. Rot a bit more. Here we go. Stick it out over there,
maybe duplicate this one, have another one that is kind
of like sticking out here, maybe another one and this
one we will like here, just like rotate or
bend it a little bit. I need to rotate it like
a different direction. Come on, just let me rotate. Oh, it's being really
difficult. There we go. Okay. So we got one over there. It would be good if
we probably still have another piece
sitting in here. And then what we have is we have all of
these rebar pieces, which we will then nicely
also move in here. Although for those I'm
going to do the bending, most likely a little
bit different in a way that it will basically speed up our workflow even more. So I will show you
what I mean with that. First of all, let
me just sometimes just twice like use 1 bar for multiple purposes like this. And maybe let's do, like, one more that is kind of just sitting around here.
Okay, so we got that. So basically, for these pieces, what I then like
to do is I like to already pretty much just give them a little bit of a bend, mess them up a little bit, and then we will just reuse those pieces
over and over again. So if we go in here, let's
go ahead and just add the band modifier on I
think the YXs degrees 90. Yeah, give it a little bit
of, like, a downwards bend, and you can go into your bend
and you can just move it like this also you don't
always need to use the limits. So we just have a
band like this. And once we've done
that, we can also do some random variation like
adding an added pool. And I ever showed
you soft select? Soft select is pretty cool. If you go to soft
selection and turn it on, you can basically set
a file off and it will basically just like
softly here, see. It will kind of softly
move everything around. So this could just be
interesting to just add a bit more variation to
our shape like that, see? And we can then go ahead and
do the same with this one. Let's say that for this one, we, for example, would
only do a soft select. Can go up here to
soft selection, turn it on, tone it
down a little bit. Here, and even with
soft selection, you can kind of like,
also art and bends. Here like that. So we have
another one that's uneven. And then this one, this
one, this one, I wanted to. Let's go ahead and grab
this line over here. Let's go ahead and go to
add the jom tree and turn on preserve vs. Let's
push it out like this. Select this line, push
it out over here. And what I'm going to do
is I'm actually going to go ahead and I'm going to, sorry. There we go. I'm going to delete this strip, and then I'm going to move
this a little bit closer, and I'm going to also
do that over here. And basically, my goal is
to then make it all just, like, a little bit
closer together. Here. So now I can just grab
this one and I can move this because there's empty space in between, you won't
really notice. Now what I'm going to do is now I'm going to add the bend, YXs 90 degrees, set in the
minus, and just go ahead. And this one I want to give quite a strong bend like
you can see over here, and then maybe like an
added pool and then add some soft selection to this. Let's see, maybe move this
up. Yeah, there we go. Give it like something a little bit interesting like that. Okay, so now that we have
done all of these pieces, now what we can do is we can
pretty much just reuse them. So let's start with just
converting them to an Addipl. Let's move them here
and then give them, like, a proper scaling. So yeah, this looks like a
pretty good scale that we have over here. And then it's just a
matter of going in here and sticking
them in here in, like, some logical locations. So let's say that sometimes
you want to have them, hanging out in case we have any gravity,
we can do this stuff. But Wie don't go too far.
This probably far enough. And also in here,
this is perfect. If you have them in
here, this is really great because this
will really sell the look that it is just
hanging on to all of the bar, compared to that it is
just floating in the air. So I can do like one of these, feel free to also then, for example, rotate this. Let's say that we move
one over here like that. So we can do, like, a
bunch of this stuff. Maybe over here also,
like, a little bit. Don't go too overboard,
I would say. Like you still want to do it, yeah, just not too much because then it will just
look a little bit silly. We still want to gamer fight a little bit. Let me
say it like that. So with that, I just
mean that it is like a typical game where it is
not too hyperrealistic, because if it is
too hyperrealistic, we would need to have rebar
absolutely everywhere, and then it would
just become noise, and it would actually
not look as nice. But if we do
something like this, this should be fine.
So we can, like, here. Just here and there, have these pieces
sitting in here. Go ahead and scribe, for example, like this
one, stick it out here. And you can see that
I just leave it quite a bit, quite a big area. I just leave inside of my mash that it is just sticking
out a little bit. Let's go ahead and
have another one over here where it will just be kind of like
sticking out like this. We can also reuse
this one over here, and that will look quite cool. And once we've done
this, we are going to start painting in our masks, and then we can get
everything into in real and that will look nice. But painting in the masks for something like
this does take once again a little
bit longer. Let's see. I want to grab yeah, I just basically look
at the shape to see if which one I need to grab
or which one I need to use. Here's like this
one I want to use, just to still get some
variation in here. So we can move this
one down here. And let's see. Let's duplicate this one also over here so
that it is still holding on. So here there's just, like, a
lot of entangled entangled. I think is the word
rebar, like that. Then what we can do is we can give it like maybe like
a little bit over here, but just give it like,
yeah, something like that. And if we go down here,
we can go ahead and we can add some extra
rebar in those areas. And these areas,
for some reason, I'm starting to go
quite slow with PC, maybe because we have every
single thing in one scene. So if that is the case, I might be a little bit
worried about later on. So then we might split
the scene into two, just to make everything a
little bit more manageable. But it's not like we have that much stuff going
on in the scene. So if the only slowness is, like, when we duplicate it, you can see that little yeah, you can see it just needing a second to actually duplicate. And that's the stuff that we
can that I don't like see. Yeah, it's like a tiny leg, but I'm quite picky
when it comes to slowness and everything,
especially in tutorial. This one, I'm going to, like, stick out a little bit
further like that. So this one is really
like hang on to one area and always have
rebar if this one, for example, this one we
are hanging onto the side, what we can then say is that the rebar is
only in this area, and that is why it is starting to hang off to the side because there is no longer any
support in those areas. So you basically want
to make some sense out of why the rebar is placed
in specific places. Let me just oops. Grab this, so let's push
it out a little bit more. Like that. And you know what? There we go. So that
looks pretty good. So we have iba now also placed. So, that's all looking good. So let's go ahead
and save scene. Now at this point, this one, we can go ahead and
we could already export. So we have this. We can file export selection, and we are going to
export this to unreal, collapsed concrete
big variation one. Yes, I want to replace it. Save. And now what we're
going to do is, first of all, let's go ahead and
go into substance paintal to paint our mask.
40. 39 Taking Our Big Concrete Rubble Pieces To Final Part6: Okay, so here we are
in substance painter. We are going to
create a new scene, and this time we can use our
destruction mask template. Then for the file, we are
going to open up our lop. The only thing is that I
hope that we only have one material on it
because I did not check. We can go also to art and we can also art in our
normals. Where are you? Um Am I blind or Bags. That was it Bags. There
we go. Open it up. Let's have a look. Okay. Oh, yes, we only
have one material. So let's call this material
collapsed, concrete, big 01. And all we need to
do now is over here, everything is already
nicely set up. So we need to art a norm map, and then we just need to
go to bake mesh maps, set this nicely to four K, use low pol meshes hypolen just turn off the normal and
just bake everything else, just to get a basic bacon here. Of course, we don't
need an ID map, and we probably don't
need a thickness map, but it's still good
to just have this. And it doesn't take
too long to bake. There we go. Okay, so
here is our piece. Now all that we need
to do is remember that we created a SMG
material already, we call it destruction. Yeah, here, destruction. So
let's just drag it in here. And then we have our textures. Okay, so for these textures, I believe that white means that we are going to have
it's a bit whiter. Yeah, so white meant
the actual flat areas. So we can go to
our artistic head. And we can go ahead and
then go into a mask. And then it is just a matter
of basically painting in these areas.
So let's press X. So yeah, you basically
just want to go ahead and start doing this. Maybe you can go ahead and go a little bit bigger
in your brush size. But luckily, it's quite easy to see where that
you need to paint. So I know that this
will once again, take quite a while to do. So this is another thing that we're going to like time laps. It's just that's the
thing with destruction. It's time consuming. It is so time consuming to
make stuff like this. Like doing the blockout, that's really cool and quick and easy. Well, yeah, not super easy, but still it is quite easy compared to what
we're doing now. But yeah, once you actually
turn it in the vinyl, that's where the time
consuming parts come in. So let me just
quickly contain this, and I also don't have my
drawing tablets right now. Well, I have it, but I
don't have it turned on, so I'm just going to go ahead
and do this. Over here. Now, once we've done this,
we do need to have a check on our edges to see how
bad that those are. And if we need to apply another second masking in
our G in our green channel, this is something yeah,
we kind of need to just check because it
will take a while. However, for these pieces,
I do have a way that we can make it a little
bit quicker to do. So I will show you, but it would still be a little
bit of manual work. So we'll see. Basically, what we're going to do over
here is just let's quickly paint all the way around to get started
with over here. And, yeah. For this one, now let's set my brush
size a little bit bigger. Now it is just a matter
of painting this entirely in you can try and
do a symmetry. So up here, you can mess around with the symmetry options. However, because
these pieces are not completely flat and they are actually hanging off the side, symmetry would
often just cause us needing to remove a
bunch of stuff again. And in the end, I feel
like that it's probably not save too much
time and just be more frustrating than
just doing this. But over here, this is now fine. So now what we can
do is we can just go ahead and conti onto
the other side. Yeah, it even already did a
little bit on the other side. It tends to sometimes
shine through. Also, another thing
that's a little bit annoying is
that it's difficult to see everything from the bottom side because
of the lighting. And yet, this is
not like the kind of lighting you
can easily change. But it's also not that
difficult to actually But yeah, we do need to go in
and now in here. We need to paint this stuff and just make sure that it does not paint
also at the top. So it does sometimes go through. I don't know exactly
why it does that because not like there
is backface culling. I think it is a little
bit same concept as in Zbrush that sometimes it just
gets a little bit confused, and it thinks that it also
needs to paint below it. In Zebush, you have a setting. However, in substance,
I am not sure if there is an actual
setting for dims. I've never actually seen it, so I'm not completely sure. But in here, what we can do is we can just go ahead
and now paint this in, and then all we need to do
is just double check top because they did paint
it on the back face, like you can see over here,
but it is not as strong. So it's not like a
fury strength mask. That's why we need to go over it again. You can see over here. And then you just want to kind
of go in and double check that I did not
accidentally paint over all the edges or
anything weird like that, and then go in here and now we can go ahead and just paint this out last And this one. Oh, yeah, and then
also the dirt. I really want to make
sure that the dirt is correct because
that looks so cool. If we get the dirt to look just white, it will
look really nice. So that is something I also want to just spend a bit of time on. But right now, the
blending over here is probably the most
important thing. Oh, we still have some
pieces over here. Do you recall? Okay. So that's now done. So that is that
mask. At this point, we can go ahead and we
can save our scene, and let's save this one as I'm just going to
call it like concrete, big underscore 01
underscore mask because else it becomes
a really long name. So let's go ahead and
save this. So yeah, the G and the B texture, we don't really need to
worry about just yet. I'm just going to
go to my A texture. And for this one, I do
want to use a generator. So what I was thinking is of
using our surface generator. But I believe white is dirt. So what I almost want
to do is I want to grab my surface generator,
like you can see over here. Tone it down and then invert
it so that we get like here. Set the dirt is not so much
on all of the white areas, but it's mostly just linking
around the sides like that. And I think that would
look quite cool. It might be a little
bit strong than to have dirt on all of
these edges over here. So if you want, you can then go in with
like a paint layer, or we can do, like a
masking and everything. But if you just do paint layer, grab your dirt and just set
the flow a little bit low. You can go ahead and
you can just go in here and just quickly, reduce that effect like this. Like this, or what we
can do is we can ty. Yeah, let's do that temporary. Let's see if we add another
generator on top of this. Let's go for, like, I think Edges fabric
often looks quite cool. That's like an edges fabric. Okay, that's not the
one that I want. Let's go for something a bit. Concrete edge over here. Here. Let's see, concrete edge, for example, turn
off that crunch map. And then in your concrete edge, what you can do is first of
all, tone down the levels. And then in your blending mode, we want to go ahead and
set this to not multiply, but probably which one
is it inverse divide? Yeah. No, that's not the one. Darken. Ighten Sorry, I just need to linear
Deutsche art, subtract. I think subtract is the Yeah, I think we are going
to go for subtract. Yeah. Okay, so subtract is
the one that we needed. That's actually kind of obvious that that's the
one that we needed. But okay, so now we are
subtracting some of these edges. So that will look
quite cool, I think. So let's go ahead
and save our scene, and let's go ahead and
export this already. So we are going to go ahead and I'm just navigating
to my text folder. This is exciting to see
how everything looks. So let's go ahead
and in here, masks, and we are going to
grab our what is called destruction destruction
destruction mask, taga file, and let's just go nice and high at
four K to get started, and we can always tone it down. And safe. And now we are ready. Okay, here we are
inside of unreal. Let's go ahead and just
start importing everything. First of all, let's
go to textures, and let's go in our masks. And we have a concrete
big mask over here. Yeah, that looks fine, I think. And then we will go ahead
and go into our normal maps. And import our normal map. Double click on it and just flip the green channel around. And now we have the star
of the show over here. Right click reimport
our big concrete map. Press done. There it goes. Now this is how it
looks over here. Okay. I just want to make
sure, wherever I see it. Yeah, that works quite well. Yeah, here. So in
most locations, it is working quite well. Of course, it looks a little bit strange because everything
right now is sharp, and then all of a sudden,
we have a soft one. But if we go ahead and open
this up, we can go in here, and the first thing
we need to do is just get rid of this gray channel because that one is
no longer valid. So we have isolate. Okay, so we first
of all, need to have a material that
beams concrete. You know what? No.
Let's do a proper one. For my mass material, let's go ahead and
create an instance, and let's just
call this concrete underscore big underscore 01. Let's open this one up. And we are just going
to go ahead and start with like a really good one. So let's turn all of
this stuff on over here, has detail normal, has dirt. We can turn all that on. Then we are going
to go for concrete stripes in our base color. Broken just have
a look over here. So concrete stripes
in our base color. Concrete. No, wait,
that's a blend. Here we go. Normal
map, roughness map. And then for our blend,
we need to have, I believe the rebar, but
I'm missing something. So let's just double check that. After we've added this, then we need to have
our mask in here, and we need to have our
detail normal in here. Yeah, I feel like I'm missing
something, but we'll see. So we can now just go
ahead and in our concrete, we can go to our materials. Concrete big. Okay, that is the one way around,
but that's no problem. Let's go ahead isolate. So this one is the
concrete Riba. Then we have this
one, which I believe is the first one. So 01. This one is probably 02 then, and this one is 03. Okay, so we can save that up. Now, if we go ahead
and go in here, it looks like that
we want to go in and grab our broken concrete
on the site, actually. Yeah, so our broken concrete
needs to be on the side. Base, normal roughness
and our stripy concrete, we can just use into the blend. Doesn't really matter,
or you can just flip around your mask if you
want inside of unreal. So we got this one done. Now, see, there's something
going wrong in our Shada. There is something going wrong in our shader Let's have a look. So these maps parameters here, these maps are not even exposed. That's what's going wrong. Convert to perimeter, concrete, underscore bar,
underscore base color. Yes. Convert pemter, concrete, underscore rebar,
underscore normal. That was the problem.
Concrete, underscore rebar, underscore roughness. Okay, so those are now exposed. So now that should be fine. And then the blend
should just be the plain concrete,
actually, yes. So we got this one,
save it. Here we go. Now, let's just do this again. First of all, the
concrete blend, I want to keep as the
concrete without rebar. And now all I need to do
is I need to flip around my these rebar pieces over here to be the concrete
stripes, normal roughness. It is going in the
wrong direction. That's not so nice, but I
have control over rotation, so I can actually control that. So we have these ones now. Now we can go ahead and
look at the tiling. So the tiling, if I
set this to like five, ten, let's do like seven, maybe. Seven. Now, how is the tiling
being controlled over here? I'm controlling this
by damaged tiling. So yeah, that's a little
bit confusing in this case, but we can just fix the naming. So that is the big
tiling over here. To. Actually, you know
what one is quite fine. Now, another thing is that
we can add some rotation, but before we do that. I'm surprised that did I
miscalculate in which way? Oh, yeah, I miscalculate it, in which way that it's going. But then you also wonder
is, does it really matter? Because I believe depends
on how you look at it, which direction you
would want to go. In any case, we have this. Now, this is a tricky one. I feel like that
we would want to actually flip around our mask because now if I
would go ahead and I would work on my color overlay, I don't know if that just okay, the color overlay gets
included into everything. Then it should still be doable. Let's give it a little bit of an orange look and like
a darker color overlay. Now, another thing
is that I do not see any dirt, which is surprising. Let me just quickly
have a check. Here. I know why because we made the same mistake as that we've done last time. Over here, You know what
I'm going to do is I'm going to go ahead
and I'm going to set all of these maps correctly. Now in my SMRT materials, type in destruction and just right click and just delete it. Then once again, right click and just create the smart
material again, and then it will just have
the correct Smart material. Now it should work a lot better. Let's go ahead and export and let's go ahead and go
into real reimport this. Okay, so now we got this one, and now if we go
into a dirt color and make this like here, this is more what
I was looking for, like a quite a dark looking
dirt color over here. Like this, save. What I'm going to do is I'm
actually going to go into my mask and on top of the dirt, I'm going to add like a levels, and I'm just going to push everything out a
little bit more. Export this once more. By this point, we
can close that one. We can also go ahead and
we can close this one. And let's go ahead and
right click reimport. Oh, that is always
that's interesting. That's always a little
bit too strong. Push my levels back
and let's just set my mask build up a little
bit bigger in the balance. So this one we just want
to take our time and we really want to just balance everything until
it looks perfect. Now, of course,
without our lighting, because we don't have
proper lighting yet, it's always a little bit
tricky to really see how. But if we have a look at this, for example, it's already
shown to look pretty good. So I can see this work the way
that we have it over here, especially when we have
some proper decals, so we are going to have some leaking decals and
stuff like that. So if I have another look
at this, let's open it up. I think what I'm going to do is I'm actually going to make my color overlay a little
bit lighter here, see. This will also
automatically just make our dirt stand out a
little bit better. So we make this a
little bit lighter. Now we have our normal strength. Let's say to like
minus two, maybe. Just make it a little bit stronger in terms
of, like, normal. And like over here, like
that stuff that is working. I feel like my
rebar is just here, let's art this over here, and tiling is fine. I want to set my normal strength
of my bar to minus five. So I'm going to make
it like, really, really strong. Here we go. And yeah, these normals over
here, that is probably fine. And also, then again, have
a look at your roughness. So if we're going into
our roughness amount, it heads to like 1.5 to make
it a little bit less shiny. Then go down here and make it even a little
bit darker still. That will often work or
look a little bit better. And then what we do
need to do is we need to go into our bar masks. And for these ones, I'm going to set all my roughness to 1.5. 1.5, 1.5. I'm just going to make this
all a little bit darker. So, we are now just doing
a little bit of like a balancing pass before
we got this one done. Oh, hey, I never changed
the color for that one. Let's copy our SRGB over here. And that's based SRGB in here. There we go. Okay,
so we got this. So that is already looking
quite interesting. I'm not a big fan of like
this one patch over here. So whenever you have
those kind of things, you can always just
go ahead and add like a paint layer on top and just go into your brushes and
grab, for example, like, a dirt brush over here, press X to flip
the color around, and like, just like, get rid of it, like you
can see it like that. And then we can
always just reexport. Now, I had to have
a look at, like, the seams if we need to
do anything with that. And that's basically,
if you go up close over here, it's
this kind of stuff. If this kind of stuff
over here is too bad, and I do think that
it is quite bad, like, you don't
see it everywhere, but you do see the seams
transitioning sometimes, that's those places
where we kind of, like, want to go ahead and fix it
by adding an additional mask. So what I will do is I will
reimport my mask over here. That's looking
pretty good. Yeah, I think I can see this one work, although I do still feel like I should probably
rotate my UV around. So what we will be doing in
the next chapter is we will ar the systems
that we can rotate this texture around
however we want. And once we've done that, we
will also go ahead and we will add an additional mask
just to improve our UVs. And for the rest, yeah, there isn't much roughness. So maybe also like some
general balancing. But it is working.
So that is good. So we got it working over here. It's just that with
everything else being white around it and having
nothing else interesting, it might not look
as interesting. So let's go ahead and continue with this in the next chapter.
41. 40 Taking Our Big Concrete Rubble Pieces To Final Part7: Okay, so now there
are a few things that I want to change
before we move on. So first of all, let's
go ahead and go into our main master
material over here. And what I want to do is, let's go ahead and call this one instead of damage tiling. Let's call this map
two underscore tiling, just to not make
it as confusing. And then I want to give
control over the rotation. And I probably want
to go ahead and do this for all of them. So if we go ahead and we
have these two over here, the way that this works
is there is a node, and the note is called
custom rotator. There we go. Custom
rotator over here. W note what we can do
is we can insert UV. Then in here, what we need
to do is we need to have a float to default
value being this. I believe that we do not need to enter
it, but if you want, you can enter it by adding a constant two vector over here, and just set this to 0.5 by 0.5. Basically, what this
did does is it will say that it needs to rotate in the center
instead of near the edges. And then our rotation angle, we can go ahead and do a
scalar pemter and call this rotation on
the score angle. And I'm not sure if we need
to do this for both of them, or if we can just use the
same rotation because I think we will only once need
to rotate something. So having this one, if we then go ahead and just
plug this in here like this, and now it is a
little bit tedious. On, of course, it's not tedious to reconnect this because we can just hold Control and we
can reconnect it like this, and then we just need
to flip it around. There we go and do the same
over here, hold Control, reconnect reconnect it like
this and flip it around. There we go. So these are UVs. Do we will make this a lot more cleaner and we will just like
nicely cleaned up later on. So for now, let's
go ahead and save, and with the rotation
angle being zero, it should not in general do
anything. That is concerning. But let's just see if
the norm map is broken, and rotations can sometimes
break the norm map. So we do need to be a little bit careful about it,
but let's you see. So if we go into our rotation
angle and rotate this. Okay, so see, now we are
able to basically rotate RUV I set this to like 0.2, for example, that looks
like quite a nice rotation. And I'm just making sure that my normals and my norm map and everything is
still looking correct. And not that it is
flipped or anything. So if we set the rotation
angle back to zero, no, it looks like it
is still correct. There we go, see. So
that feels like a little bit better if we
have it from this angle. And this will also give us flexibility. So we
got that one done. Now, next thing is that we are
going to go into our mask. Oh, no, wait, by
the way. I wanted to do something
with my roughness. Let's set my dirt roughness to 1.5 to make it like extra dull, and let's set my dirt
amount exceed to 0.8. So probably to reduce it. But I wanted to add a little bit more roughness to this one. So if we set this
roughness amount to 0.7, Okay, that's a
little bit too much. 0.8. There we go. Just to give a little
bit of, like, a shine. We might need to balance it
out a little bit later on, but I think that will
look a little bit better. Wow, I said little bit many
times in one sentence. So now that we've done this, now what I want to do is I
want to go ahead and let's have a look because this is a system that
I want to create. So we got this one. And basically what
we need to do is we need to go on the UVs, and that's where we
need to split this out. So basically what we
want to do is we almost want to mask this
edge over here. Now, we could use anchor points. It's always a bit tricky
to do it with this one, but let's see if we can make it work because that would save
us a little bit of time. So first of all, we need to
kind of detect the edge. We need to have this
in our green journal. So what we can do
is we can click on our original mask to get started
and art at anchor point. A anchor point is
just a reference. It means that we can reference this mask and that we can
add this mask in here. Now, in order to add
the anchor points, you do need to add a fill layer down here so that you
can actually select it. So let's have a look. So
we have a mask over here. And then if you go ahead,
you can just click on the mask called Alt
and click on the mask. And what you can do
then is you can preview the actual mask and makes it
a little bit easier for us. So let's have a look. So
we have our mask now. What I want to do is I
want to go ahead and I want to probably blur it. So let's add a
filter and blur it, which means that if we
blur this out here, we basically are covering
both these sites, and here you can also start
seeing the seams over here. So we blur it. Then what we basically do is we go
at ter levels on top, so go down here ter levels. And then I want to
do is I want to just push out these
levels over here. And you can also, by the
way, always just right click and here you can find
all of these other filters. And then I want to add
another fill layer. Re add our anchor points, and this time set is to
be subtract most likely. Now we are subtracting this anchor point and then
we can go ahead and go down here in our levels to basically push it back out that we are
subtracting it like this. We got this one. Now we still have a little bit of
a prom over here. Then what we probably
want to do is add another filter and
then blur it again. So that is a lot of functions. But hopefully this way, we have automated the process, which will save us time needing
to go in, like, fix it. If you want, you can add
the paint layer on top. If you just hold alt and just click on the very top layer, you can see that now
everything is working again, or we are back, or
you can just hold M, press M to go back
into material view. So having this, let's
just see if it works. Let's go ahead and export
this out over here. Let's go into our unreal scene, and let's find a way
where we can kind of see these type of seams
I'm not too worried about. It's more like a seam where the transition happens
here, for example. And then if we go ahead
and go into our masks, right click and
reimport, there we go. Okay, so that seems
to work pretty well. So now you can see
that it basically adds these masks now and
then on the side, we just need to make
sure that we still have all of our rebars, so
that is not too intense. But that is already
looking like a lot better. Sure, there's like
small bits here and there that are still
a little sharp. And for those bits, all I
can say is that you could go in you could add a paint
layer on top of all of this, and then just simply
grab your brush. And if you just hold alt and click to preview these masks, you can go down
here and you can, like, click on your
paint. Oh, press X. And then whenever
you see a seam, you can try to paint them out. Like there. Like over here. And that's like extra polish. If you really will, you
need to be very specific. So if your camera gets
really super close to this, then I recommend
doing this kind of stuff just to make absolutely sure that there are no longer
any really strong UV seams. Yeah, but as you can see, just as like a little bit here
and there, but not a lot. Okay, yeah, that's
pretty much it. Fret that should fix this mask. And I believe that after that, we are pretty much
done with this one. I will see if we need to do
a little bit more polishing, but else I'm already going
to end this chapter, and then in the
next chapter, what we'll do is we will go ahead and start designing
all of the other ones. And then we will do
a bulk operation. So we will do all of them in, like, one go most of the time. There we go. Okay, let's
just leave it at this. Let's go ahead an export. Save. Go in here, and then you can reimburse. Oh, yeah. So there's one extra
thing that I want to do. Right now, this feels
very flat and boring. So what I want to do is I want
to introduce some cracks. Now, I don't think I
have this one yet. So what I'm going to do
is I'm going to right click and add a new fold
that I will call concrete, nscore stripes, unscoe cracks, and I will add a texture that
has like cracks in them. So it's like this
concrete, but then it has, like, some cracks on top of it. And then later on we will
also just add some decals. So for those, we actually
have another map left, and that is our B
texture map over here. So what we can do
is for this one, let's just turn off the color and just turn
on the color for B. All we really need to do
is we need to go in here, artistic head and
just do like this, painting wherever
you want cracks. So we can just go
ahead and have it in like some locations like you
can see over here like this. And then you just
want to make sure that it is only included in the areas where we have
our mask over here. So what we can do is
we can then go ahead and add a fill layer, and we can just reference
that same anchor point that we created the first time. And we need to set that
anchor points to multiply. I believe. Let's double
check. Yeah, so you see. So then it will just make
sure that it does not have cracks on the areas where
we have broken concrete. So we can once again
export this here we go. Let's go ahead and go into reel. I'm going to start by just
importing these quacks over here that I already
set up for you guys. And you can also find this, of course, just in your folder. Flip the green channel around. Let's go to our masks, right click and reimport
our mask. There we go. And now, if we go
into our main master, we just need to grab
our quacks over here. Strike them in. Okay.
So first of all, what these need is cool trick. If you press C, you
can add the comments, which means that you can
nicely divides up into boxes. So I can call this UVs. And then what I can do is I can make sure that these three over here have the correct UV tiling, so we can just use one of these. Here we go. And yes,
yes, that is correct. And then what we're
going to do is we are going to go
ahead and just go in here and we have our
mask. So let's have a look. We are lurping this along with
our world aligned texture. But before we lurp our
world aligned texture, I want to add one more larp. And I know that gets a
little bit confused, so we will clean it up after this because
I think after this, most of our material is done. Go ahead and throw this into B, A, I believe that we need to throw it into
A, but we will see, and then go ahead and plug
this into B and then plug our blue channel into the Alpha and throw this into A over here, let's just go ahead
and quickly save so that we can see if
it is even working. So let's have a look.
Okay, so that looks crack. So we now have our
cracks in those areas. So that's perfect. So now what we can do is
we can go ahead. And though I feel like maybe
it's in the opposite area, it kind of depends on
how you look at it. So it needs to be in like in this area, there
needs to be cracks. Oh, yeah, yeah. So that
is working correctly. Okay, so we got this one.
Now what we need to do is we just need to go ahead and
do the same over here. And then what I will do is
I will just clean this up. Lu This one goes into A. This one goes into B and use the blue channel in
here and plug this into A. And then finally over here, we have another one
where we are going to lurpTh one goes into A. This one goes into B, and then we have a blue channel. So yeah, this has gotten
quite a large shader, although most of it
is still quite basic. So we got this stuff over here. Let's go ahead and
just move these down, and then what I will do
is, like, nice cleaned up. But let's first of all,
make sure that it works. And yeah, you can expose
your cracks if you want, although I believe that we will always only have these
specific cracks, but we can expose
them. Here we go. So now we have our cracks
also sitting over here. Feel like the norm map is a little bit strong
for our cracks, and that might
simply be the case because I made my norm
map stronger in general. So if I just go ahead
and just tone it down, say minus one, here we go.
But at least it is working. So we now also have some of these cracks sitting over here, and that will look a lot better, especially from distance. Yeah, then we probably just want to work on the
tiling a little bit more. So what I'm going to do now is I'm going to go
ahead and select this, C and call this roughness. And just nicely clean it
up a little bit over here. Now what we can do is
we can go ahead and select this C mask. Let's go ahead and go down here. This one needs to go
back into our UV boxes. This one needs to go
into our roughness area. C normal. Then over here, we can just go ahead and we can grab all of these
except for your metallic, C base color. And if you want, you can go
even more precise on this. But just in case we need to
change anything later on, I just want to go
ahead and control it like this. So we
are lurping that. That's good. Then we give it some normal strength. So
that's all looking good. Save our scene. And then
the last thing that I would probably do is I would just work on the tiling a little bit more. So map tiling, too. You know, if we set this to two, then it becomes a
little bit smaller. And yeah, I'm not
a big fan here. If we set this to zero, this is the original
concrete strength. So minus one is already
a double strength. So I think zero
works a little bit better in this case, especially
with like the cracks. Although over here, it might
not be as interesting. But I think in general that now this piece is
pretty much done. Of course, you can just keep
continuing on improving it, but I think that we have gotten a pretty good idea of how
everything now works. So what we'll be
doing in the next few chapters is we will just start by basically completing
all of these other ones, and it will come together. Once we have all of them
done in this scene, the scene will come
together a little bit more. Or quite a bit more. The only thing that we
also need to keep in mind is to keep
some variation in here and not to make everything look too monotone,
because, of course, right now, it will just end up being a big concrete building, but that's something that we can work on a little
bit later on. So for now, sung to
look pretty cool. Let's go ahead and continue on by creating all of
our other pieces.
42. 41 Taking Our Remaining Big Concrete Rubble Pieces To Final Part1: Okay, so now that
we have finished our first large concrete
piece over here, now what we can finally
do is we can go ahead and also do
the other pieces. And also, I had the idea of basically for these
pieces, the rubble pile, we can probably
just steal all of these smaller bits from
all of the other ones. So that's going to be a
nice time, Save again. So we are now going to go
ahead and we are going to turn all of these other pieces also like all the
finals in Tres Max. At this point, we will do all
of them at the same time. So these four, I
will first of all, do all of the ray fires
and, like, the setup. Then I will do all
of the sculpting, then I will do all of the UVon
wrapping, stuff like that. Just in general, it saves
a little bit of time. Yeah, this is like
the half piece, so we don't really need
to worry about that. Getting started with this one. I think we want to
start like straight. So let's go to our
top view over here. And now let's go ahead
and just decorate a box. Convert stone at a pool. See, we're going
to start straight, and then we will kind of push it down later on. You know what? I think I actually want to
keep it as a box because I can just remove some
of these pieces. Let me just double
check and make sure that the thickness is
pretty much correct. And what I'm going to do is I'm probably going to go ahead
and start the box up here so that I know that this end needs
to hit the ground, and then I just need to make
it work. So we got this one. I'm going to go ahead
and you know what here. Let's move a temporary
over here so that I can still have this
one as like a reference. So let's go in. Let's get rid of our text tools, and let's add a ray fire
Voronoi modifier. Here we go. And we're going to go ahead
and call this or call this. We're going to go ahead and
set the number of points to start with 500. And let's do a fragment. We want quite a bit
of fragments in here. They are going to
still be quite large, but I want to, like, the flexibility
to go around the edges. And yeah, you know what? Yeah, this looks pretty good. So we got this one. I don't know if we need to
do anything with, like, the length over here. Just by pushing it up
a little bit, maybe. No, sorry, that's not
the length, the height. I mean, pushing the
height up a little bit. Yeah, you know what? Let's start with this. Okay, so
we got this one. Now the side pieces are
going to stay intact, which basically means that I
first need to go ahead and I need to just here, let's go ahead and delete
this area over here. And then it looks like
it kind of goes out, so let's go ahead
and just kind of follow that same shape by also deleting these bits over here. Yeah, that looks pretty good. Small one. Let's get rid of it. Let's just try and
get rid of some of those problem pieces that we know will cause
problems inside of. See Brush. This one
is a tricky one. Yeah, probably do that. Okay, then now we're
here at the top, quickly drag like that. And let's see. So around here, this one is sticking
out a little bit much, but I think we can make it
work. It's the lead that one. It's the lead these two
over here. Let's see. We are pushing it
back like that. And let's also delete these too. Yeah, and maybe this one. That seems like, here we
go. That seems quite fine. Okay, so we are going
to go ahead and we are going to basically
if I have a look, so we are going to make
these quite large. So the breakup is going
to be quite large. And then later on, for these
really small bits over here, what we will do is
we will just create some extra models that
we will add on top. And these models we can
reuse on every single bit. So that we'll just like, add quite a bit of extra quality. For now, yeah, we will
do those later on. I don't know probably like
almost at the end, probably. So let's go ahead and let's say that the ground spit is
where it hits the ground, often, which means that that one will be
probably more broken up. So let's just go ahead and let's try something like this, detach. Let's go ahead and yeah, let's also do probably
like this one, detach. She'll delete it down here. And you know what
maybe over here. I'm actually going to
also grab another piece like this and probably
also detach that one. Okay, so it breaks
off quite strongly. Then at this point, it pretty much stays intact
for most of the time. So it just has like
a massive chunk like this probably here, detach. Then it will have over here, like this chunk, which is
just kind of sitting there. And then over here this is where it starts to
break off again. So what we can do is probably
do like a chunk over here. Yeah, let's detach this chunk. This one will kind of split off. And maybe let's just go ahead and have this one over here. And then what we're
going to do is we are going to give it
quite a bit of space that we have room to later on add some extra
models in here. I think that's quite
a nice division. Oh, there's like a
little object in here. So let's just double
check by selecting everything if it doesn't have
anything strange going on. Okay, so that's
looking pretty good. So let's go ahead and now
reset the pivot to center. Let's add a quick
plane on the ground. This is just that I can properly see when I hit the ground. And you can just right
click on segments just to make the plane
completely down. So, okay, at this
point, these pieces, what will most likely happen is so these pieces would
sit on the ground, maybe have this one, rotated
a little bit over here. And let's also maybe, rotate this one, move it up. Let's rotate a bit
like this so that now we kind of know which
direction we need to go. So, let's do this. Okay, so now at this point, what we can do with
this one is we can, Okay, so this one, it is
like hanging by the thread. No way these ones,
we probably want to. So these ones we are going to
rotate still a little bit. Maybe like sideways, let's
push it out a little bit. And then these ones,
let's rotate it a little bit like this. And this one I probably want to have quite hanging like that. And then this one
I kind of want to, I kind of want to push it down, but that means that I probably want to move these
ones a little bit forward because else we have
too much clipping going on. So we move this one forward. We probably, like, rotate this one a little
bit because else, there's a bit too much space. Yeah, so we do this,
and then it will have a little bit more bits and pieces sitting
in between there. This one, it would maybe
be cool if we have hanging quite a bit
stronger, like off the side. And that it got pushed
to the side over here. There we go. So that is not hitting the
ground, so that's good. So we have, now this nice
little difference between them. And then this one
we can kind of just rotate a little bit
sideways like that. So these are kind of like
just hang on over here. Um Yeah, I want to keep this
like a big piece. I'm not going to split up. I'm just going to rotate it
a bit, and then later on, we will just need to
make sure that the rebar really like connexion and here the rebar
can break and then it can have some small
pieces in between here. Same over here. It can also have some small pieces
in between there. And then this one is fine. So as you can see, a big difference compared
to, like, the earlier one. It's the lead that
small little bit. So at this point, what I'm
going to do, first of all, let's go ahead and merge this all into one and just
drag it into our backup, but quickly turn it
on so that now we can go ahead and we can
select these pieces, and we basically
just want to move them in the same location. Pretty much. We might need to do some movements
later on because as you can see, they're
not perfect. But now we can
turn off a backup, and now we know that, okay, this one is sitting
on the ground. So if we turn off
our edges and faces, we can see like, Okay,
how does this look? Yeah, I think maybe rotate this one a little
bit more like that, maybe sync it in a
little bit more. Move this out. And it's
also kind of push this one, and maybe it got torn off, so it is still hanging on
by a little bit of rebar. So let's have it like moving a little bit to
towards this piece, as if there's still some rebar just sitting
there later on, and maybe, like, push this
one a little bit back. I think that does
the trick over here. Yeah, that should be fine. So let's save our scene. And then, of course,
if you want, you can even go ahead and try to export this one to our big variation to just so that you can get an
even better feel for it. But of course, it will
still change quite a bit, so it's always a little
bit difficult to really know what the end
result will look like. We can just, like, make a guess. But here, if we just re input
this, there we go, see. So that's how this piece
is looking right now. Um yeah, we do need to do some movements like that just to make sure
that it all fits. But that should be
pretty much fine. Once we have, like in here, we definitely need
to fill it up. Maybe move this one
a little bit closer. Let's have a look
like, Yeah, here, so I'm going to move this piece a little bit closer together, like over here, so
that it's, like, kind of still sitting
inside of it. And I think at that point, yeah, so there will be
like piece in here. I think at that point,
this should be fine. Like, if we have a look,
yeah, that will work fine. So we've done that. Oh, by the way, let's
replace with this version. Same over here. I just saw it. But of course, we will do a
nice pass on this later on. So for now, this is fine. I'm not happy with this
one also, but okay. So now what we're going to do is we are not going
to export this yet. We are, first of all, going to go ahead and just
do the next one. So that was kind
of like the goal. So we got this one now done. Now what we can do is we
can go variation three. Now, variation three actually, have a look at my
edge and faces. It is actually pretty damn
close to what I already want. Yeah, it is actually. Yeah, it is. So maybe convert soon a Apoolm we can
actually just use this one. So if we go ahead and let's see, it is a tricky one because
this one is completely flat, so that's why we kind of want to make it
into one big chunk. Maybe have, like, one of
these pieces sitting here, but we definitely do not want to make it not flat,
if that makes sense. Maybe, push it up a little bit, if there's something there. But honestly, at this
point, so we got this one. That's about everything I
need for this, I think. Yeah, because it is just basically one of
these random things. And here on the
side, we of course will not have any destruction. Okay, easiest one. So that one is now also done. Let's just double check, make sure that I did
not accidentally, make a big mistake
by doing that. Okay. Variation three
reimport. Here we go. I don't see anything that is super intense, just
like here over here. It just looks like it has an extra little piece just
sitting here and there. So now what we have is probably one of the
most important. Like, this was a
really important one, but these are also
super important because they have a
lot more gravity, so we can do, like,
a lot more stuff with it. Yeah, definitely. So I need to work on that. But I do not want to
make them too small. Like on these ones, Um, yeah, so in some locations,
like this is fine, but in some locations, it does feel like I created
too many pieces. So I almost feel like
I want to kind of, like, reduce that a little bit. On this stuff it's great though, because it's like, it's hanging off the edge and everything. So if we go to number four, this is the one
that we have here. I do think I want to go for, like, and do I want
to use this blockout? Like, we will create
stuff like that a little bit later
on in these areas. Right now, we really like
going for that kind of stuff and like this kind of
stuff that you see over here. So I probably just
want to go in and see, maybe say, move
this a little bit, and let's move this
one down a little bit. And if we need it, we can add a bit more fractures and just
in general, improve things. So this one will already
be over the edge, so we can really make
it quite strongly, fallen down, and
then it will have some extra bits and
pieces in there. And then what I'm going
to do is I'm going to go ahead and split this one up. So detach this one. Oh, and let's just go ahead
and center your pivot. Okay, so this one this one
kind of like moved over here. So this one has, like,
broken off over here. And then this kind of like
where the breaking point happened in this area. See, so this one is flat on the ground, that
is totally fine. Yeah, this one it is fine if we push this one
up a little bit. Still have it, broken off. Don't know if we maybe want
to have a piece missing. Yeah, that might be cool.
Let's have a piece missing. And then if we do not like it, we just add the pieces back in. So this one, let's push
it up a little bit, and then over here, it starts to really fall off the edge. And this one is a bit straight because it's
almost like it does not fit, like it's not matching up. Maybe like push this
edge back a little bit. Over here, Okay, let's
see. So we got this one. Now if we just
have a quick look, I want to get rid of
that kind of stuff. See if possible, also this
one. Don't know this. No, let's leave that one and then we can maybe just
fill it up inside the sebush. Let's have a look at this one. This one is pretty much fine, maybe cut it up a little
bit in those areas. And then this one, once
again, here, delete. I do not like that really
intense stuff sticking out. Here we go. So we got this. Let's push this a little
bit closer like that. And see. So this one
is pretty much fine. And then this piece is
really hanging off the edge, and then we will probably need to fill this up
a little bit more. So yeah, I think the filling up, it is actually so important
now that I look at it. We didn't really need
to on the first one, but it is important enough that once we've
done these pieces, what I will do is I
will then go ahead and already like these
fill the pieces. Also, I'm just curious.
What was this one? Oh, yeah, so that one.
Don't worry about that. So there's a variation
four over here. Now, I'm not sure over here. I want to, like, get rid of that stuff,
and then maybe, like, push this a little bit
further in and then grab this one and maybe like here, move it out a little bit. Yeah, so yeah. Okay, I think that
will do the trick. Let's have a look safe. Arsene and let's export this
concrete big variation four. Okay. And now, if we go in here, concrete big variation
four, we can re import. Yeah, that looks
pretty much fine. This is like variation five, so I don't need to
look at that yet. Yeah, variation four, it's
like, nicely hanging off. I think that should work. What I'm basically
mostly looking at is that the shape does
not look too repetitive. So when I look at
this, of course, it needs to look
appealing to the eye, but I'm also looking
that if I look at this, that I do not see one, two, three, one,
two, three, one, two, three, one, two,
three, like everywhere, like the exact same shape. That's basically what
I'm looking for. But if I look at this,
I don't see that. Even this one is
a variation four, but because it is being
covered by other pieces, it is working quite well. Like a Vega see like a tiny bit, but you can just cover it up. So that one is also
looking quite good. Go ahead and save
I scene over here. The last one is going
to be variation five. Let's go ahead and
also do this one and then once this one is done, we will go ahead
and continue on. So for this one, I don't
really like the look of it. I think I'm actually going to go ahead and create a
new shape for this. Let's go and create a box. Oh, a botobject selection. Let's go to variation
five layer. Let's go ahead and create this box up until around
this point over here, and we are just going
to redo this bit a little bit. There we go. Let's make it a bit
bigger. And at this point, we can go ahead and we can
move it out like this. And let's go ahead and add
a ray fire Fornoi to this. It's already fragmented. Okay, so, yeah, we gave it
some edges. Let's do 500. And what we did we do on
the y axis, I believe. No, not the Y. Oh, yeah, you're on the x axis. We push this out. Let's go like, a little
bit bigger, 700 maybe. Yeah, we can work with this. The sites are going
to be intact and then just breaks off. So we know what we need to do. We need to basically
grab this side, grab this side,
and you know what? Maybe keep part of it. Let's grab only this side. Once we've done that, we need to go in and we need
to just make sure, wow this fornoi does have
a lot of these edges. Do I want to change that?
I will probably be fine. I do need to just make
sure that I like, properly connected
and just leave in. Like, yeah, there's stuff like we can properly fill it in. Or not. That is a lot. Sorry, guys, I'm
going to do this. Why are you all of a
sudden doing this? Let's go ahead and just
scale this up like that. Oh, that does not seem to work. In that case, let's see if we can scale it up on the Z axis. There we go, so that we are
at least pushing it out. Til it again. So let's
go ahead and see. So I'm going to at this
point, delete that side. At this point, maybe break
it up a little bit more. So let's delete it up
until the very tip. And then over here, let's delete only one side over like that. And now we need to have a look. So for this one, I want to kind of,
like, keep it. And, of course, because
we stretched it, that's most likely the reason why over here, it is
such a strong look. Oh, but these ones are
actually quite decent. Here, see, because here
it is not as strong. Delete this one,
and at this point, it kind just goes
back to normal. And then over here, let's
also delete these few bits. Maybe that one also. There we go. Then it goes back to normal. Okay, so that looks
pretty much fine. Now, if we have a look,
one that is quite obvious is that this one needs
to become its own piece. Let's go ahead and detach that. This one is probably also good
to have as its own piece. Maybe make it a little
bit bigger than the previous one like that, just to add some more
size variation in here. Then that's quite interesting. Let's go in and because that's also why
we did the blockout. In the blockout, I already spent my time experimenting a
little bit with stuff. I can now just go ahead and
implant what I learned. I'm going to have
this one over here. And then I'm pretty much
going to do like Oh, God. I don't know what that shape is. Do I need it? I do
need that shape. Let's focus on that later on. Let's first of all,
just go ahead and grab this. There we go. Let's deselect it over
here, push it out. Detach. Then we have this shape left. I'm
going to go ahead. I'm going to art this
parked over here. Hmm, that is an interesting one. Let's detach it. Let's see, maybe
add it to this one. It's isolate and have look. Yeah, that is quite strong, but we can then
probably at this point, oh, did I crash? Now, it looks like I just accidentally opened
up a wong view. So let's quickly save. I was
worried there for a second. So yeah, so it has
a little bit of, like, a hole in there,
but that should be fine. So let's see. So
we have this one. And then at this
point, I kind of like, because we do want to keep
this like quite far out, I'm going to have you only almost like a
sideways over here. And I think I'm going
to leave it at that. So I think we are
going to select like this site over here, and then selected quite
decently, also on this side. So let's detach. And then definitely
for this one, we need to fix this
stuff over here because that's way too strong
in terms of, like, cutting. Here, let's just do that. Okay,
so we now have that side. So these ones will
kind of, like, stay pretty much the
way that they are, and then it starts to,
like, crumble down. So let's go ahead and
sent it to pivot, and let's just start crumbling. So we got this one. I'm going to go ahead
and I'm going to actually probably move this out and maybe move
it up a little bit. Then at this point, let's see. So this one, let's
say that these bits, they started crumbling a little bit and then moving
away from the side. So this one is quite large. So we do not want to have
it as much in terms of, like, movement, and then
these ones are a lot smaller. So these ones we can increase
the movement quite a bit. So let's first of all,
just like, push it out. And also, then this one and
push it down. Like that. And then over here for this one, we are going to
go quite intense, that it is almost like
just hanging quite low. So that's why we'll almost
be like what you can see over here, that
kind of stuff. And then this one is kind of like also
moving along with it, but still being pushed out. So let's push this
down and to the side. And let's have this one
really like, let's let's see. Let's rotate it
maybe a little bit. Et's move this up
a little bit more. Let's get rid of this shape because that one is a
little bit in the way. So we got this shape over here. Maybe also get rid of this one, although I think that one, yeah, that creates too much of a cut, so I will just get rid
of it inside of Cebah. And let's see. So this one
we push down like that. Yeah, we are a
little bit overtime, but I think this is pretty good. So we have one side
that is really strongly damaged and really,
like, falling apart. And then we have
another side over here that is not as bad. And maybe have this one here. Maybe like rotate a
little bit like this and then push it out and
then move it up a little bit so that it's
not clipping too much. Let's just have a look
and see if this box. This one, I'm going to first
of all, attach it all. Makes my life a
little bit easier, and I'm going to move this
one into its place like this. Grab the old one and just
throw it in the backup, and it looks like I
accidentally make like a particle view.
So let's delete that. Let's try this out.
So number five. Export, export selection,
variation five. Let's go ahead and go in
here, variation five, and let's re import.
Let's have a look. Okay, that's too strong.
See, this is what I mean. One, two, three, four. I can really easily see
it. So this one is good. I'm quite happy with that one, but this one looks like
it is too obvious. So we kind of like what to
then minimize that look because right now you can
see it all over the place. So instead, let's go ahead
and not push it as far. Let's just move it
back a little bit. Maybe move it a little bit
too like the site over here, and that is why we check. Because if we didn't
check this now, it would be simply more of
a pain to do it later on. So let's try this, and that's another look to see if there's anything else we need to change. So these pieces, they are kind of like just merging together. That is all no problem.
Over here, that's fine. Yeah, so it's really
just that one bit that we need to fix. And let's go ahead
and just re import. You see? That's
already a lot less. Like, I can still see like a little bit over here and there. But at least now it is fixable. So now you will not notice
it as much if I go to, like, my main views here, see? We just see these three,
but everywhere else, we do not really notice
it as much anymore. So we just need to fix those three probably by just
switching it out. It can be as easy as if I
look at this one to simply grab this piece and just turn it into,
like, a variation for. Here. Now it's
already like less, maybe grab this piece and turn this one also into like
a variation four and just push this variation
four out a little bit more and maybe
like to the side. There we go, see. Okay, that's awkward because now we have two variation
fours over here. Maybe let's push it like
the opposite direction, like further back in, like that. There we go. Now you cannot
really see it anymore. You get to drill, just
like mess around with it. We will do that later on,
just to make sure that it still looks quite
unique. Okay, perfect. So we can go at a Sava scene. And now that this is all done, what we will be doing
in next chapter is we will be exporting
all of this to Zi Brach, setting up our different pieces, and then what we can do is we can start with the
sculpting process. So let's go ahead and continue with this in our next chapter.
43. 42 Taking Our Remaining Big Concrete Rubble Pieces To Final Part2 Timelapse: Oh. M I I I I I
44. 43 Taking Our Remaining Big Concrete Rubble Pieces To Final Part3 Timelapse: [No Speech]
45. 44 Taking Our Remaining Big Concrete Rubble Pieces To Final Part4 Timelapse: By a Do. I
46. 45 Taking Our Remaining Big Concrete Rubble Pieces To Final Part5 Timelapse: [No Speech]
47. 46 Taking Our Remaining Big Concrete Rubble Pieces To Final Part6 Timelapse: An an
48. 47 Taking Our Remaining Big Concrete Rubble Pieces To Final Part7 Timelapse: An an H.
49. 48 Taking Our Remaining Big Concrete Rubble Pieces To Final Part8 Timelapse: I I y B D. D. D. D. D the
50. 49 Taking Our Remaining Big Concrete Rubble Pieces To Final Part9 Timelapse: M B The the y so
51. 50 Importing Our Remaining Big Concrete Rubble Pieces Part1: Okay, so, wow, those were a lot of time lapses. Even I have to admit that. But yeah, the time lapses,
they were straightforward. It was just super time consuming
to do all of this stuff. But yeah, definitely
probably the longest time maps I've ever done
for past racted oils. But in any case, we
are finally done. So we finally have done
all the sculpting, baking, and mask generation
of our extra pieces. And to imagine
that all that time was only for four extra pieces, but at least it is done now. So what we're going to do now in this chapter is we are
going to finalize it. And I just wanted to
go ahead and I wanted to switch over to real time
because at this point, we do need to have a little
bit more thinking work again. So first of all, what we're going to do is we
are going to add our Riba, then we are going to input it one by one into a el, set it up, and then later on, what we will do is we will create some
smaller pieces that can fit in between here to really give that nice feeling
that the concrete is, like, crumbling and
everything like that. So what I tend to
do is I tend to go ahead and always go
to my first one. Which for some reason, I
think Max froze a little bit. Come on, Max, it's
not that difficult. Although we do have a lot of pieces at this
point in our scene, but it should still be
doable. Here we go. And what I want to do is
let's go ahead and just quickly select these
pieces over here, right click and
just hide selection so that I can grab these pieces. I can do a controv on
them and copy them, and then it's just a
matter of throwing these into big variation two. J makes it a little
bit easier for me to here I have this. Oh, okay, that's a
little bit annoying. Let's just go ahead
and deselect these. It's a little bit
easier for me if I just like a bunch of pieces that I can quickly grab and
just like place into place. So at this point, we are just going to go ahead and
well, place into place. So for this one, actually, I need to be careful because this will always
be on the ground. So we probably do
not want to have these hanging rebar
pieces there, and we probably
just want to have them maybe like
sitting over here. Like this is like a
nice area where we can switch from high
to low like that. And then what we
can do is we can go ahead and grab
these pieces over here and sit those a
little bit inside. Over here, also, keep it all nicely connected,
pretty much. So first of all, yeah, the bigger bar pieces,
I'll just do after this. Doesn't really matter
which order you do it in because they never really interact with each other anyway. But, yeah, so this is like,
pretty straightforward. We're just going to
go ahead and just move a bunch of this stuff. The only thing is
that with flat ones, this technique of
duplicating everything, it's a little bit
easier when you have flat pieces
because of course, with these pieces because
they are so moved, we still need to do
a lot of movement. Let's crab one of these.
So this like a good way that you just want to
kind of like have one, for example, sitting in here. And then what is often nice to show is to have another one, and this one is almost
like broken off. So you basically go
ahead and rotate it and you move it up a
little bit like this. There you go. Oh, let's rotate it around because one
side does not have an end. I probably should have
left that end there. This would have been
a little bit easier. But okay, so we got
this one over here. And yeah, at this
point, it's probably easier if I just go ahead
and duplicate these. I'm getting a little
bit worried that my maxine is getting so slow, so we'll see how bad it becomes. And else what we will do is, like, for the wood pieces, we will just go ahead and
do those in their own scene because a lot of simulations and everything will just make
your scene even slower. So that's probably the
plan for those pieces. If I remember, by the
time we get there, because it's still a little
while away before we actually get to that point.
Not too long, of course. But here you can see that
sometimes when I'm moving, it's so snappy that it actually
moves in the wrong axis. And that's what I mean
with it not being so good. Let's move this one over here and just have kind
of sticking out. Here, I'm going to move this one up so that I can just quickly select and place it um, here we go. And then this one is also a perfect one
to have some of these physical pieces or like actual geometry
rebar pieces that are a little bit thicker that are just
sticking out as if, yeah, these are the bigger ones that were really holding
everything together, and then they just snapped. And because they snapped,
this is why you can no longer have this
properly connected. But of course, we do need
to have some connection. So see, this one we
can just delete. So let's go ahead
and maybe, like, have one over here that
is just sitting in between 2 bars like that. Then maybe grab one
of these pieces, rotate it up and have this one, sticking out a little
bit like this. And then maybe grab
one of these pieces, and that one is going to go
here to the side, like that. So it's really, still a
little bit connected. Maybe push it down a
little bit. There we go. And this one we can probably
just move down here. Yeah, let's do like
somewhere along here. So it's still just connected, and then it just kind of
like stops being connected. And this is why because
it's not connected there, that they have fallen off. So yeah, I will
basically do this. Sorry, my voice broke
up a little bit. But there you go. So yeah, this one, that's why I wanted
to do this in real time. Seeing how long this
takes, I might do, like, a quick time laps
of just placing these ba pieces because
now you should kind of, like, know the logics behind it. It's not too difficult logics. It's just like the way that
we have placed these pieces, make sure that it is simply logical the way that everything kind of sticks
out and everything. It doesn't have to be
like 100% pure logic, of course, because most people will never ever
notice that logic. But if you do 1% for 50 times, it still looks 50% logic. And I know that that analogy itself is not really logical, but I'm sure that
you get the point. Like doing many small bits makes the bigger
asset look better. So we basically
just do something like this, and then over here, maybe it would be
nice to just increase the amount of rebar
sticking out. So let's go ahead
and duplicate this. And then we will
immediately set one up because I'm really excited
to see how this one looks. Because this is quite
an important piece, probably the most important one. We've probably used
this one the most, and it's the most
visible now everything. So, of course, we are still missing like a bunch of little
stones in between here. But in general, it
should be quite fine. I'm just going to go
ahead and maybe, like, at the very end, stick in a
few rebar pieces like this. Here we go. You know, it might be slow
because I'm working on this project from an HDD
drive and not an SSD drive. Yeah, that might be the case. So I'm just thinking
out loud here. Because, normally Tris
Max is not this slow. Like I can normally handle like 50 million pulleys in Tres Max. So of course, 200,000
should be nothing. Um, Okay, I'm going to have
like one more over here. And then that looks pretty good. Maybe have like one more
like sticking out. There. Yeah, that should be fine. Okay, so these pieces, I can just temporarily delete or temporarily forever delete, and I can save my
scene. Okay, cool. So let's have a look. Let's
go ahead and grab this one. All of our materials
are correct, yes, as far as I can remember. So to unreal, collapse
concrete big variation two. Let's get this in. So we're
going to export this one. Inside of Unreal engine,
which is still open. It has already been open
for days from my end. So let's first of all, go ahead and go into masks. Remember, we create all of
these masks in our time labs. So let's just go ahead
and just drag all of them in already. Over here. There we go. And then we also have no maps,
and once again, this is something that
we did in the time labs, a very quick non map bake. So let me just quickly
import all of these also. And then the thing with the
nonmps that we just need to quickly open them up and make sure to flip
the green channel around. Yeah, those notifications
will go away soon. You can't get used
to just ignoring them until something goes wrong. Okay, so those are now all
nicely flipped around. So let's do this. Collapse concrete bag variation
two. Let's re import. Okay. Done. There we go. See that already looks
a lot more filler. Now that we do not have
the really sharp pieces. Concrete, big 01, let's
duplicate this and call this 02. That's fine. Let's open it up because then we can
pretty much just reuse this. So all we need to do is
we need to swap around our mask for the 02 mask, and we need to swap around our detail normal over here
for the 02 detail normal. And that should already
be it. So that's nice thing about this because
they're all the same. We can just kind
of swap these out. So now if we open up
our collapsed concrete, maybe go into our content
browser over here. Move up here. Delete this one because that one's not needed. Isolate. So you need
to be concrete, big, and then I assume
you need to be rebar. Oh, no, sorry, you need
God, that's annoying. Gretna, you cannot use. I'm still getting
used to this view. One, two, and three. That should be. No, that's
not the one. You know what? I'm going to do the view
like this because it's too annoying for me to properly, swap around in here where
it just moves the window. If I remember, I will leave a comment as in like a feedback comment
about unreal on it. So this one, let's see,
which one needs to be. Okay, so this one needs
to be number three, then this one needs
to be number two. No, that's incorrect because this one is supposed
to be number three. Okay, so two, three, one. That's the one I need. Okay. So let's go
ahead and save a sin. Look at that. Am I
in full resolution? I am it's looking pretty good, if I say so myself. Yeah, so yeah, fill
this up. That's fine. But just in general, this is working pretty
well. Like here. If we just fill up those
really obvious pieces that it blends in a
little bit better, and maybe like blends
in a few more pieces. I think this one
worked out quite well. Another thing that I
do need to focus on later on is to make sure that
it's not all too monotone. Not that everything
is just like a slap of concrete because that
never looks interesting. But here, especially here,
this stuff is great, where it just like perfectly works in these type of areas. So I'm quite happy with that. Yeah, the rebar is looking good. So what we can do now is we can just go ahead and continue
on with our next piece. And what I will do is what
I will do is at this point, I will just go ahead and
kick in the time naps, where we will just only place like the rebar for those pieces. That's how I will not import it into the time naps. I will
do that in real time. So let's go ahead and
continue with this well, actually, no, I will just slap the time labs behind
this chapter. Sorry, force of habit. So yeah, let's kick in the Taps.
52. 51 Importing Our Remaining Big Concrete Rubble Pieces Part2: Okay, so our rebar
is now placed. So this is going to
be a fun chapter because we will see
everything coming together. So what we're going to do now
is we're just going to go ahead and start by exporting
all of these pieces. So, luckily, because all
of the naming is the same, we can just go ahead and
overwrite everything. And that's the whole
goal for doing this. Clay Oh, right click nHtOll. There we go. Export,
number four. We do have 4.5 for which
I just need to have a quick look and see how that we're going to
break that one up. So let's first of
all, do number five. Expot selection, variation five. Yes, I want to replace. Thank you. And then I just need to have a look, and let's see. So number four. Oh,
that is a tricky one. I feel like we will
probably just use these pieces over here
as a number four, and it would not be too special. Yeah, that might work because else this one would
be too long, basically. Another thing that we
can do is we can sort of use this one using as symmetry. So what we can do is we can go ahead and let's
select all of this. Let's hold Sorry, sometimes's
but you have many objects. So just hold Shift,
and let's copy this over. Throw this into 4.5. And now for 4.5,
what I wanted to do is so these
three can go away, including all of the bar pieces. We don't need those. And what I was thinking of is we
might be able to use a symmetry because Symmetry
does not actually break your how you say it? Oh, no, wait, we
cannot do symmetry. So symmetry does not break
your UVs and everything. I was thinking of doing a
symmetry, but now I look at it. If I would do that
on the X axis, it would still kind of,
like, get rid of that stuff. And I don't think I could,
like, try to, like, rotate it and see
if it looks okay, but yeah, from what I can see that will
not look very nice. So instead, let's just
also delete this one. And let's just go ahead and just move these pieces up here. This one also a
little bit close. So we're just going to repurpose
these pieces over here. We do just need
to make sure that all of the rebar and everything looks a little bit more logical. There we go. And we're just
going to use this one. So what we can do
is we can just go ahead and move this
one over here, maybe scale it up
like a tiny bit. Let's move it side. Nicely placed into location. And then we have the old one for which we can just go ahead
and we can delete it. There we go. And we will just call this 14.5, so let's export. See? So doing these extra bits, it's very quick to do them. Same with like later on with the wood and everything
it's very quick. Once we've created a few of
our wood planks, that's it. Then we are almost done
and just like simulating. So we are also going to later on simulate this one over here. But first of all, let's go
ahead and set everything up. So in unreal, let's go ahead. Assets, three, four, 4.5, five. Let's re import all of
them, and just press done. Actually, let's do a reset the FBX because then it
immediately gets rid of that one material that we
assigned. And give the second. You will see probably
a big change. See so now everything
looks a lot smoother. Yeah, that works. Over here, like the sharp pieces, of course, now
feel out of place. But okay, so we got
this stuff done. Now what we need to do is
we just need to go ahead. Right click duplicate 03, duplicate 04 and duplicate 05. Let's open these three up. And all we need to do is replace the mask and the detail normal. So let's get started
with the mask. So this one is 03. This one is 04. This one is 05. And if we also go
into our norm maps, we can also here in
detail normal 03. Zero, four and 05. Okay. That's all done. And now it's just a matter
of assigning everything. So let's open up
variation three, four, 4.5 and five. And I'm just going to
already drag them down here. Just make my life a bit easier. Okay, so what do we have? Let's get started with this one. UR variation four. And I need to just get rid of the 1 second of the
gray slot over. Oh, no, wait. We don't need
to get rid of that one. Okay, so variation four bar. Zero, one, 0302. Because the two and the one
and two are so similar, it does not matter too much
if you are going of it. Oh, that one is quite bad. That's strange. Did I
place that like that? Oh, yeah, I did. Never
noticed how far that was out. Let's quickly move it down, and let's just quickly
re export this. There we go. If we
see your problem, it's better to just
fix it right away. Then we don't forget about it. Then I don't forget about it
because I'm very forgetful. You might have noticed
that if you watch titils. So this one is pretty
much the same. It's just going to
be variation four, rebar, variation
one, three and two. Here we go because
it's the same model. This one is going to
be variation three. Oh, wait, here, we need
to get rid of that. So variation three. Bar.
This time, this one is 03. It's weird. Sometimes
they just decide to swap around with the materials. And I don't know exactly
why it does that. It's also not the
biggest problem, but it's just a bit strange. We got this 10, one, 0302. And that's about it. Let's
go ahead and save scene. And now you can see everything already starting to come
together a lot more. So okay, it's quite
a bit of saving. Let's close our mass
material. There we go. So that is already
looking quite good. As you can see, we
do start to note, a little bit of that
monotone feeling, especially like in these areas. However, I hope that
once we have our wood, and then along with that, we break it up with some foliage and everything and
with some decals, maybe some green decals and
everything to break out. I hope that it will be better. Also, of course, it might
look a little bit bad. These do not look
bad, but these ones because we still need to
have a concrete below it. But okay, so that's starting
to look pretty good. What's this? Oh, it's pile. Push that back. So yeah, I'm just double
checking everything. Yeah, the only one I'm not
happy about yet is this one, but that's because
we need filled up because over
here you can see, it's too obvious in
terms of how it looks. So, like, right now, it
almost feels like just wavy. Like, it feels too
wavy, pretty much. But that should
be fine later on. We are going to work on that. So I always like to
have a quick look around just to make sure
you should do that, too. Just make sure everything
will work correctly. And yeah, sometimes we can also go in and let's
say that this one, maybe this one is now no longer, the best match or maybe
you want to use one of these pieces to
basically swap it around. Like that, maybe that might
look a little bit nice. But let's just go ahead and work on that a
little bit later on. What I want to do to end of this chapter is I just
want to go ahead and I want to simulate those rubber piles that
we have over here. These ones over here. I don't know. Yeah,
you can add rebar. I don't think they really need that much rebar and
everything in between them. So we are first going
to simulate them without because else
it will be really difficult to simulate
these pieces with the rebar and everything
because of the collision. So that one is going
to be this version. So what I'm going to
do is I'm going to go ahead and let's see. Let's grab this piece. Let's grab this piece over here. And this one Let's go
ahead and go to this one. Let's grab these two
pieces over here. And these are going
to be the pieces that we will use to simulate. This one over here. Let's do these three
also. And maybe this one. Okay, let's leave it there. So once we've done all of this, what we can do is we can go
ahead and just a quick trick, if you just turn everything
on because else, it's very annoying to
just drag it all out, we can now just go ahead
and select everything, and then we can grab the
very last one and then we can drag it in
here because else you need to do a lot of
dragging back and forth. So at this point, we can turn off all of
these other pieces. And now what you
can see is we have a nice collection of some
of these random bits. So at this point, what
we can do is we can go ahead and they are pretty
much already in location, so we don't need to
do randomizations of the transforms and everything like we
did with our wood. For this one, it seems
like we can pretty much just basically move this a little bit on
top of each other. To prepare it for
simulation, simulate it, maybe I'd like a little
bit of rebar here and there once we are
happy with the simulation. And let's make sure to
center a pivot, by the way. And once that is done, we have a very quick rubble pile
with already pieces, so it costs almost
no extra work. And that's what we want. We do not want to spend
an insane amount of work just creating even more pieces
when we can just do this. So what we can do is we can
go ahead and move it up here. I'm going to quickly
select all of my blockout pieces,
isolate them. And then if I just
grab one piece in the attach list over here, just go ahead and attach
everything. Like this. This one because simulations are always a little bit unpredictable how
everything will fall. What we will do is we will just go ahead and move
it out of the way. And now for these pieces, what I'm going to do
is I'm going to go up here and turn this into
a dynamic ridge body. But one thing you want to
double check over here. So this is the collision that
you can see these lines, but you can see that the
collision is not very accurate. So you need to decide
for yourself if this is enough or accurate enough. Like over here, I can see also something that's
going really wrong. Here, see? So it's like
weird stuff is going on. What you can also try to do
that will often improve it, but it will be a little
bit slower in terms of simulating is that you go down here and in the physical
mesh instead of convex, set it to be custom. And when it is custom, it should there used
to be another one. There used to be original. Willi did they change that? No, they changed that
and I never noticed. Whoops. They used to
also be original. So if I do custom, I wonder, let's see, so convex. And we have also concave. Oh, concave is the
same as original. Sorry, I think
concave is the one. And then the mesh
detail you can set this to be like how
details you wanted. So we only need to have like
50. Probably even less. We probably need like 30, just to roughly get the mesh. Then in our physical material, let's just go ahead and make this concrete because
it is concrete. And then what we can
do is we can go in here and we can start
the simulation. Do not bake, start the
simulation to see if it works. It does not work. See,
our ragi bodies are fine. We have a directional
and we have all of the stuff turned on. So then I feel like it
is about the concave. Let's just try convex and see if it does
simulate like this. Okay, yeah, it is the convex. Then what I want to
do is I just want to see if the convex
is really that bad. You know what the convex
might not be super bad. Let's go ahead and set
this to be cardboard so that it's bouncing
around even less. Okay, so what I see right now is that it
gets pushed too far out, so I probably want to grab
these three pieces and maybe, like, move them a
little bit to the side. Let's try that again. Okay, so yeah, it
is bouncing a lot. The reason that it is
bouncing is because it has really difficult
geometry to work with. But I do think that it is good enough us to then go in and
fix it up a little bit. So let's go ahead and
reset simulation, and this time press
bake selected. So let's just go
ahead and bake them, and then we just need to
do some manual movement. You'll see all the
bouncing. That's just because it's trying
to calculate, but because of the collision, it is just difficult. So now what you can do
is same thing as before. You just go ahead and same
thing as in the blockout. We set our timeline slider
all the way to the end, delete everything except
for the last keyframe, hold Shift, move this
last keyframe back here. And now what we can do is we can just do a converter at a poly. At which point, we can go ahead and we can fine tune this. So let's have this
one below here. Let's have this one
sitting in here that is less pushed out. So this one is just make
sure that it is all nicely laying on top of each other and not floating in the air, like you
can see over here. Because that's the thing like the bad collision that
sometimes it floats. Yeah. Oh, this one, the reason that this one
probably doesn't work is because it has here, it has a verse. That's why it was
acting so strange. It had like a random
vertice really far away. So, whoops, that does
not matter, of course, for a normal mesh because
you won't notice that, but it does matter for
simulation meshes. So let's just rotate
this and place it pretty much
manually over here. And then this one, we can
just have nicely and flat laying on top of here like that. Let's have a look. So
this one over here, let's push it down
And in this one, yeah, we can have it maybe
pushing in a little bit more. Actually, let's make this one. Go. Up here, that might look a little
bit nicer if we do that. There we go. And there is our
little concrete pile. Okay, so we got this stuff done. Now at this point, as you know, the blockout, we can just go
ahead and throw into backup. And then if we want, we can go ahead and go to variation one, for example, quickly hide
some of these pieces, steal some of these
ones over here. So let's just go
ahead and copy them and let's throw them into
our pile layer over here. At which point we can go
ahead and we can Move it up here. There we go. We'll just go to do like some. These pieces are, of
course, not connected. Do not white like
intersect the rebar and have them like connected
in different places as if they belong together. These are all individual pieces, so they will just randomly have some pieces
sticking out here and there that are just like leftovers inside
of the concrete. Go ahead and maybe, like, a few more here and
there, but that's about it. Like, I don't need to push
too much stuff in here. Yeah, that's something
I always need to keep in mind with,
like, destruction. It has to look great on its own, but there is always there
always needs to be like an element of extra
sitting along with it. That can be foliage, that can be decals, anything like that, it needs something extra
because destruction itself, even in real life,
it just looks plain. If you also look
at your reference, over here, you can see, like little bits of foliage, you can see, like, nice decals and everything, and
you can see leaking. So that stuff is what
we try and capture. But if I look at this,
it's just plain plain. Noise. Like, it will be very difficult to
differentiate with it. And that's always a
slightly tricky thing to get white with destruction. But I would say that if you
make destruction assets, I would say that in
your final environment, they are often covered
up by about 40%, at least, most of the time. At least that's from my experience in games and
everything. So they are. Sometimes they are, of
course, stand alone, especially in our
environment because we have so many destruction
pieces in a small area, so there will be more than
40% just standing alone. But just to give you an idea. So we got something like
this. That is fine. Now, one thing I
forgot is materials. I believe let's export it. Let's see if these
materials are correct. Luckily, because they
have a color coding, we can just add different
materials to them. Maybe it's actually better
if I do that first. Let's say that everything
with pink, which is only one. You can go ahead and material one, everything that is red. You can go a next one.
So that's a nice thing when you change your
wife frame colors, everything that's yellow,
it's the next one. But they might already just
have their own material. I'm just not 100% sure. And then this one
becomes the last one. Right click on hight A again. So now at least we are sure that they have
different materials. So let's go ahead
and save our scene, and let's go ahead
and export this. Collapse concrete smell
variation one. Let's export. And now what we can do
is we can go in here. Grab this, reimport reset
the AVX. There we go. So it's like a little pile. And now what we can
do is we can go ahead and let's see, isolate. So this one now comes the tricky thing that
we kind of need to guess which pile
belongs to which. So we can start by just
dragging on number one. And if it kind of fits, which I think it
actually does fit. Yeah, so that's number one. This one, maybe number two. Oh, okay, so it looks like that everything is
already nicely organized. Is this one then number three? A, that's making my life a lot easier instead of needing to try out every
single material. Number four, and then yeah, this one is going
to be number five. Then we have the bar solids. And then we have bar 01
and bar 02, most likely. Perfect. Save sin,
and there we go. Now we have a little
concrete pile. And that's even less gray now. So that's great. Okay,
so that's looking good. We have some nice rebar pieces. So just like a nice
broken concrete pile. Yeah, that's working
really nicely. Also, like over here, this stuff where the normal is broken, that looks also quite nice. So we got this stuff
now also done. Now, in our next chapter, what we will do is we
will go ahead and we will add those small extra
concrete bits in here. Once that is done, it is
time for us to move on. And then what I think I
will do is I will just go ahead and do some
more structural pieces, which is going to be like
over here are concrete. And I do want to at that point, try and bring in a
little bit more color. So that's something that
we will also work on. Just bring in a little
bit more color. But this is starting
to look really good. So we did a lot of
stuff in a short time. So let's go ahead and continue
on to the next chapter.
53. 52 Creating Aditional Small Rubble Pieces: Okay, so what we're going to do now is we are just
go to go ahead and create a few small pieces
that we can use in between, like, all of these really big
gaps and stuff like that, and also to nicely
hang on the ends. This will just, like,
add an extra level of detail on top of everything. So to do this, this one
is actually really easy. We do need to probably
create a new layer. So actually, you know what? This double door layer,
let's delete it, and let's just rename it because we are no longer
having a double door. Small concrete. Rubble. And the nice thing
is that if you want, you can also later on simulate this and turn it
into like a pile. But this one is very easy. So we're just going to go
ahead and grab like a box. Oh, go ahead and do this so that we actually
are in the right layer. Here we go. So just
grab like a random box, make it like, I don't know, 50. Doesn't really matter,
50 by Oh, God. I already forgot the Size. There we go. Let's go ahead and just scale this
down. There we go. And do you still want to get
the same size over here. Maybe a little bit
thinner for this one. Okay, once you've done
that, all you need to do is just throw
on a Voronoi. Over here, fragment it. Let's go ahead the sens to 200 and you probably guessed it. So at this point, what
we can do is we can just convert to aiplyG to elements, like by pressing five, and
this is like one rubble piece. This is like a rubble piece. Maybe this one over here. This one looks pretty nice. And let's do this one, and that's probably the ones that I'm going to leave it with. Of course, if you want, you can create as
many as you want. So we got over here,
we got these pieces. Are they, I probably need to like let's make this one
like a little bit bigger. This one also because they are a little bit too
thin. This one is fine. And maybe let's make this one, a little bit larger over here. Okay. And then it's just
a matter of detaching them. That's already it. We can already take
these two Z brush, do some super quick
sculpting on them, and then it is pretty
much the same process. But I will go ahead and I will just do it in real
time. Why not? Over here, what I'm going to
do is I'm just going to go ahead and do a target belt, grab this piece and let's
push it a little bit further back in over here. There we go, that
it's not as sharp. Then at that point, s
grab all of these pieces. We can go ahead and
we can export it, and let's go ahead
and export into inTZi small rubble
pieces underscore 01, just in case you
want to make more. OBJ save and export using
the Z brush preset. So here in ZBrush,
you know the drill, that's set our
range a bit lower, set our material to be
the basic material, and we can just go ahead
and we can start by importing our rubble pieces, that one goes to exports Z, small rubble pieces, 01. Oh, yeah, I forgot
to triangulate it. It's probably too broken. Let's see. Ah. Yeah, here I don't trust. I don't trust it. Let's just quickly go
ahead and add addi bool, select everything,
do a quick connect. There we go. Just to
triangulate all of this. I wish she has a option that it's built
just out of triangulate. Doesn't seem like
such a big deal to do something like
that, but okay. It's twilight again, sphere. Ip at this point, I will
do this quite quickly because it's just the
same thing again. Geometry, dynamesh,
probably about 1,000. Although these ones they are going to be so destroyed that it doesn't really matter too much. So we have dynamesh. Oh, no, let's not subdivide yet. Let's go into subto
split, group split, okay. Okay, there we go.
And now what we can do is we can switch
over to our drawing tablet, and let's just grab
the first one. And I'm just going to see,
so I do not, first of all, just subdivide it,
trim dynamic with a square Alpha. Let's see. So I probably want
to still keep, like, some sharpness
in here or not. But if I keep some sharpness in, that would mean that I don't know where I would actually have my noise. Yeah, you know what? Yeah. Let's keep a little bit of sharpness as if
this is the top, and then all of our noise will
actually be at the bottom. I think that will
actually look quite interesting doing
something like that. It is the first time I've
I'm really doing this. Normally, I just make
them noisy on all ends. But now I remember that
doesn't always look as nice. So let's just do
this. Let's move on to the next one
over here, subdivide. Yeah, because all of these ends, they have a proper
top over here. So we will break the edge of the top because
it is broken off. So it makes sense
that it's not like a perfectly straight
edge anymore. But then down here,
just go ahead and do your average breakup
stuff like this. Scrap the next one.
You should check. Okay? So this is top There we go. And let's break the
bottom quite strongly. Yeah, and then
we're just going to go through the same
process, pretty much. The only thing is that
for the mask painting, we most likely do
not need any mask. Oh, no, wait, since
we have the top, we do need to have
mask painting or not. Like we can choose if we really need mask
painting or not. You can add it, but honestly, for these what you
can just add the without rebar generic
concrete on here, and you are probably totally
fine if you do that. On this one is being annoying, let's hold shift to smooth. Come on, just trying to
hit that etche over here. A Oh. That was way too difficult. Don't know why it was so
difficult just to hit an edge. So yeah, I'm not gonna do all
the sculpting, everything. I think it would be too time
consuming for what we get. So I'm just gonna go ahead and I'm going to do
the baking, of course, but then I will just, like, turn off all of our mask pieces. And that's pretty good
because we need to add that functionality anyway
for some other pieces. So if we haven't had
that functionality yet, I do believe we can
turn off the dirt, but I'm not sure if we
can turn off the rest. Over here, let's just do
a quick clay buildup. Give it a little bit more thickness around the
edges because, else, it will be so difficult to
properly break them up. Oh, okay, so this
is pretty cool. So many of you
probably notice if your edges really thin and
you try to do clay buildup, what it will do is it will shine or it will just
go straight through. Here, if I do this, you can
see that it will just break. However, if you go to
your brush and then go to outer masking and turn on backface mask, now
if you paint on it, you can see that now it will not include the back face mask, so this makes it easier for you to add some thickness to w thin edges from below, as
you can see over here. Surprised that we have
not had that problem yet. And then what I
will do is I will do a quick smooth over here. Trim dynamic. And now let's just break it up
quite roughly over here. There we go. And at this point, I can just do two subdivisions, probably, and just continue
on breaking this up. And then over here we
are just going to make this w broken up, but the noise will take
care of any incorrections, just by nuking them
all out, basically. That's the thing with the
noise. It's good or bad. It's bad because we cannot have any very specific details, but it's good because
if we make a mistake, it will just add
it into the noise. Okay, so that's probably it. Let's just double
check that all of them have two subdivisions. Okay. And now, probably
what we can do is, can we do them all
at the same time? I think so. Let's
go ahead and go to SubTo. Let's go down here. Merge, merge down. There we go. And now what we can do is
we can just do a masking. So let's go ahead
and mask this here, but also mask it slightly over the edges like that pretty much. So that we are also
including the final edge. So if you look at it
how it looks on site. Yeah, maybe you're
like on the side, you might want to
just quickly go in, hold contralt to remove
some of these edges, but for the rest, that's fine. You can go over here,
do the same thing. A just go over the
etches and fill it in. Just have a quick
look that it doesn't go over too far.
No, that's fine. Next one. And after
we've done this, what I want to do is I want
to start working on the roof. It's going to be another
interesting one. I mean, the actual like the
ceilings and everything, so the broken pieces. But that's one, I don't know if we are going to
do sculpting for it. I don't think it's
worth it because it's almost always covered up. So it might just be
a nice time save to not have specific sculpting. Not everything needs to be
sculpted, important pieces, yes, because as you can see how much we are deforming them, sculpting is quite necessary. However, not for pieces. And there are even workflows to not do these type
of things sculpted, but those workflows will not result in as nice of a quality. In any case. So we now got this. We can now go ahead
and go to surface, noise and you know the drill, just open up your brush folder, open up your noise,
press Okay, press apply. There we go. So here's our
noise, just sitting below it. I don't expect like that
to be any poms with these. So, there we go. That's just like some
quick pieces like that. You can use them in many
different ways if you want. Yeah, so maybe maybe there's, like, one that I want
to have completely. Now, I know it? No. Let's
leave it like this. Okay. So now that we
have these pieces, all we need to do is
do a quick save us. And let's go ahead and save
this as small rubble pieces. Why does it say 05? Dide called small rubble
piece 05 instead 01. In any case. Let's start by just doing a quick
export for these. Exports, scalps, small
rubble pieces score 01, small rub piece 01
score HP, save. Now you know the
drill. We're just going to go ahead and we
are going to optimize this. Plugin. Decimation master. We're still at 1.7 million, so it might still take a
second to compute. Here we go. And now let's go set this to 1%. Deci made current again. This one can go quite low. Let's do like 20%. That's made current.
Again, that's made current, probably again. Okay, it might be a
little bit too low. Let's at least compare
to the other ones. It will probably work, but
let's just set this to like here, 350 polis. That should be fine.
Easy to unwrap. So let's go at an export these. And just call them small
rubble pieces 01 score p, save them up. Let's
go back in here. Let's go ahead and
delete this old dipol. Attach all of these pieces, and let's just go ahead and
throw them into our backup. What is this thing?
An empty object. Okay. Let's just delete that. Let's go ahead and import. And we're going to import
our small rubble pieces, low poli over here. There we go. Let's do some housekeeping
by going to vertex mode, selecting everything,
weld settings, and setting this to like 0.01. Then let's go ahead and just
detach these pieces over here. There we go. Let's go ahead and do
like a center to pivot. Let's go ahead and do a
super quick turnaround of every single piece. Make sure that it
does look correct. And here, stuff like
this does not happen. That we just move
it nicely down. Those are always
like risky ones. I always want to connect them, but then I remember
that technically, it does not really matter
because they get triangulated. Yeah, I mean, these, I have
the urge to connect them, but they always
get triangulated. So, honestly, it does
not matter too much. Okay, so we got these
pieces over here. At this point, it might
be easier if I just do all of them at the same
time in terms of UVs, because all these need, if
we just add the text tools, is they need to
have the over here, let's go ahead and turn
off our all the pieces. Here we go. And then we can just
do like the bottom. So it's like the most
easy UVs there are. So iron this, do a quick relax. Contra iron this. And let's just do like a pelt
unwrap or peel, quick peel. Sorry. Wow, I'm really
bad with those naming. Let's add quickly, Checker box just to make sure that it is not too intense in
terms like stretching. No, it looks fine.
So at this point, we can go ahead and
we can average scale, set the padding to
0.001 over here. And I'm just going to
convert soon and add a poly and we can just
go ahead and leave this. I do probably want
to go ahead and just add a single material
to it because lst will do that thing
again where it just adds a bunch of
different materials. So let's just go ahead and
add one single material. And so high pool, low poly, we are going to
bake it, but we're not going to do a mask. So at this point, we can go
ahead and just export this. Export it sculpts,
small rubble pieces as an FBX this time so that we can triangulate it in a little
bit of better format. Small rubble pieces underscore
01 underscore LP again. Should triangulate
this on. Here we go. And let's move the Momoset. Here we go. So we can just delete like the old one
that we were baking. It will also make our
scene a little bit faster. Import your low poly
FVX and your high poly. Hi polen here, low polen
here. Double check the cage. Yeah, by this point,
this stuff is not too interesting anymore.
Bake project. It's going here. There is the wong folder that
was a folder for. A tutorial on YouTube, I did for you guys.
So textures, bags. And yeah, just throw this into, like, big collapsed concrete. Because the kind is still
from the same family, so to speak, small, concrete, rubble 01, save, bake, give the second, press
P to preview Yeah, it works the way that I want it to work. So
that's totally fine. So now what we can do, yes. So for the mask, I'm not sure yet. We can see how it looks. So let's just do a very
quick test export. And for that, we can actually
just use our low poly. That should not be
a problem. So let's just go ahead and go in here. Assets and let's just create
a folder called Temp. And then in here, what we
can do is we can just import that low poly version that we had because it should be
pretty much the same. So small rubble pieces,
low poli import. Over here. So these are
the small rubble pieces. And then what we want to
do is we just want to see if our material works fine. Now, for this, we
probably do need to, and we need to make this anyway, so it doesn't really matter. Let's grab our concrete
bag survive, duplicate it, and call it small rubble
pieces on the score 01. On a weight, we did
like the black mask. I forgot. So what did we do? We had a black, we had a black mask to kind
of, like, turn it off. O then for no maps, we do want to already
input that no map. Because we need it anyway, so let me just navigate to it. Small rubber pieces over here. Throw this into
our detail normal. The only thing is that
what is it now showcasing a tiny tilable Is it
the worldspace tiling? No, it is this one. Okay, so it is showcasing
the rebar tiling. Yeah, this doesn't really work, but where we used
it on here, right? Yeah, we used it
on a brick wall, but Oh, wait, it has dirt, I believe it has
to be turned off. So I'm just having a refresher. That's what you
get after a while. Okay, so it has this one, then we can just apply whatever material we
want. We did this stuff. It has our normal map. Yes. Okay. It has
our normal map. And I believe that it then
just uses our base color. So if we turn our base color into probably the
normal broken version, norm map and roughness map. Here, for a distance,
for now, that is fine. As a polish, we could
add a material, but for now, I think
this is totally fine. Knowing that that
works, first of all, we can just go ahead
and get rid of Zbrush. We can get rid of Marmoset and then we can just go
ahead and go in here, we have these pieces,
and now I will show you finally why. Let's go ahead and duplicate these and let's just
throw them into our it allows me to scroll collapse concrete
bake variation two, turn off the old one, turn
on the new one over here. Here we go. So you
have these pieces. Let's move them to the side. Let's go ahead and just
do a quick center pivot, just to make sure that
it's all correct. And we are going to,
like, place them in here. So if I just go ahead
and duplicate these so that we have, still a backup. Basically, these ones, they
are going to be like this. So we are going to
have them sitting in between these pieces over here, and it could be a
little bit like this. And then we have like this
one, for example, or actually, this one would be perfect, like in these really
thin cavities. Also, if you want, you can set your I don't know why
it's set to working. You can set this to local, which means that
when you rotate, it will also move
in that rotation, so that can sometimes
be handier, although it is 50 50. So sometimes it's handier. If I want to do
this, it's handier, but not if I want to do
the initial position, then it's always a
little bit messier. But basically, what we
can do is we can just fit these pieces in
here to basically showcase that there
is still extra rubble sitting along with everything. Let's push this one down here. And of course, you
want to do this very nicely and stuff like that. I'm just doing it a little
bit quick as always. Yeah, this one, I just kind of have it floating
here as if it is, like, stuck still to this piece. So just like that, you kind
of want to fill it up. Feel free to also
sometimes like scale it down and just make
it fit a little bit. Like that. You can do
all of that stuff also. And also like stuff over here. You can do another
one, for example, where you just grab
this And let's see. So these ones, they are never really You can add
them if you want. Yeah, let's just grab one
of these, for example. So you can add them in
here. I would also be nice. But adding them
on the very ends, that one will work
perfectly for the, you know, the pieces
that hang over the edge. For those ones that will
work really well in here, it will not work
always as great. But what I want to do basically for this one is I'm
just trying to, like, fill up all of these
holes that we have. Because they are a little
bit too intense right now. Like, these holes, not so much, but it's like so this
one we want to fill up, maybe one or two here, and then also here a few. A, you know what? This
might also be a nice place to just have one last
piece hanging on. And it's like the rebar that is basically holding
it in place. So you always need to have
it intersecting with rebar, because else, it would
not be very logical. Whoa. That was a camera switch. So let's go ahead and
move one over here, and then we can see
the end result and see if it actually works the
way that we want it to work. Um, let's grab one of Tsieces
and throw it down here. And also, probably in games, they would often
also do this kind of stuff if you need to
walk on top of it, or they would just
make the collision so different that it
doesn't matter that there are holes in
there in your couch, but just kind of walk on top of the holes,
one of the two. But in any case, I'm just
going to switch over to view. We like my movement.
At this point, I just need to do very
basic movement anyway. The only reason why I'm mostly doing this in
real time is because I just want to check if it
is not too overpowering. Because sometimes having all of these smaller bits will actually make it worse what I'm trying to fix with having more
closed up holes because then you can see
everything even better. But it all depends.
So we will see. I'm just going to
push this one here. And let's say that
at this point, I'm pretty much fine
with what we got. So what we can do now is we can go ahead and
we can export this. Collapse concrete, big, CO two. So we want to go ahead
and go into two unreal, collapse concrete, big, CO two. Here we go. Stride out. Right click and re and pot. Give it a second.
Then it will give us a pop up saying that we
have another one, press done. Go in here, go into
your materials and grab your material which is going
to be small rubble pieces. Okay, so this is what
we got right now. Looks like it, they do need to be like a little bit darker. So let's just go ahead and just make them all a little bit darker so that they fit better. But for the rest, Yeah, see, here, that's
working quite well. So you got like,
these extra pieces. Um Yeah, I don't think I'm
going to do a mask for now. I'm just gonna leave these. Maybe what would
also be nice is, so we have our pieces, but I did not flip
the green channel. Here, there we go. See, that looks a little
bit more logical. But I was actually mostly also focused on setting normal
strength to minus one, or maybe minus w strong, like minus three, for example, just to make it a
little bit stronger, so that now from distance here
to also work a bit better. But as you can see,
so that already reads a lot better where
we have some breakup. We can probably even
art a little bit more over here and maybe like
one or two over here. But just in general, that's
looking pretty good. See that already works a lot better. That's basically
what you can do. We will mostly focus
on adding them on here and on the smaller bits so
that they are also hanging. That's something that we will be doing in the next chapter. And once that is done, we can finally go ahead and move
on to the next piece, which is going to be our roof. Let's go ahead and continue with this in our next chapter.
54. 53 Placing Our Small Rubble Pieces: Okay, so now that we've finished all the small
pieces and are the there, now what we're going to
do is we're just going to go ahead and also
include them into, like, two other pieces which are going to be our
variation four and five. So let's go ahead and just grab these rubble
pieces over here. Let's duplicate them,
move them out of the way, throw them into number
four to get started. We don't really need to
use them a lot for these. It's just that sometimes it would be nice if you have, like, one of these pieces over here to grab this and just kind
of throw it in here. You maybe scale down a
little bit, stuff like that. That's basically going to be it. And then if we
have, for example, one of these, it would be nice like for example, over here. There's a lot of
space, so it would be nice if it just has
one extra piece, just kind of like
sitting in here. And then we can kind
of, do the same. Let's see that over here. We can maybe throw
this one down here, scale it a little bit,
and move it like that. And another one maybe like
down here. Like that. That's about it. Just needs to have a few bits
here and there. So let me just add one extra bit over here because else it feels a
little bit lonely. Here we go. Okay,
so we got that one, maybe one last one over here, and that
should be about it. Although we will, of course,
check to make sure that looks correct or not
because you never know. So let's go ahead and just grab these pieces and we
can export them. Concrete bake variation four. Let's go ahead and export. And then we can just
quickly going into Unreal. I believe this is
like a variation for. So where are you? Here you are R import. Done and navigate to our materials and just throw that last material
in here. Here we go. Um, S, we got this. I'm still, I'm a bit on the
fence of, like, the texture. If we want to maybe go for, like, the rebar version. I'm not sure. So if we do
like the rebar version, and so it's a little bit bigger, I guess, 0.5 maybe. I guess that might look
a little bit nicer. Okay, so we cannot
really go bigger. Let's leave it at
maybe, you know what? I'm just gonna cheat
that I'm going to go off the even numbers
and do like 0.8. Yeah, I guess that that
kind works a bit better. And else, what we can do is I
guess we can create a mask. I wanted to avoid that,
but we can just do that. That's no problem.
Let's first of all, just continue placing them. So we got these ones. I
feel like it could still use a little bit in here. So let's just go ahead
and grab this one. Scale it down a little
bit. Maybe like rotate it. So we have one. It's like
sitting on this one iba piece, and then maybe
duplicate this one. Once again, rotate it a bit. Here we go. Maybe move this one a little bit
closer like that. Okay, so those pieces
are now also done. So now what we're
going to do is, well, of course, first of all,
just quickly re export them. For the half piece, I'm
not going to do it. I'm now just going to go ahead and move over to the next one. So probably we can
probably, like, quickly duplicate this
stuff for the next one, CtraVe let's just strike
this one into number five. Here we go. Okay, so number five, doesn't need anything
on these ends. Let's grab this one. Let's move it like maybe
have like one over here. Another one maybe over
here would be nice. Let's make it a
little bit bigger. Yeah, then with time
left in this course, we will just go ahead or
time left in this chapter. We will just go at and
we will like the mask. Just to give us a little
bit more flexibility, although the mask is going to
be a little bit more basic. First, let's just finish
off the placement. Let's see one over here. Let's do another one that is like sitting Here. And let's go ahead
and have one piece. It just kind of like in here, maybe just below the
rebar, like that, so that's like sitting on, like the larger chunk of bar. Here we have another one
just randomly floating. Let's throw this one between
here. Maybe like this. A grab this one over here. And one last piece that I found. Let's move it here. And
then I do want to, like, add one extra piece
in this area. So we have this one,
and let's just grab this one over here
and just kind of like place it next to it. Et's make this one,
a little bit forward just to give a little
bit more variation. There we go. So just like add a few small pieces
here and there. And then what we can
do is we can also go ahead and export this one. Variation five. Yes,
I want to replace it. Okay, save my scene. And now we can just
go ahead and go in here. Variation five. Let's reimport it.
Done. Open it up, add our material. There we go. Variation five, you can see. Let's see. Some of these. This one here, here,
you can see it. It just has some of these
extra pieces in here. And as promised as
an extra bonus, let's go ahead and create a mask and I will do
this super quickly. I'm just going to go ahead and
I'm going to find my file. Over here. OpenGL. That's fine. I do not need the normal
in this case because, well, let's just add the normal. You don't exactly
need a normal for, like, very quick stuff. But I guess it doesn't
take too long to just add one. Here we go. Assign a norm map, page
all of the other maps. Let's go down here
and let's just call this small rubble pieces. Delete that smart material. At the destruction,
smart material to this. Let's go ahead and turn off this one and let's
grab the first one for which we can just go
ahead and add a black mask. Go to our brushes,
artistic head. Quickly paint in over here. The tops Like that. Okay, so that's that one. Don't forget to just re arch your anchor point so
that you can go in here. You can click on the fill
layer and you just need to, like, reassign the anchor point once more, just to update it. There we go. That's
like for those edges in case we have them, get
rid of, like, the paint. Then we have our texture
over here, anchor point. And that one, yeah, we can just like this one
is like for cracks. So if you want, you can already, start also blending
in some cracks, even though it's,
like, really small pieces to do that on butterca. So those are like the cracks. And then finally, we also
still have the dirt over here, for which we can just get
rid of a paint layer, go into our original,
and just like, tone it down a little bit more, and there we go. Okay, perfect. So save sin small
concrete pieces, 01 underscore mask. And then it is just a matter
of exporting it also. And I'm just navigating to my
export location over here. This one's going to
be destruction mask as a Targa file, it's export. And then we can go in
here. See? So you can do this stuff really quickly
once you get used it. And if I didn't have
to talk, I can do it even quicker. So
we got this one. Now, let's go ahead and go into our materials, small
rubble pieces. And I believe that all we need
to do is just turn on dirt and then go into our masks and just grab these small
rubble pieces over here. Maybe now go back
down and just set the color overlay a little bit lighter again. But there we go. So now we have the small
rubber piece rear, which, yeah, it looks
better, I would say. Oh, yeah, you're a
flip that around. So let's go ahead
and call that done. And that pretty much
marks the end for our really large concrete
pieces over here. I'm still not completely sure if I want to
have the center one. So I think what I will do is I think I'm going to replace
it. We have a look. Yeah, I feel like it's just
a little bit too obvious. So let's just replace this
with variation one over here. Let's turn off snap rotate. There we go, see?
I feel like that will work a little bit better if we start with
something like that, and then we will take it
from there. Okay, perfect. So what we will be focusing on the next chapter
is going to be our roof floor pieces,
whatever you want to call it. I'm just going to call it
the roof pieces over here. So those are the next thing
that we will take the final. Once you've done that, we will probably just
do it like a quick pass for all of our pillars
and take it from there. And the thing with these pieces is because they are
often so hidden, we do not really need to do any type of sculpting on them. So I'll show you
how we are going to do that in our next chapter.
55. 54 Creating Our Final Roof Pieces Part1: Okay, welcome. So in
the next few chapters, what I want to do
is I want to focus on creating over here
our roof pieces. Now, they're not going
to be too difficult. The biggest reason for this
is because we are going to make them pretty much
without any sculpting. So we're going to make
them a lot more flexible. Now, we will, of course, over here, these
bars and everything. And for the rest, what
we will do behind here to kind of close it off is we will just use dilable materials. So I will show you
what I mean with this. So if we have a look over
here, let's see. Wood. Okay, that's the flooring. We need to have the actual
Oh, God, where are you? Roof? That's the
one that we need. So let's get started with
our roof clean over here. Okay, so our roof clean,
if we have a look, because I believe am I using
them over here? Wood floor. Okay, so we have the
floor sitting on top, so we actually don't need
to worry about that. That's really nice.
So roof clean is only used in these
areas over here. Yeah, you can see that there's,
like, a little bit of, like, some capping going
on, but that's no problem. Okay, um I believe that roof clean can just literally stay like this, as far
as I know, yeah. So what we can do is pretty
much just get rid of this etche because it's just going to be like a top piece. It's never really going to
be exposed as far as I know. Yeah, here, it's never
really going to be exposed. Okay. Wow, that makes
our life a lot easier. In that case, what
we're going to do with this piece is simply go ahead and just add like
a concrete on this. Do I already have this. Well,
I do not have concrete. Okay, let's grab this
one. Let's just call this concrete over here. And then all we need to do
is just go ahead and go in here and give the
second to load. So we want to grab
a bitmap lookup and then go ahead and just grab the concrete plane
stripes, most likely, because it would make sense to have the same
material as that we have our rubble pieces because then kind
of like all fits. Okay? So we have added this one. And now, what I'm
going to do is, I'm just going to
go ahead and just add like a UVW unwrap box. I'm going to keep it the same like this so that
it stays modular. The only thing that I want
to do is I want to set my height also to
100. There we go. So now, it should stay modular because it's
a perfect square with a perfectly square
unwrap like this. And even it is at the center. So what we can do is this one, that's all we need to do because it needs to
be perfectly til. We don't need to add any
edges or anything like that. I guess, if you want, you can add a few
segments like this, and you can sometimes give it like a little
dent to almost give it the effect that there's
some weathering or something going on or that it is just a little bit damaged. And that's about it. So this
one we can already export. So that's probably the easiest
proper we've ever done. Roof clean. Over here? Yes. Oh, yeah, for the half
version, I forgot about that. So here we have like
roof clean half. You know what, for that one? Because I don't
know. Yeah, here, I did not match up
the roof clean. So for the half one, I'm
just going to go ahead and I'm just going to art
this material again. And I'm just doing a new unwrap. So box map, box, let's just make it 100 by
100 by 100 for this one. So that on the side, this box should still line up correctly. Looks like that we
need to rotate this. So let's flip the V No. Come on. Which tile
do I need to flip? I think what I need to
do is let's go ahead and let's just grab our unwrap. This probably
doesn't even matter too much that we need
to do it like this. So let's just go
ahead and rotate it nine degrees like
this. There we go. And then what I'm
going to do is I am going to go ahead
and in my gizmo, Let's go ahead and snap this
back to my grid over here. And it probably doesn't line up, but we'll see how well it does. I don't really care
to be very honest because you will never ever
really be able to see it, most likely, so
we'll test it out. Let's go ahead and just
export this one also. And now if we just go in here, we can go ahead and grab our roof clean roof clean
half, re import it. Press done or actually press reset the FBX keep pressing
done. I shouldn't do that. And then in our materials, we will need to let's duplicate
the brick wall and call this roof clean,
unscoe concrete. Actually, you know what? We can just call
this clean concrete. Oops.'s go ahead and
what am I doing here? I'm trying to rename it. There we go. Sorry about that. Clean concrete. Wow,
that was annoying. And then just go down here
and all we need to do is we just need to go for
our concrete stripes, base color, normal roughness. And I believe at this point, if we go to our roof clean and our roof clean half,
we just need to enter. Over here, for this one, we just need to quickly
remove the old material. And then it should
just be a matter of entering our clean
concrete in here. And what I'm also going to do, my clean concrete is
I'm just going to reset my color like that. Set the lightness to 00.5. Set the lightness to 0.5. And the roughness back to one. Normal strength can
just be like minus one. Yeah, there we go. That
should do the trick. Just you see right now, it
doesn't make too much sense, but at least we have
our concrete over here. And over here, it is probably also here,
but you just cannot see it. Here it is below here. Don't know why this
one is so high up. See, that's like small
stuff that we need to fix. But that's why I said that I don't really
care because you will probably almost never
be able to really see it. See, this is over here, this is a flooring that
is sunken in too much. There we go. So yeah, for that one, we don't
really need to do much. It's just like in this
one corner over here. So what we can do now is
we can now move on to our roof broken and then pick our first
variation over here. Okay, so with our
destruction pieces, we need to make a decision. So and the decision is
basically over here, as you can see, we
already kind of, like, changed the
positioning over here. So what I feel like
would be the best thing to do is to just cut it off, and I'll show you what
I mean because it's a bit tricky for me to explain. So these pieces for
now, I can like delete. I don't care about them. The
way that this is going to work is I want to use this
one as a base. So let's see. I want to probably
let's over here. I think I just want
to select these. And so I'm just
having a think here. Yeah. Okay, select
these, delete. So con I delete the rest. And then I'm going to
add a segment here. And a segment here. I
delete these pieces. So I'm just having a k here. For some reason, I'm
having a hard time just thinking about the
best way to do this. I want to blend this out. So we have these
pieces over here. I would then bridge them. And what I'm going on
against is that over here, I just need to figure
out the best way to, like, connect these
pieces down here. So let's actually do this.
So let's go ahead and select these pieces over here, and we will just edit them. In the beginning, I
was like, Oh, no, I want to remake them,
but you know what? I'm just going to edit them.
So we have these pieces. And what I'm going to do is
I'm just going to hold shift, and I'm just going to give them a little bit of
thickness like that. Not too thick. It's just going to be like a
thin concrete slab. And basically, the way that this is going to work is we have two thin concrete slabs that
we are going to create. And come on, just let me select. Thank you. And then in between these concrete
slabs, we have the metal, and then behind these
concrete slabs, we have our broken concrete where the metal kind
of, like, goes into. So we have these
pieces over here. Now, in order to
properly clean this up, we do need to add
a quick swift loop on both back ends like this, and then you can go ahead and you can just select
these and I'm just holding ld X to basically
go into Xray mode. I don't know why I
did that. I can just do this. Oh, yeah. I sometimes go in X ray
mode to make sure that they do not accidentally
select something behind it, because in X ray mode, I can
see whatever is behind it. So I do that mostly just
for drag selecting. So we got these
pieces over here. Okay, that's fine. Now
what I'm going to do is I'm going to bridge
these pieces over here. It's a little bit tricky to do this in terms
like spacing. Then I'm going to add,
like a few segments, and the only reason I really
do this is because I want to add some more
variation over here to, like, make it a little
bit more interesting. Like pushes back, maybe
like pushes forward. Okay, so we got this
stuff now done. And now over here,
I'm going to go ahead and we are
probably just going to make this quite smooth, which means that we can
pretty much connect this. So if we select this
one, let's bridge it. Let's bridge this one. Let's move this a little bit. Let's bridge this one. And now we can also bridge this one
and this one over here. Okay, so we are
going to do this. Then what we're going
to do is we are going to smooth the corners, and after we've done that,
then what we're going to do is we are going to just
like art weight normals. I'm just formulating
a plan over here. Because I just want
to reuse my blockout. If I do, of course, if I
would make it separately, it would be a little bit easier, but because I want
to reuse my blockout specifically because it's
such a nice location, it's just easier
to do it this way. So over here we
have like an end. Now, this end over here, I do then want to make it
a little bit smoother. So what I'm going to do is
I'm going to add and chamfer to this sets to zero. Actually, you know what? Let's
at this to maybe even two. So we're going to basically
have a chenv over here, which will just smoothly
transition to the site, and once we have
arrived at the site, you will no longer be
able to see anything. And then over here, what
I'm going to do is I'm just going to go ahead
and I'm going to select. Here actually, you know,
let's double click on here. So we basically just
want to connect these pieces like this. Okay, so we've done that. And now what we're
going to do is we're going to basically
chant for this quite largely over here. Yeah, let's just
make it like zero. So we don't want to
make it to over top. Okay, so we've done that. So now those
connections are done, and now what we need to do
is we would need to go ahead and connect these
pieces down here. And of course, a swift
loop does not really work. So instead just
let's do like a cut. And let's just place
your cut like this. That will probably be the
easiest way to clean this up. And after we've
done that, we are going to outweight the normals. And then I'm just going to
quickly export it because I have no idea if this
will look good or not. If you want to push it, you can, of course, sculpt it. I personally, I am
not going to do that, just to save a
little bit of time because it is not
really worth it. You don't see it good
enough for that. But okay, so we're doing
this one over here. After we've done that,
we will do, like, the internal, no, you know what? No, I'm going to
do the wood next because the internal pillars are going to be
exactly the same. So for those pieces
are almost the same. Okay, so over here,
I'm just going to I do try to avoid triangles. Triangles, yes, over here, just to keep things
a bit cleaner. And then if we just go ahead
and just select Ts pieces, and I think we probably
want to end it here, and I will just clean this up
later on. Do I want to end? No, I probably Oh, yeah, yeah, I do want to end like this because it doesn't matter
how the transition works. So we are just going
to go ahead and double click Select all of these
pieces over here. Okay. Let's add the quick chamfer. Not too large.
Probably around 0.3. Yeah, around 0.3 should be fine. Okay, so we got
these pieces down. Now I just need to
do a little bit of cleanup. Sorry I can speak. So let's do a target
world like this because these pieces we don't
really need after all. At least they don't
really add much value. Let's do this one pushes a
little bit closer like that. And this one I'm
just gonna keep. You don't really have to do
this, but I just like to do it to make it a
little bit nicer. Yeah, I should have just
done that. There we go. It's just a bit tricky to sometimes see exactly
how everything flows. It's just go out
and connect this. Okay, in any case, the goal is that we just get something
like this, for example. So once we have this, what we're going to do is
basically in terms of concrete, only it will just be normal concrete and then
in here and these bits, they will become the
rougher concrete. So what we can do
is if you want, we can already just
go ahead and dd this. So if we go in here,
we have our material. So we have a normal concrete, and all we really need to do
for this one is a UVW map, which will automatically
also unwrap the internal concretes. And then if we just
said this to box, we're going to go 100 by
100 by 100 over here. To match it up correctly. Yeah, that should be fine because it is still
at the center point. And then what we're
going to do is we're going to go ahead
and convert dipole. We are going to quickly add
another material that we'll call concrete unscore broken. And if you want,
you can already, add a quick bitmap to this one. So this is going to
be the no bar one. So the broken one
without bar over here. And then it is as simple
as just selecting your faces and then
applying the material. So we are going to go
ahead and if you want, you can select by
angle over here, and that makes it easier for
you to select these bits. And I'm going to connect it. Shall we do, I think it
would be more logical. Let's actually, yeah, let's
turn off select Bangle. I think it would be more
logical to just end it here. Yeah, so we have this. So
what you can do is you can basically just do a
drag select like this. And once you've done that,
you can just go ahead and select by angle and just
deselect the bottom and the top. And then we just
need to Oh, sorry, because I turned on
Ignore backfacing, the selection did
not work correctly. Let me just re try that. Select by angle,
deselect these bits. And make sure that you basically select this end over here. Yeah, and it should do the twig. Let's also select this last bit, and that's where I'm pretty
much going to end it. Yeah, okay. And now, what you can do is
you can just go in here, apply the material, and then it will be able
to register that that is going to be another
different material, see? So that's basically how it is going to look. So quite basic. And then what we
need to do is we just need to go
at and we need to add some of that extra
metal in between here. And for this, we can go at. We can still use our lines. So if we go to, like,
a side view over here, for the metal, what I like
to do is I do like to add a little bit more
structure into this version. So basically, what we're going
to do is we are going to add both object creation.
It's going here. We are going to add a line like this and first of
all, just set it up. So we're going to go
ahead and in this line, let's add a sweep modifier. Okay, so we have
our white flange. I don't know what it's called. And what I'm going to do now is I'm just going to
go ahead and I'm going to Can I flip this around
angle zero? There we go. Flip it around. Let's mess around with our
length a little bit. So these are like the internals. And now you can just go at it. You can make this properly.
So I'm just going to set the corner radius to see
rot make it straight. I'm going to make my
thickness a little bit more. So this is like a very
heavy duty piece of metal. Yeah, let's make it a
little bit thinner. So we got something
like this, for example. And now what you can do at
this point is we are going to basically like
properly position it. So let's say that we
have one over here. And I'm going to have like I should have
a side view, right? There we go. Okay, so
here I have a side view. So I'm going to have another one that's like a little bit bend. Let's move this
down a little bit. And I'm going to
have probably one more That is a
little bit more in, like, a straight bend like that. So having these
three, what we can do is let's go ahead and just select the edges and move them out of
each other like this. Select the original
one and just copy your Sweep modifier and
simply paste it in here. Oh, for some reason,
this one needs to be rotated back to 90 again. So this one is like
the straight one, and then this one should
be like the bend one. Set the angle back to 90. Here we go. So we got,
these three pieces. Now, basically, what we're going to do is we are
going to make this fairly even in terms of,
like, the positioning. So what I can do is I can just basically use
my grid point, and I can say I want to have one every two points like this. And then let's grab the
straight version again. And let's grab this
version over here, one last time. There we go. That should be fine.
And then at that point, it will be one and
then one half. So this will I'll be tilable. And then when you
have these pieces, the first thing that
we're going to do is we are going to add and add a pole and just do stuff
like small rotations, like you can see
over here, where it is almost like
it is breaking. So we're just going to
add like small rotations like this, maybe over here. This version, let's go
ahead add a pol let's say, for example, push this
back. Or, you know what? It might be easier for
this one to just add like a swift loop down here and here. Here, let's try that
and then see we can push it back a little
bit better over here. And maybe let's say that we push this entire piece
a little bit back. This one, we can pretty
much, keep the way it is. This one, again,
let's add at a poly. Let's just rotate
it a little bit. It's not so much the angle I was hoping for. Let's try this. And then for this one,
what I'm going to do is I'm going to
add also added ply. Let's push this a little bit up, and let's just go
ahead and like here. Let's move this down. And
now it is more a matter of, of course, adding
a little bit of variation with the
lengths of it. Like this so that there's a little bit of
variation going on. Okay, so once we
have these pieces, all that we need to do now is probably the easiest
way to just add the Chafer modifier
instead of adding the chefs in your added pole so that we can copy them over. So just go into modifiers
and add the chamfer, and then down here, just set the amount lower and set
the segments to zero. So this is all going to be
for our weighted normals. So we got this one. If you want you can connect
these pieces, I'm not too worried about them because they will
be triangulated. I can go in here, I can paste And what you can see in the
champ is that it ignores stuff at a certain angle
so that when we bend it, it will not try to also
champ for those edges. Over here and over here, so
we can paste all of those. Now what we can do is
we can grab everything. Let's go in here and
we just want to well, we are going to
use the Riba tile, but we also have a rust texture. Arte UVW Unwrap box, make it like 200 by 200 by 200. Okay, that might be
a little bit much. Let's go 100 by 100 by 100. So that is our UV unwrapping. And then we just want to go at te weight normals modifier, which I believe I've
already showed you. Here we go so that we can add a nice weighted normals
to make our edges soft and also often just
turn on snap to large face, that will also improve
things a little bit more. So this will just make
sure that everything feels a little bit more hipoly. Okay, so we now got
these pieces over here. Let's just go ahead and export
this and see how it looks. And then in next chapter, we will just go ahead
and dd improvements and continue with this
and stuff like that. So broken roof variation 01. So we can go ahead
and go in here and roof broken variation
01, this one. Yes, I want to go
ahead and export it. Make sure that
triangulate is turned on. And then if we go in here, reset the AVX. There we go. See,
so that's that one. She can see. So that's already starting
to look a little bit better. Although over here
with concrete, we need to be a
little bit careful on how we are actually
going to do that. So we might have a
variation without the metal because else there will always be metal
sticking through, and that might not
always be very handy. Oh, and I forgot the art
weight normals to this one. So go in here and also add your weight to normals and
turn on snap by large face. And actually, before I do that, let's go ahead, select all
of this stuff over here. Now, you know what,
select everything. Go to our smoothing groups, press clear A and select one. And then if we just
select by angle, we just want to go
ahead and select these out angles and
turn them off like this. It's twilight again. Roof
broken variation 01. Do you want to replace it? Yes. Right click reimport. There we go see that should
look a little bit better. Top piece. Yeah,
that should be fine. So what we can do now is we can go ahead and
we can open it. And in our materials, the first one is going
to be quite easy. It's just going to be our
plain concrete like this. Yeah, so that goes in the
right direction over here. Of course, we can
see that we have a little problem with
the transitioning. However, we can always just
turn the plain concrete into actual plain concrete
without the stripes on it. Then what we're going to do is let's duplicate this and just call this broken concrete. And this one we can
already assign, and all we need to do is we
just need to open it up. Go down here and grab a concrete
broken, nobar like that. And I just want to go in
here and set the tiling maybe to like two or three. Of course, we will need decals
and everything in order to make this look a little
bit more decent later on. I'm also going to go ahead
and I'm going to set my color to be a little
bit dark or that it here, so that fits a
little bit better. So we got that one, and
then the last one is rust. Did I already create that one? No, I just create the bar tile. So let's duplicate
this and just call this rust and plug that
one into the last one. And the rust one, what we want to do is we
want to go up here. I have an actual rust
texture that I can apply and we're just going to go ahead
and set the tiling, probably to like five or
three, something like that. So as you can see now, we also have the broker rebar over here. So, okay, so yeah, we
still need to, like, probably, I think it can benefit from like a dirt
mask. So that would be it. And, of course, we can
also just create like a version without
the rebar or without the metal pieces so that we can blend it in
better over here. So if I have a look at this,
just in general, Yeah, here. So, in general, it
does read fine. So what I'm going to do
is in the next chapter, well, first of all,
create a corner piece. And then what we will do
is we will go ahead and we'll add like a mask to this, just like a dirt
mask in between here just to make everything feel
a little bit more grounded. And if you want, you
can also go in here. You can also add some
extra iba pieces. However, I personally will probably not do that,
at least not now. Maybe in the polishing
phases, I will do that. So let's go ahead and continue with this
in our next chapter.
56. 55 Creating Our Final Roof Pieces Part2: Okay, so we finished off by creating this
piece over here. And what I'm going
to do first is, I think I will first go
ahead and actually generate a mask for it and like some dub, because I think for this one,
we can just use asymmetry. And if we can use asymmetry, we would hopefully be able to
still re use the same mask. And just in general, I want
to make sure that this one does look a little bit better than what
we have right now. Of course, you kind of
need to imagine having decas and everything
on top to just make it look a little
bit more interesting. But for now, what
we're going to do is so we technically
already did our unwrap. Only our unwrap is not
completely perfect. It is perfect for
the modular side of things because it will
just properly flow over. However, it is not
properly contained. Here, I I would go to
my unreb UVW modifier, you can see that there
are random seams, but more important is you can see that everything
is overlapping over here. But as you can see, because we need to have
this transition over here, we cannot just go ahead and
we cannot just change this. So what I want to
show you is how to use a second UV channel, which is also a quite
handy technique. So what you can do is
if you go ahead and you add your Unwrap UVW
modifier over here, over here, it shows
you your map channels. Now, you probably
have heard of this. Unreal, for example,
they use UV Channel two for light maps,
stuff like that. So what we can do is we can go ahead and we can, for example, use UV Channel three
because as far as I know, Unreal still doesn't really
like you using UVhannel two. So what you want to do is
you want to press three, Enter, and then you
want to press move. And what that will
do is it will move your UVs or it will copy your UVs from UV Channel
zero or one to three. Then what we can do is
we can just open it. We can go ahead and
select everything and do the classic here, so like auto packing, like you can see over
here, stuff like that. Very basic. But basically, what you will be able to see is that nothing
actually changes. This because we are using
a different V channel. Now at this point, this one, we can go ahead
and we can export, so we can go export selection. Roof broken variation 01. But now the important thing
is that we also now need to export a version that
goes to substance painter. Now, for this version, the tricky thing about this
is that substance painter, you cannot just choose
your UV channel. So what we need to do is
we need to go ahead and go exports to painter.
Okay, perfect. So to painter, and in here, I can go ahead and
create another folder that I'll call Roof. And basically what we
want to do is we want to temporary art our UV on map, set the channel to three
and press abandon, which means that it will
not change anything, and then set the UV map back
to one and then press move. And now, basically what we're
doing is we are grabbing UV channel three and throwing
it into UV channel one. At which point, we can go ahead and we can go now to file
export export selection. Oh, one thing I forgot to do. Also assign only one
material to everything. So you just basically
assign one material, file export export selection, go to the correct folder and call this Roof underscore 01. And let's go ahead
and export this. And then as soon as
you've exported it, what I tend to do is I tend
to go ahead and just Undo. And then delete over
here my unwrap. So now I Undoed
adding the material, and I've also deleted the unwrap that's actually
switches stuff around. So now we are back at normal. So at this point, we can
just go ahead and open up substance painter. Here we go. We can go file new
art our model, and our model
doesn't have a bake, so we don't need to
input anything else. We can just press Okay. Here we go because all we
really care about is the dirt. So all we really need to
do is we need to go ahead and just call this
Roof underscore 01, go in here, press
bake mesh maps, use low poly mesh is high poly. And you said that like, Okay, so even though we only are
caring about the dirt, we still need the
maps in order to basically generate
the actual dirt. So we've done that, and
now we can also see that the emuloclusion
over here is working. At which point we can go in
here into smart materials. Art or destruction smart
material over here. And what I'm going to do is
I'm basically going to go ahead and this one can be black. This mask can be black, and this mask can be black. And the only one that we
care about is the dirt. So on the dirt, we can just
go ahead and go to color. And if we go ahead
and go in here, let's get rid of the paint. Let's probably get rid of this one over
here, there we go. Now if we have a collar bounce, we can go ahead and we can
play around with this. Let's set it up
until this point. And let's then add
like a paint layer behind it so that we can go ahead and just clean
it up a little bit. Let's grab where are
you dirt one brush, press X to flip
around the color, and just over here
at these areas, let's just reduce the
dirt on our metal. Because it is
sticking out, lots of weathering and wetness
and everything, so the dirt wouldn't really
stick as much on here. There we go. And then what
I probably also want to do, so there is some transition going on, but it's
not good enough. Let's grab our artistic head. And just here on the
sites and everything, we will just go ahead and take
care of that using decals. We're not going to go
ahead and generate it properly because then
I'm worried that it just doesn't transition
properly anymore, and that we will see the tiling. So we've got this stuff. Let's
go ahead and once again, grab our dirt one brush. Press X again and maybe just
cleaned up a little bit. And it's okay to have
a lot of dirt build up sitting in the transition between the metal
and the concrete. I think that will
look quite nice. So we can go ahead and do that
a little bit. There we go. Okay. Yeah, that should be fine. Like, the dt over here might not be as nice,
so you might want to, like, kind of reduce that over here, maybe also like a little bit. Around these areas, let's
reduce it a little bit more. And there we go. Then
we have our mask. So let's just go ahead
and give this a try. Let's start by saving our scene. And I'm just going
to call this roof underscore 01, underscore mask. And then it is just a
matter of exporting. And I'm just navigating
to our masks over here. So the folder is the same mask folder
that we just saved it. We just use our destruction
mask Export preset, target file, and we
can just press Export. And let's give this go. So oh, that's Max. Let's go in here. Right click Rinput
just to be sure. Now, of course, we
do need to change our shader a little bit,
but don't worry about that. It's a very easy change. If it wants to actually Hello, I feel like we're
going to crash. Yeah. Okay, let me just restart. Okay, so we are
back into unreal. I don't think I lost
any specific work. No, let's just go
ahead and open it. And let's have a look over here. So I probably need
to reimport it again because it didn't
really work like that. Wow. Huh. Okay, let's send a restart, but
let's have a look. So it should be totally fine. Yeah, so let's just
reexportO here. Let's reexportFBX. Maybe something somewhere is
going a little bit wrong. This is just part
of wel five being not completely stable yet,
but that is no problem. So let's just go ahead
and re export like this. Okay. And I just
opened up real again, and I already tried to re
import, and now it is working. So maybe something
just went wrong during the export of the FBX.
Stuff like that can happen. So what we're going to
do is, first of all, we need to import
our mask over here. Roof 01 mask. That's an easy one. Just
make sure that yeah, okay, so the Alpha is included. White, is that correct? Yes. Okay, so that's
correctly included. Now, it does mean
that we need to change round to
materials a little bit, but I believe that we have not yet used them anywhere else. So instead of clean concrete, we can just rename this and call this roof underscore concrete. And instead of rust, we can call this rename
Roof underscore rust. Oh, and then we probably
also need broken concrete, rename, roof, broken
unscoe concrete. And at this point, I guess
what we can do is we could combine these two into one single mask because we're
going to use a mask anyway. So I guess that is
more optimized. So let's just go ahead and
do that as the last thing. But for this, we only need
textion number. Let's see. So red channel is those two, yeah, the G channel. So we only need to have
this one over here. So all we need to do is basically
go in here and press X, and let's just paint this
in. And you know what? This will probably even give us a nicer transition doing this. So we're basically going to,
like, paint this in here. Like this. Yeah, yeah. So that gives a nice transition. I don't even know why I
didn't decide to do that. Oh, yeah, because I didn't want to need to generate
an dire mask, which jokes on me because then I realized that the dirt
doesn't look nice. Because even though
it's a tudoil, sure, I can just tell you, Oh, yeah, yes, so just generate a mask. But then it would not
look nice for me, so I can just as well do this. In any case, what we're now going to do is we're
going to go ahead and let's just start
by selecting this. And now, if we go up
here to polygon Select, we can go ahead and we can
go to UV select and we can actually just select
all of these UVs over here. And once you've done that, it's just a matter of
filling in those holes. Do not worry about going over the metal because we
will unmask the metal. So just fill in those black spots that you can
see over here. There we go. And now if you
go to Polygon Select again, click on Element Select, and then you can just go
ahead and set the color to black and get rid of
the metal like this. So there we go. So we can just go ahead and
we can reexpot this. And let's also just
go ahead and press Save and now in here, all we need to do is masks, of Let's re import
the roof mask. And then if we go
into our materials, we no longer need our here, so let's rename this back
to just broken concrete, and then we only need
our roof concrete. Don't forget that you do
need to go in here and just, like, change the material
to one single material. So we just need to, for example, apply only our
concrete material, and then we do need
to re export this. So let's hope it works
correctly this time. Roof broken variation 01. Yes, I want to export
you. Thank you. Now if we go in here, we
can go ahead and assets. Let's save my scene
at this point, just in case it crashes again. Okay, don't crash. Thank you. Okay, so that's working. So we already have
everything assigned. So the only thing that we
need to do now is we need to go into our master material, which is main master over here. And the way that you can
swap around your UVs. Oh, God, which UV? I think this one I hope so. We can see. Basically
what we need to do now is we just need to
go ahead and yeah, you know what? Let's do
it for both of them. We need to add a static
switch parameter over here and just
call this UV tree. If it is false, it will use this UV and just duplicate
the static switch perimeter. And if it is true, the
only thing that you want to do is you
just want to go ahead and duplicate this one. Oh, and just still
use the same tiling. But in your texture coordinate, set the coordinate index to
two because inside of a Mel, it goes zero, one, two. Inside of three is Max,
it goes one, two, three. So if you do this and plug it in here, that
should do the trick. So same over here, you can
just duplicate your multiply. Set this the true, plug it in here and set this
one also to number two. And then by default, this
will always be false, so we don't need to
worry about that. So once we've done that, and just give the second to save, now all that we need to do
is we need to go ahead, grab our roof
concrete over here. It's moved out of the way. Let's turn on has dirt. Let's turn on UV three, and let's go into our mask, and let's grab our Roof 01 mask. Okay, so I just need to
quickly check for my tiling. Which way it's
always a bit tricky. Let's open up my model to see if it did properly import
the UV just to double check. So you can go down here
to UVs, UVhannel zero. Oh, it just through the
UVhannel one. Uh, that's weird. That's new. Normally, okay, then we set it just
like the UV channel one and just call this UV two. I guess that I don't know
why it exactly did that. Normally, in Unrealizing
four, it doesn't do it. So maybe it's just like one of those small things
that they changed. So let's try it
again with the save. So now it is using UVhannel
two, which is correct. So this over here is UVhannel
Well, yeah, UVhannel one. It's using UVhannel one, if you want to look
at it like that. Now, the tiling, the tiling
is a little bit tricky. So on the way, the tiling does not matter. We are setting the Wong. We are tiling the
Wong thing over here. Let's revert this back because the one that
we truly need to tile, is let's see, let's delete this. Let's duplicate
these three notes. Here, we need to set
this on our mask, of course. Sorry about that. I completely forgot.
So we need to have our mask set if it is false, it will use UVhannel zero, if it is true, I
will use UVhannelO? Yes, one. And this
one needs to go into our blend mask because
our mask is the one that leads to UVs. I
forgot about that. So let's go ahead
and go in here, and now it should hopefully do something still not
exactly correct or is it? No. That is still not
completely correct. Let's see. So UV Channel two. 1 second because this
is a bit confusing. So we got them over here, UVhannel two, yeah,
yeah, that's fine. If it is true, then it becomes UV channel one and else it
becomes UV channel zero. It does not have any tiling. It might be that
our concrete panels are switched the
wrong way around, but that would be a little
bit strange. So let's see. This is our blend concrete, which is our broken concrete, and then over here we
have a concrete rebar. Let's get started
by just replacing the concrete rebar into our
normal concrete over here, and then we have those Let's go ahead and have a look in
our roof mask over here. So what do we have? We
have a green channel, an Alpha channel, so
that should be our good. Yeah, because this
one, of course, it just goes into dose bit. So to be very honest, I'm not completely sure are
the UVs matching up? Let's double check because I'm not completely sure why it is not working correctly
to the view. These UVs look
different, don't they? I feel like it
just didn't import the UVs here or C. The
UVs are different. That's why I was confused. I was confused
because over here, it did something
with the UV channel. So I have a feeling
that for some reason, my UVs did not get through. So let's go into our UV unwrap. Let's set the tree and press
abandon and open it up. Okay, so something
went wrong in our UVs, which is a little bit
of a pain because it means that I will
need to regenerate them. I don't know if I can undo this. Now, maybe maybe I can
do this far enough. Let's set a tree. Abandon, let's have a look. Are you still broken? Yes, you are. Let's undo
this again. There we go. Okay, so we mentioned
though it's far enough, so that was a lucky break. So number three, that is fine. So convert it to an added ply. I know it might be a
little bit confusing, but you most likely
won't have this problem. It's just me that I
accidentally lost my UV. So if I go ahead and now
export this, it should work. So now we do have a UV three. So now if we go into roof, broken variation 01 over here, let's go ahead and press Okay. Let's twilight again.
Let's re import this. Oh, it's gonna crash. Maybe there is a problem
here. You know what? I will pass the
video. Maybe there's a problem during the crashing. Okay, so I think I managed
to fix the problem. So it looks like it's a bug. Basically, what is happening
is that if we have a UV channel one and
a UV Channel three, but not a UV Channel
two, it crashes. So all I did is I went to
UV Channel three over here, which is just this
one, like this. And then what I did is I just simply moved it down
to UVhannel two, and then I exported that again. So that should do the trick. So now if we go ahead and go
in here, let's have a look. Okay, UV channel
zero, one, two, see? That looks more logical. So now, sorry about the back and
forth, but can happen. Now we need to set a
coordinate index to UVhannel two save one more time, and that should do the trick. So let's give this
a go. Go in here. Roof concrete has
dirt Vannel two. I think I lost my progress
of assigning these masks. So let's assign our mask. There we go. Finally. That
took surprisingly long. Okay, so that actually has quite a nice blend
now, so that's great. Let's go ahead and just
set our dirt color to be a little bit like
a darker color. And let's see, let's
set our lightness. We can probably leave
at, let's leave at 0.5. Let's set our dirt
amount to two maybe. Okay, that's N, that's
not going to work. Let's leave it at
one. Instead, what I'm going to do is
let's see a tiling. Okay, a tiling is fine. This one is world space tiling, but 250 seems fine. Yeah, yeah, so 250 seems fine. So all I'm going to do is
I'm just going to go and paint go to Tweedy only and then go ahead
and just go into our dirt layer over here. And let's push these
levels on top and just push them out a little bit like this to make the dirt
a lot more stronger. And let's just go ahead
and re export that. Also at this point,
let's go ahead and save our scene actually before
we have another crash. So right click reimport. There we go. So now we have
some actual dirt going on, which is working a
little bit better. Let's finally go in here. Let's set our dirt amount
maybe to like 0.8. So we're of 0.9. So let's tone it down a
little bit over here. And that is looking pretty good. So we got that one,
along with some decails, it will work totally fine. For these pieces,
then of course, yes, we would need to have
another variation. So if we duplicate this,
that will be plain concrete. And then this plain
concrete variation, this one will contain just a
simple black mask over here, and it will contain no
UV two and no dirt. So if you go to Roof clean, you can now go ahead
and open it up and use your plain concrete.
Where are you? Roof concrete, what? Oh, here. It's Artist One. Oh, I
thought I turned off He dirt. Yeah, H dart is turned off. Well, that's confusing again. Maybe it didn't register,
turn on, turn off. Okay, I didn't register. Once again, small little
problems can happen. They're not that big of a deal. So now that we have
this, let's just go ahead and already start to try and create a mirror of this. So if we go ahead and just do a simple contra vie
on these pieces, we can add these pieces
to variation number two. And then in here with
variation number two, what we can do is
so here we have variation number
two. I believe, yes. I believe that it just needs
to stay in this corner. So let's go ahead
and just select everything except for
this corner variation, and we should be able to
pretty much do the same thing because we don't need to have something super
special for this. So let's go ahead and
do a symmetry modifier on the Y axis, flip it around, and then let's go ahead and
in a rotation, make sure that snap
rotate is turned on. Let's see if we can just
snap rotate this over here. And it's nicely, pushes out. Okay, let's see if that works. So this one over here, let's just go ahead and
temporarily, move it up here. Okay? So that
definitely does not work because we are going
the wrong direction. Looks like that we need to
not flip the Y. Let's see. How do we need to rotate this? Oh, yeah, so I do know
what we need to do. We need to actually just
move it a little bit, because that's how
it went last time. So what we can do is we
can still move this away. Double check this that it
is looking pretty decent. Okay. So what we're going to do is we are going
to grab this piece. Let's convert to added poly. Let's go ahead and delete this little corner
bit over here. So once we've converted
it to added poly, we need to go ahead
and we need to add a rotation of 90 degrees. And we need to kind of carefully move this up until this point. And this one, as far as I know, does not have to be precise,
but we will have a look. Just go ahead and re grab
this piece over here. At your faces. The
only thing you really want to do is
just grab the center. And for center, just add like a very quick chamfer
That's quite thin, and it's just to kind of
support the weight normals. So once we've added this av, all we need to do is go into face mode, select everything, set this to just one
smoothing group, and then just go ahead
and set the angle to five and then select like
these outer bits over here. And turn it off so that now
we can arterate the normals, snap the largest phase, and use smoothing groups. There we go. See now our
smoothing groups are back. At this point, what we can
do is we can just go ahead and we can mess around
with this a little bit, but let's actually
first see if it works. So let's first of
all, grab this piece. Export selection, roof
broken variation 02. And now if we go
ahead and go in here, we should be able to
just reimport it. Let's once again save my scene because now I'm a
little bit paranoid. So let's right click reimport. Reset the FBX. Okay, okay. It looks like that it pushed
it back a little bit, so that's something
that we do need to fix. But let's first of all,
assign our materials. So it looks like this one
is going to be our rust, and this one is going
to be our roof. Oh, yeah, we still need to add
our dirt to our roof rust. So we got this
version over here. Let's let's have a look
and see why it is not Oh, that's why it is not
lining up properly. We need to go in here and
we need to kind of push it. I think the safest thing for
us is to push it forward. So we basically just
go ahead and we move this forward until over here, it is pretty much
like sitting on top. There we go. That's now
pretty much sitting on top. Now, also, let's push
it back a little bit. There we go. Let's try it again. So that one should now pretty much be in the right location. At this point, yeah, honestly, I don't even think you will
notice that it is a mirror, except, of course,
on the very top because the stripes are
a little bit different. Oh, careful. Do not accidentally do what I did and select the wrong one. So the reason I'm not so worried about is because
most of the time, we will have wood
sitting on top. That's why I'm so lax
with this specific model. So right click
reimport here, see? Because there's always or there are going to be decals on top, or there's going to be wood on top, like you
can see over here. So you can pretty much never
really see this piece, see? But that is looking pretty good. So we got that one
also. Now, last thing that I want to do
or two more things. One of them is that I'm going
to go ahead and open up my roof rust and very quickly
just set a dirt and UV two. Let's turn those two on. And then, of course, add
our roof mask over here. Let's go ahead and make it a
little bit darker than dirt. Does not seem to work as well
as I expected to be honest. Yeah, so the tiring does work. Huh. Oh, there we go. It's once again didn't register. Wow, that is actually
getting really annoying because I just keep thinking I did something wrong. In that case, let's just go
ahead and make this dirt quite a bit darker over here. So at least we also have some
dirt sitting on the metal. Okay, so what we would
later on, of course, do is you would
do the same thing as that I've
showcased you before, but we will do, like,
a big chapter on this. And that is that we
can, for example, grab these leaks, and we can, for example, make them
like really large. And even though it's on a roof, you can still get away with these type of details over here, or what you can do is you
can grab your patches. Like this. And
using your patches, you can generate this, make this look a little
bit more interesting. Here, let's say that we grab these leaks and also
have them over here. And just like that, you
can see that you can very quickly get some extra interest. And if you then also add some moss which we still
need to make, but just for the sake of
showing you, it's a Wong. Here we go, see. So
we can very quickly, break up this roof,
and from a distance, that will look totally fine. So that is it for these pieces. Now, as you know, you can also go ahead
and you can make another variation that is
simply going to be here. If you just open up
roof variation 01, just only grab this one piece. And then just export it as
roof broken variation 03, that will just not have the
actual metal beams in here. So when we do that, we can
just go ahead and reuse this. So exports to unreal roof
broken variation three, open it up assign your roof
concrete material like that. And then, this one
is not too bad. But for example, for this one, it would be greater
than just do this. See so that it all fits
a little bit better. So whenever it gets too bad, we can just go ahead
and we can do that. So if we really see very, very obvious clipping, then we can go ahead
and we can just fix it. Yeah, I see surprisingly little. Oh, yeah, over here,
we do need, of course, improve these kind of bits, but that comes once
again later, everything. I feel like I just keep saying that everything comes later, but that's kind of
just how it works. Oh, the surprisingly
little clipping. It was mostly just at
the top that I saw it. But over here in general,
that is working great. So what we'll be doing
in the next chapter, now that these are
done, that we will most likely go ahead and
let's do the wood first. Let's first focus on our wood because that's
another really large chapter. And then all of
these other things, those are like extras. They're just like very simple plishing bits and
stuff like that. So let's start with the wood and the flooring in
our next chapter.
57. 56 Creating Our Final Floor Pieces Part1: Okay, so what we're going to do in the next few
chapters is we are going to start
working on our floor that you can see over here. Now, for our floor, unlike, for example,
for our roof piece, where we can kind cut corners, and we can just make
everything quick, quick, we cannot really do that for our floor because our floor is such
an important piece. So we kind of need
to do the same stuff as like these concrete pieces that we really need
to take our time, and I will show you how
we're going to do it. Now, we are going to go ahead
and we are going to use a very optimized way of creating the floor pieces because right now they are
quite expensive. Of course, doing this is the easiest way if you
would just be able to cut it out like this
because then all we need to do is throw on the wood
material and be done with it. But unfortunately, we cannot do that because if
we have a look, let's go ahead and open up the first one that
we're going to work on. Yeah, so here we have,
for example, wood floor. Let's do broken
two, for example. You can see that we
are literally rocking 20,000 triangles, and we
cannot really do that. So technique that we're going to do is we're going
to use Alpha maps. It might not look as nice like
this from specific angles, but it will be highly optimized. So I will show you how to
actually do that kind of stuff. And all we need to do. So it's actually
not too difficult. All we will need to do
is we need to create, let's say that we're going
to create like I don't know, like ten variations of planks. Once we've done those
ten variations, then it is just a matter of
placing them all together. We are actually still going to place them as individual planks, like you can see over because
it will look really nice. I'm willing to pay for a little bit extra to do that stuff. I'm not even sure if
for the flat pieces, not that one, but for, like, the flat wood pieces, I'm not even sure if
I'm going to go for, like, a plain material. So let's go first
create our wood pieces. And then I think this is
also starting to become like a main shot somewhere over here, just because of the
wood and everything. So the way that this
is going to work is, first of all, we need to
generate an Alpha map. For this, what we can
do is we can go ahead and let's have a look.
So we have our roof. Yeah, you know what?
Let's just. Let's create a new layer. Let's
create a new layer. Call this floor underscore
Alpha over here. And basically, all
we need to do is we need to generate
an Alpha map, and this alpha map is
basically going to be the little spikes that
we can see over here. So it's almost like this is
going to be an Alpha map. These spikes that
you can see here, we're going to bake it down. Now, if I have a think of this, I think we can
just make it into, like, a single
cube, most likely. So let's go ahead and just
grab our wood floor clean. Let's do Contra V to copy it and let's throw this
one into our Oh, God. Won floor Alpha over here. There we go. Now we can
turn off wood flog lean. So we're just going
to use this one. Now, nice thing about this,
because it is an Alpha, we do not have any restrictions in terms of the poly count. So what we can do is
we have this one. Yeah, thickness is fine. It's converted soon add a pool. And now let's go ahead and add
our fire Fornoy over here. Okay, at faces turn on, we need to go way higher. Let's go like 1,000. He, thousand points. Let's first of all,
press fragment. Now remember that we just
need to make it spiky. I don't know if it
is the X or the Y. So let's do 50. No, it is the Y. So 5,180 maybe. Yeah, so I think 80
can do the spikes, and then I want to go even more. So let's say 2000. You're surprised that for 2000, you would think it would
be way more pieces, but apparently not. I don't know. Like 4,000 maybe. I want to make this,
like, really spiky. Like, Yeah, okay, so
that's probably better. So what we can do with the
Alpha is we can create a few variations because we have an entire
square to work with. So what I'm going to do
is I'm going to go ahead and I will show you what I
mean with the Alpha, yes. Alpha always needs
to have a flat part. What I mean by that is
if we have this one, that's art and added pol I mean that the back
end always needs to have a little piece along the entire Alpha that is
just completely flat. But beyond that point, what we can do is if
we go in here and, for example, grab all of
these pieces and delete them, here, see? So that's already it. That's literally all we need. But then what we need to do
is we need at one point, let's say over here,
the lead this. And then what we can
do is you can see that we can use all
of these Alphas. So since we are going to bake
it down into map anyway, now, if you only want one, you could create a texture
map that is, for example, I don't know, like 1024 by
256 or the other way around. And then you could map
this one thing in here. If I think of that, that might actually be, yeah, you
know what? Let's do that. Because if we do that,
it will give you guys overview how to bake
non squared textures. And honestly, I don't
need more than this. So what I can do is I can
actually go ahead and just delete all of these pieces, unless I need them
for anything else. Do I need them for
anything else? No. So let's just
delete these pieces. Okay, so this is now
going to be our hypol. What we're going to do now is we are going to
create a plane, and as I said before, we are not going to
make it a square. So if we just create a plane, let's get started
with the square. So 100 by 100. Yeah, that's fine if it's
sticking over a little bit. I don't really care about that. And instead, we are
going to go 100 by 25 so we are splitting
it up in four, that would become 1024 by 256. Yes. If I do that, that is. I kind of wish I had
a little bit more, but I should be able
to now just scale it because we have the
correct dimensions. Now, you know what scaling
it doesn't look nice. Let's go ahead and instead scale our hypol so that it
just fits in here. So what we can do is we
can scale our hypoly down. Maybe scale it in a
little bit like this. There we go. Let's just grab this one and use it as Alpha. If you even want to, you can even go ahead and you
can stick it over, if you want to try and
make it sort of tilable. It will not be
perfectly tilable, although if you really want to, you can use photogram
tree techniques to make it tilable in subspainer, but we won't be covering
that because that would be a lot of work to cover. But then what I'm going
to do is I'm going to go, like, duplicate this. And if we just go ahead and detach it over here,
I've got to do that. I can now grab this piece, center my pivot and
then I'm just going to basically do this and maybe
give it like a rotation. Here we go. Then what you can
do is you can do one more. And for this one,
let's say that we delete a few more
pieces like this, and then we can kind of
just fit it on like this. See? Okay, so in any case, you end up with this really
spiky looking wood piece that we can then
turn into Alpha. Perfect. So at this point, we can go ahead and we
can save seen over here. Now, the UV for our plane is already correct
because we actually do want to still have a plane
mapping on the entire square like this because the
square is just going to be squashed down when
we are baking. So we do want to make sure that it covers the
entire square. But at this point,
what we can do is we can go ahead and
we can export our plane, and let's export it to huh. I know it might be a
little bit confusing, but I'm just going to throw
it into the scalps fer, because everything we are
baking, we throw in here. So let's just call this
wood floor splinters. I think that's also the same
word in English as in Dutch, where it is just
like the spikes. And just call this,
splinters score LP, Export as FBX.
That's totally fine. Okay, and now we
just grab the top one, and you guessed it. This is going to be
our hypol score HP. And then all we need to
do later on is we just need to make sure that
everything, of course, matches. Oh, sorry, almost
not export dating. Yeah, we just need to make
sure everything matches. But hopefully, what we can
do is we can literally just slap on the exact
same material everywhere. If we are going to make
it all physical planks, we no longer need
that plank texture, which will save me a
little bit of time. So we got this one.
And if you want, you can even later
on paint in dirt, but that one, that would be a little bit overkill, probably. So we got these two. Now, let's go ahead and open up mom set. Here we go in our
bake cinemmset. Now, I do not really want to use this baker because we are
going to change the setting so much that it would be annoying for the people that are opening this to change it back. So I'm just going to
pass Control D to duplicate my baker and call this Wood baker.'s call this one like concrete
Baker. There we go. And for this one, we can
delete our high and low. I'm just navigating to our pieces that
we've just exported. This stuff is really
easy, actually, so don't worry about
it. Here we go. So we now have these ones. So our high needs to go in here, our low
needs to go here. And because it is a plane, all we need to do is we just need to make sure that the plane
pushes above our splinters. That's everything. Here see? So I'm just doing this so that the green plane is above it. Ironically, I actually just
released a tutorial on YouTube for free on how to do, high object baking like this. And then for our
maps, what we need, first of all, let's go ahead
and set a better location. Bakes, Wood underscore splinters Wood
underscore splinters. Now, with this, you
often can just get away with only using a mask, but just in case we will also go ahead and just do the normals. So if you go and
configured maps, you want to have the
normals and you want to have the Alpha mask over here. And the Alpha mask will only grab the hypol and it will just basically subtract whatever
falls outside of the hypol. Now the next thing
that we want to do is we do want to
set up exercise. So I'm going to go ahead and let's start high so that
we can always go lower. That's the general rule. This one, so if we go for 2048, then this one most
likely needs to be 512. I am sometimes mistaken depending on the way
that the UV is rotated, which direction I actually need to go to if I need
to swap these two around, but only one way to find out,
and that is to press bake. And then while that is baking, although it's probably
already done because it takes no effort to bake
a low poly pretty much, bakes, wood splinters,
let's have a look. See, I went one way around.
That's exactly what I mean. So then I can just go ahead
and do 2048, buy 512 instead. Bake again. And now you can see that now we have our root splinters over here. So let's have a look
at them in Photoshop. Here we go. And now we got this. Now, of course, if you want, you could have made this
in Photoshop itself, probably just using your polygon lesser tool because you can
also make this kind of stuff. But doing it by hand, it is really hard to
do this kind of, like, wi generic stuff that
you can see over here. So that's why I like
to use this technique. It's just nice and quick. And also, we get a norm map out of it in case
we ever need it. Although, as you can
see, it probably doesn't do anything because it
is a norm map based upon a low poly mesh so that you would kind
of need to smooth it in order to get
something good. But in any case,
that's now working. So what we're going to do now now that we
have these pieces, we can go ahead and we
are basically going to start by creating
our floor planks. For this, we are
going to go ahead and let's go to our
wood floor clean. And yeah, let's use this
one as like a vessel. So we want the planks. You pretty much know it
from the broken versions. I'm going to make
the planks half the size that you
can see over here. So if we're going to
go ahead and see, is this one still Oh, yeah, here, so we can
actually use this one. So let's duplicate this one. So we are going to make
the what it the length? Yeah. So the length, we
are going to make 50. And then the width we are going to go ahead
and we are going to make it ten, no, five Let's see, five. Yeah. Although this one, I
really like this one. So let's do four. Let's make it four over here. Okay, so that's like the
length and the width. So that's going to be
like our basic plank. And because we
still have already the same thickness,
that's totally fine. Then what we are
going to do later on is we are going to
shift them around, and then we're just going
to cut off the ends just to fake the effect
of the wood look. But what I want to do
with these is we are basically going to create
a bunch of variations. Now, first of all,
the variations that we're going to
do is we are going to have some clean versions that simply have different UVs. So if we go ahead and let's
say that we create like five, let's do five versions
because five versions means six different UVs because you can have
the top and the bottom. So having these,
what I can do is I can already go ahead
in my material, and it's grab a material
that we have not used yet. So I think, well, I have a feeling we use nine, so let's just grab this one. Wood underscoePlane. That's one that we
want to use for this. So let's open it up. Oh,
do we have this bug again? Or not. No, Okay, don't
know if that works. I think something's wrong,
but we'll see. Wood plane. And just grab this
one. Does that work? For some reason I really
feel like it doesn't work. I guess it works. Fine.
We got now these pieces. Now, all that we need to
do is grab one of them. Add the UVW Unwrap,
set it to be a box, and we're going to go
ahead and we are going to make this quite even. 50 by 50 by 50 and then
just click once on the UVW unwrap to go
into the Gizmo and I rotate this 90 degrees
like this over here. The only reason that we're really doing this
is so that we can copy this unwrap,
paste it everywhere. Like this. And this is basically the reason
why we have variations. Imagine if we have all of
the same stripes like this, it will not look very nice. So now what we're going
to do is in the unwrap, we are just going
to click on it once and just move it
around a little bit. See? So that now we are creating a lot of variation within
our planks over here. Now, our planks, they do
not need weighted normals. They are already hypolenough once we actually started
placing all of them. So often when you have really,
really hi polly stuff, you just tend to basically not use weighted normals on it.
So something like that. So those planks are
now already done. We can go at them,
we can save them, and that is ready to go. Now what we're going to
do is we are going to add our broken planks. And for that, see,
one, two, three, four, five, six, seven,
eight, nine, ten, 11, 12, 30, 14, 15, 16, 17 80. Oh, that's quite a lot. 20? I think we need a
minimum of ten variations. If we have a row of 20 things and just swapping them around, I think ten variations
would be fair. So let's go ahead
and go in here. And basically for
these ten variations, we are going to grab our
wood again like this. And what you want to do is let's just convert it
to an added poly. We first of all, kind
of like set sizes. So with the ten variations, I believe that most of
them except for maybe one, we need to go ahead and we need to always have a flat
end on the back. So what we want to do is we
basically want to say, like, Okay, move this stuff
around, and don't worry. We will fix the UVs later on. So we are basically
moving this stuff around at different lengths. So that we can cut it off, so those are the
breaking points. And we can do this one,
let's say, over here. They don't always need
to be super different, but do make sure that they are a little bit different
because else it would be a waste. So we have these. Now, let's go ahead and just duplicate them so that
we have ten of them. And for these ones, what I'm going to do is so
this one, you know what? I'm going to push out. This is the only
one that's going to have two sides like this. And then this version,
we're just going to go ahead and maybe
have a Wi shot one. Maybe have secretly a longer one that is sticking
out a little bit more, just for, like, an
interesting look. And then at this point, yeah, you don't need to do too
much changes in terms of, like, the scaling
because it's just about adding our extra pieces. Like this. That should
be probably fine having all these variations
over here. Okay, perfect. So now what we're going to do is we're
going to save our scene, and now it is just a matter
of grabbing a plane, and our plane will basically contain all of these
little shards. So, oh, make sure to
add it to our layer. Here we go. So
let's grab a plane. Let's make it the
same. What did we do? 50 by 100. No, 25, 25 by 100. There we go. So that should
already immediately like fit. And then what we need to do is we need to add our splinters. And for our splinters, for our wood, what
we're going to do is, see here, it's broken. I'm just going to restart Max. Okay, so we are back, so
let's try that again. Here we go. So, does it work? Yes, this time it works.
It's a strange one. I never actually
had a problem until I started recording,
which is typical. As soon as you start recording, that's when the problems happen. But in any case, we are going to actually use our plain wood
for the base over here. And then what we're
going to do is the same thing as what
we've done with the bar, we're going to go
down to the cut out and not
transparency this time. Cut out, and then
we're going to grab our I believe it is in bakes, wood splinters and grab
our Alpha over here. Yeah, I'm starting to realize that normp that
doesn't do anything. So anyway, we have
this one over No. Cut out should be fine. I'm not sure exactly
why it is not showing. Is it because I did
something with my UVs? Well, we can try. We
can just try adding a UVW on web and seeing
if we moved around. No, that does not
seem to be the case. That is interesting
because you can see the cutout working over here. Let's just clear our base color. Huh. Let's turn off our cut out. Let's at the artist to our
base color just to see what might be the problem.
Let's open this up. That is very strange. What could be the
problem for that? One thing that we can try
it will probably not work, but it just feels like a
strange thing is to do a saves copy and to save
our mask also as a JPEG. Maybe for some reason, the PSD is broken. I don't know. So let's save it as a JPEG and
see if that works. So let's do a little bit of
debugging before we move on, just to make sure that
this works correctly. Here. Okay. I swear that PSD works within
TriSMx, but fair enough. Okay, so now, now that
we know that it works, what we can do is we can just
go ahead and we can regrab our wood plane over
here like this. And then what we
can do is we can go ahead and go down here into our paste and we can just swap this one around
for our JBC version. Yeah, Trees Max
supports PSD, right? Be really strange if it doesn't. Turn off cut out,
and there we go. Okay. So we got
these pieces now. All we need to do now is we
do need to go ahead and well, actually, the rotation, that is a tricky one because we
want to keep our cut out. So most likely what we
will do is the rotation, we will actually create
this rotation inside of, well, we will create
a special shader. So inside of unreal,
we will actually do, the entire rotation of this
piece because over here, it's not really easy for
us to probably do, like, a rotation on UV coordinates
and stuff like that. So having this piece,
that is already fine. What I'm going to do is I
basically now want to go ahead and I want to cut it
into little pieces. Now, my plan, what
would be really nice is to actually
move this on top. So this is kind of
how it will sit. It will kind of sit
on top like this. And what I was hoping
is that if I go ahead and convert this to an at a poly that I might be able to connect it exactly the amount of times needed for our planks. And that will probably
be last thing that we'll be doing
for this chapter. So let's go to Connect
and just boost up your values until you are
hitting exactly, see? 24. And that should now
kind of break it up nicely. Okay, so once we've
broken these pieces up, now what we can do is
we can do one more cut. Let's see here and
probably around here. And this is why we
need that flat part because what we can
do is we can go ahead and now the
fight is all up. So we have all of these
little cuts over here, way more than we
ever need, but okay. And now what we can do is we can just go ahead and detach. And it's okay to just
rapidly cut them off because it's wood. Like wood often just gets
rapidly cut off like that. So once we've done
this, you know what? I will do this off camera
in the next chapter. So I'm just going to
literally for all of these, select one, detach, select one, detach, and just
keep doing that. So in the next
chapter, what we will do is we will pick the
best ones from this, apply them to our wood, and then just test our wood inside of unreal just to
make sure that it works, create a shader and
stuff like that.
58. 57 Creating Our Final Floor Pieces Part2: Okay. So now that we have all of these pieces
separated over here. Now, what we're going to
do is we are going to pick the best 11? Yeah, the best 11 or something. But, of course, keep
the other ones. So let's have a look.
This one I quite like. This one I quite like,
this one I quite like this one, four, five, six, Um, seven. Oh, no, wait. Top and bottom. Now, we want to do the top and
bottom the same, actually, because if we don't
do it the same, then it will look strange. Seven, eight, nine, ten, 11. Let's grab these. So basically, because we need to place them
on the top and the bottom, but we most likely want
to do that the same because else you will
see the mismatch. So let's leave this over here. And basically, so we are going to go ahead
and place them, and then we can see how
good that they look. So let's go ahead
and first of all, just rotate these 180 over here. And it is going to
be pretty easy. So let's just grab
the first one. And basically, the way
that's going to work is we are going to go ahead and just place
this into place. And what you often want
to do is you do often. Oh, yeah, here, so it's
not quite big enough. But I do like to often
actually have it on top of it, but I'm not sure in this case, because we will later need
to rotate our texture, so we cannot map it. So it might actually be
better to have it like just on the bottom here, but we can change
it soon enough. So basically, we
got these pieces. Now what we can do is we
can just move it down. It should be no
problem to needing to rotate it because we can
just inside the engine, say that we want
to have it flipped or that we want to
have it two sided. And then from a distance, if you just turn off
the edge and faces, you can see that this is what it will look like
from a distance. And that's basically how
this is going to work. Now, of course, next to this, what we can also do is if you want to give
it a parallax effect, you can add maybe like
a few extra pieces in between, like this. Which might not look as nice, but it will just give you, like, the fakeness of thickness
from a distance. But even most time games
do not bother doing that. They just grab a top and the bottom and they
just cull the day. So what we're going to do is we are basically going to
go ahead and place it. So let me just first of all, set these to their correct ones. It doesn't really matter
which one you grab like this. And that is basically the
optimized way of doing this stuff instead
of just going in and basically setting
everything to be the same resolution. Oh, so I do not have enough. So let's grab this one, and I want to also
have one on the end, so let's grab this
one. There we go. Okay, so once I've placed it, it's just a matter of
going in here and actually properly placing it like this. So what we can do is we can go ahead or we can
just move it down. Once again, just make sure that it's like really
close to the edge. Unless I change my
mind again later on, but it kind of depends. Like, Bow techniques work. I've used bow
techniques in the past. It just depends on the context. So that's why it's always
good to just try it out, especially when it just
doesn't take any effort to Wi. Why it out that much. You know, we just have this
one here. This one. The only thing is, I do
want to make sure that later on when we have the wood floor that is
completely broken, we probably want to have
it more on both sides. And for that one, I just
want to make sure that it does look nice. So we'll have to have
a think about that. Like if we need to maybe
create more pieces or if we are going to symmetry or mirror the pieces
or stuff like that. It's all stuff to consider. But for now, let's go
ahead and focus on just getting this in here. Like that. And this one, you want to make sure that you
move it forward so that it does cover the entire area. And that's also often the
thing with destruction. For some reason,
the destruction, you almost never will let a
player get super close to it. So that's why you can always
cheat a little bit with these small millimeters over here that you cannot
cheat with in, for example, first person
game when you need to get really close to a specific
object and everything. Then everything
has to be perfect, but destruction
is never perfect. That's the whole thing
about destruction. Well, as in real life, it's always a mess,
and you can kind of take that or use
it to your advantage. No, I think this is
going to look cool. Although, hopefully,
at one point, we are able to just use geometry because it does
look a little bit cooler, of course, when
we have geometry, just because when you
look at it from the side. This stuff is great
if we are looking at it slightly from an
angle from the top. But if you look at it
from the side over here, then it will start to
look a little bit silly. So that's kind of what
we're going to try and improve over here. Another thing that you can
try to improve it is to add a few segments here
and to basically break it up a little
bit more on the inside. But I will show you
which technique that we need to have for this. It all depends. We can just
do like a prototyping, see which technique works best. And take it from there. But what we are now
first going to do is we are going to go ahead and
we have these pieces. We are going to go in
and already export them. Yeah, so we can just
go ahead and export these pieces over
here, save sin. And once we've exported them, then we can just create a
shader and test it out. So this wood shader over here, it's going
to be very easy. Shall I add it to
our You know what? We might? We could add to
our original mass material. I'll show you how to do that. So let's go ahead
and export selected. Let's go in here. Exports too unreal? Or do I not have a temp? Mm, I thought I had
like a Temp folder. Well, it doesn't really matter. Wood score planks
underscore damp. I can always just
remove it later on. So let's go ahead
and export this one. It's going to unreel over here. Let's just go down
here so that we can probably preview it. Yeah, we're just
going to do this. We like our original material. So I'm just navigating
wood planks damp. Here you are import. Okay, let's open
this up over here. So what we're going to do is let's go into
our mask material. And I also need to
go in and I already need to import our mask. Yeah, you know what? I can probably just
throw it in here. So let's go ahead
and I'm just going to once again navigate because I don't want to just
keep dragging over this one window for
everything I do. I'm not going to utilize the actual how you
call it, norm map. I'm just going to grab this one. And now what I basically want
to do is in my main master, you can go down here, and
what you can do is you can always set your blending
mode over here to mask. Then what we can do is if we add a static switch parameter, over here, we can say has pa
I shouldn't call it pa has. I also shouldn't
call mask because we called something else
mask has cut out. Mask. Let's do that.
Has cut out mask. And we can always
throw this in here. And if it is false, it will be a constant tree vector that
is always completely white, which means that everything is always just completely visible. And if it is true, we are going to grab a
mask, in this case, we are going to
use this one, but we are going to convert
this to peremter and just call this cut out mask just in case we ever want
to have a different one. Throw this in here, and I will always assume that it
does not need a UV. So it will always be like
the default UVs over here. So we got this stuff done. Let's go ahead and save our
scene or save our material. And let's have a look to
see if I broke everything or not. We will
know soon enough. Okay, so everything
still looks the same, so that is totally fine. Now if we go ahead and go
down here, where can I, I'm just going to do it there with my keyboard registration. So let's go ahead and grab
the plain concrete one. Duplicate this and call
this plain underscore Wood. And in this version,
desaturation lightness, okay? So that should be fine. So yeah, in this version, we
are going to go ahead Wood plane one, normal roughness. We can go ahead
and already, like, open up our wood
planks over here. Plain wood, whatever
you want to call it. Okay, so this are plain wood. So I'm just going to
keep my wood planks open on the side lightness. I think I actually
want to go for one. I don't know why the concrete needs to be so much
darker than the rest. So having this one, now what we can do is we can go ahead and we can duplicate this, call it wood
underscore splinters. Apply this one to
the second version. And with our wood splinters,
if we just open it up, all we should need to do is has a cutout
mask, turn it on. Like that. Then all
we need to do is set the rotation angle
was it 90 or was it? Oh, wait. No, because
now I'm, of course, changing No, wait, I am
changing my rotation angle. On which 1:00 A.M.
I changing it? I'm changing it on both
of them. Rotation angle. Yeah, those go into the
default, so who'd splinters? Come on. Oh, there we go. It's super, super
sensitive. 0.5? No, 0.25. Okay, so I think I
need to go for 0.25. And what I can do in
here is I can set my tiling smaller because, of course, it works a
little bit different. Now, you will see that
there is a little cut off going on over here, which is something we
need to live with. I guess if you really
want to get rid of it, you can try to add
the transparency at the end of this mask
so that it kind of, like, fades from one to another. But that is also more
expensive in the shaders. So if we go ahead
and go in here and tiling, let's set
the tiling to, like, two, and for the rest, keep everything the same
because from a distance, you can see that it will not make that big of a difference, although now I look at it, that does feel like
quite a big difference, to be very honest. What if we split this
one into UV two? No, that wouldn't Yeah, we might want to do
the transparency mask thing after all. Yes. Okay, so let's do
the transparency masking. If we are going to
do the transparency masking because over here, I'm also just making sure to get the best
quality, of course. So keep that in mind that I do sometimes go back
and forth a little bit. But you do see, kind
of like how it works. See? And then over here, what I'm going to do is I'm
going to do a few things. First of all, I want
to grab one piece. Let's just grab
one in the middle. And I'm just going
to go ahead and just duplicate it a few more times. To basically get a depth effect. So that's going to
be like a tryout. And then for the
transparency mask there, it's just a shade or change. Basically, all
that we need to do is we need to go
ahead and go in here. And in our mask, if we
temporal just add a new layer, grab a brush and set
the brush to black. You basically want
to go for, like, soft round over
here in your brush. So it's a bit bigger and you
basically want to do this. So you basically
want to give it like a fade so that it gets
like a soft fate. Now, this is probably
not good enough yet, but it's just a tryout. So we have this one.
We can save it up as a PSD because that's the
one that I imported. Masks. Here I go in here, right click and
reimport this mask. Now, you will see that it
will not work perfectly. I think we also need to
push it back a little bit. But what we then need to
do just like a twi out, once again, a twi out. Let's move this one basically
up slightly like this. Move this one down
slightly like this. And let's reexport this, and then I'll show you what I mean. So I'm going to
reexport this wood to be wood planks damp. And this is why
we try out before we start applying it everywhere. So Wo Planktmp Let's save my sea before it
crashes again because it is a bit crashy in this one. Here we go. So now, this
one is sitting on the top, which ironically, as you can
see, makes it even harder. Oh, yeah, here. Do
we really need to? Yeah, so basically, the difference between
transparency and this one is that we would
need to break it up. But honestly, if I look at this, I guess the darkening. I guess the darkening
could be a problem. So let me just show
you what I mean. In our main mass, let's just temporarily duplicate
this and call this main master on
the score transparent. It is just a shaded change, but the shaded change is
big enough that we cannot then just turn it off for
all of the other pieces. So what we need to do is
we need to go in here, and we would need to set our blending mode to
translucent like this. And now what I tend
to do is I set my surface to deferred decal. And set my decor blending
mode to de buffer, translucent color,
normal roughness, so that we can still
get all of our masks. Now, in here, we can turn on
the cutoar mask in this one. So we have a roughness still, we have a base color, we have a metallic, and
we have a normal. So I don't think we
lost any inputs. Now you can already see over here that this is how it looks. And then if we go in here, you can see that now it
looks a little bit broken, but it should work
pretty much so if we go down here and scroll
all the way down to your main master and just plug in your transparent master, the fading is too strong. Why is the fading so strong? We can, of course, control it, but normally it
should not be Oh, yeah, maybe because it
is hanging in empty air. That is probably why
it is so strong. That's the thing with
the transparency. So you can go ahead and you
can ty scale a peremter. So we are using basically the same technique that
we use for decals. But the problem with that
is that when decals are floating in the air, you
cannot really see them. Um, capacity, strength. And to be honest, I did not
completely think of that. So I wonder if this would
work, probably not. So let's multiply this with our capacity strength and set our passage strength to, like, 100, just to see if we can push it out far
enough so that we can see. Most likely not. No. See, you can push
it out on this end, but it looks like that as
soon as it goes over it, this is not worth it. So knowing that's what
we're going to do is we are just going to go ahead and use our original mask. At least now you do know
how to create transparency, and that is also how
you create decals. So it's just setting
it to that mode. So instead, what we're going to do is we are
just going to go ahead and assign back the other
one to our wood splinters. So our main master over here. But we can use the technique
where we cut it off, so this is not like wasted
time or anything like that. The only thing that I'm going
to do is I'm going to go in Photoshop and go to
quickly delete this one, create a new layer and
I'm going to make it a little bit of like
a small or fall off. So click Hold Shift, and then you can just go ahead
and click like that. And that's what just
create like an there you go, just like a line. So let's go ahead and save that. And then if we go
ahead and go in here, masks, right click reimport. So when it is a little bit
further back like this, what I'm hoping that will happen and we can improve it even more is that the blending will later on just work
a little bit better. The way that we can improve
it even more is to do, although it is risky because, of course, you are cutting out of your shape is to do
something like this, where you make your
bris a little bit smaller and you
basically do this. Because then you're almost
doing the same as the wood, as you are giving it a little bit variation
in the blending, which should make it a little
bit more difficult to see. The only thing is that I
then need to, of course, make sure that it is not
accidentally going over it. So if I do this, save my scene. Just see if that works. Right, click reimport. Here, see. So you
get stuff like this where it is just slightly
in a different angle, and that will basically fit everything a
little bit better. Also, over here, we can
see the wood like this. Now, another thing that
we can try for that one. I know we are trying out
a lot of stuff here, but it's just because there
are so many techniques that I want to show you and that
can make a big difference. So first of all, what I would do is I would select
the top ones over here. And I would just move them up a tiny bit with
our new technique. Then select the bottom
ones over here. And once we've
done all of these, then the placement is going
to be super easy because it's just going to
be the same thing as that we've done
in the blockout. So select all of the
bottom ones over here. Same deal. Move it down like a tiny bit
until it's sticking out. Okay, so we've done
this technique. Now I'm going to show
you another technique, and that technique
is basically that we grab another one like this. But for this one, what we
do is we basically like a swift loop here and there, and we basically, let's
add one more over here. We basically move it
down a little bit. So we basically do this so
we move it down like this, and this is the
technique that you can kind of compare
with, for example, foliage, where you then also go ahead and you
select another one, and you basically move this up, and sometimes you can
even go ahead and you can clip it through the
other one like this. And that's the technique that
you often see with foliage. So we have this technique. We have this technique, and then we have just like
the empty technique. Let's see. Is there
any other technique I want to try out before we complete this and
turn this into final? No, I think this should be fine. I'm already pushing
the boundaries compared to what games would do. Like games would be way quicker, as in that they would just take the easy way out and
just have two of them, because in production, you don't really have time to
do a lot of stuff. So let's just go ahead and
export it one more time. And then what we can
do is we can just see which one we like most.
So we go in here. We can go ahead and we can
boot blank stamp, re import. Oh, yeah, wait, there's
one more technique. Sorry. There is one
more tech Hello. There you go. One
more technique, which does add a little bit
more geometry on this one, and that is that you basically
add a few segments like this and you use it to basically make cuts
like you can see over here. So these cuts are, of
course, a lot less defined, but it is basically just to give the impression
that there is more stuff going on below it. That was the last
technique that I forgot. I knew I forgot something. So let's do this one last time. We are near the end of
the chapter anyway. So if you want, you
can test it out, pick whatever one you want,
and just go with that one. Going to re import this. And I'm going to have a look.
And we want to go ahead and make sure that we look at it a little bit from a distance. So if I look at it from this, let's see. We have these ones. We have these ones, I
don't like this one. Honestly, I also
don't like this one. I think actually, this one is actually probably the
best technique because, you know, from a distance, it just reads a
little bit better. Now, another thing
is that sometimes we will have over here, as you can see,
like the lightness. That is the thing that
I probably want to fix, where I just go in and if
the lightness is so extreme, like over here, this is almost, like, completely lined up. But if the lightness is so extreme that we just
go out there and we swap around our UVs a little bit just to match
it up a little bit better. And later on what we can do
is we can add some dirt. So we got these pieces. Yeah, so I'm going to
go for that technique over there. That should be fine. And then for, so if you want, I guess that you can use a little bit more
planes in here, and that would also
technically work. But then at that point, you are using so many
planes that you can just as well use the actual geometry. So it kind of depends. I could do this, or just
a little bit closer. Yeah, but even here, that
is probably not worth it because let's see how
much I use for one plank. Here, I'm still using 40 triangles while the
other ones are two. So yeah, that is just not
worth it for me at all. So let me just delete that.
Okay, so in the next chapter, we will just completely finalize these and we will already start just placing
our final mood and we'll see how
far that we get. Save sine and continue
to next chapter.
59. 58 Creating Our Final Floor Pieces Part3: Okay, so we're almost there. So what we're going
to do is we are just going to go ahead and add
a few extra segments here, not too many because the whole goal of this is
keeping it quite low poly, but I think it is worth
the extra segments. So let's do that. Yeah,
sometimes you can do two, sometimes you can
do four or three doesn't really matter too much. Oh, yeah, this one, let's get
rid of this one over here. And once we've done
that, we just need to do some little balancing. Of course, it's a little
bit annoying that in here, they are flipped
the wood textures. Now, if you want, you can save my wood texture or flip it 90 degrees and
then quickly save it. But honestly, I'm just going to move it
around a little bit. There isn't that much
of a difference, so it is still quite
a plain wood texture, but I did add, like, a little bit of just, like, interesting features to it, and that's why we can sometimes
see like this mismatch. So in any case, let's move
this one out and this one. Let's go ahead and do this one. Maybe like this one over here. So just do whatever you
think will look nice. Of course, do not,
like, surpass. So vague can see that
we kind of, like, surpassed it, so we can just, like, push this
back a little bit. So we got that one. Let's push this out. Um, That one is already done. Let's go ahead and push this one also over here and also
on the other side. Of course, if you feel like
the stretching is too much, you can always go ahead
and just do like a unwrap. We probably need to do it for some of these pieces anyway. Or you can just go into your
UV unwrap and you can relax it just to kind of compensate for that little
bit of stretching. But at the end, we should
have some nice planks. And since we are going to
use these planks everywhere, that's why I'm so keen on just spending the time on them and I don't want to rush things. Because if we are messing it up now and need
to go back in later, we would need to replace a lot of pieces or we
would need to redo, a lot of stuff, and it would just honestly be a
pain to do that stuff. So we got these ones over here. So yeah, in terms of the
UVs, let's have a look. Honestly, that looks
still pretty much fine. So we got those done. Now if we go ahead
and go in here, the first one is
blending really nicely. Second one is also
blending fine. The third one, we
want to go ahead and go a little bit more towards,
like, a lighter area. So whenever we found one, we can just go to the UVW nw and we can just go
ahead and open it up, select everything and just go
to set like a lighter area. So let's say that's
like a lighter area. Then what we can do is we can just move on
to the next one. This one is blending. Yeah, it's just on level. Like this one over here is dark. So you can see it over here, also like that it is probably
a little bit too dark. So we can go ahead and
I'll UVW wrap over here. Go ahead and go for Wait
which one was too dark? Okay, yeah, so we need
to make it lighter. Just trying to find there
we go, a light spot. Then the one next to it needs to also be a
little bit lighter. Lots of light areas. I'm probably just
in the masked one. I'm probably just happening to hit like a really light area. Okay, so we got that one, so that ones a
little bit lighter. This one is blending fine.
This one is blending fine. Yeah, on this end,
it's like a tiny bit, but I'm fine with
that, honestly. This one is blending
pretty good also. Over here, this one is,
I can live with that. This one maybe go a
little bit lighter, and this one maybe go
a little bit lighter. Let's go over here,
let's do these two. And then what we can
do is we get expo it. Double check, make sure
it all looks good, and then we can start
by placing everything. So for this one, I'm going to go, like a little bit lighter. And then for this one, I
also just want to go ahead and it's a little bit light. Like that. Okay, let's see
if this works, shall we? So let's go ahead
and export this. Export selection,
wood planks, temp. Yep, I want to export
you to go in here. Right click reimport.
And let's have a look. Okay, that one is blending fine. Over here, I'm missing
some of the blending. So I think I need to make that blending a little bit bigger. Those are blending fine,
those are blending fine. Yeah, so everything
is now blending fine. I just need to go in
Photoshop, probably. Oh, I closed Photoshop. Here we go. It's open again. So what I'm going
to do is I'm going to make my size a
little bit bigger, and I'm just going
to go ahead and, like, hit some of these
lower points over here. And then what I need to do is I just need to also export this to JPEG just so that I can make sure inside of T is MX
if I need to push anything forward or backward in order to basically have
the blending look correct. So it might look a
little bit silly, but it is effective. And if you want,
you can even go way sharper and stuff like that.
So that's all up to you. I'm going to just save as copy, JPAC because in
the new Photoshop, for some reason, they decided that you need to save it as a copy instead of anything else. So now I can go in here. Did I already not 100%
sure of reloaded. Yeah, it should it should
have reloaded, I think. Else I can just
quickly reselect it. Wait. Yeah, I messed it up. Well, I messed up technically, but it looks like it did reload. Here I accidentally selected the wrong one set you back because I meant
to select my cut out, but I think my cutout
has been connected. I just want to make sure
that the fading is not going beyond this point,
which it does not. So now all I need to
do is go in here, masks, right click reimport. And hopefully that will give me a slightly better result where it is just like
cutting out around. It might be nicer
if you do a little bit more smaller
cuts here and there. I guess you could
use a brush for it, but I'm pretty much happy
with what we got right now. Only over here might
be a little bit much, but honestly at this point,
I don't really mind. Here you can see
that now we do have some good broken
pieces. Okay, perfect. So we got these
pieces over here. That is all happy.
That's all looking good. Now, another thing
that we do need to have a quick look at is if I bend my wood or
if I just move it. Okay, so I just move my
wood instead of bending it, which is good to know,
because that means that I do not need to add any
extra segments. It does mean that
we have these type of locations where you can see me basically having the wood, like, cut into,
like, the center. If we have those type of boots, what we can try to do for those ones because they
are so limited is we can try to add little
segment pieces. Basically, with
that, what I mean is let's go ahead and let's
do that as the last one. So let's first of
all, go in here, and let's just go ahead
and press attach. And then you just
want to press Okay. So these are now done, so we are going to attach these. Oh, make sure that you do
not accidentally Wait, let me just quickly
convert everything to addi pooling Makes it easier. So we basically just
want to make sure that when we select a woop lank, it will have everything
selected along with it. And then like those
centerpieces, what I basically I am going to do is I almost like
what to just create a little intersection cut
that I can always just throw in where we can almost
have a breakpoint. So it's sort of like
a breakpoint area. And I will show you
what I mean with that. That one is a little
bit risky, though. It is a little bit higher poly, but we don't have it that often, so that's why I'm not
worried about it. It was more like if we had
to do it on everything. It would be so much work
and to optimize it, and then we would still only we would still have quite a bit more polis than what
we have right now. So this is, like, really nice and optimize what
we have right now. A, that's the thing
with optimization. You are, of course, paying a little bit in
terms of quality. So basically what I mean is, did I connect
everything here? Yeah. Let's go ahead and grab this piece over
here, for example. And with the intersections,
we can just use this one. If we go ahead and add
a Voronoi to this, save my scene because it
feels a little bit slow. And if we set this to 500, for example, fragment it. Okay, 500 is a bit too
much in this case, 300, 200 to 200. And then if we go to our
fragments over here, we want to set this to like
80. So we are cutting it out. Now, basically what I'm
talking about is for those join pieces, it
would be like this. So let's say that we
have this one over here. Let's do this as
like a cut, Detach. And then what we're
going to do is we have this one as a cut, detach. These two are going to become a break piece in between here. It's just that we need to, of course, clean this up. But what we can do is,
oh, well, 1 second. That is a little bit too
intense for my taste. So let's just quickly do that until we get our afire
Vanoy back because I just want to go
ahead and I want to click on it once. Here,
let's push this out. Oh, let's go ahead and do
it in what is it height? No YXs, no XXX axis. Let's stretch this around 60 in the ZXs just to make the
cuts a little bit cleaner. Twilt again. So
let's have a look. So we have this one. Sure that you are element select because else
it doesn't work. Yeah, that's better. So
basically, cuts, yes. We have this one over
here. We can detach it. Then we have this one over here, and we
can detach it also. So the way that this
breakpoint would work, and we will create probably another variation or maybe even two is the breakpoint
will happen over here. So what we can do is we can
move this out of each other. We can now go ahead and
go to our face select, and basically what we
want to do is we want to select all of the
top inside faces, except for the inner
center phases. Now, normally it
saves my selection, which is a little bit annoying. Like if I go here, Okay, so looks like this time it decided not to
save my selection. No problem. The only thing that we didn't need to do
is we need to isolate this, go to our face mode and
just select everything. Yeah, our scene is getting
really big right now. Hold control and control. Hold Alt and just go ahead and deselect all of the
site faces over here. And now if we go ahead
and we basically want to just select these sites. These sites, that's
why I imagine if we had to do all of these optimizations
for the entire planks, non stop and these sites, and then everything else we are basically going to delete. And then we are going to do
like a merge on our vertices. Okay. Okay, so see,
so we got this. We can now press Contra I. And now you can see
that it selects all of these in the
centerface which are still 436 triangles,
so we can delete. Now if we press contra A, we can go to welt weld settings. And just like welt is together,
like, quite a low level, and you can see that we
have now ended with well, still around 300 twists, so that's why it is
still expensive. But at least it's a
little bit cheaper. And if you want,
you can, try and go in here and do like
optimization like that. But I personally like to just keep it like this just to
save a little bit of time. So this would be Come
on. There we go. This would be an isolate point. Now, over here, what we need to do is we need to go
ahead and go in and add a slice modifier over
here, rotated 90 degrees. And place like around here, which is basically going
to be our cut off point. At which point, we can
convert this to added poly. We can go ahead
and we can select or delete this site over here, and here you can
see all of these center faces, see how many. So the thing is with
select by angle. Select by angle only works
if it is like a flat face. That's why we cannot
use that technique. So we now got this one. Then later on what we can
do is having these two, we can link these
two other planks. And then what we can do
is we can rotate this out and it will basically
create like a break point. So that's the general idea
for this kind of stuff. So Come on. Why are you freezing again? Now, I'm starting
to get a little bit annoyed at this point. Okay, it's back. I have no idea why. But
basically, having these points, what we can do now is we can go ahead and we
can do another one, where, for example,
let's say that we select this one detach and select
this one and detach. I'm just going to leave
it at these points. So at this point, I can just
delete everything else. And with these pieces, you need to do the same. So we need to go
ahead and isolate it. We need to go in and do quite an accurate
selection like this. Then what we need to do is
just hold Alt and just de select These few pieces over here that we want to
keep, few faces, at least. Hey, yeah, we are paying
for the topology, but it's not that much. Over here, delete
everything else. It's also delete like this one. Let's go ahead and
select everything. Weld it together, not
too high, so 0.02. And then over here, yeah, so you probably want to
go ahead and cap this. Honestly, at this point,
what I tend to do is I tend to cap it like this. I then select the
face, hold Shift, and click on vertex, and
then just press connect. And it is maybe a
little bit messy, but it is also fast. And honestly, I don't
even care about the UVs because you will
probably never even see it. So like that, we got
these two pieces, and now what we need
to do is we just need to go ahead
and for these ones, we do, of course, need to add
the slice to both of them. So wow, we spent again like 20 minutes
on this. Don't worry. This is the last
chapter, and then we are honestly going to just
place everything together. And the placement should
be quite quickly. So we got this slice,
let's copy it. And let's paste the
slice over here also. And we got this slice Oops. This one needs to actually be
on the other end over here. Let's go ahead and just convert them both to an added poly. At which point we can go, for
example, to our top view, and I can simply delete and do the same
over here. Delete. There we go. And this is immediately
also a way that if you really want to go ahead
and use all geometry, this is sort of the way
that you would do it, although I would then recommend probably going into
brush and doing a decimation master because
you would probably still save more geometry
than doing it in here. It's just that, yeah, it will
be a little bit of a mess. But that's what you
then need to live with, or you can try to retopo it. At which point, yes, okay, if you are retopening it, then I guess that the jump tree will be fairly cheap for
what you're getting, but then you can
just well make it by hand with stuff like this. There we go, just delete it, select it, weld it. Select the end, cap ply, select the face, all
shift, and connect it. Seems like a lot of functions, but they are easy
functions to do. So last one over here. Let's go ahead and once again, do quite accurate
selection like this. And let's just deselect the
stuff that we want to keep. That's the thing with a fire. Ray fire is very
often used in movies, and in movies, they
don't really care about geometry as much. But of course, we do need to go ahead and go in here
and, like, optimize it. So let's go ahead
and lower this down. Cap. Oh, this cap is not correct
because we need to Okay, so one of these edges is
being a little bit annoying, probably because there's
like a phase in between. Why not. Let's, uh, Oh,
that's interesting. That's a weird one. Let's
delete it, I guess. Let's collapse this. And
let's bridge it again. But does mean that I now
need to redo my UVs. We got even more of them. Why is this one all of a sudden
being so much different? Let's, uh Here, let's collapse
that. Let's try it again. You over here, you can see how many triangles or
faces you have. So I don't know why
it's doing that. Let's go ahead and now
go to Edge Mot and just deselect that one
and try to cap it. Ah, come on. Okay, fine. Wealth is over
here, and now it should gap. Only that means that
now I will need to redo all of my EVs. So
let's connect this. But redoing the EVs
for these ones. It is not too big of a deal. It's just going into
our UVW rep box. What did we do 50 by 50 by 50. Rotate it in 90 degrees. Yeah, 50 by 50 by
50 was the one. There we go. Okay. So finally, we got all of our pieces. Now what we're going to
do is in next chapter, we will finally go
ahead and actually apply all of it to our plane. We will start with, like,
our normal wood floor. So let's go ahead and continue with this
in the next chapter.
60. 59 Creating Our Final Floor Pieces Part4: Okay, so let's go ahead and start putting
it all together. I'm going to go ahead
and at this point, I will place all of these
in their own layer. So let's create a
layer, and let's just call this wood pieces. Yeah, just wood pieces. Sure. Because we are later on also going
to simulate these. Now, for this one, this is just going to
be our flood plank. What we're going to do is we're just going to duplicate these, and then these ones
we can throw back into our wood floor clean, and then we can turn
off our wood pieces. Okay, having these pieces,
first thing first, center your pivot like this, duplicate them. Rotate them 180. So now we have ten
variations, right the way. Now what we can do is so
these are hitting two. So we want to basically
have three per row. And just to fake that
they are planks, we do want to give them a
little bit of space in between. So what I'm going to do is I'm basically going to have three of these per row. And once you've moved your pivot on the right axis
like doing this, you can then just move closer. You can still move your pivot just by moving it like that. So having this one and now
what I can do is I can go ahead and I can, for
example, grab this one. Over here. And just like that, I can just quickly
already set these. Now, we're just
going to basically, create a bunch of
rows that we can use. Actually, we don't even
need to place it this close because we will
most likely change it. Oh, no, wait, we can place
it this close, actually. Yeah, let's go
ahead and do that. So we got these ones over here. Then down here, what we need
to do is we need to probably just grab these and
throw them together. I want to have a
little bit of space. This kind of space, what it
will do in the game engine, even though it might not be very logical because
it's a wood floor. But in the game engine,
it will look dark because there's tiny bits of
occlusion in between them. And when it looks dark,
it will basically fake the effect as
if we have an edge. The reason I'm doing
that is because it saves me needing to add a bevel, which adding a bevel
to many planks will in turn still be quite expensive to do in terms
of jom try and everything. Now what I can do
is I can go ahead and let's say grab
this one over here. Let's scrape this one over here. So basically going to,
like, fit these in. And then I'm going to, like,
one, two, three, four. One, two, three, four,
let's go out and just duplicate ideas
ones over here. And move them close. Okay,
so we got this stuff. Yeah, it's not perfect, but it doesn't have to like, there's still a little bit
of messiness going on. But okay, now that we
have this stuff now, all that we need to
do is we need to, first of all, go ahead
and move it down here. See, you know what,
let's move it down here so that we can
properly measure it out. So let's go ahead and just
grab it on this point. And now what I'm
going to do is I'm going to just keep duplicating this and then set my number of copies a bunch
of times. There we go. So that we are hitting beyond all of these bits and let's
delete this stuff over here. Now as you can
see, so we are not completely perfectly
on the line. So for that, look, what you can do what
I like to do is, I like to use an FFD
modifier for this often. So I like to go ahead
and go in here and art FFD two by two by two. And what that will allow us to do is almost like
this box over here. We can simply select it
and we can basically move everything in
this direction. So if I go here, I can basically very precisely set these ends
so that they are modular. The thing is because
they are planks, we can actually leave
a gap in between us. That's no problem. So
once we've done this, we can go ahead and convert
this all to an added poly. And now the next thing
that we're going to do is we're going to temporarily move it over
here and basically do this. You grab three planks,
you move it out. You grab three planks,
you move it out. Let's leave that one. Let's grab three planks, move
it out a little bit. And just like that,
we've done it before. We are just going
to give it only last time we did it
using the vertices, but this time, of course,
we cannot really do that. The goal is that we still keep
a square that we can use. So we might likely to move some stuff in or out or
something like that. But the goal is that we now have basically a wood flooring. And once we have done
that, all we need to do is we need to
just combine it, cut it up into little pieces, and then we are ready to go. Then this one is also done so that we have our fill on planks. And yeah, I know that
it is not as optimized, but it will fit
better with all of the other ones
because if we have one wood piece that's
completely flat, and it's all aligning
wood pieces that are, like broken and that are
unique and everything, it yeah, it just doesn't
feel the same way. There we go. So once
we've done this one, all we need to do is
we need to go in here. And then I am aware that
it will not be completely tilable in terms of wait,
let me just deselect this. It will not be
completely tilable in these ends, most likely. However, this is where
we can once again, just, see if we can just
cut it off using the wood. So once we have these
pieces over here, all we will need to
do is isolate them, quickly grab one of them, and then just go
into your attach and simply select every
single piece of wood. Here we go. At this point, I'm just going to press
Contra V. Copy it, and I'm just going to
throw this one into our backup because we might
need to use it later on. I'm not sure yet, but better come on to be safe than sorry. So we now got this one. Now all we need to do is
we need to once again, some cuts over here, so slices. I mean, yeah, because doing the Boolean never really seems to work in these type
of instances for some reason, which is strange because in
every other tree program, it works totally fine. Even unreal, it would work. But in Max the Booleans
are not very good. I find. So we got like one
slice over here, and then we can just go ahead
copy and paste this slice. And then the next slice, it's going to be over here. At which point we
can just add and add a poly on delete, delete. And now we have these pieces. Now, just for the sake of here. So this is our floor,
we can now delete this. Just for the sake of making
sure that it all works, what we're going to do is
go to border select and just do it like a
Capli over here. We don't really need
to do anything on this Capli I'm
fine with the UVs. It is just here in case we
can ever see it because we will most likely have some instances where
we can see it. So this is like our plain floor. We can now go ahead and
we can save our scene, and with this plain floor, we can go ahead and
we can export it. And you are wood floor clean. And then we also have
the half version, which I will focus on
a little bit later. I first of all, want to do the
destruction because I feel like I've been keeping you guys waiting for
too long for that. So let's go ahead
and go in here. Wood, floor, clean, right, click reimport, reset the FBX. Like in these ones, no. Oh, yeah, here you can
see it. Open it up. And all we need
to do is let's go into the content
browser and grab our plain wood,
throw it in here. Safe. There we go. And, of course, typically
that now Oh, you know what? No, the color might
actually be good. So here you can see that
now we have our plain wood, and you can see that
it just looks like a wood floor because of
the cutting over here, we are not really
missing it, and you can see that in
between these pieces, although I could have made
the spaces even bigger, because from a distance,
you cannot see them. Yeah, you can see
that there's, like, some tightening. So
this is already great. It's already starts out
like a little bit of color, although I probably
do want to make it a little bit more
colorful later on. Now what I want to do is I now want to just go
ahead and go with, like, our edge over here. So with that, what
we can do is we can grab this piece, contra vie. And just throw this into wood
floor broken variation one. So if we turn off the clean
one, and let's have a look. So our wood floor
broken variation one, we can see that over
here. It cuts it off. But this is where our
planks come in because now if I go ahead and Okay, so I just need to
remember that it can come out a little bit
further than this, what I can do is if
I just isolate this, I can go to element select, select all of these, and delete. Okay, let's be careful
at this point. So we are deleting it because we are now basically
just going to slot in our broken pieces. That's it. It is that easy. So we have wood
pieces over here, and this one only needs
the ones with the ends, and that's why we
created all those ends. So these ones, we can just
go ahead and copy it, throw it into wood
broken variation one. And that's why everything will later just fit really nicely, and it will just make sense. We got these pieces over here, and as I said before, I know that I can stick it
out a little bit further. So you know what
I'm going to do? I'm going to go to my
effect pivot only, and I'm just going to move
my pivot closer to the end. Makes it a little
bit easier for me. So for this one, what I would do is I would place it,
for example, in here. Oh, yeah, the pieces,
they do need to, like, bend a little bit. But that's something that I can also do in just like a sack. A second. So we will
probably need to do some small UV changes
to this because I think most of our planks are a little bit too
long in this case. But what we can do,
so we are going to basically place this randomly. First of all, we are going
to place the ones that are ideal cuts and that are
working properly together. And then later on what
we need to do is we need to do some bits of bending, which is no problem at all. I just need to add a little bit of extra geometry for that. But first of all, let's actually just get it to stick over. And so because these are
now real wood pieces, we would probably also
go out and we would actually bend them
from this base. So not all of them
are like bend. They are going to
be ripped. So we are going to bend
them from that base. If I had more time because I don't have that I would
probably also create a decal. I might do that as
like a bonus where it will just be like a decal that is like a little bit
of, like, ribbed wood. So the decal would
be like this piece. So you would
basically just, like, have this one over
here like this. And then you would bake it down onto like a small little plain. And then what
you're doing is you would just fade out the edges, and that would be your decal that you can then place on top. Yeah, so, yeah, you know what? Sure. At this point, this tutorial has
become so long anyway, I can just as well
go the extra mile because I did not expect that this toy would take this
long to be very honest. Not that it's bad, of course, but I can imagine for you guys, if you need to sit through
listening to me for 40, 50 hours, it would probably
get a little bit annoying. But in any case, so
we got over here, we got these, and we
just want to have them, like, sticking out over it. So yeah, we just need to
have the torn pieces. So at this point,
what I'm going to do is I'm just going to
go ahead and I'm going to even though they are
going to be ways along, we are going to push them
back a little bit later. So what I will do is I will
just, like, kind of, like, move these in some of
these locations also. And the rest is
same basic concept. The only thing is that it is, of course, going to
be a lot more work. Now, I guess at this point, what you could do is you
could also hold shift and rotate this like 180 to
add more variation to it, and then push it down here. But oh, yeah, here. So that's the before we do that, we do need to center to bivot else it does not
rotate in the center, we do want to make sure
that that stays the same. Here we go we can move it like over there, for
example, stuff like that. But you most likely
will never even see the difference between these because there's
so much stuff going on. So let's see, we need
to have useU over here. This one, we'll need to have say this do this one over
here. We're almost there. And then what we're
going to do is we're going to push a
few of them back. Let's have long one over here. Let's do this one over here. Yeah, almost done. Almost
there. Got this one. Let's move this one here. And the last one,
I'm going to grab like a small one over here. Okay, so now for the
pieces that are too long, what we are going to do is, which is going to
be, for example, like this one, you just want to go ahead and go to face mode and just move it
back a little bit more so that it's
not too intense. But I will have a quick look
in engine to see how okay, so here's our break. So if we go ahead and just
grab a very quick Oh, show it you. Use
the right layer. Create a very quick
box like this, and it just makes it
easier for me to see where I need to push things back a little bit more because I do not want to
have them like too intense. And then we're
just going to redo the UV unwrap for most of those, although it will just
be like relaxing. We are just going to
relax like the unwrap. Okay, so let's say that we
have these pieces over here. Have a quick looking engine. So over here, of course, I'm
cutting it out like this, but the goal is that it is
rotating in these points, which is working quite well. Okay. So knowing that, now that we have these
pieces over here and we know that the cut off
point is pretty much there, I'm basically, oh, sorry,
move this one closer. I am basically going
to go ahead and I will probably just
rotate them individually. So what I mean with that
is if we have these ones, it's a little bit annoying
because of the end. That's why it is annoying
because I need to make sure that it is over
the edge because if I start rotating
it, this will happen. You can literally see
it happening over here. So that is something
that we do need to keep in mind that we will most likely need to change this around and actually
move it like this. Or what we can do is we can basically have
the flat plane, and we are just going
to have this near the ends. Okay, let's do that. It does mean a little
bit of more movement, but it gives us
more flexibility. So what I'm going to
do is I'm actually going to go ahead and I'm going to move let's look at
our clean version. Here, let's move it
probably around here, where our cut off
point is going to be. Wow, that's like a lot of
movement, to be honest. Yeah, that is a lot. I'm not too happy about
that, to be honest. I'm just trying to decide how far I want to actually
have it extending over. Because if this is
going to be the end, it's already extending over. So I don't think we can do it. Let's just try. Let's
just go ahead and basically do this stuff
where we have this one. Oh, turn off your snap rotate. So basically, we
are going to have points where we are
going to have this one. And honestly, at this point, it's maybe easier for
us to center our pivot. And in some of these, we will need to go ahead
and we will need to adjust them to make sure that
they are working correctly. And that we are going to
cut them in the center, and that's where
we will have maybe like the decal that
I was talking about. Because right now, I
need to really, like, put messes up and
break it up and just make it look interesting, but it's a little bit
tricky to do that when we have such long pieces. So what we're going to do is we are going to just
to first of all, a few of them that are
literally like sunken in. And maybe what we
can do is we can actually have them
also a little bit higher as if they are like, just hanging on top of something because they will be hanging
on top of, like, a ledge. Like this. And then
we would also have one where we are basically going to go in with
the swift loop. And we are basically going
to move this down and just make sure that you
carefully rotate it so that it will basically become like
a cut over there. So we got these
ones. So this end is basically where our
edge will happen. Yeah. So for those
kind of things, we probably want to kind of make sure that
we push it all. Try to, like, kind of, like,
push it all above the edge, basically, above this point. And sometimes it's
fine to, like, push it up the
opposite direction like this, give
it some rotation. I'm going to, like,
push this one down. And then here is the edge. So what I'm going
to do this, I'm just going to go
ahead and carefully, rotate it and move it a
little bit. Like this. Yeah, this should
still work nicely. This is more like a
prototype, I would say. So it's like the virgin that we are going to
try everything out. And once we have something
that is absolutely perfect, the way that we are breaking it up and the way that
we are moving it, then what we can do is we
can just assign this to all of the other pieces and just use the same basic concept. It is fine to sometimes
have some pieces broken. Right now, if I look
at it from the side, like this stuff is nice, but then over here, it
starts to I really want to, like, have it more broken up. So where's the edge over here. So what I'm going to do
is I'm just going to, like, move some of these, like, will strongly tilted. Some of these, it would maybe be nice if we actually
move it a little bit further down
the edge and then move it up again
and then rotate it. And I'm basically looking
at these lines over here. That's where I basically decide if my rotation is enough or not. So we got this piece. Let's go ahead and
let's rotate you. Let's see if this is the point. Let's go ahead and
do the same where we give it a little
bit of rotation, maybe move it back a little bit. There we go. This one, I'm going to maybe
move up a little bit. This one is leave because it's quite whenever it's
really close to the edge, I kind of just want to leave
it because that we have a few bits that
are not as strong. This one I probably
need to push up. This one, what I'm going to do even though it is
already tilted, I'm just then going to again, like, rotate it and just
move it down like that. Over here, what I'm
going to do is I'm probably going to end
this one so that it just hits the normal node.
Let's see that we have this. Let's turn on our action
faces from a distance, it's could work maybe let's see. The ones that I did not
put a lot of effort in. This one, this one, and let's say, this
one, let's delete it. Or at least for now,
let's hide it that we know if we can maybe, like,
get rid of, like, a few. And then in here, what I can do is I can go ahead and maybe angle it a little bit to give it the effect like it's
just kind of broken off. Okay? So let's try
this out, shall we? Let's save a scene.
Very important. And this is going to be
broken variation 01. Wood floor broken variation one. I'm quite curious to see if this is working as well
as I'm hoping to. Probably not. It never happens
like that, but we'll see. So wood broken variation I save my scene because
I'm still paranoid. So let's go ahead
and just reimport. Reset to FBX. Okay, so this is what it looks
like right now. And if we go in here, we want to have like
our plain wood, and then we want to have
like our wood splinters. Save scene. Okay. Not too
shabby, whatever the saying is. Let's go ahead and just quickly set like maybe like a lightness to 0.5.
Actually, you know what? No. I'll do that later on, because else we will need to
do like a bunch of bouncing. So let's have a look. So it definitely looks like
it is broken like that. So that's pretty good. How far is it sticking out? Um, it is sticking out
quite far, in my opinion. Which is a bit of a
tricky one because, yes, we can push it back, but I
wonder how that will react. To test it out, also, by the
way, I just want to see. Okay, so it works if we
sometimes have one missing. So to test it out, what we can do is we can
go ahead and select everything and
remember that FFD, we can use it to basically
try some stuff out. So we can try to push it back. And then what we
can do is we can just export it and see how it basically behaves compared
to how we placed everything. And then we can kind
of take it from there. But just in general, like it is working
pretty decently. Maybe I also want to move some of these other planks
up a little bit, just to give it the
effect that the wood is really like broken
up everywhere. So if I would re import this, now I'm basically pushing
it back, so it is closer. The reason it's tricky because the broken ceiling below
it is also pushed back. So if we would just
use the same wood as that we've done before, it might not always
look as logical. So that's why I'm
basically doing this now. So that is looking pretty good. So I think I'm going to leave
it pushed back like this. You can see the clear
broken wood pieces. So that is working. Still lots of balancing
going on that we need to do. This kind of stuff, what
you can do is honestly, at this point, you
cannot see it. So just like scale
it out a little bit. See, you will never
notice the difference. Even up close, you
wouldn't notice. So that's pretty good. Now, what we're going to
do in the next chapter, in this case, is we're going to add some small improvements
still to them. And once we've done that,
we will start by adding the other roof pieces or
the other wood pieces with, of course, the
most difficult one being this one over here,
but it will be fine. So let's go ahead and continue with this in our next chapter.
61. 60 Creating Our Final Floor Pieces Part5: Okay, so let's go ahead and
continue on with our roof. Now, what I wanted to do at this point, say,
Okay, so this is fine. I'm going to go ahead and
convert soon ai pool. By the way, my UVs are
surprisingly intact, so I don't think I actually
need to change much. It's at phases. And what I wanted to do is
just like this kind of stuff. So kind of, like, move
it, maybe give it, like, a small bit of rotation, and it's just to make everything like a
little bit more uneven. So just don't do it too often, sometimes move it around, rotate it a little bit here and there. And it will just like add
that extra little bit. Of course, all the stuff
that I'm showing you, you can always upscale
it, so to speak. You can always just add
more details like this, small details and everything. That's what I would normally do. If I work in a
production environment, I would add more and more and
more to this kind of stuff. But yeah, now, this is fine. And also, by the way, the deca
that I was talking about, I don't think it's
really needed. I don't think we will get
enough use out of it. So that will be maybe
something for future tutorial. But here in general, or, of course, you can
just make it yourself. It's not that difficult to do. Just like pretty basic baking. So okay, so there we go. Now what I will do is I will go ahead and I will
call this one done. So file export,
export selection, wood floor broken, 01. And what I'm going to do
is I will probably just be able to reuse these pieces
also for 02 later on. So first of all, let's
go in here. Report. Oh, God, yeah, we
definitely need to work on the color.
Just look at this. Like everything is plain. Everything is gray and I'll. Now, we are later
on going to have some nice lighting effects and everything that will
hopefully improve it, but just in general, I need to swap things
around a little bit. But also a bunch of the color of the splash of color is
going to be from the walls, and it's going to
be from the wood. So we're definitely
going to make our wood like a
little bit darker. So yeah, I'm sure
it will be fine. It's just something that we kind of need to look past for now. And this kind of stuff,
we will later on need to do a pass where
we are just basically replacing a bunch of stuff
and making sure that it all works because right now we still have a little
bit too much clipping. But okay. So the next
one, let's have a look. So what are these
pieces? It's n hid al? No. Okay, so those pieces
are just a blockout. So let's go ahead and
just delete that. And then all we have left
is this, so that's fine. Variation number two, what is
variation number two about? Variation number two
is just like broken. Oh, it's a corner.
Variation number two is a corner. That's why. Okay, so for the corner, I think what we can do is
we can just go ahead and grab variation number one. Yeah, how are we
going to do a corner? We have not designed
this to be a corner. But then again, how often,
okay, so the corner. So the corner, it
will be straight. We're just going to basically
change it up a little bit. So let's just go ahead and grab this variation number one. Copy it, throw it into
broken number two. Okay, so over here,
I kind of wish that I first selected
all of these pieces. Let me just have a look. So
it is sticking out less far. So we're going to push
it in a little bit, and we are going to
then have, like, the last few pieces around. So 1 second. Let me just quickly
you know this because this is way too annoying if I need to go
in and switch it around. So I'm going to just
do a quick attach. Throw everything into one model
and throw it into backup. Or at least for now, it
doesn't need to be in backup. For now, what we can do is
we can just move it here. And now what I can do is I can
go ahead and these pieces, delete them because like I said, I don't need them. Let's go ahead and controve
copy, throw in variation two. I'm really forgetful. I already forget that we did
all of this stuff. So now what I'm
going to do is I'm just going to temporarily move this over here
you select everything. Okay, it looks like that we do not have our FFD
modifier anymore, so let's just re art
our FFD modifier. So push this a little
bit back like this. Converts to an added poly, and then looks like that the
last two or three pieces, we are basically going to
hang them on the edge. For which, that means that
I need to grab these ones, detach, grab these ones, detach, and grab
these ones, detach. Let's go ahead and
select everything. Center pivot. This point, I will just like, do this
like a little bit quicker. Et's make sure that it
is still a little bit assigned or a little
bit connected. Like that. So that's kind of like hangover. Of course, it's kind
of like imaginary what it is still being stuck to. But at least it will give
the right impression. There we go. So
let's try this out. Let's go ahead and export this. You are going to
be variation two, and then variation three
is basically going to be this piece, but
all over the place. So variation two so in the
end, it's not too difficult. Broken floor variation
too, let's re import this. I think once we've done this, we will go ahead and we
will do some balancing. Once we've done our
wood, we are going to do a lighting pass, a balancing pass and
just in general, try and play around
with the colors to see if we can get some
more color in here. Yeah, that's probably
a fun thing to do. It's just like a
little break again. So in here, we have
our plain wood and we will have our wood
splinters, save it. This one is even lighter. That's so unlogical that some
are lighter than others, but at least it is working. So that stuff is
working just fine. Now the last one which we
actually used quite often. Oh, wait, and of course, we need to create the simulated ones. But simulated ones we can they're not too
difficult to do. Yeah, so let's go
ahead and go on to the last one over here, for which we are going to
go ahead and throw this one into our backup layer. Let's see. Okay, yeah. So that one actually
is not that difficult. It goes down a little bit, but basically, it is
just on both ends. So seeing that, let's go
ahead and let's go in here. First of all, convert
everything to the added Poly. Oh, yeah, we need to have
those connection pieces also. Let's attach everything, and we'll see how we can do this. Go a attach over here. Now, what we're going
to do is we're going to grab variation one. But then without those pieces, let's quickly convert at the
podium, just make these. Without those extra pieces, let's go ahead and
just duplicate them, throw them into variation three. Let's see. So this is already something that we
got for variation one. Then what we're going
to do is we're going to go into our wood
pieces over here. We are going to grab these
over here also, copy them. Let's go ahead and throw
these also in here. Now this is basically all everything that
we have to work with. Okay, so having these
pieces. That's pretty good. You can already see the
resemblance back into them. What I'm going to do is,
I'm just going to go ahead and move one over here, so we're basically going to close up these holes
a little bit better. One here and one here. Now what we're going to do is we are basically
going to just assign sometimes
these breakpoints. What I'm going to do for those breakpoints is
I'm going to go ahead and keep this one straight. Yeah, we do need to be careful. I think I rather want to go
upwards instead of downwards, so that one is straight and
the other one goes up because else we might have problems with that it is clipping
into the ground. Instead, if we do this,
so we're moving this up, and then over here we
will have another one. Maybe this one the
other way around where we grab this piece,
sent a pivot. And let's just move this. Up like this. The goal is just
that you can see a break point over here that is still being interconnected. So once we have these, all we need to do is we
need to go ahead and go in here and just sometimes
throw it in here. So like over here,
we can have one. And then later on what we'll
do is we will use these ones to assign extra
planks on the end. And then all the
other planks, we will also just go ahead and
assign on the end. So let's go ahead
and for this one, because this one is up
in those directions, we probably want to go ahead
and move it around here. I feel like maybe grab one and it snap rotate
it 180 and like, move it down here. Yes. Okay, so we got
that stuff done. Now, let's just close off these
bits by duplicating this, pressing contra I over here just to remove
those extra pieces. And what I'm going
to do with this one is I'm basically going to match the rotation
turn off snap rotate. And move it back a little bit. So we're just going to you can do this quite sloply
that's no problem. Okay, so we got
this one now done. Now, if we go ahead
and move this over, actually, let's first of all, move this one on top of it. So we first grab this, we move
it on top of it like this. That is fine. Stick
it out around here. Now what we need to
do is we just need to basically rotate these pieces around and also have
them on the other end. And then for the other ends, the other ends do
need to be flatter. So as you can see, always made this one, a
little bit angled. And then later on we will add some larger scale variation. And once we've done that,
everything should be fine. So if we go ahead and look
at the flatter pieces, it looks like I want to
mostly use these bits. So I'm basically just selecting
the ones that are pretty much flat over here. Square and duplicate them. Rotate them 180
degrees. Over here. And now that we've done that, it is just a matter of using these pieces and just
placing them in these areas. And because it is broken
all the way around, we can be super flexible with
this so we don't have to worry about a specific line
that we need to place it on. We can just go ahead and we
can just grab this stuff. And it would be good to also
then sometimes grab these. So this is a long one, so I'm going to go ahead and
move this one over here. Here we have, for example, a shorter one that I
can move up here. At this point, for some reason, it's really slow my Max.
Let's save my scene. I honestly, I don't know why. Like, Max is normally
not this slow. I don't know what it is. Even if we have
this many models, it should not really do that. Let's just do a center
pivot for this one. And basically just, like, push it in here so that it kind of, like, sort of matches
up like that. That should already
do the trick. So have this one
over here maybe. And then they told me
we'll also look at it from the side and just make sure that everything
looks interesting. Like this one, we can go
ahead and just throw in here. So that will come
later. Oh, remember how we had that one that
was broken on both sides. Now I feel like we
never really used it, but I don't really see a way that we would even
need it, to be honest. Se, don't worry
about the movements. I will fix those later on. Let's sometimes, let's
not do it at the end. Let's leave one or two missing. So let's leave that one
over there missing. Push this one on here. This is like a small one,
so that one would be good to match up over here
and maybe move it up. Et's move this one over here. And now what we can do is we can just start by filling
some stuff in. So let's leave one of these. Sorry, I almost
started to whistle. Let's leave one of
these open like this. Let's grab up like a small
one, and maybe, like, throw it in here and maybe
also leave that one open. Let's grab a bigger one
that we throw here maybe. Let's do this one down here, probably see this
one, maybe down here. It's over here, grab
one of these pieces and just push it out like that so that it has something that's broken and let's leave these two also
in here. There we go. Now what we need to do here still feel like we do
need to have a bit more. Let's go ahead and copy it
over here. You know what? Maybe just have like this one last bit that
is sitting over here and throw that down here. Okay, so now that you've
done this, of course, we do need to go ahead and we need to make sure
that it's sort of like lines up a
little bit better. Not so much against each other, but just make sure that
it does not do like insane movements because
it still needs to, like, resemble the
floor a little bit. Yeah, for stuff
like this, you can just probably push it down a little bit like this and
just have it like here see. The blending is pretty good, so you won't be able to notice that too much in all the
chaos that is going on. This one, I want to probably turn off our snap
rotator at this point. This one I probably
do not want to have it rotated that much, but we can rot it rotate
it like sideways. Let's do this. Um, it's fine to, like, have this one over here. You see? So we still see like some of those breakpoints
here and there, but they are not
as overwhelming. Yeah, not much to say here. I'm just having a look, making sure that
everything looks correct. And there's always just giving it a little bit of variation. Maybe like move just
like a little bit. Okay, so let's see
compared to this one. The ends good. I think
I feel like maybe we do need do we have a really
long one like this one? I feel like that maybe
we can use it after all on one of these. I don't know. Probably
this one over here. Let's use it on this one. And then let's go ahead and let's move this
down a little bit, out, and then kind of, like, just match the same look. But not exactly the same
look, something like that. Yeah, I think that can work. Let's go ahead and
save our scene. Let's grab these pieces. What we can do now is we can
just go ahead and export, and this is a variation three. After this, just one more simulation for which we can once again use all
of these pieces. But let's have a look.
Variation number three, that's a big one because it's
used all over the place. Let's go ahead and open it up. Let's go ahead and re import it. Reset apex, plain
wood, splinters, save. Let's remove that one. Yeah, let's save that one. Okay. That's not too bad. You
see the concrete below it. Imagine some extra
decals on here. That is not too bad. No, need to balance out the color a little
bit, of course. But just in general, especially
like from a distance, seems to work the way that
I intended it to work. So yeah, I think for us just like a little
bit of collar bouncing. But for us, that is
looking pretty good. So I want to leave this chapter off by just creating the half version that
we still need to do. So we have over here
all of these versions. So here we have our clean, and then we have our clean half, so I just need to go ahead
and quickly create that copy, throw it into clean half. And then in the next year
I thought what we'll do is we will just
do some simulations. So at this point, let's
go ahead and honestly, at this point, I can
probably just cut it. Stir our edge and pass. Throw in a slice. Come
on, slice. Where are you? There you are. Turn
on snap rotate. A rotate is 90 degrees. Throat pretty much like
on the end like this. Convert to add ply. Delete,
select the borders, cap, and that's it. That is our half.
So at this point, just quickly hide selection, delete the old one
and unhide again. Now we can just go
ahead and export this. Wood floor clean half. Okay, so that one is done. Wood floor, clean half. Let's re import, reset
ravag, open it up, quickly throw on your plain
wood material and save. Okay, so that is those ones. Okay, let's go ahead
and continue on to the next chapter where we
will do some simulations. And once that kind of
stuff is done, oh, wait. And 1 second, one thing
I almost forgot to do is some big scale rotations, which are just going to be stuff like over here if
you just grab these. Don't have snapping turn on. It was going to be like
some bigger scale rotations like you can see over here. So that's the ones that we did. We also did like
over here a couple. Let's not include those pieces. But we do need to be a
little bit careful about this because I do not want to have too much clipping going on. Yeah, so that's pretty much it. And maybe like rotate this one. There we go. Let's quickly,
export this one last time. Floor broken variation three. Save scene. Floor broken
variation three, L's reimport. There we go. It's a smolt
thing, but it will work. Okay, so next chapter is
going to be simulations, chapter after that,
we will also include, like some cleanup like doing this kind of stuff and just make sure that
everything fits. And then what we are going to
do is a polishing session. So let's go ahead and continue with this
in our next chapter.
62. 61 Creating Our Final Floor Pieces Part6: Okay, so in this chapter, what I want to do is I
want to go ahead and do some simulations and then just do some general scene cleanup, which is always good to just
do in between instead of leaving it all at the very end because you never know
what you will come across. So if we have these
pieces over here, we can probably just use
these for a simulation. All we need to do
is we do need to deselect these joints over
here because they are too small for us to really
simulate. Is that it? Yeah, okay. So what I can
do is I can go ahead and I can Let's temporarily just move it like this because I just remember that we most
likely once again, did not combine our
simulated pieces. So Wood rubble
pile. Oh, no, wait. We did combine this
like one big piece. Although it's pretty
much in the center, so it doesn't really
matter too much. So rubber pile 33,000 triangles. Let's definitely reduce that. Let's go ahead and grab
these pieces over here. Let's throw them into
our wood rubber pile. Now, all we need to do is
we just need to simulate. And yeah, so the
simulation, of course, will look different, but
it shouldn't be too bad. So let's delete that
one, grab this one, and we're going to go ahead
and get started by just centering all of our pivots,
just make things easier. Then what we want to
do is we just want to go ahead and move
this into the air. So we're going to place
it into the center, and once that is done, what I'm going to do is I'm going to use our Solburn
scripts which we've used before and grab a
transform randomizer in here. Transform randomizer do. Then for this one, let's go
ahead and let's get started. Do not turn on three
as one object. Let's set the rotation to -90 by 90 and then just rotate it on every
single axis like that. Now, what I want to do is I
probably want to go ahead and rotate it
upwards, most likely. I feel like that would
give me a nice result. And I feel like we could probably go ahead
and just boost up the amount by just setting
another version like this, and maybe for this
one, like rotate it sideways a little bit
more to once again, like this all helps in the way that it will
actually fall down. So having these pieces, we can go ahead and go into our simulation and we
are going to set this as being dynamic rigid body. And then if we go
ahead and okay, so that looks pretty decent, how does it look whenever
we have something bend? This time, well, actually, doesn't even matter
because we cannot here. So like, Okay, so the bend
pieces are not as great. But this time, we cannot use the original because we
have Alphas in here. And you cannot really simulate with an Alpha as an
original because, yeah, it won't work. Well. So let's go ahead and
let's go into our settings. We are going to make
the preset to be cardboard so that it is not bouncing around
and everything. And honestly, we can just go ahead and press Start
simulation and have a look. Yeah, that looks pretty good. Is there anything else
that I should do? I'm going to maybe grab some of these pieces
and push them a bit further in like that so that it's a little
bit closer together. And yeah. Okay. I think I'm
happy with this. Okay, so let's go
ahead and just do a very simple bake
selected. Easy, does it? And then we just need to do some movements here and
there, and that's about it. Here we go. Simulate, and done. And now you know the drill. You're going to go
ahead and you're going to move your animation
slider to the very end, delete the first last keyframe, delete everything else,
select the last keyframe, hold shift, and move
it to the font. That now, no matter where you move, it will
always stay the same. And then just do a simple
converter add a pool. Over here, and now
at this point, I'm going to move this a
little bit more in the center, and I'm mostly just going
to have a look like some of the pieces that might
not make complete sense. Like, for example, this
one, it will probably just be sitting like this. But with the wood, it will
be so difficult to even see that most of these
pieces will be fine. I quite like that. It's
like sticking up like that. So I'm fine with this. Yeah, I'm not too worried
with this. Sometimes you can try and move
something a little bit down just to make sure that it is resting on top of
the other wood pieces, even if it means,
intersecting it a little bit. But this is looking pretty good. Okay, so we got these
pieces over here. All we need to do now is
just need to go file export, export selection.
Actually, know what? Let's go ahead and
connect them first, or attach them because it
will make the export a lot faster because these are a bit too many pieces.
So let's attach. Let's press okay. There we go. So 3,000. We went from 33,000
triangles to 3,000, so that's pretty damn
good, I would say. So let's go ahead and wood
rubble pile variation 01. Yes, I want to
replace it over here. And now, if we go in here, wood rubble pile variation 01, let's re import. Reset Ravax. Open it up and you
know the drill, just go ahead and plain wood, and then wood splinters save
our model, and there we go. So now we also have our wood
piles sitting over here. This one over here,
we can delete. So that's all
looking pretty good. Now, what I want to do
now is I'm first of all, just going to go
ahead and balance the wood a little bit more. And then I'm going to
do a pass where I will just fix this kind of stuff over here and just in general, move everything
around a little bit just to make sure that
everything works. And once we've done that, what we will do is we will do another pass where we
are already going to do a little bit more
of the lighting and just see if we can improve
it a little bit already. So to get started with our wood, I want to go ahead
and I want to go from our distance camera over here because this
is our main view, so everything needs
to really work well in this specific view. Once we've done that, what we can do is go
into our materials, and we can start with
our plain wood material over here, scroll down, and then in the color overlay, I'm just going to go ahead and I think I'm
going to make this like towards orange
a little bit, and then, make it a
little bit darker. Here, something in
this direction. Brown orange, and then make
it a little bit darker. It will still stand out,
but it's not as intense. Probably something like this. Go ahead and copy your SRGB, save your scene, and then go
into your wood splinters. Scroll down, and then
in the color overlay, paste in your SRGB again. Like that. If I just also
have a look up close, yeah, that looks pretty decent. Okay, so we got those pieces. Now what I'm going to do is I'm basically just going
to go ahead and I'm going to run
through the environment and just basically
scan everything. For example, I'm going
to start over here, and I just make sure
that things do still look fairly logical after all of these changes
that we have added. It can be simple stuff like moving something up a tiny bit, making sure that over here like these pieces that they are correctly located and not
clipping in any place. In these areas,
it's a little bit difficult to see
because it's dark and currently the sun is also
shining on my screen, which makes it even harder. Over here, it's stuff like just pushing this down a
little bit like that. It is better to push
it down than up in this specific case because we rarely look at
it from this angle, and we are almost always looking at it from the top angle. Of course, if you're
making this for a game, you want to probably work
a little bit more precise. But for now, for us in
general, we can just, like, nicely move this around, just try and avoid clipping, like you can see over here. Sometimes, maybe like say, we move and rotate some
stuff here and there. Just small stuff like that. Maybe like move this one a little bit just to
make everything work. These pieces, let's say that we replace these ones with the more broken
versions over here. So that kind of stuff
we can also do. Let's go ahead and
let's have a look. So yeah, like small bits
of clipping, that's fine. I'm not too worried about
that. These pieces are fine. Over here, this is quite a
strong amount of clipping. Don't know if we can
just move this down. And maybe like in, let's
do something like this. Oh, this is a tricky one. Maybe rotate it down a little
bit more. There we go. And then if we just grab
something like I don't know, maybe like some
rubble piles over here and just throw
them below it to kind of show as if
they are supporting the weight of this
concrete bit over here. So we got those ones down. Over here, we have
our wood pieces which are looking pretty good. Let's just move it around a little bit here and
there just to make sure and also like the wood
floor that is below it. We don't really need
to per se have it, we can show the concrete between all of these
pieces and everything. Over here, we have
these pieces that are, like sinking in
and falling down. That stuff is also fine. Nice little rubble pile. Yeah, I'm happy with that. This one, so it is
sinking in here, but I feel like that could
use another one of these that we basically just kind of
like place on top like this. Even though there's
like a tiny bit of clipping, I think
it is worth it. Then over here, we have
another piece that is, this one is just like
the plain pieces in which you can, if you want, Wa, sorry, I'm way too
close to the microphone, so let me just quickly
push it down a little bit because else it
might be a bit too loud. So we got these
pieces over here, and these ones, I'm just going
to rotate a bit and maybe, like, move a little bit down. These ones are a bit tricky. These ones, what
you can probably do in order to avoid it is by throwing another
piece of wood on top that is kind of
like covering it. And that is an easy way to
just avoid those pieces because it's really
hard for us to move this one specifically
for that reason. For these ones, what we can
do is we can swap these around with our variation one, actually, our variation
one over here. And maybe say that we push
this forward a little bit, because you most likely
cannot see the actual ends. And if you can see
the ends, you can always just duplicate like a flat version or throw on another piece of
wood on top of that. This one is tricky. This one, I feel like I meant to actually have
it on top of here. So I feel like I meant to
have it on top of here, and then I would want to replace my broken roof with a variation tree that does not have the rebar in that area, and then throw in
maybe like a 4.5. So variation 4.5 and just
kind of like throw it in here just to also give it still some hanging effect and just
kind of push it in there. See, that looks a
little bit nicer. These variations, I feel like
we probably want to twine, make it a little bit more flat, maybe have a rubble pile in these specific areas over here. There we go just to fill
it up a little bit. Or maybe just delete it in
general. Yeah, you know what? Maybe, maybe just delete
it and then actually have a slightly larger rubble
pile sitting over here. That might look a
little bit nicer if we do something like that, so that we still have some
empty spaces going on. We shouldn't feel like having everything just
filled up to the brim with concrete pieces because that's also not always as nice. This one over here, let's
do a variation tree, wood. And let's go ahead and maybe, let's have it like sunken
over a little bit. There we go, just to hide
that transition piece. See you know what? Feel like this one might, we probably need to
rotate this a little bit. There we go. Sunken oval
piece is also fixed. These ones over
here that is fine. This one down here, we either want to have it, sitting on the top and
forward. Yeah, let's do that. Okay, so we got that one. This one, I'm just going to
push up a little bit more. Yeah, then these kind of pieces, you can probably
here, let's see. Let's let's try to hide it a little bit like
this by moving this. And then this one, let's replace this one with
like a floor tree. Oh, no, maybe floor two. Floor two is only at the end. Let's do floor three over here. Let's move this back and let's focus it mostly around this area. So
here, let's rotate this. Let's focus it mostly around this area because
that's where you can see it. Over here, there's so
much concrete going on that you won't really be
able to notice anything. Now, over here, let's see, we have this one that I'm
just going to have a top. This one that I'm going to do a floor one, broken version. Let's rotate this nine degrees. Here we go. That's also broken. Maybe we can do like a floor tree just kind of like sitting in here because there's a transition going on over here. And maybe we just have
it sitting in here to kind of like make that
transition hidden a little bit more so that you don't really
notice it because it's like almost as if there's broken wood and
everything going on. There we go. So
that's that fixed. These ones over here
are pretty much fine, so we already did
a pass on that. This one over here, I'm going to go ahead
and I'm just going to carefully scale this down a little bit so that
I can keep this one. This one is also fine. Maybe we can do another rubble pile in
this area over here. Yeah, something like that. Okay, so let's have a look. Over here, I want to probably replace this one
with a variation tree. Rotated 90 degrees and just kind of move
this one down here. So it's just sticking out
because at that point, you cannot really see
anything anymore anyway. So we got that one over here. This one we need to push down, and these are going
to be variation ones, which luckily are already
in the right rotation. Okay, so we got those one, see. We're just slowly chipping
away at everything. Maybe we have another wood, rubble bit over there. This is a roof clean. I want to turn this
roof clean into a roof broken
variation 390 degrees and just move it back over here. There we go, just so that
you can see that stuff. Over here, this is
also going to be a wood broken variation one. Before we continue on, let's
just have an extra look. Okay, so this floor is
pretty good already. Maybe let's move down like a tiny bit. But it
is pretty good. Over here, you do have
some roof pieces that are, that could be a little
bit better by doing this. And let's just carefully,
move forward a little bit. I'm not worried anymore
behind all the things in the back because I'm starting to note that it's
simply not as important. Let's rotate this one and have it sitting around here to
kind of cover the fact that, of course, the concrete
kind of like clips in there. Let's see. We have this one
over here, we have some nice roof pieces
that are breaking out. And over here we are really
getting into the effect of our broken flooring. I don't know if we
maybe want to break it up even more by having another one that is kind
of like sitting on top. It's probably overkill because I think we already have that. Here, see, we already
even have that. So I literally am just
recycling my ideas. Okay, so over here,
can I maybe, like, replace you into, like,
a roof broken variation? Push it back a little bit. There we go, just to make
it fit a bit better. Yeah, at that point,
that is fine. Over here, I can see
that this one needs to be moved back a little
bit because it's clipping. So, this can, of course, be quite time
consuming at times. Now, I'm doing this quite
quickly, but of course, if you have many more
pieces, you just want to, of course, make
everything perfect. And then over here, these are also really tricky ones where I need to decide if I want to have it sitting in the front
a little bit like this, which in this case works, but it doesn't always
work like that. And then back here, we can do like a roof broken variation 01. Let's go ahead and rotate this 90 degrees and just
push it back. There we go. So that we just see a little
bit more of that metal going on over there. Let's
push this down. Yeah, the rubble piles, I will show you how
we are going to basically create something
very basic for that. It doesn't need to
be very special, but that comes at,
like, near the end. So this is, I
think, pretty good. I think we have a
quick look down here, but for the rest, yeah, I think this is
looking pretty good. This little guy can
go away. Okay, great. So that is pretty much
like nice designs. Now, if you would
fly through it, you would not see as many
arrows and stuff like that. That is good. Let's
save our scene. What we will be doing
in the next chapter is we are just going
to go ahead and we are going to make the entire
scene look a little bit more interesting with some more
interesting lighting going on, and also just in general, maybe some color
balancing post effects, maybe adding some more materials in here just to change the
colors around a little bit. Now, of course, we do
need to keep in mind that foliage will add
an insane amount, like you will be surprised
how much it adds. But basically, once you've
done all of the polishing, let's get started probably with a yeah, let's do the walls. Let's do the walls because the internal pillars are exactly the same as
the external pillars. So for those ones,
honestly, at this point, I might actually use these ones and then slap something on top. So I have an idea for that,
where we use these ones, and then we throw
basically plaster on top, and that plaster will be like its own geometry that
is like chipping away. So yeah, let's go ahead and continue with those
things in the next chapter.
63. 62 Doing A Polishing Pass On Our Scene Part1: Okay, so we now have the biggest chunks that we had to do in the most
difficult parts. We are done with that. All of these other
pieces that are going to be quite a bit easier to create. So what I want to do in this
chapter is I want to go ahead and I want to do
some general polishing. With that, I mean, just like doing a little
bit of lighting, post effects, changing some
materials here and there. And I also want to work a
little bit more on our color coding where we
will actually give our blockouts already
some color just to see what colors work and what do not work and
stuff like that. So knowing all of that,
what we're going to do is let's get started
and first of all, focus on the ground over here. What I want to do with
this is I want to go ahead and I want to create a material that is
specifically like a world space material so that we do not need to
worry about UVs. And that's great for
these type of things. Now, of course, this
material would not have as many options
as the rest. So what I'm going to do is create a new material
and just call this world space
underscore master. And let's open this one up.
Et's move it over here. And now also open up our
main master over here. What I'm going to do
is I'm going to grab. Actually, let's delete
this stuff just to keep it nice and clean. So
let's have a look. What do I want to grab for this? This one over here. These ones I'm just
holding control. So the color overlay I want to grab These ones over
here, I want to grab. These ones over here, I
want to grab and this one. Yeah, that's probably
it. Contra Z. Let's go in here, Contra V.
Okay, so as you can see, we are just stealing a bit of stuff that we can then re use. Tada. So XYZ goes into
our color overlay, and we can just throw
this into our base color. And all we really need to do
here is we need to go ahead and just call this
base color only. Let's call this one normal only. And let's call this
one roughness only. And yeah, so we
can just leave in, like, for example,
the broken concrete. That doesn't really matter
because these are parameters. So we got the base
color, XYZ texture. This is the normal, yes. And XYZ texture, this is
going to be the roughness. Now, let's quickly go in
here and just give us a little bit more control
over the roughness and a little bit more control
over the normal strength. Because why not? We can
literally just copy paste. So this one is the
normal strength. And where are you? Oh, did I not copy
that properly? This one over here is
the roughness strength. I'm a little bit laggy. Again, lots of stuff is going on with MPC
for some reason, and I don't understand
why this is slow because I definitely
should not have a slow PC. But in any case, we're
going to save this. And now all we need to do
is just a wordspacemster. Let's create the material
instance and call this WoodncoePlank,
ns WorldSpace. So it's perfect. So we
can still use the planks texture that I imported. So what I'm going to do is
let's go ahead and go in here and I'm going to get
started by going to textures, wood planks, and let's simply
drag this stuff in here. Done that. Roughness,
we'll see how it goes. Let's move this over
to the other side, and let's go ahead and all we need to do in our materials, we have our woodblanks worldspace
simply drag it on here. And then we can have
a look. Okay, so the first thing that I'm
going to do is I'm just going to quickly open
up our plain wood, go to the color
overlay and just copy the SRGB and apply it also
to our worldspace wood. There we go, see. Now, in our worldspace
let's do 150 maybe. Oh, no, wait 300. So it becomes a little
bit bigger, okay? So we've done that.
Remember, there's going to be a lot of foliage, degils, all of that stuff is
going to be on top of this. Our roughness is fine,
our normal strength. Yeah, not much going on between minus two
or anything else. Yeah, so let's just leave this at minus one or maybe minus two. And you know what, that's about it. That is really all we need. And as you can see
the world space, it doesn't matter what we do. It will always just be
properly tilable like that. Okay, so that is
already like our Wood. Now, what I want to do is I just want to go ahead and
probably do, like, a pass where I will be
doing some how you say it? Yeah, just like some general
lighting and everything. Sorry, I was distracted because I was thinking
on the outside. The outside buildings
will not be included because I
simply don't have them, so I will have to buy them
from the unreal marketplace, and I cannot include those. So the foliage, like everything will just be about
this building. All of the foliage
and everything will be included into the project, but everything outside of
it, except for maybe, like, the highway over here,
it will not be included. Just keep that in mind. So in any case, we got this stuff. What I'm going to do
is I'm probably just, first of all, going
to work on lighting. So let's do some
cleanup, rendering, 64. Okay, so all of these things, let's Oh, throw these in assets. These are decals, so we can
throw them into decals. And over here, these are
also assets to throw them into here. Okay, cool. Now if I go into my rendering, I do want to go ahead and try
to go a little bit more for this direction where
it is like overcast, a little bit foggy, a little bit bluish, that kind of stuff. I'm going to go ahead
and I'm going to get started by probably just re changing my camera
angle a little bit. My screen percentage is 200, but because I'm
working on ten ATP, it doesn't look very impressive. So let's do something like this to get started with, okay? Let's have a look.
Okay, rendering. Exponential height fog. Let's get started with that one. So right now, here, if you like, increase that, you
can see that it will give us quite a bit more. And I believe that we did
like a volumetric, here, see. And I think volumetric
was the nicest one. Yeah, definitely. Volumetric
was the nicest one. So our volumetric fog over here, we are going to
go ahead and tone down the fork density
a little bit. Let's give it a little bit
more like a bluish tone. Like you can see over
here to kind of, like, mimic the same bluish vibe that we get from
the other pieces. So let's do that. Let's
set our instinction scale to maybe like point let's
see if we do it like 0.2, we make this a little
bit less blue, and we just make it a little bit darker, just trying to, like, get a nice balance between like the blue and
everything else. So, let's give it a little
bit of like a blue tone. We're making it a
little bit darker. Extinction scale
0.15 maybe 0.17. Let's do 0.17. And then
we can always go into the fog density to
basically control a little bit more like
how much we want from it. And we do sometimes need to
wait for it to update because the lighting needs to update
based upon this four. So let's do 0.04. Now if we go into
our light source over here, indirect lighting. Let's set this back
to one because now it does not really do too
much anymore. And let's see. Yeah, so we set this
to one, maybe 0.5. That does look very overcasty. I don't know if let's do 0.7. And now in my lighting or in
my light sorry, my sunlight, maybe it's nice if I
push this one a little bit more towards the
orange, yellow color. Yeah, so I push this
one a little bit more towards the orange
and yellow color. Or not. Or should I just go for blue? That is a tricky one. So this is like blue. This
is like orange yellow. Wow, that is a tricky one. So I am really picky when it
comes to this kind of stuff. Or shall we just go white and
just use our color grading? That can also be it I just want to try and get a
little bit of color in here. You know what? I'm going to
make it like tiny bit yellow. Let's make it like a tiny bit
or like a tiny bit orange, I think, more in
direction of orange. And then what we'll do is
in our post effects there, we will go ahead and we will
make some more changes. Our source angle, which is like the sharpness
of our shadows, you can definitely
see it up here. Let's leave it to around two. Okay, so I don't really, I don't need light shafts
and all that stuff. For this, Yes, I'm
fine with that. Our sky atmosphere is fine. Our sky light. Set our intensity a
little bit lower. Let's have a look. Okay, so our skylight actually does quite a bit in terms
of the density. Let's set this to
probably like 1.5. So we are going to make it a little bit brighter,
but not too much. Okay, so that's our skylight. So yes you can see
why we are basically just running through
all of our options. Now we have arrived
at our post effect. So our post effect is going to be a little bit
more interesting. So what I want to do
is I want to go ahead and if we go into our let's see, our bloom is probably fine, our exposure is fine. Chromatic aberration.
Let's have a look at that. Chromatic aberration
is basically the distortion effect on the very ends of your
lens when you use a DSLR. So if you set this
two for exam 0.5, you can see it like
it's really strong. But if you set this to 0.05, it's like a very subtle effect that sometimes
happens on the edges. I do like to always include that. We don't need
that to field. So the color grading, we will actually cycle back
through a little bit later. Global emation. Yeah, so we don't need to
do much of this stuff. Lumen reflections,
let's you set this to a quality of two,
just to boost it up. Like ambit clusion
all of this stuff, it is no longer valid because the lumen kind of takes
over all of these settings. So pretty much all
of these settings you don't actually need to use. What I want to do
probably is I probably want to go ahead
and work a little bit more on our color grading. Now, for our color grading, I am going to use
Da vinci resolve. The cool thing about
DavinciRsolve is that it is completely free and it is a cinematic quality
color grader. Also, one thing that
I do want to check is do I have green turned on? Image effect. Oh, I do. S. It's surprising like it still feels quite blurry,
even without the grain. But I think I quite
like the grain, to be honest, 0.050 0.1 maybe. Let's do 0.07 in terms
of, like, our grain. And yeah, our vignetting
maybe set our vignetting. Yeah, let's leave it at 0.4. Okay. So color grading. That's the next thing that
we are going to do because color grading makes a massive
difference on everything. So if we have a look over here, we are going to go ahead
and start by saving scene. And then what you
want to do is down here, you want to first of all, create a high resolution screenshot because we
need to have an image on which we are going
to preview our color grading because
we are going to create something called a
ut or a color lookup table, and I'll show you how it goes. Let's set the screenshot
multiply to two and simply press Take screenshot and then click on
the link down here. You can find this one
in your Says files. As you can see, I
created more screenshots back when we did the
blockout, just like progress. Here you can see that that is quite a big difference
that we already have. So knowing that's what
we're going to do now is we are going to go ahead and open up
the Vinci Resolve. So you can download it.
It's completely free. And what you want to do is
you basically want to go ahead and press new
project over here, and we are going to call this
one. Let's call this one. Collapsed building underscore 01 because
I most likely want to change it up a little
bit with the 02 version. So you just want to go
ahead and press Create. Yeah, new update. I don't care for what we need.
It doesn't matter. And you simply want
to drag your image into your clips media
pool over here. Once you've done
that, what you can do is you can right click and press create new timeline
using selected clips. Now, this color grading is
often yeah just press create. This color grading is often
actually meant for movies. However, we can, of
course, also use it for images because it's just
a very powerful tool. However, we need
something to preview. So we simply add it to our timeline so that
we can preview it. And then all you need to do
is go down here to color. Now what you can
see it might feel overwhelming with the amount
of stuff that is in here, but we are going
to keep this very basic for the first one. All we're going to
do is go up here and press the enhanced viewer. This will make it a little
bit easier for us to just zoom in and be
able to see our image. Now, there was a way,
but you can do by pressing split screen
and then setting this over here to Versions
and original where it basically arts our
original version and our edited version. So here, Versions original. And now down here we have
a bunch of settings. Now, to keep this very simple, over here we have
some basic settings like a temperature contrast, and saturation, you guys
know shadow intensity, color boosting and detail. And then up here we
have the curves. And with the curves, we
can actually control our individual over here
individual RGB channels, or we can just go ahead and
control everything in one go. The curves also has many
different settings. Over here you can see that
it has the color settings, but it also has luminosity
settings, for example. The good thing about
this is what you can control is you can control specific colors based upon the darkness in your image
and stuff like that. So let's go ahead and go in
here and let's get started. I will keep this one on, and I will just imagine that there's a lot of green
stuff going on, also. I'm going to get started
by just going ahead and boosting my contrast
up a little bit. So let's set my
contrast to around 1.1. Now let's go ahead
and set my shadows, maybe down a little bit
to minus ten down here. You can actually set your gamma and everything into
an actual color. So if I move this around,
you can see that I can control the entire
vibe of my color. But I can also do this with multiple different other values. Let's have a look
at the mid detail. This one probably does not
get translated correctly, but let's set this to around 20. And if we then go into our curves over here,
let's have a look. Saturation. Let's
go to this one. And let's go ahead
and just press this Link button to
select everything. So over here, you
can see that now we can control the entire cool. So, if we want to introduce a little bit more blue,
we can do this. We can just go ahead
and go to the blue. And then if we push
this slider up or even push the center
sliders just by clicking, we can introduce a
little bit more blue. Let's actually reset that. Let's set the link and go down
here and let's give this, like, a tiny bit of, like, a wave like you
can see down here. See what you can
estaish with this. So basically, I'm
starting with boosting up my contrast a little bit
more just by doing this, but it's a very specific
contrast because the contrast is not
going all the way, but I'm only setting contrast
near the mid values, which basically means
on the light values, they stay the same. The dark values,
they stay the same, although you can make them
a lot darker if you want. But then as soon as we get
into the general mid values, we just want to control
it a little bit more. And give it a little
bit more of a strength. Now, you are also
able to Houdini. In DaVinci, you are able to specify specific colors
and change them around. However, that is a little bit more advanced, let's
not do that for now. Let's go ahead and
if I see this, I probably want to introduce
a little bit more blue. I just only click on my blue. Then what I can do
is I can go in here. What I can say is I
can, for example, say all the dark spots. I want to make a
tiny bit more blue, and what this will hopefully
do is it will give us that effect that
you often see in cinematic movies where
the actual shadows are a little bit more bluish. Then in the light
spots over here, you can also go ahead and
I'm basically just like, Okay, so these light spots I think we need
to have this one. No, actually, I don't like that. How about this one?
This one is too close, so let's just go ahead and do
that by pressing Contra Z. It's a tricky one to,
like, you can see, where all of the values and the blue and the
red really runs, and they all run
into this level. So maybe you want
to give it a little bit more of like a
push around here. So let's do something like this. Now, let's also go
ahead and just play around with our color
boost a little bit, let's give it a color
boost of round ten. I do not want to
make it too much, but I still want to make
it, stand out quite a bit. Honestly, ten is
actually too much. Let's set this back
to, like, five, maybe. So the next thing, right now, like the wood and everything, it's a little bit too intense, but that's something
we can control in the shader.
That's no problem. It's just like some general
balancing that we need to do. So if I have a look, you
can already see, like, it's quite a big difference
between before and after. But I think that this will work. Let's press the
link button again. Uh, I'm gonna just see if I'm going to set this
one a little bit lower. That's what I'm
going to do. And I think I kind of have
it at this point. I think this is fine for now. So when you are
happy with your ut, let's go ahead and
create a folder called Lutz because we
also need Photoshop for this because we cannot
just directly out of Davinci. We cannot directly,
export our ut. I'll show you how it looks
like or what it looks like. So we want to go ahead and
now that we have this, we can go in here and we can go to Oh, God, where are you? So many settings. I have a
feeling it was under clips. If you click up here to clips. Oh, yeah, here, right,
click Generate Lute, generate Lute then
we want to go ahead and just pick a 65 point. As far as I know, I
always pick 65 or 33. I forgot, but we'll
know soon enough. You can go ahead
and click on here. And then all you need
to do is you need to go ahead and into
your Texas folder. Just call this Lute
underscore 01. Then all you need to
do is just press Save. Now, what this
will do is it will generate a really
strange looking file, which is a dot cube file, but that's the one that we want. Now, as you might
notice, there's another thing that
we have over here, and that is an RGB table. Basically, it is a PNG file. This file I have downloaded from this documentation
from Unreal. It's literally
called Lookup table. So Luts If you type into
Google Unreal Engine LUT, you can find this and you
can find it down here. Basically, what it is,
it is a ut is basically a it's a file with a bunch
of different RGB boxes, and these boxes read colors. So in the engine, whenever you change the colors
into these boxes, the engine will be able to read that and apply
it to your camera. What this file is
specifically, is it is a file, as you can see over here, that does not have any
color grading yet, so it is just completely clean. All we need to do is we need
to go to image adjustments, color lookup over here. Then if you just go ahead and
click on the three D LUT, file, just click on the text and then you are
able to find it. Then all we need to
do is we need to copy over this value, grab the cube, press Okay, and then simply go ahead
and press Okay again. That's it. Now at this point, we can do a save a copy and
we can set this copy as Lut on the score 01 and it
will just be a PNG copy. You save it, you then
go ahead and you can go inside of
unreal over here. Make this a bit higher.
And then in our textures, we can just go ahead and
make a folder called ut if I just navigate
to my folder, we can import the
ut underscore 01. And very important, something to do is you
need to open it up, and you need to set
the texture group to be a color lookup table,
else it will not work. You press save. And now the last thing that you need
to do is if we just go ahead and let's make this nice
and big so that you can see the difference because it's often quite
a big difference. Go into your post effects. Go down into color
grading and then Misc. In here, you can go ahead
and you can drag in your lute and boom, there we go. This is now our lute which
was our color grading. As you can see, it looks fairly similar to what we have
over here, pretty much. Now at this point, I can
just go ahead and I can save project the Vincsv and
I can close it down. In here, you can control your color grading
amount that you can see over here
on top of this, we can still go in
here, for example, and we can still
change colors around. But for now, this
is pretty good. Only thing that I would
say is I would go into my materials and
we would go into our plain wood and just turn on the desaturation
amount a little bit to maybe like 0.3, let's say 0.2. There we go. Just to tone
that down like a tiny bit and probably also do this for 0.2, for the wood splinters
and maybe also Oh, no, wait, worldspace doesn't have that, but that
doesn't matter. Okay, so we now got our wood and everything
all balanced out. Now, what we're going to
do next chapter is we are going to play a little
bit more with colors, do some general decal
placement and stuff like that. Although most of the actual decal placements will
come a little bit later. And once we've done that,
we will go ahead and start turning our
internal walls to final. So let's go ahead and continue with this
in our next chapter.
64. 63 Doing A Polishing Pass On Our Scene Part2 And Creating Internal Pillars: Okay, so what I want to
do in this chapter is we're just going to
work a little bit more like the colors
because over here, as you can see in our reference. Now, I don't mean, like all the grass and
everything, but I mean, of the objects that
we have right now, like our walls and everything, I just want to mess around
with the colors a bit. So it looks like one
of them is green. Let's just see how that looks. So if we go ahead and go
into our destroyed assets, materials, we have over
here like a plain master. So let's create a material
instance and just call this plain underscore
green, for example. Open it up. And actually, it's green bluish, to be honest. I forgot what the actual color is called. I'm sure
it has a name. So let's try something like
this and just move it over to my screen so that I can
actually try it out. And basically, what I'm
going to do is I'm just going to go ahead
and like, Whoa. Okay. That is very bright. But what we are going to
do is basically assign it. Maybe it's easier if I just
simply assign it in here. And then we will later on, we can always change the colors. So let's apply it
in here like that. And then in our plain green. Okay, so that does add
something quite nice. So if we go ahead
and go in here, it makes this a much darker
version, of course, of it. Mm. Yeah, I think a bit more bluish will
actually work a little bit better. Here we go. So if we do something like this, so we have a green color coding. And then if we also just have a beige or yellowish
color coding, here, it's a beige plane. And for this one, let's
go ahead and go for, like, something like this. Let's try that out.
And let's say, so like over here, we
have, for example, here, and then this like another floor and then just decided to paint. Okay, so I'm way off with
the color that I wanted. But just so that we can
see roughly what it will look like if we have
some more color in here. And then next to this. So actually, this one,
let's make this one, like almost whitish,
to be honest. Here. So that makes a little bit more sense
when it is almost white because especially if
it's like a modern office, you would just think
it would all be white. So you can also just
multi select if you want, and then assign materials. So let's have these back there. Let's see. So yeah, the green, it almost
stands out too much. Like over here, it is
fine to have the green. And then I feel like this
one over here would need to be like white. I think that makes more sense. So I'm just trying to
get a good balance between the different
colors and which ones work, which ones do not
work, stuff like that. So over here, I quite
like the green. But then over here,
I might want to, like, turn these
once again, also. It more like a whitish color
or, like, yellow white. So we got a little bit of
green going on over here. We got a bit that is also
standing out quite a bit. This green, by the way,
let's make it a little bit more saturated or darker or make it a little bit just
less green. Here we go. Let's try something
like that. Then we've got these extra pieces
over here. That's fine. And then in here, what I'm
going to do is I'm going to apply green to
these ones over here. Or green. Sorry, I mean
beige or beige, beige. I don't know how to say it or white ish and maybe
also on these ones. There we go. We got those. Describe this one and also
turn that one into green or into beige and this
one over here. Okay, see, so now we
are already starting to get a little bit more of
like an interesting look. I think what I'm going to do is I'm going to go
ahead and I'm going to make these ones over here also
white, and then one more. So I do want to have the
majority to be white. White also is pretty good
because it does stand out. So the only tricky thing is to not make it
look like a blockout. Which technically still
is a blockout right now, but let's do something
like this over here. So we got a little splashes of color in there,
and for the rest, it is still a little
bit more monotone, and then the foliage will
kind of bring that out. And we will also go ahead and
do that for these pieces. Now, what I want to
do for our pillars, which we have time left, so we can easily just do the pillars because they're
going to be very simple. It's just going to be this. Basically, we grab
a vertical pillar broken that's not too
broken. Let's see. B. Okay, so we have D and B. These are all Okay, so
we have a flat one. Yes, we have a flat one, and
then we have the other ones. So for the flat
ones, you know what? We are probably just
going to go ahead and keep those the way
that they are now. So if we go for our
internal pillar clean. So the flat ones
because we never actually stack flat ones
on top of broken ones. So for this one, what
we're going to do is we're simply going to
Adichava over here. Do something like
0.2, and press Okay. And then all that we're going
to do is select everything, go ahead and one polar group, and then just select the top and the bottom and then turn off that one smoothing group and then add like a
weighted normals over here, snap the largest face, use smoothing groups, and
convert spec to an added pool. Done. At this point, all we need to do is just
do like a UVon wrap, box, and just make everything the same as the width in
order to keep it tilable. Done, also. Let's go ahead and just apply
a quick material. So we're just going
to go ahead and call this one plaster. Apply it and that's
already done. So this one is ready to go. And then for the internal
pillars, what I want to do, which are these ones over here, I'm going to grab like
a vertical pillar, for example, the
broken one over here. I'm going to go and contrave then basically throw this into your internal pillar broken And in your internal
pill broken? Oh, wait. 1 second. Let's hide selection because we do want to just get
rid of these pieces. Just delete that so that all
that we have left is this. Now unhide. And now having
all of these pieces, we can just select
everything except for our blockout piece. At this point, it
might be easier if we just Attach everything, so let's just attach everything. It is quite a few materials. I never really like
to attach a lot of pieces when the materials
are all different, but just because there's
more room for arrow. But basically, now
that we have this one, what we're going to do is we
are just going to go ahead. Scale this down and we are just going to
keep it like this. And then the last thing
that we need to do is so this one we can
delete at this point, and we are just going to grab a very simple box over here. I'll show you how we are going
to do the internal pillars so that we can save a lot of time but still have
something nice. We grab a box, we
convert son at a poly. Then all we need to
do is just give it a little bit of
spacing outside of this pillar over
here. There we go. So we just give a
little bit of spacing, see that might even be too much. And then what I'm
going to do is I'm going to select the
top and the bottom. I'm going to inset it. And I'm just going to
go ahead and I'm going to inset this until
we are reaching quite close or
maybe even reaching inside of our pill
over here, delete it. Then go to border slack, select the top and
the bottom border and do a quick bridge. And now that you
have this piece, we are going to add
a Voronoi on it, and this will basically
give the effect. If you want, you can make
it the effect of tiles, or you can make it the
effect of actual plaster. Now, I'm going to go ahead
and I will probably go for plaster myself just because I do not have a tiles texture. But it's same basic
concept for tiles. Although with the tiles, you
might want to just like, have the tiles separately on it. But basically, we
have this stuff. We now add a Voronoi
on top if you want, you can even later on optimize
this inside of Sebrah. Here we go. So we like
artvornoy on top, 100 segments is fine. Then if we go ahead and
we Add an added ply, we can just go to
Element select. Oh, do I want to delete these? It's probably better
if I delete them. Let's go ahead and go to phase select and press
delete right away, and this will just delete
all of those phases. And now, first of
all, here at the top, we are going to just
basically get rid of these so that we do not have
an actual top piece anymore. Like this. And then what
we can do is we can just sometimes get rid of some areas over here to
basically have it all broken up. Yeah, so we can do
the same over here, and we just need to go
ahead and let's see, is there anywhere else? Maybe there. Yeah. Let's
say something like this. Now if we just go ahead
and go into isolate mode, we just need to go in here and it looks like that because, of course, we deleted
those in center edges, we also need to delete
over here, these pieces. And then you guess it, then what we're going to do
is we're just going to do a quick merge, and
after we've done that, all we need to do is do a
bridge or just close the holes, and we can close the holes
in many different ways. So we got these ones over here. This one is now, it's a big one. So that's looking pretty good. If you want, you can also
go ahead and you can also select these bottom
bits and delete them just to save a little bit more
geometry because you cannot see these.
So delete dose. Let's go into our vertex mode, select everything and
just do a simple weld, and we are going to go ahead
and just weld it to 0.1. That's totally fine.
It's quite a large area. And now what we can try
is if we first of all, do like a border select. So it looks like, Okay, so border selects aren't
really working well. So what I'm going to
do, I'm just going to bridge this. You
can try and cap it. But to my experience, capping it with these pieces, it does not actually know
exactly where to cap it. So it's often faster
to just go ahead and by hand, select
these pieces. Oh, sorry, I accidentally
miss clicked. Yes, it is a little bit annoying sometimes to
actually select it. And also, if you want,
you can get rid of the ertzes that are not needed. So we can, for example, go in here, have a
quick look around. And, if we see a
ertzie like that, we can just press
Control Backspace. Or just backspace, actually, backspace is also
fine. Both works. Here we have one,
here we have one. Here we have even two. You see? So just like a little
bit of cleanup. But next to this,
that's pretty much it. That's all we need to do
for our internal pillars instead of needing to go in and, like, do the exact same
process that we've done for external pillows because
that would not be as fun. Et's get rid of it again. Oh, sorry, my keyboard
shortcut is not active. Here we go. Now you can see it. Although, at this point, I'm pretty sure that
most of you will know the flow of this stuff. There we go. Okay. Here, for these pieces, as I said
before, if you want, you can try to do a fill, although there we go. So we can try to
select it and do a Capli I mean, as
you can see here, it doesn't know which direction it actually needs
to place the Capli. Often doing this might
work a little bit better. And then just selecting these two and then
pressing bridge. And then it does tend to
actually bridge it altogether. So that is one thing
that you can try. So you basically select
a border select. You de select these two ends. But this only works
once you have removed those extra vertices most of the time because else
it gets interrupted. And then we can go over here. The select this one, this one, bridge, double check your work. So over here, it's just good enough where it is
starting to screw. And once you have these
pieces over here, all you need to do now is you
just need to art a UVW map. It doesn't need to be tilable. You can just make it like 50
by 50 by 50, for example, convert to addi pool, maybe just for good measure, r to smooth and then
out smooth on it. And there we go. We can go ahead and we can go in
here, Export selection, internal pillar
broken variation one, and then we can just
go ahead and go internal Pillar
broken variation one. And I wonder if I even
need a variation too. I need to check how often I use it or if I can just get
away with rotating it. Yeah, you know
what? One is enough because what we can do
is we can just rotate it and then move it up and
down and clip it inside of the mesh because I only made two because of these
bottom pieces over here. So if we go ahead and just get started with, for
example, these ones. So we have our internal pillar clean, let's re import this. As you can see, now it just has like
a weight and normals. We can open it up, and
all we need to do for this is we need to go ahead
and create the material. Let's grab the plain
wood as a reference. Duplicate and call this
Plaster underscore white, and let's just make
the pillows white. So here we have a plaster white. Let's dig this out. Let's go ahead and textures. And here we have a
plaster texture. It's artist Make sure that the color overlay
is just like normal. Well, probably a little bit darker because else it
would be too strong. And then in our internal pillar, we can just go ahead
and we can just grab our plaster white,
throw it in here. And as you can see,
here is our pillar. It looks like that
the UVs are nut. I thought I did the UVs. Um, Yeah, I'm pretty
sure did the UVs. Let's see. Is there
anything else? No, there seems to be the one. Yeah. So let's just
re check that. Sometimes what can happen if
we go internal pillar clean is that we just need to reset our FBX or
reset our X forms, I mean, and that often
then does the trick. So if we now do a UVW map box and make it all the same
value as the height, there we go. That
should do the trick. So internal pillar clean or maybe we just
didn't export it yet. No, we did because
else we wouldn't have the Oh, no, wait. We never actually explained it. That's why. That's just
typical of me to do. Over here, now it works. So now what we can
do is we can just go ahead set tiling
maybe to like two. There we go. Internal pillar. Check. And that internal pillar
is not working everywhere. So now all you need to do
is just look at it from a distance and then go in and just balance out
your color overlay. Maybe give a little bit
of an orange tone to it. There we go. Nothing
too special. Now what we're going
to do and later we are going to use
these materials for walls is for the broken
pillar variation one. We're just going
to re import that, reset the FBX and if we just go ahead and
open this one up, we can go in, let's isolate, so we need to go
in our materials. Beams concrete.
Rebar 01, rebar 02. Bar tile, and once
again, plaster white. Save it. And there you go. Now you just basically
get a look like this. And then for these ones here, maybe we want to
go ahead and make these internal
pillars a little bit lighter as if there's
like residue on them. So what we can do is we
can duplicate our beams, concrete and call them beams,
concrete underscore light. And if we just go
ahead and once again, open up our internal pillar, art beams concrete light, open that one and go ahead and set the let's set the color overlay
to get started with, a little bit light or
see, so that it also just gives a nice difference
between those two, and that it does not feel
like there's that big of a contrast between the
plaster and the rest. And once you've done
that, what you can do is you can go in here and we are basically going to sometimes
grab broken variation 01, and then we would rotate it, move it, and maybe move
it down a little bit. Here, we can do this one. Then over here, we
can, for example, rotate it move it into place. This one, we can go ahead
and rotate it once again 90, move it down here, and you will never
really be able to properly notice the
difference between all of these whenever we
rotate these things around. So we got this one, that's fine. Yeah, because we're just
not using it enough for me to justify spending the
time on another one. Because I can just move this.
I can maybe move it down a little bit. Go in here. Rotate this one, maybe
just move it like this. These are all fill pillars. There are no internal
pillars in here. There's one over here for which we can probably just
go ahead and do a 180. And honestly, this one, I'm just going to move
it here because there is no proper place. And this one we
can just go ahead and we can, You know what? Actually, I want to maybe have this one more
in view like this. Maybe make a little bit smaller. See? You never notice. So once you've done this,
you can save your scene, and you kind of know if you still have internal pillars
broken to by deleting it. And then we can see, Okay,
so there's still probably an internal pillar broken to somewhere, although
I cannot find it. Although sometimes you
Oh, yeah, here it is. So then you just kind of,
like, want to replace it. And at one point, we are able to basically delete. So here, maybe there's
like this one. We also need to,
like, swap around. Save delete internal
pill the broker too. No, there's still one left. Although sometimes it
just requires a restart. The tricky thing is we internal pillar broken variation two. The tricky thing is that
we sometimes just like her or see internal pillar
clean or broken. We just replace them, and that's why we cannot just
search for it. But that's no problem. Like,
at this point, I don't mind. At least we got all
of these pieces done. So what we'll be doing
in the next chapter, yeah, this one probably
needs brick later on. What we'll be doing
in next chapter is we are going to go ahead and
start working on our wall. The nice thing is that our
Wal will have plaster, then it will have
brick, and then it will have another
layer of plaster. And we can actually
use those bricks that we need to
create for a while, to later on also create the rubble for our
pile over here. So I'm also going to
show you how to do that, although it will be a
very quick and easy one. But we are getting quite close. Two I really like finishing it. You know, let's turn
this one to Beige. So it is starting to
look really good. Now, of course, still quite
a bit of work to be done, but that is more
like level art work. It's not so much
creating models work. So let's go ahead and continue with our walls in
the next chapter.
65. 64 Creating Our Final Internal Walls Part1: Okay, so what we're
going to focus on in the next few chapters is
on our internal walls. Now, our internal walls, the only thing that is
really the stuff that we really need to focus on
is going to be over here, if we look in a
reference, these bricks. So we are just going
to go ahead and we are going to create a few
brick variations that are broken so that we can basically build up
like a broken wall. Normally, photogramtry
would be ideal for this. You would just photoscan a few different bricks
and do it that way. However, because we cannot
really do that right now, what I have is I just have
like a generic brick texture, which literally just
looks like this. And we can use that
one in its place. So, knowing this, all we
really need to do is, let's get started with
first creating our bricks. I know that we could just first create like the plain
wall over here, but I think it is nicer if
we first create our bricks. One thing to keep in
mind, these bricks, we are also going to use them later on for our rubber piles. Rubber piles will consist
of some wood, some bricks, and also some stronger concrete. So just keep that in mind. So let's go ahead and
let's turn that one off. Shall we just do this into our internal wall or
shall we just Oh, wait, let me get rid of that. Let's see. Where am I going to probably Yeah, you know what? Let's just go ahead and
just do a new layer and call this broken bricks, and let's just use it in here. So having this layer
for these bricks, it is not too special. If you will want to make sure
that your size is correct. You can always use
where are you? The window stuff. Here we go. You can always just go
ahead and use this one. So if you want, you can
just go ahead and duplicate it and throw it into all the way at
the top. Here we go. So rotate this nine degrees. And we can just use this as like a template for roughly
the brick size. So over here, if we
now go to a side view, most likely, go from
wireframe to default. And let's just go ahead
and use like one of these. So these are like the bricks
that we're going to use. Now, we will not actually
be using this texture. It's just so that
our size is correct, so that when I grab a box, I can just click and drag. And then I know
that this is like the default size of a brick. At which point, this one, honestly, you can
already delete. We just need to figure
out the thickness of our brick because that's also going to be
the thickness of our wall. So let's go for something
like this over here. Now, if you want to go go super advanced with this with
sculpting and everything, we will not be doing that
because it is simply not worth it for how
close we get to it. What we'll do is we will
later on go ahead and maybe add some bevels to this. I think that would be
nice if we do that. So let's go ahead and just
hot shift, duplicate this, and let's go for maybe
like seven variations. One of them is
going to be normal. One of them, and now I'm just going to
basically go in here, and all you want to do is, well, let's first of all, convert this out to the added
ply to make it easier. What we're going to do
now is this one is, for example, going
to simply do this. This one, we're going
to go ahead and say, Oh, let's always have a
little edge over here. So this one is going
to push this back and maybe also like this over here. And it is just going to give us, a few different variations
that we need to go with. Let's go ahead and
do like this one. And then the ends, the ends
will just stay the same. Like we don't want to
actually have those tilted or anything like
that because then we cannot properly
transition it anymore. Let's go ahead and do
like one over here. Yeah, it doesn't. It's
not really that special. It's just Come on. It's just stuff like this. And I'm just having
a quick look, but most of them, they are like, there is noise on the end. We could sculpt this
noise if you want, like we can make
them more broken. But then we would add a lot of geometry that is honestly
not really needed. So that's why I decide
to just not do that. But if you want, go ahead, and if you want to push it, you can always do that. So let's say that we just have these few bricks over here. All we need to do
is we need to just add the chamfer note on top and set the amount to zero and then
carefully move it up. Oh, set the segments too. A zero. There we go. So we just give it
like a little bevel. Let's move this back so that the bevel is not intersecting. Okay, so we get that stuff done. Now if we just go ahead and we need to create the material. So let's go ahead and go
in here and just call this one like plain 'score brick. Ah, no, is it doing this again? That's a really strange bug that it just keeps doing that. Okay, I will need
to restart my PC or restart Max again.
Okay, so we are back. So let's go ahead and go
down to Bitmap Lookup. And let's navigate
to our Texas folder. I added a new folder in here, which I call plain brick, which will have the
albedo brick in here. Now we can just art this. We can go ahead and add a UVW
map on top of this. Let's make it 50 by 50
by 50. Is that too much? Oh, yeah, it's way too much. Let's go like 20 by 20 by 20. You know what, let's
do ten by ten by ten. Just make them nice and small. Okay, over here. So
we've got those done. And then if you want,
you can already alter weighted normals and just snap
the large face like this. Yeah, maybe this one is a little bit tricky, but that
should do the trick. So as you can see, this
is a very basic function. The next step that you could do is you could go
ahead and well, even before you do
the chat first, you could bring this
inside of Cebush. You could add the noise only at the ends and just don't
make the noise too strong, and then you could go through
the entire baking process and then optimizations
in get it in here. So that's another way
that you could do it. For now, I will use this. Maybe as like a bonus chapter, I will also like addi
it like the sculpting, everything, but
I'm not sure yet. It all depends how close theta camera is
going to get to it, because it's all the
same basic concept. In any case, we now have our broken bricks over here.
Now what we're going to do? So let's go ahead and actually
add this to our blockout. Now, if we go ahead and have
a look at our blockout, so internal wall
broken over here. Okay, so this is
like our blockout. Now, one thing to keep in
mind is we can actually use part of this blockout as
the generic flow of things. So what I'm going to
do is I'm going to go ahead and I'm going
to just change this up a little bit until the
flow is a little bit better. So let's say we go for something like this
instead like the flow. So it's a little bit
more it doesn't, like, stick out in a weird
way or anything like that. So once we've done this,
we can also already, use this sort of
as like plaster. So we are going to go ahead
and do this in two stages. First stage is going to be
having our bricks over here. And what we can do is, yeah, let's do it this way. So you can use your
photogramtry material that is like from the bricks. Or else we can do
is we can use like one layer of brick
sitting behind it. And it would basically
work something like this. Let's go ahead and I'm just going to use
something to measure. Where are we front?
Yeah, let's use the front view. 1 second. I'm just using something
simply to measure things. So I'm going to grow
up like a plane. Like this and just make it like 55 by 55 or
something like that, doesn't really matter because what you want to do
is on this plane, you want to go ahead
and apply your brick, which we do not have yet. Oh, let's go ahead and brick. No, we should have, because
I liter you have it. What you can do cool trick. If you go ahead and
go to, for example, your broken window
because our broken window has the brick or just
window in general. Yeah. So our window
give it the second. It's frozen a little bit. There we go. Our
window has a brick. So what you can do is you
can click on this material, and then press the picker and then grab your
brick material. And then what we'll do
is it will showcase that material in case
it was hidden or ting. We can go ahead and we
can go in here, apply it, and then we need to go
ah and do a UVW map box, start with 100 by 100 by 100. No 50 by 50 by 50, no 25 by 25 by 25. Is this the correct size? Yeah, 25 by 25 by 25 seems
to be the correct size. Now what you can do is there's two ways that
you can do this. One way is a little
bit more geometry, but at least everything matches
up a little bit better. The other way is to use this, so it means less geometry. I'll show you what it means. One thing that we
can do is we can basically go ahead and I will just go ahead
and start over here. We can use these
pieces to basically detect where things
start to get excluded. So like this, we can go
at, and we can place it. And then over here, this
where broken pieces will just come in between
and stuff like that. Another way that you can do it is literally going
into this plane, using your catol and
literally cutting it out. So actually we can sort
of already do that. So we can use a catol
to basically see. You move this a little
bit further back to basically try and
follow this curve, and then we can use it
to our reference points. So what I can do is here,
I can use my cat see? Like this. And I'm just basically trying to follow the contour
of this shape, and then my Max froze again. Come on, Max. This isn't. It's not like I'm doing
anything difficult here. Maybe it's out of saving. Here, see, you can
see not responding. The reason I cannot press
pass right now just wait for it to respond is because I'm in the middle of a CAT function. If I press pass, I will
lose the GAT function. But it will show up again. But I do apologize for this. I hope that you don't
have these problems. I honestly have no
idea. There we go. We are back again. I have no
idea why it is doing this. Maybe it is like a weird out to save thing or
something like that. Honestly, I just don't know. I tried to fix it, couldn't gave up and decided that
it's workable. So, okay, so here you can see that now I'm just kind of like guiding along, but I do still sometimes
cut out a piece. Like that. And then if you just go ahead
and grab your face, you can see that now
you have this cut. And then if you want, yes,
you can, like, of course, extrude this out, or you can go ahead and just replace
these with the bricks. It kind of depends on
what you want to do. So for me having this one, what I can do is I can go
ahead and I can basically place these bricks on top of here on top of the
very first layer. And once I've done that, what I can do is I can go ahead and I can place like some broken
bricks linking to it. So I'm going to move this
forward a little bit. Let's probably go to
like our side view sets to be default shading. Maybe also do edge and faces just to make
it easier to see. We're basically going
to go ahead and I'm going to get started with this one. Place
this one on top. And yeah, the grout in between, that one is a little
bit trickier. So the grout in between, or you can replace
with concrete, or you can just have your
brick sitting closer together. It kind of depends on
what you want to do. So let me just quickly place
them into places like this. And for these one, yeah,
you can just use this one. Yeah, we can probably
do the grout, like in between plane. That would probably be easier. Over here, what I'm
going to do is just to compensate because this tiling
is a little bit strange. I'm going to move
it a bit closer. Like this, we can go
ahead and we can start by placing these pieces. And then it's just a matter
of adding our plane. And then, of course,
this layer of air, we will push very far
back behind our plaster. It is just in case our plaster that you can't see anything, then at least we have an
extra layer that we can avoid But I'll show
you what I mean. So we got these
pieces over here. Might be a little bit of
like a slope process, but I think we only
need to create one broken wall,
and that is fine. And for your rubber pile, because your rubber
pile doesn't care about Polycount, you could go at it. You could actually also do
some sculpting in there. You know, let me just improvise a little bit over here by doing this. Oh, almost there. So that is also something
that you can do. And don't worry
about the size being exactly the same everywhere
because once again, this is stuff that will
be hidden behind plaster. So you won't actually be
able to really see it. Okay, so here we go. So we got those pieces.
Now, for this one, what we can do is
we can temporarily hide it or move it away. We can go ahead and
grab these pieces, and I'm just going to
move them in here and move them up a little bit so that they kind of like match. And now what you want to
do is so these pieces, I just need to make
sure that they are on the same level. Yes, they are. Now what we can do is
we can simply grab these pieces and then
place them in front of it. And sometimes if you have
a long version like that, that it is fine
to just leave it. So we now basically go
ahead and place this. And then what we're
going to do is after we've done displacement, we are going to go ahead
and then a bunch of rotation variation and just general other types
of variation. We could use a plug in for this. I don't know if that
would look very good. Also, something that
you can do is you can, for example, say that
we grab this one. You can place this one,
for example, over here, and then just carefully move it back a little
bit like this. Like, you won't bring
notes in the UVs, or you can always change
the UVs if you want to. That could add an extra bit
of variation on top of it. But I'll show you
what I mean with, like, the variation
stuff later on. Let me just It's just like something to speed up the workflow because
to be honest, I'm not very invested in
these type of walls because, yeah, you just won't be
able to see them much. Like, you'll mostly be able to see the plain
walls, and that's about it. Let's go ahead and Oh,
yeah, here. That's one. We need to keep in
mind that we have one that looks like a normal
brick from the side. Let's push this back in a bit. Move this over here. This one over here. This one over here. So, yeah, it's not the
most exciting thing to do. But well, we're almost there. So what we can do now
is we can, for example, just quickly grab some
of these pieces over here, duplicate all of them. Swap this one around because
I don't want to have the exact same two bricks
sitting on top of each other. I would not look
very interesting. But because of this layout that we did over here,
automatically, this brick, as you can see, it will
look a little bit, like, messy and everything like
that. So we can do that. Then later on, what we'll
have is we will have the grout let's move
this one over here. Although I'm a
little bit worried because that's a lot
of space in between, so we will have to
see how bad this, but let's just place
last one over here. Okay, so now that we have
something like this, now what we can do
is for these pieces, or you can do it by hand, or what we can try to do
is we can try to, like, select the ones that we want to wiggle around and just rotate a little bit and
stuff like that, which are mostly like the
broken ones over here. We can go ahead and select them, and then if we go to
our Sol Bn scripts and do a transform randomizer again, Here we go. We can carefully. It
treats one group. So rotation. We want to maybe
do like, you know what? Here. Let's center a
pivot to make sure. Actually, instead
of center pivots, maybe what we can do is we can push all of our
pivots back over here. There we go. Let's try that. And let's see. Rotate
on the R and Z axis. R and Y axis once
and R and X axis, maybe a few times like this. Yeah, for our position,
I probably don't want to move anything in our position because we
would need to go like -0.01, for example, and then 0.01. So it would need to be
very subtle movements. But as you can see doing that, it already gives you a start. Now you can just go
in, fix anything that might have gone a little bit or that might
have become a little bit too strong in
terms of rotation. But and it might save you
a little bit of time, especially like over here,
we have a lot of grout. So it would maybe be logical
if we just push it back. But honestly, if I look at this, to be very honest,
I feel like this is too much space now that I
really start to look at it. So what I might want
to do is I might want to go in and push it down, and does mean that
we later on probably need to add another
layer of brick. But in turn, it also means that our grout will look a
little bit more logical because look how much space that we are going to have left. And for these ones, you
can also go ahead and you can do like rotations
and stuff like that. So it does look a
little bit nicer. And this one I'm just going
to leave over there to almost give a break point where
we can just go ahead and, like, rotate this stuff. But yeah, definitely.
If I look at this, it is better if
we just move down because look how
much crowd that in the end gets added
or it gets removed. And then, like, rotate these move these
down a little bit. Let's move this. You know what I'm going
to duplicate this? Because seems like
we always have this one brick just
sitting there. Select these two.
Let's move them out. These two also
needn't be moved out. And then at that point, we are going to move
it back in again. Here we go. And then
we just place, like, a few more bricks on
top and call today. And then it's just a matter
of pushing it in here, of course, improving the
shape a little bit better. But then pushing it back in. And then we have
basically our broken wall Let's move this a little bit further back and
maybe rotate this. And then what we will do is we will also just have
a little bit more grout sitting in between.
So we got like this one. So what I can do is
I can go ahead and I can have this one will tilted. And then if I just
grab, for example, some of these pieces over here, what I can do is I
can say, like, no, I want you to rotate other direction. Add
some more variation. Maybe give this one, like, a little bit more
rotation. There we go. And now from the side, you can see that now we have
this messy looking brick. Okay, cool. So we got that stuff done. So here, now you know the low
poly and high poly version. For this one, what you can do is you can always just
go ahead and then like extrude this out and then have bricks in
here and just try to, like, UV unwrap this
using your plain brick, for example, stuff like that, and try to match it all up. However, for this one, we have a little bit more
control over this. So having this piece, what we would do is so
if you have this one, let's go ahead and
save our scene. I would add a Voronoi to this. Let me just go
ahead and just add a ray fire Voronoi over here. And it's just like to break
up these edges around here. So if we fragment, here,
that's already fine. So we just go ahead and we
can convert to at the pony, and you know what probably
to make this one cheaper. Let's first of all,
get started by just breaking up this edge, but try to keep it, close to what we actually are what we actually
have as a shape. So sometimes I just
leave in those. It's just to kind of break
up this edge like that. And now at this point, what might actually
be easier if we select our outer
lines over here, contra I detach this. So now we just have
these pieces over here. I'm going to go ahead and start
with a quick target belt. I'm going to go ahead and get
rid of some of these verts. Oh, wait, actually
a cool technique. I completely forgot about that. If you go to selection, you can go ahead and
select everything, and if you're over here by
numeric, set the edge to two, what it will do
is it will select every Vertzi that is not connected by more
than two edges. So if I do that, it should work. Okay, for some reason,
it doesn't detect. Huh. Maybe if it's less? That's weird.
Normally, this works. Okay. Normally, what it would
do is it would select this. I don't know why for now. It's like exactly when I
try to show it in tutorial, it doesn't I've literally
showed it before in tutorial. So I don't know exactly why
it decides not to work now, but normally try it out. It works great when you
do, like, booleans, because it allows
you to basically, select all of those
leftover messy pieces that look very similar to
what we have over here. So we can go ahead
and collapse this. And now let's go
in. And let's see. Let's collapse this
one, this one, just go ro backspace,
that stuff. Let's target about
this. Like so. So we basically just
want to go ahead and we want to whenever we have something that's really close by or that is just not needed, just go ahead and,
like, collapse it. And that gives us the option to later on extrude
all of this stuff. So now what we can do is
we can go ahead and we can Oh, sorry, mode. We can go ahead and grab all of this stuff, extrude this out, and that will save us
even more topology than the old technique
that we did. That once again, is a little
bit more time consuming, but that shouldn't
matter too much. Over here, that's a tricky area because then what it will do is it the face or the edges will
go a little bit strange, but we will fix it later on. So now what we can do is we can go ahead and we can hold Shift. We can scale this
flat completely just with the normal scale
tool, or if you want, you can go up here,
you can go like, plain on the X axis or
a line on the X axis. Go in here, let's turn
on our snapping and snap it to grid points
and grid lines. And let's see if we can
just snap this together. No, it doesn't do it properly. I know that there's
like a bi angle, but it's this one, maybe. No, that's not the one. That's strange. This
is just a braid. Like, there is a way
to lock it bi angle, but to be honest, I kind
of forgot right now. But it doesn't matter
too much because I don't need to be as precise.
So we have this one. Now with the old one, what we can do now is we can
just go ahead and move it away. Having this piece. We just need to go
ahead and well, let's get started by just
adding a smooth modifier. Okay, so that still is broken. Let's add a welt. Why are you being so broken? That's weird. Delete hit, and let's add a new
bridge over here. You are also very broken.
Let's delete you. Try it again. Over here,
and it's collapsed this. There was one point
like this that I was talking about that it
might cause some issues. But okay, so at this point,
that should be fine. I think this one needs
to be moved down. If you want, you can also use your target well to kind of like now carefully weld some of
these pieces closer together. If you want to save even more
geometry and everything. But basically, the general goal is
that once we have this, what we can do is we can just give a little bit of thickness, and I'll show you like an easy way to also do
that that does not involve just extruding it and needing to cap poly and then
connect everything else. Oh, this one is let's go ahead and delete that
one and instead, cut it up like
this. There we go. Okay, so that looks
now pretty good. So what you can do is there is a modifier
and it's called shell. So if we go down here,
shell over here. And what it'll do
is it'll just give a plane some extra geometry. And I crashed. Oh, God. I crashed and didn't say Okay. Let me pass the
video. Let's see. Actually, let's continue on to next chapter because we
are already at 31 minutes, and let's just see if I
managed to recover anything.
66. 65 Creating Our Final Internal Walls Part2: Okay, welcome back.
Now, first of all, sorry for the strange cut off that we had in
the last chapter. So that was a real trees Max crash that you
saw over there. Nothing like that
widescreen renting note. That was just full on, I crashed. I tried to recover. Unfortunately, it
did recover all of my stones and everything
because apparently, without even realizing
I saved that stuff. However, it did not
recover my wall, so I just had to redo that,
which I did over here. Now what I'm doing is I'm
just needing to clean up this one bit over here
and having this wall. So we left off with the crash
by trying to add a shell, and for some reason,
it just broke, even though, as you
can see, it's like a very easy function, easy thing to do. So what we're going to
do is we're going to add a shell modifier,
make sure it's safe. And you just want to
make this quite thin, something like over here. Let's say 0.25 because it's going to be like a
plaster wall kind of thing. Now, having the
shell at this point, all we really need to
do now is we can go ahead and we can
grab our stones. We can push these forward. And then we can grab a shell, and we can push this
out. You know what? Let's do 0.2, because it still feels a little bit
too strong, there we go. And so this is basically
what it will look like. And that's what I mean
with that most of our second layer of
bricks or first layer, depending on how you look
at it, will be hidden. So we basically now got a
shell over here. That's fine. You can have a
look and I can see that I cannot really
look behind here. So what I can do
is I can start by duplicating it. Over here. Now what you can see is, along with the shells
and everything, you can never
really look inside. So this now are broken well. Then what I can do is I
can add and add a ply, go to Phase select and
just select by angle. So that's 25. I'm just going
to go ahead and I'm going to delete this angle and probably
all this one and this one. The back one, I
will keep just in case because it's always nice
to just have a back face. And then for this one,
we can do the same. Select the angle of
five, delete the back, and delete this top and bottom because those ones I'm sure
that we cannot really see. See. So if you can see, there will always
be a two sided, so I'm not worried about that. Now having these two pieces,
that's pretty much it. So what we can do is
we can save our scene, and we can go ahead and
this does mean that we need to have a quick focus on the thickness of
our internal wall. So first of all, let's go ahead and add our
plaster to this. And I don't know if we have
added our plaster in here. Okay, so it looks
like we did not, so I just added a plaster
material over here. So we got a plaster material. Now all that we need
to do is a UVW map, box, set this to like 50
by 50 by 50, probably. And then what I want
to do is just to make sure that our
texts are tilable. I'm going to snap this to grid. So your actual UV. So inside here, your gizmo, just snap it to your
grid point over here, and then this tiable because this is where the texture
basically starts. And now what we can do is
we can go ahead and convert soon added Polly
and there we go. So having that one, we just need to go into
our internal wall clean. Oh, sorry, that's
internal pillow clean. Internal wall clean over here. And all I need to do
is I need to make sure that this end matches up. Along with this end over here. And now we can actually
snap these to faces. Now, it might be a
little bit late, but I finally found the
option that I forgot about. So in translation, enable
access constraints. If you turn that one on, it will only snap on the
axis you are moving. So that's my fault. I forgot about that option. And then over here
in our snapping, we want to set this to face because now if
we turn on snapping, we can actually snap this
to our face over here, which makes sure that it's just, like, properly aligned, see? So I know, very late to
the party with that one. But yeah, sorry about
that. In any case. So here we have our
1 second, let's see. So these all need to go. Oh, yeah, they're still
in broken bricks. Let's throw all of these into our internal wall
broken. There we go. And then our
internal wall clean. All we need to do is
we need to UVW map, box 50 by 50 by 50. And then snap the box
to our grid points. At this point, I am
going to turn off angle constraint because LSA cannot snap like that anymore. So snap the grid box and then go ahead and just
add the plastic material, and that should do
it for that one. Okay, so our internal wall and our broken wall are now done, so we can save our scene. Let's go ahead and
export this and exports to unreal
internal wall clean. Yes, I want to export you and then this one file
OT export selection, internal while broken. And I want to also export you. Okay. Let's say well seen. And let's see how
this now looks. So over here, a good one. Actually, yeah, that man
might actually be a good one. But maybe, yeah, okay. Let's do this one over
here to have a look at. So, where are you? Internal, internal.
Here you are broken. On a way that's
plain while broken. I still need to add
like bricks to that, but that's no problem. Here they are only dark green. So let's go ahead
and re import this. Give the second
because, of course, I did not merge any of
my bricks together, so it takes a second to
just import everything. And now what we can
do is we can just go ahead and we
can open this up. So we have this one,
and let me just open up the other one also.
And let's see. In our materials, we already
have a plaster material. So all we need to
do is just plaster white, throw this in here. And then for this
one, we need to have our plaster
white down here. And I also already
created a material, which is just a duplicate
from our plain wood material that we will call
plain brick in here. Let's go ahead and
save these things. And oh, yeah, because they technically no longer match up in
terms of the pivot point. In that case, let's have a look. Internal sorry, I
need to snap this. I'm going to re snap this
and then it should fix it. So first of all, set this to vertex snapping
and you want to snap your pivot point
to this end over here. And then you want to
snap this over here. And then all we need
to do is we need to go into our internal wall broken, and we need to kind
of do the same. What I'm going to do is I'm
going to probably combine. Yeah, you can group it, but grouping it, so you can
link it and stuff like that. So what I will do is I will
go at the press attach and attach these two bit and then select everything else,
except for this one, and then go over here
to select and Link, and what you can do is you
can link it to this plane, which means that when
we move this plane, it will also move these
bricks along with it. And now we can just go ahead
and effect pivot on snap the pivot to the
very edge point. Snap this over here. And now you can see
that here you see, moves the bricks along with it. There we go. Okay, so that should fix all of our
placements in one go. So this one is
plain wall broken. Try it again. Oh,
turn on drang lad. Then we also have
plain wall clean. So I mean internal wall clean? I did just export this to plain wall or
internal wall clean. I mean, I did just export this to internal
wall broken, right? So many names.
Internal wall broken. Let's just in case, make sure that I export
it to the correct one. There we go. Okay. And
now if we go in here, we can just go ahead and we
can re import these pieces. Oh, yeah, we don't have
a top anymore now, but it looks like that we actually needed
the top after all. And it's not matching up
exactly the way I want. But that stuff I can
fix. Like if it's not matching up exactly,
I can fix that. The thing that I'm more focused on is that
it needs a top. So what we can do in here
is looks like that well, all we really need to
do is we just need to grab these few faces over
here and just bridge them. There we go. And if you want, you can then go ahead
and just quickly grab this and only select
these two faces and then do a UVW map and set
this to 50 by 50 by 50. Doing it this way, it
will basically avoid needing to do the entire
snapping stuff and everything. So if we now export this
again, internal wall broken. There we go. That
should do the trick. And then it's just a
matter of cleaning it up a little bit by re snapping, and we need to go ahead
and we need to apply our correct colors and
just reset the rest. There we go. So now
we have the top. So now if we go ahead
and have a look in here, okay, so it's already
reset everything. All we need to do
now is let's go ahead and go into
these internal walls. Let's grab all of them. These are a lot of internal
walls. Here we go. And then if you go ahead and you can go down here
into your materials, you want to go ahead and
just press the reset button. And resetting that, we'll
basically make sure that the correct materials are assigned, as you
can see over here. So now all of our correct
materials are assigned, and we have our bricks
and everything, although we might want to, like, of course, improve those
a little bit more. And now we wouldn't
need to go in here. Just press a V and, like, snap it once more whenever
we have a mismatch. I don't know if we will
have many mismatches. Okay, so it looks
like that everything, let's go to unlit mode. Looks like we just
need to do a very quick pass where
we just press a V, and we just snap this
and to our points, luckily, we don't have
that many broken walls. So it's not like an
insane amount of work to just quickly
re snap this stuff. And yeah, that's why it is normally important to keep
your pivot points the same. And it looks like this time, I just managed to mess up. I don't think this one is
not snapping to the correct. This one actually looks
already like it's fine. This one is not fine. Yeah, yeah, it's sometimes a little bit trick
to just get it to snap to the correct furs. Here we go. There's
another few on top. We still more than
I can remember. That's one we don't
need to snap because it's not linked to anything. Oh, over here, there's one. Wow, this one is way off. It's carefully. There
we go. Snap it. Snap that one. Snap this one. This one, did we
already do this? No, we did not. I know. It's a bit boring,
but almost done. Luckily, most of
the snapping now goes quite easily, surprisingly, except for that as
soon as I say it, it of course, does
something wrong. This one we already
did. These ones up here need to probably
also snap back. I'm assuming that at this point, you just passed the video
and you did it yourself, and then you are skipping
this part because I don't think this would be very
interesting to look at. Okay, I believe that
that is about it. And else if we find
another problem, then we will know soon enough. Okay, let's go outside
of unlit mode. Okay, so we now got
our broken walls done, and we got our plaster
also done with it. Of course, now what we want to do is we do want to give it like a green plaster
also in some of these. So let's just go
into plain green, copy that base color
that we created. And then if we have
a plaster white, let's just duplicate this
and call this plaster under plaster underscore green. Let's open it up,
and all we need to do is we just need to
go into our base color, apply the green over here, and now it's just a
matter of adding this. So let's have a look if
I remember correctly, this one over here
was a green version. It's too green. No,
that's actually fine. See this one over here and
you can just drag it on. Then it would be logical if this one is also green
because it's the same room. Then above it, we probably want to just go ahead and keep a little bit more
whitish going on. Maybe let's make
these ones over here. Green. Along with
these pillows, maybe. Let's say also this room. So these are going to
be our final colors. So do go into unlit
mode that I can see it. So probably apply it
and just have it like a close look and see
whatever works best for you. There we go. So we
got a little bit of green going on over there. Now, this one I probably
want to keep white, but maybe this one would
be nice if we turn green. And I'm just basically
trying to get dots of color. So we got some color here. We got some color
here, some color here. Here, um Now, let's
not do that one. But what we can do is
we can try and go in here and maybe have one of these versions green. Although you can probably
never even see it. But okay, so we got
those ones. Let's see. I'm going to also make
this wall green because it's apart and maybe
also this pillar. Give the second for lighting to, of course, get back to us. Okay, so that is all looking pretty decent. So we got those. The broken wall pieces. Yeah, we do need
to do those also. But because it's the exact same as these pieces
over here, by the way, we can go in and we can now
just have a look at see, maybe make it a little bit
more like a red brick, but then also a little bit
like a darker red brick. There we go so that
it's not as noticeable. Okay. Actually, this is notable. It kind of depends on what the plaster is if it becomes
more or less noticeable. Let's do this. Okay? So not too dark, but yeah, this is
working quite well. So we got that stuff done. That's actually safe
as seen by this point. And now what we will
do is having this. So next chapter, we are going to probably
work on our rubble pile, which is just going
to be like a texture, and then we will just
slap this texture on this rubble pile, and I will go ahead and
this one I will do in a time laps with everything else because it is literally
us doing this again. The only difference is
that we are probably going to use this texture. So actually, we kind of
already did it, didn't we? Oh, no, wait. I lost
that in the crash. That sucks. So that's
one that I cut up. That's basically what we
will be doing for this one, so it is very easy, but I
lost it when I crashed. So that is unfortunate. Let's do this one green. But in any case, we got these pieces over here
that is all pretty good. So we're getting really
close to finishing this. In the next chapter, let's
go ahead and let's continue on with our rubber pile. And I think after
that, it probably like the final real time chapter because then what
we're going to do is we are going to do level art, and the level art because this
is a destruction tutorial, will just be done in time laps. But as always, I will also supply the untilaps
versions of that.
67. 66 Creating Our Rubble Pile Texture Part1: Okay, so what we're
going to do in this chapter is we're going
to focus on a rubble pile. Now, we're going to keep
this nice and basic. Basically, the rubble pile
will consist of some bricks. It will consist of just like concrete rubble and
just some wood rubble. The only tricky
thing about this is often that, of course, we have special shaders
in here to really create all of this
rubble excuse me, my voice, to create
all of this rubble. However, we cannot
actually do that, so we kind of need
to improvise because we are going to
bake it inside of Mama's head. That's
why we can do it. So let's start by
collecting some stuff. Let's go ahead and scrab
these pieces over here. And let's just start adding
this into a rubble pile. Actually, no, let's do this into a rubble squa texture layer. So we got some bricks
that should be enough. And normally, what I would
do is I would just use a bunch of mega
scans because that is so much easier to
just grab a bunch of rubble from mega scans and
use that for your material. However, because
I'm not allowed to actually give you guys mega
scans, same basic concept. So use mega scans, if you can. It's probably it will
give you better quality, but in our case, we are going to improvise.
So we have a rubble. Now, we had our wood let's see, our wood pieces over here, let's use these ones. Let's go ahead and clone those. And just like the
smaller ones because we want to have a
small rubble pile. And this one needs to go into our rubble texture over here. Okay, so we get those. And then if we go ahead and
also have some where are you small concrete rubble and small concrete
rubble over here. Let's also duplicate that one and throw this also
into our rubble texture. Okay, so that should
do this trick. So this is more like
a concept thing. It's not going to look as good, but it's just to show you how to actually do
this kind of stuff. So having these pieces,
let's go ahead and make them roughly the
correct scaling. Let's make this one
a little bit bigger. These ones like a little
bit smaller maybe. There we go. And the materials that we have applied
are already correct. Yes. So we don't need
to worry about that. Now, what we're basically going
to do is we first of all, need to go ahead and we need to create a plane on our ground. So we are going
to simulate this, and we are going to
simulate a lot of them. Let's have a plane that is a perfect 50 by 50
centimeters, for example. Okay, that's a little bit low. 60 by 60. We do not
need any segments, and we just want the
right click down here on our transforms to
set it into the center. Now having that, what we can do is this plane is going to
be like our measurement. Now what we need is we need
some walls to make sure that all of our simulated
objects will never go outside of this plane. This is just going to be as
simple as creating a box. So we basically create a box, move it down a little bit. And this will be like our walls. So we just grab one, and then we just go
ahead and hold shift and grab another over here. And then we just go ahead
and turn on our snap rotate, grab another one over here. And this technique basically combines the
technique of creating simulated textures
and also a technique of how to clean up
photogramtry materials. That's kind of like you
basically learn two techniques in one in one. So
we got this stuff. So now, this is like our box where we are going to
simulate everything in. So what we can do with these
pieces is we can go ahead, go down here and we want to make this aesthetic rigid body, which will basically
make sure that this is a very simple collision. Then we grab these pieces, and then what we want to do
is we want to decide, Okay, how many of everything
do we want? First of all, let's
right click and free selection all of our static rigid bodies makes
it easier for me. Now, we probably want to have a majority to be like bricks. So let's just go ahead and just really duplicate them
a bunch of times. Now, I quite also like wood, but I don't want to do as much. So let's just do like this many. And then this is also some Wi good filler rubble that
we can probably use. So let's just go ahead
and actually here, let's just do this. There we go. Now, having this, we probably need to go
ahead and we probably need to do this another time, so we probably need to
duplicate all of this. But before we do that, just
quickly go ahead and go into your Solbn scripts and
just mess out with the transforms using your
transform randomizer. So if we do this, we
can go ahead and we can say -90 by 90 rotation
and just here, completely mess it up like
that. So we have this one. Now what we're going
to do is we're just going to go ahead
and duplicate it. Make sure that it does fall
in between these also, we just need to
make sure that it actually falls in
between these pieces. Here we go. Now that
we have these pieces, what we can do is we can
add a dynamic rigid body to these. Was that it? Okay. That went
faster than expected, especially for this
many measures. Let's save our scene.
Now what we're going to do is we can go
ahead and simulate this and see if we
need more or less. We can go ahead and we can just simulate this as cardboard because this is not about
making a realistic simulation, it's about just getting
the pieces on the ground. So at this point, we can just
go ahead and press start. And basically what
we need to do is we need to make sure
that we fill the entire. You'll see so we have not
even close to enough. We need to fill
this entire thing. You can see the
background a little bit, but try to minimize it
as much as possible. So I'm literally
just going to go ahead and duplicate this
entire thing again. And it will mean
that the simulation at one point will go quite slow, but it's just about
getting this. And then you can see
that it also never goes beyond the walls because it just kind of
like spreads out. So what we can do is we
can give it a second. And then we can see that. Okay, so the center
is pretty good, but we probably want to go on the outside a little bit more. So let's go ahead
and let's here, let's duplicate this and
then move it a little bit. Duplicate this, move
it a little bit. Duplicate this, move it a little bit to the outside
corners basically, and duplicate this, move it
a little bit. There we go. Tw that again. Play. And now you can see that we are
starting to go quite a bit slower because we just
have so many meshes now. But as you can see, we
are also starting to fill up this box. So if I go ahead and stop this and let me just
turn off edging faces, we can now see that now this is working a
little bit better, see. And just like that,
we can basically generate like a
bunch of this stuff. Now, if I see these pieces like this texture,
I'm not worried about. So for me, it's fine. Maybe what you would want to do is
you want to probably, reduce the amount of
the concrete bits. And the only thing is that
by this point, of course, that's quite annoying
because it means that you need to go in and do some of this removing over here to
basically reduce it. Now it doesn't take too
long to actually do that, but it's just a
little bit annoying. And I can see that the
wood is not as much. But basically, you can really nicely fine tune this and you can make sure that everything
just works correctly. So what I can do
is I can do like this and over here, and
then I can, for example, just grab all these pieces
and to compensate for having less of concrete
rubble, we can do that. We can go at and we
can press play again. We can wait, make sure
that now here, see, now we can see a little
bit more wood and a little bit more
of these pieces. It's probably still not
exactly the way I wanted to. So maybe I just
need to go in here. So it looks like that
I really overshot the amount of concrete
I expected to have. So I'm just going to
basically flow through this process a little bit
more concrete over here. Luckily, the selecting goes
really quickly this time. So we can just kind of like specially like
here near the top because the top is the last
stuff that gets added. So let's just go ahead
and reduce that. And let's say that
at this point, it's fine. So we got this one. What we can do now is I will
do one last simulation, just make 100% sure
before I bake it down. And then it's just a
matter of exporting this to marmoset, setting up our materials. And once we've done
that, you know, let's make sure that fills it. Once we've done that, we go into substance painter actually
to make the stylable. Okay, so this is pretty good. You can see behind here, we still got some stuff, but that stuff we are just going to fill up. So I'm
happy with this. Maybe do, like, a tiny
bit more like this. And once you are done with this, we are going to
select everything, and let's save our scene
and press Bake selected. And I will just pass the
video until that's done. Here we go. You know the drill. We are basically
going to go ahead, delete the last one,
delete all of this, hold shift, move it to the font. And now that we've
done this, what we can do is we can go ahead and convert this to an added
bowl. And there we go. So that is going to be
basically our texture. So what we want to do now is
let's get rid of this one, which somehow managed to
get outside of our shapes. Same we like these ones.
If you ever see one that accidentally fell
outside of our box, we can just go ahead
and we can select it and then delete it. And at this point, you
basically want to go ahead and unfreeze let's just height
selection, this stuff. And you can see that this is actually already
also our low poly. So this one we just
convert to Pole. So this is now what we
got for our texture. So what I can do
is I can go ahead. Make a folder that we'll call just throated scalps and just
call this rubble texture. And in here we are
just going to go ahead and we are
going to export it. So this one is our low ply, so export, export selection. Rubble score LP. Here we go. Right, click Height selection. And then this Export, Export Selection,
rubble on ScolHB. And if you want to make
everything export a bit faster, just turn off triangulate
because we don't don't need it, so we can just go
ahead and press. Export, there we go. Okay, so this is now done. At this point, yes, I am
going to save my scene. Yeah, so let's go ahead
and save our scene. Let's hope I don't
regret that that I need to re simulate later on. And now what we can
do is we can open up. We can open up Mamset. Now for this, let's go
ahead and use a new seam. So here we are in a BNwcene
I'm just going to go ahead and set my
color to be darker. I'm going to add my bake project because we need to add a
lot more materials to this. So it would be a little bit messy doing this in
our original scene. And now, what you
can see is we have a high poly, we have a low poly. Make sure to not delete
these materials over here. This time we do actually need them because we
need to go in here, and we need to grab
our materials. So this is our concrete
broken with the small pieces. Now we can actually
use a normal, although Yeah, I think it
will include a normal. I think we define it that
it will include anormal. However, we would
need two normals. So what we need is
you need to go down here and we need to
set detail normals. So now what we can do is
we can go ahead and we can go to our textures bags, big concrete pieces, and then we have a small concrete rubble. We want to do our
small concrete rubble, I believe in our detail normal. Yes. Okay, so that works. And then we want to go and do the rest in our normal normal. I know. Always sounds
a little bit stupid. For this, we are going to
go ahead and we are going to maybe do the
one with a rebar. I think that would be
nice. So we have our bido. We have our normal, and we have our roughness. And now the tiling
of the dieta normal is separate from the other one. So what we can do is, I
believe that we can just set this to like two or one. Now, let's not do the rebar one. Let's do the one without rebar. I think that one actually
looks a little bit better. Here we go. Okay, so we got that one. Now we have our plain brick, so that's why it's
not too difficult. It's just importing our
albedo normal roughness. That's our plain
brick over here. And then we have our plain out where we can just go ahead
and have, like, our albedo. Normal and roughness
again. There we go. So we just have this
texture over here. Might not look very
interesting yet, but we are going to make it look a little bit
more interesting, of course, inside of
substance painter. So this is pretty good.
We got this stuff here. Now, all we need to do is
we need to go into low, turn off outer bake and just
make sure that once again, your plane is sitting
above everything else like this so that we can
bake it down from here. Uh, yeah, I covered that in this tutoil, right?
Thi kind of stuff? Or, is that a different
tutoril? Oh, God. I can't even differentiate anymore between the
tutorials I make. That's bad. In any case, we're just going to
set bake output. So over here, I made
a folder called bakes inside of a folder
called rubber pile. Rubble on scopile is what
we're going to call it. That was different tutorial I didn't show you this before. I made a YouTube tutorial
for you if you want to go over Willet fence baking
with this kind of stuff. Any case, sample 16. Let's go nice four k and
then in our configure. For this one, we
need quite a bit. We need a normal object height, position, curvature,
emit oclusion. We don't need material
ID, but we do need probably an Alpha
mask could be handy, albedo, roughness
would be handy. I think that is it.
So we need these maps basically for our generators
inside of painter. This one to differentiate
between our hypoly and the tiny bits of ground that
we can see between that. And these ones are
the actual maps. And in the norm map, this one will be baked inside
of the norm map. So having all of this, we can go ahead and we
can just turn it all on. And at this point,
let's go ahead and first of all, let's
do Save Scene. And let's save it as bake
rubble pile, bake scene. And we are ready
to go, I believe. So the only thing is
that with our height, we need to always like mess around with the height later on. But let's go ahead
and press bake and I will pass the
video until it is done. And here we go. As you can see, we have most of these that
are working totally fine. We have our mask.
The ambit seclusion often will also look
quite cool, see? That always looks
like really cool. Ambit seclusion, that
kind of suf is fine. Now, our height, that's the one that I
wanted to focus on. As you can see, our height
is not correct yet. This is because we need to set it between specific levels. And for this, it's always
a little bit fiddly. So let's go ahead and turn
everything off except for our height because we can use our height inside of painter, for example, or A
we can also use it inside of Max, which
we might even do. And then in here,
you kind of want to set the inner
and outer distance. I tend to often set
my outer distance then to five to
get started with, and then my inner
distance to zero. And what we can do then
is we can press bake. Then we can go back into
Photoshop and basically, oh, sorry, for some reason. Here we go. For some
reason, it literally closed every single tab that I have open. Which
is a bit strange. In any case, first of all, what I like to do is I
like to actually look at my thumbnail to make
sure if it is correct. Basically, you want to go
for like a gray scale here. If I update this, you can see
that we are getting closer, but it looks like that we
need to go even higher with our outer distance. So let's set this
like 18, for example. I don't know if
the outer distance corresponds with
our cage might be. Let's try 26. I don't think it works
quite as easy as that, but we can go ahead and
we can press bake again. Then just have a look
at the thumbnail. Okay, so it might actually
do it that way, also. I always thought that it was not as straightforward as this. So now what you can see is
now we have our height, which is also looking
a little bit better. Is like a grayscale image. Perfect. So all of
this stuff is here. We have our albedo
and everything. So what we're going
to do at this point is we are going to jump inside of substance painter and we are going
to turn this til. We will go ahead and do
that in the next chapter.
68. 67 Creating Our Rubble Pile Texture Part2: Okay, so we finished in last chapter by baking all
of these pieces over here. Now, one thing we need to do now if we right click and just unhide and well we can actually just hide
these pieces again, we need to have a plane that we can preview things
on inside a subs painter. However, previewing
it on a flat plane is really annoying in
terms of light so what I like to do is I like to
always just quickly rotate this 90 degrees and
then just quickly export this and just call this preview underscore
plane, for example. It's just so that
we can actually see our material inside
the painter properly. So we export it, and
then we can just undo this and we can
save it over here. Now inside of painter, we are going to
create a new scene, and this time you want
to have your template to be PBR metallic roughness. Then what we want to do is we want to go ahead and we want to go to file, and in here, we want to navigate to exports, sculpts, rubble tech
ship preview plane. Let's open that one
up, make it four K, open GL, and then
in our mesh maps. We want to add all
of our bake maps. So bakes. Oh, no,
sorry, not bakes, rubble pile, bakes and just
have everything in here. And just press Import
or press okay. And give it a second,
and there we go. Okay, so we need to have a
little bit of setup here. Normally, if you only have a normal roughness and base color, it's a little bit easier. But because we have
all of our other maps, we need to make every single
map that we have tilable. So what we're going
to do is we need to go ahead and well, I first of all, need to see
how many maps I have again. Let's set this to be
rubble pile in name. And if we go to our textures, it should be all in here. Where are you? Come on. Here you are. So
one so let's see. If we go into our
text chat setting, so we have a base color. Base color, yes, height, yes, roughness, yes. Metallic. We don't need normal yes. And then I need to have
another map for which I'm just going to go
to user channels and use a user channel map, which is just like
a default channel. So this one is going
to be Oh, no, wait, one of them is going to be
ambient clusion. User channel. One of them is going
to be object space. Use channel, one of them
is going to be position. I'm not going to do thickness. So what a normal check, object space check and
seclusion curvature. That's the one. And one of
them is going to be curvature. So we will have OBJ space, we will have position and we will have curve,
as in curvature. Okay, so now all of
our maps are in here. Now, the way that we can
make this tilable is we need to to fill
layer to get started. We're doing this
in two versions. One make it tilable,
two may improve it. So if we go in here and
just call this material, we can go down over here and basically
add all of our maps. Base color into base color, height into height, roughness
or normal into normal. This is my roughness. No, this is my curvature, roughness into roughness, ambient seclusion into
ambient occlusion. And then we have object space,
position. And curvature. Wow. And yes, we
do have our mask, but if I look at this, I don't really see my mask. So as you can see here,
it's just a flat texture, but it is already
working quite well. Then what you want
to do is you want to go ahead and what
at the offset to 0.5. Sorry, don't press
Tapxty by 0.5. Doing this, you
can see that over here now the offset is basically showcasing exactly where
we cut things off. Now, if I see this, I see
that I made an error. Yeah, I made an error. The
error is that I accidentally added the padding and we don't
really want to have that. Let's go ahead and open up
marmoset, open up Momoset. Go and all we need to do is
just turn everything on. So this is not a big error and simply set your
padding to be none. That's why the mask
wasn't showing up. That means that we do actually need a mask, yes, later on. So let's go ahead
and just press bake again and it will bake. And let me just pass the video. Oh no, wait, while it is baking, we can just as well go to our
texture sets and let's add one more user channel
and call it mask. There we go. So that we
can also add our mask. Now, what we need to do
is once it's done baking, we just need to re load and reassign the maps
again over here. It's almost done. I believe. Okay, so that's done.
Now one thing that I'm quite curious about
that I want to try is I want to also try adding a material ID map because what we could try to do with
the material ID map, which might make things a bit easier if we turn everything
off and only this one on, is we can differentiate inner
texture between the wood, the brick and concrete
so that we can basically add variations to
those separately. So if we just go ahead
and have a look, make sure if that even worked, it should work, technically. So if we go textures, rubble pile, Oh, cool. See here. So the material
ID map actually works also. And I am a little
bit freestyling now. I was thinking of making
it even more basic, but now I think of this, I just want to do this.
So let's go ahead. First of all, reload
all of these maps. Just right click,
although I think oh, no, you cannot multi select. Let's go ahead and just right
click all of this stuff. Over here. And then we do need to reassign it because else it
does not register. So just reassign
these maps in here, and then you will know soon enough when it starts to work. And then you can also see the splitting and everything
in between it. Here you see. So now you can see the background
also sitting in here. And then what we need
to do is we need to add our mask over here. And then finally, we
actually need to now add another one up here, which is going to be user
channels four MT ID. And then what we
can do is we can go File Import resources, Import your material
ID as a texture. There we go. And simply
artist on here also. See, so that's a lot of
maps that we need to do, but we'll be totally fine. Okay, cool. So we
got this stuff. So we basically just
need to make sure that this area over here is tilable. One thing to keep in
mind is so the black. You can actually kind
of, like, ignore for now because it will
not actually be included. Yeah, I think in my roughness, it's the roughness that
makes it so shiny, which makes it a
little bit annoying. What we can do temporarily is temporarily just go to your roughness and
set this to zero. There we go. Then we just need to turn it
back on later on. We got this one.
That's all fine. We can go ahead and save scene, which would be nice
at this point. Let's go textislePile, underscore, make tilable. Me tilable. Here we go. Okay. So now what we're going to do is we are
basically going to use the clone patch tool in order
to make this piece tilable. The way that this
works is very easy. You want to go down here and add a paint layer to
this map and you want to set this paint
to be passed through so that it basically paints
on every single channel. Then if we go down here, we have our clone tool down here, and with our clone tool, just make sure that everything
is checked over here. Now what we can do is we can
very simply grab a piece. So if we go ahead and
let's say that we yeah, down here, it's
always a bit tricky. So let's just start
over here, for example. Let's say that we want to have some more space
in between here. What we can do is we
can press V and click. And what it will do
is it will basically set your clone tool
to be in this area. And then what you can do is
if you paint somewhere else, it will add this on top. Although it's not doing
it exactly the way that I was hoping for.
Let's have a look. So we are pressing V Mmm. Am I only painting
in my base color? Oh, wait, I need to go and set it to pass through on
every single channel. So let's click on every
single channel and just set every single
thing pass through. That's why we are only
painting on our base color. Object, position,
curvature, mask and ID. Okay, let's see. Now
if I go ahead and press V, there we go. See now you can see
that it literally just paints the entire material. Okay, so that's basically
how it's going to go. You basically click on one and
let's say that you want to then go in here and you
want to art, this brick. You can go ahead and you can art this brick over
here in this area. And because of the
fate and the fall off, it will just blend a
little bit better. Now it's not perfect,
definitely not. But it does often do
the trick where we can just basically use this to create some overlapping
so here you can see me. This technique, it works great, especially for, like, brick
walls and everything. But over here, from
a distance here, you are able to
basically make it look as if that everything
is just kind of fitting. And then I just press V over
here and let's say that I like art this one on top. And then try to
blend this in here. So just like that, we can carefully just start by
blending pieces together. Also, over here, if you
have these type of bits, it is good to then go in here. And maybe like here,
like set this. Okay, that's not a good one. Let's try something else, maybe like this over here. And then basically blend
this together. Like that. So yeah, you kind of want to try and really take your time and do
this really properly. I once again will not do that, so I will just do
this quite quickly. And it's just about overlapping on those few edges over here
so that from a distance, you won't really be able to notice much of a
difference over here. And just like that. So
you can even also go in the Eastol and I believe
in the eras tool, you can also here, you can see care like paint
some stuff out again. So we can use the eras tool to basically paint stuff in and out to make sure that it all still fits
together properly. So let's just go back
to our clone stem tool. Here, just like for those
etches, that's quite nice. So yeah, at this point, we basically just
want to go ahead and we want to keep doing
that a bunch of time. So over here, we
have like this one, and I can just go in here. And I can just basically
like here, add this. I can then go down here
and I can say, like, Okay, I want you to be
overlapping over here. And just try to kind, fill it in like that so that
it's not a snowsball. Like, this one we can live
with or I can live with. And then over here,
I feel like, Okay, that would, like, need
another brick, maybe. So maybe we just go
ahead and do this, and then we add an
extra brick like that. And then if you say,
like, Okay, but I'm adding too much of my brick, I can always go in with
my eraser tool and I can, like carefully on the wood. Like over here, I can
start to erase stuff again so that it kind of fits a little bit better.
So that's the goal for this. You basically do that. And normally this would take still quite a while to make sure that
everything works properly. But over here, you can see, over here that works quite well. So what we can do is
we can, for example, grab this one over here and's
layer it out like this. There we go. Let's grab
this one over here. I don't know why it's
slow, all of a sudden. Let's layer it out over here. There we go. Now, it's
fast again. And let's see. Let's grab I know, I don't want to have these
really big ones too often, so I do want to be
careful with that. Let's grab this one and maybe,
like, throw it in here. No, let's try it again. This one, throw it up here. There we go. And yeah, so we are basically just
filling this stuff up. And it should be Is it tilable? No, it's probably not tilable that's why
we do the offset. So when you paint over here, it will not end up in here. So that's where we need to always be a little bit careful. But we will see you can always do this
twice to basically make sure that
everything is tilable. So if I go ahead
and grab this one, I can go ahead and just
paint it like in here. Then maybe go to
my eraser tool and maybe just reduce it
around this area. Okay. Oh, we need to
be careful about that. When I already painted in
another brick somewhere else, it can sometimes also
remove that brick. But of course, you do
not always want that. So just make sure that you
then set your size really low to kind of, like, paint stuff
out, stuff like that. But I'm mostly looking at it also from a bit
of a distance. So we got this, and
you basically just want to make sure
that it does not look as if that it's not properly
table. So I can go in here. I can grab, for example, say, this piece, plus V, and let's just throw
this piece in here. And let's try it
again. There we go. And if we have some empty
spaces in between here, I'm totally fine
with that because I'm going to give
it the background. That's why we created a mask. So I don't actually
mind having that stuff. Let's have a brick over here. Let's see. Maybe if we like this stuff that we
can see over here, you can see that now over here, it is no longer tilable. I'm aware of that. But that's something that we can later on. Once we have finished
this texture, what we can do is we can change the offset back to
the way that it was. And then all we need to do
is make some small changes, but we need to do that
anyway because we are going to add some interesting
stuff and everything. So let's go ahead and let's see. I'll say, that is pretty good. Maybe only have
one thing that we fill in here and then
I will call the day. So maybe let's say this brick.
Okay, that didn't work. Try again. V. Here we go and start painting that there. Maybe I can then get rid of
this little bit over here. There you go. You can also if you need to do something
even more precise, you can add multiple
paint layers to basically make sure
that you paint out everything only
that you want. But, okay, so let's say that
this is now tilable ish. It's not perfect
yet, but it's good enough for what we
are going to do and for me to just show you
the logics behind everything. So I'm just trying to get rid of this one line over here,
which is a bit annoying. So we now got this stuff. Okay. With everything now done, what we need to do is we need
to export these textures. Then we need to set up another painter scene where
we import them again. We switch the offset back
and take it from there. So we do not want to move this offset because if we
move this offset, everything will be
just ruined again. So what we're going to do is
we're going to go and save this and then what we're going to Okay,
that takes long to save. Probably because we
have so many maps. Okay, so that's now saved. While it was saving, I did
see this thing over here, which I don't I
still don't like. So let me just carefully, let's just do it as if
that is, like, damaged. There we go. So you can
actually just paint it out as if it is just
like a damaged brick. Mm. Yeah, let's do that. So that's
a little bit less notable. Okay, let's save once more. And now what we need to
do is we need to go to potexis and we need to set a new output
template once again, and this output template will just include
the use of files. So if we go to PBR
metallic roughness, we can just right click
and duplicate and call this rubble underscore. Texture underscore fill export. I will probably just throw this away once we're done with this. So with this one, what
we're going to have is, let's go ahead and I'm
going to actually, let's delete all of these names. Let's get rid of the emissive. This one is going to be
taxisetUnderscore, base color. This one is going to be and you can just look
at it roughness. So taxi set,
underscore roughness. This one is metallic,
which we don't need. This one is normal direct X. Let's set this to be
normal OpenGL, RGB. So taxisetce normal. This one is going
to be our height. So taxi set underscore height. Then we want to have
another gray scale that is going to be
tax set underscore AO, which will have our ambit
occlusion map in here. Then we will have another. Let's just do RGB
colors at this point. So we need to have position. We need to have
our object space. We need to have our ID map, and we need to have it's
going to be gray scolor mask. Yes, I think that's it. Oh, God. And now I forgot the
naming or the order. So let's have a look Okay. Object position,
curvature. That's the one. Let's go back. It will have
just saved our template. Where are you Rubble Rubble
texture fill export. This one is going
to be OBJ space. Oh, sorry, text set
underscore OBJ space, and this one will be User
channel zero, RGB channels. This one will be taxi set, underscore position and this
will be user channel one, RGB and just make
sure that to set the position to 16
bits over here. This one will be texture set, underscore curve and we'll be
user channel two down here. This one will be Jesus. Texture set, underscore mask, and user Channel three. And finally, we need
to have another RGB, which is going to be
texture set underscore ID, which is going to
be number four. I've never created I think a
texture with this many maps, because normally, yeah, I do it in different
ways, basically. But this is like a new
workflow that I'm using. So we got all of these
now that should be fine. Base color roughness, normal, height, AO. Yeah,
okay, not the rest. Okay, so what I've done is in our folders in our texture
V one folder over here, we can just go ahead and copy this location and start
pasting it in here. We are going to use, of course, our destruction or rubble
texture fill export, Targa files, eight
bits is fine for now, although the position will most likely need to be
16 bits later on, four k, and let's go
ahead and export. Okay, so it should
not take too long. And let's have a
quick look by going into view and extra large icons. Okay, that looks I don't worry
about those black spots. We will get rid of them,
but it looks correct. No, the object space for
some reason is grayscale. Our roughness is not Oh, yeah, so few things. We need to go in here and set
our roughness back to 100%. And that's why we check.
We need to go export. And in our presets,
where are you? Rubble texture. Let's see. Object space, you are an RGB. You are RGB 16 bits. Maybe we also need
to expertise as PNG. Maybe that's the problem for some reason because
they are not 16 bits, they are registering
not as color. Or what it could be, is that user channels,
maybe that's it. No, user channels should
be able to receive color. If we go in here,
Oh, yeah, that's it. So let's set this one to SRGB eight this one
needs to be RGB 16. This one I don't care. Oh, yeah, this one,
I also don't care. And this one, God, this is slow. Oh, no, height needs to be
L 16 F. So position needs probably also be L 16 F. Let's
give it a second to load. It's quite slow. L 16 F. So this is basically
controlling if it is a color or if it is a gray
scale and how to optimize it. So we got all of
that stuff done now. Our normal looks
like it is inverted. So it looks like it is not
direct X or not open GL. This is a bit strange because
we set it to OpenGL, right? Normal OpenGL. Yeah. Okay, in any case, let's just go ahead and try
exporting this again. And then we will
know soon enough if this Okay, so here we see this. So the roughness now works, position still does not
work. The rest does work. So the only thing that we now have problems with
is the position, which I probably I am
going to set to RGB 16. Maybe that works a
little bit better. It's not the most important map, so let's go ahead and
export this once more, and then we can give it a try. Okay, position now also works. Okay, finally, we got
all of this stuff. We can now go ahead
and save our scene, and now what we can do is we can just create
a brand new scene. However, we will go
ahead and continue with this in our next chapter.
69. 68 Creating Our Rubble Pile Texture Part3: Okay, so now that we have sort of like a table
material here done, now what we're going to do is
we are going to improve it. So let's go ahead and
create a new scene, and we want to go ahead and import sculpt,
rubble texture. Preview plane. Let's
go ahead and set this to four K, OpenGL. Let's go ahead and go in here. Although I'm a little bit
worried about the normals. I feel like something
is going wrong, but we can always
change that later on. So textis Rubble pile, texture V one, and want to
imput all of these again. And yeah, save sine. Okay,
so let's see how this looks. Hello. Give the
second. There we go. Okay. Now, for our
material over here, what we need to do
is we need to kind of switch this back again. Oh, yeah, we need to
switch this back again. That's a pain
because we probably cannot really switch it
back properly in here. So what we almost would need
to do is do another export. So we would almost
need to go ahead and call this material. Let's just double check
before we do anything more. I need to have my
material over here. You need to find it. Base color. A height. We can have on here, but I do want to later
on turn off my height. My normal, so my
normal is correct. We don't need a metallic
and we have a roughness. So basically what we
would then need to do is like -0.5, -0.5. Here see so that it
is matching back. Okay, so when it
is matching back, this is all looking correct. But the annoying thing right now is that I would
kind of need to set up my scene again if I want to be able to
properly export this. So knowing that, what I
almost want to do is, well, we can, if you want,
you can use this scene, but then you would need to,
like, reset everything up. So let's just go ahead
and quickly open up. So let's disregard this scene. Let's quickly open
up this scene. And now that we have
export everything, let's just temporarily
turn off this material. And just to show you,
basically, over here, if we would set this to
zero and zero again, you can see that it basically just messes up with our paint. So let's give that
second to load in. Here, see. So it just completely messes up with our
paint and everything. So that's why we cannot just
do something like this. But what we can do is
we can go ahead and we can delete this
material for now, quickly import all of our resource materials in here and just select
all of them and set them to be a texture and set the optional prefix
underscore V one so that basically we are able to differentiate
between them, import them into the
scene temporarily, create a new fill layer, then all that we need to
do is we need to just quickly add these pieces, and then we do need to make sure Did it not add the prefix. Well, I can still
differentiate between them, but that's annoying
because I literally just said that I want to
have the prefix added. Normal. This one
is the roughness. And then we have
our object space, which is, that must be this one. Object space, position. This one is then the curvature. This one is then the mask, and this one is then
the material ID. Okay, so that's now Oh, yeah, and the height, and
this one is the height. Okay, so in any case, what we need to do with this
one is set this to -0.5 by -0.5, like this. And now what we want to do is we want to just export
this once more. Let's go ahead and call this. I know it's a little
bit of back and forth. This is because this
is a new workflow, but I think I still need to fine tune it a
little bit more. So we can just go ahead and
set this to texture feet two. PBR full Export plus export again, and now
it should be done. So now if we go
ahead and go to New, the only reason why we need
to do this is because we have our Bk Maps because
I want to generate masks. If I wouldn't need
to generate masks, none of this had to happen. So for photogramtr, you don't need to do
anything like this. So we can go ahead and well, let's first of all, four K, OpenGL, let's just art or
V two textures over here. And let's just select for the file our rubble
texture over here. Okay, that should
now do the trick. So we can just disregard this. We just had to use
it as a vessel that file for a temporary import. Then over here, we
can call this rubble pile unscoreFinal, go down here. And for this one,
we basically now only want to go ahead and
just grab our norm map, our world space map, which is our object space,
our ambient occlusion. Oh, that's a mask.
Ambit seclusion, our curvature. Position. And we don't need
to take this map. So we got these pieces, and
now if we go at an to fill layer, base underscore material. Now what we are able to do, and at least I hope that
this is all correct. We can drag in our base color. We can drag in our height,
but we don't need it. So let's just turn it off
now because it will just be a double strong
normal if we do that, our roughness, our normal, and let's go ahead and
get rid of our metallic. Okay, so over here
we have our scene, something still looks warm. Oh, wait, maybe we do need
to have our metallic. Just keep it white?
No, what is wrong? Is it our norm map?
Is our normp not in the right? Space maybe. Yeah, I feel like it's our
no map that's being won. Let's go ahead and
go, what was it? Edit Settings. No, sorry, added project
configuration sets do direct X. Okay? No, that's not a
problem. That is strange. Let's have a think what
could be the case for this? I don't think it's
like setting up a texture or anything like that. This is a tricky one. So for this one, see, that all looks correct. Let's twine a height over here. I know what it is.
I know what it is. Double normal. See? There we go. It's simply because I added a norm map while I already have my norm map in the BC it's just double normal,
which we did not want. So now that looks good. It was basically using the
norm map twice. Okay, finally. So we got all of
this stuff here. Now what we can do is we
can go ahead and we can start with some basic
dirt and everything. So let's add a fill layer
and just call this OCC. Oh, no, wait, let's
do like a ground. Let's delete this. We need something like in between
these spaces first. Let's go ahead and go in here. And I'm sure that we have
a smart material for this, and if not, we can
always find one. Let's see. It needs to be, the most basic stuff ever. Honestly, we can
even probably get away with like a collar, but I just want to see if
there's maybe something in here that I can use. Ground gravel. That's already enough. So we have ground gravel over here. Let's go ahead and really, it does not have a color
slider. Okay, fair enough. Let's go ahead and
make the gravel amount and the gravel scale
a little bit higher. And then for our color
because apparently, we don't have a color slider, what we are going to
do is we are just going to go ahead and let's add a filter color balance, color cracks, no color match. We could do that. Or
we can just try like an HSL note and see
if we can go like for like a dark brownish
color or something like that. Yeah, that probably
is not the nice one. Let's go ahead and just add the levels.'s art this in the back. And if we now go ahead and
set it down to luminosity, we just want to make
this like very dark. And basically, what
we're going to do is we are going to add a
black mask to this. And in this black mask, we are going to
add a fill layer, and this fill layer
will have our mask. So that's the first map
that we're going to use. So if we have a look over here, we have a rubber pile
mask, we can add that one. Oh, and we just want to go ahead and we want to invert it. Unfortunately, you cannot
invert it directly in here, so all you need to do is add
the levels and press invert. See? So it's just that we have that stuff
sitting below here. And then what we can do
is in our parameters, we can probably set the luminosity down to
make it even darker. So it's just going to be
like this dark background. See? That's why I don't
really care what it looks like because it just
doesn't need that much. Maybe set a scale to two. Just give it a little
bit of til here, let's do something like
this, for example. Okay. Basically, what
we're going to do now is we are going to have
another one that we'll call OCC underscore dirt. And this one will just
be a occlusion dirt. Set the roughness quite low. Set the color to be
like a brownish color, something like
this, for example. And then if you're
at a black mask, we can then go at
and we can go into a mask generators and there
is one that is called OCC dirt or occlusion dirt or something in that direction. Where are you? Dust
oclusion. That was it. This one, so here
now we can see like we got some dust and
everything in here. So you can play around
with just your scaling. Maybe let's make this a
little bit of a lighter dust. There we go. So
it's just a little bit more dusty. So
we got that one. Now, let's say that
we want to have, for example, some stuff
going on on our bricks. That's like some
color variation. So what we can do is we can
go ahead and we can add a folder and call this
brick underscore variation. And in this folder, if we, for example, add, let's say, a fill red color. So I'm just going to add some more red color into my brick. So red color, that's quite dull. Let's add a black mask to this, and let's add a fill
layer to it and just grab some kind of like an texture or something
like that. A grunge map. I don't know, maybe,
like, something like this and set the tying to, like, tree or
something like that. Yeah, that can
already be enough. Let's maybe make it a
little bit more like a darker color. Here we go. Play around a little
bit more with, like, your balance in this. And if you want, you can even twine and
set this to be like an overlay or something else. I don't know. I'm just
using my scroll wheel here to see if there's
maybe something nice going on. Okay, nothing. In any case, in our
brick variation, we want to add a bitmap mask. And then what we want to
do is we want to grab the ID mask over here
because what we can do with this bitmap ID mask,
that's not the right one. Add a mask with color
selection, I mean. And then grab your
bitmmle because now you can pick color and
you can just pick the blue. And now you can see
that it will only have this on a blue
color. And that's it. Now what we can do is we
can just go in here and you can basically mess
around however you want. Let's say that we set this from UV projection to
triplanar projection, press E to rotate and
maybe give it a bit of a rotation and maybe set
the color intensity, a little bit down like this. Let's say that we maybe add
some whiteness also in there, so we can duplicate this, make this like a white color. And you said this
grunge to be maybe, I don't know, like,
something else. Grunge map 013, for example, play around your
balance a little bit. You can once again, you can
just rotate this and you can tone it down so that you don't have
it all over the place. But as you can see
like this, we can just add some small little bits
of colors and everything, and that will, in general, just make everything a bit
more interesting. We can also duplicate
this again, get rid of this and just
use this as highlights. So what we can do is we can set our roughness a bit stronger. And then if we add
a mask to this, just something that generates edges because we
have a curvature. So we can do like etches dusty, for example, here see. And look at that edge is dusty, and we can instantly just
add some extra edges. To us bricks, which we can
reduce or increase like that. So we got this kind of
stuff, for example. Now we can just go
ahead and we can also go in here and say, Okay, I want to have another folder, and this one is wood variation. And in here, I just
want to add maybe like some darkening
for our wood, which is going to be
like a brownish color. Let's actually turn
off our roughness. Let's turn off everything
except for the brown color. Let's add a mask. Let's add a fill layer. In this fill layer,
let's add the grind map. You know this drill by now. It's just this stuff
over and over again. So let's go ahead and go for, like, here, dirt splat. Maybe set the scale into, like, two play out a bit more
like your balance. And then in your wood
variation, once again, mask with color selection, and this time, select the
green, which is our wood. Then we can just tone this up and down if we want, like this. And just as like a last one, we can also go ahead
and we can also add another one
that we will call, for example, this one is going
to be concrete variation. Add mask with color selection and just select the
concrete, which is the red. And then what we
can do in this one is we can add
another fill layer. And let's call this concrete, and all we need to do for
this one is we need to, for example, import our
clean concrete texture. So if we go concrete plane, for example, we can simply import these three in
here as a texture. N our project. By the way, at this point, let's go
ahead and do a save as. Rubble pile table on the score. Rubble pile on the
score, final, actually. Here we go. And you guess it. We can just go ahead and
once it is done, saving. Come on. Okay, there we go. We can drag in our base color, our normal roughness,
turn off our height, and turn off our metallic. Then what we can do
is we can just add a black mask to this one and do almost the same as that
we do a mask generation where we go for
an artistic head, and we just basically
go in here, and we just basically
in some areas, make this like a slightly
different concrete like this, for example, you can see, just in some really
flat areas like that, to once again add a little
bit more variation to these concrete bit You can just use as much or
as little as you want. Let's see. So we have that one. If you want, you
can even also add some rebar and
everything like that. That's all up to you. I'm just
going to leave it at this. So we got, this kind
of stuff over here. And then if we want,
we can, for example, also add maybe just
like some darkening, which is just going to be
like some surface noise. So let's set the
roughness lower, turn off everything else. Surface dirt. Add a black mask to this. And let's say that we
grab, for example, our surface worn mask for this. Okay, I don't like the
surface worn mask. Let's maybe try something else. I don't know what is here. Dust, subtle, maybe. Here we go. In any case, you get the
deal, or you get the idea. So we can just go
ahead and we can just mess around with this as long as we want to really create like the perfect texture, you can even go in
do manual painting. But I'm going to
leave it at this because it's quite
clear at this point, and we barely are able to
even see this texture, so I don't want to spend
massive amounts of time on it. So once you're
happy with it, you can go ahead and
save your scene. And then all that
we need to do is create a rubber pile and then a new folder that we
call final and in here, what we will do is
we will go ahead and export our actual
final textures, and our final textures
are going to be a simple PBR template. So PBR metallic
roughness, Targa, and let's just export
this four K and you know how to reduce it down
inside of unreal. Perfect. So we have
this stuff over here. Now, what we're going to do is if we go ahead and
go into Tris Max, we can save our scene. Let's turn this stuff off, and let's go into our
rubble pile variation one. Now our rubble pile variation one already has some geometry, which is actually good because what we can do for this,
well, first of all, let's go ahead and actually
import our texture, just our base color, at least. Rubble score pile. Yeah, it didn't bug this time. So we can go ahead
and just import our base color
texture and apply it. Then what we want to
do is UVW map box. And in this case, I actually want to
only set the tiling. Let's set the tiling
to five by five. No, let's do three by
three. Three by three. Yeah, three by three
is probably best. So we are going to
set the tiling. The reason I'm setting the
tiling is because after this, we want to add a
displacement modifier, which you can find over here. So it's just called display. And in your display modifier, you can basically go in
here and you can set this same tiling to make
sure that it all lines up. So if this one is
three by three, we want to make sure that this one is also three by three. Actually, let's make this one
also plainer. There we go. And then what we're
going to do is in our bitmap over here,
we can click on it. And then what we can do is
navigate to our scene and just grab our height, which does not export. Then what we can do is
we can go ahead and we can just go and grab it
from our texture V two. Here we go there.
We have a height. Open that up. And now if
you set your strength, it should here see, it should kind match up with your height although
it's not perfect, it looks like it's trying to. We might want to like art a little bit more
geometry to this. Let's go ahead and
go in the base. Let's turn these pieces off. And then in here, you can always go ahead
and you can press Tesslate then you can see if that maybe just
like a better job. Oh, yeah, so it's
like those spiky bits that are making it a
little bit stronger. But that should be no problem. It's just that we get
a little bit of shape out of this. Over here. You can use decay to basically swap between the extra high
points and the rest. So if you play around a little
bit more with your decay, and you can also play around
with your luminosity center, which will basically set like how strong everything
is going to be, but I'm just going
to turn it off. We can just try to
find a sweet spot. So let's say that this
is like a sweet spot so that we still
have some height. And yes, we have
some strong spikes. Here and there, but
it's not too bad. Once you've done that, last
thing that you need to do is some optimization because
right now we are at 80,000 triangles,
which is a bit much. So the last thing we need to do is throw on a pro optimizer, turn on keep textures
to keep your textures, calculate, and then
just have a look up close and see if
you can reduce this. So let's go 100-20. Here, see. And then we can
reduce this and you can see in your wire frame
that it will look like this. So it's very similar to
the decimation master, not as good, but similar. So let's say 15, so that we still keep some of that bumpiness in here,
but it's not as much. You can do this, or what
you can do is you can do the parallax
mapping technique. It is called parallax
mapping inside of Unreel, but we are just going to use
this technique because else, it's quite a bit of setup. So we got this stuff here. We can export our rubble pile to unreel rubble pile
variation one. Yes, I want to export you turn on tranglate,
save our scene. And now we have arrived. New texture, rubble. I will sco pile, and then we can actually see how it looks. We just want to import our
base color, normal roughness. Let's have a look over here. So this is open GL. It does not look like
open GL for some reason. This looks like OpenGL. So this should
already be correct. Yes, I think the
normal is correct, but we can just test it out. So if we, for example,
go over here, what we need to do is
we just need to create a new material, plain brick. Let's duplicate you and call
you rubble underscore pile. Open it up. And then
in our rubber pile, we can just drag
in these textures and set the color
to be just a bit of maybe a little bit darker, like a gray color. And then last thing
that we need to do we save sine
before we do that, just in case, open up a
rubber pile over here. Re import, reset the FBX. So now you can see
that looks like this. And then if we go into
our content browser, we can just find our rubber
pile and artist on top. I need to play with our
roughness and color a bit, but it is working,
as you can see. Here you see? So it is working. It's just that we need to play out a little bit more
with our material. Can we maybe just throw
it in here temporarily? Here, rubber pile, let's
throw you in here. And then let's have a
look at our material. No, that's the model. Come on, have a look at
our material. Thank you. Make sure that the
tiling is set to one because that's the key goal. Desaturation, let's
set this to zero. Let's set our metallic is
zero. Let's set our roughness. I know, normal strength. Let's set our normal
strength to zero because it's already a
really strong normal. Roughness maybe 1.5,
1.4. Let's do 1.4. And for the color, Yeah, actually, the color
is quite fine. So as you can see, you have a quick rated
rubber pile that still has some geometry and
everything just to give it a little bit extra. Yeah, I'm going to make the
color a little bit darker so that when you see it
in those little spots, I want to have this sitting in the background a little bit. Like it's just falling
in the background, and it's just like
this extra bit. But over here, you
can see that now, we can see like
these rubber piles, and they do not
really feel out of place. They're just
kind of there. You can increase the
tiling if you want. Think I'm going to actually make it a little bit darker even. But you get the deal,
or you get the idea. In general, that
works totally fine. And that is it for
our rubber pile. So now that we've done that, I think that is the final
thing in terms of, like, our real time stuff because now what we're
going to do is time labs. So we will go ahead and
create this brickwall, which is going to be a very, very basic version of this
brick wall over here. And once that is done, we
are going to do level art. Also, we will do this
as like a time naps. Now, the level art
will not be included, but it will just be a Tips
that's also included in real time of me like placing
some foliage and twees. I will try to include as much as possible
in my project is, but it will most likely
be only containing this. So we will have, like, grass
and ivy and everything. But all of these external
buildings that you see they will not actually be included
in this project file. So when you open this up,
that although by this point, you probably already
noticed that, those things will
not be included because I do not have
them laying around. I need to buy them
in order to do that, but I'm not allowed
to give it to you. But in general, if
we have look at the camera angles,
song look really good. CAC so you can see
that the walls they are working correctly
the way that they want. Although this one
you might want to carefully just push
back a little bit, even if it means, a
little bit of clipping. But just in general, this
is looking pretty good. So we got already a
really good effect, and I'm very confident that by now if you
followed along everything, you know now how to
create destruction, and you have the
knowledge to create many different types of
destruction like this. So I will go ahead and I
will do an outro later on, so you will not or you will still hear my voice
at the very, very end. But for now, I hope that you
already really enjoy this, and let's go ahead and
just finish this thing.
70. 69 Creating Our Broken Wall Timelapse: [No Speech]
71. 70 Taking Our Scene To Final Part1 Timelapse: And I Oh.
72. 71 Taking Our Scene To Final Part2 Timelapse: M and and and and and and
73. 72 Taking Our Scene To Final Part3 Timelapse: D.
 FastTrackTutorials, Premium 3D Art Education