Transcripts
1. Introduction: Hey, what is going on, guys? So today we're going to be taking a look at how to greet Crystal, dispersing inside of cinema foodie and a little bit off. Unless Bill, if you guys don't know what channel is honored, is 1/3 party render engine for 7 40 So if you guys don't have an ally, really apologize. I don't usually use that Mr Body pregnant, but we're going to be using all in for this scene. If you guys are family with physical, you can still light and shoot this instead of physical. But for the majority of the class that we're going to be doing is completely instead of cinnamon 40 we are going to see how we can create those studies. Or we can create those crystals, some cages, and then we live in tow onions Network shooter, how to create a frosted glass, how to give a little bit of roughness for to create a gold and copper material. And then again, we'll dive into how to give the lighting how to give that Indians kind of thing. And then, after the holding doing is done, will take that image into for a show for some final touches and supposed pressing how toe color great, every your images and how are rid of greens. The added weight off in yet and then your abstract are deserting, so enjoy the class and hopefully we'll get something out of this so
2. Terrain: what everybody? So let's start off migrating, altering the landscape. So that's very easy to do. So first of all, during the war into our primitives Andi here we see landscape selector so instantly you get this. So I'm going to make the size to something like 1000 and one time something like this. And then I'm gonna do as you can see, you're getting kind off a mountain kind of thing there. The fall off has been set to radio, but everything inside of the terrain is going up and everything else going toe radial fall off that everything is going smooth and downward motion. So obviously we don't want that you want a monkey fact, your kind of thing. So we have to turn off the border etc. Level and instead we get this. So the first thing is tragic NCR landscape is pretty locally. If I don't on my lines and you can sleep, this is our segment. The more amount of segments you have, the better detail you're going to get but at the cost of render time off this year. So let's take something like let's make 1000 10,000. So as we continue in a cemetery if you want to start out by taking some less German so you can also go for 800. And for the final end of having to make it 1000. So a Z conceive. You have something like this. I'm going to just gene the skier toe, make our Doreen smaller. You can see in skill. So we're going to make this kind off a sci fi surface. So the next thing we have to do is creating art abstract art.
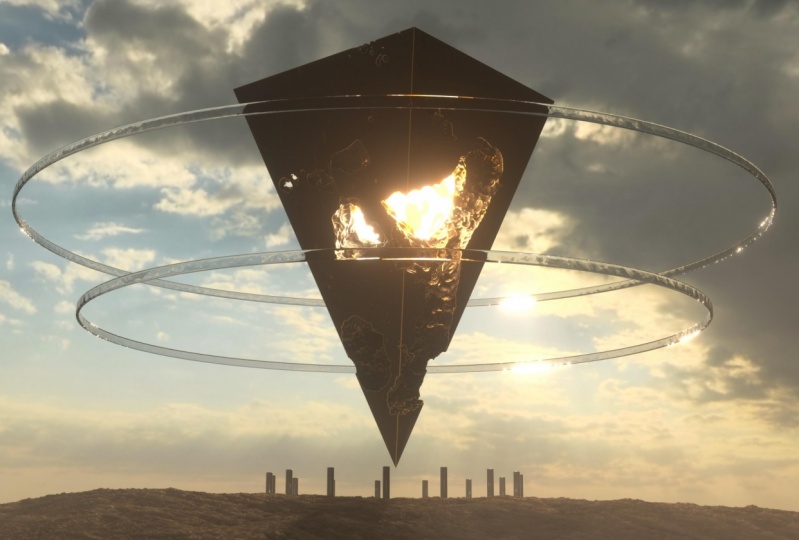
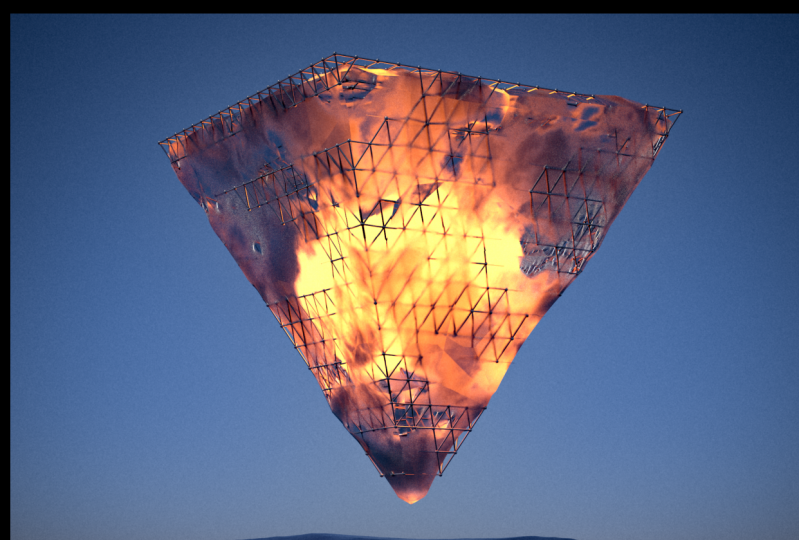
3. Abstract: so creating are abstract art. We're going to dig a pyramid. Felix, bring this up on instead. Off plus y orientation. We're going to take a negative by condition. So we have something like this. Now I'm just going toe Make this a little parlor. Yeah, so I think this is too big. So I'm just going to scale this down. All right? On this. Bring this down somewhere around here. Order. So now they're two things, as you can see since you're working in and I have this layout, but if you have this start a player, it's totally fine. Doesn't make it doing making a difference, So yeah. So this is what I have. I'm going to do it in my perimeter. Simply anything. Control and dragging and dropping. So I'm going to turn this off for now. So I have this simple premise. If I had done on my lines again, as you can see a mentor down off my landscape, it's also concentrate on this. As you can see, we have simple geometry. Not too many civilians. I can make this five. Onda actually was making changing into this. Yeah, This is originally something to make this fight. So as you can see, we have this kind of signals going on. So for this one, actually, we need a large amount of segments somewhere around like 1000. As I said, you can start off by making it 800 is really, totally, really depends on you, but for me, I'm going to work with 1000. So the reason why we need this kind of high geometries that because you're going to displace it with this placer. So I'm going to win negotiator on. I'm going to change, actually, mirror take and noise instead of my noise. As you can see instantly, we have something like this instead of my noise and moved to take something like Warren I. And here comes the creative process. Now everything from now this point really depends on your hand off. You can see abstract you want I can follow along where you can create something off your All you have to do is experiment with different kind off noises. So undertake something like your vote when I do. And as you can see, we have a very small amount of detail going on, right? Right around here on duh the reason we have such a small geometries because our global scale, he said. 200. So if I lower this are lower more 200. As you can see the lesson on the segments we have, the more you can say bad looking. It is since, uh, patterns like noises requires a very high directly something to make it 800. And for the final render waving to change your toe Ah, 1000. Right? So let's go into our geometry and I'm going to make it 1000 Your ideal dad work A Z can see we have something like this. Something to make this somewhere around 800. Yeah. So this is looking good Presidency. Not too bad, I guess so. Now it really depends on As you can see, we have some weird in the section going on around here. So if you want to figure this, all you have to do is go to your the space, it the object and Jesus type from intensity center intensity and that you do now we're do anything. I'm just going to make the skill too small to something like 600. I think it's too big you can make it small, Make it interesting. So our remedies looking good. I'm going to make this 500. All right, this is good again. Let's turn on our landscape. So, yes, we have our landscape. Now go back to my was Bram it the different one. So this is our We're going to call this crustal, and we're going to call this cage. So under big and at Emory on Drop this child of ag Marie. So I'm going to make the segment to something like four. And obviously we don't see a pyramid. Or you can say that Maybe the reason is we have a very small amount of scale comparison to the original question We have so scale this up pretty on the go. Just bring this fountain. Do it. So as you can see, we start to see something. So I'm going to make this right around here. So as you can see, our at Emory's are pretty big. So I'm going to make the spirit is to somewhere along the way one on cylinders, 2.5, maybe even 24. Something like this on. But let's make the spear subversion 16. It looks good. Let's increase the amount of segment every 20 eating. Okay, so this is looking good. So the next time you need to do is select both of these, and I'm doing right. Click, connect, object, less deed. So now we have a single thing Lawless at Emory, and I'm leaning. Gets to teach. So we have something like this right on. Now, what we're going to do is we're going to make As you can see, there are object is already ready. And vegetables were going to go into our faces mode and select our selection mode like selection. Andi, turn off. Only select physical evidence. If you have this turned on, if you can see if I select this behind every nothing is selected behind it, it will only select the visible element only. And we don't want that $100 off. So yes, just goingto do some randomized patent kind of thing way. We're going to select unusual patterns like this, and we have been polluted. Who makes some variations. So I'm going to select something like this. Do you all right? Just going toe randomly select anything you need. Andi, this looks good. I think I'm to keep it like this. So now I'm goingto go to my object mode again and just skill this little downwards, just no. So not all gauges visible, just some part of it. So I'm doing great and I'll now and call this stage brought Bizinsider. No, take another. Now let's call it is Crystal and drop McChrystal on the nun. And let's call it a communal for our Kareen. It's for this stripping on, I think this child off the none. So, uh, you can say modeling has been done. There's one last thing to do, which is adding a simple spear, which which we are going to be doing a later on when we're done with our lighting and everything. So we're done with her overall morning, you can say Oh are creating are abstract likes, jumping through some lighting and cheering
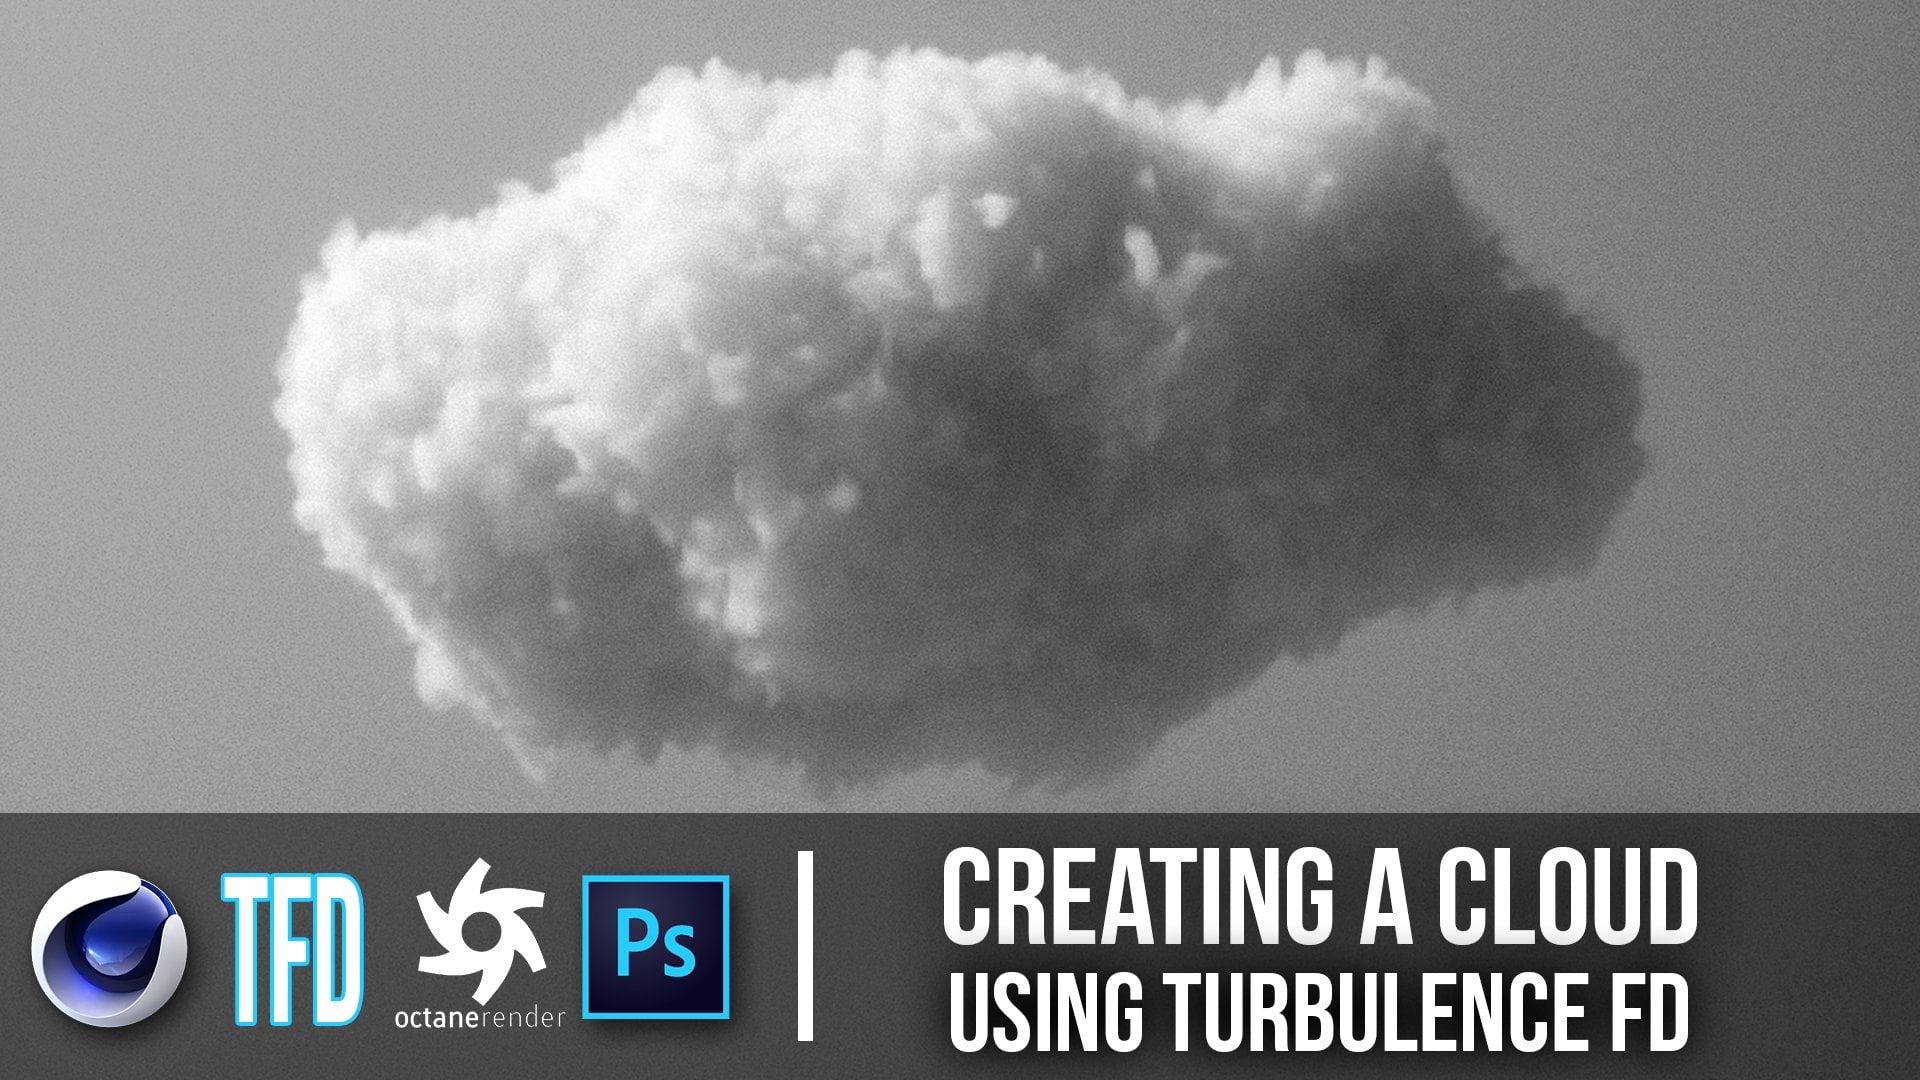
4. Lighting & Shading: All right. So let's getting toe some, like Nigerian. So I'm going to first for take a camera. Like clicking on this I can to make this active on the 1st 1 between the focal in something like report it. This looks good. It's always looks good. And we're going Yes, before goes on my I mean, And, uh, I don't his old man Just really There's something like this, Okay? And I'm going to get out of my camera. On As you can see, a scene is pretty. You can see everything is pretty big compression to our crystal. So what I'm going to do is create another null. And I'm going to call this crystal mean and drop my cage and my question instead of the no time to bring this little backwards going toe camera angle and select a crystal mean, having this down and skilled is known as well. Yeah, something like this. So the next thing is, as you can see, um, Doreen has a few Burton in see too much off waves going on something. You just bring this down to something like 60 going down in camera again. And if you're not happy, with the role How your landscape looks. You can always change your seats to get different kind of results, which obviously we're going to do. Or either you can also mean the role size toe 4000 to make the area a little bigger. Yes, she's you. I'm just going to bring our landscape on your back, okay? For literally keep it center. And instead, let's move camera. Yeah. So I think this is looking good. Some would this angle just Yeah. So when do I keep on my camera tag and protection time? There's one more thing to do is ah, changer. Resolution from the default standard for soldier injuring the Donald on from the output. We're going to change toe squared. Ok, okay. So now we have a perfect visualization off. What kind off you can say? Look, we're going for I didn't move the prediction back and just I think zoom in a little bit. Yeah, and drop this back in and just make the big I guess, Mark, since we are having let me zoom in. Yeah. So this is back to default and just my no score. Say toe wherever it may go into your autograph accuses fit middle mouse button and go into this. And here you can align it properly. Oh, either it's best if you like bringing the border. Yeah. So click on this to turn it off. And now, if you skill this all right, it's everything skills perfectly. Okay. Okay. So I'm back into my camera angle, and now you can also rotate your crystal if you think that your original crystal is looking to done for your C. So maybe just skill this something like this, the traitor. But atoms are kind of shrinking insights and not going to do that. So the next thing we have to do is give a little bit off light so we can actually visualize everything. Someone working into my playing 40 in sky. And I'm going to jump into my ANA interface, which I've created on done on my idea. Okay. So, as you can see, we have something like this. You can also I mean, take some HD arise if you like. So, in the understand, what I'm going to do is change it to physical space. Okay. So instantly we get this, I'm going to keep the ability to supply this elevation to maybe like three. And this until I find my son. There you go. Keep it like that on here. Okay? I'm going to make the sun sites for one and Exposure one. And let's bring this up. Samples to five. So this is a sitting we're going to go with for now, All right? I mean, during the production tax, I can just move my lines. People camp adjusted downwards. Something like this on about this back in. So this is what we have. Now let's start by bring some chilling and research back to my sky. Oh, and you can sit back and forth with this and just turned on your explosion. So the first material we're going to be creating is a frosted glass. Now, how do you create that? In honor? It's very simple to do, Go understand service and greatest time itself is inside this lips called this frost and don't know the right here. I there I will have this thing where it can't refreshes multiple things at the same time. So we use only one thing after thing to visualize it. I cannot run your right here and your material prepared the same time, so we can only run one. So for material is not rooting, make sure you have done no pure I get right now it's running. So if I change anything, it won't show in my material, because it on this up. So how do we create a foster glass? Well, first of all, good. Their transmission on brand of your translation. Now we have a glass to create a frost urging us All you have to do is make that off Mr Point for. And they're you. So I'm going to drop this look in your crystal. This is my crystal. Drop this on you, Christine. Okay, we're not actually it's really close and switch. My skied of fiscal skies will, so you can see we have ah, frosted glass going on, but we don't actually see the world last kind of thing. And the reason is ana uses something called less, you know, pick, which you have to turn off. Which means this object right now is a marked object and not a transparent objects. So we have to tell under that it's a transparent all just So I'm going to turn this off okay. And now you can see a little better now if I change something elevation to something like this, right? And now, as you can see, you can have a better visualization like, but let's keep it like this for now. So the next thing is to create a copper material for our cages. Something to paid one more surface san surface done myself on them to make the materials to one and read one and in the metal preset. I'm going to go toe copper and that's it So easy to make. I want to drop this to my kids on now. We're going to create a material for our terrain. So good. Agreed. Actually, let's rename this to gauge Uh, let's go to create understand surface. It's called this 13 on here and to meet the color to something like like in the blue area on gruffness toe maybe. Do you? So drop this on your during Let's your right yard and let's see. So, as you can see if you have something like this going on, um, you really okay. So I think this is good looking for now and now, the last piece of German Turkish you have to do is take a sphere early on. Let's skin the radius to something like 50 for now. And the segment before the I'm going to get out of my candor. Done this off Now on going to align the spear exactly where my crystal is. So bring it around here. Just make it smaller, Mrs Thing, This is looking good from the talk. You It's perfect. So as you conceive via our sphere here No, it's, like, done on my yet again. Okay, You have something like this as you can see, our spirits completely visible. Which exactly what? You want me to make this work a little smaller, so it looks pretty good on I'm change my channel sky to three elevation Three, actually. So 33 Onda until icing my son. Yes, So right around your exposure to back to one. Okay, so this is looking great now for our spear. What we're going to do is writing on it and go toe cinema, 40 toe tags and greed and measure. Right now, what my slight is going to do is emit light from a mesh. So here, as you can see, it is a meeting like Bert. Suddenly geometry is then disappeared. So we have toe check are like, visible on. What I'm going to do is make the exposure to one on and custom like visited. Done this on why we're doing this is because the exposure value is going to ridiculous. But the amount we're going to be showing is pretty big, so we are kind of faking it. I'm going to make the exposure to something like four. Right on. The next thing we have to do is go toe details, use color temperature and just bring this down to something like this. Okay, so as you can see, it looks nice. No, As you can see, we have, like, glowing object and everything, but completely visualize this being in some roughness, going on on a fluster glass, as we have on our original render. So to do that, what we're going to do is open unit with a little It's close this up, and it's being this down is, um So what I'm going to do is take a noise. Okay, drop this noise. A tragic toe beauty. So you can visualize what's going on. And here, as you can see, we have operatives, which basically means how high your quality off your noises, some distortion dissolution to. And like when Artie, maybe like one point. Lee, if you like a lower this too much, it's going to lose its details. Let me show you. So as you can see, they were not going to be loading it. We're going to keep some something like this one point it or something A little bit off this ocean. Now I want to add a color. Correct. Nord Fridge is going to help us to control this. Nice. So drop this on you collaborate. Input on beauty. So here, I'm going to me reduce my grandma a little bit and increase Nikon plus something like this . Yeah, and some exposure. Yes. So this is looking good to me. Something to drop this to my speculative roughness and attach this to the beauty to instantly We get this right on this on now, As you can see, we have ah roughness backing going on and you condone on your geometry. Sorry. Destruction Totally up to you. Go to collect addict Increase Norman, Both exposure if you want to make it with more hardship And if you don't like the patent, simply change the time to one. This is basically kind off the seeds you can say two on if you think your noise pattern is too small If I passed this tunnel beauty, As you can see, we have this pattern going on. If you think it's true. Small even do is Jesus. Skill to 7.5. And you have bigger patterns. So I think bigger will be much more you can say easy to find in our abstract art. So I think this skill is pretty good. So what has this to the beauty? Andi, Here we go again. All right. I'm just going to mess around with my time until, like, trying a profit. Look for my noise, Patton. I mean, this is looking good. Like when nothing was done on my exposure. So it's kind of bringing in the foster glass. Yeah. So I think this is what I'm going to move it. One more thing that I think this is, like over eating my crystal. So I thought turning down my help. So it's looking good now after your specific, The next thing is ah, well, I think pretty much messing around with your Doreen's color and everything until you can find a darker virgin over. And I'm going to also change the sealed off my land. No, until I find a good look at your return is open now, right? Like think that this is also looking good, but I'm still not satisfied. All right, so I think this is looking good. I'm goingto take my landscape, Make this 2000 again on in my crystal I can actually subdivide this if you if I want to make commish a little higher so I can take a subdivision. But instead of taking a subdivision, all I can do is like, keep on my kids would want it back on, take a parameter And in the parameter I'm going to subdivide and Cara Clarke. But instead of cattle clerking it which will kind of softened everything we're going to go with linear, which will kind of just multiplied the subdivisions without missing with your geometry. Citing this is looking very nice. If you feel like changing anything, you can always play around with the noises, right? So the reflection is nice If you want to kind of make a doctor original pit. You can always go to your Donald, stay and mess around with your is You want, uh, make something like this make a bait over Nothing. Dorial depends on you. So this is kind of the creative process is totally depends on which kind of look you want and be showing you an example of what you can achieve with this.
5. Render Settings: So now we'll concentrate on the render settings for the rendering. Go to your render engine, make sure it's on honor. No, no. We're going to make the samples to somewhere around 6 to 8 if the system can handle it. But you refused to forward and four transmission also for no subsurface, scattering William in like one in the real adept. We want the transmission this time so I'm going to keep it. Will eat its default so the rest is good on Exclude this in the final thing. Make sure you from the samples to something like it or five with sufficient or those suits you guys. And now I'm going to hit Render and I'll see you in the post Russ's.
6. Post Process: everybody. So here we are in the post process infection. So I brought my pulling power shop and we begin this photo, right? Control Jake, I don't know like this. Go to build a camera temperatures. Now it's certainly a P if you want a coursing or one thing going for do this for this explanation on immune to go, a little warning on break up. Imagine Diner. Just one drink, then increase in its usual can be trusted with highlights on shadows. So it gives more contrast with dignity. And there's a white. So the next best picture on picture, this kind of going to help us individualize is working. Doing too. Increase the moment you can see kind of works in that. Is there anything it clear apps or things so go just like could be intended. So the next thing is clarity and clarity basically means sharpening of damage. Don't overdo this too much, but if you like going to the negative value if you have, like greenies him seen in surrender your board seen with high samples so you can decrease the clarity and religious kind of blood, Everything going to business good and let's be used this looking good. Now, I mean, a reply brings I've been Just add a liquid, Morgan. I'm not going to actually touch my saturation of private is good job. All right, so the next thing is, I'm not achieving toe pretending you can decrease. The highlights are increasing the highlight of this. I think the highlights from the sun is looking very good. All right, so the next is a fix. We're going toe toe the boost growth be needing, and here we will add. All right. Just right around my nesting. So we need is basically this or all black borders. Anything. Look tonight. Well, if you know, if you want to add some greens, you can have some greens, make this and recruiting stroke. I'm going to add a little bit off green. I think it looks pretty nice. And if you think you're not unable to rule of this or you don't want to manually correct each and every single thing, what you can do is simply go to the last section of the staff on this is far less precept section, which is already handmade precepts will weaken Barican, select into anything on Just go with it. So the results are pretty nice. As you can see, something like this, you have some black and writing goods. So you don't have election man leaving your, uh, goes actually so you can do some things. It's live shadow, strong and adult with the greens as well. And some shopping on urinating is so if you don't want manual dual of this thing that struck here, you can choose this matter as well. Someone do it looking. And there we go. So this was before this is after before. So I hope you enjoyed this class. Thank you so much for speaking up this plus, uh, absolutely need projects coming up. So if you do make something out of this, definitely send me on instagram. I love to see your work. And again thank you so much. Looking at this plastic. You having a tradition for the next last? Definitely let me know
 Reimagine Fx, Reimagine Fx