Transcripts
1. Intro: Do you have 1 million
photos on your phone or in a shoe box and have no
idea what to do with them? Gone are the days when people
printed their photos at the local Photo lab and then stuck them in a big
binder with plastic film. What if I told you
making a photo book is nowhere near as
intimidating as you fear? Modern online services
have automated layouts and captions
in user friendly apps. Just click a button and AI
does most of the work for you. I'll show you how to identify perfect pictures for your book, and more importantly, identify pictures that
aren't so perfect. I'll show you how to edit, move things around,
add stickers and text. Your project will be
screenshots of your book pages, demonstrating the skills
you learned in the class. Follow along with me
to make a photobok, and by the end of the class, you'll have an actual finished
product you can put on your coffee table to cherish and share
with your loved ones.
2. Welcome: Okay, so I know you're probably overwhelmed by the number of photos on your phone. To make you feel better,
I'll confess I personally am at 17,000 photos
and 1,600 videos. I even had to recently upgrade to a larger Cloud
storage solution. I'm traveling for two
years, so I do need it, as I like knowing that
my images are safe in the cloud should anything
happen to my phone. I decided that while
I was on the road, I'd make photo books and have them delivered to
my family so they can join me from their
armchair. Here's how it'll go. You'll learn how to identify the best photos for the book. I'll recommend a superior
online service called Mix Book, which has a usable interface and which services
many countries. I'll show you how
to easily insert your photos into many
different layouts and themes, and how to add text, swap out images, and add pages. Finally, we will order
our book together. By the end of this class, you'll have a finished book
to put on your coffee table. Your project will be a few
screenshots of your work, demonstrating the knowledge and skills you have
learned in the class. The gear you'll need an iPhone, a MacBook, an
Internet connection, and lots of great photos. Once you've finished one book, you'll realize that
you can create lots of other products
like recipe books, yearbooks, annuals,
and family histories. The options are endless.
3. Photo Selection: What makes good photos
for a printed book? I would recommend choosing
a variety of photos, including close up portraits, unique perspectives,
beautiful landscapes, and lots of fun and activity. Select only the gems. What photos make you go, Wow. Those are the keepers. What
do you want to remember? Any photo that triggers
a memory or that represents something
important is also a keeper. Conversely, what makes
a not so good photo? Any photo that looks a lot like another photo, basically,
avoid duplication. Anything that lacks quality, such as an out of focus photo or one that features your
thumb in the corner. And any blah pictures. If it doesn't tell a story, make you smile or
go, Wow, move on. Next, you'll need to decide
the theme of your book, as this will help you be selective with your
photo choices. Is it a range of dates
like a yearbook? Is it a trip? Is it a specific person or pet
you want to feature? As you can see, McBook has hundreds of amazing
themes to choose from. For my demonstration,
I'm going to create a book project
called Turkey. For my design, I chose a theme
called modern geometrics, which is a travel theme, but it's very customizable. I'll be covering themes
in a later lesson. Okay. Are you ready? Now we're going to select our photos and get them
ready for the book. Essentially, the
three steps are, we're going to make an
album in our Photos app, and then we're going to go through select the best photos. I'll walk you through that.
And then we'll prepare for printing by downloading
the high quality versions. The first thing we'll want to do is open up our Photos app. So hold down command,
hit Spacebar, type in photos, hit Enter, and here is our Photos app. By default, it's sorted by date. The first thing we'll
want to do is create a new album with the same
name as your photobook. So I'm going to hit
the plus button here, and I am going to call it Dirk. And we'll be copying
our chosen photos into this album in a minute. Let's go back to our library. There's a number of ways
to select our photos. We can either hit this
little favorites heart here, which places it in
this favorites album. We can filter it by days,
months, even years. We can filter by just
photos, which I'll do now. I don't want any videos in here. It'll help with the
selection process. If you want to enlarge an image, you just click once,
hit the Space Bar, and you'll see it full screen. To make it go back
to the grid view, you just hold Spacebar again. You can select the
images as you go. It's probably the easiest way. So I'm going to grab this
one and then I'm going to hold down Command
to select multiple. Now what I can do, making sure that this is on
the left hand side, hold down and just drag it over. It's not making a
copy of the photo. It won't add any extra file
space to your hard drive. It's just making a reference. Let's select a few more. I'm going to click Favorites. Filter by Photos is
on, which is great. And I will select a range, so you click one, and then you go up there, and then you hold down Shift and you'll see that
all are selected. I'm going to scroll down
here to the turkey album, grab it and copy that over. And now we have a larger album. Now what we want to do is
make a folder on our desktop. Now, this might be confusing, but it's a two step
process because your Photos app uploads high resolution versions to the Cloud to save device space. By creating a folder
on your desktop, what we're going to be
doing is downloading the version from the Cloud
down onto your hard drive. And this is a high
resolution version that's suitable for
printing in the book. So go ahead and right click on your desktop to
create a new folder. So, I am going to name
this folder turkey. Going to open it up and then put these two
windows side by side. I'm going to go in here, select them all again by clicking, holding down Shift, and
then dragging them over. Now, to make sure you have
the high resolution versions, take a look at the file size. Low res versions
are around 300 K. High res versions are two
megs and up so to recap, we selected our best photos. We created a folder in e Photos, and then we downloaded our print ready images
from the Cloud. Guess what? We are now ready to create an account on Mxbook
and start making our book.
4. Digitizing slides and prints: Do you have printed photos in a shoe box you want to include? You may also have negatives that you don't have prints for. You can get them into a digital format a few different ways. The simplest way is to photograph prints
with your iPhone. I recommend placing your
pictures on a surface close to a natural light
source such as a large window. It's best if the
light is indirect or diffused with a
shear white curtain. Ensure you photograph
it straight down with no shadows
or distortion. I often use the two time Zoom
to avoid casting shadows. There are apps available, so you can even shoot
negatives with your phone. Or you can take them to a local photoshop or big
box store for scanning. This option can be pricey if you have a lot of
images to process, but it is convenient if
you are a busy person. If you have a large project, it might be worthwhile
investing in a scanner. I personally own and can
recommend the Epson Photo 600. It has a negative and a
slide scanner attachment, and you can scan many images at once, saving valuable time. I.
5. Getting Started on Mixbook: I did quite a bit of research and reached the conclusion that MxBook offers the
best quality and price combined with
an easy to use app. You can design your book on
your laptop like I'm going to show you or download an
app onto your phone. Essentially, the principles
are the same for both, but it's easier, I find, at least on my laptop. Let's get started
building our book now. Go to mixbook.com and
create a new account. Click here, enter email,
create a password. I got started right away here, but I'm not sure if it's because I had already signed
up for an account, but you might be able to get
started right away as well. Now the fun can start.
We're going to choose a theme and insert our pictures. Now, to choose a theme, you
hover over photo books here. My book is a travel photo
book, but as you can see, we have a year in review, holiday, family, kids,
baby, et cetera. And you can even filter
by subtopic here, theme parks, outdoors,
honeymoon, et cetera. And as you can see here, you can filter by shape. So we have a landscape, shape, square shape,
and portrait rectangle. Mine I chose to have a landscape orientation just
because I like it better, and I think it suits
travel books the best. So when you're
deciding on a theme, it's really a
personal preference. You can do previews here. So this one's
clean. It's simple. This one looks like a
little bit more Hipster. This really feels more like Instagrammers
photo album here. And then you've got
a beach theme here. There's so many
options with MxBook. You can change the backgrounds. You can add fun stickers, change the color palette. And here you can
favorite your theme. The one I chose is called
modern geometrics. What I like about this
template is that it has lots of different layout
options. It's clean. So I am just going to go
ahead and click Start Book, and this is the
window that you're presented with first off. There are a number of ways to
add photos to your project. You could choose files here, which brings up the dialog
box to select all photos, hold down command, hit
A, and then click Open. You can scan this QR code on your phone to upload
photos from your phone, or you can load from Google,
Facebook, or Smugmug. Okay, so I have gone
ahead and uploaded my images from that turkey album that we had created earlier, and now they're appearing in
the left hand photos menu. I think my favorite part
of the Mxbook service is this button right
here, Auto Create Book. So when I click it, It's going to warn me,
we're going to do it. I'm going to exclude the front cover
because I'm going to be designing it by myself, and I'm going to hit Apply. Now, in just a few seconds, it has analyzed my photos, auto selected layouts, and
inserted my photos for me. Being a graphic designer, I'm quite particular
about certain things. So I will be going through and fine tuning
some of this stuff, but it's a really
good place to start if you don't have a lot of time or graphic
design knowledge. Okay, next, we're going
to take a look at the interface and edit
the cover. To recap. We created an account on Mxbook. We chose a theme. We added our photos automatically
using the magic button, and now we're ready
to fine tune.
6. Interface Tour and Jump Start: Let's dive into the
interface a little bit, so I can show you
all the awesome features that MxBook has. Then we can get started right
away designing our cover. On the left here, you'll
see the photos tab, and it shows you all the
photos that you have. This is layouts, and they are organized by number
of photos per page. And if you roll over, it will give you a preview
in the main working area. Here you can add backgrounds, which will go over later. There's some stickers
you can click and drag. Here's the textbox.
You can add bold, italic, a line center left, right, and we can change the fill color and add a
border to the text box. And there's even
AI caption ideas. If you want to change the
theme of your book entirely, you can always select one from a different theme
to mix and match. And there's a Beta
feature with a map on it. So you just here enter the location where
you'd like the pin, and it will generate
the map for you. You can always collapse the
window if you need more room. Here's an undo button if you
don't like what you've done, or if you undo it and
you want to redo it, there's that option as well. You can add pages, delete pages, over here, you can do a full screen view of all your pages and you can click and drag
to rearrange them, and you can scroll through all your pages to
the right here. And if you wanted to jump ahead, you just click there. You can copy pages or you can clear a
page of its content. You can share to collaborate
with other people. And when you're ready to order, there's the Order
button up top there. You can toggle the view to single page or two page spread, and to navigate
through the pages, you can just click
these arrows here. If you want to zoom in,
click the plus button. You'll see this
little red box here. So if you grab that, you can navigate within
the Zoomed area. To get rid of that pop up, you have to go back to 100%. If you have more questions
that I didn't cover, you can always click
this button here. And Mxbook has a lot
of video support. If you're anything like me, you'll want to jump in right away and start experimenting. So now that we're familiar
with the interface, we can get started
designing the cover. First things first, let's
change the layout here. So there's a lot
of graphics here. I wanted a really plain cover, and I want to put the
blue mask on the cover. So the first thing
we'll do is go over to the left hand menu here
and click layouts. Click one because it's a
single photo that I want. And there's a plain
one right here. So I'm just going to
click that to apply. Now I'm going to go back
to the photos tab here. And here's the blue mask. So I'm just going to
click and I'm going to drag the photo onto there. Make sure you uncheck
this box here. What it does when
it's checked is hide your used photos to
avoid duplication. The reason I personally
like to uncheck that is I like to see all
the photos that I have. I will go through manually
and avoid duplication myself. Okay, let's go ahead and just the photo
and add some text. So when you click on the photo, you'll see that you have
these options up top here. So when you zoom in, you're basically cropping it
a little bit tighter. And you can see these arrows that go up down left to right, and you can drag
your photo around. So actually, that's
a bit too tight. I'm going to zoom
out just one click, and I'm going to make sure
that it's even left to right. Now let's add some text. And I'm going to go over
to the left hand side here and scroll down
to the text option. This button here
adds a text box, and then you go over
here and you just click. You just simply start typing. I'm just going to
type turkey here. And I'm double clicking to select the text. I
don't like this font. So what I'm going to
do here is go over and choose Hello Lucky is the typeface that
I quite like here. I'm going to change
the font size to 128 and change the color here to white because
the background is black. I'd like to center the text between these two minarets here. So I'm going to grab
this right handle, drag it over to the right. Grab the left handle,
drag it over to the left. And the text is a line centered, and I'm going to grab the top handle here to
raise it up a little bit. There you have it. It's
right in the middle, and that makes a really
nice simple cover. Now that we have a
good overview of the interface and how to
add pictures and text, let's dive a little deeper. To recap, we toured
the interface. We changed the cover layout, and we learned how
to add a text box.
7. Placing and Editing Photos: To replace one image with
another, it's very simple. Just make sure you
have your photos tab selected on the left, and you just grab a photo here and drag it on
top of the other, and it just swaps it out. Let's grab another one here. And a third. It's as easy as that. So now let's learn how to swap photos. I don't love this photo here. So what we can do is just click swap and now I want to
swap with this photo. So you'll see that they
just change places. And this makes way more
sense because the one on the right can't be cropped
in half like it was, but the cat can. So
let's just click. I'm just going to raise this cat just a bit so its
whole body is showing. And that's a much
more pleasing layout. Now, to edit a photo, you click on it and click
this little Edit button here. You can change the border shape. You can add a drop shadow. Here you can adjust so you
can change the brightness of the photo so you can see
it's going up and down. So I'm just going to adjust
the brightness here a little bit and increase the
saturation or decrease it. If you decrease it all the way, it becomes black and white. And the contrast increases the difference between the
Blacks and the whites. So you'll get quite a flat image here if you pull it down. And then I'm going
to click it done. And if I wanted to
fade out a little bit, you can change the opacity. So if you had a
background behind here and you wanted the background to show through a little bit, you could adjust that too. And these effects are
basically presets. So if you want to
go black and white, CPA, lighten, darken, make a retro look
or another retro look. I'm just going to hit
reset to go back. So to recap, we learned
how to place photos, swap photos, and edit photos.
8. Adding Text: So in the jump start lesson, we did place a text box and edited the typeface and
the color and the size, but we're going to go
into greater detail now. Now, let's edit some text. You'll see here that this
template has this text box. It's added a travel quote, so I can't read it very well, so I'm going to zoom
in a little bit. And this box here
lets you navigate. And if you double click inside, now you can highlight the text. So I'm going to just
highlight this text here and change it
to my own quote. And I don't love this typeface. So I'm going to just
highlight it, go over here. Something that confused
me when I first used this template is that some of these text
boxes are not editable, and that's because they're
actually stickers. So I just deleted them, and you can just type your own by adding another text box. Now, you can add a text
box anywhere you like. Let's remove one of
these photos here. I'm going to just remove that. So you just click the
photo and just hit remove. And we'll also want to remove
this photo box as well. Let's go over to add text, and we are going to click to add and we are going to
paste some text here. And it looks like it's
remembered the last style. So here's how to affix that. So let's just go Command
A to select all the text. That's the correct font, but we want this to be black, and we want this to
be about 12 point, left aligned, not bold. And there's a header here
that needs to be separated, so I'm just going
to hit Enter twice, and then I'm going to
change the typeface of the header to this font here, and then let's make it
quite a bit bigger. Let's try 24 point. Let's add a caption. The first thing before you
get started is to make sure that the font is correct and the correct
size and the correct color. I like to choose a nice simple Sansa font at about ten point. Now we're going to actually, let's make this white because I'm overlaying on
top of a photo. Going to add text, and I'm just going to
click right here. Start time 6:00 A.M. But totally worth it. If you click off,
and then on again, now you can just move the caption around to
wherever you want. So your choice is either
to if you have space, you could move the caption below the picture into a white space
and make the text black, or if you wanted to overlay
it over a dark portion of the photo, make
the color white. Now, I've placed this
caption over this photo, but it's a little hard to read. So what I can do is actually fill the text box with a color. I'll choose black, and you can even change the opacities
if it's a bit strong. So let's just pull the
caption back a little bit. So it adds a little
bit of background, but it's not too overpowering. MxBook also offers AI
generated captions. So if you like one of them, you can click on it, and
then just click to Paste. You can also click Regenerate
if you need new ones, another thing you can do is put a box around your text box. So I'm just going to select that and go over here to border. I'm going to add a white
border and make it one pixel. And that's what it looks like. So to recap, we learned how to add text boxes, change fonts, change font sizes and colors,
change the alignment, and add fills to our
boxes and borders.
9. Backgrounds and stickers: Mxbook has a lot of really awesome backgrounds you
can add to your page, too. You can see I've added one here. You can add a solid color. So let's say you wanted something fun like
this light blue, you can upload your own
background if you're creative, or you can just browse through
and apply anyone you like. And you can favorite them by clicking this
little heart here. And let's now add some stickers. So you go over here
and you can search. I searched by Travel. But maybe let's search
something different. Let's just type in fun. See what we get. So if you see one you like, you just click and drag it over. You can change the color.
Let's change it to white. And you can change the size by shrinking the
corners and to rotate. You grab this little guy, and it gives you a readout
of the angle there. And to move, you
just click and drag. To remove it, you click
Remove. You can flip. You can change the opacity here. You can change the
order in which objects appear stacked on top of each other by using these
little buttons here, so I could send it to
back or bring it forward. I wanted to show you
a cool new feature that MCBook offers. So on the inside front
cover of my book, I would like to show a map of
where I've been in Turkey. So what I'm going to do is
just click on the maps. Icon here on the left hand
side, choose my style. I think I quite like this one. So I am going to add a location. So Istanbul and I'm going
to add a new location. T trace. So these are all the
places I'm going. And now, when I click and
drag a map over here, it thinks about it
for a little while. And when you click Resize, you can zoom in and out, so stumbles kind
of cut off here. So I'm going to zoom
out just a little bit. That looks like a
better view here. So you can see almost
the whole country here. And then when I'm
finished resizing, I just click there, and there is the map of
the places I've been. This is a very cool feature. So to recap this lesson, we learned how to add
backgrounds, how to add stickers, and how to create a map with multiple locations on it. But
10. Adding and Arranging Pages: Now, here is how to
rearrange pages. I'm just going to collapse this window here so
I can see better. I'm going to make sure
I can view the spreads. So you can add pages
by doing this, either themed or blank, two page spread, I think
I'll add a two page spread. And I can just change the
layout as I like here. I think that's too many photos. I think I'll just do
three on that side. Click that page and do three
on the other side like. And then add photos like
we had done before. If I wanted to delete this
spread, I can just hit Delete. To rearrange spreads,
you just click this purple circle here and just click to drag where
you'd like to drop the page, and it'll be indicated
with a little purple line, and you just let go and
your pages are rearranged. To recap this lesson, we learned how to
rearrange pages and how to delete
spreads and pages.
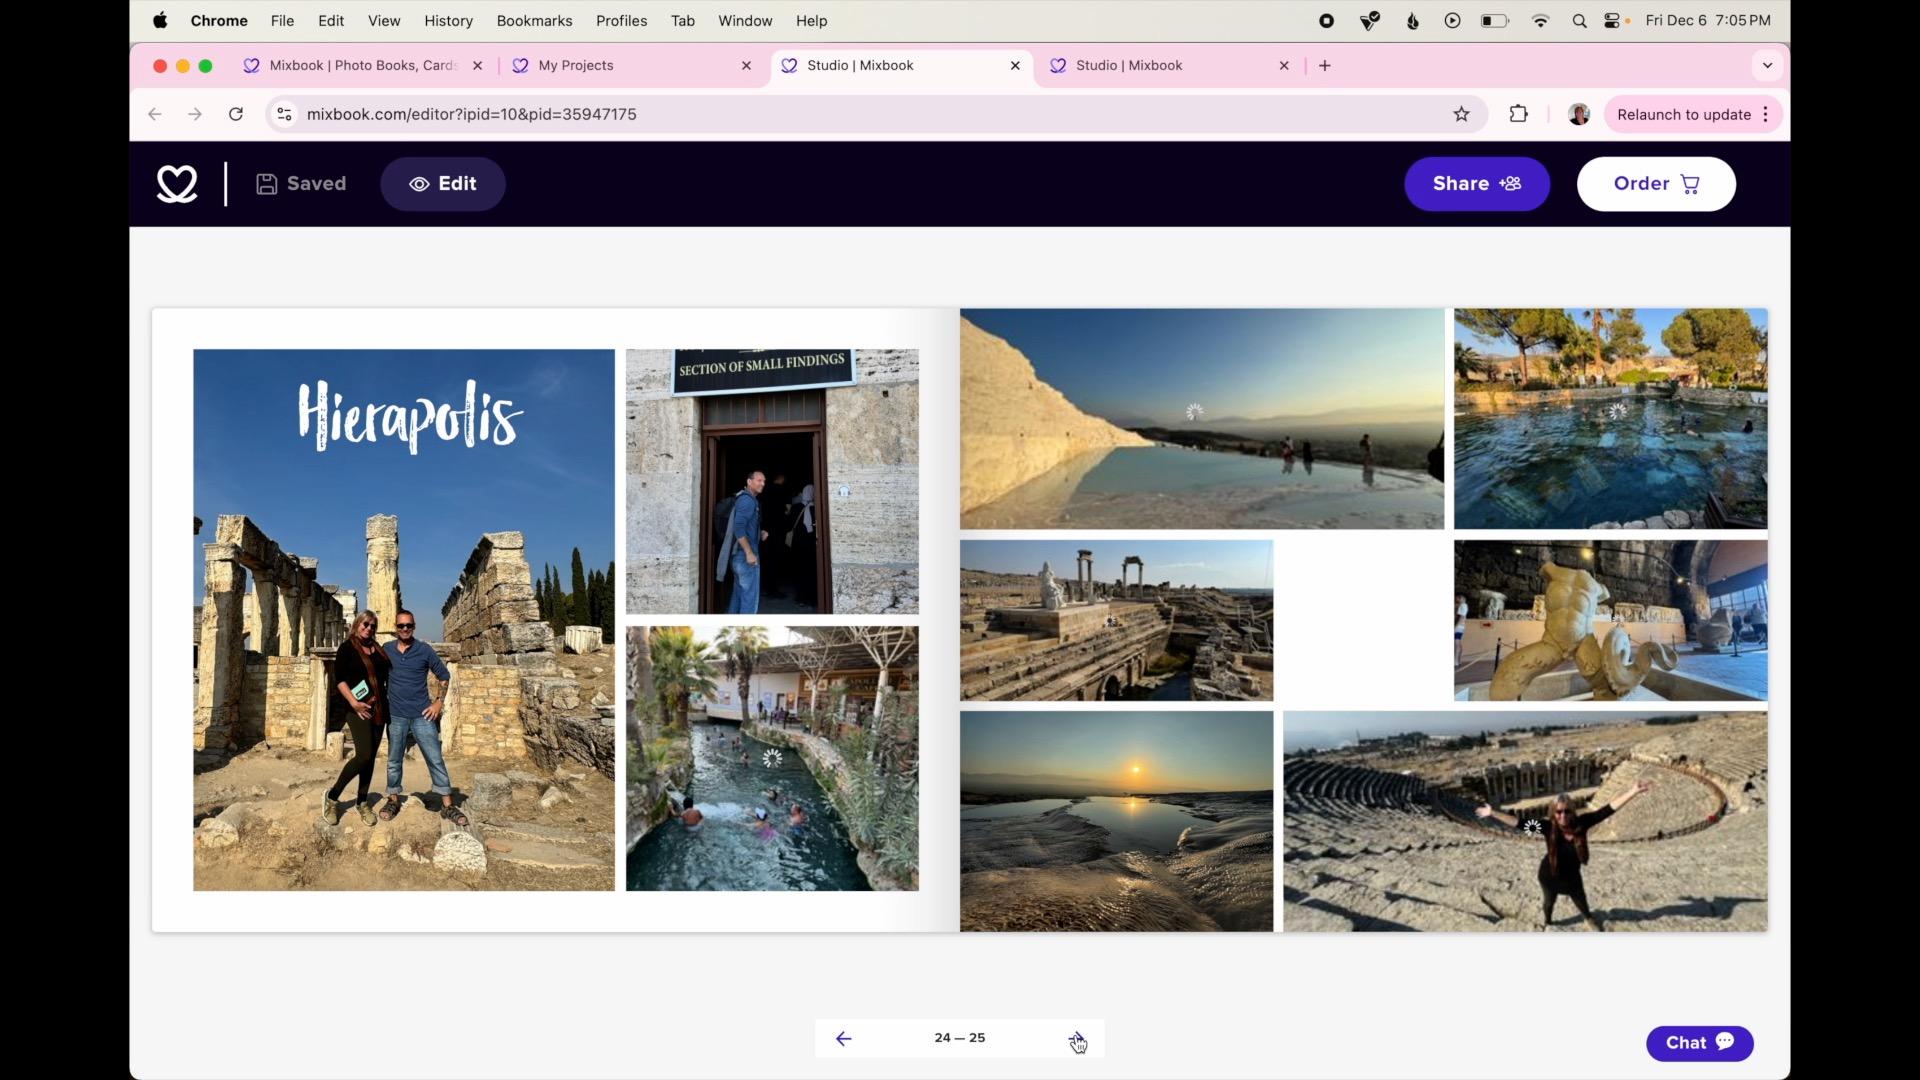
11. Ordering Your Book: Okay, I'm gonna be, like, a cooking show and show
you my final product, even though the last version we saw did not look like this. I have spent quite a bit
of time fine tuning this. I am a bit of a perfectionist. What I'm going to do now
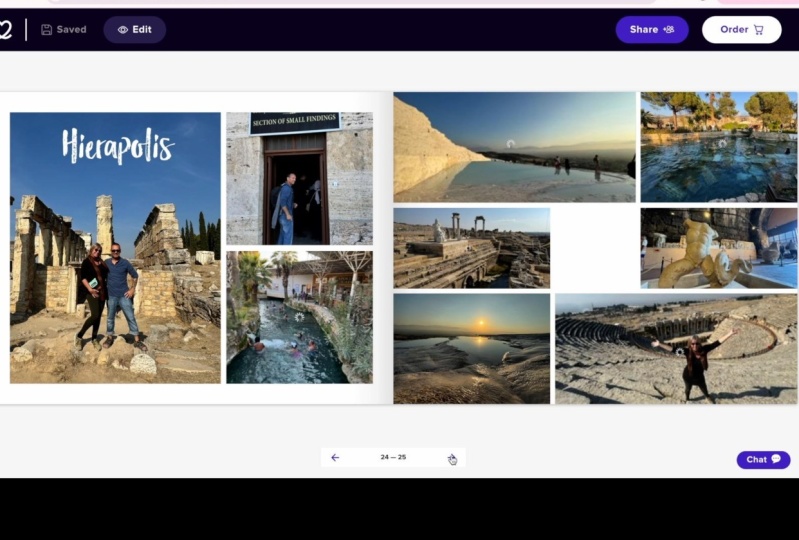
is just click Preview. So it's nice and clean.
And I'm just gonna page through and just show
you what I designed. You can see, I don't like
really busy layouts. I find them a little
bit overwhelming. And I did choose a variety of different layouts just
to keep it interesting. You'll see my
Internet connection here is a little bit slow. It's taking a while
to refresh the photo. And there's the back cover. Before you order your book, you can share it with
friends or family, and you can even
invite people to edit. So up here, you'll see
there's a Share button. You have three options
here. Share your project, invite others to edit, and then you can invite others to order your finished book. So when you share your project, you enter their email address, And then you send an
invite or you can simply just copy the link and
paste it into an email. Here's what your
recipient's email will look like this button here
to accept Invite. And your recipient will get
a preview of your book. If you want to collaborate
on a book together, you can invite people to edit. Again, enter their
email and a note, send invite or copy the link or simply just to order the book,
you use this link. So once we're happy
with our book, we are going to click Order. Let's give it a five star. I thought that was pretty cool. So there are three
different options, soft cover for more
economy, hardcover, for durability, and the
lay flat has thick pages and lays flat so you can spread a picture over two spreads. I chose the larger size here. I've heard the everyday
semigloss is a nice finish. And for the cover, I'd like to choose matte
rather than glossy. I have coupon code here
for my first time. I can choose more
than one if I like. And now we're going
to add to Cart. And when we're
ready to purchase, we can click Checkout. So to recap, we learned how to preview our book with a
nice clean interface, how to share with
friends and family, to collaborate and ask them to add photos or
order your book. And then we ordered our book and applied a coupon
code if you have one.
12. Conclusion: Congratulations on
your first photobok. Now your memories are safe
for generations to come. To recap, you learned how to identify the best
photos for the book, how to use Mix Book to
insert your photos, choose different layouts,
and fine tune your pages. You added text,
stickers, backgrounds, and captions, and you
ordered your first book. Soon your masterpiece will
arrive on your doorstep. Don't forget to upload a few
screenshots of your work, demonstrating the knowledge and skills you have
learned in this class. You're probably excited
about making another book. It might be a recipe book, a family history book or my
favorite, a travel memoir. You are only limited
by your imagination, and I hope you go for it. Thanks again for joining
me in this class. A note about the photos of
turkey you saw in this class. They were all taken
on my iPhone 15. Learn how to take photos
just like these with my other class vacation
portraits on the iPhone. Alright, then, until next
time, happy bookmaking.
 Beth Doman, Creative Professional