Transcripts
1. Introduction Trailer: My name is Mario Stable. I'm a senior three
D character artist, and I will be your
instructor for this course. In this course, you will learn how to create
the high poly of a semi realistic character using modern workflows
from start to finish. There is a lot that will
be covered in this course, but the main topics
are as followed. One, blocking out
the character in zebrus to set the
basis and proportion. Two, creating the realistic clothes simulation
in Marvelous Designer. Three, creating the
accessories and harulfas pieces in three dS Max. Four, detailing the character in Zibros to achieve
realistic result. Five, using XZ workflow to
detail the face and skinning, and six, creating stylisshair in Zibros using curve process. Now, as you can imagine, there will be so many more
things covered in this course. Essentially, the way
you should think about this is at the end
of this course, you will be able to create exactly what you see
in this trailer. As for the programs
that we will use, we will be using Zebras for blocking and high
quality tailing, Marvelous designer for all
the clothes simulation, and three DS Max for hard to face modeling
and accessories. We will surely use
Topogan for topology, but it can be replaced with
any other topology tool. We will start by going
over our reference and then dev writing and create the blockout of our
character in Cybras. Then we will create all of
our closed simulations in Marvelous designer to later on bring again into Zybras
and detail them. Once that is done, we
will jump into Topogan, retpologize some of
the blockout pieces to later on use as a
base in three d Max, where we will be cleaning up
the high polymodel of all of our character accessories
and heartilfas pieces. Finally, we will jump into Cybrus one last time
to create hair, detail the pace using
XYZ displacement maps, and detailing the character to achieve a catching results. With a total of 28 chapters, this course is considered
a large course, but I feel confident that
at the end of this course, you have the know
how on how to use different workflows to
create realistic characters. As always, although there is a few time lapses for
repetitive tasks, these time lapses include
some commentary on top to give context on the third
criteria used in them. Now, this course is
targeted more towards intermediate artists
who already have some basic understanding
of the programs mentioned. If you're an absolute beginner, I do recommend that you first view some introduction courses. This course will also come with auto generated subtitles in English, Chinese, and Spanish. I hope that you will enjoy this course and that it will have a positive
impact in your life.
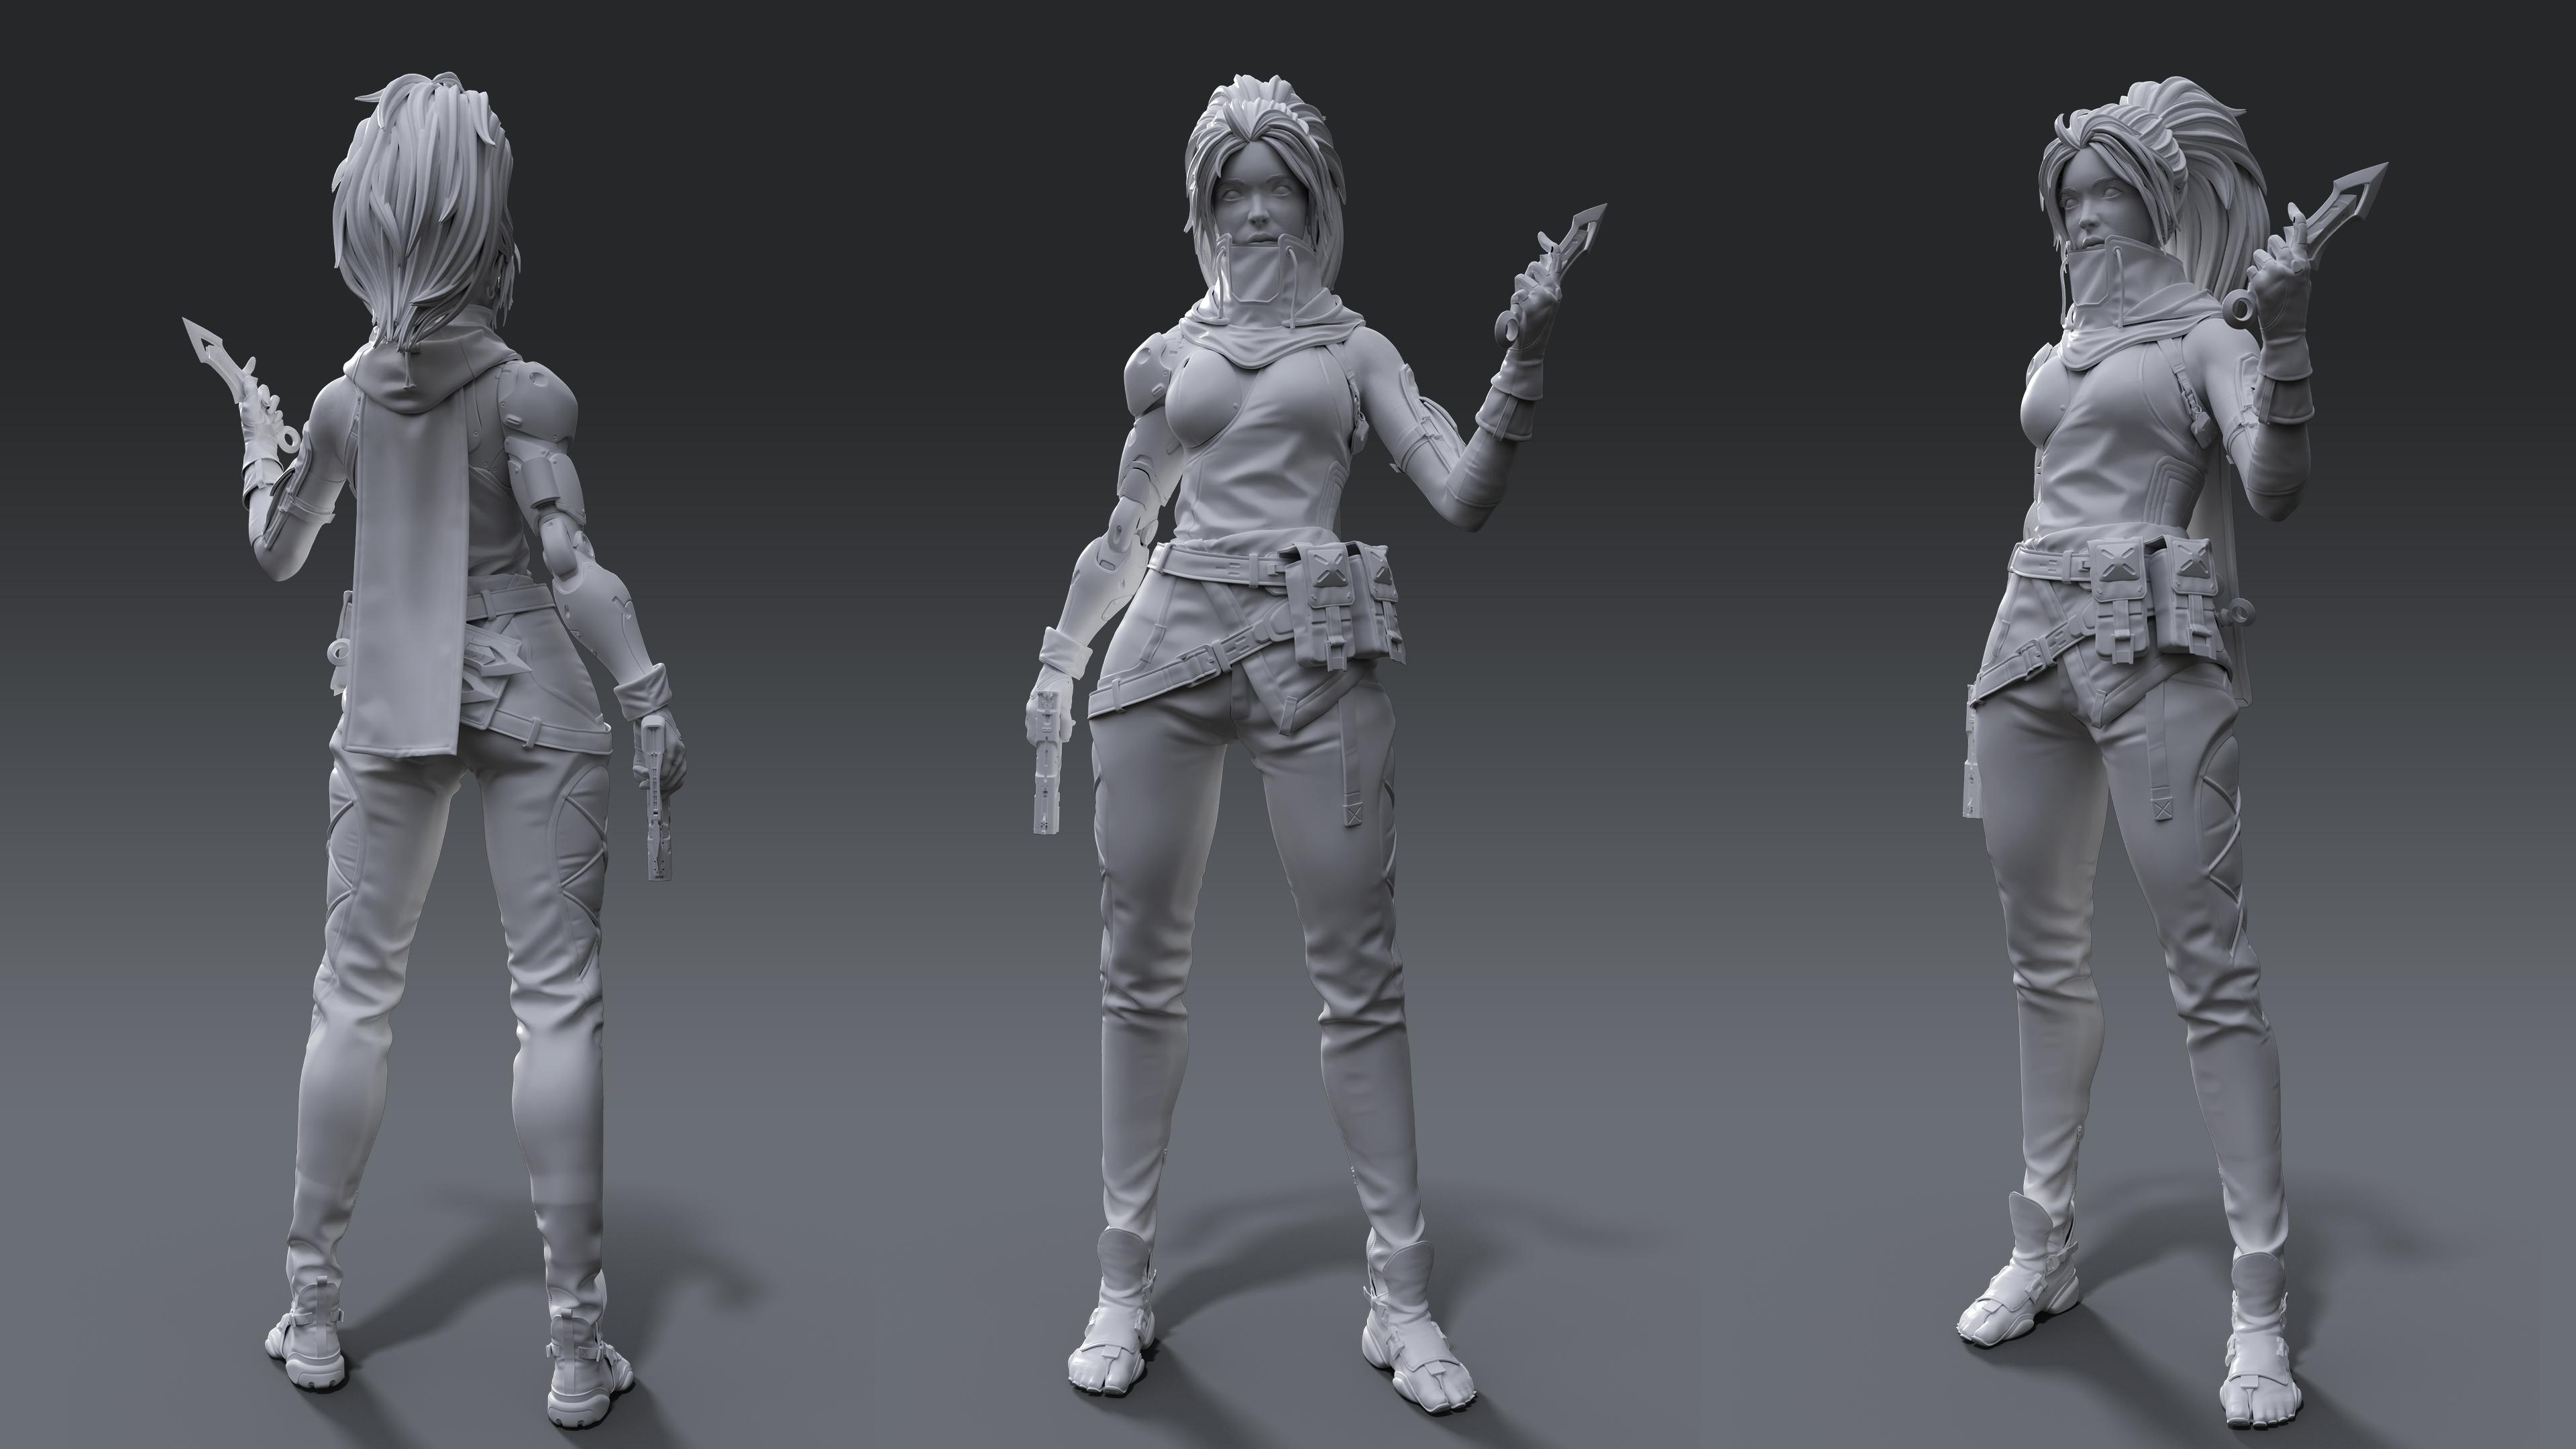
2. 01-Defining Anatomy: Welcome, everyone, and thank you for watching Fast
Track tutorials. I'm Marie Savile, and I will
be your instructor today. I've worked in the industry
for over eight years, working in video games mostly and working franchises
such as Cal of Beauty, Hitman, Mafia, and many others. Today, we will be
covering the process of creating the high poly of
a video game character. For it, we will be using Marvelous Designer for
clothe simulation, zebras for sketching, blocking, and some other modeling, and three D Max for
hard to face modeling. The course will go as follow. First, we will block out
the character in Zebras. Then we will jump and do some clothes simulation
in Marvelous to set up the base
for the clothing. Then we will go back into Zbrus refine this process of
Marvelous designer, and then we will
police and create the props both in three
D Max and cebras. In the end, we will do
a base for the hair. It will not final result. It's just a sketch to have a rough idea of how it will go. We will model head
high ply as well. And lastly, we will add or knife done in the
previous tutorial. Everything you see in the
course will be included in the final source files
of your tutorial. You will have
included hi poly and any possible asset or prop that we model
during the tutorial. It's also advisable to have some basic experience
with di Max, Marvelous designer,
and Zebrus because we will not be covering
the basics of each sa. Rather, we will
focus on techniques, workflows, and methods to approach a more
efficient production. This tutorial will be
subtitled in English, Chinese, Russian, and Spanish. The tutorial will
be sliced up in fragments of 30 minutes so that it's easier
for you guys to watch. So expect a small cut between 30 minutes
and 30 minutes with an ultra and intro in the
next video so you guys can keep track of which
chapter we are watching. Also, the pace of the video will be quite dynamic because
we'll be jumping from slow sections where we will be giving explanations
on how to do stuff and other sections that
will be speed up without commentary and some others
that will be speed up, but with commentary in
the case that we are explaining something that
doesn't need as much detail, but it's also good
to add some notes. So don't mind me changing
from commentary mode to just thinking comments
about how I'm doing stuff because the
audio recording is mixed up in that way. So without further ado, let's jump into the tutorial. Okay, so first off, we're going to be starting
from these basements, which is provided in
the source files. First thing we're going
to be doing is creating the basic proportions for the character, which
is quite important. Otherwise, it will not have
the same feel in the end. We're going to be using the
head proportions method, which is commonly used in
traditional art or drawing. So for it, we're going
to isolate the head head and create as many duplicates as we have on our reference. For that, we
previously established head proportion next to our reference, as
you can see here. We have a total of 8.5, which is kind of
heroic proportions. So now we're going to be doing
that in our three d model. So right now, that would be 8.5. We might need to
adjust slightly, but dropping this would
be a good general idea. And now, having this
as a reference, a line like that is
going to allow us to easily create a better
proportion ratio for character. So the head should be like
you can see one head above, actually, a little
bit more over a head. So we're going to scale
down or 8.5 heads, since it will be a lot harder
to scale up the character. So now we're going to select mask aso then blow the
mask a little bit, and we're going to
stretch the legs. It is good that you guys have the reference on the
other screen like I have right now you can see I'm comparing the measures to create a proper
length for the femur for any other segments
of the character. So basically, at this point, it's pretty fairly simple.
What do we have to do. We just have to mask midway into the bone so
that it doesn't feel like the joints are deformation,
deformating too much. Then we're blurring
that mask so that, yeah, deformation is as
well, less noticeable. Lastly, we're going to
move up and not scale because we don't want to get
odd deformations as well. So we move up, stretch the indicated bone and then keep refining that area until we
have a more natural aspect. Right now, I'm focusing more
a little bit on the sides, not just the length because legs look about the right
length at the moment, comparing head size
and everything. I'm going to till the character
a little bit, like so. Yeah. And now let's use let's use to the upper part because right now it feels like
it has very long legs, so we need to elongate the
tore a little bit more. It's almost there.
Yeah. Now the feet is now the feet is perfect. All the heads. Mm. Okay. This is click Move. As you can see, I have
my most used tools on here on the interface so that it's quicker for me to
change from one to other. I think this might be
the trickiest part to make it look good because yeah, her legs are very, very long. So we have from
segment seven to 8.5. So yeah, knees are about
there that height. Right now, it feels too long, but it is because legs
are still too thin. We need to just volumes
and everything. So yeah, don't mind the character looking
like slender man. It will be just
for a little bit. Okay, so now we are going to be speting up a little
bit in just a second. Because at this point,
what we're going to be doing mostly is adjusting, yeah, the proportions by masking and rotating,
masking and moving, using the move tool
like 80% of the time to get back those
correct proportions after stretching the legs. So there is nothing like to complicated or
interesting in this point. So we're going to jump
on a quick speed up. And after that, we're
going to be doing basic clothing on the character,
nothing marvelous yet. We're going to be
sketching it up in zebras with extract tool and some other tools we
haven't used until now, so move and transpose. Okay, so as you can see, we are adjusting small things. We are also going to be defining some muscle groups with them standard just by
accentuating some, yeah, like here in the ribs. We're going to pull a little
bit hips back in the butt, mostly to make her
look a little bit more fit and muscular because yeah, our character looks a
little bit athletic. So we need to bring that
up into the character. So yeah, mostly developing
those muscle parts, we wouldn't really need to go
for a very specific shape. Just basic anatomy, checking
references if you like, but we don't really need, like I said, to be very specific. In the end, we're going
for a semi cartoony aesthetic realistic be
based on a cartoony design. And in the end, this is going to be covered by the clothing, most of the body, actually. So we just need to create
the basic landmarks, basic volumes so that when applying clothes
simulation on top of it, it feels like on the concept. But yeah, as you can
see, we're going to have very plain details on
most of the character, very smooth, not anatomically correct in most of the cases. I mean, silhouette wise, yes, but it also has
some exaggeration to make it look more aesthetic, more athletic as well, and like human body deforms differently because of fat
deposits and everything. So really, we are going for e animal but realistic
kind of body. So that's why it's just
polishing up those areas. Yeah, not much apart from that. Okay, now that we are getting a pretty good result
at the moment, I feel that we can jump into
developing the clothing. So we're going to go
for the pants first. We're going to be using masking and extract for most
of the clothe pieces. So now speed is going to be back to normal
in just a few seconds. And we are going to be masking for the
pants, like I said. Okay. We're going to check the head or where the pants are starting, which is slightly
above the third head. So we count one, two, three. We get approximate to
here, to this height. So we go to mask the body with mask laser like always sort of like
this. It's good. Yeah, mask looks pretty
good like some leggings. So now we're going to
go to our body mass, make sure that
it's on the third, slightly above the third one, like we said, We
include that part, which was not perfectly aligned. Now we're going to go and extract adjusting
the values a little bit, so it is not double it is not a sick and
we create extract. That's too much with
just slider a little bit. This feels better. Let's see from close. Mm. Okay, let's adjust
the mask a little weight. Okay. Let's put a little bit more
thickness, just slightly. And we accept, and we
should have more pans. On a different sub
tool right now. We have for now three
polygroups like we had on the base mess because they usually transfer Okay. We're using the slice to cut perfectly the
shape of the pants. Now we can isolate that
and delete hidden. We're going to do the
same thing on the ankles. We're going to slice height
with control sf click, and then delete hidden. And now we have a straight
cut on our pants. We'll go to Serums to get a
cleaner topology for the pan as you can see,
polygraps are gone by now because of the
serum measure. So we want to make sure
that the extract we used has enough, the
serum mess we just did, sorry, has enough density to recreate these shapes
because as you can see, the waist draws a lot of
attention, and it's quite white. Same for the knees
on the back and the front on the ankles. We have quite white
folds and shapes. So we want to make sure that we can represent all of these. So getting back into our model, we're going to sculpt with
clay build up basic shapes. One thing I recommend
is to activate the back face mask and the brush so that you guys don't sculpt
on the other side, but we only have
one side right now, so it shouldn't have an issue. But in case when you extract it, you guys have two
sides, I really recommend to activate
the backface brush. So yeah, you to sculpt on the
side that you are seeing. K. TAM standard, we can create
these sort of shapes, both in positive and
negative by policing alt. And yeah, then, repeating
the process once again. It is very easy to create connection folds
within rised areas. And it's also a
very good tool to pull the basic
shapes for any fold. So right now, you see that we're doing that dad smoothing, and it already looks a
little bit stylized. Usually it is very
rough right now, so it is not like final
result or anything close, but it is quite easy tool to
use quick results as well. And it's easy to go back and
forth to create that idea. Although we don't need to
worry as much because we will be doing some of the simulations
in Marvelous Designer. So for now, this is just a
blockout as for blockouts, one thing that I would
like to mention, which is my personal opinion, but I've seen a lot
of artists treat blockouts very differently to
what I normally like to do. And I feel that blockouts
are quite important. Sometimes when working on a team or working
on a production, you guys will see that
blockouts tend to be treated as just a base mess, it is not a base mess. A blockout should be
a a very accurate, I would say very
accurate representation of the character you're
going to be producing, but created at a very fast pace. So, for example, if
your blockout doesn't represent properly
the weights of the character or the feel
of the steelization, or the character
of the character. So imagine you're doing a crpitude or maybe a
really strong hero. If on the blockout,
you cannot tell that. You don't see that, you
don't see their personality. Then the blockout you
used serves no purpose because it is not like a clean mess that you
will be using later on. It is also not representation
of the current character. So it is lost time. So blockout should
be a not police, but they should be good. They should represent very nicely what we're
going to be producing. And it is a very cool way of seeing if three D design
is really working. Like, Okay, this is cool. This totally works inside
the game or totally works inside the cinematic or
whatever you're working on. And it's also a very
very efficient way to show producers,
leads or directors, your progress or how you
plan to do the character, which in the end will save
a lot of time in feedbacks, or a errors in design because
sometimes you will see a great concept works
awesome in two D, but then you bring
it up in three D, and some areas don't
look as interesting. So redesigns are good to do in those cases if
it's not working very good. So like I said, blockout is awesome way to create this
first iteration of the model, which looks like
the final result if you kind of close your eyes. And will save a lot of
time in production will make your life a lot
easier because you will not receive as much
feedback later on because you will show your clear idea of how it's going to look to your leads or to
your supervisors. So basically, all this work that I'm doing right now
is not really like lost work because some people don't even scope those folds. And those faults
are going to serve my leads to show them before
even jumping into Marvelous. What's going to be the looks
of the character in three D? And if they don't
like a specific fold, I can just go and
try to not do this one or maybe focus more attention on another
one that they like most. So yeah, that is the general
purpose for a blockout. As you can see while
I was speaking, what we have been doing is
used, same thing all the time, using dam standard to
create connection within the creases or creasing the basic landmarks
for the folds, then smoothing them out, using dam standard as well in a negative way so that yeah, we define more the depth
of that fold specifically. I'm using the move
tool as well in case I'm using dam
standard too strong, so it clips with the basements. So basically at this point is use dance standard
move and smooth tools. I think at this point,
it is good to jump on another quick time
laps of the process until we get into
a new area where I can give you some new
notes on the process. But for now, it's
going to be the same process for quite a while. So we'll see you in a few minutes when you see that the speed
goes back to normal, after a few seconds, I'll just start talking again. Okay, so now what
we are going to be doing is we're
going to be masking mask curve the manual masking to achieve
that curvature because laser doesn't
work too good, as you can see, because
we select the other side. So we mask manually.
Then we're going to be extracting same way as
we did with the pens. Then we're going to
slice the upper part of the waist to make it clean cut. Then we're going to serums, which is the same process as
we did with the pens again. We are going to size it up a little bit with a
modifier of size. And then with move, we're going to adjust
the sap to remove any anatomically shaped
yeah trees that we have. We're going to slice
that size as well. So basically, we are
going to be doing same process for this for the shirt or for other
parts of the blockout. There is not really
much addition to the process we are following. So basically, it's
always the same. We mask, we extract, we slice to make it clean. Then we move standard, smooth, and maybe du standard
depending on which part. We will detail the piece, but we want to keep all
of them fairly simple. Like I said, on
blockout is important to give the feel of
how you want to look, but we don't need
to go overboard and make everything
clean and nice. So the next few minutes are
going to be a speed up video. Since what we're
going to be doing is mostly detailing
a little bit more of the pants and also extracting and creating
the base for the t shirt. But since it's pretty
much the same process, I will just commend you guys
over what we are doing, but there is no need to see
any specific detail about it, since it is same process
for all the pieces. So we'll just go on and
see slide overview. At this point, the only thing you need to make sure
you're doing right is masking correctly
in a smooth way so you don't get
really bumpy borders. And after we extract, we're
doing the same thing. We get some initial
folds with them standard connecting areas like the breast with the armpit, so it doesn't feel
like it's defined. We can fill the gaps with clay buildup as well,
as you can see. But it's really just basic
landmarks at this point. So we go with DAM standard
great falls here and there, fill the gaps with
clay build up sorry. And overall, just
making sure it doesn't feel as tight as the initial
extract usually feel. But that it is pretty
much it for every piece. So what we are going to be
doing now, it is the neck. The neck is slightly different. So let's slow this
down for a sec. Okay, as you can see, we first created a cylinder, which we just position
in the neck area. And what we did was we hide the polygroup that is on top and on the bottom,
and we deleted it. So we don't have anything except for the
geometry on the sides. So now we are going to
be moving the surface with a move tool to achieve similar shape as we
will have on the reference. On the display
properties, like you saw, we activated double
so that we can see the cylinder on both sides without having to
have any thickness on it. And really at this point, this is just looking
at the reference, moving a little bit here
and there. Like this. Trying to make this a
little bit more natural. Alright. I think that now that
we have the basic volumes, it is good that we
start defining a little bit more the
shape with the standard, like always or two
of preference. No, but to be honest, like, 80% of the time, my main tools are three, which are clay build up
dam standard and move. I think with those, you can achieve pretty much
every save you want. So now let's Um, yeah. So we are going to be clipping this to do a polygroup in here. We're going to hide this one and we're going to delete it. That is how you guys
do an easy opening on an carve without much hassle. Now, we can serums
this and start polishing a little bit more
after serums works correctly. I think this should be good. Okay. Let's see
the whole picture. Okay, actually,
we're going to be detailing a little bit more
this section right here. We want to do a cool connection, not just feel like a square cut. So we're going to
bring back to where we had or removed
section in a second. Let me just adjust this sac. Yeah, it doesn't work. Yeah, so let's get here. Let's just move with C modeler, with PCM is the shortcut. We're going to move the edges a little bit and
remove this loop. So it has, like,
a rounder shape, and when we smooth and Sims, we actually get smoother result. Okay, like this works better. So basically, we just
went to siumes went to vertex mode and move with slide or without
slide, whatever you prefer. I think we're ready
to detail and create those big strong fold shapes that we have around the neck. This crease is a little bit more accentuated
than on the back, so we're going to create the connection in between
until this point, I think the back
would be less strong. And we're going to repeat the same process on the other
assets with them standard, move and smooth until we
achieve the look we are after. This is going to be speed up, and this will be
end of Chapter one, where we have videos sliced
in 30 minutes approximately. So you'll see how I finish
this using the same process, and we'll see you in
the next episode. Y y
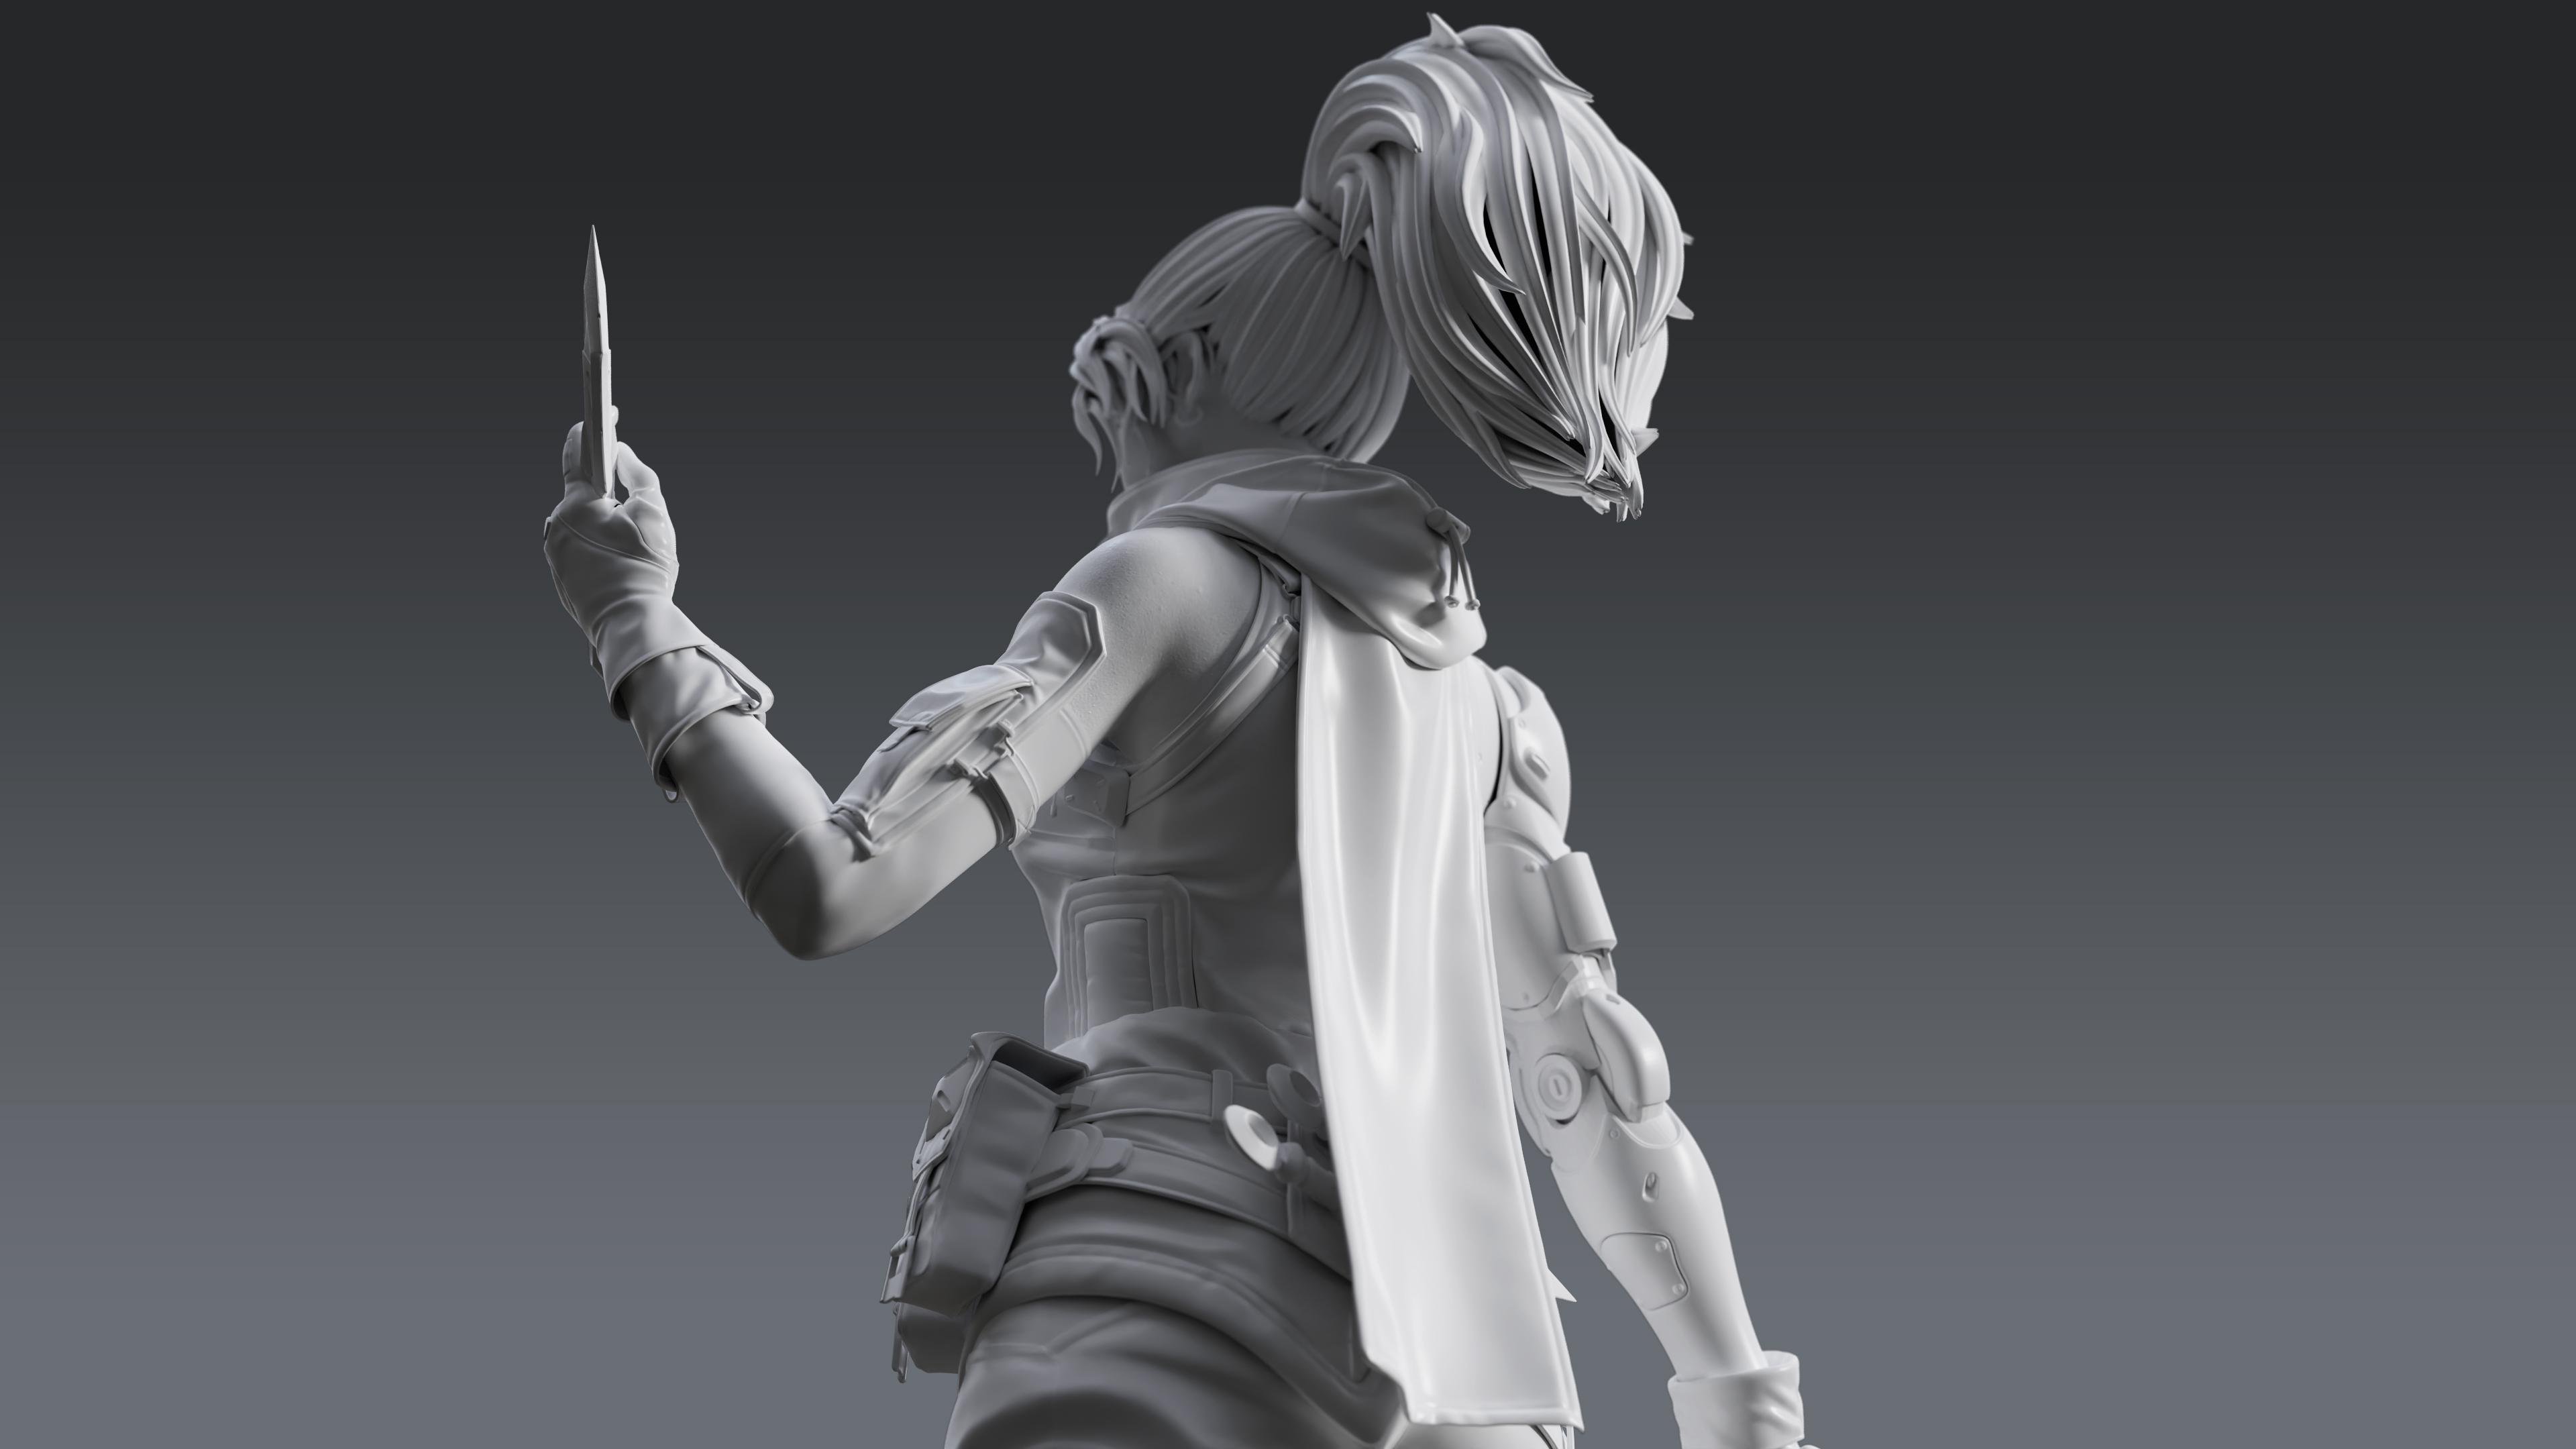
3. 02-Creating Clothing Part1: Hello, everyone, and
welcome to Chapter two. Here we continue
extracting some parts of the character in this moment we're extracting the bracelet. The process is same as before. No need to explain
anything here. But for the glove, we are going to slow
down for a second, because we're going to do a
second layer in here over the hand to do like a small lace which we can
find in the reference. So for it, we're going to be masking the previously
created extract. We're going to adjust
the volume slightly position the camera in an angle that we can sort of mask
correctly what we want to do. And now with mask laser, we're going to slowly
get the finger like so. We want to make sure we didn't
select any other finger, so a little bit of rotation
is good to check that out. Since we did okay. Now let's just unmask this area manually because
we just want to get the finger and around the wrist. That looks pretty
cool. But let's just refine a little
bit more of the mask. Okay. Go to create the extract. Hopefully, it's not too thick. Seems about right, but
a little bit thicker, I think will be
better. Let's try now. I mis selected the other finger, so cleaning that up. And improving a little bit the wrist because
I'm not too happy about that shape to
make it feel clean. The trick I did is
very useful sometimes. So you blur the mask and
then you sharpen it. You have that in the sub
menu from sub to masking. But, yeah, it is quite good to improve
selection sometimes. So like this, the
extra will be good, I think. Seems pretty nice. Go to serum acid. That usually helps to get cleaner loops
around the borders. But still, like always, we can do some adjustments
to make it better. So we're going to get some
folds in with them standard, basic landmarks like
before with the pants. And now through working on
this part, I think, yeah, the border The border needs to be a little
bit more straight, so we can go with move
topological to make it better. And same thing on the
other parts of the hand. I'm just going to improve
curvature here and there and continue adding
some basic landmarks. Okay, now a little
bit of speed up. At this point, there's
going to be just repeating this process of adding the
main falls with them standard. And then we are going to do a mirror using Subtolmster
from plugging. So first, we delete the
subdivision levels. We go to subtle master mirror. Oh, we had a selection done, so we need to control set and
select and redo the step. Okay. Now we have the symmetry here. We're going to mask this
to create the bracelet. So for that we go to mask curve. Clip curve, sorry. And now we're actually
selecting mask curve. Like I said, we're going
to mask the bracelet area. And we're going to be
extracting that section. This time is going to be
a little bit thicker. Om, we isolate the exterior and delete the
interior like always. And to do a panel loops on the border to create
some thickness. Just the value to get
the right thickness. And we've moved topological, we adjust it so it
feels the right way. Gonna move this a
little bit, so. Just want to do like a cone
area, cone shape, sorry. Making the area closer to
the wrist a little bit thinner and making it
wider towards the forearm. We're going to select the interior and
scale it down so that we make it thicker. Like so. And now we are going
to start adding a little bit of detail with
them standard like always. So we're going to jump
again to speed up till the next part of the
process which is going to be probably the shoes. Actually, we're going
to quickly do here, as you can see on the video, bracelet, it is a simple step, so let's quickly do it. We do a manual mask, like we are doing all
the time over the body. We do a little strat
and clean it up with the trim curve once we have the initial shape and create a panel loops
to add the thickness, we're going to create a box, insert a box, place
it on the arm. And now we are going to be
duplicating the object, isolating this polygon to
create the flap of the pocket. Way lid hidden. We move
it a little bit up here. Going to subdivide it with
control the For this one, we are going to do
the same thing, remove the upper polygon
so it feels like a pouch. So divide it as well. And now we will add panel loop
so that it has thickness. At first, we want to create
an organic shape to it. Okay, now, we mask the
upper part of the flap, we move it towards the arm. All right. I think this will be
sufficient for now. We place it where
we should have. And now let's jump into the fit. So for the shoes, we're going
to follow similar process, but since the shoes are a
little bit more complicated, we're going to go over
slowly and check every step. So now we duplicated
the basements. We are going to go
to polygroup mode, isolate the feet and the
fingers on one side, and now we're going to delete hidden to just keep the feet. Now we can hide this, go to the formation and
size inflate sorry, to create a bigger
volume now we're going to move and create the ankle of the
shoe. So like this. We're going to be
later on dyna missing, so we don't mind about the
polygons being stretched. We're going to turn the
finger a little bit more straight to look more
like the reference, the thumb. Sorry. And yeah, A this is good. Create that ninia separation between the thumb and
the rest of the fingers. So now we're going to be
dynamessing the food. At first, we're going to be increasing the
subdivision levels up. We need to delete lower. And yeah, this amount
of resolution is enough because we want to do
use them shape of the field. We don't need as much detail. We're going to clean
the border like always with the slice
and delete hidden. We're going to
smooth the fingers. This point is a little bit speed up because at the moment, we're going to just adjust
the pants a little bit more. This is for a few minutes. And we are going to be
creating next the sole of the shoe after we create some basic shapes to make
it closer to the reference. It is quite cool design. Feels like a Ninja futuristic snicker or
something like that. I don't know, for running
in a very agile way. So we're just creating the dynamic shape
for the back part. We will create later on
the red thing right here. But for now, we are going to be focusing on the sole
and the shoe itself. So once we reach this point, we can duplicate the
object to create the soil. We're going to mask the
lower part like this. Yeah, create slice polygraphs, hide the rest, delete
hidden like always. We're going to adjust the pivot here because we're
going to be scaling that. We move it down.
We're going to be doing We're going to
be flattening it. And now we're going to create panal loops all for siumes
and then Pana loops for it. To get some thickness out of it. So serums is looking
pretty good. Now, let's just create the
panal loops. What is that? Okay, hold on. Yeah, we need to flatten
everything perfectly. Otherwise, it's not going
to look good when we do the panal oops, this is better. But still, let me adjust with another serum measure
to get rid of the rest. Yeah, that looks way better. So now we're going to be moving so up and deforming
it a little bit. Let's make it thicker. And now we're going
to rotate and twist the front part to
better adjust the fit. So we move the pivot to the rotation point
so it feels natural. I think like this is good, but we're going to move it further. Okay. Now, a little bit
of speed up verson. So we have the sole ready. We're going to be masking the sides now after
this quick time laps, and we're going to
be doing, like, the area of the sole that
is bracing the shoe. So we are actually dynamising the sole to have
more density to this process. So we go here. We want to mask the
area we're going to be moving and
invert the selection, and now we move this
up a little bit. We scale it on every edge, so it raise properly the ankle Not the ankle, sorry. So now we do the
same in the front, we scale that up on the sides. And now we're going
to be using move topological and a little bit of dam standard and clay buildup to create more round
and detailed shape, like on the reference. A little bit of sculpting here. The things I'm trying to look at the reference to get the right proportions,
the right shapes. It is mostly like negative spaces and also trying to compare
different thickness. So let's say if the soil has one or 2 centimeters
of thickness, then I try to see
how many times that is for the areas that
braise the sides. And I just try to
replicate that. It is very important for
Blocka that you take visual references
because obviously, if you just focus on
specific shapes of the shoe, it is very easy to lose
track of proportions. So it is very important
that at this stage, you don't focus as much on
detailing or specific parts, as you see, everything
is very simple. And we need to focus on
creating the right fiel. Sometimes it will mean adjusting a small proportion or just changing the
measure of something. So it's very important
that you constantly pay attention of the overall
picture and see, Okay, so this is not feeling
as round as it should. This is feeling shorter,
this is feeling longer. So those sort of things are what you should be looking
for in this part. And also try to not mess
up like I did on the salt. But yeah, the important part, it is not the quality of
what you're sculpting because we're going to be throwing most of this work away. We will use it as a proportion reference
and proportion base for future clean messages
that we will be developing. So it's the most important
thing is that you really, really, really focus on silhouette and proportions
and separating. I think at this point, because we are doing the same
all the time with clay buildup and move until
we achieve the right reading, we can speed this up a
little bit until we get to destruction of the
red section of the hue. So we'll get back at that point. Y Okay, so our shape is mostly ready. We are about to slow back
down and do the red area, which is going to be
masking the shoe. We create a duplicate
like always, we're going to be slicing
the area that we want. Remember to press Alt when you're done with
this mask because otherwise it will mask it will not mask the opposite
side to what you want. So we're going to start off from this purple polygrp move
it up a little bit. And I think we're
going to write away the serie measure before slicing anything or
adding the panal loops. Hm. Yeah, I don't
like that area. Let's go back a little bit. Slice it from this angle, which is going to
be better for sure. And now let's try serums. Yes, that is better. Sometimes depending on the angle you will catch a angle and about polygon and yeah it
will mess up your work. So it is good to go back. Okay, so we move this up. Like I told you before, what I'm trying to
do here is sort of to catch the overall
feel for the shoe. Like just checking
the distances between the tips of the toes
and this red section. Also try to see how it opens and until what point
on the leg it gets. And yeah, just trying to
get that initial feel. Obviously, it's not going to be even close to final
at that point. But as you can see,
I'm not focusing on any cleanness
on this point and just really rough
sketching to get those fierce landmarks
and everything and get a sense of what
is going to be the shoe. And even if you don't finish
one part of the lookout, um, the more you add
to the blockout, the more easy it gets to understand what's not
working or what it is. So it is good to jump
from one piece to another and keep adding, keep adding until you
know this is okay. So this is working, this
is not working or whatnot, and you keep
improving the design. So this part is quite speed up. We are not really adding
much value to the design. We're just adding
some volumes on the soil to make it
more puffy and more, like, sporty, like in reference. Policing a little
bit the angles. Separating the front and the back piece and
really just masking, rotating, just working
those sections, so it feels a
little bit cleaner, a little bit more
like in the concept, but not really doing anything
very essential for it. But what we will do
after this is going to be adding the straps
and the laces and the backs that the
shoe has and also the backside like straps
the piece that goes like the back laces, I don't know how
they are called. So yes, you can see we're just polishing a little
bit more those areas. Like still in a very rough way, we're preparing this to be
later on the high poly. But at this point, just policing the shapes
a little bit more to get closer to the right design, making the field
areas on the sides, making the whole design
a little bit more round. But now let's go and
do the front part. So we're going to be
masking like always. For the side strap, we
use the mask curve, which allow us to do
like a straight strap, which is going to be easier. Now we're going to be extracting this. I came pretty good. But let's go on do
the same process of serumsing and panel looping once we're happy
with the serums. So this time, we're
going to be doing the panel loops
slightly different. First, we're going to
remove those loops with Cmdlar like the ones we
used to remove, sorry. And now we do the panel
loops once we're happy with the position and
shape they're placed in. Okay, once we have that, we're going to be doing the front part on a
very similar way. But instead of extracting, we will be doing an
insert with a box. So let me just check this out. Okay. So we're going to
be inserting a box now. We scale that down until
we have some sort of similar volume to
what we need to do the separation within
the toes and the thumb. Let's place it there, scale it a little bit more
and position it in place. Let me just as well this area. So you can see every
element that I add. It helps me understand the rest of the volume
so that allowed me to see that the red section was too big
on the front of the feet, so we had to scale it down. Now we're going to do a
curve curve tube, actually, from the center, sorry, within the toes and the thumb. Just to do that
rope right there. We pull a little bit to put
it in place. And there we go. Just moving it a little bit, so it feels more natural. But hey, we're already
starting to have a pretty good feel
for the whole thing. Feels already like
a solid design. Now let's go jump and do
the buckle things next. So let's tweak
this a little bit, and we'll jump into the
buckles in a second, one sec. All right, this looks cleaner. And let me actually quickly adjust those
things on speed up erson so we can get the shoe a little bit more prepared
for the buckles and the back laces that we are going to be creating in just a second. So some adjustments
here and there, and we are good to create
the box for the buckles. So let's go here,
insert another box. Going to rotate, scale a
little bit, put in place. It's going to be like
just buckle blockout, not like a really final
design or anything, but just to also help
understand the design. To be fair, what I mentioned before about the
blockout having to be representative of
the final result, even if it was not as clean. Normally, I don't go this far, so maybe I will not
do these buckles. It will be just a box,
which by the way, we are doing by adding
a bullion right here. So normally, I will
not add these buckles. I will just do like a box and same thing for the rope and some
details that we did. We'll just keep it
slightly more simple, just for the sake
of effectiveness. But since this is
for the tutorial, we want to make it look
good from the beginning, we're going this extra
mile with a blockout. But just keep in mind that probably this is not necessary
for a production thing. So this is just like show you guys a little bit
more of lockout process. Also, for this kind of stuff, you could easily instead
of just throwing a box, you could easily throw a
kid bass buckle that you have around or maybe a buckle from another
model that you did before. So yeah, this is just for entertaining
purposes, let's say. So yeah, we have this
buckle in place. We're going to
just duplicate it, move it to the other side. And we should be good
for the buckles. And after we put this in place, the only thing left that we'll
have to do for the shoe, I think is the back laces. We obviously need some
thickness and some stuff, but I think that
will come later. Let's finish the straps thing. Okay. So more detailing
in quick camera. Now, we will grab we reorganize the scene a
little bit, as you can see, and we will grab
the connection we had in the hand
between the fingers, and we're going to
be using this as a duplicate and move it down to the back of the
shoe as a back lace. So we're going to be
placing this Yeah. A here. But we're going to do
some more adjustments. So it looks nicer. So first stuff, we're
going to grab that part. We're going to move
that up all the way. And also, we're going to
grab the move tool and move it in so it feels that
it's attached to the shoe. So the rest of the process of the shoes is going
to be speed up. Since we are not
doing much changes, we are just refining some of the shapes
using the move tool, adding really small folds, and we're going to be
doing panel loops for all the pieces so that we
have thickness on them, as you can see in a few seconds, but that's pretty
much everything. So we are done with
the shoes for now. We're going to be finishing
Chapter two in just a second. And after this in Chapter three, we will be covering
the creation of the rest of the pieces
for the blockout. So enjoy the rest of the speed aversion and
see you in Chapter three.
4. 03-Creating Clothing Part2: Welcome to Chapter three. We continue to extract some of the new plates and cloth
pieces for the character. As for now, we are asking
for the chess piece, extracting and polishing
a little bit with smooth the traditional
tools we are using, now we're going to stop for a second because
we're going to create three poly groups to create this separation
right there. So we need to split this
one as well into asking this then grouping by mask. I think the mask works. But let's improve it slightly. Okay, no mask polygroups
sorry, polygroup by masking. And now we are going to do seri measure based on groups so that we have a
sharp edge on each group, and then we're going to
be doing panel loops with the option changing
the elevation and the amount panel loops. It is important that we
enable the groups option, otherwise it will
not do it like this. So by tweaking the thickness
and the elevation, we achieve a result that
we consider acceptable. This is what we're
after. So ideally you want to play with loops, elevation, thickness, and bevel to achieve a similar result to what
we're seeing right now. But this looks pretty good. We just need to
refine a little bit the curve that
we're getting here, so it feels smooth and correct. But again, this is just
for blockout purposes, so don't stress too much.
Like, this should be okay. So now we're going to
speed up a little bit. And next thing we're
going to be doing is the rest of the
plates on the chest, on the arms, and we're going to follow a
very similar process. We are going to keep extracting. Once we're happy
with the silhouette, we're going to be doing
panaoops with pebble, so it feels like a thick plate. But for the chess
piece in particular, we are going to be
doing polygroups. So what I'm doing now is just masking the overall
shape that we want. Once we have the plate, the full plate, symmetrical. We are going to be
doing polygroups, so this will be the first
group for the sleeves. We'll slow down in a
second bet for this part, which took a little bit longer. It's more fun to
watch in speed up. So now that we have
the leaves separated, as you saw, I basically
did the same thing. Just try the panalops
and see how it looked. So that's me going
back and refining the mask to make it look more clean and
just around the shoulder. So it feels like
more professional, more like craft
well crafted armor. Now going back to
the first layer of the shirt to adjust it with the underlaying armor,
same for the breastplate. Same for the neck, small adjustments to bring
everything together. Like we mentioned before, every
time you add a new piece, it is good to reevaluate
the shape of the others, watch for negative spaces, watch for the new
silhouettes that it creates. So now that we have a pretty
decent looking chest plate, we're going to be
doing the groups, we slow down a little bit. And we need to align the mask to nicely fit the breastplate
that we have on the right breast We want to keep the group similar to what we
see on the reference, as you can see, it has multiple pieces
on this chest plate. So we need to
polish these masks. We're going to be creating polygroups on all
those sections. Then going to extract
those masks and yeah, do the same thing as any
other piece we're working on, create polygroups for
it, do the extraction, do the panel loops, and refine a little bit until
we have shape that we like. So now we are masking the back piece to create a new polygroup apart
from the breast one, and we're going to be hiding
a loop around the neck, this one and this one
and the one on the back. To create a new polygroup from that selection with transpose, we Control click and
those polygroups on the neck, we isolate them, and we're going to
once that's mask, create a polygroup for
that next section. We're also going to slice it
in four sections by hiding this loop and this one and
auto groups with that. Then we will have those four
polygroups on the neck, the one on the chest plate, the one on the back,
and we're going to be doing like the harness
piece on the back. So we are doing this mask. I know this is quite a speed up, but to be honest for
masking and polygroups, I don't see that there is much need for
explanation in there. We're just really
masking and clicking either auto groups or group
masked or group visible. So those three options. And we really need to
just hide some pieces and mask the new shapes that
we see on the reference. So now, most of the pieces
are already grouped, so we are about to proceed to extract those pieces
and create the plates, which are going to look awesome. But Okay, now that we have all the
polygroups mostly done, we are going to be smessing
with groups option enabled, like always so that
the smess create sharp and continuous loops
around the polygroup border, so like this, and it increases a little
bit near the border. Now when we panel
loops by groups, you already see that we have those separations very nicely
done without much effort. Now, the thing we're going to do is tweak those polygroups because some of those
areas are going to look way better if we
work them separately. So we are going one by one, doing the panel loops by groups. Reworking some of those
series measures in case that the topology in that
area is not working as good. And tweaking the
levels and elevation, thickness, and loops on each pan loop to achieve the result we're looking
for on each piece. So like I said, it
is best idea to work individually on each of those sections rather
than altogether, otherwise it will
look very similar. Also we want some of
them to be positive, some of the negative
so that we have those difference in the
reading of the plate. So as you can see,
without much effort from an original
extract from the test, then some polygrouping
on top of it, some serumes and panaoops, we can achieve a fairly
quick armor design as a blockout, again. But still, it has quite
nice reading, I would say. Now we're going to get
an add some last twigs. And now we're going to get to work on the shoulders
a little bit. So let me first clean
this up a little bit. Okay, time to work
on the shoulders. So first, we duplicate the
base because we're going to be creating a new
polygroup section like always with a good mask, following what we see
on the reference. And once we are happy
with the overall shape, we are going to get creating
a polygrup serums by groups. And once we have that,
which should be about now, we need to make sure the density of the serumes is good enough. Now we can actually play
with Pan loops and create that extraction that
we like to get. And just like that,
pretty quickly. Obviously, pretty quickly in the speed up version,
it took a few minutes. But pretty quickly, we achieve secondary shape that is going to have a nice reading, and with our very
lovely tools of Move topological
and dam standard, as well as smooth,
we are achieving this nice silhouette reading and by masking and
moving a little bit, we're going to get here a
second differentiated volume. You'll see that we are going
pretty quickly over blockout because in the end,
it's basic ZebrsTolset. I'm trying to give context, some explanation, but in
reality, this is fairly simple. And we will jump in
more detail into techniques later on in hi poly and Marvelous
designer stage. But for now, this is the
same process all the time. You see one, you see it all. So basically just stopping and giving some more context in case some piece is getting a little bit
different from another. But in the end here pretty
much everything is the same. Here, we are just creating
an insert mess of a cube, which we are going to be
applying as a boolean mess here. So we intersect it.
We select both and we change the boolean type
to the second one. Then we just have to
activate live boolean. And there we go. So this is the basic result
for the boolean. Now we can just move it around
because it's live boolean. It allow us to just move any volume that we activate
on substract boolean mode. So any change that we
do to this subject will be reflected
on the Boolean. So now we can took the options for a panel
loop of this piece. Of the arm shell, and it will always have
the boolean applied on it. So now if we scale the
volume of the boolean, it will be smaller if we
scale it up or move it down. I will also change.
And if we subdivide it or we change the shape, it will also be
applied real time. So we just need to
look at the reference, see how it looks, kind of apply one on the front
then one on the back. And with C modeler,
we are going to be removing the border edges, so it looks a little bit more rounded like
on the reference. We're going to do this in both. But we might change
more drastically the shape. We'll see. I mean, like this
works pretty nicely by removing the corners
or it feels more rounded. But yeah, so far it's
looking pretty nicely. So I think that we are
going to leave it here. Actually, I will
apply the Bollon and now that I have applied the Boolean creates a new object that I just
inserted into the scene, and now we are just going to be serimesing quickly
this so that it has a cleaner topology
because booleans mess up the topology
a little bit. But apart from
that, we just have to do the panal oops,
and we're good to go. So now we're going to
quickly do the arm section, the elbow, sorry, which we are going to do inserting
a cylinder like this. And it is going to
create some section for this extract on the forearm because we need to make it
feel like a robotic arm, so two sections, one connection. And yeah, for this section, we're going to pretty much
do the same as before, read polygroups on the
areas that we're going to be cutting off or extracting with mask curve like
lwys and just work around the selections so you can hide like clean
polygroup sections. The useful part of that tool of mask curve is because you can do clean curves and alter the curve attire by
pressing Alt or double Alt. And now that we
have sort of like a base armor section for that, we can hide the under arm, duplicate the elbow cylinder, and we're going to
slow down for a second here to show how in C model, we add connection in there. Another one in here and on
the other side to do a beble. That way we can make
for a rounder cylinder. And those are the
super loops that we are adding on the
side so that it stops flat by that point, sorry. And we have, like, a
more rounded aesthetic, which looks a little
bit more stylized, which is nice. So there we go. We have two sections,
two plates, which we did both with booleans and both
with hiding groups. You could do both
plates either way by using booleans or by using
poly group sections, but wanted to display
both for you guys. Now that we have sort
of the sap finished, we need to make sure that
before doing panel loops, we have a proper round
aspect and smooth. And now we just have
to do panel loops on that with the amount
of thickness, elevation, loops and
bevel that we like, and same for the forearm plate. Okay. I mean, I mean, I'm not too happy about how the topology is going
near those corners. So doing a serums can solve
that issue sometimes. We need to play with
a value so that we can get properly
distributed loops. What we're looking for is not to stretch loops near the corners. Um yeah. This still doesn't
look too good. Usually it's good to try to play changing from
legacy ser meser, changing the density
and doing tests, changing those options until we get something
we're happy with. But to be honest, it's
proving to be tricky now. There is this corner
which is not working. Let me change this and see. Yeah, this is not too
bad. Let's go with this. H. Okay. Okay, I'm pleased with this. I mean, like I said,
don't sweat it too much. It is just blockout for now. So let's go back
and do more pieces. We don't want to
be here all day, just doing a very
perfect and nice piece. We want to create just
the overall feel, weights, and shapes
for everything. So it's important to keep adding pieces with an acceptable
level of refinement, but not too much so that when we add those,
we can go back, like you said, like you are seeing right now to the
shoulder to the joint, and adjust the
proportions in there. Uh, because yeah,
new pieces mean more measures and
more saves that you can use to compare to the reference and see
what is working and whatnot. So, yeah, it's
important to don't get stuck too much on certain
parts of the blockout. So you try to make it look good, but if you see that it's
taking too much time, normally it is not going
to be production friendly, so just hop on into
something different. And yeah, you don't need to finish every part
perfectly until you continue. So now, this is going to be a little bit
of speed up since we are just going back all
the pieces we created, sculpting a little
bit inside them, so it feels more like a robotic
arm with clay build up, dam standard or
very lovely tools. Trine dynamic we're using
there to flatten that out. Nothing too fancy for now. And hopefully, this
arm is going to be feeling more robust and more robotic because she looks
quite fit, quite athletic. So the arm needs to
be in line with that. So it needs to feel
like muscular, but at the same time robotic, which I think we're doing
a good job about it. And we are hopping back
into the strap here. We're going to create
it with curve strap. Also very useful tool. But, you know, with curvetrap, you always have the issue that the orientation of the
curve is not too good. So we ideally want to remove all the sides
except for one of them, the one that is facing us, and then we can trick
and adjust that one. Because as you can see, it gets messy on the curved areas. By pulling, you can sort
of fix it a little bit, like we did on the back
like we are doing here now. But it is not perfect. So it is always
good to get closer, remove the polygons
on the back on the sides after some pulling. But I don't think this
is going to fix much. Okay, so let's click on
split on Musket parts. So we have the object fully splitted in a different up tool, and now by clkin
on outer groups, it should have
different sections for each of those poly sorry faces. So we're going to
be removing all of them except for the
one that's facing us. And now it's easier to
work with this one because we're not going to get
twist the sections, and we can use panel loop after we are done
toking the shape, which is going to be a
lot more effortless. So we can just get
moving this part. And now, this is going
to be a little bit speed up because I just took too
much time adjusting that. So it's just me
adjusting the strap, creating the panal loops to make it look good. But it
doesn't have too much. I just I don't know why
it took so long on this. So yeah, now it's adjusted. It has the panel loops
very nicely done. So we're going to be
doing the buckle that goes under the armpit. Again, we insert a box, and we're going to be working
with Cmdular for this. So we just sort of scale the box to the
proportions we want. We place it where we like. Okay. This should be better. Just comparing to
the ref to make it as close as possible
position wise. Yeah. Okay, so we see that the buckle has
this bevel on the sides, and it also feels like it
has a crease on the base. So first off, we're going to just keep it here because
the curvature is so much, it is not working too
good on all the angles. For it to be seen both in
the front and the back, it needs to be under the armpit, which doesn't really convince
me because both is going to clip more and also it's not
going to be seen as much. So probably one of those concept things
we need to adjust. Although we could
put two bucles or a very long metallic
piece there, but we're going to go for a small buccal for
now for the blockout. So we go to C modeler. We're going to be
removing the edge on the corner so that we can make
it feel like a big beble. We're going to get rid
of all the others to make this a little bit
more of a big pebble. And now we are going to be selecting those edges on the
bottom and creating extrude, sorry, extrude, an extra loop. And that extra loop, we can mask it with
mask laser like this. We can invert the mask
and now we can scale it down a little bit. We need one more loop, one sec. So we go back to some we add this extra loop and now this extra one
on the other side. This is to avoid for it
use deforming the sites. Now we need to mask that loop again because it kept
the old selection, invert this and shrink the
selection, the polygroup. Jesus, I'm making a mess of this selection Osc.
Yeah, there we go. Now we scale this down
a little bit like this. And now let's preview it
looks. That's about right. All right. I think some extra loops are going
to help with the shape. We can put those near
the corners super loops, similar to what we did
in previous tutorials on the Knife one in
case you have seen it, and in case you have missed
it, I really recommend it. We show how to do very nice
similar techniques to do all these things in
a more advanced way, I would say. All right. I don't want to take
much more time in this, so I'm going to speed this up, and we'll see you
guys in Chapter four.
5. 04-Creating Belt: Welcome to Chapter four. Now we're going to go
and start the belts, which is going to consist
of inserting two cylinders, removing the caps, leaving
just the outside area. And now, since we can modify these polygons
without creating much deformation on the
inside polygons, of course, we're going to adjust
them with move mostly, but we are also going
to use smdular to move the vertices on the upper
side to adjust to the waist. You can also select the loop or the interior polygons to move them and scale
them together. And once we are
kind of happy with the curve they have,
following the reference, we will just have to remove the caps and create with
panel loops the volume. Same process as before. We are always playing
with the same values. So a fairly easy task. We play with the width, sorry with the thickness
with the bevel, with the loops until we are happy with the
result we're getting. And if we do any twigs, it's going to be
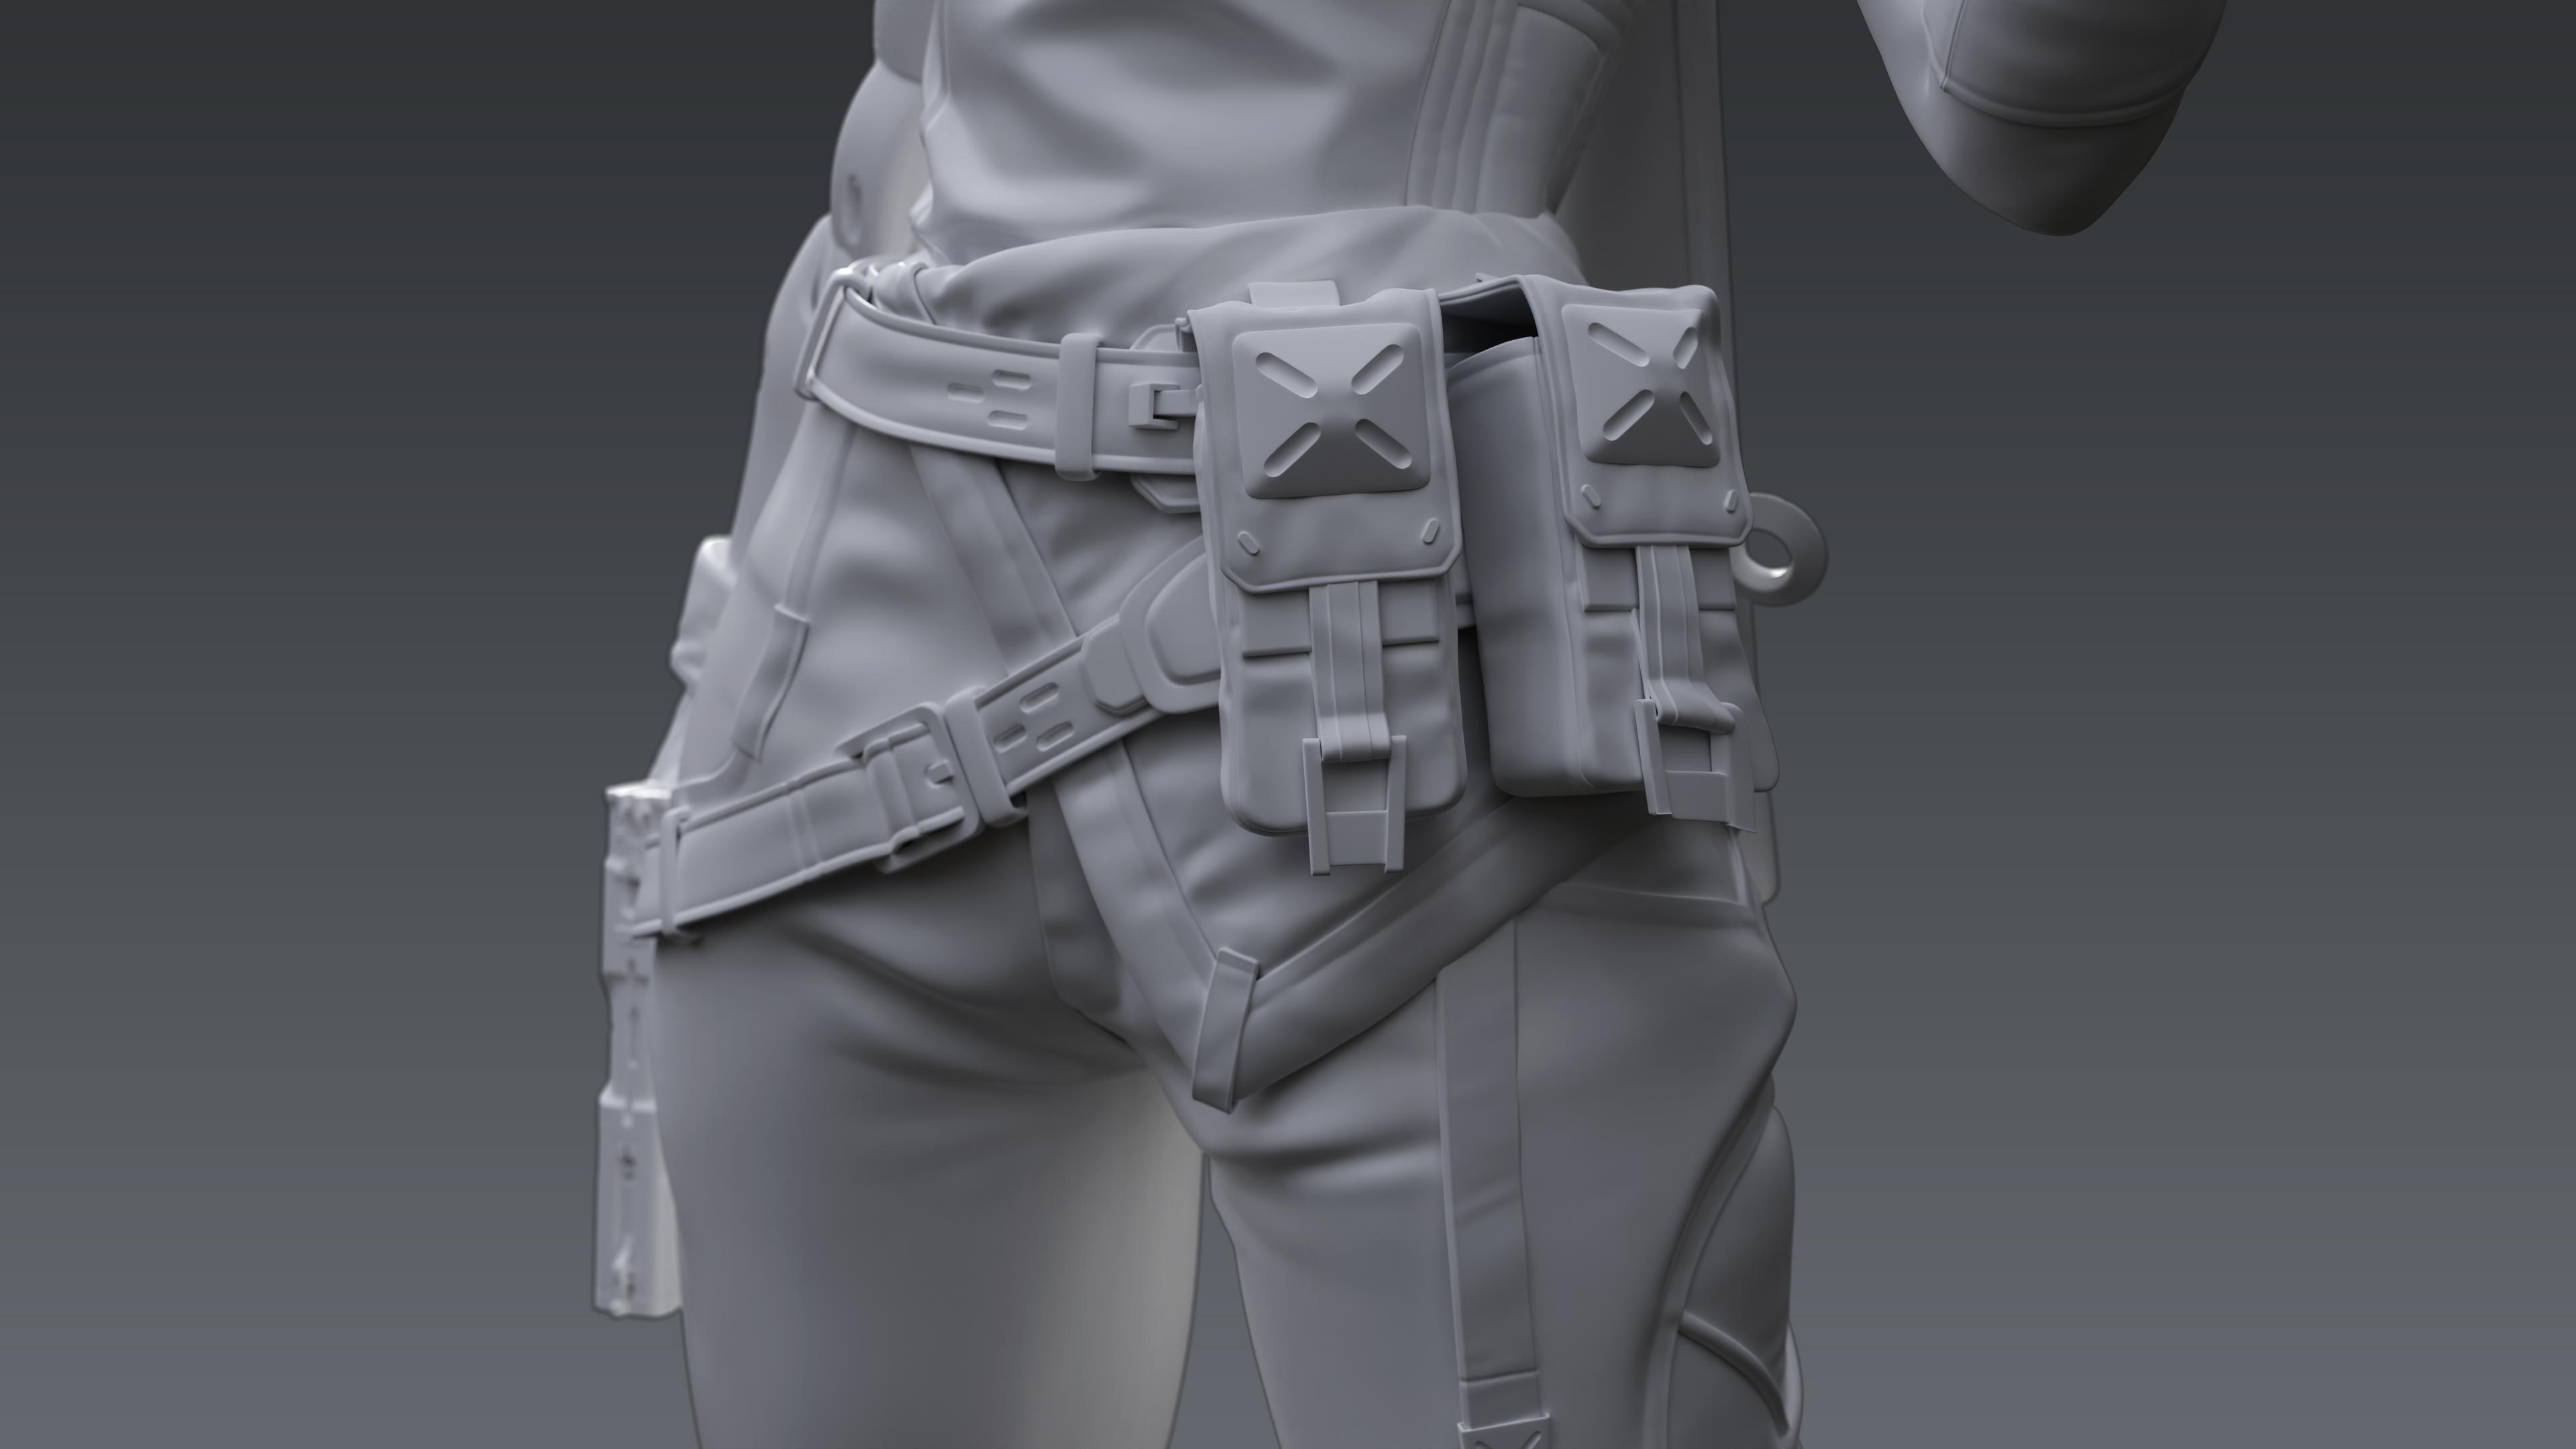
mostly with S modular removing some of the loops near the border to achieve a different smoothing finished. Once the belves are ready, we're going to jump on these pockets, which are going to be pretty similar process to
the one on the arm. So we're going to grid
these two boxes as a base. First, we're going to do is to remove some of the caps to grid the flap by duplicating
the box and removing the non
desired polygons, masking the areas of the
flap that we want to modify, doing a slice on the coroners, same thing as we did
on the next scarf, exact same process here. Once we have sort of the same shape that we
want to go for, we are going to group
by faces this box, and then we are going
to do a panel loops by groups like we have done
a few times before. And this will by
toking the values, we will get this
effect of having different patterns of
clothe sewed together. Now with polyframe activated, we can see that they're
separated in groups. We're going to do the same
thing on the flap later on. Maybe serums before because
it's too dense like this. Okay, so now we have
pretty decent base. We're going to back
to spit a version. We're going to create
the decoration that there is on the flap
by inserting a box and removing with similar
most of the edges and beveling the surface so
that we achieve the shape, then inserting these capsules, stretching them, and applying them as live bullion
like we did before. We need to do that on
four of the corners. And once we have
that, we will have to serumes together the
box together with the bulling applied until
we achieve a topology that can be welded together and can be smoothed
together correctly. So we need to
serums a few times. You will see me here.
I'll slow this down. So you'll see me here, serumssing and tweaking
the parameters of serums until I achieve a topology that
differs from this one, which at the moment is unusable. By keeping groups,
rising groups, sorry, and using legacy, we can achieve this sort of
connected result. Which which not always works. So we might have to go back change the density of
the bullins a little bit to make different layout of topology and see if
then by serial messing, we achieve a good result, which can happen sometimes because topology can be tricky. This looks quite
good, to be honest. But let's try with a loop in the middle of the box, and maybe now it's going
to look better. Let's try. Okay. We're having some issues, which is normal for
these kind of shapes. An easy way out of this
would be to just dynamise this and apply a police
with the formation, which you guys can do
if you prefer that way. I'm just trying to
get a good result by using clean topology, well, sort of clean topology. I think this could
be sufficient? So let's remove the other pieces which we are not using and
get back into the next piece. This is going to be
the under part of the flap and the buckle and the loop
connecting both parts. For the buckle, we are
going to use to reuse the one from the shoes
and mask half of it, stretch it out and thin the lower part a
little bit like this. As you see for blockade, it's good to be resolutive. So sometimes it's way better to reuse stuff you
already have around. It will make your
work out faster. It looks good most of the time and not as noticeable
if you took it enough. So we're going to remove those areas which
don't look as clean. Probably simss them. An Walla looks a lot better. Let's try with
different settings. Because by groups is
going to work with her. So we can polygroup
by normal here. So let's do that and see. Okay. Yeah, we need to group this visible together, so it doesn't do weird
things when we serums. And now I think we can
serums again. Yeah. That's better. Let's try now.
That's not too good. I think it's getting some information from
a group and it's not doing a proper serums
in some areas. So let's try with this. This looks much better now. I think this is
what we're after. So now we can the mask and do the same
modifications we did before, but we're using tapper in the formation so that it
looks a little bit clean. We just need to get the right
angle right axis, sorry. Now we can stretch this, elongated a little bit it is important to have the pivot set on the
right direction, otherwise we will get
that weird deformation. And now we can have
this piece just a little bit more clean
than we had before. We're going to insert a
box for the strap now, remove the sides, adjust it, and then use panal
oops, like always. Just on a speed up version because this part is
going to be fairly lazy. So after that,
we're just going to sculpt a little bit
with them standard with standard brass with masking and inflate for the borders,
like you'll see now. Yeah. Here. So with this, we just want to
improve a little bit the blockout for the pouch. Once we have this ready, we're going to duplicate it put two units around the waist, and then we're going to work on the underneath piece on top
of the tarp that we have. So we're going to be masking,
extracting the selection. And just like any
other part we created, we mask, we extract. We slice sides to
make it cleaner. You'll see in just a
second. Like this. And once it's looking clean, we will remove the sides and use the panal
loops on the piece, serum as before,
and then panaloops. So you guys can see
it's pretty much the same process throughout the whole blockout
of the character. Technically, it's quite easy. Once you learn to do one piece, you know how to
do all the others because it's all
the same process. And yeah, that's why
we are speeding up this version because it
will be quite boring to see 10 hours of
the same extracting, serumsing and panal
oops all the time. So this way, you guys
can see the workflow a little bit more on a
more entertaining way. So yeah, next thing
we're going to hop on is we're going to be working
on the belt buckles. So first, we'll do
the middle buckle and then the one that's
holding up the pouches. For the buckle, we are going
to be inserting a box first. Then we scale it down to better
match the reference size. Then we're going to be removing the front and the back
cap because we want to do a ring buckle so it
doesn't have a center part. We're going to serims
this before Yeah, before doing the pan loops. And we're going to try. So
we need to scale it down, put it in position,
and then we will do the panel loops to
avoid any deformation. This is a duplicate
of the piece. We're going to scale
that down and ser mess it to create the middle pin of the buckle and rotate it and make it seem like
it's going through. Then we panel loops the
sides just like this. We can trick the values a little bit to make it look more solid. But like always, we
don't need to stress too much about leaving everything super nice and clean because we will be scrapping that after when we jump
into high poly stage. So for now, you get the
overall proportions, create some good looking
pan loops for the blockout. And Yeah. String to figure out
a good curvature on the corners and a proper
amount of loop definition. So it looks like I
want it to look, but we might need
to adjust this with similar removing some of the loops because I
don't really want to have the curvature in there,
but it's just doing it. So I'll just remove manually, all these loops and leave the transversal
ones and then smooth, and I think it will
look just like I want. Yes. Adding some super
loops here near the corner so it doesn't
smooth like a circle. It's quite tricky to click on
those edges from far away. Sometimes it's good
to enable on Samdler the ignore option when you're working just with one
kind of selection. We now are going to rotate this a little bit
to put in position, make it feel like
it's a belt buckle. Uh, Now, we're going to adjust
the belt a little bit more so it feels like
it's bending by the belt. Sorry, by the buckle.
I'm so focused, I don't know what I'm saying. And then we are going to
create the other buckle. It's going to go
near the pouches, so a little bit faster now. For this one, we're
just going to do something simple with a bebel. So we're going to just
the scale of the box, like I always get
rid of the sides. We just want the top part. Maybe we'll keep it actually. Let's see rems. Let's
get rid of these loops. Yeah. I think this
initial shape is better to try to remove all
the sides and all the loops, and now we are going
to be paneling this. Let's stick the values
to get a simpler Yeah. Like so. So yeah, let's create the panal
oops, smooth it out, and then we want some we want to duplicate this because
we're going to be overlaying one
on top of another. Just not too sure
about the shape because I might want to do
like a bubble or something. So let me play with
this a little bit. Maybe not as much like this. Yeah. So here we're creating the duplicate
with Control and drag using transpose. We scale it down a little
bit, and we move it up. That way we get a
pretty solid piece with a very simple process. So good trick right there. Going to bend it a
little bit, masking it. It is very important to
work with poly groups, otherwise, creating
these maskings. For certain areas will
be a lot more tricky. So yeah, try to keep them
up all the time you can. We're going to create
one more piece so that it feels like a clip. H. Now, we slice the
borders to make it feel a little bit
more sci fi and cool. We're going to
serums this again. One more time. I'm slicing
this because I'm not getting the stricter I want. This is a disaster. Is B valid as well. Okay, this looks better. I think I'm rolling with this. I don't want to spend
much more time on here. It's going to police this a little bit with move and
go for the next buckle. We're going to be
duplicating this as a group. Put it on the other side. Fit it properly to the belt. So next thing we're
going to do is we're going to insert
a plane to create the back pouch from
the reference. We're going to pyomize it to lower the
amount of polygons. We're going to be creating
the sections with C modular that we will be needing to extract
the different pieces. We're going to create a
duplicate of the plane, another duplicate, and so on
as many times as we need. To create like this the
Moya sections of the panel. So by creating the
initial plane, we created the second tab. Now we're creating
the first belt loop. We use Moove, we
created the curvature, and now we just need to
locate it wherever we want, scale it down, duplicate, and once we're done, we
will just panel loops. As you can see the same
approach for everything, it is fairly simple and doesn't require to give much thought to how you're going to
approach one specific piece, at least on the blockout stage. I need to be like getting as many pieces as
quick as possible and simpler, the better because
here we're not looking for quality or refinement. Here we're looking for speed and representing
properly the shape. So talking about shape, next thing we're going to do is to adjust the shape for the
planes a little bit better. Make this one
thinner and smaller. Now we're going to sculpt
some detail on it. To make it feel more like
cloth and not so industrial. So with inflate, we create a little bit of deformations
here and there. So it feels like a
little bit more puffy. Same thing with the
standard. We just drop some random brush
strokes around there. Like I said, not quality, creating the feel for how
the piece looks initially. So it doesn't look so stiff. So basically
standard and smooth, trying to simulate some
folds and some fill inside. Thumb standard,
we can accentuate the borders a little bit more. Now let's go back to this. Let's create panal
loops for them. Smooth them out.
Now, same thing, we're going to move and make them feel a little
bit more natural. W transpose, scale this
up a little bit more. I think this is more correct
checking the reference. Please remember that I have the reference
on the other screen. So during this tutorial, it's important that
you guys have that open on the left or right
screen if you have one. If not, you guys
can use Pure ref, which is probably you guys
already know about it, but this is a fantastic software to visualize references
while you're working. So you can open the
reference on PureRef. You can set the option right click and in PR
ref of always on top, and that way you can have
your reference on top of your Cebus scene to
compare all the time, because in blockout, the
most important thing is to be comparing proportions, negative spaces, and volumes. So it's essential that
you guys have it. Otherwise, all these
props that we're getting through wouldn't
be as easy to get. Also, keep in mind that we are doing a little bit more realistic
version of the concept. So that's why we are not worrying that much
about certain things, but we are giving more
attention to others. Okay, so jumping into the
pants, as you can see, I just isolated
one of the loops, and I'm going to
isolate the other one. This one is to create
the separation that will be created later on in Marvelous designer
from two different patterns. This is what we are
going to be using for seam line of the pants, which is normally where
you would see real pants cut or suit because as you know, they are created from
flat fabric patterns. So the union usually is on the sides and the
inner sides as well. So you just trying to get that polygroup that it's going
to be easier to work with. We're also going to
the polygroup for the sort of patch that
we have on the sides, which is kind of like rounded. So we're going to
mask that manually. And at this point, we're going to jump into speed aversion soon because
what we're going to be doing for the next few minutes is
masking different areas of the pants to create the same patterns as we
see on the reference. So we're going to be doing
polygroups for all that. And after we finish with the polygroups the
ones you see here, for the pockets, for
the side panels, and for the initial
patterns as well. Once we're done with
those polygroups, we will be panel looping by groups like we did previously
with the chess piece. And with that, we will have different subtols to work with. As you can see here, I'm
creating more groups, and I'm going to be doing that during the
next few minutes. Since there is not
much addition and explanation to do
on this because we just did that before
with a chess piece, I'll let you guys enjoy
this in speed up version, and we'll see you guys
in the next chapter.
6. 05-Creating Cape: Welcome to Chapter five. So after doing the pul
groups for the pans, we're going to keep
improving them by starting to do some folds, sculpting with the same
method as always like using dam standard, Mool smooth tool. Keep rocking same techniques. Later on, we're going to do some more grouping for them
to polish some details. That for now, we're just
going to accentuate the saps we see
on the reference. Yeah, using the dam
standard brush. Especially the hip side, you can see here that it
is quite pronuncated. Even if we are doing a
realistic version of the model, we still want to accentuate those things and
keep some amount of stilization So we're going to get some folds here
in the middle section. Alternating between
the positive value for standard now and
the negative one. We're going to speed
this up a little bit because it is the
same process as before, but check out how we are going very smoothly about all
the details that we see. Here for this detail, we just click and then with
sift and drag, we do a continuous
trace for the sides. For the majority of the folds, we're just going around
creating the rhomboid shape, you can see here, which
is creating yeah, like a rhomboid structure
throughout the folds. That applies for sleeves, pant sleeves and every sort
of cloth construction. You're going to
stop for a second, speed up to try do a detail here by hiding those
loops and masking them. And we're going to try create an interesting double reading or sorry, following
this selection. You need to be careful with
the ones I'm selecting. And Oops. Yeah. That one. Now I need to invert
the selection, go to the formation,
inflate balloon. We're going to use
a negative value. I'm not too convinced,
to be honest. Not sure if I should keep that. For now, I think, let's skip it. And let's go back to a little
bit more detailing for now, the faults are quite simple. Yeah. And we're going to
create the strap here. We will also duplicate one of the faces from the
strap and remove all its loops to then do a panel loops on it and create the metal buckle
in the end of it. So we're going to
do that about now. So we isolate those polygons, duplicate, remove all
these loops we don't need. Then panel loops, add
some super loops, and taper it a little
bit and subdivide it. We are also going to
create the hoops. The cape, which is going
to be started off a plane. In this case, we are going
to sort of place it in position then we're going
to just with a little bit. Okay. I need to move
this a little bit and just select this
blur the mask a lot. And I'm going to scale this
and move it in a little bit. Like this, and rotate it so it fits nicely
the curve of the back. I'm going to stretch
it down a little bit. Yes. Mm hmm. At this point, I'm going to
create some initial folds. Let me just quickly do it. We're going to, we just want to break the flat
shape a little bit. So since we mostly
have the main shape, we're going to make it feel
more natural by angling this down a little bit with
rotation with symmetry, placing the pivot on
the side of the plane. And we can smooth
the pinch created by the rotation and get
to where is this? Yeah, we're going to create some breakdown with them standard. Sorry, with the
standard, I meant. Use some loose falls coming from the back up to the butt
in positive and negative. And yeah, use the basic thing
to make it feel more loose, more of like a hanging
cloth rather than just a very solid carpet. We can intensify the initial
landmarks we created. Just trying out some
folds here and there. I'm not too convinced by
the initial base I had. So we are going to create some secondary
faults coming from different directions
and see how that works. Okay. I think as for the cape, we could use some
more curvature here. And if it doesn't feel like
a hanging cloth anymore, but it will be more interesting visually
for the character, Although next thing
we're going to be creating because probably the cape is
going to stay like this. It's going to be the belt loops. So use the rings that go around the belt to add some more
interesting reading to it. So we're going to start off a cylinder where we are
going to remove the caps, the upper and bottom cap. Just like we did
before with a buckle. So we're going to pulley
groups by angles, then remove those caps. We're going to be displaying double so that we
can see both sides. Removing some of those
loops to create, yeah, like a belt loop shape because we don't want
it to be cylindrical, we want it to be like a rectangle with
angled top and bottom. And now that we have this shape, we just need to yeah, do panel loops like always, making sure the
parameters are correct. So play a little bit with them until we achieve
what we are after. Like this. So now that we sort
of get what we get, sorry, we sort of
get what we want. We're going to rotate it, put it in place like this, angle it a little bit
more and scale it. And once we sort of
have it in position, we're going to try panops again. Yeah, this works pretty neatly. Let me tweak this and see. Okay, that is nice. So now, let's just
quickly duplicate it, place it around on the positions that we
have on the reference. And we should be done
with the bell loops. It's so hard to pronounce. There you go. And now, I'm going to
jump back on the head, and we're going to start
sculpting the hair. So first of, we're
going to create this sphere to create the
main volume for the hair. We are going to use Move now
to adjust it to the skull. So we need to first off
start off from the sides. At this point, I'm not
really looking to create a very exact shape of the hair because we will be carrying that later on in the Indian version. So we're just going to create a sort of representative idea. So we go bit by bit moving and smoothing to adjust
it to the skull better. Okay. Okay, so for the ponytail, we're going to use
another sub tool as well as the front loose hairs that are going to be represented
by a stretch sphere. So now we're going to
do the pony tail first, which is going to also be
started by sphere and then move topological and just try
to create that curve, which sometimes is a
little bit tricky. So we're just going to
get the main thing going. Get the main block in position. And we're going to try C. With pinch, we can actually
achieve a pretty nice, like a stretch effect
near the rubber thing. But for the end of the ponytail, sometimes it's easier to try with this other tool that we
are going to see in a bit. Let me just create the
rubber n real quick. Okay, we can pinch
here the end of the ponytail like this to
achieve like a morphine result, although it's not there yet, but it is something for now. Here I'm just trying
to get, like I said, not really trying to
get into concept shape. Just trying out this tool. I'll see how it works. Not
very convinced, to be honest. Um, so yeah, I'm used trying to create like aesthetic aesthetic
shape for the whole hair. Um, now we're going
to do, like I said, some loose hairs on the forehead and also some
sculpting on the main screw, but nothing too complex. So, I mean, here we're not really going
to see how we cover her production because
that will come later on in real time version. But rather here,
we're just going for something like
aesthetically pleasing. So it works with the
rest of the blockout, and it doesn't look
like a bold character. I'm going to speed this up a
little bit until the point that I start off with the loose irs from
the forehead. Okay. Here, we're going to
start off as well by inserting a sphere
and escalate it down to make a close to a cylinder as possible
from the sphere. The reason we start
from a sphere and not from a cylinder is
because this way we already have tapperd ends to simulate the tip of
the hair and the root. So just by using a little bit
of inflated negative value, we already achieve this effect. And then by using the move tool, we can already achieve
a prens result. Then with masking and rotating, we can achieve pretty
good curvature and yeah, just like that, we can get a clump of hair, which we are going to be
placing a little bit in position and then just
duplicating a few times and adjusting
individually to create a composition and a hair
look similar to this one, but not as stylized for now, although we are going to be flattening it up a little bit. And remember, this is, like, a more realistic
version of the concept, so it's not going to have
such an anime hairstyle. So this is just going to be a quick representation of
a more real hairstyle, similar to hair design. So here I'm just duplicating, masking and in case that I
want to make the hair shorter, I will delete heading and
then dynamze the hair again. So I'm just doing this and transforming
the hair with move tool, conforming to the
overall head curve and trying to represent the hairstyle as
best as possible. But as you can see, is mostly just rotate and move
most of the time. Um usually, if I'm
doing haircuts, I will try to follow
Well, please first, I will look for more references, and I will try to follow the path that I can see on those reference to create a more natural
construction for the hair. But in this case,
because like I said, we're just blocking and we
don't need to be as accurate. We're just like placing out of memory and just looking the
reference from the concept. And now we're going to start off sculpting the hair
a little bit more. So just before that, we're going to adjust the forehead clums a
little bit more and the ponytail to create a nicer curve and flattening those hair
clams in the front. So we need to inflate
them a little bit more, and we're going to
use clay build up and trin dynamic to create a more
flat surface like this one. And we're going to play
again by duplicating, rotating and moving them because before they were
feeling too cylindrical, to be honest, for
what we are after. I feel that this is
going to work better. Also, it is a good idea to
try to overlay them somehow. So try to try them
making intersect, especially just keep
a layering of them. And now that I'm sort
of happy with that, I'm going to start sculpting
a little bit more. So with the standard,
we're going to create some guidelines
of the hair direction. Try to merge it with her clums so it feels
sort of integrated. Still adjusting stuff here and there used to get something that pleased
me more aesthetically. And at the at the same time
works in the amount of sterilization and yeah detail
that we want to achieve. So now let's get some
basic brush strokes here. Okay. Just the basic marks in
negative, sorry, in positive, and then with negative, we will create the sort of like trimmed
hair clams as well. So both the forehead clams and the main school have the same thickness
for the hair clams, and it all feels integrated and like a cohesive hairstyle. Obviously, it's not going
to look as defined, and to be honest, we don't care at this point. So we just want to try create a good
representation quickly. So I would say, this looks
pretty good for what we want. So now let's go ahead
and jump into the head. Actually, we're going to
do that in next chapter. But now we are going
to be creating the evals by
inserting an sphere, rotating it, placing it under the bases
socket for the eye. Just try to leave it a few
millimeters away from the eyelid and level it correctly. And then once we
have both in place, we're just going
to put a standard, changing the appliance
method to dots and changing the Alpha to sort of
yeah, this alpha re here. So if we tweak the
fall off as well, it will feel more natural
when we place it. And we can smooth
it up later on. Let's try to make it
a little bit bigger. That's why I zoomed
out to see if it was working naturally and
it was aiming straight. Still, I don't think
I achieved it. So cost mode is useful for this. Although I think because I still want the
look to be relaxed. I don't want her to look scared. So let's see like this. Okay.
7. 06-Polishing Face: Welcome to Chapter six. We are going to get started
with the head and the face. Or plan is to make it
look like this reference, which is a little
bit more stylized, childish, and with more
anime look on her face. So one of the things
we're going to be doing is increasing the
size of the eyes, reducing the size of
the nose and the mouth, as well as creating
more aesthetically pleasing and curve
features on the face. So having this side
reference as a guide, we are going to try
apply those changes, keeping as well a
realistic style. So to start, we are
going to be creating a layer to start in some detail. The first thing we are
going to be doing is to increase the
size of the eyes, like we mentioned, as well as
exaggerating a little bit, some of the features like
cheek bones, the chin. And the main purpose
for this, like I said, is to make everything more
curve and statically pleasing. So let's get started on this. As you can see on the eyes, I'm trying to get
them wider first, as well as slightly more open, which is going to get the eblls out of proportion a little bit. But we can fix that later. Also, as you can see, I'm trying to thin out and
smooth out some features. So nose is getting thinner. The area under the eyelids
is getting smoother, as well as the
sides of the head, and as well as some of the
fat on the sides of the lips. All that is going to be
gone in a few minutes. And what I'm trying to do is just make everything look
as childish as possible, take some years
of the basements, and give it more
like an animal look. At this point, what you see is that I'm mostly using Move tool, actually move topological
to adjust those features, lift up the tip of the
nose a little bit, s going back and forth, disabling and enabling the layer so that I can better see
the changes I've done, adjusting the eyes, like I said, then we're going to be
a little bit off now. And especially on the eyes, I notice that it is
still not there. I want to lift up the look on her face so she looks a
little bit more cheer up. For the lips, I'm
using inflate and move topological to get a more
fleshy feel on them, although the sess
is pretty good, and it doesn't really need
much change in that aspect. But having some more fat
addition under the lips with standard and adjusting the
features a little bit, smoothing them out helps a lot. One reference that
you can take is that normally the separation
between the ables, it is another able in
between both eye sockets. So that is a good
point of reference to measure most features
on the face. As you saw a few seconds ago, I was separating the eyes to
make it look more natural. But I'm also using
that measure to see how long the nose is, how wide the mouth is. So use measuring with
eyeballs, you can see, maybe this is
eeightll and a half, and it helps a lot. This point, I'm already
using a little bit of dam standard
together with MOV to redefine a little more some of the features that
we made looser and smoother because our intention is not really to get
fully rid of them. It is to smooth them out. And once the overall
volume is softer, we want to create some
definition on the wrinkles, so it feels like more organic and solidified,
but still smooth. As you can see I'm
going back and refining a little bit the under eyelid, but still without having much fat accumulation
down there. Same thing for the
wrinkle that falls from the inner eyelid up
to the cheek bone. And smoothing out most of the cheek bone fleshy area and thinning out the
chin a little bit. One thing which is very
useful, as you can see, is having different polygrps for the under part of the mouth. This way allows for a
very easy selection, and I really
recommend you guys do this in all of your characters. In these basements, you'll
already have this provided. But in case that it is not provided and you start
off from one sketch of yours is really recommended to the groups like that because it's very useful for different processes depending on how you work with the client. So for example, sometimes you will need to do blend
shapes or mouth interior or just bake
the lips properly. So if the lips are too close
together and you don't have a polygroup to help
select and move them apart. I will be a quite tricky task. So a very useful tip I would give you is to always when you're working
on a character, first a polygroup for that, then create a layer. Then having that
layer on record mode, select that polygroup
and open the mouth. This way, you'll have a layer that opens and close the mouth, and this will be incredibly
useful to bake and to do any possible detailing and sculpting inside
the mouth or the lips. Having said that, as you
can see on the time laps, we are going back to the ice to try to do a better result. But to be fair, the ones that we had before
work pretty neatly. So now we are doing
some paint on top, which I like to start seeing some of the
vibes of the face, as well as masking some fake avows that are
not going to be done now. That helps me see proportions. So if you guys need some
landmarks like that, some painted landmarks,
just go for them. It is very helpful,
even if you end up discarding them the very
second you do them. So just look at the
difference before it was looking like a 30 something
year old person or 40, and now it's looking more like a teenager or maybe early 20s, which is what we are after. Faces is very good to try
to simplify because one mistake that at least I
felt that I used to do when I was less experienced is
that I was overdoing pass, like just making them very
wrinkly, very detailed. And in the end, simpler surfaces work a lot more naturally. Obviously, you need to
understand anatomy and do all the subtleties on the face, but not overdo it. In the end, it looks more
plastic and more fake. So try to have a good anatomy breakdown on your
reference board while working on phases. And I always try to work
with low resolution messes. I find that this is also
very useful for head scoptingE especially if you are not going to be applying Alphas until the
very last second, so it's good to be always
on a low resolution level. Then it is also very useful to even if you have a really good photo of the actor or person you're
trying to model, still analyze a little bit, do a small breakdown
of that person, analyze where she or he has fat accumulation or
maybe more blood flow or use some more scar tissue on the skin because all
that will be very helpful or understanding on which areas you need
to build more mass, and but yeah, if you're
starting from a basement, like we did, it is going to be a quite easy task to
adjust your basements. But still, like I said,
it's a good idea to have a wide reference board and breakdown before
starting any phase. So as for detailing, I think you have a few
tips that can be useful. So most of the shapes
from the head, both if you're starting from basements or if you're
starting from scratch, should be done by using
mostly the move tool. Because if you start
creating volumes, well, adding mass, actually, with clay buildup with
standard brush or any other like brushes that
add volume to the mess. That way, if you don't have a very good
understanding of anatomy, it's going to be more
blobby and more, it's going to be more
difficult for you to spot the volumes and the
shapes of the sorry, the volumes and
features of the face. So my advice is try to work
with quite a big move brush, make the fallow to be
quite big as well, so that every transform
that you do either from pushing or pulling is
going to be quite soft. So that is going
to help construct the main things
like cheek bones, the chin, the size and
width of the skull. So for that stage, I would go for move mostly. Then when you are doing
lips and nose, also eyes, I find very useful to do some masking before because if you pull the mouth or the
nose without a mask, because of how the
brushes from cebrus work, it's going to be a big pull. So it is good to do a mask, then move those volumes to get the main
structure for them. And then if you're
going to detail and create main shapes,
sorry main shapes. Secondary shapes like
we are doing right now, 100%, my favorite
tool is dam standard. And sometimes clay
buildup and standard, but mostly them standard
because as you can see, we can create a trace under the eye that already give
us the feel of having some fat imation under
there or use like a wrinkle created from the connection from the
eye to the cheek bone. And then we can just
smooth that out a little bit and make
it feel very natural. Same way as we are doing
with the eyelid right now and same way that we
have done with the eyebrows, with the nose, lips, et cetera. So DAM standard is key to
this part of the process. To do stuff like
refining the border of the lips and the inner
part of the lips, 100%, I would go with mop topological because it's going
to allow you for an easier transform
not deforming the under lid because they don't have continuous topology. And then for the border, if you want to clean
that up a little bit, I would use mix a mix of smooth and also standard
and dam standard brush. So smooth will allow
you to round the lip, like you would want
in the lower one, which normally is less sharp or it is sculpted
less sharp normally. And then using dam standard
for the upper lip. I by pressing d, you will get the
positive results. It is good to do the border. Okay, so right now, I'm happy with your aspect. We didn't really take that long. I mean, obviously, we
had some speed up parts. But I think at this point,
the whole process has been around 30 minutes
or 40 minutes maybe. And we have already a
pretty pleasant look. On the face is to
apply the well, after some more policing,
which we are going to do now, what we are doing next
is going to be applying the textures from the basements
because in this case, what we did is we started off
from a basement with scan. So basically, already
has a good topology, which is very useful
for production. I already has UBS, and it also has some textures
from the original scan. So that is one of
the best scenarios nowadays to start a character. Even if it's not anything, even if the scan is not
anything you want to produce, but still is very reusable data. One, you're going to be saving time just blocking
out the anatomy. Two, you're going to
be saving time in low poly because even if
you have to redo it, if the base mess is nice, you'll be able to to have at least some parts of it reused, which
will save time. Probably UVs you will have to redo because not
many times are nice. But still, it will help you to have UBS during the
high police state, like you will see now to pre visualize the
textures from the scan. And then it will also
save you some time on texturing because doing proper skin texture
is quite difficult. So having some raw scan data is quite useful, you will see. So now, like you saw we
are working on the lips. We are doing different
stages in different layers. So this one is not all
the transformations. Just one that is making a little bit more
of an angry face and making the lips
a little bit cleaner because we soft them
out too much before. So now we're going
to be checking if it's working better
or worse than before. Let me just quickly this more volume in there and we're going to
check with the layer. So yeah. I think this angry look
is looking quite good. I mean, before it
was very relaxed, but now eyes are
more anime, I think. So now let's get the texture we had previously loaded from the scan in the
spotlight in textures. So let's load it
here in texture. And same thing we're
going to add in our brush texture from the eye, which we can unload
anything from the Internet. So where we have
texture, we select that. We unload the Alpha, and with the method
of the arrow, the click and drag one, we can paint the eyes
with an eye Alpha. It is actually
looking quite dark. So let's come here to
adjustments, color adjustments. And let's tick the
saturation and brightness, which was I think this is saturation down left,
and this is brightness. Yeah. So let's tick
the brightness and the saturation a little bit. No, that's too much. We wanted to look as
neutral as possible, and the white needs to be filled like natural
white from the ice. You know, liking this
a little bit alien, but remembers me of
Alita a little bit. We're going to paint some red
around the ice to make it more natural and integrate
it together with the eyelid. And now some dark on the top, so it feels like the
ambien occlusion from the eyelid. Yeah. Okay, I think I'm
liking hots looking. They are clearly very, very big, but we
are going for this. Let's see how it works together. I try the pupil a little
bit bigger and darker. I like this. Yeah,
that feels more real. Maybe the iris can be brighten it a little bit. Just don't want to
affect the pupil. Okay, that's too much,
but on the lower part, it works. Okay. Painting the pupil over
again because I tainted it. Okay. Just trying to police a little bit
more those shadows on the eye so that it
doesn't look as flat and as three d. You just
want to make it feel more that has more depth. So painting a little bit of black shades under the
eyelid feels quite nice. And same thing on the bottom. I want to put a little
bit more redness, so it doesn't feel
like dull ice. But I think that's it. So we're going to select
the head and create a poly paint from the texture. So we can actually edit skin tone and paint over it because if we keep it as a
texture, we won't be able to. So now that we have done that, we can actually come to the head and paint the eyelids
with some warrior makeup. Which I think accentuates the
look a lot. And it's going Okay, so now let's check together the hair to
see how it looks. And so far, I'm
really liking it. I mean, it feels like
a powerful woman. The looks are good. The eyes are clearly exaggerated
and very big, but that is the look we are going after
from the beginning. So it's like anime stylized, but at the same time,
it's realistic. So use a few last twigs in here and we're going
to jump back into the armor to polish last
few notes on the blockout. And we would be
ready with blockout. I mean, we still have
some work to do, but most of what's
left is going to be, yeah, like, policing these
small things, adding bullions. So yeah, for Bollans we're
going to go like before, we're going to
insert some sphere here to work on
the shoulder pad, and we change the boolean
to substract mode, activate Live bullan
yeah, pretty simple. And now we can adjust it to
move it wherever we want. I get the feel on the reference. Sometimes I will not do this stage or maybe will
just do it with an Alpha. So don't stress too
much about this. It is just for
presentation purposes to make it look very, very cool. But yeah, trying
different options now to see which one
convinced me the most. I think I'll leave
you guys to enjoy this part in a little
bit of speed up. And I don't think that there is going to
be any new notes to add, apart from just wrapping up
details on the blockout. So we'll jump back
when we get to the elbow joint because there is something I want
to show you guys there. But apart from that,
enjoy some speed up. Okay. So we're going to
use this cylinder that we just inserted to create
at the elbow joint. So we add those extra
loops with Cmduler. We're going to mask this
vertex and move it in. Although we can also do that with C modular, however
you guys prefer. This is the section
we wanted to move. This already gives the cylinder a quiet Sci Fi and
hers face look. So now we're just going to add some extra insert loops so that it looks smoother
when we subdivide it. It's going to do
more inserts here so that I can transform
this individually, and we are going to be inserting this to create this
sort of cut in there, make it look like two pieces. And same thing in here. We just polygroup the
selection and move it in. And now we have the side
view of elbow joint. Like I said, we are
going a little bit overboard with the blockout. Like this could perfectly just a cylinder
for the blockout. But we are going, yeah, like, a little bit
the extra step, both for presentation
of the curse and both for reusing some of
these pieces later on. Okay, so we're going to do some more paneling
on the form. And with this, we should
be done with a blockout, so we will see the results
in just a little bit. We're going to do some
masking, like always. Then you know what comes next, is going to be creating the polygroups from
that selection. Yeah. So now we have the selection with
polygroup from it. And now you also know
what comes next. We're going to be
doing panel loops from polygroups before
doing the panel loops, we actually are using
group loops to achieve this double border panel. I et's do another
selection on the bottom. Okay. Lure the masks, pulls them a little bit more, and I think we can group
now and pan a loop. Okay. Without seru missing by groups before to get clean
cut around the polygroups. You know, it takes always a few tries changing
the settings, but we are almost there. Okay. So finally,
we got the groups. We can panel loop now. It's looking pretty nice. So now just two more things. We're going to insert a cylinder here on the back of the triceps. Scalip and put it in place. This is the detail from the ref. And this one is for
sure going out. Use a placeholder. And lastly, one front plane that is going
to go on the next curve. Yeah. Just that missing, I think that plane is going to cover this chin neck section. I think that will be it
for the blockout guys. Like I said, you guys don't need to go this far normally
for blockouts. Client don't usually
spec this much. The stuff you can simplify are the elbow joint and every area that we detail in a clean way because you can get away
with rough sketching at this point and using
main Man proportions. Also, everything that we
did with panel loops, you can sketch it out
over the main volume, although doing the
panel loops is cleaner and it really
doesn't take that much time. So overall time of the
blockout might have been like two days of work, two days worth of work, like, maybe 14 to 15 hours. Obviously, we have reduced the time and spit up some areas, so it's more digble
for you guys. So yeah, this is it
for the blockout. Next thing we're going to be going to cover is
Marvelous designer. That topic is quite interesting. It's going to have from technical aspects from
the software up to, yeah, an overall view
from how I work. And hopefully you
guys will love it, will enjoy it as much
as I did working on it. So end of Chapter six and see
you guys on Chapter seven.
8. 07-Creating Final Pants Part1: Okay, so now that we have
our character blocked out, next thing we need to
do is to get this into Marvelous designer
to start creating the first simulations
for the high poly. So we're going to bring or basements as an avatar
for Marvelous designer. But first, we need to
disable the texture. For this, we just
need to turn it off here on the right settings, and we're going to be exporting
the character as an OBJ. So we go export it And now into Marvelous Designer, we're going to go
to import units would be on centimeters. And yeah, all by default
is good, usually. Okay, so here we
have our avatar. If it's very large
or very small, maybe we should try
different units, but usually centimeters
works quite well. So now that we have
the avatar here, first thing is going
to be creating the pants because the shirt is conditioned to
be under the pants. So ideally, we want to
create the layers on the outer level first so that they can apply
pressure to the other ones. So we're going to
first do the pants, create the basic patterns
to achieve base faults, and then we will proceed with applying all the
assets like the poaches, the globes, everything
that is going to be applying pressure
other cloth pieces. So we will be bringing that
later on into Marvelous. So first thing, we're
going to create with the rectangle pattern tool in the two db port
or basic pattern. And we are going to be
editing the curve here, is to create the center
area for the pants. We can edit the curve
with a curve tool. Then this one we're going to be making it like
a temper shape. And we need to try to leave some extra room on the sides for the
pan to go around the leg and also try to get the proper height to fit
the length of the leg. What I'm doing now is creating some extra points on the side because these
pans in particular, like you remember
from the reference, they have a weird excess
of fabric around the hip. So that's why I created that
extra curve up there and added another point down to keep the rest of
the pan straight. So now we're going to
do asymmetry for this. We want to have the
exact same pattern, and this could be our base. We are coping this and rotating it to create
the back part, which we are going to be
adjusting in a second. You can right click and flip
them instead of rotating, but you need to reorganize those in the two D view
board if you like. So we're going to create
quick sewing between them to see how it works. Making sure that
all the stitching is going in the right direction, which he's actually doing. Okay. We need to
fix this left leg. If we put it closer,
it's more difficult for them to go in the
wrong direction. So let's try now.
Okay, there we go. So they're looking okay. We're going to actually
we're going to make darker the avatar so that we can see better the work we
are doing with the pants. We could do it with the pans, but since by default, all the fabrics are white, it is easier this way. Okay, so next thing
we're going to do is now that we have our
base patterns created. We are going to bring as a reference the blockout
we did in Zibros. We could use that to
create the basic patterns, but it's not the
way we're going to go for the pans specifically. So what we're going to
do is bringing them as a reference for position for height and
overall proportions. So we are going to go back
into Cibros in just a second. Making sure that
the tight is good, the fit is tight for now. Okay, so we're
going to get those, and we're going to export
them the same way we did before with the
avatar as an OBJ. This time we're going to
import them differently. Instead of importing
them as an avatar, we want to add them. So inside Marvelous Designer, Yeah. Since I
Marvelous designer, I'm going to go here to import
OBJ selecting this one. And now I'm going to select, first hide the patterns, select the reference for the
pans that as you can see, they are slightly higher
than the ones we have now. We're going to deactivate them so that it doesn't
affect or simulation, and we're also
going to hide them. So we can use height and
hide whenever we consider. So with this, we can see that basically your pans are
a little bit lower. We need to increase this.
This is way better. Also, we see that the
shape we had is incorrect, so we need to lower the front
center and up the sides. To try and replicate the same shape as we
see on the reference. But we are also going
to be adjusting a little bit the tightness
on certain areas. So we're going to select
the vertice right here. We're going to make it shorter so that the waist is more tight. Likewise, for the crotch area
or yeah the inner pelvis. So we select both sides from
the front and back pattern. We move it up so that it
will create tightness, simulate and see how it
results. Looks pretty good. And we're about to be doing the same on the lower part of the pants so we
select both sides, move them to the
side a little bit, adjust the curve, and select both patterns both
front and back, and we're going to
be adjusting those, so the overall result is
more tight on the ankle. So it feels more like
a sporty legging. Like so. Okay, so
next thing we're going to be working
on is the belt area. So since the height of
the bond is correct, we're going to be
selecting both patterns, front and back and see the
measurement so that we can create a belt that measures the same as both front
sorry, back and front. So we add those measures here on the rectangle
pattern creation. We actually have to
adjust, hold on. Yeah. Now it is correct. Sorry. So now we're going to be sewing this with three sewing first to the
back then to the front. And the reason we do it first, the back and the front and not just both front patterns or both back patterns is so
that the stitching of the pattern stays on the middle of the waist
instead of on the sides. So we copy and symmetry this. We also seal those together, and we get this ready. So now we need to make this
a little bit more fitted. So we're going to
make it sorter. And we need to adjust
the upper segment, which we are going to
be doing in a second. Just let me, let me adjust the thickness of the pattern so that
it looks more, more thick like a belt. And now we are going to
be doing this thing. So we move the vertex a little bit to the
right and to the left so that we have less fabric
on the upper part and it tightens better
around the waist. And to be honest, it
doesn't look so good. So we are going to
adjust a little bit, pull a little bit
so that we can fix that weird pinching that is gritting both on
front and the back. And since we don't seem
to be fixing that, maybe we can adjust the
weft or warp on sec. Okay. That is a
little bit better. Let me do it in a different fabric preset so that doesn't affect the rest of the simulation. So
I create a new one. I will rename it and
assign it to the belt. And basically what
warp or weft does is that it will increase the
amount of fabric per axis, so it can increase it
in the Y axis or X axis without having to change the actual
measurements of the patterns. So this helps a lot
when you already have measured specific patterns
for the character, and you have done the fitting. So it helps to create
more guinss or tightness once you're
done with that stage. So this is looking
already quite nice. Yeah, I'm liking how it looks. So next step is going to be just a few more minor things
on the general fitting. And we are going to focus
on this area first, then this area and
then the lower area to create those folds, those really accentuated hips. But for that, we need
to fit to adjust the tightness of the pant because right now
it's all very tight. So we're going to select
here contact indicator, we would call it that way. This allow us to see where we have more tension on the cloth. So we can go back to
our patterns and adjust accordingly so that we can give more excess of fabric on those areas by adjusting
with the curve. So first, we're
going to be working, like I said, on this hip area. So for that, we need
to adjust the curves a little bit both on the bottom, and the upper part. So I'm pulling a little bit
and see which results we get. Sometimes this is more
a matter of trial and error rather than just go
for the shot directly. So what I'm doing now is adding curve points to achieve
more control curve overall. And to be fair at this point, I feel that it's going to be more useful top speed things
up a little bit, sorry. So I'll give some
general comment on how we are going to
approach this because it's going to be a
lot of try this, try that until we get
all the tensions out. So I'm going to
quickly speed this up. And now we can comment
this in a more fluent way. So as you guys can
see right now, I'm going back and forth from the tension view and
back to the pattern. And with the croof edit, I'm just adding more
curve to the hip area, adding more curve to
the inner pelvis area, and basically trying here and there until I get rid
of those tensions. Obviously, always keeping in
mind that we're trying to achieve that fault on the hip, some faults on the knee and
some falls near the ankle. So this is looking
better already. You see that there is
no as much red anymore, but we still don't have
any interesting folds. So as you can see now, I'm pinching up a little bit of the clothing until I get
some interesting results, then I go back adjust the amount of fabric that
we have by, like you see, changing a few of the curves, sorry, until we get a
better result in this area. If we see that we
are lacking folds, we might have a lot of tension, so we need to make the pattern bigger on their area,
increasing the curve. If we see that we
have a lot of faults, we might need to
do the opposite. So there is no specific
way to approach a pattern. But these general notes I'm giving you because every
Ater is different, every clothe piece is different. So we need to just keep adding where we see on the
reference that we have more. Of course, every fabric preset folds differently, but for now, we are just working
with the default and we're not playing that
much with warp and weft. But also you can guys use it if you
consider it necessary. Like I said before,
it's very useful to get more general folds, if you increase it when you have the fitting done
already or to get less, if you increase the parameter when you want to
get more tension. So that's basically
what we're doing now. We're just playing
back and forth with a bad area because we don't want to have excessive
guinss on this area, but we do want to get
that heap accumulation. So basically, I used discarded the last ten, 15
minutes of work. I'm just trying
different approach, which is adjusting the curve of the pattern somehow
differently than before. Trying to see if the
result is any better. Just moving the center of the
pelvis a little bit more, and this seems to
be working better, but still not quite there yet. So yeah, not too fun to watch sometimes because
as you can see, I'm just pinching
here, pinching there, painting here, painting
there all the time. Just resetting the
simulation with Control seat because I don't like it.
Just training again. It's pretty simple to get interesting falls on the knees
and maybe on the ankles, but the hip area is
really the trouble here. So that's why we are trying
to go back and forth. Really worrying that much
about the knees, to be honest. He's trying to get some
cloth accumulation over the knees so that we have enough to achieve that bagginss
on the side of the hips. At this point, the knees
looks pretty good, maybe too much fabric,
but they are not too bad. Hips we still want to force
them a little bit more. They're not terrible. We might need some help from internal lines
which will come in a little bit to really get
these to the point we need. So we are trying
to get these folds behind the butt to make
that area as well, interesting, not just the knees. A lot of painting
in the process, a lot of control seed as well. Taking back the tension. You know, like, at this point, to me, the hips are
not really working. I'm not too happy with them. I was going back
and forth with it, just trying to pint to increase the amount
of fabric that we had that wasn't really
making the click for me. So in the end, I considered that the best
approach was to really create a huge peak, like a corner on the
clothing, really noticeable, not like the curve
we have right now, rather than like a mountain
peak or something. I'll show you in a second.
And that was going to make really obvious the shape
different on the hip. So to avoid making a shortcut so that
you guys can see all the struggle and all the
process that goes into this, at least for the first lock
of the Marvelous segment, I'm going to leave all the
part in speed up verson. But here at this point,
is when I'm realizing, like, Hey, I'm not getting
the result I want. So it's when I'm
going to approach sooner or later the hips
and try to do as a set, create a very noticeable peck on the front and
the back patterns. So here it is. Here's
where I'm seeing how they are sewing together, and I'm creating this
super exaggerated extrude, which I'm going to even out a little bit so that it's
not a square thing. And this is looking way nicer, still a little bit weird. So we're going to fix that
weirdness by pinching, we fix everything in
Marvelous designer and by making used a different
shape on the pattern, but this is already
looking quite nice. I mean, it's obviously still a very rough base of
the Marvelous designer, but it is quite good start for what's to come in
the next chapters. So before jumping
into the next one, we are going to create some internal lines
for these shapes. So for that, we're going to be seeing the reference
we imported before to see which height it is going and we are going to create the internal line trying to
replicate that exam shape, so we first going to block it out with a very simple shape
and see where it lands. Oops. Okay. Yeah,
that's pretty accurate. So I'm going to make
sure it fits nicely. We're going to
just every corner, and then we will make it curvy. But for now, it's just
going to be a rough out of it. All right. Now we are going to
curve this by using the create corner tool and making sure the curve is about right with
the reference. Now we are going to same on the back make sure the connection is well
aligned with front pattern, otherwise it will
look very badly. Same thing, we are going to repeat the same process as
we did on the front pattern. We first adjust the main corners and once we are happy with that, we create the corner with these two to make it smooth and round. That looks pretty
cool. I think we already have our main
blockout for the Marvelous. We are going to be
ending the chapter here and we'll see you
guys in Chapter eight.
9. 08-Creating Final Pants Part2: Welcome to Chapter eight. On this chapter, we're
going to keep adding a few internal lines to create the pockets on the
sides of the pants. We're also going to be refining
the borders of most of the patterns to create
some stitching effect, and we're also
going to accentuate the hips shape with some
overlaying patterns. Right now, we are adding
an internal line with a curve to create the side
panels for the pouches. We are going to be creating this line on both front
and back patterns, and we're going to be
offsetting the line to create a double internal line and to simulate that stitching effect that we mentioned before. First, we are placing
the internal line on the correct position and addressing any curvature that
we want to give it to it, then creating the
curve on the corner as we can see here, we have the rigid shape
on hips on both sides. It's a little bit
flatter on the right, but we are going to be
creating that either with an underlying shape
created by some patterns or overlapping another
pattern on top of it, but that will come later on. For now, we're going
to keep refining the pocket and the side caps we're going to create the connection line
between these 22 segments, since it has a continuous
stitching on the reference. We're going to be creating
the offset for both lines. And now we can actually
adjust the external line. Now we're going to be
right clicking this two, this forcery at point
to the intersection so that we can properly
snap the vertical line and make it seamless and remove the section that we're not going to
be using anymore. And this way, they have a
perfect seamless connection. So here we have
basically our layout, and next thing we're going to be creating is a copy
of these patterns. Then we're going to select
the internal lines. This one's right here and
we're going to create a cut on the patterns. We're going to remove
the excess material to have some pieces to
use as side panels. We're going to create
a new fabric preset. We're going to name it
accordingly with the panels, and we're going to be changing the signed fabric preset
for the patterns. Here we are also
going to be creating a cut, inverted cut, and now we're going
to be sewing this to the correspondent segment on each piece to replace that
volume with this new volume. This way we will be able to
to have overlaying stitching, which we are doing right
now, as you can see, we're seeing the
internal lines to the internal lines thing
which wasn't done before. This way we have the overlaying stitching it is a
really cool effect. This way we can also treat differently with
different presets to the gray patterns and
to the white patterns. Now when we simulate, we might need to pull here a few times But it already
is looking quite nice. We already have this
double stitching effect as a result of having one pattern stitch
over the other one. We need to sew this to the
belt because it didn't keep the stitching and
the other part. Okay. Let's stitch this part. And I think the other
side is missing as well. So sec. That one is right. Okay, I think all
of them are good. Yeah. Okay. Just
checking to make sure. Okay. Yeah. So this looks pretty
good already. So this will be well, we already had a base, but this is a more advanced base with the two different kind of cloth that we're
going to be using. Still we're missing
the final blockout on the Marvelous stage. Right now, we are creating like the baseline for the
whole simulation. So we are creating the secondary internal lines that are going to be
supporting the other patterns. We are some basic folds. But still we need to
achieve final falls. We need to achieve
the hip shape, which we're going to be
jumping in just a few minutes. And we're also going to be working on the side
rhomboid shapes. But I think that will
come next chapter. For now, we're going to
select the internal lines. And we're going to adjust the force and the
angle so that we can achieve a more
defined stitching effect. You can see now
when we simulate. Depending on the angle that
do apply and the force, the strength of
the internal line will go inwards or outwards. So right now we want
it to go inwards. We're going to play a little
bit with the web and web to see if we achieve a more baggy effect because
before they were very tight. This looks a little bit better. But now we want to get
this side panel working. So that's why we created
the vertical internal line. So we're going to use that as frame to stitch another pattern. So we're going to be creating a cut from the internal lines. Now we're going to be
getting rid of this. We're going to be the remaining surface to do another cut. Oops. I think I
cannot cut because it's not touching the borders.
Let me double check that. Oh, well, now it works. We wanted to duplicate
the patterns to cut all the internal
lines so that we can have a perfect measured
panel that is going to go over that
pretty fine shape we created with internal lines. Just having some issues here to cut this, but now it's good. So now we have the
two front parts and the two back parts. We're going to also create
a new fabric preset. But first, we're going
to be sewing that to the corresponding areas. And this is what's
going to be creating the hips effect that
we were looking for so desperately and in a more fancy and easier
way than before. Let's give it a shot now
with the new properties. We're going to change the layer, so it goes Sorry, so it goes under. As you can see, the
pattern is there under laying under the pants, and we're going to use that to create a little bit more volume. So let's create
this offset which we are going to use, again, to pull some force using force and angle on
the internal line. Now when we simulate again, by changing these parameters, we should achieve
a little bit of pull upwards, exactly like this. And it doesn't feel
too weird yet. It feels just like
reinforcement from the inside. We're going to change
the particle distance so it feels smoother as well. It is not there yet, but it
is getting there slowly. So we're going to be
freezing this so that we can get this in a more
pronounced way without affecting the rest. And once we're happy with
the shape that we have, we will freeze the proxy
shape. Let's call it that way. We will freeze that one and just leave the
others to simulate. Now we're sewing those in
place with the other patterns. Okay. Now we are actually getting
way nicer volume here. Yeah, we have a stitching
problem here. We need to dress. So let me just quickly
check, here is the issue. We just need to move
the stitching there. Now, it should be solved. Okay. Now the other piece, I think, there must be something similar to
that issue somewhere else. So I'm just checking all
the stitching everywhere. It's happening both sides. So let me just check what it is. Maybe it's just the
layers having issues, deciding which one goes on top. The layer seem to be fine. Let me deactivate this and freeze this area and
see how it reacts. There is some issue
with that stitching there that's causing
all the trouble. We really need to spot where, yeah, this must be it. I think that is where all
the issues coming from. Let's do it on the other
side. I think two more. Let's see. I think I need to activate those,
freeze the others. Is it still pinching?
Hm, that's unlucky. I'm not really sure what it is. I mean, this stitching
seems to be fine. Um, is this? All right. So it was that one. You guys
need to be very careful. When you do manos stitching, just make sure that
you're actually sewing it to the
corresponding area. Otherwise, these
sort of issues can happen and maybe it's
not too noticeable, but it will mess
your whole work. So it is important to spot those issues and
fix them early on. Otherwise, it will carry on till the end of
the simulation. And if someone else start
working on your character, maybe a colleague
or just a friend who is working together with
you on the same character, maybe it will make their
life very miserable to spot those issues if they
didn't work on the character. So just for yourself
or for others, make sure your work is clean. So now we keep adjusting this. What we are trying to
do is refine the shape, so it looks more
like the concept, and it is more continuous
to the side panel shape. So just adjusting
the curve on all of them and simulating to achieve crispy and
continuous flow. So far so good. Now,
let's simulate on top. This is looking very nice. Not too bad for just marvelous, huh? Actually, I like it. Very happy. As you can
see, I'm excited about it. Okay, so even if I have
achieved this shape so far, there is a few more things
that I would like to achieve. It's going to take some time, so I'm going to speed
this up for you guys, and I'll stay silent
while I do it. I'll just give you
now a little bit of context so you can
follow what I'm doing. But basically, I was struggling with the shape.
I was not happy with it. So I was playing with web
and webt of that pattern so that I had either more
volume or less volume, depending on the
test I was running. And also, I was trying
to change the curve. Because I was not too
happy with how sharp it was feeling with the
cloth on top of it. So I was just going
back and forth a lot until I was happy
with the result. So it's going to be a speed
up version during the next. I think it's until
minute 2022 23, which I will be continuing
with more internal shapes to achieve more shapes on
different parts of the pants. But until then, it's
just me playing with the same parameters and the same things we have
been checking before. So just silent for
a few minutes, you guys can follow up, but not really important
notes to it right now. Okay, so now we're back and we ended up with a good
result on the hips. We are going to keep adding
some internal lines first on the pocket sides to create the like the stitching effect that the pockets have
on the reference. Same process, we create
an internal line. We add the curvature, we
appreciate on the reference, and then we're going
to play with force and the angle of the internal line to get the final result
we are looking after. Something like this, we
play with the angle to get this.This quite good. So
for now, this will do. Then we're going to keep adding some more
internal lines here. This is going to be
a halfway thing. We're going to split this
into the next chapter, but we're going to be creating the X pattern we have
on these side panels. First, we're going
to create the arc. We're getting some leitching
here on the pattern, we play with the angle until
we get the result we like. Whoops. Because now after having
this secondary shape, we might need to
readjust a little bit, the previous 11 last
time, hopefully. Something like this will do. K.
10. 09-Creating Final Pants Part3: Welcome to Chapter nine. Part of this video
is going to be speed up since the
process we're going to be covering is mostly playing
a little bit with warp and weft and adjusting some of the folds by pinching
here and there. Since there is no major
changes on the simulation, you'll be guys seeing
this speed up, and we'll shortly come back to create the rhomboid shapes
on the side panels. In case that you
guys want to jump straight ahead to the end
of the speed up video, just go to the minute
22. See you in a bit. Okay. So what we are going
to be creating next is the side sip lines or
however you want to call it, but read it segment that we can find on the lower part of
the ankle and the reference. So for that, we are going to be creating an internal
line on the side. To allow us to control in a better way the
folds that we are getting on this area and also to create a contrast in the
reading of the clothing, making a change from a more soft clothe into a more
rigid cloth cloth, sorry. So we create the internal
line Like always, we want to adjust it so that it has a similar shape
to the reference. And we're going to re click click on cut and sew
so that we get a cut, and it's automatically
sewed to the pant. And we're going to assign a new pattern property for this piece of cloth,
this pattern. We're going to make it yellow, so it's easier to spot and
goes more with the design. And we're also going to change
this to fuzzibal rigid. So it has a very nice reading and contrast in comparison
to the rest of the clothe. Okay. Now we're also going to be creating an offset here
from the bottom segment, about 20, and we're going
to do similar things. So we're going to copy
and paste this on top. We're going to move it away. We're going to cut. And now we're going to be removing these
excessive patterns, and we are going to
be sewing this to the correspondent internal lines on the top and the bottom. And on the sides as well,
let's not forget that. Now, let's change the layer, so they stay on top of the pant, and now Valla have like a more puffy like a padding
on the bottom of the pants, which we read nicely and we'll give it a touch
of more yeah, sporty pants. Now we hide the avatar. We see that it feels like a continuous continuous
fold over the pants. And it looks decent. With this, we will
be able to control a little bit the hold on
the bottom of the ankles. And also, like I said,
having a rigid part on the side will not only
follow the reference, but also allow us to
create a good break. T is going to be a little
bit of pinching and adjusting until we get into
the side panels as well. Okay, so for the side panels, we're going to still use internal lines to
create the main shapes. So we are going to be first
creating the landmarks like we always do. Just like so. Sorry. Okay, just want to make sure that the
internal line always intersects with the border to avoid weird twitching and
glitches on marvelous. So make sure it really
clicks on the border, both from the exterior
of the pattern to the internal line that is doing the left frame right here. An hour ago to select
both internal lines, copy them, paste them
here. Same thing. Try to keep, yeah, the
points in the border. Otherwise, we'll
have some issues. And now we adjust it so that both the front and back
panel fit together nicely. Okay. Here is the main areas that we usually have issues. You can always move it
away outside the panel, outside the pattern, sorry. And this way, you will
also avoid issues because the end of the internal line
is not inside the pattern. So yeah, either you
leave it outside or you align it perfectly
with the border. And we're trying to
get this as smooth as possible and as
align as possible. Get those to intersect
on the border as well. Almost there. Okay. H. Just making sure that everything is in place
before we move forward. And like always, we
are going to adjust the strength and the angle of the internal lines and see how they behave
when we simulate, we are going to deactivate the preview of the
internal lines so that we can actually
see what effect they are taking on the pattern. So far as you can see, they
are barely noticeable. This is not what
we want, so we're going to be playing with
this a little bit more. But still, it is, like I
said, a good landmark, a good base to start from So now we go
back step simulation, and we're going to be playing
with the particle distance so that we can have
more resolution and yeah, more wrinkle creation. The less particle distance, the more dense the
geometry gets. So, it allows us to get more realistic
simulations overall. So we play with
that. We also copy that to the underlying
patterns that we had. A We're going to be using these underlying
patterns to create volume. Same thing with it.
Apologies for the energy. So same thing with it
with the heap prothess. We could call it that way
or for the heat volume. So this is exactly the same. We want to copy the internal lines also there
so that we can sew them together so that they can
actually act together. You'll see in just a second how it changes
the whole thing. Just making sure they are also aligned with
the other ones. I'm going to be setting all four and changing the fabric preset so that it is a
little bit more rigid one, like the ones we had before. And also and Yeah. So with the new preset, having both internal lines on the exterior and
interior patterns, we are getting this
different volume. So the interior one has a more rigid and
solid kind of fabric, and the exterior one
has a more thin one. So this is what allow us
to create the structure inside of a more puffy
and inflated look. Yeah, we're going to be
playing with these presets, and the exterior one has a
more thin and wrinkly look, so that's why in combination, we achieve this result. This is a technique that is
also very useful for jackets, where you can create the feather filling with a more
rigid and solid preset. And then on the outer layer, we can have a very thin
and wrinkly preset to create the plastic key filling that some winter jackets have. So here is pretty
much the same thing. We have a double layer. One with one preset,
the exterior, one with another thinner. And right now, we're
just going to be playing around with both fabric presets, trying different ones
from Marvelous designer. We're not doing any
custom one yet. So we're playing with those two, and we're also playing with the stitching between
the internal lines of the exterior and interior so that the connection between both patterns is more noticeable like
we are getting now. So you can see the
pattern doesn't disappear as much
as we had before. So this is what we are
trying to achieve. Not sure if this is the look
we're going for exactly, but like I said,
most of the time, this is trial and error until we get something
that we're happy with. So we still need to
play with angle with force with the pattern presets. We're going to keep doing
this for a while and it's going to be speed
up because we're not going to do anything
key at this point, rather than playing
with those patterns. So if you want to jump into the next step in case you
had this figure out quicker, it's going to be in
the 14 44 creation of the tarp that we have on the left side
of the character. So see you on that minute. Okay, so back in action, what we are going
to be doing now is creating the left tarp. So we're going to start
off from a rectangle, which we are going to be placing first, sort
of in position. So we're going to ustate move, and get it where we want. At least to have sort
of accurate perspective on the size and we don't do a huge pattern. Okay. We're going to rearrange a little bit the
presets that we have, and we're going to be freezing the whole pans while
we work on this, so we don't affect
the simulation. We don't want to mess
anything up for now. So all this is
going to be freeze. I'm going to create here a stitching for one
side of the tarp. Oops. I think mess that up. Okay, now it's good. Need
to flip the stitching. And adjust it right. But I'm thinking
if it's going to be starting on that pattern
or on the other one. Okay. And the rest of
the pattern is going to go here last chunk
might go there. So this is just going to
be the initial approach. We are not fully sure yet
how big this is going to be. But if we commit to
the size for now, we want to be sewing
all to the pant. It looks a little bit big, but I think what refers to
waist circumference is good. It's not too big. Let's increase the particle distance,
so it looks better. Sorry, decrease decrease it, so it is easier to
work with first. We might need to
make it shorter, even a bit shorter still. Just make sure by taking the reference that you're
getting the right size, this might be a bit shorter. Yeah. This is about
right, I would say. We want to create an asymmetry. So let's use first
of one corner. Okay. Let's just pinch
for a little bit. So the way we're
going to approach this is pretty
similar to the pant. And the more patterns we create, the series is going
to be getting. So first, we create
the basic pattern. We put it in place like
any other piece of the cloth we want to get
the right proportion. So this is what
we are doing now, making sure it aligns
with the crutch, it aligns with the waist. Then we will start working
on the internal shapes, and then we will do
all the paddings and all the details that you
see here on the reference. So for now, we're
going to be creating a little bit of curvature
here so that it flows better with a curve
on the side panels. We're going to change the pre
not quite sure if this one, but we can play with a few
and see how it reacts. So at the moment, it is the same thing as we
did with the pens. What I'm trying to achieve, it is a good base result.
Obviously, not final. Obviously, it's not going to feel like the kind of
fabric that we like. But we want to make sure that the base and the
structure is good, so that then when
we build on top, we don't need to go back a lot. So make sure proportions and at least the basic
folds that we're getting are sort of interesting
to If we achieve that, the rest will come fairly easy because as you saw,
adding internal lines, playing with overlying patterns and sewing and pressure
is all pretty simple. Just going to be a little bit
of painting here and there. Same way as the pants until
we are happy with the base. I'll leave you guys
with that and we will get back when we start
adding internal lines. Oh Okay, so up until this point, we have been pinching and adjusting the base
structure of the tarp. Right now it's time
to offset the border. You guys already
know how to do this. So right click upset and set
the measure that you like. We're going to be refining the corners as before
with the pans. We're also going to
be upsetting this to create a double
internal line in there, and we are going to be
first playing a little bit with the corner here to create the X stitching that
we see on the reference. Pretty simple. And now that we have the base
internal lines created, we are going to click
layer clone over, same as with the pans so that we can create some thickness, some realistic puffy
feeling to it. So now we're going
to also change the preset to same
procedure as we had before. So interior one is going
to be a thicker preset, exterior one is going
to be a thinner one. So the underlying layer
is always for structure. The other one is
always for details, not always, but yeah, it's a pretty useful technique. So now we are going to be creating this offset on
the exterior border. Copy those two patterns, so that we can right click
on that internal line, click on cut like we did before, remove the excess of fabric. And we are going to be using those borders the same way as we did on the
ankles of the pants to create some volume
and to make it feel more like well sealed
manufactured fabric, I don't know, but to make it
feel more appealing overall. So we stitch those
two internal lines to the main patterns, both interior and exterior. Now, when we are going
to be simulating them, you will see that you're setting up the layers
so that they go on top and under depending on if
it's exterior and interior. And now, as you can see, we are getting a
very nice effect, which you'll see in a second. Okay, we are getting
some twitching there. That's very likely
because there is not enough space between the
avatar and the pants. So we might have to actually resimulate
the belt on the pants. Okay. Yes that might fix it. Inks, it's glitching too much. We need to make sure that
the layers are properly set. So remember, the
lower the number, it is supposed to go
in the underlayer, of course, and the
higher the number is overlaying layer always. So zero will be the base, one next, two next, three next, et cetera. The issue here is
that as you can see, we are having conflict between one layer and the belt layer because it is supposed
to go over it, but it's actually
looping around. So that's why it has conflict
deciding where to go. That is normal, that
happens sometimes. So you just need to
play a little bit, giving it maybe more
fabric to the belt so that it can be looser and
it doesn't twitch as much. But in case that it
doesn't stop tiching, we could roll with it. It's not ideal. But we are
going to try to fix it. So what we can do, we can play with or different fabric presets
that can be an issue. So we can try less
complex fabric presets. So either thinner, which can
help or thicker which don't fold as much and it can
make the simulation easier to resolve the
program, there can be a way. Another way can be
playing with the layers, but we have tried that already, and it doesn't seem
to be fixing much. And lastly, we can play with force and angle of the
internal lines that we have, which could also
be causing that, but it's not really that common. Very likely it's going to be how tight the belt
is to the avatar. So I think a mix of changing
the patterns, sorry, the fabric preset
and also giving it more space is going
to be the solution. So as you can see me
here on the video. I'm just trying to get, again, good falls, but every
once in a while, I'm getting this twitch. It's not making me very happy because that will
mess up your folds, that will mess up
your workhle work, even if you're working with
lower particle distance. So ideal thing is to get that fixed before
keep moving forward. So now you see that I'm trying to get the good falls and
forget about the twitching. But at some point, it's just
getting an annoying for me. So that's why after
a few minutes, I end up deciding that, okay, it is time to use
resimulate with a belt and make sure that
the twitching gets fixed. So that's me just trying to get to the corners where
we're getting the issue, trying to see where
it is coming from. It took me a while to realize. But now it seems that it's working nicely, not
twitching anywhere. So I'm going to get
back to assigning the right fabric
resets to each layer, play with web and weft, and get back again on the pinching game and trying to get interesting
folds for the tarp. So I'll leave you with
another spit up version until we are happy with the folds that
we are getting here. But until this point,
as you can see, the construction of the
tarp is done mostly. Steps are simple like
we did with the pen. So first, we create
the basic pattern. We se it properly to where it's going to be and create
the basic structure, so we can build internal lines and secondary layers
of fabric on top. Once we get that structure, we create the internal lines for what is going
to be stitching and the guidelines for the overlaying layers that
are going to come after. And once we have those
internal layers, sorry, internal lines, we just create
duplicated versions of the base pattern and
base internal lines, remove the excess of fabric, and stitch it on top. And yeah, the base
is that process, pretty simple, pretty
straightforward. It is the same with
every marvelous thing ever, most of the time. And now it's just going to be assigning an interesting preset. So remember one rigid
one for the base, one thin one for the top. And pinting and painting and pinting until we get
something that we like. So I'll leave you with
speed up and see you in the next chapter. A
11. 10-Creating Final Top Part1: Come to Chapter ten.
On this chapter, we are going to be
covering decoration of the t shirt and
the details on it. The process is going
to be very simple, same as we did with the
pans or the left tarp, but in a more simple and
fast way, you will see. So first, we're going to be
creating a basic pattern, always starting
from a rectangle. And we're going to be cutting up the top left corner and top right corner to create
a quarter of the tis shirt. So once we have that quarter, we will symmetry copy it. And then do the same
for the backside. So now we are
cutting the corners, adjusting the sap so it fits what a normal
tissue would look like. Sleafless shirt, actually. And now that we
have this pattern, we're going to do symmetry
symmetric pattern. And then we're
going to copy paste those to create the backside. So we rotate them
and put them in place, stitch them together. You just need to see its segment to the
correspondent part. So you can see this video
is speed up per four times, I think it is because the process is very simple.
We have already covered this. So we're going to be
doing a voice over on the specifics of the details, but not really stopping in simple parts of the process so that it doesn't get
very repetitive. Okay, so now that we have
the base, as we normally do, we are going to be assigning
different fabric preset, one that works good with our
avatar and our character. So it's up to our selection. We're going to be
doing small changes to better fit the shoulders, to better fit the chest in case of female de
boobs so that they don't feel too
tight or they don't create a lot of tension on
the front part of the tissue. Yeah, we're going to keep
doing this for a little bit. And the shirt like you
saw, is nothing too crazy. First, we're going
to be creating it symmetrical like
we are doing now. And when we are happy
with the overall shape, we are going to be
doing the diagonal cut from her left shoulder
to the right armpit. There is when we will
break the symmetry, but we won't do that until we are happy with the
overall fitting. So right now, like we said, we are adjusting the fitting, so it's nice and after
doing the asymmetric cut, next step, every time
on every cloth piece, we're going to be creating the internal shapes that will be the base for the future
overlaying patterns. So right now, we
can see that here, we have this strap going over. And the shirt doesn't leave
much of the chest visible, so we need to adjust
that as well. As you can see this is
folding a little bit weird. So we're going to be doing pinching from certain parts
and adjusting the pattern, also playing with warp and webb until we are
happy with this. So as you can see, giving
it a little bit of excess of fabric on the
sides can help a little bit, but still is resulting
in a very pinchy result. That is due to the
size of the breast. So that can be solved. Apart from trying like
we are doing now, by pulling the cloth into different directions
can also help out by giving it more space on the back so it can flow
and rest differently. But we very likely will end up just doing a cloth
reduction cut, which basically consists in just doing a triangle
cut on the side, on areas like this one
with a lot of volume, which are hard to achieve
with normal curve. So yeah, using that kind
of cut is a good solution. So we're going to be trying to remove cloth from that area. If we don't achieve a
good result in here, which by the way, I
will spoil you that we end up not achieving it
just by tweaking the curve. So we are going to be doing
that cut at some point. I just want to show
you the process, the struggle that we
went through to show you that it doesn't always
go good the first time. So we create here the cut. As you can see,
it's fairly simple. That already solved a lot
of the fitting issue. We need to adjust the curvature on both sides accordingly, so it feels continuous
and not weird. This is not ideal solution, but for very voluminous shirts, which are not elastic
or we don't want it to feel very adjusted. It is a good solution. So now that we have that solved mostly, we are going to proceed and do a few of pinches here
and there in really speed up camera to achieve some interesting folds and make the shirt go
under the pants. Which is achieved
by using layers. And once we are
kind of happy with the folding we're getting
in the front and the back, still using a pretty
high particle distance. So once we achieve that,
we are going to be starting with the horizontal
cat, well, diagonal cat. And as you can see, we're fixing the same twitching
and clipping issues that we had before
with the tarp. So basically what we did
was setting the shirt to the lowest layer
possible and then just move it in and then
pull some cloth out, so we are getting
this baggy effect you're seeing on screen. Since the result is
kind of nice right now, we're trying to get
closer to the ref, but so far, I'm happy
with what we're getting. We're going to proceed very
soon to the diagonal cut. And for that, we're going to
be using an internal line. We're going to try to create that continuity from both sides. First, always very polygonal to create a preview of how
it's going to look. And once that we
have that preview, we're going to refine it with curves like we're doing now, making sure it feels continuous
between both patterns. By the way to do this, you will need to right click on one of the patterns and create make
unique or break asymmetry. So yeah, they are not linked. And we're going to do a
similar cut on the back side. Unlike before, we will
use the internal line to right click click cut and get rid of the
excess of clothe. Just making sure that
the cut works correctly. We're going to need
to adjust some stuff. But mostly just adjusting
the curves on the pattern on the bigger pattern
that's going over the shoulder so that the
curve feels continuous. Okay, so up to this
point, it looks good. There is still some refinement that we're going to be doing. But we're going to
start thinking on the different patterns that are going to be stitched
on top of the shirt. So we will probably
have one here and near the border that we are working
on right now on the curve. That will be, similar to the one we did for the
ankles on the pants. And then we have on the
left side of the reference, we also have not leather but like a cloth
piece suit to the shirt. Like with a triple
rivet, triple border. And then we have another one on the right part of the shirt. So we will do that in
just a second after we work a little bit more on getting back some
interesting folds with this new shape of the shirt. You can see the areas
where we are pinching here and there or speed up because you guys
already rock this part. It's fairly simple. Just play with the web, play with the wb, adjust a little bit
of the pattern, and just pinch here and
there and try how results. So I'll leave you guys
with this part of the process until we get to
the border creation part, so enjoy the time lapse. Okay, so now that we
get to this point, as you can see, we
selected the border, created the offset like before, duplicated the object,
remove the excess of fabric, and stitch to the
corresponding part. This is the same process
as we did before. Nothing too fancy. Pre simple. Now we get it simulated
to see how it looks, and it gives us this slightly more
rigid and thick feel on the border of the shirt. This is just a touch. So
since it's very small, it doesn't really
add that much to it. We're going to do
same on the exterior, so duplicate, remove the excess of fabric and stitch to the
offset that we created. So now we have borders on both the slip side and the
size chest side, sorry. Next, we are going to be creating the pats
on the left side. So for now, you're going to
be seeing spit up version. Well, I refine this border, and we'll zoom back in a second. Okay, so at this point, we have been pinching and pulling the shirt
for a little bit, refining the border, improving the folds on the
front and the back. So now we're going
to go and create a base internal line on the
left side of the torso. We're going to adjust it to fit as close as possible
the shape of the reference and create a curve on the corner and
a symmetry on the back. Like always, what we
want to do first is to create the basic
landmarks for it. And once we are done with it, we will start
policing the shape, the curves, every corner
of the internal line. In here, we want to do
sort of like a chamfer, so we don't go for a curve. Something like that will do. And the same thing on the front now we want to polish the curve, so it follows on the
three D pattern, the straight or curve line
depending on how you set. And now we are going to create
a triple or double offset. So here we change the
amount the distance. And we're going
to be duplicating the main patterns after
creating the offset on both sides to create the overlaying patterns like always duplicating
the base ones. So we copy this paste it. The reason I pasted
it always on top is that they are placed on the same space in the
three D be part. Now we want to select the internal lines and extend right click extend
to Pattern Hotline. Do that in both sides
and on the other ones. And this one as well. And now we're going to make sure to sew the exterior and the
second internal line and the same for the third one. And we will repeat this process both for the front and the back. This will make it feel like there is three straps,
well, actually, two straps, sewed to
the left of the top. Now we're going to
also create as well, a different fabric preset so that we can assign a
different material and color. Also going to upset it one more time on both the
front and the back. And this one is going
to be sealed as well. We are going to cook
this one and use it. Just for the trims. We don't need the
interior. Now we need to do this cut and sew. It's a different piece because it feels like a different patch. So we're going to do
it just like that. We're going to seal that we are going to be Sorry, let me seal this properly
on the back as well. So now we need to pull a little bit and simulate
to see how this is looking. So far, the result is good, but like I said, we're going to create a different
fabric preset. Okay, we need to adjust
the kind of fabric, so we are going to be
using trim hardware like always for this sort of rigid, yeah, rigid pieces of cloth. And I think we could try to
merge this or no, never mind. Um, Yeah, I think it's going to be tricky because of how many internal lines
and shape it has. So let's just keep them
separated for now and play a little bit with the
angle and strength of those lines to achieve
a nicer result in here. Oops. Trying to see if I can fix
this middle line because it's not sewing correctly. So I'm trying to either merge
them together or you seal them together, so
they work better. But I think for
now they are good. Let's assign a different
fabric preset as well. Just for the color
to the side panel. Increase as well, the
warp so that it has more density and also go
for the same fabric preset, so it feels a little
bit more rigid. Let's try a different one. Like I always try and error
until we are happy with this. Maybe too much deformation. All right. I think I'm going to be playing with
this for a little bit. So I'll speed this
up for you guys. So it's going to be again
some fabric preset testing, playing with the angle and strength of the internal lines, and also a lot of pinching
and pulling of the cloth. So you guys can see
how the process goes a little bit faster and we'll be with you in a second. The end of the result,
you can jump into the minute 25, 10 seconds. Okay, so this is what we
have achieved so far. It is not perfect yet, but so far so good, we have interesting
folds on the belly. We also have pretty decent
folds on the back side. Yeah, overall, we are
kind of happy with this. There is some errors between the internal line
that we have created during the time laps and the triangle we use
to reduce fabric. So we might reconsider this. Um but it is not too bad. We can fix that in zeros, and overall simulation
is quite good. We have some rhomboid
areas after yeah, a lot of pinching, but so far so good. So this is going to be this for this chapter and see
you guys in Chapter 11.
12. 11-Creating Final Top Part2: Welcome to Chapter 11. This chapter, we're going to be covering the creation
of the next carve. First, we're going to
be importing the sketch we created in zebras
into Marvelous Center, and we are going to be using
it as a reference like we did on the pans for the
creation of the patterns. Well, the way this next
carve has been designed or how it looks
like in the concept is like it has the
main neck area. The sides falls a little bit, and then we have the hoodie, which is like stitched to
the back from the front to the back and is hold by Daddy Elastic
that we can see there. So okay, this is the
overall initial plan that we're going to be
having for the creation. So, always, for a start, we're going to
start from a plane, and we're going to be
creating like a rigid base, and then we will create a
more soft overlay on top of that to create the
hoodie and all the folds. Okay, so let's get started
and create the first plane. With the symmetric copy. We're going to put it
around because we're going to be creating
the base of the neck, not the area that goes up. We're going to give it a little bit of
roundness by moving the vertices and we're going to be creating
a hole inside. But first, we're going to be
adding a few extra points. And now we create
an internal line with the base of the circle. We move it to the center, and we are going to be
using this around the neck, put it in place, make
it slightly bigger, and we are going to cut this
to create the neck hole. We get rid of the
excess of fabric, stitch both sides together. Now when we simulate, we already have some sort of layout to start
to build from. Now, we want to have
a rigid preset. You guys can go with
the one you prefer, but I'm going to
be using this one. We can actually the density a little bit so that it
doesn't float as much. Now we're going to
be right clicking on the points and convert to curve point so that
it is a round surface. Now we're going to be doing
some small adjustments so that it gets similar to the
reference that we created. You guys are already
familiarized with this, like we just need to keep
tricking the curves, moving the vertices until we are happy with the
overall silhouette. And once we have
this base layout laying over the shoulders, we will then create the tube of the neck that will
act as a support, both for the overlaying
layer of cloth for the wrinkles and also as a stitching point
for the hoodie. Okay, so the base is
looking pretty good so far. Maybe just a little bit
of refinement here, refinement here sorry, and
maybe on the other side. But so far so good. Okay, I think that will
be pretty much it. So we're going to be hiding
the avatar in just a second after we set the layers
and the density correctly. We're going to be creating now the base for the next piece. We create here a rectangle
using the same measurements. I think I did measure this
wrong. Let me adjust this. Okay. That should be good. We duplicate it with those together and we should have an okay base to
start working from. Let's get the avatar back on. Let's start adjusting
the properties on the angle of the curve. We might have to
address a little bit the upper part maybe make it more pointed
towards the front and less tall towards the back. That is the front part. You will notice it is
connected for now. We will cut that a
little bit later on. I'm trying to create a correct curvature for
the neck on the backside. Playing with the angle,
but not quite happy. We want it to be
a little bit more open inflated
towards the outside. Trying to force the
shape here with really accentratd curves and hopefully we'll get
somewhere close. Still too thin, so we might have to do
something about that. Although with the overlayer, it will get fixed a little bit. Okay. Okay, trying to
play with the price a little bit to see
if we can achieve some sort of similarity
in the structure. I mean, right now, it
is floating too much, but we still want
it to feel rigid. I mean, usually the sort of constructions could be
done perfectly in zebras, and maybe the Hoodie
and Marvelous, but we're going to try
go all the way in here. So let's play a little bit with everything we know so far. This is also well, new territory for
me in some way. So I mean, I've done
stuff like this before, but sometimes you
just need to try. Like I said, every avatar, every cloth piece
feels different. So maybe adding these borders, common technique we
have done a few times already can help us maybe by bringing rigidity to the
border but not to the base. So let's see. Let's try playing with
the web and and weft. I feel like the shape of the
patterns is good for now. I don't want to change it much. I think we can get away with
the warp and weft, sorry, and changing the angle and
the pattern a little bit. But let's see. Is not looking too bad, to be honest. Oh, this is good.
This is quite good. Let's see if by
adjusting this area, yes, I think it we hit
the spot right here. Maybe not that. Okay. So normally I would speed
this up for you guys, but because it is, like, real time trying to figure out something which is not easy
to achieve in Marvelous. I'd rather you guys
see which parameters I'm actually tricking. So as you can see, I'm
playing a lot with the weft and with the wb sometimes adjusting
slightly the pattern, but it's not really my main
source of change right now. I'm happy with the shape. I think we could
use this for now. So having this freeze can help. I need to adjust a
little bit more. The shape overall is
not too different. I could fit within my
parameters for blockout. So that kind of makes me happy. But let's try change this a little bit more,
see how it changes. A Okay. So the tube part, I'm pretty
much convinced with it. This area right here. I feel like we can
sort of improve this and will help us also get a
better result on the rest. But I think I'm going
to speed up this area because the major issue
is already solved. We already have a pretty good
fall a pretty good preset, so it's actually falling
correctly on the back. The shape of the
neck area is cool. So now I'm used rebuilding the base by
changing the pattern size, by changing the angle. At this point, this is not
going to be changing much. So it's not going to be
a super fast time lapse, but just a little
bit so it doesn't get too boring and
at the same time, you guys can appreciate the
changes that I'm doing. I'll see you in
just a few seconds. I Okay. So adjustments on the
base is mostly done. So let's go ahead and create the cut for the front
area of the neck. Like always starting
from an internal line, which outlines the
basic shape of the cat. We want to make sure
to check in once again that we are getting
similar shape to the reference. This is quite accurate, I would say, but
still, let's check. That's pretty good. Maybe a
little bit less. In here. But I think we are good. We should be able
to go ahead and. 1 second. Yeah, so we are going to
be cutting this already, but the secondary internal
line I created was to already have a pattern
that fits in there correctly. Let's just get it in there with a different fabric preset. Do the unfold so that
we have the symmetry and remove the middle point, get rid the center lines, sew half and half to both sides. This is a pretty good feel. Keep in mind that the
rest of the next carve, we're going to keep it
pretty rigid mostly. So it doesn't lose
the shape as much. And we're going to be building the rest of the patterns
on top of all these. I'm having a lot
of trouble keeping that backside close to the body. So let's go once again and
try different presets. Let's play again with the
density. This is too much. I think. Let's just pin it to the body and play with the
length of the thread. Hm. Let's give it a little bit
more length so it doesn't feel so fake. All right. Just trying to play with the
sewing a little bit to see if maybe whilst
making it go so high, it is the neck pattern, which seems like
so a little bit. Maybe by creating
a separated sewing like I just did and playing with the angle, we
can achieve that. We might have to stay with
this solution for now. But still it's not quite
enough what I like, but I guess we could
fix the rest in zebras. We then achieve
to fix this here. I Okay. So now let's just create
the overlaying patterns. So we select all of those copy paste on the same position. Now we move them apart. Let's get a new fabric
preset for them. Different color, similar
to the reference. Let's sign it unless you
change it for this one. Let's s to the previous base,
the corresponding patterns. Okay, and this is the first
result we get so far. It is not too bad, too
honest for a start. There is some areas
we need to fix, but feeling pretty solid, which is quite nice. For the first time. Let's see. So let's play let's play with the seam lines and swell
with warp and weft. We're probably going to be
doing this for a little bit. We'll cover this
in speed camera. But we are going to
try to chief is get some more horizontal
folds and more of a fluffy and puffy
feel on the whole thing, keeping in mind that the
interior frame is going to be frozen and still keep
the rigidness of the piece. So now we're getting speed mode. And as you can see,
we are playing with seam line angle and force, playing with a warp and weft, increasing the density to be able to chief something that feels soft, but
at the same time, gives that rigidness sometimes I was unfreezing the
under frame for, for the neck, as you
can see, to see if I was getting any more
interesting results. But I was not too happy, still So that's why I came back and restructured
it a little bit. As you can see, I got rid of the patterns and did
the same once again, copy them, see them again. Play again with the same line, play again with
the warp and weft. So you can see, sometimes
we need to throw work away, so it's trial and error. Again, curves. Try once more. I was trying to work
both at the same time, leaving the interior unfrozen, but used with a
more rigid preset. The thing you saw
right there was the two layers clipping, so don't worry too
much about it. So now we're going to
go back to normal speed because what we're going to do to achieve a nicer
result, which in the end, I figured out what
was not working is that having these
two black pieces sewed together was
working more nicely, but I was also in
need of creating some internal lines both from the neck border and to
the shoulder border. So I'm creating here the offset
for the shoulder border. And I'm just going to do the exact same thing
on the neck area. Just that allowed me to have some more rigidness
keeping the overall shape better and then getting more interesting folds
done on the black pattern. I still needed to pinch
for a little bit. But so far, the result was much nicer after trying
different cloth presets. So now doing the same thing here of setting and simulating. Keep in mind and stitching both the exterior and
interior panels so that they keep the pressure and show that line
in the simulation, as you can see
when I get closer. So so far, I'm starting
to be happy with this. So next, it's going
to be pinching a little bit more until the
folds look slightly better, and we're going to just almost jump into
grating the hoodie. I'm not really caring
that much about the backside of the neck because we are going to have
the hoodie there. So we just need these
extra excess of cloth created out of
the warp and weft. This is looking quite
promising already. So let's just go ahead. Leave this on one side. Let's use friezet for now. And let's create a
rectangle for the Hodie. Let's just sign it
the same preset, rotate it, put it in place. Get the hoodie
shape a little bit. So let's create this corner. Let's sew it to the
part of the neck that's correspondent and let's create the symmetry and
seal them together. Let's see how it behaves. I need to set up the
layer correctly. Okay. This is a start. I'm just editing this
stitching to make it go more forward into the neck
because that's how I feel. It works on the reference. We're not going to
go in much detail on the hoodie because we
are going to be pulling this back and see how it looks. We need to make sure it
doesn't bunch too much. We wanted to use
fall a little bit, so we might tweak some
of the fabric presets. Let's see if it stays. Sometimes because
of the bunching, it doesn't want to go down, so make sure you pull
from the right places. Also try to work
with a low, sorry, with a high particle distance so it's not too
heavy to simulate. Let's go to the fabric preset. Let's go into play with the
SIM line and internal line a little bit to see if we can get a different union from
the hoodie to the neck. Doesn't seem too bad. Okay, let's hide
it for a second. Just trying to see how
far into the neck we should put it so that it works nicely and how much
cloth we actually need. Okay. Let's try again. Let's see. Yeah. This will force
the Hodie to go back, which is good for what we want. Let's see if we give it more
clothe on the front part. Okay, that even helps more. So now let's give it one more shot with a different preset. Yeah. This falls way nicer, so let's try now. Let's see. Okay. That can work. All right. Let's
try all together. Give it some
thickness. All right. I mean, it's not
looking bad at all. The folds are very nice. Say I'm pretty much convinced. It feels cool, the way it
connects, so that's nice. And also, in a way it
falls. It is quite natural. I would say it doesn't feel
too bunched or too too loose. I think it's fine. Let's try. Just with a little
bit less so that it's more compact because
on the reference, it doesn't feel like
it goes too far. But I think I was
more happy like this. Just the middle point
would be ideal. Straightening the curve so it is more tight
towards the center. Okay. You know what?
I think having actually a border is
going to help a lot. Same thing we had with the neck. So let's try go, do that. Let's create here and offset, sorry, on these heads. So like I always
right click offset, set the measure we like. And now let's just
copy this copy paste, actually, and remove
the excess of fabric. Checking that the
thickness was right. Once you cut this
remove axes of fabric, now let's sew it together. Let's simulate. Changing the layer so that it doesn't glitch too much. Whoops. I think I need to put different
preset or play with this. It's getting glitchy because
it is folding over itself. And because of the layer thing, it's having trouble identifying which one should go on top. Let's see what we can do. Let's just pull it up, stop simulation,
then do this thing. Again, with the hoy
without folding yet. Let's see if it folds better after clearing the
borders same process, remove excess of
Fabrico together. And let's simulate now
that it's not folding. I think now it's not going
to be glitching as much. Let's freeze it just in case. Okay, seems okay. Let's on freeze this and
let's try it all together. No, this is going to be nice. Yeah. You see, now the border stands in a more solid state. So it actually
feels more compact, more rigid, which is what we
are after. This is awesome. Stry slightly different
presets to see how it behaves. But the main construction with internal lines and everything we have already,
so that's awesome. Remember, it's always
like three stages. Stage one is creating the
basic patterns and structure, stage two is internal lines. Stage three is when you apply
the overlaying patterns and try to get final simulation
or not final final, but, you know, like final
structurally speaking. And we will try to get
maybe more detail in a fourth stage depending on
the clothe we are doing. With less particle
distance and yeah, trying to get something
more wrinkly, but that really depends
on the piece we're doing. In this one, I think
we will be good with the three common stages we
are doing all the time. Okay. Let's play with the
word and weft a little bit. Trying to make it a
little bit more pointy. And so far, I think there is going to be a little bit
more pinching here and there, but I'm kind of happy
with the hoodie. This I'm doing right
now is just to get some more cloth on the
inside of the hoodie and not as much falling
on the back side. But I think I think this is going to be it. Not much more. So the next chapter, Chapter 12, we are actually going to
jump into the gloves, which is going to be a
completely different workflow to what we have done so far, which was getting pretty
easy for you guys already, I guess, because it is
the same all the time. So stay tuned because
Chapter 12 is quite interesting. You'll
see in a second. And I'll leave you guys with time laps of
how we end this. But there's nothing too fancy, some more pulling, and
we will have this ready. So see you guys in Chapter 12. I
13. 12-Creating our gloves Part1: Hello, everyone, and
welcome to Chapter 12. This chapter, like we mentioned, we're going to be covering
the creation of the gloves. So this process is going to be slightly different to
what we have done before, since the shape is quite
complex and would take a lot of time to create
the patterns from scratch. What we're going
to be doing this time is that we are going to be outlining the silhouette of the pattern with
this tool right here. This tool allow us to click
on the hand just like so, and we're just going to
be going over the border, which is where the seams
usually go in gloves. We're just going to be
outlining the whole perimeter, we could say, of the
hands and fingers. This might take a little
bit to do correctly, but it will save us a lot
of time in comparison to the traditional way of creating patterns
in the TD Bipart. So the way this acts
is that it will it's basically estimating
a two D pattern based on the three D model. So now we will be
able to transfer this information
of measurements, lines and direction
to the wpard. It will create some weird
looking to the pattern. It will look like a hand, but
maybe like a broken hand, and we are going to be
doing this two times, one for the upper
part of the glove, which we're going
to be closing right now, and one for the lower. So now that we have
it, we are going to be looking here just a little bit and making sure that everything
is looking nice. Make sure you put
those points in interesting areas like maybe
joints and stuff like that. And if you see anything
too distorted, it is okay. We are going to be working on that on the two the pattern. So it just needs
to be acceptably clean, not perfect. Okay. So now we click here, we select the pattern. It's not a pattern yet. Now, We are going to be, sorry. No, I created it. So now, as you can see, it looks like I told you,
like a broken hand. We're going to
remove this preview. By removing the sorry, first we remove the preview and go back to the
creation tool. We are going to remove the
upper part of the loop so that we can create the same
one, but on the bottom, so we select this point
and get rid of it, and now it automatically
closes it on the other side. So now we go again, click on
the preview and right click. Now there is something
we're here on set. It will take some time. But just let it think for a second
and should be ready. Two years later. Sometimes this really
takes some time. But it's doing its
thing, I think. Let me just Okay. Actually, it already created it. It was just overlaying
on the same spot, because they are
on the same place. So now we need to
invert the normals for this one so that it's
facing the right way. Let's do the symmetric
copy so that it looks correct on the
two Depard and it's easier to sew both together. So now we're going to be doing
a little bit of cleanup. So what we want to do is to clean the
curve points because, as you saw, it was a
little bit overwhelming. So we just want
to simplify this. It's like, making it like
polygonally, not curved. So when we do that action, you'll see that it gets a lot more simple,
which is what we want. Um Now in the tips, we just want the opposite
to make it rounder. This way, we are
achieving cleaner lines. In the end, the objective of this cleanup process
is just keeping sort of a consistent structure within all the
fingers both hands, achieving some clean curves, keeping two points on
the tip of the fingers, and then couple as well on
the base of the fingers. This looks much better now. Yeah, but we still need
to clean up this area. And when you speed
this up because it's the same process until we
have both sides cleaned up, and we will continue
with the process. Okay, so now that we have
cleaned up the main shapes, and we have simulated
the first time, which didn't go so badly. We can see that we have
some stuff to fix. First, we're going to try
fix all this clipping, which can be easily fixed
by just pinching here and there to indicate the cloth
which weight has to go, not inside the mess, of course. And we're going to try get some initial folds
on the gloves. Just trying to sort
it out somehow. Maybe with more density, it's going to work
a lot this year, and it's not getting really
that heavy to simulate. So yeah, let's keep
it that way for work. One thing we want
to do early on, since the gloves doesn't
seem to work very badly, and the amount of excess of fabric seems to be
good is that we are going to be just playing
slightly with the preset. I want to make sure we have
one for this one that works. Nicely. And once we have decided which
one is going to be, we are going to be creating
the internal lines, playing a little bit with
warp and weft to create or first base or first structure
for the glove creation. This part of the process
already gets similar to what we will find in the
pants and the shirt before. But still, I will do a
little bit of explanation, even though we use
the same techniques. So I'll speed this up slightly
and comment over the Okay, so what we are going to
be doing here most of the time is just pinching, pulling, getting the cloth
we created in position. Those folds in the palm
are actually quite nice. So we are trying to
preserve them somehow, but not as big as
they were before. Otherwise, they will look weird with objects holding
in the hand. So we play with a warp
and weft to try to get something which is not very
exaggerated fault wise, but something that
has some interest. So the pumps to me are
working quite nice, just trying to get
some more interest on the thumb area on the
dorso of the hand. So for that, we're
going to start creating the internal lines. We're going to first create the sides of what will be
there is like this arc, this middle piece that
goes over the gunlet. So we're going to be creating the first landmarks for this. So this looks quite okay. We want to the internal
line to go just exactly around the thumb between the thumb
and in the index. So just find the middle point. And then the curve must braise
correctly the full thumb. So make sure it really
goes all the way. We're going to split this up. Because usually in gloves, the thumbs are separated. We're going to right Yeah, sorry. We're going to keep pulling a little bit because
after a few simulations, the cloth starts to fold. We don't want to
freeze the glove, but we don't want to grade those folds you see right
here on the knuckles. So, this one is
looking quite okay. Mm trying to get
something more relaxed. So it doesn't interfere
with objects in the hands. In case we want to do
any, which we will do. Okay. All right. Since we are just
pinching and pulling, if you guys prefer to go to
the end of the time laps, go to the minute,
13, 10 seconds. Okay, so we are done pulling and pinching
from here and there. So now we are going
to start working on the internal lines to construct the next stage on our glove. So we're going to create the one for the border
like we usually do. So let's create the offset line. And you know what comes next, copy paste on top of it, display, cut, remove
the excess of fabric. Usual drill, you guys already
are pros at doing this. So we stitch it together. We assign a different
preset for more rigidity, and we got it easy and fast. All right. So now
that we have this, which is going to be creating
the opening for the glove, and it will allow us to
have more control over it. We are going to be, let me just open this up
a little bit more. This type of control will be very difficult
without the border, for every cloth piece is
usually very nice to have this additional piece of fabric in every border that you want to control
more specifically. By the way, we broke the cemeterrial
already on both sides. Yeah. Sorry about that nonsense. We were just trying to
get these straight. I just created them from
the original pattern, but it was not
working so nicely. So creating them straight is allowing me to
have a better shape, more contrast the
shape, actually. So this is how we want to go. Okay, so let's speed
this up a little bit. And basically, what we
are trying to do now, which took me quite
a long interaction, it is to get the border of the glove wide enough as we
can see in the reference. And the approach
that I tried was, was to make the border going on the other side of the glove,
like you said before. Then now I'm trying to
bring it in the inside, and I'm trying to
freeze it, scale it up, make it larger by simulating it without having
the glove activated. And this way, it can expand
because of the preset it has. And once it expanded, I freeze it and I simulate
the glove on top. But I was not very
happy with the results. So in the end, I just left it, like you guys see on the screen. So basically the glove goes on top of the ring of the bracelet. So now what I'm trying to fix here is the tips
are always falling, obviously because of gravity. So because it's a continuous
issue that I'm getting, and I don't want to be
pinching all the time. A Troy with web and wb, it doesn't work as
nice because, yes, it makes the finger tighter, but it removes most of the folds that I have on the gloves and it's
not what I want. So what we're going to be doing is we're going to be pinning those using a different tool. So they're going to be fixed in that position and they're
never going to fall again. So for that, we are going to be using the pintol which
is this one right here. We're going to be selecting a lasso on the tips and
same on the other side. And of course, this is after placing them in position with the
pinching, sorry. So now I can freely turn the webton war again
to the previous value, and the tips will stay in place. So now I'm able to achieve
nicer cloth simulation on the whole glove without really having the shaggy
tips of the fingers, since they're always going
to stay round and sharp. So now you see that even if
I change this value a lot, tips stay the same, which
is what we're after. So we're going to play a
little bit with these values. Until we're happy with those. So since we don't want as
many folds in the palm of the hand and to keep
more in the wrist, we need to have this
orpanwvve we're going to be ironing palm of the
hand a little bit. So we're going to use the iron to freeze the rest just in case. And we're going to use very
softly go about this area, using the shrinkage for that. And you'll see that
now we are getting more tight and tight every
time, which is what we want. Close to the fingers,
we don't want to have much looseness. So that's why we are
painting like this. And then on the fingers, we're painting a
little bit of more shagginess so that
we get more folds, but still not those that we
were getting on the hand. So the tool is quite nice. Once you are already happy with the overall proportions and amount of fabric that
you have in a piece, if you use it very early on, it will mess your
simulation up so badly. It will be so
difficult to control. So just use it when
you're fully happy, and you just want to do small edits on specific
parts like we are doing now. This glove is about to
be final as the base. We're not going to be working
much more on the base, and we are sure that it
is going to work nicely. If we use the iron. But if
we have done this before, it will take us probably
triple the time just to get the gloves
in a good state. So always use it in the
end of the process. So now we're going to be using the iron a
little bit more on the other side of
the hand to achieve more detailed result as well, and that will be
it for Chapter 12. On the next chapter, we will be covering some more
detailing on the glove, especially on the centerpiece
and some other details. So see you guys on Chapter 13.
14. 13-Creating our gloves Part2: Welcome to Chapter 13. After creating the
base of our gloove, we're going to
proceed and create the rest of the
internal lines that are going to be the landmarks for the centerpiece
of the gloove. So first, we're going to be creating one of the sides and
the other the other side. Now we're going to
try to replicate the exact curve that we
have on the reference, both from the interior and
from the exterior of the hand. Keep in mind that
it's going to be like a pattern stitch to
the glove itself. We need to align properly the internal lines to avoid any issues
with the stitching, and now we're going
to refine the curves so that it feels more
like in the reference. Trying to get it
some fashion here, making it go around the hand. But in a cool way, just
trying to fix how this looks. Okay, this looks flows quite nice. All right. So overall sap is quite nice, still too thick, I would say. So let's go and refine
this a little bit more, and once we're ready, we will proceed with the shape creation. A Okay. So now that we have policed
the internal lines, we're going to be
offsetting a few of them. To create that double stitching
effect that we usually, we are going to make sure
they're properly aligned. So we need to move them slightly so that they
fit as perfect as possible. Now this speed up
process is just going to be making sure
the internal lines trim at the border
of the pattern to avoid any issues like
mentioned before. Now that we've
done this cleanup, we are going to
proceed, duplicate, well, copy paste the patterns, cut on the desired
internal lines, which are dis right here, and we are going to be cutting. I takes a little bit. And now we get rid of the fabric
we do not desire. Since we just want to have
the middle center piece, we stitch these to the
corresponding areas. Same for the finger on the
under part of the hand. Let me just do that again. I think I removed
the wrong area. I want to adjust the curve
a little bit better. So yes. Quickly stitching this. Stitching both of
the internal lines. We're going to be adjusting the fabric preset on this so
it looks slightly different. And it's easier for
us to identify, so it's going to be
slightly darker. And now we do exact same thing as we did
before with the tips, we want them to be a little bit more tense, a
little bit more tight. So it doesn't look
like this floppy thing hanging from the finger. So we need to solve it somehow. I was throwing iron,
but like I told you, sometimes it makes it even more difficult. Let's
see how this works. Okay, this is slightly better. But yeah, the tip is
not really working. This is going to be a
little bit tricky to solve. So let's try. Okay. Maybe by making this certer, we can get a better fit in here or it will
get crazy as hell. Let's try ironing again. Maybe with more strength
and see what it does. Well, this might
actually might solve it. So I'm sewing this
to the interior part of the gluf and see
how it behaves. Okay. I mean, it kind
of does a trick. I used to stitch
the bottom part. The upper part is not stitch, so it still feels like it is loose there and just
has a seam going through. So I think this could be
a good solution for now. Let's just get to the
rest of the glue. Okay, so let's actually
create the border here. Let's offset an internal line. This will help us to
create the differentiation between the underglove and
this piece right here. So we're going to always copy, paste, separate, cut, and
remove the excess of fabric. We're going to seal
this correctly. And we are also going to adjust a different
fabric preset, the one we're using
on the other border, change the layer, same
processes always. And now we are going to try create a more rigid and
separated shape for the border. So now we're going to be
selecting the underglve Oops. I think we're having
issues because of the layer and the warp and weft. Okay. Let's freeze everything except for the gluf. We are going to be
pinning the tips to avoid any movement in the changes that we
are going to be doing. Now we freeze back for one sec. And we're going to start
with this one right here. First off. So we
want to offset this. We're going to use those
lines, offset again. Same thing here. We're
doing double stitching. Okay, we don't want to
lose the round shape, so make sure you
always have one of the size freeze at any time. This process is a
little bit tricky, so we need some patience to try to see which part
is going to be working. Let's try to change the angle and strength of the
internal line for a second. Okay. Trying to think how
we're going to be doing it. All right, so let's try
to put this manually. Let's just change the
angle there, the strength. What we want to do is for
the internal lines to make some force for the border of the gunlet to
open a little bit. But it's a little bit
tricky to do it this way. Let's just get some more
work done on other areas. Since right now, I'm not
fresh enough to fix this. Sometimes it's good to change
the task you're doing. Focus on something else
and come back later on. Maybe the solution gets easier. Let's just keep refining the seines so that they look
more like deep and yeah, make the overall cloth
feel a little bit more thick and realistic. So let's just go
seamline by seam line. And this is kind of the
result we're looking for. Trying to freeze all the
patterns I'm not working on to avoid losing the structure and the folds of the glove because I was already
pretty happy with those. So I just simulate one
pattern at a time. And this way is pretty good
to keep the overall shape. Otherwise, when we simulate, we risk losing all
the structure. So Let's just try now do this. Again, I'm going to
do the loop around. Maybe that will help me
bring more rigidness to it. So like I said, let's just get more work done in case we cannot
solve that yet. And maybe by adding
some other rigid pieces around, it's going to be easier. Let's create the rectanal
here for the bell loop. Same, create a new fabric preset for different color,
different properties. Now, we are going
to be sewing it here on the border on the interior because we
want it to loop around. We set the layer to two, so it's overlaying the rest. And then the other
part is going to be sewed on the border
of the second piece. Interior as well. Whoops.
We may need to increase. Particle distance will
decrease actually. Yeah. Because it is
stitching on the inset, we need to be
careful with layers. And also might be
better to set to zero and now increase
particle distance. Sorry, Ncrese always messed up. And now it will look much nicer. We might need to make
it shorter as well. That might be too
long and too wide. Oops. That is much better. Still
might need to adjust a little bit more and soft that weird
twitch that it has there. That can get fixed by changing, again, the particle distance. Now, let's do a copy
for the other side and just replicate
this stitching. Y Okay, now it's time to try
again to open this. So we freeze the overglove
we're going to try get this a little bit more open by playing with the
angle of the stitching. We might be able to
get it more wide open. By increasing the
solidify amount, because I think I mentioned it that we solidify these
two patterns inside. By increasing the amount,
it will tend to open more, but to a certain amount, so we want to keep
it in place as well. So in this occasion, it's going to be more
a matter of playing with the solidify value and also the stitch angle or the internal line
angle of that segment. With that we could achieve
more open angle overall, but still we are not there yet. Okay, so we're going to keep trying to get
some more falls into this new piece we created by
playing with the warp and weft and doing some
pinching and pulling, and we'll shortly get back into the border to see if we can achieve that opening
we were talking about. All right. So we're going
to get back into the borer. And we are going to try make it straight again because it's not working
so good with the curves. We want to try
different presets. Let's see if we can get
these to really open. Okay. Having this stitch to the laces on the sides
helps a little bit. But we might need to use,
like I said, reset this. Let's just get this straight. Usually works out
better this way. Whoops. I need to fix that. Alright. Let's make. Let's make it straight vertically
and horizontally. Okay. Et's try to get it
serve in place. Now, the opening is quite nicer, as you can see on
the bottom part. We want to center it slightly. We might need to freeze
this before continuing. And now let's resimulate
the laces and now the center pattern we adjust this hopefully
in a good way. That's right. Okay. I need to give it
some more space. There was not enough for
the laces and the gauntlet. But this is looking quite nicer. Let's try with different preset. So I just wanted to try if it was going
to stay in position, but it doesn't seem like so. Okay, and strength is
not making the trick. Well, Okay. Okay, so I think this is as far as we're going to be
pushing the border for now. It is not too bad. I think
we could improve it. So let's see, we'll
come back later on. Like I said, when you get
stuck in these areas, it is just better to
change to a different one and see if you can
improve the overall quality. So now we are going to be
wrapping up Chapter 13. We're going to still
pint a little bit more. Try try different
approaches to each pattern. We're going to be
trying the pre set of Muslin 32 38, I
think it's called. We're going to play
with the Wb and web, and we are going to be
pinching a bunch of times to see how
it actually works. And once we're done
doing those pinchings, we'll jump into Chapter 14. So see you guys in
the next chapter. I
15. 14-Creating Final Sleeves: Welcome to Chapter 14. And this episode, we're going to be creating the other glove. So for it, we're going
to be copying this one, duplicating about here. We want to estimate
the distance which we have one glove to the other so that when we
place the patterns, it is sort of in
the same position. And we're going to be doing the correspondent changes to it. So first thing we noticed
is that it's not as long, so we are going to be
folding the wrist. Let's save as a new sin just to avoid having too many
patterns on the same sin. Okay, so first thing we need to do is get this fingerpiece removed because we can appreciate that
on the other one. And we're going to be doing the pink overlay we have
here on the right hand. So first, this is going out. This is going out as well. We might use it as a similar
base for the other pizza. Let's actually try to get this. Let's create an internal line
around the same measure. You know what? Now, let's just
remove this and all this. Let's adjust the
internal lines here, and we will just create
it from scratch, which is going to
look nicer, I think. So let's just get
rid of the offsets, which we don't need right now. It's going to be more
troll than anything. Let's just adjust
this one this one, let's just remove the other
segments and connect this. Now, we want to make sure
proportions are right. Let's check this
with a reference. Okay. All right. That
looks about right. Just making sure
the direction that it goes on the other
side of the palm. It looks about right. So
let's just offset this. Okay. Okay. All right. Let's get these two lines. Let's offset them already. Oops. What happened there? Yeah, the distance was too much. So let's try to get it smaller. Same thing here. Let's just do quick fix on the curves
and try set all of these. Let's offset as well. And this measure
seems about right. Making sure this fits correctly. And now we will create
your laying pattern. We copy paste like
always, move to the side, remove the well, cut, and remove the pieces
we don't want to keep. Now, let's create a new fabric preset with a pink
color so we can differentiate it better
and adjust individually. Now let's stitch it together
and simulate together. Layer one, so it
always stays on top. And we sell it to the
exterior internal line, so we can also create pressure
with the interior one. Like so And we are good, I think. Let's see. Yeah, this looks cool. But we want it to make this
a little bit more rigid, like a shell, rather than some cloth going
on top of the glove. So we will change
later on how it feels changing
adjusting the fabric preset and some settings. But for now, we are going to work on the folding
of the wrist. So we are going to be
offsetting this line. We are going to be using
it as a folding point. So we need to set the
offset to the right amount. I think that would be good. So now let's just cut
and we're going to be rotating these two patterns so that they face
towards the exterior. And we want you to freeze this part that is
going to be folding, so the rest doesn't simulate. Let's freeze those, simulate
and see how it works. We need to change the layer on this so it doesn't mess
up with the pink part. And it is a good start. It is working pretty decently. Also, the glof is
looking marvelous. That yoke, the glouf is
working pretty decently. So now let's try to
improve this a little bit. Let's go and do the usual
process of fine tuning. So I'll speed this up but
cover it with ice over. So we are creating the
border like we usually do and assign a different
fabric reset so that we have
more control on it, but we're going to be tricking
first this base fold part. So we pin the fingers so that we can
simulate all together. And we are trying to
achieve a round fold. So that's why I'm working
on this area right now. I'm making the pattern straight, so it doesn't fold
in a weird way. But like you can see,
I'm just trying to achieve a very round effect on the corner rather than
just very thin and pointy. So that's why I'm
going back and forth, changing the preset, changing
a little bit the shape. Making the part, which is like the external
part of the fault, we're trying to make it
a little bit more rigid. So either by reducing it or by adding this border
we are adding right now, the border process is pretty much the same as
always internal line, duplicate the pattern, cut, stitch the desired part. And this allow us to get a
more rigid border without any deformation and still keep a pretty nice soft fold
angle on the glove. So this is already quite
close to what we're after. So we are going to freeze interior and just
get working on this part. Because the rest of the
process of tweaking the folded part is not
as complex and detailed. We're going to speed
this up a bit more, and we will be back
in the next step. A Okay, so we're done with
the folded area. It is looking much more puffy. So let's focus now
on the pink part. Like I mentioned before,
we are going to try different fabric
presets until we achieve something
more of a shell, plastic cell or rigid filling. So let's simulate it
with the internal line, the new fabric
preset we selected. Let's try how it feels with
the gray patches on top. So let's create an
internal line for it. Let's put it on top on the position and scale
correctly because right now, I think they're slightly
large. Let's try, though. Okay, so let's copy
and paste, cut, remove the excess, and let's stitch those to the corresponding
patterns, sorry, segments. Let's set the layers at the thickness so it
simulates properly. Okay, it looks quite similar, so I would say this
is a good start. She play with angle
a little bit, so they feel a little
bit more inserted. And to be honest, I'm quite happy with the
overall result of the glove. The folded part can
improve a little bit. So let's get some
more work on that. So what we're doing now is same thing as
we were trying before. This took quite a
long time to iterate, but basically is playing with the internal part of the fold and the external
part of the fold. Same way we did with
Nick to achieve a I like a thicker result, which is what we are after. And in the end, this is just
personal preference. I just wanted it to feel
like sort of a tube, like a pretty thick
and rigid tube. And the exterior I wanted
it to feel soft and foldy. So that is why I'm playing
with a thinner preset on the exterior and a thicker
preset on the interior. Also, the internal
line is going to allow me to create this
elastic effect, which I wanted to try. But as you can see, I'm
just playing around, going back and forth,
using the same principles, two patterns, stitch together
with different presets. And it's going to be like
this for quite a while. So that's why I spit this up. But now we are going to
jump into the arm piece. So this one is pretty simple. We might also cover it in a slide and slide
speed it up video. But the process is going to be main we're going to
create the main sleeve, which is going to start
off from this rectangle. We're going to simulate, let it simulate and lay on
top of the arm a little bit. Now we're going to
sew it on the sides. Make it shorter because we don't want it to
reach all the way. And simulate again,
is getting in place, making sure we are not using the gluf as a simulated object. We actually deactivated it, so it doesn't affect. And now we are saving
this as a new scene. The reason I'm keeping
there the gluf is to use as a reference for measures to
know where it actually is, but I'm not going to be
using it for simulation. So this is going to
be our main sleeve. We don't need as
much folds in this, but we want it to feel
softer on the arm. So not too loose. That's why we are adjusting the measures on the bottom part. Just making sure the
feed is correct. Okay. That looks about right. Now we're going to just pinch a little bit more to achieve
some wrinkle wrinkle, sorry, wrinkles
around the elbow. Change the weft. And it doesn't need to be
anything too noticeable. Just something soft
and light that adds a little bit of flavor to
the arm to the arm cover. So then it is not just
like a flat tube. But we're going to be building a few more
pieces on top of this, so it is not really that important to really
police match. We just want some
interesting falls happening, and that would be it. Okay, let's create
the double slip here. We're going to select this one. Create a new preset
for it and copy paste, move to the side, always
adjust the measures, sign the new preset, so it has a slightly
different color. Yeah, adjust the size now. And the layer, so
it stays on top. Okay, that is good. Okay. Let's play with the friction. That is, how much stick
it gets to the character. If it doesn't have much, it will just float
over the surface. It will not get sticky. And if it has more, it will get more sticky. So it is easier to keep this kind of patterns in
position with more friction. All right. So now let's just place the internal lines
around the same height. We're going to be also
changing the length of both. This one, apologies
for the large. Sorry. We're going to play
with a warp and weft, so we get more faults
going on in this one, especially on the leaf area. Sorry, on the
forearm sleep area. You know what? Et's just
keep this as it is. We don't need much
more detail in here, so let's jump work on
this part right here. Okay. So let's get all freezed. Create a pattern which is
going to be the base for that. We are going to be placing it
as always in the position, simulate very softly and see if the proportions
are right. Just slide the longer. Let's try to get the coroners
looking nice with a bevel, similar to the reference. Let's just simulate
for a second. I think you overdid
the pressure. We need to put a slight
amount of pressure so it goes towards its normal
negative vector. If we put positive
pressure, it will fly away. If we leave it in negative, it will just get
sticked to the arm. We just leave a little bit of
amount, so it stays there. We're going to
tweak a little bit of pattern, and
once we are happy, we will just freeze this and use as a base for
constructing the rest. Let's try of the presets to see if any of those work
better as a soft pad. This one is quite good. So let's just stick with it, freeze. We're going to
copy this pattern, but make it straight first. Okay, let's just offset the whole thing and
now copy this one. And we are going to be
coping it as a layer clone. Now we just have to
play a little bit with the angles of the internal
lines and the force, and it's going to create
this soft pudding effect, keeping both pieces together. So far, we have the
interior one with the pressure An exterior one will have a compensate pressure. Okay, now, let's try to get a little bit more
information on these folds. So more density. Let's try to pinch a little
bit playing with web. Now we're going to try to do this belt loop grabbing the pad. So for now, this is
going to stay as it is. We just need to do this
one more thing, sec. Segment the sides so we
can actually get the loop, the belt loop going from around to under this
pad, like the reference. So now we create this one. Let's rotate and
put it in place. Let's simulate and say, Okay, we need to make
it shorter, obviously. Just playing with the
sealings to see what works better. Okay, this is good. Okay. All right,
so we're going to try and improve the
puffy effect on these two guys by
changing the preset. I mean, it doesn't look too bad. But like always, there
is room for improvement. So let's just go back
here since I don't have very clear what I
want to do to the pad. So let's just simulate all
together and see how it feels. Okay, so it's okay. So let's jump and get this
piece done, the pocket. And yeah, use the
flap and the belt, not the belt, but the clip that holds the flap composition. So we are going to start
over from this rectangle. And there is where the pocket
is going to be stitched. So we are only going to
be stitching for now. Yeah, the bag itself, the flap is going to
go somewhere else. So let's just get this adjusted. Get the base for the pocket in a different color
and different preset. In. Now let's do this offset batter outline, which will create the sides. And this tool works perfect for pockets and poaches as well. Here we can configure the
specifics of what we want. We want, in particular, this distance more or less. And we're going to be
stitching this one to another, so it falls and then
this to the base. We want some extra room
because we're going to be doing the falling over
itself effect on the pouch. So that's why we did another, like, extrude of the segments. Those that need to be
stitched to each other. And now we can play with those angles so that
it feels not this way, but the other way around. And it keeps sort of the
rigidity on the reference, but we still want it to make
it feel a little bit looser. So let's go ahead and split all these segments and now we are going to create
internal lines that will allow us to control the
angles of the sides. So now we can grab those three, trick the angle. Oh, sorry. Took the angle towards
interior or the exterior. Obviously, we want to go
for interior, like so. And now we can do some
stitching in here, and that's how we are going
to fold the upper part. It might be too
aggressive, to be honest. So let's see. No. Just trying different configurations and see which one
convinced me the most. But this one is not too bad. You just need to make this
work slightly better. This preset makes
it better for sure, but we lose all the volume. So let's try get these angles better and maybe a
different preset and hopefully we can get acceptable result in this because right now
it's not too nice. Okay, we want to chew
this curve right here. This must be smaller
This must be longer. That is better, I would say. Okay, that is not too bad, actually. Okay. Let's play with the
angle of this one to see if makes it better
and also the sides. I think if we end up
changing the main three, which are from the one we're
extruding all the segments, I think that is going
to be the key for a more soft pouch filling. So let's go and do
that at some point. Just want to make
sure before that. And Yeah, this is what I mean. This looks already more
like a soft cloth, which is what we are after. And actually, I think
we're going to be better off without those stitchings. Mm, no. This was
not a right step. I mean, it doesn't look bad, but maybe it's too much inflate. Yes. So since I took 15 to 20 more minutes playing with this without
much success until the end, this is a time lapse
of how it went. So in the end, what I ended
up doing was changing the stitchings and the way
the poach was constructed, so realized we got rid
of the under part, and now it's just like,
like a rectangle pattern. So that made easier to fold the lower part as
well as the top part. And having that internal
line on the center allowed me to get some
more extra volume. So that is the best approach
I achieved in the end. And the result you guys will see you see
here is what stayed. So now we are going
to copy this, cut, and we're going
to use this as a flap. We want to get rid
of all the segments. We just want the same
measurements for a rectangle which is going
to be stitched here. We're going to just the length, cut the corners, offset like we always
do for more details. Play with angle a little bit, so it correctly on position. But yeah, like I
said, we're going to cut the corners now. We there and there. We're going to be
offsetting some parts of the flap to sew on top a copy
of the flap as the border. So this way, we have
the flap imposition looking much more fancy. We are going to set
this like we said, and layer clone over. So we are going to, as well, play with the internal
lines just a little bit, so we get the border effect change those angles
like we like to do. In the end, as you
can see, many times the patterns and simulations we create in Marvelous are
not as complex, really. But it's just a faster
way, I would say, to create those
shapes than you would be doing them in zebras
or any other software. So it really helps out. And as well, it's not
just creating them, but it's also easier to tweak
if we get any feedback. Or easier to scale the
quality of the result. So right now we are
mostly blocking out most of the
pieces we created. Some of them are going
to stay like they are. Some others are going to be re simulated later on
for more quality. Maybe the t shirt, I
don't know, we'll see. But you see, it's a fast way to create a preice set of volumes. About scalability, like I said, now we have a pretty good
set of volumes to start off and we are going to just keep working on these exact
same patterns we have and by adding some internal
lines to add more control by playing with the web and webt
like we always do, playing with the angles
of those internal lines and changing some parameters
on the cloth presets, we are going to make
this look much nicer. So enjoy a spit version of that, and we'll see you
guys in Chapter 15, where we will jump
into a new piece.
16. 15-Refining Belt: Welcome to Chapter 15. In this chapter, we're
going to be covering the creation of the
poaches and the belts. As in previous cases, we are going to be starting
off from a reference and then creating the basic patterns
to construct the poaches. This whole chapter
is going to be speed up since the process
is quite simple, and it is the same as we
have been doing till now. So we will be commenting this
while on a speed camera. So for now, we have created
all three base patterns. One is going to be
all the side loop for the pouch and then
the back and front flaps. Now we're going to be creating
the base of the belt where the pouches are going to
be hanging from so far, everything is going
to be pretty simple. Just basic rectangles. Maybe we can add some curves, but we don't need much from now. We're going to be duplicating
this pattern to create the padding effect after offsetting the exterior
borders as internal lines. We're going to create
one more plane, long one that is going to
be the circumference around the waist and the main
structure of the belt. We pin certain parts of it so that we can
rotate it around. Otherwise, the
simulation would be very difficult to go around
the waist by itself. So by pinning it, we have this control that we
wouldn't have otherwise. It is important to
deactivate the reference so that we can work freely during
this part of the process. And we are going to measure how tall the belt is so that we can create this
segmentation in the pads as well and we can properly
stitch it together. Now that both are
stitched together, we can simulate the belt. And once we have that simulated we can freeze everything
and simulate together. We're going to try to
get the same elevation as we have on the reference, but it might not be exactly
the same for obvious reasons. But we will try to get
as close as possible. Okay, now that the belt
and the pads are good, we're going to focus
again on the poaches. We're going to be creating a duplicated version so that we have a certain
amount of thickness. And it feels more puffy. Remember to play with
the seal lines and the internal lines to
achieve a different angle on the stitching in
case we want to make this stitching feel like it's going towards the inside
or towards the outside. In this case, we want it
to feel slightly rigid, so we're going to adjust
the angle for that. Create the flaps based on the same pattern on the same vertical
pattern for the front, and we're going to be sewing
that into the back pads. We're going to upset some
internal lines in the side in a pattern of the
side of the pouch so that we can create this
sort of border around it. We're also adjusting
the internal line to create a double
stitching for the flap of the poach and something similar on the poach
itself so that we can stitch the flap to it. We're going to always
duplicate that pattern, cut and remove the excess
material to create this plate that is going to be where it's
going to be clipping. We had another
internal line there, and now is when we see both
the flap and the plate. There we go. We have the first
pots, sort of a structure. We're adding these
internal lines to create these angles to fake the structure of a
magazine or something inside. And same way, we're
going to be doing a double pattern to add some thickness to it as
the rest of the pouch. We're going to continue to adjust the angles
and the position of the internal lines until we get something that feels
as a right fit. And we're going to be
freezing and clipping part of this belt so that we can simulate together
because as you can see, the flap and the belt
are clipping for now. So we want to simulate
those two together ideally. So that's why we're
clipping now the rest of the belt and simulate it
together the belt and the flap. And now we can
freeze back the belt and continue working
on the pouch. We're going to work
on the sides on the interior and the flap until we achieve a base
result that we like. And now we are
simulating altogether. But always keeping
the interior part of the pad freeze so that it doesn't move from
the original position, that we get a natural simulation for the
rest of the piece. Okay, now we're going to start making this a
little bit more nice, get a nice color for it, adjust the angles on the stitching and
the internal lines, so it feels a little bit more
soft rather than so boxy. For this, we also decrease the particle distance
a little bit. And we are also adjusting the stitching on this
piece a little bit. Now we're going to add
some more Werb weft. Play a little bit with
those values until we get a soft result. Same thing on all the pieces. We want to get some sort
of fold on the padding. Remember, we have double
sided double sided patterns, I mean, duplicated
and stitch on top. So we can actually have
different presets for the exterior and achieve
thinner and smaller wrinkles. So this is what we're
trying to do now. And now one last detail, which is going to be this
negative internal line to make it feel like there is some sort of
stitching on the flap. So we're going to keep
adjusting the usual parameters. We're going to playing with
warp and weft internal lines. And I'm not too sure if
we're going to be changing much the fabric preset because so far this is
working pretty nicely. We just need to get
slightly better results. So we're going to go for small time laps adjusting the
same values until we have a result we like. Okay. So up until this point, we have been playing with web
and web and internal lines. So far, this is what
we ended up with. We have created this internal
line on the back and we are creating a strap there to use some sort of
holder for the pouch. But this is going to be
pretty much it for the pouch. We don't need we don't really
need more detail than this. The sides are looking
pretty puffy and nice. The flap is also having some interesting detail
between this flat right now, the front decoration
and the angles itself. So now we are going to
copy and paste this pot, move it near the other
internal line we previously created at the
beginning of this chapter, and we're going to sew the corresponding
places and simulate. We will need to pinch a
little bit and unfreeze the belt so that they all
simulate well together. But now we have this ready. Need to make sure to
implement it the same way we did with the other pouch,
and we're good to go. So pouches are pretty
simple. Easy task. It works the same way for
every kind of pouch in case you guys are doing other
characters in the future. It's always the same along
strip for the sides, front and back, play with the stitching lines on the
corners and internal lines. Make a double, well, a layer clone over for all the pieces so
that you can assign different fabric
preset and achieve this puffy look and make sure to add some interesting
details like borders, straps and plates that are based on the concept
in the reference, but also if they are not, just make sure you add some sort of detail that make more
interesting to see that pouch. And as far as they look puffy and you have some
main folds on the sides, you should be good
because then you can add some more details in Zebras. Remember, we're just
doing the Marvelous vase, so small detailing
will come later on, although we try to leave everything as good
as possible in here. But yeah, don't
forget that we still have the cebrus
stage coming next. So the pouches are
almost in place. I'm just rotating the internal
lines a little bit to achieve a cool rotation that makes it a little bit
more interesting. And we might want to also pinch a little bit more on the front as
well on this pouch to achieve different folds than the ones we have
on the other pouch so that they don't
feel the exact same. So overall, the feels nice. They look quite
solid, I would say. Uh, so yeah, let's go ahead and improve a little
bit some areas. So we want to get this done on the belt on
the bottom part, as well as the buckles here that might be done
in zebras probably. So let's just simulate
all together one sec. Let's go and tweak a little bit of this
pouch to like I said, get some nicer
results and make them more asymmetrical so they
don't feel exact same. So now we're getting this bottom part done,
as well as the sides. And in the other pot, what we're doing is use playing with the web and
web a little bit, pins here and pins
there until we achieve some sort of
folds that work for us. I think this is it.
For the pouches, we're going to jump to the back panel and the
secondary loop for the belt. So we duplicate this, we rotate a little bit
to get it in place, unless you deactivate
the pouches and the belt so that it's
easier to get in place. And there we go. Yeah. It's great.
Quite in position. Okay, so this is pretty
much in position. Let's see how
everything looks so far and jump into
the back panel. So start by a rectangle, always rotate it and put it
in place on the reference. This is why having
a blockout is so useful because you can make
everything work in zebras, which is a lot easier to trick. And then once you have that, you can use it as
an exact reference for your Marvelous
designer template. We're going to be offsetting
the exterior line. Remember, we always try
to curve the corners, both from the exterior
and interior, duplicate the panel,
remove the s material, stitch to the center
of the panel to create that padding effect like
we are doing all the time. Play with internal
lines so it feels like soft and puffy padding. Let's stitch as well,
a duplicated border so that we can also
inflate that area. V, we have the base, I'd say, and let's duplicate
the back part as well. So we have everything
bi duplicated. It's restitching everything
so it works nicely. Okay. Now that we have
this, let's just offset it with an
internal line to grid like a rim and
double stitch border, which is going to look nice. Is curving the corners
on all four corners. And now let's just
play with angles. Remember to freeze one of the borders while you
work on the rest. Otherwise, you will
lose your saps. And now we're trying to get
some folds on this padding. Once we have that, we are going to be creating the
internal shapes, internal lines, sorry, for
the loops of the Moja system. But first, this needs to
look a little bit more soft. Like always playing with
the warp and weft and the angle and strength
of the lines, we can achieve a prenee result
as well as in this case, playing with the thickness
of the patterns. It looks more like a
thick piece of cloth. This seems to be done,
let's go ahead and start adding the internal lines that we're going to
use for the loops. We're going to have
this duplicated create a loop for those
with an offset on top and the bottom so that
we can do double stitching, maybe shorter so it
doesn't hang as much. But long enough so that
it has some silhouette. And just like that, very simple way to get a nice
result on the loops. Internal lines on the pad and then use two loops
with offset lines so you can stitch them and it doesn't
require more than this, just play with the lines a
little bit at the thickness, and we have a pretty
nice result on this. So this is going
to be pretty much everything for Chapter 15. We're going to be
covering Chapter 16, the merge of all the work of the belt and the pouches into the pan into the pants scene and we'll see all coming
together very nicely. So stay tuned, see you
guys in Chapter 16.
17. 16-Refining Pants: Hello, everyone, and
welcome to Chapter 16. With the poaches done, now it's time to bring them
together with the pants. So we're going to import
the project right here, and we will need to do
some adjustments so that they work on top of
the tarp and the pants, and it all comes
together nicely. First of all, like every
time we're going to freeze everything that we are
not working at the moment. So we're going to first
adjust all the straps. We can use the pinning to move them without having
to pinch as much. We're going to be doing the
same on the other strap. This one is a little
bit more tricky because the volume is higher
on this area of the waste, and we have this
padding as well. So we need to be careful
and do it bit by bit. So everything doesn't go too
crazy, like, right there. Sometimes it's good to try with other parts of the
simulation to unfreeze. Try simulate altogether
and see how it comes. But like I said,
it's pretty tricky. We cannot unfreeze
yet the padding, otherwise we will lose shape. So this might be a
tricky situation. So layering is also a factor
that can affect here. So we might need to
go back and play with the angles of
certain splines, certain internal lines and stitchings and make sure that
we try bit by bit moving, use very little, certain areas and making
sure it doesn't glitch. If it glitch, we stop the
simulation, we go back. But now everything
seems pretty nice. So you can see, I've
left the pins on the other side of the
belt so it doesn't move while we fix all this. And we will need to relocate moving
manually, all the pouch, so they sit nicely together all at the same time on top of the tarp and
without glitching. So this part of the work requires a
little bit of patience. But now it seems that everything is sitting
pretty nicely, looking actually quite nice. I'm pretty happy
with the result. And we're just going to make
sure that after inserting this and after
inserting the belts, we get some pressure on
the tarp and the pants, which is going to make
everything feel more solid, more realistic, super nice. So leave it simulating
for a while, so it creates some pressure and make sure that you
remove the pins at some point so that it sits
naturally on your simulation. Okay, this area is
looking quite nice, quite nice, to be honest. Now, we are going to be jumping into the legs as
well to improve that area. So now, I'm going to leave you
guys with long time lapse. This is going to be the
longest one so far, and there's not much explanation required on what we are
going to be doing now, so I'll leave you guys
to enjoy it with music. So basically, it's going to be fine tuning of all the patterns
that we have done so far, both on the shirt pants,
pouches, everything. You will see that
the only thing that we are doing is maybe trying different cloth presets to see if it improves
anything of the ops, but that's not going
to be the main case. Most of the time
it's going to be what you're seeing right now, which is going to be
pinching from certain areas, making sure the folds are
looking as best as possible, maybe playing with
warp and weft, like always and just tuning
a few of the curves but not following any specific
or or anything, we're just going to be trying piece by piece and
see how it improves. So as you can see now,
I'm just playing with different web and web on the different pieces
and see how they react. And if I like the faults,
I will just leave them. If I don't like them, I will
just try different thing. I'm not trying
anything in particular because I know that it's
going to behave that way. It is just trial and error. If I see that I want some more
detail like I'm doing now, I will use the iron and
specific parts since now we are working towards the final details
and simulation. I think that's all the notes
I need to give you guys. I hope you enjoy this
part of the video, and next step is
going to be just jump right ahead into zebra and detail all the work
that we have done here. See you guys in
the next chapter. I.
18. 17-Creating Final Cape: Welcome to Chapter 17. Hopefully, you guys enjoy the previous time laps in which we were detailing the different
parts of the simulation. And as you can see, they
look pretty nice in here, even though they are frozen. You guys are going
to be seeing this in a little bit because
we're going to be bringing all these to Zebras. But first, we're going
to be creating the cape, which is the last stage
into this marvelous part. We didn't have it before
because it makes our life more difficult when detailing
the rest of the clothe, but it is time to do it now. What is interesting about the cape is that we
are going to be using a wind controller
to separate from the character and create
a slight wind effect. For it, we're going
to come up here. We're going to enable and we're going to activate
it here with a tick. We're going to put
that in front of the character aiming towards the direction we
wanted to activate. As you can see, depending
on the strength, it's going to do more
or less effect on it. So we want this to be able to separate all the cape at
once because as you can see, it is sort of sticking
to the character. So this way we can achieve like a soft and
natural separation. We want to reduce slightly the strength try bit by bit until you achieve the straightness of the
cape that you like. And once we're happy with this, you can just leave that there. And we're going to keep
working as normal on the rest of the hoodie
sorry, hoodie cape. So what steps are we
going to be taking? I know that this is sticking
right now. Don't worry. We'll just get back and do the same thing
with the wind as before. So we're going to be
disabling the Hoodie for now and we're going to be adding the same process that we
always do to the cape. So we're going to first adjust the pattern until we
are happy with it, both from shape and
tilt and every detail. We want from the base. Then we're going to be doing the internal lines
and layer clone over until we achieve the thickness and padding
that we like on it. So don't worry about
all these messy board. As you can see, in the end, the best solution is just
to freeze the hoodie. Otherwise, it's
going to be doing weird clips with
it with the cape. And now that the cape is looking quite okay in terms of shape, we're going to proceed with the previously indicated steps. So first thing is going to be offsetting this like always. And we're going to cut it and
remove the excess fabric. We're going to be sewing
those borders to the cape, used to add some
rigidness to it, like we always tend to do for more control and cooler details. Now we're going to try to
always resimulate a little bit after we add any extra
patterns to our cape. We're going to upset that again. Use that to create a little
bit of extra rim and details. We're going to play with
our preset until we achieve some fall details and yeah, the wrinkles need to
look a little bit nice. But we need to be careful
because as you can see the wind will make
depending on the preset, the cape float more or less
like this. So be careful. Try different presets until one gives you interesting
falls and adjust the wind strength accordingly
so it doesn't go sky high. And this looks quite promising. So we might play with
this preset, sorry. We need to try to achieve
more vertical falls. So remember, uh, we can play with warp
and weft a little bit, although in the cape will
not have the same effect. So try to pinch. At this point, it's basically the same process as the rest. We have the interior
border frozen so that we have that control of keeping the same
silhouette of the cape, but still being able to
adjust different foldings. So you can keep that in mind. And what we really want to do is not any particular result. But as in general
note for characters, it's important to keep
this in mind that we need to balance detailed
areas with rest areas. So we're going to use
the cape as some sort of rest area because we're
going to have on the neck, we have the next calf,
we have the hoodie, which both are quite complex.
They have a lot of detail. They will have even
more detail later on. We have the same in the
shirt and the arms. They are complex areas. And then on the hips, we
have all the pouches. And it is overall a
quite complex character, not in terms of small
details and stuff like that, but in terms of the reading, it has a lot of detailed areas with different shapes,
different readings. So it's important to have small simple areas
like the cape. So we just wanted to
keep pretty straight. We some soup tail folds. We don't want much
information in here. That is why I'm just going back and forth,
trying the presets, trying different settings on the presets until one
behaves the way I want. And same pre simple, it's the same we have
applied to Sorry, to the pants as well, and we will apply to the shoes to the glove and
to certain areas, you'll see on the pants, we
have the same situation. We have the sides,
which are quite complex with the strings, with the side panels. So we want to keep
the front a simple. That is why previously
on the simulation, we use kept the minimal folds we needed for the pelvic area of the knees and then on the ankles but we
didn't overdo it. We kept it very simple. And it might seem that you will left some areas
unfinished, you think this way, but really what we are achieving is a more pleasant
reading on the character, but not making it too busy, which will end up making it feel like noisy and just
not pleasant to look at. So keep that in mind when you're working on different
areas on your character, don't try to overdo or over
detail everything you have. Try to save some elements
as simple elements, especially when you have
multiple accessories. I think that's a general
note that you guys can apply to any
character you work on. Even though the concept it
is busy, try to simplify. Sometimes concepts don't
usually represent faults. So if the overall
design is very busy, don't do a very
wrinkly clothing. Otherwise, it will be too much. That is why when I'm working on military characters
or any sort of character that has gear on top of the
chest or the back. Since the chest is already
quite complex and it is like the busy area
we are looking for, then I try to leave
any sort of clothing that shows from the
sides or on the back. I try to leave it quite
simple just to balance that. Okay, so while we were chatting, you could see that I was doing some more progress on the
cloth, sorry on the cape. That is pretty much
done. We're not going to do much work than that. Like I said, offset layer clone over and just find the
right details on the folds. So this is going to be
everything for Marvelous. Next chapter is going to be
pouring this into Zebras, and very excited to show you
guys what's coming next. See you guys in Chapter 18.
19. 18-Zbrush Polishing: Hello, guys, and
welcome to Chapter 18. In this chapter, we are going
to be covering the process of bringing what we have
in Marlus into zebras. First thing we're
going to need to do is you guys are going to export. Everything you have
from Marvelous, it can be from one scene from different scenes in case
you work it separately. Select all your patterns
and click Export, and then just export it as
OBJ in specific settings. The default ones are good. Then import here in zebras and import all the OBJs you have
exported from Marvelous. And what we are going
to be doing now is make those marvelous patterns look amazing on zebras
because by default, you will see when we import
them that they don't look as good as they
were looking marvelous, mostly because of
subdivisions and edges. So we're going to
be fixing that now. First thing, we're
going to be grouping, some of the blockout resources and try to keep
everything organized, and we're going to be importing the different OBJs
we have from MRLs. In my case, I went with three. So we have one for the torso, one for the lower part,
and one for the arms. So what we're going
to be doing now is fixing some flipped
normal issues. So you will see that
some bothers are not looking as they should or they look weird or they are missing. That is because the
normals are flipped. So we are going to be selecting the ones that we don't
see and coming here, and by disabling Double, we can see the ones that are actually not
displaying correctly. So we need to isolate those and zebras and split into
a different selection or mask them and click flip so that we can set the
normal looking the right way. This is essential.
Otherwise, we will have then some issues when zero
missing or projecting. This is a step we need to
do on all of our patterns. Make sure you go do
a proper revision, proper check and everything. Check that everything has the normal facing the right way. And once we have that, you will see that it looks a little closer to what
we have in Marlos, which is what all this
process is about. We're going to be doing
that for a little bit. A Okay. Next thing you'll notice is that in some patterns like
here on the cape, we have the interior part crossing together
with exterior part. That is due to some twitching, the glitching we have
in Marvels designer. So to fix that is fair lazy. We just need to mask
one of the segments, the one you prefer,
and just move the other until they are not
intersecting anymore. By smoothing, you can make
it a little bit easier, or you can just use the move topological or move
to to fix that. You will see that
by this twitching, we also have another issue, which is that, well, you will see that now, I spotted just a
few seconds ago. But we have some polygons that are not welded properly from one segment to the other
because the way Marvelous works is that every pattern acts
as a different plane. And then when you export them, they are still different
planes and they are not really stitched together
like they seem in Marvelous. That is one thing we
need to fix here. So after modifying this, I was telling you
the intersection, you can see that
now they are not on the same spot and because they were not
stitched together, we have this issue right now. We need to go to Smodel
select stitch tool to try to make those
two work together. Some use is going to go one by one until I
have all this ready. And as you can see, I have a few of these issues throughout the cape.
Not just in this area. You will see now
that I have to fix this on some small bits, that is going to be spit up because it's the same process. You just need to spot up all
those places that glitch in your simulation and try to fix it by flipping the
normals correctly, then fixing intersections
and then stitching together. So right now, I'm going
back to the shirt. What I'm doing is splitting
everything by segments. I know we can do
that by polygroups, but it's not really advisable
because you will see that some really small
patterns that we did in Marvelous designer are also here different polygroups
if we split by polygroups we will have
a pretty hard time then bringing them together, it's better to go one by one. This you have seen me do
while I was speaking, is that we are going to be serum messing every
part of the shirt. We want to aim for clean edges so that we don't lose that
shape that structure while serumssing because
we will need most of our edges to stay in the same place so that we don't need to do extra work moving
everything together again. So just go pattern by pattern, do a serum mess, is going
to be allowed this year, mostly because maybe you
were working infraanulated, in marvelous, maybe you
were working with quads. In any case, serums
is quite good. Really recommended to create the first subdivision of mes. Just go one by one and
get all your mess clean. One more step that
we're going to be doing before doing pan
loops and creating thickness for shirt is going to be creating Ubis
for all the patterns. So just you just need to
go to i plugging, sorry. We're going to be creating automatic Gibies and
try to place them in convenient orientation
so that in case we want to add any noise pattern or fabric detail to our clothe, we can have that in handy. I don't think it's going to
be the case for this shirt, but I'll show you guys so you
can use in any other case. So now, as you can see, I'm making all the
patterns visible. All of them are
serumssed and clean. The same way we have
in our reference, so we kept those lines here
and here, as you can see. So now that it's clean,
we're going to go ahead and do the unwrap. Click on those settings. Now, it's going to
take a little bit. Shouldn't be much. Now, if we
go here and we see or UVs, we can select them by masking them with Control
click and then rotate them so that they are
placed in a way that the cloth pattern
will make sense. So if we have straight lines, we want all of our
patterns to be aiming the same direction so that
if we apply that noise, it will make more sense. So let's do a quick test. H. Let's just try
with any noise. Now, because we have UVs, we will be able to
apply this noise. And in case that this
noise had any direction, like I said, we will be able to apply and keep all of it in
the same direction. But I don't think that is going to be the
case for the shirt, like I said, right. Now that we have
everything clean, we're going to go ahead and
create the panel loops. We come here. We're going to set
the polish to zero and set the elevation
in negative, so the panel loops
go inside and not outside and will change
or volumes and folds. And this way is how we will create the thickness for fabric. So you can see, we get a
prettnice touch by clicking it, not really any work needed. And that already is a pretty good base and clean base that we will
be working on top of. So basically, this is
the whole process. It doesn't really require
that much time per piece. We're going to be doing all these process
over all of pieces. And then we will be ready
to start detailing. So this is pretty much the process from
Marvelous to Zebrus. I will speed this up like always so you guys
don't miss anything. But just to remember, we will export from Marvelous
designer into OBs, then we will import
those Os into Marvelous. We will make sure
all the normals are facing the right way, going one by one, disabling in display properties, the
double visualization. Once we select those
that are flipped and click and flip so that
they are fixing the right way. Will go and fix any overlapping of the interior or exterior of the patterns. Make sure everything
is stitched properly, like the cape, as
you can see now, I can smooth and it
is properly stitch. And once we have that, we
will go piece by piece and do a serumes for each piece. Then we will need to
split before that. Everything into the pieces
we're interested in having. Then do the serums that it said. After serums is ready, we will do the UBS in case that we want to do any
surface pattern. And after the UBS, we will
just do the panel loops with the elevation in negative
and the pools set to zero, and that pattern
should be ready to go. In the case of the
cape, where we had the overlapping
and we had borders, make sure that you separate
properly or that you seal the borders together to avoid any weird results,
but as you can see, by removing the borders
that we had from Marvelous from
those side panels, after removing them,
we can actually create a quite nice
serial measure and Pana loops and
works very nicely. So we're going to quickly go
through all this process. I will not set the speed too much so you guys can
see what is going on, and next step is going to be already starting
to detail or hi poly, which I'm already
quite excited about. Hopefully, you guys are as well. So see you guys in Chapter 19. B B Do. The the I I bras
20. 19-Creating our final shoes Part1: Hey, everybody, and
welcome to Chapter 18. Finally, we're
going to be getting started with high
polydtailing and refining. So first thing,
we're going to start off from the first
piece that we didn't polish as much for
now because we didn't go to Marvelous or
anything for these shoes. So we're going to be merging
everything together. We're going to be
exporting this as an OBJ. Into or folder to use, again, as a reference for the software we're going
to be using for modeling, which is going to be marvelous, sorry, three D Max. But first, we're going
to be re topologizing to create some clean base for TMax. The software I use for
topology is topogan. The process is quite simple by clicking advertises like
you're seeing right now. And if I want to connect them, I use Control click on them. And basically, it will connect the previous vertex I have
selected to the next one. In case I want to split any
edge like I'm doing now, I will just shift click in
the middle of the edge and I will use um split that edge. So we're going to try to create a topology that flows with
the shapes of the zoo. I'll give you some notes
on edit polymodeling, although what we're
going to be doing is fairly simple for the zoos. We want to aim to have
a continuous topology. So that means that every loop
must have start and an end. As you're seeing, I'm
not doing any loops yet. The reason for this is
that we are going to be using a cell
modifier later on to create the thickness of these tbologies we're
creating right now. So as you can see, I'm
not closing or doing any actual three D volumes. I'm just doing some
sides of them. Same thing with the
fit. I want to have this continuous loop doing all the silhouette
for the fingers. Uh and when I'm doing the
interior of that limit, not limit, but segment
that I'm doing, I will still do it continuous and avoid closing any loops. I just want to
leave them open so that it's easier
later on to work on. And the reason for this
is that if we create a closed loop when we add another loop later
on inside three D max, it will either loop
around the whole thing, which we don't want that, and and you will see why later on. So basically, we want to
leave everything open. And this way, when we
add more extra loops, they will just end
on an empty end. It's weird to explain right now, I will make more sense once
we get into three D max. So for now, you try to replicate the way I'm
approaching topology. In case you don't have
notions of it yet, but if you do, just
follow your own way. This is just my way
of approaching it. There are many different
and valid ways to do it. So as you can see here, this is the first
loop that I closed. It goes all around the sole. And the reason for
this is that in here, it is convenient for us to
close it because that way, when we add the loop
and it closes the loop, like I said, in three D max, we'll have more density on
the bottom part of the sole, and this will allow us to create a rigid border to
define that its angle. Like I said, I know
this might not make much sense right now, but it will make it later on. So for now, straight
to aim to create an even topology that
has all the loops ending somewhere and
not looping around. And just try to distribute
them somehow somewhat evenly. That's what I'm
doing now. I'm just moving them a little bit. So we have the same separation between all the vertices
on one segment. Now I'm going to use smooth to quickly redistribute the
vertex in a quicker way. Once I have done
the smooth because it doesn't work perfectly, we might want to go bits by bits and then readjust
manually some of the vertices. So they look a little
bit more even. Okay. So that is the overall
principle for re topology. Not for topology for game, but for topology for creating
clean bases for three DMX. So basically, leave
open loops unless you really want to increase
density on a specific area. Like here, for example, if we close this loop, we will have more
density near the edge, so that is why we are doing it. Basically, the will loop
around the whole shoe. So we are about to be
done with the salt. We just need to add
a few more loops to create a more even
distribution of the curve. And we are going to export this now into three D max and
go about the process that I usually do to convert this temporary topology
into a final hi poly base, which will look pretty clean, pretty nice and will
start to make your shoe feel more like a
final high poly. So we're going to export as OVJ We will create a folder
to keep everything organized. We're going to
come to three max. We're going to import the soil to rotate it
and put it in place. And we don't really
care much about where it appeared
because we're going to relocate it based on the
reference we had from the up. So we're going to hide for now the reference and
we're going to get started with or retopo. I'm going to sign
a red material to the reference so that I can
differentiate it easily, and now I'm going to apply
that cell modifier I told you about on the retopo. Also turbo smooth, with this, we are getting started. So you'll see that I'm
doing the same for both. It's going to be a
pretty similar process, even though one is more round and the other
one is more flat. So on the base, the base poly, what we want to do now, it is to do small adjustments to create some
sort of cleanness. So we're going to be assigning different smoothing groups to
the sole and to the bevels. That is why we have two smooth. One is based on smoothing groups to help us
create those angles, and the other one is to smooth
the whole thing together. So now that we have that, we're going to try make all these lines as
straight as possible. This will make the
high poly fuel more clean and more like it is properly manufactured and not just some
blobby random mesh. So I'm just going to be aligning all those points
somewhat organized. But first, like you saw, I just got rid of a few of them even if they were
creating the main silhouette, but I think I can pretty
much recreate them later on. So it is going to be easier for me to adjust the curves and alignment of all those
vertices I was telling you if the retopo is simpler. So just going about it right now trying to make all
these look more organized. So by organized, I mean, trying to look for
negative spaces, try to have the same distance on one side and on the
other same on the soul. If you have a gap on one side, try to mimic that gap
into the other side. Otherwise, it will look just so random will not feel believable. And it will lose
overall quality. Now that I cleaned
it up, as you saw, I actually added back
that subdivision, those loops that I removed. Going to align those as well. And now, it's going
to extrude with bebel and try to replicate the
volume that we had before. But this time around is
going to be more consistent, which is what we
are looking for. It is not like before
Woods where on the sketch, maybe we had different thickness on the soil depending
on which part we were. So now everything
is going to have the same thickness and it's going to be
curved the same way, which is what we're after. So Okay. So I was thinking, once again, we're
going to be doing the smoothing group thing
to keep those angles. You will see that
sometimes you get these issues like we're
having right here. We need to fix that
by playing with the different groups and see
if it behaves better or not, we can also change the topology a little bit to make
it work better. At this point, I'm
just really looking at getting nice angles with
those different groups. Sometimes you need to play with a combination of multiple
groups depending on the segments so that we achieve a different curvature
and different smooth. Now those two loops
I added are going to be to reinforce the curve and make it a little
bit more sharp, but I'm not sure about if
I will keep it or not. Those loops are
the kind of loops. I told you before that
we were interested in closing so that they
will go all the way around. And those are thought
for this kind of detail. So as you saw by doing a bevel extrude
with negative value, we can achieve this
detail fairly easy, not saying that it is the
detail we are looking for, but it is definitely an option. So in case you're looking
to do stuff like this, try to keep closed loops when you're doing your
retopo before high poly. If you are not, if you want to have those details fade to
the exterior of the piece, don't close those loops. As for the front
part, we're going to take a very similar approach, but it's going to be a
little bit more enticus to do because we need to adjust and refine a little bit of curves because we didn't have
that done in the sketch. We're also going to have to curve the fingertips, actually. I'm going to speed
the overall process a little bit because the
shoot took quite a few hours, and it's going to be mostly this same process
throughout all the pieces. So it doesn't get repetitive. What I will do is play
in a higher speed and just comment on the
notes that I feel that are important to the overall
approach of the character. And if I feel that
there is anything technical that I need to
mention, I will do so. Okay, so without further ado, let's jump right ahead. Okay, so first thing
you'll notice me doing, it is going over
with a plane that I created going over the
the reference with the shell activated used
to have some notion of how close the
topology actually is to the shoe to keep
those thickness evenly throughout the same throughout other
parts of the shoe. Like I said, those
details are the ones that are going to make your hi polis look solid and consistent. If they are clipping and
have different thickness, different parts of the shoe, it will look just sketchy
and not very nice. Also same thing for
the fingertips. Right now, they're a
little bit random. I'm just trying to
make them more even, try to make them more flat, replicate the same
curvature for all of them, replicate the same tips, and just make it of flow like it was cut
with a laser cut or something like this and just make it as
clean as possible. Now you see that I'm going over the loops of the borders
and removing them. That was a mistake. I did closing a full loop. It was making my work a
little bit more difficult. And now I'm just working with different
subdivisions and CAFRs. You'll see me using Quad Sanfer. It is pleading for three D Max. It is used the same as TNFR used a little
bit more controlled, but you can achieve the
same results with TANFR. Don't worry if you
don't have quadfer or you're not familiar with it. So basically adjusting
the topology to get those volumes at
some extra loops wherever I want to define
those lines better. And for creating those paddings, those so I was extruding those polygons and then the smooth and the super loops
do the rest of the work. Okay, so since the process of the sole is pretty much
done and fairly easy, we're going to be
creating some buckles. But if we start with a
box, we subdivide it, adjust a polygon to create roughly a blockout of the shape we want to
get for the buckle. Once we have that,
we're going to be duplicating the element, and we're going to be connecting these two segments
in just a second. So for it, we're
going to select uses, make some more room, and now, once again, subdivide this, and we're going to be
extruding that center polygon. Just let me get the
subdivisions correctly. And vertically as well. The reason for this
is so that we have more control over where we are actually going
to be extruding, in case I want to do
any modification, we already have super loops and connection loops for those two segments
that I'm connecting. So we can extrude them, and with symmetry modifier, they will automatically
see together. Like so in the middle. So because I did all
those subdivisions, it is fairly easy to do. Now, I just need to adjust. And once I have the
proportions I like, the smoothing of this is going
to be fairly simple to do. We just need to assign smoothing group biangles then one turbo smooth and
then another one on top. The first one always
will be just affecting smoothing groups and the one on top, everything generally. If we have too much curvature
on one area we don't like, we just need to add
extra subdivisions near the border so that
it makes it sharper. Now we are going to
put this in place, rotate it just following
the reference. And now, after this one, we're going to be
doing the other one. Just make sure we don't
have much clipping. I know it's impossible
to don't get any, but just try to make
it in a way that feels solid and properly
attached to the fit. Otherwise, always it will
look lobby and sketchy and the overall piece will
lose weight and realism, even though it is
not fully realistic. But, you need to make aspects in your model that
feel grounded and believable. Ischif a different result, we're going to do a
different buckle now. I'm just changing the way I'm
structuring the topology. And the reason for that
is that I'm going to be I'm going to be just refining this buckle because the ones we placed before were created
as an instance. So every change I do in this one will be applied
on the other ones. So the reason for that is that I felt that the curve
was not good enough. So I'm just restructuring
the topology in a way that everything feels with a
better smooth than before. So for that, I'm just changing The structure of the topology. I just want some borders
to look more round. Okay, that looks much nicer. So now we're going
to be cleaning up the strap we have
under those buckles. Fairly simple process. We're going to be selecting you selecting one of
the center loops. Let's use cop it here to decide. So one of the center
loops and we're going to create on
create plan from loop. We will get this result. And we're going to remove
the bottom part and use the normalized spline modifier to simplify it a little bit and remove most of
the points that we have. Now that this plane is
a little bit cleaner, we need to play with the
rectangle settings until we have a pretty nice looking strap very close to the
reference we had before, and we can play with
the angle options, thickness options, and get a clean plane with the
same shape of the strap. Now that we have this base, we can actually go and select the edges, play
with the rotation. Simplified it, so it is simpler for you to achieve the
shape that you like. Important thing always
consistency in the thickness, consistency in the shape. It is important for
it to look realistic. So please make sure it doesn't have different measurements
throughout the spl. Sorry, throughout the
different polygons. So when you rotate,
it is easy to change that to change the width. So make sure you
keep it consistent. And And now we're just going to be extruding the border of the edge to create the loop
around the buckle. So that we just need to sift click and drag,
pretty simple. So now that we have
that belt around, we're going to do
the other side. That is looking quite nice. Let's create this new buckle. So for it, we're going
to start off from a box. We're going to be doing an insert's turn it to
editable poly scale down. We're going to do the, the insert to create that
curve that shape, sorry. We do it like this and now we're going to
remove the interior. So we want to get those
in position to replicate the same shape from the
reference and get rid of that. Just going back with the
same messed up here, not removing that extra piece
and just collapsing it, so I wanted to keep
that in place. All right. So let's a cell
modifier, like always. This time around, we will
add another edit poly so that we can apply changes
over the previous modifier. So that we can create this
gap here and connect it. We're going to be doing, again, the smoothing based
on smoothing groups. Let's play the smoothing
groups to get the right shape, and some sof loops wherever
we consider necessary. Okay. We're going to speed
this up a little bit. We're just going to
do the same thing some extra loops on
the borders to achieve a more sharp result than work here having instanced the
copy we applied on the shop. Now we're going to be copying
the strap on the bottom, rotating and adjusting so that it goes well
around the ankle. We can just go back to
the base load polyly I would just remove one side
and then just do symmetry. We're going to be first adjusting actually rather than just adding those subdivisions. First thing we want to do is just get everything in place, add maybe some subdivisions for the curvature and
move the so that loops around the correct buckle. Okay. So I just duplicated the element selection so that I have the
loop going around. And we can do this double loop. We want to keep those sort of together except for the end, which is going to
add a good reading. But most of it, we want to keep it pretty stick together so that then when we
work on the low poly we can just make
it as one piece. We're going to duplicate once
again one of the polygons to create not the
backup but the clip. We're going to end
that to the tip. Same for the other side. Now we connect those two and
we have the lays. Let's just remove some loops and we will get a
more rounder result. Va that is how we
get the bell loops, basically extruding
one of the polygons, duplicating and connect
them then together. Now we're going to
adjust a little bit this strap and then we can
go and do the other side. It is always good to activate the preview
of your modifiers so that you can see real time how it's looking with the
shell and the smooth. Otherwise, it might
change a lot. I just want to do now
the metallic tip, so we're going to we're happy
with the rotation of this. H now it is time to
get this in place. Use small refinements
here and there. Trying to avoid any clipping. For the same reason we're always talking about just trying to make this more
grounded and believable. If you see clips everywhere it is just not going
to sell itself. So try to avoid that
as much as possible. Now we're going to select all the elements together
and duplicate it. Put it sort of in
the same place, and now we're going to
connect both with this lace. So extruding a plane, creating a cell for it, and adjusting so all
the thickness is consistent and the lace looks
quite complex, complete. Let's just adjust the sides so that they have the
same separation to the lace in both sides
and same rotation. Let's model the tip, extruding a polygon
and adding a al to it, scale it up a little bit. And those details on the shoe are done the same way
throughout everything. So if you want rounder surfaces, don't add super loops, just leave bigger
topology spaces. If you want to get
something more sharp, just get loops closer
to the surface. Same approach is
going to go for this. We use the start
from a box to create the the plate that will
separate the fingers. Et's just try to create
a similar volume. We are going to
create that twist, that curvature that we
see on the reference. So we add that subdivision
and lift the tip at the super loops near to the
edges so that when we smooth, we get this effect of having sharp edges on both
sorry, on all of the sides. If we don't add
those, the smoothing would occur in a different way. So that is basically the same
logic for all the pieces. Okay, so the shoe is coming
along nicely so far, apart from adjustments
of this piece, we're going to be creating the
connection here for Sorry, the connection of this loop that will go through the thumb
on the next finger. And after that,
we're going to add some more detail to the
back part of the sole, which is going to be maybe the more difficult
part of this shoe. But so far, the
rest is quite easy. For this loop,
we're just creating a spline with a
cylindrical finish, and we're just going to adjust the points to flow in
the direction we like. Once we have that imposition, we can just play
with thickness and position of each of the points to get it in
the exact shape we like. Now, let's make
it Edit Poly once we're happy with the piece. And we're going to adjust the tips so that they
open up a little bit, like we see on the reference. First, we're going to work on this border
piece to make it just wider in one edge
and just slowly fade into the tube shape then use the push modifier to
create that sort of extrude. So now, having the edit
poly on top allow us to add some super loops to create that rigid and defined effect under the turbo smooth modifier. That way we create a
clean and crispy effect of having two tubes connected. Okay. So now that this
is looking quite okay, we're going to
jump onto the back so and we are going to be creating those
details I told you about. So let's just leave
this at here. So first thing, we want
to create this sort of detail in here,
not with split, but we're going to do it with Quad chamfer or you
guys can do it with any separation or detailing
method that you like. In this case, we're going
with Quad chamfer because it offers this sort of easy
way of approaching it, but you can do it
with split as well. I will just work same way. The important thing here
is keeping in mind that topology needs to look similar, no matter the tool that you use. So in the end, it is use creating a
separation between both pieces or just increasing the subdivisions you have in those loops so that
you can extrude towards the interior and create this effect of
having a seam line. So let's just try to do
it slightly different. Let's select these loops
and see how it looks. In the end, we want
a smooth result. So it might not be as convenient to use close it too close. We just want to play around and see how it could work
depending on the selection. That looks interesting, but
I'm just playing around. Sometimes this is sort of stuff that you need to
redesign while you go. Sometimes we will
look very nice and stuff will not look as good as you think
based on the concept, so it is good to improvise. Sorry about the cat.
I was a little bit decisive on which
approach to take. I did a few tests to see
what I like it the most. And in the end, I
decided to go with this. So this is how
topology should look. So having the same
smoothing group for all that back part creates this round smooth when I use
smooth based on polygroups. So we want this because feels somewhat rubbery or at least this is
what I'm going for. And I'm going to be creating the caps that we can see on
the reference, the two holes. So for that, I'm just going
to do the bebo thing. Or extrude, whatever
you guys prefer. But I think both could do the
work just fine right here. Bevel gives you
some more control, so that's what I'm going for. I'm just going to try on
a lower sedition level. Play with the values
until I'm happy with it. Like I said, it's good to have your modifiers on preview
to see how it's behaving. But the topology pretty much
has this look right now. Okay. Remember that depending on the
software you're using, this method might
change a little bit. Not all the softwares work with stack modifiers
and smooth on top. Also, not all the smooths are
based on normals and edges. So this approach is
specific to three DMX, but topology can apply
to any software, pay more attention to the
topology rather than to the specific process of three DMX because that doesn't really will
teach you much. Um so what you need
to keep in mind is that the structure we're
following for different areas. I'm having some issues to
achieve here good result. That's why you see me trying different smoothing approaches. And that's why I was specifying that this doesn't really
help much if we are working on other
software because it's limits of three max. But so far, this looks okay. I think I'm going
to keep pushing it rather than getting
stuck in that part. There are some improvements
I would like to do on the soil and
some other areas, but for now, I think
it's going to stay. And we're going to be
getting this into Cibras already since most of the other pieces left are going to be easier
to do in there. So sorry for the long chapter. This is going to be
it for Chapter 19, and the black and red part of the shoe are going to be done
in the next one in Zebras. So next thing you're going to be seeing is me bringing that from three max into Zebras and then detailing
all of these pieces. So see you guys in Chapter 20. I
21. 20-Creating our final shoes Part2: Hello, everybody, and
welcome to Chapter 20. After finishing up the cleanup
on some part of the shoes, we are finally
ready to jump onto zebras and get done the red
part and the black part. We're going to be disabling
the turbo smooth for all of these pieces because we will be subdividing
them in zebras, so we just want to keep a
certain level of subdivisions. This applies to all of the
pieces we have worked on, so make sure you deactivate
the turbo smooth, at least the one that smooth. Generally, everything,
we still want to keep the one that affects by groups so that we can keep those super loops
that this one creates and the structure is preserved. Same thing applies to
the pads on the soil. We want to preserve some
sort of subdivision. We do not want to
preserve the whole thing. So adjust the levels
of subdivision to what you consider
appropriate to your model. We do not want to have
excessive geometry. So make sure that it
has some sort of sense. So not too high density, but high enough to preserve the shapes we created
in three D Max. So we're going to be
exporting that as an OBJ. Just keep those
settings. They're good. Now we're going
to be getting rid of the sketch part of the sets that we
just model in The DMX, so that you can delete. And we will just be left with the areas that we still
didn't model in The DMX. So we get or OJ imported. As you can see, it's looking
a little bit low poly. But if we activate subdivisions here or subdivide
with Control D, we will get the same
result as we had before. So next task we're going to
be doing is we are going to be splitting this
into different groups. So I'm exporting the
straps into one group. Now we're going to split those. Same thing for the
salts. Same for the, I forgot this one. So I want to merge this one
with the rest of the straps. I like so. We also
are going to get rid of this And now, what we want to do is
we want to group by angle so that we can have
different selections and we can isolate the border
to do an inflate like this, or we can modify it
in a different way. This will be very useful
in case we want to do some kind of border
details or yeah, just refine those areas. For these ones are going to be doing the exact same thing, it is always good to keep them somewhat separated
so that we have more control even though we
might not really need it. We just keep splitting
those so that we can work them separately, since one might require more
subdivisions than the other, or we might just want to adjust
topology on one of them. So we are going to
be mirroring all of these subtols to have
them in both feet. Remember, we need to
keep them without subdivision levels so that we can do the mirror and wealth, and we will apply the
subdivision levels later on. We can also adjust
the subdivision, the dynamic
subdivision so that it looks the same as we had
with the turbo smooth, and we're going to be
doing the same with all of the pieces to
achieve this result. That is one reason to
keep them separated because not all the pieces
require the same amount. So it's easier to
control whenever we have everything split. Okay. I must have this ready. All right. So fit or completely separated,
completely mirrored. I would say we are ready
to get it started. So far, Marvelous as is looking
quite good on everything, but we are going to
be doing pass on everything very similar to the one we are going
to get started now. Which is going to be mostly
fold detailing to make the borders of the
stitchings more interesting and creating
some main folds as well, but we are going to respect most of the work
we have done in Marvelous. So first thing, like the stuff we did in
Marvelous we might need is to make sure the
mess is correctly distributed so that we can
sculpt the proper detail. For that, we're
going to be doing a serimes or at least trying to make sure it redistributes the mess in a more
organized way like this. This will allow us
to sculpt folds and everything cleaner because if
the polygons are stretched, we might get weird results. We're going to do this symmetry before adding
subdivision levels. Just making sure it
looks good all around. Now we're going
to start creating a layer so that all
the detail that we scoped can be decreased in intensity or disabled in
case we are not convinced. I really advise to
always work on layers. And we're going to
start creating first, like, main landmarks
with dam standard. Just to create that
contrast and the silhouett. Although we're going
to be smoothing this pretty soon and just making
everything look soft. The dam standard is
a very strong tool. It helps to create pretty
nice structure for foldings because
how sharp it is. So we just want to
create a basic idea, like a sketch of how the flow of the folds is going to look. It is always good to do
the pinball structor. So basically, same on the
pinball machines which every ramp aims down so
that the ball can fold. So same thing for the folds. You can also use the rhomboid
structor which basically is rhomboids on the sides,
one on top of each other. And we actually
have those sort of structures on some of
the cloth we did in Marvelou so we will come
back to that later. Right now I'm smoothing
the main structure that I created to start to pre visualize where the
secondary folds are going to be. At this point,
because the process is going to be the
same dam standard, and then smoothing and
then some standard brush, this is going to be a
little bit speed up, but you guys can
pretty much see. I'm using the guides that I
created with DAM standard, and now I'm just going over those same details with the standard brush and
smoothing some of them. I'm going to go with a
smaller standard brass near the borders to create
some tensions where the clips are so that it feels like they are actually
grabbing the sole, as well as creating some
silhouette under the strap that connects between the
fingers so that it feels like it's adding
some pressure to the stew. A good idea for the wrinkles in the borders if you want to
keep some sort of structure. It is to throw when
you see empty spaces, just throw a big brushstroke. And if you see that it
actually connects randomly, but connects good with the
fall that you previously had, then it is a good
idea to continue that fold and detail around it. If you see that it just
breaks the flow of the folds, then just not add it. And then when you are kind
of happy with the borders, what I recommend is, do
what I'm doing right now, which is going to going to
the center of the shoe, also add a little bit
more on the corners, but not just the border, but the corners and try to
create different directions. So you see that from that corner on the left,
they are going all down, but I'm trying to greet them facing up on the upper segment. So having different
directions based on the corner you're working on also helps make
it more believable. And try to create really small and really
thin ones so that they read nice in contrast with
the main and big ones. The idea is to create these
soft and patty filling. So obviously, as well, try to get more fold bunching on the area that usually
the feet is folding. And if you also follow the
reference a little bit, like we are doing, well, obviously, it's going to end up resulting in a cooler look. You'll see that now some of
the folds are looking good but still a little bit
blobby or not clean enough. So now it's when I go back with DM stander and just try
to bring back some of that detail and smooth This also brings up some
better reading to them. Just going to reinforce this
so that it looks a little bit more present. All right. So this is about to be ready. Yeah, just trying the last steps of cleanup having looking good. I would say yes. Now
let's do the symmetry. They look pretty cool. I create a new layer to work
on the borders. Like I said before, having the pull groups biangles
is pretty useful because now we can actually come here and do this
masking for lazy. We use mask at the border. Inverted the selection
and then inflate. Now, with the damp standard, we are going to be sculpting damp standard activating
the lazy mouse. We're going to be
sculpting the border around Well, like you guys know, lazy mouse makes everything
fairly easier to keep the lines straight
and less shaky to make sure enable it in a stroke, lazy mouse and increase the step quite enough so
that you have a centimeter or so in a screen
step so that yeah, you keep curve soft like this. And now by playing
with the layer. We can actually get
more or less intensity on this border that we created. We're going to
refine a little bit interior just so that
when seen from the sides, you have some detail there, just on the upper part really. Now we're going to get
working on the feed itself. We're going to try making
it connect better with the soil and add some more details so that
they feel more correct. Okay, adjusting the sole
so that the contact with the ulcer so that it all feels
tight and well assembled. And it doesn't look like I said, while working on MX
sketchy and random. We want everything
to feel on point. So small adjustments
here and there so that it fits well
together with everything. This just using
mostly Move tool. But we're going to start adding some details like defining a bit more separation
between the fingers and also adding some extra
details like faults, which are going to be
mostly on contact areas. So for example, we're
going to have more faults coming out from the straps area, from the sole ahe's
trying to make also the same fluffy
and soft effect that has the front
part of the shoe, trying to bring that
also on the sole. Now creating some contact
folds from the center pad. I'm just trying to
create those tension within the finger
so that it feels more like a soft cloth
rather than a rigid sue. I'm just trying to create those tension folds
coming out the straps, especially where the shoe
would normally flex. So yeah, near the ankle, near the back part. H. And I just strength to bring
that border just slightly so that it feels like it has been pulled in the past and it
flexes a little bit. Now, just trying to get some
more work on the underp, create that tension
coming out from the interior and re
accentuate those side folds, especially created
from the feet, pressing against the soles. Just create that wrinkly sides. Just adding some mass
right as a border of the sole will create the effect that there is actually some
weight pressing outside. Doing check to see that
everything worked out good. Now we're going to do the same as we did with
the front part, we're going to mask a loop. And we are going to use flat a little bit. Used to create that
extra thickness that will improve the reading. And now we're going to reinforce that with the dam standard
just like before. Going carefully around it, making sure that everything looks with a consistent width. We don't want to break. We don't want to break the effect of being properly
manufactured just by having a weekly
thickness in the border. And we're going to do just
the same on the straps. I want to do the X
connection here. So trying to get a straight line so that it doesn't look wobbly. And getting this one right. Ns to be asymmetrical, so that's why I went
back for a second. Just going to end up
detailing the straps. But the zoos are
pretty much done. So you can see having
the selection, the trick to select
some loops and then inflate helps out
a lot with borders. For most of the detailing
has been all the time, either damp standard
or standard brass together with a smooth. And that is pretty much it. Try to keep the folds
near the contact areas, the small ones,
like tension folds. Those are usually thin
and um and longer, I would say, or
shorter depending on the area of the shoe. And for the main folds, deeper areas, sorry,
deeper folds, bigger brass strokes, don't go as thin and
sub tile with folds. I'm just trying to
transfer those folds and details to the straps as
well so that they don't feel as rigid and they
feel like proper clothes. But apart from that, I would say the sus are pretty much done. So we're going to be jumping
next into the pants. So I'll let you guys see
the end of the policing of the Seuss T laps and
we'll see you guys on Chapter 21. A
22. 21-Polishing our pants: Hello, everybody.
Welcome to Chapter 21. We're going to continue
to detail or hi poly. In this particular chapter, we're going to be
doing the pants. So for that, we're going to keep using the same
methods as before. We're going to smooth the noisy areas we don't
like from the simulation. Like this one right
here, we want to make this side heap uh, prosthetic or shape feel smooth. So that's why we're
using a little bit of clay build up and
smooth to get it very nice and round and try to get all the bumpy and
blobby shapes out of it. And then once we
have that cleanup, we're going to start adding some minor folds on the sides. Like you can see, I'm
getting rid of some of the more big ones and trying to let them flow on
the back of the knee, but not in the in the quads
area or the back of the leg. So we're going to keep smoothing some of
those folds and then trying to refine the one that actually go well
with the character. So like we mentioned
a few chapters ago, trying to give proper rest
areas for the character. So avoiding having faults
everywhere, it is a good idea. And now just trying to make those back knee folds feeling a little bit more
horizontal and clean. So when we animate
the character, we don't have any kind of issue. During these time laps, you are going to watch me
first do this cleanup process. And once that cleanup is ready, I will just start
adding secondary folds near the seal lines like I
did on the shoes previously, and then just add
some more main folds, like the ones I'm
adding right now if I feel that that is going to
add up to the simulation. But like every step on the process is going to be
a trial and error thing, and you'll see me just going back and forth on some of those folds like I'm
doing right now. One thing to notice is that
because of the sides of the pans are from a
different preset of cloth, we want to use those hints
that Marvelous proportioned us and we want to follow them to create this kind of different vibe and
feel for the cloth. So make sure you use any A fold that you can reuse or give information about how
the fabric behaves, use it to sculpt the other
ones in a similar way. So I won't bother much. From now on, you guys can keep
watching approaching this. And if I feel that there is any comment which
is worth noticing, I will just drop it while
we go over the time laps. It's not going to be
just silent all the time because I feel there is some important things
to tell in here. So just pay attention to it. Okay, so quick stop in
here in just a second because it's worth mentioning
how we're going to be approaching the cables
on the side panels. We're going to be using the
curve tube brush from zebras. We're going to first do like one half of a
rhomboid with it. Just try to make the
tube slightly more thick than you would like to
so that when we smooth it, it gets onto the
right thickness, and we're going to keep
doing half and half, and then we're going to get
them crossed by using move. Make sure you move topological so that only one of them move, and we can keep both
of them merged into the same up tool
use adjust it until we achieve something
that doesn't clip too much and actually feels like they are
crossing each other. Just make them feel
like try to create a smooth curve so that it doesn't feel wobbly and then
duplicate it with control, click and drag, and
then mask half of it and conform the rest
of the curve the tube, sorry, to fit the pattern
we created previously. We're not going to
tackle the tips now, but we will be
placing them under the pant and we will be doing some bump there in the pan so it feels like it's
actually going under. So something like
this is pretty good. So we're going to
speed a little bit back in just a second. And we're going to be
doing the details, like I mentioned on the sides, adjusting this so that it feels tight and realistic when the
sculpting folds around it, so it feels like it's creating some pressure
and tension around it. And now, this is the kind of
details I was talking about, used with the standard brush. Do a few brush strokes around, so it feels like the cable
is going under the pant, and we don't really need to show the end of the cord
that you try to make us at the very start at
the very end of the cords, try to add some volume, so it feels a little bit more like a grounded design
and more realistic. So that is pretty much to yeah, how to create the
cables, pretty simple. And now we're going
to try to reinforce the pressure effect that
it's creating around them. So we're going to go with the move tool and pulling a
little bit around the cord, so it feels like the
flesh or the cloth is actually pushing outwards while the cables are
pressing against it. And once we have that feeling reinforced a little
bit we are going to be sculpting some minor falls to increase the tension effect. Okay, so we're going to tackle the sips on the lower pants now. First thing we want
to achieve is to get these strips of cloth well aligned with the rest
of the pants to avoid any gaps and make
everything tight seal. So just go with the move
and just bit by bit. We're going to get rid of
the subdivision level so that we can actually
use a curve rush, which is going to
be the super one. This one right here, yes. And now we just need to go
over the strap and click and drag until we achieve
The result we like. Try to get on a camera that it is sort of
flat to the plane. Don't get it angled because
based on the camera, you might also see different curves and it will affect how you
place the Zibline. So just continue the
curve till the end. We can adjust the
size, but adjusting size on the bar and then
clicking again on the curve. And once we have it, su Let
me just redo the curve. I was really liking how
straight it was looking. This alignment
looks pretty nice. Let's just finish until here. For adjusting the position, it is better to do it
with a curve brass, because if we do it with
a move tool later on, we will create deformations
and stretches on the zipline. So make sure you adjust it now and leave the minor
adjustments for later on. Just making sure it works on both sides. Both angles, sorry, from
the back and the front. I want to take my time on this. Okay. So now we're going to be splitting
it so that we can do a new curve in here
on the other side. We cannot mirror it because the simulation was asymmetrical, so we need to work
on this one as well. We're going to keep on speed mode because it is going to be the same
as the other one. But as you can see, what we are pretty much
doing is just keep adjusting the position with the curve brush until we have
everything looking solid, straight like always, ensuring us the thickness of the sip line is the same
throughout the whole thing. So now it is time to get
to individual adjustments. So both ip lines are splitted, and now we are going
to subdivide it, and but first, we're
going to do a crease, so it doesn't subdivide
too much and feels blobby. So crease, then
subdivide and any manual adjustments you can do
already by using the MOTol. We're going to mask that
loop that goes through the center and do
an inflate negative one so that we have
the feeling of having the sib line
attached to something. It is just a very small detail, barely going to be
visible, to be honest. And if we bring that into and when we bring
that into the low poly, it is not even going to be seen, but it is always a
nice touch to add, and I don't know, extra
details are never too much. We're going to scale up the
zipper itself a little bit. So it has the same width as the strap on the back and so that they are more
visible from far away. And now that those are ready, we're going to get back on the rest of the
sculpting on the pants. We're going to try and get
this piece right here, a small detail from
the reference. We mask those polygons
and then do extract. And now we're just going
to keep adjusting it until we have somewhat
similar to the reference. Remember to add those dam
standard and small folds so that it feels like
it's stitch to the pant. And now we're going to do same process as we did on the shoe, masking all the borders, going to do a small inflate. So it feels like a
reinforced border, and then we're going to be going all the way in another
layer with them standard, with the lazy mouse activated. Remember, like 1 centimeter or so so that we don't have
that shakiness on the brush. We're going to go all around, detailing a little bit
more with them standard. So that we can achieve
that clean look and it's going to feel
very nice on the borders. We're also going to be detailing that a little bit more later on, adding small wrinkles
and some minor folds that make it feel like the fold actually creating some
tension on the fabric. And now we're just
going into detail every pocket and every sew
that we have on the pant. Oh now to this point, as you can see, I'm
getting started with the tight tension folds
on every pattern. So we're going to go analyzing which patterns
are going to recur from this. Just putting
everything in place on the IP area before
jumping into this. Because this is a
connection piece, we are going to go back
and forth a lot on this because once we get started
adjusting the shirt, we might need to move
this back again, so it is not the only time we're going to get
working on this. Minor adjustments here
and there on the shirt, trying to get the folds to
lay in a more realistic way, feeling more heavy, not as floaty as they can
come from Marvelous. So giving them a little bit
of gravity with a move tool, smoothing out some of them, like you can see on the chest. Remember, it is good to keep a good balance
from rest areas to detailed areas and also making the folds rest on top of
the other cloth pieces. So this one right here, I want to keep a
straight line over the pant and the
one on the front, I want to rest on
top of the tarp. So those are small adjustments
we're going to keep doing. So you can see if we
go back and forth, we will be able to
perceive the changes a little bit better and use overall cleaning up
those folds that feel a little bit wobbly or
noisy from Marvelous. So reinforce them with
standard and dump standard. If you want to reduce
the depth of them, just fill them up with
clay buildup and then smooth all of these
previous steps to make it look more consistent. As you can see, even on
the speed up version, the changes are not major. At this point, everything
is quite subtle. If we do a good
marvelous designer work, like we did, most of the
work is already done. We just want to give that extra flavor by
policing those areas, but really the main structure
is already created. So I'm just trying to to see how those folds can work
better, as you can see, I'm just working
on the base that came from Marvelous
Designer right here and not really creating
any faults by my own. Anything that I create is just based on the
previous structure. I I I likes Okay, so at this point, most of the tarp and
pans are detail. As you can see, there is not
much additions fold wise. We have used polys, a few of them and used added very subtle ones wherever
we consider necessary. We're just creating
these last few steps like creating heel here, this belt loop going around, like the level of the tarp. So for it, as you could
see, fairly simple. We started off from a box, removed the sides and then use the panel loops on
it for a last step, detailing with them standard,
inflating the borders, refining those, and creating the effect of being soft tissue. Now we're going to
add some minor ones around the border
of the tarp to add the same effect of being
sealed to the underlayer and being a little bit soft rather than a rigid
piece of plastic. In this case, it's going to
be more like a soft fabric. So we're going to keep doing this step until the
end of the chapter. Next chapter is going to
be detailing the shirt, pretty much same process, and it's going to be like changing main folds
with MOV tool and smooth, which we did a little bit
of that on this chapter, and then just adding
minor secondary folds with standard dam
standard and yeah, just inflating some borders and policing up the whole piece. So that's going to be
it for Chapter 21. See you guys on Chapter 22.
23. 22-Polishing our top: Hello, everybody, and
welcome to Chapter 22. We're going to
proceed, as we said, with the shirt, and we're going to continue doing
pretty much the same process. So we're going to really get this engraved on your workflow. So we're going to first clean up all those folds we brought
from Marvelous Signer. Both from using smooth tool, as well as move as well
to get the proper curve. Like it needs to look smooth, not only geometry wise, but also the curve needs
to flow correctly. We're also going to be
adjusting the straps we created in the blockout to the new proportions
of the shirt, and then pretty much as before, we are going to start
adding some volume, adjusting the main folds, and then detailing borders
and small wrinkles. As you can see, we're
starting to get a pretty cool, solid look. And once we have all
the clothes finished, it's going to look pretty nice. You can see everything
I'm doing right now. It is making sure the curves of the cloth are good,
the shirt, sorry. Now, I'm adding the
usual border detail, which really pops up the silhouette of every pattern and makes it more readable. It is not a very
noticeable thing, but it really brings better
reading for the simulation. So now let's start adding layers and creating those small
details and folds. Let's just pop this up
a little bit more with inflate. And let's get it going. We're going to refine a
little bit the few borders, like we did before to reinforce the reading and make it feel like we have some sewing
stitching around. Usual setup with dam
standard and lazy mouse around a centimeter
or two of lazy step. Just trying to make
sure that width is consistent throughout
the whole border. Making it continuous with
the rest of the patterns. Yeah, we pretty much have this. We need a few more Okay. Now let's get it running with those tension folds
around the borders. We don't want to overdo
the intensity on the chest because it has
quite a lot of tension there. So if we do big deep folds, they're going to look
very fake and blobby. Use small and subtle ones. Just trying to make them
flow from the border we defined on the chest
to the breast, sorry. No trying to define
without really breaking the initial folded
structure that we have. Since the belly area
is quite baggy, we cannot really add
much in here apart from mini folds on the border. So just trying to create
something that flows with that big fault we have down here and flows along the chest. Okay. Those back falls usually add a lot of
flavor to every character. So it is important to
create something that feels with good gravity
and at the same time, fake that tension from both patterns connected
in that middle area. That usually looks cool and
adds a nice touch to it. Not too hard to use some
subtle folds and some that follow the direction of the straps and the
tension created by the secondary elements
in the character. Since at this point,
this is going to be pretty much same as before. Like on the previous chapter, I will speed this up, and if there is any
important note, I will use comment about it. But for now, just
enjoy the time lapse. Okay. So now that the
shirt is mostly done, we just have some small
details there to polish. We are going to be jumping
into the neck section. So for the neck we
first are going to create with curve
ras, the laces. Same way we did on the leg. Remember to allocate, sorry, to locate and adjust
the curve with the curve tool before just splitting it into
different sub tool. That way, we avoid
having deformation. And now we're going to use the final adjustments
with the MV tool. We're going to grad the caps, starting off from a cylinder, masking the middle loop and just using negative inflate
the same way we create most of our most of our
ridges in the borders, and now just create
thickness with panel loops. Pretty simple, but looks detail. So it is a nice nice dip. Add some variety on the sculpt
in the end of the curd. Just to make it more
mixed with the cap. And now we're going to create the center clip that is going to hold the
elastic for the hoodie. First, we're going to create
this gap by isolating those polygons and
deleting isolated. Now we are duplicating the initial object and adding
a chamfer with C modeler, as well as some super loops
around the borders to keep that smoothing in position and then a panel loops
for the centerpiece. Pretty similar process to the
ones we have been using so far in blockout and
high poli detailing. Play with the panel loops
and with the position of those super loops in the
other two pieces to achieve the desired smoothing
when subdividing. Now we just need to put this in place on both places,
actually, front and the back. Et's get same detail
on the borders as we had on the pants
and other pieces. Mask the border and then inflate and let's
get this neck area, back neck area a little bit more interesting because right now
it's a little bit simple. I'm just smoothing out some of the areas before I
start working on this. I just getting started on the full detailing
for the hoodie. In here, faults are a little bit more
tricky, as you can see, I'm not really getting as
natural faults as before, but it is one of the areas with less information from the Marvelous simulation. So I kind of have to figure
out how they would work here. And it's also a flat surface, so it is not as easy to really
make them feel natural, but we can add a few of them, and hopefully they will work together with the
rest of the character. We don't need to
have same amount of quality and everything,
so it is okay. On the backside,
something pretty similar. We're going to try to get something natural going on here. Trying to have this
pinball structor and also the rhomboid
on the side. Hopefully, we can make
this work nicely. This point, as you can see, I'm just going around, not really focusing
on any specific area, mostly because I was not very happy with how the folds on the front and the
back were coming out. And when you get
stuck on something, sometimes, like, you know, it's better to jump into
different sections, try to get some
work done in there, and hopefully inspiration
will come for the other areas or by
improving the rest, we will be able to easily see a solution for the areas that we were
not really seeing before. So just jumping on the other segments,
inflating the borders, making it feel consistent with the quality we were
doing on the other pieces, just doing general pass
of cleanup and detailing. Whenever you feel like a border, it is too thin, in
comparison to the rest, you can do like I just did, going over it with
inflate, a big brush, and a soft intensity so that the smooth result
feels more natural. Now we are just
going to put this in place and create the elastic. It's a little bit tricky
because we don't really have a good angle to create it. So just place it wherever and then adjust until we
have a good result. I really love when
doing characters, they kind of feel to blocky or maybe not like
refined, I would say. Honestly, I don't know how
to describe that feeling. But when you get to
the point of adding these small laces and
super thin details, it is when I feel that it really comes together because you have the brute force
of solid pieces. And yeah, everything
feels super solid. And now when you add these
sleek and delicate pieces, it is when it really
looks amazing to me. So to create the
nut, as you see, pretty simple trick is
to create two tortses or two doughnuts or yeah, cross them with rotation, and then doing an
inflate so they intersect each other
and just put them close to the end
of the elastic and it sells pretty good without
having to do much work. Now let's just get
this border done and hopefully it will
work good as a piece because it is getting closer to me having to go back into those folds that I
don't want to go into. So hopefully, it's going to work good already
and we can skip those. Okay, so use last
bid on the interior. So the reading is good
when we rotate the camera. If you're having
trouble, by the way, when painting with any of the brushes in thin
areas like this one, my advice is to either mask the other side if you have
it grouped by polygroups or in case you are not able to mask the other side
because everything is the same polygroup and it
is hard to mask manually. I would recommend to go to deactivate the
backface masking. I think that's in
the brush menu. And that way, you
will not be affecting the back face of the
mess you are working on. New layer and getting
back into last fixes. We're going to create deep
border for the hoodie. This way, it will feel like the elastic we created actually goes through it and we
have this segmentation. And now with this, we can use it to fake this distension that
it will create. We can add extra minifols if
we consider it necessary, although it's looking very
nice and I'm not sure if overdetailing is going to be such a good idea, but we could. Okay. So now let's just hide this detailed interior part. As you can see the reason I hide those pieces and
hiding these ones, it is because it affects. If the bruss goes really close, it actually affects how the brus behaves and allows
me to see it better. So quick hide, and then we can bring that
back once we are done. Let's just get
those other borders on the other patterns
of the hoodie. As you can see, actually, I didn't mention this before, but when working
with them standard, I prefer to work with a
pretty soft intensity. And if I do trace and
I want more intensity, maybe you can go over
it again manually, which will give it a
more organic feel, or if you just want to replicate the exact same trace without having to go
over it manually, press one without moving
the camera and one in zebras if you guys don't know will actually repeat
your last step. Okay, so this is going to
be it for this chapter. On next chapter, we are going
to get working on the arm, the gloves, and some other areas from
Marvelous Simulation. All right, so see you
guys on Chapter 23.
24. 23-Polishing our gloves: Hello, everybody, and
welcome to Chapter 23. As we have completed the hoodie, the shirt, the pants,
and the shoes, we're going to be jumping
right now on the gloves, Cantlets or however
you want to call it. First thing, we're going to make sure we have the
proportions right. So anything that
we want to add to the glove as a general
shape or change the size, we should do it now
before detailing. So I'm just going
to try duplicating them and see which
one works better. The bigger version or the
lower version because I was not sure that the
hands were the right size. So we're going to go
with slightly bigger. I think it works better with the design before the
hands were too tiny. So having that ready, we're going to get started
directly adding folds. And we're going to start
probably by the fingers, which is more time
consuming area. And also, we have more interesting fills already going on the rest of the glove. So I feel that it
is going to bring everything together better if we start off from the fingers. So let's mask the borders
like always at that inflate. And just like that, we already have this pretty
nice feel over all the glove. So let's just jump
into the fingers. Create new layer like we have done in the rest
of the pieces and start smoothing and refining
the current existing folds. And very quickly
after we have that, we're going to start adding
with them standard some of those initial
landmarks for holic. So let's just quickly
get done with cleanup. There's not much to do really, so it is going to
go fairly quick. And let's just get the camera on an easy spot to start
adding wrinkles. Let's define more
the folding areas. This already has a quite nice
feeling just by doing that, and now let's construct
the folds around them. So let's use them standard
in negative value so that we have actually a positive volume because by default, is negative. Let's just keep adding those structural folds to keep some sort of
structure for those, as you can see, we are doing horizontal
line for the fold, and then rhomboid area aiming
towards the main fold. We don't need to do the full
rhomboids on top and bottom. We just need to do maybe
one or half of it. And basically, try to keep
more folds on the area that is going to be more
visible or more readable. And then with the standard
brass, we're going to, like, circle those main folds,
put some info around. Same thing on the fingers. The logic is basically if
you would close the fingers, there will be more
excess of fabric near your pum and less fabric
on your knuckles. So we need to create that fold that will be created naturally. And also on the interior of the fingers on
the folding areas. So we're going to keep doing this, as you can see right now. They're not looking very nice. They are still a little
bit whip, I would say. We need to clean those up, make them look more
crisp and nice, but we're just
creating the base. If you get stuck with those,
you can jump to other areas, start adding more
details somewhere else. However you feel like. But it is good to rest the eyesight every once in
a while so you don't get used to your current sculpt because sometimes cannot
look as good as you think, and it's good to just reset
your eyesight a little bit. So let's jump into this section. We're going to do the border, which is mostly done. So we just have to go with the damp standard and lazy
mouse to end up to polish it. That already makes it feel
a little bit more nice. Let's put some
inflate on the border on the areas that are too thin. Let's get on the palm torso, and let's also refine
those borders. This actually is a
step I love to do on every simulation that I
do, masking the borders, inflating and then
defining because it is super quick to do,
doesn't take any time, makes everything feel super
nice, super readable, and really I don't know, it makes it look better
to me to my opinion. So it is something
that I usually do for everything and recommend
you guys to also try. Also, for padding is amazing, as you can see, everything
feels so puffy and so nice. But since that's done already, let's get back to wrinkles. Let's do, for example, here on the thumb a
little bit as well. So you can see same structor that I applied before
to the middle finger. I'm trying to do the
same for the rest. So excess of fabric
on the folding areas, negative spaces in the
connection so that the fold area is
more accentuated. And same here. If we have
a mean fold with tension, let's create a negative
space right next to it, so it reads more nicely. Let's just jump
into the other hand and try to get some of
those details as well. As a general note for
any sculpt that you do, it is good to progress in a linear progressive
way we could call it. So rather than just
grabbing one piece and doing super fine
detailing on everything, which we are doing right now. Don't get me wrong, but this is a tutorial. This
is not for work. But in productions, a lot
of things can happen. We can run out of time. We need to stop that character
for certain reasons. So it is good to approach
it in a different way. It is good to do it the way we're doing
the gloves right now. So jump into one piece, and then just police every other piece in the
character to stage one. Let's call it that way, which is basic detail for reading. Then stage two on every
piece of the character, then stage three will be
final cleanup and detailing. This way, if you need to stop, you'll have your character
detailed with the same quality everywhere rather than just
having a piece completely finished and looking amazing and the rest used very roughly. So yeah, I don't know, but feels like the correct
way to approach things to me. That's why now on the gloves, we are doing it this way. We're going to do this
buckle or thing we have on the interior part of the
palm next to the wrist. Let's just put this block out. We just did with clip
curve and plane. And whenever we have it in
position, let's do project, and we will get the fold from
the underlying geometry. We can increase subdivisions
and do panel loops. And just like that,
we can get a plane looking pretty similar
to what we have under. Let's just do the border
so that it feels as well, properly sealed to the gloves, bla, we have it. Let's do some foldings
so that it feels more natural and jump
into a different thing. This part of the glove
has some big faults, but it's true that there is also an area which
is quite empty, and we would like
to have some of a general fill for all of it. I'm going to sculpt
here some main folds, trying to see how
the other ones are behaving going to
probably reduce them a little bit because
they were too deep. Going to try and see if I
get something interesting. You see me going
back and forth with the standard and
dam standard brush seeing how the
result is looking. You go to spin around here for a little bit until I find something that
really convinced me. Since I don't see much progress, I just move to a different
part and keep trying to have progressive
continuous progression. Sorry. So I'm just trying to do same thing
as we did on the shoes, creating pressure folds
near contact surfaces, which is how cloth
normally works, especially thick cloth like this one here or the
one on the shoe. Trying to create
those tension folds between the thumb and the
exterior of the palm. Playing with the
density to see if tight clothe feels better
or e very deep creases. And every time I get
stuck with an area, you see me jumping
into another area and like I said,
working progressively. So now I'm getting some
details on the fingers. Meanwhile, I leave the other
areas resting, let's say, whenever I have more
details on the fingers, maybe when I see those areas, I will have a better idea
of how to approach them. So here you can see, again, the structa I create for
the fingers, straight cut, and then rhomboid shapes on the top or the bottom
of the middle cut. Now, I try to smooth
them so that they feel in the same line as
the rest of the folds. Not so far. So good. Well, let's get
into this section. Same thing as the main
part of this glove. Folds feel a little bit blobby, so I'm just going to
smooth them out and try to create a more rigid
and puffy surface. I'm going to create my own
landmarks with them standard, same as we did on the shoe. Trying to create either
some negative folds by using the standard brush on a big scale and following any reference
that can be useful for me. So if you are stuck with the
kind of folds you are doing, you want to get
some new results. You can look for references
of Candlets and gloves. This case, I'm just
working from memory. And again, whenever I get
stuck with one piece, I will just transition into
another one and so like let's just get on the lass. And here, the process is
going to be fairly quick but good looking, I would say. So we're going to go ahead and mask the borders
like usual inflate, define a few folds so it feels like a soft
piece of cloth. And now once we're
done with that, we're going to be sculpting
the border lines. For that, we can
isolate some loops. The ones that we like
as a thickness loops, and then negative inflate. Pretty automatic process, but it still results
very nicely. Honestly, I love when
I have to do pieces like this because it's so quick and it still looks so nice. Now let's use this
border for the gauntlet. And this one in the palm. This is slowly, like I said, we are approaching everything in a general way and by adding
details here and there, changing from one pattern to
another is helping me see the overall image
better rather than just detailing one part completely. Now, let's do this border
with a bigger dam standard. If you see that the
roundness of a border is more soft round
and less sharp, then we should adapt
or brush for it. So basically, let's
see intensity, set intensity, sorry,
and bigger size. That will create a more
soft curve when we do the brush stroke and the gradient and fallow
will also be bigger. Gloves are looking pretty okay. Let's get some work done
into this piece and see how the rest of the arm starts to
look with the gloves. And if we feel like so, we will come back and
detail a little bit more. But for now, I feel that
this is quite good progress. Let's start as usual. Let's detail the borders. Okay. So we might actually add one more layer to add
some scoped wrinkles. This must be really
soft and minimal but long because this is more like spandex or something
like this kind of fabric. So we do not want
super defaults, like the ones we have
hidden under the glove. We're just going to
keep it pretty light. Uh surface folds, let's say. You can see the big ones I just created and basically using them to create some sort
of memory of those folds, but I'm later on smoothing
them almost completely. Straying out different
structures for folds. And use the residue from the previous one I sculpted
already are giving some flavor to it and helping imagine how the rest of
the folds are going to go. So some of them are mistake
faults where you just do them and use from what you remove from
them and you leave, they will already help you to imagine how the rest
are going to flow. This is actually a common way of u detailing almost anything, like if you're doing skin or cloth or damage on
any metal or rock. If you apply intentional
detail on what you want to do, like faults or
damages or whatever, but you just do it randomly
and then remove it. Maybe it'll leave some
trace that will help you picture how to do a better job for the
next round, let's say. So that's why working with
layers is very useful. You could add just
a bunch of faults, the lower the intensity and then sculpt final
faults on top of those. Now I'm just getting those super thin folds near the elbow so that you can have those memory folding near
the interior of the elbow. I'm also going back to the glove because now seeing everything as a whole has helped me to see that this fold could
work better in that way. That's why it is so important to jump back and forth between
different pieces. Just filling those areas
which were not working as nice and also making sure to activate and
deactivate the layer, which shows the
work you have done. It's quite important to see if what we are working towards, it is actually a good
idea or use a bad idea. Now, let's just get
on this pocket thing. Like, always, let's
start with the Brothers, which is the easiest
first step to do and helps us see
what should come next. It's going to do it with
the loop inflation. And making sure everything sits tight and more
organically from pattern to another because sometimes
Marvelous leaves these gaps because of the thickness
simulation simulation thickness. Sorry. Just closing every possible gap that I see and making sure that the strap pops up properly. Now, let's just keep adding some more
details to this one. The reason you see me
polygrouping and hiding the rest is because right now it says too many subdivisions and we're going to be using
the subdivisions for this. It is going to be
a lot easier to work with lower subdivisions. We can create better
fold when we subdivide. If we had too many,
it will probably look like pinchy or something. So always try to
reduce that and then when we panel loop it, it
will look more natural. Make sure you set the value to positive or negative depending on which direction
you rotate it. And the areas that got deformed because we
were moving things, make sure you inflate
them a little bit, so we get a natural sorry,
a consistent thickness. Now, making those
closer and closer. And now I'm just going
to do the stitching, which looks quite nice and makes everything
feel more realistic. Now, let's just get
the borders inflated. Stitching on the proper place. And the same as the
elastics on the hoodie, this kind of strap and
loose detail hanging from some other bigger
and chunky area is what I think brings nice detail and reading
to the character. So it is good to balance the design always small things
like that here and there. All right. So I would say
arm is pretty cool already. Let's jump into the cape. Maybe we would come
back to some areas, maybe not depending on how
everything comes together. But like I said, it is good
to jump from here to there. Cape is going to be
super quick process. We just need to add minor
faults and the borders. So we're just going to redefine the areas that got a little
bit lost on the simulation. Dam standard. In this case, the brass is going to be smaller and with more
intensity because we want a deeper crease
and not affecting as much the curvature of
the rest of the areas. Throwing the interior now very quickly because
this is not going to be seen as much. And there we go. Okay, so now let's
create a new layer. Let's do the border thing, so inflate a little bit. And let's sculpt some
minor falls near the border to create
cross tension. So if the cap is going down, vertically, we want
some horizontal action. Okay. So let's just write this up by creating these tiny
folds on some areas. We're going to try
starting up here. Just to create different
textures inside the high poly. Not sure if it's
going to look right. Let's just try. No. So we can get them out and
try different size. But cape doesn't really
require much work. So we're going to jump quickly to the pockets to the
pouches on the left. We are going to be detailing
them just a little bit, bringing some patterns together. And then on the next chapter, we'll be covering
decoration of the straps, the buckles on those pockets and use some pieces
in three D max. So we are going to jump out
of zebras in Chapter 24, and we will be covering some
other hard to face pieces. Okay. So for these pouches, we want to get them isolated
so that we can work better. We're going to do these
panels right here. So mess them, get them simple. Weird subdivisions. And now we want to
add with C modeler, the super loops on every
coronary so that when we panel loop this
and smooth it, it's going to be
like a rigid plate. We want to move those things that are clipping
from the simulation. And basically did same processes with it on the other pieces
like refined borders. Weld everything together and make when we have
excess of cloth, sorry, excess of
folds like here, just make them a
little bit flatter. This feels like throwing
back some details, but we want to bring
those bullins, so we need to
smooth those folds, get the bulling shape, so we're going to
select this brush which is going to allow us
to insert this geometry. We're going to put it
in position, scale it, and now we're going to set the bullion option to
the substract one, which is the second one
on the Subtool menu, and we are going to
activate live bullion. So first, we're going
to just the proportion, so it looks like
in the reference, we're going to place the
other one in position. I think about there is right. Let's just get the
other three in place. And actually, I think we are just not going
to go with Willian. I'm liking how plates
look floating here, so they are going
to stay like this. Let's just create a new
layer for the flap and add some detail around the pin, the cross pin so that it feels like it is actually pinned. They're making some pressure. So let's just go
with the standard brush and the move brush, and we will get some
nice pressure effect. Apart from that, we
need to fix some of the clipping here
on the borders with most topological because from the simulation, they
are intersecting. So just make sure you make
that nice and tidy as well as the corners if
they look any blobby. And we're going to
create this other plate, which is going to
be the buckle for the pouches that strap
you see on the center. So we're going to start
off from a plane, put it in position, and just always scale it to make
it long and straight. Use mask to create the
loop going around. Just do it here, and then we can stretch it.
No worries about that. Once you have it in position, let's just do the
panel loop thing. Make it closer so
that it actually feels like they are
properly looping. Now, let's get this in position. Now, let's adjust the
loop so that it actually brases the buckle
and duplicate it. So the boohes are looking
already quite solid, with a few adjustments and the plate and strap
already looks pretty nice. Let's do the usual border
inflation and detail, which will make the strap look a little bit
more believable and also like quick stitching
and possibly some folds. Let's create the internal strap, which is slightly different. So let's just group
it differently, extract it and just make
it a pan loop again. A few more border work in
some of the other areas. As you guys can
see, this is just, like, a lot of many times. Like, all the time, we are going around
this process. So that's why it's good to in Marvelous create those
internal lines to create the pre established measurements for these borders that
we will be doing here. Of course, you could just
ignore the internal lines in Marvelous and do
it here directly because we would have the loops. But still save us some work makes the process
quicker and looks good. So I think it's worth the
time doing it in Marvelous. Okay. Just a few
more steps in this. We're going to be jumping
into three D max. We're going to be refining
the borders for everything. So the flap looks same as
the rest of the patterns, a little bit more presentable. Like so. Oh. Okay. So now, actually, the only areas
that don't look to the same amount of level is the belt that is
holding the pouches. So that is what we're going to be doing in the next chapter. I think we're going to just
add a few volumes here, so displays feel integrated. Super subtelflls
on the pouches on the flap so that we
have this final touch, but this is going to be it. So next chapter, we are covering creation of the
straps and buckles for the loops, sorry,
for the belts. So see you guys on Chapter 24.
25. 24-Creating Hard Surface Elements Part1: Hello, everybody, and
welcome to Chapter 24. So we're going to continue creating or straps on buckles in three Max in a pretty
similar way to what we did with the
shoes previously. So we are going to
get rid of some of these meshes since we don't
need such a heavy file here, and we will just need a template of what we're going
to be creating. So we're going to be
starting off from the previously created
ones we had from Zebras. We're just going to
be doing a cleanup since we created them with
preciple geometry and zebras, we can sort of reduce this, but we're going to
be like you see, adding a few more loops, cutting somewhere,
and doing the loop around by extruding certain
parts of the geometry. We're also going to be
creating the buckles and the process as well
will be very similar to the ones we created
previously for the shoes. So we're going to
get this detached. Like I said, since the
geometry we created in zebras is quite okay
to get it started from, we're going to be
able to reuse this. So first of all, we're
going to be selling this at a turbo smooth and now we're going to do some
cleanup over the base one. So we're going to come here and try to do those loops
you see around. So we are going to
cut in the middle and make it loop around the
belt, the buccal, sorry. So we remove those superloops. We're going to split that one and move it
through the edge. Just add enough subdivisions, so we can loop it around
like the real thing. Now, with the previous
the Tur smooth, we're going to be adjusting
it so that we get the proper loop
effect on both sides. And we're going to be touching this because we're going to be creating that right
now so that we can do the belt accordingly
to the final backup. So we're going to
be creating spline with a rectangle structure. Sorry, then add the editable spline modifier
on top so that we can adjust spline properly like this and add some extra points. We're going to use the
symmetry modifiers that we get those changes
in both sides. We're going to trick
the curves until achieve the angle
we're looking for. Maybe that might be just
a little bit too much. Let's try to adjust it better. Yeah. Let's just make it
thinner because yeah, too thick was not really
making it for me. And also, let's make the curve
just slightly less strong. Try to keep both sides aligned, although we are going to
be using symmetry now, but to avoid any weird
issues later on, we're going to play
with the angle here so that we get it straight. Now we're going to be
filled on the corners. Now we can go back and at the usual tus moves we work with by angles and as a general way. Now we want to increase
the durations here. We want smoother results, so we're going to look for that after
we connect these two. So far, the connection
is not too bad, but we still need
the super loops. I would say this is about
right. We can totally use this. Do the pin. Or it's going to be pinching
the loop or going through. Now, let's sell this. Now, usalth smooth like
always make it thinner. Now if we want for it
to be squared as well, we need to add the
correspondent super loops, and if not, we can just
leave it like this. Now we're going to be
putting this in place as an instance always so that
if we modify the original, we modify this placed copy, and we're going to
move it in place, rotate it so that we
can have it as we like. And now we're going to
adjust the straps according. Apologies for my allergy. I will try to not
sneeze too much. Okay. I was trying to get this
slop around nicely. Trying to keep them
not clipping together. Okay, this is starting
to look good. I made speed this
up a little bit so that it doesn't
get too boring. But objective here is to get these angles correctly
looping around the belt. And once that done,
we will continue. It. Okay, so now that our belt is adjusted, we're going to be
creating the side panel, the padding that we
have under the pouches. So process is going to be pretty much the same starting off from the belt that we
created in zebras. We're going to be
extracting those polygons, adding a few subdivisions to match the shape of the panel, then select the loop that is the bigger segment
from those two loops, we're going to select
all the others on top. And we're going to be
moving them a little bit so that we match that shape. Make sure you don't have edge enable edge constraints, sorry, which was the tool
for moving the edge through its normal
vector from the edges. Now we're going to
be doing a shell. And we're going to detach those because we're going
to be changing the cell settings on this one. We're going to add the usual
to smooth by angles and normal to smooth. Yeah. We're going to do an inset here. A bible now to create
that inflated effect. Now we move those edges using the edge constraints which
we deactivated before. Now we're going to play with
the smoothing groups to achieve the desired smoothing. But before we're going
to do this inset and add a few super loops. This is looking much better now. Now we're doing that
temper using quad temper, but I always remember we can use the usual, the normal one. Just doing some
refinements in here. Looks about right. Still
a little bit too hard or we're going to
keep adjusting it. Okay. We want to keep some
sort of cleanness in there. So let's just jump
on the next piece. Let's try to replicate
the shape we had. Now let's just do the shell. Let's insert the geometries that we have correct topology. Okay. Let's just the belt
and now back to this piece. Now, as I said before, let's grab this and create an inset so that the topology connects nice for the smoothing. The inset we can do
it with a bevel. That way we also
achieve some volume. And now you select for
the smoothing groups. To smoothing groups, sorry. Okay. Yeah. With this amount of shell, I think it works is fine. Now, let's just get those
two working nicely together. Isolate everything
to see if we're getting it working nicely. We just need to fix any
possible clipping or structural issue. Almost have this. A couple super loops to
make that more defined. That double rim there to
add an extra bit of detail. We need to adjust as well. Okay. Alright, so I'm trying to
get this sort of clean. I want to have this, like, secondary reach so that it adds a little bit of complexity to the piece because they
are quite simple. And this way, it will also be able to read better
from far away. Just making sure that the
whole thing is smooth, except for this, which needs to read clean, sharp and nice. But I think we got it. Okay, now, we just
need to get rid of those clipping issues and
the old pieces we created. And we're going to get
rid of the shoes as well. They are used adding polygons to the skin which we don't need. Same for the mouth interior. Let's go ahead. We're going to create the
connection with the belt. So the padding from the
pad to the belt itself, We're going to create
this sort of cap first. I is going to be the
connection piece. Then we're going to create the bit that goes in the center. Now, we're going to create this next root to
make this connection. Adjusting the inclination for that loop so that we
have some sort of angle in there and it looks a
little bit more interesting, although those details might not even be visible on the wake, but they will just add a little bit of
noise on that area. And because of the
belt being so simple, it is good to have
some extra noise in there to extra complexity. Now, let's get those
rims on the belt. We first create the loops. There is going to be
the base for them, then the secondary loops around them and then just move them to create that effect. Just like that, we get
that extra bit of flavor. We're going to do this
last buckle belt. Sorry, belt buckle. Pretty much same process as we have been doing with
any other buckle, so I need to further
explain on this one. To get those in place. Because the one we had
previously graded in Zibros might be a little bit more thick and
not as refined. Uses bits in here. Okay, so we're going to be doing pretty much the
same thing on this loop. We're going to be cleaning
this up a little bit and doing the rims, as well as creating. The bottom. We are going to create a explain as well that we are going to be using symmetry and
creating two more instances. So we're going to start
off from this shape and creating symmetry here. We're going to just the
roundness on it and then add edit polymodifier so
that we can bevel the caps, do the three instances, and then we have this
very good looking piece for Okay. Yeah, so we have this
really cool looking piece for the connection of the
belt here on the back. Now we're going to do
the be lop around, duplicate that piece and
connect and adjust accordingly. Almost got those ready. We need to grade the
other two belts. So pretty much just copy this one a couple of
times and adjust it. And since they are
not going to be seen, you can just remove that
part and adjust this loop. This one, we're going to
be doing the same thing. Just move it
somewhere, that makes sense and adjust the
other loop so that it looks like it has a good flow and then adjust
the belt around the loop. Now, just a few more little
adjustments in here, and I think which
should be good. It honestly looks quite solid, I think, looks pretty cool. We can adjust this
to make it a little bit more wavy or just
keep it straight. And now we're going to be doing this whole thing under here, which is going to be
a little bit tricky, but we're going
to start off from this belt buckle that
we created before. Now for this piece, we're
going to grid the copy, do an instance, put it straight. We're going to be
working over this one so that we can work in an easier manner
rather than just working with a
piece on the side. But sorry, since
it is an instance, we're going to be able
to keep those hinges on the one that is
placed on the armpit. We're going to be cleaning
the shape so that we don't have as
much as many loops. Now we're going to be doing this filet on the gardener
so that it looks round. And now extrude the center loops so that we
have that extra edge loops, do the same on all the
edges to make them feel round and use those two
inset towards the interior. And that way, we have the
piece soft the wet chamfer, the good thing is that we
can adjust the chamfer even after smoothing
or finishing with it. So it is still a good tool
that I would recommend. As for the vacuum, we're going
to adjust it a little bit. We're just doing the pin here. We need to align it
correctly with the rest of the buckle. Give it some volume. For this one, we're trying
something different, so that is why we're
going this way. Okay. So for this, we're going
to be adding this ring. So you just create elix which we're going to
adjust a little bit, and then we're going to
be placing it in here. We need to make it like
tight sealed so that it's easier for low poly to be
done and baked later on. Now, we just put it in place. And already looks
quite interesting. We just do the loop
around like always. Okay, so a little bit more cleanup on the curf so
that this looks much cleaner. And we're going to be doing
the cut here so that it's like a thinner strap grabbed
onto another thicker strap, wider, not thicker, sorry. Let's get everything in
place without any clipping. Et's create quickly
this connection pin. Very simple one. C. Move this a little bit. With the connection
piece that belts around to creating like this
hanging cord from the ring, which we are going to be
starting from this cap, this spheor we're going
to be exterding it, doing the inset, internal inset, and then the instance, which we are going to be
placing here and then creating a spline
that loops around, increase subdivisions,
adjust the spline slightly until we have a knot. Just refine those
angles a little bit, increasing the amount of points, make it feel natural and loose and put
everything in place. That is, like we said before, the sort of details
that are going to bring flavor into this. Okay. Time to clean
this bracelet up. We need to get the in
two separate pieces so that it feels like it really connects on
different layers. And we are going to quickly
get this buckle done and apart from this and adjusting the
belt around the arm, I think that's
going to be pretty much all the stuff
we are going to be doing in this chapter
for three NIMxF the cal, it's going to be the
exact same thing. I think as before,
starting off spline, refining the curves we
want on the corner, and then just continuing the spline with the direction
or shape we want for it. This one in particular, we're going to be doing the
attachments on the sides. Just like this freeziv stuff, we need to get an
edit poly for this. But yeah, we're going
to wrap this one quickly and then adjust
the loops on the arm, and we'll see you
guys on Chapter 25.
26. 25-Creating Hard Surface Elements Part2: Hello, everybody, and
welcome to Chapter 25. We're going to keep
working on three D Max to create now the
prosthetic arm. We're going to start detecting all the tools that
we created in bras, and we're going to
proceed and just try to create a cleaner
version of those. So even though the topology from zebras is not too bad
and we could reuse it, we're going to start creating
this piece from scratch. So let's just get it
sort of in position so that we can use
it as a template. We're going to create
a spline well, align, actually,
which is spline. We're going to put the vertices and replicate
the curvature from the reference and just adjust it as much as we can
on a flat angle for now. And we are going to
create edited poly, set the pivot in the center, then go for a symmetry
and also a cell. Oh, extrude, actually. We're going to be connecting
all the points so that we can have a pretty decent structure
here for topology. And we're actually going to be removing that extrude that we did because we're going to be bending this to
fit the reference. So we just want to
create this sort of base topology structure. Let's get rid of that.
Let's do an inset. And now let's add
a turbo smooth. Let's just keep it on
that sub div level for now and we're going to put
it sort of in the center, and now with a bend, we're going to try and get this angled the same
way as the reference. We need to play with
the angle there, and now we're going to use
another one which is verify to create that front curve so that it fits more
nicely the reference. We don't need it to exactly fit, but we want to get it
as close as possible, since otherwise we will be affecting much the
initial blockout, and it is not what we want. So make sure you spend some
time with the bend and this verify to make it work
as best as possible. Let's just get a
tapper in place as well so that we can twist, not twist, actually, tapper. Which part of the
shell is going to be thinner or more white. And with those
three controllers, we are going to be able to
suit the shape quite nicely. Okay. I think we just need a few more adjustments.
It's quite nice. So good thing is now we can actually put the
through smooth on top, set it biangles and
we are going to chief a quite nice
bevel with this. If we assign properly
the smoothing groups. But also, because we have
everything on stack modifiers, we're able to modify the
shape quite easily here. If we don't break it, of course, but we can modify
the shape quite nicely in an easy manner. And then with just
activating the stacks again, we can see if it fits or not. We are going to place it as an instance and try to replace the previous one
to see how is it working? We need to see if it's really making the cut or we still
need to police it a bit more. So let's play with
the shell a little bit so that it fits. There is a few things I
still want to improve, but it's not too bad. The process is
going to be pretty similar for all
the other pieces. So I will speed it up a little bit and
comment on top of them, but it's going to be pretty
much the same thing. So you guys should be good to go with these
modifiers I already explained. And for this one, we're going to be doing
something even easier. So we're going to create an
instance of the reference, put it in place so that
we can actually have the arm on the side to model
all the tools straight. So for this one, I started
from the tool itself, and I'm just reducing
the amount of polygons. And we are going to do asymmetry by putting the pivot
in the center. And let me make sure I have the pivot
right for the symmetry. We just need to set
the proper reset angle for the pivot in the program we are
working on and make sure it is aligned
on the center. Then on the other pieces
we work on previously, we just put super loops near the borders to achieve
a hard defined style. And then here we're
just doing an extrude and rotating it until we achieve the intersection
we want to create. Then to achieve the
smoothing results, we're just going to be changing the the smoothing group the smoothing groups inside so that it's smooth like that. And then we're just
going to use a quad safer to police the
bevel around it. No, just some more
adjustments on the sides. If you realize they've got spur, it is more subtile now. So I ended up reducing it so
that it's not so noticeable. And I'm just trying to get the protective shell to align better with the
cylinder underneath. So here, I was just playing a little bit with the
alignment of the loops. Since on the side, I
was not being able to achieve a good alignment
using a snap tool. And now for the interior
piece is going to be the same starting from the same
piece I had created already. And for this one as well, we're just going to be
making sure pivots of all these are working nicely
so that when it rotates, it makes sense because we want to make the arm functional. So we want to set
all the cylinders, which are the key points
in rotation and to set the pivots on the center of the elbow so that it
all can rotate nicely. And for the piece,
we're going to be modeling the same way. We're just going to go
for the initial primitive we created in zebras. We're going to be reducing
the geometry and doing symmetry and then adding any extra super loops or extrudes that we need for the tailing, and
that will be it. Then for nuts and bolts, we're just going to use the three Dymax insert messes that come by default
with the software. Nothing too difficult. And we're going to link
it to the Subtool. That way, when we
rotate in here, even though it's not going
to be animated in here, but we can already test that the rotation
is working nicely. If we don't do these
things early on, then we will have issues
on the low poly and they will carry on furthermore. So it is better to
just fix them now. To hear you, you see me
adding some extra detail. This is just adding another chamfer in
there for extra detail. Fillops we'll cut it. Just going back
and forth a little bit until I'm happy
with that piece. Just working a lot with
the Pivot, as you can see, because I just
modeled the pieces inside zebras just as a sketch. They are not perfectly aligned, so we're having issues
with all those pieces. So I might end up just like you saw trying again
realignment of the Pivot. A few times I'm also removing some geometry
from the interior piece so that the extrudes on these pieces can
actually go through. And I'm back again playing with that symmetry until I
get something clean. You can see that's me just
exploring the options, see if it works any
better without the gap, realigning the vertices
so that they are on the same loop direction as the rest and just trying a different extrude so it doesn't look the
same as the front. It is going to be
the same principle. So now we're going to be
doing a quid sampling here and changing the
smoothing group so that it only smooths the walls of that extrude and then going
to get and do another set. Of the same process. All right. Same
thing for the knot. Now, we're going to get on this piece because we need
to really clean this up. Let's just create a cylinder
and stretch it a little bit. But we really need this piece
to have a proper pivot. So we're going to just replicate the shape exactly the same. But now the pivot is
going to be correct, so we're going to be able
to align the rest of the elbow to this one and it's
going to rotate correctly. This is much nicer. Let's
add this extra detail. All these rims are
pretty easy to do by selecting an edge and
creating a chamfer. It can either be quad chamfer
or use normal chafer. And they are always very nice. They add some detail and they
are not difficult to do so. Quite handy tool
to fill some gaps. Now let's just try
to align the center. We're going to create
that extra cylinder. Again, as another tool
in max so that we have the pivots correct and they don't have any
stress or deformation, which is the issue we're having we were having with
the other cylinder. So now let's just replicate the exact same shape which
is here sort of extrude, and then another one here,
and we can connect those. Just make sure you add the
correspondent super loops so that when you smooth
and you chan for them, you get some very nice rims, which are going to look quite nice for the amount
of time it takes. Now let's just get
some interesting Sci fi bolt in the center. Let's just scale it so
the pebbles look thicker. Turbo smooth, like I
always do asymmetry, and now we're going to be
finally having the joint, very nice detailed with the pivots correctly,
which is quite important. Remember, don't underestimate the technical aspect of joints, especially if you
don't want to have a pain in the *** later
on during low poly stage. So now this is way much
cleaner, way much functional. Now let's just go ahead and
create the arm section, which is going to
be a tricky one. So we start off from a cylinder. We want to have some sort of similar proportions
to the head of the let's call it muscle, but, you know, like
the armor cell. Now let's just go angle this slice so that we can
remove that geometry. Now we just have to
create a cell as a placeholder to smooth the usual set of
modifiers we always use. Get this properly aligned. Please try to do it with the edge constraints so that we don't break
the cylinder shape. Still, it's a little bit
difficult because if you move much the edge on the horizontal angle, you
will break the shape. So you need to do it using a little bit more
subdivision as well. By adding this extra
loop near the border, we are actually restricting
the deformations that the arm can suffer if we tweak the
border, so it is a good idea. We're also going to be
creating the forum from here. But so far as you can
see, we are just creating the templates for
the joint section, which is going to be the
tricky part because we want them to rotate
correctly using as a parent the same
pivot and being properly aligned with
the rest of the pieces. Now, we want to add
some extra loops here to add some thickness, and at the same time,
we want them to keep some sort of good angle. That's why we are restructuring
the topology like this so that it feels
hard cut in that area. And here, that's me playing a little bit
with topology because, you know, we don't always
land it the first tray. So you need to see
how topology behaves. And that's why we want to get this sort of
border structure. Now let's get this adjusted. This is just the internal joint. So We just need it to look very clean and
very fitting with the other piece, the form piece. As you can see, the
topology is quite simple. We are getting most of the use of this piece by
using the smoothing groups, and turbomoth using
smoothing groups, of course. And we just need to properly
fit this and add enough cuts so that the piece really flows around the intersections
with the form. I just set every loop and every line on the center
position they need to be. I'm just adding these
extra loops for more support and achieving
a different smoothing. Here, I will stop the speed a little bit so that you guys
can see the topology better. So basically, there was not much order in the way I was
approaching this piece. But what I'm trying to create is this not sure if it's called Ecdral but this
very angled shape, following the
different cuts that I previously created on
the sketch and used at the same time deviating its direction a little bit towards the form so that
it all fits nicely. Not sure if I will keep this
interior part, honestly. I just trying to make it work. That sort of makes sense. But as you can see, we have a little bit of rim
near the joint. So those two flaps that
open to the sides, that here, it is what it's actually making it
look sealed and nice. Also, this piece I'm
editing right now, we need to align it so it
doesn't really intersect. Align it or edit,
like this looks good. And the piece overall,
as you can see, we just created a few
super loops down here, and the rest is done
by smoothing groups, so it is a fairly easy
piece in topology. Not too complex. So now I'm just trying to get
everything even more clean. And this cut right
here, you will see now. So I'm just trying to get
some extra detail in here, which reads nicely and also adds some more
complexity to the joint area. Just trying to play around and see how it's
going to work out. Some of these pieces
are designed as we go. So we need to be careful
on the steps we take. We don't want to
mess up the rest. But it is pretty
simple structure. So and also we have
a lot of the piece hiding on the back part
of some other piece. So it is easy to do
this sort of extracts. We are not going to really mess up anything on the other side. Yeah. Since this
took a little bit, I'm going to speed this up
again and we're going to keep commenting over this piece. Okay, so in the
end, you see that I spend a lot of time
playing with this, even though it is not a
complicated extra to do, but just wanted to make it
clean and have a good bevel, which in the end, I
achieved, as you can see, by removing, sorry, by adding a couple more centimeters
to the under polygon. Yeah, the one that's
hiding under that plate, and also adding a
quite spur in the end. Trying to get the
whole thing moved back with sf selection
because I didn't want it to click with the
form and I don't want to or do not intend to change
the shape of the form. But at the same time,
when I'm doing this, I'm just messing up the topology a little bit of the frame piece, let's call it the
one that's under. So the frame piece was
getting messed up by this. So I was being very called, very careful when moving
with so selection. But in the end, it
worked out well. So for the shoulder pad, we are going to be starting
from sphere because it's the more similar piece. We're going to rotate it this way because we do
not want to get those caps the area
where the sphere closes. We do not want those caps
to be on the sphere. It sorry, on the shoulder pad, it will make our
life more difficult. So we're going to be adjusting with poly and self
selection sphere until it suits kind of
nicely the shoulder pad. Keep in mind, we're
going to try to do it in a symmetrical way although we are going to be fixing
that as well later on, but just be mindful of the formations you do so that they do not
destroy a lot your work. And keep it sort of symmetrical. I know the design
is not symmetrical, but still don't
make it too blobby. If you work very symmetrically, it will not feel as well
and grounded as before. So now let's just move the more closest verte to the contact position by
using the edge constraint. And with this, we are going to try to get the shape
as close as possible, remove the s polygons and now try to get it as close and similar as possible to the sketch we previously did. Okay. So the border
section is almost ready. We're going to reinforce
this upper edge with a super loop, sorry. For the sides here, we're going to add
some subdivision so that we can properly represent those curves until we are really achieving that
initial sketch curvature. Then here on the center, we're going to do the exact
same thing, use the line, the nearest one and then
cut so that we can get that bevel It's like so. Keep in mind, we are
going to be getting some different
smoothing depending on how we structure
topology on that area. So just be mindful of keeping
it quite clean and round. If we break much the stricter, it will not look
as nice and sharp. The upper section, we're going to be doing the
exact same thing. Just make sure we
have enough curves. We can use here
the flow connect, which is the connect tool that also curves the shape based on the algorithm of both loops around the interpolation,
sorry, not algorithm. And keep doing this process
of adding more loops and moving the border sections until you are happy
with the result. Also, make sure like
I'm doing right now, use sub selection to avoid any weird pinches or
deformation in the shape. As for the bull in here, we're going to
select the squares, do an inset like this. And now we're going to select the smoothing groups and
do smoothing like that. If we use that just
slightly the shape around and play with
the smoothing groups, sorry, turbo smooth
by smoothing groups, we will be able to
chief something pretty nicely just by
playing a little bit with this shape
and try to make it as cylindrical as possible. Keeping everything
on the same plane, using the snap tool so that it actually has a flat surface. I'm using the snap using the sketch reference so that they actually
have the same depth. Just going to flip this
element. Like this. I'm going to be attaching the topology because
it will take me less time and it will
look more consistent. So now I just have to use
target well to connect the exterior polygons to
the cylinder polygons, and we should have
exact same structure. You just need to fix
some of those pumps and inconsistencies that we created throughout the attachment
of this piece. And now we're probably
going to be moving some extra vertices so that we make it all
look more smooth. Now we do a chamfer so that it looks a little
bit more round, which we're going to
be adjusting in a bit. So we just play with the values until we are happy with it. Now we put some more
bolts that will also help bring the design
closer together. Add some rims and stuff like the same kind of details that
we were working on before. That always helps hide any kind of pinch or detail that
doesn't look as clean. With some extra detail, it will look more complex
and more difficult to read any possible inconsistencies
or noises on the surface. So make sure you add those
sort of stuff sometimes, and it is a really
cool and easy trick to make your designs
look more complex, more detail, and
at the same time, hiding any mistake you could possibly drag
throughout the process. Okay. Arm is looking
quite nicer now. Let's just polish
this underpiece. Not adding much
detail on this one, because it is just under armor pieces which are not
going to be seen as much, so we don't really
care that much. We're just going to add some bevels with
interesting shapes, like we have done in
other pieces and some extrudes to make the piece look a little bit
more interesting, but nothing you should
stress too much about. As you can see, I'm not really making any particular design. Is something that flows
nicely with the shoulder pad. But we are actually just, like I said, creating some bevels, some chamfers and not
much apart from that, as for the plates on the chest, the process is going
to be quite similar. We already have are pretty
good base from zebras, and it is complex
enough so that we are not going to be spending time
creating it from scratch. It is also not as blobby
as other arm pieces were. So we're going to be
starting from this one. What we want in this case is just a little
bit of cleanup in the borders in case they were a little bit messy like they were. And use some connection detail together with the arm so that
it feels more consistent, more part of the same design. So yeah, we're just going to add some chamfers
here and there. And for the chest, pretty
much the same thing. We're going to work
over the base we had. We're just going to do some
refinement and cleanup. So detach both pieces, do cell, a new shell, so that we can actually edit one thin pattern and then get the whole thing
looking like a plate. In here, we're just going to
take advantage of that to clean the lines and
add some extra detail, which we didn't have before. Setting those tips in a better position to
make it feel more solid and well connected. And for the forearm, we're just going to
be doing the same. Since the pieces are
complex enough and we already have a pretty
good base from cebrs, we're just going to
add some details that are going to
help bring the piece forward onto the next level. So we're just going to be
selecting the edges around doing a chaf Again, to make them feel more complex without actually doing much extra work, as you can see, it's just a few clicks
and just playing with a beble It also helps creating this angled bebel on the side helps make
the design feel more robust and forming grabbing the interior fragment,
the interior frame. So now we get lower
on the forearm. We're going to be adding some
more detail to this planet. Jumping back into the arm now
to this piece right here, we're going to use
duplicate it to the side to create this border
on the lower part, which is going to add
some more details. So I'm editing this duplicated version,
moving it to the side. Now we're going to extract
just this frame right here. We're going to align it in
place, add a different cell. And now we have the border and the other part of the shell
in two different pieces. So now I can control
this one better and add this chamfer right
here on the border, which is going to make it
look more solid and just adds a lot more flavor just by separating the
piece from a loop, then adding the shell on two different pieces and then
chamfering the lower one. So it just makes it look more
complex and in my opinion, much nicer. Same thing for this. Even though, if it's
just a simple piece, it is worth spending a
little bit of time making it look more structured, realistic. So adding the chamfer down there and cleaning up the
curves on the upper section. Okay. So we're just going
to adjust a little bit more the other frame
for the arm section. And with the modifier FFX
we are going to FFD, sorry, we're going to adjust
the arm exterior armor a little bit so
that it feels more beefy without actually
destroying much of the detail. It is a cool way to
adjust pieces once you're done adding detail and you don't want to mess up much
with the topology. We're going to add this
cut here that it feels more well crafted so that there is no intersection and it actually feels gets going inside the So we are just moving the
vertices until we have the same roundness
as the piece going in. And we do the same.
On the other side. Daddy almost ready. We're just going
to add this move this bevel towards the inside so that it feels,
again, more solid. It doesn't feel
like a thin piece, which could just break easily. So everything needs
to feel robust. So see that something
useful is that we are working on a flat plane, and then we have
the shell modifier. If we don't do it like this, and we will be working all the time using a shell
or some thickness, it will be super difficult
to make all the loops loop around correctly
because the piece will not be like one side. It's two sides, so it
already connects all the way around and will make your
life a lot more harder. So keep it simple. Always work on the ddited
poly under the shell. Like this, once you're
done with the IDT, you will see that all the detail comes with cell and
the truth smooth. So now at this point, all the arm is
already well crafted. We are just solidifying
everything together, making it really connect and feel like it's well engineered, even though this will never
work in the real world, but at the same time, you need to make it
feel like it could. H So now we're just doing small cuts here and there to just finish
up crafting this, adding some extra
loops to make it more sharp or less sharp,
depending on how you want it. And we are just refining until
we have the perfect shape. This extra step here
where we are making everything really well,
like connect properly. It is what deference is normally a less professional work to a more
professional work, because sometimes you see really cool designs which work super amazingly
at first sight. But later on, if you start
paying attention to details, you will see that
there are some stuff that are not used
working correctly. And it's not like
it's essential. We're just doing video
games or movies. It doesn't really need to work. But the more you document
your work with references, the more you make it feel
that it could actually work. But at the same time,
keeping a cool design. It is when your work is
really going to come forward and stand up. Stand out. Sorry. So yeah, make sure you spend some time on that
because as you can see, we're not really
changing much right now during the last few minutes, but it is really adding all those details and making
it feel much nicer, I think. So I think it's worth it
spending that time in there. Alright, so now we
are, as you can see, collapsing all those tub
smooths on every piece, because we are about
to export this into zebras because we
are final done. So make sure you either remove the tuvimooth if
you're going to be smoothing in zebras or just
collapse it in case that it is spline and you want
it to make it deadly poly. In the end, just make sure
you keep it at the same at the subdivision level
you want for zebras, which should be not too dense for everything that we have done using
Avi Polinrovmooth. But remember to collapse the trovo smooth by
smoothing groups, otherwise you will lose all those hard edges you
created using that tool. So now, this is pretty much it. We're going to get
this into Zebras right now and we'll
see how this looks. And after Chapter 25, we're going to
jump into creating the hair for the
character on Chapter 26. Okay, so these guys saw the final result for all the three Dymax
pieces as a result. As you can see, arm
is looking fantastic. It is looking much
more solid now. All the detail we put into every piece is really
coming along nicely here. There is so more stuff that will pop up with the textures, but for now for high
poly, it is pretty clean, pretty nice and same for every other piece
that we created. So that's everything
for Chapter 25. See you guys on Chapter 26.
27. 26-Polishing Hair and Face: Hello, everybody, and
welcome to Chapter 26. We're going to be covering
the hair creation right now. For it, we're going to
be using special tool, which makes life much easier, and the results are quite nice. So first thing we need
to know is, well, to specify for ourselves, which direction we want
to get the hair going. And even though we already
did sketch and a blockout, we are going to be doing some minor adjustments
on the direction. So first off, we're
going to select OTool which is going to
be provided for you. In the tutorial folders. And as you can see,
it's simple curvas like I'm showing you now. So you just trace the
hair wherever you want, and it will create like ice
cream shape or star shape, which you can trick a little. Here on the curve modifiers, and that will change the
parameters of the width of the start of the
hair and the end and how it's going to evolve. So you can tweak that depending on which part of the
hair you're creating. So we're going to create
a group for the hair, and we're just going to get
going on top of our blockout, we're going to do these
traces to create the base. If we consider that we need to tweak the curve
throughout the process, we will do, but if not, we will just keep it the same. The way we're going
to be approaching this is just
carrying the curves, then splitting it differently and just readjust the
previous curve so that we don't need to do
multiple traces and we don't have issues of stacking the curve on top of
some other geometry. So let it happen right there. So we're just going
to be creating new curves in case that we want to create a new curvature. If not, we will just
duplicate them. So this is going to be all the time like this,
just placing curves. What is important here as a general criteria to
follow during the tutorial is that you need to create
the hair like flowing in a direction that
feels natural to you or to your hairstyle. So if you have some reference, that will be better
because you can already see the flow of the
hairs and if you don't try to make it curvy
and with some intersection, so it doesn't look too much
like an ice cream cone. And and the result will be
much better. It is okay. If the tips are not
perfect right now, we will be tweaking tips and
the overall volume later on. And we will be also creating what you will call a flyaway, which are some hairs
that don't really follow the main
direction of the rest. But for now, this
structure is going to be first laying out the base. I'm actually going to
speed this up while I speak about this.
Okay, there we go. So like I was saying, the process is
better structure if we start off by creating
a base for everything, no extra details, no floating, no floating hairs or anything, like you're seeing here,
like the main block of hair, fixing some intersections
that you see and trying to create that
layering a little bit, but not really spending
much time on this for now. Then we will be covering the same process
for all the hair. Then we will create
what will be stage two, which is going to
be flying hairs, not like flyaways, which is
going to be some details, but more like all
parts of the hair look that are floating like
the ones on the forehead, the ones on the sides, you'll see now in a little bit. So for now we just need to worry about fixing the first stage. So any any layering that we have between different
hairs so that everything feels sort of natural
and now proceed and create the same pass
on the scalp itself. So this one is a lot faster
because they all end up hidden behind
the elastic band, and they all start
from the forehead. So pretty simple part. Just try to not make symmetric this area, the center so that it doesn't look too fake and it feels
a little bit more natural. Yeah, same thing for the back. Just make a little
bit of asymmetry, then create some different
curves here around the ears. Quite simple. We're going to be stopping now
for the flying heirs, which is a little bit
different process, and I want to show you slower. S for those areas, use
first place the curve. As you can see, we
have variation if we pinch them away from the head
and they won't snap to it. Just trying to intersect them
like I'm doing right now. And make it feel like yeah, the hairs are flowing
from under the rest of the hair loop so that it
looks more connected. And now we're going to
be doing this segment. The hairs from the forehead. I don't know how to
call them honestly, but the process is
pretty much the same. We are just starting
from the sketch. Only difference is that we're going to be pinching
the tips like we're doing right now to get them flowing in a
different direction. Like I was saying, not spending much time in here now because we will be doing this with a different process
later on in the game version. But this one is a
cool way to get a quick hair look
for your hi pools, and it's also nice for the
amount of time that it takes. I think the total
time for this was about maybe an hour or so. It's speed up, obviously, but the real time verson
was just an hour. So I think it's worth to do it. I always looks very nice for
presentation to the clients. As you can see, it's just
dragging some curves, then trying to get the curve to flow a little bit better with the forehead
and everything. In the ultimate instance, just creating some
loose hairs that break the overall
flow of the rest. So I'm going to
speed this up again and comment over the
more final result. Okay, so we're going to finish
those clams right here, which they're
mostly symmetrical. We're just going to break
the symmetry a little bit, but it's helpful to be
working with symmetry to just get the main
volumes quicker. Once we have this, which
we are almost ready, we just need to make
sure that it really blends well with the roots
of the rest of the hair, and we don't have any
super huge blank space. So everything needs
to look sealed and well connected
and natural as well. So make sure no clipping,
no weird overlaying. Just try to keep it airy
and flowy. Just like this. Basically moving the
different hair clamps on top of each other so that
the connection is good. So this you're seeing right now. This is the flyaway stage. So basically, we create
really short hair clamps and we move them up so that it feels like they're just
flying out of the head. This really helps break down
different hair directions. So if you have the
on the front part, you have two
different directions, and the third one being the one going towards the pony tail. So it is a good point
to create those, and that will act as a connector of all
those three parts, making it look more
natural and not so fake. We're going to do the same on some parts of the ponytail as well so that it feels as well, like messy and crazy. We just land the curves, and then we just move them either with the curve s or with the move tool depending on which kind of deformation
we want to achieve. And you can create
some as you saw coming within the
middle of the rest. So not all of them
need to be on top. You can just do
intersections with those. And all that together,
as you can see, very quickly is making the whole thing
feeling quite natural. It doesn't take much time
to do this whole process. It is fairly simple, but at the same time, looks
pretty cool, I think. Next up, after we
finish this pass, is going to be creating the eyelasses the eyebrows
for the character. I still need to do
some more work, but that is what we're
going to be covering next. Okay, so you see me here placing just a bunch of
them very randomly. At this point, what
I'm trying to do is create different layers
coming from up to bottom, different layers of flyaways. So basically, I
started from the top, and then I create some
more that start underneath those to fly away
as well, midway. So we end up with three
layers, one on top, one on the middle and
the end of the ponytail. We are going to do a few
more adjustments here, and the hair should be good. Like I said, it's just temporary,
it's not a final thing. It is used for a
color presentation or if you're doing a high poly, then you can use this as a helper tool instead of having to do fierns
or sculpt it manually. This achieves a quite nice
result without much effort. Now, let's just put
all of these into one folder so that we can rotate it and give it some
more nice angulation. Then we modify all of those with a move tool as a block so that we can change
the volume easily. And some final
adjustment so that it flows more similarly to the
reference we're looking for. But remember, we're going for a more realistic
version of the concept. Let's just get the color, although we are not really
going to be using it, but it helps us spot the
different gaps that we have. Working with flat color like
we did, it is quite useful. Now, what we are
going to be doing is changing slightly the
preset for the hairbrush. We're going to be
deleting the subdivisions and layers from the head
so that we can actually use the brush into the head, but remember to use
duplicate it first so that we don't break or high
poly working phase. And we're going to
isolate the rest so that we can create
here thei lasses. So we're going to get
on the side view. We don't need much geometry. And we're going to use scale the brush so that is not so big. Oh, we need to
deactivate the snap. And just find the right
angle. That looks quite okay. I think I'm going
to go with this. Let me just change this. Okay, that looks about right. So we don't want much
curvature on this one. It needs to be subtle. And we will adapt each
one of them later on. Okay. So now we select, sorry, split the curve so that it doesn't work
as a curve anymore, and we are going
to duplicate and place manually all of these. That is going to
take some time, and we are going to be scaling
down some of them. So basically, the
closer they are to the corners you
make them smaller. Try to create some sort
of randomness on it. So angle them differently, stick two of them together every once in a while,
which feels natural. That happens all the
time with eyelashes. And place them if you can following a reference as well so that they really
feel natural, you will see in a second,
and speed this up. Seeing this in a quick view, it is much easier to understand which pattern
we are following. Basically, as you can see, trying to stick a few
of them together, you get them flowing
with a curve of the eye and just trying to get them smaller near the corner, especially on the interior. Because fake elases which
are very common nowadays or when you use eyeliner, the eye lasses get much bigger. So that is commonly done towards the exterior of
the eye to make it feel more sharp or
bigger eye look. So just make the interior ones smaller and exterior
ones larger. As for the under eyelid, usually they are smaller,
so just go like this. And keep the same principle, use some of them
sticking together. Some of them randomly rotated. And once you have all of them, just merge them
together and with move, you will be able to contar
this much easier than just painting black so that they actually look like eyelases Ava. You have a quite nice
eye look fairly quick, fairly simple,
with a few curves. If you don't want to use
this hair inceebras, you can also do it
with clay tubes and just create tubes. It
works the same way. For ELSes it doesn't really
make much difference. Now we are enlarging
them and moving them so that they are more
visible from far away. Just try to follow
a reference from a model or some person with makeup Now we're going to paint with poly
paint on the head, the eyebrows away because
we're going to be doing them as well,
using the brush. So what we need to do is
first paint them away and just picking the color
from the texture, painting on top of it,
and we are going to be doing a mask. You have an idea of the
direction we want to follow. Let's start with this basic one, and we're going to keep
adjusting as we consider. Okay. So this looks quite in the line of what
we're looking after. We don't want her
to look too angry, but we don't want her to
look either too peaceful. So someone like this is good. Now, we're going to also adjust the brush
like we did before, so that the size is way
smaller because for eyebrows, we don't need much thickness. And for eyebrows, it's
also very important that you check reference for direction because they change a lot depending on the person. So just make sure that you have something a
pattern you can follow. Can just create a
group for all this? I the eyebrows on volume
with inflate on the head. Now, I'm just going to get
started by duplicating a few and trying to place them trying to place them following the
reference that I have. Any eyebrow reference can work. Just follow the direction
you have for that set of eyebrows and try to create some main ones for
the overall direction. Then once we're done with
that main direction, we're going to do
the upper section, which basically are going to be crossing with the lower one. I'm going to speed
the process a little bit because there is not much interest on how to place those basically the same way as on the hair and eyes lasses, tricking the curves so that
they follow the direction. Just keep in mind the more away you are from the
center of the forehead, the thinner and the smaller
they need to get like this. But now after I
place all of them, I'm going to do some general
tricking that is going to be more appreciated
in quick speed. So now we are creating
those like flyaways, but on the eyebrows
on that center part. Now we're going
to be duplicating the eyebrows after we merge
all of those hairs together. And with this, we
want to create some more like eyebrow thickness, but we're going to be smoothing them so that they look thinner. And now we need to compensate
for that little that little thickness by mixing those two duplicated
eyebrows together. So this is how the final
result would look like, making sure we can improve that with smooth
a little bit more, but that is pretty much it. Like I said, we will
change this later on on textures and Alpha cards. So no need to work more on this. It is as well, a quick process similar to the hair
and the eyebrows. And as you can see, the
overall look is quite nice, I think, hopefully
you guys enjoyed it. This is going to be
it for Chapter 26. We'll see you guys
on Chapter 27.
28. 27-Finalizing Face: Hello, everybody, and
welcome to Chapter 27. On this chapter, we're
going to be covering the creation of the
detail for the head. For it first, we're
going to be hiding all the sub tools that
we're not going to be using like the hair and yeah, everything that can bother us. We're going to get started by creating a layer,
a morph target. We're going to start adding different segments of what is called XYC displacement map. XYC is a web page
where you can find many different displacement
maps for human heads, hands, feet, different
parts of the human body. Those maps that XYC provide include different
segments of scans, which include high detail, high frequency detail of
those parts of the body. In particular, today we're
going to be applying one of the XYC maps to the head to achieve hyperrealistic
detail on lips, eyelids, and the rest of
the parts of the head. And we will see now
how to apply it. First, we're going to
do a quick pass on some secondary
details that could be handy to define before
applying this fine detail. And of course, anything that is very unique or
particular from the face like scars or big
bumps or whatever that you're going
to be needing to be smoothing the surface, it is advised to do now before starting applying the
XYC displacement. So we're going to quickly go through the secondary
pass of detail, and I will shortly get to explain how to use
XYC displacement. One part we want to accent to it before adding more
detail is the lips. We want to create this sort of separation between
the border and the inner lip and also
any big curvature or volume that we want to add to it because
the high frequency data that we are going
to be adding is not really going to do
major changes on the shape. So everything that we
are doing right now is because later on will
not be possible to do. So basically, it's just cleaning up some of those features, making them more readable. And in some cases, like you adding subtle
wrinkles that might not be in the information
from the XYZ MA. You can see most of
the stuff we are doing is going with them standard over some creases of the skin, going with standard brass
to define the borders of the lips and mostly
those two tools. Also some clay
buildup to increase the fat accumulation on
some areas of the skin. But the process
is quite subtile. We don't need to do super
big changes right now. Just like doing cleanup
and definition pass. Okay. So you can
see here what is interesting is to
be working with a really thin damp
standard brush with high intensity but
small size as well. So that basically just creates a thin crease
for areas like the nose. And for other softer
areas like the cheeks, we are looking for
a bigger brush with less intensity so that it
creates a more round crease. Okay, we're almost
done with this pass. So now, to be able
to see how actually the detail is going
to be affecting the character into a final
state with subsurface, we're going to tweak the
parameters of the shader. The idea is to achieve somewhat similar to the shader we
will be using in the end. So we want to aim
for some sort of wax effect or subsurface effect, however you want to call it so that's why we did those
two tweaks on the material. And now we can test how the
detail we did is working. So this map you're
about to see right now, it is the XYZ information. We have different numbers
for different sections. So basically, we're going
to go select those segments because when you
load the map into Zebras into the Alphas, you actually get all
those sections separated. So we're going to select the different areas since
here the mid value. You need to make
sure it is set to 50 and the backface activated. Now we're going
to see which one. If you see the number of the Alpha we selected,
this one is 01. So you just need to go to your atlas where it's
indicated where 01 goes, and you just need to place
it in the same place. In this particular case, let me just quickly hide
some of this stuff. Yeah, this is better for
this part of the task. So in this particular place, we're going to be placing this Alpha in between
the eyebrows, if I'm not mistaken. So we drug it. At first, you might not
be able to see much, and the alpha might seem
a little bit weird. Sometimes this is better to
do in a different layer. With more subdivisions, that's
why we baked all layers. So in a different layer, a and sometimes without
the symmetry. Otherwise, the
detail can be mixed, at least in center
areas like this one. We'll be using symmetry
later on, though. Okay, so now that
this one is placed, the rest is quite simple. We're just going to be
selecting the different ones, 03 for this section, 06, for the symmetric one, And the other ones,
you see me placing them in what I think it
is the right orientation. But basically, it
is just like this. We just go, select the different ones and just
drag them and rotate them. Putting them in place, trying them to connect
properly between one another and really
the difficult areas are the ones under the eyes. We need to make the wrinkles of flow together with the rest
of the eye that we modeled. So I'm going to
quickly speed this up so that you guys can see a
little bit of the progress. But as you can see,
it doesn't have any complication whatsoever.
Pretty simple process. Just click the correct
one from the Atlas. Place it wherever
it's supposed to go. Sometimes they feel super weird. They don't really
seem to go there, but it is the right position. So just trust the Atlas, place them there, and then we will just do
some adjustments. Okay, so now camera is
on super speed mode, and this is a fun part to watch. So basically, same thing
as we were just saying, getting those Alpha indicators, sorry, Atlas
indicators, telling us which number to apply on which area and just going through covering
the whole phase. The only thing you need
to keep in mind here is connecting the Alphas
to the neighbor Alpha, so there is no gap in
between which looks weird. And if there is some
gaps which can happen sometimes and you are seeing that I have some in
the cheek bones, some in some other
areas of the head, we're going to be
covering those with an alpha that feels sort
of like generic to us. So if we have I don't
know, like a cheek alpha, which normally are quite simple, we can reduce that to fill
the gaps from other areas. For the lips, that is why
it's so useful to have a polygroup for
the lower part of the lips and another one on the top so that we can actually
go about this correctly. As you can see, still
proves to be very tricky. Also, masking is
essential for this part. But placed on the correct side, they can look quite nice. It's also important
that you guys use morph target and layers
so that you can triag the intensity of these XYZ
passes because right now, as you can see, it
is quite crispy. We want to change that later on. So we keep adding detail throughout the scope and
throughout the rest of the head. This is step takes
time. The scope, we don't want as much intensity, so I recommend you guys do it in a different layer because later on when we chan the
intensity of the phase, it needs to match
somehow with the school. So if you have them separated, it's going to work better. And as for the same approach, you'll have some Alphas
indicated on the Atlas document, you just click and
drag them there. And for the rest, use some random generic noise,
it's going to do the job. Now that we have all the detail, we can go back
with them standard and actually bring back some of those small
wrinkles that we had. Just keep in mind, we
cannot smooth anymore, so just do it very softly with low intensity and a brush that you can actually
control nicely. So this is going to just
bring that extra flavor, that extra nice reading, and that is a pass that you want to do on
a different layer. Otherwise, it's going
to look a little bit weird if we turn down the intensity for some and then lose that secondary
detail we do on top. Okay. The head is looking
quite complete. We're going to do some
additional details. So we're going to
add earring here. Now, let's hide this section, split it into a different
polygroup and scale down this part for the
pin of the ring. M. That's just an extra
unit on the other side. And a small detail that brings some more flavor to the head. Make the rinkhlesw we're going to work a little
bit on the ponytail on the elastic band so that
is not just a cylinder. So from that base
cylinder, remove the caps, then do either a panel loops or a panel loops
will do actually. And then just adjust
so that the clipping is not as much with the hair. Now we're going to
add some more folds and details to the
skinning, sorry, to a rubber band like this. So it feels a little
bit more organic. That's going to be
pretty much it for it. We don't need to do
much extra on this. It's like a minor detail not
going to be seen that much. Next thing we're going
to do is just go again. This was a little brick
from skin detailing. We're going to do the same
thing we did with the face, but with the body so that
everything feels detail, not just like a soft skin. Is to feel that it has
some pores as well. So just do a selection of the area that we're
going to be working on, which is visible, split it on a different sub
tool so that we don't need to subdivide
the full character and make the file too heavy. Now you just go,
create a new layer and start adding any Alpha from the atlas of
the face can work. But first, let's just do
some wrinkles on the armpit, some skin folding, so it
feels more realistic, not just like a doll and once that we
have this ready, we are going to be jumping
into the detailing, which is use the same stuff. So fairly easy. Actually, skin
detailing is one of the more quick things
to do, I would say. It pops up the
detail quite nicely, and it is super easy, super fast to do and makes your work stand
out a lot more. So yeah, basically, use
the noise alpha from the Atlas one with a high
frequency detail for small skin pores, and the one that we
used on the neck, we're using it here on
the armpit and also like a big bumpy alpha for the overall thing with
low intensity and blurry result so that it
feels like big bumps. So this is going to be it for this chapter and see
you guys on Chapter 28.
29. 28-Final Polish: Hello, everybody, and
welcome to Chapter 28. This is going to be
the last chapter of the Hi Poli stage on where
we are going to be adding the knives from one of our
previous tutorials into the back panel that we created previously on
Marvelous and zebras. So we're going to be placing one and two copies there just to add some more flavor
to the character. The files will also
be provided in your source file directory
for the tutorial. And now we're just going to add a little bit
more detail just to bring everything
together with elegant seer. So we are going to be adding the useful process we used
to do a few chapters back. So add the stitching lines, increase the thickness of the orders by masking them
and applying an inflate, and then we're going to add some more seal lines,
isolating those loops. We're going to do
three probably. And we're just going
to be isolating them in both belt loops. We're going to blur
the mask and now with the inflate
in negative value, we're going to get
that extra detail. So that is looking a
little bit better, but still make sure the curve is always smooth and nice so that it feels tight
and well assembled. Looking fantastic. You guys have de tutorial of these
knives if you're interested on fast
track tutorals as well. It is covered on how to model them entirely in Zibros
by using Cmdel In there, you will be seeing a lot
more techniques on how to model with Cmdel inside bros. And now we're going to use some
more details here on the pad so that it
looks more refined. So some sem lines
on the borders, adding a little bit of them standard and
positive value around them. And just some more steps here and there to finish
polishing all this stuff. We are adapting the
Ubis so that they are straight in case we want to add some noise on this pattern. We're also going to be
adding a little bit of detail on the gloves. We're going to first create
the shape to then use it as a bullion We're going to put that
here on the center. Just make it insert
a little bit. Now we're going to be
chamfering a little bit the exterior,
so it looks nicer. Make sure it's, it's intersecting with the
object all the way around. So it looks again, well placed and use the standard around to make it feel like it's inserting there. And we're also going to be
doing here this section. Like a knuckle pad. And one on its finger. So now we can use
police little bit. This one right
here. We don't want them all to be super thick. Oh creating a secondary square
box right there. We want the shape to be
a little bit longer. I think it's going to be easier to work
it out differently. So let's just grab
those inflate. It's going to work
nicer, I think, like this before I was just
getting too distracted. Okay, so use a little bit more detail
here with the dam standard, and we will have those ready. Okay, so this is it, guys. This is our high poly. It's looking quite
nice, quite nice. In a few seconds, you're
going to be seeing some final renders that we took after finishing
the high poly. I think it's looking quite cool. I'm happy
with the result. Hopefully, you guys are as well. Hopefully, as well, you
guys enjoy the process. Hopefully, it was not
too slow or too fast. And this is going to be on my part on the
character tutorial. I'm just going to be covering the high poly for
deadline reasons. And we have a new
artist coming for the new game tutorial that you guys will be
seeing after this one. He's going to do great. Hopefully you guys
will enjoy as well. So that's been everything
for the Tutorial. Hopefully, you guys
have learned a lot and wish you guys the best
in your careers. Bye bye.
 FastTrackTutorials, Premium 3D Art Education